


CLE_multi.book Page 1 Tuesday, November 16, 2004 4:51 PM
English. . . . . . . . . . . . . . . . . . . . . . . . . . . . . . . . . . . . . . . . . . 3
Français. . . . . . . . . . . . . . . . . . . . . . . . . . . . . . . . . . . . . . . .10
Deutsch . . . . . . . . . . . . . . . . . . . . . . . . . . . . . . . . . . . . . . .17
Italiano . . . . . . . . . . . . . . . . . . . . . . . . . . . . . . . . . . . . . . . . 25
Español . . . . . . . . . . . . . . . . . . . . . . . . . . . . . . . . . . . . . . . .33
Nederlands . . . . . . . . . . . . . . . . . . . . . . . . . . . . . . . . . . . . . 41
Português . . . . . . . . . . . . . . . . . . . . . . . . . . . . . . . . . . . . . .49
Dansk . . . . . . . . . . . . . . . . . . . . . . . . . . . . . . . . . . . . . . . . . 57
Norsk . . . . . . . . . . . . . . . . . . . . . . . . . . . . . . . . . . . . . . . . .64
Svenska . . . . . . . . . . . . . . . . . . . . . . . . . . . . . . . . . . . . . . . . 71
Suomi . . . . . . . . . . . . . . . . . . . . . . . . . . . . . . . . . . . . . . . . .78
. . . . . . . . . . . . . . . . . . . . . . . . . . . . . . . . . . . . . . . . .85
Polski. . . . . . . . . . . . . . . . . . . . . . . . . . . . . . . . . . . . . . . . . . 93
. . . . . . . . . . . . . . . . . . . . . . . . . . . . . . . . . . . . . . 101
1

CLE_multi.book Page 2 Tuesday, November 16, 2004 4:51 PM
2
CLE_multi.book Page 3 Tuesday, November 16, 2004 4:51 PM
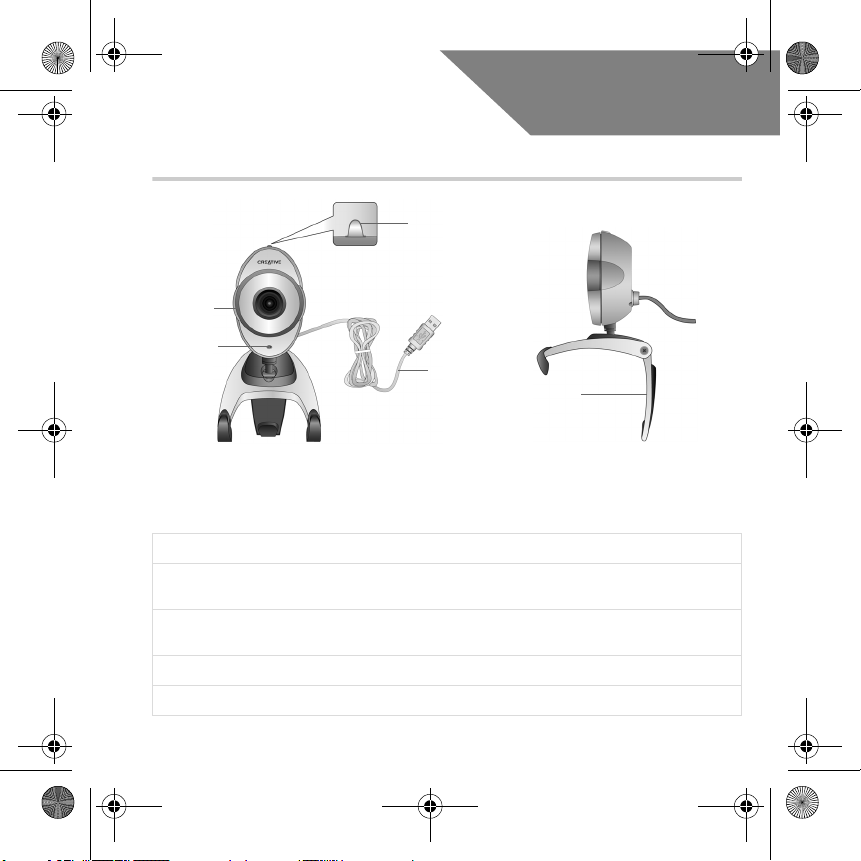
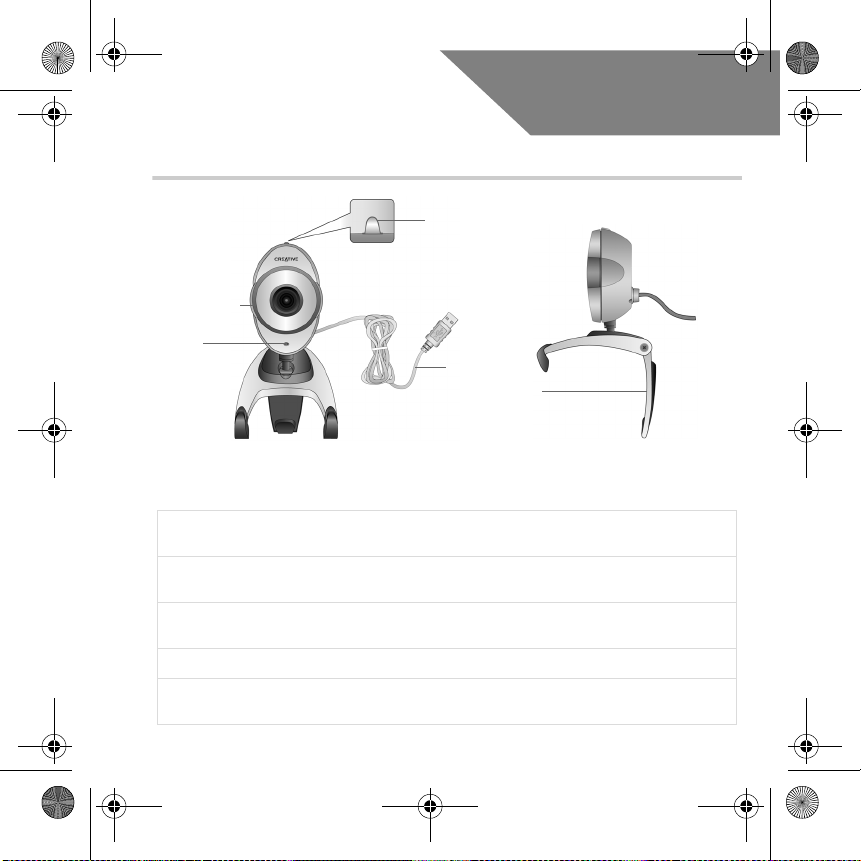
About Your Creative WebCam
Snapshot
button
Focus ring
Power L ED
USB cable
Hinged
lever
Front View Side View
Figure 1
Power LED Lights up when your webcam is connected to your computer's USB port.
Focus ring
Snapshot
button
USB cable Connect it to your computer's USB port.
Hinged lever Use this to mount your camera on an LCD display panel.
Adjusts the view focus. Point the lens toward your subject and then rotate this ring in
a clockwise or counterclockwise motion until the image is in focus.
Press it to launch WebCam Center and capture images.
English
3

CLE_multi.book Page 4 Tuesday, November 16, 2004 4:51 PM
Getting Started
Installing Your Webcam
1
1
You need to install device drivers and applications before using your webcam.
Do not connect your webcam to your computer before installing the drivers.
If you accidentally begin installation with your webcam connected and the Add New
Hardware Wizard or Found New Hardware Wizard dialog box appears, click the
Cancel button.
1. Insert the Installation CD into your CD-ROM drive. Your CD should start
automatically. If it does not, follow the steps below:
i. Start Windows Explorer.
ii. On the left pane, click the My Computer icon.
iii. Right-click the CD-ROM/DVD-ROM drive icon, and then click Autoplay.
2. Select the region you are in and then click the Next button.
3. Select a language and then click the Next button.
4. Click the options for installing drivers and applications, and then click the Install
button.
4
CLE_multi.book Page 5 Tuesday, November 16, 2004 4:51 PM
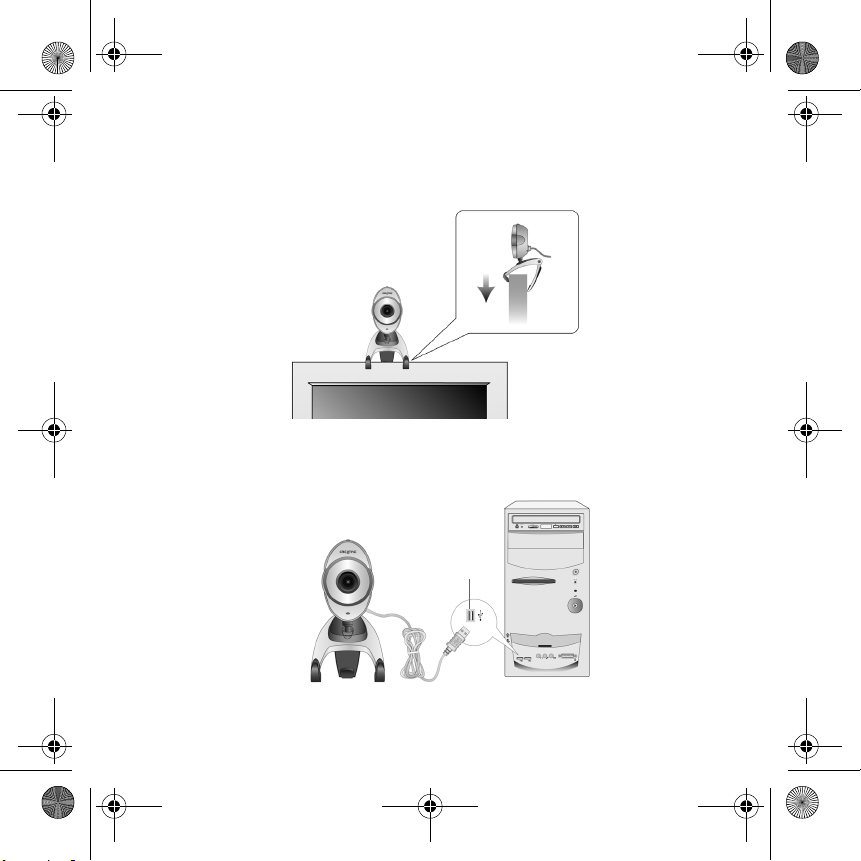
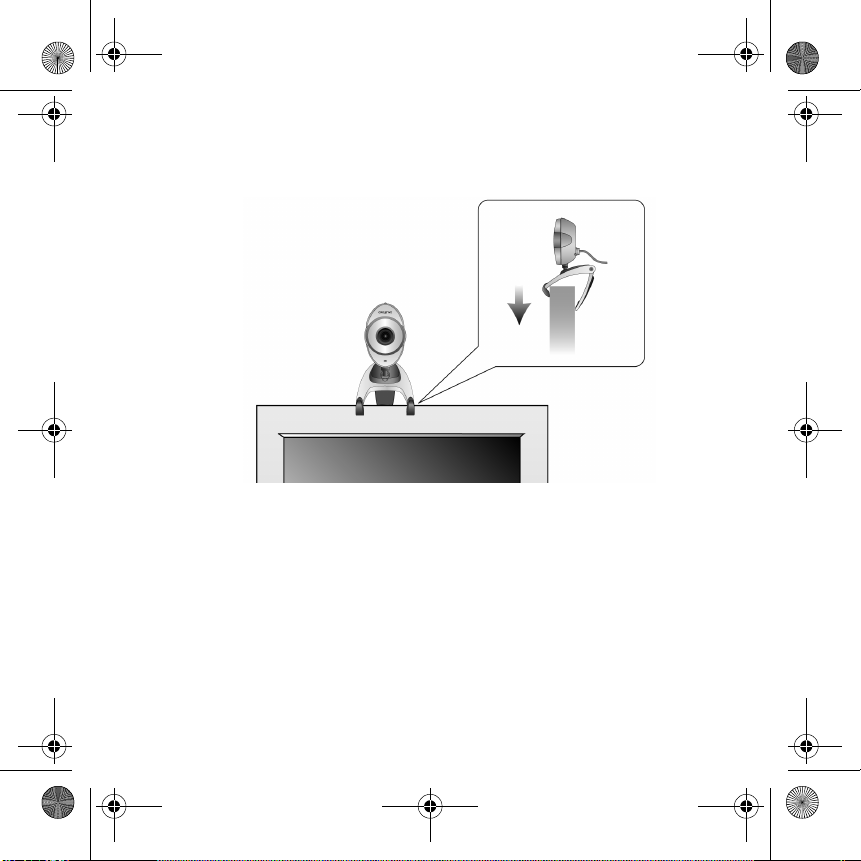
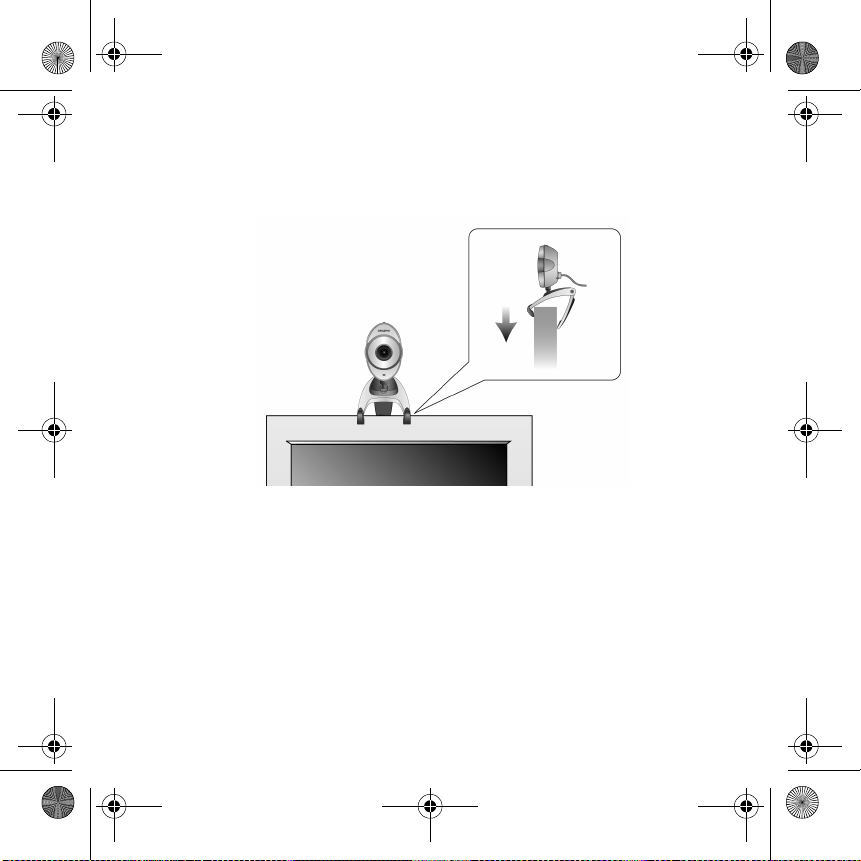
5. Place your webcam on top of your computer monitor or other flat surface. For LCD
flat panel monitors or notebook computers, use the integrated hinged lever to balance
the camera (see Figure 2).
Figure 2
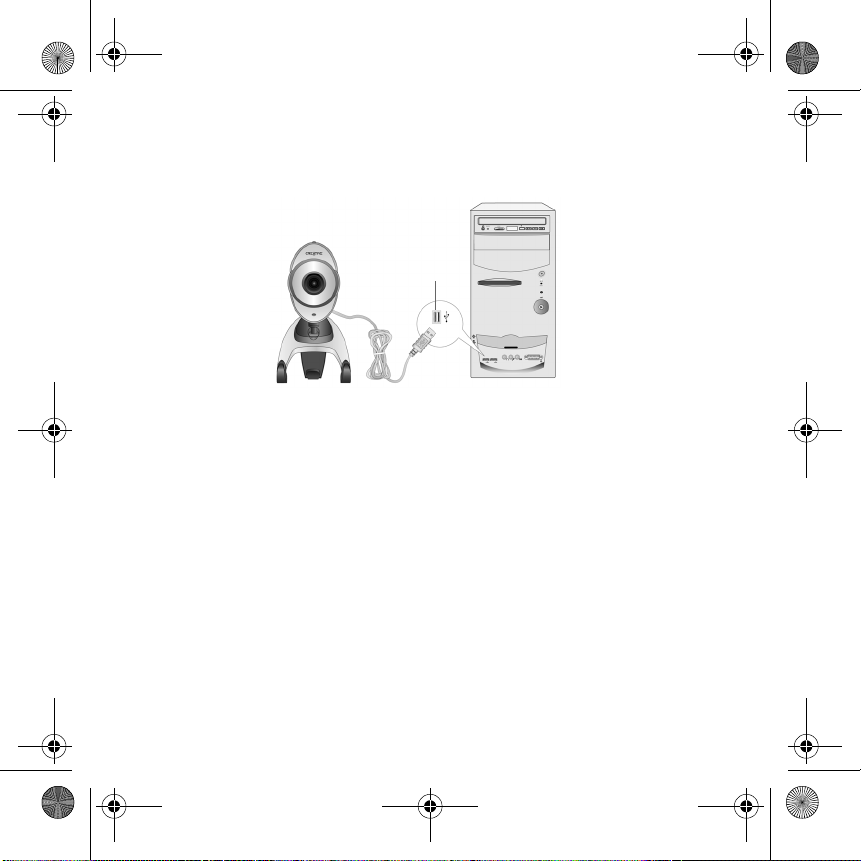
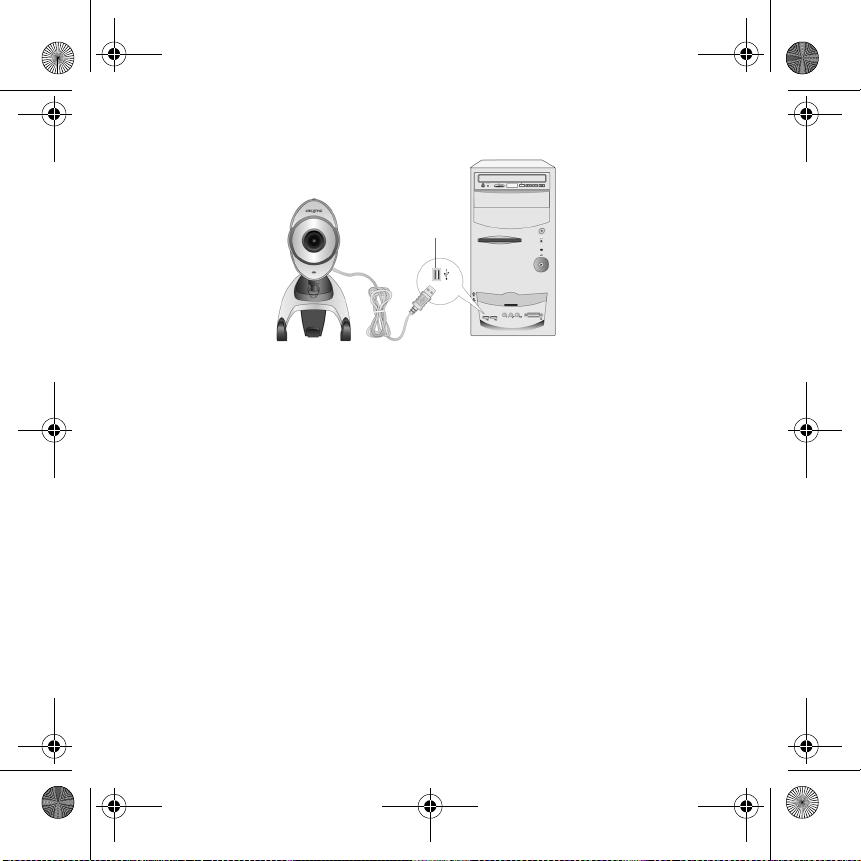
6. When prompted, connect your webcam's USB cable to an available USB port on your
computer (see Figure 3). Windows
®
automatically detects the device.
USB port
Figure 3
5

CLE_multi.book Page 6 Tuesday, November 16, 2004 4:51 PM
7. To complete the installation, follow the appropriate steps below:
For Windows XP
When the Found New Hardware Wizard dialog box appears, select Install the software
automatically (Recommended), and then click the Next button.
For Windows 2000
When a Digital Signature Not Found dialog box appears, telling you that Creative WebCam
Live! Ultra has been detected, click the Yes button.
For Windows Me and Windows 98 SE
i. If you are prompted to insert the Windows 98 SE or Windows Me CD, replace the Creative
WebCam Live! Ultra Installation CD with the appropriate CD.
ii. In the Insert Disk dialog box, click the OK button.
iii. Follow the instructions on the screen to complete the installation.
iv. Click the Finish button.
8. You may be asked, after the drivers have been successfully installed, if you want to
restart your computer. Select No until all the applications are installed.
9. Restart your computer after all the applications have been installed.
For users with USB 2.0-equipped computers only
Creative Installation automatically checks that the software components required
for optimal USB 2.0 performance are installed on your computer, and alerts you if
these components are missing. If you receive such a message, do one of the
following to ensure that your webcam always performs to its fullest potential over a
USB 2.0 connection:
• install the USB 2.0 driver provided by your hardware vendor
• download and install the latest Windows Service Pack for your operating system
• if you are using Windows XP SP1, install Windows XP Hotfix KB822603
The latest Windows Service Packs and Windows Hotfix KB822603 can be obtained
from the Microsoft Help and Support website or via Windows Update.
6

CLE_multi.book Page 7 Tuesday, November 16, 2004 4:51 PM
Verifying the Installation
2
2
1. Right-click the My Computer icon on your desktop or in the Windows Start menu.
2. On the menu that appears, click Properties.
In Windows XP and Windows 2000 only:
In the System Properties dialog box, click the Hardware tab. Click the Device Manager
button.
In Windows Me and Windows 98 SE:
In the System Properties dialog box, click the Device Manager tab.
3. Click the plus (+) sign next to the Imaging Device icon. The entry "Creative
WebCam Live! Ultra" appears.
Using Your Creative WebCam
3
3
Taking a Photo
1. Click Start → Programs → Creative → Creative WebCam → Creative
WebCam Center.
2. In the Creative WebCam Center window, click the Capture tab.
3. Click the Photo Resolution box and select the resolution that you want.
4. Click the Snap photo button to capture an image. Images are saved as files in the
default media folder.
To view the photos in the image viewer, double-click the image files in the Thumbnails/
Details pane.
7

CLE_multi.book Page 8 Tuesday, November 16, 2004 4:51 PM
Recording a Video
1. Click Start → Programs → Creative → Creative WebCam → Creative
Web C am C e n t e r.
2. In the Creative WebCam Center window, click the Capture tab.
3. Click the Video Resolution box and select the resolution that you want.
4. Click the Record button to start and stop video recording. Videos are saved as files in
the default media folder when you stop recording.
To view the videos in the video viewer, double-click the video files in the Thumbnails/
Details pane.
Enabling Face Tracking
With Face Tracking, your camera automatically zooms in on your face during video instant
messaging sessions, or when recording video.
You can enable Face Tracking in the Face Tracking Utility. You can launch the Face Tracking
Utility in the following ways:
• In WebCam Center, click Tools → Face Tracking Utility.
• Right-click the Creative Cam Detector icon in the System Tray and click the Face
Tracking Utility option.
• Click Start → Programs or All Programs → Creative → Creative WebCam
Center → Face Tracking Utility.
For more information, read the User’s Guide on the Installation CD.
Go to d:\manual\<language>\manual.chm (replace d:\ with the drive letter of your CD-ROM/
DVD-ROM drive, and <language> for the language the document is in)
8

CLE_multi.book Page 9 Tuesday, November 16, 2004 4:51 PM
More Information
If you have a technical problem with this product, you may wish to consult our
Creative Knowledge Base
self-help tool “Knowledge Base” for on-line troubleshooting and solutions
(www.europe.creative.com/support)
Register your product!
Enjoy a host of benefits by registering your product during installation, or at
www.creative.com/register. Benefits include:
• Service and product support from Creative
• Exclusive updates on promotions and events.
Please note that your warranty rights are not dependent on product registration.
Customer Support Services and Warranty
You can find Customer Support Services, Warranty and other information in the Installation CD.
Customer Support
Services
Warra nty d:\warranty\<region>\<language>\warranty.chm
User’s Guide d:\manual\<language>\manual.chm
(replace d:\ with the drive letter of your CD-ROM/DVD-ROM drive, <region> with the region that you
are in, and <language> with the language that your document is in)
Copyright © 2004 Creative Technology Ltd. All rights reserved. The Creative logo is a registered trademark of Creative
Technology Ltd. in the United States and/or other countries. Microsoft and Windows are registered trademarks of Microsoft
Corporation. All other products are trademarks or registered trademarks of their respective owners and are hereby
recognized as such. All specifications are subject to change without prior notice. Actual contents may differ slightly from
those pictured.
d:\support\<region>\<language>\support.chm
Please keep your Proof of Purchase for the duration of the warranty period.
9

CLE_multi.book Page 10 Tuesday, November 16, 2004 4:51 PM
Français
A propos de votre Creative WebCam
Bouton
Vue
Bague de
mise au point
Ecran
d'alimentation
Vue de face Vue latérale
Câble
USB
Figure 1
Levier à
charnière
Ecran
d'alimentation
Bague de mise
au point
Bouton Vue Appuyez dessus pour lancer WebCam Center et capturer des images.
Câble USB Connectez-le au port USB de l'ordinateur.
Levier à
charnière
S'allume lorsque votre webcam est connectée au port USB de votre ordinateur.
Permet de régler la mise au point. Dirigez l’objectif vers votre sujet puis faites
tourner la bague vers la gauche ou vers la droite jusqu’à ce que l’image soit nette
(mise au point).
Utilisez-le pour monter votre caméra sur un écran d’affichage LCD.
10

CLE_multi.book Page 11 Tuesday, November 16, 2004 4:51 PM
Démarrage
Installation de votre webcam
1
1
Vous devez installer les pilotes et les applications des périphériques avant d’utiliser votre
webcam.
Ne connectez pas votre webcam à votre ordinateur avant d'installer les pilotes.
Si, par erreur, vous avez commencé l'installation avec votre webcam connectée et que la
boîte de dialogue Assistant Ajout de nouveau matériel ou Assistant Ajout de
nouveau matériel détecté apparaît, cliquez sur le bouton Annuler.
1. Insérez le CD d'installation dans le lecteur de CD-ROM. Le CD démarre
automatiquement. Dans le cas contraire, effectuez les étapes suivantes :
i. Démarrez l'Explorateur Windows.
ii. Dans le volet gauche, cliquez sur l'icône Poste de t ravail .
iii. Cliquez avec le bouton droit sur l'icône de CD-ROM/DVD-ROM, puis sur Exécution
automatique.
2. Sélectionnez la région où vous résidez puis cliquez sur le bouton Suivant.
3. Sélectionnez une langue puis cliquez sur le bouton Suivant.
4. Cliquez sur les options pour installer les pilotes et les applications, puis cliquez sur le
bouton Installer.
11
CLE_multi.book Page 12 Tuesday, November 16, 2004 4:51 PM
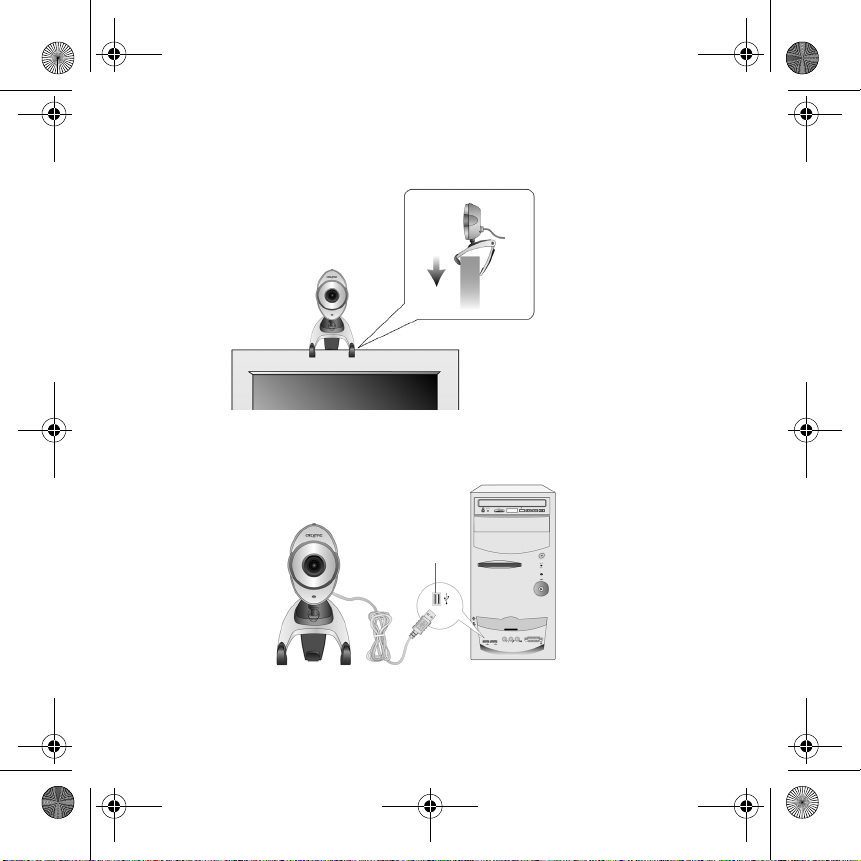
5. Placez la webcam sur le haut de votre moniteur ou sur toute autre surface plane. Pour
les moniteurs à écran plat LCD ou les ordinateurs portables, utilisez le levier à
charnière intégré pour équilibrer la caméra (Voir Figure 2).
Figure 2
6. A l'invite, connectez le câble USB de votre webcam à un port USB disponible sur votre
ordinateur (voir Figure 3). Windows
®
la détecte automatiquement.
Port USB
Figure 3
7. Pour finir l'installation, suivez les étapes appropriées ci-dessous :
12

CLE_multi.book Page 13 Tuesday, November 16, 2004 4:51 PM
Pour Windows XP
Lorsque la boîte de dialogue Assistant Ajout de nouveau matériel détecté s'affiche,
sélectionnez Installer le logiciel automatiquement (recommandé), puis cliquez sur le
bouton Suivant.
Pour Windows 2000
Lorsque la boîte de dialogue Signature numérique non trouvée apparaît, vous indiquant que la
Creative WebCam Live! Ultra a été détectée, cliquez sur le bouton Oui.
Uniquement pour Windows Me et Windows 98 Deuxième Edition
i. Si vous êtes invité à insérer le CD Windows 98 Deuxième Edition ou Windows Millenium
Edition, remplacez le CD d'installation de Creative WebCam Live! Ultra par le CD-ROM
approprié.
ii. Dans la boîte de dialogue Insérer un disque apparaît, cliquez sur le bouton OK.
iii. Suivez les instructions à l'écran pour terminer l'installation.
iv. Cliquez sur le bouton Gestionnaire de périphériques.
8. Vous serez peut-être invité à redémarrer l'ordinateur après l'installation réussie des
pilotes. Sélectionnez Non tant que toutes les applications ne sont pas installées.
9. Redémarrez votre ordinateur lorsque toutes les applications ont été installées.
Pour les utilisateurs d'ordinateurs avec USB 2.0
Le programme d'installation de Creative vérifie automatiquement que les
composants logiciels requis pour une performance optimale d'USB 2.0 sont installés
sur votre ordinateur et vous prévient si des composants manquent. Si vous recevez
un tel message, effectuez l'une des opérations suivantes pour vous assurer que
votre webcam fonctionne toujours à son potentiel maximum avec une connexion
USB 2.0.
• installez le pilote USB 2.0 fourni par votre vendeur de matériel
• téléchargez et installez le dernier Service Pack Windows approprié à votre
système d'exploitation.
• Si vous utilisez Windows XP SP1, installez le correctif XP KB822603.
Vous pouvez obtenir les derniers Services Packs Windows et le correctif KB822603
Windows depuis le site Web d'aide Microsoft ou via une mise à jour Windows.
13

CLE_multi.book Page 14 Tuesday, November 16, 2004 4:51 PM
Vérification de l'installation
2
2
1. Cliquez avec le bouton droit de votre souris sur l'icône Poste de travail sur votre
Bureau ou dans le menu Démarrer de Windows.
2. Dans le menu qui s'affiche, cliquez sur Propriétés.
Sous Windows XP et Windows 2000 uniquement :
Dans la boîte de dialogue Propriétés système, cliquez sur l’onglet Matériel. Cliquez sur le
bouton Gestionnaire de périphériques
Sous Windows Me et Windows 98 Deuxième Edition :
Dans la boîte de dialogue Propriétés système apparaît, cliquez sur l’onglet Gestionnaire de
périphériques.
3. Cliquez sur le signe plus (+) situé en regard de l'icône Périphérique d'acquisition
d'images. L'entrée « Creative WebCam Live! Ultra » apparaît.
Utilisation de votre Creative WebCam
3
3
Prise d'une photo
1. Cliquez sur Démarrer → Programmes → Creative → Creative WebCam →
Creative WebCam Center.
2. Dans la fenêtre Creative WebCam Center, cliquez sur l'onglet Capturer.
3. Cliquez sur la zone de résolution Photo et sélectionnez la résolution souhaitée.
4. Cliquez sur le bouton Prendre une photo pour capturer une image. Les images sont
enregistrées en tant que fichiers dans le dossier de média par défaut.
Pour visualiser les photos dans l'afficheur d'images, double-cliquez sur les fichiers image
dans le volet Miniatures/Détails.
14

CLE_multi.book Page 15 Tuesday, November 16, 2004 4:51 PM
Enregistrement d'une vidéo
1. Cliquez sur Démarrer → Programmes → Creative → Creative WebCam →
Creative WebCam Center.
2. Dans la fenêtre Creative WebCam Center, cliquez sur l'onglet Capturer.
3. Cliquez sur la zone de résolution Vidéo et sélectionnez la résolution souhaitée.
4. Cliquez sur le bouton Enregistrer pour commencer et arrêter l'enregistrement d'une
vidéo. Les vidéos sont sauvegardées en tant que fichiers dans le dossier de média par
défaut lorsque vous arrêtez l'enregistrement.
Pour visualiser les vidéos dans l'afficheur de vidéos, double-cliquez sur les fichiers vidéo
dans le volet Miniatures/Détails.
Activation du suivi de visage
Avec la fonction Suivi du visage, votre caméra effectue un zoom automatiquement sur votre
visage lors de sessions de messagerie instantanée ou lors d'enregistrement de vidéos.
Vous pouvez activer le suivi de visage dans l'utilitaire Suivi du visage. Vous pouvez démarrer
l'utilitaire Suivi du visage de différentes façons :
• Dans WebCam Center, cliquez sur Outils → Utilitaire Suivi du visage.
• Cliquez avec le bouton droit de la souris sur l'icône Creative Cam Detector dans la
barre d'état système et cliquez sur l'option Utilitaire Suivi du visage.
• Cliquez sur Démarrer → Programmes ou Tous les programmes → Creative →
Creative WebCam Center → Utilitaire Suivi du visage.
Pour de plus amples informations, consultez le guide de l'utilisateur (User's Guide) sur le CD
d'installation.
Accédez à d:\manual\<langue>\manual.chm (remplacez d:\ par la lettre correspondant à votre
lecteur de CD-ROM/DVD-ROM, et <langue> par la langue du document)
15
CLE_multi.book Page 16 Tuesday, November 16, 2004 4:51 PM
Informations complémentaires
Si vous rencontrez un problème technique avec ce produit, vous pouvez consulter
notre « Base de connaissances » d’auto pour obtenir un dépannage ou des solutions au
problème en ligne. (www.europe.creative.com/support)
Base de connaissances de Creative
Enregistrez votre produit !
Bénéficiez de nombreux avantages en enregistrant votre produit durant l'installation ou
depuis notre site www.creative.com/register, entre autres :
• Service et support technique de Creative
• Mises à jour exclusives concernant les promotions et les événements.
Notez que vos droits de garantie ne sont pas dépendants de l'enregistrement du produit.
Services de support client et garantie
Le CD d'installation contient des informations relatives au support client, à la garantie...
Services de support client d:\support\<région>\<langue>\support.chm
Garantie d:\warranty\<région>\<langue>\warranty.chm
Guide de l’utilisateur d:\manual\<langue>\manual.chm
(remplacez d:\ par la lettre correspondant à votre lecteur de CD-ROM/DVD-ROM, <région> par la
région dans laquelle vous résidez, et <langue> par la langue de votre documentation)
Copyright © 2004 Creative Technology Ltd. Tous droits réservés. Le logo Creative est une marque déposée de Creative
Technology Ltd. aux Etats-Unis et/ou dans d'autres pays. Microsoft et Windows sont des marques déposées de
Microsoft Corporation. Tous les autres produits sont des marques commerciales ou des marques déposées de leurs
propriétaires respectifs et sont reconnus par la présente en tant que tels. Toutes les spécifications peuvent faire l'objet de
modifications sans préavis. Le contenu réel peut être légèrement différent de celui illustré dans ce document.
16
Veuillez conserver votre preuve d'achat durant toute la période de garantie.

CLE_multi.book Page 17 Tuesday, November 16, 2004 4:51 PM
Deutsch
Einführung in Ihre Creative WebCam
Auslöser
Fokussierring
Betriebs-LED
USB-Kabel
Gelenk
arm
Vorderansicht Seitenansicht
Abbildung 1
Betriebs-LED
Fokussierring
Auslöser Drücken Sie diese Taste, um WebCam Center zu starten und Bilder aufzunehmen.
USB-Kabel Schließen Sie das Kabel direkt an den USB-Anschluss Ihres Computers an.
Gelenkarm Mit diesem Arm bringen Sie Ihre Kamera an einem LCD-Bildschirm an.
Leuchtet auf, wenn Ihre WebCam an den USB-Anschluss Ihres Computers
angeschlossen ist.
Passt die Fokussierung an. Richten Sie das Objektiv auf das gewünschte Motiv.
Drehen Sie anschließend diesen Ring im bzw. entgegen dem Uhrzeigersinn, bis das
Bild scharf eingestellt ist.
17

CLE_multi.book Page 18 Tuesday, November 16, 2004 4:51 PM
Erste Schritte
Installieren Ihrer Webcam
1
1
Sie müssen Gerätetreiber und Anwendungen installieren, bevor Sie Ihre WebCam
verwenden können.
Schließen Sie die WebCam erst an den Computer an, nachdem Sie die Treiber
installiert haben.
Wenn Sie versehentlich mit der Installation beginnen, während die WebCam angeschlossen
ist, und der Hardware-Assistent oder das Dialogfeld Neue Hardware gefunden
angezeigt wird, klicken Sie auf die Schaltfläche Abbrechen.
1. Legen Sie die Installations-CD in das CD-ROM-Laufwerk ein. Ihre CD sollte
automatisch starten. Ist das nicht der Fall, wiederholen Sie die nachstehenden Schritte.
i. Starten Sie Windows Explorer.
ii. Klicken Sie im linken Fenster auf das Symbol Arbeitsplatz.
iii. Klicken Sie mit der rechten Maustaste auf das Symbol für das CD-ROM/DVD-ROM-Laufwerk
und anschließend auf Autoplay.
2. Wählen Sie die Region, in der Sie sich befinden, und klicken Sie dann auf die
Schaltfläche Wei te r.
3. Wählen Sie eine Sprache, und klicken Sie dann auf die Schaltfläche Weiter.
4. Klicken Sie auf die Optionen zum Installieren von Treibern und Anwendungen, und
klicken Sie dann auf die Schaltfläche Installieren.
18
CLE_multi.book Page 19 Tuesday, November 16, 2004 4:51 PM
5. Stellen Sie die WebCam auf den Monitor oder eine andere ebene Fläche. Für die
Montage auf LCD-Flachbildschirmen oder Notebook-Computern können Sie den
integrierten Gelenkarm verwenden (siehe Abbildung 2).
Abbildung 2
19
CLE_multi.book Page 20 Tuesday, November 16, 2004 4:51 PM
6. Schließen Sie, wenn Sie dazu aufgefordert werden, das USB-Kabel der WebCam an
einen freien USB-Anschluss an Ihrem Computer an (siehe Abbildung 3). Das Gerät
wird durch Windows
®
automatisch erkannt.
USB-Anschluss
Abbildung 3
7. Führen Sie die entsprechenden Schritte unten aus, um die Installation abzuschließen:
Windows XP
Wählen Sie im angezeigten Dialogfeld Hardware-Assistent die Option Software automatisch
installieren (empfohlen), und klicken Sie anschließend auf die Schaltfläche Weit er.
Windows 2000
Wenn Ihnen über das Dialogfeld Digitale Signatur nicht gefunden (siehe Abbildung unten)
mitgeteilt wird, dass die Creative WebCam Live! Ultra gefunden wurde, klicken Sie auf die
Schaltfläche Ja.
20

CLE_multi.book Page 21 Tuesday, November 16, 2004 4:51 PM
Windows Me und Windows 98 SE
i. Wenn Sie aufgefordert werden, die Windows 98 SE- oder Windows Me-CD einzulegen,
nehmen Sie die Installations-CD der Creative WebCam Live! Ultra aus dem Laufwerk und
legen die entsprechende CD ein.
ii. Klicken Sie im Dialogfeld Datenträger einlegen auf die Schaltfläche OK.
iii. Folgen Sie den Anweisungen auf dem Bildschirm, um die Installation abzuschließen.
iv. Klicken Sie auf die Schaltfläche Fertig stellen.
8. Nach der erfolgreichen Installation der Treiber werden Sie möglicherweise aufgefordert,
Ihren Computer neu zu starten. Wählen Sie
9. Starten Sie Ihren Computer neu, nachdem alle Anwendungen installiert wurden.
Nur für Benutzer, deren Computer mit USB 2.0 ausgestattet sind
Die Creative-Installation überprüft automatisch, ob die für eine optimale USB
2.0-Leistung erforderlichen Softwarekomponenten auf dem Computer installiert sind,
und zeigt eine Meldung an, wenn diese Komponenten fehlen. Wenn Sie eine derartige
Meldung erhalten, führen Sie einen der folgenden Schritte aus, um sicherzustellen,
dass Ihre WebCam über die USB 2.0-Verbindung stets optimal funktioniert:
• Installieren Sie den von Ihrem Hardwarehändler bereitgestellten USB 2.0-Treiber
• Rufen Sie das neueste Windows Service Pack (SP) für Ihr Betriebssystem ab, und
installieren Sie es.
• Falls Sie Windows XP SP1 verwenden, installieren Sie Windows XP Hotfix
KB822603
Die neuesten Windows Service Packs und Windows Hotfix KB822603 erhalten Sie
über die Support-Website von Microsoft oder über Windows Update.
Nein
, bis alle Anwendungen installiert sind.
Überprüfen der Installation
2
2
1. Klicken Sie auf dem Desktop oder im Windows-Start-Menü mit der rechten Maustaste
auf das Symbol Arbeitsplatz.
21

CLE_multi.book Page 22 Tuesday, November 16, 2004 4:51 PM
2. Klicken Sie in dem Kontextmenü, das daraufhin angezeigt wird, auf die Option
Eigenschaften.
Nur Windows XP und Windows 2000:
Klicken Sie im Dialogfeld Systemeigenschaften auf die Registerkarte Hardware. Klicken Sie auf
die Schaltfläche Geräte-Manager.
Nur Windows Me und Windows 98 SE:
Klicken Sie im Dialogfeld Eigenschaften von System auf die Registerkarte Geräte-Manager.
3. Klicken Sie auf das Pluszeichen (+) neben dem Symbol Bildverarbeitungsgerät. Der
Eintrag "Creative WebCam Live! Ultra" wird angezeigt.
Verwenden Ihrer Creative WebCam
3
3
Aufnehmen eines Fotos
1. Klicken Sie auf Start → Programme → Creative → Creative WebCam →
Creative WebCam Center.
2. Klicken Sie im Fenster Creative WebCam Center auf die Registerkarte Erfassung.
3. Klicken Sie auf das Auflösungsfeld Foto, und wählen Sie die gewünschte Auflösung.
4. Klicken Sie auf die Schaltfläche Foto aufnehmen, um ein Bild aufzunehmen. Bilder
werden als Dateien im Standardmedienordner gespeichert.
Wenn Sie die Fotos in einer Bildanzeige sehen möchten, doppelklicken Sie im Teilfenster
Miniaturen/Details auf die Bilddateien.
Aufnehmen eines Videos
1. Klicken Sie auf Start → Programme → Creative → Creative WebCam →
Creative WebCam Center.
22

CLE_multi.book Page 23 Tuesday, November 16, 2004 4:51 PM
2. Klicken Sie im Fenster Creative WebCam Center auf die Registerkarte Erfassung.
3. Klicken Sie auf das Auflösungsfeld Video, und wählen Sie die gewünschte Auflösung.
4. Klicken Sie auf die Schaltfläche Aufnahme, um die Videoaufzeichnung zu beginnen und
zu beenden. Videos werden nach Abschluss der Aufnahme als Dateien im
Standardmedienordner gespeichert.
Wenn Sie die Videos in einer Videoanzeige sehen möchten, doppelklicken Sie im Teilfenster
Miniaturen/Details auf die Videodateien.
Aktivieren der Gesichtsverfolgung
Mit der Gesichtsverfolgung vergrößert die Kamera Ihr Gesicht automatisch, wenn Sie eine
Video-Instant-Messaging-Sitzung abhalten oder ein Video aufnehmen.
Sie können die Gesichtsverfolgung im gleichnamigen Dienstprogramm aktivieren. Das
Dienstprogramm Gesichtsverfolgung starten Sie folgendermaßen:
• Klicken Sie in WebCam Center auf Werkzeuge → Face-Tracking-Programm.
• Klicken Sie mit der rechten Maustaste auf das Symbol Creative Cam Detector in der
Systemablage, und klicken Sie auf die Option Face-Tracking-Programm.
• Klicken Sie auf Start → Programme oder Alle Programme → Creative →
Creative WebCam Center → Face-Tracking-Programm.
Weitere Informationen finden Sie im Benutzerhandbuch auf der Installations-CD.
Wechseln Sie zu d:\manual\<Sprache>\manual.chm (ersetzen Sie d:\ durch den
Laufwerksbuchstaben Ihres CD-ROM-/DVD-ROM-Laufwerks und <Sprache> durch die gewünschte
Dokumentsprache.)
23

CLE_multi.book Page 24 Tuesday, November 16, 2004 4:51 PM
Weitere Informationen
Solten bei der Verwendung dieses Produkts technische Probleme auftreten, finden
Sie nützliche Tips zur Fehlerbehebung und Lösungsvorschläge in unserem
Selbshilfe-Tool, der (Online-Wissendatenbank) „Knowledge Base“
Creative Knowledge Base
(www.europe.creative.com/support)
Lassen Sie Ihr Produkt registrieren!
Sie können eine Fülle von Vorteilen in Anspruch nehmen, wenn Sie Ihr Produkt während
der Installation oder unter www.creative.com/register registrieren lassen. Zu den
Vorteilen zählen:
• Service- und Produktunterstützung durch Creative
• Exklusive Benachrichtigungen zu Promotionen und Events.
Beachten Sie bitte, dass Ihre Garantierechte unabhängig von der Produktregistrierung
gelten.
Kundenunterstützungsservices und Garantie
Kundenunterstützungsservices, Garantie und andere Informationen finden Sie auf der Installation-CD.
Kundendienst d:\support\<Region>\<Sprache>\support.chm
Garantie d:\warranty\<Region>\<Sprache>\warranty.chm
Benutzerhandbuch d:\manual\<Sprache>\manual.chm
(ersetzen Sie d:\ durch den Laufwerksbuchstaben Ihres CD-ROM/DVD-ROM-Laufwerks, <Region>
durch die Region, in der Sie sich befinden, und <Sprache> durch die gewünschte Dokumentsprache.)
Copyright © 2004 Creative Technology Ltd. Alle Rechte vorbehalten. Das Creative-Logo ist eine eingetragene Marke von
Creative Technology Ltd. in den USA und/oder anderen Ländern. Microsoft und Windows sind eingetragene Marken der
Microsoft Corporation. Alle anderen Produkte sind Marken oder eingetragene Marken ihrer jeweiligen Eigentümer und
werden hiermit als solche anerkannt. Alle technischen Daten können jederzeit ohne vorherige Ankündigung geändert werden.
Der eigentliche Inhalt kann geringfügig von den Abbildungen abweichen.
24
Bewahren Sie Ihren Kaufbeleg während der gesamten Garantielaufzeit gut auf.
CLE_multi.book Page 25 Tuesday, November 16, 2004 4:51 PM
Italiano
Presentazione di Creative WebCam
Pulsante
Istantanea
Regolatore di
messa a fuoco
LED di
alimentazione
Vista anteriore Vista laterale
Cavo USB
Figura 1
Leva
incernierata
LED di
alimentazione
Regolatore di
messa a fuoco
Pulsante
Istantanea
Cavo USB Collegarlo alla porta USB del computer.
Leva
incernierata
Si accende quando la webcam è collegata a una porta USB del computer.
Regola la messa a fuoco. Puntare l'obiettivo sul soggetto, quindi ruotare la ghiera
in senso orario o antiorario fino a mettere a fuoco l'immagine.
Premere questo pulsante per avviare WebCam Center e acquisire le immagini.
Utilizzarla per montare la videocamera su uno schermo LCD.
25

CLE_multi.book Page 26 Tuesday, November 16, 2004 4:51 PM
Operazioni preliminari
Installazione della webcam
1
1
Per poter utilizzare la webcam, è necessario installare i driver di dispositivo e le varie
applicazioni.
Non collegare la webcam al computer prima di aver installato i driver.
Se involontariamente si avvia l'installazione con la webcam collegata e vengono visualizzate
le finestre di dialogo Installazione guidata Nuovo hardware o Trovato nuovo
hardware, fare clic sul pulsante Annulla.
1. Inserire il CD d'installazione nell'unità CD-ROM. Il CD dovrebbe avviarsi
automaticamente, in caso contrario, adottare la seguente procedura:
i. Avviare Esplora risorse.
ii. Nella parte sinistra della finestra, fare clic sull'icona Risorse del computer.
iii. Fare clic con il pulsante destro del mouse sull'icona dell'unità CD-ROM/DVD-ROM, quindi fare
clic su Riproduzione automatica.
2. Selezionare la propria area geografica, quindi scegliere il pulsante Avanti.
3. Selezionare la lingua, quindi scegliere il pulsante Avanti.
4. Fare clic sulle opzioni per l'installazione dei driver e delle applicazioni, quindi scegliere il
pulsante Installa.
26
CLE_multi.book Page 27 Tuesday, November 16, 2004 4:51 PM
5. Posizionare la webcam sulla parte superiore del monitor del computer o su un'altra
superficie piana. Nel caso di monitor a schermo piatto LCD o di computer portatili,
utilizzare la leva incernierata e integrata per posizionare la webcam in equilibrio
(vedere la Figura 2).
Figura 2
27
CLE_multi.book Page 28 Tuesday, November 16, 2004 4:51 PM
6. Quando viene richiesto, collegare il cavo USB della webcam alla porta USB libera del
computer (vedere la Figura 3). Windows
®
rileva automaticamente la periferica.
Porta USB
Figura 3
7. Per completare l'installazione, adottare la seguente procedura:
Per Windows XP
Quando viene visualizzata la finestra di dialogo Installazione guidata nuovo hardware,
selezionare Installazione software automatica (consigliata), quindi scegliere il pulsante
Avanti.
Per Windows 2000
Quando appare la finestra di dialogo Firma digitale non trovata, che informa l'utente che è stata
rilevata la periferica Creative WebCam Live! Ultra, fare clic sul pulsante Sì.
Per Windows Me e Windows 98 SE
i. Se viene richiesto di inserire il CD di Windows 98 SE o di Windows Me, sostituire il CD di
installazione di Creative WebCam Live! Ultra con il CD corrispondente.
ii. Nella finestra di dialogo Inserisci disco, fare clic sul pulsante OK.
iii. Seguire le istruzioni visualizzate sullo schermo per portare a termine l'installazione.
iv. Fare clic sul pulsante Fine.
8. Una volta completata l'installazione dei driver, potrebbe essere richiesto il riavvio del
computer. Selezionare No fino a quando tutte le applicazioni non sono state installate.
28

CLE_multi.book Page 29 Tuesday, November 16, 2004 4:51 PM
9. Una volta installate tutte le applicazioni, riavviare il computer.
Solo per utenti con computer dotati di porte USB 2.0
Il programma di installazione Creative verifica automaticamente se i componenti
software richiesti per un funzionamento ottimale con porte USB 2.0 sono installati
sul computer e in caso contrario visualizza un apposito messaggio. Se si riceve un
tale messaggio, eseguire una delle seguenti operazioni per assicurare che la webcam
funzioni in modo ottimale con porte di connessione USB 2.0.
• Installare il driver USB 2.0 fornito dal rivenditore dell'hardware.
• Scaricare e installare l'ultima versione del Service Pack per il sistema operativo
Windows utilizzato.
• Se si utilizza Windows XP SP1, installare Windows XP Hotfix KB822603.
Le ultime versioni dei Service Pack di Windows e Windows Hotfix KB822603 sono
disponibili sul sito Web del servizio di supporto tecnico Microsoft o sono accessibili
utilizzando Windows Update.
Verifica dell'installazione
2
2
1. Fare clic con il pulsante destro del mouse sull'icona Risorse del computer
visualizzata sul desktop o sul menu Start di Windows.
2. Dal menu a discesa visualizzato, fare clic su Proprietà.
Solo in Windows XP e Windows 2000:
Nella finestra di dialogo Proprietà del sistema, fare clic sulla scheda Hardware. Fare clic sul
pulsante Gestione periferiche.
In Windows Me e Windows 98 SE:
Nella finestra di dialogo Proprietà Sistema, fare clic sulla scheda Gestione periferiche.
3. Fare clic sul segno più (+) accanto all'icona Periferiche di imaging. Viene visualizzata
la voce "Creative WebCam Live! Ultra".
29

CLE_multi.book Page 30 Tuesday, November 16, 2004 4:51 PM
Utilizzo di Creative WebCam
3
3
Cattura di una foto
1. Fare clic su Start → Programmi → Creative → Creative WebCam → Creative
Web C am C e n t e r.
2. Nella finestra Creative WebCam Center, fare clic sulla scheda Cattura.
3. Fare clic sulla casella di selezione del tipo di risoluzione Foto e selezionare la
risoluzione desiderata.
4. Fare clic sul pulsante Cattura foto per catturare l'immagine. Le immagini vengono
salvate come file nella cartella multimediale predefinita.
Per visualizzare le foto nel visualizzatore di immagini, fare doppio clic sui file delle immagini
visualizzati nel riquadro Miniatura/Dettagli.
Registrazione di un video
1. Fare clic su Start → Programmi → Creative → Creative WebCam → Creative
Web C am C e n t e r.
2. Nella finestra Creative WebCam Center, fare clic sulla scheda Cattura.
3. Fare clic sulla casella di selezione del tipo di risoluzione Video e selezionare la
risoluzione desiderata.
4. Fare clic sul pulsante Registra per avviare o arrestare la registrazione del video.
Quando si arresta la registrazione, le immagini vengono salvate come file nella cartella
multimediale predefinita.
Per visualizzare i video nel visualizzatore di video, fare doppio clic sui file dei video
visualizzati nel riquadro Miniatura/Dettagli.
30
 Loading...