

Creative WC LIVE! Quick Start Manual

1
English. . . . . . . . . . . . . . . . . . . . . . . . . . . . . . . . . . . . . . . . . .3
. . . . . . . . . . . . . . . . . . . . . . . . . . . . . . . . . . . . . . .10
. . . . . . . . . . . . . . . . . . . . . . . . . . . . . . . . . . . . . .17
. . . . . . . . . . . . . . . . . . . . . . . . . . . . . . . . . . . . . . . .24
Türkçe . . . . . . . . . . . . . . . . . . . . . . . . . . . . . . . . . . . . . . . .31
Language TOC.fm Page 1 Wednesday, November 10, 2004 10:20 AM

2
Language TOC.fm Page 2 Wednesday, November 10, 2004 10:20 AM
3
English
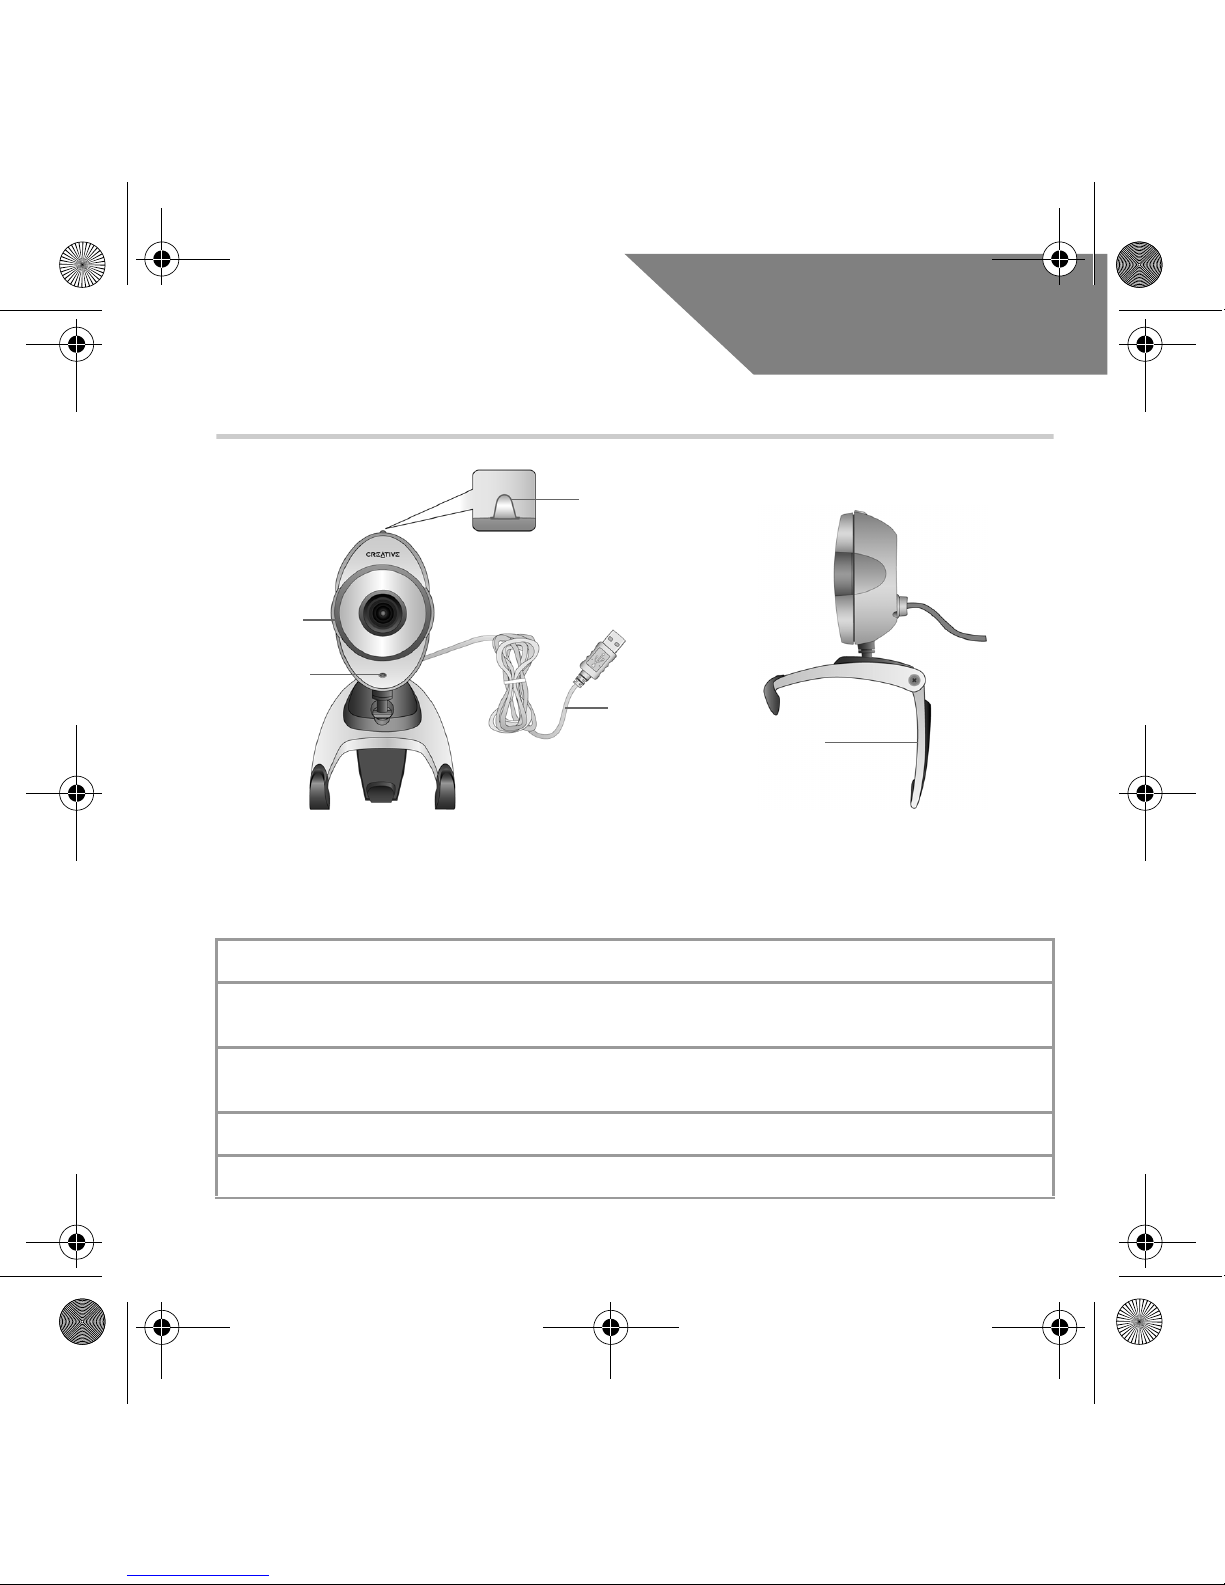
About Your Creative WebCam
Power LED Lights up when your webcam is connected to your computer's USB port.
Focus ring
Adjusts the view focus. Point the lens toward your subject and then rotate this ring in
a clockwise or counterclockwise motion until the image is in focus.
Snapshot
button
Press it to launch WebCam Center and capture images.
USB cable Connect it to your computer's USB port.
Hinged lever Use this to mount your camera on an LCD display panel.
F
ocus ring
Snapshot
button
USB cable
Hinged
lever
Figure 1
Front View Side View
P
ower LED
WC Live! Ultra.fm Page 3 Wednesday, November 10, 2004 10:21 AM

4
Getting Started
1
1
Installing Your Webcam
You need to install device drivers and applications before using your webcam.
Do not connect your webcam to your computer before installing the drivers.
If you accidentally begin installation with your webcam connected and the Add New
Hardware Wizard or Found New Hardware Wizard dialog box appears, click the
Cancel button.
1. Insert the Installation CD into your CD-ROM drive. Your CD should start
automatically. If it does not, follow the steps below:
i. Start Windows Explorer.
ii. On the left pane, click the My Computer icon.
iii. Right-click the CD-ROM/DVD-ROM drive icon, and then click Autoplay.
2. Select the region you are in and then click the Next button.
3. Select a language and then click the Next button.
4. Click the options for installing drivers and applications, and then click the Install
button.
WC Live! Ultra.fm Page 4 Wednesday, November 10, 2004 10:21 AM
5
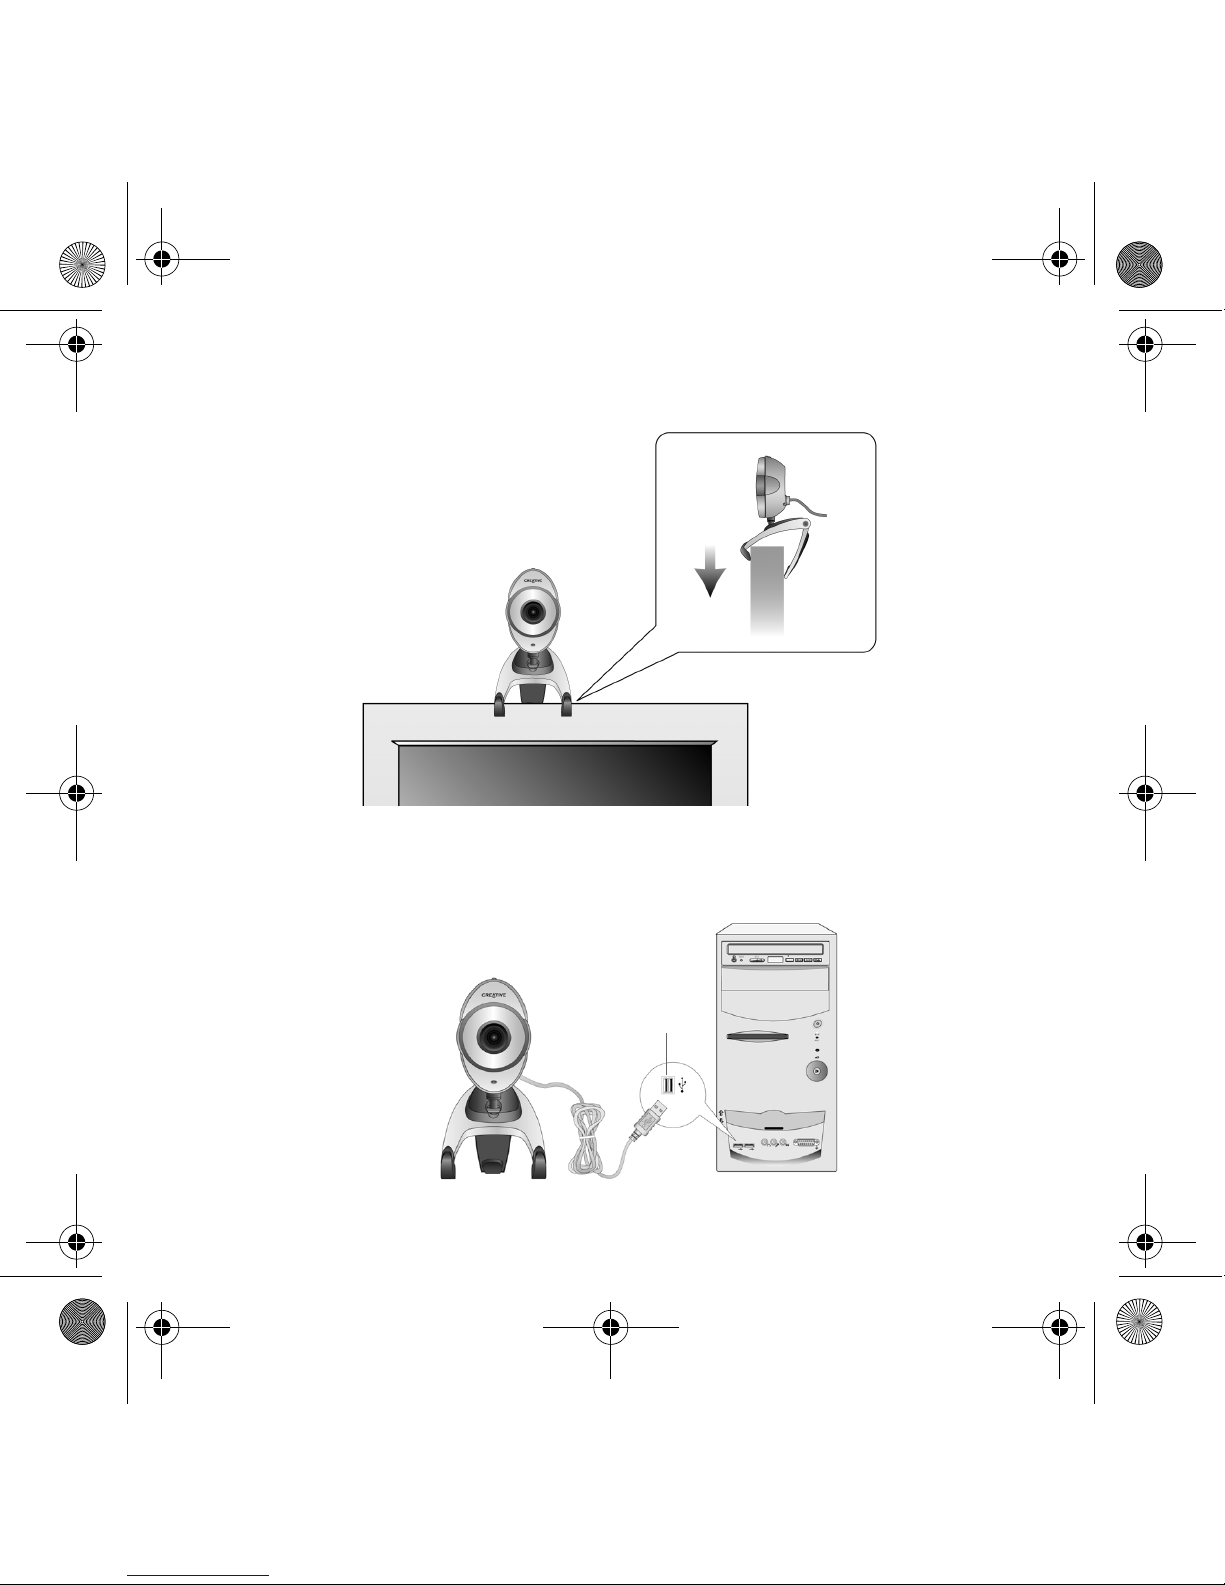
5. Place your webcam on top of your computer monitor or other flat surface. For LCD
flat panel monitors or notebook computers, use the integrated hinged lever to balance
the camera (see Figure 2).
6. When prompted, connect your webcam's USB cable to an available USB port on your
computer (see Figure 3). Windows
®
automatically detects the device.
Figure 2
Figure 3
USB port
WC Live! Ultra.fm Page 5 Wednesday, November 10, 2004 10:21 AM

6
7. To complete the installation, follow the appropriate steps below:
For Windows XP
When the Found New Hardware Wizard dialog box appears, select Install the software
automatically (Recommended), and then click the Next button.
For Windows 2000
When a Digital Signature Not Found dialog box appears, telling you that Creative WebCam
Live! Ultra has been detected, click the Yes button.
For Windows Me and Windows 98 SE
i. If you are prompted to insert the Windows 98 SE or Windows Me CD, replace the Creative
WebCam Live! Ultra Installation CD with the appropriate CD.
ii. In the Insert Disk dialog box, click the OK button.
iii. Follow the instructions on the screen to complete the installation.
iv. Click the Finish button.
8. You may be asked, after the drivers have been successfully installed, if you want to
restart your computer. Select No until all the applications are installed.
9. Restart your computer after all the applications have been installed.
For users with USB 2.0-equipped computers only
Creative Installation automatically checks that the software components required
for optimal USB 2.0 performance are installed on your computer, and alerts you if
these components are missing. If you receive such a message, do one of the
following to ensure that your webcam always performs to its fullest potential over a
USB 2.0 connection:
• install the USB 2.0 driver provided by your hardware vendor
• download and install the latest Windows Service Pack for your operating system
• if you are using Windows XP SP1, install Windows XP Hotfix KB822603
The latest Windows Service Packs and Windows Hotfix KB822603 can be obtained
from the Microsoft Help and Support website or via Windows Update.
WC Live! Ultra.fm Page 6 Wednesday, November 10, 2004 10:21 AM

7
2
2
Verifying the Installation
1. Right-click the My Computer icon on your desktop or in the Windows Start menu.
2. On the menu that appears, click Properties.
In Windows XP and Windows 2000 only:
In the System Properties dialog box, click the Hardware tab. Click the Device Manager
button.
In Windows Me and Windows 98 SE:
In the System Properties dialog box, click the Device Manager tab.
3. Click the plus (+) sign next to the Imaging Device icon. The entry "Creative
NOMAD MuVo²" appears.
3
3
Using Your Creative WebCam
Taking a Photo
1. Click Start → Programs → Creative → Creative WebCam → Creative
WebCam Center.
2. In the Creative WebCam Center window, click the Capture tab.
3. Click the Photo Resolution box and select the resolution that you want.
4. Click the Snap photo button to capture an image. Images are saved as files in the
default media folder.
To view the photos in the image viewer, double-click the image files in the Thumbnails/
Details pane.
WC Live! Ultra.fm Page 7 Wednesday, November 10, 2004 10:21 AM

8
Recording a Video
1. Click Start → Programs → Creative → Creative WebCam → Creative
WebCam Center.
2. In the Creative WebCam Center window, click the Capture tab.
3. Click the Video Resolution box and select the resolution that you want.
4. Click the Record button to start and stop video recording. Videos are saved as files in
the default media folder when you stop recording.
To view the videos in the video viewer, double-click the video files in the Thumbnails/
Details pane.
Enabling Face Tracking
With Face Tracking, your camera automatically zooms in on your face during video instant
messaging sessions, or when recording video.
You can enable Face Tracking in the Face Tracking Utility. You can launch the Face Tracking
Utility in the following ways:
• In WebCam Center, click Tools → Face Tracking Utility.
• Right-click the Creative Cam Detector icon in the System Tray and click the Face
Tracking Utility option.
•Click Start → Programs or All Programs → Creative → Creative WebCam
Center → Face Tracking Utility.
For more information, read the User’s Guide on the Installation CD.
Go to d:\manual\<language>\manual.chm (replace d:\ with the drive letter of your CD-ROM/
DVD-ROM drive, and <language> for the language the document is in)
WC Live! Ultra.fm Page 8 Wednesday, November 10, 2004 10:21 AM

9
More Information
Register your product!
Enjoy a host of benefits by registering your product during installation, or at
www.creative.com/register. Benefits include:
• Service and product support from Creative
• Exclusive updates on promotions and events.
Please note that your warranty rights are not dependent on product registration.
Customer Support Services and Warranty
You can find Customer Support Services, Warranty and other information in the Installation CD.
(replace d:\ with the drive letter of your CD-ROM/DVD-ROM drive, <region> with the region that you
are in, and <language> with the language that your document is in)
Customer Support
Services
d:\support\<region>\<language>\support.chm
Warranty d:\warranty\<region>\<language>\warranty.chm
Please keep your Proof of Purchase for the duration of the warranty period.
User’s Guide d:\manual\<language>\manual.chm
Creative Knowledge Base
Resolve and troubleshoot technical queries at Creative's 24-hour self-help
Knowledge Base. Go to www.creative.com and select your region.
Copyright © 2004 Creative Technology Ltd. All rights reserved. The Creative logo is a registered trademark of Creativ
e
Technology Ltd. in the United States and/or other countries. Microsoft and Windows are registered trademarks of Microso
ft
Corporation. All other products are trademarks or registered trademarks of their respective owners and are hereb
y
recognized as such. All specifications are subject to change without prior notice. Actual contents may differ slightly fro
m
those pictured.
WC Live! Ultra.fm Page 9 Wednesday, November 10, 2004 10:21 AM
10
繁體中文
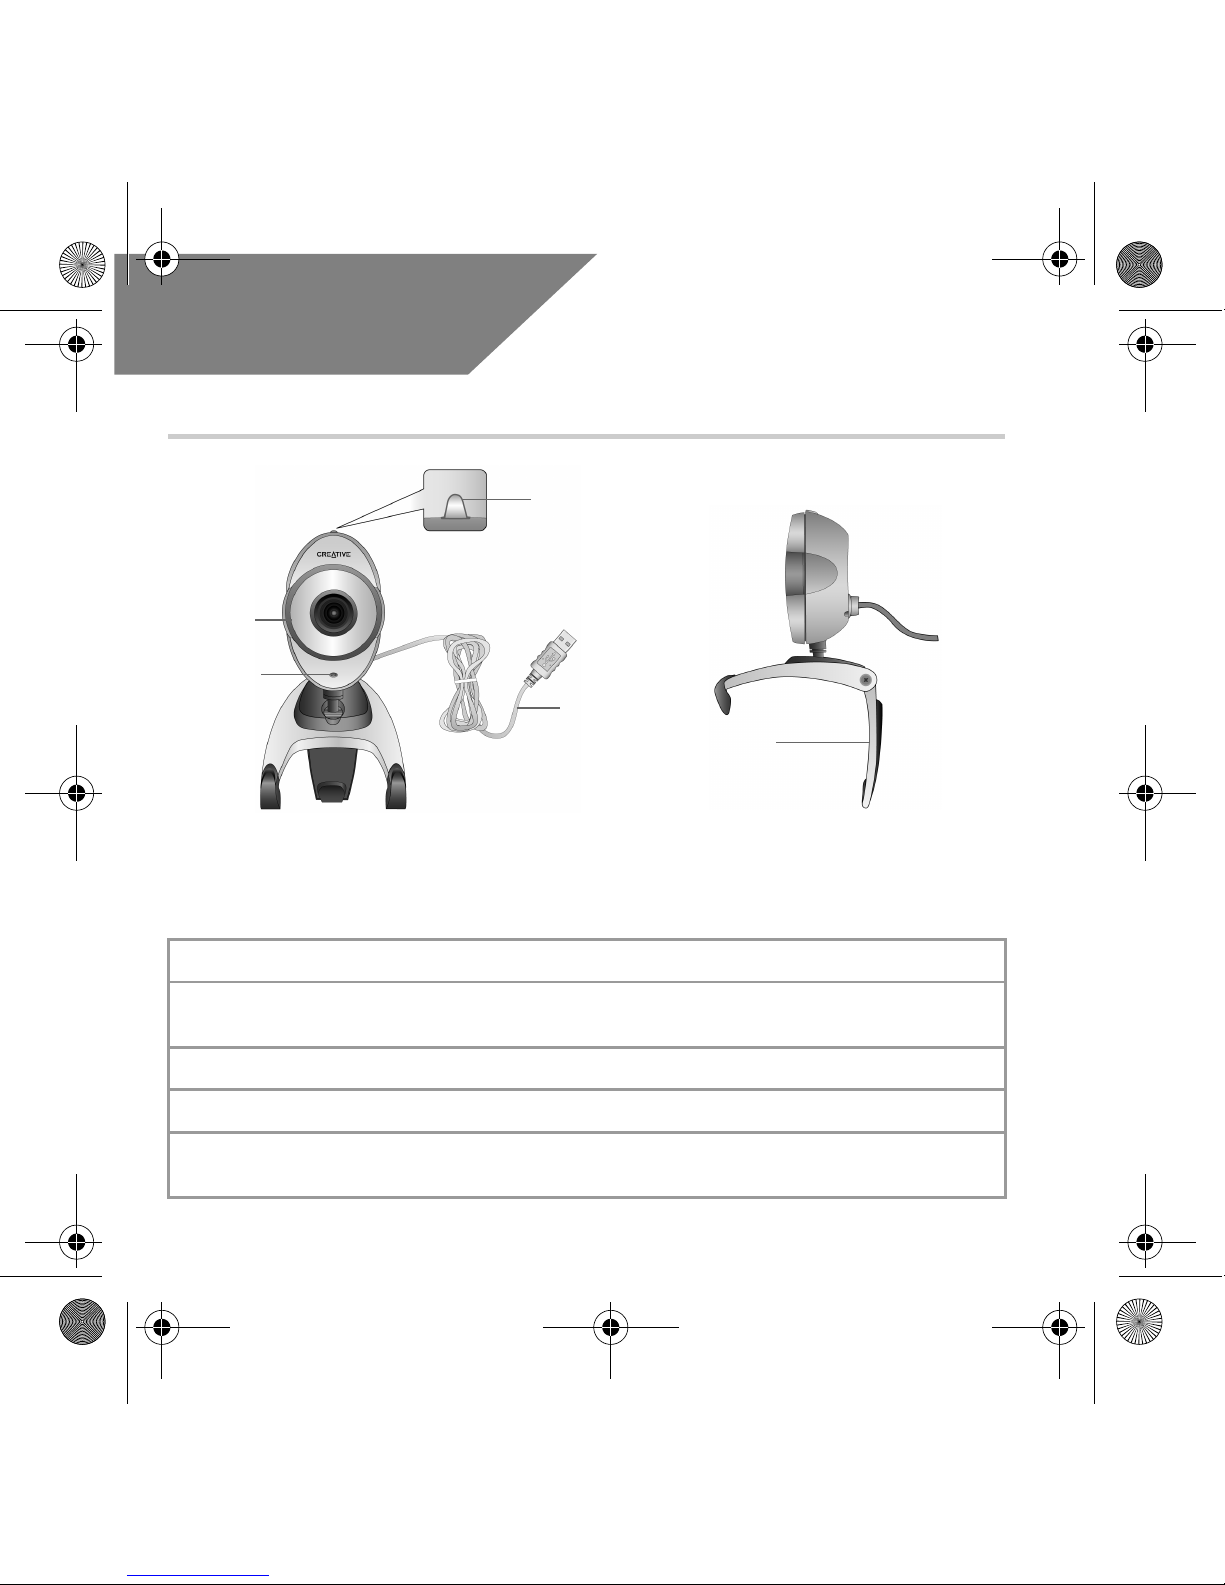
Creative WebCam 的組成
電源 LED 當 webcam 與電腦的 USB 連接埠相連時亮起。
調焦光圈
調整焦距。將鏡頭對準要拍攝的物件,然後順時針或逆時針旋轉此光圈,直到
圖像位於焦距中。
快門按鈕 按下即可開啟 WebCam Center 與擷取圖像。
USB 連接線 將其連接至電腦的 USB 連接埠。
兩用式活動
支架
用這個支架把攝影機固定到 LCD 的顯示面板上。
調焦光圈
快門按鈕
USB 連接線
兩用式
活動支
架
圖 1
前部視圖 側視圖
電源 LED
WC Live! Ultra.fm Page 10 Wednesday, November 17, 2004 2:53 PM

11
使用入門
1
1
安裝 WebCam
您需要安裝裝置驅動程式和應用程式才能使用這款 webcam。
安裝驅動程式前不要將 webcam 接至您的電腦。
如果您在安裝驅動程式時已經連接了 webcam,並且新增硬體精靈或找到新硬體精靈
對話方塊出現,請單按取消按鈕。
1. 將安裝光碟放入 CD-ROM 光碟機中。光碟將自動開始執行。如果沒有,請按下面
的步驟作業:
i. 啟動 Windows 檔案總管。
ii. 在右邊的窗格中,單按 “我的電腦”圖像。
iii.右按 CD-ROM/DVD-ROM 光碟機圖像,然後單按 “自動播放”。
2. 選擇您所在的地區並單按 “下一步”按鈕。
3. 選擇語言,然後單按 “下一步”按鈕。
4. 單按安裝驅動程式和應用程式的選擇,然後單按 “安裝”按鈕。
WC Live! Ultra.fm Page 11 Wednesday, November 17, 2004 2:53 PM
12
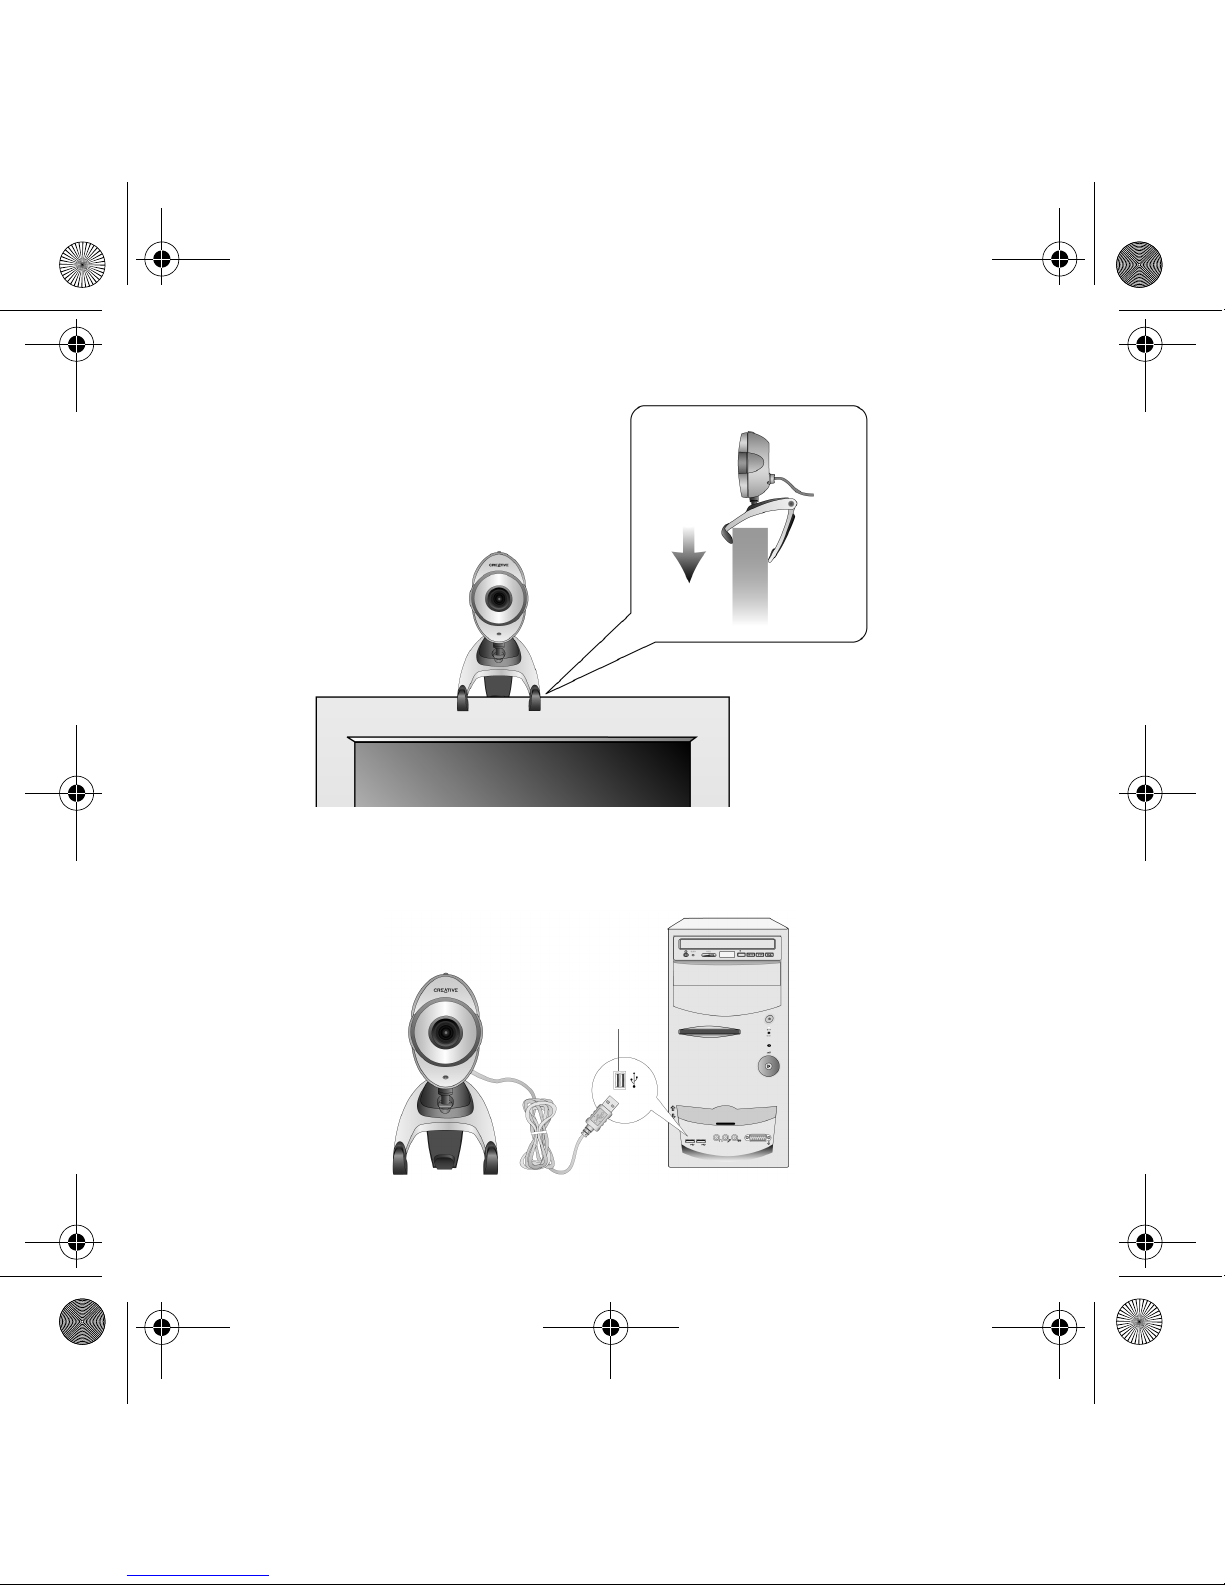
5. 將 webcam 置於電腦顯示器的頂部或其他平坦的表面。如果要放置在液晶顯示器
或筆記型電腦上,請使用兩用式活動支架 ( 請參閱 Figure 2)。
6. 在出現提示時,將 webcam 的 USB 連接線接至電腦的空閒 USB 連接埠 (見圖
Figure 3)。Windows
®
會自動偵測到該裝置。
圖 2
圖 3
USB 連接埠
WC Live! Ultra.fm Page 12 Wednesday, November 17, 2004 2:53 PM
 Loading...