

Creative VF0820 User Manual

Introduction
Keep a watch on your family, pet, home or office 24/7, even when you’re not there. Creative Live!®Cam IP
SmartHD gives you a live update on your phone, wherever you are. Get activity alerts, listen or talk to your
kids or pets and capture moments. It’s as good as being there at different places at the same time.
Package Checklist
Your Creative Live! Cam IP SmartHD package comes with the following:
l The Creative Live! Cam IP SmartHD
l USB cable
l AC power adapter
l Mounting kit
l Quick Start Guide
Minimum System Requirements
Network Connectivity
l 2.4 GHz Wi-Fi network connection
For iOS device
l iPhone
®
running iOS 8.0 or higher
For Android™ device
l Phone running Android 4.0 or higher
For Windows®OS
l Microsoft
®
Windows 7 or higher
For Mac®OS
l Mac OSX
®
10.11 or higher
Registering Your Product
Registering your product ensures you receive the most appropriate service and product support available.
You can register your product during installation or at register.creative.com.
Please note that your warranty rights are not dependent on registration.
More Help
For the latest news and products, please visit www.creative.com. The site also includes information on
making purchases, technical help and the latest software updates.
Live! Cam IP SmartHD (VF0820) – Introduction 2
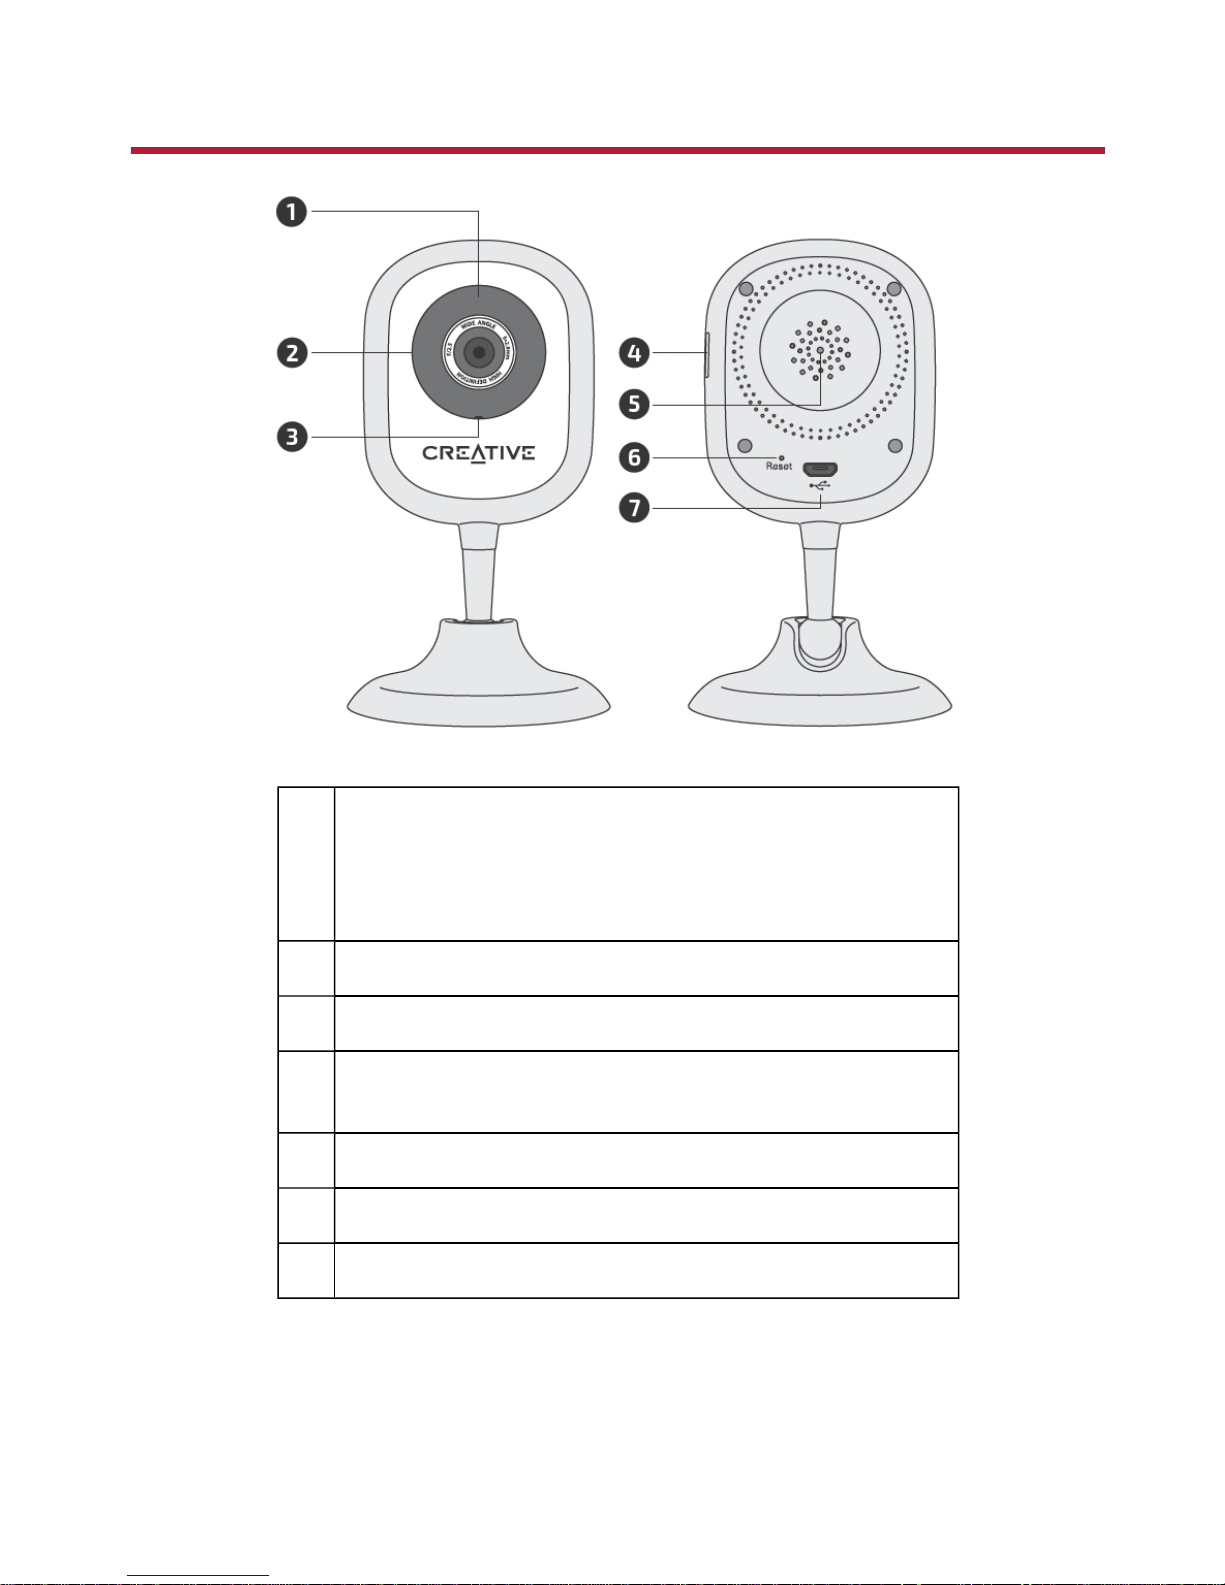
About Your Hardware
1 LED Indicator
l Red: Booting
l Red (blinking): Ready to connect
l Blue (blinking): Wi-Fi connecting
l Blue: Wi-Fi connected
2 Infrared LEDs
3 Microphone
4 microSD slot
l Insert a microSD card to store video recordings
5 Speaker
6 Reset button
7 USB port
Live! Cam IP SmartHD (VF0820) – About Your Hardware 3
Setting Up Your Device
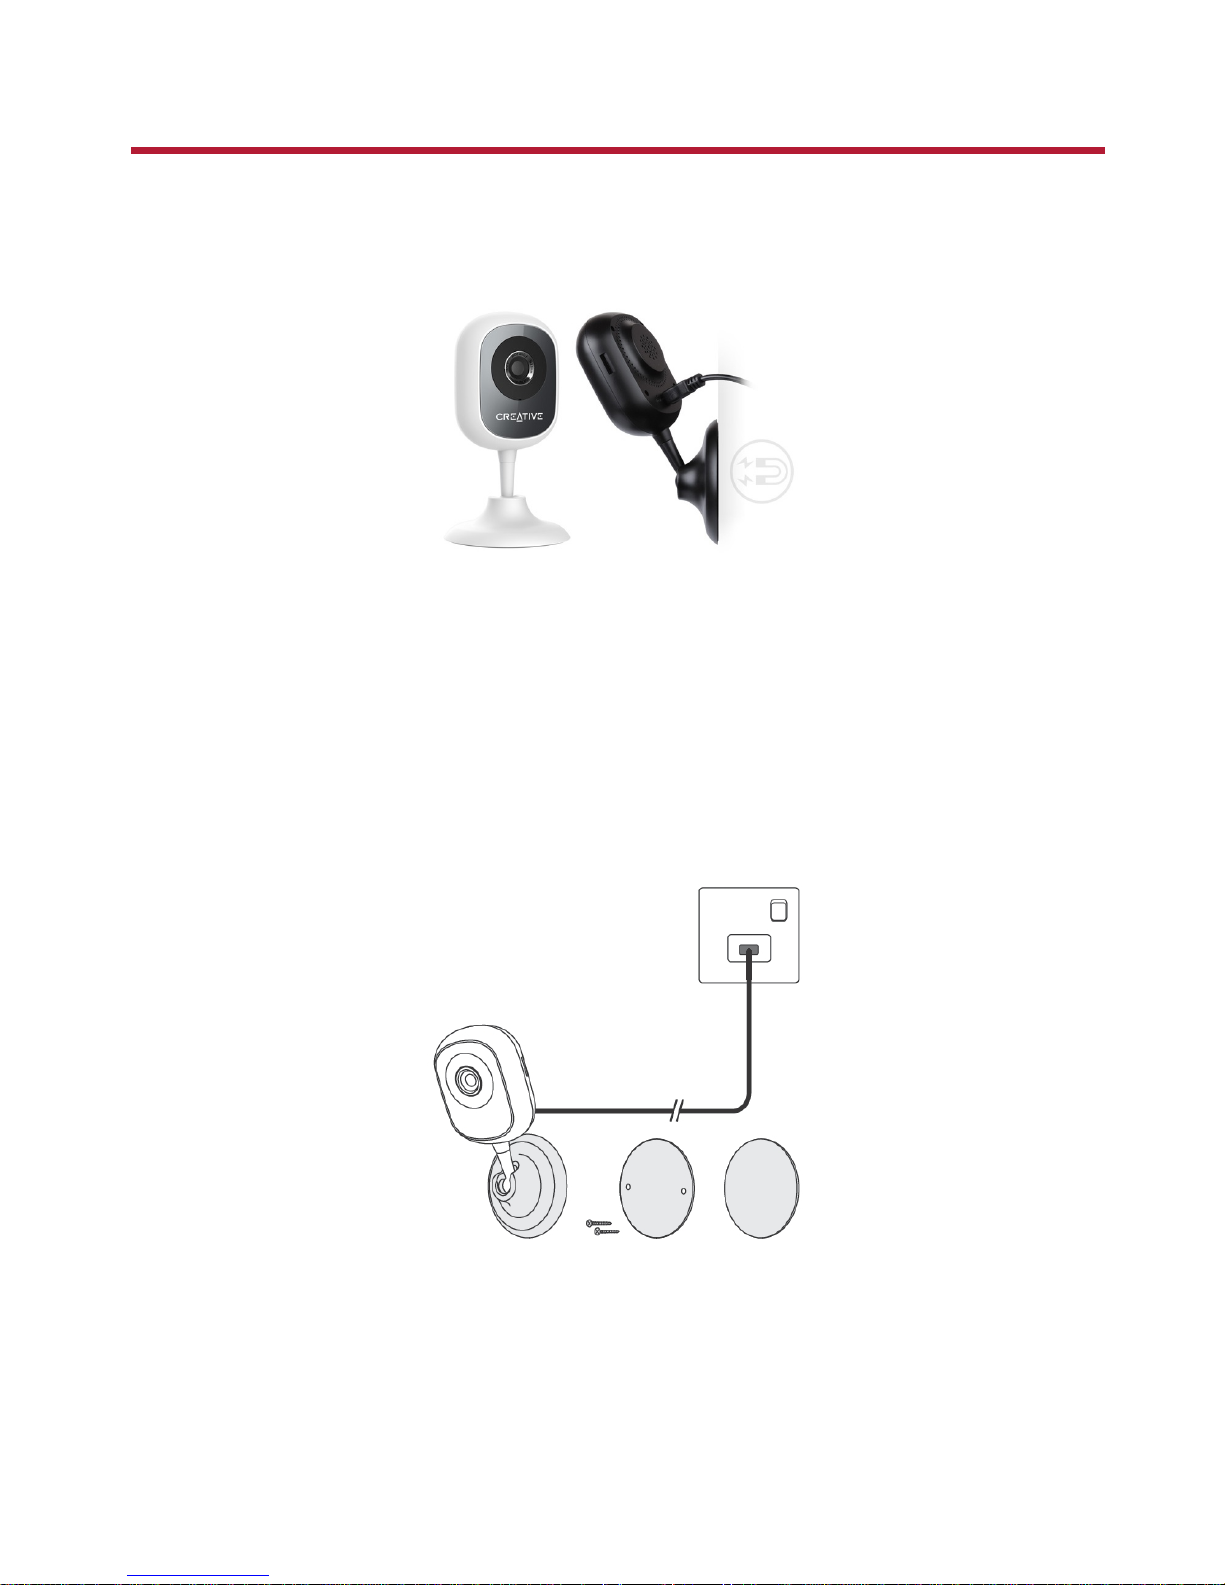
Step 1: Positioning of Live! Cam IP SmartHD
Place it upright, mount it on the wall or stick on metal surfaces with its magnetic base.
Connecting to power supply
Connect your camera directly to an ACpower supply using the supplied cable and power adapter.
LEDindicator:
l Red: Booting
l Red (blinking): Ready to connect
Mounting the camera
Secure the mounting plate to a flat surface using either the screws or mounting tape supplied.
Notes:
Peel off the protective film on the bottom of the camera before mounting.
Ensure the camera is mounted within reach of an AC power supply.
Live! Cam IP SmartHD (VF0820) – Setting Up Your Device 4
Step 2: Installing the Live! Cam app
1. Connect your smart device to your Wi-Fi network.
2. Install the free Creative Live! Cam app from the App Store or Google Play.
Notes:
Ensure you connect to a 2.4GHz Wi-Fi network.
Keep your Wi-Fi name and password ready.
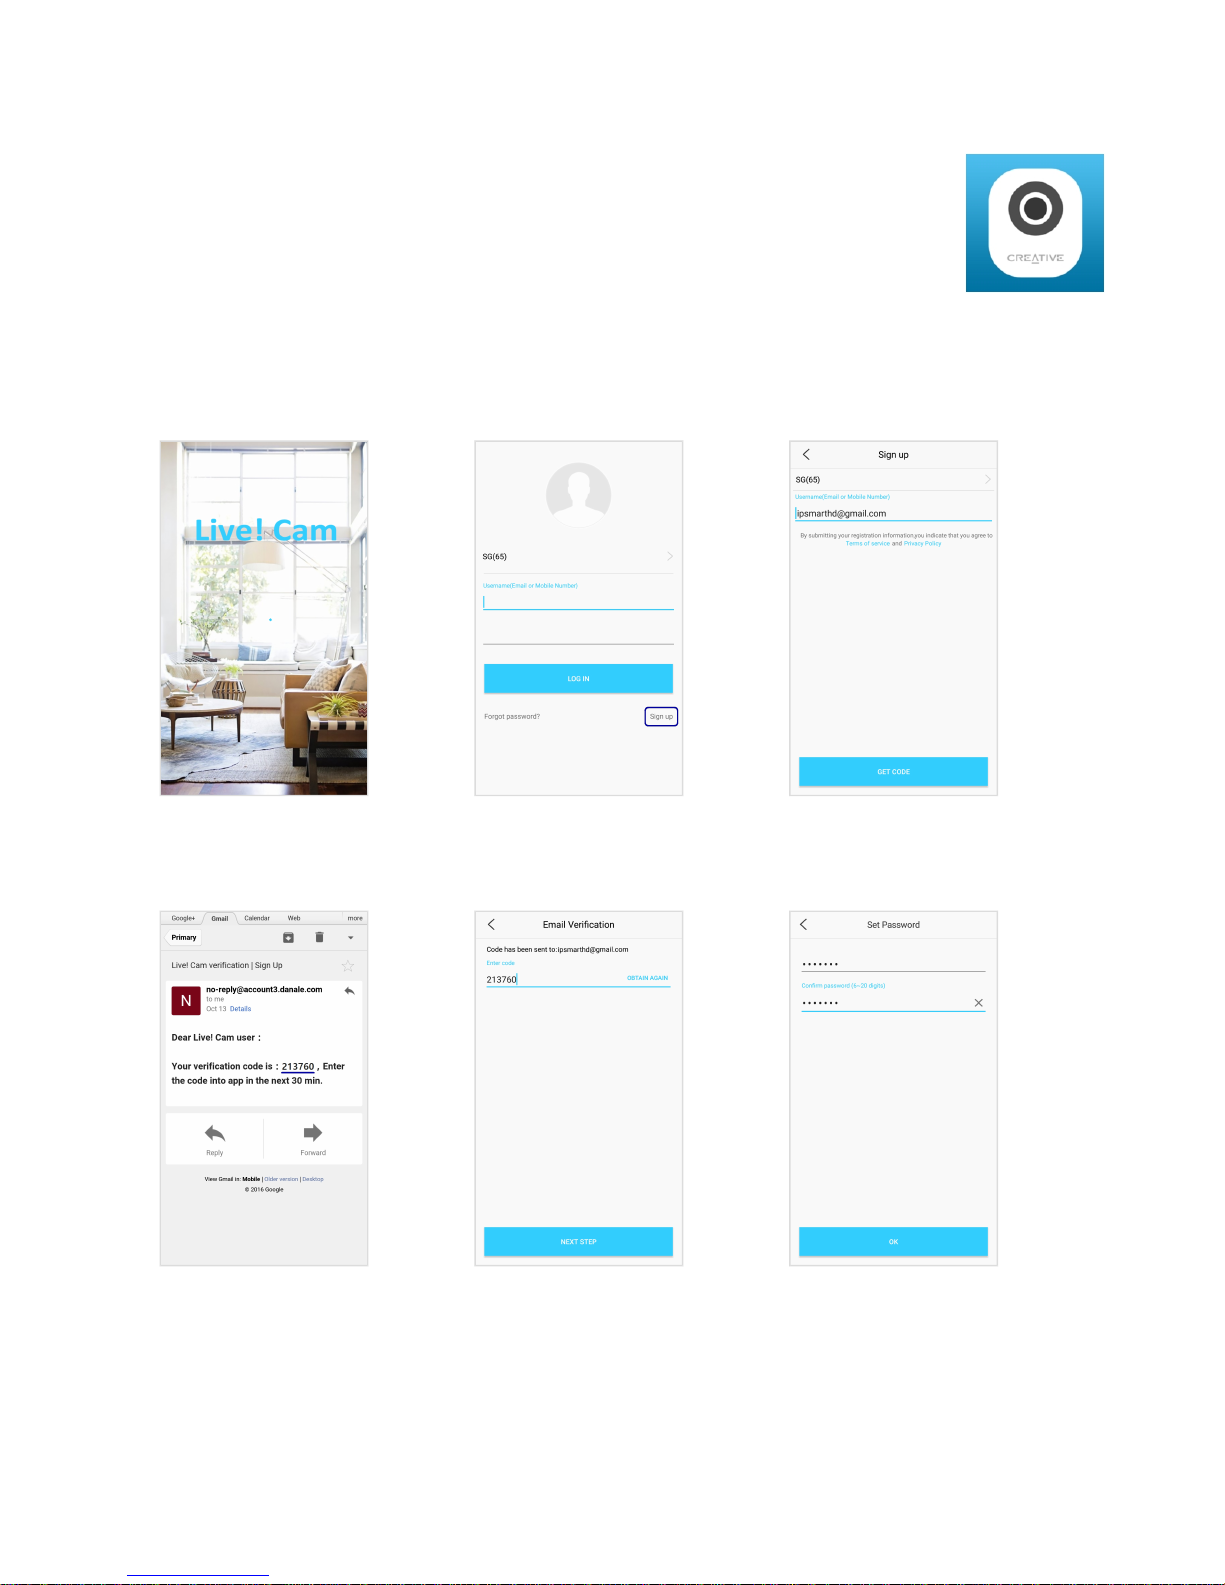
Step 3: Creating an account
Open the Live! Cam app.
Select Sign Up to create a new
account.
Enter your valid Email address
OR Phone Number.
A Verification Code will be
sent to your email or phone.
Enter the Verification Code.
Enter your preferred
Password.
Live! Cam IP SmartHD (VF0820) – Setting Up Your Device 5
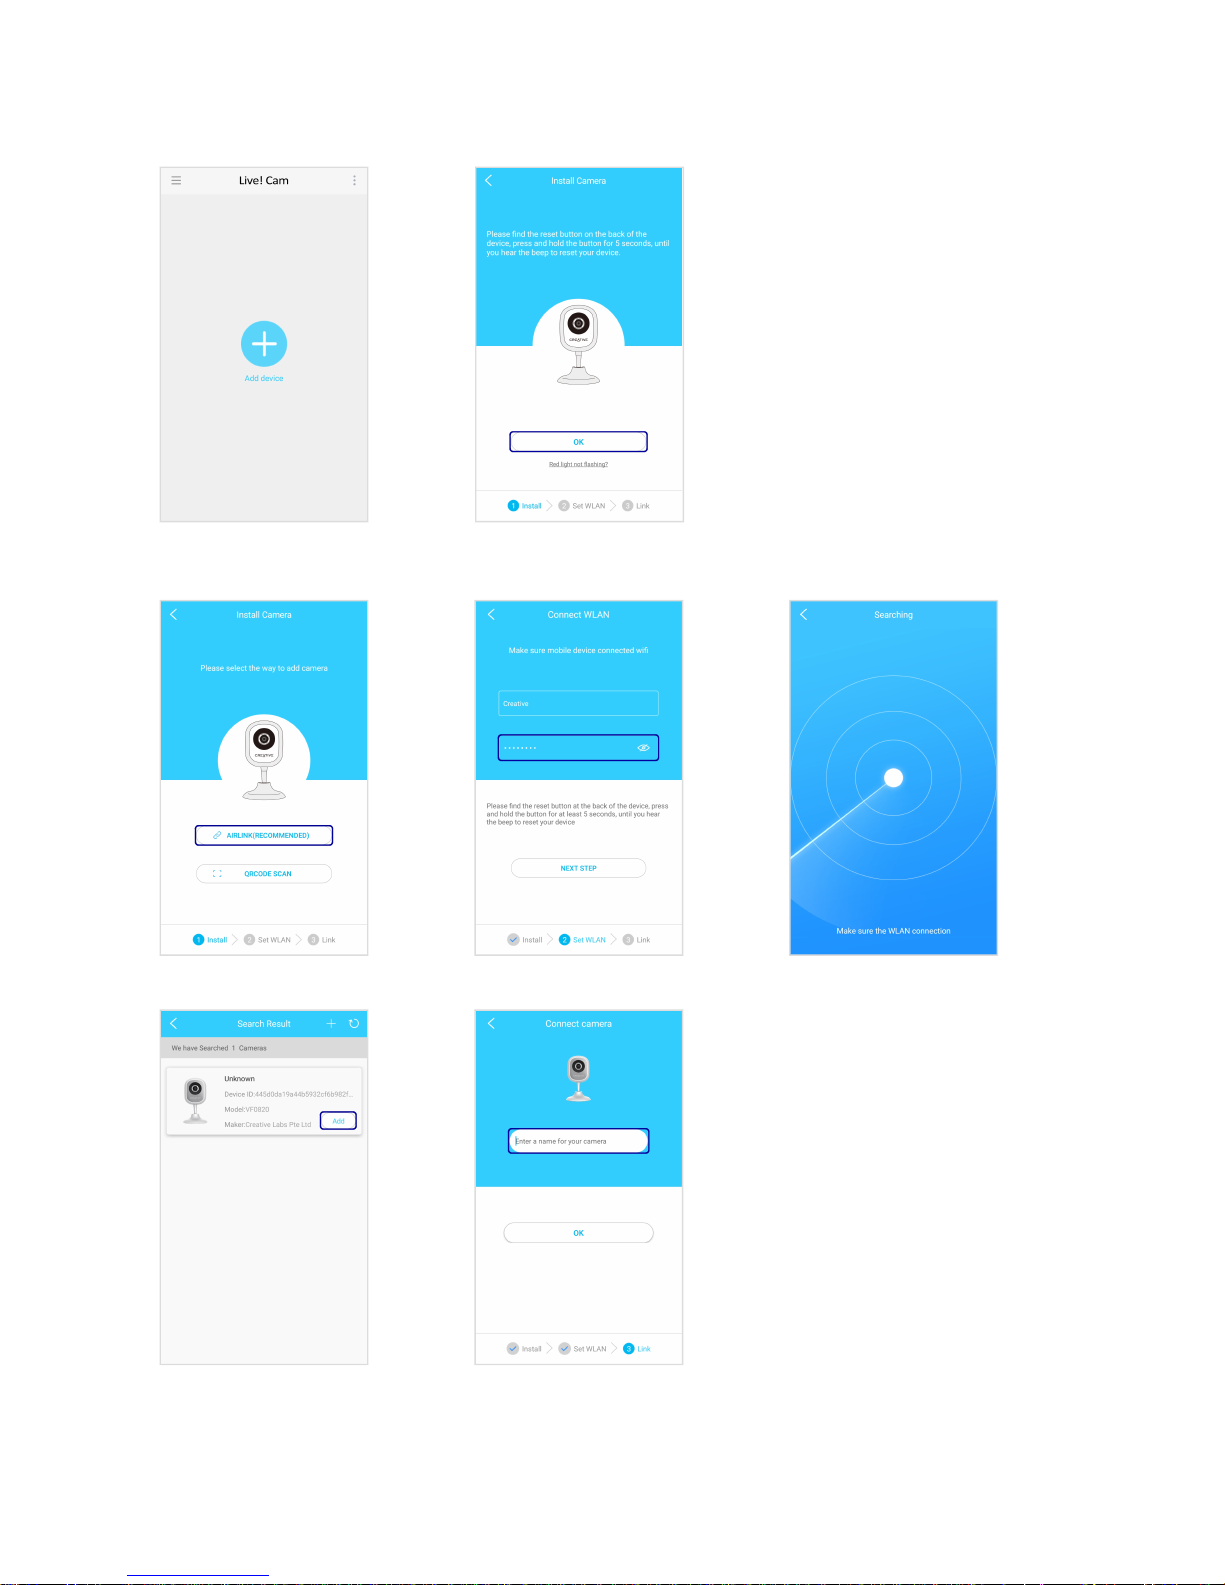
Step 4: Adding Camera
Note:
If the LED indicator is not blinking red,
reset the camera. Use a pin and press
the reset button at the back of your
camera for 10 seconds or until you hear a
sound. See Using Your Device –
Restore Factory Default Settings.
Via Airlink (Recommended)
Enter your Wi-Fi password.
When your camera is
connected, the LED indicator
will light up in blue.
^
Enter a name for your camera.
Live! Cam IP SmartHD (VF0820) – Setting Up Your Device 6

Via QR Code Scan
Enter your Wi-Fi password.
When your camera is
connected, the LED indicator
will light up in blue.
^
Enter a name for your camera.
Note:
^ If your camera fails to connect:
i. Check your Wi-Fi connection.
ii. Ensure that the Wi-Fi password is correct.
iii. Reset the camera and try again.
To change the name of your camera, see Using Your Device – Rename Camera
Live! Cam IP SmartHD (VF0820) – Setting Up Your Device 7
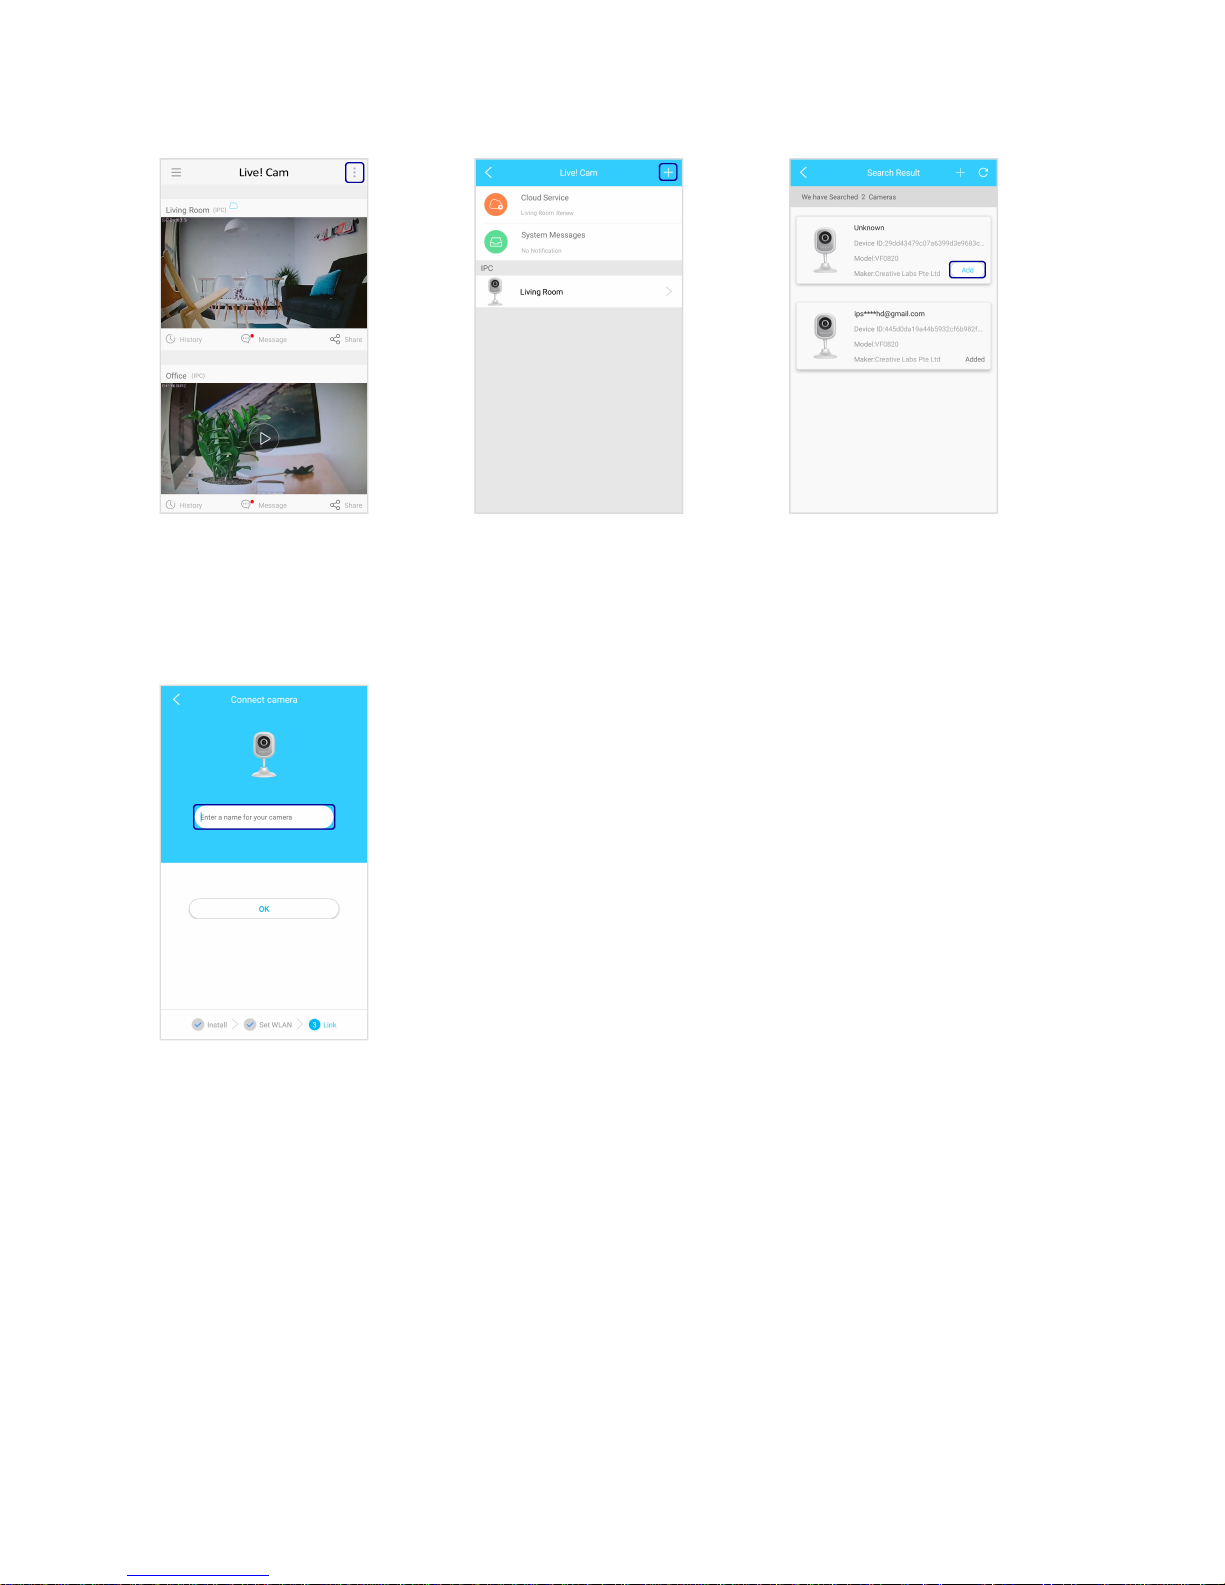
To add another camera
Select Add to add your
camera.
When your camera is
connected, the LED indicator
will light up in blue.
^
Enter a name for your camera.
Note:
^ If your camera fails to connect:
i. Check your Wi-Fi connection.
ii. Ensure that the Wi-Fi password is correct.
iii. Reset the camera and try again.
Live! Cam IP SmartHD (VF0820) – Setting Up Your Device 8

Using Your Device
View Live Video
After adding your camera(s), the camera(s) will be displayed on the main screen.
If there is more than one camera, tap to view the live video of the selected camera.
For more playback options, tap on the playback screen.
1. Multiview
View 4 cameras live on one screen.
fullscreen mode
single view
Live! Cam IP SmartHD (VF0820) – Using Your Device 9
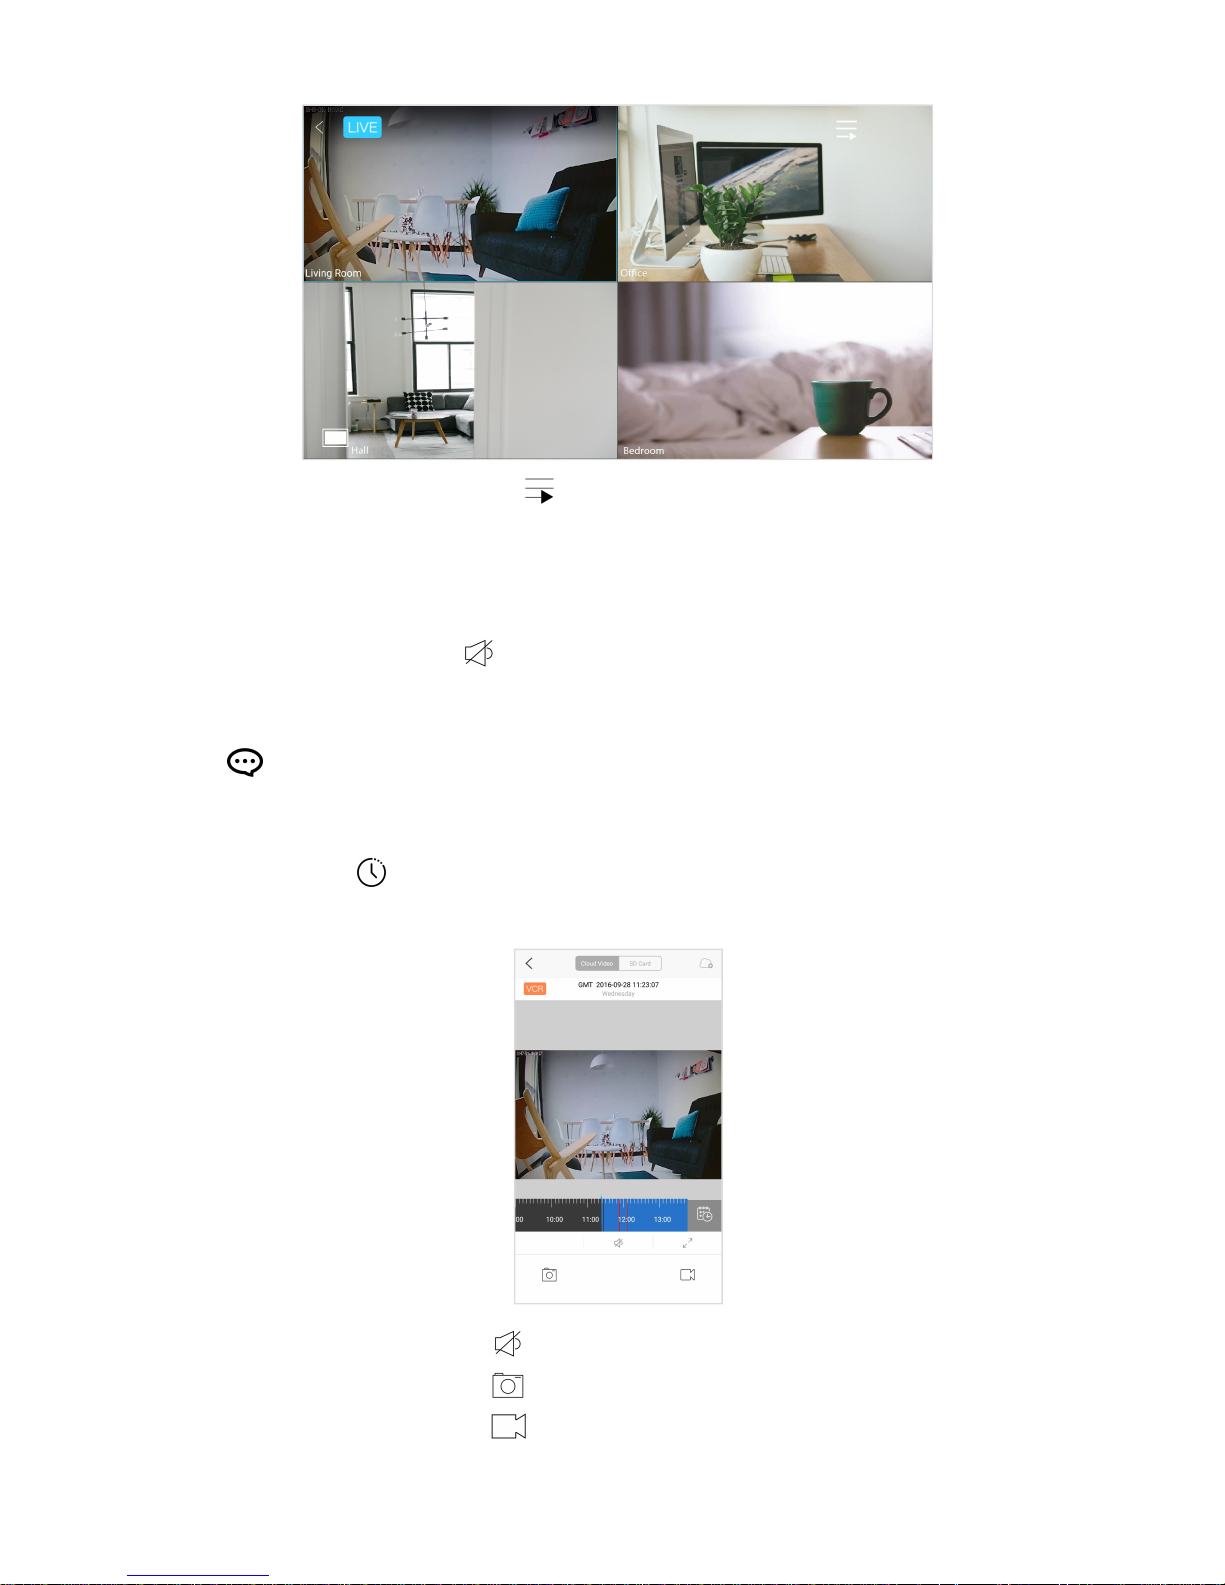
list of cameras
Tip:
Double-tap the playback screen to switch from single view to multiview, and vice versa.
2. On/Off Camera Microphone
Turn on the camera microphone to listen to audio via the camera.
3. Alerts
View short video recordings of motion or sound detected.
4. Recording history
View the video recording history stored on the cloud or microSD card.
on/off recorded audio
take snapshot*
record video*
Live! Cam IP SmartHD (VF0820) – Using Your Device 10
 Loading...