

User’s Guide
Model No: SB1580

Introduction
Congratulations on your purchase of Sound Blaster®X7! This high resolution, high performance USB
DAC(Digital-to-Analog Converter) incorporates the advanced SB-Axx1 audio processor -- the next
generation multi-core sound and audio amplifier incorporated voice processor for accelerating advanced
audio and voice processing technologies. It is designed to work perfectly with your computer and mobile
devices, making your audio sound simply amazing while giving you a truly immersive listening
experience!
Package Checklist
Your Sound Blaster X7 package comes with the following components.
l The Sound Blaster X7 device
l Headphone stand
l Gold plated 2.0m 3.5mm stereo male to RCA cable for Line-Out (Front L/R)
l Gold plated 55mm 3.5mm stereo female to RCA cable for Line-In
l 1.5m Micro-USB cable
l AC/DC power adapter
l 1.08m AC power cord
Minimum System Requirements
For computer,
l Intel
®
Core™ 2 Duo or AMD®equivalent processor, 2.8 GHz or faster recommended
l Intel, AMD or 100% compatible motherboard
l 1GB RAM
l >600 MB of free hard disk space
l Available USB 2.0/3.0 port (High Speed recommended)
l Microsoft
®
Windows®8.1 64-bit, Windows 8.1 32-bit, OR
Windows 8 64-bit, Windows 8 32-bit, OR
Windows 7 64-bit, Windows 7 32-bit, OR
Windows Vista®64-bit, Windows Vista 64-bit (Service Pack 1 or higher), OR
Mac®OS X®10.6.8 and above.
For mobile device,
l Android 2.3 and above for Bluetooth
®
, OR
Android 4.1 and above for USB host streaming*;
l iOS 6.0** and above for Bluetooth, and USB host audio streaming via lightning port.
Note:
* Devices firmware must implement AOA2 protocol that support USB Host Audio Streaming.
**Devices must support Bluetooth 4.1 LE(Low Energy).
Introduction - 1 -

Registering Your Product
Registering your product ensures you receive the most appropriate service and product support
available. You can register your product during installation or at register.creative.com. Please note that
your warranty rights are not dependent on registration.
More Help
For the latest news and products for the Sound Blaster, please visit www.soundblaster.com. The site
also includes information on making purchases, technical help and the latest software updates.
Using Creative Software AutoUpdate
Locating, downloading and installing updates for your Creative products is now simpler and faster with
the web-based Creative Software AutoUpdate system.
When you connect to Creative Software AutoUpdate via the Internet, the website will analyze your
computer system to determine your operating system, language and which Creative products are
connected to your system.
When this analysis is completed, you will then be given a list of only the most relevant software updates
for your connected products. The files can then be retrieved and installed.
To learn more about the Creative Software AutoUpdate, please visit support.soundblaster.com.
Note:
First-time users of Creative Software AutoUpdate may be prompted to authorize the download of a
browser component required for system analysis. Check to ensure that this content is signed by
Creative Labs, Inc., then click the Yes button.
Please ensure that all your Creative products are connected and installed on the same computer
running Creative Software AutoUpdate.
Introduction - 2 -
About Your Hardware
Your USB audio device is equipped with a variety of input and output jacks to enable connection to
various devices. Other controls give you basic control over the system's functions.
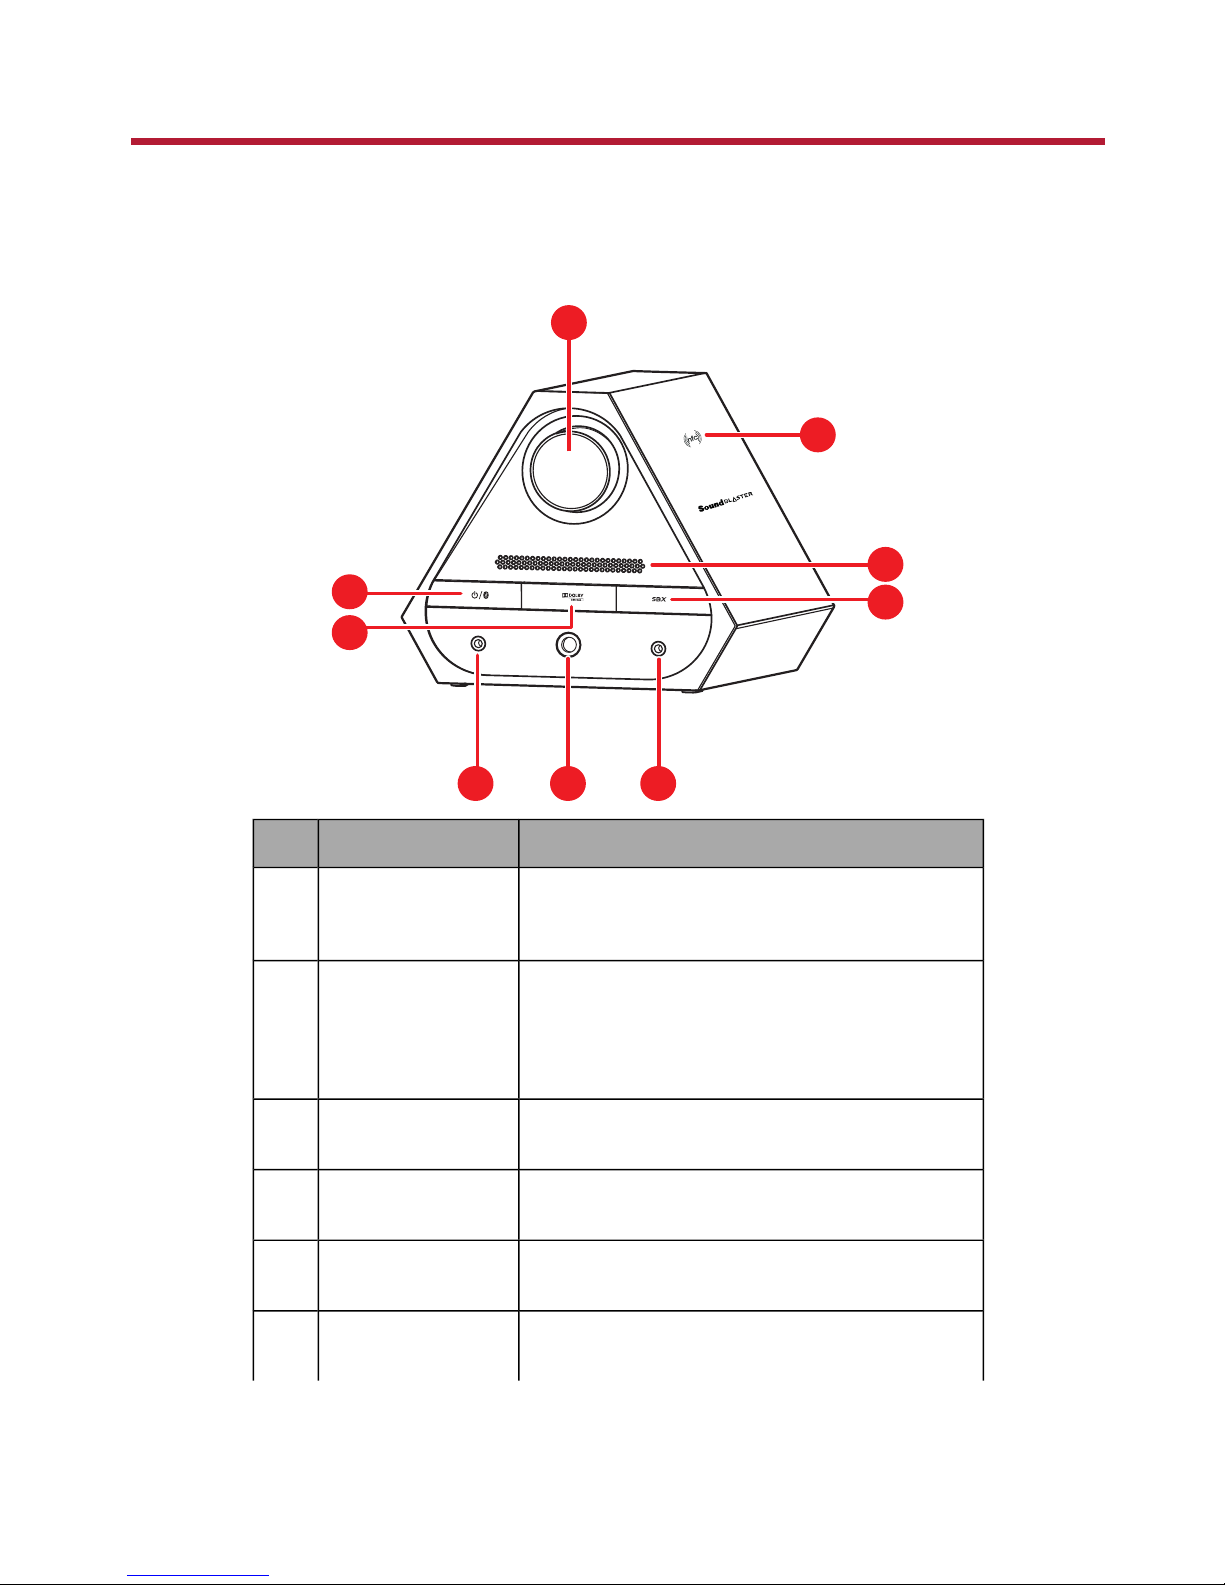
Front
1
2
3
9
8
7
4
5 6
Control or Jack Description
1 Playback
Volume/Mute knob
Turn clockwise or counterclockwise to increase or
decrease the playback volume.
Push to mute/unmute playback volume.
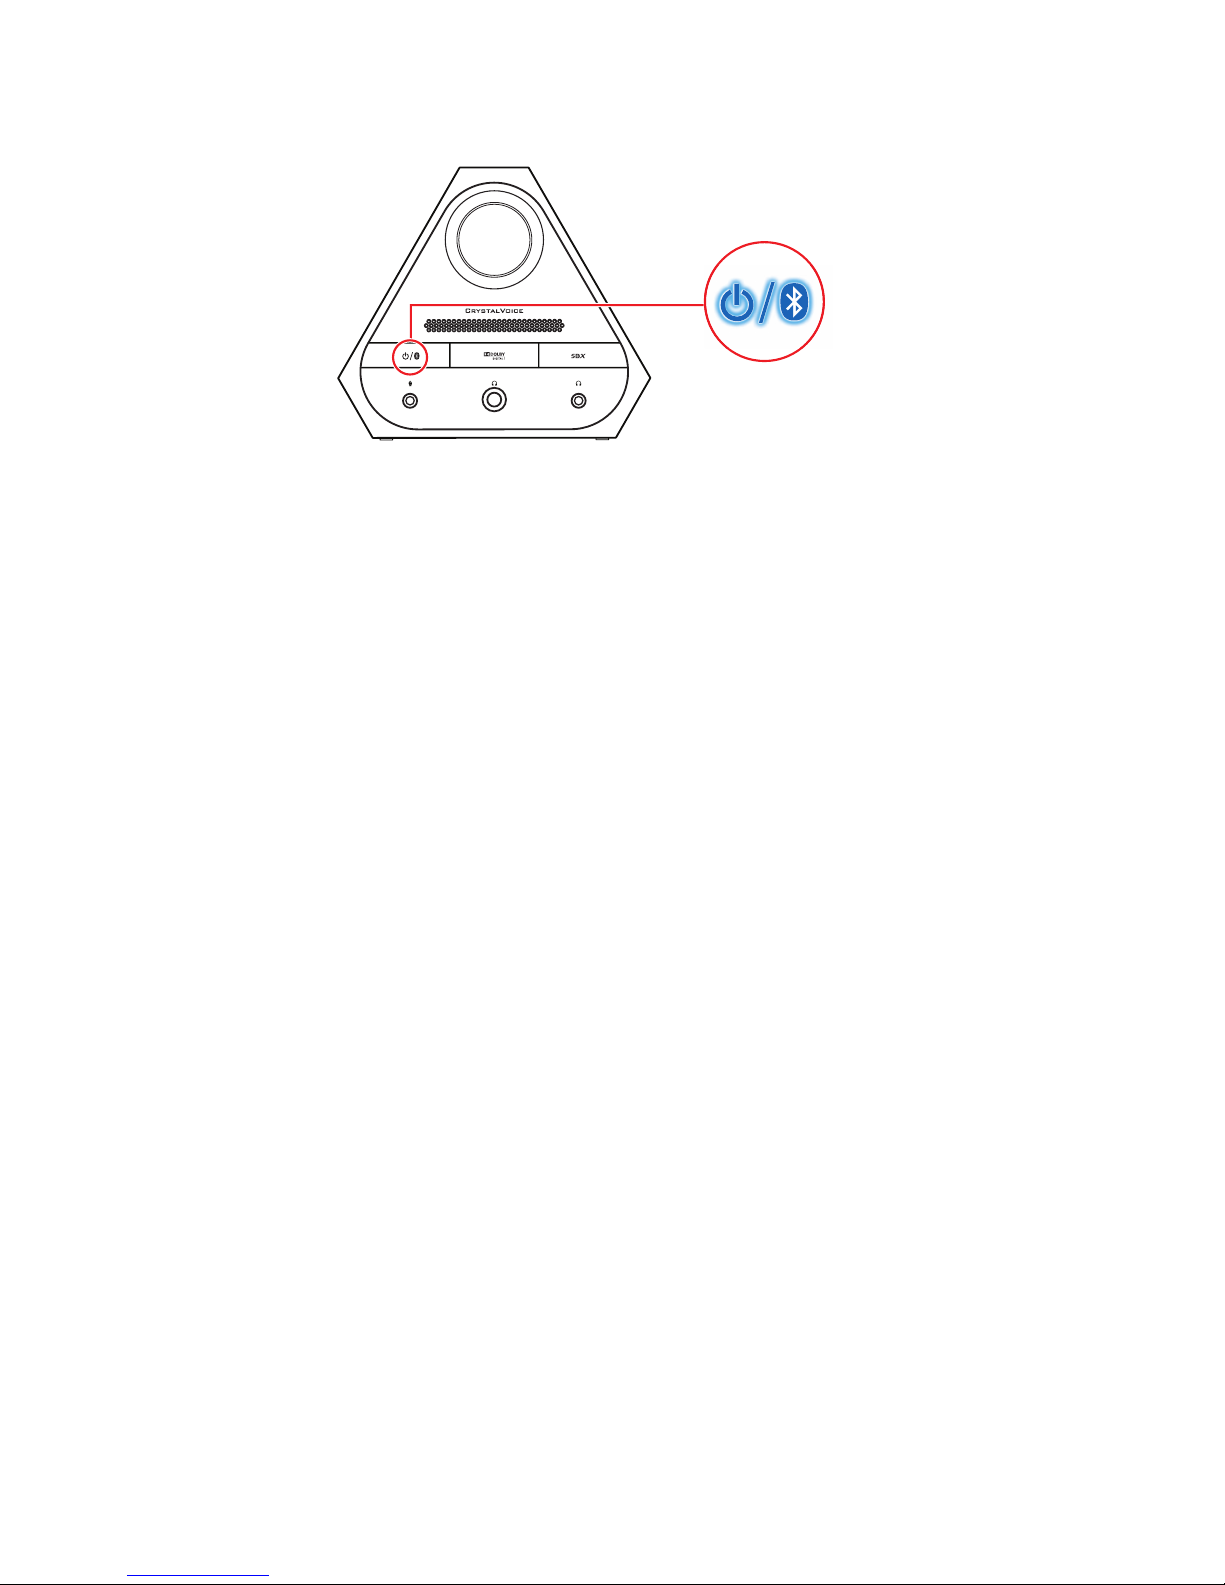
2 Power/Bluetooth
button/indicator
Press the button once to power Sound Blaster X7
ON. Press again to power it OFF (Standby).
When it is turned ON, press and hold the button for2
seconds to enter Bluetooth pairing mode.
3 Dolby Digital
indicator
Lights up in white when Dolby Digital decoding is
activated.
4 Mic-In jack Connects to a microphone using a 3.50 mm (1/8-
inch) plug.
5 6.3mm Headphone
1 jack
Connects to stereo headphones using a 6.3 mm
(1/4-inch) stereo plug.
6 3.5mm Headphone
2 jack
Connects to stereo headphones using a 3.50 mm
(1/8-inch) stereo plug.
About Your Hardware - 3 -
Control or Jack Description
7 SBXbutton/indicator Toggles SBX Pro Studio audio enhancements
ON/OFF.
The SBX Pro Studio is ON when the LED is lighted
and dimmed otherwise.
8 Built-In Microphone
Array
For voice pickup and recording.
9 NFC sensor Tap NFC device to connect.
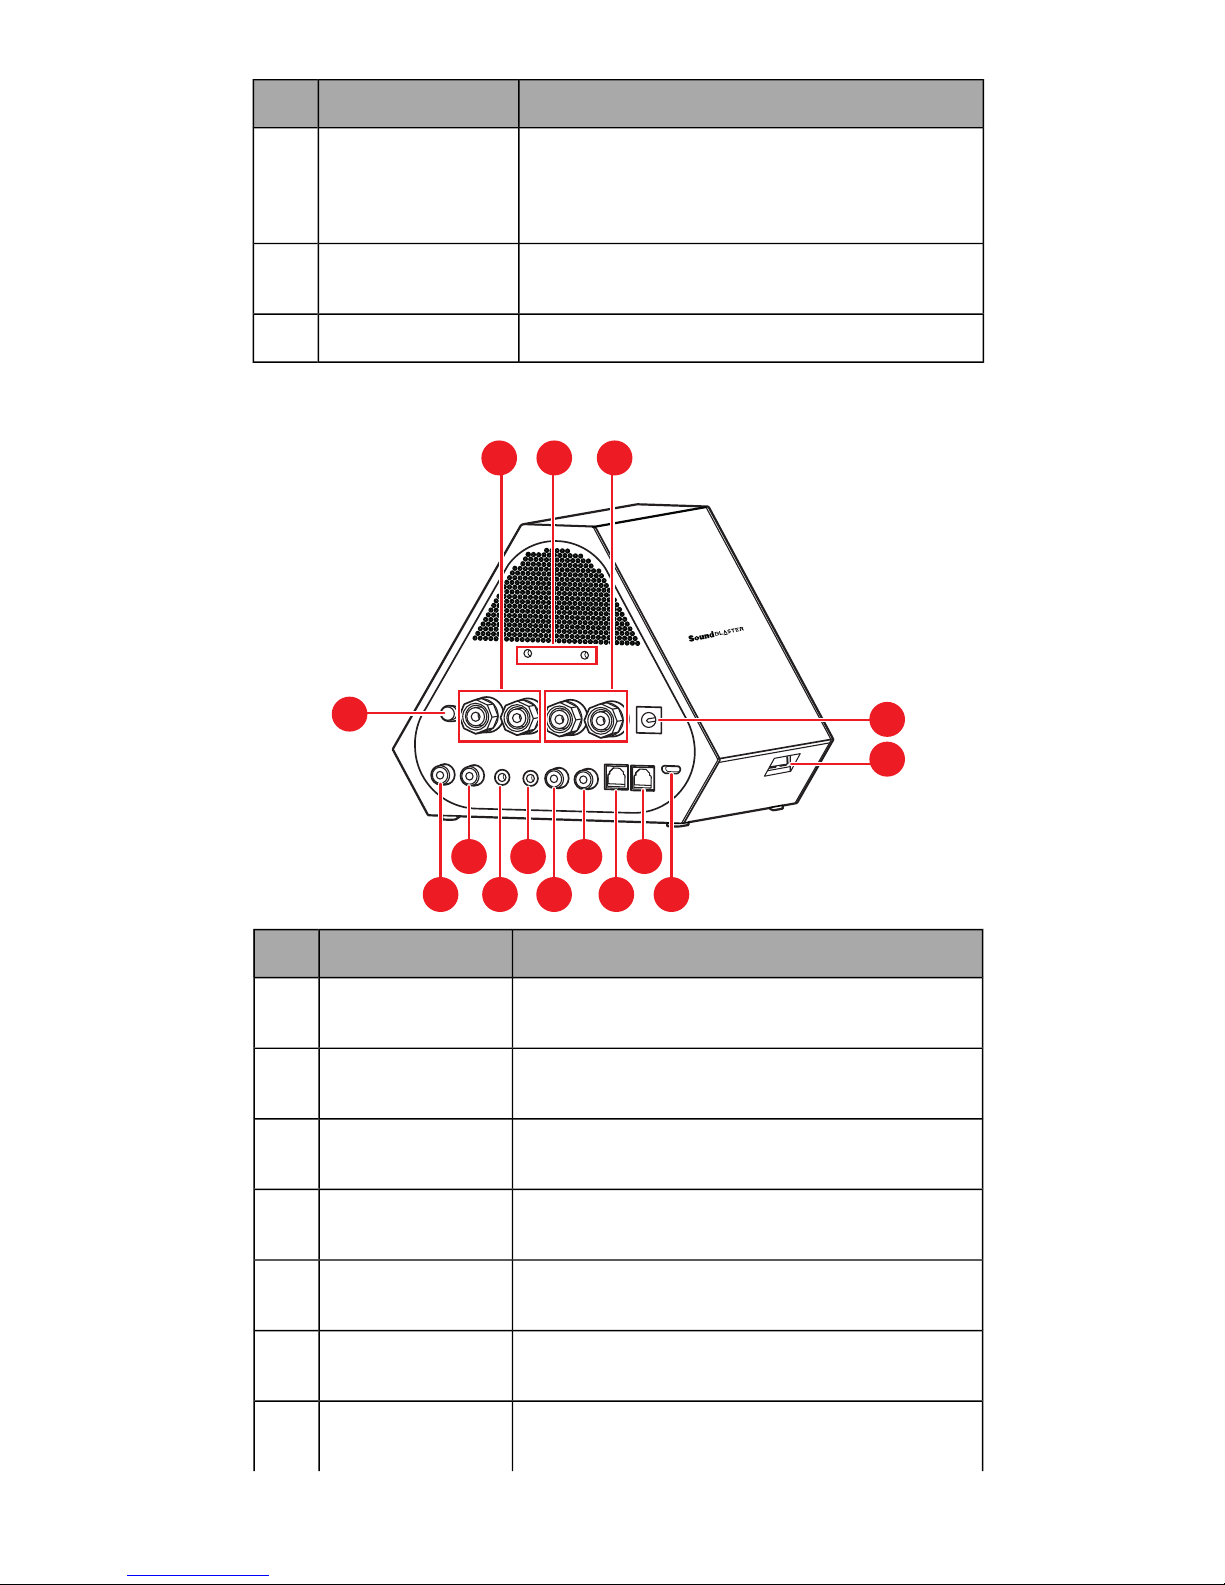
Back
1112
141516171819202122
13
10
23
24
Control or Jack Description
10 Speaker Output
terminal (Left)
Connects to the Left input of passive speakers.
11 Headphone Stand
slots
For installing the supplied headphone stand.
12 Speaker Output
terminal (Right)
Connects to the Right input of passive speakers.
13 Impedance switch Set switch to 4 ohm or 8 ohm to match speaker
impedance.
14 RCA Line-Out jack
(Front Right)
Connects to the Front Right input on powered analog
speakers or an A/V receiver.
15 RCA Line-Out jack
(Front Left)
Connects to the Front Left input on powered analog
speakers or an A/V receiver.
16 3.5mm Line-Out
jack (Rear L/R)
Connects to the Rear Left and Rear Right inputs on
powered analog speakers or an A/V receiver.
About Your Hardware - 4 -

Control or Jack Description
17 3.5mm Line-Out
jack (Center/
Subwoofer)
Connects to the Centre and Subwoofer inputs on
powered analog speakers or an A/V receiver.
18 RCALine-In jack
(Right)
Connects to the Left output on line-level sources (for
example, MP3 players).
19 RCALine-In jack
(Left)
Connects to the Right output on line-level sources
(for example, MP3 players).
20 Optical S/PDIF-Out
jack
Connects to recording devices with optical connectors
(for example, Digital Audio Tape recorders, MiniDisc
recorders or external A/V receivers).
21 Optical S/PDIF-In
jack
Connects to playback devices with optical connectors
(for example, Digital Audio Tape players, MiniDisc
players, DVD players or televisions with optical
output).
22
USBport
Connects to the USB port of a PC/laptop for audio
streaming via a Micro-USB cable.
23 USBHost port Connects to mobile devices (for example,
smartphones and tablets) for audio streaming. You
may also charge your mobile devices with this port.
24 DC-In port Connects to a suppliedAC/DC power adapter.
About Your Hardware - 5 -
Setting Up Your Audio Device
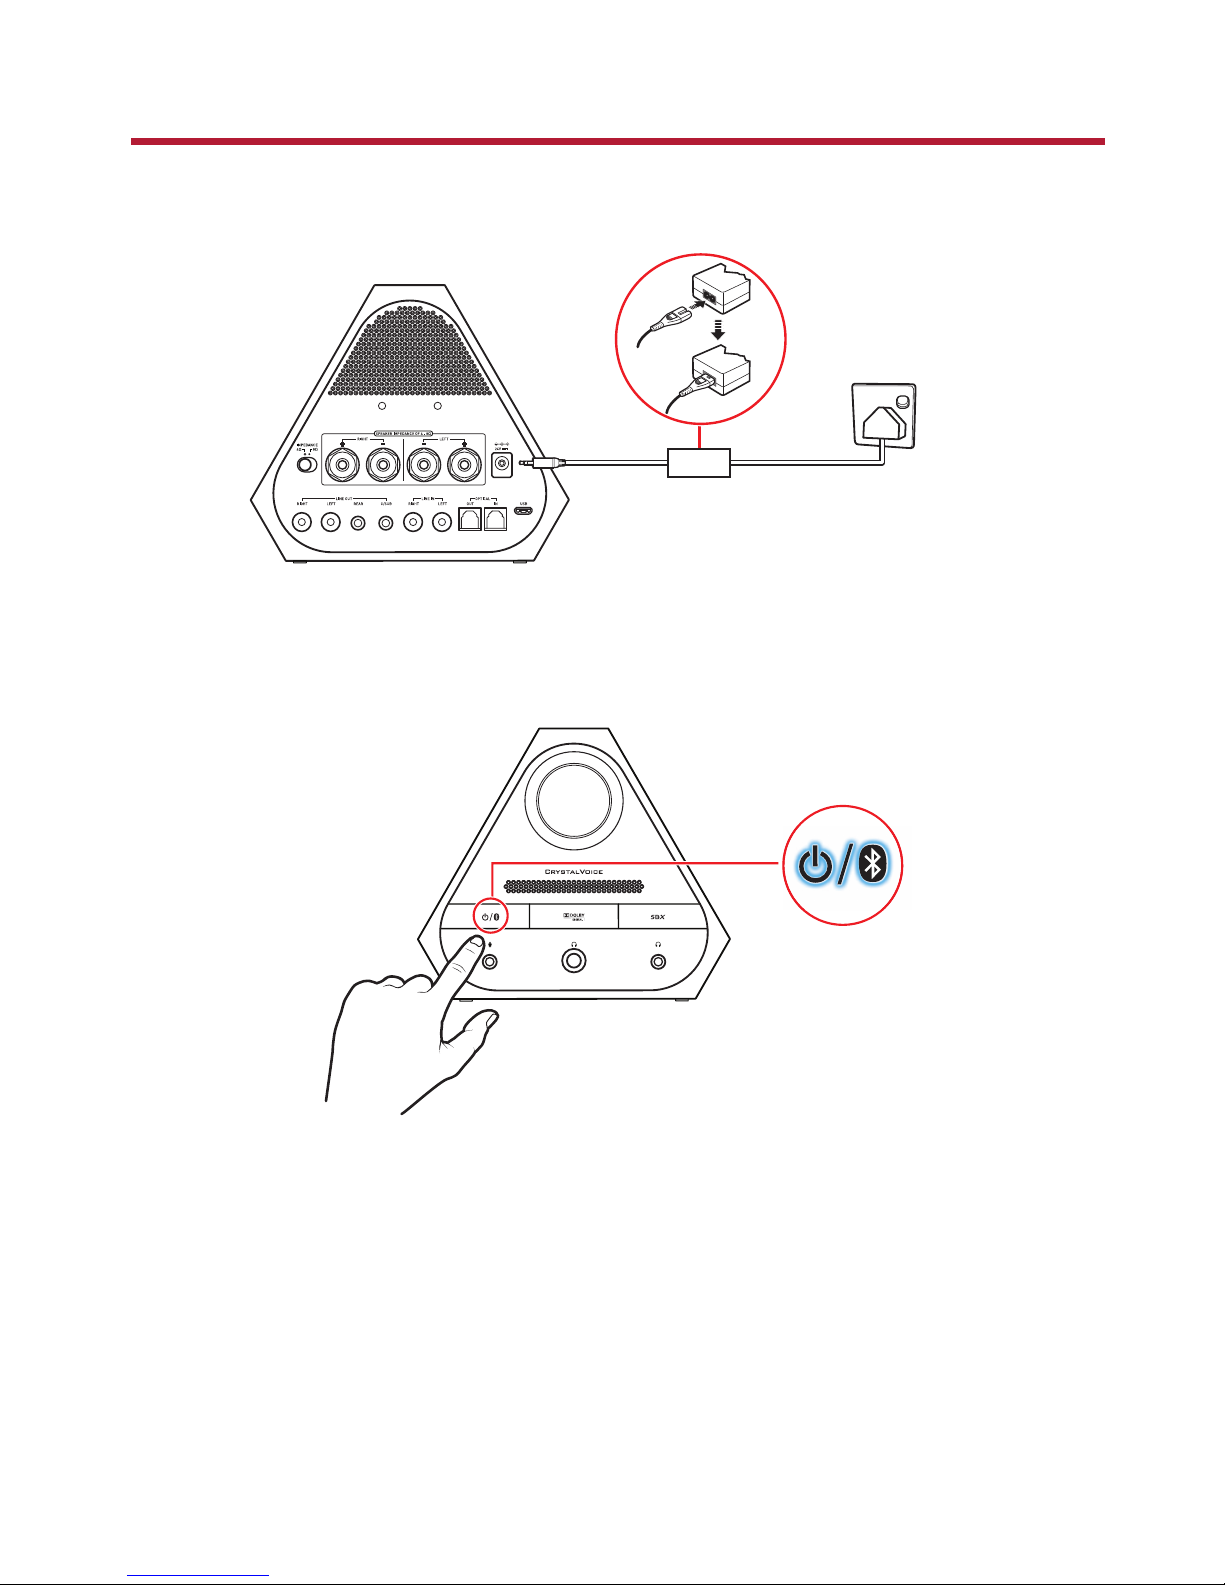
Step 1:Connecting to a Power Supply
Turning On Sound Blaster X7
Press the Power/Bluetooth button to turn on Sound Blaster X7. The Power/Bluetooth indicator
lights up in white once the device is properly connected and turned on.
Note:
Sound Blaster X7 fully boots up within 4 seconds. It's ready to play audio when the
Power/Bluetooth indicator lights up in white.
Setting Up Your Audio Device - 6 -
Step 2:Connecting to an Audio Source
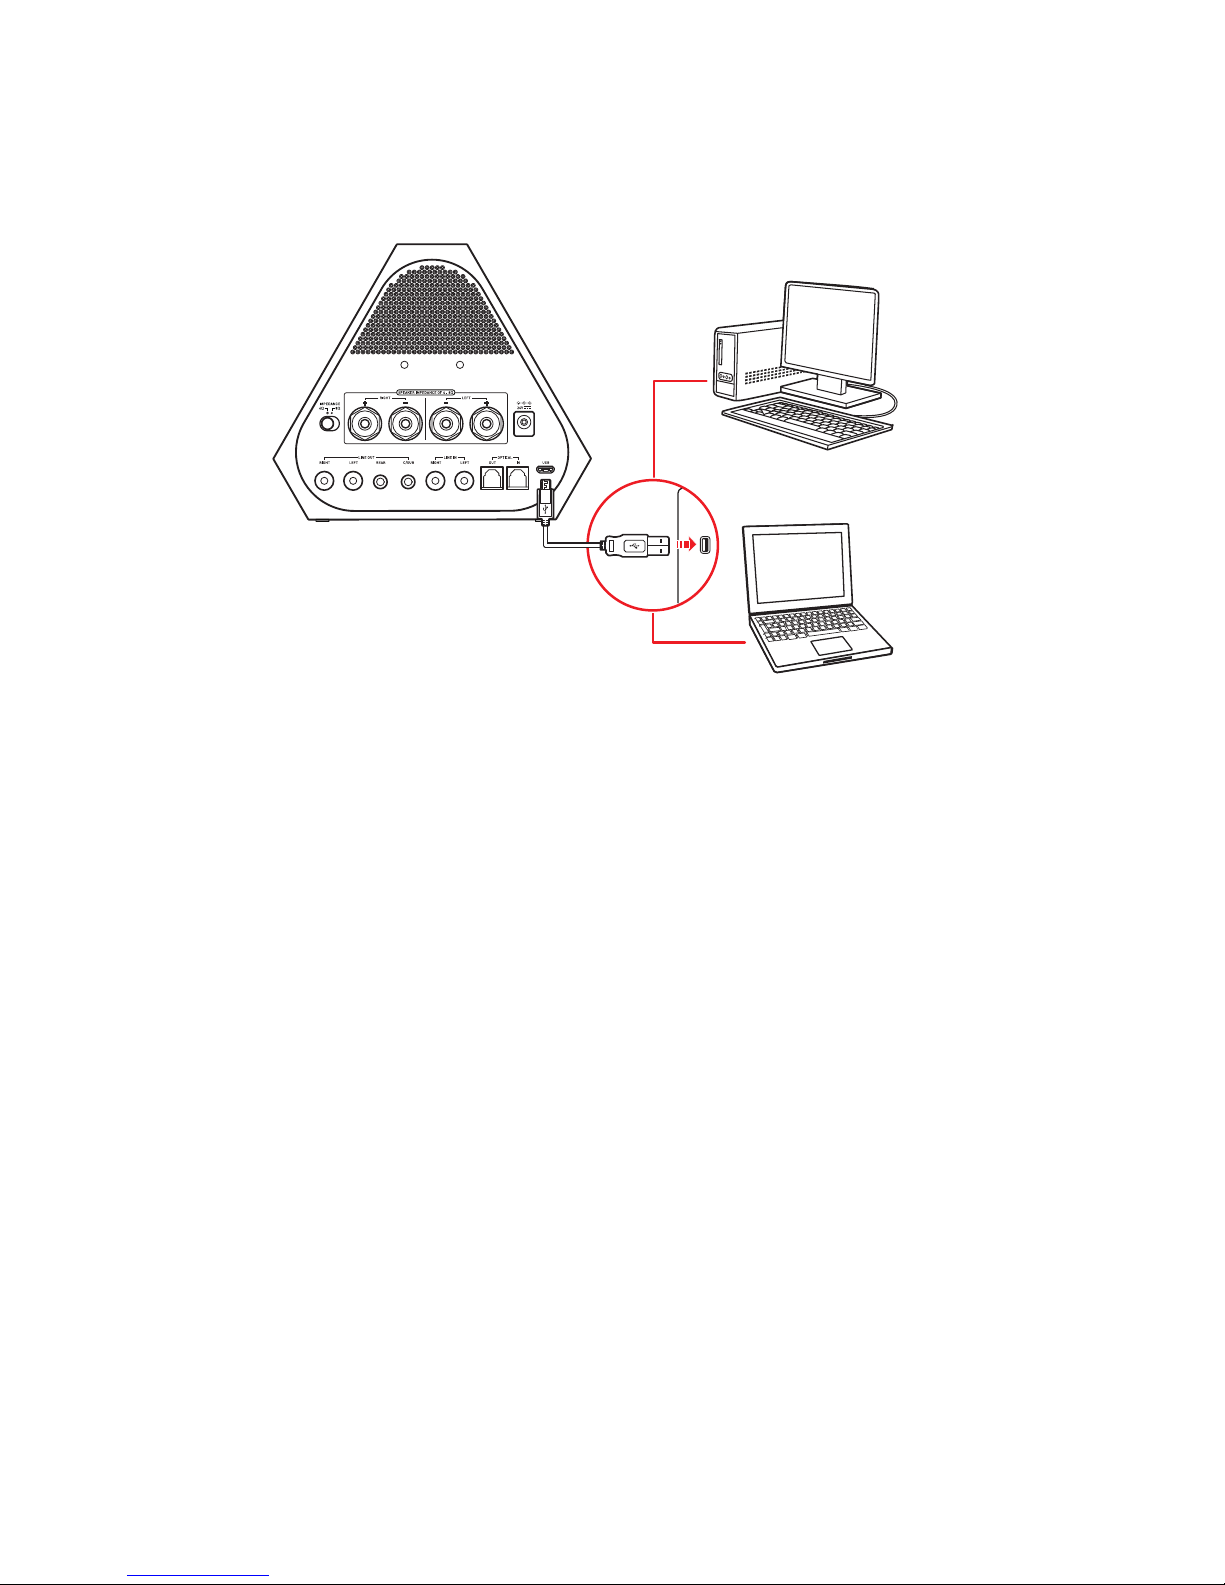
Connecting to a Computer via USB
Setting the default audio device
For Windows:
After the Sound Blaster X7 Control Panel is installed, Sound Blaster X7 will be automatically set as the
default audio device. Alternatively, you can set the desired default audio device from the Windows
Sound Control Panel.
For Mac:
1. Go to System Preferences and click Sound.
2. Select Sound Blaster X7 in the Output tab.
3. In the Input tab, select Line-In or Mic-In/Mic Array.
Setting Up Your Audio Device - 7 -
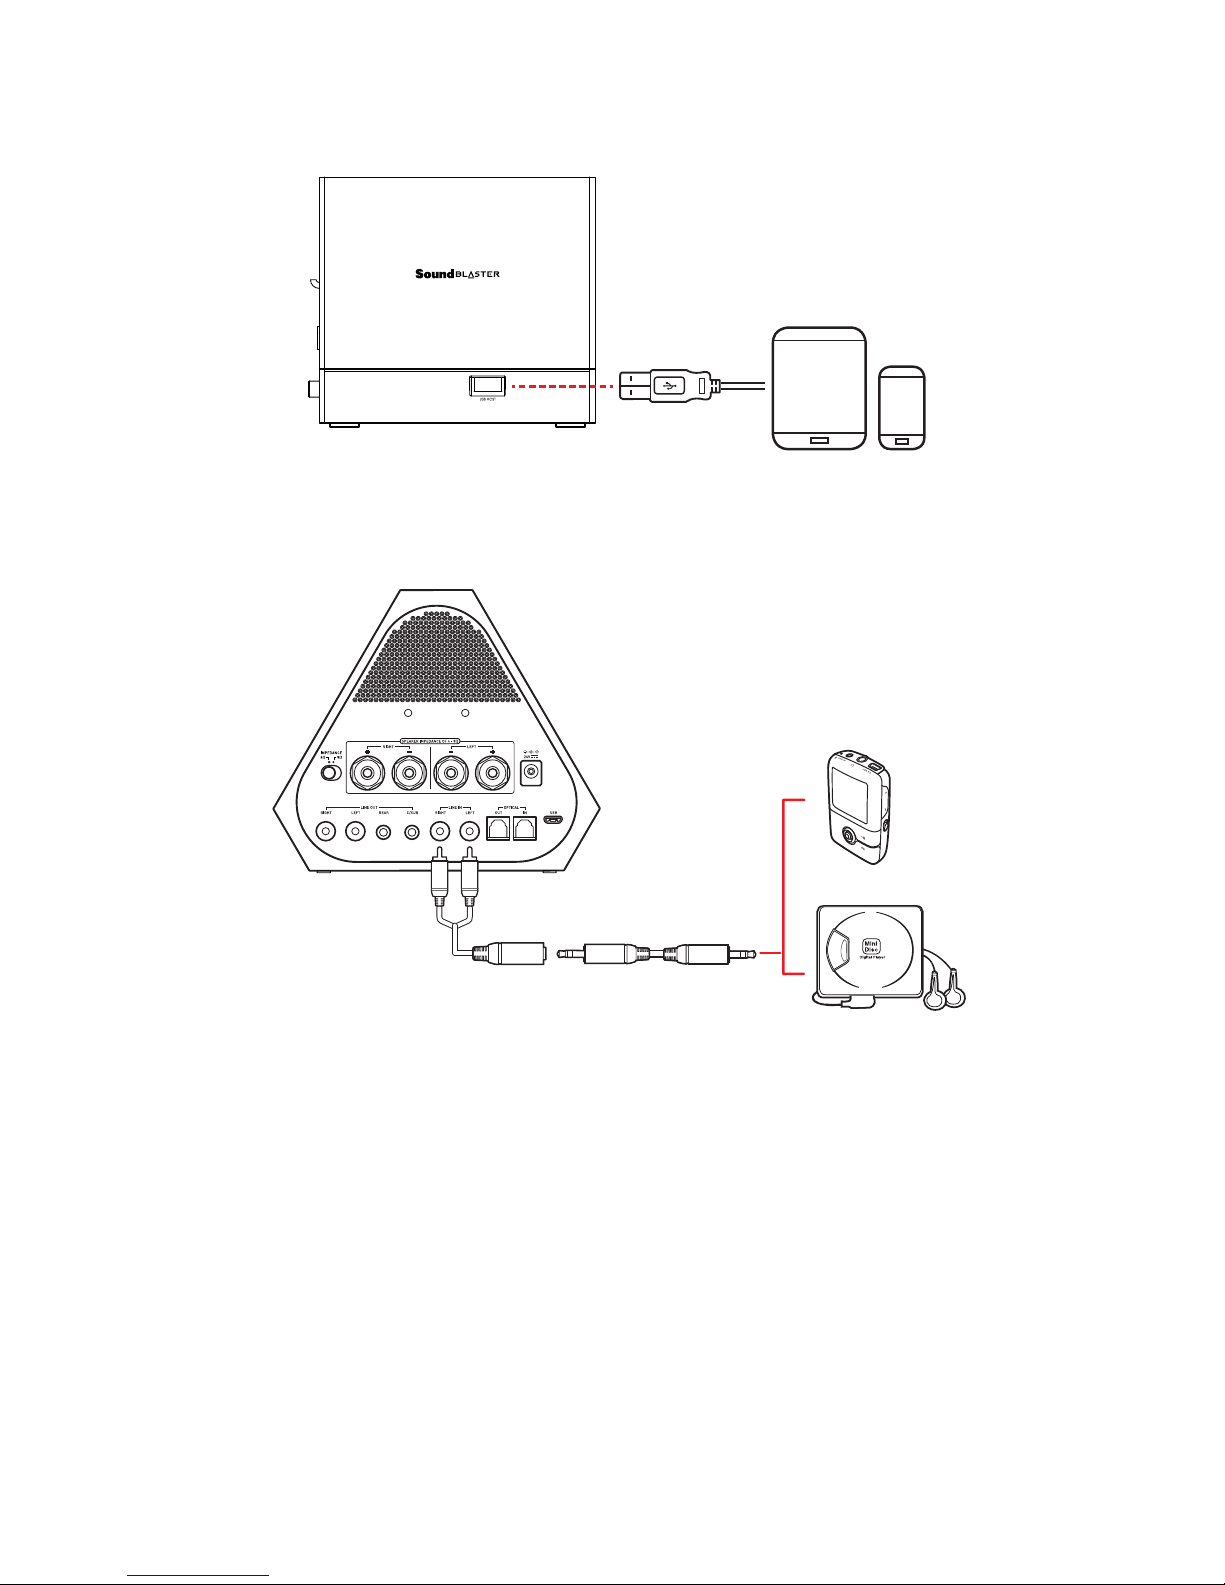
Connecting to a Mobile Device via USB Host
Connecting to Line-In Sources (e.g. MP3 Player, CDPlayer)
Setting Up Your Audio Device - 8 -
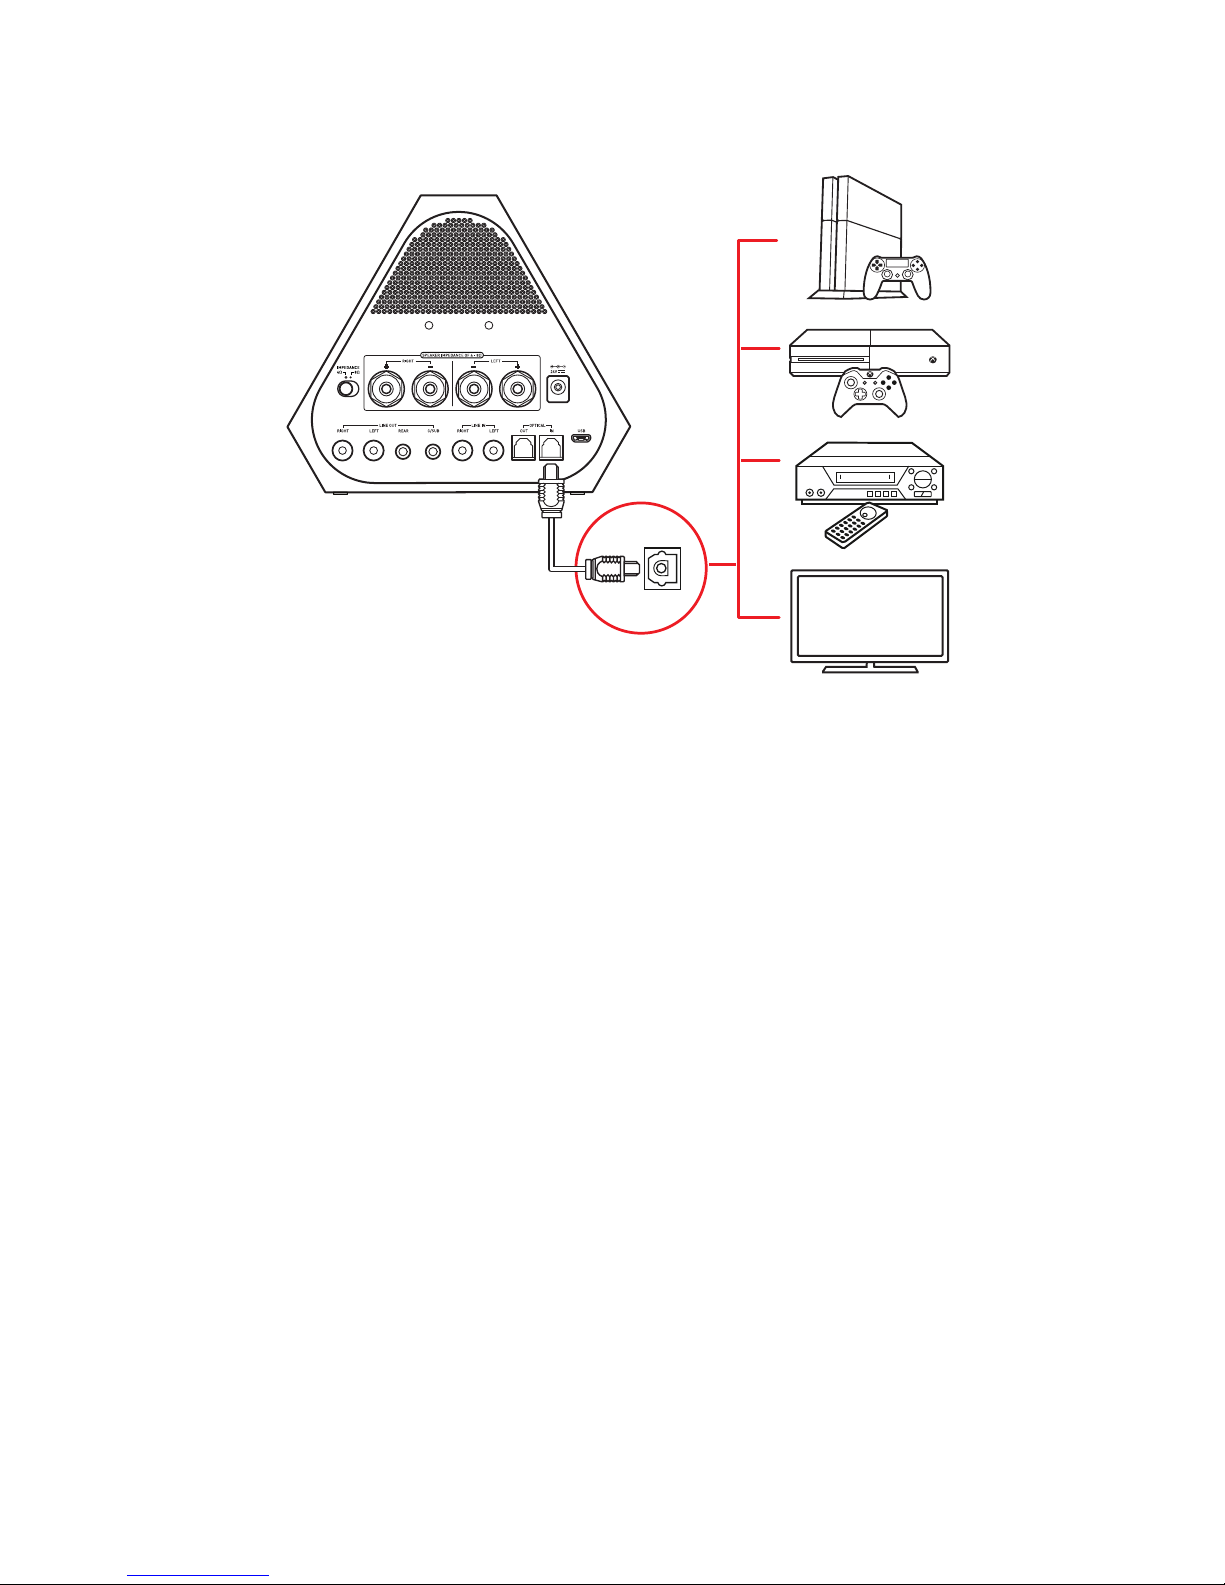
Connecting to Optical-In Sources (e.g. DVD/Blu-rayPlayer, TVSet)
OPTICAL
OUT
Setting Up Your Audio Device - 9 -
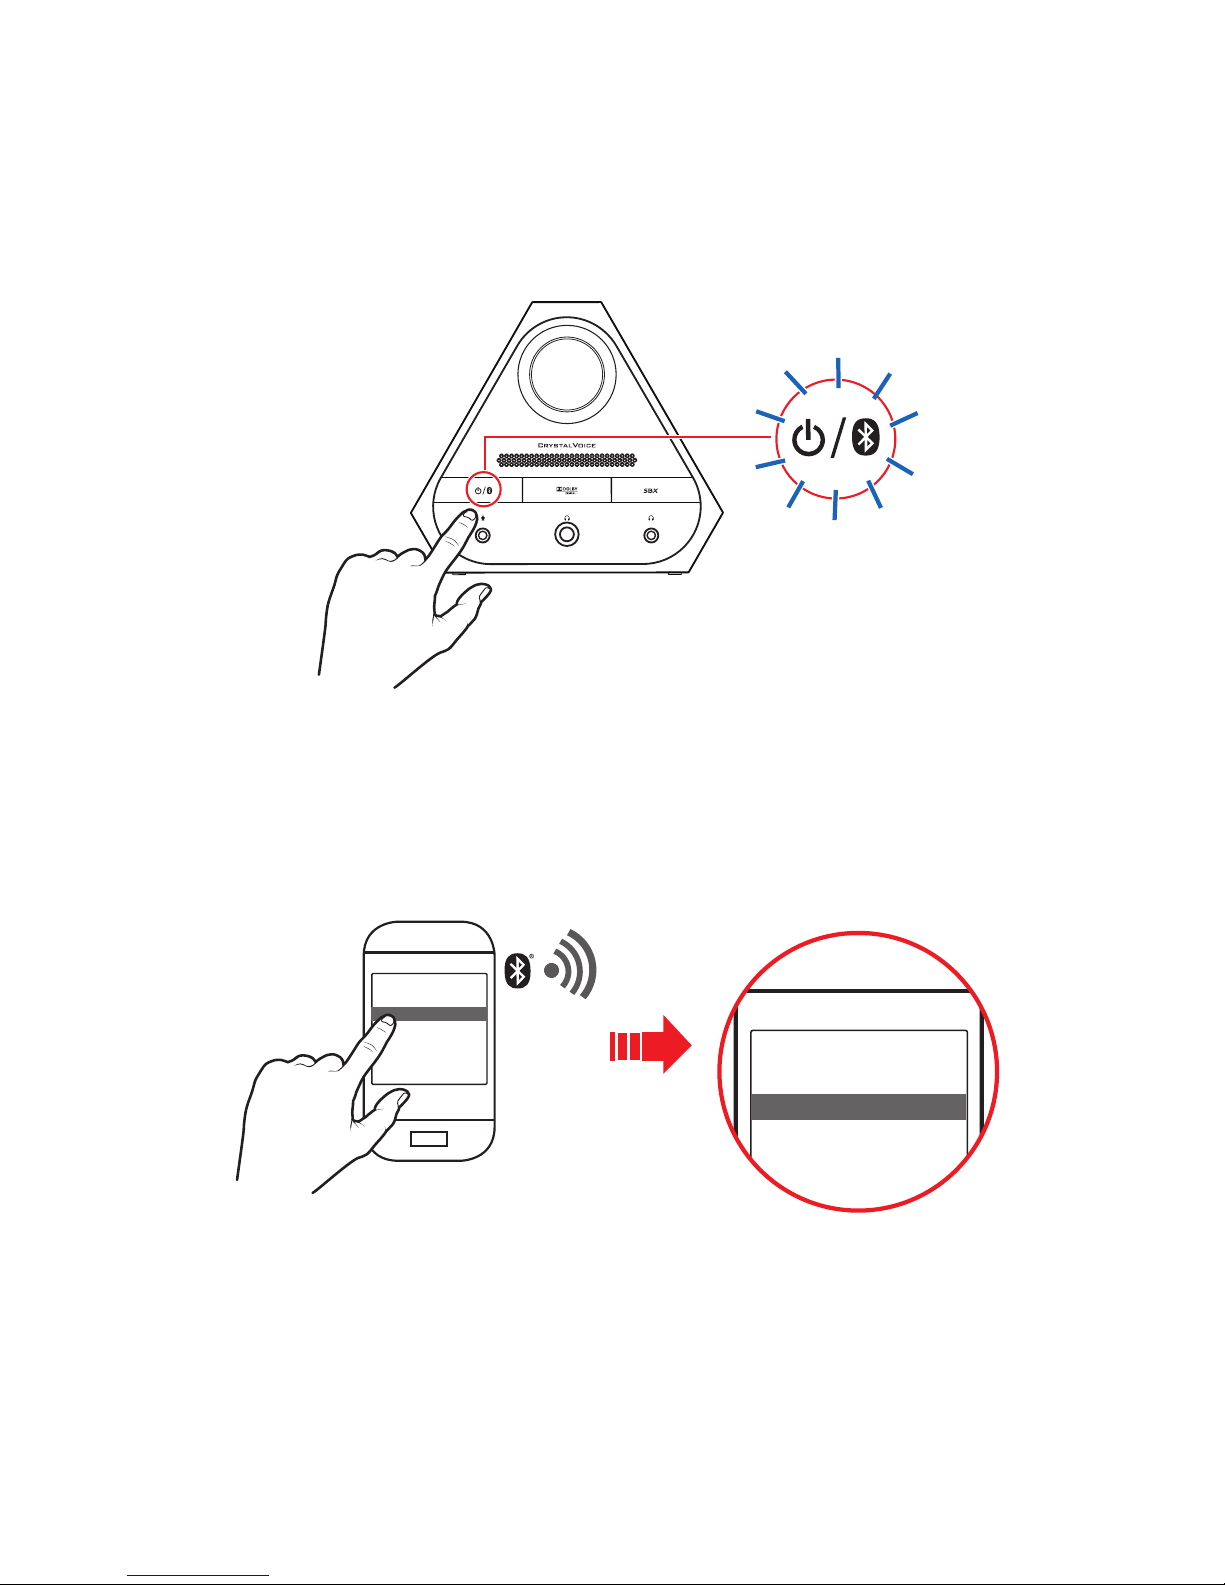
Connecting to Bluetooth Devices
To enjoy your favorite music from your Bluetooth devices, simply follow these steps to connect your
devices.
i. Activate Bluetooth pairing mode on Sound Blaster X7
Turn on Sound Blaster X7. Press and hold the Power/Bluetooth button for 2 seconds. The
Power/Bluetooth indicator will begin to blink in blue while waiting to be connected.
Note:
If no device is paired within 60 seconds, it will exit from pairing mode.
ii. Activate Bluetooth pairing mode on your mobile device
Activate Bluetooth on your mobile device. From the list of discovered Bluetooth devices, select "Sound
Blaster X7".
Devices
Ziisound D5
ZK-S9
Sound Blaster X7
Devices
Ziisound D5
ZK-S9
Sound Blaster X7
Note:
Bluetooth pairing between these devices may vary depending upon the model type. Consult your
device’s manual on how to pair.
Setting Up Your Audio Device - 10 -
iii. Pairing success
When both devices are paired, the Power/Bluetooth indicator will light in blue.
Pairing Multiple Devices
The Sound Blaster X7 supports multipoint Bluetooth connection. It can be connected to two Bluetooth
devices at the same time! To have the second device paired, repeat steps i to iii on Connecting to
Bluetooth Devices. If you wish to connect it with a third device, one of the two devices that are
currently paired with the audio device has to be disconnected.
Setting Up Your Audio Device - 11 -
One Touch Pairing with NFC
You may pair your NFC-enabled device with Sound Blaster X7 with a single tap using the NFC
technology. Simply follow these steps to connect them.
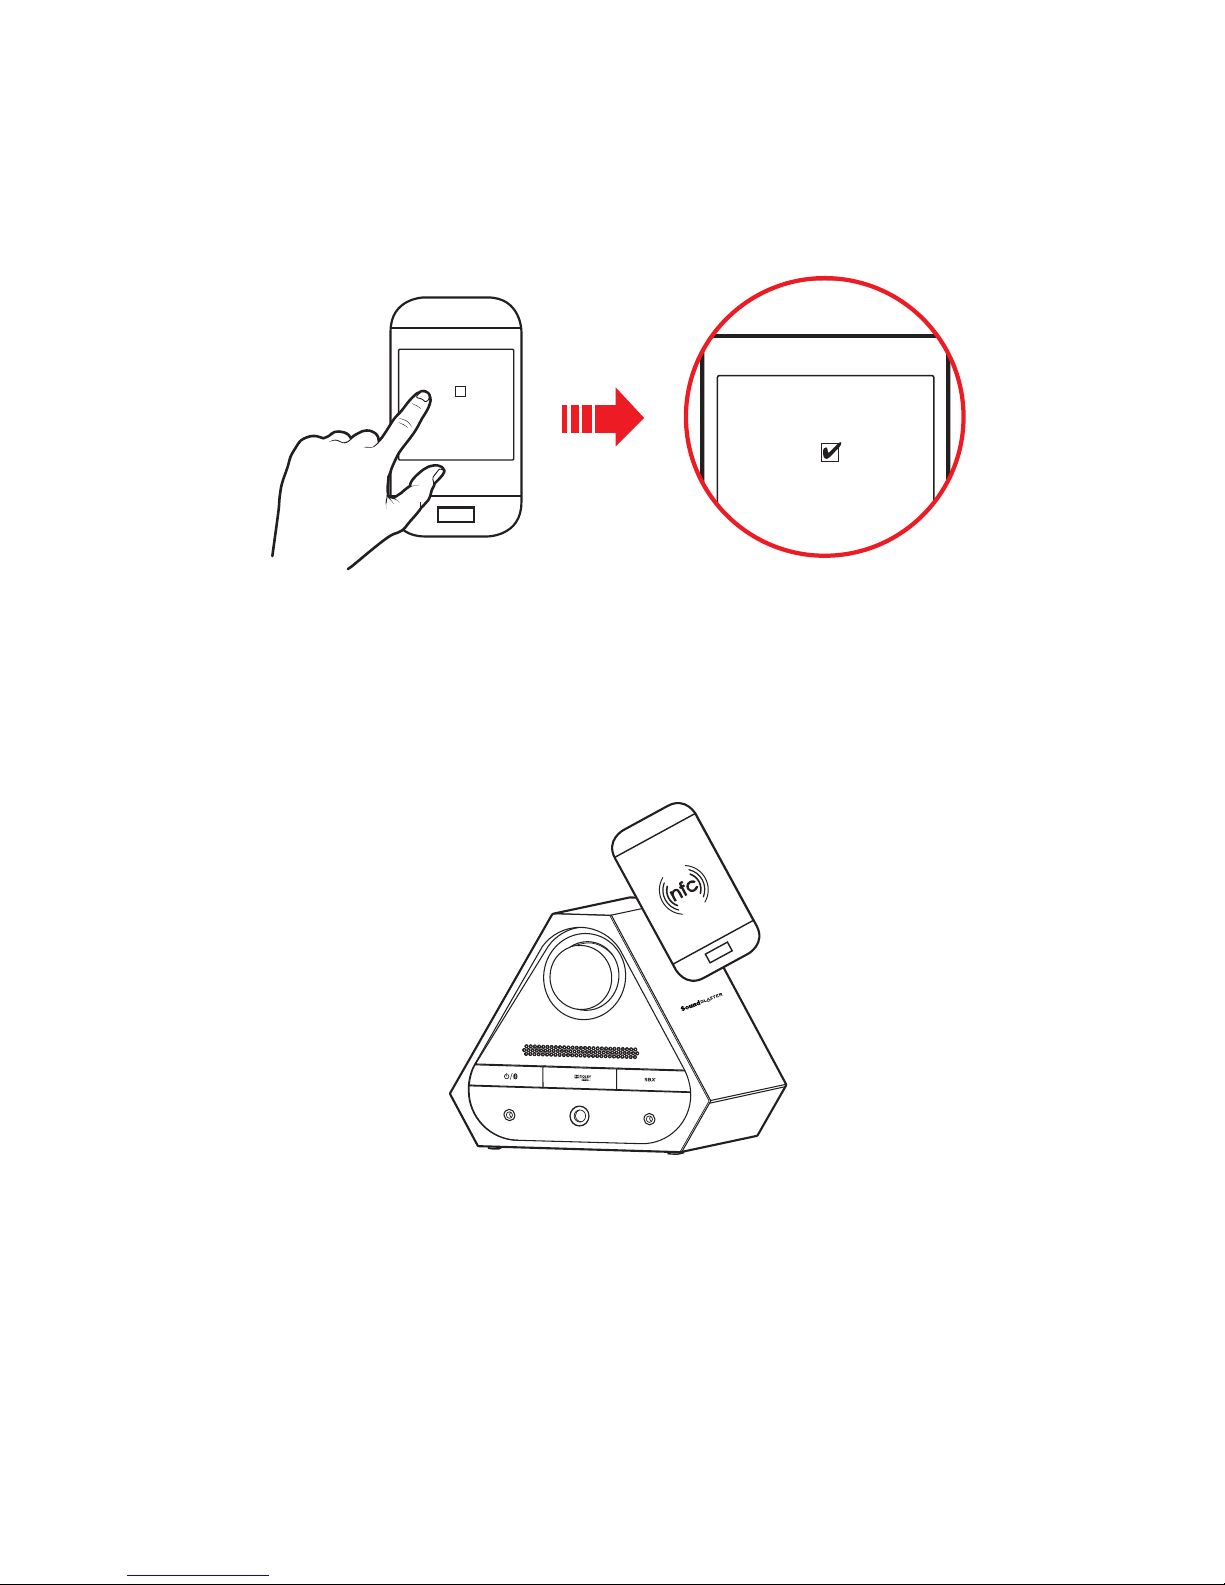
i. Activate NFC on your mobile device
Turn on the NFC feature on your mobile device by enabling "NFC" on the "Settings" screen.
Wireless & Network
Airplane mode
VPN
NFC
Wireless & Network
Airplane mode
VPN
NFC
Note:
Some of these settings may vary depending on the device's model type. Consult your device’s
manual on how to activate NFC.
ii. Tap your mobile device on Sound Blaster X7
Touch your mobile device on the NFC logo on Sound Blaster X7 to connect.
Note:
Be sure that your mobile device is NFC-enabled and find out where the NFC sensor is located on your
device. Consult your device's manual for more information.
Aim the device's sensor at the NFC logo on Sound Blaster X7 before tapping the devices.
Setting Up Your Audio Device - 12 -

iii. Pairing success
When both devices are paired, the Power/Bluetooth indicator will light in blue.
To disconnect, tap your device with Sound Blaster X7 again.
Setting Up Your Audio Device - 13 -

Step 3:Connecting to Speakers / Headphones
Connecting to Passive Speakers
1 4 53
2
Component
1 Speaker Output terminal (Right)
2 Speaker cords
3 Speaker (Right)
4 Speaker Output Terminal (Left)
5 Speaker (Left)
Setting Up Your Audio Device - 14 -
Speaker Cables
There are different types of speaker cables or connectors that can be attached to the Speaker Output
terminals (Right and Left) of Sound Blaster X7. Ensure that the rubber covers are removed from the
binding posts before attaching the speaker cables.
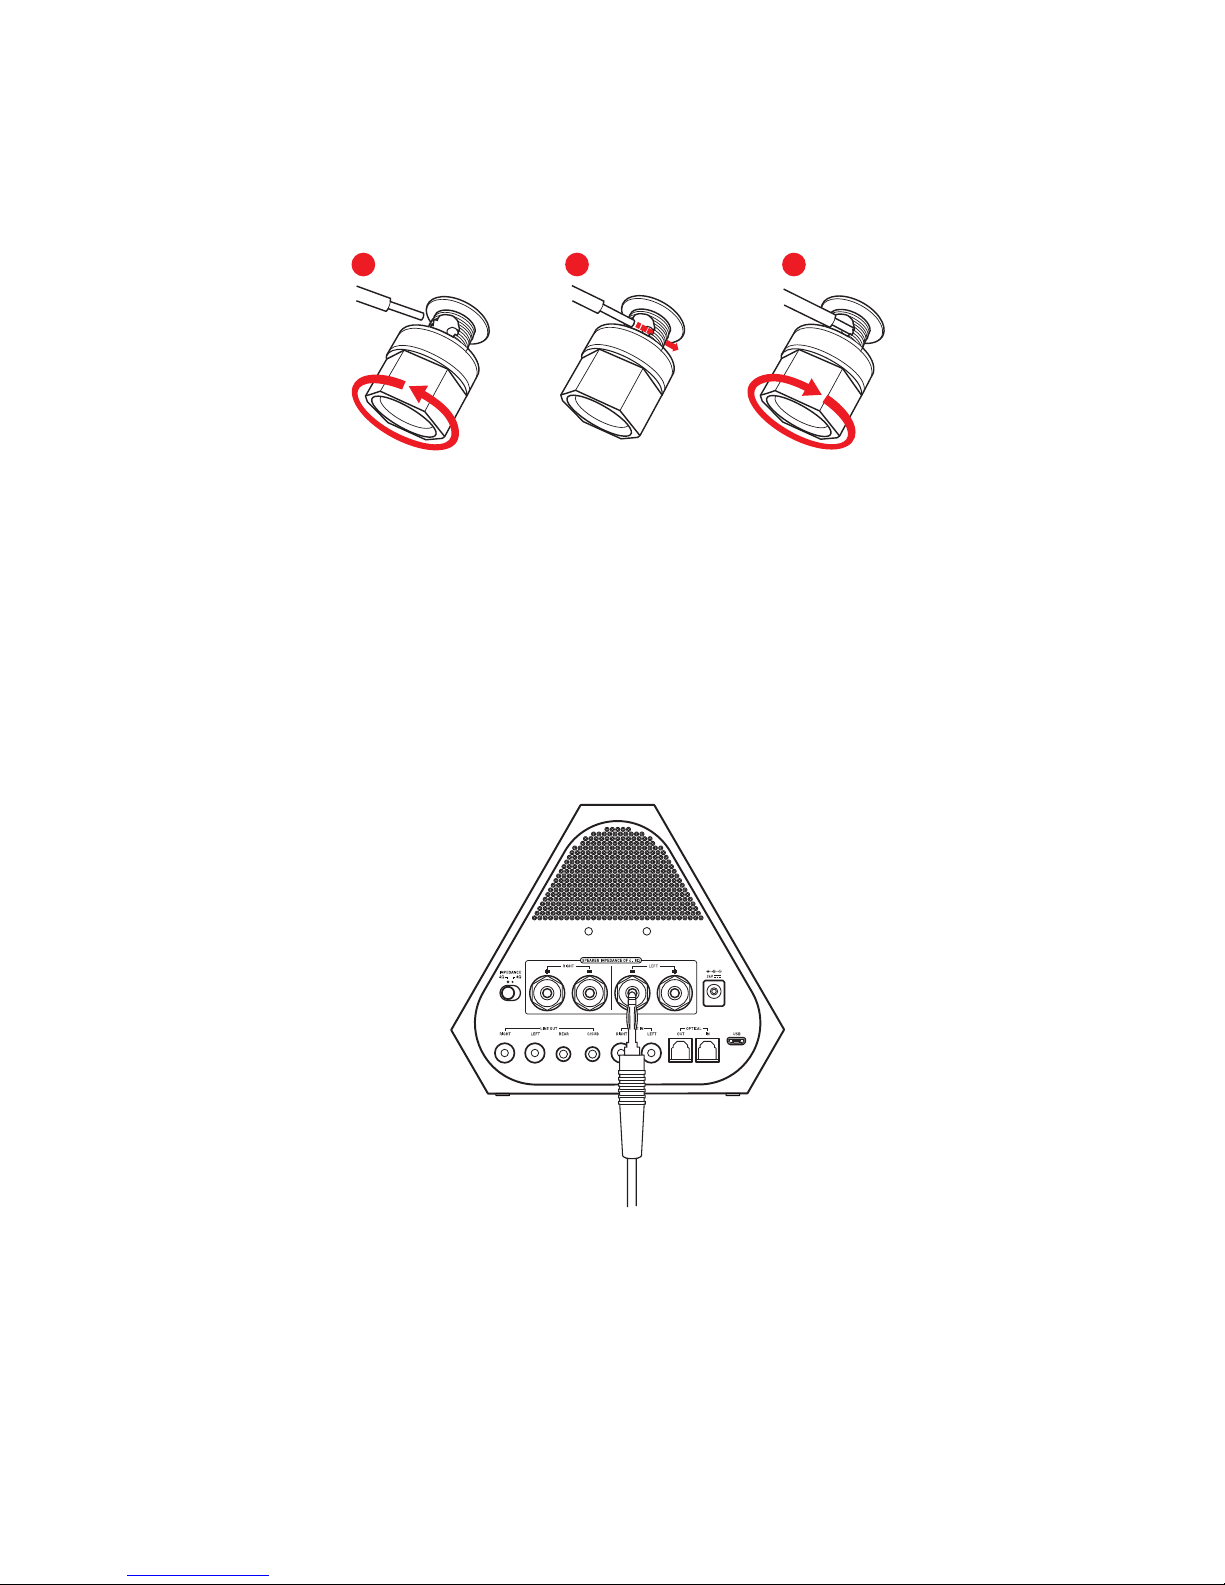
i. Bare Wires
1 2 3
1. Turn the binding post of the Speaker Output terminal counter-clockwise to reveal the metal hole in
the binding post.
2. Tightly twist the bare wire and insert it into the hole. Ensure that the polarities of the wires match.
For example, connect the wire from the positive (red/white) terminal on each speaker to the
corresponding positive terminal on your receiver. Similarly, connect the wire from the negative
(black) terminal on each speaker to the negative terminal on your receiver.
3. Tighten the binding post to the speaker cable by rotating clockwise.
ii. Banana Plug
Simply push the banana plug into the binding post of the Speaker Output terminal. Ensure that the
polarities of the wires match.
Setting Up Your Audio Device - 15 -
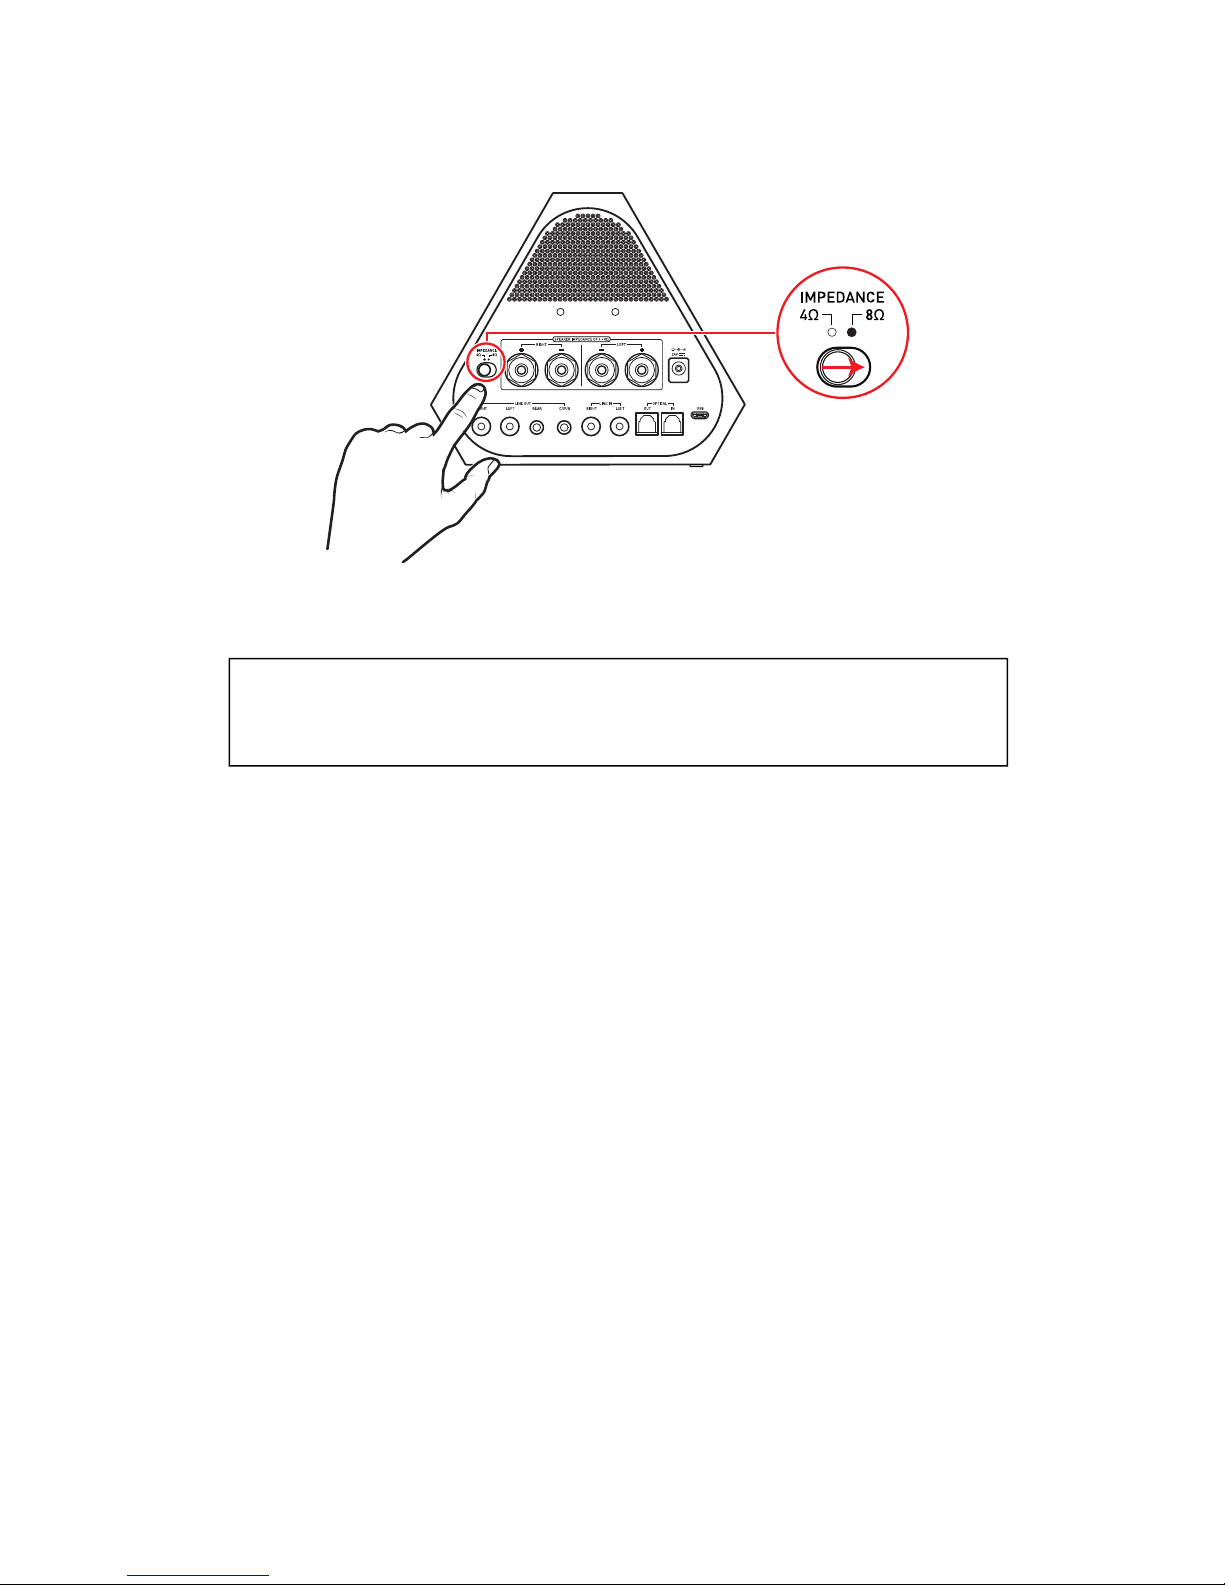
Select Speaker Impedance
The 4 ohm/8 ohm speaker impedance switch allows the Sound Blaster X7 to be configured to correctly
match the impedance of the passive speakers used.
Note:
Only applicable when Sound Blaster X7 is connected to passive speakers.
Warning:
To avoid damaging your speakers, be sure to select the correct impedance
rating that matches the impedance of your passive speakers.
Setting Up Your Audio Device - 16 -

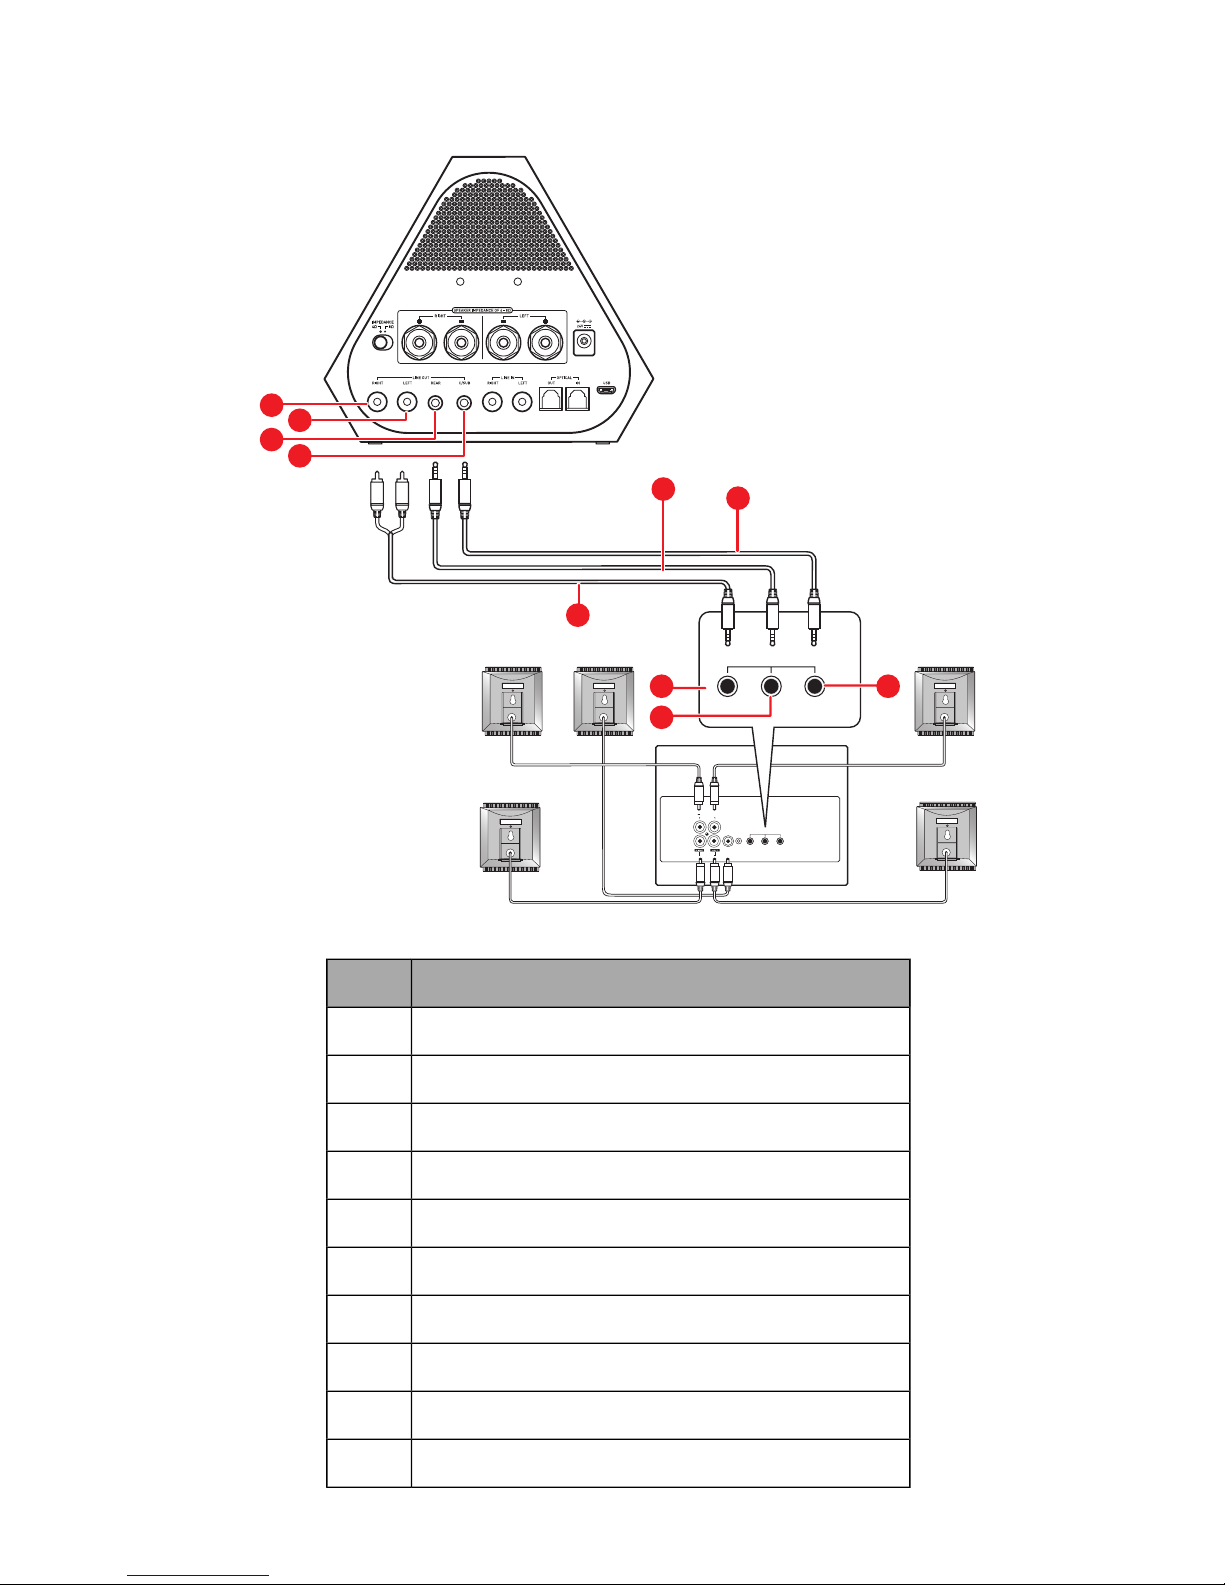
Connecting to Analog Speaker Systems
2.1 Channel Analog Speakers
audio
inputs
speakers
3
audio
inputs
4
2
1
Component
1 RCALine-Out jack (Front Right)
2 RCALine-Out jack (Front Left)
3 RCA to Stereo cable
4 Audio Input jack
Setting Up Your Audio Device - 17 -
5.1 Channel Analog Speakers
front rear center/
subwoofer
audio
inputs
center
speaker
front
speakers
rear
speakers
front rear center/
subwoofer
audio
inputs
7
6
5
4
3
2
1
8
9
10
Component
1 RCA Line-Out jack (Front Right)
2 RCA Line-Out jack (Front Left)
3 3.5mm Line-Out jack (Rear L/R)
4 3.5mm Line-Out jack (Center/Subwoofer)
5 RCA to Stereo cable
6 2-channel audio cable
7 2-channel audio cable
8 Front (Audio Input) jack
9 Rear (Audio Input) jack
10 Center/Subwoofer (Audio Input) jack
Setting Up Your Audio Device - 18 -

Connecting to Digital Speaker Systems
1
2
OPTICAL
COAXIAL
REAR
16V AC IN
~
FRONT
CENTRE/
SUBWOOFER/
REAR CENTER
AUDIO
OUTPUTS
AUDIO INPUTS
ANALOG
LEFT RIGHT
1
2
3
1
2
3
SPEAKER
CONFIGURATION
-- 6.1/7.1
-- 5.1
3
Component
1 Optical S/PDIF-Out jack
2 Optical cable
3 Optical S/PDIF-In jack
Setting Up Your Audio Device - 19 -

Connecting to Headphones/Microphone
3
1
5
2 64
Component
1 3.5mm Microphone jack
2 3.5mm Microphone plug
3 6.3mm Headphone 1 jack
4 6.3mm Headphone plug
5 3.5mm Headphone 2 jack
6 3.5mm Headphone plug
Note:
When headphones and a line-out device are connected simultaneously, audio will output to the
headphones.
Setting Up Your Audio Device - 20 -

Installing and Uninstalling Software
To take full advantage of your Sound Blaster X7 audio device, you need to install device drivers and
applications. At times, you may also need to uninstall some or all of the device drivers and applications
to correct problems, change configurations, or upgrade outdated drivers or applications. To learn how to
do so in all supported Windows and Mac operating systems, consult the following sections:
l Installing Drivers and Applications
l Uninstalling Drivers and Applications
Installing Drivers and Applications
Ensure that your audio device is connected before proceeding. For instructions on
installing your audio device, consult your Quick Start leaflet.
After you have connected your audio device, turn on your computer. Windows automatically detects
your audio device and searches for device drivers.
For Windows OS
1. Using a standard web browser, visit support.creative.com and locate the software package for the
Windows operating system.
2. Download this package into your local hard disk.
3. Locate and launch the software package.
4. Follow the on-screen instructions to complete the installation.
5. When prompted, restart your computer.
For Mac OS
1. Using your web browser, visit support.creative.com and locate the software package for the Mac
OS.
2. Download this package into your local hard disk.
3. Double-click the downloaded file to uncompress it.
4. Double-click the uncompressed DMG file.
5. Double-click the Install icon and follow the subsequent on-screen instructions to complete the
installation.
Installing and Uninstalling Software - 21 -

Uninstalling Drivers and Applications
In the event that an uninstallation is required (such as for upgrades), please follow the following
procedure.
Before you begin, close all running audio applications. Applications that are still running
during uninstallation will not be removed.
For Windows OS
1. From the Control Panel, click Uninstall a program.
2. Select your audio device's entry.
3. Click the Uninstall button or option.
If the User Account Control dialog box appears, click the Continue button.
4. Click the Yes button.
5. When prompted, restart your computer.
For Mac OS
1. Click Applications > Creative > Creative Uninstaller
2. Select the Creative product to be uninstalled.
3. Click the Uninstall button.
4. Follow the on-screen instructions.
Installing and Uninstalling Software - 22 -

Installing the Mobile App
Sound Blaster X7 Control (for iOS and Android)
Sound Blaster X7 comes with an amazing app, Sound Blaster X7 Control, that supports both iOS and
Android OS, so you can customize your audio – you now have total control right from the palm of your
hand. Download Sound Blaster X7 Control from the Apple App Store or Google Play Store.
Installing and Uninstalling Software - 23 -

Using the Creative Software Suite
A specialized software for the Sound Blaster X7 is developed to provide additional enhancements to the
audio and voice inputs and outputs of the product. The software bundle supports a range of operating
systems including:
l Windows 8.1, Windows 8, Windows 7, Windows Vista
l Mac OS X 10.6.8 or higher
l iOS v6.0 or higher
l Android v2.3 or higher
To take full advantage of your audio device, we recommend downloading and installing this software
into your computer. The following applications are included in the software bundle:
For Windows OS,
l Sound Blaster X7 Control Panel
l Creative Smart Recorder
l Creative WaveStudio
l Creative Host OpenAL
l Creative ALchemy
l Creative Software AutoUpdate
l Creative System Information
l Creative Online Registration
For Mac OS,
l Sound Blaster X7 Control Panel
l Creative Online Registration
For iOS and Android,
l Sound Blaster X7 Control
Note:
Some applications are available only for certain operating systems. To learn more about each
application, please consult its respective Online Help.
Using the Creative Software Suite - 24 -

Sound Blaster X7 Control Panel
Configuring Your Software Settings
Click each feature to access its settings page. More information on each feature can be found in their
respective sections in this manual.
Using the Creative Software Suite - 25 -

SBX Pro Studio Settings
Enhancing Your Listening Experience
You can adjust the amount to apply for each enhancement by dragging its slider left to decrease or right
to increase. To test the effects of the audio enhancements, click and listen to the demo video.
l SBX Pro Studio Surround provides immersion control of sounds not just around you, but also
above and below for a full 3D audio experience. Hear the natural sense of audio depth, spaciousness
and stunning 3D surround effects from your audio content. Enjoy an unbelievably true-to-life audio
experience, whether it's over stereo speakers or headphones.
l SBXPro Studio Crystalizer restores the dynamic range that is lost when iTunes and MP3 music
gets compressed. This makes the music sound as good as the artist originally intended, and adds an
enhanced level of realism for movies and games.
l SBX Pro Studio Bass fills in the low frequency tones and gives the extra impact for a better
entertainment experience. It dramatically improves the sound experience without a subwoofer.
l SBXPro Studio Smart Volume addresses the problem of abrupt volume level changes during
playback and between songs by automatically and continously measuring volume, and intelligently
applying gain and attenuation to compensate for those changes.
l SBX Pro Studio Dialog Plus enhances the voices in movies for clearer dialog, allowing the
listener to hear the dialog over the rest of the soundtrack and over ambient noise in the listening
environment.
Using the Creative Software Suite - 26 -

CrystalVoice Settings
Having Fun with CrystalVoice
After configuration, click and speak into your microphone to hear how your voice sounds
with CrystalVoice applied. Readjust as desired.
l CrystalVoice FX enables the speaker's voice to be altered with a variety of effects, which can be
used to enhance the tone of the speaker's voice, create interesting accents or to sound like a completely different person.
l CrystalVoice Smart Volume automatically adjusts the loudness of the speaker's voice to main-
tain a consistent volume level. This makes it convenient for the speaker to converse normally,
regardless of whether the speaker is close to or far away from the microphone.
l CrystalVoice Noise Reduction enables the speaker to be heard clearly over background noise by
constantly monitoring the environment and eliminate the unwanted noise that interferes with the
conversation.
l CrystalVoice Acoustic Echo Cancellation eliminates echoes and enables the speaker to listen to
the other party clearly. Echoes are a common problem present in voice communication systems
that disrupts conversations by making it difficult to hear the other party.
l CrystalVoice Focus creates a zone and suppresses noise outside it to enable the speaker within to
be heard with amazing clarity. Multiple microphones are used to focus, enhance the speaker's
voice, and eliminate sounds outside the zone.
Using the Creative Software Suite - 27 -

Scout Mode
Scout Mode delivers audio realism that enables you to hear your opponents from further away, giving
you a distinct tactical advantage in combat.
1. Scout Mode
Select to turn on or off Scout Mode.
2.
Click to configure hotkeys for turning on and turning off Scout Mode.
Using the Creative Software Suite - 28 -

Speakers/Headphones Settings
1. Switch between Speakers or Headphones mode.
2. Speakers / Headphones Configuration
Select your current physical speakers or headphones configuration.
l Direct Mode
Direct Mode gives you audio in its purest form, directly from the source. In this mode, all
playback, monitoring and microphone effects are by-passed. Direct Mode will remain on until
the device is disconnected from power.
l SPDIF-In Direct
SPDIF-In Direct allows bit-to-bit input stream of up to 24-bit 96kHz signals without processing.
When turned on, other audio input sources will be disabled. SPDIF-In Direct will remain on until
the device is disconnected from power.
3. For headphones, select the gain for headphone out:
l Normal Gain (32/300 ohm headphones)
l High Gain (600 ohm headphones)
WARNING!
Setting to high gain may damage your headphones if their impedance does not match the
specified level of 600 ohms.
4. Option to set to high gain by default.
Select Always set to high gain when in headphones configuration. This check box is only
applicable when High Gain is being selected as shown in the figure below.
Using the Creative Software Suite - 29 -

Mixer Settings
1. Volume sliders
Adjust the playback and recording volume for your various inputs and outputs.
2. Mixer Settings
Click the icon to mute/unmute the input/output. You can click the icon to adjust the settings
for your input/output.
Using the Creative Software Suite - 30 -

Equalizer Settings
1. EQ presets
Select an equalizer preset to apply to your audio.
2. EQ sliders
Adjust the equalizer settings.
Customizing Your EQSettings
Select the EQ checkbox to enable this feature, then click the EQ drop-down arrow and select a preset
from the list.
Selecting a preset will move the EQ sliders to the appropriate values. You can then adjust the equalizer
setting by dragging the sliders up or down to the desired level. Click to save the new
configuration as a new preset.
Note:
The list of default EQ presets cannot be deleted or overwritten.
Using the Creative Software Suite - 31 -

General Specifications
Controls and Indicators
l Power/Bluetooth button/indicator
l Playback Volume/Mute knob
l Dolby Digital indicator
l SBXbutton/indicator
l Impedance switch
l Bluetooth wireless
l NFC sensor
Inputs
l One 3.5 mm (1/8") Microphone-In jack
l Built-In Microphone Array
l Two RCA Line-In jacks
l One Optical S/PDIF-In jack
l One USB port
l One USB Host port
l One DC-In port
Outputs
l One 6.3 mm (1/4") Headphone 1 jack
l One 3.5 mm (1/8") Headphone 2 jack
l Two RCA Line-Out jacks for Front L/R
l One 3.5mm (1/8-inch) Line-Out jack for Rear L/R
l One 3.5mm (1/8-inch) Line-Out jack for Center/Subwoofer
l One Optical S/PDIF-Out jack
l Four Speaker Output terminals for connecting to the Left and Right inputs of passive speakers
Technical Specifications
l Manufacturer: Creative Technology Ltd.
l Operating Temperature Range: 0°C to 40°C
l Audio Codec: AAC, SBC, aptX
®
, aptX-LL(Low Latency)
l USBHost Port Output: 5 V 2.1 A
l Power Adapter:
o
Manufacturer: Golden Profit Electronics Ltd.
Model Number: GPE060D-240291D
Input: 100V – 240V 50/60Hz 1.5A
Output: 24V 2.91A 69.84W
or
o
Manufacturer: Foshan Shunde Guanyuda Power Supply Co., Ltd
Model Number: GM150-2400600
Input: 100V – 240V 50/60Hz 2.5A
Output: 24V 6A 144W
General Specifications - 32 -

l Power Consumption:
o
Power consumption during standby/off : < 0.5 W
o
Power consumption during networked standby for each network port (Bluetooth, USB): < 6.0 W
o
Power consumption during networked standby when all network ports are activated: < 10 W
o
When the device is powered on and connected to mains with no audio playback and not
performing other main functions,
n the device will enter networked standby mode within 20 minutes.
n the device will enter standby mode in 80 minutes after all network ports are
deactivated/disconnected.
l Bluetooth Technology:
o
Version: Bluetooth 4.1 LE (Low Energy)
o
Bluetooth Profiles:
n A2DP (Wireless Stereo Bluetooth)
n AVRCP (Bluetooth Remote Control)
n HFP (Hands-Free Profile)
o
Operating Frequency: 2402 - 2480 MHz
o
Operating Range: Up to 10 meters / 33 feet
(Measured in open space. Walls and structures may affect range of device.)
o
To disable/enable the Bluetooth module, refer to Troubleshooting and Support - Sound
Blaster X7 Controls and Indicators.
l Audio Performance:
o
Signal-to-Noise Ratio (DAC): 127 dB
o
Signal-to-Noise Ratio (ADC): 123 dB
o
24-bit Analog-to-Digital conversion of analog inputs at up to 96 kHz sample rate
o
24-bit Digital-to-Analog conversion of digital sources at up to 192 kHz sample rate
o
24-bit recording sampling rates: 44.1, 48, 88.2, 96 kHz, 192 kHz
o
24-bit playback sampling rates: 44.1, 48, 88.2, 96, 176.4, 192 kHz
o
Stereo Direct Playback at 24-bit / 44.1, 48, 88.2, 96, 176.4, 192 kHz
o
Surround Playback (Dolby Digital) at 24-bit / 44.1, 48, 88.2, 96 kHz
o
Frequency Response (24-bit / 192 kHz):20 Hz - 90 kHz
l Amplifier:
o
Maximum Power Output
n 50 W +50 W (4 ohm, 1 kHz, 10% THD)*
n 38 W+ 38 W (4 ohm, 1 kHz, 10% THD)**
n 27 W+ 27 W (8 ohm, 1 kHz, 10% THD)**
o
Rated Power Output
n 37 W +37 W (4 ohm, 1 kHz, 1% THD)*
n 35 W+ 35 W (4 ohm, 1 kHz, 1% THD)**
n 20 W+ 20 W (8 ohm, 1 kHz, 1% THD)**
o
Total Harmonic Distortion:
n 0.05% (1 kHz, 4 ohm, 33 W)*
n 0.05% (1 kHz, 4 ohm, 30 W)**
Note:
General Specifications - 33 -

* Requires upgrade to high power AC/DC adapter (24V 6A)
** Using bundled AC/DC adapter (24V 2.91A)
Compliance markings are located at the bottom of this product.
General Specifications - 34 -

Troubleshooting and Support
This section provides solutions to problems you may encounter during installation or normal use. This
includes:
l Problems with Sound
l Sound Blaster X7 Controls and Indicators
Problems with Sound
No sound from the headphones connected to Sound Blaster X7.
Check the following:
l The headphones are connected to the Headphone jack of Sound Blaster X7.
l In the Speakers/Headphones selection of Sound Blaster X7 Control Panel, the Headphones option
is selected.
No audio output from speakers when playing digital files.
Check the following:
l The Sound Blaster X7 and speakers' Volume Control knob are set at mid-range. Adjust the Volume
Mixer settings in Sound Blaster X7 Control Panel, if necessary.
l The powered speakers are connected to the Line-Out jack, OR
the passive speakers are connected to the Speaker Output terminals.
l The Speakers/Headphones selection in Sound Blaster X7 Control Panel corresponds to your speaker
or headphone configuration.
No audio from the microphone/line-in can be heard from the source connected to
Line-In or Mic-In jack.
Do the following:
l In the Mixer selection of Sound Blaster X7 Control Panel, go to Mic-In/Line-In option under REC,
click , and enable Listen to this device.
No audio can be recorded from the source connected to Line-In or Mic-In jack.
Do the following:
i. Navigate to Windows Control Panel > Sound > Recording tab.
ii. Select Mic-In/Line-In as the default recording device.
iii. In the Mixer selection of Sound Blaster X7 Control Panel, unmute the Mic-In/Line-In from REC
option.
Troubleshooting and Support - 35 -

Sound Blaster X7 Controls and Indicators
Different actions can trigger the Sound Blaster X7 to go into different states. The table below lists the
controls and related actions, and the meaning of the LED indications.
Control/
Indicator
Action LED Status
Power/Bluetooth
button/indicator
Press once White Power on
Press again Off Power off (standby)
Press and hold for
2 seconds
Blue blinking Bluetooth pairing
Blue Bluetooth connected
Press and hold for
5 seconds
Blue (blinks five times
quickly)
Bluetooth settings reset
No activity within 15
minutes
Dim Power saving mode
Playback Volume/
Mute knob
Press once Flashes slowly Mute sound
Set volume level to
maximum or minimum
Blinks three times Maximum or minimum
volume
SBXbutton/indicator Press once White SBXon
Press again Off SBXoff
Press and hold for 3
seconds
Power LEDblinks two
times quickly
Voice recognition assistant
triggered
Press and hold for 6
seconds
Power LEDblinks five
times quickly
Audio prompts are turned
off
Dolby Digital indicator Play Dolby Digital encoded
audio via Optical-In
White Dolby Digital decoding is
activated
Connect mobile device to
USB Host port
White (blinks five times) USB Host is ready for audio
streaming
SBX button/indicator
+
Power/Bluetooth
button/indicator
Press and hold SBX
button/indicator followed
by Power/Bluetooth
button/indicator
Power,SBXand Dolby
Digital LEDsblink five
times quickly
Factory reset
Playback
Volume/Mute knob
+
SBX button/indicator
+
Power/Bluetooth
button/indicator
Press and hold in
sequence SBX
button/indicator,
Playback Volume
/Mute knob and
Power/Bluetooth
button/indicator
Dolby Digital LED
blinks three times
The Bluetooth feature is
disabled permanently.
To reactivate Bluetooth,
perform one of the following
actions:
- Trigger NFC pairing
- Perform a Bluetooth
setting reset*
- Perform a factory reset*
- Remove and plug in power
cable again
Troubleshooting and Support - 36 -

*See above
Additional Support
If you encounter any other issues or have any other enquiries about your Sound Blaster X7 or any other
Creative products, please visit our comprehensive knowledge base at support.creative.com or
www.soundblaster.com for additional information.
Troubleshooting and Support - 37 -

Safety Information
Refer to the following information to use your product safely, and to reduce the chance of electric shock,
short-circuiting, damage, fire, hearing impairment or other hazards. Improper handling may void
the warranty for your product. For more information, read the warranty available with
your product.
l Do not dismantle or attempt to repair your product.
Refer all servicing to authorized repair agents.
l Do not expose your product to temperatures outside the range of 0°C to 40°C (32°F to 104°F).
l Do not pierce, crush or set fire to your product.
l Keep your product away from strong magnetic objects.
l Do not subject your product to excessive force or impact.
l Do not expose your product to water or moisture.
If your product is moisture-resistant, take care not to immerse your product in water or expose it to
rain.
l Use a mains plug that is appropriate for your country or region.
l To be completely disconnected from the power input, the mains plug has to be disconnected /
detached from the mains.
l Disconnect the mains plug when the device is expected to be unused for several days.
Additional guidelines for Bluetooth devices
l The short wave radio frequency signals of a Bluetooth device may impair the operation of other elec-
tronic and medical devices.
l Switch off the device where it is prohibited. Do not use the device in medical facilities, aircraft, refu-
eling points, close to automatic doors, automatic fire alarms or other automatically controlled
devices.
l Keep this device at least 20 cm from pacemakers and other medical devices. Radio waves may
impair the operation of pacemakers and other medical devices.
[FR] Informations de sécurité
Consultez les informations suivantes pour utiliser votre produit en toute sécurité et pour réduire les
risques de choc électrique, mise en court-circuit, dégât, incendie, perte auditive ou tout autre danger.
Toute mauvaise utilisation peut annuler la garantie de votre produit. Pour toutes
informations complémentaires, lisez la garantie fournie avec votre produit.
l Vous ne devez ni démonter ni tenter de réparer votre produit.
Toute opération de maintenance doit être confiée à un réparateur agréé.
l N'exposez pas votre produit à des températures en dehors de la plage de températures de 0° C à
40° C.
l Ne percez pas le produit, ne l'écrasez pas et veillez à ce qu’il ne prenne pas feu.
l Tenez votre produit éloigné d'objets fortement magnétiques.
l Ne soumettez pas le produit à une force ou à un impact excessif.
l N'exposez pas votre produit à l'eau ou à l'humidité.
Même si votre produit est résistant à l'humidité, évitez de l'immerger dans l'eau ou de l'exposer à la
pluie.
l Utilisez une prise électrique correspondant à votre pays ou à votre région.
l Pour mettre l'appareil complètement hors tension, débranchez le câble d'alimentation de la prise
secteur.
Safety Information - 38 -

l Débranchez le câble d'alimentation de la prise secteur lorsque l'appareil risque de rester inutilisé
pendant plusieurs jours.
Lignes directrices supplémentaires pour les périphériques Bluetooth
l Les fréquences radio à ondes courtes émises par un périphérique Bluetooth peuvent perturber le
fonctionnement des autres appareils électroniques et médicaux.
l Arrêtez l'appareil si son utilisation est interdite.
l N'utilisez pas cet appareil à moins de 20cm d'un simulateur cardiaque ou d'autres appareils méd-
icaux.
[IT] Informazioni sulla sicurezza
Leggere attentamente le informazioni riportate di seguito per utilizzare il dispositivo in modo sicuro e
minimizzare i rischi di scosse elettriche, cortocircuiti, danni, incendi, lesioni all'udito o di altra natura.
Un uso non corretto potrebbe invalidare la garanzia del prodotto. Per ulteriori
informazioni, consultare la garanzia fornita con il prodotto.
l Non smontare o provare a riparare il prodotto.
Per tutti gli interventi di manutenzione, rivolgersi agli agenti autorizzati.
l Non esporre il dispositivo a temperature inferiori a 0 °C o superiori a 40°C.
l Non perforare, rompere o incendiare il dispositivo.
l Non usare il dispositivo vicino a oggetti che possono generare forti campi magnetici.
l Non sottoporre il dispositivo a forti pressioni o urti violenti.
l Non esporre il prodotto all'acqua o all'umidità.
Se il prodotto resiste all'umidità, prestare attenzione a non immergere il prodotto in acqua o ad
esporlo alla pioggia.
l Utilizzare una spina dell'alimentazione di rete adeguata per il paese o la regione di utilizzo.
l Per scollegare completamente il dispositivo dall'alimentazione, la presa deve essere scollegata
dalla rete elettrica.
l Scollegare la presa se si prevede di non utilizzare il dispositivo per diversi giorni.
Linee guida aggiuntive per dispositivi Bluetooth
l I segnali a onde corte di frequenza utilizzati dai dispositivi Bluetooth possono ostacolare il fun-
zionamento di altri dispositivi elettronici e medici.
l Spegnere il dispositivo nei luoghi in cui ne è proibito l'utilizzo.
l Mantenere il dispositivo ad almeno 20 cm da pacemaker e altri dispositivi medici.
[DE] Sicherheitsinformationen
Lesen Sie die folgenden Hinweise, um Ihr Produkt sicher anzuwenden und die Risiken von elektrischen
Schlägen, Kurzschlüssen, Beschädigungen, Bränden, Gehörschäden oder anderen Gefahren zu
reduzieren. Unsachgemäße Handhabung kann zum Erlöschen der Gewährleistung Ihres
Produktes führen. Weitere Informationen sind in der Garantieerklärung enthalten, die dem
Produkt beiliegt.
l Das Produkt nicht öffnen und keine eigenen Reparaturversuche unternehmen.
Alle Service-Vorgänge von autorisiertem Reparaturpersonal durchführen lassen.
l Setzen Sie Ihr Produkt keinen Temperaturen unter 0°C oder über 40°C aus.
l Das Produkt darf nicht durchbohrt, zerdrückt oder in Brand gesteckt werden.
l Bewahren Sie das Produkt oder die Batterie nicht in der Nähe stark magnetischer Gegenstände auf.
l Setzen Sie das Produkt keiner übermäßigen Kraft- oder Aufpralleinwirkung aus.
Safety Information - 39 -

l Das Produkt nicht Regen oder Feuchtigkeit aussetzen.
Falls Ihr Produkt feuchtigkeitsbeständig ist, darauf achten, dass das Produkt nicht in Wasser eingetaucht oder dem Regen ausgesetzt wird.
l Verwenden Sie einen landesüblichen Netzstecker.
l Für die vollständige Trennung von der Stromversorgung muss der Netzstecker vom Stromnetz
getrennt (aus der Steckdose gezogen) werden.
l Ziehen Sie den Netzstecker, wenn Sie das Gerät mehrere Tage nicht verwenden möchten.
Zusätzliche Sicherheitshinweise für Bluetooth-Geräte
l Die Kurzwellen-Funksignale eines Bluetooth-Geräts können den Betrieb anderer elektronischer und
medizinischer Geräte stören.
l Schalten Sie das Gerät in Bereichen ab, in denen die Nutzung verboten ist.
l Halten Sie dieses Gerät mindestens 20cm von Herzschrittmachern oder anderen medizinischen Ger-
äten entfernt.
[ES] Información sobre seguridad
Consulte la siguiente información para usar el producto de forma segura y reducir así las posibilidades
de que se produzcan descargas eléctricas, cortocircuitos, averías, incendios, lesiones auditivas u otros
accidentes. El uso inadecuado puede anular la garantía del producto. Para obtener más
información, lea la garantía disponible con el producto.
l No desmonte ni intente reparar el producto.
Deje todas las tareas de reparación en manos de agentes de reparación autorizados.
l No exponga el producto a temperaturas que no estén entre los 0 °C y los 40 °C (32 °F a 104 F).
l No agujeree, aplaste ni prenda fuego al producto.
l Mantenga el producto alejado de objetos magnéticos potentes.
l No someta el producto a una presión excesivas y evite que reciba golpes.
l No deje que el producto quede expuesto al agua ni a la humedad.
Si su producto es resistente a la humedad, tenga cuidado de no introducirlo en el agua ni exponerlo
a la lluvia.
l Utilice un enchufe de corriente que sea apropiado para su país o región.
l Para desconectar completamente la entrada de alimentación, debe desenchufar el cable ali-
mentación de red de la toma de corriente.
l Desconecte el enchufe de alimentación de red cuando no vaya a utilizar el dispositivo durante varios
días.
Instrucciones adicionales para dispositivos Bluetooth
l Las señales de radiofrecuencia de onda corta de un dispositivo Bluetooth pueden afectar al fun-
cionamiento de otros dispositivos electrónicos o médicos.
l Apague el dispositivo en los lugares en los que se prohíba su uso.
l Mantenga el dispositivo a más de 20cm de marcapasos u otros dispositivos médicos.
[NL] Veiligheidsinformatie
Raadpleeg de volgende informatie voor veilig gebruik van uw product en om het risico op elektrische
schokken, kortsluitingen, beschadigingen, brandgevaar, gehoorbeschadiging en andere problemen te
verminderen. Door onjuist gebruik kan de garantie op dit product vervallen. Lees de
garantievoorwaarden die bij uw product zijn meegeleverd voor meer informatie.
l Demonteer het product niet of probeer het niet te repareren.
Laat al het onderhoud over aan geautoriseerde agente voor herstelling.
Safety Information - 40 -

l Stel het product niet bloot aan temperaturen buiten het bereik van 0 °C tot 40 °C.
l Het product niet doorboren, pletten of in vuur steken.
l Het apparaat niet blootstellen aan sterk magnetische objecten.
l Zorg ervoor dat het apparaat niet blootstaat aan overmatige druk of trillingen.
l Uw product niet blootstellen aan water of vochtigheid.
Als uw product vochtbestendig is, let er dan op om uw product niet onder te dompelen in water of
bloot te stellen aan de regen.
l Gebruik het type stekker dat in uw land of regio wordt gebruikt.
l Om te zorgen voor een volledige afsluiting van de stroomvoorziening moet de stekker uit het stop-
contact worden verwijderd.
l Haal de stekker uit het stopcontact wanneer u het apparaat enkele dagen niet gaat gebruiken.
Aanvullende richtlijnen voor draadloze apparaten
l De radiofrequentiesignalen in de korte golf van een Bluetooth-apparaat kunnen de werking van
andere elektronische en medische apparatuur verstoren.
l Schakel het apparaat uit op locaties waar het verboden is het apparaat aan te hebben staan.
l Houd dit apparaat op een afstand van minstens 20 cm van pacemakers en medische apparaten van-
daan.
[PT] Informações de segurança
Consulte as informações a seguir para usar o produto com segurança e reduzir as chances de choques
elétricos, curtos-circuitos, danos, incêndios, problemas auditivos ou outros riscos. O uso indevido do
produto pode invalidar a sua garantia. Para mais informações, leia a garantia fornecida
com o produto.
l Não desmonte nem tente consertar o seu produto.
Consulte os serviços de manutenção nos agentes autorizados.
l Não exponha o produto a temperaturas fora da faixa de 0ºC a 40ºC (32ºF a 104ºF).
l Não perfure, quebre ou incinere o produto.
l Mantenha o produto longe de objetos magnéticos.
l Não exponha o produto a força ou impacto excessivos.
l Não exponha o seu produto à água ou umidade.
Se o seu produto for resistentes à umidade, cuidado para não colocar o seu produto na água nem
deixar exposto à chuva.
l Utilize uma ficha eléctrica apropriada ao seu país ou região.
l Certifique-se de que desliga a ficha de alimentação da corrente eléctrica.
l Desligue a ficha de alimentação se o dispositivo não for utilizado durante um longo período de
tempo.
Directrizes adicionais para dispositivos sem fios
l Os sinais de frequência de rádio de onda curta de um dispositivo Bluetooth poderão impedir o fun-
cionamento de outros dispositivos electrónicos e médicos.
l Desligue o dispositivo onde for proibida a sua utilização.
l Mantenha este dispositivo a pelo menos 20 cm de pacemakers e outros dispositivos médicos.
[SV] Säkerhetsinformation
Läs följande information för att använda produkten på ett säkert sätt och för att minska risken för
elektriska stötar, kortslutning, skada, eld, hörselskador eller andra faror. Felaktig hantering kan
Safety Information - 41 -

göra att produktens garanti upphör att gälla. Mer information finns i garantin som
medföljer produkten.
l Montera inte isär produkten, och försök inte utföra reparationer av den.
Allt service- och reparationsarbete måste utföras av behöriga reparatörer.
l Utsätt inte produkten för temperaturer under 0 °C och över 40 °C.
l Borra inte i produkten, krossa den inte och sätt inte eld på den.
l Håll produkten borta från starka magnetiska objekt.
l Utsätt inte produkten för våld eller stötar.
l Utsätt inte produkten för fukt eller väta.
Produkten får inte sänkas ner i vätska eller utsättas för regn, även om den är fukttålig.
l Använd en strömkontakt som fungerar för ditt land eller område.
l För att koppla från en nätanslutning fullständigt måste nätkontakten tas ur nätuttaget.
l Koppla ur nätkontakten om enheten inte ska användas under en längre tid (flera dagar).
Viktig information om Bluetooth-enheter
l Kortvågsradiosignaler från en Bluetooth-enhet kan orsaka störningar på andra elektroniska och med-
icinska apparater.
l Stäng av enheten där användning är förbjuden.
l Enheten måste användas på minst 20 cm avstånd från pacemakers och annan medicinsk utrustning.
[NO] Sikkerhetsinformasjon
Les denne informasjonen for å bruke spilleren trygt, og for å redusere mulighetene for elektriske støt,
kortslutning, skade, brann, hørselsskade eller andre farer. Uriktig behandling kan gjøre garantien
til produktet ugyldig. Les garantien til produktet for å få mer informasjon.
l Ikke demonter eller forsøk å reparere produktet.
La autorisert servicepersonell ta seg av all service.
l Ikke utsett produktet for temperaturer utenfor området 0 til 40 °C.
l Ikke stikk hull på, knus eller sett fyr på produktet.
l Hold produktet borte fra sterkt magnetiske gjenstander.
l Ikke utsett produktet for store påkjenninger eller støt.
l Ikke utsett produktet for vann eller fuktighet.
Hvis produktet tåler fuktighet, må du passe på å ikke senke produktet i vann eller utsette det for
regn.
l Bruk en nettplugg som passer for ditt land eller region.
l For å koble helt fra strømmen må kontakten kobles fra strømuttaket.
l Koble enheten fra strømuttaket når den ikke skal brukes på noen dager.
Ekstra retningslinjer for Bluetooth-enheter
l Kortbølgeradiofrekvenssignaler fra en Bluetooth-enhet kan påvirke bruken av andre elektroniske og
medisinske enheter.
l Slå av enheten på steder der den ikke skal brukes.
l Hold enheten minst 20 cm fra pacemakere og annet medisinsk utstyr.
[DK] Sikkerhedsoplysninger
Gennemlæs følgende oplysninger, så du kan bruge produktet på sikker vis samt reducere risikoen for
elektrisk stød, kortslutning, beskadigelse, brand, tab af hørelse eller andre farer. Ukorrekt
Safety Information - 42 -

håndtering kan ophæve garantien på produktet. Du finder flere oplysninger ved at læse
garantien, der følger med produktet.
l Undlad at skille produktet ad eller forsøge at reparere det.
Overlad al service til autoriserede teknikere.
l Produktet må ikke udsættes for temperaturer uden for området 0 °C til 40 °C.
l Undlad at lave hul i produktet, knuse det eller sætte ild til det.
l Hold produktet væk fra stærkt magnetiske objekter.
l Udsæt ikke produktet for overdreven fysisk magt.
l Udsæt ikke produktet for vand eller fugt.
Hvis produktet er fugtafvisende, skal du sørge for ikke at nedsænke produktet i vand eller udsætte
det for regn.
l Brug et netstik, der passer til dit land eller din region.
l Strømmen afbrydes helt ved at tage stikket ud af stikkontakten.
l Afbryd på hovedkontakten, når enheden ikke skal anvendes i flere dage.
Yderligere retningslinjer for Bluetooth-enheder
l De radiofrekvente kortbølgesignaler fra en Bluetooth-enhed kan forringe funktionen af andre elek-
triske og medicinske enheder.
l Sluk enheden, hvor den er forbudt.
l Hold denne enhed mindst 20 cm væk fra pacemakere og andre medicinske enheder.
[FI] Turvallisuustiedot
Lue nämä tiedot huolellisesti, jotta osaat käyttää tuotetta turvallisesti. Näin vähennät sähköiskun,
oikosulun, laitevaurion, tulipalon ja kuulovaurion vaaraa sekä muita vaaratilanteita. Takuu ei korvaa
väärästä käytöstä aiheutuneita vahinkoja. Lisätietoja takuusta on takuutodistuksessa.
l Älä pura äläkä yritä korjata tuotetta.
Vie huollon tarpeessa oleva tietokone valtuutetulle huoltajalle.
l Älä altista laitetta alle 0 °C:n tai yli 40 °C:n lämpötiloille.
l Älä lävistä, murskaa tai polta laitetta.
l Älä säilytä laitetta magneettisten esineiden läheisyydessä.
l Älä altista laitetta iskuille tai kohdista siihen suurta voimaa.
l Älä altista tuotetta vedelle tai kosteudelle.
Jos tuote on kosteussuojattu, älä upota tuotetta veteen tai altista sitä sateelle.
l Käytä maassasi tai alueellasi käytössä olevaa verkkopistoketta.
l Virransaannin katkaiseminen kokonaan edellyttää, että virtajohdon pistoke on irrotettu pis-
torasiasta.
l Irrota virtajohdon pistoke pistorasiasta, kun odotat laitteen olevan käyttämättä muutaman päivän
ajan.
Bluetooth-laitteisiin liittyviä lisäohjeita
l Bluetooth-laitteen lyhytaaltoiset radiosignaalit voivat häiritä muiden elektroniikka- ja lää-
kintälaitteiden toimintaa.
l Sammuta laite paikoissa, joissa sen käyttö on kiellettyä.
l Pidä tämä laite vähintään 20 cm:n etäisyydellä sydämentahdistimista ja muista lääkintälaitteista.
Safety Information - 43 -

[CZ] Bezpečnostní informace
Následující informace se týkají bezpečného používání výrobku a snížení rizika úrazu elektrickým
proudem, zkratu, poškození, požáru, poškození sluchu a dalších rizik. Při nevhodné manipulaci
může záruka na výrobek pozbýt platnosti. Další informace získáte v přiloženém záručním
listu.
l Nerozebírejte výrobek ani se ho nepokoušejte opravit.
Veškeré opravy nechte provádět v autorizovaných opravnách.
l Nevystavujte výrobek teplotám mimo rozsah 0 až 40 °C.
l Výrobek nepropichujte, nepromačkávejte ani nevystavujte ohni.
l Nevystavujte výrobek působení silného magnetického pole.
l Nevystavujte výrobek nadměrnému tlaku ani úderům.
l Nevystavujte výrobek vlhkosti.
Pokud je výrobek odolný proti vlhkosti, dávejte pozor, abyste jej neponořili do vody a nevystavujte
jej dešti.
l Používejte zástrčku, která je vhodná pro vaši zemi či region.
l Chcete-li zařízení úplně odpojit od sítě, musíte vytáhnout zástrčku ze zásuvky.
l Kabel napájení vytáhněte ze zásuvky vždy, když předpokládáte, že zařízení nebudete několik dní
používat.
Další pokyny pro zařízení s rozhraním Bluetooth
l Krátkovlnné rádiové signály zařízení s rozhraním Bluetooth mohou narušit funkci jiných elek-
tronických a lékařských zařízení.
l Vypněte zařízení, je-li jeho použití zakázáno.
l Vzdálenost mezi zařízením a kardiostimulátory či jinými lékařskými zařízeními by neměla být
menší než 20 cm.
[PL] Informacje dotyczące bezpieczeństwa
Poniższe informacje dotyczą bezpiecznego korzystania z produktu i zminimalizowania zagrożeń
związanych z porażeniem prądem elektrycznym, zwarciem, uszkodzeniem sprzętu, pożarem,
uszkodzeniem słuchu oraz innymi zagrożeniami. Niewłaściwe korzystanie może spowodować
unieważnienie gwarancji produktu. Aby uzyskać więcej informacji, przeczytaj gwarancję
dołączoną do urządzenia.
l Nie należy rozmontowywać produktu lub podejmować prób jego naprawy.
Wszystkie prace serwisowe powinien wykonywać uprawniony personel.
l Nie narażać produktu na temperatury przekraczające zakres od 0°C do 40°C.
l Produktu nie należy przebijać, zgniatać lub zapalać.
l Produktu nie należy zbliżać do urządzeń wytwarzających silne pole magnetyczne.
l Nie wolno narażać produktu na nadmierne wstrząsy lub uderzenia.
l Nie należy narażać produktu na działanie wody lub wilgoci.
Jeśli produkt jest odporny na wilgoć, nie należy go zanurzać w wodzie ani wystawiać na deszcz.
l Korzystaj z wtyczki zasilania odpowiedniej dla danego kraju lub regionu.
l Aby całkowicie odłączyć urządzenie od zasilania, należy wyjąć wtyczkę przewodu zasilania z gni-
azda.
l Jeśli urządzenie nie będzie używane przez dłuższy czas, należy odłączyć je od zasilania.
Safety Information - 44 -

Dodatkowe wskazówki dotyczące urządzeń Bluetooth
l Przesyłane przy użyciu fal krótkich sygnały radiowe urządzeń Bluetooth mogą mieć wpływ na dzi-
ałanie innych urządzeń elektronicznych i medycznych.
l Urządzenie należy wyłączać w miejscach, w których jego używanie jest zabronione.
l Należy zachować co najmniej 20cm odległości między urządzeniem a rozrusznikiem serca i innymi
urządzeniami medycznymi.
[HU] Biztonsági információk
Olvassa el a következő információkat a termék biztonságos használata, valamint az áramütésveszély,
rövidzárlat, károsodás, tűz, halláskárosodás és más veszélyek elkerülése érdekében. Helytelen
kezelés esetén érvénytelenné válhat a termékre vonatkozó garancia. További
információkért olvassa el a termékhez tartozó jótállást.
l A termék szétszerelésére vagy javítására ne tegyen kísérletet.
Bízza az összes javítást hivatalos szervizszakemberre.
l Ne tegye ki a terméket 0-40°C-on kívüli hőmérsékletnek.
l Ne szurkálja, ne törje össze és ne gyújtsa fel a terméket.
l Tartsa távol a terméket az erősen mágneses tárgyaktól.
l Ne tegye ki a terméket nagy erőhatásnak.
l Ne tegye ki a terméket víz vagy nedvesség hatásának.
Amennyiben a termék nem vízálló, gondoskodjon arról, hogy a termék ne kerüljön vízbe, illetve ne
érje eső.
l Az országának vagy régiójának megfelelő tápcsatlakozót használjon.
l Az áramellátás teljes megszüntetéséhez a dugót ki kell húzni a hálózatból.
l Ha a készüléket előreláthatóan néhány napig nem használja, húzza ki a dugaszt.
További tudnivalók a Bluetooth készülékekről
l A Bluetooth készülékek rövidhullámú rádiófrekvenciái megzavarhatják más elektronikus vagy
orvosi berendezések működését.
l Ahol a készülék használata tilos, kapcsolja ki azt.
l A készüléket legalább 20 cm távolságra helyezze a pacemakerektől és más orvosi műszerektől.
[EL] Πληροφορίες Κανονισμών
Ανατρέξτε στις ακόλουθες πληροφορίες για να χρησιμοποιείτε το προϊόν με ασφάλεια και για να
ελαττώσετε τον κίνδυνο πρόκλησης ηλεκτροπληξίας, βραχυκυκλώματος, βλάβης, πυρκαγιάς,
προβλημάτων ακοής και άλλου τύπου κινδύνων. Ο ακατάλληλος χειρισμός ενδέχεται να
καταστήσει άκυρη την εγγύηση του προϊόντος. Για περισσότερες πληροφορίες, ανατρέξτε
στην εγγύηση που συνοδεύει το προϊόν.
l Μην αποσυναρμολογήσετε και μην προσπαθήσετε να επισκευάσετε το προϊόν.
Για οποιαδήποτε επισκευή, απευθυνθείτε σε εξουσιοδοτημένους αντιπροσώπους επισκευής.
l Το προϊόν δεν πρέπει να εκτίθεται σε θερμοκρασίες εκτός του εύρους των 0°C έως 40°C (32°F έως
104°F).
l Μην τρυπήσετε, μη συνθλίψετε και μη βάλετε φωτιά στο προϊόν.
l Κρατήστε το προϊόν μακριά από αντικείμενα με ισχυρό μαγνητικό πεδίο.
l Μην ασκείτε υπερβολική δύναμη όταν χρησιμοποιείτε το προϊόν και μην το υποβάλλετε σε σοκ.
Safety Information - 45 -

l Το προϊόν δεν πρέπει να εκτίθεται σε νερό ή υγρασία.
Αν το προϊόν σας είναι ανθεκτικό στην υγρασία, μην το βυθίζετε σε νερό και μην το εκθέτετε στη
βροχή.
l Χρησιμοποιήστε βύσματα κατάλληλα για την περιοχή ή τη χώρα σας.
l Για να αποσυνδεθείτε τελείως από την είσοδο τροφοδοσίας, θα πρέπει να αποσυνδέσετε/αφαιρέσετε
το φις τροφοδοσίας από την τροφοδοσία.
l Αποσυνδέστε το βύσμα τροφοδοσίας όταν δεν πρόκειται να χρησιμοποιήσετε τη συσκευή για αρκετές
ημέρες.
Επιπλέον οδηγίες για συσκευές Bluetooth
l Τα σήματα ραδιοσυχνότητας βραχέων κυμάτων μιας συσκευής Bluetooth μπορεί να παρεμποδίσουν
τη λειτουργία άλλων ηλεκτρονικών και ιατρικών συσκευών.
l Απενεργοποιείτε τη συσκευή σε χώρους όπου απαγορεύεται η χρήση της.
l Η συσκευή πρέπει να έχει πάντοτε ελάχιστη απόσταση 20 εκ. από βηματοδότες και άλλες ιατρικές
συσκευές.
[LT] Saugos informacija
Remdamiesi informacija, gaminiu naudositės saugiai, todėl sumažės elektros šoko, trumpojo jungimo,
pažeidimų, gaisro, klausos pablogėjimo ar kitokios žalos pavojus. Dėl netinkamo naudojimosi
gaminiu gali būti panaikinta garantija. Norėdami gauti išsamesnės informacijos, skaitykite
garantiją, kurią gavote su gaminiu.
l Neardykite ir nebandykite taisyti šio gaminio.
Visą priežiūrą patikėkite įgaliotiems remonto įmonės atstovams.
l Nelaikykite gaminio žemesnėje kaip 0 C (32 F) ir aukštesnėje kaip 40 C (104°F) temperatūroje.
l Nebadykite, nespauskite, neuždekite gaminio.
l Laikykite gaminį atokiau nuo stiprų magnetinį lauką turinčių objektų.
l Saugokite gaminį nuo didelės jėgos poveikio ar smūgio.
l Pasirūpinkite, kad gaminio nepaveiktų vanduo ar drėgmė.
Jei gaminys atsparus drėgmei, vis tiek nemerkite jo į vandenį ir nelaikykite lietuje.
l Naudokite kištukinį lizdą, kuris tinkamas jūsų regione arba šalyje.
l Norint visiškai atjungti įrenginį nuo maitinimo šaltinio, reikia iš elektros tinklo lizdo ištraukti mai-
tinimo kištuką.
l Jei neketinate įrenginiu naudotis kelias dienas, ištraukite maitinimo laido kištuką iš tinklo.
Papildomos belaidžių įrenginių naudojimo rekomendacijos
l Trumpųjų bangų radijo dažnio signalas, sklindantis iš Bluetooth įrenginio, gali trikdyti kitų elek-
troninių ir medicinos įrenginių veikimą.
l Išjunkite įrenginį atsidūrę vietose, kuriose draudžiama jį naudoti.
l Šį įrenginį laikykite bent 20cm atstumu nuo širdies stimuliatorių ir kitų medicinos įrenginių.
[SK] Bezpečnostné informácie
Ak chcete, aby bola prevádzka výrobku bezpečná a aby sa obmedzilo nebezpečenstvo úrazu
elektrickým prúdom, skratu, hmotných škôd, požiaru, poškodenia sluchu či iné nebezpečenstvo,
prečítajte si nasledujúce informácie. Nesprávne používanie výrobku môže zapríčiniť ukončenie
platnosti záruky. Podrobnejšie informácie nájdete v záručnom liste výrobku.
l Výrobok nerozoberajte ani neopravujte.
Servis a opravy zverte kvalifikovaným servisným technikom.
l Nevystavujte výrobok teplotám pod 0 °C a nad 40 °C.
Safety Information - 46 -

l Výrobok sa nesmie prepichovať, lámať ani zapaľovať.
l Chráňte výrobok pred pôsobením silného magnetického poľa.
l Nevystavujte výrobok pôsobeniu nadmernej sily či tlaku.
l Nevystavujte výrobok vode ani vlhkosti.
Ak je výrobok odolný proti vlhkosti, dbajte na to, aby sa neponoril do vody ani nezmokol.
l Použite zástrčku, ktorá sa používa vo vašej krajine alebo regióne.
l Úplné odpojenie od napájania zabezpečíte odpojením a vytiahnutím sieťovej zástrčky zelektrickej
siete.
l Keď predpokladáte, že zariadenie nebudete používať niekoľko dní, vytiahnite sieťovú zástrčku.
Doplnkové pokyny pre zariadenia Bluetooth
l Signály krátkych vĺn rádiovej frekvencie zariadenia Bluetooth môžu narúšať prevádzku iných elek-
tronických amedicínskych zariadení.
l Keď je používanie zariadenia zakázané, vypnite ho.
l Toto zariadenie udržiavajte vo vzdialenosti minimálne 20cm od kardiostimulátorov alebo iných med-
icínskych zariadení.
[RU] Техника безопасности
Ознакомьтесь с информацией, содержащейся в данном разделе, чтобы обеспечить условия
безопасного использования изделия и снизить риск поражения электрическим током,
возникновения короткого замыкания, нанесения травм, возгорания, ухудшения слуха и прочих
опасностей. Неправильная эксплуатация изделия может привести к аннулированию
гарантии. Дополнительную информацию см. в гарантийном документе, входящем в
комплект поставки.
l Не разбирайте и не пытайтесь самостоятельно ремонтировать изделие.
Все работы по техническому обслуживанию и ремонту должны проводить квалифицированные специалисты.
l Запрещено эксплуатировать устройство при температурах ниже 0°C (32°F) и выше 40°C
(104°F).
l Запрещено пробивать или повреждать корпус устройства и бросать его в огонь.
l Держите устройство вдали от источников мощных магнитных полей.
l Запрещено подвергать изделие сильным механическим воздействиям и ударам.
l Запрещено подвергать изделие воздействию воды или влажности.
Если продукт устойчив к влажности, не погружайте его в воду и не выносите под дождь.
l Используйте сетевую вилку, соответствующую типу электророзетки в данной стране или
регионе.
l Для полного отключения питания необходимо отсоединить разъем питания от источника
питания.
l Если устройство не будет использоваться в течение нескольких дней, отключите его от
источника питания.
Дополнительные рекомендации в отношении устройств Bluetooth
l Коротковолновые сигналы устройства Bluetooth могут повлиять на работу других электронных
и медицинских устройств.
l Отключайте устройство в местах, где его использование запрещено.
l Устройство должно находиться на расстоянии не менее 20см от кардиостимуляторов и других
медицинских устройств.
Safety Information - 47 -

[TR] Informations sécuritaires
Reportez-vous aux informations suivantes pour utiliser votre produit en toute sécurité et réduire les
risques de choc électrique, de court-circuit, de dégâts, d'incendie, de perte auditive et autres risques.
Une manipulation non appropriée peut entraîner l'annulation de la garantie de votre
produit. Pour plus d'informations, lisez la garantie fournie avec votre produit.
l Ne démontez pas et n'essayez pas de réparer votre produit.
Confiez toute tâche d'entretien à des agents de réparation autorisés.
l N'exposez pas votre produit à des températures extérieures inférieures à 0° C ou supérieures à 40°
C.
l Ne percez pas, n'écrasez pas et n'enflammez pas votre produit.
l Tenez votre produit éloigné des objets fortement magnétiques.
l Ne soumettez pas votre produit à une pression ou un impact excessif.
l N'exposez pas votre produit à l'eau ni à l'humidité.
Si votre produit est résistant à l'humidité, prenez soin de ne pas l'immerger dans l'eau ni de l'exposer à la pluie.
l Yaşadığınız ülkeye ya da bölgeye uygun bir fiş kullanın.
l Elektrik girişinden tamamen bağlantıyı kesmek için, fişin prizden çıkarılmış ya da bağlantısı kesil-
miş olmalıdır.
l Cihazı birkaç gün kullanmayacaksanız fişini prizden çekin.
Bluetooth cihazları için ek bilgi
l Bluetooth cihazlarının kısa dalga radyo frekans sinyalleri diğer elektronik ve tıbbi cihazların çal-
ışmasını etkileyebilir.
l Kullanılmasına izin verilmeyen yerlerde cihazı kapatın.
l Cihazı kalp pili ve diğer tıbbi cihazlardan en az 20 cm uzakta tutun.
[CS] 安 全 信 息
请 参 考以 下 信 息 ,以安 全 地使 用 产 品 ,减 少 触 电 、短路 、损 坏、起 火 、听力 损 伤等 危 险 发 生的 可 能 。使 用 不 当
会 使 您的 产 品 无 法获 得 保 修 服务 。详 情 请 参 阅 产 品 附 带 的 保 修 说 明 。
l 不 要 擅自 拆 卸 或 尝试 修 理 产 品。
所 有 相关 服 务 应 交与 授 权 的 维修 代 理 处 理。
l 不 要 将产 品 放 置 在 0°C 至 40°C(32°F 至 104°F)范 围 之外 的 环 境 中。
l 不 要 刺戳 、挤 压或 燃 烧 产 品。
l 将 产 品远 离 具 有 强磁 场 的 物 体。
l 不 要 使产 品 受 到 强大 外 力 冲 击。
l 不 要 使产 品 浸 水 或放 在 潮 湿 的环 境 中 。
即 使 您的 产 品 具 备防 潮 功 能 ,也要 注 意 不 要 使 其 浸 水 或 淋 雨 。
l 使 用 的电 源 插 头 要适 用 于 您 所在 的 国 家 或地 区 。
l 要 彻 底切 断 电 源 ,需要 拔 下主 插 头 或 断 开 主 插 头 与 主 机 的 连 接 。
l 如 果 设备 闲 置 几 天不 用 ,需断 开 其 与 主 插 头 的 连 接 。
蓝牙设备 补 充 说明
l 蓝 牙 设备 发 出 的 短波 无 线 电 频率 信 号 可 能会 影 响 其 他电 子 设 备 和医 疗 设 备 的正 常 使 用 。
l 在 禁 止使 用 的 地 方请 关 掉 设 备。
l 在 距 电子 起 搏 器 或其 他 医 疗 设备 20 cm 的 范 围 以 内请 勿 使 用 此设 备 。
Safety Information - 48 -

[CT] 安 全 資 訊
為 避 免觸 電 、產品 短 接 、損 壞 、起火 、聽 力 損 害 或其 他 危 險 ,請參 閱 以下 資 訊 獲 取產 品 的 安 全使 用 說 明 。使
用 不 當可 能 導 致 您的 產 品 保 固失 效 。詳情 請 閱 讀 產 品 附 帶 的 保 固 資 訊 。
l 不 要 拆卸 或 嘗 試 自行 維 修 產 品。
所 有 維修 和 相 關 服務 應 交 由 授權 的 維 修 代理 進 行 。
l 不 要 在 0°C 至 40°C(32°F 至 104°F)這 個 範圍 之 外 的 溫度 下 存 放 或使 用 產 品 。
l 不 要 刺穿 、擠 壓或 焚 燒 產 品。
l 遠 離 強磁 場 的 物 件。
l 不 要 重壓 或 用 力 擠碰 。
l 避 免 沾水 ,遠 離潮 濕 環 境 。
即 使 產品 具 有 防 潮特 性 ,也注 意 不 要 將 其 浸 入 水 中 或 被 雨 淋 。
l 使 用 您所 在 國 家 或地 區 通 用 的電 源 插 頭 。
l 如 要 與電 源 輸 入 完全 分 開 連 接,必 須 將 電 源 插 頭 從 電 源 上 斷 開 /拔 下 。
l 如 果 裝置 在 數 日 內不 用 ,請將 電 源 插 頭 斷 開 。
藍芽裝置 的 額 外指示
l 藍 芽 裝置 的 短 波 無線 電 訊 號 可能 影 響 其 他電 子 和 醫 療裝 置 的 正 常執 行
l 在 禁 止使 用 該 裝 置的 場 所 將 其關 閉 。
l 將 此 裝置 與 心 律 調節 器 和 其 他醫 療 裝 置 保持 至 少 20 cm 的 距 離 。
[JP] 安 全 性 に関する情報
製 品 を安全にご使 用 いただき、感電 、漏電 、損 傷、火 災 、聴力 障 害、またはその他 の危険 を避 けるため、下 記 の情報
をよくお読みください。不 適 切 な 取 扱 いが原因 とみなされる場合 、製 品の保 証 が無効 になる場 合 があります。詳 細 につい
ては、製 品 に付属 の保証 書 をお読みください。
l 製 品 をお客様 ご自身 で修 理 、分 解 しな いでくyださい。
修 理 に関し ては製 品 を購入 された国/ 地 域 のカスタマーサポートサービスにご連絡 下 さい。
l ご使用 の製品 を0 - 40 の範囲 を超 える温 度 下に置かないでください。
l 製 品 に穴を開 けたり、壊 したり、火 中 に投じな いでください。
l 製 品 を強い磁気 のそばに置かないでください。
l 製 品 に強い衝 撃 を与えないでください。
l 製 品 を濡らしたり、湿 気 のあるところに置かないでください。
製 品 が耐湿 性 の場合 、水 中 に浸したり、雨 に濡 らしたりしないでください。
l 日 本 国内 向 け製品 用 の主電 源 プラグを使 用 し、100Vの電源 にてお使い下さい。
l 電 源 入力 を完 全 に切断 するには、電 源 プラグをコンセントから抜きます。
l デバイスを数日 間 使用 しない場合 は、電 源 プラグををコンセントから抜いて下さい。
ワイヤレスデバイス用の追 加 ガイド ライン
l Bluetoothデバイスの短 波 無 線 周波 数 信 号 は、他 の電子機 器 や医 療 機 器の動 作 に悪 影 響を及 ぼすことがありま
す。
l 使 用 を禁止されている場 所 ではデバイスの電 源 をお切りください。
l このデバイスはペースメーカーや他 の医 療 機 器 から20cm以上離 し てください。
[KR] 안 전 정 보
다 음 의 정 보 를 참 고 하 여 제 품 을 안 전 하 게 사 용 하 고 , 감 전 , 단 락 , 손 상 , 화 재 , 청 력 손 상 및
기 타 위 험 의 발 생 가 능 성 을 줄 이 십 시 오 . 부 주 의 하 게 취 급 하 는 경 우 제 품 보 증 을 받 지 못 할
Safety Information - 49 -

수 도 있 습 니 다 . 자 세 한 내 용 은 제 품 보 증 서 를 읽 어 보 십 시 오 .
l 직 접 제 품 을 분 해 하 거 나 수 리 하 지 마 십 시 오 .
모 든 서 비 스 는 공 인 서 비 스 대 행 업 체 에 문 의 하 십 시 오 .
l 0°C ~ 40°C(32°F ~ 104°F) 범 위 이 외 의 온 도 에 제 품 을 노 출 하 지 마 십 시 오 .
l 제 품 에 구 멍 을 뚫 거 나 부 수 거 나 점 화 하 지 마 십 시 오 .
l 제 품 을 자 기 성 이 강 한 물 체 가 까 이 에 두 지 마 십 시 오 .
l 제 품 에 과 도 한 힘 이 나 충 격 을 가 하 지 마 십 시 오 .
l 제 품 을 물 이 나 수 분 에 노 출 하 지 마 십 시 오 .
내 수 성 제 품 인 경 우 제 품 이 물 에 젖 거 나 비 에 노 출 되 지 않 도 록 주 의 하 십 시 오 .
l 사 용 하 는 국 가 또 는 지 역 에 적 합 한 메 인 플 러 그 를 사 용 하 십 시 오 .
l 전 원 을 완 전 히 차 단 하 려 면 메 인 플 러 그 의 연 결 을 해 제 해 야 합 니 다 .
l 며 칠 동 안 장 치 를 사 용 하 지 않 을 때 에 는 메 인 플 러 그 의 연 결 을 해 제 하 십 시 오 .
무선 장 치에 대 한 추 가 지 침
l Bluetooth 장 치 의 단 파 라 디 오 주 파 수 신 호 는 다 른 전 자 및 의 료 장 비 의 작 동 에 영 향 을 미 칠 수 있 습 니
다 .
l 사 용 이 금 지 된 곳 에 서 는 장 치 를 끄 십 시 오 .
l 이 장 치 를 심 장 박 동 조 절 장 치 및 기 타 의 료 장 비 에 서 최 소 20cm 멀 리 두 십 시오 .
Safety Information - 50 -

Regulatory Information
The following sections contains notices for various countries.
Caution:
This product is intended for use with FCC/CE certified computer equipment. Please check the
equipment operating/installation manual and/or with the equipment manufacturer to verify/confirm if
your equipment is suitable prior to the installation or use of the product.
Notice for the USA
Federal Communication Commission (FCC) Interference Statement
FCCPART15: This equipment has been tested and found to comply with the limits for a Class B digital
device, pursuant to Part 15 of the FCC Rules. These limits are designed to provide reasonable protection
against harmful interference in a residential installation. This equipment generates, uses and can
radiate radio frequency energy and, if not installed and used in accordance with the instructions, may
cause harmful interference to radio communications. However, there is no guarantee that interference
will not occur in a particular installation. If this equipment does cause harmful interference to radio or
television reception, which can be determined by turning the equipment off and on, the user is
encouraged to try to correct the interference by one or more of the following measures:
l Reorient or relocate the receiving antenna.
l Increase the separation between the equipment and receiver.
l Connect the equipment into an outlet on a circuit different from that to which the receiver is con-
nected.
l Consult the dealer or an experienced radio/TV technician for help.
This device complies with part 15 of the FCC Rules. Operation is subject to the following two conditions:
1. This device may not cause harmful interference, and
2. This device must accept any interference received, including interference that may cause undesired
operation.
Caution:
To comply with the limits of the Class B digital device, pursuant to Part 15 of the FCC Rules, this
device must be installed with computer equipment certified to comply with Class B limits.
All cables used to connect to the computer and peripherals must be shielded and grounded. Operation
with non-certified computers or non-shielded cables may result in interference to radio or television
reception.
MODIFICATION: Any changes or modifications not expressly approved by the grantee of this device
could void the user’s authority to operate the device.
Federal Communication Commission (FCC) Radiation Exposure Statement
Power is so low that no RF exposure calculation is needed.
Regulatory Information - 51 -

Notice for Canada
This Class B digital apparatus complies with Canadian ICES-003 and RSS-210.
Cet appareil numérique de la classe B est conforme aux normes canadiennes NMB-003 et CNR-210.
This device complies with Industry Canada licence-exempt RSS standard.
Operation is subjected to the following two conditions:
1. This device may not cause harmful interference, and
2. This device must accept any interference received, including interference that may cause undesired
operation.
Cet appareil est conforme avec Industrie Canada RSS standard exempts de licence.
Son fonctionnement est soumis aux deux conditions suivantes :
1. Le matérial ne peut étre source D’interférences et
2. Doit accepter toutes les interférences reques, Y compris celles pouvant provoquer un fonctionnement indésireable.
CANADIAN CLASS B STATEMENT: This digital device does not exceed the Class B limits for radio
noise emissions from digital apparatus as set out in the interference-causing equipment standard
entitled "Digital Apparatus," ICES-003 of the Department of Communications.
Cet appareil numerique respecte les limites de bruits radioelectriques applicables aux appareils
numeriques de Classe B prescrites dans la norme sur le materiel brouilleur. "Appareils Numeriques,"
NMB-003 edictee par le ministre des Communications.
MODIFICATION: Any changes or modifications not expressly approved by the grantee of this device
could void the user's authority to operate the device.
Toute modification non approuvée explicitement par le fournisseur de licence de l'appareil peut
entraîner l'annulation du droit de l'utilisateur à utiliser l'appareil.
Regulatory Information - 52 -

European Compliance
This product conforms to the following:
EMC Directive 2004/108/EC.
RoHS Directive 2011/65/EU.
Mains operated products for the European market comply with Low Voltage Directive 2006/95/EC and
Commission Regulation(s) Implementing Directive 2009/125/EC.
Communication / RF wireless products for the European market comply with R&TTE Directive
1999/5/EC.
CAUTION: To comply with the Europe CE requirement, this device must be installed with CE certified
computer equipment which meet with Class B limits.
All cables used to connect this device must be shielded, grounded and no longer than 3m in length.
Operation with non-certified computers or incorrect cables may result in interference to other devices
or undesired effects to the product.
MODIFICATION: Any changes or modifications not expressly approved by Creative Technology Limited
or one of its affliated companies could void the user’s warranty and guarantee rights.
[FR] European Compliance
Ce produit est conforme aux normes suivantes :
Directive 2004/108/CE sur les émissions électromagnétiques.
Directive RoHS 2011/65/UE.
Les produits secteur pour le marché européen sont conformes à la Directive sur la faible tension
2006/95/CE et à la réglementation de la Commission exécutant la Directive 2009/125/CE.
Les produits de communication/sans fil RF destinés au marché européen sont conformes à la directive
R&TTE 1999/5/CE.
ATTENTION : pour respecter les critères CE d'Europe, cet appareil doit être installé avec du matériel
informatique certifié CE respectant les limites de la classe B. Tous les câbles utilisés pour connecter cet
appareil doivent être blindés, reliés à la terre et ne pas faire plus de 3 m de long. L'utilisation
d'ordinateurs non certifiés ou de câbles inappropriés peut entraîner des interférences avec d'autres
appareils ou des effets indésirables sur le produit.
MODIFICATION : toute modification non approuvée explicitement par Creative Technology Limited ou
l'une de ses sociétés affiliées peut entraîner l'annulation de la garantie et des droits de garantie de
l'utilisateur.
[IT] Conformità alle normative europee
Questo prodotto è conforme alla seguente normativa:
Direttiva EMC 2004/108/CE.
Direttiva RoHS 2011/65/UE.
I prodotti che funzionano con corrente di rete per il mercato europeo sono conformi alla direttiva bassa
tensione 2006/95/CE e alla direttiva di implementazione nelle normative europee 2009/125/CE.
I prodotti di comunicazione/wireless RF per il mercato europeo sono conformi alla Direttiva R&TTE
1999/5/CE.
ATTENZIONE: ai fini della conformità con i requisiti del marchio CE europeo, il dispositivo deve essere
installato in un computer certificato CE conforme ai limiti di Classe B. Tutti i cavi usati per collegare il
Regulatory Information - 53 -

dispositivo devono essere schermati, dotati di idonea messa a terra e avere una lunghezza massima di
3 metri. L'uso del dispositivo con computer non certificati o cavi non idonei può provocare interferenze
ad altri dispositivi nonché danneggiare il prodotto stesso.
MODIFICHE: eventuali modifiche o alterazioni non espressamente approvate da Creative Technology
Limited o dalle sue società controllate possono rendere nulli la garanzia e il diritto dell'utente a
utilizzare il prodotto.
[DE] Einhaltung der europäischen Bestimmungen
Dieses Produkt erfüllt die folgenden Bestimmungen:
EMC-Richtlinie 2004/108/EG.
RoHS-richtlinie 2011/65/EU.
Netzbetriebene Produkte für den europäischen Markt erfüllen die Niederspannungsverordnung
2006/95/EG und der Commission Regulation(s) Implementing-Verordnung 2009/125/EG.
Drahtlose Kommunikationsgeräte/Funksender und -empfänger für den europäischen Markt erfüllen die
R&TTE-Richtlinie 1999/5/EG.
ACHTUNG: Um die Anforderungen der europäischen CE-Norm zu erfüllen, muss dieses Produkt an
einem CE-geprüften Computer der Klasse B angeschlossen werden.Alle Verbindungskabel zu diesem
Gerät müssen abgeschirmt und geerdet sein und dürfen nicht länger als 3 m sein. Der Betrieb mit nicht
zertifizierten Computern oder nicht ordnungsgemäßen Kabeln kann zu Störungen anderer Geräte oder
unerwünschten Auswirkungen auf das Produkt führen.
MODIFIZIERUNG: Jegliche Änderung oder Modifizierung des Produkts, die nicht ausdrücklich von
Creative Technology Limited oder einer der zugehörigen Firmen genehmigt worden ist, kann für den
Benutzer zum Erlöschen der Garantie und der Gewährleistungsrechte führen.
[ES] Homologación para Europa
Este producto cumple:
la Directiva de compatibilidad electromagnética 2004/108/CE.
Directiva RoHS 2011/65/UE.
Los productos funcionando con corriente electrica cumplen con la Directiva 2006/95/CE de baja tensión
y con la implementación de los requisitos de la Comisión para la directiva 2009/125/CE.
Los productos inalámbricos de comunicación o frecuencias de radio para el mercado europeo cumplen la
Directiva 1999/5/CE de equipos de radio y terminales de telecomunicaciones.
ATENCIÓN: para cumplir con los requisitos de Homologación para Europa, este dispositivo debe
instalarse con un equipo informático con certificación CE que cumpla los límites de la Clase B. Todos los
cables utilizados para conectar este dispositivo deben estar protegidos, conectados a tierra y no tener
más de 3 m de longitud. El funcionamiento del dispositivo con equipos no certificados o cables
incorrectos podría provocar interferencias a otros dispositivos o efectos no deseados al producto.
MODIFICACIÓN: los cambios o modificaciones no aprobados expresamente por Creative Technology
Limited o una de sus empresas afiliadas podrían invalidar la garantía del usuario y los derechos de la
garantía.
[NL] Europese naleving
Dit product voldoet aan de volgende voorschriften:
EMC-richtlijn 2004/108/EG.
RoHS-richtlijn 2011/65/EU.
Regulatory Information - 54 -

Electrische producten voor de Europese markt voldoen aan de Laagspanningsrichtlijn 2006/95/EG en EC
and Verordening(en) voor uitvoering van Richtlijn 2009/125/EG.
Communicatie- of draadloze RF-producten voor de Europese markt voldoen aan de richtlijn R&TTE
1999/5/EG.
LET OP: Om te voldoen aan de Europese CE-norm, moet dit apparaat zijn geïnstalleerd in
computerapparatuur die CE-gecertificeerd is voor de Klasse B-limieten. Alle kabels die worden gebruikt
om dit apparaat aan te sluiten, moeten zijn afgeschermd en geaard, en mogen niet langer dan 3 meter
zijn. Gebruik met niet-gecertificeerde computers of incorrecte kabels kan leiden tot interferentie van
andere apparaten of ongewenste effecten op het product.
AANPASSING: Alle wijzigingen of modificaties die niet uitdrukkelijk zijn goedgekeurd door Creative
Technology Limited of een van de gelieerde maatschappijen, kunnen ertoe leiden dat de rechten van de
gebruiker met betrekking tot garantie en vrijwaring vervallen.
[PT] Conformidade Europeia
Este produto está em conformidade com a seguinte regulamentação:
Directiva EMC 2004/108/EC.
Directiva RoHS 2011/65/UE.
Os produtos com ligação à rede destinados ao mercado europeu estão em conformidade com a directiva
de baixa voltagem 2006/95/CE. Directiva de Implementação do(s) Regulamento(s) da Comissão
2009/125/CE.
Os produtos de comunicação/radiofrequência sem fios destinados ao mercado europeu estão em
conformidade com a directiva R&TTE 1999/5/CE.
ATENÇÃO: De modo a cumprir com os requisitos da marca CE Europeia, este dispsotivo deve ser
instalado com equipamento informático com certificação CE que cumpra com os limites de Classe B
limits. Todos os cabos usados para ligar este dispositivo devem ser blindados, ligados à terra e não
devem exceder os 3m de comprimento. O funcioanemnto com computadores não certificados ou cabos
incorrectos pode resultar em interferências em outros dispositivos ou provocar efeitos indesejados no
produto.
MODIFICAÇÃO: Quaisquer alterações ou modificações que não sejam expressamente aprovadas pela
Creative Technology Limited ou por uma das suas afiliadas, pode anular a garantia do utilizador e os
direitos inerentes à mesma.
[SV] Europeisk efterlevnad
Denna produkt uppfyller följande:
EMC-direktivet 2004/108/EC.
RoHS Direktivet 2011/65/EU.
Produkter för den europeiska marknaden som drivs via elnätet uppfyller Lågspänningsdirektivet
2006/95/EC och Kommissionens regleringsimplementeringsdirektiv 2009/125/EG.
Trådlösa kommunikations/RF-produkter för den europeiska marknaden uppfyller R&TTE-direktivet
1999/5/EC.
VARNING: För att uppfylla CE-kraven i Europa måste denna produkt installeras med CE-certifierad
datorutrustning som uppfyller gränsvärdena för klass B. Alla kablar som används för anslutning av
denna produkt måste vara avskärmade, jordade och får inte vara längre än 3 m. Användning med icke
certifierade datorer eller felaktiga kablar kan leda till interferens på annan utrustning eller oönskade
effekter på produkten.
Regulatory Information - 55 -

MODIFIERING: Alla förändringar och modifieringar som inte är uttryckligen tillåtna av Creative
Technology limited eller något av dess filialföretag kan göra användarens garanti och garantirättigheter
ogiltiga.
[NO] Europeisk samsvar
Dette produktet er i samsvar med følgende:
EMC-direktivet 2004/108/EC.
RoHS-Direktivet 2011/65/EU.
Elektriske produkter til det europeiske markedet er i samsvar med Lavspenningsdirektivet 2006/95/EC
og Økodesigndirektivet 2009/125/EC.
Kommunikasjon/RF trådløse produkter til det europeiske markedet er i samsvar med R&TTEdirektivet
1999/5/EC.
ADVARSEL: For å overholde det europeiske CE-kravet må denne enheten installeres med CEsertifisert
datautstyr som tilfredsstiller klasse B-grensene. Alle kabler som kobles til enheten må være skjermet,
jordet og ikke lenger enn 3 m i lengde. Bruk av ikke-sertifiserte datamaskiner eller feil kabler kan føre
til forstyrrelse av andre enheter eller uønsket effekt på produktet.
MODIFIKASJON: Eventuelle endringer eller modifikasjoner som ikke uttrykkelig er godkjent av
Creative Technology Limited eller et av dets tilknyttede selskaper, kan ugyldiggjøre garantien eller
garantirettighetene.
[DK] Overholdelse af Europæiske regler og standarder
Dette produkt overholder følgende:
EMC-direktivet 2004/108/EC.
RoHS-Direktivet 2011/65/EU.
Produkter til det Europæiske marked, skal ovberholde Lavspændingsdirektivet 2006/95/EC og
Kommissionens forordninger for implementering af direktivet 2009/125/EF.
Kommunikations- / RF-trådløse produkter til det Europæiske overholder R&TTE-direktivet 1999/5/EC.
ADVARSEL: For at overholde Europe CE-kravet, skal denne enheden installeres med CE-certificeret
computerudstyr, der opfylder klasse B-grænserne. Alle kabler der anvendes til at tilslutte enheden skal
være skærmede, jordforbundne og ikke længere end 3 m lange. Drift med ikke-certificerede computere
og ukorrekte kabler kan medføre interferens for andre enheder eller uønskede effekter på produktet.
MODIFIKATION: Enhver ændring eller modifikation, der ikke er udtrykkeligt godkendt af Creative
Technology Limited eller et associerede selskab, vil gøre brugerens garanti og garanterede rettigheder
ugyldig.
[FI] Eurooppalainen yhdenmukaisuus
Tämä tuote täyttää seuraavat tuotemääritykset:
TEMC-direktiivin 2004/108/EC.
RoHS-direktiivin 2011/65/EU.
Euroopan markkinoiden verkkovirtaa käyttävät tuotteet ovat matalajännitedirektiivin 2006/95/EY
mukaisia. Euroopan parlamentin ja neuvoston ohjaava direktiivi 2009/125/EY.
Euroopan markkinoiden tietoliikenne- ja langattomat radiotaajuustuotteet noudattavat R&TTEdirektiiviä
1999/5/EY.
Regulatory Information - 56 -

VAROITUS: Jotta tämä laite noudattaisi Euroopan CE-vaatimuksia , tämä laite on asennettava
CEsertifioituun tietokoneeseen, joka noudattaa luokan B rajoituksia. Kaikki tämän laitteen liittämiseen
käytetyt kaapelit tulee suojata ja maadoittaa eivätkä ne saa olla 3 m pidempiä. Luokan rajoituksia
noudattamattoman tietokoneen tai vääränlaisten kaapeleiden käyttäminen voi aiheuttaa häiriöitä
muihin laitteisiin tai haitata itse laitteen toimintaa.
MUOKKAUKSET: Muutokset tai muokkaukset, joita Creative Technology Limited tai sen tytäryhtiöt
eivät nimenomaisesti ole hyväksyneet, voivat mitätöidä tuotteelle annetun takuun.
[CZ] Evropská shoda
Tento výrobek splňuje následující směrnice:
Směrnice EMC 2004/108/EC.
Směrnice RoHS 2011/65/EU.
Výrobky napájené z elektrické zásuvky pro evropský trh splňují směrnici o nízkém napětí 2006/95/EC a
směrnici komise 2009/125/EC o zavádění předpisů.
Komunikační / vysokofrekvenční bezdrátové výrobky pro evropský trh splňují směrnici R&TTE
1999/5/EC.
UPOZORNĚNÍ: Aby toto zařízení splňovalo evropský požadavek CE, musí být nainstalováno s
počítačovým vybavením s certifikátem CE, které splňuje limity pro zařízení třídy B. Veškeré kabely
používané pro připojení tohoto zařízení musí být stíněné, uzemněné a nesmí být delší než 3 metry. Při
používání s necertifikovanými počítači nebo nesprávnými kabely může dojít k rušení jiných zařízení
nebo k nežádoucím vlivům na produkt.
ÚPRAVY: Jakékoli změny nebo úpravy, které nebyly vysloveně schváleny společností Creative
Technology Limited nebo některou z jejích dceřiných společností, mohou způsobit propadnutí záruky
uživatele a záručních práv.
[PL] Zgodność z przepisami europejskimi
Urządzenie jest zgodne z
dyrektywą EMC 2004/108/EC.
Dyrektywa RoHS 2011/65/UE.
Urządzenia zasilane z sieci elektrycznej przeznaczone na rynek europejski muszą być zgodne z
dyrektywą dotyczącą urządzeń niskonapięciowych 2006/95/EC oraz z dyrektywą wdrażającą komisji
regulacyjnej 2009/125/WE.
Urządzenia komunikacyjne / bezprzewodowe wykorzystujące transmisję radiową przeznaczone na
rynek europejski spełniają warunki dyrektywy RTTE 1999/5/EC.
UWAGA: Aby uzyskać zgodność z wymogami europejskiej normy CE urządzenie musi być
zainstalowane wraz ze sprzętem komputerowym mającym certyfikat CE z ograniczeniami klasy B.
Wszystkie przewody używane do podłączania niniejszego urządzenia muszą być ekranowane, uziemione
i nie dłuższe niż 3 metry. Użytkowanie z komputerami nie posiadającymi certyfikatów lub
wykorzystanie niewłaściwych przewodów może powodować zakłócenia pracy innych urządzeń lub
opisywanego urządzenia.
MODYFIKACJE: Dokonanie jakichkolwiek zmian lub modyfikacji, na które firma Creative Technology
Limited lub spółki z nią stowarzyszone nie udzielają wyraźnej zgody, może doprowadzić do
unieważnienia praw gwarancji i rękojmi użytkownika.
[HU] Európai megfelelőség
Ez a termék megfelel a következőknek:
Regulatory Information - 57 -

2004/108/EGK sz., az elektromágneses összeférhetőségre. 2011/65/EU, RoHS.
Az Európa területére szánt hálózati termékek megfelelnek az alacsony feszültségre vonatkozó
2006/95/EC irányelvnek.
Az irányelvet 2009/125/EK végrehajtó bizottsági rendeletek.
Az Európa területére szánt, távközlési, illetve rádiófrekvenciás vezeték nélküli termékek megfelelnek a
rádióés távközlő végberendezésekre vonatkozó 1999/5/EK irányelvnek.
FIGYELEM!: Az európai CE követelmények teljesítéséhez ezt a készüléket a B kategóriájú értékeknek
megfelelő, CE minősítésű számítógéppel együtt kell telepíteni. A készülék csatlakoztatására használt
valamennyi kábelnek árnyékoltnak és földeltnek kell lennie, továbbá hosszúsága nem haladhatja meg a
3 métert. A nem hitelesített számítógépekkel vagy helytelen kábelekkel való használat más készülékek
zavarását vagy a termék nem kívánatos befolyásolását okozhatja.
MÓDOSÍTÁS: Minden módosítás vagy változtatás, amit kifejezetten nem hagyott jóvá a Creative
Technology Limited vagy valamelyik leányvállalata, érvénytelenítheti a készülék garanciáját és
felhasználó garanciális jogait.
[EL] Ευρωπαϊκή συμμόρφωση
Το παρόν προϊόν συμμορφώνεται με τα παρακάτω:
Οδηγία ΗΜΣ 2004/108/EΚ.
Οδηγία RoHS 2011/65/EE.
Τα προϊόντα που λειτουργούν με ρεύμα για την ευρωπαϊκή αγορά συμμορφώνονται με την Οδηγία περί
χαμηλής τάσης 2006/95/EΚ και τους κανονισμούς της επιτροπής που υλοποιούν την οδηγία 2009/125/EK.
Τα ασύρματα προϊόντα επικοινωνιών / RF για την ευρωπαϊκή αγορά συμμορφώνονται με την οδηγία
R&TTE 1999/5/EK.
ΠΡΟΣΟΧΗ: Για τη συμμόρφωση με τις απαιτήσεις του ευρωπαϊκού CE, αυτή η συσκευή θα πρέπει να
εγκατασταθεί σε εξοπλισμό υπολογιστή με πιστοποίηση CE ο οποίος πληροί τα όρια της κατηγορίας Β.
Όλα τα καλώδια που χρησιμοποιούνται για τη σύνδεση της συσκευής θα πρέπει να είναι θωρακισμένα,
γειωμένα και να μην υπερβαίνουν σε μήκος τα 3μ. Η λειτουργία με μη πιστοποιημένους υπολογιστές ή
λάθος καλώδια μπορεί να οδηγήσει σε παρεμβολές με άλλες συσκευές ή ανεπιθύμητες επιδράσεις στο
προϊόν.
ΤΡΟΠΟΠΟΙΗΣΗ: Οι όποιες αλλαγές ή τροποποιήσεις που δεν έχουν εγκριθεί ρητά από την Creative
Technology Limited ή κάποια από τις θυγατρικές της ενδέχεται να ακυρώσουν την εγγύηση του χρήστη
και τα δικαιώματα που απορρέουν από αυτήν.
[LT] Europos Sąjungos atitiktis
Šis gaminys atitinka šiuos reikalavimus:
„Elektromagnetinės atitikties“ („EMC“) direktyva 2004/108/EC.
RoHS direktyva 2011/65/ES.
Produktai, kurie veikia maitinami iš elektros tinklo, skirti Europos rinkai, atitinka Žemos įtampos
direktyvą 2006/95/EB. Komisijos reglamentas(-ai) dėl Direktyvos 2009/125/EB įgyvendinimo.
Europos Sąjungos rinkai skirti ryšių / radijo dažnių bevieliai gaminiai atitinka 1999/5/EB direktyvą „Dėl
radijo ryšio įrenginių ir telekomunikacijų galinių įrenginių bei abipusio jų atitikties pripažinimo“.
ATSARGIAI: Tam, kad šis prietaisas atitiktų Europos Sąjungos „CE“ reikalavimus, jis turi būti įdiegtas į
„CE“ sertifikuotą kompiuterinę įrangą, atitinkančią „B“ klasės ribas. Visi su šiuo prietaisu naudojami
laidai turi būti ekranuoti, įžeminti ir neviršyti 3 m ilgio. Nesertifikuotų kompiuterių ar netinkamų laidų
Regulatory Information - 58 -

naudojimas gali tapti trikdžių kitiems prietaisams arba nepageidaujamų šio gaminio veikimo pasekmių
priežastimi.
MODIFIKAVIMAS: Bet kokie pakeitimai ar modifikavimai neturint aiškiai patvirtinto „Creative
Technology Limited“ ar vienos iš su ja susijusių bendrovių leidimo gali panaikinti vartotojo garantiją ir
garantijos teises.
[SK] Dodržiavanie predpisov Európskej únie
Tento výrobok spĺňa nasledujúce normy:
Smernica EMC 2004/108/ES.
Smernica RoHS 2011/65/EÚ.
Výrobky napájané zo siete určené na európsky trh sú v súlade so smernicou o harmonizácii právnych
predpisov členských štátov týkajúcich sa elektrického zariadenia určeného na používanie v rámci
určitých limitov napätia 2006/95/ES a s nariadeniami Komisie, ktorými sa vykonáva smernica
2009/125/ES.
Bezdrôtové komunikačné/RF výrobky určené na európsky trh sú v súlade so smernicou R&TTE
1999/5/ES.
VAROVANIE: Toto zariadenie musí byť nainštalované s počítačovým zariadením s certifikáciou CE,
ktoré spĺňa limity triedy B, aby bolo v súlade s európskymi požiadavkami CE. Všetky káble použité na
pripojenie tohto zariadenia musia byť tienené, uzemnené a nie dlhšie ako 3 m. Prevádzka pomocou
necertifikovaných počítačov alebo nesprávnych káblov môže mať za následok rušenie iných zariadení
alebo nežiaduce účinky na výrobok.
ÚPRAVY: Akékoľvek zmeny alebo úpravy, ktoré neboli výslovne odsúhlasené spoločnosťou Creative
Technology Limited alebo jednou z jej sesterských spoločností, môžu zrušiť platnosť záruky a záručných
práv používateľa.
[RU] Соответствие европейским нормам
Данное изделие соответствует следующим стандартам:
EMC Директива 2004/108/EC.
RoHS директива 2011/65/EU.
Продукция с питанием от сети, поставляемая на европейский рынок, соответствует Директиве по
низковольтному оборудованию 2006/95/EC и Имплементирующей директиве постановления (- й)
комиссии 2009/125/EC.
Коммуникационное/радио- беспроводное оборудование, поставляемое на европейский рынок,
соответствует Директиве по оконечному радио- и телекоммуникационному оборудованию
1999/5/EC.
ВНИМАНИЕ! Для обеспечения соответствия европейским требованиям CE, это устройство должно
устанавливаться с компьютерным оборудованием, сертифицированным по стандарту CE и
удовлетворяющим нормам класса B. Все кабели, используемые для подключения данного
устройства, должны быть экранированы, заземлены и иметь длину не более 3 м. Работа с
несертифицированными компьютерами или неподходящими кабелями может привести к
возникновению помех другим устройствам или негативному влиянию на работу самого изделия.
ИЗМЕНЕНИЯ КОНСТРУКЦИИЛ юбые изменения конструкции, на которые не было получено
прямое разрешение компании Creative Technology Limited или ее дочерней компании, может
привести к аннуляции гарантии и связанных с нею прав.
[TR] Avrupa Uyumu
Bu ürün aşağıdakilere uygundur:
Regulatory Information - 59 -

2004/108/EC EMC (Elektromanyetik Uyumluluk) Yönetmeliği.
2011/65/EU RoHS (Tehlikeli Maddelerin Kısıtlanması) Yönetmeliği
Avrupa piyasasına yönelik, elektrik şebekesi tarafından çalıştırılan ürünler 2006/95/EC Alçak Gerilim
Yönetmeliği (LVD) ve 2009/125/EC Enerji ile İlgili Ürünlerin Çevreye Duyarlı Tasarımına İlişkin
Yönetmeliğe uygundur.
Avrupa piyasasına yönelik İletişim / RF kablosuz ürünleri Yönetmelik R&TTE 1999/5/EC ile uyumludur.
DİKKAT: Avrupa CE gereksinimleriyle uyumlu olması için bu cihazın, B Sınıfı sınırlarına uygun olan CE
sertifikalı bilgisayar donanımları ile birlikte kurulması gerekir. Bu cihazı bağlamak için kullanılan tüm
kabloların koruyuculu ve topraklanmış olması ve 3 metreden uzun olmaması gerekir. Sertifikalı
olmayan bilgisayarlarla veya yanlış kablolarla birlikte kullanılması, diğer cihazların düzgün
çalışmamasına veya üründe istenmeyen etkiler görülmesine neden olabilir.
DEĞİŞİKLİKLER: Creative Technology Limited veya bağlı şirketlerinden biri tarafından açıkça
onaylanmamış tüm değişiklikler kullanıcının garanti ve teminat haklarını geçersiz kılabilir.
Notice for Singapore
Ukraine RoHS Statement
Обладнання відповідає вимогам Технічного регламенту щодо обмеження використання деяких
небезпечних речовин в електричному та електронному обладнанні, затвердженого постановою
Кабінету Міністрів України від 3 грудня 2008 № 1057
Vietnam RoHS Statement
This product is in compliance with Circular 30/2011/TTBCT of the Ministry of Trade of the Socialist
Republic of Vietnam (“Circular”), it does not contain the following substances in concentration greater
than the Maximum Limit value as specified in the Circular.
Substance Maximum Limit (ppm)
1, 2
l lead
1000
l mercury
1000
l cadmium
100
l hexavalent chromium
1000
l polybrominated biphenyls (PBB)
1000
l polybrominated diphenyl ethers (PBDE)
1000
1
Maximum Limit does not apply to applications exempted from the Circular.
2
Maximum Limit refers to concentration by weight in homogeneous materials.
Regulatory Information - 60 -

Notice for Korea
B급 기 기
(가 정 용 방 송 통 신 기 자 재 )
이 기 기 는 가 정 용 (B급 ) 전 자 파 적 합 기 기 로 서 주 로 가 정 에 서 사 용 하 는 것 을 목 적 으 로 하 며
, 모 든 지 역 에 서 사 용 할 수 있 습 니 다 .
Regulatory Information - 61 -

License and Copyright
Information in this document is subject to change without notice and does not represent a commitment
on the part of Creative Technology Ltd. No part of this manual may be reproduced or transmitted in any
form or by any means, electronic or mechanical, including photocopying and recording, for any purpose
without the written permission of Creative Technology Ltd.
Copyright © 2014 Creative Technology Ltd. All rights reserved. Creative, the Creative logo, Sound
Blaster, the Sound Blaster logo, SBX Pro Studio, the SBX logo, Creative ALchemy and CrystalVoice are
trademarks or registered trademarks of Creative Technology Ltd. in the United States and/or other
countries. Manufactured under the license from Dolby Laboratories. Dolby and the double-D symbol are
trademarks of Dolby Laboratories. Intel and Pentium are registered trademarks of Intel Corporation.
AMD and AMD Athlon are trademarks of Advanced Micro Devices, Inc. Microsoft, Windows Vista,
Windows and the Windows logo are trademarks or registered trademarks of Microsoft Corporation. Mac
OS®, OS X®, GarageBand, iPad, iPhone, iPod, iPod nano, iPod touch, and Retina are trademarks of
Apple Inc., registered in the U.S. and other countries. iPad Air and iPad mini are trademarks of Apple
Inc. The trademark “iPhone” is used with a license from Aiphone K.K. Android is a trademark of Google
Inc. aptX is a trademark of CSRplc. The Bluetooth®word mark and logos are registered trademarks
owned by Bluetooth SIG, Inc. and any use of such marks by Creative Technology Ltd is under license.
Other trademarks and trade names are those of their respective owners. All specifications are subject
to change without prior notice. Use of this product is subject to a limited hardware warranty. Actual
contents may differ slightly from those pictured. The software included in this packaging may not be
used separately from the hardware. Before using the software, you must agree to be bound by the
terms and conditions of the end user license agreement.
Version 1.0
November 2014
License and Copyright - 62 -
 Loading...