

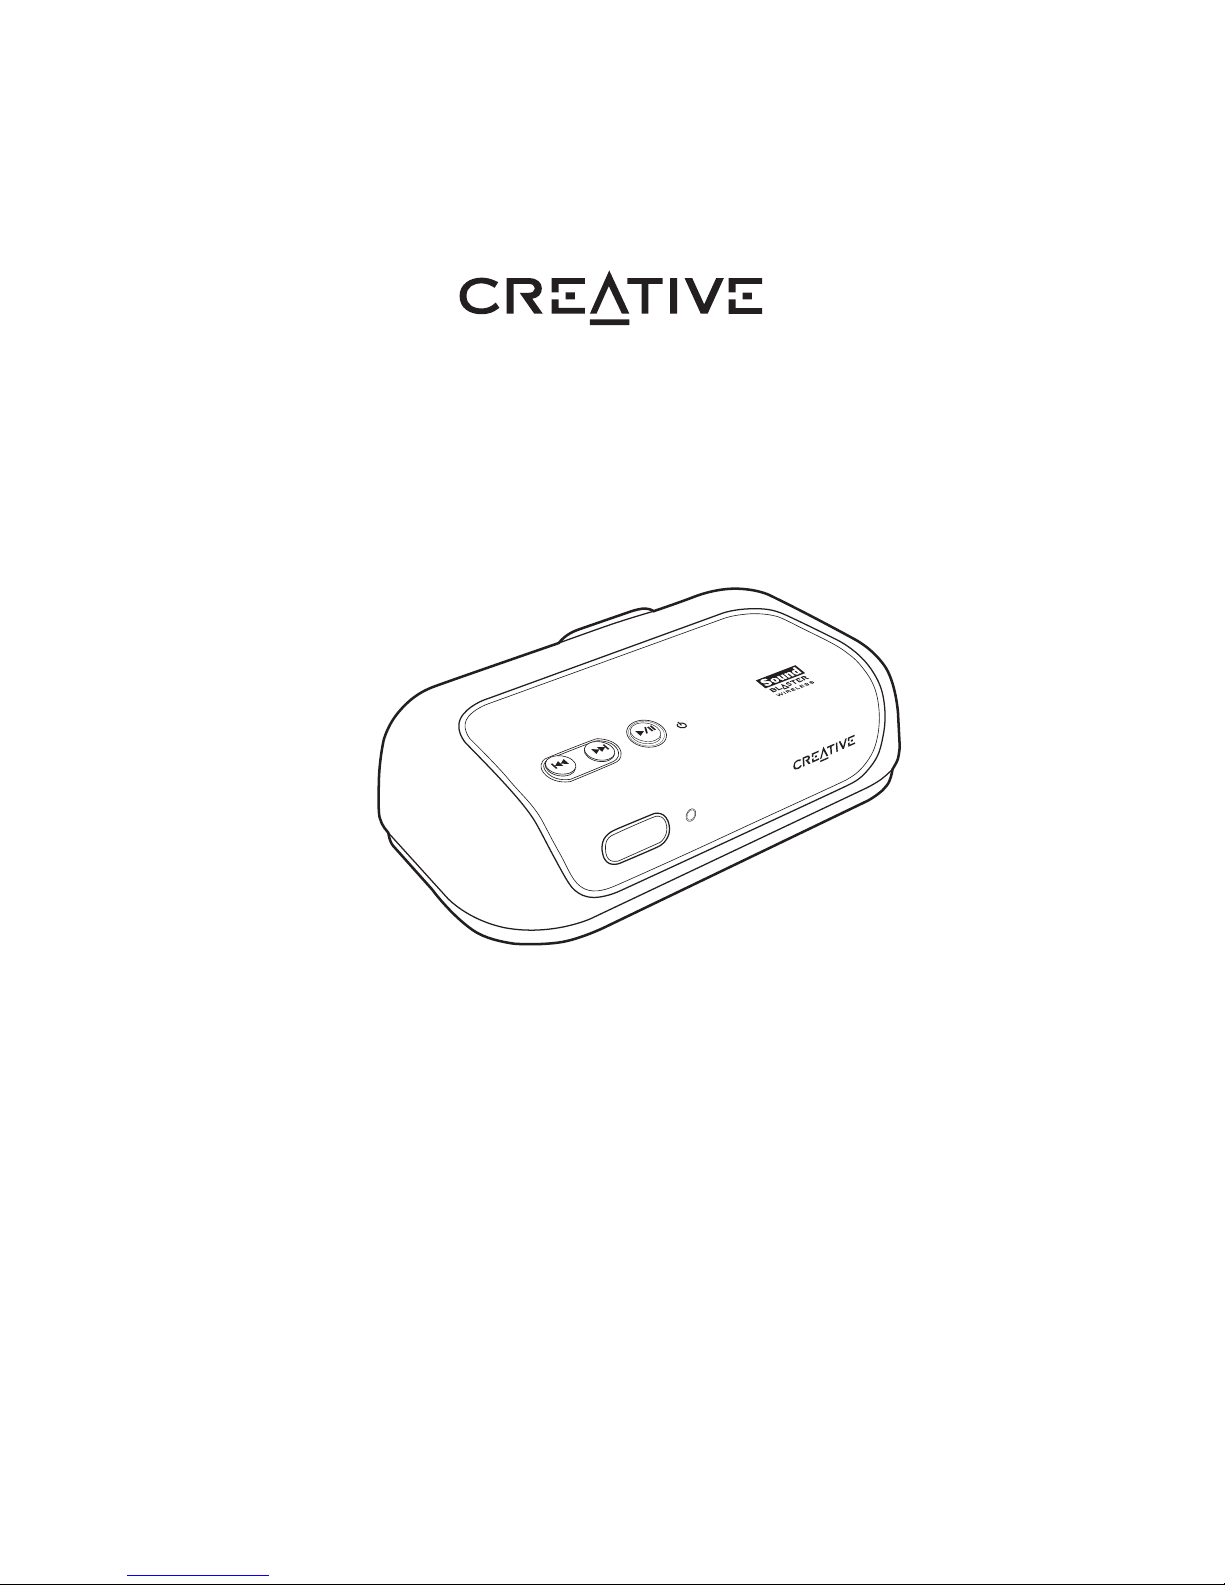
Sound Blaster
®
Wireless Receiver
User’s Guide
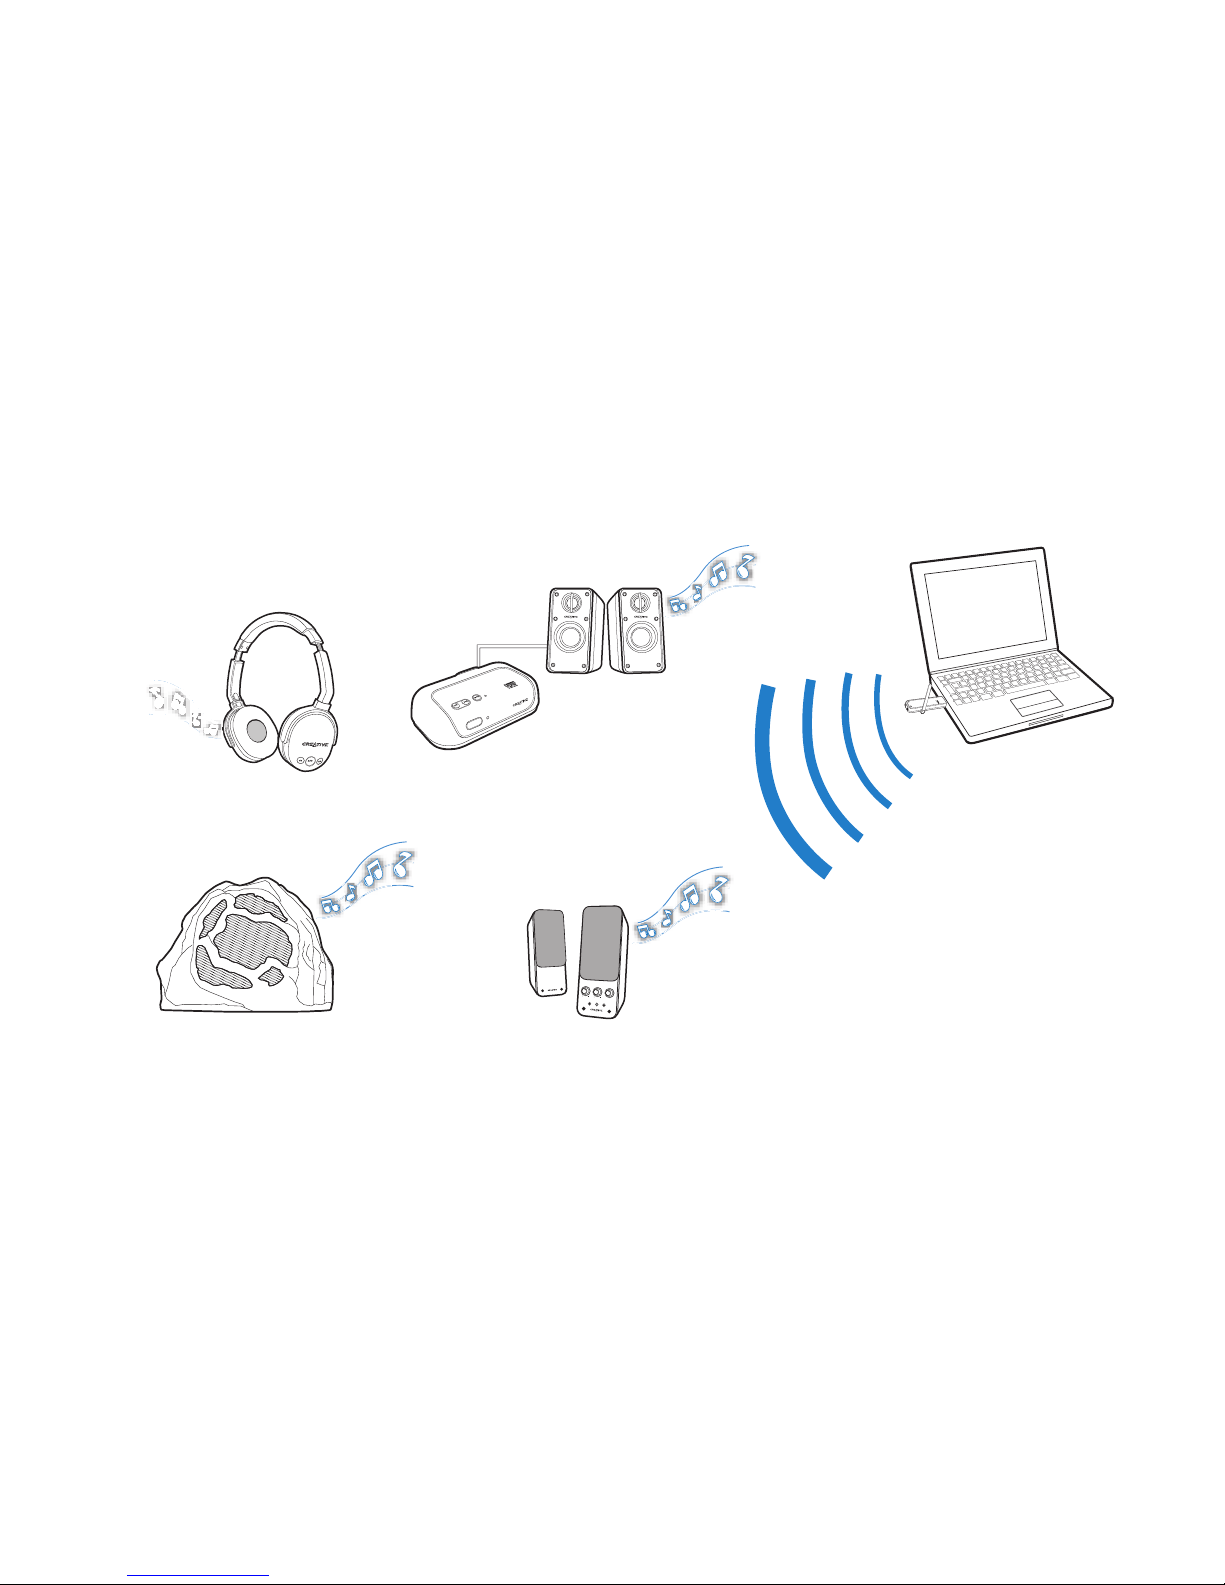
Congratulations!
Your Sound Blaster® Wireless Receiver complements Creative transmitters
like Sound Blaster Wireless Transmitter and Sound Blaster X-Fi™ Notebook.
Together, your receiver and transmitter enable you to enjoy high-quality music,
wherever you are in your home, wirelessly. You can also expand your wireless
system by adding on other Sound Blaster Wireless devices.
NOTE
The term “receiver” used throughout this User’s Guide refers to the
Sound Blaster Wireless Receiver. “Transmitter” refers to any of the
transmitters mentioned above.
B
A
S
S
T
R
E
B
L
E
O
F
F
A
U
X
I
N
M
A
X
V
O
L
U
M
E
Sound Blaster
Wireless Rock -
Outdoor Speaker*
Sound Blaster Wireless
Headphones*
Creative GigaWorks
T20W Series II*
Sound Blaster
Wireless Transmitter
Sound Blaster
Wireless Receiver
*Available separately
Creative GigaWorks
T20W Series II*
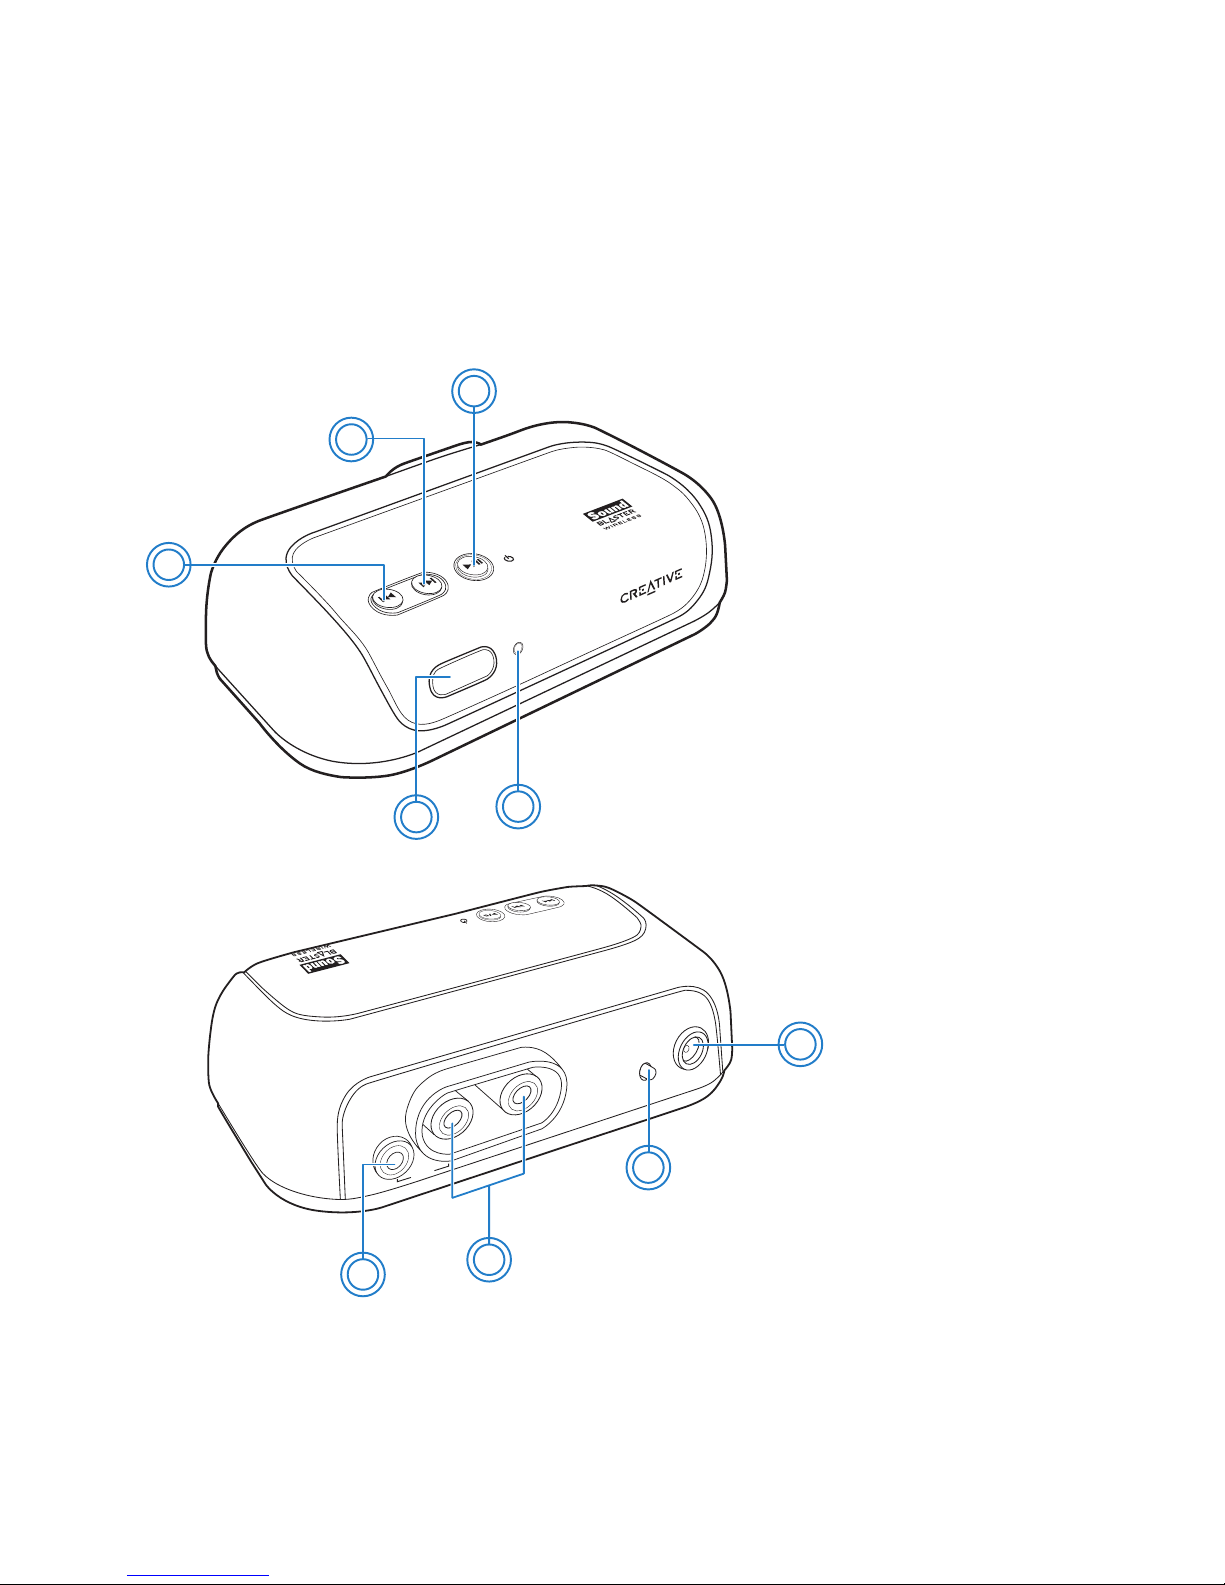
About Your Receiver 2
About Your Receiver
LINE
OUT
5V
DC
LINK /
CONNECT
7
6
8
9
4
5
1
2
3
1 Power/Standby and
Play/Pause button
Press to turn on.
Press and hold to enable Standby
mode.
2 Next/Fast forward button
Press and hold to Fast forward.
3 Previous/Rewind button
Press and hold to Rewind.
4 Infrared receiver
5 Power LED
See “Understanding the Power
LED” on page 14.
6 Line Out jack
7 RCA Audio Line Out jacks
8 [Link/Connect] LED
button
See “Understanding the Link LED”
on page 14.
9 5V DC In jack
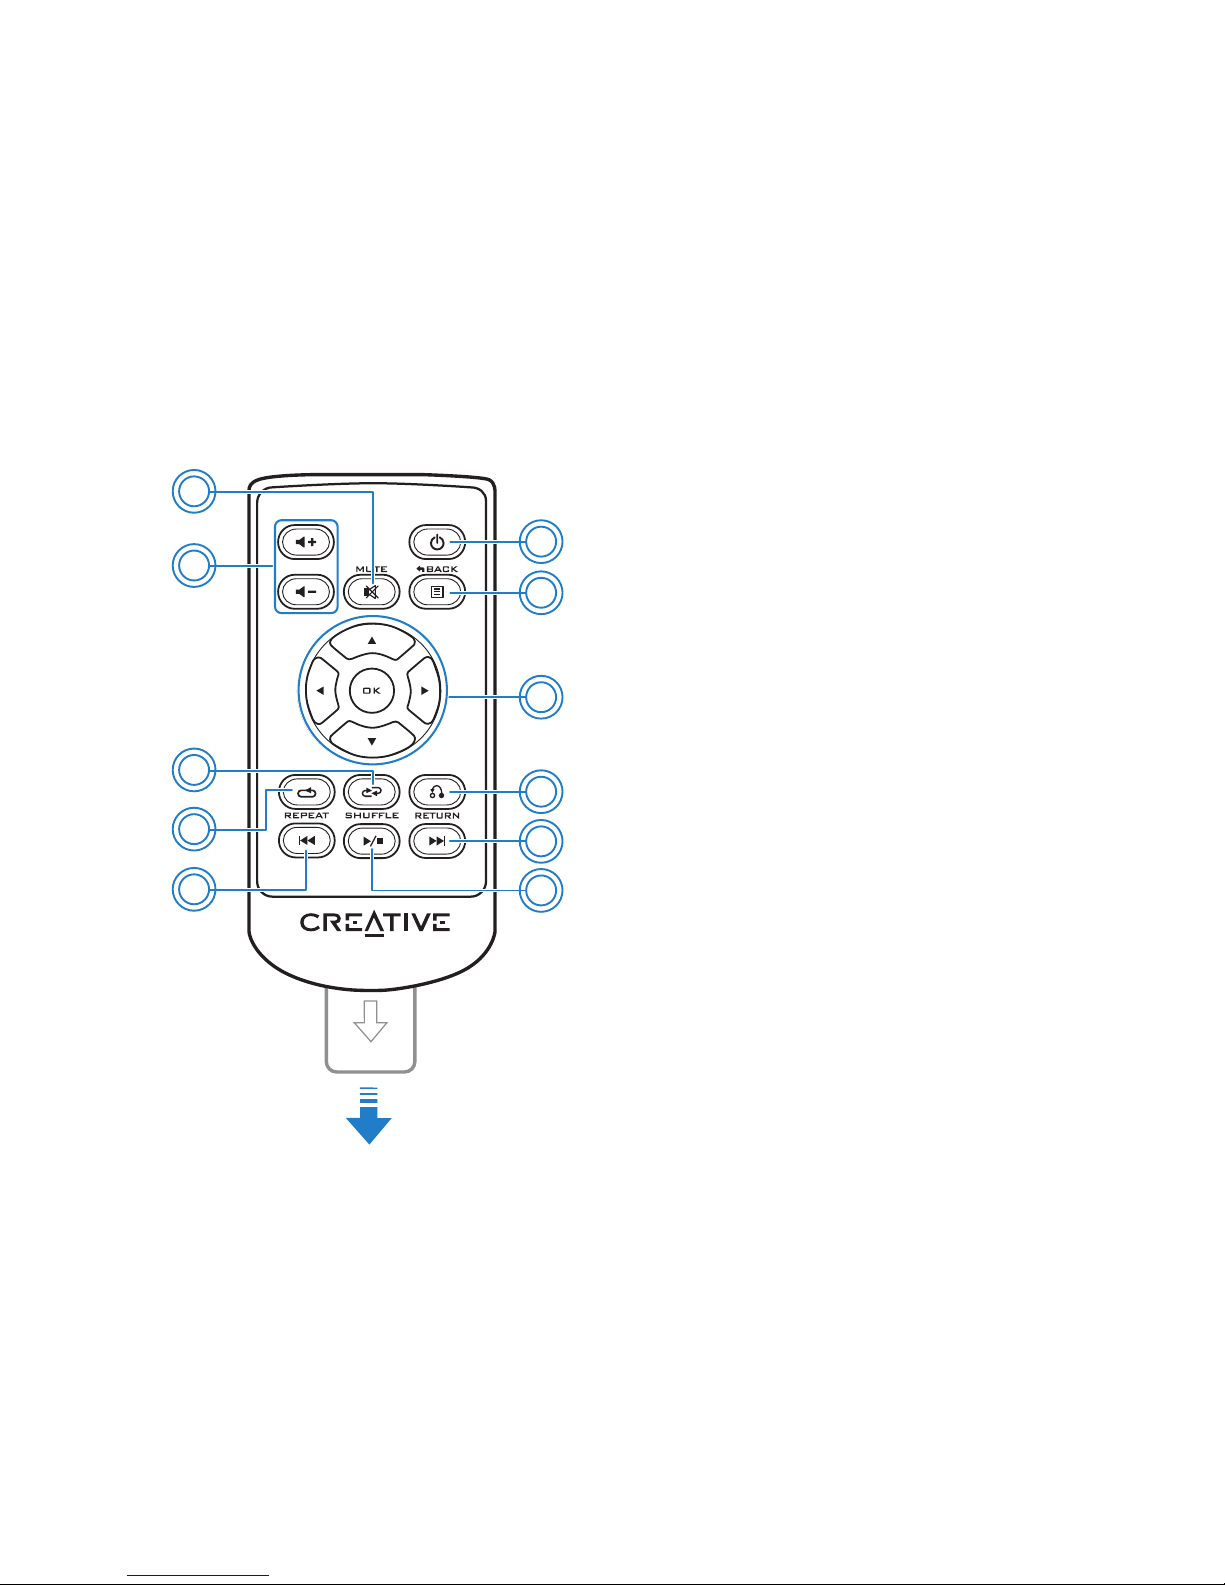
About Your Remote Control 3
About Your Remote Control
Your remote control has an operating distance of up to three meters
(approximately 9.8 feet). To remove and replace the remote control’s battery,
see “Replacing the remote control battery” on page 15.
RM-820
1
2
4
5
6
7
8
9
11
10
3
1 Power/Standby
2iPod
®
Back/Menu*
3 Menu Navigation buttons
Press OK to execute the selected menu option.
4 (Not applicable)
5Next/Fast forward
Press and hold to Fast forward.
6 Play/Pause
7 Previous/Rewind
Press and hold to Rewind.
8 Repeat
9 Shuffle
10 Volume up/down
11 Mute on/off
* For use with transmitters that support iPod
players.
NOTE
The battery is included. Remove the plastic strip
before using the remote control.
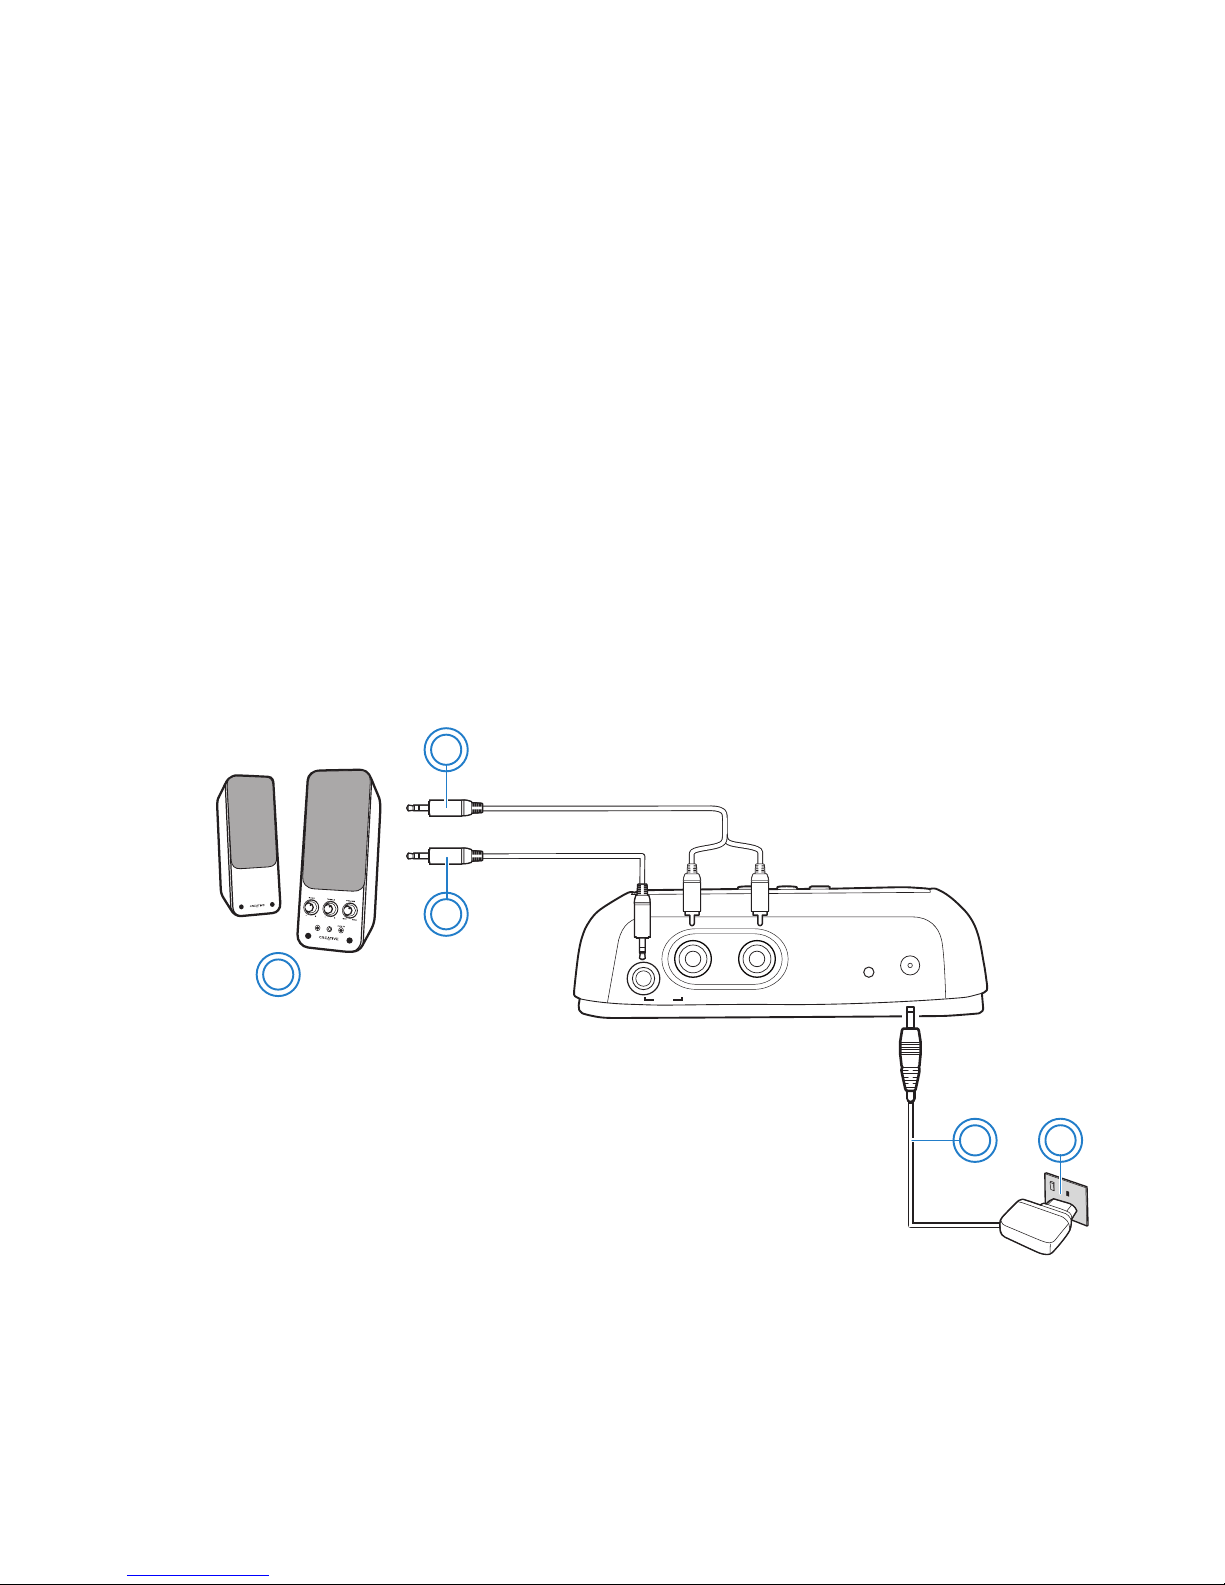
Setting Up Your Receiver 4
Setting Up Your Receiver
Step 1: Position your receiver
You can pair (connect wirelessly) your transmitter and receiver before
positioning your receiver. Once paired, place your receiver up to 30 meters
away from your transmitter.
Step 2: Connect your receiver
NOTE
Signal quality between the transmitter and receiver may be affected
by any object or structure (for example, multiple walls) that is
between the units. Experiment with different positions if necessary.
LINK/
CONNECT
5v DC
LINE
OUT
OR
4 5
2
3
1
1 Powered stereo or 2.1 speakers
2 Stereo to RCA cable
3 Stereo cable
4 Power adapter
5 Power outlet
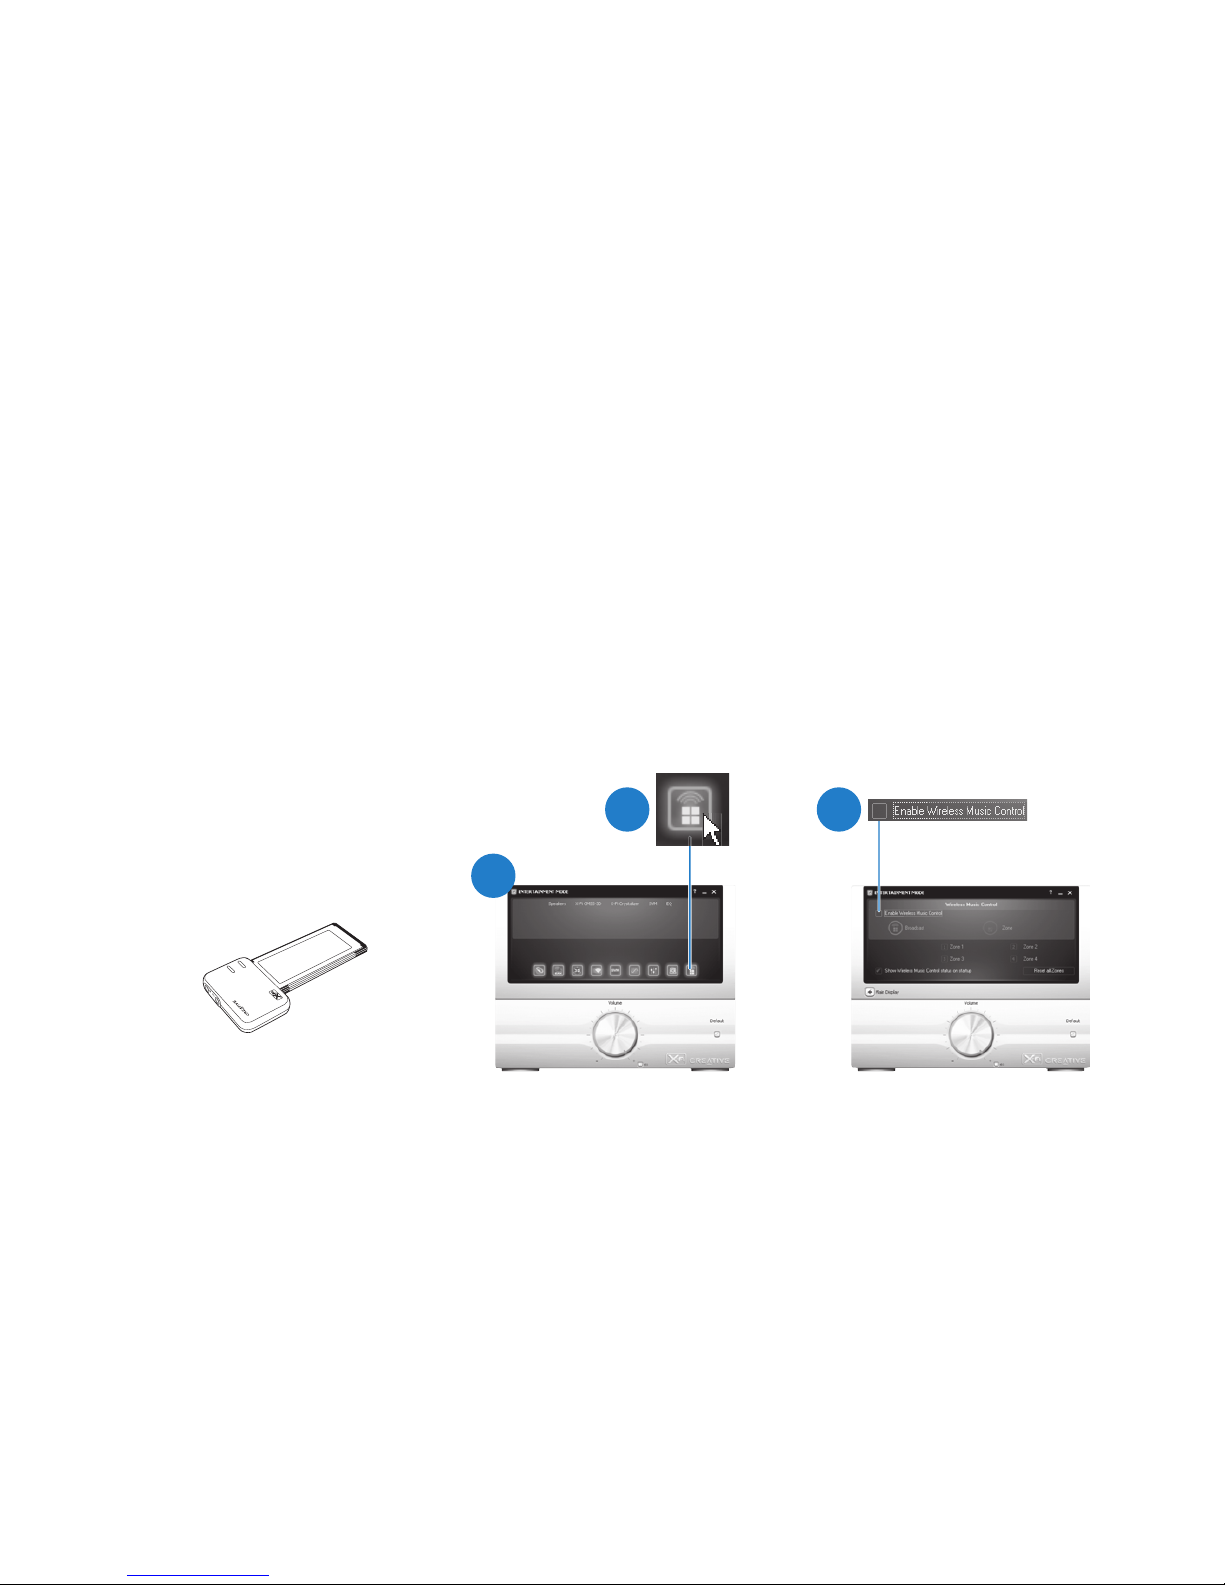
Enable wireless control for your transmitter 5
Step 3: Enable wireless control for your transmitter
For Sound Blaster Wireless Transmitter
The device’s wireless features are enabled by default. If not, refer to its
documentation to enable it.
For Sound Blaster X-Fi Notebook
Follow these steps to enable the device’s wireless features:
1 Launch Entertainment Mode. To do this, click Start -> Programs ->
Creative -> Sound Blaster X-Fi Notebook -> Creative Console Launcher.
2 Click the Wireless Music Control button.
3 Select the Enable Wireless Music Control check box.
The device’s Link LED lights up green.
1
2 3
CONNE
CT
POWER

Turn on your receiver and Auto Pair 6
Step 4: Turn on your receiver and Auto Pair
Your transmitter and receiver pair (connect wirelessly) automatically when
turned on. The Link LED, at the back of the receiver, flashes and then lights up
green when pairing is successful.
NOTE
If your transmitter and receiver do not pair, simply reset them. On
one unit at a time, press and hold the Connect button for five
seconds.
5V
DC
LINK /
CONNECT
5V
DC
LINK /
CONNECT
RM-820
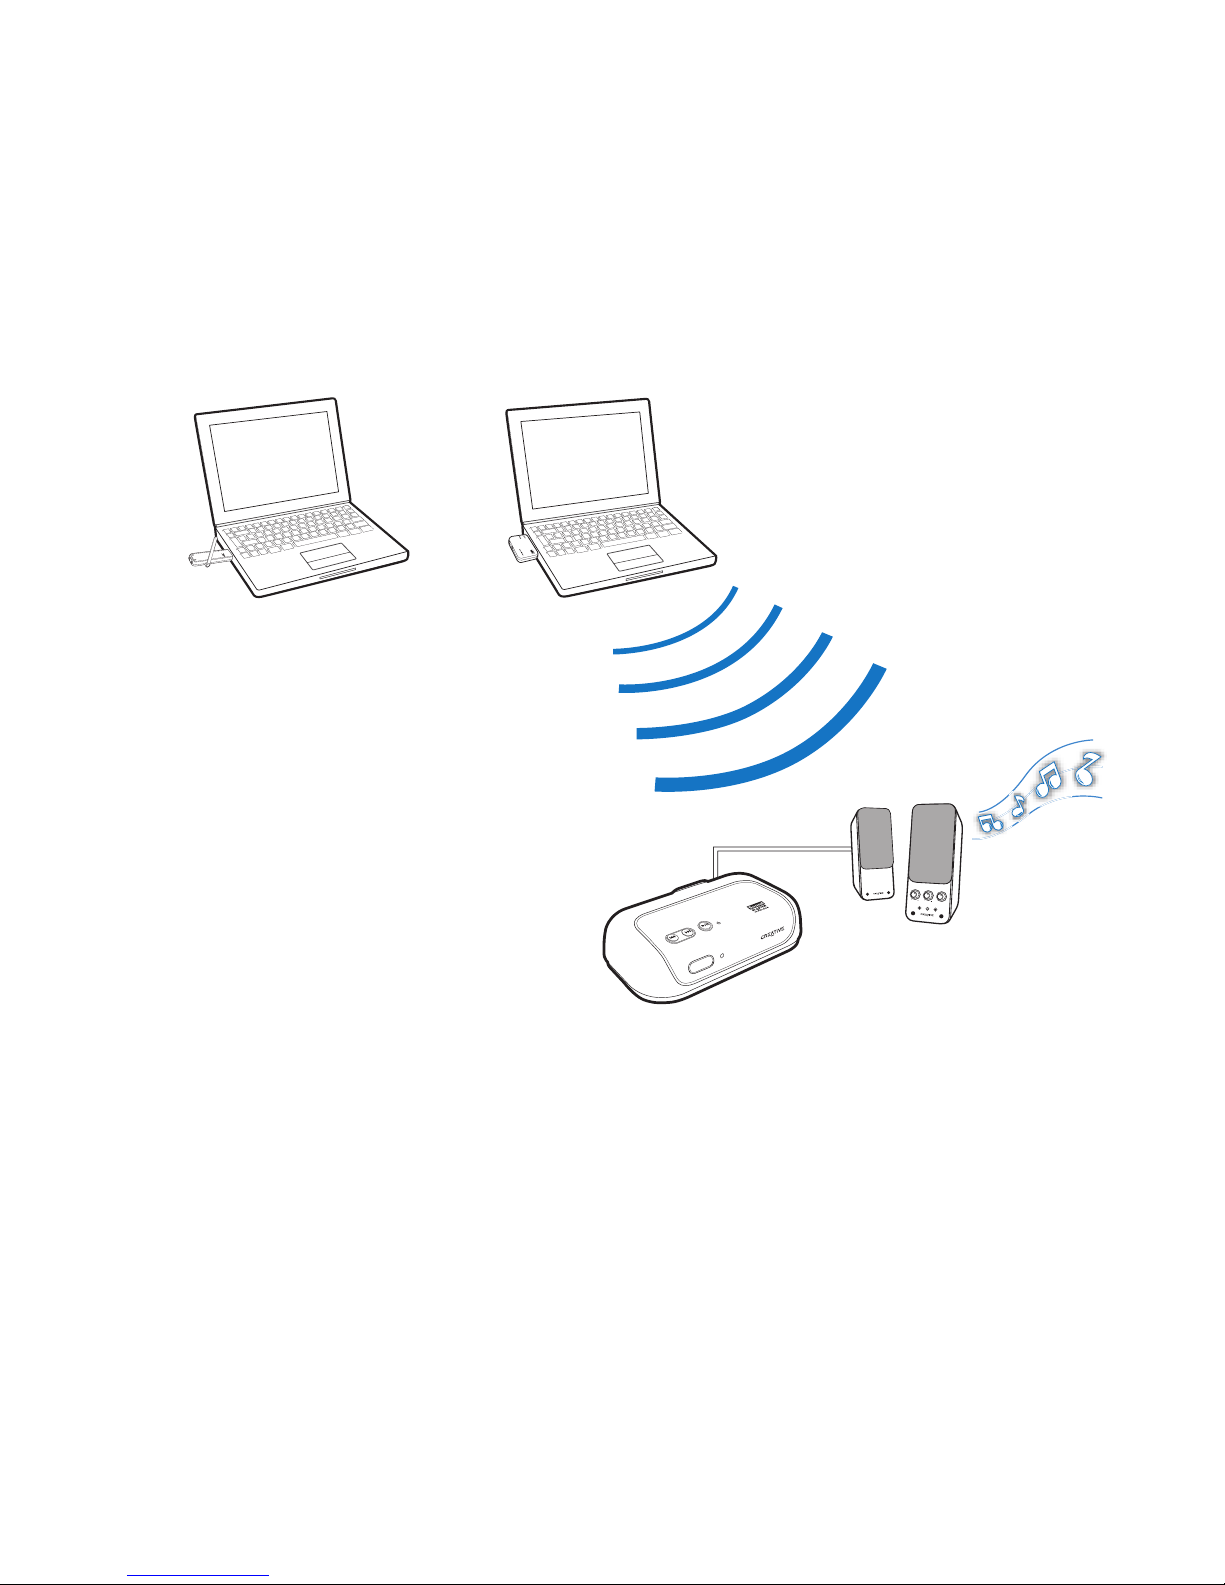
Play and stream music from transmitter 7
Step 5: Play and stream music from transmitter
Play music on your transmitter and broadcast music to your receiver.
Setting Up Two or More Receivers
Repeat Steps 1 to 2 in “Setting Up Your Receiver” on page 4. In Step 4, turn on
all your receivers. Your receivers pair automatically with your transmitter, and
you can start playing music on all your receivers.
B
A
S
S
T
R
E
B
L
E
O
F
F
A
U
X
I
N
M
A
X
V
O
L
U
M
E
C
O
N
N
E
C
T
P
O
W
E
R
OR
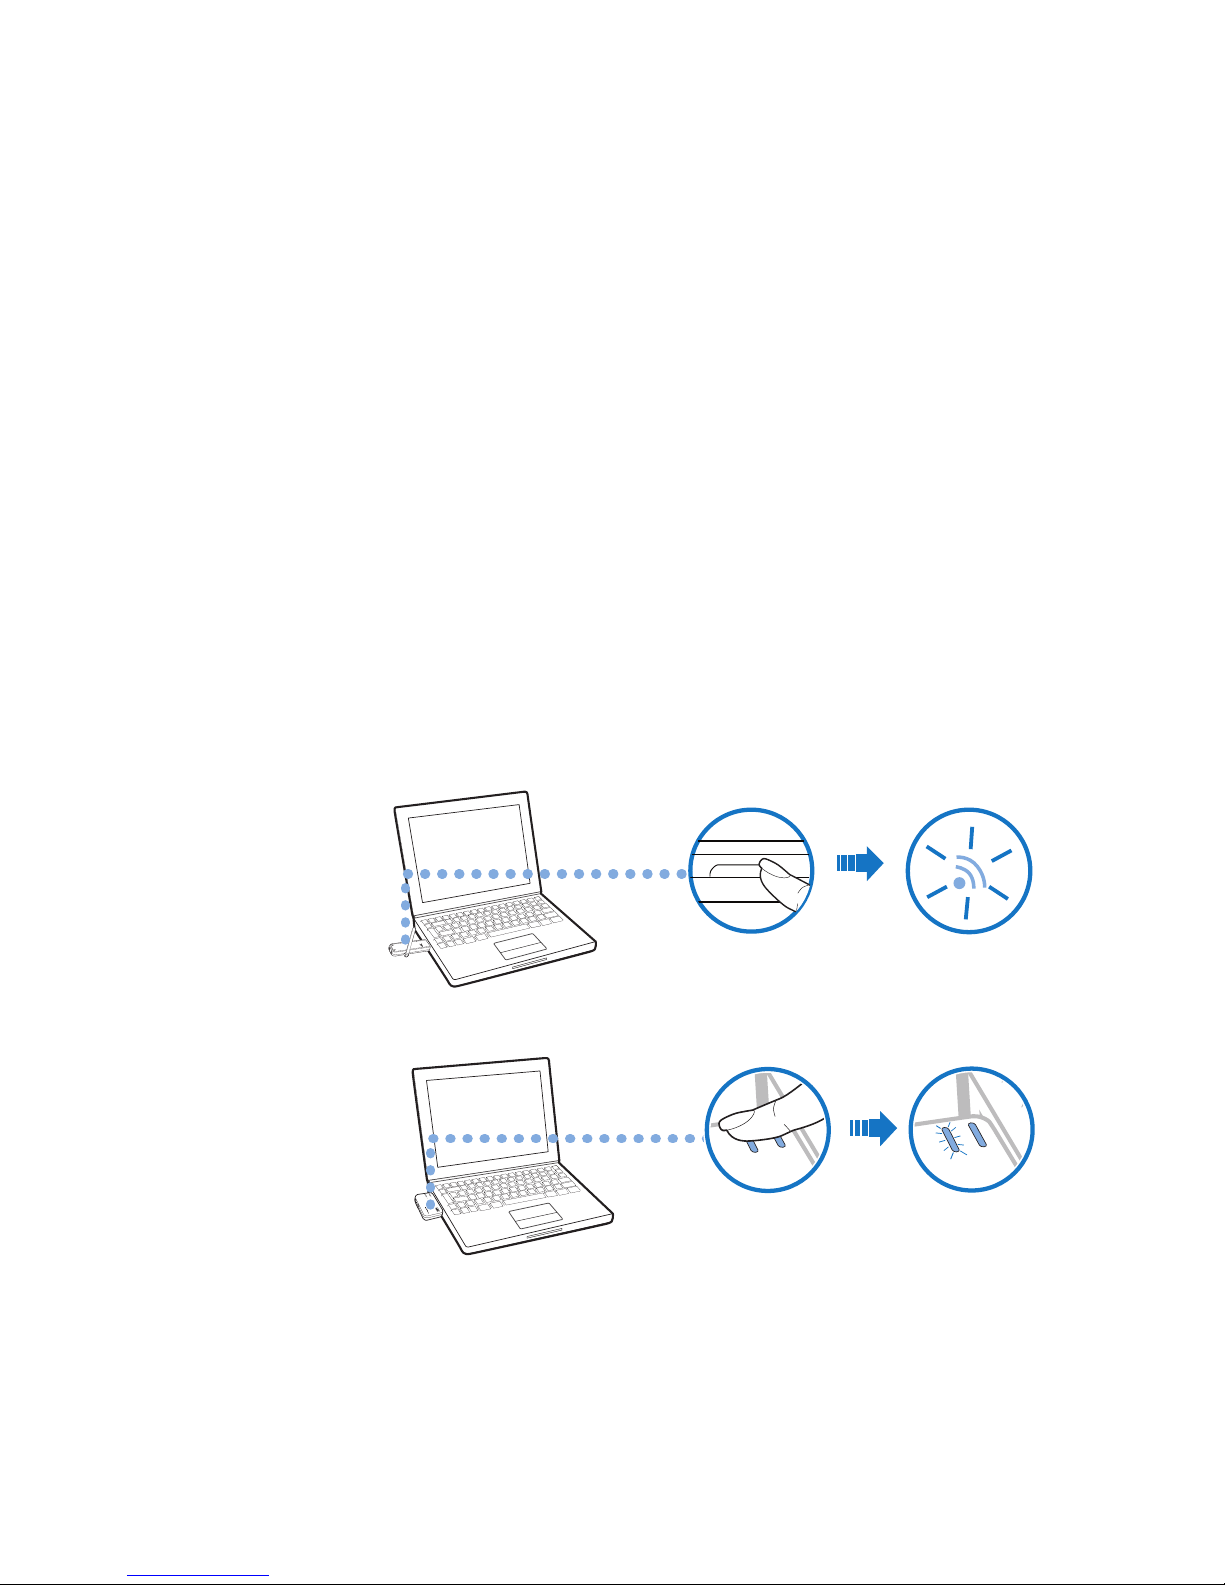
Manual Pairing 8
Manual Pairing
This section shows you how to pair your transmitter manually with two to four
receivers. If you wish to use zone control, you must pair your units manually.
For more information about broadcasting and zone control, see “Using Your
Wireless Features” on page 11.
Only the first four manually paired receivers will be assigned to a wireless
zone. Each manually paired receiver will be assigned to the next available zone.
Step 1: Press the Connect button on your transmitter
With your transmitter and receivers turned on, press the Connect button on
your transmitter. Alternatively, you can click the Connect button in the
transmitter software installed. The transmitter’s Link LED flashes.
CONNECT
P
O
W
E
R
C
O
N
N
E
C
T
P
O
W
E
R
CONNECT
P
O
W
E
R
OR
CONNECT
Sound Blaster
X-Fi Notebook
Sound Blaster
Wireless
Transmitter

Press the Connect button on your first receiver 9
Step 2: Press the Connect button on your first receiver
This must be done within three minutes after pressing the Connect button on
the transmitter (Step 1). Once the transmitter and receiver are paired
successfully, the Link LED on both units light up green and remain on. The first
receiver to be paired will be assigned to Zone 1.
IMPORTANT
DO NOT press the Connect button repeatedly on your transmitter
or receiver before a pairing process is complete or else you may
not be able to perform the correct zone assignment for your
receivers.
5V DC
LINK /
CONNECT
5V DC
LINK /
CONNECT

Press the Connect button on your transmitter again 10
Step 3: Press the Connect button on your transmitter again
The transmitter’s Link LED flashes. Refer to the diagram in Step 1.
Step 4: Press the Connect button on your second receiver
Refer to the diagram in Step 2. Once the transmitter and receiver are paired
successfully, the Link LED on both units light up green and remain on. Repeat
the steps to pair your third and fourth receivers (if applicable) manually.
Step 5: Test your receivers
1 Play music from your transmitter.
2 Use the transmitter software to select the zones assigned to the receivers
you want to activate or deactivate. See “Using Your Wireless Features” on
page 11 for instructions do this.
NOTE
For troubleshooting information, see “Troubleshooting” on
page 16.

Using Your Wireless Features 11
Using Your Wireless Features
Use the transmitter software installed on your computer to control your
receivers remotely from your transmitter.
Broadcasting
Broadcasting can be used on any number of paired receivers. This feature
enables you to activate or deactivate all paired receivers simultaneously.
For Sound Blaster Wireless Transmitter
In Sound Blaster Wireless Control Panel, click the Broadcast button.
For Sound Blaster X-Fi Notebook
In Entertainment Mode, click the Enable Wireless Control check box.
R
R
R
R
T
T
R
OR
Transmitter
Receiver
Sound Blaster
X-Fi Notebook
Sound Blaster
Wireless
Transmitter

Using Your Wireless Features 12
Zone Control
Zone control is limited to the first four manually paired receivers. This feature
enables you to activate or deactivate each paired receiver individually.
OR
R1
R2
R3
R4
T
T
R
Transmitter
Receiver
Sound Blaster
X-Fi Notebook
Sound Blaster
Wireless
Transmitter

Using Your Wireless Features 13
For Sound Blaster Wireless Transmitter
1 In Sound Blaster Wireless Control Panel, click the Zone button, and then
click the zones assigned to the receivers you want to activate or deactivate.
2 Clicking the Zone button will put the activated zones/receivers on
standby.
3 Click the Zone button again to activate the previously selected zones/
receivers.
For Sound Blaster X-Fi Notebook
1 In Entertainment Mode, click the Zone button, and then click the zone
number buttons (1 to 4) assigned to the receivers you want to activate or
deactivate.
2 Click the Enable Wireless Music Control check box to deselect it. Activated
receivers will then be on standby.
3 Click the Enable Wireless Music Control check box again to select it.
Previously selected receivers will be activated.
NOTE
Your transmitter can only save and reactivate one combination of
receivers. It remembers the last combination of activated
receivers just before the Zone button is clicked.

Other Information 14
Other Information
Understanding the Power LED
Understanding the Link LED
Returning to factory default settings
Return to the factory default settings if you want to
• revert to the original volume setting,
• reset your zone numbering sequence, or
• “unpair” a receiver.
LED Behavior Status
White Stable Turned on and ready for use
Continuous slow flashing Not detecting any signal or signal
is weak
Red Stable In Standby mode
Quick flashing (twice) Receiving remote control signals
Continuous slow flashing Muted
LED Behavior Status
Green Stable Paired (Turned on / In Standby
mode)
Flashing Pairing in progress
Quick flashing (twice) -> Not lit ->
Stable
Wireless reset
Not lit – Connection lost

Other Information 15
Press and hold the Previous/Rewind and Next/Fast forward buttons on your
receiver together for five seconds. The Power LED goes off for two seconds
before lighting up again.
Replacing the remote control battery
Refer to the following diagram to remove and replace the battery (when it is
depleted) from the remote control.
NOTE
The receiver pairs with your transmitter automatically if both
return to factory default settings.
1
2

Troubleshooting 16
Troubleshooting
Here are some tips if you encounter these problems.
There is no sound from the speakers that are connected to the
receiver.
Check the following:
• The Connect LEDs are lit up. Else see the following troubleshooting tip.
• The receiver is connected to the power outlet and turned on.
• The speaker system’s power is turned on.
• You have connected the speakers to your receiver correctly.
• The receiver volume is not muted.
The wireless connection does not seem to work.
The Connect LEDs do not light up.
The signal from the transmitter may be weak or the receiver has lost its
connection with the transmitter.
Try the following:
• Move your transmitter and receiver closer to each other.
• Reposition your transmitter or receiver so that there are fewer objects (for
example, multiple walls or large metal structures) between them.
• Make sure your transmitter and receiver are not placed on metal surfaces.
• Reset the wireless connection. Press and hold the receiver’s Connect button
for five seconds.
• Disconnect the transmitter and receiver from the power source. Then
reconnect them again and reset the wireless connection.

Troubleshooting 17
My receiver seems to be picking up extra noise, or there are
intermittent pauses.
The position of your Sound Blaster Wireless devices as well as signals from
other wireless routers or Bluetooth equipment may affect the quality of the
transmissions.
Try the following:
• In Sound Blaster Wireless Control Panel, change the RF Channel from Auto
to either Ch 1, 2 or 3.
• Place your transmitter and receivers closer to each other.
• Place your transmitter away from other devices that transmit wireless
signals, and away from large metal surfaces.
• Reposition your devices so that there are fewer objects (for example,
multiple walls or large metal structures) between them.
• Set your wireless LAN router's channel to Auto, 1 or 11. To do this, refer to
your router's user documentation.
• Refrain from doing large file transfers via the wireless internet or Bluetooth
connection while you are streaming music. Alternatively, stop streaming
music during intensive file transfers.
I have two Sound Blaster Wireless transmitters. My receiver is
receiving the incorrect transmission.
Your receiver may be alternating transmissions between the transmitters.
Manually pair your receivers. See “Manual Pairing” on page 8.

Troubleshooting 18
My remote control is not responding.
• Your remote control’s battery may have depleted. To remove and replace the
battery, see “Replacing the remote control battery” on page 15.
Also check the following:
• You have installed the transmitter software.
•In the Remote Control Settings application, ensure that the Enable control
of Windows Application check box is selected. To launch this application,
click Start -> All Programs -> Creative -> Remote Control Settings.
• The media player that you are using must be the highlighted window for the
playback functions to work.
I need to change the wireless zone numbers of my receivers.
Do the following:
i. Return the receivers to factory default settings. See “Returning to
factory default settings” on page 14.
ii. Manually pair the receivers. Follow the steps in “Manual Pairing” on
page 8.
All kinds of sounds from my computer are transmitted to the
receiver.
Your transmitter streams all sounds from your computer to the receiver,
including sounds from other programs, as well as system sounds and alerts.
Disable these sounds, or close programs that generate unwanted sounds.

Troubleshooting 19
(For Sound Blaster X-Fi Notebook only)
When I switch my recording source from Mic In to Line In in
Entertainment Mode, the wireless connection is lost.
When the recording source is changed to Mic In, wireless music control is
automatically disabled so that input from the microphone (for example, a
private internet voice conversation) will not be unintentionally streamed to all
paired receivers. After changing the recording source back to Line In, you must
enable the wireless features again in Entertainment Mode.

General Specifications 20
General Specifications
Connectivity
• Audio Line Out - 3.5 mm (1/8") Stereo jack
• RCA Audio Line Out jacks
Power Adapter
• Supply Voltage: 5V +/- 5%
• Current: 1 A
• Power: 5 W
Radio Frequency (RF)
• Operating RF range: 2400 - 2483.5 MHz
• Number of RF channels: 3
• RF transmitter power output: 16 dBm (typical)
NOTE
You cannot tune the RF channels.

Safety Information 21
Safety Information
Refer to the following information to use your product safely, and to reduce the chance of
electric shock, short-circuiting, damage, fire, hearing impairment or other hazards.
Improper handling may void the warranty for your product. For more information, read
the warranty available with your product.
• Read these instructions.
• Keep these instructions.
• Heed all warnings.
• Follow all instructions.
• Do not use this apparatus near water.
• Clean only with dry cloth.
• Do not block any ventilation openings. Install the product in accordance with the
instructions.
• Do not install near heat sources such as radiators, heat registers, stoves, or
other apparatus (including amplifiers) that produce heat.
• Do not expose your product to temperatures outside the range of 0°C to 40°C
(32°F to 104°F).
• Do not pierce, crush or set fire to your product.
• Keep your product away from strong magnetic objects.
• Do not subject your product to excessive force or impact.
• Do not defeat the purpose of the polarized or grounding-type plug. A polarized
plug has two blades with one wider than the other. A grounding type plug has
two blades and a third grounding prong. The wide blade or the third prong are
provided for your safety. If the provided plug does not fit into your outlet,
consult an electrician for replacement of the obsolete outlet.
• Protect the power cord from being walked on or pinched particularly at plugs,
convenience receptacles, and the point where they exit from the apparatus.
• Only use attachments/accessories specified by the manufacturer.
• Use only with the cart, stand, tripod, bracket or table specified by the
manufacturer, or sold with the apparatus. When a cart is used, use caution
when moving the cart/apparatus combination to avoid injury from tip-over.
• Unplug this apparatus during lightning storms or when unused for long periods
of time.
• Do not dismantle or attempt to repair your product.
Refer all servicing to authorized and qualified service personnel. Servicing is
required when the apparatus has been damaged in any way, such as powersupply cord or plug is damaged, liquid has been spilled or objects have fallen
into the apparatus, the apparatus has been exposed to rain or moisture, does
not operate normally,or has been dropped.

Safety Information 22
• WARNING: To reduce the risk of fire or electric shock, do not expose your
product to water or moisture. If your product is moisture-resistant, take care
not to immerse your product in water or expose it to rain.
Earphones
•
When a conductive apparatus, such as earphones, is used in close proximity
with a CRT television or CRT monitor, the latter may emit an electrostatic
discharge. The electrostatic discharge can be felt as a static shock. While this
static shock is usually harmless, it is good practice to avoid close contact with
CRT devices when using earphones.
• Do not listen to audio on your earbuds or headphones at high volume for
prolonged periods of time as hearing loss may result. For users in the United
States, go to www.hei.org for more information.
• Do not listen to your audio device at high volume when driving, cycling or
crossing the road, especially in heavy traffic, or in any other traffic condition
where such use will hinder safe travel on the roads. We recommend that
consumers be extremely cautious when using this device on the road.
Embedded Battery
• Do not attempt to remove the embedded battery.
The product must be disposed of according to local environmental regulations.
To replace the battery, return your product to your regional support office. For
product service information, go to www.creative.com.
Removable Battery
• The battery must be recycled or disposed of properly. Contact local agencies for
recycling and disposal information.
• Do not allow metal objects to touch the terminals of your battery.
• If there is leakage, an offensive odor, discoloration or deformation during
charging or use, remove the battery and do not use it again. Clean your hands
well before touching food or sensitive areas, for example, your eyes.
Wireless Device
• Switch off the device where it is prohibited, or when its use may cause danger
or inteference such as inside an aircraft, hospitals, or near refuelling points.

Safety Information 23
WEEE DIRECTIVE 2002/96/EC
BATTERIES DIRECTIVE 2006/66/EC
The use of the WEEE Symbol indicates that this product may not be
treated as household waste. By ensuring this product is disposed of
correctly, you will help protect the environment. For more detailed
information about the recycling of this product, please contact your
local authority, your household waste disposal service provider or the
shop where you purchased the product.
For Removable Battery
This product may contain one or more of the following removable
batteries:
Li-ion/polymer, button/coin cells, cylindrical cells. In this case, the
following applies:
The crossed-out wheeled bin symbol indicates that the battery in this
product should not be treated as unsorted municipal waste upon
reaching its end of life. Instead it should be taken to separate collection
and recycling schemes. Batteries containing heavy metal content will
have a two-letter symbol for the chemical under the crossed-out
wheeled bin symbol. 'Cd' stands for cadmium, 'Pb' for lead, and 'Hg' for
mercury. You can help the environment and avoid public health hazards
by recycling the battery at an authorized recycling facility or the place of
purchase. To find the nearest authorized recycle centre contact your
local authority. Instructions for removing the battery can be found in the
product user manual. The instructions should be followed carefully
before attempting to remove the battery.
For Integrated Battery
This product may contain a Lithium ion/polymer battery that should
only be removed by an authorized recycling centre. By recycling this
product at your local authorized recycling centre or the place of
purchase, the battery will be removed and recycled separately.

Declaration of Conformity 24
Declaration of Conformity
According to the FCC96 208 and ET95-19
Manufacturer/Importer's Name: Creative Labs, Inc.
Manufacturer/Importer's Address: 1901 McCarthy Boulevard
Milpitas, CA. 95035
United States
Tel: (408) 428-6600
declares under its sole responsibility that the product
Trade Name: Creative Labs
Model Numbers: SB1122
has been tested according to the FCC / CISPR22/97 requirement for Class B devices and found
compliant with the following standards:
EMI/EMC: ANSI C63.4 2003, FCC Part 15 , Subpart B & C
Complies with Canadian ICES-003 Class B, RSS-GEN & RSS-210
This device complies with part 15 of the FCC Rules.
Operation is subject to the following two conditions:
(1) This device may not cause harmful interference, and
(2) This device must accept any interference received, including interference that may cause
undesirable operation.
Ce matériel est conforme à la section 15 des régles FCC.
Son Fonctionnement est soumis aux deux conditions suivantes:
(1) Le matériel ne peut étre source D'interférences et
(2) Doit accepter toutes les interférences reques, Y compris celles pouvant provoquer un
fonctionnement indésirable.
Compliance Manager
Creative Labs, Inc.
March 5th, 2009

Regulatory Information 25
Regulatory Information
Notice for the USA
FCC Part 15: This equipment has been tested and found to comply with the limits for a
Class B digital device, pursuant to Part 15 of the FCC Rules. These limits are designed to
provide reasonable protection against harmful interference in a residential installation.
This equipment generates, uses and can radiate radio frequency energy and, if not
installed and used in accordance with instructions, may cause harmful interference to
radio communications. However, there is no guarantee that interference will not occur in a
particular installation. If this equipment does cause harmful interference to radio or
television reception, which can be determined by turning the equipment off and on, the
user is encouraged to try to correct the interference by one or more of the following
measures:
• Reorient or relocate the receiving antenna.
• Increase the separation between the equipment and receiver.
• Connect the equipment into an outlet on a circuit different from that to which
the receiver is connected.
• Consult the dealer or an experienced radio/TV technician for help.
This device complies with part 15 of the FCC Rules. Operation is subject to the following
two conditions:
1 This device may not cause harmful interference, and
2 This device must accept any interference received, including interference that may
cause undesired operation.
CAUTION: To comply with the limits of the Class B digital device, pursuant to Part 15 of the
FCC Rules, this device must be installed with computer equipment certified to comply with
Class B limits.
All cables used to connect to the computer and peripherals must be shielded and
grounded. Operation with non-certified computers or non-shielded cables may results in
interference to radio or television reception.
MODIFICATION: Any changes or modifications not expressly approved by the grantee of
this device could void the user’s authority to operate the device.
WARNING: To satisfy FCC RF exposure requirements for mobile transmitting
devices, a separation distance of 20 cm or more should be maintained between
the antenna of this device and persons during device operation.

Regulatory Information 26
To ensure compliance, operations at closer than this distance is not recommended. The
antenna used for this transmitter must not be co-located in conjunction with any other
antenna or transmitter.
California Proposition 65 Statement
WARNING: Handling this product may expose you to chemicals known to the State of
California to cause cancer and birth defects or other reproductive harm.
Wash hands after handling.
Explanatory Note: California Safe Drinking Water and Toxic Enforcement Act of 1986
(Proposition 65) requires special product labeling for products containing certain
chemicals known to the State of California to cause cancer, birth defects or other
reproductive harm. Creative has chosen to provide a warning based on its knowledge
about the presence of one or more listed chemicals without attempting to evaluate the
level of exposure. With Creative's products, the exposure may be below the Proposition 65
level of concern, or could even be zero. However, out of an abundance of caution, Creative
has elected to place the Proposition 65 warning on its products.
Déclaration de la Proposition 65 de la Californie
AVERTISSEMENT: La manipulation de ce produit peut vous exposer à des produits
chimiques qui sont reconnus par l'État de la Californie comme pouvant provoquer le
cancer, des anomalies congénitales ou d'autres effets nuisibles à la reproduction.
Veuillez vous laver les mains après l'avoir manipuler.
Note explicative: La Proposition 65 (California Safe Drinking Water and Toxic Enforcement
Act of 1986) de la Californie sur les matières dangereuses et l'eau potable exige un
étiquetage spécial pour les produits contenant certains produits chimiques qui sont
reconnus par l'État de la Californie comme pouvant provoquer le cancer, des anomalies
congénitales ou d'autres effets nuisibles à la reproduction. Creative a choisi d'inclure une
mise en garde s'appuyant sur sa connaissance de la présence d'un ou de plusieurs de ces
produits chimiques sans essayer d'en évaluer le niveau d'exposition. Pour les produits de
Creative, le niveau d'exposition peut être inférieur au niveau critique établi par la
Proposition 65 ou même être nul. Néanmoins, par souci extrême de prudence, Creative a
choisi de placer l'avertissement de la Proposition 65 sur ses produits.

Regulatory Information 27
Notice for Canada
This Class B digital apparatus complies with Canadian ICES-003.
Operation is subject to the following two conditions:
1 This device may not cause harmful interference, and
2 This device must accept any interference received, including interference that may
cause undesired operation.
Cet appareil numérique de la classe B est conforme à la norme NMB-003 du Canada.
CANADIAN CLASS B STATEMENT: This digital device does not exceed the Class B limits
for radio noise emissions from digital apparatus as set out in the interference-causing
equipment standard entitled “Digital Apparatus,” ICES-003 of the Department of
Communications.
Cet appareil numerique respecte les limites de bruits radioelectriques applicables aux
appareils numeriques de Class B prescrites dans la norme sur le materiel brouilleur.
“Appareils Numeriques,” NMB-003 edictee par le ministre des Communications.
MODIFICATION: Any changes or modifications not expressly approved by the grantee of
this device could void the user’s authority to operate the device.
Toute modification non approuvé explicitement par le fournisseur de licence de l’appareil
peut entraîner l’annulation du droit de l’utilisateur à utiliser l’appareil.

Regulatory Information 28
European Compliance
This product conforms to the following:
EMC Directive 2004/108/EC.
Mains operated products for the European market comply with Low Voltage Directive 2006/
95/EC.
Communication / RF wireless products for the European market comply with R&TTE
Directive 1999/5/EC.
CAUTION: To comply with the Europe CE requirement, this device must be installed with
CE certified computer equipment which meet with Class B limits.
All cables used to connect this device must be shielded, grounded and no longer than 3m
in length. Operation with non-certified computers or incorrect cables may result in
interference to other devices or undesired effects to the product.
MODIFICATION: Any changes or modifications not expressly approved by Creative
Technology Limited or one of its affiliated companies could void the user’s warranty and
guarantee rights.
Information in this document is subject to change without notice and does not represent a commitment
on the part of Creative Technology Ltd. No part of this manual may be reproduced or transmitted in any
form or by any means, electronic or mechanical, including photocopying and recording, for any purpose
without the writtn permission of Creative Technology Ltd.
Copyright © 2010 Creative Technology Ltd. All rights reserved. The Creative logo, Sound Blaster and X-Fi
are trademarks or registered trademarks of Creative Technology Ltd. in the United States and/or other
countries. iPod is a registered is a registered trademark of Apple Inc., registered in the U.S. and other
countries.
Version 2.0
May 2010
 Loading...