

Creative SB1560, Sound Blaster Omni Surround 5.1 User Manual
User’s Guide
Model No.: SB1560

Introduction
Congratulations on your purchase of Sound Blaster® Omni Surround 5.1! Featuring SBX® Pro Studio™
technology, this USB audio solution will give you an unparalleled audio experience and provide you with
years of entertainment.
Package Checklist
Your Sound Blaster Omni Surround 5.1 package comes with the following components.
l The Sound Blaster Omni Surround 5.1 USBdevice
l 1.5m MicroUSB 2.0 cable
l Stereo RCA to 3.5mm (1/8-inch) plug
l Remote Control (available for selected countries only)
Minimum System Requirements
For Windows®OS
l Intel Core™2 Duo processor 2.2 GHz, AMD Athlon 64x2 Dual Core or equivalent processor
l Microsoft® Windows 8 32-bit or 64-bit, Windows 7 32-bit or 64-bit, Windows Vista® 32-bit or 64-bit
l CD-ROM or DVD-ROM drive for software installation
l 1 GB RAM
l 600 MB of free hard disk space
l Available USB 2.0 port
For Mac OS
l Intel Core 2 Duo processor 2.8 GHz
l Mac OSX10.6 and above
l 1 GB RAM
l 600 MB of free hard disk space
l Available USB 2.0 port
Registering Your Product
Registering your product ensures you receive the most appropriate service and product support
available. You can register your product during installation or at www.creative.com/register. Please
note that your warranty rights are not dependent on registration.
More Help
For the latest news and products for the Sound Blaster, please visit www.soundblaster.com. The site
also includes information on making purchases, technical help and the latest software updates.
Using Creative Software AutoUpdate
Locating, downloading and installing updates for your Creative products is now simpler and faster with
the web-based Creative Software AutoUpdate system.

When you connect to Creative Software AutoUpdate via the Internet, the website will analyze your
computer system to determine your operating system, language and which Creative products are
connected to your system.
When this analysis is completed, you will then be given a list of only the most relevant software updates
for your connected products. The files can then be retrieved and installed.
To learn more about the Creative Software AutoUpdate, please visit www.soundblaster.com/support.
Note:
First-time users of Creative Software AutoUpdate may be prompted to authorize the download of a
browser component required for system analysis. Check to ensure that this content is signed by
Creative Labs, Inc., then click the Yes button.
Please ensure that all your Creative products are connected and installed on the same computer
running Creative Software AutoUpdate.
About Your Hardware
Refer to the Quick Start leaflet for instructions on setting up your audio device. To learn more about
your product, refer to the relevant section below:
l Your Audio Device
l Your Remote Control
Your Audio Device
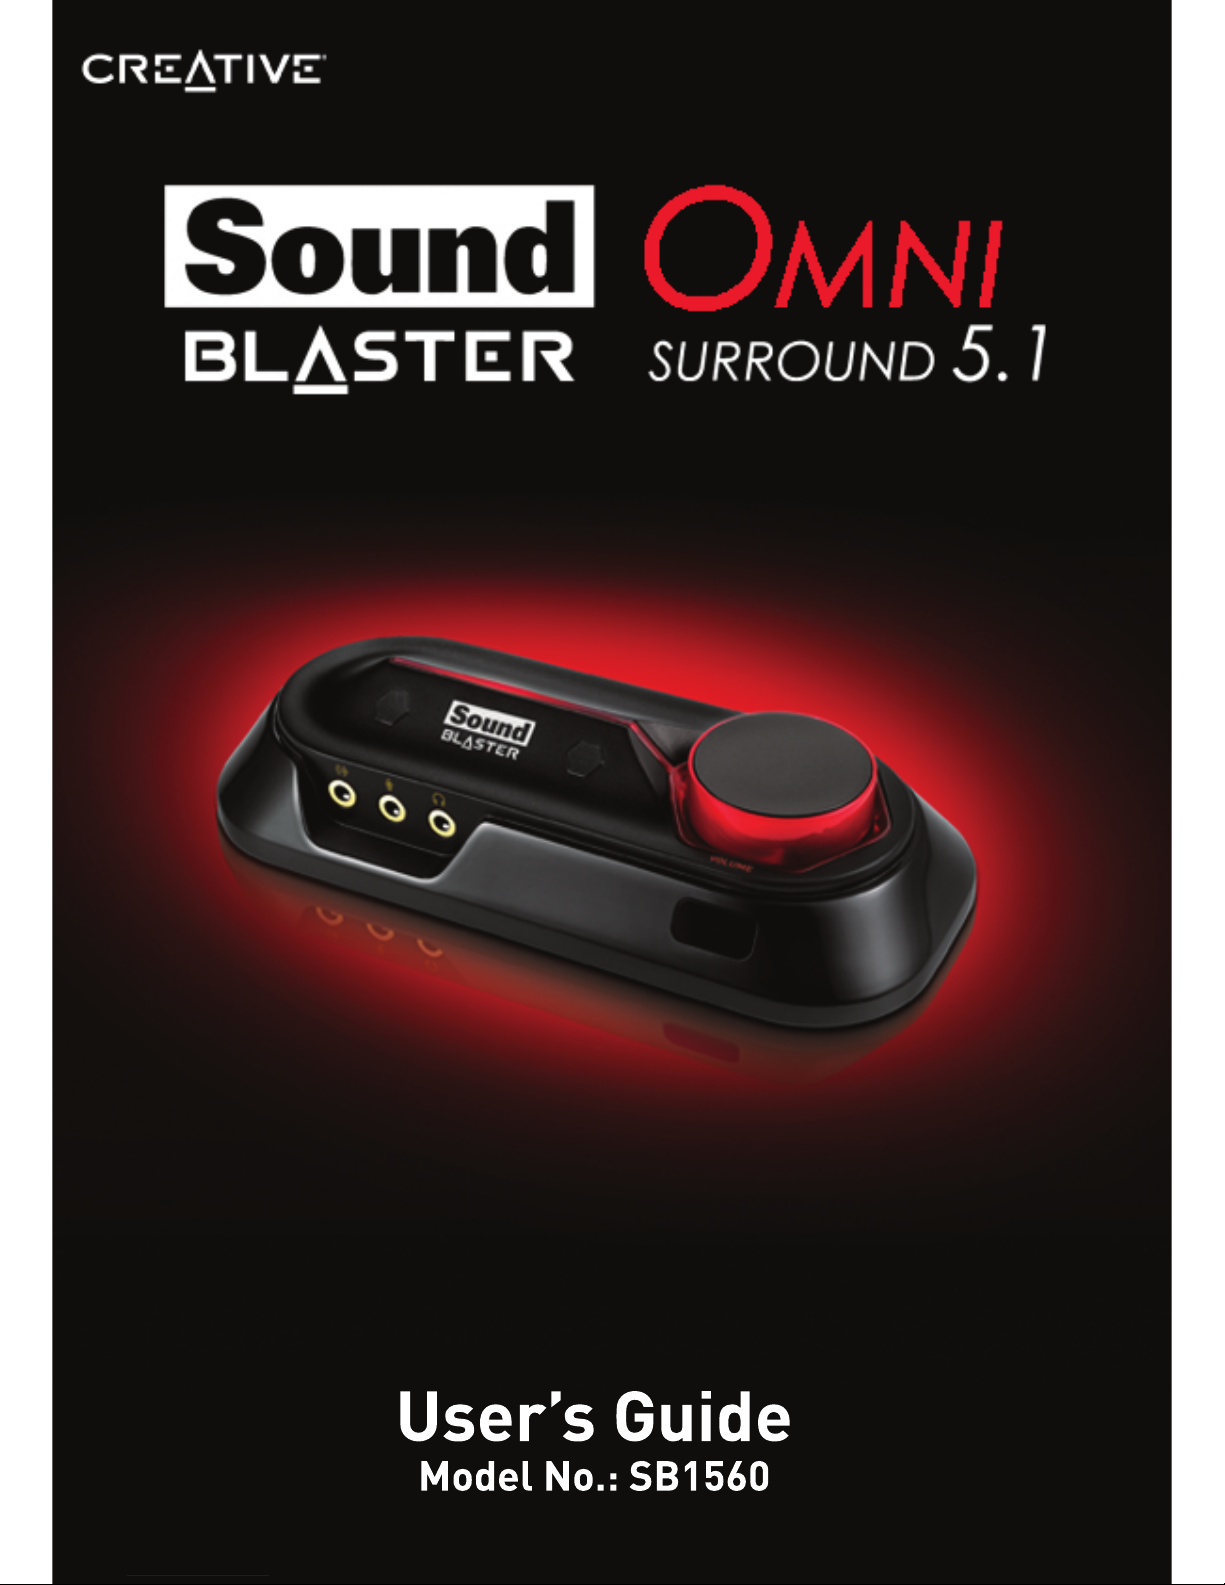
Your USB audio device has these jacks and connectors to enable the attachment of a wide variety of
devices:
Jack or
Connector
Description
1 Line-In jack Connects to the line output of external stereo sources
(such as an MP3 player or CD player).
2 Mic-In jack Connects to a microphone using a 3.50 mm (1/8-inch)
mono jack.
3 Headphone jack Connects to stereo headphones using a 3.50 mm (1/8-
inch) stereo jack. Speaker output is muted when the
jack is detected.
4 USB port Connects to the computer with the USB cable.
5 Optical S/PDIF
Out Connector
Connects to the Optical In connector of recording/playback devices with optical connectors (for example, MiniDisc recorders, Digital Audio Tape recorders or
external amplifiers).
6 RCA Front Out
jacks
Connect to amplified stereo or multi-channel speaker
systems, or to an external amplifier.
7 Rear Out jack Connects to rear or surround channel inputs of an
amplified multi-channel speaker system or to the
multi-channel inputs of a home theater receiver.
8 Center/Subwoofer
Out jack
Connects to center/subwoofer channel inputs on an
amplified 5.1 speaker system or to the multi-channel
inputs of a home theater receiver.
Note:
External microphone will override the built-in microphones when it is plugged in.
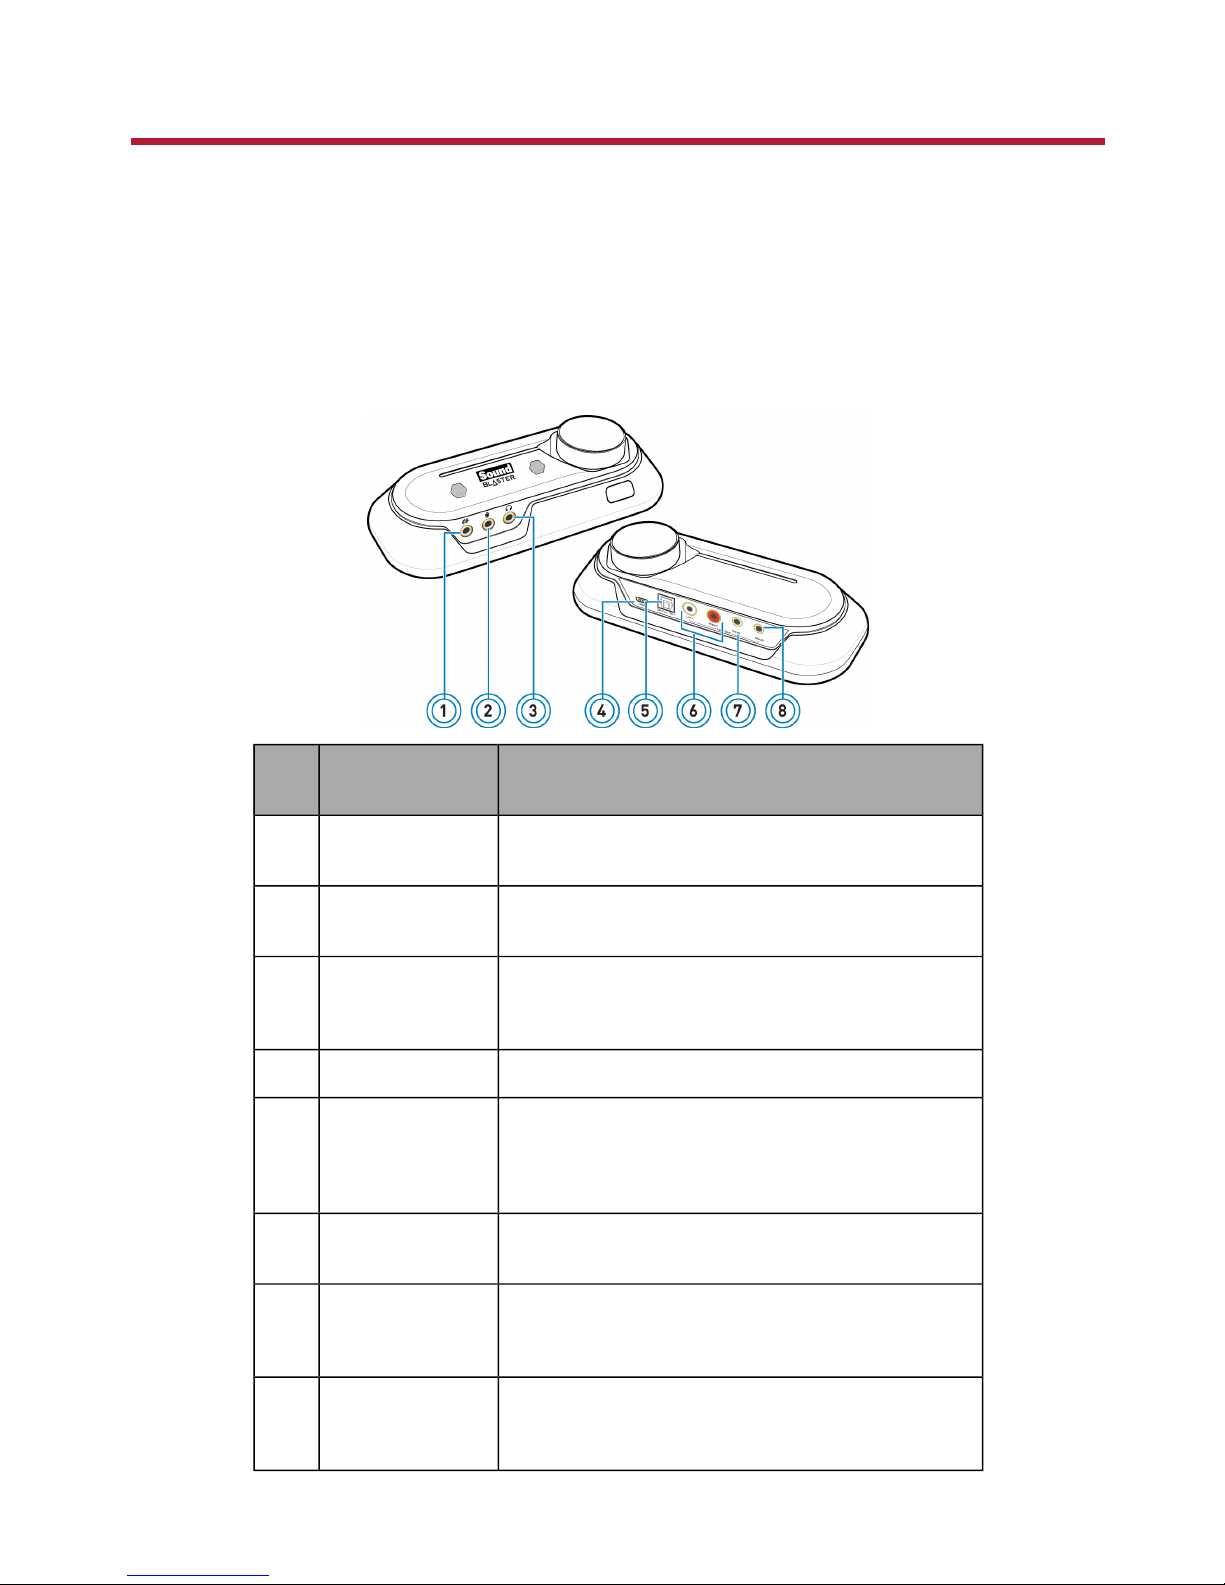
Using display indicators and control dials
Your USB audio device has the following indicators and control dials to adjust and monitor operational
status.
Button / Slider Description
1 Internal
Microphone Array
Built-in dual microphone with CrystalVoice technology.
2 Volume control dial Turn clockwise or counterclockwise to increase or
decrease the volume. Press down to mute.
3 Infrared receiver Receives infrared commands from the remote control.
4 Power LED Lights up in red when USB power is detected. Blinks
intermittently when there is infrared activity. Blinks
continuously when audio is muted.
Adjusting volume
Besides using the Volume control dial, you can also adjust or mute volume using:
l Your remote control
l Sound Blaster Omni Control Panel
Note:
If you mute the volume in the software applications, you will not hear any sound output even if the
Volume control dial is set to the maximum.
Your Remote Control
Your USB audio device has an infrared receiver for your Creative remote control. Your remote control
lets you operate your computer from the comfort of your sofa or bed, at a distance of three meters (9.8
feet).
Note:
The Creative remote control is available for selected countries only.
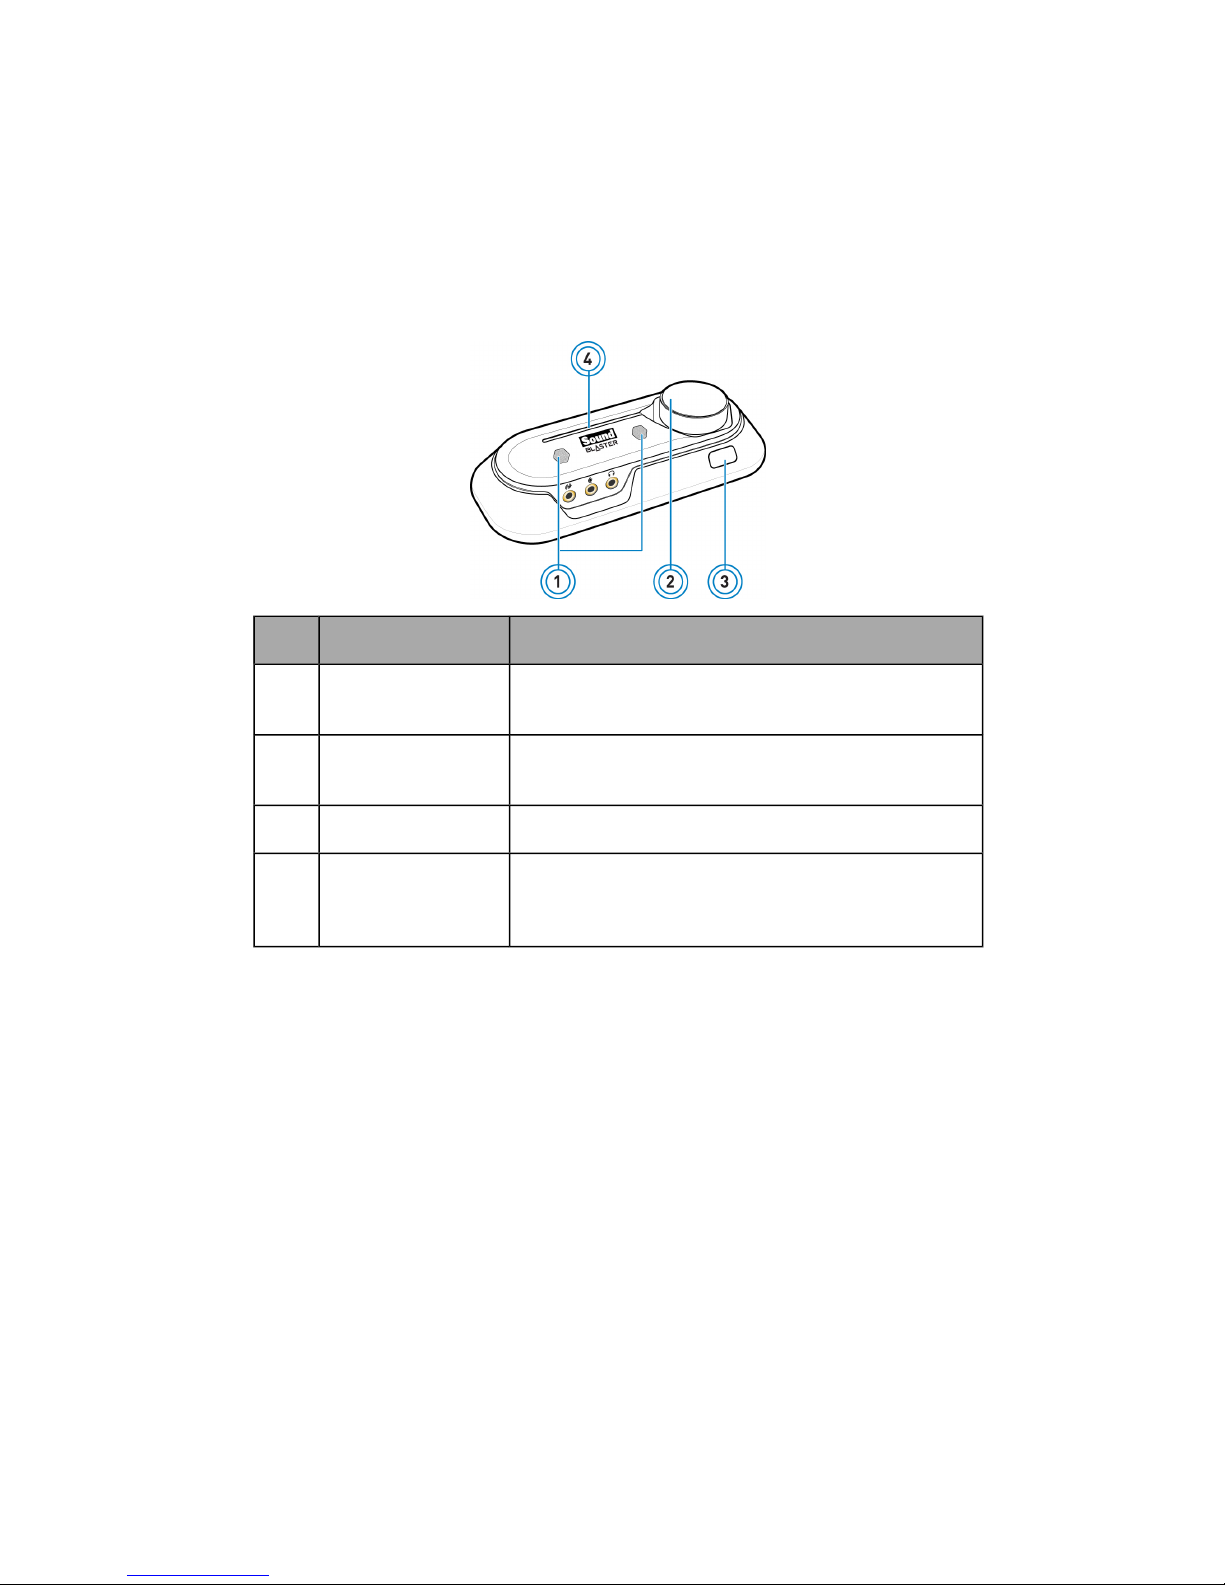
Using your remote control
Button Description
1 Power Not applicable.
2 Menu Not applicable.
3 Menu Navi-
gation
Scrolls up or down in a menu. Press OK to execute
selected menu option.
4 Return Returns to a previous submenu or function.
5 Next Plays the next track.
6 Play/Pause Starts, pauses or resumes current playback.
7 Previous Plays the previous track.
8 Repeat Repeats the current track or playlist.
Only applicable for Windows Media Player on PC.
9 Shuffle Plays the tracks of the current playlist in random order.
Press to toggle shuffle ON or OFF.
Only applicable for Windows Media Player on PC.
10 Volume
Up/Down
Volume Up (+) and Volume Down (-) control the master
volume of your audio output.
11 Mute On/Off Mutes or unmutes audio.
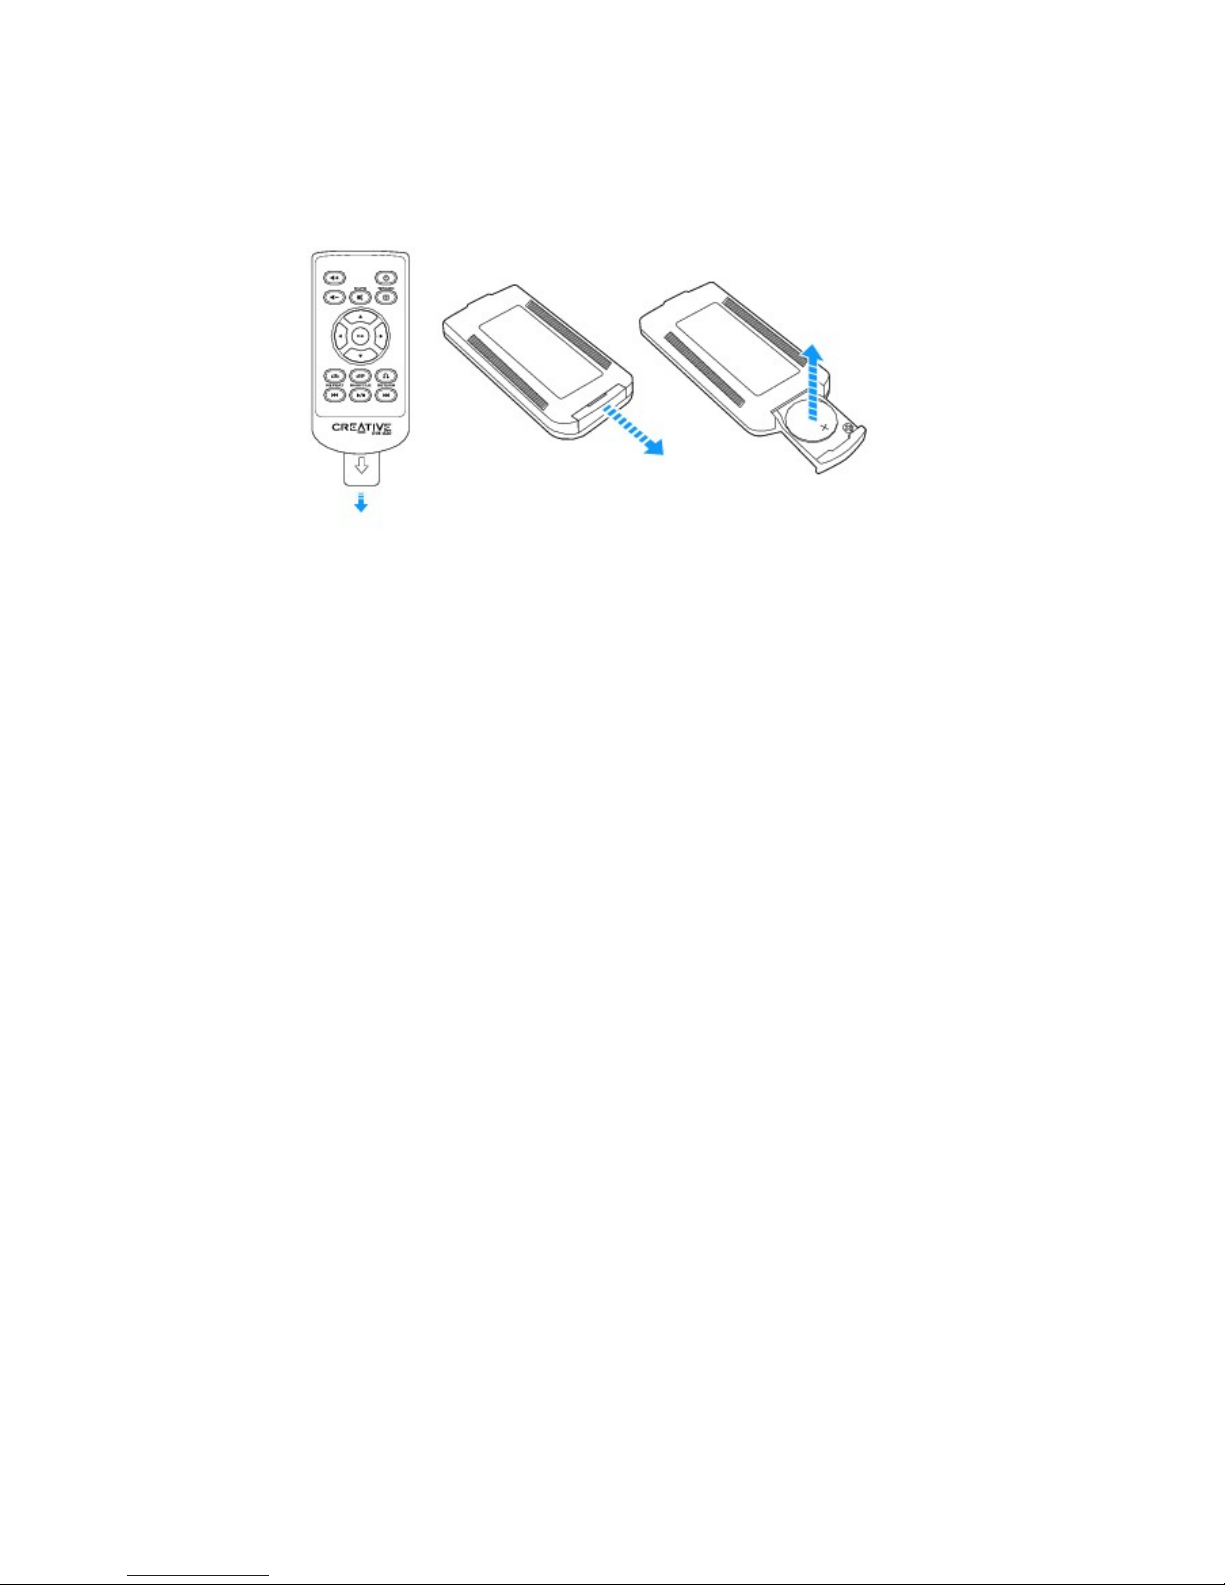
Replacing the battery
Remove the plastic strip before using the remote control. To replace the battery, refer to the diagram
below.

Installing and Uninstalling Software
To take full advantage of your Sound Blaster Omni Surround 5.1 audio device, you need to install device
drivers and applications. At times, you may also need to uninstall some or all of the device drivers and
applications to correct problems, change configurations, or upgrade outdated drivers or applications. To
learn how to do so in all supported Windows and Mac operating systems, consult the following sections:
l Installing Drivers and Applications
l Uninstalling Drivers and Applications
Installing Drivers and Applications
Ensure that your audio device is connected before proceeding. For instructions on
installing your audio device, consult your Quick Start leaflet.
After you have connected your audio device, turn on your computer. Windows automatically detects
your audio device and searches for device drivers.
For Windows Vista / Windows 7
1. Insert the Installation CD into your CDor DVD drive.
Your CDshould start automatically. If it does not, follow the steps below:
i. Click Start >Computer.
ii. Right-click the CD or DVD drive icon, and then click Open AutoPlay.
2. To complete the installation, follow the instructions on the screen.
3. When prompted, restart your computer.
For Windows 8
1. Insert the Installation CD into your CD or DVD drive.
2. In a short while, a drive icon will be displayed. Click on the icon, and then choose Run setup.exe.
If you do not see the drive icon, follow the steps below:
i. Right-click on the background of the Windows start screen, and then click All apps.
ii. Click Computer.
iii. Right-click the CD or DVD drive icon, and then click Open AutoPlay.
3. To complete the installation, follow the instructions on the screen.
4. When prompted, restart your computer.
For Mac OS
1. Using your web browser, visit www.creative.com/support and locate the software package for the
Mac OS.
2. Download this package into your local hard disk.
3. Double-click the downloaded file to uncompress it.
4. Double-click the uncompressed DMG file.
5. Double-click the Install icon and follow the subsequent on-screen instructions to complete the
installation.

Uninstalling Drivers and Applications
In the event that an uninstallation is required (such as for upgrades), please follow the following
procedure.
Before you begin, close all running audio applications. Applications that are still running
during uninstallation will not be removed.
For Windows OS
1. From the Control Panel, click Uninstall a program.
2. Select your audio device's entry.
3. Click the Uninstall button or option.
If the User Account Control dialog box appears, click the Continue button.
4. Click the Yes button.
5. When prompted, restart your computer.
For Mac OS
1. Click Applications > Creative > Creative Uninstaller
2. Select the Creative product to be uninstalled.
3. Click the Uninstall button.
4. Follow the on-screen instructions.
Using Your Audio Device
Your audio device works seamlessly with many external devices. To connect these peripherals, refer to
their relevant sections below:
l Playing Music
l Recording Music
l Creating Music
l Watching DVDs
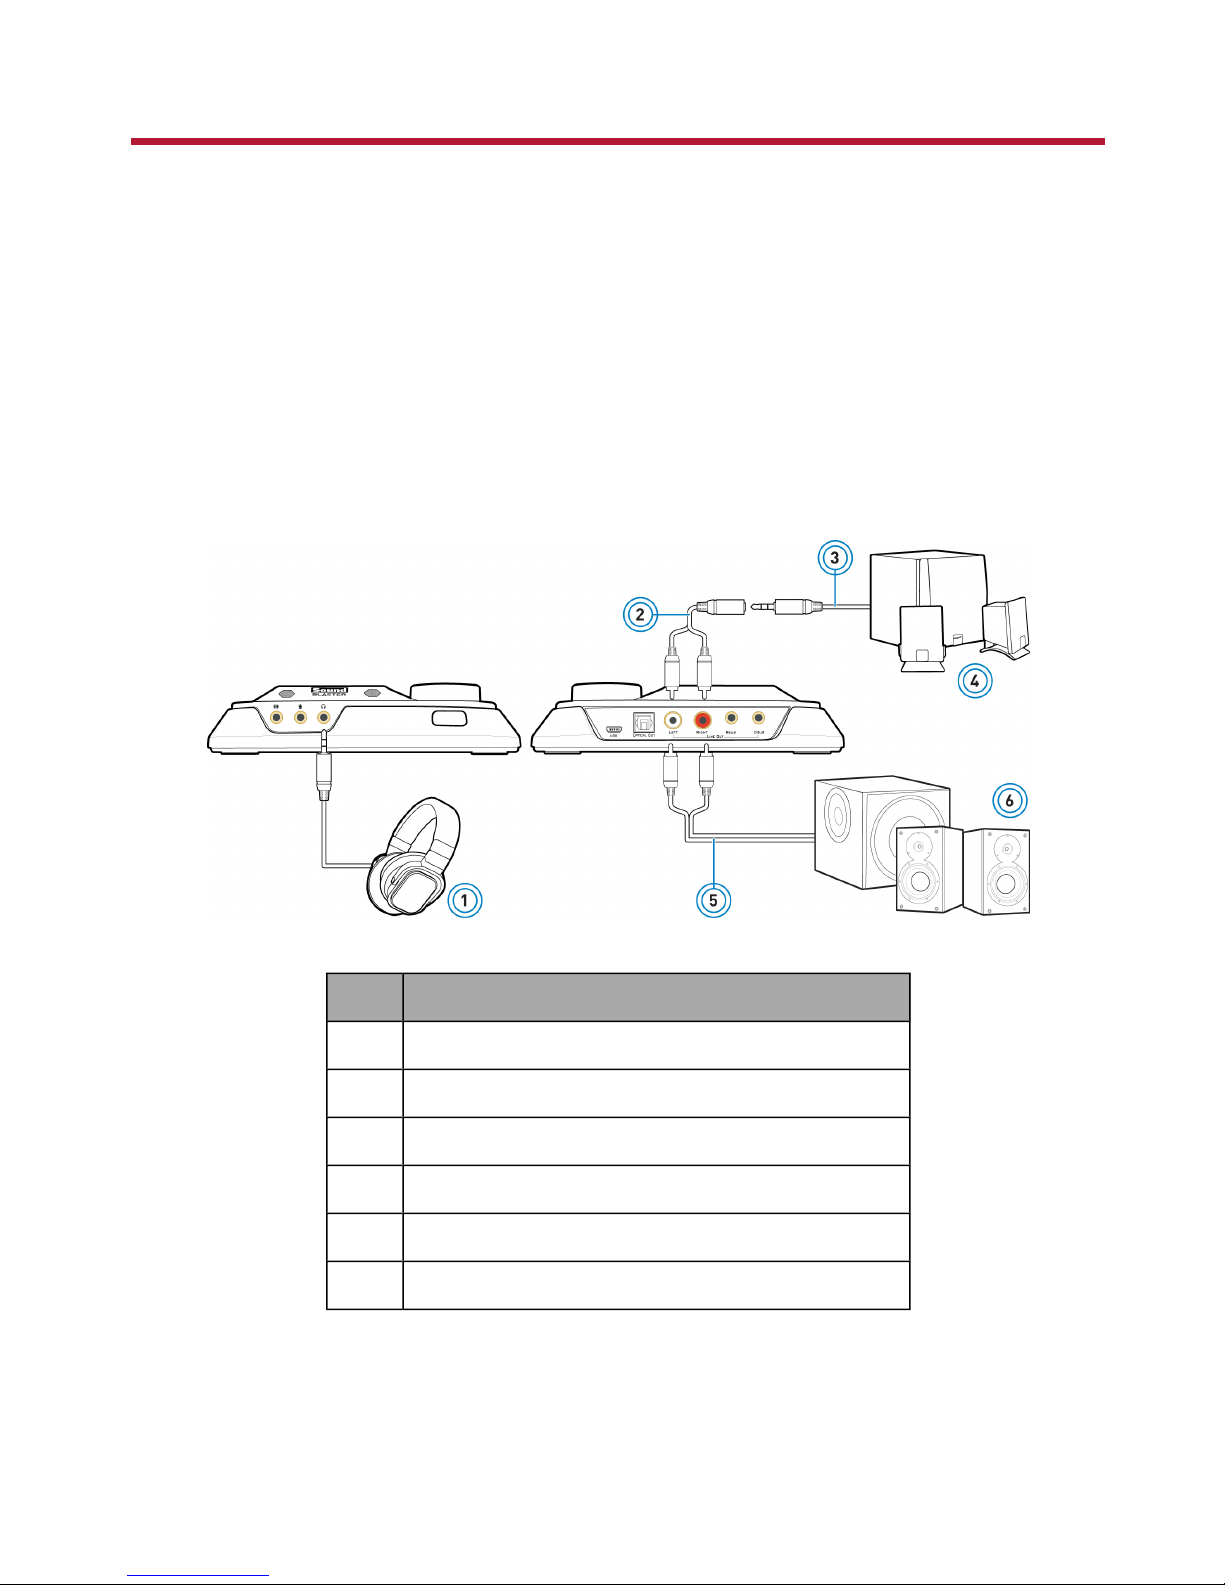
Playing Music
You can connect stereo headphones to the Headphone jack of your audio device. The following diagram
also shows the connection for analog stereo or 2.1 channel speakers. For connection to analog 5.1
channel speakers, see Connecting Speakers.
Component
1 Headphones
2 Y-Splitter cable
3 Analog speaker cable (available separately)
4 Analog stereo speakers
5 RCA-to-RCA stereo cable (available separately)
6 Analog stereo speakers with RCA audio input jacks
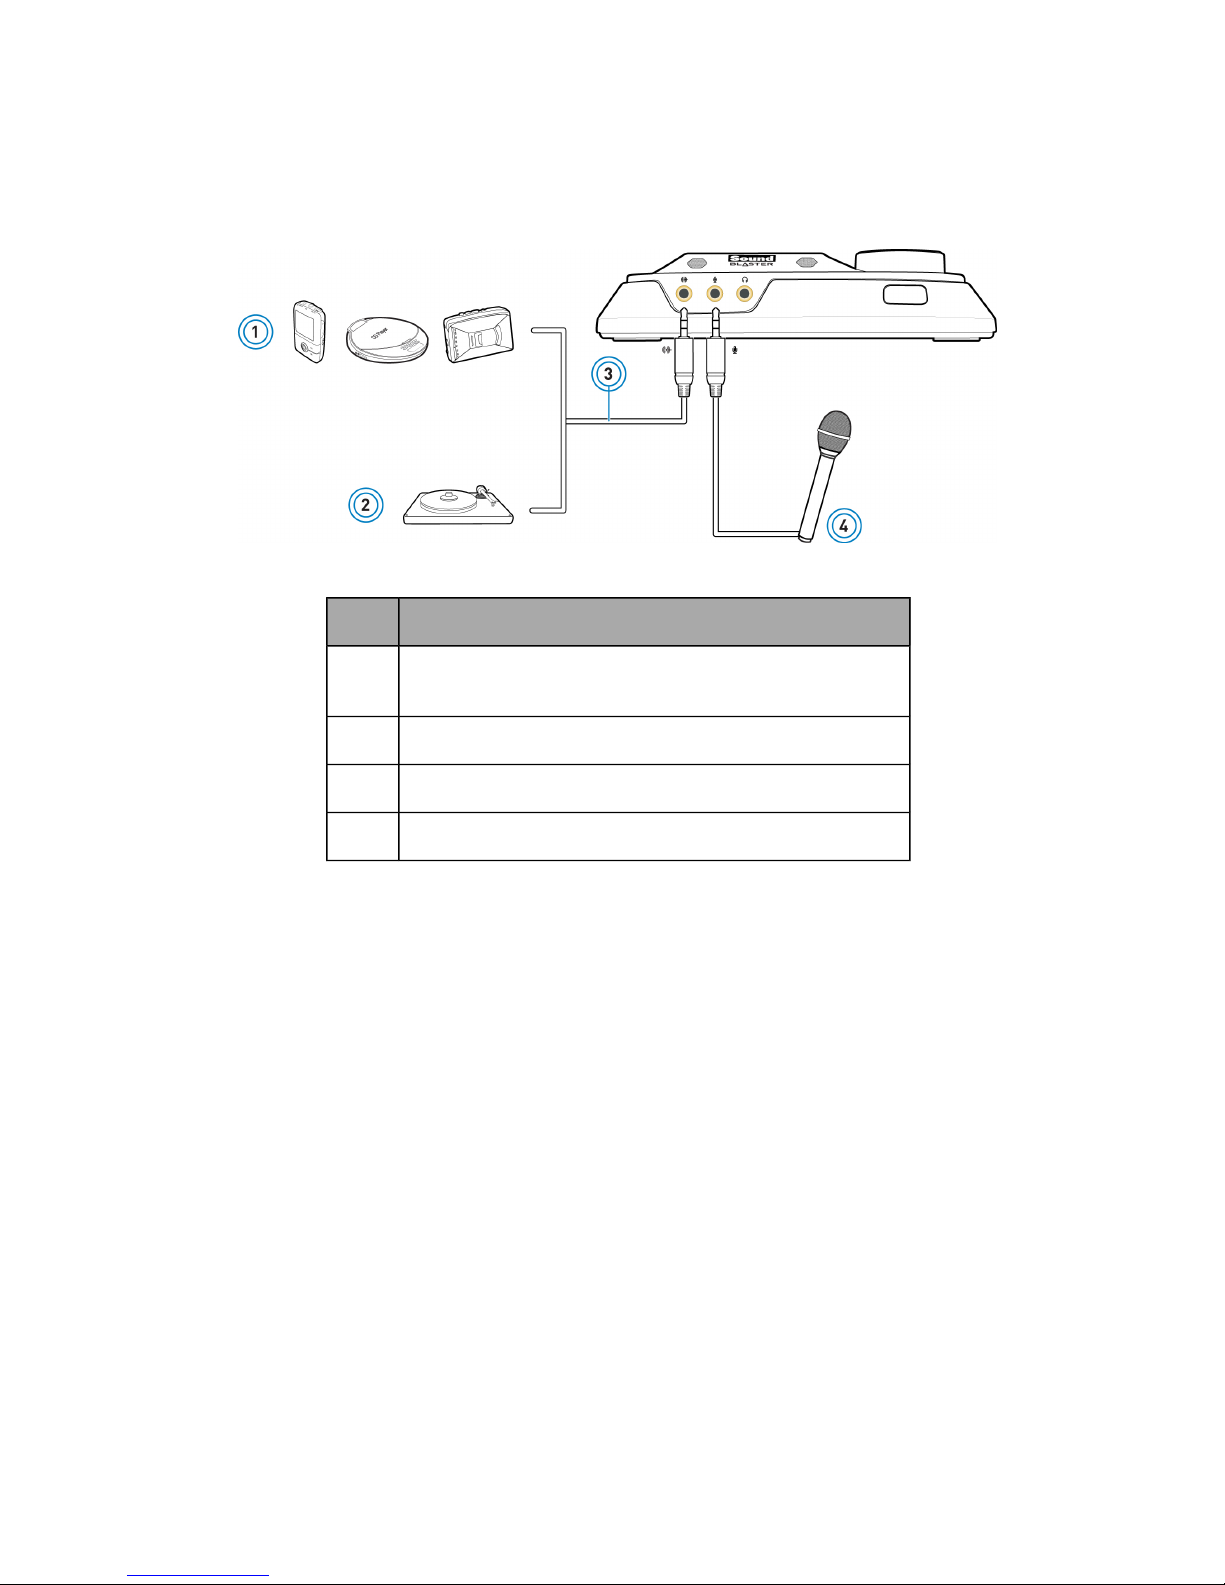
Recording Music
To record audio from external sources like MP3 or CD players, connect the source to the Line-In jack of
your audio device. Connect a microphone to the Mic-In jack.
Component
1 External audio sources (MP3 players, CD players, cassette
players, etc.)
2 Turntable (at line level)
3 Analog audio cable (available separately)
4 Microphone
Note:
To listen to the audio from the source connected to the Line-In or Mic-In jack, or the Internal
Microphone Array, refer to Using the Creative Software Suite - Mixer Settings.
 Loading...