

Page 1
Page 2

User’s Guide
Creative Sound Blaster Audigy 2 Platinum eX
Information in this document is subject to change without notice and does not represent a commitment on the part of Creative Technology Ltd. No part of this manual may be
reproduced or transmitted in any form or by any means, electronic or mechanical, including photocopying and recording, for any purpose without the written permission of
Creative Technology Ltd. The software described in this document is furnished under a license agreement and may be used or copied only in accordance with the terms of the
license agreement. It is against the law to copy the software on any other medium except as specifically allowed in the license agreement. The licensee may make one copy of
the software for backup purposes only.
The Software License Agreement is found in a separate folder on this installation CD. The copyright and disclaimer, including trademark issues are also found in the same folder.
Copyright © 1998-2002 by Creative Technology Ltd. All rights reserved.
Version 1.2
March 2003
Sound Blaster and Blaster are registered trademarks, and the Sound Blaster Audigy logo, the Sound Blaster PCI logo, EAX ADVANCED HD, Multi-Environment, Environment
Panning, Environment Reflections, Environment Filtering, Environment Morphing, Creative Multi Speaker Surround, Inspire, and Oozic are trademarks of Creative Technology
Ltd. in the United States and/or other countries. E-Mu and SoundFont are registered trademarks of E-mu Systems, Inc.. Cambridge SoundWorks, MicroWorks and PC Works are
registered trademarks, and PC Works FourPointSurround is a trademark of Cambridge SoundWorks, Inc.. Microsoft, MS-DOS, and Windows are registered trademarks of
Microsoft Corporation. Manufactured under license from Dolby Laboratories. "Dolby", "Pro Logic", "MLP Lossless", and the double-D symbol are trademarks of Dolby
Laboratories. Confidential unpublished works. Copyright 1992-1998 Dolby Laboratories. All rights reserved. The FireWire logo is a trademark of Apple Computer, Inc.. THX
is a registered trademark of THX Ltd.. All other products are trademarks or registered trademarks of their respective owners.
This product is covered by one or more of the following U.S. patents:
4,506,579; 4,699,038; 4,987,600; 5,013,105; 5,072,645; 5,111,727; 5,144,676; 5,170,369; 5,248,845; 5,298,671; 5,303,309; 5,317,104; 5,342,990; 5,430,244; 5,524,074;
5,698,803; 5,698,807; 5,748,747; 5,763,800; 5,790,837.
Page 3

Important: This PDF file has been designed to provide you with complete product knowledge. The following are instructions on how to
make use of this PDF file effectively by launching applications and help files, as well as accessing relevant web sites, where applicable,
via specially prepared links.
• To launch applications, Help files or to access relevant web sites, click the blue text, or whenever the symbol or appears on the
object or text.
• For best viewing, this PDF is by default set to "Fit Width" so that all the contents on every page is visible. If you are unable to read the text
clearly, press Ctrl + <+> to zoom in or Ctrl + <-> to zoom out. To view full screen, press Ctrl + <L>.
Note: To access the applications and Help files, you must first install the manual and the applications in your computer. Otherwise, you
will receive error messages. When you click a link to launch a program, a dialog box may appear to inform you that Adobe Acrobat is
going to launch the application. Click the All button to run subsequent applications without the message appearing again. To access linked
web sites, your computer must be connected to the Internet.
Page 4

Contents
Page 5

Contents
Introduction
High-definition digital audio entertainment ................................................................................... i
What is EAX ADVANCED HD? .............................................................................................................. ii
Package Contents........................................................................................................................... iii
System Requirements .................................................................................................................... iii
Getting More Information ............................................................................................................. iv
Visit the Soundblaster website ...................................................................................................... iv
Technical Support ........................................................................................................................... v
Document Conventions .................................................................................................................. v
1 About your Sound Blaster Audigy 2 Platinum eX hardware
What You Need ........................................................................................................................................ 1-1
Your Sound Blaster Audigy 2 Platinum eX card....................................................................................1-2
Your Audigy 2 Platinum eX External I/O Module................................................................................. 1-3
Adjusting the volume-level of Headphones and Microphone................................................... 1-7
Using the Remote Control ....................................................................................................................... 1-8
Remote Control Functions....................................................................................................................... 1-9
2 Installing Hardware
Installation Steps ...................................................................................................................................... 2-1
Step 1: Prepare the Sound Blaster Audigy 2 Platinum eX hardware........................................ 2-1
Step 2: Prepare your computer.................................................................................................... 2-2
Step 3: Install the audio card ....................................................................................................... 2-3
Step 4: Install the joystick............................................................................................................ 2-3
Step 5: Install the cables .............................................................................................................. 2-4
Step 6: Connect to AC power socket.......................................................................................... 2-6
Connecting Related Peripherals .............................................................................................................. 2-7
Connecting Related Peripherals (cont’d)................................................................................................ 2-8
Page 6

Connecting Speakers Systems............................................................................................................... 2-11
Positioning Your Speakers..................................................................................................................... 2-12
3 Installing Software
Installing Drivers and Applications......................................................................................................... 3-1
Using Creative Software AutoUpdate..................................................................................................... 3-2
Sound Blaster Audigy 2 Feature Showcase Demo................................................................................. 3-2
Uninstalling and Reinstalling the Applications and Device Drivers..................................................... 3-3
Reinstalling all Audio Drivers and Applications...................................................................... 3-3
Uninstalling all Audio Drivers and Applications ................................................................................... 3-3
Installing/Uninstalling selected Audio Drivers and Applications.......................................................... 3-4
Updating Windows 2000 (Service Pack 3)............................................................................................. 3-5
Updating Windows with Digital Video Update......................................................................................3-5
4 Using Audigy 2 Software
Creative Sound Blaster Audigy 2 Applications...................................................................................... 4-1
Demos....................................................................................................................................................... 4-2
Sound Blaster Audigy 2 Getting Started Demo ......................................................................... 4-2
Sound Blaster Audigy 2 Feature Showcase Demo .................................................................... 4-2
Introduction to the Sound Blaster Audigy 2 software suite ................................................................... 4-3
Creative MediaSource Go!.......................................................................................................... 4-3
Creative MediaSource Go! Launcher ......................................................................................... 4-3
Creative MediaSource Player...................................................................................................... 4-4
“What-U-Hear” multichannel recording .................................................................................... 4-4
Creative MediaSource Organizer................................................................................................ 4-4
Creative MediaSource DVD-Audio Player................................................................................ 4-6
Creative EAX Console ................................................................................................................ 4-6
Creative Surround Mixer............................................................................................................. 4-8
Creative Speaker Settings............................................................................................................ 4-8
Creative Speaker Calibrator......................................................................................................... 4-8
Creative MiniDisc Center............................................................................................................ 4-9
Creative SoundFont Bank Manager............................................................................................ 4-9
Page 7

Creative Audio Stream Recorder 2............................................................................................. 4-9
Creative Wave Studio................................................................................................................. 4-10
Diagnostic and troubleshooting utilities................................................................................................ 4-10
Creative Diagnostics.................................................................................................................. 4-10
Creative Speaker Settings.......................................................................................................... 4-10
A General Specifications
Features.................................................................................................................................................... A-1
Connectivity............................................................................................................................................. A-3
Sound Blaster Audigy 2 Platinum eX Card............................................................................... A-3
Sound Blaster Audigy 2 Platinum eX External I/O Module .................................................... A-4
B Troubleshooting and FAQs
Problems Installing Software.................................................................................................................. B-1
Problems with Sound .............................................................................................................................. B-1
Problems with File Transfers on Some VIA Chipset Motherboards.................................................... B-5
Insufficient SoundFont Cache ................................................................................................................ B-6
Problems with the Joystick ..................................................................................................................... B-7
Problems with Multiple Audio Devices................................................................................................. B-8
Problems with Sound Blaster Live! Series or Sound Blaster PCI512 card.......................................... B-9
Resolving I/O Conflicts ........................................................................................................................ B-10
Problems with Encore DVD Player ..................................................................................................... B-11
Problems with Software DVD Player .................................................................................................. B-11
Problems with DV driver for Windows 98 SE/2000/Me/XP.............................................................. B-12
Problems in XP...................................................................................................................................... B-13
Problems with Digital Audio Devices.................................................................................................. B-14
Page 8
Introduction
Page 9

Introduction
High-definition digital audio entertainment
MLP (Meridian Lossless
Packing), the method of
audio data compression used
in DVD-Audio, reduces file size
without removing any of the
information contained in the
original recording. The listening
audience will hear the audio as it
was intended in the original
recording. Other packing
methodologies that remove data as
part of the compression are
referred to as 'Lossy
Compression'.
Thank you for purchasing Sound Blaster® Audigy™ 2 Platinum eX, consisting of the Sound Blaster
Audigy 2 Platinum eX card, the Sound Blaster Audigy 2 Platinum eX External I/O Module and an IR
remote control. It is the most complete affordable high-definition digital audio entertainment solution you
can find on the market today.
Sound Blaster Audigy 2 has received the prestigious THX Multimedia Certification award, making it the
perfect choice for PC audiophiles seeking the very best music and movie experiences.
Featuring 24-bit/192 kHz audio playback feature, Sound Blaster Audigy 2 Platinum eX delivers highdefinition sound of astounding quality with 24-bit/96 kHz audio recording capability from all Line Ins and
SPDIF In. Sound Blaster Audigy 2 Platinum eX supports 6.1 channel Dolby
surround sound audio on your computer and 5.1 output from the 96 kHz sampling rates of DVD-Audio
discs using MLP lossless compression.
The External I/O Module provides front panel access to microphone, headphone, input/output, and MIDI
connections — all located away from your computer and closer to your work area. The Sound Blaster
Audigy 2 Platinum eX is the only Audigy 2 product with ASIO driver support for 24-bit/96 kHz recording
- allowing musicians to produce high quality works. Additionally, an IEEE 1394-compliant SB1394™/
FireWire
external CD-RW drives and other IEEE 1394 compatible devices like DV Camcorders, printers, scanners,
and digital still cameras.
The infrared remote control offers convenient control of your computer for tasks like playing audio or
video CDs, at distances up to four meters (13 feet).
®
connection is provided for high-speed connectivity to NOMAD® portable digital audio players,
®
Digital Surround EX
Introduction i
Page 10

What is EAX ADVANCED HD?
EAX® ADVANCED HD™ brings a new level of performance, power, and flexibility to PC audio. Taking
advantage of the increased processing capabilities of the Sound Blaster Audigy 2 processor, EAX
ADVANCED HD delivers a host of new features to achieve high definition audio for gaming and music
enhancement.
The EAX ADVANCED HD Game Audio Library takes in-game audio and acoustic simulation to a whole
new level. These innovative technologies bring tremendous realism and total audio immersion to PC
gamers:
❑ New Multi-Environment
TM
technology renders multiple environment audio environments in real
time.
❑ Environment Panning
TM
makes it easy for gamers to track with three-dimensional precision, the
location and movement of sounds that usually represent enemies or team mates. This gives Sound
Blaster Audigy 2 gamers a better advantage as they are more aware of the game environment.
❑ Environment Reflections
TM
offers localization of early reflections and echoes such as reflections
created by canyon walls or cliffs.
❑ Environment Filtering
❑ Environment Morphing
TM
simulates the propagation of sound in both indoor and outdoor game arenas.
TM
allows for seamless transitions from one environment to the next.
EAX ADVANCED HD Music Technologies also ensures sonic superiority:
❑ Audio Clean-Up removes unwanted noise in a digital audio file.
❑ Time Scaling speeds up and slows down music without distortion.
❑ EAX ADVANCED HD music effects, developed especially for music listening, further enhance
playback of songs.
EAX ADVANCED HD offers dramatically increased 3D audio performance and functionality. Delivering
superior audio fidelity and sophisticated reverb effects, this unsurpassed digital entertainment experience
is available only from the Sound Blaster Audigy 2 family of products.
Introduction ii
Page 11

Package Contents The following items are included in your package:
❑ Sound Blaster Audigy 2 Platinum eX card
❑ Sound Blaster Audigy 2 Platinum eX External I/O Module and IR remote control
❑ AD_LINK cable
The items listed here may vary
from country to country.
❑ Power converter Cable
❑ Joystick/MIDI bracket
❑ 3.5 mm minijack to ¼” plug adapter
❑ Two AAA batteries for the IR remote control
❑ Sound Blaster Audigy 2 Installation and Applications CD
❑ Sound Blaster Audigy 2 Feature Showcase Demo CD
❑ Creative DVD-Audio Sampler Disc
❑ Quick Start leaflet
❑ User’s Guide (on CD)
❑ Warranty (printed or on CD)
❑ Technical Support (printed or on CD)
System Requirements
Sound Blaster Audigy 2
Platinum eX hardware
❑ Genuine Intel® Pentium® II 350 MHz, AMD® K6 450 MHz or faster processor
for SB1394/FireWire applications or games
❑ Intel, AMD or 100% compatible motherboard chipset
❑ Windows
2 (SP2) or Windows XP
❑ 64 MB RAM for Windows 98 SE and Windows Me
128 MB RAM for Windows 2000 (SP2) and Windows XP
❑ 600 MB of free hard disk space
❑ Available PCI 2.1 compliant slot for the audio card
❑ Available space for the included joystick/MIDI bracket (optional)
®
98 Second Edition (SE), Windows Millennium Edition (Me), Windows 2000 Service Pack
Introduction iii
Page 12

❑ Headphones or amplified speakers (available separately)
❑ At least one CD-ROM/CD-RW or DVD-ROM drive installed
SB1394/FireWire applications, games, DVD
audio and video
Minimum 256 MB RAM
recommended for Windows 2000
SP3 and Windows XP users for
games and DV capture and editing.
Internet multimedia and
entertainment
Getting More Information
Visit the Soundblaster website
❑ Genuine Intel Pentium III 500 MHz, or AMD 700 MHz processor for SB1394/FireWire applications
or games
❑ SB1394/FireWire: minimum 128 MB RAM and 1 GB workspace for digital video (DV) capture and
editing. For DV applications, recommended minimum is an Ultra DMA hard disk with 6 GB
workspace (ATA-100, 7,200 rpm type).
❑ Games: At least 128 MB RAM, 3D graphics accelerator with at least 8 MB of texture RAM, available
300–500 MB of free hard disk space
❑ DVD: At least second generation DVD-ROM drive with these recommended soft-DVD players:
InterVideo’s WinDVD 2000 or CyberLink’s PowerDVD 3.0 or later
❑ DVD-Audio: Pentium III or AMD Athlon 1 GHz or faster processor recommended. Requires 256 MB
RAM for Windows 98 SE, Windows Me, Windows 2000 SP3 or Windows XP SP1, Also requires a
second-generation 6X or faster DCD-ROM drive.
Visit www.soundblaster. com for updates on OS-specific support issues.
Internet Radio: requires at least a 56 kbps modem and an active Internet connection to run the application
Other Internet applications may have higher system requirements or may require a microphone. Refer to
the application’s online Help documentation for details.
Refer to the Sound Blaster Audigy 2 Getting Started demo and the various online Help files for detailed
information on Creative applications. The Sound Blaster Audigy 2 Feature Showcase demo gives you an
interactive introduction to Sound Blaster Audigy 2 and demonstrates the card’s capabilities.
View the contents of the Sound Blaster Audigy 2 Installation and Applications CD for additional libraries
and other software. Visit the www.soundblaster.com site for the latest Sound Blaster news and products.
The site also includes information on making purchases, technical help, and http://www.soundblaster.com/
support for the automated driver download and installation.
Introduction iv
Page 13
Technical Support Visit http://www.soundblaster.com/support/faq/ for general help.
Document Conventions
The following typographical conventions are used throughout this manual:
The notepad icon indicates information that is of particular importance and
should be considered before continuing.
The alarm clock designates a caution or warning that can help you avoid
situations involving risk.
The warning sign indicates that failure to adhere to directions may result in
bodily harm or life-threatening situations.
Introduction v
Page 14

1
About your Sound Blaster Audigy 2
Platinum eX hardware
Page 15
About your Sound Blaster Audigy 2 Platinum eX hardware
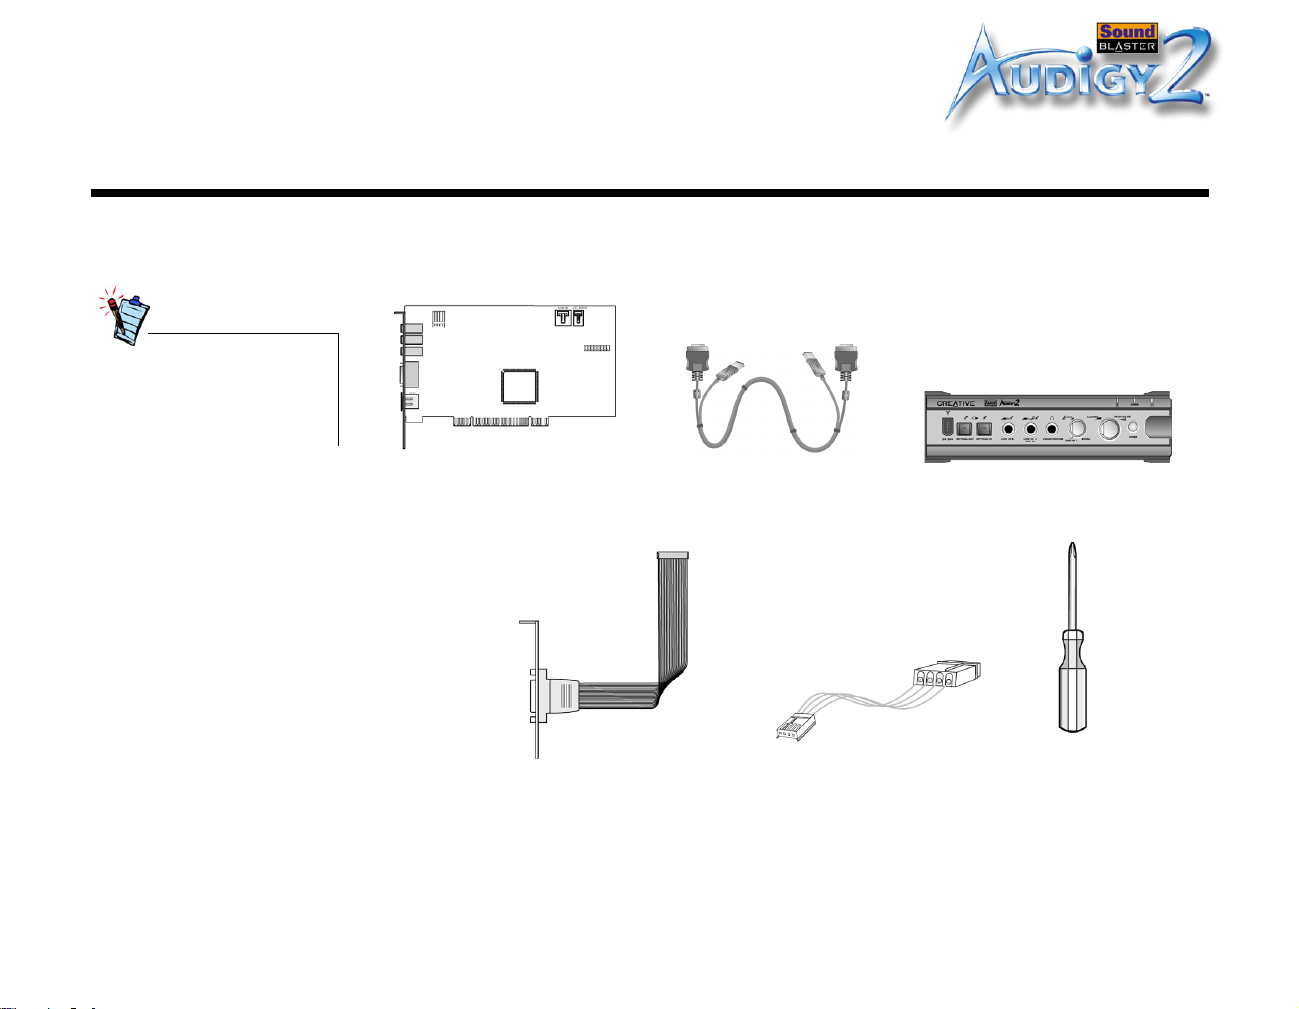
What You Need
In addition, you will also need
an available PCI slot and another
adjacent available slot on your
computer.
Before you begin installation, be sure that you have these:
Sound Blaster
Audigy 2 Platinum eX card
Joystick/MIDI bracket
Figure 1-1: What you need.
AD_LINK cable
Power Converter Cable
Audigy 2 Platinum eX External I/O
Module
Phillips-head
screwdriver (not
included)
About your Sound Blaster Audigy 2 Platinum eX hardware 1-1
Page 16
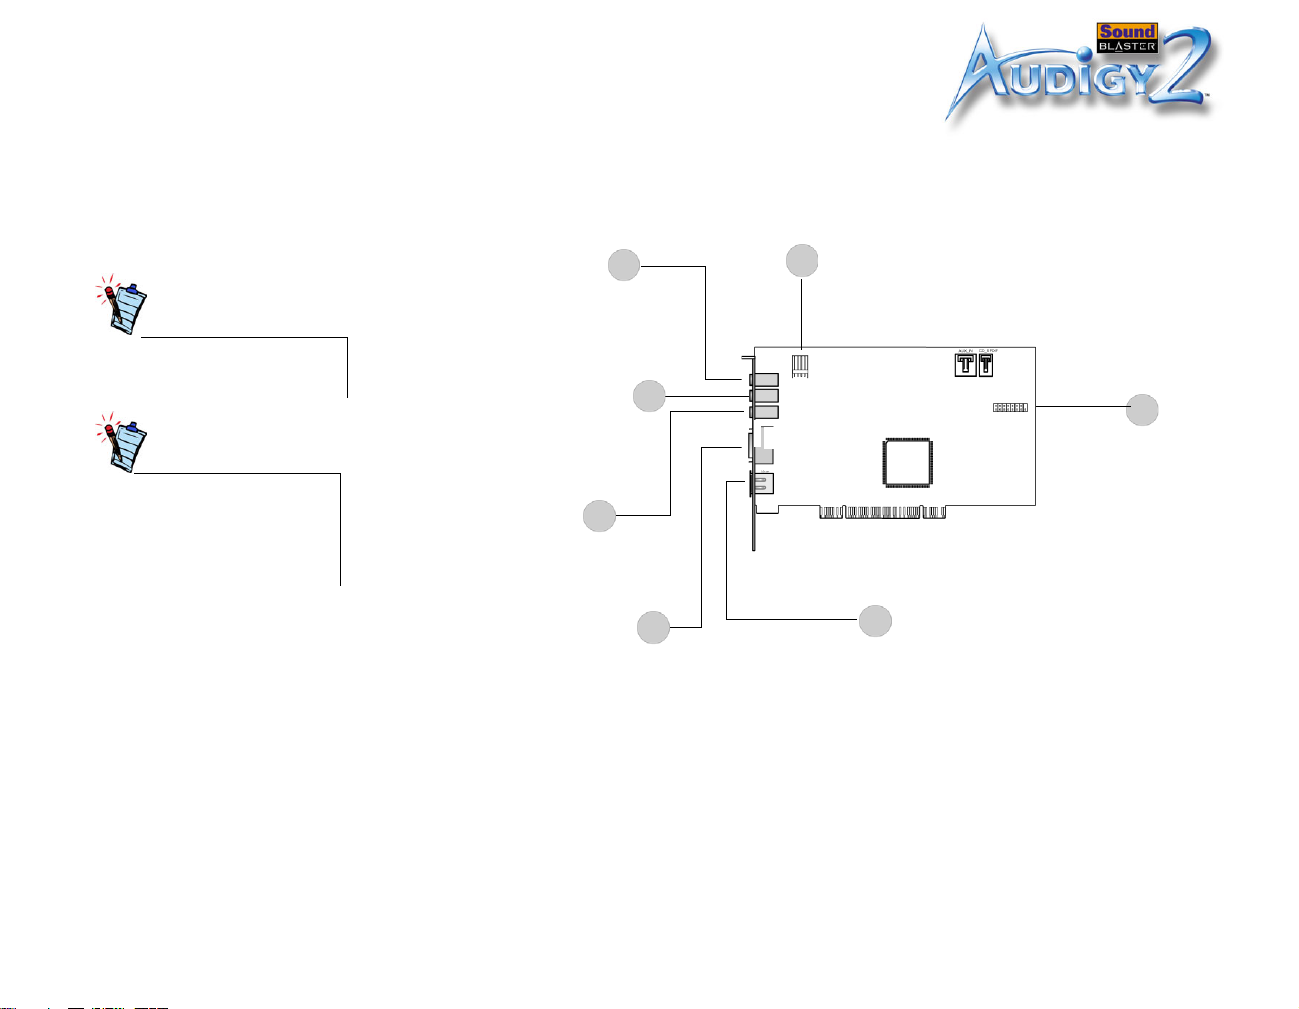
Your Sound Blaster Audigy 2 Platinum eX card
Click any circled number in the
diagram to see a description of the
item.
The Audigy 2 Platinum eX card
works as a stand-alone audio card.
However to enjoy all the features
available, you need to connect it to
the External I/O Module.
Your audio card has these jacks and connectors to enable the attachment of a wide variety of devices:
6
5
4
7
1
3
Figure 1-2: Jacks, connectors and ports
About your Sound Blaster Audigy 2 Platinum eX hardware 1-2
2
Page 17
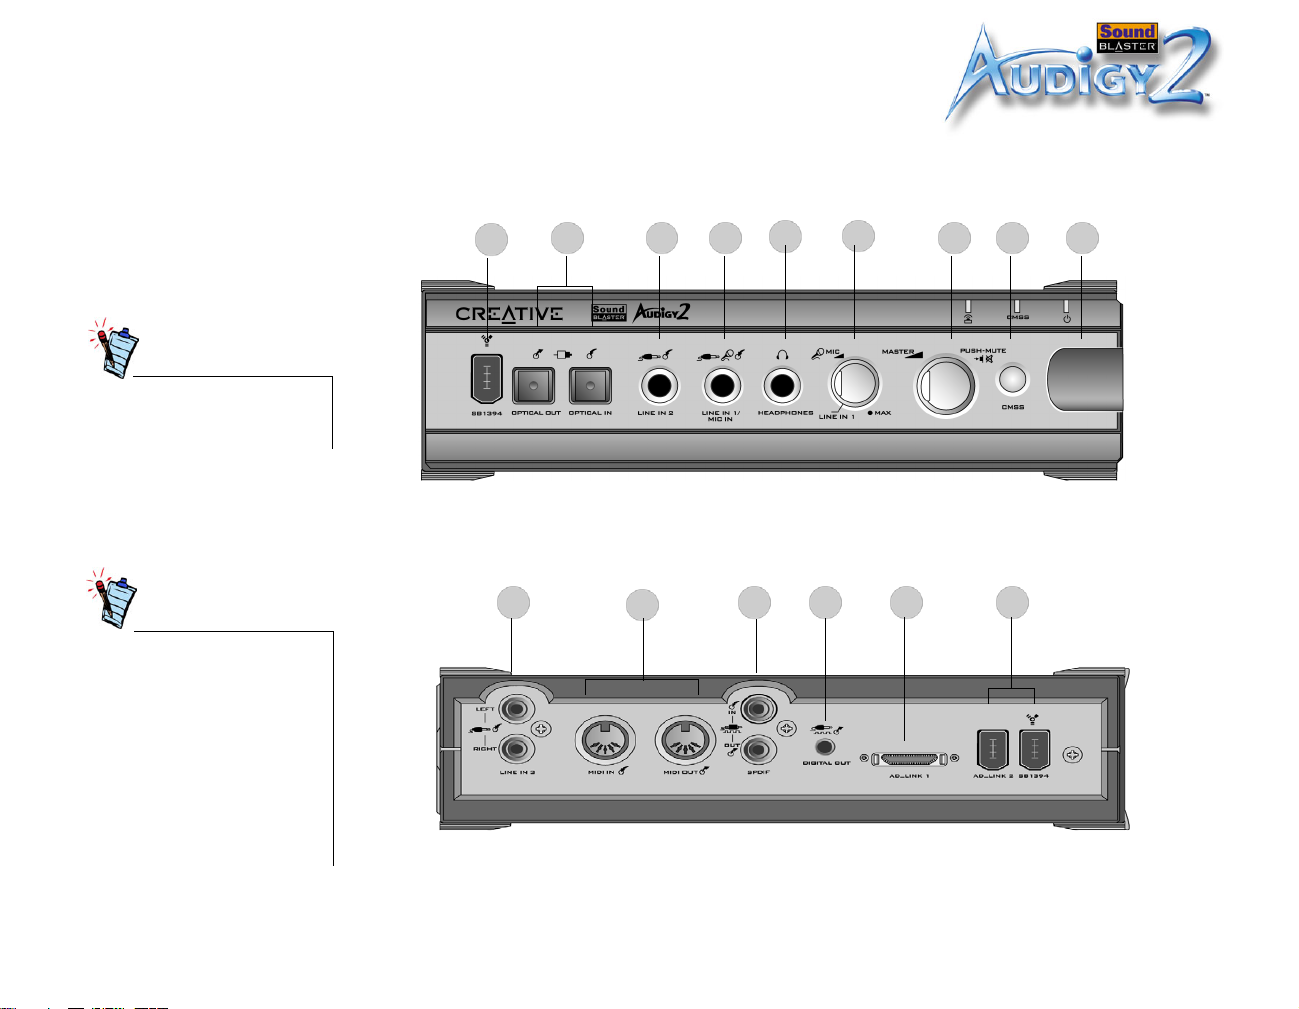
Your Audigy 2 Platinum eX External I/O Module
Click any circled number in the
diagram to see a description of
the item.
Your Sound Blaster Audigy 2 Platinum eX External I/O Module has these jacks, connectors and controls:
1 2 3 4
56
7 8 9
• To connect your existing
computer headphones and
microphone to the External I/
O Module, use a 3.5 mm (1/
8”) minijack to 1/4” plug
adapter.
• Set the gain level of the Mic In
2 jack to the minimum before
connecting or turning on a
microphone, especially if you
are using headphones.
10
11
Figure 1-3: Jacks, connectors and controls.
12
13
About your Sound Blaster Audigy 2 Platinum eX hardware 1-3
14
15
Page 18
Click here or on any description to
return to the diagram of the Sound
Blaster Audigy 2 Platinum eX
card.
Table 1: The Sound Blaster Audigy 2 Platinum eX card
Number Description
1 Joystick/MIDI connector
Connects to the Joystick/MIDI bracket for gamepads, other input and MIDI devices.
2AD_LINK 2 port
Connects to the External I/O Module’s AD_LINK2 port to supply power.
3 AD_LINK 1 connector
Connects to the External I/O Module for transferring data.
4 Line Out 3 jack
Connects to Front Center, subwoofer and Rear Center inputs of powered analog
speakers or an external amplifier.
5 Line Out 2 jack
Connects to Rear Left/Right analog inputs of powered analog speakers or an external
amplifier.
6 Line Out 1 jack
Connects to Front Left/Right analog input of an external amplifier or to powered
analog speakers, or headphones.
7 Power Connector
Connects to the supplied power converter cable.
8 Aux_In connector
Connects to an analog output of a CD or DVD-ROM drive.
9 CD_SPDIF connector
Connects to the digital output of a CD or DVD-ROM drive.
About your Sound Blaster Audigy 2 Platinum eX hardware 1-4
Page 19

Click here or on any description to
return to the diagram of the
External I/O Module.
Table 2: Audigy 2 Platinum eX External I/O Module
Number Description
1 SB1394/FireWire port
Connects to an IEEE 1394 compatible external device (such as a digital video
camcorder, digital still camera, printer or scanner).
2 Optical SPDIF Out/In
For recording/playback devices with optical connectors.
3Line In 2 jack
For analog devices like music synthesizers and other line-level sources.
4 Line In 1/Mic In jack
For line sources (for example, electric guitars) or dynamic microphones.
5 ¼-inch Headphone jack
For connecting to headphones. (Speaker output will be muted).
6 Microphone Input Sensitivity control knob
Controls the input level of a microphone signal.
7 Master Volume control knob
Controls the overall output volume.
8CMSS Switch
Turns the Creative MediaSource MultiSpeaker Surround
9 Infrared Receiver
Lets you control your computer via the IR remote control.
®
feature on or off.
About your Sound Blaster Audigy 2 Platinum eX hardware 1-5
Page 20

Table 2: Audigy 2 Platinum eX External I/O Module
Number Description
Click here or on any description
to return to the diagram of the
External I/O Module.
10 Line In 3 (Aux In) jacks
Connects to analog devices like VCRs, TVs and CD players.
11 Standard MIDI In/Out connectors
Connects to MIDI devices via standard DIN cables.
12 SPDIF In/Out Coaxial jacks
For digital audio recording/playback devices such as DAT and MiniDisc recorders.
13 SPDIF Digital Out Mini DIN jack
Outputs digital audio via mini DIN cable.
14 AD_LINK 1 Connector
Connects to the Sound Blaster Audigy 2 Platinum eX card's AD_LINK 1 cable's
connector.
15 AD_LINK 2 Connector (SB1394/FireWire port)
Connects to the Sound Blaster Audigy 2 Platinum eX card's AD_Link 2 connector
via the supplied 1.8 meter (5-feet) AD_LINK cable. It provides power to the External
I/O Module. Next to AD_LINK 2 is another SB1394/ FireWire port, for connection
to IEEE1394-compatible devices.
About your Sound Blaster Audigy 2 Platinum eX hardware 1-6
Page 21

Adjusting the
You can adjust the headphones volume and microphone gain in two ways.
volume-level of
Headphones and
Microphone
Using the control knobs On the front panel of the External I/O Module, turn the respective control knob:
❑ Counterclockwise to decrease the headphone volume or microphone gain.
❑ Clockwise to increase the headphone volume or microphone gain.
About your Sound Blaster Audigy 2 Platinum eX hardware 1-7
Page 22

Using Creative
Surround Mixer
To install Creative Surround
Mixer and other applications, see
“Installing Drivers and
Applications” on page 3-1.
• For best effects, set the
headphones volume and
microphone gain levels to
75% in Surround Mixer, and
then use the Audigy 2
Platinum eX External I/O
Module’s control knobs to
make further adjustments.
• If you set the headphones
volume or microphone gain
levels to 0%, or mute them in
Creative Surround Mixer, you
hear no sound even if the
Sound Blaster Audigy 2
Platinum eX External I/O
Module’s control knobs are set
to the maximum.
To adjust headphones volume:
1. Click Start -> Programs -> Creative -> Sound Blaster Audigy 2 -> Surround Mixer.
2. On the Master Control panel of Creative Surround Mixer, make sure that there is no red “X” on the
Speaker button under the Vol um e slider. Otherwise, click the Speaker button. This will unmute the
headphones output.
3. Drag the Vo l um e slider up or down to adjust the headphones volume.
To adjust microphone gain:
1. Click Start -> Programs -> Creative -> Sound Blaster Audigy 2 -> Surround Mixer.
2. On the Source panel of Creative Surround Mixer, click an audio input source button with a down
arrow, and then select Line-In 1/Mic.
3. Make sure the Speaker button below the Line-In 1/Mic slider has no red “X” on it. Otherwise, click
the Speaker button. This will unmute the audio input.
4. Drag the slider to adjust the microphone gain.
Using the Remote Control
The external External I/O Module has an infrared receiver for the remote control. This remote control lets
you operate your computer from the comfort of your sofa or bed up to a distance of 4 meters (13 feet).
About your Sound Blaster Audigy 2 Platinum eX hardware 1-8
Page 23
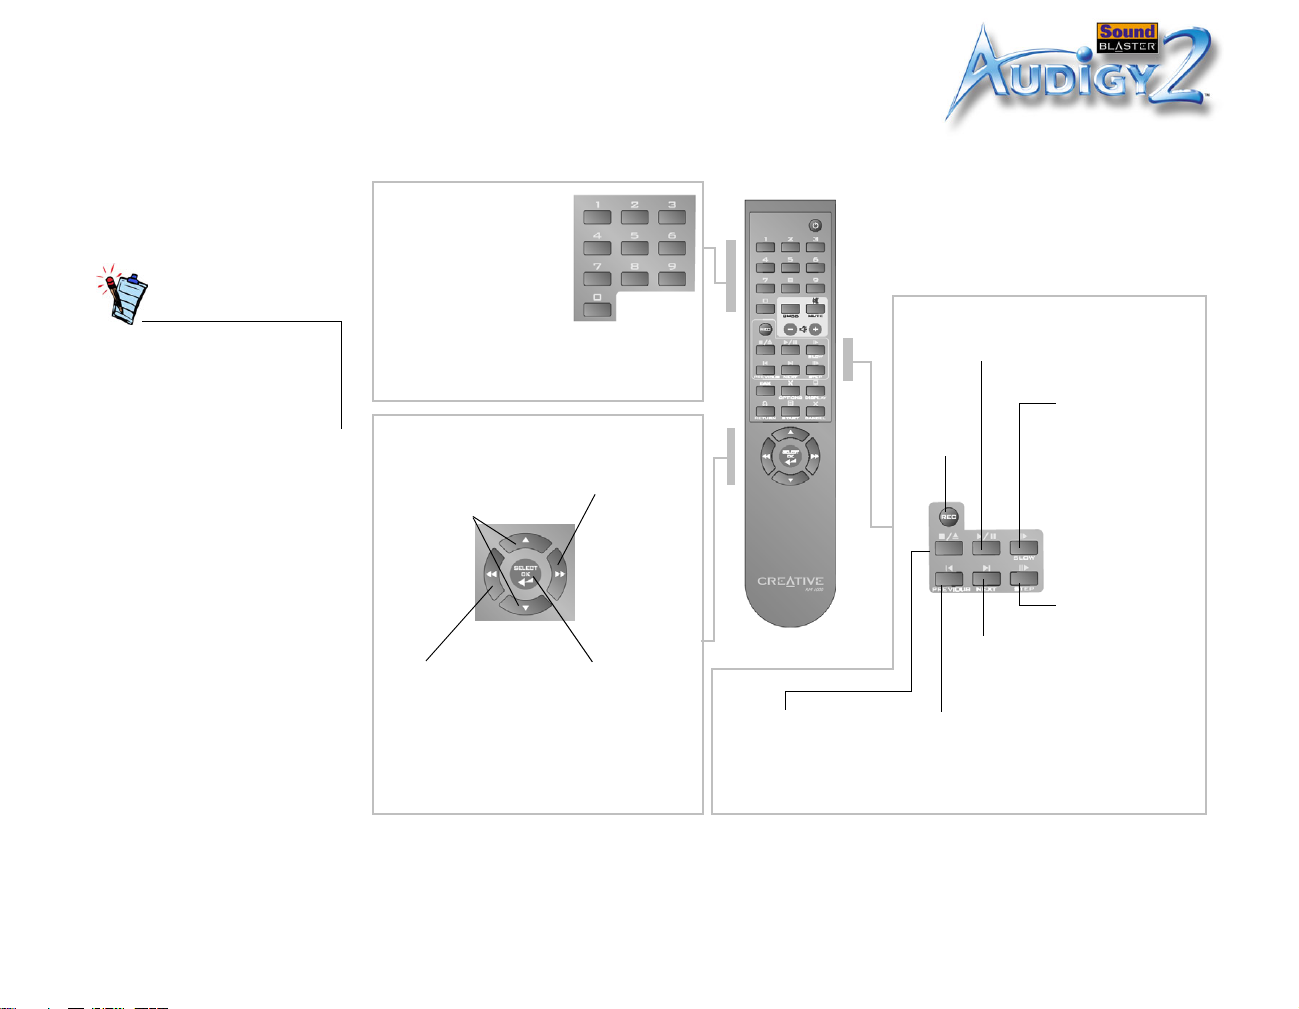
Remote Control
Refer to Figure 1-4 and Figure 1-5 below for a description of your remote control’s functions.
Functions
• *OSD - On Screen Display.
• The model of your remote
control may be different from
the unit displayed here.
Number pad
Used for the selection of
tracks and menu items. To
access a two-digit number
track such as track 10,
press the "1" button
followed by the "0" button in
quick succession. During
playback of a media format,
press the "0" button to display the track list on the
Up/Down buttons
Used for navigating up/
Rewind/Left
rewinding a track,
decreasing a
navigating left.
down.
button
Used for
value or
OSD* for selection.
Select/OK button
Executes a selected task or
command. During playback
of a media format, press
this button to display the
content menu on the OSD*
for selection.
Fast Forward/
Right button
Use this to
cue forward
through a track,
or increase a
value or
navigate right.
Stop/Eject button
Stops the current
playback. Pressing the
button subsequently will
eject the disc.
Play/Pause button
Starts, pauses or resumes the current
Record
button
Starts audio
recording.
Next button
Goes to the next
track or menu
Previous button
Goes to the
previous track or
menu page.
page.
playback.
CDs and MIDI files).
Press the Play/Pause
Press once to pause
the button each time
the next video frame.
Slow Motion
Forward button
Reduces the
playback speed
(except for audio
Press repeatedly to
select the speed.
button to resume
normal playback.
Step Forward
button
(For video only)
playback. Pressing
will advance you to
To resume normal
playback, press the
Play/Pause button.
Figure 1-4: Navigation Buttons on the Remote Control.
About your Sound Blaster Audigy 2 Platinum eX hardware 1-9
Page 24

EAX button
Displays the
EAX-specific
OSD menu.
Display button
Displays the current
task status, and the
time and date on the
Options button
Displays options for
current task.
OSD.
Power button
Displays the Shutdown Menu
CMSS button
Press to select CMSS mode.
Return button
Returns to
parent menu.
Close/Cancel button
Cancels the current
OSD menu or closes
controlled by the
Start button
Displays the OSD
Start menu for the
selection of a task.
the application
currently being
remote control.
Figure 1-5: Other Buttons on the Remote Control.
About your Sound Blaster Audigy 2 Platinum eX hardware 1-10
Mute button
Press to mute audio.
Master Volume buttons
Press the Volume Up (+) or Volume Down
(-) button to control the master volume of
your computer and Sound Blaster Audigy
2 Platinum eX.
Page 25

2
Installing Hardware
This chapter tells you how to install the Sound Blaster Audigy 2 Platinum
eX hardware.
Page 26

Installing Hardware
Installation Steps
Step 1: Prepare the Sound Blaster Audigy 2 Platinum eX hardware
Turn off the main power supply
and disconnect your computer’s
power cord. Systems using an
ATX power supply unit with soft
power off may still be powering
the PCI slot. This can damage
your audio card when it is
inserted into the slot.
1. Place the Sound Blaster Audigy 2 Platinum eX External I/O Module near your computer.
2. Locate the AD_LINK cable that links your External I/O Module to your Sound Blaster Audigy 2
Platinum eX card.
Figure 2-1: Audigy 2 Platinum eX External I/O Module and AD_LINK cable
Installing Hardware 2-1
Page 27

Step 2: Prepare your computer
Remove any existing audio card
or disable the onboard audio.
For more information, see
“Troubleshooting and FAQs” on
page B-1.
1. Turn off your computer and all peripheral devices.
2. Touch a metal plate on your computer to ground yourself and to discharge any static electricity, and
then unplug the power cord from the wall outlet.
3. Remove the computer cover.
4. Remove the metal brackets from two adjacent unused PCI slots as shown in Figure 2-2.
Remove screws (if any) and put
aside for securing the audio card’s
metal bracket.
metal bracket
PCI slot
ISA slot (on older mainboards)
Figure 2-2: Removing metal brackets
Installing Hardware 2-2
Page 28

Step 3: Install the audio card
1. Align the audio card with the PCI slot and press the card
gently but firmly into the slot as shown in Figure 2-3.
2. Do not force the audio card into the slot. Make sure that the
gold traces of the card’s PCI connector are aligned with the
PCI bus connector on the motherboard before you insert the
card into the PCI expansion slot. If it does not fit properly,
gently remove it and try again.
3. Secure the audio card to the computer.
PCI
slot
Figure 2-3:Aligning the card against the slot.
Step 4: Install the joystick connector
1. Align the joystick connector bracket next to
the audio card.
2. Secure the Joystick bracket with a screw (if necessary).
See Figure 2-4.
Figure 2-4: Installing the joystick port
Installing Hardware 2-3
Page 29

Step 5: Install the cables
To use the front and back SB1394/
FireWire connectors on the
External I/O Module, you must
connect the AD_LINK 1 and
AD_LINK 2 connectors on both
the audio card and the External
I/O Module.
If your computer chassis blocks
the AD_LINK cable from
connecting to the audio card:
1) Unscrew and loosen the card
from the PCI slot
2) Insert the AD_LINK cable
3) Reinstall the card securely into
the PCI slot.
If the AD_LINK cable is too long,
coil it gently to prevent damage to
the delicate wires inside the cable.
1. Connect the AD_LINK 1 connectors on the AD_LINK cable first. With the connector’s side springs
pressed down, push the connector until it clicks firmly into place on both the audio card and the
External I/O module.
2. Connect the AD_LINK 2 connectors at both ends. See Figure 2-5.
3. Locate the supplied power converter cable. Insert the small white connector into the audio card's power
connector.
4. Connect the other end of the power convertor to an available power supply cable from your computer's
power supply unit.
Note: Make sure that the power cable connected to the audio card is not shared with other devices like
disk drives.
Powe r conver te r
cable and connector
To system power supply
unit
3
Side spring
4
6
5
CD_SPDIF connector
1
2
CD-ROM or DVDROM drive
Figure 2-5: Connecting the cables to the audio card.
Installing Hardware 2-4
Page 30

Windows 98 SE users can also
listen to audio CDs via Windows
Media Player 7.x or later, using
the Digital Playback option. Your
CD-ROM/DVD-ROM drive must
support sustained digital reads.
Read the Media Player help for
more information.
Digital CD Audio
Extraction
On a fresh installation of
Windows Me, you may not hear
audio from your CD-ROM drive
even after enabling Digital CD
Audio. To solve this, disable
Digital CD Audio and then restart
the computer. When the system
has restarted, re-enable Digital
CD Audio and restart the system
again.
5. Connect your CD-ROM or DVD drive’s analog audio output cable to the Audigy 2 Platinum eX card’s
Aux_IN connector.
6. If your CD-ROM or DVD drive has a digital SPDIF audio output connector, you may wish to skip Step
5 and use a two-pin digital audio cable (available separately) to connect the drive to the Audigy 2
Platinum eX card’s CD_SPDIF connector instead, for better sound quality.
Note: Audio can be sent to your computer through your CD or DVD drive’s IDE cable instead, through
a feature called Digital CD Audio Extraction. See “Digital CD Audio Extraction” below if you wish
to use this feature.
To enable this feature in Windows Me or Windows 2000
(enabled by default in Windows XP), follow the steps below:
1. In Windows 2000/XP or Windows Me, click Start ->
Settings-> Control Panel -> System.
2. Select the Device Manager tab.
3. Double-click the CD-ROM or DVD-ROM icon. Doubleclick the name of your drive.
4. In the Properties tab, click the “Enable Digital CD audio
for this CD-ROM device” checkbox to select it.
Figure 2-6: Enabling Digital CD Audio in
Windows 2000
Installing Hardware 2-5
Page 31

Step 6: Connect to AC power socket
1. Replace the computer cover.
2. Plug the power cord into the AC wall outlet, and turn on the computer.
To connect your Sound Blaster Audigy 2 Platinum eX card and External I/O Module to other devices, see
“Connecting Related Peripherals” on page 2-7.
To install software. refer to “Installing Drivers and Applications” on page 3-1.
Installing Hardware 2-6
Page 32

Connecting Related Peripherals
Click any circled number in the
diagram to see a description of the
item.
Sound Blaster Audigy 2 Platinum eX will give you endless hours of listening pleasure. Figure 2-7 shows
you how to connect related peripherals to your Sound Blaster Audigy 2 Platinum eX to optimise your
enjoyment.
1
2
3
6
7
4
The supplied AD_LINK cable
consists of two connectors
(AD_LINK 1 and AD_LINK 2) at
both ends. AD_LINK 1 transfers
data while AD_LINK 2 provides
power via an IEEE1394
connection.
Analog Source
5
Figure 2-7: Connecting Sound Blaster Audigy 2 Platinum eX to other devices.
Installing Hardware 2-7
Page 33

Connecting Related Peripherals (cont’d)
Click any circled number in the
diagram to see a description of the
item.
Other IEEE 1394
2
1
3
7
6
Dolby Digital (AC-3)
Amplifier SPDIF In
4
devices you can
connect:
•IEEE 1394 hard disk
•IEEE CD-RW drive
•SB 1394/Firewire
or
NOMAD Jukebox
•IEEE-compliant
1394 devices
5
Figure 2-8: Connecting peripherals to the External I/O Module.
Installing Hardware 2-8
Page 34

Click here or on any description in
the table to return to the main
diagram.
Table 1: Description of components on Page 2-7
Number Description
1 Surround Amplifier or powered speakers
Multichannel analog audio-video amplifier or 5.1/6.1 analog multi-speaker system,
or ordinary stereo receiver.
2 Line Out 1 jack
Connects to powered stereo speakers or an external amplifier. Also supports
headphones. Outputs front Left/Right audio channels.
3 Line Out 2 jack
Connects to powered surround speakers or an external surround amplifier with
surround inputs. Outputs Surround Left/Right audio.
4 Line Out 3 jack
Three-channel analog jack outputs Subwoofer, Front Centre and Rear Centre signals.
A 4-pole 3.5mm plug is required.
5 Digital Audio device
Devices like DAT or MD players that have a 3.5mm input jack.
6 Coaxial Analog Line In jacks
Connect to external analog stereo devices like cassette recorders, tuners or other linelevel sound sources.
7 SPDIF Digital Out jack
Outputs up to 6.1-channels or compressed AC-3 SPDIF output for connection to
digital surround decoders and amplifiers or digital speaker systems, like the Creative
Inspire 5.1
TM
speaker system.
Installing Hardware 2-9
Page 35

Table 2: Description of components on Page 2-8
Number Description
Click here or any description in
the table to return to the main
diagram
1 Optical Input/Output
Connect to digital recording/playback devices with TOSLINK optical input and
output connectors.
2 Line In 1/Mic In jack
Connects to analog line-level devices like electric guitars, or microphones.
3 1/8-inch Headphone jack
Connects to stereo headphones with 3.5mm (1/8-inch) jack. Use a convertor if your
headphones come with a smaller connector.
4 Digital Video camcorder or other IEEE 1394 device
Connect IEEE-compliant 1394/Firewire devices like Digital Video camcorders or the
NOMAD Jukebox.
5 Mini DIN SPDIF connector
Found on Creative digital speaker systems like the Creative Inspire 5.1™, which can
be connected to the External I/O Module’s SPDIF Digital Output via a Mini DIN-tomini plug convertor.
6 MIDI In/Out connectors
Connect to MIDI devices like synthesizers, etc. MIDI devices can be daisy-chained
if they have both MIDI In and MIDI Out jacks.
7 Digital Recording Device
Connect to external digital playback and record stereo devices such as another
Creative audio card, or DAT recorder.
Installing Hardware 2-10
Page 36

Connecting Speakers Systems
If you have a 5.1 or 6.1 channel speaker system, you can “upmix” your stereo sources (such as MP3,
WMA, MIDI and Wave) to 6.1 channels by using the Creative MultiSpeaker Surround (CMSS)
technology. To upmix, you need to enable the CMSS feature in Creative EAX console. Refer to the EAX
ADVANCED HD online Help.
For discrete 7-channel amplifiers
or systems, use a 3.5 mm
(stereo) Audio/Video-to-RCA
cable (available separately) to
connect Line Out 3 to available
Center, Subwoofer and Rear
Center channels.
For connection to center and
subwoofer channels using a 3.5
mm (stereo)-to-RCA cable or 3.5
mm (stereo) Audio/Video-toRCA cable (available
separately), connect the white
RCA jack to the Center input,
and the red RCA jack to the
Subwoofer input.
Surround amplifier or speaker
system with analog 5.1 inputs
Rear Center connectors for
use in 6.1-channel systems
only
3.5 mm (mono)-to-3.5
mm (mono) digital cable
Dolby Digital
Decoder/Amplifier
Figure 2-9: Connecting external consumer electronic devices to the Sound Blaster Audigy 2 Platinum eX.
For 5.1-channel systems, Line Out 1, 2 and 3 require
a standard 3-pole mini plug. For 6.1-channel systems,
Line Out 3 requires a 3.5mm stereo Audio/Video plugto-RCA jack for output of Center, Subwoofer and Rear
Center signals.
Line Out 1 (Analog)
Line Out 2 (Analog)
Line Out 3 (Analog)
Right
channel,
Left
channel
for twochannel
output
Subwoofer,
Center and
Rear
Center for
threechannel
output
Installing Hardware 2-11
Page 37

Positioning Your Speakers
Good speaker placement can
enhance your movie enjoyment,
while careless placement can make
good audio systems sound bad.
For detailed loudspeaker
placement tips visit the Dolby
Laboratories website at http://
www.dolby.com/ht/co_br_0110_
ListenersGuideEX.html
If you are using four to six speakers, place
them to form a circle around you
(Figure 2-10), and the speakers angled
toward you.
Make sure that the computer monitor is not
blocking the path of your front speakers.
You may want to adjust the relative
positions of the speakers until you get the
audio experience you like best. If you have a
subwoofer, place the unit near a corner of
the room for the best bass experience.
SW
FL
RL
Figure 2-10: Recommended speaker
CS
FR
RC
RR
placement.
Speaker notation
FL: Front Left
CS: Front Center
FR: Front Right
RL: Rear Left
RC: Rear Center
RR: Rear Right
SW: Subwoofer
Installing Hardware 2-12
Page 38

Installing Software
This chapter tells you how to install the Sound Blaster Audigy 2
3
Platinum eX software.
Page 39

Installing Software
Installing Drivers and Applications
• During the installation process,
Windows 98 SE users may be
prompted to insert the
Windows 98 SE installation
CD into the CD-ROM drive.
Do so and click the OK button.
• Some computers may be
supplied without the Windows
98 SE CD, but have the
necessary files stored in
C:\Windows\Options\Cabs
(where C: represent the drive
Windows has been installed
on).
You need to install device drivers and applications prior to using Sound Blaster Audigy 2 Platinum eX.
To install these drivers and the selected software applications, use the following instructions. The
instructions are applicable to all supported Windows operating systems.
1. After you have installed the Sound Blaster Audigy 2 Platinum eX card and Audigy 2 Platinum eX
External I/O Module, turn on your computer. Windows automatically detects the audio card and device
drivers.
2. When prompted for the audio drivers, click the Cancel button.
3. Insert the Sound Blaster Audigy 2 Installation and Applications CD into your CD-ROM drive.
If your system’s Windows AutoPlay mode is enabled, the CD starts running automatically. If not, you
need to enable your CD-ROM drive’s auto-insert notification feature. For more details, see “Problems
Installing Software” on page B-1.
4. Follow the instructions on the screen to complete the installation.
5. When prompted, restart your computer.
Downloading the latest applications and device drivers from the Internet is easier than ever with Creative
Software AutoUpdate. See “Using Creative Software AutoUpdate” on page 3-2 for details.
Installing Software 3-1
Page 40

Using Creative Software AutoUpdate
For your privacy, no personal
information is captured by or sent
to Creative Labs during the
Software AutoUpdate process.
Only system information and
Creative product details are
required for the AutoUpdate
analysis. None of this information
can or will be used by Creative for
any other purpose.
Locating, downloading and installing updates for your Creative Products is now simpler and faster with
the new web-based Creative Software AutoUpdate system.
Instead of spending valuable time searching for individual files to download and install for each of your
installed Creative Products, let Creative Software AutoUpdate do the work for you.
When you connect to Creative Software AutoUpdate via the Internet, the website will analyze your
computer system to determine what operating system (OS), language and Creative products are installed
in your system.
After the online analysis, you will be able to select from a list of only the most relevant software and driver
updates. The files will then be dynamically retrieved and installed on your system for you. As the files are
customised for your specific OS, language and Creative hardware, they are smaller and take less time to
download, compared to the huge generic multi-language files available via non-customised software
downloads.
Points to note:
❑ First-time users of Creative Software AutoUpdate may be prompted to authorise the download of a
browser component required for system inspection. Ensure that the content is signed by Creative Labs,
Inc., and then click the Ye s button.
❑ Ensure that all your Creative products are connected and installed on the same computer running
Creative Software AutoUpdate.
To find out more about Creative Software AutoUpdate, visit www.soundblaster.com.
Sound Blaster Audigy 2 Feature Showcase Demo
To feel the audio card’s awesome gaming, music reproduction and home studio capabilities, install the
Sound Blaster Audigy 2 Feature Showcase Demo. This demo requires high-quality 5.1/6.1 speaker for
optimal listening experience.
1. Insert the Sound Blaster Audigy 2 Feature Showcase Demo CD into your CD-ROM drive.
If the drive supports Windows AutoPlay mode, the CD starts running automatically. If not, you need
to enable your CD-ROM drive’s auto-insert notification feature. For more details, see “Problems
Installing Software” on page B-1.
2. Follow the instructions on the screen to complete the installation, and to run the Demo.
Installing Software 3-2
Page 41

Uninstalling and
Reinstalling the
At times you may need to uninstall or reinstall some or all of the audio card's applications and device
drivers to correct problems, change configurations, or upgrade outdated drivers or applications. The
following instructions tell you how to do so in all Windows operating systems.
Applications and
Device Drivers
Reinstalling all Audio Drivers and Applications
Uninstalling all Audio Drivers and Applications
Before you begin, close all audio card applications. Applications that are still running during the
uninstallation will not be removed.
If you are experiencing problems with the Audigy 2 device drivers or application, you may want to
reinstall all of them. To do so:
1. Click Start -> Settings -> Control Panel.
2. Double-click the Add/Remove Programs icon.
3. Click the Install/Uninstall tab or the Change or Remove Programs button.
4. Select the Sound Blaster Audigy 2 entry, and then click the Add/Remove (or Change/Remove)
button.
5. In the InstallShield Wizard dialog box, select the Repair option. If prompted, insert the Sound
Blaster Audigy 2 Installation and Applications CD into your CD-ROM and click the OK button.
6. Click the Ye s button.
7. Restart your computer when prompted.
You can now check the computer to see if the reinstalled software works properly. If not, proceed to
“Troubleshooting and FAQs” on page B-1.
For a cleaner installation, you may want to uninstall all the audio drivers and applications before you
reinstall them again. To do so:
1. Click Start -> Settings -> Control Panel.
2. Double-click the Add/Remove Programs icon.
3. Click the Install/Uninstall tab or Change or Remove Programs button.
4. Select Sound Blaster Audigy 2 entry, and then click the Add/Remove (or Change/Remove) button.
Installing Software 3-3
Page 42

5. In the InstallShield Wizard dialog box, select the Remove option.
6. Click the Ye s button.
7. Restart your computer when prompted.
To uninstall Creative MediaSource and all its components, do the following:
1. Click Start -> Settings -> Control Panel.
2. Double-click the Add/Remove Programs icon.
3. Click the Install/Uninstall tab (or Change or Remove Programs button).
4. Select Sound Blaster Audigy 2 entry, and then click the Add/Remove (or Change/Remove) button.
5. In the InstallShield Wizard dialog box, select the Full Uninstallation button, and then click the Next
button.
6. Click the Ye s button.
7. Restart your computer when prompted.
Installing/ Uninstalling selected Audio Drivers and Applications
The above instructions helped you to install or uninstall all device drivers or applications. However, you
can also install or uninstall only selected drivers or applications. To do so:
1. Click Start -> Settings -> Control Panel.
2. Double-click the Add/Remove Programs icon.
3. Click the Install/Uninstall tab (or the Change or Remove Programs button)
4. Select Sound Blaster Audigy 2 entry, and then click the Add/Remove (or Change/Remove) button.
5. In the InstallShield Wizard dialog box, select the Modify option. A list of applications appears.
6. To uninstall an application, click the check box adjacent to it so that the box is clear. To install an
application, click the adjacent check box so that a tick/cross appears within it.
7. Click the Next button. If prompted, insert the Sound Blaster Audigy 2 Installation CD into your CDROM, and click the OK button.
8. Restart your computer when prompted.
Installing Software 3-4
Page 43

To uninstall a selected component in Creative MediaSource, do the following:
1. Click Start -> Settings -> Control Panel.
2. Double-click the Add/Remove Programs icon.
3. Click the Install/Uninstall tab (or the Change or Remove Programs button)
4. Select the Creative MediaSource entry, then click the Add/Remove (or Change/Remove) button.
5. In the InstallShield Wizard dialog box, click the Custom Uninstallation button, and then click the
Next button.
6. Click the check box of the application that you want to uninstall, to select it.
7. Click the Next button.
8. Restart your computer when prompted.
Updating Windows 2000 (Service Pack 3)
Updating Windows with Digital Video Update
Windows 2000 now provides better support for AC-3 SPDIF output (non-PCM through WaveOut) for
software DVD viewing. Click the web site link below to download the Windows 2000 Service Pack 3 to
enjoy this support and to fix other issues in the Windows 2000 OS.
http://www.microsoft.com/
If you have installed DirectX 8.0 or 8.0a run time, install the latest update for this application. If DirectX
8.1 has been installed, users do not need the update.
This update provides PAL support and improved device support to 1394 Digital Video equipment users
This is applicable for Windows 98 SE and Windows 2000 users. This update provides minor
improvement to the Windows Me OS. To look for this update, go to the web site below.
http://www.microsoft.com/
Installing Software 3-5
Page 44

Using Audigy 2 Software
Find out how the software accompanying your audio card can be used
4
to control and customise the card for best performance.
Page 45

Using Audigy 2 Software
Creative Sound Blaster Audigy 2 Applications
The applications included with
Sound Blaster Audigy 2 Platinum
eX may be different from those
described here. Sound Blaster
Audigy 2 Platinum eX may also
come with third party
applications that may include
user manuals and other help
documents not produced by
Creative.
The following software is designed for you to access the basic as well as the advanced features of your
audio card. We recommend that you familiarise yourself with their functions in order to make full use of
Sound Blaster Audigy 2 Platinum eX’s rich features.
Demos: Providing an overview of Sound Blaster Audigy 2’s features
❑ Creative Sound Blaster Audigy 2 Getting Started Demo
❑ Creative Sound Blaster Audigy 2 Feature Showcase Demo
Introduction to the Sound Blaster Audigy 2 software suite
❑ Creative MediaSource Go!
❑ Creative MediaSource Go! Launcher
❑ Creative MediaSource Player
❑ Creative MediaSource Organizer
❑ Creative MediaSource DVD-Audio Player
❑ Creative EAX Console
❑ Creative Surround Mixer
❑ Creative Speaker Calibrator
❑ Creative Speaker Settings
❑ Creative MiniDisc Center
❑ Creative SoundFont Bank Manager
❑ Creative Audio Stream Recorder 2
❑ Creative Wave Studio
Diagnostic and troubleshooting utilities
❑ Creative Diagnostics
❑ Creative Speaker Settings
Using Audigy 2 Software 4-1
Page 46

Demos
Three demo packages have been included to showcase the basic as well as the advanced features of your
Sound Blaster Audigy 2 Platinum eX hardware. We recommend that you play them at least once in order to
have a good overview of your card’s features.
Sound Blaster Audigy 2 Getting Started Demo
Sound Blaster Audigy 2 Feature Showcase Demo
This is a good starting point from which you can learn about Sound Blaster Audigy 2 Platinum eX. The
Sound Blaster Audigy 2 Getting Started Demo consists of several interactive and informative demos that
highlight different aspects of Sound Blaster Audigy 2: experiencing digital music and digital gaming,
watching movies, connecting speakers, and performing tasks.
Use the Sound Blaster Audigy 2 Feature Showcase Demo to feel the audio card’s awesome gaming, music
reproduction and home studio capabilities.
Experience the following exciting features of the new Sound Blaster Audigy 2:
❑ DVD-Audio Playback — Learn more about this new, high-resolution music format and experience the
difference when a DVD-Audio clip is being played.
❑ EAX ADVANCED HD technologies — Experience complex multi-environment audio effects as you
navigate through a fascinating virtual 3D world. Run this demonstration and experience EAX
ADVANCED HD technologies such as Environment Panning, Environment Reflection and
Environment Morphing. Compare the scenes with and without EAX ADVANCED HD, and you will
understand why more game developers are using EAX ADVANCED HD technologies for the best
gaming experience.
❑ Dolby Digital Surround EX Support — Listen to a THX audio demonstration containing an additional
rear channel (rear center) that produces a richer and more consistent surround effect than that of
systems with only two rear channels.
Note: The Sound Blaster Audigy 2 Feature Showcase Demo can be installed using the separate Feature
Showcase Demo CD in your package. This demo will run only if a Sound Blaster Audigy 2 Platinum
eX card is installed because the software utilises the card’s hardware capabilities for the demonstrations.
Using Audigy 2 Software 4-2
Page 47

Introduction to the Sound Blaster Audigy 2 software suite
This section walks you through the main suite of the Sound Blaster Audigy 2 software that enables you to
make full use of Sound Blaster Audigy 2 Platinum eX’s versatile and powerful features.
Creative MediaSource Go!
Creative MediaSource Go! Launcher
Creative MediaSource Go! is a convenient launch pad, not only for Creative MediaSource's components,
but also for your own frequently used applications. If you have desktop shortcuts for your favorite
applications, you can place them in one central location, Creative MediaSource Go!
The Creative MediaSource Go! button launches Creative MediaSource Go! Launcher. Creative
MediaSource Go! floats on your desktop as a small profile bar. Clicking a button on the bar causes it to
expand horizontally into a shortcut bar. Creative MediaSource Go! Launcher contains icons that launch
the various MediaSource modules for controlling Sound Blaster Audigy 2 Platinum eX. You can also add
your own shortcut icons to Creative MediaSource Go!.
For more information and usage details on Creative MediaSource Go!, refer to its online Help.
Just like the Start button in Windows, Creative MediaSource Go! Launcher provides a single point of access
to most of the software programs you need, to control and customise Sound Blaster Audigy 2 Platinum eX.
Creative MediaSource Go! Launcher consists of four tabs:
and
Companion Products
❑ Programs houses shortcuts to Sound Blaster Audigy 2 applications. You can also add your own
shortcuts to other applications.
❑ Product Settings houses shortcuts to specific programs for changing Sound Blaster Audigy 2
Platinum eX’s hardware settings.
❑ Product Support contains diagnostic software, product update information, product registration
forms, demonstration software as well as helpful documentation such as Getting Started guides.
❑ Companion Products allows viewing of information on other Creative products and applications.
.
Programs, Product Settings, Product Support
Using Audigy 2 Software 4-3
Page 48

For more information and usage details on Creative MediaSource Go! Launcher, refer to its online Help.
Creative MediaSource Player
“What-U-Hear” multichannel recording
Creative MediaSource Organizer
Creative MediaSource Player is the only software you will need for music and multimedia entertainment.
Unlike other media players, Creative MediaSource Player is specially designed to access the power of your
Sound Blaster Audigy 2 Platinum eX hardware. With it, you can:
❑ play back music and multimedia files: MP3, WAV, WMA, NVF, MLP, VideoCD, etc
❑ enhance playback of ordinary music with surround effects using EAX
❑ vary the speed of audio playback without affecting the pitch (Time Scaling)
❑ use Smart Volume Management to play back a list of songs at a similar volume level even if they were
originally recorded at different loudness levels
❑ switch between Creative MediaSource Organizer and Creative MediaSource Player with just a click of
the mouse
❑ use the built-in Creative MediaSource Recorder to record audio (see below).
Use Creative MediaSource Recorder to record at up to 24-bit/96 kHz from any audio sources processed
by the audio card. A multichannel What-U-Hear recording mode lets you capture audio directly from the
audio card's 6.1-channel analog speaker outputs, without the need to connect any cables to the Line Out
connectors. You can then capture surround-sound movie/gameplay audio, and even audio content
enhanced or upmixed with CMSS and EAX effects. For more information and usage details on Creative
MediaSource Player and Recorder, refer to the online Help.
Managing a huge collection of audio CDs and MP3 files can be a headache. With Creative MediaSource
Organizer, you can find any recording easily, no matter where it is stored on your hard disk or external
storage devices. The following is a list of tasks you can perform with Creative MediaSource Organizer.
Using Audigy 2 Software 4-4
Page 49

Finding and organizing
songs
Creative MediaSource Organizer searches your hard disk to compile a database of songs available, called a
“PC Music Library” or
very fast due to a sophisticated engine and use of three search fields: artist, genre and album.
PCML
. Once you have a PCML, you can sort it and search for songs. Searching is
Keeping your music
database up to date
Transferring songs
Automatically playing
multimedia content
Extracting and
converting songs
Once songs have been found, you can create
You can also enter and edit extra information about each MP3 recording with
As songs are added or deleted from your computer and other storage devices, your PCML will need to be
kept up to date. The Media Sniffer will monitor specified folders on your hard disk for file changes, and
update your PCML accordingly.
NOMAD users can use Creative MediaSource Organizer to transfer music files to and from the computer
and other compatible devices.
Media Detector makes it easy for users to access multimedia content from various internal or external
media. There is no need to hunt through a maze of different software to play different types of files.
Media Detector automatically recognises the insertion or connection of CDs, VCDs, and external devices
like the NOMAD Jukebox and NOMAD MP3 players. Upon recognition, the content in the media will
automatically start playing without further intervention from the user.
Storing hundreds of songs on your computer can consume much hard disk space. WAV files and tracks
from audio CDs can take up to 50 MB per song. To reduce storage on your hard disk, you can convert
tracks from audio CDs into smaller 4 to 5 MB MP3 files. Creative MediaSource Organizer’s built-in Rip
Now module lets you easily extract tracks from audio CDs, then convert them to MP3 and WMA formats
at high resolution bit rates of 320 Kbps and 160 Kbps, respectively.
To eliminate the need for you to manually type the track information of an audio CD’s ripped tracks, a
feature called CDDB can connect your computer to the Internet (Gracenote’s CDDB service) and
automatically retrieve the track names and other useful track information for you.
playlists
to automatically replay them in any desired sequence.
ID3
tags.
Using Audigy 2 Software 4-5
Page 50

Storing music on
recordable CD
If you have a CD-writer, another way to reduce music storage on your computer’s hard disk is to record
audio tracks onto CD-R or CD-RW for playback on many consumer hi-fi devices. Creative MediaSource
Organizer’s Burn CD module lets you create your own audio and MP3 CDs from WAV, MP3 and WMA
files. The Burn CD feature also lets you easily design, create, and print matching CD covers and liner notes
for your audio CDs.
For more information and usage details on Creative MediaSource Organizer, refer to its online Help.
Creative
MediaSource DVDAudio Player
During playback of DVD-Audio
content, the recording feature will
be disabled in accordance to
copyright regulations.
Creative EAX Console
Use this application to play back today’s highest quality audio recordings available on DVD-Audio discs.
You can enjoy music 24-bit/96 kHz multichannel surround-sound music, or stereo recordings of up to 24bit/192 kHz resolution. A Pentium III/AMD Athlon 1 GHz or faster processor is recommended. Requires
256 MB RAM for Windows 98 SE, Windows Me, Windows 2000 SP3 or Windows XP SP1. Also requires
a second-generation 6x or faster DVD-ROM drive. Visit www.soundblaster.com for updates on OSspecific support issues.
EAX Console allows you to configure the Audigy 2 processor's effects engine.
EAX ADVANCED HD promises to deliver sounds that are so life-like, you can almost see them! It is the
computer industry's first system to recreate and deliver real-world, interactive audio experiences in games,
music, and other audio applications. These audio effects take your computer beyond home-theater quality,
immersing you in sound so vivid, your imagination can almost “see” it. The effects go beyond today's
surround sound and 3D positional audio to actually model an environment by taking into account room
size, acoustic properties, reverb, echo, and many other effects that create a real-world experience.
EAX Console consists of four sections: Audio Effects, CMSS 3D, Audio Clean-up, and Time Scaling.
Using Audigy 2 Software 4-6
Page 51

Audio Effects:
Environmental Sound
Processing
In Audio Effects, you can choose how you want to enhance all kinds of ordinary two-channel sounds.
❑ Advanced EQ lets you boost or de-emphasise the low, mid or high frequencies of sound to suit
individual preference and equipment characteristics. Choose various presets like Jazz or Rock to suit
the audio characteristics you like best.
❑ Special Effects let you modify sounds with pre-programmed algorithms so that male voices can be
turned into female voices, or human speech turned into “chipmunk talk”. You can have lots of fun,
especially when communicating over the Internet.
❑ Studio Effects can add standard distortion, wah, delays and chorus effects to an electric guitar or other
musical instrument.
❑ Environmental Effects simulate typical acoustic environments like stadiums, concert halls, and jazz
clubs. By choosing an effect like “concert hall”, you can make any music sound like it is being
produced inside a concert hall, with all the characteristic echos and reverberation. Various settings let
you vary the type of effect, amount of effect applied, and others. If you have connected rear speakers
to your computer, EAX will trick your ears into believing that your room has turned into a concert hall
or jazz club. EAX becomes more effective as the number of speakers connected is increased. It
supports up to 6 speakers and one subwoofer.
❑ Karaoke Effects let singers add high-quality echo to add richness to their voices. Users can also vary
the music’s pitch to suit their vocal range.
CMSS 3D: Simulating
Surround Sound
Creative MultiSpeaker Surround (CMSS) 3D makes ordinary two-channel (Left and Right Stereo) sound
seem to surround you, even through only two speakers. For users with 5.1 or 6.1 multichannel speaker
systems, CMSS can also simulate surround sound from ordinary stereo. This is useful for watching DVDs
and VCDs, which contain only stereo soundtracks.
Select CMSS for multichannel audio enhancement on 4/4.1, 5.1 or 6.1 speaker systems, and CMSS2 for
movies.
Note: For a 4/4.1-speaker system, audio for your subwoofer is processed by the speaker system.
Using Audigy 2 Software 4-7
Page 52

Audio Clean-up:
Removing noise and
distortion
Audio Clean-up allows you to process prerecorded as well as real-time audio, in order to remove noise,
click sounds and other artifacts. For example, when recording music from old vinyl records, “click” and
“pop” sounds can be removed with the Clean-up feature. The Click Meter informs you whenever the noise
clean-up feature is activated during recording and also how many clicks are removed.
Time Scaling: Varying
the speed of playback
Creative Surround Mixer
Creative Speaker Settings
Creative Speaker Calibrator
Karaoke fans and musicians may sometimes wish to slow a song down (or speed it up) to catch the lyrics
or play along with the music. However, varying the speed usually also varies the pitch of the song. With
the Time Scaling feature, Sound Blaster Audigy 2 users can maintain the pitch of a song while varying the
playback speed.
For more information and usage details on EAX Console, refer to the Creative EAX online Help.
Use Creative Surround Mixer to select the device you wish to listen to or record from. It operates in two
possible modes. Click the Basic Mode or Advanced Mode button to switch between the two modes:
In Basic mode, you can:
❑ mix sounds from various audio input sources when playing or recording
❑ control volume, bass and treble
In Advanced mode, you can:
❑ control balance and vary the loudness ratio between front/rear speakers (fader)
❑ control the relative loudness levels between Front Center, Rear Center and Subwoofer speakers (if any)
For more information and usage details on Creative Surround Mixer, refer to its online Help.
This is the main application to use for the following tasks:
❑ Designating the number and configuration of speakers to use
❑ Testing your speakers
❑ Activating or deactivating Digital Output
❑ Managing bass output by selecting subwoofer crossover frequency and volume
Creative Speaker Calibrator assists the user to optimise loudspeaker settings and positioning to create much
better surround sound and gaming sound effects.
Using Audigy 2 Software 4-8
Page 53

Creative MiniDisc Center
Creative MiniDisc Center allows you to play back songs on CDs or supported audio formats, and record
them to digital recorders such as Digital Audio Tape machines, and also MiniDisc (MD) recorders.
With Creative MiniDisc Center, you can:
❑ create an album of your favorite songs, each of which may be in a different audio format
❑ insert a preset period of silence automatically between each track
❑ play back your personal album and record it to your MD recorder
For more information and usage details on Creative MiniDisc Center, refer to its online Help.
Creative SoundFont Bank Manager
Creative Audio Stream Recorder 2
You can use Creative SoundFont Bank Manager to easily switch between multiple SoundFont banks for
performances. This module is optimised to let users quickly audition various presets, reset MIDI devices, or
create/modify/save various SoundFont banks from your computer’s RAM. Creative SoundFont Bank
Manager also switches the Drum Kit on or off at Midi Channel 10.
A virtual keyboard is provided for the user to use the computer’s keyboard or mouse to audition SoundFont
banks or play musical notes produced through MIDI devices. To edit the presets in the SoundFont banks,
use Vienna SoundFont Studio, which you can download from http://www.SoundFont.com.
You can use external MIDI input devices to audition your MIDI banks and instruments. First, connect a
MIDI input device to your audio card and then select that device in the Creative SoundFont Bank Manager.
Once you discover the power of SoundFont technology, you will be amazed at the sound design
possibilities available.
For more information and usage details on Creative SoundFont Bank Manager, refer to its online Help.
Normally, to listen to a song on the Internet, you need to download the entire file onto your hard disk first
— before you can even hear the music.
Internet radio stations can, however, make it more convenient for you to enjoy downloaded music: they
employ “streaming” technology by which music data flows like a “stream” to your audio card directly,
bypassing permanent hard disk storage. Thus, the song starts to play as soon as a portion of its data stream
has arrived at your audio card. The downside of streaming technology was that you could not record the
music onto your hard disk for future reference.
Using Audigy 2 Software 4-9
Page 54

Audio Stream Recorder 2 (ASR2) is designed to overcome this problem by letting you record streaming
audio onto your hard disk as standard MP3 or WMA files.
To use ASR2, select from its predefined list of radio stations to listen to. You can click the red Record
button to start recording music to your hard disk, or use the Schedule feature to program the computer to
record streaming music unattended. You can also use ASR2 to listen to selected radio stations live by
clicking the blue Play button.
For more information and usage details on Creative Audio Stream Recorder 2, refer to its online Help.
Creative Wave Studio
Diagnostic and troubleshooting utilities
Creative Diagnostics
Creative Speaker Settings
When you need to edit sound files, use Creative Wave Studio. This application supports popular file
formats like WAV and AIFF. With Wave Studio, you can convert between file formats and edit out any
section of sound. Apply effects like fade-in/fade-out. You can also use it to blend two or more songs into
a single file.
For more information and usage details on Creative Recorder, refer to its online Help.
Use Creative Diagnostics to quickly test your audio card’s Wave, MIDI or CD Audio playback capability,
recording function and speaker output. For more information and usage details on Creative Diagnostics,
refer to its online Help.
This is the main application to use for managing your speakers and troubleshooting problems related to
speaker configurations. See “Creative Speaker Settings” on page 4-8.
Using Audigy 2 Software 4-10
Page 55

General Specifications
Technical details of the Sound Blaster Audigy 2 Platinum eX card and
A
External I/O Module.
Page 56

General Specifications
Technical details of Sound Blaster Audigy 2 Platinum eX card and your Audigy 2 Platinum eX External
I/O Module.
Features
PCI Bus Mastering ❑ PCI Specification Version 2.1 compliant
❑ Bus mastering reduces latency and speeds up system performance
Audigy 2 Processor ❑ Advanced hardware accelerated digital effects processing
❑ 32-bit digital processing, which maintains a theoretical 192 dB of dynamic range
❑ Patented 8-point interpolation that reduces distortion to inaudible levels
❑ 64-voice hardware wavetable synthesizer
❑ Professional quality digital mixing and equalization
Versatile Audio
Features
Professional Digital
Audio Processing
❑ Playback of 64 audio channels, each at an arbitrary sample rate
❑ 32-bit mixing of all digital sources within Audigy 2’s Digital Mixer
❑ 24-bit Analog-to-Digital conversion of analog inputs at 96 kHz sample rate
❑ 24-bit Digital-to-Analog conversion of digital sources at 96 kHz to analog 6.1 speaker output
❑ 24-bit Digital-to-Analog conversion of stereo digital sources at 192 kHz to stereo output
❑ 16-bit to 24-bit recording sampling rates: 8, 11.025, 16, 22.05, 24, 32, 44.1, 48 and 96 kHz, including
ASIO2 support at up to 24-bit, 96 kHz resolution.
❑ Supports Sony/Philips Digital Interface (SPDIF) format of up to 24-bit/96 kHz quality
❑ SPDIF output at selectable sampling rate of 48 or 96 kHz
General Specifications A-1
Page 57

Note: SPDIF output not available during playback of protected digital audio contents authored with
DRM (Digital Rights Management) technology
❑ Selectable 6-channel SPDIF output to matching digital speaker systems
❑ Software switching of SPDIF Input-to-Output (bypass) to minimise cable connection hassle
❑ Low latency multitrack recording with ASIO2 support
Flexible Mixer Control ❑ Selectable input source or mixing of various audio sources for recording
❑ Adjustable master volume control
❑ Separate bass and treble control
❑ Front and rear balance control
❑ Muting and panning control for mixer sources
THX Certification ❑ Sound Blaster Audigy 2 has received the prestigious THX Multimedia Certification award, making it
the perfect choice for PC audiophiles seeking the very best music and movie experiences.
Dolby Digital (AC-3)
and Digital Surround
EX Decoding
Creative MultiSpeaker
Surround
(CMSS)
SB1394/FireWire
Compatibility
❑ Decodes Dolby Digital Surround EX to 6.1 or 5.1 channels, or will pass through a compressed SPDIF
bitstream to an external decoder
❑ Bass redirection: enhances bass output to subwoofer for small satellite speaker systems
❑ Crossover bass frequency (10-200 Hz): adjustable to standalone subwoofer units for desired bass level
❑ Adjustable Center, Rear Center and LFE level control
❑ Multispeaker technology
❑ Upmixes mono or stereo sources to 6.1 channels
❑ Professional-quality panning and mixing algorithm
❑ Compliant with IEEE1394a specification
❑ Supports data rates of 100, 200, and 400 Mbps
❑ Supports up to 63 IEEE1394 compatible devices in a daisy-chain configuration
❑ Supplies up to 3 watts to IEEE1394 compatible devices
General Specifications A-2
Page 58

Connectivity
Sound Blaster Audigy 2 Platinum eX Card
Audio Outputs ❑ 2 x line-level analog outputs via stereo jacks on rear bracket: Front and Rear Line-Outs 1 and 2
❑ Stereo headphone (32-ohm load) support on Line Out 1
❑ 1 x line-level three channel analog output via 4-pole 3.5 mm minijack on rear bracket: Front Center,
Rear Center and Subwoofer channel
SB1394/FireWire ❑ AD_LINK 2 connector on rear bracket for power supply to the External I/O Module.
The 6-pin SB1394/FireWire
connector/port has a 3-watt
maximum power output.
Connect only one high power
usage device such as an IEEE
1394 hard disk or CD-RW drive
to this port unless it is powered
off the AC outlet.
Interfaces ❑ AD_LINK 1 connector for linking to the External I/O Module
❑ Joystick/MIDI connector for connection to the audio card
General Specifications A-3
Page 59

Sound Blaster Audigy 2 Platinum eX External I/O Module
Inputs and outputs on
front panel
Inputs and outputs on
rear panel
❑ One headphone output with auto detection via ¼” stereo jack with volume control
❑ One shared line-level analog Line/Microphone input (Line-In 1/Mic-In) via ¼” stereo jack. Shared
input selectable via knob. Gain/level control for microphone
❑ One standalone line-level analog input (Line-In 2)
❑ Two optical connectors for optical SPDIF input and output
❑ One SB1394/FireWire connector for IEEE1394 compatible devices
❑ One infrared receiver for receiving information from the remote control. Transmission range within 4
meters with 15-degree deviation from the center axis.
❑ One AD_LINK 1 connector for linking to the audio card
❑ One AD_LINK 2 (SB1394/FireWire) connector for power supply to the External I/O Module
❑ 1 x standard MIDI OUT and 1 x standard MIDI In jack for MIDI instruments
❑ One SB1394/FireWire port for connection to IEEE1394 compatible devices
❑ One Mini-DIN SPDIF digital output
❑ Two RCA jacks for Auxiliary Line Input (Line-In 3)
❑ Two RCA connectors for coaxial SPDIF input and output
General Specifications A-4
Page 60

Troubleshooting and FAQs
This section provides solutions to problems you may encounter
B
during installation or normal use.
Page 61

Troubleshooting and FAQs
This appendix provides solutions to problems you may encounter during installation or normal use.
Problems Installing Software
Problems with Sound
To check if your audio card is
producing sound, connect a pair of
headphones to it. If you hear
sound, then the problem is with
the speakers or connection; if not,
the problem may lie in the card or
software configuration
The installation does not start automatically after the Sound Blaster Audigy 2 Installation and
Applications CD is inserted.
To start the installation program through the My Computer shortcut menu:
1. Double-click the My Computer icon on your Windows desktop.
2. In the My Computer window, double click the CD-ROM drive icon.
3. In the Explorer window, locate the file named Setup.exe and double click it.
There is unexpected, excessive environmental sound or effects when an audio file is played.
The last selected preset is an inappropriate environment for the current audio file.
To switch to an appropriate environment:
1. Click the Audio Effects tab in EAX Console.
2. Click the Enable/Disable Audio Effects check box to clear it.
Note: The preset box title may change, depending on the effect you select.
No sound from the headphones.
Check the following:
❑ The headphones are connected to the Headphones jack.
❑ In the Speaker Selection tab of Creative Speaker Settings, the Headphones option is selected in the
Speaker/Headphone Selection box.
❑ In the Basic tab of Creative Surround Mixer, the recording source selected is “What U Hear”.
Troubleshooting and FAQs B-1
Page 62

Individual analog recording sources are not displayed in Creative Surround Mixer.
The following analog recording sources are combined in one recording control called Analog Mix (Line/
CD/Aux/PC), which is found in the Record panel of the Basic tab:
❑ Line-In
❑ CD Audio
❑ Auxiliary
❑ PC Speaker
Individual analog recording sources cannot be selected in Creative Surround Mixer.
Five analog recording sources are combined under the selection Analog Mix (Line/CD/Aux/PC). For
more information, see “Individual analog recording sources are not displayed in Creative Surround
Mixer.” on page B-2.
To record an individual analog source:
❑ In the Record panel of the Basic tab in Creative Surround Mixer, make sure the recording source
selected is Analog Mix (Line/CD/Aux/PC).
❑ In the Source panel, mute the analog sources that you do not want to record — by clicking the Speaker
button to change it to a button with a red cross sign on it.
No sound from the speakers.
Check the following:
❑ You have connected your speakers to your audio card's output.
❑ You have selected the correct source in the Source panel of Creative Surround Mixer.
❑ If both the above conditions have been met and you still do not get any sound, click the red plus sign
above the Vol um e control and check whether the Digital Output Only check box is selected. If it is,
you are in the Digital Output Only mode and so must connect to digital speakers to hear the sound from
your audio card. See the section on “Speaker Selection Settings” in Creative Speaker Setting’s online
Help for more information.
Troubleshooting and FAQs B-2
Page 63

No audio output when playing digital files such as .WAV, MIDI files or AVI clips.
Check the following:
❑ The speakers’ volume control knob, if any, is set at mid-range. Use Creative Surround Mixer to adjust
the volume, if necessary.
❑ The powered speakers or external amplifier are connected to the card’s Line Out or Rear Out jack.
❑ There is no hardware conflict between the card and a peripheral device. See “Resolving I/O Conflicts”
on page B-10.
❑ The Speaker selection in Creative Speaker Settings corresponds to your speaker or headphone
configuration.
No audio output when playing audio CDs or DOS games that require a CD-ROM.
To solve this problem, enable digital CD playback as follows.
For Windows 98 SE
❑ Click Start -> Settings -> Control Panel.
❑ In the Control Panel dialog box, double-click the Multimedia icon.
❑ In the Multimedia Properties dialog box, click the CD Music tab.
❑ Click the Enable digital CD audio for this CD-ROM device check box to select it.
❑ Click the OK button.
For Windows Me
❑ Click Start -> Settings -> Control Panel.
❑ In the Control Panel dialog box, double-click the System icon.
❑ In the System Properties dialog box, click the Device Manager tab.
❑ Double-click the DVD/CD-ROM drives icon. Your computer’s drive icons will appear.
❑ Right-click the CD disk drive icon. A menu will appear.
❑ Click Properties.
❑ In the Digital CD Playback box of the next dialog box, click the Enable digital CD audio for this
CD-ROM device check box to select it.
Troubleshooting and FAQs B-3
Page 64

❑ Click the OK button.
For Windows 2000 and Windows XP
❑ Click Start -> Settings -> Control Panel.
❑ In the Control Panel dialog box, double-click the System icon.
❑ In the System Properties dialog box, click the Hardware tab.
❑ Click the Device Manager button.
❑ Double-click the DVD/CD-ROM drives icon. Your computer’s drive icons will appear.
❑ Right-click the CD disk drive icon. A menu will appear.
❑ Click Properties.
❑ In the Digital CD Playback box of the next dialog box, click the Enable digital CD audio for this
CD-ROM device check box to select it.
Panning a source sometimes turns off its sound.
This occurs when you are in the Digital Output Only mode and the source’s left-right balance in a software
mixer application other than Creative Surround Mixer (for example, the Windows Volume Control
application) is at the opposite end compared to the position to which you have panned the source in the
Basic tab of Creative Surround Mixer. For example, the CD Audio balance in Windows Volume Control
is on the left but in Creative Surround Mixer you have panned the CD Audio to the right.
Troubleshooting and FAQs B-4
Page 65

To solve this problem:
Open that other mixer, and center the balances for all the audio input sources.
This ensures that your analog sources will not turn silent when you pan them in Creative Surround Mixer.
Problems with File Transfers on Some VIA Chipset Motherboards
After you install the Sound Blaster Audigy 2 Platinum eX card on a VIA chipset motherboard, you may
see one of the following:
When transferring large amounts of data, the computer stops responding (‘hangs’) or restarts itself,
OR
Files transferred from another drive are incomplete or corrupted.
These problems appear in a small number of computers, which contain the VIA VT82C686B controller
chipset on their motherboards.
To verify if your motherboard has the VT82C686B chipset:
❑ Refer to your computer or motherboard manual, or
Troubleshooting and FAQs B-5
Page 66

❑ In Windows:
i. Click Start -> Settings -> Control Panel.
ii. Double-click the System icon.
iii. Click the Device Manager or Hardware tab.
iv. Click the Systems devices icon.
v. In the list that appears, see if the items highlighted in
Figure B-1 appear.
vi. If the items appear, remove your computer cover and
locate the VIA chipset on your motherboard. (Take note
of the safety precautions on page 2-1.)
The VT82C686B chipset has its model number inscribed
on the chip.
If you have the VT82C686B chipset: Some users have solved the
above problems by doing one or both of the following:
• downloading the latest VIA 4in1 drivers from http://
www.viatech.com*,
• obtaining the most current BIOS for your motherboard
from the manufacturer’s web site*.
*Content in these web sites is controlled by other companies. Creative bears no responsibility for
information or downloads obtained from them. This information is provided only as a convenience to you.
Figure B-1: Device Manager tab.
Insufficient SoundFont Cache
There is insufficient memory to load SoundFont banks.
This may occur when a SoundFont-compatible MIDI file is loaded or played while insufficient memory
has been allocated to Creative SoundFont Bank Manager.
To have sufficient SoundFont cache memory:
❑ Remove an existing SoundFont bank from the system RAM.
Do the following:
Troubleshooting and FAQs B-6
Page 67

The trade-off of a smaller
SoundFont file is its lower
sound quality.
i. Click the Bank button.
The Configure Bank dialog box appears.
ii. Click the Select Bank drop-down button, and select a bank index.
iii. Highlight the bank and click the Remove button.
iv. Click the OK button to finish configuring your banks.
❑ Load smaller SoundFont banks instead; or add more RAM to your system.
Do one of the following:
•In the Configure Bank dialog box of Creative SoundFont Bank Manager, select a smaller
SoundFont bank, if available, from the Select Bank box.
• Increase the system RAM on your computer. For more details, visit the www.soundblaster.com
site for technical help.
Note: The amount of SoundFont cache you can allocate depends on the system RAM available. Your
computer may slow down if the amount of cache allocated is too high.
Problems with the Joystick
The joystick port is not working.
The audio card’s joystick/MIDI connector may be conflicting with the system’s joystick port.
To solve this problem:
Disable the audio card’s joystick/MIDI connector and use the system port instead. Do the following:
1. Click Start -> Settings -> Control Panel.
2. In the Control Panel window, double-click the System icon.
3. In the System Properties dialog box, click the Device Manager tab.
4. Double-click Sound, Video And Game Controllers, and then select Creative Audigy 2 Gameport
(Creative Game Port for Windows 2000).
5. Click the Properties button.
6. In the Properties dialog box:
If you have an Original Configuration (Current) check box:
Troubleshooting and FAQs B-7
Page 68

Do not attempt to make changes to
the BIOS unless you have
experience with system software.
• Clear the check box to disable it.
If you have a Disable In This Hardware Profile check box:
• Make sure that the check box is selected to disable it.
7. Click OK to restart Windows and for the change to take effect.
When the Gameport Joystick interface is disabled, the entry in Device Manager has a red cross.
The joystick is not working properly in some programs.
The program may use the system processor timing to calculate the joystick position. When the processor
is fast, the program may determine the position of the joystick incorrectly, assuming that the position is
out of range.
To solve this problem:
Increase your system’s 8 bit I/O recovery time of the BIOS setting, usually under the Chipset Feature
Settings section. Or, if available, you may adjust the AT Bus speed to a slower clock. If the problem
persists, try a different joystick.
Problems with Multiple Audio Devices
The other installed audio card is not working well.
You may have an existing audio device installed in your computer. The audio device may be an audio card
or an onboard audio chipset. Before you install your Sound Blaster Audigy 2 Platinum eX card, you are
advised to completely uninstall and remove your existing audio device. Operating multiple audio devices
in your computer may introduce usability issues.
Alternatively, during the installation of your audio card, do the following:
❑ If your computer detects an installed Sound Blaster Live! Series or Sound Blaster PCI512 audio card,
a message box recommending that you completely uninstall and remove the older audio device will
appear. Click the Yes button and follow the instructions on the screen to complete the removal of the
old audio device. Remove the old audio card from your computer.
Troubleshooting and FAQs B-8
Page 69

❑ If your computer detects any other installed audio card, a message box recommending that you
completely uninstall and remove the older audio device will appear. Click the Ye s button to continue
with the installation of the Sound Blaster Audigy 2 Platinum eX card.
After the installation of the audio card, completely uninstall the existing card and remove the audio
card from your computer.
The onboard audio chipset is not working well.
To disable an onboard audio chipset, do the following:
1. Restart your system.
2. During the memory check, press <F2> or <Delete>, depending on your motherboard.
The BIOS setup menu appears.
3. Select Chipset Features Setup and press <Enter>.
4. Select Onboard Legacy Audio and press <Enter> to disable your onboard audio chipset.
5. Press <Esc> to return to the BIOS setup menu.
6. Select Save & Exit Setup, and then press <Enter>.
7. Press <Y> and then press <Enter>
Problems with Sound Blaster Live! Series or Sound Blaster PCI512 card
Sound Blaster Live! or Sound Blaster PCI512 applications are not working.
Other than normal playback and recording functions, older audio devices may not work well when Sound
Blaster Audigy 2 Platinum eX is installed.
To solve this problem:
Uninstall and remove the older card from the computer. Otherwise, you can choose to disable the Sound
Blaster Live! or Sound Blaster PCI512 card:
1. Click Start -> Settings -> Control Panel.
2. In the Control Panel window, double-click the System icon.
3. In the System Properties dialog box, click the Device Manager tab.
Troubleshooting and FAQs B-9
Page 70

4. Double-click Sound, Video And Game Controllers, and then select Creative Sound Blaster Live!
Series or Creative Sound Blaster PCI512.
5. Click the Properties button.
6. In the Properties dialog box:
If you have an Original Configuration (Current) check box:
• Clear the check box to disable it.
If you have a Disable In This Hardware Profile check box:
• Make sure that the check box is selected to disable it.
7. Click OK to restart Windows and for the change to take effect.
When the Sound Blaster Live! series is disabled, the entry in Device Manager has a red cross.
Resolving I/O Conflicts
You can also refer to the
Troubleshooting section in the
online Help of Windows 98 SE/
Me.
Conflicts between your audio card and another peripheral device may occur if your card and the other
device are set to use the same I/O address.
To resolve I/O conflicts, change the resource settings of your audio card or the conflicting peripheral
device in your system using Device Manager in Windows 98 SE/Me.
If you still do not know which card is causing the conflict, remove all cards except the audio card and other
essential cards (for example, disk controller and graphics cards). Add each card back until Device
Manager indicates that a conflict has occurred.
To resolve hardware conflicts in Windows 98 SE/Me:
1. Click Start -> Settings -> Control Panel.
2. In the Control Panel window, double-click the System icon.
3. In the System Properties dialog box, click the Device Manager tab.
4. Under the Sound, Video And Game Controllers entry, select the conflicting audio card driver—
indicated by an exclamation mark (!)—and click the Properties button.
5. In the Properties dialog box, click the Resources tab.
6. Make sure that the Use automatic settings check box is selected, and click the OK button.
Troubleshooting and FAQs B-10
Page 71

7. Restart your system to allow Windows 98 SE/Me to reassign resources to your audio card and/or the
conflicting device.
Problems with Encore DVD Player
Problems with Software DVD Player
The Encore DVD Player is not launched when a DVD disc is inserted into the drive.
To solve this problem:
1. In the Windows system tray, right-click the Disc Detector icon, and then click Properties.
2. On the General tabbed page of the Creative Disc Detector dialog box, make sure that the Enable Disc
Detector check box is selected.
3. Click the Players tab.
4. Select the DVD Disc entry and then click the Select Player button.
5. In the Players Properties dialog box, click the Browse button.
6. Locate and select C:\Program Files\Creative\PC- DVD Encore (where D: represents your CD-ROM
drive)
and double-click the entry ctdvdply
The Name box now displays the entry ctdvdply.
7. Click the OK button twice.
Changing audio configuration (for example, switching from multi-channel mode to SPDIF Output
mode or vice versa) while watching a DVD movie does not seem to work, even though all settings in
the software DVD player and in Creative Surround Mixer are correct.
To solve this problem:
Close and restart the software DVD player.
Troubleshooting and FAQs B-11
Page 72

Problems with DV driver for Windows 98 SE/ 2000/Me/XP
The DV camcorder is not working properly.
The MSDV camcorder driver may not be the latest version (v4.10.2226 or later).
To solve this problem:
1. Visit the http://www.microsoft.com and download the Digital Video update (dx80bda.exe) for the
DirectX 8.0 files.
2. Install the above file into your computer.
Note:
You need to install DirectX 8.0 or 8.0a run time first.
If the problem still persists, the MSDV camcorder driver may not be fully optimised for your DV
camcorder.
To solve this problem:
1. Turn on your DV camcorder.
2. Insert the Sound Blaster Audigy 2 Installation and Applications CD into your CD-ROM drive.
Exit from the welcome screen.
3. Using Windows Explorer, locate the 1394 folder in the CD-ROM, and run the DVConnect 240.exe file.
Follow the instructions on the screen to complete the setup.
If you are in Windows 98 SE, you may be prompted to insert the Windows 98 SE CD-ROM first.
Follow the instructions on the screen to complete this setup.
4. Click the Finish button.
5. Turn off and then turn on your DV camcorder.
Troubleshooting and FAQs B-12
Page 73

Problems in XP
The 1394 DVConnect driver does
not run on Windows XP.
A Hardware Installation error message appears on a Windows XP operating system when nonCreative applications are being installed.
At the time of this product's release, Microsoft strongly encouraged companies to submit their hardware
solutions for certification. If a hardware device driver is not submitted, or does not qualify, for Microsoft
certification, a warning message similar to the one below appears.
You may see the message when you install hardware drivers from companies other than Creative. If you
do, you may choose to click the Continue Anyway button. Device drivers not signed by Microsoft may
be used in Windows XP, and need not impair or destabilise your computer.
Should you need more XP-related information or help, you can contact the company that developed the
driver, at the company's web site or helpline.
Troubleshooting and FAQs B-13
Page 74

Problems with Digital Audio Devices
Intermittent hissing or no sound is heard from my digital speakers.
Make sure you select the sampling rate of the PCM SPDIF output of your Digital Out connector to match
the requirements of the receiving device. You may need to select a lower digital output sampling rate. The
choices available are 48 kHz and 96 kHz.
To solve this problem:
For Windows 98 SE and Windows Me:
1. Click Start -> Settings -> Control Panel.
2. In the Control Panel dialog box, double-click the System icon.
3. In the System Properties dialog box, click the Device Manager tab.
4. Double-click the Disk drives icon.
Your computer drives will appear.
5. Double-click the hard disk drive icon.
6. In the box that appears, click the Settings tab.
7. Click the DMA (direct memory access) check box to select it.
An alert message box appears.
8. Click the OK button.
9. Click the OK button in the next box.
10. Click the Close button on the System Properties dialog box.
11. When prompted to restart your computer, click the Ye s button.
12. Repeat steps 4-11 if you have other drives, for example, other hard disk drives, CD-ROM, CD-RW, and
DVD-ROM drives. In step 4, double-click the respective drive icon.
For Windows 2000 and Windows XP:
1. Click Start -> Settings -> Control Panel.
2. In the Control Panel dialog box, double-click the System icon.
3. In the System Properties dialog box, click the Hardware tab.
4. Click the Device Manager button.
Troubleshooting and FAQs B-14
Page 75

5. Double-click the ATA /ATA PI I DE C o nt r oll e rs icon.
Your IDE channels will appear.
6. Right-click the Primary IDE Channel icon.
7. Click Properties.
8. In the Properties dialog box, click the Advanced Settings tab.
9. Click the DMA if available check box to select it.
10. Click the OK button.
Troubleshooting and FAQs B-15
 Loading...