

Creative MF8235, MF8240 User Manual

Creative X-Fi Sonic Carrier (Model MF8235)
X-Fi Sonic Carrier Subwoofer(Model MF8240)
User Manual
For the latest information, visit: www.creative.com/support/soniccarrier
Product Registration
Registering your product ensures you receive the most appropriate service and
product support
available. You can register your product during installation or at
http://www.creative.com/register.
Please note that your warranty rights are not dependent on registration.
PN 03MF823500000
Package Content
Main Unit
Sonic Carrier Main unit
IR remote control
AAA Battery x 2 for IR remote control
IR Blaster
Wall mount brackets + hardware
Wall mount bracket installation template
Driver décor rings x 8
Power cable
Warranty / Tech Support booklet
Safety and regulatory leaflets
QSG
Subwoofer
Subwoofer
Power cable
Link cable
Warranty / Tech Support booklet
Safety and regulatory leaflet
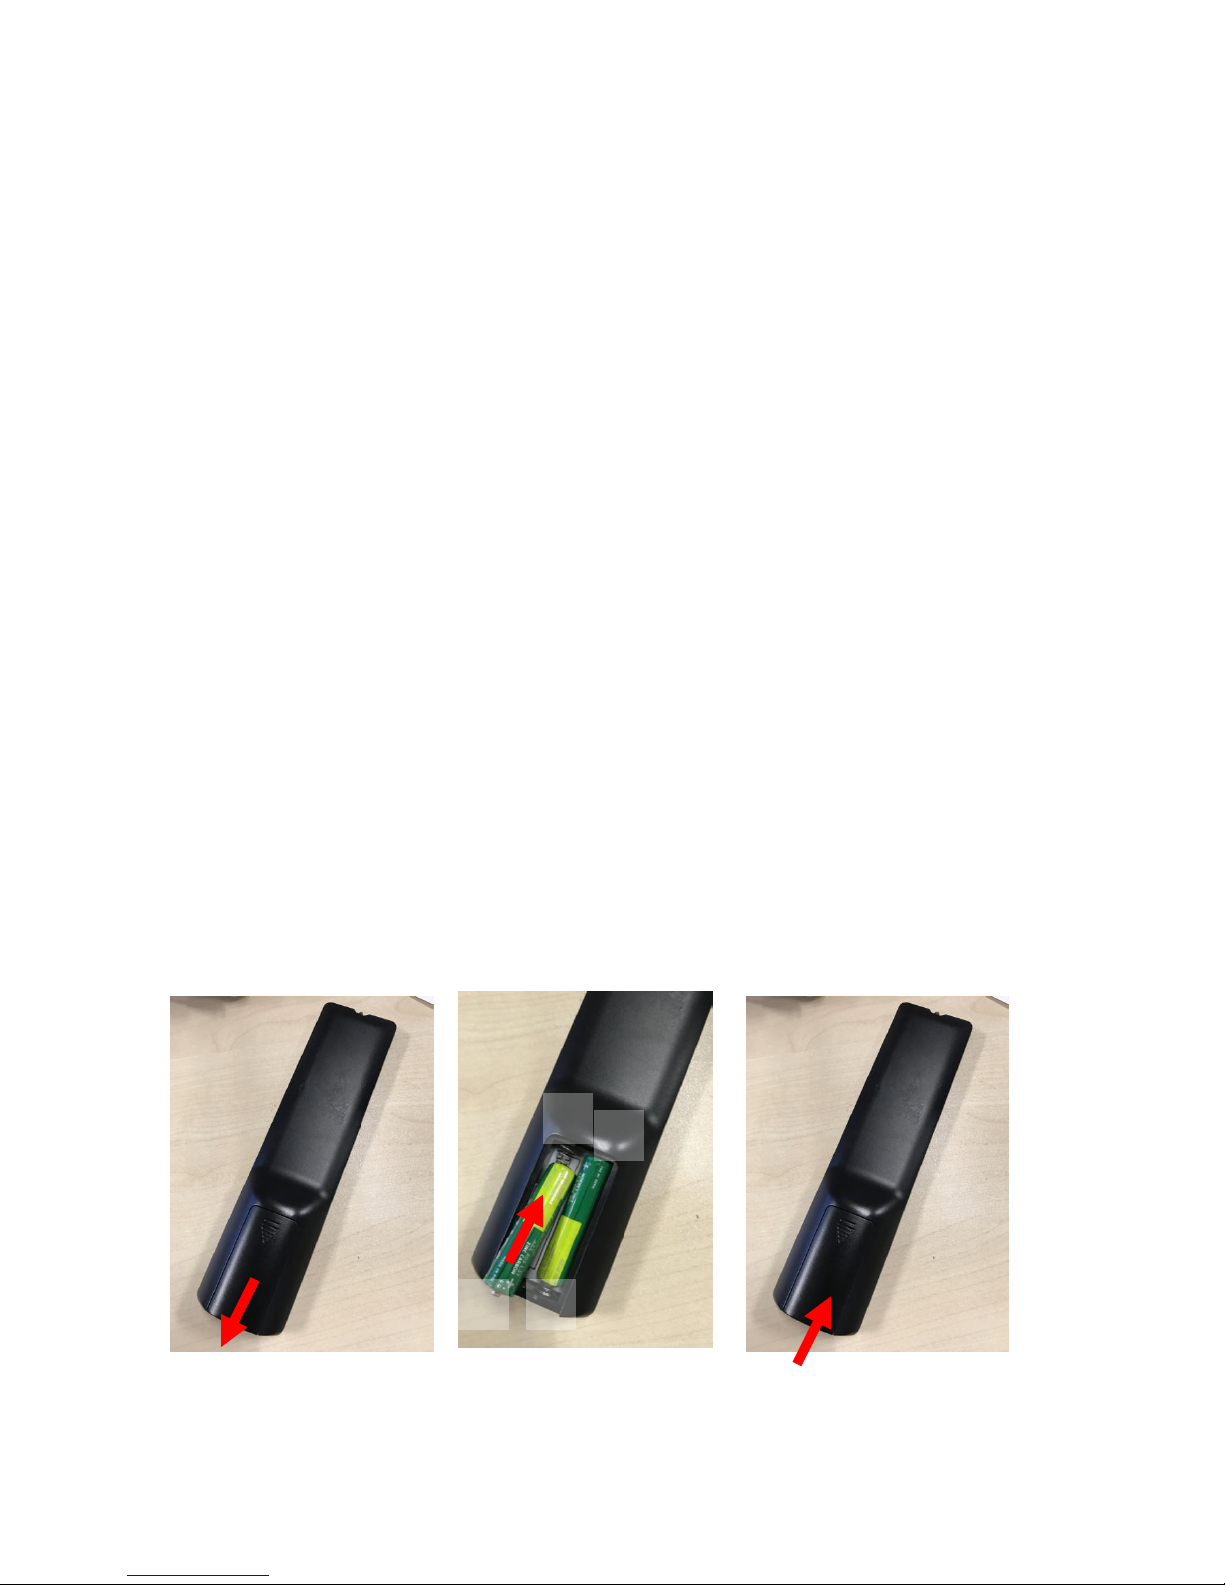
Inserting Batteries (AAA Battery x 2)
Slide the battery cover in the direction of the arrow until it is completely removed.
Insert 2 AAA atteries (1.5V) in the correct +/- polarity. Slide the battery cover back
into position.
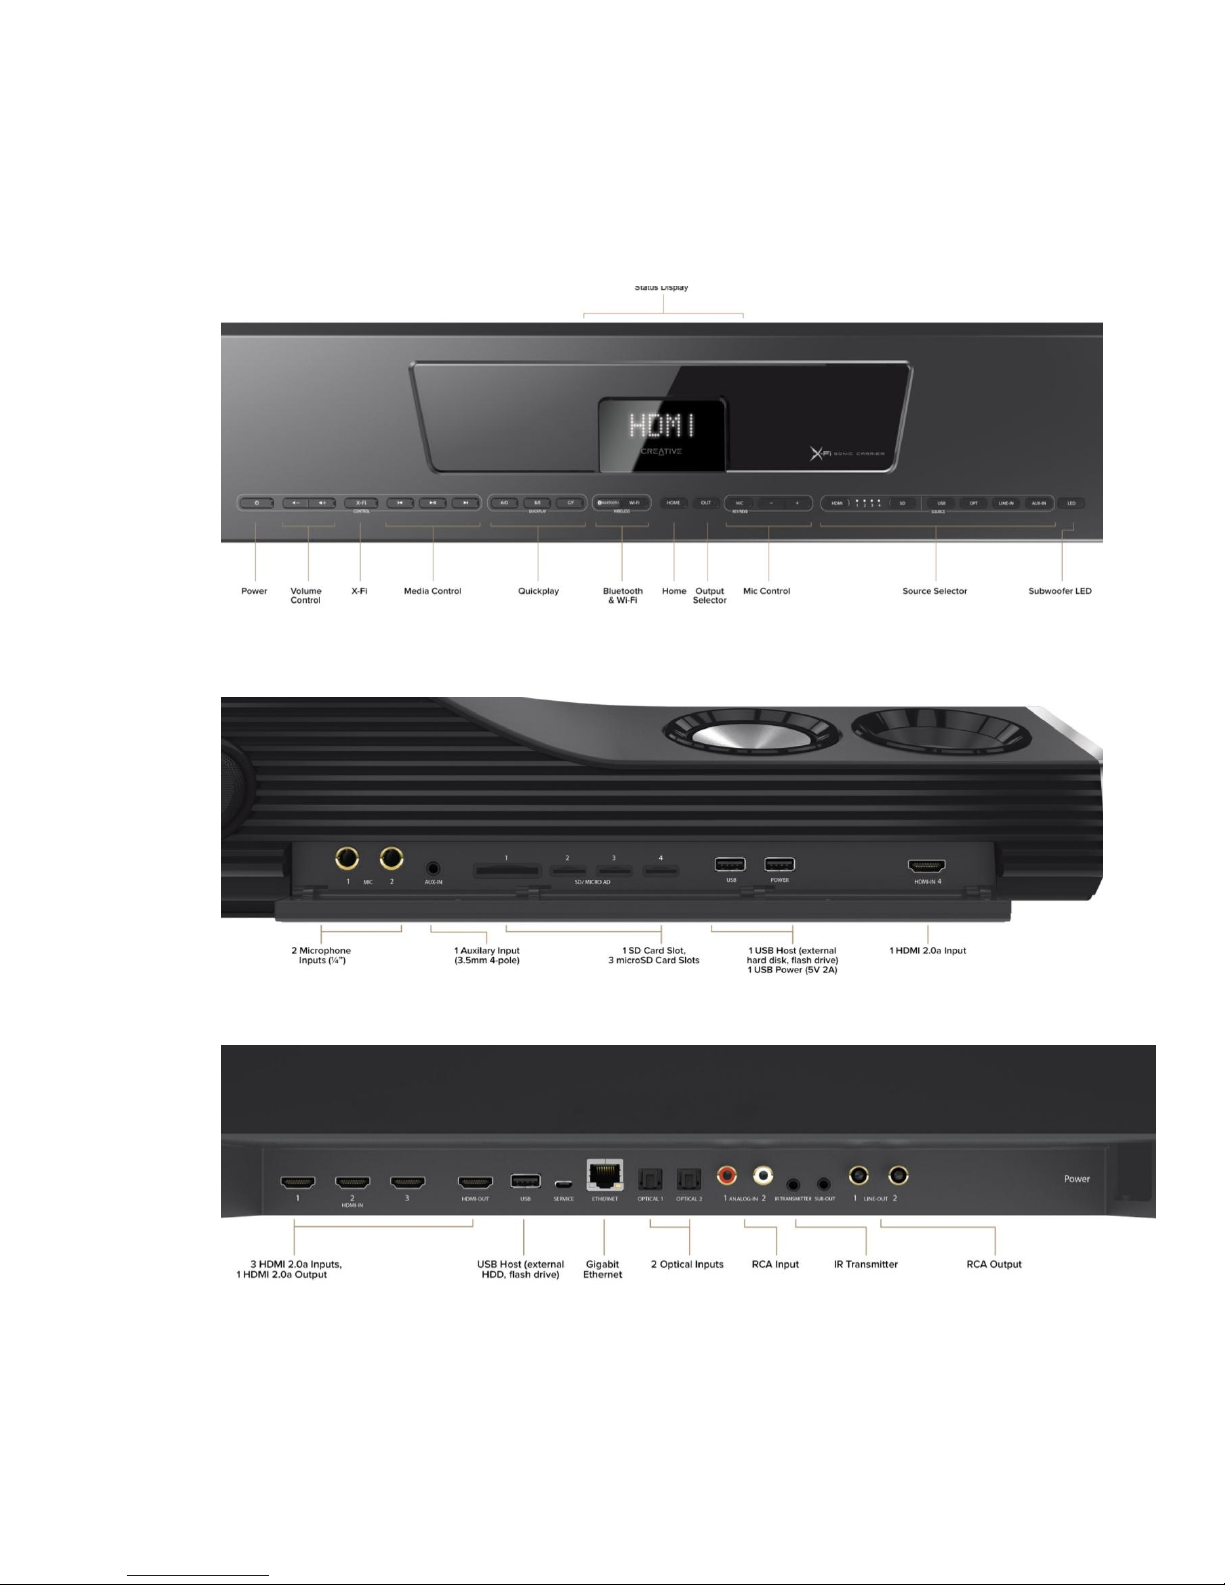
Sonic Carrier Main unit Overview
Top Panel
Front Panel
Rear Panel

Remote Control
Power: Turn On/Off Main Power.
LED: Cycles to the next LED preset on all the
Subwoofers.
HDMI: Press to Switch to the last accessed HDMI
source, or to cycle between available HDMI sources.
SD: Press to Switch to the last accessed SD card, or to
cycle between available SD cards.
USB: Press to Switch to the last accessed USB drive, or
to cycle between available USB drives
HDMI: Press to Switch to the last accessed Optical
input, or to cycle between available optical inputs.
L-In: Switch to Line in
Aux: Switch to Aux in
BT: Switch to Bluetooth in
WIFI: Switch to WiFi audio
SPK: Selects sound output from main unit, mutes Line-
Out and BT headphone out
L-Out: Selects sound output from Line-output, mutes
main unit and BT headphone out
Bt-HP: Selects sound output from connected BT
headphone, mutes main unit and Line-Out
Bass+ : Bass level adjustment
Mic: Switch to next Microphone mode.
Key +-: Adjust Mic Vol, Key, Reverb for playback
Mouse: Toggles on/off mouse mode.
Home: Switch to OTT mode, Home screen.
Info: Displays any info or menu for OTT mode.
Cursor & OK: Navigates the OTT options.
Return: Backs up to previous screen/option.
Exit: Close current screen.
Volume +/- : Increase decrease volume.
Mute: Silence the unit or unmute it.
X-Fi : Off, Last Selected Sound Experiences,
SuperWide.
Channel +/- : increase decrease channel in OTT
mode.
Rewind/Previous: Press once to rewind. In rewind
mode, press and hold to auto rewind. In rewind
mode, press again to skip to previous track.
Play/Pause: Toggles between play and pause
Forward/Next: Press once to forward. In forward
mode press and hold to auto forward. In forward
mode, press again to skip to next track.
Like: Likes the current selected song.
Stop: Stops playback.
Shuffle: Toggles between shuffle and repeat
playback mode.
QuickPlay A-F: Custom buttons that can be
assigned to web services.
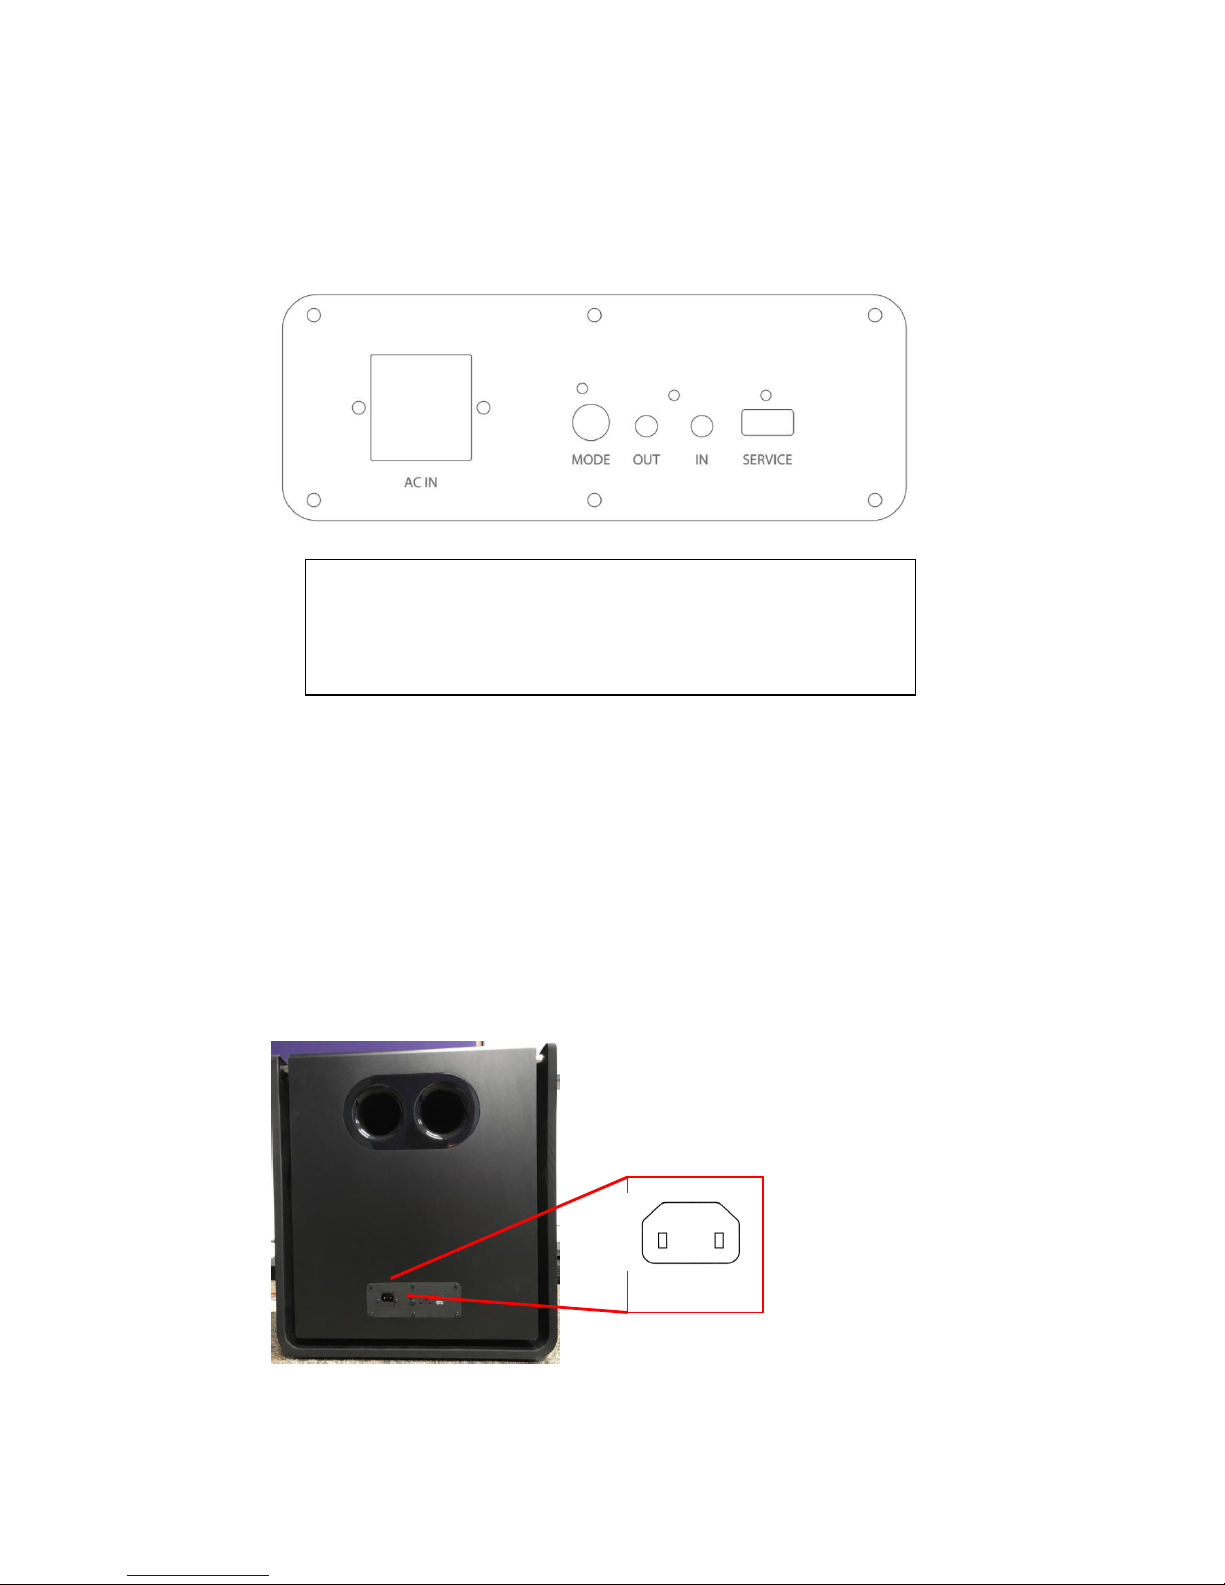
Subwoofer Rear Panel
Connecting Electrical Power
Connect the power cords to the main unit and subwoofers, socket location are located
at the back of the units and are marked below. Connect power cords to the mains
socket.
For more information about the power supply and power consumption, refere to the
label attached to the product. (Main Unit : Bottom panel, Subwoofer : Rear panel)
Mode: Multifunction key. Press to toggle between lighting modes. Hold
for wireless association mode
Out: Audio and data output port
IN: Audio and data input port
Service: USB ‘A’ connector for service only
 Loading...