

Page 1

User’s Guide
Creative Live! Drive II
Information in this document is subject to change without notice and does not re present a commit m ent on the part of Cr eative Technol ogy Ltd. No part of this
manual may be reproduced or transmi tt ed in any form or by an y means, electronic or me chanical, including photocopyin g and recording, for any purpose
without the writte n permis sio n of Crea tive Technology Ltd. The software de sc ribed in this docu me nt is furnishe d und er a licens e agreement and may be used
or copied only in accordance with the terms of the license agr eement. It is agains t the law to copy the sof tware on any other medium except as specifically
allowed i n the license agreement . The licensee may make one copy of the softw are for backup purposes.
Copyright © 2000 by Creative Technology Ltd. Al l rights reserved.
Version 1. 0
June 2000
Sound Blaster and Blaster are registered trademarks, and the Sound Blaster Live! logo, the Sound Blaster PCI logo, EMU10K1, E-mu Environmental Modeling, Environmenta l
Audio, Creative Multi Speaker Surround, and DynaRAM are trademarks of Creative T echnology Ltd. in the United States and/or other countries. E-Mu and SoundFont are
registered trademarks of E-mu Systems, Inc. PCWorks and FourPointSurround are trademarks of Cambridge SoundWorks, Inc. Microsof t, MS-DOS, and Windows are registered
trademar ks of Microsoft Corporation . All other products are trademarks or registered trademarks of their respective owners.
This pr oduct is covered b y one or more o f the following U .S. patent s :
4,506,579; 4,699,038; 4,987,6 00; 5,013,1 05; 5,072,645; 5,111,72 7; 5,144,676 ; 5,170,369 ; 5,248,845; 5,298,671; 5,303,309; 5,317,104; 5,342,990; 5,430,244 ;
5,524,074; 5,698,803; 5,698,807 ; 5,748,747; 5,763,800; 5,790,837.
Page 2

Creative End -User Soft ware Licens e Agreement
PLEASE READ THIS DOCUMENT CAREFULLY BEFORE INSTALLING THE SOFTWARE. BY INSTALLING AND USING THE SOFTWARE,
YOU AGREE TO BE BOUND BY THE TERMS OF THIS AGREEMENT. IF YOU DO NOT AGREE TO THE TERMS OF THIS AGREEMENT, DO
NOT INST ALL OR USE THE SOFTWARE. PROMPTLY RETURN, WITHIN 15 DA YS, THE SOFTW ARE, ALL RELATED DOCUMENT A TION AND
ACCOMPANYING ITEMS TO THE PLACE OF ACQUISITION FOR A FULL REFUND.
This is a lega l agree ment bet ween you and
Techno logy Ltd.
This Agreement states the terms and conditions
upon which Creative offers to license the software
sealed in the disk package together with all related
documentation and accompanying items including,
but not limited to, the executable programs, drivers,
libraries and data files associated with such
programs (col lectively, the “Softw ar e”).
LICENSE
1.
Grant of License
The Softwa re is licensed, not sold, to you fo r use
only under the te rms of this Agreemen t . You ow n
the disk or other media on which the So ft ware is
originall y or subsequentl y recorded or fixed; but,
as between you an d Creative (and, to the extent
applicable, its licensors), Creative retains all title
to and ownership of the Software and reserves all
rights not expressly granted to you.
2.
For Use on a Single Computer
The Softwa re may be used only on a single
computer by a single user at any time. You may
transfer the machi ne-readable portion of the
Software f rom one co mputer to a nothe r computer ,
provided that (a) the Software (includ ing any
portion or copy thereof) is erased from the first
computer and (b) there is no possibility that the
Software will be used on more than one computer
at a time.
3.
Stand-Alone Basis
You may use the Soft w are only on a stand-alone
basis, such that the Software and t he f unctions it
and its subsidiaries (“Creative”).
Creative
Version 2 .3, Januar y 2000
provides are accessible only to per s ons who are
physically present at the locati on of the comp uter
on which the Sof tware is loaded. Yo u may not
allow the Softw are or its funct ion s to be access ed
remotely, or transmit all or any portion of the
Software through any network or communication
line.
4.
Copyright
The Software is owned by Creative and/or its
licensees and is protected by United States
copyr ight l aws an d inter nat ional treaty pro visio ns.
You may not remove the copyright notice from
any copy of the Software or any copy of the
written materials, if any, accompanying the
Software.
5.
One Archival C opy
You may make one (1) archival copy of the
machine-readable portion of the Software for
backup purpo ses o nly in s upport of your use of the
Software on a single computer, provided that you
reproduce on the copy all copyright and other
proprietar y r ights notices included on the
originals of the Software.
6.
No Merger or Integration
You may not merge any portion of the Software
into, or integrate any portion of the Software with,
any other program, except to the extent expressly
permitte d by the laws of the jurisdic tio n where
you are located. Any portion of the Software
merged into or inte grated with a nother pr ogram, if
any, will continue to be subject to the terms and
conditio ns of th is Agre em ent, and you must
reproduce on the merged or integrated portion all
copyrig ht and other propri e tary rights notices
included in the originals of the Software.
7.
Network Version
If you have purchased a “network” version of t he
Software, this Agreement applies to the
installation of the Software on a single “file
server”. It may not be copied onto multiple
systems. Ea ch “node” connected t o the “file
server” mus t also have its own license of a “node
copy” of the Software, which becomes a license
only for that specific “node”.
8.
Transfer of License
You may transfer your license of the Softwa r e,
provid ed that (a) you transfer all portions of the
Software or copies thereof, (b) you do not retain
any port i on of the S o f tw are or any co py t he r e o f ,
and (c) th e transfer ee read s and ag rees to be b ound
by the terms and conditions of this Agreement.
9.
Limitat ions on Usin g, Cop yi ng, an d Mo di fyi ng
the Software
Except to the extent expressly permitted by this
Agreement or by the laws of the ju risdic tion
where you acquired the Software , you may not
use, copy or mod if y th e Software . Nor may you
sub-license any of your r ights under this
Agreement. You may use the software for your
personal use only, and not for public performance
or for the creation of publicly disp lay ed
video t apes.
Page 3

10.Decompiling, Disassembling, or Reverse
Engineering
Y ou ac knowled ge that t he Softwar e contai ns trad e
secrets and oth er proprietary information of
Creativ e and its licensors. Ex cept to the extent
expressly permitted by this Agreement or by the
laws of t he jur isdiction where you are located , you
may not de c o m pile, di s a s semble or otherw is e
rever s e engineer the Software, or engage in any
other activities to obta in underlying information
that is not visi ble to the user in connection with
nor m al use of t h e S o f tw are.
In particular, you agree not for any purpose to
transmit the Software or display the Software's
object code on any computer scree n or to make
any hardcopy memory dumps of the Software's
object code. If you believe you require
information related to the interoperability of the
Softwar e w it h other programs, you shall not
decompile or disassemble the Software to obtain
such information, and you agree to request such
information from Cr eative at the addres s lis ted
below. Upon recei ving such a request, Creative
shall determine whether you require such
information for a legitimate purpose and, if so,
Creative will provide such information to you
within a reasonable time and on reasonable
conditions.
In any event, you will notify Creative of any
info rmatio n de r i ve d fr om revers e eng i n e ering or
such other acti vities, and the results thereof will
constitute the confidential information of Creative
that may be used onl y in connection with the
Software.
TERMINATION
The license granted to you is effective until
terminated. You may terminate it at any time by
returning the Software (including any portions or
copies thereof ) to Creative. The license will also
terminate automatically without any notice from
Creative if you fail to comply with any term or
condition of this A greement. You agree upon such
termination to return the Software (including any
portions or copies thereof) to Creative. Upon
termination, Creative may als o enf orce any rights
provided by law. The provisions of this Agreement
that protect the proprietary rights of Creative will
continue in force after termination.
LIMITED WARRANTY
Creativ e w arrants, as the sole war ranty, t hat the
disks on whic h the So ftware is furni shed wil l be free
of defects, as set forth in the Warranty Card or
printed manual included with the Software. No
dist r ibutor, deal e r or a ny other en ti ty or pers o n is
authorized to expand or alter this warranty or any
other provisions of this Agreement. Any
representation, other than the warranties set forth in
this Agreemen t, w ill not bi nd Creative.
Creative does not warrant that the functions
contained in th e Sof tware will meet your
requirements or that the operation of the Software
will be uninterrupted, error-free or free from
malicious code. For purposes of this paragraph,
“malicious code” mea ns any program c ode desi gned
to contam inate other com puter progr a m s or
computer data, consume computer resources,
modify , de stro y, record, or transmit da ta, or in som e
other fashion usurp the normal operation of the
computer , computer system, or computer network,
including viruses, Trojan horses, droppers, worms,
logic bombs, an d the like. EXCEPT AS STATED
ABOVE IN THIS AGREEMENT, THE
SOFTW ARE IS PROVIDED AS-IS WITHOUT
WARRANTY OF ANY KIND, EITHER
EXPRESS OR IMPLIED, INCLUDING, BUT
NOT LIMITED TO, ANY IMPLIED
WARRANTIES OF MERCHANTABILITY
AND FITNESS FOR A PARTICULAR
PURPOSE. CREATIVE IS NOT OBLIGATED
TO PROVIDE ANY UPDATES, UPGRADES
OR TECHNICAL SUPPORT FOR THE
SOFTWARE.
Further, Creative shall not be liable for the accuracy
of any inf or m a t i o n pr ov ided by Cr e a tiv e or th i r d
party technical support personnel, or any damages
caused, either directly or indirectly, by acts taken or
omissions made b y you as a result of such techni cal
suppor t.
You assume full respo ns ibi lity f or the select ion of
the Softw are to achieve your intended results, and
for the ins tallation , use an d results o btained from the
Software. You also assume the entire risk as it
applies to the qualit y and perform a nc e of the
Software. Should the Software prove defective, you
(and not Creative, or its distributors or dealers)
assume the enti re cost of all necessary servicing,
repair or correction.
This warr anty gives you specific legal rights, a nd
you may also hav e ot her rig ht s which vary from
country/state to country/state. Some countries/states
do not allow the exclusion of implied warranties, so
the above exclusion may not apply to you. Creative
disclaims all warranties of any kind if the Software
was customi zed, repackaged or al tered in any way
by any thir d party ot he r th an Crea ti ve .
LIMITATION OF REMEDIES AND
DAMAGES
THE ONLY REMEDY FOR BREACH OF
WARRANTY WILL BE THAT SET FORTH IN
THE WARRANTY CARD OR PRINTED
MANUAL INCLUDED WITH THE
SOFTWARE. IN NO EVENT WILL
CREATIVE OR ITS LICENSORS BE LIABLE
FOR ANY INDIRECT, INCIDENTAL,
SPECIAL OR CONSEQUENTIAL DAMAGES
Page 4

OR FOR ANY LOST PROFITS, LOST
SAVINGS, LOST REVENUES OR LOST DATA
ARISING FROM OR RELATING TO THE
SOFTWARE OR THIS AGREEMENT, EVEN
IF CREATIVE OR ITS LICENSORS HAVE
BEEN ADVISED OF THE POSSIBILITY OF
SUCH DAMAGES. IN NO EVENT WILL
CREATIVE’S LIABILITY OR DAMAGES TO
YOU OR ANY OTHER PERSON EVER
EXCEED THE AMOUNT PAID BY YOU TO
USE THE SOFTWARE, REGARDLESS OF
THE FORM OF THE CLAIM.
Some countries/states do not allow the limitation or
exclusion of liab i lity for inci dent al or cons equent ial
damages, so the above limitat ion or exclusion may
not apply to you.
PRODUCT RETURNS
If you must ship the softw are to Creative or an
authorized Creative distributor or dealer, you must
prepay shipping and either insure t he s oftware or
assume all risk of loss or damage in transit.
U.S. GOVERNMENT RESTRICTED RIGHTS
All Softw are and related documentation are
provided with restricted rights. Use, duplication or
disclosure by the U.S. Government is subject to
restrictions as set forth in subdivision (b)(3)(ii) of
the Rights in Technical Data and Computer
Software Clause at 252.227-7013. If you are sublicensing or using the Soft ware out side o f the Unit ed
States, you wil l comply with the applicabl e local
laws of you r country, U.S. export control law, and
the English v ersio n o f this Agreement.
CONTRACTOR/MANUFACTURER
The Contractor/Manufacturer for the Software is:
Creative Technology Ltd
31, International Business Park
Creative Resource
Singapore 609921
GENERAL
This Agreement is binding on you as w ell as your
employees, empl oyers, contractors and agents, an d
on any successors and assignees . Neither the
Software nor any information derived therefrom
may be expo rte d exce pt in ac corda nce wi th t he l aws
of the U.S. or other applicabl e provisions. This
Agreement is governed by the law s of the State of
California (except to the extent federal law governs
copyrights and federally registered trademarks).
This Agreemen t i s the entire agreement between us
and supersedes any other understandings or
agreemen ts, inc ludin g , but not limit ed to,
advertising, with respect to the Software. If any
provision of this Agr eeme n t is deem ed invalid or
unenforcea ble by any cou ntry or go vernmen t age ncy
having jur isdi cti on, tha t part icul ar pro vi sion w ill be
deemed modified to the extent necessar y to make the
provision valid and enforceable, and the remaini ng
provisions will remain in full force and effect.
For questions concerning this Agreement, please
contact Creative at the address stat ed above. For
questions on product or technical matters, contact
the Creative technical sup por t center nearest you.
ADDENDUM TO THE MICROSOFT
SOFTWARE LICENSE AGREEMENT
(WINDOWS 95)
IMPORTANT: By us ing the Microsoft soft w are
files (the “Microsoft Software”) provided with this
Addendum, you are agreeing to be bound by the
following terms. If you do not agree to be bound by
these terms, you may not use the Micr os oft
Software.
The Microsoft Software is provided for the sole
purpose of replacing the corresponding files
provided with a previously licensed copy of the
Microsoft software product identified above
(“ORIGINAL PRODUCT”). Upon installation, the
Microsoft Software files become part of the
ORIGINAL PRODUCT and are subject to the same
warrant y and license terms and conditions as the
ORIGINAL PRODUCT. If you do not have a valid
license to use the ORIGINAL PRODUCT , you may
not use the Mi crosoft Softw are. An y other us e of the
Microsof t Software is prohibited.
SPECIAL PROVISIONS APPLICABLE TO
THE EUROPEAN UNION
IF YOU ACQUIRED THE SOFTWARE IN THE
EUROPEAN UNION (EU), THE FOLLOWING
PROVISIONS ALSO APPLY TO YOU. IF THERE
IS ANY INCONSISTENCY BETWEEN THE
TERMS OF THE SOFTWARE LICENSE
AGREEMENT SET OUT EARLIER AND IN THE
FOLLOWING PROVISIONS, THE FOLLOWING
PROVISIONS SHALL TAKE PRECEDENCE.
DECOMPILATION
You agree not for any purpose to transmit the
Software or display the Soft w a re’s object code on
any computer screen or to make any hard copy
memory dumps of the Software’s object code. If you
believe you require informatio n relate d to the
interoperability of the Software with other
programs, you shall not decompile or disassemble
the Softw are to obtain such information, and you
agree to request such information from Creative at
the address listed earlier. Upon receiving such a
request, Creative shall determine whether you
require such information for a legitimate purpose
and, if so, Creative will provide such information to
you within a reasonable time and on r eas onable
conditi ons .
LIMITED WARRANTY
EXCEPT AS STATED EARLIER IN THIS
AGREEMENT, AND AS PROVIDED UNDER
THE HEADING “STATUTORY RIGHTS”,
THE SOFTW ARE IS PROVIDED AS-IS
Page 5

WITHOUT WARRANTY OF ANY KIND,
EITHER EXPRESS OR IMPLIED,
INCLUDING, BUT NOT LIMITED TO, ANY
IMPLIED WARRANTIES OR CONDITIONS
OF MERCHANTABILITY, QUALITY AND
FITNESS FOR A PARTICULAR PURPOSE.
LIMITATION OF REMEDY AND DAMAGES
THE LIMITATIONS OF REMEDIES AND
DAMAGES IN THE SOFTWARE LICENSE
AGREEMENT SHALL NOT APPLY TO
PERSONAL INJURY (INCLUDING DEA TH)
TO ANY PERSON CAUSED BY CREATIVE’S
NEGLIGENCE AND ARE SUBJECT TO THE
PROVISION SET OUT UNDER THE
HEADING “STATUTORY RIGHTS”.
STATUTORY RIGHTS
Irish law provides that certain conditions and
warra nties ma y be im plied in c ontrac t s for the s ale
of goods and in contracts for t he supply of s e rvices.
Such condi tions a nd war ranties are hereby exc luded,
to the extent such exclusion , i n the context of this
transaction, is lawful under Irish law. Conversely,
such conditions and warranties, insofar as they may
not be lawfu lly excluded, s hall apply.
Accordingl y nothing in this Agre ement shall
prejudice an y rig hts that you may enj oy b y vir tue of
Sections 12, 13, 14 or 15 of the Irish Sale of Goods
Act 1893 (as amended).
GENERAL
This Agreement is governed by the laws of the
Republic of Ireland. The local language version of
this agreement shall apply to Software acquired in
the EU. This Agreement is the entire agreement
between us, and you agree that Creative will not
have an y liability for any untrue statement or
represent ation made by it, its ag ents or anyone else
(whether inn ocently or negli gentl y) upon whi ch you
relied upon entering this Agreement, unless such
untrue statement or representat ion was made
fraudule ntly.
Safe ty In fo rmatio n
The following sections contain notices for
CAUTION: This device is intended to be installed
by the user in a CSA/TUV/UL cert ified/li s ted IBM
AT or compatible pers ona l com pute rs in th e
manufacturer’s defined oper ator access area. Check
the equipment ope ra tin g/ in sta llatio n manua l and/ or
with the equipment manufacturer to verify/confirm
if your equi pment is suitable for us er-installed
applicat ion cards.
Any chang e s or modifications not expressly
approv ed by the gra ntee of th is de vice c ould vo id the
user’s authority to operate the device.
various countries:
Modifications
Compliance
This product conf orms to th e following Counc il
Directive:
Directive 89/336/EEC, 92/31/EEC (EMC)
❑
Page 6

Contents
Introduction ....................................................................................................................1
System Requirements ....................................................................................................1
Your Live! Dr ive .............. ... .. ...................... .. ... .............. ... .. ............... .. ... .............. ... .. ....2
Switching Audio Input Sources..........................................................................3
Connecting Headphones .....................................................................................4
Connecting Microphone.....................................................................................4
Adjusting Headphones Volume and Microphone Gain...... ................................5
Installing Hardware........................................................................................................6
Step 1: Prepare the System for Hardware Installation........................................6
Step 2: Insert the Live! Drive into the System....................................................7
Step 3: Connect to the SB Live! Card ................................................................ 9
Step 4: (Optional) Install the Digital DIN Metal Bracket
(To connect to FPS2000 or DTT2500 speakers )................ ............. ...............10
Step 5: (Optional) Connect to the Digital I/O Card (Only if you have one)....10
Step 6: Complete the Installation .....................................................................10
Using Your Live! Drive................................................................................................10
Playing Games and Music................................................................................11
Watching DVD Movies Using SoftPC-DVD ...................................................11
Recording and Content Authoring....................................................................11
Installing Software.......................................................................................................14
Additional Features in Device Controls ........................................................... 14
Gener a l S p eci fi ca ti o ns .......... .. ........ .. ... .............. ... .. ............... .. ... .............. ... .. .............. 15
Troubleshooting........................................................................................................... 15
Page 7

Introduction
Connect Live! Drive to your Sound Blaster Live! audio card, and you will have the best audio
solution available for your music, digital audio content creation, games, movies, CDs, MP3
songs and other Internet entertainment. The Live! Drive has a front panel, which allows you to
connect commonly used audio sources to external devices ea sily . It convenie nt ly allows you to
plug in your microphone and headphones, and adjust the ga in/volume from the front pa nel.
Live! Dri ve also provides MIDI, as well as, digital input and output connectors for your audio
recording and content authoring purposes.
System Requirements
The minimum system requirements for Live! Drive are:
❑ An installed Sound Blas ter Live! (with an AUD_EXT expansion header)
❑ An availa ble 5¼" PC drive bay
®
❑ Genuine Intel
133 MHz for Windows 95/98, 200 MHz for Windows NT 4. 0
❑ Intel or 100% compatibl e mo therboard chipset
❑ Windows 95, 98 or Windows NT 4.0
❑ 16 MB RAM for Windows 95/98 (32 MB RAM recommended),
32 MB RAM for Windows NT 4.0
❑ 160 MB of free hard disk space
❑ Headphones or amplified speakers (available separately)
❑ CD-ROM drive required for software installat ion
Pentium® class processor:
Live Drive CT4860/CT4861 1
Page 8
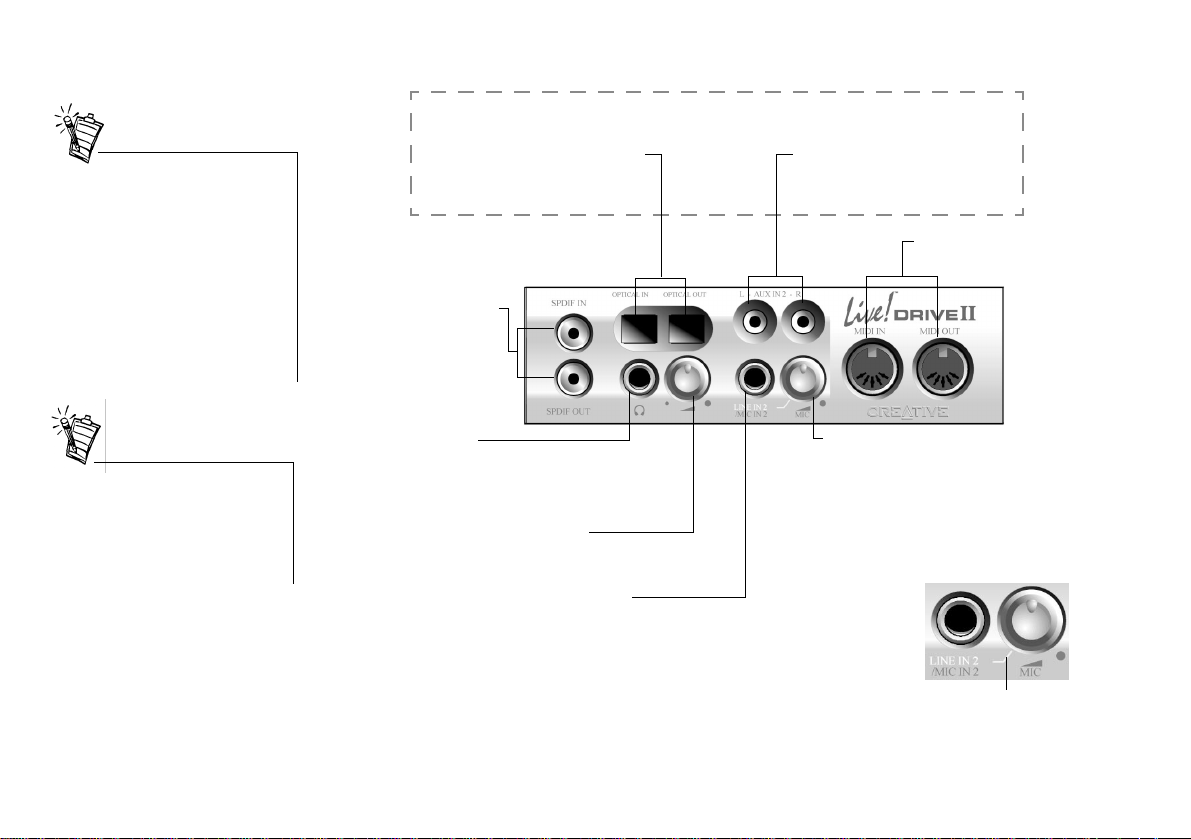
Your Live! Drive
The front panel of your Live! Drive has these jacks , connectors and controls:
(These two sets of connectors and jacks are available only on Live! Drive II.)
If a particular INPUT sour ce (for
example, Line In 2) is supported
by the Live! Drive as well as the
Digital I/O card, only the input on
the Live! Drive w ill be enabled.
However, using the microphone
via the Line In 2/Mic In 2 input on
the Live! Drive will also disable
the Line In 2 input on the Digi tal
I/O card.
To connect to your existing
computer headphones and
microphone to the Live! Drive,
use the ¼" to 3.5mm adapter
provided.
Optical SPDIF In/Out connectors
Connects to digital audio devices
such as DA T and MiniDisc recorders,
via optical input/output.
RCA SPDIF In/Out jacks
Connects to digital audio
device s such as DAT and
MiniDisc recorders, via
RCA input/output.
¼" Headphones jack
Allows you to connect to a pair of
high-quality headphones. Your
speaker output will be muted when
you connect the headphones.
Headphones Volume Control
Controls the headphones
output volume.
¼" Line In 2/Mic In 2 jack
Allows you to connect to a high-quality
dynamic microphone or audio device such
as an electric guitar, DAT, or MiniDisc player.
RCA Auxiliary In jacks
Connects to consumer equipment
such as VCR, TV and CD player, via
RCA Auxiliary outputs.
MIDI In/Out connectors
Connects to MIDI devices.
Line In 2/Mic In 2 selector
(Microphone Gain Control)
To switch to Line In 2, turn the knob anticlockwise over the Line In 2/Mic In 2 mode
separator mark until a “click” sound is
heard. To s witch back to Mic In 2, turn the
knob clockwise over the separator mark
until a “click” sound is heard. To control
the microphone gain, continue to turn
clockwise.
Line In 2/Mic In 2 mode
separator mark
2 Live Driv e CT 4860/CT4861
Figure 1: Jacks, connectors and controls on the Live! Drive.
Page 9
Switching Audio Input Sources
You need to install the software
first before you can switch audio
input so urces.
However, if the SPDIF Bypass
feature and Aux In 2 are both
enabled, both the SPDIF In and
Aux In 2 channels will be
available.
For details on th e SP D I F By pass
featu re , see “Digital I/ O” on pa ge
14.
On your Sound Blaster Live! and Live! Drive, two audio input sources may share a connection.
In such cases, only one of the input source can be enabled and used at any one time.
2
If your audio card has an I
S connector, you can use only either one of the following inputs at
any one time:
2
S
❑ I
❑ Line In 2 or Line In 2/Mic In 2
To switch the audio input source:
1. Click Start -> Programs -> Creative -> Sound Blaster Live! -> Surround Mixer.
2. On the Mixer deck (lower portion of Surround Mixer), cli ck a ny of the audio input source
icon, and then se lect either th e I
3. C l ick the red plus sign above the I
2
S In or Line In 2/Microphone 2 icon.
2
S In or Line In 2/Mic In 2 icon.
4. In the Other Advanced Controls dialog box, s elect the Enable Line In 2/Mi c In 2 che ck
2
box to enable the Line In 2/Mi c In 2 input source. Clear the check box to enable I
S In.
If your Live! Drive has Aux In 2 connectors, you can use only either one of the following inputs
at any one time:
❑ Aux In 2
❑ SPDIF In (Coaxial or Optical)
To switch the audio input source:
1. Click Start -> Programs -> Creative -> Sound Blaster Live! -> Surround Mixer.
2. On the Mixer deck (lower portion of Surround Mixer), cli ck a ny of the audio input source
icon, and then se lect either th e SPDIF In or Auxiliary 2 icon.
3. C l ick the red plus sign above the SPDIF In or Auxiliary 2 icon.
4. In the Other Advanced Controls dialog box, select the Enable Auxiliary 2 check box to
enable the Auxili ary 2 input source. Clear the check box to enable SPDIF In.
Live Drive CT4860/CT4861 3
Page 10
Connecting Headphones
To listen to an analog source (e.g.
CD Audio) usi ng headphones,
make sure that in Surround Mixer,
the recording source selected is
“What U Hear”. Otherwise , no
sound wil l be heard from the
headphones.
There are two types of headphones which you can connect to the Live! Drive :
❑ Home audio or profes siona l audi o headph ones, which a re usua ll y fit te d with a ¼" st ereo pl ug
❑ Personal stereo he adphone s, which ar e usual ly f itte d wit h a 3.5mm ster eo plug, such as tho se
used for portable audio playe rs.
.
Connecting Microphone
The shunt for Jumper C85 can be
found to gether w ith the pac ke t of
screws provided.
4 Live Driv e CT 4860/CT4861
There are two types of microphone which you can connect to the Live! Drive:
❑ Dynamic microphone, which is usually fitted with a ¼" stereo plug, such as those used in
vocal performances
.
❑ Condenser microphone, which is usually fitted with a 3.5mm stereo plug, such as the Telex
microphone bundled with Creative audio products.
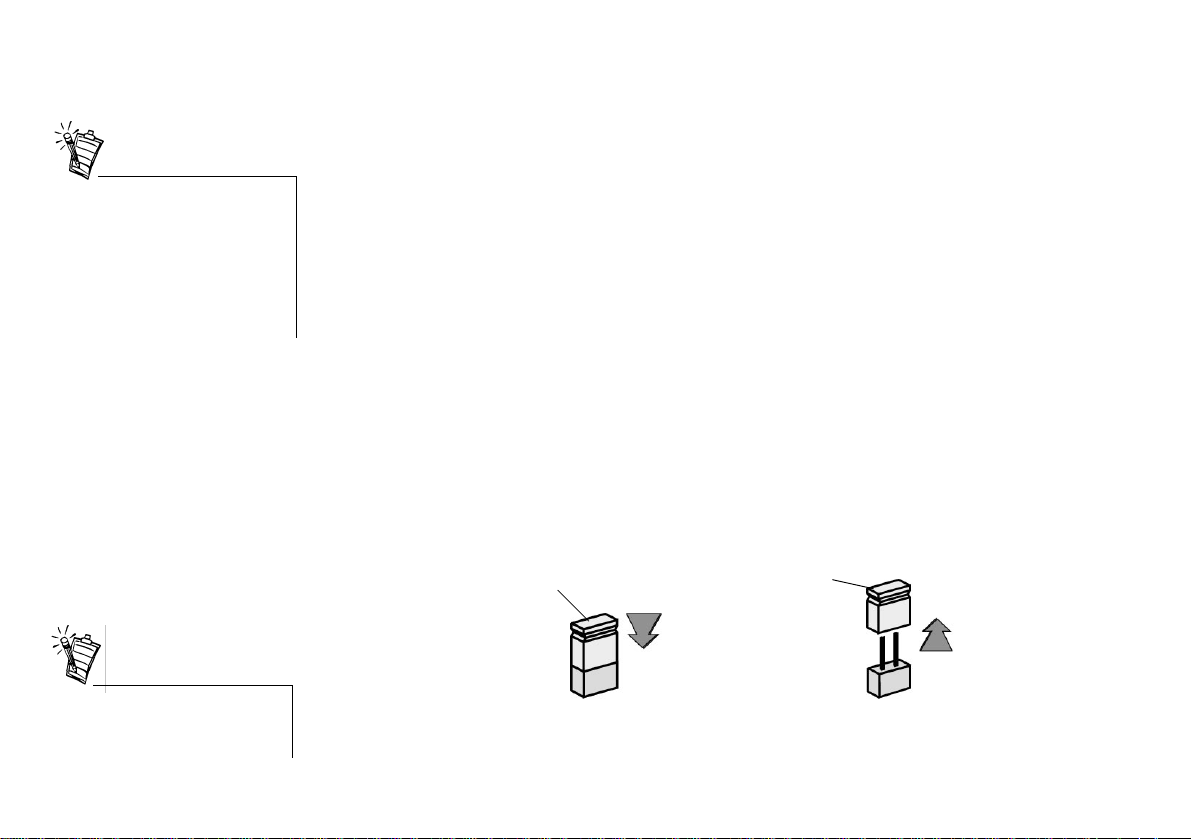
By default, Live! Drive is set for use with a condenser microphone . To use a dynamic
microphone, you must place the shunt (jumper cap) onto Jumper C85 on the Live! Drive. See
Figure 4 on page 8 for the location of Jumper C85 on the Live! Drive.
Shunt
Jumper C85
To use a dynamic
microphone,
place the shunt
onto Jumper C85.
Shunt
Jumper C85
Figure 2: Micr ophone jumper set ti ngs.
T o use a condenser
microphone,
remove the shunt
from Jumper C85
(default setting).
Page 11
Adjusting Headphones Volume and Microphone Gain
If your headphones and microphone are attached to the Live! Drive, the headphones volume and
microphone gain can be adjusted in two ways.
Using the Live! Drive
Control Knobs
Using Creative Surround
Mixer
It is rec ommend ed t hat you set the
headphones volume le vel and
microphone gain level to 75% in
Surround Mixer, and use the
control knobs on the Live! Drive
to make fu rther adjustments.
Even if you turn the cont rol knob
on the Live! Drive to the
maximum , your headphones w ill
hav e no sound if you set the
headphones volume level to 0% or
mute it in Surround Mixer. The
same applies for your
microph one.
On the front panel of the Li ve! Drive, turn the res pective control knob:
❑ Anti-clockwise to decrease the headphones volume or micr ophone gain.
❑ Clockwise to increase the headphones volume or microphone gain.
To adjust the headphones volume:
1. Click Start -> Programs -> Creative -> Sound Blaster Live! -> Surround Mixer.
2. On the Mixer deck (lower portion of Surround Mixer), if the button below the VOL slider is
not highlighted, click it to unmute the output sound.
3. Adjust the VOL slider.
To adjust the microphone gain:
1. Click Start -> Programs -> Creative -> Sound Blaster Live! -> Surround Mixer.
2. On the Mixer deck (lower portion of Surround Mixer), cli ck a ny of the audio input source
icon, and then select the Line In 2/Microphone 2 icon.
3. If the butt on b e l ow th e Line In 2/Microphone 2 slider is not highlighted, click it to unm ute
the audio input source.
4. Adjust the slider under the Line In 2/Microphone 2 icon.
Live Drive CT4860/CT4861 5
Page 12
Installing Hardware
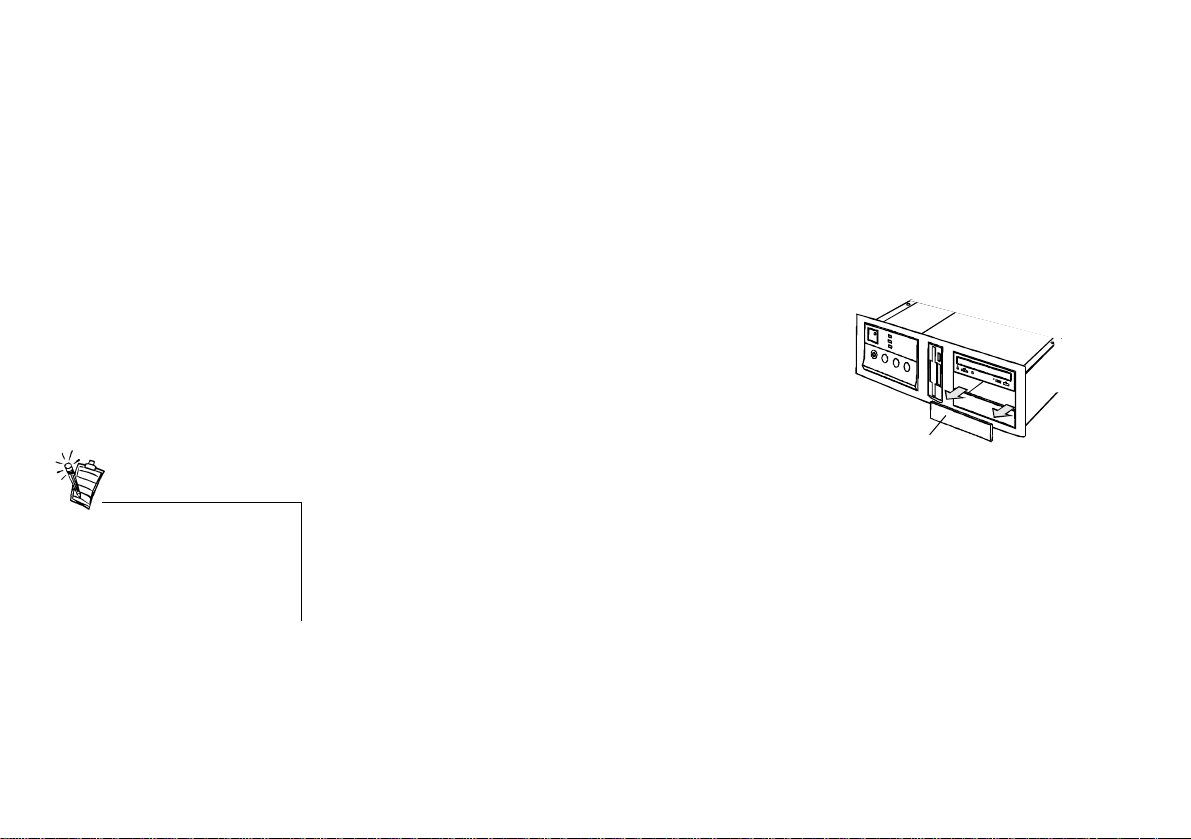
Figure 3: Removing front panel cover.
Front panel cover
To install your Live! Drive, you need to perform the following:
❑ Step 1: Prepare the System for Hardware Installation
❑ Step 2 : I nsert th e L ive! Drive in to the Sy s t em
❑ Step 3: Connect to the SB Live! Card
❑ Step 4: (Optional ) Install the Digi tal DIN Metal Bra cket (To connect to FPS2000 or DTT2500
spea ke rs )
❑ Step 5: (Optional) Connect to the Digital I/O Card (Only if you have one)
❑ Step 6 : Co mple te the In s t al lation
Step 1: Prepare the System for Hardware Installation
Place you r C D -ROM/DVD-ROM
drive above the Live! Drive to
prevent dangling cables from the
front panel blocking access to the
drive tray.
6 Live Driv e CT 4860/CT4861
1. Switch off your system and all peripheral devices.
2. T ouch a metal plate on your system to ground yourself
and to discha rge any stat ic electri city , and then unplug
the power cord from the wall outlet.
3. Remove the cover from your system.
4. Remove the f r ont panel cover from one unused 5¼"
drive bay.
Page 13

Step 2: Insert the Live! Drive into the System
1. Pass the follo win g cable ends from t he inside of th e casing thr ough th e v acan t 5¼" driv e ba y ,
and then leave the cables dangling half way on the outside of the casing:
❑ Smaller end of the power splitter cable
❑ Dark grey flat cable end with a black circle near the connector
❑ (Optional) Any end of the light grey flat cable (if you wan t to connect to a Digital I/O
card fro m an ea rl i er pur ch a s e)
❑ (Optional) Cable end of the Digital DIN metal bracket (if you want to connect to
FPS2000 or DTT2500 speakers)
Live Drive CT4860/CT4861 7
Page 14
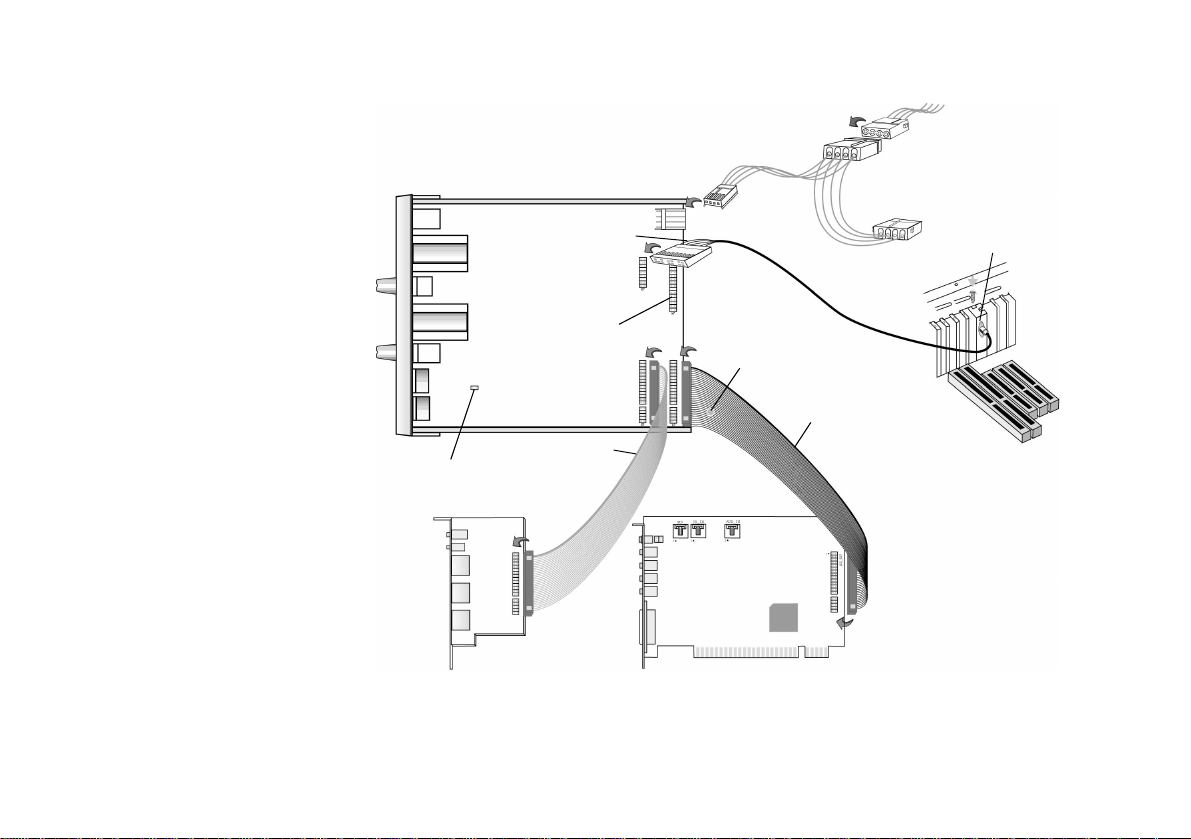
2. Connect the cables to the Live! Drive as shown in Figure 4.
Power splitter cable
Live! Drive
To system
power supply unit
8 Live Driv e CT 4860/CT4861
Digital DIN
metal bracket
C85
Jumper for microphone
type selection
(Optical)
Digital I/O card
Orange-colored wire
Connector for
future upgrades
Red-colored wire
Light grey
flat cable
J3
J1
J2
Sound Blaster Live! card
Digital
DIN cable
Black circle on the
underside of the cable
Red-colored wire
Dark grey
flat cable
Fig ure 4: Connecting cabl es to the Live! Drive.
3. Slide th e Li ve! D ri ve in to the v aca nt 5¼" dr iv e bay, and then sec ure it s sid es to the c asi ng with
the screws provided.
Page 15
Step 3:
Connect to the
Connect the dark grey flat cable to Sound Blaster Live!’s AUD_EXT header.
SB Live! Card
Do not force the audio card into
the slot. If it does not fit properly,
gently remove it and try again
.
If you have difficulty con nec ting to the AUD_EXT head er:
1. Remove the So und Blaster Live! card from its PCI slot.
2. Connect the dark grey flat cable to Sound Blaster Live!’s AUD_EXT header.
3. Align the Sound Blaster Live! card with the vacant PCI expansion slot. Press the card gently
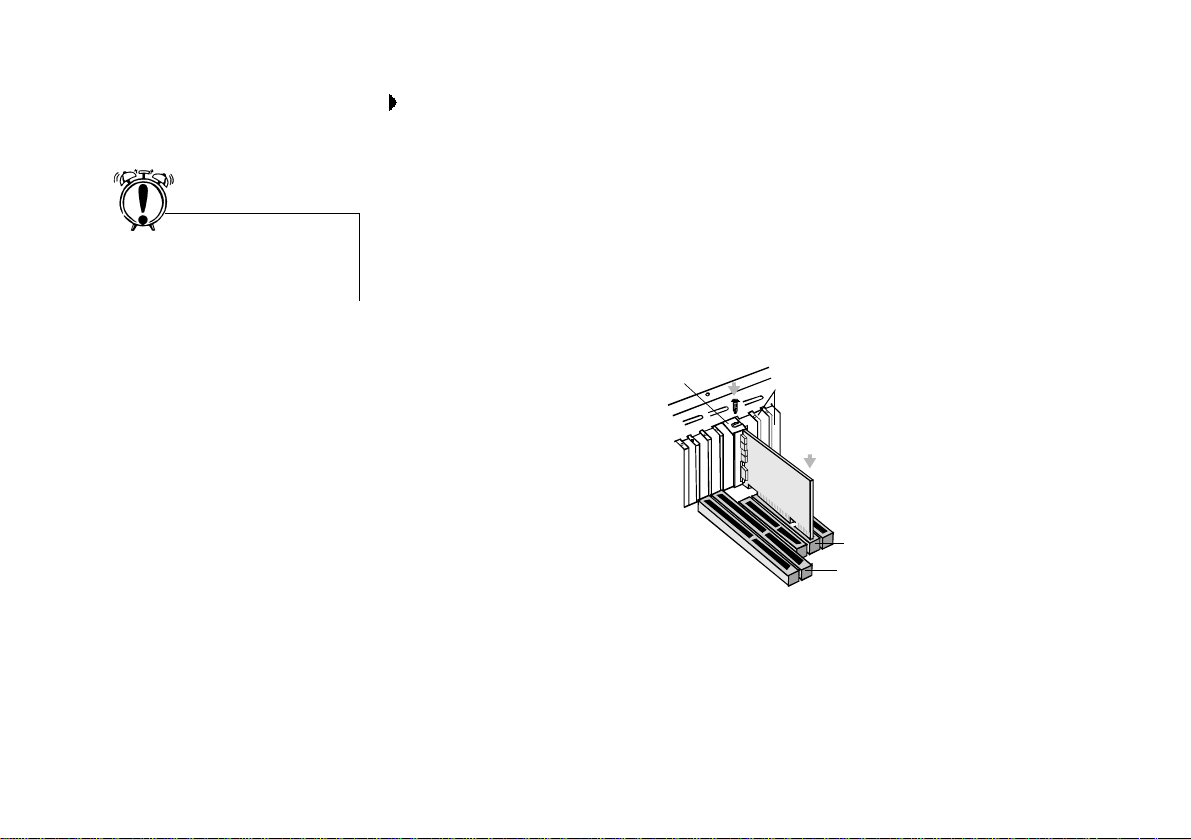
and evenly into the slot as shown in Figure 5. Ensure that the card is seated firmly inside the
PCI expansion slot.
4. Secure the card to the expansion slot with a scre w.
ii. Fasten the card
to the slot with a
screw.
Fig ur e 5: Securi ng the au dio c ar d to the P CI
expan s io n slot.
Unused brackets
i. Gently press the
audio card into
the slot.
PCI slot
ISA slot
Live Drive CT4860/CT4861 9
Page 16

Step 4: (Optional) Install the Digital DIN Metal Bracket (To connect to FPS2000 or DTT2500 speakers)
Step 5: (Optional)
Connect to the
1. Remove the me tal plate from a vacant ISA or PCI expans ion slot.
2. Align the Digita l DIN metal bracket with the vacant expansion slot opening.
3. Secure the metal bracket to the system casing with a screw.
Connect the light grey flat cable to the Digital I/O card’s AUD_EXT header.
Digital I/O Card
(Only if you have one)
Step 6: Complete the Installation
Using Your Live! Drive
10 Live Drive CT4860/CT4861
If you have difficulty conn ec ting to the AUD_EXT header:
1. Remove the Digital I/O card from the system.
2. Connect the light grey flat cable to the Digital I/O card.
3. Place the me tal bracket of the Digital I/O card into the vacant bra cket on the system cas ing.
4. Secure the card to the system cas ing with a screw.
1. Connect the power splitter cable to the system pow er supply unit.
2. Replace the cover onto your system.
3. Plug the power cord back into the wall outlet, and switch on the system .
The Live! Drive will most undoubtedly give you endless hours of listening pleasure. The
followin g information and diagrams on the next two pages show how you can connect to your
Live! Drive to optimize your enjoyment.
Page 17
Playing Games and Music
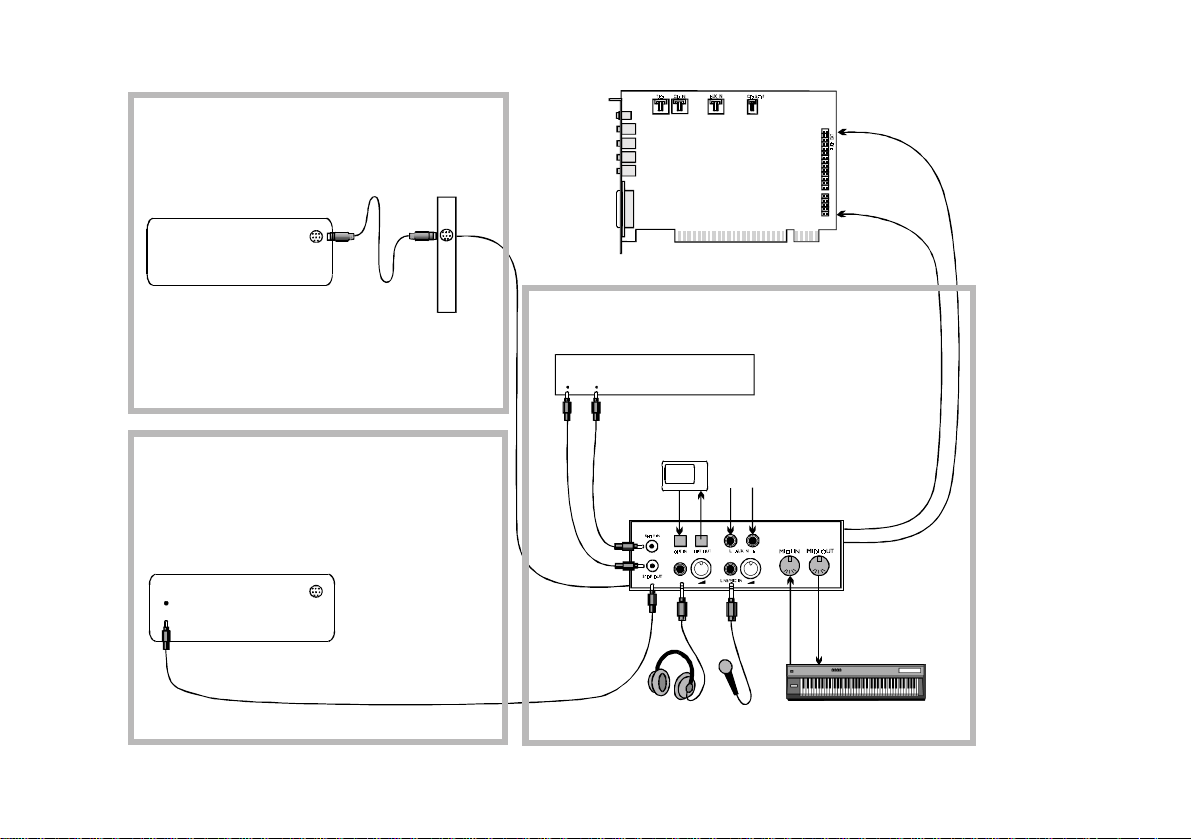
❑ With FourPointSurround or DeskTop Theater 5.1 Digital Speaker System from Cambridge
SoundWorks, you can experience crystal clear gaming se quences or music from the Digital
DIN connection.
Watching DVD
Movies Using SoftPCDVD
Recording and Content Authoring
FourPointSurround and DeskTop
Theater 5.1 speaker sy stems,
Digital I/O Module, Di gital
Output Module and Digital I/O
card ar e availabl e se pa ratel y.
❑ If you are using Creative SoftPC -DVD to watch DVD movies on your PC, connect from the
SPDIF Output of your Live! Drive to an ext erna l Dolby Digital (AC-3) decoder such as the
DeskTop Theater speaker systems.
❑ The Live! Drive fits into the standard 5¼" drive bay of your computer and thus allows you
easy access to the following connectors fr om it s front panel:
• Standard MIDI input/output connectors for con nec tion to MIDI devices;
• A second analog Line In allows you to connect to an additional input device (e.g. a CD
player) for recording. Switchable to Microphone mode for a second microphone input,
with front panel volume control;
• A Headphones jack to connect to your headphones, with front panel volume control.
• A set of SPDIF (RCA) input/output jacks for recording to and from external digital
devices such as M ini D is c or DAT record er s
• A set of SPDIF Optical input/output jacks for recording to and from external digital
devices such as MiniDisc or DAT recorders via an optical connection.
(Available on Live! Drive II only.)
• A set of Auxiliary input j acks for recording from consumer equipment such as television,
video cassette recorder and CD players. (Available on Live! Drive II only.)
❑ A Digital DIN connec tor for c onnect ion t o dig ital spe ake rs such a s the F ourPoi ntSur round o r
DeskTop Theater 5.1 Digital S peaker Systems.
❑ The Headphones and Mi cro phone co nnecti ons ut ili zes ¼ " jacks fo r hig h-qua lity c onne cti vity.
Live Drive CT4860/CT4861 11
Page 18
Playing Games and Music
with FourPointSurround Digital
Speaker System
FourPointSurround
Digital Speaker System
Digital
DIN
Sound Blaster Live! card
Recording and Content Authoring
Digital DIN
Metal bracket
with Live! Drive
SPDIF (RCA)
In Out
Digital device
(e.g., DAT)
Note:
The Optical and
AUX input jacks are
available only on Live!
Drive II.
Watching DVD Movies
with Creative SoftPC-DVD and
DeskTop Theater 5.1 Digital Speaker System
DeskTop Theater 5.1 Digital Speaker System
Dolby Digital
(AC-3)
SPDIF In
12 Live Drive CT4860/CT4861
Digital
DIN
MiniDisc
Headphones Microphone /
Figure 6: Connecting peripherals to the Live! Drive.
AUX input from
an analog so urce
(e.g., CD player
or tape deck)
Line In
Live! Drive
MIDI devices
(e.g., MIDI keyboard)
Page 19
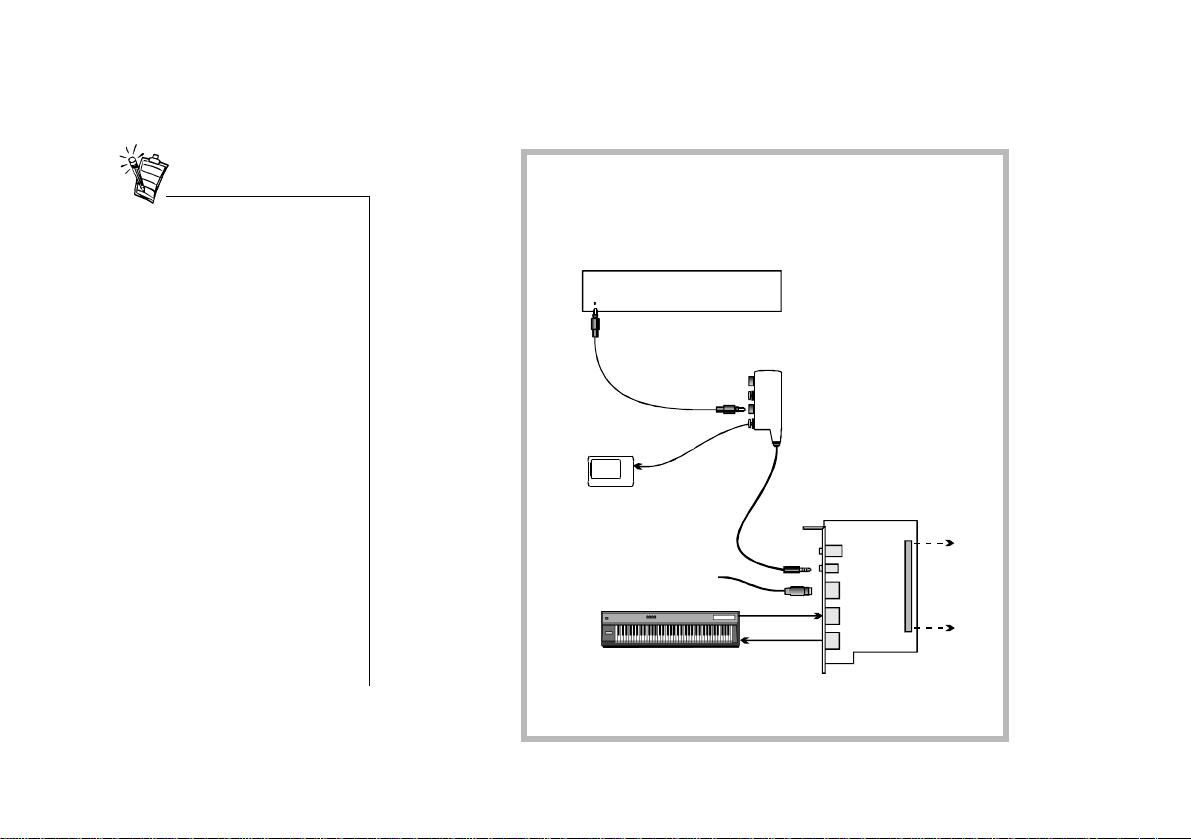
When you cascade your existing
Digital I/O card to the Live! Drive,
pleas e no te the following:
• On the Digital I/O card, only
the SPDIF Out puts are
available.
The SPDIF Inputs and 2nd
Line Input are available on the
Live! Drive. The SPDIF
Outputs are al so available on
the Live! Drive.
• You can connect two MIDI
devices simultaneously to the
MIDI Input of the Live! Drive
and Digi tal I/O card. However,
at any one time, you can only
use the MIDI Input on either
the Live! Drive or the Digital
I/O card.
The MIDI Output is av ai lab le
on both the Digital I/O card
and the Li ve! Drive.
If you have an Optical Digital I/O card (or Digital I/O card) from an earlier purchase, you can
connect it to your Li ve! Drive. The figure below shows an alterna tive method for audio
recording and content authoring using the Optical Digital I/O card.
Recording and Content Authoring
with Optical Digital I/O card and
Digital I/O Module
Recording to or from an
SPDIF (RCA)
In
MiniDisc
Recorder
To FourPointSurround
or DeskTop Theater 5.1
Digital Speaker Systems
MIDI devices
(e.g., MIDI keyboard)
SPDIF Out (RCA)
Optical
Input
Digital device
(e.g., DAT)
Optical
Output
external digital device
supporting RCA SPDIF
input/output
Digital I/O Module
(RCA/Optical SPDIF In and Out)
Line In 2
Digital In/Out
Digital DIN
MIDI In
MIDI Out
Optical
Digital I/O
card
Connects to
Live! Drive
Figure 7: Connecting peripherals to an Optical Digital I/O card.
Live Drive CT4860/CT4861 13
Page 20
Installing Software
1. Insert the installation disc into your CD-ROM drive.
The disc supports Windows AutoPlay mode and starts running automatica lly.If not, see
“Troubleshooting” on page 15.
2. Follow the instructions on the screen to complete the installation.
Additional Features in Device Controls
Digital I/O
Live! Drive
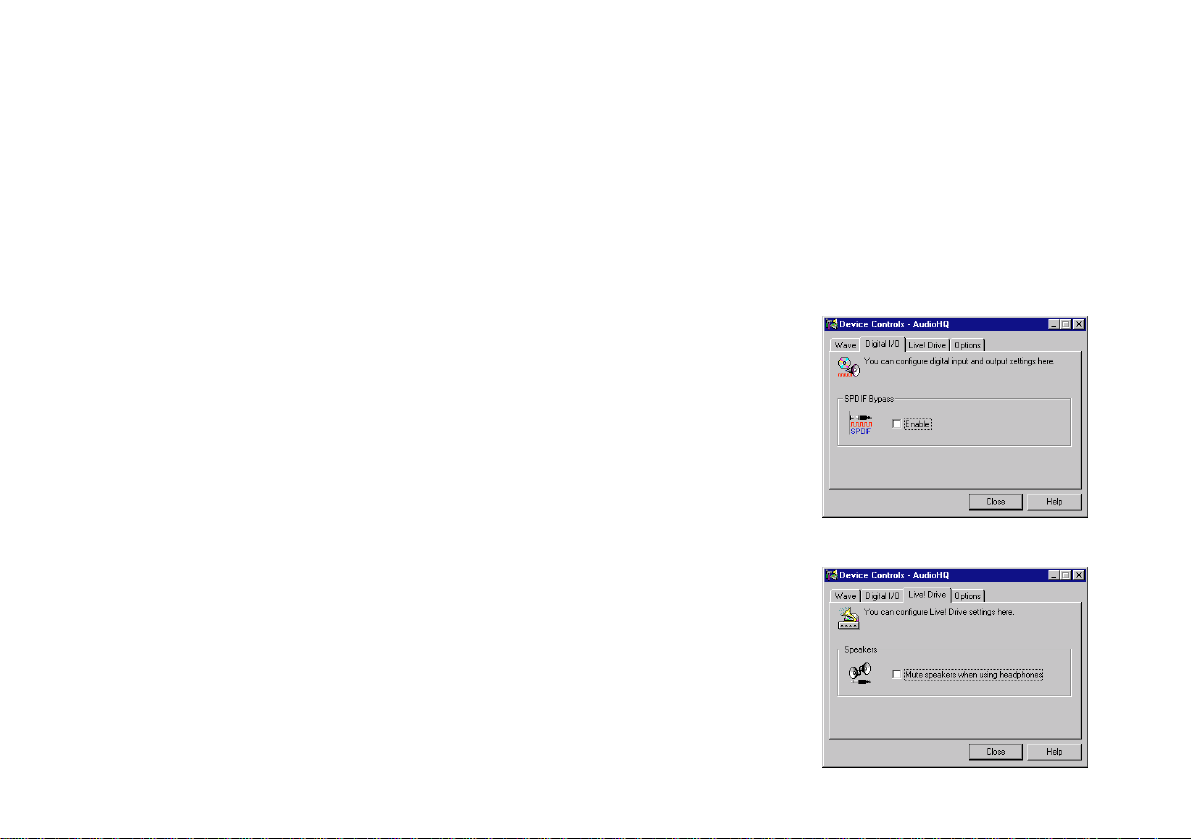
After you install the software f or the Live! Drive, you will be able to enable the SPDIF Bypa ss
feature for your digital inputs and outputs, and mute your speakers when you plug your
headphones into Live! Drive. These two new features appears as two new tabbed pages in
Device Controls.
To enable the SPDIF Bypass feature:
•On the Digital I/O tabbed page, selec t the Enable check
box to place a check mark in it.
SPDIF Bypass is required if you want audio signals
passing through SPDIF In to be routed directly to SPDIF
Out, without passing through the processor chip.
To mute the speakers when using headphones:
•On the Live! Drive tabbed page, select the Mute
speakers when using headphones check box to place a
chec k m a r k in it .
14 Live Drive CT4860/CT4861
Page 21

General Specifications
Audio Inputs and Outputs
On Front Panel
Additional Audio Inputs
and Outputs on Front
Panel
(For Live! Drive II)
Interfaces
Troubleshooting
Problems Installing Software
❑ Two RCA jacks for coaxial SPDIF input and output
❑ One Headphone output with auto detection via ¼" stereo jack with volume control
❑ One shared line-level analog Line/Microphone input via ¼" stereo jack. Shared input
selectable via switch with gain (or level) control
❑ Two 5-pin standard DIN female con nector for MIDI input and output
❑ Two RCA jacks for left and right chan nel stereo Auxiliary inputs
❑ Two optical connectors for Optical SPDIF input and output
❑ Digital DIN pin header (J3) for rear metal bracket Digital DIN
❑ Power input connector to system power supply unit
❑ One AUD_EXT (SB LIVE! CARD) 2x20 pin head er (J 1) for connection to SB Live! card
❑ One DIGITAL I/O CARD 2x20 pin header (J2) f or conne ction to Di git al I/O card (s ee Fi gure
4 on pa ge -8)
In Windows 95/98, the installation does not start automatically after the CD-ROM is
inserted.
Cause The AutoPlay feature in your Windows 95/98 system may not be enabled.
Solution To start the installation program through the My Computer shortcut menu:
1. Double-click the My Computer icon on your Windows desktop.
2. In the My Computer window, right-click the CD-ROM drive icon.
3. On the shor tcut menu , clic k AutoPlay and follow the inst ructio ns on the scr een.
Live Drive CT4860/CT4861 15
Page 22

Problems with Sound
No sound from the headphones.
Cause The headphones may not be connected or configured properly.
Solution Check the follo w ing:
❑ The headphones are connected to the Headphones jack.
❑ Under the Speaker view in the Main deck of Surround Mixer, make sure that the Speaker
selected is “Headphones”.
❑ In the Mixer deck of Surround Mixer, the rec ording source selected is “Wha t U Hear”.
No sound from the speakers.
Cause The speakers may not be connected properly, the mixer settings may not be
configured properly, or the he adphones are connected to the Live! Drive.
Solution Check the follo w ing:
❑ The speakers are connecte d to your card's output.
❑ The correct source has been selected in the Mixer deck.
❑ If the above conditions have been met and you still do not get any sound, click the red plus
sign above the VOL control and check whether the Digi tal Output Only check box is
selected. If it is, you are in the Digital Output Only mode and so must connect to digital
speakers to hear the sound from your audio card. See the section on Digital Output Only in
Surround Mixer’s online help for more information.
❑ If your headphones and/or the ¼" to 3.5m m adapter are connected to the Live! Drive,
disconnect them . Alte rnatively, open the De vi ce Contr ols ap ple t in AudioHQ, cl ick the Live!
Drive tab, and then clear the M ute speakers when using headphone s check box.
16 Live Drive CT4860/CT4861
 Loading...