

Page 1
DigMP3.book Page i Friday, April 12, 2002 3:26 PM
User Manual
Creative Digital MP3 Player 2
Information in this document is subject to change without notice and does not represent a commitment
on the part of Creative Technology Ltd. The software described in this document is furnished under a
license agreement and may be used or copied only in accordance with the terms of the license agreement.
It is against the law to copy the software on any other medium except as specifically allowed in the
license agreement. The licensee may make one copy of the software for backup purposes. No part of this
manual may be reproduced or transmitted in any form or by any means, electronic or mechanical,
including photocopying and recording, for any purpose without the written permission of Creative
Technology Ltd.
Copyright © 2002 Creative Technology Ltd. All rights reserved.
Version 1.0
April 2002
Intel and Pentium are registered trademarks of Intel Corporation.
Microsoft, MS-DOS, Windows, and the Windows logo are registered trademarks of Microsoft
Corporation.
All other products are trademarks or registered trademarks of their respective owners.
Page 2

DigMP3.book Page ii Friday, April 12, 2002 3:26 PM
Contents
Before using your player ............................................................................. 1
Introduction ............................................................................. 1
Package contents ..................................................................... 1
Minimum system requirements ............................................... 2
Safety precautions ................................................................... 2
Inserting or changing the batteries .............................................................. 5
Installing hardware ...................................................................................... 6
Installing software ........................................................................................ 6
Using Digital Audio Manager ..................................................................... 7
Downloading files ................................................................... 9
Uploading files ........................................................................ 9
Playing files on your computer ............................................... 9
Playing voice files on your computer ................................... 10
Deleting files from your player ............................................. 10
Using your player ....................................................................................... 11
Turning off or on your player ............................................... 11
Changing modes .................................................................... 12
Recording a voice file ........................................................... 12
Playing audio or voice files ................................................... 13
Changing and seeking audio or voice files ........................... 13
Deleting audio or voice files ................................................. 14
Repeat mode .......................................................................... 15
Hold mode ............................................................................. 15
Equalizer mode ..................................................................... 15
Installing or Removing the External Memory ......................................... 16
General specifications ................................................................................ 17
Troubleshooting ......................................................................................... 19
ii
Page 3
DigMP3.book Page 1 Friday, April 12, 2002 3:26 PM
Before using your player
Introduction
Thank you for purchasing the Creative Digital MP3 Player 2, a premium digital
audio player. It plays MP3 and Windows Media (WMA) files. Your player allows
you to enjoy crystal clear audio sound anywhere. You can also obtain a Multi
Media Card (MMC) to expand your player’s memory capacity.
The Creative Digital MP3 Player 2 is designed for your convenience. You can
record your voice into the player and transfer the voice file to your computer.
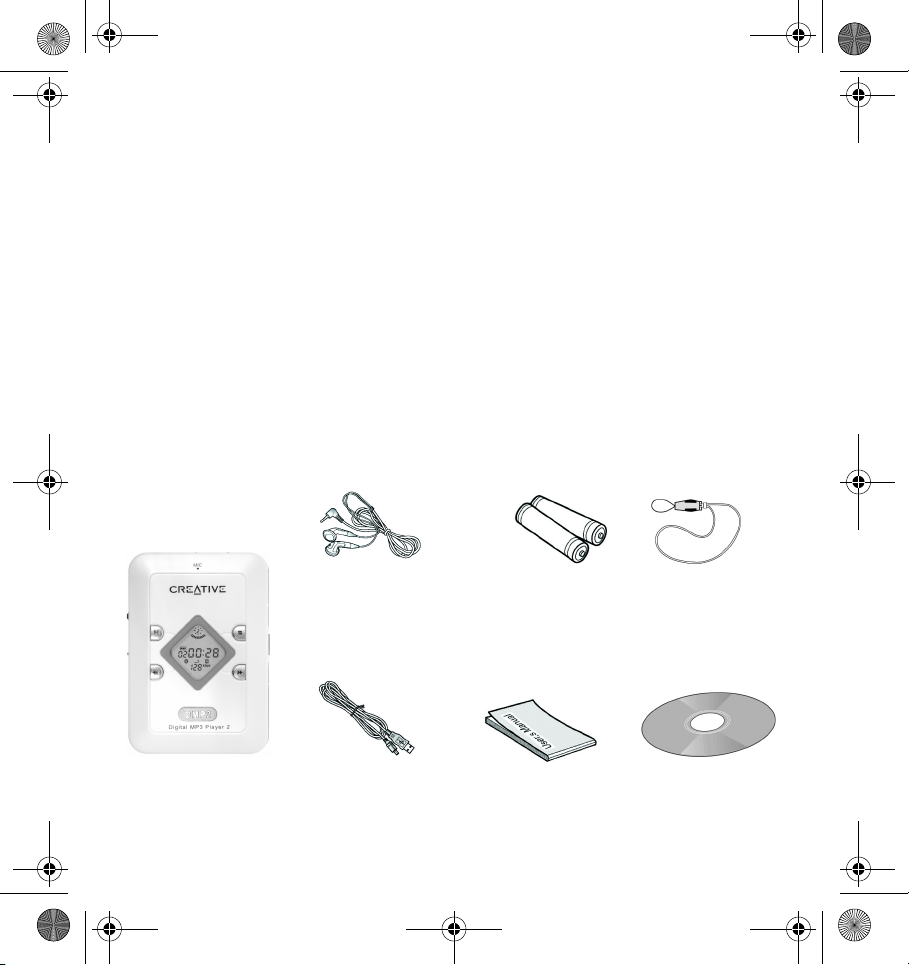
Package contents
Before you begin installation, be sure that you have these:
Creative MP3
Digital Player 2
Stereo earphones
USB cable
2 x AAA batteries
User guide
Neck strap
Installation CD
1
Page 4
DigMP3.book Page 2 Friday, April 12, 2002 3:26 PM
Minimum system requirements
• Genuine Intel® Pentium® 166 MHz or faster processor
®
• Microsoft
Windows® 98 Second Edition (SE), Windows Millennium
Edition (ME), Windows 2000, or Windows XP
•64 MB RAM
• 10 MB of free hard disk space
• SVGA: 800 x 600 at 16 bit colors
• CD-ROM drive installed
Safety precautions
• Do not drop or subject the player to shock
• Do not press or put any weight on the player
• Avoid humid conditions. Do not place the player near a water source or outlet.
• Do not clean the player with alcohol, thinner, or benzene.
• Do not use new and old batteries in the player at the same time.
• Do not disassemble the player. This may damage the player and void the
warranty.
• Allow only qualified personnel to service or repair the player, if such is
necessary.
2
Page 5
DigMP3.book Page 3 Friday, April 12, 2002 3:26 PM
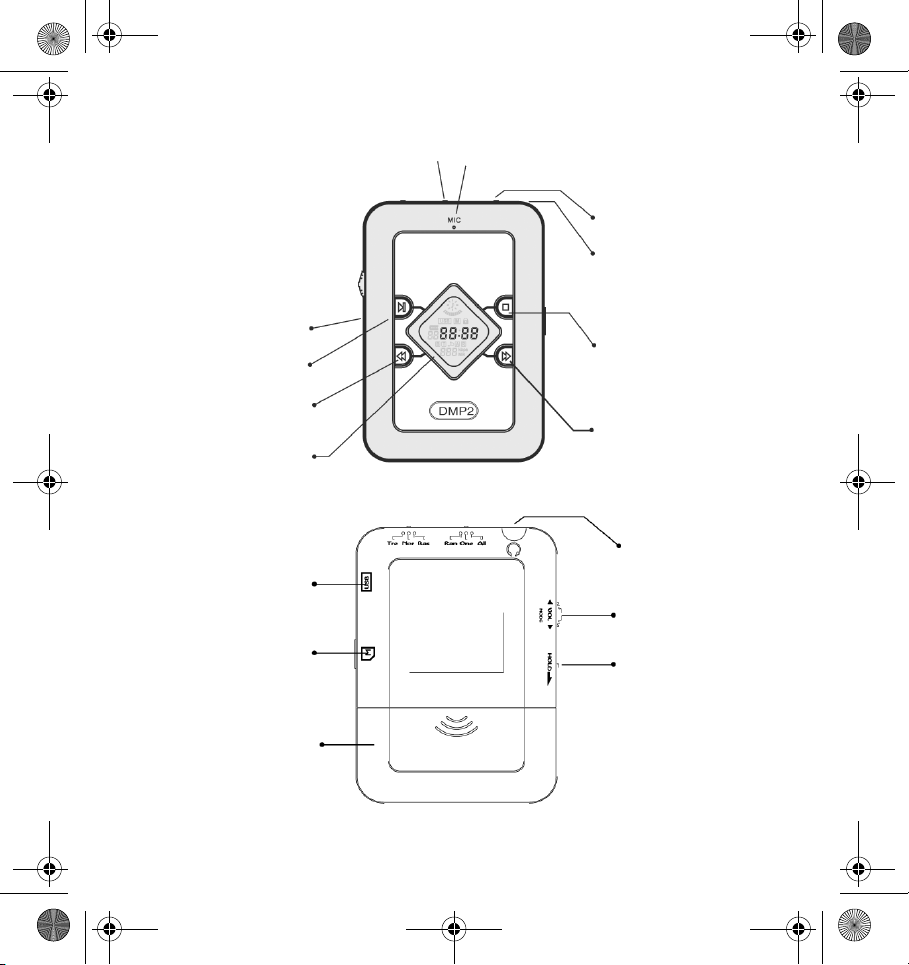
About your player
Hold switch
Play/Power On/
Pause button
Previous Track/
Rewind button
EL Backlit LCD
USB port
MMC Memory
Slot compartment
Repeat switch
Front panel
MIC
Equalizer switch
Neck strap pin
Stop/Power Off button
Next Track/Forward button
Headphone connector
Volume/Mode/Jog
adjustment switch
Hold switch
Battery cover
compartment
Rear panel
3
Page 6
DigMP3.book Page 4 Friday, April 12, 2002 3:26 PM
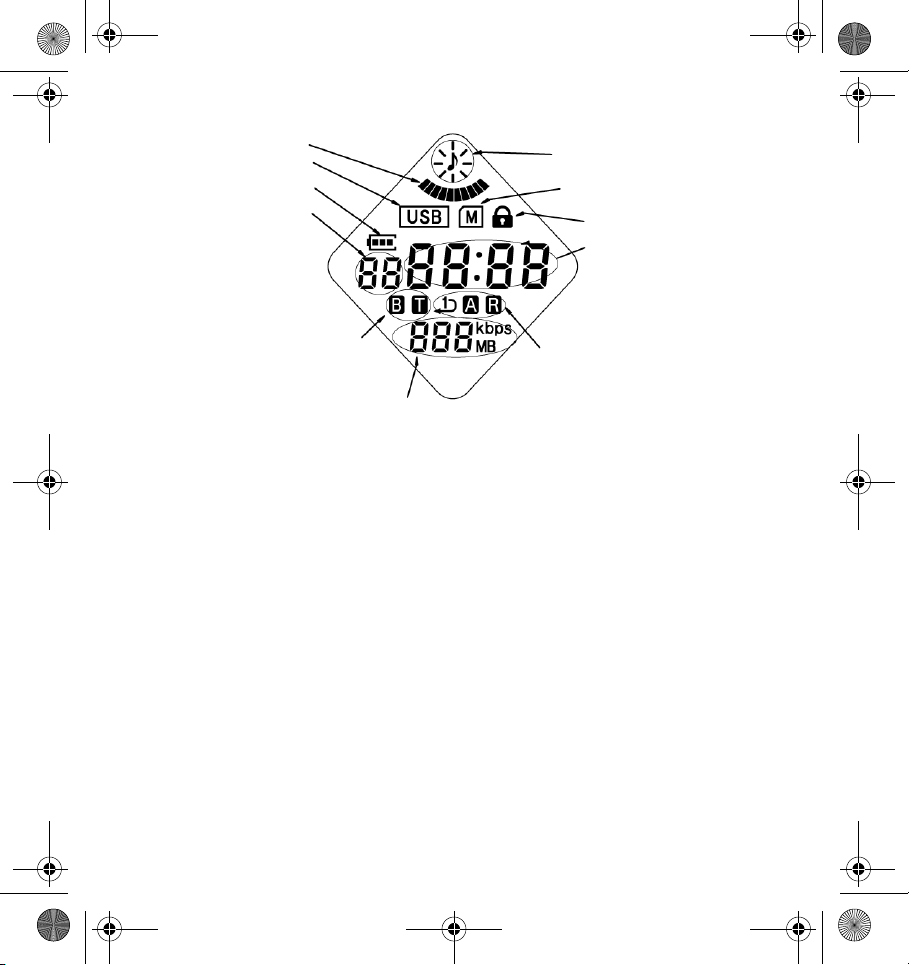
Volume level
USB connection on/off
Battery level indicator
Track number
Bass/Treble boost icon
Bit rate/Total memory
Playback status animation icon
MMC Memory Slot indicator
Hold indicator
Play time
Repeat mode
LCD screen
4
Page 7
n
DigMP3.book Page 5 Friday, April 12, 2002 3:26 PM
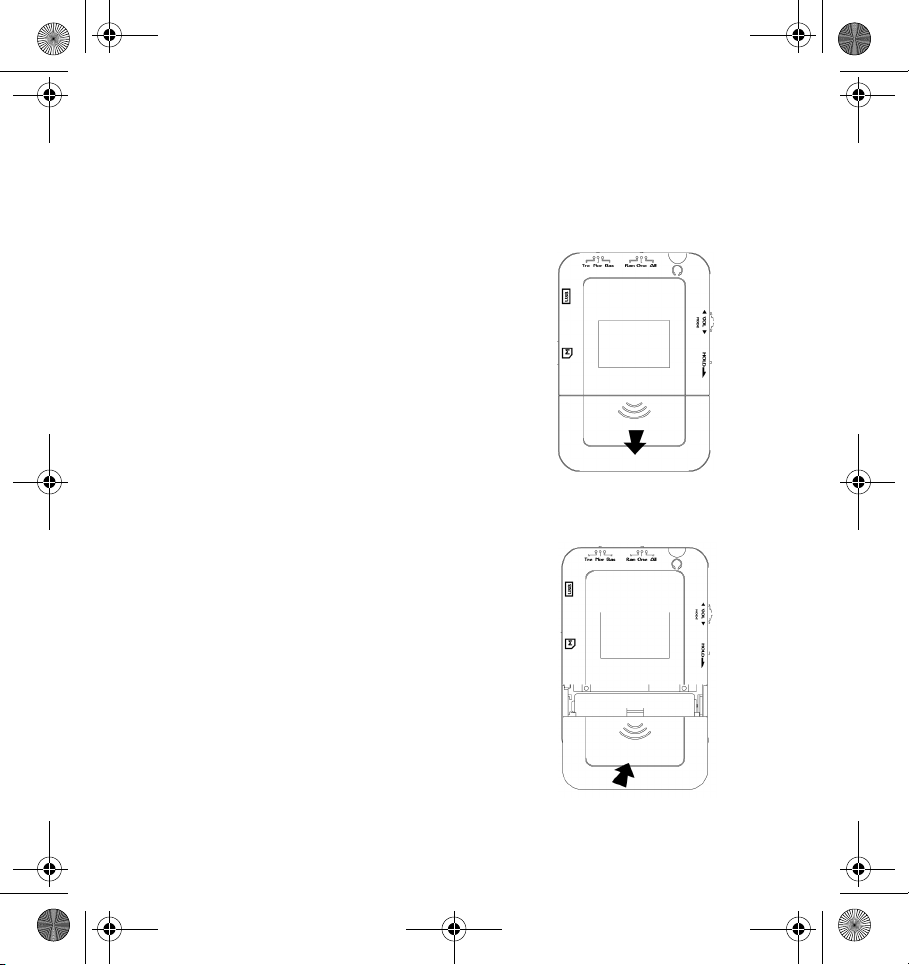
Inserting or changing the batteries
For the Creative Digital MP3 Player 2 to function, you need to insert two 1.5 V
AAA alkaline batteries into its battery compartment.
To insert or replace batteries:
1. Press the
2. Holding the player in one hand, push the
battery compartment cover catch
downwards as shown in Figure 1.
3. Remove the old batteries (if any).
4. Insert the new batteries according to the
directions shown in the battery
compartment.
5. Close the compartment cover and then
push the catch inward to lock the
compartment cover as shown in Figure 2.
Stop
button to turn off the player.
Figure 1: Opening the battery compartme
Figure 2: Closing the battery compartmen
5
Page 8

DigMP3.book Page 6 Friday, April 12, 2002 3:26 PM
Installing hardware
1. Connect the USB cable to the USB port in your computer as shown in Figure 3.
2
1
USB cable
Figure 3: Connecting the USB cable.
2. Connect the other end of the USB cable to the USB connector on your player.
Installing software
You need to install device drivers and Digital Audio Manager to use the Creative
Digital MP3 Player 2. To install these drivers and Digital Audio Manager, use the
following instructions. The instructions are applicable to all supported Windows
operating systems.
1. After you have connected the player to the computer, turn on your computer.
2. Insert the Installation CD into your CD-ROM drive.
The disc supports Windows Autoplay mode and starts running automatically.
3. Follow the on screen instructions to complete the installation.
4. When prompted, restart your system.
6
Page 9

DigMP3.book Page 7 Friday, April 12, 2002 3:26 PM
Using Digital Audio Manager
The Digital Audio Manager icon appears on your computer’s desktop after you
have installed the drivers and application. Double-click the Digital Audio Manager
icon. A dialog box similar to Figure 4 appears.
Computer file list frame
Folder frame
Memory
selection frame
Figure 4: Digital Audio Manager dialog box.
Player file list frame
Selects the internal memory or external memory to
manage.
Formats the internal or external memory.
7
Page 10

DigMP3.book Page 8 Friday, April 12, 2002 3:26 PM
Downloads selected files from the computer to the target memory.
Uploads selected files from the target memory to the computer.
Deletes selected file from target memory.
Converts uploaded voice files to MP3 format and stores it in your
computer.
Refreshes the target memory’s information.
Changes the Digital Audio Manager’s background skin.
The Explorer skin changes the background image of the folder frame.
The File List skin changes the background image of the computer’s
file list frame.
The Player skin changes the background image of the player file list
frame.
8
Page 11

DigMP3.book Page 9 Friday, April 12, 2002 3:26 PM
Downloading files
To download files , do the following:
1. On the computer file list frame, click the files that you
want to download. Hold down the
Shift
or CTRL button
if necessary.
2. Click the
Internal memory or External memory
button
to select the target memory.
3. Click the
Download
button. You can also drag and drop
the selected files to the player file list frame. A screen
similar to Figure 5 appears.
Uploading files
To upload files, do the following:
1. Click the
select the memory that contains the files that you want to
upload.
2. On the player file list frame, click the files that you want to
upload.
3. Click the
selected files to the computer file list frame. A screen
similar to Figure 6 appears.
Internal memory or External memory
Upload
button. You can also drag and drop the
button to
Figure 5: Downloading
screen.
Figure 6: Uploading
screen.
Playing files on your computer
To play audio files on your computer, do the following:
1. On the computer file list frame, right-click the file that you want to play, and
then click
2. To change the order of the files, drag and drop the files.
Play
.
9
Page 12

DigMP3.book Page 10 Friday, April 12, 2002 3:26 PM
Playing voice files on your computer
To play voice files on your computer, do the following:
1. Upload the voice files that you want to your computer (refer to “Uploading
files” on page 9).
2. Convert the voice file to an MP3 file.
i. On the computer file list frame, click the voice files that you want to convert to MP3
format.
ii. Click the
iii. Click the
voice file.
The converted file’s extension will be g726.
Convert
Convert Now
button. The
Voice to Mp3Converter
button. It takes around one and a half minutes to convert one
dialog box appears.
3. On the computer file list frame, right-click the voice file that you want to play,
and then click
Play
.
Deleting files from your player
To delete a file from your player, do the following:
1. Click the
memory
contains the files that you want to delete.
2. On the player file list frame, click the files
that you want to delete.
3. Click the
Internal memory or External
button to select the memory that
Delete
button.
Internal
memory
External
memory
10
Page 13

DigMP3.book Page 11 Friday, April 12, 2002 3:26 PM
Using your player
Turning off or on your player
To turn on your player:
Press the
Play
button for more than 2 seconds.
Firmware version
Internal memory
To turn off your player:
Press the
Note:
itself off automatically.
Stop
button for more than 2 seconds.
If your player is not used for longer than 2 minutes, it will turn
Track number
Play time
Total memory
space
11
Page 14

DigMP3.book Page 12 Friday, April 12, 2002 3:26 PM
Changing modes
To change modes:
Press the
Jog
switch to select the mode that you want.
Voice recording mode Voice play mode Delete modeAudio play mode
Recording a voice file
To record a voice file, do the following:
1. Press the
record mode.
2. Press the
voice track recorded is labeled with a track
number (for example, VOC_F001.726).
3. Press the
Digital Audio Manager to upload the
recorded voice files to your computer. This
will give you more memory space on your
player for future recordings. Alternatively,
use a MMC to increase available recording time.
Jog
switch until you are in voice
Play
button to start recording. Each
Stop
button to stop recording. Use
Indicates current
track number and
remaining time
for recording
Indicates that
the memory is
full
12
Page 15

DigMP3.book Page 13 Friday, April 12, 2002 3:26 PM
Playing audio or voice files
To play an audio or video file, do the following:
1. Press the
The track number, play time, volume
level, bit-rate and animation icons
appears.
2. To pause the playback, press the
button.
3. To resume playback, press the
4. To stop playback, press the
than 2 seconds, your player will be turned off.
5. To adjust the volume, push the
the volume level. The volume adjustment increases or decreases in minor steps
(ranging from 0 to 20). Volume level is indicated on the LCD screen.
Play
button to start playback.
Stop
Play
Play
button again.
button. If you press the
Jog
button up or down to increase or decrease
Stop
button for more
Changing and seeking audio or
voice files
To go to the next track:
Press the
Next Track/Forward
button.
To go to the previous track:
Press the
Previous Track/Rewind
button.
13
Page 16

DigMP3.book Page 14 Friday, April 12, 2002 3:26 PM
To fast forward a track during playback:
Press the
more than 2 seconds. Release the
Trac k/ Forwa rd
Next Track/Forward
button to resume
button for
Next
playback.
To rewind a track during playback:
Press the
Trac k/ Re wi nd
Next Track/Rewind
button to resume playback.
button for more than 2 seconds. Release the
Deleting audio or voice files
To delete a track, do the following:
1. Press the
Jog
switch to delete mode.
Next
2. Press the
Trac k/ Re wi nd
Next Track/Forward
button or
button to select the track that
you want to delete. Voice tracks are displayed
after audio tracks.
3. Press the
Play
button to delete the track that you
want.
Next
14
Page 17

DigMP3.book Page 15 Friday, April 12, 2002 3:26 PM
Repeat mode
To use Repeat mode, do the following:
1. Slide the
2. To playback the tracks in random order, with your player’s front panel facing
you, slide the
3. To repeat a selected track, with your player’s front panel facing you, slide the
Repeat
4. To repeat all the tracks, slide the
Repeat
switch to the middle.
switch to the left or right.
Repeat
switch to the right.
Repeat
switch to the left.
Hold mode
To use Hold mode, do the following:
1. Slide the
player is in Hold mode and will not respond when its keys are pressed.
2. To disable the Hold mode, slide the
Hold
switch downwards. A icon appears. This indicates that your
Hold
switch upwards.
Equalizer mode
To use Equalizer mode:
1. Slide the
2. To set your player to treble, with your player’s front panel facing you, slide the
Equalizer
signals.
3. To set your player to bass, with your player’s front panel facing you, slide the
Equalizer
signals.
Equalizer
switch to the right. In this mode, your player boosts high frequency
switch to the left. In this mode, your player boosts low frequency
switch to the left or right to boost the bass or treble levels.
15
Page 18

DigMP3.book Page 16 Friday, April 12, 2002 3:26 PM
Installing or Removing the External Memory
To install the external MMC, do the following:
1. Press the
2 seconds to turn of your player.
2. Holding the player in one hand, push
and lift the MMC Memory Slot
compartment cover catch upwards as
shown in Figure 7.
3. Insert the MMC into the MMC
Memory slot. Make sure that the
card is facing the correct direction
and that it is inserted all the way in.
4. Close the compartment cover.
5. Press the
should appear.
To remove the external MMC, do the following:
1. Press the
seconds to turn of your player.
2. Holding the player in one hand, push
and lift the MMC Memory Slot
compartment cover catch upwards.
3. Push the lever next to the MMC
Memory Slot compartment with a
sharp, pointed material as shown in
Figure 8. The MMC slides out.
4. Carefully remove the MMC, and then close the compartment cover.
5. Press the
should not appear.
Stop
button for more than
Figure 7: Opening the MMC Memory Slot
Play
button to turn on the player. The MMC icon on the LCD screen
Stop
button for more than 2
Play
button to turn on the player. The MMC icon on the LCD screen
compartment.
Figure 8: Removing the MMC .
16
Page 19

DigMP3.book Page 17 Friday, April 12, 2002 3:26 PM
General specifications
Audio formats
❑
WMA
❑
MP3
PC interface
❑
USB V1.1
Built-in memory
❑
32 MB or 64 MB depending on the package purchased
Memory expansion
❑
Multi Media Card
Battery
❑
2 x AAA batteries
Voice recording format
❑
G.726
Play time
❑
up to 4 hours (depends on battery condition)
Recording time
❑
up to 4 hours (64 MB)
Size
❑
52 x 75 x 15 mm
Weight
❑
40 g (without batteries)
17
Page 20

DigMP3.book Page 18 Friday, April 12, 2002 3:26 PM
Equalizer
❑
3 presets (Bass, Treble, and Normal)
Download speed
❑
320 KB (Internal)
❑
100 KB (MMC)
Audio output power
❑
5 mW
18
Page 21

DigMP3.book Page 19 Friday, April 12, 2002 3:26 PM
Troubleshooting
The player cannot be turned on.
To solve the problem, do one of the following:
❑
Make sure that the batteries have been inserted into the player.
❑
Make sure that the batteries are inserted according to the directions indicated in
the battery compartment.
The buttons on the player do not respond
Make sure that the
There is no sound from the player even though the power is on.
To solve the problem, do one of the following:
❑
Make sure that the MMC was inserted correctly.
❑
Make sure that the MP3 file is not damaged. You can check it by playing it on
your computer.
❑
Try increasing the volume level.
Audio files cannot be downloaded into the player.
To solve the problem, do the following:
❑
Make sure that the USB cable is connected properly to the player and the
computer.
❑
Uninstall and reinstall the drivers and manger software.
Hold
switch is not in Hold position (disabled).
The player does not read the Multi Media Card (MMC).
To solve the problem, do one of the following:
❑
Make sure that the MMC is inserted firmly and in the correct position.
❑
Make sure that the MMC is not broken or damaged.
❑
Reformat the MMC using your player if it is new or was previously used for
other devices.
19
 Loading...