

Page 1

Page 2

User’s Guide
Creative Desktop Wireless 8000
Information in this document is subject to change without notice and does not represent a commitment on the part of Creative
Technology Ltd. No part of this manual may be reproduced or transmitted in any form or by any means, electronic or mechanical,
including photocopying and recording, for any purpose without the written permission of Creative Technology Ltd. The software
described in this document is furnished under a license agreement and may be used or copied only in accordance with the terms of
the license agreement. It is against the law to copy the software on any other medium except as specifically allowed in the license
agreement. The licensee may make one copy of the software for backup purposes.
The Software License Agreement is found in a separate folder on the installation CD
Copyright © 2004 by Creative Technology Ltd. All rights reserved.
Versi on 1.0
January 2004
The Creative logo is a registered trademark of Creative Technology Ltd. in United States and other countries.
Microsoft, MS-DOS, and Windows are registered trademarks of Microsoft Corporation. All rights reserved. All other logos, brand or
product names are trademarks or registered trademarks of their respective holders and are hereby recognised as such. All
specifications are subject to change. Actual contents may differ slightly from those pictured.
Page 3

Table of Contents
Page 4

Table of Contents
Introduction
System Requirements ........................................................................................ ii
Document Conventions .................................................................................... iii
1 About Creative Wireless Keyboard and Optical Mouse
Creative Wireless Keyboard ................................................................................ 1-1
Creative Wireless Optical Mouse ....................................................................... 1-4
Creative RF Receiver............................................................................................... 1-5
2 Installing Hardware
Step1: Insert batteries into Creative Wireless Optical Mouse ..................... 2-1
Step 3: Connect the Creative RF Receiver ....................................................... 2-3
Step 4: Activate the wireless desktop devices ................................................. 2-4
Step 5: Test the keyboard and mouse................................................................. 2-5
3 Installing Software
Installing Software ................................................................................................... 3-1
4 Using Creative Mouse And Keyboard Software
Using Creative Mouse Software ........................................................................... 4-1
Configuring the mouse buttons ................................................................... 4-1
Configuring the mouse wheel ...................................................................... 4-2
Configuring the pointer .................................................................................. 4-2
Page 5

Using Creative Keyboard Software .................................................................... 4-3
Configuring the hotkeys ................................................................................. 4-3
Configuring the OnScreen Display (OSD) ................................................. 4-4
Tips On Using Your Keyboard and Mouse ........................................................ 4-5
Changing device channels and IDs........................................................................ 4-5
A Technical Specifications
Creative Wireless Optical Mouse ....................................................................... A-1
B Troubleshooting
Problems Installing Software.................................................................................. B-1
Problems With Your Creative Wireless Keyboard or Optical Mouse....... B-2
Page 6

Introduction
Page 7

Introduction
Creative Desktop Wireless 8000 is a stylish wireless keyboard and mouse
combination at a great price. Convenient wireless technology gives you responsive
keyboard and mouse performance within 1.8 meters (6 feet) of your computer
without cluttering your desktop with cables. The 20 one-touch keys offer faster
access to popular Internet, multimedia, and email functions. Your Creative
Wireless Optical Mouse provides precise 800 dpi optical performance on virtually
any surface with no moving parts to clean. Intelligent power saving features
extend the battery life of your keyboard and mouse, and still provide immediate
response with a simple keystroke or mouse movement.
Installation is effortless with a simple USB receiver that will swiftly connect your
keyboard and mouse.
Introduction i
Page 8

Package Contents The following items are included in your package:
❑ Creative Wireless Keyboard (with detachable palm rest)
❑ Creative Wireless Optical Mouse
❑ Creative RF Receiver (USB interface)
❑ 4 x AA batteries
❑ Installation CD
❑ Quick Start leaflet
System
Requirements
For Microsoft Windows
98 or 98 SE users, the
Windows installation CD
will be needed to install
Desktop Wireless 8000
successfully.
❑ Genuine Intel® Pentium® or AMD® Athlon™ 266 MHz processor or higher
❑ Microsoft
®
Windows® XP, Windows 2000, Windows Millennium Edition (Me),
Windows 98 Second Edition (SE) or Windows 98
❑ 32 MB RAM
❑ 16 MB available hard disk space
❑ DVD-ROM/CD-ROM drive for software installation
❑ Available USB port or powered USB hub
❑ For multimedia playback, sound card and speakers are required
Introduction ii
Page 9

Document
Conventions
The following typographical conventions are used throughout this document.
Tip. This tells you about short cuts or hints relating to a feature.
Note. This highlights additional or important information about a
feature.
Caution! This highlights proper usage of your product. Follow the
directions to prevent the loss of data, or damage to your product or
system.
Warning! This warns you of possible hazards that may result in
bodily harm or life-threatening situations.
Introduction iii
Page 10

1
About Creative Wireless Keyboard and Optical Mouse
Page 11
About Creative Wireless Keyboard and Optical Mouse
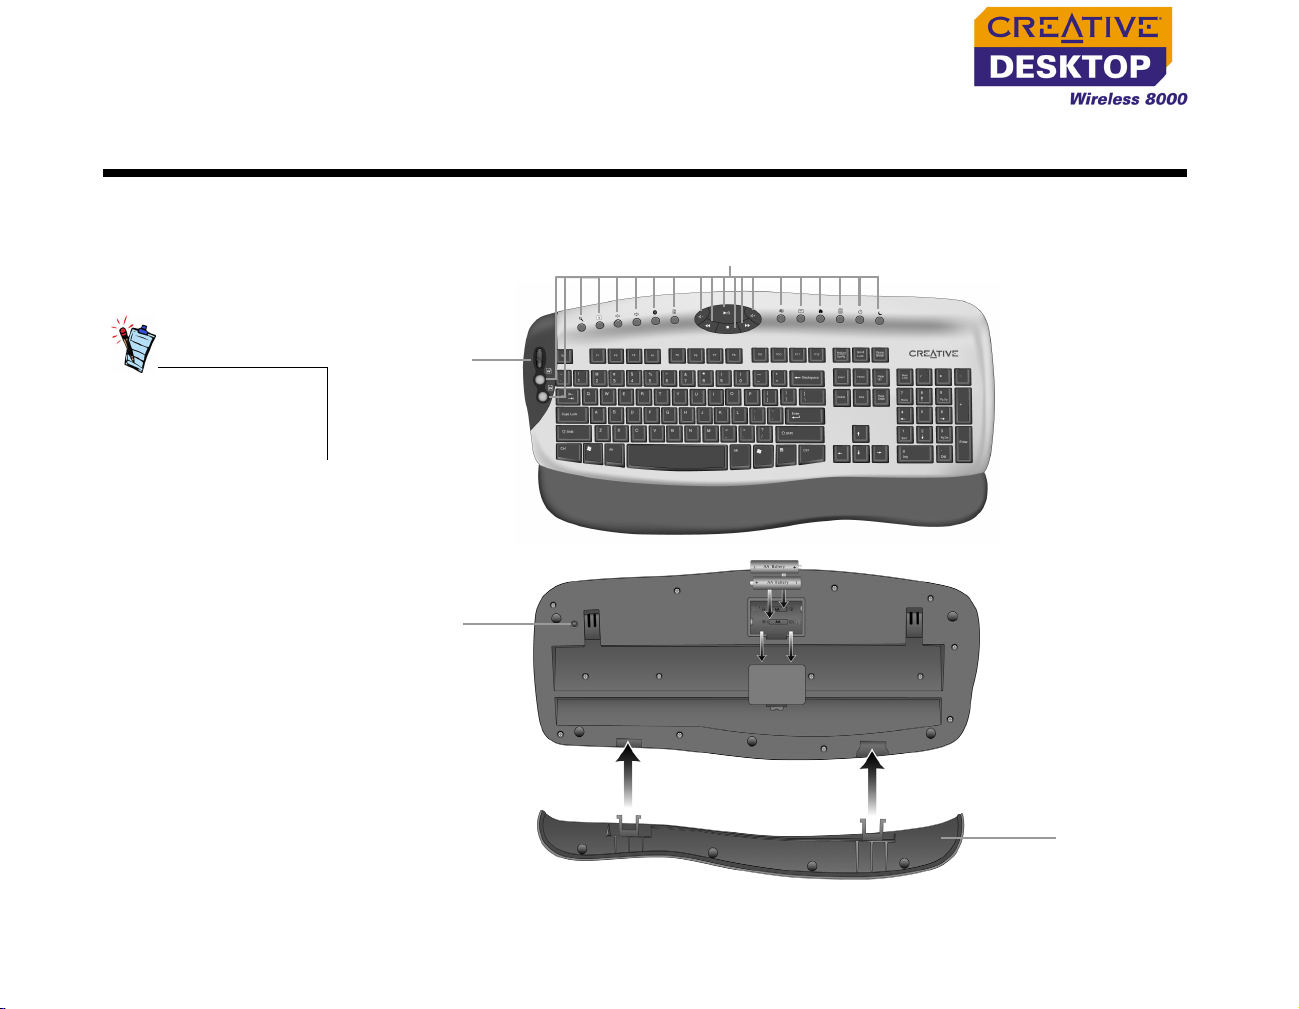
Creative Wireless Keyboard
The appearance of your
keyboard may differ
depending on model
and region of purchase.
The keyboard and its one-touch keys are shown below:
One-touch keys
Tas k
Switch
wheel
Connect
button
Front view
Rear view
Detachable
palm rest
About Creative Wireless Keyboard and Optical Mouse 1-1
Page 12
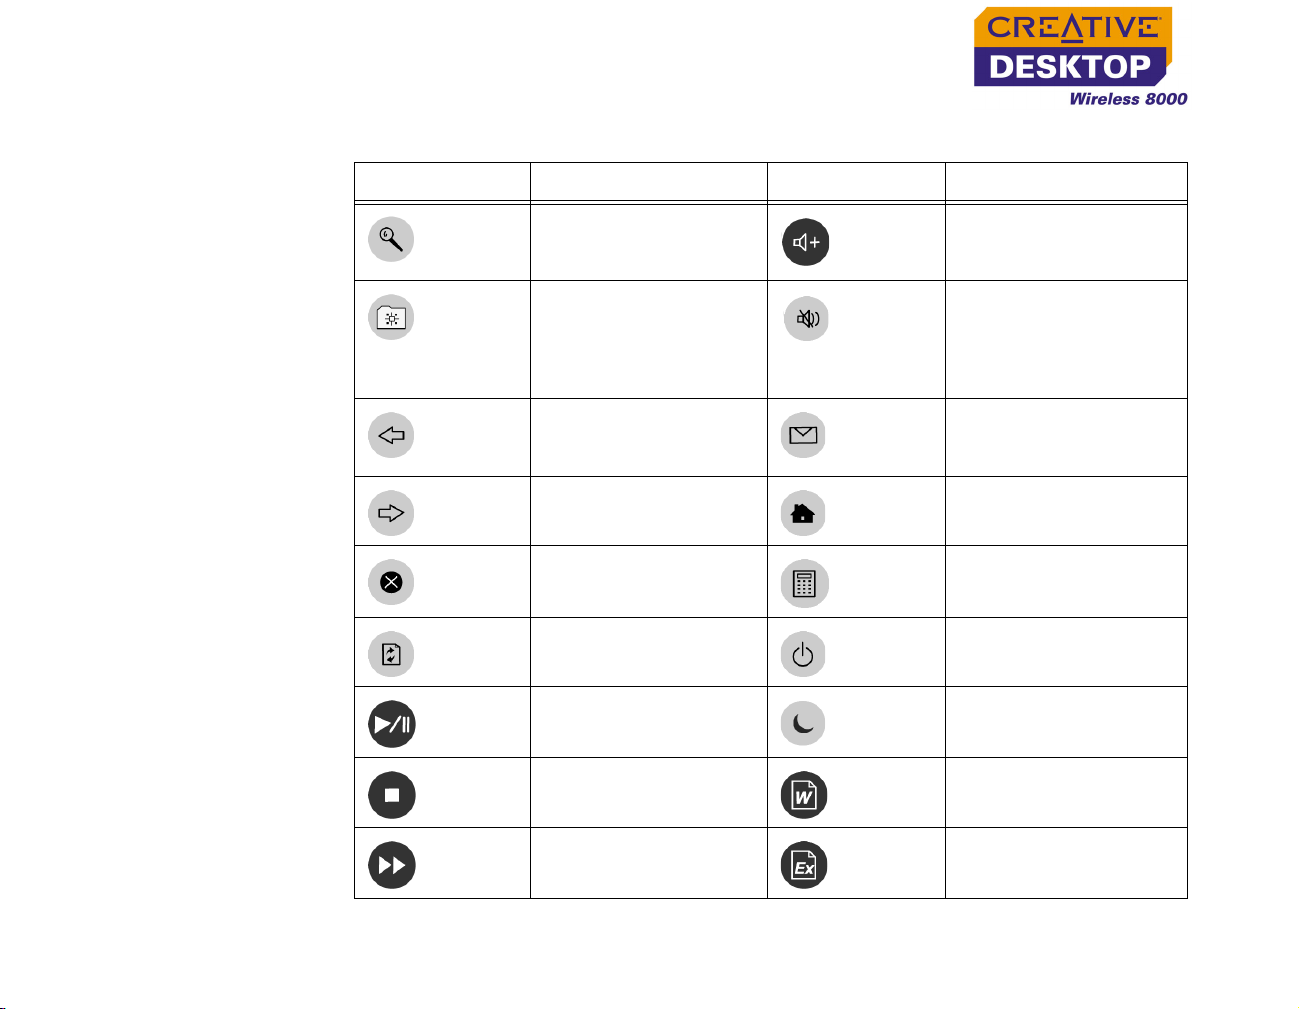
Key Function Key Function
Search Opens a Search box in
the current Web
browser
My
Favorite
Launches either
Internet Explorer’s
Favorites folder, or
Netscape Navigator’s
Bookmarks folder
Back Goes to the previous
page in your Web
browser
Forward Goes to the next page
in your Web browser
Stop
Loading
Stops loading a Web
page
Refresh Reloads the current
Web page
Play/
Pause
Plays or pauses a CD/
VCD/DVD
Stop Stops playing the CD/
VCD/DVD
Volume
Up
Increases the volume
level
Mute Turns audio output
off/on
E-mail Launches the default
e-mail application
World
Wide Web
Launches the default
Web browser
Calculator Opens the default
calculator application
Power Turns your computer off
Suspend Enables the power
saving mode
Word
Launches Microsoft
®
Word
Next
Track
Goes to the next track
in a CD/VCD/DVD
About Creative Wireless Keyboard and Optical Mouse 1-2
Excel Launches Microsoft
Excel
Page 13

Key Function Key Function
Previous
Track
Volume
Down
Goes to the previous
track in a CD/VCD/DVD
Decreases the volume
level
Task Switch
Wheel
Switches between
applications.
Press to see a list of
applications currently
running. Scroll to an
application and press to
make it active.
About Creative Wireless Keyboard and Optical Mouse 1-3
Page 14

Creative Wireless Optical Mouse
The mouse and its controls are shown below:
The appearance of your
mouse may differ
depending on model
and region of purchase.
Right-click button
Scroll wheel
Left-click button
Front view
Connect button
Rear view
About Creative Wireless Keyboard and Optical Mouse 1-4
Page 15

Creative RF Receiver
The RF receiver, with USB connector and LED indicator, are shown below:
LED indicator
USB connector
Connect button
About Creative Wireless Keyboard and Optical Mouse 1-5
Page 16

2
Installing Hardware
Page 17

Installing Hardware
Step1: Insert batteries into Creative Wireless Optical Mouse
1. Turn the mouse over and open the battery
compartment cover, as shown in Figure 2-1.
Figure 2-1: Opening the battery
compartment
2. Insert two AA batteries according to the directions
in the battery compartment, as shown in Figure
2-2.
3. Close the battery compartment cover and push
the catch downwards to lock it.
Figure 2-2: Inserting batteries
Installing Hardware 2-1
Page 18

Step 2: Insert batteries into Creative Wireless Keyboard
1. Turn the keyboard over.
2. Open the battery compartment cover as
shown in Figure 2-3.
Figure 2-3: Opening the battery
compartment
3. Insert two AA batteries according to the
directions in the battery compartment, as
shown in Figure 2-4.
4. Close the battery compartment cover.
Figure 2-4: Inserting batteries
Installing Hardware 2-2
Page 19

Step 3: Connect the Creative RF Receiver
Make sure that you
have inserted
batteries into the
mouse and keyboard
before Step 3.
1. Turn on your computer.
2. Connect the USB connector on the RF receiver to the USB port on your
computer as shown in Figure 2-5.
Figure 2-5: Connecting the RF receiver to the computer
3. Place the RF receiver at least 8 inches (20 cm) from your computer or monitor.
Installing Hardware 2-3
Page 20

Step 4: Activate the wireless desktop devices
1. Press the Connect button on the RF receiver, as shown in Figure 2-6.
2. Press the Connect button on the mouse. The LED indicator on the RF receiver
blinks blue for about 5 seconds.
3. Press the Connect button on the RF receiver again, then press the Connect
button on the keyboard. The LED indicator on the RF receiver blinks blue for
about 5 seconds.
•Make sure that the
keyboard and
mouse are within
1.8 meters (6 feet)
of the RF Receiver.
• Press the Connect
buttons on each of
your Desktop
Wireless 8000
devices, as shown
here, each time you
change batteries.
• Make sure you press
the Connect
buttons on the
keyboard and
mouse within 30
seconds after
pressing the
Connect button on
the RF Receiver.
LED indicator
2
1
3
Figure 2-6: Activating the Creative keyboard and mouse
To install drivers, refer to "Installing Software" on page 3-1.
Installing Hardware 2-4
Page 21

Step 5: Test the keyboard and mouse
Move the mouse cursor or press a key on the keyboard to test that the keyboard
and mouse are connected. If nothing happens, repeat Step 4.
To improve receiver sensitivity, you can change the default device ID for your
keyboard and mouse. See "Problems With Your Creative Wireless Keyboard or
Optical Mouse" on page B-2.
Installing Hardware 2-5
Page 22

3
Installing Software
Page 23

Installing Software
Installing
Software
Windows 98 and 98 SE
users may be
prompted by an Add
New Hardware
Wizard dialog box
when Windows detects
a USB device. Follow
the instructions on the
screen. You may need
to insert the Windows
Installation CD into the
CD-ROM drive during
installation. Some
computers may be
supplied without the
Windows CD, but have
the necessary files
stored in
c:\windows\
options\cabs
(replace c:\ with the
drive letter your
Windows has been
installed on).
You need to install software to use Creative Desktop Wireless 8000. The following
instructions are applicable to Windows XP, Windows 2000, Windows Millennium
Edition (Me), Windows 98 Second Edition (SE) and Windows 98.
1. After you have connected Creative Desktop Wireless 8000, Windows will
detect the USB device and install the required drivers automatically.
2. Insert the Creative Desktop Wireless 8000 Installation CD into the CD-ROM
drive. The CD supports Windows Autoplay mode and starts running
automatically. If the CD does not run automatically, click Start
→ Run. In the
Run dialog box, type d:\ctrun\ctrun.exe (replace d:\ with the drive letter
of your CD/DVD-ROM drive).
3. Select the applications to install, and then click the OK button.
4. Follow the instructions on the screen to install your Creative Desktop Wireless
8000.
5. When prompted, restart your computer.
For your USB keyboard to work with MS-DOS-based utilities and non-windows
modes, your computer must have USB Legacy Support (may vary depending on
motherboard manufacturer) enabled in the BIOS.
Installing Software 3-1
Page 24

4
Using Creative Mouse And Keyboard Software
Page 25

Using Creative Mouse And Keyboard Software
Using Creative Mouse Software
Configuring the mouse buttons
Some functions are
available in selected
Windows operating
systems only.
With the Creative Mouse software, you can preset the mouse buttons and mouse
wheel to perform specific functions, and configure the pointer.
1. Double-click the mouse icon on the Windows taskbar.
The Mouse Properties box appears.
2. Click the box that corresponds with the mouse button you want to change and
select the function you want. Table 1 below describes the functions available.
3. Click the Apply button, and then click the OK button.
Table 1: Highlighted functions
Function Description
Back Command
Front Command
ClickLock
Recall window ❍ To restore a Windows application.
❍ To go back to the last page you viewed in
your web browser.
❍ After using the Back Command function, use
the Front Command function to go back to
the page you came from.
❍ To highlight or drag without holding down the
mouse button.
Minimize All/Undo
❍ To minimize all Windows applications or
restore them to their original size.
Using Creative Mouse And Keyboard Software 4-1
Page 26

Configuring the mouse wheel
With the mouse, you
can control either the
scroll speed or the
volume, but not both
at the same time.
1. Double-click the mouse icon on the Windows taskbar.
The Mouse Properties box appears.
2. Click the Configure Mouse Wheel tab.
3. To adjust the wheel scroll speed with the mouse wheel, click the Wheel Scroll
Speed option, if it is not selected.
4. Click the Lines box to select the number of text lines to skip for each notch of
the mouse wheel.
5. To control the volume of your speakers with the mouse wheel, click the Adjust
Volume option.
6. To adjust the amount of volume change for each notch of the mouse wheel,
drag the slider to adjust the speed.
7. Click the Apply button, and then click the OK button.
Configuring the pointer
1. Double-click the mouse icon on the Windows taskbar.
The Mouse Properties box appears.
2. Click the Pointers tab to change a scheme or an image of your pointer.
3. Double-click the image you want to change. You can preview the image on the
top-right corner of the tab.
4. If you want to select a scheme, click the Scheme box, and click the Save As
button.
5. Click the Apply button, and then click the OK button.
6. To adjust the motion of the pointer, click the Motion or Pointer Options tab.
7. Drag the top slider to adjust the pointer speed.
8. If you want to show the pointer trail, click the Show pointer trails check box
to select it, and drag the bottom slider to adjust the length of the trail.
9. Click the Apply button, and then click the OK button.
Using Creative Mouse And Keyboard Software 4-2
Page 27

Using Creative Keyboard Software
Configuring the hotkeys
1. Double-click the keyboard icon on the Windows taskbar. A user interface
showing the shortcut keys on Creative Wireless Keyboard appears.
2. Click the tab of the button you want to configure.
You can only configure buttons that have tabs.
3. To change the application assigned to the button, click the Select one
Function option, and click the down arrow to select another application. Click
the OK button.
Using Creative Mouse And Keyboard Software 4-3
Page 28

4. To select an application that is not listed in the above option, click the Select
a Program or URL option.
5. Click the Browse button, locate the application you want, and click the Open
button.
6. Click the OK button.
Configuring the OnScreen Display (OSD)
With Creative Desktop Wireless 8000, you can
• change the default font for the OSD.
• enable or disable the OSD.
• set a default screen position for the OSD.
1. Right-click the keyboard icon on the Windows taskbar.
2. Move your mouse cursor over the OSD option.
3. To change the OSD font, click the Font option.
After selecting a font, click the OK button.
4. To disable the OSD, click the Enable option to remove the checkmark.
5. To change the default screen position, move the cursor over the Location
option.
Select a screen position from the option that appears.
Using Creative Mouse And Keyboard Software 4-4
Page 29

Tips On Using Your Keyboard and Mouse
The following are a few tips to help you to work effectively with minimal physical
discomfort:
• When using the keyboard and mouse, keep your forearms, wrists and hands in a
relaxed position, with your elbows at your side.
• Position the keyboard and mouse nearby so that you do not have to stretch.
• Do not strike the keys too hard. Type with a soft touch.
• Keep your thighs parallel to the ground, and your feet flat on the ground or on a
footrest.
• Use a chair that offers you good back support.
• Take a break every half an hour.
• Place your computer’s monitor away from sunlight glare.
• Vary your tasks throughout the day.
• Keep your wrists straight and if necessary, use the detachable palm rest
provided.
Changing device channels and IDs
If there is more than one Creative Desktop Wireless 8000 user near you, you can
change the default keyboard or mouse channel. See "Problems With Your Creative
Wireless Keyboard or Optical Mouse" on page B-2.
If the keyboard or mouse is not responding well, you can change the default
keyboard or mouse ID. See "Problems With Your Creative Wireless Keyboard or
Optical Mouse" on page B-2.
Using Creative Mouse And Keyboard Software 4-5
Page 30

A
Technical Specifications
Page 31

Technical Specifications
Creative Wireless Optical Mouse
Dimensions ❑ 126 mm (L) x 64 mm (W) x 41 mm (H)
Wei gh t ❑ 87 g
Operating temperature
Humidity ❑ 0% - 90% RH
Working distance ❑ Up to 1.8 m (6 feet)
Power ❑ 2 x AA batteries
Standby mode current
Resolution ❑ 800 dpi
Radio Frequency ❑ Dual channel 27MHz with 255 random IDs
❑ 0ºc - 40ºc
❑ < 5 mA
Technical Specifications A-1
Page 32

Creative Wireless Keyboard
Dimensions ❑ 501 mm (L) x 210 mm (W) x 45 mm (H)
Wei gh t ❑ 850 g
Operating
❑ 0ºc - 40ºc
temperature
Humidity ❑ 0% - 90% RH
Working distance ❑ Up to 1.8 m (6 feet)
Power ❑ 2 x AA batteries
Customizable hot
❑ 10 keys on keyboard (excluding the Power, Calculator, Sleep mode and Audio keys)
keys
Radio Frequency ❑ Dual channel 27MHz with 255 random IDs
Technical Specifications A-2
Page 33

Creative RF Receiver
Dimensions ❑ 98 mm (L) x 76 mm (W) x 24 mm (H)
Wei gh t ❑ 92 g
Operating
❑ 0ºc - 40ºc
temperature
Humidity ❑ 0% - 90% RH
Working distance ❑ Up to 1.8 m (6 feet)
Technical Specifications A-3
Page 34

B
Troubleshooting
Page 35

Troubleshooting
If you have a technical problem with this product, you may wish to consult our
self-help tool “Knowledgebase” for online troubleshooting and solutions. Go to
www.creative.com and select your region.
Problems Installing Software
The installation does not start automatically after the installation CD is
inserted.
The AutoPlay feature in your Windows system may not be enabled.
To start the installation program through the My Computer shortcut menu:
1. Double-click the My Computer icon on your Windows desktop.
2. In the My Computer window, right-click the CD-ROM drive icon.
3. On the shortcut menu, click AutoPlay and follow the instructions on the
screen.
To install the software from the CD without enabling AutoPlay:
1. Leave the installation CD in the CD-ROM drive.
2. Click Start
3. In the Run dialog box, type d:\ctrun\ctrun.exe (replace d:\ with the drive
letter of your CD-ROM drive).
4. Click the OK button.
5. Follow the instructions on the screen to complete the installation.
To enable AutoPlay through Auto Insert Notification:
1. Click Start → Settings → Control Panel.
2. In the Control Panel window, double-click the System icon.
3. In the System Properties dialog box, click the Device Manager tab and
select your CD-ROM drive.
4. Click the Properties button.
5. In the Properties dialog box, click the Settings tab and select Auto Insert
Notification.
6. Click the OK button to exit from the dialog box.
→ Run.
Troubleshooting B-1
Page 36

Problems With Your Creative Wireless Keyboard or Optical Mouse
The cursor does not move or its movements are erratic on the screen.
Do one or more of the following:
• Make sure that the batteries have been inserted properly and according to the
directions shown in the battery compartment.
• Make sure that the batteries are not discharged.
• Change the position of the Creative RF receiver. The RF receiver should be at
least 8 inches (20 cm) away from the computer or monitor.
After pressing the Suspend button, the computer does not wake up.
There may be a problem with your computer’s power management settings. Some
systems are unable to wake up after being placed in Suspend mode.
Do the following:
• Make sure that the power management settings for your operating system are
correct, as described in the Windows operating system’s online Help.
After changing the batteries, the keyboard and mouse do not work.
Do one or more of the following:
• Make sure that the batteries have been inserted properly and according to the
directions shown in the battery compartment.
• Make sure that the batteries are not discharged.
• Make sure that there is a connection between the RF receiver and keyboard or
mouse. For more information, refer to "Step 4: Activate the wireless desktop
devices" on page 2-4.
The computer cannot detect the Creative keyboard or mouse.
Do one or more of the following:
• Make sure that the RF receiver is connected correctly to your computer.
• Make sure that the batteries have been inserted properly and according to the
directions shown in the battery compartment.
• Make sure that there is a connection between the RF receiver and keyboard or
mouse. For more information, refer to "Step 4: Activate the wireless desktop
devices" on page 2-4.
Troubleshooting B-2
Page 37

The cursor moves erratically and/or some characters appear on the
screen when you are not using the mouse or keyboard.
There may be some interference from other nearby computers. This may be due to
similar radio frequencies being used in some systems.
Do the following:
• Change the default device channel.
a. Press the Connect button on the RF receiver.
b. Press the Connect button on the mouse or keyboard.
For more information on the radio frequency, refer to "Technical
Specifications" on page A-1.
• Change the default device ID.
a. Press the Connect button on the RF receiver.
b. Press and hold the Connect button on the mouse or keyboard for at least
two seconds.
Troubleshooting B-3
 Loading...