


Ender-5 Plus Printer
To be the Chief Evangelist
Guide Book
To make Top-quality 3D printer
This guide book is for standard Ender-5 Plus only.
Please plug the power cord into a three-hole power jack.
Detailed instructions are available in the TF card.
V.2.1
WARNING
1.Do not use the printer any way other than described herein in order to avoid personal injury or property damage.
2.Do not place the printer near any heat source or flammable or explosive objects. We suggest placing it in a well-ventilated, low-dust environment.
3.Please place your printer under a stable environment in order to achieve hight print quality.
4.Before using experimental or exotic filaments, we suggest using standard filaments such as ABS or PLA to calibrate and test the machine.
5.Do not use any other power cable except the one supplied. For your safety, you must use a grounded three-prong power outlet.
6.Do not touch the nozzle or printing surface during operation as they may be hot. Keep hands away from machine while in use to avoid burns or other personal injuries.
7.Do not wear gloves or loose clothing when operating the printer. Such cloths may become tangled in the printers moving parts leading to printer damage, burns, or personal injuries.
8.When cleaning debris from the printer hot end, please use the provided tools. Do not touch the nozzle when heated. This maybe cause personal injury.
9.Clean the printer frequently. Always turn the power off when cleaning, and wipe with a dry cloth to remove dust, adhered printing plastics or any other material off the frame, guide rails, or wheels . Use glass cleaner or isopropyl alcohol to clean the print surface before every print for consistent results.
10.Children under 10 years of age should not use the printer without supervision.
Contents
1.Introduction.................................... |
1 |
6.Loading |
Filament ........................... |
9 |
|
2.General List.................................... |
2 |
7.Bed Leveling..................................... |
10 |
||
3.Assembly Step....................................... |
3 |
8.Software |
Installation....................... |
12 |
|
4.Cable |
Connection............................ |
7 |
9.Preparing to Print.......................... |
13 |
|
5.Screen |
Information........................ |
8 |
1 0 . C irc uit |
W iring .......................... |
1 4 |
Preface
Dear consumers,
Thank you for choosing our products. For your best experience, please read the instructions before operating the Printer. Our 3D team will always be ready to provide you the best service. Please contact us via the phone number or e- mail address provided on the last page of the instruction when you encounter any issue with the Printer.
For a better experience in using our product, you may learn how to use the Printer in the following ways:
1.View the accompanied instructions and videos in the TF card.
2.Visit our official website www.creality3d.cn You will find relevant software/hardware information, contact details and operation and maintenance instructions on the website.

Introduction
1 |
9 |
16 |
2 |
10 |
15 |
|
|
|
|
8 |
|
3 |
|
14 |
|
|
4 |
|
5 |
|
6 |
|
|
7 |
|
|
11 |
|
|
12 |
|
|
13 |
1. |
BL Touch |
|
5. |
Power switch |
|
9. |
X-axis limit switch |
13. |
Antivibration feet |
|||||||
2. |
broken filament detecting device |
6. |
Touch screen |
|
10. |
X-axis motor |
14. |
Filament Holder |
||||||||
3. |
Hot Bed |
|
7. |
Leveling nut |
|
11. |
TF card USB |
15. |
Y-axis motor |
|||||||
4. |
Main control box |
|
8. |
Hot end |
|
12. |
Z-axis motor |
16. |
Y-axis limit switch |
|||||||
1
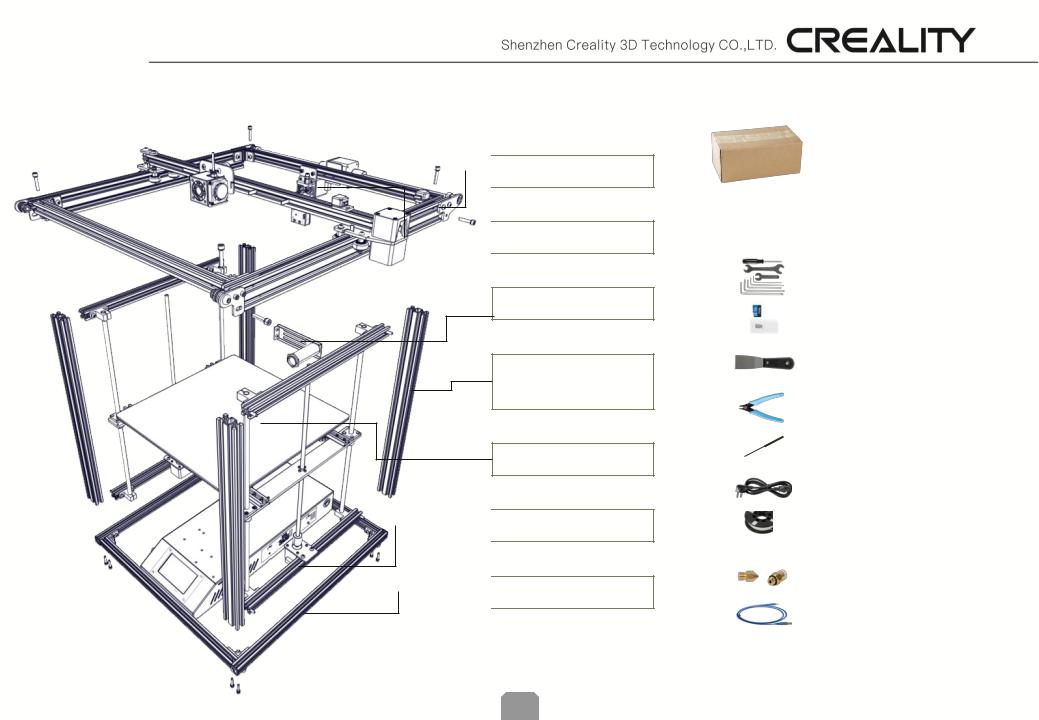
General List :
 A:Top Frame
 B:Extruder kit
C:Filament Holder
D:2040 Aluminum profile(4Pcs)
E:Hot Bed
 F:Z-axis Frame
 G:Bottom Frame
Tool List
No. |
Image |
Name |
Qty |
1 |
|
Wrench & Screw |
1set |
|
driver |
||
|
|
|
|
|
|
|
|
2 |
|
TF Card & Reader |
1set |
|
|
|
|
3 |
|
Spatula |
1 |
|
|
|
|
4 |
|
Pliers |
1 |
|
|
|
|
5 |
|
0.4mm |
1 |
|
Nozzle Cleaner |
||
|
|
|
|
6 |
|
Power Cable |
1 |
|
|
|
|
7 |
|
Filament(200)g |
1 |
|
|
|
|
8 |
|
Spare Parts |
1set |
|
|
|
|
9 |
|
USB |
1 |
|
|
|
|
2
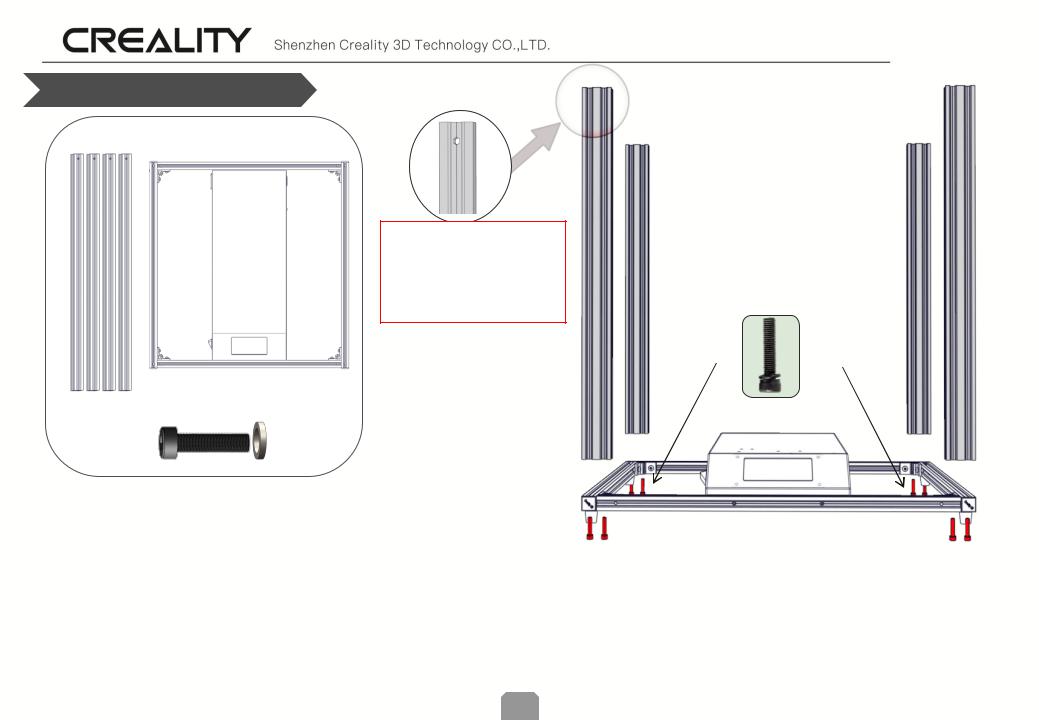
Frame Assembly Pt. 1
Ready:
 Note: Please note that the hole at the top of piece facing left and right, in relation to the front of the printer.
2040 Aluminum |
Bottom Frame |
profile(4Pcs) |
|
|
8pcs |
|
M5X25 |
Step 1. Keep the front of the Bottom Frame facing you.
Step 2. Take one of the Aluminum frame pieces and place it in the corner of the bottom frame , On top of the frame, and lined up with the corner. Notice the hole at the top of piece facing left and right, in relation to the front of the printer. Use 2 M5x25 screws and washers to secure part to the bottom frame.
Step 3. Install the remaining 2 aluminum profile in the same way as Step 3.
3
 Loading...