


V1.0

To Our Dear Users
Thank you for choosing Creality. To make using our products easier, please read this User Manual before you start and follow the instructions provided carefully.
Creality is always ready to provide you with high-quality services. If you encounter any issues or have any questions when using our products, please use the
contact information at the end of this manual to contact us.
To further enhance your user experience, you can also use the following methods to f ind out more about using our devices:
SD card user manual: You can f ind instructions and videos in the SD card provided with your device.
You can also log in to the Creality of f icial website (www.creality.com) to f ind information regarding software and hardware, contacts, device instructions, device
warranty information, and more.
Instructions for Use
1
Please do not use this device with methods and operations that have not been described in this manual to avoid accidental personal injury and property damage;
2
Do not place the device in f lammable and explosive materials or near high heat sources. Please place the device in a ventilated and cool environment with little dust;
Do not place the printer in a vibrating or any other unstable environment. The shaking of the machine will affect the printer’s printing quality;
4
It is recommended to use the f ilament recommended by the manufacturer to avoid damaging the device;
5
Do not use the power cable of other products as a replacement during the installation process. Please use the power cable provided with the machine. The power
plug needs to be plugged into a three-hole socket with a ground wire;
6
To prevent moving parts from pulling the human body into the device and cause cuts and lacerations, do not wear cotton gloves while operating the printer;
7
To avoid burns caused by overheating of the platform, after printing, please wait for the temperature of the HotBed platform to drop before removing the model;
8
Please maintain the device often. When the device is unplugged, use a dry cloth to clean the printer, clean up remnants in the f ilament box, and check for foreign
objects on the belt and endstop switch;
9
To avoid injuries, children under the age of 10 should not operate this device without adult supervision;
10
Do not manually move the nozzle or the heating platform quickly, otherwise, it may cause damage to the moving mechanisms or control circuit;
11
Users should abide by the laws and regulations of the corresponding country and region where the equipment is located (place of use), abide by professional
ethics, and pay attention to safety obligations. The use of our products or equipment for any illegal purpose is strictly prohibited. Our company is not responsible
for the relevant legal responsibilities of any violators.
0101
0101

Table of Contents
1. Device Description
1.1 About the device
1.2 List of tool kit items
1.3 Device specif ications
2. Instructions for Use
2.1 Unboxing instructions
2.2 Local printing
2.3 Cloud printing via app
3. Notes and Daily Maintenance
3.1 Changing f ilaments
3.2 Lubrication maintenance
3.3 Leveling the platform
3.4 Using and maintaining the magnetic adhesive sticker
3.5 Cleaning foreign objects from the chassis
3.6 Connecting to cloud print
.......................................................................................................................................................................................
.....................................................................................................................................................................................................
.................................................................................................................................................................................................
.............................................................................................................................................................................................
.....................................................................................................................................................................................
.............................................................................................................................................................................................
.................................................................................................................................................................................................
.............................................................................................................................................................................................
...................................................................................................................................................................16-20
...................................................................................
.........................................................................................................................................................................................
...............................................................................................................................................................................................
............................................................................................................................................................
.......................................................................................................................................................................................
......................................................................................................
..........................................................................................................................................
03-04
04-04
05-14
05-05
07-11
12-15
16-16
17-17
17-18
19-19
19-19
20-20
0102
Device Description
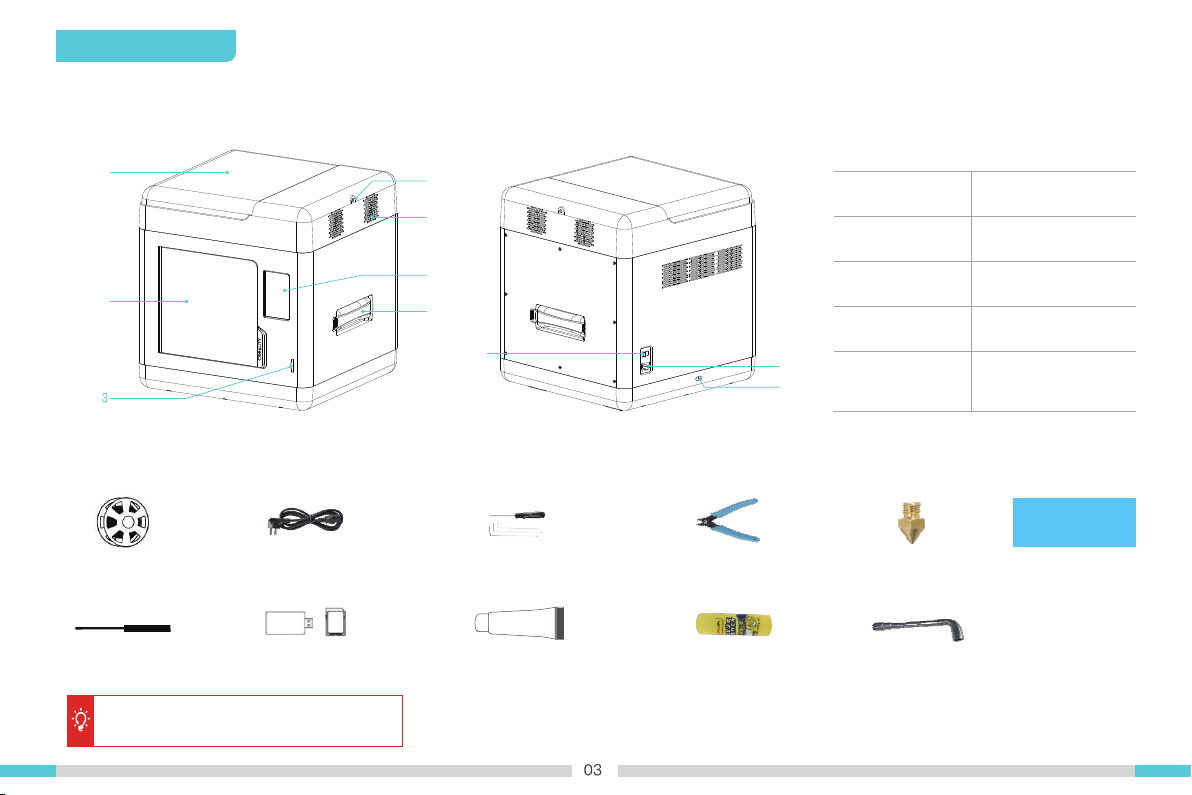
1.1 About the device
1
2
4
5
6
7
8
1.2 List of tool kit items
Filament x1
Nozzle cleaner x1 Card reader and SD card x1 grease x1
Note: The components above are for references
only. The actual product may vary.
Power cable x1 Wrench and screwdriver x1 Cutting plier x1 Nozzle x1 Leveling card x1
(For lubricating the bearings)
01
1. Cover
2. Front door
3. SD card slot
4. Filament entrance
9
5. Ventilation fan
10
Glue stick x1 M6 socket wrench x1
(Can be used directly on the
printing platform to increase
adhesiveness and prevent
models from wrapping)
6. Display screen
7. Rack
8. Power switch
9. Power socket
10. Voltage adjustment
port

1.3 Device specif ications
Model Sermoon V1 | Sermoon V1 Pro
Modeling size 175x175x165 mm
Modeling technology FDM
Number of nozzles 1
Nozzle diameter 0.4 mm (Standard)
Accuracy ± 0.1 mm
Print materials 1.75 mm PLA / ABS / PETG
Supported slicing f ile formats STL / OBJ / AMF
Power rating 150W
HotBed temperature ≤ 80℃
Nozzle temperature ≤ 250℃
Ambient temperature 10℃ - 30℃
Power Loss Recovery Yes
Filament detection Yes
Supported slicing software Creality Slicer, Repetier-Host, Cura, Simplify3D
Printing methods Locally via SD card or cloud printing via Wi-Fi
Power specifications 100-120Vac 200-240Vac 50/60Hz
Operating systems Windows XP / Vista/ 7 / 10/ MAC / Linux
Printing speed ≤ 150 mm/s, normally between 30-60 mm/s
Open door sensor Comes standard with the Pro version
Camera Comes standard with the Pro version
Basic Parameters
0104
2. Instructions for Use
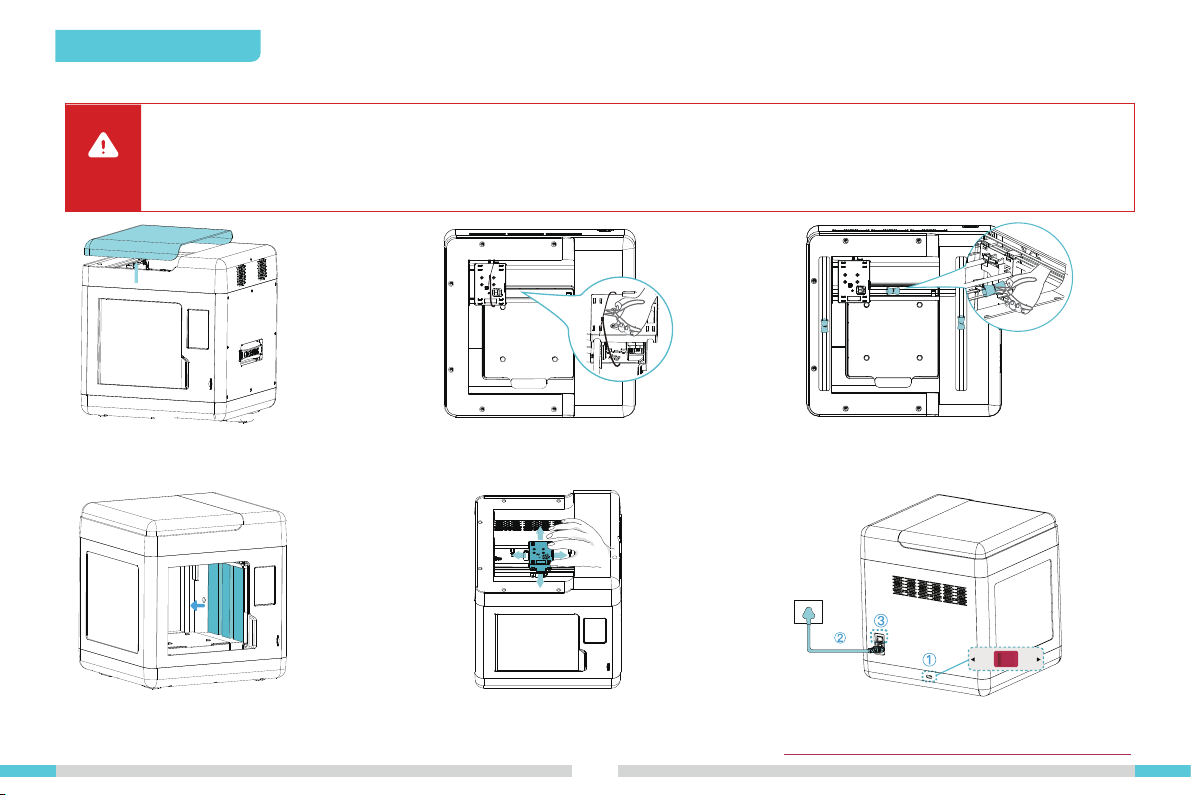
2.1 Unboxing instructions
• Please ensure the correct position for the power supply switch and mains before supply connection, in order to avoid damage to
the device.
Caution
• If the mains between 100V and 120V, please select the 115V for the power supply switch.
• If the mains between 200V and 240V, please select the 230V for the power supply switch (default is 230V).
③
A. Open the device’s cover.
D. Remove the foam from the inside
of the device.
B. Use the cutting plier to cut the cable
ties around the nozzle.
E. Check whether the moving mechanisms
are moving smoothly.
0105
①
②
C. Use the cutting plier to cut of f the cable ties on the
X-axis and Y-axis belts, and remove the cut cable
ties and foam.
115V
230V
F. Note: Please ensure that the voltage matches the power
switch, otherwise the power supply may be damaged or
burnt out.

Local printing Cloud printing
Method 1 (Connect via Wi-Fi)
Connected to network
Insert SD card
Method 2
(Connect via Bluetooth)
Server
Data
3D / STL G-code files
Model slicing
Install apps
1. Cloud slicer
2. Cloud print
3. Cloud monitor (Pro version)
0106
2.2 Local printing
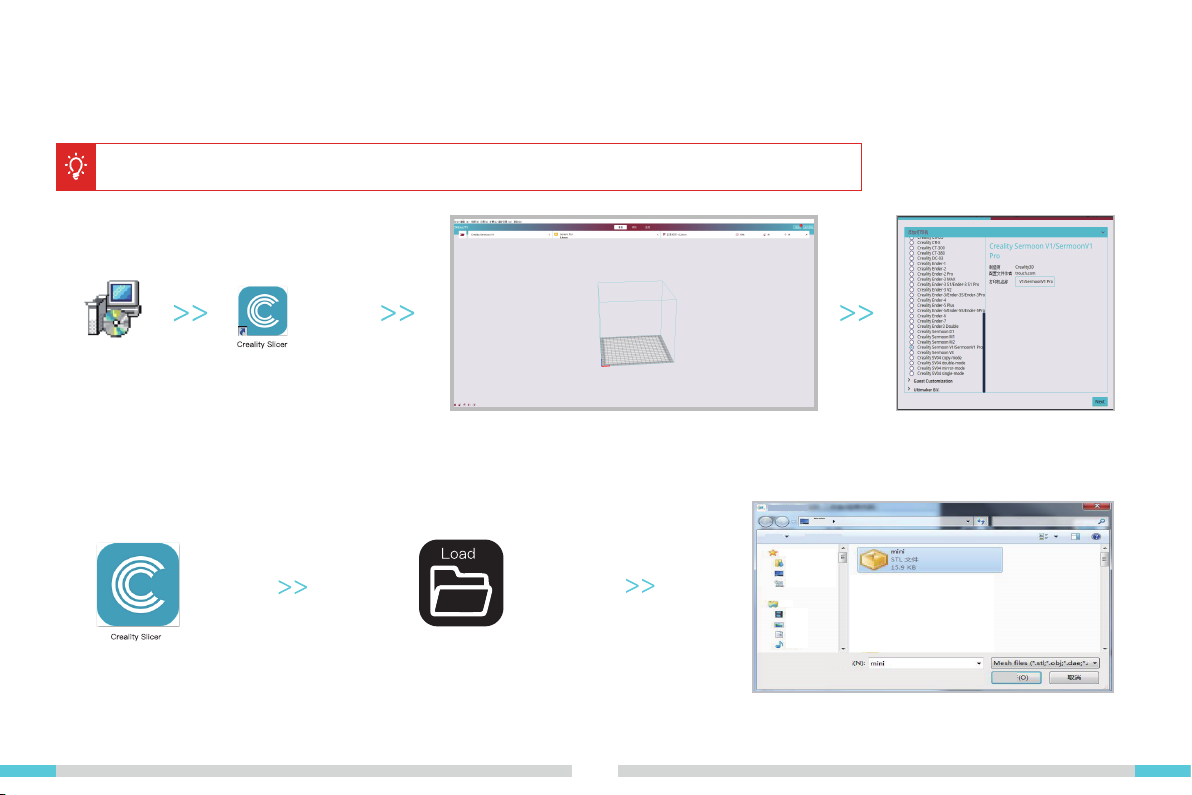
2.2.1 Install slicer
This manual only introduces the installation of Creality slicer software. If users use other slicer software, we recommend
to set the retraction parameter to 3mm to avoid the risk of plugging.
1. Please login of f icial Creality website
(www.creality.com) to download the
latest Creality Slicer software.
4. Open Creality Slicer. 5. Load File
2. Select Preferences in sequence → Conf igure Creality
→ Next → Select corresponding language → Next →
Finish to complete the setting.
3. Select the current model.
6. Select File
0107
 Loading...