

Page 1
Owner’s Manual
6.75 HORSEPOWER
2500 PSI
2.5 GPM
PRESSURE WASHER
CLEANING SYSTEM
Model No. 580.767451
HOURS: Mon. - Fri. 8 a.m. to 5 p.m. (CT)
CAUTION: Before using this product,
read this manual and follow all Safety
Rules and Operating Instructions.
SEARS, ROEBUCK and CO., Hoffman Estates, IL 60179 U.S.A.
Visit our Craftsman website:
Part No. !93946GS Draft 0 (10/17/2003)
www.sears.com/craftsman
Safety
• Assembly
• Operation
• Maintenance
• Parts
• Español
24847 G7333
Page 2

TABLE OF CONTENTS
WARRANTY.......................................................................2
SAFETY RULES
KNOW YOUR PRESSURE WASHER
ASSEMBLY
OPERATION.................................................................9-11
MAINTENANCE
SPECIFICATIONS............................................................12
.............................................................
...............................
.....................................................................
..........................................................
12-16
2-4
6-8
STORAGE...................................................................17-18
TROUBLESHOOTING......................................................19
5
REPLACEMENT PARTS
NOTES........................................................................26-28
EMISSION CONTROL WARRANTY................................29
ESPAÑOL. ..................................................................30-47
HOW TO ORDER PARTS................................BACK PAGE
............................................
20-25
WARRANTY
LIMITED WARRANTY ON CRAFTSMAN PRESSURE WASHER
For one year from the date of purchase, when this Craftsman pressure washer is maintained and operated
according to the instructions in the owner's manual, Sears will repair, free of charge, any defect in material and
workmanship.
if this washer is used for commercial purposes, this warranty applies for only 90 days from the date of pur
chase. If this pressure washer is used for rental purposes, this warranty applies for only 30 days after date of
purchase.
This warranty does not cover:
• Expendable items such as spark plugs or air filters, which become worn during normal use.
• Repairs necessary because of operator abuse or negligence, including damage resulting from no water
being supplied to pump or failure to maintain the equipment according to the instructions contained in the
owner's manual.
Warranty service is available by returning the pressure washer to the nearest Sears service center or dealer in
the United States.
This warranty gives you specific iegal rights and you may aiso have other rights, which vary from state to state.
Sears, Roebuck and Co., Dept 81 TWA, Hoffman Estates, IL 60179
SAFETY RULES
This is the safety alert symbol. It is used to alert you to potential personal injury hazards. Obey all
safety messages that follow this symbol to avoid possible injury or death.
A
Read this manuai carefully and become
familiar with your pressure washer. Know its
applications, its limitations, and any hazards
involved.
The safety aiert symbol (A) is used with a signal
word (DANGER, CAUTION, WARNING), a pictorial
and/or a safety message to alert you to hazards.
DANGER indicates a hazard which, if not avoided, will
result in death or serious injury. WARNING indicates a
hazard which, if not avoided, could result in death or
serious injury. CAUTION indicates a hazard which, if
not avoided, might result in minor or moderate injury.
CAUTION, when used without the aiert symbol,
indicates a situation that could result in equipment
damage. Follow safety messages to avoid or reduce
the risk of injury or death.
Hazard Symbols and Meanings
1(1
Toxic Fumes
2 \ ^
Slippery Surface
Miit ^
Fire
Fall Fluid Injection
Explosion
Electrical Shock
w
*
Moving Parts
Flying Objects
Hot Surface
Kickback
Page 3

In the State of California a spark arrester is required
by law (Section 4442 of the California Public
Resources Code). Other states may have similar laws.
Federal laws apply on federal lands. If you equip the
muffler with a spark arrester, it must be maintained in
effective working order.You can order a spark arrester
through your authorized Sears service deaier.
^ WARNING
The engine exhaust from this product contains
chemicals known to the State of California to cause
cancer, birth defects, or other reproductive harm.
A DANGER
Running engine gives off carbon monoxide,
an odorless, colorless, poison gas.
Some chemicals or detergents may be
harmful if inhaled or ingested, causing
severe nausea, fainting or poisoning.
Breathing carbon monoxide will cause
nausea, fainting or death.
Operate pressure washer ONLY outdoors.
Use a respirator or mask whenever there is a chance
that vapors may be inhaled.
Read all instructions packed with mask so you are certain
mask will provide necessary protection against inhaling
harmful vapors.
A WARNING
Fuel and its vapors are extremely
Ml
WHEN ADDING FUEL
• Turn pressure washer OFF and let it cool at least
2 minutes before removing gas cap.
• Fill fuel tank outdoors.
• DO NOT overfill tank. Allow space for fuel expansion.
• Keep fuel away from sparks, open flames, pilot lights,
heat, and other ignition sources.
• DO NOT light a cigarette or smoke.
WHEN OPERATING EQUIPMENT
• DO NOT tip engine or equipment at angle which causes
fuel to spill.
• DO NOT spray flammable liquids.
WHEN TRANSPORTING OR REPAIRING EQUIPMENT
• Transport/repair with fuel tank EMPTY or with fuel shutoff
valve OFF.
WHEN STORING FUEL OR EQUIPMENT WITH FUEL IN
TANK
• Store away from furnaces, stoves, water heaters, clothes
dryers or other appliances that have pilot light or other
ignition source because they can ignite fuel vapors.
flammable and explosive.
Fire or explosion can cause severe burns or
death.
^ WARNING
Spray contact with electrical wiring can
1
Keep water spray away from electric wiring or fatal
electric shock may result.
result in electrocution.
A WARNING
2
• Keep spray nozzle between 8 to 24 inches away from
cleaning surface.
• Operate this unit on a stable surface.
• Cleaning area should have adequate slopes and
drainage to reduce possibility of falls due to slippery
surfaces.
• Be extremely careful if you must use pressure washer
from a ladder, scaffolding or any other relatively unstable
location.
• Firmly grasp spray gun with both hands when using high
pressure spray to avoid injury if gun kicks back.
Use of pressure washer can create puddles
and slippery surfaces.
High pressure spray could cause you to fall
if you are too close to the cleaning surface.
A WARNING
The high pressure stream of water that this
equipment produces can pierce skin and its
underlying tissues, leading to serious injury
and possible amputation.
NEVER aim spray gun at people, animals or plants.
DO NOT allow CHILDREN to operate pressure washer.
NEVER repair high pressure hose. Replace it.
Keep high pressure hose connected to pump and spray
gun while system is pressurized.
A WARNING
Running engines produce heat and hot
JÊ
DO NOT touch hot surfaces.
Stay clear of exhaust gases.
Allow equipment to cool before touching.
exhaust gases. Temperature of muffler and
nearby areas can reach or exceed 150°F
(es^c).
Fire or severe burns can occur.
Page 4

^WARNING
starter and other rotating parts can entangle
hands, hair, clothing, or accessories.
¥r
DO NOT wear loose clothing, Jewelry or anything that
may. be caught in starter or other: rotating parts.:::::::
Tie up long hair and remove jewelry.
.......................
^WARNING
Unintentional sparking can result in fire or
electric shock.
WHEN ADJUSTING OR MAKING REPAIRS TO YOUR
PRESSURE WASHER ^ ^ ^ ^ ^ ^ ^ ^
Disconnect spark plugi wire from spark plug and place
wire where it cannot conMct spark plug;::::::::::::::::::::
^WARNING
High pressure spray can cause paint chips
or other particles to become airborne.
•: Always wear eye pnstection when using equipment or when:
n vicinity of equipment in use,
A CAUTION
Excessively high or low operating speeds increase
risk of injury and damage to pressure washer.
•: DO NOT tami№r with governed speed; : :: : t : :: -
• DO NOT operate pressure washer above rated pressure.
......................................
^CAUTION
A pressure washer produces a high pressure spray
which increases risk of injury and damage to unit.
DO NOT
DO NOT
running.
NEVER use a spray gun which; does not: have a trigger
lock or trigger: guard in place and: in working order.
Always be certain spray gurs, nozzles and accessories
are correctly attached.^
secure spray gun in open position.: : :
leave spray gun unattended: »rfiile machineiS
CAUTION
High pressure spray may damage fragile items
including glass.
DO NOT point spray gun at giass: when ih j:et spray mode.
NEVER aim spray gun at plants. ...................................
CAUTION
Improper treatment of pressure washer can
damage it and shorten its life.
If you have questions about intended use, ask dealer or
contact Sears. ■ t :........: t,:: t,::::
NEVER operate units with broken or missin:g parts,:or
without: protective :housingi or: covers.:
DO NOT by-pass any safety device on this machine.
Before starting pressure washer in cold weather,: check
all: parts of the equipment to be sure ice has not formed
there, t
NEVER move machine by pulling on high pressure hose
Use handle provided on unit,: j: ::: j: : : : : ::::: T
Check fuel system for leaks or signs of deterioration,: :
such as
clamps,
before operati:ng pressure washer; :
This equipment is designed to be used
authorized parts ONLY, if equipment is used with
that DO: NOT comply with minimum specifications
assumes ail risks and liabilities,
chafed: or spongy hose,; loose or missing t j t
or damaged tank or cap. Correct: all defects t t
...
.....
: t:':,::
..
....
.....
: ■
with Sears
parts
.user
Page 5
KNOW YOUR PRESSURE WASHER
Read this owner’s manual and safety rules before operating your cleaning system.
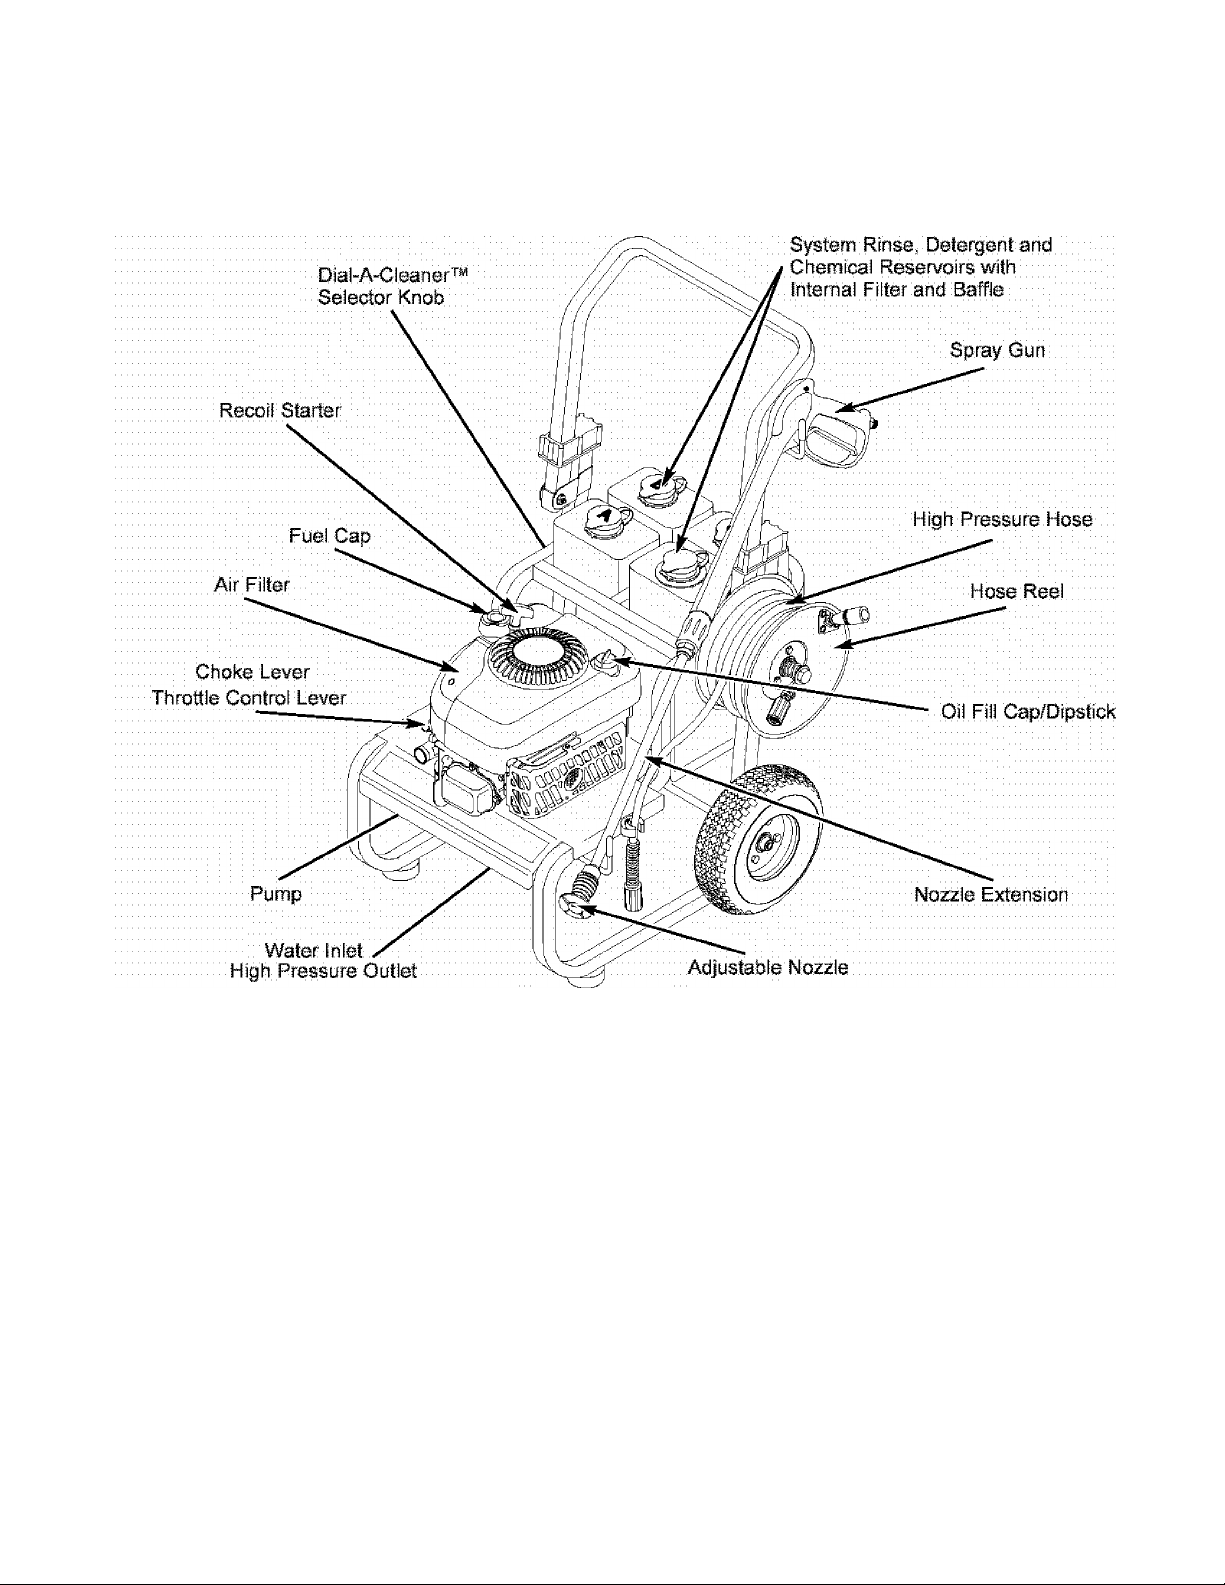
Compare the illustrations with your cleaning system to familiarize yourself with the locations of various controls
and adjustments. Save this manual for future reference.
Adjustable Nozzle - Always attached to nozzle
extension. Adjust for high or low pressure; narrow or
fan spray.
Air Filter - Dry type filter element limits the amount of
dirt and dust that gets in the engine.
Choke Lever ~ Used to help start a cold engine.
Dial-A-Gleaner™ Selector Knob - Selects any one
of three chemicals or the clean water system rinse.
Fuel Cap - Fill engine with regular unleaded fuel here.
High Pressure Hose - Connect one end to the spray
gun and other end to the high pressure outlet.
High Pressure Outlet - Connection for high pressure
hose.
Hose Reel ^— Used for storing hose while unit is not in
use. Hose must be detached from pump and spray
gun before storage.
Nozzle Extension - Attach to spray gun to use
adjustable nozzle.
Oil Fill Cap/Olpstick - Fill engine with oil here. See
page 7 for oil recommendations and filling instructions.
Pump - Develops high water pressure.
Recoil Starter - Used for starling the engine.
Spray Gun - Controls the application of water onto
cleaning surface with trigger device, includes safety
latch.
System Rinse, Detergent and Chemical Reservoirs
vBith Internal Filter and Baffle - Used to provide
detergent or other chemicals to the low pressure water
stream.
Throttle Control Lever - Sets engine in starting
mode for recoil starter and stops running engine.
Water Inlet - Connection for garden hose.
Page 6
ASSEMBLY
Your cleaning system requires some assembly and is
ready for use only after it has been properly serviced
with the recommended oil and fuel
If you have any problems with the assembly of
your pressure v^^sher, please call the pressure
washer helpline at 1-800-222-3136.
IMPORTANT: Any attempt to run the engine before it
has been serviced with the recommended oil will result
in an engine failure.
REMOVE PRESSURE WASHER FROM CARTON
1. Open carton and slice two corners opposite guide
handle from top to bottom so the panel can be
folded down flat.
2.
Remove hose reel box, fillers, and parts bag
shipped with cleaning system.
3,
Remove spray gun, nozzle extension, and engine
oil from fillers.
Roil cleaning system out open end of carton.
5.
Raise guide handle, secure in place.
Become familiar with each piece before assembling
the pressure washer. Identify all contents with the
illustration on page 5, If any parts are missing or
damaged, call the pressure washer helpline at
1-800-222-3136.
ASSEMBLING CLEANING SYSTEM
Your Craftsman cleaning system will need assembly
before operation:
1. Attach hose reel.
2. Add oil to engine crankcase,
3. Add fuel to fuel tank.
4. Connect high pressure hose to spray gun and pump.
5. Connect water supply to pump.
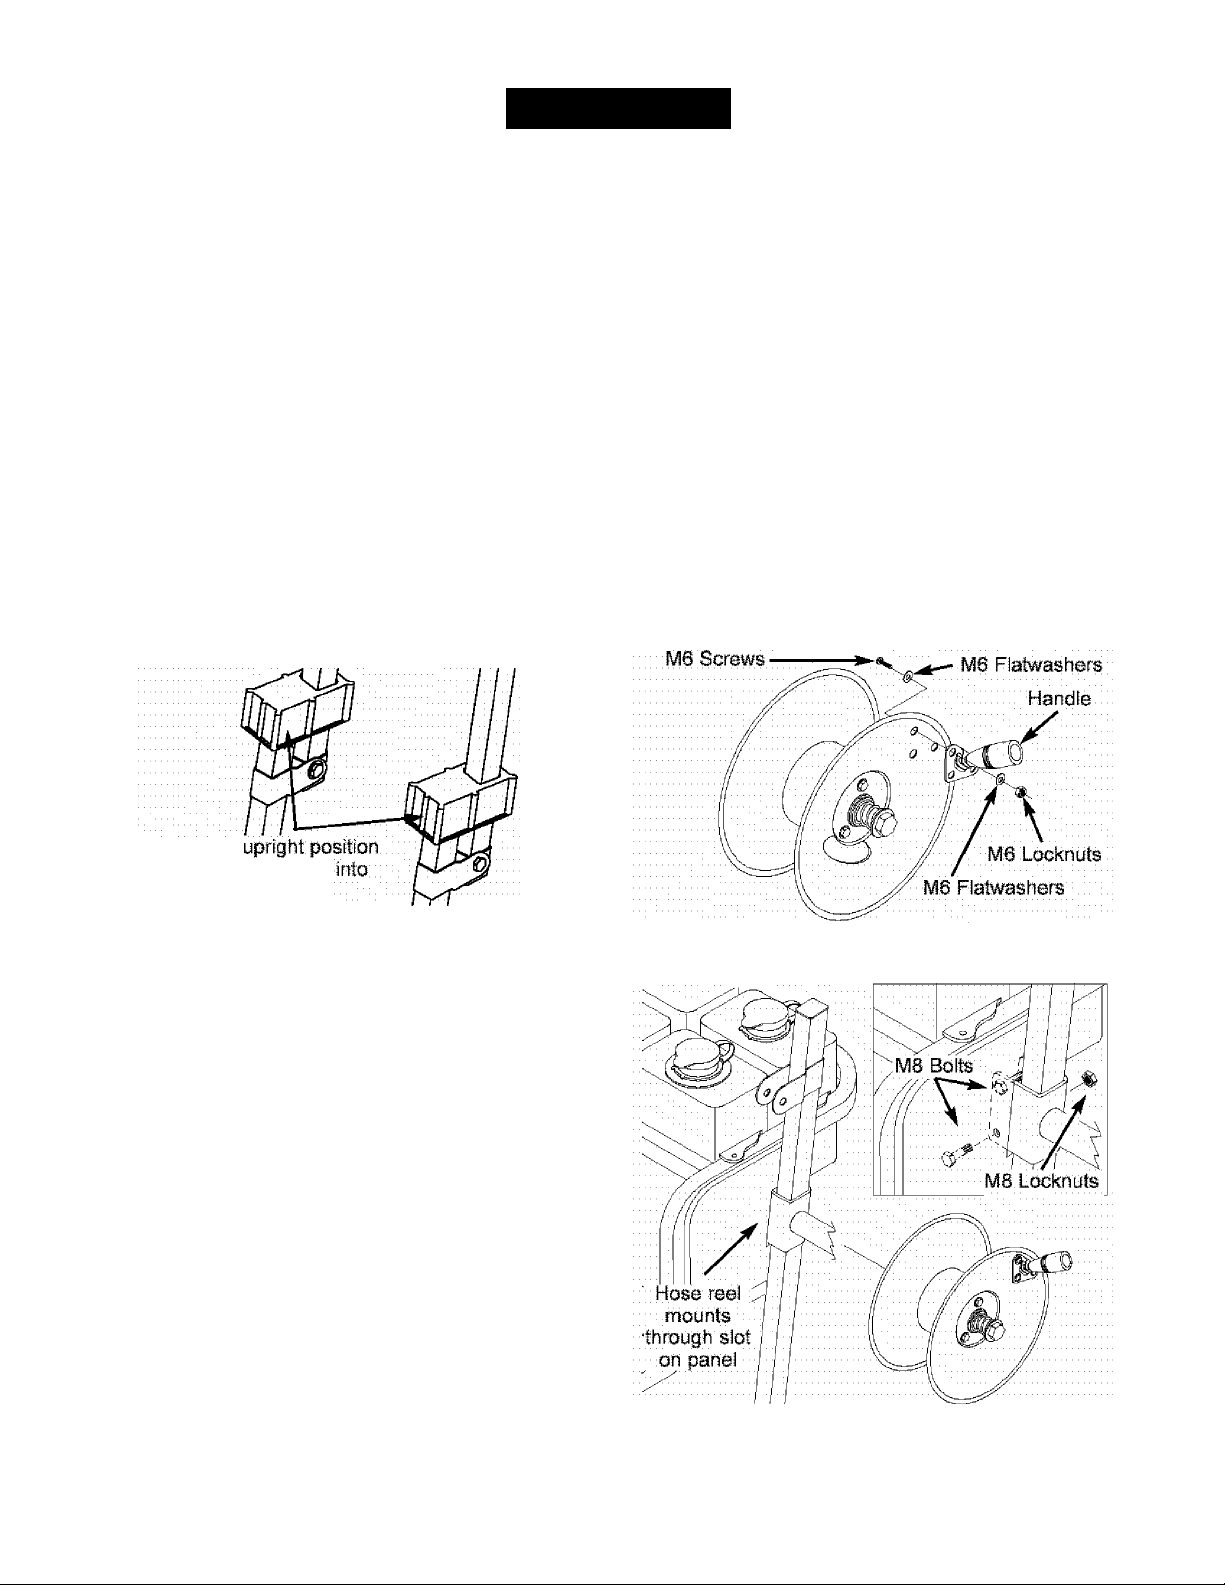
Assembling Hose Reel
Obtain 14mm and 10mm open end wrenches and a #2
Phillips screwdriver.
1. Attach handle to reel with locknuts, flalwashers,
and bolts as shown.
;ift handle to
and slide locking caps
^ Y : place
0, Check carton for additional loose parts.
CARTON CONTENTS
Check all contents. If any parts are missing or
damaged, call the pressure washer helpline at
1-800-222-3136,
• Main unit — cleaning system with wheels, chemical
tanks, guide handle
• Hose reel components
• High pressure hose
• Spray gun
• Nozzle extension with adjustable nozzle
• Engine oil
• Parts bag (which includes items listed below)
Three-pack of chemical concentrates
Owner’s manual
Maintenance kit
Tank labels
Registration card
2. Secure hose reel to left side upright with locknuts
and bolts.
Page 7
NOTE: There may be small tube adapters included
with the hose real kit that are not used on this model.
IMPORTANT: You must take the hose off the reel
when operating your cleaning system. The reel is for
storage puqaoses only.
Add Engine Oil
IMPORTANT: Any attempt to crank or start the engine
before it has been properly serviced with the
recommended oil may result in an engine failure.
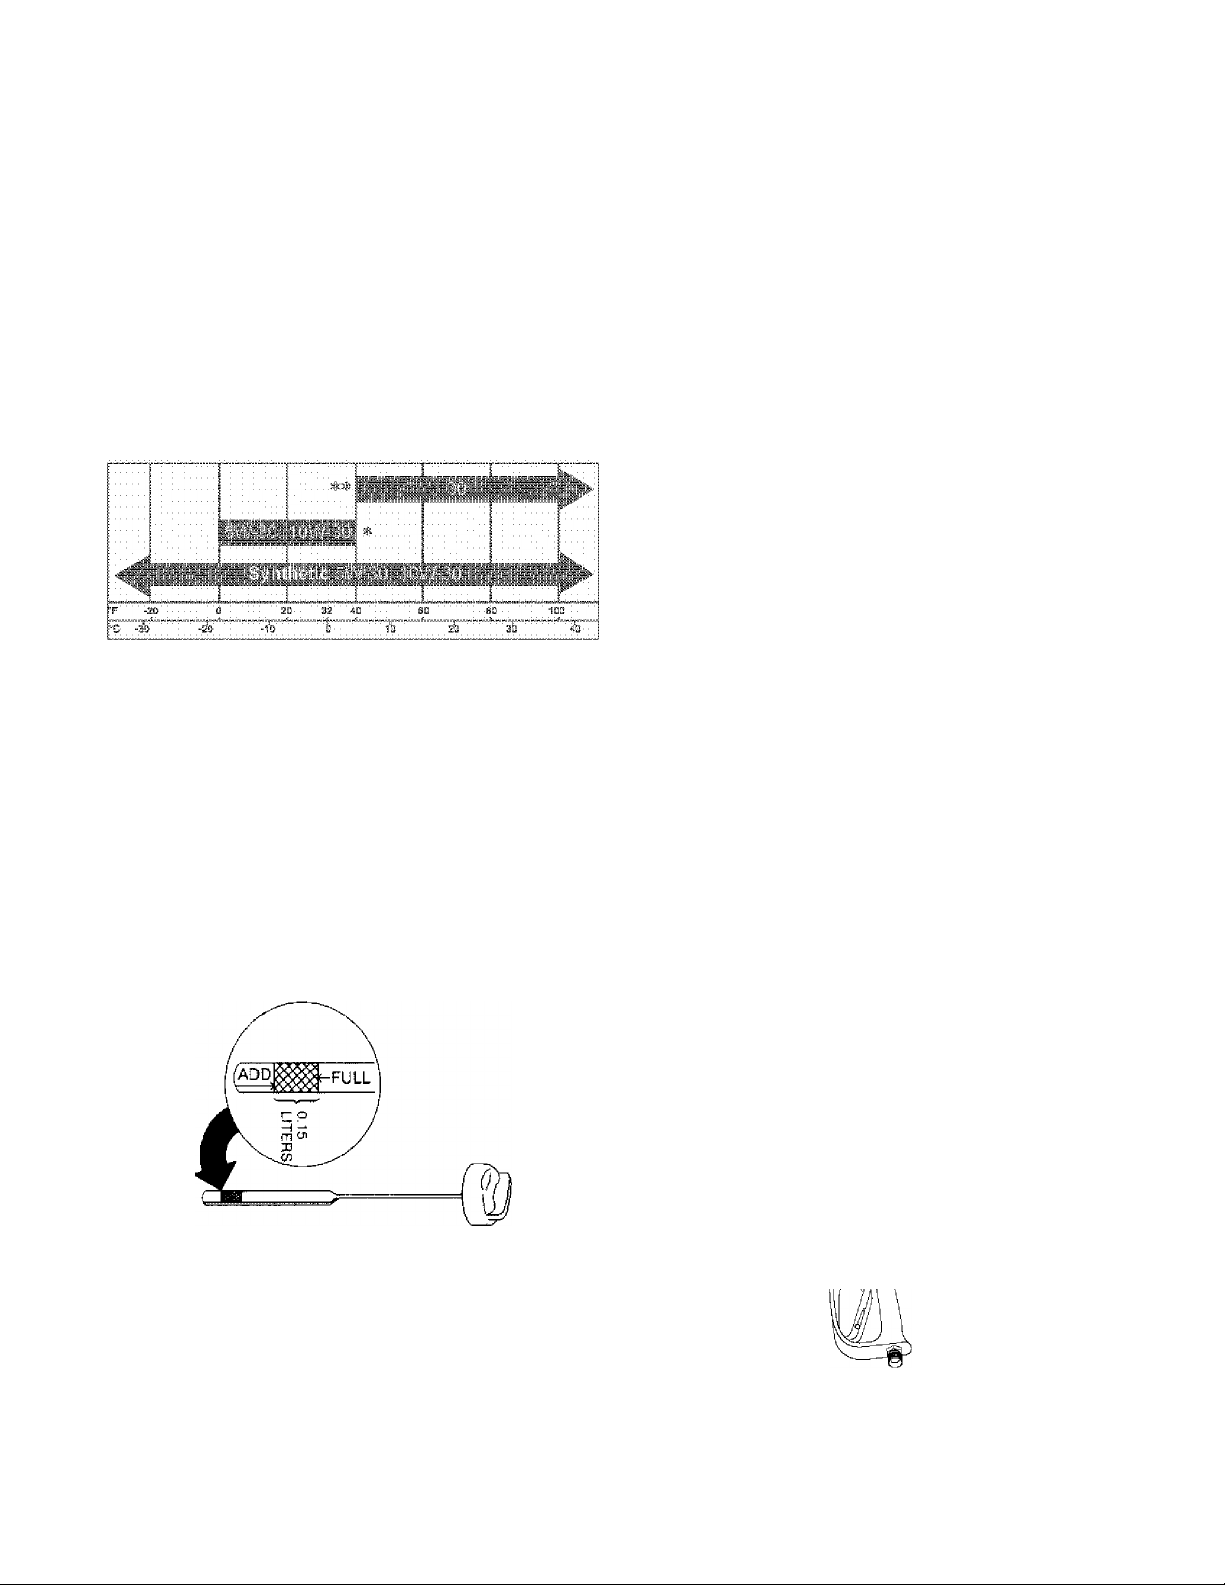
NOTE: When adding oil to the engine crankcase, use
only high quality detergent oil rated with API service
classification SF, SG, SH, SJ or higher rated SAE 30
weight. DO NOT use special additives.
1. Choose a viscosity according to table below.
STAHTiNC TEMPERATURE RANGE ANTICIPATED BEFORE NEXT: OIL CHANGE
* The use of multi-viscosity oils (5W-30, 10W-30, etc.)
in temperatures above 40°F {4°C) will result in higher
than normal oil consumption. When using a multi
viscosity oil, check oil more frequently.
** If using SAE 30 oil in temperatures below 40°F
(4”C), it will result in hard starting and possible
engine bore damage due to inadequate lubrication.
2. Place pressure washer on a level surface.
3.
Clean area around oil fill.
:CS^
Remove oil fill cap and dipstick.
Wipe dipstick clean, insert it into oil fill hole and
5.
tighten securely, remove dipstitdc. Add
recommended oil up to “Full” mark on dipstick.
Add Fuel
WARNING! NEVER fill fuel tank indoors.
A
A
2.
3,
NEVER fill fuel tank when engine is running or
hot. Allow unit to cool for two minutes before
refueling, DO NOT light a cigarette or smoke
when filling the fuel tank.
WARNING! NEVER fill fuel tank completely
full. Provide space for fuel expansion. Wipe
away any fuel spillage from engine and
equipment before starting.
1.
Use fresh, clean unleaded automotive fuel and
store in approved, clean, covered containers. Use
clean fill funnels. NEVER use “stale” fuel left over
from last season or fuel stored for long periods.
Clean area around fuel fill cap, remove cap.
Slowly add “UNLEADED” regular fuel to fuel tank.
Use a funnel to prevent spillage. Fill tank to about
1.5” below the bottom of the filler neck.
pTank „
4^
Fuel
£.
4. install fuel cap and wipe up any spilled fuel.
IMPORTANT: It is important to prevent gum deposits
from forming in essential fuel system parts, such as
the carburetor, fuel filter, fuel hose or tank during
storage. Also, experience indicates that
alcohol-blended fuels (called gasohol, ethanol or
methanol) can attract moisture, which leads to
separation and formation of acids during storage.
Acidic gas can damage the fuel system of an engine
while in storage.
To avoid engine problems, the fuel system should be
emptied before storage of 30 days or longer. See
“Storage” on pages 17-18. NEVER use engine or
carburetor cleaner products in the fuel tank or
permanent damage may oixur.
6. Pour slowly. Wipe dipstick clean each time oil
level is checked. DO NOT overfill.
NOTE: You may not need to use all the supplied oil.
7. Install oil fill plug and dipstick, tighten securely.
NOTE: Check oil often during engine break-in.
Connect Hose and Water Supply to Pump
IMPORTANT: To avoid pump damage, you must
assemble the nozzle extension to the spray gun and
attach aii hoses before you start the engine.
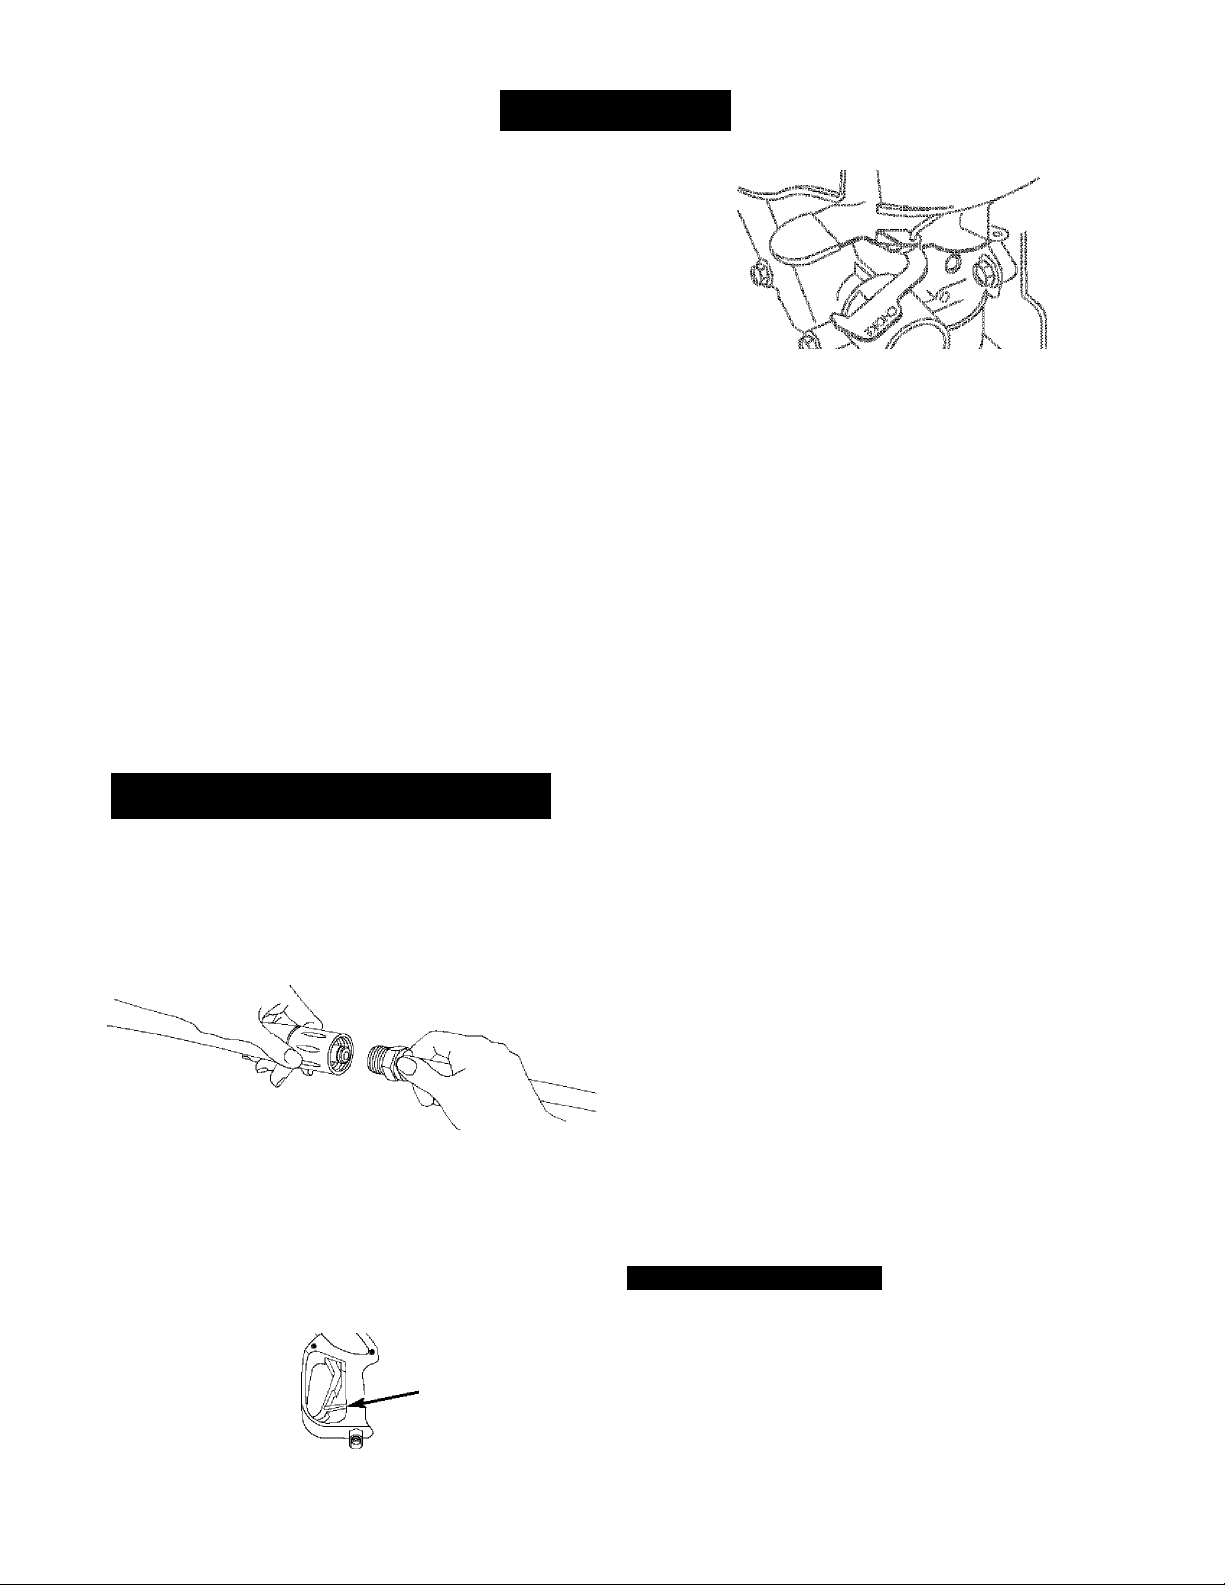
1, Uncoil high pressure hose and attach one end of
hose to base of spray gun. Tighten by hand.
Page 8
2. Remove and discard shipping caps from pump iniet
and outlet.
3. Attach other end of high pressure hose to high
pressure outlet on pump. Tighten by hand.
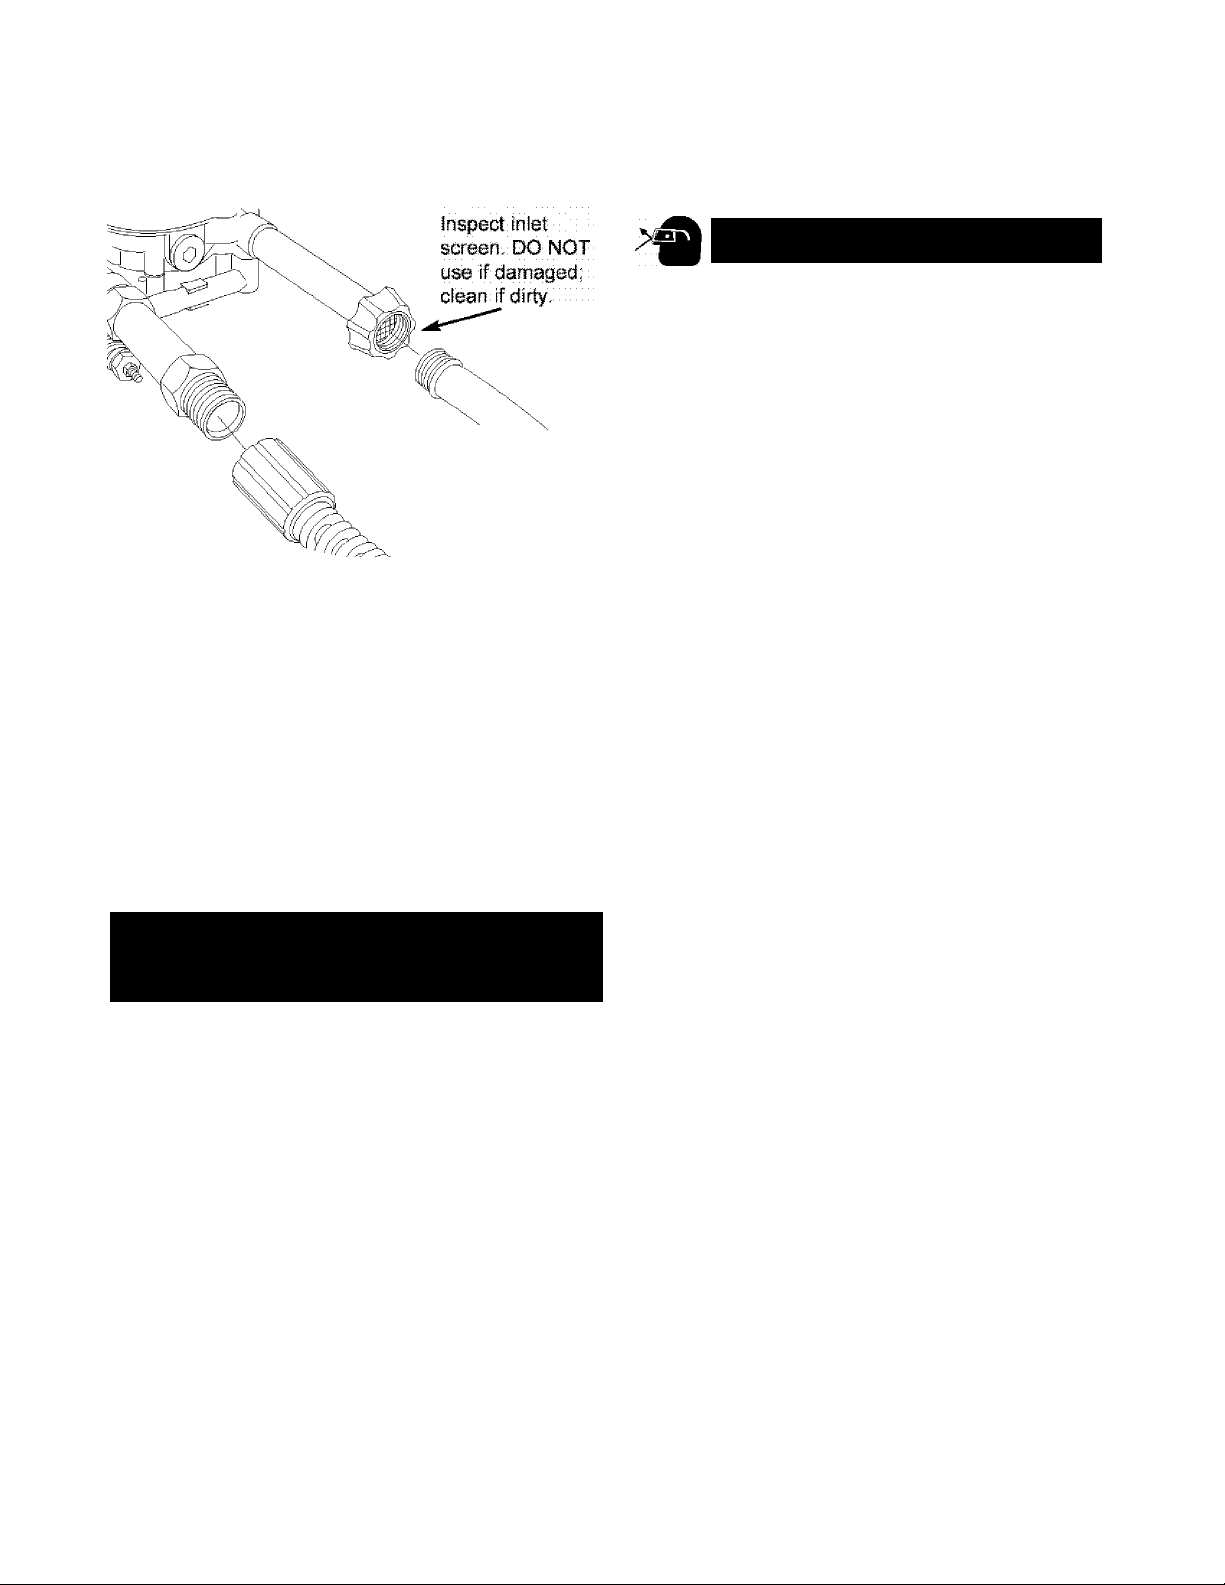
4. Before connecting garden hose to water inlets
inspect inlet screen. Clean screen if it contains
debris or have it replaced if damaged. Refer to
section “0~Ring Maintenance” if inlet screen is
damaged. DO NOT run pressure washer if iniet
screen is damaged.
5. Run water through garden hose for 30 seconds to
flush it of debris. Turn off water.
IMPORTANT; DO NOT siphon standing water for the
water supply. Use ONLY cold water (less than 100°F).
6. Connect garden hose (not to exceed 50 feet in
length) to water inlet. Tighten by hand.
7. Turn ON water and squeeze trigger on spray gun
to purge pump system of air and impurities.
A WARNING
High pressure spray can cause paint chips
or other particles to become airborne.
Always wear eye protection when using! this equipment
or in vicinity of where equipment is in use.! tit
Before; starting the pressure washer, ;be sure you; i
wearing! adequate eye protection,
.................
CHECKLIST BEFORE STARTING
ENGINE
Review the unit to ensure you have performed all of
the following:
1, Check that hose reel fasteners are tight.
2, Check that oil has bean added to proper level in
engine crankcase.
3, Add proper fuel to fuel tank.
4, Check for proper hose connections {high pressure
and water supply) and that there are no kinks,
cuts, or damage to the high pressure hose,
5, Provide proper water supply (not to exceed
100=F).
0, Be sure to read “Safety Rules” and “Operation”
sections before using the cleaning system.
are
CAUTION
There MUST be at least ten feet of unrestricted garden
hose between the pressure washer inlet and any flow
shut off device, such as a *Y' shut-off connector or
other convenience-iype water shut-off valve.
Damage to equipment; resulting from failure tO; follow
this instruction will void warranty.
...............................
Page 9
OPERATION
HOW TO USE YOUR CLEANING SYSTEM
if you have any problems operating your pressure
washer, please call the pressure washer helpline at
1-800-222-313S,
To Start Your Cleaning System
To start your engine-powered cleaning system for the
first time, follow these instructions step-by-step. This
information also applies whenever you start the engine
after you have let the pressure washer sit idle for at
least a day.
1. Place pressure washer near an outside water
source capable of supplying water at a flow rate
greater than 3.5 gallons per minute and no less
than 20 PSl at pressure washer end of garden
hose.
2. Check that high pressure hose is tightly connected
to spray gun and pump. See “Assembling Your
Pressure Washer" for illustrations.
3. Make sure unit is in a level position.
4. Connect garden hose to water inlet on pressure
washer pump. Turn ON water.
9. Move the choke lever to the “Choke" position.
NOTE; For a warm engine, be sure the choke lever is
in the “Run” position.
10. Move the throttle lever to “Fast” position, shown
on unit as a rabbit.
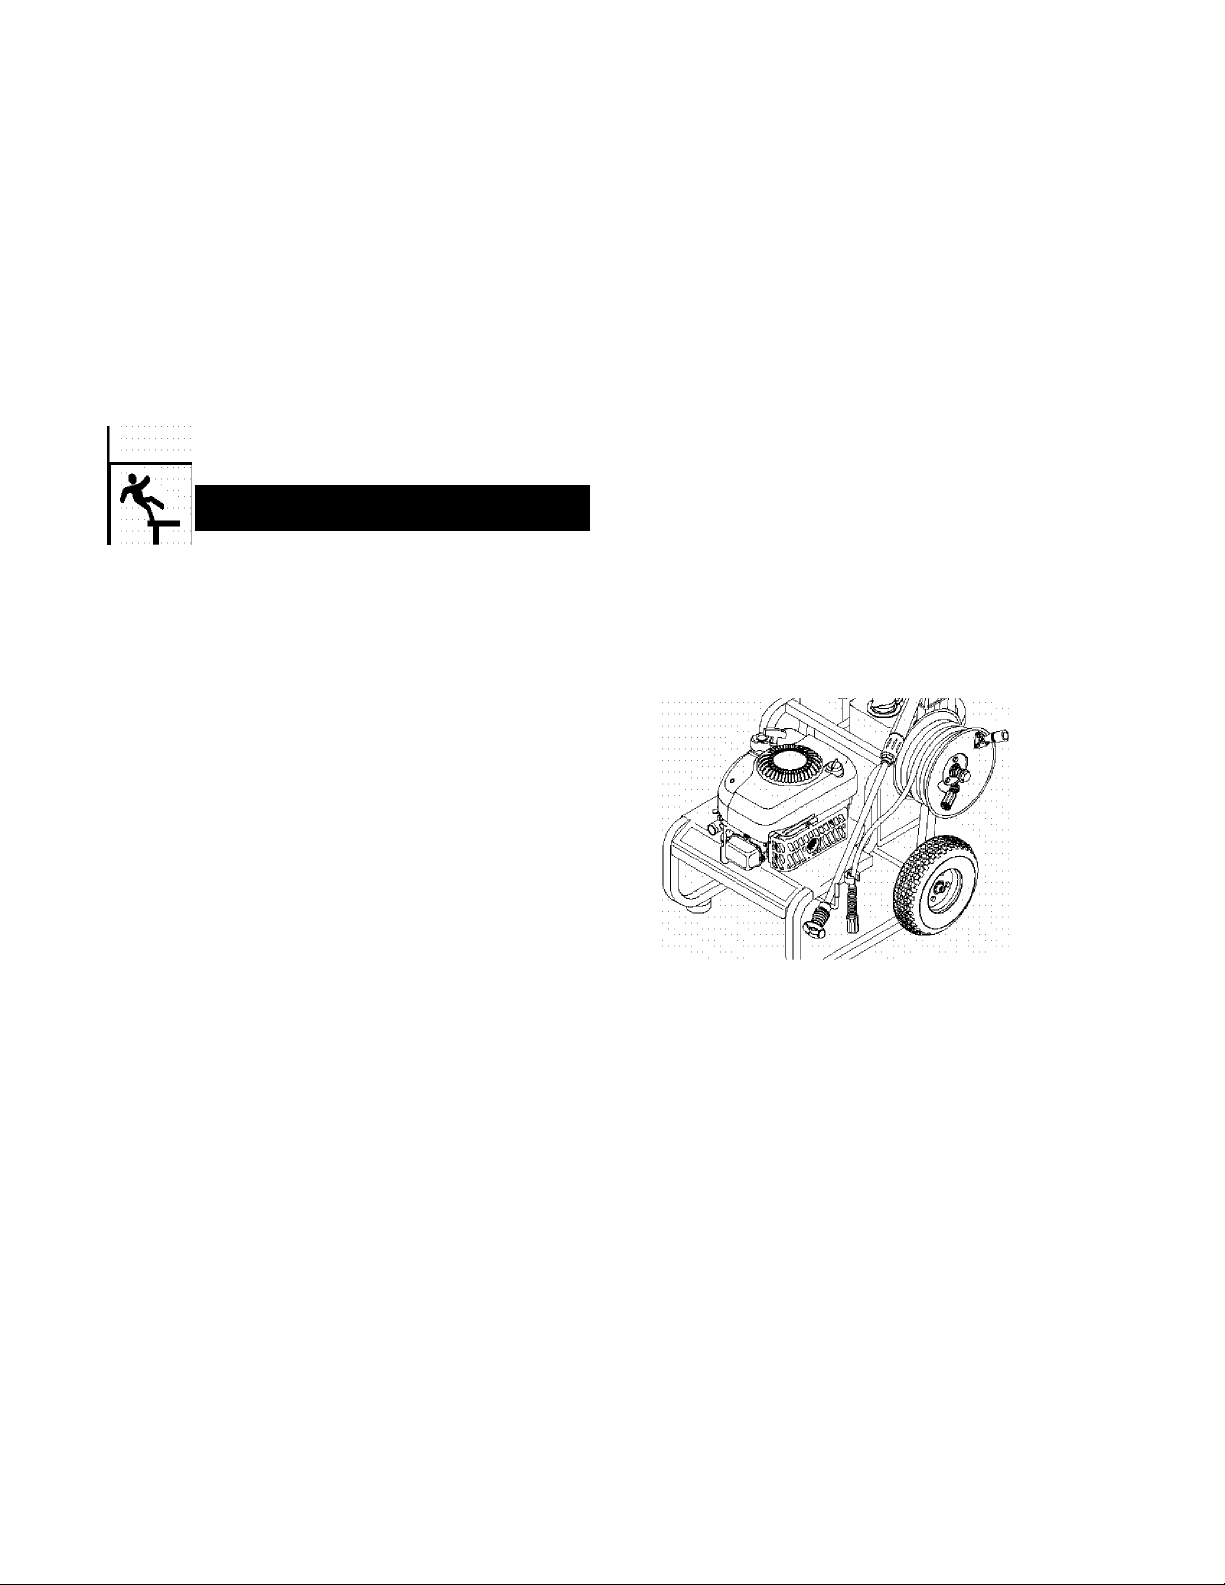
11. Place your left foot on the lower frame and grasp
the handle as shown. Your unit may appear
slightly different from that shown here.
CAUTION
DO NOT run the pump without the water supply
connected and turned on.
Damage to equipment: will result from failure to follow
this Instruction.:.............................................................
5. Squeeze trigger on gun to purge pump system of
air and impurities.
0. Attach nozzle extension to spray gun. Tighten by
hand.
7. Position nozzle in low pressure mode (slide nozzle
forward) and squeeze trigger on spray gun to
relieve pressure caused by turning ON water.
Water will flow out of gun in a thin stream.
Continue to hold trigger until there is a steady
stream of water and no air remains in system.
Release trigger.
8. Engage the safety latch to the spray gun trigger.
12. Puli the starter grip handle lightly with your right
hand until you feel some resistance, then pull
briskly.
13. Return the starter grip handle slowly. DO NOT let
rope "snap back" against starter.
14. When engine starts, slowly move choke lever to
the "Run" position. If engine falters, move choke
lever to the “Choke” position, then to the “Run”
position.
If engine fails to start after six pulls, move choke
15
lever to the “Run" position. If engine fires, but
does not continue to run, move choke lever to the
"Choke” position, then to the "Run" position.
CAUTION
Avoid injury from kickback.
Squeeze: trigger: on :spray gun each: time reosii starter: is
puileci: and engine fails to start,:::::::::::::::::::::::::::::::::::
Safety Latch
NOTE: Always keep the throttle lever in the “Fasf
position when operating the pressure washer.
Page 10
How to Stop Your Cleaning System
• Move throUia iever to “Stop” position.
• Squeeze trigger on the spray gun to relieve
pressure in the hose,
NOTE: A small amount of water will squirt out when
you release the pressure.
• Rotate the Dial-A~Cleaner™ selector knob to the
OFF position to prevent chemical leakage.
How To Use the Adjustable Nozzle
Now that you know how to START and STOP your
pressure washer, the information in this section will tell
you how to adjust the spray pattern and apply
detergent or other cleaning chemicals.
A CAUTION
A pressure washer produces a high pressure spray
which increases risk of injury and damage to unit.
•: NEVER adjust spray pattern when spraying. ; : : : : :
. : NEVER put hands in frönt of nozzie to adjust spray pattern.
Your unit is equipped with an adjustable nozzle that
permits you to adjust the spray pressure and the spray
pattern, as follows:
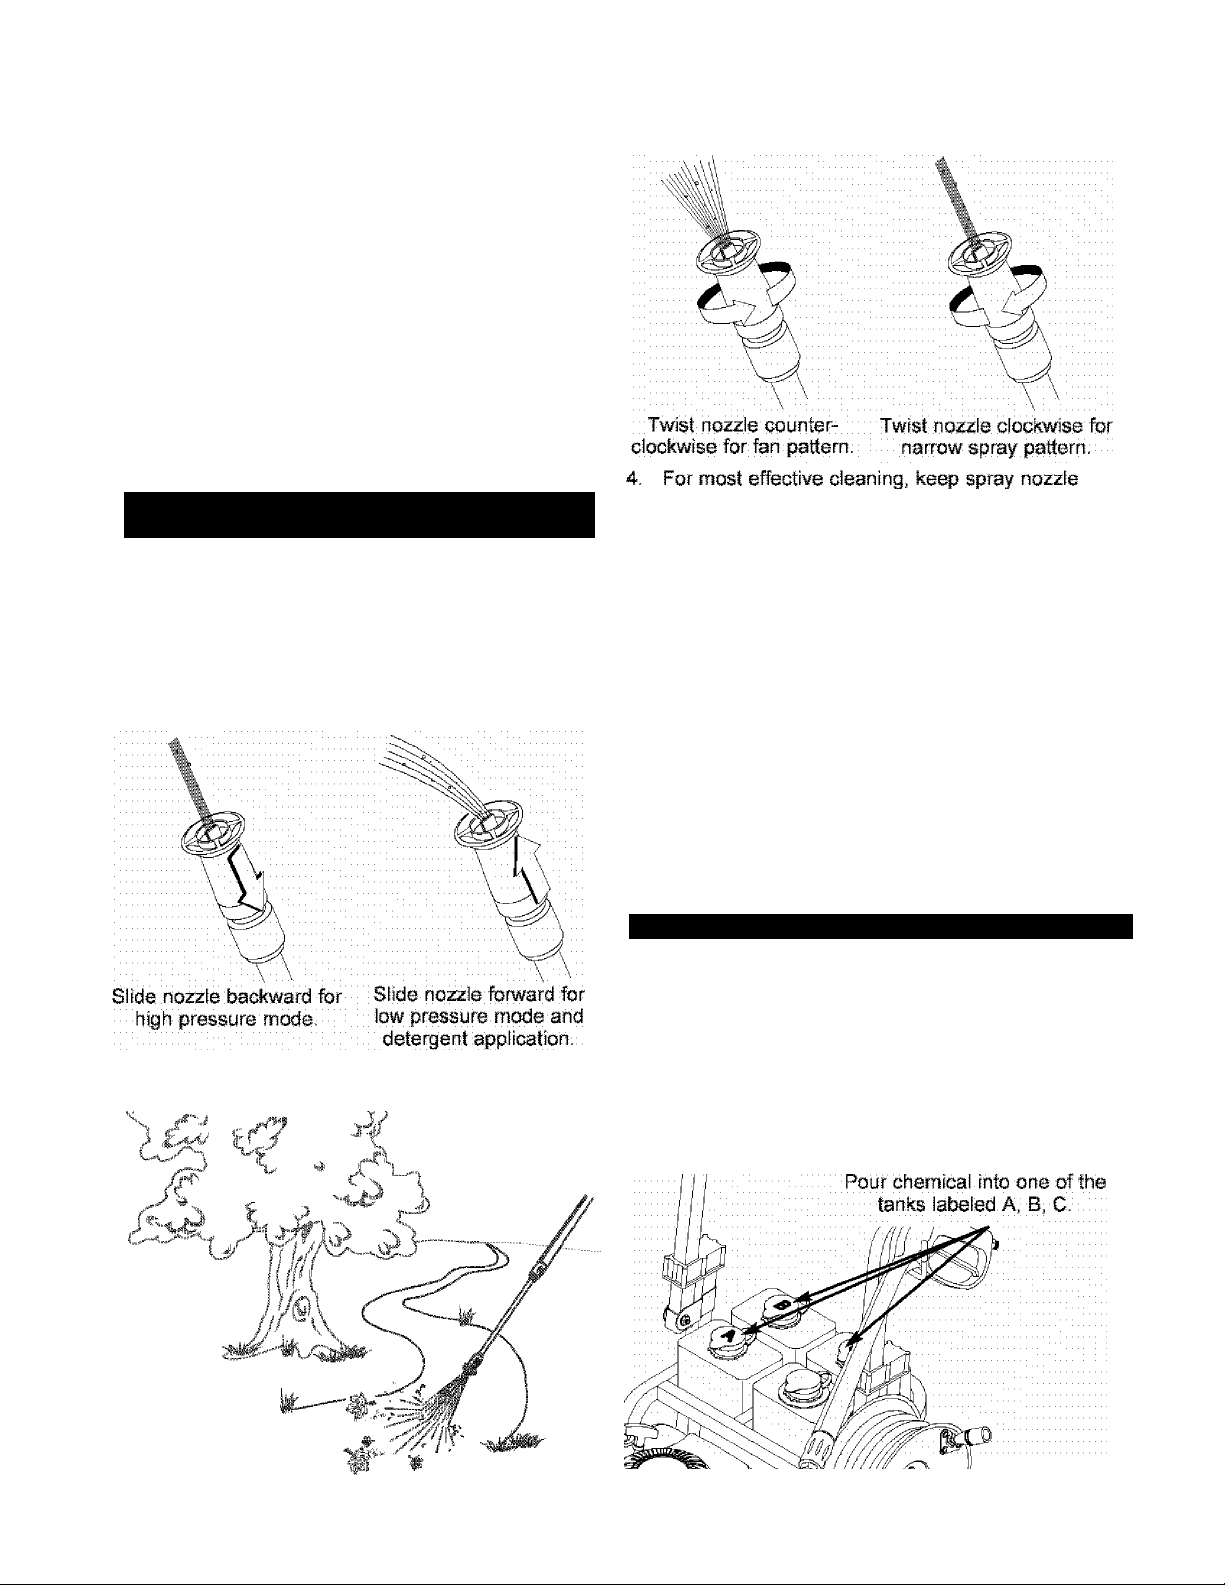
1, Push nozzle forward (backward) to adjust spray
pattern for high (low) spray pressure.
Twisting nozzle adjusts spray pattern from a
3.
narrow pattern to a fan pattern.
from 8 to 24 inches away from cleaning surface.
If you get spray nozzle too close, especially using
high pressure mode, you may damage surface
being cleaned.
DO NOT get closer than 6 inches when cleaning
6.
tires.
Cleaning With The Adjustable Nozzle
CAUTIONl Before starting your cleaning system,
make sure you have read and followed the instructions
in the sections “Assembling your Cleaning System”
and 'To Start your Cleaning System”.
IMPORTANT; Use chemicals designed specifically
for pressure washers. Househoid detergents ojuid
damage the pump.
2, Point nozzle toward ground, disengage safety
latch, and press trigger to test pattern.
CAUTION
You must attach a I! hoses before you start the engine.
Si^rting the: engine without all the hoses connected and
without the water turned ON will damage the pump.
Up to three (3) different solutions can be carried with
the cleaning system at one time. To apply detergent
follow these steps:
1. Dilution is necessary when using supplied chemicai
packets. Simply snip one corner of plastic pouch,
pour chemical into tank, then fill tank with clean
water. Label tanks with provided tank labels.
........
10
Page 11
2. if using another chemical designed for use with
pressure washers, prepare chemical solution as
required by chemical manufacturer. Fiil chemica!
reservoir(s) with prepared solution as needed.
3. Rotate the Dial-A-Cleaner™ selector knob to letter
corresponding to desired reservoir.
4. Push adjustable nozzle forward to low pressure
mode. Chemical cannot be applied vsnth nozzle
in high pressure position.
5. Connect garden hose to water iniet, check that
high pressure hose is connected to spray gun and
pump {see pages 7-8), and start engine.
A WARNING
High pressure spray coiiid cause you to fail
if you are too close to the cleaning surface.
Keep spray nozzle between 8 to 24 Inches away frotin
cieaningeurface.')':'''::::::::::':::''':':::::
Ofsrate tris unit on a stable surface, ■
8e extremely careful if you must: use the piessure
washer from a ladder, scaffolding or any other relatively
unsteble. location. : 11 111111 : t )
Firmly grasp spray gun; with both hands when using high
pressuie spray to avoid injury if gun kicks back.: 11111
0. Start at lower portion of area to be washed and
work upward, using long, even overlapping
strokes.
.........
4. Rotate the Dial-A-Cleaner™ selector knob to letter
corresponding to System Rinse tank. As clean
rinse water is drawn through the system, continue
the flow until no detergent foam is observed.
5. Rotate the Dial-A-Cleaner™ selector knob to
the OFF position when finished to prevent
chemical leakage.
Siphoning
DO NOT siphon standing water for your water supply.
Contaminated, brackish or dirty water can damage the
pump. Connect only to household water supply.
How to Use the Hose Reel
Your pressure washer is equipped with a hose reel
that is designed to store your hose when unit is not in
use. These instructions are for short term storage only.
For long term storage see “Storage” on page 16.
Alter eNach use;
1, Disconnect hose from spray gun and high
pressure outlet on pump.
Drain water from hose.
2.
3. Slide one end of hose into hole on hose reei. Turn
hose reei with handle to coil hose onto reel.
7, Allow detergent to 'soak in' {between 3-5 minutes)
before washing and rinsing. Reapply as needed to
prevent surface from drying.
Wash and Rinse Surface
After you have applied detergent, scour the surface
with the high pressure water stream and then rinse it
clean, as follows:
1. Pull adjustable nozzle backward for high pressure
mode. Chemica! will not flow when in high
pressure mode.
2. Test a small area of the surface to be cleaned.
Make sure there is no surface damage caused by
the high pressure spray.
3. Expand spray pattern for a more gentle rinsing
action. Start at top of area to be rinsed, working
down with same action as for cleaning.
Rinse System After Every Use
it is imperative that the chemical dispensing system be
rinsed after each use to prevent clogging or leaks:
1. Fill System Rinse reservoir with clean water.
2. Before disconnecting water supply, start your
cleaning system.
3. Push nozzle forward for low pressure mode.
4, Push other end of hose into clip on side of unit.
IMPORTANT: DO NOT use your pressure washer with
the hose coiled onto the hose reei. The hose reel is for
storage purposes only.
Tips
• NEVER use garden hose inlet to siphon detergent
or wax.
• If you hoid the spray nozzle too far away from the
object being cleaned, washing will not be as
effective.
• Always store the cleaning system with the Dial-ACieaner™ selector knob in the OFF position.
Automatic Cool Down System (Thermal Relief)
if you run the engine on your pressure washer for
3-5 minutes without pressing the trigger on the spray
gun, circulating water in the pump can reach
temperatures above 125°F. The system engages to
cooi the pump by discharging the w^rm water onto
the ground.
11
Page 12

MAINTENANCE
OWNER’S RESPONSIBILITIES
Follow the hourly or calendar intervals, whichever occurs first.
More frequent service is required when operating in adverse conditions noted below.
fiSAÍNTEMANCE SCHEDULE
FILL IN DATES AS ¥OU COMPLETE
...................
REGULAR SERVICE :.................................
MAINTENANCE TASK
PRESSURE WASHER
Check/cîean water inlet screen
on pump.
Check high pressure hose.
Check detergent hose.
Check spray gun and assemdiy for leaks.
Puige pump of air and ccmtamlnanis.
Change pump oi!
ENGINE
Check oil level.
Service air cleaner. X**
Change engine oil.
Repiace spark piug
Service spark arrester
Prepare for storage. Prepare unit for storage if it is to remain idle for longer than 30 days.
t Clean if clogged. Replace if perforated or tom.
* Change oil after the first (5) operating hours and every 50 hours thereafter. Change eveiy 25 hours when operating under dirty or
dusty conditions.
“ Repiace more often under dirty or dusty conditions.
.
HOURLY OPERÄTINO INTERVAL
Before Each
......
Use
........
Every 26
Hours or
Yearly
Every 50:
Hours or
Yearly
Xt
X*
Every 100
Hours or
Yearly
SERVICE DATES
PRODUCT SPECIFICATIONS
Pressure Washer Specifications
Pressure.....................................2,500 PSI
Flow Rate
Chemical Mix..............................Use as directed
Water Supply Temperature
Shipping Weight
Engine Specifications
Rated Horsepower
Spark Plug Type:
Fuel Capacity
Oil
..........
.........................2.5 GPM
.........................
.....................
Resistor
................................
Long Life Platinum
Set Gap To;
.........................
.............................
Above 40* F
0“F - 40“F
.................
......................
........
..............
Not to Exceed 10Q“F
102 lbs.
6.75 HP
Champion RC12YC
Champion RC12PYP
0.020 inches (0.50 mm)
1.6 Quarts
SAE 30
SÄE 5W-30 or 10W-30
GENERAL RECOMMENDATIONS
The pressure washer’s warranty does not cover items
that have been subjected to operator abuse or
negligence. To receive full value from the warranty,
the operator must maintain pressure washer as
instructed in this manual including proper storage as
detailed in ’’Storage” on pages 17-18.
Some adjustments will need to be made periodically to
properly maintain your pressure washer.
Ail service and adjustments should be made at least
once each season. Follow the requirements in the
"Maintenance Schedule” chart above.
NOTE: Once a year you should clean or replace the
spark plug and replace the air filter. A new spark plug
and clean air filter assure proper fuel-air mixture and
help your engine run better and last longer.
If equipped with inflatable tires, keep the air pressure
at the value marked on the tire or within 15 and 40 psi.
12
Page 13
BEFORE EACH USE
• ChecJc engine oil level.
• ChecJc water inlet screen for damage.
• ChecJc high pressure hose for leaks.
• Checdc chemical tanks and filters for damage.
• Chetdc spray gun and nozzle extension assembly
for leaks.
• Purge pump of air and contaminants.
PRESSURE WASHER MAINTENANCE
Check and Clean Inlet Screen
Examine garden hose inlet screen. Clean if it is
clogged or replace if it is torn.
Check High Pressure Hose
High pressure hoses can develop leaks from wear,
kinking, or abuse. Inspect hose before each use.
Check for cuts, leaks, abrasions, bulging of cover, or
damage or movement of couplings. If any of these
conditions exist, replace hose immediately.
^WARNING
The high pressure stream of water that this
equipment produces can pierce skin and its
underlying tissues, leading to serious injury
and possible amputation.
NEVER: repair: high pressure hose. Replace it-: :
Replacement hose rating MUST exceed maximum
pressuiB rating of unit.
Check Chemical Reservoirs
Tank covers should snap cleanly onto tank. Ensure
chemical labels correctly identify tank contents.
Ensure that the System Rinse tank is filled with clean
water. Ensure that Dial-A-Cleaner™ selector knob
rotates freely between each position. Examine the
tanks and replace if the filter is clogged,
Ch^k Cun and Nozzle extension
Examine hose connection to spray gun and make sure
it is secure. Test trigger by pressing it and making
sure it springs back into place when you release it. Put
safety latch in UP position and test trigger. You should
not be able to press trigger. Replace spray gun
immediately if it fails any of these tests.
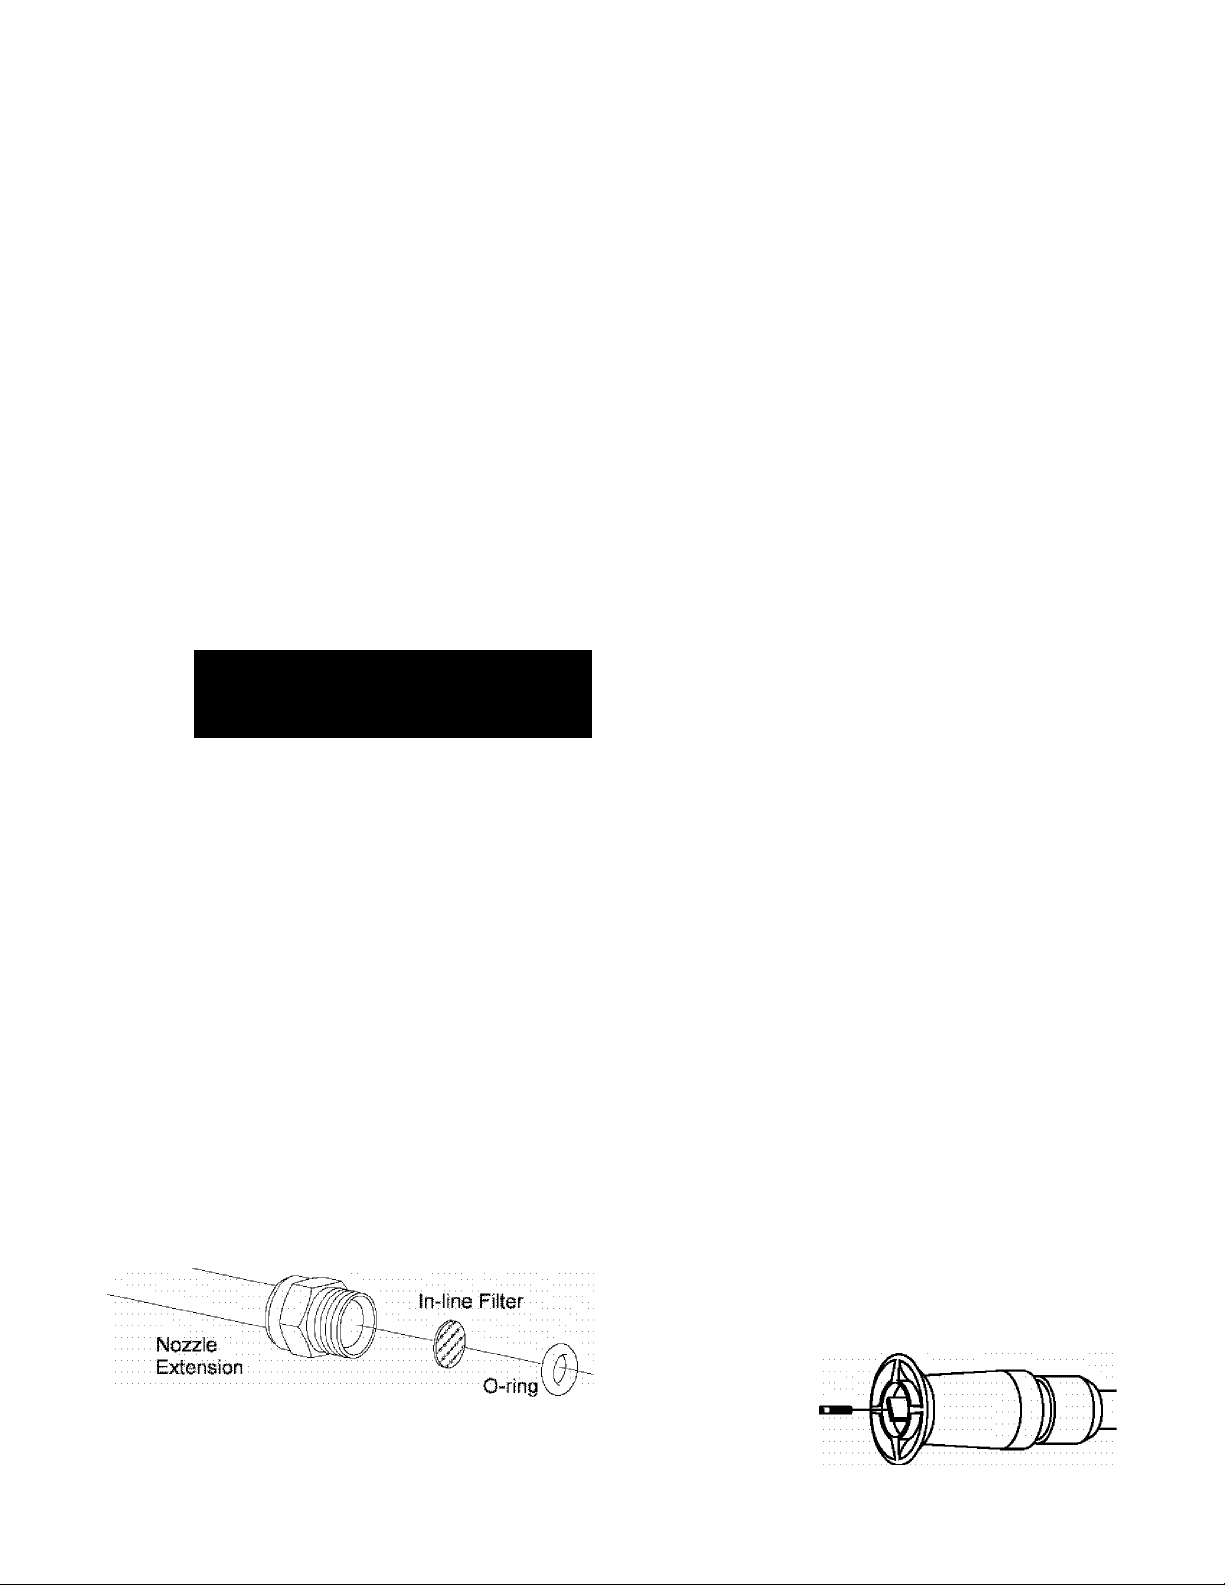
Check In-Line Fiiter
Refer to the illustration and service the in-line filter if it
becomes clogged, as follows:
.............................................
1. Detach spray gun and nozzle extension from high
pressure hose. Detach nozzle extension from
spray gun and remove o-ring and screen from
nozzle extension. Flush screen, spray gun, and
nozzle extension with clean water to clear debris.
2. If screen is damaged, the o~ring kit contains a
replacement in-line filter screen and o-ring. if
undamaged, reuse screen.
3. Place in-line filter screen into threaded end of nozzle
extension. Direction does not matter. Push screen in
with eraser end of pencil until it rests flat at bottom
of opening. Take care to not bend screen.
4. Place o-ring into recess. Push o-ring snugly against
in-line filter screen,
5. Assemble nozzle extension to spray gun, as
described earlier in manual.
Purge Pump of Air and Contaminants
To remove air from the pump, follow these steps:
1. Set up cleaning system as described in the
"Assembling Your Cleaning System” and connect
water supply,
2. Pull trigger on spray gun and hold until a steady
stream of water appears.
To remove contaminants from the pump, follow these
steps:
1. Set up cleaning system as described in
"Assembling Your Cleaning System”, and connect
water supply,
2. Remove nozzle extension from spray gun.
3. Start engine according to instructions in “How To
Use Your Cleaning System”.
4. Pull trigger on spray gun and hold.
5. When water supply is steady and constant,
engage safety latch and refasten nozzle
extension.
Nozzle Maintenance
A pulsing sensation felt while squeezing the spray gun
trigger may be caused by excessive pump pressure.
The principal cause of excessive pump pressure is a
nozzle clogged or restricted with foreign materials,
such as dirt, etc. To correct the problem, immediately
clean the orifice following these instructions:
1. Shut off engine and turn off water supply.
2, Detach nozzle extension from spray gun. Twist
nozzle clockwise to stream position. Using
supplied 2mm (5/64) alien wrench, remove orifice
from end of nozzle extension.
13
I
Page 14
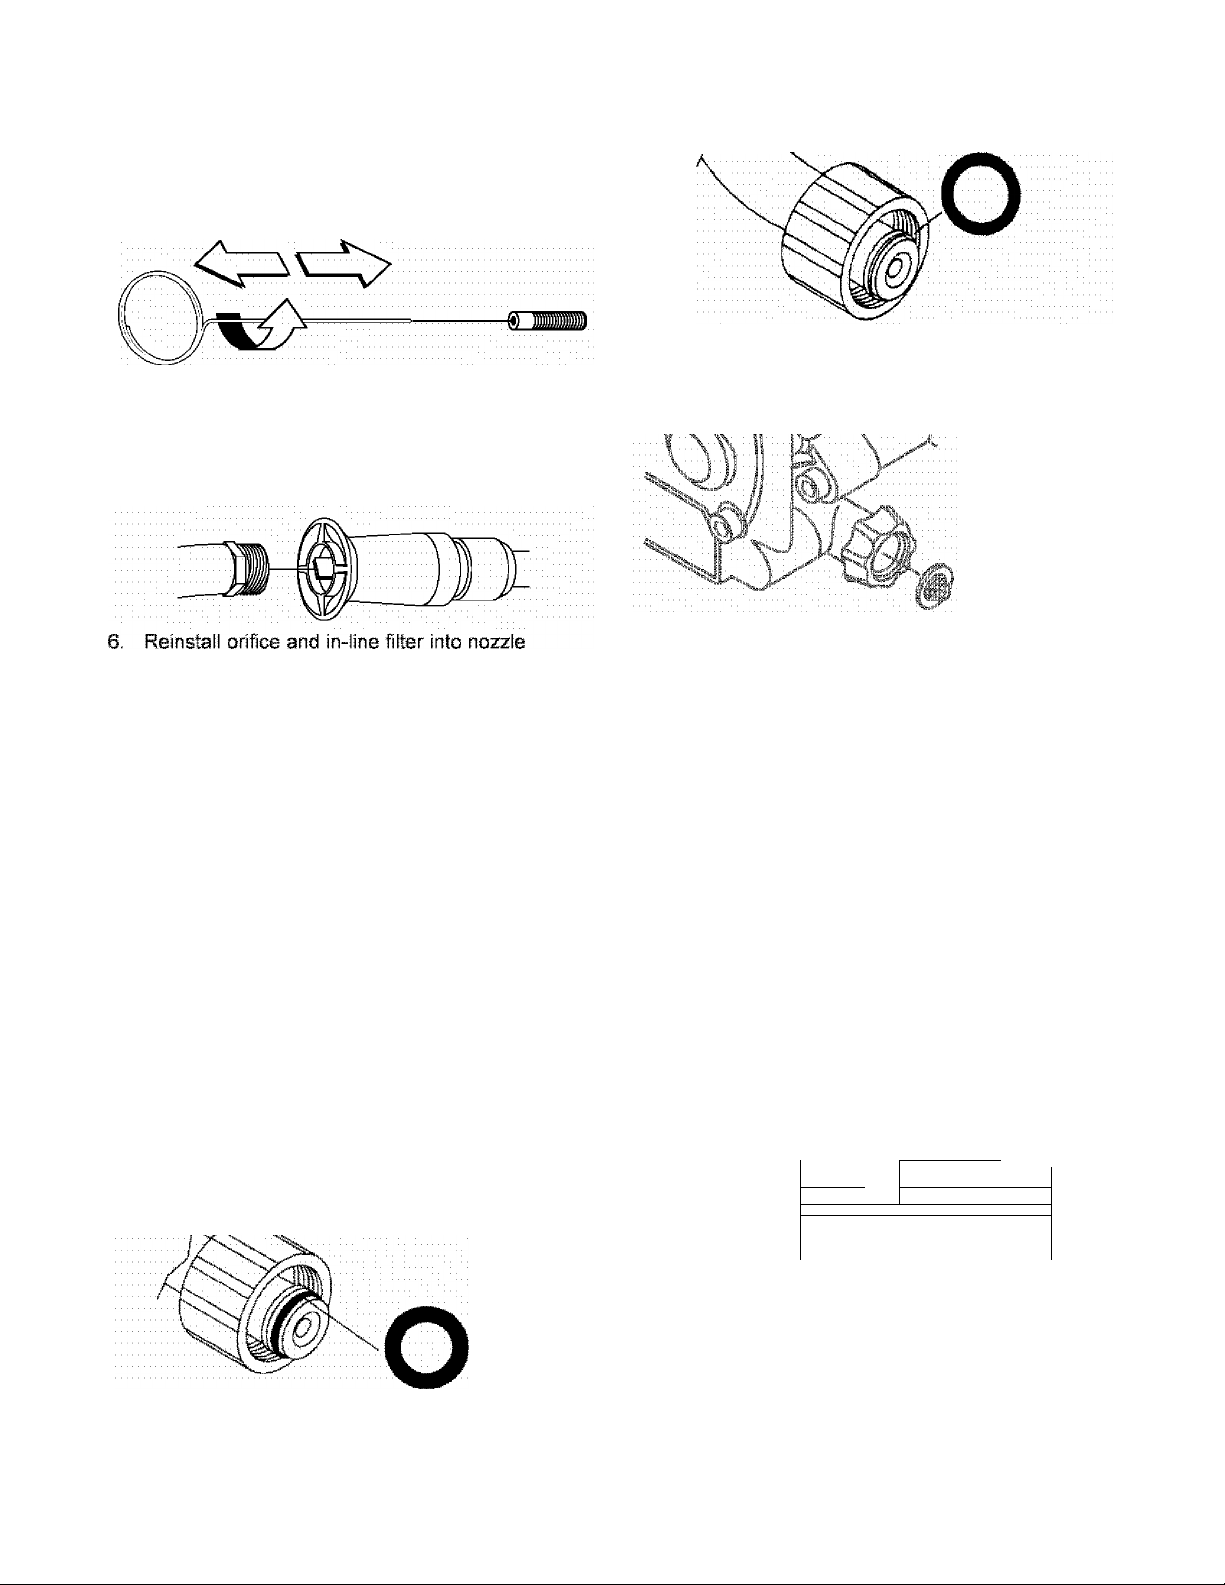
3. Remove in-line filter from other end of nozzle
extension.
4, Use wire included in kit (or a small paper clip) to
free any foreign material clogging or restricting
orifice.
Using a garden hose, remove additional debris by
back flushing water through nozzle extension.
Back flush between 30 to 60 seconds. Turn
adjustable nozzle extension to stream spray and
move nozzle from low to high while flushing.
extension. DO NOT overtighten orific® with alien
wrench.
Reconnect nozzle extension to spray gun.
Reconnect water supply, turn on water, and start
engine.
Test pressure washer by operating with nozzle in
9.
high and low positions.
0-Ring Maintenance
Through the normal operation of your cleaning system,
o-rings keep the connections of the hoses and spray
gun tight and leak-free. These o-rings may become
worn or damaged with use.
An 0-Ring Maintenance Kit is provided with your
cleaning system which includes replacement o-rings,
rubber washer and water inlet filter. Refer to the
instruction sheet provided in the kit to service your
unit's O-rings. Note that not ail of the parts in the kit
will be used on your unit.
• 1 o-ring, yellow, (p/n B2264) for end of high
pressure hose.
NOTE: The previous two o-rings are close in size.
Please match carefully to assure proper o-ring usage.
• 1 water inlet screen (p/n B2384) for garden hose
connector.
To remove a worn or damaged o-ring:
• Use a small flathead screwdriver to get underneath
the o-ring and pry it off.
PUMP MAINTENANCE
Changing Pump Oil
Change oil every 50 hours or once yearly, whichever
occurs first.
NOTE: You must purchase a premeasured bottle of
pump oil, item number 190585GS, by calling
1-800-356-PART or online at
Change pump oil as follows;
1. Drain engine oil and fuel from pressure washer.
2. Use a 8mm alien wrench to remove black pump
oil cap between high pressure outlet and garden
hose inlet.
www.sears.com.
Parts in tbe O-Ring Kit Include:
• 1 o-ring, red, (p/n B2726) for end of spray gun
connection between spray gun and nozzle
extension.
Oil Cap
. ..
'V.,.
\
.........
■ " '■n.'-'.X,; ,,,, :
.................................
"S,
3. Tilt pressure washer to drain oil into an approved
container until it drips slowly from pump.
14
.
Page 15
4. Tilt pressure washer in opposite direction and
empty premeasured pump oil bottle into same
opening (a smaii funnel may be heipful).
5. install black pump oil cap and tighten firmly.
6. Set pressure washer in upright position. Add fuel
and engine oil.
ENGINE MAINTENANCE
Checking OH Level
Oil level should be checked prior to each use or at
least every 5 hours of operation. Keep oil level
maintained.
Changing Oil
Change engine oil after the first 5 hours and every
50 hours or annually thereafter. If you are using your
pressure washer under extremely dirty or dusty
conditions, or in extremely hot weather, change oil
every 25 hours.
A CAUTION
Avoid prolonged or repeated skin contact with used
motor oil.
Used motor oil has beerr shown to cause skin cancer in
certain laboratory aniniais,: i ::::
Thoroughly wash exposed areas with!
soap and water.
3. Slowly pour oil into oil fill opening. Replace and
tighten dipstick, remove and check oil level. Oil
level should be at "Fuir mark on dipstick, DO
NOT overfill above that mark.
4. When engine crankcase is filled to proper level,
install and tighten oil cap/dipstick,
5. Wipe up any remaining oil.
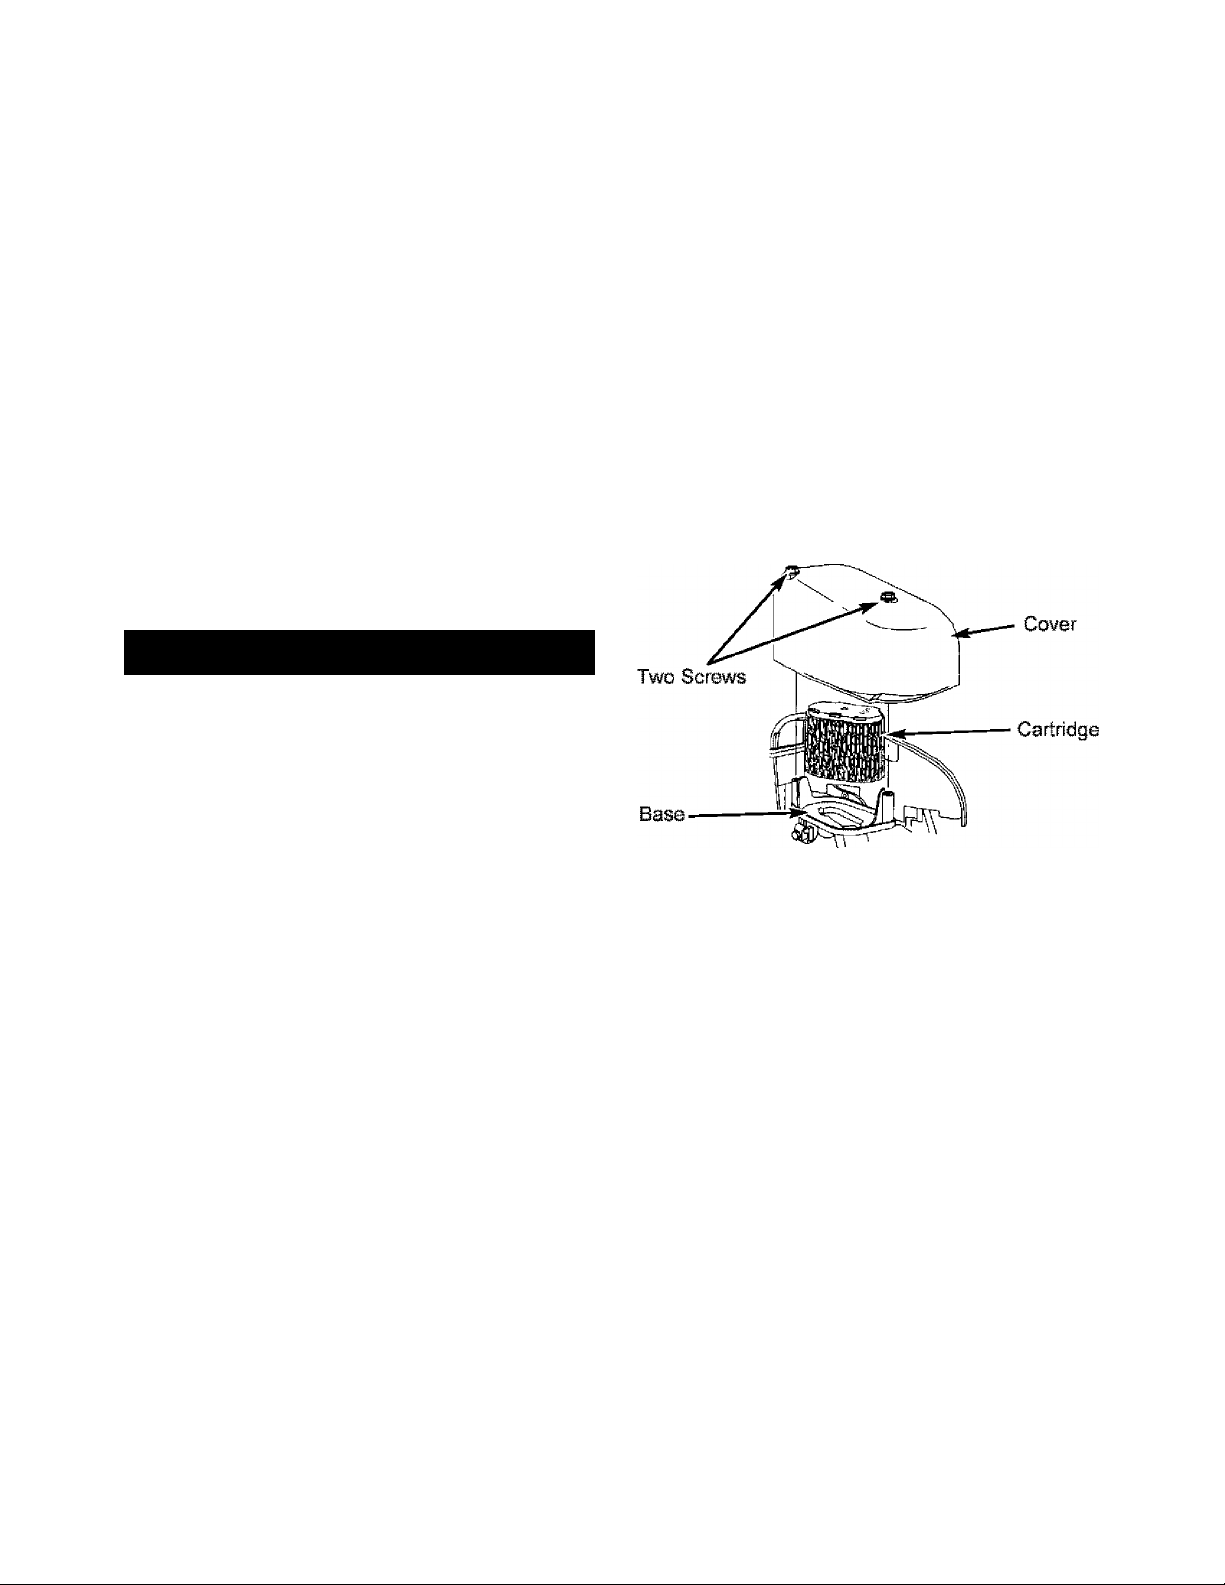
Service Air Cleaner
Your engine will not run properly and may be
damaged if you run it with a dirty air cleaner.
Service the air cleaner once every 25 hours of
operation or once each year, whichever comes first.
Service more often if operating under dirty or dusty
conditions. Replacements are available at your local
Sears service center.
To service the air cl^ner, follow th^e steps:
1, Loosen two screws and iift off cover.
KEEP OUT OF REACH OF CHILDREN,
DON'T POLLUTE. CONSERVE
RESOURCES, RETURN USED OIL TO
COLLECTION CENTERS.
Change oil while engine is still warm from running, as
follows;
1, Remove drain plug from the bottom of engine.
2. Drain oil into a suitable container. When
crankcase is empty, replace drain plug in engine.
2.
Carefully remove air cleaner from base.
3.
To clean cartridge, gently tap pleated paper side
on a fiat surface.
install clean (or new) air cleaner in base. Air
cleaner must fit securely in base.
Place cover over air cleaner and tighten screws.
IS
Page 16

Service Spark Plug
Service the spark plug every 100 hours of operation or
yearly, whichever occurs first.
^WARNING
Jfe
WHEN ADJUSTING OR MAKING REPAtRS TO YOUR
PRESSURE WASHER ^ ^ ^ ^ ^
Disconiiect spark plug wire from spark plug and place
wire where it cannot contact spark plug.::::::::::::::::::
1. Clean area around spark plug.
2. Remove and inspect spark plug.
3. Replace spark plug if the electrodes are worn, or if
4. For replacement use either the standard resistor
5. Check electrode gap with wire feeler gauge and
Uninteniiona! sparking can result in fire or
electric shock.
the insulator is cracked or chipped.
spark plug. Champion RC12YC or the long life
platinum spark plug, Champion RC12PYP.
set gap at 0.020 inches (0.50mm), If necessary.
Carburetor
If you think your carburetor needs adjusting, see your
nearest Sears service center. Engine performance
may be affected at altitudes above 3000 to 5000 feet.
For operation at higher elevations, contact your
nearest Sears service center.
Spark Arrester Service
Your engine is not factory-equipped with a spark
arrester, in some areas, it is illegal to operate an
engine without a spark arrester. Check local laws and
regulations. A spark arrester is available from your
nearest Sears service center. For the part number call
1-800-366-PART.
The spark arrester must be serviced every 50 hours to
keep it functioning as designed.
If the engine has been running, the muffler will be very
hot. Allow the muffler to o)oi before servicing the
spark arrester.
• Remove spark arrester screen for cleaning and
inspection,
• Replace if screen is damaged.
NOTE: You can purchase a new spark plug by calling
1-800-366-PART,
16
Page 17

01"(3RâOE
AFTER EACH USE
Water shouid not remain in the unit for iong periods of
time. Sediments or minerals can deposit on pump
parts and “freeze” pump action. Follow these
procedures after every use:
1. Flush chemical system by selecting system rinse
tank and run pressure washer with nozzle in low
pressure mode. Flush for one minute or until
chemical is cleared from system.
2.
Shut off engine and let it coof then remove all
hoses.
3.5.Disconnect spark plug wire from spark plug.
Empty pump of all pumped liquids by pulling recoil
handle about 6 times. This shouid remove most
liquid in pump.
Rotate the Dial-A-Cleaner™ selector knob to the
OFF position.
0. Coil high pressure hose and inspect it for damage.
Cuts in hose or fraying could result in leaks and
loss of pressure. Should any damage be found,
replace hose. DO NOT attempt to repair a
damaged hose. Replace hose with genuine
Craftsman part.
7. Disconnect hose from spray gun and high
pressure outlet on pump. Drain water from hose,
gun, and nozzle extension and wipe of hose with
a rag.
8. Slide one end of hose into hole on hose reel. Turn
hose reel with handle to coil hose onto reel. Push
other end of hose into clip on side of unit.
9. Reconnect spark plug wire to spark plug.
10. Store system in a clean, dry area.
WARNING! NEVER store the engine with fuel
in the gas tank indoors or in enclosed, poorly
A
ventilated areas where fumes may reach an
open flame, a spark, or pilot light.
WINTER STORAGE
CAUTION
You must protect your unit from freezing temperatures.
Failure to; do so; will permanently damage your pump
ahdl render your unit inoperable,: I I : - ■: ■
Freeze damage is not covered under warranty.
To protect the unit from freezing temperatures;
1, Empty all chemical reservoirs as follows:
a. Disconnect hose connected to chemical inject
fitting on pump. Place end of hose into
suitable container.
b. Move selector knob to Tank A and open that
tank’s cover. Gravity should shortly empty tank
contents into container.
c. When tank is empty, repeat step (b) for tanks
B and C, using different container for each
chemical.
d. Reconnect hose to chemical inject fitting on
pump. Add 0.5 liter of clean fresh water to
each tank and close tank’s covers,
2, Flush chemical system by selecting a tank and run
pressure washer with nozzle in low pressure
mode. Flush until each tank is empty, then switch
selector knob to next tank. The iast tank to be
emptied must be the System Rinse tank.
3. Use PumpSaver, available at Sears retail item
number 7174403, to treat pump. This prevents
freeze damage and lubricates pistons and seals.
4. If PumpSaver is not available, connect a 3-foot
section of garden hose to water inlet adapter. Pour
RV-antifreeze (antifreeze without alcohol) into
hose. Puli recoil handle twice. Disconnect 3-foot
hose.
.........
17
Page 18

long term storage
if you do not pian to use the pressure washer for more
than 30 days, you must prepare the engine for iong
term storage.
it is important to prevent gum deposits from forming in
essentia! fue! system parts such as the carburetor, fue!
fiiter, fue! hose or tank during storage. Aiso,
experience indicates that aicohoi-biended fueis (caiied
gasohoi, ethano! or meihano!) can attract moisture,
which leads to separation and formation of acids
during storage. Acidic gas can damage the fue!
system of an engine while in storage.
Protect Fuel System
Protect Pump
To protect the pump use Sears pump saver to prevent
freeze damage and lubricate pistons and seals.
NOTE: Sears pump saver, item number 7174403, is
available as an optional accessory. It is not included
with the pressure washer.
CAUTION
You must protect your unit from freezing temperatures.
Failure to do so will permanently damage your pump
and' render your unit inoperable. : ■
Freeze damage is not covered under warranty.
To use the pump saver;
.........
Fuel Additive:
if adding a fuel additive, fill the fue! tank with fresh
fuel, if only partially filled, air in the tank will promote
fuel deterioration during storage. Engine and fuel can
be stored up to 24 months with additive.
• Add fuel additive following manufacturer’s
instructions.
• Connect water supply to pump inlet and turn it ON.
• Run the engine outdoors for 10 minutes to be sure
that treated fuel has replaced the untreated fuel in
the carburetor.
if fuel additive is not used, remove all fuel from tank
and run engine until it stops from lack of fuel.
Change Oil
While engine is still warm, drain oil from crankcase.
Refill with recommended grade (see Changing Oil on
page 15).
Oil Cylinder Bore
• Remove spark plug. Squirt about 1 ounce (30 ml)
of engine oil into the cylinder. Cover spark plug
hole with rag. Pull recoil handle slowly to distribute
oil. Avoid spray from spark plug hole.
• Install spark plug. DO NOT connect spark plug wire.
^CAUTION
Read and follow all cautions and warnings on the
PumpSaver can label.
Always wear eye protection when using PumpSaver.
1. Attach hose on pump saver can to pump inlet.
2. Push in can top to dispense pump saver.
3. When pump saver fluid begins to exit pump outiet,
the pump is protected.
4. Remove pump saver from pump inlet.
OTHER
• DO NOT store fuel from one season to another.
• If possible, store your unit indoors and cover it to
give protection from dust and dirt. BE SURE TO
EMPTY THE FUEL TANK
IMPORTANT: NEVER cover your cleaning system
while engine and exhaust area are warm.
18
Page 19

TROUBLESHOOTING
em
Pump has follovying
problems: failure to produce
pressure^ erratic pressure,
chattering, loss of pressure,
low water volume.
Oetergoht fails to mix with
spray.iii I ::::::::::::::
...............
Cause
1, Nozzle in low pressure mode.
Water inlet is blocked: :::
Inadequate water supply. :
Inlet hose is kinked or leaking
Clogged inlet hose strainer.
Wate r: s upp ly i s ove r 100®F.
High pressure hose is blocked
orleaks.:::'F''''''F::''''''''''
Gun1eaks.::::::':..F::::::::::::
Nozzle is obstructed.
Pump is faulty. i i
10.
Detergent
line is collapsed or
kinked. : : :
Chemical: tank filter
In-line: filter is dirty.
Nozzle is in high pressure
mode.
Dial
-a-Cleaner™ knob: is id: off 5.
position.:
.........
is clogged;
Correction
t.
Pull mozzle backward for
pressure mode. i :
Clear inlet. : : : Provide adequate water flow.
Straighten inlet hose,
Check arid clean: inlet hose strainer.
Provide cooler water
Clear blocks in
Replace gun.
Clean: nozzle.
10.
Contact Sears service facility.
Repair or replace detergent line
1:.
Replace tank.: :
See "Check In-Line Filter".
Push: nozzle forward for low
pressure mode.: : : : : : I : : : : :
Rotate: knob for' desired chemical
patch: leal
supply.
outlet hose.
Engine runs good at no-ioad
but "bogs" when load is
added,.:::::::::::::::::::::::::::::::::::::
Engine will not stali; or
starte and runs rough.
Engine shuts down during
operation.:::::::::::::::::::::::::::
Engine lacks power.
Engine "hunts" or faiters.
Eng
ine: speed is too: slow.
Move: throttle control: to FAST position
engine still "bogs: down”; contact Sears
service facility.:::::::::::
Dirty air cleaner.
Out of gasoline,:
Stale gasoline.
Spark plug' wire not connected
Clean: or replace air cleaner.
Fill fuel tank.
fill:with fresh fuelDrain: gas tank;
Connect:wire to: spark;plug.
to spark: plug, r
Bad spark plug.
Water in gasoline.
Overchoking:
Intake valve stuck open or
Replace spark plug;
Drain: gas tank; fiilwith fresh fuel.
Open choke fully and crank engin
8.
Contact Sears service facility.
9.
Contact Sears service facility.
closed. i : : : : : ' :, : : : ' i,
1.
10;
Out of gasoline.
Dirty air filter.
...
10.
Contect Sears service facility.
Fill fuel tank.
Replace air filter.
Choke Is opened too soon. Move choke to halfway position until
engine runs smoothly, ::::::::::::::::::::::
eá
19
Page 20

PARTS
CRAFTSMAN 2500 PSI Cleaning System 580.767451
Main Unit —^ Exploded View
20
Page 21

CRAFTSMAN 2500 PSI Cleaning System 580.767451 Main Unit — Parts List
Item Part # Description
1 MB5691GS BASE
2 M191774GS HANDLE
3 B4992GS HOSEREEL
4 194O01GS KIT. Chemical Tank
5 192133GS KIT. Engine Mounting Hardware
6 192140GS KIT. Handle Connector
7 192131GS KIT. Pump Mounting Hardware
8 192126GS KIT. Vinyl Cap. Base
9 192127GS KIT. Vinyl Cap. Handle
10 30S09GS GROMMET
11 194O02GS KIT. Pushnut
12 194066GS KIT. Clip Holder
13 B3454GS KIT. Tags
14 192149GS KIT. Concentrate, 3 Bottle
15 194O03GS KIT. Knob. 4-Way Valve
16 194064GS KIT. Subassy. Valve 4-way
17 194065GS KIT. Handle Hardware
18 194074GS KIT. Hose, Subassy.
19 194075GS KIT. Hose. Subassy, (cut to length)
20 192553GS KIT. Vibration Mount
21 21783GS VALVE, Thermal Relief
22 194076GS KIT. Caps, Chemical Containers
23 186317GS KIT. Hose Reel Mounting Hardware
24 190937AGS ASSY, Wand Adjustable Nozzle
25 B3263GS GUN
26 190246GS HOSE
27 94804GS ORIFICE
28 23139DGS KEY
29 194059GS ASSY, Pump (see pages 22-23)
30 192526GS KIT. Wheel
900 NSP ENGINE
Items Not Iliustrated
Part#
AB3061BGS
191922GS
193946GS
194011GS
Optional Accessories
71751S7GS
7175197GS
7175199GS
7175115GS
7175116GS
7174400GS
7174401GS
7174403GS
7174300GS
7174301 GS
7174302GS
7174303GS
7174307GS
Description
BOTTLE, Oil
KIT. 0-Ring Maintenance
MANUAL, Owners
KIT. Decal Service
Not Illustrated
Garden Hose Quick Connect
Accessory Quick Connect
Rotating Brush Kit
25' Replacement Hose
O Ring Repair Kit
Turbo Nozzle
25' Extension Hose
Pump Saver
House Wash Concentrate (makes 4 gallons)
Deck Wash Concentrate (makes 2 gallons)
Vehicle/Boat Wash Concentrate (makes 4 gallons)
Degreaser Concentrate (makes 4 gallons)
Mold/Mildew Concentrate (makes 2 gallons)
21
Page 22

CRAFTSMAN 2500 PSI Cleaning System 580.767451
Pump — Exploded View
22
Page 23

CRAFTSMAN 2500 PSI Cleaning System 580.767451
Pump — and Parts List
Item Part#
19 190571GS
28 190574GS
45 190578GS
62 190581 GS
76 21783GS
77 190585GS
A 190594GS
B 190588GS
C 190589GS
D 193808GS
E 193806GS
F 190592GS
G 190593GS
H 193807GS
J 189971 GS
K 193971 GS
L 193972GS
NOTE: Item letters A - L are service kits and include all parts shown within the box.
Description
CAP, Oil
MANIFOLD
PIN
CAP
THERMAL RELIEF
OIL BOTTLE {not shown)
KIT. UNLOADER
KIT. WATER INLET. ANODIZED
KIT. OUTLET. ANODIZED
KIT. HEAD BRASS
KIT. CHECK VALVES
KIT. INLET CHECK
KIT. CHEMICAL INJECTION
KIT. SEAL SET
KIT. CHEMICAL HOSE
KIT. PIPE FITTING
KIT. UNLOADER SEAT
23
Page 24

ENGINE, 6.75 HP, Briggs and Stratton, 128612 - Exploded View
Page 25

ENGINE, 6.75 HP, Briggs and Stratton, 128612 - Exploded View
Page 26

ENGINE, 6.75 HP, Briggs and Stratton, 128612 - Exploded View
26
Page 27

ENGINE, 6.75 HP, Briggs and Stratton, 128612 - Parts List
llem
32A
51A
202
208 691290
222
227
238 691300 Cap-Valve
258 691189
2J0
287
300 697590
304
Part# Description Item
1
692670
2
399269 Kit-Bushing/Seal (Magneto Side) 306
3 299819 Seal-Oi! (Magneto Side) 307 690345
4
498983 Sump-Engine
5 695276
7
695166
8 495786
9 272481
10 691125
11
691260
12 692232
691137 Screw (Cylinder Head)
13
15 691680
691457
16
20 399781 Seal-Oil (PTO Side) 445 697028
22 691092 Screw (Engine Sump)
23 697586 Flywheel 456 692298
24
222698 Key-Flywheel 468 281505
690021
25
694167
694168
694169
26 499631
692785
692786
692787
27
691866
28 499423
499424
29
32 691664 Screw (Connerang Rod)
695759
499642
33
34 499641
691304
35
691304
36
37 694086 Guard-Flywheel
692194 621
40
691997
43
690977
45
46 694039 Camshaft 635 66538
51 692668 Gasket-intake 670
692799 Gasket-intake
691421
55
58 692259
281434 Grip-Starter Rope 718 690958
60
690837 Screw (Rewind Starter) 741
65
78 691108 Screw (Flywheel Guard) 830
95 691636
97 499682
104 691242
691182
108
108 693866 Shaft-Choke 868
117
498978
118 497466
121
692703
125 694203
127
694468
130 691203 Valve-Throttle
398187 Float-Carburetor
133
134
398188 Kit~Need!e/Seat 968
137
693981 Gasket-Float Bowl 968 691138
146
690979
691894 Gasket-Air Cleaner 975 493640
163
187
691050 Line-Fuel (Cut to Required Length) 976 694395
691147
188
190 690940
192
694543
691303 Link-Mechanicai Governor
692618 Bracket-Control 1026 692045
690783
690940
499676
Cylinder Assembly
Head-Cylinder
Gasket-Cylinder Head
Breather Assembly
Gasket-Breather For Platinum equ
Screw (Breather Assembly)
Tube-Breather
Gasket-Crankcase 358 694090
Plug-Oil Drain
Crankshaft 443 690255
Piston Assembly (S^ndard)
Piston Assembly (,010" Oversize)
Piston Assembly (.020" Oversize)
Piston Assembly (.030" Oversize)
Ring Set (Standard)
Ring Set (.010" Oversize)
Ring Set (.020" Ovefsize]
Ring Set (.030" Oversize)
Lock-Piston Pin 585 691879
Pin-Piston 582
Rod-Connecting
Screw (Connecting Rod)
Valve-Exhaust 613 691108
Valve-intake
Spring-Valve (Intake) 615 690340
Spring-Valve (Exhaust) 616 691308
Retainer-Valve
Slinger-Governor/Oil 033
Tappet-Vatve
Housing-Rewind Starter
Rope-Starter (Cut to Required Length)
Screw (Throttle Valve)
Shaft-Throttle 843
Pin-Float Hinge
Vatve-Choke 851 493880
Jet-Main (Standard)
Jet-Main (High Altitude)
Kit-CarbuiBtor Overhaul
Carburetor 921
Plug-Welch
Key-Timing 972
Screw (Control Bracket)
Screw (Fuel Tank)
Ball-Rocker Arm
Spring-Governor
Lever-Governor Control
Bracket-Casing Clamp
Washer-Sealing
Screw (Dipstick Tube) 1102
Muffler
Housing-Blower 1211 498144
305 691108
332 690662
333
334
337
sold in multi-pack
613A
633A 691321
1005 691346
1022
1023
1029 691230
1034
1059 692311
1085 694081
1210
Part#
691232
802574
691061
692051
356 692390
365 691136
404 690272
455 695161
231082
505
499621
523
524
692296
525
495265
692937
528
534
690244
62
92613
584
692342
690800
587
691696
95162
601
608 497680
691140
618 691108
692310
693867
692294
684
690345
688 691855
082 690572
691830
694544
842
691031
691884
847 692047
692044
883 691893
886 69626S
914
6911OS
692698
930 692691
957 692046
966 690243
692692
499618
977 692704
983 694088
691890
499624
691343
691255
498144
Description
Screw (Biower Housing)
Shield-Cylinder
Screw (Cylinder Shield)
Nut (Flywheel)
Armature-Magneto
Screw (Magneto Armature)
Plug-Spark
™re-Stop
Gasket Set-Engine
Screw (Carburetor)
Washer (Governor Crank)
Screw (Air Cleaner Primer Base)
Filter-Air Cleaner Cartridge
Cup-Flywheel
Retainer-Spring
Plate-Pawl Friraion
Nut (Governor Control Lever)
Dipstick
O Ring Seal (Dipstick)
Dipstick Tube
Grommet
Screw (Air Cleaner Cover)
Bolt (Governor Control Lever)
Cover-Breather Passage
Gasket-Breather Passage
Nut (Rewind Starter)
Screw (Pawl Friction Plate)
Clamp-Hose
Starter-Rewind
Screw (Muffler)
Screw (Muffler)
Retainer-Governor Shaft
Crank-Governor
Screw (Cylinder Head Plate)
Switch-Stop
Seal-Choke/Throttle Shaft
Seal-Choke/Throttle Shaft
Boot-Spark Plug
Spacer-Fuel Tank
Screw (Breather Passage Cover)
Spring-Friction
Spring-Detent
Pin-Locating
Gear-Timing
Stud-Rocker Arm
Seal-0 Ring (Dipstick Tube)
Lever-Sieeve
Dipstick/Tube Assembly
Terminal-Sparkplug
Seal-Valve
Gasket-Exhaust
Gasket Kit-Cylinder Head/Plate
Screw (Rocker Cover)
Cover-Blower Housing
Guard-Rewind
Cap-Fuel Tank
Base- Air Cleaner Primer
Cover-Air Cleaner
Screw (Biower Housing Cover)
Tank-Fuel
Bowl-Float
Primer-Carburetor
Gasket Set-Carburetor
Gasket-Cylinder Head Plate
Fan-Flywheel
Gasket-Rocker Cover
Cover-Rocker
Rod-Push
Rocker Arm
Guide-Push Rod
ScrewA/Vasher Kit
Valve Gasket Set
Guide-Pilot
Pulley/Spring Assembly (Pulley)
Pulley/Spring Assembly (Spring)
27
Page 28

NOTES
28
Page 29

EMISSION CONTROL SYSTEM WARRANTY
Sears, Roebuck and Co., U.S.A. (Sears), the California Air Resources Board (CARB) and
the United States Environmental Protection Agency (U.S.EPA)
Emission Control System Warranty Statement
{Owner's Defect Warranty Rights and Obligations)
EMiSSION CONTROL WARRANTY COVERAGE IS
APPLICABLE TO CERTIFIED ENGINES PURCHASED IN
CALiFORNiA iN 1995 AND THEREAFTER WHICH ARE
USED IN CALiFORNiA, AND TO CERTIFIED MODEL
YEAR 1997 AND LATER ENGINES WHiCH ARE
PURCHASED AND USED ELSEWHERE iN THE UNITED
STATES (AND AFTER JANUARY 1, 2001 iN CANADA).
California and U.S. ERA Emission Control Warranty
Statement Your Warranly Rights and Obligations
The California Air Resources Board (CARB), U.S.EPA and
Sears are pleased to explain the Emission Control System
Warranty on your model year 2000 and later small off-road
engine (SORE), In California, new small off-road engines
must be designed, built and equipped to meet the State's
stringent anti-smog standards. Elsewhere in the United
States, new non-road, spark-ignition engines certified for
model year 1997 and later, must meet similar standards set
forth by the U.S.EPA, Sears must warrant the emission
control system on your engine for the periods of time listed
beiow, provided there has been no abuse, neglect, or
improper maintenance of your small off-road engine.
Your emission control system may include parts such as the
carburetor or fuei-injeciion system, the ignition system, and
catalytic converter. Also included may be hoses, belts,
connectors and other emission related assemblies.
Where a warrantable csndition exists, Sears will repair your
small off-road engine at no cost to you including diagnosis,
parts and labor.
Sears Emission Gontroi Delects Warranty Coverage
The 1995 and later small off-road engines are warranted for
two years. If any emission-related part on your engine is
defective, the part will be repaired or replaced by Sears.
Owner's Warranty Responsibilities
As the small off-road engine owner, you are responsible for
the performance of the required maintenance listed in this
owner's manual. Sears recommends that you retain ail your
receipts covering maintenance on your small off-road
engine, but Sears cannot deny warranty solely for the lack of
receipts or for your failure to ensure the performance of all
scheduled maintenance.
As the small off-road engine owner, you should however be
aware that Sears may deny you warranty coverage if your
small off-road engine or a part has failed due to abuse,
neglect, improper maintenance or unapproved modifications.
You are responsible for presenting your small off-road
engine to an approved Sears Service Center as soon as a
problem exists. The warranty repairs should be completed in
a reasonable amount of time, not to exceed 30 days.
If you have any questions regarding your warranty rights and
responsibilities, you should contact a Sears Service
Representative at 1-800-469-4663,
Seans Emission Control Defects Warranty Provisions
The following are specific provisions relative to your
Emission Control Defects Warranty Coverage,
1, Warranted Parts
Coverage under this warranty extends only to the parts
listed below (the emission control systems parts) to the
extent these parts were present on the engine purchased.
in the USA and Canada, a 24-hoür Hotiihe,
maintenance information.
..........................
1-800-469-4663,: has a menu of pre-recorded ^messages offering you product:
a. Fuel Metering System
Cold start enrichment system
Carburetor and internal parts
Fuel Pump
b. Air Induction System
Air cleaner
Intake manifold
c. Ignition System
Spark piugCs)
Magneto ignition system
d. Catalyst System
Catalytic converter
Exhaust manifold
Air injection system or pulse valve
e. Miscellaneous Items Used in Above Systems
Vacuum, temperature, position, time sensitive valves
and switches
Connectors and assemblies
2.
Length of Coverage
Sears wamants to the initial owner and each subsequent
owner that the Warranted Parts shall be free from
defects in materials and workmanship which caused the
failure of the Warranted Parts for a period of two years
from the date the engine is delivered to a retail
purchaser.
No Charge
3.
Repair or replacemert of any Warranted Part will be
performed at no charge to the owner, including
diagnostic labor which leads to the determination that a
Warranted Part is defective, if the diagnostic work is
performed at an approved Sears Service Center.
4,
Claims and Coverage Exclusions
Warranty claims shall be filed in accordance with the
provisions of the Sears Warranty Policy. Warranty
coverage shall be excluded for failures of Warranted
Parts which are not original Sears parts or because of
abuse, neglect or improper maintenance as set forth in
the Sears Engine Warranty Policy. Sears is not liable to
cover failures of Warranted Parts caused by the use of
add-on, non-original, or modified parts.
5.
Maintenance
Any Warranted Part which is not scheduled for
replacement as required maintenance or which is
scheduled only for regular inspection to the effect of
"repair or replace as necessary" shall be warranted as to
defects for the warranty period. Any Warranted Part
which is scheduled for replacement as required
maintenance shall be warranted as to defects only for
the period of time up to the first scheduled replacement
for that part. Any replacement part that is equivalent in
performance and durability may be used in the
performance of any maintenance or repairs. The owner
is responsible for the performance of all required
maintenance, as defined in this owner's manual.
Consequential Coverage
Coverage hereunder shall extend to the failure of any
engine components caused by the failure of any
Warranty Part still under warranty.
29
Page 30

TABLA DE CONTENIDOS
GARANTIA
CONOZCA SU MAQUINA LAVADORA DE PRESIÓN
.. .30 ESPECIFICACIONES .40
,30-32 ALMACENAMIENTO , ...............
.. .33
.34-36
,37-39
.40-43
REPARACION DE DAÑOS ....
GARANTIA DEL CONTROL DE EMISIONES . .
COMO ORDENAR PARTES . . . .., PAGINA POSTERIOR
___
44-45
_____
.46
Л7
GARANTÍA
GARANTIA LIMITADA DE LA MAQUINA LAVADORA DE preSION CRAFTSMAN
Durante un año a partir de la fecha de compra, Sears reparará, sin cargo alguno, cualquier defecto en material y mano de
obra, siempre y cuando esta máquina lavadora a presión Craftsman haya sido mantenida y puesta en funcionamiento de
acuerdo a las instrucciones suminisíiadas en el manual del propietario.
Si esta máquina lavadora es usada para fines comerciales, (a garantía se aplicará tan solo por 90 días a partir de la fecha de
compra. Si esta máquina lavadora de presión es usada para alquiler, la garantía se aplicará tan solo por 30 días después de
la fecha de compra.
Esta garantía no cubre:
• Elementos perecederos como bujías o filtros de aire, los cuales se desgastan con el uso normal.
• Reparaciones necesarias debido al abuso o negligencia del operador, incluyendo daños ocasionados por la ausencia de
suministro de agua a la bomba o por no mantener el equipo de acuerdo a las instrucciones contenidas en el manual del
propietario.
El servicio de garantía se hace efectivo devolviendo la máquina lavadora de presión al centro de servicio o distribuidor Sears
mas cercano en los Estedos Unidos,
Esta garantía le proporciona derechos legales específicos; usted también puede tener otros derechos, los cuales varían de
estado a estado.
Sears, Roebuck and Со., Dept. 817WA, Hoffman Estates, IL 60179
REGLAS DE SEGURIDAD
Este es ei simbolo de alerta de seguridad. Es usado para indicarte situaciones con peligros potenciales de
lesión para e! personal. Siga las instrucciones de todos ios mensajes de seguridad que aparecen después de
A
este simbolo para evitar posibles lesiones o muerte.
Lea este manual minuciosamente y conozca a
fondo las partes y el funcionamiento de su
máquina lavadora a presión. Conozca sus
aplicaciones, sus limitaciones y los peligros
involucrados.
El símbolo de alerta de seguridad (A) es usado con una
palabra (PELIGRO, ADVERTENCIA, PRECAUCIÓN), un
mensaje por escrito o una ilustración, para alerterlo acerca
de cualquier situación de peligro que pueda existir,
PELIGRO indica un riesgo el cual, si no se evita, causaré la
muerte o una herida grave, ADVERTENCIA indica un riesgo
ei cual, si no se evita, puede causar la muerte o una herida
grave. PRECAUCIÓN indica un riesgo, el cual, si no se
evita, puede causar heridas menores o moderadas,
PRECAUCIÓN, cuando se usa sin el símbolo de alerta,
indica una situación que podría resultar en ei daño del
equipo. Siga ios mensajes de seguridad para evitar o reducir
los riesgos de heridas e inclusive !a muerte.
Símbolos de Peligro y Significados
Descarga EléctricaGases Tóxicos
2 \ ^
Superficies Resbalosas
Caer
Inyección Líquida
Ml ^ ^
Fuego
Explosión
Superficie Caliente
w
*
Partes en Movimiento Objetos Voladores Contragolpe
30
Page 31

En el estado de California es obligatorio, según la ley, el uso
de apagachispas (Secsión 4442 del Código de Recursos
Públicos de California), Otros estados pueden tener leyes
similares. Las leyes federales se aplican en tierras
federales. Si equipa el silenciador con un apagachispas,
este deberá ser mantenido en buenas condiciones de
trabajo. Usted puede ordenar el apagachispas a través de
su distribuidor de servicio autorizado Sears.
^ ADVERTENCIA
El escape de! motor de este producto contiene
elementes químicos reconocidos en el Estado de
California por producir cáncer, defectos de nacimiento
Opere el lavadora de presión SOLAMENTE al aire libre.' ' ' '
Utilice un respirador' o máscara siempre que exista: la: ^
posibilidad; de inhalar vapores.:
Lea todas las instruccipnes de la;máscara: para asegurarse de
que le brindará la: protección necesaria contra: la: inhalación: de
vapores nocivos.:
u otros dañ№ de tipo reproductivo.
Al motor fundortaf, se produce monóxido de
carbono, un gas inodoro y venenoso.
El respirar e! monóKido de carbono, producirá
náusea, desmayo o la muerte.
.....
.......................................................................
w ADVERTENCIA
La gasolina y sus vapores son extremadamente
inflamables y explosivos.
El fuego o una explosión pueden causar
quemaduras severas e inclusive la muerte.
CUANDO AÑADA COMBUSTIBLE ................ ^ ^ ^ ^
Apagúe e! generador (posición OFF) y déjelo enfriar a! menos
por;¿ minutos antes de remover la tapa de la gasolina: : ri :
Llene el tanque' al aire libre.■: : ; : ; ^ ■ :
NO llene demasiado eí tanque. Permita ai menos espacio para
la expansión del; combustible.: ; : ;; ;
Mantenga la gasolina alejada de chispas, llamas abiertas,
pilotos, calor y otras fuentes de ignición. ;;; : ; ;;;; : ;
NO: encienda un: cigartiilo o fume.
CUANDO OPERE EL EQUIPO
NO inclineiei motor o el equipo, de tal manera: que la gasolina
se pueda derramar.; : ; ;; ; : ; ; ^..................
NO rocíe líquidos inflamables. ; ; ; : : ;................
CUANDO TRANSPORTE O REPARE EL EQUIPO
Transporte o repare el equipo con el tanque de combustible
vacío, o con la válvula para apagar el combustible, apagada
(posición OFF).. ;':... : ■: ri : ■ ■
CUANDO ALMACENE O GUARDE EL EQUIPO CON
COMBUSTIBLE EN EL TANQUE ^ ^ ^ ^ ^ ^ ^ ^ ^
Almacene alejado de calderas, estufas, calentadores de
secadoras de rop® ú aparatos electrodomésticos que
posean: pilotos u otras feentes dé ignición, pofqú;e;éilos ;puedeh
encender los vapores de ia gasolina;
.
........................................
agua,
Д ADVERTENCIA
El contacto de! rocío con alambrado eléctrico
Ч
Mantenga el chorro del agua alejado de alambrados eléctricos,
de lo contrario podrían ocurrir descargas eléctricas fatales.
puede tener como resultado elertrocution.
Д ADVERTENCÍA
El uso de lavadora de presión puede crear los
charcos y superficies resbalosas.
El rociado de la alta presión podría hacerlo caer
si está muy cerca de la superficie de limpieza.
Mantenga la boquilla de rociado de 6 a 24 pulgadas da la
superficie dé' limpieza.
Saa extremadamente cuidadoso si usa ;ia máquina lavadora a
presión desde una escalera,: andamio o cualquier superficie
rgíatiyamente i;nestabie, ; : ; : ; ; ; ; ; ; ; ; ; - ; : ri ;
El área de; limpieza deberá tener ìnclihaGiones y drenajes ; ri ;
adecuados para disminuir la: posibilidad de caídas debido a ; ri
superficies resba.iosas. :■■■;' ri ' ri ri ; ■ ■ : ; ' ; ; ;
Opere y almacene esta unidad sobre una superfíci® estable, ;
Sujete la pistola de la hidrolavadora firmemente con ambas
manos cuando utilice el rociado a alta; presión, De esta mariera
evitará lesiones producidas por el posible golpe: de la: pistola:
hacia atrás....................................................................................
....
: :
Д ADVERTENGtA
La corriente de agua de alta presión que
produce este equipo pueden perforar la piel y
sus tejidos profundos, ocasionando lesiones
serias y posible amputación.
NUNCA apunte la pistola a la gente, animales p plantes. :
NO peimiía en; ningún mqm;ento;que NIÑOS operen la máquina
lavadora a, presión;
NUNCA repare la manguera de alta presión.' Remplacela.: ri ri
Mantenga conectada ia manguera a la máquina o a la pistola de
rociado cuando el sistema está presurizado.
...............................
Д ADVERTENCIA
Los motores en funcionamiento producen calor y
m
NO: toque las superficies calientes. : : :
Manténgase alejado de los gases de escape,
NUNCA mueva ei equipo mientras este en funcionamiento.
Permita que el equipo se enfríe antes de tocarlo.
gases de escape a altas temperaturas. La
temperatura del silendador y de las zonas cercanas
puede alcanzar o superar los 65®C (15(FF)
Se pueden producir incendios o quemaduras
i
graves.
................
31
Page 32

Д ADVERTENCIA
El arrancador y otras piezas que rotan pueden
enredar las manos, el pelo, la ropa, o los
accesorios.
¥r
NO use ropa suelta, joyas c elementos que puedan quedar
atrapados en el aitanque ó en otras parte® rotaíofías. ........
Ate para arriba el pelo largo y quite la Joyería.
.....................
Chispear involuntario puede tener como
resultado el fuego o el golpe eléctrico.
Ч
CUANDO AJUSTE O HAGA REPARACiDNES A SU
MÁQUINA LAVADORA DE ALTA PRESIÓN ^ ^ ^ ^ ^
• Siempre desconecte e! alambre de la bujía y colóquelo donde
no pueda entrar en corrtaGíto con la bujía,
................................
A
El rociado de alta presión puede hacer que
partículas pequeñas de pintura u otras partículas
salgan disparadas y viajen a altas velocidades.
Siempre use protección para ios ojos cuando: utiüce este equipo
o cuando esté cerca de donde se esté usando el equipo.
^PRECAUCION
Hacer funcionar el motor a velocidades excesivas
aumenta el riesgo de lesiones personales.
NO juegue con paríes que puedan aumentar :o disminuir la
s^locldad:de.mando,: ; r , :
NO opere la máquina lavadora a presión con: un valor de
presión superior a su clasificación de presión. .....................
............
.......
^PRECAUCION
El lavadora de presión produce un rocío alto de la
presión cuál riesgo de aumentos de la herida y dañe a ia
unidad.
NO: asegure la pistoia de rociado en la posición (open = i
abierípj.iii ■ ■: :
NO abandone fa pistoia de rociado cuando la máquina esté en
funcionamiento.: i,::':,::': ^
NUNCA utiiira una pistola de rociado que no tenga un seguro
para gatilio o protección para gatillo en su lugar y en buenas
condicionés,.: r ,;' I
Siempre asegúrese de: que la pistola de rociado, boquillas y
accesorios estén conectados correctamente. ........................
.......
:,' i i i i i' i i, i i':,' ■ ■: ■: ■ ■, i i' ..................
.....
■
PRECAUCION
El rociado de alta presión puede dañar elementos
frágiles, incluyendo el vidrio.
NO apunte la pisfoiá de rociado al vidrio cuando éstéien el
modo de rociado a chorro, i : : ■ : : .......................................
NUNCA apunte ia pistoia a plantas.
PRECAUCION
El tratamiento inadecuado del lavadora de presión puede
dañarlo y acortar su vida productiva.
Si usted: tiene alguna pregunta acerca de' las finalidades de uso
del generador, pregúntele a su concesionario o contacte a
Sears.:, ^ r .. ' :
NUNCA deberán ser operadas las unidades con partes rotes o
ausentes, o sin la caja o cubiertas de protección. : .........: : :
NO eluda ningún dispositivo de seguridad de este máquina.
Antes de poner en marcha la máquina lavadora a presión en
clima frío, revise todas las partes del equipo y asegúrese de ■
que no se haya formado hielo sobre ellas.: :
NUNCA mueva la máquina halando la manguera ds aita : : : : :
presión. Utilice la manija que viene con !a unidad. : : : : : : : : r
Revise que el sistema de combustible no presente fugas o
signos de:deterioro, corno mangueras désgastadas o porosas,
sujetadore® flojos o ausentes, tapa: o tanque dañados. Corrija
todos los defectos antes de operar la máquina lavadora a
presión.
El equipo de alta presión está:diseñado para ser utilizado
UNICAMENTE con las partes autorizadas Sears. Si utiliza
equipo con partes que no cumplan cort las especificaciones
mínimas, el usuario asume todos los riesgos y : : : : : : : : : : : : : :
responsabilidades. ................................................................
........ :. :.. | ^ ^ ^ r ■ ■ ; ^ ' ■, ' ' ' : | ^ :
.......
: : : : : : ^
.........
: :, ■ : : : : : ■ ^
........
este
, ■ : :
32
Page 33

CONOZCA SU MAQUINA LAVADORA DE PRESION
Lea el manuai del propietario y las regias de seguridad antes de poner en marcha su sistema de limpieza.
Compare las ilustraciones con su sistema de limpieza para famütanzarse con las ubicaciones de los diferentes controles y
ajustes. Guarde este manual para referencias futuras.
Arrancador de Retroceso - Usado para el arranque del motor,
Somba - Desarrolla alta presión de agua.
Soquilla Ajustable - Ajusta la presión a alta o baja presión:
rociado a chorro o en abanico,
Carmte de la Manguera - Usado para almacenar la manguera
cuando la unidad no estó siendo usada. La manguera deberá
ser desconectada de la bomba y la pistola antes de
aimacenarfa.
Enjuague del Sistema, Recipientes para Químicos y
Detergente con Filtro Interno y División ™ Usado para
proporcionar detergente u otros químicos a (a corriente de
agua de baja presión.
Entrada de Agua ™ Conexión para la manguera de jardín.
Extensión para Boquillas ™ Conectada a la pistola de rociado
para un uso más conveniente.
Filtro de Aire - El elemento de filtro tipo seco limita la
cantidad de suciedad y polvo que se introduce en el motor.
Manguera de Alta Presión - Conecte un extremo a la pistola
de rociado y el otro extremo a la torna de aita presión.
Palanca de Control de la Válvula de Regulación - Coloca e!
motor en modo de arranque para el arrancador de retroceso y
detiene ai motor en funcionamiento.
Palanca del Cebador - Usada para arranque de motores
fríos.
Perilla Selectora Diai-A-Cleaner™ - Selecciona cualquiera de
los tres químicos o el enjuague del sistema de agua limpia.
Pistola de Rociado - Controla la aplicación de agua sobre la
superficie de limpieza con el gatillo, iriciuye cerrojo de
seguridad.
Tapa de la Combustible ™ Llene el motor con combustible
regular sin contenido de plomo en este punto.
Tapa del Depósito del Aceite - Llene el motor con aceite
aquí. Vea ia página 35 para las recomendaciones dei aceite y
las instrucciones de llenado.
Toma de Alta Presión - Conexión para la manguera de alta
presíóíi.
33
Page 34

MONTAJE
Su sistema de limpieza requiere de cierto ensamble y estará
Hsta para ser usado únicamente después de haber
depositedo ei combustible y ei aceite recomendado.
Si tiene problemas con el ensamble de su máquina
lavadora a presión, llame a la línea de ayuda de la
máquina lavadora a presión al 1-800-222-313S.
IMPORTANTE: Cualquier intento de hacer funcionar el
motor sin haber depositado el aceite recomendado resultará
en falla del mismo.
RETIRE LA MAQUINA LAVADORA A PRESION DE LA CAJA
1. Abra la caja y corte dos esquinas opuestas a la manija
guía de la parte superior a la inferior de tal forma que el
panel pueda ser doblado hacia abajo.
2, Retire la caja del carrete de la manguera, material de
relleno y la bolsa de repuestos enviada con el sistema
de limpieza,
3. Retire pistola aspersora, extensión de boquilla y aceite
para motor de material de relleno,
4, Saque ei sistema de limpieza de la caja.
Familiarícese con cada parte antes de ensamblar la
máquina lavadora a presión. Compare el contenido con la
ilustración de la página 33. Si alguna de la partes no está
presente o se encuentra dañada, llame a la linea de ayuda
de la máquina lavadora a presión al 1-800-222-313S,
MONTAJE DEL SISTEMA DE LIMPIEZA
La gran mayoría de su sistema de limpieza de presión
Craftsman ha sido ensamblado en ia fábrica. Sin embargo,
usted deberá llevar a cabo ios siguientes procedimientos
antes de poner en funcionamiento su sistema de limpieza:
1.
Conecte el carrete de la manguera.
2,
Deposite aceite en la caja del cigüeña! del motor.
3.
Deposite combustible en el tanque.
4,
Conecte la manguera de alta prasión a la pistola de
rociado y a la bomba.
5.
Conecte el suministro de agua a la bomba.
Montaje del Carrete de la Manguera
Necesitará una la llave inglesa de lOmm y 14mm y #2
destornillador de phillips
1. Conecte la manija ai can^e utilizando tuercas de fijación,
arandelas planas y pernos como se ilustra a continuación.
5, Levante la manija guia, asegúiBla en su sitio.
6. Revise la caja para ver si existen partes sueltas
adicionales,
CONTENIDO DE LA CAJA
Revise ei contenido de la caja. Si alguna de las partes no
está presente o está dañada, llame a la línea de ayuda de la
máquina lavadora a presión al 1^00-222-3136.
• La unidad principal - sistema de limpieza con ruedas,
tanques para químicos, manubrio
• Los componentes de! carrete de la manguera
• La manguera de alta presión
• Pistola de rociado
• Extensión para boquillas con boquilla ajustabie a
Aüa/Baja presión
• Aceite para motor
• Bolsa de partes (incluye los elementos descritos a
continuación)
Tres paquetes de concentrado químico
Manual del operador
Juego de mantenimiento’
Rótulos para ios tanques
Tarjeta de la matricula
Asegure el carrete de la manguera a la parte vertical del
lado izquierdo utilizando tuercas de fijación y pernos.
34
Page 35

NOTA: Puede haber alguna ferretería incluida con el juego
de carrete de manga que no se usa en este modelo.
ÍMPORTANTE: NO use la máquina lavadora a presión
teniendo la manguera enrollada en el carrete. El carrete es
únicamente para su almacenamiento.
Agregue Aceite de Motor
ÍMPORTANTE: Cualquier intento de hacer girar o arrancar
el motor antes de que se haya depositado el aceite
recomendado puede resultar en falla del motor.
NOTA: Cuando agregue aceite al compartimiento del motor,
utilice únicamente aceite detei^ente de alta calidad, designado
con la clasificación API de servicio SF, SG, SH, SJ o superior,
clasificado con el p^o SAE 30, NO use aditiv® ^pedales.
1. Seleccione una viscosidad de acuerdo a la tebla
siguiente.
Temperaturas de Uso Esperadas
* El uso de aceites muitigrado (SW-30, IOW-30, etc.) en
temperaturas mayores a los 40®F (4®C) ocasionará un
consumo de aceite mayor al normal. Cuando utilice un
aceite muitigrado, revise con mayor frecuencia el nivel de
aceite del motor.
** Si utiliza aceite SAE 30 en temperaturas inferiores a los
40®F (4-C), ocasionará que et arranque sea más difícil e
incluso que se deshiele el motor debido a su inadecuada
lubricación interna.
2. Coloque la máquina lavadora a presión en una
superficie nivelada.
3. Limpie el área alrededor del llenado de aceite.
4. Retire e! tapón del orificio de llenado y la varilla de
medición,
5. Limpie la varilla de medición, insértela en el orificio de
llenado y apriétela firmemente; retire !a varilla de
medición. Deposite el aceite recomendado hasta la
marca "Full" ("Lieno") de la varilla de medición.
6. Deposite e! aceite lentamente. Limpie la varilla de
medición cada vez que revise el nivel del aceite. NO
ilene excesivamente.
NOTA: Usted no puede necesitar usar todo ei aceite
suministrado.
7, Instale el tapón del orificio de llenado de aceite y la
varilla de medición y apriétela firmemente.
NOTA: Revise ei aceite frecuertlemente durante ei
despegue del motor.
Agregue Gasolina
¡PELIGRO! NUNCA llene ei tanque de combustible
en recintos cerrados. NUNCA ilene el tanque de
A
combus-tibie cuando ei motor esté funcionando o
esté caliente, NO fume cuando esté llenando el
tanque de combustible.
¡ADVERTENCIA! NUNCA ilene por completo el
tanque de combustible. Deje espacio para la
A
expansión del rambustible. Limpie cualquier derrame
de combustible del motor y del equipo antes de darle
arranque a !a unidad.
1.
Use combustible limpio y almacénelo en recipientes
cubiertos, limpios y aprobados. Utilice embudos limpios.
Nunca utilice gasolina "vieja" dejada de !a estación
anterior o gasolina almacenada por períodos de tiempo
prolongados.
2.
Limpie b! área alrededor de la tapa de llenado del
combustible, retire la tapa.
3.
Agregue lentamente gasolina regular "SIN PLOMO" al
tanque de combustible. Use un embudo para evitar que
se derrame. Llene el tanque lentamente hasta
aproximadamente 1.5" por debajo de !a parte la cima
del cuello del tubo de llenado.
I- Tanque
Combustible
г
4, Instale la tepa del tanque de combustible y limpie la
gasolina que se haya derramado,
IMPORTANTE: Es impórtente evitar la formación de
depósitos de goma en las partes esenciales del sistema de
combustible como en ei carburador, filtro dei combustible,
manguera del combustible o tanque, durante su
almacenamiento. Los rambustibles mezclados con alcshol
(llamados gasohol, etanoi o metano!) pueden atraer la
humedad, !a cual produce la separación y formación de
ácidos durante el almacenamiento. La gasolina àcida puede
dañar el sistema de combustible de un motor durante su
almacenamiento.
Para evitar problemas en ei motor, deberá vaciar ei sistema
de combustible antes de períodos de almacenamiento de
30 días o más. Vea "Almacenamiento" en !a página 44.
NUNCA use productos para limpiar motores o carburadores
en el tenque del combustible; si lo hace ocurrirán daños
permanentes.
3S
Page 36

Conecte la Manguera y el Suministro ele
Agua a la Bomba
ÍMPORTANTE: Usted deberá armar la extensión para
boquillas y conectar todas las mangueras antes de darle
arranque al motor. La bomba resultará dañada si arranca el
motor sin tener todas las mangueras conectadas y el
suministro agua abierto,
1, Desenrroile la manguera de alta presión y conecte un
extremo de la manguera a ia base de la pistola de
rociado. Apriete con la mano.
5. Haga correr el agua a través de la manguera de su
jardín por 30 segundos para limpiar cualquier escombro
que se encuentre en ella. Desconecte el agua.
IMPORTANTE: Hace NO agua de parar de siphon para el
abastecimiento de agua. Use agua SOLO fría (menos que
iOOT).
6. Conecte la manguera de jardín (no exceder 60 pies en
la longitud) a la entrada del agua. Apriete con la mano.
PRECAUCíON
DEBE haber por lo menos diez pies de manguera de jardín
libre entre ia entrada de agua de la lavadora a presión y
cualquier dispositivo de control de flujo de agua, sea ei
caso de un conector 'Y' o de cualquier otro tipo de válvula.
Ei daño 3' lavadora a presión, resulíado da ta : desatención a;
esta precaución, no será cubierto por la garantía.
7. ABRA el suministo del agua y abra la válvula de
suministro para purgar la sistema de bomba de aire y
impureza.
.....................
Retire y deseche todos los tapones de transporte de la
bomba antes de conectar !as mangueras.
Conecte ei otro extremo de la manguera de alte presión
a la salida de alta presión de la bomba. Apriete con la
mano.
entrada de agua, inspeccione el colador de la entrada.
Limpie e! colador si tiene residuos o solicite su remplazo
si está dañado. Refiérase a la sección “Mantenimiento
de los Anillos ‘O“' si la colador de 1a entrada se dañado,
NO haga ftrnciortar ia máquina lavadora a presión si
ei coiador de la entrada está dañado.
^ADVERTENCIA
El rociado de alta presión puede hacer que
partículas pequeñas de pintura u otras partículas
salgan disparadas y viajen a altas velocidades.
Siempre Use prqtécción para los ojos cuándo uíilics este; equipo
o cuando esfé cerca de donde se esté usando e! equipo; : :
Antes de dad® arranque a la máquina lavadora a presión, : ; ; ; ; ;
asegúrese de usar prctecoión adecuada para los ojos.
................
LISTA DE REVISION PREVIA AL
ARRANQUE DEL MOTOR
Revise la unidad para asegurarse que ha nevado a cabo ios
siguientes procedimientos:
1, Revise que los sujetadores del carrete de la manguera
estén apretados,
2, Revise que haya sido depositado aceite y esté al nivei
correcto en la caja del cigüeñal del motor.
3, Deposite la gasolina adecuada en ei tanque del
combustible.
4, Revise que todas las conexiones de las mangueras
(alta presión y suministro de agua) estén apretadas
correctamente y que no existan dobleces, cortes o daño
de la manguera de alta presión,
5, Proporcione el suministro de agua adecuado (que no
exceda los iOO^F),
6, Asegúrese de leer las secciones "Reglas de Seguridad”
y “Operación" antes de usar el sistema de limpieza.
36
Page 37

OPERACION
COMO USAR SU SISTEMA DE LIMPIEZA
Si tiene problemas озп ei funcionamiento de su máquina
lavadora a presión, por favor llame a la línea de ayuda de la
máquina lavadora a presión ai 1.^00-222-3136.
Para Poner en Marcha el Sistema de Limpieza
Para darle arranque a su sistema de limpieza movido a
motor por primera vez, siga estas instrucciones paso a
paso. Esta información acerca de (a puesta en marcha
inicial también es válida para cuando vaya a darle arranque
ai motor después de haberlo dejado la máquina lavadora a
presión fuera de funcionamiento por lo menos un día.
1, Coloque la máquina lavadora a presión en un área
cercana a una suministro de agua exterior capaz de
abastecer agua a un volumen mayor de 3,5 galones por
minuto en no menos que 20 PSi en el fin de arandela
de presión de la manga del jardín,
2, Revise que la manguera de alta presión se encuentre
conectada firmemente a la pistola de rociado y a la
bomba. Vea “Armado de Su Máquina Lavadora a Presión".
3, j^egúrese que la unidad esté nivelada.
4, Conecte la manguera de jardín a la entrada del agua.
Apriétela con la mano. Abra el suministro de agua.
9, Mueva la perilla del cebador a la posición "Choke".
NOTA: Si el motor está caliente, asegúrese que la perilla
del cebador esté en la posición "Run",
10, Mueva la palanca de la válvula de regulación a la
posición "Fasf, marcada en la unidad con un conejo,
11, Coloque su pie izquierdo en el cuadro inferior de la
unidad y sujete la manija tal y como se muestra. La
apariencia de la unidad puede ser ligeramente distinta
de la mostrada aquí.
PRECAUCION
No haga fundonaf ia bomba si no tiene e! suministro
conectado y abierto.
El daño a la: lavadora a presión, resultado: de la desatendió:?! a
esta precaudón, no será cubierto por la garantía.
5, Presione e! disparador en la pistola para purgar de aire
e impurezas el sistema de bombeo.
6. Acople !a boquilla de extensión a la pistola aspersora.
Apriétela manualmente.
!a boquina hacia adelante) y presione el disparador en
!a pistola aspersora para liberar la presión provocada
por haber abierto (ON) el agua. El agua llenará la
pistola mediante un ligero flujo. Continúe sosteniendo el
disparador hasta que haya un flujo estable de agua y
no quede residuo alguno de aire en el sistema. Suelte
entonces el disparador.
S.
Fije ei pestillo de seguridad al disparador de la pistola
aspersora.
......................
Cerrojo de
Seguridad
12,
Jale la cuerda de arranque lentamente con su mano
derecha hasta que sienta alguna resistencia, entonces
jale con energía.
13.
Regrese la cuerda de arranque lentamente. NO permita
que la cuerda regrese bnjscamente y golpee el
arrancador,
14, Cuando arranque el motor, mueva lentamente la
palanca del ahogador a la posición ”En marcha"
("Run").
funcionando, mueva entonces la palanca a la posición
"Ahogado" ("Choke"), y después a la posición "En
marcha" ("Run"),
15
Si ei motor no arranca después de seis tirones, mueva
la palanca del ahogador a la posición "En marcha"
("Run"),
palanca a la posición "Ahogado" ("Choke"), y después
a la posición "En marcha" ("Run"),
Sí el motor se enciende, pero no continúa
Si el motor incende y no core mueva la
PRECAUCION
Evite las lesiones que puede causar el retroceso.
: Apriete el :gati!lp de la pistola rociadera; cada ; vez q ue tire del
arraricador de retroceso y que ef motor no arranque.
..............
37
Page 38

Cómo Detener su Sistema ele Limpieza
• Mueva la palanca de la válvula de regulación a la
posición “Stop" (“Parado").
• Aprieto ei gatillo de la pistola de rociado para
eliminar la presión de la manguera.
NOTA; Observará una pequeña cantidad de agua cuando
elimine la presión,
• Mueva ia perilla selectora DIal-A-Cieaner™ a la
posición OFF para evitar la fuga del químico.
Cómo Usar la Boquilla AJustable
Usted ya debe saber como darle ARRANQUE a su máquina
lavadora a presión y como DETENERLA. La información de
esta sección le dirá como ajustar el patrón de rociado y
como aplicar detergente u otros qulmicss de limpieza.
A PRECAUGION
El lavadora de presión produce un rocío alto de la presión
cuál riesgo de aumentos de la herida y dañe a la unidad.
nunca ajuste el patrón de: rociado:cuando este: rodando. i
nunca coloque las manos en frente de la boquilla para ajustar
el patrón de rodado:
......................................................................
3. El patrón de rociado se ajusta de un patrón angosto a
un patrón en abanico girando la boquilla.
Gire la boquilla: en sentido
contrario a las márieciliás dei
:: reloj' para un' patrón de: ^
rociado en abanico.
4.
Para una limpieza más efectiva, mantenga la boquilla de
rociado de 8 a 24 pulgadas de la superficie de limpieza.
5.
Si cfflloca la boquilla de rociado demasiado cerca podría
dañar la superficie, especialmente cuando esté usando
el modo de alta presión.
6. NO coloque la boquilla a menos de 6 pulgadas cuando
esté limpiando liantes.
Gire la: boquilla en sentido de
as manecillas del reloj para
: un patrón de rociado a :
'":,::chorro.:::::::'f■■■:
Trabajo de Limpien con la Boquilla AJustable
En ei extremo de su pistola de rociado existe una manija
que puede mover hacia adelante y hacia atrás para ajustar
ei patrón de rociado para que sea de alta o baja presión.
1. Usted también puede ajustar el patrón de rociado
girando la boquilla para que esté concentrado en un
patrón de chorro o un patrón expandido en abanico.
Mueva la boquilla hacia: : ::: : Mueva ia boquilla hacia
atrás para obtener el modo adelante para obtener e!
de alta presión.
:
.......
: : :
2. Apunte la boquilla hacia el suelo, desenganche e!
cerrojo de seguridad y apriete el gatillo para probar el
patrón de rociado.
.........
...............
: : modo de baja presión y para
.......la aplicaclón de! detergente.
jPREGAüGíONi Antes de darle arranque a su sistema de
limpieza, asegúrese de haber leído y seguido las
instnjcclones de las secciones "Montaje de su Sistema de
Limpieza" y “Para Poner en Marcha el Sistema de Limpieza".
IMPORTANTE: Utilice químicos diseñados
específicamertle para máquinas lavadoras a presión. Los
detergentes caseros podrían dañar la bomba.
PRECAUCION
Usted deberá conectar todas las mangueras antes de
darle arranque al motor.
Arrancar el motor sin: tener todas las mangueras conectadas y
sin el suministro de: agua ABtERTp (ON) causará :ei daño de :
la bomba.: f,
Ei daño a ia lavadora a presión,
esta precaución, no será cubierto por ia garantía.
Se pueden tener hasta tres (3) diferentes soluciones en el
sistema de limpieza al mismo tiempo. Para aplicar el
detergente, siga los siguientes pasos;
1.
Es necesario diluir los paquetes de químicos
suministrados. Tan solo corte una esquina de la bolsa
plástica, vierte el químico en el tanque, después llene el
tanque con agua limpia. Coloque los rótulos
suministrados en los tanques correspondientes.
.......
f, : : : ' :
resultado de la desatención a
tónq
C.
ues
38
Si está usando otro químico diseñado para uso en
máquinas lavadoras a presión, pispare la solución química
Page 39

siguiendo las instrucciones del fabricante del químico. Llene
el rBctplente(s) del químico con la solución preparada.
3. Gire la perilla selectora DíaLA-Gleaner™ y colóquela en
la letra que corresponda al recipiente que desea usar,
4. Mueva la boquilla ajustable hacia adelante para obtener
el modo de baja presión. El detergente no puede ser
aplicado si tiene la boquilla en la posición de alta
presión,
5. Conecte la manguera de jardín a la entrada del agua,
revise que la manguera de alta presión esté œnecfeda
a la pistola de rociado y a la bomba (vea la página 36) y
dele arranque al motor.
A ADVERTENCIA
El rociado de la alta presión podría hacerlo caer
si está muy cerca de la superficie de limpieza.
sistema, permita que dicha circulación csntinue hasta
que deje de observar espuma de detergente.
S. Mueva la perilla selectora Dial-A-Cleaner™ a !a
posición OFF cuando termine para evitar la fuga de
químicos.
Succión de Líquidos
NO utilice agua estancada como suministro de agua. El
agua sucia, contaminada o salobre puede dañar la bomba.
Use únicamente el suministro de agua de su casa.
Cómo Usar el Carrete de la Manguera
Su máquina lavadora a presión está equipada con un
carrete diseñado para almacenar la manguera cuando la
unidad no estó siendo usada. Estas instrucciones se aplican
únicamente para almacenamientos por un corto período de
tiempo. Para almacenamiento prolongado ransulte la
sección “Almacenamiento“ de la páginas 44-45.
Mantenga la boquilla de rociado de 6 a 24 pulgadas da la
Sliperfioie de: limpieza. : : : : ::: t :: : : : t t
Opere y almacene este unidad sobre una superfícia estable.
Sea extremadamente cuidadoso si usa la máquina lavadora a
presión desde una escalera, andamio o cualquier superficie
relativamente inestable. : : : t 11111 11 t
Sujete la pistola de la hidrolavadora firmemente con ambas
manos cuando utilice el rociado a ate; presión. De esta manera
evitará lesiones producidas por;^ posible golpei de la| pistdla: '
hacia'atrás.:..................................................................................
6. Comience en la porción inferior de! área que va a lavar
y diríjase hacia arriba, usando movimientos parejos,
largos y superpuestos,
7, Permíta que el detergente ‘penetre’ (entre 3-5 minutos)
antes de lavar y enjuagar. Vuelva a aplicar cuando sea
necesario para evitar que la superficie se seque.
Lavado y Enjuague de la Superficie
Después de haber aplicado el detergente, lave la superficie
con agua a alta presión y después enjuagúela hasta que
esté limpia de la siguiente manera:
1, Mueva la boquilla ajusteble hacia atrás para obtener el
modo de alta presión. NO habrá circulación de qulmics
si está en el modo de alta presión.
2, Haga una prueba en un área pequeña de la superficie
que va a limpiar. Asegúrese de que el rociado de alta
presión no cause daños en la superficie.
3, Expanda e! patrón de rociado para obtener una acción
de enjuague más suave. Comience en la parte superior
del área que va a enjuagar dirigiéndose hacia abajo con
la misma acción usada para limpieza.
Enjuague el Sistema Después de Cada Uso
Es muy Importante que el sistema dispensador de químicos
sea enjuagado después de cada uso para evitar que se tape
o que presente fugas:
1, Llene el recipiente para Enjuague del Sistema con agua
limpia.
2, Antes de desconectar el suministro de agua, ponga en
funcionamietito el sistema de limpieza.
3, Mueva la boquilla ajustable hacia adelante para obtener
el modo de baja presión.
4, Coloque la perilla selectora Dial-A-Cleaner™ en la letra
que corresponda ai tanque de Enjuague del Sistema, A
medida que el agua de enjuague limpia circula por el
Después de cada uso:
1. Desconecte la manguera de la pistola y la toma de alta
presión de la bomba.
2, Drene el agua de la manguera.
carrete de la manguera. Haga girar el carrete con la
manija para enrollar la manguera en el carrete.
4. Coloque el otro extremo de la manguera en la presilla
ubicada en el costodo de la unidad.
IMPORTANTE: NO use la máquina lavadora a presión
teniendo la manguera enrollada en el carrete. El carrete es
únicamente para su almacenamiento.
Sugerencias
• NUNCA use la entrada de la manguera de jardín para
succionar detergente o cera,
• Si tiene la boquilla de rociado demasiado lejos de la
superficie que está limpiando, la limpieza no será tan
efectiva.
• Siempre almacene el sistema de limpieza con la perilla
selectora Dial-A-Cleaner™ en la posición “OFF“.
Sistema de Enfriamiento Automático {Alivio Termico)
El agua que circuia dentro de la bomba puede alcanzar
temperaturas entre los 125“-155-F si hace funcionar el
motor de su máquina lavadora a presión de 3 a 5 minutos
sin oprimir el gatillo de la pistola de rociado. Ei sistema de
enfriamiento automático se activa a esta temperatura y
enfría la bomba descargando agua caliente en el piso,
evitando así ei daño interno de la bomba.
39
Page 40

MANTENIMIENTO
RESPONSABILIDADES DEL PROPIETARIO
Siga el programa de mantenimiento según ei número de horas o según ei caiendarto, lo que suceda primero. Se requiere
de servicio con mayor frecuencia cuando opere la unidad en ias condiciones adversas descritas a continuación.
......
HOfiARlG DE IHáNTENIMlEWrO
COLOQUE LAS FECHAS A MEDIDA QUE VA
COMPLETANDO EL SERVICIO REGULAR
TAREA DE MANTENIMIENTO
MAQUINA LAVADORA A PRESION
Revise/limpie el colador de la entrada
de agua de la bomba.
Revise (a manguera de alía presión.
Revise !a manguera del detergente.
Revise (a pistola de rociado y el conjunto.
Elimine el aire y tos ranteminantes de la bomba.
Cambio del aceite de la bomba.
MOTOR
Revise el nivel de aceite
Propcrcione servido al depurador de aire.
Cambie el aceite del motor.
Remplace ía bujía.
Proporcione servido al apagachispas.
Prepare la unidad para almacenamiento.
t Limpiar si está obstruido. Remplazar si está perforado o roto.
* Cambiar ei acete después de fas primeras (5) horas y después cada 50 horas. Hacer el cambio de acete con mayor
frecuencia cuando trabaje en condiciones de mucha suciedad o polvo,
** Remplazar más a menudo bajo condiciones de suciedad o polvo.
INTERVALO DE OPERACION POR HORA
Aíitssda
cada usa
Xt
X
X
f cada 25 '
Horas a
Anualmente
Cada 60 :
: Horas o
Aniralmeníe
X.
X**
Pnspar® la unidad para alrnacariamiento si va a
asíar fiera de servicio por más de 30 días.
FECHAS DE SERVICIO
0
ite
i_
ESPECIFICACIONES DEL PRODUCTO
Especificaoiones de la Máquina Lavadora a Presión
Presión....................................2,500 PS!
Velocidad de flujo
Mezcla de químicos
Temperatura del suministro
de agua
..................................
Peso que Embarca
Especificaciones del Motor
Caballos de fuerza
Bujía
Resistor
Platino de Larga Duración .Champion RC12PYP
Calibre la separación a: .. .0.020 pulgadas (O.SO mm)
Capacidad de gasolina
Aceite
......................................
Por encima de 40‘^F
O^^F » 40'-F ..................SAE 5W-30 O 10W-30
...................
...............
.................
..................
...............................
...........
-----
2.5 GPM
Use según instrucciones
Que no exceda los lOO^F
102 Ibs,
8.75 HP
Champion RC12YC
1.6 Cuartos
SAE 30
RECOMENDACIONES GENERALES
La garantía de la máquina lavadora a presión NO cubre ios
elementos que han sido sujetos a abuso o negligencia por
parte del operador. Para hacer válida la cobertura total de la
garantía, el operador deberá mantener la lavadora de
presión tai y como se indica en ei manual, incluyendo su
adecuado almacenamiento, como se describe en la sección
"Almacenamiento" en ia página 43-44.
Algunos ajustes tendrán que hacerse periódicamente para
mantener adecuadamente su máquina lavadora a presión.
Todos ios servicios y ajustes deberán hacerse por lo menos
una vez en cada estación. Siga (as instrucciones de !a tabla
“Programa de Mantenimiento” descrita anteriormente.
NOTA: Una vez al año, usted deberá limpiar o remplazar la
bujía y el filtro de aire. Una bujía nueva y un filtro de aire
limpio garantizan una mezcla de combustible-aire adecuada
y le ayuda a su motor a funcionar mejor y a tener una vida
útil más prolongada.
Si equipó con llantas que se pode hinchar, mantenga la
presión aérea en el valor marcado en la llanta o dentro de
15y40psi,
40
Page 41

ANTES DE CADA USO
• Revise ei nivel de aceite def motor,
• Revise si existen daftos en ei ralador de !a entrada de agua,
• Revise si existen fugas en la manguera de alta presión,
• Revise si existen dañ® en los filtros y tanques de químicos,
• Revise si existen fugas en el conjunto de la extensión
para boquillas y pistola,
• Elimine el aire y (os contaminantes de la bomba.
MANTENIMIENTO DE LA MAQUINA LAVADORA A PRESION
Revise y Limpie el Colador de Entrada
Examine el colador de entrada de la manguera de jardín.
Limpíelo si está tapado o remplacelo si está roto.
Revise la Manguera de Alta Presión
Las mangueras de alta presión pueden desarrollar fugas
debido al desgaste, dobleces o abuso. Revise la manguera
antes de cada uso. Revise si existen cortes, fugas,
abrasiones, levantamiento de la cubierta, daño o movimiento
de los acoplamientos. Si existe cualquiera de estas
condiciones, remplace la manguera inmediatamente.
......
^ADVERTENCIA........................
La corriente de agua de alta presión que
produce este equipo pueden perforar la piel y
sus tejidos profundos, ocasionando lesiones
serias y posible amputación.
NUNCA repare ía manguera de alía presión. Remplacela.
Remplaoela con una manguera que cumpla con ¡a capacidad
mínima de presión de su máquina iavadora a presión.
Revise los Recipientes de los Químicos
Las cubiertas de los tanques deben ajuster firmemente en el
tanque. Asegúrese que los rótulos de los químicos
identifiquen correctamente el contenido del tanque,
j^egúrese que el tenque de Enjuague del Sistema esté
lleno con agua limpia. Asegúrase que la perilla selectora
Dial“A"Cleaner^“ gire sin problemas entre posiciones.
Examine los tanques y remplace si el filtro este tapado.
Revise la Pistola y la Extensión para Boquillas
Examine la conexión de la manguera a la pistola y
cerciórese de que esté en buen estado. Pruebe el gatillo
oprimiéndolo y asegurándose de que se devuelve a su sitio
cuando lo suelte. Coloque el cerrojo de seguridad en la
posición UP y pnjebe el gatillo. Usted no debe ser capaz de
oprimir ei gatillo. Remplace la pistola inmediatemente si falla
cualquiera de estas pruebas.
Revise el Filtro en Línea
Consulte la ilustración y suministre servicio al filtro en linea
si se tepa siguiendo estos pasos:
.............
1.
Retira la pistola y la extensión para boquillas de la
manguera de alte presión. Retíre la extensión para
boquillas de la pistola y ratire ei anillo ’o’ y ei calador de
la extensión para boquillas. Lave el colador, pistola y
extensión para boquillas con agua limpia para eliminar
toda clase de residuos.
2.
Si el colador este dañado, encontrará un colador para el
filtro en linea y un anillo 'o'de repuesto en el juego de
anillos ‘o’. Sí no está daftado, vuelva a usarlo.
Coloque el colador del filfifo en linea en el extremo con rosca
de la extensión para boquillas. Su dirección no importa.
Coloque el colador ejerciendo presión con el borrador de un
lápiz hasta que se asiente por completo en el fondo de la
abertura. Tenga cuidado de no doblar ei raiador,
4.
Coioque el anillo 'o'en la ranura respectiva. Empuje el
anillo 'o' hasta que quede ajustado contra el colador def
filtro en linea.
5. Conecte la extensión para boquillas a la pistoia de rociado
de la manera descrita anteriormente en este manual.
Elimine el Aire y los Contaminantes de la Bomba
Para retirar el aire de ia bomba, siga los siguientes pasos:
1, Instale ei sistema de limpieza como está descrito en
“Montaje Del Sistema Limpieza" y conecte ei suministro
de agua,
2, Hale ei gatillo de la pistola y manténgalo apretado baste
que obtenga una corriente de agua constante.
Para retirar los contaminantss de la bomba, siga ios
siguientes pasos:
1, Instale ei sistema de limpieza como está descrito en
“Montaje Del Sistema Limpieza" y conecte ei suministro
de agua.
2,
Retire el accesorio para boquillas de la pistola.
Ponga en marcha el motor de acuerdo a las
3.
instrucciones de “Como Usar Su Sistema De Limpieza".
4.
Hale ei gatillo de la pistola y manténgalo apretado.
Cuando ei suministro de agua sea uniforme y
5.
constante, enganche el cerrojo de seguridad y vuelva a
ajustar ei accesorio para boquillas.
Mantenimiento de la Boquilla
Si siente una sensación pulsante ai momento de apretar ei
gatillo de la pistola rodadora, puede que sea causada por la
presión excesiva en la bomba. La causa principal de la
presión excesiva en la bomba es cuando la boquilla se
encuentra atascada o tepada con materiales extraños, tales
сюто tierra, etc. Para corregir el problema, limpie
inmediatemente la boquilla las instruraones siguientes;
1, Apague el motor y apague el suministro de agua.
2, Remueva la boquilla del extremo de la extensión de la
boquilla. Separe ia extensión de la boquilla, de la pistola
rodadora. Gire la boquilla en dirección de las agujas del
reloj, a la posición "stream" (chorro). Usando un Alien
de 2mm (¿/64) provista, remueva la boquilla del
extramo de la extensión de la boquilla.
41
Page 42

Quite ei en ef filtro de la línea del otro fin de fa extensión
3.
de boquilla.
4.
Use el alambre incluido en el juego (o un pequeño sujeta
papeles) para liberar cualquier material extraño que esté
tapando la boquilla.
5. Usando una manguera de jardín, remueva cualquier
desecho adicional, poniendo agua en la extensión de la
boquilla. Haga ésto de 30 a 60 segundos. Gire la
extensión de la boquilla ajustable a "stream spray"
(chorro rociador) y mueva la boquilla de "[ow*' (bajo) a
"high" (alto), mientras drene el agua.
6. Instale de nuevo la boquilla y en ei filtro en-línea en la
extensión, MO la apriete demasiado con la llave Alien,
7. Conecte de nuevo la extensión de la boquilla a la pístoia
rodadora.
8. Conecte de nuevo el suministro de agua, prenda el agua,
y encienda ei motor,
9. Pmebe el lavador a presión al hatsr funcionar la boquilla
en la posición "high" y "low",
Mantenimiento de tos Anillos 'o'
Durante la operación normal de su sistema de limpieza ios
anillos 'o' mantienen apretadas y libres de fugas las
conexiones de las mangueras y la pistola. Ellos pueden
desgastarse o dañarse csn el uso. Su sistema de limpieza
viene con un Juego de Mantenimiento para anillos ’O', el cual
contiene anillos 'o‘, una arandela de caucho y un colador de
repuesto para la entrada de la manguera de jardín.
Las partes del Juego de Anillos ’o'incluyen:
• 1 anillo 'o' rojo, (p/n B2726) para el extremo de la
conexión de la pístoia de rociado entre la pístoia y la
extensión para boquillas.
NOTA; Los dos anillos ‘o‘ anteriores tienen un tamaño
similar. Por favor compárelos y asegúrese de usarlos en ei
lugar correcto.
• 1 colador para la entrada de agua (p/n B23S4) para el
conector de la manguera de jardín.
Para retirar un anillo 'o" desgastado o dañado;
• Utilíce un destornillador de cabeza plana ¡»queflo, col&juelo
por debajo del anillo 'o' y sáquelo haciendo palanca,
MANTENIMIENTO DE LA BOMBA
Cambio del aceite de la bomba
Cambie el aceite cada 50 horas o una vez al año, lo que
suceda antes.
NOTA; Debe adquirir una botella de aceite para la bomba
previamente medido, N® de pieza 190S8SGS, llamando al
1-800-366-PART o en línea en www.sears.com.
Cambie el aceite como se indica a continuación:
1. Vacie el aceite dei motor y el combustible de la
limpiadora a presión.
2, Use una 8mm llave alien para extraer ei rapón negro de
aceite de la bomba que hay entre la salida de presión y
la entrada de ia manguera de riego.
manguera de alta prasíón
vaciar completamente la bomba de aceite, y vierta este
en un recipiente homologado.
4. Incline la limpiadora a presión hada el lado conttario y llene
la bomba son el aceite recomendado a través del mismo
orífiao (puede utilizar para ello un embudo pequeño).
5. Instale e! rapón negro de aceite de la bomba y apriételo
firmemente,
6. Coloque la limpiadora de presión en su posición normal
(de pie). Añada csmbustible y aceite de motor.
MANTENIMIENTO DEL MOTOR
Revisión del Nivel del Aceite
El nivel del aceite deberá ser revisado antes de cada uso o al
menos cada 5 horas de operación. Conserve el nivel dei aceite.
42
Page 43

Cambio de Aceite
Cambíe el aceite del motor después de las primeras 5 horas y
cada 50 horas, o anualmente, a partir de ese momento. Si
está utilizando su máquina lavadora a presión bajo
condiciones de extrema suciedad o polvo, o en un clima
demasiado caliente, haga ei cambio de aceite cada 25 horas.
3. Para limpiar cartucho, utiliza suavemente el lado plisado
de papel en una superficie plana.
4. Instele limpie (o nuevo) limpiador de aira en la base. El
limpiador aéreo debe quedar seguramente en base.
5. La cubierta dei lugar sobre limpiador de aire y aprieta
los tornillos.
^PRECAUCION
Evite ei contacto prolongado o repetido de piel con
aceite usado de motor.
El aceite usado del motor ha sido mostrado al cáncer de la piel
de la causa en ciertos animales del laboratorio.
Complétameníaíavacld expuso áreas cori el jabón y si agua.
MANTENGA FUERA DE ALCANCE DE
NIÑOS. NO contamíne. CONSERVE los
RECURSOS. VUELVA ACEITE USADO A la
COLECCION CENTRA.
Cambie e! aceite cort el motor caliente después del
funcionamiento, como se indica a continuación:
1. Retire el tapón del drenaje ubicado en la parte inferior
del motor,
2. Drene el aceite en un recipiente adecuado. Cuando la
caja del cigüeñal esté vacia, vuelva a colocar ei tapón
dei drenaje.
3. Deposite el aceite lentamente por la abertura de llenado
dei aceite. Vuelva a colocar y a apretar la varilla de
medición, retírela y revise el nivel del aceite. El nivel del
aceite debe estar en la marca de Tul!” (“Lleno”) de la
varilla de medición. NO llene por encima de esa marca.
4. Instale y apriete la varilla de medición/tapa del aceite
cuando la caja dei cigüeñal esté llena al nivel correcto.
5. Limpie los residuos de aceite.
..........
Remplace la Bujía
Remplats la bujía anualmente o cada 100 horas de operación.
1, Limpie el área alrededor de la bujía y retírela.
^ ADVERTEMGIA
M
^9
CUANDO AJUSTE O HAGA REPARACIONES A SU
MÁQUINA LAVADORA DE PRESIÓN ^ ^ ^ ^ ^ ^
• Siefnpre desconecte el alariibre de ia bújíai y cpléduelo dbrtdé
no pueda entrar en contacto con la bujía....................................
2, Retire y revise la bujía.
3, Para el uso del raemplazo o el bujía uniforme de la
4, Revise la separación del electrodo con un calibrador de
Chispear involuntario puede tener como
resultado el fuego o ei golpe eléctrico.
chispa de reòstato, ei Champion RG12YC o ei bujía
largo de la chispa de platino de vida, el Champion
RC12PYP,
alambre y ajuste la separación a 0,020 pulgadas
(0,50 mm), si es necesario.
Servicio del Depurador de Aire
Su motor no funcionará adecuadamente y puede dañarse si
usted lo hace funcionar con un depurador de aire sucio.
Suministre servicio ai depurador de aire una vez cada
100 horas de operación o una vez por año, lo que suceda
primero. Suministre servicio más frecuentemente si ia
unidad funciona bajo condiciones de mucha suciedad o
polvo. Los rapuestos se encuentran disponibles en su centro
de servicio local Sears.
Para suministrar servicio al depurador de aire, siga los
siguientes pasos:
1. Afloje dos torniilos y levante lejos cubierta.
Cubierta
Dos Tornillos
Cartucho
Base
2, Retire cuidadosamente aire limpiador de la base.
NOTA: Puede adquirir nuevos bujía ai número telefónico
1-800-3SS-PART.
Carburador
Si usted cree que su carburador necesita ajuste, visite su
centro de servicio Sears más cercano. El fundonamierito dei
motor podría resultar afectado a altitudes por encima de 3000 a
5000 pies. Para operaciones a elevaciones mayores, póngase
en contacto con el centro de servicio Sears más cercano.
Servicio del Apagachispas
El motor de su unidad no viene equipado de fábrica con un
apagachispas. En ciertas áreas, es ilegal operar motores
que no tengan apagachispas. Revise las leyes y
regulaciones locales. Si necesita apagachispas, !o puede
comprar en su centro de servicio Sears más cercarie. Para
obtener el número de parte llame ai 1.^00-366-PART,
Deberá suministrarle servicio ai apagachispas cada 50 horas
para conservarlo en buenas condiciones de funcionamiento.
Si el motor ha estado funcionando, el silenciador estará
bastante caliente. Deje que el silenciador se enfrie para
poder darle servicio ai apagachispas.
• Retire !a pantalla del apagachispas para limpieza e
inspección,
• Remplace la pantalla si está dañada.
43
Page 44

ALMACENAMIENTO
DESPUES DE CADA USO
NO deberá haber agua en la unidad por largos períodos de
tiempo. Los sedimentos de minerales se pueden depositar
en partes de la bomba y “congelar" su funcionamiento. Lleve
a cabo estos procedimientos después de cada uso:
1, Lave el sistema de químicos seleccionando el tanque
de enjuague del sistema y haciendo funcionar la
máquina lavadora a presión con la boquilla en el modo
de baja presión. Lave por un minuto o hasta que se
haya eliminado el químico del sistema,
2, Apague el motor y déjelo enfriar, después retire todas
las mangueras.
Desconecte el alambre de la bujía.
3,
4,
Saque todos los líquidos de la bomba halando la manija
de retroceso aproximadamente 6 veces. Esto deberá
evacuar la mayoría del liquido de la bomba.
Gire la perilla selectora Dial-A-Cleaner™ a la posición
5.
OFF.
6. Enrolle la manguera de alte presión y revísela para ver
si presenta daños. Los cortes en la manguera o el
desgaste de la misma pueden ocasionar fugas y
pérdida de presión. Si encuentra algún daño, remplace
la manguera. NO intente reparar una manguera
dañada. Remplace la manguera con la parte Craftsman
genuina,
7. Desconecte la manguera de la pistola y la toma de alta
presión de la bomba. Drene el agua de la manguera,
pistola, y extensión de la boquilla y limpíela con un
trapo.
S. Pase un extremo de la manguera por el orificio del
carrete de la manguera. Haga girar el carrete con la
manija para enrollar la manguera en el carrete. Coloque
el otro extremo de la manguera en la presilla ubicada
en el costedo de la unidad.
9, Vuelva a conectar el alambre a la bujía.
10, Almacene el sistema en una área limpia y seca.
jADVERTENClA! NUNCA almacene el motor con
combustible en el tanque en recintos cerrados o en
A
áreas encerradas con poca ventilación donde los
vapores puedan entraren contacto con llamas
abiertas, chispas o luces de piloto.
ALMACENAMIENTO PARA
INVIERNO
PRECAUGtON
Usted deberá proteger su unidad de las temperaturas de
congelamiento.
Si no lo hace, dañará pétrnanéntemente |a; bomba y la unidád
ПО: podrá: fMnC:ÍOnar., 1 11 1 1
La garantía no cubre al daño de la unidad ocasionado por
congeiamierto..............................................................................
Para proteger !a unidad de las temperaturas de
congelamiento;
1. Vacie todos los recipientes de químicos de la siguiente
manera:
a. Desconecte la manguera conectada ai adaptador de
inyección de químicos de la bomba. Coloque el
extremo de la manguera en un recipiente adecuado,
b. Mueva la perilla selectora al Tanque A y abra la
cubierta dei tanque. La fuerza de gravedad se
encargará de vaciar ei contenido del tanque en el
recipiente,
c. Cuando el tanque esté vacio, repita ei paso (b) para
los tanque B y C, utilizando un recipiente diferente
pare cada químico.
d. Vuelva a conectar la manguera al adaptador de
inyección de químicas de la bomba. Añada O.S litros
de agua limpia a cada tanque y cierne las cubiertas
de ios tanques.
2. Enjuague el sistema de químicos seleccionando un
tanque y ponga en funcionamiento la máquina lavadora a
presión con la boquilla en el modo de baja presión.
Enjuague hasta que cada tenque esté vacío, después
mueva !a perilla selectora al siguiente tanque. El último
tanque que se debe vaciar es el tanque de Enjuague del
Sistema.
3. Utilice un protector de bomba, disponible en Sears con
el número de catálogo 7174403, para cuidar la bomba.
Aquél protege a la unidad contra el congelamiento y
lubrica tanto los pistones como los empaques.
4. Si el protector de bomba no este disponible, conecte un
tramo de 3 pies de manguera de jardín a la entrada de
agua. Vierte anticongelante RV (anticongelante sin
alcohol) en la manguera. Jale la manija de arranque
dos veces. Desconecte después la manguera de 3 pies.
..............
: ' ■ ■ : ■ : ■ ■ : i MI'
.......
44
Page 45

ALMACENAMIENTO PROLONGADO
Si usted no pianea usar la máquina lavadora a presión por
más de 30 días, deberá preparar el motor para uri
almacenamiento prolongado.
Es importante evitar la formación de depósitos de goma en
las partes esenciales del sistema del combustible tales
como carburador, filtro del combustible, manguera o tanque
del combustible durante el almacenamiento. También, la
experiencia indica que ios combustibles con mezclas de
alcohol (llamados gasohol, etanol o metano!) pueden atraer
la humedad, lo que lleva a la separación y formación de
ácidos durante el almacenamiento. La gasolina àcida puede
dañar el sistema del combustible de un motor durante el
almacenamiento.
Proteja el Sistema de Combustible
Aditivo para CombustiblB:
Si va a usar aditivo para combustible, llene el tanque de
combustible con gasolina fresca. Si el tonque está
parcialmente lleno, ei aire del tanque va a promover el
deterioro dei combustible durante el almacenamiento. El
motor y el combustible pueden ser almacenados hasta
24 meses con aditivo.
• Deposite el aditivo para combustible siguiendo las
instrucciones del fabricante.
• Asegúrese de tener conectado y ABIERTO el suministro
de agua a la entrada de la bomba,
• Ponga en funcionamiento el motor en un área
descubierta por 10 minutos para asegurarse de que la
gasolina tratada ha remplazado la gasolina no tratoda del
carburador.
Si no usa aditivo para combustible, retire todo el
combustible del tanque y haga funcionar ei motor hasta que
se detenga por falta de combustible.
Cambio de Aceite
Con el motor todavía caliente, drane ei aceite de la caja del
cigüeñal. Vuelva a llenarlo con el grado de aceite
recomendado. Vea "Cambio de Aceite" en la página 42.
Protección de la Bomba
A protege al salvador de bomba de uso de bomba Sears a
previene congelar ei daño y lubrica émbolos y sellos.
NOTA: El protector de (a bomba, número de ítem Sears
número 7174403, eston disponible sólo como un accesorio
opcional. No es incluido con la arandela de la presión.
PRECAUCÍON
Usted deberá proteger su unidad de las temperaturas de
congelamiento.
Si no lo hace, dañará patmanentemsnte la bomba y la unidad
no; podrá; fúndonar. ^ ^,;;' ^,;' ■ ■
La garantía no cubre el daño de !a unidad ocasionado por
congeiamiento.............................................................................
/U uso e! salvador de bomba:
.......
A RRECAUCION
Lea y siga todo advierte y las advertencias en el
PumpSaver pueden tnarcar.
Siempre protección de ojo de uso cuando se usa PumpSaver.
1. Conecte manga en el salvador de bomba puede a la
cala de la bomba.
2. El empujón en puede la cima a distribuye bomba
salvador.
3. Cuándo líquido de salvador de bomba comienza a la
salida de la bomba de la salida, la bomba es protegida.
4. Quite bomba salvador de la cala de bomba.
OTROS
• NO almacene gasolina de una estación a otra.
• Sí es posible, almacene su unidad en un recinto «rrado
y cúbrala para protegeria del polvo y la suciedad.
ASEGURESE DE VACIAR EL TANQUE DEL
CORABUSTIBLE.
IMPORTANTE: NUNCA cubra Su máquina lavadora a
presión cuando el motor y el área del escape estén
calientes.
Aceite el Diámetro Interior del Cilindro
• Retire la bujía. Rocíe aproximadamente 1 onza de aceite
(impío para motor dentro del cilindro. Cubra el orificio de
la bujía con un trapo. Hale la manija de retroceso
lentamente para distribuir el aceite. Evite el rociado del
oríflcío de la bujía,
• Instale la bujía. NO conecte el alambre de la bujía.
45
Page 46

REPARACION DE DAÑOS
Problema Causa
1:
La boquiiia está en el modo de baja
presión,: 1 1 11 /: 1.1 1 ■ ■
La entrada de agua está: bioqueada.
Suministro de agua inadecuado.
La manguera: de entrada está;::
La bomba presenta los
Siguientes problemas; no
produce presión, produce una
pmsión errada, traqueteo,
pérdida de presión, bajo
volumen de agua.
Ei detórgente nó se mezcla
con el rociado
El motor funciona bien
cuando rto tiene cargas, pero
funciona "mal" cuando se
conecta una carga.
Ei motor nó arranca; o
arranca y funciona mal.
Ei motor se apaga durante ia
operación. T T
........................
..................
doblada o presenta :fugas,
El :coiador de la :mar?guera de entrada
está tapado, . i
encima de los lÓQ^F, : : : -
bloqueada: o presenta:fugas.
La pistola presenta: fugas.
9.
La boquilla está obstruida
Bomba defectuosa, :
10,
La llnea detergente se ha obstruido o
está doblada.
Et filtro del: tanque de los químicos
estátópadQ, : : : : : : : : : - : : ■
Sucio en ei filtro de Ja línea. : : ::::
La boquiiia está en el modo de alta:
■presión.:'■■:.' 1 : :.::'i ■ ■
:L3' perilla Diai-a-Cieaner™ está en la:
5.
posición de apagado .........................
La velocidad dei: motor es demasiado
lenta,....................................................
Depurador de aire sucio.:
Sin gasolina.:.
Gasolina vieja. : : : ■ :
4.
Ei: alambre de !a :bujía no está
cfflnectódo a la bujía. ..............
Bujía maia.: :::::: i
Agua en la gasolina. : :
Estrangulación excesiva.
Mezcla de combustible demasiado
rica.
8.
Válvula de entrad a trabada en ia
posición abiertó o cerrada. ; : : : : T : :
Et motor ha perdido compresión.
10.
Sin
gasolina. Llene el tónque de combustibie.
.......
Suministro de agua esM por:
manguera de altó presión está
.
.....
..............................
::
Solución
Mueva: ta boquilla hacia atrás pára el
modo de alta presión,
Li:mpie ia entrada, : :
Proporcione flujo de agua adecuado.
Estire !a manguera: de entrada, coloque
un parche en ¡a fuga.: : : ::: ^
Revise y limpie et :cffltador de ia
manguera'de entrada. :::::'
Proporciorte suministro de agua más fría.:
Retire las obstrucciones déla manguera
desalida.l''': I 1 I 1
Remplace, la pistola,. : : : : : : : :
Limpie ia boquilia, : :
Póngase en contacto con: el centro de
10
servicio Sears.......................................
1. : : Repare o remplace la línea del
: : ' : detergente, : ■ ■ ■ ■
2. : ' Remplace el tanque. ' I : : : : :
3. : Vea "Cheque En: el Fiitfo de la Línea". :
4. Mueva: ta boquilla hacia adelante para el
modo de baja presión. : : :::::::
5. : : :Gire la perilla a: !a pasición dei químicffl::
.....
que'desea.. .............................................
Mueva el: contro! de la váivuia de regulación a
la posición FAST fRAPIDÓ),' Si: el motor : I f
continua funcionando mal:,: póngase en : :
contacto con el centro de servicio Sears.:
Limpie o remplace e! depurador de aire.
Llene el tanque de combustible. : : : : :,
Drene el tanque de gasolina; llénelo con
combustible fresco, :
Conecte el : alambre: a la buj:ía:
Remplace la bujía.
Drene el tónque de gasolina
combustible fresco, : ':
Abra el cebador por Icompleto y haga
girar: e! :motor.:■
Póngase en contacto con el centro de
servicio Sears. : : : : : 1 :
9.
Póngase en contacto con el centro de
servicio Sears. ■ :. :
10.
Póngase: en contacto con el centro de
servicio Sears.
.........................
..........
: :
.......
.....
: :
; llénelo con
........
: I
:
........
: I
Ei motor no tiene fuerza.
Ei motor intenta estabilizarse
o su funcionamiento no es
constente.. ::::::::::::::::::::::::::::
Filtro de aire sucio. Remplace el filtro de aire.
Cebador abierto demasiado: rápido
46
Mueva: et cebador a !a posición intermedia
hasta: que el'motor funcione normalmente.
Page 47

OâRÂNTÎÂ OEL 3f3TEMÂ OE CONTROL OE EMi3fONE3
Sears, Roebuck and Со., U.S.A. (Sears), California Air Resources Board (Consejo de Recursos sobre el Aire de
California, CARB, por sus siglas en inglés) y United States Errvironmental Protection Agency (Agencia de Protección
Ambiental de EE.UU,, EPA, por sus siglas en inglés).
Deciareción de garantía del sistema de control de emisiones
(derechos y obligaciones del propietario para la garantía contra defectos)
LA COBERTURA DE LA CSAHANTÍA DE CONTROL DE EMISIONES SE
APLICA A LOS MOTORES CERTIFICADOS ADQUIRIDOS EN
CALIFORNIA EN 1995 Y POSTERIORMENTE, QUE SE UTILICEN EN
CALIFORNIA, Y A MOTORES CERTIFICADOS MODELO 1S97 Y
POSTERIORES QUE SEAN ADQUIRIDOS Y UTILIZADOS EN OTRA
REGIÓN DE ESTADOS UNIDOS (Y A PARTIR DEL 1° DE ENERO DE
2001, EN CANADÁ}.
Declaración de earantía sobre el control de emistone» de la EPA de
EE.UU. ¥ California.
El California A'r Resources Boaní (CARB), la EPA de EE.UU. y Sears se
complacen en explicar la Garantía para el sistema de control de emisiones
fara motores pequeños para exteriores (SORE) modelos afio 2000 y
posteriores. En California, los nuevos motores pequeños para exteriores se
deben diseñar, construir y equipar para cumplir юп las estrictas normas
del estado oontra el smog. En otras regiones de Estados Unidos, los
nuevos motores para interiores de ignición por chispa certificados para
modelos afio 198? y posteriores deben cumplir oon normas similares
esteblecidas por la EPA de EE.UU. Sears debe garantizar e! sistema de
con&oi de emisiones de su motor para los periodos indicados a
continuación, siempre y cuando no se haya abusado, descuidado o dado
mantenimiento inoorreoto al motor pequeño para exteriores.
Su sistema de control de emisiones podr^ incluir partes como el
carburador o el sistema de inyección de combustible, el sistema de
ignición y el convertidor catelltico. También se pueden incluir mangueras,
correas, conectores y otros componentes relacionados con las emisiones.
Cuando exista una condición que pueda ser cubierta por la garantía,
Sears reparará el motor pequeño para exteriores sin costo alguno,
incluyendo el diagnóstico, las partes de repuesto y la mano de obra.
Cobertura de la garantía de Sears contra defectos en el control de
emisiones
Los motores pequeños para exteriores modelos 1895 y posteriores tienen
una garantía de dos afios. Si alguna parte de su motor relacionada con
las emisiones este defectuosa, Sears la reparará o sustituirá.
Responsabilidades del propietario para la garantía
Como propietario del motor pequeño para exteriores, usted es
responsable de realizar las actividades de mantenimiento requeridas
que se indican en este manual del propietario. Sears recomienda que
conserve todos los recibos que cubran el mantenimiento de su motor
pequeño para exteriores, pero Sears no puede negar la garantía
solamente por la feita de recibos ni por su imposibilidad de garantizar la
realización de todas las actividades de mantenimiento programadas.
Como propietario del motor pequeño para exteriores, usted siempre
debe tener en cuente que Sears podré negar la cobertura de ia garantía
si su motor pequeño para exteriores o una parte del mismo presente
fallas debido a abuso, descuido, mantenimiento incorrecto o
modificadones no aprobadas.
Usted es responsable de presentar su motor pequeño para exteriores a
un Centro de servicio Sears aprobado tan pronto como se presente el
problema. Las reparaciones bajo garantía deberán concluirse en un
periodo razonable, que no excederá de 30 dias.
Si tiene alguna pregunta con respecto a sus derechos y
responsabilidades para la garantía, póngase en contacto con un
representante de servicio Sears al i-.aoo-469.4663.
Disposición« da la garantía de Sears contra defecto» en et control
de emisiones
Las siguientes son disposiciones especificas relacionadas con la
cobertura de la garantía contra defectos en el control de emisiones,
1. Partes garantizadas
La cobertura bajo esta garantía incluye solamente aquellas partes
que se enumeran a ooniinuaoión (las partee del sistema de control
En EE.UU- y Canadá contamos con una línea de emergencia las 24 horas (1-8004694663}, que ofrece un menù de mensajes pregrabados con
información sobre mantenimiento de productos.
de emisiones) en la medida que dichas partes hayan estado
presentes en el motor adquirido.
a. Sistema de medición de combustibie.
Sistema de enriquecimiento para arranque en frío.
Carburador y partes internas.
Bomba de combustible.
b. Sistema de inducción de aire.
Filtro de aire.
Colector de entrada.
c. Sistema de ignición
BujíasSistema de ignición por magneto,
d. Sistema catalizador.
Convertidor oaíalitíco.
Colector de escape.
Sistema de inyección de aire o válvula por impulsos.
e. Distintos elementos utilizados en los sistemas anteriores.
Váivuias e interruptores de vacío, temperatura, posición y de
detección de tiempo.
Conectores y conjuntos.
Vigencia de la cobertura
Sears garantiza ai propietario inicial y a cada propietario
subsiguiente que las partes garantizadas estarán libres de defectos
en material y en mano de obra, que ocasionen fallas de las partes
garantizadas durante un periodo de dos años a partir de la fecha
en que el motor sea entregado al comprador minorista.
NO habrá cargos
La reparación o reemplazo de cualquier parte garantizada se
realizará sin cargo alguno para el propietario, ¡nduyendo la mano de
obra de diagnóstico que derive en la determinación de que una parte
garantizada está defectuosa, si la labor de diagnóstico se realiza en
un Centra de servicio Sears aprobado.
Reclamos y excíuslone» de cobertura
Los reclamos vinculados oon la garantía se presentarán conforme a
las disposiciones de la Póliza de garantía de Sears. La cobertura de
la garantía se excluirá para aquellas fallas de partes garantizadas
que no sean partes originales de Sears o debido a abuso, descuido
o mantenimiento incjorrecto, según se establece en la Póliza de
garantía de motores de Sears. Sears no es responsable por la
cobertura de fallas de partes garantizadas ocasionadas por el uso
de partes adicionales, no originales o modificadas.
Mantenimiento
Cualquier parte garantizada cuyo reemplazo no esté programado
como mantenimiento requerido o que esté programada únicamente
para inspección frecuente con el fin de "reparar o reemplazar
conforme sea necesario", estará garantizada en cuanto a defectos
por el período de la garantía. Cualquier parte garantizada cuyo
reemplazo esté programado como mantenimiento requerido tendré
solamente una garantía contra defectos únicamente por el período
hasta el primer reemplazo programada para esa parte. Se podra
utilizar cualquier parte de repuesto que tenga un rendimiento y
durabilidad equivalentes, al realizar cualquier actividad de
mantenimiento o reparación. El propietario es responsable de
realizar todo el mantenimiento requerido, según se define en este
manual del propietario.
Cobertura consiguióme
La cobertura bajo la presente se ampliará a la falla de cualquier
componente del motor provocada por un desperfecto en cualquier
parte garantizada que siga gozando de la cobertura de la garantía.
47
Page 48

,qiVí''i,",,-/,';; i'.. u‘:n:' iv)'';*.,;'"'i íí““';?;'', „
■ y ■ 'i'i:í-í:'i^
■■:-í', r,; ^'í!mí?ftír:íw^i/'' ?
.'if ''kx,/.'
Your Home
^'í Jj/■'••''
For repair - in your home - of all major brand appliances,
m
''Sii'
:-Sf'
■
'O!’'
: l' V,;
ínsf,
jí'^íí^;
',' i'^'lj
í¿,''7''
Í',ÍÜ
.Ji'r'';?
i?;'
lawn and garden equipment, or heating and cooling systems,
no matter who made it, no matter who sold it!
For the replacement parts, accessories and
owner’s manuals that you need to do-it-yourself.
For Sears professional installation of home appliances
and items like garage door openers and water heaters.
1-800-4-MY-HOME® Anytime, day or night
f'/; I, ,'/,
\l‘;>y/¿
^i'l'.ií'
if.'-J,
>1,V,!,
‘i'%' ,
S^í'y
(1-800-469^663) (U.S.A. and Canada)
www.sears.com www.sears.ca
Our Home
For repair of carry-in products like vacuums, lawn equipment,
'/n't, 'i
;. 'jV'
^ l'/M
i-';/'
V 'A,,
and electronics, call or go on-line for the nearest
Sears Parts and Repair Center.
1-800-488-1222 Anytime, day or night (U.S.A. oniy)
WWW.sears.com
fS
in,
v4i
To purchase a protection agreement on a product serviced by Sears:
'i
1 -800-827-6655 (U.SA) 1 -800-361 -6665 (Canada)
(6)i{
Í
J .'U
, i'I '
■> i.JI'.'l
‘tii'U,
Para pedir servicio de reparación
a domicilio, y para ordenar piezas:
1-888-SU-HOGAR^^
V(
'¿j'ij'i'j'
'{■if/,'-
j. 'SdSi'i'y -
l'-n 'vX'
li. J r .* f' Al I I
(1-88&-7846427)
Au Canada pour service en frangais:
l-OOO-LE-FOYER“'^
(1-8005336937)
www.sears.ca
‘/'y !\^-y Y<t,
I ¡/^'i /;
© Sears, Roebuck and Ca
® Registered Trademark / Trademark / Service Mark of Sears, Roebuck and Co.
® Marca Registrada / ™ Marca de Fábnca / Marca de Servicio de Sears, Roebuck and Co.
Marque de commerce / Marque déposée de Sears, Roebuck and Co.
n-t‘
nS
}j ‘I
M
fi'r'O '
„ ■■! J I
n
 Loading...