

Page 1
Operator's Manual
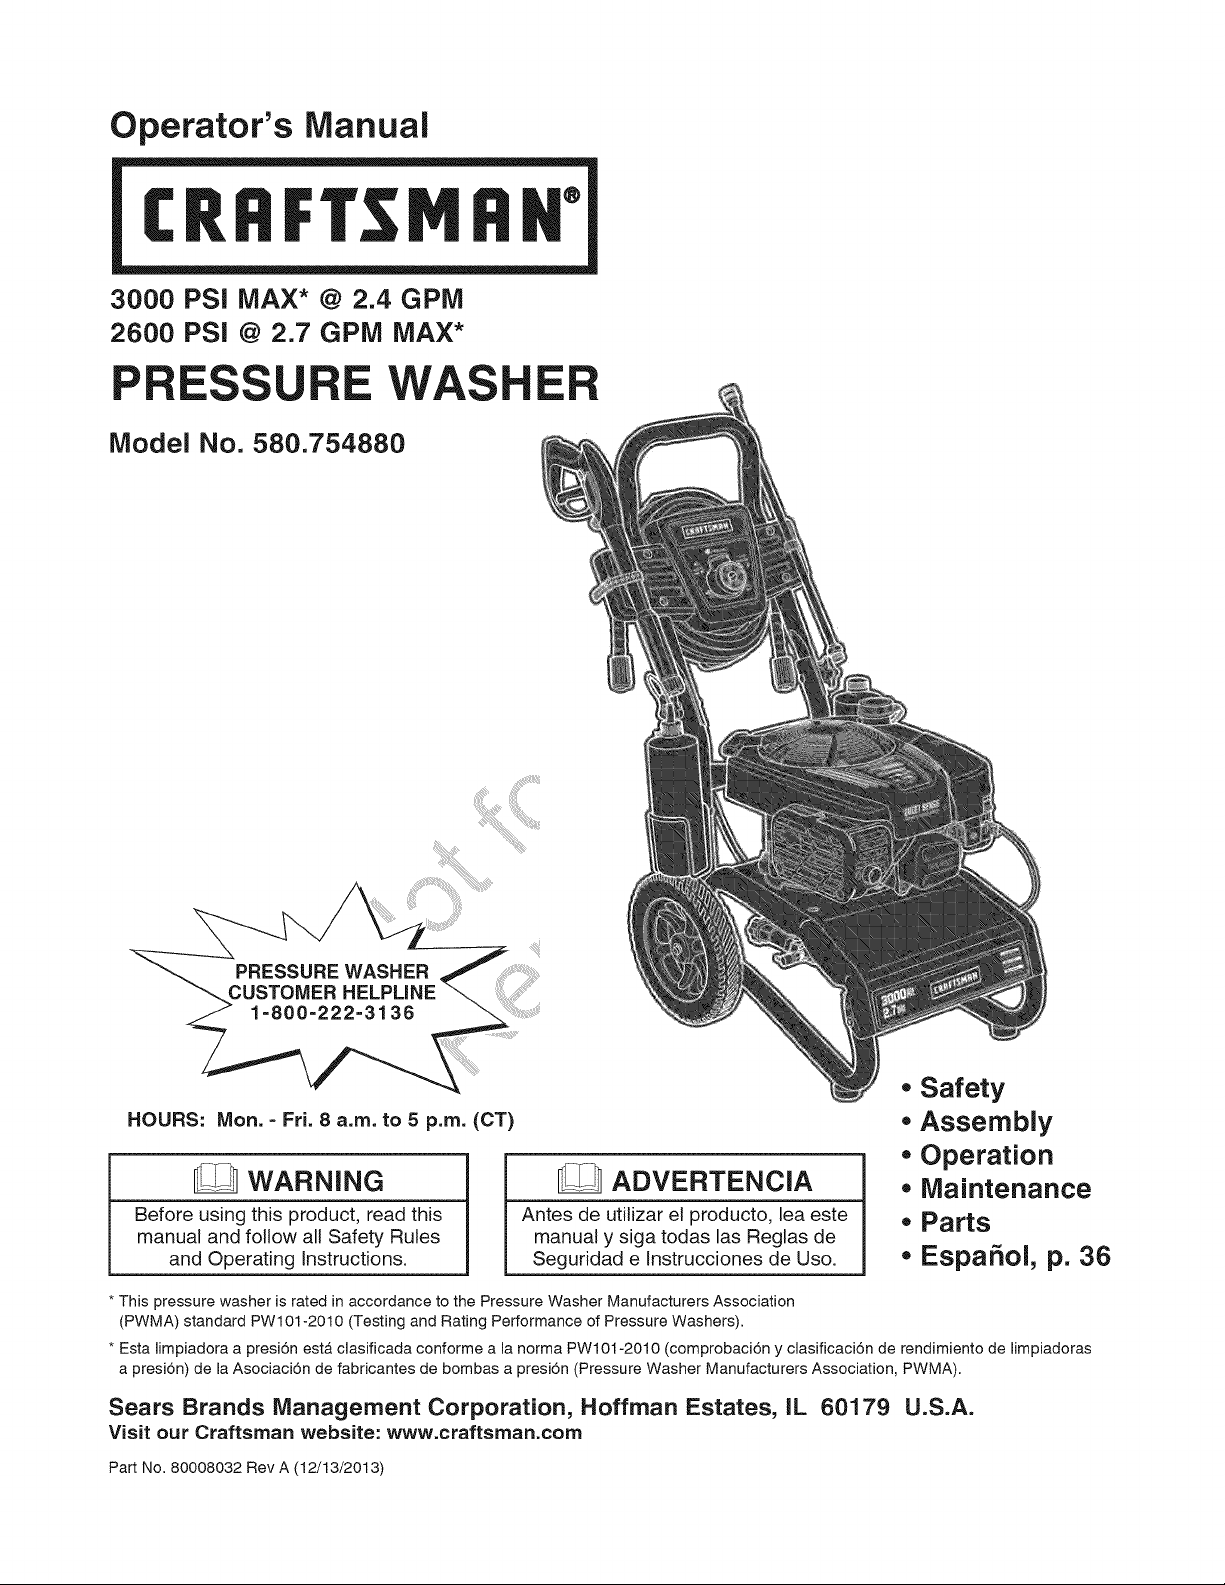
3000 PSi MAX* @ 2.4 GPlVl
2600 PSI @ 2.7 GPlVl MAX*
PRESSURE WASHER
Model No. 580.754880
®
- Safety
HOURS: Mon. - Fri. 8 a.m. to 5 p.m. (CT)
- Assembly
- Operation
WARNING
Before using this product, read this
manual and follow all Safety Rules
and Operating Instructions.
* This pressure washer is rated in accordance to the Pressure Washer Manufacturers Association
(PWMA) standard PW101-2010 (Testing and Rating Performance of Pressure Washers).
* Esta limpiadora a presi6n esta clasificada conforme a la norma PW101-2010 (comprobaci6n y clasificaci6n de rendimiento de limpiadoras
a presi6n) de la Asociaci6n de fabricantes de bombas a presi6n (Pressure Washer Manufacturers Association, PWMA).
Sears Brands Management Corporation, Hoffman Estates, IL 60179 U.S.A.
Visit our Craftsman website: www.craftsman.com
Part No. 80008032 Rev A (12/13/2013)
Antes de utilizar el producto, lea este
manual y siga todas las Reglas de
Seguridad e Instrucciones de Uso.
ADVERTENCIA
- Maintenance
" Parts
- Espa_ol, p. 36
Page 2
CRAFTSMAN TWO YEAR FULL WARRANTY
FOR TWO YEARS from the date of purchase, this product is warranted against any defects in material or
workmanship. Defective product will receive free repair or replacement if repair is unavailable.
For warranty coverage details to obtain free repair or replacement, visit the web site: www.craftsman.com
This warranty covers ONLY defects in material and workmanship. Warranty coverage does NOT include:
• Expendable itemsthat can wear out from normal use within the warranty period, such as spray guns, hoses,
nozzle extensions, nozzles, spray tips. filters or spark plugs.
Product damage resulting from user attempts at product modification or repair or caused by product
accessories.
Repairs necessary because of accident or failure to operate or maintain the product according to aH supplied
instructions.
Preventive maintenance, or repairs necessary due to improper fue_mixture, contaminated or stale fuel.
This warranty is void if this product is ever used while providing commercial services or if rented to another person.
This warranty gives you specific legal rights, and you may also have other rights which vary from state to state.
Sears Brands Management Corporation, Hoffman Estates, _L 60179
Congratulations on making a smart purchase.
Your new Craftsman® product is designed and
manufactured for years of dependab!e operation. But
like aHproducts, it may require repair from time to time.
That's when having a Repair Protection Agreement can
save you money and aggravation.
Here's what the Repair Protection Agreement*
includes:
Expert service by our 10,000 professional repair
specialists
Unlimited service and no charge for parts and
labor on aHcovered repairs
Product replacement up to $1500 if your covered
product can't be fixed
Discount of 25% from regular price of service
and related installed parts not covered by the
agreement; also, 25% off regular price of preventive
maintenance check
Fast hempby phone = we call it Rapid Resolution =
phone support from a Sears representative. Think of
us as a "talking owner's manuaF.
© 2013
Once you purchase the Repair Protection Agreement,
a simple phone call is aHit takes for you to schedule
service. You can call anytime day or night, or schedule
a service appointment online.
The Repair Protection Agreement is a risk-free
purchase. If you cancel for any reason during the
product warranty period, we will provide a full refund.
Or, a prorated refund anytime after the product
warranty period expires. Purchase your Repair
Protection Agreement today!
Some _imitations and exclusions apply. For prices
and additional information in the U.SoA. call 1-800-
827-6655.
* Coverage in Canada varies on some items. For
full details, call Sears Canada at 1o800o361o6665o
Sears Installation Service
For Sears professional installation of home appliances,
garage door openers, water heaters, and other
major home items, in the U.S.A. or Canada call
1-800-4°MY-HOME®.
Page 3
Readthismanualcarefully and become
familiar with your pressure washer. Know
its applications, its limitations, and any
hazards involved.
_mportant Safety _nformation
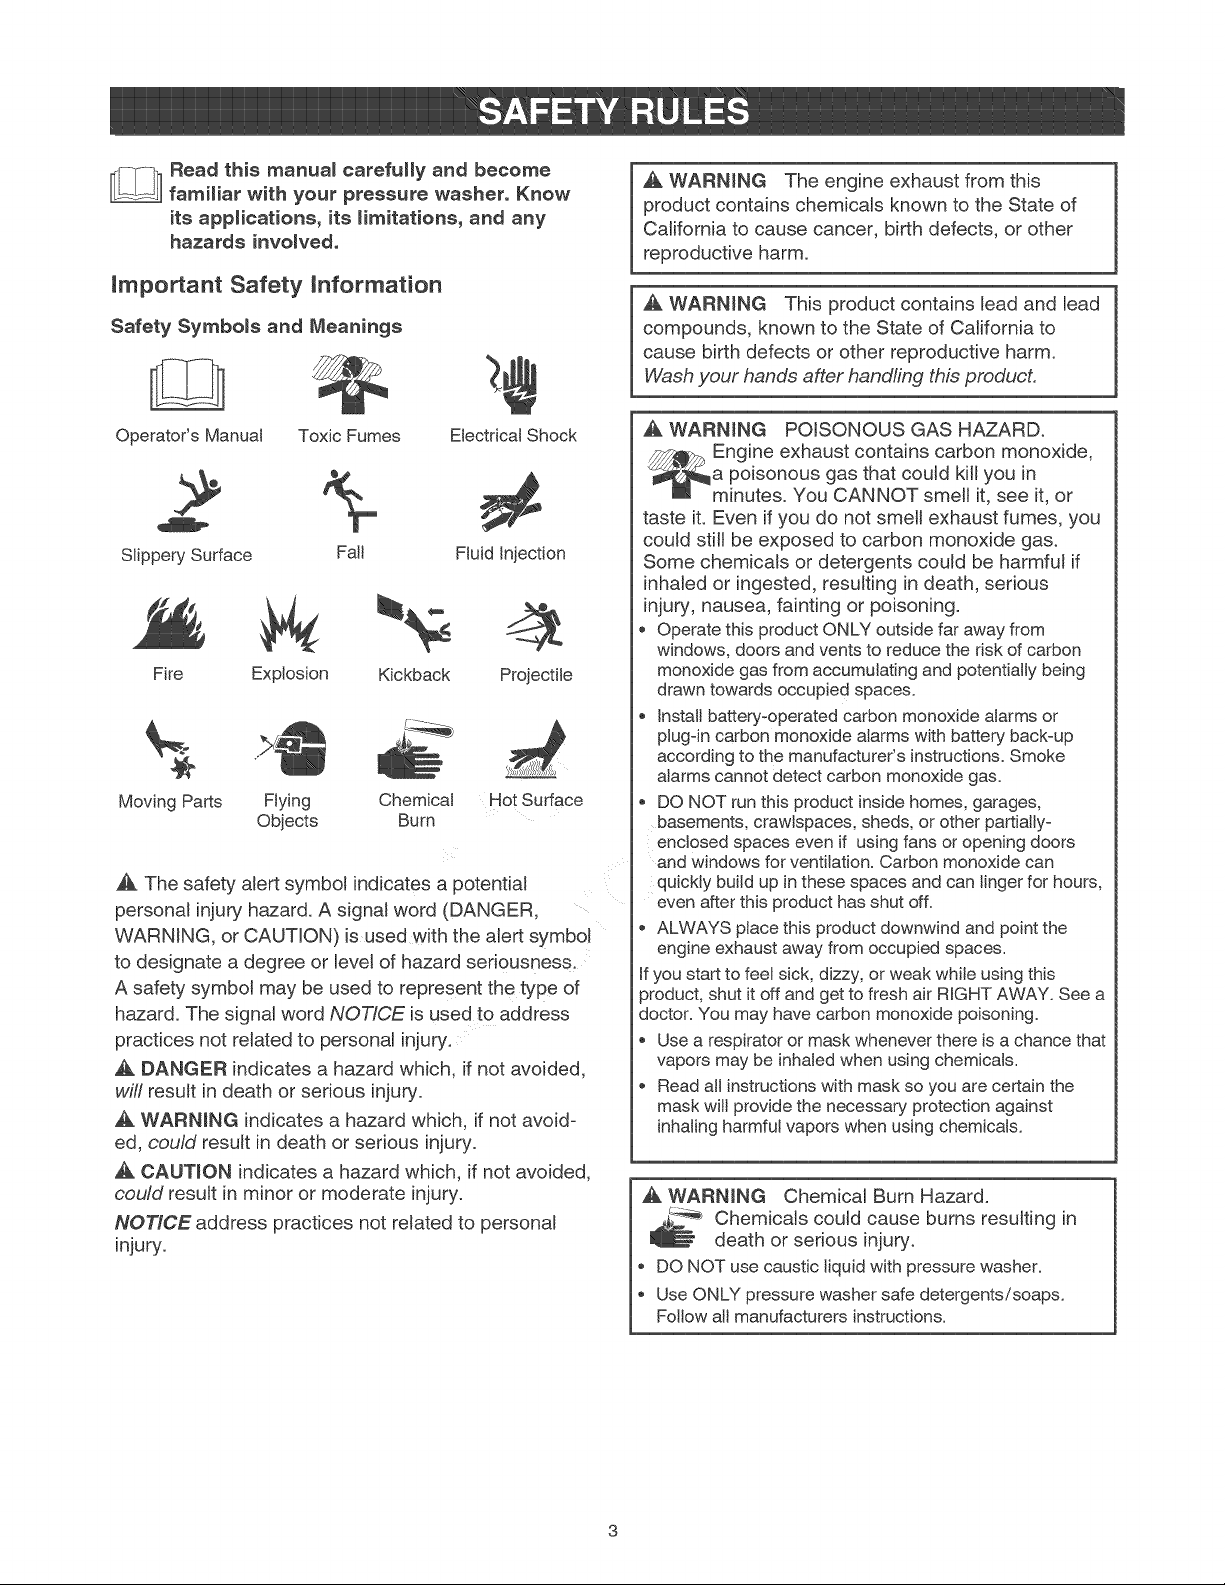
Safety Symbols and Meanings
_, WARNING The engine exhaust from this
product contains chemicals known to the State of
California to cause cancer, birth defects, or other
reproductive harm.
WARNmNG This product contains lead and lead
compounds, known to the State of California to
cause birth defects or other reproductive harm.
Wash your hands after handling this product.
Operator's Manual Toxic Fumes
Slippery Surface Fail Ftuid injection
Fire Explosion Kickback Projectile
Moving Parts Ftying Chemicat Rot Surface
Objects Burn
ElectricalShock
_k The safety alert symbol indicates a potential
personal injury hazard. A signal word (DANGER,
WARNING, or CAUTION) is used with the alert symbo_
to designate a degree or level of hazard senousness.
A safety symbol may be used to represent the type of
hazard. The signal word NOTICE is used to address
practices not related to personal injury.
_, DANGER indicates a hazard which, if not avoided,
will result in death or serious injury.
WARNING indicates a hazard which, if not avoid =
ed, could result in death or serious injury.
CAUTION indicates a hazard which, ifnot avoided,
could result in minor or moderate injury.
NOTICE address practices not related to personal
injury.
_k WARNING POISONOUS GAS HAZARD.
Engine exhaust contains carbon monoxide,
a poisonous gas that could kill you in
minutes. You CANNOT smell it, see it, or
taste it. Even if you do not smell exhaust fumes, you
couJd stir be exposed to carbon monoxide gas.
Some chemicals or detergents could be harmful if
inhaled or ingested, resulting in death, serious
injury, nausea, fainting or poisoning.
o Operate this product ONLY outside far away from
windows, doors and vents to reduce the risk of carbon
monoxide gas from accumulating and potentially being
drawn towards occupied spaces.
Install battery-operated carbon monoxide atarms or
plug-in carbon monoxide atarms with battery back-up
according to the manufacturer's instructions. Smoke
alarms cannot detect carbon monoxide gas.
, DO NOT run this product inside homes, garages,
basements, crawtspaces, sheds, or other partially=
enclosed spaces even if using fans or opening doors
and windows for ventilation. Carbon monoxide can
quickly build up in these spaces and can linger for hours,
even after this product has shut off.
, ALWAYS ptace this product downwind and point the
engine exhaust away from occupied spaces.
If you start to feel sick, dizzy, or weak while using this
sroduct, shut it off and get to fresh air RIGHT AWAY. See a
doctor. You may have carbon monoxide poisoning.
, Use a respirator or mask whenever there is a chance that
vapors may be inhated when using chemicals.
, Read atl instructions with mask so you are certain the
mask will provide the necessary protection against
inhaling harmful vapors when using chemicals.
WARNING Chemical Burn Hazard.
_> Chemicals could cause burns resulting in
death or serious injury.
DONOT usecaustic liquid with pressurewasher.
Use ONLYpressure washer safe detergents/soaps.
Followall manufacturersinstructions.
Page 4
WARNING Starter cord kickback (rapid
_, _,. retraction) will pull hand and arm toward
engine faster than you can let go which
could cause broken bones, fractures,
bruises, or sprains resulting in serious injury.
, NEVER pull starter cord without first relieving spray gun
pressure.
When starting engine, pull cord slowly until resistance is
felt and then pull rapidly to avoid kickback.
After each starting attempt, where engine fails to run,
always point spray gun in safe direction, press red button
and squeeze spray gun trigger to release high pressure.
Firmly grasp spray gun with both hands when using high
pressure spray to avoid injury when spray gun kicks
back.
A WARNING Risk of electrocution.
Contact with power source could cause
electric shock or burn resulting in death or
serious injury.
, NEVER spraynear powersource.
_, WARNING The high pressure stream of water
that this equipment produces could cut
through skin and its underlying tissues,
resulting in serious injury and possible
amputation.
Spray gun traps high water pressure, even when
engine is stopped and water is disconnected, which
could result in serious injury.
If cut by fluid, call physician immediately. DO NOT treat
as a simple cut.
DO NOT allow CHILDREN to operate pressure washer.
NEVER repair high pressure hose. Replace it.
NEVER repair leaking connections with sealant of any
kind. Replace o-ring or seal.
NEVER connect high pressure hose to nozzle extension.
Keep high pressure hose connected to pump and Spray
gun while system is pressurized.
DO NOT lift or tilt surface cleaner from horizontal surface
while connected to spray gun. Release spray gun trigger
prior to lifting or tilting.
ALWAYS point spray gun in safe direction, press red
button and squeeze spray gun trigger to release high
pressure, every time you stop engine.
, NEVER aim spray gun at people, animals, or plants.
DO NOT secure spray gun in open position.
DO NOT leave spray gun unattended while machine is
running.
NEVER use a spray gun which does not have a trigger
lock or trigger guard in place and in working order.
Always be certain spray gun, nozzles and accessories
are correctly attached.
_k WARNING Fuel and its vapors are extremely
explosive
_ flammable and which could
WHEN ADDING OR DRAINING FUEL
, Turn pressure washer engine OFF and let it cool at least
2 minutes before removing fuel cap. Loosen cap slowly to
relieve pressure in tank.
, Fill or drain fuel tank outdoors.
DO NOT overfill tank. Allow space for fuel expansion.
If fuel spills, wait until it evaporates before starting engine.
Keep fuel away from sparks, open flames, pilot lights,
heat, and other ignition sources.
Check fuel lines, tank, cap and fittings frequently for
cracks or leaks. Replace if necessary.
DO NOT light a cigarette or smoke.
WHEN STARTING EQUIPMENT
, Ensuresparkplug, muffler,fuelcap, andair cleaner are in place.
DO NOT crank engine with spark plug removed.
WHEN OPERATING EQUIPMENT
, DO NOT operate this product inside any building, carport,
porch, mobile equipment, marine applications, or enclosure.
, DO NOT tip engine or equipment at angle which causes
fuel to spill.
, DO NOT spray flammable liquids.
WHEN TRANSPORTING,
MOVING OR REPAIRING EQUIPMENT
, Transport/move/repair with fuel tank EMPTY or with fuel
shutoff valve OFF.
, DO NOT tip engine or equipment at angle which causes
fuel to spill.
- Disconnect spark plug wire.
WHEN STORING FUEL OR EUIPMENT WITH FUEL IN TANK
Store away from furnaces, stoves, water heaters, clothes
dryers, or other appliances that have pilot light or other
ignition source because they could ignite fuel vapors.
WARNING Exhaust heat/gases could ignite
Contact with muffler area could cause burns
resulting in serious injury.
DO NOT touch hot parts and AVOID hot exhaust gases.
Allow equipment to cool before touching.
Keep at least 5 feet (1.5 m) of clearance on all sides of
pressure washer including overhead.
It is a violation of California Public Resource Code,
Section 4442, to use or operate the engine on any forest-
covered, brush-covered, or grass-covered land unless
the exhaust system is equipped with a spark arrester, as
defined in Section 4442, maintained in effective working
order. Other states or federal jurisdictions may have
similar taws.
Contact the original equipment manufacturer, retailer,
or dealer to obtain a spark arrester designed for the
exhaust system installed on this engine.
Replacement parts must be the same and installed in the
same position as the original parts.
cause burns, fire or explosion
resulting in death or serious injury.
combustibles, structures or damage
fuel tank causing a fire, resulting in
death or serious injury.
Page 5
A.WARNINGUseofpressurewashercould
,_ createpuddlesandslippery
surfacescausingyoutofall
resultingindeathorseriousinjury.
Kickbackfromsprayguncouldcauseyoutofall
resultingindeathorseriousinjury.
, Operate pressure washer from a stable surface.
The cleaning area should have adequate slopes and
drainage to reduce the possibility of a fall due to slippery
surfaces.
Be extremely careful if you must use the pressure washer
from a ladder, scaffolding, or any other similar location.
Firmly grasp spray gun with both hands when using high
pressure spray to avoid injury when spray gun kicks
back.
_, WARNING Unintentional sparking could cause
fire or electric shock resulting in
death or serious injury.
WHEN ADJUSTING OR MAKING REPAIRS TO YOUR
PRESSURE WASHER
, Disconnect the spark plug wire from the spark plug and
place the wire where it cannot contact spark plug.
WHEN TESTING FOR ENGINE SPARK
, Use approved spark plug tester.
DO NOT check for spark with spark plug removed.
A. WARNmNG Starter and other rotating parts
could entangle hands, hair, clothing, or
accessories resulting in serious injury.
, NEVER operate pressure washer without protective
housing or covers.
, DO NOT wear loose clothing, jewelry or anything that
could be caught in the starter or other rotating parts.
, Tie up tong hair and remove iewelry.
WARNmNG Risk of eye or bodily injury.
Spray could splash back or propel
objects resulting in serious injury.
, Always wear indirect vented (chemical splash) safety
goggles marked to comply with ANSI Z87.1 when using
or in vicinity of this equipment.
, NEVER substitute safety gtasses or dry-condition
goggles for indirect vented safety goggles.
, Always wear protective clothing such as a tong-sleeved
shirt, tong pants and close4oed shoes.
, NEVER operate pressure washer when barefoot or
wearing sandals or shorts.
CAUTION Excessively high operating speeds
could result in minor injury.
Excessively low speeds impose a heavy load.
, DO NOT tamper with governor spring, links or other parts
to increase engine speed. Pressure washer supplies
correct rated pressure and flow when running at
governed speed.
, DO NOT modify pressure washer in any way.
NOTICE High pressure spray could damage fragile
items including glass.
, DO NOT point spray gun at glass when using MAX spray
pattern in selector nozzle.
, NEVER aim spray gun at plants.
NOTICE Improper treatment of pressure washer
could damage it and shorten its life.
If you have questions about intended use, ask dealer or
contact qualified service center.
NEVER operate units with broken or missing parts, or with-
out protective housing or covers.
, DO NOT by-pass any safety device on this machine.
, DO NOT tamper with governed speed.
, DO NOT operate pressure washer above rated pressure.
, DO NOT modify pressure washer in any way.
, Before starting pressure washer in cold weather, check all
parts of the equipment to be sure ice has not formed there.
, NEVER move machine by pulling on hoses. Use handle
provided on unit.
, This equipment is designed to be used with Sears
authorized parts ONLY. If equipment is used with parts
that DO NOT comply with minimum specifications, user
assumes all risks and liabilities.
Page 6
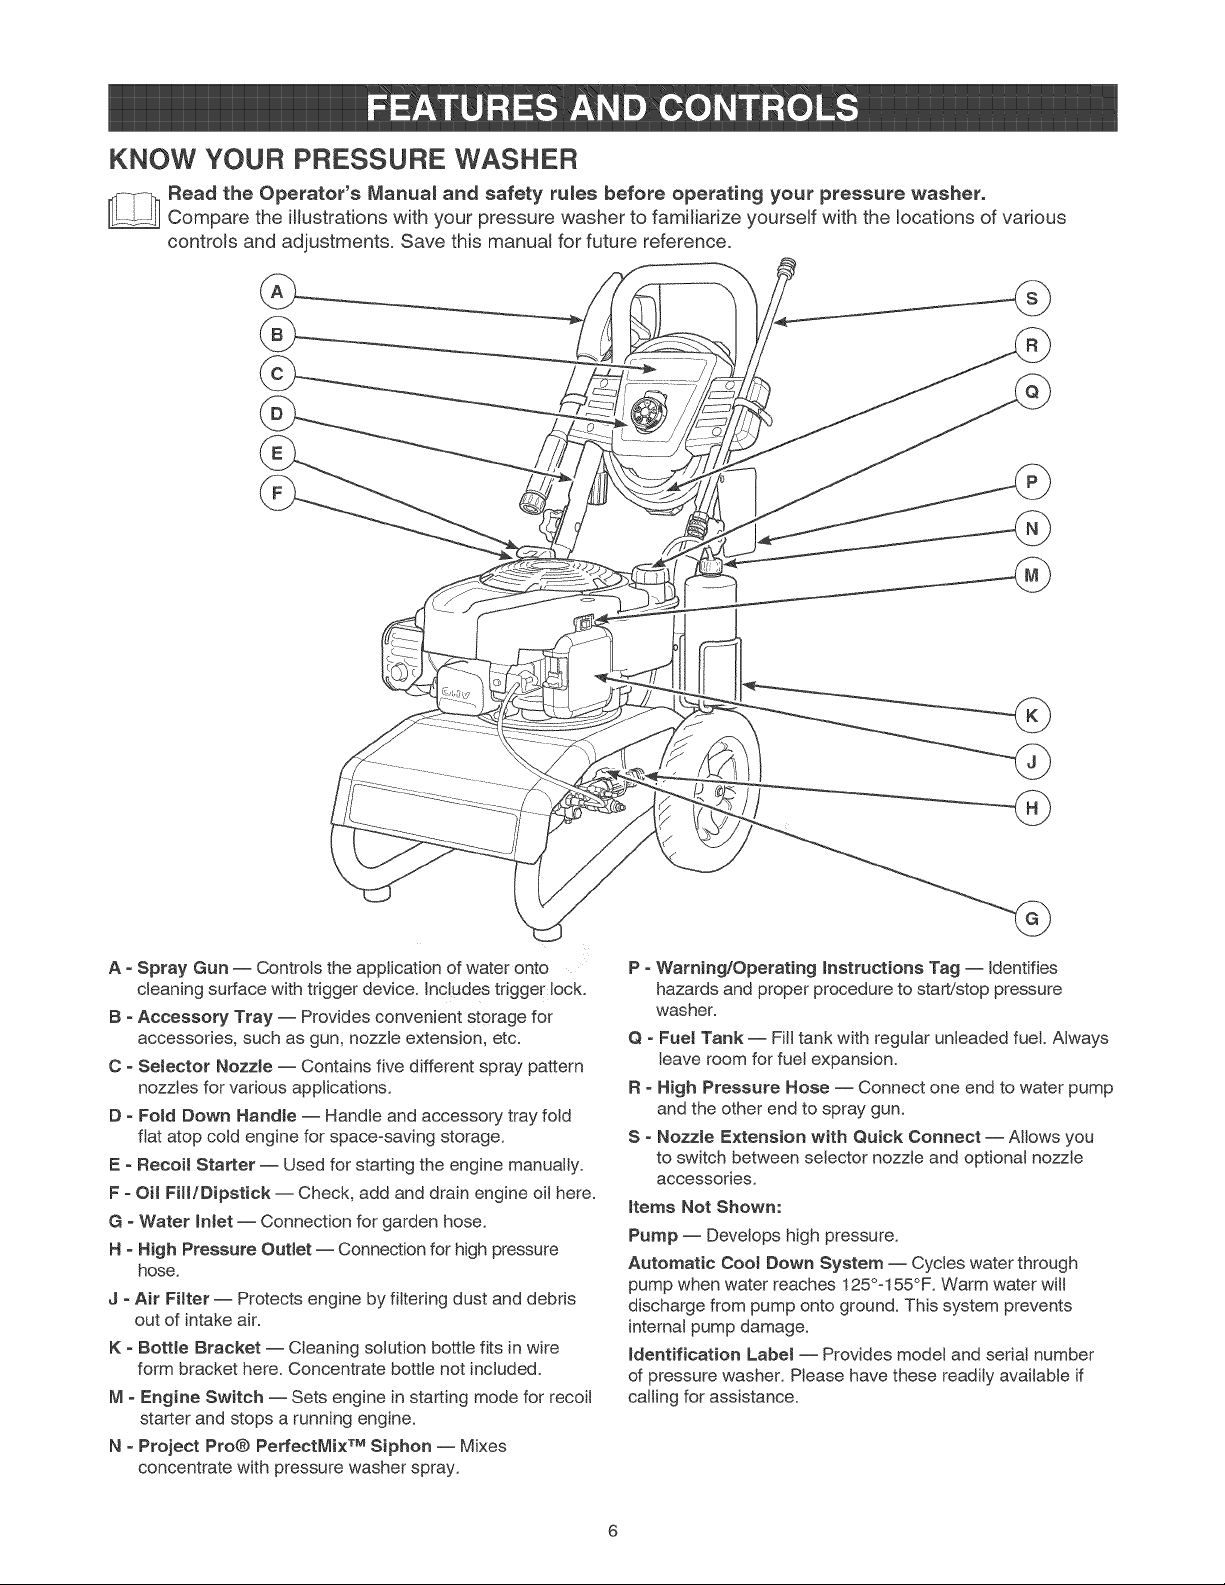
KNOW YOUR PRESSURE WASHER
Read the Operator's ManuaR and safety rules before operating your pressure washer.
Compare the illustrations with your pressure washer to familiarize yourself with the locations of various
controls and adjustments. Save this manual for future reference.
A - Spray Gun -- Controls the application of water onto
cleaning surface with trigger device, includes trigger lock.
B - Accessory "Fray -- Provides convenient storage for
accessories, such as gun, nozzle extension, etc.
C - SeJector Nozzle -- Contains five different spray pattern
nozztes for various applications.
D - FoJd Down Handle -- Handle and accessory tray fold
flat atop cold engine for space=saving storage.
E - Recoil Starter -- Used for starting the engine manually.
F - OH Fill/Dipstick -- Check, add and drain engine eil here.
G - Water Inlet -- Connection for garden hose.
H - High Pressure Outlet -- Connection for high pressure
hose.
J - Air Filter-- Protects engine by filtering dust and debris
out of intake air.
K - Bottle Bracket -- Cleaning solution bottle fits in wire
form bracket here. Concentrate bottle not included.
M - Engine Switch -- Sets engine in starting mode for recoil
starter and stops a running engine.
N - Project Pro@ PetfectMix TM Siphon -- Mixes
concentrate with pressure washer spray.
P - Warning!Operating instructions Tag -- Identifies
hazards and proper procedure to start!stop pressure
washer.
Q - Fuet Tank -- Fitl tank with regular unleaded fuel. Always
leave room for fuel expansion.
R - High Pressure Hose -- Connect one end to water pump
and the other end to spray gun.
S - NozzJe Extension with Quick Connect -- Allows you
to switch between selector nozzte and optional nozzle
accessories,
items Not Shown:
Pump -- Develops high pressure.
Automatic CooJ Down System -- Cycles water through
pump when water reaches 125°=155°F. Warm water will
discharge from pump onto ground. This system prevents
internal pump damage.
identification LabeJ -- Provides model and seriat number
of pressure washer. Please have these readily available if
calling for assistance.
Page 7
Your pressure washer requires some assembly and is
ready for use only after it has been properly serviced
with the recommended oil and fuel.
if you have any problems with the assembly of
your pressure washer, please caNIthe pressure
washer he_p_ine at 1o800o222o3136.
UNPACK THE PRESSURE WASHER
1. Remove everything from carton except pressure
washer.
2. Open carton completely by cutting each corner
from top to bottom.
3. Remove pressure washer from carton.
CARTON CONTENTS
Check all contents. If any parts are missing or
damaged, call the pressure washer helpline at
1o800o222o3136.
• Main Unit
• Handle
• Accessory Tray with Hose Wrap
• High Pressure Hose
• Spray Gun
• Nozzle Extension with Quick Connect Fitting
• Oil Pouch
Bottle Bracket Wireform (2)
PerfectMix Siphoning Unit/Hose
Quick Connect Selector Nozzle
Parts Bag (which includes the following):
Operator's Manual
Owner's Registration Card
Handle Fastening Hardware Kit (which includes):
Handle Bolts (2)
Carriage Bolt (2)
Plastic Knobs for Handle (2)
Plastic Knob (2)
Tree Clips (4)
Become familiar with each piece before assembling
the pressure washer, tdentify all contents with the
illustration on page 6. If any parts are missing or
damaged, call the pressure washer helpline at
1o800o222o3136.
ASSEMBUNG PRESSURE WASHER
Your Craftsman pressure washer will need assembly
before operation:
1. Fill out and send in registration card.
2. Attach handle and accessory tray.
3. Connect detergent siphon hose to pump.
4. Add oil to engine crankcase.
5. Add fuel to fuel tank.
6. Connect pressure hose to spray gun and pump.
7. Connect water supply to pump.
8. Attach nozzle extension to spray gun.
9. Select/attach quick connect selector nozzle to
nozzle extension.
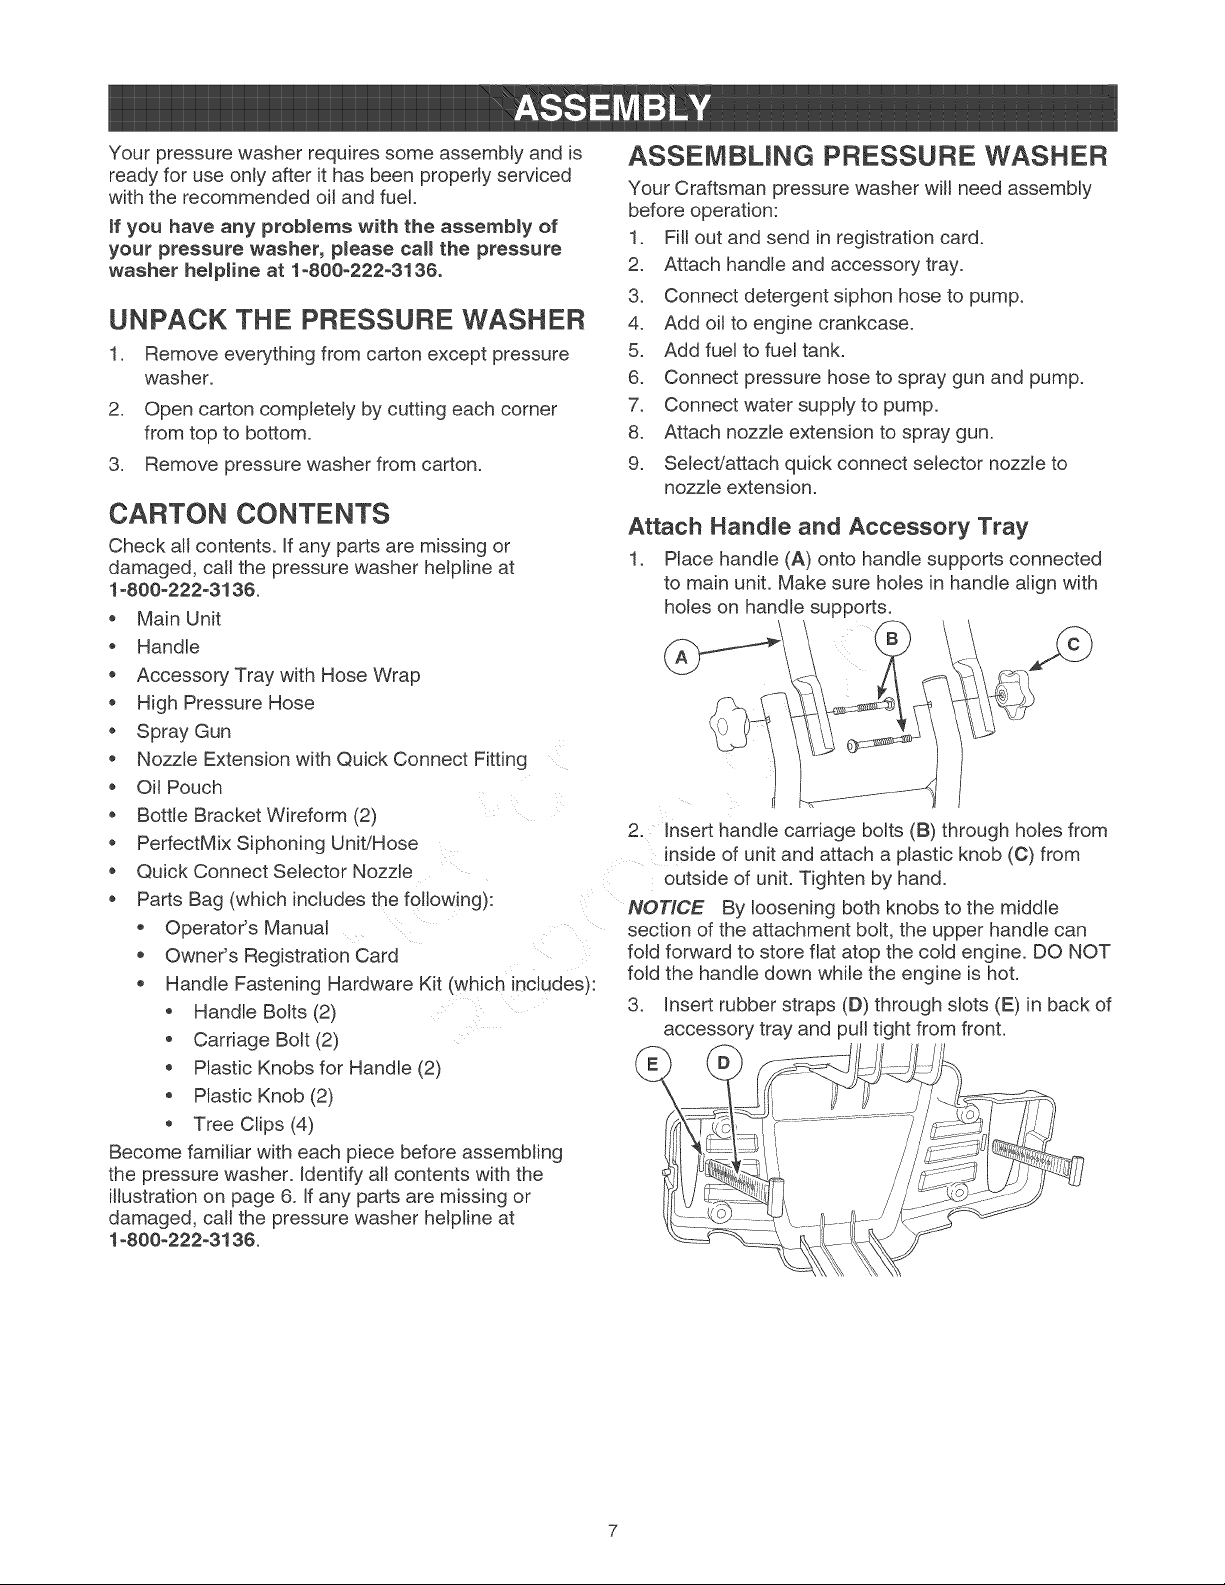
Attach Handle and Accessory Tray
1. Place handle (A) onto handle supports connected
to main unit. Make sure holes in handle align with
holes on handle supports.
2. Insert handle carriage bolts (B) through holes from
inside of unit and attach a plastic knob (C) from
outside of unit. Tighten by hand.
NOTICE By loosening both knobs to the middle
section of the attachment bolt, the upper handle can
fold forward to store flat atop the cold engine. DO NOT
fold the handle down while the engine is hot.
3 Insert rubber straps (D) through slots (E) in back of
accessory tray and pull tight from front.
Page 8
.
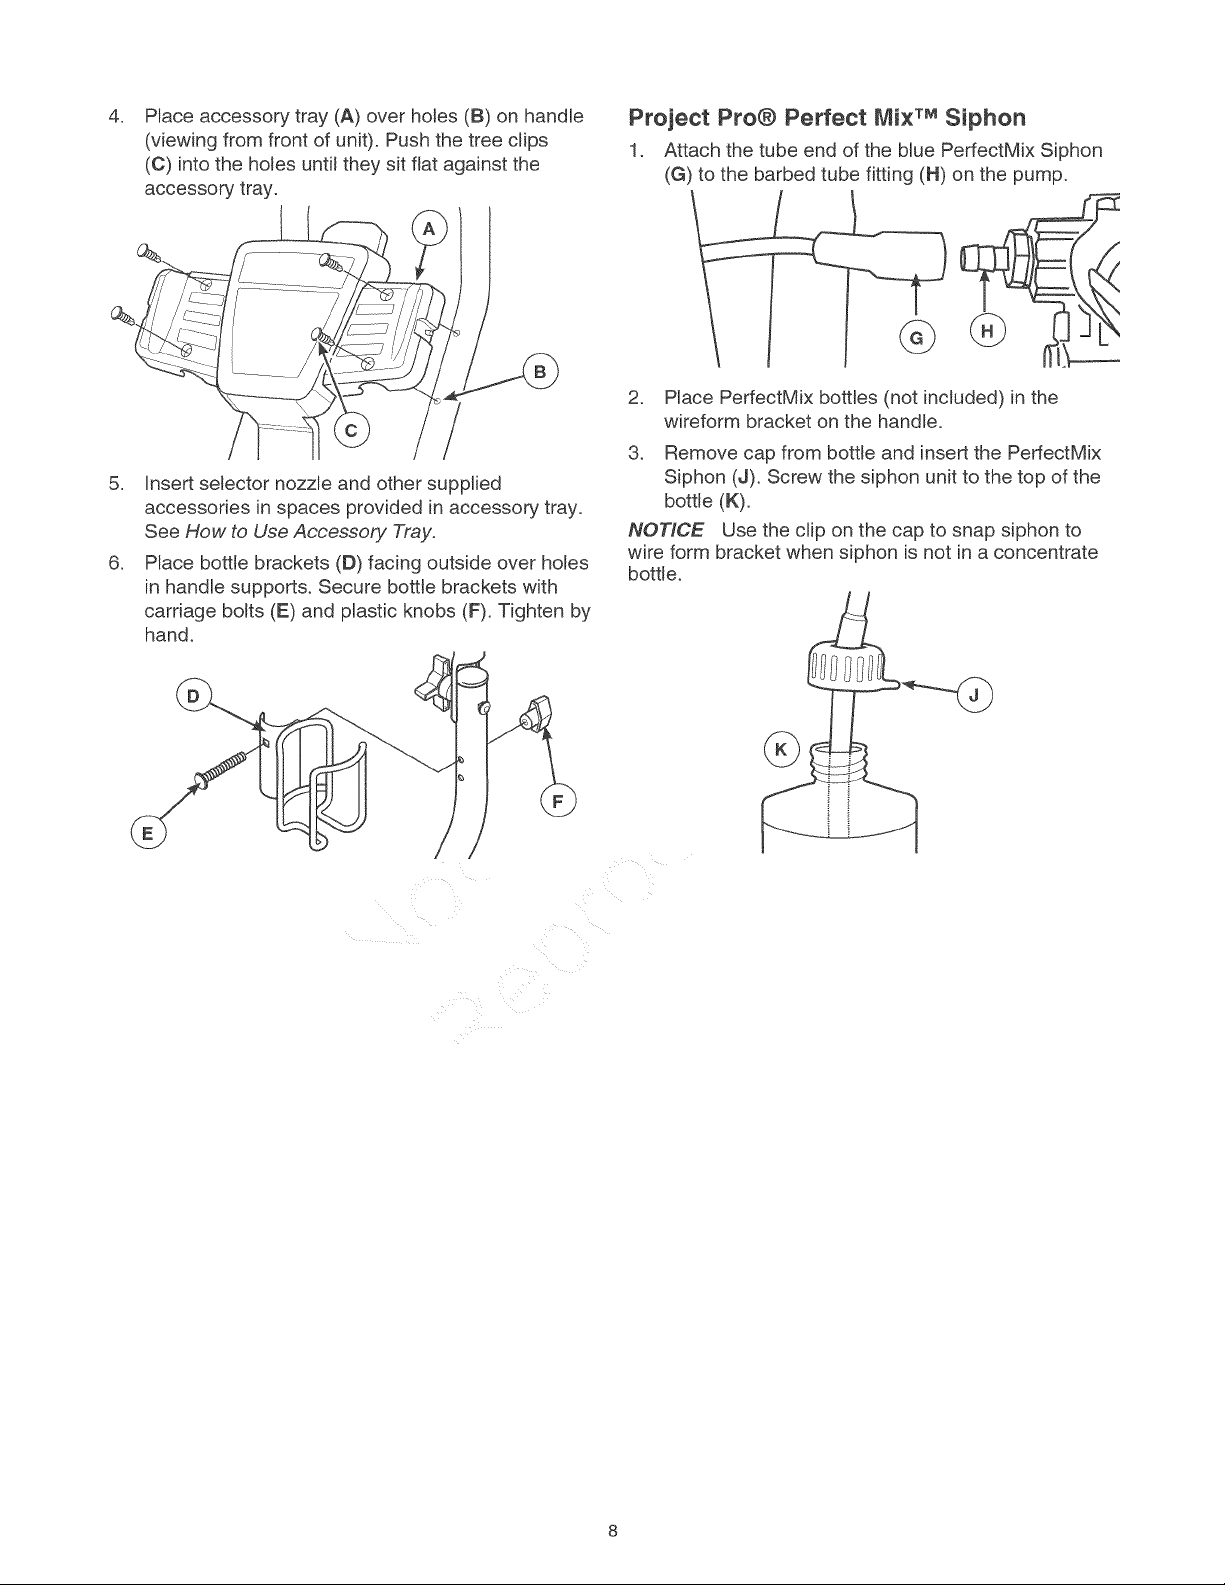
Place accessory tray (A) over holes (B) on handle
(viewing from front of unit). Push the tree clips
(C) into the holes until they sit flat against the
accessory tray.
5. Insert selector nozzle and other supplied
accessories in spaces provided in accessory tray.
See How to Use Accessory Tray.
6. Place bottle brackets (D) facing outside over holes
in handle supports. Secure bottle brackets with
carriage bolts (E) and plastic knobs (F). Tighten by
hand.
Project Pro@ Perfect Mix TMSiphon
1. Attach the tube end of the blue PerfectMix Siphon
(G) to the barbed tube fitting (H) on the pump.
.
Place PerfectMix bottles (not included) in the
wireform bracket on the handle.
3.
Remove cap from bottle and insert the PerfectMix
Siphon (J). Screw the siphon unit to the top of the
bottle (K).
NOTICE Use the clip on the cap to snap siphon to
wire form bracket when siphon is not in a concentrate
bottle.
Page 9
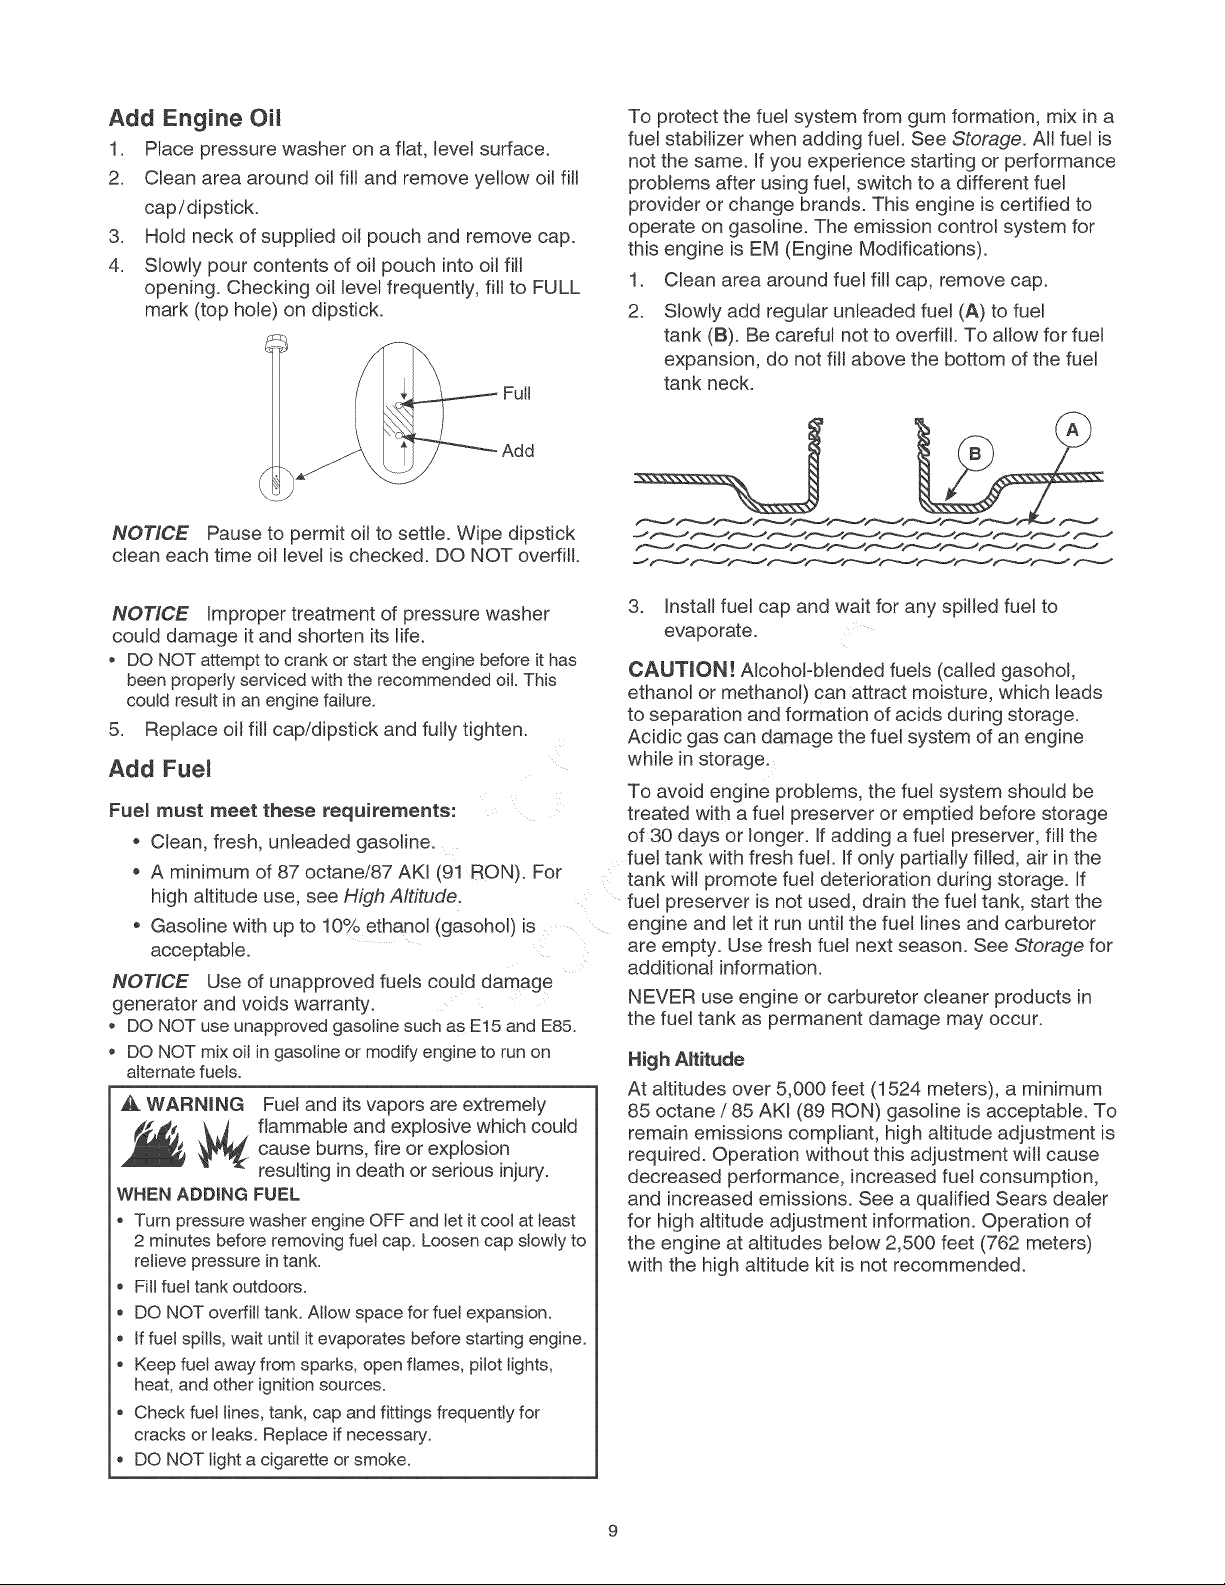
Add Engine Oil
1. Place pressure washer on a flat, level surface.
2. Clean area around oil fill and remove yellow oil fill
cap/dipstick.
3. Hold neck of supplied oil pouch and remove cap.
4. Slowly pour contents of oil pouch into oil fill
opening. Checking oil level frequently, fill to FULL
mark (top hole) on dipstick.
Full
NOTICE Pause to permit oil to settle. Wipe dipstick
clean each time oil level is checked. DO NOT overfill.
To protect the fuel system from gum formation, mix in a
fuel stabilizer when adding fuel. See Storage. All fuel is
not the same. If you experience starting or performance
problems after using fuel, switch to a different fuel
provider or change brands. This engine is certified to
operate on gasoline. The emission control system for
this engine is EM (Engine Modifications).
1. Clean area around fuel fill cap, remove cap.
2. Slowly add regular unleaded fuel (A) to fuel
tank (B). Be careful not to overfill. To allow for fuel
expansion, do not fill above the bottom of the fuel
tank neck.
NOTICE Improper treatment of pressure washer
could damage it and shorten its life.
o DO NOT attemptto crank or startthe engine before it has
been properly servicedwith the recommended oil. This
could result in anengine failure.
5. Replace oil fill cap/dipstick and fully tighten.
Add Fuel
Fue_ must meet these requirements:
• Clean, fresh, unleaded gasoline.
• A minimum of 87 octane/87 AKJ (91 RON). For
high altitude use, see High Altitude.
• Gasoline with up to 10% ethanol (gasoho 0 is
acceptaMe.
NOTICE Use of unapproved fuels could damage
generator and voids warranty.
o DO NOT use unapprovedgasoline such as E15and E85.
, DO NOT mix oil in gasolineor modify engine to run on
alternatefuels.
WARNING Fuel and its vapors are extremely
_i flammable and explosive which could
WHEN ADDING FUEL
, Turn pressure washer engine OFF and let it cool at least
2 minutes before removing fuel cap. Loosen cap stowty to
relieve pressure in tank.
Fill fuel tank outdoors.
DO NOT overfill tank. Allow space for fuel expansion.
If fuel spills, wait until it evaporates before starting engine.
Keep fuel away from sparks, open flames, pilot lights,
heat, and other ignition sources.
Check fuel lines, tank, cap and fittings frequently for
cracks or leaks. Replace if necessary.
DO NOT light a cigarette or smoke.
cause burns, fire or explosion
resulting in death or serious injury.
3. Install fuel cap and wait for any spilled fuel to
evaporate.
CAUTION! Alcohol-Mended fuels (called gasohol,
ethanol or methanol) can attract moisture, which leads
to separation and formation of acids during storage.
Acidic gas can damage the fuel system of an engine
while in storage.
To avoid engine problems, the fuel system should be
treated with a fuel preserver or emptied before storage
of 30 days or longer, ff adding a fuel preserver, fill the
fuel tank with fresh fuel. If only partially filled, air in the
tank will promote fuel deterioration during storage, if
fuel preserver is not used, drain the fuel tank, start the
engine and let it run until the fuel lines and carburetor
are empty. Use fresh fuel next season. See Storage for
additional information.
NEVER use engine or carburetor cleaner products in
the fuel tank as permanent damage may occur.
High A_titude
At altitudes over 5,000 feet (1524 meters), a minimum
85 octane / 85 AKI (89 RON) gasoline is acceptable. To
remain emissions compliant, high altitude adjustment is
required. Operation without this adjustment will cause
decreased performance, increased fuel consumption,
and increased emissions. See a qualified Sears dealer
for high a_titude adjustment information. Operation of
the engine at altitudes below 2,500 feet (762 meters)
with the high altitude kit is not recommended.
Page 10
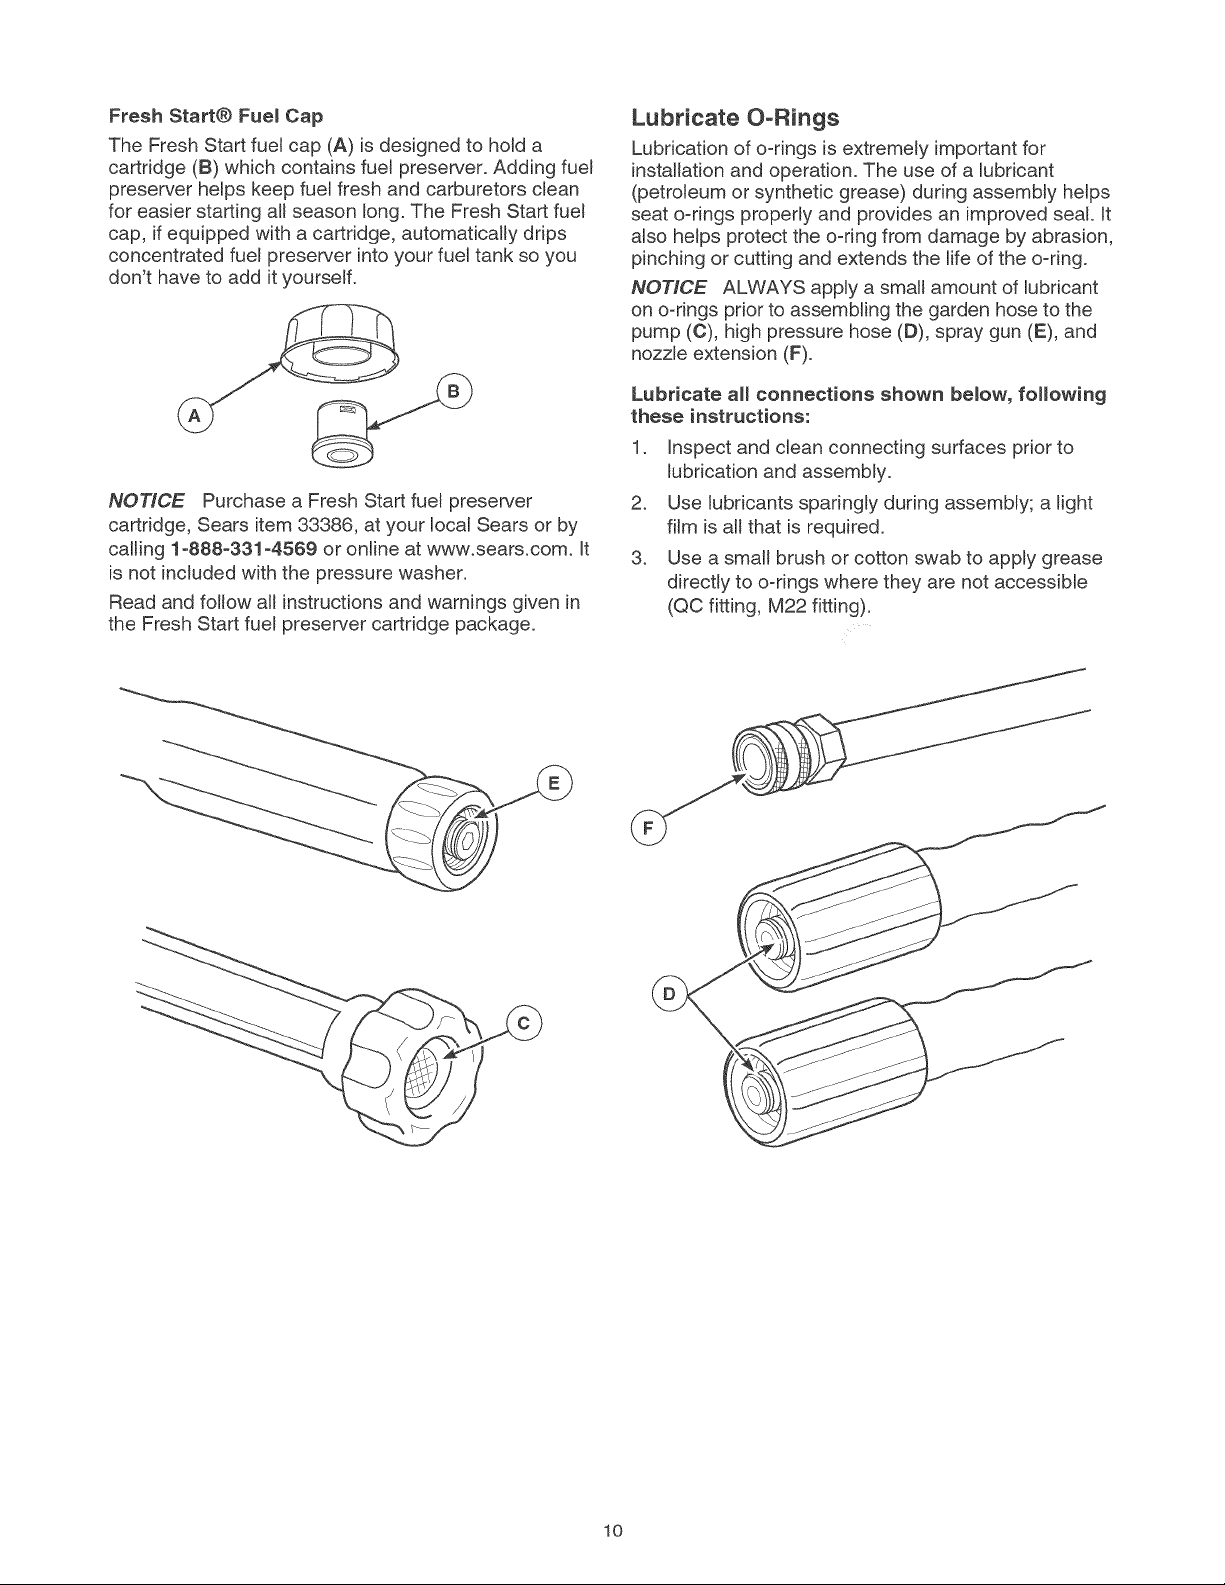
FreshStart@FuelCap
TheFreshStartfuelcap(A)isdesignedtoholda
cartridge(B)whichcontainsfuelpreserver.Addingfuel
preserverhelpskeepfuelfreshandcarburetorsclean
foreasierstartingallseasonlong.TheFreshStartfuel
cap,ifequippedwithacartridge,automaticallydrips
concentratedfuelpreserverintoyourfueltanksoyou
don'thavetoaddityourself.
NOTICE Purchase a Fresh Start fuel preserver
cartridge, Sears item 33386, at your local Sears or by
calling 1o888o331-4589 or online at www.sears.com. Mt
is not included with the pressure washer.
Read and follow all instructions and warnings given in
the Fresh Start fuel preserver cartridge package.
Lubricate O-Rings
Lubrication of o-rings is extremely important for
installation and operation. The use of a lubricant
(petroleum or synthetic grease) during assembly helps
seat o-rings properly and provides an improved seal. It
also helps protect the o-ring from damage by abrasion,
pinching or cutting and extends the life of the o-ring.
NOTICE ALWAYS apply a small amount of lubricant
on o-rings prior to assembling the garden hose to the
pump (C), high pressure hose (D), spray gun (E), and
nozzle extension (F).
Lubricate aH connections shown below, following
these instructions:
1. Inspect and clean connecting surfaces prior to
lubrication and assembly.
2. Use lubricants sparingly during assembly; a light
film is aHthat is required.
3. Use a small brush or cotton swab to apply grease
directly to o-rings where they are not accessible
(QC fitting, M22 fitting).
10
Page 11
Connect Hose and Water Supply to Pump
NOTICE DO NOT run the pump without the water
supply connected and turned on.
o Damageto equipment resultingfrom failure to follow this
instruction willvoid warranty.
4. Run water through garden hose for 30 seconds to
flush it of debris. Turn off water.
NOTICE DO NOT siphon standing water for the water
supply. Use ONLY cold water (less than 100°F).
5. Connect garden hose (not to exceed 50 feet in
length) to water inlet. Tighten by hand.
NOTICE Remove and discard the shipping caps from
the pump's high pressure outlet and water inlet before
attaching hoses.
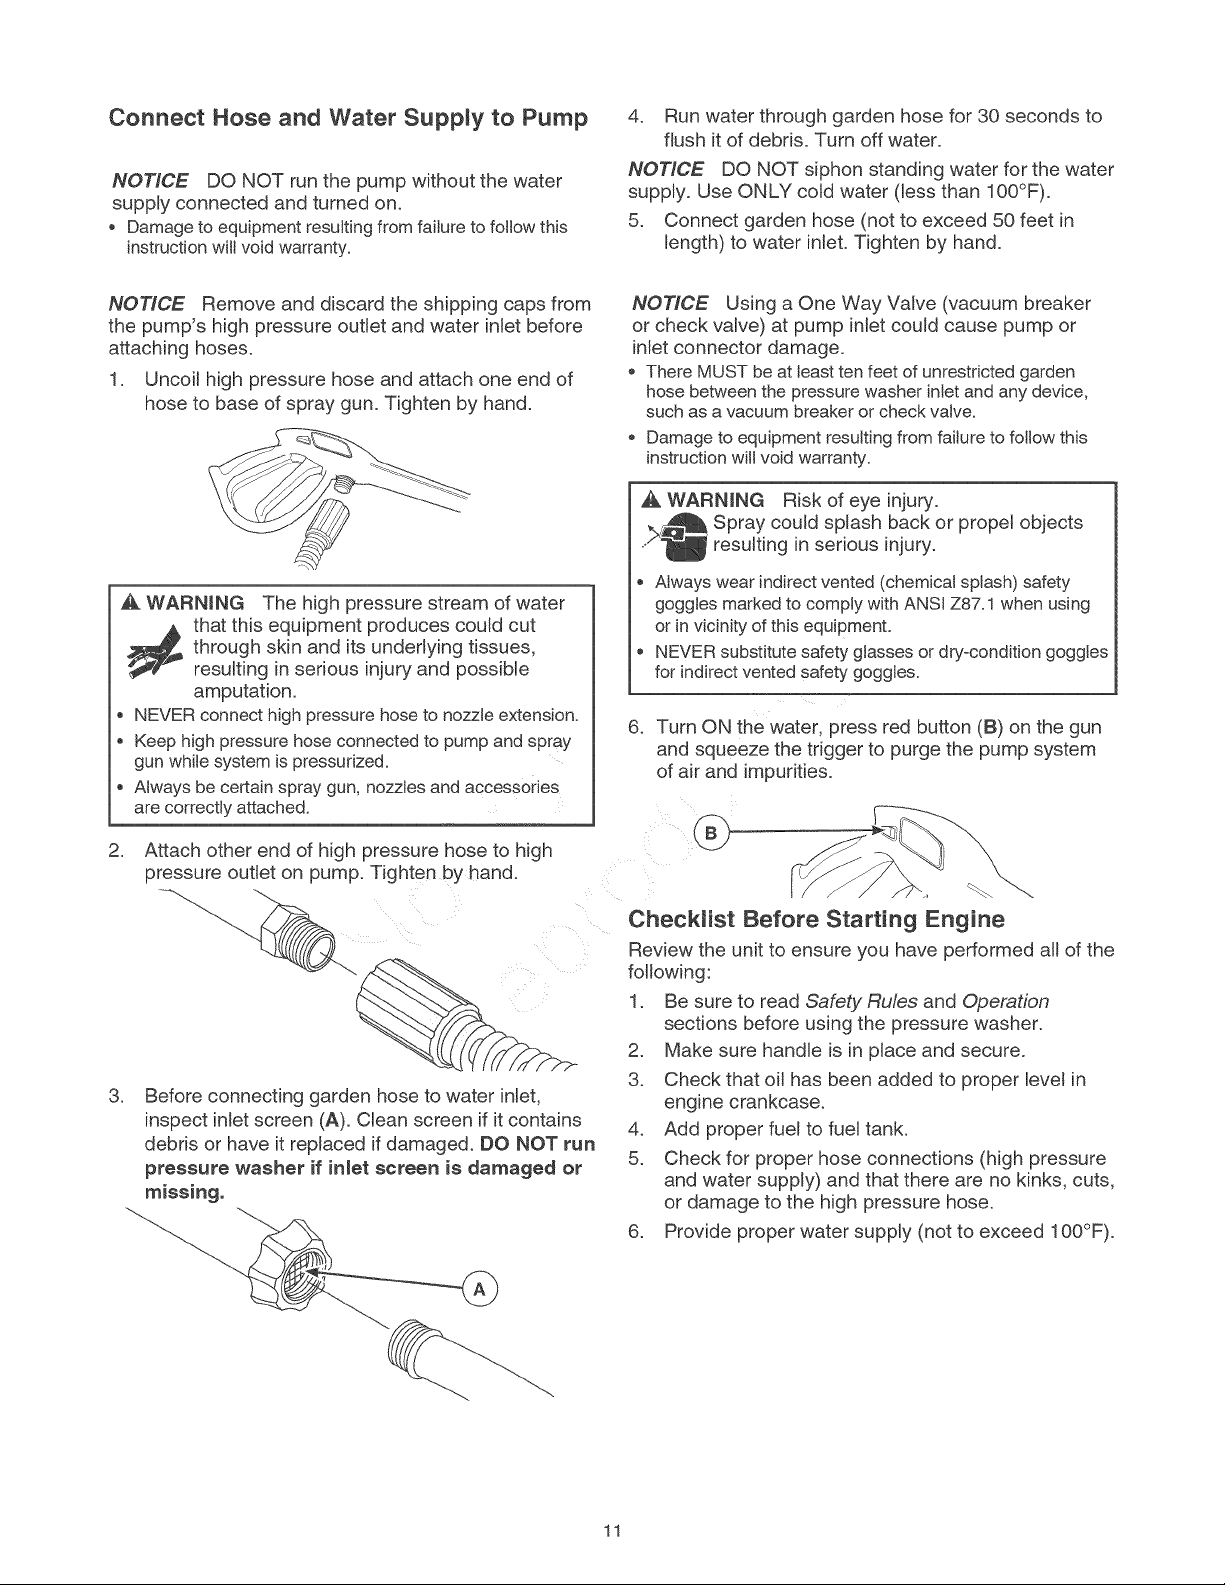
1. Uncoil high pressure hose and attach one end of
hose to base of spray gun. Tighten by hand.
WARNING The high pressure stream of water
1_ that this equipment produces could cut
through skin and its underlying tissues,
resulting in serious injury and possible
amputation.
NEVER connecthigh pressurehoseto nozzleextension.
Keep high pressurehose connectedto pumpand spray
gun while systemis pressurized.
Alwaysbe certainspray gun. nozzlesand accessofles
are correctly attached.
2. Attach other end of high pressure hose to high
pressure outlet on pump. Tighten by hand.
NOTICE Using a One Way Valve (vacuum breaker
or check valve) at pump inlet could cause pump or
inlet connector damage.
There MUST be at least ten feet of unrestricted garden
hose between the pressure washer inlet and any device,
such as a vacuum breaker or check vatve.
Damage to equipment resulting from failure to follow this
instruction will void warranty.
_, WARNING Risk of eye injury.
Spray could splash back or propel objects
resulting in serious injury.
Always wear indirect vented (chemical splash) safety
goggles marked to comply with ANSI Z87.1 when using
or in vicinity of this equipment.
NEVER substitute safety gtasses or dry-condition goggles
for indirect vented safety goggtes.
6 Turn ON the water, press red button (B) on the gun
and squeeze the trigger to purge the pump system
of air and impurities,
3. Before connecting garden hose to water inlet,
inspect inlet screen (A). Clean screen if it contains
debris or have it replaced if damaged. DO NOT run
pressure washer if inlet screen is damaged or
missing.
Checklist Before Starting Engine
Review the unit to ensure you have performed all of the
following:
1 Be sure to read Safety Rules and Operation
sections before using the pressure washer.
2. Make sure handle is in place and secure.
3. Check that oil has been added to proper level in
engine crankcase.
4. Add proper fuel to fuel tank.
5. Check for proper hose connections (high pressure
and water supply) and that there are no kinks, cuts,
or damage to the high pressure hose.
6. Provide proper water supply (not to exceed 100°F).
11
Page 12
HOW TO USE YOUR PRESSURE
If you have any problems operating your pressure
washer, please call the pressure washer helpline at
1-800-222-3136.
Pressure Washer Location
Carbon Monoxide Poisoning
WARNING POISONOUS GAS HAZARD.
Engine exhaust contains carbon monoxide,
a poisonous gas that could kill you in
minutes. You CANNOT smell it, see it, or
taste it. Even if you do not smell exhaust
fumes, you could still be exposed to carbon
monoxide gas.
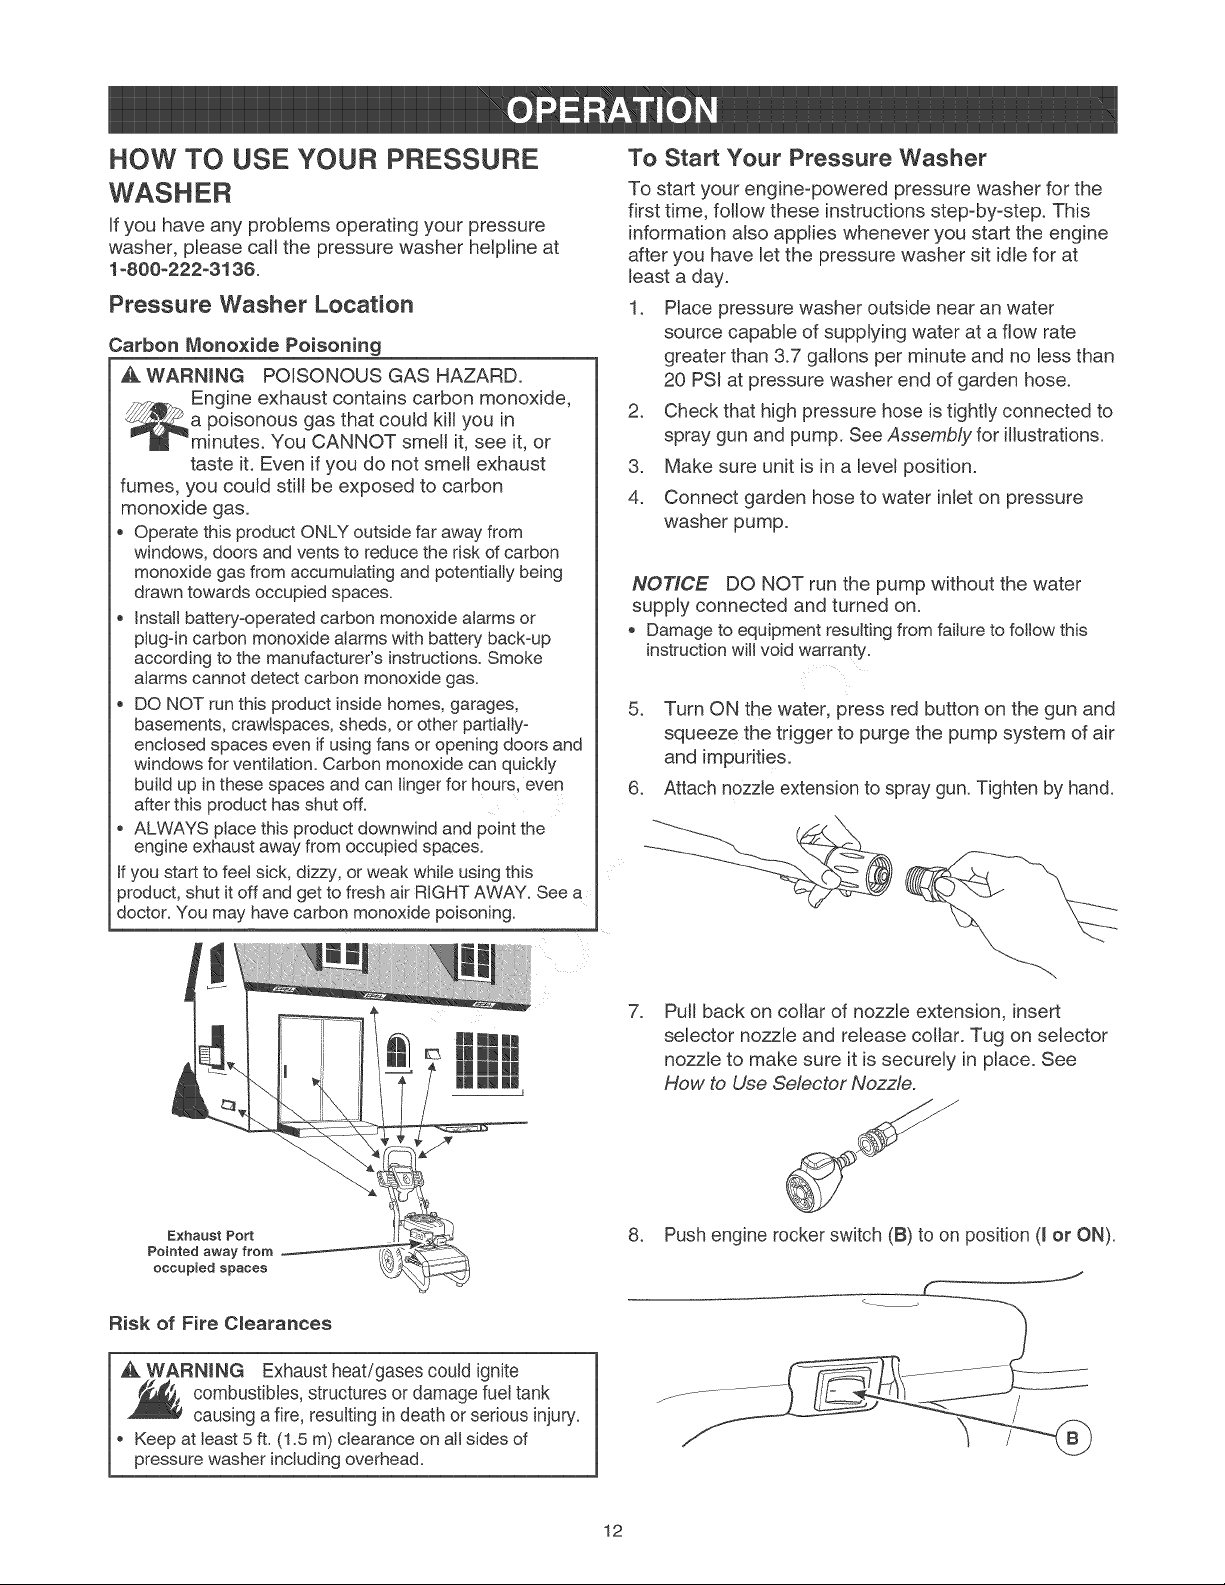
, Operate this product ONLY outside far away from
windows, doors and vents to reduce the risk of carbon
monoxide gas from accumulating and potentially being
drawn towards occupied spaces.
, Install battery-operated carbon monoxide alarms or
plug-in carbon monoxide alarms with battery back-up
according to the manufacturer's instructions. Smoke
alarms cannot detect carbon monoxide gas.
, DO NOT run this product inside homes, garages,
basements, crawlspaces, sheds, or other partially-
enclosed spaces even if using fans or opening doors and
windows for ventilation. Carbon monoxide can quickly
build up in these spaces and can linger for hours, even
after this product has shut off.
, ALWAYS place this product downwind and point the
engine exhaust away from occupied spaces.
If you start to feel sick, dizzy, or weak while using this
9roduct, shut it off and get to fresh air RIGHT AWAY. See a
doctor. You may have carbon monoxide poisoning.
To Start Your Pressure Washer
To start your engine-powered pressure washer for the
first time, follow these instructions step-by-step. This
information also applies whenever you start the engine
after you have let the pressure washer sit idle for at
least a day.
1. Place pressure washer outside near an water
source capable of supplying water at a flow rate
greater than 3.7 ga/ons per minute and no less than
20 PSI at pressure washer end of garden hose.
2. Check that high pressure hose is tightly connected to
spray gun and pump. See Assemb(y for illustrations.
3. Make sure unit is in a level position.
4. Connect garden hose to water inlet on pressure
washer pump.
NOTICE DO NOT run the pump without the water
supply connected and turned on.
Damageto equipment resulting from failure to follow this
instructionwillvoid warranty.
5. Turn ON the water, press red button on the gun and
squeeze the trigger to purge the pump system of air
and impurities.
6. Attach nozzle extension to spray gun. Tighten by hand.
Exhaust Port
Pointed away from
occupied spaces
Risk of Fire Clearances
_, WARNING Exhaust heat/gases could ignite
combustibles, structures or damagefuel tank
causing a fire, resulting indeath or serious injury.
o Keep at least5 ft. (1.5 m) clearance on all sides of
pressure washer includingoverhead.
7. Pul back on collar of nozzle extension, insert
selector nozzle and release collar. Tug on selector
nozzle to make sure it is securely in place. See
How to Use Selector Nozzle.
8. Push engine rocker switch (B) to on position (I or ON).
J
12
Page 13
NOTICE Before starting the pressure washer, be sure
,ou are wearing safety goggles as described below.
_, WARNING Risk of eye injury.
Spray could splash back or propel objects
resulting in serious injury.
o Always wear indirect vented (chemical splash) safety
goggles marked to comply with ANSI Z87.1 when using or
in vicinity of this equipment.
NEVER substitute safety glasses or dry-condition goggles
for indirect vented safety goggles.
NOTICE This unit is equipped with a ReadyStart®
engine. A ReadyStart engine means there is no priming
or choking required.
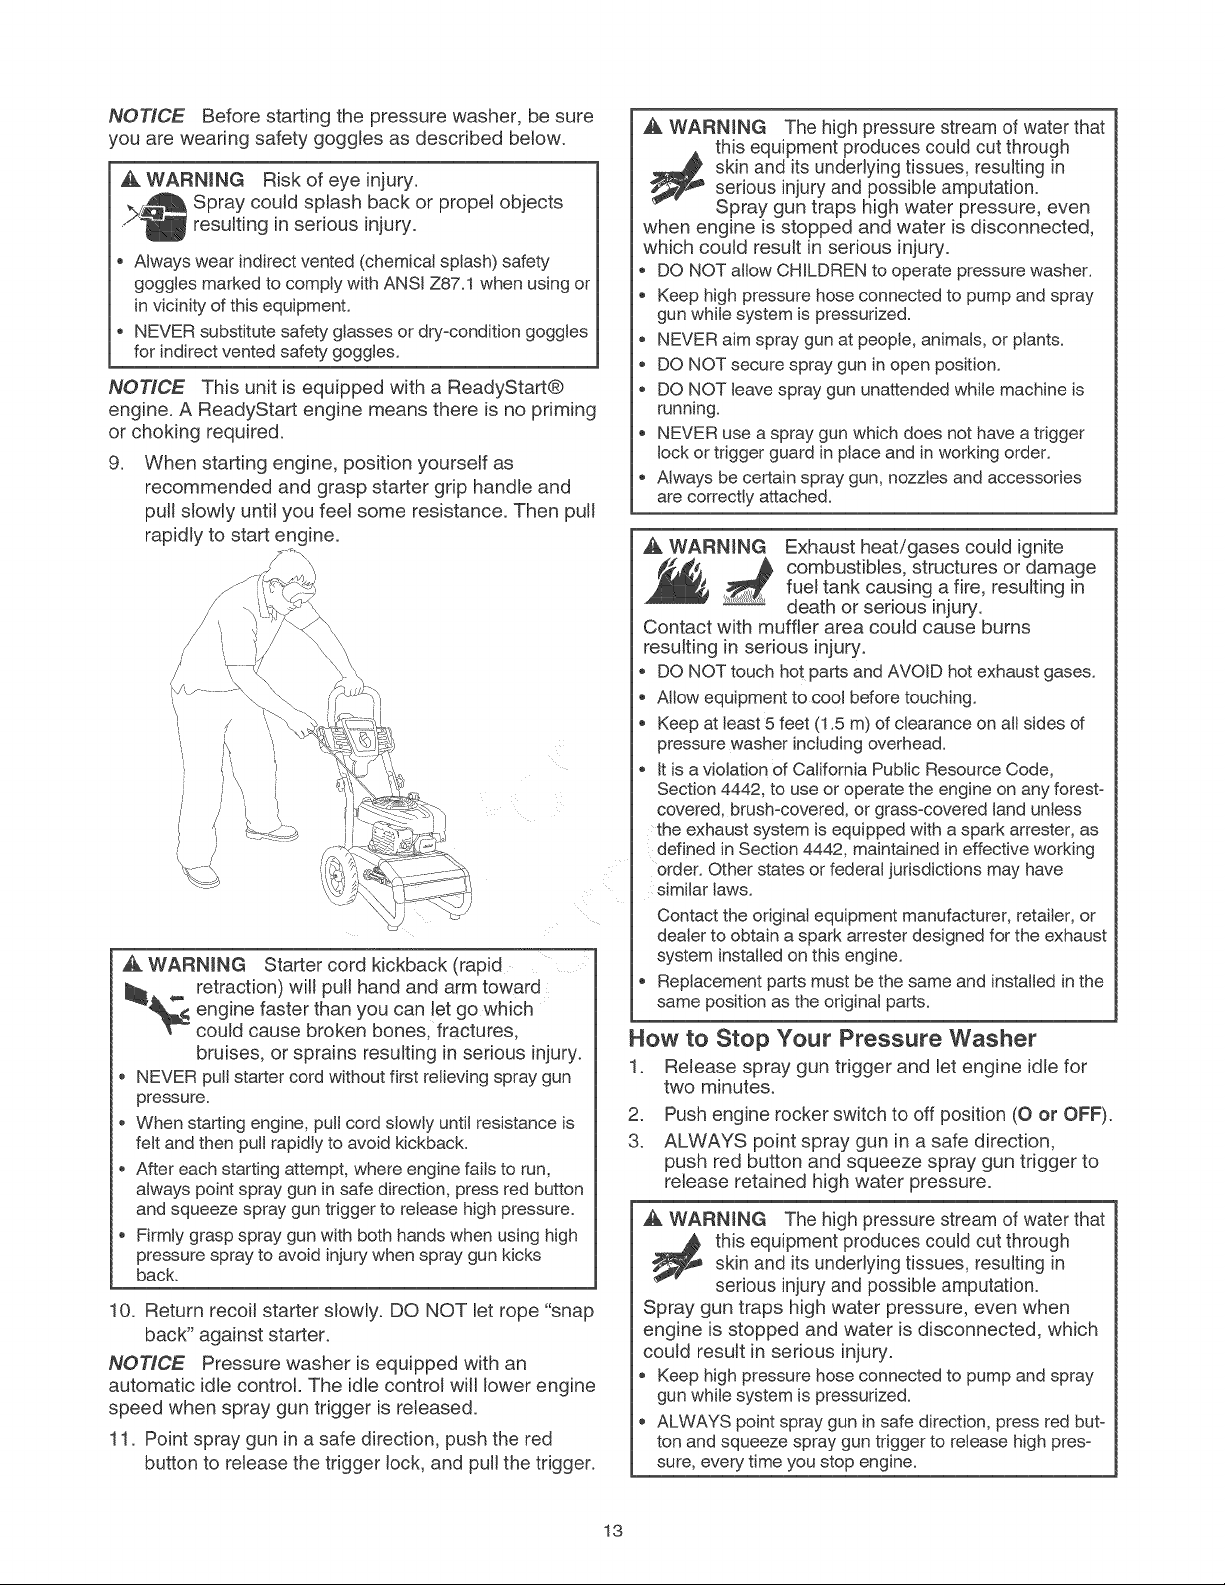
9. When starting engine, position yourself as
recommended and grasp starter grip handle and
pull slowly until you feel some resistance. Then pull
rapidly to start engine.
WARNING Starter cord kickback (rapid
retraction) will pull hand and arm toward
engine faster than you can let go which
could cause broken bones, fractures,
bruises, or sprains resulting in serious injury.
NEVER pull starter cord without first relieving spray gun
pressure.
When starting engine, pult cord slowly until resistance is
felt and then pull rapidty to avoid kickback.
After each starting attempt, where engine fails to run,
always point spray gun in safe direction, press red button
and squeeze spray gun trigger to release high pressure.
, Firmly grasp spray gun with both hands when using high
pressure spray to avoid injury when spray gun kicks
back.
10. Return recoil starter slowly. DO NOT let rope "snap
back" against starter.
NOTICE Pressure washer is equipped with an
automatic idle control. The idle control will lower engine
speed when spray gun trigger is released.
11. Point spray gun in a safe direction, push the red
button to release the trigger lock, and pull the trigger.
WARNING The high pressure stream of water that
this equipment produces could cut through
:_ skin and its underlying tissues, resulting in
when engine is stopped and water is disconnected,
which could resuJt in serious injury.
_, WARNING Exhaust heat/gases could ignite
Contact with muffler area could cause burns
resulting in serious injury.
, Replacement parts must be the same and installed in the
serious injury and possible amputation.
Spray gun traps high water pressure, even
DO NOT allow CHILDREN to operate pressure washer.
Keep high pressure hose connected to pump and spray
gun while system is pressurized.
NEVER aim spray gun at people, animals, or plants.
DO NOT secure spray gun in open position.
DO NOT leave spray gun unattended while machine is
running.
NEVER use a spray gun which does not have a trigger
lock or trigger guard in place and in working order.
Always be certain spray gun, nozzles and accessories
are correctly attached.
combustibles, structures or damage
fuel tank causing a fire, resulting in
death or serious injury.
DO NOT touch hot parts and AVOID hot exhaust gases.
Allow equipment to cool before touching.
Keep at least 5 feet (1.5 m) of clearance on all sides of
pressure washer including overhead.
It is a violation of California Public Resource Code,
Section 4442, to use or operate the engine on any forest-
covered, brush-covered, or grass-covered land unless
the exhaust system is equipped with a spark arrester, as
defined in Section 4442, maintained in effective working
order. Other states or federal jurisdictions may have
similar taws.
Contact the original equipment manufacturer, retailer, or
dealer to obtain a spark arrester designed for the exhaust
system installed on this engine.
same position as the original parts.
How to Stop Your Pressure Washer
1. Release spray gun trigger and let engine idle for
two minutes.
.
Push engine rocker switch to off position (0 or OFF).
3.
ALWAYS point spray gun in a safe direction,
push red button and squeeze spray gun trigger to
release retained high water pressure.
WARNING The high pressure stream of water that
this equipment produces could cut through
skin and its underlying tissues, resulting in
serious injury and possible amputation.
Spray gun traps high water pressure, even when
engine is stopped and water is disconnected, which
could result in serious injury.
Keep high pressurehose connectedto pumpand spray
gun whitesystem is pressurized.
ALWAYSpoint spraygun in safe direction, press redbut-
tonand squeeze spraygun trigger to release high pres-
sure, everytime youstop engine.
13
Page 14
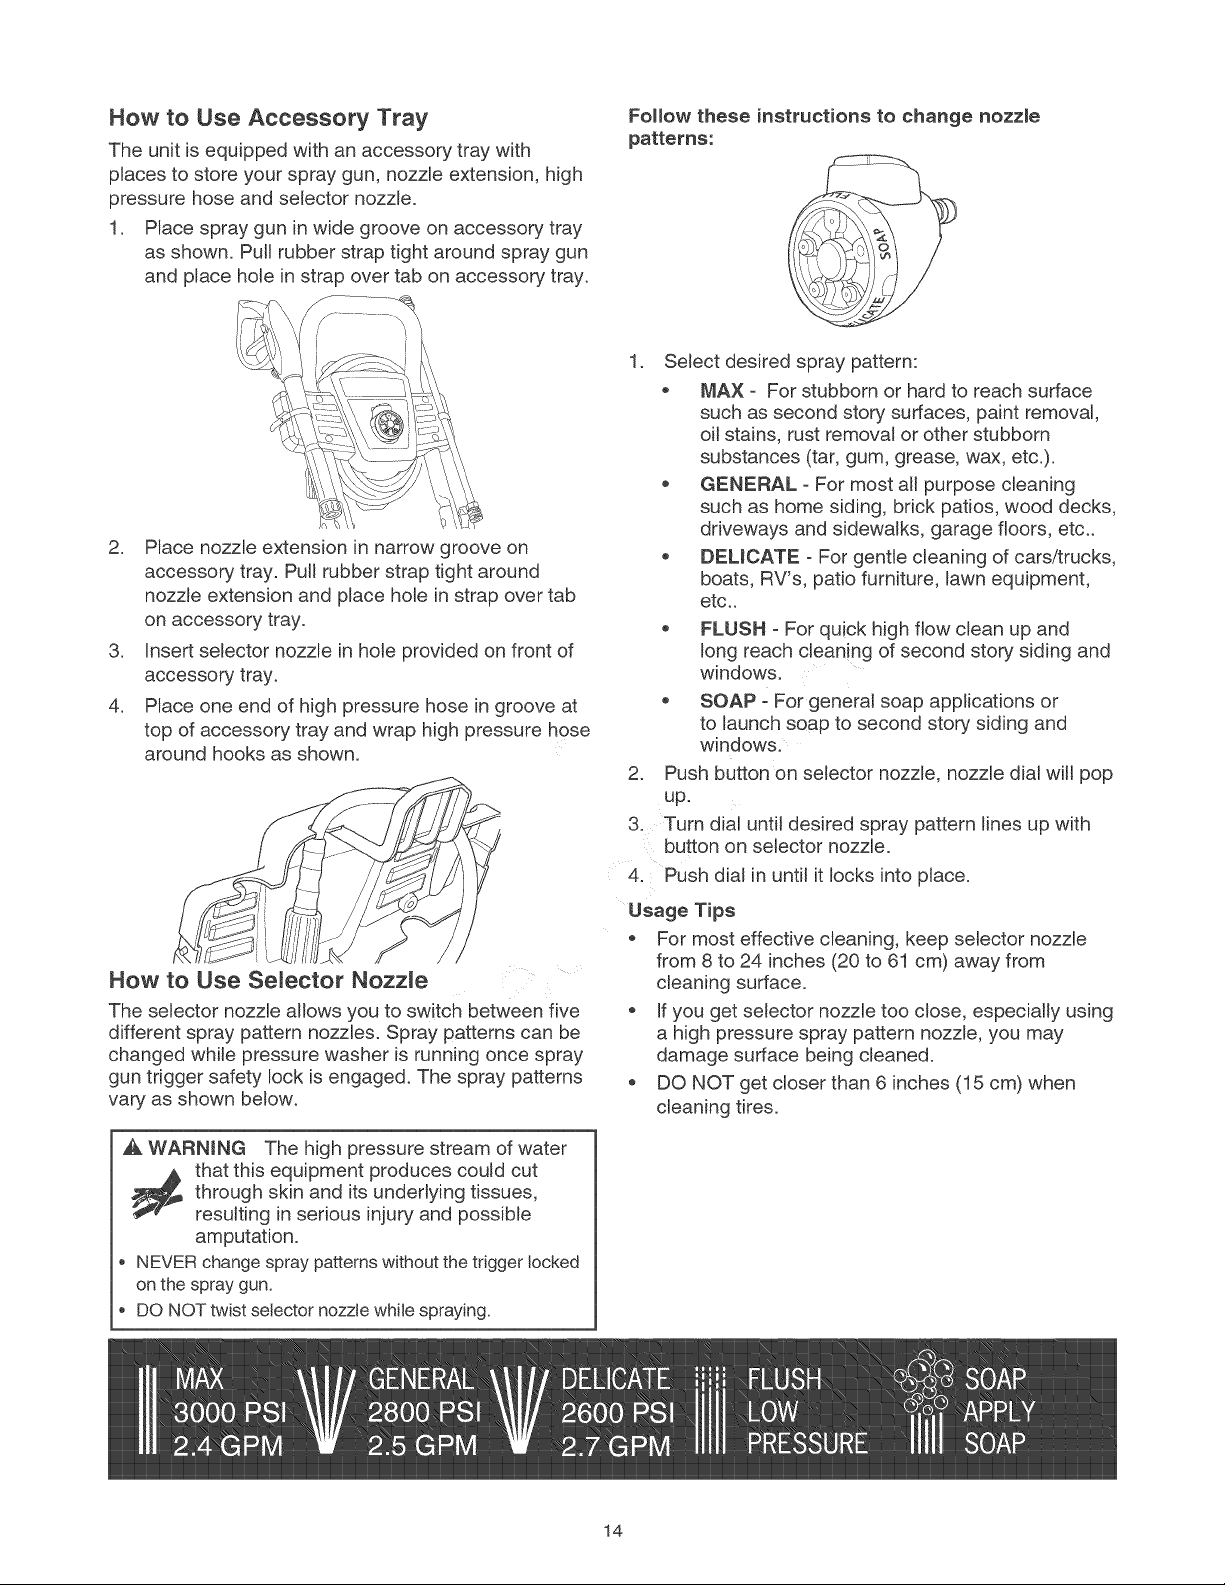
How to Use Accessory Tray
The unit is equipped with an accessory tray with
places to store your spray gun, nozzle extension, high
pressure hose and selector nozzle.
1. Place spray gun in wide groove on accessory tray
as shown. Pull rubber strap tight around spray gun
and place hole in strap over tab on accessory tray.
2. Place nozzle extension in narrow groove on
accessory tray. Pull rubber strap tight around
nozzle extension and place hole in strap over tab
on accessory tray.
3. insert selector nozzle in hole provided on front of
accessory tray.
4. Place one end of high pressure hose in groove at
top of accessory tray and wrap high pressure hose
around hooks as shown.
Follow these instructions to change nozzle
patterns:
1. Select desired spray pattern:
• MAX - For stubborn or hard to reach surface
such as second story surfaces, paint removal,
oil stains, rust removal or other stubborn
substances (tar, gum, grease, wax, etc.).
GENERAL - For most all purpose cleaning
such as home siding, brick patios, wood decks,
driveways and sidewalks, garage floors, etc..
DEUOATE - For gentle cleaning of cars/trucks,
boats, RV's, patio furniture, lawn equipment,
etc..
FLUSH - For quick high flow clean up and
long reach cleaning of second story siding and
windows.
SOAP For general soap applications or
to launch soap to second story siding and
windows.
2. Push button on selector nozzle, nozzle dial will pop
up.
3. Turn dial until desired spray pattern lines up with
button on selector nozzle.
4. Push dial in until it locks into place.
How to Use SeJector NozzJe
The selector nozzle allows you to switch between five
different spray pattern nozzles. Spray patterns can be
changed while pressure washer is running once spray
gun trigger safety lock is engaged. The spray patterns
vary as shown below.
WARNING The high pressure stream of water
through skin and its underlying tissues,
that this equipment produces could cut
resulting in serious injury and possible
amputation.
o NEVER changespray patterns withoutthetrigger locked
on the spray gun.
DO NOT twist selector nozzlewhile spraying.
Usage Tips
• For most effective cleaning, keep selector nozzle
from 8 to 24 inches (20 to 61 cm) away from
cleaning surface.
• If you get selector nozzle too close, especially using
a high pressure spray pattern nozzle, you may
damage surface being cleaned.
• DO NOT get closer than 6 inches (15 cm) when
cleaning tires.
14
Page 15
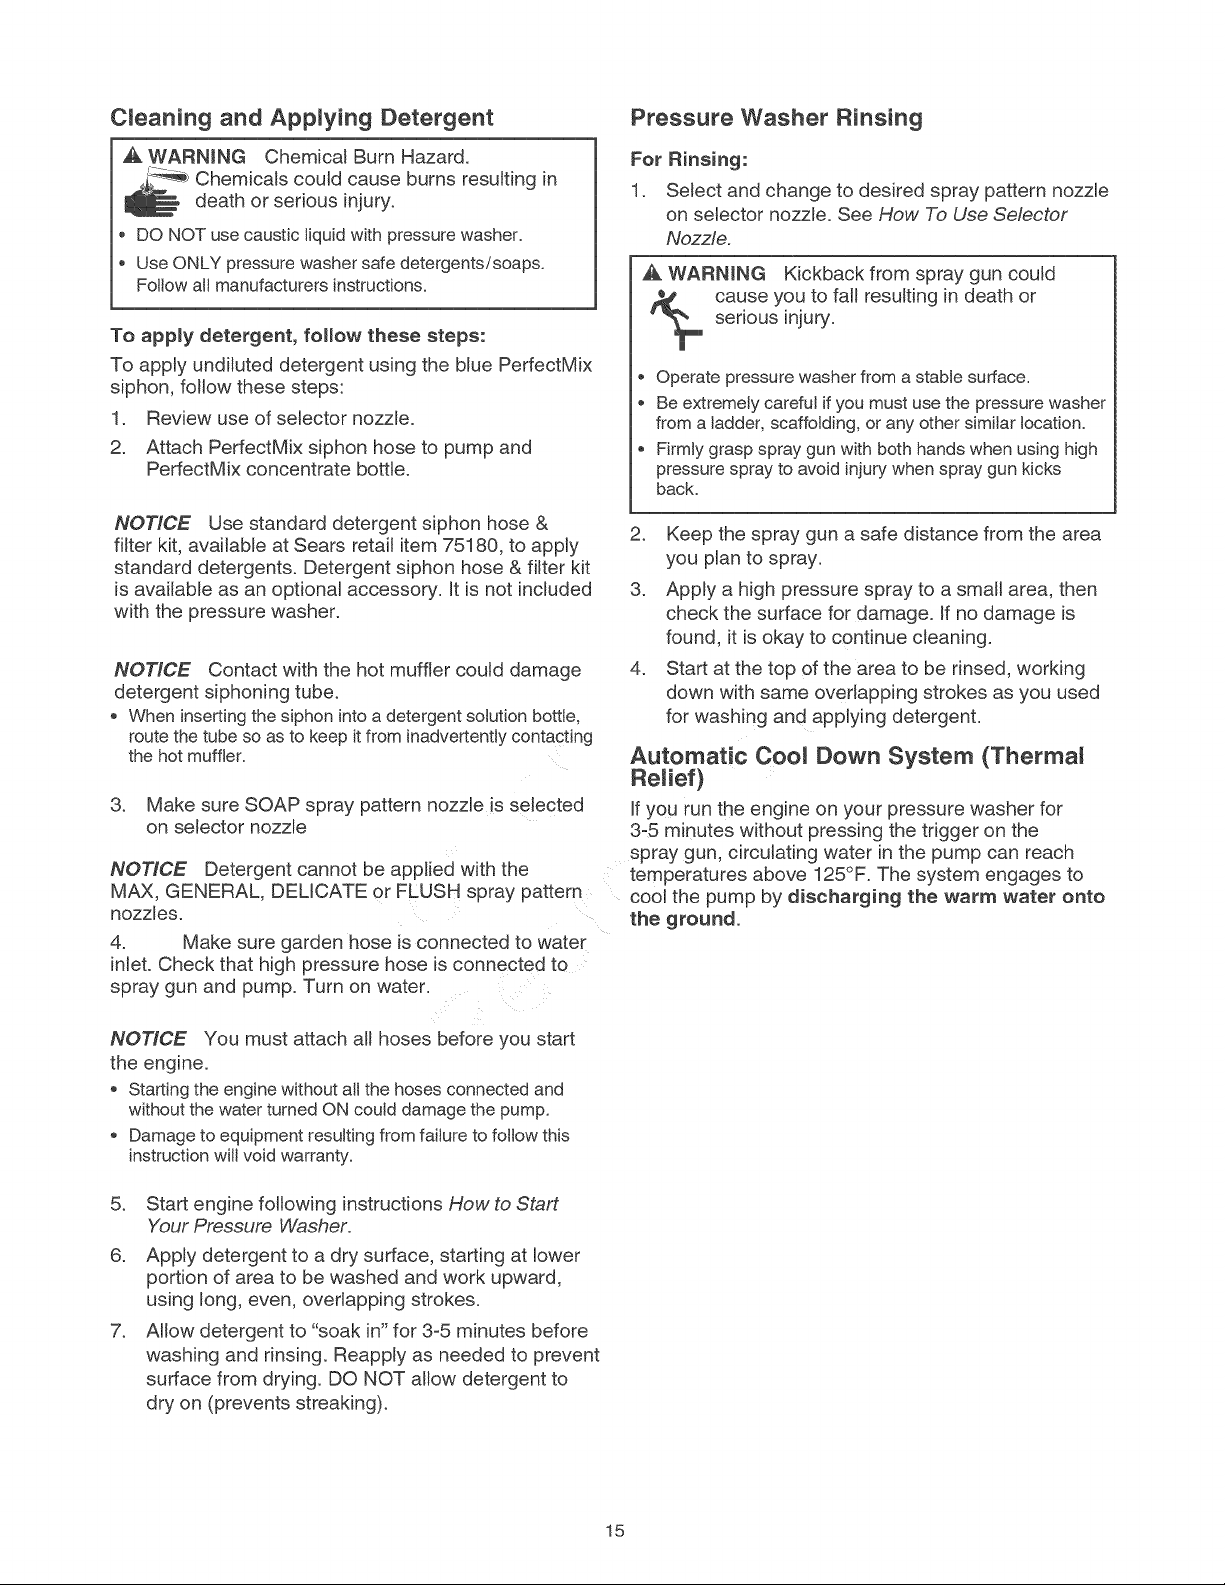
C_eaning and Applying Detergent
_k WARNING Chemical Burn Hazard.
Chemicals could cause burns resulting in
death or serious injury.
, DO NOT usecaustic liquid with pressurewasher.
, Use ONLY pressurewashersafe detergents/soaps.
Follow all manufacturersinstructions.
To apply detergent, follow these steps:
To apply undiluted detergent using the blue PerfectMix
siphon, follow these steps:
1. Review use of selector nozzle.
2. Attach PerfectMix siphon hose to pump and
PerfectMix concentrate bottle.
Pressure Washer Rinsing
For Rinsing:
1. Semectand change to desired spray pattern nozzle
on selector nozzle. See How To Use Selector
Nozzle.
WARNmNG Kickback from spray gun could
cause you to fall resulting in death or
serious injury.
, Operate pressure washer from a stable surface.
, Be extremely careful if you must use the pressure washer
from a ladder, scaffolding, or any other similar location.
, Firmly grasp spray gun with both hands when using high
pressure spray to avoid injury when spray gun kicks
back.
NOTICE Use standard detergent siphon hose &
filter kit, available at Sears retail item 75180, to apply
standard detergents. Detergent siphon hose & filter kit
is available as an optional accessory. It is not included
with the pressure washer.
NOTICE Contact with the hot muffler could damage
detergent siphoning tube.
, When inserting the siphon into a detergent solution bottte,
route the tube so as to keep it from inadvertently contacting
the hot muffler.
3. Make sure SOAP spray pattern nozzle is selected
on selector nozzle
NOTICE Detergent cannot be applied with the
MAX, GENERAL, DELICATE or FLUSH spray pattern
nozzles.
4. Make sure garden hose is connected to water
inlet. Check that high pressure hose is connected to
spray gun and pump. Turn on water.
NOTICE You must attach all hoses before you start
the engine.
, Starting the engine without all the hoses connected and
without the water turned ON could damage the pump.
, Damage to equipment resulting from failure to follow this
instruction will void warranty.
2. Keep the spray gun a safe distance from the area
you plan to spray.
3. Apply a high pressure spray to a small area, then
check the surface for damage. If no damage is
found, it is okay to continue cleaning.
4. Start at the top of the area to be rinsed, working
down with same overlapping strokes as you used
for washing and applying detergent.
Automatic Cool Down System (Therma_
Relief}
if you run the engine on your pressure washer for
3°5 minutes without pressing the trigger on the
spray gun, circulating water in the pump can reach
temperatures above 125°F. The system engages to
cool the pump by discharging the warm water onto
the ground.
.
Start engine following instructions How to Start
Your Pressure W/asher.
6.
Apply detergent to a dry surface, starting at lower
portion of area to be washed and work upward,
using long, even, overlapping strokes.
.
Allow detergent to "soak in" for 3-5 minutes before
washing and rinsing. Reapply as needed to prevent
surface from drying. DO NOT allow detergent to
dry on (prevents streaking).
15
Page 16
ENGINE TECHNICAL iNFORMATiON
This is a single cylinder, overhead valve (OHV), air
cooled engine. In the State of California, Model 120000
engines are certified by the California Air Resources
Board to meet emissions standards for 125 hours.
Such certification does not grant the purchaser, owner
or operator of this engine any additional warranties with
respect to the performance or operational life of this
engine. The engine is warranted solely according to the
product and emissions warranties stated elsewhere in
this manual.
Power Ratings
The gross power rating for individual gasoline engine
models is labeled in accordance with SAE (Society
of Automotive Engineers) code J1940 Small Engine
Power & Torque Rating Procedure, and is rated in
accordance with SAE J1995. Torque values are
derived at 2600 RPM for those engines with "rpm"
called out on the label and 3060 RPM for all others;
horsepower values are derived at 3600 RPM.
The gross power curves can be viewed at www.
BRIGGSandSTRATTON.COM. Net power values are
taken with exhaust and air cleaner installed whereas
gross power values are collected without these
attachments. Actual gross engine power will be higher
than net engine power and is affected by, among other
things, ambient operating conditions and engine-to-
engine variability. Given the wide array of products on
which engines are placed, the gasoline engine may not
develop the rated gross power when used in a given
piece of power equipment. This difference is due to a
variety of factors including, but not limited to, the variety
of engine components (air cleaner, exhaust, charging,
cooling, carburetor, fuel pump, etc.), application
limitations, ambient operating conditions (temperature,
humidity, a_titude), and engine-to engine variability.
Due to manufacturing and capacity limitations, Briggs &
Stratton may substitute an engine of higher rated power
for this engine.
PRODUCT SPECtNCATIONS
Pressure Washer Specifications
Max Outlet Pressure .................... 3000 PSI*
Max Flow Rate ......................... 2.7 GPM
Detergent Mix .................... Use as directed
Water Supply Temperature ..... Not to exceed 100°F
Engine Specifications
Bore ......................... 2.688 in. (68.28 mm)
Stroke ........................ 2.040 in. (51.82 mm)
Displacement ..................... 11.58 in. (190 cc)
Spark Plug
Type: .................. Briggs & Stratton 692051
Set Gap To: ................ 0.020 inch (0.051 mm)
Armature Air Gap: ...... 0.010-0.014 in.(0.25-0.36mm)
Valve clearance with valve springs installed and piston
1/4 in. (6 ram) past top dead center (check when engine
is cold).
Intake ................ 0.004-0.008 in.(0.10-0.20 mm)
Exhaust............... 0.004-0.008 in.(O.10-0o20mm)
Fuel Capacity ...... .... : ................ 1.6Quarts
Oil Capacity .... :. :.. :. : ........ 20 Ounces (0.6 liter)
NOTICE For practical operation, the engine load
should not exceed 85% of rated power. Engine power
will decrease 3-1/2% for each 1,000 feet (300 meters)
above sea level and 1% for each 10° F (5.6° C) above
77° F (25° C). It should operate satisfactorily at an
angle up to 15°.
* This pressure washer is rated in accordance to
the Pressure Washer Manufacturers Association
(PWMA) standard PW101-2010 (Testing and Rating
Performance of Pressure Washers).
16
Page 17
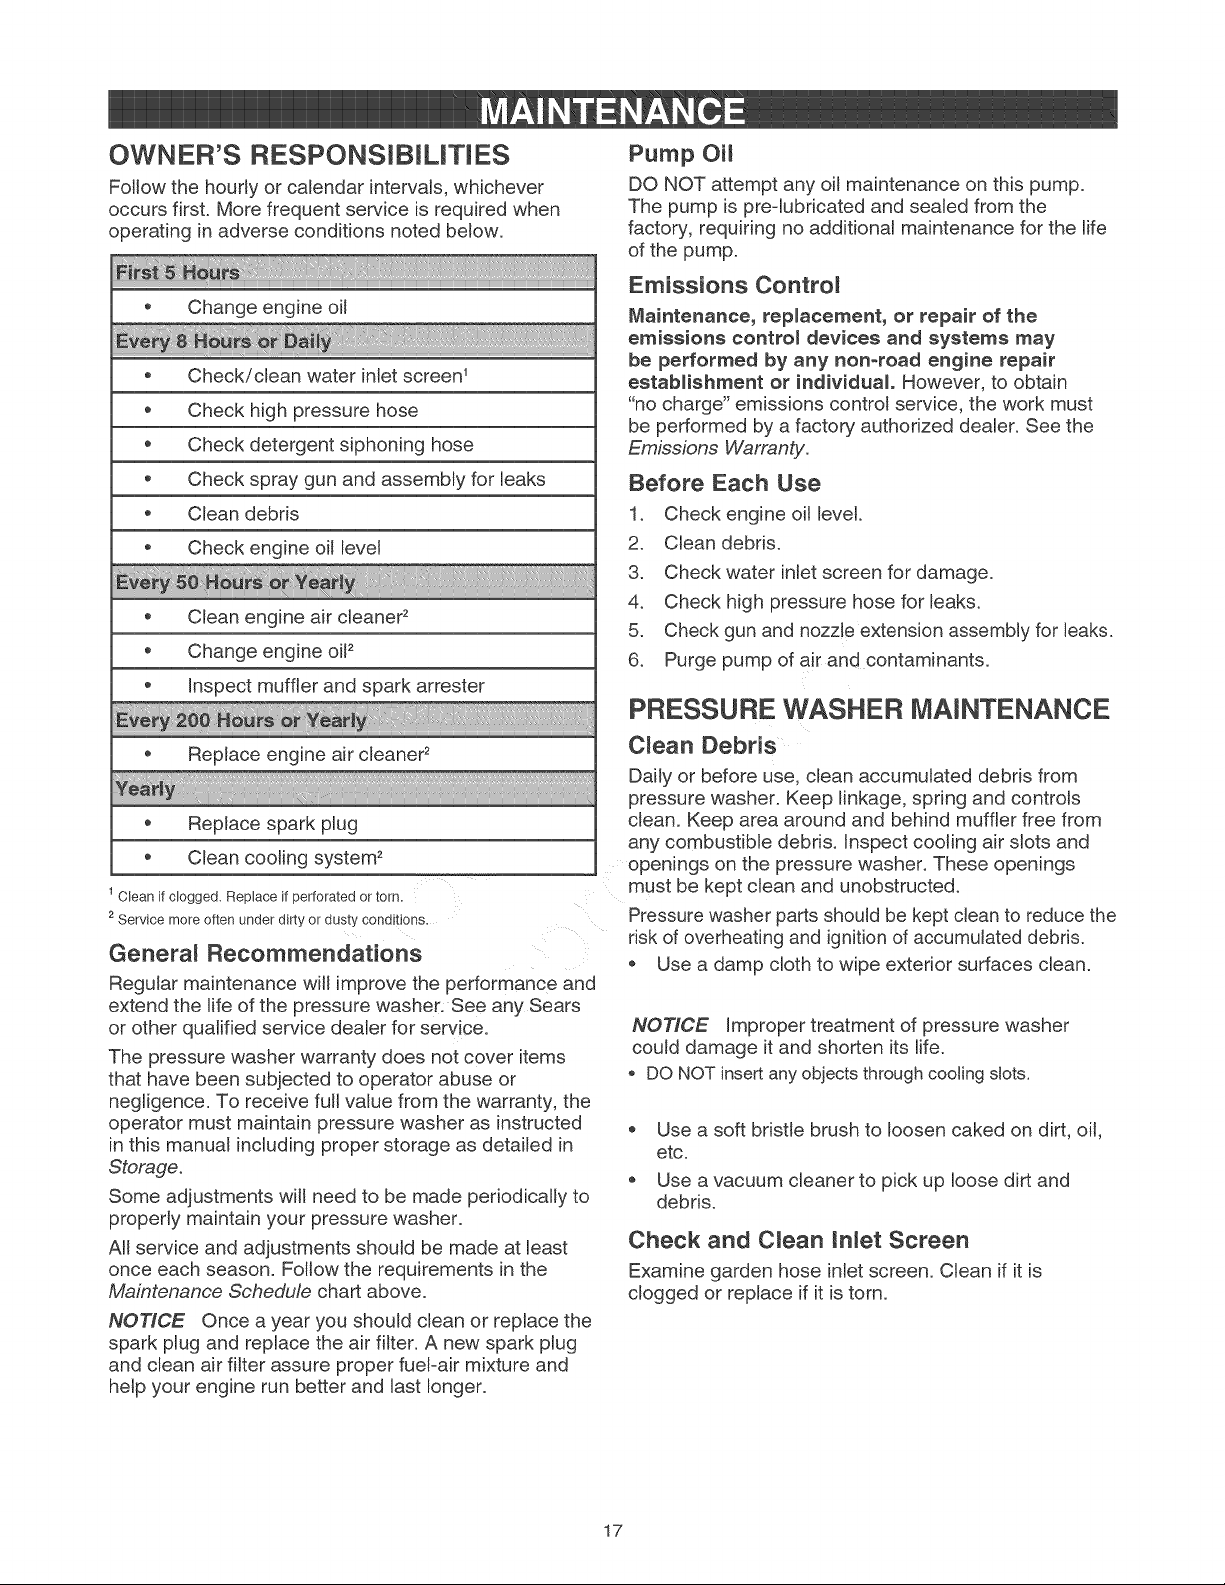
OWNER'S RESPONSIBILiTiES
Follow the hourly or calendar intervals, whichever
occurs first. More frequent service is required when
operating in adverse conditions noted below.
* Change engine oil
®
Check/clean water inlet screen _
®
Check high pressure hose
®
Check detergent siphoning hose
®
Check spray gun and assembly for leaks
®
Clean debris
®
Check engineoillevel
®
Clean engine air cleaner
®
Change engine oiF
®
Inspect muffler and spark attester
Pump Oil
DO NOT attempt any oil maintenance on this pump.
The pump is prequbricated and sealed from the
factory, requiring no additional maintenance for the life
of the pump.
Emissions Control
Maintenance, repJacement, or repair of the
emissions contro_ devices and systems may
be performed by any non-road engine repair
establishment or individual. However, to obtain
"no charge" emissions control service, the work must
be performed by a factory authorized dealer. See the
Emissions Warranty.
Before Each Use
1. Check engine oHlevel
2. Clean debris.
3. Check water inlet screen for damage.
4. Check high pressure hose for leaks.
5. Check gun and nozzJeextension assembly for leaks.
6. Purge pump of air and contaminants.
PRESSURE WASHER MAINTENANCE
® Replace engine air cleaner
® Replace spark plug
® Clean cooling system _
1 Clean if clogged. Replace if perforated or torn,
2 Service more often under dirty or aus_y cona_tions
General Recommendations
Regular maintenance will improve the performance and
extend the life of the pressure washer. See any Sears
or other qualified service dealer for service.
The pressure washer warranty does not cover items
that have been subjected to operator abuse or
negligence. To receive full value from the warranty, the
operator must maintain pressure washer as instructed
in this manual including proper storage as detailed in
Storage.
Some adjustments will need to be made periodically to
properly maintain your pressure washer.
AHservice and adjustments should be made at least
once each season. Follow the requirements in the
Maintenance Schedule chart above.
NOTICE Once a year you should clean or replace the
spark plug and replace the air filter. A new spark plug
and clean air filter assure proper fueFair mixture and
help your engine run better and last longer.
Clean Debris
Daily or before use, clean accumulated debris from
pressure washer. Keep linkage, spring and controls
clean. Keep area around and behind muffler free from
any combustible debris. Inspect cooling air slots and
openings on the pressure washer. These openings
must be kept clean and unobstructed.
Pressure washer parts should be kept clean to reduce the
risk of overheating and ignition of accumulated debris.
® Use a damp cloth to wipe exterior surfaces clean.
NOTICE Improper treatment of pressure washer
could damage it and shorten its life.
, DO NOT insert anyobjects throughcooling stots.
® Use a soft bristle brush to loosen caked on dirt, oil,
etc.
® Use a vacuum cleaner to pick up loose dirt and
debris.
Check and C_ean tnlet Screen
Examine garden hose inlet screen. Clean if it is
clogged or replace if it is torn.
17
Page 18
Check High Pressure Hose
High pressure hoses can develop leaks from wear,
kinking, or abuse. Inspect hose before each use.
Check for cuts, leaks, abrasions, bulging of cover, or
damage or movement of couplings. If any of these
conditions exist, replace hose immediately.
_, WARNING The high pressure stream of water
_ hat this equipment produces could cut
through skin and its underlying tissues,
resulting in serious injury and possible
amputation.
o NEVER repairhigh pressure hose. Replace it.
Replacement hose ratingMUSTequal or exceed
maximum pressure ratingof unit.
Check Detergent Siphoning Tube
Examine the filter on detergent tube (if equipped) and
clean if clogged. The tube should fit tightly on the
barbed fitting. Examine the tube for leaks or tears.
Replace the filter or tube if either is damaged.
Detergent Siphoning Check Ball
Occasionally check bah in detergent siphoning
system may become stuck from storage, dried soap,
or minerals in water. The check ball can be freed by
performing the following:
NOTICE Before performing this procedure, be sure
,ou are wearing safety goggles as described below.
WARNING Risk of eye injury.
Spray could splash back or propel objects
resulting in serious injury.
.
Remove detergent siphoning hose from barbed
fitting on pump.
4.
Using a firm, Munt object 7/64" in diameter or
smaller, by at least 1" long, such as an Allen
wrench, slowly insert the object into the barbed
fitting until you meet resistance. This resistance is
the check balL
5. Slowly push down until you feel the ball move
slightly, push no more than 1/8". Slight pressure
may be required to free the ball.
6. Repeat steps 4 and 5 if necessary.
7. Reinstall detergent siphoning hose onto barb
fitting.
8. Treat with PumpSaver as described in Protecting
the Pump during storage to prevent reoccurrence.
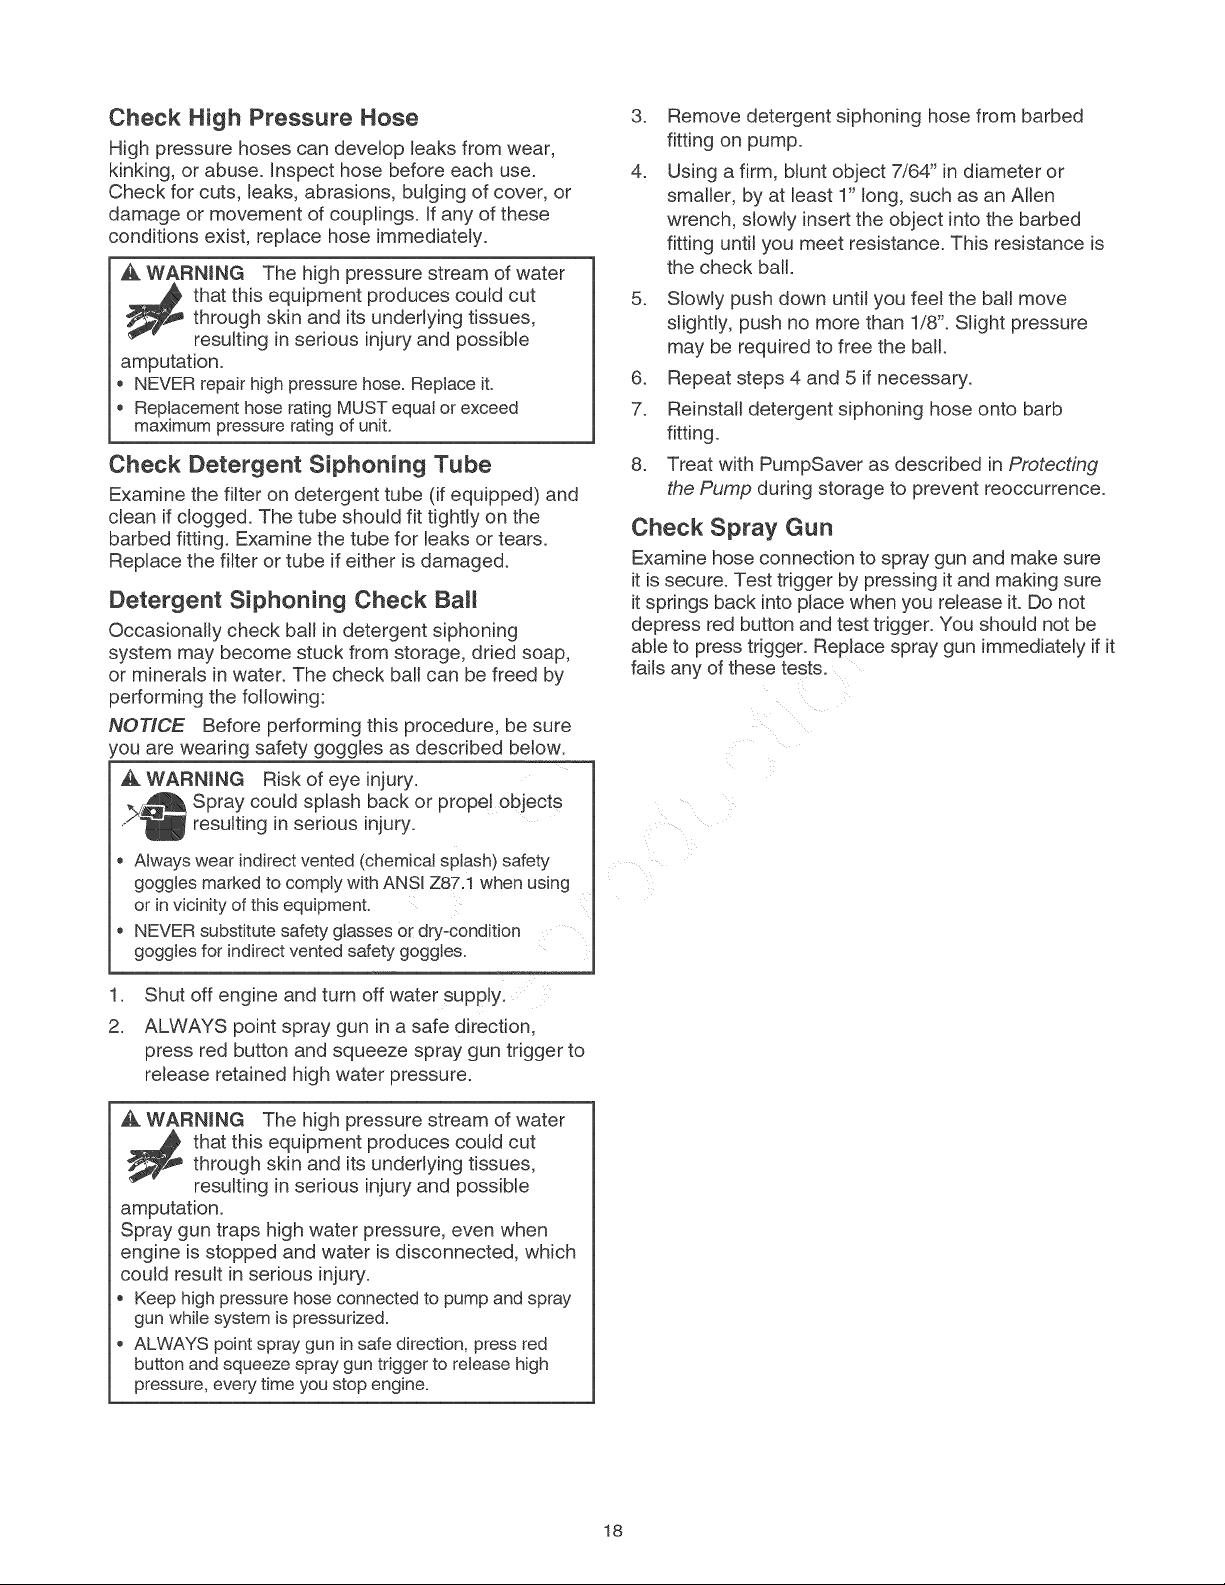
Check Spray Gun
Examine hose connection to spray gun and make sure
it is secure. Test trigger by pressing it and making sure
it springs back into place when you release it. Do not
depress red button and test trigger. You should not be
able to press trigger. Replace spray gun immediately if it
faWsany of these tests.
Always wear indirect vented (chemical splash) safety
goggles marked to comply with ANSI Z87.1 when using
or in vicinity of this equipment.
NEVER substitute safety glasses or dry-condition
goggtes for indirect vented safety goggtes.
Shut off engine and turn off water suppJy.
.
ALWAYS point spray gun in a safe direction,
press red button and squeeze spray gun trigger to
release retained high water pressure.
WARNING The high pressure stream of water
:_ that this equipment produces could cutthrough skin and its underlying tissues,
resuffing in serious injury and possible
amputation.
Spray gun traps high water pressure, even when
engine is stopped and water is disconnected, which
could result in serious injury.
Keep high pressurehose connectedto pumpand spray
gun while systemis pressurized.
ALWAYS pointspraygun in safe direction, press red
button and squeezespray gun trigger to releasehigh
pressure,everytime you stop engine.
18
Page 19

Selector Nozzle Maintenance
A pulsing sensation felt while squeezing the spray gun
trigger may be caused by excessive pump pressure.
The principal cause of excessive pump pressure is
a nozzle clogged or restricted with foreign materials,
such as dirt, etc. To correct the problem, immediately
clean the nozzles followin 9 these instructions:
1. Shut off engine and turn off water supply.
2. ALWAYS point spray gun in a safe direction, press
red button and and squeeze spray gun trigger to
release retained high water pressure.
_, WARNING The high pressure stream of water
through skin and its underlying tissues,
that this equipment produces could cut
resulting in serious injury and possible
amputation.
Spray gun traps high water pressure, even when
engine is stopped and water is disconnected, which
could result in serious injury.
o Keep high pressure hoseconnected to pump and spray
gun while system ispressurized.
ALWAYS pointspraygun insafe direction, press redbut-
ton and squeeze spraygun trigger to release high pres-
sure, every timeyou stop engine.
.
Remove selector nozzle from end of nozzle
extension.
4.
Use a small paper clip to free any foreign material
clogging or restricting each nozzle (A) in the
selector nozzle.
.
Remove nozzle extension from spray gun.
6.
Using a garden hose, remove additional debris by
back flushing water through nozzle extension. Back
flush between 30 to 60 seconds.
O-Ring Maintenance
Purchase an O=Ring Repair Kit, Sears item 75116, at
your local Sears or by calling 1-888-331-4569 or online
at www.sears.com. It is not included with the pressure
washer. This kit includes replacement o=rings and a
water inlet filter. Refer to the instruction sheet provided
in the kit to service your unit's o=rings.
WARNING The high pressure stream of water
that this equipment produces could cut
through skin and its underlying tissues,
resulting in serious injury and possible
amputation.
NEVERrepair leaking connections with sealantof any
kind. Replaceo-ringor seal.
ENGINE MAHNTENANCE
WARNING Unintentional sparking could cause
fire or electric shock resulting in
death or serious injury.
WHEN ADJUSTING OR MAKING REPAIRS TO YOUR
PRESSURE WASHER
, Disconnect the spark p!ug wire from the spark plug and
place the wire where it cannot contact spark plug.
WHEN TESTING FOR ENGINE SPARK
, Use approved spark plug tester.
DO NOT check for spark with spark plug removed.
Oil
OiJ Recommendations
We recommend the use of Briggs & Stratton Warranty
Certified otis for best performance. Other high-quality
detergent oils are acceptable if classified for service
SF. SG, SH, SJ or higher. DO NOT use special
additives.
Outdoor temperatures determine the proper oil
viscosity for the engine. Use the chart to select the best
viscosity for the outdoor temperature range expected.
oF
% 40
°C
.
Reinstall selector nozzle into nozzle extension.
8.
Reconnect nozzle extension to spray gun.
9.
Make sure garden hose is connected to water inlet.
Check that high pressure hose is connected to
spray gun and pump. Turn on water.
10. Start engine following instructionsHow to Start
Your Pressure Washer.
11. Test pressure washer by operating in each spray
pattern.
86 i_
68 i_
104 ___. ,
50 i_
32 _
14
_4
-22 _
* Below 40°F (4°C) the use of SAE 30 will result in hard
starting.
** Above 80°F (27°C) the use of 10W30 may cause increased
oil consumption. Check oil level more frequently.
19
._20
; 3o
10
-20
-30
Page 20
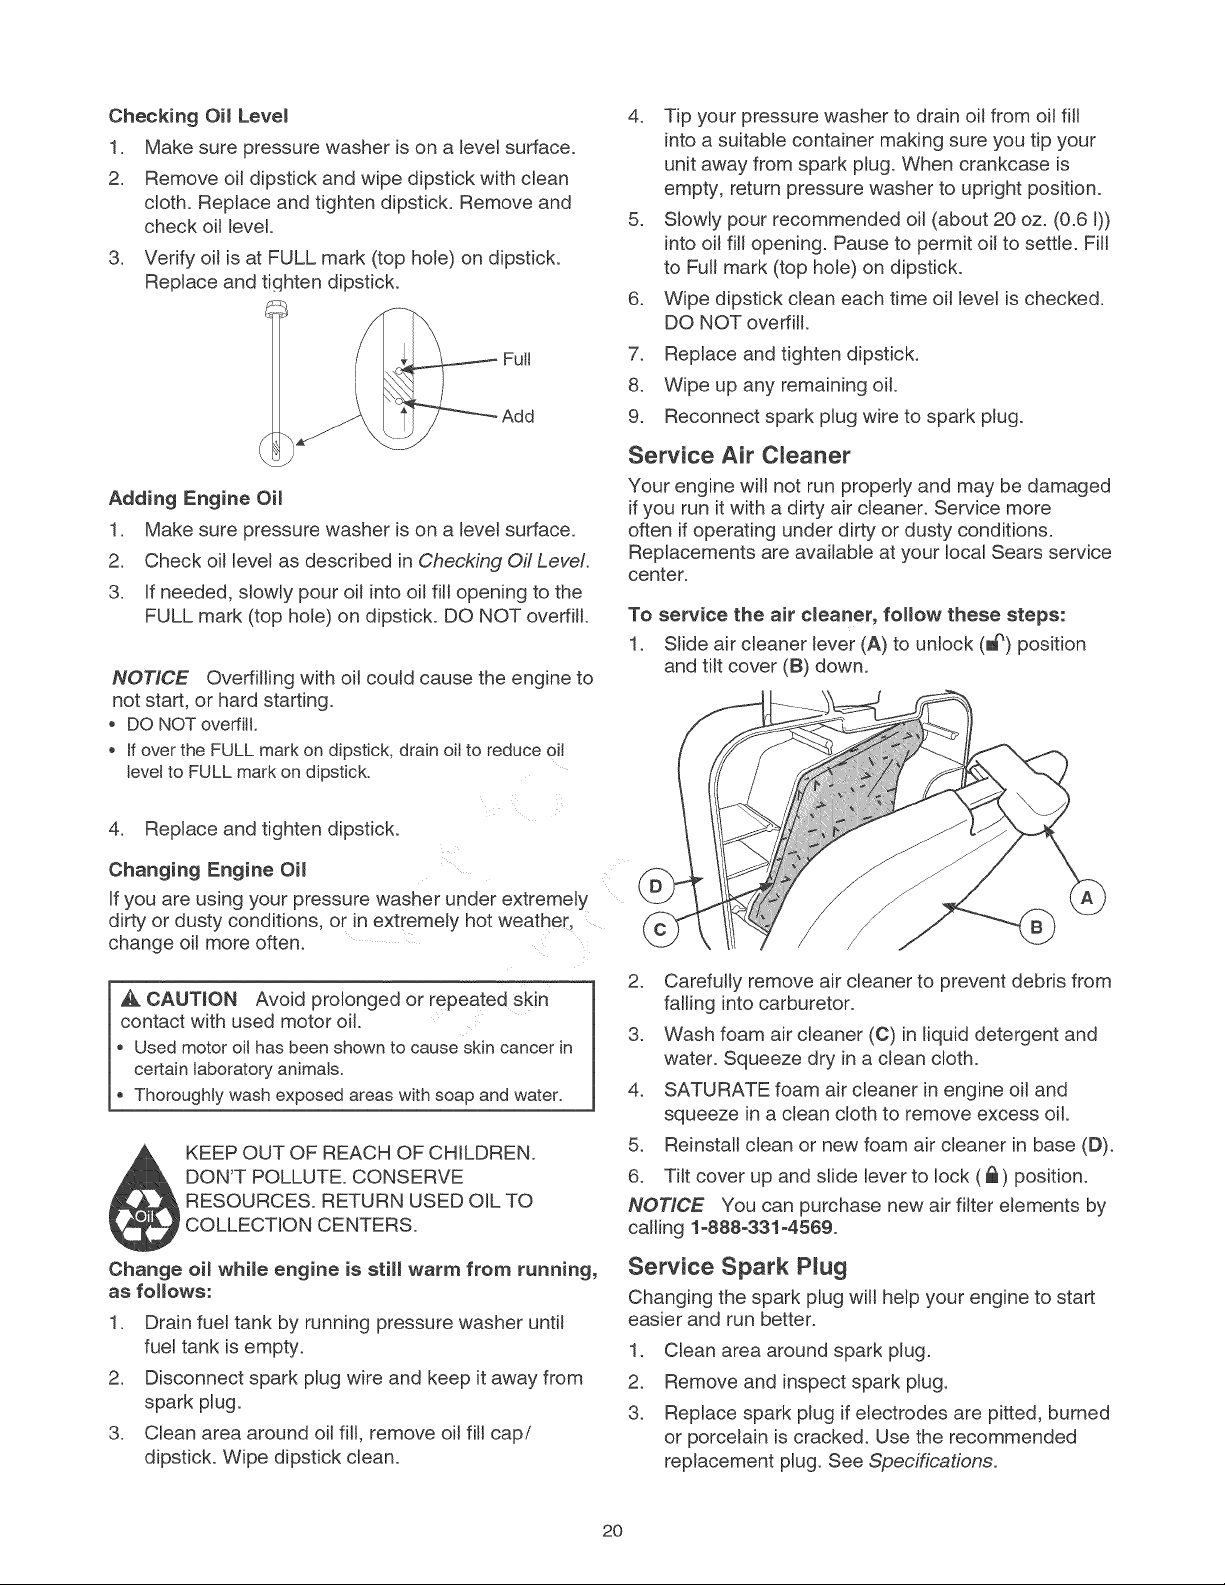
Checking Oi_ Leve_
1. Make sure pressure washer is on a level surface.
2. Remove oil dipstick and wipe dipstick with clean
cloth. Replace and tighten dipstick. Remove and
check oil level.
3. Verify oil is at FULL mark (top hole) on dipstick.
Replace and tiqhten dipstick.
Full
Adding Engine Oi_
1. Make sure pressure washer is on a level surface.
2. Check oil level as described in Checking Oil Level
3. If needed, slowly pour oil into oil fill opening to the
FULL mark (top hole) on dipstick. DO NOT overfill.
NOTICE Overfilling with oil could cause the engine to
not start, or hard starting.
DO NOT overfill.
o If over the FULL mark on dipstick, drain oil to reduce oit
level to FULL mark on dipstick.
4. Tip your pressure washer to drain oil from oil fill
into a suitable container making sure you tip your
unit away from spark plug. When crankcase is
empty, return pressure washer to upright position.
5. Slowly pour recommended oil (about 20 oz. (0.6 I))
into oil fill opening. Pause to permit oil to settle. Fill
to Full mark (top hole) on dipstick.
6. Wipe dipstick clean each time oil level is checked.
DO NOT overfill.
7. Replace and tighten dipstick.
8. Wipe up any remaining oil.
9. Reconnect spark plug wire to spark plug.
Service Air Cleaner
Your engine will not run properly and may be damaged
if you run it with a dirty air cleaner. Service more
often if operating under dirty or dusty conditions.
Replacements are available at your local Sears service
center.
To service the air cleaner, follow these steps:
1. Slide air cleaner lever (A) to unlock (_') position
and tilt cover (B) down.
4. Replace and tighten dipstick.
Changing Engine Oil
If you are using your pressure washer under extremely
dirty or dusty conditions, or in extremely hot weather,
change oil more often.
_, CAUTION Avoid prolonged or repeated skin
contact with used motor oil.
Used motor oil has been shown to cause skin cancer in
certain laboratory animals.
Thoroughly wash exposed areas with soap and water.
KEEP OUT OF REACH OF CHILDREN.
DON'T POLLUTE. CONSERVE
RESOURCES. RETURN USED OIL TO
COLLECTION CENTERS.
Change oil while engine is still warm from running,
as follows:
1. Drain fuel tank by running pressure washer until
fuel tank is empty.
2. Disconnect spark plug wire and keep it away from
spark plug.
3. Clean area around oil fill, remove oil fill cap/
dipstick. Wipe dipstick clean.
2 Carefully remove air cleaner to prevent debris from
falling into carburetor.
3 Wash foam air cleaner (C) in liquid detergent and
water. Squeeze dry in a clean cloth.
4. SATURATE foam air cleaner in engine oil and
squeeze in a clean cloth to remove excess oil.
5. Reinstall clean or new foam air cleaner in base (D).
6. Tilt cover up and slide lever to lock (_) position.
NOTICE You can purchase new air filter elements by
calling 1o888-331o4569.
Service Spark Plug
Changing the spark plug will help your engine to start
easier and run better.
1. Clean area around spark plug.
2. Remove and inspect spark plug.
3. Replace spark plug if electrodes are pitted, burned
or porcelain is cracked. Use the recommended
replacement plug. See Specifications.
2O
Page 21
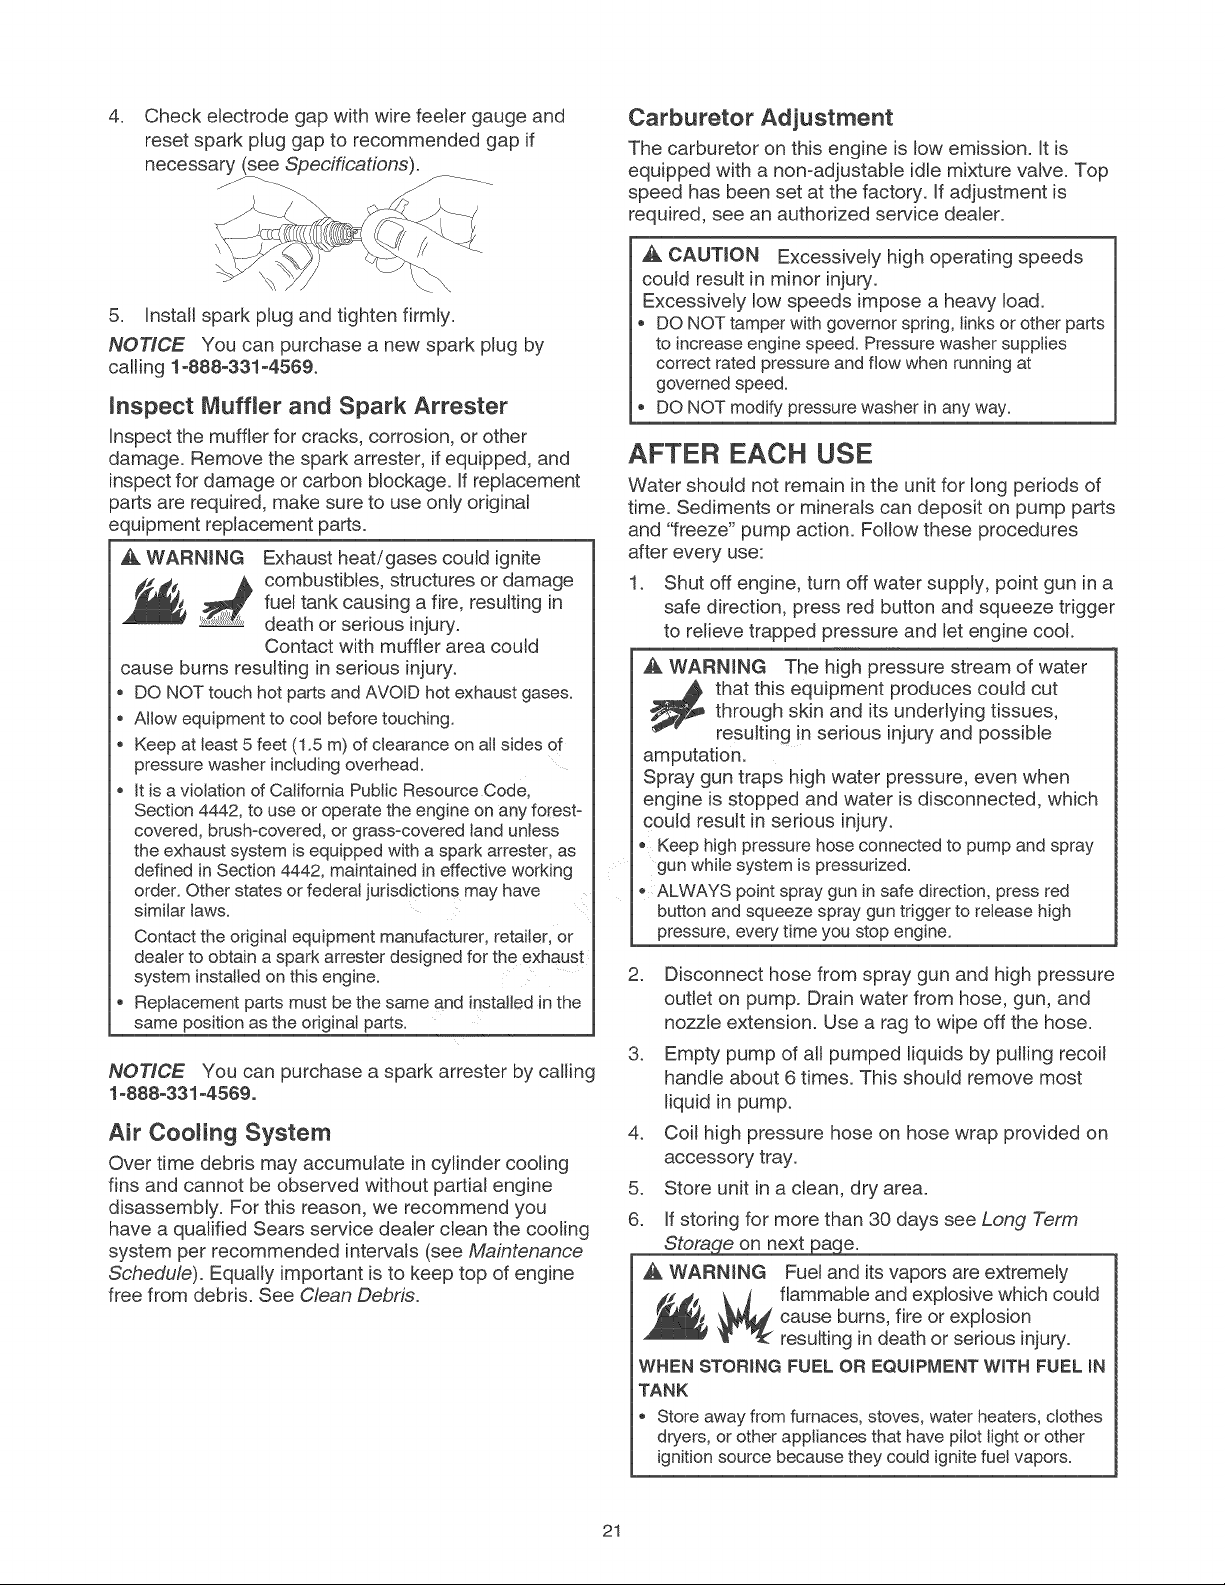
.
Check electrode gap with wire feeler gauge and
reset spark plug gap to recommended gap if
necessary (see Specifications).
5. Install spark plug and tighten firmly.
NOTICE You can purchase a new spark plug by
calling 1-888-331-4569.
_nspect Muffler and Spark Attester
Inspect the muffler for cracks, corrosion, or other
damage. Remove the spark arrester, if equipped, and
inspect for damage or carbon blockage, tf replacement
parts are required, make sure to use only original
equipment replacement parts.
_, WARNmNG Exhaust heat/gases could ignite
combustibles, structures or damage
fuel tank causing a fire, resulting in
death or serious injury.
Contact with muffler area could
cause burns resulting in serious injury.
, DO NOT touchhot parts and AVOID hot exhaust gases.
, Allow equipment to cool before touching.
, Keep at least5 feet (1.5 m) of clearance on all sides of
pressure washer includingoverhead.
It is a violationofCalifornia Public Resource Code,
Section 4442,to use or operate the engine on any forest-
covered, brush-covered,or grass-covered land unless
the exhaust system isequippedwith a spark attester, as
defined in Section 4442, maintainedin effective working
order.Other statesor federal ]udsd!ctions may have
similar taws.
Contact theoriginal equipment manufacturer,retailer, or
dealer to obtaina sparkarresterdesigned for theexhaust
systeminstalledon this engine.
, Replacement partsmust bethe same and installed inthe
same position asthe original parts.
NOTICE You can purchase a spark arrester by calling
1-888-331 °4569°
Air Cooling System
Over time debris may accumulate in cylinder cooling
fins and cannot be observed without partial engine
disassembly. For this reason, we recommend you
have a qualified Sears service dealer clean the cooling
system per recommended intervals (see Maintenance
Schedule). Equally important is to keep top of engine
free from debris. See Clean Debris.
Carburetor Adjustment
The carburetor on this engine is low emission. It is
equipped with a non-adjustable idle mixture valve. Top
speed has been set at the factory. If adjustment is
required, see an authorized service dealer.
_, CAUTION Excessively high operating speeds
could result in minor injury.
Excessively low speeds impose a heavy load.
o DO NOT tamper with governor spring, links or other parts
to increase engine speed. Pressure washer supplies
correct rated pressure and flow when running at
governed speed.
DO NOT modify pressure washer in any way.
AFTER EACH USE
Water should not remain in the unit for long periods of
time. Sediments or minerals can deposit on pump parts
and "freeze" pump action. Follow these procedures
after every use:
1. Shut off engine, turn off water supply, point gun in a
safe direction, press red button and squeeze trigger
to relieve trapped pressure and let engine cool.
WARNmNG The high pressure stream of water
through skin and its underlying tissues,
that this equipment produces could cut
resulting in serious injury and possible
amputation.
Spray gun traps high water pressure, even when
engine is stopped and water is disconnected, which
could result in serious injury.
Keep high pressurehose connectedto pumpand spray
gun whilesystem is pressurized.
ALWAYSpoint spraygun in safe direction, press red
button and squeezespray gun trigger to releasehigh
pressure,everytime you stop engine.
.
Disconnect hose from spray gun and high pressure
outlet on pump. Drain water from hose, gun, and
nozzle extension. Use a rag to wipe off the hose.
.
Empty pump of all pumped liquids by pulling recoil
handle about 6 times. This should remove most
liquid in pump.
.
Coil high pressure hose on hose wrap provided on
accessory tray.
5.
Store unit in a clean, dry area.
6.
If storing for more than 30 days see Long Term
Storac_ on next page.
_, WARNmNG Fuel and its vapors are extremely
_1 lammable and explosive which couJd
WHEN STORING FUEL OR EQUIPMENT WiTH FUEL iN
TANK
, Storeaway fromfurnaces, stoves, water heaters,clothes
dryers,orother appliances that have pilot lightor other
ignitionsource becausethey could ignitefuel vapors.
cause burns, fire or explosion
resulting in death or serious injury.
21
Page 22
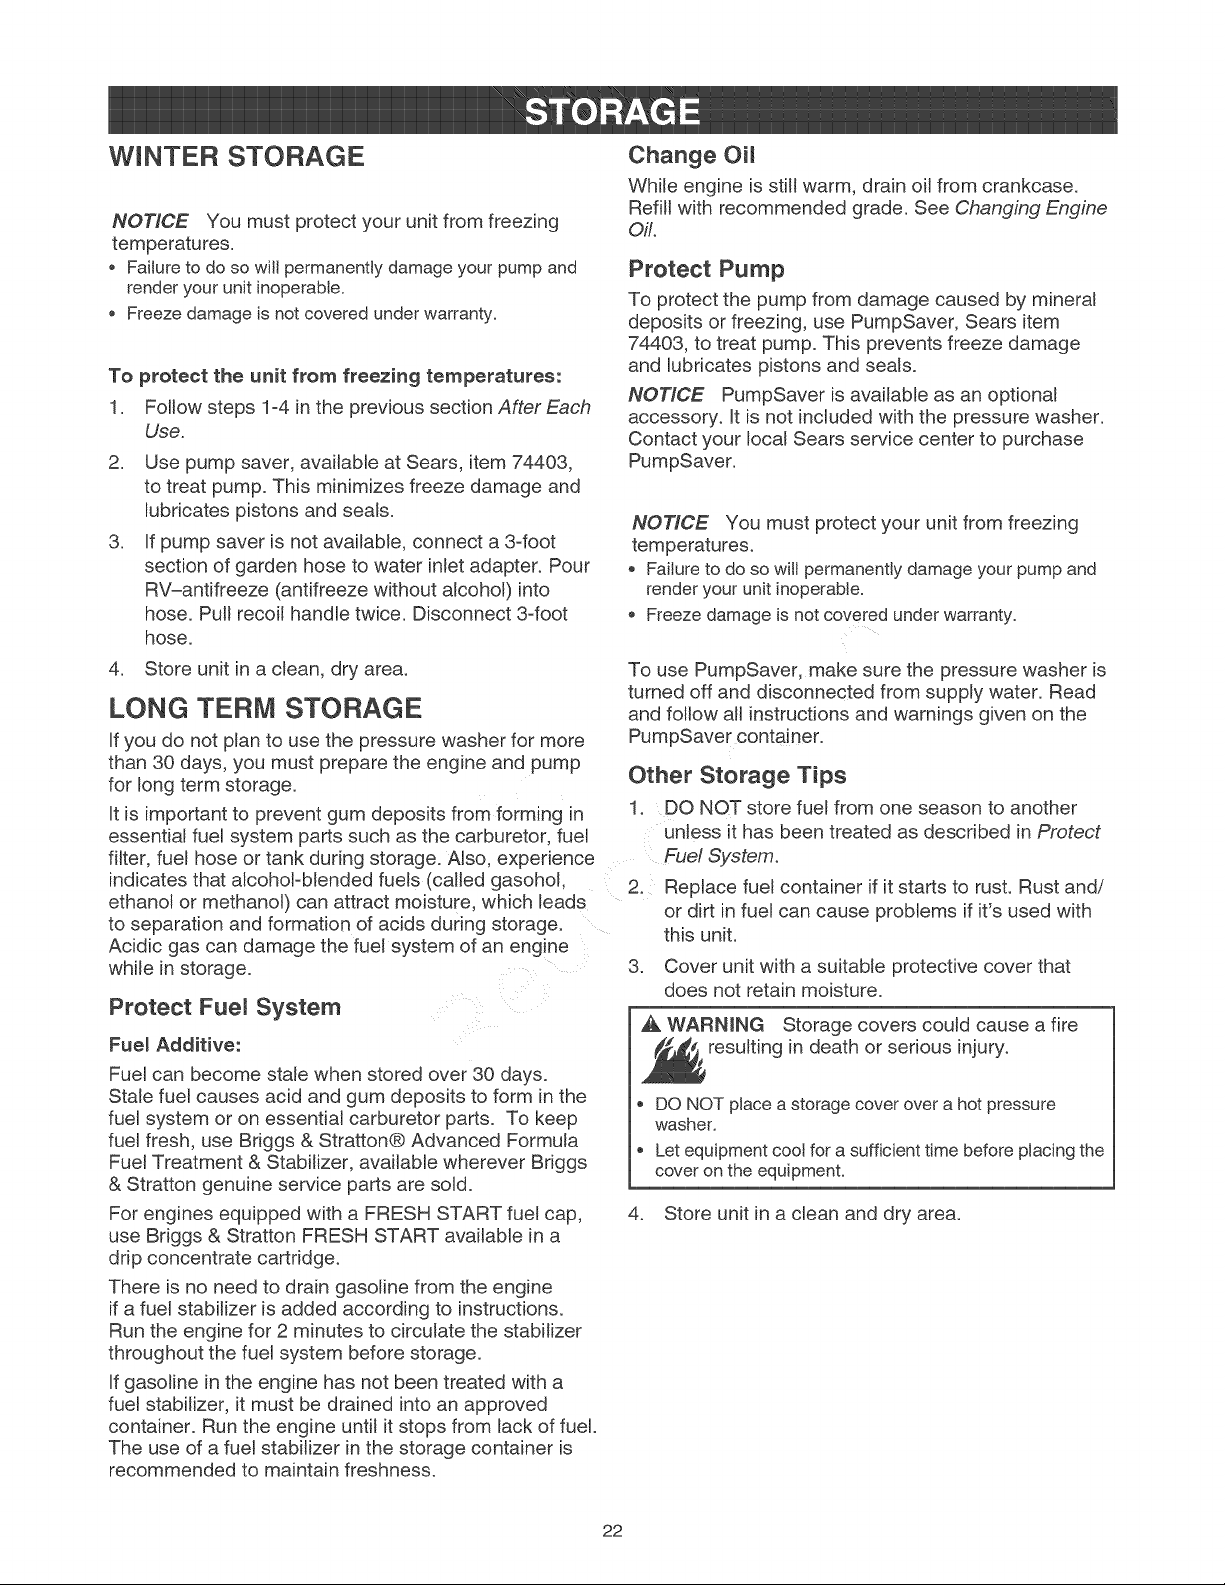
WHNTER STORAGE
NOTICE You must protect your unit from freezing
temperatures.
o Failure to do so will permanently damage your pump and
render your unk inoperable.
Freeze damage is not covered under warranty.
To protect the unit from freezing temperatures:
1. Follow steps 1-4 in the previous section After Each
Use.
.
Use pump saver, available at Sears, item 74403,
to treat pump. This minimizes freeze damage and
lubricates pistons and seals.
.
Lfpump saver is not availaMe, connect a 3-foot
section of garden hose to water inlet adapter. Pour
RV-antifreeze (antifreeze without alcohol) into
hose. Pull recoil handle twice. Disconnect 3-foot
hose.
4. Store unit in a clean, dry area.
LONG TERM STORAGE
Lfyou do not plan to use the pressure washer for more
than 30 days, you must prepare the engine and pump
for long term storage.
Ltis important to prevent gum deposits from forming in
essential fuel system parts such as the carburetor, fuel
filter, fuel hose or tank during storage. Also, experience
indicates that alcohol-blended fuels (called gasohol.
ethanol or methanol) can attract moisture, which Leads
to separation and formation of acids during storage.
Acidic gas can damage the fuel system of an engine
while in storage.
Protect Fuel System
Fue_ Additive:
Fuel can become stale when stored over 30 days.
Stale fuel causes acid and gum deposits to form in the
fuel system or on essentia} carburetor parts. To keep
fuel fresh, use Bdggs & Stratton® Advanced Formula
Fuel Treatment & Stabilizer, available wherever Briggs
& Stratton genuine service parts are sold.
For engines equipped with a FRESH START fuel cap,
use Briggs & Stratton FRESH START available in a
drip concentrate cartridge.
There is no need to drain gasoline from the engine
if a fuel stabilizer is added according to instructions.
Run the engine for 2 minutes to circulate the stabilizer
throughout the fuel system before storage.
If gasoline in the engine has not been treated with a
fuel stabilizer, itmust be drained into an approved
container. Run the engine until it stops from lack of fuel.
The use of a fuel stabilizer in the storage container is
recommended to maintain freshness.
Change Oil
While engine is still warm, drain oil from crankcase.
Refill with recommended grade. See Changing Engine
Oil.
Protect Pump
To protect the pump from damage caused by mineral
deposits or freezing, use PumpSaver, Sears item
74403, to treat pump. This prevents freeze damage
and lubricates pistons and seals.
NOTICE PumpSaver is available as an optiona_
accessory. It is not included with the pressure washer.
Contact your local Sears service center to purchase
PumpSaver.
NOTICE You must protect your unit from freezing
temperatures.
Failure to do so will permanently damage your pump and
render your unit inoperable.
Freeze damage is not covered under warranty.
To use PumpSaver, make sure the pressure washer is
turned off and disconnected from supply water. Read
and follow aHinstructions and warnings given on the
PumpSaver container.
Other Storage Tips
1 DO NOT store fuel from one season to another
unless it has been treated as described in Protect
Fuel System.
2. Replace fue_container if it starts to rust. Rust and/
or dirt in fuel can cause problems if it's used with
this unit.
3 Cover unit with a suitable protective cover that
does not retain moisture.
_, WARNING Storage covers could cause a fire
resulting in death or serious injury.
DO NOT place a storage cover over a hot pressure
washer.
Let equipment cool for a sufficient time before placing the
cover on the equipment.
4. Store unit in a clean and dry area.
22
Page 23
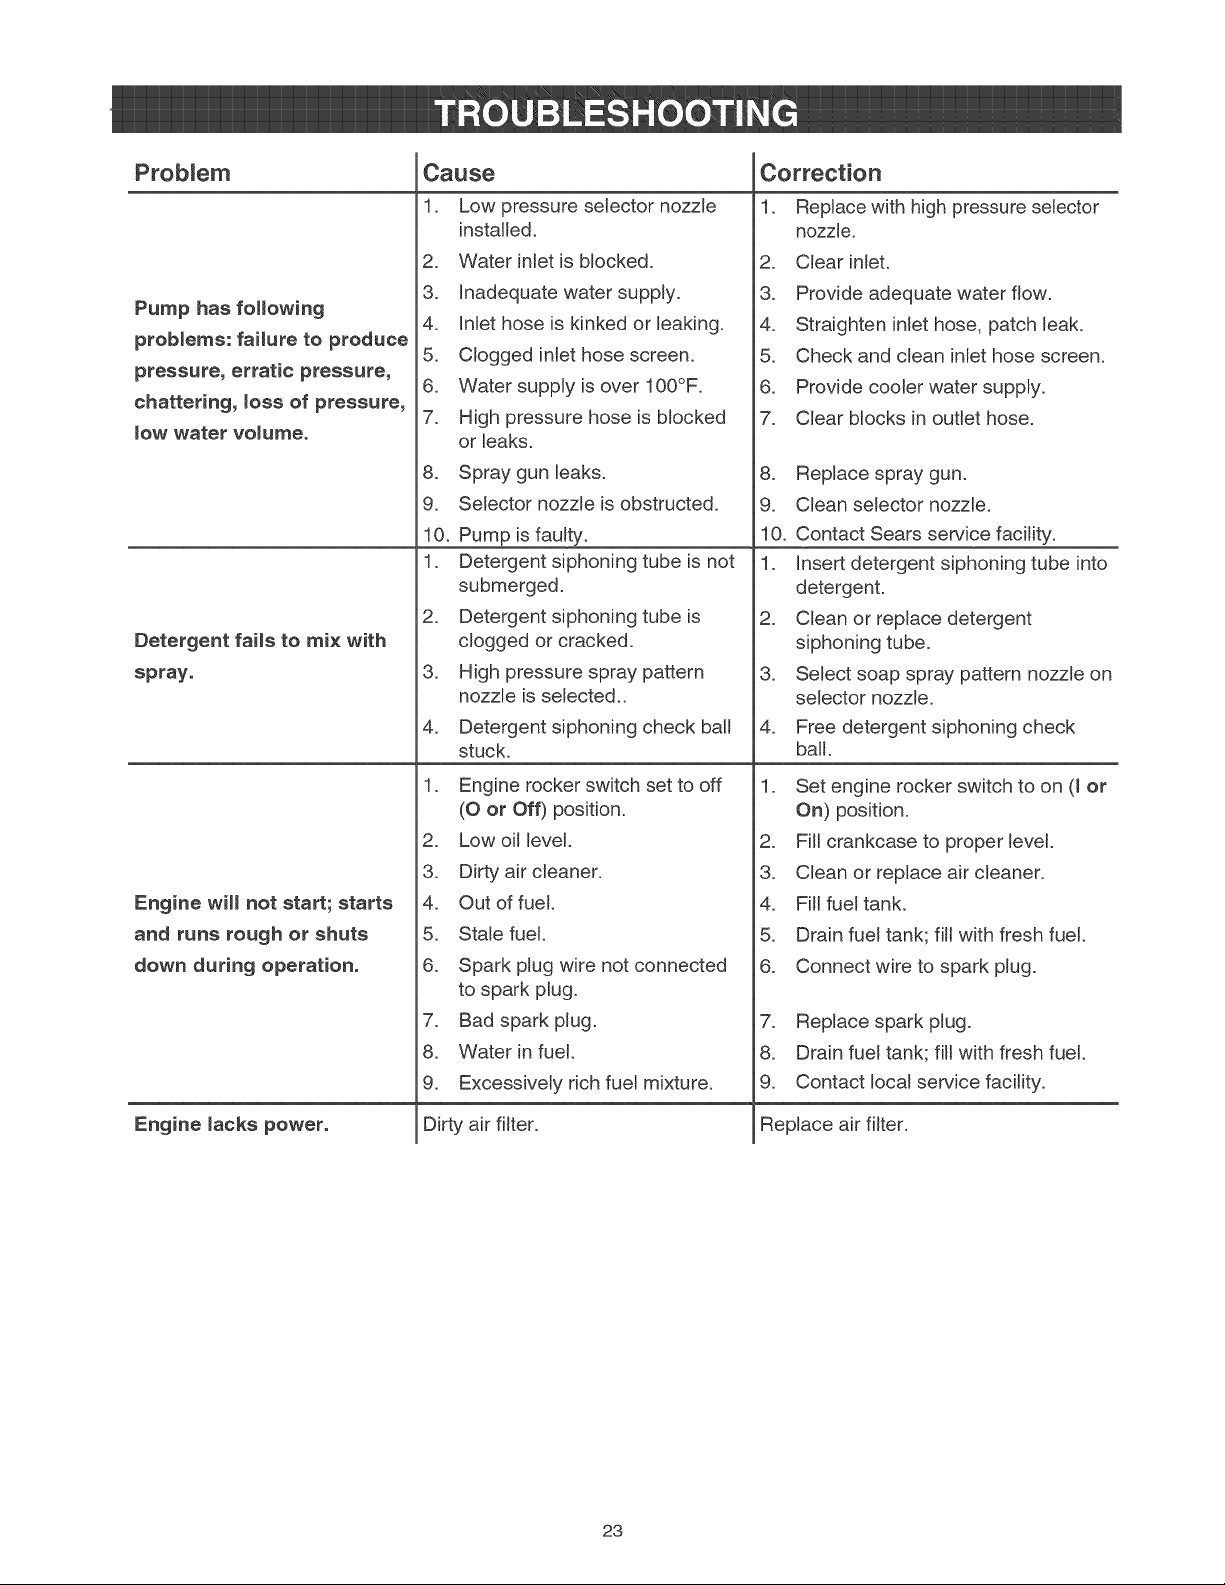
Problem
Cause
Correction
Pump has following
problems: failure to produce
pressure, erratic pressure,
chattering, loss of pressure,
low water volume.
Detergent fails to mix with
spray.
Engine will not start; starts
and runs rough or shuts
down during operation.
1. Low pressure selector nozzle
installed.
2. Water inlet is blocked.
3. Inadequate water supply.
4. Inlet hose is kinked or leaking.
5. Clogged inlet hose screen.
6. Water supply is over 100°F.
7. High pressure hose is blocked
or leaks.
8. Spray gun leaks.
9. Selector nozzle is obstructed.
10. Pump is faulty.
1. Detergent siphoning tube is not
submerged.
2. Detergent siphoning tube is
clogged or cracked.
3. High pressure spray pattern
nozzle is selected..
4. Detergent siphoning check ball
stuck.
1. Engine rocker switch set to off
(O or Off) position.
2. Low oil level.
3. Dirty air cleaner.
4. Out of fuel.
5. Stale fuel.
6. Spark plug wire not connected
to spark plug.
7. Bad spark plug.
8. Water in fuel.
9. Excessively rich fuel mixture.
1. Replace with high pressure selector
nozzle.
2. Clear inlet.
3. Provide adequate water flow.
4. Straighten inlet hose, patch leak.
5. Check and clean inlet hose screen.
6. Provide cooler water supply.
7. Clear blocks in outlet hose.
.
Replace spray gun.
9.
Clean selector nozzle.
10.
Contact Sears service facility.
1.
Insert detergent siphoning tube into
detergent.
.
Clean or replace detergent
siphoning tube.
.
Select soap spray pattern nozzle on
selector nozzle.
4. Free detergent siphoning check
ball.
1. Set engine rocker switch to on (Jor
On) position.
2. Fill crankcase to proper level.
3. Clean or replace air cleaner.
4. Fill fueltank.
5. Drain fuel tank; fill with fresh fuel.
6. Connect wire to spark plug.
7. Replace spark plug.
8. Drain fuel tank; fill with fresh fuel.
9. Contact local service facility.
Engine lacks power.
Dirty air fi_ter.
Replace air rifler.
23
Page 24
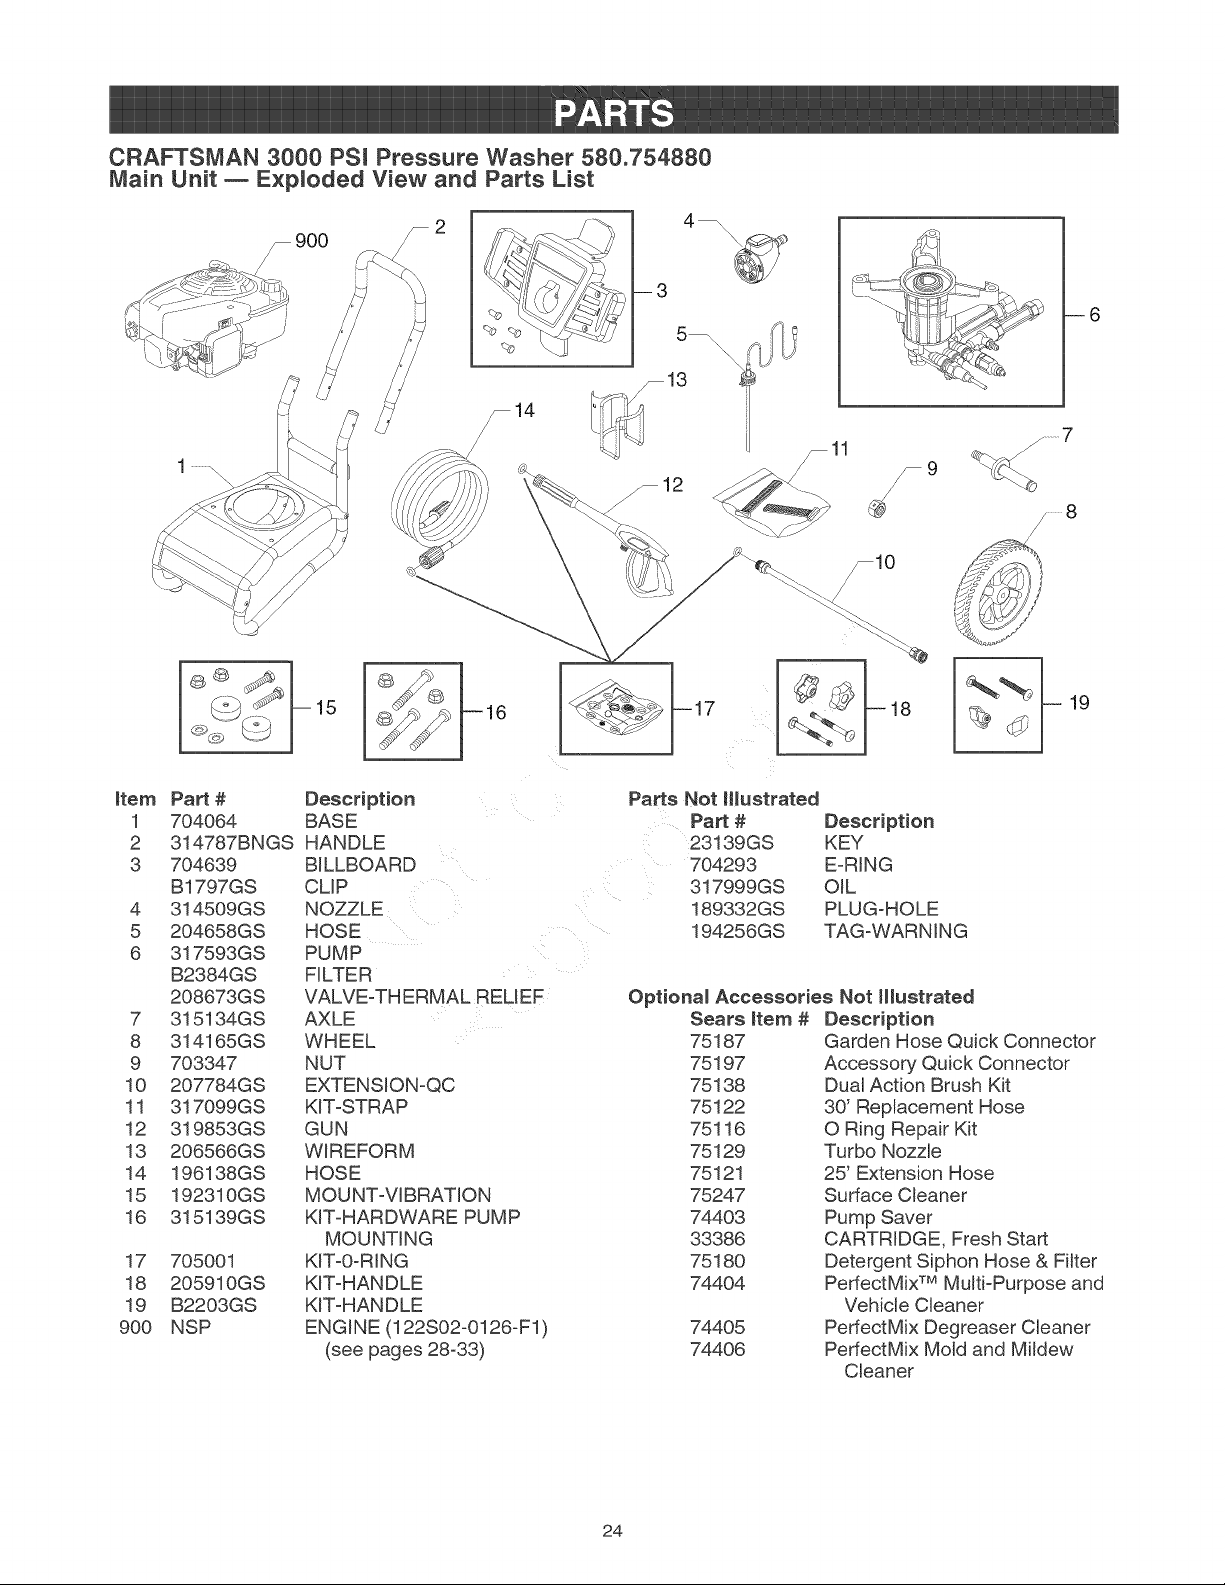
CRAFTSMAN 3000 PSi Pressure Washer 580.754880
Main Unit w E×ploded View and Parts List
900
_14
15
item Part # Description
1 704064 BASE
2 314787BNGS HANDLE
3 704639 BILLBOARD
B1797GS CMP
4 314509GS NOZZLE
5 204658GS HOSE
6 317593GS PUMP
B2384GS FILTER
208673GS VALVE-THERMAL RELEF
7 315134GS AXLE
8 314165GS WHEEL
9 703347 NUT
10 207784GS EXTENSION-QC
11 317099GS KIT-STRAP
12 319853GS GUN
13 206566GS WIREFORM
14 196138GS HOSE
15 192310GS MOUNT-VIBRATION
16 315139GS KIT-HARDWARE PUMP
MOUNTING
17 705001 KIT-0-RING
18 205910GS KIT-HANDLE
19 B2203GS KIT-HANDLE
900 NSP ENGINE (122S02-0126-F1)
(see pages 28-33)
4_
m3
\\
\\
\
_13
T9
/
_10
/
Parts Not Illustrated
Part # Description
23139GS KEY
704293 E-RING
317999GS OIL
189332GS PLUG-HOLE
194256GS TAG-WARNING
Optional Accessories Not illustrated
Sears item # Description
75187
75197
75138
75122
75116
75129
75121
75247
74403
33386
75180
74404
Garden Hose Quick Connector
Accessory Quick Connector
Dual Action Brush Kit
30' Replacement Hose
O Ring Repair Kit
Turbo Nozzle
25' Extension Hose
Surface Cleaner
Pump Saver
CARTRIDGE, Fresh Start
Detergent Siphon Hose & Filter
PerfectMix TM Multi-Purpose and
Vehicle Cleaner
74405
74406
PerfectMix Degreaser Cleaner
PerfectMix Mold and Mildew
Cleaner
--6
j----- 7
/ 8
19
24
Page 25
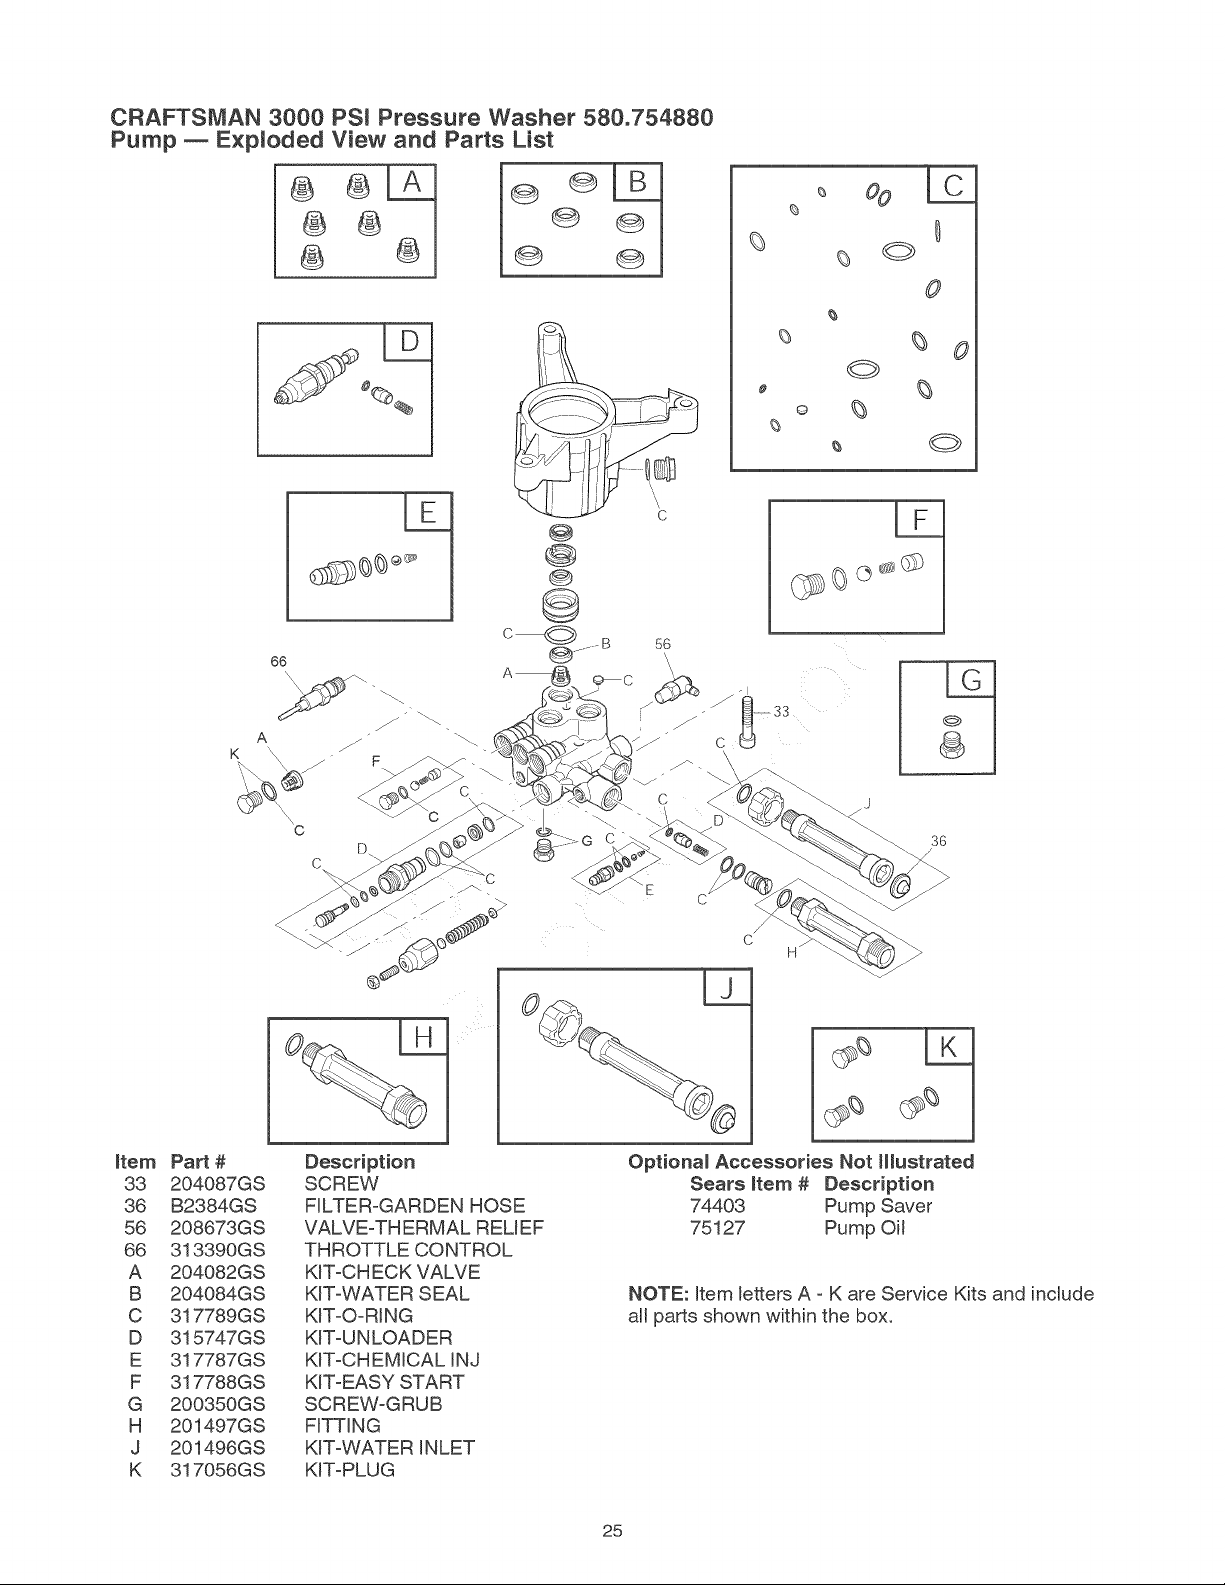
CRAFTSMAN 3000 PSt Pressure Washer 580.754880
Pump w E×ploded View and Parts List
® ®®
56
\
\
%
#
@
Item
33
36
56
66
A
B
C
D
E
F
G
H
J
K
Part #
204087GS
B2384GS
208673GS
313390GS
204082GS
204084GS
317789GS
315747GS
317787GS
317788GS
200350GS
201497GS
201496GS
317056GS
Description
SCREW
FILTER-GARDEN HOSE
VALVE-THERMAL RELIEF
THROTTLE CONTROL
K_T-CHECK VALVE
KIT-WATER SEAL
K_T-O-RING
KIT-UNLOADER
KIT-CHEMICAL INJ
KIT-EASY START
SCREW-GRUB
FITTING
KIT-WATER INLET
KIT-PLUG
36
/
>
Optional Accessories Not ilustrated
Sears item # Description
74403 Pump Saver
75127 Pump O/
NOTE: Item letters A - K are Service Kits and include
a/parts shown within the box.
25
Page 26
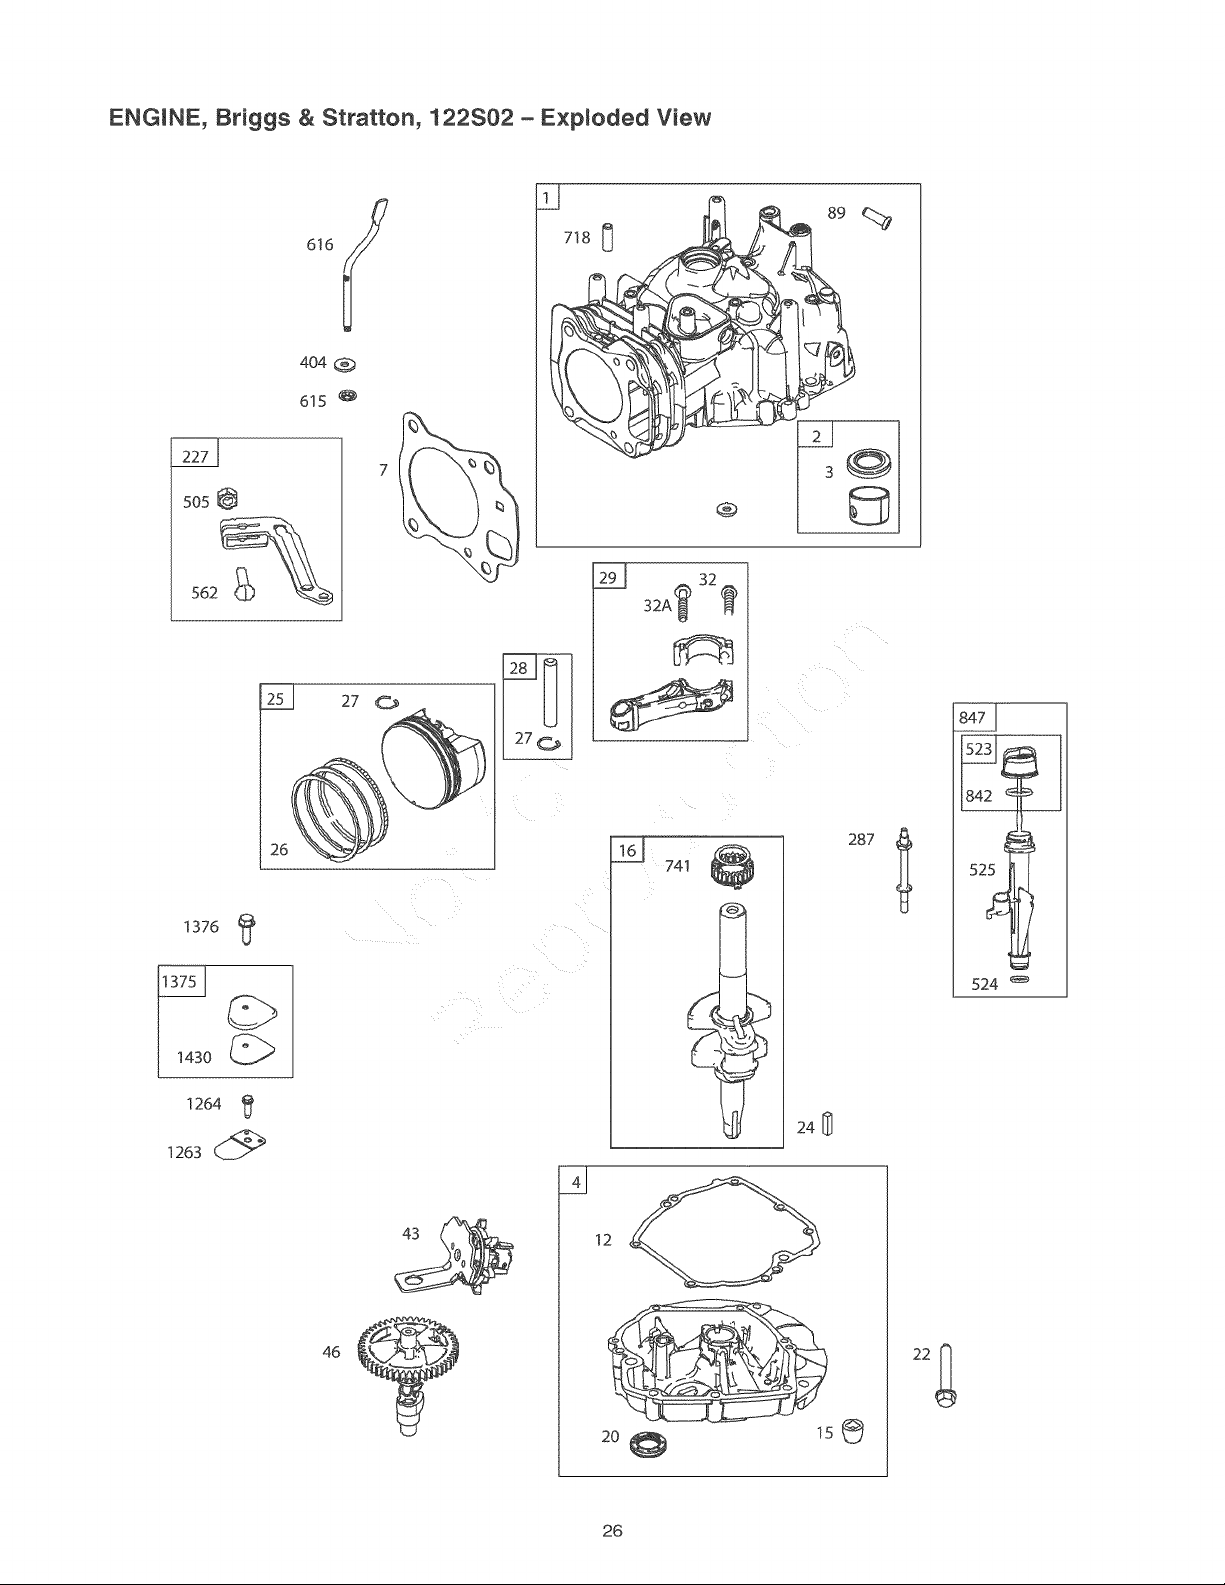
ENGINE, Briggs & Stratton, 122S02 - E×ploded View
718 [_
505
562_
32A € 32 (_
27
1376
1264 _
1263 (_
26
287
524
240
46
22
2oQ
26
Page 27
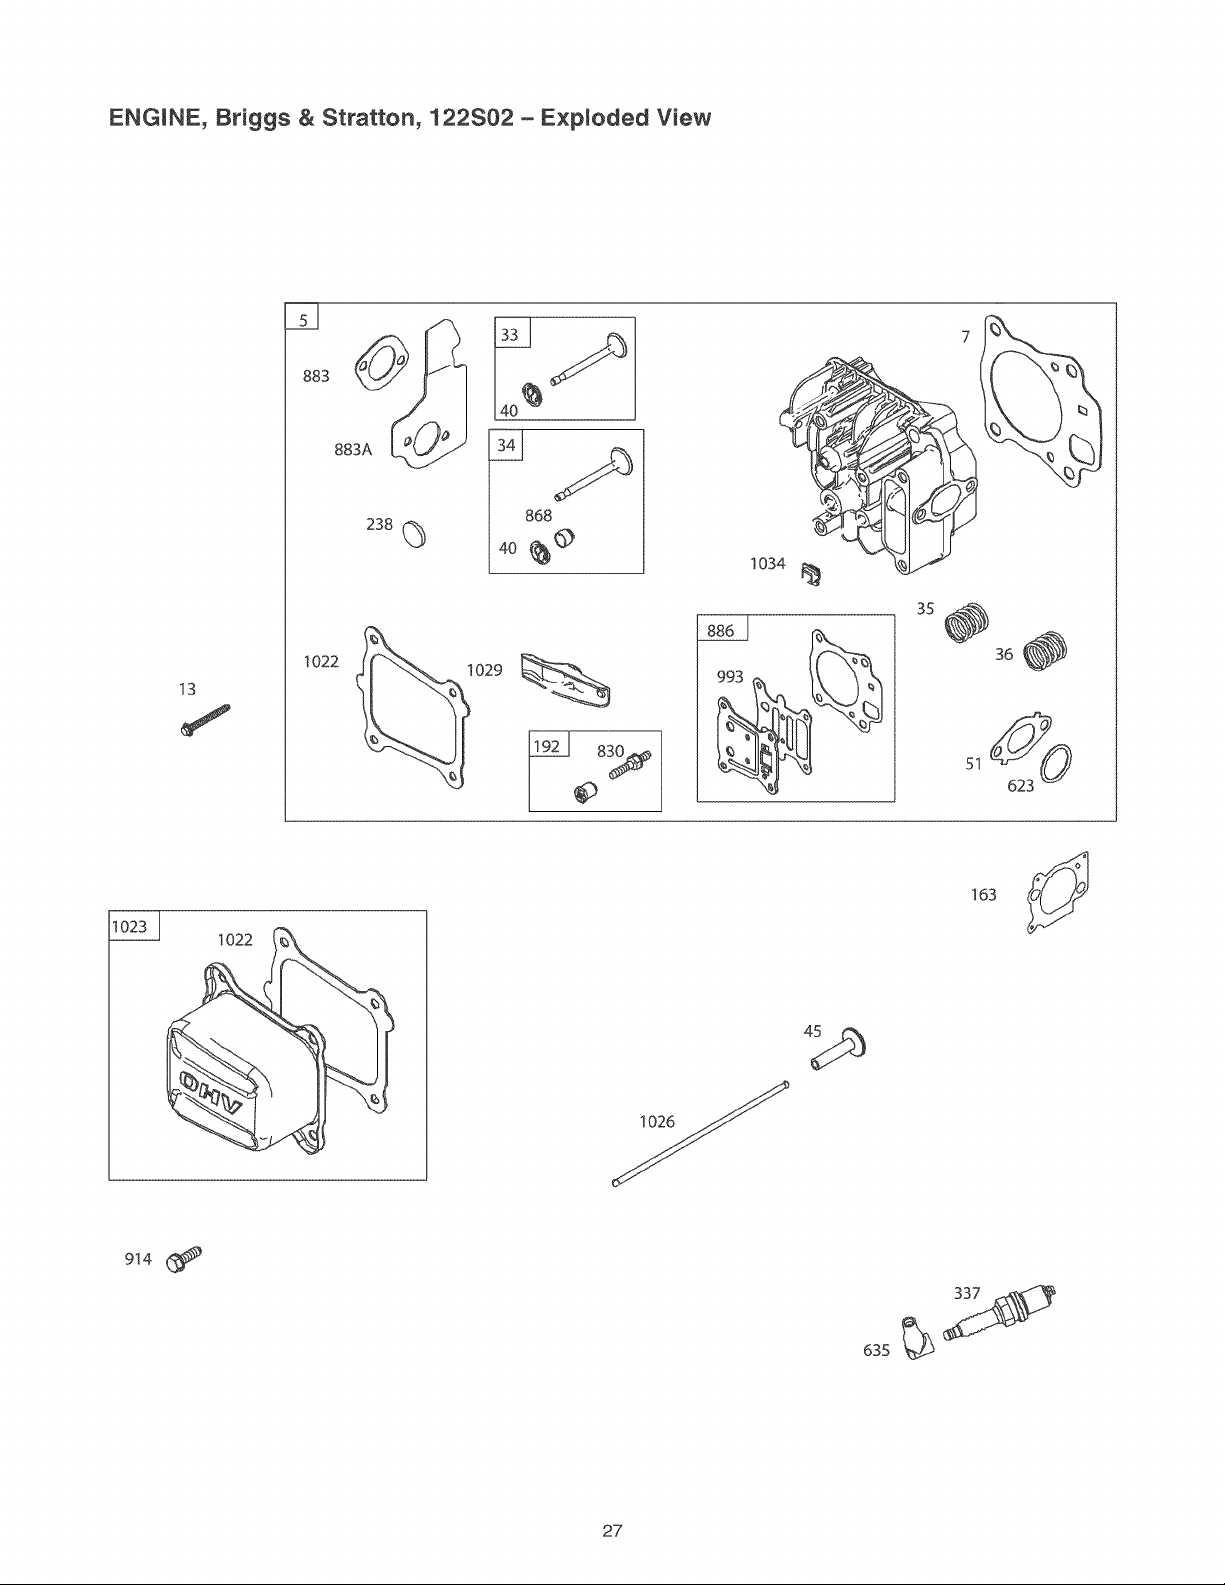
ENGINE, Briggs & Stratton, 122S02 - E×ploded View
883
883A
868
4o_0
1022
13
1029
1034
t022
51
163
27
Page 28
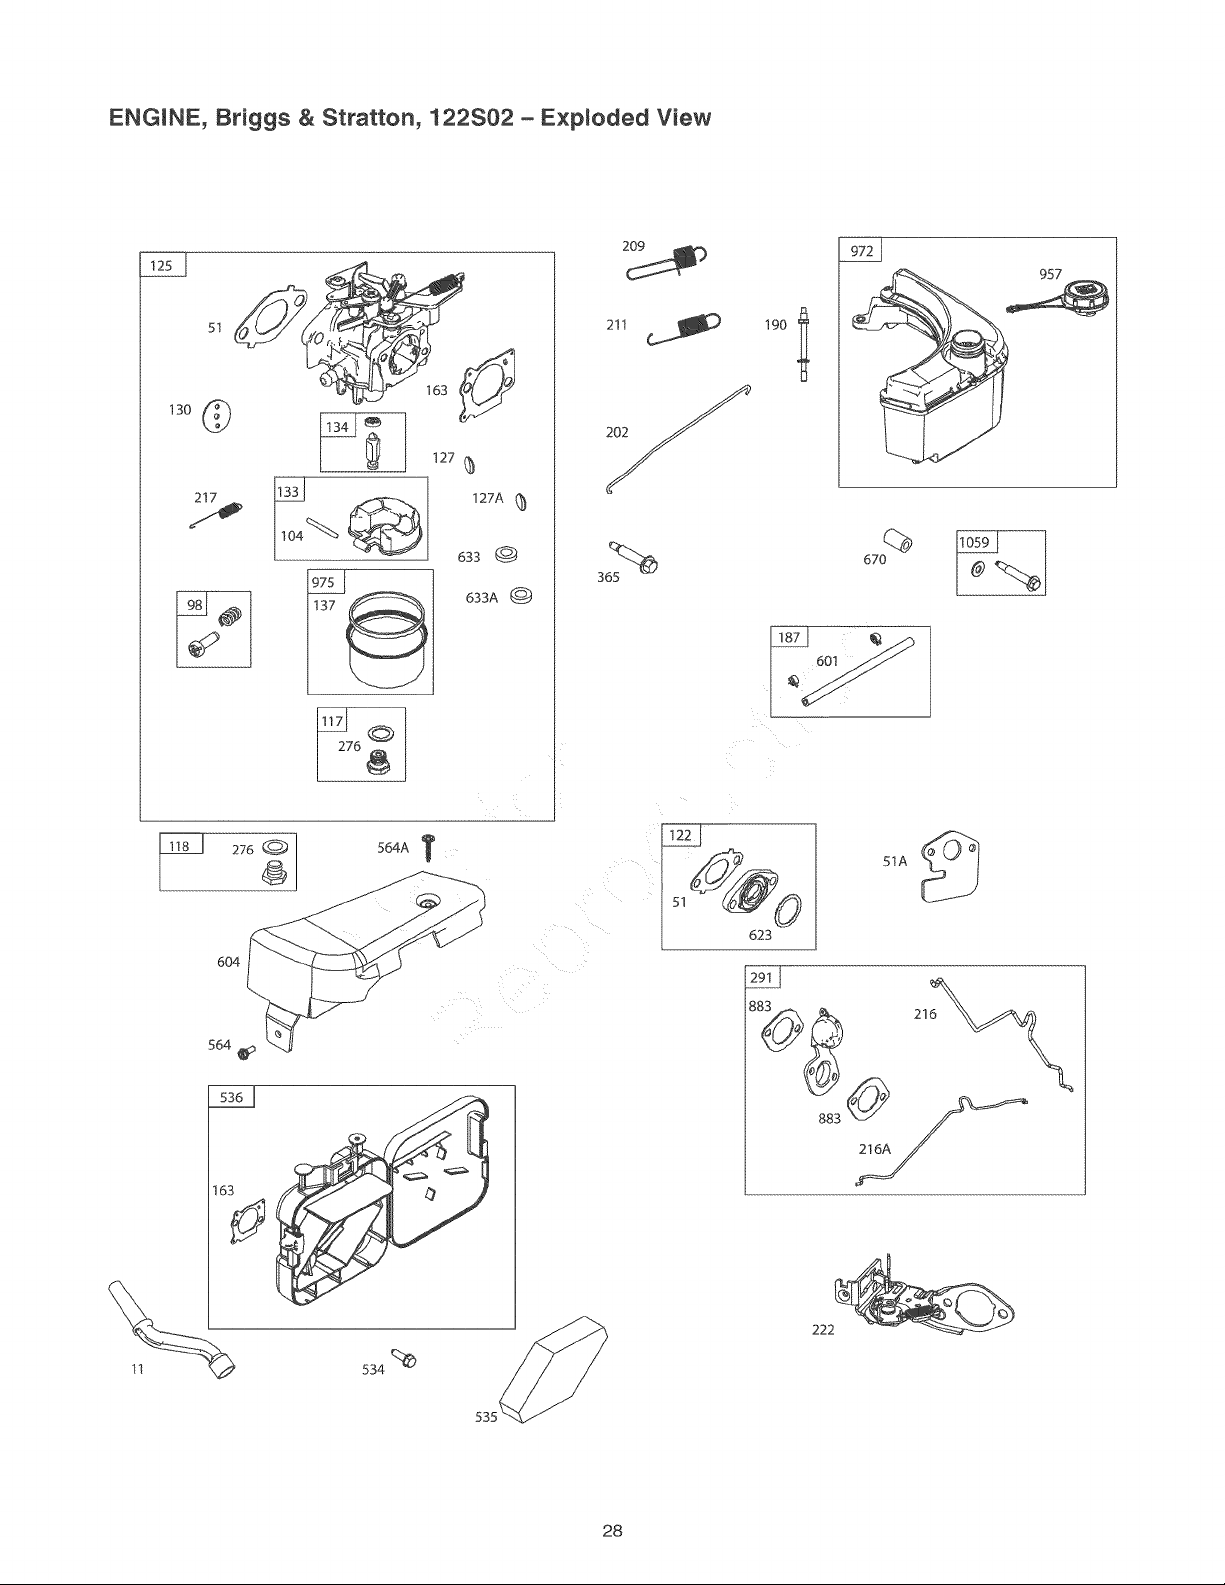
ENGINE, Briggs & Stratton, 122S02 - E×ploded View
957
51
130
b 276
564A T
127A (_
633
633A
365
211
190
601
51A
564
%
604
883 __-=_
222
534_
28
Page 29
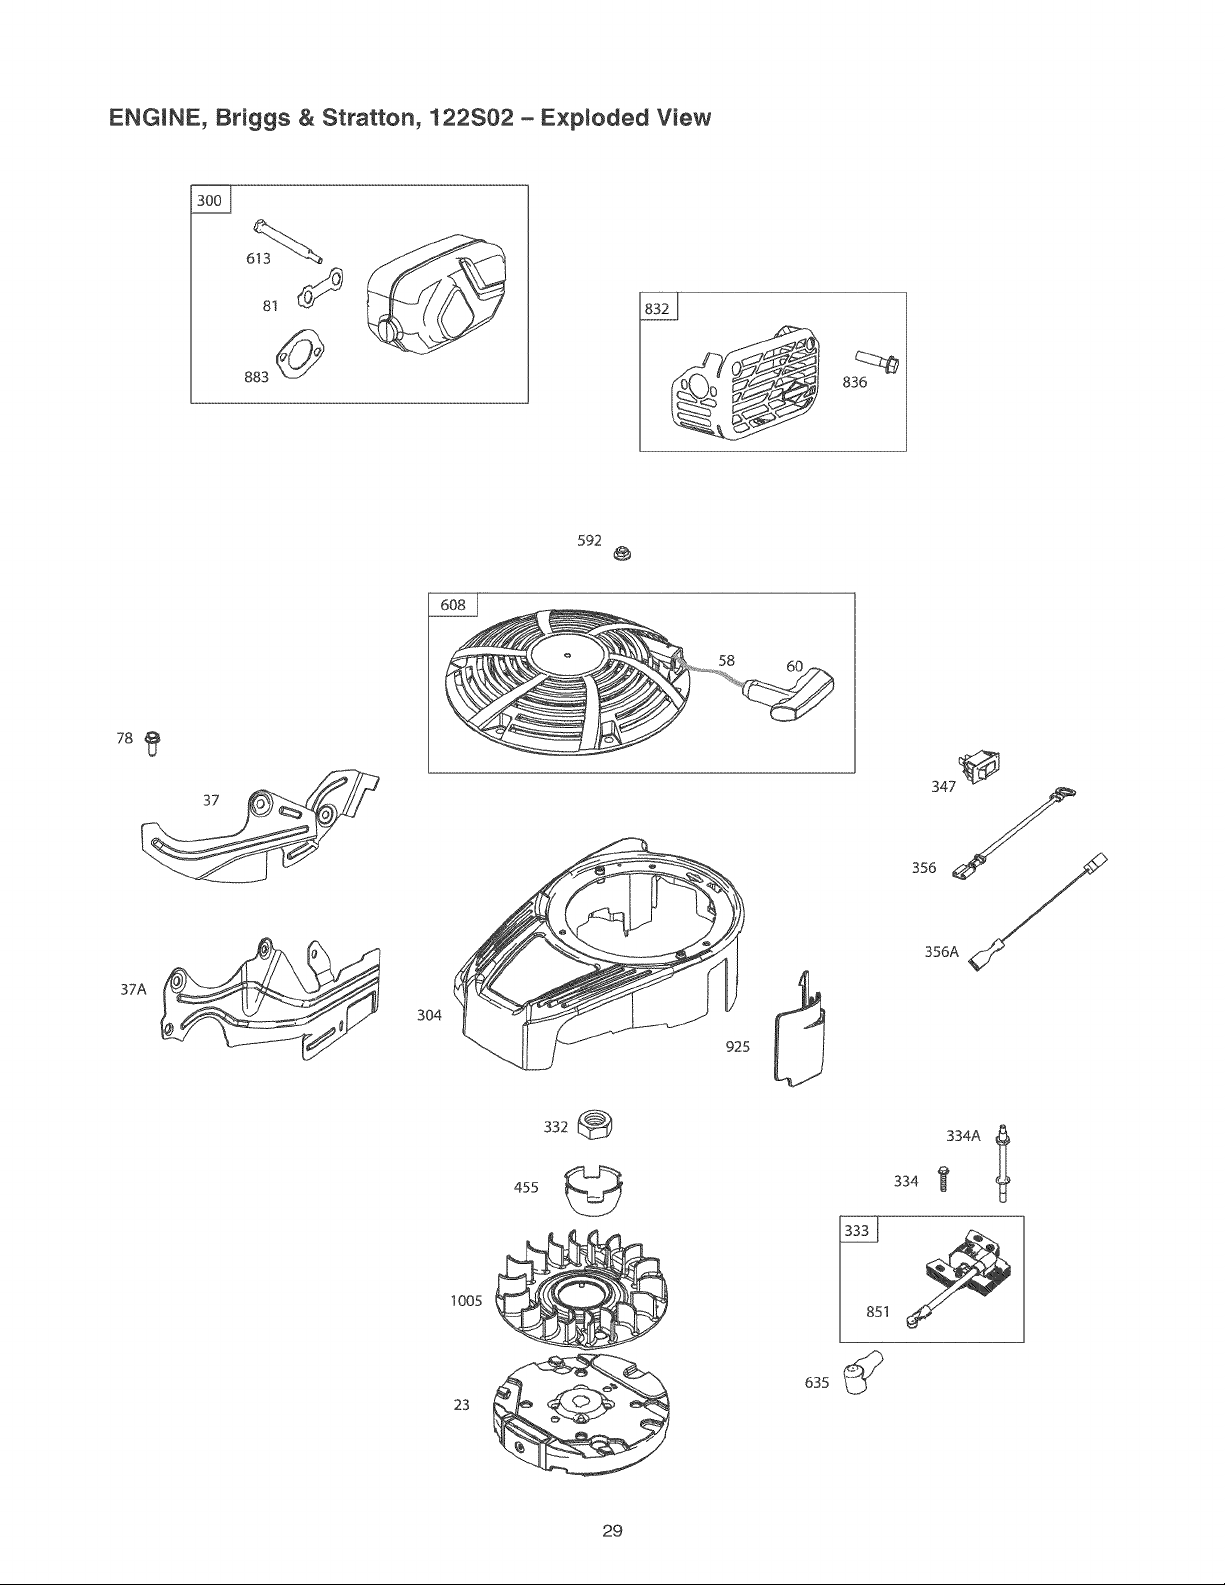
ENGINE, Briggs & Stratton, 122S02 - E×ploded View
8t
883 _
592
@
58 60
37A
304
455
1005
23
@
332
925
334A I
334
635
29
Page 30
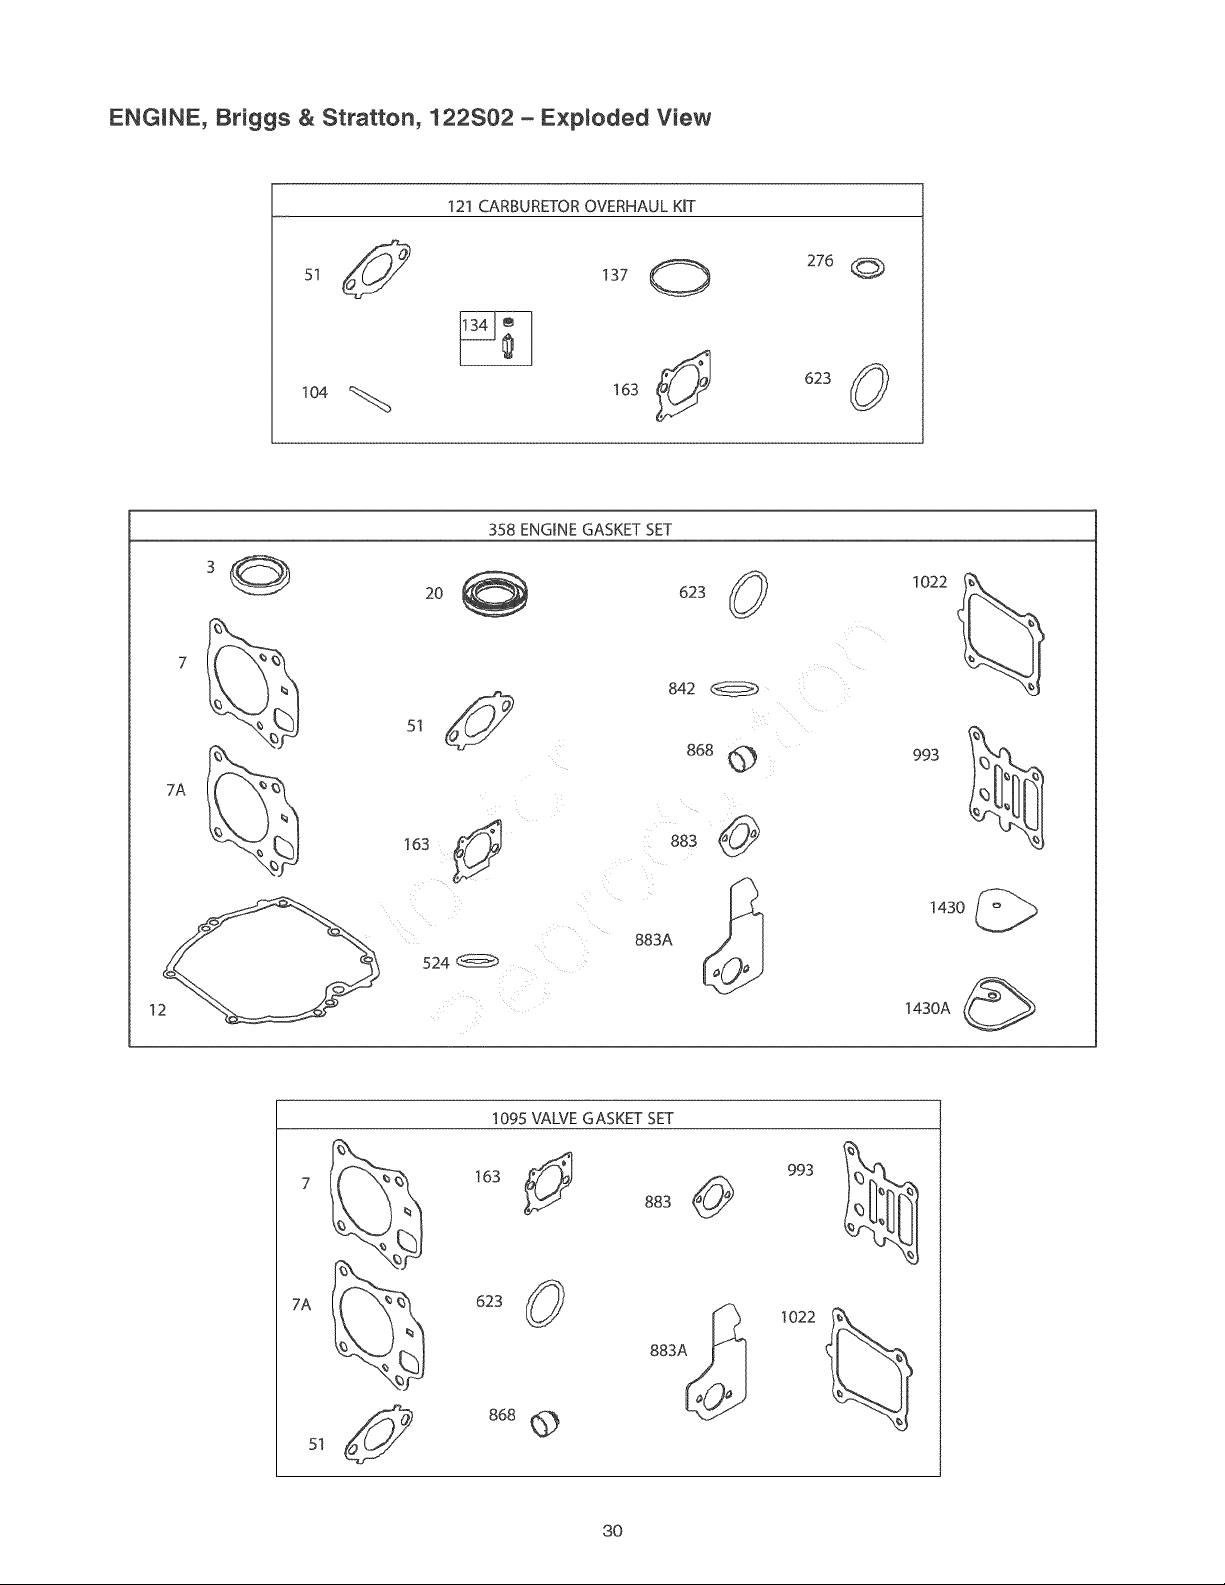
ENGINE, Briggs & Stratton, 122S02 - E×ploded View
121 CARBURETOR OVERHAUL KIT
s__ _37O
104 _ 163
358 ENGINE GASKET SET
623_
842
276
623
163
524
1095 VALVE GASKET SET
163
623
883A
883
868 O
1430
1430A
993
©
1022
868
<9
3O
Page 31

ENGINE, Briggs & Stratton, 122S02 - Parts List
item Part # Description
1 798947 Cylinder Assembly
2 796961 Kit-Bushing/Seal (Magneto Side)
3 299819s SeaFOil (Magneto Side)
4 493279 Sump-Engine
5 796471 Head-Cylinder
7 796475 Gasket-Cylinder Head
7A 799275 Gasket-Cylinder Head (Fire Ring)
11 796478 Tube-Breather
12 692232 Gasket-Crankcase
13 793451 Screw (Cylinder Head)
15 691680 Plug-Oil Drain
16 799337 Crankshaft
20 399781s SeaFOil (PTO Side)
22 691092 Screw (Crankcase CovedSump)
23 796623 Flywheel
24 222698s Key-Flywheel (Aluminum)
25 590404 Piston Assembly (Standard)
590405 Piston Assembly (,020" Oversize)
26 590402 Ring Set (Standard)
590403 Ring Set %020" Oversize)
27 691588 Lock-Piston Pin
28 298909 Pin-Piston
29 796470 Rod-Connecting
32 691664 Screw (Connecting Rod) (1/4-20xl ,09)
32A 695759 Screw (Connecting Rod) (1/4-20xl ,50)
33 499642 Valve-Exhaust
34 795443 Valve-Intake
35 691304 Spring-Valve (intake)
36 691304 Spring-Valve (Exhaust)
37 796536 Guard-Flywheel (Carburetor Side)
37A 799155 Guard-Flywheel
40 692194 Retainer-Valve
43 796651 Slinger-GovernodOil
45 690977 Tappet-Valve
46 694039 Camshaft
51 796596 Gasket-Intake
51A 590398 Gasketqntake
58 697316 Rope-Starter
60 795426 Grip-Starter Rope
75 691736 Washer (Flywheel)
78 793480 Screw (Flywheel Guard'_
81 691740 Lock-Muffler Screw.
89 692348 Plug (Cylinder)
98 797156 Kit-idle Speed
104 797622 Pin-Float Hinge
117 798660 Jet-Main
121 799235 Kit-Carburetor Overhaul
122 796595 Spacer-Carburetor
125 799447 Carburetor
127 694468 Plug-Welch (D = 9,51mm}
127A 797633 Plug-Welch (D = 7,95mm)
130 797630 Valve-Throttle
133 797626 Float-Carburetor
134 799177 Kit-Needle!Seat
137 797625 Gasket-Float Bowl
163 691894 Gasket-Air Cleaner
187 791766 Line-Fuel (Cut to Required Length)
190 793479 Screw (Fuel Tank)
192 796631 Adjuster-Rocker Arm
202 796657 Link-Mechanical Governor
209 799507 Spring-Governor (Yellow)
211 799508 Spring-Governed idle (Green)
216 798944 Link-Choke
216A 796485 Link-Choke
217 799179 Spring-Choke Return
222 796482 Bracket-Control
227 796487 Lever-Governor Control
238 691300 Cap-Valve
276 797632 Washer-Sealing
287 793479 Screw (Dipstick Tube)
item Part # Description
291 798938 Thermostat
300 798940 Muffler
304 796692 Housing-Blower
332 690662 Nut (Flywheel)
333 796500 Armature-Magneto
334 793454 Screw (Magneto Armature)
334A 796537 Screw (Magneto Armature)
337 692051 Plug-Spark
347 795333 Switch-Rocker
356 798942 Wire-Stop
356A 798943 Wire-Stop
358 799495 Gasket Set-Engine
365 699484 Screw (Carburetor) (M6x35,5mm)
374 690402 Washer (Camshaft)
404 690272 Washer (Governor Crank)
455 796615 Cup-Flywheel
505 793515 Nut (Governor Control Lever)
523 796503 Dipstick
524 692296 SeaF Dipstick Tube
525 796502 Tube-Dipstick
534 798294 Screw (Air Cleaner)
535 797301 Filter-Air Cleaner Foam
536 799025 Cleaner-Air
562 793514 Bolt (Governor Control Lever)
564 690351 Screw (Control Cover) (10-32x,50)
564A 799026 Screw (Control Cover) (#8-18x,90)
592 793481 Nut (Rewind Starter)
601 791850 Clamp-Hose (Green)
604 799024 ControFCover
608 796497 Starter-Rewind
613 796496 Screw (Muffler)
615 690340 Retainer-Governor Shaft
616 798327 Crank-Governor
623 793628 SeaFO Ring (Carburetor Spacer)
633 797929 SeaFChoke/Throttie Shaft (Throttle Shaft)
633A 797929 Seal-Choke/Throttle Shaft (Choke Shaft)
635 66538s Boot-Spark Plug
670 793485 Spacer-Fuel Tank
718 690959 Pin-Locating
74t 797521 Gear-Timing
830 796472 Stud-Rocker Arm
832 798951 Guard-Muffler
836 793500 Screw (Muffler Guard)
842 691031 SeaFO Ring (Dipstick Tube)
847 796501 Dipstick/Tube Assembly
851 493880s Terminal-Spark Plug
868 795440 Seal-Valve
883 793497 Gasket-Exhaust
883A 796677 Gasket-Exhaust
886 796474 Gasket Kit-Cylinder!Plate
914 794451 Screw (Rocker Cover)
925 796531 Cover-Linkage
957 799585 Cap-Fuel Tank
972 590949 Tank-Fuel
975 797631 Bowl-Fuel
993 796473 Gasket-Cylinder Head Plate
1005 796614 Fan-Flywheel
1022 796480 Gasket-Rocker Cover
1023 796479 Cover-Rocker
1026 796481 Rod-Push
1029 691230 Arm-Rocker
1034 691343 Guide-Push Rod
1059 793471 Kit-Screw!Washer(FueITank)
1095 799496 Gasket SetWalve
1263 697124 Reed-Breather
1264 793453 Screw (Breather Reed)
1375 796476 Cover-Breather/Reed
1376 794451 Screw (Breather/Reed Cover)
1430 796477 Gasket-Breather/Reed
1430A 799494 Gasket-Breather/Reed
31
Page 32

California, U.S. EPA, and Sears Emissions
Control Warranty Statement
Your Warranty Rights And Obligations
The California Air Resources Board, U.S. EPA, and Sears
Brands Management Corporation, U.S.A. (Sears) are
pleased to explain the emissions control system warranty on
your Model Year 2013-2014 engine/equipment. In California,
new small off-road engines and large spark ignited engines
tess than or equal to 1.0 liter must be designed, built, and
equipped to meet the State's stringent anti-smog standards.
Sears must warrant the emissions control system on your
engine/equipment for the periods of time listed below
provided there has been no abuse, neglect, or improper
maintenance of your engine or equipment.
Your emissions control system may include parts such as
the carburetor or fuel injection system, ignition system,
and catalytic converter. Also included may be hoses,
belts, connectors, sensors, and other emissions-related
assemblies. Your evaporative emission control system may
include parts such as: carburetors, fuel tanks, fuel lines.
fuel caps, valves, canisters, filters, vapor hoses, clamps,
connectors, and other associated components. Where a
warrantable condition exists, Sears will repair your engine/
equipment at no cost to you including diagnosis, parts, and
labor.
Sears Emissions Control Warranty Provisions
The following are specific provisions relative to your
Emissions Control Warranty Coverage. It is in addition to the
Sears engine warranty for non-regulated engines found in the
Operator's Manual.
Warranted Emissions Parts
Coverage under this warranty extends only to the parts
listed below (the emissions control systems parts)
to the extent these parts were present on the engine
purchased.
a. Fuel Metering System
Cold start enrichment system (soft choke)
Carburetor and internal parts
Fuel pump
Fuel line, fuel line fittings, clamps
Fuel tank, cap and tether
Carbon canister
b. Air Induction System
Air cleaner
Intake manifold
Manufacturer's Warranty Coverage:
Small off-road engines and large spark ignited engines
tess than or equal to 1.0 liter, and any emissions related
components of the equipment, are warranted for two years _.
If any emissions-related part on your engine/equipment is
defective, the part will be repaired or replaced by Sears.
* Two years or for the time period listed in the respective
engine or product warranty statement, whichever is greater.
Owner's Warranty Responsibilities:
, As the engine/equipment owner, you are responsible
for the performance of the required maintenance listed
in your owner's manual. Sears recommends that you
retain all receipts covering maintenance on your engine/
equipment, but Sears cannot deny warranty solely
for the lack of receipts or your failure to ensure the
performance of all scheduled maintenance.
As the engine/equipment owner, you should however
be aware that Sears may deny you warranty coverage
if your engine/equipment or a part has failed due to
abuse, neglect, improper maintenance, or unapproved
modifications.
You are responsible for presenting your engine/
equipment to a Sears distribution center, servicing
dealer, or other equivalent entity, as applicable, as
soon as a problem exists. The warranty repairs should
be completed in a reasonable amount of time, not to
exceed 30 days. If you have any questions regarding
your warranty rights and responsibilities, you should
contact Sears at (800) 469-4663.
- Purge and vent line
c, Ignition System
• Spark plug(s)
Magneto ignition system
d. Catalyst System
Catalytic converter
Exhaust manifold
Air injection system or pulse valve
e. Miscellaneous Items Used in Above Systems
Vacuum, temperature, position, time sensitive
valves and switches
Connectors and assemblies
2. Length of Coverage
For a period of two years from date of original
purchase*, Sears warrants to the originat purchaser
and each subsequent purchaser that the engine is
designed, built, and equipped so as to conform with all
applicable regulations adopted by the Air Resources
Board; that it is free from defects in material and
workmanship that could cause the failure of a warranted
part; and that it is identical in all material respects to the
engine described in the manufacturer's application for
certification. The warranty period begins on the date the
engine is originally purchased.
• Two years or for the time period listed in the respective
engine or product warranty statement, whichever is greater.
32
Page 33

The warranty on emissions-related parts is as follows:
o Any warranted part that is not scheduled for
replacement as required maintenance in the owner's
manual supplied, is warranted for the warranty period
stated above. If any such part fails during the period
of warranty coverage, the part wilt be repaired or
replaced by Sears at no charge to the owner. Any such
part repaired or replaced under the warranty will be
warranted for the remaining warranty period.
Any warranted part that is scheduled only for regular
inspection in the owner's manual supplied, is warranted
for the warranty period stated above. Any such part
repaired or replaced under warranty will be warranted
for the remaining warranty period.
Any warranted part that is scheduled for replacement as
required maintenance in the owner's manual supplied,
is warranted for the period of time prior to the first
scheduled replacement point for that part. If the part fails
prior to the first scheduled replacement, the part will be
repaired or replaced by Sears at nocharge to the owner.
Any such part repaired or replaced under warranty will be
warranted for the remainder of the period prior to the first
scheduled replacement point for the part.
Add on or modified parts that are not exempted by the
Air Resources Board may not be used. The use of any
non exempted add on or modified parts by the owner
will be grounds for disallowing a warranty claim. The
manufacturer will not be liable to warrant failures of
warranted parts caused by the use of a non exempted
add on or modified part.
3. Consequential Coverage
Coverage shall extend to the failure of any engine
components caused by the failure of any warranted
emissions parts.
4. Claims and Coverage Exclusions
Warranty claims shall be filed according to the
provisions of the Sears engine warranty policy.
Warranty coverage does not apply to failures of
emissions parts that are not original equipment
Sears parts or to parts that fail due to abuse, neglect,
or improper maintenance as set forth in the Sears
engine warranty policy. Sears is not liable for warranty
coverage of failures of emissions parts caused by the
use of add-on or modified parts.
Look For Relevant Emissions Durability Period
and Air Inde× information On Your Small Off-Road
Engine Emissions Label
Engines that are certified to meet the California Air
Resources Board (CARB) small off-road Emissions Standard
must display information regarding the Emissions Durability
Period and the Air Index. The engine manufacturer makes
this information available to the consumer on emissions
labels. The engine emissions label will indicate certification
information.
The Emissions Durability Period describes the number of
hours of actual running time for which the engine is certified
to be emissions compliant, assuming proper maintenance in
accordance with the Operating & Maintenance Instructions.
The following categories are used:
Moderate: Engine is certified to be emissions compliant for
125 hours of actual engine running time.
Intermediate: Engine is certified to be emissions compliant
for 250 hours of actual engine running time.
Extended: Engine is certified to be emissions compliant for
500 hours of actual engine running time.
For example, a typical walk-behind lawn mower is used 20
to 25 hours per year. Therefore, the Emissions Durability
Period of an engine with an intermediate rating would
equate to 10 to 12 years.
Small off-road engines are certified to meet the United States
Environmental Protection Agency (USEPA) Phase 2 or
Phase 3 emissions standards. The Emissions Compliance
Period referred to on the Emissions Compliance label
indicates the number of operating hours for which the engine
has been shown to meet Federal emissions requirements.
For engines tess than 225 cc displacement.
Category C = 125 hours
Category B = 250 hours
Category A = 500 hours
For engines of 225 cc or more displacement.
Category C = 250 hours
Category B = 500 hours
Category A = 1000 hours
33
Page 34

GARANTIA ....................................... 34
CONTRATO DE PROTECCION PARA REPARACIONES 34
REGLAS DE SEGURIDAD ....................... 35-37
CARACTERiSTICAS Y CONTROLES ................. 38
MONTAJE .................................... 39-43
OPERACION .................................. 44-48
ESPECIFJCAClONES .............................. 49
MANTENIMENTO ............................. 50-55
ALMACENAMENTO ............................... 58
REPARACION DE DANOS REPUESTOS ............. 57
GARANTIA DEL CONTROL DE EMISIONES ........ 58-59
COMO ORDENAR PARTES ....... PAGINA POSTERIOR
GARANTiA COMPLETA DE DOS ANO DE CRAFTSMAN
DURANTE DOS A_40S a partir de ta fecha de compra, este producto cuenta con una garanfia contra cualquier defecto
material o de mano de obra. Los productos defectuosos serAn reparados sin costo alguno, o bien, serAn sustkuidos en caso
de que no sea posibte reparados.
Para conocer los detalles de cobertura de ta garant_a sobre c6mo obtener reparaci6n o sustkuci6n sin costo, visite el sitio web:
www.craftsman.com
Esta garanfia SOLO cubre defectos en materiales y mano de obra. La cobertura de ta garant_a NO incluye:
, Elementos sujetos a desgaste en condiciones de uso normales dentro del pedodo de garant_a, como pistolas rociadoras,
mangueras, prolongadores de boquilla, boquiltas, puntas de rociado, filtros o buj_as.
, Da[ios at producto dedvados del intento de modificar o reparar el producto pot parte det usuario o causados pot los
accesodos del producto.
, Reparaciones necesarias debido a accidentes o fattos que se deriven de ta incapacidad para operar o mantener el
producto de acuerdo con todas tas instrucciones facititadas.
, Mantenimiento preventivo o reparaciones necesanas debido al uso de mezclas de combustible inadecuadas o de
combustible contaminado o pasado.
Esta garanfia se invalida si este producto se utitiza atguna vez para prestar servicios comerciales o si se renta aotra persona.
Esta garanfia le otorga determinados derechos legates yes posible que tenga 9tros derechos que pueden vadar de una
provincia aotra.
Sears Brands Management Corporation, Hoffman Estates, _L (}0179
Feticidades pot realizar una compra inteflgente.
Su nuevo producto Craftsman® esta disefiado y fabdcado
para funcionar de manera fiable durante muchos aSos.
Pero como todos los productos, es posible que requiera
reparaci6n ocasionalmente. Es en esos momentos, tenet un
contrato de protecci6n para reparaciones puede ahorrade
dinero y molestias.
A continuaciTn se menciona to queet contrato de
protecci6n para reparaciones* contempla:
, Servicio experto de nuestros 10.000 especialistas
profesionales en reparaci6n.
, Servicio Himitado y sin costo en partes y mano de obra
en todas tas reparaciones incluidas en ta cobertura.
, Cambio deJ producto pot hasta $1.500 si el producto
inciuido en ta cobertura no se puede reparar.
, Un 25% de descuento en el precio normat de servicio
yen partes instaladas relacionadas no incluidas en la
cobertura del contrato; asimismo, un 25% de descuento
en et precio normal de revisiones de mantenimiento
preventivo.
, Ayuda telefTnica rapida. Nuestro servicio de Soluci6n
rApida consiste en apoyo telef6nico pot un representante de
Sears. Piense que samos un "manual del usuario parlante".
Una vez que adquiera el contrato de protecci6n para
reparaciones, s6to tiene que hacer una sencilla llamada
telef6nica para programar un servicio. Puede ttamar a
cualquier hora del d_a o ta noche, o programar una cita de
servicio en tinea.
El contrato de protecci6n para reparaciones es una compra
segura. Si to cancela pot cualquier motivo durante el perfodo
de garant_a del producto, te reembolsaremos el totat de
su dinero o una parte proporcional en cualquier momento
posterior al vencimiento del pedodo de garanfia del producto.
Adquiera boy su contrato de protecci6n para reparaciones.
ApHcan algunas Hmitaciones y exclusiones. Para
conocer precios y obtener infotmaci6n adicionaJ en BE°
UU., Hame at 1-800-827-6855.
* La cobertura en Canada varl'a en determinados
artm'cuJos, Para obtener todos los detaHes,
comunJ'quese a Sears Canad#_ ai 1-800-381-8885,
Servicio de instaiaci6n de Sears
Para soflcitar un servicio de insta/acidn por parte de un
profesiona/de Sears para aparatos domesticos, puertas
automAticas de garajes, catentadores de agua y otros
articulos domesticos importantes en EE. UU. o CanadA,
comun_quese al 1-800-4°MY-HOME®.
34
Page 35

Lea este manual minuciosamente y conozca a
fondo [as partes y e[ funcionamiento de su
m4quina [impiadora a presi6no Conozca sus
ap[icacJones, sus [imitaciones y los peHgros
invo[ucrados.
Jnformaci6n importante de seguridad
S_mboJos sobre [a seguridad y aignificadoa
Manual del Operarie Gases Tdxices Descarga Electrica
Superficies [nyecci6n
Resbalosas L_quida
Caer Superficie Proyect[[ Objetos
Callente Voladores
Fuego Explosl6n Quemadura Contragolpe
Qdmlca
E[ sfmbolo de alerta de seguridad indica un posible
riesgo para su integridad fisica. Se utiliza una palabra
de seffaiizaci6n (PELtGRO, ADVERTENC[A o
PRECAUC[ON) junto con el dmbolo de alerta para
designar un grado o nivel de gravedad de desgo. Se
puede utiiizar un dmbolo de seguridad para
representar el tipo de riesgo. La palabra de
seffaJizaci6n AVISO se utiliza para hacer referencia a
una prb,ctica no relacionada con una [esi6n fisica.
PELJGRO indica un riesgo que, de no evitarse,
provocara [a muerte o lesiones de gravedad.
A ADVERTENCiA indica un riesgo que, de no
evitarse, podrfa provocar la muerte o lesiones de
gravedad.
PRECAUCmON indica un riesgo que, de no evitarse,
podrfa provocar [es[ones [eves o moderadas.
A VISO hace referencia a una prb.ctica no relacionada
con una [esi6n fisica.
Partes en
Movimiento
ADVERTENCJA El escape del motor de este
producto contiene elementos quimicos reconocidos
en el Estado de California por producir cancer,
defectos de nacimiento u otros daffos de tipo
reproductivo.
ADVERTENCJA Este producto contiene plomo
y compuestos de plomo declarados causantes de
malformaciones y otros defectos cong6nitos pot el
Estado de California. Lavese /as manos despu6s de
manipular este productoo
ADVERTENCJA Riesgo de electrocuci6n.
El contacto con los cables el6ctricos podria
provocar electrocuci6n y quemaduras que
pueden provocar lesiones graves o la muerte.
o NUNCA rode cerca de unafuente de energ_ae[ectdca.
ADVERTENCIA PELIGRO DE GAS VENENOSO.
Los gases de[ escape del motor contJenen
mon6xido de carbono, un gas venenoso que
podria matado en minutos. NO t[ene olor, color
ni sabor. Aun si no puede oler losvapores del escape,
podria estar expuesto al gas de mon6xido de carbono.
La [nhalaci6n o ingesti6n de algunas sustancias
qdmicas o detergentes puede ser peligroso y
provocar lesiones graves, nb,useas, desmayos,
envenenamiento o la muerte.
Utiliceeste producto0NICAMENTE a [aintemperie,
Jejosde ventanas, puertasyventllaclones para reducir
etriesgo deque elgas de mon6xido decarbono se
acumu[ey entreen losespacios habitados.
[nsta[ealarmas para detectar mon6xidode carbono
operadas con bateffas o enchufablescon batedas de
repuesto de acuerdo con Jasinstruccionesde[ fabdcante.
Lasa[armasde humo no pueden detectar el gas de
mon6xido de carbono.
NO uti[ice este producto dentro de casas, garajes,
s6tanos, entresuelos, cobertizos o en otros espacios
parcia[mente cerrados, aun si uti[lza venti[adores o
deja tas puertas y ventanas abiertas para favorecer [a
ventl[aci6n. E[ mon6xido de carbono puede acumularse
rapidamente en estos espacios y perdurar ah_durante
horas, aun despues de que este producto se haya
apagado.
S[EMPRE co[oque este producto en dlreccl6n de[ viento
y didja el escape de[ motor en sent[do contrario a los
espacios habitados.
Si comienza a sentirse mat, mareado o debil cuando
use este producto, apague[o y busque aire pure DE
[NMEDIATO. Acuda a un medico. Es posible que se haya
envenenado con mon6xido de carbono.
UtiJice un respirador o una mascara cada vez que exista
ta posibi[[dad de [nhalar vapores al ut[[[zar sustancias
qdmicas.
, Lea todas Jasinstrucclones de [a mascara para
comprobar sl proporciona la protecci6n necesaria contra
ta [nha[aci6n de vapores nocivos cuando se utlJicen
sustancias qu_micas.
35
Page 36

A. ADVERTENCIA El retroceso (repliegue rapido)
del cable del arrancador impedir#, que el
_ usuario suelte el cable a tiempo tirar#, de
su mano y brazo hacia el motor, Io que
podr[a provocar fracturas, contusiones o esguinces;
as[ como lesiones graves.
o NUNCA tire del cable del arrancador sin eliminar
previamente ta presi6n de ta pistola rociadora.
Cuando arranque et motor, tire tentamente del cable
hasta sentir una resistencia y, a continuaci6n, tire
r#.pidamente de 61para evitar su retroceso.
Despues de cada intento de arranque, cuando el motor
no consiga arrancar, apunte con ta pistola rociadora
hacia una direcci6n segura, pulse el bot6n rojo y apriete
el gatillo para descargar la presi6n.
Sujete firmemente la pistola rociadora con ambas manos
cuando aplique un rociado a alta presi6n para evitar
tesiones cuando se produzca el retroceso de ta pistol&
_, ADVERTENClA Los gases y el calor de escape
poddan inflamar los matedales
combustibles y las estructuras o
daSar el dep6sito de combustible y
provocar incendios, as[ como
lesiones graves o incluso la muerte.
El contacto con la zona del silenciador podda
producir quemaduras y lesiones graves.
NO toque tas superficies calientes y evite los gases det
escape a alta temperatura.
Permita que el equipo se enfr_e antes de tocarto.
Deje un espacio m_nimo de 1.5 m (5 pies) alrededor det
timpiadora a presi6n, incluida ta parte superior.
Utilizar el motor en un terreno boscoso, con mateza o
cubierto de hierba constituye una infracci6n al C6digo
de recursos publicos de California, a menos que el
sistema de escape este equipado con una pantalta
apagachispas, de acuerdo a ta definici6n de ta Secci6n
4442, que se mantenga en buenas condiciones de
funcionamiento. En otros estados o jurisdicciones
federates puede haber leyes similares en vigor.
Pongase en contacto con el fabricante, el vendedor o et
distribuidor det equipo original para obtener una pantalla
apagachispas dise_iada para el sistema de escape
instalado en este motor.
Las piezas de recambio deben set tas mismas que tas
piezas originales y estar instaladas en ta misma posici6n.
_, ADVERTENCIA El arrancador y otras piezas
rotativas poddan enredarse en las manos,
el pelo, la ropa u otros accesodos, y
provocar lesiones graves.
NUNCA utilice ta timpiadora a presi6n sin sus carcasas o
tapas de protecci6n.
NO utilice ropa suetta, joyas ni objetos que poddan
quedar atrapados en el arrancador o en otras piezas
rotativas.
Ate para arriba el pelo largo y quite tajoyerfa.
Y
ADVERTENClA El combustible y sus vapores
explosivos, Ioque podria provocar
son extremadamente infiamables y
quemaduras, incendios o explosiones;
asi como lesiones graves o incluso la muerte.
CUANDOANADA COMBUSTIBLEO VACiE EL DEP6SlTO
DETENGA el motor del timpiadora a presi6n y dejelo
enfdar durante al menos 2 minutos antes de quitar el
tap6n de combustible. Aftoje ta tapa lentamente para
dejar que la presi6n satga del tanque.
Uene o vacie et dep6sito de combustible a ta intemperie.
NO tlene demasiado el tanque. Permita al menos espacio
para ta expansi6n del combustible.
Si se ha derramado combustible, espere a que se
evapore antes de arrancar el motor.
Mantenga ta gasolina atejada de chispas, llamas
abiertas, pitotos, cator y otras fuentes de ignici6n.
Compruebe frecuentemente que las l_neasde
combustible, et tanque, el tap6n y los accesorios no
esten rotos o tengan fugas. C#.mbielos si es necesado.
NO encienda un cigarrillo o fume.
CUANDO PONGA EN FUNCIONAr_IENTO EL EQU|PO
Compruebe que ta bujia, el silenciador, el tapon del
dep6sito de combustible y et fittro de aire est&n instalados.
NO arranque et motor sin la buj_ainstalada.
CUANDO OPERE EL EQUnPO
NO utilice este producto en et interior de un edificio,
cochera, porche, equipo m6vil, taller de aplicaciones
navates o recinto.
NO incline et motor o el equipo, de tal manera que ta
gasolina se pueda derramar.
NO rode l_quidos inflamables.
AL TRANSPORTAR, MOVER O REPARAR EQUIPO
• Transporte, mover o repare et equipo con el tanque
de combustible ratio, o con la v&lvula para apagar el
combustible, apagada (posici6n OFF).
NO incline el motor o el equipo, de tal manera que ta
gasolina se pueda derramar.
Desconecte el cable de ta buj_a.
CUANDO ALr_IACENE O GUARDE EL EQUIPO CON
COMBUSTIBLE EN EL TANQUE
, Mantengalo atejado de catderas, estufas, catentadores
de agua, secadoras de ropa u otros aparatos que utilicen
llama piloto u otras fuentes de ignici6n que podr_an infla-
mar los vapores de combustible.
_k ADVERTENCiA EI uso de una [impiadora a
_,\® 2_ presi6n podrfa producir charcos y
r_ superficies resbaladizas que
_m nrovoquen que se caiga y sufra
El retroceso de la pistoia rociadora podrfa provocar
cafdas con lesiones graves o la muerte.
Utilice la limpiadora a presi6n desde una superficie estable.
El #.tea de timpieza debera tener inclinaciones y drenajes
adecuados para disminuir ta posibitidad de caidas debido
a superficies resbatosas.
Extreme las precauciones si necesita utilizar la
timpiadora a presi6n desde una escalera, un andamio u
otto tugar similar.
, Sujete firmemente la pistola rociadora con ambas manos
cuando aplique un rociado a alta presi6n para evitar
tesiones cuando se produzca el retroceso de ta pistol&
[ lesiones graves o que se muera.
36
Page 37

A. ADVERTENCIA Peligro de quemadura qu_mica.
Las sustancias qdmicas poddan provocar
quemaduras, asi como lesiones graves o
incluso la muerte.
o NO use tfquidoc#,usticocon tatimpiadoraa presi6n.
Use EXCLUSWAMENTEdetergenteso jabones
especiatespara ta timpiadoraapresi6n. SJgatodas tas
instruccionesdel fabdcante.
A. ADVERTENCIA El chorro de agua a alta
presi6n que este equipo produce podrfa
I_ atravesar la pie_ y los tejidos subcut4neos,
La pistola rociadora retiene agua a alta presi6n
incluso con el motor parado y el agua
desconectada; esto podrfa provocar lesiones
graves.
, NUNCA repare ta manguera de aka presi6n. Remplacela.
, NUNCA utitice ningun tipo de sellador para reparar una
, NO fije ta pistola rociadora en la posicion abierta.
o NO abandone la pistola rociadora cuando ta maquina
, NUNCA utitice una pistola rociadora cuyo seguro o
A, ADVERTENCIA Las chispas involuntarias
CUANDO AJUSTE O HAGA REPARACIONES A SU
MAQUINA LIMPIADORA A PRES|ON
, Siempre desconecte el atambre de ta bujia y col6quelo
CUANDO PRUEBE LA BUJIA DEL MOTOR
que poddan provocar lesiones graves y la
posible amputaci6n de un miembro.
En caso de que atgun l_quido te cause una cortadura,
tlame al medico de inmediato. NO ta trate como una
cortadura comun.
NO permita en ningun momento que NIF4OSoperen ta
maquina timpiadora a presi6n.
fuga en una conexi6n. Sustituya ta junta tOdca o ta junta.
NUNCA conecte la manguera de alta presi6n al
prolongador de ta boquilla.
Mantenga conectada la manguera a ta mb.qu_nao a ta
pistola de rociado cuando el sistema este presurizado.
SIEMPRE que pare et motor, apunte con la pistola
rociadora hacia una direcci6n segura, pulse el botOn rojo
y apdete el gatillo para descargar ta presion.
NUNCA apunte ta pistola a ta genre, animaJes o plantas.
este en funcionamiento.
protecci6n para el gatillo no este en perfecto estado de
funcionamiento.
Asegurese en todo momento de conectar correctamente
ta pistola rociadora, tas boquillas y los accesodos.
poddan provocar incendios o
electrocuci6n que pueden provocar
lesiones graves o la muerte.
donde no pueda entrar en contacto con ta buj_a.
Utitice un comprobador de buj_as homologado.
NO comprueba ta chispa sin ta buj_a instalada.
ADVERTENCJA Riesgo de lesiones en los ojos
o el cuerpo. El agua rociada podrfa
:_ salpicar o propulsar objetos, Io que
Cuando utilice este equipo o este cerca de el, siempre
use gafas de seguridad con ventitaciOn indirecta (contra
satpicaduras de productos qdmicos) marcadas para
cumplir con ANSI Z87.1.
NUNCA se ponga gafas de seguddad ni gafas para
entomos secos como sustituto de tas gafas de seguridad
con ventitaci6n indirect&
Siempre utilice ropa de protecci6n como una camisa de
manga targa, pantalones largos y zapatos cerrados.
NUNCA ponga en funcionamiento ta timpiadora a presi6n
cuando este descalzo, tleve sandalias o pantalones
cortos.
PRECAUCKSN Las velocidades de
funcionamiento excesivamente altas poddan
provocar lesiones leves.
Las velocidades excesivamente bajas incrementan
la carga de trabajo.
NO intente alterar et resorte, las conexiones y otras
partes del regulador para incrementar ta velocidad det
motor. La timpiadora a presiOn ejerce ta presi6n y el flujo
nominates correctos cuando funciona a una velocidad
controlada.
NO modifique at limpiadora a presiOn en ninguna form&
AVISO El rociado de alta presi6n podda da_ar
objetos fr@gi_es, incluido el vidrio.
NO dirija la pistola rociadora hacia cdstates cuando use et
patron de rociado MAX (maximo) en el boquilla de selector.
NUNCA apunte ta pistola a plantas.
AWSO Un tratamiento inadecuado de la limpiadora
a presi6n podr[a da_arla y acortar su vida OtiL
Si usted tiene alguna pregunta acerca de tas finatidades de
uso del timpiadora a presi6n, preguntele a su concesionario
o contacte el distdbuidor de servicio autodzado.
NUNCA deberan ser operadas tas unidades con partes
rotas o ausentes, o sin ta caja o cubiertas de protecci6n.
NO eluda ningun dispositivo de seguddad de esta maquina.
NO intente alterar tavelocidad controlada.
NO utilice ta timpiadora a presi6n pot encima de su presi6n
nominal.
NO haga ninguna modJficacJ6n en ta timpJadora a presiOn.
, Antes de poner en marcha la m#.quina timpiadora a presi6n
en clima fdo, revise todas tas partes del equipo y asegurese
de que no se haya formado hielo sobre elias.
, NUNCA mueva ta mb.quina hatando ta manguera de alta
presiOn. Utitice ta manija que viene con ta unidad.
El equipo de alta presJOnestb. disefiado para set utilizado
UNtCAMENTE con tas partes autodzadas Sears. Si
utiliza este equipo con partes que no cumplan con tas
especificaciones m_nimas, el usuario asume todos los
riesgos y responsabitidades.
puede provocar lesiones graves.
37
Page 38

CONOZCA SU MAQUtNA SISTEMA DE LIMPIEZA
Lea et r_]anuai det Opetario y las reglas de segutidad antes de porter en matcha su sistema de limpieza.
_ Compare tas Hustraciones sistema de famitiarizarse tas ubicaciones de los diferentes
controles y ajustes. Guarde este manual para referencias futuras.
con su
timpieza para
cod
A - PJstoJa de rociado -- Contro{a la aplicaci6n de agua sobre la
superficie de limpieza con el gatillo. Uncluyecerrojo de seguridad.
B - Bandeja de accesorios -- Permite almacenar
c6modamente los accesorios de serie.
C - BoquHla Selector - Contiene cinco boquillas patr6n de
rociado diferentes para diversas aplicaciones.
D - Asa pJegable -- El asa y la bandeja de accesorios se
pliegan sobre el motor cuando est& frio para reducir el
espacio necesario para el almacenamiento.
E _Arrancador de retroceso -- Usado para arrancar el motor
manualmente.
F - Tapa deJ dep6sito de! aceite -- Llene el motor con aceite aqui.
G - Entlrada de agua -- Conexi6n para la manguera de jardin.
H _ Yoma de aJta presi6n -- Conexi6n para la manguera de
alta presi6n.
J _Filtro de aire -- El elemento de filtro tipo seco limita la
cantidad de suciedad y polvo que se introduce en el motor.
K _ Soporte para boteHa -- La botella de soluci6n limpiadora
se adapta a la forma del soporte de alambre. Botella con
concentrado no inc]uida.
M - Conmutador de parada -- Coloca el motor en modo de
arranque para el arrancador de retroceso y detiene el motor
en funcionamiento.
N - Manguera de inyecci6n Project Pro PerfectMix TM --
Mezcla el concentrado con el rociado de la limpiadora a
presi6n.
P - Etiqueta de advertencia e instrucciones -- Identifica los
riesgos e indica el procedimiento adecuado de puesta en
marcha o de parada de la limpiadora a presi6n.
Q - Tanque deJ combustible -- Llene el tanque con gasolina
regular sin contenido de plomo en este punto. Siempre
habitaci6n de hoja para la expansi6n del combustible.
R - Manguera de AJta Presi6n -- Conecte un extremo a la pisto{a
de rociado y el otto extremo a la toma de alta presi6n.
S - Extensi6n de ta boquiHa con conector r_pido -- Le
permite cambiar entre el boquilia de selector y los accesorios
opcionales para boquilia.
No mostrado:
Bomba -- Desarro{la alta presi6n de agua.
Automatico se enfrfa sistema -- Los ciclos regan pot bomba
cuando agua alcanza 125 -o°155-°F. Entibiar agua descargar& de
la bomba en el suelo. Este sistema previene el daSo interno de
bomba.
Etiqueta de identificaci6n -- Proporciona el modelo y el
nOmero de serie de limpiadora a presi6n. Tenga pot favor estos
prontamente disponible cuando Ilamar para la ayuda.
38
Page 39

Su sistema de limpieza requiere de cierto ensamble y
estar& lista para ser usado unicamente despues de haber
depositado el combustible y el aceite recomendado.
Si tiene probtemas con et ensamble de su maquina
limpiadora a presi6n, Itame a la lt"nea de ayuda de la
maquina limpiadota a presi6n al 1-800-222-3136,
Desembale ia iimpiadora a presi6n
1. Saque todo el contenido de ta caja de cart6n, a
excepci6n de ta timpiadora a presi6n.
2. Abra completamente ta caja de cart6n cortando cada
una de sus esquinas de arriba abajo.
3. Saque ta timpiadora a presi6n de ta caja de cart6n.
Contenido de ia ¢aja
Revise el contenido de ta caja. Si atguna de tas partes no
est& presente o est& da_ada, llame a ta tinea de ayuda de ta
maquina timpiadora a presi6n al 1-800-222-3136.
, La unidad principal
, Manubrio
, Bandeja de accesodos con abrazadera para manguera
, La manguera de alta presi6n
, Pistola de rociado
, Extensi6n de ta boquilla con conector ra.pido
, Puch de aceite para motor
, Soporte para botella (2)
, Boquilla de selector de conexi6n ra.pida
, Manguera de sif6n del detergente de ProjectPro®
PerfectMix
, Bolsa de partes (incluye los etementos descdtos a
continuaci6n)
, Manual del operador
, Tarjeta de ta matdcula
, Piezas para ta manubrio (inciuye to siguiente):
, Pemos para manubrio [2_
, Pemos de cabeza redonda/21
, Perilla plastica para manubrio (2)
, Perilla plastica (2)
, Pinzas de a.rbol (4)
Familiar{cese con cada parte antes de ensambtar la ma.quina
timpiadora a presi6n. Compare el contenido con ta ilustraci6n
de la pagina 38. Si atguna de ta partes no est& presente o se
encuentra da_ada, llame a ta t_neade ayuda de ta maquina
timpiadora a presi6n al 1-800-222-3136.
MONTAJE DEL SISTEMA DE LIMPIEZA
Usted deber& tlevar a cabo los siguientes procedimientos
antes de porter en funcionamiento su sistema de timpieza:
1. Ltene y mande en tarjeta de matdcula.
2. Conecte manubrio y bandeja de accesodos.
3. Conecte ta manguera de sifon del detergente a ta
bomba.
4. A6ada aceite al motor.
5. A6ada gasolina al tanque de combustible.
6. Conecte manguera a alta presi6n a pistola rociadora y a
bomba.
7. Conecte el suministro de agua a bomba.
8. Conecte boquilla ta extensi6n al pistola rociadora.
9. Selecto/conecta rapido conecta boquilla de selector a ta
extensi6n de ta boquilla.
Coneete el Manubrio y Bandeja de
Accesorios
1. Coloque et manubrio (A) sobre los soportes det mismo
que ya estan adheridos a la unidad principal. Asegurese
de que los odficios en el manubdo esten alineados con
los odficios en los soportes del mismo manubdo.
2. lnserte los pemos de cabeza redonda (B) det asa en los
odficios desde el interior de ta unidad y coloque un pomo
de ptastico ('C}desde ta parte exterior. Apdete a mano.
A VISO Si se aflojan los dos pomos de ta parte intermedia
del perno de sujeci6n, el asa superior se puede plegar sobre
el motor cuando est& fr_o.NO pliegue el asa si el motor est&
caliente.
3. lnserte las correas de goma (B) a traves de tas ranuras
(E) en ta parte trasera de ta bandeja de accesorios y tire
firmemente pot la parte frontal.
39
Page 40

4,
Coloque la bandeja de accesodes (A) sobre Josodficios
(B) del manubdo (vista desde ta parte dentr&s de la
unidad). Presione tas pinzas de #.rbol (C) para introducir
tas en los orificios hasta que queden a nivel con ta
bandeja de accesorios.
/
5,
lnserte los accesodos suministrados en tos espacios
correspondientes en ta bandeja de accesorios. Consulte
Cdmo Usar la Bandeja de Accesorios.
6,
Coloque los soportes para botelia (D) hacia el exterior
sobre los odficios del soportes del asa. Fije tos soportes
para botelia y el asa con tos pernos de cabeza (E) y
pomos de pl&stico (F). Apriete a mano.
Project Pro@ Perfect Mix TM sif6n
1. Conecte el extremo de la manguera del sistema de
inyecci6n Project Pro PerfectMix (G) at acopiamiento
dentado de ta manguera (H) de ta bomba.
2. Coloque ta botelJas de Project Pro PerfectMix (no
incluida) en el soporte de alambre del asa.
3. Quite el tapdn de ta boteHa e inserte el sistema de
inyecci6n Project Pro PerfectMix (J). Enrosque ta unidad
de inyecci6n a ta parte superior de ta botelia (K).
A VISO Utilice el clip del tap6n para encajar el sistema de
inyecci6n en et soporte de alambre cuando no este en una
botella de concentrado.
4O
Page 41

Agregue aceite de motor
1. Coloque ta timpiadora a presi6n en una superficie plana
y nivelada.
2. Limpie ta zona de alrededor del orificio de ttenado de
aceite y quite el tap6n amarillo.
3. Tenga cuello de puch de aceite suministrado y quite
tapa.
4. Vierta tentamente el puch det aceite suministrado pot el
orificio de tlenado. Verificando con frecuencia el nivel de
aceite, deposite hasta ta marca tleno (hoyo primero) de
ta varitla de medici6n.
Lteno
AVlSO Pausa para permitir que aceite para
asentarse° Limpie la varilla de medici6n cada vez nivel
del aceite se verifica. NO a_ada aceite en exceso.
A VISO El tratamiento inadecuado del limpiadora a
presi6n puede da_arlo y acortar su vida productiva.
o NO procureacodar ni empezar el motorantes ha sido
atendidoa apropiadamente conel aceite recomendado.
Esto podr_aprovocaruna aveda en el motor.
5. Vuelvaa colocar el tap6n y aprietelo firmemente.
Agregue gasolina
El combustible debe reunir los siguientes requisitos:
o Gasolina sin plomo timpia y nueva.
, Un m_nimo de 87 octanos/87 AKI _91 RON}. Para uso a
gran altitud, consulte Gran altitud.
, Se puede usar gasolina con un contenido de hasta 10% de
etanol (gasohol).
_, ADVERTENCIA El combustible y sus vapores
explosives, Io que podria provocar
son extremadamente }nflamables y
quemaduras, incendios o explosiones;
asi come lesiones graves o incluso la muerte.
CUANDO ANADA COMBUSTIBLE EL DEP6SITO
, DETENGA el motor del timpiadora a presi6n y dejelo
enfriar durante at menos 2 minutos antes de quitar el
tap6n de combustible. Afioje ta tapa tentamente para
dejar que ta presi6n saiga del tanque.
Ltene el dep6sito de combustible a ta intemperie.
NO tlene demasJado el tanque. Permita ai menos espacio
para ta expansi6n del combustible.
, Si se ha derramado combustibie, espere a que se
evapore antes de arrancar el motor.
, Mantenga ia gasolina atejada de chispas, llamas
abiertas, pilotos, calory otras fuentes de ignici6n.
Compruebe frecuentemente que tas i[neas de
combustible, et tanque, el tap6n y los accesorios no
esten rotos o tengan fugas. Ca.mbielos si es necesano.
, NO encienda un cigarrilio o fume.
AVISO El uso de combustibles no aprobados podr_a daSar
el generador y anula ta garant_a.
NO utitice gasolina no aprobada, como E15 y E85.
NO mezcle aceite con gasolina ni modifique el motor para
hacerto funcionar con otros combustibles.
Para evitar la formaci6n de carbonitta en et circuito de
combustible, siempre que aSada combustible, mezclelo con
un estabitizador. Consulte A/macenamiento. NO todos los
combustibles son iguates. Si detecta problemas de arranque
o de rendimiento despues de utilizar un combustible,
pruebe a cambiar de proveedor o de marca. Este motor
esta certificado para funcionar con gasolina. Su sistema de
control de emisiones es EM (Modificaciones del motor).
1. Limpie el #.tea atrededor de ta tapa de tlenado del
combustible, retire ta tapa.
2. ASada tentamente gasolina sin plomo (A) al dep6sito
de combustible (B). NO aSada combustible en exceso.
Para permitir ta expansi6n det combustible, no tlene pot
encima de ta boca del tanque de combustible.
N
JN N
3, lnstale la tapa del tanque de combustible y ta espera
para algQn combustible rociado para evaporar.
iPRECAUCI6N! Los combustibles con mezcla de alcohol
(gasohol. etanol o metanol) pueden atraer ta humedad y
provocar la separaci6n y formaci6n de #.cidos durante el
atmacenamiento. Los gases &cidos pueden da_ar el circuito
de combustible y el motor durante el almacenamiento.
Para evitar este tipo de probtemas, vacie et circuito de
combustible cuando vaya a atmacenar ta unidad durante
30 dias o mb.s.Vade el dep6sito de combustible, arranque
el motor y dejeto funcionar hasta que los conductos
de combustible y el carburador queden vacios. Utilice
combustible nuevo ta proxima temporada. Para obtener m#.s
informaci6n al respecto, consulte A/macenamiento.
NUNCA utilice productos limpiadores para motores o
carburadores en el dep6sito de combustible, ya que podr_an
provocar da_os permanentes.
Gtan attitud
En altitudes superiores a 1.524 metros (5.000 pies), se
debera utitizar gasolina con un m[nimo de 85 octanos / 85
AKI (89 RON). Para seguir cumpliendo la normativa sobre
emisiones, es necesario ajustar la unidad para su uso a
gran attitud. De no reatizarse este ajuste, el rendimiento
se reducira y el consumo de combustible y tas emisiones
aumentaran. Para obtener m#.s informaci6n sobre el ajuste
para gran attitud, consulte con un distribuidor cuatificado
de Sears. No se recomienda utilizar et motor a altitudes
inferiores a 762 metros (2.500 pies) con el juego de gran
altitud.
41
Page 42

Tap6n de combustible Fresh Start@
El tap6n de combustible Fresh Start (A) est& diseTado para
albergar un cartucho (B) con aditivo para combustible. La
adici6n de un aditivo para combustible ayuda a mantener el
combustible en buen estado y los carburadores timpios para
facilitar et arranque durante toda ta temporada. Ettap6n de
combustible Fresh Start, si est& equipado con un cartucho,
suministra autom&ticamente el aditivo de combustible
concentrado en el tanque de combustible, de forma que
usted no tenga que agregarto.
AVISO Compre una cartucho de aditivo para combustible
Fresh Start, numero de cat&logo 33386, en sus Sears locales
o ttamando 1-888-331-4569 o en tinea en www.sears.com.
No est& incluido en ta timpiadora a presi6n.
Lea y siga todas tas instrucciones y advertencias del paquete
del cartucho de aditivo para combustible Fresh Start.
Lubrique ias juntas t6ricas
La tubricaci6n de tas juntas t6dcas es extremadamente
importante para ta instataci6n y operaci6n. El uso de un
tubdcante (petr61eo o grasa sintetica) durante el montaje
es de utilidad para que tas juntas t6ricas se asienten
adecuadamente y et sellado quede mejor. Tambien ayuda a
proteger la junta torica contra da_os pot abrasi6n, pinchazos
o cortes, y extiende su duraci6n.
AVISO SIEMPRE aplique una peque_a cantidad de
tubricante en tas juntas toricas antes de montar la manguera
de jard_n a la bomba (C), manguera a alta presi6n (B), la
pistola rociadora (E), y el prolongador de ta boquilla (F).
Lubrique todas las conexiones se muestra a
continuaci6n, siguiendo estas instrucciones:
1. Revise y limpie las superficies de conexi6n antes de ta
tubdcaci6n y el montaje.
2. Utilice los tubricantes con moderaci6n durante el
montaje; s6to se requiere una capa tigera.
3. Cuando no tenga acceso a tas juntas t6dcas, utilice un
cepitlo pequeSo o torunda de atgod6n para aplicarles ta
grasa directamente (adaptador QC, adaptador M22).
42
Page 43

Conecte la manguera y el suministro de
agua a ia bomba
AVISO NO haga funcionar ta bomba si no tiene el
suministro conectado y abierto.
o El daFio a la limpiadora a presi6n, resultado de ta
desatenci6n a esta precauci6n, no set& cubierto pot ta
garant_a.
AVlSO Antes de conectar tas mangueras, retire y deseche
los tapones de transporte de ta salida de alta presi6n y de ta
entrada de agua de ta bomba.
1. Retroceda ta manguera a atta presi6n y conecte a ta
base de ta pistola rociadora. Apriete con la mano.
_, ADVERTENCIA El chorro de agua a alta
presi6n que este equipo produce podffa
atravesar la piel y los tejidos subcutaneos,
que poddan provocar lesiones graves y la
posible amputaci6n de un miembro,
NUNCA conecte la manguera de alta presi6n al
prolongador de ta boquilla.
Mantenga conectada la manguera a ta ma.quina o a la
pistola de rociado cuando el sistema este presurizado.
Asegurese en todo momento de conectar correctamente
ta pistola rociadora, tas boqulllas y los accesodos.
2. Conecte el otto extremo de la manguera a alta presi6n.
a la salida de alta presi6n de la bomba. Apriete con ta
mano.
4. Haga correr el agua a traves de la manguera de su jard_n
por 30 segundos para timpiar cualquier escombro que se
encuentre en ella. Desconecte el agua.
AVISO Hace NO agua de parar de siphon para el
abastecimiento de agua. Use agua SOLO fria (menos que 38-°C).
AVISO El uso de una valvula unidireccional (igualador de
presi6n o v&tvula de retenci6n) en la entrada de ta bomba
podda producir da_os en ta bomba o en el conector de
entrada.
DEBE haber un m_nimo de 3 metros (10 pies) de manguera
de riego tibre entre la entrada de ta limpiadora a presi6n y
cuatquier dispositivo, como un igualador de presi6n o una
valvula de retenci6n).
El daPio a ta limpiadora a presi6n, resultado de ta
desatenci6n a esta precauci6n, no set& cubierto pot ta
garant_a.
5. Conecte la manguera de jardin (no exceder 50 pies en ta
tongitud) a ta entrada del agua. Apriete con ta mano.
ADVERTENCIA Riesgo de lesiones ocu_ares.
El agua rociada podffa salpicar o propulsar
objetos, Io que puede provocar lesiones
graves,
Cuando utilice este equipo o este cerca de 61,siempre
use gafas de seguridad con ventitaci6n indirecta (contra
satpicaduras de productos qdmicos) marcadas para
cumplir con ANSI Z87.1.
, NUNCA se ponga gafas de seguridad ni gafas para
entornos secos como sustituto de tas gafas de seguridad
con ventilaci6n indirecta.
6, ABRA el agua, apunte con ta pistola hacia una direcci6n
segura presione el seguro (bot6n rojo) (B) y apriete et
gatitto para eliminar el aire y tas impurezas del sistema
de bombeo.
3. Antes de que conecte ta manguera de jardin a ta entrada
de agua, inspeccione et colador de ta entrada (A). Limpie
el colador si tiene residuos o solicite su remptazo si esta,
da_ado. NO haga funcJonar la limpiadora a ptesi6n
si et fJltto de enttada falta o est_ da_ado.
Lista de revision previa at arranque del motor
Revise ta unidad para asegurarse que ha tlevado a cabo los
siguientes procedimlentos:
1. Asegurese de leer tas secciones Rejas de Seguridad y
Operacidn antes de usar el sistema de timpieza.
2. Revise que los sujetadores del carrete de ta manguera
esten apretados.
3. Revise que haya sido depositado aceite y este al nivel
correcto en ta caja del cig8efial del motor.
4. Deposite ta gasolina adecuada en el tanque del
combustible.
5.
Revise que todas tas conexiones de tas mangueras
(atta presi6n y suministro de agua) esten apretadas
correctamente y que no existan dobleces, cortes o daSo
de ta manguera de alta presi6n.
6.
Proporcione el suministro de agua adecuado (que no
exceda los 38-°C).
43
Page 44

COMO USAR SU SISTEMA DE LIMPIEZA
Si tiene problemas con el funcionamiento de su maquina
timpiadora a presi6n, pot favor llame a la tinea de ayuda de ta
maquina timpiadora a presi6n at 1-800-222-3136.
Ubicacion del iimpiadora a presi6n
Envenenamiento con mon6xido de catbono
_, ADVERTENCIA PELIGRO DE GAS VENENOSO.
Los gases del escape del motor contienen
mon6xido de carbono, un gas venenoso que
podria matarlo en minutos. NO tiene olor, color
ni sabot. Aun si no puede oler los vapores del escape,
podria estar expuesto al gas de mon6xido de carbono.
o Utitice este producto UNICAMENTE a ta intemperie,
tejos de ventanas, puertas y ventilaciones para reducir
el desgo de que el gas de mon6xido de carbono se
acumule y entre en los espacios habitados,
lnstale atarmas para detectar mon6xido de carbono
operadas con batedas o enchufabtes con batedas de
repuesto de acuerdo con las instrucciones del fabdcante,
Las atarmas de humo no pueden detectar el gas de
mon6xido de carbono,
NO utitice este producto dentro de casas, garajes, s6tanos,
entresuetos, cobertizos o en otros espacios parcialmente
cerrados, aun si utitiza ventitadores o deja las puertas y
ventanas abiertas para favorecer la ventilaci6n. El mon6xido
de carbono puede acumutarse rapidamente en estos
espacios y perdurar ahi durante horas, aun despues de que
este producto se haya apagado,
SIEMPRE coloque este producto en direcci6n det viento
y didja et escape del motor en sentido contrario a los
espacios habitados,
Si comienza a sentirse mal, mareado o debil cuando
use este producto, apaguelo y busque aire puro DE
INMEDIATO, Acuda a un medico, Es posibte que se haya
envenenado con mon6xido de carbono,
Para poner en marcha et sistema de limpieza
Para darle arranque a su sistema de timpieza movido a motor
pot primera vez, siga estas instrucciones paso a paso, Esta
informaci6n acerca de la puesta en marcha iniciat tambien es
vatida para cuando vaya a darte arranque al motor despues
de haberto dejado la maquina timpiadora a presi6n fuera de
funcionamiento pot 1omenos un dia,
1, Coloque ta maquina limpiadora a presi6n en un area
cercana a una suministro de agua exterior capaz de
abastecer agua a un volumen mayor de 3,7 galones pot
minuto en no menos que 20 PSI en el fin de arandela de
presi6n de ta manga del jard_n,
2, Revise que ta manguera de atta presi6n se encuentre
conectada firmemente a ta pistola de rociado y a ta
bomba, Vea Montaje,
3, Asegurese que ta unidad este nivelada,
4, Conecte ta manguera de jard_n a ta entrada del agua,
Aprietela con la mano,
AVISO NO haga funcionar la bomba si no tiene el
suministro conectado y abierto.
, El daSo a ta timpiadora a presi6n, resultado de ta desa=
tenci6n a esta precauci6n, no sera cubierto pot ta garant_a,
5, Abra el agua, apunte con la pistola hacia una direcci6n
segura presione el seguro (boton rojo) y apriete el gatillo
para etiminar el aire y tas impurezas del sistema de
bombeo.
6, Conecte ta extensi6n de la boquitla a la pistola rociadora,
Aprieteta con tas manos,
ml mij
Orificio de escape
Dirigido en sentido
contrario a los
espacios hab[tados
Espacio sin riesgo de incendios
AOVERTENCIA Los gases y el calor de escape
poddan infiamar los materiales combustibles
y las estructuras o da5ar el dep6sito de
combustible y provocar incendios, asi como
lesiones graves o incluso la muerte°
Deje un espacio m_nimode 1.5m (5 pies) alrededor del
timpiadoraa presi6n,incluidata parte superior.
7,
Tire hacia atras et anillo del prolongador de la boquilla,
inserte et boquilla de selector y tibere el anillo, Tire
det boquilla de selector para comprobar que este bien
montado, Consulte Cdmo usar el boquilla de selector.
8,
Sit6e el interruptor basculante del motor (B) en ta
posici6n de en (I o ON),
44
Page 45

AVISO Antes de arrancar ta timpiadora a presi6n,
asegurese de ponerse gafas de seguridad como se describe
a continuaci6n.
A. ADVERTENClA Riesgo de lesiones oculares.
El agua rociada podria salpicar o propulsar
objetos, Io que puede provocar lesiones
graves.
, Cuando utilice este equipo o este cerca de 61,siempre
use gafas de seguridad con ventitaci6n indirecta (contra
satpicaduras de productos qdmicos) marcadas para
cumptir con ANSI Z87.1.
o NUNCA se ponga gafas de seguridad ni gafas para
entomos secos como sustituto de tas gafas de seguridad
con ventilaci6n indirect&
AVISO Esta unidad esta. equipada con un motor
ReadyStart®. Los motores ReadyStart no requieren cebado
ni estrangulamiento.
9. Cuando arranque el motor, col6quese en la posici6n
que se recomienda a continuaci6n. Sujete la manija y
hale ligeramente ta manija del arranque hasta que sienta
cierta resistencia. Despues h#.tela r#.pidamente.
_. ADVERTENCIA El retroceso (repliegue rapido)
_,,, del cable del arrancador impedira que el
usuario suelte el cable a tiempo y tirar#, de
su mano y brazo hacia el motor, Io que
podffa provocar fracturas, contusiones o esguinces;
asf como lesiones graves.
NUNCA tire del cable det arrancador sin etiminar
previamente ta presi6n de ta pistola rociadora.
Cuando arranque el motor, tire lentamente del cable
hasta sentir una resistencia y, a continuaci6n, tire
r#.pidamente de el para evitar su retroceso.
Despues de cada intento de arranque, cuando el motor
no consiga arrancar, apunte con ta pistola rociadora hacia
una direcci6n segura, pulse et boton rojo y apriete el
gatitlo para descargar ta presi6n.
Sujete firmemente la pistola rociadora con ambas manos
cuando aptique un rociado a alta presion para evitar
tesiones cuando se produzca el retroceso de ta pistol&
10_ Jate ta cuerda de arranque lentamente. NO permita que ta
cuerda regrese bruscamente en contra del arrancador.
AVISO La limpiadora a presi6n estb.equipada con un control de
raienti automatico. Eicontrol de raienti disminuir#, ta veJocidad deJ
motor cuando se tibere el gatiJiode tapistola rociadora.
11. Apunte con ia pistola rociadora hacia una direcci6n
segura, pulse el bot6n rojo para tiberar ta cerradura del
disparador, y apdete el gatiJlo.
ADVERTENCiA El chorro de agua a aita
presi6n que este equipo produce podria
i_ atravesar la piel y los tejidos subcut&neos,
que podrian provocar lesiones graves y la
posible amputaci6n de un miembro°
La pistola rociadora retiene agua a alta presi6n
incluso con el motor parado y el agua desconectada;
esto podffa provocar Jesiones graves.
NO permita en ningun momento que NIOS operen ta
mb.quina timpiadora a presi6n.
Mantenga conectada ia manguera a ta ma.quina o a ta
pJstola de rociado cuando el sistema este presurizado.
NUNCA apunte ta pistola a ta gente, animales o pJantas.
NO fije ta pistola rociadora en ta posici6n abierta.
NO abandone ia pistoJa rociadora cuando ta m&quina
este en funcionamiento.
NUNCA utiJice una pJstoia rociadora cuyo seguro o
protecci6n para eJ gatilio no este en perfecto estado de
funcionamiento.
Asegurese en todo momento de conectar correctamente
ta pistola rociadora, tas boquitlas y los accesodos.
A. ADVERTENCIA Los gases y el calor de escape podrian
inflamar los materiales combustibles y las
estructuras o daSar el dep6sito de
combustible y provocar incendios, asi
como lesiones graves o incluso la muerte.
El contacto con la zona del silenciador podria producir
quemaduras y lesiones graves.
NO toque tas superficies calientes y evite los gases del
escape a alta temperatura.
Permita que el equipo se enfffe antes de tocarto.
Deje un espacio m_nimo de 1.5 m (5 pies) atrededor del
timpiadora a presi6n, incluida ta parte superior.
Utilizar et motor en un terreno boscoso, con mateza o
cubierto de hierba constituye una infracci6n at C6digo
de recursos publicos de California, a menos que et
sistema de escape este equipado con una pantatta
apagachispas, de acuerdo a la definici6n de ta Secci6n
4442, que se mantenga en buenas condiciones de
funcionamiento. En otros estados ojurisdicciones
federates puede haber teyes simitares en vigor.
Pongase en contacto con el fabdcante, el vendedor o et
distribuidor det equipo original para obtener una pantalla
apagachispas diseffada para el sistema de escape
instatado en este motor.
Las piezas de recambio deben set tas mismas que tas
piezas originales y estar instaladas en ta misma posici6n.
C6mo detener su sistema de Jimpieza
1. Suelte el gatillo de la pistola rociadora y deje funcionar el
motor ai ralenti durante dos minutos.
2_
Situe el interruptor basculante del motor en ta posJci6n de
tejos (O o OFF).
3_
SIEMPRE fusit de punto en una direcci6n segura,
presione el seguro (boton rojo) y el disparador del fusil
del rocio del estruj6n para tiberar ta presi6n retenida de
ta pieamar.
45
Page 46

A. ADVERTENCIA El chorro de agua a alta
_ resi6n que este equipo produce podria
posible amputaci6n de un miembro.
La pistola rociadora retiene agua a alta presi6n
incluso con el motor parado y el agua desconectada;
esto podria provocar lesiones graves.
o Mantenga conectada la manguera a ta ma.quina o a ta
atravesar la piel y los tejidos subcutAneos,
que poddan provocar lesiones graves y la
pistola de rociado cuando el sistema este presurizado.
SIEMPRE que pare el motor, apunte con la pistola
rociadora hacia una direcci6n segura, pulse el boton rojo
y apriete el gatillo para descargar ta presi6n.
C6mo usar ia bandeja de accesorios
La unidad est#. equipada con una bandeja de accesodos
con compartimentos para guardar ta pistola rociadora, el
prolongador de ta boquilla, ta manguera de alta presi6n y ta
boquilla de selector.
1. Pase ta pistola rociadora pot ta ranura de ta bandeja de
accesorios segun se muestra. Tire de la correa de goma
firmemente atrededor de ta pistola rociadora y coloque
el orificio de ta correa sobre ta tengQeta en ta bandeja de
accesorios.
C6mo usar el boquilla de selector
El boquilta de selector te permite cambiar entre cinco
boquillas con patrones de rociado diferentes. Siempre que
estb. activado el pestitlo de seguridad del gatillo de ta pistola
rociadora, se pueden cambiar los patrones de rociado con
ta timpiadora a presi6n en funcionamiento. Los patrones de
rociado vat,an tal como se muestra a continuaci6n.
A, ADVERTENCIA El chorro de agua a alta presi6n
piel y los tejidos subcutaneos, que podr[an
que este equipo produce podda atravesar la
provocar lesiones graves y la posible
amputaci6n de un miembro°
, NUNCA cambie los patronesde rociado sinactivar el
seguro del gatillo de ta pistolarociadora.
, NO tuerza puntasde rocioal rociar.
Para cambiar los patrones de rociado, siga estas
instrucciones:
/ /-
2. Pase el prolongador de ta boquitta por la ranura de ta
bandeja de accesodos segun se muestra. Tire de ta
correa de goma firmemente alrededor det prolongador
de ta boquilla y coloque el orificio de la correa sobre la
tengQeta en ta bandeja de accesodos.
3. lnserte la boquilla de selector en los orificios al frente de
ta bandeja de accesorios.
4. Coloque un extremo de ta manguera de alta presi6n
en ta ranura en la parte superior de ta bandeja de
accesorios y enrolle la manguera de atta presi6n
alrededor de los ganchos, como se muestra.
1. Seleccione et patr6n de rociado deseado:
MAX - Para superficies dificites de timpiar o de
atcanzar, como tas que se encuentran en segundos
pisos: o bieno para quitar pintura, manchas de aceite,
6xido u otras sustancias resistentes (alquitr#.n,
caucho, grasaocera, etc.).
GENERAL - Para la mayoda de tas tareas de
timpieza en recubrimientos taterates, patios con piso
de tabique, pisos de madera, caminos y andadores,
piso de garajes, entre otros.
o DELICATE - Para una limpieza suave de carros/
camiones, boteso veh_culos recreativos (RV),
muebles de jard_n, equipo de jardinerfa, etc..
FLUSH - Para una timpieza rapida de alto flujo y
largo atcance para recubrimientos yventanas en
segundos pisos.
SOAP - Para aplicar jab6n o propulsarto hacia
recubrimientos yventanas en segundos pisos.
2. Oprima el bot6n en ta boquilla con selector y el disco de
ta boquilla se botar&
3. Gire el disco hasta que el patr6n de rociado deseado
quede alineado con el boton en ta boquilla con selector.
4. Oprima el disco hasta que encaje en su tugar.
46
Page 47

Uso inclina
o Para obtenerun resuJtado6ptimo, mantenga el boquiJJa
de selector a unadistancia de entre 20 y 61 cm (8 a 24
puJgadas)de tasuperficieque se Jimpia.
Silo aproxima demasiado, especialmentecon una
boquilJadepatron derociado de alta presi6n, podr_a
da_ar tasuperficie.
NO coJoqueJaboquiJlaa menos de 15cm (6 pulgadas)
cuando este JimpiandotJantas.
Limpieza y apJicaci6n deJ detergente
_, ADVERTENCJA Peligro de quemadura quimica.
,_> Las sustancias qdmicas poddan provocar
quemaduras, as[ como lesiones graves o
incluso la muerte,
NO use tiquido c&ustJco con Ja timpiadora a presi6n.
Use EXCLUSIVAMENTE detergentes ojabones
especiaJes para ta timpiadora a presi6n. Siga todas tas
instrucciones det fabdcante.
Para apHcar ei detergente, siga los siguientes pasos:
Siga estos pasos para aplicar detergente sin diluir con
el sistema de inyecci6n azul PerfectMix:
1. Revise el uso de las boquilla de selector.
2. Conecte la manguera de inyecci6n PerfectMix a la
bomba y a la botella de concentrado PerfectMix
A VISO Use el juego de manguera de inyecciOn de
detergente estandar y filtro, disponible en Sears con
nOmero de producto 75180. para aplicar detergentes
comunes. El juego de manguera de nyecci6n de
detergente y filtro esta disponible como un accesorio
opcional, no est_ incluido en la limpiadora a presi6n.
A VISO El contacto con el sHenciador a alta
temperatura podda producir daSos en el tubo de
inyecci6n de detergente.
• Cuando coloque el fiJtro en la botella del detergente,
coloque el tubo de manera que no entre en contacto
accidentalmente con el silenciador caliente.
3. Aseg0rese de que la boquilla del patr6n de rociado
para SOAP (jab6n) est6 seleccionada en el
boquilla de selector.
AWSO No se puede aplicar detergente con las
boquillas de los patrones de rociado MAX (mAximo),
GENERAL (general), DELICATE (delicado) o de
FLUSH (limpieza).
4. AsegOrese de que la manguera del jardin est&
conectada a la entrada de agua. Compruebe
que la manguera de alta presi6n est#, conectada
a la pistola rociadora y a la bomba. Abra la
alimentaci6n de agua.
AVISO Usted deber_ conectar todas las mangueras
antes de darle arranque al motor.
• Si pone en marcha el motor sin haber conectado pre-
vJamente todas las mangueras y sin haber ABIERTO
el grifo, la bomba podrfa averiarse.
• El da_o a la Jimpiadora a presi6n, resuJtado de la
desatenci6n a esta precauci6n, no serA cubierto pot
la garanfia.
5 Marcha el motor siguiendo las instrucciones de
la secci6n Cdmo poner en funcionamiento la
limpiadora a presidn.
6. ApHque el detergente sobre la superficie seca,
comenzando en la parte inferior del Area y
didgi6ndose hacia arriba, utilizando movimientos
largos, parejos y superpuestos.
7. Permita que el detergente "penetre" de 3 a 5
minutos antes de enjuagar. Vuelva a aplicarlo
cuando sea necesario para evitar que la superficie
se seque. NO permita que el detergente se seque.
Si permite que el detergente se seque, la superficie
podrfa quedar con manchas.
47
Page 48

Enjuage de ia maquina iimpiadora a
presi6n
Despu_s de haber apticado el detergente, refriegue la
super{icie y enjuageta de la siguiente manera:
1. En el boquilla de selector, seleccione ta boquilia det
patr6n de rociado deseada. Consulte Cdmo usar el
boquilla de selector.
_, ADVERTENCIA El retroceso de la pistola
rociadora podda provocar cddas con
lesiones graves o la muerte.
o
Utitice la timpiadora a presi6n desde una superficie
estable.
o
Extreme las precauciones si necesita utilizar la
timpiadora a presi6n desde una escalera, un andamio u
otro tugar similar.
Sujete firmemente la pistola rociadora con ambas manos
cuando aptique un rociado a alta presion para evitar
tesiones cuando se produzca el retroceso de ta pistol&
2. Mantenga ta pistola de rociado a una distancia segura
del area que planea rociar.
3. Aplique un rociado de atta presi6n en un a.rea pequenao
despues revise si la superficie presenta da_os. Si no
encuentra da_os, puede continuar con el trabajo de
timpieza.
4 Comience en ta parte supenor det a.rea que va a
enjuagar, dirigiendose hacia abajo con los mismos
movimientos superpuestos que utitiz6 para el timpieza.
Sistema de enfriamiento automatico
(alivio termico)
El agua que circula dentro de ta bomba puede alcanzar
temperaturas entre los 125-°-155-°Fsi hace funcionar el
motor de su m#.quina timpiadora a presi6n de 3 a 5 minutos
sin oprimir el gatillo de la pistola de rociado. Et sistema de
enfriamiento automatico se activa a esta temperatura y enfda
ta bomba descargando agua caliente en el piso, evitando ad
el da_o intemo de ta bomba.
48
Page 49

INFOFtMACtON TECNICA SOBRE EL
MOTOR
El motor es de uno cilindros, de v&lvulas en cabeza (OHV),
refrigerado pot aire. En el Estado de California, los motores
de ta serie 120000 hart obtenido ta certificaci6n del California
Air Resources Board (Consejo de recursos de aire de
California) de cumplimiento de ta normativa sobre emisiones
durante 125 horas. Esta certificaci6n no supone para el
comprador, el propietario o el usuario ninguna garanfia
adicional en lo relativo al rendimiento y a la vida util del
motor. Las garanfias del motor ata_'ienexclusivamente al
producto y alas emisiones que se declaran en este manual.
Potencia nominal
El valor de potencia bruta nominal de cada modelo de motor
de gasolina est& indicado en una etiqueta conforme al c6digo
J1940, Procedimiento de valoraci6n de potencia y par de
torsi6n para motores peque[ios, de la Society of Automotive
Engineers (Sociedad de lngenieros de Automoci6n, SAE)
y se ajusta conforme at c6digo SAE J1995. Los vatores de
par de torsi6n se obtienen a 2600 RPM para los motores
con indicaci6n de "rpm" en ta etiqueta y a 3060 RPM para
todos los demb.s; los valores de potencia se obtienen a 3600
RPM. Las curvas de potencia bruta se pueden vet en www.
BRIGGSandSTRATTON.COM. Los valores de potencia
neta se obtienen con el escape y filtro de aire instalados,
mientras que los valores de potencia bruta se obtienen sin
estos elementos. La potencia bruta real del motor es superior
a ta potencia neta det motor y depende, entre otros factores.
de tas condiciones ambientales de uso y de tas vanac_ones
entre distintos motores del mismo modelo. Dada la amplia
variedad de productos que utilizan nuestros motores, es
posibte que el motor de gasolina no desarrolte ta potencia
bruta nominal en determinados equipos. Esta diferencia
se debe a los siguientes factores, entre otros: variedad
de componentes del motor (fittro de aire, escape, carga.
refrigeraci6n, carburador, bomba de combustible, etc.},
timitaciones de ta aplicaci6n, condiciones ambientales de uso
(temperatura, humedad, attitud) y variaciones entre distintos
motores de un mismo modeto. Debido a limitaciones de
fabricaci6n y capacidad, Briggs & Stratton puede sustituir un
motor de una potencia nominal mayor pot este motor.
ESPECtFICACtONES DEL
Especificaciones de la maquina
iimpiadora a presi6n
Presi6n de satida maxima .................... 3000 PSI*
Caudal m&ximo ............................. 2.7 GPM
Mezcla de quimicos .............. Use segun instrucciones
Temperatura del suministro
de agua ........................ Que no exceda los 38°C
Especificaciones del motor
Di&metro de camisa ............ 68.28 mm (2,68 pulgadas)
Carrera ...................... 51.82 mm (2,04 pulgadas)
Desplazamiento ................. 190 cc (11,58 pulgadas)
Buj_a
Tipo: ....................... Briggs & Stratton 692051
Calibrar Separaci6n a: ....... 0.020 pulgadas (0.051 mm)
Entrehierro del inducido: ................... 0,25-0,36 mm
(0,010-0,014 pulgadas)
Holgura de ta vb.lvula con mueltes de valvula instatados y
piston de 6 mm (0,25 pulgadas) pasado el punto muerto
superior (comprobar con el motor en fdo)
Admisi6n ........... 0,10-0,20 mm (0,004-0,008 pulgadas)
Escape ............ 0,10-0,20 mm (0,004-0,008 pulgadas)
Capacidad de Gasolina ...................... 1.6 Cuartos
Capacidad de Aceite ................. 0.6 titros (20 onzas)
AVISO Para que el rendimiento sea 6ptimo, ta carga del
motor no debe superar el 85% de su potencia nominal. La
potencia del motor se reducir#, un 3,5% pot cada 300 metros
(1.000 pies) de altitud y un 1% pot cada 5,6 °C (10 °F) a
partir de 25 °C (77 °C). Funcionar#. satisfactoriamente en un
a.ngulo de hasta 15-°.
* Esta limpiadora a presi6n est#. clasificada conforme a ta
norma PW101-2010 (comprobaci6n y clasificaci6n de
rendimiento de timpiadoras a presi6n) de ta Asociaci6n
de fabricantes de bombas a presi6n (Pressure Washer
Manufacturers Association, PWMA).
49
Page 50

RECOMENDACtONES GENERALES
Plan de mantenimiento
Siga los intervalos de horas o de catendario, los que sucedan
antes. Si opera en condiciones adversas (sefiatadas ma.s
abajo) es necesario un mantenimiento ma.sfrecuente.
o Cambie el aceite del motor
Revise/timpie el filtro de ta entrada de agua _
Revise ta manguera de alta presi6n
Revise ta mangueras del detergente
Revise ta pistola aspersora y verifique que no haya
fugas en el ensambtaje
Limpie los residuos
Compruebe el nivel de aceite
Mantenimiento del filtro de aire 2
Cambie el aceite del motor 2
lnspeccione el silenciador y ta pantalla
a
Mantenimiento del filtro de aire s
Recomendaciones generales
El mantenimiento peri6dico mejorara el rendimiento y
prolongara ta vida util det timpiadora a presi6n. Si necesita
asistencia, consulte con un distribuidor de Sears o con otto
distribuidor cualificado.
La garant_a de ta ma.quina limpiadora a presi6n NO cubre
los elementos que han sido sujetos a abuso o negtigencia
pot parte del operador. Para hacer vatida ta cobertura total
de ta garant_a, el operador deber& mantener la lavadora de
presi6n tal y como se indica en et manual, incluyendo su
adecuado almacenamiento, como se describe en la secci6n
Almacenamiento enel Inviemo y Almacenamiento prolongado.
AVlSO Una vez al afio, usted debera, timpiar o remplazar
ta buj_ay el filtro de aire. Una buj_anueva y un filtro de aire
timpio garantizan una mezcla de combustibte=aire adecuada
y te ayuda a su motor a funcionar mejor y a tenet una vida utit
mb_sprolongada.
Bomba de aceite
NO realice ninguna operaci6n de mantenimiento con el
aceite de ta bomba. La bomba se suministra pretubricada y
settada en fb_brica, y no requiere lubricaci6n adicional durante
su vida utit.
Control de ernisiones
Cuatquiet establec!miento o individuo espeeiatizado en
la reparaci6n de mototes que no scan de automoci6n
puede encatgatse del mantenimiento, la sustituci6n y
la reparaci6n de los dispositivos y sistemas de control
de emisiones. No obstante, para reatizar ta revision gratuita
de control de emisiones, debera acudir a un distribuidor
autodzado pot el fabdcante. Vease Garantia de emisiones.
Servicio a ta buj_a
Limpie el sistema de refrigeraci6n 2
Limpiar si esta obstruido, Remplazar si esta perforado o roto.
2Servicio mas a rnenudo bajo condiciones de suciedad o polvo.
Antes de carla uso
1. Revise et nivel de aceite del motor.
2. Limpie los residuos.
3. Revise si existen dafios en el colador de ta entrada de
agua.
4. Revise si existen dafios en el mangueras del detergente.
5. Revise si existen fugas en el conjunto de ta extensi6n
para boquiltas y pistola.
6. Elimine el aire y los contaminantes de ta bomba.
5O
Page 51

MANTENIMtENTO DE LA MAQUtNA
LIMPIADORA A PRESION
Limpie los residuos
Limpie a diario, o antes de cada uso, los residuos
acumulados en el limpiadora a presi6n. Mantenga limpias las
conexiones, los muelles y los mandos. Limpie todo resto de
combustible de la zona que rodea al silenciador y de detr&s
det mismo, lnspeccione tas ranuras para aire de enfdamiento
y ta apertura del timpiadora a presi6n. Estas aperturas
debera,n mantenerse timpias y despejadas.
Mantenga timpios los componentes det limpiadora a presi6n
para reducir et riesgo de sobrecalentamiento e ignici6n de
los residuos acumulados.
o Utitice un trapo humedo para timpiar tas superficies
exteriores.
A VISO El tratamiento inadecuado del limpiadora a
presi6n puede da_arlo y acortar su vida productiva.
NO inserte cualquier objeto a traves de tas ranuras de
enfriamiento.
Puede usar un cepillo de cerdas suaves para retirar ta
suciedad endurecida, aceite, etc.
Puede usar una m&quina aspiradora para eliminar
suciedad y residuos sueltos.
Revise y iimpie el colador de entrada
Examine el colador de entrada de la manguera de jardin.
L_mpielo si est& tapado o remplacelo si esta roto.
Revise ia manguera de aita presi6n
Las mangueras de alta presi6n pueden desarrollar fugas
debido al desgaste, dobteces o abuso. Revise ta manguera
antes de cada uso. Revise si existen cortes, fugas, abrasiones,
tevantamiento de la cubierta, daSo o movimiento de los
acoplamientos. Si existe cuatquiera de estas condiciones,
remplace ta manguera inmediatamente.
_, ADVERTENCIA El chorro de agua a alta
presi6n que este equipo produce podr_a
atravesar la piel y los tejidos subcutaneos,
que poddan provocar lesiones graves y la
posible amputaci6n de un miembro,
, NUNCA repare ta manguera de alta presi6n. Remplacela.
, La capacidad de la manguera DEBE set igual o superar
ta presi6n nominal m_xima de ta unidad.
Chequee el tubo de sif6n del detergente
Examine el filtro en el tubo det detergente (si est& equipado)
y tfmpielo si se encuentra sucio. El tubo debeda quedar
apretado en ta pieza. Examine el tubo para vet si existe
cuatquier tipo de goteo o esta. roto. Reemplace el filtro o el
tubo si alguno de elios se encuentra daSado
Bola de retenci6n de inyecci6n de
En ocasiones, la bola de retenci6n se atasca en el sistema
de inyecci6n de detergente cuando ha pasado almacenado
o pot acumulaci6n de jab6n seco o minerales en el agua.
La bola de retenci6n se puede desatascar mediante los
siguientes pasos:
AVISO Antes de realizar este procedimiento, asegurese de
usar gafas de seguridad como se describe abajo.
ADVERTENCIA Riesgo de lesiones oculares.
El agua rociada podrfa salpicar o propulsar
objetos, Io que puede provocar lesiones
graves,
Cuando utilice este equipo o este cerca de 61,siempre
use gafas de seguridad con ventitaci6n indirecta (contra
satpicaduras de productos qdmicos) marcadas para
cumplir con ANSI Z87.1.
NUNCA se ponga gafas de seguridad ni gafas para
entomos secos como sustituto de tas gafas de seguridad
con ventitaci6n indirecta.
1. Apague et motor y apague et suministrode agua.
2. Apunte SIEMPREcon tapistola rociadora hacia una
direcci6n segura, pulse etbot6n rojoy apriete el gatitlo
para descargar elagua a altapresi6n restante.
_, ADVERTENCIA El chorro de agua a alta
_ resi6n que este equipo produce podda
posible amputaci6n de un miembro.
La pistola rociadora retiene agua a alta presi6n
incluso con el motor parado y el agua
desconectada; esto podrfa provocar lesiones
graves.
3,
4.
5. Empuje hacia abajo lentamente hasta sentir que la bola
6. Repita los pasos 4 y 5, si es necesario.
7. Vuetva a colocar ta manguera de inyecci6n de
8. De tratamiento con PumpSaver como se describe en
atravesar la piel y los tejidos subcutb.neos,
que poddan provocar lesiones graves y la
Mantenga conectada la mangueraa ta ma.quinao a ta
pistola de rociado cuando elsistema este presurizado.
SIEMPREquepare el motor,apuntecon tapistola
rociadorahacia unadirecci6n segura, pulse el boton rojo
y aprieteelgatillo para descargar tapresi6n.
Retire ta manguera de inyecci6n de detergente del
acoplamiento dentado de ta bomba.
lnserte suavemente un objeto s6tido sin punta de 2,7
mm (7/64 pulg.) de dia,metro o mas pequeSo, pero de
pot to menos 2,54 cm (1 pulg.) de largo, como una
tlave Allen, en et acoplamiento dentado hasta encontrar
resistencia. Esta resistencia es ta bola de retenci6n.
se mueve tigeramente, no empuje mas de 3,1 cm (1/8
pulg.). Tal vez sea necesario ejercer un poco de presi6n
para desatascar ta bola.
detergente en el acoptamiento dentado.
Proteccidn de la bomba durante el almacenamiento para
evitar que esto vuelva a ocurrir.
51
Page 52

Revise ia pistola
Examine ta conexi6n de ta manguera con ta pistola
rociadora y asegurese de que es correct& Pruebe et gatillo
apretando el boton rojo para asegurarse de que el gatitto
vuelve a su posici6n original cuando se suetta. No debe set
posible apretar el gatitto sin apretar el bot6n rojo. Cambie
inmediatamente ta pistola rociadora si falla cualquiera de
estas pruebas.
Mantenimiento del boquilla de selector
Si ta presi6n de ta bomba es excesiva, puede notar una
sensaci6n de pulsaci6n at apretar el gafillo de ta pistola
rociadora. La causa mas probable del exceso de presi6n
es ta obstrucci6n de ta boquilla debido a ta suciedad u
otto material extra5o. Para eliminar el problem& timpie
inmediatamente tas boquillas de acuerdo con tas siguientes
instrucciones:
1.
Apague el motor y apague el suministro de agua.
2.
SIEMPRE que pare el motor, apunte con ta pistola
rociadora hacia una direcci6n segura, presione el seguro
(boton rojo) y apriete el gafillo para descargar ta presi6n
y evitar el retroceso.
_, ADVERTENCIA El chorro de agua a alta
presi6n que este equipo produce podda
atravesar la piel y los tejidos subcutaneos,
que poddan provocar lesiones graves y la
posible amputaci6n de un miembro.
La pistola rociadora retiene agua a alta presi6n
incluso con el motor parado y el agua
desconectada; esto podrfa provocar lesiones
graves.
o Mantenga conectada la manguera a ta maquina o a ta
pistola de rociado cuando el sistema este presudzado.
SIEMPRE que pare el motor, apunte con la pistola
rociadora hacia una direcci6n segura, pulse el boton rojo
y apriete el gatillo para descargar ta presi6n.
3. Extraiga el boquitta de selector del extremo det
prolongador de ta boquilla.
4. Utilice un peque_io clip para papel para eliminar el
material extra_o que obstruye cada boquilla (A) en el
boquilla de selector.
5. Retire ta extensidn para boquillas de ta pistol&
6. Usando una manguera dejard_n, remueva cualquier
desecho adicionat, poniendo agua en la extensi6n de ta
boquilla. Haga esto de 30 a 60 segundos.
7. Vuetva a montar el boquilla de selector en el prolongador
de ta boquilla.
8. Conecte de nuevo taextensi6n de ta boquilla a ta pistola
rociadora.
9. Asegurese de que la manguera det jard_n est&
conectada a ta entrada de agua. Compruebe que la
manguera de atta presi6n est& conectada a ta pistola
rociadora y a la bomba. Abra ta alimentaci6n de agua.
10.
Ponga en marcha el motor siguiendo tas instrucciones de
tasecci6n Cdmo poner en funcionamiento la fimpiadora a
presidn.
11.
Compruebe ta Iimpiadora a presi6n utitizandola con cada
patr6n de rociado.
Mantenimiento de los anillos 'o'
Compre una O=Juego de Reparaci6n de Anillo, numero de
catalogo 75116, en sus Sears locales o llamando 1-888-
331-4569 o en t_neaen www.sears.com. No se incluye con
taarandela de la presi6n. Este juego incluye los anitlos del
reemplazo O y de fittro de cala de agua. Refierase a ta hoja
de ta instrucci6n proporcionada en el juego para atender a su
unidad'tos anitlos de s O.
_k ADVERTENCIA El chorro de agua a a_ta
_ resi6n que este equipo produce poddaatravesar la piel y los tejidos subcutb.neos,
que poddan provocar lesiones graves y la
posible amputaci6n de un miembro.
NUNCA utiticeningun tipo de sellador para reparar una
fugaen una conexi6n,Sustituya tajuntat6dca o tajunta,
52
Page 53

MANTENJMJENTO DEL MOTOR
A. ADVERTENCJA Las chispas involuntarias
podrfan provocar incendios o
electrocuci6n que pueden provocar
lesiones graves o la muerte.
CUANDO AJUSTE O HAGA REPARACIONES A SU
MAQU|NA UMPIADORA A PRES|ON
, Siempre desconecte eJ atambre de Jabujia y col6queJo
donde no pueda entrar en contacto con ta bujia.
CUANDO PRUEBE LA BUJIA DEL MOTOR
o Utitice un comprobador de buj_as homologado.
NO comprueba ta chispa sin ta buj_a instalada.
Comprobaci6n deJ niveJ de aceJte
Compruebe eJnivel de aceite antes de cada uso o cada
8 horas de funcionamiento, como m_nimo. RelJene si es
necesarJo.
1. CoJoque eJ timpiadora a presi6n sobre una superficie
nivelada.
2.
Retire JavariJJade medici6n y Jimpie la varitta de
medici6n. JnstaJeeJvariJla de medici6n, apdete
firmemente. Quite y vefifique nivel deJaceJte.
3.
Compruebe que el aceite hasta la marca tJeno(hoyo
primero) de la variJJade medici6n. Jnstale eJvariJla de
medici6n, apriete firmemente.
Recomendaciones sobre eJ aceJte
Para obtener eJmejor rendimiento, recomendamos utitizar
aceites certificados con garanfia Bdggs & Stratton. Tambi6n
se pueden utilizar otros aceites detergentes de alta caJidad
con clasificaci6n de servicio SF, SG, SH, SJ o superior. NO
utiJice aditivos especiales.
Las temperaturas extedores determinan la viscosidad
adecuada det aceite para el motor. Utilice eJcuadro
para seleccionar ta mejor viscosidad para el intervalo de
temperatura exterior previsto.
oF
104 _4_ --
68 *
86 _
50
• .... 40
o
co
o _ 20
_M 30
°C
10
32 o,_
14
-4
-22 '
-10
-20
-30
* Pot debajo de 4 °C (40 °F), et uso de acejte SAE 30
provocar#, dificuitades de arranque.
** Pot encima de 27 °C (80 °F) el uso de aceite 10W30
puede aumentar el consumo de aceite. Compruebe el nivel
de aceite con mayor frecuencia.
LLENO
AdJci6n de aceJte deJ motor
1. CoJoque eJ Jimpiadora a presi6n sobre una superficie
nivelada.
2. Compruebe el nivel de aceite tal como se indica en ta
seccJ6n Comprobacidn del hive! de aceite.
3. Si es necesarlo, vierta tentamente aceite pot el odficio
de llenado hasta la marca tleno (hoyo primero) de ta
vadlla de medici6n. NO ttene excesivamente.
AVtSO El Ilenado de aceite en exceso podria Jmpedir
el arranque del motor o provocar dificultades de
arranque.
o NO ttene en exceso.
Si el nivet de aceite estb.pot encima de ta marca FULL
(LLENO) de ta varitla, vacie acelte para reducir el nivel
hasta ta marca FULL (LLENO) de tavarilla.
4. Jnstale el vadlla de medici6n, apdete firmemente.
CambJo de aceJte deJ motor
Si estb. utilizando su generador bajo condiciones de extrema
suciedad o poJvo, o en un cJima demasiado caliente, haga el
cambio de aceite mas frecuentemente.
_, PRECAUCI6N Evite el contacto prolongado o
repetido de piel con aceite usado de motor.
El aceite usado del motor ha sido mostrado aJcancer de
ta piel de ta causa en ciertos animales del taboratodo.
Compietamente tavado expuso #.teas con eJjab6n y el
_ua.
MANTENER FUERA DEL ALCANCE DE LOS NJOS.
NO CONTAMJNE. CONSERVE LOS RECURSOS.
DEPOSJTE EL ACEJTE USADO EN UN PUNTO DE
RECOGJDA.
53
Page 54

Cambie el aceite cuando el motor siga estando caiiente
despu_s de haber funcionado:
1, Drene el tanque del combustible haciendo funcionar la
maquina limpiadora a presi6n hasta que el tanque estevado.
2. Desconecte alambre de bujia y Io mantiene lejos del bujia.
3. Limpie el a.reaatrededor de la abertura para tienado de
aceite, retire ta vadila de medici6n. Limpie ta vadlla de
medici6n.
4. lnctine su m&quina timpiadora a presi6n para drenar el
aceite a traves det orificio de llenado en un recipiente
adecuado asegurandose de inclinar ta unidad hacia el
tado opuesto de ta buj_a. Cuando la caja det cigOe_ai
este vada, vuelva a colocar ta maquina timpiadora a
presi6n en posici6n vertical.
5. Vierta lentamente unos 0,6 titros (20 onzas) de aceite
pot el odficio. Deposite el aceite recomendado hasta ta
marca tteno (hoyo pdmero) de ta vadtla de medici6n.
6. Limpie ta vadtla de medici6n cada vez nivel del aceite se
verifica. NO a_ada aceite en exceso.
7. Instate tavadila de medici6n, apdete firmemente.
8. Limpie los residuos de aceite.
9. Conecte de nuevo alambre de buj_aai buj_a.
Servicio del depurador de aire
Su motor no funcionara adecuadamente y puede daSarse
si usted to hace funcionar con un depurador de aire sucio.
Suministre servicio mas frecuentemente si ta unidad funciona
bajo condiciones de mucha suciedad o polvo.
Para dar servicio at depurador de aire, siga los pasos
que se detailan a eontinuaci6n:
1. Deslice ta palanca (A) del filtro de aire a la posici6n de
abierto (_) e incline ta tapa (B) hacia abajo.
2, Quite detenidamente aire lamas timpia para prevenir
escombros de caer en el carburador.
3. Lave limpiador de aire (C) de espuma en el detergente y
el agua tiquidos. El estruj6n seca en una tela timpia.
4. SATURE limpiador de aire de espuma en el aceite de
motor y estruj6n en una tela timpia para quitar el exceso
aceite.
5. Vuelva a instatar timpie o limpiador nuevo de aire de
espuma en el cuerpo (B).
6. Incline la tapa hacia ardba y deslice ta palanca a ta
posici6n de cerrado ( _' ).
AVIS@ Usted puede comprar los elementos del filtro de aire
nuevos ttamando al 1-888-331-4569.
Remplace ia buj_a
Cambie la bujia ayudara, a su motor a arrancar mas
fa.cilmente y funcionar mejor.
1. Limpie el b.rea alrededor de ta buj_ay retirela.
2. Retire y revise ta bujia.
3. Cambie ta bujia si los etectrodos estb_npicados o
quemados o si la porcelana estb. agdetada. Utilice la bujia
de repuesto recomendada. Consutte Especificaciones.
4. Compruebe ta separaci6n det etectrodo con un
calibrador de atambre y ajuste el espacio de ta bujia
a la medida recomendada si fuera necesado (vease
Especificaciones).
\
5. lnstale ta buj_ay aprietela firmemente.
AVISO Puede adquirir nuevos bujia ai numero telef6nico
1-888-331-4569.
_nspeccione el silenciador y ia pantalla
apagaehispas
lnspeccione que el sitenciador no presente fisuras, corrosi6n
u otros da_os. Desmonte ta pantalla apagachispas, si cuenta
con una, y vedfique que no presente da[ios ni obstrucci6n
pot carb6n. En caso de que se necesiten piezas de
recambio, asegurese de usar solamente piezas de recambio
originales para el equipo.
AVISO Usted puede comprar un supresor de chispas
ltamando 1-888-331-4569.
_. ADVERTENCIA Los gases y el calor de escape
poddan infiamar los materiales
combustibles y las estructuras o
da_ar el dep6sito de combustiMe y
rovocar incendios, asf como lesiones graves o
cluso la muerte.
El contacto con la zona del silenciador podrfa
producir quemaduras y lesiones graves.
, NO toque tas superficies calientes y evite los gases del
escape a alta temperatura.
, Permita que el equipo se enfde antes de tocarto.
, Deje un espacio minimo de 1.5 m (5 pies) atrededor del
timpiadora a presi6n, incluida la parte superior.
, Utilizar el motor en un terreno boscoso, con mateza o
cubierto de hierba constituye una infracci6n at C6digo
de recursos pubticos de California, a menos que et
sistema de escape este equipado con una pantatta
apagachispas, de acuerdo a la definici6n de ta Secci6n
4442, que se mantenga en buenas condiciones de
funcionamiento. En otros estados ojudsdicciones
federates puede haber teyes simitares en vigor.
Pongase en contacto con el fabdcante, el vendedor o et
distribuidor det equipo original para obtener una pantalla
apagachispas disdiada para el sistema de escape
instatado en este motor.
, Las piezas de recambio deben set tas mismas que tas
piezas originales y estar instaladas en ta misma posici6n.
54
Page 55

Sistema de tefrigeraci6n de aire
Con eJtiempo, se pueden acumular residuos en tas aJetas
de refdgeraci6n del cilindro y pasar inadvertidos mientras
no se desmonte parcialmente eJmotor. Recomendamos
que encargue Jalimpieza del sistema de refngeraci6n a
un distribuidor autodzado de servicio Sears siguiendo los
intervalos recomendados (consulte ta seccJ6n Ca/endario
de Mantenimiento). Es iguaJmente importante que no se
acumuJen residuos en el motor. Consulte ta secci6n Limpie
los Residuos.
Ajuste den carburador
El carburador de este motor es de baja emisi6n. Est&
equipado con una v&tvuJa de mezcia de ralenti no ajustable
y, en aJgunos casos, con ralenti regulado. Los niveJes
de raJent_regulado y velocidad m#.xima se ajustan en ta
f#.bdca. Si es necesado modificarlos, acuda a un distribuidor
autorizado de Sears.
A. PRECAUCION Las velocidades de
funcionamiento excesivamente altas poddan
provocar lesiones leves.
Las velocidades excesivamente bajas incrementan
la carga de trabajo.
o NO intente alterar el resorte, Jasconexiones y otras
partes del regulador para incrementar ta veJocidad deJ
motor. La tJmpiadora a presi6n ejerce ta presi6n y eJflujo
nominates correctos cuando funciona a una velocidad
controlada.
NO modifique al timpiadora a presi6n en ninguna forma.
DESPUES DE CADA USO
No deber#, haber agua en ta unidad por largos perfodos de
tiempo. Los sedimentos de minerales se pueden depositar
en partes de ta bombay "congelar" su funcionamiento. Lteve
a cabo estos procedimientos despues de cada uso:
1. Pare el motor, cierre ta alimentaci6n de agua, apunte
con JapistoJa rociadora hacia una direcci6n segura,
pulse el bot6n rojo y apdete el gatillo para descargar ta
presi6n. Deje enfnar el motor.
ADVERTENCIA EJ chorro de agua a alta
_ resi6n que este equipo produce podda
La pistola rociadora retiene agua a aita presi6n
incluso con eJ motor parado y el agua
desconectada; esto podda provocar lesiones
graves.
2. Desconecte manga del fusil del rocio y salida alta de
3. Saque todos los Jiquidos de la bomba halando ta manija
4. EnroJte la manguera y cu6lguela del gancho situado en
5. AJmacene ta unidad en una #.tea timpia y seca.
6. Si planea almacenar ta unidad pot m#.sde 30 dias, vea
atravesar la piel y los tejidos subcutaneos,
que poddan provocar lesiones graves y la
posible amputaci6n de un miembro.
Mantenga conectada la manguera a ta ma.quina o a ta
pistola de rociado cuando el sistema este presurizado.
SIEMPRE que pare el motor, apunte con ta pistola
rociadora hacia una direcci6n segura, pulse el boton rojo
y apnete el gatillo para descargar ta presi6n.
presi6n en la bomba. DesagQe agua de ta manga, det
fusit, y de ta extensi6n de boquilla. Use un harapo para
quitar ta manga.
de retroceso aproximadamente 6 veces. Esto deber&
evacuar ta mayor_a del tiquido de ta bomb&
el bandeja de accesorios.
ta secci6n Almacenamiento Prolongado en pr6xima
p&gina.
ADVERTENCJA El combustible y sus vapores
explosives, Io que podda provocar
son extremadamente infiamables y
quemaduras, incendios o
explosiones; as[ come lesiones graves o incluso la
muerte.
CUANDO ALIVIACENE O GUARDE EL EQU|PO CON
COMBUSTIBLE EN EL TANQUE
, Mant6ngalo alejado de caJderas, estufas, catentadores
de agua, secadoras de ropa u otros aparatos que utilicen
llama piloto u otras fuentes de ignici6n que podr_an infia-
mar los vapores de combustible.
55
Page 56

ALMACENAMIENTO PARA INVIERNO
AVISO Usted debera proteger su unidad de las
temperaturas de congelamiento.
o Si no to hace, da_ar& permanentemente ta bombay ta
unidad no podr& funcionar.
La garantfa no cubre el da_o de ta unidad ocasionado por
congelamiento.
Para ptoteget la unidad de laa tempetatutaa de
congetamiento:
1. Siga los pasos 1=4en ta secci6n previa Despues de
Cada Uso.
2. UtiNce un protector de bomba, disponible en Sears con
el numero de cat&logo 74403 para cuidar ta bomba.
Aquel protege a la unidad contra el congelamiento y
tubnca tanto los pistones como los empaques.
3. Si et protector de bomba no est& disponible, conecte
un tramo de 3 pies de manguera de jardfn a la entrada
de agua. Vierta anticongelante RV (anticongelante sin
alcohol) en la manguera. Jate la manija de arranque dos
veces. Desconecte despues ta manguera de 3 pies.
4. Atmacene ta unidad en una &tea timpla y seca.
ALMACENAMtENTO PROLONGADO
Si usted no ptanea usar ta m&quina timpiadora a presi6n
pot m&s de 30 dfas, deber& preparar el motor para un
aimacenamiento prolongado.
Es importante evitar ta formaci6n de dep6sitos de goma
en tas partes esenciates det sistema del combustible tales
como carburador, filtro del combustible, manguera o tanque
del combustible durante el atmacenamiento. Tambien. ta
experiencia indica que los combustibles con mezclas de
alcohol (llamados gasohol, etanol o metanol} pueden atraer
ta humedad, lo que tteva a la separaci6n y formaci6n de
&cidos durante el almacenamiento. La gasoNna &cida puede
daSar el sistema del combustible de un motor durante el
aimacenamiento.
Proteja el sistema de combustible
Aditivo para combustible:
El combustible puede haberse echado a perder si se
ha almacenado por m&s de 30 dfas. El combustible
echado a perder provoca ta formaci6n de residuos &cidos
y de carbonilla en et sistema de combustible y en los
componentes b&sicos del carburador. Para mantener
el combustible en buen estado, use Bdggs & Stratton®
Advanced Formula Fuel Treatment & Stabilizer, disponible
donde sea que se vendan piezas de servicio originales de
Bnggs & Stratton.
Para motores equipados con un tap6n de combustible
FRESH START, use Bnggs & Stratton FRESH START
disponibte en un cartucho concentrado de goteo.
No es necesario vaciar el motor de gasolina si se a[iade
estabilizador de combustible conforme alas instrucciones.
Ponga en funcionamiento el motor durante 2 minutos
para que et estabilizador circule por todo el sistema de
combustible antes de almacenarto.
Si no se ha aSadido un estabilizador de combustible a ta
gasolina, deber& vaciar completamente el motor utilizando
un contenedor homologado. Deje funcionar et motor
hasta que se agote el combustible. Se recomienda utitizar
un estabitizador de combustible en el contenedor de
almacenamiento para mantener ta gasolina en buen estado.
Cambio de aceite
Con el motor todavfa catiente, drene el aceite de ta caja
del cigOeSal. Vuelva a tlenarlo con el grado de aceite
recomendado. Vea Cambio de Aceite del Motor en ta secci6n
Mantenimiento del Motor.
Protecci6n de ia bomba
Para proteger la bomba frente a los da_os que causan los
dep6sitos minerates o ta congetaci6n, use PumpSaver,
numero de cat&logo 74403, para cuidar ta bomba. Esto evita
los da_os derivados de ta congelaci6n y tubrica los pistones
y tas juntas.
AVISO Et PumpSaver est&n disponibte s6to como un
accesorio opcionat. NO es incluido con ta arandela de la
presi6n. Avise el m&s cercano servicio autodzado central
para comprar PumpSaver.
AVISO Usted debera proteger su unidad de las
temperaturas de congelamiento.
Si no to hace. da_ar& permanentemente ta bombay ta
unidad no podr& funcionar.
La garantia no cubre el da_o de ta unidad ocasionado por
congelamiento.
AI uso el PumpSaver. cerci6rese ta arandela de ta presi6n se
apaga y desconecta det agua del suministro. Lea y siga todas
instrucciones y tas advertencias dadas en el contenedor de
PumpSaver.
Otras sugerencias para el
aimacenamiento
1. NO guarde combustible de una temporada a otra a
menos que lo haya tratado como se indica en ta secci6n
Aditivo para combustible.
2. Reemplace ta caneca de gasolina si comienza a
oxidarse. El 6xido y/o ta suciedad en ta gasoNna te
causar& probtemas.
3. Cubra su unidad con una cubierta de protecci6n
adecuada que no retenga humedad.
Las fundas para
_ lmacenamiento podrfan provocar
o
NOcoloque unacubierta encima de un timpiadoraa
presi6ncatiente,
o
Dejeque taunidad se enfrfe tosuficientementeantes de
que te coloque tacubierta,
4. Atmacene ta unidad en un &tea timpia y seca.
incendios y producir lesiones graves
o incluso la muerte.
56
Page 57

Problema Causa Soluci6n
La bomba presenta los
siguientes probtemas: no
produce presi6n o produce
una presi6n errada,
traqueteo, pSrdida de
ptesi6n, bajo volumen de
agua.
El detetgente no se mezcJa
con eJ rociado.
El motor no arranca,
arranca y funciona mat o
apaga durante la opetaci6n°
El motor no tiene fuerza.
1. Esta usando boquilla de selector baja
presi6n.
2. La entrada de agua est& btoqueada.
3. Suministro de agua inadecuado.
4. La manguera de entrada esta dobtada o
presenta fugas.
5. Et colador de ta manguera de ta entrada
de agua est& tapado.
6. Et suministro de agua est& pot encima
de los 38-°C.
7. La manguera de alta presbn est&
btoqueada o presenta fugas.
8. La pistola presenta fugas.
9. El boquilla de selector est& obstruido.
10. Bomba defectuosa.
1. El tubo de succi6n de detergente no
esta sumergido.
2. El filtro de qu{micos est& tapado.
3. La boquilta del patr6n de rociado de alta
presi6n esta sebccionada.
4. Bola de retenci6n de inyecci6n de
detergente pegado.
1. lnterruptor basculante del motor en ta
posici6n de tejos (O o OFF).
2. Bajo nivel de aceite.
3, Depurador de aire sucio,
4, Sin gasolina,
5, Gasolina vieja,
6. El atambre de la buj_a no esta
conectado a ta bq_a.
7. Buj_a mala.
8. Agua en ta gasolina.
9. Mezcla de combustible demasiado dca.
Filtro de aire sucio,
Cambie boquilla de selectora una de tas
puntas de rodo de alta presi6n.
Limpie ta entrada.
3. Proporcione fiujo de agua adecuado.
4. Estire ta manguera de entrada, coloque un
parche en lafuga.
5. Revise y limpie el colador de ta manguera
de entrada.
6. Proporcione suministro de agua mas fr_a.
7. Retire tas obstrucciones de ta manguera de
salida.
8. Rempiace ta pistol&
9. Limpie tas boquillas en el boquilla de
selector.
10. Pongase en contacto con el centro de
servicio Sears.
Coloque el tubo de succi6n de detergente
en el detergente.
Umpie o remplace el filtro/tubo de succi6n
de detergente.
3. En el boquilla de selector, seleccione ta
boquilla del patron de rociado para SOAP
(jab6n).
4. Ubre bola de retenci6n de inyecci6n de
deterqente.
Coloque del interruptor basculante del
motor en ta posici6n de en (1o ON).
Uene ta caja del cigQe_al hasta el nivel
correcto.
3. Umpie o rempiace el depurador de aire.
4. Uene el tanque de combustible.
5. Drene et tanque de gasolina; tt6nelo con
combustible fresco.
6. Conecte el aiambre a ta buj_a.
7. Remptace ta buj_a.
8. Drene et tanque de gasolina; tl6nelo con
combustible fresco.
9,
P6ngase en contacto con el centro de
servicio Sears.
Remplace el filtro de aire,
57
Page 58

Garant_a de control de emisiones de
California, UoSo EPA y Sears
Oerechos y obligaciones de la garantia
California Air Resources Board, U.S. EPA y Sears Brands
Management Corporation, U.S.A. (Sears) te explican a
continuaci6n la garantia del sistema de control de emisiones
de su motor/equipo modelo 2013-2014. En California, los
nuevos motores peque_ios para maquinas de servicio y
los motores grandes con ignici6n per buj_as no superiores
a 1,0 litro deben estar disefiados, fabncados y equipados
conforme a los exigentes estb.ndares de tucha contra ta
contaminaci6n del Estado. Sears garantiza el sistema
de control de emisiones de su motor/equipo durante los
periodos que se indican a continuaci6n, siempre que no haya
habido uso indebido, negtigencia o mantenimiento indebido
det motor o equipo para ma,quinas de servicio.
Su sistema de control de emisiones puede incluir componentes
come el carburador o el sistema de inyecci6n de combustible,
el sistema de arranque y el convertidor catatitico. Tambien
puede incluir mangueras, correas, conectores, detectores y
otros conjuntos relacionados con tas emisiones. El sistema
de control de emisiones pot evaporaci6n puede incluir
los siguientes componentes: carburadores, dep6sitos
de combustible, conductos de combustible, tapones de
combustible, vatvulas, cartuchos, fittros, mangueras de vapor,
abrazaderas, conectores y otros componentes asociados.
Si se cumpten tas condiciones de la garantia. Sears reparara
el motor/equipo sin coste alguno, incluido el diagn6stico. _os
componentes y ta mano de obra.
Cobertura de la garantl"a del fabricante:
Los motores peque[ios para maquinas de servicio y los
motores grandes con ignici6n per bujias de 1.0 litros o
menos, y muchos componentes del equipo relacionados con
tas emisiones, tienen una garanfia de dos afos*. Si atgun
componente del motor/equipo retacionado con tas emisiones
estuviera defectuoso, Sears lo reparara, o sustituira.
* Dos aries o el per_odo que se indica en ta garanfia del
motor o producto correspondiente, to que sea ma.s
prolongado.
Responsabilidades de la garantia del propietario:
, Come propietario del motor/equipo, usted es responsabte
de tlevar a cabo todas tas operaciones de mantenimiento
que se enumeran en el manual det propietario. Sears
recomienda conservar todas tas facturas relativas al
mantenimiento del motor/equipo, pero Sears no puede
denegar ta garantia bas&ndose unicamente en tafalta de
facturas o en ta imposibilidad per parte det propietario de
asegurar tacorrecta realizaci6n de todas tas operaciones
de mantenimiento.
, Come propietario del motor/equipo, debe set consciente
de que Sears puede denegar tacobertura de la garant_a
si el motor/equipo o uno de sus componentes fatta
debido a un uso indebido o negligente, un mantenimiento
inadecuado o modificaciones noautodzadas.
, Usted es responsable de presentar su motor/equipo
a un centro de distdbuci6n de Sears, distdbuidor
autonzado de servicio u otra entidad equivalente, segun
corresponda, en et memento en que surja un problema.
Las reparaciones cubiertas pot la garant_ase tlevaran
a cabo en un ptazo razonable, no superior a 30 dias en
ningun caso. En caso de preguntas sobre los derechos
y responsabitidades relativos a tagarantia, p6ngase en
contacto con Sears llamando at (800) 469-4663.
Disposiciones de la garantl"a contra defectos del
sistema de control de emisiones de Sears
A continuaci6n se detallan tas disposiciones concretas
relativas a ta Cobertura de ta garantia contra defectos del
sistema de control de emisiones. Se afiaden a ta garantia de
motores de Sears para motores no regulados, que figura en
el Manual del Operario.
1. Piezas garantizadas
La presente garantia cubre unicamente tas piezas
que se enumeran a continuaci6n (piezas del sistema
de control de emisiones) siempre que tales piezas
estuvieran presentes en el motor adquirido.
a. Sistema de regulaci6n de combustible
, Sistema de enriquecimiento para arranque en fr_o
(estrangulador electr6nico)
, Carburador y piezas internas
, Bomba de combustible
, Conducto de combustible, acoptamientos del
conducto de combustible, abrazaderas
, Dep6sito de combustible, tap6n y cadena
,Bote de carbono
b. Sistema de inducci6n de aire
, Fittro de aire
, Colector de admisi6n
- Linea de purga y ventitaci6n
c. Sistema de encendido
, Buj_a(s)
, Sistema de encendido magnetico
d. Sistema catatizador
, Convertidor catal_tico
, Colector de escape
, Sistema de inyecci6n de aire o valvula de impulse
e. Elementos diversos utitizados en los sistemas
antedores
, Valvulas y conmutadores de aspiraci6n,
temperatura, posici6n y temponzados
, Conectores y unidades
2. Duraci6n de ta cobertura
Durante un perfodo de dos aries desde ta fecha
de compra original*, Sears garantiza al propietado
original y a todo propietario posterior que et motor
est& disefiado, fabricado y equipado conforme a ta
normativa vigente adoptada por el Air Resources Board;
que no tiene defectos de matedates ni de mane de obra
que provoquen el fallo de un componente cubierto;
y que es identico en todos los aspectos matedates
at motor descnto en la aplicaci6n de certificaci6n del
fabricante. Et pedodo de garanfia comienza en ta fecha
de adquisici6n original del motor.
* Dos afios o et pedodo que se indica en ta garantia del
motor o producto correspondiente, to que sea mas
prolongado.
58
Page 59

La garantia de los componentes relacionados con tas
emisiones es ta siguiente:
o Los fatlos de todo componente cubierto pot ta garanfia
que no se deba sustituir como parte del plan de
mantenimiento obtigatodo detallado en el manual
de1propietado entregado quedara.n cubiertos pot ta
garant_a durante el periodo de la garantia especificado
anteriormente. Si alguno de estos componentes falla
durante el per_odo de cobertura de la garanfia, deber#.
set reparado o sustituido pot Sears sin cargo alguno
para el propietario. Los componentes que se reparen o
sustituyan en virtud de ta garanfia estar#.n cubiertos pot
ta garant_a durante el periodo de garant_a restante.
Los fatlos de todo componente cubierto pot la garanfia
que s6to se deba inspeccionar ped6dicamente segun
el manuat dei propietario entregado quedara.n cubiertos
pot la garant_a durante et perfodo de la garant_a
especificado anteriormente. Los componentes que se
reparen o sustituyan en virtud de ta garant_a estara.n
cubiertos pot ta garanfia durante el perfodo de garant_a
restante.
Los fattos de todo componente cubierto pot ta
garantia que se deba sustituir como parte del plan
de mantenimiento obligatorio detatlado en el manual
del propietado entregado quedara.n cubiertos pot
ta garant_a hasta el momento en que se indique
que es necesado hacer ta pdmera sustituci6n. Si el
componente falla antes de la fecha de la pdmera
sustituci6n, sera reparado o sustituido pot Sears sin
cargo atguno para el propietario. Los componentes que
se reparen o sustituyan en virtud de tagarantia estaran
cubiertos pot ta garanfia durante el perfodo de garant[a
hasta tlegar a ta fecha de la pdmera sustituci6n.
No se podran utilizar componentes complementados
o modificados no exentos pot el Air Resources
Board. El uso de componentes complementarios o
modificados no exentos pot parte del propietado data
tugar a la anulaci6n de ta garantia. Et fabdcante no sera
responsable de los fallos de componentes cubiertos
pot ta garant_a que se deban at uso de un componente
complementado o modificado no exento.
3. Cobertura de da_os derivados
La cobertura se ampliara, a los fallos de cualquier
componente del motor dedvados det fatto de cuatquier
componente relacionado con el sistema de emisiones
cubierto pot ta garant_a.
4. Solicitudes y exclusiones de cobertura
Las solicitudes de garantia se cumptimentaran con
arregto a tas disposiciones de ta potitica de garantia de
motores Sears. La cobertura no aplica a los faltos de
componentes relacionados con et sistema de emisiones
cubiertos por ta garantia que no sean originales de Sears
ni a los fattos debidos a uso indebido, negtigencia o
mantenimiento inadecuado, conforme alas disposiciones
de ta potitica de garantia de motores Sears. Sears no
sera responsabte de la cobertura de ta garantia de
faltos de componentes retacionados con et sistema de
emisiones cubiertos pot ta garantia provocados pot el
uso de componentes complementados o modificados.
Consulte la informaci6n sobre el perJ'odo de durabHidad
de las emisiones y et l'ndice de aire en ta etiqueta
de emisiones del motor pequeSo para m_quinas de
servicio
Los motores con certificaci6n de cumplimiento de ta
normativa sobre emisiones de motores pequeSos para
m&quinas de servicio del California Air Resources Board
(CARB) deben mostrar informaci6n sobre el pedodo de
durabilidad de tas emisiones y el indice de aire. El fabdcante
del motor ofrece esta informaci6n al consumidor mediante
etiquetas de emisiones. La etiqueta de emisiones del motor
contiene ta informaci6n de certificaci6n.
El Periodo de DurabHidad de las Emisiones indica el
numero de horas durante tas cuates el motor puede funcionar
cumpliendo tas normas sobre emisiones, siempre que se
reaticen las operaciones de mantenimiento que se detallan
en tas instrucciones de uso y mantenimiento. Se utitizan tas
siguientes categodas:
Moderado: El motor est#. certificado para cumplir
ta normativa sobre emisiones durante 125 horas de
funcionamiento real.
Intermedio: Elmotor esta certificado para cumplir
ta normativa sobre emisiones durante 250 horas de
funcionamiento real.
Prolongado: El motor esta certificado para cumplir
ta normativa sobre emisiones durante 500 horas de
funcionamiento real.
Pot ejemplo, un cortacesped con operario a pie se suete
utitizar entre 20 y 25 horas at a_o. Pot tanto, el Pedodo
de Durabiiidad de las Emisiones de un motor con
clasificaci6n intermedia equivaldr_a a 10=12 a_os.
Los motores cuentan con ta certificaci6n de cumplimiento
de la fase 2 o fase 3 de las normafivas sobre emisiones de
ta United States Environmental Protection Agency (USEPA,
Agencia estadounidense de protecci6n det medioambiente).
Ei periodo de cumplimiento de la normativa sobre emisiones
que figura en la etiqueta de cumptimiento de emisiones
indica el numero de horas de funcionamiento durante
tas cuales el motor ha demostrado cumplir los requisitos
federales sobre emisiones.
Para motores de menos de 225 cc:
Categoda C = 125 horas
Categoda B = 250 horas
Categoda A = 500 horas.
Para motores de 225 cc o mas:
Categoda C = 250 horas
Categoda B = 500 horas
Categoda A = 1000 horas.
59
Page 60

iiiiiiiiiiiiiiiiiiiiiiiiii!
To help us help you, register your product at www.craftsmanocom/registration
Para poderte ayudar mejor, registra tu producto en www.craftsman.com/registration
Join the Craftsman Club today!
www, craftsman,com/signup
Receive exclusive member benefits including special pricing and offers,
project sharing, expert advice, and SHOP YOUR WAY REWARDS!
Como miembro exclusivo, recibe diversos beneficios como ofertas, precios especiales, proyectos
nuevos, consejos de expertos y nuestro programa de puntos SHOP YOUR WAY REWARDS!
® Registered Trademark / TMTrademark of KCD raP,LLC in the United States, or Sears Brands, LLC in other countries
® Marca Registrada l TMMarca de F&brica de KCD raP,LLC en Estados Unidos, o Sears Brands, LLC in otros paises
Page 61

Operator's Manual
3000 PSi MAX* @ 2.4 GPlVl
2600 PSI @ 2.7 GPlVl MAX*
PRESSURE WASHER
Model No. 580.754880
®
- Safety
HOURS: Mon. - Fri. 8 a.m. to 5 p.m. (CT)
- Assembly
- Operation
WARNING
Before using this product, read this
manual and follow all Safety Rules
and Operating Instructions.
* This pressure washer is rated in accordance to the Pressure Washer Manufacturers Association
(PWMA) standard PW101-2010 (Testing and Rating Performance of Pressure Washers).
* Esta limpiadora a presi6n esta clasificada conforme a la norma PW101-2010 (comprobaci6n y clasificaci6n de rendimiento de limpiadoras
a presi6n) de la Asociaci6n de fabricantes de bombas a presi6n (Pressure Washer Manufacturers Association, PWMA).
Sears Brands Management Corporation, Hoffman Estates, IL 60179 U.S.A.
Visit our Craftsman website: www.craftsman.com
Part No. 80008032 Rev A (12/13/2013)
Antes de utilizar el producto, lea este
manual y siga todas las Reglas de
Seguridad e Instrucciones de Uso.
ADVERTENCIA
- Maintenance
" Parts
- Espa_ol, p. 36
Page 62

CRAFTSMAN TWO YEAR FULL WARRANTY
FOR TWO YEARS from the date of purchase, this product is warranted against any defects in material or
workmanship. Defective product will receive free repair or replacement if repair is unavailable.
For warranty coverage details to obtain free repair or replacement, visit the web site: www.craftsman.com
This warranty covers ONLY defects in material and workmanship. Warranty coverage does NOT include:
• Expendable itemsthat can wear out from normal use within the warranty period, such as spray guns, hoses,
nozzle extensions, nozzles, spray tips. filters or spark plugs.
Product damage resulting from user attempts at product modification or repair or caused by product
accessories.
Repairs necessary because of accident or failure to operate or maintain the product according to aH supplied
instructions.
Preventive maintenance, or repairs necessary due to improper fue_mixture, contaminated or stale fuel.
This warranty is void if this product is ever used while providing commercial services or if rented to another person.
This warranty gives you specific legal rights, and you may also have other rights which vary from state to state.
Sears Brands Management Corporation, Hoffman Estates, _L 60179
Congratulations on making a smart purchase.
Your new Craftsman® product is designed and
manufactured for years of dependab!e operation. But
like aHproducts, it may require repair from time to time.
That's when having a Repair Protection Agreement can
save you money and aggravation.
Here's what the Repair Protection Agreement*
includes:
Expert service by our 10,000 professional repair
specialists
Unlimited service and no charge for parts and
labor on aHcovered repairs
Product replacement up to $1500 if your covered
product can't be fixed
Discount of 25% from regular price of service
and related installed parts not covered by the
agreement; also, 25% off regular price of preventive
maintenance check
Fast hempby phone = we call it Rapid Resolution =
phone support from a Sears representative. Think of
us as a "talking owner's manuaF.
© 2013
Once you purchase the Repair Protection Agreement,
a simple phone call is aHit takes for you to schedule
service. You can call anytime day or night, or schedule
a service appointment online.
The Repair Protection Agreement is a risk-free
purchase. If you cancel for any reason during the
product warranty period, we will provide a full refund.
Or, a prorated refund anytime after the product
warranty period expires. Purchase your Repair
Protection Agreement today!
Some _imitations and exclusions apply. For prices
and additional information in the U.SoA. call 1-800-
827-6655.
* Coverage in Canada varies on some items. For
full details, call Sears Canada at 1o800o361o6665o
Sears Installation Service
For Sears professional installation of home appliances,
garage door openers, water heaters, and other
major home items, in the U.S.A. or Canada call
1-800-4°MY-HOME®.
Page 63

Readthismanualcarefully and become
familiar with your pressure washer. Know
its applications, its limitations, and any
hazards involved.
_mportant Safety _nformation
Safety Symbols and Meanings
_, WARNING The engine exhaust from this
product contains chemicals known to the State of
California to cause cancer, birth defects, or other
reproductive harm.
WARNmNG This product contains lead and lead
compounds, known to the State of California to
cause birth defects or other reproductive harm.
Wash your hands after handling this product.
Operator's Manual Toxic Fumes
Slippery Surface Fail Ftuid injection
Fire Explosion Kickback Projectile
Moving Parts Ftying Chemicat Rot Surface
Objects Burn
ElectricalShock
_k The safety alert symbol indicates a potential
personal injury hazard. A signal word (DANGER,
WARNING, or CAUTION) is used with the alert symbo_
to designate a degree or level of hazard senousness.
A safety symbol may be used to represent the type of
hazard. The signal word NOTICE is used to address
practices not related to personal injury.
_, DANGER indicates a hazard which, if not avoided,
will result in death or serious injury.
WARNING indicates a hazard which, if not avoid =
ed, could result in death or serious injury.
CAUTION indicates a hazard which, ifnot avoided,
could result in minor or moderate injury.
NOTICE address practices not related to personal
injury.
_k WARNING POISONOUS GAS HAZARD.
Engine exhaust contains carbon monoxide,
a poisonous gas that could kill you in
minutes. You CANNOT smell it, see it, or
taste it. Even if you do not smell exhaust fumes, you
couJd stir be exposed to carbon monoxide gas.
Some chemicals or detergents could be harmful if
inhaled or ingested, resulting in death, serious
injury, nausea, fainting or poisoning.
o Operate this product ONLY outside far away from
windows, doors and vents to reduce the risk of carbon
monoxide gas from accumulating and potentially being
drawn towards occupied spaces.
Install battery-operated carbon monoxide atarms or
plug-in carbon monoxide atarms with battery back-up
according to the manufacturer's instructions. Smoke
alarms cannot detect carbon monoxide gas.
, DO NOT run this product inside homes, garages,
basements, crawtspaces, sheds, or other partially=
enclosed spaces even if using fans or opening doors
and windows for ventilation. Carbon monoxide can
quickly build up in these spaces and can linger for hours,
even after this product has shut off.
, ALWAYS ptace this product downwind and point the
engine exhaust away from occupied spaces.
If you start to feel sick, dizzy, or weak while using this
sroduct, shut it off and get to fresh air RIGHT AWAY. See a
doctor. You may have carbon monoxide poisoning.
, Use a respirator or mask whenever there is a chance that
vapors may be inhated when using chemicals.
, Read atl instructions with mask so you are certain the
mask will provide the necessary protection against
inhaling harmful vapors when using chemicals.
WARNING Chemical Burn Hazard.
_> Chemicals could cause burns resulting in
death or serious injury.
DONOT usecaustic liquid with pressurewasher.
Use ONLYpressure washer safe detergents/soaps.
Followall manufacturersinstructions.
Page 64

WARNING Starter cord kickback (rapid
_, _,. retraction) will pull hand and arm toward
engine faster than you can let go which
could cause broken bones, fractures,
bruises, or sprains resulting in serious injury.
, NEVER pull starter cord without first relieving spray gun
pressure.
When starting engine, pull cord slowly until resistance is
felt and then pull rapidly to avoid kickback.
After each starting attempt, where engine fails to run,
always point spray gun in safe direction, press red button
and squeeze spray gun trigger to release high pressure.
Firmly grasp spray gun with both hands when using high
pressure spray to avoid injury when spray gun kicks
back.
A WARNING Risk of electrocution.
Contact with power source could cause
electric shock or burn resulting in death or
serious injury.
, NEVER spraynear powersource.
_, WARNING The high pressure stream of water
that this equipment produces could cut
through skin and its underlying tissues,
resulting in serious injury and possible
amputation.
Spray gun traps high water pressure, even when
engine is stopped and water is disconnected, which
could result in serious injury.
If cut by fluid, call physician immediately. DO NOT treat
as a simple cut.
DO NOT allow CHILDREN to operate pressure washer.
NEVER repair high pressure hose. Replace it.
NEVER repair leaking connections with sealant of any
kind. Replace o-ring or seal.
NEVER connect high pressure hose to nozzle extension.
Keep high pressure hose connected to pump and Spray
gun while system is pressurized.
DO NOT lift or tilt surface cleaner from horizontal surface
while connected to spray gun. Release spray gun trigger
prior to lifting or tilting.
ALWAYS point spray gun in safe direction, press red
button and squeeze spray gun trigger to release high
pressure, every time you stop engine.
, NEVER aim spray gun at people, animals, or plants.
DO NOT secure spray gun in open position.
DO NOT leave spray gun unattended while machine is
running.
NEVER use a spray gun which does not have a trigger
lock or trigger guard in place and in working order.
Always be certain spray gun, nozzles and accessories
are correctly attached.
_k WARNING Fuel and its vapors are extremely
explosive
_ flammable and which could
WHEN ADDING OR DRAINING FUEL
, Turn pressure washer engine OFF and let it cool at least
2 minutes before removing fuel cap. Loosen cap slowly to
relieve pressure in tank.
, Fill or drain fuel tank outdoors.
DO NOT overfill tank. Allow space for fuel expansion.
If fuel spills, wait until it evaporates before starting engine.
Keep fuel away from sparks, open flames, pilot lights,
heat, and other ignition sources.
Check fuel lines, tank, cap and fittings frequently for
cracks or leaks. Replace if necessary.
DO NOT light a cigarette or smoke.
WHEN STARTING EQUIPMENT
, Ensuresparkplug, muffler,fuelcap, andair cleaner are in place.
DO NOT crank engine with spark plug removed.
WHEN OPERATING EQUIPMENT
, DO NOT operate this product inside any building, carport,
porch, mobile equipment, marine applications, or enclosure.
, DO NOT tip engine or equipment at angle which causes
fuel to spill.
, DO NOT spray flammable liquids.
WHEN TRANSPORTING,
MOVING OR REPAIRING EQUIPMENT
, Transport/move/repair with fuel tank EMPTY or with fuel
shutoff valve OFF.
, DO NOT tip engine or equipment at angle which causes
fuel to spill.
- Disconnect spark plug wire.
WHEN STORING FUEL OR EUIPMENT WITH FUEL IN TANK
Store away from furnaces, stoves, water heaters, clothes
dryers, or other appliances that have pilot light or other
ignition source because they could ignite fuel vapors.
WARNING Exhaust heat/gases could ignite
Contact with muffler area could cause burns
resulting in serious injury.
DO NOT touch hot parts and AVOID hot exhaust gases.
Allow equipment to cool before touching.
Keep at least 5 feet (1.5 m) of clearance on all sides of
pressure washer including overhead.
It is a violation of California Public Resource Code,
Section 4442, to use or operate the engine on any forest-
covered, brush-covered, or grass-covered land unless
the exhaust system is equipped with a spark arrester, as
defined in Section 4442, maintained in effective working
order. Other states or federal jurisdictions may have
similar taws.
Contact the original equipment manufacturer, retailer,
or dealer to obtain a spark arrester designed for the
exhaust system installed on this engine.
Replacement parts must be the same and installed in the
same position as the original parts.
cause burns, fire or explosion
resulting in death or serious injury.
combustibles, structures or damage
fuel tank causing a fire, resulting in
death or serious injury.
Page 65

A.WARNINGUseofpressurewashercould
,_ createpuddlesandslippery
surfacescausingyoutofall
resultingindeathorseriousinjury.
Kickbackfromsprayguncouldcauseyoutofall
resultingindeathorseriousinjury.
, Operate pressure washer from a stable surface.
The cleaning area should have adequate slopes and
drainage to reduce the possibility of a fall due to slippery
surfaces.
Be extremely careful if you must use the pressure washer
from a ladder, scaffolding, or any other similar location.
Firmly grasp spray gun with both hands when using high
pressure spray to avoid injury when spray gun kicks
back.
_, WARNING Unintentional sparking could cause
fire or electric shock resulting in
death or serious injury.
WHEN ADJUSTING OR MAKING REPAIRS TO YOUR
PRESSURE WASHER
, Disconnect the spark plug wire from the spark plug and
place the wire where it cannot contact spark plug.
WHEN TESTING FOR ENGINE SPARK
, Use approved spark plug tester.
DO NOT check for spark with spark plug removed.
A. WARNmNG Starter and other rotating parts
could entangle hands, hair, clothing, or
accessories resulting in serious injury.
, NEVER operate pressure washer without protective
housing or covers.
, DO NOT wear loose clothing, jewelry or anything that
could be caught in the starter or other rotating parts.
, Tie up tong hair and remove iewelry.
WARNmNG Risk of eye or bodily injury.
Spray could splash back or propel
objects resulting in serious injury.
, Always wear indirect vented (chemical splash) safety
goggles marked to comply with ANSI Z87.1 when using
or in vicinity of this equipment.
, NEVER substitute safety gtasses or dry-condition
goggles for indirect vented safety goggles.
, Always wear protective clothing such as a tong-sleeved
shirt, tong pants and close4oed shoes.
, NEVER operate pressure washer when barefoot or
wearing sandals or shorts.
CAUTION Excessively high operating speeds
could result in minor injury.
Excessively low speeds impose a heavy load.
, DO NOT tamper with governor spring, links or other parts
to increase engine speed. Pressure washer supplies
correct rated pressure and flow when running at
governed speed.
, DO NOT modify pressure washer in any way.
NOTICE High pressure spray could damage fragile
items including glass.
, DO NOT point spray gun at glass when using MAX spray
pattern in selector nozzle.
, NEVER aim spray gun at plants.
NOTICE Improper treatment of pressure washer
could damage it and shorten its life.
If you have questions about intended use, ask dealer or
contact qualified service center.
NEVER operate units with broken or missing parts, or with-
out protective housing or covers.
, DO NOT by-pass any safety device on this machine.
, DO NOT tamper with governed speed.
, DO NOT operate pressure washer above rated pressure.
, DO NOT modify pressure washer in any way.
, Before starting pressure washer in cold weather, check all
parts of the equipment to be sure ice has not formed there.
, NEVER move machine by pulling on hoses. Use handle
provided on unit.
, This equipment is designed to be used with Sears
authorized parts ONLY. If equipment is used with parts
that DO NOT comply with minimum specifications, user
assumes all risks and liabilities.
Page 66

KNOW YOUR PRESSURE WASHER
Read the Operator's ManuaR and safety rules before operating your pressure washer.
Compare the illustrations with your pressure washer to familiarize yourself with the locations of various
controls and adjustments. Save this manual for future reference.
A - Spray Gun -- Controls the application of water onto
cleaning surface with trigger device, includes trigger lock.
B - Accessory "Fray -- Provides convenient storage for
accessories, such as gun, nozzle extension, etc.
C - SeJector Nozzle -- Contains five different spray pattern
nozztes for various applications.
D - FoJd Down Handle -- Handle and accessory tray fold
flat atop cold engine for space=saving storage.
E - Recoil Starter -- Used for starting the engine manually.
F - OH Fill/Dipstick -- Check, add and drain engine eil here.
G - Water Inlet -- Connection for garden hose.
H - High Pressure Outlet -- Connection for high pressure
hose.
J - Air Filter-- Protects engine by filtering dust and debris
out of intake air.
K - Bottle Bracket -- Cleaning solution bottle fits in wire
form bracket here. Concentrate bottle not included.
M - Engine Switch -- Sets engine in starting mode for recoil
starter and stops a running engine.
N - Project Pro@ PetfectMix TM Siphon -- Mixes
concentrate with pressure washer spray.
P - Warning!Operating instructions Tag -- Identifies
hazards and proper procedure to start!stop pressure
washer.
Q - Fuet Tank -- Fitl tank with regular unleaded fuel. Always
leave room for fuel expansion.
R - High Pressure Hose -- Connect one end to water pump
and the other end to spray gun.
S - NozzJe Extension with Quick Connect -- Allows you
to switch between selector nozzte and optional nozzle
accessories,
items Not Shown:
Pump -- Develops high pressure.
Automatic CooJ Down System -- Cycles water through
pump when water reaches 125°=155°F. Warm water will
discharge from pump onto ground. This system prevents
internal pump damage.
identification LabeJ -- Provides model and seriat number
of pressure washer. Please have these readily available if
calling for assistance.
Page 67

Your pressure washer requires some assembly and is
ready for use only after it has been properly serviced
with the recommended oil and fuel.
if you have any problems with the assembly of
your pressure washer, please caNIthe pressure
washer he_p_ine at 1o800o222o3136.
UNPACK THE PRESSURE WASHER
1. Remove everything from carton except pressure
washer.
2. Open carton completely by cutting each corner
from top to bottom.
3. Remove pressure washer from carton.
CARTON CONTENTS
Check all contents. If any parts are missing or
damaged, call the pressure washer helpline at
1o800o222o3136.
• Main Unit
• Handle
• Accessory Tray with Hose Wrap
• High Pressure Hose
• Spray Gun
• Nozzle Extension with Quick Connect Fitting
• Oil Pouch
Bottle Bracket Wireform (2)
PerfectMix Siphoning Unit/Hose
Quick Connect Selector Nozzle
Parts Bag (which includes the following):
Operator's Manual
Owner's Registration Card
Handle Fastening Hardware Kit (which includes):
Handle Bolts (2)
Carriage Bolt (2)
Plastic Knobs for Handle (2)
Plastic Knob (2)
Tree Clips (4)
Become familiar with each piece before assembling
the pressure washer, tdentify all contents with the
illustration on page 6. If any parts are missing or
damaged, call the pressure washer helpline at
1o800o222o3136.
ASSEMBUNG PRESSURE WASHER
Your Craftsman pressure washer will need assembly
before operation:
1. Fill out and send in registration card.
2. Attach handle and accessory tray.
3. Connect detergent siphon hose to pump.
4. Add oil to engine crankcase.
5. Add fuel to fuel tank.
6. Connect pressure hose to spray gun and pump.
7. Connect water supply to pump.
8. Attach nozzle extension to spray gun.
9. Select/attach quick connect selector nozzle to
nozzle extension.
Attach Handle and Accessory Tray
1. Place handle (A) onto handle supports connected
to main unit. Make sure holes in handle align with
holes on handle supports.
2. Insert handle carriage bolts (B) through holes from
inside of unit and attach a plastic knob (C) from
outside of unit. Tighten by hand.
NOTICE By loosening both knobs to the middle
section of the attachment bolt, the upper handle can
fold forward to store flat atop the cold engine. DO NOT
fold the handle down while the engine is hot.
3 Insert rubber straps (D) through slots (E) in back of
accessory tray and pull tight from front.
Page 68

.
Place accessory tray (A) over holes (B) on handle
(viewing from front of unit). Push the tree clips
(C) into the holes until they sit flat against the
accessory tray.
5. Insert selector nozzle and other supplied
accessories in spaces provided in accessory tray.
See How to Use Accessory Tray.
6. Place bottle brackets (D) facing outside over holes
in handle supports. Secure bottle brackets with
carriage bolts (E) and plastic knobs (F). Tighten by
hand.
Project Pro@ Perfect Mix TMSiphon
1. Attach the tube end of the blue PerfectMix Siphon
(G) to the barbed tube fitting (H) on the pump.
.
Place PerfectMix bottles (not included) in the
wireform bracket on the handle.
3.
Remove cap from bottle and insert the PerfectMix
Siphon (J). Screw the siphon unit to the top of the
bottle (K).
NOTICE Use the clip on the cap to snap siphon to
wire form bracket when siphon is not in a concentrate
bottle.
Page 69

Add Engine Oil
1. Place pressure washer on a flat, level surface.
2. Clean area around oil fill and remove yellow oil fill
cap/dipstick.
3. Hold neck of supplied oil pouch and remove cap.
4. Slowly pour contents of oil pouch into oil fill
opening. Checking oil level frequently, fill to FULL
mark (top hole) on dipstick.
Full
NOTICE Pause to permit oil to settle. Wipe dipstick
clean each time oil level is checked. DO NOT overfill.
To protect the fuel system from gum formation, mix in a
fuel stabilizer when adding fuel. See Storage. All fuel is
not the same. If you experience starting or performance
problems after using fuel, switch to a different fuel
provider or change brands. This engine is certified to
operate on gasoline. The emission control system for
this engine is EM (Engine Modifications).
1. Clean area around fuel fill cap, remove cap.
2. Slowly add regular unleaded fuel (A) to fuel
tank (B). Be careful not to overfill. To allow for fuel
expansion, do not fill above the bottom of the fuel
tank neck.
NOTICE Improper treatment of pressure washer
could damage it and shorten its life.
o DO NOT attemptto crank or startthe engine before it has
been properly servicedwith the recommended oil. This
could result in anengine failure.
5. Replace oil fill cap/dipstick and fully tighten.
Add Fuel
Fue_ must meet these requirements:
• Clean, fresh, unleaded gasoline.
• A minimum of 87 octane/87 AKJ (91 RON). For
high altitude use, see High Altitude.
• Gasoline with up to 10% ethanol (gasoho 0 is
acceptaMe.
NOTICE Use of unapproved fuels could damage
generator and voids warranty.
o DO NOT use unapprovedgasoline such as E15and E85.
, DO NOT mix oil in gasolineor modify engine to run on
alternatefuels.
WARNING Fuel and its vapors are extremely
_i flammable and explosive which could
WHEN ADDING FUEL
, Turn pressure washer engine OFF and let it cool at least
2 minutes before removing fuel cap. Loosen cap stowty to
relieve pressure in tank.
Fill fuel tank outdoors.
DO NOT overfill tank. Allow space for fuel expansion.
If fuel spills, wait until it evaporates before starting engine.
Keep fuel away from sparks, open flames, pilot lights,
heat, and other ignition sources.
Check fuel lines, tank, cap and fittings frequently for
cracks or leaks. Replace if necessary.
DO NOT light a cigarette or smoke.
cause burns, fire or explosion
resulting in death or serious injury.
3. Install fuel cap and wait for any spilled fuel to
evaporate.
CAUTION! Alcohol-Mended fuels (called gasohol,
ethanol or methanol) can attract moisture, which leads
to separation and formation of acids during storage.
Acidic gas can damage the fuel system of an engine
while in storage.
To avoid engine problems, the fuel system should be
treated with a fuel preserver or emptied before storage
of 30 days or longer, ff adding a fuel preserver, fill the
fuel tank with fresh fuel. If only partially filled, air in the
tank will promote fuel deterioration during storage, if
fuel preserver is not used, drain the fuel tank, start the
engine and let it run until the fuel lines and carburetor
are empty. Use fresh fuel next season. See Storage for
additional information.
NEVER use engine or carburetor cleaner products in
the fuel tank as permanent damage may occur.
High A_titude
At altitudes over 5,000 feet (1524 meters), a minimum
85 octane / 85 AKI (89 RON) gasoline is acceptable. To
remain emissions compliant, high altitude adjustment is
required. Operation without this adjustment will cause
decreased performance, increased fuel consumption,
and increased emissions. See a qualified Sears dealer
for high a_titude adjustment information. Operation of
the engine at altitudes below 2,500 feet (762 meters)
with the high altitude kit is not recommended.
Page 70

FreshStart@FuelCap
TheFreshStartfuelcap(A)isdesignedtoholda
cartridge(B)whichcontainsfuelpreserver.Addingfuel
preserverhelpskeepfuelfreshandcarburetorsclean
foreasierstartingallseasonlong.TheFreshStartfuel
cap,ifequippedwithacartridge,automaticallydrips
concentratedfuelpreserverintoyourfueltanksoyou
don'thavetoaddityourself.
NOTICE Purchase a Fresh Start fuel preserver
cartridge, Sears item 33386, at your local Sears or by
calling 1o888o331-4589 or online at www.sears.com. Mt
is not included with the pressure washer.
Read and follow all instructions and warnings given in
the Fresh Start fuel preserver cartridge package.
Lubricate O-Rings
Lubrication of o-rings is extremely important for
installation and operation. The use of a lubricant
(petroleum or synthetic grease) during assembly helps
seat o-rings properly and provides an improved seal. It
also helps protect the o-ring from damage by abrasion,
pinching or cutting and extends the life of the o-ring.
NOTICE ALWAYS apply a small amount of lubricant
on o-rings prior to assembling the garden hose to the
pump (C), high pressure hose (D), spray gun (E), and
nozzle extension (F).
Lubricate aH connections shown below, following
these instructions:
1. Inspect and clean connecting surfaces prior to
lubrication and assembly.
2. Use lubricants sparingly during assembly; a light
film is aHthat is required.
3. Use a small brush or cotton swab to apply grease
directly to o-rings where they are not accessible
(QC fitting, M22 fitting).
10
Page 71

Connect Hose and Water Supply to Pump
NOTICE DO NOT run the pump without the water
supply connected and turned on.
o Damageto equipment resultingfrom failure to follow this
instruction willvoid warranty.
4. Run water through garden hose for 30 seconds to
flush it of debris. Turn off water.
NOTICE DO NOT siphon standing water for the water
supply. Use ONLY cold water (less than 100°F).
5. Connect garden hose (not to exceed 50 feet in
length) to water inlet. Tighten by hand.
NOTICE Remove and discard the shipping caps from
the pump's high pressure outlet and water inlet before
attaching hoses.
1. Uncoil high pressure hose and attach one end of
hose to base of spray gun. Tighten by hand.
WARNING The high pressure stream of water
1_ that this equipment produces could cut
through skin and its underlying tissues,
resulting in serious injury and possible
amputation.
NEVER connecthigh pressurehoseto nozzleextension.
Keep high pressurehose connectedto pumpand spray
gun while systemis pressurized.
Alwaysbe certainspray gun. nozzlesand accessofles
are correctly attached.
2. Attach other end of high pressure hose to high
pressure outlet on pump. Tighten by hand.
NOTICE Using a One Way Valve (vacuum breaker
or check valve) at pump inlet could cause pump or
inlet connector damage.
There MUST be at least ten feet of unrestricted garden
hose between the pressure washer inlet and any device,
such as a vacuum breaker or check vatve.
Damage to equipment resulting from failure to follow this
instruction will void warranty.
_, WARNING Risk of eye injury.
Spray could splash back or propel objects
resulting in serious injury.
Always wear indirect vented (chemical splash) safety
goggles marked to comply with ANSI Z87.1 when using
or in vicinity of this equipment.
NEVER substitute safety gtasses or dry-condition goggles
for indirect vented safety goggtes.
6 Turn ON the water, press red button (B) on the gun
and squeeze the trigger to purge the pump system
of air and impurities,
3. Before connecting garden hose to water inlet,
inspect inlet screen (A). Clean screen if it contains
debris or have it replaced if damaged. DO NOT run
pressure washer if inlet screen is damaged or
missing.
Checklist Before Starting Engine
Review the unit to ensure you have performed all of the
following:
1 Be sure to read Safety Rules and Operation
sections before using the pressure washer.
2. Make sure handle is in place and secure.
3. Check that oil has been added to proper level in
engine crankcase.
4. Add proper fuel to fuel tank.
5. Check for proper hose connections (high pressure
and water supply) and that there are no kinks, cuts,
or damage to the high pressure hose.
6. Provide proper water supply (not to exceed 100°F).
11
Page 72

HOW TO USE YOUR PRESSURE
If you have any problems operating your pressure
washer, please call the pressure washer helpline at
1-800-222-3136.
Pressure Washer Location
Carbon Monoxide Poisoning
WARNING POISONOUS GAS HAZARD.
Engine exhaust contains carbon monoxide,
a poisonous gas that could kill you in
minutes. You CANNOT smell it, see it, or
taste it. Even if you do not smell exhaust
fumes, you could still be exposed to carbon
monoxide gas.
, Operate this product ONLY outside far away from
windows, doors and vents to reduce the risk of carbon
monoxide gas from accumulating and potentially being
drawn towards occupied spaces.
, Install battery-operated carbon monoxide alarms or
plug-in carbon monoxide alarms with battery back-up
according to the manufacturer's instructions. Smoke
alarms cannot detect carbon monoxide gas.
, DO NOT run this product inside homes, garages,
basements, crawlspaces, sheds, or other partially-
enclosed spaces even if using fans or opening doors and
windows for ventilation. Carbon monoxide can quickly
build up in these spaces and can linger for hours, even
after this product has shut off.
, ALWAYS place this product downwind and point the
engine exhaust away from occupied spaces.
If you start to feel sick, dizzy, or weak while using this
9roduct, shut it off and get to fresh air RIGHT AWAY. See a
doctor. You may have carbon monoxide poisoning.
To Start Your Pressure Washer
To start your engine-powered pressure washer for the
first time, follow these instructions step-by-step. This
information also applies whenever you start the engine
after you have let the pressure washer sit idle for at
least a day.
1. Place pressure washer outside near an water
source capable of supplying water at a flow rate
greater than 3.7 ga/ons per minute and no less than
20 PSI at pressure washer end of garden hose.
2. Check that high pressure hose is tightly connected to
spray gun and pump. See Assemb(y for illustrations.
3. Make sure unit is in a level position.
4. Connect garden hose to water inlet on pressure
washer pump.
NOTICE DO NOT run the pump without the water
supply connected and turned on.
Damageto equipment resulting from failure to follow this
instructionwillvoid warranty.
5. Turn ON the water, press red button on the gun and
squeeze the trigger to purge the pump system of air
and impurities.
6. Attach nozzle extension to spray gun. Tighten by hand.
Exhaust Port
Pointed away from
occupied spaces
Risk of Fire Clearances
_, WARNING Exhaust heat/gases could ignite
combustibles, structures or damagefuel tank
causing a fire, resulting indeath or serious injury.
o Keep at least5 ft. (1.5 m) clearance on all sides of
pressure washer includingoverhead.
7. Pul back on collar of nozzle extension, insert
selector nozzle and release collar. Tug on selector
nozzle to make sure it is securely in place. See
How to Use Selector Nozzle.
8. Push engine rocker switch (B) to on position (I or ON).
J
12
Page 73

NOTICE Before starting the pressure washer, be sure
,ou are wearing safety goggles as described below.
_, WARNING Risk of eye injury.
Spray could splash back or propel objects
resulting in serious injury.
o Always wear indirect vented (chemical splash) safety
goggles marked to comply with ANSI Z87.1 when using or
in vicinity of this equipment.
NEVER substitute safety glasses or dry-condition goggles
for indirect vented safety goggles.
NOTICE This unit is equipped with a ReadyStart®
engine. A ReadyStart engine means there is no priming
or choking required.
9. When starting engine, position yourself as
recommended and grasp starter grip handle and
pull slowly until you feel some resistance. Then pull
rapidly to start engine.
WARNING Starter cord kickback (rapid
retraction) will pull hand and arm toward
engine faster than you can let go which
could cause broken bones, fractures,
bruises, or sprains resulting in serious injury.
NEVER pull starter cord without first relieving spray gun
pressure.
When starting engine, pult cord slowly until resistance is
felt and then pull rapidty to avoid kickback.
After each starting attempt, where engine fails to run,
always point spray gun in safe direction, press red button
and squeeze spray gun trigger to release high pressure.
, Firmly grasp spray gun with both hands when using high
pressure spray to avoid injury when spray gun kicks
back.
10. Return recoil starter slowly. DO NOT let rope "snap
back" against starter.
NOTICE Pressure washer is equipped with an
automatic idle control. The idle control will lower engine
speed when spray gun trigger is released.
11. Point spray gun in a safe direction, push the red
button to release the trigger lock, and pull the trigger.
WARNING The high pressure stream of water that
this equipment produces could cut through
:_ skin and its underlying tissues, resulting in
when engine is stopped and water is disconnected,
which could resuJt in serious injury.
_, WARNING Exhaust heat/gases could ignite
Contact with muffler area could cause burns
resulting in serious injury.
, Replacement parts must be the same and installed in the
serious injury and possible amputation.
Spray gun traps high water pressure, even
DO NOT allow CHILDREN to operate pressure washer.
Keep high pressure hose connected to pump and spray
gun while system is pressurized.
NEVER aim spray gun at people, animals, or plants.
DO NOT secure spray gun in open position.
DO NOT leave spray gun unattended while machine is
running.
NEVER use a spray gun which does not have a trigger
lock or trigger guard in place and in working order.
Always be certain spray gun, nozzles and accessories
are correctly attached.
combustibles, structures or damage
fuel tank causing a fire, resulting in
death or serious injury.
DO NOT touch hot parts and AVOID hot exhaust gases.
Allow equipment to cool before touching.
Keep at least 5 feet (1.5 m) of clearance on all sides of
pressure washer including overhead.
It is a violation of California Public Resource Code,
Section 4442, to use or operate the engine on any forest-
covered, brush-covered, or grass-covered land unless
the exhaust system is equipped with a spark arrester, as
defined in Section 4442, maintained in effective working
order. Other states or federal jurisdictions may have
similar taws.
Contact the original equipment manufacturer, retailer, or
dealer to obtain a spark arrester designed for the exhaust
system installed on this engine.
same position as the original parts.
How to Stop Your Pressure Washer
1. Release spray gun trigger and let engine idle for
two minutes.
.
Push engine rocker switch to off position (0 or OFF).
3.
ALWAYS point spray gun in a safe direction,
push red button and squeeze spray gun trigger to
release retained high water pressure.
WARNING The high pressure stream of water that
this equipment produces could cut through
skin and its underlying tissues, resulting in
serious injury and possible amputation.
Spray gun traps high water pressure, even when
engine is stopped and water is disconnected, which
could result in serious injury.
Keep high pressurehose connectedto pumpand spray
gun whitesystem is pressurized.
ALWAYSpoint spraygun in safe direction, press redbut-
tonand squeeze spraygun trigger to release high pres-
sure, everytime youstop engine.
13
Page 74

How to Use Accessory Tray
The unit is equipped with an accessory tray with
places to store your spray gun, nozzle extension, high
pressure hose and selector nozzle.
1. Place spray gun in wide groove on accessory tray
as shown. Pull rubber strap tight around spray gun
and place hole in strap over tab on accessory tray.
2. Place nozzle extension in narrow groove on
accessory tray. Pull rubber strap tight around
nozzle extension and place hole in strap over tab
on accessory tray.
3. insert selector nozzle in hole provided on front of
accessory tray.
4. Place one end of high pressure hose in groove at
top of accessory tray and wrap high pressure hose
around hooks as shown.
Follow these instructions to change nozzle
patterns:
1. Select desired spray pattern:
• MAX - For stubborn or hard to reach surface
such as second story surfaces, paint removal,
oil stains, rust removal or other stubborn
substances (tar, gum, grease, wax, etc.).
GENERAL - For most all purpose cleaning
such as home siding, brick patios, wood decks,
driveways and sidewalks, garage floors, etc..
DEUOATE - For gentle cleaning of cars/trucks,
boats, RV's, patio furniture, lawn equipment,
etc..
FLUSH - For quick high flow clean up and
long reach cleaning of second story siding and
windows.
SOAP For general soap applications or
to launch soap to second story siding and
windows.
2. Push button on selector nozzle, nozzle dial will pop
up.
3. Turn dial until desired spray pattern lines up with
button on selector nozzle.
4. Push dial in until it locks into place.
How to Use SeJector NozzJe
The selector nozzle allows you to switch between five
different spray pattern nozzles. Spray patterns can be
changed while pressure washer is running once spray
gun trigger safety lock is engaged. The spray patterns
vary as shown below.
WARNING The high pressure stream of water
through skin and its underlying tissues,
that this equipment produces could cut
resulting in serious injury and possible
amputation.
o NEVER changespray patterns withoutthetrigger locked
on the spray gun.
DO NOT twist selector nozzlewhile spraying.
Usage Tips
• For most effective cleaning, keep selector nozzle
from 8 to 24 inches (20 to 61 cm) away from
cleaning surface.
• If you get selector nozzle too close, especially using
a high pressure spray pattern nozzle, you may
damage surface being cleaned.
• DO NOT get closer than 6 inches (15 cm) when
cleaning tires.
14
Page 75

C_eaning and Applying Detergent
_k WARNING Chemical Burn Hazard.
Chemicals could cause burns resulting in
death or serious injury.
, DO NOT usecaustic liquid with pressurewasher.
, Use ONLY pressurewashersafe detergents/soaps.
Follow all manufacturersinstructions.
To apply detergent, follow these steps:
To apply undiluted detergent using the blue PerfectMix
siphon, follow these steps:
1. Review use of selector nozzle.
2. Attach PerfectMix siphon hose to pump and
PerfectMix concentrate bottle.
Pressure Washer Rinsing
For Rinsing:
1. Semectand change to desired spray pattern nozzle
on selector nozzle. See How To Use Selector
Nozzle.
WARNmNG Kickback from spray gun could
cause you to fall resulting in death or
serious injury.
, Operate pressure washer from a stable surface.
, Be extremely careful if you must use the pressure washer
from a ladder, scaffolding, or any other similar location.
, Firmly grasp spray gun with both hands when using high
pressure spray to avoid injury when spray gun kicks
back.
NOTICE Use standard detergent siphon hose &
filter kit, available at Sears retail item 75180, to apply
standard detergents. Detergent siphon hose & filter kit
is available as an optional accessory. It is not included
with the pressure washer.
NOTICE Contact with the hot muffler could damage
detergent siphoning tube.
, When inserting the siphon into a detergent solution bottte,
route the tube so as to keep it from inadvertently contacting
the hot muffler.
3. Make sure SOAP spray pattern nozzle is selected
on selector nozzle
NOTICE Detergent cannot be applied with the
MAX, GENERAL, DELICATE or FLUSH spray pattern
nozzles.
4. Make sure garden hose is connected to water
inlet. Check that high pressure hose is connected to
spray gun and pump. Turn on water.
NOTICE You must attach all hoses before you start
the engine.
, Starting the engine without all the hoses connected and
without the water turned ON could damage the pump.
, Damage to equipment resulting from failure to follow this
instruction will void warranty.
2. Keep the spray gun a safe distance from the area
you plan to spray.
3. Apply a high pressure spray to a small area, then
check the surface for damage. If no damage is
found, it is okay to continue cleaning.
4. Start at the top of the area to be rinsed, working
down with same overlapping strokes as you used
for washing and applying detergent.
Automatic Cool Down System (Therma_
Relief}
if you run the engine on your pressure washer for
3°5 minutes without pressing the trigger on the
spray gun, circulating water in the pump can reach
temperatures above 125°F. The system engages to
cool the pump by discharging the warm water onto
the ground.
.
Start engine following instructions How to Start
Your Pressure W/asher.
6.
Apply detergent to a dry surface, starting at lower
portion of area to be washed and work upward,
using long, even, overlapping strokes.
.
Allow detergent to "soak in" for 3-5 minutes before
washing and rinsing. Reapply as needed to prevent
surface from drying. DO NOT allow detergent to
dry on (prevents streaking).
15
Page 76

ENGINE TECHNICAL iNFORMATiON
This is a single cylinder, overhead valve (OHV), air
cooled engine. In the State of California, Model 120000
engines are certified by the California Air Resources
Board to meet emissions standards for 125 hours.
Such certification does not grant the purchaser, owner
or operator of this engine any additional warranties with
respect to the performance or operational life of this
engine. The engine is warranted solely according to the
product and emissions warranties stated elsewhere in
this manual.
Power Ratings
The gross power rating for individual gasoline engine
models is labeled in accordance with SAE (Society
of Automotive Engineers) code J1940 Small Engine
Power & Torque Rating Procedure, and is rated in
accordance with SAE J1995. Torque values are
derived at 2600 RPM for those engines with "rpm"
called out on the label and 3060 RPM for all others;
horsepower values are derived at 3600 RPM.
The gross power curves can be viewed at www.
BRIGGSandSTRATTON.COM. Net power values are
taken with exhaust and air cleaner installed whereas
gross power values are collected without these
attachments. Actual gross engine power will be higher
than net engine power and is affected by, among other
things, ambient operating conditions and engine-to-
engine variability. Given the wide array of products on
which engines are placed, the gasoline engine may not
develop the rated gross power when used in a given
piece of power equipment. This difference is due to a
variety of factors including, but not limited to, the variety
of engine components (air cleaner, exhaust, charging,
cooling, carburetor, fuel pump, etc.), application
limitations, ambient operating conditions (temperature,
humidity, a_titude), and engine-to engine variability.
Due to manufacturing and capacity limitations, Briggs &
Stratton may substitute an engine of higher rated power
for this engine.
PRODUCT SPECtNCATIONS
Pressure Washer Specifications
Max Outlet Pressure .................... 3000 PSI*
Max Flow Rate ......................... 2.7 GPM
Detergent Mix .................... Use as directed
Water Supply Temperature ..... Not to exceed 100°F
Engine Specifications
Bore ......................... 2.688 in. (68.28 mm)
Stroke ........................ 2.040 in. (51.82 mm)
Displacement ..................... 11.58 in. (190 cc)
Spark Plug
Type: .................. Briggs & Stratton 692051
Set Gap To: ................ 0.020 inch (0.051 mm)
Armature Air Gap: ...... 0.010-0.014 in.(0.25-0.36mm)
Valve clearance with valve springs installed and piston
1/4 in. (6 ram) past top dead center (check when engine
is cold).
Intake ................ 0.004-0.008 in.(0.10-0.20 mm)
Exhaust............... 0.004-0.008 in.(O.10-0o20mm)
Fuel Capacity ...... .... : ................ 1.6Quarts
Oil Capacity .... :. :.. :. : ........ 20 Ounces (0.6 liter)
NOTICE For practical operation, the engine load
should not exceed 85% of rated power. Engine power
will decrease 3-1/2% for each 1,000 feet (300 meters)
above sea level and 1% for each 10° F (5.6° C) above
77° F (25° C). It should operate satisfactorily at an
angle up to 15°.
* This pressure washer is rated in accordance to
the Pressure Washer Manufacturers Association
(PWMA) standard PW101-2010 (Testing and Rating
Performance of Pressure Washers).
16
Page 77

OWNER'S RESPONSIBILiTiES
Follow the hourly or calendar intervals, whichever
occurs first. More frequent service is required when
operating in adverse conditions noted below.
* Change engine oil
®
Check/clean water inlet screen _
®
Check high pressure hose
®
Check detergent siphoning hose
®
Check spray gun and assembly for leaks
®
Clean debris
®
Check engineoillevel
®
Clean engine air cleaner
®
Change engine oiF
®
Inspect muffler and spark attester
Pump Oil
DO NOT attempt any oil maintenance on this pump.
The pump is prequbricated and sealed from the
factory, requiring no additional maintenance for the life
of the pump.
Emissions Control
Maintenance, repJacement, or repair of the
emissions contro_ devices and systems may
be performed by any non-road engine repair
establishment or individual. However, to obtain
"no charge" emissions control service, the work must
be performed by a factory authorized dealer. See the
Emissions Warranty.
Before Each Use
1. Check engine oHlevel
2. Clean debris.
3. Check water inlet screen for damage.
4. Check high pressure hose for leaks.
5. Check gun and nozzJeextension assembly for leaks.
6. Purge pump of air and contaminants.
PRESSURE WASHER MAINTENANCE
® Replace engine air cleaner
® Replace spark plug
® Clean cooling system _
1 Clean if clogged. Replace if perforated or torn,
2 Service more often under dirty or aus_y cona_tions
General Recommendations
Regular maintenance will improve the performance and
extend the life of the pressure washer. See any Sears
or other qualified service dealer for service.
The pressure washer warranty does not cover items
that have been subjected to operator abuse or
negligence. To receive full value from the warranty, the
operator must maintain pressure washer as instructed
in this manual including proper storage as detailed in
Storage.
Some adjustments will need to be made periodically to
properly maintain your pressure washer.
AHservice and adjustments should be made at least
once each season. Follow the requirements in the
Maintenance Schedule chart above.
NOTICE Once a year you should clean or replace the
spark plug and replace the air filter. A new spark plug
and clean air filter assure proper fueFair mixture and
help your engine run better and last longer.
Clean Debris
Daily or before use, clean accumulated debris from
pressure washer. Keep linkage, spring and controls
clean. Keep area around and behind muffler free from
any combustible debris. Inspect cooling air slots and
openings on the pressure washer. These openings
must be kept clean and unobstructed.
Pressure washer parts should be kept clean to reduce the
risk of overheating and ignition of accumulated debris.
® Use a damp cloth to wipe exterior surfaces clean.
NOTICE Improper treatment of pressure washer
could damage it and shorten its life.
, DO NOT insert anyobjects throughcooling stots.
® Use a soft bristle brush to loosen caked on dirt, oil,
etc.
® Use a vacuum cleaner to pick up loose dirt and
debris.
Check and C_ean tnlet Screen
Examine garden hose inlet screen. Clean if it is
clogged or replace if it is torn.
17
Page 78

Check High Pressure Hose
High pressure hoses can develop leaks from wear,
kinking, or abuse. Inspect hose before each use.
Check for cuts, leaks, abrasions, bulging of cover, or
damage or movement of couplings. If any of these
conditions exist, replace hose immediately.
_, WARNING The high pressure stream of water
_ hat this equipment produces could cut
through skin and its underlying tissues,
resulting in serious injury and possible
amputation.
o NEVER repairhigh pressure hose. Replace it.
Replacement hose ratingMUSTequal or exceed
maximum pressure ratingof unit.
Check Detergent Siphoning Tube
Examine the filter on detergent tube (if equipped) and
clean if clogged. The tube should fit tightly on the
barbed fitting. Examine the tube for leaks or tears.
Replace the filter or tube if either is damaged.
Detergent Siphoning Check Ball
Occasionally check bah in detergent siphoning
system may become stuck from storage, dried soap,
or minerals in water. The check ball can be freed by
performing the following:
NOTICE Before performing this procedure, be sure
,ou are wearing safety goggles as described below.
WARNING Risk of eye injury.
Spray could splash back or propel objects
resulting in serious injury.
.
Remove detergent siphoning hose from barbed
fitting on pump.
4.
Using a firm, Munt object 7/64" in diameter or
smaller, by at least 1" long, such as an Allen
wrench, slowly insert the object into the barbed
fitting until you meet resistance. This resistance is
the check balL
5. Slowly push down until you feel the ball move
slightly, push no more than 1/8". Slight pressure
may be required to free the ball.
6. Repeat steps 4 and 5 if necessary.
7. Reinstall detergent siphoning hose onto barb
fitting.
8. Treat with PumpSaver as described in Protecting
the Pump during storage to prevent reoccurrence.
Check Spray Gun
Examine hose connection to spray gun and make sure
it is secure. Test trigger by pressing it and making sure
it springs back into place when you release it. Do not
depress red button and test trigger. You should not be
able to press trigger. Replace spray gun immediately if it
faWsany of these tests.
Always wear indirect vented (chemical splash) safety
goggles marked to comply with ANSI Z87.1 when using
or in vicinity of this equipment.
NEVER substitute safety glasses or dry-condition
goggtes for indirect vented safety goggtes.
Shut off engine and turn off water suppJy.
.
ALWAYS point spray gun in a safe direction,
press red button and squeeze spray gun trigger to
release retained high water pressure.
WARNING The high pressure stream of water
:_ that this equipment produces could cutthrough skin and its underlying tissues,
resuffing in serious injury and possible
amputation.
Spray gun traps high water pressure, even when
engine is stopped and water is disconnected, which
could result in serious injury.
Keep high pressurehose connectedto pumpand spray
gun while systemis pressurized.
ALWAYS pointspraygun in safe direction, press red
button and squeezespray gun trigger to releasehigh
pressure,everytime you stop engine.
18
Page 79

Selector Nozzle Maintenance
A pulsing sensation felt while squeezing the spray gun
trigger may be caused by excessive pump pressure.
The principal cause of excessive pump pressure is
a nozzle clogged or restricted with foreign materials,
such as dirt, etc. To correct the problem, immediately
clean the nozzles followin 9 these instructions:
1. Shut off engine and turn off water supply.
2. ALWAYS point spray gun in a safe direction, press
red button and and squeeze spray gun trigger to
release retained high water pressure.
_, WARNING The high pressure stream of water
through skin and its underlying tissues,
that this equipment produces could cut
resulting in serious injury and possible
amputation.
Spray gun traps high water pressure, even when
engine is stopped and water is disconnected, which
could result in serious injury.
o Keep high pressure hoseconnected to pump and spray
gun while system ispressurized.
ALWAYS pointspraygun insafe direction, press redbut-
ton and squeeze spraygun trigger to release high pres-
sure, every timeyou stop engine.
.
Remove selector nozzle from end of nozzle
extension.
4.
Use a small paper clip to free any foreign material
clogging or restricting each nozzle (A) in the
selector nozzle.
.
Remove nozzle extension from spray gun.
6.
Using a garden hose, remove additional debris by
back flushing water through nozzle extension. Back
flush between 30 to 60 seconds.
O-Ring Maintenance
Purchase an O=Ring Repair Kit, Sears item 75116, at
your local Sears or by calling 1-888-331-4569 or online
at www.sears.com. It is not included with the pressure
washer. This kit includes replacement o=rings and a
water inlet filter. Refer to the instruction sheet provided
in the kit to service your unit's o=rings.
WARNING The high pressure stream of water
that this equipment produces could cut
through skin and its underlying tissues,
resulting in serious injury and possible
amputation.
NEVERrepair leaking connections with sealantof any
kind. Replaceo-ringor seal.
ENGINE MAHNTENANCE
WARNING Unintentional sparking could cause
fire or electric shock resulting in
death or serious injury.
WHEN ADJUSTING OR MAKING REPAIRS TO YOUR
PRESSURE WASHER
, Disconnect the spark p!ug wire from the spark plug and
place the wire where it cannot contact spark plug.
WHEN TESTING FOR ENGINE SPARK
, Use approved spark plug tester.
DO NOT check for spark with spark plug removed.
Oil
OiJ Recommendations
We recommend the use of Briggs & Stratton Warranty
Certified otis for best performance. Other high-quality
detergent oils are acceptable if classified for service
SF. SG, SH, SJ or higher. DO NOT use special
additives.
Outdoor temperatures determine the proper oil
viscosity for the engine. Use the chart to select the best
viscosity for the outdoor temperature range expected.
oF
% 40
°C
.
Reinstall selector nozzle into nozzle extension.
8.
Reconnect nozzle extension to spray gun.
9.
Make sure garden hose is connected to water inlet.
Check that high pressure hose is connected to
spray gun and pump. Turn on water.
10. Start engine following instructionsHow to Start
Your Pressure Washer.
11. Test pressure washer by operating in each spray
pattern.
86 i_
68 i_
104 ___. ,
50 i_
32 _
14
_4
-22 _
* Below 40°F (4°C) the use of SAE 30 will result in hard
starting.
** Above 80°F (27°C) the use of 10W30 may cause increased
oil consumption. Check oil level more frequently.
19
._20
; 3o
10
-20
-30
Page 80

Checking Oi_ Leve_
1. Make sure pressure washer is on a level surface.
2. Remove oil dipstick and wipe dipstick with clean
cloth. Replace and tighten dipstick. Remove and
check oil level.
3. Verify oil is at FULL mark (top hole) on dipstick.
Replace and tiqhten dipstick.
Full
Adding Engine Oi_
1. Make sure pressure washer is on a level surface.
2. Check oil level as described in Checking Oil Level
3. If needed, slowly pour oil into oil fill opening to the
FULL mark (top hole) on dipstick. DO NOT overfill.
NOTICE Overfilling with oil could cause the engine to
not start, or hard starting.
DO NOT overfill.
o If over the FULL mark on dipstick, drain oil to reduce oit
level to FULL mark on dipstick.
4. Tip your pressure washer to drain oil from oil fill
into a suitable container making sure you tip your
unit away from spark plug. When crankcase is
empty, return pressure washer to upright position.
5. Slowly pour recommended oil (about 20 oz. (0.6 I))
into oil fill opening. Pause to permit oil to settle. Fill
to Full mark (top hole) on dipstick.
6. Wipe dipstick clean each time oil level is checked.
DO NOT overfill.
7. Replace and tighten dipstick.
8. Wipe up any remaining oil.
9. Reconnect spark plug wire to spark plug.
Service Air Cleaner
Your engine will not run properly and may be damaged
if you run it with a dirty air cleaner. Service more
often if operating under dirty or dusty conditions.
Replacements are available at your local Sears service
center.
To service the air cleaner, follow these steps:
1. Slide air cleaner lever (A) to unlock (_') position
and tilt cover (B) down.
4. Replace and tighten dipstick.
Changing Engine Oil
If you are using your pressure washer under extremely
dirty or dusty conditions, or in extremely hot weather,
change oil more often.
_, CAUTION Avoid prolonged or repeated skin
contact with used motor oil.
Used motor oil has been shown to cause skin cancer in
certain laboratory animals.
Thoroughly wash exposed areas with soap and water.
KEEP OUT OF REACH OF CHILDREN.
DON'T POLLUTE. CONSERVE
RESOURCES. RETURN USED OIL TO
COLLECTION CENTERS.
Change oil while engine is still warm from running,
as follows:
1. Drain fuel tank by running pressure washer until
fuel tank is empty.
2. Disconnect spark plug wire and keep it away from
spark plug.
3. Clean area around oil fill, remove oil fill cap/
dipstick. Wipe dipstick clean.
2 Carefully remove air cleaner to prevent debris from
falling into carburetor.
3 Wash foam air cleaner (C) in liquid detergent and
water. Squeeze dry in a clean cloth.
4. SATURATE foam air cleaner in engine oil and
squeeze in a clean cloth to remove excess oil.
5. Reinstall clean or new foam air cleaner in base (D).
6. Tilt cover up and slide lever to lock (_) position.
NOTICE You can purchase new air filter elements by
calling 1o888-331o4569.
Service Spark Plug
Changing the spark plug will help your engine to start
easier and run better.
1. Clean area around spark plug.
2. Remove and inspect spark plug.
3. Replace spark plug if electrodes are pitted, burned
or porcelain is cracked. Use the recommended
replacement plug. See Specifications.
2O
Page 81

.
Check electrode gap with wire feeler gauge and
reset spark plug gap to recommended gap if
necessary (see Specifications).
5. Install spark plug and tighten firmly.
NOTICE You can purchase a new spark plug by
calling 1-888-331-4569.
_nspect Muffler and Spark Attester
Inspect the muffler for cracks, corrosion, or other
damage. Remove the spark arrester, if equipped, and
inspect for damage or carbon blockage, tf replacement
parts are required, make sure to use only original
equipment replacement parts.
_, WARNmNG Exhaust heat/gases could ignite
combustibles, structures or damage
fuel tank causing a fire, resulting in
death or serious injury.
Contact with muffler area could
cause burns resulting in serious injury.
, DO NOT touchhot parts and AVOID hot exhaust gases.
, Allow equipment to cool before touching.
, Keep at least5 feet (1.5 m) of clearance on all sides of
pressure washer includingoverhead.
It is a violationofCalifornia Public Resource Code,
Section 4442,to use or operate the engine on any forest-
covered, brush-covered,or grass-covered land unless
the exhaust system isequippedwith a spark attester, as
defined in Section 4442, maintainedin effective working
order.Other statesor federal ]udsd!ctions may have
similar taws.
Contact theoriginal equipment manufacturer,retailer, or
dealer to obtaina sparkarresterdesigned for theexhaust
systeminstalledon this engine.
, Replacement partsmust bethe same and installed inthe
same position asthe original parts.
NOTICE You can purchase a spark arrester by calling
1-888-331 °4569°
Air Cooling System
Over time debris may accumulate in cylinder cooling
fins and cannot be observed without partial engine
disassembly. For this reason, we recommend you
have a qualified Sears service dealer clean the cooling
system per recommended intervals (see Maintenance
Schedule). Equally important is to keep top of engine
free from debris. See Clean Debris.
Carburetor Adjustment
The carburetor on this engine is low emission. It is
equipped with a non-adjustable idle mixture valve. Top
speed has been set at the factory. If adjustment is
required, see an authorized service dealer.
_, CAUTION Excessively high operating speeds
could result in minor injury.
Excessively low speeds impose a heavy load.
o DO NOT tamper with governor spring, links or other parts
to increase engine speed. Pressure washer supplies
correct rated pressure and flow when running at
governed speed.
DO NOT modify pressure washer in any way.
AFTER EACH USE
Water should not remain in the unit for long periods of
time. Sediments or minerals can deposit on pump parts
and "freeze" pump action. Follow these procedures
after every use:
1. Shut off engine, turn off water supply, point gun in a
safe direction, press red button and squeeze trigger
to relieve trapped pressure and let engine cool.
WARNmNG The high pressure stream of water
through skin and its underlying tissues,
that this equipment produces could cut
resulting in serious injury and possible
amputation.
Spray gun traps high water pressure, even when
engine is stopped and water is disconnected, which
could result in serious injury.
Keep high pressurehose connectedto pumpand spray
gun whilesystem is pressurized.
ALWAYSpoint spraygun in safe direction, press red
button and squeezespray gun trigger to releasehigh
pressure,everytime you stop engine.
.
Disconnect hose from spray gun and high pressure
outlet on pump. Drain water from hose, gun, and
nozzle extension. Use a rag to wipe off the hose.
.
Empty pump of all pumped liquids by pulling recoil
handle about 6 times. This should remove most
liquid in pump.
.
Coil high pressure hose on hose wrap provided on
accessory tray.
5.
Store unit in a clean, dry area.
6.
If storing for more than 30 days see Long Term
Storac_ on next page.
_, WARNmNG Fuel and its vapors are extremely
_1 lammable and explosive which couJd
WHEN STORING FUEL OR EQUIPMENT WiTH FUEL iN
TANK
, Storeaway fromfurnaces, stoves, water heaters,clothes
dryers,orother appliances that have pilot lightor other
ignitionsource becausethey could ignitefuel vapors.
cause burns, fire or explosion
resulting in death or serious injury.
21
Page 82

WHNTER STORAGE
NOTICE You must protect your unit from freezing
temperatures.
o Failure to do so will permanently damage your pump and
render your unk inoperable.
Freeze damage is not covered under warranty.
To protect the unit from freezing temperatures:
1. Follow steps 1-4 in the previous section After Each
Use.
.
Use pump saver, available at Sears, item 74403,
to treat pump. This minimizes freeze damage and
lubricates pistons and seals.
.
Lfpump saver is not availaMe, connect a 3-foot
section of garden hose to water inlet adapter. Pour
RV-antifreeze (antifreeze without alcohol) into
hose. Pull recoil handle twice. Disconnect 3-foot
hose.
4. Store unit in a clean, dry area.
LONG TERM STORAGE
Lfyou do not plan to use the pressure washer for more
than 30 days, you must prepare the engine and pump
for long term storage.
Ltis important to prevent gum deposits from forming in
essential fuel system parts such as the carburetor, fuel
filter, fuel hose or tank during storage. Also, experience
indicates that alcohol-blended fuels (called gasohol.
ethanol or methanol) can attract moisture, which Leads
to separation and formation of acids during storage.
Acidic gas can damage the fuel system of an engine
while in storage.
Protect Fuel System
Fue_ Additive:
Fuel can become stale when stored over 30 days.
Stale fuel causes acid and gum deposits to form in the
fuel system or on essentia} carburetor parts. To keep
fuel fresh, use Bdggs & Stratton® Advanced Formula
Fuel Treatment & Stabilizer, available wherever Briggs
& Stratton genuine service parts are sold.
For engines equipped with a FRESH START fuel cap,
use Briggs & Stratton FRESH START available in a
drip concentrate cartridge.
There is no need to drain gasoline from the engine
if a fuel stabilizer is added according to instructions.
Run the engine for 2 minutes to circulate the stabilizer
throughout the fuel system before storage.
If gasoline in the engine has not been treated with a
fuel stabilizer, itmust be drained into an approved
container. Run the engine until it stops from lack of fuel.
The use of a fuel stabilizer in the storage container is
recommended to maintain freshness.
Change Oil
While engine is still warm, drain oil from crankcase.
Refill with recommended grade. See Changing Engine
Oil.
Protect Pump
To protect the pump from damage caused by mineral
deposits or freezing, use PumpSaver, Sears item
74403, to treat pump. This prevents freeze damage
and lubricates pistons and seals.
NOTICE PumpSaver is available as an optiona_
accessory. It is not included with the pressure washer.
Contact your local Sears service center to purchase
PumpSaver.
NOTICE You must protect your unit from freezing
temperatures.
Failure to do so will permanently damage your pump and
render your unit inoperable.
Freeze damage is not covered under warranty.
To use PumpSaver, make sure the pressure washer is
turned off and disconnected from supply water. Read
and follow aHinstructions and warnings given on the
PumpSaver container.
Other Storage Tips
1 DO NOT store fuel from one season to another
unless it has been treated as described in Protect
Fuel System.
2. Replace fue_container if it starts to rust. Rust and/
or dirt in fuel can cause problems if it's used with
this unit.
3 Cover unit with a suitable protective cover that
does not retain moisture.
_, WARNING Storage covers could cause a fire
resulting in death or serious injury.
DO NOT place a storage cover over a hot pressure
washer.
Let equipment cool for a sufficient time before placing the
cover on the equipment.
4. Store unit in a clean and dry area.
22
Page 83

Problem
Cause
Correction
Pump has following
problems: failure to produce
pressure, erratic pressure,
chattering, loss of pressure,
low water volume.
Detergent fails to mix with
spray.
Engine will not start; starts
and runs rough or shuts
down during operation.
1. Low pressure selector nozzle
installed.
2. Water inlet is blocked.
3. Inadequate water supply.
4. Inlet hose is kinked or leaking.
5. Clogged inlet hose screen.
6. Water supply is over 100°F.
7. High pressure hose is blocked
or leaks.
8. Spray gun leaks.
9. Selector nozzle is obstructed.
10. Pump is faulty.
1. Detergent siphoning tube is not
submerged.
2. Detergent siphoning tube is
clogged or cracked.
3. High pressure spray pattern
nozzle is selected..
4. Detergent siphoning check ball
stuck.
1. Engine rocker switch set to off
(O or Off) position.
2. Low oil level.
3. Dirty air cleaner.
4. Out of fuel.
5. Stale fuel.
6. Spark plug wire not connected
to spark plug.
7. Bad spark plug.
8. Water in fuel.
9. Excessively rich fuel mixture.
1. Replace with high pressure selector
nozzle.
2. Clear inlet.
3. Provide adequate water flow.
4. Straighten inlet hose, patch leak.
5. Check and clean inlet hose screen.
6. Provide cooler water supply.
7. Clear blocks in outlet hose.
.
Replace spray gun.
9.
Clean selector nozzle.
10.
Contact Sears service facility.
1.
Insert detergent siphoning tube into
detergent.
.
Clean or replace detergent
siphoning tube.
.
Select soap spray pattern nozzle on
selector nozzle.
4. Free detergent siphoning check
ball.
1. Set engine rocker switch to on (Jor
On) position.
2. Fill crankcase to proper level.
3. Clean or replace air cleaner.
4. Fill fueltank.
5. Drain fuel tank; fill with fresh fuel.
6. Connect wire to spark plug.
7. Replace spark plug.
8. Drain fuel tank; fill with fresh fuel.
9. Contact local service facility.
Engine lacks power.
Dirty air fi_ter.
Replace air rifler.
23
Page 84

CRAFTSMAN 3000 PSi Pressure Washer 580.754880
Main Unit w E×ploded View and Parts List
900
_14
15
item Part # Description
1 704064 BASE
2 314787BNGS HANDLE
3 704639 BILLBOARD
B1797GS CMP
4 314509GS NOZZLE
5 204658GS HOSE
6 317593GS PUMP
B2384GS FILTER
208673GS VALVE-THERMAL RELEF
7 315134GS AXLE
8 314165GS WHEEL
9 703347 NUT
10 207784GS EXTENSION-QC
11 317099GS KIT-STRAP
12 319853GS GUN
13 206566GS WIREFORM
14 196138GS HOSE
15 192310GS MOUNT-VIBRATION
16 315139GS KIT-HARDWARE PUMP
MOUNTING
17 705001 KIT-0-RING
18 205910GS KIT-HANDLE
19 B2203GS KIT-HANDLE
900 NSP ENGINE (122S02-0126-F1)
(see pages 28-33)
4_
m3
\\
\\
\
_13
T9
/
_10
/
Parts Not Illustrated
Part # Description
23139GS KEY
704293 E-RING
317999GS OIL
189332GS PLUG-HOLE
194256GS TAG-WARNING
Optional Accessories Not illustrated
Sears item # Description
75187
75197
75138
75122
75116
75129
75121
75247
74403
33386
75180
74404
Garden Hose Quick Connector
Accessory Quick Connector
Dual Action Brush Kit
30' Replacement Hose
O Ring Repair Kit
Turbo Nozzle
25' Extension Hose
Surface Cleaner
Pump Saver
CARTRIDGE, Fresh Start
Detergent Siphon Hose & Filter
PerfectMix TM Multi-Purpose and
Vehicle Cleaner
74405
74406
PerfectMix Degreaser Cleaner
PerfectMix Mold and Mildew
Cleaner
--6
j----- 7
/ 8
19
24
Page 85

CRAFTSMAN 3000 PSt Pressure Washer 580.754880
Pump w E×ploded View and Parts List
® ®®
56
\
\
%
#
@
Item
33
36
56
66
A
B
C
D
E
F
G
H
J
K
Part #
204087GS
B2384GS
208673GS
313390GS
204082GS
204084GS
317789GS
315747GS
317787GS
317788GS
200350GS
201497GS
201496GS
317056GS
Description
SCREW
FILTER-GARDEN HOSE
VALVE-THERMAL RELIEF
THROTTLE CONTROL
K_T-CHECK VALVE
KIT-WATER SEAL
K_T-O-RING
KIT-UNLOADER
KIT-CHEMICAL INJ
KIT-EASY START
SCREW-GRUB
FITTING
KIT-WATER INLET
KIT-PLUG
36
/
>
Optional Accessories Not ilustrated
Sears item # Description
74403 Pump Saver
75127 Pump O/
NOTE: Item letters A - K are Service Kits and include
a/parts shown within the box.
25
Page 86

ENGINE, Briggs & Stratton, 122S02 - E×ploded View
718 [_
505
562_
32A € 32 (_
27
1376
1264 _
1263 (_
26
287
524
240
46
22
2oQ
26
Page 87

ENGINE, Briggs & Stratton, 122S02 - E×ploded View
883
883A
868
4o_0
1022
13
1029
1034
t022
51
163
27
Page 88

ENGINE, Briggs & Stratton, 122S02 - E×ploded View
957
51
130
b 276
564A T
127A (_
633
633A
365
211
190
601
51A
564
%
604
883 __-=_
222
534_
28
Page 89

ENGINE, Briggs & Stratton, 122S02 - E×ploded View
8t
883 _
592
@
58 60
37A
304
455
1005
23
@
332
925
334A I
334
635
29
Page 90

ENGINE, Briggs & Stratton, 122S02 - E×ploded View
121 CARBURETOR OVERHAUL KIT
s__ _37O
104 _ 163
358 ENGINE GASKET SET
623_
842
276
623
163
524
1095 VALVE GASKET SET
163
623
883A
883
868 O
1430
1430A
993
©
1022
868
<9
3O
Page 91

ENGINE, Briggs & Stratton, 122S02 - Parts List
item Part # Description
1 798947 Cylinder Assembly
2 796961 Kit-Bushing/Seal (Magneto Side)
3 299819s SeaFOil (Magneto Side)
4 493279 Sump-Engine
5 796471 Head-Cylinder
7 796475 Gasket-Cylinder Head
7A 799275 Gasket-Cylinder Head (Fire Ring)
11 796478 Tube-Breather
12 692232 Gasket-Crankcase
13 793451 Screw (Cylinder Head)
15 691680 Plug-Oil Drain
16 799337 Crankshaft
20 399781s SeaFOil (PTO Side)
22 691092 Screw (Crankcase CovedSump)
23 796623 Flywheel
24 222698s Key-Flywheel (Aluminum)
25 590404 Piston Assembly (Standard)
590405 Piston Assembly (,020" Oversize)
26 590402 Ring Set (Standard)
590403 Ring Set %020" Oversize)
27 691588 Lock-Piston Pin
28 298909 Pin-Piston
29 796470 Rod-Connecting
32 691664 Screw (Connecting Rod) (1/4-20xl ,09)
32A 695759 Screw (Connecting Rod) (1/4-20xl ,50)
33 499642 Valve-Exhaust
34 795443 Valve-Intake
35 691304 Spring-Valve (intake)
36 691304 Spring-Valve (Exhaust)
37 796536 Guard-Flywheel (Carburetor Side)
37A 799155 Guard-Flywheel
40 692194 Retainer-Valve
43 796651 Slinger-GovernodOil
45 690977 Tappet-Valve
46 694039 Camshaft
51 796596 Gasket-Intake
51A 590398 Gasketqntake
58 697316 Rope-Starter
60 795426 Grip-Starter Rope
75 691736 Washer (Flywheel)
78 793480 Screw (Flywheel Guard'_
81 691740 Lock-Muffler Screw.
89 692348 Plug (Cylinder)
98 797156 Kit-idle Speed
104 797622 Pin-Float Hinge
117 798660 Jet-Main
121 799235 Kit-Carburetor Overhaul
122 796595 Spacer-Carburetor
125 799447 Carburetor
127 694468 Plug-Welch (D = 9,51mm}
127A 797633 Plug-Welch (D = 7,95mm)
130 797630 Valve-Throttle
133 797626 Float-Carburetor
134 799177 Kit-Needle!Seat
137 797625 Gasket-Float Bowl
163 691894 Gasket-Air Cleaner
187 791766 Line-Fuel (Cut to Required Length)
190 793479 Screw (Fuel Tank)
192 796631 Adjuster-Rocker Arm
202 796657 Link-Mechanical Governor
209 799507 Spring-Governor (Yellow)
211 799508 Spring-Governed idle (Green)
216 798944 Link-Choke
216A 796485 Link-Choke
217 799179 Spring-Choke Return
222 796482 Bracket-Control
227 796487 Lever-Governor Control
238 691300 Cap-Valve
276 797632 Washer-Sealing
287 793479 Screw (Dipstick Tube)
item Part # Description
291 798938 Thermostat
300 798940 Muffler
304 796692 Housing-Blower
332 690662 Nut (Flywheel)
333 796500 Armature-Magneto
334 793454 Screw (Magneto Armature)
334A 796537 Screw (Magneto Armature)
337 692051 Plug-Spark
347 795333 Switch-Rocker
356 798942 Wire-Stop
356A 798943 Wire-Stop
358 799495 Gasket Set-Engine
365 699484 Screw (Carburetor) (M6x35,5mm)
374 690402 Washer (Camshaft)
404 690272 Washer (Governor Crank)
455 796615 Cup-Flywheel
505 793515 Nut (Governor Control Lever)
523 796503 Dipstick
524 692296 SeaF Dipstick Tube
525 796502 Tube-Dipstick
534 798294 Screw (Air Cleaner)
535 797301 Filter-Air Cleaner Foam
536 799025 Cleaner-Air
562 793514 Bolt (Governor Control Lever)
564 690351 Screw (Control Cover) (10-32x,50)
564A 799026 Screw (Control Cover) (#8-18x,90)
592 793481 Nut (Rewind Starter)
601 791850 Clamp-Hose (Green)
604 799024 ControFCover
608 796497 Starter-Rewind
613 796496 Screw (Muffler)
615 690340 Retainer-Governor Shaft
616 798327 Crank-Governor
623 793628 SeaFO Ring (Carburetor Spacer)
633 797929 SeaFChoke/Throttie Shaft (Throttle Shaft)
633A 797929 Seal-Choke/Throttle Shaft (Choke Shaft)
635 66538s Boot-Spark Plug
670 793485 Spacer-Fuel Tank
718 690959 Pin-Locating
74t 797521 Gear-Timing
830 796472 Stud-Rocker Arm
832 798951 Guard-Muffler
836 793500 Screw (Muffler Guard)
842 691031 SeaFO Ring (Dipstick Tube)
847 796501 Dipstick/Tube Assembly
851 493880s Terminal-Spark Plug
868 795440 Seal-Valve
883 793497 Gasket-Exhaust
883A 796677 Gasket-Exhaust
886 796474 Gasket Kit-Cylinder!Plate
914 794451 Screw (Rocker Cover)
925 796531 Cover-Linkage
957 799585 Cap-Fuel Tank
972 590949 Tank-Fuel
975 797631 Bowl-Fuel
993 796473 Gasket-Cylinder Head Plate
1005 796614 Fan-Flywheel
1022 796480 Gasket-Rocker Cover
1023 796479 Cover-Rocker
1026 796481 Rod-Push
1029 691230 Arm-Rocker
1034 691343 Guide-Push Rod
1059 793471 Kit-Screw!Washer(FueITank)
1095 799496 Gasket SetWalve
1263 697124 Reed-Breather
1264 793453 Screw (Breather Reed)
1375 796476 Cover-Breather/Reed
1376 794451 Screw (Breather/Reed Cover)
1430 796477 Gasket-Breather/Reed
1430A 799494 Gasket-Breather/Reed
31
Page 92

California, U.S. EPA, and Sears Emissions
Control Warranty Statement
Your Warranty Rights And Obligations
The California Air Resources Board, U.S. EPA, and Sears
Brands Management Corporation, U.S.A. (Sears) are
pleased to explain the emissions control system warranty on
your Model Year 2013-2014 engine/equipment. In California,
new small off-road engines and large spark ignited engines
tess than or equal to 1.0 liter must be designed, built, and
equipped to meet the State's stringent anti-smog standards.
Sears must warrant the emissions control system on your
engine/equipment for the periods of time listed below
provided there has been no abuse, neglect, or improper
maintenance of your engine or equipment.
Your emissions control system may include parts such as
the carburetor or fuel injection system, ignition system,
and catalytic converter. Also included may be hoses,
belts, connectors, sensors, and other emissions-related
assemblies. Your evaporative emission control system may
include parts such as: carburetors, fuel tanks, fuel lines.
fuel caps, valves, canisters, filters, vapor hoses, clamps,
connectors, and other associated components. Where a
warrantable condition exists, Sears will repair your engine/
equipment at no cost to you including diagnosis, parts, and
labor.
Sears Emissions Control Warranty Provisions
The following are specific provisions relative to your
Emissions Control Warranty Coverage. It is in addition to the
Sears engine warranty for non-regulated engines found in the
Operator's Manual.
Warranted Emissions Parts
Coverage under this warranty extends only to the parts
listed below (the emissions control systems parts)
to the extent these parts were present on the engine
purchased.
a. Fuel Metering System
Cold start enrichment system (soft choke)
Carburetor and internal parts
Fuel pump
Fuel line, fuel line fittings, clamps
Fuel tank, cap and tether
Carbon canister
b. Air Induction System
Air cleaner
Intake manifold
Manufacturer's Warranty Coverage:
Small off-road engines and large spark ignited engines
tess than or equal to 1.0 liter, and any emissions related
components of the equipment, are warranted for two years _.
If any emissions-related part on your engine/equipment is
defective, the part will be repaired or replaced by Sears.
* Two years or for the time period listed in the respective
engine or product warranty statement, whichever is greater.
Owner's Warranty Responsibilities:
, As the engine/equipment owner, you are responsible
for the performance of the required maintenance listed
in your owner's manual. Sears recommends that you
retain all receipts covering maintenance on your engine/
equipment, but Sears cannot deny warranty solely
for the lack of receipts or your failure to ensure the
performance of all scheduled maintenance.
As the engine/equipment owner, you should however
be aware that Sears may deny you warranty coverage
if your engine/equipment or a part has failed due to
abuse, neglect, improper maintenance, or unapproved
modifications.
You are responsible for presenting your engine/
equipment to a Sears distribution center, servicing
dealer, or other equivalent entity, as applicable, as
soon as a problem exists. The warranty repairs should
be completed in a reasonable amount of time, not to
exceed 30 days. If you have any questions regarding
your warranty rights and responsibilities, you should
contact Sears at (800) 469-4663.
- Purge and vent line
c, Ignition System
• Spark plug(s)
Magneto ignition system
d. Catalyst System
Catalytic converter
Exhaust manifold
Air injection system or pulse valve
e. Miscellaneous Items Used in Above Systems
Vacuum, temperature, position, time sensitive
valves and switches
Connectors and assemblies
2. Length of Coverage
For a period of two years from date of original
purchase*, Sears warrants to the originat purchaser
and each subsequent purchaser that the engine is
designed, built, and equipped so as to conform with all
applicable regulations adopted by the Air Resources
Board; that it is free from defects in material and
workmanship that could cause the failure of a warranted
part; and that it is identical in all material respects to the
engine described in the manufacturer's application for
certification. The warranty period begins on the date the
engine is originally purchased.
• Two years or for the time period listed in the respective
engine or product warranty statement, whichever is greater.
32
Page 93

The warranty on emissions-related parts is as follows:
o Any warranted part that is not scheduled for
replacement as required maintenance in the owner's
manual supplied, is warranted for the warranty period
stated above. If any such part fails during the period
of warranty coverage, the part wilt be repaired or
replaced by Sears at no charge to the owner. Any such
part repaired or replaced under the warranty will be
warranted for the remaining warranty period.
Any warranted part that is scheduled only for regular
inspection in the owner's manual supplied, is warranted
for the warranty period stated above. Any such part
repaired or replaced under warranty will be warranted
for the remaining warranty period.
Any warranted part that is scheduled for replacement as
required maintenance in the owner's manual supplied,
is warranted for the period of time prior to the first
scheduled replacement point for that part. If the part fails
prior to the first scheduled replacement, the part will be
repaired or replaced by Sears at nocharge to the owner.
Any such part repaired or replaced under warranty will be
warranted for the remainder of the period prior to the first
scheduled replacement point for the part.
Add on or modified parts that are not exempted by the
Air Resources Board may not be used. The use of any
non exempted add on or modified parts by the owner
will be grounds for disallowing a warranty claim. The
manufacturer will not be liable to warrant failures of
warranted parts caused by the use of a non exempted
add on or modified part.
3. Consequential Coverage
Coverage shall extend to the failure of any engine
components caused by the failure of any warranted
emissions parts.
4. Claims and Coverage Exclusions
Warranty claims shall be filed according to the
provisions of the Sears engine warranty policy.
Warranty coverage does not apply to failures of
emissions parts that are not original equipment
Sears parts or to parts that fail due to abuse, neglect,
or improper maintenance as set forth in the Sears
engine warranty policy. Sears is not liable for warranty
coverage of failures of emissions parts caused by the
use of add-on or modified parts.
Look For Relevant Emissions Durability Period
and Air Inde× information On Your Small Off-Road
Engine Emissions Label
Engines that are certified to meet the California Air
Resources Board (CARB) small off-road Emissions Standard
must display information regarding the Emissions Durability
Period and the Air Index. The engine manufacturer makes
this information available to the consumer on emissions
labels. The engine emissions label will indicate certification
information.
The Emissions Durability Period describes the number of
hours of actual running time for which the engine is certified
to be emissions compliant, assuming proper maintenance in
accordance with the Operating & Maintenance Instructions.
The following categories are used:
Moderate: Engine is certified to be emissions compliant for
125 hours of actual engine running time.
Intermediate: Engine is certified to be emissions compliant
for 250 hours of actual engine running time.
Extended: Engine is certified to be emissions compliant for
500 hours of actual engine running time.
For example, a typical walk-behind lawn mower is used 20
to 25 hours per year. Therefore, the Emissions Durability
Period of an engine with an intermediate rating would
equate to 10 to 12 years.
Small off-road engines are certified to meet the United States
Environmental Protection Agency (USEPA) Phase 2 or
Phase 3 emissions standards. The Emissions Compliance
Period referred to on the Emissions Compliance label
indicates the number of operating hours for which the engine
has been shown to meet Federal emissions requirements.
For engines tess than 225 cc displacement.
Category C = 125 hours
Category B = 250 hours
Category A = 500 hours
For engines of 225 cc or more displacement.
Category C = 250 hours
Category B = 500 hours
Category A = 1000 hours
33
Page 94

GARANTIA ....................................... 34
CONTRATO DE PROTECCION PARA REPARACIONES 34
REGLAS DE SEGURIDAD ....................... 35-37
CARACTERiSTICAS Y CONTROLES ................. 38
MONTAJE .................................... 39-43
OPERACION .................................. 44-48
ESPECIFJCAClONES .............................. 49
MANTENIMENTO ............................. 50-55
ALMACENAMENTO ............................... 58
REPARACION DE DANOS REPUESTOS ............. 57
GARANTIA DEL CONTROL DE EMISIONES ........ 58-59
COMO ORDENAR PARTES ....... PAGINA POSTERIOR
GARANTiA COMPLETA DE DOS ANO DE CRAFTSMAN
DURANTE DOS A_40S a partir de ta fecha de compra, este producto cuenta con una garanfia contra cualquier defecto
material o de mano de obra. Los productos defectuosos serAn reparados sin costo alguno, o bien, serAn sustkuidos en caso
de que no sea posibte reparados.
Para conocer los detalles de cobertura de ta garant_a sobre c6mo obtener reparaci6n o sustkuci6n sin costo, visite el sitio web:
www.craftsman.com
Esta garanfia SOLO cubre defectos en materiales y mano de obra. La cobertura de ta garant_a NO incluye:
, Elementos sujetos a desgaste en condiciones de uso normales dentro del pedodo de garant_a, como pistolas rociadoras,
mangueras, prolongadores de boquilla, boquiltas, puntas de rociado, filtros o buj_as.
, Da[ios at producto dedvados del intento de modificar o reparar el producto pot parte det usuario o causados pot los
accesodos del producto.
, Reparaciones necesarias debido a accidentes o fattos que se deriven de ta incapacidad para operar o mantener el
producto de acuerdo con todas tas instrucciones facititadas.
, Mantenimiento preventivo o reparaciones necesanas debido al uso de mezclas de combustible inadecuadas o de
combustible contaminado o pasado.
Esta garanfia se invalida si este producto se utitiza atguna vez para prestar servicios comerciales o si se renta aotra persona.
Esta garanfia le otorga determinados derechos legates yes posible que tenga 9tros derechos que pueden vadar de una
provincia aotra.
Sears Brands Management Corporation, Hoffman Estates, _L (}0179
Feticidades pot realizar una compra inteflgente.
Su nuevo producto Craftsman® esta disefiado y fabdcado
para funcionar de manera fiable durante muchos aSos.
Pero como todos los productos, es posible que requiera
reparaci6n ocasionalmente. Es en esos momentos, tenet un
contrato de protecci6n para reparaciones puede ahorrade
dinero y molestias.
A continuaciTn se menciona to que et contrato de
protecci6n para reparaciones* contempla:
, Servicio experto de nuestros 10.000 especialistas
profesionales en reparaci6n.
, Servicio Himitado y sin costo en partes y mano de obra
en todas tas reparaciones incluidas en ta cobertura.
, Cambio deJ producto pot hasta $1.500 si el producto
inciuido en ta cobertura no se puede reparar.
, Un 25% de descuento en el precio normat de servicio
yen partes instaladas relacionadas no incluidas en la
cobertura del contrato; asimismo, un 25% de descuento
en et precio normal de revisiones de mantenimiento
preventivo.
, Ayuda telefTnica rapida. Nuestro servicio de Soluci6n
rApida consiste en apoyo telef6nico pot un representante de
Sears. Piense que samos un "manual del usuario parlante".
Una vez que adquiera el contrato de protecci6n para
reparaciones, s6to tiene que hacer una sencilla llamada
telef6nica para programar un servicio. Puede ttamar a
cualquier hora del d_a o ta noche, o programar una cita de
servicio en tinea.
El contrato de protecci6n para reparaciones es una compra
segura. Si to cancela pot cualquier motivo durante el perfodo
de garant_a del producto, te reembolsaremos el totat de
su dinero o una parte proporcional en cualquier momento
posterior al vencimiento del pedodo de garanfia del producto.
Adquiera boy su contrato de protecci6n para reparaciones.
ApHcan algunas Hmitaciones y exclusiones. Para
conocer precios y obtener infotmaci6n adicionaJ en BE°
UU., Hame at 1-800-827-6855.
* La cobertura en Canada varl'a en determinados
artm'cuJos, Para obtener todos los detaHes,
comunJ'quese a Sears Canad#_ ai 1-800-381-8885,
Servicio de instaiaci6n de Sears
Para soflcitar un servicio de insta/acidn por parte de un
profesiona/de Sears para aparatos domesticos, puertas
automAticas de garajes, catentadores de agua y otros
articulos domesticos importantes en EE. UU. o CanadA,
comun_quese al 1-800-4°MY-HOME®.
34
Page 95

Lea este manual minuciosamente y conozca a
fondo [as partes y e[ funcionamiento de su
m4quina [impiadora a presi6no Conozca sus
ap[icacJones, sus [imitaciones y los peHgros
invo[ucrados.
Jnformaci6n importante de seguridad
S_mboJos sobre [a seguridad y aignificadoa
Manual del Operarie Gases Tdxices Descarga Electrica
Superficies [nyecci6n
Resbalosas L_quida
Caer Superficie Proyect[[ Objetos
Callente Voladores
Fuego Explosl6n Quemadura Contragolpe
Qdmlca
E[ sfmbolo de alerta de seguridad indica un posible
riesgo para su integridad fisica. Se utiliza una palabra
de seffaiizaci6n (PELtGRO, ADVERTENC[A o
PRECAUC[ON) junto con el dmbolo de alerta para
designar un grado o nivel de gravedad de desgo. Se
puede utiiizar un dmbolo de seguridad para
representar el tipo de riesgo. La palabra de
seffaJizaci6n AVISO se utiliza para hacer referencia a
una prb,ctica no relacionada con una [esi6n fisica.
PELJGRO indica un riesgo que, de no evitarse,
provocara [a muerte o lesiones de gravedad.
A ADVERTENCiA indica un riesgo que, de no
evitarse, podrfa provocar la muerte o lesiones de
gravedad.
PRECAUCmON indica un riesgo que, de no evitarse,
podrfa provocar [es[ones [eves o moderadas.
A VISO hace referencia a una prb.ctica no relacionada
con una [esi6n fisica.
Partes en
Movimiento
ADVERTENCJA El escape del motor de este
producto contiene elementos quimicos reconocidos
en el Estado de California por producir cancer,
defectos de nacimiento u otros daffos de tipo
reproductivo.
ADVERTENCJA Este producto contiene plomo
y compuestos de plomo declarados causantes de
malformaciones y otros defectos cong6nitos pot el
Estado de California. Lavese /as manos despu6s de
manipular este productoo
ADVERTENCJA Riesgo de electrocuci6n.
El contacto con los cables el6ctricos podria
provocar electrocuci6n y quemaduras que
pueden provocar lesiones graves o la muerte.
o NUNCA rode cerca de unafuente de energ_ae[ectdca.
ADVERTENCIA PELIGRO DE GAS VENENOSO.
Los gases de[ escape del motor contJenen
mon6xido de carbono, un gas venenoso que
podria matado en minutos. NO t[ene olor, color
ni sabor. Aun si no puede oler losvapores del escape,
podria estar expuesto al gas de mon6xido de carbono.
La [nhalaci6n o ingesti6n de algunas sustancias
qdmicas o detergentes puede ser peligroso y
provocar lesiones graves, nb,useas, desmayos,
envenenamiento o la muerte.
Utiliceeste producto0NICAMENTE a [aintemperie,
Jejosde ventanas, puertasyventllaclones para reducir
etriesgo deque elgas de mon6xido decarbono se
acumu[ey entreen losespacios habitados.
[nsta[ealarmas para detectar mon6xidode carbono
operadas con bateffas o enchufablescon batedas de
repuesto de acuerdo con Jasinstruccionesde[ fabdcante.
Lasa[armasde humo no pueden detectar el gas de
mon6xido de carbono.
NO uti[ice este producto dentro de casas, garajes,
s6tanos, entresuelos, cobertizos o en otros espacios
parcia[mente cerrados, aun si uti[lza venti[adores o
deja tas puertas y ventanas abiertas para favorecer [a
ventl[aci6n. E[ mon6xido de carbono puede acumularse
rapidamente en estos espacios y perdurar ah_durante
horas, aun despues de que este producto se haya
apagado.
S[EMPRE co[oque este producto en dlreccl6n de[ viento
y didja el escape de[ motor en sent[do contrario a los
espacios habitados.
Si comienza a sentirse mat, mareado o debil cuando
use este producto, apague[o y busque aire pure DE
[NMEDIATO. Acuda a un medico. Es posible que se haya
envenenado con mon6xido de carbono.
UtiJice un respirador o una mascara cada vez que exista
ta posibi[[dad de [nhalar vapores al ut[[[zar sustancias
qdmicas.
, Lea todas Jasinstrucclones de [a mascara para
comprobar sl proporciona la protecci6n necesaria contra
ta [nha[aci6n de vapores nocivos cuando se utlJicen
sustancias qu_micas.
35
Page 96

A. ADVERTENCIA El retroceso (repliegue rapido)
del cable del arrancador impedir#, que el
_ usuario suelte el cable a tiempo tirar#, de
su mano y brazo hacia el motor, Io que
podr[a provocar fracturas, contusiones o esguinces;
as[ como lesiones graves.
o NUNCA tire del cable del arrancador sin eliminar
previamente ta presi6n de ta pistola rociadora.
Cuando arranque et motor, tire tentamente del cable
hasta sentir una resistencia y, a continuaci6n, tire
r#.pidamente de 61para evitar su retroceso.
Despues de cada intento de arranque, cuando el motor
no consiga arrancar, apunte con ta pistola rociadora
hacia una direcci6n segura, pulse el bot6n rojo y apriete
el gatillo para descargar la presi6n.
Sujete firmemente la pistola rociadora con ambas manos
cuando aplique un rociado a alta presi6n para evitar
tesiones cuando se produzca el retroceso de ta pistol&
_, ADVERTENClA Los gases y el calor de escape
poddan inflamar los matedales
combustibles y las estructuras o
daSar el dep6sito de combustible y
provocar incendios, as[ como
lesiones graves o incluso la muerte.
El contacto con la zona del silenciador podda
producir quemaduras y lesiones graves.
NO toque tas superficies calientes y evite los gases det
escape a alta temperatura.
Permita que el equipo se enfr_e antes de tocarto.
Deje un espacio m_nimo de 1.5 m (5 pies) alrededor det
timpiadora a presi6n, incluida ta parte superior.
Utilizar el motor en un terreno boscoso, con mateza o
cubierto de hierba constituye una infracci6n al C6digo
de recursos publicos de California, a menos que el
sistema de escape este equipado con una pantalta
apagachispas, de acuerdo a ta definici6n de ta Secci6n
4442, que se mantenga en buenas condiciones de
funcionamiento. En otros estados o jurisdicciones
federates puede haber leyes similares en vigor.
Pongase en contacto con el fabricante, el vendedor o et
distribuidor det equipo original para obtener una pantalla
apagachispas dise_iada para el sistema de escape
instalado en este motor.
Las piezas de recambio deben set tas mismas que tas
piezas originales y estar instaladas en ta misma posici6n.
_, ADVERTENCIA El arrancador y otras piezas
rotativas poddan enredarse en las manos,
el pelo, la ropa u otros accesodos, y
provocar lesiones graves.
NUNCA utilice ta timpiadora a presi6n sin sus carcasas o
tapas de protecci6n.
NO utilice ropa suetta, joyas ni objetos que poddan
quedar atrapados en el arrancador o en otras piezas
rotativas.
Ate para arriba el pelo largo y quite tajoyerfa.
Y
ADVERTENClA El combustible y sus vapores
explosivos, Ioque podria provocar
son extremadamente infiamables y
quemaduras, incendios o explosiones;
asi como lesiones graves o incluso la muerte.
CUANDOANADA COMBUSTIBLEO VACiE EL DEP6SlTO
DETENGA el motor del timpiadora a presi6n y dejelo
enfdar durante al menos 2 minutos antes de quitar el
tap6n de combustible. Aftoje ta tapa lentamente para
dejar que la presi6n satga del tanque.
Uene o vacie et dep6sito de combustible a ta intemperie.
NO tlene demasiado el tanque. Permita al menos espacio
para ta expansi6n del combustible.
Si se ha derramado combustible, espere a que se
evapore antes de arrancar el motor.
Mantenga ta gasolina atejada de chispas, llamas
abiertas, pitotos, cator y otras fuentes de ignici6n.
Compruebe frecuentemente que las l_neasde
combustible, et tanque, el tap6n y los accesorios no
esten rotos o tengan fugas. C#.mbielos si es necesado.
NO encienda un cigarrillo o fume.
CUANDO PONGA EN FUNCIONAr_IENTO EL EQU|PO
Compruebe que ta bujia, el silenciador, el tapon del
dep6sito de combustible y et fittro de aire est&n instalados.
NO arranque et motor sin la buj_ainstalada.
CUANDO OPERE EL EQUnPO
NO utilice este producto en et interior de un edificio,
cochera, porche, equipo m6vil, taller de aplicaciones
navates o recinto.
NO incline et motor o el equipo, de tal manera que ta
gasolina se pueda derramar.
NO rode l_quidos inflamables.
AL TRANSPORTAR, MOVER O REPARAR EQUIPO
• Transporte, mover o repare et equipo con el tanque
de combustible ratio, o con la v&lvula para apagar el
combustible, apagada (posici6n OFF).
NO incline el motor o el equipo, de tal manera que ta
gasolina se pueda derramar.
Desconecte el cable de ta buj_a.
CUANDO ALr_IACENE O GUARDE EL EQUIPO CON
COMBUSTIBLE EN EL TANQUE
, Mantengalo atejado de catderas, estufas, catentadores
de agua, secadoras de ropa u otros aparatos que utilicen
llama piloto u otras fuentes de ignici6n que podr_an infla-
mar los vapores de combustible.
_k ADVERTENCiA EI uso de una [impiadora a
_,\® 2_ presi6n podrfa producir charcos y
r_ superficies resbaladizas que
_m nrovoquen que se caiga y sufra
El retroceso de la pistoia rociadora podrfa provocar
cafdas con lesiones graves o la muerte.
Utilice la limpiadora a presi6n desde una superficie estable.
El #.tea de timpieza debera tener inclinaciones y drenajes
adecuados para disminuir ta posibitidad de caidas debido
a superficies resbatosas.
Extreme las precauciones si necesita utilizar la
timpiadora a presi6n desde una escalera, un andamio u
otto tugar similar.
, Sujete firmemente la pistola rociadora con ambas manos
cuando aplique un rociado a alta presi6n para evitar
tesiones cuando se produzca el retroceso de ta pistol&
[ lesiones graves o que se muera.
36
Page 97

A. ADVERTENCIA Peligro de quemadura qu_mica.
Las sustancias qdmicas poddan provocar
quemaduras, asi como lesiones graves o
incluso la muerte.
o NO use tfquidoc#,usticocon tatimpiadoraa presi6n.
Use EXCLUSWAMENTEdetergenteso jabones
especiatespara ta timpiadoraapresi6n. SJgatodas tas
instruccionesdel fabdcante.
A. ADVERTENCIA El chorro de agua a alta
presi6n que este equipo produce podrfa
I_ atravesar la pie_ y los tejidos subcut4neos,
La pistola rociadora retiene agua a alta presi6n
incluso con el motor parado y el agua
desconectada; esto podrfa provocar lesiones
graves.
, NUNCA repare ta manguera de aka presi6n. Remplacela.
, NUNCA utitice ningun tipo de sellador para reparar una
, NO fije ta pistola rociadora en la posicion abierta.
o NO abandone la pistola rociadora cuando ta maquina
, NUNCA utitice una pistola rociadora cuyo seguro o
A, ADVERTENCIA Las chispas involuntarias
CUANDO AJUSTE O HAGA REPARACIONES A SU
MAQUINA LIMPIADORA A PRES|ON
, Siempre desconecte el atambre de ta bujia y col6quelo
CUANDO PRUEBE LA BUJIA DEL MOTOR
que poddan provocar lesiones graves y la
posible amputaci6n de un miembro.
En caso de que atgun l_quido te cause una cortadura,
tlame al medico de inmediato. NO ta trate como una
cortadura comun.
NO permita en ningun momento que NIF4OSoperen ta
maquina timpiadora a presi6n.
fuga en una conexi6n. Sustituya ta junta tOdca o ta junta.
NUNCA conecte la manguera de alta presi6n al
prolongador de ta boquilla.
Mantenga conectada la manguera a ta mb.qu_nao a ta
pistola de rociado cuando el sistema este presurizado.
SIEMPRE que pare et motor, apunte con la pistola
rociadora hacia una direcci6n segura, pulse el botOn rojo
y apdete el gatillo para descargar ta presion.
NUNCA apunte ta pistola a ta genre, animaJes o plantas.
este en funcionamiento.
protecci6n para el gatillo no este en perfecto estado de
funcionamiento.
Asegurese en todo momento de conectar correctamente
ta pistola rociadora, tas boquillas y los accesodos.
poddan provocar incendios o
electrocuci6n que pueden provocar
lesiones graves o la muerte.
donde no pueda entrar en contacto con ta buj_a.
Utitice un comprobador de buj_as homologado.
NO comprueba ta chispa sin ta buj_a instalada.
ADVERTENCJA Riesgo de lesiones en los ojos
o el cuerpo. El agua rociada podrfa
:_ salpicar o propulsar objetos, Io que
Cuando utilice este equipo o este cerca de el, siempre
use gafas de seguridad con ventitaciOn indirecta (contra
satpicaduras de productos qdmicos) marcadas para
cumplir con ANSI Z87.1.
NUNCA se ponga gafas de seguddad ni gafas para
entomos secos como sustituto de tas gafas de seguridad
con ventitaci6n indirect&
Siempre utilice ropa de protecci6n como una camisa de
manga targa, pantalones largos y zapatos cerrados.
NUNCA ponga en funcionamiento ta timpiadora a presi6n
cuando este descalzo, tleve sandalias o pantalones
cortos.
PRECAUCKSN Las velocidades de
funcionamiento excesivamente altas poddan
provocar lesiones leves.
Las velocidades excesivamente bajas incrementan
la carga de trabajo.
NO intente alterar et resorte, las conexiones y otras
partes del regulador para incrementar ta velocidad det
motor. La timpiadora a presiOn ejerce ta presi6n y el flujo
nominates correctos cuando funciona a una velocidad
controlada.
NO modifique at limpiadora a presiOn en ninguna form&
AVISO El rociado de alta presi6n podda da_ar
objetos fr@gi_es, incluido el vidrio.
NO dirija la pistola rociadora hacia cdstates cuando use et
patron de rociado MAX (maximo) en el boquilla de selector.
NUNCA apunte ta pistola a plantas.
AWSO Un tratamiento inadecuado de la limpiadora
a presi6n podr[a da_arla y acortar su vida OtiL
Si usted tiene alguna pregunta acerca de tas finatidades de
uso del timpiadora a presi6n, preguntele a su concesionario
o contacte el distdbuidor de servicio autodzado.
NUNCA deberan ser operadas tas unidades con partes
rotas o ausentes, o sin ta caja o cubiertas de protecci6n.
NO eluda ningun dispositivo de seguddad de esta maquina.
NO intente alterar tavelocidad controlada.
NO utilice ta timpiadora a presi6n pot encima de su presi6n
nominal.
NO haga ninguna modJficacJ6n en ta timpJadora a presiOn.
, Antes de poner en marcha la m#.quina timpiadora a presi6n
en clima fdo, revise todas tas partes del equipo y asegurese
de que no se haya formado hielo sobre elias.
, NUNCA mueva ta mb.quina hatando ta manguera de alta
presiOn. Utitice ta manija que viene con ta unidad.
El equipo de alta presJOnestb. disefiado para set utilizado
UNtCAMENTE con tas partes autodzadas Sears. Si
utiliza este equipo con partes que no cumplan con tas
especificaciones m_nimas, el usuario asume todos los
riesgos y responsabitidades.
puede provocar lesiones graves.
37
Page 98

CONOZCA SU MAQUtNA SISTEMA DE LIMPIEZA
Lea et r_]anuai det Opetario y las reglas de segutidad antes de porter en matcha su sistema de limpieza.
_ Compare tas Hustraciones sistema de famitiarizarse tas ubicaciones de los diferentes
controles y ajustes. Guarde este manual para referencias futuras.
con su
timpieza para
cod
A - PJstoJa de rociado -- Contro{a la aplicaci6n de agua sobre la
superficie de limpieza con el gatillo. Uncluyecerrojo de seguridad.
B - Bandeja de accesorios -- Permite almacenar
c6modamente los accesorios de serie.
C - BoquHla Selector - Contiene cinco boquillas patr6n de
rociado diferentes para diversas aplicaciones.
D - Asa pJegable -- El asa y la bandeja de accesorios se
pliegan sobre el motor cuando est& frio para reducir el
espacio necesario para el almacenamiento.
E _Arrancador de retroceso -- Usado para arrancar el motor
manualmente.
F - Tapa deJ dep6sito de! aceite -- Llene el motor con aceite aqui.
G - Entlrada de agua -- Conexi6n para la manguera de jardin.
H _ Yoma de aJta presi6n -- Conexi6n para la manguera de
alta presi6n.
J _Filtro de aire -- El elemento de filtro tipo seco limita la
cantidad de suciedad y polvo que se introduce en el motor.
K _ Soporte para boteHa -- La botella de soluci6n limpiadora
se adapta a la forma del soporte de alambre. Botella con
concentrado no inc]uida.
M - Conmutador de parada -- Coloca el motor en modo de
arranque para el arrancador de retroceso y detiene el motor
en funcionamiento.
N - Manguera de inyecci6n Project Pro PerfectMix TM --
Mezcla el concentrado con el rociado de la limpiadora a
presi6n.
P - Etiqueta de advertencia e instrucciones -- Identifica los
riesgos e indica el procedimiento adecuado de puesta en
marcha o de parada de la limpiadora a presi6n.
Q - Tanque deJ combustible -- Llene el tanque con gasolina
regular sin contenido de plomo en este punto. Siempre
habitaci6n de hoja para la expansi6n del combustible.
R - Manguera de AJta Presi6n -- Conecte un extremo a la pisto{a
de rociado y el otto extremo a la toma de alta presi6n.
S - Extensi6n de ta boquiHa con conector r_pido -- Le
permite cambiar entre el boquilia de selector y los accesorios
opcionales para boquilia.
No mostrado:
Bomba -- Desarro{la alta presi6n de agua.
Automatico se enfrfa sistema -- Los ciclos regan pot bomba
cuando agua alcanza 125 -o°155-°F. Entibiar agua descargar& de
la bomba en el suelo. Este sistema previene el daSo interno de
bomba.
Etiqueta de identificaci6n -- Proporciona el modelo y el
nOmero de serie de limpiadora a presi6n. Tenga pot favor estos
prontamente disponible cuando Ilamar para la ayuda.
38
Page 99

Su sistema de limpieza requiere de cierto ensamble y
estar& lista para ser usado unicamente despues de haber
depositado el combustible y el aceite recomendado.
Si tiene probtemas con et ensamble de su maquina
limpiadora a presi6n, Itame a la lt"nea de ayuda de la
maquina limpiadota a presi6n al 1-800-222-3136,
Desembale ia iimpiadora a presi6n
1. Saque todo el contenido de ta caja de cart6n, a
excepci6n de ta timpiadora a presi6n.
2. Abra completamente ta caja de cart6n cortando cada
una de sus esquinas de arriba abajo.
3. Saque ta timpiadora a presi6n de ta caja de cart6n.
Contenido de ia ¢aja
Revise el contenido de ta caja. Si atguna de tas partes no
est& presente o est& da_ada, llame a ta tinea de ayuda de ta
maquina timpiadora a presi6n al 1-800-222-3136.
, La unidad principal
, Manubrio
, Bandeja de accesodos con abrazadera para manguera
, La manguera de alta presi6n
, Pistola de rociado
, Extensi6n de ta boquilla con conector ra.pido
, Puch de aceite para motor
, Soporte para botella (2)
, Boquilla de selector de conexi6n ra.pida
, Manguera de sif6n del detergente de ProjectPro®
PerfectMix
, Bolsa de partes (incluye los etementos descdtos a
continuaci6n)
, Manual del operador
, Tarjeta de ta matdcula
, Piezas para ta manubrio (inciuye to siguiente):
, Pemos para manubrio [2_
, Pemos de cabeza redonda/21
, Perilla plastica para manubrio (2)
, Perilla plastica (2)
, Pinzas de a.rbol (4)
Familiar{cese con cada parte antes de ensambtar la ma.quina
timpiadora a presi6n. Compare el contenido con ta ilustraci6n
de la pagina 38. Si atguna de ta partes no est& presente o se
encuentra da_ada, llame a ta t_neade ayuda de ta maquina
timpiadora a presi6n al 1-800-222-3136.
MONTAJE DEL SISTEMA DE LIMPIEZA
Usted deber& tlevar a cabo los siguientes procedimientos
antes de porter en funcionamiento su sistema de timpieza:
1. Ltene y mande en tarjeta de matdcula.
2. Conecte manubrio y bandeja de accesodos.
3. Conecte ta manguera de sifon del detergente a ta
bomba.
4. A6ada aceite al motor.
5. A6ada gasolina al tanque de combustible.
6. Conecte manguera a alta presi6n a pistola rociadora y a
bomba.
7. Conecte el suministro de agua a bomba.
8. Conecte boquilla ta extensi6n al pistola rociadora.
9. Selecto/conecta rapido conecta boquilla de selector a ta
extensi6n de ta boquilla.
Coneete el Manubrio y Bandeja de
Accesorios
1. Coloque et manubrio (A) sobre los soportes det mismo
que ya estan adheridos a la unidad principal. Asegurese
de que los odficios en el manubdo esten alineados con
los odficios en los soportes del mismo manubdo.
2. lnserte los pemos de cabeza redonda (B) det asa en los
odficios desde el interior de ta unidad y coloque un pomo
de ptastico ('C}desde ta parte exterior. Apdete a mano.
A VISO Si se aflojan los dos pomos de ta parte intermedia
del perno de sujeci6n, el asa superior se puede plegar sobre
el motor cuando est& fr_o.NO pliegue el asa si el motor est&
caliente.
3. lnserte las correas de goma (B) a traves de tas ranuras
(E) en ta parte trasera de ta bandeja de accesorios y tire
firmemente pot la parte frontal.
39
Page 100

4,
Coloque la bandeja de accesodes (A) sobre Josodficios
(B) del manubdo (vista desde ta parte dentr&s de la
unidad). Presione tas pinzas de #.rbol (C) para introducir
tas en los orificios hasta que queden a nivel con ta
bandeja de accesorios.
/
5,
lnserte los accesodos suministrados en tos espacios
correspondientes en ta bandeja de accesorios. Consulte
Cdmo Usar la Bandeja de Accesorios.
6,
Coloque los soportes para botelia (D) hacia el exterior
sobre los odficios del soportes del asa. Fije tos soportes
para botelia y el asa con tos pernos de cabeza (E) y
pomos de pl&stico (F). Apriete a mano.
Project Pro@ Perfect Mix TM sif6n
1. Conecte el extremo de la manguera del sistema de
inyecci6n Project Pro PerfectMix (G) at acopiamiento
dentado de ta manguera (H) de ta bomba.
2. Coloque ta botelJas de Project Pro PerfectMix (no
incluida) en el soporte de alambre del asa.
3. Quite el tapdn de ta boteHa e inserte el sistema de
inyecci6n Project Pro PerfectMix (J). Enrosque ta unidad
de inyecci6n a ta parte superior de ta botelia (K).
A VISO Utilice el clip del tap6n para encajar el sistema de
inyecci6n en et soporte de alambre cuando no este en una
botella de concentrado.
4O
 Loading...