

Page 1
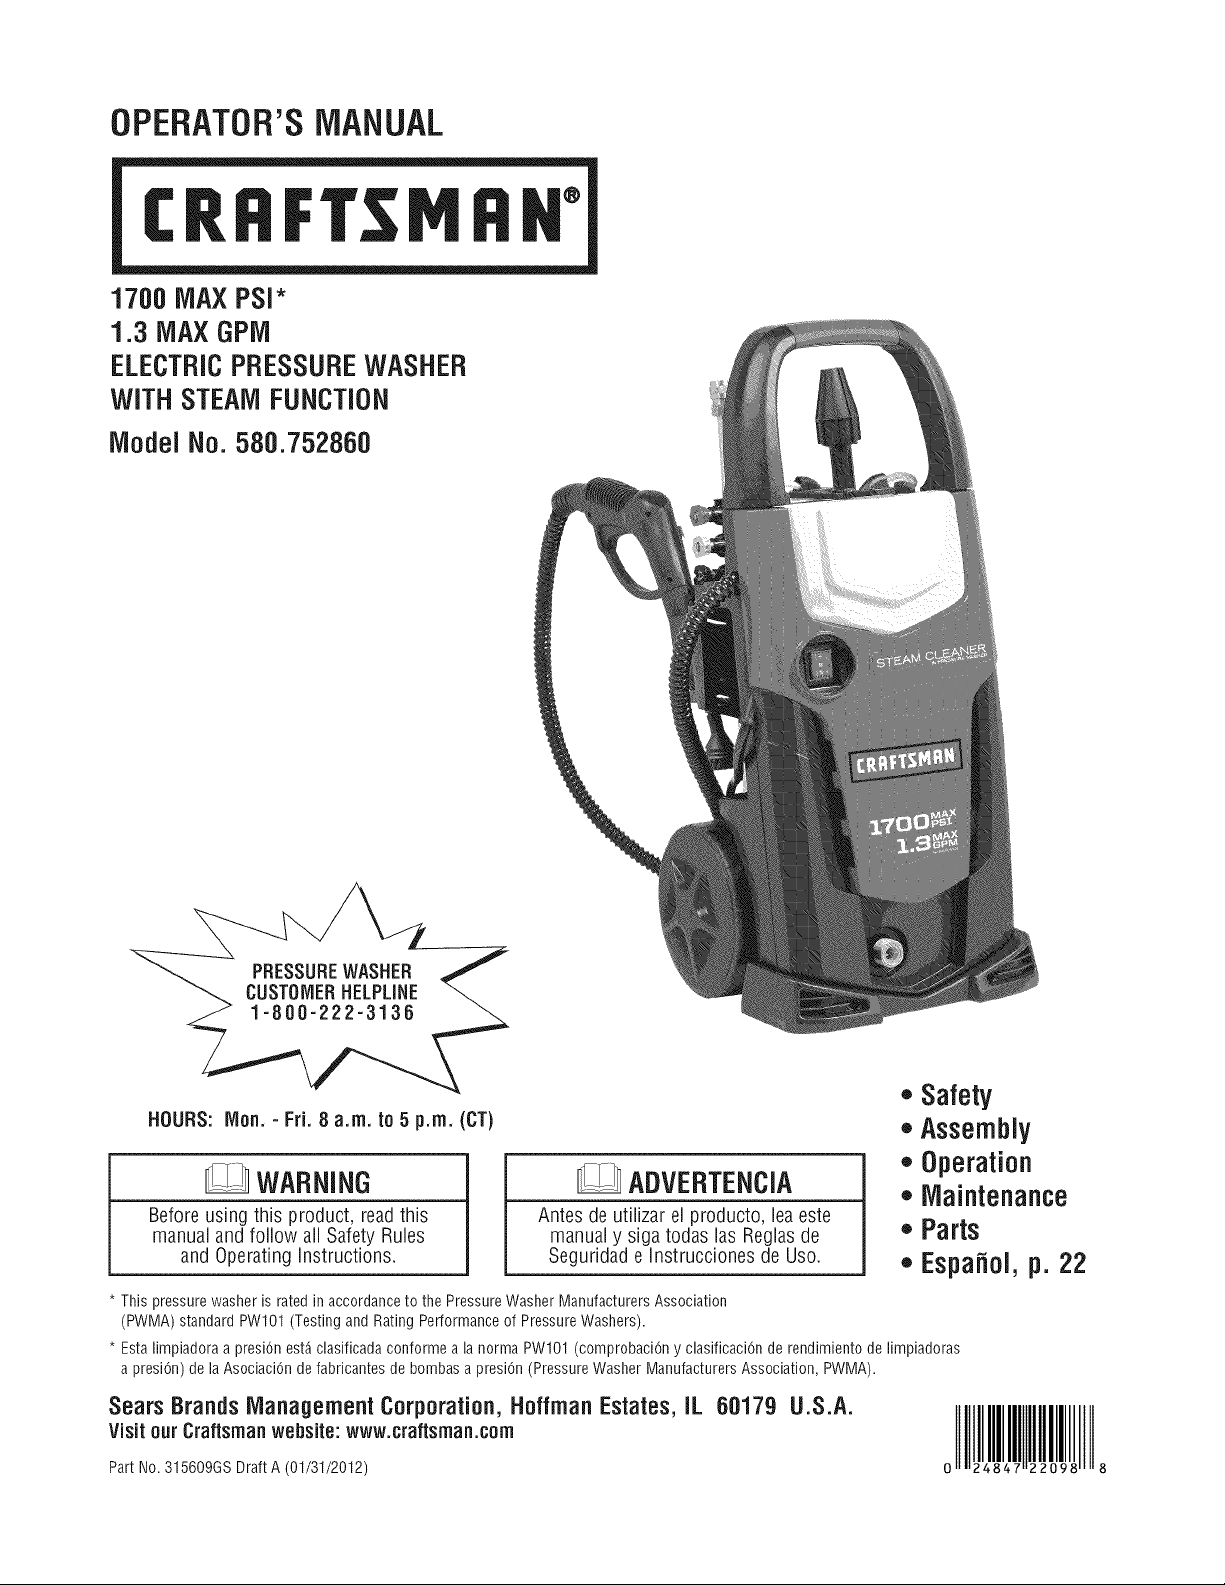
OPERATOR'SMANUAL
1700 MAX PSi*
1.3 iVlAXGPIVi
ELECTRICPRESSUREWASHER
WiTHSTEAMFUNCTION
iViodelNo. 580.752860
®
,, Safety
HOURS: IVIon.- Fri. 8 a.m. to 5 p.m. (CT)
,, Assembly
,, Operation
WARNING
Beforeusing this product, readthis
manualand follow all Safety Rules
and OperatingInstructions.
* This pressure washer is rated in accordanceto the PressureWasher Manufacturers Association
(PWMA) standard PWl01 (Testing and Rating Performance of Pressure Washers).
* Esta limpiadora a presiOn est_ clasificada conforme a la norma PWI01 (comprobaciOn y clasificaciOn de rendimiento de limpiadoras
a presiOn) de laAsociaciOn defabricantes de bombas a presiOn(Pressure Washer Manufacturers Association, PWMA).
SearsBrands ManagementCorporation, HoffmanEstates, IL 60179 U.S.A.
Visit our Craftsman website: www.craftsman.com
Part No. 315609GS Draft A (01/31/2012)
Antes de utiiizar el producto, leaeste
manualy siga todas las Reglasde
Seguridad e Instrucciones de Uso.
ADVERTENCIA
,,Maintenance
,,Parts
,, EspaNol,p. 22
Page 2
WARRANTY .......................................... 2
REPAIRPROTECTIONAGREEMENT........................ 2
SAFETYRULES...................................... 3-4
FEATURESAND CONTROLS.............................. 5
ASSEMBLY........................................ 6-10
OPERATION...................................... 10-14
SPECIFICATIONS..................................... 15
MAINTENANCE.................................... 15-17
STORAGE........................................... 18
TROUBLESHOOTING.................................. 19
NOTES............................................. 20
REPLACEMENTPARTS................................. 21
ESPANOL........................................... 22
HOWTO ORDERPARTS......................... BACKPAGE
CRAFTSMANONEYEARFULLWARRANTY
FORONEYEARfrom the dateof purchase, this product is warrantedagainst any defectsin material or workmanship. A
defective product will receivefree repair or replacementif repair is unavailable.
Forwarranty coveragedetails to obtain free repair or replacement,visit the web site:www.craftsman.com
This warranty does not cover spray guns, hoses,nozzleextensions, nozzles,spray tips or filters, which are expendableparts
that canwear out from normal usewithin the warranty period.
This warranty is void if this product is everusedwhile providing commercial servicesor if rented to another person.
This warranty givesyou specific legalrights, and you may also haveother rights which vary from stateto state.
Sears Brands Management Corporation, Hoffrnan Estates, IL 60179
Congratulations on making a smart purchase.
Your new Craftsman® product is designed and manufactured
for years of dependableoperation. But likeall products, it
may requirerepair from time to time. That's when having
a RepairProtectionAgreement can saveyou money and
aggravation.
Here's whatthe Repair ProtectionAgreement* includes:
* Expert service by our 10,000 professional repair
specialists
* Unlimited serviceand no chargefor parts and labor on
all coveredrepairs
* Product replacement up to $1500 if your covered
product can't befixed
* Discountof 25% from regular priceof serviceand related
installed parts not covered bythe agreement;also, 25%
off regular price of preventivemaintenancecheck
* Fast help byphone-we caii it RapidResolution- phone
support from a Sears representative.Think of us as a
"talking owner's manual."
Onceyou purchasethe Repair Protection Agreement,a
simple phonecall is all it takes for you to schedule service.
You cancaii anytimeday or night, or schedulea service
appointment online.
The RepairProtectionAgreement is a risk-free purchase.
Ifyou cancelfor any reason during the product warranty
period, wewill provide a full refund.Or, aprorated refund
anytime afterthe product warranty period expires. Purchase
your RepairProtectionAgreement today!
Some limitationsand exclusions apply. Forpricesand
additional informationin the U.S.A. call 1-800-827-6655.
* Coverage in Canada varies on some items. Forfull
details, cail Sears Canadaat 1-800-361-6665.
Sears InstallationService
ForSears professional installation of homeappliances,
garagedoor openers,water heaters,and other major home
items, inthe U.S.A.or Canadacall 1-SOO-4-MY-HOME@.
© KCDIP, LLC
Page 3
SAVETHESE iNSTRUCTiONS
WARNING Riskof electrocution. Contactingboth
Readthis manual carefully and becomefamiliar
with yourpressurewasher. Knowits applications,
itslimitations, and anyhazardsinvolved.
importantSafety information
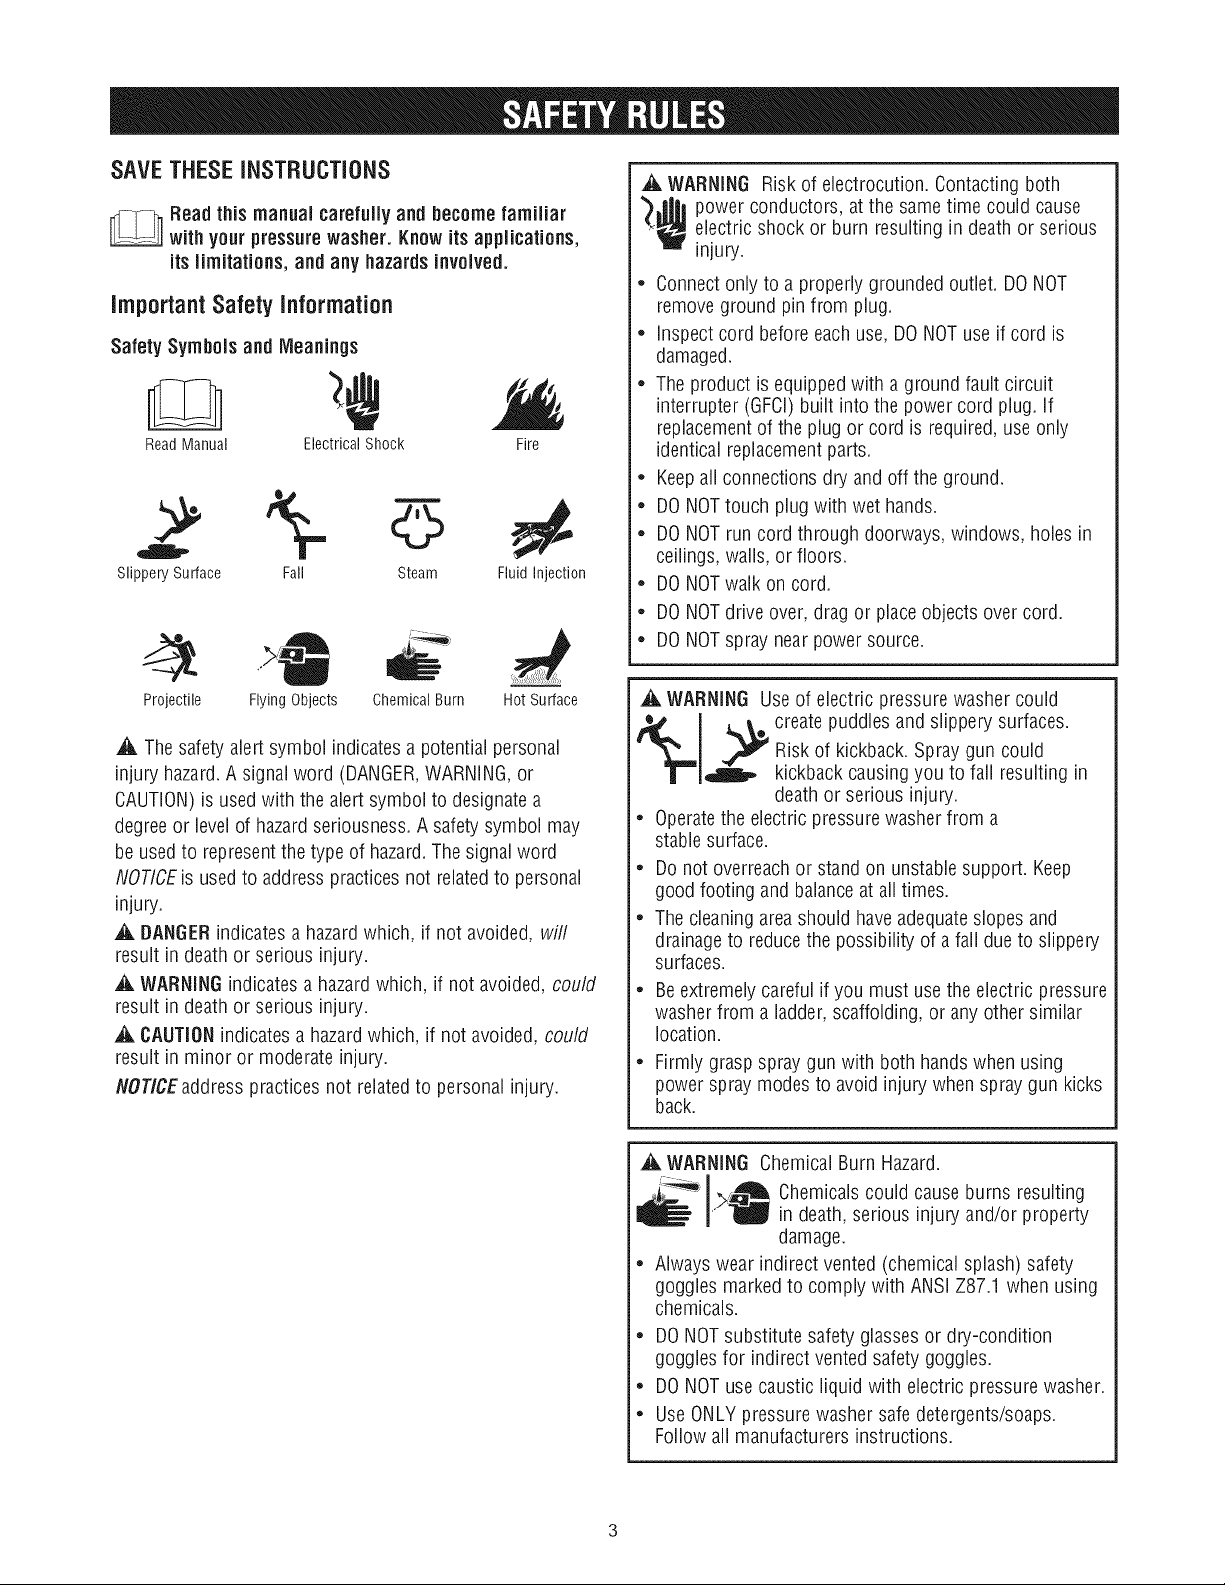
Safety Symbols and Meanings
ReadManual Electrical Shock Fire
Slippery Surface Fall Steam Fluid Injection
Projectile Flying Objects
,A. Thesafety alertsymbol indicatesa potential personal
injury hazard.A signalword (DANGER,WARNING,or
CAUTION)is usedwith the alertsymbol to designatea
degreeor levelof hazardseriousness. A safety symbol may
be usedto representthe typeof hazard.The signalword
NOTICEis usedto address practices not relatedto personal
injury.
,_, DANGERindicatesa hazardwhich, if not avoided, will
result in deathor serious injury.
WARNINGindicates a hazardwhich, if not avoided, could
result in deathor serious injury.
,_, CAUTIONindicatesa hazardwhich, if not avoided, could
result in minor or moderate injury.
NOTICEaddress practicesnot relatedto personal injury.
Chemical Burn Hot Surface
*_¢ power conductors, at the sametime could cause
.electricshock or burn resulting in deathor serious
injury.
, Connectonly to a properly groundedoutlet. DONOT
remove ground pin from plug.
, inspect cordbefore eachuse, DONOTuse if cord is
damaged.
, The product isequippedwith a ground fault circuit
interrupter (GFCI)built into the power cord plug. If
replacementof the plug or cord is required,useonly
identical replacementparts.
, Keepall connectionsdry andoff the ground.
, DONOTtouch plug with wethands.
, DONOTrun cord through doorways, windows, holes in
ceilings,wails, or floors.
, DONOTwalk on cord.
, DONOTdrive over, drag or placeobjects over cord.
, DONOTspray nearpower source.
,_, WARNING Useof electric pressurewasher could
_ldBp_ reatepuddlesand slippery surfaces.
• Operatethe electric pressurewasherfrom a
stable surface.
• Do not overreachor stand on unstablesupport. Keep
good footing and balanceat alltimes.
• Thecleaningareashould haveadequateslopes and
drainageto reducethe possibility of afall due to slippery
surfaces.
• Beextremelycareful if you must use the electric pressure
washer from a ladder,scaffolding, or anyother similar
location.
• Firmly graspspray gun with both handswhen using
power spraymodes to avoidinjury when spray gun kicks
back.
Risk of kickback.Spray gun could
kickback causingyou to fall resulting in
deathor serious injury.
,A WARNING ChemicalBurn Hazard.
i
_i-'''_> >_ Chemicalscould causeburns resulting
I W in death,serious injury and/or property
damage.
• Alwayswear indirect vented (chemical splash) safety
goggles markedto comply with ANSIZ87.1 when using
chemicals.
• DONOTsubstitute safety glasses or dry-condition
goggles for indirect ventedsafetygoggles.
• DONOTuse caustic liquid with electric pressurewasher.
• UseONLY pressurewasher safedetergents/soaps.
Follow all manufacturers instructions.
Page 4
_, WARNINGRiskofeyeorbodilyinjury.Spraycould
_, WARNING Hot Surface and SteamBurn Hazard.
i,_ splashback,propelobjectsorcause
* Always wear indirect vented(chemical splash) safety
gogglesmarked tocomply with ANSIZ87.1 when using
or in vicinity of this equipment.NEVERsubstitute safety
glassesor dry-condition gogglesfor indirect vented
safetygoggles.
* Know howto stop the pressurewasher and bleed
pressure quickly. Bethoroughly familiar with the
controls.
* DONOTallow CHILDRENto operatethe electric pressure
washer.
* Keepoperatingareaclear of all persons.
* inspect high pressurehosebeforeeach use. NEVER
repair high pressurehose; replaceit.
* DONOT repairleaking connections with sealantof any
kind; replaceo-rings and gaskets.
* Keephoseconnectedto electric pressurewasherand
spray gun while system is pressurized.
* ALWAYS point spraygun in safedirection while system
is pressurizedandsqueezespray guntrigger to release
high pressure,everytime you turn off the unit.
* DONOTaim spray gun at peopleor animals.
* DONOTdrink from hose connectedaccessories.
* DONOTsecure spraygun in open position.
* DONOTleavespray gun unattendedwhile the electric
pressurewasher is in ON(-) position.
* DONOTuse a spray gun which does not havea trigger
lock or trigger guard in place and in working order.
* Always be certain spray gun and accessoriesare
correctly attached.
* Stayalert - watch whatyou aredoing.
* DONOToperatethe product whenfatigued or under the
influenceof alcoholor drugs.
* Closesupervision is necessarywhen this product isused
nearchildren.
_, WARNING The highpressurestream of water that
and its underlying tissues, resulting in serious
this equipment producescould cut through skin
injury and possible amputation.
Spraygun traps high water pressure, evenwhen motor is
stopped and water is disconnected,which could result in
serious injury.
* NEVERaim spray gun at people,animals,or plants.
* ALWAYS point spray gun in safe direction, squeeze
spray gun trigger to releasehigh pressure,every time
you turn off pressure washer.
internalharmresultinginseriousinjury.
_1_ Hot surfaces and steam produced by the
* DONOTtouch the steam jet or nozzleend with your
handsduring use.
* Allow equipment to cool before touching.
* ALWAYS point steamgun in safedirection while system
is operating.
* DONOTaim steamgun at peopleor animals.
_, WARNING Riskof fire. Sprayingflammable liquids
* DONOTspray flammable liquids.
WARNING Riskof fire. Overheatedcord could result
* Uncoil cord completely prior to use.
* DONOTcover cord with any material.
A WARNING This product contains leadand lead
compounds, knownto the Stateof Californiato cause
birth defects or other reproductive harm. Washyour
hands afterhandling this product.
IVOTICEHigh pressurespray could damagefragile items
including glass.
* DONOTpoint spray gun at glass when using red (0°)
spray tip.
* NEVERaim spray gun at plants.
NOTICE improper treatment of electric pressurewasher
could damageit and shorten its life.
* If you havequestions about intendeduse, ask dealeror
contact authorizedservicecenter.
* DONOToperate units with broken or missing parts, or
without protectivehousing or covers.
* DONOTby-pass anysafety deviceon the electric
pressurewasher.
* DONOTmodify the electricpressure washer in anyway.
* Beforestarting the electricpressurewasher in cold
weather, checkallparts of the equipment to besure ice
hasnot formed there.
* DONOTmove the electric pressurewasher by pulling on
hoses.Move unit usingthe transport handlesupplied.
* This equipment isdesignedto be usedwith Sears
authorizedparts ONLY.Ifequipment is usedwith parts
that DONOTcomply with minimum specifications, user
assumesall risks and liabilities.
steam gun could cause burns resulting in
serious injury.
could result in death, serious injury and/or
property damage.
in death, serious injury, and/or property damage.
Page 5
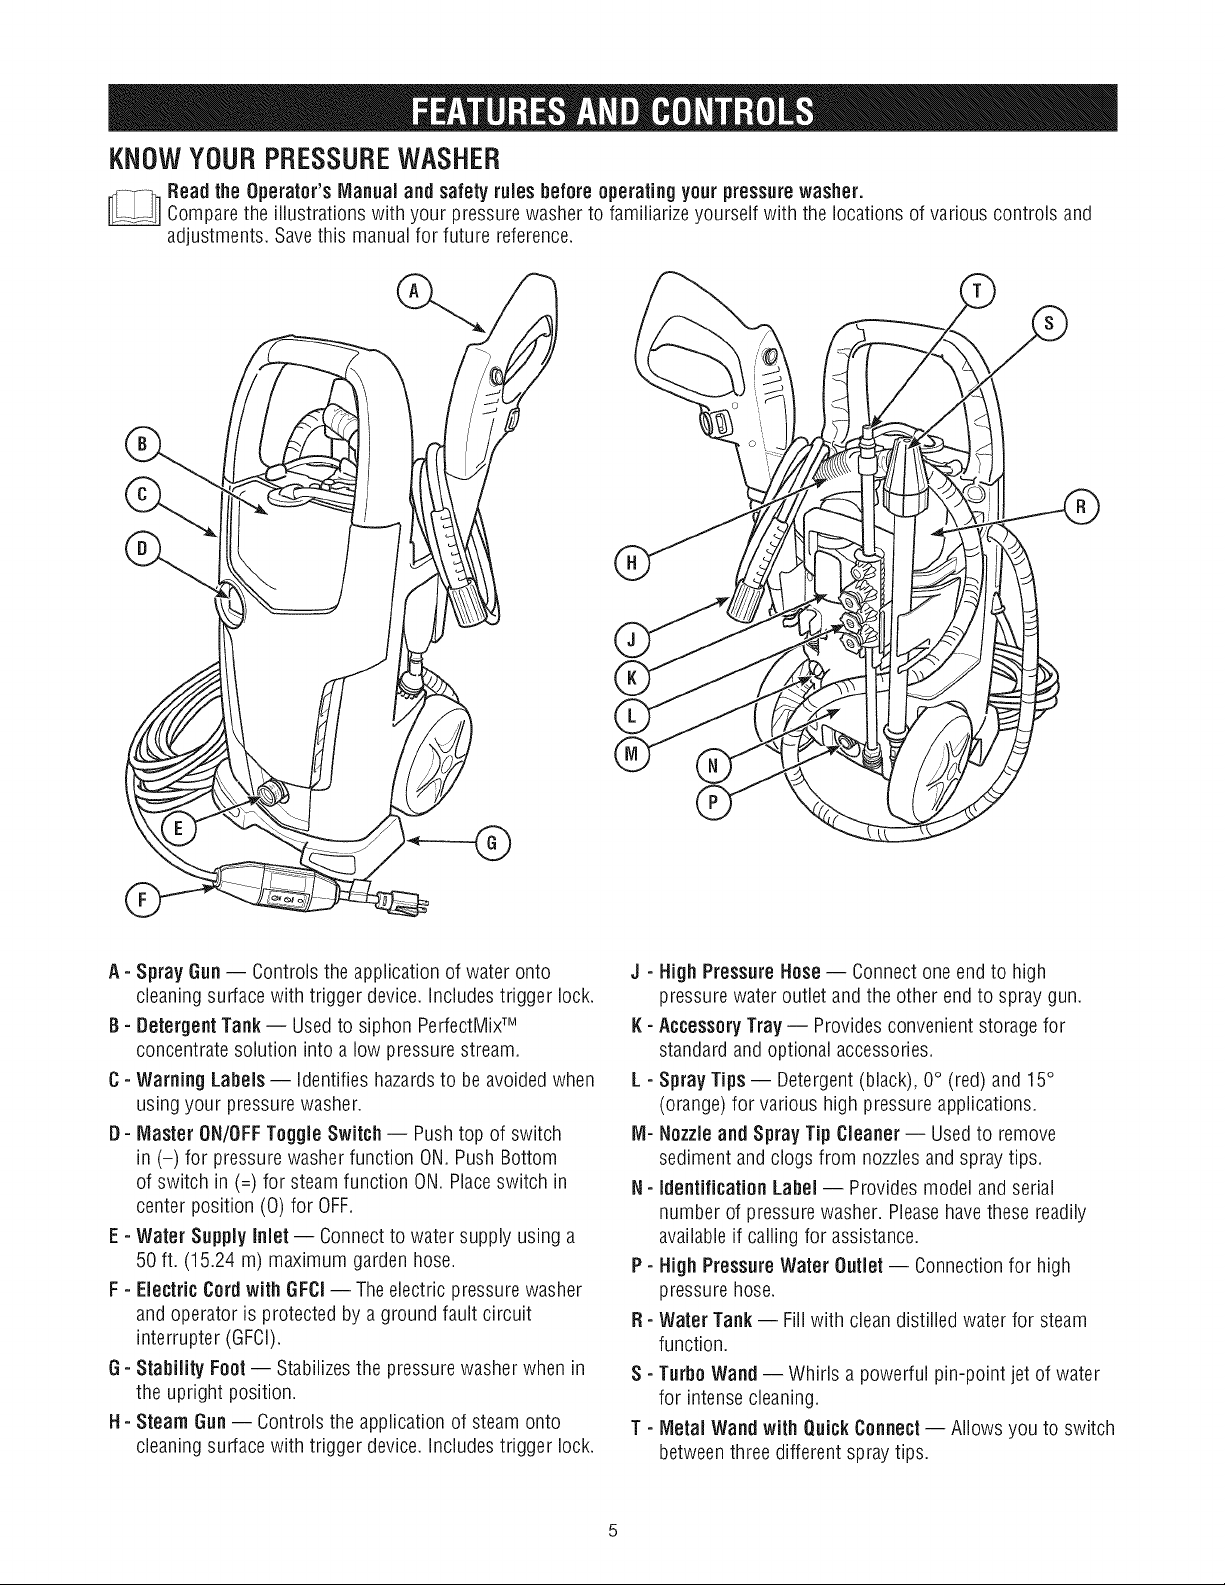
KNOWYOURPRESSUREWASHER
Readthe Operator's Manual andsafetyrules beforeoperating your pressure washer.
Comparethe illustrations with your pressurewasher to familiarize yourself with the locations of various controls and
adjustments. Savethis manual for future reference.
A - Spray Gun-- Controls the application of water onto
cleaningsurface with trigger device, includestrigger lock.
B - DetergentTank -- Usedto siphon PerfectMWM
concentrate solution into a low pressurestream.
C- Warning Labels -- identifies hazardsto be avoidedwhen
using your pressurewasher.
D- Master ON/OFFToggle Switch -- Push top of switch
in (-) for pressurewasher function ON.Push Bottom
of switch in (=) for steamfunction ON.Placeswitch in
center position (0) for OFF.
E - Water Supply Inlet -- Connectto water supply using a
50 ft. (15.24 m) maximum garden hose.
F - Electric Cord with GFCI-- Theelectric pressurewasher
and operator is protected bya ground fault circuit
interrupter (GFCI).
6 - Stability Foot -- Stabilizesthe pressure washer when in
the upright position.
H- Steam Gun-- Controlsthe application of steamonto
cleaningsurface with trigger device, includestrigger lock.
J - High Pressure Hose-- Connect one end to high
pressure water outlet and the other endto spray gun.
I( - Accessory Tray -- Providesconvenient storage for
standard and optional accessories.
L - Spray Tips- Detergent(black), 0° (red) and 15°
(orange) for various high pressure applications.
IVl-Nozzle and Spray Tip Cleaner -- Usedto remove
sediment andclogs from nozzlesand spray tips.
N- Identification Label -- Providesmodel and serial
number of pressurewasher. Pleasehavethese readily
availableif calling for assistance.
P - High Pressure Water Outlet -- Connectionfor high
pressure hose.
R- Water Tank-- Fill with clean distilled waterfor steam
function.
S - Turbo Wand -- Whirls a powerful pin-point jet of water
for intense cleaning.
T - Metal Wand with QuickConnect -- Allowsyou to switch
betweenthree different spraytips.
Page 6
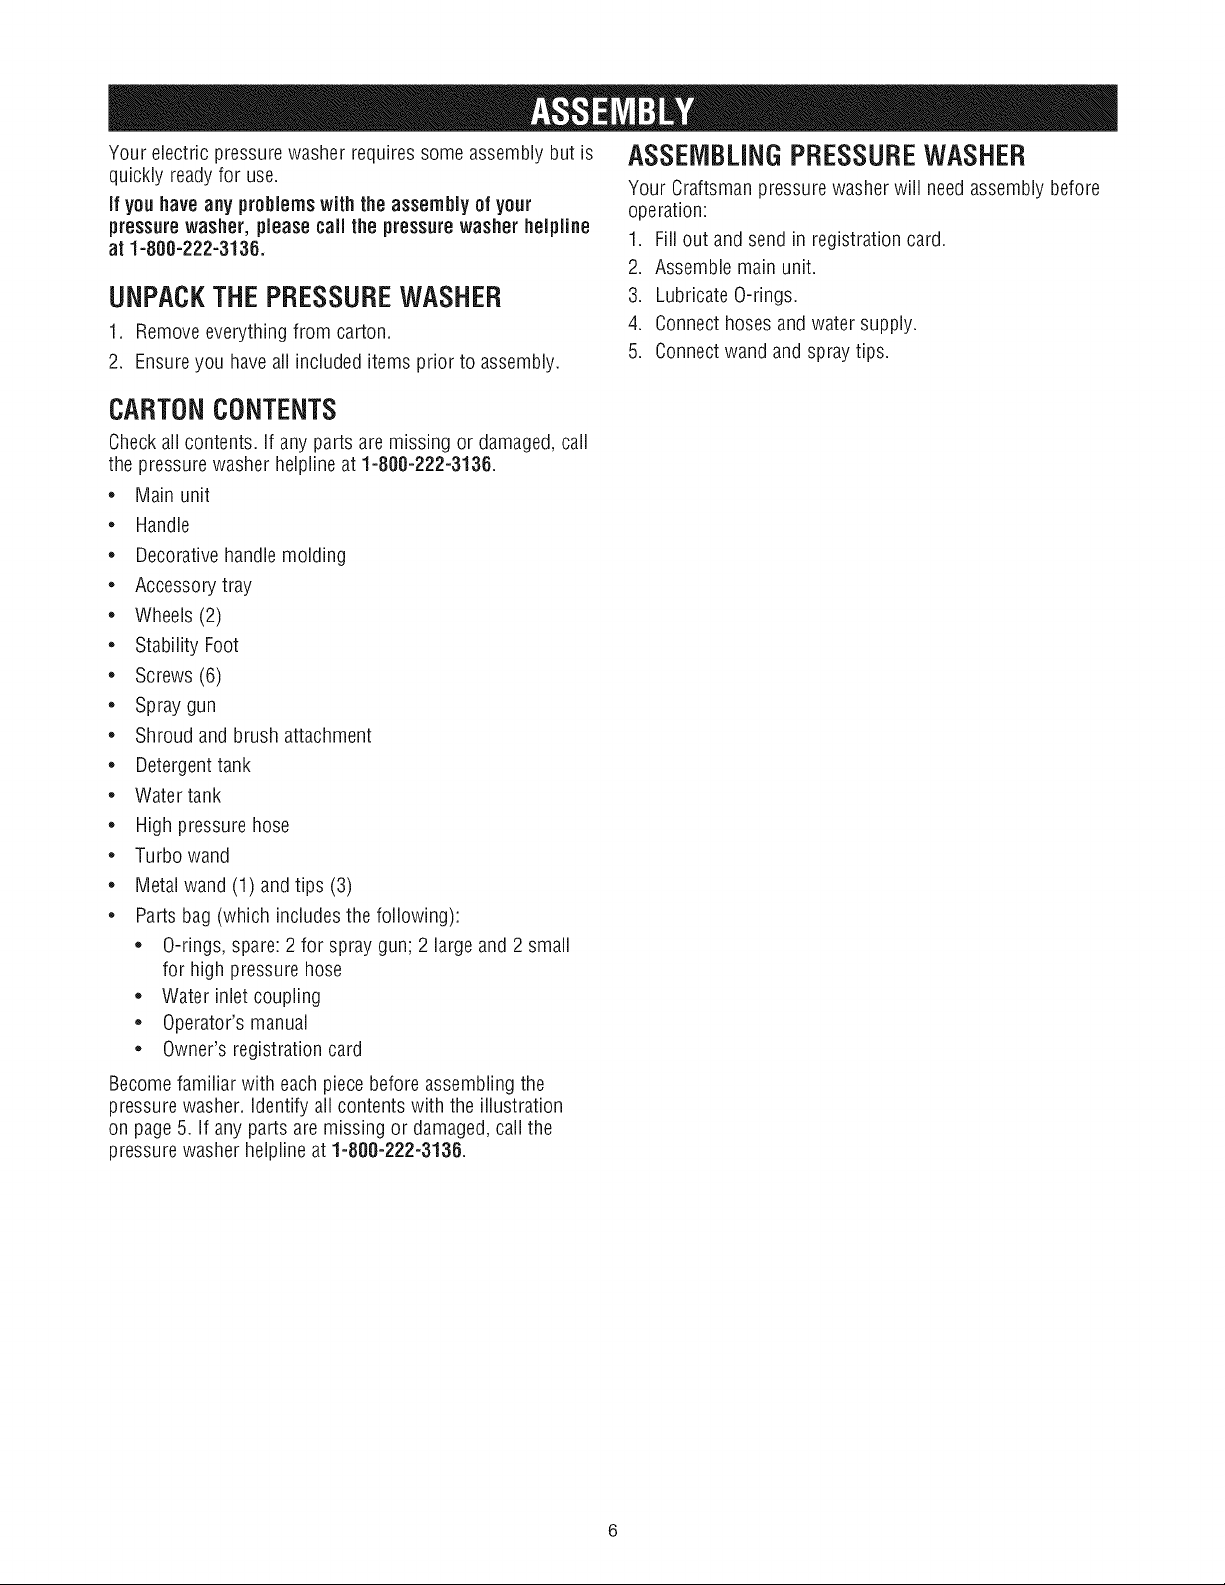
Your electric pressure washerrequires some assembly but is
quickly readyfor use.
If you have any problemswiththeassembly of your
pressurewasher, pleasecaii the pressurewasher heJpJiue
at 1=800-222-3136.
UNPACKTHEPRESSUREWASHER
1. Removeeverything from carton.
2. Ensureyou haveall included items prior to assembly.
CARTONCONTENTS
Checkaii contents, if anyparts aremissing or damaged,call
the pressurewasher helplineat 1-800-222-3136.
• Main unit
• Handle
• Decorativehandle molding
• Accessorytray
• Wheels(2)
• Stability Foot
• Screws(6)
• Spraygun
• Shroud and brush attachment
• Detergenttank
• Watertank
• High pressurehose
• Turbowand
• Metal wand (1) andtips (3)
• Parts bag (which includes the following):
• O-rings, spare: 2 for spray gun; 2 large and 2 small
for high pressure hose
• Water inlet coupling
• Operator's manual
• Owner's registration card
Becomefamiliar with eachpiece beforeassembling the
pressure washer, identify all contents with the illustration
on page5. If any partsare missing or damaged,call the
pressure washer helpline at 1-800-222-3136.
ASSEMBLINGPRESSUREWASHER
Your Craftsmanpressurewasher will needassembly before
operation:
1. Fill out and send in registration card.
2. Assemble main unit.
3. Lubricate 0-rings.
4. Connecthoses andwater supply.
5. Connect wand andspray tips.
Page 7

Assemble Main Unit
1. Removeand discard the protectivecap (A)from each
wheel shaft.
2. Slide wheel shafts (C) into holesat sides of main unit (B). 5.
Wheels are installed correctly when you hear a CLICKand
they aresecurely in place. 6.
3. Slide the handle(H) into the slots at top of main unit.
install two (2) screws to securethe handleto the main
unit. 7.
,
Slide accessorytray (6) into slots at backof main unit.
Install two (2) screws to securethe accessorytray to the
main unit.
Install stability foot (F) if equipped, and secureusing two
screws.
Match thecontour of the decorative handlemolding (J)
with that of the handle.Slide decorative handlemolding
into handle opening until it snaps into place.
Confirm that water inlet screen (E) is installedin water
inlet; Do Not remove exceptfor cleaning. Screw water
inlet coupling (D) onto water inlet.Tighten by hand.
!D
/
/
Page 8

LubricateO-Rings
Lubrication of o-rings is extremelyimportant for installation
and operation. Theuse of a lubricant (petroleum or synthetic
grease)during assembly helpsseat o-rings properly and
provides animproved seal. It also helps protect the o-ring
from damageby abrasion, pinching or cutting and extends
the lifeof the o-ring.
NOTICE ALWAYSapply a small amount of lubricant on
o-rings prior to assembling the garden hoseto the pump
(A), high pressure hose (pump end) (B), high pressurehose
(gun end) (C),turbo wand (gun end) (D), metalwand (spray
tip end) (E) and metalwand (gun end) (F).
Lubricateall connectionsshown below, following these
instructions:
1. inspect andclean connecting surfacesprior to lubrication
and assembly.
2. Uselubricants sparingly during assembly;a light film is
all that is required.
3. Usea small brush or cotton swab to apply greasedirectly
to o-rings where they are not accessible (QCfitting, M22
fitting).
Page 9
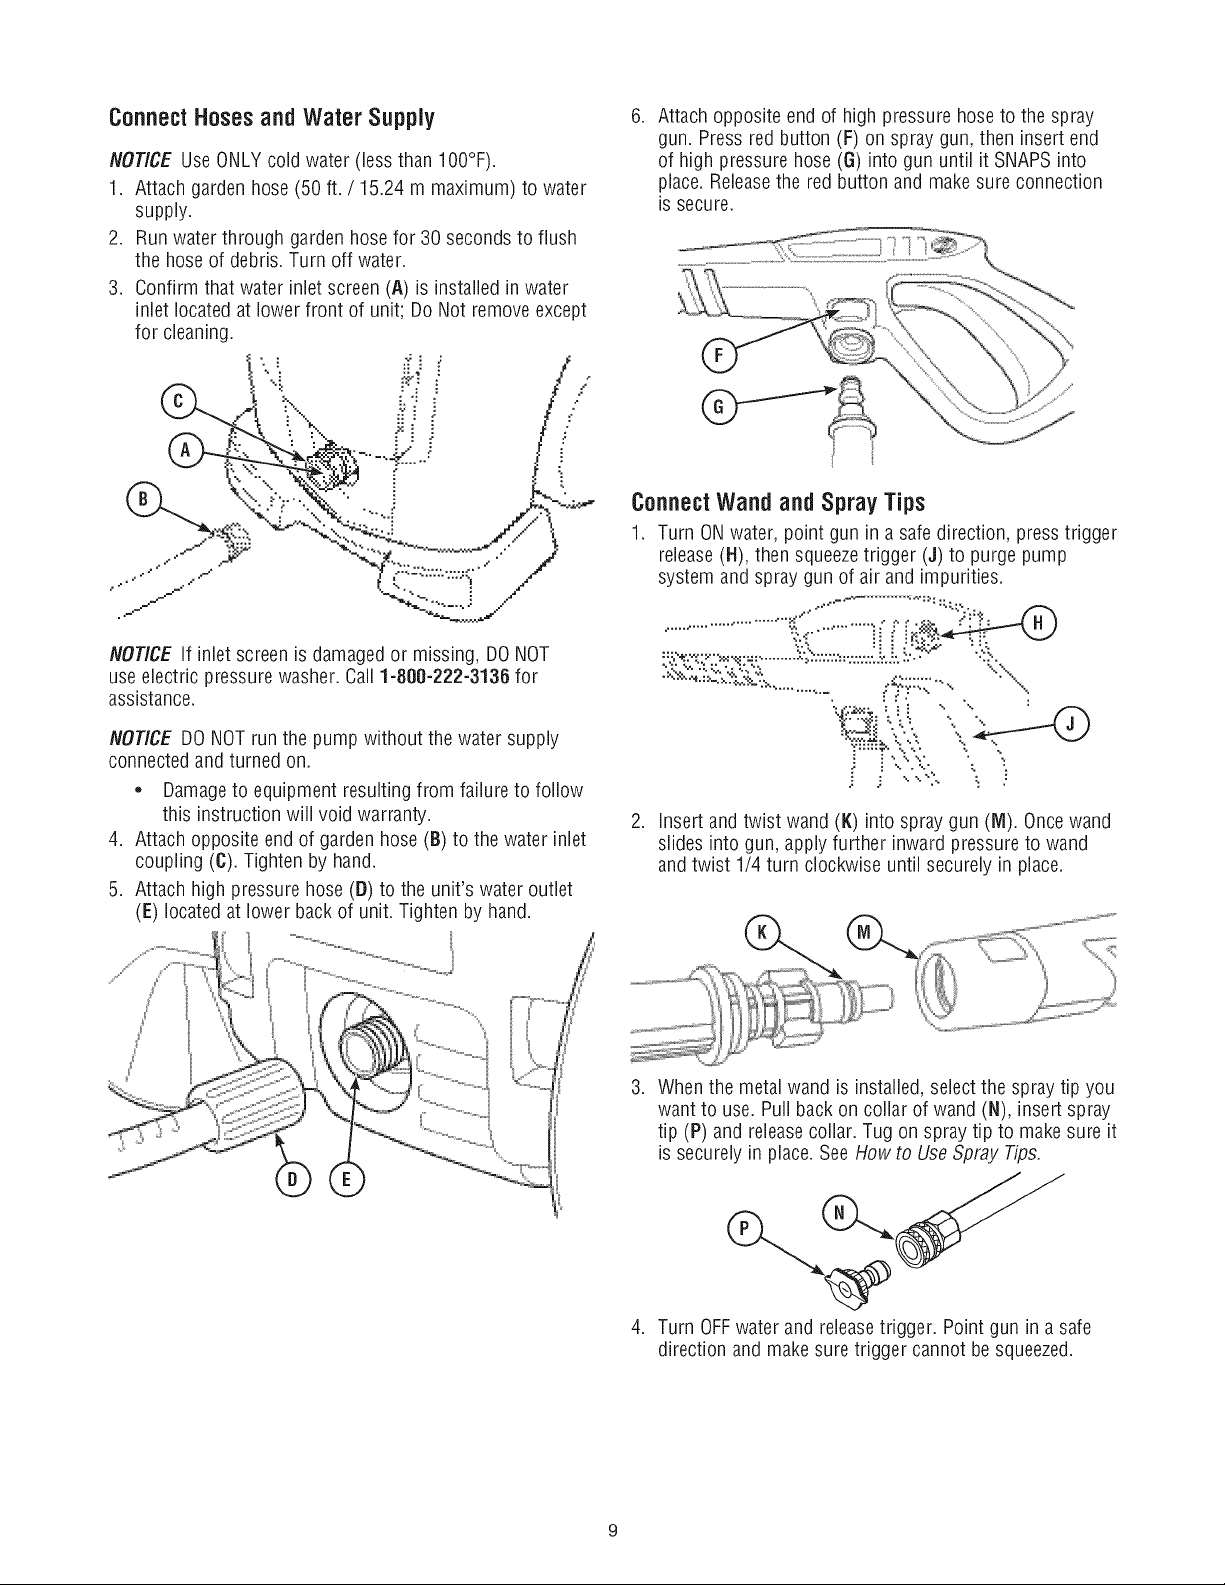
ConnectHosesandWater Supply
NOTICE Use ONLYcold water (less than 100°F).
1. Attach garden hose(50 ft. / 15.24 m maximum) to water
supply.
.
Runwater through garden hosefor 30 secondsto flush
the hoseof debris. Turn off water.
3.
Confirm that water inlet screen (A) is installed in water
inlet locatedat lower front of unit; Do Not removeexcept
for cleaning.
°. •
NOTICE If inlet screenis damagedor missing, DONOT
use electricpressure washer. Call1-800-222-3136 for
assistance.
.
Attach opposite end of high pressurehoseto the spray
gun. Pressred button (F) on spraygun, then insert end
of high pressure hose (G) into gun until it SNAPSinto
place. Releasethe red button and makesure connection
is secure.
ConnectWand andSpray Tips
1. Turn ONwater, point gun in asafe direction, press trigger
release(H), then squeezetrigger (J) to purge pump
system andspray gun of air and impurities.
........... "t,._........ _i_i_._,_ _::_'
...._, _ ",'2,, :_ _ :'_4,:_ ".'&
o,y .•'._' '-_.._.=;:,• ........ _,_..V•'.V:._.W,,,:,,,_. ,,,. :".'° • ,:..o
NOTICE DONOT run the pump without thewater supply
connectedand turned on.
• Damageto equipment resulting from failure to follow
this instruction will void warranty.
4. Attach opposite endof garden hose (B) to the water inlet
coupling (C). Tighten by hand.
5. Attach high pressure hose(B) to the unit's water outlet
(E) located at lower backof unit. Tighten by hand.
2. insert and twist wand (1()into spray gun (IVi).Oncewand
slides into gun, apply further inward pressure to wand
andtwist 1/4 turn clockwise until securelyin place.
3. When the metalwand is installed, selectthe spray tip you
want to use. Pull back on collar of wand (N), insert spray
tip (P)and releasecollar. Tug on spray tip to make sure it
is securelyin place.See How to UseSpray Tips.
4. Turn OFFwater andreleasetrigger. Point gun in a safe
direction andmake suretrigger cannotbe squeezed.
Page 10
ChecklistBeforeStarting Pump Motor
Reviewthe unit's assemblyto ensureyou haveperformed all
of thefollowing.
1. Besure to read OperatorSafetyand Operationbefore
using theelectric pressurewasher.
2. Checkfor properly tightened hoseconnections.
3. Checkto makesure there are no kinks, cuts, or damage
to hoses.
4. Providea proper water supply at an adequateflow (not to
exceed 100°F).
5. Plug electrical cord into a properly grounded electrical
source.
GroundingInstructions
This product must be grounded. If it should malfunction or
breakdown,grounding providesa path of least resistance
for electric current to reducethe risk of electric shock.
This product is equipped with a cord having an equipment-
grounding conductor and a grounding plug. The plug
must be plugged into anappropriate outlet that is properly
installed andgrounded in accordancewith all local codes and
ordinances.
DANGER!- improper connection of the equipment-
grounding conductor can result in arisk of electrocution.
Checkwith aqualified electrician or service personnelif you
are in doubt as to whether the outlet is properly grounded.
Do not modify the plug provided with the product - if it will
not fit the outlet, havea proper outlet installed by a qualified
electrician. Donot useany type of adaptor with this product.
HOWTOUSEYOURPRESSUREWASHER
If you have any problems operatingyour pressure washer,
pleasecall the pressure washer helplineat 1-800-222-3136.
Howto Start YourElectricPressure Washer
A WARNING Risk of eye injury. Spraycould splash
back or propel objects resulting in serious injury.
Alwayswear indirect vented (chemicalsplash)
safety goggles markedto comply with ANSi
Z87.1 when using or in vicinity of this equipment.NEVER
substitute safetyglassesor dry-condition gogglesfor
indirect ventedsafetygoggles.
1. Placethe electric pressurewasher near anoutside water
source capableof supplying water at aflow rate greater
than 3gallons per minute (11.4 I) and no less than 20 psi
(1.38 bars) at the electric pressurewasher endof garden
hose. DONOTsiphon supply water.
2. Connect garden hose to water inlet.
3. Check that high pressure hoseis tightly connectedto
spray gun. See ConnectHosesand WaterSupply for
illustrations.
NOTICE DONOTrun the pump without the water supply
connectedand turnedon.
• Damageto equipment resulting from failure to follow
this instruction will void warranty.
4. Turn ONwater, point gun ina safedirection, presstrigger
lock button andsqueezetrigger to purge pump system of
air.
5. Removeany dirt or foreign matterfrom spraytips. Install
desired wandand spray tips onto spray gun. SeeConnect
Hosesand WaterSupply and How to Usethe Spray Tips
for details.
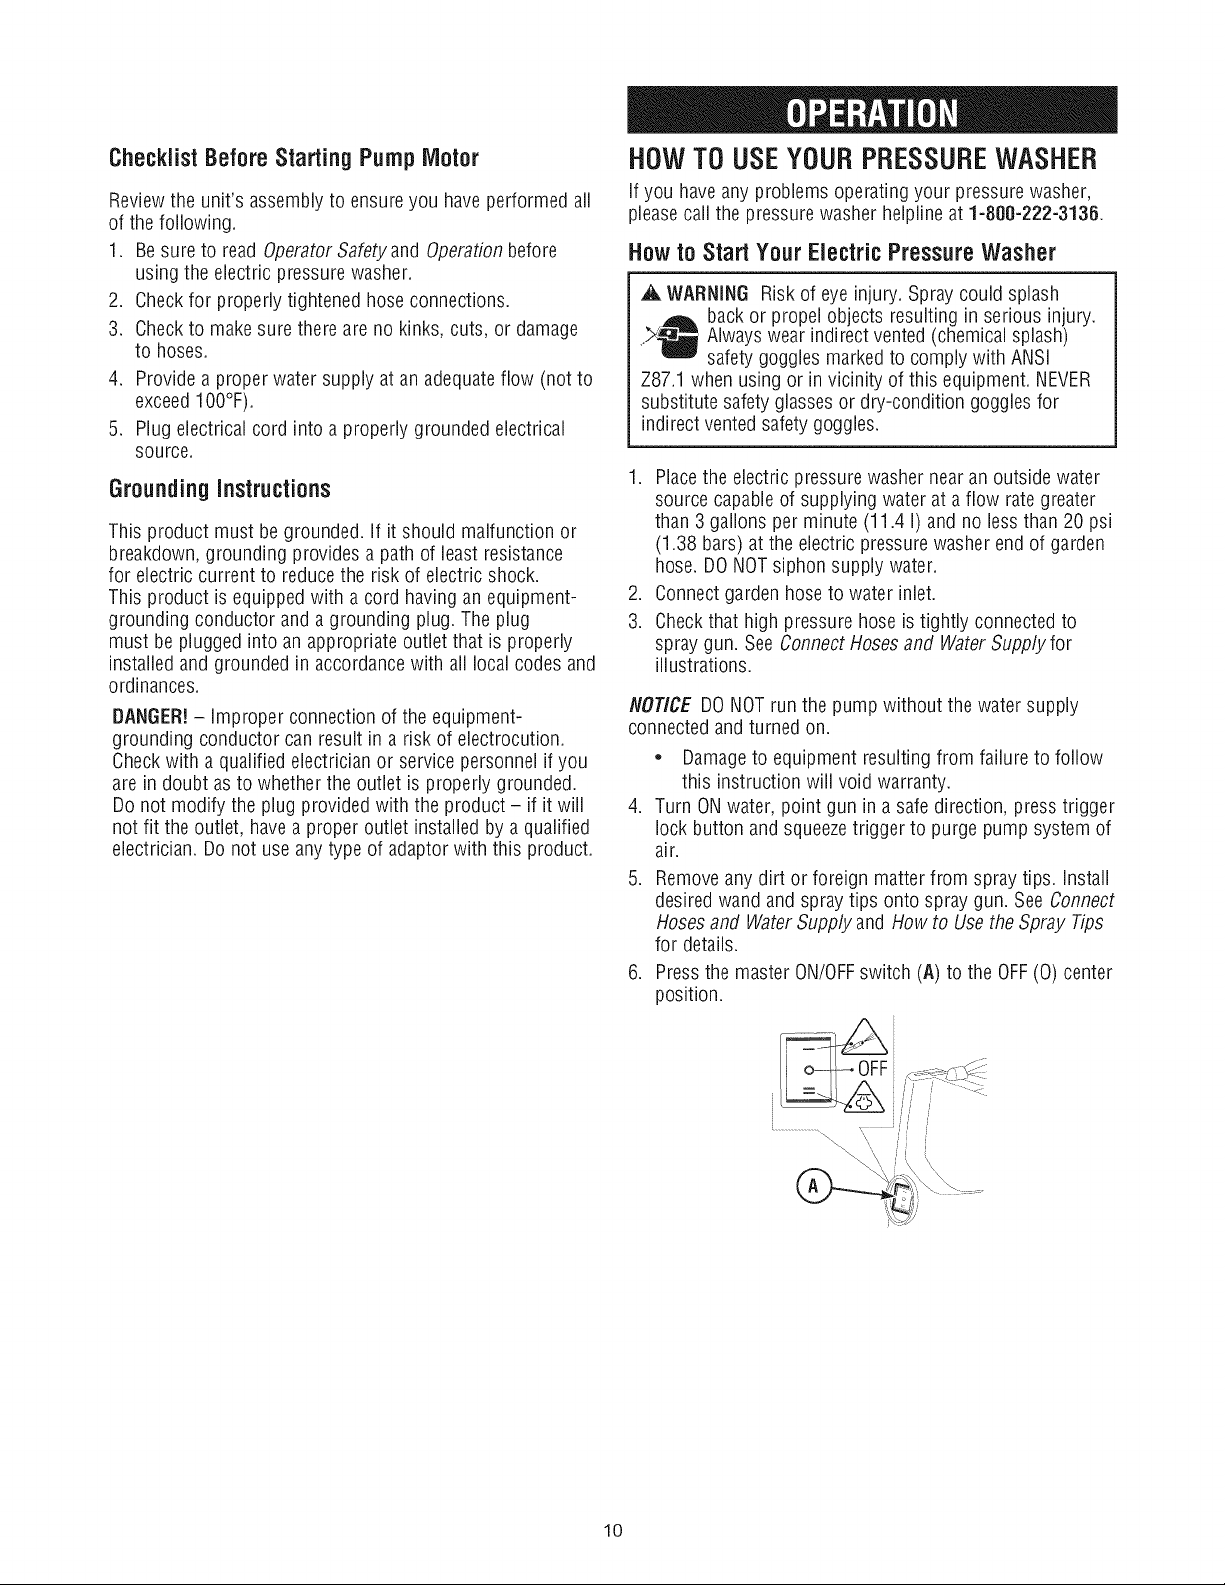
6. Pressthe master ON/OFFswitch (A) to the OFF(0) center
position.
10
Page 11
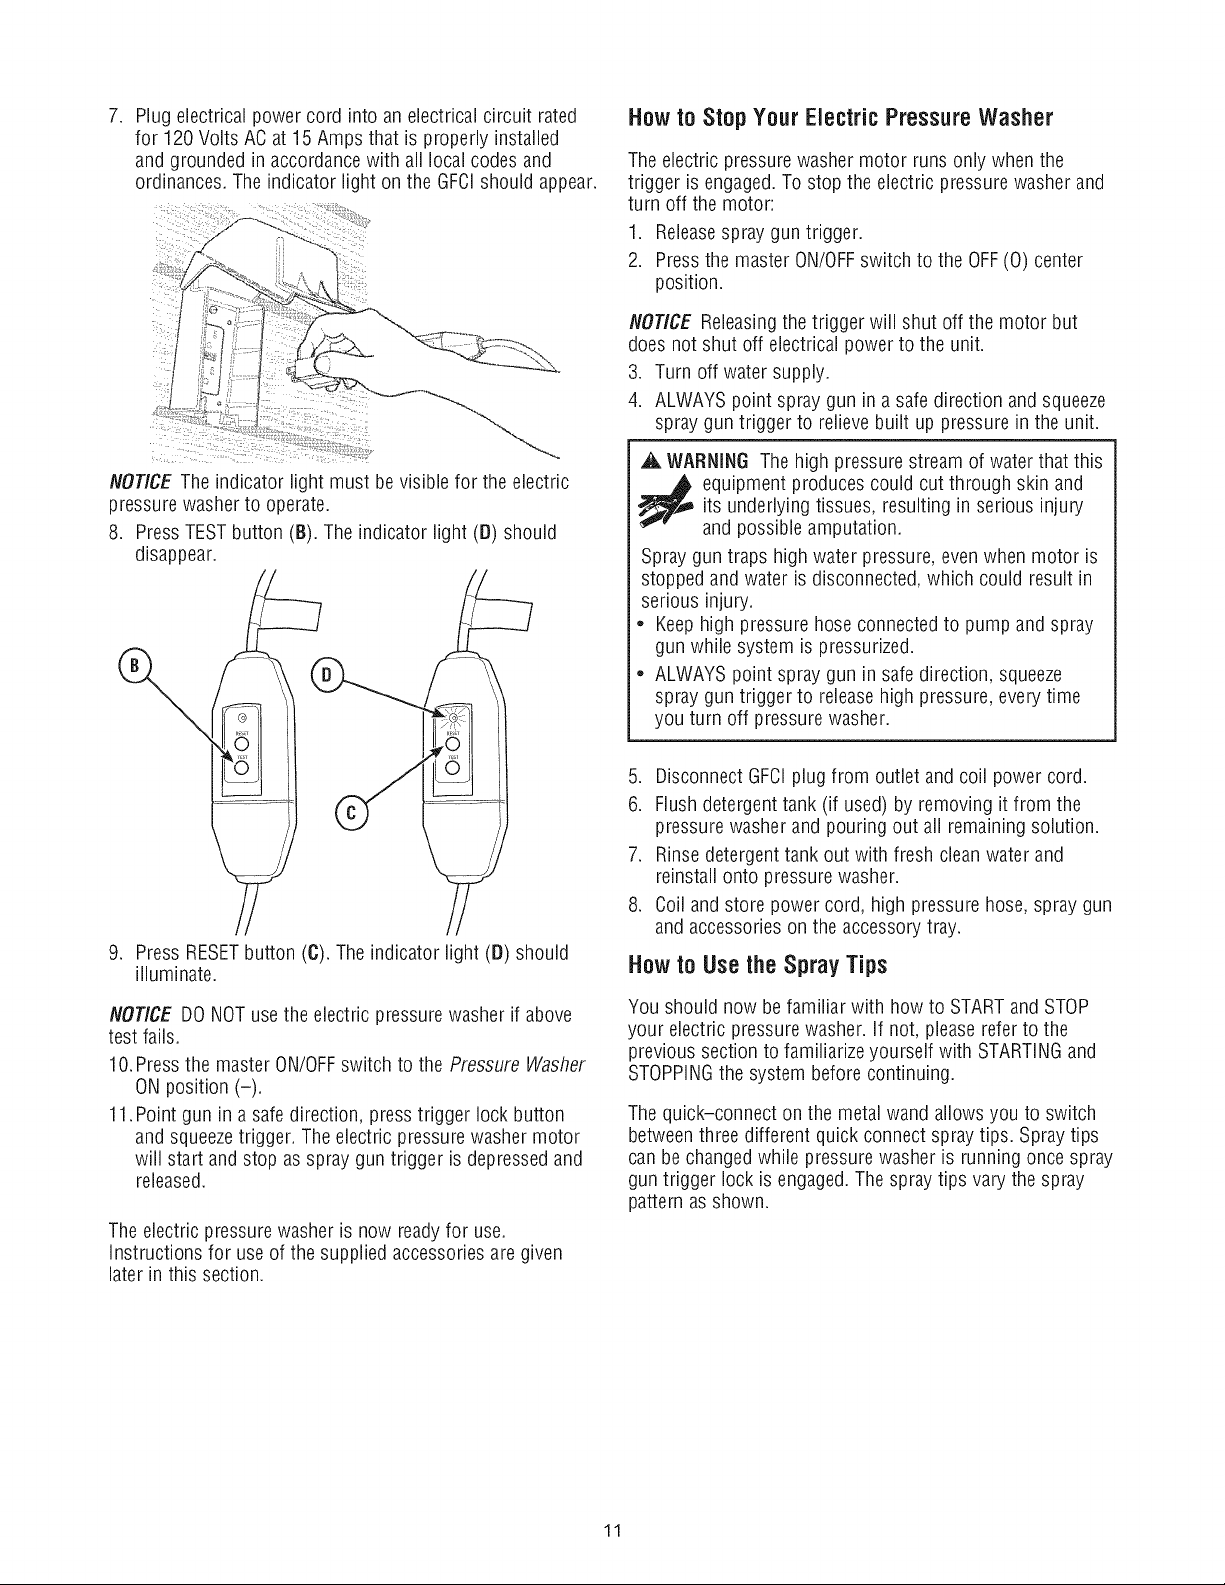
.
Plug electrical power cord into an electrical circuit rated
for 120Volts AC at 15Amps that is properly installed
and grounded inaccordancewith all local codesand
ordinances. Theindicator light on the GFCIshould appear.
Howto Stop YourElectricPressureWasher
The electricpressurewasher motor runs only whenthe
trigger is engaged.To stop the electric pressure washerand
turn off the motor:
1. Releasespray guntrigger.
2. Pressthe master ON/OFFswitch to the OFF(0) center
position.
i
/
NOTICE The indicator light must be visible for the electric
pressure washer to operate.
8. PressTESTbutton (B). Theindicator light (D) should
disappear.
9. Press RESETbutton (6). The indicator light (D) should
illuminate.
NOTICE DONOTusethe electric pressure washerif above
test fails.
10.Pressthe master ON/OFFswitch to the Pressure Washer
ONposition (-).
11.Point gun in asafedirection, presstrigger lock button
and squeezetrigger. The electric pressure washer motor
will start and stop as spraygun trigger is depressedand
released.
Theelectric pressurewasher is now readyfor use.
Instructions for use of the supplied accessoriesare given
later in this section.
NOTICE Releasingthe trigger will shut off the motor but
does notshut off electrical power to the unit.
3. Turn off water supply.
4. ALWAYSpoint spray gun ina safe direction and squeeze
spray gun trigger to relievebuilt up pressure in the unit.
A WARNING The high pressure stream of waterthat this
_ equipment producescould cut through skin and
Spray guntraps high water pressure,even when motor is
stopped and water is disconnected,which could result in
serious injury.
• Keephigh pressure hose connectedto pump and spray
• ALWAYSpoint spray gun in safe direction, squeeze
5. DisconnectGFCIplug from outlet and coil power cord.
6. Flush detergenttank (if used) by removing it from the
7. Rinsedetergent tank out with fresh cleanwater and
8. Coil and store power cord, high pressure hose,spray gun
its underlying tissues, resulting in serious injury
and possible amputation.
gun while system is pressurized.
spray guntrigger to releasehigh pressure, everytime
you turn off pressure washer.
pressure washer and pouring out all remaining solution.
reinstall onto pressurewasher.
and accessorieson the accessory tray.
Howto Usethe Spray Tips
You should now be familiar with how to STARTand STOP
your electric pressurewasher, if not, pleasereferto the
previous section to familiarize yourself with STARTINGand
STOPPINGthe system before continuing.
The quick-connect on the metal wand allowsyou to switch
betweenthree different quickconnect spraytips. Spraytips
canbe changedwhile pressure washer is running oncespray
gun trigger lock is engaged.The spray tips vary the spray
pattern as shown.
11
Page 12
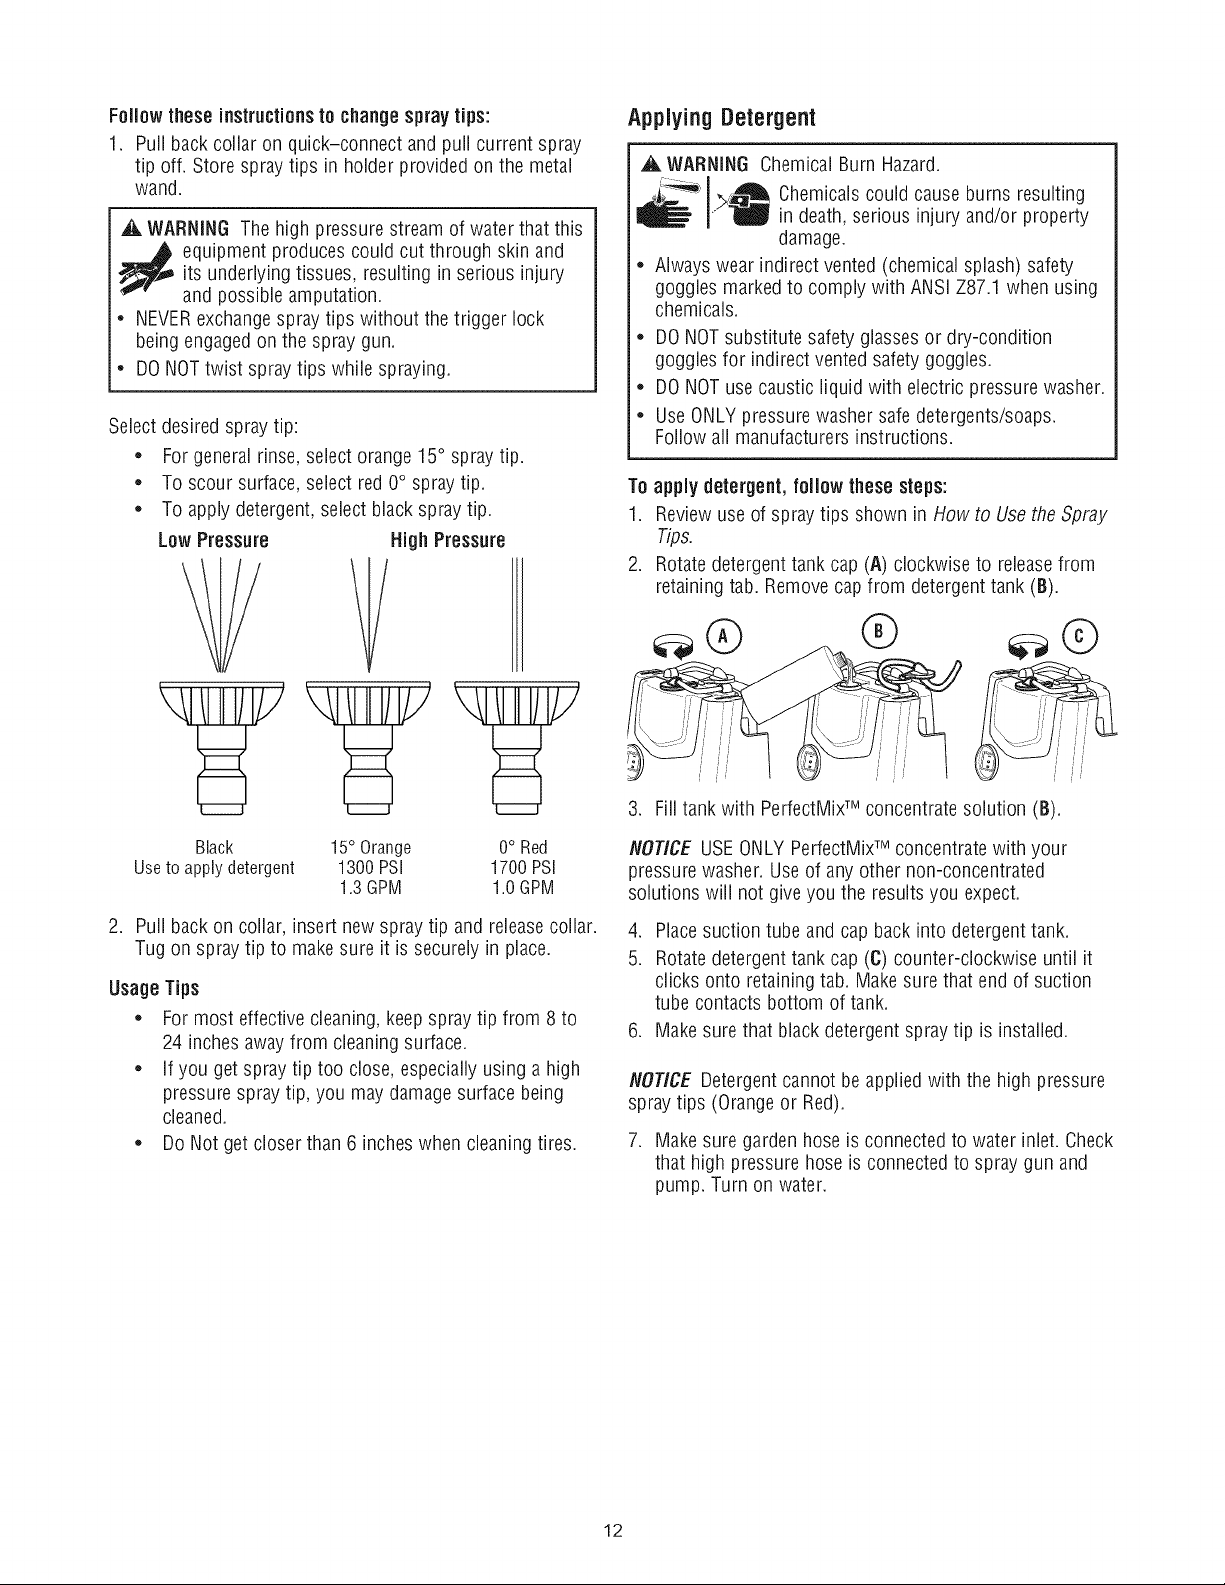
FoJJowtheseinstructionsto changespraytips:
1. Pull back collar on quick-connect andpull current spray
tip off. Store spraytips in holderprovided on the metal
wand.
_, WARNING The highpressurestream of water that this
_ quipment producescould cut through skin and
its underlying tissues, resulting in serious injury
and possibleamputation.
• NEVERexchangespray tips without the trigger lock
being engagedon the spraygun.
• DO NOTtwist spray tips while spraying.
Select desiredspraytip:
• Forgeneral rinse, selectorange 15° spray tip.
• To scour surface,select red 0° spraytip.
• To apply detergent, select blackspray tip.
Applying Detergent
A WARNING ChemicalBurn Hazard.
_:--'q' I>-_ Chemicalscould causeburns resulting
•" in death, serious injury and/or property
damage.
• Alwayswear indirect vented (chemical splash) safety
goggles markedto comply with ANSi Z87.1 when using
chemicals.
• DONOTsubstitute safety glasses or dry-condition
goggles for indirect ventedsafetygoggles.
• DONOTuse caustic liquid with electric pressurewasher.
• UseONLY pressurewasher safedetergents/soaps.
Follow all manufacturers instructions.
To apply detergent, follow these steps:
1. Reviewuse of spraytips shown in How to Usethe Spray
Tips.
2. Rotatedetergent tank cap (A) clockwise to releasefrom
retainingtab. Removecapfrom detergenttank (B).
Black 15° Orange 0° Red
Useto apply detergent 1300 PSi 1700 PSi
1.3 GPM 1.0 GPM
2. Pull back on collar, insert new spraytip and releasecollar.
Tug on spray tip to makesure it is securelyin place.
Usage Tips
• For most effective cleaning,keepspray tip from 8 to
24 inchesawayfrom cleaning surface.
• if you get spray tip too close, especially using a high
pressure spray tip, you may damagesurface being
cleaned.
• Do Not getcloser than 6 incheswhen cleaningtires.
3. Fill tank with PerfectMWMconcentratesolution (B).
NOTICE USEONLYPerfectMixTM concentrate with your
pressurewasher. Useof anyother non-concentrated
solutions will not giveyou the resultsyou expect.
4. Placesuction tube and cap backinto detergenttank.
5. Rotatedetergent tank cap (C)counter-clockwise until it
clicks onto retainingtab. Make sure that endof suction
tube contactsbottom of tank.
6. Make sure that black detergent spray tip is installed.
NOTICE Detergentcannotbe applied with the high pressure
spray tips (Orange or Red).
7. Make sure garden hose is connected to water inlet. Check
that high pressurehose is connectedto spray gun and
pump. Turn on water.
12
Page 13

NOTICEYou must attach all hoses beforeyou start the
pressurewasher.
8. Start the pressurewasher asinstructed in How to Start
Your ElectricPressure Washer.
9. Apply detergent to adry surface, starting at lower portion
of areato bewashed and work upward using long,even,
overlapping strokes.
lO.AIIow detergentto "soak in" for 3-5 minutes before
washing and rinsing. Reapplyas neededto prevent
surfacefrom drying. To prevent streaking, Do Notallow
detergent to dry on surface.
ElectricPressure Washer Rinsing
1. Remove black detergent spraytip from metal wand.
2. Selectand install desiredhigh pressure spray tip
following instructions Howto UseSpray Tips.
3. Keepspray gun a safe distance from areayou plan to
spray.
_. WARNING Riskof kickback.
_ Spraygun could kickbackcausing you to fall
• Operatetheelectric pressurewasherfrom a
4. Apply a high pressure spray to a small areaand then
5. Start at top of areato be rinsed, working down with same
resulting in deathor serious injury.
stable surface.
Beextremely careful if you must usethe electric pressure
washer from aladder, scaffolding,or anyother similar
location.
Firmly graspspray gun with both handswhen using
power spraymodes to avoid injury when spraygun kicks
back.
checksurface for damage,if nodamageis found, you can
assumeit is okayto continue rinsing.
overlapping strokesasyou used for cleaning.
Howto Usethe Steam Function
NOTICE UseONLYdistilled / demineralizedwater. DO NOT
use anyother liquids that could be flammable or could clog
up the system.
1. Rotatewater tank cap(A) clockwise to releasefrom
retaining tab. Removecap from water tank (B).
//
2. Filltank with clean distilled/ demineralizedwater (B).
NOTICE To ensurethat your unit operatesoptimally and
lasts a long time, use ONLYdistilled / demineralizedwater.
Limestonedeposits could compromise the unit's normal
operation (intermittent steam supply,water leaks from the
reliefvalve, nozzleandsupply pipe clogging), if this occurs,
pleasecontact SearsCustomerService.
.
Placesuction tube and cap back into water tank.
4.
Rotatewater tank cap (O)counter-clockwise until it clicks
onto retainingtab. Make surethat end of suction tube
contacts bottom of tank.
.
Make surethe shroud (F) and brush attachment (G)are
installed on the steam gun (B). Theshroud is secured by
a spring loaded button (E)on the gun. Pushthis button in
to install and removethe shroud. The brush attachment
tightly slidesover the shroud end.
OtherCleaning Tips
• NEVERleavethe electric pressurewasher unattended
while it is pluggedinto an electrical outlet andwhile
water is supplied to the equipment.
If you havethe nozzletoo far awayfrom the surface
being washed, the cleaning maynot be as effective.
NOTICE Garden hoseand high pressure hose do not need to
be connectedto use the steamfunction.
6. Perform Steps 6, 7 and8 in How to Start YourElectric
Pressure Washer.
WARNING HotSurface andSteam Burn Hazard.
_1_ Hot surfaces andsteam produced by the
DONOTtouch the steamjet or nozzleend with your
hands during use.
Allow equipmentto cool before touching.
ALWAYSpoint steam gun in safedirection while system
is operating.
DONOTaim steamgun at peopleor animals.
13
steam gun could cause burns resulting in
serious injury.
Page 14

7. Pressthe master ON/OFFswitch to the SteamFunction
ONposition (=) and wait 20 seconds.
NOTICE Whenthe trigger isfirst squeezed,a small amount
of water may precedethe steam.ALWAYS point steam gun
in asafe direction.
NOTICE Never let the water in the tank run out completely.
Refill thetank when the water levelreaches1/4 full.
Operatingthe unit without water can damagethe boiler feed
pump.
.
Pointgun in a safe direction, disengagetrigger lock(H)
and squeezetrigger (J). Steamwill be releasedfrom the
nozzle.
NOTICE The steamfunction is equippedwith a pressure
relief valvethat releaseshot water through a drain at the
bottom of the unit in the eventof pressure build-up.
14
Page 15

PRODUCTSPECIFICATIONS
OWNER'SRESPONSIBILITIES
PressureWasherSpecifications
Max OutletPressure ........... 1700 PSi (117.2 BARS)*
Max Flow Rate ................... 1.3 GPM(4.9 LPM)*
DetergentMix ................. See MFR's Instructions
Water Supply Temperature.... Not to exceed100°F (38°C)
Motor ........................ Universal(brush) Type
RatedVoltage .......................... 120 Volts AC
Current ................................. 12.5Amps
* This pressure washer is rated in accordanceto the
PressureWasher Manufacturers Association (PWMA)
standard PWl01 (Testing andRating Performance of
PressureWashers).
GeneralRecommendations
Regularmaintenancewill improvethe performanceand
extendthe life of the pressure washer. Seeany Searsor
other qualifiedservicedealer for service.
The pressurewasher warranty does not cover items that have
beensubjectedto operator abuseor negligence.To receive
full value from the warranty, the operator must maintain
pressurewasher as instructed in this manual including
proper storage asdetailed in Storage.
Before EachUse
1. Cleandebris.
2. Check water inlet screenfor debris or damage.
3. Check high pressure hosefor leaks.
4. Checksteam hosefor leaks.
5. Check detergent and water tank siphoning tubes for
damage.
6. Check spray gun operation.
7. Check steamgun operation.
8. Cleansteam gun tip.
PRESSUREWASHERMAINTENANCE
CleanDebris
Daily or before use,clean accumulated debris from electric
pressurewasher, inspect cooling air slots and openings on
the front, rear and bottom of the electric pressurewasher.
These openings must be kept cleanand unobstructed.
The electricpressure washer parts should be keptcleanto
reducethe risk of overheatingand ignition of accumulated
debris.
* Usea dampcloth to wipe exterior surfaces clean.
NOTICE Improper treatment of the electric pressurewasher
candamage it and/or shorten its life.
* DONOTinsert any objects through cooling slots.
15
Page 16

CheckandClean WaterInlet Screen
CheckSprayGun
Removewater inlet coupling (A). Then removewater inlet
screen (B) from the unit's water inlet (C) using a needle nose
pliers. Waterinlet is located at bottom front of unit. Examine
water inlet screen. If the screenis dirty, cleanwith a small
brush andwater. If the screenis damaged,replaceit.
CheckHighPressure Hose
The highpressure hosecan developleaksfrom wear,
kinking, or abuse, inspect the hose eachtime beforeusing it.
Checkfor cuts, leaks,abrasions or bulging of cover, damage
or movementof couplings, if any of theseconditions exist,
replacethe hose immediately.
,A. WARNING The highpressure stream of water that this
Examinethe hoseconnection to the spray gun andmake sure
it is secure.Testthe trigger (D) by pressing the trigger lock
button (E)and making sure the trigger "springs back" into
placewhen you release it. You should not beable to press
the trigger without pressing the trigger lock button. Replace
spray gun immediately if it fails anyof thesetests.
........... :'.._........ _ii i_.*_,_ _=.1
÷ _. ",'\ ::: :._._o ..&
: .4.4,:', _
CheckSteam Gun
Test thetrigger by pressing trigger release(F), then squeeze
trigger (G). Makesure the trigger "springs back" into place
when you releaseit. Presstrigger lock (R). You should
not beable to squeezethe trigger. Replacespray gun
immediately if it fails any of these tests.
,///
_ quipment producescould cut through skin and
• NEVERrepair high pressure hose.Replaceit.
• Replacementhose rating MUST equal or exceed
its underlying tissues, resulting in serious injury
and possibleamputation.
maximum pressurerating of unit.
CheckSteamHose
Thesteam hose can develop leaksfrom wear, kinking, or
abuse, inspect the hose eachtime before using it. Checkfor
cuts, leaksand abrasions, if anyof these conditions exist,
pleasecall 1-800-222-3136 for assistance.
CheckDetergentandWater TankSiphoning
Tubes
Examinethe tubesand cleanif clogged. Examinethe tubes
for leaksor tears and replaceif damaged.
CleanSteam GunTip
1. Pressthe master ON/OFFswitch to the OFF(0) center
position. Removepower cord plugfrom electrical outlet.
2. Allow at least10 minutesfor unit to cool.
.
Slide brush attachment (J) off end of gun (K). insert end
of wire tip cleaner(IVl)into small opening repeatedlyto
removeany clogor sediment buildup. Thewire tip cleaner
is stored at the lower backleft of the unit.
16
Page 17

SprayTip Maintenance
Excessivepump pressure cancause a pulsing sensationfelt
while squeezingthe spray guntrigger. Theprincipal causeof
excessivepump pressureis aspray tip clogged or restricted
with foreign materials suchas dirt, etc.A clogged spraytip
could leadto pump cycling ON/OFFor not turning on even
when thereis someflow.
6. Using a garden hose, remove additional debris by back
flushing water through metal wand. Backflush between
30 to 60 seconds.
To correctthe problem, immediatelycleanthe spray tip by
following these instructions:
1. Pressthe master ON/OFFswitch to the OFF(0) center
position. Removepower cord plug from electricaloutlet.
2. Disconnectwater supply atthe electric pressurewasher.
3. ALWAYS point spray gun in a safe direction, presstrigger
lock button andsqueezespray guntrigger to release
retainedhigh water pressure.
_, WARNING The highpressure stream of water that
and its underlying tissues, resulting in serious
this equipment producescould cut through skin
injuryand possible amputation.
Spraygun traps high water pressure, evenwhen motor is
stopped and water is disconnected,which could result in
serious injury.
• Keephigh pressure hose connected to pump andspray
gun while system is pressurized.
• ALWAYSpoint spray gun in safe direction, squeeze
spray gun trigger to releasehigh pressure,every time
you turn off pressure washer.
4. Removespray tip from end of metalwand (A).
5. Usethe wiretip cleaner to free anyforeign material
clogging or restrictingspray tip (B).The wire tip cleaner
is stored at the lowerback leftof the unit.
7. Reinstallspray tip into metal wand.
8. Reconnectmetal wand to spray gun.
9. Makesure gardenhose is connected to water inlet. Check
that high pressure hoseis connected to spray gunand
pump. Turn on water.
10.Plug powercord into electrical outlet and press the
master ON/OFFswitch to the Pressure WasherON
position (-).
11.Test the electric pressure washer by operating with each
quick connect spraytip.
Pumpand Motor Maintenance
Theelectric pressurewasher doesnot require any
maintenanceto the pump or motor. Both assembliesare
pre-lubricated andsealed, requiring no additional lubrication
ever.
AFTEREACHUSE
Water should not remain in the unit for long periods of
time. Sedimentsor minerals candeposit on pump parts and
"freeze" pump action. Follow theseprocedures afterevery
use:
1. Turn off water supply, point gun in a safedirection, press
trigger lock buttonand squeezetrigger to relievetrapped
pressure.
2. Disconnectgarden hosefrom the water supplyand the
electric pressurewasher.
3. Disconnecthose from spray gun and high pressure outlet
on pump. Drainwater from hose,gun, andwand. Usea
rag to wipe off the hose.
4. Drainwater from pump by tipping unit on its front side
(water inlet facing down).
5. Coil powercord and store on accessorytray.
6. Coil highpressure hoseand placeon accessorytray.
7. Store unit in a clean, dry area.
8. If storing for more than 30 days see Winter or Long Term
Storageon next page.
17
Page 18

WINTERORLONGTERMSTORAGE Protectingthe Pump
Water should not remainin the unit for long periods of
time. Sedimentsor minerals can deposit on pump parts and
"freeze" pump action.
Initial Storage Procedures
1. Flushdetergent tank by removing it from unit andpouring
out all remaining solution.
2. Rinsedetergent tank out with fresh cleanwater.
3. Runthe electric pressurewasher with the (red) high
pressure spray tip. Flush for one or two minutes.
4. Pressthe master ON/OFFswitch to the OFF(0) center
position. Removepower cord plug from electricaloutlet.
5. Turn off water supply. Point gun in a safedirection, press
trigger lock button and squeezetrigger to relievetrapped
pressure.After a few moments, releasetrigger on spray
gun.
6. Disconnectgarden hosefrom the water supply andthe
electric pressure washer. Disconnectpressure hosefrom
the pump andthe spray gun.
7. Drainwater from hosesand spray gun, then use a cloth
or equivalentto wipe off all exteriorsurfaces.
8. Ensurethat inlet and outlet hoses are disconnectedfrom
the pump. Then drain water from pump by tipping unit on
its front side (water inlet facing down).
NOTICE Water left in the pump could freezeanddamagethe
pump.
To protect the pump from damagecaused by mineral
deposits orfreezing, use PumpSaver, Model 6039, to treat
pump. This preventsfreeze damageand lubricates plunger
and seals.
NOTICE PumpSaveris availableas anoptional accessory, it
is not includedwith the electric pressure washer. Contactthe
nearestauthorized service centerto purchase PumpSaver.
NOTICEYou must protect your unit from freezing
temperatures.
• Failureto do so will permanently damageyour pump
and render your unit inoperable.
• Freezedamageis not coveredunder warranty.
To usePumpSaver,make surethe electric pressurewasher
is turnedoff and inlet and outlet hosesare disconnected.
Readand follow all instructions and warnings givenon the
PumpSavercontainer.
Final Storage Procedures
1. Coil high pressurehose andpower cord and store on
accessorytray.
2. Reinstalldetergenttank onto unit. Store spraygun and
accessorieson accessorytray.
3. Store unit in a clean, dryareathat is protectedfrom
freezing temperatures.
4. Cover unit with a suitable protectivecover that does not
retainmoisture.
18
Page 19

ProbJern
Pumphasfollowing problems:failure
to producepressure,erraticpressure,
chattering,loss of pressure,low water
voJurne.
Unitfails to startwhen spraygun
trigger is squeezed.
Cause
1. Water inlet is blocked.
2. inadequatewater supply.
3. Gardenhoseis kinked or leaking.
4. Cloggedwater inlet screen.
5. Water supply is over IO0°F (38°C).
6. High pressurehose is blocked or
leaks.
7. Spraytip or nozzleis obstructed.
8. Pump is faulty.
1. Water supply is not turned on.
2. Unit is notturned on.
3. Gardenhose istoo long.
Correction
1. Clearinlet.
2. Provideadequatewater flow.
3. Straighten garden hose or replaceif
leaking.
4. Checkand cleanwater inlet screen.
5. Providecooler water supply.
6. Clearblocks in high pressurehose
or replacehose.
7. Cleanspray tip or nozzle.
8. ContactSearsservice facility.
1. Turn on water supply.
2. Pressthe master ON/OFFswitch to
the Pressure WasherONposition
(-). Reset GFCI.
3. Useonly 50 ft. (15.24 m) maximum
garden hose.
Detergent faiJsto mix with spray.
Steam functionfaiJsto operate.
1. Siphon tube is cloggedor cracked.
2. Siphon tube is not fully inserted in
detergenttank.
3. High pressurespray tip installed.
1. Steamfunction is not turned on.
2. Nowater in water tank.
3. Siphon hose is cut or leaks.
4. Siphon hose is not fully inserted in
water tank.
5. Trigger is locked.
1. Cleanor replacesiphon tube.
2. insert siphon tubeso that end
contacts bottom of detergent tank.
3. Replacewith low pressure (black)
spray tip.
1. Pressthe master ON/OFFswitch to
the SteamONposition (=).
2. Fillwater tank with cleandistilled
water.
3. Examinesiphon hose and replaceif
faulty.
4. insert siphon hoseso that end
contacts bottom of water tank.
5. Unlocktrigger.
19
Page 20

20
Page 21

CRAFTSMAN1700 PSi ElectricPressureWasher580.752880
ExplodedView and PartsList
2
/
/
/ 3
/
/
/
10
6
11
/
/
12
13
/
item
1
2
3
4
5
6
7
8
9
10
11
12
13
14
15
16
17
18
19
2O
5
Part #
315947GS
315948GS
315951GS
315950GS
315961GS
315963GS
315952GS
316382GS
315949GS
315957GS
316299GS
316298GS
316297GS
315954GS
315958GS
315959GS
315960GS
315962GS
316391GS
316392GS
Description
HANDLE
GRIP
TANK
CAP,TANK
FOOT,STABILITY
INLET,FILTER
ACCESSORYTRAY
DECAL
KIT,WHEEL
KIT,ADAPTER
GUN
WAND,TURBO
EXTENSION,QC
HOSE,PRESSURE
BRUSH,STEAM
KIT,NOZZLES
KIT,O-RINGS
ADAPTER,STEAMGUN
DECAL
DECAL
PartsNot illustrated
Part#
315609GS
316399GS
316394GS
316395GS
Optional Accessories
7174404
7174405
7174406
14
\\
\\
Description
MANUAL,OPERATOR
KIT,HARDWARE
DECAL,WARNING,CORD
DECAL,STEAM
Not Illustrated
PerfectMixTM Multi-Purpose and
Vehicle Cleaner
PerfectMixTM Concrete,Brick, andTile
Cleaner
PerfectMixTM Mold and Mildew Cleaner
21
Page 22

GARANTfA.......................................... 22
ACUERDODEPROTECCIONDEREPARACION............... 22
NORMASDESEGURIDAD........................... 23-24
CARACTERiSTICASYCONTROLES....................... 25
ENSAMBLAJE..................................... 26-30
ESPECIFICACIONES................................... 35
MANTENIMIENTO.................................. 35-37
ALMACENAMlENTO................................... 38
RESOLUCIONDEPROBLEMAS.......................... 39
COMOSOLICITARPIEZASDEREPUESTO..... CONTRAPORTADA
FUNCIONAMIENTO................................. 30-34
GARANTJACOiViPLETADEUNANODECRAFTSMAN
DURANTEUNANO a partir de lafecha de compra, este producto cuenta con unagarantia contracualquier defecto en el
material o ia manede obra. Un producto defectuoso ser_ reparadosin costo alguno, o bien, ser_ sustituido en case deque no
seaposible repararlo.
Paraconocer los detaNesde cobertura de la garantia sobre c6mo obtener reparaci6no sustituci6n sin costo, visite el sitio
web: www.craftsman.com
Estagarantia nocubre pistolas rociadoras, mangueras,prolongadores de boquilia, boquiNas,puntasde rociado ofiltros, ya
que son recambios que puedendesgastarsecon el use normal dentro del periodo de garantia.
Estagarantia seinvaNdasi esteproducto seutiNzaalgunavez paraprestar servicios comerciales o si se renta a otra persona.
Estagarantia leotorga determinados derechos legalesyes posible quetenga otros derechos quepuedenvariar de unpais o
estado a otto.
Sears BrandsManagement Corporation,HoffmanEstates,IL 60179 EE.UU.
Feficitacionesper haber hecho unacompra inteligente.
Los productos Craftsman® est_ndise_adosy fabricados
para tenet muchos a_os de vida Otil.Pete, come todo
producto, es posible que hayaquerepararlo de vez en
cuando. En esos cases es cuando firmar un Contrato
de Protecci6nde Reparaci6npuedeahorrarle dinero y
problemas.
EI Contratode Protecci6n de Reparaci6n incluyeIo
siguiente:
* EI serviciode expertos per parte de los 10.000
reparadores profesionales conlos que contarnos.
* Servicio ilirnitado y repuestos y mane de obra sin cargo
para todaslas partes cubiertas.
* Reemplazo del producto de hastaUS$1500 en case de
que el producto notenga arreglo.
* Descuentodel 25% en el precio normal del servicio
y partes instaladas relacionadas que no cubra el
acuerdo. 25% de descuento en el precio normal de las
revisiones de rnantenirnientopreventive.
* Ayuda al instanteper tel_fono:Io Namamos"Soluci6n
r_pida",ayudateief6nica deun representantede Sears.Es
come si fu6ramos un "Manualdel usuario parlante".
Unavez quehayaaccedidoai Contratode Protecci6n de
Reparaci6n,Io Onicoque debe hacerpara programar el
servicio esreaiizaruna iiamadatelef6nica. Laslineas est_n
disponibles las 24 horas,o puede programar una cita en
linea.
El Contratode Protecci6nde Reparaci6nes unacompra
libre deriesgo. Si, per cualquier motive, cancelaei Contrato
duranteei periodo de garantia, iedevolveremos la totalidad
del dinero. 0 un reembolso a prorrata en cualquier memento
unavez finalizado ei periodo de garantia, iAdquiera ya su
Contratode Protecci6nde Reparaci6n!
Existen ciertas limitaciones y exclusiones. Para conocer
los precios y obtener inforrnaci6nadicional en los EE. UU.,
Ilarne al 1-800-827=0055.
* Lacobertura en Canad_varia en algunos punlos. Para
rn_sdetalles, p6ngaseen contactoconSears Canadd al
1=800-301=0055.
Servicio de instalaci6nde Sears
Para obtenerla instalaci6nprofesional de artefactos
dom6sticos, abrepuertas para garaje, calentadoresde agua
y otros dispositivos dom6sticos de Sears en los Estados
Unidos o en Canada,Name al 1-800-4-1VlY-HOIVlE®.
© KCDIP, LLC
22
Page 23

CONSERVEESTASINSTRUCCIONES
Lea estemanual detenidarnenteyfarniiiadcese con
ia limpiadora a presi6n el_ctrica. Conozcasus
apiicaciones,suslirnitacionesy todopeligro
asociado.
Informaci6ndeseguridadimportante
Sirnboios de seguridady significados
ManualdelOperario Descargael6ctrica Fuego
Superficie Caida Vapor Inyecci6n Liquida
resbaladiza
Proyectil Objetos Quemadura Superficie
,A El simbolo dealertade seguridad indicaun riesgode
lesionespersonales.Se usanpalabrasde advertencia
(PELIGRO,ADVERTENCIAo PRECAUCION)como simbolos
de alertaparadesignar elnivel degravedadde los peNgros.
Elsimbolo de seguridad puedeusarse pararepresentarel
tipo de peNgro.LapalabraAVlSOse utiNzaparahacer
referenda apr_cticas no relacionadascon lesiones
personales.
_kPELIGROindica un peligro que,si no se evita, ocasionar6
la muerte o una lesi6ngrave.
_kADVERTENCIAindica un peligro que,si no se evita,
podrfa ocasionarla muerte o una lesi6n grave.
,_.PREOAUOI6Nindica un peiigro que,si no se evita,podrfa
ocasionar en lesi6n leveo moderada.
AFI$O hacereferenciaa pr_cticas no relacionadascon
lesiones personales.
_k ADVERTENCIASuperficie calientey peligro de
_1t _ quemaduraspor vapor.
__ Lassuperficies calientesy ei vapor que
quemadoras que resulten en lesionesgraves.
• NO toque elchorro de vapor ni la boquilla con las manos
mientras Ioest6 utilizando.
• Deje que la m_quinase enfrie antes de tocarla.
SIEMPREapuntela pistolade vapor enunaposici6n
seguramientras laest6 utiNzando.
NOapunte apersonaso animalescon lapistola
pulverizadora.
propulsados quimica Caliente
genera la pistola de vapor puedenprovocar
_k ADVERTENCIA Riesgode electrocuci6n. Poner en
energia podria provocar una descargaei6ctricao
_¢ ontacto al mismo tiempo ambos conductoresde
incendio quecausenmuertes o lesionesgraves.
Conectadasolo aun toma corriente con unabuena
descargaatierra. NOquite elterminal detierra del
enchufe.
• Compruebeque el cableest6 en buenascondiciones
antesde usarla unidad.NOla utilice si el cableest_
dafiado.
El producto cuentacon un interruptor del circuito de
fallo atierra (GFCI)que se encuentraen el cabledel
enchufe.Si esnecesarioreempiazarel enchufe o ei cable,
reempi_celosexclusivamentepot piezasde repuesto
id6nticas.
• Mantengatodas las conexionessecas y lejos del suelo.
• NOtoque el enchufecon las manos mojadas.
• NO paseel cable pot entradas,ventanas,orificios en los
techos, paredeso pisos.
• NO piseei cable.
• NO aplaste,arrastre o coloqueobjetos sobre elcable.
• NO moje el_reacercanaa lafuente deenergia.
ABVERTENCIA Cuandose utiliza la limpiadora a
%12 ,osse uo on,o a, ha,cos
pulverizadorapuede generar un rebotey esto puedehacer
que usted se caiga,Io cual podria provocarle la muerte o
lesiones graves.
• Utiiice laiimpiadora apresi6n el6ctricadesdeuna
superficieestable.
• No lasobreexijani ia coloqueen unlugar inestable.
Mant6ngalasiempre en equilibrio.
• El_rea de limpiezadebetenet declivesy drenajes
apropiadosparadisminuir iaposibilidad de una caida
debido a las superficiesresbaladizas.
• Tengamucho cuidadoen caso deque deba utilizaria
limpiadora apresi6n ei6ctrica paradosobre una escalera,
andamioo algunaubicaci6n similar.
• Agarre la pistola pulverizadoracon ambasmanos cuando
utiiice los distintos modos de pulverizaci6npara evitar
lesionescuando lapistola pulverizadorarebota.
_, ADVERTENCIA Riesgode incendio. El
sobrecalentamientodei cablepuede provocar la
muerte, lesionesgraves y/o dafios a la propiedad.
• Desenrosqueel cablepor completo antesde utilizarlo.
NOcubra el cablecon ning0n material.
aguay lassuperficies puedenvolverse
resbaladizas.
Riesgo de descargael6ctrica. La pistola
23
Page 24

_k ADVERTENCIA Riesgo delesiones oculareso
A ABVERTENCIA Peligro de quemaduras quimicas
[_ orporales. La pistola puedesalpicar,
empujar objetoso provocar da_os
intemos que ocasionen unalesi6n grave.
* Cuandoutilice o est6cercade este dispositivo,
coi6quesegafasde seguridadcon ventilaci6n indirecta
(salpicaduraquimica) quecumplan con iadisposici6n
ANSI Z87.1. NUNCAreempiacelas gafasde seguridad o
lasgafas paratareas secas pot gafasdeseguridadcon
ventiiaci6n indirecta.
* Saberc6mo detenerla limpiadoraa presi6ny eliminar la
presi6n r_pidamente.Estarperfectamentefamiliarizado
con loscontroles.
* NOpermita a losNINOSutilizar la limpiadoraa presi6n
el6ctrica.
* No permitala presenciade personasen el _reade uso.
* Antes decada uso, revise la mangueraa aita presi6n.
NUNCAreparela mangueraa alta presi6n;c_mbiela.
* NOreparep6rdidas con ning0ntipo de sellador; cambie
lasjuntas t6ricasy obturadoras.
* Mientrasel sistemaest6 presurizado,mantengala
mangueraconectada a la limpiadora y a la pistola
pulverizadora.
* SIEMPREapuntela pistola puiverizadoraen una
direcci6n seguramientras ei sistemaest6 presurizadoy
aprieteel gatillode la pistoia para liberar lapresi6n alta
cadavez queapagueei dispositivo.
* NOapunte a personaso animales con la pistola
puiverizadora.
* NObebade los accesoriosconectados a la manguera.
* NOfije ia pistola pulverizadoraen la posici6n deabierto.
* NOdescuide lapistoia pulverizadoramientras la
limpiadoraa presi6nse encuentraen laposici6n de
encendido(-).
* NOutiiice una pistoia pulverizadoraque notenga una
traba o un bloqueadorde gatilloen su lugary que
funcione correctamente.
* Siempreaseg0resede quela pistoia pulverizadoray los
accesoriosest6n colocadoscorrectamente.
* Mant6ngasealerta:preste atenci6na Io quehace.
* NOutilice el dispositivo si est_ cansadoo bajo la
infiuencia de alcoholo drogas.
* Cuandose usaeste productocerca de ni_os es
necesariorealizaruna supervisi6ncercana.
_k ABVERTENCIA El chorro de agua de alta presi6n que
_ roduce esta unidad podria generar cortes en
la piely tejidos subcut_neos,io cuai provocaria
lesiones graves o una posible amputaci6n.
La pistola pulverizadoracontiene agua a altapresi6n
incluso cuandoel motor est_ detenidoy el suministro de
aguadesconectado.Esto podria provocar lesionesgraves.
NUNCAapuntea personas,animales o plantas con la
pistola pulverizadora.
SIEMPREapunte la pistola pulverizadoraen una
direcci6n segura,apriete el gatillo de ia pistola para
liberar la presi6n alta cadavezque apague la limpiadora
a presi6n.
i___ Los productos quimicos pueden
" provocar quemaduras queproduzcan la
muerte, lesionesgraves y/o da_os ala
propiedad.
* Cuandoutilice productos quimicos, colOquesegafasde
seguridadcon ventilaciOnindirecta (salpicadura quimica)
que cumplan con iadisposiciOn ANSI Z87.1.
* NOreemplacelas gafas de seguridado las gafaspara
tareassecas pot gafasde seguridadcon ventilaciOn
indirecta.
* NOutiiice liquido c_ustico con la limpiadora a presiOn
el6ctrica.
* SOLOutilice detergentes/jabonesseguros para ia
limpiadora a presiOn.Siga todas lasinstrucciones del
fabricante.
_i, ABVERTENCIA Riesgo de incendio. Rociar liquidos
inflamables puedeprovocar la muerte, lesiones
gravesy/o da_os ala propiedad.
* NOrocie liquidos inflamables.
_k ABVERTENOIA Este producto contieneplomo y
compuestos deiplomo, que, como se haestudiado enel
estadode California,EstadosUnidos, puedenprovocar
defectos a beb6su otros da_os relacionadoscon la
reproducciOn.L6veselas manos despu6sdemanipular
este product&
AV/SO El pulverizador dealta presi6n puededa_ar
objetos fr_giles, incluso cristales.
* NOdirija la pistola rociadora haciaun cristal cuando
utilice iapuntade rocio de roja de 0°.
* NUNCAapuntealas plantascon la pistolapulverizadora.
AV/SO Si manejade manera incorrecta la limpiadora a
presi6n el6ctrica,podria da_arlay acortar su vida 0til.
* Si tiene preguntassobre el uso de ia m_quina,consulte
a su vendedoro p6ngaseen contactocon un centro de
servicio autorizado.
* NOhagafuncionar las unidadescon piezasrotas o sin
algunaspiezas,o sin usar cubiertasde protecci6n.
* NOomita usar ning0n dispositivo de seguridadenla
limpiadora apresi6n el6ctrica.
NO modifique la limpiadora a presi6n el6ctrica.
Antes de arrancarla iimpiadora apresi6n el6ctrica en
climas muyfrios, revisetodas las piezasdel equipopara
asegurarsede queno est6n cubiertas de hieio.
NO tire de lasmangueras paramover la limpiadora a
presi6n el6ctrica.Mueva la unidaddesde la manija de
transporte provista.
El equipo de alta presi6n est_dise_ado paraset utilizado
UNII::;AMENTEcon las partesautorizadasSears.Si
utiNzaesteequipo conpartes que no cumpiancon las
especificacionesminimas, eiusuario asumetodos los
riesgos y responsabilidades.
24
Page 25

CONOZCASU LliViPIADORAA PRESION
Leael IVlanualdel usuarioy las norrnas de seguridad antesde utilizar la lirnpiadoraa presi6n.
Compare los dibujos con la limpiadora a presi6n parafamiliarizarse con la ubicaciOndelos distintos controles y
ajustes. Guardeeste manualpara consultas futuras.
<.
A- Pistoiapulverizadora:controla ia aplicaci6n de agua
sobre lasuperficie pot limpiar con un gatillo. Incluye
traba degatillo.
B- Tanque de detergente: se utilizapara trasvasarsoluci6n
concentradapara PerfectMWMauna corriente de baja
presi6n.
C- Etiquetas de advertencia: identifique los peligros que
deben evitarsecuando utiliza la limpiadoraa presi6n.
D- Interruptor principal de encendido/apagado: presione
el extremosuperior del activador en laposici6n (-) para
encenderla funci6n de la limpiadora apresi6n. Coloque
ei interruptor en (=) paraencenderla funci6n de vapor.
Coloqueel interruptor en la posici6n central (0) para
apagarla.
E - EntradadeJsurninistrode agua: conecteel suministro
de agua utilizando una manguera para jardin de un
m_ximo de 50 ft (15,24 m).
F - Cable el_ctricocon GFCI:la limpiadoraa presi6nel6ctrica
y el operador est_n protegidos por un interruptor de
circuito con fallos atierra.
G- Basede estabilidad: estabilizalapresi6n dela
limpiadora cuandose encuentraen posici6n vertical.
H- Pistola de vapor:controla ia aplicaci6n de vapor en la
superficie alimpiar con un gatillo. Incluye traba degatillo.
J - IVlangueraa alta presi6n:conecte un extremo ala salida
de agua a alta presi6ny el otto a lapistola pulverizadora.
K- Bandejapara accesorios: esideal para almacenar
accesorios b_sicosy opcionales.
L =Extremos del pulverizador:detergente(negro), 0°
(rojo) y 15° (naranja) paradistintas aplicacionesde alta
presi6n.
IVl-Limpiadorde boquillasy extremos del pulverizador:
se utilizapara quitar sedimentosy obstrucciones de las
boquillas yextremos del pulverizador.
N- Etiqueta de identificaci6n: proporciona ei modelo y el
nOmerode seriede la limpiadora apresi6n. En casode
Ilamar y solicitar ayuda, tengala etiquetacerca.
P - Salida de agua a alta presi6n: conexi6n de la manguera
a alta presi6n.
R- Tanque deagua: 116nelocon agua destilada limpia para
utiiizar la funci6n de vapor.
S - Vafilla tubo: lanzaun fuerte chorro de aguapara ofrecer
una limpieza intensa.
T - Varilla de metal conconexi6nr_pida: ie permite
cambiar entre tres pulvefizadoresdistintos.
25
Page 26

Ser_ necesarioque monte la limpiadora apresi6n, pero esto
no leiievar_ muchotiempo.
Si tiene alg_n problernapara rnontarla limpiadora a
presi6n, p6ngaseen contactoconla Ifnea de ayuda de
limpiadoras a presi6n Ilamando al 1-800-222-3136.
DESEIViBALELALllViPIADORAA PRESI6N
1. Saque todos los elementosde la caja.
2. Aseg0resede tenet todos los elementos que se incluyen
antes de ensamblarla.
CONTENID0DELACAJA
Revisetodo el contenido. En casode que falte oest6 da_ada
alguna pieza,p6ngaseencontacto con ia iinea deayuda de la
limpiadora a presi6n Ilamando al 1-800-222-3136.
• Unidadprincipal
Manejo
Molde demanija decorativa
Bandejaparaaccesorios
Ruedas(2)
Basede estabilidad
Tornillos (6)
Pistola pulverizadora
Accesorio decubierta y cepillo.
Dep6sitode detergente.
Dep6sitode agua.
Mangueraa altapresi6n
VariNaturbo
Varilla demetal (1) y extremos (3)
Bolsade piezas(que incluye Io siguiente):
Juntas t6ricasde repuesto:2 para la pistola
pulverizadora;2 grandesy 2 peque_asparala
mangueraa altapresi6n
Acoplamiento deentradade agua
Manual delusuario
Tarjetade registro del propietario
Conozcacada piezaantesde montar la limpiadora apresi6n.
Identifique todo elcontenido dela cajacon ia imagende ia
p_gina 25. Encaso deque faite o est6da_adaalguna pieza,
p6ngaseen contacto con ia lineade ayudade la limpiadora a
presi6n Ilamandoal 1-800-222-3136.
iViONTAJEDELALllViPIADORAA PRESION
Antes deutilizarla, tendr_ que montar la limpiadora a presi6n
Craftsman:
1. Lleney envie latarjeta de registro.
2. Monte la unidad principal.
3. Lubrique lasjuntas t6ricas.
4. Conectelas manguerasy el suministro de agua.
5. Conecte la varilla y los extremos del pulverizador.
26
Page 27

IVlontajede la unidadprincipal
1. Quitey desechela tapa deprotecci6n (A) de cada ejede
rueda.
2. Deslicelos ejesde las ruedas(C) hastalos agujeros
situados a los iadosde ia unidad principal (B). Las ruedas
estar_n instaladascorrectamente cuando oiga un CLICy
est6n fijas en su lugar.
3. Coloqueia manija (H) en las ranurasen lapartesuperior
de launidad principal. Coioquedos (2) tornillos para fijar
la manija ala unidad principal.
4. Deslicela bandejaparaaccesorios (G) en las ranuras de
la partetrasera dela unidad. Coioquedos (2) tornillos
parafijar la bandejapara accesorios enla unidad
principal.
.
Coloquela basede estabilidad(F), si la tiene,y ajOstela
con dostornillos.
6.
Ajuste el contorno del moide de lamanija decorativa
(J) con elde ia manija. Desliceel molde de lamanija
decorativaen la apertura de la manija hastaque se
enganche.
.
Confirme queel fiitro de entradadeagua (E) est6
instaiado en ia entradade agua; noio quite, exceptopara
fines delimpieza.Atornille el acoplamiento de entradade
agua (D) en laentrada de agua. Apriete amano.
/
27
Page 28

Lubriquelas juntast6ricas
La lubricaci6n de lasjuntas t6ricas es extremadamente
importante para la instaiaci6ny el funcionamiento. El uso de
un lubricante (grasalubricante o sint6tica) durante ei montaje
ayudaa que ias juntas t6ricas se asienten correctamentey
ofrece un mejor seiiado.Tambi6n ayudaa evitar que la junta
t6rica resulteda_ada pot abrasi6n, pellizcadoo cortes, y
aumenta la vida 0til de la junta t6rica.
AI/l$O SIEMPREaplique unapeque_acantidad de
lubricante eniasjuntas t6ricas antes de conectar la
manguerapara jardin a la bomba (A), a lamanguera a
alta presi6n(extremo de labomba) (B), a la manguera a
alta presi6n(extremo de lapistola) (C), a la variilaturbo
(extremo de ia pistola) (D), a lavarilla de metal (extremo
dei pulverizador)(E) y a lavarilla de metal (extremo dela
pistola) (F).
=,
Lubriquetodas las conexiones moslradas debajo. Para
clio, siga estas instrucciones:
1. Revisey limpie las superficiesde conexi6n antes de
lubricar y armar.
2. Seamoderado en el uso delubricantes durante el
armado. Solo necesitauna peque_alubricaci6n.
3. Useun cepillo peque_oo un bastoncilio de algod6n
para aplicar lagrasa directamenteaias juntas t6ricas
en los lugares donde no son accesibles(adaptadorQC,
adaptador M22).
28
Page 29

Conectelas mangueras y el surninistrode agua
AV/SO SOLOuseaguafria (menos de 100 °F/38 °C).
1. Conecteuna manguera parajardin (m_ximo: 50 ft!
15,24 m) alsuministro de agua.
2. Dejecorrer agua por la mangueraparajardin durante 30
segundos paralimpiar la suciedad.Desconecteel agua.
3. Verifique que la pantalladeentrada deagua (A)est6
instaladaen laentradade aguaubicada en la parte
inferior frontal de la unidad. NOla retire a menos que
vaya a limpiarla.
/
AV/SO Si falta la pantallade entradao est_da_ada,NO use
la limpiadora a presi6n el6ctrica. Llameal 1-800-222-3136
para obtener ayuda.
,
Coioqueel extremo opuestode lamangueraa alta
presiOnen ia pistola pulverizadora. Presioneel botOnrojo
(F) dela pistola pulverizadora.Luego,coloque elextremo
de la mangueraa alta presiOn(G) en ia manguera hasta
que quedecolocada correctamente. Suelte el botOnrojo y
compruebe que la conexiOnest6segura.
Conexi6ndela variiia y extrernosdel
pulverizador
1. Abra el suministro de agua, dirija ia pistola en una
direcci6n segura, presioneel bot6n paraliberar el gatillo
(H); luegoaprieteel gatillo (J) paraliberar elsistema de
la bombay la pistola pulverizadorade aire e impurezas.
..o_. ._ "_'?., "E E _'_:._" ".'.&.
AV/SO NOuse iabomba sin el suministro deagua
conectadoy funcionando.
* Si nose siguen estasinstruccionesy seda_a el
equipo, quedar_anulada la garantia.
4. Coloqueel extremo opuestode la mangueraparajardin
(B) enel acoplamiento deentradade agua (C).Apriete a
mano.
5. Conectela manguera a alta presi6n (D) enla salidade
agua de la unidad (E) ubicada en la partetrasera inferior
de iaunidad. Aprietea mano.
,
Coloquey gire la varilla (!() en la pistola pulverizadora
(IVl).Despu_sde quela varilla hayaentrado enla pistola,
empOjeiahaciaadentro un poco m_s y girela 1/4 haciala
derechahastacolocarla en su lugar.
3. Unavez instaladala varilia demetal, elijael extremo
del pulverizador que quiera utiiizar. Tire del cuello de
la varilla (N), inserteel extremo delpuiverizador (P) y
libere el cuello. Tire delextremo del pulverizador para
asegurarsede que est_ bien colocado. Vea C_mo utilizar
extremos del pulverizador.
4. Apague elaguay suelte el gatillo. Apunte la pistola hacia
una direcci6n segura y compruebe que no se pueda
apretarel gatillo.
29
Page 30

Lista deverificaci6npreviaal arranquedel motor
de la bomba
Reviseel montaje de la unidadpara asegurarsede quehaya
reaNzadotodas las siguientes acciones.
1. AsegOresede leerSeguridad del usuario y
Funcionamientoantes de usar la NmpiadoraapresiOn
el6ctrica.
2. Compruebeque las conexionesde mangueraest6n
correctamente apretadas.
3. AsegOresede quelas manguerasno tengan nudos, cortes
ni da_os.
4. Coloqueun suministro de agua adecuadocon el flujo
correcto (que no exceda los 38%).
5. Enchufeel cable el6ctrico en una fuenteel6ctrica
conectadaa tierra adecuadamente.
Instrucciones de conexi6na tierra
Este producto sedebe conectar a tierra. Encaso de que no
funcione correctamenteo falie, ia conexi6n a tierra brinda a
la corriente el6ctrica unatrayectoria de menor resistencia,a
fin de reducir el riesgo de electrocuci6n. Este producto est_
equipado con un cableque tiene un conductor de conexi6n a
tierra dei equipo y enchufe con conexi6n atierra. Elenchufe
debe introducirse en unatoma adecuada,correctamente
instaladay conectadaa tierra conforme a toda lanormativa
vigente.
iPELIGRO!- Una conexi6n inadecuadadel conductor de
conexi6n a tierra del equipo puede representarun riesgo de
electrocuci6n. Verifiquecon un electricistacaNficadoo con
ei personalde servicio si tiene dudas de que la toma est6
correctamenteconectada a tierra. No modifique el enchufe
que vienecon ei producto; si no se ajusta a iatoma, haga
que un electricista caNficadoinstaieuna toma adecuada.No
use ning0ntipo de adaptador con este producto.
COIViOUSARLALllViPIADORAA PRESION
Si tiene alg0nproblema para usar la limpiadora a presi6n,
p6ngaseen contactocon la linea de ayudade limpiadoras a
presi6n Ilamandoal 1-800-222-3130.
C6moarrancarla limpiadoraa presi6nel6cirica
A ADVERTENCIA Riesgo delesi6n ocular. Ei
pulverizador podria salpicar o empujar objetos
y esto podria causar lesionesgraves.Cuando
utilice oest6 cerca de estedispositivo, col6quese
gafas de seguridadcon ventilaci6nindirecta (salpicadura
quimica) quecumplan con iadisposici6n ANSi Z87.1.
Jam_s reemplaceiasgafasde seguridado ias gafas
para tareassecaspot gafasde seguridad con ventilaci6n
indirecta.
1. Coloque la limpiadoraa presi6nel6ctricacerca de una
fuente externa de agua quepuedasuministrar aguaa un
flujo superior a 3 gaiones por minuto (11,4 L), no inferior
a 20 psi (1,38 bares) en elextremo de lalimpiadora a
presi6n el6ctricadela mangueraparajardin. NO trasvase
el suministro de agua.
2. Conecte la manguera para jardin a la entradade agua.
3. Verifique que la mangueraa alta presi6n est6firmemente
conectadaa la pistola puiverizadora. ConsuiteConectelas
manguerasy el suministro de aguapara vet los gr_ficos.
AilI$O NO usela bombasin ei suministro de agua
conectadoy funcionando.
• Si no se siguen estas instrucciones y se da_ael
equipo, quedar_anuladala garantia.
4. ENCIENDAei agua, apuntela pistola haciauna direcci6n
segura, presione elbot6n de bloqueo del gatillo y apriete
el gatillo para purgar deaire el sistema dela bomba.
5. Quite la suciedad que haya en los extremos del
pulverizador. Coioqueiavarillay extremos dei
pulverizador deseadosen la pistola pulverizadora.Para
m_s detalles,vea Conectelas manguerasy el suministro
de aguay C6moufilizar los extremos delpulverizador.
6. Coioque ei interruptor principal deencendido/apagado(A)
en laposici6n de apagado(0).
3O
\
Page 31

.
Enchufeel cablede energiaen uncircuito el6ctrico de 120
VCAa 15 A queest6 correctamente instaiadoy conectado
a tierra de acuerdocon las normasy disposiciones
locales.Deberia encendersela luz delindicador en el
GFCI.
/
I
AV/SO La luz del indicador debeestar visible paraque la
limpiadora a presi6n el6ctrica puedafuncionar.
8. Presioneel bot6n TEST(prueba) (B). Sedeberiaapagar la
luzdel indicador (D).
C6modetener la limpiadoraa presi6nei6ctrica
El motor de la limpiadora apresi6n el6ctricasolo funciona
cuandoest_ presionadoel gatillo. Paradetener la limpiadora
a presi6n el6ctricay apagarel motor:
1. Suelte el gatilio de lapistola pulverizadora.
2. Coloque el interruptor principal deencendido/apagadoen
la posici6ncentral de apagado(0).
AV/SO AI soltar elgatillo, se apagar_el motor, pero no se
cortar_ el suministro de energiaa launidad.
3. Desconecteei suministro de agua.
4. SIEMPREapunte la pistoia puiverizadorahaciauna
direcci6n seguray presionesu gatillo para liberar la
presi6n acumuladaen la unidad.
,A. ABVERTENCIA El chorro de aguade alta presi6n que
_ roduce esta unidad podria generar cortes en
inciuso cuando ei motor est_ detenido y el suministro de
agua desconectado.Estopodria provocar lesiones graves.
* Mientras ei sistemaest6 presurizado,mantenga la
* SIEMPREapuntela pistola pulverizadoraen una
la piel y tejidos subcut_neos,Io cual provocaria
lesiones graves o una posible amputaci6n.
La pistola pulverizadora contiene aguaa altapresi6n
manguerade altapresi6n conectadaa la bombay a la
pistola pulverizadora.
direcci6n segura,aprieteel gatillo de lapistola para
liberar la presi6nalta cadavez que apaguela limpiadora
a presi6n.
9. Presioneel bot6n RESET(reiniciar) (6). Sedeberia
encender laluz delindicador (B).
AV/SO NOuse lalimpiadora apresi6nel6ctrica si falla la
prueba mencionadaanteriormente.
10.Coloque ei interruptor principal de encendido/apagadode
la limpiadora apresi6n en la posici6n de encendido (-).
11.Apunte la pistola haciauna direcci6n segura, presione
el bot6n de bloqueo deigatillo y apriete ei gatiiio. El
motor de laiimpiadora apresi6n el6ctrica arrancar_y se
detendr_ mientrasse presionay se sueita el gatiNode la
pistola pulverizadora.
Ahora la limpiadoraa presi6n ei6ctricaest_ lista para set
usada. M_s adelante,en esta secci6n,encontrar_ las
instrucciones de uso de los accesorios provistos.
.
Desconecteei enchufedel GFCIde la salida y enrolle el
cablede alimentaci6n.
6.
Parapurgar ei tanquede detergente(en casode haberlo
utilizado), quiteio dela limpiadora a presi6n y tire la
soiuci6n restante.
7. Enjuaguela botella de detergente con agua limpia y
vuelva a colocarla en la limpiadora a presi6n.
8. Enrolle y guarde el cablede la alimentaci6n, la manguera
a alta presi6n, lapistola puiverizadoray los accesoriosen
la bandejaparaaccesorios.
C6moutiiizar los extremosdel pulverizador
Ya deberia estar familiarizado con c6mo arrancar y c6mo
detenerla limpiadoraa presiOnel6ctrica. Sino es asi,antes
de continuar, consulte la secci6nanterior parafamiNarizarse
con cOmoarrancary cOmodetener el sistema.
La opci6n deconexi6n r_pida enia varilla de metal ie permite
intercambiar entretres extremos depuiverizadoresdistintos
de manerar_pida. Los extremos de los pulverizadores
puedencambiarse mientrasla limpiadora a presi6n
est_encendida, siempre y cuando el gatillo dela pistola
pulverizadoraest6 bloqueado. Losextremos del pulverizador
cambian el tipo de pulverizaci6nseg0n se muestra.
31
Page 32

Siga estas instruccionespara cambiarlos extremos del
puiverizador:
1. Tire el cuello de laconexi6n r_piday quite elextremo
del pulverizadorque tengaen esemomento. Coloque
los extremosdel pulverizador en elcontenedor que se
encuentra en la variNade metal.
_k ADVERTENCIA Ei chorro de agua de aita presi6n que
_ roduce esta unidad podria generar cortes en
• NUNCAcambie extremos de pulverizadoressin
• NOgire los extremos del pulverizador mientras los est6
Elija ei extremo dei pulverizadorque quiera:
la piely tejidos subcut_neos,io cual provocaria
lesiones graves o una posible amputaci6n.
que ia traba delgatillo est6 enganchadaa la pistola
puiverizadora.
utilizando.
• Paraun enjuague general,elija el extremo naranja15°.
• Parafregar la superficie, elija el extremo rojo 0°.
• Para colocar detergente,elija el extremo negro.
Baja presi6n Alia presJ6n
C6moapJicardetergente
,& ADVERTENCIA Peligrode quemadurasquimicas
- .> Los productos quimicos pueden
i'l Q
propiedad.
• Cuandoutilice productos quimicos, colOquesegafas de
seguridad conventiiaciOnindirecta (salpicadura quimica)
que cumplan con la disposiciOnANSIZ87.1.
• NOreemplacelas gafas deseguridad o lasgafas para
tareas secaspot gafas de seguridadconventilaciOn
indirecta.
NOutiiice liquido c_]usticocon la limpiadora a presiOn
el6ctrica.
SOLOutilice detergentes/jabonesseguros para ia
limpiadora a presi6n. Sigatodas las instrucciones del
fabricante.
Para aplicar detergenie, siga esios pasos:
1. Reviseel uso delos extremos quese muestraen C6mo
utilizar los extremos delpulverizador.
2. Gire latapa deltanque dedetergente(A) hacia laderecha
para liberarla de la ieng0eta de retenci6n.Quite la tapadel
tanquede detergente(B).
provocar quemadurasque produzcan la
muerte, lesionesgravesy/o da_os a la
Negro 15° naranja 0° rojo
UtiNcelopara aplicar 1300 PSi 1700 PSi
detergente 1.3GPM 1.0GPM
2. Tire del cuello,coloque el extremonuevoy suelte el
cuello. Tire del extremo del pulverizador para asegurarse
de queest6 bien colocado.
Consejos de uso
• Parauna mejor limpieza, mantengaei extremo dei
puiverizador a una distancia de entre 8y 24 in
(20 y 60 cm) de ia superficie a limpiar.
• Si acerca demasiadoel extremo delpulverizador, en
especialcuando utiiiza un extremo paraalta presiOn,
puede da_ar la superficie que est_ limpiando.
• AI limpiar neum_]ticos,no se acerquea m_]sde6 in
(15 cm).
.
Lleneel tanque con una soluci6n concentradade
PerfectMixTM (B).
Ai//SO USESOLAMENTEsoluci6n concentradaPerfectMixTM
con sulimpiador a presi6n. Si utiliza cualquier otra soluci6n
no concentrada, 6sta no le proporcionar_]los resultados
esperados.
.
Vuelvaa colocar en eltanque el tubo de succi6n y la tapa.
5.
Gire la tapa deltanquede detergente(C) haciala izquierda
hasta que haga tope con la ieng0etade retenci6n.
Aseguresede que el extremo deltubo de succi6n toque el
fondo del tanque.
.
Aseg0resede que est6 colocado el extremodel
pulverizador negro para detergente.
AFISO Nose puedeaplicardetergente con los extremos del
pulverizador paraalta presi6n (naranjao rojo).
.
Aseg0resede que la manguerapara jardin est6 conectada
a laentradade agua.Verifique quela mangueraa alta
presi6n est6conectadaa la pistola pulverizadoray a la
bomba. Enciendael agua.
32
Page 33

All/SO Debeconectartodas las manguerasantesde
arrancar lalimpiadora a presi6n el6ctrica.
8. Arranque la limpiadoraa presi6n el6ctricaseg0n las
indicacionesde C4mo arrancar la limpiadora apresi4n
el6ctrica.
9. Apiique detergentea una superficie seca.Comienceen
una parte inferior de la zona quelimpiar_ y vaya subiendo
de forma ampliay pareja.
10.Deje que el detergente entreen "remojo"de 3 a 5 min
antesde lavary enjuagar.Vuelva a aplicar, seg0n sea
necesario,para evitarque ia superficie seseque. Para
evitar que queden vetas, NODEJEque el detergentese
sequeen lasuperficie.
Enjuagarla limpiadora a presi6nei6ctrica
1. Quite el extremo del pulverizadornegro paradetergente
de la varilla de metal.
2. Elijay coioque elextremo dei pulverizadorde aitapresi6n
que usted desea. Paraello, siga las instrucciones en
C4mo utilizar los extremos delpulverizador.
3. Mantenga la pistola pulverizadoraa una distancia segura
de la zona queva a limpiar.
_.ADVERTENCIA Riesgode rebote
y esto puedehacer queustedse caiga,Io cuai
La pistoia pulverizadora puedegenerar un rebote
podria provocarlela muerte o lesiones graves.
• Utilice lalimpiadora apresi6n el6ctricadesdeuna
superficieestable.
• Tengamucho cuidadoen caso deque deba utilizaria
limpiadora a presi6n ei6ctricaparado sobreuna escalera,
andamioo algunaubicaci6n similar.
• Agarre la pistola pulverizadoracon ambas manos cuando
utiNcelos distintos modos depulverizaci6nparaevitar
lesionescuando lapistola pulverizadorarebota.
4. Rocie a alta presi6n en unazona peque_ay luego
compruebe que no hayada_os enla superficie. Si no
encontr6 da_os, puedecontinuar con el enjuague.
5. Comienceen la partesuperior de lazonapot enjuagar
y baje con movimientos amplios y parejos, al igual que
cuando limpi6.
C6mo utiiizarla funci6n de vapor
All/SO Solo utilice aguadestilada/desmineralizada.NO
utilice otros liquidos que podrianset inflamables o que
podrian obstruir el sistema.
1. Gire la tapa del tanquede agua(A) hacia iaderechapara
liberarla de la leng0etade retenci6n.Quitela tapa del
tanque deagua (B).
///
ii i/
.
Llene el tanquecon aguadestilada/desmineralizadalimpia
(B).
All/SO Paraasegurarse deque la unidadfuncione a la
perfecci6n ydure bastantetiempo, SOLOutilice agua
destiiada/desmineralizada.Los dep6sitos de cal pueden
comprometer el normal funcionamiento de la unidad
(suministro de vapor intermitente, p6rdidas de agua de la
v_ivuia de descarga,obstrucci6n en iaboquillas y tuberia de
abastecimiento). En caso de queesto ocurriese, p6ngaseen
contacto con el servicio al cNentede Sears.
3. Vuelva a colocar en el tanque de agua el tubo desucci6n
y la tapa.
4. Gire la tapa del tanquede agua(6) hacia la izquierda
hasta que hagatope con la lengOetade retenciOn.
AsegOresede que el extremo del tubo de succiOntoque el
fondo del tanque.
5. AsegOresede quelas conexionesde la cubierta (F)y la
escobilla (6) est6n instaladas en la pistola de vapor (D).
La cubierta est9 aseguradacon un botOnaresorte (E)
en la pistola. Presioneeste botOnparainstalar y quitar
la cubierta. LaconexiOnde la escobiNase desNzapor el
extremo dela cubierta.
.... S::.... ;
Otros consejosde limpieza
* NUNCAdescuidela limpiadora a presi6n el6ctrica
mientras est_enchufada a unasalida el6ctricay
mientras seest_ suministrando agua ai equipo.
* Si la boquilla est_ muy lejos dela superficie queest_
lavando, la limpieza puedeno set tan efectiva.
All/SO Parautilizar la funci6n de vapor, no es necesario que
est6n conectadasla manguerapara jardiny la mangueraa
alta presi6n.
33
Page 34

6. Siga ios pasos6, 7y 8 en la secci6n C6moarrancar la
limpiadora apresi6n el6ctrica.
_, ADVERTENCIA Superficiecalientey peligro de
AVISO Nuncadeje queel aguaen el tanque se gastepor
completo. Vuelvaa Ilenarel tanque cuandoel nivel deagua
bajea uncuarto de tanque. Utiiizarla unidad sin agua puede
daffar la bomba dealimentaci6n decaldera.
_1_ quemaduras porvapor.
__ Las superficies calientesy el vapor que
generala pistolade vapor pueden provocar
quemadorasque resultenen lesiones graves.
* NOtoque el chorro de vapor ni laboquilla con las manos
mientras Ioest6 utiNzando.
* Dejeque lam_quina se enfrie antes de tocarla.
SiEIVIPREapunte la pistola devapor en una posici6n
segura mientraslaest6 utiNzando.
NOapunte a personaso animalescon la pistola
pulverizadora.
7. Coloqueei interruptor principal de encendido/apagado
en laposici6n de encendido (=) de la Funci6nde vapory
espere20 segundos.
AV/SO Cuandoapriete el gatillo por primera vez, es posible
que salga un pocode aguaantesdel vapor. SIEMPREapunte
la pistolade vapor en unadirecci6n segura.
8. Apunte la pistola haciauna direcci6n segura,quite la
traba delgatilio (H) y aprieteel gatillo (J). Saldr_vapor
por la boquilla.
AVISO LafunciOn devapor cuentacon unav_ivuia de
seguridadque libera aguacaliente pot un drenaje que se
encuentraen laparte inferior de la unidad en caso de quese
acumule presiOn.
34
Page 35

ESPECIFICACIONESDELPRODUCTO
RESPONSABILIDADESDELPROPIETARIO
Especificacionesde la limpiadoraa presi6n
Presi6n m_ximade salida ...... 1700 PSI(117,2 BARES)*
Velocidadm_xima deflujo .......... 1,3 GPM(4,9 LPM)*
Mezclade detergente ....... Ver las instrucciones de MFR
Temperaturadel suministro de agua ... Nodebe superar los
100 °F (38 °O)
Motor ...................... Detipo universal (cepillo)
Rangode voltaje............................ 120 VCA
Corriente................................... 12,5 A
* Estalimpiadora a presiOnest_clasificada conforme
a la norma PW101(comprobaciOn y clasificaciOnde
rendimiento delimpiadoras a presiOn)de ia AsociaciOn
de fabricantes de bombas a presiOn(PressureWasher
ManufacturersAssociation, PWMA).
RecomendacionesGenerales
Un mantenimiento regular mejorar_el funcionamiento
y extender_la vida Otilde la limpiadora a presi6n. Para
mantenimiento, p6ngaseencontacto con algOnproveedor de
Searso algOnotto proveedor calificado.
La garantiadela iimpiadora a presi6n no cubre articulos que
hayansido sometidos aabusos o negligenciapot parte del
operador. Parapoder gozar de la garantia ensu totaiidad,el
operador debe mantener la limpiadora a presi6n segOnlas
indicacionesen el manual y guardarla en un lugar adecuado,
tal como se indicaen el capitulo Almacenamiento.
Antes de cadautiiizaci6n
1. Limpie los desechos.
2. Verifique que ia pantallade entradade agua no tenga
suciedady no est6 da_ada.
3. Verifique que la mangueraa alta presi6n notenga
p6rdidas.
4. Compruebe que la mangueradevapor no tengap6rdidas.
5. Compruebe quelos tubos delos sifones delos tanques
de detergentey de aguano est6n
da_ados.
6. Verifique el funcionamiento de la pistola pulverizadora.
7. Compruebeel funcionamiento de la pistola devapor.
8. Limpieel extremo dela pistola de vapor.
iViANTENIIVilENTODELALIIViPIADORAA
PRESION
Limpieza de desechos
A diario, o antes deusarla, limpie los desechosacumulados
en ia iimpiadora apresi6n el6ctrica. Reviselas ranurasy las
entradasde aire de refrigeraci6n adelante,atr_s y abajode la
limpiadora apresi6n el6ctrica. Estasaberturas debenestar
limpias y sin obstrucciones.
Laspiezasde ia limpiadora a presi6n el@trica
debenmantenerseiimpias para reducir elriesgo de
sobrecaientamientoe incendiode desechosacumuiados.
• Use un trapo hSmedopara iimpiar iassuperficies
exteriores.
AI/ISO Si manejainadecuadamentela limpiadora apresiOn
el6ctrica, podria da_arlay acortar su vida Otil.
• NOinserte ningOnobjeto por las ranurasde
enfriamiento.
35
Page 36

Verificaci6ny limpiezade la pantallade entrada
deagua
Quiteel acoplamientode la entradade agua (A). Luego,retire
la pantaliade entrada de agua (B) de iaentrada de aguade
la unidad(C) con alicatesde puntaaguja. Laentradade agua
est_ ubicadaen iaparte inferior frontal de la unidad. Revise
la pantaiiade entrada de agua. Si est_ sucia, limpiela con
un cepiilo peque_oy con agua.Si la pantalla est_da_ada,
reempl_cela.
Revisi6n de la mangueraa alia presi6n
La mangueraa aitapresi6n puedetener p6rdidasa
causadel desgaste,los nudesyei mat use. Siempre
revise ia mangueraantes deusaria. Compruebeque no
hayacortes, fugas, abrasioneso bultos en lacubierta, y
da_os o movimientos de acopiadores.Si ocurre aigo de
Io mencionadoanteriormente, reemplacela manguera
inmediatamente.
Revisi6n de la pisiolapulverizadora
Revisela conexi6nde la manguera a la pistola pulverizadora
y aseg0resede que est6firme. Pruebeel gatillo (D).
Paraello, presioneei bot6n debioqueo del gatilio (E)y
aseg0resede queei gatilio vuelva asu posici6n, come si
fuera un resorte, al soltario. No deberia poder presionar el
gatillo sin presionar antesel bot6n de bloqueodel gatiilo.
Si estas pruebasfallan, cambie inmediatamente lapistola
pulverizadora.
"'"7::._:JS%
.................. ML'.', ". ':
Revisi6n de la pistolade vapor
Apriete ei liberador dei gatillo (F) para probar el gatillo y
luego aprieteel gatiilo (G).Aseg0resede queel gatillo "salte"
de nuevoa su posici6n cuando io suelte. Presione latraba
del gatiilo (H). No tendria que poderpresionar el gatilio.
Siestas pruebasfallan, cambie inmediatamente la pistola
pulverizadora.
,&, ADVERTENCIA El chorro de agua de alta presiOnque
_ roduce esta unidad podfia generarcortes en
• NUNCArepare la mangueraa alta presiOn.C_mbiela.
• La potencia dela manguera reemplazadaDEBEset igual
la piely tejidos subcut_neos,io cual provocaria
lesiones graves o una posible amputaciOn.
o superior a la presiOnm_ximade la unidad.
Revise la manguera de vapor
La manguera puedetener p6rdidasa causadel desgaste,
los nudesy el mal use.Siempre revisela mangueraantes
de usarla. Compruebeque no tenga cortes, p6rdidasni
abrasiones.En casede que ocurrieseaigo de esto, pOngase
en contacto con el1-800-222-3130 paraobtener ayuda.
Revisi6n de lostubes de sif6nde losianques de
deiergente y de agua
Reviselos tubes y limpielos si est_ntapados. Compruebe
que lostubes no tengan p6rdidas ni rajadurasy reempl_celos
si est_nda_ados.
Limpie el extremede la pistoladevapor
1. Coloque el interrupter principal deencendido/apagadoen
la posici6ncentral de apagado(0). Quite ei enchufedel
cablede alimentaci6nde la salidael6ctrica.
,
Esperediez minutes para que seenfrie la unidad.
3.
Quiteel cepillo (J) de la pistola (K). Inserte repetidamente
el extreme del limpiador de la puntadel cable (IVl)en
la abertura peque_ade ia boquilla paraeliminar los
sedimentos o desechosacumulados. Ellimpiador de
la puntadel cableest_ guardado en la parte inferior
izquierdade la unidad.
36
Page 37

iVlantenimientodel extremodel pulverizador
Unapresi6n excesivaen la bomba puede provocar una
sensaci6nde pulsaci6n al apretar el gatiilo de la pistola
pulverizadora.Ei principal motivo de que haya presi6n
excesivaen la bomba es queel puiverizador est_ tapado
o Nmitadopot matefiales externoscomo la tierra. Un
pulverizador tapado podriahacer que ia bomba se encienda
y se apague,o que no se encienda,incluso cuando haya algo
de flujo.
Para corregir el problema, useestasinstrucciones para
Nmpiarinmediatamente el extremo del pulverizador:
1. Coloqueel interruptor principal de encendido/apagadoen
la posici6n central de apagado(O). Quiteel enchufe del
cable dealimentaci6n dela salida el6ctrica.
.
Desconecteel suministro de agua dela limpiadora a
presi6n el6ctrica.
3.
SIEMPREapunte lapistola pulverizadorahacia una
direcci6n segura. Presioneel bot6n de bioqueodel gatillo
y aprieteel gatiiio de ia pistola pulverizadorapara liberar
el aguaa alta presi6n retenida.
ADVERTENCIA Eichorro de aguade alta presi6n que
_ roduce esta unidad podfia generarcortes en
• Mientras elsistema est6 presurizado,mantengala
4. Quiteel extremo del pulverizador de la varilla de metal
5. Utiliceelextremo del Iimpiadorde la punta delcable para
la piely tejidos subcut_neos,io cuai provocaria
lesiones graves o una posible amputaci6n.
La pistola pulverizadoracontiene agua a altapresi6n
incluso cuandoei motor est_ detenidoy el suministro
de aguadesconectado.Estopodria provocar lesiones
graves.
manguerade altapresi6n conectadaa la bombay a la
pistola pulverizadora.
SIEMPREapunte la pistola pulverizadoraen una
direcci6n segura,apriete el gatillo de la pistola para
liberar la presi6n alta cadavezque apague la limpiadora
a presi6n.
(A).
Iiberarcualquier materialexterno que obstruga o restrinja
el extremo del pulverizador(B).ElIimpiadorde la punta
del cableest_ guardado en la parte inferiorizquierdade
launidad.
6. Utilice unamanguera para jardin para quitar los restos
enviandoagua por la varilla de metal. Circuleagua entre
30 y 60 segundos.
.
Vuelvaa colocar el extremo del pulverizador en la varilla
de metal.
8.
Vuelvaa conectar lavarilla de metal a la pistola
pulverizadora.
9.
Aseg0resede quela manguera parajardin est6conectada
a la entradade agua.Verifique que la manguera a alta
presi6n est6conectadaa la pistola pulverizadoray a la
bomba. Enciendael agua.
10.Enchufeel cablede alimentaci6n enunasalida ei6ctrica,
presioneel interruptor principal de encendido/apagado
de la limpiadora a presi6ny 116veloa la posici6n de
encendido(-).
11.Compruebeia limpiadora apresi6n el6ctrica utilizando
cadaextremo del pulverizador de conexi6n r_pida.
iVlantenimiento de la bomba y del motor
Labombay el motor de lalimpiadora a presi6n el6ctrica
no requierenmantenimiento. Ambosconjuntos est_n
prelubricados y sellados, y no es necesariovolver a
lubricarlos.
DESPUI SDECADAUSO
Ei agua no deberia permanecerdurante mucho tiempo en la
unidad. Lossedimentos o los mineraies puedendepositarse
en ias piezasde la bombay "congelar"sufuncionamiento.
Despu6sde cadauso, sigaestos procedimientos:
1. Corteel agua,apunte ia pistola haciauna direcciOn
segura, presioneel botOnde bloqueo del gatillo y apriete
el gatillo para liberar lapresiOnatrapada.
2. Desconectela manguera parajardin del suministro de
aguay de la limpiadora a presiOnel6ctrica.
3. Desconectela manguerade lapistola pulverizadoray de
la saiidade altapresiOnde labomba. Dreneei agua de
la manguera, de la pistolay de la varilla. Utilice untrapo
para limpiar la manguera.
4. Dreneel agua dela bomba. Paraello, d6 lavuelta a la
unidad desdesu parte delantera(la entradade aguadebe
quedar haciaabajo).
5. Enrolle ei cable de alimentaciOny gu_rdelo en labandeja
paraaccesorios.
6. Enrolle ia manguera a alta presiOny gu_rdelaenla
bandejapara accesorios.
7. Guardela unidad en unazona limpiay seca.
8. Encaso de mantenerlaguardada durantem_s de treinta
dias, lea la secciOnAlmacenamiento eninvierno o
durantelargos perfodos, en la p_ginasiguiente.
37
Page 38

ALIViACENAiViiEHTOENIHViERNO0
DURAHTELARGOSPERJODOS
El agua no deberia permanecerdurante mucho tiempo enla
unidad. Lossedimentos o los minerales puedendepositarse
en las piezasde la bombay "congelar"su funcionamiento.
Procedimientos iniciales de almacenamiento
1. Quitede la unidadla botella de detergente para purgarla y
tire la soluci6n restante.
,
Enjuaguela botella dedetergentecon agua limpia.
3.
Hagafuncionar ialimpiadora a presi6nel6ctrica con el
extremo de pulverizador paraalta presi6n (rojo). Enjuague
durante uno o dos minutos.
,
Coloqueel interruptor principal de encendido/apagadoen
la posici6n central de apagado(0). Quiteei enchufe del
cable dealimentaci6n dela salida el6ctrica.
5. Desconecteei suministro de agua. Apunte la pistola hacia
una direcci6n segura, presioneei bot6n de bloqueo del
gatiilo y apriete ei gatillo paraliberar ia presi6n atrapada.
Espereun momento y suelte el gatiNode lapistola
pulverizadora.
6. Desconecteia manguera parajardin del suministro de
agua y de lalimpiadora a presi6n el6ctrica. Desconecte
la mangueraapresi6n de labombay de la pistola
puiverizadora.
7. Dreneel aguade lasmanguerasy la pistola pulverizadora;
luego utilice un trapo o algo similar para limpiar las
superficies externas.
8. AsegOresede quelas manguerasdeentraday salida
est6n desconectadasde iabomba. Drene el agua de ia
bomba. Paraelio, d6 la vueltaa la unidad desdesu parte
delantera (laentradade agua debe quedarhaciaabajo).
AV/SO Si quedaraaguaen la bomba, esta podria congelarse
y da_arla bomba.
Protecci6n de la bomba
Paraproteger ia bomba de da_os provocados pot dep6sitos
de mineraies o congelamiento, utiiice la PumpSaver,
modelo 6039,para tratar la bomba. Esto evita da_os pot
congelamientoy lubrica elpist6n y los cierres.
AV/SO La PumpSaverest_ disponible como un accesorio
opcional. No viene incluida con ia limpiadora apresi6n
ei6ctrica. Paracomprar la PumpSaver,p6ngaseen contacto
con elcentro de mantenimiento autorizado m_s cercano.
AiflSO Debeproteger la unidadde temperaturas
extremadamentebajas.
* Si no Io hace,le causar_un da_o permanentea la
bombay la unidad quedar_inservible.
* La garanfiano cubre da_os por congelamiento.
Parautilizar la PumpSaver,asegOresede que la limpiadora
a presiOnei6ctricaest6 apagaday que lasmangueras de
entraday salidaest6ndesconectadas.Leay siga todas las
instrucciones yadvertencias que aparecenen la caja dela
PumpSaver.
Procedimientos para el almacenamientofinal
1. Enrolle la mangueraaalta presi6ny el cable de energiay
gu_rdelos enla bandeja paraaccesorios.
2. Vuelva a coiocar en la unidad laboteila deidetergente.
Guardeia pistoia pulverizadoray los accesoriosen la
bandejapara accesorios.
3. Guardela unidad enun _rea limpiay seca queest6
protegida contra las bajastemperaturas.
4. Cubraia unidad conuna manta protectora apropiadaque
no retengala humedad.
38
Page 39

Problema Soiuci6n
CalJsa
1. La entradade agua est_ bloqueada.
2. Suministro de aguainadecuado.
1. Libere la entrada.
2. Proporcione unflujo de agua
adecuado.
La bombatiene los siguienles
problernas:nogenera presi6n,
presi6nerr_tica, vibraci6n, p_rdidade
presi6n, bajovolurnende agua.
3. La manguerapara jardin est_
enroscadao tiene p6rdidas.
4. Revisela pantallade entradade
agua.
5. Elsuministro de aguasupera los
100 °F (38 °C).
6. La mangueraa alta presiOnest_
obstruida o pierde.
3. Estire ia manguera para jardin o
reempl_celasi pierde.
4. Revisey limpie la pantallade
entradade agua
5. Proporcione unsuministro deagua
m_s fresca.
6. Libere las obstrucciones en la
mangueraa altapresi6n o reemplace
la manguera.
7. Eiextremo dei pulverizadoro la
boquilla est_n tapados.
8. Fallala bomba.
7. Limpie elextremo del pulverizadoro
la boquiila.
8. P6ngaseen contacto con ei centro
de servicio t6cnico de Sears.
1. Elsuministro de agua no est_
1. Enciendael suministro de agua.
encendido.
La unidadnose enciendecuando
se aprieta el gatillo de la pistola
pulverizadora.
2. La unidad no est_ encendida.
3. La manguerapara jardin es
demasiadolarga.
1. Eltubo del sifOnest_tapado o
2. Coioqueel interruptor principal de
encendido/apagadode la limpiadora
a presi6n enla posici6n de
encendido(-). Reinicie el GFCI.
3. Utilice unamanguera para jardin de
50 ft (15,24 m) como m_ximo.
1. Limpie o reemplaceel tubo del sif6n.
rajado.
EI detergentenose rnezclaconel
pulverizador.
2. Eitubo del sifOnno est_ insertado
pot completo enel tanque de
detergente.
3. Extremodei pulverizador paraalta
presiOninstalado.
2. Inserte eltubo del sif6n paraqueel
extremo hagacontacto con elfondo
del tanquededetergente.
3. Reempl_celopor el extremodel
puiverizador para baja presi6n
(negro).
1. La funciOnde vapor no est_
encendida.
1. Coloqueel interruptor principal de
encendido/apagadoen la posici6n de
encendido(=) del vapor.
2. No hayagua en el tanque de agua.
2. Lleneei tanquede aguacon agua
destiladalimpia.
La funci6nde vapornofunciona.
3. La mangueradel sif6n est_ cortada
o tiene p6rdidas.
4. La mangueradei sif6n no est_
insertada pot completo en el tanque
de agua.
5. El gatillo est_bloqueado.
3. Revisela mangueradel sif6n y
c_mbielasi tienefallas.
4. Inserte lamanguera dei sif6n para
que el extremo hagacontacto con el
fondo del tanque de agua.
5. Destrabeel gatiNo.
39
Page 40

Your Home
For troubleshooting, product manuals and expert advice
managemylife
www.managemylife.com
For repair - in your home - of all major brand appliances,
lawn and garden equipment, or heating and cooling systems,
no matter who made it, no matter who sold it!
For the replacement parts, accessories and
owner's manuals that you need to do-it-yourself.
For Sears professional installation of home appliances
and items like garage door openers and water heaters.
1-800-4-MY-HOME ® (1-800-469-4663)
Call anytime, day or night (U.S.A. and Canada)
www.sears.com www.sears.ca
Our Home
For repair of carry-in items like vacuums, lawn equipment,
and electronics, call anytime for the location of your nearest
Sears Parts & Repair Service Center
1-800-488-1222 (U.S.A.) 1-800-469-4663 (Canada)
www.sears.com www.sears.ca
To purchase a protection agreement on a product serviced by Sears:
1-800-827-6655 (U.S.A.)
Para pedir servicio de reparaci6n
a domicilio, y para ordenar piezas:
1-888-SU-HOGAR ®
(1-888-784-6427)
www.sears.com
1-800-361-6665 (Canada)
Au Canada pour service en frangais:
1-800-LE-FOYER Mc
(1-800-533-6937)
www.sears.ca
sears
® Registered Trademark / Trademark of KCD IP, LLC in the United States, or Sears Brands, LLC in other countries
® Marca Registrada / TMMarca de F_brica de KCD IP, LLC en Estados Unidos, o Sears Brands, LLC in otros paises
MCMarque de commerce / MDMarque d6pos6e de Sears Brands, LLC
TM
 Loading...