

Craftsman 580.752850 User Manual
OPERATOR'SMANUAL
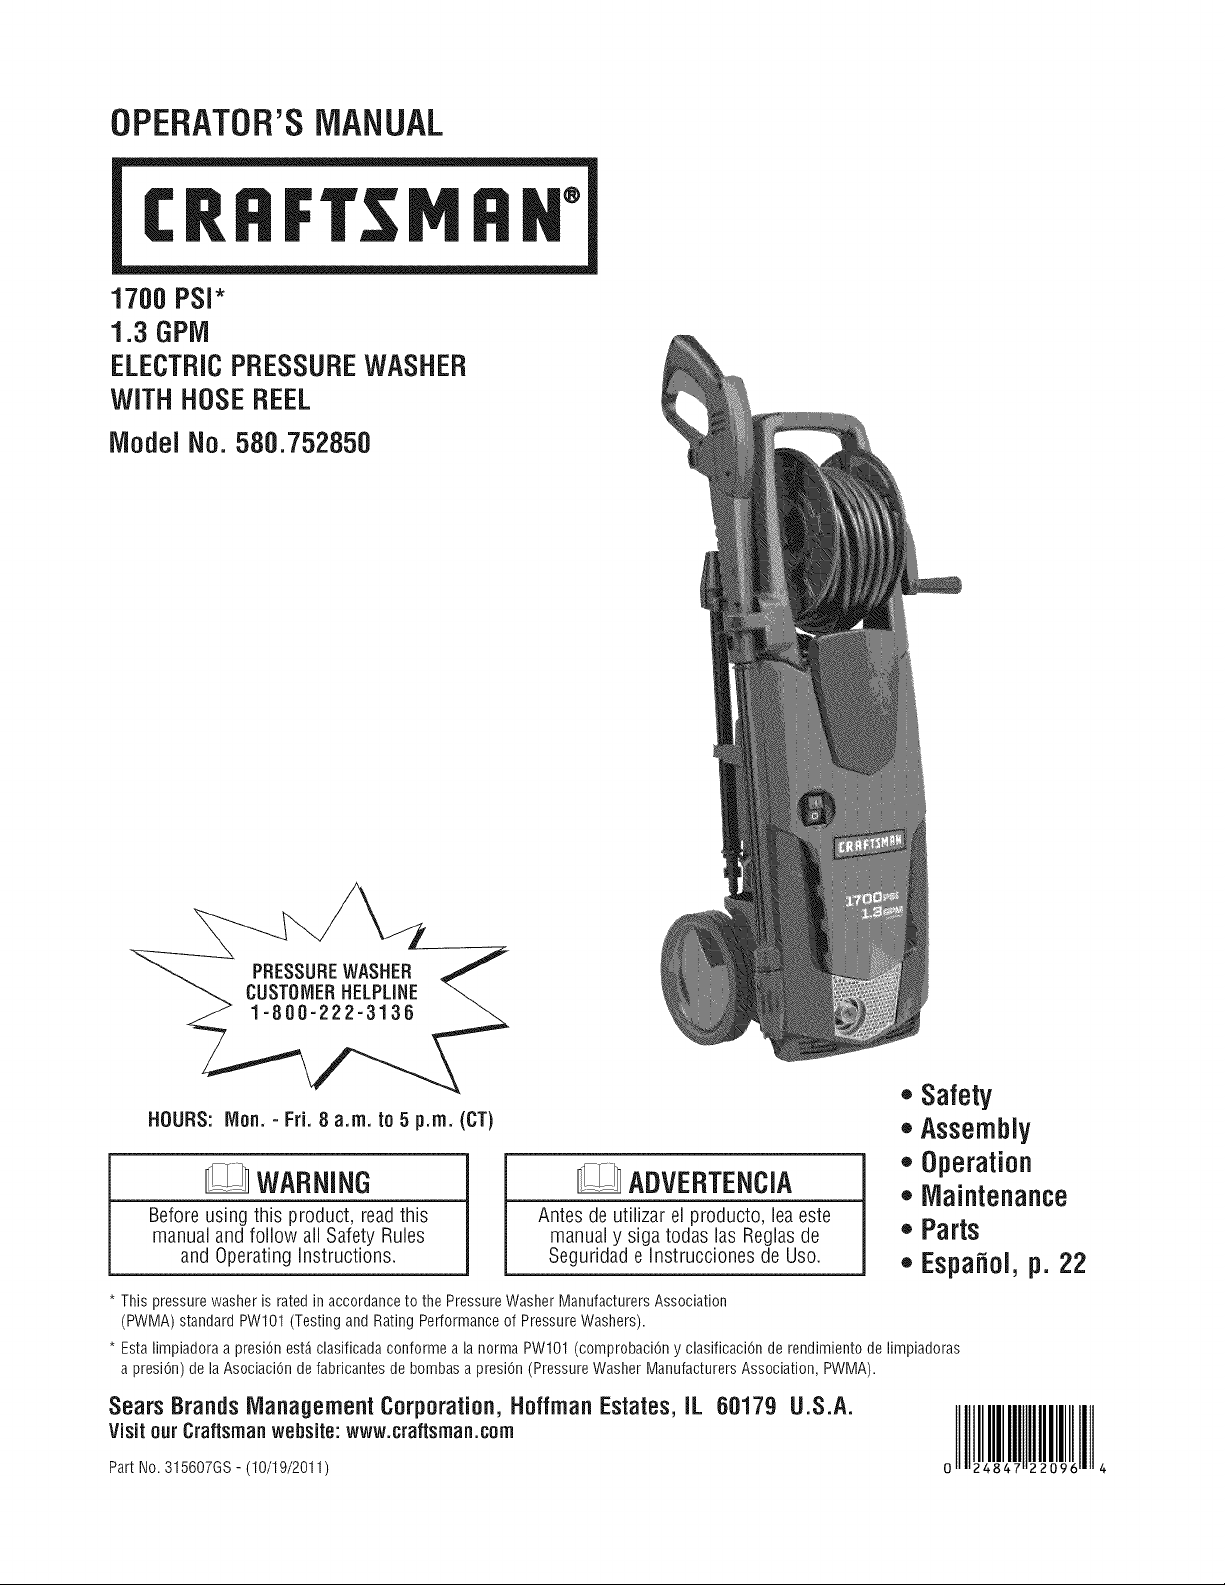
1700 PSi*
1.3 GPIVl
ELECTRICPRESSUREWASHER
WiTHHOSEREEL
iViodelNo. 580.752850
®
,, Safety
HOURS: IVIon.- Fri. 8 a.m. to 5 p.m. (CT)
,, Assembly
,, Operation
WARNING
Beforeusing this product, readthis
manualand follow all Safety Rules
and OperatingInstructions.
* This pressure washer is rated in accordanceto the PressureWasher Manufacturers Association
(PWMA) standard PWl01 (Testing and Rating Performance of Pressure Washers).
* Esta limpiadora a presiOn est_ clasificada conforme a la norma PWI01 (comprobaciOn y clasificaciOn de rendimiento de limpiadoras
a presiOn) de laAsociaciOn defabricantes de bombas a presiOn(Pressure Washer Manufacturers Association, PWMA).
SearsBrands ManagementCorporation, HoffmanEstates, IL 60179 U.S.A.
Visit our Craftsman website: www.craftsman.com
Part No. 315607GS - (10/19/2011)
Antes de utiiizar el producto, leaeste
manualy siga todas las Reglasde
Seguridad e Instrucciones de Uso.
ADVERTENCIA
,,Maintenance
,,Parts
,, EspaNol,p. 22
WARRANTY .......................................... 2
REPAIRPROTECTIONAGREEMENT........................ 2
SAFETYRULES...................................... 3-4
FEATURESAND CONTROLS.............................. 5
ASSEMBLY........................................ 6-11
OPERATION...................................... 11-13
SPECIFICATIONS..................................... 14
MAINTENANCE.................................... 14-16
STORAGE........................................... 17
TROUBLESHOOTING.................................. 18
NOTES.......................................... 19-20
REPLACEMENTPARTS................................. 21
ESPANOL........................................... 22
HOWTO ORDERPARTS......................... BACKPAGE
CRAFTSMANONEYEARFULLWARRANTY
FORONEYEARfrom the dateof purchase, this product is warrantedagainst any defectsin material or workmanship. A
defective product will receivefree repair or replacementif repair is unavailable.
Forwarranty coveragedetails to obtain free repair or replacement,visit the web site:www.craftsman.com
This warranty does not cover spray guns, hoses,nozzleextensions, nozzles,spray tips or filters, which are expendableparts
that canwear out from normal usewithin the warranty period.
This warranty is void if this product is everusedwhile providing commercial servicesor if rentedto another person.
This warranty givesyou specific legalrights, and you may also haveother rights which vary from stateto state.
Sears Brands Management Corporation, Hoffrnan Estates, IL 60179
Congratulations on making a smart purchase.
Your new Craftsman® product is designed and manufactured
for years of dependableoperation. But likeall products, it
may requirerepair from time to time. That's when having
a RepairProtectionAgreement can saveyou money and
aggravation.
Here's whatthe Repair ProtectionAgreement* includes:
* Expert service by our 10,000 professional repair
specialists
* Unlimited serviceand no chargefor parts and labor on
all coveredrepairs
* Product replacement up to $1500 if your covered
product can't befixed
* Discountof 25% from regular priceof serviceand related
installed parts not covered bythe agreement;also, 25%
off regular price of preventivemaintenancecheck
* Fast help byphone-we caii it Rapid Resolution- phone
support from a Sears representative.Think of us as a
"talking owner's manual."
Onceyou purchasethe Repair Protection Agreement,a
simple phonecarlis all it takes for you to schedule service.
You cancaii anytimeday or night, or schedulea service
appointment online.
The RepairProtectionAgreement is a risk-free purchase.
Ifyou cancelfor any reason during the product warranty
period,we will provide a full refund.Or, aprorated refund
anytime afterthe product warranty period expires. Purchase
your RepairProtectionAgreement today!
Some limitationsand exclusions apply. Forpricesand
additional informationin the U.S.A. call 1-800-827-6655.
* Coverage in Canada varies on some items. Forfull
details, cail Sears Canadaat 1-800-361-6665.
Sears InstallationService
ForSears professional installation of homeappliances,
garagedoor openers,water heaters,and other major home
items, inthe U.S.A.or Canadacall 1-800-4-MY-HOME@.
© KCDIP, LLC
Readthis manual carefully and becomefamiliar
with yourpressurewasher. Knowits applications,
itslimitations, and anyhazardsinvolved.
importantSafety information
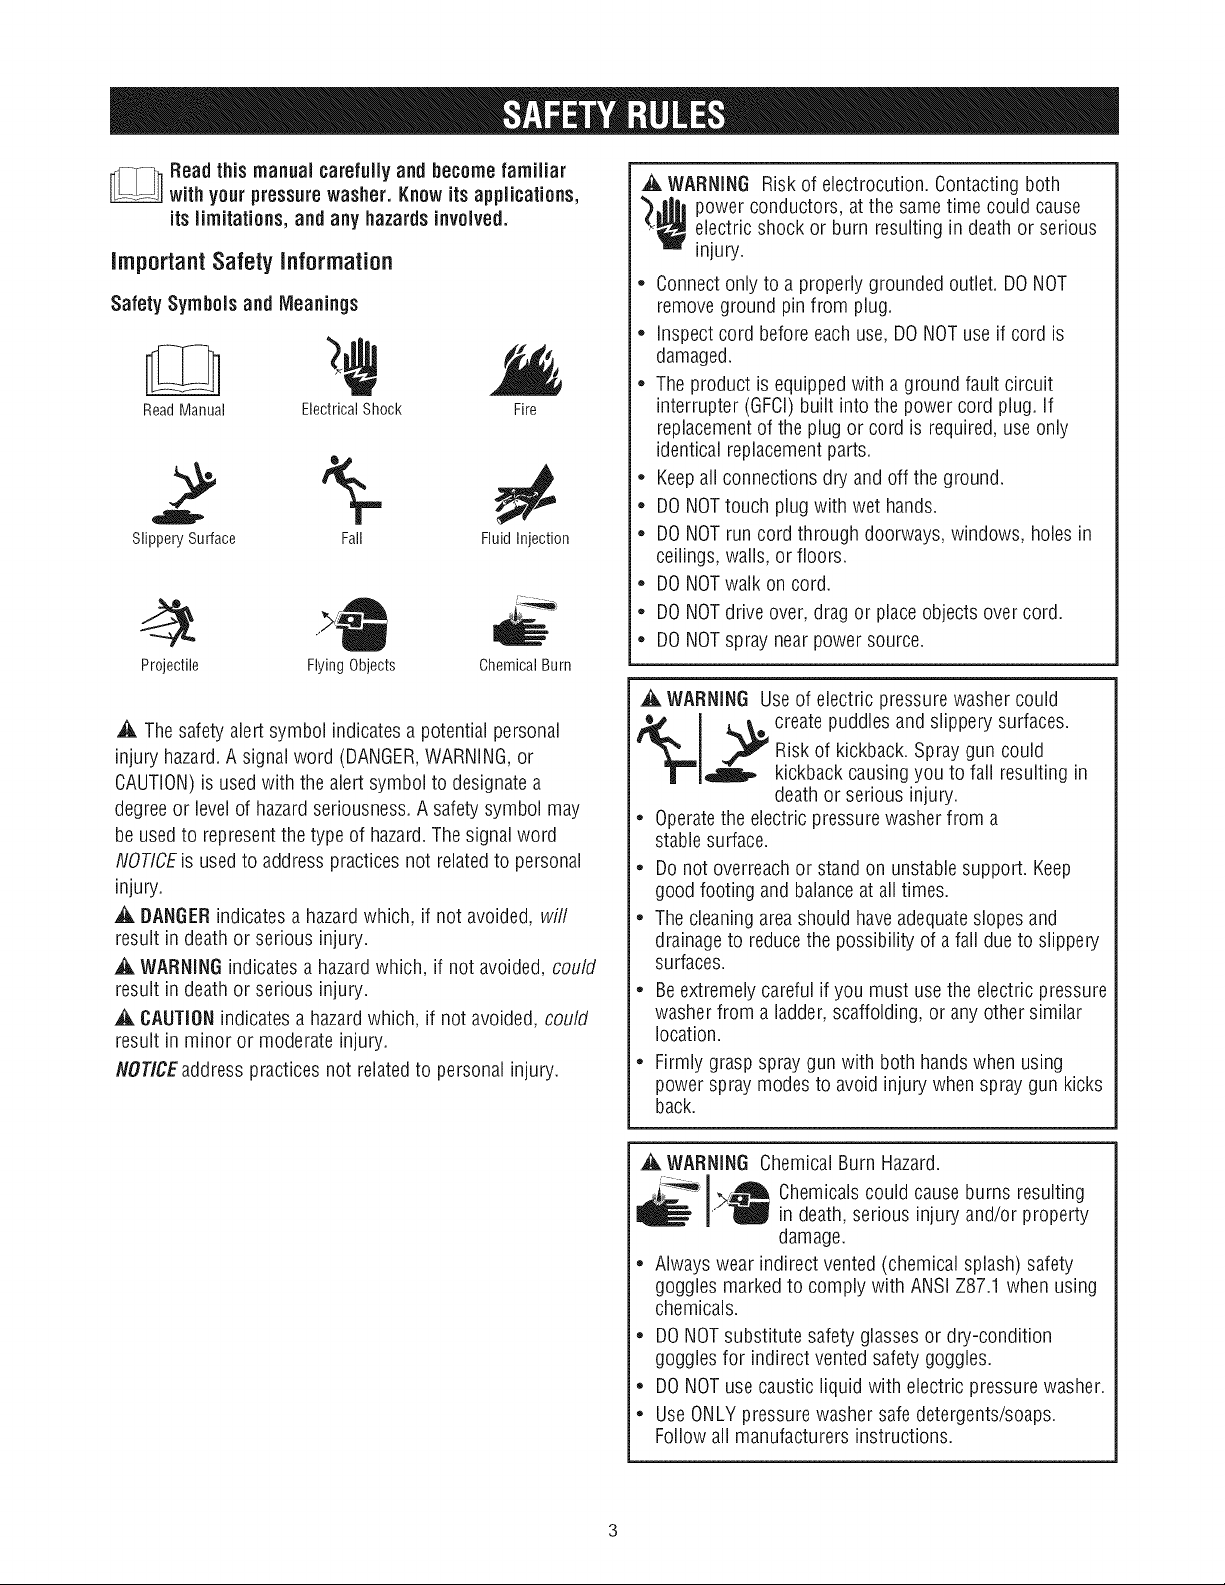
Safety Symbols and Meanings
ReadManual Electrical Shock Fire
Slippery Surface Fall Fluid Injection
Projectile Flying Objects
,_, Thesafety alertsymbol indicatesa potential personal
injury hazard.A signalword (DANGER,WARNING,or
CAUTION)is usedwith the alertsymbol to designatea
degreeor levelof hazardseriousness. A safety symbol may
be usedto representthe typeof hazard.The signalword
NOTICEis usedto address practices notrelatedto personal
injury.
,_, BANGERindicatesa hazardwhich, if not avoided, will
result in deathor serious injury.
,_, WARNINGindicatesa hazardwhich, if not avoided, could
result in deathor serious injury.
,_, CAUTIONindicatesa hazardwhich, if not avoided, could
result in minor or moderate injury.
NOTICEaddress practicesnot relatedto personal injury.
Chemical Burn
_. WARNING Riskof electrocution. Contactingboth
*_¢ power conductors, at the sametime could cause
.electricshock or burn resulting in deathor serious
injury.
, Connectonly to a properly groundedoutlet. DONOT
remove ground pin from plug.
, inspect cordbefore eachuse, DONOTuse if cord is
damaged.
, The product isequippedwith a ground fault circuit
interrupter (GFCI)built into the power cord plug. If
replacementof the plug or cord is required,useonly
identical replacementparts.
, Keepall connectionsdry andoff the ground.
, DONOTtouch plug with wet hands.
, DONOTrun cord through doorways, windows, holes in
ceilings,wails, or floors.
, DONOTwalk on cord.
, DONOTdrive over, drag or place objectsover cord.
, DONOTspray nearpower source.
,A WARNING Useof electric pressurewasher could
_l_iiRp_ reatepuddles and slippery surfaces.
Risk of kickback.Spray gun could
kickback causingyou to fall resulting in
deathor serious injury.
• Operatethe electric pressurewasherfrom a
stable surface.
• Do not overreachor stand on unstablesupport. Keep
good footing and balanceat alltimes.
• Thecleaningareashould haveadequateslopes and
drainageto reducethe possibility of afall due to slippery
surfaces.
• Beextremelycareful if you must usethe electric pressure
washer from a ladder,scaffolding, or anyother similar
location.
• Firmly grasp spray gun with both handswhen using
power spraymodes to avoidinjury when spray gun kicks
back.
,A WARNING ChemicalBurn Hazard.
_1 O Chemicalsc°uid cause burns resulting
> in death,serious injury and/or property
damage.
• Alwayswear indirect vented (chemical splash) safety
goggles markedto comply with ANSIZ87.1 when using
chemicals.
• DONOTsubstitute safety glasses or dry-condition
goggles for indirect ventedsafetygoggles.
• DONOTuse caustic liquid with electric pressurewasher.
• UseONLY pressurewasher safedetergents/soaps.
Follow all manufacturers instructions.
_, WARNINGRiskofeyeorbodilyinjury.Spraycould
i,_ splashback,propelobjectsorcause
internalharmresultinginseriousinjury.
• Alwayswearindirectvented(chemicalsplash)safety
gogglesmarkedtocomplywithANSIZ87.1whenusing
orinvicinityofthisequipment.NEVERsubstitutesafety
glassesordry-conditiongogglesforindirectvented
safetygoggles.
DONOTallowCHILDRENtooperatetheelectricpressure
washer.
• Keepoperatingareaclearofallpersons.
• inspecthighpressurehosebeforeeachuse.NEVER
repairhighpressurehose;replaceit.
• DONOTrepairleakingconnectionswithsealantofany
kind;replaceo-ringsandgaskets.
Keephoseconnectedtoelectricpressurewasherand
spraygunwhilesystemispressurized.
• ALWAYSpointsprayguninsafedirectionwhilesystem
ispressurizedandsqueezesprayguntriggertorelease
highpressure,everytimeyouturnofftheunit.
DONOTaimspraygunatpeopleoranimals.
DONOTdrinkfromhoseconnectedaccessories.
DONOTsecuresprayguninopenposition.
DONOTleavespraygununattendedwhiletheelectric
pressurewasherisinON(1)position.
DONOTuseaspraygunwhichdoesnothaveatrigger
lockortriggerguardinplaceandinworkingorder.
Alwaysbecertainspraygunandaccessoriesare
correctlyattached.
Stayalert- watchwhatyouaredoing.
DONOToperatetheproductwhenfatiguedorunderthe
influenceofalcoholordrugs.
_, WARNINGThehighpressurestreamofwaterthat
anditsunderlyingtissues,resultinginserious
thisequipmentproducescouldcutthroughskin
injuryandpossibleamputation.
Sprayguntrapshighwaterpressure,evenwhenmotoris
stoppedandwaterisdisconnected,whichcouldresultin
seriousinjury.
NEVERaimspraygunatpeople,animals,orplants.
ALWAYSpointsprayguninsafedirection,squeeze
sprayguntriggertoreleasehighpressure,everytime
youturnoffpressurewasher.
A WARNINGRiskoffire.Sprayingflammableliquids
couldresultindeath,seriousinjuryand/or
propertydamage.
• DONOTsprayflammableliquids.
A WARNINGRiskoffire.Overheatedcordcouldresult
indeath,seriousinjury,and/orpropertydamage.
Uncoilcordcompletelypriortouse.
DONOTcovercordwithanymaterial.
A WARNINGThisproductcontainsleadandlead
compounds,knowntotheStateofCaliforniatocause
birthdefectsorotherreproductiveharm.Washyour
handsafter handling this product.
IVOTIC,E High pressure spray could damagefragile items
including glass.
DONOTpoint spray gun at glass when using MAXspray
pattern in selector nozzle.
NEVERaim spray gunat plants.
NOTICE improper treatment of electric pressure washer
could damageit and shorten its life.
If you have questionsabout intendeduse,ask dealeror
contact authorizedservicecenter.
• DO NOToperateunits with broken or missing parts, or
without protectivehousing or covers.
• DO NOTby-pass anysafety deviceon theelectric
pressurewasher.
• DONOTmodify theelectric pressurewasher inanyway.
Beforestarting the electricpressure washer in cold
weather, checkallparts of the equipment to besure ice
hasnot formed there.
• DONOTmove the electric pressurewasher by pulling on
hoses.Move unit usingthe transport handlesupplied.
• This equipment is designedto be usedwith Sears
authorizedparts ONLY.if equipment is usedwith parts
that DONOTcomply with minimum specifications, user
assumesall risks and liabilities.

KNOWYOURPRESSUREWASHER
Readthe Operator's Manual andsafetyrules beforeoperating yourpressure washer.
Comparethe illustrations with your pressurewasher to familiarize yourself with the locations of various controls and
adjustments. Savethis manual for future reference.
A - Spray Gun-- Controls the application of water onto
cleaningsurface with trigger device, includestrigger lock.
B - Master ON/OFFToggle Switch -- Pushtop of switch in
( I) to turn pressure washer ON. Push Bottom ofswitch
in (0) to turn pressure washer OFF.
C- Electric Cord with GFCI-- Theelectric pressurewasher
and operator is protected bya ground fault circuit
interrupter (GFCI).
D- Water Supply Inlet -- Connectto water supply using a
50 ft. (15.24 m) maximum garden hose.
E - Warning Labels -- identifies hazardsto be avoidedwhen
using your pressurewasher.
F - HoseReel -- Providesconvenientstorage for high
pressure hose.
G- High Pressure Hose-- Connectone end to high
pressure water outlet and the other end to spray gun.
H- Accessory Tray-- Providesconvenient storage for
standard and optional accessories.
J - Foam Lance-- Usedwith adjustablefan jet wand to
apply detergentto surfaces.
I( - Nozzle Cleaner -- Usedto remove sediment and clogs
from nozzles.
L- Identification Label -- Provides model andserial
number of pressurewasher. Pleasehavethese readily
availableif calling for assistance.
IVl-High PressureWater Outlet -- Connectionfor high
pressure hose.
N- Turbo Wand -- Whirls a powerful pin-point jet of water
for intense cleaning.
P - Adjustable FanJet Wand-- Allows adjustment of spray
pattern for various high pressure applications.

Your electric pressure washerrequires some assembly but is
quickly readyfor use
If you have any problemswiththeassembly of your
pressurewasher, pleasecaii the pressurewasher heJpJine
at 1=800-222-3136.
UNPACKTHEPRESSUREWASHER
1. Removeeverything from carton.
2. Ensureyou haveall included items prior to assembly.
CARTONCONTENTS
Checkaii contents. If anyparts are missing or damaged,call
the pressurewasher helplineat 1-800-222-3136.
• Main unit
• Handle
• Hose reel (left and right side)
• Hose reel handle
• Hose reel retainers (left and right side)
• Decorative handlemolding
• Accessorytray
• Wheels (2)
• Decorativeshield
• Screws (9)
• Spraygun
• High pressure hose
• Turbo wand
• Adjustable fan jet wand
• Foam lance
• Water inlet coupling
• Parts bag(which includes the following):
• O-rings, spare: 2 for spray gun; 2 largeand 2 small
for high pressure hose
• Operator's manual
• Owner's registration card
ASSEMBLINGPRESSUREWASHER
Your Craftsmanpressurewasher will needassembly before
operation:
1. Fill out and send in registration card.
2. Assemble main unit.
3. Assemble hose reel.
4. Lubricate O-rings.
5. Connect hoses and water supply.
6. Connect wand.
7. Connect foam lance.
Becomefamiliar with eachpiece beforeassembling the
pressure washer. Identify allcontents with the illustration
on page5. If any partsare missing or damaged,call the
pressure washer helpline at 1-800-222-3136.
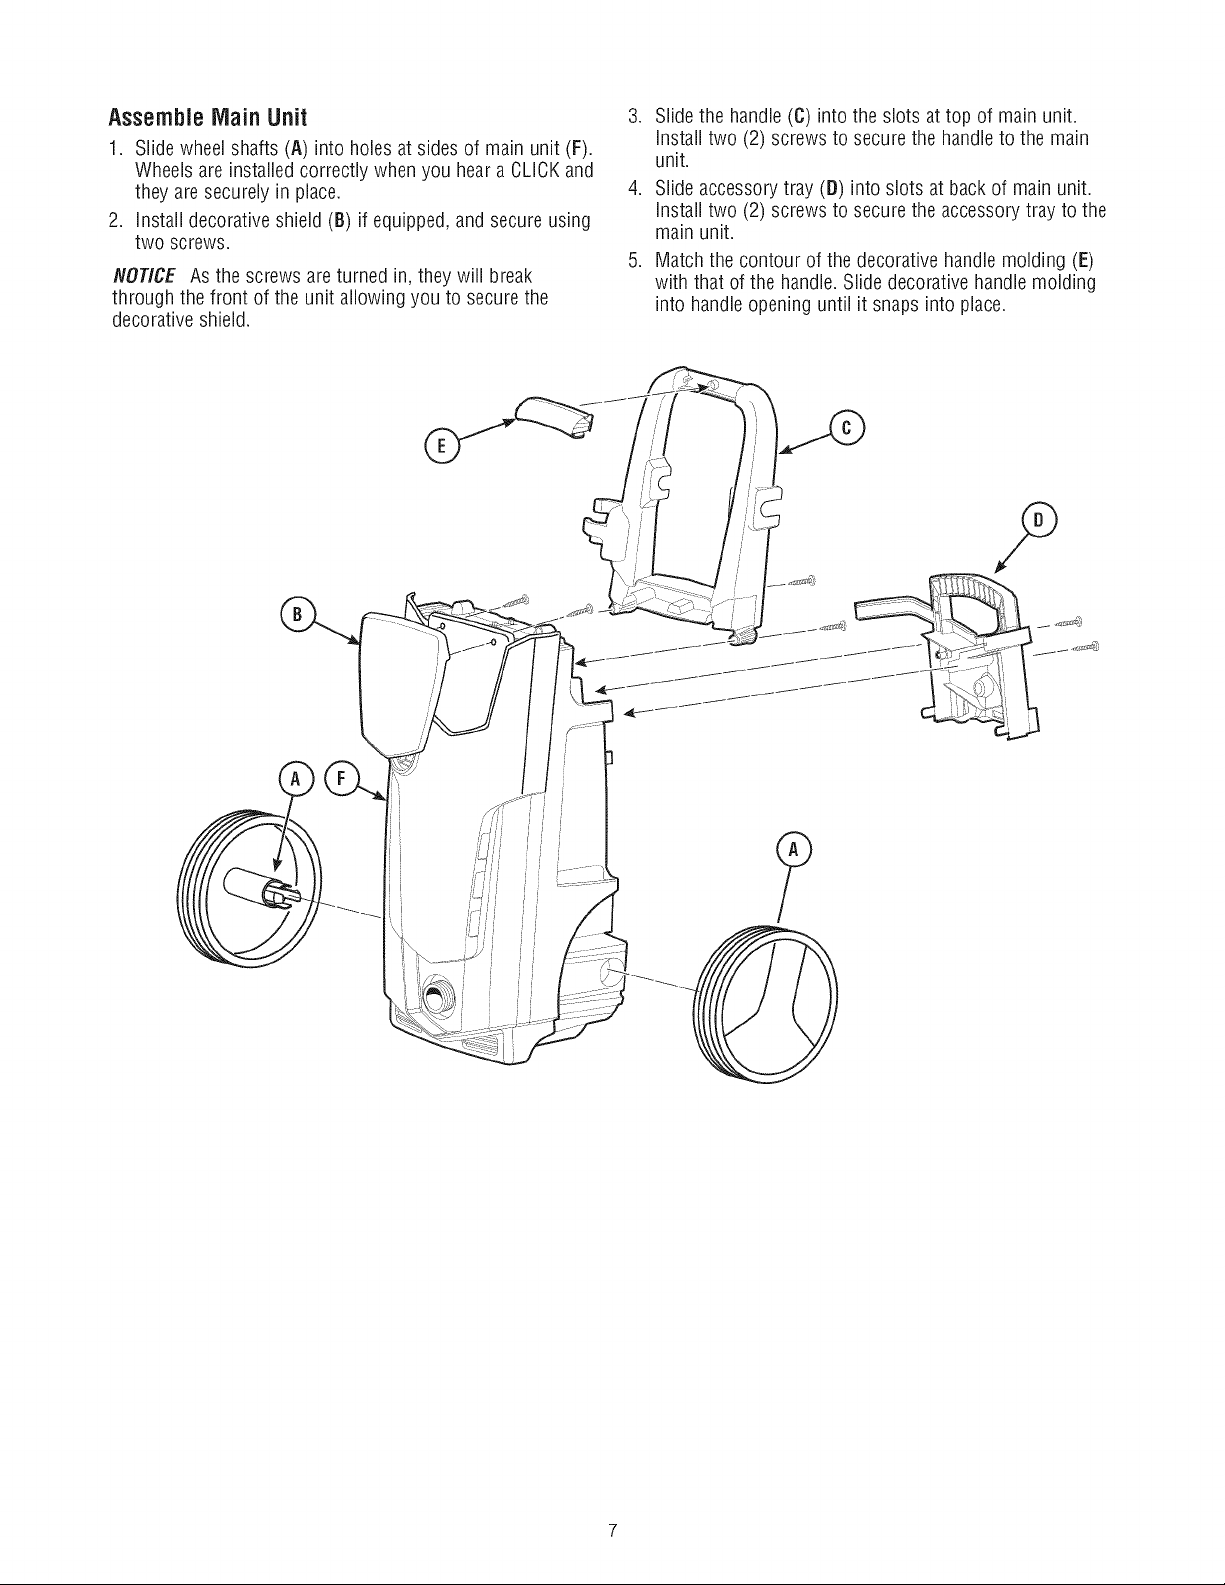
Assemble Main Unit
1. Slide wheel shafts (A) into holesat sides ofmain unit (F).
Wheels are installed correctly when you hear a CLICKand
they aresecurely in place.
2. install decorative shield(B) if equipped,and secure using
two screws.
NOTICE Asthe screws are turned in, they will break
through the front of the unit allowing you to secure the
decorativeshield.
.
Slide the handle(C) into the slots at top of main unit.
install two (2) screws to secure the handle to the main
unit.
.
Slide accessorytray (D) into slots at backof main unit.
Install two (2) screws to securethe accessorytray to the
main unit.
.
Match thecontour of the decorative handlemolding (E)
with that of the handle.Slide decorative handlemolding
into handle opening until it snaps into place.
?
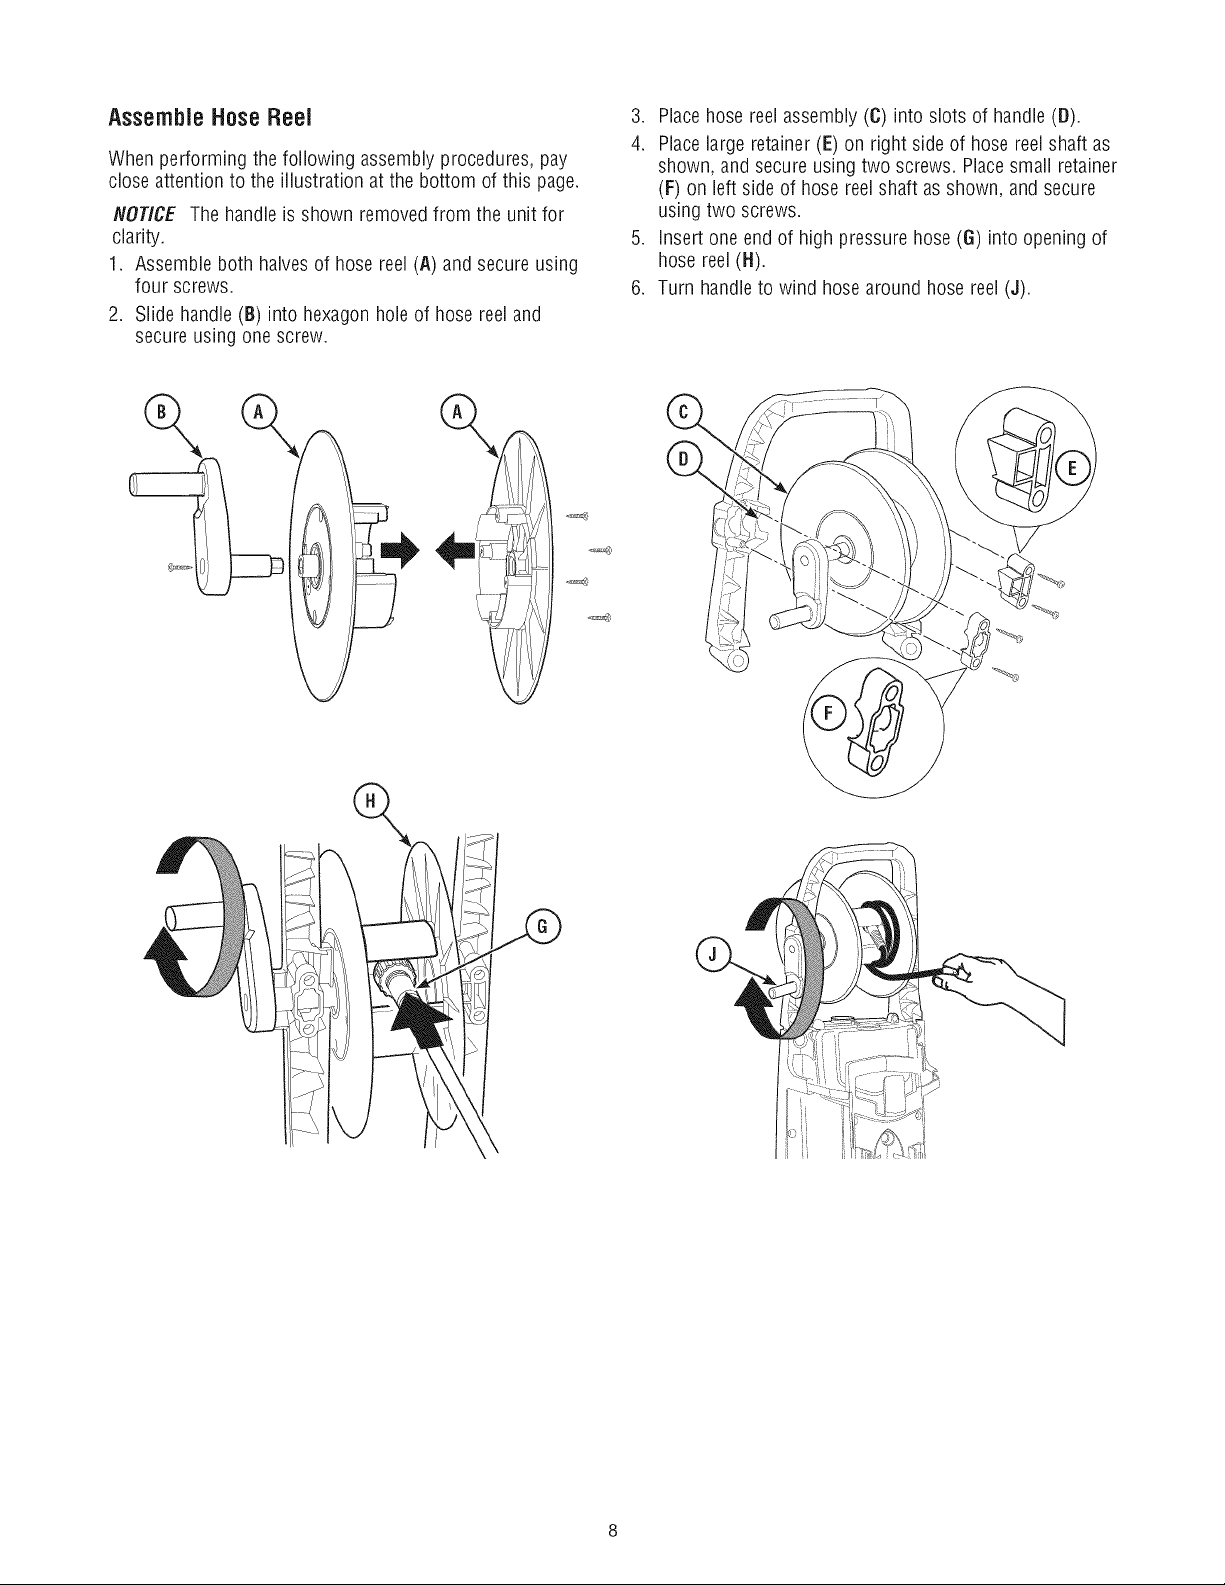
Assernble HoseReel
When performing the following assembly procedures, pay
close attention to the illustration at the bottom of this page.
NOTICE Thehandle isshown removedfrom the unit for
clarity.
1. Assemble both halvesof hosereel (A) andsecure using
four screws.
2. Slide handle (B) intohexagon holeof hose reel and
secure using one screw.
%
..... S
3. Placehose reel assembly (C)into slots of handle(B).
4. Placelarge retainer (E) on right sideof hose reelshaft as
shown, andsecure using two screws. Placesmall retainer
(F) on left side of hose reel shaft as shown, andsecure
using two screws.
5. insert one end of high pressure hose (6) into opening of
hose reel(H).
6. Turn handleto wind hosearound hose reel(J).

LubricateO-Rings
Lubrication of o-rings is extremelyimportant for installation
and operation. Theuse of a lubricant (petroleum or synthetic
grease)during assembly helpsseat o-rings properly and
provides animproved seal. It also helps protect the o-ring
from damageby abrasion, pinching or cutting and extends
the lifeof the o-ring.
NOTICE ALWAYSapply a small amount of lubricant on
o-rings prior to assembling the garden hoseto the pump
(A), high pressure hose (pump end) (B), high pressurehose
(gun end) (C),turbo wand (gun end) (D),adjustable fan
jet wand(fan jet end) (E) and adjustablefan jet wand (gun
end) (F).
Lubricate all connectionsshown below, following these
instructions:
1. inspect andclean connecting surfacesprior to lubrication
and assembly.
2. Uselubricants sparingly during assembly;a light film is
all that is required.
3. Usea small brush or cotton swab to apply greasedirectly
to o-rings where they are not accessible (QCfitting, M22
fitting).
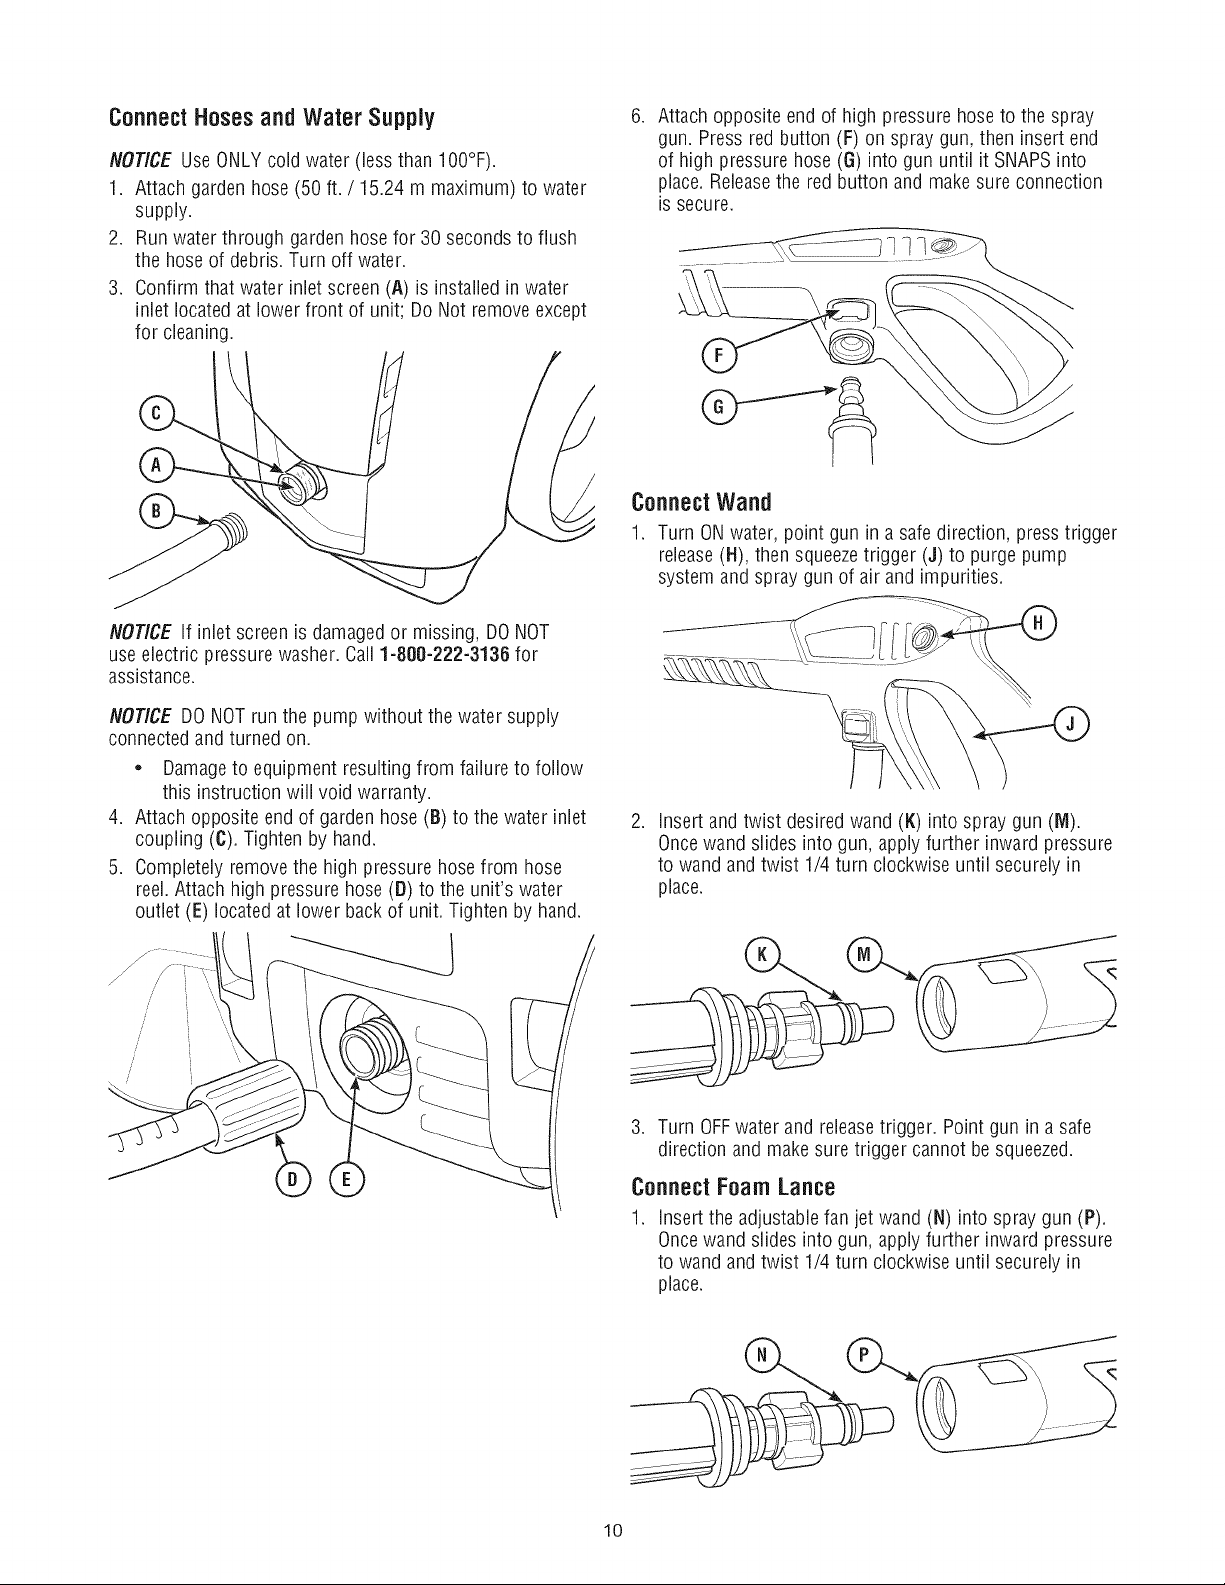
ConnectHosesandWater Supply
NOTICE Use ONLYcold water (less than 100°F).
1. Attach garden hose(50 ft. / 15.24 m maximum) to water
supply.
2. Runwater through garden hosefor 30 secondsto flush
the hoseof debris. Turn off water.
3. Confirm that waterinlet screen(A) is installedin water
inlet locatedat lower front of unit; Do Not removeexcept
for cleaning.
NOTICE If inlet screenis damagedor missing, DONOT
use electricpressure washer. Call1-800-222-3136 for
assistance.
.
Attach opposite end of high pressurehoseto the spray
gun. Pressred button (F) on spraygun, then insert end
of high pressure hose (G) into gun until it SNAPSinto
place. Releasethe red button and makesure connection
is secure.
ConnectWand
1. Turn ONwater, point gun in asafe direction, press trigger
release(H), then squeezetrigger (J) to purge pump
system andspray gun of air and impurities.
NOTICE DONOT run the pump without thewater supply
connectedand turned on.
• Damageto equipment resulting from failure to follow
this instruction will void warranty.
4. Attach opposite endof garden hose (B) to the water inlet
coupling (C). Tighten by hand.
5. Completely removethe high pressure hosefrom hose
reel.Attach high pressurehose (B) to the unit's water
outlet (E) located at lower backof unit. Tighten by hand.
/
/
/
/
/
.
insert andtwist desiredwand (1()into spray gun (IVl).
Oncewand slides into gun, applyfurther inward pressure
to wand andtwist 1/4 turn clockwise until securely in
place.
3. Turn OFFwater and releasetrigger. Point gun in asafe
direction andmake suretrigger cannotbe squeezed.
ConnectFoamLance
.
insert the adjustablefan jet wand (N) into spraygun (P).
Oncewand slides into gun, applyfurther inward pressure
to wand andtwist 1/4 turn clockwise until securely in
place.
10
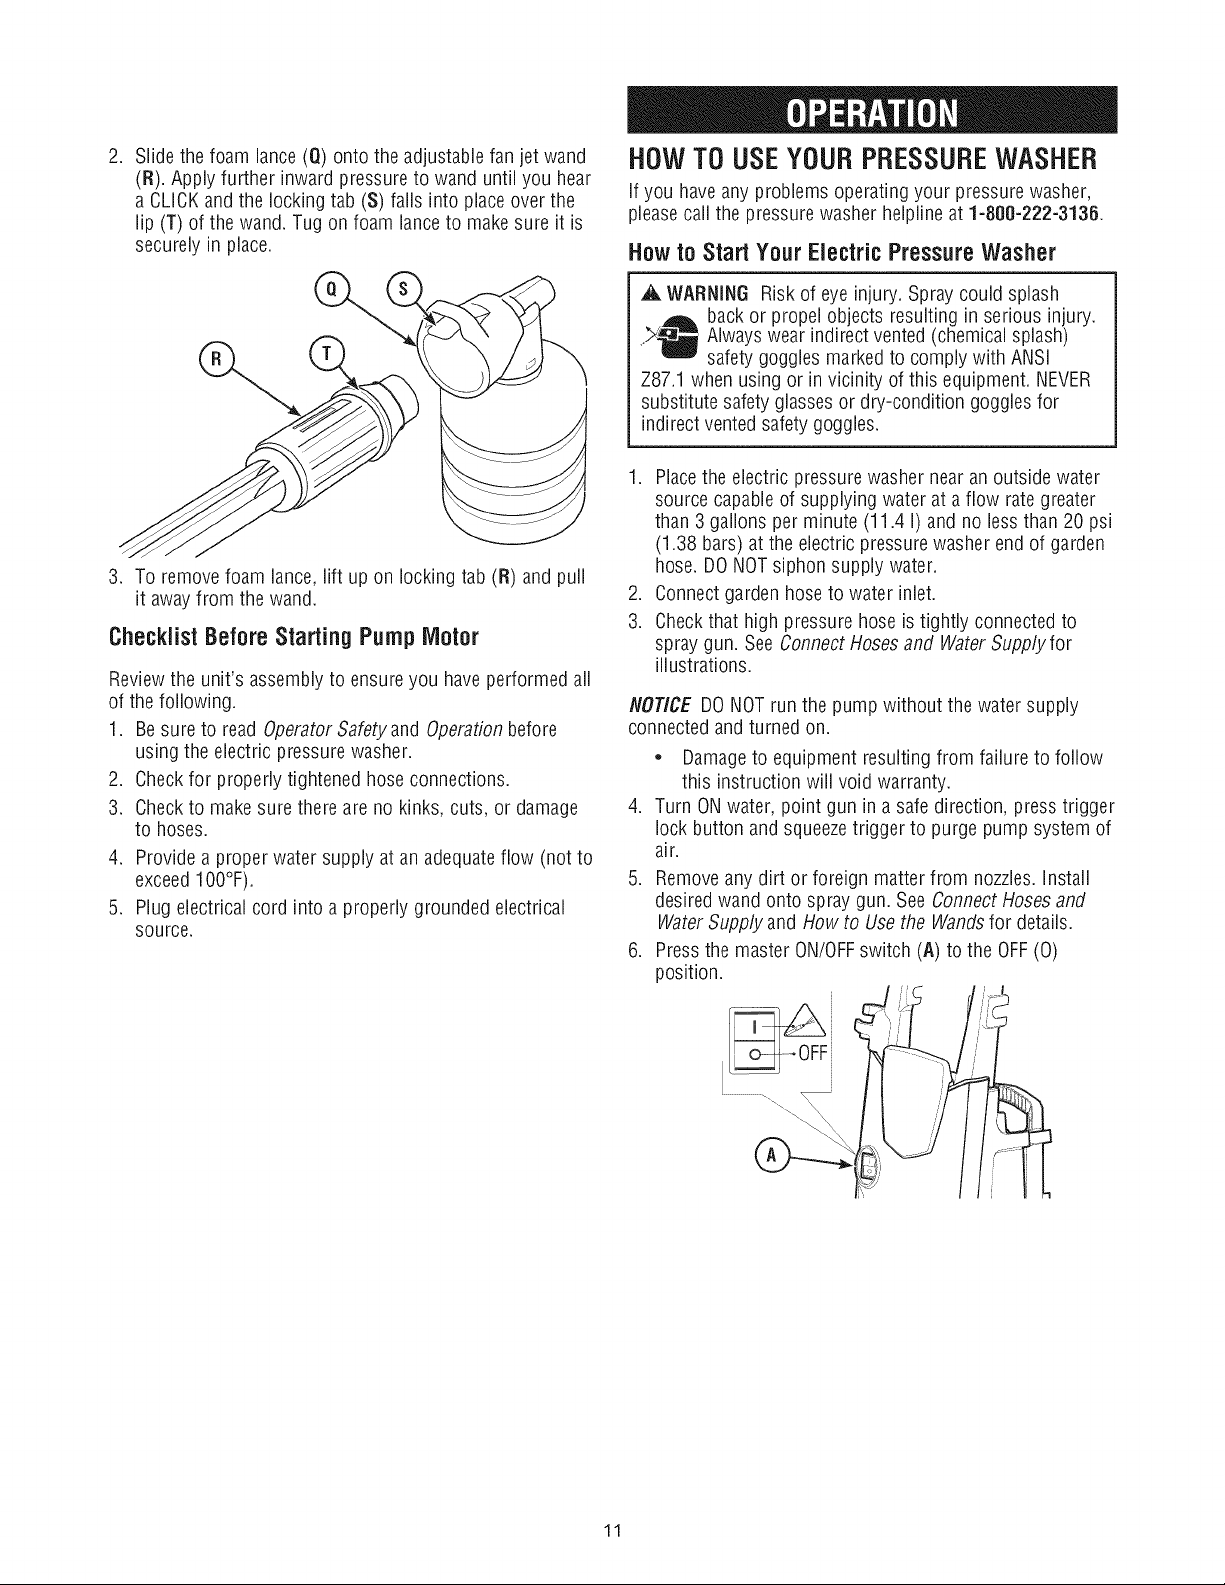
.
Slide thefoam lance (Q) onto the adjustablefan jet wand
(R). Apply further inward pressure to wand until you hear
a CLICKand the locking tab (S) falls into placeover the
lip (T) of the wand. Tug on foam lanceto make sure it is
securely in place.
3. To removefoam lance, lift up on locking tab (R) andpull
it awayfrom the wand.
ChecklistBeforeStarting Pump Motor
Reviewthe unit's assemblyto ensureyou haveperformed all
of thefollowing.
1. Besure to read OperatorSafetyand Operationbefore
using theelectric pressurewasher.
2. Checkfor properly tightened hoseconnections.
3. Checkto makesure there are no kinks, cuts, or damage
to hoses.
4. Providea proper water supply at an adequateflow (not to
exceed 100°F).
5. Plug electrical cord into a properly grounded electrical
source.
HOWTOUSEYOURPRESSUREWASHER
if you haveany problems operatingyour pressure washer,
pleasecall the pressure washer helplineat 1-800-222-3136.
Howto Start YourElectricPressure Washer
A WARNING Risk of eye injury. Spraycould splash
back or propel objects resulting in serious injury.
Alwayswear indirect vented (chemicalsplash)
safety goggles markedto comply with ANSi
Z87.1 when using or in vicinity of this equipment. NEVER
substitute safetyglassesor dry-condition gogglesfor
indirect ventedsafetygoggles.
1. Placethe electric pressurewasher near anoutside water
source capableof supplying water at aflow rate greater
than 3gallons per minute (11.4 I) and no less than 20 psi
(1.38 bars) at the electric pressurewasher endof garden
hose. DONOTsiphon supply water.
2. Connect garden hose to water inlet.
3. Check that high pressure hoseis tightly connectedto
spray gun. See ConnectHosesand WaterSupplyfor
illustrations.
NOTICE DONOTrun the pump without the water supply
connectedand turnedon.
• Damageto equipment resulting from failure to follow
this instruction will void warranty.
4. Turn ONwater, point gun ina safedirection, presstrigger
lock button andsqueezetrigger to purge pump system of
air.
5. Removeany dirt or foreign matterfrom nozzles,install
desiredwand onto spraygun. See ConnectHosesand
WaterSupply and How to Use the Wandsfor details.
6. Pressthe master ON/OFFswitch (A) to the OFF(0)
position.
11
.
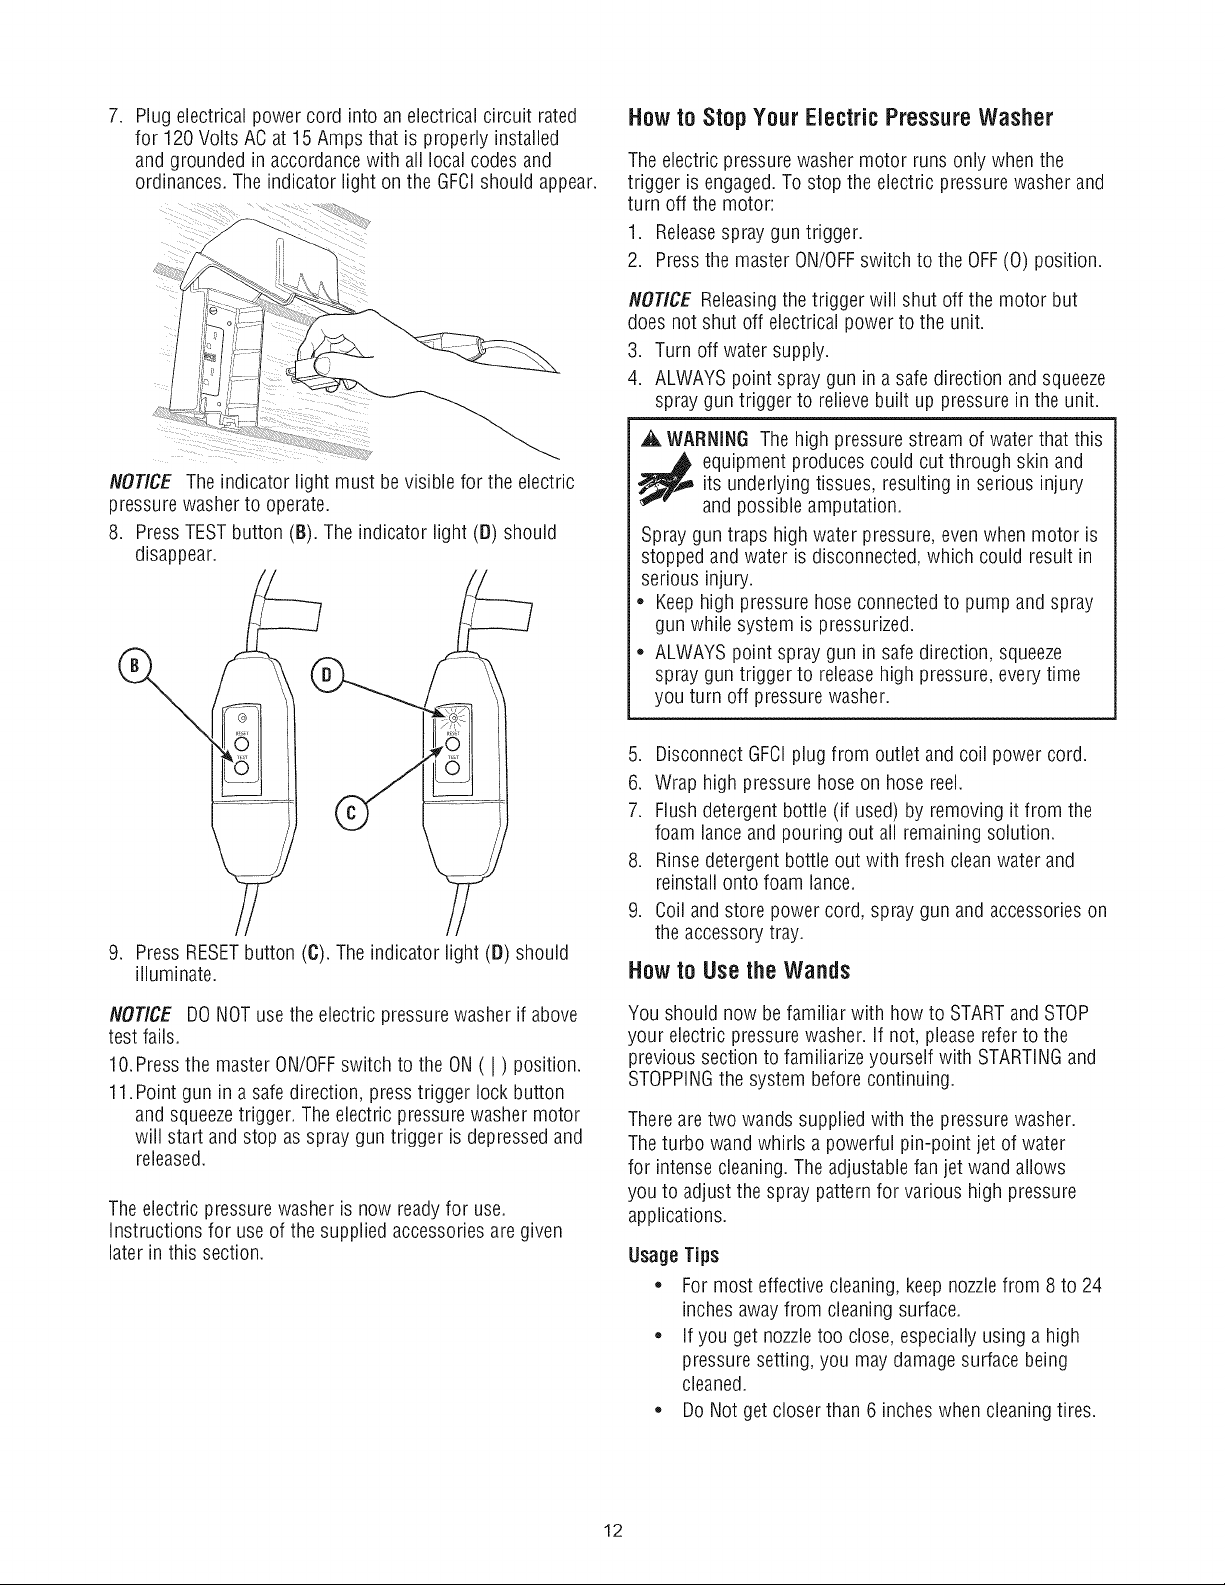
Plug electrical power cord into anelectrical circuit rated
for 120Volts AC at 15Amps that is properly installed
and grounded inaccordancewith all local codesand
ordinances. Theindicator light on the GFCIshould appear.
Howto Stop YourElectricPressureWasher
The electricpressurewasher motor runs only whenthe
trigger is engaged.To stop the electric pressure washerand
turn off the motor:
1. Releasespray guntrigger.
2. Pressthe masterON/OFFswitch to the OFF(0) position.
NOTICE Releasingthe trigger will shut off the motor but
does not shut off electrical power to the unit.
3. Turn off water supply.
4. ALWAYSpoint spray gun ina safe direction and squeeze
spray gun trigger to relievebuilt up pressure in the unit.
A WARNING The high pressure stream of water thatthis
NOTICE Theindicator light must be visible for the electric
pressure washer to operate.
8. PressTESTbutton (B). Theindicator light (D) should
disappear.
9. Press RESETbutton (C). Theindicator light (D) should
illuminate.
NOTICE DONOTuse the electric pressure washer if above
test fails.
10.Pressthe master ON/OFFswitch to the ON ( I ) position.
11.Point gun in asafedirection, presstrigger lock button
and squeezetrigger. The electric pressure washer motor
will start and stop as spraygun trigger is depressedand
released.
Theelectric pressurewasher is now readyfor use.
instructions for useof the supplied accessoriesare given
later in this section.
_ equipment producescould cut through skin and
its underlying tissues, resulting in serious injury
and possible amputation.
Spray guntraps high water pressure,even when motor is
stopped and water is disconnected,which could result in
serious injury.
• Keephigh pressure hose connectedto pump and spray
gun while system is pressurized.
• ALWAYSpoint spray gun in safe direction, squeeze
spray guntrigger to releasehigh pressure, everytime
you turn off pressure washer.
5. DisconnectGFCIplug from outlet and coil power cord.
6. Wrap high pressurehose on hosereel.
7. Flush detergentbottle (if used) by removingit from the
foam lanceand pouring out all remaining solution.
8. Rinsedetergent bottle out with fresh cleanwater and
reinstall onto foam lance.
9. Coil and store power cord, spraygun and accessories on
the accessorytray.
Howto Usethe Wands
You should now be familiar with how to STARTand STOP
your electric pressurewasher. If not, please referto the
previous section to familiarize yourself with STARTINGand
STOPPINGthe system before continuing.
Thereare two wands supplied with the pressurewasher.
Theturbo wand whirls a powerful pin-point jet of water
for intensecleaning.The adjustablefan jet wand allows
you to adjust the spray pattern for various high pressure
applications.
UsageTips
* Formost effectivecleaning, keepnozzlefrom 8 to 24
inches awayfrom cleaning surface.
, if you get nozzletoo close, especiallyusing ahigh
pressure setting, you may damagesurface being
cleaned.
, Do Not get closer than 6 incheswhen cleaning tires.
12
 Loading...