

Page 1
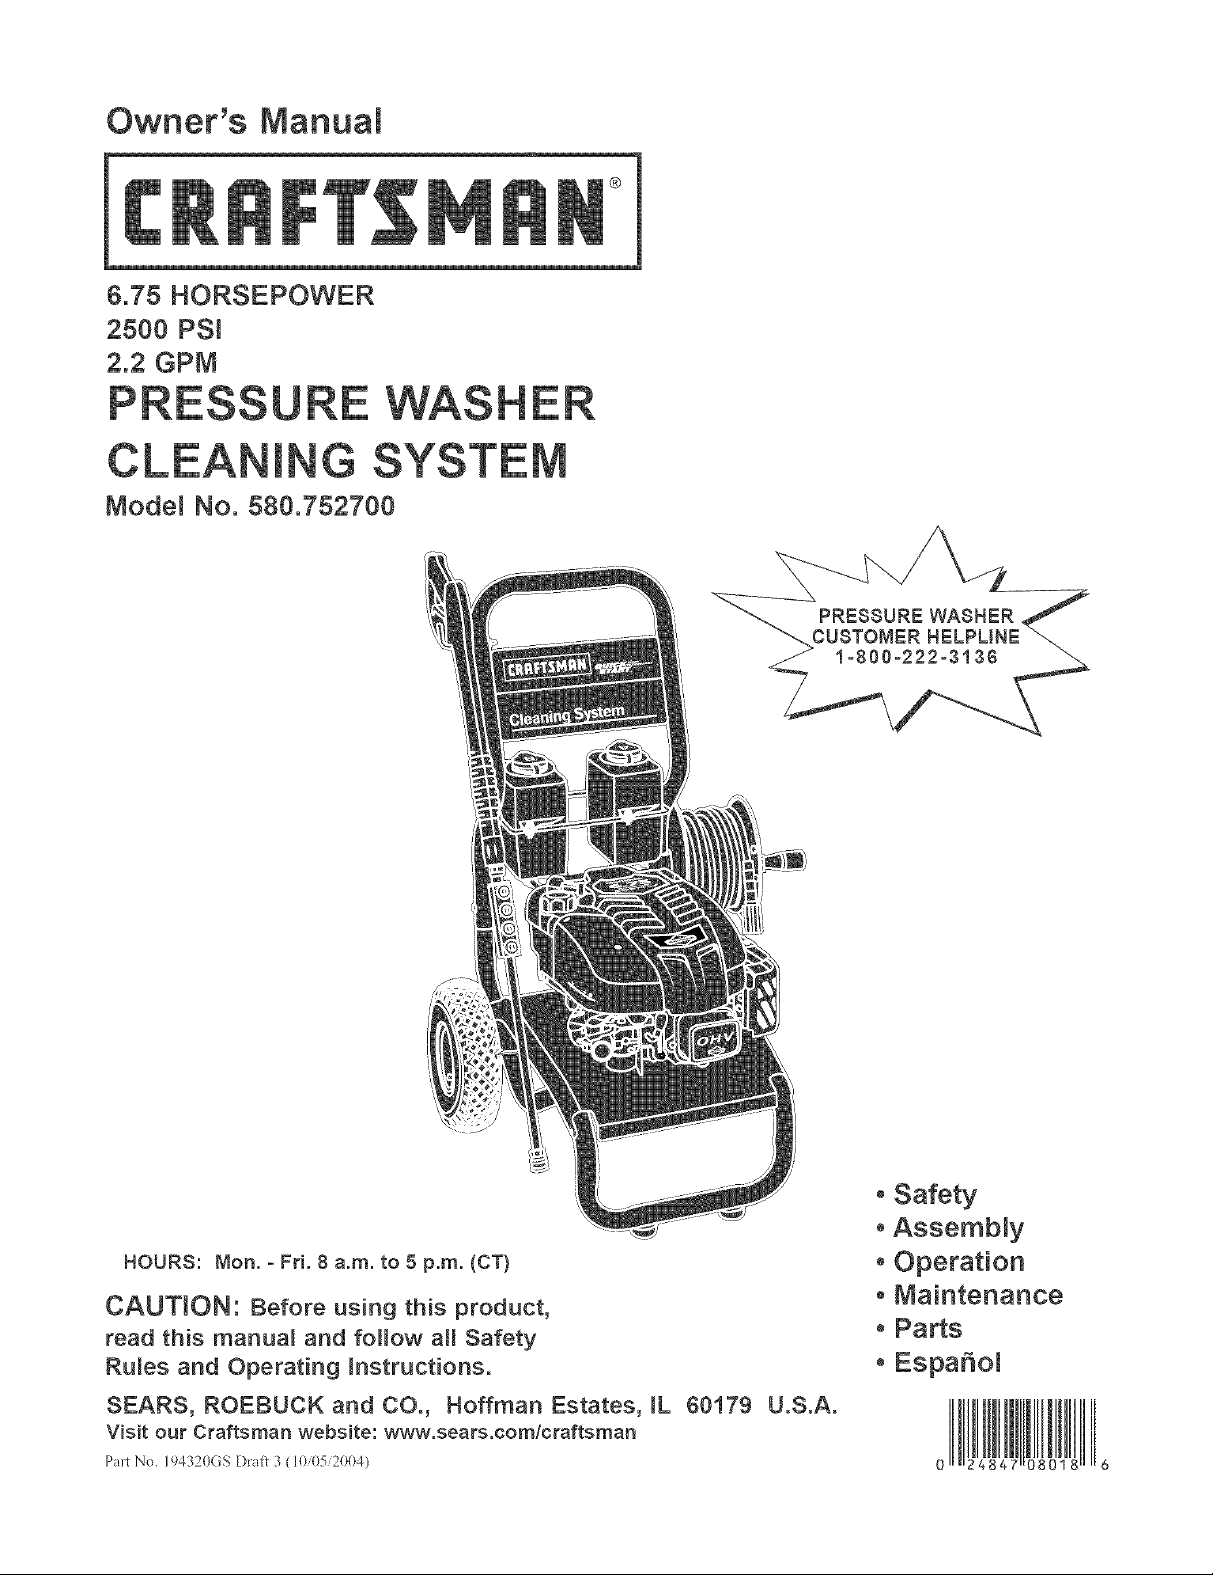
Owner's Manual
6.75 HORSEPOWER
2500 PSI
2.2 GPM
®
HOURS: Mort. - Fri. 8 a.m. to 5 p.m. (CT)
CAUTION: Before using this product,
read this manual and follow aH Safety
Rules and Operating Instructions.
SEARS, ROEBUCK and CO., Hoffman Estates, [L 60179 U.S.A.
Visit our Craftsman website: w_v.sears.comlcraftsman
Pal_t No. 194320OS D_'afl 3 (]0 05 2004)
oSafety
oAssembly
oOperation
oMaintenance
oParts
oEspaffo_
Page 2
WARRANTY .................................... 2
SAFETY RULES ............................... 2-4
KNOW YOUR PRESSURE WASHER ................ 5
ASSEMBLY ................................... 6-8
OPERATION ................................. 9-12
SPECIFICATIONS ............................... 13
MAINTENANCE .............................. 14-18
STORAGE .................................. 19-20
TROUBLESHOOTING ............................ 21
REPLACEMENT PARTS ....................... 22-29
EMISSION CONTROL WARRANTY .............. 30-31
ESPANOL ................................... 32-55
HOW TO ORDER PARTS ................ BACK PAGE
L_M_TED WARRANTY ON CRAFTSMAN PRESSURE WASHER
For one year from the date of purchase, when this Craftsman pressure washer is maintained and operated
according to the instructions in the owner's manual, Sears will repair, free of charge, any defect in material and
workmanship.
if this washer is used for commercial purposes, this warranty applies for only 90 days from the date of
purchase, if this pressure washer is used for rental purposes, this warranty applies for only 30 days after date
of purchase.
This warranty does not cover:
• Expendable items such as spark plugs or air filters, which become worn during normal use.
• Repairs necessary because of operator abuse or negligence, including damage resulting from no water
being supplied to pump or failure to maintain the equipment according to the instructions contained in the
owner's manual.
Warranty service is available by returning the pressure washer to the nearest Sears service center or dealer in
the United States.
This warranty gives you specific legal rights and you may also have other rights, which vary from state to state.
Sears, Roebuck and Co., Dept. 817WA, Hoffman Estates, _L 60179
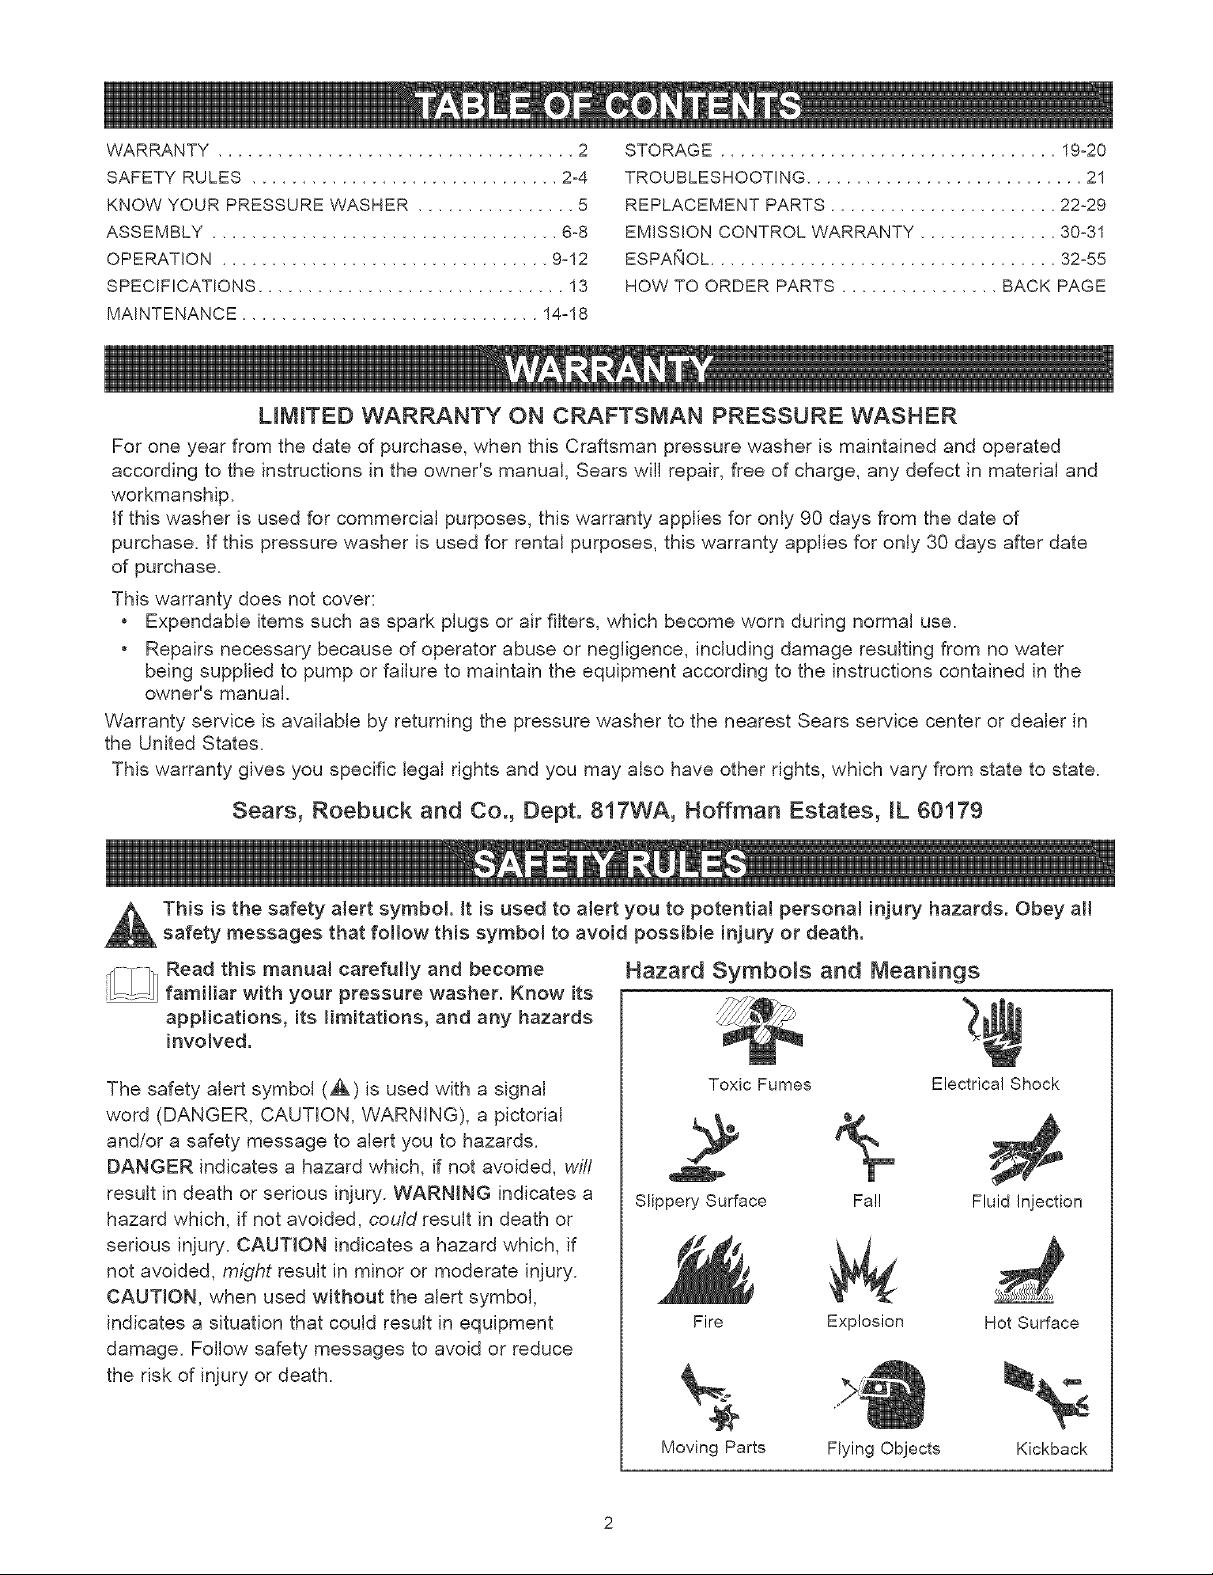
This is the safety alert symbol, it is used to alert you to potential personat ir_jury hazards. Obey aH
safety messages that follow this symbol to avoid possible injury or death.
_!/11 Read this manual carefully and become
familiar with your pressure washer. Know its
applications, its limitations, and any hazards
involved.
The safety alert symbol (,&) is used with a signal
word (DANGER, CAUTION, WARNING), a pictorial
and/or a safety message to alert you to hazards.
DANGER indicates a hazard which, if not avoided, wifl
result in death or serious injury. WARNING indicates a
hazard which, if not avoided, cou/d result in death or
serious injury. CAUTION indicates a hazard which, if
not avoided, might result in minor or moderate injury.
CAUTION, when used without the alert symbol,
indicates a situation that could result in equipment
damage. Follow safety messages to avoid or reduce
the risk of injury or death.
Hazard Symbols and Meanings
Toxic Fumes
Slippery Surface
Fire
Fal!
Explosion
Electrical Shock
Fluid Injection
Hot Surface
Moving Parts
Flying Objects
Kickback
Page 3
WARNtNG
The engine exhaust from this product contains
chemicals known to the State of California to cause
cancer, birth defects, or other reproductive harm.
WARNING
, DANGER
Operate pressure washer ONLY outdoors.
Keep exhaust gas from entering a confined area through
windows, doors, ventilation intakes or other openings.
DO NOT operate pressure washer inside any building or
enclosure,
Use a respirator or mask whenever there is a chance
that vapors may be inhaled.
Read all instructions packed with mask so you are certain
mask will provide necessary protection against inhaling
harmful vapors.
WARNING
Keep spray nozzle between 8 to 24 inches away from
cleaning surface.
Operate this unit on a stable surface.
Cleaning area should have adequate slopes and
drainage to reduce possibility of falls due to slippery
surfaces.
Be extremely careful if you must use pressure washer
from a ladder, scaffolding or any other relatively unstable
location.
Firmly grasp spray gun with both hands when using high
pressure spray to avoid injury if gun kicks back.
WARNING
When starting engine, pull cord slowly until resistance is
felt and then pull rapidly to avoid kickback.
If engine starts and fails to continue to run or if increased
resistance is felt during starting pull attempts, squeeze
trigger on spray gun.
WHEN ADDING OR DRAINBNG FUEL
Turn pressure washer OFF and let it cool at least 2
minutes before removing fuel cap. Loosen cap slowly to
relieve pressure in tank.
Fil! or drain fuel tank outdoors.
DO NOT overfill tank. Allow space for fuel expansion.
Keep fue! away from sparks, open flames, pilot lights,
heat, and other ignition sources.
DO NOT light a cigarette or smoke.
VHEN STARTING EQUIPMENT
Ensure spark plug, muffler, fuel cap and air cleaner are
in place.
DO NOT crank engine with spark plug removed.
If fuel spills, wait until it evaporates before starting
engine.
VHEN OPERATmNG EQUIPMENT
* Do not tip engine or equipment at angle which causes
fuel to spill.
DO NOT spray flammable liquids,
WHEN TRANSPORTING OR REPAIRBNG EQUIPMENT
Transport/repair with fuel tank EMPTY or with fuel shutoff
valve OFF.
Disconnect spark plug wire.
WHEN STORING FUEL OR EQUBPMENT WITH FUEL mN
TANK
Store away from furnaces, stoves, water heaters, clothes
dryers or other appliances that have pilot light or other
ignition source because they can ignite fue! vapors.
WARNING
NEVER aim spray gun at people, animals or plants.
DO NOT allow CHILDREN to operate pressure washer.
NEVER repair high pressure hose. Replace it.
Keep high pressure hose connected to pump and spray
gun while system is pressurized.
Squeeze trigger on spray gun to relieve trapped
pressure, every time you stop engine. Engage trigger
lock on spray gun.
Page 4
WARNING
Keep water spray away from electric wiring or fatal
electric shock may result.
WARNING
WARNING
Always wear eye protection when using equipment or when
in vicinity of equipment in use.
CAUTION
DO NOT tamper with governed speed.
DO NOT operate pressure washer above rated pressure.
DO NOT touch hot surfaces.
Allow equipment to cool before touching.
The pressure washer must be at least 5 feet from
structures having combustible walls and/or other
combustible materials.
Keep at least 3 feet of clearance on all sides of pressure
washer for adequate cooling, maintenance and servicing,
In the State of California a spark arrester is required by law
(Section 4442 of the California Public Resources Code).
Other states may have similar laws. Federal laws apply on
federal lands. If you equip the muffler with a spark arrester,
it must be maintained in effective working order.
WARNING
• DO NOT wear loose clothing, jewelry or anything that
may be caught in starter or other rotating parts.
• Tie up long hair and remove jewelry.
WARNING
WHEN ADJUSTING OR MAKmNG REPAIRS TO YOUR
PRESSURE WASHER
Disconnect the spark plug wire from the spark plug and
place the wire where it cannot contact spark plug.
WHEN TESTING FOR ENGINE SPARK
Use approved spark plug tester.
DO NOT check for spark with spark plug removed.
CAUTION
DO NOT secure spray gun in open position.
DO NOT leave spray gun unattended while machine is
running.
NEVER use a spray gun which does not have a trigger
lock or trigger guard in place and in working order.
Always be certain spray gun, nozzles and accessories
are correctly attached.
CAUTION
DO NOT point spray gun at glass when in jet spray mode.
NEVER aim spray gun at plants.
CAUTION
If you have questions about intended use, ask dealer or
contact Sears.
NEVER operate units with broken or missing parts, or
without protective housing or covers.
DO NOT by-pass any safety device on this machine.
Before starting pressure washer in cold weather, check
all parts of the equipment to be sure ice has not formed
there.
NEVER move machine by pulling on high pressure hose.
Use handle provided on unit.
Check fuel system for leaks or signs of deterioration,
such as chafed or spongy hose, loose or missing
clamps, or damaged tank or cap, Correct all defects
before operating pressure washer.
This equipment is designed to be used with Sears
authorized parts ONLY. If equipment is used with parts
that DO NOT comply with minimum specifications, user
assumes al! risks and liabilities.
Page 5
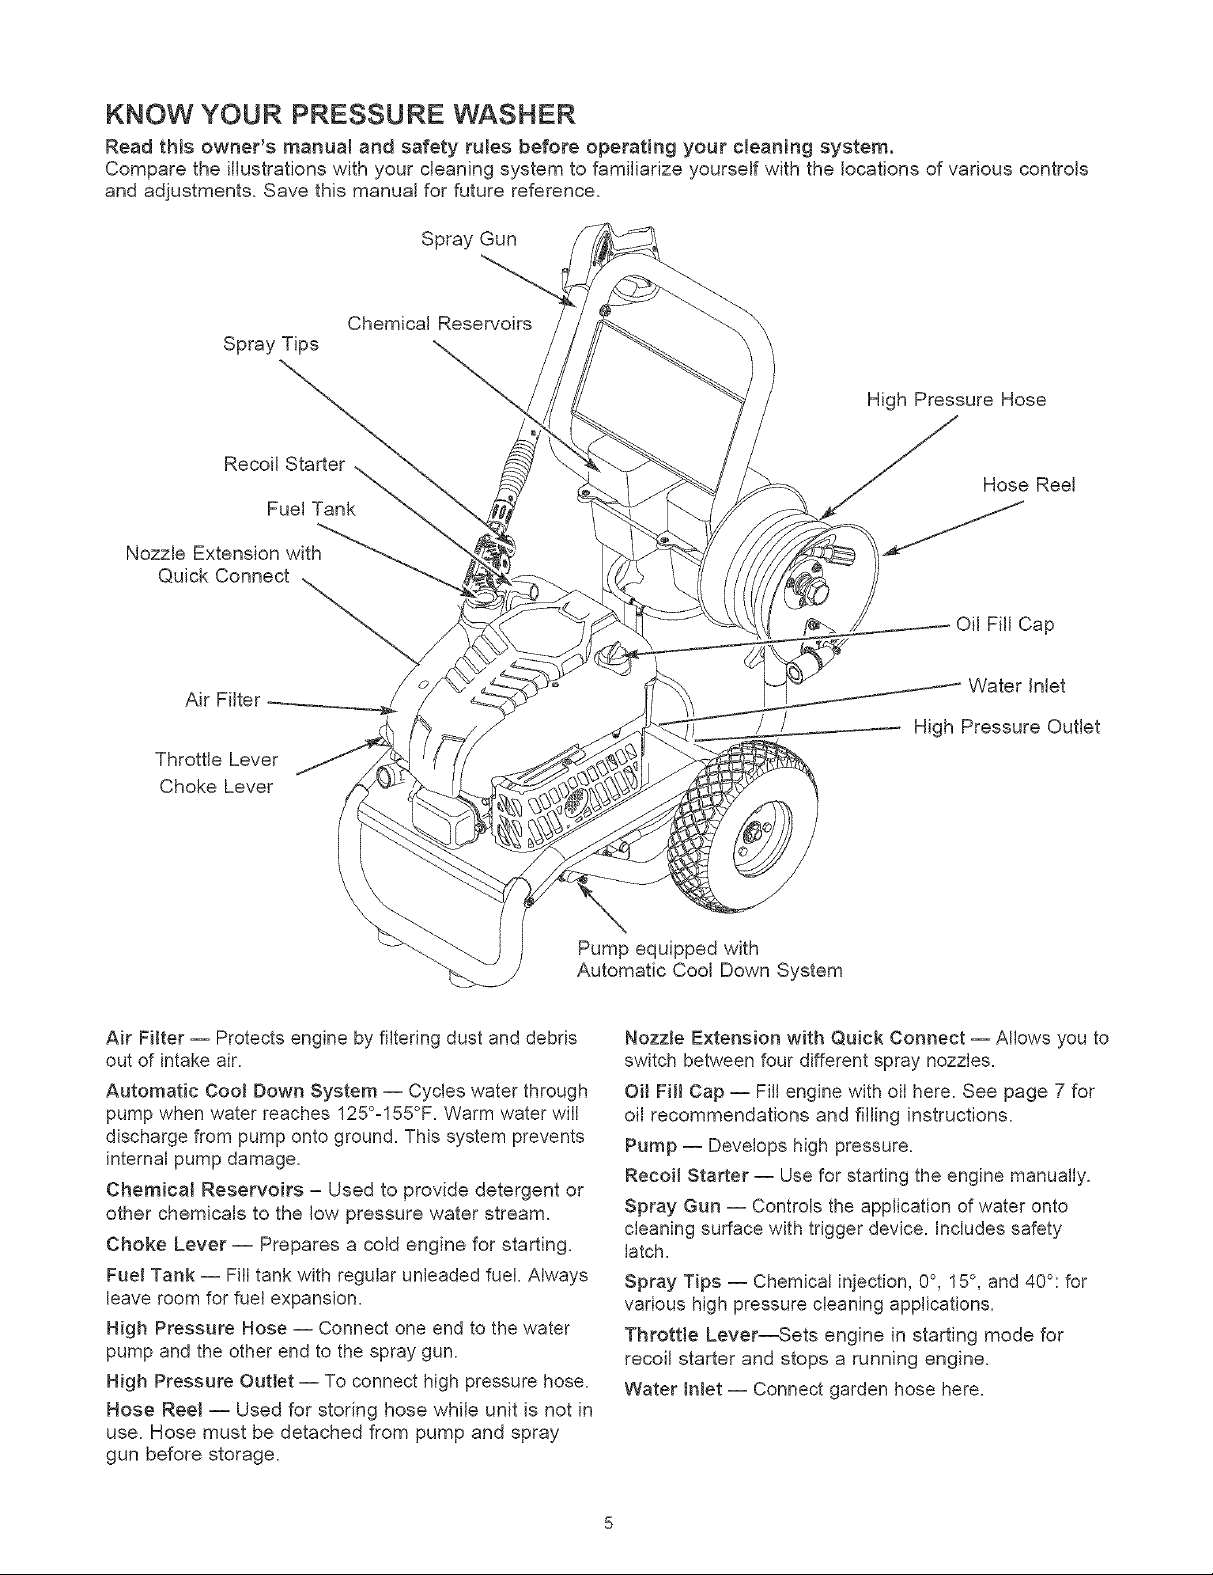
KNOW YOUR PRESSURE WASHER
Read this owner's manual and safety rules before operating your cleaning system.
Compare the illustrations with your cleaning system to familiarize yourself with the locations of various controls
and adjustments. Save this manual for future reference.
Spray Gun
Chemical Reservoirs
Spray Tips
High Pressure Hose
RecoJJStarter ,_
Fuel Tank
Nozzle Extension with
Quick Connect
Air FiJter
ThrottJe Lever
Choke Lever
Air Filter = Protects engine by filtering dust and debris
out of intake air.
Automatic Cool Down System -- Cycles water through
pump when water reaches 125°-155°F. Warm water will
discharge from pump onto ground. This system prevents
internal pump damage.
Chemical Reservoirs = Used to provide detergent or
other chemicals to the low pressure water stream.
Choke Lever -- Prepares a cold engine for starting.
Fuel Tank -- Fill tank with regular unleaded fuek Always
leave room for fuel expansion.
High Pressure Hose -- Connect one end to the water
pump and the other end to the spray gun.
High Pressure Outlet -- To connect high pressure hose.
Hose Reem-- Used for storing hose while unit is not in
use. Hose must be detached from pump and spray
gun before storage.
Hose Reel
Oil FiJJCap
Water inlet
High Pressure Outlet
Pump equipped with
Automatic Cool Down System
Nozzle Extension with Quick Connect -- Allows you to
switch between four different spray nozzles.
Oit Fill Cap -- Fill engine with oil here. See page 7 for
oil recommendations and filling instructions.
Pump -- Develops high pressure.
Recoil Starter -- Usefor starting the engine manually.
Spray Gun -- Controls the application of water onto
cleaning surface with trigger device. Includes safety
latch.
Spray Tips -- Chemical injection, 0°, 15°, and 40°: for
various high pressure cleaning applications.
Throttle Lever--Sets engine in starting mode for
recoil starter and stops a running engine.
Water inlet -- Connect garden hose here=
Page 6
Yourcleaningsystemrequiressomeassemblyandis
readyforuseonlyafterit hasbeenproperlyserviced
withtherecommendedoilandfuel.
if youhaveanyproblemswiththeassemblyof
yourpressurewasher,pleasecallthepressure
washerhelplineat 1=800=222=3136.
iMPORTANT:Anyattempttoruntheenginebeforeit
hasbeenservicedwiththerecommendedoilwillresult
in an engine failure.
REMOVE PRESSURE WASHER
FROM CARTON
1. Slice two corners at the end of carton from top to
bottom so the panel can be folded down flat.
2. Remove hose reel box, fillers, and parts bag
shipped with cleaning system.
3. Remove spray gun, nozzle extension, and engine
oil from fillers.
4. Roll cleaning system out open end of carton.
5. Check carton for additional loose parts.
3. Attach hose reel to handle as shown on page 5
according to instruction sheet included with hose
reel.
4. Add oil to engine crankcase.
5. Add fuel to fuel tank.
6. Connect high pressure hose to spray gun and
pump.
7. Connect water supply to pump.
8. Attach nozzle extension to spray gun.
9. Select/attach quick connect spray tip to nozzle
extension.
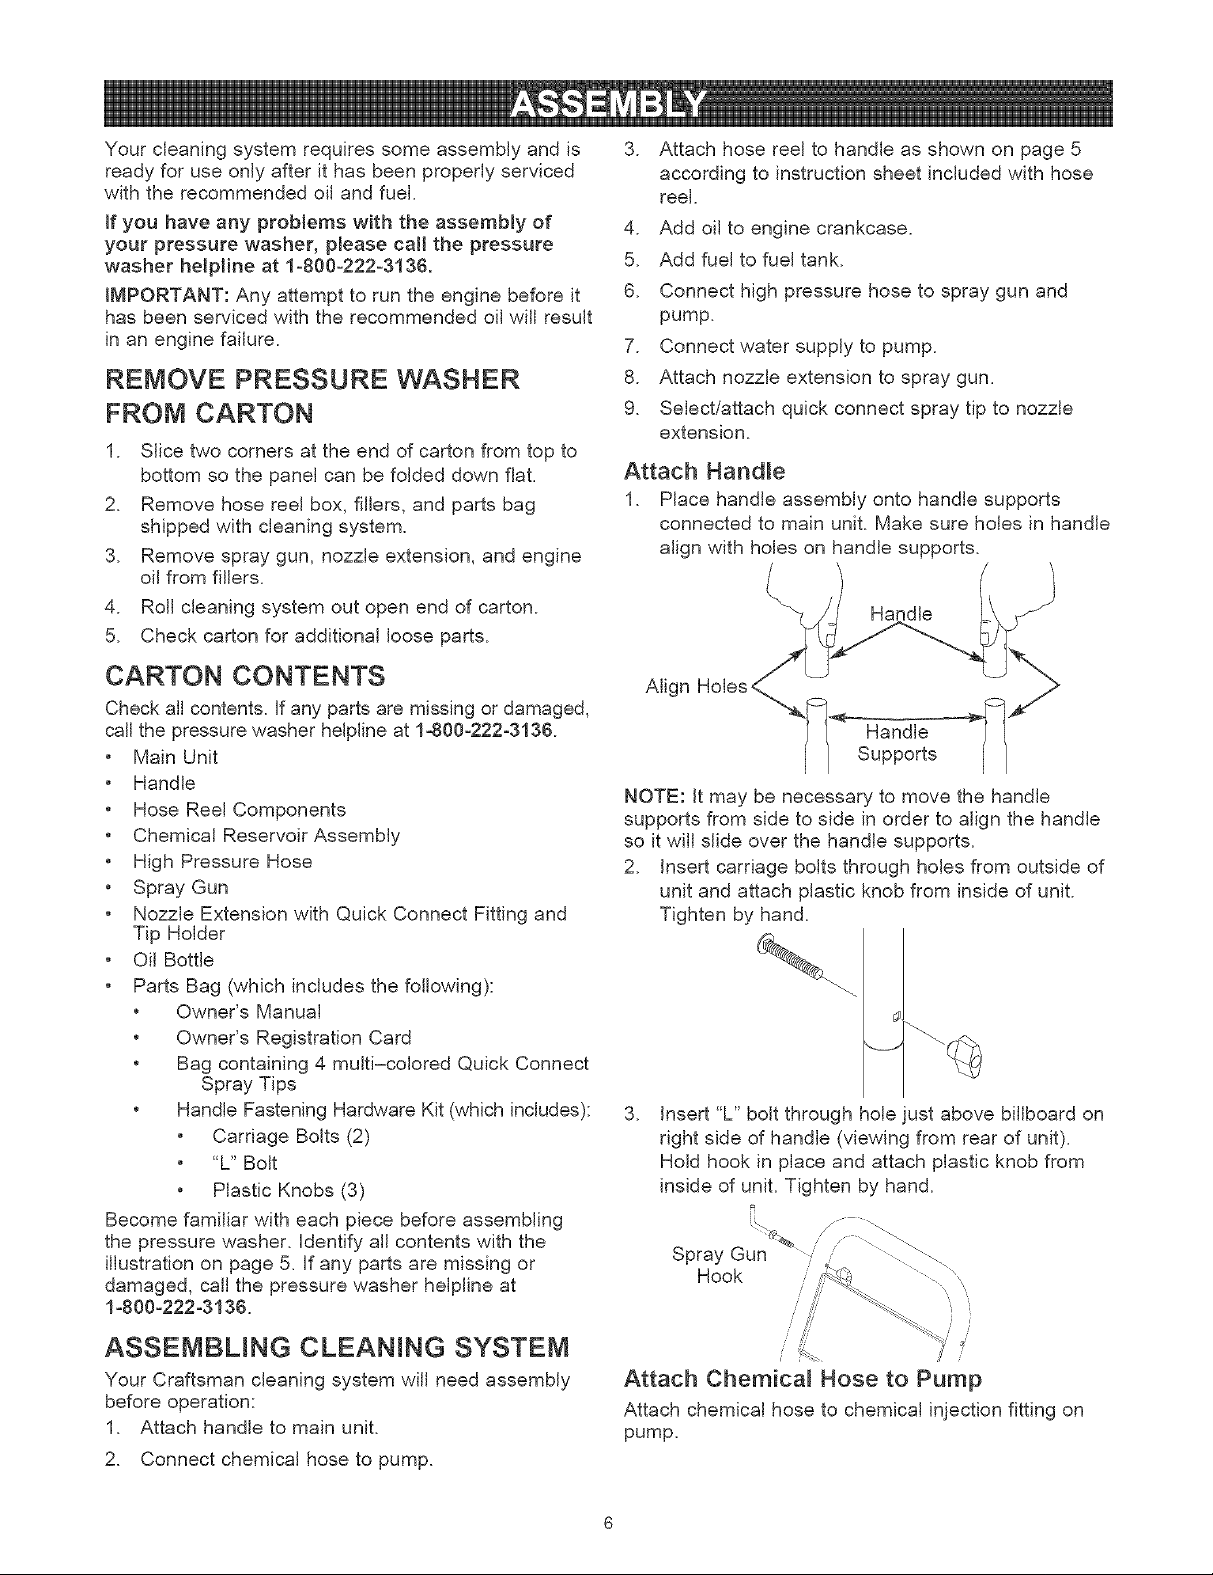
Attach Handme
1. Place handle assembly onto handle supports
connected to main unit. MaRe sure holes in handle
align with holes on handle supports.
CARTON CONTENTS
Check all contents. Jfany parts are missing or damaged,
call the pressure washer helpline at 1-800-222-3136.
Main Unit
Handle
Hose Reel Components
Chemical Reservoir Assembly
High Pressure Hose
Spray Gun
Nozzle Extension with Quick Connect Fitting and
Tip Holder
• Oil Bottle
• Parts Bag (which includes the following):
• Owner's Manual
• Owner's Registration Card
• Bag containing 4 multi-colored Quick Connect
Spray Tips
• Handle Fastening Hardware Kit (which includes):
• Carriage Bolts (2)
• "L" Bolt
• Plastic Knobs (3)
Become familiar with each piece before assembling
the pressure washer. Identify all contents with the
illustration on page 5. if any parts are missing or
damaged, call the pressure washer helpline at
1.800o222o3136.
ASSEMBLING CLEANING SYSTEM
Your Craftsman cleaning system will need assembly
before operation:
1. Attach handle to main unit.
2. Connect chemical hose to pump.
Align Holes <_
::]_" Handle
Supports
NOTE: It may be necessary to move the handle
supports from side to side in order to align the handle
so it will slide over the handle supports.
2. Insert carriage bolts through holes from outside of
unit and attach plastic knob from inside of unit.
Tighten by hand.
%%.
.
Insert "L" bolt through hole just above billboard on
right side of handle (viewing from rear of unit).
Hold hook in place and attach plastic knob from
inside of unit. Tighten by hand.
,',:!i, } )
_i?¸
_ er
/
Attach Chemica_ Hose to Pump
Attach chemical hose to chemical injection fitting on
pump.
Page 7
• • / i ......
j .....
\ jJ
// i
i i
Attach Hose Reem
Attach hose reel to handle as shown on page 5
according to instruction sheet included with hose reel.
NOTE: There may be small tube adapters included
with the hose reel kit that is not used on this model.
IMPORTANT: You must take the hose off the reel
when operating your pressure washer. The reel is for
hose storage purposes only.
Add Engine Oi_
IMPORTANT: Any attempt to crank or start the engine
before it has been properly serviced with the
recommended oil may result in an engine failure.
NOTE: When adding oil to the engine crankcase, use
only high quality detergent oil rated with API service
classification SF, SG, SH, SJ or higher rated SAE 30
weight. DO NOT use special additives.
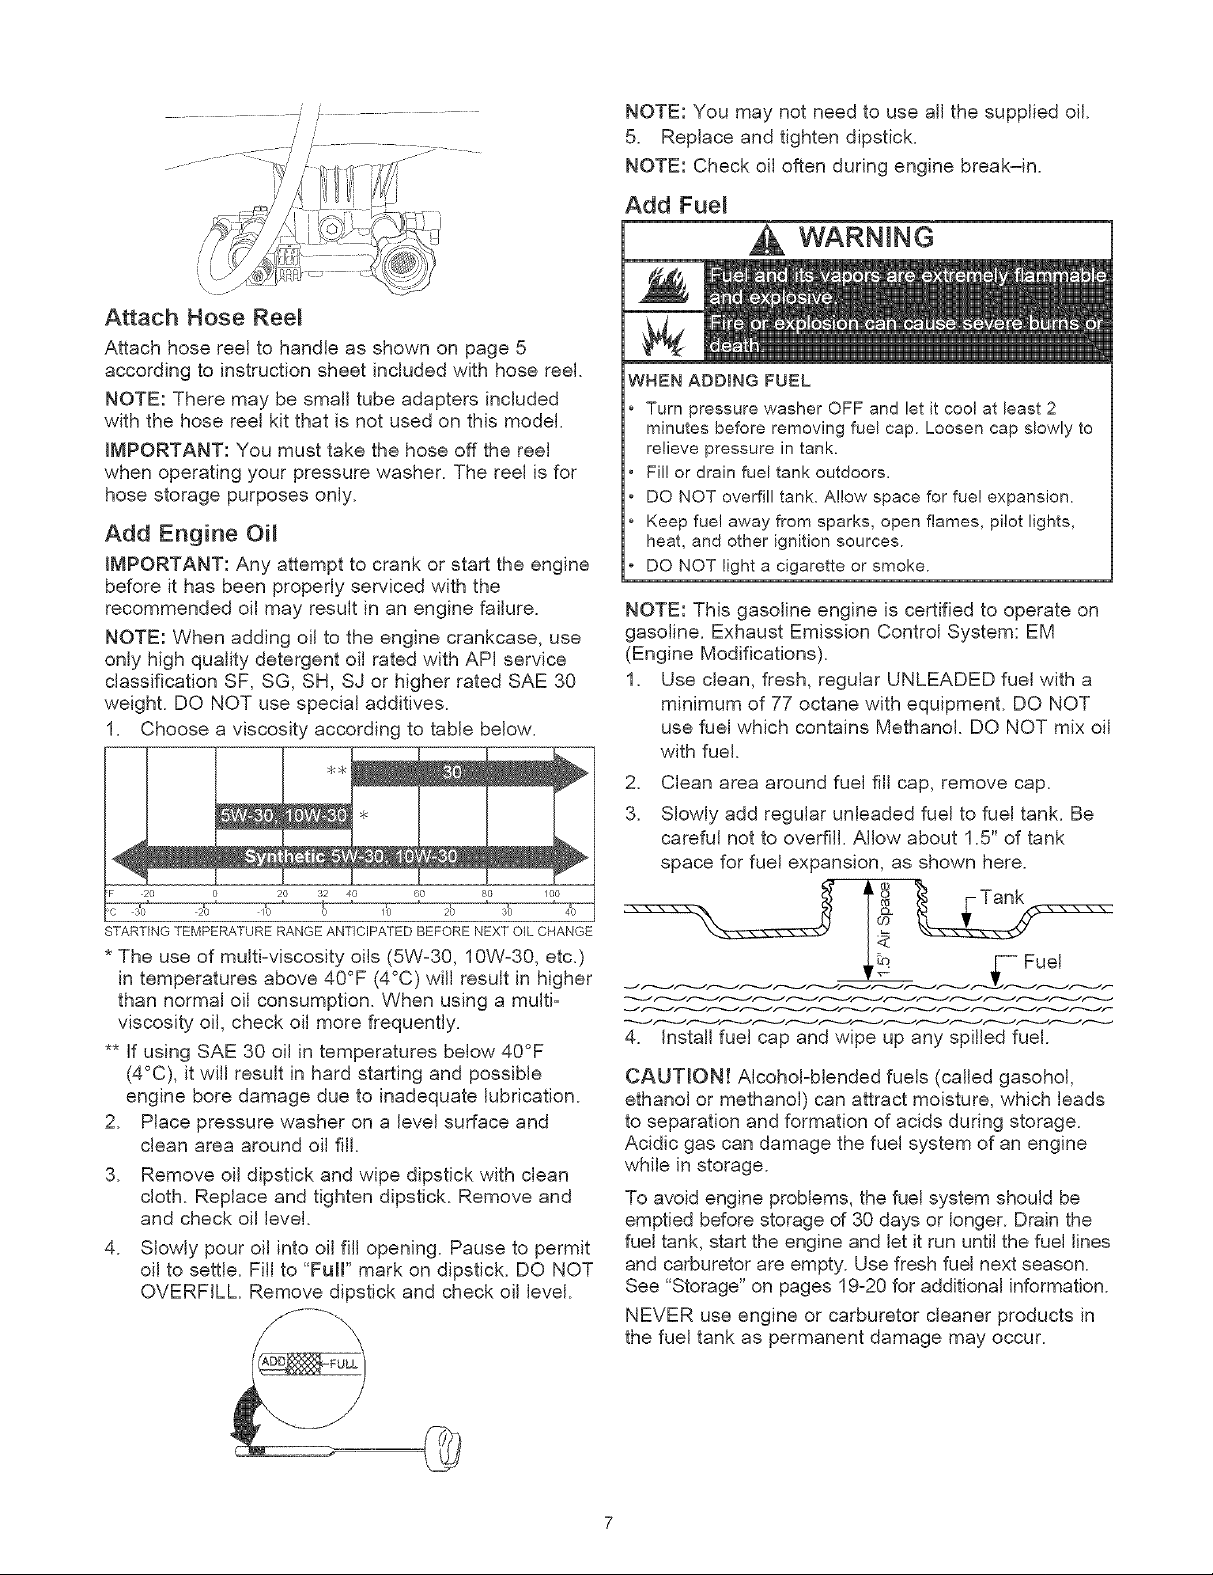
1. Choose a viscosity according to table below.
NOTE: You may not need to use aHthe supplied oil.
5. Replace and tighten dipstick.
NOTE: Check oil often during engine break-in.
Add Fue{
WARNING
WHEN ADDING FUEL
Turn pressure washer OFF and let it coo! at least 2
minutes before removing fuel cap. Loosen cap slowly to
relieve pressure in tank.
Fil! or drain fuel tank outdoors.
DO NOT overfill tank. Allow space for fue! expansion.
Keep fuel away from sparks, open flames, pilot lights,
heat, and other ignition sources.
DO NOT light a cigarette or smoke.
NOTE: This gasoline engine is certified to operate on
gasoline. Exhaust Emission Control System: EM
(Engine Modifications).
1. Use clean, fresh, regular UNLEADED fuel with a
minimum of 77 octane with equipment. DO NOT
use fuel which contains Methanol. DO NOT mix oil
with fuel.
2. Clean area around fuel fill cap, remove cap.
3. Slowly add regular unleaded fuel to fuel tank. Be
careful not to overfill. Allow about 1.5" of tank
space for fuel expansion, as shown here.
STARTING TEMPERATURE RANGE ANTICIPATED BEFORE NEXT OIL CHANGE
* The use of multi-viscosity oils (5W-30, 10W-30, etc.)
in temperatures above 40°F (4°C) will result in higher
than normal oil consumption. When using a multi-
viscosity oil, check oil more frequently.
** if using SAE 30 oil in temperatures below 40°F
(4°C), it will result in hard starting and possible
engine bore damage due to inadequate lubrication.
2. Place pressure washer on a level surface and
clean area around oil fill.
3. Remove oil dipstick and wipe dipstick with clean
cloth. Replace and tighten dipstick. Remove and
and check oil level.
4. Slowly pour oil into oil fill opening. Pause to permit
oil to settle. Fill to "Full" mark on dipstick. DO NOT
OVERFILL. Remove dipstick and check oil level.
4. InstaJJfueJ cap and wipe up any spiJJedfuel.
CAUTRON! Alcohol-blended fuels (called gasohol,
ethanol or methanol) can attract moisture, which leads
to separation and formation of acids during storage.
Acidic gas can damage the fuel system of an engine
while in storage.
To avoid engine problems, the fuel system should be
emptied before storage of 30 days or longer. Drain the
fuel tank, start the engine and let it run until the fuel lines
and carburetor are empty. Use fresh fuel next season.
See "Storage" on pages 19-20 for additional information.
NEVER use engine or carburetor cleaner products in
the fuel tank as permanent damage may occur.
Page 8
Connect Hose and Water Supp{y to Pump
IMPORTANT: To avoid pump damage, you must
assemble the nozzle extension to the spray gun and
attach all hoses before you start the engine.
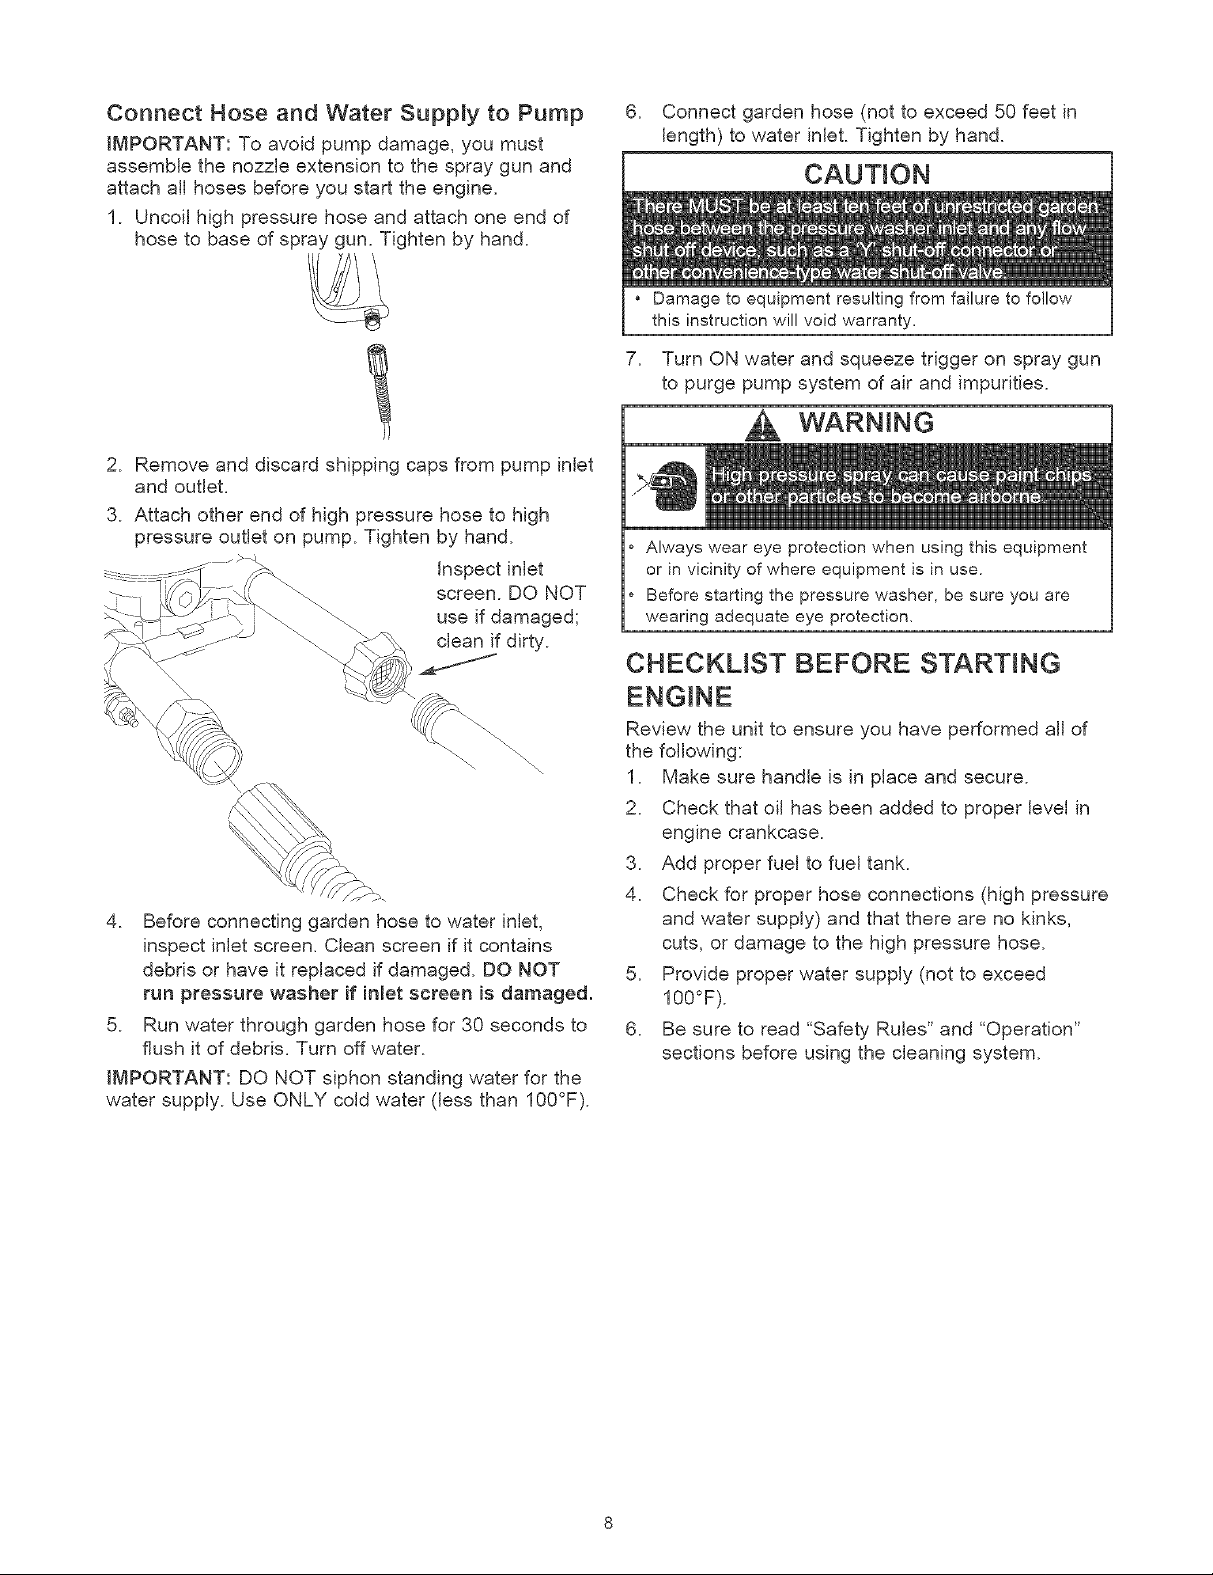
1. Uncoil high pressure hose and attach one end of
hose to base of spray gun. Tighten by hand.
2. Remove and discard shipping caps from pump inlet
and outlet.
3. Attach other end of high pressure hose to high
pressure outlet on pump. Tighten by hand.
inspect inlet
screen. DO NOT
use if damaged;
clean if dirty.
6. Connect garden hose (not to exceed 50 feet in
length) to water inlet. Tighten by hand.
CAUTION
* Damage to equipment resulting from failure to follow
this instruction will void warranty,
7. Turn ON water and squeeze trigger on spray gun
to purge pump system of air and impurities.
VVARNtNG
Always wear eye protection when using this equipment
or in vicinity of where equipment is in use.
Before starting the pressure washer, be sure you are
wearing adequate eye protection,
CHECKLIST BEFORE STARTING
4. Before connecting garden hose to water inlet,
inspect inlet screen. Clean screen if it contains
debris or have it replaced if damaged. DO NOT
run pressure washer if inlet screen is damaged.
5. Run water through garden hose for 30 seconds to
flush it of debris. Turn off water.
llVIPORTANT: DO NOT siphon standing water for the
water supply. Use ONLY cold water (less than 100°F).
Review the unit to ensure you have performed all of
the following:
1. Make sure handle is in place and secure.
2. Check that oil has been added to proper level in
engine crankcase.
3. Add proper fuel to fuel tank.
4. Check for proper hose connections (high pressure
and water supply) and that there are no kinks,
cuts, or damage to the high pressure hose.
5. Provide proper water supply (not to exceed
100°F).
6. Be sure to read "Safety Rules" and "Operation"
sections before using the cleaning system.
Page 9
HOW TO USE YOUR CLEANING
SYSTEM
if you have any problems operating your pressure
washer, please call the pressure washer helpline at
1-800-222-3136.
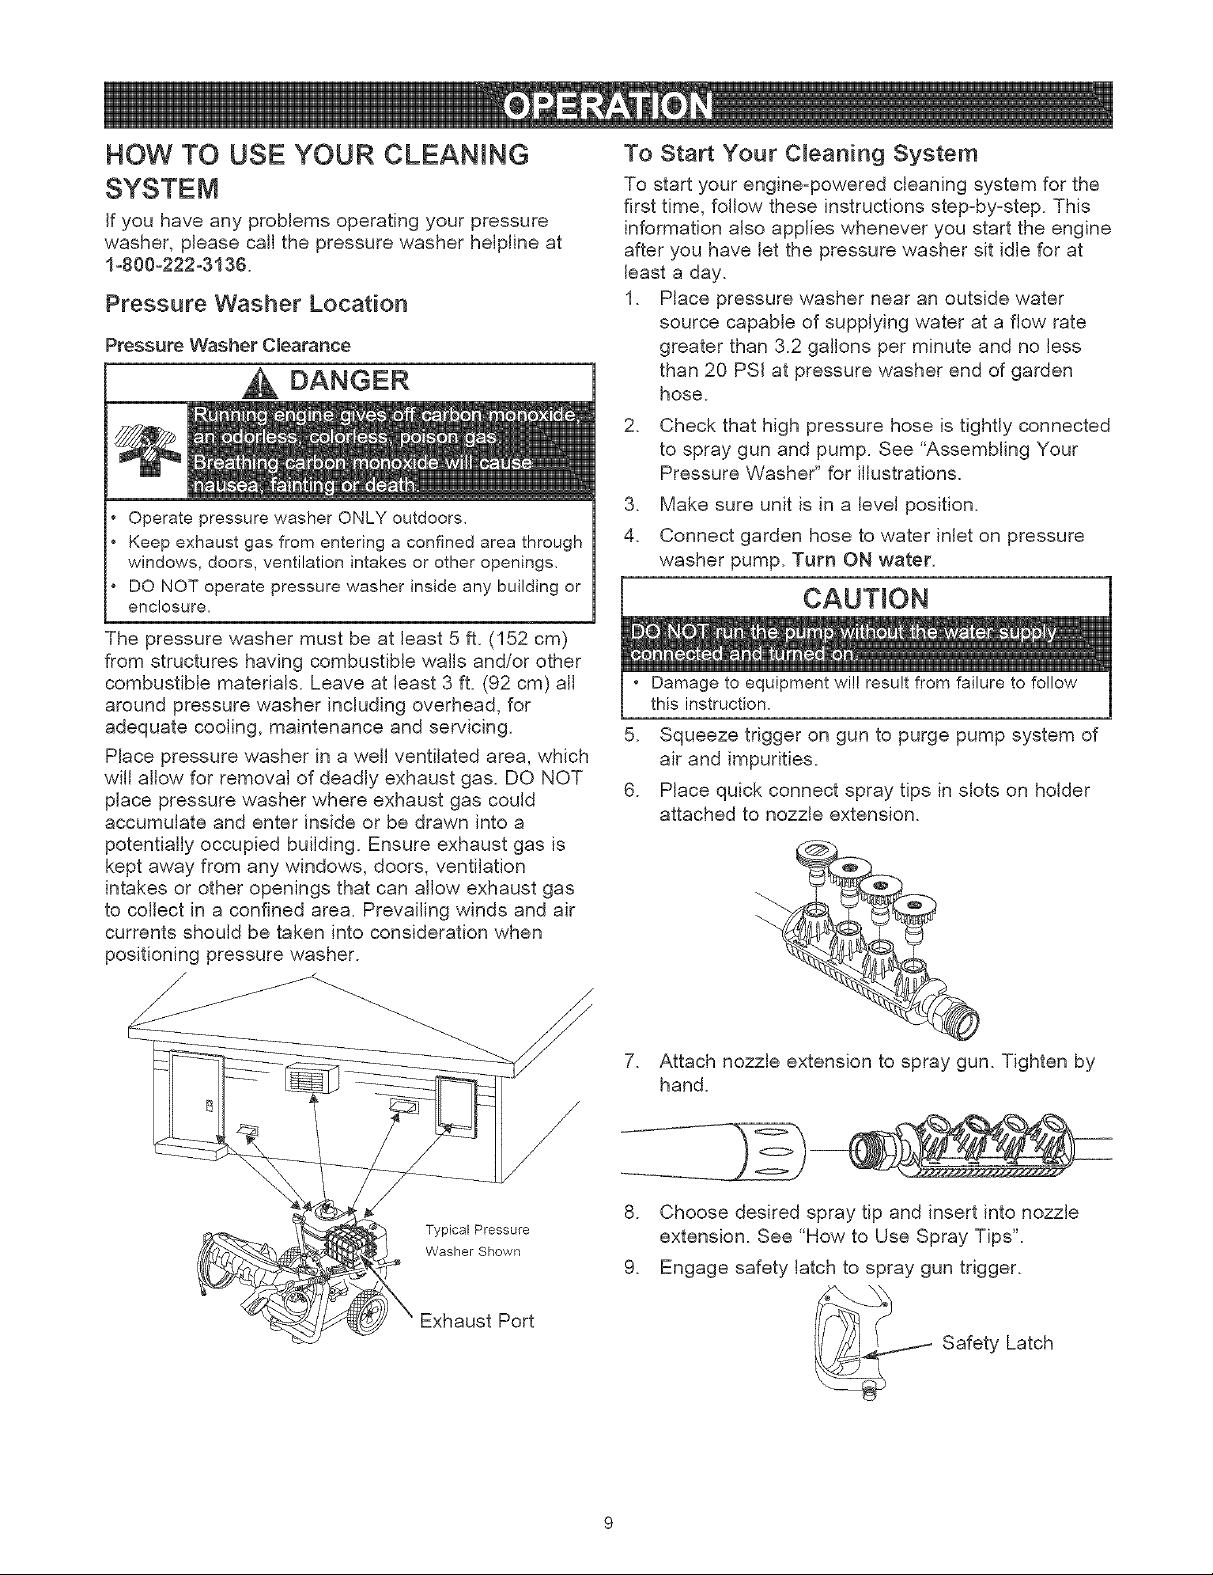
Pressure Washer Location
Pressure Washer Clearance
Operate pressure washer ONLY outdoors,
Keep exhaust gas from entering a confined area through
windows, doors, ventilation intakes or other openings,
DO NOT operate pressure washer inside any building or
enclosure,
The pressure washer must be at least 5 ft. (152 cm)
from structures having combustible walls and/or other
combustible materials. Leave at least 3 ft. (92 cm) all
around pressure washer including overhead, for
adequate cooling, maintenance and servicing.
Place pressure washer in a well ventilated area, which
will allow for removal of deadly exhaust gas. DO NOT
place pressure washer where exhaust gas could
accumulate and enter inside or be drawn into a
potentially occupied building. Ensure exhaust gas is
kept away from any windows, doors, ventilation
intakes or other openings that can allow exhaust gas
to collect in a confined area. Prevailing winds and air
currents should be taken into consideration when
positioning pressure washer.
To Start Your C_eaning System
To start your engine-powered cleaning system for the
first time, follow these instructions step-by-step. This
information also applies whenever you start the engine
after you have let the pressure washer sit idle for at
least a day.
1. Place pressure washer near an outside water
source capable of supplying water at a flow rate
greater than 3.2 gallons per minute and no less
than 20 PSI at pressure washer end of garden
hose.
2. Check that high pressure hose is tightly connected
to spray gun and pump. See "Assembling Your
Pressure Washer" for illustrations.
3. Make sure unit is in a level position.
4. Connect garden hose to water inlet on pressure
washer pump. Turn ON water.
CAUTION
• Damage to equipment will result from failure to follow
this instruction.
5. Squeeze trigger on gun to purge pump system of
air and impurities.
6. Place quick connect spray tips in slots on holder
attached to nozzle extension.
Typical Pressure
Washer Shown
Exhaust Port
7. Attach nozzle extension to spray gun. Tighten by
hand.
.
Choose desired spray tip and insert into nozzle
extension. See "How to Use Spray Tips".
9.
Engage safety latch to spray gun trigger.
__ Safety Latch
Page 10
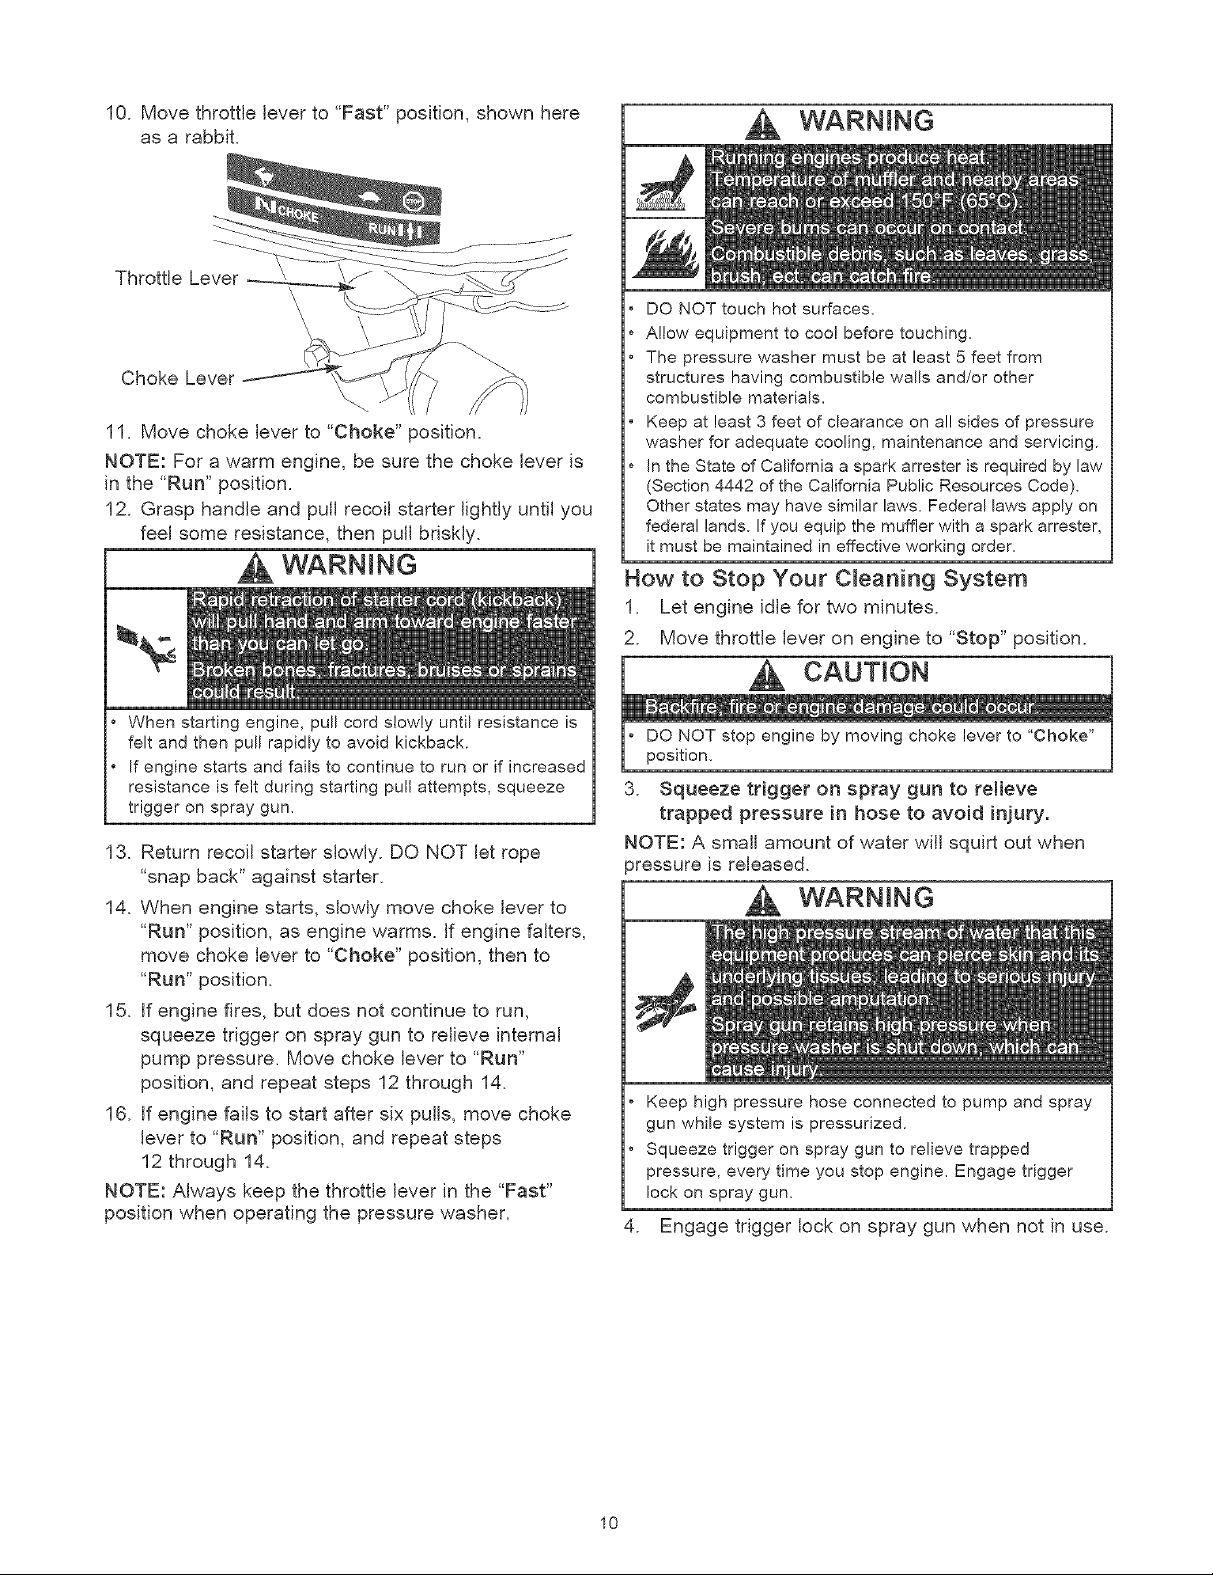
10. Move throttle lever to "Fast" position, shown here
as a rabbit.
WARNING
Throttle Lever
\
\
Choke Lever
11. Move choke lever to "Choke" position.
NOTE: For a warm engine, be sure the choke lever is
in the "Run" position.
12. Grasp handle and pull recoil starter lightly until you
feel some resistance, then pull briskly.
WARNING
• When starting engine, pull cord slowly until resistance is
felt and then pull rapidly to avoid kickback.
• If engine starts and fails to continue to run or if increased
resistance is felt during starting pull attempts, squeeze
trigger on spray gun.
13. Return recoil starter slowly. DO NOT let rope
"snap back" against starter.
14. When engine starts, slowly move choke lever to
"Run" position, as engine warms. If engine falters,
move choke lever to "Choke" position, then to
"Run" position.
15. if engine fires, but does not continue to run,
squeeze trigger on spray gun to relieve internal
pump pressure. Move choke lever to "Run"
position, and repeat steps 12 through 14.
16. if engine fails to start after six pulls, move choke
lever to "Run" position, and repeat steps
12 through 14.
NOTE: Always keep the throttle lever in the "Fast"
position when operating the pressure washer.
DO NOT touch hot surfaces.
Allow equipment to coo! before touching.
The pressure washer must be at least 5 feet from
structures having combustible walls and/or other
combustible materials.
Keep at least 3 feet of clearance on al! sides of pressure
washer for adequate cooling, maintenance and servicing.
In the State of California a spark arrester is required by law
(Section 4442 of the California Public Resources Code).
Other states may have similar laws. Federal laws apply on
federal lands. If you equip the muffler with a spark attester,
it must be maintained in effective working order.
How to Stop Your C_eaning System
1. Let engine idle for two minutes.
2. Move throttle lever on engine to "Stop" position.
DO NOT stop engine by moving choke lever to "Choke"
position.
3. Squeeze trigger on spray gun to relieve
trapped pressure in hose to avoid injury.
NOTE: A small amount of water will squirt out when
_ressure is released.
WARNING
Keep high pressure hose connected to pump and spray
gun while system is pressurized.
Squeeze trigger on spray gun to relieve trapped
pressure, every time you stop engine. Engage trigger
lock on spray gun.
.
Engage trigger lock on spray gun when not in use.
10
Page 11
How to Use Spray Tips
The nozzle extension quick-connect allows the use of
several different spray tips. Each spray tip provides a
different spray pattern.
C_eaning and Appmying Chemicam
IMPORTANT: Use soaps designed specifically for
pressure washers. Household detergents could
damage the pump.
CAUTION
• NEVER exchange spray tips without locking the safety
latch on the trigger,
Follow these instructions to change spray tips:
1. Engage safety latch on spray gun.
2. Pull back collar on quick-connect and pull current
spray tip off.
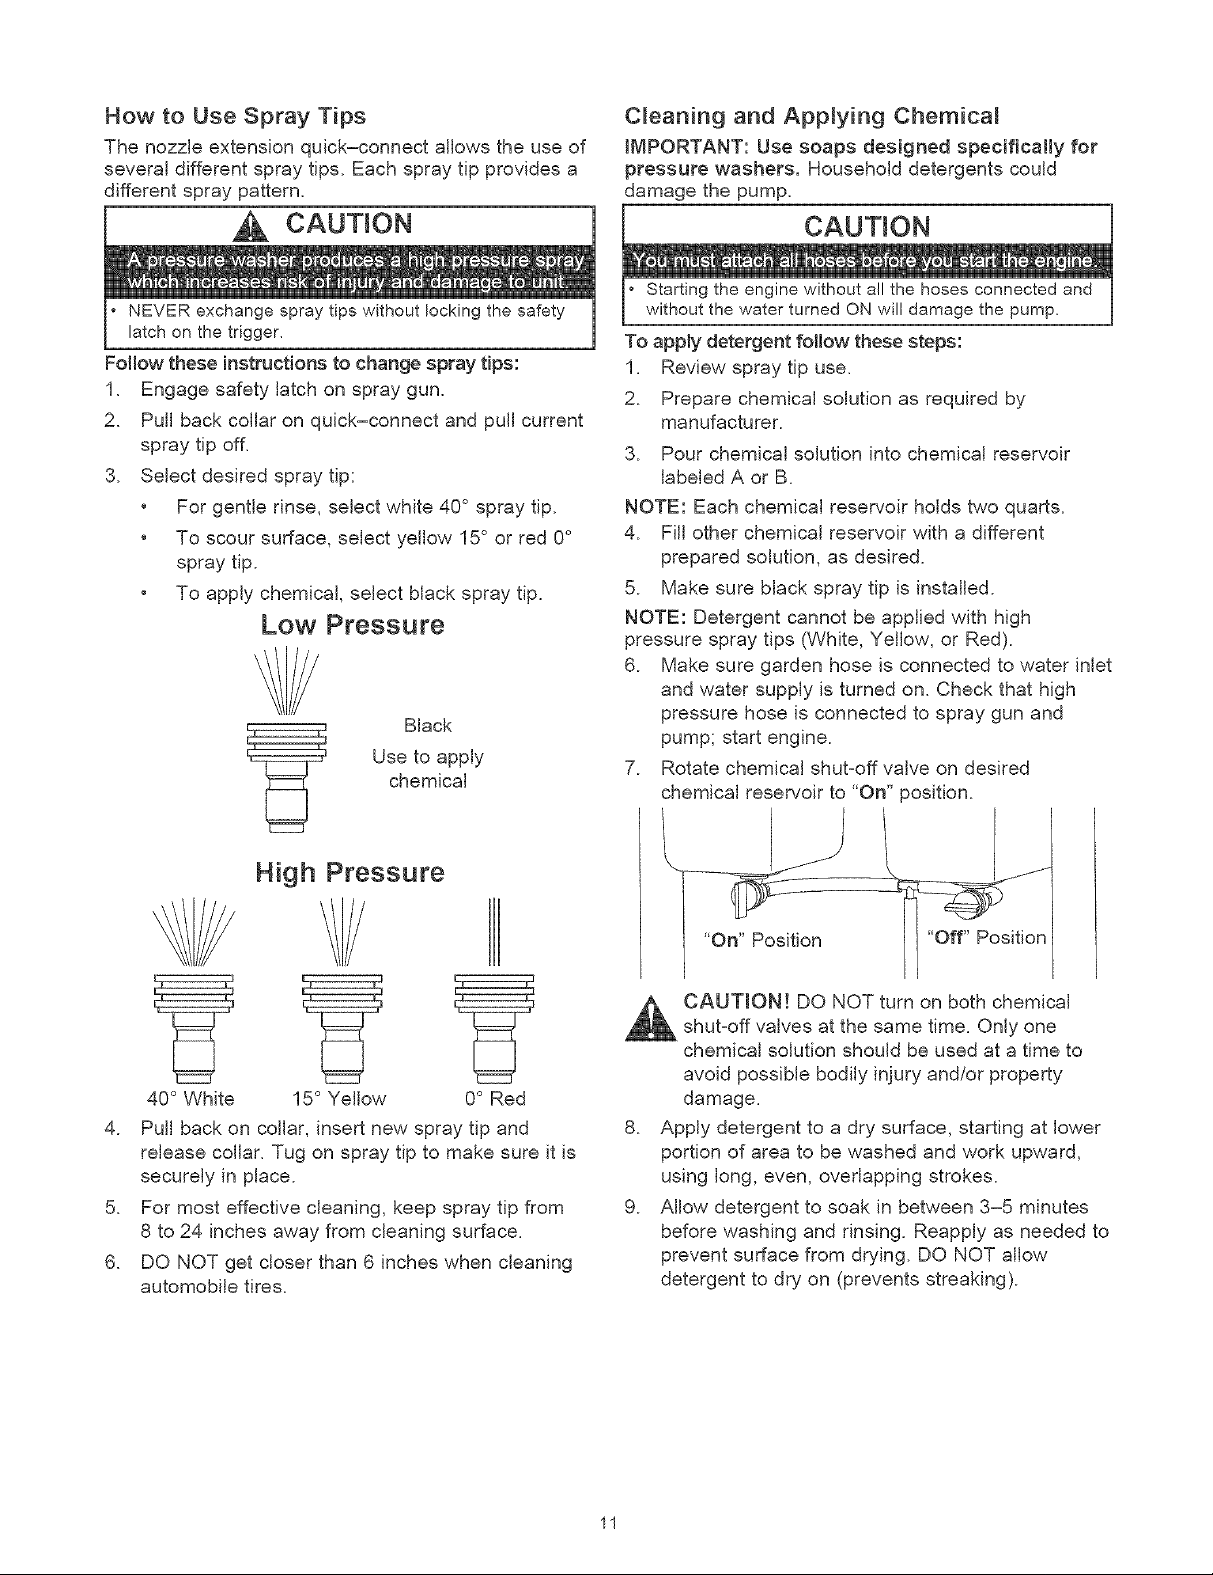
3. Select desired spray tip:
• For gentle rinse, select white 40° spray tip.
• To scour surface, select yellow 15° or red 0°
spray tip.
• To apply chemical, select black spray tip.
Low Pressure
Use to apply
chemical
Black
CAUTION
Starting the engine without all the hoses connected and
without the water turned ONwill damage the pump.
To apply detergent follow these steps:
1. Review spray tip use.
2. Prepare chemical solution as required by
manufacturer.
3. Pour chemical solution into chemical reservoir
labeled A or B.
NOTE: Each chemical reservoir holds two quarts.
4. Fill other chemical reservoir with a different
prepared solution, as desired.
5. Make sure black spray tip is installed.
NOTE: Detergent cannot be applied with high
pressure spray tips (White, Yellow, or Red).
6. Make sure garden hose is connected to water inlet
and water supply is turned on. Check that high
pressure hose is connected to spray gun and
pump; start engine.
7. Rotate chemical shut-off valve on desired
chemical reservoir to "On" position.
High Pressure
Y
40 ° White 15° Yellow 0° Red
4. Pull back on collar, insert new spray tip and
release collar. Tug on spray tip to make sure it is
securely in place.
5. For most effective cleaning, keep spray tip from
8 to 24 inches away from cleaning surface.
6. DO NOT get closer than 6 inches when cleaning
automobile tires.
CAUTION! DO NOT turn on both chemical
shut:off valves at the same time. Only one
chemical solution should be used at a time to
avoid possible bodily injury and/or property
damage.
.
Apply detergent to a dry surface, starting at lower
portion of area to be washed and work upward,
using long, even, overlapping strokes.
g.
Allow detergent to soak in between 3=5 minutes
before washing and rinsing. Reapply as needed to
prevent surface from drying. DO NOT allow
detergent to dry on (prevents streaking).
11
Page 12
Pressure Washer Rinsing
After detergent is applied, scour the surface and rinse
it clean as follows:
1. Apply safety latch to spray gun.
2. Make sure both chemical shut-off valves are in
"Off" position.
3. Remove black chemical spray tip from nozzle
extension.
4. Select and install desired high pressure spray tip,
as described in "How to Use Spray Tips".
5. Keep spray gun a safe distance from spray
surface.
WARNING
Keep spray nozzle between 8 to 24 inches away from
cleaning surface.
Operate this unit on a stable surface.
Be extremely careful if you must use the pressure
washer from a ladder, scaffolding or any other relatively
unstable location.
Firmly grasp spray gun with both hands when using high
pressure spray to avoid injury if gun kicks back.
.
Apply a high pressure spray to a small area and
then check the surface for damage, if no damage,
proceed to step 7.
.
Start at top of area to be rinsed, working down
with same overlapping strokes used for cleaning.
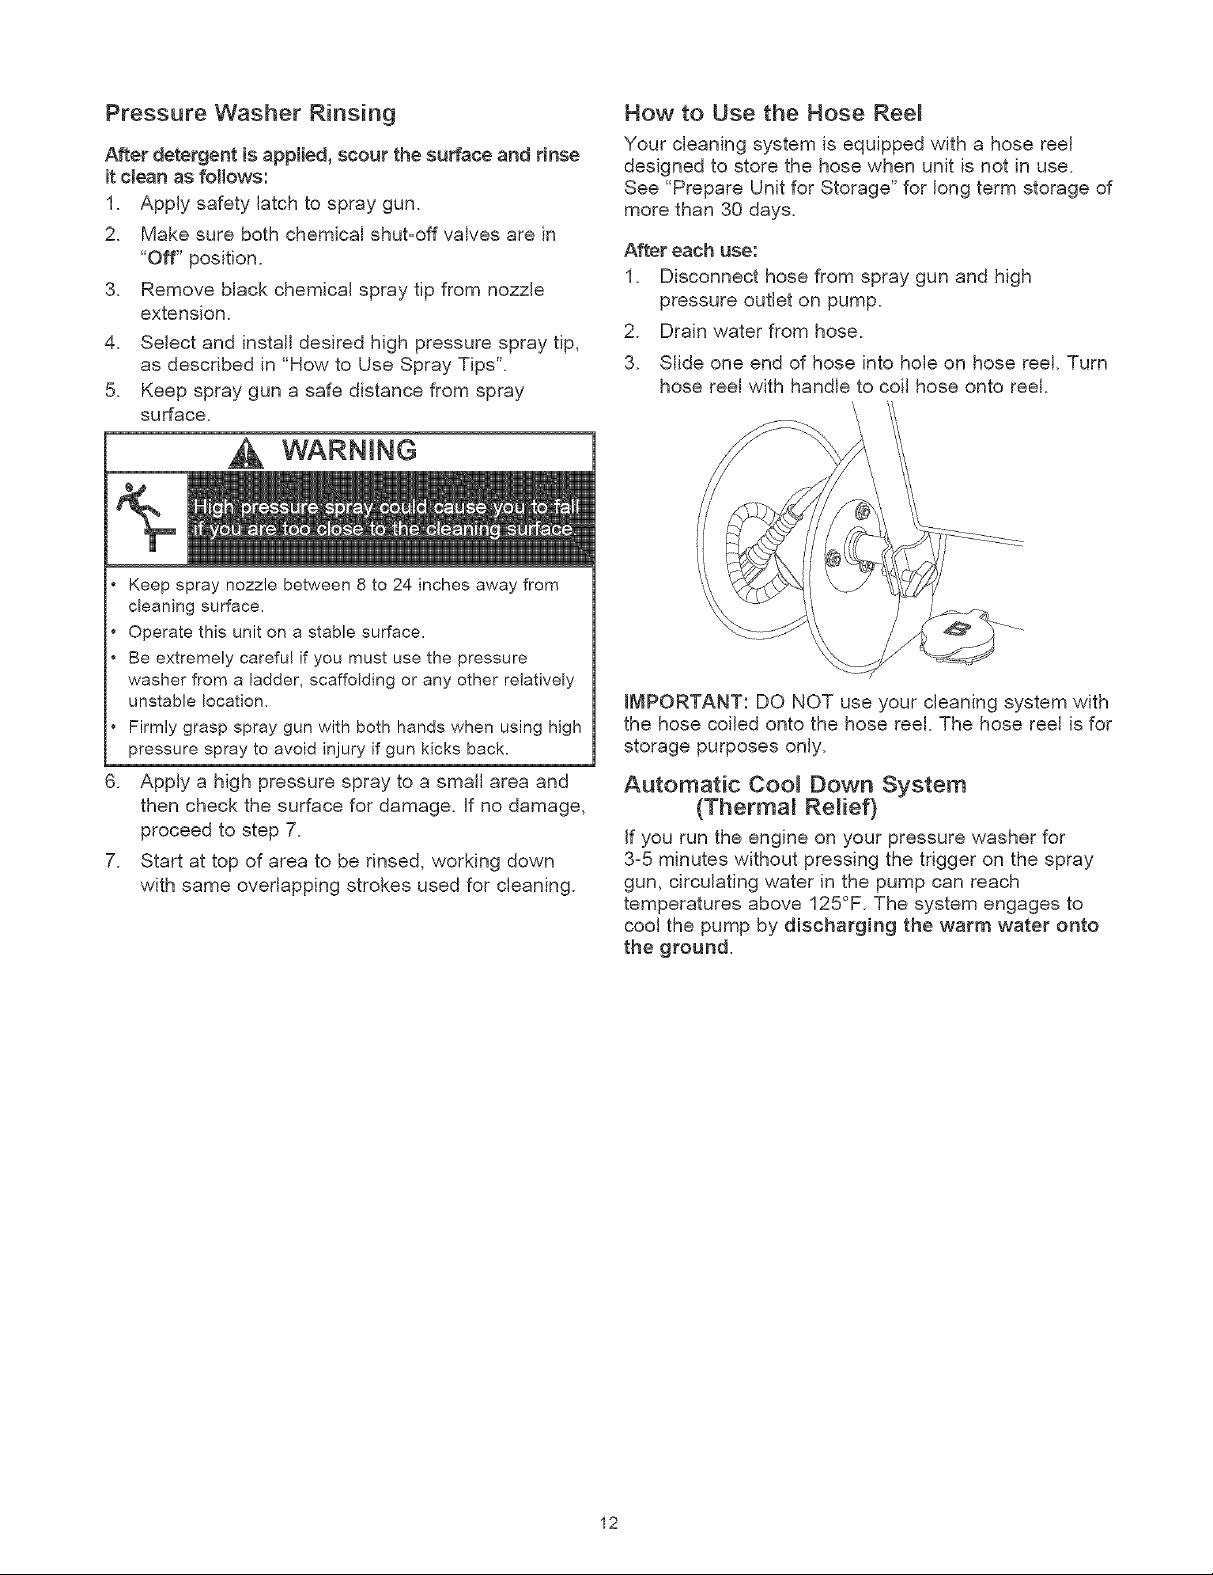
How to Use the Hose Reel
Your cleaning system is equipped with a hose reel
designed to store the hose when unit is not in use.
See "Prepare Unit for Storage" for long term storage of
more than 30 days.
After each use:
1. Disconnect hose from spray gun and high
pressure outlet on pump.
2. Drain water from hose.
3. Slide one end of hose into hole on hose reel. Turn
hose reel with handle to coil hose onto reel.
'\
IMPORTANT: DO NOT use your cleaning system with
the hose coiled onto the hose reel. The hose reel is for
storage purposes only.
Automatic Cool Down System
(Thermal Relief)
If you run the engine on your pressure washer for
3-5 minutes without pressing the trigger on the spray
gun, circulating water in the pump can reach
temperatures above 125°F. The system engages to
cool the pump by discharging the warm water onto
the ground.
12
Page 13

ENGtNE TECHNICAL INFORMATION
This is a single cylinder, overhead valve(OHV)+ air
cooled engine. It is a low emissions engine.
in the State of California, Model Series 120000
engines are certified by the California Air Resources
Board to meet emissions standards for 125 hours.
Such certification does not grant the purchaser, owner
or operator of this engine any additional warranties
with respect to the performance or operationa+ life of
this engine. The engine is warranted solely according
to the product and emmisions warranties stated
elsewhere in this manual.
Power Ratings
The power ratings for an individual engine model are
initially developed by starting with SAE (Society of
Automotive Engineers) code J1940 (Small Engine
Power & Torque Rating Procedure) (Revision 2002-
05). Given both the wide array of products on which
our engines are placed, and the variety of
environmental issues applicable to operating the
equipement, it may be that the engine you have
purchased will not develop the rated horsepower when
used in a peice of power equipment (actual "on-site"
power). This difference is due to a variety of factors
including, but not limited to, the following: differences
in altitude, temperature, barometric pressure, humidity,
fuel, engine lubrication, maximum governed engine
speed, individual engine to engine variability, design of
the particular pe+ce of power equipment, the manner in
which the engine is operated, engine run-in to reduce
friction and clean out of combustion chambers,
adjustments to the valves and carburetor, and other
factors. The power ratings may also be adjusted
based on comparisons to other similar engines
utilizedin similar applications, and will thereforenot
necessarily match the values derived using the
foregoing codes.
PRODUCT SPECIFICATIONS
Pressure Washer Specifications
Pressure .................. 2,500 PSI
Flow Rate ................. 2+2 GPM
Chemical Mix............... Use as directed
Water Supply Temperature .... Not to exceed 100°F
Shipping Weight ............ 63 Ibs+
Engine Specifications
Rated Horsepower ............ 6.75 at 3600 rpm
Bore ....................... 2.69 in. (68mm)
Stroke ...................... 2.04 in. (52mm)
Displacement ................ 11.57 in. (190 cc)
Spark Plug
Type: ..................... Champion RC12YC or
Equivalent
Set Gap To: ............... 0.020inch (0.51ram)
Armature Air Gap: ............ 0.010-0.014 in.
(0.25+0.36mm)
Valve clearance with valve springs installedand piston 1/4 in.
(6 mm) past top dead center (check when engine iscold).
intake ...................... 0.004-0.006 in.
(0.10-0.!5 mm)
Exhaust .................... 0.004-0.008 in.
(0.I0-0.20 ram)
Fuel Capacity ................ 1.6 Quarts
Oil Type:
Above 40° F ............... SAE 30
Below 40° F ............... SAE 5W=30or 10W=30
13
Page 14
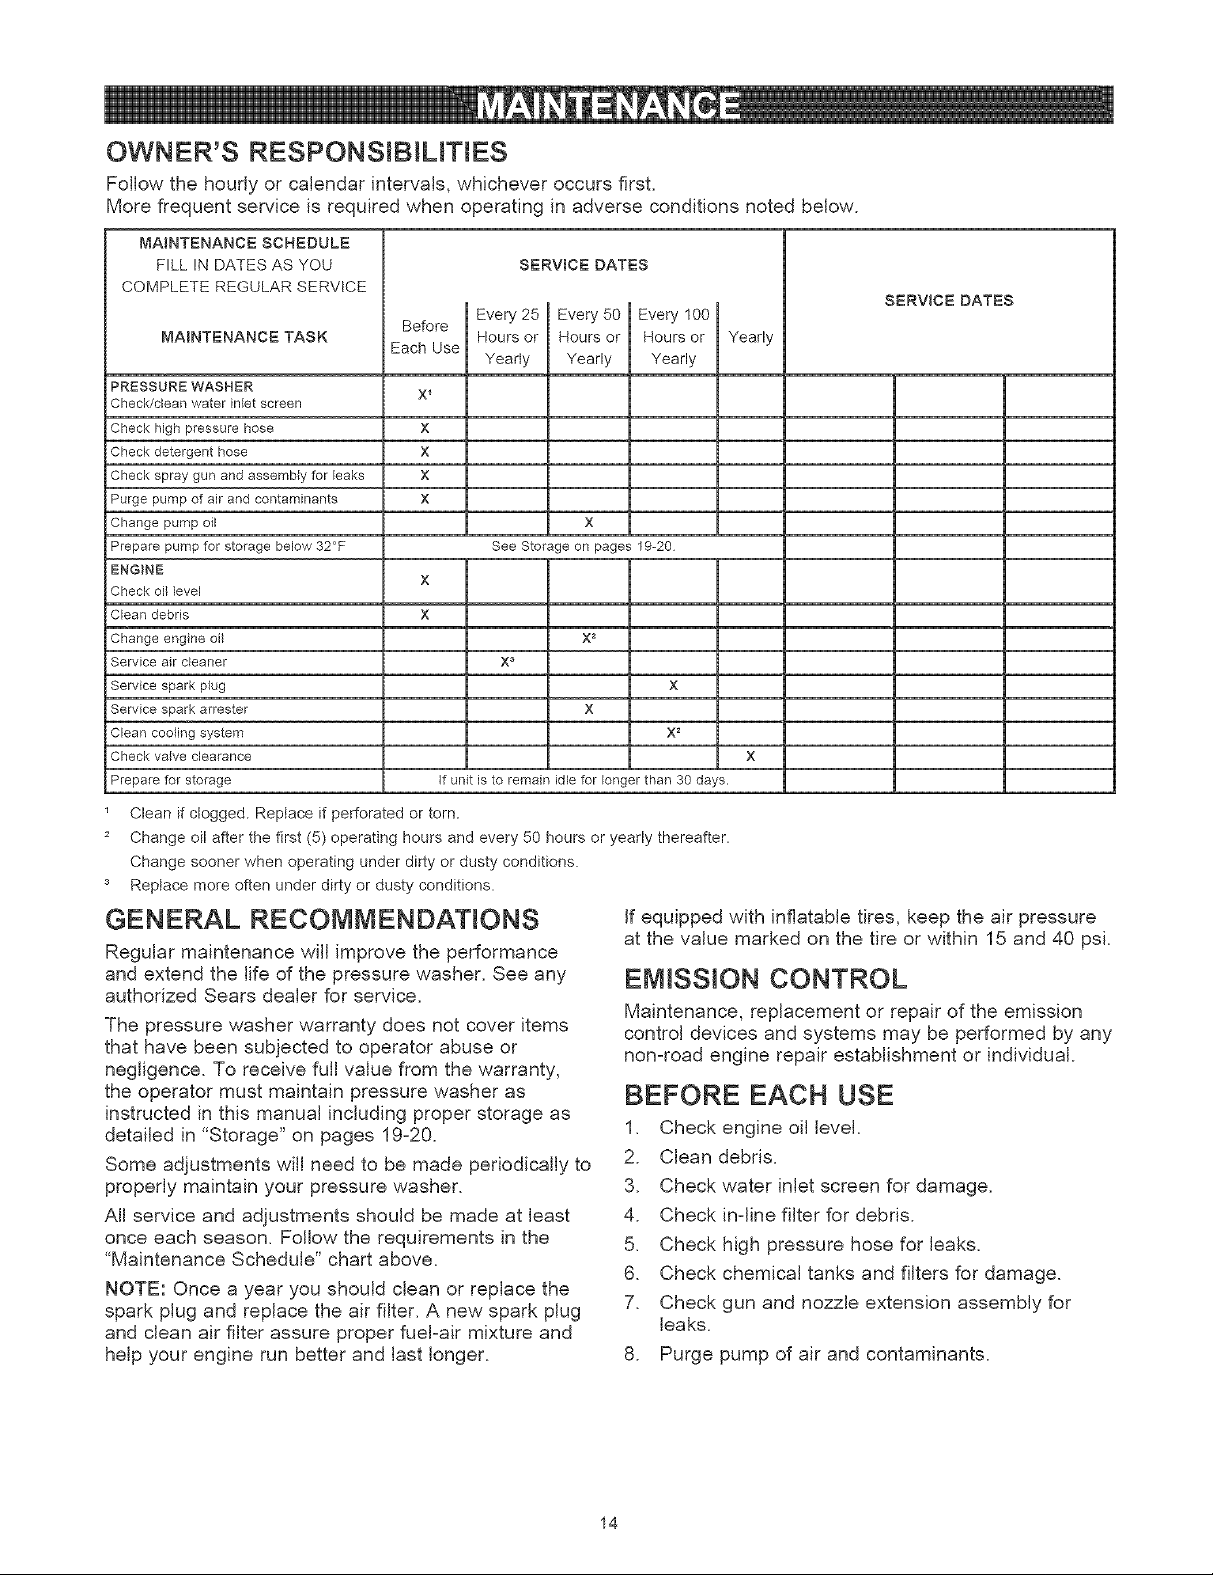
OWNER'S RESPONSIBIUTtES
Follow the hourly or calendar intervals, whichever occurs first.
More frequent service is required when operating in adverse conditions noted below.
MAINTENANCE SCHEDULE
FILL IN DATES AS YOU
COMPLETE REGULAR SERVICE
MABNTENANCBTASK
PRESSURE WASHER
Check/clean water inlet screen
Check Ngh pressure hose
Check detergent hose
Check spray gun and assemb{y for Eeaks
Purge pump of air and contaminants
Change pump oil
Prepare pump for storage below 32°F
ENGINE
Check oil Eevel
Clean debris
Change engine oil
Service air deaner
Service spark p_ug
Service spark arrester
Clean coo_ing system
Check valve clearance
Prepare for storage
Clean if clogged. Reptace if perforated or torn.
2 Change oil after the first (5) operating hours and every 50 hours or yearly thereafter.
Change sooner when operating under dirty or dusty conditions.
Replace more often under dirty or dusty conditions.
Before
Each Use
x_
x
x
x
x
x
x
if unit is to remain idle for longer than 30 days.
GENERAL RECOMMENDATIONS
Regular maintenance will improve the performance
and extend the life of the pressure washer. See any
authorized Sears dealer for service.
The pressure washer warranty does not cover items
that have been subjected to operator abuse or
negligence. To receive full value from the warranty,
the operator must maintain pressure washer as
instructed in this manual including proper storage as
detailed in "Storage" on pages 19-20.
Some adjustments will need to be made periodically to
properly maintain your pressure washer.
All service and adjustments should be made at least
once each season. Follow the requirements in the
"Maintenance Schedule" chart above.
NOTE: Once a year you should clean or replace the
spark plug and replace the air filter. A new spark plug
and clean air filter assure proper fuel-air mixture and
help your engine run better and last longer.
SERVICE DATES
Every 25 I Every 50
Hours or I Hours or
Yeady Yearly
x
See Storage on pages 19-20
X 2
X _
If equipped with inflatable tires, keep the air pressure
at the value marked on the tire or within 15 and 40 psi.
EMISSION CONTROL
Maintenance, replacement or repair of the emission
control devices and systems may be performed by any
non-road engine repair establishment or individual.
BEFORE EACH USE
1. Check engine oil level.
2. Clean debris.
3. Check water inlet screen for damage.
4. Check in-line filter for debris.
5. Check high pressure hose for leaks.
6. Check chemical tanks and filters for damage.
7. Check gun and nozzle extension assembly for
8. Purge pump of air and contaminants.
Every 100
Hours or
Yearly
x
x 2
leaks.
Yearly
SERVICE DATES
14
Page 15
PRESSURE WASHER MAINTENANCE
C_ean Debris
Daily or before use, clean accumulated debris from
cleaning system. Keep linkage, spring and controls
clean. Keep area around and behind muffler free from
any combustible debris.
Cleaning system parts should be kept clean to reduce
the risk of overheating and ignition of accumulated
debris.
• Use a damp cloth to wipe exterior surfaces clean.
CAUTION
• DO NOT insert any objects through cooling slots.
• Use a soft bristle brush to loosen caked on dirt, oil,
etc.
• Use a vacuum cleaner to pick up loose dirt and debris.
• Use low pressure air (not to exceed 25 psi) to blow
away dirt. inspect cooling air slots and openings on
the pressure washer. These openings must be kept
clean and unobstructed.
Check and C_ean _n_et Screen
Examine garden hose inlet screen. Clean if it is
clogged or replace if it is torn.
Check High Pressure Hose
High pressure hoses can develop leaks from wear,
kinking, or abuse. Inspect hose before each use.
Check for cuts, leaks, abrasions, bulging of cover, or
damage or movement of couplings. If any of these
conditions exist, replace hose immediately.
WARNING
NEVER repair high pressure hose, Replace it,
Replacement hose rating MUST exceed maximum
pressure rating of unit.
Check Gun and Nozzle Extension
Examine hose connection to spray gun and make sure
it is secure. Test trigger by pressing it and making
sure it springs back into place when you release it. Put
safety latch in UP position and test trigger. You should
not be able to press trigger. Replace spray gun
immediately if it fails any of these tests.
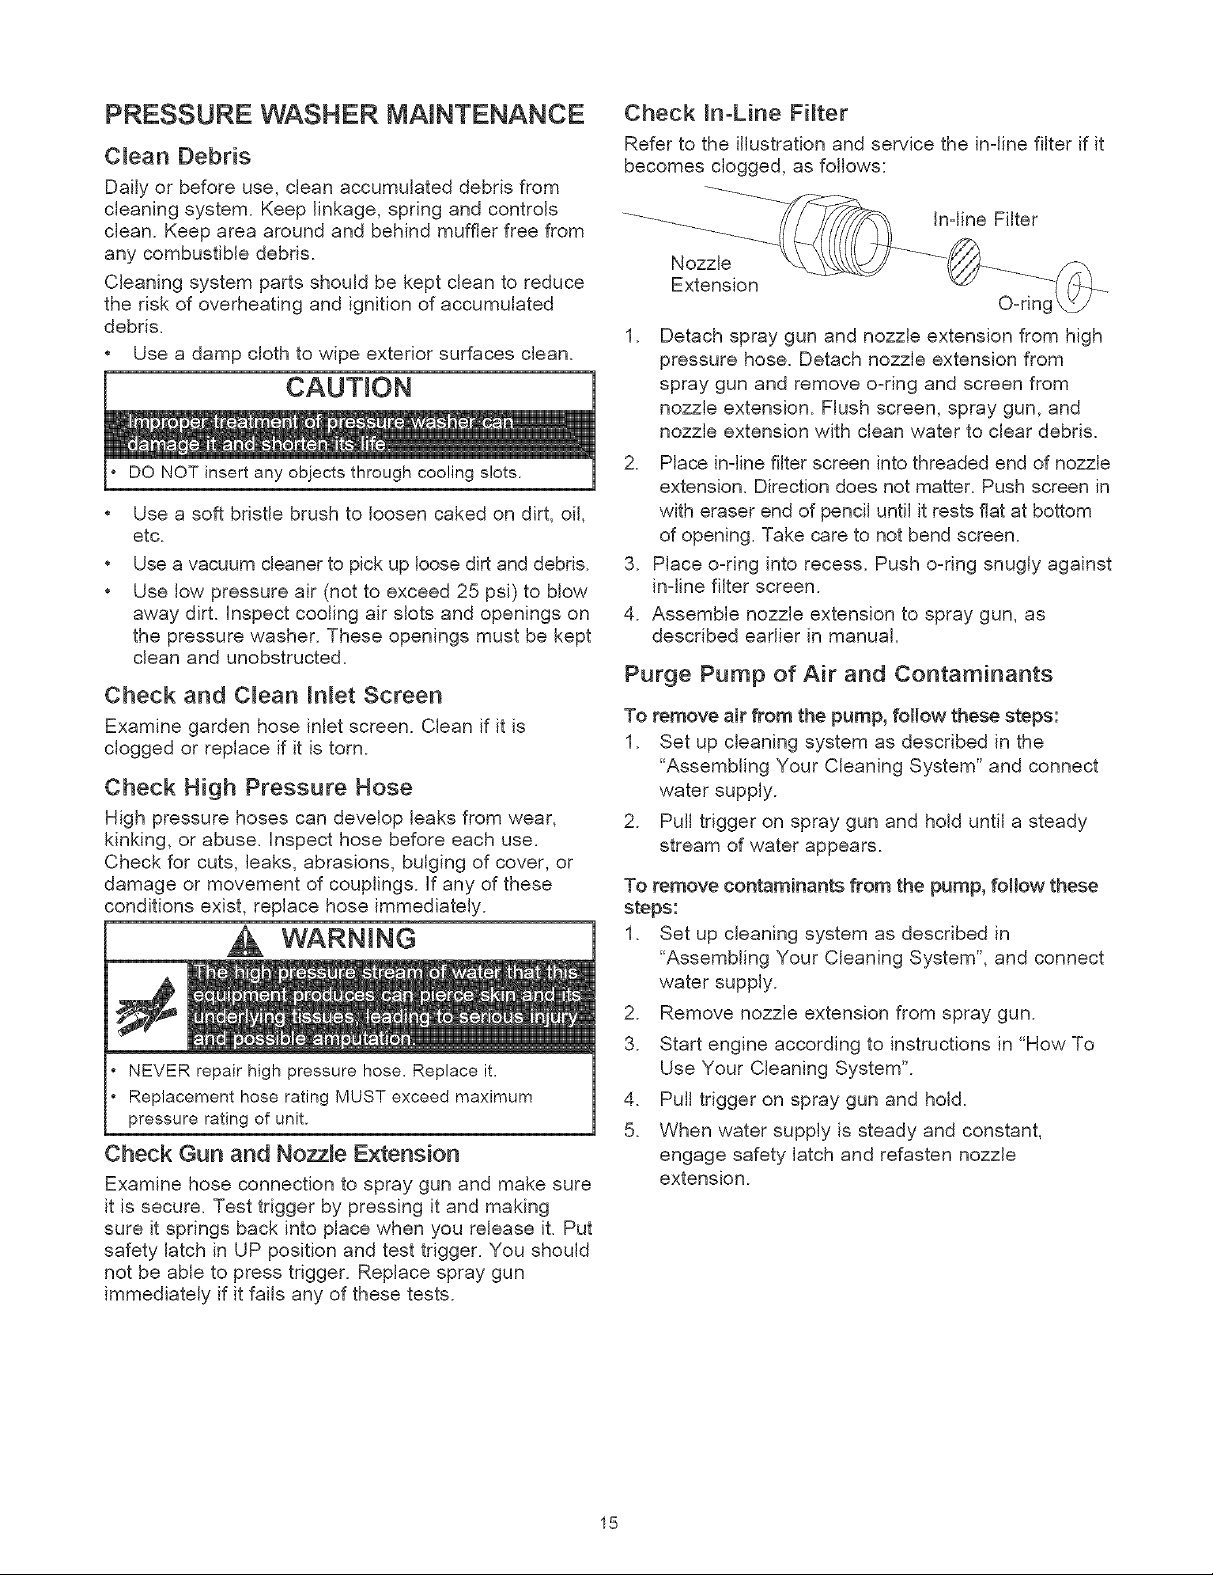
Check _n-Line Fi_ter
Refer to the illustration and service the in-line filter if it
becomes clogged, as follows:
Nozzle
Extension
O-ring
1. Detach spray gun and nozzle extension from high
pressure hose. Detach nozzle extension from
spray gun and remove o-dng and screen from
nozzle extension. Flush screen, spray gun, and
nozzle extension with clean water to clear debris.
2. Place in-line filter screen into threaded end of nozzle
extension. Direction does not matter. Push screen in
with eraser end of pencil until it rests flat at bottom
of opening. Take care to not bend screen.
3. Place o-ring into recess. Push o-ring snugly against
in-line filter screen.
4. Assemble nozzle extension to spray gun, as
described eadier in manual.
Purge Pump of Air and Contaminants
To remove air from the pump, follow these steps:
1. Set up cleaning system as described in the
"Assembling Your Cleaning System" and connect
water supply.
2. Pull trigger on spray gun and hold until a steady
stream of water appears.
To remove contaminants from the pump, follow these
steps:
1. Set up cleaning system as described in
"Assembling Your Cleaning System", and connect
water supply.
2. Remove nozzle extension from spray gun.
3. Start engine according to instructions in "How To
Use Your Cleaning System".
4. Pull trigger on spray gun and hold.
5. When water supply is steady and constant,
engage safety latch and refasten nozzle
extension.
15
Page 16

Nozzle Maintenance
A pulsing sensation felt while squeezing the spray gun
trigger may be caused by excessive pump pressure.
The principal cause of excessive pump pressure is a
spray tip clogged or restricted with foreign materials,
such as dirt, etc. To correct the problem, immediately
clean the spray tip following these instructions:
1. Shut off engine and turn off water supply.
2. Remove spray tip from end of nozzle extension.
3. Remove in-line filter from other end of nozzle
extension.
.
Use a small paper clip to free any foreign material
clogging or restricting spray tip.
J
Pump Maintenance
Changing Pump Oil
Change oil every 50 hours or once yeady, whichever
occurs first.
NOTE: You must purchase a premeasured bottle of
pump oil, item number 190586GS, by calling
1-800-366-PART or online at www.sears.com.
Change pump oil as follows:
1. Drain engine oil and fuel from pressure washer.
2. Use a 8mm allen wrench to remove black pump
oil cap between high pressure outlet and garden
hose inlet.
f s > t
J
to remove
debris.
usow, oho o y
5. Using a garden hose, remove additional debris by
back flushing water through nozzle extension.
Back flush between 30 to 60 seconds.
6. Reinstall spray tip and in-line filter into nozzle
extension.
7. Reconnect nozzle extension to spray gun.
8. Reconnect water supply, turn on water, and start
engine.
9. Test pressure washer by operating with each
Quick Connect spray tips.
O-Ring Maintenance
Purchase an (;:)-Ring Repair Kit, item number 71-75116,
at your local Sears or by calling 1-800-366-PART or
online at v,^,uw.sears.com. It is not included with the
cleaning system. This kit includes replacement o-dngs,
rubber washer and water inlet filter. Refer to the
instruction sheet provided in the kit to service your unit's
o-rings.
/ "\\
Oil Cap
3. Tilt pressure washer to drain oil into an approved
container until it drips slowly from pump.
4. Tilt pressure washer in opposite direction and
empty premeasured pump oil bottle into same
opening (a small funnel may be helpful).
5. Install black pump oil cap and tighten firmly.
6. Set pressure washer in upright position. Add fuel
and engine oil
16
Page 17
ENGINE MAINTENANCE
WARNING
WHEN ADJUSTING OR MAKING REPAIRS TO YOUR
PRESSURE WASHER
Disconnect the spark plug wire from the spark plug and
place the wire where it cannot contact spark plug.
WHEN TESTING FOR ENGINE SPARK
Use approved spark plug tester.
DO NOT check for spark with spark plug removed.
Checking OH Leve_
Oil level should be checked prior to each use or at least
every 8 hours of operation. Keep oil level maintained.
Changing Oil
Change engine oil after the first 5 hours and every
50 hours thereafter. If you are using your pressure
washer under extremely dirty or dusty conditions, or in
extremely hot weather, change oil more often.
CAUTION
4. Tip your pressure washer to drain oil from oil fill
into a suitable container making sure you tip your
unit away from spark plug and air cleaner. When
crankcase is empty, return pressure washer to
upright position.
5. Wipe dipstick clean, insert it into oil fill hole and
tighten securely, remove dipstick. Add
recommended oil up to "Full" mark on dipstick.
Pour slowly. Wipe dipstick clean each time oil
level is checked. DO NOT overfill.
6. Install oil fill plug and dipstick, tighten securely.
7. Wipe up any remaining oil.
8. Reconnect spark plug wire to spark plug.
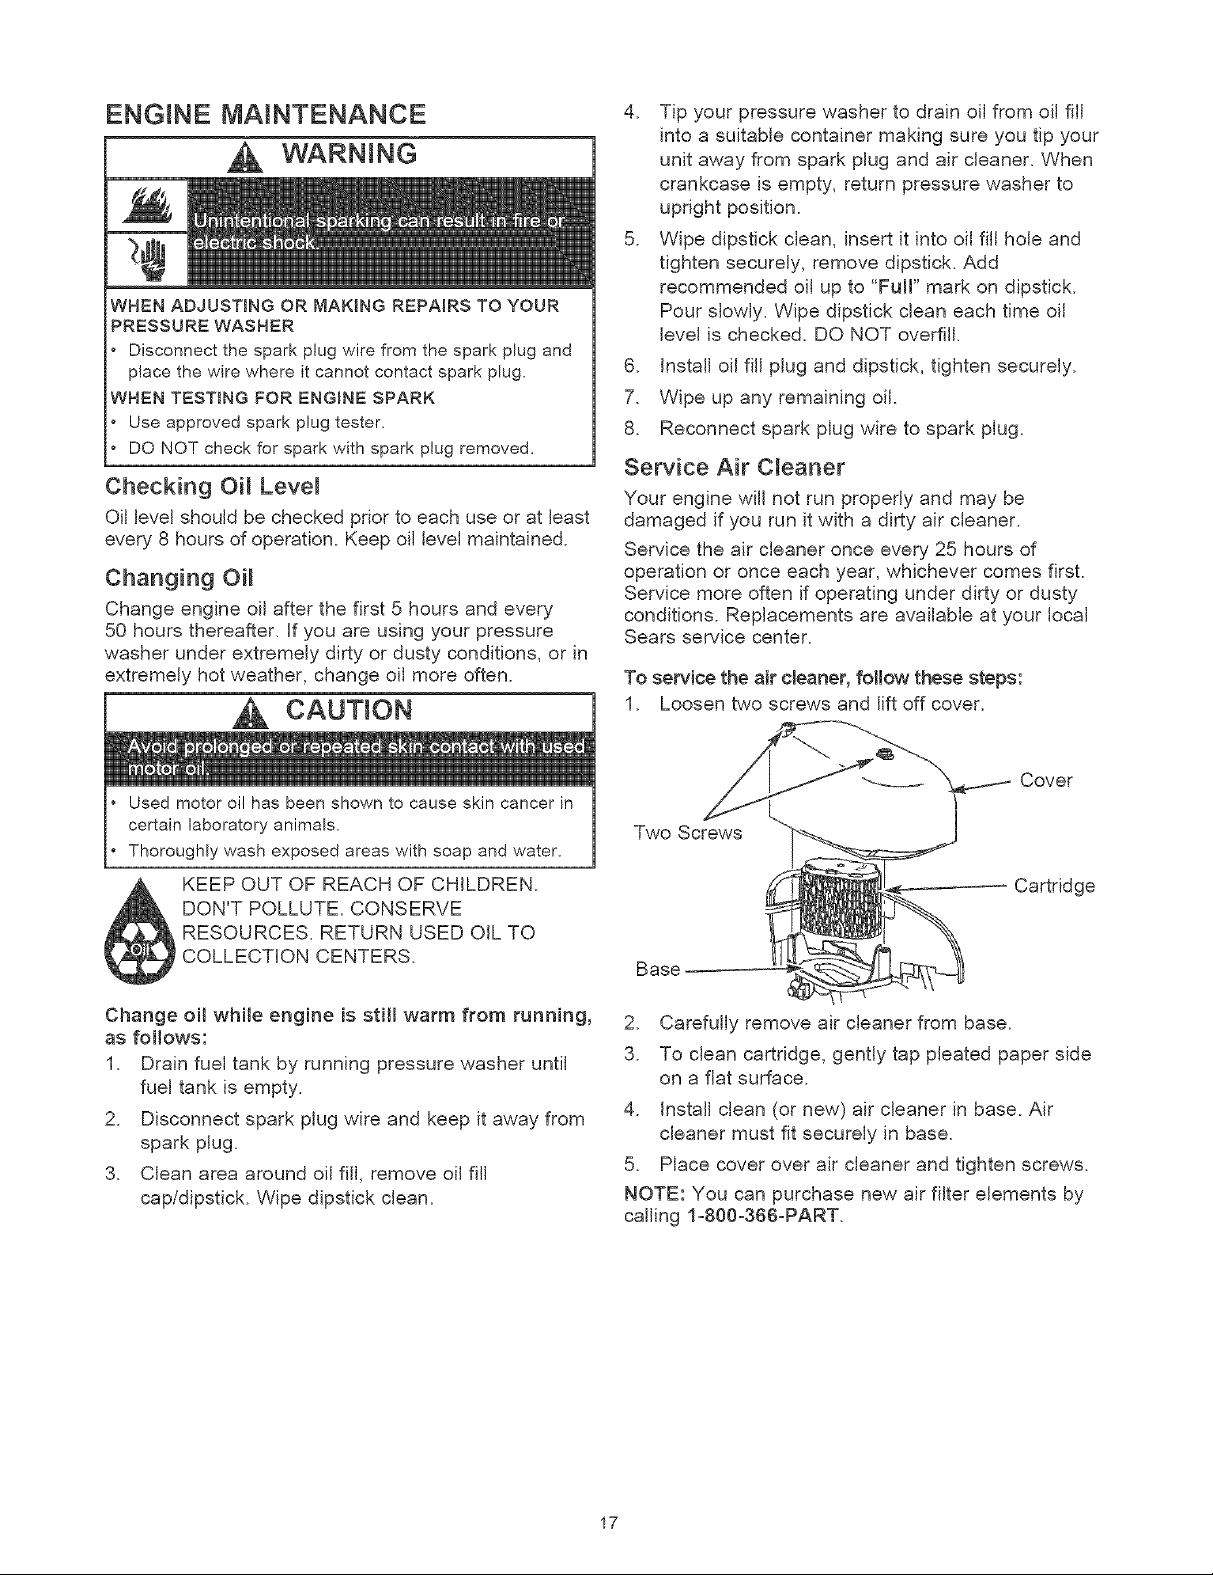
Service Air CReaner
Your engine will not run properly and may be
damaged if you run it with a dirty air cleaner.
Service the air cleaner once every 25 hours of
operation or once each year, whichever comes first.
Service more often if operating under dirty or dusty
conditions. Replacements are available at your local
Sears service center.
To service the air cleaner, follow these steps:
1. Loosen two screws and lift off cover.
• Used motor oil has been shown to cause skin cancer in
certain laboratory animals,
• Thoroughly wash exposed areas with soap and water,
KEEP OUT OF REACH OF CHILDREN.
DON'T POLLUTE. CONSERVE
RESOURCES. RETURN USED OIL TO
COLLECTION CENTERS.
Change oil while engine is still warm from running,
as follows:
1. Drain fuel tank by running pressure washer until
fuel tank is empty.
2. Disconnect spark plug wire and keep it away from
spark plug.
3. Clean area around oil fill, remove oil fill
capldipstick. Wipe dipstick clean.
Cover
Two Screws
Cartridge
Base
2. Carefully remove air cleaner from base.
3. To clean cartridge, gently tap pleated paper side
on a flat surface.
4. Install dean (or new) air cleaner in base. Air
cleaner must fit securely in base.
5. Place cover over air cleaner and tighten screws.
NOTE: You can purchase new air filter elements by
calling 1-800-366-PART.
17
Page 18

Service Spark Pmug
Service the spark plug every 100 hours of operation or
yearly, whichever occurs first.
1. Clean area around spark plug.
2. Remove and inspect spark plug.
3. Replace spark plug if the electrodes are worn, or if
the insulator is cracked or chipped.
4. For replacement use either the standard resistor
spark plug, Champion RC12YC or the long life
platinum spark plug, Champion RC12PYP.
5. Check electrode gap with wire feeler gauge and
set gap at 0.020 inches (0.50mm), if necessary.
6. Install spark plug, tighten securely.
NOTE: You can purchase a new spark plug by calling
1-800-366-PART.
Carburetor
if you think your carburetor needs adjusting, see your
nearest Sears service center. Engine performance
may be affected at altitudes above 3000 feet. For
operation at higher elevations, contact your nearest
Sears service center.
Spark Attester Service
Your engine is not factory-equipped with a spark
attester. In some areas, it is iWegalto operate an
engine without a spark arrester. Check local laws and
regulations. A spark attester is available from your
nearest Sears service center. If you need to order a
spark arrester, please call 1-800-366-PART.
The spark arrester must be serviced every 50 hours to
keep it functioning as designed.
If the engine has been running, the muffler will be very
hot. Allow the muffler to cool before servicing the
spark arrester.
• Remove spark attester screen for cleaning and
inspection.
• Replace if screen is damaged.
WARNING
DO NOT touch hot surfaces,
Allow equipment to coo! before touching.
The pressure washer must be at least 5 feet from
structures having combustible walls and/or other
combustible materials,
Keep at least 3 feet of clearance on all sides of pressure
washer for adequate cooling, maintenance and servicing.
In the State of California a spark attester is required by law
(Section 4442 of the California Public Resources Code).
Other states may have similar laws, Federal laws apply on
federal lands, If you equip the muffler with a spark attester,
it must be maintained in effective working order,
Air Coo_ing System
Over time debris may accumulate in cylinder cooling
fins and cannot be observed without partial engine
disassembly. For this reason, we recommend you
have an authorized Sears service dealer clean the
cooling system per recommended intervals (see
"Maintenance Schedule" on page 14). Equally
important is to keep top of engine free from debris.
See "Clean Debris".
18
Page 19

AFTER EACH USE
Water should not remain in the unit for long periods of
time. Sediments or minerals can deposit on pump
parts and "freeze" pump action. FolJow these
procedures after every use:
1. Flush chemical system by turning its chemical
shut-off vaJves to "Off" position and run pressure
washer with black spray tip. Flush for one to two
minutes.
2. Shut off engine, Jetit cool, then remove aJJhoses.
3. Disconnect spark plug wire from spark pJug.
4. Empty pump of aJJJiquids by puJJingrecoil handJe
about 6 times. This should remove most liquid in
pump.
5. if storing for more than 30 days see "Long Term
Storage" on next page.
6. Uncoil high pressure hose and inspect it for
damage. Cuts in hose or fraying could result in
leaks and loss of pressure. Should any damage
be found, replace hose. DO NOT attempt to repair
a damaged hose. Replace hose with genuine
Sears part.
7. Disconnect hose from spray gun and high
pressure outlet on pump. Drain water from hose,
gun, and nozzle extension. Use a rag to wipe off
hose.
8. Slide one end of hose into hole on hose reel. Turn
hose reel with handle to coil hose onto reel.
9. Reconnect spark plug wire to spark plug.
10. Store unit in a clean, dry area.
WARNING! NEVER store the engine with fuel
in the gas tank indoors or in enclosed, poorly
ventilated areas where fumes may reach an
open flame, a spark, or pilot light.
WINTER STORAGE
CAUTION
• Failure to do so will permanently damage your pump
and render your unit inoperable,
• Freeze damage is not covered under warranty.
To protect the unit from freezing temperatures:
1. Empty aJJchemicaJ reservoirs as follows:
a. Disconnect hose connected to chemical inject
fitting on pump. PJaceend of hose into
suitable container.
b. Rotate one of the chemical shut-off valves to
"On" position and open that tanks cover.
Gravity wilJ empty tank contents into container.
c. When first tank is empty, repeat step (b) for
other tank, using a different container.
d. Reconnect hose to chemical inject fitting on
pump. Add 0.5 quart of clean fresh water to
each tank and close tanks covers.
2. Flush chemical system by selecting one tank,
turning its chemicaJ shut-off vaJve to "On" position
and run pressure washer with black spray tip.
Flush untiJ first tank is empty. Turn its chemicaJ
shut-off vaJve to "Off" position. Flush other tank
the same way.
3. Shut off engine and Jet it cool, then remove high
pressure and garden hoses. Disconnect spark
plug wire from spark plug.
4. Empty pump of aJJpumped liquids by puJJingrecoiJ
handle about 6 times. This should remove most
liquid in pump.
5. Use pump saver, avaiJable at Sears retail item
71-74403, to treat pump. This minimizes freeze
damage and lubricates pistons and seals.
6. If pump saver is not avaiJabJe, connect a 3-foot
section of garden hose to water inlet adapter. Pour
RV-antifreeze (antifreeze without alcohol) into
hose. PulJ recoiJ handJe twice. Disconnect 3-foot
hose.
19
Page 20

LONG TERM STORAGE
if you do not plan to use the pressure washer for more
than 30 days, you must prepare the engine and pump
for long term storage.
it is important to prevent gum deposits from forming in
essential fuel system parts such as the carburetor, fuel
filter, fuel hose or tank during storage. Also,
experience indicates that alcohol-blended fuels (called
gasohol, ethanol or methanol) can attract moisture,
which leads to separation and formation of acids
during storage. Acidic gas can damage the fuel
system of an engine while in storage.
Protect Fuel System
Fuel Additive:
if adding a fuel additive, fill the fuel tank with fresh
fuel. If only partially filled, air in the tank will promote
fuel deterioration during storage. Engine and fue[ can
be stored up to 24 months with additive.
• Add fue[ additive following manufacturer's
instructions.
• Make sure you have water supply to pump inlet
connected and turned ON.
• Run the engine outdoors for 10 minutes to be sure
that treated fuel has replaced the untreated fuel in
the carburetor.
If fuel additive is not used, remove all fuel from tank
and run engine until it stops from lack of fuel.
Change Oil
While engine is still warm, drain oil from crankcase.
Refill with recommended grade. See "Changing Oil" on
page 17.
Oil Cylinder Bore
• Remove spark plug. Squirt about 1 tablespoon of
dean engine oil into the cylinder. Cover spark plug
hole with rag. Pull recoil handle slowly to distribute
oil. Avoid spray from spark plug hole.
• Install spark plug. DO NOT connect spark plug
wire.
Protect Pump
To protect the pump use Sears pump saver to prevent
freeze damage and lubricate pistons and seals.
CAUTION
• Failure to do so will permanently damage your pump
and render your unit inoperable.
• Freeze damage is not covered under warranty.
NOTE: Sears pump saver, item number 71-74403, is
available as an optional accessory, it is not included with
the pressure washer.
To use the pump saver:
,_ CAUTION
Always wear eye protection when using pump saver,
1. Attach hose on pump saver can to pump inlet.
2. Push in can top to dispense pump saver.
3. When pump saver fluid begins to exit pump outlet,
the pump is protected.
4. Remove pump saver from pump inlet.
OTHER
• DO NOT store fuel from one season to another.
• If possible, store your unit indoors and cover it to
give protection from dust and dirt. BE SURE TO
EMPTY THE FUEL TANK.
[MPORTANT: NEVER cover your cleaning system
while engine and exhaust area are warm.
2O
Page 21

Problem
Cause
Correction
Pump has following
problems: failureto produce
pressure, erratic pressure,
chattering,lossof pressure,
low water volume.
Detergentfallsto minxwith
spray.
Engine tuns good at noqoad
but "bogs" when load is
added.
1. Low pressure spray tip
installed.
2. Water inlet is blocked.
3. inadequate water supply.
4. inlet hose is kinked or leaking.
5. Clogged inlet hose strainer.
6. Water supply is over 100°F.
7. High pressure hose is blocked
or leaks.
8. Gun leaks.
9. Spray tip is obstructed.
10. Pump is faulty.
1. Chemical shut-off valves are in
the "Off" position.
2. In=line filter is dirty.
3. High pressure spray tip
installed.
Engine speed is too slow.
1. Replace spray tip with high pressure
spray tip.
2. Clear inlet.
3. Provide adequate water flow.
4. Straighten inlet hose, patch leak.
5. Check and clean inlet hose strainer.
6. Provide cooler water supply.
7. Clear blocks in high pressure hose
or replace hose.
8. Replace gun.
9. Clean spray tip.
10. Contact Sears service facility.
1. Rotate chemical shut=off valve on
desired chemical reservoir to "On"
position.
2. See "Check In-Line Filter".
3. Replace spray tip with low pressure
spray tip.
Move throttle control to FAST position. If
engine still "bogs down", contact Sears
service facility.
1. Dirty air cleaner.
2. Out of gasoline.
3. Stale gasoline.
Engine witl not start; or
starts and runs rough.
Engine shuts down during
operation. Out of gasoline. Fill fuel tank.
Engine lacks power. Dirty air filter.
Engine "hunts" or falters.
4. Spark plug wire not connected
to spark plug.
5. Bad spark plug.
6. Water in gasoline.
7. Overchoking.
8. Excessively rich fuel mixture.
Choke is opened too soon.
1. Clean or replace air cleaner.
2. Fill fuel tank.
3. Drain gas tank; fill with fresh fuel.
4. Connect wire to spark plug.
5. Replace spark plug.
6. Drain gas tank; fill with fresh fuel.
7. Open choke fully and crank engine.
8. Contact Sears service facility.
Replace air filter.
Move choke to halfway position until
engine runs smoothly.
21
Page 22

CRAFTSMAN 2500 PSI Cleaning System 580.752700
Main Unit _ Exploded View
900 --\
\\
\
23_
24_
22
Page 23

CRAFTSMAN 2500 PSI C_eaning System 580.752700
Main Unit m Parts List
Item Part #
1 194667GS
2 M194719GS
3 194316GS
4 194662GS
5 194663GS
6 192645GS
7 194664GS
8 194264GS
9 191265GS
10 192309GS
11 B5646GS
12 B2203GS
13 194628GS
14 194627GS
15 194328GS
16 190246GS
17 190049GS
18 192199GS
19 192310GS
20 192648GS
21 192317GS
22 194298GS
23 23139GS
24 194258GS
900 NSP
Description
BASE
HANDLE
ASSY, Billboard
KIT. Chemical Tank
KIT. Chem Caps with Tags
KIT. Engine/Pump Mounting Hardware
KIT. Chem Tank Hardware
KIT. Hook, Handle
KIT. E-Ring
KIT. Hook, Base
KIT. Spray Tips
KIT. Handle Connector
KIT. Chemical Hoses
KIT. Wireform Hardware
WIREFORM
HOSE
GUN
ASSY, Extension
KIT, Vibration Mount
KIT, Hose Reel
KIT, Wheel
VALVE, Thermal Relief
KEY
ASSY, Pump (see pages 24-25)
ENGINE
Items Not Illustrated
Part # Description
AB3061BGS BOTTLE, Oil
194320GS MANUAL, Owners
194256GS KIT, Tag, Warning, Service
Optional Accessories
7175187GS
7175197GS
7175199GS
190249GS
7175116GS
7174400 GS
100513GS
7174403GS
7174300GS
7174301GS
7174302 GS
7174303GS
7174307GS
Not Hlustrated
Garden Hose Quick Connect
Accessory Quick Connect
Rotating Brush Kit
25' Replacement Hose
O Ring Repair Kit
Turbo Nozzle
25' Extension Hose
Pump Saver
House Wash Concentrate (makes 4 gallons)
Deck Wash Concentrate (makes 2 gallons)
Vehicle/Boat Wash Concentrate (makes 4 gallons)
Degreaser Concentrate (makes 4 gallons)
Mold/Mildew Concentrate (makes 2 gallons)
23
Page 24

CRAFTSMAN 2500 PSi Cleaning System 580.752700
Pump m Exploded View
½
½
0 °
S
o
0
@
8
@
b_
o
LL
°o<@
L_
b"
E
_ 00_ >
24
Page 25

CRAFTSMAN 2500 PSI C_eaning System 580.752700
Pump m Parts List
Item Part # Description
19 190571GS
28 190627GS
45 190578GS
62 190581GS
76 194298GS
77 190586GS
A 190594GS
B 190632GS
C 190634GS
D 193808GS
E 193806GS
F 190592GS
G 190593GS
H 193807GS
J 189971GS
K 193971GS
L 193972GS
NOTE: item letters A - L are service kits and include all parts shown within the box.
CAP, Oil
MANIFOLD
PIN
CAP
THERMAL RELIEF
OIL BOTTLE (not shown)
KIT UNLOADER STEM
KIT
WATER INLET, ALUM
KIT
OUTLET, ALUM
KIT
HEAD BRASS
KIT
CHECK VALVES
KIT
INLET CHECK
KIT
CHEMICAL INJECTION
KIT
SEAL SET
KIT
CHEMICAL HOSE
KIT
PIPE FITTING
KIT
UNLOADER SEAT
25
Page 26

ENGINE, 6.75 HP, Briggs and Stratton, 129602 - E×ploded View
26
ls_ 2o@
Page 27

ENGINE_ 6.75 HP, Briggs and Stratton, 129602 - Exploded View
0
633
692
365
137_
276 @
95
188
51
968
445
=
[
883 'I
524_
334_
27
977 CARBURETOR
137
GASKET SET
276 @
633 @
163_ 633A@
Page 28

ENGINE, 6.75 HP, Briggs and Stratton, 129602 - Exploded View
12'
55
592 ®
.... i
459
689 o
456
597
58
121 CARBURETOR
OVERHAUL KUT
276_ 104%
51
6330 134
633A G
163 _ 137
356
37
3589ENGINE GASKET SET
868%
883
78 _
305
592 ®
332
324
1005
28
Page 29

ENGINE, 8.75 HP, Briggs and Stratton, 129602 - Parts List
Item Part # Description totem Part #
1 697893 Cylinder Assembly 332 690662
2 399269 Kit-Bushing/Seal (Magneto Side) 333 802574
3 299819 § Seal-Oil (Magneto Side) 334 691061
4 493279 SumpoEngine 337 692051
5 695276 Head-Cylinder 356 692390
7 695166 § _ Gasket-Cylinder Head 358 694090
8 495786 Breather Assembly 365 691136
9 699833 § Gasket-Breather 404 690272
10 691125 Screw (Breather Assembly) 445 697029
1! 69! 260 Tube-Breather 456 692299
11A 692937 Tube-Breather 459 28! 505
12 692232 § Gasket-Crankcase 505 691251
13 69! 137 Screw (Cylinder Head) 523 499621
15 691680 Plug-Oil Drain 524 692296
16 692823 Crankshaft 525 495265
20 399781 § Seal-Oil (PTO Side) 534 690244
22 691092 Screw (Engine Sump) 562 69! 119
23 790116 Flywheel 584 697734
24 222698 Key-Flywheel 585 69! 879
25 690021 Piston Assembly (Standard) 592 690800
694168 Piston Assembly (.020" Oversize) 597 691696
26 499631 Ring Set (Standard) 601 95162
692786 Ring Set (.020" Oversize) 608 497680
27 691866 Lock-Piston Pin 6!3 691108
28 499423 Pin-Piston 613A 69! 140
29 499424 Rod-Connecting 615 690340
32 691664 Screw (Connecting Rod) 616 698801
32A 695759 Screw(Connecting Rod) 619 691108
33 499642 Valve-Exhaust 621 692310
34 499641 Valve-Intake 633 693867
35 691304 Spring-Valve (Intake) 633A 691321
36 69! 304 Spring-Valve (Exhaust) 635 66538
37 694086 Guard-Flywheel 670 692294
40 692! 94 Retainer-Valve 684 690345
43 691997 Slinger-Governor/Oil 689 691855
45 690977 Tappet-Valve 692 690572
46 694039 Camshaft 718 690959
48 692747 Short Block 741 691830
5! 692668 1 § $ _ Gasket-intake 830 694544
51A 692799 1"§ $ _ Gasket-intake 832 691466
55 691421 Housing-Rewind Starter 836 691147
58 691921 Rope-Starter (Cut to Required Length) 836A 697551
60 281434 Grip-Starter Rope 842 691031
65 690837 Screw (Rewind Starter) 843 69! 884
78 691108 Screw (Flywheel Guard) 847 692047
95 691636 Screw (Throttle Valve) 851 493880
97 499682 Shaft-Throttle 868 692044
104 691242 1"Pin-Float Hinge 875 698003
108 691182 Valve-Choke 883 69! 893
109 499681 Shaft-Choke 886 696268
117 694250 Jet-Main (Standard) 9!4 69! 108
121 692703 Kit-Carburetor Overhaul 914A 691127
125 698055 Carburetor
127 694468 1"Plug-Welch 921 699633
130 69! 203 Valve-Throttle 957 692046
133 398187 Float-Carburetor 968 691342
134 398! 88 1"Kit-Needle/Seat 969 69! 138
137 693981 1"$ Gasket-Float Bowl 971 690255
146 690979 Key-Timing 972 699384
163 691894 1"§ $ _ Gasket-Air Cleaner 975 493640
187 691050 Line-Fuel (Cut to Required Length) 977 692704
188 69! !47 Screw (Control Bracket) 993 694088
190 690940 Screw (Fuel Tank) 1005 691346
192 694543 Bali-Rocker Arm 1022 69! 890
202 691303 Link-Mechanical Governor 1023 499624
209 691290 Spring-Governor 1026 692045
222 692618 Bracket-Control 1029 691230
227 690783 Lever-Governor Control 1034 69! 343
238 691300 Cap-Valve 1059 692311
259 691189 Bracket-Casing Clamp 1095 694091
276 271716 1"$ Washer-Sealing 12!0 498144
287 690940 Screw (Dipstick Tube) 1211 498144
300 697590 Muffler
304 499676 Housing-Blower § included
305 691108 Screw (Blower Housing) 1" included
306 691232 Shield-Cylinder _: Included
307 690345 Screw (Cylinder Shield) ¥ Included
324 695161 Screen/Cup Assembly
Description
Nut (Fl,_vheel)
Armature-Magneto
Screw (Magneto Armature)
Plug-Spark
Wire-Stop
Gasket Set-Engine
Screw (Carburetor)
Washer (Governor Crank)
Filter-Air Cleaner Cartridge
Retainer-Spring
Plate-Pawl Friction
Nut (Governor Control Lever)
Dipstick
_)SeaI-O Ring (Dipstick)
ipstick Tube
Screw (Air Cleaner Cover)
Bolt (Governor Control Lever)
Cover-Breather Passage
_ Gasket-Breather Passage
ut (Rewind Starter)
Screw (Pawl Friction Plate)
Clamp-Hose
Starter-Rewind
Screw (Muffler)
Screw (Muffler)
Retainer-Governor Shaft
Crank-Governor
Screw (Cylinder Head Plate)
Switch-Stop
1":it:Seal-Choke/Throttle Shaft
1"$ Sea!-Choke/Throttle Shaft
Boot-Spark Plug
Spacer-Fuel Tank
Screw (Breather Passage Cover)
Spring-Friction
Spring-Detent
Pin-Locating
Gear-Timing
Stud-Rocker Arm
Guard-Muffler
Screw (Muffler Guard)
Screw (Muffler Guard)
§ SeaI-O Ring (Dipstick Tube)
Lever-Sleeve
Dipstick/Tube Assembly
Terminal-Spark Plug
§ _4Seal-Valve
Base- Air Cleaner
§ _ Gasket-Exhaust
Gasket Kit-Cylinder Head/Plate
Screw (Rocker Cover)
Screw (Rocker Cover)(Assemble in
Number 1 and Number 2 Positions)
Cover-Blower Housing
Cap-Fuel Tank
Cover-Air Cleaner
Screw (Blower Housing Cover)
Screw (Air Cleaner Base)
Tank-Fuel
Bowl-Float
Gasket Set-Carburetor
_ Gasket-Cylinder Head Plate
an-Flywhee!
§ -_Gasket-Rocker Cover
Cover-Rocker
Rod-Push
Rocker Arm
Guide-Push Rod
Kit-Screw/Washer
Gasket Set-Valve
Pulley/Spring Assembly (Pulley)
Pulley/Spring Assembly (Spring)
in Engine Gasket Set
in Carburetor Overhaul Kit
in Carburetor Gasket Set
in Valve Gasket Set
29
Page 30

Sears,Roebuckand Co., U.S.A. (Sears), the California Air Resources Board (CARB) and
the United States Environmenta_ Protection Agency (U.S.EPA)
Emission Contro_ System Warranty Statement
(Owner's Defect Warranty Rights and Obligations)
EMiSSiON CONTROL WARRANTY COVERAGE iS
APPLICABLE TO CERTIFIED ENGINES PURCHASED iN
CALIFORNIA iN 1995 AND THEREAFTER WHICH ARE
USED IN CALIFORNIA, AND TO CERTiFiED MODEL
YEAR 1997 AND LATER ENGINES WHICH ARE
PURCHASED AND USED ELSEWHERE IN THE UNITED
STATES (AND AFTER JANUARY 1, 2001 iN CANADA).
California and U.S. EPA Emission Control Warranty
Statement Your Warranty Rights and Obligations
The California Air Resources Board (CARB), U.S.EPA and
Sears are pleased to explain the Emission Control System
Warranty on your model year 2000 and later small off-road
engine (SORE). in California, new small off-road engines
must be designed, built and equipped to meet the State's
stringent anti-smog standards. Elsewhere in the United
States, new non-road, spark-ignition engines certified for
mode] year 1997 and later, must meet similar standards set
forth by the U.S.EPA. Sears must warrant the emission
control system on your engine for the periods of time listed
below, provided there has been no abuse, neglect, or
improper maintenance of your small off-road engine. 2.
Your emission control system may include parts such as the
carburetor or fuel-injection system, the ignition system, and
catalytic converter. Also included may be hoses, belts,
connectors and other emission related assemblies.
Where a warrantable condition exists, Sears will repair your
small off-road engine at no cost to you including diagnosis,
parts and labor. 3.
Sears Emission Controt Defects Warranty Coverage
The 1995 and later small off-road engines are warranted for
two years. If any emission-related part on your engine is
defective, the part will be repaired or replaced by Sears.
Owner's Warranty Responsibilities 4.
As the small off-road engine owner, you are responsible for
the performance of the required maintenance listed in this
owner's manual. Sears recommends that you retain al! your
receipts covering maintenance on your sma]! off-road
engine, but Sears cannot deny warranty solely for the lack of
receipts or for your failure to ensure the performance of al!
scheduled maintenance.
As the small off-road engine owner, you should however be
aware that Sears may deny you warranty coverage if your 5.
small off-road engine or a part has failed due to abuse,
neglect, improper maintenance or unapproved modifications.
You are responsible for presenting your small off-road
engine to an approved Sears Service Center as soon as a
problem exists. The warranty repairs should be completed in
a reasonable amount of time, not to exceed 30 days.
if you have any questions regarding your warranty rights and
responsibilities, you should contact a Sears Service
Representative at 1-800-469-4663.
Sears Emission Controt Defects Warranty Provisions
The following are specific provisions relative to your
Emission Control Defects Warranty Coverage.
1. Warranted Parts 6.
Coverage under this warranty extends only to the parts
listed below (the emission control systems parts) to the
extent these parts were present on the engine purchased.
In the USA and Canada, a 24-hour hotline, 1-800-469-4663, has a
maintenance information.
a. Fuel Metering System
Cold start enrichment system
Carburetor and internal parts
Fue! Pump
b. Air Induction System
Air cleaner
Intake manifold
c. Ignition System
Spark plug(s)
Magneto ignition system
d. Catalyst System
Catalytic converter
Exhaust manifold
Air injection system or pulse valve
e. Miscellaneous Items Used in Above Systems
Vacuum, temperature, position, time sensitive valves
and switches
Connectors and assemblies
Length of Coverage
Sears warrants to the initial owner and each subsequent
owner that the Warranted Parts shall be free from
defects in materials and workmanship which caused the
failure of the Warranted Parts for a period of two years
from the date the engine is delivered to a retail
purchaser.
No Charge
Repair or replacement of any Warranted Part will be
performed at no charge to the owner, including
diagnostic labor which leads to the determination that a
Warranted Part is defective, if the diagnostic work is
performed at an approved Sears Service Center.
Claims and Coverage Excmusions
Warranty claims shaw be flied in accordance with the
provisions of the Sears Warranty Policy. Warranty
coverage shall be excluded for failures of Warranted
Parts which are not origina! Sears parts or because of
abuse, neglect or improper maintenance as set forth in
the Sears Engine Warranty Policy. Sears is not liable to
cover failures of Warranted Parts caused by the use of
add-on, non-original, or modified parts.
Maintenance
Any Warranted Part which is not scheduled for
replacement as required maintenance or which is
scheduled only for regular inspection to the effect of
"repair or replace as necessary" shall be warranted as to
defects for the warranty period. Any Warranted Part
which is scheduled for replacement as required
maintenance shall be warranted as to defects only for
the period of time up to the first scheduled replacement
for that part. Any replacement part that is equivalent in
performance and durability may be used in the
performance of any maintenance or repairs. The owner
is responsible for the performance of all required
maintenance, as defined in this owner's manual.
Consequential Coverage
Coverage hereunder shall extend to the failure of any
engine components caused by the failure of any
Warranty Part still under warranty.
menu of pre-recorded messages offering you product
3O
Page 31

Emissions Durability Period and Air index
Information On Your Engine Emissions Labe_
Engines that are certified to meet the California Air
Resources Board (CARB) Tier 2 Emission Standards must
display information regarding the Emissions Durability Period
and Air Index. The engine manufacturer makes this
information available to the consumer on emission labels.
The Emissions Durability Period describes the number of
hours of actual running time for which the engine is certified
to be emissions compliant, assuming proper maintenance in
accordance with the Operating & Maintenance Instructions.
The following categories are used:
Moderate: Engine is certified to be emission compliant for
125 hours of actual engine running time.
Intermediate: Engine is certified to be emission compliant
for 250 hours of actual engine running time.
Extended: Engine is certified to be emission compliant for
500 hours of actual engine running time.
For example, a typical walkobehind lawn mower is used
20 to 25 hours per year. Therefore, the Emissions
Durability Period of an engine with an intermediate rating
would equate to 10 to 12 years.
The Air hdex is a calculated number describing the relative
level of emissions for a specific engine family. The lower the
Air Index, the cleaner the engine. This information is
displayed in graphical form on the emissions label.
Emissions Compliance Period On Engine
Emissions Compliance Label
After July 1,2000 certain Sears engines will be certified to
meet the United States Environmental Protection Agency
(USEPA) Phase 2 emission standards. For phase 2 certified
engines, the Emissions Compliance Period referred to on
the Emissions Compliance labe! indicates the number of
operating hours for which the engine has been shown to
meet Federal emission requirements. For engines less than
225 cc displacement, Category' C = 125 hours, B = 250
hours and A = 500 hours. For engines of 225 cc or more,
Category C = 250 hours, B = 500 hours and A = 1000 hours.
This engine has a moderate rating with and Air Index of 3.
The EPA Emissions compliance period is Category C. The
diplacement of this engine is 190 cc.
Below is a generic representation of the emission label
typically found on a certified engine.
31
Page 32

GARANTIA .................................... 32
INSTRUCCIONES DE SEGURIDAD .............. 33°34
CONOZCA SU MAQUINA LAVADORA DE PRESION . . .35
MONTAJE .................................. 36-38
OPERACION ................................ 39°42
ESPECIFiCACiONES ............................ 43
MANTENiMIENTO ............................ 44-48
ALMACENAMIENTO .......................... 49-50
REPARACION DE DANOS ........................ 51
GARANTiA DEL CONTROL DE EMISIONES ....... 52-53
NOTAS ..................................... 54-55
COMO ORDENAR PARTES ...... PAGINA POSTERIOR
GARANT_A L_M_TADA DE LA MAQU_NA LAVADORA DE PRESTON CRAFTSMAN
Durante un aSo a partir de la fecha de compra, Sears reparara, sin cargo alguno, cualquier defecto en material y mano de
obra, siempre y cuando esta maquina lavadora a presion Craftsman haya sido mantenida y puesta en funcionamiento de
acuerdo alas instrucciones suministradas en el manual de! propietario.
Si esta maquina lavadora es usada para fines comerciales, la garanfia se aplicara tan so!o por 90 d{as a partir de la fecha de
compra. Siesta m4_quina lavadora de presi6n es usada para alquiler, la garantia se aplicar& tan solo por 30 dias despues de
la fecha de compra.
Esta garantia no cubre:
Elementos perecederos como bu]ias o filtros de aire, los cuales se desgastan con el uso normal.
Reparaciones necesarias debido a! abuso o negligencia del operador, incluyendo da_os ocasionados por la ausencia de
suministro de agua a la bomba o por no mantener el equipo de acuerdo a las instrucciones contenidas en el manual de!
propietafio.
El servicio de garant{a se hace efectivo devolviendo la m4_quina lavadora de presi6n al centro de servicio o distribuidor Sears
mas cercano en los Estados Unidos.
Esta garantia le proporciona derechos legales especificos; usted tambi6n puede tener otros derechos, los cuales varian de
estado a estado.
Sears, Roebuck and Co., Dept. 817WA, Hoffman Estates, _L 60179
Este es e[ simbo[o de a[erta de seguridad. Es usado para indiear[e situaciones con pe[igros poteneiaJes de
mesion para el personal Siga Bas instrucciones de todos los mensa]es de seguridad que aparecen despues de
este simbolo para evitar posibmes Besiones o muerte.
Simbo_os de Pe_igro y Significados
Lea este manual minuciosamente y conozca a
....... fondo [as partes y e[ funcionamiento de su
m&quina lavadora a presi6n. Conozca sus
aplicaciones, sus limitaciones y los peligros
involucrados.
El simbolo de alerta de seguridad (_) es usado con una
palabra (PELIGRO, ADVERTENCIA, PRECAUCiON), un
mensaje por escrito o una ilustraci6n, para alertarlo acerca
de cualquier situaci6n de peligro que pueda existir.
PELIGRO indica un riesgo e! cua!, si no se evita, causar& la
muerte o una herida grave. ADVERTENCIA indica un desgo
el cual, si no se evita, puede causar la muerte o una herida
grave. PRECAUCI6N indica un riesgo, e! cual, si no se
evita, puede causar heridas menores o moderadas.
PRECAUCION, cuando se usa sin el simbolo de alerta,
indica una situaci6n que podria resultar en e! daSo del
equipo. Siga los mensajes de seguridad para evitar o reducir
los riesgos de hefidas e inclusive la muerte.
Gases T6xicos
Superficies Resbalosas
Cser
Explosi6nFuego Superficie Caliente
Descarga EI6ctrica
Inyecci6n Liquida
Partes en Movimiento Objetos Voladores Contragolpe
32
Page 33

A
E[ escape dei motor de este producto contiene
eiementos qu[micos reconocidos en ei Estado de
California pot producir c&ncer, defectos de nacimiento
u otros dagos de tipo reproduetivo.
, ADVERTENCiA
PELIGRO
Opere et lavadora de presi6n SOLAMENTE al aire fibre.
AsegOrese de que los gases de escape no puedan entrar por
ventanas, puertas, tomas de aire de ventitaci6n u otras
aberturas en un espacio cerrado en el que puedan acumutarse.
NO opere el lavadora de presi6n dentro de un edificio o lugar
cerrado.
Utilice un respirador o mascara siempre que exista ta
posibitidad de inhalar vapores.
Lea todas tas instrucciones de ta mascara para asegurarse de
que le brindara ta protecci6n necesaria contra la inhalaci6n de
vapores nocivos.
Mantenga la boquilta de rociado de 8 a 24 pulgadas de ta
superficie de limpieza.
Sea extremadamente cuidadoso si usa la maquina lavadora a
presi6n desde una escatera, andamio o cualquier superficie
relativamente inestable.
El area de limpieza deber_ tener inctinaciones y drenajes
adecuados para disminuir la posibilidad de caidas debido a
superficies resbalosas.
Opere y atmacene esta unidad sobre una superficie estable.
Sujete la pistola de ta hidrotavadora firmemente con ambas
manos cuando utilice et rociado a alta presi6n. De esta manera
evitara lesiones producidas por el posible golpe de la pistola
hacia atras.
CUANDO ANADA COMBUSTIBLE O VACiE EL
DEP6SJTO
Apague et lavadora de presi6n (posici6n OFF) y dqelo enfriar al
menos pot 2 minutos antes de remover la tapa de la
combustible. Afloje la tapa lentamente para dejar que ta presi6n
salga det tanque.
Llene o vacie el dep6sito de combustible a ta intemperie.
NO Ilene demasiado et tanque. Permita al menos espacio para
ta expansi6n det combustible.
Mantenga la combustible alejada de chispas, llamas abiertas,
pilotos, cator y otras fuentes de ignici6n.
NO encienda un cigarrillo o fume.
;UANDO PONGA EN FUNC_ONAMIENTO EL EQUJPO
Compruebe que la bujia, el sitenciador, el tap6n del dep6sito de
combustible y el fittro de aire estan instalados.
NO arranque el motor sin la bujia instatada.
Si se ha derramado combustible, espere a que se evapore
antes de arrancar el motor.
;UANDO OPERE EL EQUIPO
NO incline et motor o e! equipo, de tal manera que la
combustible se pueda derramar.
• NO rocie liquidos inflamables.
CUANDO TRANSPORTE O REPARE EL EQUIPO
• Transporte o repare et equipo con el tanque de combustible
vacio, o con la valvula para apagar el combustible, apagada
(posiciOn OFF).
• Desconecte el cable de la bujJa.
CUANDO ALMACENE O GUARDE EL EQUIPO CON
COMBUSTIBLE EN EL TANQUE
Almacene alejado de catderas, estufas, catentadores de agua,
secadoras de ropa u otros aparatos electrodomesticos que
posean pilotos u otras fuentes de ignici6n, porque ellos pueden
encender los vapores de ta combustible.
ADVERTENCiA
Cuando arranque el motor, tire lentamente del cable hasta
sentir una resistencia y, a continuaci6n, tire rapidamente de 6t
para evitar su retroceso.
Si el motor arranca y deja de funcionar o si la resistencia
aumenta al tirar del cable en intentos sucesivos de arranque,
apriete el gatilto de la pistola rociadora.
NUNCA apunte la pistola a la gente, animates o plantas.
NO permita en ningOn momento que NtK!OS operen ta maquina
tavadora a presi6n.
NUNCA repare ta manguera de alta presi6n. Remptaceta.
Mantenga conectada la manguera a la maquina o a la pistota de
rociado cuando el sistema este presurizado.
Siempre que pare el motor, apriete et gatillo de ta pistola
rociadora para descargar la presi6n. Active el seguro del gatitto
de la pistola rociadora.
33
Page 34

Mantenga et chorro det agua alejado de alambrados electricos,
de to contrario podrian ocurrir descargas el6ctricas fatales.
ADVERTENCIA
NO toque tas superficies calientes.
Permita que el equipo se enfde antes de tocarlo.
Et tavadora a presi6n debe estar situado a an minimo de
152 cm (5 pies) de toda estructura con muros combustibles y/o
otras materias combustibles.
Mantenga un minimo de 92 cm (3 pies) atrededor de ta carcasa
del tavadora a presi6n, para facilitar la ventilaci6n y el
mantenimiento del tavadora a presi6n.
En el estado de California es obtigatorio, seg0n la ley, et uso de
apagachispas (Secci6n 4442 det C6digo de Recursos P0blicos de
California). Otros estados pueden tener leyes similares. Las leyes
federales se aptican en tierras federales. Si equipa el silenciador
con an apagachispas, este debera ser mantenido en buenas
condiciones de trabajo. Usted puede ordenar et apagachispas a
trav6s de su distribuidor de servicio autorizado Sears.
Siempre use protecci6n para los ojos cuando utilice este equipo
o cuando est_ cerca de donde se est6 asando et equipo.
NO juegue con partes que puedan aumentar o disminuir la
velocidad de mando.
NO opere ta maquina tavadora a presi6n con un valor de
presi6n superior a su ctasificaci6n de presi6n.
NO asegure la pistota de rociado en la posici6n (open = abierto).
NO abandone la pistota de rociado caando la maquina est6 en
fancionamiento.
NUNCA utilice una pistola de rociado que no tenga un seguro
para gatillo o protecci6n para gati!to en su lugar yen buenas
condiciones.
Siempre asegQrese de que la pistota de rociado, boquiltas y
accesorios est_n oonectados correctamente.
• NO use ropa suelta, joyas o etementos qae puedan quedar
atrapados en el arranque o en otras partes rotatorias.
• Ate para arriba el pelo largo y quite ta joyeria.
CUANDO AJUSTE O HAGA REPARACIONES A SU
MAQUiNA LAVADORA DE PRES_6N
Siempre desconecte el alambre de la bujia y cot6quelo donde
no pueda entrar en contacto con ta bujia.
CUANDO PRUEBE LA BUJiA DEL MOTOR
Utilice an comprobador de bajias homologado.
NO compraeba la chispa sin la bujia instalada.
NO apunte la pistola de rociado at vidrio cuando est6 en el
modo de rociado a chorro.
NUNCA apunte ta pistola a plantas.
Si usted tiene atguna preganta acerca de tas finalidades de aso
del generador, pregOntete a su concesionario o contacte a Sears.
NUNCA deberan ser operadas tas anidades con partes rotas o
ausentes, o sin ta caja o cubiertas de protecci6n.
NO eluda ningOn dispositivo de segundad de esta maquina.
Antes de poner en marcha ta maquina tavadora a presi6n en
ctima frio, revise todas tas partes de! equipo y aseg0rese de
que no se haya formado hielo sobre elias.
NUNCA mueva la maquina hatando la manguera de atta
presi6n. Utilice la manija que viene con ta unidad.
Revise que et sistema de combustible no presente fugas o signos
de deterioro, como mangueras desgastadas o porosas,
sujetadores flojos o ausentes, tapa o tanque dafiados. Corrija
todos tos defectos antes de operar la maquina lavadora a presi6n.
El equipo de alta presi6n esta disefiado para ser utilizado
UNICAMENTE con las partes autorizadas Sears. Si utitiza este
equipo con partes que no cumptan con las especificaciones
minimas, el usuario asume todos los riesgos y responsabilidades.
34
Page 35

CONOZCA SU MAQUINA SISTEMA DE LIMP[EZA
Lea e[ manual de[ propietario y [as reg[as de seguridad antes de porter en mareha su sistema de Bimpieza,
Compare las ilustraciones con su sistema de limpieza para familiarizarse con las ubicaciones de los diferentes controles y
ajustes, Guarde este manual para referencias futuras.
Pistola de Rociado
Recipientes para
Quimicos
Boquillas de Rociado
Manguera de AIta Presion
Arrancador de Retroceso .._
\
Tanque del Combustible
Extension para Boquillas_
con Conexion Rapida
Filtro de
Palanca de Control de la
Valvula de Regulacion
Perilla del Cebador
Arrancador de Retroceso = Usado para arrancar el motor
manualmente.
Autom&tico se Enfria Sistema - Los ciclos regan por
bomba cuando agua alcanza 125°o155°F, Entibiar agua
descargara de la bomba en el suelo, Este sistema previene
el daffo intemo de bomba,
Bomba - Desarro[la alta presion de agua,
BoquH[as de Rociado - Inyecci6n de quimicos, 0°, 15 °,
40°: para diferentes alta presion aplicaciones de limpieza,
Carrete de Ba Manguera - Usado para almacenar la
manguera cuando la unidad no est& siendo usada, La
manguera debera ser desconectada de la bombay la pistola
antes de almacenarla.
Entrada de Agua = Conexi6n para la manguera de jardin.
Extensi6n para Boqui[ias con Conexi6n R&pida = Le
permite usar cuatro boquillas de rociado diferentes,
Recipientes para Quimicos - Usado para proporcionar
detergente u otros quimicos a la corriente de agua de baja
presi6m
Carrete de
la Manguera
Tapa de! Dep6sito
de[ Aceite
Entrada de Agua
Toma de Alta Presi6n
Bomba equipado con Automatico
se Enfria Sistema
Fi[tro de Aire = El elemento de filtro tipo seco limita la
cantidad de suciedad y polvo que se introduce en el motor.
Manguera de Amta Presi6n - Conecte un extremo a la
pistola de rociado y e! otro extremo a la toma de alta
presi6n.
Palanca de Control de [a V&lvuIa de ReguIaci6n - Co!oca
el motor en modo de arranque para el arrancador de
retroceso y detiene el motor en funcionamiento,
PeriiIa de[ Cebador = Usada para arranque de motores frios.
Pistola de Rociado - Controla la aplicaci6n de agua sobre
la superficie de limpieza con e! gati!lo. Incluye cerrojo de
seguridad.
Tanque dei Combustible - Llene el tanque con gasolina
regular sin contenido de plomo en este punto.
Tapa de[ Dep6sito de[ Aceite = Llene el motor con aceite
aqui. Siempre habitacidn de hoja para la expansi6n del
combustible,
Toma de A[ta Presi6n - Conexion para la manguera de
alta presion.
35
Page 36

Su sistema de limpieza requiere de cierto ensamble y estar&
lista para set usado Onicamente despues de haber
depositado el combustible y e! aceite recomendado.
Si tiene probmemas con e[ ensarnb[e de su m_quina
lavadora a presi6n, Imame a la linea de ayuda de Ba
m_quina lavadora a presi6n a[ 1-800o222-3136.
mMPORTANTE: Cualquier intento de hacer funcionar el
motor sin haber depositado e! aceite recomendado resultar&
en falla del mismo.
RETIRE LA MAQUINA LAVADORA A
PRESION DE LA CAJA
1. Abra la caja y corte dos esquinas opuestas a la manija
guia de la parte superior a la inferior de tal forma que el
panel pueda ser doblado hacia abajo.
2. Retire la caja de! carrete de la manguera, material de
relleno y la bolsa de repuestos enviada con el sistema
de limpieza.
3. Retire pistola aspersora, extension de boquilla y aceite
para motor de materiar de relleno.
4. Saque el sistema de limpieza de la caja.
5. Revise la caja para ver si existen partes sueitas adicionales.
CONTENtDO DE LA CAJA
Revise el contenido de la caja. Si alguna de las partes no
esta presente o est& daffada, Ilame a la linea de ayuda de la
maquina lavadora a presi6n a[ 1o800-222o3136.
La unidad principal
Manubrio con conjunto del deposito de productos
quimicos
Los componentes de[ carrete de la manguera
La manguera de alta presion
Pistola de rociado
Extensi6n de la boqui!la con conector rapido y soporte
para puntas
Aceite para motor
Bolsa de partes (incluye los elementos descritos a
continuaci6n)
Manual del operador
Tarjeta de la matricula
Bolsa con 4 lanzas de conexiones r&pidas multicolores
Piezas para la manubrio (incluye Io siguiente):
Pemos del Soporte (2)
Pemo "L"
Perilla Pl&stica (3)
Familiaricese con cada parte antes de ensamblar la
maquina lavadora a presi6n. Compare el contenido con la
ilustracion de la pagina 35. Si alguna de la partes no esta
presente o se encuentra daffada, Ilame a la I[nea de ayuda
de la m&quina lavadora a presi6n al 1-800-222-3136.
1. Conecte manubrio a unidad principal.
2. Conecte la manguera de productos quimicos a la bomba.
3. Conecte la carrete de la manguera a manubrio como
mostrado en la pagina 35 seg0n hoja de instrucci6n
incluy6 con carrete de la manguera.
4. A_ada aceite al motor.
5. ASada gasolina al tanque de combustible.
6. Conecte manguera a alta presi6n a pistola rociadora y a
bomba.
7. Conecte e! suministro de agua a bomba.
8. Conecte boquilla la extensi6n al pistola rociadora,
9. Selecto/conecta rapido conecta boquilla a la extension
de la boquilla.
Conecte e_ Manubrio
1. Coloque el manubrio sobre los soportes del mismo que
ya estan adheridos a la unidad principal. Aseg0rese de
que los orificios en e! manubrio esten alineados con los
orificios en los soportes de! mismo manubrio.
-_ Manubrio I
Alinear
Orificios
NOTA: Tal vez sera necesario mover los soportes del
manubrio de un lado a otro para alinear el manubrio de tal
manera que pueda deslizarse sobre los soportes del mismo
manubrio.
2. Inserte el perno de! soporte a traves de los orificios desde
fuera de la unidad y sujete una perilla de plastico desde e!
interior de la misma unidad. Apriete manualmente.
Inserte el "L" gancho de! agujero apenas arriba la
cartelera en el derecho de la manija (visto desde la parte
posterior de la unidad).Sostenga el gancho en lugar y fije
la perillas de plastico. Apriete la perillas manualmente.
Pistola -, ,
MONTAJE DEL StSTEMA DE
La gran mayoria de su sistema de limpieza de presi6n
Craftsman ha sido ensamblado en la fabrica. Sin embargo,
usted debera !levar a cabo los siguientes procedimientos
antes de poner en funcionamiento su sistema de limpieza:
Montaje de Manguera para Productos
Quimicos de Bomba
Conecte la manguera para productos quimicos al
acop]amiento de inyecci6n de productos quimicos de
la bomba.
36
Page 37

NOTA: Usted no puede necesitar utilizar todo el aceite
suministrado.
5. Vuelva a colocarla y ajQstela en su posici6n.
NOTA: Revise e! aceite frecuentemente durante ei
despegue de! motor.
Agregue Gaso_ina
Montaje de_ Carrete_ de Manguera
Conecte la carrete de la manguera a manubrio como
mostrado en la pagina 35 segQn hoja de instruccion incluy6
con carrete de la manguera.
NOTA: Puede haber alguna ferreteria incluida con el juego
de carrete de manga que no se usa en este modelo.
mMPORTANTE: NO use la maquina lavadora a presi6n
teniendo la manguera enrollada en el carrete. El carrete es
Onicamente para su almacenamiento.
Agregue Aceite de Motor
mMPORTANTE: Cualquier intento de hacer girar o arrancar
el motor antes de que se haya depositado el aceite
recomendado puede resultar en falla del motor.
NOTA: Cuando agregue aceite al compartimiento del motor,
utilice Qnicamente aceite detergente de alta calidad, designado
con la clasificaci6n API de servicio SF, SG, SH, SJ o superior,
clasificado con el peso SAE 30. NO use aditivos especiales.
1. Seleccione una viscosidad de acuerdo a la tabla siguiente.
Temperaturas de Uso Esperadas
* El uso de aceites multigrado (5W°30, 10W-30, etc.) en
temperaturas mayores a los 40°F (4°C) ocasionara un
consumo de aceite mayor al normal. Cuando utilice un
aceite multigrado, revise con mayor frecuencia el nivel de
aceite de! motor.
** Si utiliza aceite SAE 30 en temperaturas inferiores a los
40°F (4°C), ocasionara que el arranque sea mas dificil e
incluso que se desbieie e! motor debido a su inadecuada
lubricaci6n interna.
2. SitQe el lavadora a presion en una superficie plana y limpie
la zona de alrededor del tapon de Ilenado de aceite.
3. Quite la varilla de nivel de aceite y limpiela con un trapo
limpio. Vuelva a colocarla y ajOstela en su posici6n.
S&queia de nuevo y compruebe el nivel de aceite.
4. Vierta lentamente aceite en la abertura de Ilenado.
Haga pausas para permitir que el aceite se deposite.
Llene hasta la marca "Full" (lleno) de la varilla de nivel.
NO ANADA ACEITE EN EXCESO. Saque la varilla y
compruebe el nivel de aceite.
DEPOSITAR _ LLENO
/
ADVERTENCIA
CUANDO ANADA COMBUSTBLE
Apague et lavadora a presi6n (posici6n OFF) y d6jeto enfriar al
menos pot 2 minutos antes de remover la tapa de la
combustible. Afloje la tapa tentamente para dejar que ta presi6n
salga det tanque.
Llene et dep6sito de combustible a ta intemperie.
NO Ilene demasiado et tanque. Permita al menos espacio para
ta expansi6n det combustible.
Mantenga ta combustible alejada de chispas, llamas abiertas,
pilotos, cator y otras fuentes de ignici6n.
NO encienda un cigarrillo o fume.
NOTA: Este motor esta certificado para funcionar con
gasolina. Sistema de control de emisiones de gases de
escape: EM (Modificaciones del motor).
1. Utilice gasolina normal sin p!omo, limpia y nueva con un
minimo de 77 octanos. NO utilice combustible que
contenga metano! ni mezcle aceite con combustible.
2. Limpie el area alrededor de la tapa de Ilenado del
combustible, retire la tapa.
3. Agregue lentamente gasolina regular "SIN PLOMO" al
tanque de combustible. Use un embudo para evitar que
se derrame. Llene el tanque lentamente hasta
aproximadamente 1.5" pot debajo de la parte la cima
del cuello del tubo de Ilenado.
4. Instale la tapa del tanque de combustible y limpie la
gasolina que se haya derramade.
iPRECAUCION! Los combustibles con mezcla de alcohol
(gasoho!, etanol o metanol) pueden atraer la humedad y
provocar la separaci6n y formacion de acidos durante el
almacenamiento. Los gases acidos pueden daSar el circuito
de combustible y el motor durante el almacenamiento.
Para evitar este tipo de problemas, vacie el circuito de
combustible cuando vaya a almacenar la unidad durante
30 dias o mas. Vacie el deposito de combustible, arranque
el motor y dejelo funcionar hasta que los conductos de
combustible y e! carburador queden vacios. Utilice
combustible nuevo la proxima temporada. Para obtener mas
informacion al respecto, consulte "Almacenamiento" en la
p&ginas 49-50.
37
Page 38

NUNCA utilice productos limpiadores para motores o
carburadores en el deposito de combustible, ya que podrian
provocar dafios permanentes.
Conecte la Manguera y e_ Suministro de
Agua a la Bomba
IMPORTANTE: Usted debera armar la extensi6n para
boquillas y conectar todas las mangueras antes de darle
arranque al motor. La bomba resultara da_ada si arranca e!
motor sin tener todas las mangueras conectadas y e!
suministro agua abierto.
1. Desenrrolle la manguera de alta presi6n y conecte un
extremo de la manguera a la base de la pistola de
rociado. Apriete con la mano.
2.
Retire y deseche todos los tapones de transporte de la
bomba antes de conectar las mangueras.
3.
Conecte el otto extremo de la manguera de alta presion
a la salida de alta presi6n de la bomba. Apriete con la
mano.
Inspeccione la
reji!la de entrada.
NO la use si esta
da_ada, limpiela
si se encuentra
sucia.
4,
Antes de que conecte la manguera de jardin a la
entrada de agua, inspeccione e! colador de la entrada.
Limpie e! colador si tiene residuos o solicite su remplazo
siesta daBado, Refi@ase a la secci6n 'Mantenimiento
de los Anillos 'O'" si la colador de la entrada se da_ado.
NO haga funcionar [a rn&quina [avadora a presi6n si
eJ coJador de [a entrada est_ da_ado.
5. Haga correr el agua a traves de la manguera de su
jardin por 30 segundos para limpiar cualquier escombro
que se encuentre an ella. Desconecte el agua.
IMPORTANT_=: Hace NO agua de parar de siphon para el
abastecimiento de agua. Use agua SOLO fria (menos que
100"F).
6. Conecte la manguera de jard[n (no exceder 50 pies en
la Iongitud) a la entrada de! agua. Apriete con la mano.
PRECAUCION
El daffo a la lavadora a presi6n, resuttado de la desatenci6n a
esta precauci6n, no sera cubierto por ta garantia.
7. ABRA el suministo del agua y abra la valvula de
suministro para purgar la sistema de bomba de aire y
impureza.
Siempre use protecci6n para los ojos cuando utilice este equipo
o cuando este cerca de donde se est6 usando et equipo.
Antes de darte arranque a [a maquina [avadora a presi6n,
aseg0rese de usar protecci6n adecuada para los ojos.
LISTA DE REVISION PREVIA AL
ARRANQUE DEL MOTOR
Revise la unidad para asegurarse que ha Ilevado a cabo los
siguientes procedimientos:
1. Revise que los sujetadores del carrete de la manguera
esten apretados.
2. Revise que haya sido depositado aceite y este a! nive!
correcto en la caja de! cigOe_a! de! motor.
3. Deposite la gasolina adecaada en el tanque del
combustible.
4. Revise que todas las conexiones de las mangueras
(alta presion y suministro de agua) esten apretadas
correctamente y que no existan dobleces, cortes o dado
de la manguera de alta presi6n.
5. Proporcione el suministro de agua adecuado (que no
exceda los 100°F),
6. AsegOrese de leer las secciones 'Reglas de Seguridad"
y "Operacion" antes de usar el sistema de limpieza.
38
Page 39

COMO USAR SU StSTEMA DE
Si tiene problemas con el funcionamiento de su maquina
lavadora a presion, pot favor Ilame a la linea de ayuda de la
maquina lavadora a presi6n a! 1o800o222o3136.
Ubicaci6n de_ Lavadora a Presi6n
Espacio Libre A[rededor de[ Lavadora a Presi6n
PELIGRO
Opere et lavadora de presi6n SOLAMENTE al aire fibre.
AsegOrese de que los gases de escape no puedan entrar por
ventanas, puertas, tomas de aire de ventitaci6n u otras
aberturas en un espacio cerrado en et que puedan acumutarse.
NO opere et lavadora de presi6n dentro de un edificio o lugar
cerrado.
El lavadora a presi6n debe estar situado a un minimo de
152 cm (5 pies) de toda estructura con muros combustibles
y/o otras materias combustibles. Mantenga un minimo de
92 cm (3 pies) alrededor del lavadora a presion, incluido la
parte superior, para facilitar la ventilaci6n y el mantenimiento
del lavadora a presi6n.
SitOe ei lavadora a presion en una zona bien ventilada que
permita la eiiminaci6n de los gases de escape mortales. No
instale e! lavadora a presion en lugares en los que los gases
de escape se puedan acumular o entrar en un edificio que
pueda estar ocupado. AsegOrese de que los gases de
escape no puedan entrar por ventanas, puertas, tomas de
aire de ventilacion u otras aberturas en un espacio cerrado
en el que puedan acumularse. Tenga en cuenta los vientos
y las corriente de aire preponderantes cuando elija la
ubicaci6n del lavadora a presi6n.
Para Porter en Marcha e_ Sistema de
Limpieza
Para darle arranque a su sistema de limpieza movido a
motor por primera vez, siga estas instrucciones paso a
paso. Esta informaci6n acerca de la puesta en marcha
inicial tambien es valida para cuando vaya a darle arranque
al motor despues de haberlo dejado la maquina lavadora a
presion fuera de funcionamiento por Io menos un dia.
1. Coloque la maquina lavadora a presion en un area
cercana a una suministro de agua exterior capaz de
abastecer agua a un volumen mayor de 3.2 ga!ones por
minuto en no menos que 20 PSI en el fin de arandela
de presion de la manga de! jardin.
2. Revise que la manguera de alta presi6n se encuentre
conectada firmemente a la pistola de rociado y a la
bomba. Vea "Armado de Su Maquina Lavadora a Presion'.
3. AsegQrese que la unidad este nivelada.
4. Conecte la manguera de jardin a la entrada del agua.
Aprietela con la mane. Abra el suministro de agua.
PRECAUCtON
• Et daF_oa ta tavadora a presi6n, resultado de la desatenci6n a
esta precauci6n, no sera cubierto por la garantia.
5. Presione el disparador en la pistola para purgar de aire
e impurezas el sistema de bombeo.
6. Coloque las puntas de rociado con conectores rapidos
en las ranuras del soporte unido al pro!ongador de la
boqui!la.
Tipica Lavadora a
Presi6n Mostrada
Salida del Escape
7. Acople la boquilla de extensi6n a la pistola aspersora.
Aprietela manualmente.
8. Seleccione la boquilla de conexion rapida que usted
desee e insertela en el extremo de la extension de la
lanza (Vea "Como Usar las Puntas de Rociado").
9. Fije el pestillo de seguridad al disparador de la pistola
aspersora.
Cerrojo de
Seguridad
39
Page 40

10. Mueva el control de la valvula de admisi6n a la posici6n
"Rapido" ("Fast"), que se distingue con la figura de un
conejo.
Control de la V&lvula
de Admisi6n
Palanca dei Ahogador
11. Mueva la palanca del ahogador a la posici6n "Ahogado"
("Choke").
NOTA: En el caso de que el motor este caliente, asegOrese
de que la palanca deJ ahogador se encuentre en la posici6n
"En marcha" ("Run").
12. Sujete la manija y hale ligeramente la manija del
arranque hasta que sienta cierta resistencia. Despues
halela rapidamente.
ADVERTENCIA
ADVERTENCIA
NO toque las superficies catientes.
Permita que el equipo se enfrie antes de tocado.
El lavadora a presiOn debe estar situado a un minimo de
152 cm (5 pies) de toda estructura con muros combustibles y/o
otras materias combustibles.
Mantenga un minimo de 92 cm (3 pies) alrededor de la carcasa
det lavadora a presi6n, para facititar la ventitaci6n y et
mantenimiento del lavadora a presiOn.
En eI estado de California es obligatorio, segOn la tey, el uso de
apagachispas (Secci6n 4442 del C6digo de Recursos POblicos de
California). Otros estados pueden tener leyes similares. Las teyes
federates se aplican en tierras federales. Si equipa et silenciador
con un apagachispas, este debera ser mantenido en buenas
condiciones de trabajo. Usted puede ordenar el apagachispas a
trav6s de su distribuidor de servicio autorizado Sears.
C6mo Detener su Sistema de Limpieza
1. Espere que el motor descanse.
2. Mueva la palanca de control a la posici6n "Stop"
("Parado").
Cuando arranque el motor, tire lentamente de! cable hasta
sentir una resistencia y, a continuaci6n, tire rapidamente de 6t
para evitar su retroceso.
Si el motor arranca y deja de funcionar o si la resistencia
aumenta al tirar del cable en intentos sucesivos de arranque,
apriete el gatilto de la pistola rociadora.
13. Jale la cuerda de arranque lentamente. NO permita que
la cuerda regrese bruscamente en contra deJ arrancador.
14. Cuando arranque el motor, mueva lentamente la
palanca de! ahogador a la posici6n "En marcha"
("Run"). Si el motor fa!la, mueva la palanca a la
posicion "Ahogado" ("Choke"), y despues a la posici6n
"En marcha" ("Run").
15. Si los fuegos de motor, pero no continOa correr, Presione
el disparador en la pistola para aliviar la presion interna
de bomba. Mueva la palanca del ahogador a la posici6n
"En marcha" ("Run"), y repite los pasos 12 por 14.
16. Si el motor no arranca despues de 6 tirones, mueva la
palanca de! ahogador a la posicion "En marcha" ("Run").
-NO coloque ta patanca estranguladora en ta posici6n "Choke"
para parar el motor.
3. Apriete e[ gatiHo de la pistoJa rociadora para
descargar la presi6n de [a manguera a fin de evitar
lesiones.
NOTA: Observara una pequeffa cantidad de agua cuando
elimine la presi6n.
Mantenga conectada ta manguera a la maquina o a la pistola de
rociado cuando el sistema est6 presurizado.
Siempre que pare el motor, apdete el gatillo de ta pistola
rociadora para descargar la presi6n. Active el seguro del gatitto
de la pistola rociadora.
4,
Active el seguro del gati!lo de la pistola rociadora
cuando no la utilice.
4O
Page 41

C6mo Usar _as Puntas de Rociado
El conector rapido de! prolongador de la boquilJa admite
varios tipos distintos de puntas de rociado. Cada punta de
rociado proporciona un patr6n de rociado diferente.
PRECAUCI0N
Limpieza y Ap_icaci6n de_ Quimico
IMPORTANTE: UtHice quimicos diseSados
especificamente para m_quinas mavadoras a presi6n. Los
detergentes caseros podrian daBar la bomba.
PRECAUCiON
• NUNCA intercambie puntas de rocio sin haber asegurado el
cerrojo de seguridad det gatillo.
Para cambiar las puntas de rociado, siga Jas
instrucciones qae se indican a continaaci6n:
1. Coloque e! pestillo de seguridad de la pistola de
rociado.
2. Desplace hacia atras el anillo del conector rapido y tire
de la punta de rociado que este montada.
3. Seleccione la punta de rociado deseada:
Para enjuagado suave, seleccione la punta de
rociado de 40 °.
Para ffegar la superficie, seleccione las puntas de
rociado amarilla de 15 ° 6 roja de 0°.
Para aplicar productos quimicos, seleccione la
punta de rociado negra.
La Presi6n Baja
Negra
Usada para
ap!icar quimicos
• Arrancar el motor sin tener todas tas mangueras conectadas y
sin el suministro de agua ABtERTO (ON) causara el dar_o de
ta bomba.
El daho a la lavadora a presi6n, resuitado de ta desatenci6n a
esta precauci6n, no ser4_ cubierto por ta garantia.
Para apHcar e[ detergente, siga Jos siguientes pasos:
1. Revise e! uso de las puntas de rociado.
2. Prepare la soluci6n detergente siguiendo las
instrucciones del fabricante.
3. Vierta la soluci6n quimica en el deposito de productos
quimicos con la indicaci6n A 6 B.
NOTAS: Cada deposito tiene una capacidad de 1,9 litros.
4. Llene e! otto deposito para productos quimicos con otra
soluci6n diferente, segOn se requiera.
5. AsegOrese de que la puntas de rociado negra este
instalada en la extensi6n para boquillas.
NOTA: NO se puede aplicar detergente con las puntas de
rociado de alta presion (Blanca, Amarilla o Roja).
6. AsegOrese que la manguera de jardin este conectada a
la entrada del agua. Revise que la manguera de alta
presi6n este conectada a la pistola de rociado y a la
bomba. Dele arranque al motor.
7. Gire la !lave de paso de productos quimicos dei
deposito que desee hasta la posici6n "On".
La Presi6n A_ta
40 ° Blanca 15 ° Amarilla 0° Roja
4. Desplace hacia atras e! anillo, inserte la nueva punta de
rociado y suelte el ani!lo. Tire de la punta de rociado 8.
para comprobar que esta bien montada.
5. Para una limpieza mas efectiva, mantenga la boqui!la
de rociado de 8 a 24 pulgadas de la superficie de
limpieza. Si coloca la boquilla muy cerca, podria daSar 9.
la superficie que esta limpiando.
6. NO co!oque la boquilla a menos de 6 pulgadas cuando
este limpiando Ilantas.
"On" Posici6n
iPRECAUCJ6N! NO gire ambas Ilave de paso de
productos quimicos en el mismo tiempo. S61o una
soluci6n quimica se debe usar para evitar a la vez
posible en persona dafio de herida y/o propiedad.
Aplique e! detergente sobre la superficie seca,
comenzando en la parte inferior del 4_rea y didgiendose
hacia arriba, utilizando movimientos largos, parejos y
superpuestos.
Permita que e! detergente penetre de 3 a 5 minutos
antes de enjuagar. Vuelva a aplicar cuando sea
necesario para evitar que la superficie se seque. NO
permita que el detergente se seque. Si permite que el
detergente se seque, la superficie podHa quedar con
manohas.
41
Page 42

Enjuage de _a M_quina Lavadora a
Presion
Despu_s de haber aplicado e! detergente, refriegue la
superficie y enjuagema de Ba siguiente manera:
1. Coloque e! cerrojo de seguridad a la pistola de rociado,
2. Aseg0rese de que las dos !laves de paso de los
dep6sitos de productos quimicos estan en la posici6n
"Off',
3. Retire la puntas de rociado negra para quimicos de la
extensi6n para boquillas,
4. Seleccione e instale la puntas de rociado de alta
presi6n que desee siguiendo las instrucciones de
'C6mo Usar las Puntas de Rociado",
5. Mantenga la pistola de rociado a una distancia segura
del &rea que planea rociar,
ADVERTENCIA
Mantenga la boquilta de rociado de 8 a 24 pulgadas de ta
superficie de limpieza.
Opere y atmacene esta unidad sobre una superficie estable.
Sea extremadamente cuidadoso si usa la maquina lavadora a
presi6n desde una escatera, andamio o cualquier superficie
relativamente inestable.
Sujete ta pistola de ta hidrolavadora firmemente con ambas
manos cuando utilice et rociado a alta presi6n. De esta manera
evitar_ lesiones producidas por el posible golpe de la pistola
hacia atras.
6. Aplique un rociado de alta presi6n a una peque_a zona
y luego compruebe si se ha producido algOn tipo de
da_o, Si no aprecia da_os, continOe en el paso 7,
7. Comience en la parte superior del area que va a
enjuagar, dirigiendose hacia abajo con los mismos
movimientos superpuestos que utilizo para la limpieza,
Cdmo Usar e_ Carrete de _a Manguera
La limpiadora a presi6n esta equipada con un carretel de
manguera diset_ado para guardar la manguera cuando no
se utiliza la unidad, Consulte el apartado "Preparaci6n de la
Unidad para el AImacenamiento" para periodos pro!ongados
de almacenamiento (de mas de 30 dias).
Despu_s de cada uso:
1. Desconecte la manguera de la pistola de rociado y de
la salida de alta presion de la bomba,
2. Vacie el agua del interior de la manguera.
3. Deslice un extremo de la manguera en el interior de!
orificio del carretel de manguera. Gire el carretel de
manguera con el asa para enrollar la manguera en el
carretel,
IMPORTANTE: NO USE la limpiadora a presion con la
manguera enro!lada en el carrete! de manguera. El carretel
de manguera solo debe usarse con fines de
almacenamiento.
\
\
Sistema de Enfriamiento Autom_tico
(Alivio T_rmico)
El agua que circula dentro de la bomba puede alcanzar
temperaturas entre los 125°-155°F si hace funcionar el
motor de su m&quina lavadora a presion de 3 a 5 minutos
sin oprimir el gati!lo de la pistola de rociado. El sistema de
enfriamiento autom&tico se activa a esta temperatura y
enfria la bomba descargando agua caiiente en e! piso,
evitando asi el daSo interno de la bomba,
42
Page 43

INFORMACION Tg:CNICA SOBRE EL
MOTOR
El motor es de uno cilindros, de valvulas en cabeza (OHV),
refrigerado por aire y de baja emisi6n.
En e! Estado de California, los motores de la serie 120000
han obtenido la certificacion del California Air Resources
Board (Consejo de recursos de aire de California) de
cumplimiento de la normativa sobre emisiones durante
125 horas. Esta certificaci6n no supone para el comprador,
el propietario o el usuario ninguna garanfia adicional en Io
relativo al rendimiento y a la vida 0ti! del motor. Las
garantias del motor ata_en exclusivamente al producto y a
las emisiones que se declaran en este manual.
Potencia Nominal
Los valores de potencia nominal de un mode!o de motor se
establecen en primer lugar con el c6digo J1940
(Procedimiento de valoraci6n de potencia y par de
pequet'ios motores, Revision 2002-05) de la SAE (Society of
Automotive Engineers, Sociedad de ingenieros de
automocion). Dada la amplia variedad de productos que
utilizan nuestros motores y la multitud de factores
ambientales que pueden afectar a su funcionamiento, el
motor que ha adquiddo puede no Ilegar a desarrollar su
potencia nominal cuando se utilice con un aparato mecanico
(potencia real "in situ"). Esta diferencia se debe, entre otros,
a los siguientes factores: diferencias de altitud, temperatura,
presion barometrica, humedad, combustible, lubricaci6n del
motor, velocidad maxima controlada de! motor, variaciones
entre distintos motores del mismo modelo, disefio del equipo
mecanico utilizado, manera de hacer funcionar el motor,
rodaje de! motor para reducir la friccion y limpiar las
camaras de combusti6n, ajustes de las valvulas y el
carburador, etc. Los valores de potencia nominal tambien se
puede ajustar en funcion de las comparaciones con otros
motores similares utilizados en aplicaciones similares, pot Io
que no coincidira necesariamente con los valores que se
obtienen al aplicar los codigos mencionados.
ESPECIFICACtONES DEL
PRODUCTO
Espec!f!caciones de la M_quina Lavadora
a P'FeSIOrl
Presi6n .................................. 2,500 PSI
Velocidad de flujo ........................... 2.2 GPM
Mezcla de quimicos ............ Use segOn instrucciones
Temperatura del suministro
de agua ..................... Que no exceda los 100°F
Peso que Embarca ........................... 63 Ibs.
Especificaciones del Motor
Caballos de Fuerza ................... 6.75 a 3600 rpm
Diametro de camisa ............. 68 mm (2,69 pulgadas)
Carrera ....................... 52 mm (2,04 pulgadas)
Desplazamiento ................ 190 cc (11,57 pulgadas)
Bujia
Tipo: ............... Champion RC12YC o equivalente
Entrehierro del inducido: ................ 0,25°0,36 mm
(0,010-0,014
pulgadas)
Calibrar Separacion a: ........ 0.020 pulgadas (0.51mm)
Holgura de la valvula con muelles de valvula instalados y
piston de 6 mm (0,25 pulgadas) pasado el punto muerto
superior (comprobar con el motor en frio)
Admision .......... 0,10o0,15 mm (0,004-0,006 pulgadas)
Escape ........... 0,10o0,20 mm (0,004-0,008 pulgadas)
Capacidad de Gasolina .................... 1.6 Cuartos
Tipo de Aceite
Sobre 40°F ............................... SAE 30
Debajo 40°F .................. SAE 5W-30 o 10W-30
43
Page 44

RESPONSABILIDADES DEL PROPtETARiO
Siga el programa de mantenimiento segOn e! nOmero de horas o segOn e! calendario, !o que suceda primero. Se requiere
de servicio con mayor frecuencia cuando opere la unidad en las condiciones adversas descritas a continuaci6n.
CALENDARIO DE MANTENIMIENTO
ANOTE LAS FECHAS CONFORME
CUMPLA CON EL SERVICIO NORMAL
TAREA DE MANTENIMIENTO
LAVADORA A PRESl6N
Revise/iimpie e{ fiitro de la entrada de agua
Revise la manguera de alta presion
Revise la manguera del detergente
Revise la pistola aspersora y vedfique que
no haya fugas en el ensamblaje
Purgue la bomba de aire y de contaminantes
Cambio del aceite de la bomba
Prepare la bomba para almacenada a
menos de 32°F
Motor
Verificar el nivel de aceite
Limpie los residuos
Cambiar el aceite del motor
_ervicio al filtro de aire
Servicio a la bujia
Servicio al sistema de la bujia
Limpie el sistema de refrigeraci6n
Comprobacion de holgura de las valvulas
Prepar almacenamiento
Antes de
Cada Uso
INTERVALO DE OPERACION POR HORA
Cada 25 Cada 50 Cada 100
Horas o al Afio Horas o a A_o Horas o a A_o
X1
X
X
X
X
X
Vea "AImacenamiento" en la paginas 49-50
X
X
X 2
X_
X
Si la unidad permanecera sin use pot mas de 30 dlas.
FECHAS DE SERVIC$O
A_o
X
X2
Limpiar si esta obstruido Rempiazar si esta perforado o rote
2 Cambiar el aceite despues de las primeras (5) horas y despues cada 50 horas.
Hacer el cambio de aceite con mayor frecuencia cuando trabaje en condiciones de mucha suciedad o polvo.
s Remplazar mas a menudo bajo condiciones de suciedad o polvo.
RECOMENDACIONES GENERALES
El mantenimiento periodico mejorara el rendimiento y
pro!ongara la vida Otil de! lavadora a presi6n, Acuda a un
distribuidor autorizado de Sears para reparar la unidad.
La garantia de la maquina lavadora a presion NO cubre los
elementos que hart sido sujetos a abuso o negligencia pot
parte del operador. Para hacer valida la cobertura total de la
garantia, el operador debera mantener la lavadora de
Si equipo con Ilantas que se pode hinchar, mantenga la
presion aerea en el valor marcado en la Ilanta o dentro de
15 y 40 psi.
CONTROL DE EMtSlONES
Cualquier establecimiento o individuo especializado en la
reparacion de motores que no sean de automoci6n puede
encargarse del mantenimiento, la sustituci6n y la reparaci6n
de los dispositivos y sistemas de control de emisiones.
presion tal y como se indica en e! manual, incluyendo su
adecuado almacenamiento, como se describe en la seccion
"Almacenamiento" en la paginas 49-50.
Algunos ajustes tendran que hacerse periodicamente para
mantener adecuadamente su maquina lavadora a presi6n.
Todos los servicios y ajustes deberan hacerse pot Io menos
una vez en cada estaci6n. Siga las instrucciones de la tabla
"Programa de Mantenimiento" descrita anteriormente.
NOTA: Una vez al a_o, usted debera limpiar o remplazar la
bujia y el filtro de aire. Una bujia nueva y un filtro de aire
limpio garantizan una mezcla de combustible°aire adecuada
y le ayuda a su motor a funcionar mejor y a tenet una vida
Oti! mas pro!ongada.
ANTES DE CADA USO
1. Revise ei nivel de aceite del motor.
2. Revise si existen dar_os en e! colador de la entrada de
agua.
3. Revise si existen dados en e! filtro en linea.
4. Revise si existen fugas en la manguera de alta presion.
5. Revise si existen dados en los filtros y tanques de
quimicos,
6. Revise si existen fugas en ei conjunto de la extensi6n
para boquillas y pistola.
7. Elimine e! aire y los contaminantes de la bomba.
44
Page 45

MANTENJMIENTO DE LA MAQUJNA
LAVADORA A PRESiON
Limpie _os Residuos
Limpie a diario, o antes de cada uso, los residuos
acumulados en el lavadora a presi6n. Mantenga limpias las
conexiones, los muelles y los mandos. Limpie todo resto de
combustible de la zona que rodea al silenciador y de detras
del mismo.
Mantenga limpios los componentes del lavadora a presi6n
para reducir el riesgo de sobrecalentamiento e ignici6n de
los residuos acumulados.
Utilice un trapo hQmedo para limpiar las superficies
exteriores.
PRECAUCION
NO inserte cualquier objeto a trav6s de las ranuras de
enfriamiento.
Puede usar un cepi!lo de cerdas suaves para retirar la
suciedad endurecida, aceite, etc.
Puede usar una maquina aspiradora para eliminar
suciedad y residuos sueltos.
Puede usar aire a baja presion (que no exceda los 25 psi)
para eliminar la suciedad. Inspeccione las ranuras para
aire de enfriamiento y la apertura del lavadora a presi6n.
Estas aperturas deberan mantenerse limpias y
despejadas.
Revise y Limpie e_ CoJador de Entrada
Examine el colador de entrada de la manguera de ]ardin.
Limpie!o si est& tapado o remplacelo si est& roto.
Revise _a Manguera de AJta Presi6n
Las mangueras de alta presion pueden desarrollar fugas
debido al desgaste, dobleces o abuso. Revise la manguera
antes de cada uso. Revise si existen cortes, fugas,
abrasiones, levantamiento de la cubierta, da_o o movimiento
de los acoplamientos. Si existe cuaJquiera de estas
condiciones, remplace la manguera inmediatamente.
NUNCA repare la manguera de atta presi6n. Remplacela.
Remplacela con una manguera que cumpta con la capacidad
minima de presi6n de su maquina lavadora a presi6n.
Revise e_ Fi_tro en Linea
Consulte la ilustracion y suministre servicio a! filtro en linea
si se tapa siguiendo estos pasos:
Filtro en linea
Extension para boquillas
1.
Retire la pistola y la extension para boquillas de la
manguera de alta presion. Retire la extension para
boquillas de la pistola y retire e! anillo 'o' y ei colador de
la extension para boquillas. Lave el colador, pistola y
extensi6n para boquillas con agua limpia para eliminar
toda clase de residuos.
Coloque el colador del filtro en linea en el extremo con rosca
de la extension para boquillas. Su direcci6n no importa.
Coloque el colador ejerciendo presion con el borrador de un
lapiz hasta que se asiente pot completo en el fondo de la
abertur& Tenga cuidado de no doblar el colador.
3,
Co!oque e! anillo 'o'en la ranura respectiva. Empu]e el
anillo 'o' hasta que quede ajustado contra el colador de!
filtro en linea.
4,
Conecte la extensi6n para boquillas a la pistola de rociado
de la manera descrita anteriormente en este manual.
Ani,,o
Elimine e_Aire y _os Contaminantes de _a
Bomba
Para retirar eJ aire de Ja bomba, siga Jos siguientes pasos:
1. Instale el sistema de limpieza como esta descrito en
"Montaje Del Sistema Limpieza" y conecte el suministro
de agua.
2. Hale e! gatillo de la pistola y mantengalo apretado hasta
que obtenga una corriente de agua constante.
Para retirar los contaminantes de Ja bomba, siga los
siguientes pasos:
1. Instale el sistema de limpieza como esta descrito en
"Montaje De! Sistema Limpieza" y conecte el suministro
de agua.
2. Retire e! accesorio para boquillas de la pistola.
3. Ponga en marcha el motor de acuerdo alas
instrucciones de "Como Usar Su Sistema de Limpieza".
4. Hale el gatillo de la pistola y mantengalo apretado.
5. Cuando ei suministro de agua sea uniforme y
constante, enganche el cerrojo de seguridad y vueiva a
ajustar el accesorio para boquillas.
Revise _a Pisto_a y _a Extensi6n para
BoquiHas
Examine la conexion de la manguera a la pistola y
cerciorese de que este en buen estado. Pruebe el gatillo
oprimi6ndolo y asegurandose de que se devuelve a su sitio
cuando Io suelte. Coloque el cerro]o de seguridad en la
posicion UP y pruebe el gatillo. Usted no debe ser capaz de
oprimir el gatillo. Remplace la pistola inmediatamente si falla
cualquiera de estas pruebas.
45
Page 46

Mantenimiento de [a Boqui[[a
Si siente una sensaci6n pu[sante a[ momento de apretar el
gatiHo de [a pisto[a rociadora, puede que sea causada por la
presi6n excesiva en la bomba, La causa principal de [a
presi6n excesiva en la bomba es cuando la boquilla se
encuentra atascada o tapada con materiales extraffos, tales
como tierra, etc_ Para corregir el problema, limpie
inmediatamente la boqui!la y siga las instrucciones
siguientes:
1. Apague e! motor y apague el suministro de agua.
2. Remueva la boquilla del extremo de la extensi6n de la
boquilla.
3. Quite e! en el filtro de la linea del otto fin de la
extensi6n de boquilla.
4. Use e! pequero sujeta papeles para liberar cualquier
material extraffo que este tapando la boquilla.
Use el alambre
aqu[ para
eliminar los - -
residuos.
5.
Usando una manguera de jardin, remueva cualquier
desecho adiciona[, poniendo agua en la extensi6n de la
boquilla. Haga esto de 30 a 60 segundos_
MANTENIMIENTO DE LA BOMBA
Camb[o de[ ace[te de Ja bomba
Cambie el aceite cada 50 horas o una vez al aria, Io que
suceda antes.
NOTA: Debe adquirir una bote!la de aceite para la bomba
previamente medido, N° de pieza 190586GS, !lamando al
1o800o366opART o en linea en www.sears.com.
Cambie e[ aceite como se indica a continuaci6n:
1. Vacie el aceite de[ motor y e! combustible de la
limpiadora a presi6n.
2. Use una 8mm Ilave allen para extraer e! tapon negro de
aceite de la bomba que hay entre la salida de presi6n y
la entrada de la manguera de riego.
Tap6n de
Aceite
6. Instale de nuevo la boquilla yen el filtro enolinea en la
extensi6n.
7. Conecte de nuevo la extensi6n de la boqui!la a la
pistola rociadora.
8. Conecte de nuevo e! suministro de agua, prenda el
agua, y encienda e! motor.
9. Pruebe el lavador a presion al hacer funcionar con cada
una de las boquillas de Conexiones rapidas que viene
con e! lavador a presion.
Mantenimiento de [os AniJJos 'O'
Compre una O-Juego de Reparaci6n de Anillo, el artJculo
numera 71-75116, en sus Sears locales o !lamando
IoS00o366°PART o en linea en www.sears.com. No se
incluye con la arandela de la presi6n. Este juego incluye los
anillos de! reemplazo O, arandela de caucho y filtro de cala
de agua. Refierase a la hoja de la instruccion proporcionada
en el juego para atender a su unidad'los ani!los de s O.
i
3. Incline la limpiadora a presi6n hacia un lado para que
vaciar completamente la bomba de aceite, y vierta este
en un recipiente homologado.
4. incline la limpiadora a presi6n hacia e[ lado contrario y !lene
la bomba con e[ aceite recomendado a traves del mismo
orificio (puede utilizar para e[!o un embudo pequeffo).
5. Instale el tap6n negro de aceite de la bomba y aprietelo
firmemente.
6. Coloque la limpiadora de presi6n en su posici6n normal
(de pie). Arada combustible y aceite de motor.
46
Page 47

MANTENIMIENTO DEL MOTOR
CUANDO AJUSTE O HAGA REPARACIONES A SU
M,'_QUINA LAVADORA DE PRESK)N
Siempre desconecte el alambre de la bujfa y col6queto donde
no pueda entrar en contacto con ta bujia.
CUANDO PRU_=B_ = LA BUJiA D_=L MOTOR
Utilice un comprobador de bujfas homologado.
NO comprueba la chispa sin ta bujia instalada.
Revisi6n de_ Nive_ de_ Aceite
El nivel de! aceite debera ser revisado antes de cada uso o
al menos cada 5 horas de operacion. Conserve el nivel del
aceite.
Cambio de Aceite
Cambie el aceite del motor despues de las primeras 5 horas
y cada 50 horas, o anualmente, a partir de ese momento, Si
esta utilizando su maquina lavadora a presion bajo
condiciones de extrema suciedad o polvo, o en un clima
demasiado caliente, haga e! cambio de aceite cada
25 horas.
i PRECAUCION
4. Incline su maquina lavadora a presi6n para drenar el
aceite a traves del orificio de Ilenado en un recipiente
adecuado asegurandose de inclinar la unidad hacia el
lado opuesto de la bujia. Cuando la caja del cigOefial
este vacia, vuelva a colocar la m&quina lavadora a
presi6n en posici6n vertical.
5, Limpie la vari!la de medicion, insertela en el orificio de
Ilenado y aprietela firmemente; despues, vuelva a retirar la
varilla de medici6n. Deposite el aceite recomendado hasta
la marca "FuH" de la varilla de medici6n. Deposite el aceite
lentamente. Limpie la varilla de medici6n cada vez que
revise el nive! del aceite, NO Ilene excesivamente,
6. Instale el tapon del orificio de Ilenado y la varilla de
medici6n, apriete firmemente.
7. Limpie los residuos de aceite,
8. Conecte de nuevo alambre de bujia a! bujia.
Servicio de_ Depurador de Aire
Su motor no funcionar& adecuadamente y puede dar_arse si
usted Io hace funcionar con un depurador de aire sucio.
Suministre servicio al depurador de aire una vez cada
25 horas de operacion o una vez por afio, Io que suceda
primero, Suministre servicio mas frecuentemente si la
unidad funciona bajo condiciones de mucha suciedad o
polvo. Los repuestos se encuentran disponibles en su centro
de servicio local Sears.
Para suministrar servicio al depurador de aire, siga los
siguientes pasoa:
1. Afloje dos tornillos y levante lejos cubierta.
• El aceite usado del motor ha sido mostrado at cancer de ta piel
de ta causa en ciertos animaies det laboratorio.
• Completamente tavado expuso areas con el jab6n yet agua.
MANTENGA FUERA DE ALCANCE DE
NINOS. NO CONTAMINE. CONSERVE los
RECURSOS. VUELVA ACEFE USADO A la
COLECCION CENTRA.
Cambie e[ aceite con e[ motor caIiente despu&s de[
funcionamiento, como se indica a continuaci6n:
1. Drene el tanque de! combustible hacienda funcionar la
maquina lavadora a presion hasta que el tanque este
vacio.
2. Desconecte alambre de bujia y Io mantiene lejos de!
bujia.
3. Limpie el area alrededor de la abertura para Ilenado de
aceite, retire la varilla de medici6n/tapa de! aceite,
Limpie la varilla de medicion.
Cubierta
Dos Tornillos
Cartucho
Base
2. Retire cuidadosamente aire limpiador de la base.
3. Para limpiar cartucho, utiliza suavemente el lado plisado
de papel en una superficie plana.
4. Instale limpie (o nuevo) limpiador de aire en la base. El
limpiador aereo debe quedar seguramente en base.
5. La cubierta del lugar sobre limpiador de aire y aprieta
los tornillos.
NOTA: Puede adquirir nuevos depurador de aire a] nOmero
telef6nico I°800o366°PART.
47
Page 48

Remplace la Buj_a
Remplace la bujia anualmente o cada 100 horas de operaci6n.
1. Limpie el area alrededor de la bujia y retirela.
2. Retire y revise la bujia.
3. Para el uso del reemplazo o el bujia uniforme de la
chispa de re6stato, el Champion RC12YC o el bujia
largo de la chispa de platino de vida, el Champion
RC12PYP.
4. Revise la separaci6n del electrodo con un calibrador de
alambre y ajuste la separacion a 0.020 pulgadas
(0.50 mm), si es necesario.
5_ Instale la bujia y aprietela firmemente.
NOTA: Puede adquirir nuevos bujia al nOmero telef6nico
loS00o366opART.
Carburador
Si usted cree que su carburador necesita ajuste, visite su
centro de servicio Sears mas cercano. El funcionamiento del
motor podria resultar afectado a altitudes pot arriba de
3000 pies. Para operaciones a elevaciones mayores, pongase
en contacto con el centro de servicio Sears mas cercano.
Servicio del Apagachispas
El motor de su unidad no viene equipado de fabrica con un
apagachispas. En ciertas areas, es ilegal operar motores
que no tengan apagachispas. Revise las leyes y
regulaciones locales. Si necesita apagachispas, Io puede
comprar en su centro de servicio Sears mas cercano. Para
obtener el nOmero de parte Ilame al Io800o366opART.
Debera suministrarle servicio al apagachispas cada
50 horas para conservarlo en buenas condiciones de
funcionamiento.
Si el motor ha estado funcionando, ei silenciador estara
bastante caliente. Deje que e! silenciador se enfrie para
poder darle servicio al apagachispas.
Retire la panta!la dei apagachispas para limpieza e
inspecci6n.
Remplace la pantalla si esta da_ada.
ADVERTENCIA
NO toque las superficies catientes.
Permita que el equipo se enfrie antes de tocado.
El lavadora a presi6n debe estar situado a un minimo de
152 cm (5 pies) de toda estructura con muros combustibles y/o
otras materias combustibles.
Mantenga un minimo de 92 cm (3 pies) alrededor de la carcasa
del lavadora a presi6n, para facititar la ventitacidn y et
mantenimiento del lavadora a presidn.
En el estado de California es obligatorio, segQn la tey, el uso de
apagachispas (Secci6n 4442 del C6digo de Recursos PQblicos de
California). Otros estados pueden tener leyes similares. Las teyes
federates se aplican en tierras federales. Si equipa et sitenciador
con un apagachispas, este debera ser mantenido en buenas
condiciones de trabajo. Usted puede ordenar el apagachispas a
traves de su distribuidor de servicio autorizado Sears.
Sisterna de Refrigeraci6n de Aire
Con el tiempo, se pueden acumular residuos en las aletas
de refrigeraci6n del cilindro y pasar inadvertidos mientras no
se desmonte parcialmente el motor. Recomendamos que
encargue la limpieza dei sistema de refrigeraci6n a un
distribuidor autorizado de servicio Sears siguiendo los
intervalos recomendados (consulte la seccion "Calendario
de Mantenimiento" en la pagina 44). Es igualmente
importante que no se acumulen residuos en el motor.
Consulte la seccion "Limpie los Residuos".
C [ AN
48
Page 49

DESPUES DE CADA USO
No deber& haber agua en la unidad por largos periodos de
tiempo, Los sedimentos de minerales se pueden depositar
en partes de la bombay "congelar" su funcionamiento. Lleve
a cabo estos procedimientos despues de cada uso:
1. Limpie el circuito de productos quimicos girando su
Ilave de paso hasta la posici6n "Off" y utilizando la
limpiadora a presion con la punta de rociado negra.
Lave por un minuto o dos minutos.
2. Apague e! motor y dejelo enfriar, despues retire todas
las mangueras.
3. Desconecte el alambre de la bujia.
4. Saque todos los liquidos de la bomba halando la manija
de retroceso aproximadamente 6 veces. Esto debera
evacuar la mayoda del liquido de la bomba.
5. Si planea almacenar la unidad por mas de 30 dias, vea
la secci6n "Almacenamiento Pro!ongado" en pr6xima
pagina.
6. Revise la manguera de alta presi6n para vet si presenta
dados. Los cortes en la manguera o e! desgaste de la
misma pueden ocasionar fugas y perdida de presion. Si
encuentra algOn dado, remplace la manguera. NO
intente reparar una manguera da_ada. Remplace la
manguera con la parte Sears genuina.
7. Desconecte manga de! fusil del rocio y salida alta de
presi6n en la bomba, DesagOe agua de la manga, del
fusil, y de la extensi6n de boquilla. Use un harapo para
quitar la manga.
8. Pase un extremo de la manguera pot el orificio del
carrete de la manguera. Haga girar e! carrete con la
manija para enrollar la manguera en el carrete.
9. Vuelva a conectar el alambre a la bujia.
10. AImacene la unidad en una area limpia y seca.
iADVERTENCIA! NUNCA almacene el motor con
combustible en e! tanque en recintos cerrados o en
areas encerradas con poca ventilaci6n donde los
vapores puedan entrar en contacto con llamas
abiertas, chispas o luces de piloto.
ALMACENAMJENTO PARA
JNVJERNO
PRECAUCION
• Si no Io hace, da_ara permanentemente ta bombay la unidad
no podra funcionar.
, La garantia no cubre el daSo de la unidad ocasionado por
congelamiento.
Para proteger la unidad de Jas temperaturas de
conge[amiento:
1. Vacie los dos depositos de productos quimicos como
se indica a continuaci6n:
a. Desconecte la manguera conectada al
acoplamiento de inyecci6n de la bomba. Coloque el
extremo de la bomba en un recipiente adecuado.
b. Gire las Ilaves de paso de productos quire!cos
hasta la posici6n "On" y abra la tapa del deposito.
El contenido del deposito se vaciar& por gravedad
en e! recipiente.
c. Cuando se haya vaciado el primer dep6sito, repita
el paso (b) para el segundo dep6sito, usando un
recipiente distinto.
d. Vueiva a conectar la manguera al acoplamiento de
inyeccion de la bomba. Affada 0,5 litros de agua
dulce limpia a cada deposito y cierre las tapas de
los depositos.
2. Limpie el circuito de productos quimicos seleccionando
un deposito, girando su Ilave de paso hasta la posici6n
"On" y utilizando la limpiadora a presi6n con la punta de
rociado negra. Limpie el circuito hasta que se vacie el
primer dep6sito. Gire la Ilave de paso de productos
quimicos hasta la posici6n "Off". Limpie el otro deposito
de la misma forma.
3. Apague el motor y permita refrescar, entonces quita
mangas altas de presi6n y jardin. Desconecte el
alambre de la bujia.
4. Vacie todos los I{quidos presentes en la bomba,
halando la manecilla de retroceso hasta seis veces.
Esto deberia remover la mayor parte de los liquidos
presentes en la bomba.
5. Utilice un protector de bomba, disponible en Sears con
e! nOmero de catalogo 71-74403, para cuidar la bomba.
Aquel protege a la unidad contra el congelamiento y
lubrica tanto los pistones como los empaques.
6. Si el protector de bomba no esta disponible, conecte un
tramo de 3 pies de manguera de jardin a la entrada de
agua. Vierta anticongelante RV (anticongelante sin
alcoho!) en la manguera. Jale la manija de arranque
dos veces. Desconecte despues la manguera de 3 pies.
49
Page 50

ALMACENAMIENTO PROLONGADO
Si usted no planea usar la maquina lavadora a presi6n por
mas de 30 dias, debera preparar el motor para un
almacenamiento pro!ongado.
Es importante evitar la formaci6n de depositos de goma en
las partes esenciales de! sistema del combustible tales
como carburador, filtro del combustible, manguera o tanque
de! combustible durante el almacenamiento. Tambien, la
experiencia indica que los combustibles con mezclas de
alcohol (llamados gasoho!, etanol o metano!) pueden atraer
la humedad, Io que Ileva a la separaci6n y formaci6n de
acidos durante el almacenamiento. La gasolina acida puede
dafiar e! sistema del combustible de un motor durante el
almacenamiento.
Proteja el Sistema de Combustible
Aditivo para Combustible:
Siva a usar aditivo para combustible, !lene el tanque de
combustible con gasolina fresca. Si el tanque esta
parcialmente Ileno, el aire de! tanque va a promover ei
deterioro del combustible durante el almacenamiento. El
motor y el combustible pueden ser almacenados hasta
24 meses con aditivo.
Deposite el aditivo para combustible siguiendo las
instrucciones del fabricante.
AsegOrese de tener conectado y ABIERTO el suministro
de agua a la entrada de la bomba.
Ponga en funcionamiento e! motor en un area
descubierta por 10 minutos para asegurarse de que la
gasolina tratada ha remplazado la gasolina no tratada de!
carburador.
Si no usa aditivo para combustible, retire todo el
combustible del tanque y haga funcionar el motor hasta que
se detenga por falta de combustible.
Cambio de Aceite
Con e! motor todavia caliente, drene e! aceite de la caja de!
cigQeSal. Vuelva a Ilenar!o con e! grado de aceite
recomendado. Vea "Cambio de Aceite" en la pagina 47.
Aceite el Di&metro Interior de_ Ci_indro
Retire la bujia. Rocie aproximadamente 1 onza de aceite
limpio para motor dentro del cilindro. Cubra el orificio de
la bujia con un trapo, Hale la manija de retroceso
lentamente para distribuir el aceite. Evite el rociado dei
orificio de la bujia.
Instale la bujia. NO conecte e! alambre de la bujia.
Protecci6n de la Bomba
A protege al salvador de bomba de uso de bomba Sears a
previene congelar el daSo y lubrica embo!os y sellos.
NOTA: El protector de la bomba, nOmero de item Sears
nOmero 71-74403, est&n disponible s61o como un accesorio
opcional. NO es incluido con la arandela de la presi6n.
PRECAUCI6N
• Si no Io hace, da_ara permanentemente ta bombay la unidad
no podra funcionar.
• La garantia no cubre el daSo de la unidad ocasionado por
congelamiento.
Siempre protecci6n de ojo de uso cuando se usa bomba salvador.
At uso el salvador de bomba:
1. Conecte manga en el salvador de bomba puede a la
cala de la bomba.
2. El empuj6n en puede la cima a distribuye bomba
salvador.
3. Cuando liquido de salvador de bomba comienza a la
salida de la bomba de la salida, la bomba es protegida.
4. Quite bomba salvador de la cala de bomba.
OTROS
NO almacene gasolina de una estaci6n a otra.
Si es posible, almacene su unidad en un recinto cerrado
y cObrala para protegerla del polvo y la suciedad.
ASEGURESE DE VACIAR EL TANQUE DEL
COMBUSTBBLE
IMPORTANTE: NUNCA cubra su m&quina sistema de
limpieza cuando e! motor y el &rea de! escape esten
calientes.
5O
Page 51

Prob[ema
La bomba presenta los
siguientes probJemas: no
produce presi6n, produce una
presi6n errada, traqueteo,
p_rdida de presi6n, bajo
vo[umen de agua.
E[ detergente no se mezc[a
con e[ rociado.
E[ motor funciona bien
cuando no tiene cargas, pero
funciona "ma[" cuando se
coneota una carga.
E[ motor no arranca; o
arranca y funciona real.
Causa
1. Esta usando la punta de rociado de
baja presi6n (negra).
2, La entrada de agua esta bloqueada,
3. Suministro de agua inadecuado.
4. La manguera de entrada esta
doblada o presenta fugas.
5. El colador de la manguera de entrada
esta tapado,
6. El suministro de agua est& por
encima de los 100°F.
7. La manguera de alta presi6n est&
bloqueada o presenta fugas,
8, La pistola presenta fugas,
9, La punta de rociado esta obstruida.
10. Bomba defectuosa.
1. Llaves de paso de los dep6sitos de
productos quimicos estan en la
posici6n "Off".
2. Sucio en el filtro de la I[nea.
3. Esta usando la punta de rociado de
alta presion.
La velocidad de[ motor es demasiado
lenta.
1. Depurador de aire sucio.
2, Sin gasolina,
3. Gasolina vieja,
4. El alambre de la bujia no esta
conectado a la buj[a.
5. Bujia mala.
6. Agua en la gasolina,
7. Estrangulacion excesiva,
8. Mezcla de combustible demasiado
rica.
E[ motor se apaga durante Ja Sin gasolina.
operaci6n.
E[ motor no tiene fuerza, Filtro de aire sucio.
E[ motor intenta estabi[izarse
o su funcionamiento no es
constante.
Cebador abierto demasiado rapido
SoJuci6n
Cambie la punta de rociado a una de las
tres punta de rociado de alta presi6n.
2, Limpie la entrada,
3, Proporcione flujo de agua adecuado.
4. Estire la manguera de entrada, coloque
un parche en la fuga.
5, Revise y limpie el colador de la
manguera de entrada.
6. Proporcione suministro de agua mas fria.
7. Retire las obstrucciones de la manguera
de salida.
8. Remplace la pistola,
9. Limpie la punta de rociado.
10. Pongase en contacto con el centro de
servicio Sears.
Gire la Ilave de paso de productos
qu[micos de[ dep6sito que desee hasta la
posicion "On",
2, Vea "Cheque En el Filtro de la L[nea".
3. Use la punta de rociado de baja presion
(negra).
Mueva el control de la valvula de regulacion a
la posicion FAST (RAPIDO), Si el motor
continua funcionando ma[, pongase en
contacto con e! centro de servicio Sears,
Limpie o remplace el depurador de aire,
2, Llene el tanque de combustible.
3. Drene el tanque de gasolina; Ilenelo con
combustible fresco.
4. Conecte el aIambre a la bujia,
5, Remplace la buj[a,
6. Drene el tanque de gasolina; Ilene!o con
combustible fresco.
7, Abra el cebador pot completo y haga
girar el motor,
8. Pongase en contacto con el centro de
servicio Sears.
Llene ei tanque de combustible.
Remplace el filtro de aire.
Mueva el cebador a la posici6n intermedia
hasta que e! motor funcione normalmente.
51
Page 52

Sears, Roebuck and Co., U.S.A. (Sears), California Air Resources Board (Consejo de Recursos sobre eJ Aire de
California, BARB, pot sus sigJas en ingles) y United States Environmental Protection Agency (Agencia de Protecci6n
Ambiental de EE.UU., EPA, pot sus siglas en ingles).
Declaraci6n de garantia del sistema de controJ de emisiones
(derechos y obligaciones del propietado para la garantia contra defectos)
LA COBERTURA DE LA GARANTiA DE CONTROL DE EMISJONES SE
APLICA A LOS MOTORES CERTJFJCADOS ADQUIRJDOS EN
CALIFORNIA EN 1995 Y POSTERIORMENTE, QUE SE UTILlCEN EN
CALIFORNIA, Y A MOTORES CERTIFtCADOS MODELO 1997 Y
POSTERIORES QUE SEAN ADQUtRIDOS Y UTILIZADOS EN OTRA
REGION DE ESTADOS UNJDOS (Y A PARTIR DEL 1o DE ENERO DE
2001, EN CANADA,).
Declaraci6n de garantia sobre el control de emisiones de la EPA de
EE.UU. y California.
El California Air Resources Board (CARB), la EPA de EE.UU. y Sears se
complacenen explicar la Garantfa para el sistema de control de emisiones
para motores pequedos para exteriores (SORE) modelos ado 2000 y
posteriores. En California, los nuevos motores pequedos para exteriores se
deben disedar, construir y equipar para cumplir con las estrictas normas
del estado contra el smog. En otras regiones de Estados Unidos, los
nuevos motores para interiores de ignici6n por chispa certificados para
modelos ado 1997 y posteriores deben cumplir con normas similares
estabtecidas pot la EPA de EE.UU Sears debe garantizar el sistema de
control de emisiones de su motor para los periodos indicados a
continuaci6n, siempre y cuando no se haya abusado, descuidado o dado
mantenimiento incorrecto al motor pequedo para exteriores.
Su sistema de control de emisiones podr& incluir partes come et
carburador o el sistema de inyecci6n de combustible, el sistema de
ignici6n y el convertidor cataJitico. Tambi6n se pueden incluir mangueras,
correas, conectores y otros componentes relacionados con Ins ernisiones
Cuando exista una condici6n que pueda set cubierta pot la garantfa,
Sears reparara el motor pequefio para exteriores sin costo alguno_
incJuyendo el diagn6stico, Ins partes de repuesto y la mano de obra.
Cobertura de la garantia de Sears contra defectos en el control de
emisiones
Los motores pequedos para exteriores modeios 1995 y posteriores tienen
una garantia de dos ados. Si aJguna parte de su motor relacionada con
]as emisiones est_ defectuosa, Sears la reparar_ o sustituir&
Responsabilidades del propietario para la garant_a
Como propietafio del motor pequedo para extedores, usted es
responsable de realizar las actividades de mantenimiento requeridas
que se indicae en este manual del propietario. Sears recomienda que
conserve todos los recibos que cubran el mantenimiento de su motor
pequedo para exteriores, pete Sears no puede negar la garantfa
solamente pot la faita de recibos ni pot su imposibilidad de garantizar la
realizaci6n de todas las actividades de mantenimiento programadas.
Como propietario del motor pequedo para exteriores, usted siempre
debe tener en cuenta que Sears podr9 negar la cobertura de la garantia
si su motor peque_o para exteriores o una parte del mismo presenta
fallas debido a abuso, descuido, mantenimiento incorrecto o
modificaciones no aprobadas
Usted es responsable de presentar su motor pequedo para exteriores a
un Centro de servicio Sears aprobado tan pronto como se presente el
problema. Las reparaciones bajo garantia deber_n concJuirse en un
per[odo razonable_ que no exceder_ de 30 d[as.
Si tiene alguna pregunta con respecto a sus derechos y
responsabilidades para la garantia_ p6ngase en contacto con un
representante de servicio Sears al 1-800-469-4663
Disposiciones de la garantia de Sears contra defectos en el control
de emisiones
Las siguientes son disposiciones especificas relacionadas con Ja
cobertura de la garanga contra defectos en et control de emisiones.
1. Partes garantizadas
La cobertura bajo esta garanfia incluye solamente aquellas partes
que se enumeran a continuaci6n 0as partes del sistema de control
En EE.UU. y Canad_ contamos con una linen de emergencia Ins 24 horns (1-800-469-4663), que offece un menQ de mensajes pregrabados con
informaci6n sobre mantenimiento de productos
de emisiones) en la medida que dichas partes hayan estado
presentes en el motor adquirido.
a Sistema de medici6n de combustible
Sistema de enriquecimiento para arranque en fifo
Carburador y partes intemas
Bomba de combustible.
b Sistema de inducci6n de aire.
Filtro de aire.
CoJector de entrada.
c Sistema de ignici6n.
Bujias.
Sistema de ignici6n pot magneto.
d Sistema catalizador
Convertidor catalitico.
Colector de escape.
Sistema de inyecci6n de aire o vBIvula por impulsos
e Distintos elementos utilizados en los sistemas anteriores.
V_lvulas e interruptores de vacfo, temperatura, posici6n y de
detecci6n de tiempo.
Conectores y conjuntos
2. Vigencia de la cobertura
Sears garantiza al propietario iniciai y a cada propietario
subsiguiente que las partes garantizadas estaran libres de defectos
en material y en mano de obra, que ocasionen fallas de las partes
garantizadas durante un per[odo de dos ados a partir de la fecha
en que el motor sea entregado at comprador minorista
3. NO habr_ cargos
La reparaci6n o reemplazo de cuaiquier parte garantizada se
realizara sin cargo alguno para el propietario, induyendo la mano de
obra de diagn6stico que derive en la determinaci6n de que una parte
garantizada esta defectuosa, si la labor de diagn6stico se realiza en
un Centro de serdcio Sears aprobado.
4. Reclamos y exclusiones de cobertura
Los reclamos vincuJados con la garantia se presentaran conforme a
las disposiciones de la P6tiza de garantia de Sears La cobertura de
la garantia se excluira para aquellas fallas de partes garantizadas
que no sean partes originales de Sears o debido a abuso, descuido
o mantenimiento incorrecto, segQn se estabiece en la P61iza de
garanga de motores de Sears Sears no es responsable por la
cobertura de fallas de partes garantizadas ocasionadas pot el uso
de partes adicionales, no originates o modificadas
5. Mantenimiento
Cualquier parte garantizada cuyo reemplazo no est_ programado
como mantenimiento requerido o que est6 programada Onicamente
para inspecci6n frecuente con el fin de "reparar o reemplazar
conforme sea necesario", estar_ garantizada en cuanto a defectos
pot el periodo de la garantia. Cualquier parte garantizada cuyo
reemplazo est_ programado como mantenimiento requerido tendr&
soJamente una garantia contra defectos Onicamente pot el periodo
hasta el primer reemplazo programado para esa parte. Se podra
utilizar cualquier parte de repuesto que tenga un rendimiento y
durabilidad equivalentes_ al realizar cualquier actividad de
mantenimiento o reparaci6n. El propietario es responsable de
reaiizar todo el mantenimiento requerido, segOn se define en este
manual del propietario.
6. Cobertura consiguiente
La cobertura bajo la presente se ampliar_ a {a fatla de cuaiquier
componente del motor provocada pot un desperfecto en cualquier
parte garantizada que sign gozando de la cobertura de la garantia
52
Page 53

Jnformaci6n Sobre emPeriodo de
Durabilidad de masEmisiones y e_indice
de Aire en _a Etiqueta de Emisiones de_
Motor
Los motores con certificaci6n de cumplimiento de la
normativa sobre emisiones de nivel 2 del California Air
Resources Board (CARB) deben mostrar informaci6n sobre
el periodo de durabilidad de las emisiones y el indice de
aire. El fabricante de! motor ofrece esta informaci6n al
consumidor mediante etiquetas de emisiones.
El Per[odo de DurabHidad de [as Emisiones indica e!
n0mero de horas durante las cuales el motor puede
funcionar cumpliendo las normas sobre emisiones, siempre
que se realicen las operaciones de mantenimiento que se
detallan en las instrucciones de uso y mantenimiento, Se
utilizan las siguientes categorias:
Moderado: El motor esta certificado para cumplir la
normativa sobre emisiones durante 125 horas de
funcionamiento real.
Intermedio: El motor esta certificado para cumplir la
normativa sobre emisiones durante 250 horas de
funcionamiento real.
ProJongado: El motor esta certificado para cumplir la
normativa sobre emisiones durante 500 horas de
funcionamiento real.
Por ejemplo, un cortacesped con operario a pie se suele
utilizar entre 20 y 25 horas al aSo. Por tanto, el Periodo de
DurabiHdad de las Emisiones de un motor con
clasificaci6n intermedia equivaldria a 10-12 afios,
El indice de Aire es un valor calculado que indica el nivel
relativo de emisiones de una gama concreta de motores.
Cuanto menor es el indice de Aire, mas limpio es el motor.
Esta informacion se presenta en forma gr&fica en la etiqueta
de emisiones,
Periodo de Cump_imiento de _a Normativa
de Emisiones en ia Etiqueta de
CumpHmiento de Emisiones demMotor
Desde el 1 de julio de 2000, algunos motores Sears cuentan
con la certificacion de cumplimiento de la fase 2 de las
normas sobre emisiones de la United States Environmental
Protection Agency (USEPA, Agencia estadounidense de
protecci6n del medioambiente ). En e! caso de los motores
con certificaci6n de fase 2, el periodo de cumplimiento de la
normativa sobre emisiones que figura en la etiqueta de
cumplimiento de emisiones indica el nOmero de horas de
funcionamiento durante las cuales el motor ha demostrado
cumplir los requisitos federales sobre emisiones. Para
motores de menos de 225 cc, Categoria C = 125 horas, B =
250 horas y A = 500 horas, Para motores de 225 cc o mas,
Categoria C = 250 horas, B = 500 horas y A = 1000 horas.
La clasificacion de este motor es moderado, con un indice
de aire de 3. El periodo de cumplimiento de la normativa
sobre emisiones de la EPA es de categoria C. El motor
tiene una cilindrada de 190 cc.
A continuaci6n se muestra una representaci6n generica de
la etiqueta de emisiones tipica de un motor certificado.
53
Page 54

54
Page 55

55
Page 56

Your Home
iiiiiiiiiiiiiiiiii!__¸_
iiiiiiiiiiiiiiiiiii
iiiiiiiiiiiiiiiiiii
iiiiiiiiiiiiiiiiiii
iiiiiiiiiiiiiiiiiii
iiiiiiiiiiiiiiiiiii
For repair - in your home - of all major brand appliances,
lawn and garden equipment, or heating and cooling systems,
no matter who made it, no matter who sold it!
For the replacement parts, accessories and
owner's manuals that you need to do-it-yourself.
For Sears professional installation of home appliances
and items like garage door openers and water heaters.
iiiiiiiiiiiiiiiiiii
iiiiiiiiiiiiiiiiiii
iiiiiiiiiiiiiiiiiii
1-800-4-MY-HOME ® Anytime, day or night
(1-800-469-4663) (U.S.A. and Canada)
www.sears.com www.sears.ca
iiiiiiiiiiiiiiiiiii
iiiiiiiiiiiiiiiiiii
iiiiiiiiiiiiiiiiiii
iiiiiiiiiiiiiiiiiii
!!!!!!!!!!!!!!!!!!!
For repair of carry-in products like vacuums, lawn equipment,
and electronics, call or go on-line for the nearest
iiiiiiiiiiiiiiiiiii
iiiiiiiiiiiiiiiiiii
iiiiiiiiiiiiiiiiiii
Sears Parts and Repair Center.
1-800-488-1222 Anytime, day or night (U.S.A. only)
Our Home
www.sears.com
iiiiiiiiiiiiiiiiiii
iiiiiiiiiiiiiiiiiii
To purchase a protection agreement on a product serviced by Sears:
:::::::::::::::::::i
1-800-827-6655 (u.sA.) 1-800-361-6665 (Canada)
Para pedir servicio de reparaci6n Au Canada pour service en franq.ais:
a domicilio, y para ordenar piezas: 1.800.LE.FOYERMC
1-888-SU-HOGAR sM (1-800-533-6937)
(1-888-784-6427) www.sears.ca
© Sears, Roebuck and Co.
® Registered Trademark / TMTrademark / SMService Mark of Sears, Roebuck and Co.
® Marca Registrada / TM Marca de F&brica / SMMarca de Servicio de Sears, Roebuck and Co.
MCMarque de commerce / MDMarque d6posee de Sears, Roebuck and Co.
 Loading...