

Craftsman 536.7722 User Manual
3.8 Horsepower
9 Inch
EDGER/BEVEL CUT
MODEL NO.
536.772200
Caution:
Read and follow all Safety
Rules and Operating
Instructions before first use
of this product.
SEARS, ROEBUCK AND CO., Hoffman Estates, IL 60179 U.SlA.
711942 0,3/27/98

Table of Contents 2
Warranty 2
Safety Rules 2-3
Contents of Shipping Carton 4
Assembly 4-5
Operation 6-10
Maintenance 10-12
LIMITED TWO-YEAR WARRANTY ON CRAFTSMAN EDGER
For two years from the date of purchase, when this Craftsman Edger is maintained, lu-
bricated, and tuned up.according to the operating and maintenance instructions in the
owner's manual, Craftsmanwill repair, free of charge, any defect in material or work-
manship.
If this Craftsman Edger is used for commemial or rental purposes, this warranty ap-
plies for only 90 days from the date of purchase.
This warranty does not cover the following:
• Expendable items which become worn during normal use, such as spark plugs, etc.
• Repairs necessary because of operator abuse or negligence, including bent crank
shafts and the failure to maintain the equipment according to the instructions con-
tained in the owner's manual.
WARRANTY SERVICE IS AVAILABLE BY RETURNING THE CRAFTSMAN EDGER
TO THE NEAREST CRAFTSMAN SERVICE CENTER/DEPARTMENT IN THE
UNITED STATES, THIS WARRANTY APPLIES ONLY WHILE THIS PRODUCT IS IN
USE IN THE UNITED STATES.
This warranty gives you specific legal rights, and you may also have other rights which
may vary from state to state.
Sears, Roebuck and Co., D817WA, Hoffman Estates, IL 60179
Service and Adjustments 12-13
Storage 14
Troubleshooting 15
Edger Repair Parts 16-19
Engine Repair Parts 20-23
Spanish(EspaSol) 24-37
Parts Ordering/Service Back Cover
Look for this symbol to point out Important safety precautions. It means--
ATTENTION!I! Become alertl!l Your safety Is Involved,
Z_ CAUTION: Always disconnect spark footwear that will improve footing on
plug wire and place wire where itcannot
contact spark plug to prevent accidental
starting when setting-up, transporting,
adjusting or making repairs.
IMPORTANT: Safety standards require
operator presence controls to minimize the
risk of injury. Your Edger is equipped with
such controls. Do not attempt to defeat the
function of the operator presence control
under any circumstances.
BEFORE USE
• Read the owner's manual carefully. Be
thoroughly familiar with the controls and
the proper use of the Edger. Know how to
stop the edger and disengage the
controls quickly.
• Do not operate the Edger without
wearing adequate outer garments. Wear
slippery surfaces.
• Keep the area of operation clear of all
persons, particularly small children and
pets.
• Thoroughly inspect the area where the
Edger is to be used and remove all
foreign objects.
FUEL SAFETY
• Handle fuel with care; it is highly flam-
mable. °
• Use an approved container.
• Check fuel supply before each use,
allowing space for expansion as the heat
of the engine and/or sun can cause fuel to
expand.
• Fill fuel tank outdoors with extreme care.
Never fill fuel tank indoors. Replace fuel
tank cap securely and wipe up spilled
fuel.
• Never remove the fuel tank cap or add
fuel to a running or hot engine.
• Never store fuel or Edger with fuel in the
tank inside a building where fumes may
reach an open flame.
OPERATING SAFETY
• Never allow children or young teenagers
to operate the Edger. Keep them away
while it is operating. Never allow adults to
operate the Edger without proper
instruction.
• Do not operate this machine if you are
taking drugs or other medication which
can cause drowsiness or affect your
ability to operate this machine.
• Do not use this machine if you are
mentally or physically unable to operate
this machine safely.
• Always wear safety glasses or eye
shields during operation or while perform-
ing an adjustment or repair to protect
your eyes from foreign objects that may
be thrown from the Edger.
• Do not put hands or feet near or under
rotating parts.
• Exercise extreme caution when operating
on or crossing gravel drives, walks, or
roads. Stay alert for hidden hazards or
traffic.
• Exercise caution to avoid slipping or
falling.
• Never operate the Edger without proper
guards, plates, or other safety protective
devices in place.
• Never operate the Edger at high transport
speeds on slippery surfaces. Look behind
and use care when backing.
• Never allow bystanders near the Edger.
• Keep children and pets away while
operating.
• Never operate the Edger without good
visibility or light.
• Do not run the engine indoors. The
exhaust fumes are dangerous, containing
CARBON MONOXIDE, an ODORLESS
and DEADLY GAS.
• Take all possible precautions when
leaving the Edger unattended. Stop the
engine.
• Do not overload the Edger capacity by
attempting to edge too deep at too fast a
rate.
SAFE STORAGE
• Always refer to the owner's manual
instructions for important details if the
Edger is to be stored for an extended
period.
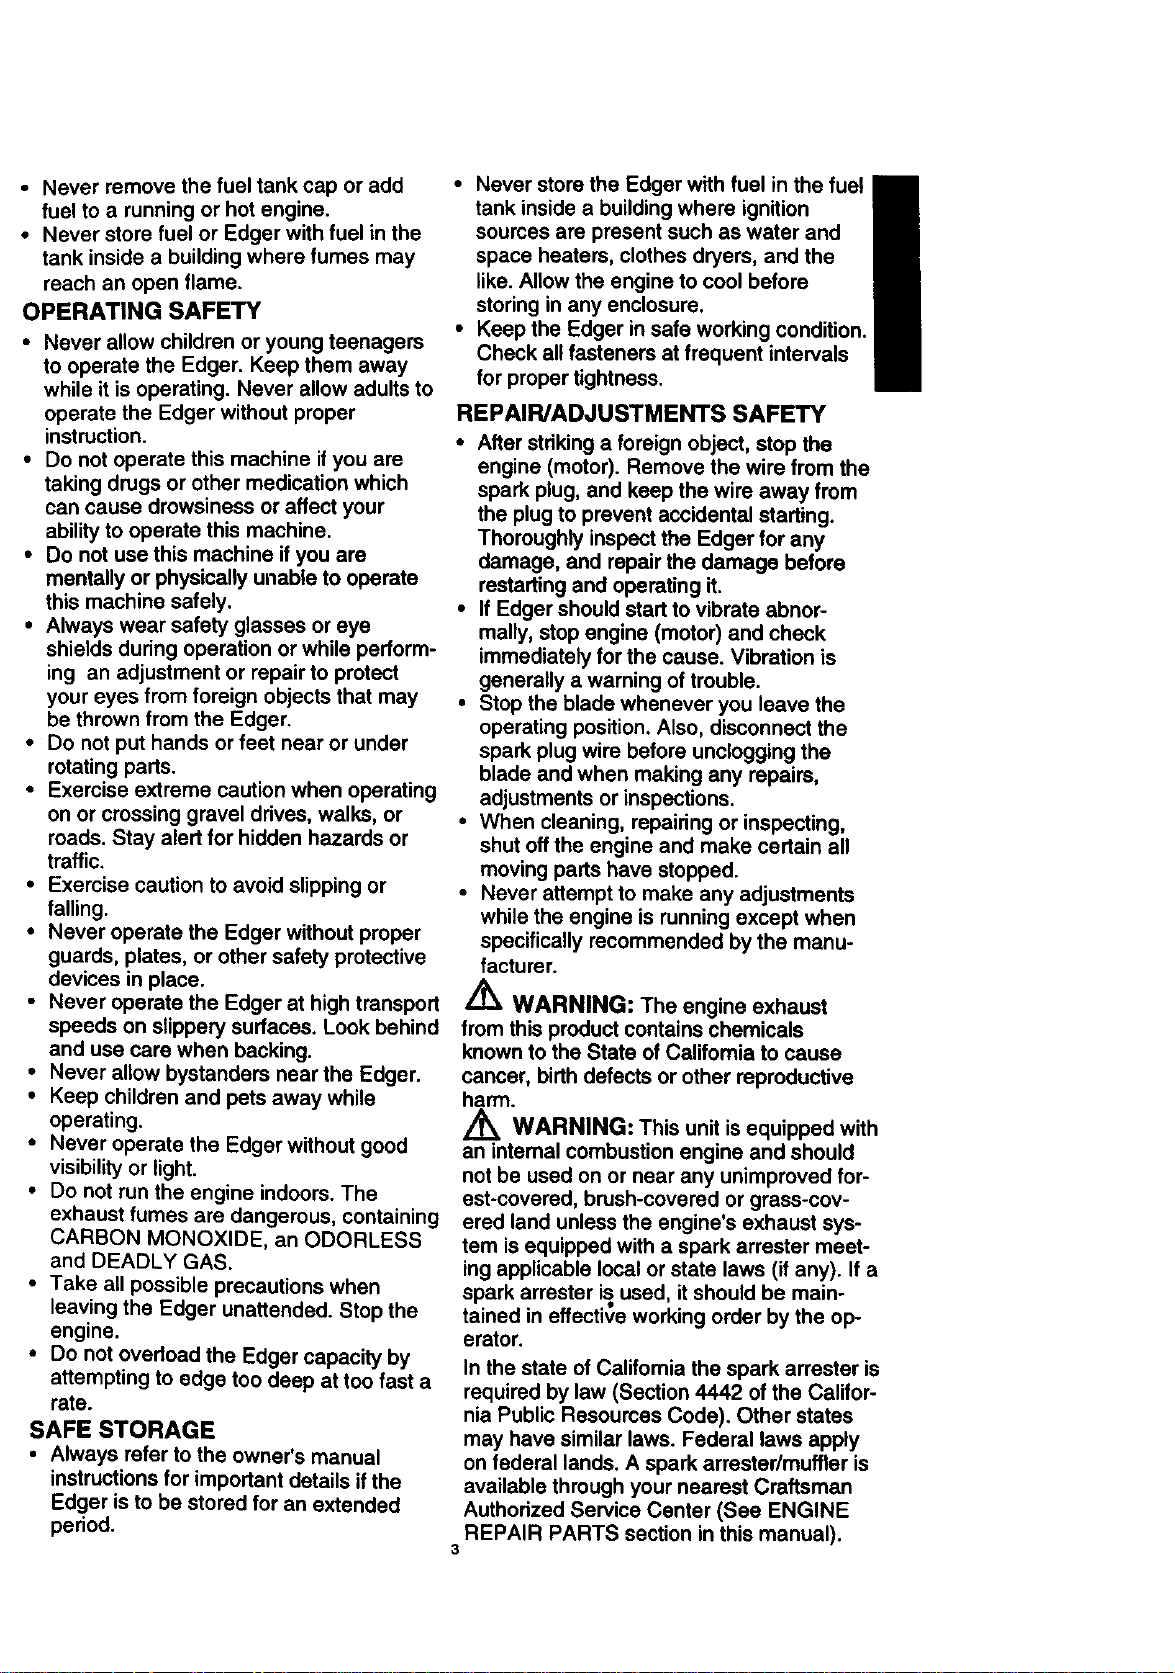
• Never store the Edger with fuel in the fuel
tank inside a building where ignition
sources are present such as water and
space heaters, clothes dryers, and the
like. Allow the engine to cool before
storing in any enclosure.
• Keep the Edger in safe working condition.
Check all fasteners at frequent intervals
for proper tightness.
REPAIR/ADJUSTMENTS SAFETY
• After striking a foreign object, stop the
engine (motor). Remove the wire from the
spark plug, and keep the wire away from
the plug to prevent accidental starting.
Thoroughly inspect the Edger for any
damage, and repair the damage before
restarting and operating it.
• If Edger should start to vibrate abnor-
mally, stop engine (motor) and check
immediately for the cause. Vibration is
generally a warning of trouble.
• Stop the blade whenever you leave the
operating position. Also, disconnect the
spark plug wire before unclogging the
blade and when making any repairs,
adjustments or inspections.
• When cleaning, repairing or inspecting,
shut off the engine and make certain all
moving parts have stopped.
• Never attempt to make any adjustments
while the engine is running except when
specifically recommended by the manu-
facturer.
A
WARNING: The engine exhaust
from this product contains chemicals
known to the State of California to cause
cancer, birth defects or other reproductive
harm.
WARNING: This unit is equipped with
an intemal combustion engine and should
not be used on or near any unimproved for-
est-covered, brush-covered or grass-cov-
ered land unless the engine's exhaust sys-
tem is equipped with a spark arrester meet-
ing applicable local or state laws (if any). If a
spark arrester is used, it should be main-
tained in effective working order by the op-
erator.
In the state of Califomia the spark arrester is
required by law (Section 4442 of the Califor-
nia Public Resources Code). Other states
may have similar laws. Federal laws apply
on federal lands. A spark arrester/muffier is
available through your nearest Craftsman
Authorized Service Center (See ENGINE
REPAIR PARTS section in this manual).
3
,0
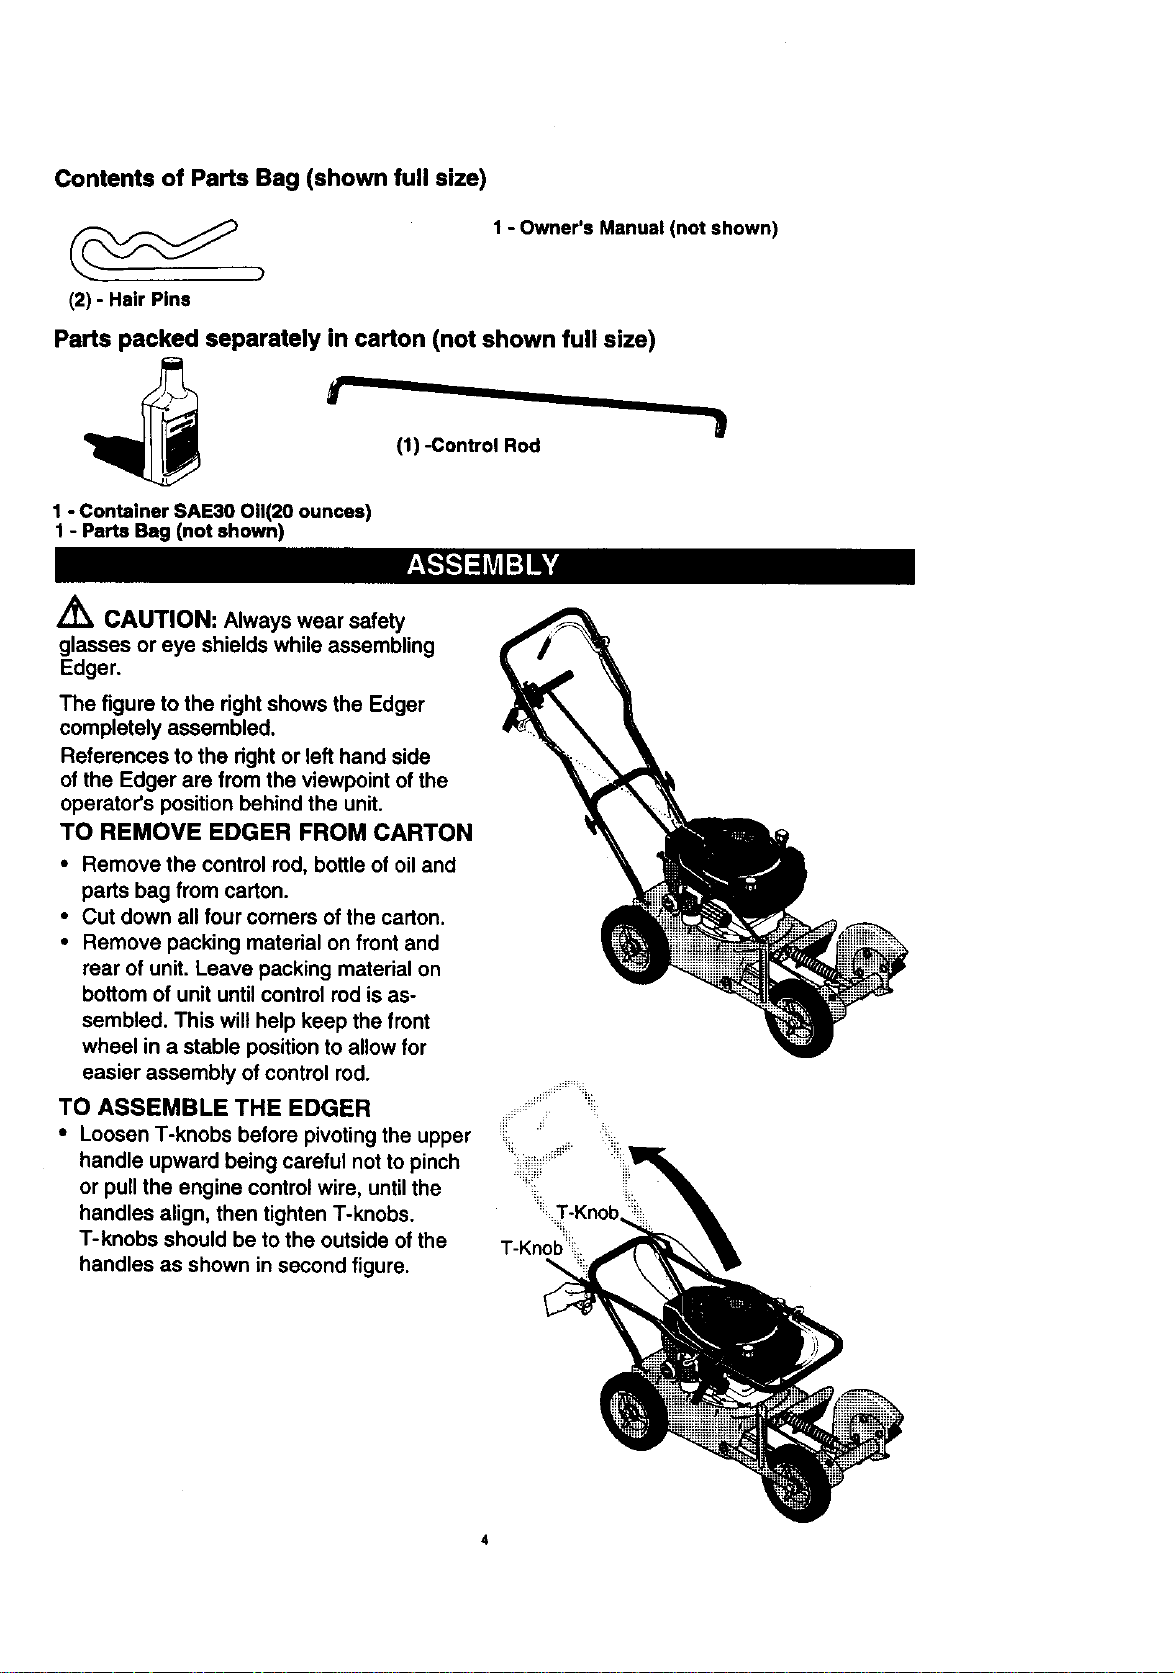
Contents of Parts Bag (shown full size)
1 - Owner's Manuel (not shown)
(2) - Hair Pins
Parts packed separately in carton (not shown full size)
(1) -Control Rod
1 - Container SAE30 0.(20 ounces)
1 - Parts Beg (not shown)
A
ZJ_ CAUTION: Always wear safety
glasses or eye shields while assembling
Edger.
The figure to the right shows the Edger
completely assembled.
References to the dght or left hand side
of the Edger are from the viewpoint of the
operator's position behind the unit.
TO REMOVE EDGER FROM CARTON
• Remove the control rod, bottle of oil and
parts bag from carton.
• Cut down all four corners of the carton.
• Remove packing material on front and
rear of unit. Leave packing material on
bottom of unit until control rod is as-
sembled. This will help keep the front
wheel in a stable position to allow for
easier assembly of control rod.
TO ASSEMBLE THE EDGER
• Loosen T-knobs before pivoting the upper
handle upward being careful not to pinch
or pull the engine control wire, until the
handles align, then tighten T-knobs.
T-knobs should be to the outside of the
handles as shown in second figure.
_i;=T.Knob.
T-Knob'_!i:

• Insertoneendofthe control rod from right
to left through the hole in the front wheel
bracket. Attach with hairpin found in parts
bag. See figure below.
r Pin
Rod
• To attach the recoil starter rope to the rope
guide, twist the rope through the rope
guide mounted on the right side of the
handle.
Bracket
• Push down on handle to tilt unit back.
• Insert the other end of the control rod
from right to left through the hole in the
depth control lever. Attach with hairpin
found in parts bag. See figure below.
• Depth control lever should be in forward
most selection slot for transport and
starting. See figure below.
• Remove bottom packing material.
Rod
Lever
Rope
Pull
J CHECKLIST
Before you operate your new Edger, to
ensure that you receive the best perfor-
mance and satisfaction from this quality
product, please review the following
checklist:
,/ All assembly instructions have been
completed.
,/ No remaining loose parts in carton.
,I All fasteners have been properly
installed and tightened.
While learning, how to use your Edger,
pay extra attention to the following impor-
tant items:
,/,/ Engine oil is at proper level.
,/,/ Fuel tank is filled with fresh, clean,
regular Unleaded gasoline.
,/,/ Become familiar with all controls, their
location and function. Operate controls
before starting engine.
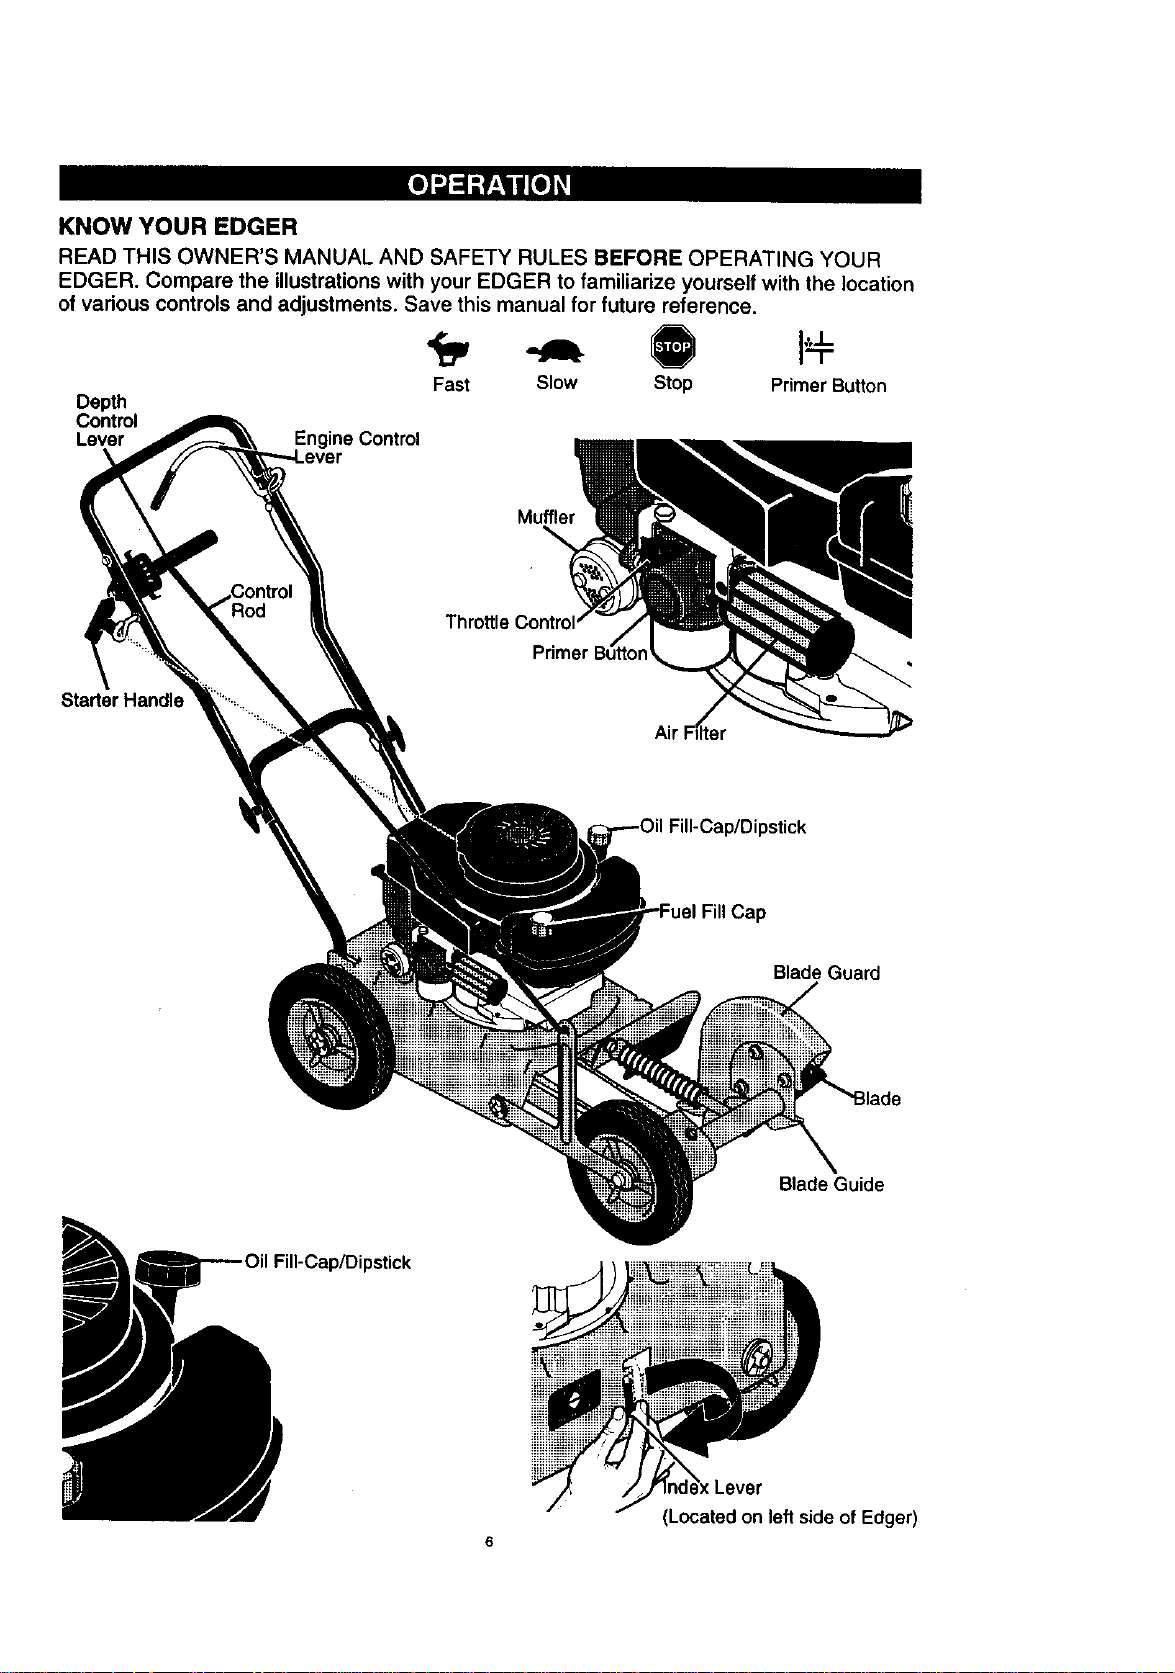
KNOW YOUR EDGER
READ THIS OWNER'S MANUAL AND SAFETY RULES BEFORE OPERATING YOUR
EDGER. Compare the illustrations with your EDGER to familiarize yourself with the location
of various controls and adjustments. Save this manual for future reference.
Depth
Control
Lever
Starter Handle
Fast Slow Stop Primer Button
Muffler
ThrottleControl
Fill-Cap/Dipstick
Fill Cap
pstick
Blade Guard
Blade Guide
Lever
(Located on left side of Edger)
6
Throttle Control - Used to control the en-
gine speed.
Primer Button - Injects fuel directly into the
carburetor manifold for faster starts.
Starter Handle - The engine on this edger
is equipped with an easy pull recoil starter.
Depth Control Lever - Controls the depth
of the blade.
Blade Guard - Used to prevent stones or
other material from being thrown at the op-
erator.
Engine Control Lever- Must be held back
to allow engine to start and run.
Index Lever- Permits adjustment from the
edging (vertical) position to beveling (45 ° )
position. To change position, pull the index
lever and rotate the quill assembly to the
desired angle or position.
/_ WARNING: Blade is rotating when
engine is running or being started. Keep
hands and feet away from blade to prevent
injury.
HOW TO USE YOUR EDGER
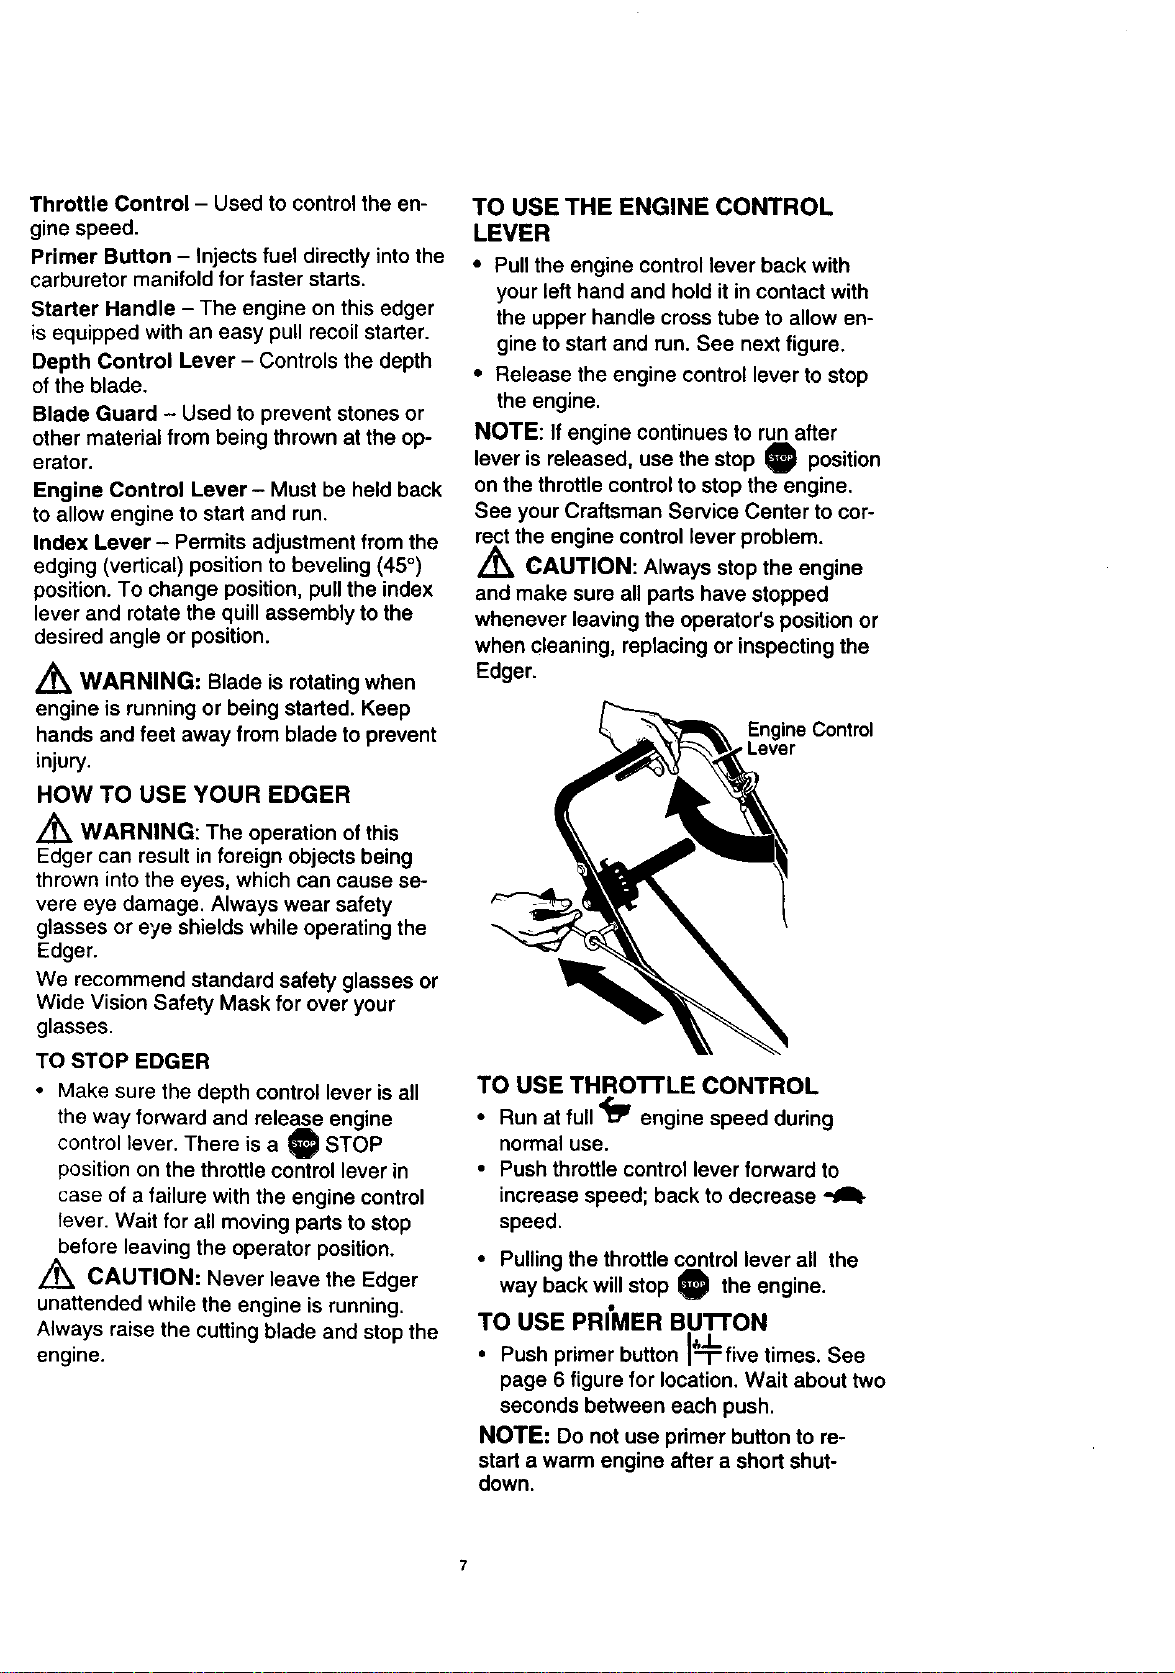
TO USE THE ENGINE CONTROL
LEVER
• Pull the engine control lever back with
your left hand and hold it in contact with
the upper handle cross tube to allow en-
gine to start and run. See next figure.
• Release the engine control lever to stop
the engine.
NOTE: If engine continues to run after
lever is released, use the stop O position
on the throttle control to stop the engine.
See your Craftsman Service Center to cor-
rect the engine control lever problem.
/_ CAUTION: Always stop the engine
and make sure all parts have stopped
whenever leaving the operator's position or
when cleaning, replacing or inspecting the
Edger.
Control
Z_ WARNING: The operation of this
Edger can result in foreign objects being
thrown into the eyes, which can cause se-
vere eye damage. Always wear safety
glasses or eye shields while operating the
Edger.
We recommend standard safety glasses or
Wide Vision Safety Mask for over your
glasses.
TO STOP EDGER
• Make sure the depth control lever is all
the way forward and release engine
control lever. There is a O STOP
position on the throttle control lever in
case of a failure with the engine control
lever. Wait for all moving parts to stop
before leaving the operator position.
Z_ CAUTION: Never leave the Edger
unattended while the engine is running.
Always raise the cutting blade and stop the
engine.
TO USE THROTrLE CONTROL
• Run at full '_ engine speed during
normal use.
• Push throttle control lever forward to
increase speed; back to decrease
speed.
• Pulling the throttle control lever all the
way back will stop IO the engine.
TO USE PRIMER BUTFON
I
• Push primer button I-r-five times. See
page 6 figure for location, Wait about two
seconds between each push.
NOTE: Do not use primer button to re-
start a warm engine after a short shut-
down.
_J_
7
TO USE THE DEPTH CONTROL
LEVER
• Position your Edger in desired edging lo-
cation before operating.
• Start the engine and move the depth
control lever back to lower the cutting
blade.
• Select the edging depth you need.
There are 3 selections up to approxi-
mately 2 inches deep.
IMPORTANT: If very deep edging is
required, we recommend that a shallow
cut be made first, then cut at greater
depths until the desired depth is ob-
tained.
/_ WARNING: Keep away from the rotat-
ing blade. The blade can cause injury.
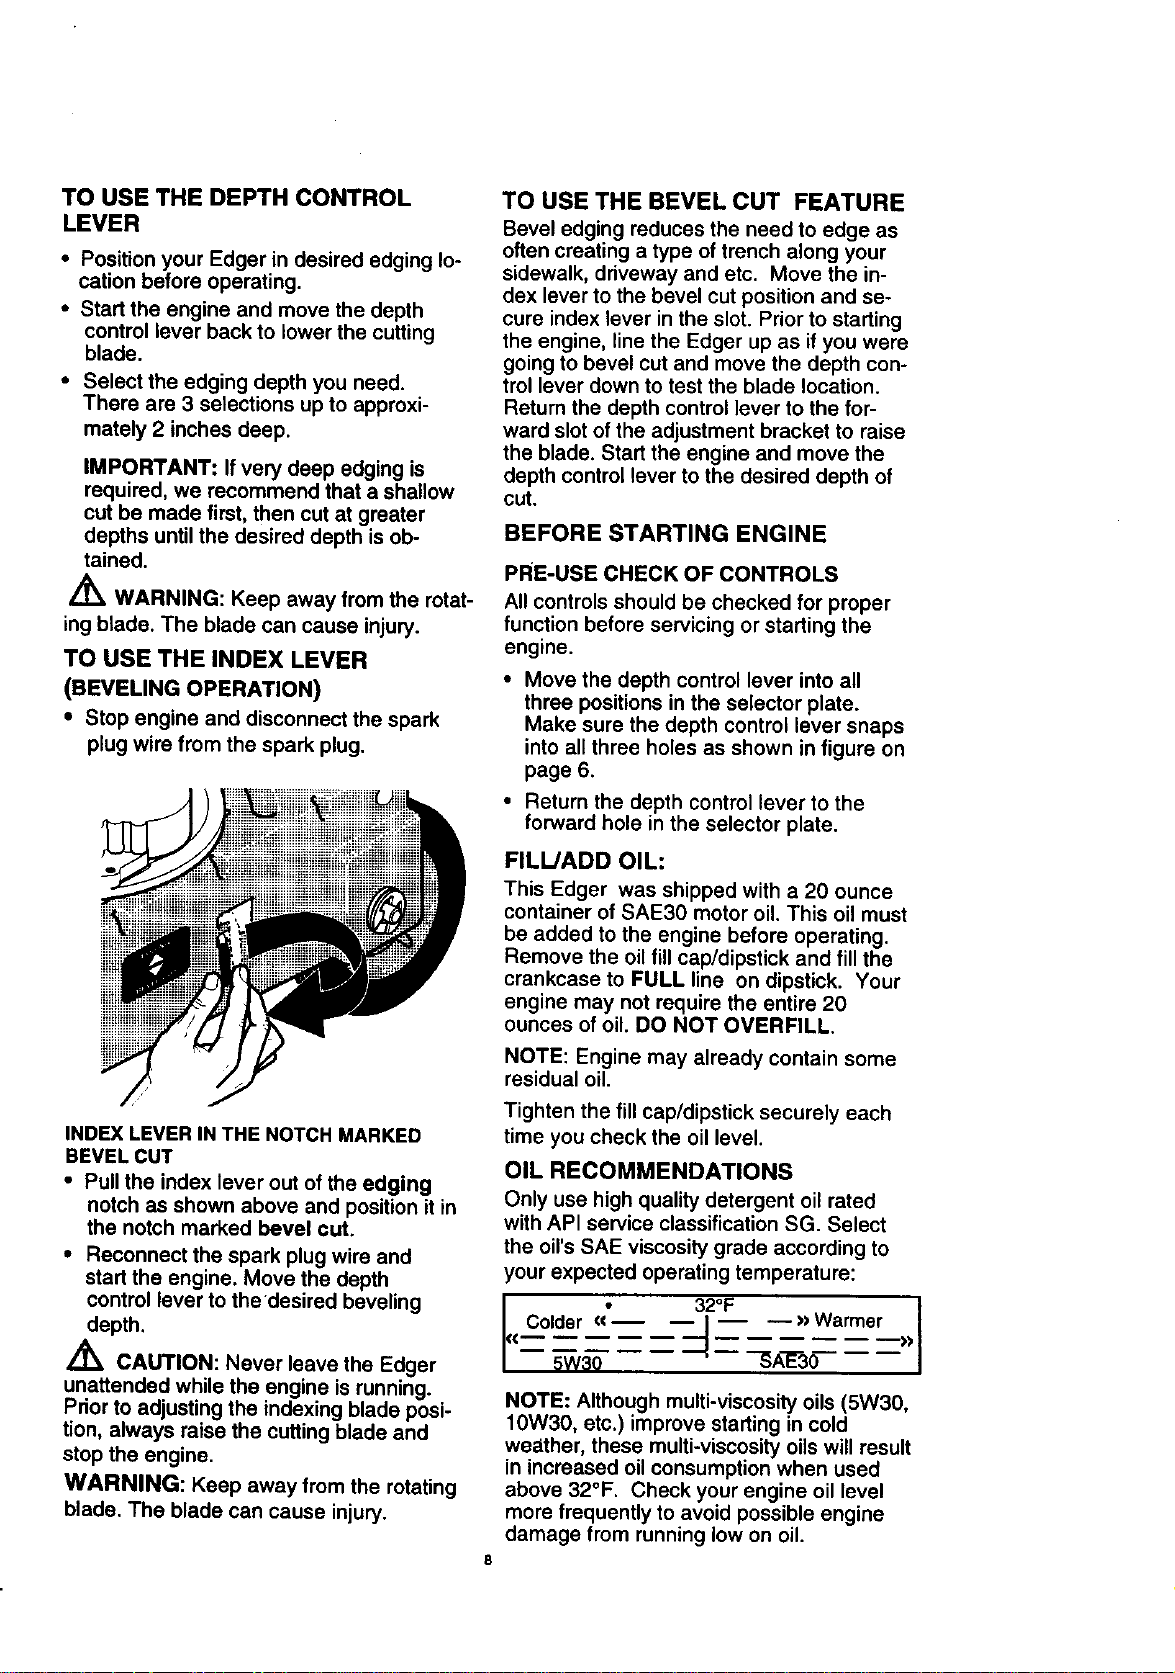
TO USE THE INDEX LEVER
(BEVELING OPERATION)
• Stop engine and disconnect the spark
plug wire from the spark plug.
TO USE THE BEVEL CUT FEATURE
Bevel edging reduces the need to edge as
often creating a type of trench along your
sidewalk, driveway and etc. Move the in-
dex lever to the bevel cut position and se-
cure index lever in the slot. Prior to starting
the engine, line the Edger up as ff you were
going to bevel cut and move the depth con-
trol lever down to test the blade location.
Return the depth control lever to the for-
ward slot of the adjustment bracket to raise
the blade. Start the engine and move the
depth control lever to the desired depth of
cut.
BEFORE STARTING ENGINE
PRE-USE CHECK OF CONTROLS
All controls should be checked for proper
function before servicing or starting the
engine.
• Move the depth control lever into all
three positions in the selector plate.
Make sure the depth control lever snaps
into all three holes as shown in figure on
page 6.
• Return the depth control lever to the
forward hole in the selector plate.
INDEX LEVER IN THE NOTCH MARKED
BEVEL CUT
• Pull the index lever out of the edging
notch as shown above and position it in
the notch marked bevel cut.
• Reconnect the spark plug wire and
start the engine. Move the depth
control lever to the desired beveling
depth.
_ CAUTION: Never leave the Edger
unattended while the engine is running.
Prior to adjusting the indexing blade posi-
tion, always raise the cutting blade and
stop the engine.
WARNING: Keep away from the rotating
blade. The blade can cause injury.
FILL/ADD OIL:
This Edger was shipped with a 20 ounce
container of SAE30 motor oil. This oil must
be added to the engine before operating.
Remove the oil fill cap/dipstick and fill the
crankcase to FULL line on dipstick. Your
engine may not require the entire 20
ounces of oil. DO NOT OVERFILL.
NOTE: Engine may already contain some
residual oil.
Tighten the fill cap/dipstick securely each
time you check the oil level.
OIL RECOMMENDATIONS
Only use high quality detergent oil rated
with API service classification SG. Select
the oil's SAE viscosity grade according to
your expected operating temperature:
<<__Colder(<*--___W30 3--_2°F-_A'LL'35>>Warmer I>>
NOTE: Although multi-viscosity oils (5W30,
10W30, etc.) improve starting in cold
we_tther, these multi-viscosity oils will result
in increased oil consumption when used
above 32°F. Check your engine oil level
more frequently to avoid possible engine
damage from running low on oil.
 Loading...