

Craftsman 536.255861 User Manual
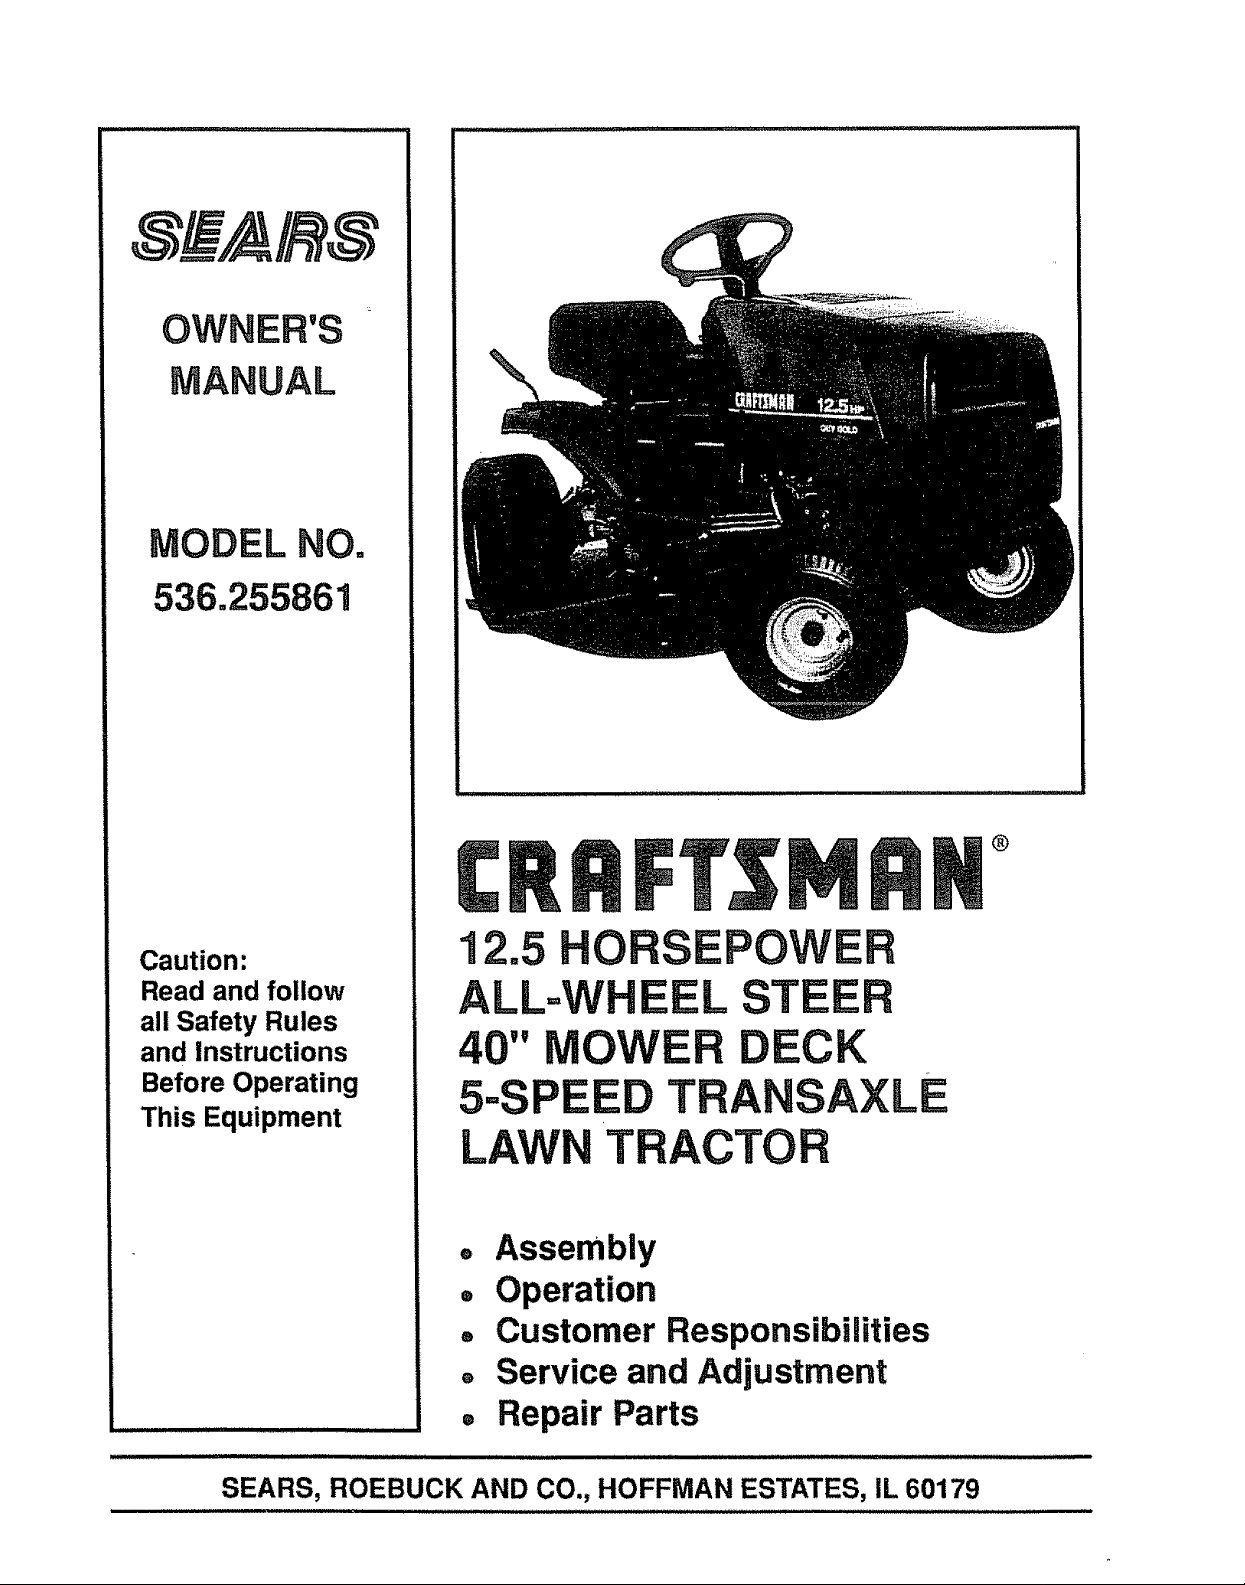
MODEL NO.
536°255861
®
Caution:
Read and follow
all Safety Rules
and Instructions
Before Operating
This Equipment
i illlllll,llllllllll i i ill l i i
SEARS, ROEBUCK AND CO., HOFFMAN ESTATES, IL 60179
12.5 HORSEPOWER
AL L STEER
40" MOWER
5=SI TRANSAXLE
LAWN TRACTO
, Assembly
= Operation
= Customer Responsibilities
, Service and Adjustment
® Repair Parts
SAFETY RULES
THESEINSTRUCTIONSAREFORYOURPROTECTION.PLEASEREADTHEMCAREFULLY.
IMPORTANT
THIS CUTTING MACHINE tS CAPABLE OF AMPUTATING HANDS AND FEET AND THROWING OBJECTS+ FAILURE 'TO OBSERVE THE
FOLLOWING SAFETY INSTRUCTIONS COULD RESULT IN SERIOUS INJURY OR DEATH.
L GENERAL OPERATION:
e Know controls and how to stop qutcl_tyo
• Reed, understand, and foUow all Instructions In the manual and
on the machine before starting.
• Only allow responsible adults, who are familiar with
instructions, to operate the machine.
• Wear safety glasses or eye shields when assembling or
operating the machine.
e Do not operate machine when barefooted+ Always wear
substantial footwear, preferably steel-toed shoes.
• Do not wear loose fitting cfothing that could get caught in
moving parts.
• Clear the area of objects such as rocks, toys, wire, etc., which
could be picked up and thrown by the blade(s)+
• Be sure the area is clear of other people before mowing. Stop
machine if anyone enters the area.
• Never carry passengers_
• Do not mow in reverse unless absolutely necessary. Always
look down and behind before and while backing.
• Be aware of the mower discharge direction and do not point it at
anyone+ Do not operate the mower without either the entire
grass catcher or the guard in place+
• Slow down before turnlng_
• Never leave a running machine unattended_ Always turn off
blades, set parking brake, stop engine, and remove keys before
dismounting.
• Turn off blade(s) when not mowing+
• Stop engine before removing grass catcher or unclogging
chute°
• Mow only in daylight or good artificial |fghL
• Do not operate the machine while under the influence of alcohol
or drugs.
• Watch for traffic when Operating near or crossing roadways
• Use care when mowing around a fixed object to prevent the
blade(s) from striking It. Never deliberately run over any foreign
objecL
• Usa extra care when loading or unloading the machine into a
belier or truck.
• Use care when putllng loads or using heavy equipmenL
e. Use only approved drewbar hitch points.
b_ Limit loads to those that you can safely control.
c+ Do not turn sharply. Use care when backing.
do Use counterweight(s), wheel weight or tire chains when
suggested in attachment(s) instructions.
IL SLOPE OPERATION:
Slopes are o major factor related to loss*of*control and tip-over
accidents, which can result in severe injury or death, Aft slopes
require extra caution. If you cannot back up the slope or if you feel
uneasy on it, do not mow tL
DO
• Mow up and down slopes, not across°
• Remove obstacles such as rocks, tree limbs, etc.
• Watch for holes, ruts, or bumps. Uneven terrain couid overturn
the rrachlne. Tall grass can hide obstacles.
• Use slow speed, Choose a low gear so that you w_lI not have to
stop or shift while on the stops+
• Follow the manufacturer's recommendations for wheel weights
or counterweights to improve stability+
• Use extra care w_th grass catchers or other attachments. These
can change the stability of the machine.
• Keep el! movement on the slopes slow end gradual Do not
make sudden changes in speed or direction.
• Avoid starting or stopping on a slope. If tires toss traction, turn
off the blade(s) and proceed slowly straight down the slope+
DO NOT
• Do not turn on slopes unless necessary, end then slowly and
gradually downhill, If possible+
• Do not mow near dtopoffs, ditches or embankments. The
mower could suddenly turn over if a wheel is over the edge of a
cliff or ditch, or If an edge caves In+
e Do not mow on wet grass. Reduced traction could cause
sliding.
• Do nor try to stabilize the machine by puffing your foot on the
ground.
• Do not use grass catcher on steep slopes.
lU. CHILDREN:
Tregtc accidents can occur if the operator is not alert to the presence
of children. Children are often attracted to the machine and the
mowing activlty_ Never assume that children will remain where you
lest saw them.
• Keep children out of the mowing area and under the watchful
care of another responsible adult.
e Be alert and turn machine off if children enter the area.
• Before end when becking, look behind and down for small
children+
• Never carry children. They may fail off and be seriously +nJured
or Interfere with safe machine operation.
• Never allow children to operate the machine.
• Use extra care when approaching blind corners, shrubs, trees,
or other objects that may obscure vision.
IV, SERVICE:
• Use extra care in handling gasoline and other fuels. They are
flammable and vapors are explosive.
a. Use only an approvedcontatner_.
b. Never remove gas cap or add fuel with the engine running+
AIIow engine to cool before re-fueling. Do not smoke.
c, Never re-fuetthe machtneindoors.
d. Never store the machine or fuel container inside where
there is an open flame, such as in e water heater.
• Check fuel suppty before each use allowing space for
expansion as the heat of the engine and/or sun can cause
gasoline to expend end overflow the tank,
• Use extra care when handling battery acid+ Acid contact with
skin may cause severe burns. Eye contact may cause
blindness.
e Use extra care when servicing the battery. Explosive gas ts
produced [n the battery. Do not service the battery while
smoking or near an open spark or f!ame+ This may cause the
battery to explode causing serious injury.
e Never run a machine Inside a closed area. Exhaust fumes
contain CARBON MONOXIDE, an ODORLESS and DEADLY
GAS.
• Keep nuts and bolts, especially blade attachment bolts, tight
and keep equipment in good condition°
• Never' tamper with safety devices+ Check their operation
regulariy_
• Do not change the engine governor settings or over speed
engine.
• Reduce fire hazards. Keep machine free of grass, leaves, or
other debris build-up. Clean up oil or fuel spillage+ Allow
machine to coot before storing,
• Stop end inspect the equipment If you strike an object. Repair, if
necessary, before restarting.
• Never make adjustments or repairs with the engine running+
• Grass catcher components are subject to wear, damager and
deterioration, which could expose moving parts or allow
objects to be thrown+ Frequently check components end
replace with manufacturer's recommended parts, when
necessary.
• Mower blade(s) are sharp end can cuL Wrap the blade(s) or
wear gloves, and use extra caution when servicing them.
• Check brake operation frequently, Adjust and service as
required.
l_k LOOK FOR THIS SYMBOL TO POINT OUT IMPORTANT SAFETY PRECAUTIONS. IT MEANS-ATTENTIONtI[BECOME ALERT!!! YOUR SAFETY IS INVOLVED.
2
CONGRATULATIONS on your purchase of a Sears
Craftsman Tractor. It has been designed, engineered
and manufactured to give you the best possible depend-
ability and performance
Should you experience any problem you cannot easily
remedy, please contact your nearest Sears Service
CenterlDepartment, We have competent, well-trained
technicians and the proper too!s to service or repair this
unit..
Please read and retain this manual. The instructions will
enable you to assemble and maintain your tractor
properly_ Always observe the "SAFETY RULES.."
MODEL
NUMBER 536.255861
SERIAL
NUMBER
DATE OF
PURCHASE
THE MODEL AND SERIAL NUMBERS WILL BE
FOUND ON A PLATE UNDER THE SEAT
YOU SHOULD RECORD BOTH SERIAL NUMBER
AND DATE OF PURCHASE AND KEEP IN A SAFE
PLACE FOR FUTURE REFERENCE_
MAINTENANCE AGREEMENT
A Sears Maintenance Agreement is available on this
product. Contact yournearest Sears Store for details,,
CUSTOMER RESPONSIBILITIES
= Readandobservesafetyrules,
e Followaregularschedulein maintaining,caringfor and
usingyourunit,,
o Followthe instructionsunder"Customer Responsi-
bilities" and "Storage" sections of this manual
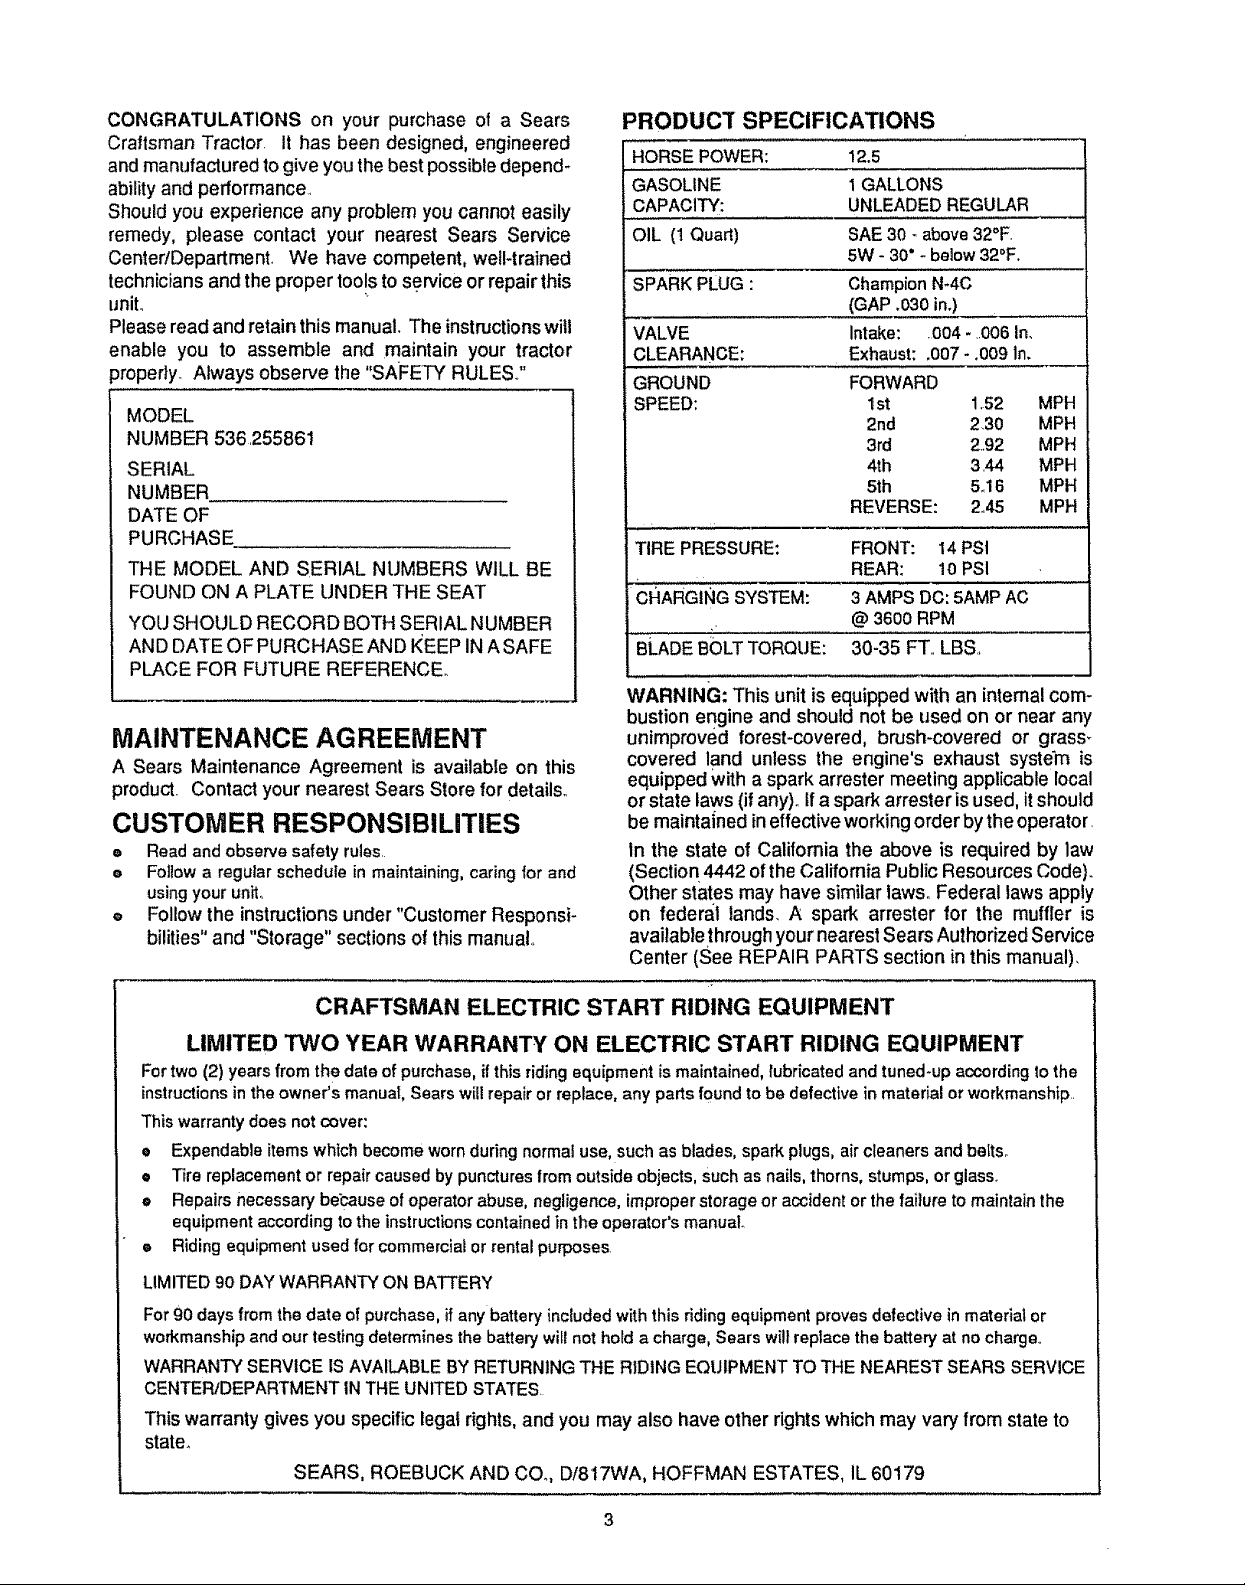
PRODUCT SPECIFICATIONS
HORSEPOWER: 12.5
GASOLINE i GALLONS
CAPACITY: UNLEADEDREGULAR
OIL (1Quart) SAE30- above32°F.
5W - 30"- below32°F.
SPARKPLUG: ChampionN*4C
(GAP.030in.)
VALVE Intake: ,004-,,006 In,
CLEARANCE: Exhaust:.007- .009 ln.
GROUND FORWARD
SPEED: 1st 1,52
2nd 230
3rd 292
4th 3.44
5th 5,.16
REVERSE: 2.45
TIRE PRESSURE: FRONT: 14PSI
REAR: 10 PSI
CHARGING SYSTEM: 3 AMPSDC:5AMPAC
@ 36O0RPM
BLADEBOLTTORQUE: 30-35 FT.,LBS.
WARNING: This unit is equipped with an internal com-
bustion engine and should not be used on or near any
unimproved forest-covered, brush-covered or grass_
covered land unless the engine's exhaust syste_mis
equipped With a spark arrester meeting applicable local
or state laws (if any). If a spark arrester is used, it should
be maintained in effective working order bythe operator.
In the state of Califomia the above is required by law
(Section 4442 of the Califomia Public Resources Code).
Other states may have similar laws. Federal laws apply
on federal lands_A spark arrester for the muffler is
avaitablethrough your nearest Sears Authorized Service
Center (See REPAIR PARTS section in this manual),
MPH
MPH
MPH
MPH
MPH
MPH
CRAFTSMAN ELECTRIC START RIDING EQUIPMENT
LIMITED TWO YEAR WARRANTY ON ELECTRIC START RIDING EQUIPMENT
Fortwo (2) yearsfrom the dateof purchase,ifthisridingequipmentismaintained,lubricatedandtuned-upaccordingto the
instructionsin theowner's manual,Searswillrepairor replace,anypartsfoundto be defectivein materialorworkmanship..
Thiswarrantydoesnot cover:
• Expendable items which become wornduring normal use, such as blades, spark plugs, air cleaners and bettso
• Tire replacement or repair caused by punctures from outside objects, Such as nails, thorns, stumps, or glass_
e Repairs necessary be_,auseof operator abuse, negligence, improperstorage or accident or the failure to maintain the
equipment according to the instructions contained in the operator's manual_
• Riding equipment used for commercial or rental purposes.
LIMITED 90 DAY WARRANTY ON BATTERY
For 90 days from the date of purchase, ifany battery includedwith this ridingequipment proves defective in material or
workmanship and our testing determines the battery will not hold a charge, Sears wiltreplace the battery at no charge,,
WARRANTY SERVICE IS AVAILABLE BY RETURNING THE RIDING EQUIPMENT TOTHE NEAREST SEARS SERVICE
CENTER/DEPARTMENT IN THE UNITED STATES.
This warranty gives you specific legal rights,and you may also have other rights which may vary from state to
state.
SEARS, ROEBUCK AND COo, D/817WA, HOFFMAN ESTATES, IL 60179

TABLE OF CONTENTS
SAFETY RULES ........................................... 2
PRODUCT SPECIFICATIONS ...................... 3
CUSTOMER RESPONSIBILITIES .... 3, 16-22
WARRANTY ................................................... 3
TABLE OF CONTENTS ................................ 4
INDEX ................................... ......................... 4
TRACTOR ACCESSORIES .......................... 5
CONTENTS OF HARDWARE PACK ............ 6
ASSEMBLY .............................................. 7-10
OPERATION .......................................... 11-15
SERVICE AND ADJUSTMENTS ........... 23-32
TROUBLE SHOOTING .......................... 33-34
STORAGE ................................................... 35
REPAIR PARTS ................ ;.................... 36-69
PARTS ORDERING/SERVICE ..... Back Cover
INDEX
Accessories .....................................................5
A
Adjustments:
Blade Brake ..............................................26
Brake .....................................................................29
Carburetor ..................................................33
Mower Deck Leveling:
Front-To-Rear ...............................................25
Side-To-Side ...............................................24
Mower Deck Height .............................25
Seat .................................................................28
Throttle Control Cable .....................:.32
Air Cleaner, Engine .................................21
Air Intake Screen, Engine ....................20
Assembly ....................................................7-10
B
Battery:
Charging ..................................................9
Cleaning ..........................................................19
Installation ...............................................10
Levels ...................................................9, 19
Preparation....................................................8
Starting with Weak Battery ...............31
Storage .....................................................35
Terminals ..................................................19
Belt:
Traction Drive
Removal!Replacement .................. 28
Mower Blade Drive
Removal/Replacement ....................27
Blade:
Blade Care .........................................18
Sharpening ...........................................19
Replacement .....................................t8
Brake Adjustment..........................................29
C
Carburetor Adjustment..........................32
Controls, Tractor,,.................................11
Customer Responsibilities .......3, 16-22
Air Cleaner, Engine ................................21
Air Intake Screen, Engine ...............20
Battery ..........................................................19
Blade ....................................................18-19
Brake Operation .......................................18
Cooling Systems, Engine ...............20
Engine Oil......................................3, 20
Fuel Fifter ..................................................22
LubricationChart ...............................17
Schedule ..............................................16
Spark Plugs ........................................21
Tire Care ..................................9, 18, 30
Cutting Height, Mower ..............................13
E
Electrical:
Interlocksand Relays .....................31
Engine:
Air Cleaner ............................................21
Air Intake Screen ..................................20
Cooling Stysem ...................................21
Oil Change ................................................20
OilLevel ..............................................14, 20
Oil Type ............................................3, 20
Preparation ..........................................14
Starting ..........................................................14
Storage ...............................................35
F
Filter:
AirCleaner...................................................21
Fuel ....................................................................22
Fuel:
Type .......................................................3, 14
Storage ..............................................................35
H
Headlights.....................................................31
Hood Removal/Instatfaltion .......................32
L
Leveling, Mower Deck .....................24-25
Lubrication:
Chart..............................................................17
M
Mower:
Adjustment, Front-To-Rear ...................25
Adjustment, Side-To-Side ......................24
Adjustment, Deck Height .....................25
Blade Sharpening ...................................19
Blade Replacement ...............................18
Brake Adjustment ..............................29
CuttingHeight...................................13
Installation ............................................23-24
Operation ..................................................13
Removal ...........................................23-24
Mowing/MulchingTips ................................15
Muffler...............................................................21
Mulching Plug Removal ......................19
Spark Arrester .....................................3, 21
O
Oil:
Cold Weather Conditions ..........13, 20
Engine.........................................................20
Storage .........................................................35
Type .................................................3, 17, 20
Operation ........................................11-t5
Operating Your Mower ...............................13
Options:
Accessories ................................................5
Spark Arrester ........................................3, 21
P
Parking Brake ......................................12-13
Parts Bag..........................................................6
Product Specifications ..................................3
R
Repair Parts ..................................36-69
Tractor .........................................36-63
Engine .....................................................64-67
Transmission .....................................68-69
S
Safety Rule .........................................................2
Service and Adjustments ................23-32
Blade Brake...................................................26
Carburetor ..................................................32
Control Lever ........................................30
Fuse..............................................................................31
Hood Rem0val/InstaUation ...............32
Traction Ddve Belt:
Removal/Replacement .............................28
Mower Blade Drive Belt:
Removal/Replacement ..................27
Blade Brake Adjustment ....................26
Mower Deck Adjustment:
Front-To-Rear ........................................25
Side-To-Side ........................................24
Mower Deck Height .........................25
Mower Deck Removal ....................23-24
Mower Deck installation ........... 23-24
Seat ................................................ 28
Steering Gear ................................ 29
T_reCare .....................................9, 18, 30
ThrottleControl................................................32
Wheel Repair ......................................30
Spark Plugs ...................................... 21
Specifications ..............................................3
Starting the Engine ............................. 14
Steering Wheel ................................................ 7
Stopping the Tractor ........................................12
Storage ......................................................35
T
Table of Contents ................................ 4
Throttle Control Cable
Adjustment....................................... 32
Tires .......................................................9, 18, 30
Tire Pressure ........................................3, 9, 16
Transaxle:
Cooling...............................................19
Troubleshooting Points .................... :33-34
W
Warranty..................................................................3
4
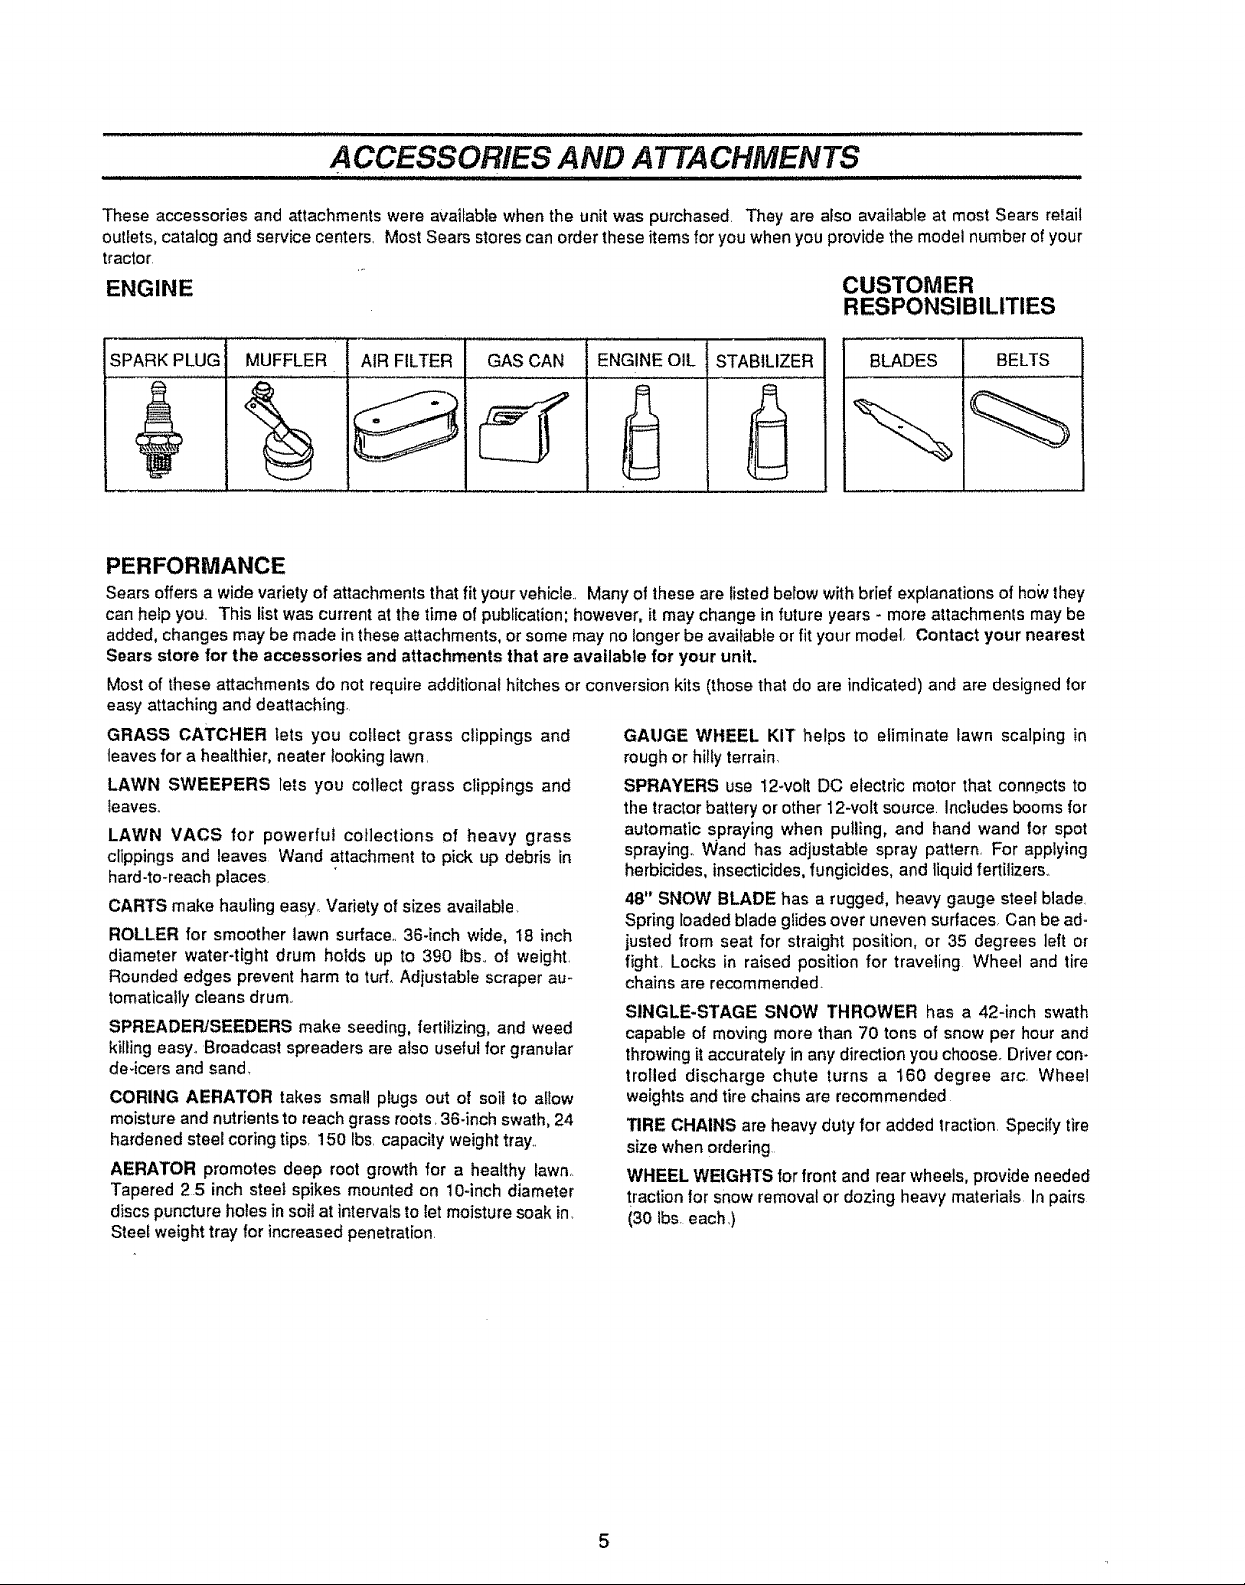
ACCESSORIES AND ATTACHMENTS
These accessories and attachments were available when the unit was purchased. They are also available at most Sears retail
outlets, catalog and service centers, Most Sears stores can order these items for you when you provide the model number of your
tractor
ENGINE CUSTOMER
RESPONSIBILITIES
SPARK PLUG BLADES BELTSMUFFLER _lRFILTER GAS CAN ENGINE OIL
STABILIZER
PERFORMANCE
Sears offers a wide varietyof attachments that fit your vehicle.. Many of these are listedbelow with brief explanations of holythey
can helpyou. This list was currentat the time of publication;however, it may change in future years - more attachments may be
added, changes may be made inthese attachments, or some may no longer be available or fityour model, Contact your nearest
Sears store for the accessories and attachments that are avaflable for your unit.
Most of these attachments do not requireadditional hitches or conversion kits (thosethat do are indicated) and are designedfor
easy attaching and deattaching.
GRASS CATCHER lets you collect grass clippings and
leaves for a healthier, nearer looking lawn,
LAWN SWEEPERS lets you collect grass clippings and
leaves°
LAWN VACS for powerful collections of heavy grass
clippings and leaves Wand attachment to pick up debris in
hard-to-reach places,
CARTS make hauling easY_Variety of sizes available.
ROLLER for smoother lawn surface. 36-inch wide, 18 inch
diameter water-tight drum holds up to 390 lbs,, ol weight,
Rounded edges prevent harm to turf. Adjustable scraper au-
tomaticallycleans drum.,
SPREADER/SEEDERS make seeding, fertilizing, and weed
killing easy,,Broadcast spreaders are also useful for granular
de-icers and sand,
CORING AERATOR takes small plugs out of soil to afiow
moisture and nutrients to reach grass roots, 36-inch swath, 24
hardened steel coring tips, 150 lbs, capacity weight tray,,
AERATOR promotes deep root growth for a healthy lawn,.
Tapered 2.5 inch steel spikes mounted on 10-inch diameter
discs puncture holes in soil at intervals to let moisture soak in,
Steel weight tray for increased penetration.
GAUGE WHEEL KIT helps to eliminate lawn scalping in
rough or hilly terrain,
SPRAYERS use 12-voft DC electric motor that connects to
the tractor battery or other 12-volt source. Includes booms for
automatic spraying when pulling, and hand wand lot spot
spraying° Wand has adjustable spray pattern, For applying
herbicides, insecticides,fungicides, and liquid fertilizers,,
48" SNOW BLADE has a rugged, heavy gauge steel blade,
Spring loaded blade glides over uneven surfaces, Can be ad-
justed from seat for straight position, or 35 degrees left or
fight, Locks in raised position for traveling Wheel and tire
chains are recommended.
SINGLE-STAGE SNOW THROWER has a 42-inch swath
capable of moving more than 70 tons of snow per hour and
throwing it accurately in any direction you choose. Driver con-
trolled discharge chute turns a 160 degree arc. Wheel
weights and tire chains are recommended
TIRE CHAINS are heavy duty for added traction, Specify tire
size when ordering
WHEEL WEIGHTS forfront and rear wheels, provide needed
traction for snow removal or dozing heavy materials In pairs
(30 lbs each,)

Parts packed separately in carton
Steering Wheel Parts Bag Battery Acid
Jl_, i i iil,ii i ill ill ii
,IJII II Ill IIIIllllll
1
t1'© i
== !
I
1
.... L
'" i
i iii iiiiii illllll ii ii ii illllllll
i i illll Hlll,ll,ll,iH,H,ILI1,1,,/,,,,lllllllIlllll
Seat
•Owner's Manual
Parts Bag contents shown actual size unless noted
Steering Wheel Assembly Parts
1 - Spring Pin
1 - Mower Clutch Lever Knob
1 - Spare Key
4 - 5/16 x 3/4 tnch Hex Head Screws
4- 5/16 Inch Split Lockwashers
6
4 - 11/32 Inch Flatwashers
ASSEMBL Y
TOOLS REQUIRED FOR ASSEMBLY
A socket wrench wifl make assembly easier Standard wrench
sizes are listed,
(t) Pliers
(!) Utility knife
(1) Screwdriver (Small Phillips with a 1/4 inch shank)
(1) Hammer
(1) Tire pressure gauge
(2) 7/16 inch wrenches
(1) 3/8 inch wrench
(t) t/2 inch wrench
(1) Tape measure
When right and left hand is mentioned in this manual, it
means when you are in the operating position (seated behind
the steering wheel),
TO REMOVE TRACTOR FROM
CARTON
UNPACK CARTON
e Remove cardboard from top of wood crate
e Remove top frame from carton.
e Carefully remove contents of parts box (see CONTENTS
OF HARDWARE PACK on page 6),
• Cut down corners of panels with a utility knife and lay
panels down,
Remove cardboard from chute deflector on deck_o
e Remove protective plastic wrap from hood°
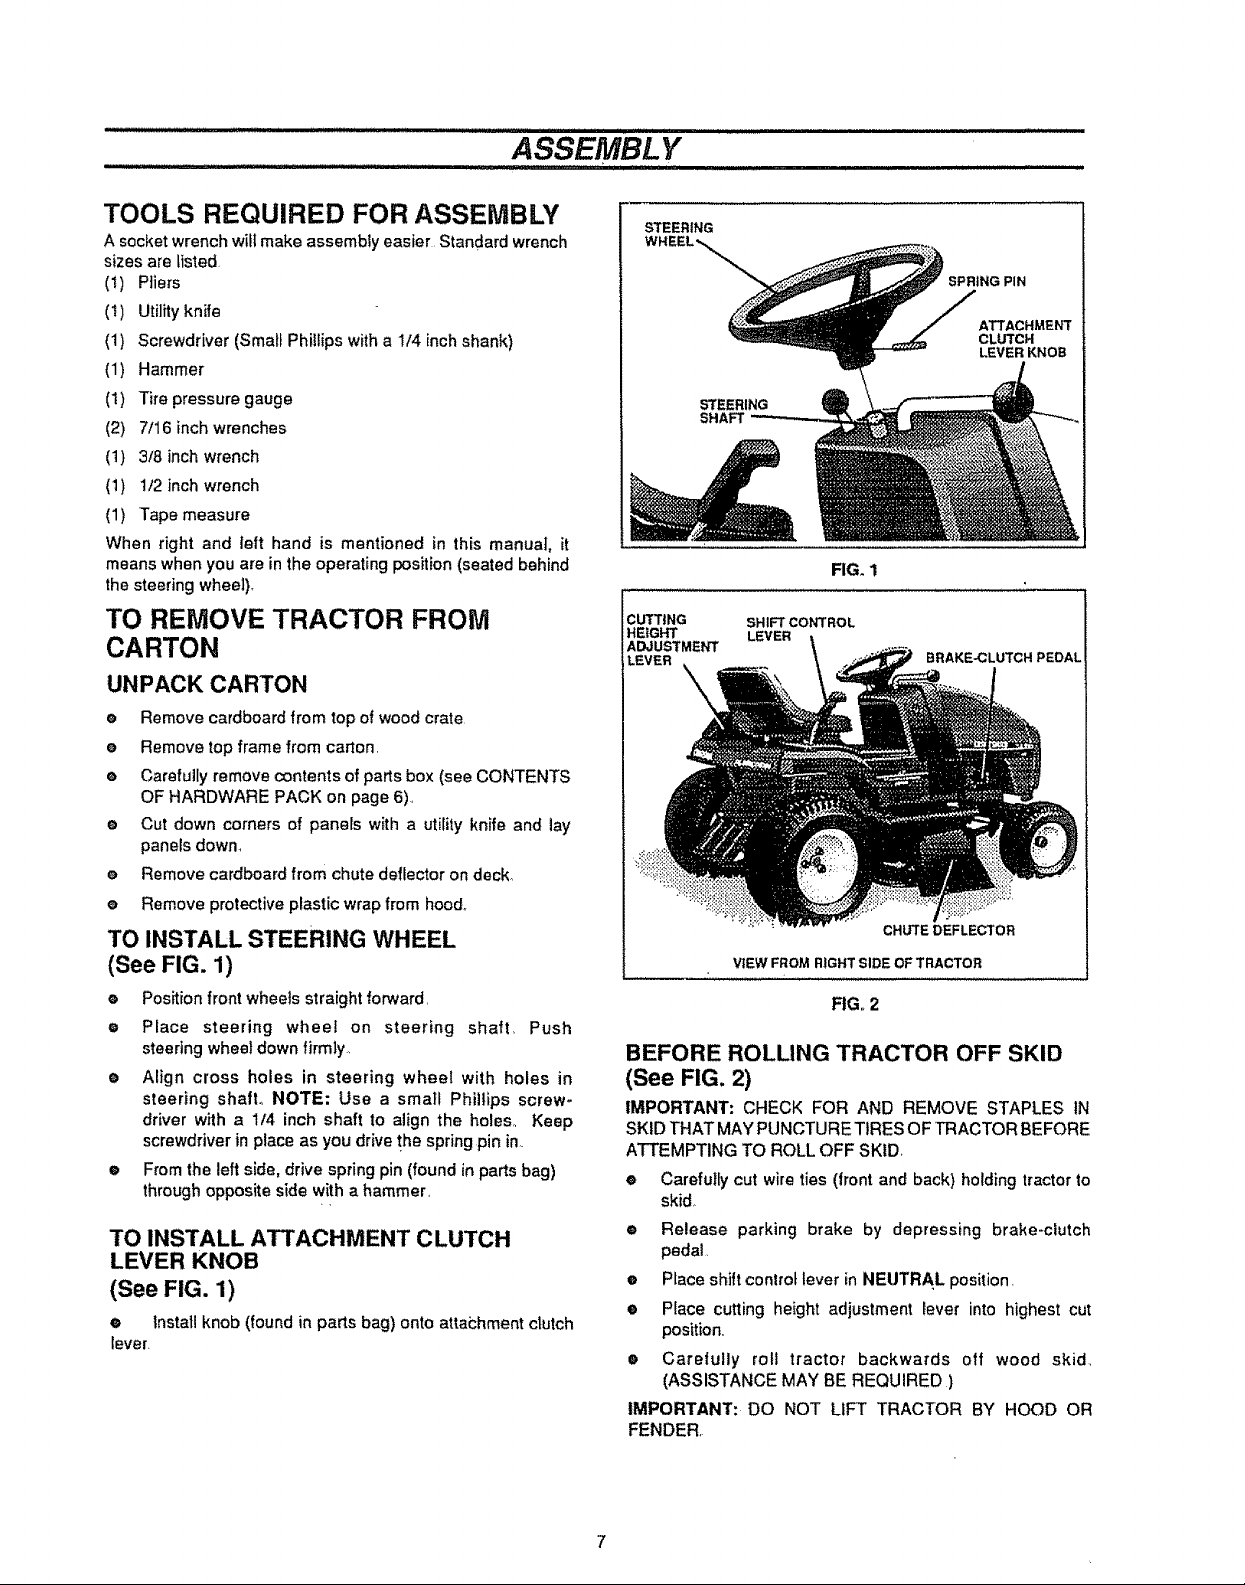
TO INSTALL STEERING WHEEL
(See FIG. 1)
e Position front wheels straight forward,
e Place steering wheel on steering shaft,
steering wheel down firmiy,
e Align cross holes in steering wheel with holes in
steering shaft° NOTE; Use a small Phillips screw-
driver with a 114 inch shaft to align the holes,, Keep
screwdriver in place as you drive the spring pin inn
® Fromthe leftside, drive spring pin (found in parts bag)
throughoppositeside with a hammer,
TO INSTALL ATTACHMENT CLUTCH
LEVER KNOB
(See FIG. 1)
• lnstall knob (found in parts bag) onto atta_;hment clutch
lever.
Push
STEERING
NGPIN
STEERING
SHAFT
FIG. 1
CUTTING SHIFT CONTROL
HEIGHT LEVER
ADJUSTMENT
LEVER
VIEW FROM RIGHT SIDE OF TRACTOR
FtGo2
BRAKE-CLUTCH PEDAL
CHLTrE DEFLECTOR
BEFORE ROLLING TRACTOR OFF SKID
(See FIG. 2)
IMPORTANT: CHECK FOR AND REMOVE STAPLES tN
SKID THAT MAY PUNCTURE TIRES OF TRACTOR BEFORE
ATTEMPTING TO ROLL OFF SKID
e Carefully cut wire ties (front and back) holding tractor to
skid,
e Release parking brake by depressing brake-clutch
pedal,
e Place shift control lever in NEUTRAL position.
e Place cutting height adjustment lever into highest cut
position,
e Carefully roll tractor backwards off wood skid,
(ASSISTANCE MAY BE REQUIRED )
IMPORTANT: DO NOT LIFT TRACTOR BY HOOD OR
FENDER,
ASSEMBLY
HOW TO SET UP YOUR TRACTOR
PREPARE BATTERY
For shipping purposes, battery is installed, Remove battery
(see TO REMOVE BATTERY instructions below),
CAUTION: Weareye and faceshield.
Wash hands or clothing Immediately if
accidentallyIn contactwith batteryacid.
Do not smoke. Fumes from charged battery acid are
explosive.
Follow the CAUTIONS located on the battery. Al-
ways wear gloves, clothing and goggles to protect
your hands, skin and eyes.
DANGER
Always disconnect negative (black) cable first.
Removing positive cable first can result In sparks if
the wrench touches any metal surface. Be sure
battery hold-down bracket does not touch battery
terminals and cause a spark.
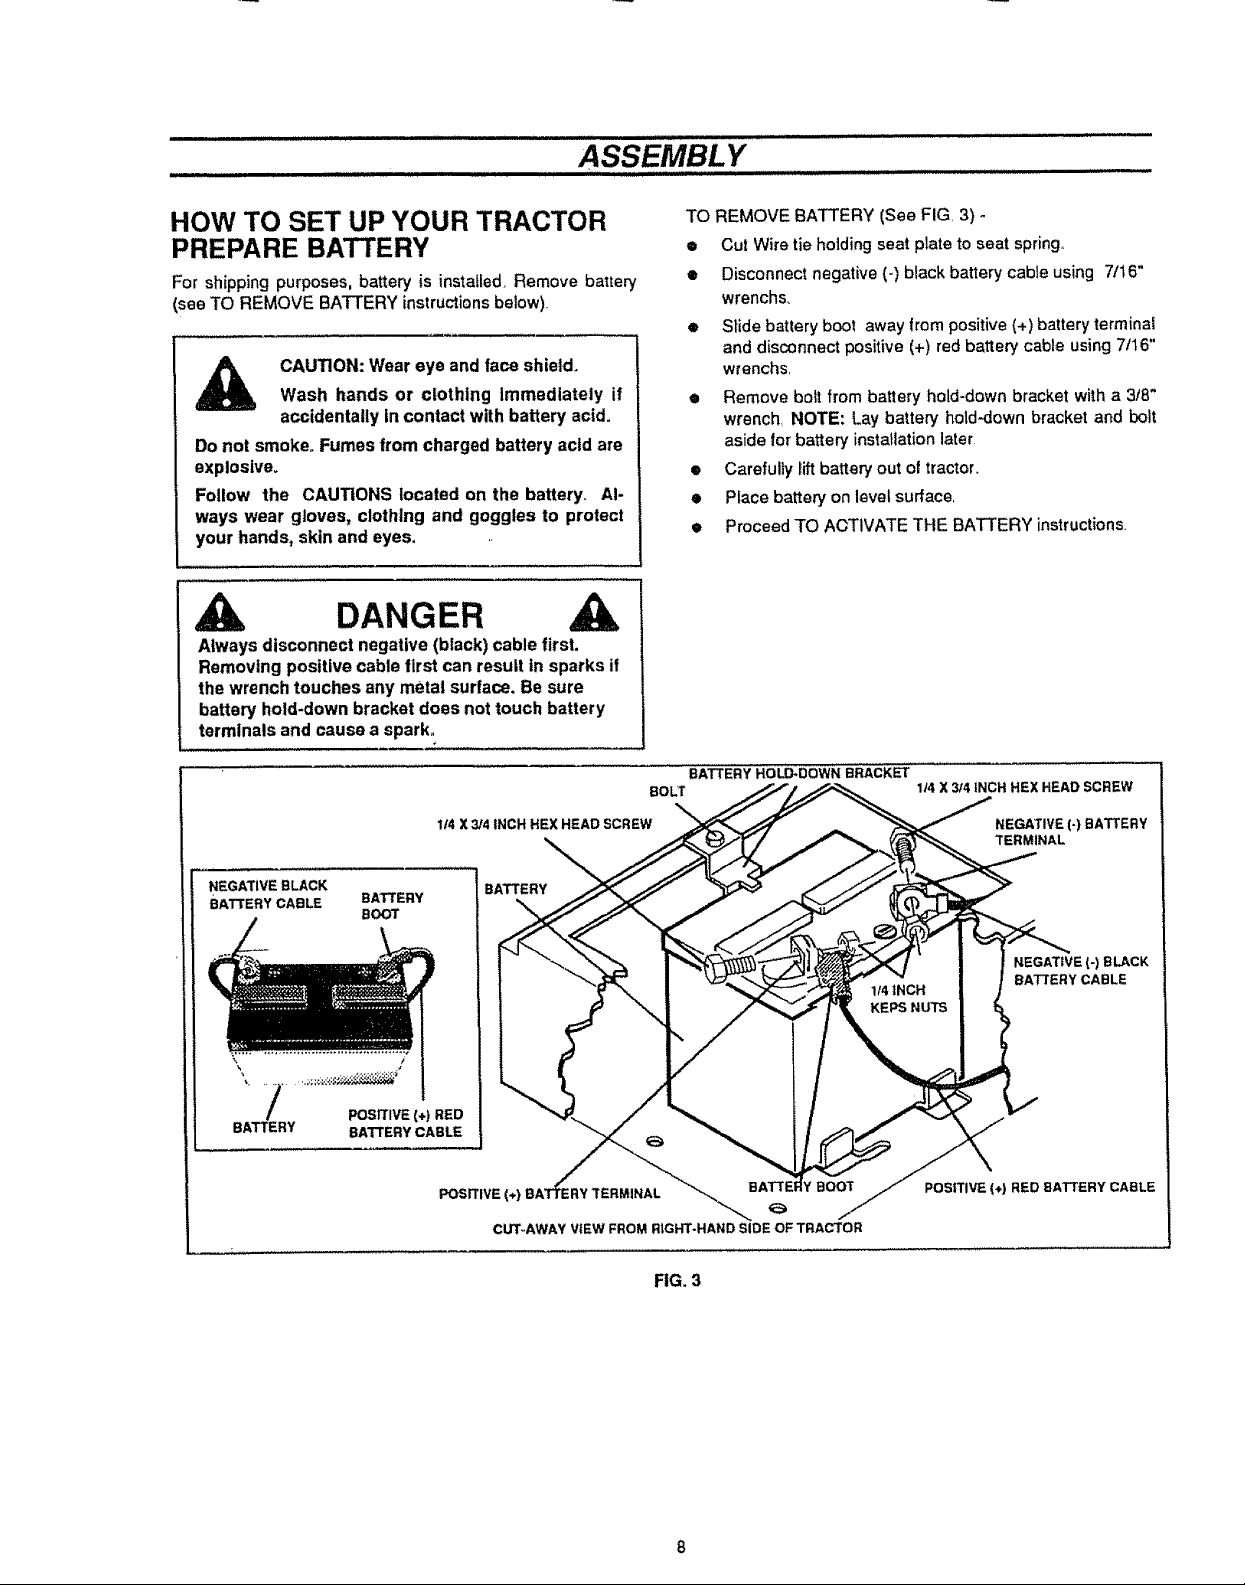
TO REMOVE BATTERY (See FIG, 3) -
• Cut Wire tie holding seat plate to seat spring,,
• Disconnect negative (-) black battery cable using 7t16"
wrenchs,
• Slide battery boot away from positive(+) battery terminal
and disconnect positive (+) red battery cable using 7/t6"
wrenchs,
e Remove bolt from battery hold-down bracket with a 3t8"
wrench, NOTE: Lay battery hold-down bracket and bolt
aside for battery installationlater
• Carefully liftbattery outot tractor,,
• Place battery on level surface,
• Proceed TO ACTIVATE THE BATTERY instructions.
BATTERY HOLD-DOWN BRACKET
1t4 X 314iNCH HEX HEAD SCREW
NEGATIVE BLACK
BATTERY CABLE
BATTERY BATTERY CABLE
BATTERY
BOOT
POSITIVE (+) RED
1/4 X 3/4 INCH HEX HEAD SCREW NEGATIVE 1-) BATTERY
BATTERY
POSITIVE (*)
CUT-AWAY ViEW FROM RIGHT-HAND SIDE OF TRACTOR
POSITIVE 1+) RED BATTERY CABLE
TERMINAL
NEGATIVE (-) BLACK
BATTERY CABLE
FIG. 3
ASSEMBL Y
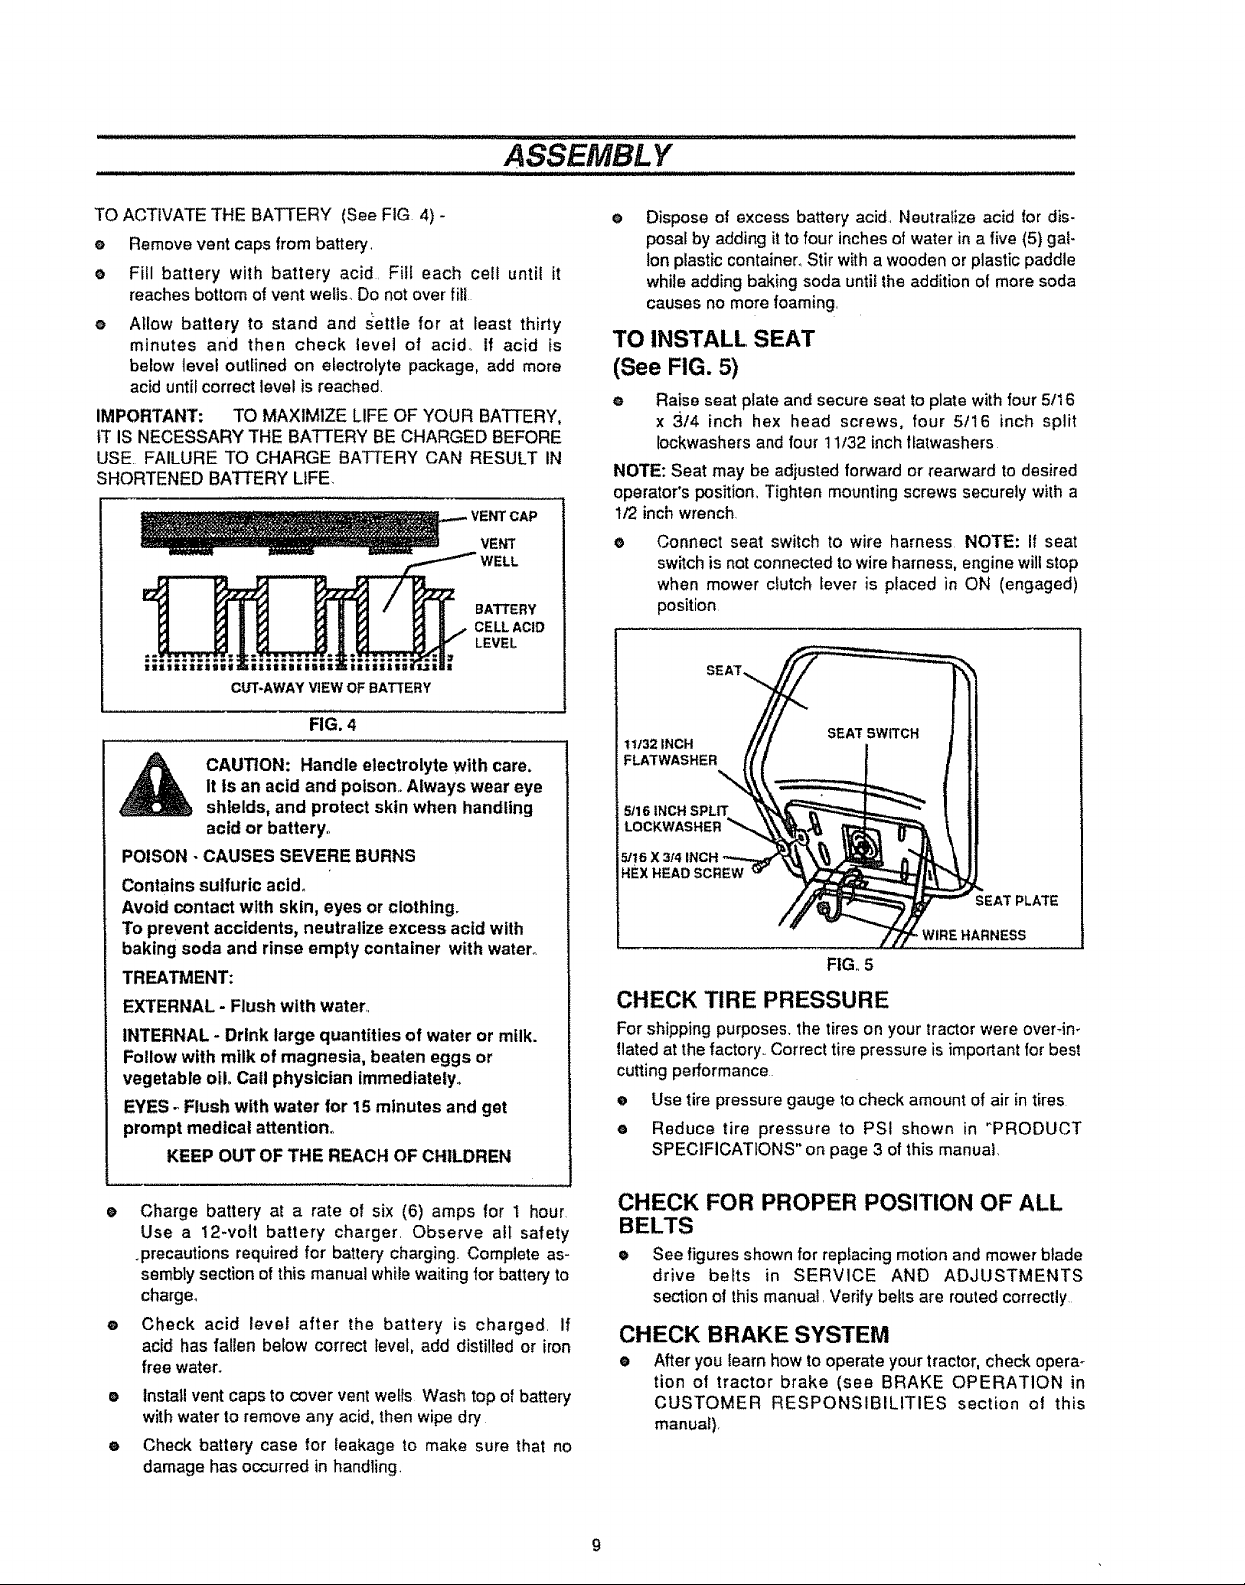
TO ACTIVATE THE BATTERY (See FIG 4) -
e Removevent caps from battery,
e Fill battery with battery acid. Fitl each celf until it
reaches bottom of vent wells.. Do not over flit
e Allow battery to stand and settle for at least thirty
minutes and then check level of acid.. If acid is
below level outlined on electrolyte package, add more
acid until correct level is reached.
IMPORTANT: TO MAXIMIZE LIFE OF YOUR BA'I3-ERY,
tT IS NECESSARY THE BATTERY BE CHARGED BEFORE
USE. FAILURE TO CHARGE BATTERY CAN RESULT IN
SHORTENED BATFERY LIFE
VENT
WELL
BATTERY
CELL ACiD
LEVEL
FIG. 4
it Is an acid and poison,. Always wear eye
CAUTION: Handle electrolyte with care,
shtelds, and protect skin when handling
acid or battery,.
POISON - CAUSES SEVERE BURNS
Contains sulfuric acid,
Avoid contact with skin, eyes or clothing.
To prevent accidents, neutralize excess acid with
baking soda and rinse empty container with water°
TREATMENT:
EXTERNAL - Flush with water..
INTERNAL - Drink large quantities of water or milk.
Follow with milk of magnesia, beaten eggs or
vegetable oil, Call physician immediately°
EYES -_Flush with water for 15 minutes and get
prompt medical attention,.
KEEP OUT OF THE REACH OF CHILDREN
Dispose of excess battery acid, Neutralize acid for dis-
posal by adding itto four inches of water in a five (5} gal-
lonplastic container, Stir with a wooden or plastic paddle
while adding baking soda until the addition of more soda
causes no more foaming.
TO INSTALL SEAT
(See FIG. 5)
e Raise seat plate and secure seat to plate with four 5/16
x 3/4 inch hex head screws, four 5/16 inch split
Iockwashers and four 11132inch t_atwashers
NOTE: Seat may be adjusted forward or rearward to desired
operator's position° Tighten mounting screws securely with a
t/2 inch wrench.
e Connect seat switch to wire harness NOTE: If seat
sw_tchis notconnected to wire harness, engine will stop
when mower clutch Iever is placed in ON (engaged)
position
11t32 iNCH
FLATWASHER
\
5116 INCH SPLIT
LOCKWASHER
5/76 X 3/4 iNCH
HEX HEAD SCREW
iEAT PLATE
WiRE HARNESS
FIG,,5
CHECK TIRE PRESSURE
For shipping purposes, the tires on your tractor were over-ira
flated at the factory..Correct tire pressure is importantfor best
cutting performance
e Use tire pressure gauge to check amount of air in tires
e Reduce tire pressure to PSI shown in _PRODUCT
SPECIFICATIONS" on page 3 of this manual
O
Charge battery at a rate of six (6) amps for I hour
Use a 12-volt battery charger. Observe aft safety
.precautions requiredfor battery charging Complete as-
sembly section of this manual while waiting for battery to
charge°
o
Check acid level after the battery is charged. If
acid has fallen below correct level, add distilled or iron
free water.
e Install vent caps to cover vent wells Wash top of battery
with water to remove any acid, then wipe dry
• Check battery case for leakage to make sure that no
damage has occurred in handling,
CHECK FOR PROPER POSITION OF ALL
BELTS
e See figures shown for replacing motion and mower blade
drive belts in SERVICE AND ADJUSTMENTS
section of this manual, Verify be_tsare routed correctly
CHECK BRAKE SYSTEM
• After you Iearn how to operate your tractor, check opera*
lion of tractor brake (see BRAKE OPERATION in
CUSTOMER RESPONSIBILITIES section o! this
manuaE),
ASSEMBLY
DANGER
Always connect positive (red) cable firsL Connect-
ing negative cable first can result In sparks if the
wrench touches any metal surface. Be sure battery
hold-down bracket does not touch battery terminals
and cause a spark_
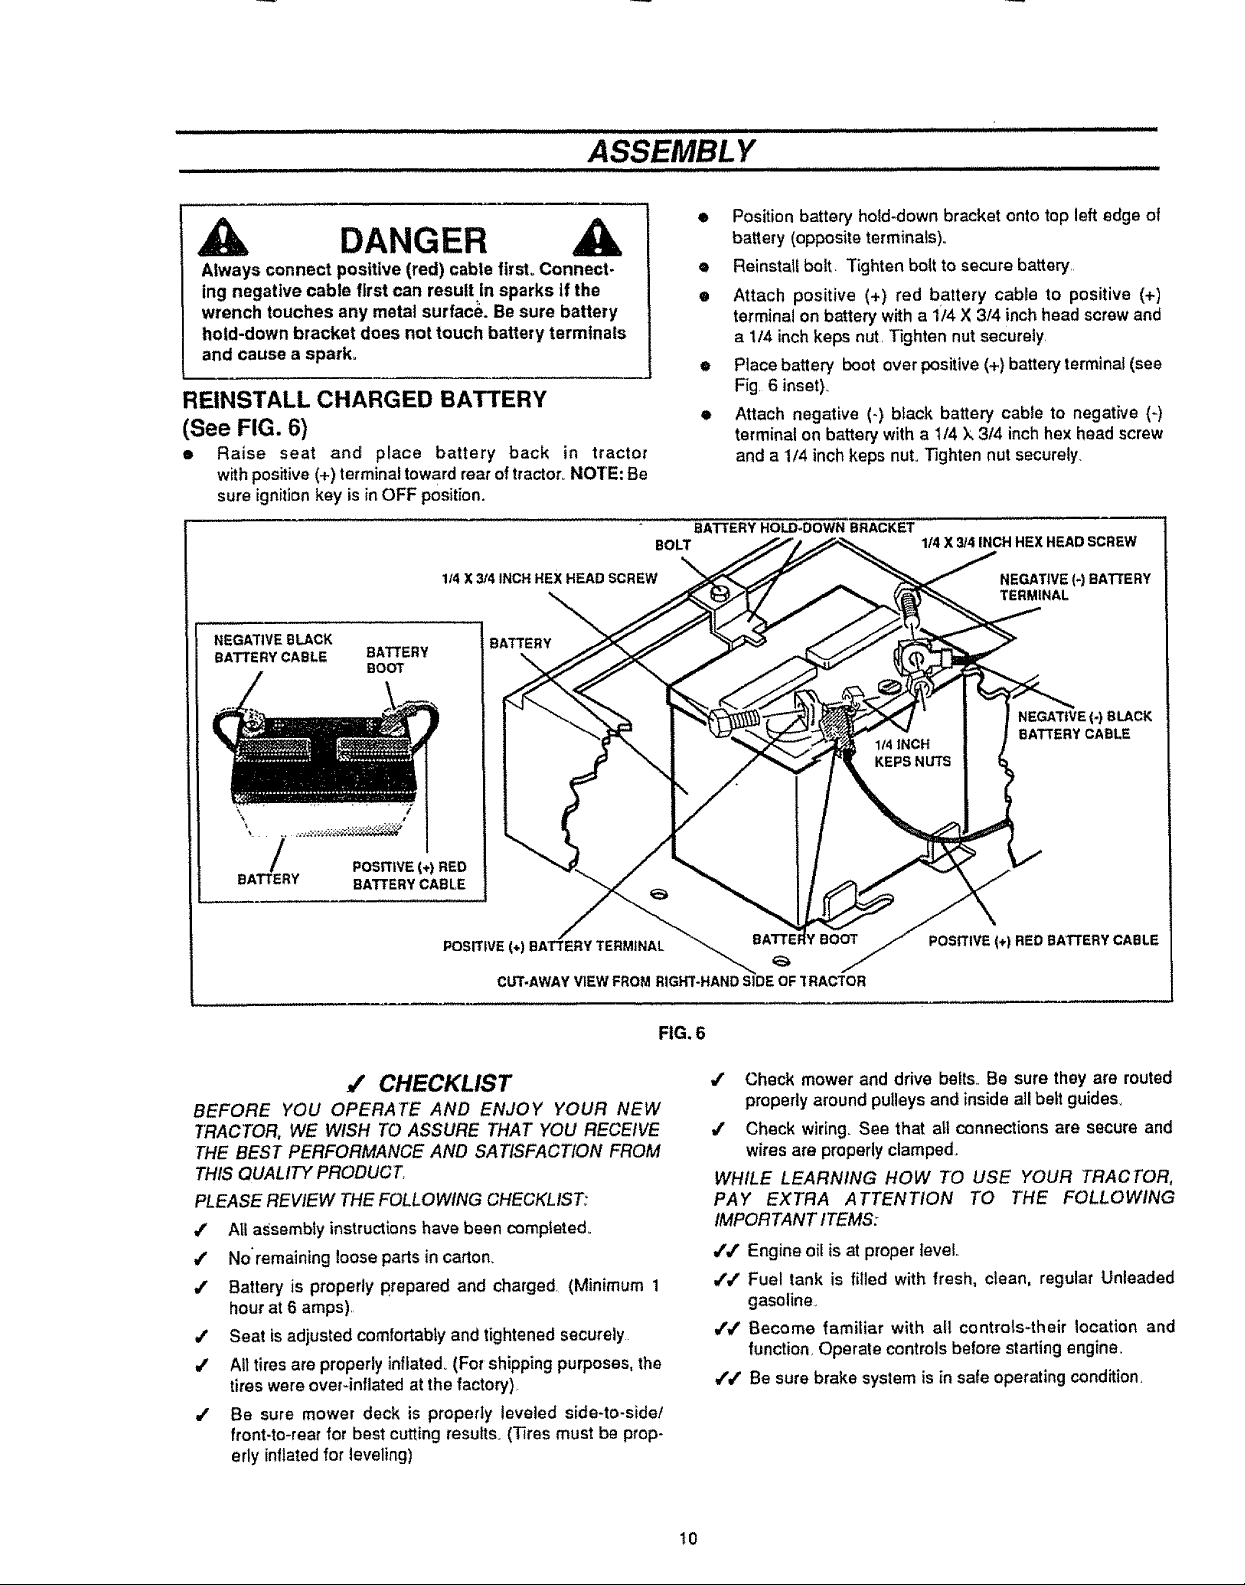
REINSTALL CHARGED BATTERY
(See FIG. 6)
• Raise seat and place battery back in tractor
with positive(+) terminal toward rear of tractor.NOTE: Be
sure ignition key is in OFF position,
114X3/4 INCH HEX HEAD SCREW
• Position battery hold-down bracket onto top left edge of
battery (opposite terminals).
• Reinstall bolt. Tighten bolt to secure battery,
• Attach positive (+) red battery cable to positive (+)
terminal on battery with a 1/4 X 3/4 inch head screw and
a 1/4 inch keps nut, Tighten nut securely,
• Place battery boot over positive(+) battery terminal (see
Fig, 6 inset).
• Attach negative (.) black battery cable to negative (*)
terminal on battery with a 1/4 X 3/4 inch hex head screw
and a 1/4 inch keps nut. Tighten nut securely.
BATTERY HOLD.DOWN BRACKET
BOLT
114X 3/4 INCH HEX HEAD SCREW
%
NEGATIVE(-] BATTERY
TERMINAL
NEGATIVE BLACK
BATTERY CABLE
BATTERY
BOOT
BATTERY
\
PoSrrlVE (+) RED
BATTERY BATTERY CABLE
POSITIVE (,,) BATTERY TERMINAL
CUT-AWAY VIEW FROM RIGHT-HAND SIDE OF _ RACTOR
,/ CHECKLIST
BEFORE YOU OPERATE AND ENJOY YOUR NEW
TRACTOR, WE WISH TO ASSURE THAT YOU RECEIVE
THE BEST PERFORMANCE AND SATISFACTfON FROM
THtS QUALITY PRODUCT,
PLEASE REVIEW THE FOLLOWING CHECKLIST:
/ AUassembly instructionshave been compteted_
,/' No'remaining loose parts in carton.
4" Battery is property prepared and charged. (Minimum 1
hour at 6 amps),,
,t' Seat isadjusted comfortablyand tightened securely
/ All tires are properly inflated_(For shipping purposes, the
tires were over-inflated at the factory),
.t" Be sure mower deck is propedy leveied side-to-side/
front-to-rear for best cutting resuitso (Tires must be prop-
erly inflated for leveling)
NEGATIVE (-) BLACK
BATTERY CABLE
POSITIVE (+) RED BATTERY CABLE
FIG. 6
/ Check mower and drive befts. Be sure they are routed
properly around pulleys and inside aUbelt guides.
!/' Check wiring. See that atl connections are secure and
wires are properly clamped_
WHILE LEARNING HOW TO USE YOUR TRACTOR,
PAY EXTRA ATTENTION TO THE FOLLOWING
IMPORTANT ITEMS:
/,f Engine oil isat proper level.
,// Fuel tank is filled with fresh, clean, regular Unleaded
gasoline,
,/#" Become famitiar with all controls-their location and
function, Operate controls before starting engine,
// Be sure brake system is in safe operating condition,
10
" OPERATION
KNOW YOUR TRACTOR
READ THIS OWNER'S MANUAL AND SAFETY RULES BEFORE OPERATING YOUR
TRACTOR
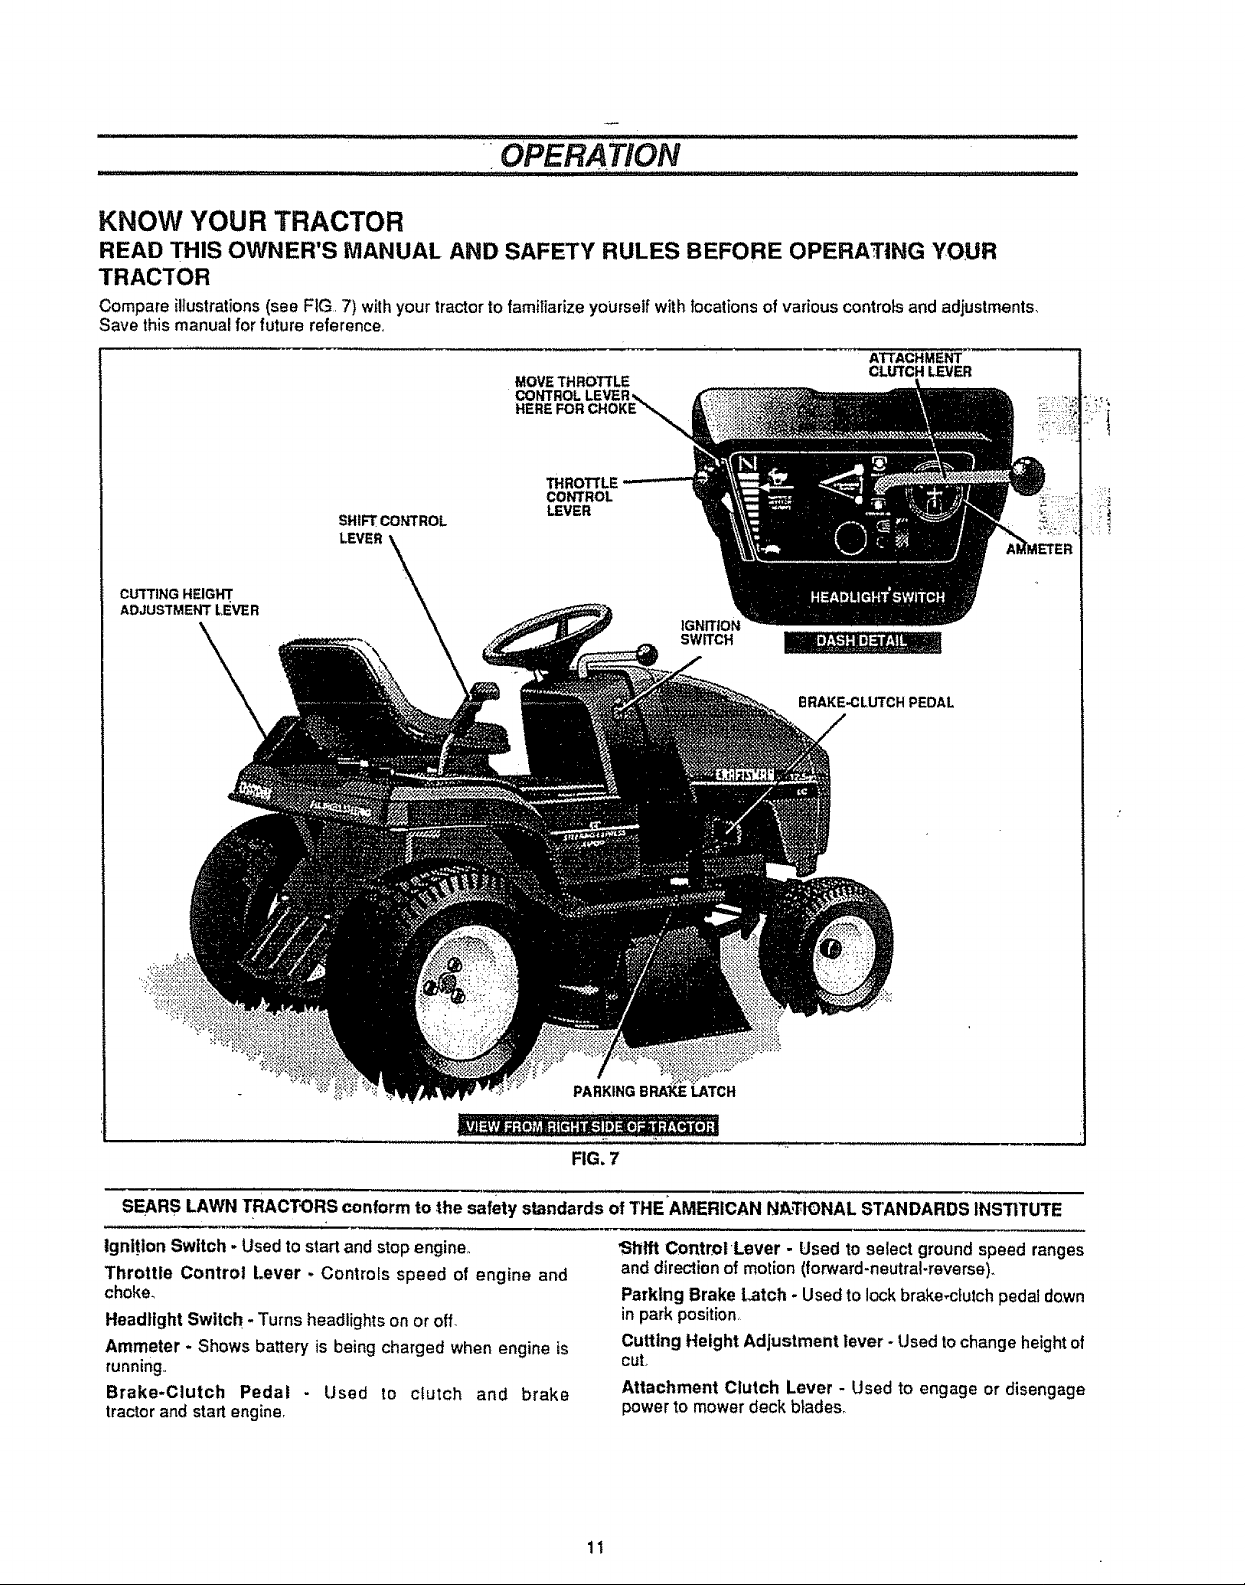
Compare illustrations (see FIG, 7) with your tractorto familiarize yourself with locations of various controlsand adjustments,
Save this manual for future reference,
ATTACHMENT
CLUTCH LEVER
cU'rTING HEIGH'r
ADJUSTMENT LEVER
SHIFTCONTROL
LEVER
MOVE THROTTLE
HERE FOR
"rHROTTLE
CONTROL
LEVER
SW_CH
BRAKE,_LUTCH PEDAL
i:ii
SEARS LAWN TRACTORS conform to the safety standards of THE+AMERICAN NA,T_NAL STANDARDS INSTITUTE
Ignition Switch - Used to start and stop engine,,
Throttle Control Lever. Controls speed of engine and
choke_
Headlight Switch - Turns headlights on or off
Ammeter * Shows battery is being charged when engine is
running.,
Brake-Clutch Pedal - Used to ctutch and brake
tractor and start engine.
"_ltlft ControlLever - Used to select ground speed ranges
and direction of motion (forward-neutral-reverse).
Parking Brake Latch. Usedto lock brake.cfutchpedat down
in park position.,
Cutting Height Adjustment lever - Used tochange heightof
cut,
Attachment Clutch Lever - Used to engage or disengage
powerto mower deck blades+
11

I IIIII I I III IIIII
........... ..........................OPERATION
The operation of any tractor can resultinforeignobjects being thrown into the eyes, which can result in
severe eye damage.. Always wear safety glasses or eye shields white operating your tractororperforming
any adjustments or repairs.
We recommend standard safety glasses, available at SEARS Retail or Catalog Stores, or a wide vision
safety mask for over your glasses,
HOW TO USE YOUR TRACTOR
TO SET PARKING BRAKE
• Depress brake-clutch pedal fully (all the way down) and
hold_
• Reach forwardwithhand and push parkingbrake latch
forward to set parking brake.
• To release parking brake, apply pressure to brake-clutch
pedal and spring will automatically retease parking brake
latch,,
STOPPING
MOWER BLADES -
• Pull the attachment clutch lever rearwardto the DISEN-
GAGED position,.
CAUTION: Blades wilt not stop imme-
diately. Keep hands and feet from under
mower deck and away from discharge
chute.
TRACTOR
Depress brake-clutch pedal fuliy (all the way down)
• Place shift control lever in NEUTRAL position.
• Set parkingbrake before leaving tractor.
ENGINE -
e Move throttle control to SLOW position.
• Turn ignition key to OFF position and remove key Always
removekey when leaving vehicle to prevent unauthorized
USe,
NOTE: Under certain conditions when unit is standing
idlewith engine running, hot engine gases may cause "brown-
ing" of grass To eliminate this possibility, always stop engine
when stopping tractoron grass areas.
TO USE THROTTLE CONTROL
FAST throttle positionis necessary for best bagging and
mowing performance,
o
Operating engine at other than FAST position reduces
battery charging rate and the engine cooling air flow
Q
Choke is necessary whenever you are starting a cold
engine Do not use to start a warm engine
o
Toengage CHOKE, movethrottle control lever past detent
position (arrowpointstothis positon). Move throttle control
lever out of CHOKE position as engine warms.,
12
OPERATION ..........
TO MOVE BACKWARD AND FORWARD
The direction of motion (forward - reverse) and ground
speed ranges (1-2-3-4-5) are controlled by shift control
lever,,
e Start tractor with brake-clutch pedat depressed and shift
control leverin NEUTRAL position.
e Move shift control leverto reverse or forward speed range.
NOTE:Always come toafull stopbefore changing direction
of motion.,
e Slowly release brake-clutch pedal to start movement.
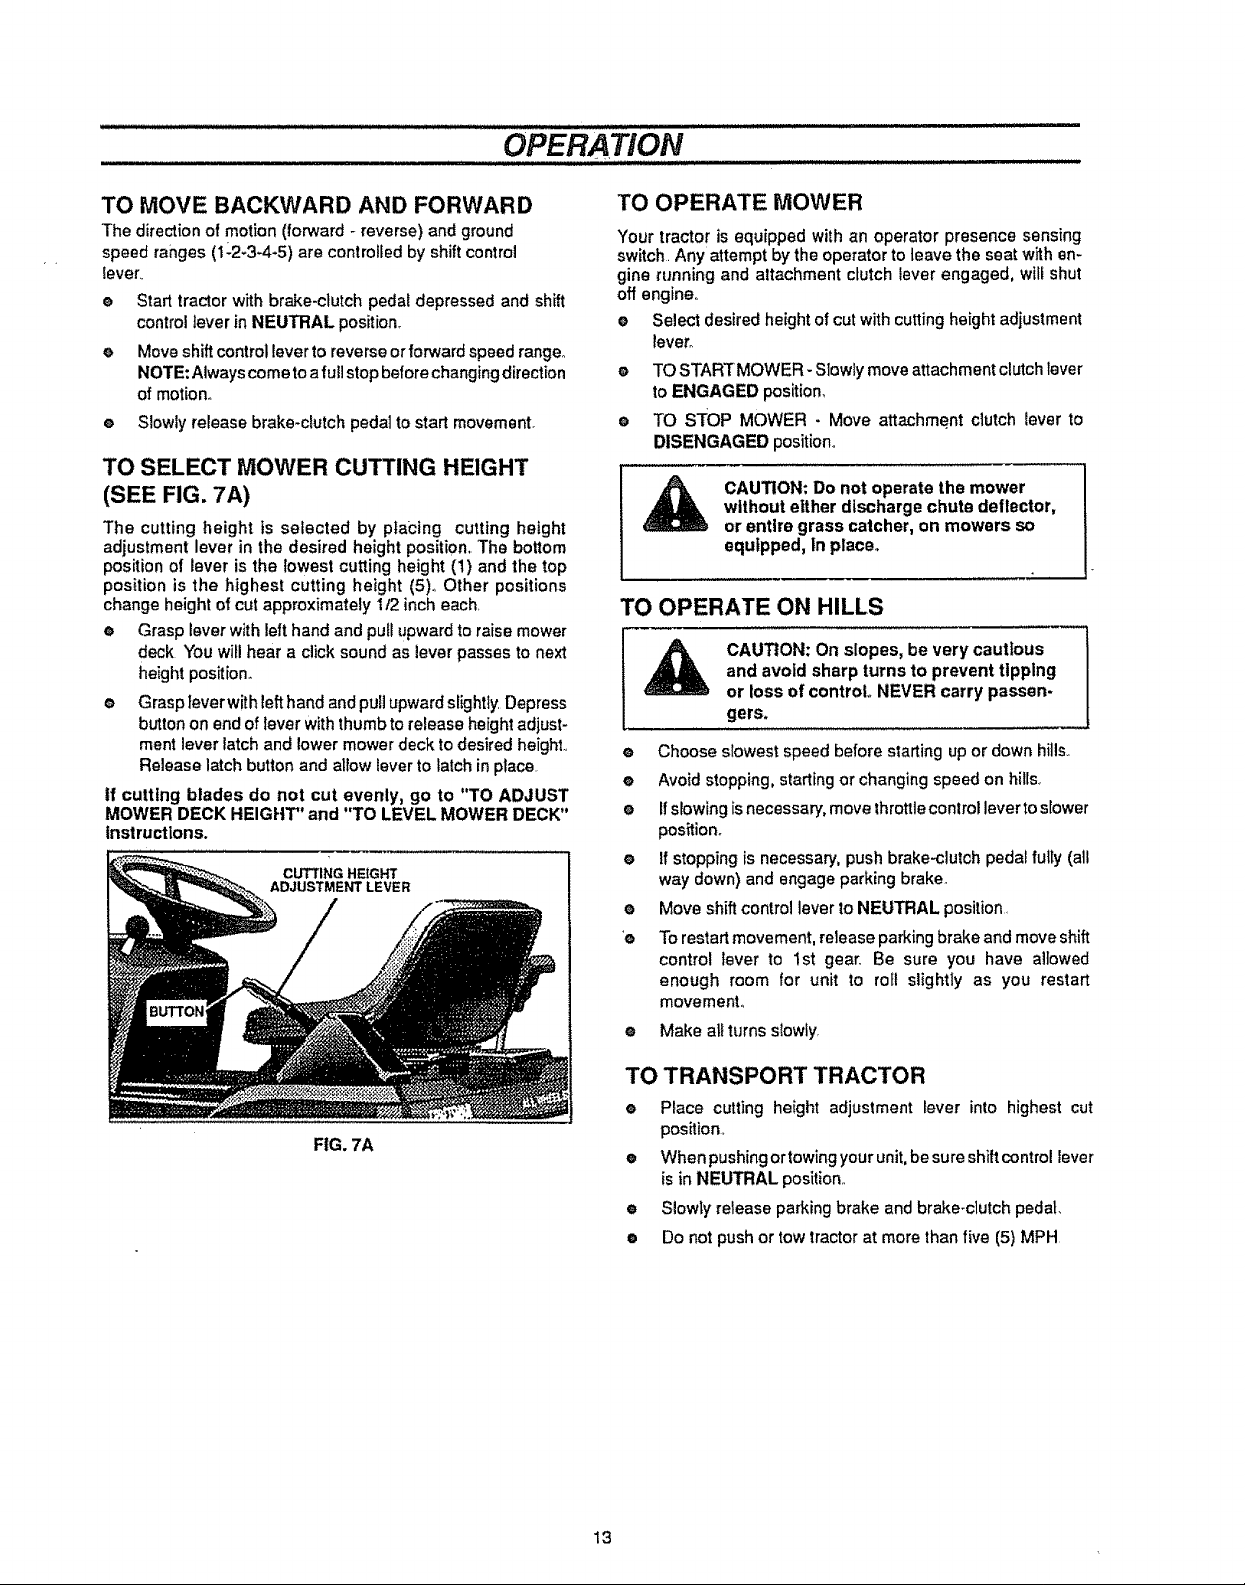
TO SELECT MOWER CUTTING HEIGHT
(SEE FIG. 7A)
The cutting height is selected by placing cutting height
adjustment lever in the desired height position,.The bottom
position of lever is the lowest cutting height (1) and the top
position is the highest cutting height (5)° Other positions
change height of cut approximately 1!2 inch each.
e Grasp lever with left hand and pullupward to raise mower
deck You will hear a click sound as lever passes to next
height positiom
Grasp teverwith lefthand and pullupward slightly Depress
button on end of lever with thumb to release height adjust-
ment lever latch and lower mower deck to desired height.,
Release latch button and allow lever to latchin place.
tf cutting blades do not cut evenly, go to "TO ADJUST
MOWER DECK HEIGHT" and "TO LEVEL MOWER DECK"
instructions.
TO OPERATE MOWER
Your tractor is equipped with an operator presence sensing
switch, Any attempt by the operator to leave the seat with en-
gine running and attachment clutch lever engaged, wilf shut
off engine,,
e Select desired height of cut with cutting height adiustment
lever_
e TO STARTMOWER -Slowly move attachment clutch lever
to ENGAGED position_
e TO STOP MOWER - Move attachment clutch lever to
DISENGAGED position_
CAUTION: Do not operate the mower
without either discharge chute deflector,
or entire grass catcher, on mowers so
equipped, in place.
TO OPERATE ON HILLS
CAUTION: On slopes, be very cautious
and avoid sharp turns to prevent tipping
or loss of control. NEVER carry passen-
gers.
• Choose slowest speed before starting up or down hills.
e Avoid stopping, starting or changing speed on hills_
e If slowing isnecessary, move throttle conlrol lever to slower
position°
e If stopping is necessary,push brake-clutch pedal fuity(all
way down) and engage parking brake.
e Move shiftcontrollever toNEUTRAL position.
e To restartmovement,releaseparkingbrakeandmoveshift
contro! lever to 1st gear. Be sure you have allowed
enough room for unit to roll slightly as you restart
movement.
e Make all turns slowly,
FIG. 7A
TO TRANSPORTTRACTOR
e Place cutting height adjustment lever into highest cut
position,
e When pushingor towingyour unit,be sure shift control lever
is in NEUTRAL position,,
e Slowly release parking brake and brake-clutch pedal.
e Do not push or tow tractor at more than five (5) MPH
13
OPERATION
BEFORE STARTING THE ENGINE
CHECK ENGINE OIL LEVEL
Read OPERATION and CUSTOMER RESPONSIBILITIES
sections of this manual before tryingto start the engine.
e Check to make sure engine crankcase is fullof oil Never
run engine unless crankcase is full of oil and dipstick is
tightened securely into oil tube,,
• To change engine ell, see ENGINE LUBRICATION in
CUSTOMER RESPONSIBILITIES section of this
manual°
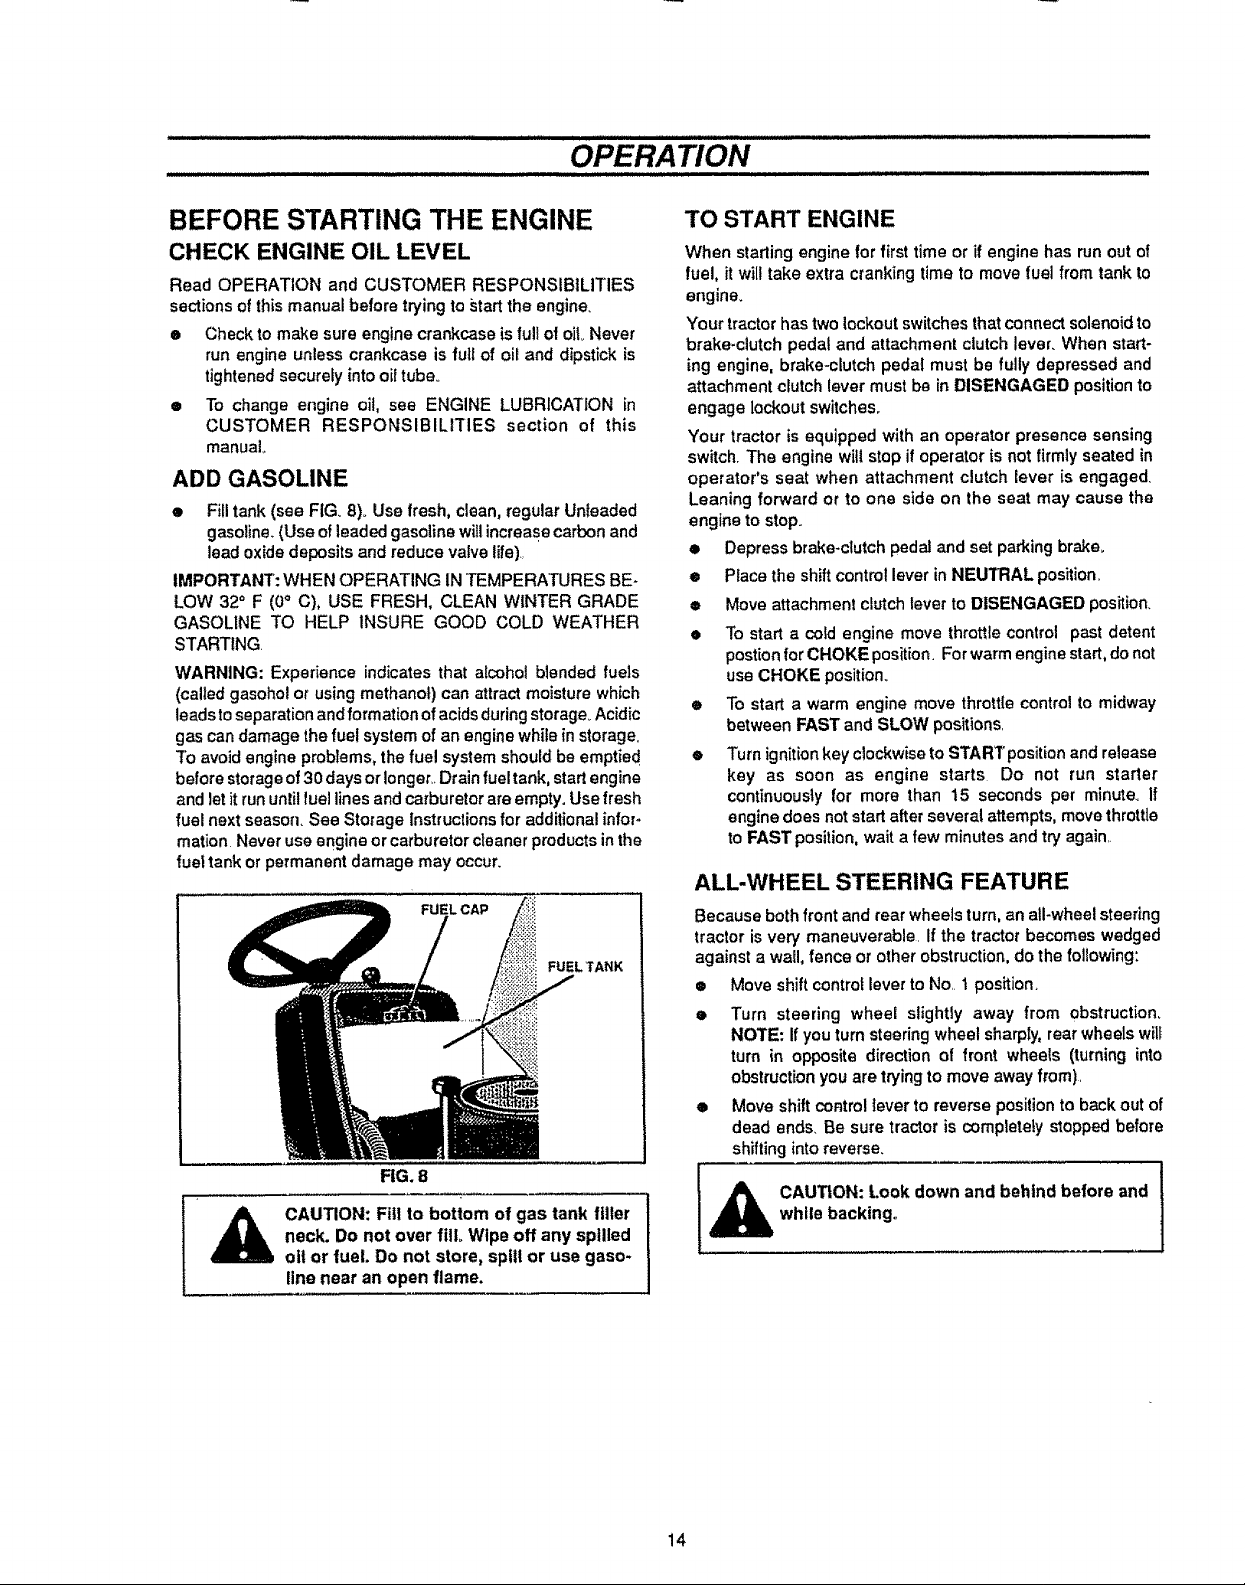
ADD GASOLINE
• Fill tank (see FIG 8). Use fresh, clean, regular Unleaded
gasoline.(Use of leaded gasoline willincrease carbonand
lead oxide depositsand reduce valve fife),
IMPORTANT': WHEN OPERATING IN TEMPERATURES BE-
LOW 32° F (0° C), USE FRESH, CLEAN WINTER GRADE
GASOLINE TO HELP INSURE GOOD COLD WEATHER
STARTING.
WARNING: Experience indicatesthat a_cohol blended fuels
(called gasohol or using methanol) can attract moisture which
leadsto separation and formation of acids during storage_Acidic
gas can damagethe fuel system of an enginewhile in storage,
To avoid engine problems, the fuel system should be emptied
before storage of 30 days orionger,_Drain fueltank, start engine
and letitrun until fuel linesand carburetor are empty, Use fresh
fuel next season. See Storage Instructionsfor additional infer*
mation Never useengine or carburetor cleaner productsinthe
fuettank or permanent damage may occur.
FUEL CAP
FUEL 'TANK
FIG. 8
CAUTION: Fill to bottom of gas tank filler
neck. Do not over fill, Wipe off any spilled
oil or fuel. Do not store, spill or use gaso-
line near an open flame,
TO START ENGINE
When starting engine for first time or if engine has run out of
fuel, it will take extra cranking time to move fuel from tank to
engine.
Your tractor has two lockoutswitches that connect solenoid to
brake-clutch pedal and attachment clutch lever. When start-
ing engine, brake-clutch pedal must be fully depressed and
attachment clutchlever must be inDISENGAGED positionto
engage lockout switches,,
Your tractor is equipped with an operator presence sensing
switch. The engine will stopif operator is not firmlyseated in
operator's seat when attachment clutch lever is engaged.
Leaning forward or to one side on the seat may cause the
engine to stop.
• Depress brake-clutch pedal and set paddingbrake,,
e
Place the shift control lever in NEUTRAL position,
Move attachment clutch lever to DISENGAGED position,
®
o
To start a cold engine move throttlecontrol past detent
postion for CHOKE position. For warm engine start, do not
use CHOKE position.
®
To start a warm engine move throttle control to midway
between FAST and SLOW positions
®
Turn ignitionkey clockwise to STARTposition and release
key as soon as engine starts Do not run starter
continuously for more than 15 seconds per minute_ If
engine does not start after several attempts, move throttle
to FAST position,wait a few minutes and try again,_
ALL-WHEEL STEERING FEATURE
Because both front and rear wheels turn, an all-wheel steering
tractor is very maneuverable, if the tractor becomes wedged
against a wa{I, fence or other obstruction,do the following:
® Move shift controt lever to No, t position.
• Turn steering wheel slightly away from obstruction,
NOTE: If you turn steeringwheel sharply,rearwheels wilf
turn in opposite direction of front wheels (turning into
obstructionyou are tryingto move away from).
• Move shiftcontroltever to reverse positionto back out of
dead ends, Be sure tractor is completely stopped before
shiftingintoreverse.
CAUTION: Look down and behind before and
while backing°
14
OPERATION
MOWING TIPS
e Do not use tire chains when mower housing is attached to
unit..
e
Run the engine at FAST speed position.
o
Control forward ground speecl with shiftcontrol lever in
accordance with type and quantity of grass being
mowed.. The more grass to be cut, a slower forward
ground speed should be used. When cutting light grass,
forward ground speed can be increased. By observing
cutting action of your mower, you can determine the
forward ground speed.
e Your mower may tend to leave unmowed strips when tong
and tender grassisbeing mowed,. Tendergrasshasahigh
internal moisture content and iseasilydepressed by lawn
tractor wheels, and may not always springback intime to
be cut,Toovercomethiscondition,we advise mowinglawn
in a counterclockwise direction,overlapping previouscut,
whichallows lifting action of rotatingbladesto liftgrass into
cuttingpath.
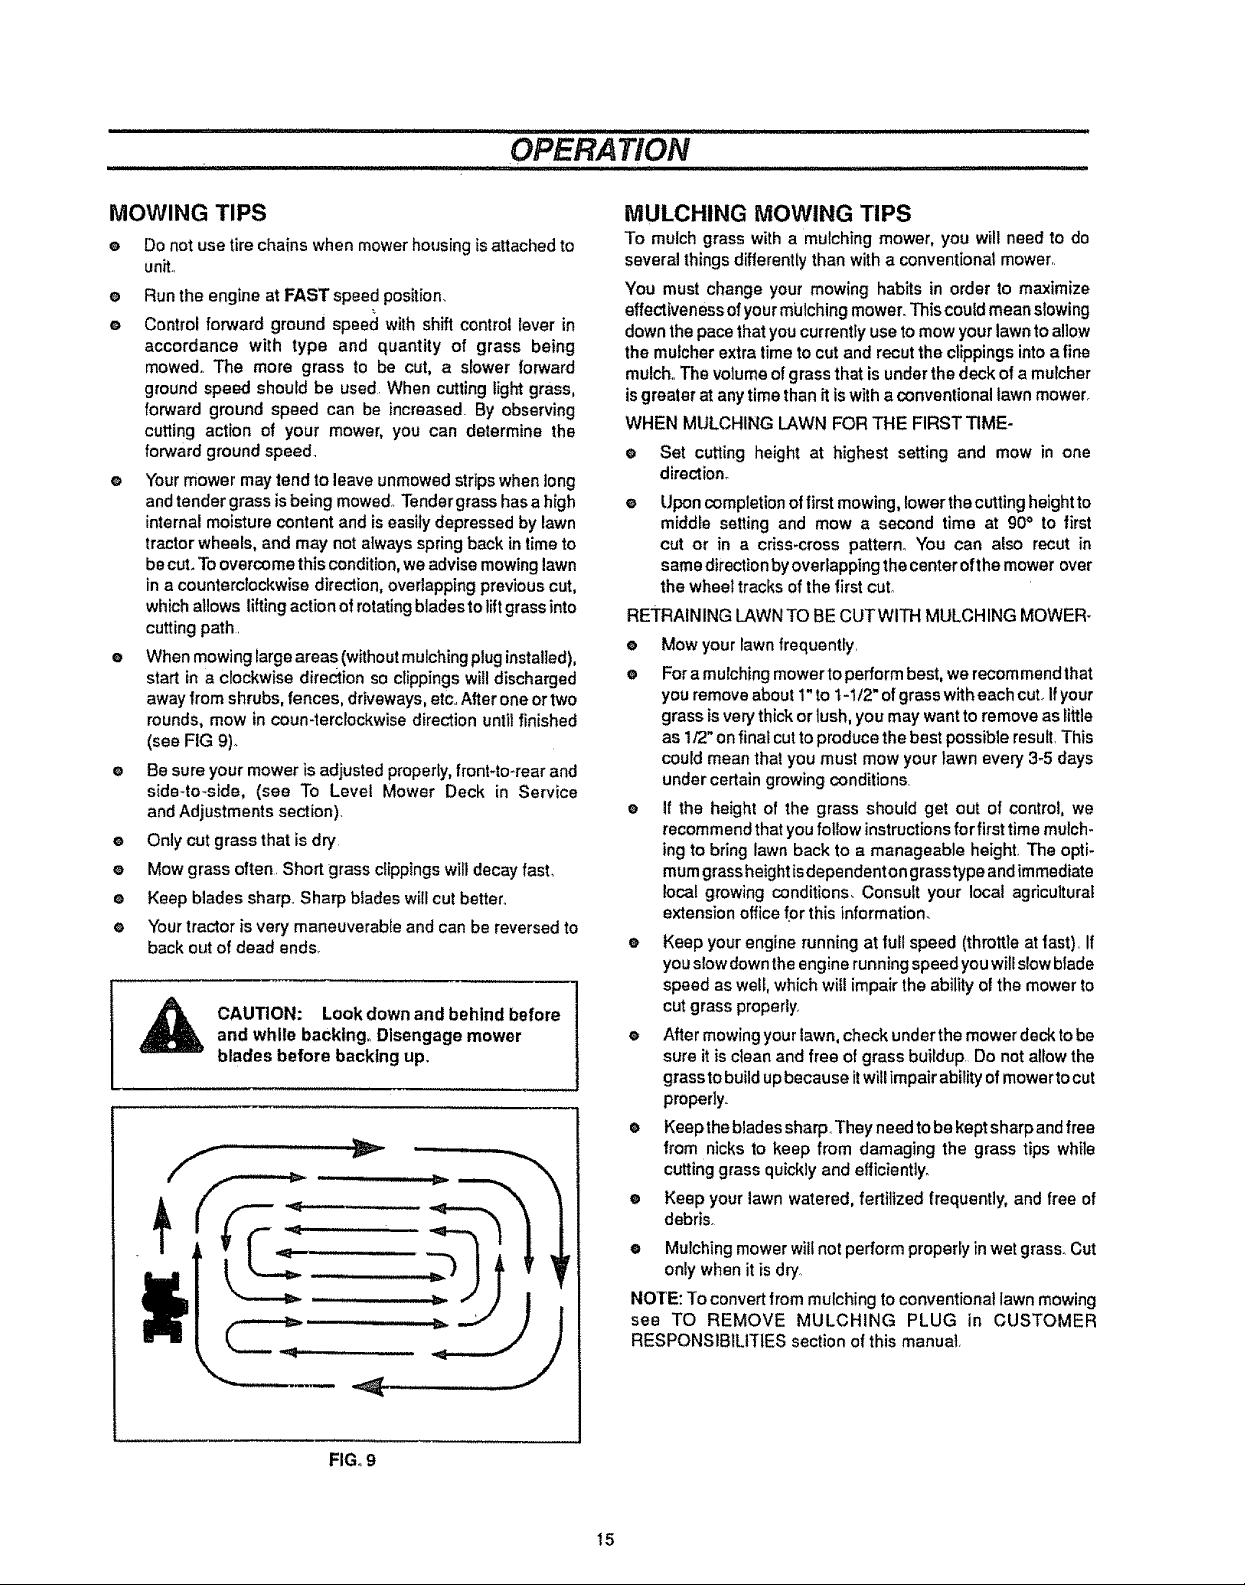
e When mowing largeareas (withoutmulching pluginstalled),
start in a clockwise direction so clippingswilldischarged
awayfrom shrubs,fences, driveways, etc.,Afterone or two
rounds, mow in coun-terclockwisedirection until finished
(see FIG 9)_
e Be sure your mower is adjusted properly,fronHo-rear and
side-to-side, (see To Level Mower Deck in Service
and Adjustments section).
e Only cut grassthat is dry
e Mow grass often. Short grass clippings will decay fast,
e Keep blades sharp.. Sharp blades will cut better..
e Your tractoris very maneuverable and can be reversedto
back out of dead ends.
CAUTION: Look down and behind before
and while backing,, Disengage mower
blades before backing up,
MULCHING MOWING TIPS
To mulch grass with a mulching mower, you will need to do
several thingsdifferentlythan with a conventional mower,.
You must change your mowing habits in order to maximize
effectiveness ofyour miJIching mower. This could mean slowing
down the pace that you currently use to mow your lawn to allow
the mulcher extra time to cut and recur the clippings into a fine
mulch,,The volume of grass that is under the deck of a mulcher
is greater at any time than it is with a conventionallawn mower_
WHEN MULCHING LAWN FOR THE FIRST TIME-
e Set cutting height at highest setting and mow in one
direction°
o
Upon completion of firstmowing, lower thecuttingheightto
middle setting and mow a second time at 90° to first
cut or in a criss-cross pattern° You can also recut in
same direction by overlapping the center ofthe mower over
the wheel tracks of the first cut°
RETRAINING LAWN TO BE CUT WITH MULCHING MOWER-
O
Mow your lawn frequently.
e
Fora mulching mower to performbest, we recommend that
you remove about 1"to 1-1t2" of grasswith each cut..Ifyour
grass isvery thick or lush, you may want to remove as tittle
as 1/2"on final cut to produce the best possible result.This
could mean that you must mow your lawn every 3-5 days
under certain growing conditions.
If the height of the grass should get out of control, we
recommendthatyou follow instructionsfor first time mulch-
ingto bring lawn back to a manageable height,The opti-
mumgrassheight isdependent on grasstypeandimmediate
local growing conditions, Consult your local agricultural
extensionofficefor this information.
e Keep your engine running at full speed (throttle at fast). If
youslowdown the enginerunningspeed youwillslow blade
speed aswell, which will impair the ability ot the mower to
cutgrass properly.
e After mowing your lawn, checkunderthe mowerdeck to be
sure it is clean and free ot grass buildup.Do not allowthe
grassto buildupbecause itwillimpair abilityofmower tocut
properly.
® Keepthe blades sharp.Theyneedtobe kept sharpandfree
from nicks to keep from damaging the grass tips while
cuttinggrass quicklyand efficiently.
® Keep your lawn watered, fertilized frequently, and free of
debris.
e Mulching mower wiltnot perform properly in wet grass_Cut
onlywhen it is dry,
NOTE: To convertfrommulchingtoconventionallawn mowing
see TO REMOVE MULCHING PLUG in CUSTOMER
RESPONSIBILITIES section ofthis manual,
.........................
FIGo9
15
CUSTOMER RESPONSIBILITIES
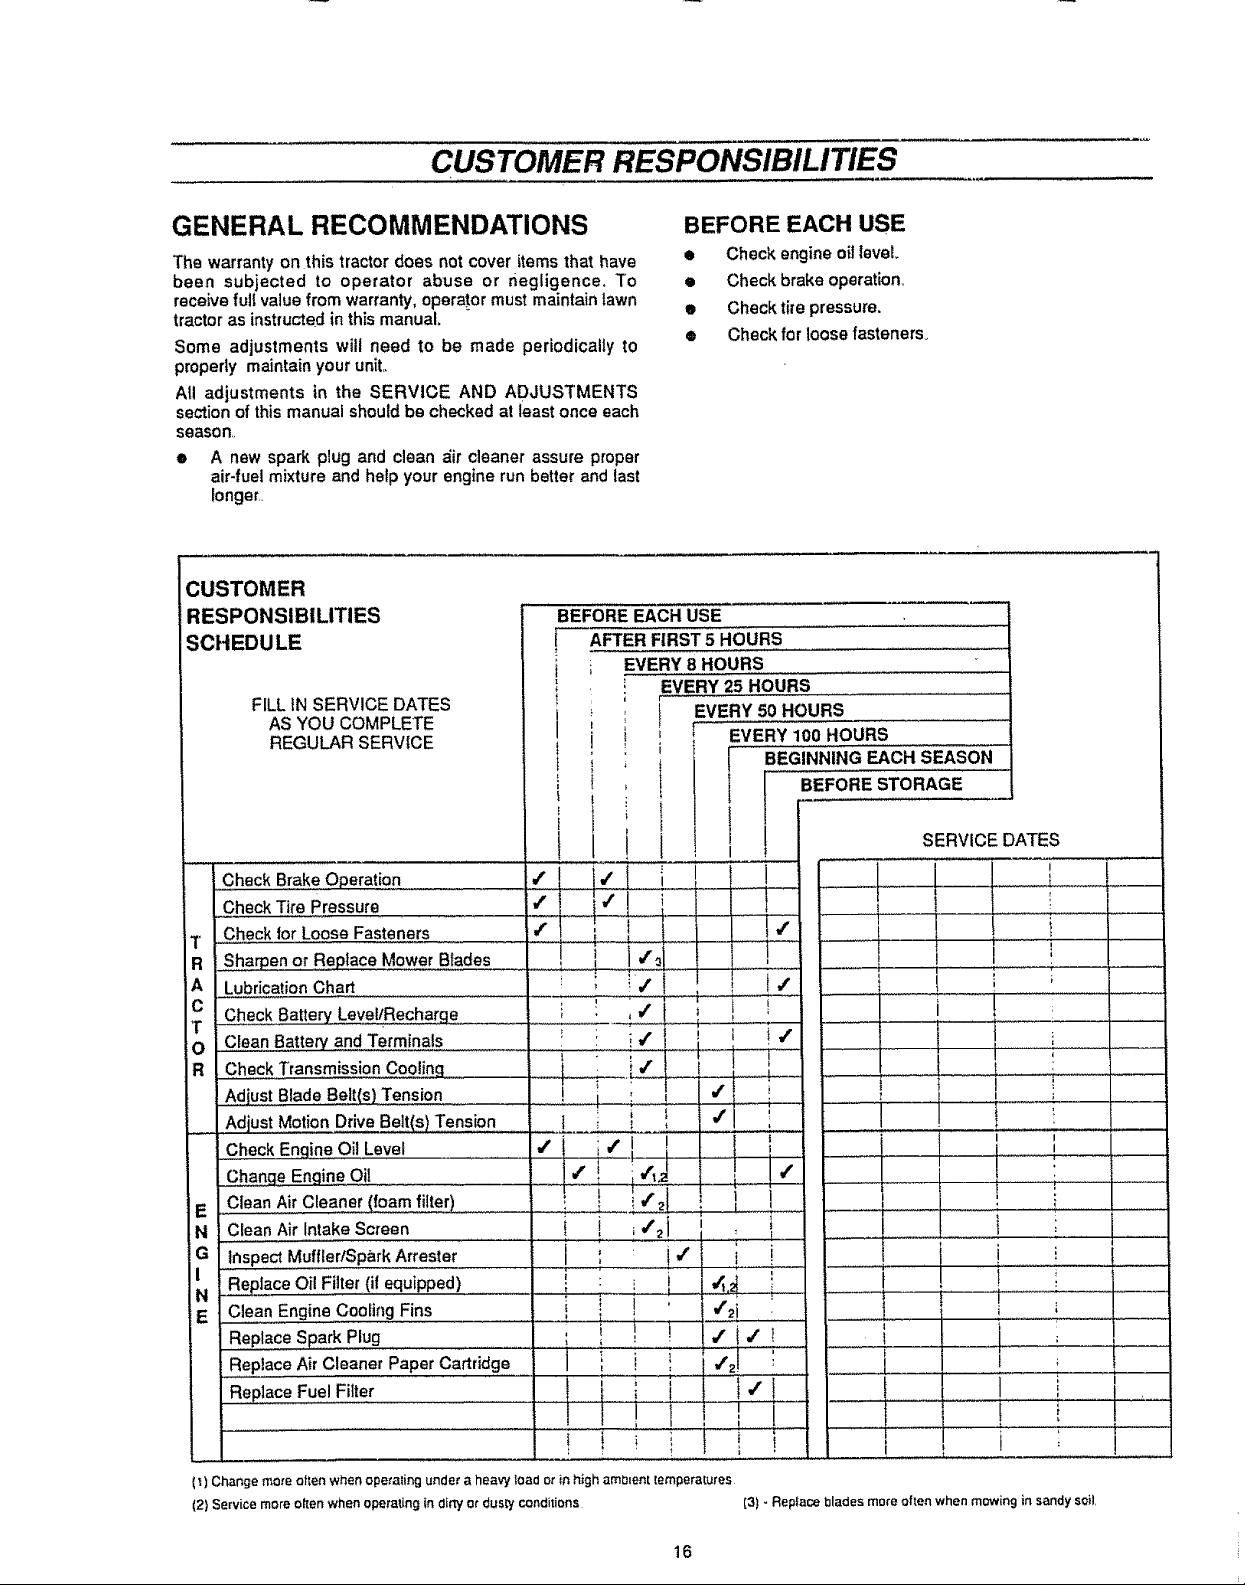
GENERAL RECOMMENDATIONS
The warranty on this tractor does not cover items that have
been subjected to operator abuse or negligence. To
receivefull value from warranty, opera!or must maintain lawn
tractor as instructed in this manual.
Some adjustments will need to be made periodically to
properly maintain your unit,,
All adjustments in the SERVICE AND ADJUSTMENTS
section of this manual should be checked at least once each
season.,
e A new spark plug and clean dir cleaner assure proper
air-fuel mixture and help your engine run better and last
longer,,
BEFORE EACH USE
• Check engine oil level
• Check brake operation.
o Check tire pressure.
• Check for loose fasteners.
CUSTOMER
RESPONSIBILITIES
FILL IN SERVICE DATES
AS YOU COMPLETE
REGULAR SERVICE
BEFORE EACH USE
AFTER FIRST 5 HOURS
I :_ EVERY 8 HOURS
' _ EVERY 50 HOURS
i _ EVERY 100 HOURS
t I ! BEGINNING EACH SEASON
i I _ BEFORE STORAGE
i
EVERY 25 HOURS
i
* i
! i i SERV,OEOATES
.....Check Brake Operation
......uCheckTire Pressure
ujCh,ecklor Loose Fasteners
T
R
Sha_en or Replace Mower Blades ! ! _ ..........,
A
,Lu,,bricationChart ..... i : _I i / i i
C
Check Battery Level/Recharge ! : ! / [ I..... '_ ..... !
T
Clean Batten! and Terminals : : i / i ! 4' _, 1
O
Check Transmission Cooling
R
Adjust Blade Belt(s) Tension _
Adjust Motion Drive Belt(s)Tension
Check Engi,ne oil Level ....
change Engine Oil
E Clean Air Cleaner (foam fi!ter)
N Clean Air Intake Screen
G Inspect Muffler/SparkArrester
I Replace Oil Filter (il equipped)
N
E C!eanEngine Cooling Fins
Replace Spark Plug i i
Replace Air Cleaner Paper Cartridge J ;_ ! ; /2J
............... : ............. *" ; ....... i .........
RoplaceFue,Filter I i ; i I I."
(_) Change more often when opetafing under a heavy toad or in high ambient temperaLures
(2) Service more often when operaling in dirly ot dusk/conditions (3) - Replace I_lades more often when mowing in sandy soil,
.'i i.' i ! i i 1 I i
I • I
I " !
"i i'li
/ i/,.
, |j'
| i ! 21
t ! _/2
i
; : i I
, ! /i/
I I I I
I i _ i i
|.... t i === "=
.....ij,t,
i i
I
I
i !
/2i
m
.....
............. i
I
i
I
I
i
I
!
' i ......
i
I : I
i I
i
i
I
i ........................
i
E
.-,.,
16
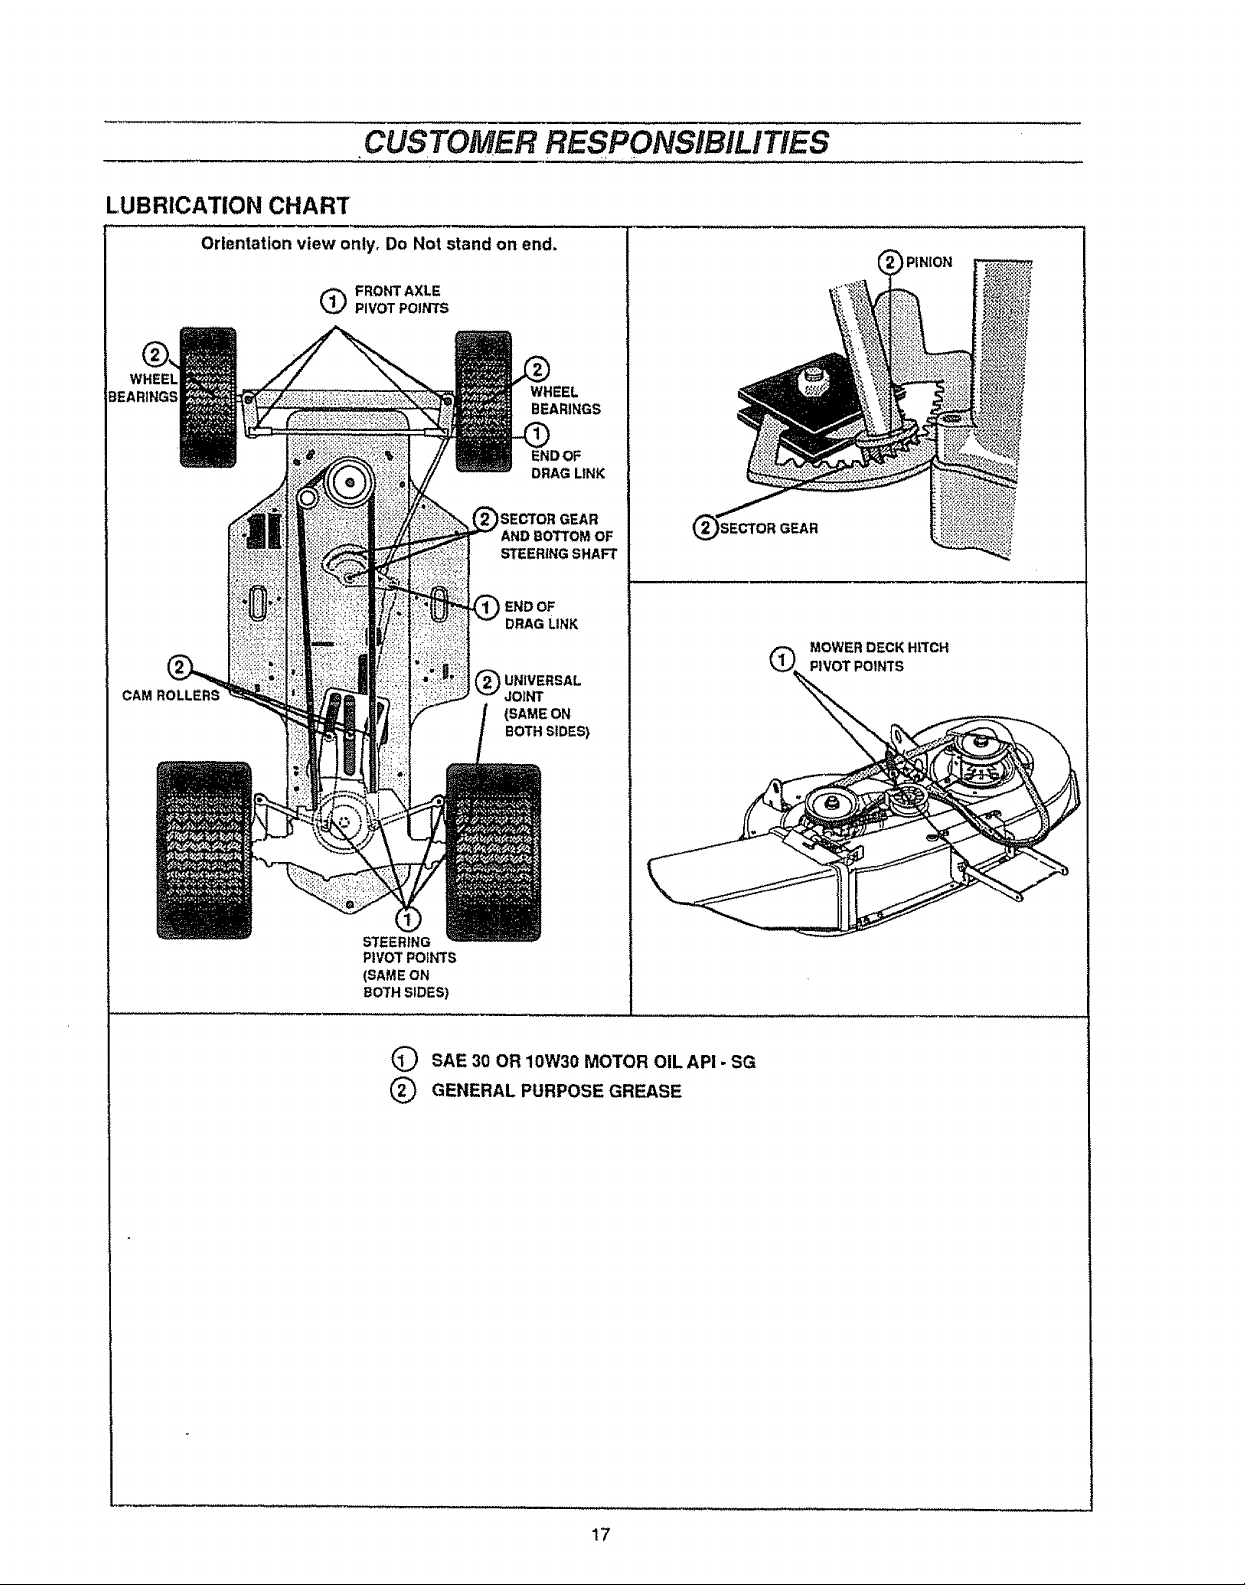
LUBRICATION CHART
Orientation view only_Do Not stand on end.
Q FRONT AXLE
,CUSTOMER RESPONSIBILiTiES
PINION
PIVOT POINTS
WHEEL
BEARINGS
END OF
DRAG LINK
) SECTOR GEAR
AND BOTTOM OF
STEERING SHAFT
(_END OF
DRAGLINK
Q NWERSAL
JOINT
(SAME ON
BOTH SIDES)
STEERING
PIVOT POINTS
(SAME ON
BOTH SIDES)
Q SAE 30 OR 10W30 MOTOR OILAPI - SG
Q GENERAL PURPOSEGREASE
,SECTOR GEAR
MOWER DECK HITCH
PIVOT POINTS
17
TRACTOR
CUSTOMER RESPONSIBILITIES
Always observe safety rules when performing any
maintenance.
BRAKE OPERATION
Your tractor is equipped with an adjustable disc brake, To
checkbrake operation do the following:
• Stop tractor on a level surface and place shift control
lever in NEUTRAL position,
e
Depress brake-clutch pedal enough to latch parking
brake in tst notch,
e
Try to push tractor. If you are unable to push tractor,
brake is too tight and should be loosened (see TO AD-
JUST TRACTOR BRAKE in SERVICE AND ADJUST=
MENTS section of this manual.
o
Depress brake-clutch pedal enough to latch parking
brake in 3rd notch_
e
Try to pushtractor_If you are able topush tractor, brake
istoo loose and should be tightened (see TO ADJUST
TRACTOR BRAKE in SERVICE AND ADJUSTMENTS
section of this manual
During tractoroperation,check for stoppingdistance.If tractor
requires more than six (6) feet stopping distance at high
speed in highest gear, the brake must be adjusted (see to
ADJUST TRACTOR BRAKE in SERVICE AND ADJUST-
MENTS section of this manua!).
TIRES
• Maintain proper air pressure in all tires,. (See
"PRODUCT SPECIFICATIONS" on page 3 of this
manual)_
e Keep tires free of gasoline, oil, or insect control
chemicalswhich can harm rubber_
Avoid stumps, stones, deep ruts, sharp objects and
other hazards that may Causetire damage.
BLADE
MOUNTING
SCREWS
SHARP EDGE
BENT TIP
,EDGE
RG.10
BENT TIP EDGE
BLADE
SPRING
WASHERS
BOLT SHOWN ING
GRADE 5 Q
FIG. 11
SCREW
CAUTION: BEFORE PERFORMING ANY
SERVICE OR ADJUSTMENTS
• Fultydepress brake-clutch pedal and set
parking brake,
• Place shift control lever in NEUTRAL
position.
• Place attachment clutch lever in DISEN-
GAGED position,
• Turn ignition key OFF and remove key_
• Make sure the blades and all moving
parts have completely stopped,
e DO NOT handle blades with bare hands.
Wear gloves or wrap blade with news-
paper or other materia! while removing
or installing blade.
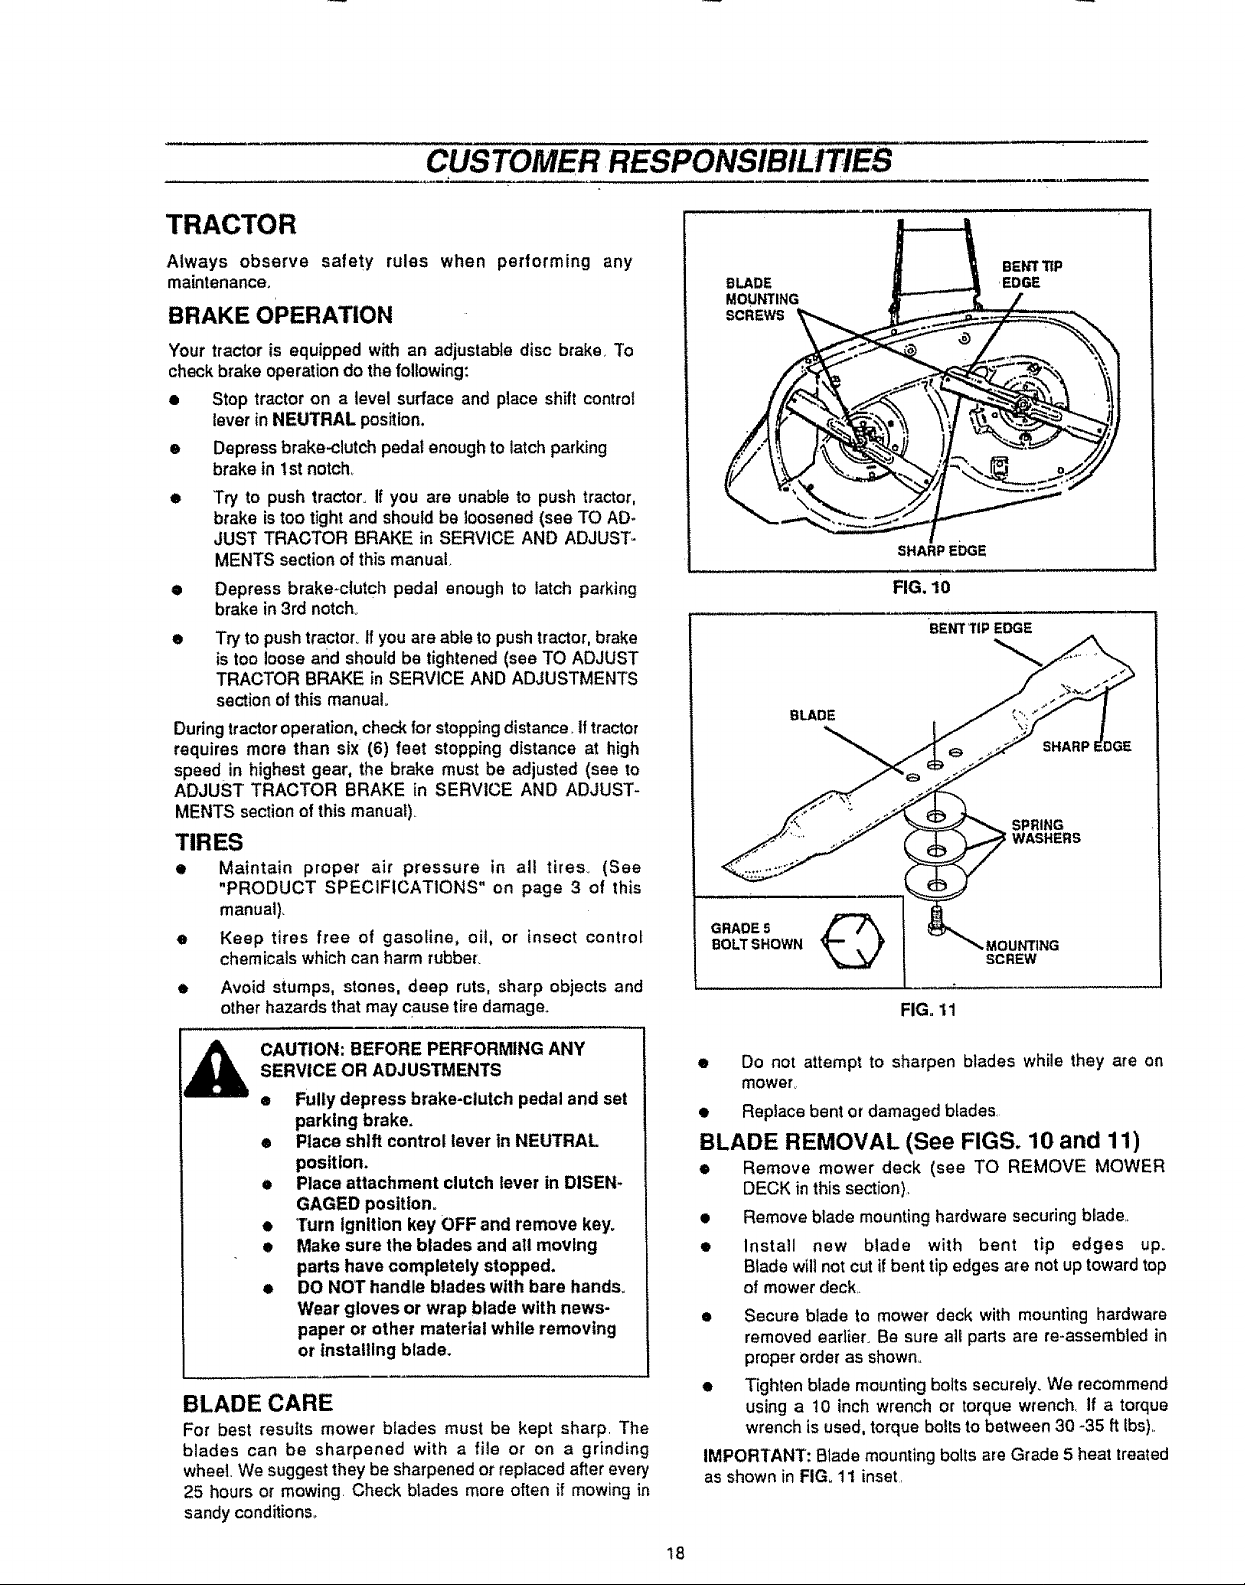
BLADE CARE
For best results mower blades must be kept sharp. The
blades can be sharpened with a file or on a grinding
wheel We suggest they be sharpened or replaced after every
25 hours or mowing. Check blades more often if mowing in
sandy conditions.,
• Do not attempt to sharpen blades while they are on
mower_
• Replace bent or damaged blades.
BLADE REMOVAL (See FIGS. 10 and 11)
• Remove mower deck (see TO REMOVE MOWER
DECK in this section)_
• Remove blade mounting hardware securing blade..
• Install new blade with bent tip edges up.
Blade will not cut if bent tip edges are not up toward top
of mower deck..
• Secure blade to mower deck with mounting hardware
removed earlier. Be sure all parts are re-assembled in
proper order as shown.,
• Tighten blade mounting bolts securely_ We recommend
using a 10 inch wrench or torque wrench. If a torque
wrench is used, torque bolts to between 30 -35 ft lbs).,
IMPORTANT: Blade mounting bolts ate Grade 5 heat treated
as shown in FIG. 11 inset.
18
CUSTOMER RESPONSiBiLITIES
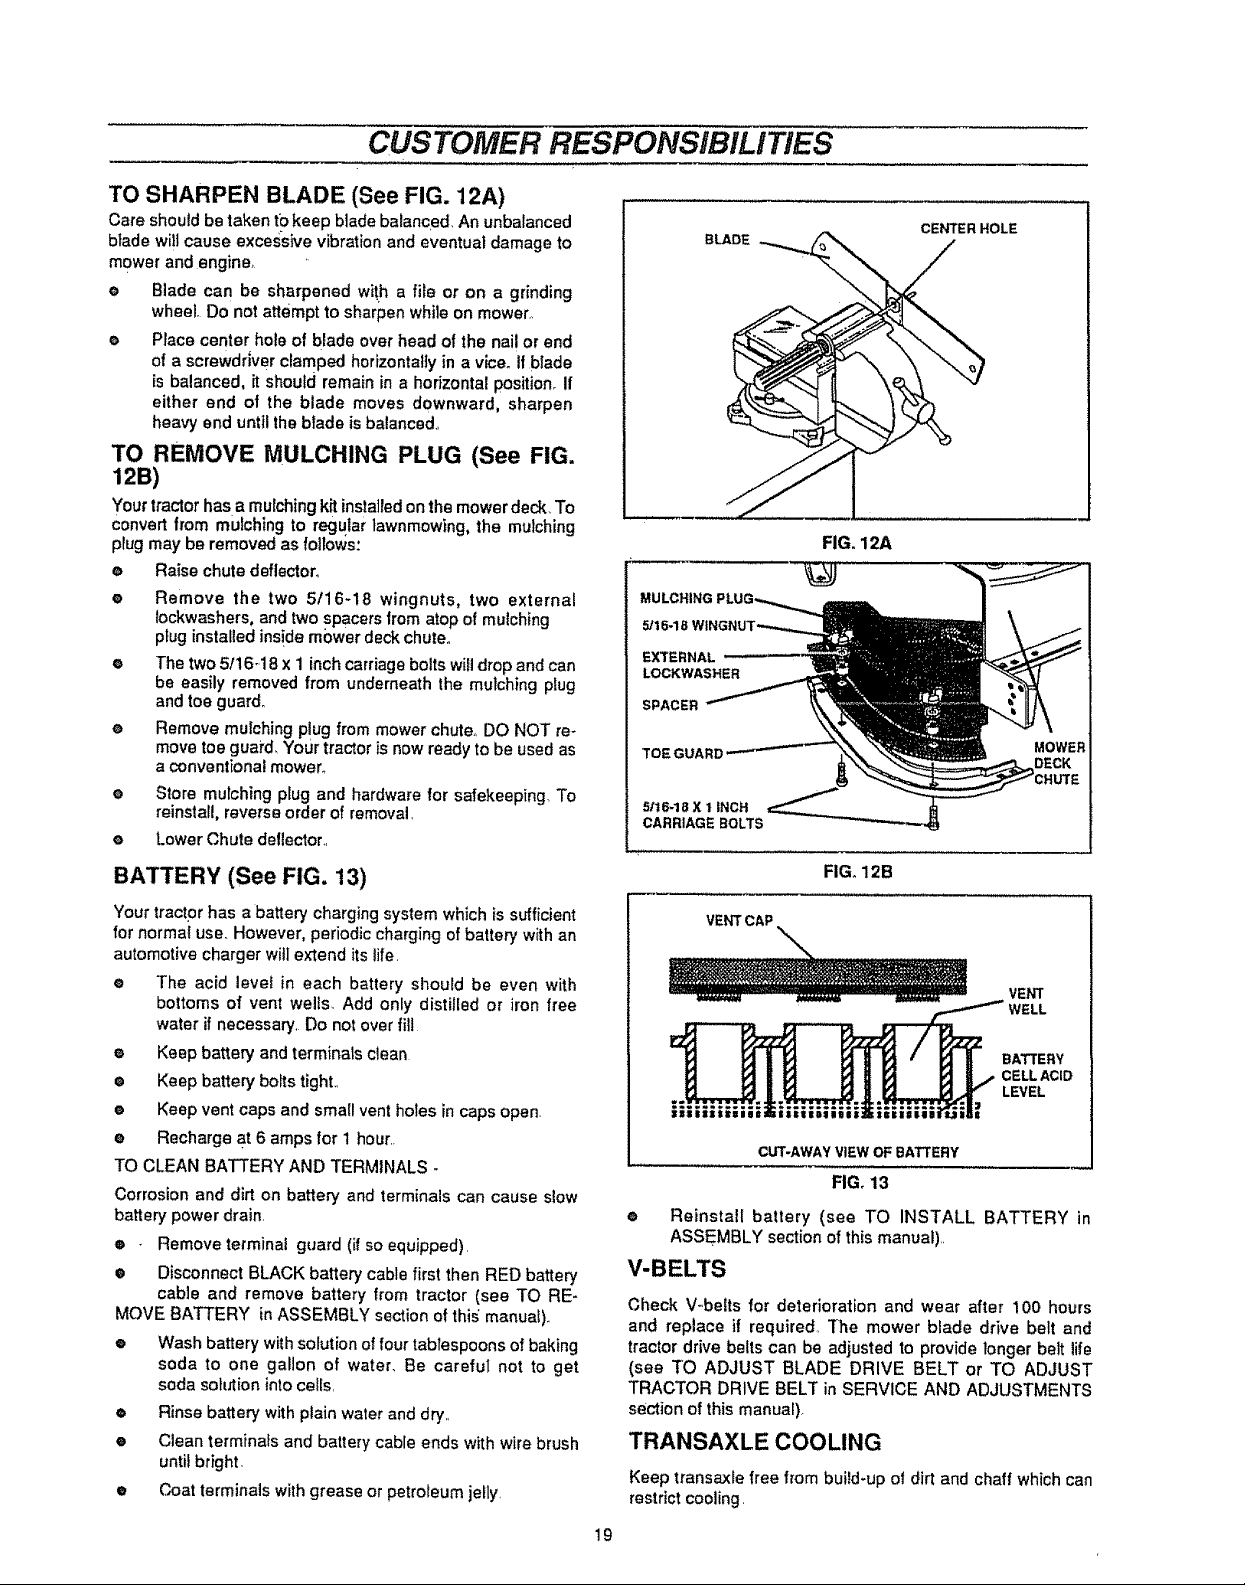
TO SHARPEN BLADE (See FIG. 12A)
Care should be taken to keep blade balanced An unbalanced
blade wilt cause excessive vibration and eventual damage to
mower and engine_
e Blade can be sharpened with a file or on a grinding
wheel, Do not attempt to sharpen while on mower..
e Place center hole of brads over head of the nail or end
of a screwdriverclamped horizontally in a vice. Ifblade
is balanced, _tshould remain in a horizontal position. If
either end of the blade moves downward, sharpen
heavy end until the blade is balanced.,
TO REMOVE MULCHING PLUG (See FIG.
129)
Yourtractorhas a mulching k_tinstalledonthemowerdeck. To
Convert from mulching to regular lawnmowing, the mulching
plug may be removed as follows:
e Raise chute deflector°
e Remove the two 5116-18 wingnuts, two external
tockwashers0 and two spacers from atop of mulching
plug installedinside mower deck chute°
e The two 5/16-18 x 1 inch carriage bolts will drop and can
be easily removed from underneath the mulching ptug
and toe guard°
e Remove mulching plug from mower chute° DO NOT re-
move toe guai*d, Your tractor is now ready to be used as
a conventional mower°
Store mulching plug and hardware for safekeeping.. To
reinstall, reverse order of removal,
e Lower Chute deflector.,
BATTERY (See FIG. 13)
BLADE
_16-18 WINGN_
EXTERNAL
LOCKWASHER
SPACER
5/t6-18 X 1 INCH
CARRIAGE BOLTS
cENTER HOLE
FIG. 12A
FIGo12B
Your tractor has a battery charging system which is sufficient
for normal use. However, periodic charging of battery with an
automotive charger wi!l extend its fife,
e The acid level in each battery should be even with
bottoms of vent wells. Add only distilled or iron free
water if necessary, Do not over fill
e Keep battery and terminals clean
• Keep battery bolts tight,,
e Keep vent caps and small vent holes in caps open.
e Recharge at 6 amps for 1 hour.,
TO CLEAN BATTERY AND TERMINALS -
Corrosion and dirt on battery and terminals can cause slow
battery power drain.
® - Remove terminat guard (if so equipped),
• Disconnect BLACK battery cable first then RED battery
cable and remove battery from tractor (see TO RE-
MOVE BATTERY in ASSEMBLY section of this' manuat).,
® Wash battery with solution of four tablespoons of baking
soda to one gallon of water. Be careful not to get
soda solution intoceils,
e Rinse battery with plain water and dry,,
e Clean terminals and battery cable ends with wire brush
until bright,
• Coat terminals withgrease or petroleum jelly,
VENT CAP
VENT
BATTERY
CELL ACID
LEVEL
IIIIIII1111t_ II11t II!1 Ii111_1
CUT-AWAY VIEW OF BATTERY
FIG, 13
Reinstall battery (see TO INSTALL BATTERY in
ASSEMBLY section of this manual),,
V-BELTS
Check V-belts for deterioration and wear after 100 hours
and replace if required,, The mower blade drive belt and
tractor drive belts can be adjusted to provide longer belt life
(see TO ADJUST BLADE DRIVE BELT or TO ADJUST
TRACTOR DRIVE BELT in SERVICE AND ADJUSTMENTS
sectionof this manual).
TRANSAXLE COOLING
Keep transaxle free from build-up of dirt and chaff which can
restrictcooling,
19
CUSTOMER RESPONSIBILITIES
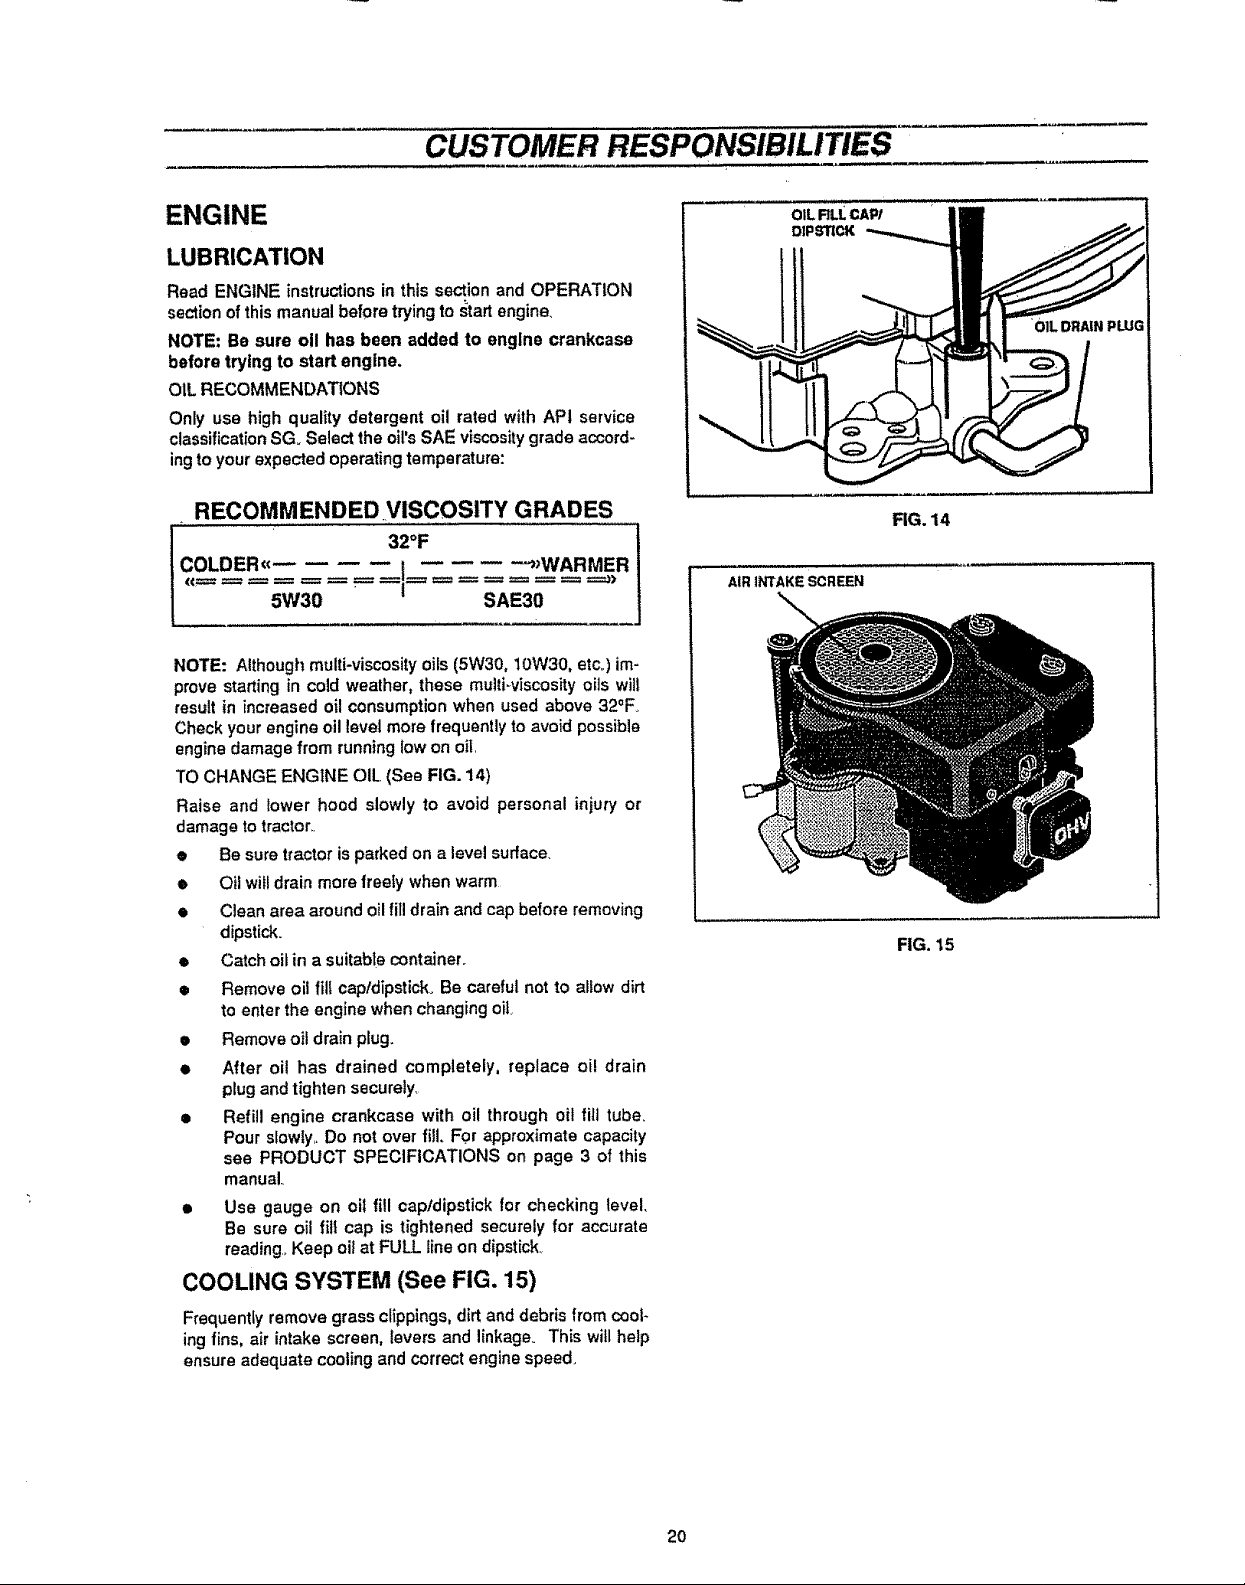
ENGINE
LUBRICATION
Read ENGINE instructions in this section and OPERATION
section of this manual before trying to _tart engine,
NOTE: Be sure oil has been added to engine crankcase
before trying to start engine,
OIL RECOMMENDATIONS
Only use high quality detergent oil rated with AP! service
classificationSO. Select the oil's SAE viscosity grade accord-
ing to your expected operating temperature:
RECOMMENDEDVISCOSITY GRADES
i._ , 32OF
coLoE.,,- ,,w.=.Mj.
_€_= 5W30 SAE30
NOTE: Although multi-viscosity oils (5W30, 10W30, etco)im-
prove starting in cold weather, these muiti_viscosity oils will
result in increased oil consumption when used above 32°Fo
Check your engine oil level more frequently to avoid possible
engine damage from running low on oil.
TO CHANGE ENGINE OIL,(See FIG. 14)
Raise and lower hood slowly to avoid personal injury or
damage to tractor,.
• Be sure tractor is parked on a level surface.
• Oil wit! drain more freely when warm
• Clean area around oil filldrain and cap before removing
dipstick.
• Catch oil in a suitable container.
• Remove oil fill cap/dipstick. Be careful not to aIlow dirt
to enter the engine when changing oil
• Remove oil drain plug.
• After oil has drained completely, replace oil drain
plug and tighten securely,
• Refill engine crankcase with oil through oil fill tube.
Pour slowly,, Do not over fill. For approximate capacity
see PRODUCT SPECIFICATIONS on page 3 of this
manual.
• Use gauge on oil fill capldipstick for checking level,
Be sure oil fill cap is tightened securely for accurate
reading., Keep oil at FULL line on dipstick_
COOLING SYSTEM (See FIG. 15)
OILRLL CAP/
D1PSTICK
FIG. 14
AIR INTAKE SCREEN
FIG. 15
Frequently remove grass clippings, dirt and debris from cool-
ing fins, air intake screen, levers and linkage_ This will help
ensure adequate cooling and correct engine speed.
2O
CUSTOMER RESPONSIBILITIES
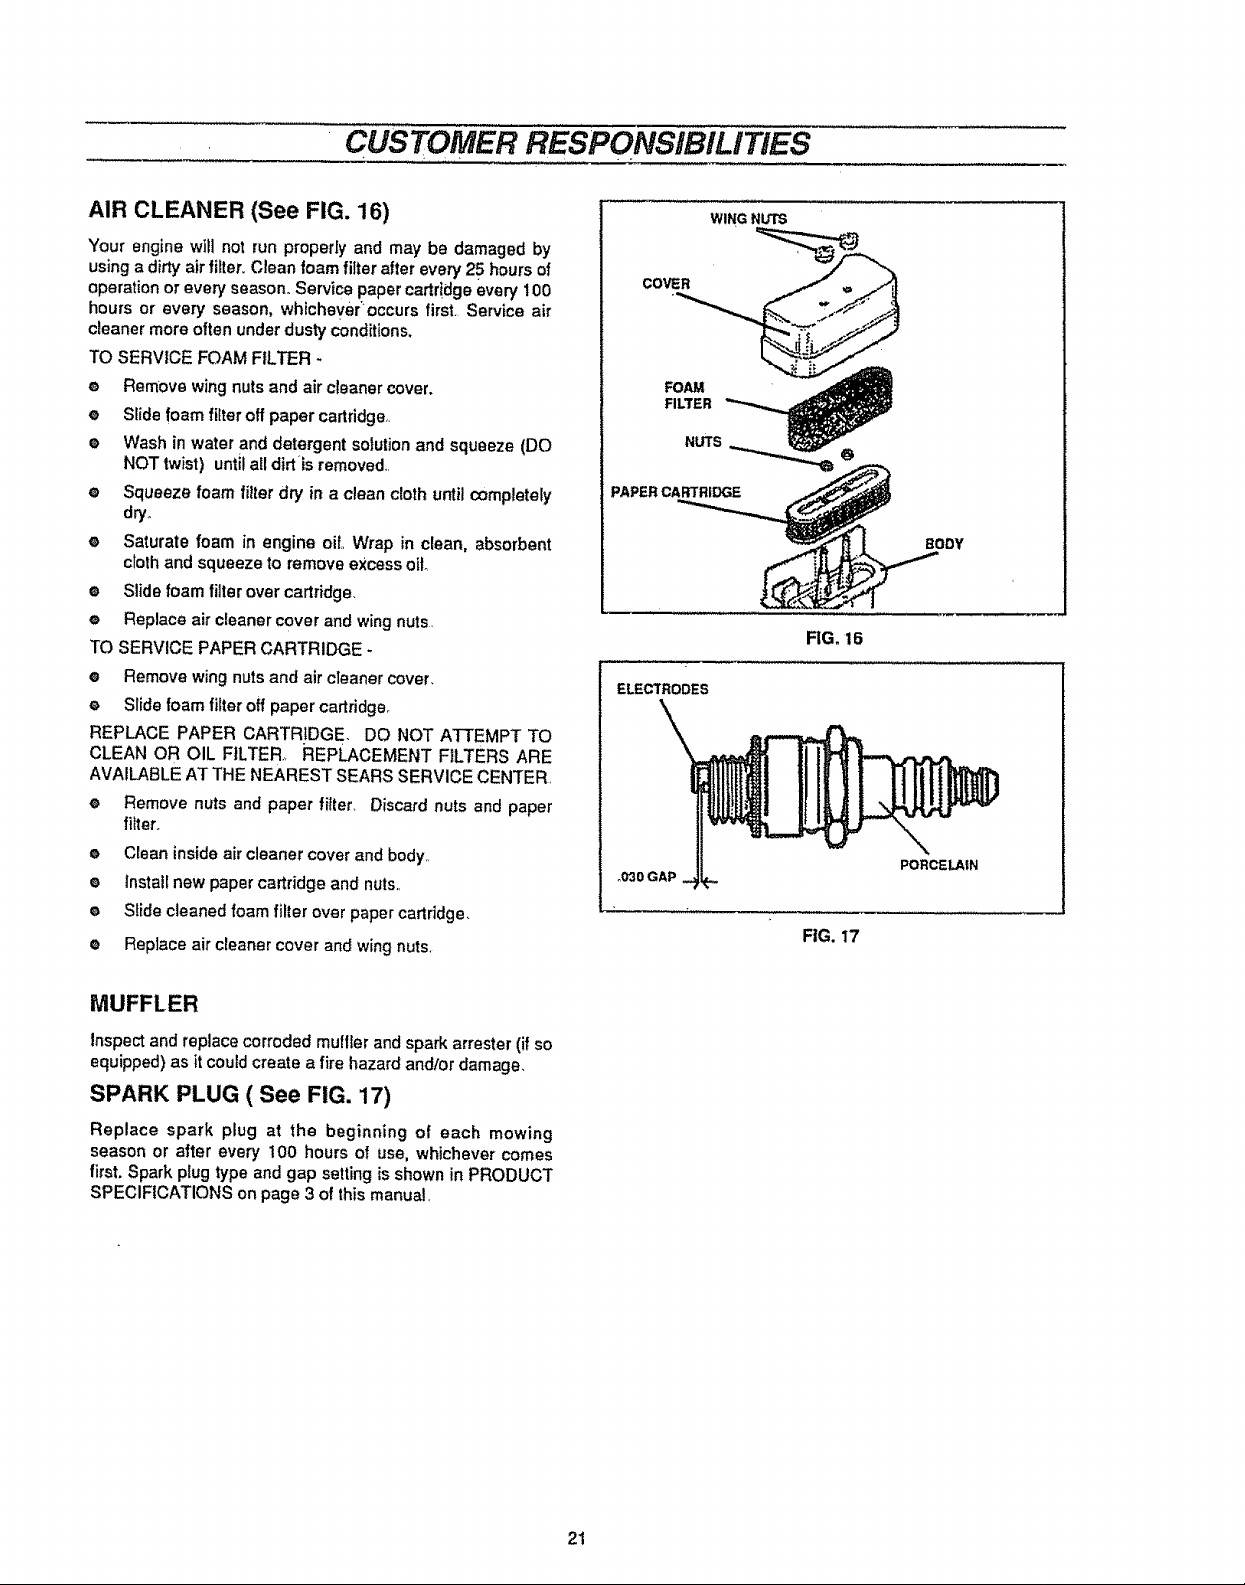
AIR CLEANER (See FIG. 16)
Your engine will not run properly and may be damaged by
using a dirty air filter,, Clean loam filter after every 25 hours of
operation or every season. Service paper cartr!dge every 100
hours or every season, whichever+occurs first. Service air
cleaner more often under dusty conditions.
TO SERVICE FOAM FILTER +
e Remove wing nuts and air cleaner cover.
e Slide foam filter off paper cartridge,,
e Wash in water and detergent solution and squeeze (DO
NOT twist) until all dirt +isremoved.,
e Squeeze foam filter dry in a clean cloth untilcompletely
dry+.
e Saturate foam in engine oil,, Wrap in clean, absorbent
cloth and squeeze to remove excess oito
e Slide foam filter over cartridge.
e Replace air cleaner cover and wing nuts.
TO SERVICE PAPER CARTRIDGE.
e Remove wing nuts and air cleaner cover.
e Slide foam filter off paper cartridge+
REPLACE PAPER CARTRIDGE. DO NOT ATTEMPT TO
CLEAN OR OIL FILTER.. REPLACEMENT FILTERS ARE
AVAILABLE AT THE NEAREST SEARS SERVICE CENTER,
e Remove nuts and paper filler, Discard nuts and paper
filter+
e Clean inside air cleaner cover and body+,
e Installnew paper cartridge and nuts,,
e Slide cleaned foam filler over paper cartridge+
• Replace air cleaner cover and wing nuts,
WING NUTS
COVER
FOAM
FILTER
NUTS
PAPER CARTRIDGE
ELECTRODES
+030 GAP
BODY
FIG. 16
PORCELAIN
FIG. 17
MUFFLER
Inspect and replace corroded muffler and spark arrester (ifso
equipped) as it could create a fire hazard andlor damage.
SPARK PLUG ( See FIG. 17)
Replace spark plug at the beginning of each mowing
season or alter every 100 hours of use, whichever comes
first. Spark plug type and gap setting is shown in PRODUCT
SPECIFICATIONS on page 3 of this manual,
21

CUSTOMER RESPONSIBILITIES
IN-LINE FUEL FILTER (See FIG, 17A)
Fuel filter should be replaced once each season,, tf fuel filter
becomes clogged, obstructing fuel flow to carburetor, replace-
ment is required.. Make sure new filter is installedwith the IN
marking toward the tank and the OUT rnarking toward the en-
gine. Check fuel system components frequently and replace
any parts showing wear or cracks.
• With engine cool, remove filter and plug fuel line sections_
• Place newfuel filter inposition infuelline with arrow pointing
towards carburetor.
• Be sure there are no fue!line leaks and clamps are properly
positioned.
i Immediately wipe up any spilled gasoline.
FUEL FILTER
CLAMP
CLAMP
CLEANING
• Clean engine, battery, seat, transaxte, finish, etc. of all
foreign matter.
• Keep finished surfaces and wheels free of altgasoline, oil,
etc.
• Protect painted surfaces with automotive type wax.
We do not recommend using a garden hose to clean your
tractor unless electrical system, muffler, air filter and
carburetor are covered to keep water out. Water in engine can
shorten engine life.
Flg. 17A
22
 Loading...