

Operator's Manual
ICRRFTSMRN°I • Safety
• Assembly
Grass Bagger
Rear Mount for 30" Rear
• Operation
• Maintenance
Engine Rider
Model 536.249810
CAUTION: Before using this
product, read this manual
and follow all of its Safety
Rules and Operating
Instructions.
Manual del usario
Recolector de hierba
• Parts
Montaje posterior para
tractores de 30" con motor trasero
Modelo 536.249810
PRECAUCION: Antes de usar este
producto, lea este manual y siga
todas las reglas de seguridad e
instrucciones de operaci6n.
Sears, Roebuck and Co., Hoffman Estates, IL. 60179 U.S.A.
F-020902L www.sears.com/craftsman
• Seguridad
• Ensamblaje
• Operacion
• Mantenimiento
• Piezas
TABLE OF CONTENTS
WARRANTY .................................... 2 MAINTENANCE ................................. 13
ASSEMBLY ..................................... 5 SLOPE GUIDE .................................. 15
OPERATION .................................... 11 REPAIR PARTS ................................. 16
LIMITED ONE YEAR WARRANTY
ON ATTACHMENTS
For one (1) year from the date of purchase, Sears will repair any defect in material or workmanship in this Attachment at no
charge.
This warranty does not cover:
• Expendable items which become worn during normal use, such as blades and blade adapters.
• Repairs necessary because of operator abuse, negligence, improper storage or accident or the failure to maintain the
equipment according to the instructions contained in the owner's manual.
• Equipment used for commercial or rental purposes.
WARRANTY SERVICE IS AVAILABLE BY RETURNING THE ATTACHMENT TO THE NEAREST SEARS SERVICE
CENTER IN THE UNITED STATES.
This warranty gives you specific legal rights, and you may also have other rights which may vary from state to state.
Sears, Roebuck and Co., D/817WA, Hoffman Estates, Illinois 60179.
GRASS BAGGER FEATURES
Dump Rear Bagger: Operator empties rear bagger from opera-
tor's position.
Large Capacity Rear Bagger: Container can be quickly re-
moved.
GRASS BAGGER
Record in the space below the serial number and the date
of purchase of this unit.
The model number and serial number are found on a decal
attached to the unit.
Model Number: 536.24981
Serial Number:
Date of Purchase:
Keep these numbers for future reference.
F-020902L 2
Congratulations on your purchase of a Craftsman Grass Bagger.
It has been designed, engineered and manufactured to give you
the best possible dependability and performance.
If you experience any problems you cannot easily remedy, please
see your nearest Sears Service Center. We have competent, well
trained technicians and the proper tools to service or repair this
unit.
Please read and keep this manual. The instructions will enable
you to assemble and maintain your unit properly. Always observe
the "Safety Rules".
CUSTOMER RESPONSIBILITIES
• Carefully read and follow the rules for safe operation, inspect
the unit.
• Follow all the assembly instructions. Carefully adjust the unit.
• Know how to operate all standard and accessary equipment
on the unit. Make sure the operator can correctly operate the
unit.
• Operate the unit only with guards, shields and other safety
items in place and working correctly.
• Complete all maintenance on the unit. Service the unit only
with authorized or approved replacement parts.
SAFETY RULES
Safe Operation Practices for Riding Vehicles
As Recommended by American National Standards Institute
WARNING: This cutting machine is capable of amputating hands and feet and throwing objects. Failure to observe the
following safety instructions could result in serious injury or death to the operator or bystanders.
GENERAL OPERATION:
1. Read, understand and follow all instructions in the Instruction
Book, on the machine, the engine and with any attachments
before starting.
2. Only allow responsible adults familiar with the instructions to
operate the machine.
3. Clear the area of objects such as rocks, toys, wire, etc.
which could be picked up and thrown by the blade.
4. Be sure the area is clear of other people before mowing.
Stop the machine if anyone enters the area.
5. Never carry passengers.
6. Disengage power to the mower or any attachments before
backing up. Do not mow in reverse unless absolutely neces-
sary. Always look down and behind before and while back-
ing.
7. Be aware of the direction the mower discharges. Do not point
discharge from the mower at anyone or at places where
people may be. Do not operate the mower without either the
entire grass bagger or the mower guard in place.
8. Slow down before turning.
9. Never leave a machine unattended with the engine running.
Always disengage the blade(s), set the parking brake, stop
the engine and remove the key before dismounting.
10. Disengage power to attachment(s) when transporting or not
in use. Disengage the blade(s) when not mowing.
11. Stop the engine before removing the grass bagger or unclog-
ging the chute.
12. Mow only in daylight or good artificial light.
13. Do not operate the machine while under the influence of al-
cohol or drugs or when very tired.
14. Watch for traffic when operating near or crossing roadways.
15. Use extra caution when loading or unloading the machine
when using a trailer or truck for transporting.
16. Disengage all attachment clutches and shift into Neutral be-
fore attempting to start the engine.
17. Always wear safety glasses or an eye shield when you oper-
ate the unit to protect your eyes from foreign objects that can
be thrown from the unit. Always wear eye protection when
you make an adjustment or repair to the machine.
18. Use care when pulling loads or using heavy equipment.
a. Use only approved drawbar hitch points.
b. Limit loads to those you can safely control.
c. Do not turn sharply. Use care when backing.
d. Use counterweights or wheel weights when suggested in
the Instruction Book.
19. Do not operate this machine if you are taking drugs or other
medication which can cause drowsiness or affect your ability
to operate this machine.
20. Do not use this machine if you are mentally or physically
unable to operate this machine safely.
F-020902L
21. Data indicates that operators, age 60 years and above, are
involved in a large percentage of riding mower related inju-
ries. These operators should evaluate their ability to operate
a riding mower safely enough to protect themselves and oth-
ers from serious injury.
SLOPE OPERATION:
Slopes and rough terrain are major factors related to loss of
control and tip over accidents which can result in severe
injury or death. ALL slopes require extra caution. If you can-
not back up the slope or if you feel uneasy on the slope, do
not mow it. See the "Slope Guide" in the back of this book to
check for safe operation.
DO
1. Mow up and down slopes, not across.
2. Remove obstacles such as rocks, limbs, etc...
3. Watch for holes, ruts or bumps. Uneven terrain could over-
turn the machine. "Tall grass can hide obstacles."
4. Use slow speed. Choose a low enough gear so that you will
not have to stop or shift while on the slope.
5. Follow the manufacturer's recommendations for wheel
weights or counterweights to improve stability.
6. Use extra care with grass baggers or other attachments,
they can change the stability of the machine.
7. Keep all movement on the slopes slow and gradual. Do not
make sudden changes in speed or direction.
8. Avoid starting or stopping on a slope. If tires lose traction,
disengage the blades and proceed slowly straight down the
slope.
DO NOT
1. Do not turn on slopes unless absolutely necessary, then
only turn slowly and gradually downhill, if possible.
2. Do not mow near drop-offs, ditches or embankments. A
wheel over the edge or an edge caving in could cause a sud-
den overturn and an injury or death.
3. Do not mow on wet grass. Reduced traction could cause
sliding.
4. Do not try to stabilize the machine by putting your foot on
the ground.
5. Do not use a grass bagger or other rear mounted accesso-
ries on steep slopes (greater than 10 degrees).
SAFETY RULES
CHILDREN:
Tragic accidents can occur if the operator is not alert to the
presence of children. Children are often attracted to the ma-
chine and the mowing activity. NEVER assume that children
will remain where you last saw them.
1. Keep children out of the mowing area and in the watchful
care of an adult other than the operator.
2. Be alert and turn the engine off if children enter the area.
3. Before and when backing, look behind and down for small
children.
4. Never carry children or any passengers. They may fall off
and be seriously injured or interfere with the safe operation
of the machine.
5. Never allow children to operate the machine. Instruct chil-
dren in the dangers of the machine.
6. Use extra care when approaching blind corners, shrubs,
trees or other objects that may obscure vision.
SERVICE:
1. Use extra care when handling gasoline and other fuels.
Fuels are flammable and the vapors are explosive.
a. Use only an approved container.
b. Never remove the gas cap or add fuel with the engine
running. Allow the engine to cool for several minutes before
refueling. Do not smoke.
c. Never refuel the machine indoors.
d. Never store the machine with fuel in the tank or fuel con-
tainer inside where there is an open flame, such as a water
heater.
2. Never start or run the engine inside a closed area.
3. Keep all nuts and bolts, especially the blade attachment nuts
tight. Frequently check the blade(s) for wear or damage such
as cracks and nicks. A blade that is bent or damaged must
be immediately replaced with an original equipment blade
from an authorized service dealer. For safety, replace the
blade every two years. Keep the equipment in good condi-
tion.
4. Never tamper with the safety devices. Check their proper
operation regularly.
5. To reduce fire hazards keep the machine free of grass,
leaves or other debris build-up. Clean up oil or fuel spills.
Allow the machine to cool before storing.
6. Stop and inspect the equipment if you strike an object. Re-
pair, if necessary, before restarting.
7. Never make adjustments or repairs with the engine running.
The carburetor can be adjusted with the engine running. Do
not change the engine governor settings or overspeed the
engine.
8. Grass bagger components are subject to wear, damage and
deterioration, which could expose moving parts or allow ob-
jects to be thrown. For storage, always make sure the grass
bag is empty. Frequently check components and replace with
manufacturer's recommended parts when necessary.
9. Mower blade(s) are sharp and can cut. Wrap the blade(s) or
wear gloves and use extra caution when servicing them or
the blade housing area.
10. Check the brake operation frequently. Adjust and service as
required.
11. Wait for all movement to stop before servicing any part of the
unit.
,_ Look for this symbol to indicate important safety
F-O20902L 4
precautions. This symbol indicates: "Attentiont
Become Alert! Your Safety Is At Risk."
ASSEMBLY
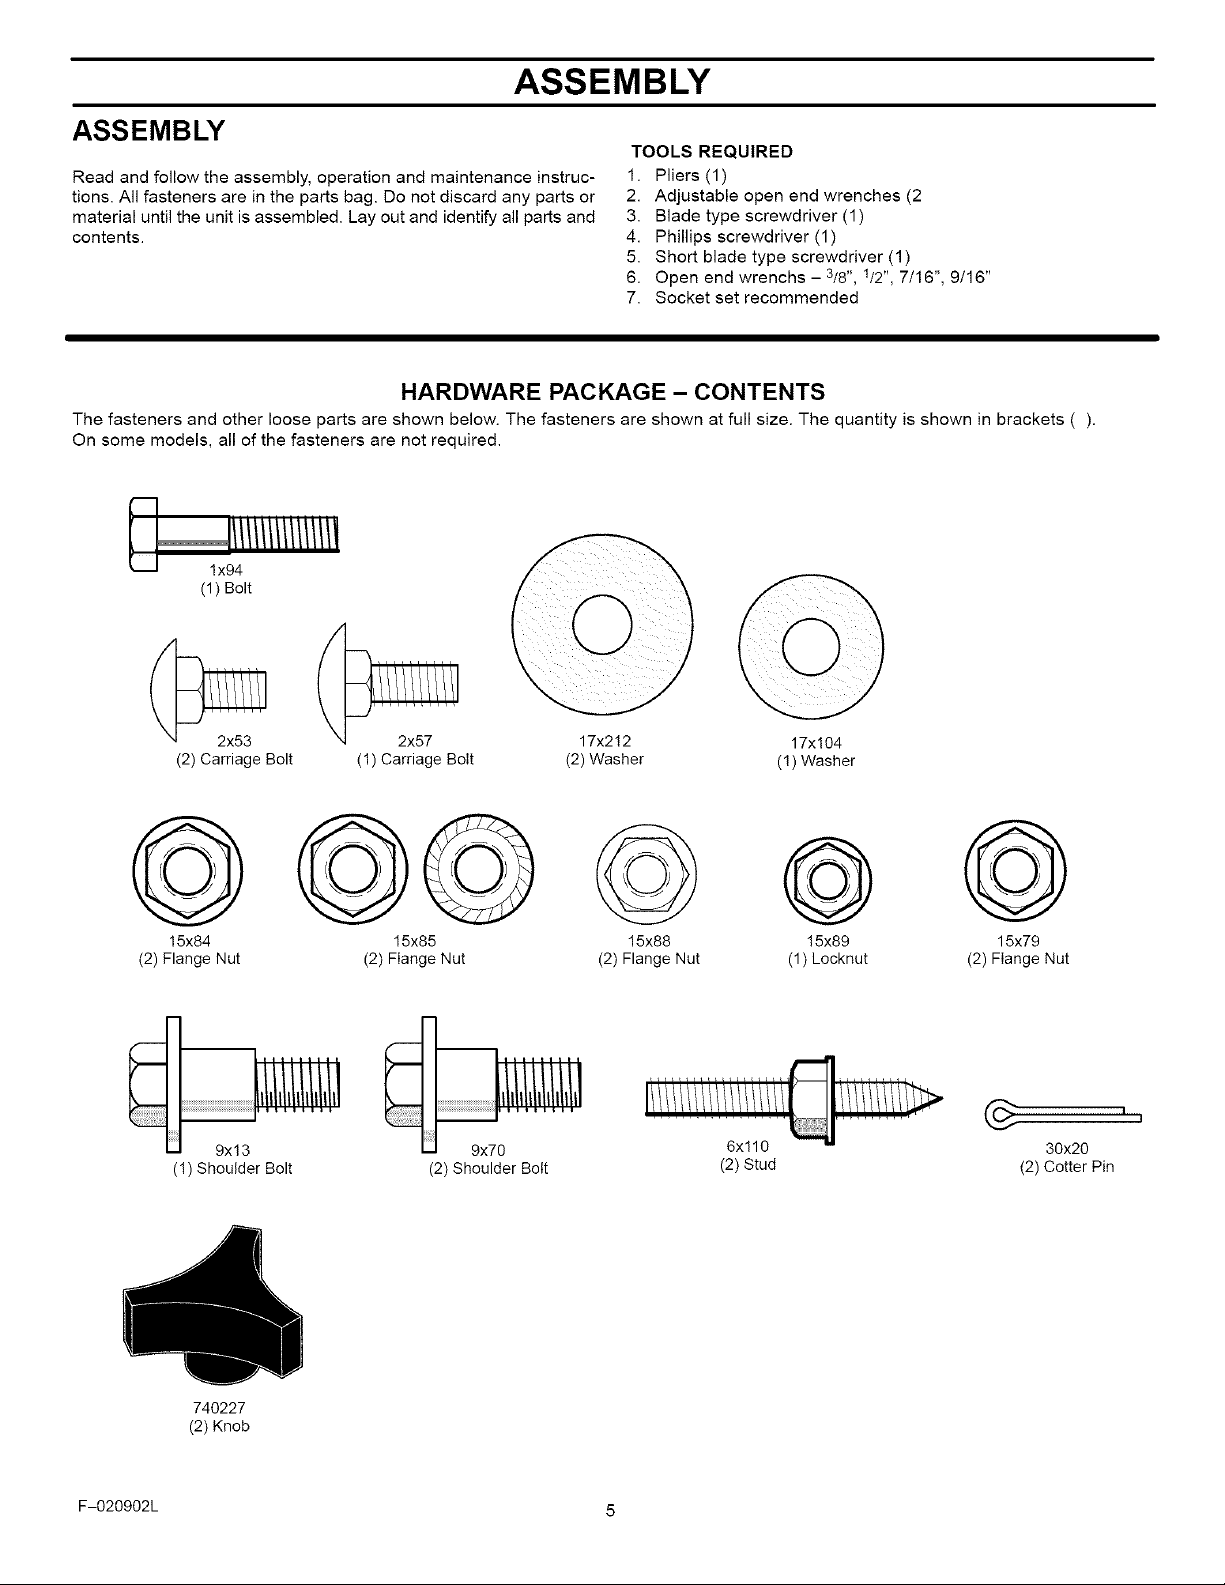
ASSEMBLY
TOOLS REQUIRED
Read and fellow the assembly, operation and maintenance instruc-
tions. All fasteners are in the parts bag. De net discard any parts or
material until the unit is assembled. Lay out and identify all parts and
contents.
HARDWARE PACKAGE - CONTENTS
The fasteners and other loose parts are shown below. The fasteners are shown at full size. The quantity is shown in brackets ().
On some models, all of the fasteners are not required.
(1) Bolt
1. Pliers (1)
2. Adjustable open end wrenches (2
3. Blade type screwdriver (1)
4. Phillips screwdriver (1)
5. Short blade type screwdriver (1)
6. Open end wrenchs - 3/8", 1/2", 7/16", 9/16"
7. Socket set recommended
(2) Carriage Bolt (1) Carriage Bolt
17x2!2 17x104
(2)Washer (!)Washer
@@@@ @ @
15x84 15x85 15x88 15x89 15x79
(2) Flange Nut (2) Flange Nut (2) Flange Nut (1) Locknut (2) Flange Nut
6x110 30x20
(!) Shoulder Bolt (2) Shoulder Bolt
(2) Stud (2) Cotter Pin
I
740227
(2) Knob
F-020902L 5
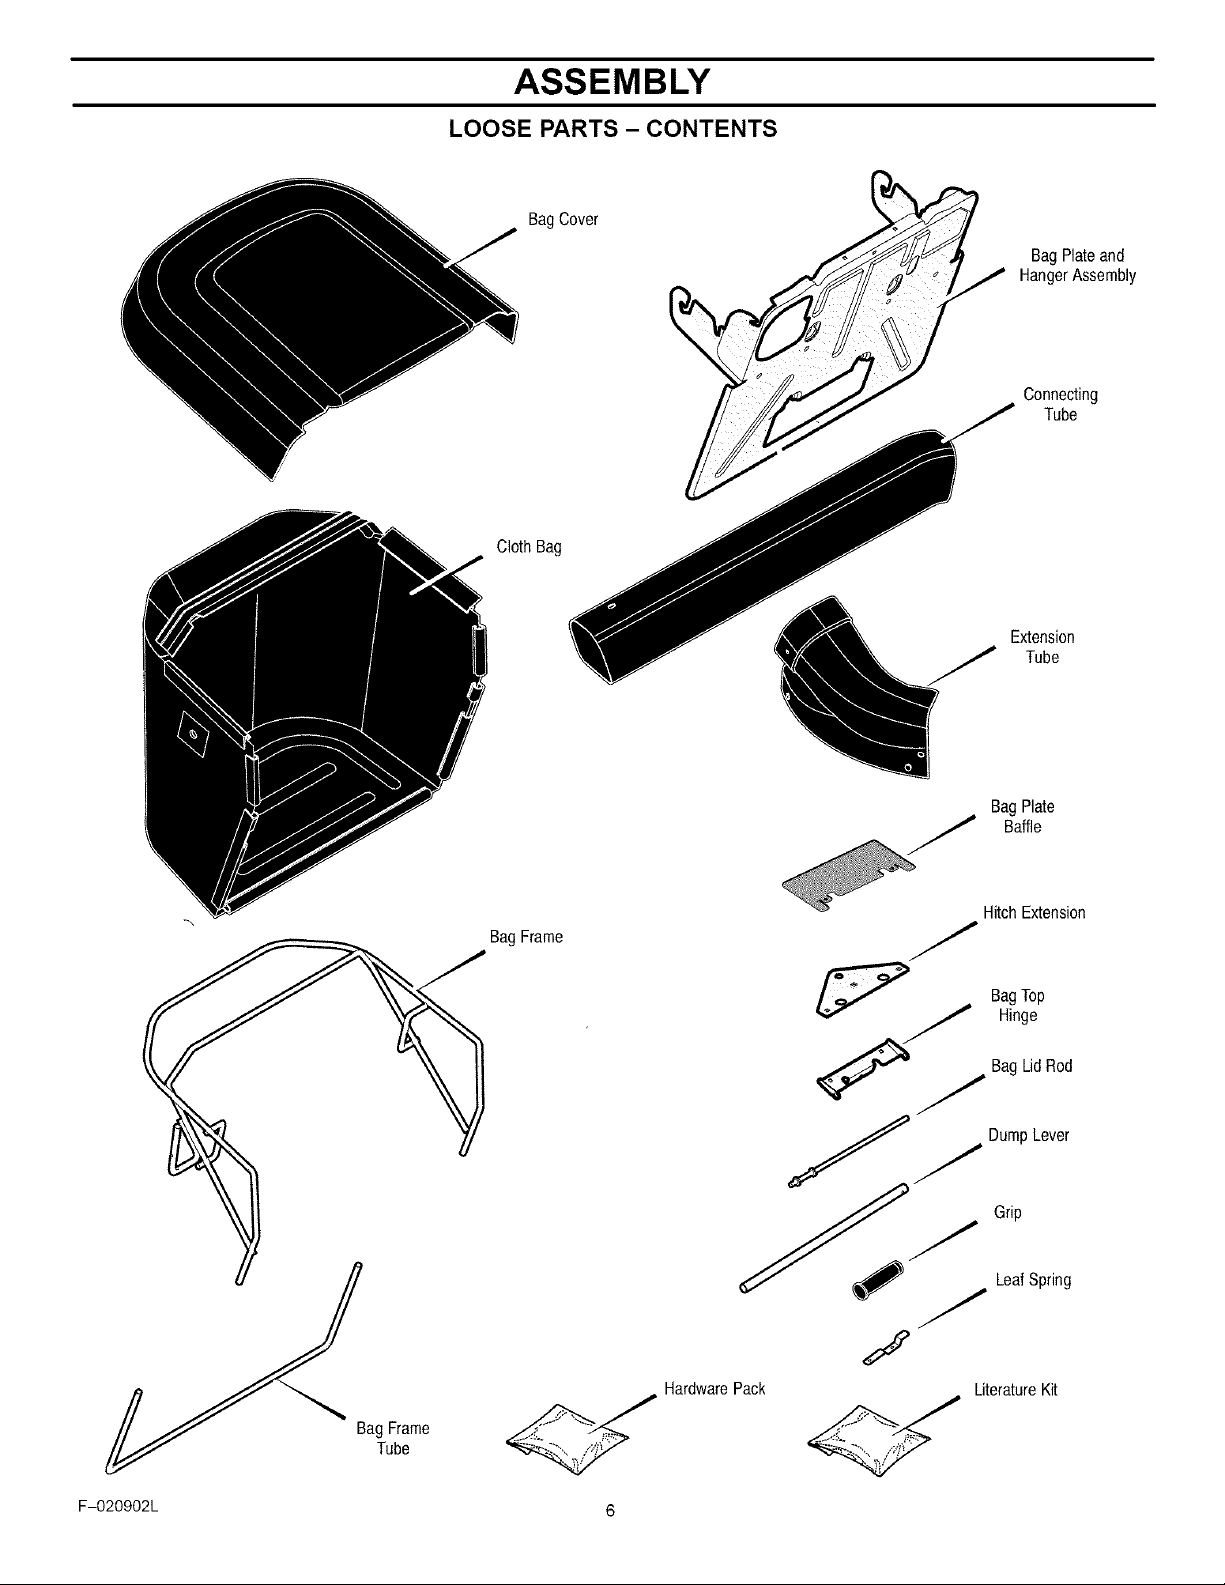
ASSEMBLY
LOOSE PARTS - CONTENTS
BagCover
ClothBag
BagPlateand
HangerAssembly
Connecting
Tube
Extension
BagFrame
J Tube
BagPlate
Baffle
HitchExtension
BagTop
Hinge
Bag LidRod
j DumpLever
Bag Frame
Tube
F-O20902L 6
LeafSpring
Grip
J
HardwarePack LiteratureKit
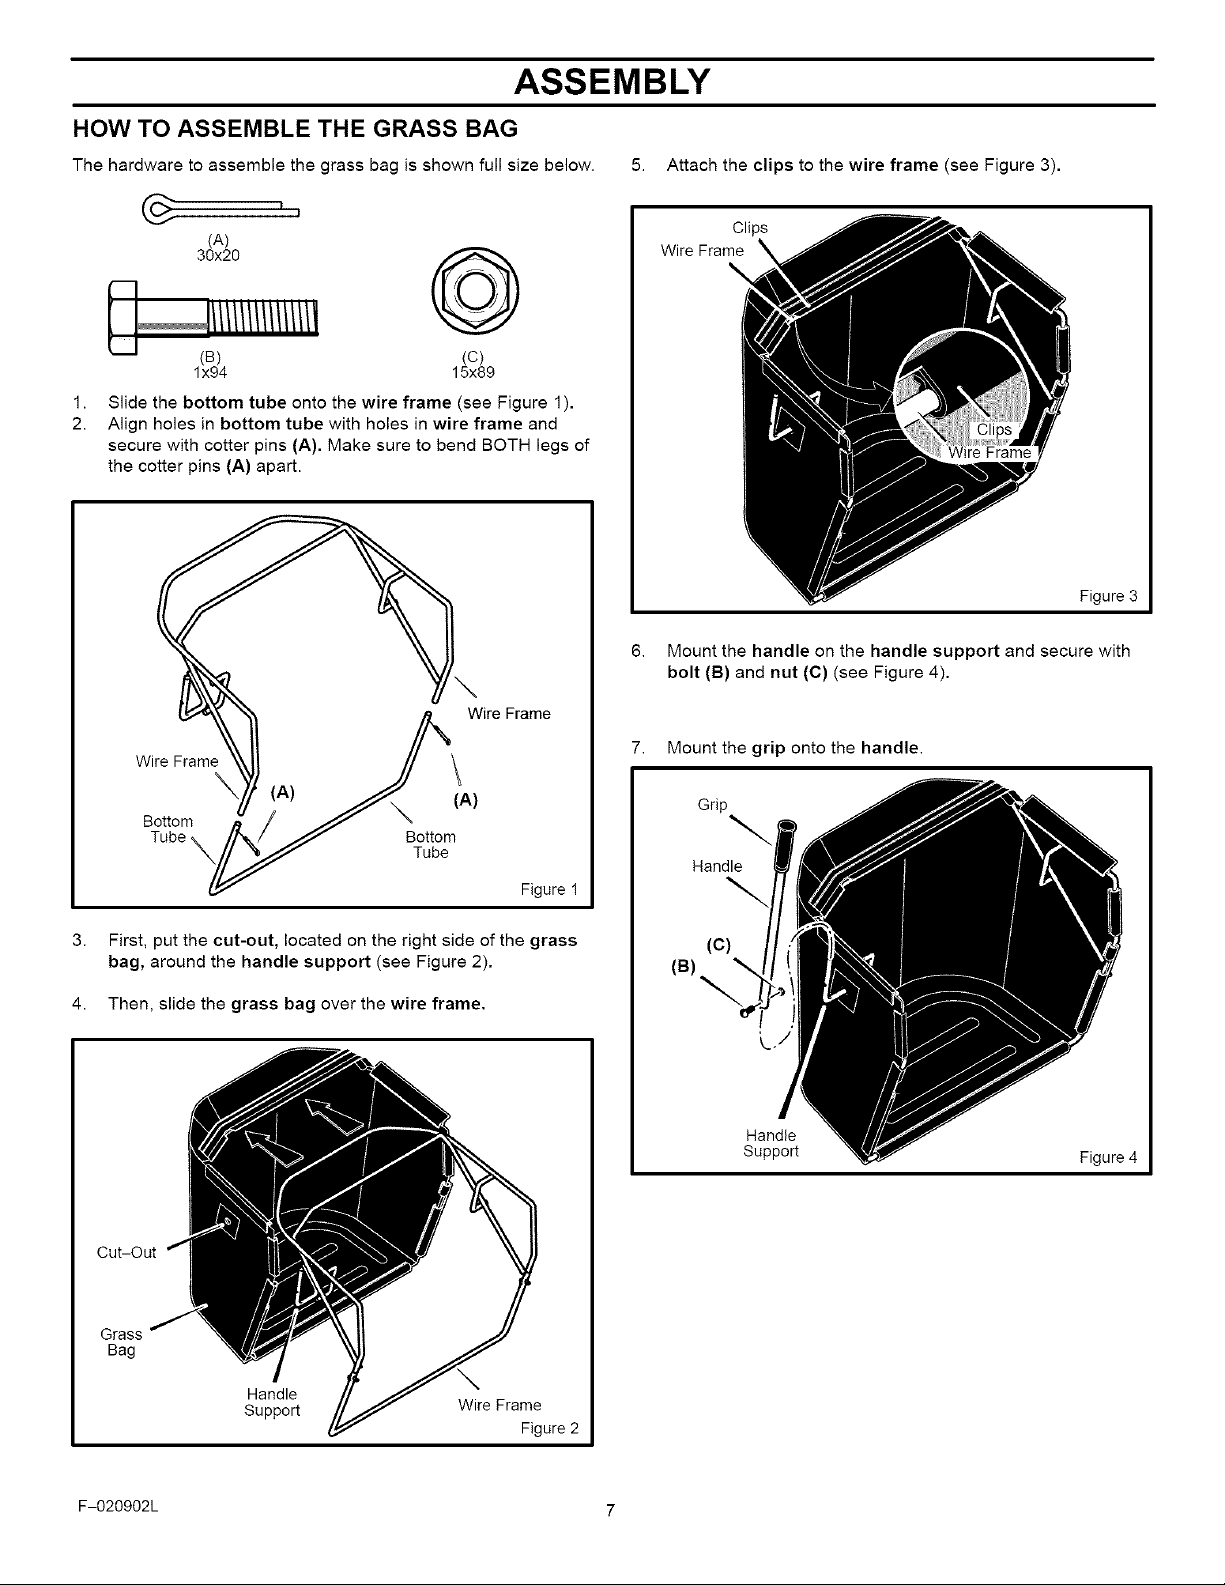
HOW TO ASSEMBLE THE GRASS BAG
ASSEMBLY
The hardware to assemble the grass bag is shown full size below.
(A)
30x20
(B) (C)
lx94 15x89
1.
Slide the bottom tube onto the wire frame (see Figure 1).
2.
Align holes in bottom tube with holes in wire frame and
secure with cotter pins (A). Make sure to bend BOTH legs of
the cotter pins (A) apart.
Wire Frame
5. Attach the clips to the wire frame (see Figure 3).
Clips
Wire Frame
Figure 3
Mount the handle on the handle support and secure with
bolt (B} and nut (C) (see Figure 4).
Wire Frame
\
Bottom
3.
First, put the cut-out, located on the right side of the grass
bag, around the handle support (see Figure 2).
4. Then, slide the grass bag over the wire frame.
Cut-Out
(A)
Bottom
Tube
Figure !
7. Mount the grip onto the handle.
Grip
Handle
(c)
(B)
Handle
Support
Figure 4
Grass
Bag
Handle
Support
F-020902L 7
Wire Frame
Figure 2
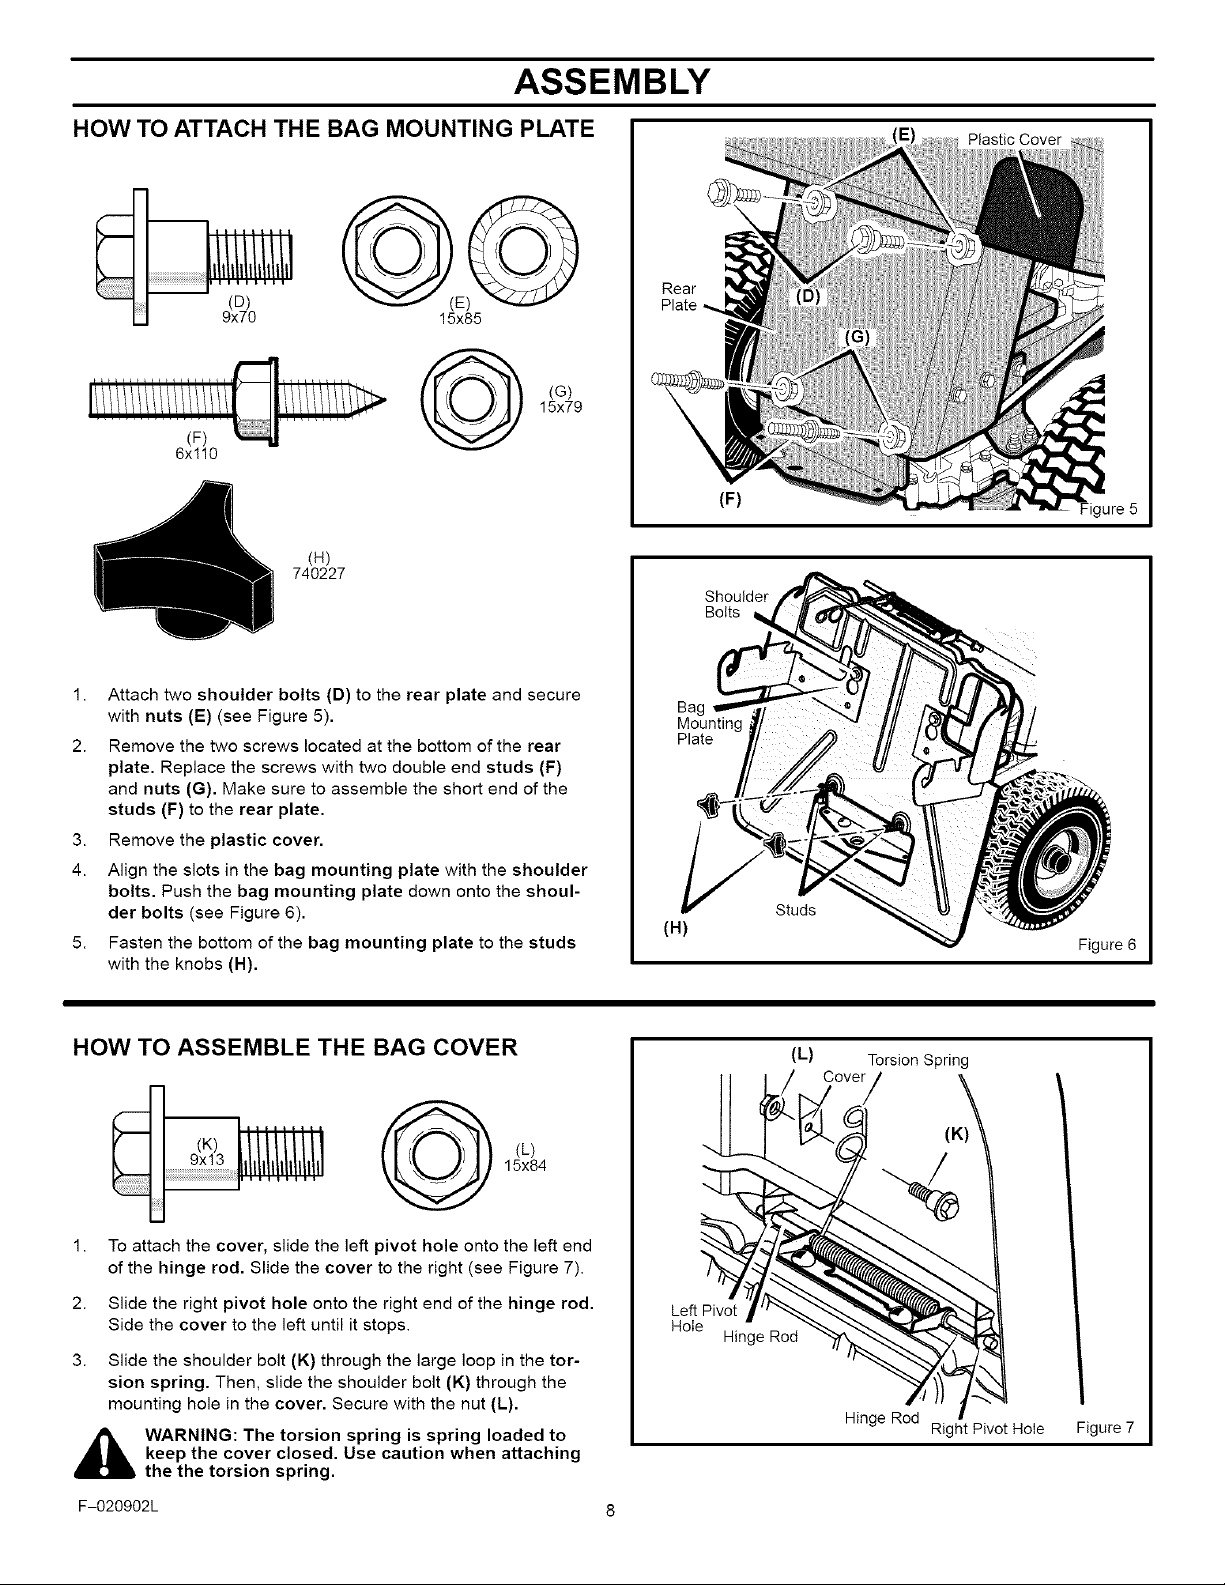
ASSEMBLY
HOW TO ATTACH THE BAG MOUNTING PLATE
15x85
15x79
(G)
6x!10
(H)
740227
1. Attach two shoulder bolts (D) to the rear plate and secure
with nuts (E) (see Figure 5).
2. Remove the two screws located at the bottom of the rear
plate. Replace the screws with two double end studs (F)
and nuts (G). Make sure to assemble the short end of the
studs (F) to the rear plate.
3. Remove the plastic cover.
4. Align the slots in the bag mounting plate with the shoulder
bolts. Push the bag mounting plate down onto the shoul-
der bolts (see Figure 6).
5. Fasten the bottom of the bag mounting plate to the studs
with the knobs (H).
Rear
Plate
Bag
Mounting
Plate
(H)
(F)
Shoulder
Bolts
Plastic Cover
Figure 5
Studs
Figure 6
HOW TO ASSEMBLE THE BAG COVER
15x84
(L)
To attach the cover, slide the left pivot hole onto the left end
of the hinge rod. Slide the cover to the right (see Figure 7).
2. Slide the right pivot hole onto the right end of the hinge rod.
Side the cover to the left until it stops.
3. Slide the shoulder bolt (K) through the large loop in the tor-
sion spring. Then, slide the shoulder bolt (K) through the
mounting hole in the cover. Secure with the nut (L).
,_ WARNING: The torsion spring is spring loaded to
F-020902L 8
keep the cover closed. Use caution when attaching
the the torsion spring.
_L) Cove_rSion Sprin_
LeftPivoti'/%
Hole Hinge Rod
" Right Pivot Hole Figure 7
ASSEMBLY
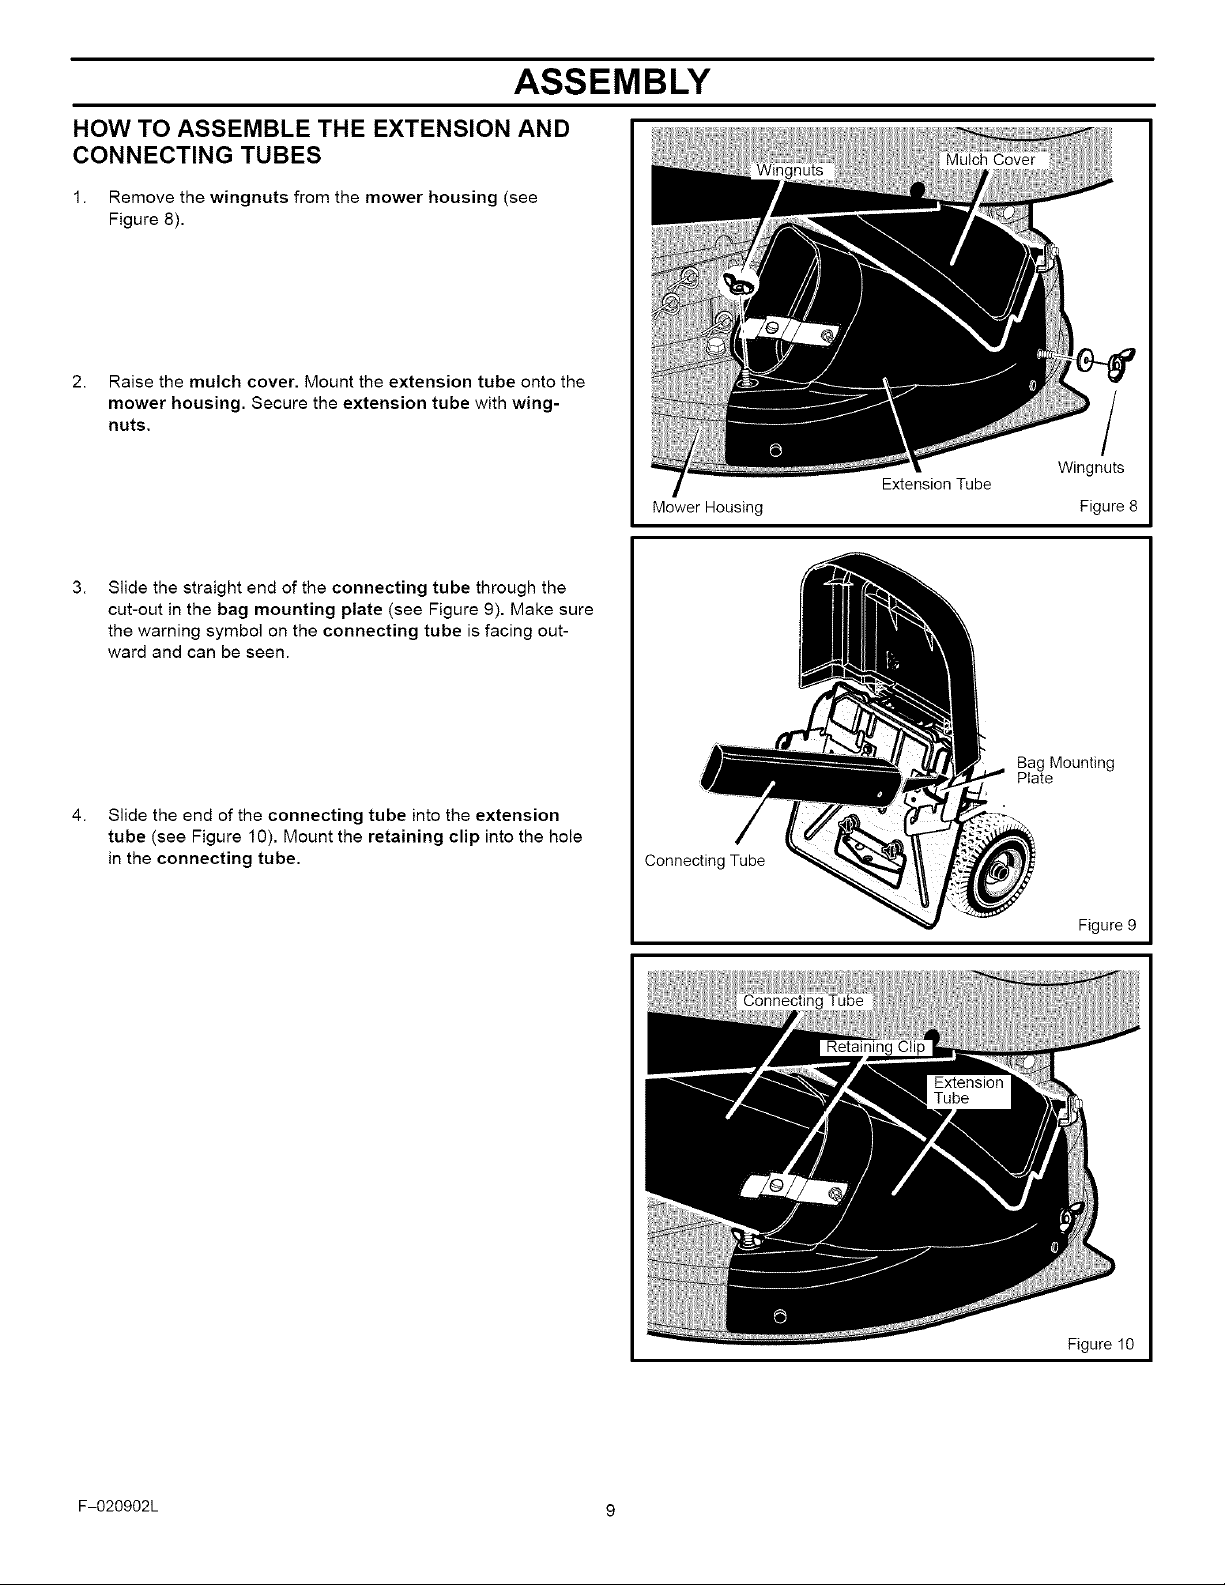
HOW TO ASSEMBLE THE EXTENSION AND
CONNECTING TUBES
1. Remove the wingnuts from the mower housing (see
Figure 8).
2. Raise the mulch cover. Mount the extension tube onto the
mower housing. Secure the extension tube with wing-
nuts.
3,
Slide the straight end of the connecting tube through the
cut-out in the bag mounting plate (see Figure 9). Make sure
the warning symbol on the connecting tube is facing out-
ward and can be seen.
4,
Slide the end of the connecting tube into the extension
tube (see Figure 10). Mount the retaining clip into the hole
in the connecting tube.
Mower Housing
Connecting Tube
Extension Tube
Wingnuts
Figure 8
Bag Mounting
Plate
Figure 9
F-020902L 9
Figure 10
ASSEMBLY
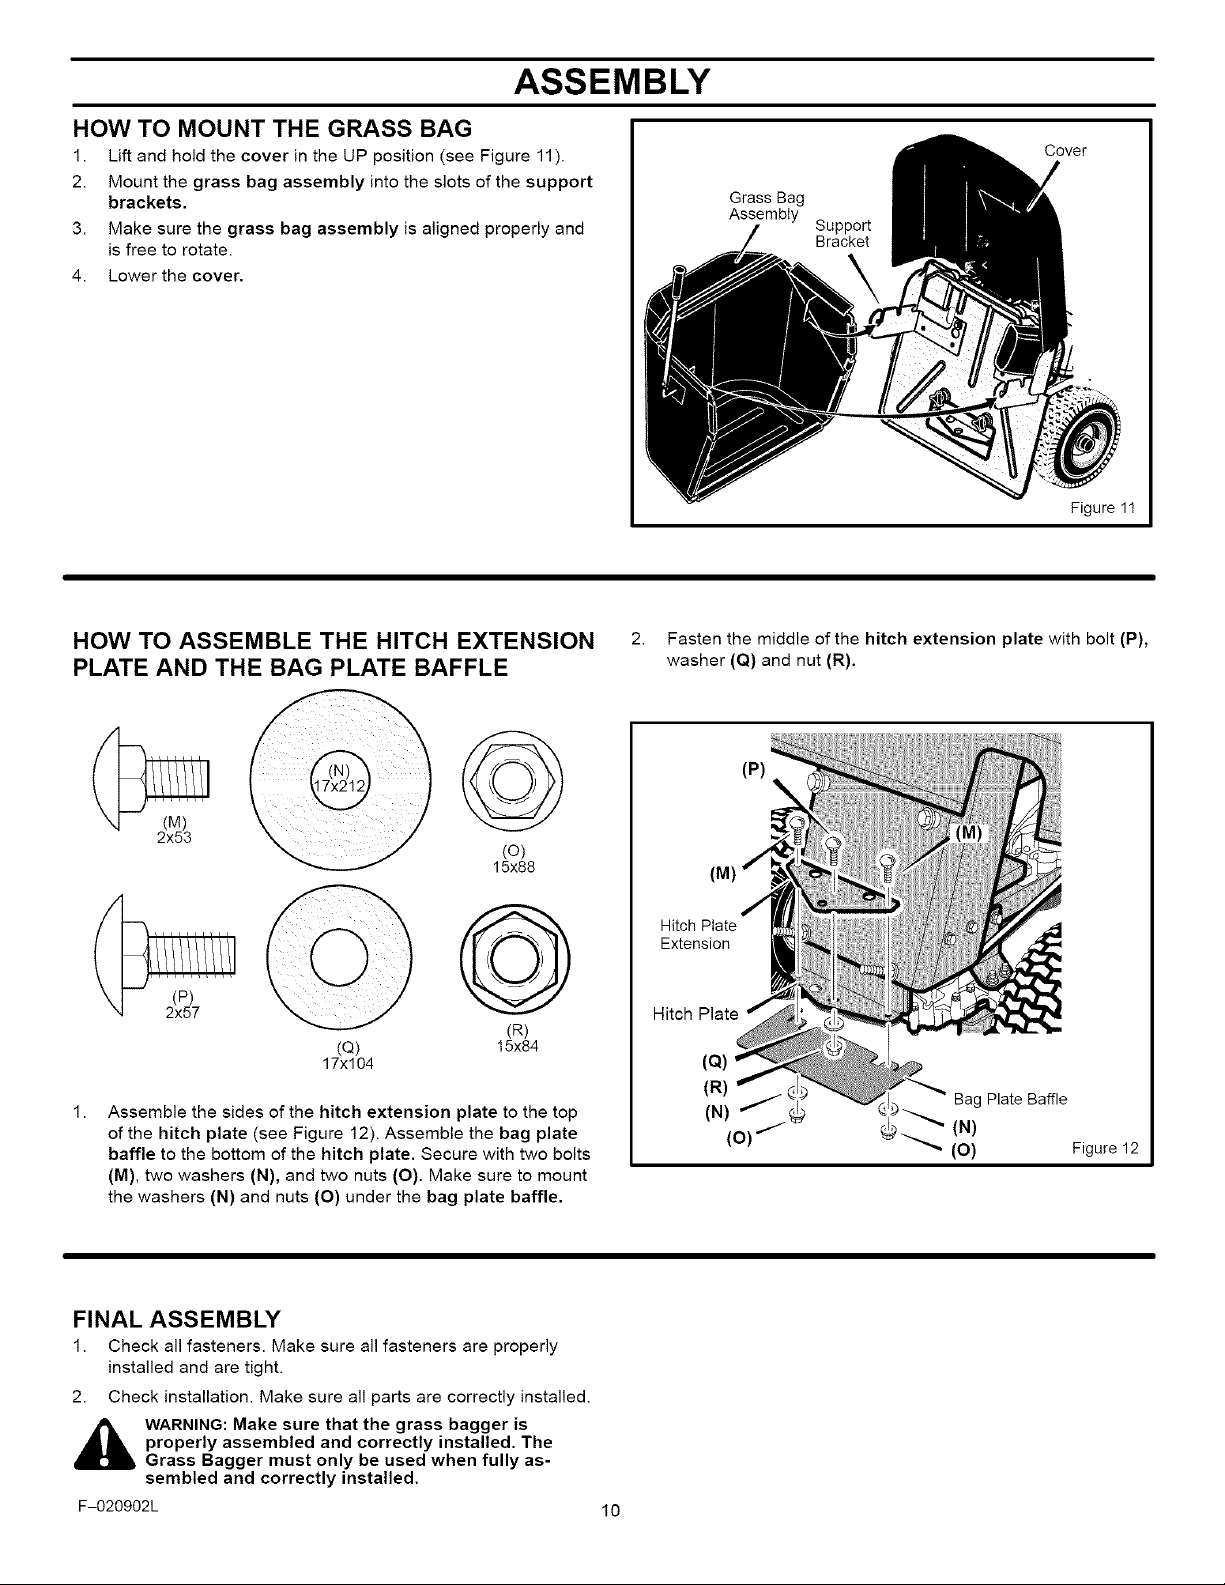
HOW TO MOUNT THE GRASS BAG
1. Lift and hold the cover in the UP position (see Figure 11).
2. Mount the grass bag assembly into the slots of the support
brackets.
3. Make sure the grass bag assembly is aligned properly and
is free to rotate.
4. Lower the cover.
Grass Bag
Assembly
Support
Bracket
Cover
Figure 11
HOW TO ASSEMBLE THE HITCH EXTENSION
PLATE AND THE BAG PLATE BAFFLE
2x53
(Q) 15x84
17x104
Assemble the sides of the hitch extension plate to the top
of the hitch plate (see Figure 12). Assemble the bag plate
baffle to the bottom of the hitch plate. Secure with two bolts
(M), two washers (N), and two nuts (O). Make sure to mount
the washers (N) and nuts (O) under the bag plate baffle.
(o)
15x88
(R)
2. Fasten the middle of the hitch extension plate with bolt (P),
washer (Q) and nut (R).
(P)
\
Hitch Plate
Extension
Hitch Plate
(Q)
(R)
(N)
(o)
_ (O) Figure 12
Bag Plate Baffle
(N)
FINAL ASSEMBLY
1. Check all fasteners. Make sure all fasteners are properly
installed and are tight.
2. Check installation. Make sure all parts are correctly installed.
,_ WARNING: Make sure that the grass bagger is
F-020902L
properly assembled and correctly installed. The
Grass Bagger must only be used when fully as-
sembled and correctly installed.
10

OPERATION
HOW TO USE THE GRASS BAGGER
_IL WARNING: Do not ride up or down slopes that are too
OPERATION
To operate with the grass bagger, follow the steps below.
IMPORTANT: Do not cut wet grass. Wet grass will not
discharge correctly into the grass bagger.
1. Start the engine.
2. Move the throttle control to FAST position.
3. To fill the grass bag, always operate with a slow forward
4.
steep to back straight up. Never ride the unit across
a slope. See the "Slope Guide" in the back of this
book for information on how to check slopes.
speed.
If the height of the grass is more than 31/2 inches (9cm), cut
the grass with the mower housing in the highest position.
Then, lower the mower housing and cut the grass again. You
can also cut at 1/2 to 2/3 of the full cutting width of the mower
housing.
Clutch/Brake
Pedal
Shift Lever Attachment Clutch Lever
Parking
Brake
/
Figure !3
HOW TO CLEAR THE CONNECTOR TUBE AND THE
EXTENSION TUBE
if the connector tube or the extension tube becomes filled with
grass, clear as follows.
1. Move the attachment clutch lever to the DISENGAGE posi-
tion (see Figure 13).
2. Move the shift lever to the neutral (N) position.
3. Engage the parking brake (see Figure 14).
4. Stop the engine.
5. Disconnect the retaining clip from the connecting tube
(see Figure 15).
6. Slide the connecting tube toward the rear. To remove grass
or debris, shake the connecting tube.
7. If necessary, remove any grass or debris from the extension
tube.
8. To connect, slide the connecting tube into the extension
tube. Secure the connecting tube with the retaining clip.
Figure !4
F-020902L 11
Figure !5

OPERATION
HOW TO EMPTY THE GRASS BAG
1. Move the attachment clutch lever to the DISENGAGE posi-
tion (see Figure 13).
2. Move the shift lever to the neutral (N) position.
3. Engage the parking brake (see Figure 14).
4. While sitting in the seat, hold the handle with your right
hand. Pull the handle forward to dump the grass bag (see
Figure 16).
HOW TO CHANGE THE MODE OF CUT
To change from bagging grass to mulching or to side discharge
operation, all of the components of the grass bagger do not have to
be removed.
1. Remove the connecting tube. See "How To Remove The
Connecting Tube" in the Maintenance Section.
2. Remove the wingnuts that secure the extension tube to
the mower housing. Remove the extension tube (see
Figure 17).
3. Attach either the side discharge attachment or lower the
mulch cover and secure with the two wingnuts.
Grass Bag
Extension
Mower Housing Tube Figure 17
:igure !6
Wingnut
MOWING AND BAGGING TIPS
1. For a lawn to look better, check the cutting level of the mow-
er housing. See "How To Level The Mower Housing" in the
Maintenance section.
2.
For the mower housing to cut level, make sure the tires have
the correct amount of air pressure.
3.
Every time you use the unit, check the blade. If the blade is
bent or damaged, immediately replace the blade. Also, make
sure the nut for the blade is tight.
4.
Keep the blade(s) sharpened. Worn blades will cause the
ends of the grass to turn brown.
F-020902L 12
If the grass is very high, cut two times to decrease the load
on the engine. First cut with the mower housing in the high-
est position and then lower the mower housing for the sec-
ond cut.
6.
Operate the engine with the throttle in FAST position and the
shift lever in first or second gear.
7.
For better cutting performance and a quality cut, mow at
slower speeds.
8.
After each use, clean the bottom and top of the mower hous-
ing for better performance. Also, a clean mower housing will
help prevent a fire.

MAINTENANCE
GENERAL RECOMMENDATIONS
1. The owner's responsibility is to maintain this product. This
will extend the life of the product and is also necessary to
maintain warranty coverage.
2. Check the fasteners. Make sure all fasteners are tight.
WARNING: Before you make an inspection, adjust-
Cover
Connector
Tube
Grass Bag Assembly
_b ent, or repair to the unit, disconnect the wire to
the spark plug. Remove the wire from the spark
plug to prevent the engine from starting by acci-
dent.
HOW TO REMOVE THE CONNECTOR TUBE
For good bagging performance, the connector tube must be clean
and free from grass and debris. Remove and clean the
connector tube as follows.
TO REMOVE
1. Move the attachment clutch lever to the DISENGAGE posi-
tion (see Figure 13).
2. Move the shift lever to the neutral (N) position.
3. Engage the parking brake (see Figure 14).
4. Stop the engine.
5. Move the lift lever to the middle cutting position.
6. Lift the cover and remove the grass bag assembly (see
Figure 18).
Bag Mounting Plate
Figure !8
7. Disconnect the retaining clip from the connector tube (see
Figure 19).
8. Pull the connecting tube back through the hole in the bag
mounting plate (see Figure 18).
9. Clean the connector tube with soap and water.
F-020902L 13
Figure !9

MAINTENANCE
HOW TO REMOVE THE GRASS BAGGER
1. Remove the connecting tube. See "How To Remove The
Connector Tube".
2. Loosen the two knobs (H) at the bottom of the bag mount-
ing plate (see Figure 20).
3. Lift the bag mounting plate off of the shoulder bolts.
4. Remove the wingnuts that secure the extension tube to
the mower housing. Remove the extension tube (see
Figure 21 ).
5. Close the mulch cover (3) and secure with the wingnuts.
(H)
Shoulder
Bolts
Studs
Bag Mounting Plate
Figure 20
F-020902L 14
Mower Housing
Extension Tube
Wingnuts
Figure 21

SLOPE GUIDE
Fold this page along dotted line indicated below. Hold page before you so that its left
edge is vertically parallel to a tree trunk or other upright structure. Sight across the
i.b'.o_'_,.,_ fold in the direction of the hill or slope you want to measure. Compare the angle of the
I """._-_.._S fold with the slope of the hill.
l ".......i--.--;................
• ; ' #e. _/
, I ......?Oo__
I _ ""..;.'_U l/A,.-
t, _ °@°_meeoo
,_ °e_°lDI t eeoQeoeoeoo
I oeootoe_oe_e °
1
Operate a walk-behind mower
across the face of slopes,
never up or down slopes.
I
Operate a riding mower
I
10 DEGREES 15 DEGREES
On a riding mower to determine if a slope is safe to mow: (1) disengage the blade(s), (2) put the unit in reverse, and (3) try to back straight up the
slope. If you can back up the slope, it is generally safe to mow. However, if you do not feel safe, or you are not completely sure, use this guide to
determine the slope angle.
A ARNING: To avoid possible serious injury, do not mow a slope that is greater than 15 degrees• If the riding mower is used with a
................................. _U'T_E'R_fO'U§E'_6P_&_D'E.................................
pull-behind or rear-mounted attachment, do not operate the unit on a slope that is greater than 10 degrees.
up or down slopes, never
across the face of slopes.
_J
LN
(:O
(3)
CO
C'q
CO
I
LL

MODEL 536.249810 REPAIR PARTS
GRASS BAGGER
8
6
31\
32
3O
12
33
/
\\
\ 14
\
34
17
29
9
23
/
15
_35
20
7
21
\
24 /_
9
25
28
23
27
F-O20902L 16
/
24
25

MODEL 536.249810
REPAIR PARTS
GRASS BAGGER
Key
No. Description Part No. No.
1 Bag, Cloth 1401246 20
2 Cover, Bag (Black) 1401189 21
3 Bolt, Shoulder 9x13 22
4 Rod, Bag Lid 1401168 23
6 Hinge, Bag Top 1401190E701 24
7 Nut 15x84 25
8 Spring, Torsion 166x47 26
9 Nut 15x89 27
10 Pin, Cotter 30x50 28
Key
Description
Nut
Tube, Connecting
Tube, Extension
Bolt
Acorn Nut
Washer
Spring, Leaf
Tube, Bag Frame
Pin, Cotter
Part No.
15x88
1401089
1401088
6x91
14x77
17xl 80
1401175
1401155E701
30x20
11 Bolt, Carriage 2x82 29
12 Knob 740227 30
13 Assembly, Bag Plate & Hanger 1401182E701 31
14 Bolt, Shoulder 9x70 32
15 Stud, Double End 6x110 33
16 Bolt, Carriage 2x53 34
17 Bolt, Carriage 2x57 35
18 Bracket, Hitch Extension 1401178E701 36
19 Washer 17x104 --
Frame, Bag
Bolt
Lever, Dump
Grip
Nut, Flange
Baffle, Bag Plate
Washer
Nut
Book, Instruction
1401167E701
1x94
1401141E701
1401176
15x85
1401242
17x212
15x79
F-O20902L
F-020902L
17

Recolector de hierba
Modelo 536.249810
PRECAUCION: Antes de usar este producto,
lea este manual y siga todas las reglas
de seguridad e instrucciones de operaci6n.
CONTENIDO
PIEZAS DEL REPUESTO ......................... 16 OPERAClON ....................................
GARANTIA ..................................... 18 MANTENIMIENTO ...............................
ENSAMBLAJE .................................. 21 GUIA DE INCLINAClON ..........................
GARANTiA LIMITADA DE UN ANO
PARA ADITAMENTOS
Durante un (1) aSo a partir de la fecha de compra, Sears reparar& sin cargo alguno, cualquier defecto en el material o mano
de obra de este aditamento.
Esta garantia no cubre Io siguiente:
• Elementos de desgaste normal, tales como cuchilla y adaptadores de cuchilla.
• Reparaciones necesarias debido al abuso o negligencia del operador, incluyendo almacenamiento inadecuado o
accidentes, o a la falta de mantenimiento de la unidad de acuerdo alas instrucciones presentadas en el manual del
propietario.
• Equipo que ha sido utilizado con fines comerciales o de arrendamiento.
EL SERVlCIO DE GARANTiA ESTA DISPONIBLE LLEVANDO EL ADITAMENTO AL CENTRO DE SERVlCIO SEARS MAS
CERCANO, EN LOS ESTADOS UNIDOS.
Esta garantia le proporciona derechos legales especificos, yes posible que tenga otros derechos los cuales varian de estado
a estado.
Sears, Roebuck and Co., D/871WA, Hoffman Estates, Illinois 60684.
27
29
31
CARACTERiSTICAS DEL RECOLECTORDE HIERBA
Ventanilla: Le indica cuando los recipientes estan Ilenos.
Recipientes de gran capacidad: Estos recipientes se pueden
desmontar y vaciar r&pida y f&cilmente.
Recolector de hierba
En el espacio indicado a continuaci6n anote el nQmero de
serie y la fecha de compra de la unidad.
El nQmero de modelo y el nQmero de serie se encuentran
en la calcomania ubicada en la parte trasera del bastidor.
N_mero de Modelo: 502.24981
NQmero de Serie:
Fecha de Compra:
Guarde estos nQmeros para referencias futuras.
Felicitaciones por su compra de un aditamento recolector de
hierba Craftsman para su cortacesped. Este recolector de hierba
ha sido diseSado, adaptado y fabricado con el proposito de
ofrecerle la mayor seguridad y rendimiento posibles.
F-020902L
Si tiene cualquier problema tecnico que no pueda solucionar
facilmente, por favor visite su Centro de Servicio Sears m&s
cercano. Tenemos tecnicos competentes y bien entrenados que
cuentan con las herramientas apropiadas para revisar y reparar
esta unidad.
Por favor lea y guarde este manual. Las instrucciones en este
manual le permitiran ensamblar y mantener su unidad
adecuadamente. Tenga siempre en cuenta las "Reglas de
Seguridad".
RESPONSABILIDADES DEL PROPIETARIO
• Lea y siga cuidadosamente las reglas de seguridad para una
operaci6n segura. Inspeccione la unidad.
• Siga todas las instrucciones de ensamblaje. Ajuste la
unidad cuidadosamente.
• Aprenda a operar bien todo el equipo estandar y accesorio
de la unidad. AsegQrese de que el operador pueda operar la
unidad correctamente.
• Opere la unidad s61o con los dispositivos de seguridad, los
protectores y otros elementos de seguridad en su lugar y
funcionando correctamente.
• Complete todos los pasos de mantenimiento para la unidad.
Utilice s61o piezas de repuesto autorizadas o aprobadas.
18

REGLAS DE SEGURIDAD
Basadas en las recomendaciones del Instituto de Est_ndares Nacionales de Estados Unidos de America
PRECAUCION: Esta m_quina cortadora es capaz de amputar manos y pies y de lanzar objetos con mucha fuerza. No
'_ de espectadores.
respetar las instrucciones de seguridad a continuaci6n podria resultar en lesiones graves o la muerte del operador o
Pr&cticas de operaci6n segura para vehiculos autoportados
OPERACION GENERAL:
1. Antes de comenzar el trabajo, lea, entienda y siga todas las
instrucciones que aparecen en el Manual de Instrucciones,
en la maquina, en el motor yen cualquiera de los aditamen-
tos.
2. S61o permita que adultos responsables, familiarizados con
las instrucciones, utilicen la m&quina.
3. Despeje el area de objetos tales como piedras, juguetes,
cables, etc., que podrian ser lanzados con fuerza por la cu-
chilla.
4. Antes de comenzar a cortar el cesped, asegQrese de que no
haya ninguna persona en el area. Si alguien entra en el
area, pare de inmediato la m&quina.
5. Nunca Ileve pasajeros.
6. Antes de retroceder, desconecte la alimentaci6n al cortaces-
ped o a cualquier aditamento que tenga instalado. No corte
el cesped en reversa a menos que esto sea absolutamente
necesario. Siempre mire hacia abajo y hacia atr&s antes de
retroceder y mientras retrocede.
7. Este atento a la direcci6n de descarga de la hierba cortada.
No dirija la descarga hacia personas o hacia lugares donde
pudiera haber gente. No opere la unidad sin tener instalado
el recolector de hierba o el dispositivo de seguridad.
8. Aminore la velocidad antes de dar la vuelta.
9. Nunca deje una maquina desatendida mientras el motor esta
en marcha. Siempre desembrague la cuchilla(s), enganche
el freno de mano, pare el motor y retire la Ilave antes de ba-
jarse.
10. Desconecte la alimentacion a los aditamentos cuando no los
este utilizando o cuando transporte la unidad. Desembrague
la cuchilla(s) cuando no este cortando el cesped.
11. Pare el motor antes de desmontar el recolector de hierba o
para desobtruir el conducto de descarga.
12. Corte el cesped a la luz del dia o con buena luz artificial.
13. No opere la maquina siesta bajo los efectos del alcohol o de
drogas, o siesta muy cansado.
14. Este atento al tr&fico cuando opere la maquina cerca de ca-
minos o si debe cruzarlos.
15. Si usa un remolque o camioneta para transportar la unidad,
tenga mucho cuidado al cargar o descargar la unidad del
vehiculo.
16. Desenganche todos los embragues de los aditamentos y
coloque la palanca de cambios en la posicion neutro antes
de arrancar el motor.
17. Siempre use galas de proteccion u algQn tipo de protector
para los ojos cuando utilice la unidad, de esta manera prote-
gera sus ojos de objetos que pudieran ser lanzados por la
maquina. Este tipo de proteccion ocular tambien debe usar-
F-020902L
Io cuando necesite hacer ajustes o reparaciones a la maqui-
ha.
18. Tenga mucho cuidado cuando deba remolcar cargas o cuan-
do utilice equipos pesados.
a. Utilice Qnicamente barras de enganche con puntos de
remolque aprobados.
b. Limite las cargas a aquellas que usted pueda controlar
con seguridad.
c. No gire el volante bruscamente. Tenga cuidado al retro-
ceder.
d. Utilice contrapesos o pesos en las ruedas cuando esto
sea recomendado en el Manual de Instrucciones.
19. No opere esta maquina si est& tomando drogas u otras me-
dicinas que pudieran causar somnolencia o que pudieran
afectar su habilidad para operar esta maquina.
20. No opere esta maquina si su estado emocional o fisico no le
permite operarla con seguridad.
21. Los datos recopilados indican que los operadores de 60
aSos o mas, sufren un mayor nQmero de accidentes y lesio-
nes relacionados con el manejo de m&quinas cortacesped.
Estos operadores deben evaluar sus habilidades para mane-
jar de manera segura un tractor cortacesped y evitar asi le-
siones graves que pudieran sufrir ellos u otras personas que
se encuentren presentes.
OPERAClON EN CUESTAS:
Las cuestas y los terrenos accidentados son factores princi-
pales que se relacionan a accidentes causados por p6rdidas
de control o por vuelcos de la unidad y que pueden resultar
en lesiones graves o muerte. TODAS las cuestas requieren
que se tomen precauciones adicionales. Si no puede subir
la cuesta usando el cambio de marcha atr_s, o si se siente
inc6modo en la cuesta, no la corte. Consulte la "Guia de
evaluaci6n de cuestas'. Para obtener mayor informaci6n al
respecto, consulte esta guia que aparece al final de este ma-
nual.
RECOMENDACIONES
1. En las cuestas, corte el cesped verticalmente (hacia arriba y
hacia abajo), y no en linea perpendicular (de lado a lado).
2. Quite todo obstaculo tal como piedras, ramas, etc.
3. Tenga cuidado con los hoyos, baches o resaltos. El terreno
disparejo puede hacer que la m&quina se vuelque. "La hier-
ba muy alta puede esconder obstaculos".
4. Maneje la unidad a baja velocidad. Seleccione una veloci-
dad suficientemente baja para que no tenga que parar o
cambiar de velocidad mientras esta en la cuesta.
5. Respete y siga las recomendaciones del fabricante acerca
de pesos para las ruedas o contrapesos para mejorar la es-
tabilidad.
6. Tenga mucho cuidado cuando utilice el recolector de hierba
u otros aditamentos, estos afectan la estabilidad de la ma-
quina.
19

REGLAS DE SEGURIDAD
7. Procure que todos los movimientos en las cuestas sean len-
tos y graduales. No haga cambios bruscos de velocidad o
de direcci6n.
8,
Evite tener que arrancar el motor o pararlo en una cuesta.
Si los neumaticos pierden tracci6n, desembrague la cuchi-
Ila(s) y continQe despacio directamente hacia el pie de la
cuesta.
PRECAUCIONES
1. No gire en las cuestas a menos que sea absolutamente ne-
cesario, si debe hacerlo, gire lenta y gradualmente cuesta
abajo, si es posible.
2. No corte el cesped cerca de precipicios, zanjas o terraple-
nes. Una rueda sobre un borde o el desprendimiento de un
borde podria causar un vuelco inesperado provocando lesio-
nes o la muerte.
3. No corte el cesped si est& mojado. La reducida tracci6n
puede hacer que la m&quina resbale.
4. No trate de estabilizar la m&quina bajando su pie al suelo.
5. No utilice el recolector de hierba ni otto accesorio de remol-
queen cuestas empinadas (de m&s de 10 grados).
NINOS:
Pueden ocurrir accidentes tr&gicos si el operador no est&
alerta a la presencia de ni5os. A muchos ni6os les atraen
las cortadoras autoportadas. NUNCA suponga que los ni-
5os permanecer_n en el t_ltimo lugar donde los vi6.
1. Mantenga a los ni_os fuera del area de trabajo y bajo el cui-
dado de un adulto que no sea el operador.
2. Mantengase alerta y pare el motor si entran niSos al area.
3. Antes y mientras retrocede, mire hacia atr&s y hacia abajo
por si hay niSos.
4. Nunca permita que niSos u otras personas vayan como "pa-
sajeros" en el cortacesped. EIIos pueden caerse, lesionarse
gravemente o pueden interferir con la operaci6n segura de la
maquina.
5. Nunca permita que niSos operen la maquina. Ensefieles a
los niSos los peligros de la m&quina.
6. Tenga mucho cuidado cuando se aproxime a esquinas cie-
gas, arbustos, &rboles u otros objetos que le impidan una
buena visibilidad.
SERVIClO:
1. Tenga mucho cuando manipule gasolina y otros combusti-
bles. Los combustibles son inflamables y los vapores son
explosivos.
a. Utilice Qnicamente un recipiente aprobado.
b. Nunca quite la tapa del tanque de gasolina ni aSada com-
bustible cuando el motor este en marcha. Deje que el motor
se enfrie durante varios minutos antes de Ilenar el tanque.
No fume cuando Ilene el tanque.
c. Nunca agregue combustible cuando la unidad se encuen-
tra en un recinto cerrado.
d. Nunca guarde el cortacesped con combustible en el tan-
que, o el recipiente de combustible en un recinto donde haya
alguna llama expuesta, tal como el piloto de un calentador
de agua.
2.
Nunca arranque el motor ni Io deje en marcha dentro de un
recinto cerrado.
3.
Mantenga todas las tuercas y pernos apretados, especial-
mente las tuercas de montaje de la cuchilla(s). Revise con
frecuencia la cuchilla(s) para ver si esta gastada o si tiene
algQn daSo tal como grietas o abolladuras. Una cuchilla tor-
cida o daSada debe ser reemplazada inmediatamente por
una cuchilla de repuesto original la cual puede obtener en un
centro de servicio autorizado. Para mayor seguridad, reem-
place la cuchilla cada dos aSos. Mantenga el equipo en
buenas condiciones.
4.
Nunca trate de modificar los dispositivos de seguridad. Re-
viselos con frecuencia para cerciorarse de que trabajan
bien.
5. Para reducir los riesgos de incendio, mantenga la maquina
libre de acumulaciones de hierba, hojas u otros desechos.
Limpie derrames de aceite o de combustible. Deje que la
m&quina se enfrie antes de guardarla.
6. Pare e inspeccione el equipo si choca contra algun objeto.
Si es necesario, repare el equipo antes de hacerlo arrancar
de nuevo.
7. Nunca realice ajustes o reparaciones con el motor en mar-
cha. El carburador puede ser ajustado mientras el motor
esta en marcha. No cambie los ajustes del regulador del
motor ni sobrepase la velocidad de regimen del motor.
8. Los componentes del recolector de hierba estan sujetos a
desgaste, daSo y deterioro, factores que pueden exponer las
partes m6viles o permitir que objetos sean lanzados por la
m&quina. AI guardar la unidad, asegurese siempre de que el
recolector de hierba este vacio. Revise los componentes
peri6dicamente, y cuando sea necesario, reempl&celos con
piezas de repuesto recomendadas pot el fabricante.
9. La cuchilla(s) de la cortadora es afilada y puede cortarle.
Envuelva la cuchilla(s) o utilice guantes y tome precauciones
cuando tenga que revisarla o revisar el &rea del alojamiento
de la cuchilla.
10. Examine los frenos frecuentemente. AjQstelos y reviselos
segQn sea necesario.
11. Antes de comenzar a revisar cualquier parte de la unidad,
espere a que todo movimiento se detenga.
dad importantes. Este simbolo significa: "Atenci6n! Est_
Fijese en este simbolo, _ste le indica precauciones de seguri-
alerta! Su seguridad est_ en peligro'.
F-020902L 20

ENSAMBLAJE
ENSAMBLAJE
Lea y siga todas las instrucciones sobre ensamblaje, operacion y
mantenimiento. La bolsa de partes contiene los sujetadores nece-
sarios para realizar el ensamblaje de la unidad. No deseche ningu-
na parte ni material hasta que se haya ensamblado la unidad.
HERRAMIENTASREQUERIDASPARAENSAMBLARLA UNIDAD
1. Alicates (1)
2. Llave de boca ajustable (se requieren 2)
3. Destomillador
4. Destornillador Philips (cruciforme)
5. Destornillador (corto)
6. Llave de boca - 3/8, 1/2, 7/16, 9/16 de pulgada
7. Se recomienda un juego de vasos
BOLSA DE PARTES- CONTENIDO
Los sujetadores y otras piezas se muestran a continuacion. Los sujetadores se ilustran en sus tamafios reales. Los nQmeros entre parente-
sis indican la cantidad. Para algunos modelos, no se requieren todos los sujetadores.
(1) Perno
(2) Pemo de coche
(!) Perno de coche (2) ArandeIa (1) ArandeIa
17x212 17x104
@@@@ @ @
15x84 15x85 15x88 15x89 15x79
(2) Tueroa de (2) Tuerca de (2) Tueroa de (1) Contratuerca (2) Tuerca de
reborde reborde reborde reborde
G
6x110 30x20
(1) Perno de tope (2) Perno de tope
(2) Tornillo (2) Pasador
prisionero abierto
I
I
740227
(2) Perilla
F-020902L 21

ENSAMBLAJE
VARIOS COMPONENTES - CONTENIDO
Cubiertadel
recolector
Bolsadetela
Placa del recolec-
tory ensamblado
de silleta
Tubo conector
Tubode
Bastidordel
recolector
extensi6n
Placa de desviaci6n
del recolector
Extensi6n de
enganche
Bisagrasuperior
delrecolector
Varillade la cubierta
del recolector
Tubodel
bastidor
F-O20902L 22
Tornilleria
J
Ballesta
Asa
Folleto informativo

ENSAMBLAJE
COMO ENSAMBLAR EL RECOLECTOR DE HIERBA
La tornilleria que se usa para ensamblar el recolector de hierba, 5.
aparece en su tamaSo real en la figura siguiente.
(A)
30x20
(B) (C)
lx94 15x89
1.
Deslice el tubo inferior en el bastidor (Figura 22).
2.
Alinee los agujeros del tubo inferior con los agujeros del
bastidor y fijelos con los pasadores abiertos (A). Procure
doblar para separar completamente AMBAS patas de los
pasadores abiertos (A).
Coloque las abrazaderas sobre el bastidor (Figura 24).
Abrazaderas
Bastidor
Abrazaderas
Figura 24
Bastidor
Bastidor
\
Tubo
3. Primero, coloque la abertura, ubicada en el lado derecho del
recolector de hierba, en posici6n para aceptar el soporte
de la palanca (Figura 23).
4. Luego, deslice el recolector de de hierba sobre el bastidor.
Agujero
(A)
Tubo
inferior
Figura 22
Coloque la palanca en el soporte de la palanca y sujetela
con el perno (B) y la tuerca (C) (Figura 25).
7. Coloque el asa en la palanca.
Asa
Palanoa
(c)
(B)
Soporte de
la palanca
Figura 25
Recolector
de hierba
Soporte de
la palanca
F-020902L 23
Bastidor
Figura 23

ENSAMBLAJE
COMO INSTALAR LA PLACA DE MONTAJE
DEL RECOLECTOR DE HIERBA
15x79
(F)
6x!10
(H)
740227
1. Instale los dos pernos de tope (D) en la placa trasera y
fijelos con las tuercas (E) (Figura 26).
2. Quite los dos tornillos ubicados en la parte inferior de la pla-
ca trasera y reempl&celos con los dos tornillos prisioneros
(F) y tuercas (G). AsegQrese de instalar el extremo corto de
los tornillos prisioneros (F) a la placa trasera.
3. Quite la cubierta pl&stica.
4. Alinee las ranuras de la placa de montaje del recolector
con los pernos de tope. Empuje la placa de montaje del
recolector hacia abajo hasta que encaje con los pernos de
tope (Figura 27).
5. Use las perillas (H) para sujetar la parte inferior de la placa
de montaje del recolector a los tornillos prisioneros.
(G)
Placa
(F)
Pernos
Placa de
mont_e deI
recolector
Tornillos
(H) prisioneros
Cubierta
)lastica
Figura 26
Figura 27
COMO MONTAR LA CUBIERTA DEL
RECOLECTOR DE HIERBA
15x84
(L)
Para montar la cubierta, deslice el agujero de pivote
izquierdo sobre el extremo izquierdo de la varilla de
articulaci6n. Deslice la cubierta hacia la derecha
(Figura 28).
2,
Deslice el agujero de pivote derecho sobre el extreme
derecho de la varilla de articulaci6n. Deslice la cubierta
hacia la izquierda hasta que se detenga.
3. Deslice el perno de tope (K) a traves del lazo grande del
resorte de torsi6n. Luego, deslice el perno de tope (K) a
traves del agujero de montaje ubicado en la cubierta. Fijelo
con la tuerca (L).
F-020902L
_i DVERTENCIA: El resorte de torsi6n es accionado
por resorte para mantener cerrada la cubierta.
Monte el resorte de torsi6n con cuidado.
Cubierta Resorte de'_orsiOn
(L)
i
Agujero de
Agujero
de pivote
izquierdo
VarilIa de
articulaci6n
Varilla de
articulacidn
24
Figura 28

ENSAMBLAJE
COMO MONTAR EL TUBO DE EXTENSION Y
EL TUBO CONECTOR
1. Quite las tuercas de mariposa del c_rter del cortac_sped
(Figura 29).
2. Levante la cubierta para trituradora. Instale el tubo de
extensi6n en el c_rter del cortac_sped. Sujete el tubo de
extensi6n con las tuercas de mariposa.
3.
Deslice la seccion recta del tubo conector a traves del es-
pacio de la placa de montaje del recolector (Figura 30).
AsegOrese de que el simbolo de seguridad en el tubo co-
nector este orientado hacia afuera y sea visible.
CaRerdetcoRac6sped
Tubo de extensidn
Tuercas de
mariposa
Figura 29
4.
Deslice el extreme del tubo conector dentro del tubo de
extensi6n (Figura 31 ). Instale la ballesta en el agujero del
tubo conector.
Tubo conector
Placa de
montaje deI
recolector
Figura 30
F-O20902L 25
Figura 31

ENSAMBLAJE
COMO MONTAR EL RECOLECTOR DE HIERBA
1. Levante y mantenga levantada la cubierta en la posicion
ARRIBA (Figura 32).
2. Coloque el ensamblado del recolector de hierba en las
ranuras de los soportes.
3. Asegurese de que el ensamblado del recolector de hierba
este correctamente alineado y que puede girar libremente.
4. Baje la cubierta.
Cubierta
Ensamblado del
recotector de hierba
Sopo_es
Figura 32
COMO MONTAR LA PLACA DE EXTENSION DE
ENGANCHE Y LA PLACA DEFLECTORA DEL
RECOLECTOR
2x53
2x57
(Q) 15x84
17x104
Monte los extremos de la placa de extensi6n de enganche
a la parte superior de la placa de enganche (Figura 33).
Monte la placa deflectora del recolector a la parte de aba-
jo de la placa de enganche. Fijela con dos pernos (M), dos
arandelas (N) y dos tuercas (O). Aseg0rese de montar las
arandelas (N) y las tuercas (O) pot debajo de la placa de-
flectora del recolector.
(o)
15x88
(R)
2. Sujete la parte del centro de la placa de extensi6n de en-
ganche con el perno (P), la arandela (Q) y la tuerca (R).
(P)
\
Placa de
extensi6n
de enganche
Placa de
enganche _
(Q)
(R) Placa deflectora
(N) _ del recolector
O)/ IN)
(o)
Figura 33
PASOS FINALES
1. Revise todos los sujetadores y asegurese de que esten co-
rrectamente instalados y bien apretados.
2. Examine la instalaci6n. AsegOrese de que todos los compo-
nentes han sido correctamente instalados.
ADVERTENCIA: Aseg_rese de que el recolector de
,_ hierba est_ correctamente ensamblado e instalado.
F-020902L 26
El recolector de hierba debe estar completamente
ensamblado y correctamente instalado antes de
usarla.

OPERACION
COMO USAR EL RECOLECTOR DE HIERBA
_hlL ADVERTENCIA: No utilice el tractor en una cuesta
OPERACION
Para operar con el recolector de hierba montado en la unidad, siga
los pasos siguientes.
IMPORTANTE: No corte el c_sped mojado. La hierba mojada
no entrar_ correctamente en el recolector de hierba.
1. Encienda el motor.
2. Mueva la palanca de control de aceleracion a la posicion
3. Para que se Ilene el recolector de hierba, opere siempre la
4,
muy empinada que haga imposible subirla en rever-
sa. Nunca debe conducir el tractor a Io largo de una
cuesta. Consulte la "Guia de cuestas", al final de este
manual, para informarse acerca de c6mo evaluar las
cuestas.
RAPIDO.
unidad con una velocidad de avance lenta.
Si la altura de la hierba es mayor de 31/2 pulgadas (9cm),
corte el cesped colocando el c&rter en la posici6n mas alta.
Luego, baje el carter del cortacesped y vuelva a cortar. Tam-
bien puede cortar de 1/2 a 2/3 del ancho completo del c&rter
del cortacesped.
Palanca de Palanca de embrague de aditamentos
cambios
Pedal de embrague
y freno
/
Figura 34
Freno de mano
COMO DESPEJAR EL TUBO CONECTOR Y EL
TUBO DE EXTENSION
Si el tubo conector o el tubo de extensi6n se llenara de hierba,
limpielo de la manera siguiente.
1. Mueva la palanca de embrague de aditamentos a la posici6n
DESENGANCHADO (Figura 34).
2. Mueva la palanca de cambios a la posici6n neutro (N).
3. Enganche el freno de mano (Figura 35).
4. Apague el motor.
5. Desconecte la ballesta del tubo conector (Figura 36).
6. Deslice el tubo conector hacia atr&s. Para quitar la hierba
cortada, sacuda vigorosamente el tubo conector.
7. Si es necesario, quite cualquier acumulaci6n de hierba corta-
da o basura del tubo de extensi6n.
8. Para volver a montar el tubo conector, deslicelo dentro del
tubo de extensi6n. Fije el tubo conector con la ballesta
Figura 35
F-O20902L 27
Figura 36

OPERACION
COMO VACIAR EL RECOLECTOR DE HIERBA
1. Mueva la palanca de embrague de aditamentos a la posici6n
DESENGANCHADO (Figura 34).
2. Mueva la palanca de cambios a la posici6n neutro (N).
3. Enganche el freno de mano (Figura 35).
4. Mientras est& sentado en la unidad, agarre la palanca con
su mano derecha y empuje la palanca hacia adelante y aba-
jo para vaciar el recolector de hierba (Figura 37).
COMO CAMBIAR LA MODALIDAD DE CORTE
Para cambiar la funcion de recoger hierba a la de triturar o de
descarga lateral, no es necesario desmontar todos los
componentes del recolector de hierba.
1. Quite el tubo conector. Consulte "C6mo retirar el tubo conec-
tor" en la secci6n de Mantenimiento.
2,
Quite las tuercas de mariposa que sujetan el tubo de ex-
tensi6n al c_rter del cortac_sped. Retire el tubo de exten-
si6n (Figura 38).
3,
Puede instalar el accesorio para descarga lateral o bajar la
cubierta para trituradora, fij&ndola con las dos tuercas de
mariposa.
Recolector de hierba
Carter del cortacesped
Tubo de extensi6n
:igura 37
Tuercas de
mariposa
Figura 38
CONSEJOS PARA EL CORTE Y LA RECOLECCION
1. Para mejorar la presentaci6n del cesped, verifique el nivel de
corte del carter del cortacesped. Consulte "Como nivelar el
c&rter del cortacesped" en la seccion de Mantenimiento.
2,
Para asegurar un nivel de corte parejo, compruebe que los
neumaticos tengan una presi6n de aire adecuada.
3.
Antes de cada uso, examine la cuchilla. Si la cuchilla est&
doblada o daSada, c&mbiela inmediatamente. AsegQrese
tambien de que la tuerca que sujeta la cuchilla este apreta-
da.
4. Mantenga la cuchilla(s) afilada. Cortar con una cuchilla gas-
tada har& que los extremos de las briznas de hierba se tor-
nen marr6n.
F-020902L 28
Si la hierba esta muy alta, haga dos pasos de corte para
minimizar el esfuerzo del motor. Haga el primer corte con el
carter en su posici6n mas alta y el segundo corte usando
una posici6n m&s baja.
Opere el motor con la palanca de aceleraci6n en la posici6n
R/_,PIDO y la palanca de cambios en primera o en segunda.
Para mejorar el rendimiento y la calidad del corte, opere la
unidad a una velocidad baja.
Para un mejor desempeSo, despues de cada uso, limpie
bien la parte superior y la parte inferior del carter del corta-
cesped. Un c&rter limpio ayudara a evitar incendios.

MANTENIMIENTO
RECOMENDACIONES GENERALES
1. Es responsabilidad del propietario mantener este producto
en buen estado de funcionamiento. No s61o ayudar& a exten-
der la vida Qtil del mismo, sino que tambien es necesario
para asegurar la validez de la garantia.
2. Examine los sujetadores. AsegQrese de que todos esten
apretados.
ADVERTENCIA: Antes de hacer una revisi6n,
Cubierta
Tubo ooneotor
Ensamblado det
recolector de hierba
,_ ajuste o reparaci6n a la unidad, disconecte el cable
de la bujia. Esto se hace para prevenir un arranque
accidental del motor.
COMO RETIRAR EL TUBO CONECTOR
Para un buen rendimiento de la funci6n de recolectar la hierba
cortada, el tubo conector debe estar limpio y sin restos de hierba
cortada o basura. Retire y limpie el tubo conector de la manera
indicada a continuaci6n.
PARA RETIRAR EL TUBO CONECTOR
1. Mueva la palanca de embrague de aditamentos a la posici6n
DESENGANCHADO (Figura 34).
2. Mueva la palanca de cambios a la posici6n neutro (N).
3. Enganche el freno de mano (Figura 35).
4. Apague el motor.
5. Mueva la palanca de elevaci6n a la posici6n de corte del
medio.
6. Levante la cubierta y retire el ensamblado del recolector
de hierba (Figura 39).
7. Desconecte la ballesta del tubo conector (Figura 40).
PIaca de montaje
dei recolector
Figura 39
8. Jale el tubo conector hacia atras, a traves del agujero de la
placa de montaje del recolector (Figura 39).
9. Limpie el tubo conector con agua y jab6n.
F-020902L 29
Figura 40

MANTENIMIENTO
COMO RETIRAR EL RECOLECTOR
DE HIERBA
1. Quite el tubo conector. Consulte "C6mo retirar el tubo conec-
tor".
2. Afloje las dos perillas (H) ubicadas en la parte inferior de la
placa de montaje del recolector (Figura 41 ).
3. Levante y saque la placa de montaje del recolector de los
pernos de tope.
Pernos de tope
4. Quite las tuercas de mariposa que fijan el tubo de exten-
si6n al c_rter del cortac6sped. Quite el tubo de extensi6n
(Figura 42).
5. Cierre la cubierta para trituradora e instale de nuevo las
tuercas de mariposa.
(H) prisioneros
Tornillos
PIaca de montaje det recolector
CaRerdetcoRac6sped
Tubo de extensi6n
Figura 41
Tuerca de
mariposa
Figura 42
F-020902L 30

........i.....
I ..........
GUIADE INCLINACION
Doble esta hoja a Io largo de la linea de puntos indicada mas abajo. Sostenga la hoja frente
a usted de manera que el borde izquierdo quede paralelo al tronco de un arbol u otra es-
tructura erecta. Mire hacia el frente sobre el doblez en la direccion de la inclinacion de la
cuesta que desea medir. Compare el angulo del doblez con la inclinacion de la cuesta.
I
/
I
i
I
10 GRADOS 15
Si se encuentra en el tractor cortacesped y quiere determinar si la cuesta es segura para cortar el cesped: (1) desenganche la cuchilla(s), (2)
ponga la unidad en marcha atras, y (3) trate de retroceder en subiendo la cuesta en forma directa. Si puede subir retrocediendo, esto indica que
generalmente el seguro cortar el cesped a ese grado de inclinacion. Sin embargo, si usted no se siente seguro, o no esta completamente seguro,
use esta guia para determinar el angulo de inclinacion de la cuesta.
grados. Si se usa en tractor cortacesped con un aditamento de remolque o de enganche, no opere el tractor en cuestas que tengan
ADVERTENCIA: Para evitar posibles lesiones graves, no corte el cesped en una cuesta que tenga una inclinacion mayor de 15
una inclinacion mayor de 10 grados.
CORTE AQUI PAPA UTILIZAR LA GUIA DE INCLINACION
Opere una cortadora de cesped manual en
sentido diagonal a traves de las cuestas,
nunca cuesta arriba o cuesta abajo.
Manejelarnbquinacuestaarribaocuesta
abajo,peronuncaensentidodiagonal
a trav_sde lascuestas.
J
Cq
O
0
Cq
0
I
LL

For repair of major brand appliances in your own home...
no matter who made it, no matter who sold it!
1-800-4-MY-HOME sMAnytime,day or night
(1-800-469-4663)
iiiiiiiiiiiiiiii_ii_iii!i_i!i_
www.sears.com
To bring in products such as vacuums, lawn equipment and electronics ...............
for repair, call for the location of your nearest Sears Parts & Repair Center.
1-800-488-1222 Anytime, day or night
iiiiiiiiiiiiiiii!iiiiii!iii!i_ w_.sears.com iiiii_ii_i_iiiiii_i_iiii:iii_iii
iiiiiiiiiiiiiii!,!!ii_i_ii¸i!i!i_
For the replacement parts, accessories and owner's manuals
that you need to do-it-yourself, call Sears PartsDirect sM!
1-800-366-PART 6 a.m. - 11 p.m. CST,
(1-800-366-7278) 7 days a week
www.sears.com/partsdirect
To purchase or inquire about a Sears Service Agreement:
1-800-827-6655
7 a.m.- 5 p.m. CST, Mon.- Sat.
Para pedir servicio de reparaci6n a domicilio,
y para ordenar piezas con entrega a domicilio:
1-888-SU-HOGAR sM
(1-888-784-6427)
® Registered Trademark / TMTrademark of Sears, Roebuck and Co.
© Sears, Roebuck and Co. @Marca Registrada / TM Marca de F&brica de Sears, Roebuck and Co.
Au Canada pour service en fran£:ais:
1-877-LE-FOYER sM
(1-877-533-6937)
 Loading...