

Page 1
Operator's lianual
STOP
18" ELECTRIC DETHATCHER
liodel No. 486.29281
DO NOT RETURN TO STORE
For Missing Parts or Assembly
Ouestions Call 1-866-576-8388
CAUTION:
Before using this product, read
this manual and follow all Safety
Rules and Operating Instructions.
Sears, Roebuck and Co., Hoffman Estates, IL 60179 U.S.A.
www.sears.com/craftsman
Safety
Assembly
Operation
Maintenance
Parts
FORM NO. 42157 (10/29/08)
Page 2

TABLE OF CONTENT
J
SAFETY RULES.................................................................2
FULL SIZE HARDWARE CHART
CARTON CONTENTS........................................................3
ASSEMBLY.........................................................................4
OPERATION.......................................................................6
MAINTENANCE..................................................................6
......................................
3
STORAGE...........................................................................6
SERVICE AND ADJUSTMENTS
TROUBLESHOOTING
REPAIR PARTS ILLUSTRATION..................................8,10
REPAIR PARTS LIST
PARTS ORDERING/SERVICE
........................................................
...................................................
........................................
............................
Back Page
9,11
7
7
■
WARRAN
j
CRAFTSMAN ONE YEAR FULL WARRANTY
In the unlikely event that this product has an initiai issue of missing parts, or you need assembly or operation assistance
piease caii 1 -866-576-8388 for immediate response. Do not return to store.
When assembied, operated and maintained according to the suppiied instructions, if this products faiis due to defect in
materiai or workmanship within one year from the date of purchase, return it to any Sears store or other Craftsman outiet in
the United States for a free repiacement.
This warranty exciudes tines, which are expendabie parts that can wear out from normai use in iess than 1 year
This warranty is void if this eiectric dethatcher / power rake is used for commerciai or rentai purposes.
This warranty gives you specific iegai rights, and you may aiso have other rights which vary from state to state.
Sears, Roebuck and Co., Hoffman Estates, IL 60179
The modei number and seriai numbers wiii be found on a
decai attached to the Power Rake.
You shouid record both the seriai number and the date of
purchase and keep in a safe pi ace for future reference.
MODEL NUMBER:
SERIAL NUMBER:
DATE OF PURCHASE:
486.29281
A
Any power equipment can cause injury if operated improperiy or if the user does not understand how to operate the
equipment. Exercise caution at aii times when using power equipment.
Read this owners manuai carefuiiy and know how to operate your Power Rake. Be famiiiar with the controis and the
proper use of the Power Rake.
Never aiiow chiidren to use the Power Rake. Do not aiiow aduits to operate without proper instructions.
Never use the Power Rake whiie peopie, especiaiiy chiidren, or pets are nearby.
Wear substantiai footwear, iong pants and eye protection whiie using the Power Rake.
Thoroughly inspect the area where the Power Rake is to be used and remove aii stones, sticks and other foreign objects.
Oniy use the Power Rake in dayiight or good artificiai iight.
Do not use the Power Rake on wet grass.
Be carefui when operating the Power Rake on siopes or uneven ground.
Do not operate on excessiveiy steep siopes.
Aiways stop the Power Rake when transporting or crossing any surface other than grass.
Never operate the Power Rake without the deflectors/grass catchers in piace.
Never operate the Power Rake with defective deflectors/grass catchers.
Switch on the motor according to instructions and with hands, feet and any other parts of the body away from the tines.
Do not tiit the Power Rake when turning on uniess absoiutely necessary for it to start. If it is necessary to tiit the
Power Rake when starting, aiways iift oniy the part which is away from the operator. Make sure both hands are in the
operating position before returning the appiiance to the ground.
Keep hands and feet away from rotating parts at aii times.
Use only outdoor rated extension cords piugged into a ground fauit receptacie.
SAFETY
A
Call 1 -866-576-8388 for missing parts or assembly help
DO NOT RETURN TO STORE
Page 3
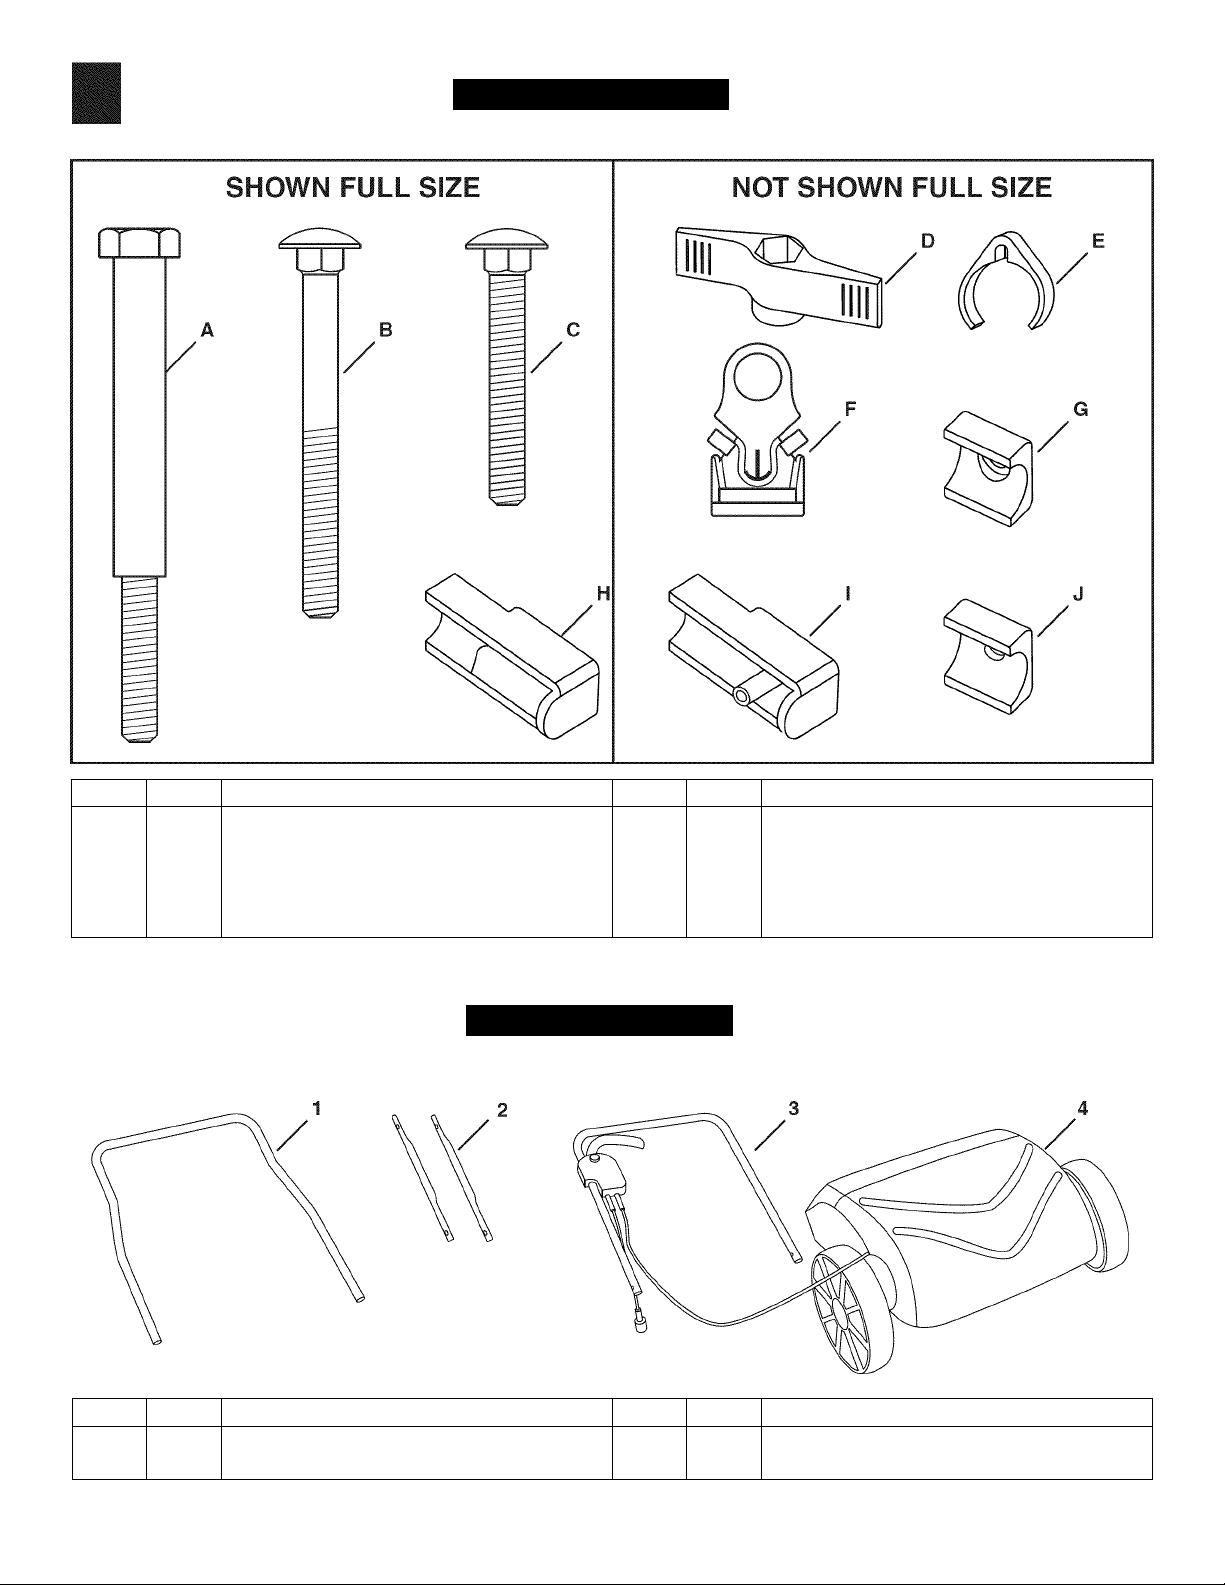
HARDWARE PACKA
J
REF QTY DESCRIPTION REF QTY DESCRIPTION
A 1 Hex Bolt F 1 Power Cord Clip
B 1
C 4
D 6 Wing Knob I 1 Left Handle Bracket
E 3 Power Cord Clip J 1 Right Handle Clamp (marked "R")
Carriage Bolt
Carriage Bolt
G 1
H 1 Right Handle Bracket
Left Handle Clamp (marked "L")
CARTON CONTENT
j
REF QTY DESCRIPTION REF QTY DESCRIPTION
1 1
2 2
Lower Handle Tube
Middle Handle Tube
3 1
4 1 Power Rake Housing
Upper Handle Tube
Call 1-866-576-8388 for missing parts or assembly help
DO NOT RETURN TO STORE
Page 4
ASSEMBLY
CAUTION: DO NOT ASSEMBLE WITH
POWER RAKE PLUGGED INTO A
A
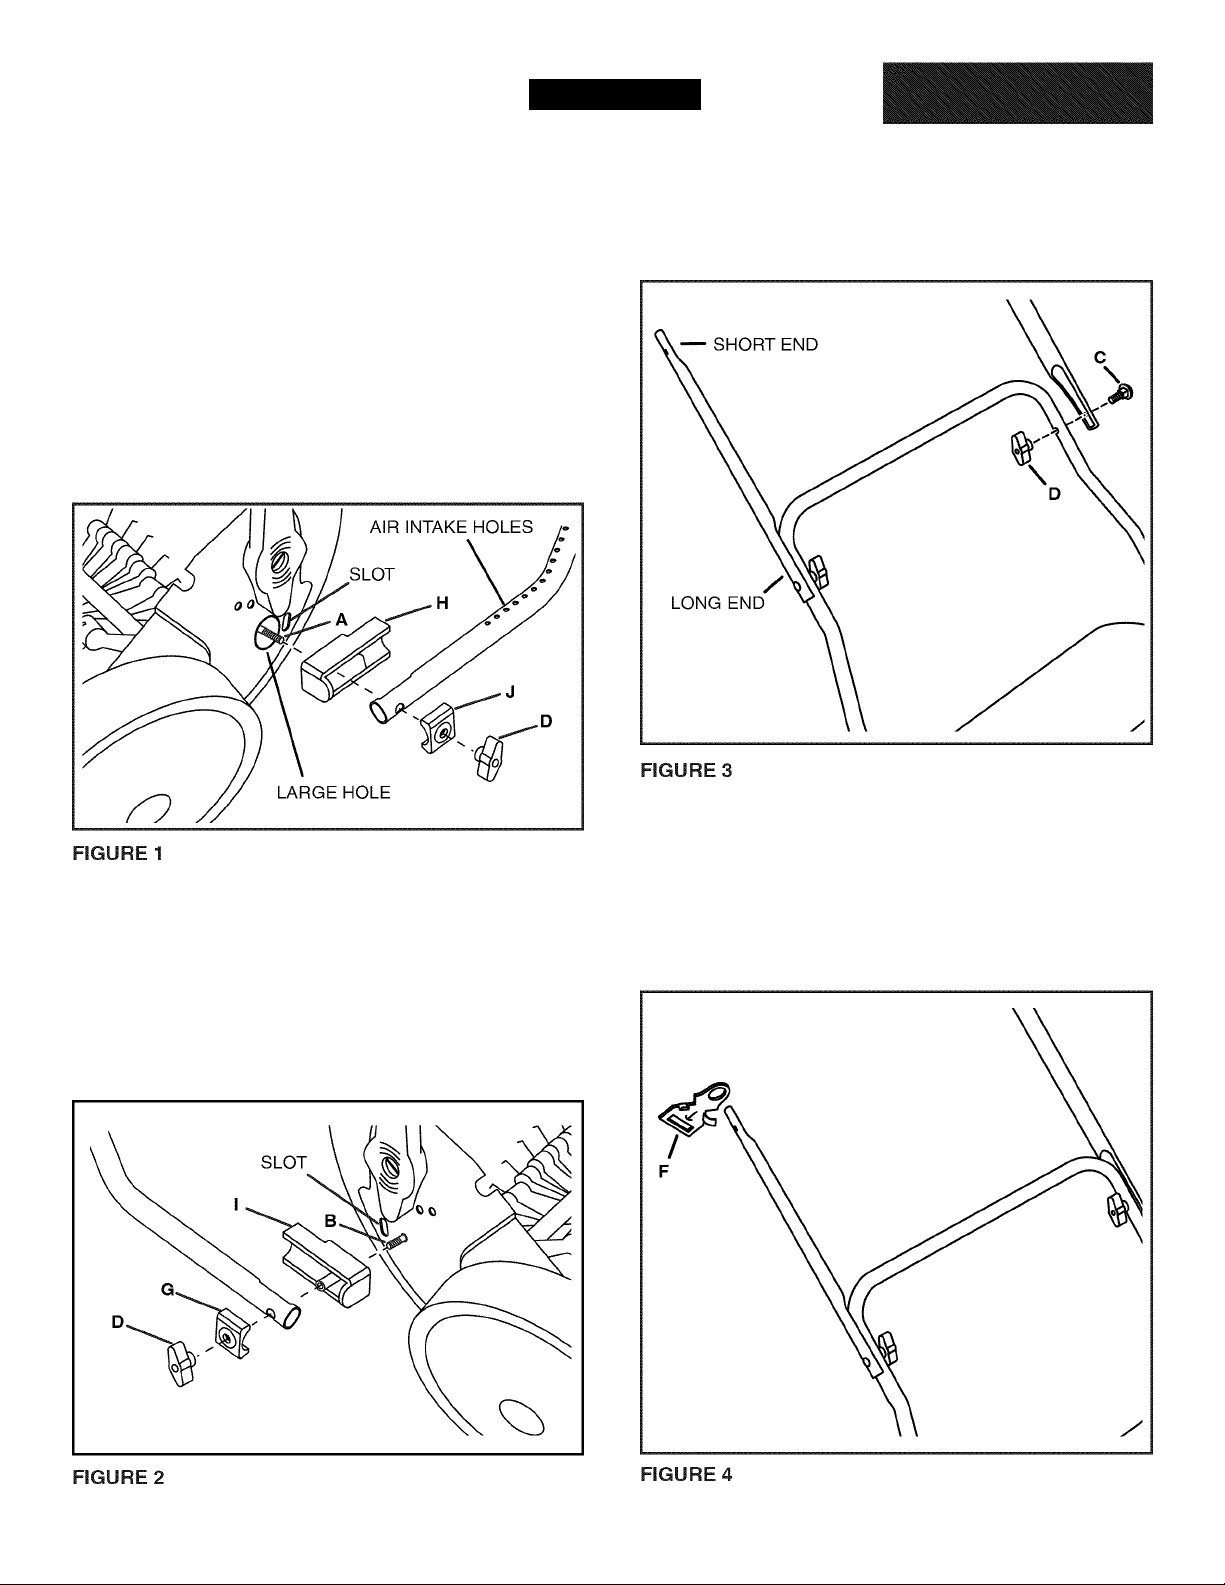
STEP1: (SEE FIGURE 1)
• Turn the Power Rake housing upside down.
• Fasten the end of the iower handie tube with air
intake hoies to the side of the Power Rake housing
with the iarge hoie. Use the right handie bracket (H),
hex boit (A), right handie ciamp (J) and wing knob
(D). Aiign the pin in the bracket with the siot in the
housing and tighten the wing knob.
POWER SOURCE
STEP 3: (SEE FIGURE 3)
• Turn the Power Rake housing upright and attach the
iong end of each of the middie handie tubes to the
iower handie tube using two carriage boits (C) and
wing knobs (D).
STEP 2: (SEE FIGURE 2)
• Fasten the iower handie tube to the ieft side of the
Power Rake housing. Use the ieft handie bracket (I),
carriage boit (B), ieft handie ciamp (G) and wing knob
(D). Aiign the pin in the bracket with the siot in the
housing and tighten the wing knob
STEP 4: (SEE FIGURE 4)
• Siide the power cord hoider (F) onto the right middie
handie tube.
Call 1 -866-576-8388 for missing parts or assembly help
DO NOT RETURN TO STORE
Page 5

STEP 5: (SEE FIGURE 5)
• Attach the upper handle tube to the middle handle
tubes using two carriage bolts (C) and wing knobs
(D). Keep the cord holder above the carriage bolt and
wing knob while assembling.
STEP 6: (SEE FIGURE 6)
• Secure the power cord to the upper and lower handle
tubes using the power cord clips (E).
Call 1 -866-576-8388 for missing parts or assembly help
DO NOT RETURN TO STORE
Page 6

OPERATION
OPERATION
Become familiar with all of the controls and adjustments
on the Power Rake before operating. Controls for
operating Power Rake are as follows:
SAFETY SWITCH - Must be pressed in before handle
switch can be used to start motor.
HANDLE SWITCH - Pull and hold to start and keep
motor running. When let go motor will stop and safety
switch should re-engage.
POWER CORD - Supplies electricity to the Power Rake,
make sure to connect to a power supply using only
outdoor rated extension cables.
CORD HOLDER - Holds extension cord to help keep it
out of the way and take stress oft of the handle switch
cord.
J
EXTENSION CORD RATINGS
(Use only outdoor rated extension cords plugged into a
ground fault receptacle.)
GAUGE LENGTH
16 Gauge
14 Gauge
0 - 50 Feet
51 - 100 Feet
MAINTENANCE
MAINTENANCE
CAUTION: BEFORE PERFORMING
ANY MAINTENANCE, MAKE SURE
THE POWER RAKE IS TURNED OFF
A
AND UNPLUGGED FROM ANY POWER
SOURCE.
STORAGE
Clean Power Rake and bag before storing. Do not
clean with water, solvents or petroleum based
products.
Store in a dry place that is not exposed to the
elements and out of the reach of children.
Clear excess debris left in Power Rake housing after
each use.
Make sure nothing has wrapped around the tines/
tine shaft. Remove anything that has wrapped itself
around the tines/tine shaft.
Check and make sure all wing knobs and carriage
bolts are tightened. Re-tighten any loose knobs and
bolts.
Call 1 -866-576-8388 for missing parts or assembly help
DO NOT RETURN TO STORE
Page 7

SERVICE AND ADJUSTMENTS
ADJUST TINE HEIGHT REPLACE DAMAGED OR WORN TINES
The tine height is pre-adjusted for average iawn and
may not need to be changed. Changes can be made to
tine height if working conditions require it. Oniy make
adjustments to tine height when Power Rake is turned
off and unpiugged from a power source. There are 5
positions for the tines (.7", .9", 1.1", 1.4" and 1.7"). Puli
adjustment arm out from engagement hole, move it and
then let it re-engage in the desired height position. Make
adjustments by 1-step increments only and alternate
between left and right sides when making adjustments.
Adjustment arms must always be same height position
when using the machine.
If a tine becomes worn a damaged, it can be replaced.
To replace any worn or damaged tines, follow the steps
below:
1.
Make sure the dethatcher is turned off and unplugged
from a power source.
2.
Turn dethatcher over so tines can be easily accessed.
3.
Remove the six screws holding the section together
where the damaged tine resides and remove the top
section.
4.
Pull out damaged tine and replace it with a new tine.
5.
Reattach the top section removed in step 3 with the
screws that were removed.
TROUBLESHOOTIN
PROBLEM CAUSE CORRECTION
Noise in unit Foreign objects in Power Rake. 1. Turn off Power Rake, unplug from outlet and
wait for rotation to stop.
2. Remove foreign objects from housing.
3. Check Power Rake for any other damage.
Whistiing sound from unit Belt (part number 28) is slipping 1. Contact your local Sears Service Center.
Power Rake not starting Faulty cable/wiring. 1. Contact your local Sears Service Center.
Motor cuts out during operation Tine rotation blocked by foreign objects 1. Turn off Power Rake, unplug from outlet and
wait for rotation to stop.
2. Remove foreign objects from housing.
3. Wait approximately 1 minute and then plug-in
and turn on Power Rake.
Tine depth set too low. 1. Turn off Power Rake, unplug from outlet and
wait for motor to cool down.
2. Set tine depth to appropriate height.
1. Mow lawn before using Power Rake.
Adjustments section on page 7.)
1. Mow lawn before using Power Rake.
Call 1 -866-576-8388 for missing parts or assembly help
DO NOT RETURN TO STORE
Dethatching is not satisfactory
Grass is too tall.
Spring tines have excessive wear. 1. Replace spring tines (see Service and
Belt (part number 28) malfunctioning. 1. Contact your local Sears Service Center.
Grass is too tall.
J
Page 8

REPAIR PARTS ILLUSTRATIO
MODEL 486.29281
J
Call 1-866-576-8388 for missing parts or assembly help
DO NOT RETURN TO STORE
Page 9

I
REPAIR PARTS LIS'
MODEL 486.29281
REF PART NO QTY DESCRIPTION REF PART NO QTY DESCRIPTION
1 MDL8.224.017 1
2 MDL6.113.025 1 Motor Assembly
3 MDL8.268.009 1 Motor Base
4 MDL8.211.052 1 Air Intake Housing 2
5 MDL8.211.051 1 Air Intake Housing 1
6 MDL8.306.030 1 Rear Flap
7 MDL8.306.028 1 Housing
8 MDL8.271.008 2 Hinge Bracket
9 MDL8.281.044 1
10 GB845-85 10 Screw (ST3.9X18-F-H)
11 MDL8.271.013 1 Pin
12 GB/T818-2000 5 Screw M5x10
13 MDL8.306.029 1 Motor Housing
14 MDL8.263.006 1 Bearing Cover
15 GB/T276-94 6 Ball Bearing
16 GB/T818-2000 6 Screw, M6x15
17 GB864-85 31 Screw, (ST4.8X16-F-H)
18 MDL8.315.004 2 Hub Cap
19 MDL8.043.032 5 Tine Housing 2 (Bottom)
Pulley (small)
Hinge Spring
20 MDL8.043.033 5 Tine Housing 1 (Top)
21 MDL8.288.004 40
22 MDL8.205.023 1
23 GB896 2 Circlip
24 MDL8.123.004 2
25 GB119-86 2
26 MDL8.224.024 1
27 GB894 4 Circlip
28 MDL8.299.004 1 Belt
29 MDL8.306.031 1 Belt Cover
30 MDL8.075.003 2 Height Adjuster
31 MDL8.224.003 4 Roller
32 MDL8.205.019 1 Roller Axle
33 MDL8.212.002 1
34 MDL8.281.025 2 Spring
35 MDL8.919.002 2 Screw
36 MDL5.050.015 1 Axle & Housing Assembly
37 MDL5.224.015 2 Wheel Assembly
Tine
Reel Axle
Reel Plate
Round Pin
Pulley (large)
Axle Sleeve
j
Call 1-866-576-8388 for missing parts or assembly help
DO NOT RETURN TO STORE
Page 10

REPAIR PARTS ILLUSTRATIO
MODEL 486.29281
J
10
Call 1-866-576-8388 for missing parts or assembly help
DO NOT RETURN TO STORE
Page 11

I
REPAIR PARTS LIS'
MODEL 486.29281
REF PART NO QTY DESCRIPTION REF PART NO QTY DESCRIPTION
1 MDL8.212.026 1 Foam Grip
2 MDL8.253.0128 1
3 MDL8.486.054 3 Power Cord Clip 17 MDL8.281.028 1 Spring
4 GB14-80 4 Carriage Bolt, M8 X 45
5 MDL8.253.0126 2
6 MDL8.253.127 1 Bottom Handle
7 MDL8.486.016 1 Power Cord Holder 21 MDL8.100.016 1 Switch Box Clamp
8 MDL8.253.129 6 Wing Knob 22 MDL8.369.006 2
9 MDL8.462.001 1 Tubing Plug 23 GB845-85 9 Screw (ST3.9X18-F-H)
10 MDL8.211.052 1 Right Handle Bracket 24 MDL5.501.026 1
11 MDL8.919.005 1 Hex Bolt 25 MDL5.501.013 1
12 GB14-80 1 Carriage Bolt M8x65 26 MDL8.100.015 2
13 MDL8.100.013 1 Left Handle Bracket 27 MDL8.933.004 2 Pin
14 MDL8.101.011 1 Left Handle Clamp 28 MDL8.101.028 1 Right Handle Clamp
Upper Handle
Middle Handle Tubes
15 MDL8.353.029 1 Switch Box 1
16 MDL8.253.052 1 Switch Trigger
18 MDL8.281.029 1 Return Spring
19 FA1-6/2B-A1 1 Switch
20 MDL8.353.030 1 Switch Box 2
Cable Jacket
Cable & Plug
Cable
Cable Clamp
42157 1
Owners Manual
J
11
Call 1-866-576-8388 for missing parts or assembly help
DO NOT RETURN TO STORE
Page 12

Get it fixed, at your home or ours!
-
Your Home
For expert troubleshooting and home solutions advice:
www.managemyhome.com
For repair - in your home - of all major brand appliances,
lawn and garden equipment, or heating and cooling systems,
no matter who made it, no matter who sold it!
For the replacement parts, accessories and
owner’s manuals that you need to do-it-yourself.
For Sears professional installation of home appliances
and items like garage door openers and water heaters.
1-800-4-MY-HOME® (i-8oo-469-4663)
Call anytime, day or night (U.S.A. and Canada)
www.sears.comwww.sears.ca
Our Home
For repair of carry-in items like vacuums, lawn equipment,
and electronics, call anytime for the location of your nearest
Sears Parts & Repair Service Center
1 -800-488-1222 (USA) 1 -800-469-4663 (Canada)
www.sears.com www.sears.ca
To purchase a protection agreement on a product serviced by Sears:
1-800-827-6655 (U S A )
Para pedir servicio de reparación
a domicilio, y para ordenar piezas:
1-888-SU-HOGAR®
(1-888-784-6427)
® Registered Trademark / ™ Trademark / Service Mark of Sears Brands, LLC
® Marca Registrada / ™ Marca de Fábrica / ™ Marca de Servicio de Sears Brands, LLC
Marque de commerce / “° Marque déposée de Sears Brands, LLC
1-800-361-6665 (Canada)
Au Canada pour service en français:
1-800-LE-FOYER“'=
(1-800-533-6937)
www.sears.ca
© Sears Brands, LLC
 Loading...