

Craftsman 486243291 Owner’s Manual
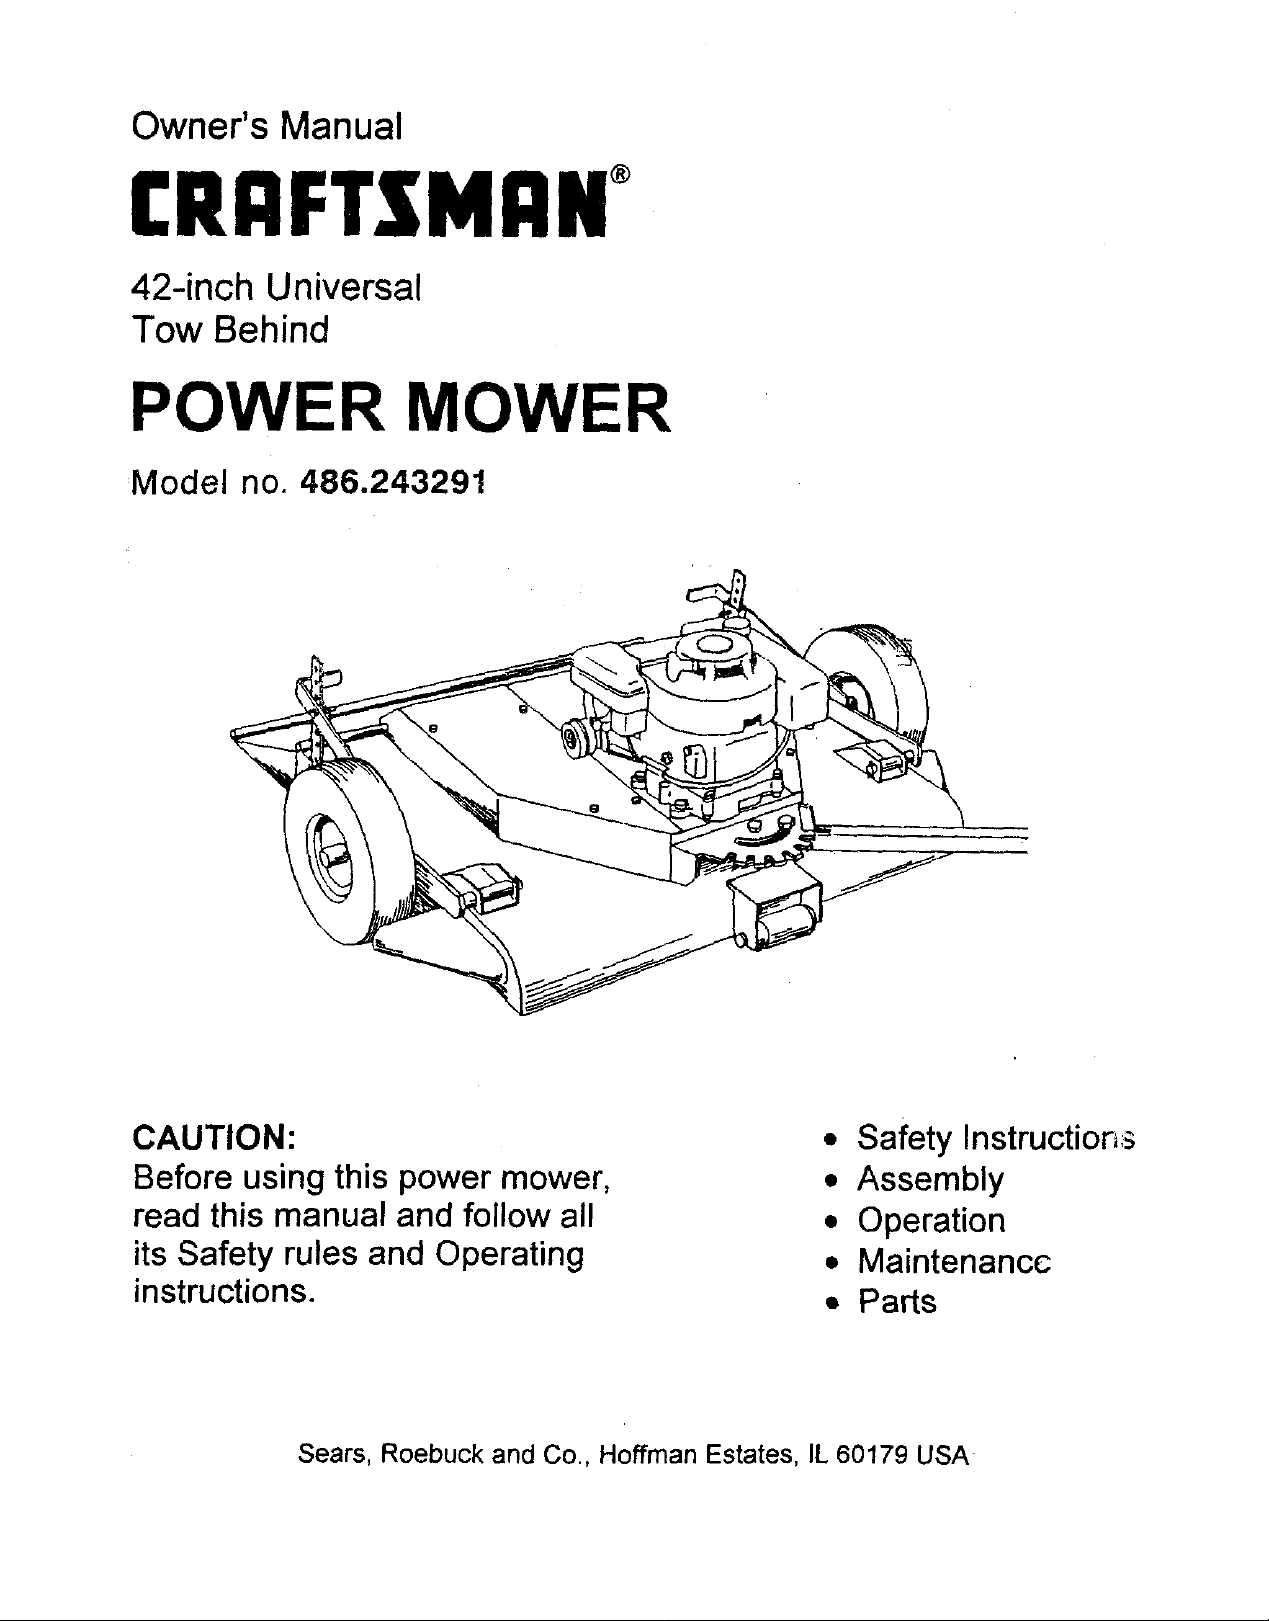
Owner's Manual
CRRFTSMRW
42-inch Universal
Tow Behind
POWER MOWER
Model no. 486.243291
CAUTION:
Before using this power mower,
read this manual and follow all
its Safety rules and Operating
instructions.
Sears, Roebuck and Co, Hoffman Estates, IL 60179 USA
• Safety Instructior_:_
• Assembly
• Operation
• Maintenance
• Parts
TABLE OF CONTENTS
_/ARRANTY ................................................................ 2
b_,FET'( RULES ....................................................... 2-4
._ONTENTSOF CARTON ........................................... 5
_SSEMBLY .............................................................. 6-8
_IRING SCHEMATIC ................................................. 9
OPERATION ......................................................... 10-14"
MAINTENANCE .................................................... 15-17
SERVICE AND ADJUSTMENT .............................. 18,19
STORAGE ................................................................. 21
REPAIR PARTS .................................................... 22-33
LIMITED ONE YEAR WARRANTY ON POWER MOWER ATTACHMENT
Forone (1) year from the dateof purchase,Ifth(sPowerMoweris maintained, lubricatedandtuned up according
to theinstructionsinthe OwneCsManual, Sears wil( repairorreplace, free of charge, anyparts that-,re
defective in materialor workmanship.
ThisWarranty does not cover:
• Expendable itemswhichbecome worn duringnormal use,such as belts or cutting blades.
• Repairsnecessarybecauseofoperatorabuse, negligence,Improper storageoraccidentor the.tailureto maintain
the equipmentaccordingto the instructionscontainedin the Owner'sManual.
• PowerMowerAttachmentused for commercialor rental purposes.
WARRANTY SERVICE IS AVAILABLE BY RETURNING THE POWER MOWER TO THE NEAREST SEARS
SERVICE CENTER IN THE UNITED STATES,
ThisWarranty gives you specificlegalrights,andyou may alsohaveotherrightswhichmay varyfrom statetostate.
SEARS, ROEBUCK AND CO., D/817 WA, Hoffman Estates, IL 60179
SAFETY RULES
Safe Operation Practices for Tow Behind Mowers
A
L
Read, understand,and fotldwall instructionsin the
manualand on the machinebefore starting.
Read th!s operator'smanual carefully. Become
familiar withthe controls and know howto operate
yourmower properly.
• Only altowresponsibleadults,who are familiar with
the instructions,to operatethe machine.
• Clear the area of objectssuchas rocks,toys,wire,
etc., which could be pickedup and thrown by the
• Be surethe area isclear of,other people before
,, Never carry passengers.
• Do not mow in reverseunlessabsolutely
WARNING: This cuttingmachine iscapable of amputating hands and feet and throwingobjects. Failure to
observethe followingsafety instructionscould result insedousinjuryor death.
GENERAL OPERATION
blade,
mowing. Stop machine if anyoneenters the area.
necessary, Always look down and behindbefore
and while..,acking.
Be aware of the mower dischargedirectionand do
not pointit at anyone. Do notoperatethe mower
withoutthe guard in place.
Slow down before turning.
Never leave a runningmachineunattended.
Alwaysturn off blades, andstop engine.
Turn off blades when not mowing.
o
Mow only in daylightor goodartificiallight.
Do not operatethe machinewhileunderthe
influenceof alcoholor drugs.
Watch for trafficwhen operatingnear or crossing
roadways.
Use extracare when loadingor unloadingthe
machineintoa trailer ortruck.
41
Do not attempt to operateyourtractoror mower
when notin drivers seat.
Disengagepowerto mowerand stopengine when
transportingor notin use.
2
• Exercise special care when mowing aroundfixed
objectsin orderto preventthe bladesfrom stdking
them. Never deliberately runtractoror mower onto
or over any foreign object.
• Use moweronly as the manufacturerintended and
as described in this manual.
• Do not operate mowerifit has been droppedor
damaged in any manner. Always have damage
repaired before usingyour mower.
• Alwayswear safety glassesor eye shieldswhen
startingand while usingyour mower.
• Dressproperly. Do not.operate mowerwhen
barefoot or wearing open sandals. Wear onlysolid
shoeswith good tractionwhen mowing.
• Alwaysmake cuttingheight adjustmentsbefore
starting your mower. Never attempt to do this while
the engine is running.
• Keep your eyes and mind on your mower and the
area being cut. Do not let otherinterests distract
you.
• Do not puthandsor feet near or under rotating
parts. Keep clear ofthe dischargeopeningat all
times.
• Before cleaning,inspecting,or repairing your
mower, stopthe engine and make absolutelysure
the bladeand all movingparts have stopped. Then
disconnectthe spark plugwire and keep it away
from the spark plugto prevent accidental starting.
• Do notoperate your mower if itvibrates
abnormally. Excessive vibration is an indicationof
damage; stopthe engine,safely checkfor the
cause of vibration and repair as required.
• Never operate yourmowerwithout properguards,
plates, or other safety devices in place.
I1. SLOPE OPERATION
Slopesare a major factor related to loss-of-controland
Upover accidents, whichcan resultin severe injuryor
death. All slopesrequire extra caution. If you feet
uneasyon it, do not mow it.
DO:
• Mow up anddown slopes, notacross.
• Remove obstaclessuchas rocks,tree limbs, etc.
• Watch for holes,ruts, or bumps. Uneven terrain
could overturnthe machine. Tall grass can hide
obstacles.
• Use slowspeed. Choose a low gear so that youwill
nothave to stop or shiftwhile onthe slope.
,P Follow the manufacturer'srecommendationsfor
wheel weights or counterweightsto improve
stability.
• Keep all movement on the slopes slow and gradual.
Do not make sudden changes in speed or direction.
• Avo_ starting or stopping on a stope. If tires Lose
traction, disengage the blades and proceed slowly
straight down the slope.
DO NOT:
• Donot tum on slopes unlessnecessary,and then,
turnslowlyand gradually downhill,if possible.
• DOnot mow near drop-offs,ditohes, or
embankments. The mower could suddenlyturn
over if a wheel is over the edge of a cliff or ditch,or
if an edge caves in.
• Do not mow on wet grass. Reducedtraction cot_ld
cause sliding.
IlL CHILDREN
Tragic accidents can occur if the operatoris not alertto
the presenceof children. Childrenare often attracted
to the machineand the mowingactivity. Never assume
that childrenwill remain where youlast sawthem.
• Keepchildrenout ofthe mowingarea and under
the watchfulcare of another responsibleadult..
• Be alertendturn machine off if childrenenter the
area.
• Before and when backing,look behind and down
for small children.
• Never carry children. They may fail off and be
seriouslyinjuredor interfere withsafe machine
operation.
• Never allowchildrento operatethe machine.
• Use extra care when approachingblindcomers,
shrubs,trees, or other objectsthat may obscure
vision.
IV. SERVICE
• Use extra care in handlinggasolineand otherfuels.
They are flammable and vapors ere explosive.
• Use only an approved container.
,,* Never remove gas cap or add fuel withthe engine
running.
• Allow engine to cool before refueling. Do not
smoke near or while operating mower.
• Never refuel the machine indoors.
• Never storethe machine or fuel container inside a
room where there is an open flame, such as with a
gas water heater.
• Never run a machine inside a c!osed area.
• Keep nuts and bolts, especially blade attachme_
nuts,tight end keep equipment in good conditio;_.
• Never tamper with safety devices. Check their
proper operation regularly.
• Keep maciline free of grass, leaves, or other debris
build-up. Clean oil or fuel spillage. Allow machine
to cool before storing.
• Stopand inspect the equipment if you stdke an
object. Repair, if necessary, before restarting.
• Never make adjustments or repairs with the engine
running.
• Mower bladesare sharpand can cut. Wrap the
blade(s)or wear gloves, and use extra caution
when servicingthem.
• Checkbrake operationfrequently, Adjustand
service as required.
Look for this symbol to point out
important safety precautions. It
means CAUTION!II BECOME
ALERTIII YOUR SAFETY IS
INVOLVED.
CAUTION: Always disconnect spark
plug wire and place wire where it
cannot contact spark plug in order
to prevent accidental starting when
setting up, transporting, adjusting
or making repairs.
4
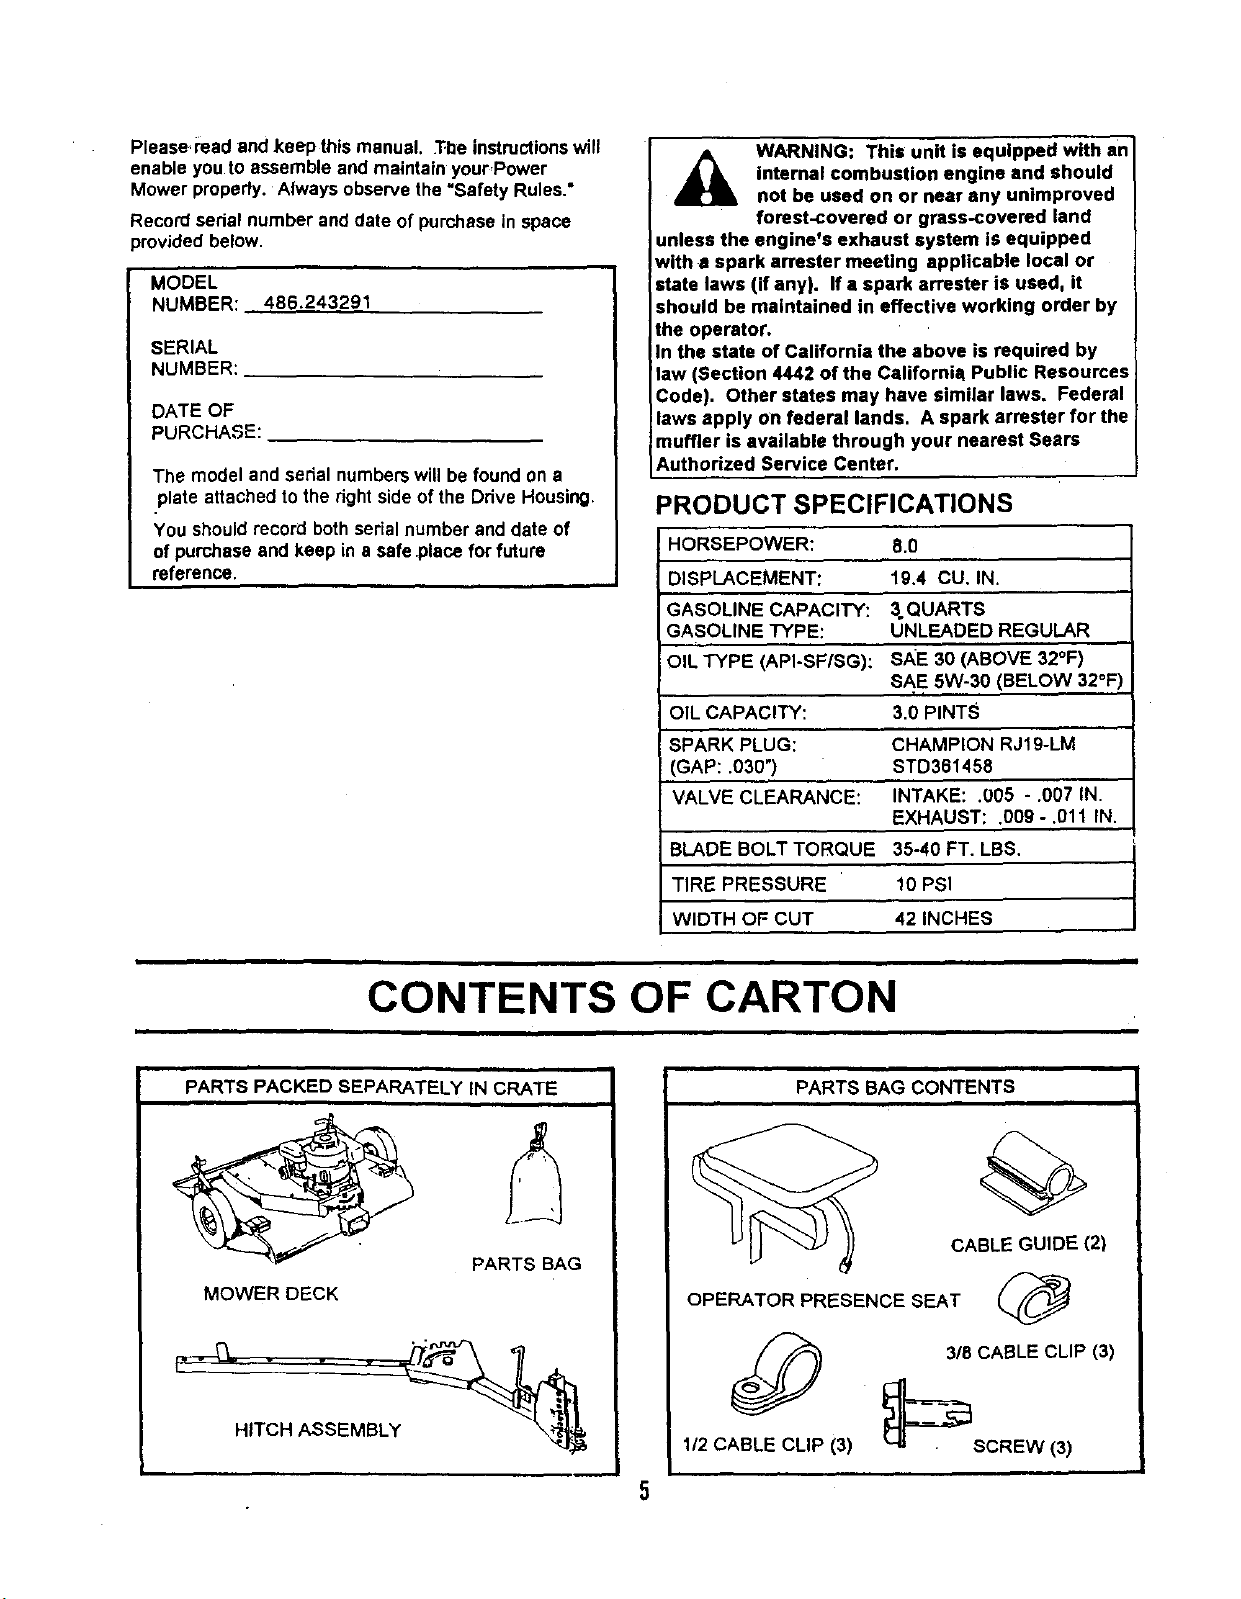
Please read and keepthis manual. The instructionswill
enable you to assemble and maintain yourPower
Mower property.Always observethe "Safety Rules."
Record serial number and date of purchase in space
provided below.
MODEL
NUMBER: 486.243291
SERIAL
NUMBER:
DATE OF
PURCHASE:
The model and serial numbers willbe found on a
plate attachedto the right side of the Drive Housing.
You should record both serial number and date of
of purchaseand keep in a safeJ_laceforfuture
reference.
internal combustion engine and should
WARNING: This unit is equipped with an
not be used on or near any unimproved
forest-covered or grass-covered land
unless the engine's exhaust system is equipped
with a spark arrester meeting applicable local or
state laws (if any). If a spark an'ester is used, it
should be maintained in effective working order by
the operator.
In the state of California the above is required by
;law (Section 4442 of the CaliforniaLPublic Resources
Code). Other states may have similar laws. Federal
laws apply on federal lands. A spark arrester for the
muffler is available through your nearest Sears
IAuthorized Service Center.
PRODUCT SPECIFICATIONS
HORSEPOWER: 8.0
DISPLACEMENT: 19.4 CU. IN.
GASOLINE CAPACITY: 3.QUARTS
GASOLINE TYPE: UNLEADED REGULAR
OIL TYPE (API-SF/SG): SAE 30 (ABOVE 32°F)
SAE 5W-30 (BELOW 32°F)
OIL CAPACITY: 3.0 PINTS
SPARK PLUG: CHAMPION RJ19-LM
(GAP: .030") STD361458
VALVE CLEARANCE: INTAKE: .005 - .007 IN.
BLADE BOLT TORQUE 35-40 FT. LBS.
TIRE PRESSURE 10 PSI
T I ,,
EXHAUST: .009 - .011 IN.
CONTENTS OF CARTON
PARTS PACKED SEPARATELY IN CRATE
PARTS B_AG
MOWER DECK
HITCH ASSEMBLY _
WIDTH OF CUT 42 INCHES
PARTS BAG CONTENTS
CABLE GUIDE (2)
OPERATOR PRESENCE SEAT
318 CABLE CLIP (3)
1/2 CABLE CLIP (3)
_SCREW (3)
i ii
REMOVING UNIT FROM CRATE
ASSEMBLY
• Remove top boards.
• Remove two Boltsfrom front of crate which hold
shippinganchors.
• Remove two Boltsfrom bottom at rear of crate
whichhold shipping anchors.
• Remove HitchAssembly and Parts Bagfrom crate.
• Remove frontof crate.
• RollMower ronsardout ofcrate.
• Remove RollerBoltfrom FrontRoller, remove
shippinganchorsand reinstall Roller Bolt.
• Remove Nuts from HeightAdjustmentStropsand .
remove shipping anchorsfrom eachside of inower.
ReinstallNutsto HeightAdjustment Straps,then
loosen1/4 tum to allow strapsto pivotfrae!y.
• Check all lOOsepartsand bag contentsagainst
Crate Contentsand Bag Contentsillustrationon
page 4. If any partis missingordamaged contact
the store where you pumhasedthe unit.
Before starting to assemble mower,
t
OPERATOR ORIENTATION
remove spark plug wire from plug of
mower engine.
CAUTION [
• Assemble a 3/8 Flat Washer onto a 3/8-16 x 2-1/2
Hex Bolt.
• InsertBolt and Wisher throughslotof Rear
Quadrant and holein Towbar Tube.
• Secure tightlywith 3/8-16 LockNut then loosenNut
114turnto allowtube to pivot freely insideRear
Quadrant.
NOTE: Tow'oarTube must pivotfreely insideRear
Quadrantwhen latch ispulledfrom notch_
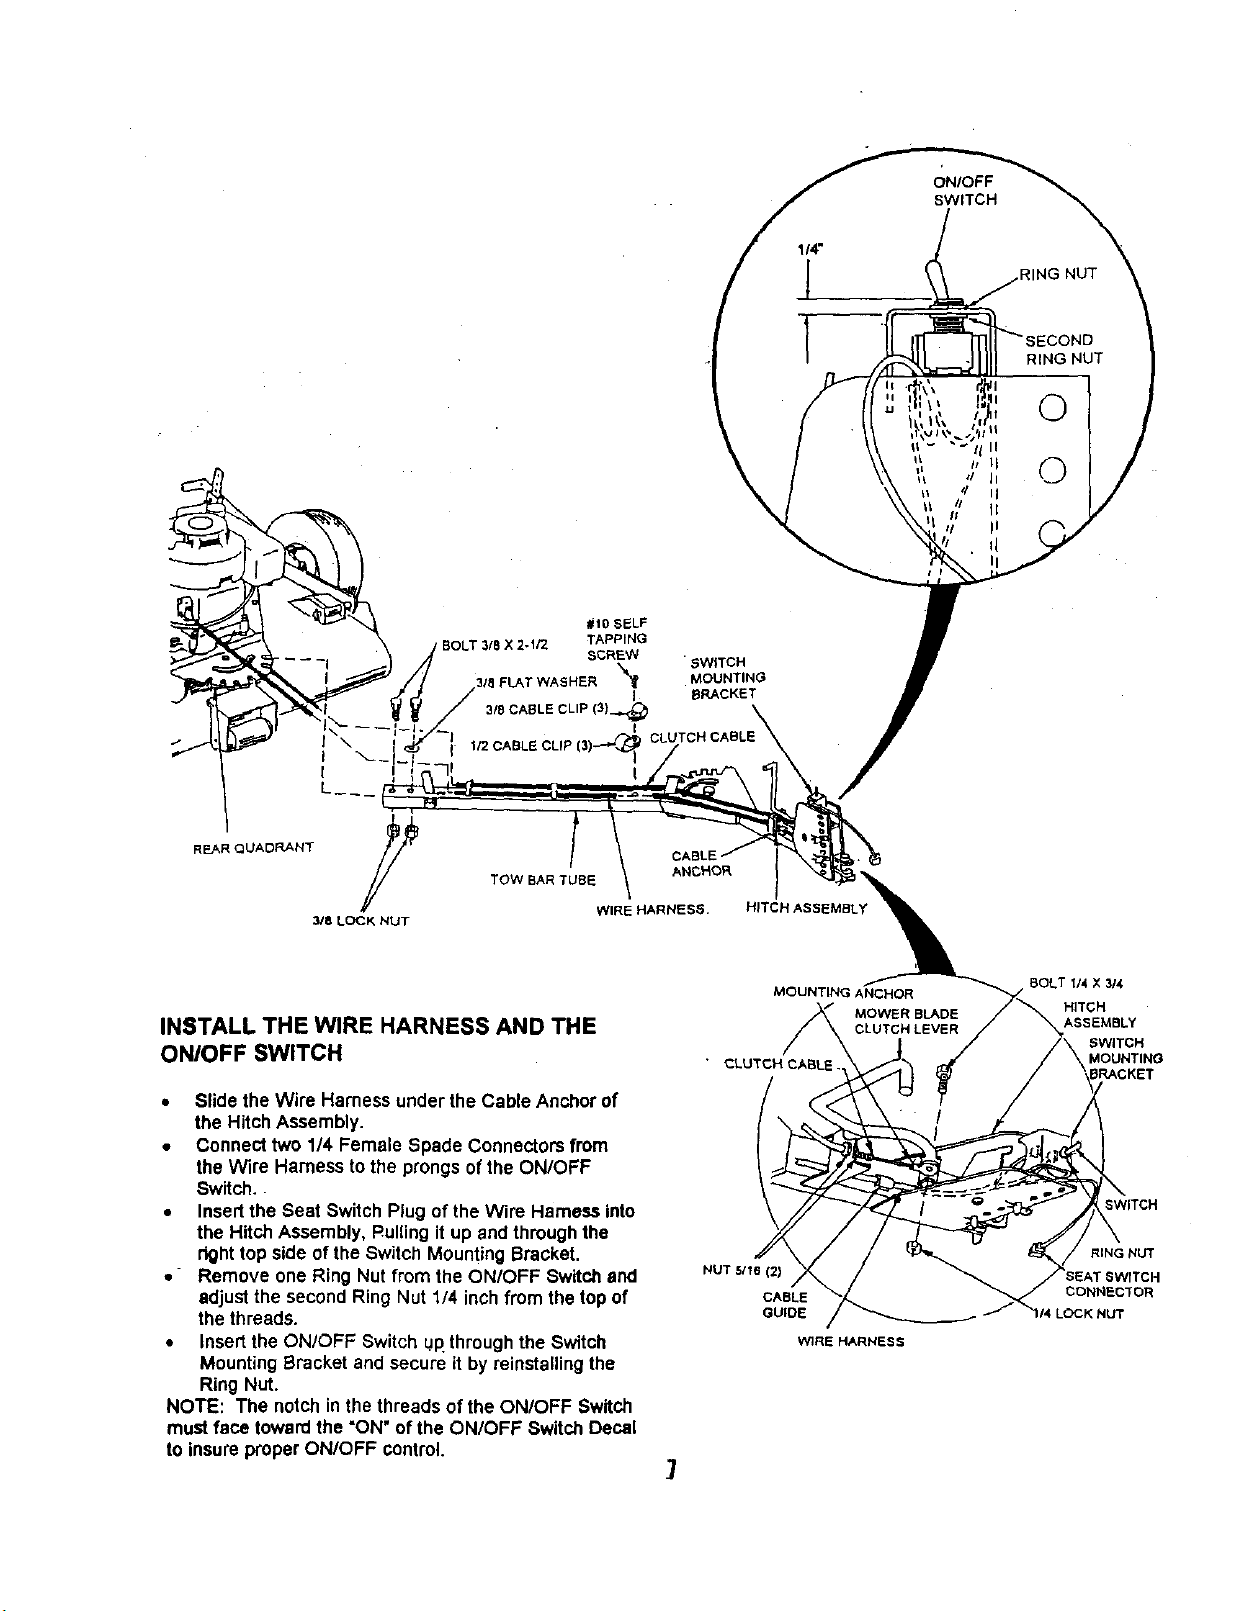
INSTALL CLUTCH CABLE AND WIRE
HARNESS TO TOWBAR TUBE.
• Unwrapthe Wire Harnessand the ClutchCable
from AroundThe Engiee.
• Laythe Clutch Cable alongthe leftside of the
Towbar Tube and the Wire Harnessalongthe right
side of the Towbar Tube.
• Installthree 3/8" Cable Clips onthe ClutchCable
andthree 1/2" Cable Clipsontothe Wire Harness.
• Align all six Cable Clipswiththe holesin the Towbar
Tube and secure them withthree #10 Self-Tapping
Screws.
INSTALL CLUTCH CABLE TO THE HITCH
ASSEMBLY
When dghtand left are mentioned inthis manual, it
meansyourrightand your leftwhen you are seated
behindthe wheel in the operatingposition.
ENGINE OIL
VERY IMPORTANT:
Engine must be filledwith oil before operation. See OIL
& FUEL RECOMMENDATIONS in engineOwner's
Manual for correctfillinginstructionsand oil fill capacity.
INSTALL TOWBAR TUBE TO REAR
QUADRANT
Cut and remove the PlasticTie which holdsthe
Wire Harnessand the ClutchCable to the Rear
Quadrant (See Fig. 1)
Remove two 3/8 Bolts,two 3/8 LockNuts and one
3/8 Flat Washer from the rear of theTowbar Tube.
Place tube into Rear Quadrant, align holes, insert
3/8-16 x =.1/2 Hex Boltthrough rear hole of tube.
Secure tightlywith 3/8-16 Lock Nut then loosenNut
1/4 turnto allow tube to pivot freely InsideRear
Quadrant.
• Remove one 1/4 inchNut and Boltfrom the eyelet
ofthe Clutch Cable. (See Fig. 1)
• Remove one of the 5/16 inchNutsfrom the
threaded end ofthe ClutchCable Housingandturn
the second Nut all the wayontothe threads.
Insertthe ClutchCable andthe loose 5/16 inch Nut
throughthe slotted hole in the Cable Guide ofthe
HitchAssembly.
NOTE: The loose 5/16 Nut mustbe cockedsideways
slightlyto get it throughthe Slot.
• Reinstallthe loose 5116inch Nut ontothe Clutch
Cable Housingto secure Cable'Housing.
• Alignthe eyelet of the C_utchCable withthe hole in
the Mower Blade Clutch Lever and securewith one
1/4 inchBoltand one 114inchNut.
See DRIVE TENSION in the SERVICE AND
ADJUSTMENTS Sectionof this manualfor proper
ClutchCable adjustment.
R
ONIOFF
SWITCH
HG NUT
\
#10 SELF
BOLT3/8 X2-t/2
"1
T WASHER _ MOUNTING
3/8 CABLE CLIP (3)_i _
1/2 CABLE CUP
TAPPING
SCREW_. " SWITCH
I ERACKET
, CLUTCH CABLE
REAR Q UADFL_NT #
3/8 LOCK NUT
TOW BAR TUBE
WIRE HARNESS.
INSTALL THE WIRE HARNESS AND THE
ONIOFF SWITCH
• Slide the Wire Hamess underthe Cable Anchor of
the Hitch Assembly.
• Connect two 114Female Spade Connectorsfrom
the Wire Harnessto the prongsof the ON/OFF
Switch.
• Insertthe Seat Switch Plug of the Wire Harnessinto
the HitchAssembly, Rulnng it up and throughthe
righttop side ofthe Switch Mounting Bracket.
• Remove one RingNut from the ON/OFF Switchand
adjustthe second Ring Nut 1/4 inchfromthe top of
thethreads.
• Insertthe ON/OFF Switch up.through the Switch
MountingBracket and secure it byreinstalling the
Ring Nut.
NOTE: The notch inthe threadsof the ON/OFF Switch
must face toward the "ON"of the ON/OFF Switch Decal
to insureproper ON/OFF control.
ANCHOR
7
HITCH ASSEMBL
NUT 5116(2)
MOUNTING ANCHOR
MOWER BLADE
CLUTCH LEVER
CABLE
GUIDE
WIRE HARNESB
BOLT 114 X 3/4
HITCH
ASSEMBLY
SWITCH
MOUNTING
RING NUT
SEAT 8WrTCH
CONNECTOR
LOCK NUT
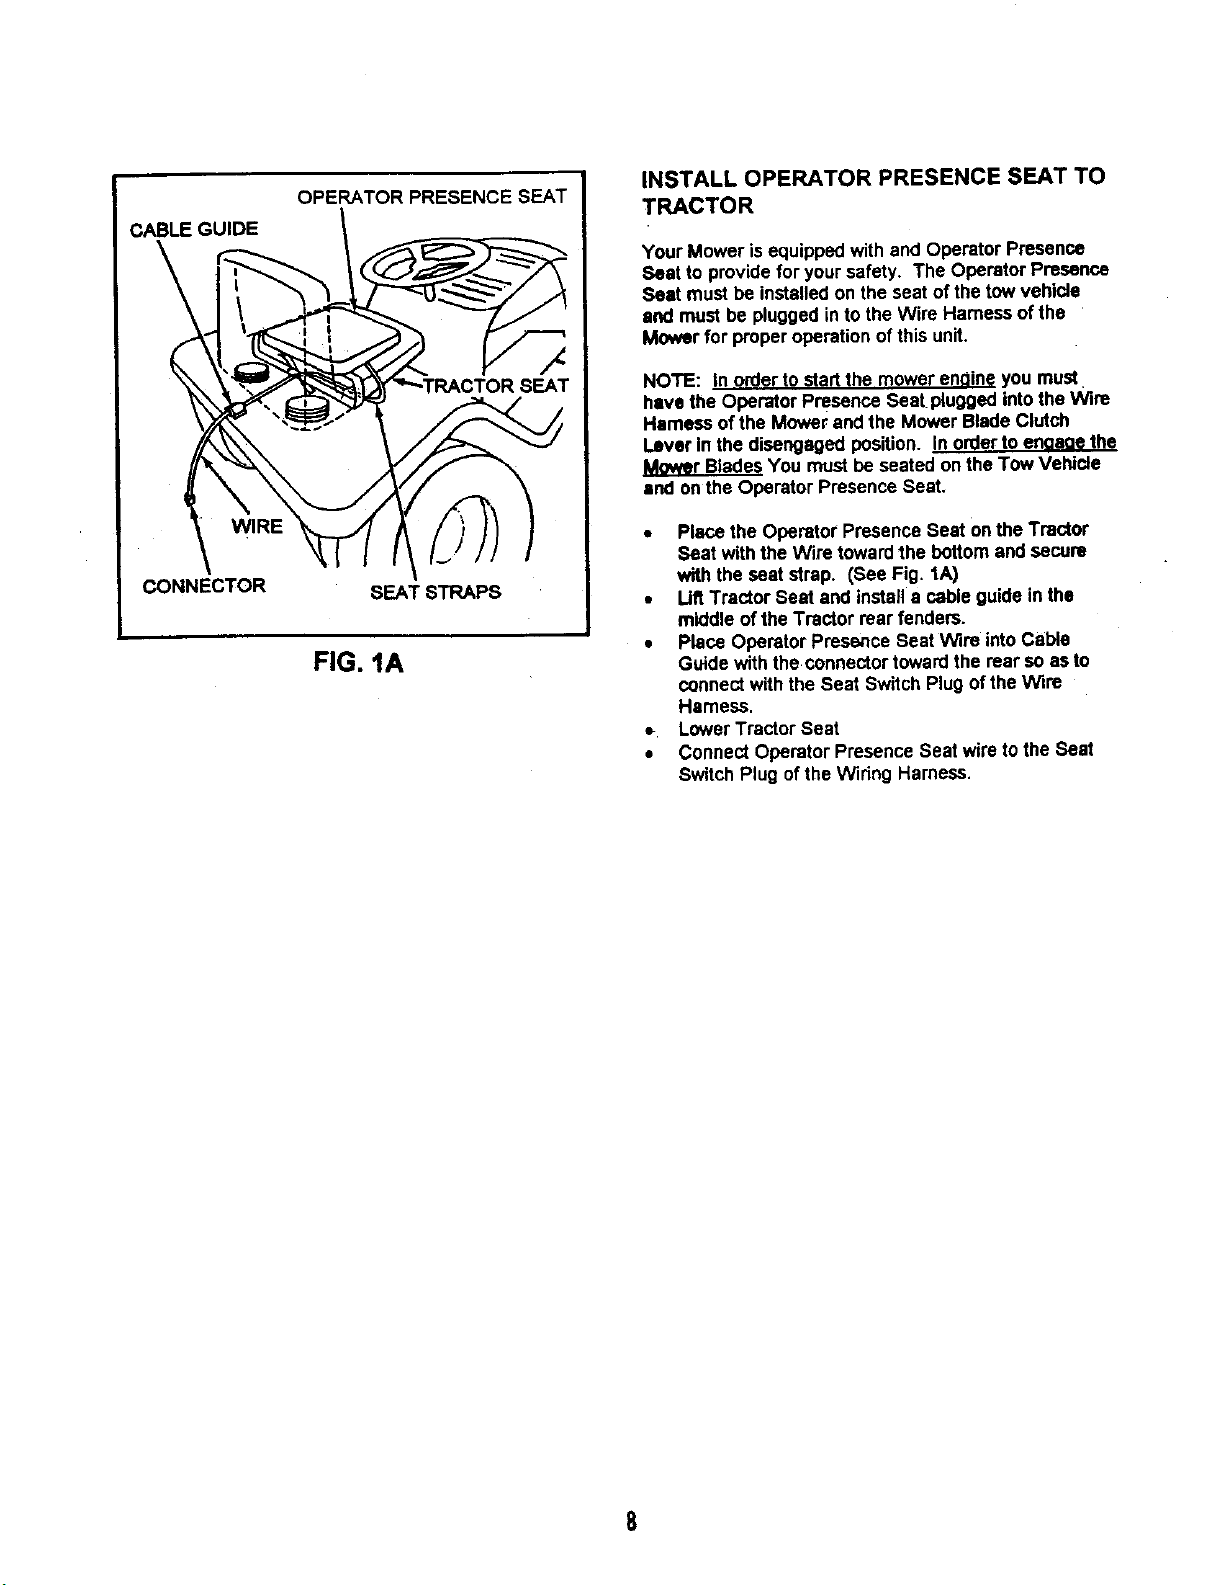
CABLE GUIDE
\
CONNECTOR
OPERATOR PRESENCE SEAT
SEAT STRAPS
FIG. IA
INSTALL OPERATOR PRESENCE SEAT TO
TRACTOR
Your Mower is equippedwithand Operator Presence
Seat to provide for yoursafety. The OperatorPresence
Seat mustbe installedon the seat of the tow vehicle
and must be pluggedinto the Wire Harness of the
Mower for proper operationofthis unit.
NOTE: In orderto start the mowerenoine you must
have the Operator Presence Seat.pluggedintotheWire
Harnessof the Mower and the Mower Blade Clutch
Lever in the disengagedposition. LD_L_JPJ_II_J_t
Mower BladesYou must be seated on the Tow Veblcle
and onthe Operator Presence Seat,
• Placethe Operator Presence Seat onthe Tractor
Seat with the Wire towardthe bottomand secure
with the seat strap. (See Fig. 1A)
• LiftTractor Seat and installa cable guide inthe
middle of the Tractor rear fendera.
• Place OperatorPresence SeatWira intoCable
Guidewith the connectortoward the rear soas to
connectwith the Seat Switch Plugof theWire
Hamess.
LowerTractor Seat
• ConnectOperator PresenceSeat wiretothe Seat
Switch Plug of the Wiring Harness.
8
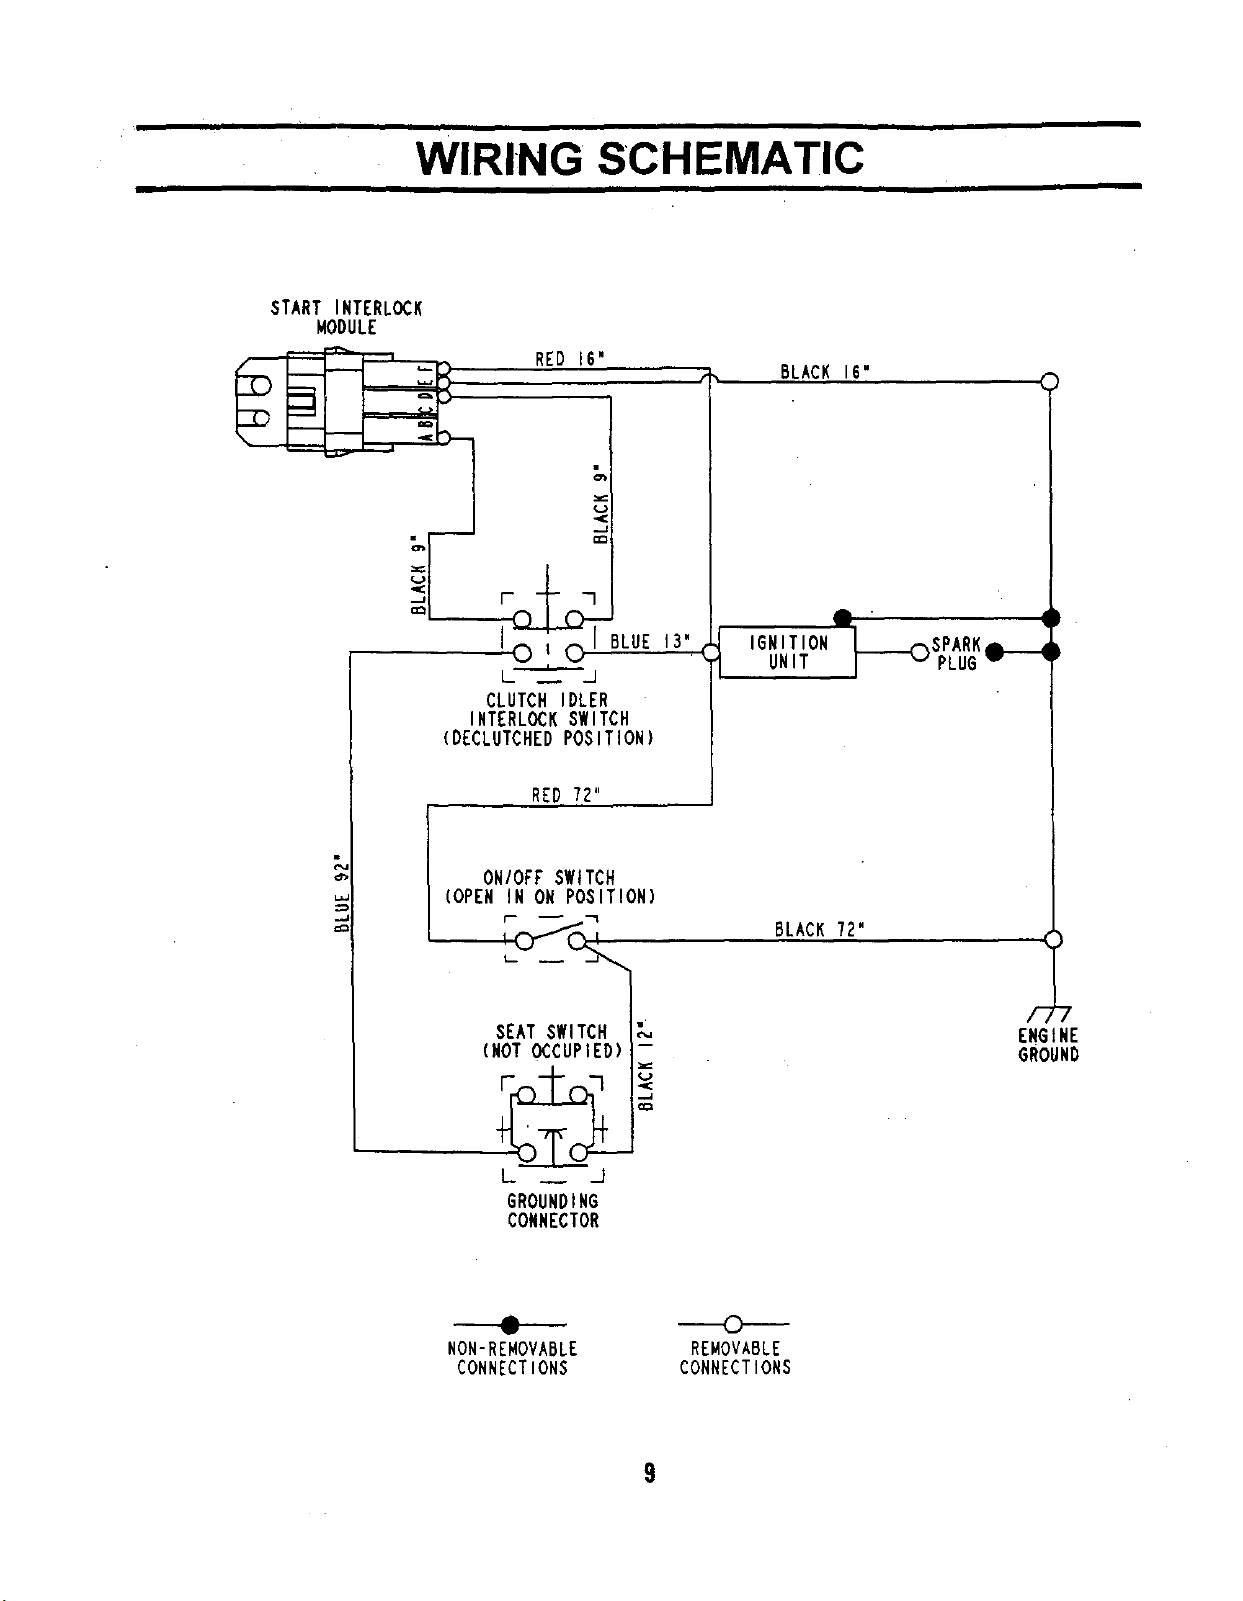
WIRING SCHEMATIC
START INTERLOCK
MODULE
RED 16"
iiii
BLACK 16"
P_BLUE 13".
IGNITION
UNIT
CLUTCH IDLER
INTERLOCKSWITCH
(DECLUTCHEDPOSITION)
RED 72"
ONIOPF SWITCH
I.L
(OPEN IN ON POSITION)
BLACK 72"
SEAT SWITCH _,
(NOT OCCUPIED) -
ENGINE
GROUND
L __ _.I
GROUNDING
CONNECTOR
A
v
NON-REMOVABLE
CONNECTIONS
C)
REMOVABLE
CONNECTIONS
9
I •
OPERATION
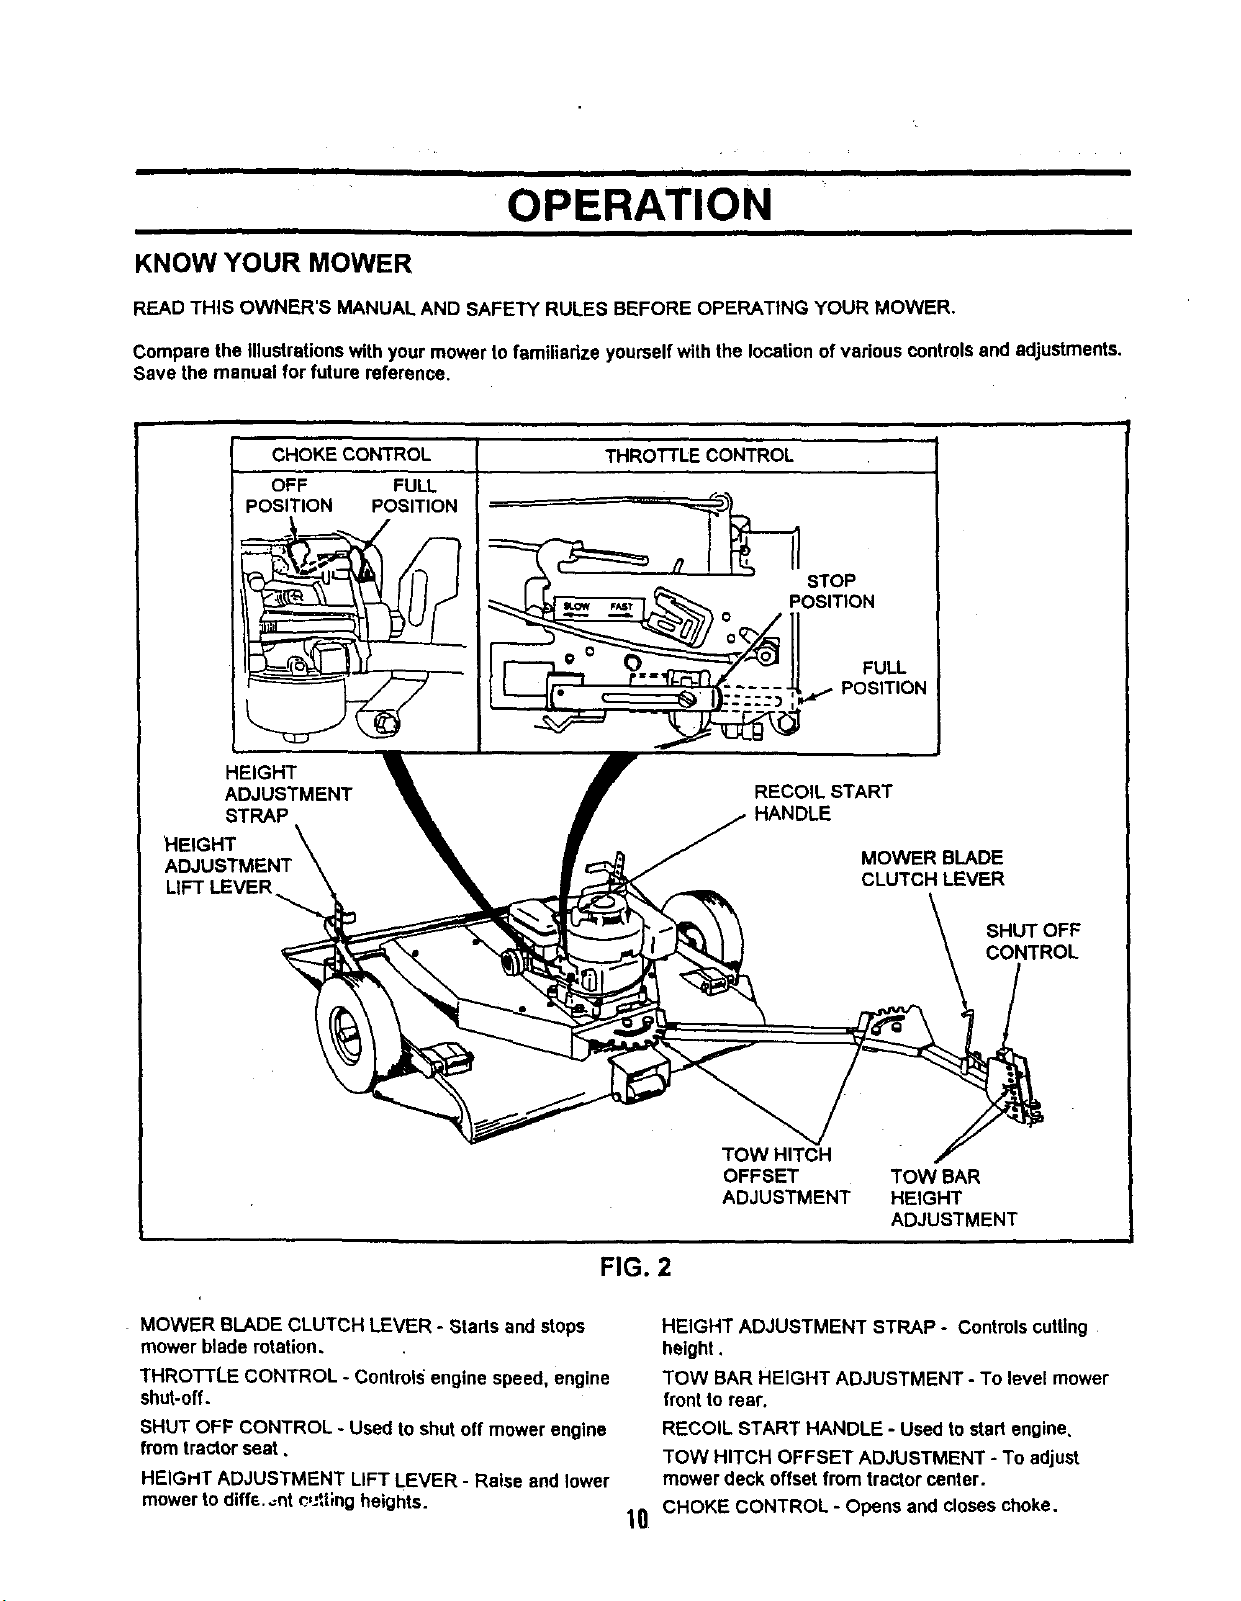
KNOW YOUR MOWER
READ THIS OWNER'S MANUAL AND SAFETY RULES BEFORE OPERATING YOUR MOWER.
Compare the illustrationswith yourmowerto familiadze yourselfwith the locationof variouscontrolsand adjustments.
Save the manual for future reference.
CHOKE CONTROL
OFF FULL
POSITION POSITION
HEIGHT
ADJUSTMENT
STRAP
THROTTLE CONTROL
RECOIL START
HANDLE
MOWER BLADE
CLUTCH LEVER
MOWER BLADE CLUTCH LEVER - Starts and stops
mower blade rotation.
THROTTLE CONTROL - Controlsengine speed, engine
shut-off.
SHUT OFF CONTROL - Used toshut off mower engine
from tractor seat.
HEIGHT ADJUSTMENT LIFT LEVER - Raise and lower
mowerto diffe.._nt_,J*,tlngheights.
TOW HIT_ R
OFFSET TOW BAR
ADJUSTMENT HEIGHT
ADJUSTMENT
FIG. 2
HEIGHT ADJUSTMENT STRAP - Controlscutting
height.
TOW BAR HEIGHT ADJUSTMENT - To level mower
frontto rear.
RECOIL START HANDLE - Usedtostartengine.
TOW HITCH OFFSET ADJUSTMENT - To adjust
mower deck offset from tractorcenter.
10 CHOKE CONTROL - Opens and closeschoke.
CHILDREN
Tragic accidents can Occur if the operator is not alert to the presence of children.
Children are often attracted to the machine and the mowing activity. Never
assume that children will remain where you last saw them.
The operation of any mower can result in foreign objects being thrown into the ayes,
which can result In severe eye damagel Always wear safety glasses or eye shields
before starting your mower and while mowing. We recommend wide vision safety mask
for over the spectacles or standard safety glasses,
HOW ToUSE YOUR MOWER
STOPPING
• Move blade clutch lever to Off position.
• Move engine shut off switch to Off position.
• Move engine throttle to Stop position.
STARTING
• Move engine shutoff switch to On position.
• Move engine throttleto Ful!position.
• Move choke to full
• Move blade clutchlever to Off position.
• Pull startrope.
• Move engine choke to Off positionafter engine
starts.
USING
• Sit ontractorseat.
• Raiseblade clutchlever to Engage position.
• Operatetractorat mediumgroundspeed, 3-4 MPH.
• Referto Safety Rules onpage 3 regardingoperation
of mower onslopes.
TRANSPORTING
• Shutoff engine.
• Place mowerdeck in the highest positiondirectly
behindtractor.
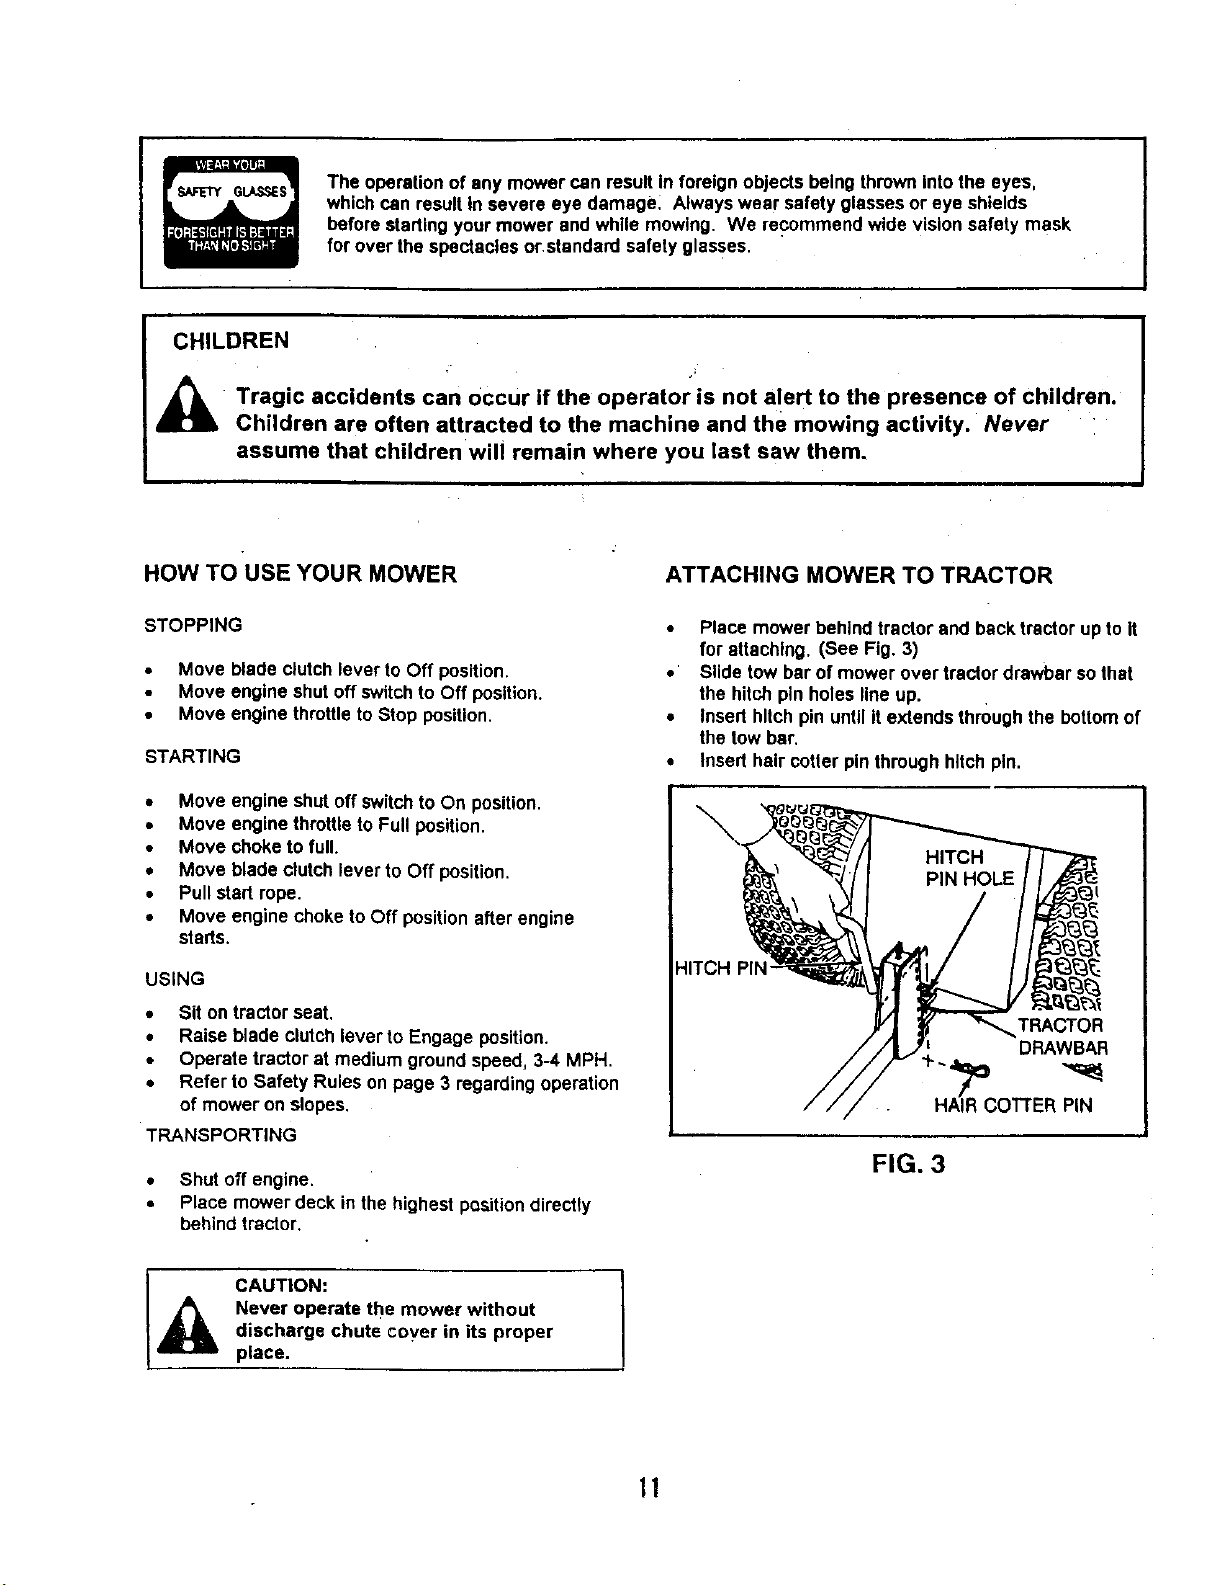
ATTACHING MOWER TO TRACTOR
• Place mowerbehindtractor and back tractorupto it
for attaching. (See Fig. 3)
• Slide tow bar of mower over tractordrawbar so that
the hitchpinholes lineup.
• Inserthitch pin untilit extends throughthe bottomof
the tow bar.
• Inserthair cofter pinthroughhitch pin.
HITCH PIN"
TRACTOR
DRAWBA.R
FIG. 3
CAUTION:
Never operate the mower without
discharge chute coyer in its proper
place.
I
11
 Loading...