

Craftsman 480.991170 Operator's Manual

OPERATOR’S MANUAL
HOURS: Mon. - Fri. 8 a.m. to 5 p.m. (CT)
ADVERTENCIA
* This pressure washer is rated in accordance to the Pressure Washer Manufacturers Association
(PWMA) standard PW101-2010 (Testing and Rating Performance of Pressure Washers).
* Esta limpiadora a presión está clasificada conforme a la norma PW101-2010 (comprobación y clasificación de rendimiento de limpiadoras
a presión) de la Asociación de fabricantes de bombas a presión (Pressure Washer Manufacturers Association, PWMA).
Sears Brands Management Corporation, Hoffman Estates, IL 60179 U.S.A.
Visit our Craftsman website: www.craftsman.com
Part No. 71-99117 Rev. - (19/12/2016)
• Safety
• Assembly
• Operation
• Maintenance
• Parts
• Español, p. 17
WARNING
Before using this product, read this
manual and follow all Safety Rules
and Operating Instructions.
Antes de utilizar el producto, lea este
manual y siga todas las Reglas de
Seguridad e Instrucciones de Uso.
2050 PSI @ 1.4 GPM
ELECTRIC 2-IN-1 PRESSURE WASHER
MODEL NO. 480.991170
PRESSURE WASHER
CUSTOMER HELPLINE
1-866-235-5112
93988-LN
93988 Craftsman 2-n-1 Pressure Washer119.indb 1 17/11/13 下午4:05

TABLE OF CONTENTS
WARRANTY
WARRANTY
SPECIFICATIONS
SAFETY RULES
PACKAGE CONTENTS
ASSEMBLY
OPERATION
.........................................................
....................................................
....................................................
.......................................................
...................................................
...............................................
3-4
6-9
10-12
2
2
5
MAINTENANCE
STORAGE
PUMP SAVER
TROUBLESHOOTING
REPLACEMENT PARTS
ESPAÑOL
.....................................................
..........................................................
.......................................................
......................................................
................................................
.............................................
12
13
13
14
15
17-32
CRAFTSMAN LIMITED WARRANTY
FOR ONE YEAR from the date of sale this product is warranted against defects in material or workmanship.
WITH PROOF OF SALE a defective product will be replaced free of charge.
For warranty coverage details to obtain free replacement, visit the web page: www.craftsman.com/warranty
This warranty does not cover spray guns, hoses, nozzle extensions, spray tips or filters, which are expendable parts that can wear out
from normal use within the warranty period.
This warranty is void if this product is ever used while providing commercial services or if rented to another person.
This warranty gives you specific legal rights, and you may also have other rights which vary from state to state.
Sears Brands Management Corporation, Hoffman Estates, IL 60179
SPECIFICATIONS
PRODUCT SPECIFICATIONS
Pressure Washer Specifications
Max Outlet Pressure
Max Flow Rate ............................................................ 1.4 GPM
Detergent Mix . . . . . . . . . . . . . . . . . ........See MFR’s Instructions
Water Supply Temperature . . . . .......................Cold Water Only
..................................
2050 PSI
Motor . . . . . . . . . . . . . . . . . . . . . . . . . Universal (brush) Type
Rated Voltage . . . . . . . . . . . . . . . . . . . . . . . . . . .120 Volts AC
Current . . . . . . . . . . . . . . . . . . . . . . . . . . . . . . . . . 13 Amps
WARNING: This product can expose you to chemicals including lead, which is known to the State of California to cause cancer and
birth defects or other reproductive harm. For more information, go to www.P65Warnings.ca.gov. Wash hands after handling.
2
93988 Craftsman 2-n-1 Pressure Washer119.indb 2 17/11/13 下午4:05
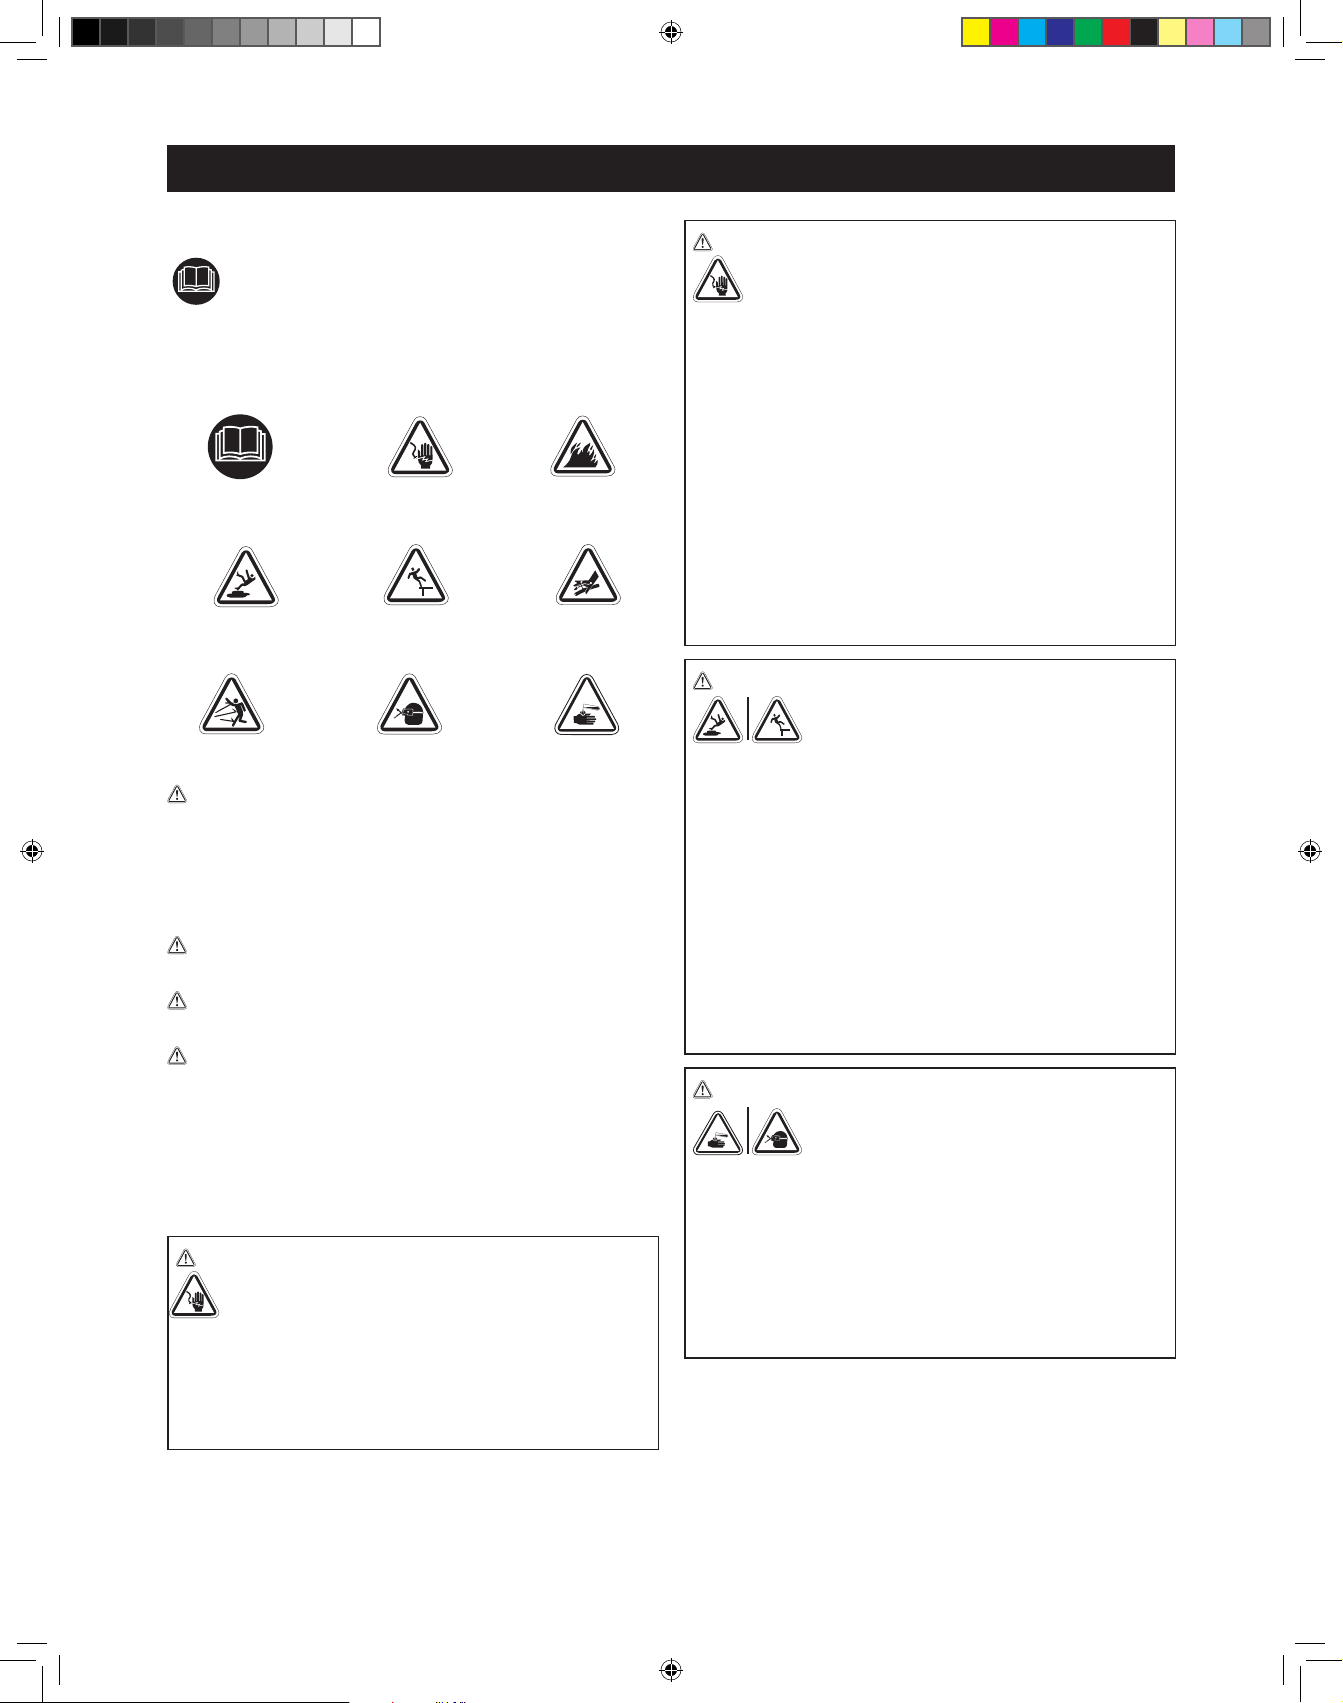
SAFETY RULES
Chemical Burn
Electrical Shock
Slippery Surface Fall
Flying Objects
Read Manual
Projectile
Fluid Injection
Fire
SAVE THESE INSTRUCTIONS
Read this manual carefully and become familiar with
your pressure washer. Know its applications, its
limitations, and any hazards involved.
Important Safety Information
Safety Symbols and Meanings
The safety alert symbol indicates a potential personal injury
hazard. A signal word (DANGER, WARNING, or CAUTION) is used
with the alert symbol to designate a degree or level of hazard
seriousness. A safety symbol maybe used to represent the type of
hazard. The signal word NOTICE is used to address practices not
related to personal injury.
DANGER indicates a hazard which, if not avoided, will result in
death or serious injury.
WARNING indicates a hazard which, if not avoided, could
result in death or serious injury.
CAUTION indicates a hazard which, if not avoided, could result
in minor or moderate injury.
NOTICE address practices not related to personal injury.
For Servicing of a Double-Insulated Appliance, See
Assembly Section.
WARNING Risk of electrocution. Use of an extension
cord could cause electric shock or burn resulting in
death or serious injury.
• DO NOT use an extension cord with this electric pressure
washer. Your home’s electrical circuit receptacle or
extension cord may not provide lifesaving ground-fault
circuit-interruption protection.
WARNING Risk of electrocution. Contacting both power
conductors, at the same time could cause electric
shock or burn resulting in death or serious injury.
• Inspect cord before each use, DO NOT use if cord is
damaged.
• The product is equipped with a ground fault circuit interrupter
(GFCI) built into the power cord plug. If replacement of the
plug or cord is required, use only identical replacement parts.
• Keep all connections dry and off the ground.
• DO NOT touch plug with wet hands.
• DO NOT run cord through doorways, windows, holes in
ceilings, walls, or floors.
• DO NOT walk on cord.
• DO NOT drive over, drag or place objects over cord.
• DO NOT spray near power source.
WARNING Use of electric pressure washer could create
puddles and slippery surfaces. Risk of
kickback. Spray gun could kickback
causing you to fall resulting in death or serious injury.
• Operate the electric pressure washer from a stable surface.
• Do not overreach or stand on unstable support. Keep good
footing and balance at all times.
• The cleaning area should have adequate slopes and drainage
to reduce the possibility of a fall due to slippery surfaces.
• Be extremely careful if you must use the electric pressure
washer from a ladder, scaffolding, or any other similar
location.
• Firmly grasp spray gun with both hands when using power
spray
WARNING Chemical Burn Hazard.
Chemicals could cause burns resulting in
death or serious injury.
• Always wear indirect vented (chemical splash) safety goggles
marked to comply with ANSI Z87.1 when using chemicals.
• DO NOT substitute safety glasses or dry-condition goggles
for indirect vented safety goggles.
• DO NOT use caustic liquid with electric pressure washer.
• Use ONLY pressure washer safe detergents/soaps.
Follow all manufacturers instructions.
3
93988 Craftsman 2-n-1 Pressure Washer119.indb 3 17/11/13 下午4:05
SAFETY RULES
WARNING Risk of eye or bodily injury. Spray could splash
back, propel objects or cause internal harm
resulting in serious injury.
• Always wear indirect vented (chemical splash) safety goggles
marked to comply with ANSI Z87.1 when using or in vicinity
of this equipment. NEVER substitute safety glasses or
dry-condition goggles for indirect vented safety goggles.
• Know how to stop the pressure washer and bleed pressure
quickly. Be thoroughly familiar with the controls.
• DO NOT allow CHILDREN to operate the electric pressure
washer.
• Keep operating area clear of all persons.
• Inspect high pressure hose before each use. NEVER repair
high pressure hose; replace it.
• DO NOT repair leaking connections with sealant of any kind;
replace o-rings and gaskets.
• Keep hose connected to electric pressure washer and spray
gun while system is pressurized.
• ALWAYS point spray gun in safe direction while system is
pressurized and squeeze spray gun trigger to release high
pressure, every time you turn off the unit.
• DO NOT aim spray gun at people or animals.
• DO NOT drink from hose connected accessories.
• DO NOT secure spray gun in open position.
• DO NOT leave spray gun unattended while the electric
pressure washer is in ON (I) position.
• DO NOT use a spray gun which does not have a trigger lock
or trigger guard in place and in working order.
• Always be certain spray gun and accessories are correctly
attached.
• Stay alert – watch what you are doing.
• DO NOT operate the product when fatigued or under the
influence of alcohol or drugs.
• Close supervision is necessary when this product is used
near children.
WARNING The high pressure stream of water that this
equipment produces could cut through skin
and its underlying tissues, resulting in serious injury
and possible amputation.
Spray gun traps high water pressure, even when motor is
stopped and water is disconnected, which could result in
serious injury.
• NEVER aim spray gun at people, animals, or plants.
• ALWAYS point spray gun in safe direction, squeeze spray
gun trigger to release high pressure, every time you turn off
pressure washer.
WARNING Risk of fire. Spraying flammable liquids
could result in death or serious injury.
• DO NOT spray flammable liquids.
WARNING Risk of fire. Overheated cord could result in
death or serious injury.
• Uncoil cord completely prior to use.
• DO NOT cover cord with any material.
WARNING This product contains lead and lead compounds,
known to the State of California to cause birth defects or other
reproductive harm. Wash your hands after handling this product.
NOTICE High pressure spray could damage fragile items
including glass.
• DO NOT point spray gun at glass when using turbo spray tip.
• NEVER aim spray gun at plants.
NOTICE Improper treatment of electric pressure washer could
damage it and shorten its life.
• If you have questions about intended use, ask dealer or contact
authorized service center.
• DO NOT operate units with broken or missing parts, or without
protective housing or covers.
• DO NOT by-pass any safety device on the electric pressure
washer.
• DO NOT modify the electric pressure washer in any way.
• Before starting the electric pressure washer in cold weather,
check all parts of the equipment to be sure ice has not formed
there.
• DO NOT move the electric pressure washer by pulling on hoses.
Move unit using the transport handle supplied.
• This equipment is designed to be used only with Craftsman
original and replacement parts. If other parts are used the user
assumes all risks and liabilities.
4
93988 Craftsman 2-n-1 Pressure Washer119.indb 4 17/11/13 下午4:05
KNOW YOUR PRESSURE WASHER
Read the Operator’s Manual and safety rules before operating your pressure washer.
Compare the illustrations with your pressure washer to familiarize yourself with the locations of various controls and
adjustments. Save this manual for future reference.
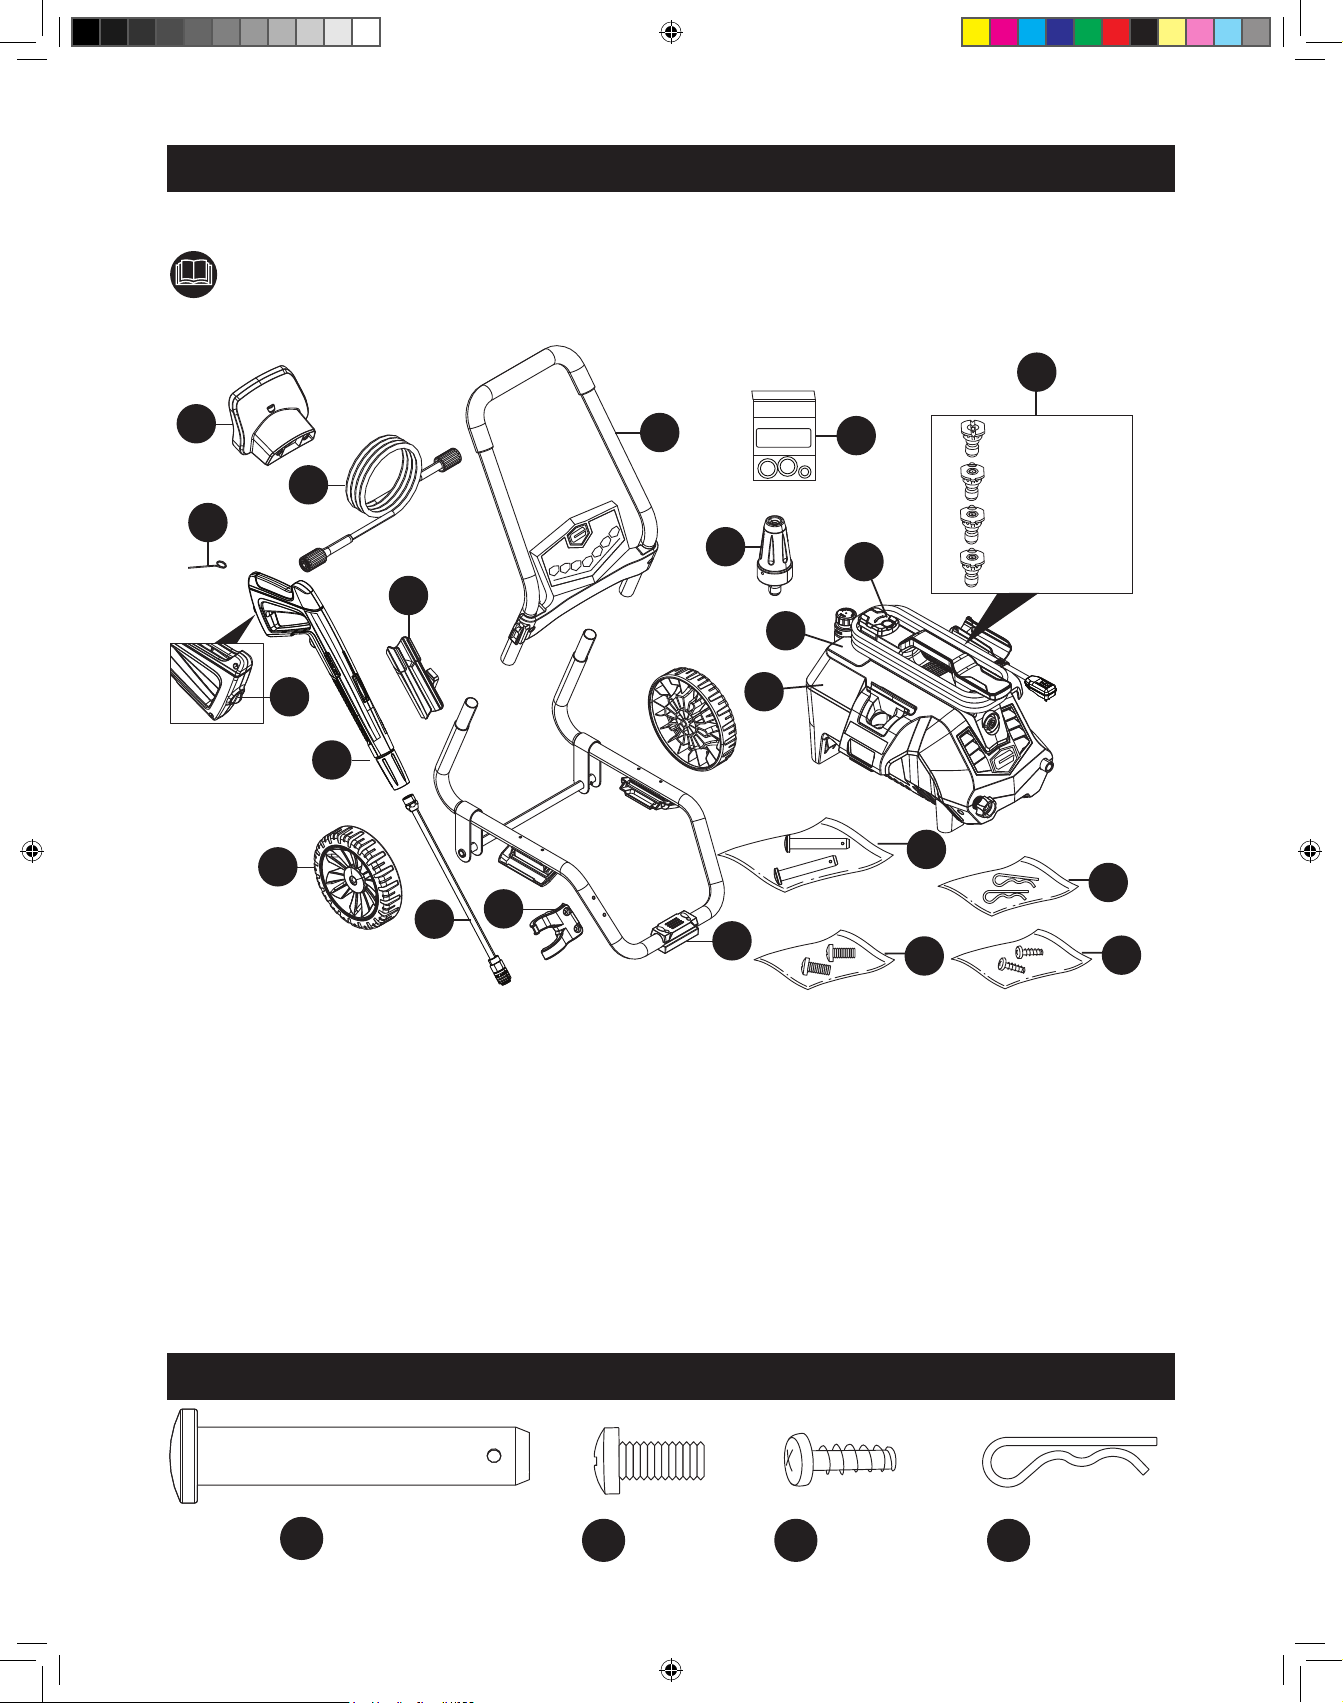
PACKAGE CONTENTS
E*
A
N
O
MAX
PSI
2050
B
MAX
GPM
1.4
PW909383SS
C
*
D
Q
Soap – Black
0° – Red
15° – Yellow
25° – Green
M
P
L
F
K
AA
J
*
I
H
G
BB
DD
CC
A - Hose Holder
B - Handle
*C - Turbo Nozzle
D - O-Ring Replacement Kit
*E - Quick Connect Nozzles
F - Power Washer Unit
G - Lower Frame
H - Nozzle Holder
* Packaged on the power washer unit.
Axle Pins
AA
Qty. 2
*I - Extension Lance
J - Wheels
K - Spray Gun
L - Spray Gun Trigger Lock
M - Spray Gun Holster
N - Soft PVC Hose
O - Nozzle Cleaning Wire
P - Detergent Tank
HARDWARE CONTENTS
Screws
BB
Qty. 2
5
CC
Q - Cord Hook
AA - Axle Pins
BB - Screws
CC - Screws
DD - Cotter Pins
Screws
Qty. 2
Cotter Pins
DD
Qty. 2
93988 Craftsman 2-n-1 Pressure Washer119.indb 5 17/11/13 下午4:05
ASSEMBLY
2
1
2
1
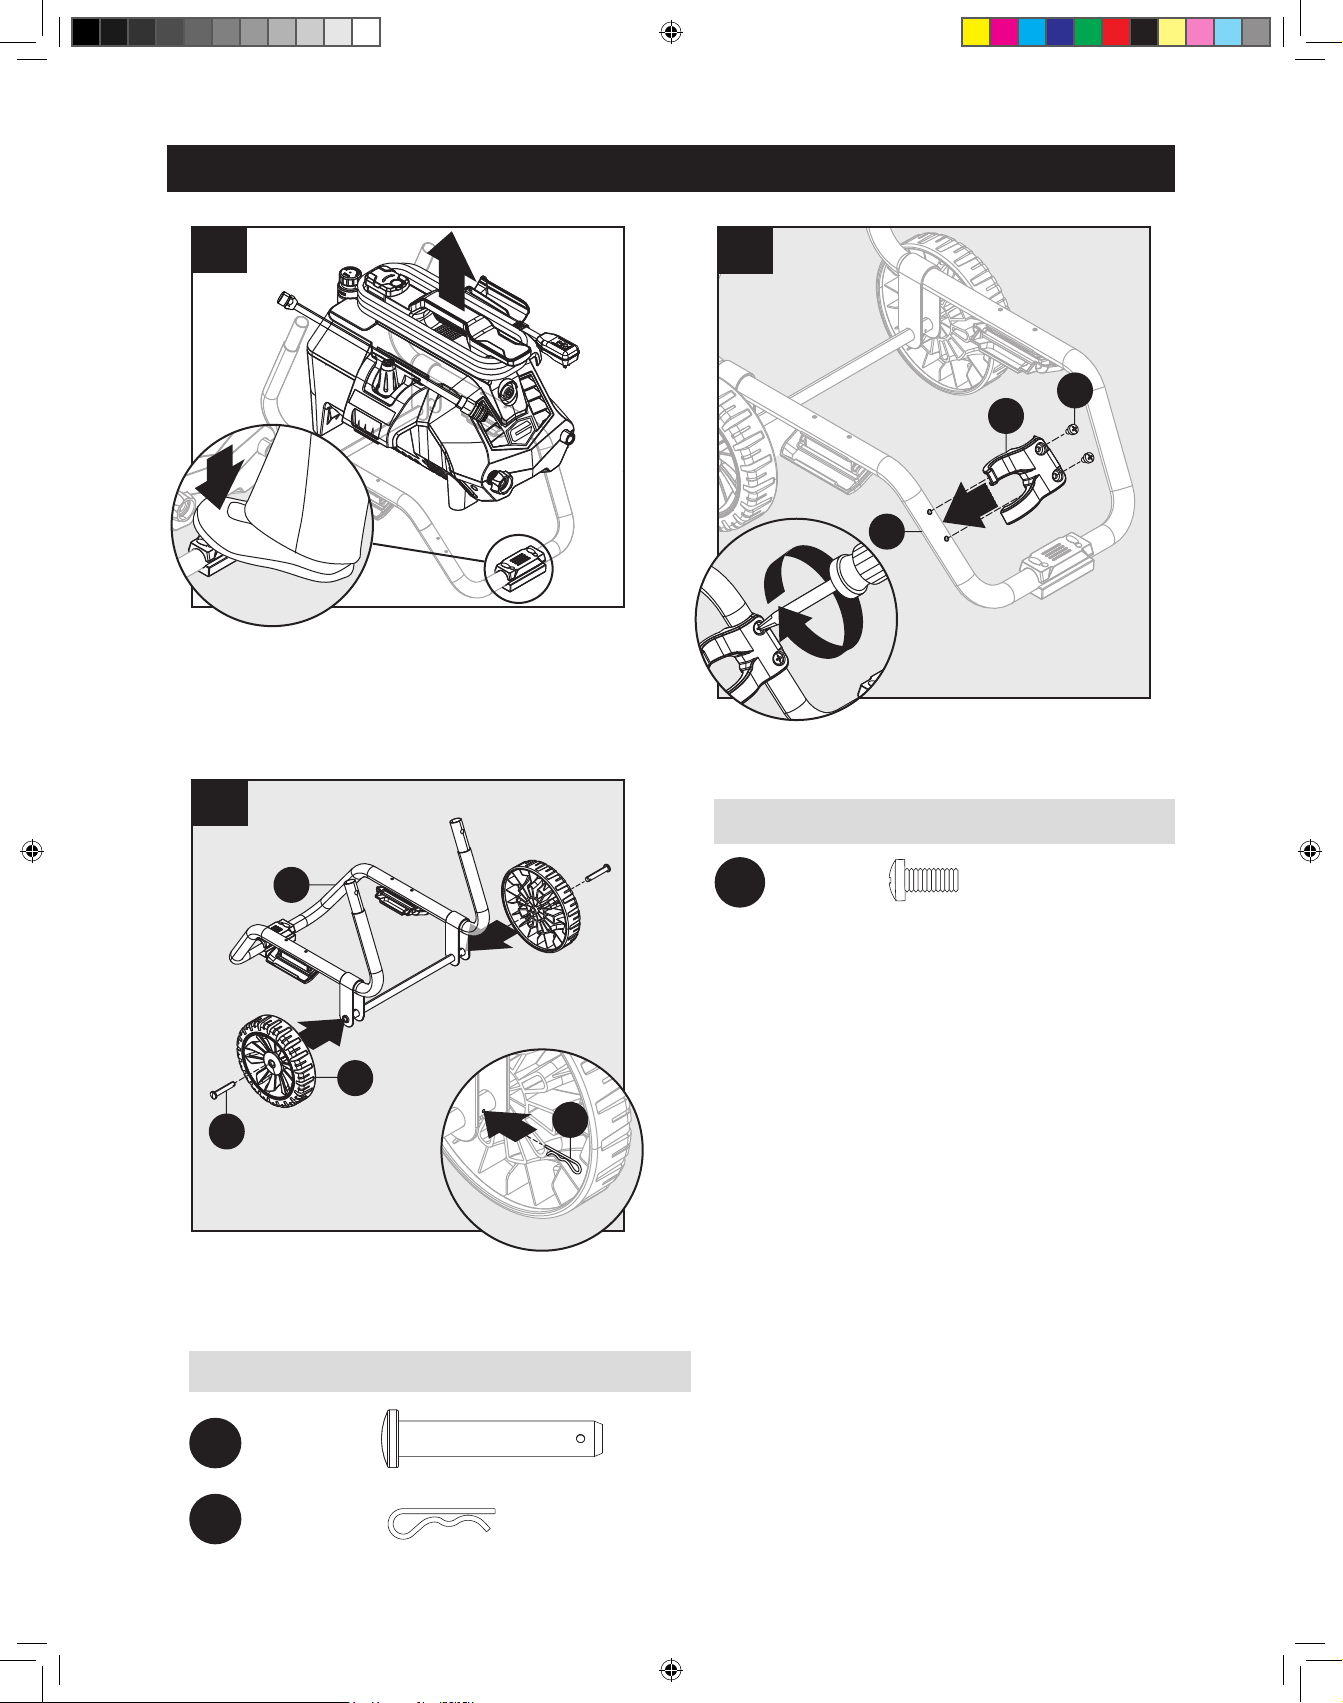
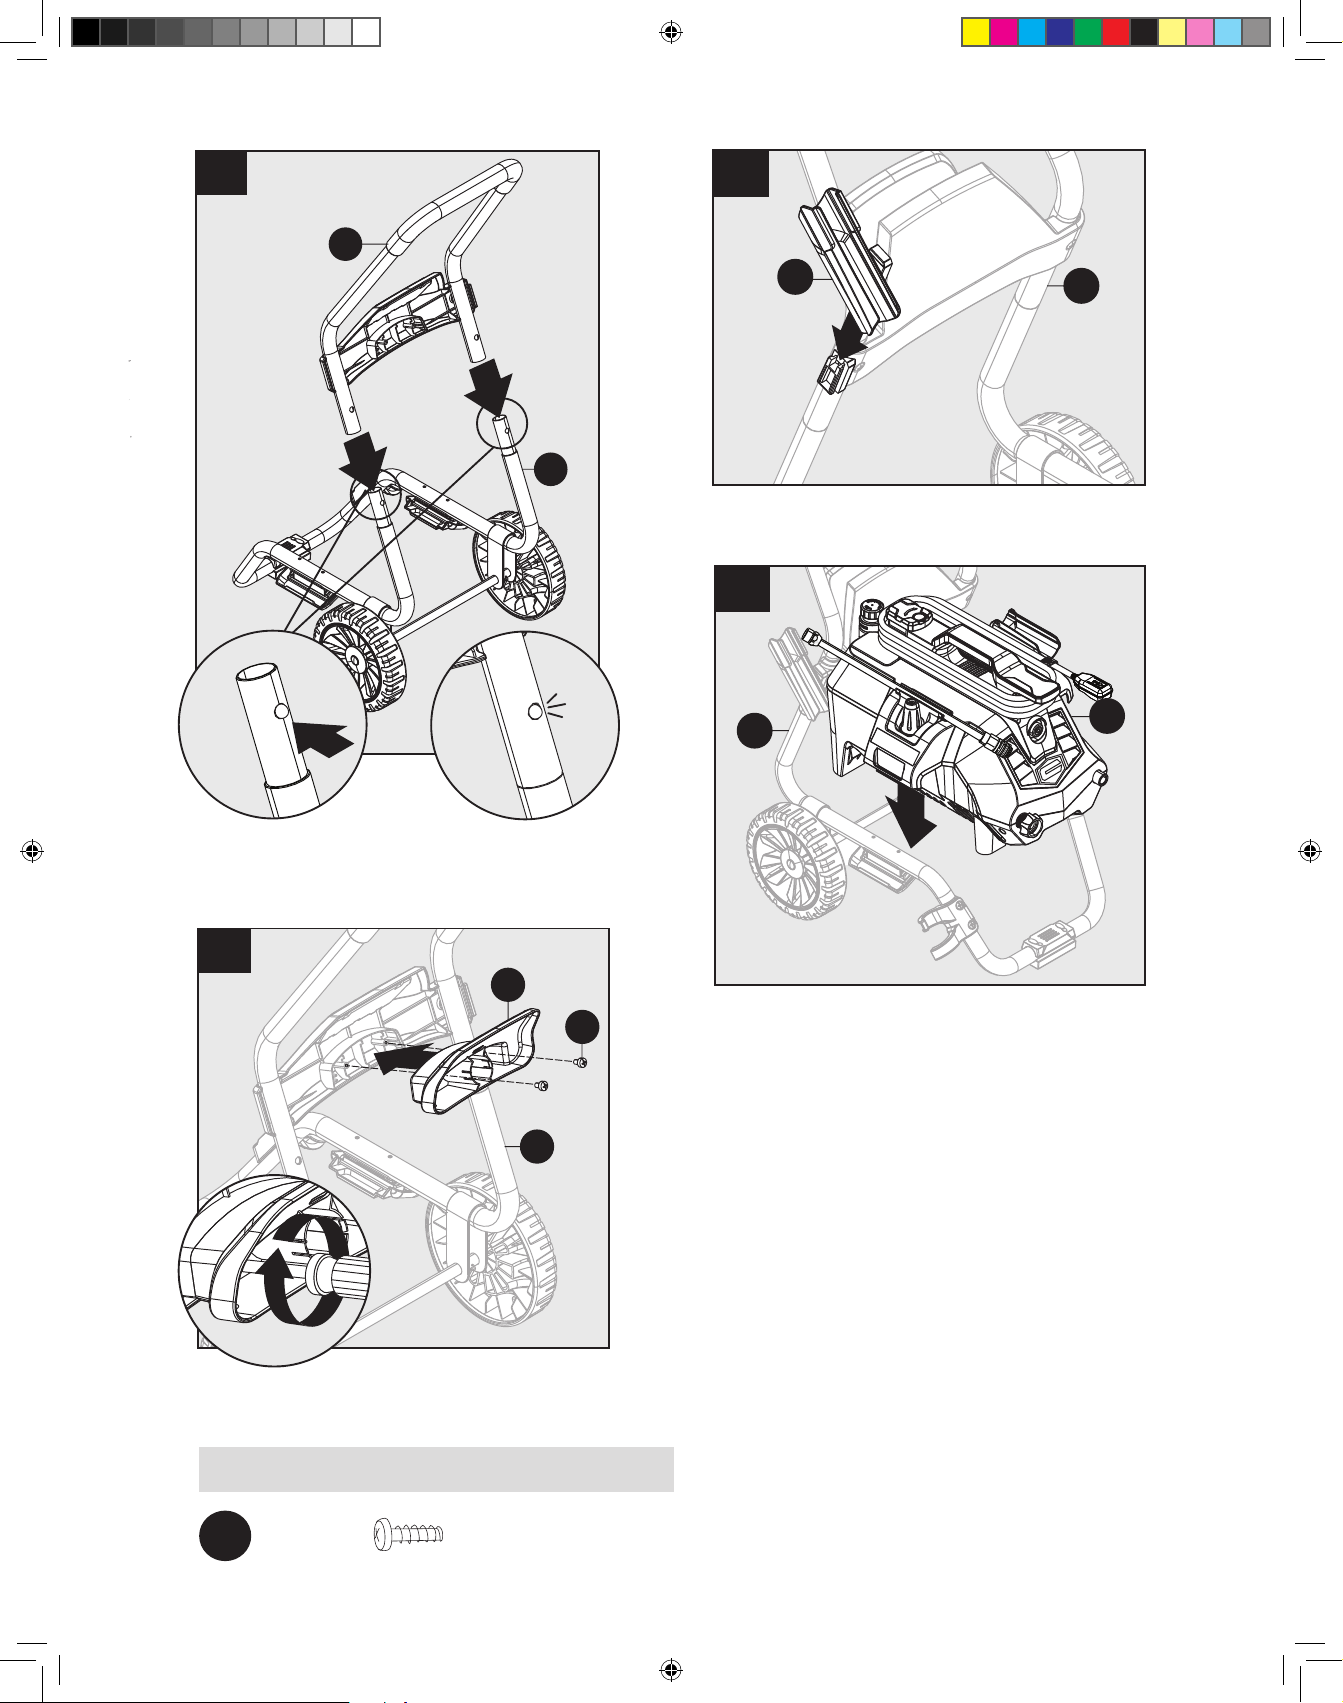
Remove Power Washer from Frame
Place a foot on the pad at the front of the lower frame (G) and
then lift the power washer unit (F) off the frame. Set pressure
washer (F) to the side.
2
3
BB
H
1
G
2
Secure nozzle holder (H) to lower frame (G). Secure with two
screws (BB).
Hardware Used:
G
1
1
J
AA
Install axle pins (AA), and wheels (J) to lower frame (G).
Secure with cotter pins (DD).
DD
Hardware Used:
Axle Pins
AA
x 2
CC
Screws
x 2
DD
Cotter Pins
93988 Craftsman 2-n-1 Pressure Washer119.indb 6 17/11/13 下午4:05
x 2
6
4
2
B
6
M
2
B
2
G
3
1
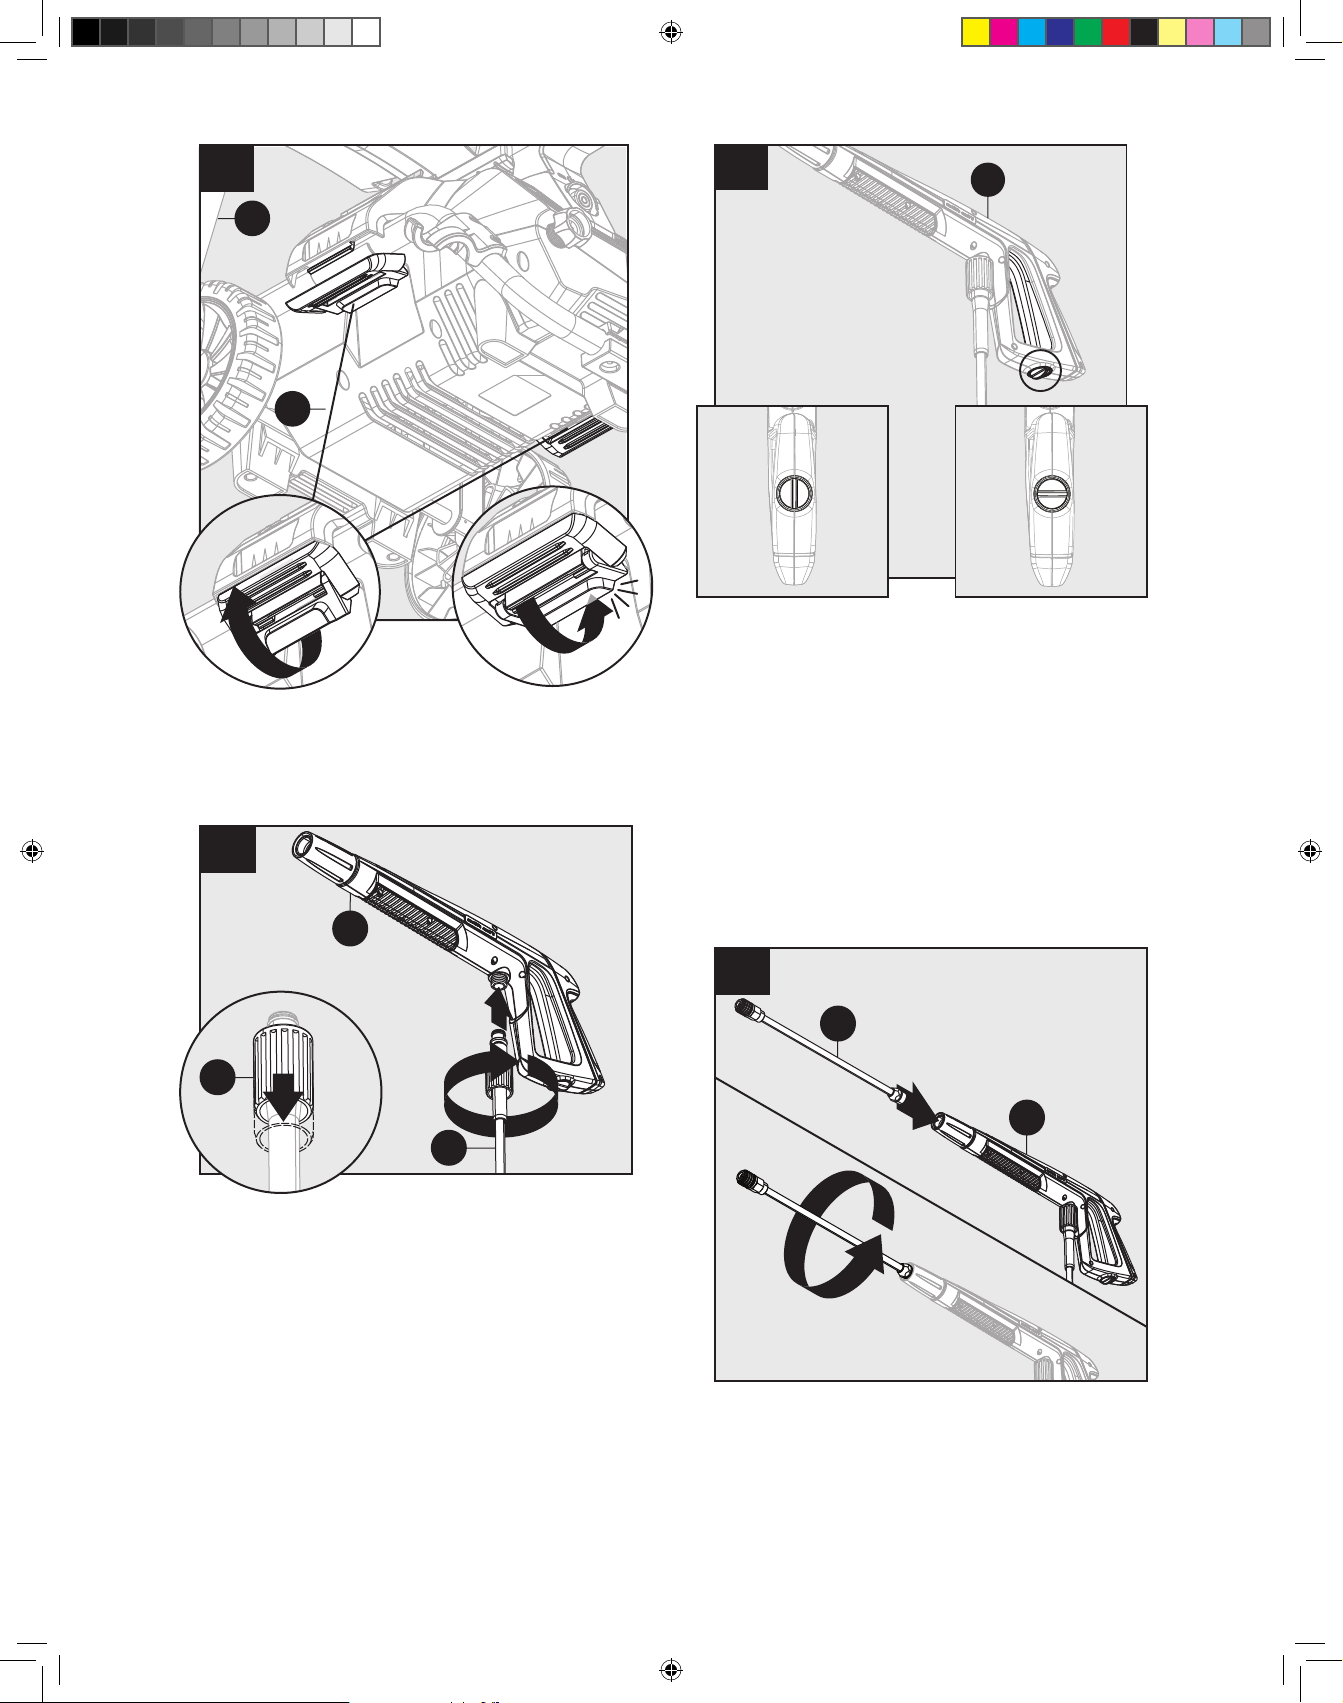
Press buttons on lower frame (G) extensions and install
handle (B). Lower frame extensions will click when handle is in
proper position.
5
A
CC
1
Slide spray gun holster (M) into place on the upper handle (B).
7
G
Place power washer unit (F) into position on the lower
frame (G).
F
B
Install hose holder (A) onto back side of upper handle (B). Secure
with two screws (CC).
Hardware Used:
CC
Screws
93988 Craftsman 2-n-1 Pressure Washer119.indb 7 17/11/13 下午4:05
x 2
7
8
G
F
1
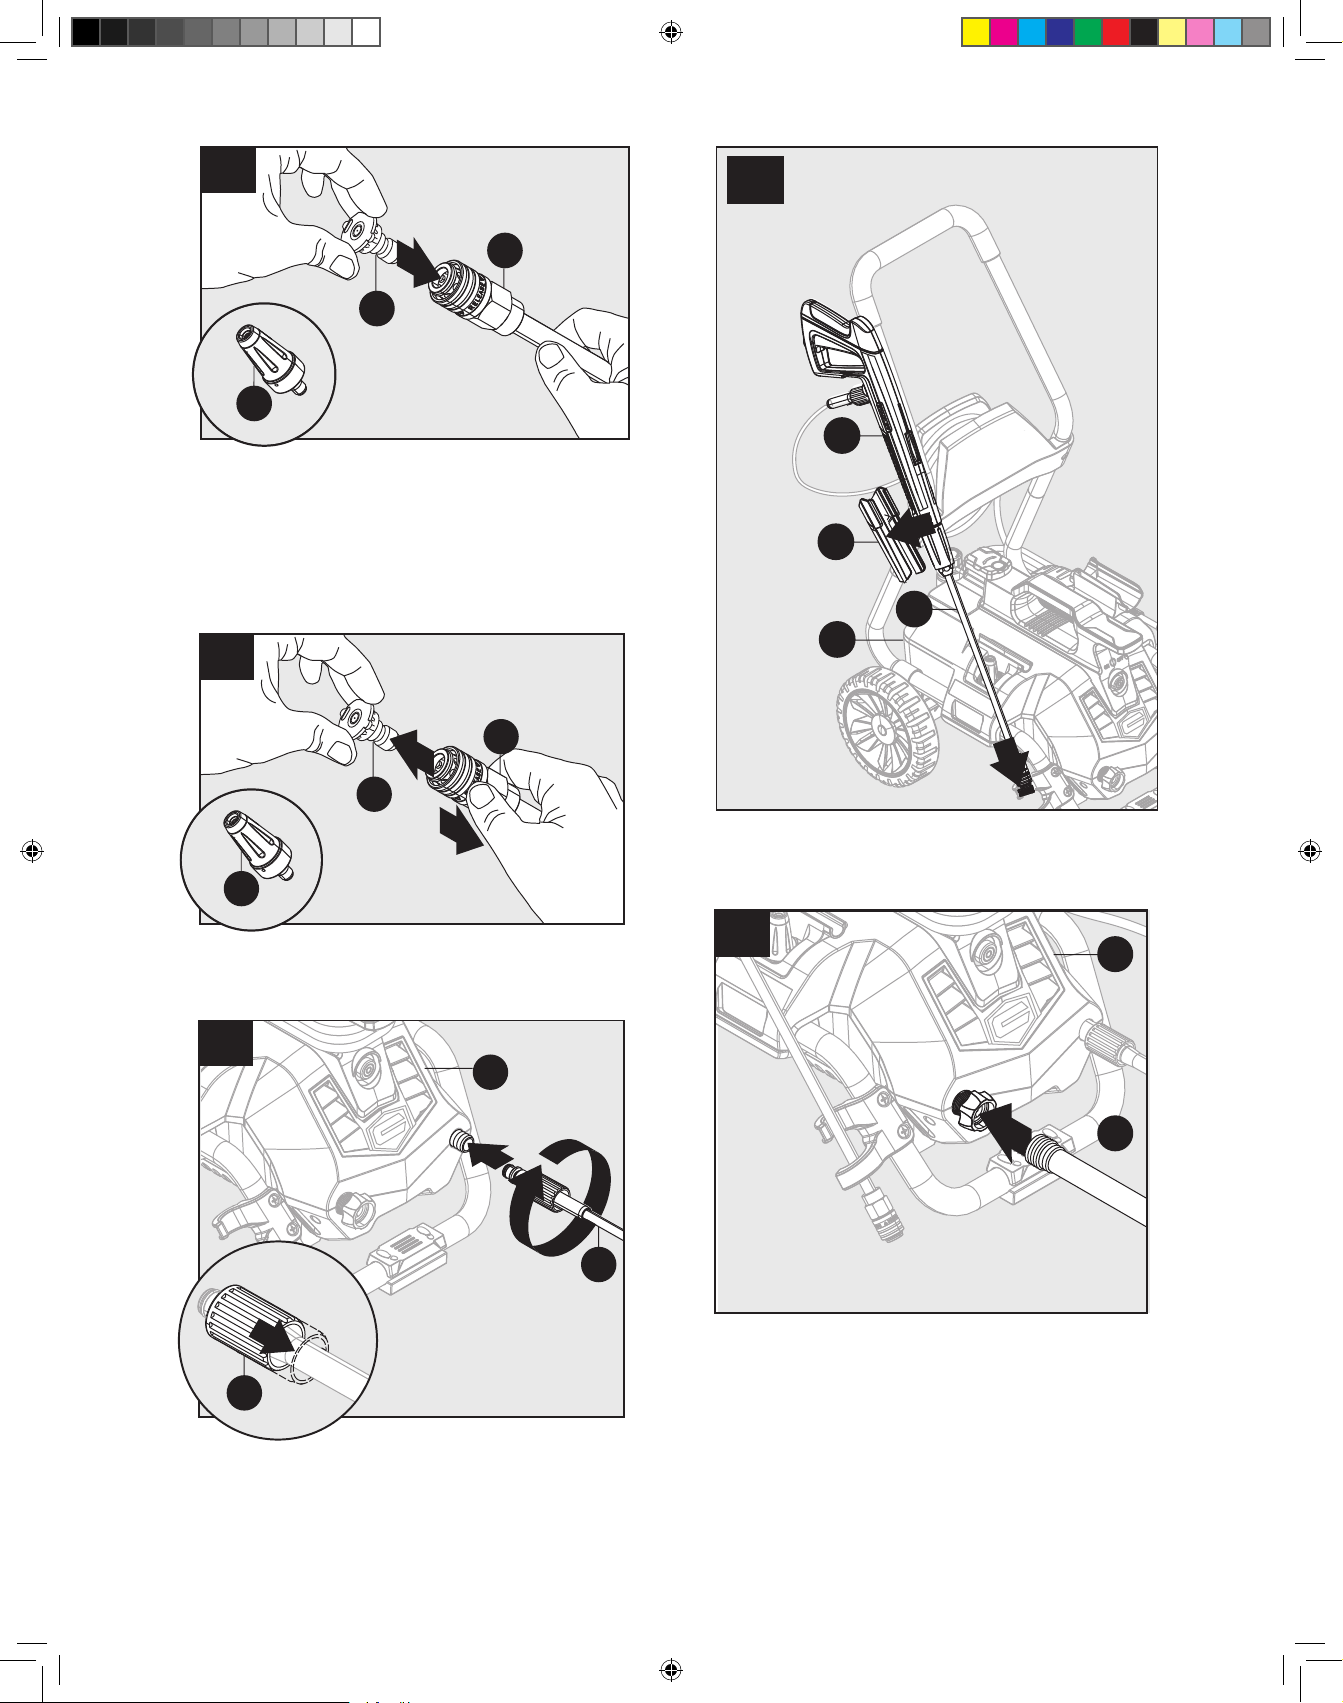
Pull latches located on sides of lower frame (G) up and over
the hooks located on sides of power washer unit (F) as shown
(1). Push latches down to secure washer unit (F) to frame (G)
as shown (2).
2
10
K
1
Unlocked Locked
Locking Spray Gun (before Lance installation)
To lock trigger of spray gun (K), point gun away from you and
turn dial to lock (either 3 or 9 o'clock position). Squeeze or
pull trigger to make sure it is locked. ALWAYS leave in locked
position when not in use. This ensures the gun is in "safe"
mode until it is ready for use. Turn dial to unlock (either 12 or
6 o'clock position) to release spray gun trigger.
9
K
2
N
1
Pull back on collar at one end of soft PVC hose (N). Push
firmly to connect hose to spray gun (K). Twist collar to secure.
Confirm hose is locked into spray gun by slightly pulling on
them. The hose is now securely attached to spray gun.
2
N
NOTE: The trigger lock prevents trigger from being
accidentally engaged.
11
*I
1
2
While spray gun (K) is in the locked position, insert lance (*I)
into the end of spray gun by inserting and turning clockwise
until fully in place. To remove turn counterclockwise.
K
8
93988 Craftsman 2-n-1 Pressure Washer119.indb 8 17/11/13 下午4:05
12
*I
*E
*C
Attach nozzle (*E) and rotary nozzle (*C) into end of lance (*I)
by pressing selected nozzle into place. It will make a “click”
sound when firmly in place.
NOTE: Always push safety lock button to lock trigger when
changing lances and nozzles to ensure that they do not
accidentally eject with force during removal.
13
15
K
2
M
*I
F
2
*I
*E
1
*C
To remove nozzle (*E) and rotary nozzle (*C), pull back on
collar of lance (*I) and pull out nozzle.
14
F
2
3
N
1
Insert extension lance (*I) into nozzle holder (H), and press spray
gun (K) with extension lance (*I) into spray gun holster (M).
16
F
N
1
Attach a garden hose to built-in garden hose adapter. The
water is now connected to your power washer.
N
NOTE: Flush out garden hose before connecting to
garden hose adapter.
Pull back on collar at the other end of soft PVC hose (N).
Push firmly to connect hose. Twist collar to secure. Confirm
hose is locked into power washer unit by slightly pulling on
hose. The hose is now securely attached.
9
93988 Craftsman 2-n-1 Pressure Washer119.indb 9 17/11/13 下午4:05
OPERATION
HOW TO USE YOUR PRESSURE WASHER
How to Start Your Electric Pressure Washer
If you have any problems operating your pressure washer,
please call the pressure washer helpline at 1-866-235-5112.
• The Craftsman 2-IN-1 can be wheeled around, or carried by
hand. To wheel the pressure washer around, grab the handle
and tilt the frame back. Use the handle to wheel the pressure
washer to the desired location. For instructions on how to
remove the pressure washer from the frame for hand held use,
see instructions on the next page.
• Turn on water supply at the faucet.
• Make sure the power switch is off (light will be off).
• Unwind the power cord completely and plug into a grounded
120 volt outlet.
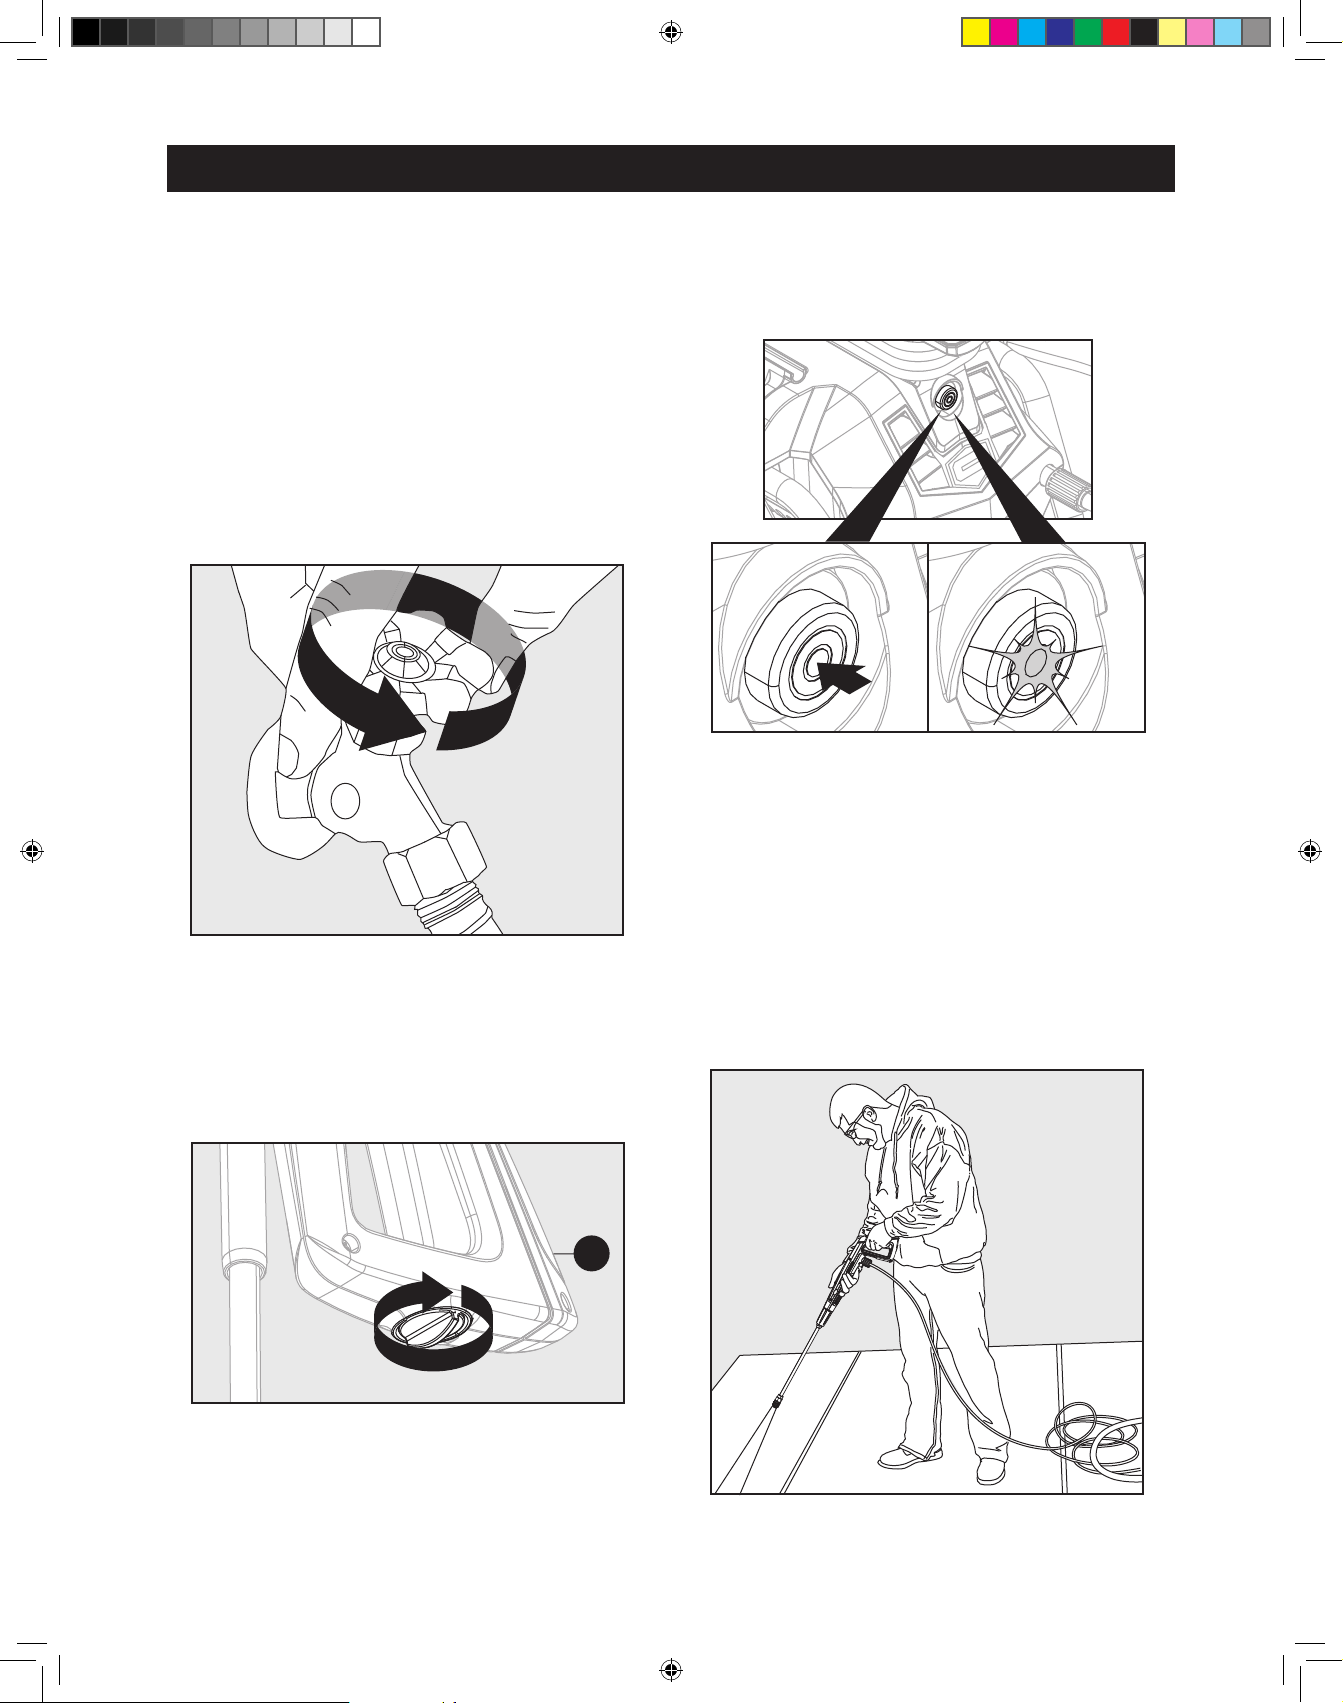
• Turn the safety lock button on the spray gun to unlocked. While
pointing the spray gun in a safe direction, squeeze the trigger
on the spray gun until there is a steady stream of water flowing
from the nozzle tip.
• To pressurize the flow of water, push the power button to turn
the unit on (red power light will turn on). The unit will turn on for
1 - 2 seconds and shut off. This is a normal function of the auto
start feature.
OFF ON
• Begin power washing by squeezing the trigger on the spray gun
all the way into the handle.
• Release the spray gun trigger to stop the power washer.
• Allow the motor to come to a complete stop before squeezing
the trigger again.
• Squeezing rapidly will cause the auto start feature to miss an
on/off cycle that may prevent it from turning on while squeezing
trigger after rapid squeezing. Use slow deliberate trigger pulls to
avoid such symptoms.
• Always test a small area to avoid chance of damaging the
surface.
lock
F
10
93988 Craftsman 2-n-1 Pressure Washer119.indb 10 17/11/13 下午4:05
 Loading...