

Page 1
Operator’s Manual
CRRFTSMRN
25CC/1.5 cu.in. 2-Cycle
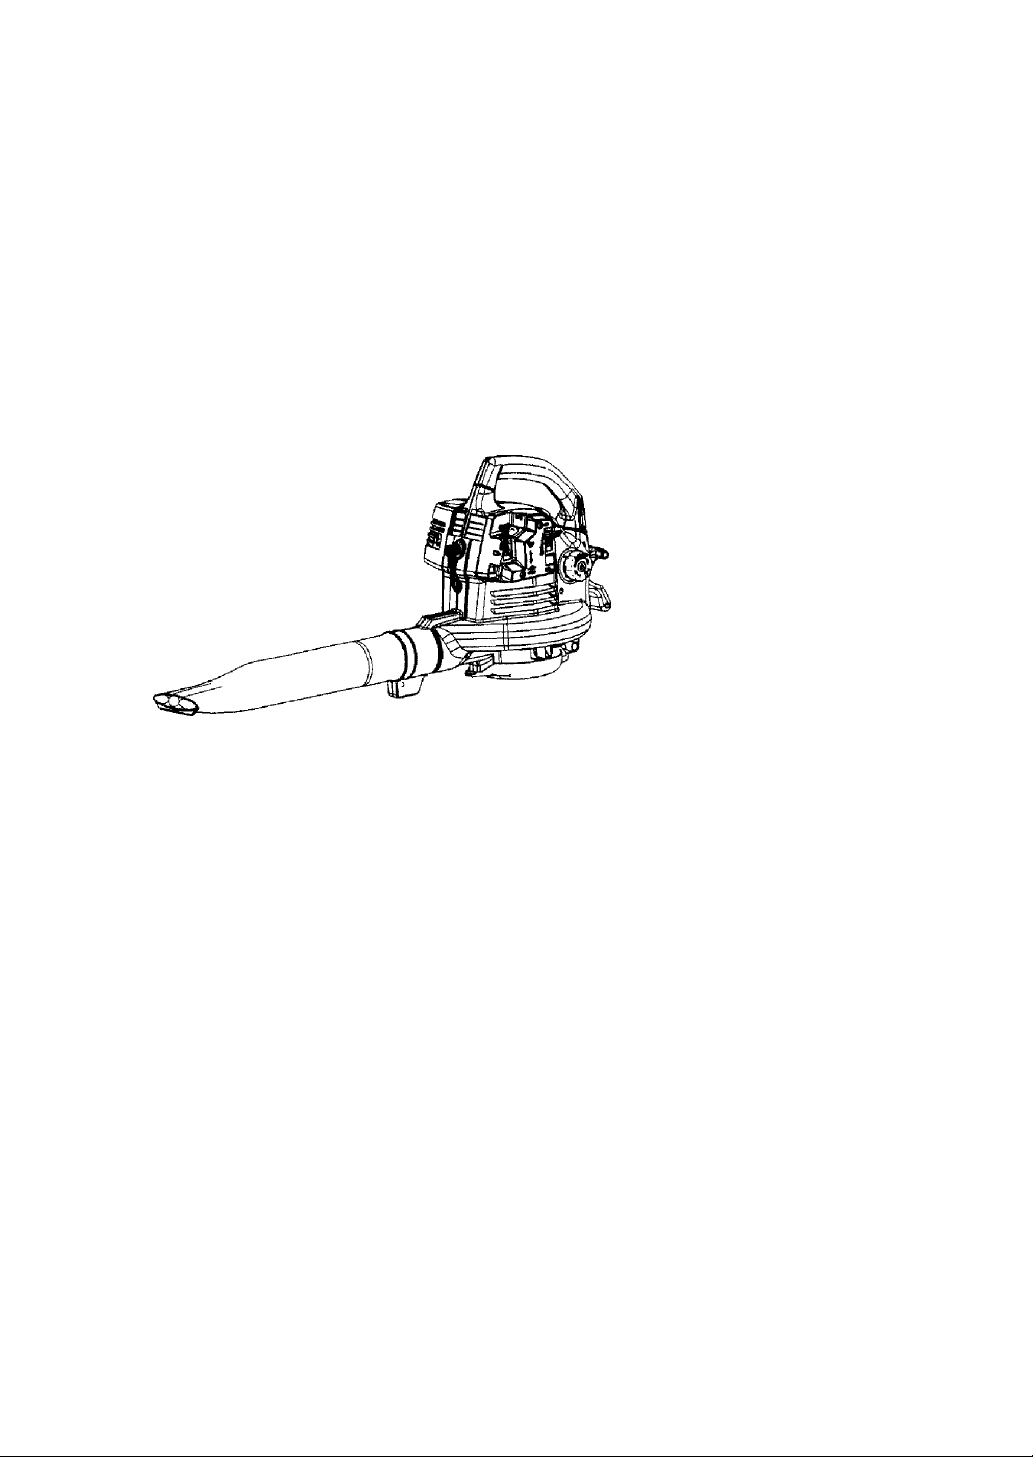
205 MPH/410 CFM
GASOLINE POWERED
BLOWERA^AC
Model No.
358.794964
• Safety
• Assembly
• Operation
• Maintenance
• Parts List
• Español, p. 19
WARNING:
Read and follow all Safety Rules and Operating
Instructions before first use of this product.
For answers to your questions about this product;
9
Call 7 am-7 pm, Mon.-Sat., or 10 am-7 pm. Sun.
1 ^00-235-5878 (Hours listed are Centra! Time)
Sears, Roebuck and Co., Hoffman Estates, IL 60179 U.S.A.
545133463 Rev. 2 7/6/07 BRW
Page 2
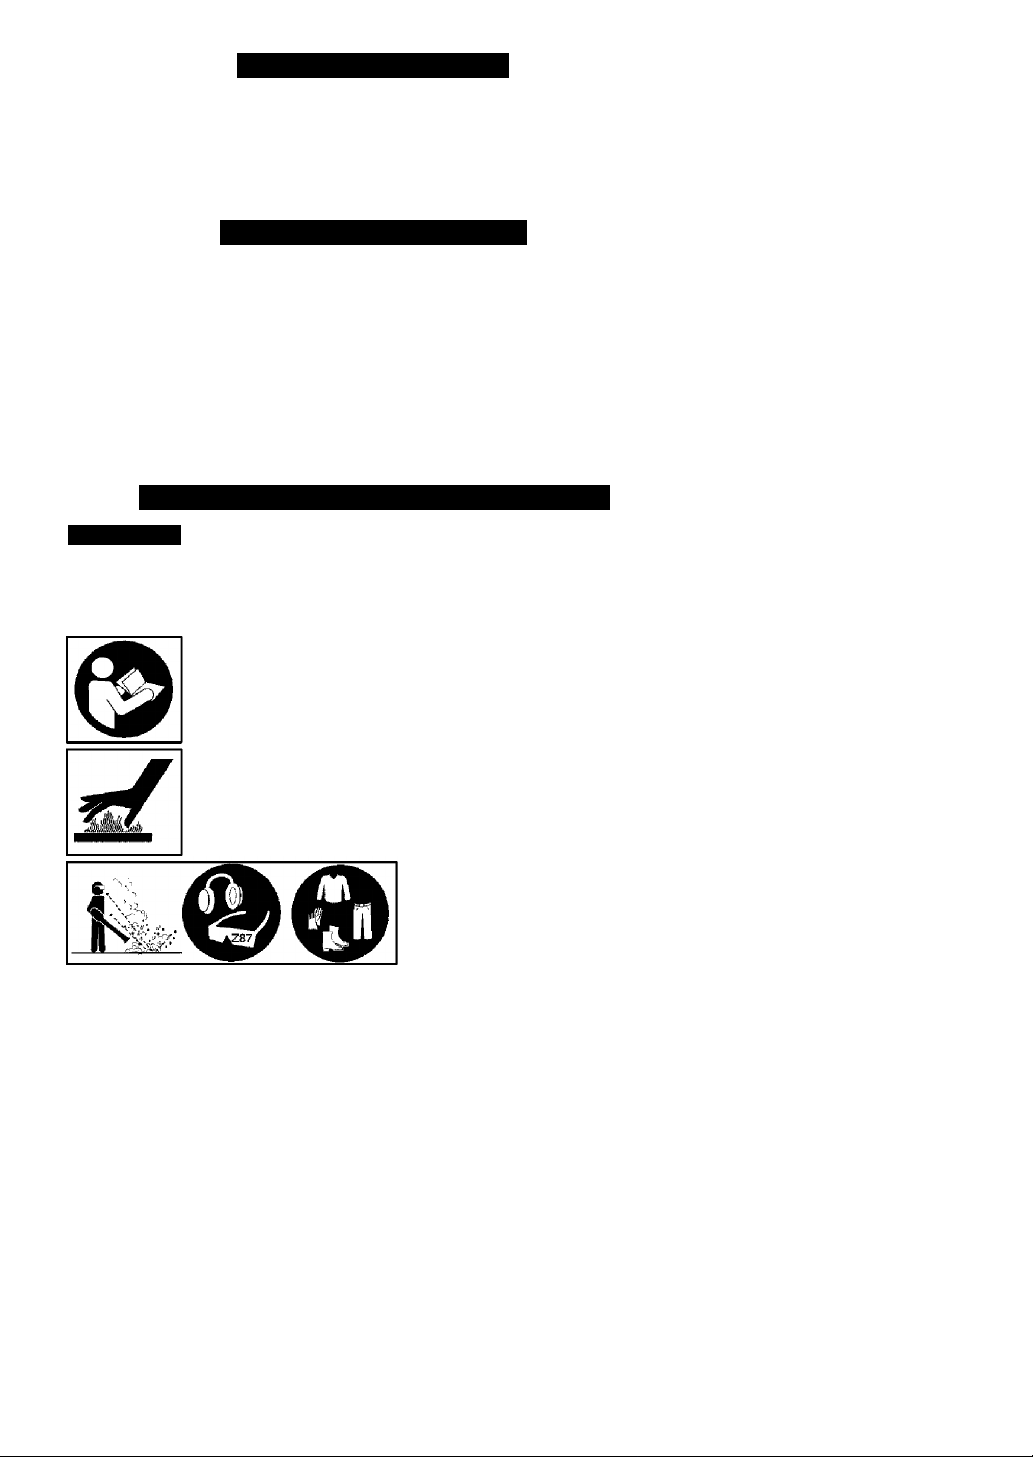
TABLE OF CONTENTS
Warranty Statement 2 Storage 12
Identification of Safety Symbols 2 Troubleshooting Table 13
Safety Rules 3 Emissions Statement 14
Assembly e Parts List 16
Operation 8 Spanish 19
Maintenance 11 Parts and Ordering Back Cover
WARRANTY STATEMENT
TWO YEAR FULL WARRANTY ON CRAFTSMAN® GAS BLOWER
When used and maintained according to the operator’s manuai, if this product faiis
due to a defect in material or workmanship within two (2) years from the date of pur
chase, return it to any Sears store, Sears Service Center, or other Craftsman outlet in
the United States for free repair (or replacement if repair proves impossible).
This warranty excludes spark plug and air cleaner, which are expendable parts
that can wear out from normal use In less than two years.
This warranty applies for only 30 days from the date of purchase if this product is
used for commercial or rental purposes.
This warranty gives you specific legal rights, and you may also have other rights
which vary from state to state.
Sears, Roebuck and Co., Hoffman Estates, !L 60179
IDENTIFICATION OF SAFETY SYMBOLS
AwARNING: This unit can be dangerous! Careless or
improper use can cause serious injury.
Read your operator’s manual carefully until you completely un
derstand and can follow all warnings and safety rules before
operating the unit. Failure to do so can result in serious injury
Save operator’s manual.
uWARNING: The muffler is very hot during and after use.
Do not touch the muffler, muffler guard, or surrounding sur
faces, or allow combustible material such as dry grass or fuel
to do so.
The blower can throw objects
violently. You can be blinded or
injured. Always wear hearing
protection and safety glasses
marked Z87. Always wear
heavy, long pants, long sleeves,
boots and gloves.
Page 3
IDENTIFICATION OF SAFETY SYMBOLS
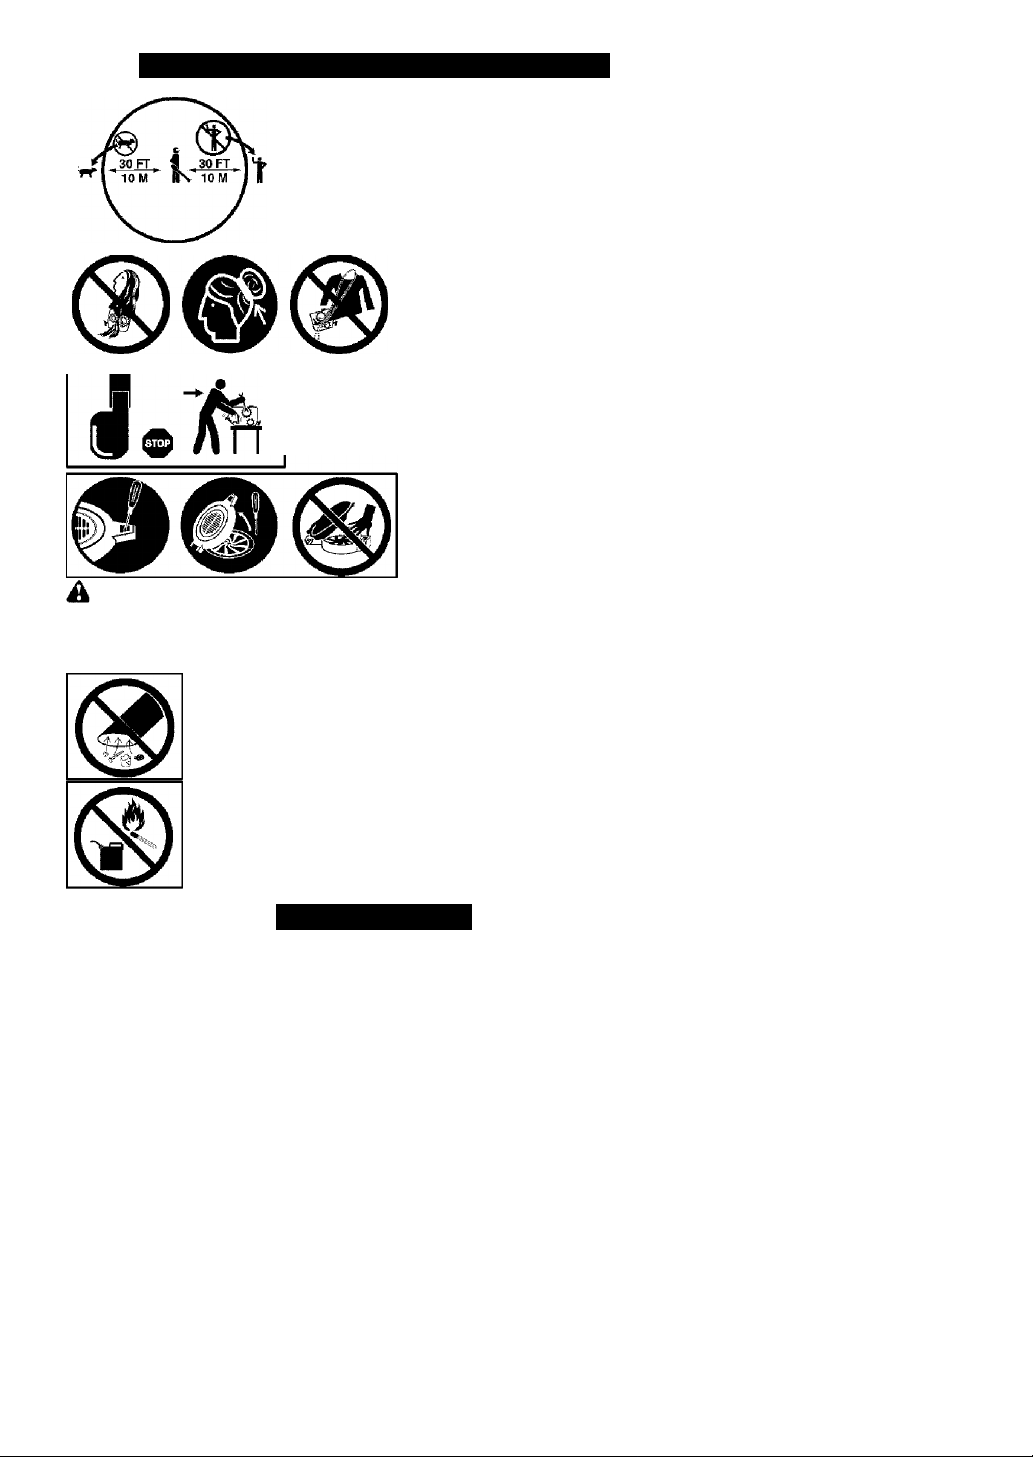
Hazard zone for thrown objects. Keep children,
bystanders, and animals away from work area a
minimum of 30 feet (10 meters) when starting or
operating unit. Do not point blower nozzle in the
direction of people or pets.
Secure hair above shoulder length.
Do not wear jewelry, loose clothing,
or clothing with loosing hanging
straps, ties, tassels, etc. They can
be caught In moving parts.
Always stop unit and disconnect spark plug
before cleaning or servicing.
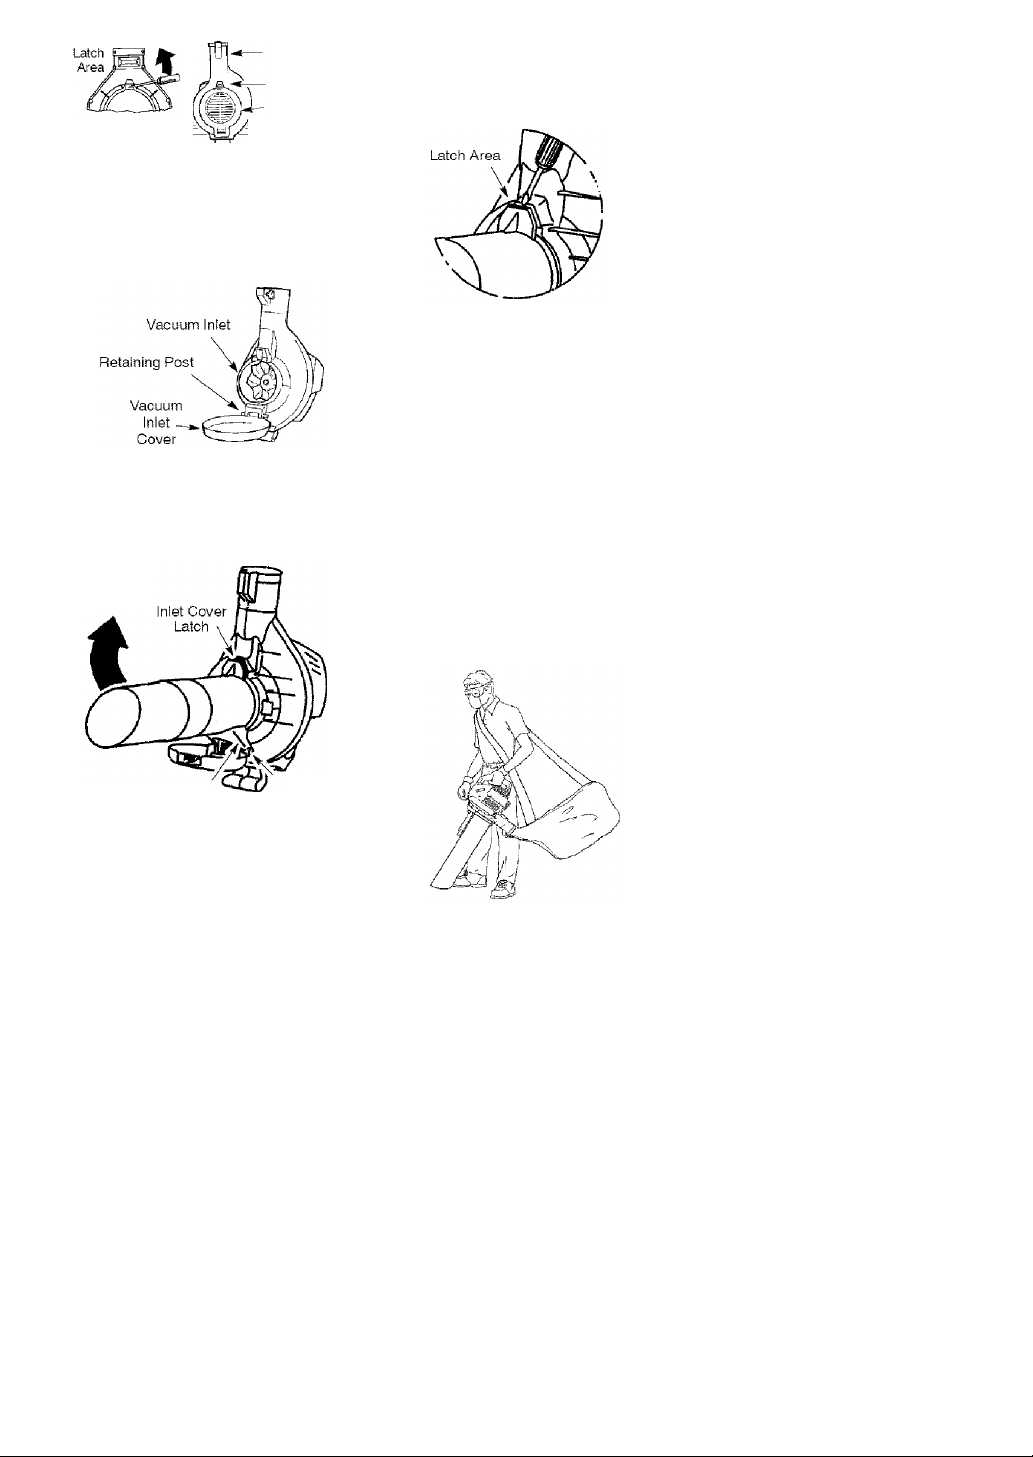
WARNING: Stop the engine before opening the vacuum inlet door The
engine must be stopped and the impeller blades no longer turning to avoid serious
injury from the rotating blades. Gently tilt the handle of the screwdriver toward the
back of the unit to release the latch while pulling up on the vacuum inlet cover with
your other hand.
When using the vacuum attachment, the unit is designed to
pick up dry material such as leaves, grass, small twigs, and bits
of paper. Do not vacuum stones, gravel, metal, broken glass,
etc., to avoid severe damage to the impeller.
A WARNING: Fire hazard. Never mix, pour, or store gasoline
or use the unit near a flame or sparks (including smoking, open
flames, or work that can cause sparks).
SAFETY RULES
WARNING: Failure to follow all
Safety Rules and Precautions can re
sult in serious injury.
KNOW YOUR UNIT
• Read your operator’s manual care
fully until you completely understand
and can follow all warnings and
safety rules before operating the unit.
• Restrict unit to users who under
stand and will follow all warnings and
safety rules in this manual.
Page 4

WARNING: Inspect area before
starting unit. Remove ail debris and
hard objects such as rocks, glass,
wire, etc. that can ricochet, be thrown,
or otherwise cause injury or damage
during operation.
Use your unit as a blower for:
• Sweeping debris or grass clippings
from driveways, sidewalks, patios, etc.
• Blowing grass clippings, straw, or
leaves into piles, around joints, or be
tween bricks.
Use your unit as a vacuum for:
• Picking up dry material such as
leaves, grass, small twigs, and bits of
paper.
• For best results during vacuum use,
operate your unit at high speed.
• Move slowly back and forth over the
materia! as you vacuum. Avoid forc
ing the unit into a pile of debris as
this can clog the unit.
• Keep the vacuum tube about an inch
above the ground for best results.
PLAN AHEAD
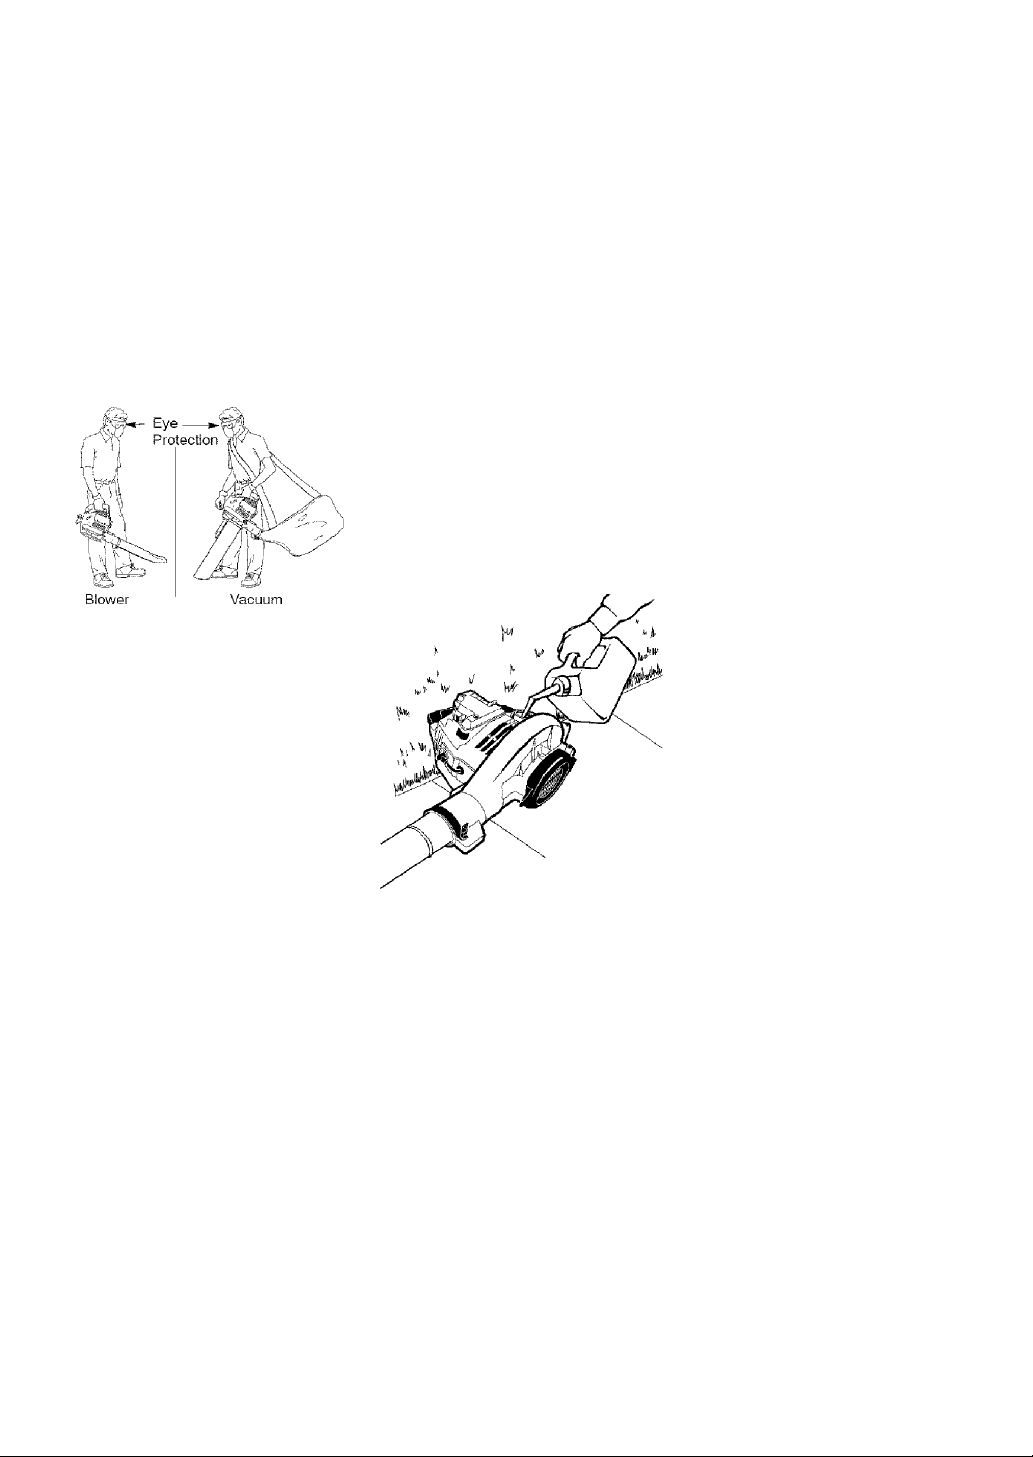
• Always wear eye protection when op
erating, servicing, or performing main
tenance on unit. Wearing eye protec
tion will help to prevent rocks or debris
from being blown or ricocheting into
eyes and face which can result in
blindness and/or serious injury. Eye
protection should be marked Z87.
• Always wear foot protection. Do not
go barefoot or wear sandals.
• Always wear respirator or face mask
when working with unit in dusty envi
ronments.
• Secure hair above shoulder length.
Secure or remove jewelry, loose
clothing, or clothing with loosely
hanging straps, ties, tassels, etc.
They can be caught in moving parts.
• Do not operate unit when you are
tired, ill, upset, or if you are under the
influence of alcohol, drugs, or medi
cation.
• Keep children, bystanders, and ani
mals away from work area a mini
mum of 30 feet {10 meters) when
starting or operating unit. Do not
point blower nozzle in the direction of
people or pets.
HANDLE FUEL WITH CAUTION, IT IS
HIGHLY FLAMMABLE
• Eliminate all sources of sparks or
flame (including smoking, open
flames, or work that can cause
sparks) in the areas where fuel is
mixed, poured, or stored.
• Mix and pour fuel in an outdoor area:
store fuel in a cool, dry, well ventilated
place; use an approved, marked con
tainer for all fuel purposes.
• Do not smoke while handling fuel or
while operating the unit.
• Make sure the unit is properly as
sembled and in good operating
condition.
• Do not fill fuel tank while engine is
running.
• Avoid spilling fuel or oil. Wipe up fuel
spills before starting engine.
• Move at least 10 feet (3 meters)
away from fuel and fueling site be
fore starting engine.
• Always store gasoline in a container
approved for flammable liquids.
OPERATE YOUR UNIT SAFELY
A WARNING: Stop the engine be
fore opening the vacuum inlet door. The
engine must be stopped and the impel
ler blades no longer turning to avoid se
rious injury from the rotating blades.
• Inspect unit before each use for
worn, loose, missing, or damaged
parts. Do not use until unit is in
proper working order.
• Keep outside surfaces free from oil
and fuel.
• Never start or run engine inside a
closed room, building or other un
ventilated area. Breathing exhaust
fumes can kill.
• To avoid static electricity shock, do
not wear rubber gloves or any other
insulated gloves while operating unit.
• Do not set unit on any surface except
a clean, hard area while engine is run
ning. Debris such as gravel, sand,
dust, grass, etc. could be picked up by
the air intake and thrown out through
discharge opening, damaging unit,
property, or causing serious injury to
bystanders or operator,
• Avoid dangerous environments. Do
not use in unventilated areas or
where explosive vapors or carbon
monoxide build up couid be present.
• Do not overreach or use from unsta
ble surfaces such as ladders, trees,
steep slopes, rooftops, etc. Keep firm
footing and balance at all times.
• Never place objects inside the
blower tubes; always direct the blow
ing debris away from people, ani-
Page 5

mais, glass, and solid objects such
as trees, automobiles, walls, etc. The
force of air can cause rocks, dirt, or
sticks to be thrown or to ricochet
which can hurt people or animals,
break glass, or cause other damage.
• Never run unit without the proper
equipment attached. When using
your unit as a blower, always install
blower tubes. When using the op
tional vacuum kit, always install vac
uum tubes and vacuum bag assem
bly. Make sure vacuum bag assem
bly is completely zipped.
• Check air intake opening, blower
tubes, and vacuum tubes frequently,
always with engine stopped and
spark plug disconnected. Keep vents
and discharge tubes free of debris
which can accumulate and restrict
proper air flow.
• Never place any object in air intake
opening as this could restrict proper air
flow and cause damage to the unit.
• Never use for spreading chemicals,
fertilizers, or other substances which
may contain toxic materials.
• To avoid spreading fire, do not use
near leaf or brush fires, fireplaces,
barbecue pits, ashtrays, etc.
• Use only for jobs explained in this
manual.
MAINTAIN YOUR UNIT PROPERLY
 WARNING; Disconnect spark
plug before performing maintenance
except for carburetor adjustments.
• Have all maintenance other than the
recommended procedures described
in the operator's manual performed
by a Sears Service Center.
• Use only recommended Craftsman
replacement parts; use of any other
parts may void your warranty and
cause damage to your unit.
• Empty fuel tank before storing the unit.
Use up fuel left in carburetor by start
ing engine and letting it run until it
stops.
• Do not use any accessory or attach
ment other than those recommended
by manufacturer for use with your unit.
• Do not store the unit or fuel in a
closed area where fuel vapors can
reach sparks or an open flame from
hot water heaters, electric motors or
switches, furnaces, etc.
• Store in a dry area out of reach of
children.
SAFETY NOTICE: Exposure to vibra
tions through prolonged use of gasoline
powered hand tools could cause blood
vessel or nerve damage in the fingers,
hands, and joints of people prone to cir
culation disorders or abnormal swelling.
Prolonged use in cold weather has been
linked to blood vessel damage in other
wise healthy people. If symptoms occur
such as numbness, pain, loss of
strength, change in skin color or texture,
or loss of feeling in the fingers, hands, or
joints, discontinue the use of this tool
and seek medical attention. An
antivibration system does not guarantee
the avoidance of these problems. Users
who operate power tools on a continual
and regular basis must monitor closely
their physical condition and the condition
of this tool.
SPECIAL NCTICE: For users on U.S.
Forest Land and in some states, includ
ing California (Public Resources Codes
4442 and 4443), Idaho, Maine, Minne
sota, New Jersey, Oregon, and Wash
ington: Certain internal combustion en
gines operated on forest, brush, and/or
grass covered land in the above areas
are required to be equipped with a spark
arresting screen, maintained in effective
working order, or the engine must be
constructed, equipped, and maintained
for the prevention of fire. Check with
your state or local authorities for regula
tions pertaining to these requirements.
Failure to follow these requirements is a
violation of the law. This unit is not facto
ry equipped with a spark arresting
screen; however, a spark arresting
screen is available as an optional part. If
a spark arresting screen is required in
your area, contact Sears Service for the
correct kit. The spark arresting screen,
blower tubes, and nozzles must be as
sembled to unit to be in full compliance
with reguiations.
Page 6
ASSEMBLY
CARTON CONTENTS
ChGck carton contents against the fol
lowing list.
Model 358.794964
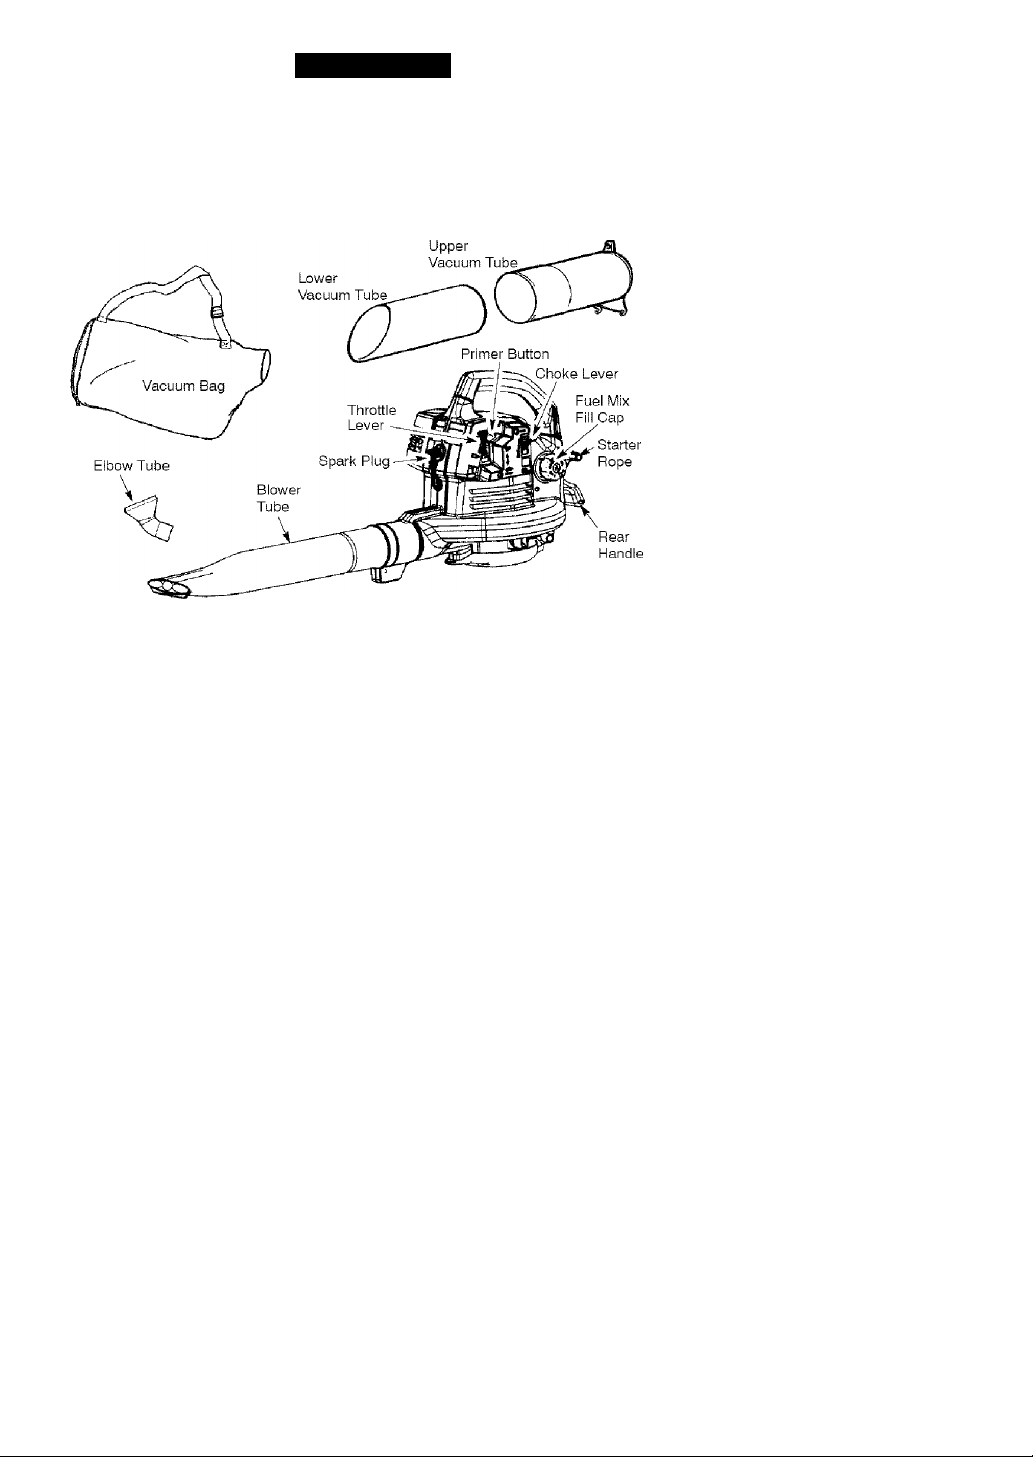
• Blower
• Blower tube
• Elbow tube
• Vacuum bag
• Upper vacuum tube
• Lower vacuum tube
• 2-Cyde Engine Oil
NOTE; It is norma! for the fuel filter to
rattle in the empty fuel tank.
ASSEMBLY
^WARNING; Stop engine and be
sure the impeller blades have stopped
turning before opening the vacuum in
let door or attempting to insert or re
move the vacuum tubes. The rotating
blades can cause serious injury.
A WARNING: If you receive your
unit assembled, repeat all steps to en
sure your unit is properly assembled
and all fasteners are secure.
• A standard screwdriver is required
for assembly.
BLOWER ASSEMBLY
BLOWER TUBE ASSEMBLY
If you have already assembled your
unit for use as a vacuum, remove the
vacuum tubes and collection bag.
1. Align the rib on the blower tube
with the groove in the blower outlet;
slide the tube into place.
NOTE: Knob must be loose enough to
allow blower tube to be inserted in blow
er outlet. Loosen knob by turning coun
terclockwise.
Blower
Outlet
Blower
Tube
(rr~
Groove^ ^— Rib
Secure the tube by turning the
knob clockwise.
To remove the tube, turn the knob
counterclockwise to loosen the
tube; remove the tube.
VACUUM ASSEMBLY
VACUUM BAG ASSEMBLY
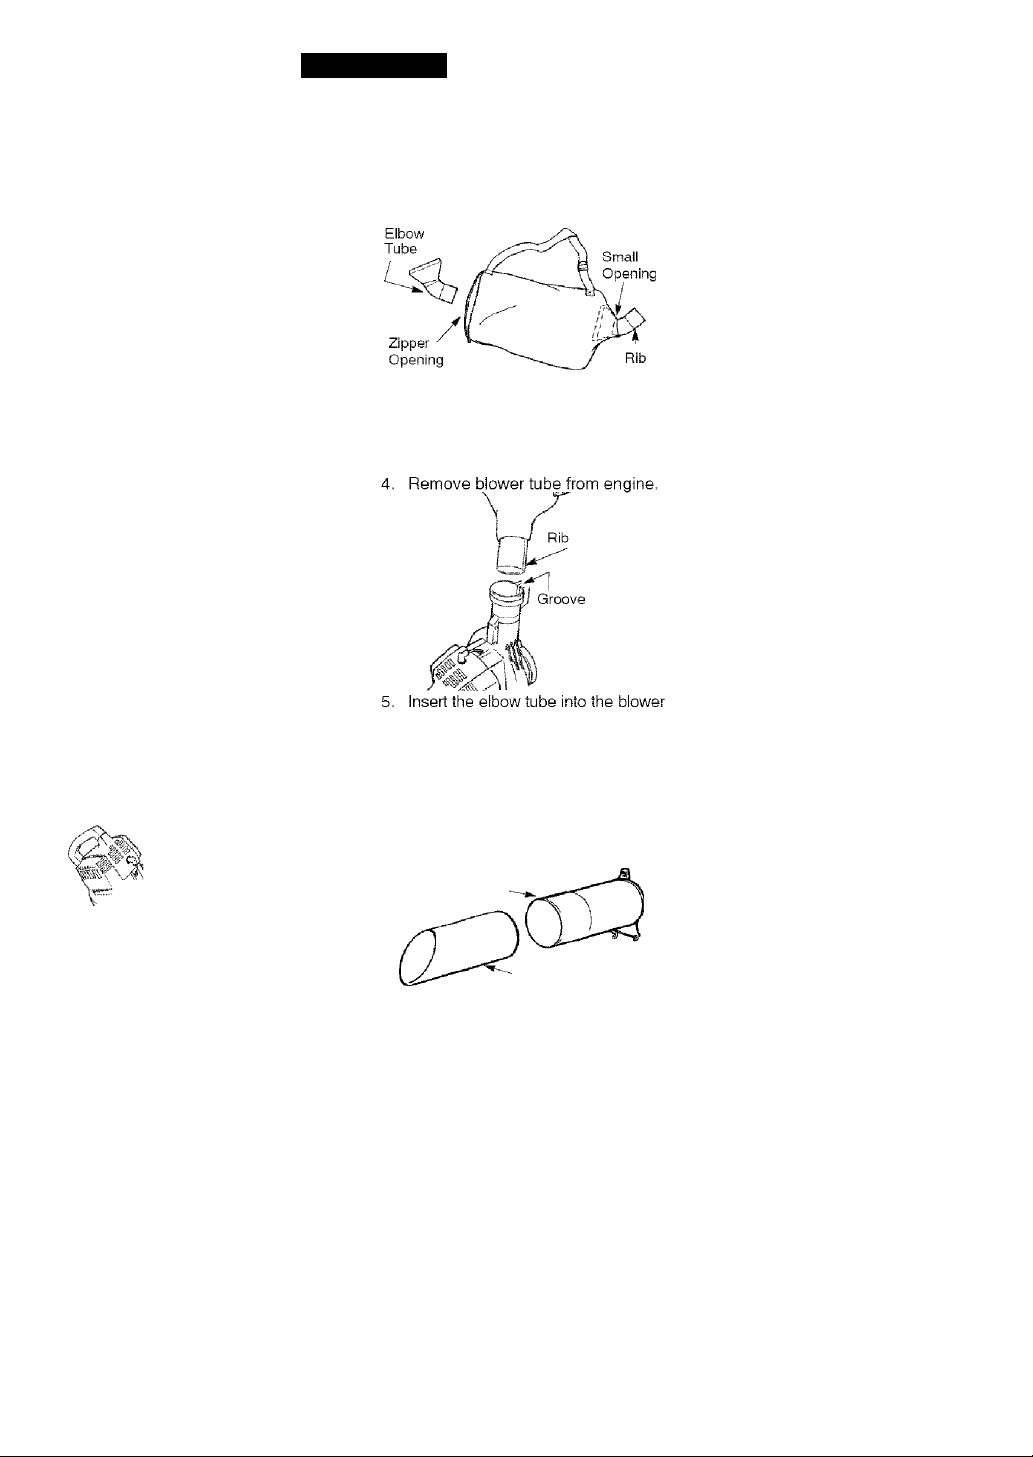
1. Open the zipper on the vacuum
bag and insert the elbow tube.
2. Push the small end of the elbow
tube through the small opening in
the bag.
NOTE: Make sure edge of the small
opening is flush against the flared area
of the elbow tube, and the rib on the
elbow tube is on the bottom.
3. Close the zipper on the bag. Make
sure the zipper is closed completely.
outlet. Make sure elbow tube is
aligned with the blower outlet
groove.
6. Turn knob clockwise to secure
elbow tube.
VACUUM TUBE ASSEMBLY
1. Align the lower vacuum tube as
shown. Push lower vacuum tube
into upper vacuum tube.
Upper
Vacuum Tube'
Lower
' Vacuum Tube
2. Insert the tip of a screwdriver into
the latch area of the vacuum inlet.
Page 7
Blower
Outlet
Latch Area
Vacuum
t Inlet Cover
Gently tilt the handle of the screw
driver toward the back of the unit to
release the latch while pulling up
on the vacuum inlet cover with your
other hand.
Hold the vacuum inlet cover open
until upper vacuum tube is installed.
Place the hooks of the upper vacu
um tube on the retaining posts of
the unit.
Pivot the tube until it is secured to
the blower unit by the vacuum inlet
latch.
PIVOT
2.
Gently tilt handle of screwdriver to
ward the back of the unit to release
the latch while pulling up on the up
per vacuum tube with your other
hand.
3. Remove the vacuum bag.
4. Close the vacuum inlet cover and
make sure it is latched closed.
5. Reinstall the blower tube (see
BLOWER TUBE ASSEMBLY).
SHOULDER STRAP ADJUSTMENT
(for vacuum use only)
1. Hold the unit as shown with the
muffler side facing away from your
body and clothes.
2. Pass the shoulder strap over your
head and onto your right shoulder.
3. Extend your left arm toward the
rear of the vacuum bag.
4. Adjust shoulder strap until the vac
uum bag/shoulder strap seam lies
between your thumb and index
finger.
5. Make sure air flows freely from the
elbow tube into bag. If bag is kinked,
the unit will not operate properly.
Hook
Retaining
Post
HOW TO CONVERT UNIT FROM
VACUUM USE TO BLOWER USE
1. Remove the vacuum tubes by in
serting the tip of a screwdriver into
the latch area of the vacuum inlet.
Page 8
OPERATION
KNOW YOUR BLOWER
READ THIS OPERATOR’S MANUAL AND SAFETY RULES BEFORE OPERATING YOUR
UNIT Compare the illustrations with your unit to familiarize yourself with the location
of the various controls and adjustments. Save this manual for future reference.
MULCHING BLADES
Your blower is equipped with mulching blades as a standard feature. When using
the optional vacuum attachment, the mulching blades automatically reduce debris
at a ratio of up to 16:1.
THROTTLE LEVER
The THROTTLE LEVER is used to select
the desired engine speed and to stop the
engine. Move the throttle lever to the
■fo* position for full speed operation.
Move the throttle lever to the h"»- posi
tion for idle speed. To stop the engine,
move the throttle lever to the STOP posi
tion.
PRIMER BUTTON
The PRIMER BUTTON removes air from
the carburetor and fuei lines and fills
them with fuel. This allows you to start
OPERATING TIPS
• While vacuuming or blowing debris,
hold the unit with the muffler side fac
ing away from your body and clothes
{see OPERATING POSITION below).
• To reduce the risk of hearing loss
associated with sound level(s), hear
ing protection is required.
• To reduce the risk of injury associated
with contacting rotating parts, stop the
engine before installing or removing
attachments. Do not operate without
guard (s) in place.
the engine with fewer pulls on the starter
rope. Activate primer button by pressing
it and allowing it to return to its original
position.
CHOKE LEVER
The CHOKE helps to supply fuel to the
engine to aid in cold starting. Activate
the choke by moving the choke lever to
the FULL CHOKE position. After engine
attempts to start, move the choke lever
to the HALF CHOKE position. Once en
gine starts, move choke lever to the
RUN position.
Operate power equipment only at rea
sonable hours-not early in the morn
ing or late at night when people might
be disturbed. Comply with times listed
in local ordinances. Usuai recommen
dations are 9:00 a.m. to 5:00 p.m.,
Monday though Saturday.
To reduce noise levels, limit the num
ber of pieces of equipment used at
any one time.
To reduce noise levels, operate pow
er blowers at the lowest possible
throttle speed to do the job.
Page 9
• Use rakes and brooms to loosen
debris before blowing.
• In dusty conditions, slightly dampen
surfaces or use a mister attachment
when water is available.
• Conserve water by using power blow
ers instead of hoses for many lawn
and garden applications, including
areas such as gutters, screens, patios,
grills, porches, and gardens.
• Watch out for children, pets, open
windows, or freshly washed cars.
Blow debris away safely.
• Use the full blower nozzle extension
so the air stream can work close to
the ground.
• After using blowers and other equip
ment, CLEAN up! Dispose of debris
in trash receptacles.
OPERATING POSITION
fuel, follow instructions printed on con
tainer. Once oil is added to gasoline,
shake container momentarily to assure
that the fuel is thoroughly mixed. Always
read and follow the safety rules relating
to fuel before fueling your unit.
IMPORTANT
Experience indicates that alcohol
blended fuels (called gasohol or using
ethanol or methanol) can attract mois
ture which leads to separation and
formation of acids during storage.
Acidic gas can damage the fuel sys
tem of an engine while in storage.
To avoid engine problems, empty the
fuel system before storage for 30 days
or longer. Drain the gas tank, start the
engine and let it run until the fuel lines
and carburetor are empty. Use fresh
fuel next season.
Never use engine or carburetor clean
er products in the fuel tank or perma
nent damage may occur.
Fuel stabilizer is an acceptable alter
native in minimizing the formation of
fuel gum deposits during storage.
Craftsman brand oil is already blended
with fuel stabilizer. See the STORAGE
section for additional information.
NOTE: Unit must be placed on its side
when adding fuel (see illustration below).
BEFORE STARTING ENGINE
À WARNING; Be sure to read the
fuel information in the safety rules
before you begin. If you do not
understand the safety rules, do not
attempt to fuel your unit. Call
1-800-235-5878.
FUELING ENGINE
À WARNING: Remove fuel cap
slowly when refueling.
This engine is certified to operate on un
leaded gasoline. Before operation, gaso
line must be mixed with a good quality
synthetic 2-cycle air-cooled engine oil.
We recommend Craftsman brand syn
thetic oil. Mix gasoline and oil at a ratio
of 40:1. A 40:1 ratio is obtained by mix
ing 3.2 ounces of oil with 1 gallon of un
leaded gasoline. Included with this
blower is a 3.2 ounce container of oil.
Pour the entire contents of this container
into 1 gallon of gasoline to achieve the
proper fuel mixture. DO NOT USE auto
motive oil or boat oil. These oils will
cause engine damage. When mixing
HOW TO STOP YOUR ENGINE
• To stop the engine, move the throttle
lever to the STOP position.
HOW TO START THE ENGINE
A WARNING: You MUST make sure
the tubes are secure before using the
unit.
• Fuel engine. Move at least 10 feet (3
meters) away from the fueling site.
Page 10
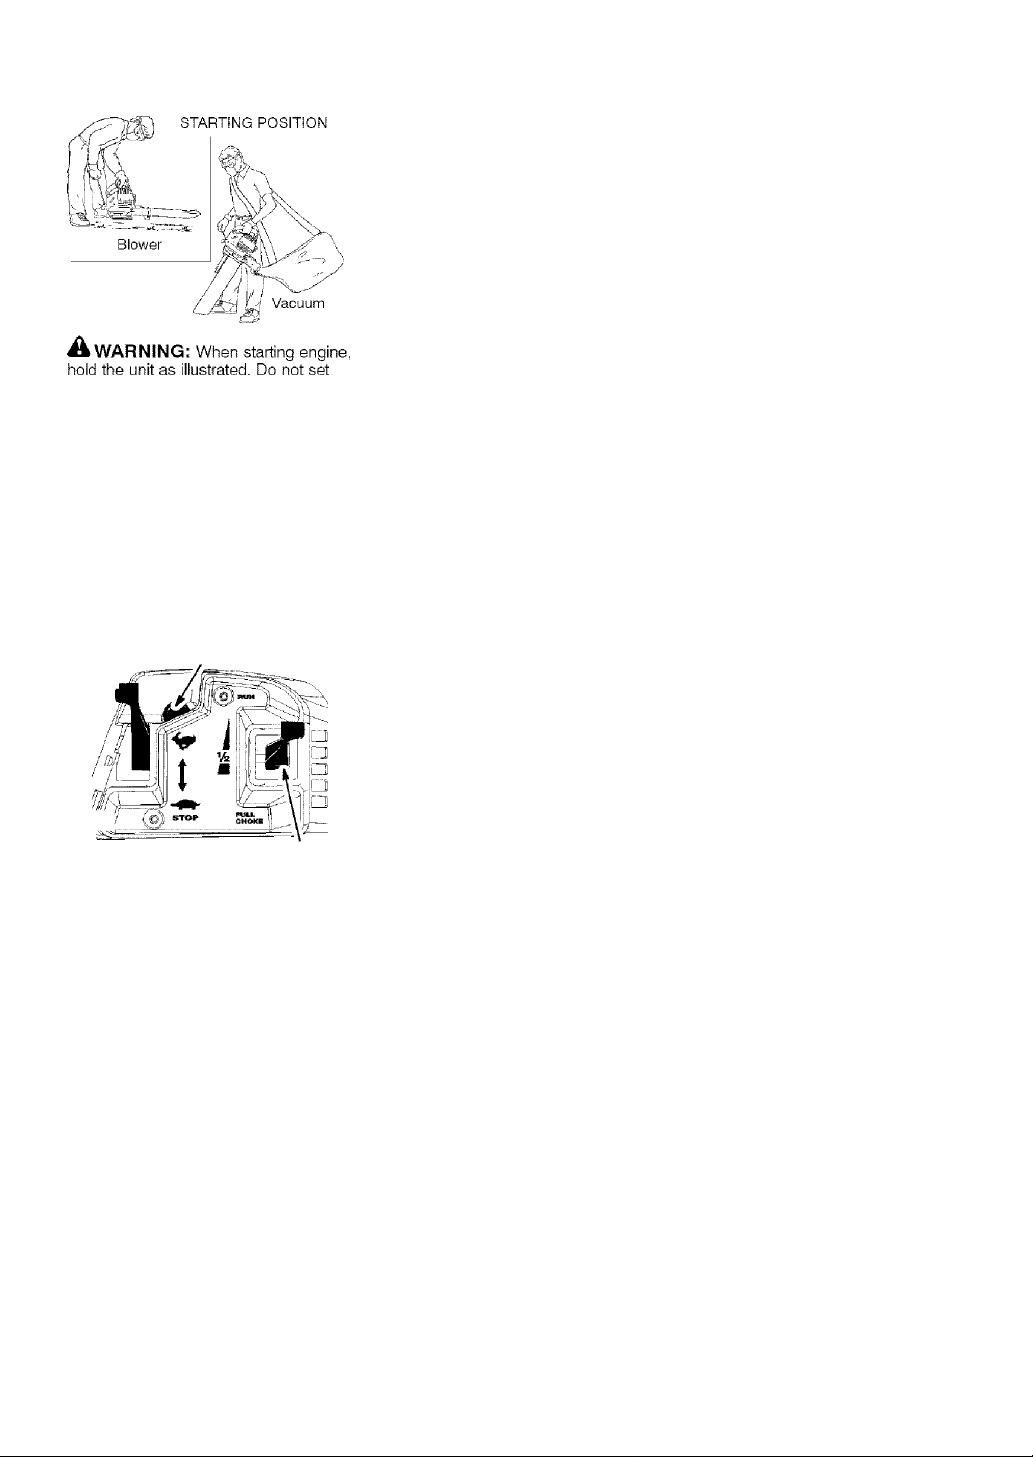
Hold the unit in the starting position
as shown. Make sure the blower end
is directed away from people, ani
mals, glass, and solid objects.
unit on any surface except a clean, hard
area when starting engine or while en
gine is running. Debris such as gravel,
sand, dust, grass, etc. could be picked
up by the air intake and thrown out
through the discharge opening, damag
ing the unit or property, or causing seri
ous injury to bystanders or the operator.
STARTING A COLD ENGINE
1. Slowly press the primer button 8
times.
2. Move the choke lever to the FULL
CHOKE position.
3. Move the throttle lever to the
position.
Throttle Lever Primer Button
ci'j;/
Choke Lever
Pull Starter handle sharply until the
engine attempts to run, but no
more than 5 pulls (below 30°F, 8
pulls).
NOTE: If the engine attempts to start
before the 5th pull, go to the next step
immediately.
5. Move choke lever to HALF CHOKE.
6. Pull the starter handle sharply until
the engine runs, but no more than
5 pulls {below 30°F, 10 pulls).
7. After a 5 second warm-up, move
the choke lever to the RUN posi
tion.
8. Allow the unit to run for 30 more
seconds at RUN before moving the
throttle lever to the -Л- position.
If the engine has not started after 5
pulls (at HALF CHOKE), repeat the
STARTING A COLD ENGINE procedure.
If the engine still does not start, pro
ceed to STARTING A FLOODED ENGINE.
9. To stop the engine, move the
throttle lever to the STOP position.
STARTING A WARM ENGINE
NOTE: If fuel tank is empty, add fuel;
then, follow STARTING A COLD ENGINE
procedure. Do not fill fuel tank while
engine is hot.
1. Move the throttle lever to the #
position.
2. Pull the starter handle sharply until
the engine starts, but no more than
5 pulls.
NOTE: If the engine has not started,
pull starter handle sharply for 5 more
pulls. If engine still does not run, it is
probably flooded. Proceed to START
ING A FLOODED ENGINE.
3. To Stop the engine, move the
throttle lever to the STOP position.
STARTING A FLOODED ENGINE
Flooded engines can be started by plac
ing the choke lever in the RUN position.
Move throttle lever to the fast position
^ ; then, pull rope until engine starts.
After engine starts, move the throttle le
ver to the slow position to allow en
gine to idle.
Starting could require pulling the starter
rope many times depending on how
badly the unit is flooded, if the unit still
doesn't start, refer to the
TROUBLESHOOTING TABLE or call
1 -800-235-5878.
- 10 ■
Page 11
MAINTENANCE
CUSTOMER RESPONSIBILITIES
A
WARNING: Disconnect the spark plug before performing maintenance,
service, or adjustments.
CARE & MAINTENANCE TASK WHEN TO PERFORM
Check for loose fasteners and parts Before each use
Check for damaged or worn parts Before each use
Inspect and clean unit and labels After each use
Clean air filter Every 5 hours of operation
Replace spark plug Yearly
Replace fuel filter Yearly
Check muffler mounting screws Yearly
a WARNING: Avoid touching muf
fler unless engine and muffler are cold.
A hot muffler can cause serious burns.
^WARNING; Stop engine and be
sure the impeller blades have stopped
turning before opening the vacuum in
let door or attempting to insert or re
move the vacuum or blower tubes.
The rotating blades can cause serious
injury. Always disconnect the spark
plug before performing maintenance or
accessing movable parts.
GENERALRECOMMENDATIONS
The warranty on this unit does not cov
er items that have been subjected to
operator abuse or negligence. To re
ceive full value from the warranty, the
operator must maintain unit as instruct
ed in this manual. Various adjustments
will need to be made periodically to
properly maintain your unit.
CHECK FOR LOOSE
FASTENERS AND PARTS
• Spark Plug Boot
• Air Filter
• Housing Screws
CHECK FOR DAMAGED OR
WORN PARTS
Contact Sears Service Center for re
placement of damaged or worn parts.
• Throttle Lever - Ensure throttle lever
functions properly by moving the
throttle lever to the STOP position.
Make sure engine stops; then restart
engine and continue.
• Fuel Tank - Do not use unit if fuel tank
shows signs of damage or leaks.
• Vacuum Bag - Do not use vacuum
bag if it is torn or damaged.
INSPECT AND CLEAN UNIT
AND LABELS
• After each use, inspect complete unit
for loose or damaged parts. Clean
the unit using a damp cloth with a
mild detergent.
• Wipe off unit with a clean dry cloth.
CLEAN AIR FILTER
/ Air Filter
A dirty air filter decreases engine per
formance and increases fuel consump
tion and harmful emissions. Always
clean after every 5 hours of operation.
Cleaning the air filter;
1. Clean the cover and the area
around it to keep debris from falling
into the carburetor chamber when
the cover is removed.
2. Remove parts as illustrated.
NOTE: Do not clean filter in gasoline
or other flammable solvent. Doing so
can create a fire hazard or produce
harmful evaporative emissions.
3. Wash the filter in soap and water.
4. Allow filter to dry.
5. Apply a few drops of oil to the fiiter;
squeeze filter to distribute oil.
6. Replace parts.
- 11 -
Air Filter
Page 12

REPLACE SPARK PLUG
Replace spark plug each year to ensure
the engine starts easier and runs better.
Set spark plug gap at 0.025 inch. Igni
tion timing is fixed, nonadjustable.
1. Twist, then pull off spark plug boot.
2. Remove spark plug from cylinder
and discard.
3. Replace with Champion CJ-6Y
spark plug and tighten securely
with a 3/4 inch socket wrench.
4. Reinstall the spark plug boot.
REPLACE FUEL FILTER
To replace fuel filter, drain unit by run
ning it dry of fuel, then remove fuel
cap/retainer assembly from tank. Puil
filter from tank and remove it from the
fuel line. Install new fuel filter on fuel
line; reinstall parts.
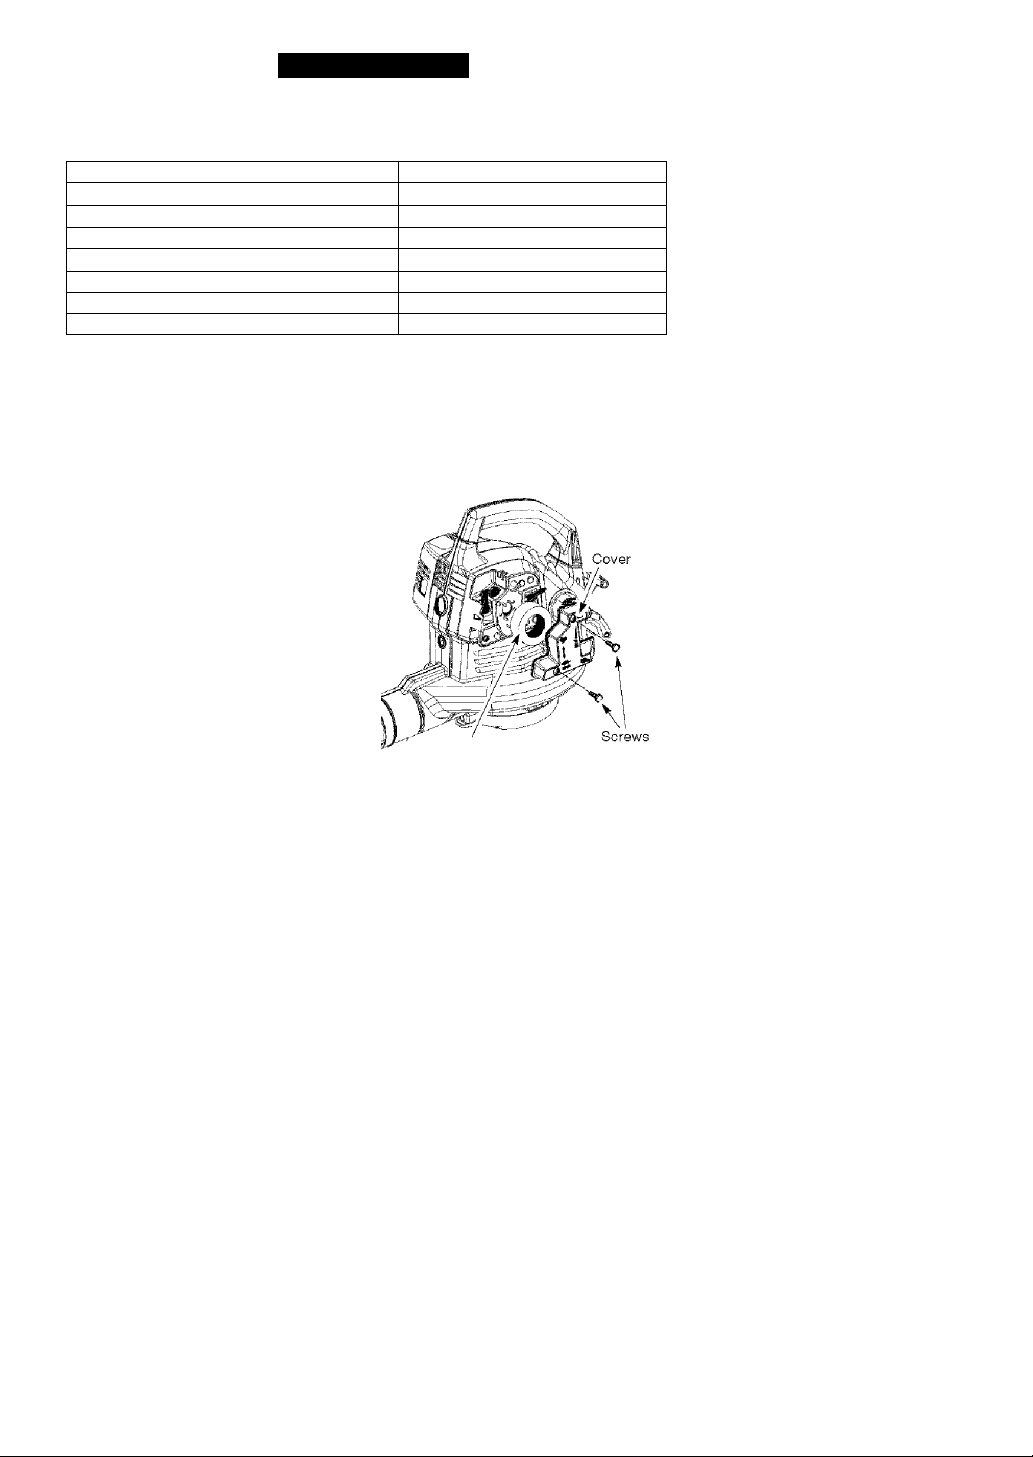
CHECK MUFFLER MOUNTING
SCREWS
Once each year, ensure muffler
mounting screws are secure and tight
ened properly to prevent damage.
Muffler Cover .
Screws
1. Loosen and remove the 2 screws
from the muffler cover.
2. Remove the muffler cover.
3. Tighten the 2 muffler mounting
screws securely.
4. Reinstall muffler cover and 2
screws. Tighten securely.
Mounting
Screw
CARBURETOR ADJUSTMENT
There is no screw for idle adjustment
on your blower. The throttle lever is
used to control engine speed. The
throttle lever can be placed in one of
four positions: STOP, IDLE or
FULL THROTTLE or ^ , and one inter
mittent position. If your engine will
not run properly or you require further
assistance, contact your Sears Service
Center or call our customer assistance
help line at 1-800-235-5878.
STORAGE
a WARNING: Perform the following
steps after each use:
• Allow engine to cool, and secure the
unit before storing or transporting.
• Store unit and fuel in a well venti
lated area where fuel vapors cannot
reach sparks or open flames from
water heaters, electric motors or
switches, furnaces, etc.
• Store unit with all guards in place.
Position unit so that any sharp object
cannot accidentally cause injury.
• Store unit and fuel well out of the
reach of children.
SEASONAL STORAGE
Prepare unit for storage at end of sea
son or if it will not be used for 30 days
or more.
If your unit is to be stored for a period
of time:
• Clean the entire unit before lengthy
storage.
• Store in a dean dry area.
• Lightly oil external metal surfaces.
FUEL SYSTEM
Empty the fuel system before storage
for 30 days or longer. Drain the gas
tank, start the engine and !et it run until
the fuel lines and carburetor are empty.
Use fresh fuel next season.
Under FUELING ENGINE in the OPERA
TION section of this manual, see mes
sage labeled IMPORTANT regarding the
use of gasohol in your engine.
Fuel stabilizer is an acceptable afterna
tive in minimizing the formation of fuel
gum deposits during storage. Add stabi
lizer to gasoline in fuel tank or fuel stor
age container. Follow the mix instruc
tions found on stabilizer container. Run
engine at least 3 minutes after adding
stabilizer.
- 12
Page 13

Craftsman 40:1,2-cycle engine oil (air
cooled) is already blended with fuel
stabilizer. If you do not use this Sears
oil, you can add a fuel stabilizer to your
fuel tank.
ENGINE
• Remove spark plug and pour 1 tea
spoon of 40:1,2-cycie engine oil (air
cooled) through the spark plug open
ing. Slowly pull the starter rope 8 to
10 times to distribute oil,
• Replace spark plug with new one of
• Clean air filter.
• Check entire unit for loose screws,
nuts, and bolts. Replace any dam
aged, broken, or worn parts.
• At the beginning of the next season,
use only fresh fuel having the proper
gasoline to oil ratio.
OTHER
• Do not store gasoline from one sea
son to another.
• Replace your gasoline can if it starts
to rust.
recommended type and heat range.
TROUBLESHOOTING TABLE
A WARNING: Always stop unit and disconnect spark plug before perform
ing any of the recommended remedies below other than remedies that re
quire operation of the unit.
TROUBLE CAUSE REMEDY
Engine will not
start.
Engine will not
idle properly.
Engine will not
accelerate,
lacks power, or
dies under a
load.
Engine smokes
excessively.
Engine runs hot.
1, Engine flooded,
2, Fuel tank empty.
3, Spark plug not firing.
4, Fuel not reaching
carburetor.
5, Compression low.
1 - Fuel not reaching
carburetor.
2. Carburetor requires
adjustment.
3. Crankshaft seals worn.
4. Compression tow.
1. Air filter dirty.
2. Fuel not reaching
carburetor.
3. Spark plug fouled.
4. Carburetor requires
adjustment.
5. Carbon build up.
6. Compression tow.
1. Choke partially on.
2. Fuel mixture incorrect.
3. Air filter dirty,
4. Carburetor requires
adjustment.
1. Fuel mixture incorrect.
2. Spark plug incorrect.
3. Carburetor requires
adjustment.
4. Carbon build up.
1. See '“Starting a Flooded Engine”
in Operation section.
2. Fill tank with correct fuel mixture.
3. Install new spark plug.
4. Check for dirty fuel filter; replace,
Check for kinked or split fuel line;
repair or replace.
5. Contact Sears Service (see back cover).
1. Check for dirty fuel filter; replace.
Check for kinked or split fuel line;
repair or replace.
2. Contact Sears Service (see back cover).
3. Contact Sears Service (see back cover).
4. Contact Sears Service (see back cover).
1. Clean or replace air filter.
2. Check for dirty fuel filter; replace.
Check for kinked or split fuel line;
repair or replace.
3. Clean or replace spark plug
and re-gap.
4. Contact Sears Service (see back cover).
5. Contact Sears Service (see back cover).
6. Contact Sears Service (see back cover).
1. Adjust choke.
2. Empty fuel tank and refill with
correct fuel mixture.
3. Clean or replace air filter.
4. Contact Sears Service (see back cover).
1. See "Fueling Engine” in Operation
section,
2. Replace with correct spark plug.
3. Contact Sears Service (see back cover).
4. Contact Sears Service (see back cover).
- 13
Page 14

U.S. EPA/CALIFORNIA
EMISSION CONTROL WARRANTY STATEMENT
YOUR WARRANTY RIGHTS AND OB
LIGATIONS: The U.S. Environmentaf
Protection Agency/California Air Re
sources Board and Sears, Roebuck and
Co., U.S.A., are pleased to explain the
emissions control system warranty on
your year 2007 and later small off-road
engine. In California, all small off-road
engines must be designed, built, and
equipped to meet the State’s stringent
anti-smog standards. Sears must war
rant the emission control system on your
small off-road engine for the periods of
time listed below provided there has
been no abuse, neglect, or improper
maintenance of your small off-road en
gine. Your emission control system in
cludes parts such as the carburetor, the
ignition system and the fuel tank (Califor
nia only). Where a warrantable condition
exists. Sears will repair your small off
road engine engine at no cost to you.
Expenses covered under warranty in
clude diagnosis, parts and labor.
MANUFACTURER'S WARRANTY
COVERAGE: If any emissions related
part on your engine (as listed under
Emissions Control Warranty Parts List) is
defective or a defect in the materials or
workmanship of the engine causes the
failure of such an emission related part,
the part will be repaired or replaced by
Sears.
OWNER’S WARRANTY RESPONSIBI
LITIES: As the small off-road engine
engine owner, you are responsible for
the performance of the required mainte
nance listed in your operator’s manual.
Sears recommends that you retain all
receipts covering maintenance on your
small off-road engine, but Sears cannot
deny warranty solely for the lack of re
ceipts or for your failure to ensure the
performance of all scheduled mainte
nance. As the small off-road engine en
gine owner, you should be aware that
Sears may deny you warranty coverage
if your small off-road engine engine or a
part of it has failed due to abuse, ne
glect, improper maintenance, unap
proved modifications, or the use of parts
not made or approved by the original
equipment manufacturer. You are re
sponsible for presenting your small off
road engine to a Sears authorized repair
center as soon as a problem exists.
Warranty repairs should be completed in
a reasonable amount of time, not to ex
ceed 30 days. If you have any questions
regarding your warranty rights and re
sponsibilities, you should contact your
nearest authorized service center or call
Sears at 1-800-469-4663.
COMMENCEMENT DATE: The warran
ty period begins on the date the small
off-road engine is purchased. LENGTH
OF COVERAGE: This warranty shall be
for a period of two years from the initial
date of purchase. WHAT IS COV
ERED: REPAIR OR REPLACEMENT
OF PARTS. Repair or replacement of
any warranted part will be performed at
no charge to the owner at an approved
Sears Service Center, if you have any
questions regarding your warranty rights
and responsibilities, you should contact
your nearest authorized service center
or call Sears at 1-800-469-4663.
WARRANTY PERIOD: Any warranted
part which is not scheduled for replace
ment as required maintenance, or which
is scheduled only for regular inspection
to the effect of “repair or replace as nec
essary” shall be warranted for 2 years.
Any warranted part which is scheduled
for replacement as required mainte
nance shall be warranted for the period
of time up to the first scheduled replace
ment point for that part. DIAGNOSIS:
The owner shall not be charged for
diagnostic labor which leads to the de
termination that a warranted part is de
fective if the diagnostic work is per
formed at an approved Sears Service
Center. CONSEQUENTIAL DAMAGES;
Sears may be liable for damages to oth
er engine components caused by the
failure of a warranted part still under
warranty. WHAT IS NOT COVERED: All
failures caused by abuse, neglect, or im
proper maintenance are not covered.
ADD-ON OR MODIFIED PARTS: The
use of add-on or modified parts can be
grounds for disallowing a warranty claim.
Sears is not liable to cover failures of
warranted parts caused by the use of
add-on or modified parts. HOW TO
FILE A CLAIM: If you have any ques
tions regarding your warranty rights and
responsibilities, you should contact your
nearest authorized service center or call
Sears at 1-800-469-4663.
- 14 ■
WARRANTY
Page 15

WHERE TO GET WARRANTY SER
VICE: Warranty services or repairs shall
be provided at all Sears Service Cen
ters. Call 1-800-469-4663.
MAINTENANCE, REPLACEMENT
AND REPAIR OF EMISSION RE
LATED PARTS: Any Sears approved
replacement part used in the perfor
mance of any warranty maintenance or
repair on emission related parts will be
provided without charge to the owner if
the part is under warranty.
The information on the product label indicates which standard your engine is certified.
Example: (Year) ERA Phase 1 or Phase 2 and/or CALIFORNIA,
_____________
WPORTART EMISSION INFORMATION
THIS ENGINE CONFORMS TO EXH, AND EVAP.
EMISSIONS REGULATIONS FOR SMALL OFF
FAMILVfflSP.
SERIAL#
MODEL#
EMISSION CONTROL WARRANTY
PARTS LIST: Carburetor, Ignition Sys
tem: Spark Plug (covered up to mainte
nance schedule), Ignition Module, Muf
fler including Catalyst, Fuel Tank (Cali
fornia only). MAINTENANCE STATE
MENT: The owner is responsible for the
performance of all required maintenance
as defined in the operator's manual.
ROAD ENGINES
Fi!l!lliTHE AIR INDEX OF THIS ENGINE IS 3
This engine is certified to be emissions compliant for the following use:
63 Moderate (50 hours)
I I Intermediate (125 hours)
□ Extended (300 hours)
- 15 ■
Page 16

REPAIR PARTS
WARNING
All repairs, adjustmenis and
maintenance not described
in the Operator’s Manual
must be performed by quailtied service personnel.
SEARS MODEL 358.794964
Ref. Part No. Description Ref. Part No. Description
1. 530071459 Air Dam (kit)
2. 530071458 Gasket-Adapter (kit)
3. 530035561 Adapter-Carburetor
4. 530016441 Screw
5. 530071458 Gasket-Carburetor (kit)
3.
7. 530050629 Air Box
8. 530015849 Screw-Carb.
9. 530049383 Air Filter
10. 530056581 Air Filter Cover
11. 530016349 Screw
12. 545085001 Guard-Muffler
13. 530058757 Handle
14. 530071459 Foam - 71.12mm (kit)
15. 530015886 Screw
16. 530049323 Isolator
17. 530015197 Nut
ia. 530016322 Knob-Tube Clamp
19. 530071458 Heat Reflector (kit)
20. 545018202 Assy-Hsg. Right (Incl, #21)
21. 530402044 Spring Cover Latch
22. 530049617 Guide-Stailer Rope
___
530071775 (WT-606)
530071632 (C1Q-W11C)
Kit-Carb Assy,
23, 545018102 Housing-Left
24. 530036792 Isolator-Crankcase
25, 545058007 Assy-Fuel Tank
26, 530049527 Gasket-Fuel Tank
27. 530049386 Fuel Cap w/Retainer
28, 530023877 Fitting-Fuel line
29. 530049656 Grommet-Shroud
30. 530069247 Kit-Line Carb/Purge
31, 530069216 Kit-LineTank/Purge
32. 530095646 Assy-Fuel Pick-up
33, 530071459 Grommet-Fuel line (kit)
545133463 Operator Manual
530057414 Warning Decai
530071715 Kit-Throttle (Zama)
530071716 Kit-Choke (Zama)
530071725 Kit-Choke (Walbro)
530071726 Kit-Throttle (Walbro)
545035737 Decal-inst./Waming
16
Page 17

SEARS MODEL 358.794964
All repairs, adjustments and
maintenance not described
in the Operator’s Manual
must be performed by quali
fied service personnel.
REPAIR PARTS
Ref. Part No. Description Ref. Part No. Description
1. 71-85920 Spark Piug (RCJ-6Y) 27. 530012452 Assy-Crankshaft
2, 530015S53 Screw 28, 530071458 0-ring-C/case (kit)
3. 530055191 Insuiator-Heat 29. 545064601 Cover-Crankcase
4. 530016387 Screw- Muffler- Internal 30, 530015810 Screw
5, 530015241 Screw 31, 530071459 Foam-219mm (kit)
6, 530071593 Kit-Spark Screen{incl. #5) 32. 530029182 Eyelet- Flange
7, 530071599 Kit-Muffler (inci. 4,5,6 & 8) 33, 530071467 Kit-Rope
8, 530071458 Gasket-Baffle (kit) 34, 530049488 Handle-Starter
s.
5S007145S Gasket-Cylinder (kit) 35. 530016391 Screw-Rope
10. 530071468 Kit-Cylinder 36, 530095461 Assy-Mulch Blade
11. 530019182 Gromme!-!gn. Module 37. 530626605 Nut
12. 530016357 Screw-Ignition Module 38, 530402043 Spring-Return Cover
13. 530035505 Ignition Module 39, 530049313 Inlet Door
14. 530071476 Kit-Piston 40. 530016402 Washer-Bellevilte
15. 530012472 Piston Ring 42. 530056625 Seal - 0-Ring
16. 530015162 Retainer-Piston Pin 43, 530016349 Screw
17. 530069945 Assy-Connecting Rod 44, 530055101 Housing-Pulley
IS. 530019264 Seal 45. 530042086 Starter Spring
19. 530055728 Outer Searing 46, 530071466 Kit-Starter Pulley (Incl, 35)
20. 530015941 Retainer Ring-C’chaft 47. 530055102 Fan Housing
21. 530016190 Flywheel Spacer 48. 530015810 Screw
22. 530015149 Washer 49, 530071459 Foam-182mm (kit)
23. 530039209 Assy-Flywheel 50, 530071458 Kit-Gasket (Includes)
24. 530071456 Assy-Crankcase/Crank (page 16 - #2,5 & 19)
25. 530012492 Assy-Crankcase 51, 530071459 kit-Foam (Includes)
26. 530032125 Bearing-Inner (page 17 - #31 & 49)
(Incl. 15,16) 41, 530069817
shaft (incl 20,25,27) (page 17 - #8,9 & 28)
(Incl. 18,19,26) (page 16 - #l ,14, &33)
Kit-lmpel!er Ass’y-
17
Page 18

REPAIR PARTS
SEARS MODEL 358.794964
Vacuum / Slower
1
KEY
NO.
PART
NO.
1 530095534 Vac Sag w/Sirap
2 530095470 Efbow-Vac Tube
3 530095589 Tube-Lower Vac
4 530056901 Tube-Upper Vac
5 530095593 Tube-Blower
DESCRIPTION
18
Page 19

TABLA DE CONTENIDO
Declaración de Garantía 19 Mantenimiento 29
Identificación de los Símbolos
de Seguridad 19
Reglas de Seguridad 21 Declaración de Emisión 33
Montaje 23 Lista de Piezas 16
Uso 26 Repuestos y Encargos Contratapa
Almacenaje 31
Tabla Diagnóstica 32
DECLARACION DE GARANTIA
DOS AÑOS COMPLETO DE GARANTÍA PARA CORTADORA DE LÍNEA A
GASOLINA WEEDWACKER® DE CRAFTSMAN®
Si este producto falla por un defecto en el material o de mano de obra dentro dos
años a partir de la fecha de compra y este se ha utilizado y mantenido de acuer
do a! manual del operador, envíelo a cualquier tienda Sears, Centro de Servicios
Sears u otra tienda Craftsman en los Estados Unidos para su reparación gratuita
(o reemplazo si no es posible repararlo).
Esta garantía excluye la bujía y el filtro de aire, que son partes desechadles y
pueden desgastarse al usarlas normalmente en menos de dos años.
Esta garantía es aplicable por sólo 30 días desde la fecha de compra si este pro
ducto se usa con fines comerciales o se usa para arriendo.
Esta garantía le otorga derechos legales específicos, y usted también puede
tener otros derechos que varían de estado a estado.
Sears, Roebuck and Co., Hoffman Estafes, IL 60179
IDENTIFICACION DE LOS SIMBOLOS DE SEGURIDAD
AaDVERTENCIA: ¡Este aparato puede ser peligrosa! El
uso descuidado o indebido de esta herramienta puede causar
graves heridas.
Lea el manual del usuario cuidadosamente hasta que comprenda
perfectamente todas las advertencias e instrucciones de seguri
dad y las pueda cumplir, antes de poner el aparato en
funcionamiento. De no cumplir con todas las advertencias e
instrucciones de seguridad, correrá el riesgo de accidentes muy
graves. Guarde el manual de usuario.
ADVERTENCIA: El silenciador es extremadamente cal
iente durante el uso y después de usar el aparato. No toque el
silenciador, la protector del silenciador, o las superficies circun
dantes ni permita que el material combustible tal como gasoli
na o hierba seca hagan contacto.
El aparato arroja objetos violenta
mente. Los objetos arrojados
pueden cegarlo o herirlo a usted y
a terceros. Use protección de
oídos y anteojos de seguridad mar
car con Z87. Use siempre panta
lones pesados y largos, mangas
largas, botas y guantes.
- 19 ■
Page 20

IDENTIFICACION DE LOS SIMBOLOS DE SEGURIDAD
Zona de peligro por objetos arrojados al aire.
Mantenga a niños, espectadores y animales a
una distancia mínima de 10 metros {30 pies) al
poner en marcha o al usar el aparato. No
señale la boquilla en la dirección de la personas
o de animales domésticos.
Asegúrese de tener el cabello re
cogido por encima de los hombros.
No use joyería, ropa suelta ni ropa
con corbatas, tiras, borlas, etc. que
cuelgan libremente. Pueden enre
darse en las piezas en movimiento.
Siempre apague el aparato y desconecte la
bujía antes de dar mantenimiento.
AaDVERTENCIA: Detenga el motor antes de abrir la compuerta de entrada
de aire del aspirador. El motor deberá encontrarse detenido y las cuchillas de la
impulsor no deberán estar girando para evitar serios accidentes provocados por
las cuchillas girantes. Suavemente, gire el mango del destornillador hacia la
parte trasera del aparato para abrir la cerradura, mientras jala hacia arriba de la
cubierta de la entrada de aire del aspirador con su otra mano.
Cuando esté usando el accesorio de la aspirador, el aparato
está diseñado para recoger material seco como son hojas,
hierba, ramas pequeñas y pedazos pequeños de papel. No
aspire piedras, gravilla, metal, vidrio roto, etc., para evitar
daños severos al impulsor.
AaDVERTENCIA: Riesgo de incendios. Nunca mezcle,
vierta, o almacene el combustible o utilice el aparato cerca de
llamas o fuentes de chispas (inclusive los cigarrillos, las llamas
abiertas, y cualquier trabajo que cause chispas).
- 20 ■
Page 21

REGLAS DE SEGURIDAD
Á ADVERTENCIA: De no cumplir
con todas las Reglas y Precauciones
de Seguridad, correrá el riesgo de ac
cidentes muy graves.
CONOZCA SU APARATO
• Lea el manual del usuario cuidado
samente hasta que comprenda per
fectamente todas las advertencias e
instrucciones de seguridad y las
pueda cumplir, antes de poner el
aparato en funcionamiento.
• Limite el uso del aparato a aquellas
personas que comprendan todas las
advertencias e instrucciones de se
guridad en este manual y vayan a
cumplir con ellas.
A ADVERTENCIA: Inspeccione el
área antes de poner en matados los es
combros y objetas sólidos tales como
piedras, vidrio, alambre, etc,, que el apa
rato pueda arrojar al aire o hacer rebotar
causando heridas de este o cualquier
otro modo durante el uso del mismo.
Utilice su aparato como propulsor de
aire para:
• Barrer escombros o recortes de
hierba de caminos de entrada,
aceras, patios, etc.
• Soplar recortes de hierba, para u
hojas en montones, o para remover
escombros de esquinas, alrededor
de uniones o entre ladrillos.
Utilice su aparato como aspiradora para:
• Recoger material seco como hojas,
hierba, ramas pequeñas y pedazos
pequeños de papel.
• Para obtener mejores resultados al
usar la aspiradora, ponga el motor a
alta velocidad.
• Muévase lentamente de un lado a
otro sobre el material que de sea
aspirar. Evite el forzar el aparato a
recoger montones de desechos
pues esto podría obstruir el aparato.
• Para obtener mejores resultados,
mantenga el tubo de aspiración unos
3 cm (uno pulgada) más arriba del
suelo.
PIENSE ANTES DE PROCEDER
• Use siempre protección para los ojos
al hacer uso, servicio o mantenimi
ento del aparato. El uso de proteción
de ojos ayudará a prevenir la pérdi
da de la vista y/u otras heridas
graves, provocadas por piedras o
escombros que reboten en los ojos y
en la cara al ser propulsados por el
aparato. La protección para los ojos
debe ser marcada Z87.
• Use siempre protección en los pies.
No use el aparato descalzo ni con
sandalias.
• Use siempre mascarilla de filtración
o de protección para la cara al traba
jar en ambientes polvorientos.
• Mantenga el cabello por encima de
los hombros, atándolo para tal efecto
si es necesario. No use joyas, ropa
suelta, ni ropa con tiras, corbatas, bor
las, etc. que cuelgen libremente, por
que podrían quedar enredadas en las
piezas en movimiento del aparato.
• No use el aparato estando cansado,
enfermo, ansioso, ni bajo la infuencia del alcohol, las drogas u otros
medicamentos.
• Mantenga a niños, espectadores y
animales a una distancia mínima de
10 metros (30 pies) al poner en mar
cha o al usar el aparato. No señale
la boquilla en la dirección de la per
sonas o de animales domésticos.
MANEJE EL COMBUSTIBLE CON
EXTREMO CUIDADO, ES ALTA
MENTE INFLAMABLE
• Elimine todas las posibles fuentes de
chispan o llamas (inclusive los cigar
rillos, las llamas abertas, y cualquier
trabajo que cause chispas) en las
áreas donde se mezcla, vierte o al
macena el combustible.
• Mezcle y vierta el combustible al aire
libre, almacene el combustible en un
lugar fresco, seco y bien ventilado;
sue un recipiente aprobado para
combustible y marcado para todo
manejo de combustible.
• No fume mientras trabaja con el
combustible ni cuando esté hacien
do uso del aparato.
• Asegúrese que el aparato esté cor
rectamente armado y en buena con
dición de funcionamiento.
• No llene el tanque de combustible
mientras el motar se encuentre en
marcha.
• Evite derramar el combustible o el
aceite. Limpie todos los derrames de
combustible antes de poner el apa
rato en marcha.
• Aléjese por lo menos 3 metros (10
pies) del combustible y del lugar de
abastecimineto antes de poner e!
motor en marcha.
- 21
Page 22

• AlmacénG siempre combustible en
un recipiente aprobado para los líqui
dos inflamables.
HAGA USO SEGURO DE SU
APARATO
Á ADVERTENCIA: Detenga el
motor antes de abrir la compuerta de
entrada de aire del aspirador. El motor
deberá encontrarse detenido y las cu
chillas del impulsor no deberán estar
girando para evitar serios accidentes
provocados por las cuchillas girantes.
• Verifique por inspección, antes de
cada uso, que no haya piezas gasta
das, sueltas, ni dañadas o piezas
que falten. No use el aparato hasta
que este se encuentre en perfectas
condiciones de funcionamiento.
• Mantenga las superficies externas
libres de aceite y de combustible.
• Nunca ponga el motor en marcha ni
lo deje en marcha dentro de un recintocerrado o en una área sin venti
lación. Respirar los vapores del com
bustible le podría causar la muerte.
• Para evitar el choque por electrici
dad estática, no use guantes de
goma ni ningún otro guante aislado
al usar el aparato.
• No apoye el aparato con el motor en
marcha en ninguna superficie que
no esté limpia o que no sea sólida.
El aparato podría aspirar escombros
tales como gavilla, arena, polvo,
césped, etc. por la entrada de aspi
ración y arrojarlos por la salida de
propulsión, dañando el aparato y/u
otros objetos, o causando graves
heridas a espectadores o al usuario.
• Evite ambientes peligrosos. No use
el aparato en lugares sin ventilación
ni donde puda haber vapores explo
sivos o monóxido de carbono.
• No se extienda excesivamente ni use
el aparato en superficies inestables
tales como escaleras, árboles, de
clives acentuadas, techos, etc. Man
tenga el equilibrio, con ios pies en una
superficie estable en todo momento.
• Nunca coloque objetos dentro de los
tubos de propulsión; siempre dirija
los escombros en dirección contraria
a donde personas, animales, vidrierasu otros objetos sólidos tales como
árboles, automóviles, paredes, etc.
se encuentran. La fuerza del aire
puede arrojar o hacer rebotar pie
dras, tierra o ramas, hiriendo a per
sonas o animales, rompiendo vidrier
as o causando otros daños.
• Nunca ponga el aparato en marcha
sin toner todo el equipo correspon
diente instalado. Al usar el aparato
como propulsor de aire, sirmpre
instale los tubos de propulsión. Al usar
el equipo opcional de aspiración,
siempre instale los tubos y la bolsa de
aspiración. Asegúrese que la cremal
lera de la bolsa de aspiración se en
cuentre completamente cerrada.
• Inspeccione frecuentemente la aber
tura de entrada de aire, los tubos de
propulsión, los tubos de aspiración y
el tubo en forma de codo siempre
con el motor detenido y la bujía des
conectada. Mantenga las aberturas
de ventilación y los tubos de descar
ga libres de escombros que se pue
den acumular y limitar la circulación
debida de aire.
• Nunca coloque objeto alguno dentro
de la entrada de aire ya que de hacer
lo podría limitar la circulación d’aire y
dañar el aparato.
• Nunca use el aparato para esparcir
substancias químicas, fertilizantes u
otras substancias que puedan con
tener materiales tóxicos.
• Para evitar la propagación de incen
dios, no use el aparato cerca de ho
gueras de hogassecas o de mator
rales, de hogares de leña, de parril
las, barbacoas, ceniceros, etc.
• Use el aparato exclusivamente para
los fines descritos en este manual.
HAGA EL MANTENIMIENTO DEL
APARATO EN LA FORMA DEBIDA
Á ADVERTENCIA: Desconecte la
bujía antes de hacer cualquier man
tenimiento, con la excepción de ios
ajustes ai carburador.
• Permita que todo mantenimiento
aparte de los procedimientos recom
endados descritos en este manual
del usuario, sean efectuados por un
Centro de Servicio Sears.
• Use exclusivamente los repuestos
recomendados de la marca
Craftsman; el uso de cualquier otro
repuesto podrá invalidar la garantía
o dañar el aparato.
• Vacía el tanque de combustible
antes de almacenar el aparato. Con
suma el combustible restante en el
carburador poniendo el motor en
marcha y dejándolo en marhca has
ta que se éste se detenga.
- 22
Page 23

• No use ningún accesorio ni pieza adi
ciona! aparte de ios recomendados
por ef fabricante para usar con su
aparato.
• No aimacene el aparato ni el combus
tible en un recinto cerrado donde los
vapores el combustible puedan entrar
en contacto con chispas o llamas
abiertas procedentes de calentadores
de agua, motores o interruptores eléc
tricos, calefactores centrales, etc.
• Almacene el aparato en un lugar
seco, fuera del alcance de los niños.
AVISO DE SEGURIDAD: El estar ex
puesto a las vibraciones a través del
uso prolongado de herramientas de
fuerza a gasolina, puede causar daños
a los vasos sanguíneos o a los nervios
de los dedos, las manos y las coyuntu
ras a aquellas personal propensas a los
trastornos de la circulación o a las hin
chazones anormales. El uso prolongado
en climas fríos ha sido asociado con
daños a los vasos sanguíneos a perso
nas que por otra parte se encuentran en
perfecto estado de salud. Si ocurriera
síntomas tales como el entumecimiento,
el color, la falta de sentido en los dedos,
las manos o en las coyunturas, pare de
usar esta máquina de inmediato y pro
cure atención médica. Los sistemas de
anti-vibración no garantizan que se evi
tan tales problemas. Los usuarios que
hacen uso continuo y prolongado de las
herramientas de fuerza deben fiscalizar
atnetamente su estado físico y el estado
del aparato.
AVISO ESPECIAL: Para los usuarios
en Tierras Forestadas en los Estados
Unidos y en algunos estados, incluyen
do California (Códigos de Recursos
Públicos 4442 y 4443), Idaho, Maine,
Minnesota, Nueva Jersey, Oregón y
Washington; Se requiere a ciertos mo
tores de combustión interna operados
en tierras cubiertas por bosques, mator
rales y/o pasto, en las área anterior
mente mencionadas, que vengan equi
pados con rejilla anti-chispas, manten
ida en perfecto estado de funcionamien
to, o que el motor esté construido y
equipado para la prevención de incen
dios y mantenido correctamente. Con
sulte con las autoridades estatales o íocales acerca de los reglamente que se
reiacionene con estos requisitos. De no
cumplir con estos requisitos, usted es
tará en violación de la ley. Este aparato
no viene equipo de fábrica con rejilla
anti-chispa; sin embargo la rejilla anti
chispa viene disponible como pieza op
cional. Si se requiere rejilla antichispa en
la localidad donde usted se encuentra,
entre en contacto con el Servicio de
Sears para obtener el equipo de re
puestos correspondiente. La rejilla anti
chispa, los tubos de propulsión y las bo
quillas deberán estar instalados en el
aparato para estar en total cumplimiento
con ei reglamento.
MONTAJE
CONTENIDO DE LA CAJA
Verifique que todos los artículos de la
siguiente lista estén induidos;
Modelo 358.794964
• Propulsor de Aire
• Tubo de Propulsión
• Tubo en Forma de Codo
• Bolsa de Aspiración
• Tubo de Aspiración Superior
• Tubo de Aspiración Inferior
• Aceite de Motor a 2 Tiempos
AVISO: Es normal que el filtro de com
bustible golpetee en el tanque vacío.
MONTAJE
A ADVERTENCIA: Detenga el
motor y asegúrese de que las cuchil
las del impulsor no se encuentren gi
rando antes de abrir la compuerta de
entrada de aire del aspirador o de in
tentar introducir o remover los tubos
de aspiración o los tubos de propul
sión. Las cuchilias girantes podrían
causar serios accidentes.
A ADVERTENCIA: Si recibió el
aparato ya armado, repita todos los
pasos para asegurarse que el aparato
haya sido armado correctamente y
que todos los fíjafores se encuentren
bien fijos.
• Un destornillador se requiere para el
montaje.
MONTAJE DEL PROPULSOR
DE AIRE
INSTALACION DEL TUBO DE PRO
PULSION
Si usted ya ha montado e! aparato
para el uso como aspiradora, remueva
¡os tubos de la aspiradora y la bolsa
de colección.
- 23
Page 24

1. Alinee la moldura saliente del tubo
de propulsión con la ranura en la
salida de aíre del propulsor; gire
hasta encajar en su lugar.
AVISO: La perilla debe ser aflojada lo
suficiente que permita a! tubo se
introduzca en la salida de aire de la
propulsora. Gire la perilla hacia la iz
quierda para aflojar.
Salida de Aire
del Propulsión Tubo de
^ Propulsión
Ranura^ Moldura saliente
2. Asegúrese de apretar el tubo al
girar la perilla hacia la derecha.
3. Para remover el tubo, gire la perilla
hacia la izquierda para aflojar e! tubo
de propulsión; remueva el tubo.
MONTAJE DEL ASPIRADOR DE
AIRE
MONTAJE DE LA BOLSA DE ASPI
RACION
1. Abra la cremallera en la bolsa de
aspiración e introduzca el tubo en
forma de codo.
2. Empuje la punta pequeña del tubo
en forma de codo por la abertura
pequeña e! la bolsa de aspiración.
Tubo en forma
de Codo
5.
codo en la salida de aire del
propulsión. Asegúrese de que la
moldura del tubo en forma de codo
esté alineada con la ranura de
salida de aire de! propulsión.
6. Gire la perilla hacia la derecha para
apretar ef tubo en forma de codo.
MONTAJE DEL TUBO DE
ASPiRACION
1. Alinee el tubo de aspiración inferior
como se ilustra. Introduzca el tubo
de aspiración inferior dentro del
tubo de aspiración superior.
Tubo de aspiración
superior
Tubo de aspiración
2. Introduzca un destornillador dentro
del área de! cerradura de la
entrada de aire de! aspirador.
inferior
Salida de Aire
de! Propulsión
Area dei
cerradura
Cubtería de
entrada de
aire
AVISO; Asegúrese de que el borde de
la abertura pequeña de la bolsa de en
cuentre pegado a la parte en forma de
embudo del tubo en forma de codo, y
la moldura saliente del tubo en forma
de codo se encuentre al fondo.
3. Cierra la cremallera de la bolsa.
Asegúrese de que la cremallera se
encuentre completamente cerrada.
4. Retire el tubo de propulsión.
3.4.Suavemente, gire el mango del
destornillador hacia la parte trasera
del aparato para abrir la cerradura,
mientras jala hacia arriba de la
cubierta de la entrada de aire del
aspirador con su otra mano.
Sostenga la cubierta de entrada de
aire del aspirador abierta hasta que
el tubo de aspiración quede
instalado.
- 24 ■
Page 25

Entrada de Aire
del Aspirador
Poste de Retención
Coloque los ganchos que se
encuentran en el tubo de
aspiración superior en el poste de
retención del aparato.
Gire el tubo hasta que este fijo por
la cerradura de la entrada de aire.
PIVOTE
Ganchos
COMO CONVERTIR EL APARATO
DE USO DE ASPIRACION A USO DE
PROPULSION
1. Remueva los tubos de aspiración
introduciendo el destornillador
dentro del área del cerradura de la
entrada de aire.
2. Suavemente, gire el mango de!
destornillador hacia la parte trasera
del aparato para abrir el cerradura,
mientras jala hacia arriba el tubo de
aspiración superior con su otra
mano.
Remueva la bolsa de aspiración.
Cierre la cubierta de entrada de
aire del aspirador y asegúrese que
este cerrada completamente.
Vuelva a instalar los tubo de
5.
propulsión (vea INSTALACION del
TUBO DE PROPULSION).
AJUSTE DE LA BANDA DEL HOMBRO
(para uso con el aspirador única
mente)
1. Sujete el aparato como se ilustra
con el lado del silenciador alejado
de su cuerpo y de su ropa.
Pasando la banda del hombro
2.
sobre su cabeza, colóquela en su
hombro derecho.
Extienda el brazo izquierdo hacia
3.
la perte posterior de la bolsa de as
piración.
Ajuste la correa de hombro hasta
4.
que la costura entre la bolsa de as
piración y la correa quede entre el
pulgar y el índice.
Asegúrese de que el aire circule
5.
libremente desde el tubo en forma
de codo hasta la bolsa. Si la bolsa
se encuentra torcido, el aparato no
funcionará apropiadamente.
- 25 ■
Page 26

CONOZCA SU PROPULSOR
LEA EL MANUAL DEL USUARIO Y SUS REGLAS DE SEGURIDAD ANTES DE COMEN
ZAR A USAR ESTE APARATO. Compare ¡as ilustraciones siguientes con su aparato
para familiarizarse con la localización de los controles y ajustes del mismo.
Guarde este manual para futuras referencias.
CUCHILLAS DESMENUZADORAS
Su propulsor viene equipado con cuchillas desmenuzadoras como característica
standard. Cuando use este accesorio opcional del aspirador, las cuchillas des
menuzadoras reducirán los escombros en una proporción de hasta 16:1.
Palanca del
Cebador
Tapa de la
Mezcla de
Combustible
Mango
Trasero
Cuerda de
Arranque
PALANCA DEL ACELERADOR
La PALANCA DEL ACELERADOR SG USO
para seleccionar la velocidad deseada
y para detener el motor. Mueva la pa
lanca del acelerador a la posición ^
para máxima velocidad. Mueva la pa
lanca del acelerador a la posición
para conseguir la marcha lenta. Para
detener el motor, mueva la palanca del
acelerador a la posición STOP.
BOMBEADOR
El BOMBEADOR es usado para remover
aire de el carburador y de las líneas de
combustible y las llena de mezcla de
combustible. Esto le permite poner el
SUGERENCIAS UTILES
• Al usar el aparato para soplar o para
aspirar los escombros, sujete el apa
rato con el lado del silenciador aleja
do de su cuerpo y de su ropa (vea
POSICION DE uso en la página si
guiente).
• Se requiere que se use protección
de oídos para reducir el riesgo de la
pérdida de la audición asociado con
los niveles de sonido.
motor en marcha con menos tirones de
la cuerda de arranque. Active el boton
del bombeador apretándolo y huego
dejando que retome su forma original.
PALANCA DEL CEBADOR
El CEBADOR ayuda a suiministrar com
bustible al motor para facilitar el arran
que cuando el motor está frió. Adone el
cebador colocando la palanca en la po
sición FULL CHOKE. Después que el mo
tor intente arrancar, mueva la palanca
del cebador a la posición HALF CHOKE.
Después que e! motor se haya puesto
en marcha, ponga la palanca de! ceba
dor en la posición RUN.
Detenga el motor antes de instalar o
remover accesorios para reducir el
riesgo asociado con el contacto de
las piezas girantes. No use este apa
rato sin antes tener todos los protec
tores en su lugar.
Use el equipo de fuerza únicamente
en horas razonables - no muy tem
prano en la mañana o muy tarde en
la noche cuando otras personas
podrían ser perturbadas. Cumpla
- 26 ■
Page 27

con el horario enlistado por los esta
tutos locales. Usualmente se recom
ienda un horario normal de 9:00 a.m.
a 5:00 p.m., de lunes a sábado.
• Limite el uso de número de piezas
de equipo al mismo tiempo para re
ducir los niveles de ruido.
• Para efectuar el trabajo, use los pro
pulsores de fuerza a la menor veloci
dad de aceleración posible para re
ducir los niveles de sonido.
• Use rastrillos y escobas para aflojar
escombros antes de soplarlos con el
porpulsor de aire.
• En condiciones de mucho polvo,
moje ligeramente las superficies del
suelo o use el accesorio “mister”
donde haya agua disponible.
• Conserve agua usando el propulsor
en lugar de mangueras de agua para
las tantas aplicaciones del césped y
de jardinería, incluyendo áreas como
lo son canales de agua en los techos,
protección de tela metálica en las ven
tanas y puertas, patios, asadores a la
parrilla, balcones y jardines.
• Tenga cuidado con los niños, ani
males domésticos, ventanas abier
tas y carros recién lavados. Sople
los escombros con precaución.
• Use la extensión completa de la bo
quilla del propulsor para que la cor
riente de aire pueda trabajar cerca
del suelo.
• Después de usar los propulsores de
aire y otro tipo de equipo, ¡LIMPIE!
Deseche los escombros en re
ceptáculos de basura.
POSICION DE USO
ANTES DE PONER EL MOTOR EN
MARCHA
Á ADVERTENCIA: Asegúrese de
haber leído toda la información sobre el
combustible en las reglas de seguridad
antes de comenzar. Si no comprende
las reglas de seguridad, o intente
abastecer el aparato con combustible.
Llame al 1-800-235-5878,
ABASTECIMIENTO DEL MOTOR
A ADVERTENCIA: Remueva la
tapa del tanque de combustible lenta
mente al reabastecer combustible.
Este motor está habilitado para
funcionar con gasolina sin plomo. Antes
de comenzar con el uso, se deberá
mezclar la gasolina con un aceite de
sintético de buena calidad para motores
de 2 tiempos enfriados a aire.
Recomendamos el aceite de sintético
de la marca Craftsman. Mezcle la
gasolina con el aceite en la proporción
40:1. Se obtiene una proporción de 40:1
mezclando 3,2 onzas de aceite con
cada galón de gasolina sin plomo. Se
incluye con esta aparato un recipiente
de 3,2 onzas de aceite. Adiera el
contenido entero de este recipiente en 1
galón de gasolina para alcanzar la
mezcla apropiada del combustible. NO
USE aceite para automóviles ni para
barcas. Estos aceites dañarán el
motor.AI mezclar el combustible, siga las
instrucciones impresas en el recipiente.
Una vez haya añadido el aceite a la
gasolina, agite al recipiente brevemente
para asegurar que el combustible esté
completamente mezclado. Siempre lea
y siga las instrucciones de seguridad
que tienen que ver con el combustible
antes de abastecer el aparato.
IMPORTANTE
La experiencia indie que los combus
tibles mezclados con alcohol, (los lla
mados gasohol o los que tienen etanol
o metanol) pueden atraer humedad, lo
que puede causar la separación y la
formación de ácidos durante el alma
cenaje. La gasolina àcida puede dañar
el sistema de combustible del motor
durante el almacenaje. Para evitar pro
blemas con el motor, deberá vaciarse
el sistema de combustible antes de
almacenar el aparato por 30 días o
más. Vacía el tanque de combustible,
ponga el motor en marcha y déjelo en
marcha hasta que las líneas de com
bustible y el carburador queden
vacíos. Use combustible fresco en la
próxima temporada. Nunca use pro
ductos de limpieza de motor o carbu
rador en el tanque de combustible ya
que de hacerlo puede provocar daños
permanentes. Un estabilizador de
combustible es una alternativa acept
able para minimizar la formación de
depósitos de goma en el combustible
durante el almacenaje. El aceite de la
- 27 ■
Page 28

marcha Craftsman viene ya mezclado
con estabilizador de combustible. Vea
la sección de ALMACENAJE para más
información.
AVISO; El aparato se debe poner de
lado al agregar el combustible (vea la
ilustración abajo).
PARA DETENER EL MOTOR
• Para detener el motor, mueva la pa
lanca del acelerador a la posición
STOP.
PARA PONER EN MARCHA
EL MOTOR
Á ADVERTENCIA: Es obliqato
RIO asegurarse que los tubos estén
bien fijos antes de usar el aparato.
• Abastezca el motor. Apártese por lo
menos 3 metros (10 pies) del lugar
de abastecimiento.
• Sostenga el aparato en la posición
de arranque alustrada. Asegúrese
de que la boquilla de propulsión no
esté direccionada hacia personas,
animales, vidrieras y otros objetos
sólidos.
Á ADVERTENCIA: Al arrancar el
motor, sostenga el aparato como se
ilustra en la figura. Apoye el aparato
exclusivamente en una superficie lim
pia y sólida siempre que vaya a efectura el arranque y siempre que tenga
que apoyar el aparato con el motor en
marcha. Los escombros tales como
gravina, arena, tierra, césped, etc.,
pueden ser succionados por la entra
da de aire y arrojados por la salida de
propulsión, dañando el aparato u otros
bienes o causando graves heridas a
espectadores o al usuario.
PARA ARRANCAR CON MOTOR
FRIO
1. Lentamente, presione el botón del
bombeador 8 veces.
2. Mueva la palanca del cebador a la
posición FULL CHOKE.
3. Mueva la palanca del acelerador a
la posición ^ .
Palanca del cebador
4. Firmemente, tire del mango de la
cuerda de arranque hasta que el
motor intente arrancar, pero no
más de 5 tirones (en temperatures
bajo los 30“ F, 8 tirones).
AVISO; Si el motor intenta arancar
antes del quinto tirón del mango, pase
al siguiente paso de inmediato.
5. Mueva la palanca del cebador a la
posición HALF CHOKE.
6. Firmemente, tire del arranque has
ta que el motor arranque, pero no
más de 5 tirones (en temperatures
bajo los 30“ F, 10 tirones).
7. Después de calentar por 5 segun
dos, mueva la palanca del cebador
a la posición RUN.
8. Permita que el aparato siga en
marcha por otros 30 segundos en
la posición RUN antes de mover la
palanca de! acelerador a la posi
ción ,
- 28 ■
Page 29

Si el motor no ha arrancado después
del quinto tirón de! mango de arranque
(en la posición HALF CHOKE), repita el
procedimiento PARA ARRANCAR CON
MOTOR FRIO. Si el motor persiste sin
arrancar, proceda con el procedimien
to baho el título ARRANQUE DE MOTOR
AHOGADO.
9. Para detener el motor, mueva la pa
lanca del acelerador a la posición
STOP.
PARA ARRANCAR CON EL MOTOR
CALIENTE
AVISO: Si el tanque de combustible
está vacío, agregue el combustible;
luego, siga el procedimiento PARA
ARRANCAR CON MOTOR FRIO. No llene
el tanque de combustible mientras el
motor está caliente,
1. Mueva la palanca del acelerador a
la posición ^ .
2. Firememente, tire del mango de ar
ranque hasta que el motor arran
que, pero no más de 5 tirones.
AVISO: Si el motor no arranca, tire del
mango de arranque firmemento otras
5 veces. Si el motor persiste sin arran
car, probablemente se encuentre aho
gado, Proceda con la sección ARRAN
QUE DE MOTOR AHOGADO.
3. Para detener el motor, mueva la pa
lanca del acelerador a la posición
STOP.
ARRANQUE DE MOTOR AHOGADO
Los motores que se encuentren ahoga
dos podrán ponerse en marcha colo
cando la palanca del cebador en la po
sición RUN. Mueva la palanca del acel
erador a la posición ; luego, itre de
la cuerda de arranque hasta que el mo
tor se ponga en marcha. Después que
el motor se haya puesto en marcha,
mueva la palanca del acelerador a la
posición -4^ para permitir que el motor
quede en marcha lenta.
Para que el motor arranque, posible
mente tendrá que tirar de la cuerda de
arranqeu muchas veces. Esto de
pende de cuán ahogado se encuentre
el motor.
Si el aparato persiste sin arrancar, vea
la TABLA DIAGNÓSTICA de este manual
o llame al 1-800-235-5878.
MANTENIMIENTO
RESPONSABILIDAD DEL USUARIO
A ADVERTENCIA: Desconecte la bujía antes de realizar mantenimiento,
servicio, o ajustes.
TAREA DE CUIDADO Y MANTENIMIENTO CUANDO HACER
Verificar que no haya fijadores flojos ni piezas sueltas Antes de cada uso
Verificar que no haya piezas dañadas o gastadas Antes de cada uso
Inspeccione y limpie el aparato y sus placas Después de cada uso
Limpiar el filtro de aire Cada 5 horas de uso
Inspeccione silenciador v la rejilla antichispa Cada 50 horas de uso
Cambie la bujía Anualmente
Cambie el filtro del combustible Anualmente
Verifique los tornillos del silenciador Anualmente
ü ADVERTENCIA: Evite hacer
contacto con e! silenciador a no ser
que el motor y el silenciador se en
cuentre frío. El contacto con un silen
ciador caliente puede causar quema
duras de gran envergadura,
A ADVERTENCIA: Detenga el
motor y asegúrese de que las cuchil
las del impulsor no se encuentren gi
rando antes de abrir la compuerta de
entrada de aire del aspirador o de in
tentar introducir o remover los tubos
de aspiración o los tubos de propul
sión. Las cuchillas girantes podrían
causar serios accidentes. Siempre
desconecte la bujía antes de hacer cu
alquier mantenimiento o de tener ac
ceso a piezas movibles.
RECOMENDACIONESGENERALES
La garantía de este aparato no cubre
los artículos que han sido sometidos ai
abuso o a la negligencia por parte dei
usuario. Para recibir el valor completo
de la garantía, el usuario deberá man
tener el aparato según las instruc
- 29 ■
Page 30

ciones en este manual. Hará falta hac
er varios ajustes periódicamente para
mantener el aparato de forma debida.
VERIFICAR QUE NO HAYA
PIEZAS SUELTAS NI FIJADORES
FLOJOS
• Capucha de la Bujía
• Filtro de Aire
• Tornillos de la Caja
VERIFICAR QUE NO HAYA PIEZAS
DAÑADAS NI GASTADAS
Entre en contacto con el Centro de
Servicio Sears para ei reemplazo de
piezas dañadas o desgastadas.
• Palanca de! acelerador- Asegúrese
de que la palanca del acelerador fun
cione de forma apropiada moviéndola
a la posición STOP. Asegúrese de que
el motor se detenga; luego, vuelva a
poner en marcha el motor y continué.
• Tanque de Combustible. Para de
usar el aparato si hay indicios de
daños o pérdidas en el tanque de
combustible.
• Bolsa de la Aspiradora. Pare de usar
la bolsa de aspiración si se encuen
tra de alguna manera rota o dañada.
INSPECCIONE Y LIMPIE EL APARA
TO Y SUS PLACAS
• Después de que cada uso, inspec
cione la aparato completa para saber
si hay piezas flojas o dañadas. Limpie
el aparato y las placas usando un tra
po húmedo con un detergente suave.
• Séquelo con un trapo limpio.
LIMPIE EL FILTRO DE AIRE
Limpieza del filtro del aire:
1. Limpie la cubierta y el área conti
gua para evitar que caiga tierra en
la cámara de! carburador cuando
remueva la cubierta.
2. Retire las piezas como se ilustra.
AVISO; No limpie e! filtro de aire con
gasolina ni ningún otro solvente in
flamable, ya que de hacerlo puede
crear peligro de incendio y de emiciones evaporativas nocivas,
3. Lave el filtro con agua y jabón.
4. Permita que eí filtro se seque.
5. Aplique varias gotas de aceite al fil
tro; a oprima el filtro para distribuir el
aceite.
6. Reponga las piezas.
CAMBIE LA BUJIA
Cambie la bujía anualmente. La sepa
ración de los electrodos de la bujía
deberá ser de 0,025 de pulgada. Ef
encendido es fijo y no es ajustable.
1. Gire y luego retire la capucha de ia
bujía.
2. Retire la bujía del cilindro y desé
chela.
3. Cámbiela por una bujía CJ-6Y y
ajústela con una llave de 3/4 de pul
gada.
4. Vuelva a instalar la capucha.
CAMBIE EL FILTRO DEL
COMBUSTIBLE
Para cambiar el filtro de! combustible,
vacie el aparato de todo combustible
dejando el motor en marcha hasta que
se detenga. Luego, remueva el mon
taje de la tapa/retenedor del tanque.
Tire del filtro que se encuentra en el
tanque y retírelo de la línea de com
bustible. Instale un filtro nuevo en la
línea de combustible; vuelva a instalar
todas ias piezas.
Los filtros de aire sucios disminuyen el
rendimiento del motor e incrementan
el consumo de combustible y la pro
ducción de emisiones nocivas.
Siempre limpie el filtro de aire después
ded cada 5 horas de uso.
VERIFIQUE LOS TORNILLOS DE
MONTAJE DEL SILENCIADOR
Para prevenir daños, asegúrese anu
almente de que los tornillos de mon
taje del silenciador se encuentren se
guros y apropiadamente ajustados.
- 30 ■
Page 31

Huecos de los
Afloje y retire los 2 tornillos de la
tapa del silenciador.
Remueva la tapa del silenciador.
Apriete firmemente los 2 tornillos de
montaje.
ALMACENAJE
A ADVERTENCIA: Realice los si
guientes pasos después de cada uso:
• Permita que el motor se enfríe y fije
bien el aparato antes de guardarlo o
transportarlo.
• Guarde el aparato y el combustible
en un lugar bien ventilado donde los
vapores de combustible no puedan
entrar en contacto con chispas o lla
mas abiertas provenientes de termotanques, motores o interruptores
eléctricos, calefactores centrales,
etc.
• Guarde el aparato con todos los pro
tectores en su lugar y coloque el
aparato de modo que las piezas filo
sas no puedan causar heridas por
accidente.
• Guarde el aparato y el combustible
completamente fuera del alcance de
los niños.
ESTACIONAL ALMACENAJE
Prepare el aparato para el almacenaje
al final de la temporada o si ca a estar
sin usar por más de 30 días.
Si va a almacenar el aparato durante
un periodo largo de tiempo:
• Limpie el aparato por completo antes
del almacenaje.
• Almacene en un área limpia y seca.
• Aplique una pequeña cantidad de
aceite a las superficies externas
metálicas.
SISTEMA DE COMBUSTIBLE
Vacíe el sistema de combustible antes
de almacenar el aparato por 30 días o
más. Vacíe el tanque de combustible,
ponga el motor en marcha y déjelo en
marcha hasta que las líneas de com
bustible y el carburador estén vacíos.
4. Reinstale la tapa del silenciador y
los 2 tornillos. Apriete firmemente.
AJUSTE AL CARBURADOR
No hay tornillo para el ajuste de la
marcha lenta en su propulsor de aire.
La palanca del acelerador se utiliza
para ajuste de las revoluciones de la
motor. La palanca del acelerador se
puede colocar en una de cuatro
posiciones: PARE, MARCHA LENTA O
, ACELERADOR ABIERTO O ^ , y
una posición intermitente. Si su motor
no funciona correctamente o si usted
necesita más ayuda, entre en contacto
con un Centro de Servicio Sears o
llame a nuestro teléfono de ayuda al
consumidor, al 1-800-235-5878.
Use combustible fresco para la próxi
ma temporada.
Bajo el ABASTECIMIENTO DEL MOTOR,
en la sección de USO de este manual,
vea el mensaje marchado como IMPOR
TANTE referente al uso de gasohol en
su motor.
Los estabilizadores de combustible
son una alternativa aceptable para
minimizar la formación de los depósi
tos de goma durante el almacenaje.
Añada estabilizador a la gasolina en el
tanque de combustible o en el recipiente
para alacenaje de combustible. Siga las
instrucciones de mezcla que se encuen
tran en los envases del estabilizador.
Ponga el motor en marcha y déjelo en
marcha por lo menos 3 minutos des
pués de haberle puesto el estabilizador.
El aceite de la marca Craftsman 40:1
para motores a 2 tiempos (enfriados a
aire) ya viene mezclado con estabiliza
dor de combustible. Si no usa este
aceite, entonces puede añadir un es
tabilizador al tanque de combustible.
MOTOR
• Retire la bujía y vierta una cucharad-
ita de aceite 40:1 para motores de 2
tiempos (enfriados a aire) por la ab
ertura de la bujía. Lentamente tíre de
la cuerda de arranque de 8 a 10
veces para distribuir el aceite.
• Reemplace la bujía con otra nueva
del tipo y de la gama de calor recom
endados.
• Limpie el filtro de aire.
• Examine todo el aparato para verifi
car que no hayan tornillos, quebra
das o gastadas.
- 31
Page 32

Al principio de la próxima temporada,
use exclusivamente combustible
nuevo con la proporción correcta de
gasolina y aceite.
OTROS
• No guarde la gasolina de una tempo
rada a la siguiente.
• Cambie el recipiente de gasolina si
se empieza a oxidar.
TABLA DIAGNOSTICA
A ADVERTENCIA: Siempre apague el aparato y desconecte la bujía antes
de hacer cualquiera de las reparaciones recomendadas a continuación que
no requieran que la unidad esté en operación.
SINTOMA CAUSA SOLUCION
El motor no
arranca,
El motor no
anda en
marcha lenta
como debe.
El motor no
acelera, le
falta
potencia 0
se para bajo
carga.
El motor
humea ex
cesiva
mente
El motor
marcha con
temperatura
elevada.
1, El motor está ahogado.
2, El tanque de combustible
está vacío.
3, La bujía no está haciendo
chispa.
4, El combustible no está
llegando al carburador,
5, La compresión está baja.
1. El combustible no está
llegando al carburador.
2. El carburador requier
ajuste.
3. Las lunas del cigüeñal
están gastadas.
4. La compresión está baja.
1. El filtro de aire está sucio.
2. El combustible no está
llegando al carburador,
3. La bujía está carbonizada.
4. El carburador requiere
ajuste.
5. Acumulación de carbón.
6. La compresión está baja.
1. El cebador está parcial
mente accionado.
2. La mezcla de combustible
se ha hecho incorrecta
mente.
3. El filtro de aire está sucio.
4. El carburador requiere
ajuste.
1. La mezcla de combustible
está se he hecho
incorrectamente.
2. Se ha instafado la bujía
incorrecta.
3. El carburador requiere
ajuste.
4. Acumulación de carbón.
1. Vea “Arranque de Motor Ahogado”
en la sección Uso.
2. Llene el tanque con la mezcla
correcta de combustible.
3. Instale una bujía nueva.
4. Verifique si e! filtro de combustible no
esté sucio; cámbielo. Verifique si hay
dobleces en la línea de combustible
0 si está partida; repárela o cámbiela.
5. Entre en contacto con el Servicio
Sears (vea parte trasera del manual).
1. Verifique si el filtro de combustible no
esté sucio; cámbielo. Verifique si hay
dobleces en la línea de combustible
o si está partida; repárela o cámbiela.
2. Entre en contacto con el Servicio
Sears (vea parte trasera del manual).
3. Entre en contacto con el Servicio
Sears (vea parte trasera del manual).
4. Entre en contacto con el Servicio
Sears (vea parte trasera del manual).
1. Limpie 0 cambie el filtro de aire.
2. Verifique s¡ e! filtro de combustible no
esté sucio; cámbielo. Verifique si hay
dobleces en la línea de combustibie
o si está partida; repárela o cámbiela.
3. Limpie 0 cambie la bujía y calibre
la separación.
4. Entre en contacto con el Servicio
Sears (vea parte trasera del manual).
5. Entre en contacto con el Servicio
Sears (vea parte trasera del manual).
e. Entre en contacto con el Servicio
Sears (vea parte trasera del manual).
1. Ajuste el cebador.
2. Vacié el tanque de combustible y
llénelo de combustible con la mezcla
correcta.
3. Limpie 0 cambie el filtro de aire.
4. Entre en contacto con el Servicio
Sears (vea parte trasera de! manual).
1. Vea “Abastecimiento del Motor” en la
sección Uso.
2. Cambie por la bujía correcta.
3. Entre en contacto con el Servicio
Sears (vea parte trasera del manual).
4. Entre en contacto con el Servido
Sears (vea parte trasera del manual).
- 32
Page 33

DECLARACION DE GARANTIA DE CONTROL
DE EMISION U.S. EPA/CALIFORNIA
sus DERECHOS Y OBLIGACIONES
DE GARANTIA: La Agencia de Pro
tección Ambiental de los Estados Uni
dos, la Junta de Recursos Ambien
tales de California y Sears, Roebuck
and Co., U.S.A., se complacen en ex
plicar la garantía con la que cuenta el
sistema de control de emisión en su
motor pequeño, modelo 2007 y más
adelante, para uso fuera de carretera.
En California, todos los motores pe
queños para uso fuera de carretera
deben ser diseñados, construidos y
equipados para satisfacer las riguro
sas normas antihumo que posee el es
tado. Sears deberá garantizar el siste
ma de control de emisión en su máqui
na de motor pequeño para uso fuera
de carretera por los períodos de tiem
po que explicamos a continuación y
con la condición de que su máquina
de motor pequeño para uso fuera de
carretera no haya sufrido ningún tipo
de abuso, negligencia o mantenimien
to inapropiado. Su sistema de control
de emisión incluye piezas tales como
el carburador, el sistema de ignición y
el tanque de combustible (solamente
en California). Donde exista una condi
ción que requiera reparación bajo ga
rantía, Sears reparará gratis su motor
pequeño para uso fuera de carretera.
Los gatos cubiertos bajo la garantía
incluyen el diagnóstico, las piezas y
labor. CUBIERTA DE GARANTIA DEL
FABRICANTE: Si cualquier pieza rela
cionada con el sistema de emisión de
su motor (como hemos enumerado en
la lista de piezas de control de emisión
bajo garantía) se encontrara defectuo
sa o defectos en el material o en la la
bor del motor causaran que tal pieza
comenzara a fallar, la pieza será repa
rada o reemplazada por Sears. GA
RANTIA DE RESPONSABILIDAD DE
DEL DUEÑO: Como dueño de una
máquina de motor pequeño para uso
fuera de carretera, usted será re
sponsable por el mantenimiento ade
cuado en los períodos previamente
programados y enumerados en su
manual del usuario. Sears recomien
da que guarde todos los recibos que
indiquen que se ha desempeñado
mantenimiento en su máquina de mo
tor pequeño para uso fuera de carret
era, pero Sears no podrá negar el ser
vicio bajo garantía únicamente a cau
sa de la falta de recibos o por el in
cumplimiento de su parte en asegu
rarse que el mantenimiento programa
do haya sido desempeñado. Como
dueño de una máquina de motor pe
queño para uso fuera de carretera,
usted deberá contar con el conoci
miento de que Sears puede negar la
cubierta bajo garantía si su máquina
de motor pequeño para uso fuera de
carretera o alguna pieza de la misma
ha dejado de funcionar debido al abu
so, negligencia, mantenimiento inapro
piado, modificaciones no aprobadas o
el uso de piezas que no hayan sido
fabricadas o aprobadas por el fabri
cante original del equipo. Es respon
sabilidad suya el llevar su máquina de
motor pequeño para uso fuera de car
retera aun centro de reparación auto
rizado Sears tan pronto como se pres
ente el problema. Las reparaciones
bajo garantía deberán ser completa
das en un período de tiempo razon
able, que no exceda los 30 días. Si
cuenta usted con alguna pregunta en
relación a sus derechos y responsabi
lidades de garantía, usted deberá
comunicarse con su centro de servicio
autorizado más cercano o llamar a
Sears al 1 -800-469-4663.
DEL COMIENZA DE LA GARANTIA:
El período de garantía comienza en la
fecha de compra de la máquina de
motor pequeño para uso fuera de car
retera. DURACION DE LA GARAN
TIA: Esta garantía cuenta con un per
íodo de duración de dos años comen
zando en la fecha inicial de compra.
QUE CUBRE LA GARANTIA: REPA
RACION O REEMPLAZO DE PIE
ZAS. La reparación o el reemplazo de
cualquier pieza garantizada serán de
sempeñados y ofrecidos al dueño sin
costo alguno en un Centro de Servicio
Sears. Si cuenta usted con alguna
pregunta en relación a sus derechos y
responsabilidades de garantía, usted
deberá comunicarse con su centro de
servicio autorizado más cercano o lla
mar a Sears ai 1 -800-469-4663.
PERIODO DE GARANTIA: Cualquier
pieza garantizada que no esté progra
mada para ser reemplazada como
parte del mantenimiento requerido, o
que esté programada únicamente para
- 33
FECHA
Page 34

inspección regular para efectos de “re
paración o reemplazo si fuera necesa
rio” deberá garantizarse por un perío
do de dos años. Cuaiquier pieza ga
rantizada que esté programada para
ser reemplazada como parte del man
tenimiento requerido deberá estar ga
rantizada por el período de tiempo que
comienza en la fecha de compra inicial
hasta la fecha del primer reemplazo
programado para dicha pieza. DIAG
NOSTICO: No se deberá cobrar al
dueño ningún tipo de cargos por la la
bor de diagnóstico la cual determine
que una pieza garantizada se encuen
tra defectuosa si el trabajo de
diagnóstico ha sido desempeñado por
un Centro de Servicio Sears.
DANOS
POR CONSECUECIA: Sears podrá
ser responsable de daños ocurridos a
otras piezas del motor causados por la
falla de una pieza garantizada que se
encuentre bajo el período de garantía.
QUE NO CUBRE LA GARANTIA: To
das las fallas causadas por el abuso,
negligencia o mantenimiento inapro
piado no están cubiertas.
PIEZAS
AÑADIDAS O MODIFICADAS; El uso
de piezas añadidas o la modificación
de piezas podrán servir como base
para que se anule la reclamación de
garantía. La garantía de Sears no se
responsabiliza por el mal funciona
miento debido al uso de piezas añadi
das o de piezas modificadas.
La información en la etiqueta del producto indica las normas de certificación de su motor.
Ejemplo: (Año) EPA Fase 1 o Fase 2 y/o CALIFORNIA.
Información Importante en relación
a! motor. Este motor satisface las
regulaciones de emisión para mo
tores pequeños operados fuera de
la carretera.
Horas de la durabilidad del motor
Familia
# De Serie
COMO ENTABLAR UNA RECLAMA
CION: Si cuenta usted con alguna pre
gunta relacionada con sus derechos y
responsabilidades de garantía, usted
deberá entrar en contacto con su cen
tro de servicio autorizado más cercano
0 llamar a Sears a! 1 -800-469-4663.
DONDE OBTENER SERVICIO DE
GARANTIA; Servicio o reparaciones
bajo garantía deberán ser provistas en
todos los Centros de Servicio Sears.
Por favor comuniqúese al
1 -800-469-4663. MANTENIMIENTO,
REEMPLAZO Y REPARACION DE
PIEZAS RELACIONADAS CON LA
EMISION: Cualquier pieza de repues
to Sears aprobada y utilizada en el de
sempeño de cualquier servicio de
mantenimiento o servicio de repara
ción bajo garantía de piezas relaciona
das con la emisión será provisto sin
costo alguno a! dueño si la pieza se
encuentra bajo garantía. LISTA SE
PIEZAS DE CONTROL DE EMISION
GARANTIZADAS: Carburador, Siste
ma de Ignición: Bujía (cubierta hasta la
fecha de mantenimiento programada),
Módulo de Ignición, Silenciador in
cluyendo el Catalizador, Tanque de
Combustible (solamente en California).
DECLARACION DE MANTENIMIEN
TO: El dueño es responsable de adqui
rir todo el mantenimiento requerido
como lo define en el manual del usuario.
Vea el manual de instrucciones
para especificaciones de ■--
mantenimiento y ajustes.
Se certifica este motor para satisfacer los requisitos de emisión para los uso
siguientes;
]5^ Moderado (50 horas)
□ Intermedio (125 horas)
THE AlFt INDEX OF THIS ENGINE IS 3
■ ■■ 41 I 61 I 81 I It
THE LOWER THE AIR INDEX. THE LESS POLLUTION
REFER TO OWNER'S MANUAL FOR MAINTENANCE
SPECIFICATIONS AND ADJUSTMENTS.
I I Extendido (300 horas)
- 34 ■
Page 35

Page 36

Get it fixed, at your home or ours!
Your Home
For repair - In your home - of alt major brand appliances,
lawn and garden equipment, or heating and cooling systems,
no matter who made it, no matter who sold it!
For the replacement parts, accessories and
owner’s manuals that you need to do-it-yourself.
For Sears professional installation of home appliances
and items like garage door openers and water heaters.
1-800-4-MY-HOME® Anytime, day or night
(1-800-469-4663) (U.S.A. and Canada)
www.sears.comwww.sears.ca
Our Home
For repair of carry-in products like vacuums, lawn equipment,
and electronics, call or go on-line for the nearest
Sears Parts and Repair Center.
1 -800-488-1222 Anytime, day or night (U.S.A. only)
www.sears.com
To purchase a protection agreement (U.S.A.)
or maintenance agreement (Canada) on a product serviced by Sears;
1-800-827-6655 (U.S A) 1-800-361-6665 (Canada)
Para pedir servido de reparadón
a domidlio, y para ordenar piezas:
1-888-SU-HOGAR*
(1-888-7846427)
© Sears, Roebuck and Co.
® Registered Trademark / Trademark / ™ Service Mark of Sears, Roebuck and Co.
® Marca Registrada / Marca de Fábrica / Marca de Servicio de Sears, Roebuck and Co.
“° Marque de commerce / “ Marque déposée de Sears, Roebuck and Co.
Au Canada pour service en français:
1-800-LE-FOYER'^c
(1-8006336937)
www.sears.ca
 Loading...