

Page 1

PERATOR'S MANUAL
MANUAL DEL OPERADOR
EXTENDED REACH HEDGE TRIMMER
Model No.
315.795490
NOmero de modelo
315.795490
A
WARNING: To reduce the risk
of injury, the user must read and
understand the operator's manual
before using this product.
!
A
ADVERTENCIA" Para reducir el
riesgo de lesiones, el usuario debe leer
y comprender el manual del operador
antes de usar este producto.
Customer Help Line: 1-800-932-3188
Tel_fono de atenci6n al consumidor: 1-800-932-3188
Sears, Roebuck and Co,, 3333 Beverly Rd,, Hoffman Estates, IL 60179 USA
Visit the Craftsman web page: www.sears.com/craftsman
Visite el sitio web deCraftsman: www.sears.com/craftsman
Save this manual for future reference
987000_603
02-02-09 (REV:00)
Guarde este manual para futuras consulta
C
Page 2

ENGLISH ESPAI_OL
[] Warranty ...................................................................... 2
[] Introduction ................................................................. 2
[] Garant[a ...................................................................... 2
[] Introducci6n ................................................................ 2
[] General Safety Rules .................................................. 3
[] Specific Safety Rules .................................................. 4
[] Symbols .................................................................. 5-6
[] Features ...................................................................... 6
[] Electrical ..................................................................... 7
[] Assembly .................................................................... 8
[] Operation .............................................................. 9-10
[] Maintenance ............................................................. 10
[] Exploded View and Parts List ................................... 11
[] Figure numbers (illustrations) .................................... i-ii
[] Reglas de seguridad generales .................................. 3
[] Reglas de seguridad espec[ficas ................................ 4
[] S[mbolos ................................................................. 5-6
[] Caracter[sticas ............................................................ 6
[] Aspectos el_ctricos .................................................... 7
[] Armado ....................................................................... 8
[] Funcionamiento .................................................... 9-10
[] Mantenimiento .......................................................... 10
[] Figura numeras (ilustraciones) .................................. i-ii
[] Pedidos de piezas / Servicio ................. P_g. posterior
[] Parts Ordering / Service .............................. Back Page
TWO-YEAR FULL WARRANTY ON CRAFTSMAN TOOL
If this Craftsman tool fails to give complete satisfaction within two year from date of purchase, RETURN IT TO ANY
SEARS STORE OR OTHER CRAFTSMAN OUTLET IN THE UNITED STATES FOR FREE REPLACEMENT.
If this Craftsman tool is used for commercial or rental purposes, this warranty applies for only 90 days from the date of
purchase.
This warranty gives you specific legal rights, and you may also have other rights which vary from state to state.
Sears, Roebuck and Co., Hoffman Estates, IL 60179
DOS ANO DEGARANT|ATOTAL EN LAS HERRAMIENTAS CRAFTSMAN
Si esta herramienta Craftsman no le brinda satisfacci6n completa dentro de un perfodo de un a_o a partir de lafecha de compra,
REGRieSELAA CUALQUIER TIENDA SEARS U OTRO LUGAR DEVENTADE PRODUCTOS CRAFTSMAN EN ESTADOS
UNIDOS, DONDE LE SERA REEMPLAZADA GRATUITAMENTE.
Si esta herramienta Craftsman se emplea para fines comerciales o se alquita, esta garantfa es valida sotamente durante 90 dfas a
partir de la fecha de compra.
Esta garant[a le confiere derechos legales especfficos, y es posibte que usted goce de otros derechos, los cuales pueden variar de
estado a estado.
Sears, Roebuck and Co., Hoffman Estates, IL 60179 USA
This tool has many features for making its use more pleasant and enjoyable. Safety, performance, and dependability
have been given top priority in the design of this product making it easy to maintain and operate.
Esta herramienta ofrece numerosascaracterfsticas para hacer mb.sagradable y ptacentero su uso. En el dise_o de este producto se
ha conferido prioridad a la seguridad, el desempe_o y lafiabilidad, pot Iocual se facilita su manejoy mantenimiento.
Page 3
A
WARNING: Read and understand all instructions.
Failure to follow all instructions listed below may result in
electric shock, fire, and/or serious personal injury.
READ ALL iNSTRUCTIONS
[] For safe operation, read and understand all instructions
before using this product. Be familiar with all controls and
proper use of the machine. Follow all safety instructions.
Failure to follow all safety instructions listed below, can
result in serious personal injury.
[] Do not allow children or untrained individuals to use this
unit.
[] Thoroughly inspect the area where the equipment is to
be used and remove all foreign objects.
[] Wear safety glasses or goggles with side shields that are
marked to comply with ANSI Z87.1 standard as well as
head protection when operating this product.
[] Dress properly -- Wear heavy long pants, long sleeves,
boots, and gloves. Do not wear loose fitting clothing,
short pants, sandals or go barefoot. Do not wear jewelry
of any kind.
[] Secure long hairaboveshoulderlevelto prevententangle-
ment in moving parts.
[] Keep Children Away -- Keep all bystanders, children,
and pets at least 50 ft. away.
[] Stay Alert -- Watch what you are doing; use common
sense. Do not operate this unit when you are tired, ill, or
under the influence of alcohol, drugs, or medication.
[] Do not operate in poor lighting.
[] Don't Overreach -- Keep firm footing and balance. Do
not overreach. Overreaching can result in loss of balance
or exposure to hot surfaces.
[] Keep all parts of your body away from any moving part.
[] Inspect the unit before each use for loose fasteners, etc.
Replace any damaged parts before use.
[] Store Idle Hedge Trimmer Indoors -- When not in use,
product should be stored indoors in a dry, locked up
place--out of the reach of children.
[] Use only original manufacturer's replacement parts. Failure
to do so may cause poor performance, possible injury,
and will void your warranty.
[] Do not, under any circumstance, use any attachment or
accessory on this product which was not provided with
the product or identified as appropriate for use with this
product in the operator's manual.
[] Avoid dangerous environments -- Do not usethe product
in damp or wet locations. Do not use in rain.
[] Use the right appliance -- Do not use the hedge trimmer
for any job except that for which it is intended.
[] Do not use on steps, a ladder, or unstable support. Stable
footing on a solid surface enables better control of the
product in unexpected situations.
3 - English
[] Do not force hedge trimmer -- It will do the job better
and with less likelihood of a risk of injury at the rate for
which it was designed.
A
WARNING: Keep hands away from cutting area.
Keep both hands on handles when power is on.
[] Risk of Cut. Keep hands away from blades. Do not reach
underneath work or around or over the blade while blade
is rotating. Do not attempt to remove cut material when
blade is moving. Make sure trimmer is off and power cord
isunplugged when clearing jammed materials from blades.
Do not grasp the exposed cutting blades or cutting edges
when picking up or holding the hedge trimmer.
WARNING: Blade coasts after being turned off.
Keep all body parts clear of blades to avoid serious injury.
[] To reduce the risk of electric shock, this product has
a polarized plug (one blade is wider than the other)
and will require the use of a polarized extension cord.
The plug will fit into a polarized extension cord only
one way. If the plug does not fit fully into the extension
cord, reverse the plug. If the plug still does not fit,
obtain a correct polarized extension cord. A polarized
extension cord will require the use of a polarized wall
outlet. This plug will fit into the polarized wall outlet
only one way. If the plug does not fit fully into the wall
outlet, reverse the plug. If the plug still does not fit,
contact a qualified electrician to install the proper wall
outlet. Do not change the equipment plug, extension
cord receptacle, or extension cord plug in any way.
[] Do not abuse the cord -- Never use the cord to carry
the product or to disconnect the plug from an outlet.
Keep cord away from heat, oil, sharp edges, or moving
parts. Replace damaged cords immediately. Damaged
cords increase the risk of electric shock.
[] Extension Cord -- Make sure your extension cord is
in good condition. When using an extension cord, be
sure to use one heavy enough to carry the current your
product will draw. A wire gauge size (A.W.G.) of at least
16 is recommended for an extension cord 50 feet or
less in length. If in doubt, use the next heavier gauge.
The smaller the gauge number, the heavier the cord.
An undersized cord will cause a drop in line voltage
resulting in loss of power and overheating.
A
WARNING:To reduce the risk of electric shock. Use
outdoor extension cords marked SW-A, SOW-A, STW-A,
STOW-A, SJW-A, SJTW-A, or SJTOW-A. These cords are
rated for outdoor use.
[] Ground Fault Circuit Interrupter (GFC() protection
should be provided on the circuit(s) or outlet(s) to be
used for the hedge trimmer. Receptacles are available
having built-in GFCI protection and may be used for
this measure of safety.
[] Inspect extension cords periodically and replace if
damaged. Keep handles dry, clean, and free from oil or
grease.
Page 4

[]
Use non-slip, heaw-duty protective gloves when operating
the hedge trimmer and when installing or removing
blades.
[] Always stop the motor and disconnect from power
supply when not in use, before attempting to remove
any obstruction caught or jammed in the blade, or before
removing and installing the blade.
[] Replace any bladethat has been damaged. Always make
sure blade is installed correctly and securely fastened
before each use. Failure to do so can cause serious
injury.
[] Do not grasp the exposed cutting blades or cutting
edges when picking up or holding the product.
[] To protect yourself from electrocution, do not operate
within 50 feet of overhead electrical lines.
[] Never cut any material over 1/2 in. diameter.
[] Maintain a firm grip on the front and rear handle while
cutting with hedge trimmer. Keep the blade away from
body.
[] Know how to stop the unit quickly in an emergency.
[] To avoid accidental starting, never carry plugged in hedge
trimmer with finger on switch. Be sure switch is off when
plugging in.
[] Maintain hedgetrimmerwith care. Keepcutting edgesharp
and clean for best performance and to reduce the risk
of injury. Follow instructions for lubricating and changing
accessories. Inspect hedge trim mer cord period ically and,
if damaged, have it repaired by an authorized service
facility. Inspect extension cords periodically and replace
if damaged. Keep handles dry, clean, and free from oil
and grease.
Check for damaged or loose parts -- Before further
use of the hedge trimmer, a guard or other part that is
damaged should be carefully checked to determine that
it will operate properly and perform its intended function.
Check for alignment of moving parts, binding of moving
parts, breakage of parts, mounting, and any other condition
that may affect its operation. A guard or other part that
is damaged should be properly repaired or replaced by
an authorized service center unless indicated elsewhere
in this manual.
[] Disconnect hedge trimmer -- Disconnect the plug
from power source before making any adjustments,
changing accessories, or storing the hedge trimmer.
Such preventive safety measures reduce the risk of
starting the product accidentally.
[] Service on the product must be performed by qualified
repair personnel only. Service or maintenance
performed by unqualified personnel could result in
injury to the user or damage to the product.
[] If the power supply cord is damaged, it must be replaced
only by the manufacturer or by an authorized service
center to avoid risk.
[]
When Servicing use only identical replacement parts.
[]
Save these instructions. Refer to them frequently and use
them to instruct others who may use this tool. If you loan
someone this tool, loan them these instructions.
4 - English
Page 5
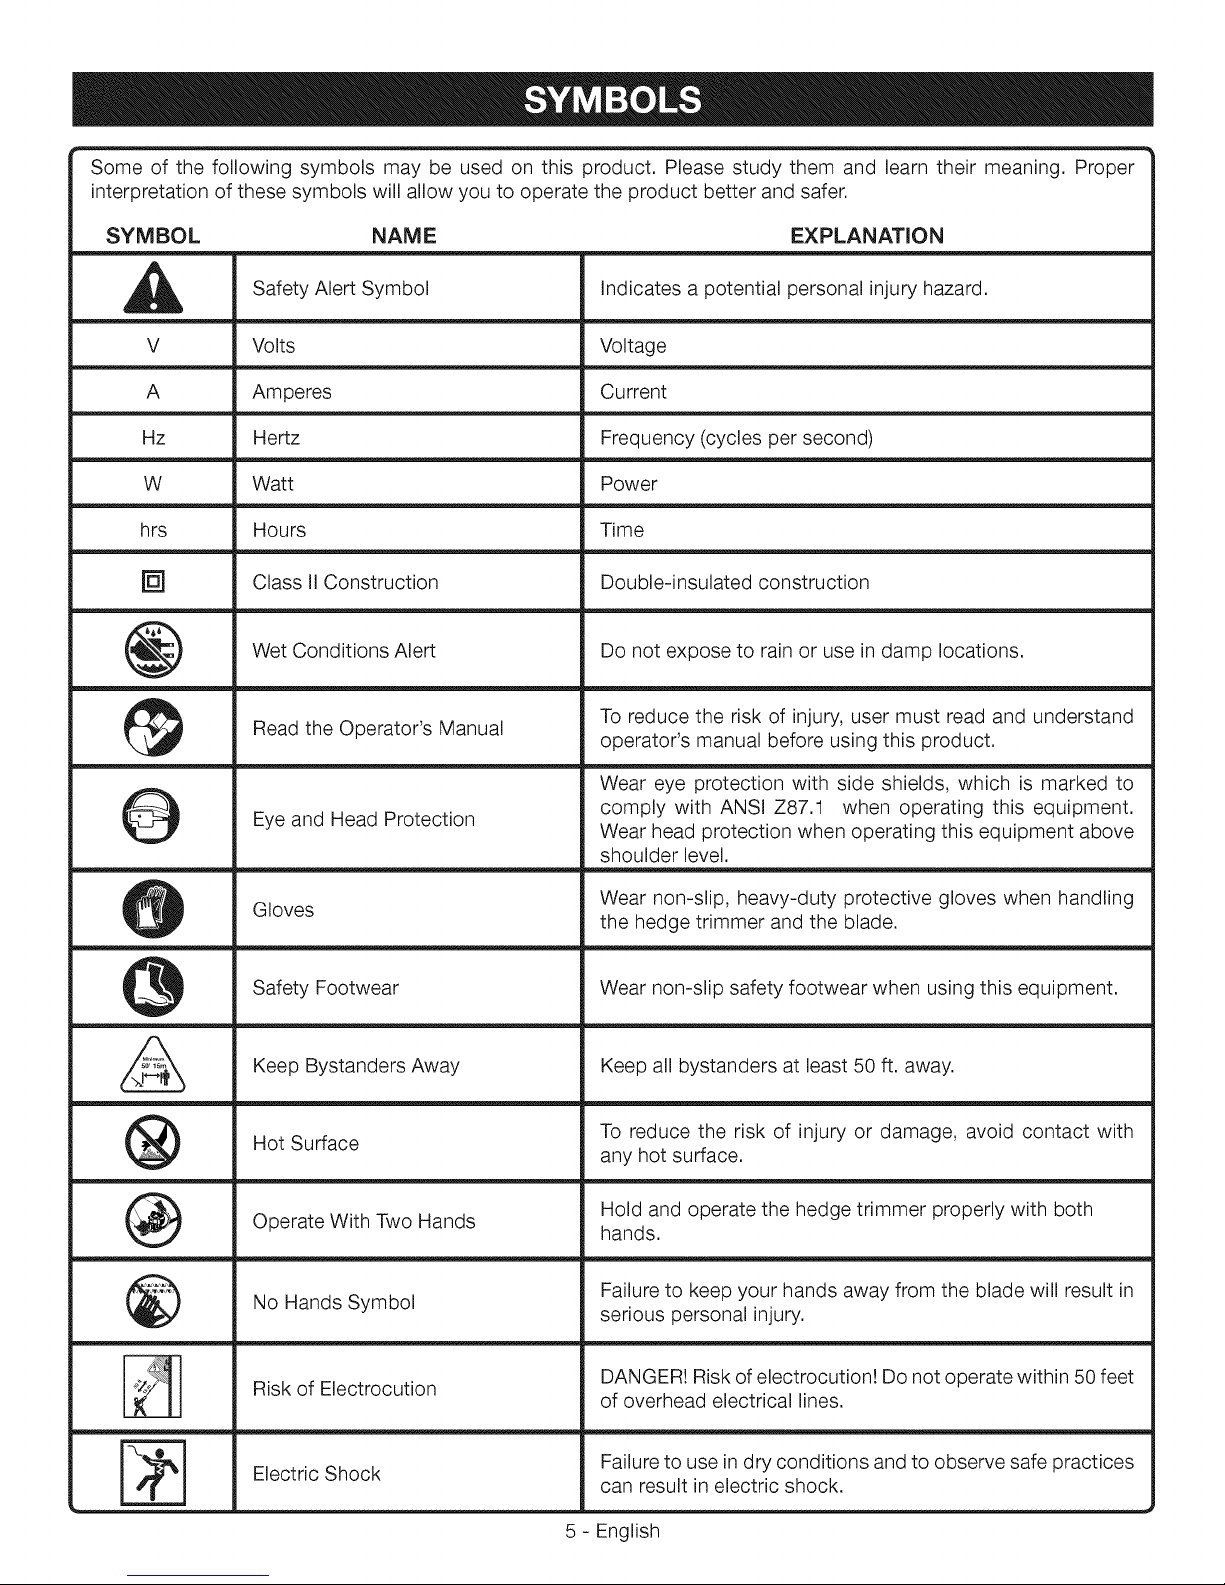
Someofthefollowingsymbolsmaybeusedonthisproduct.Pleasestudythemandlearntheirmeaning.Proper
interpretationofthesesymbolswillallowyouto operatetheproductbetterandsafer.
SYMBOL
V
A
Hz
W
hrs
[]
@
0
NAME EXPLANATION
Safety Alert Symbol
Volts
Amperes
Hertz
Watt
Hours
Class II Construction
Wet Conditions Alert
Read the Operator's Manual
Eye and Head Protection
Indicates a potential personal injury hazard.
Voltage
Current
Frequency (cycles per second)
Power
Time
Double-insulated construction
Do not expose to rain or use in damp locations.
To reduce the risk of injury, user must read and understand
operator's manual before using this product.
Wear eye protection with side shields, which is marked to
comply with ANSI Z87.1 when operating this equipment.
Wear head protection when operating this equipment above
shoulder level.
@
@
&
®
@
Z
Gloves
Safety Footwear
Keep Bystanders Away
Hot Surface
Operate With Two Hands
No Hands Symbol
Risk of Electrocution
Electric Shock
Wear non-slip, heavy-duty protective gloves when handling
the hedge trimmer and the blade.
Wear non-slip safety footwear when using this equipment.
Keep all bystanders at least 50 ft. away.
To reduce the risk of injury or damage, avoid contact with
any hot surface.
Hold and operate the hedge trimmer properly with both
hands.
Failure to keep your hands away from the blade will result in
serious personal injury.
DANGER! Risk of electrocution! Do not operate within 50 feet
of overhead electrical lines.
Failure to use in dry conditions and to observe safe practices
can result in electric shock.
5 - English
Page 6
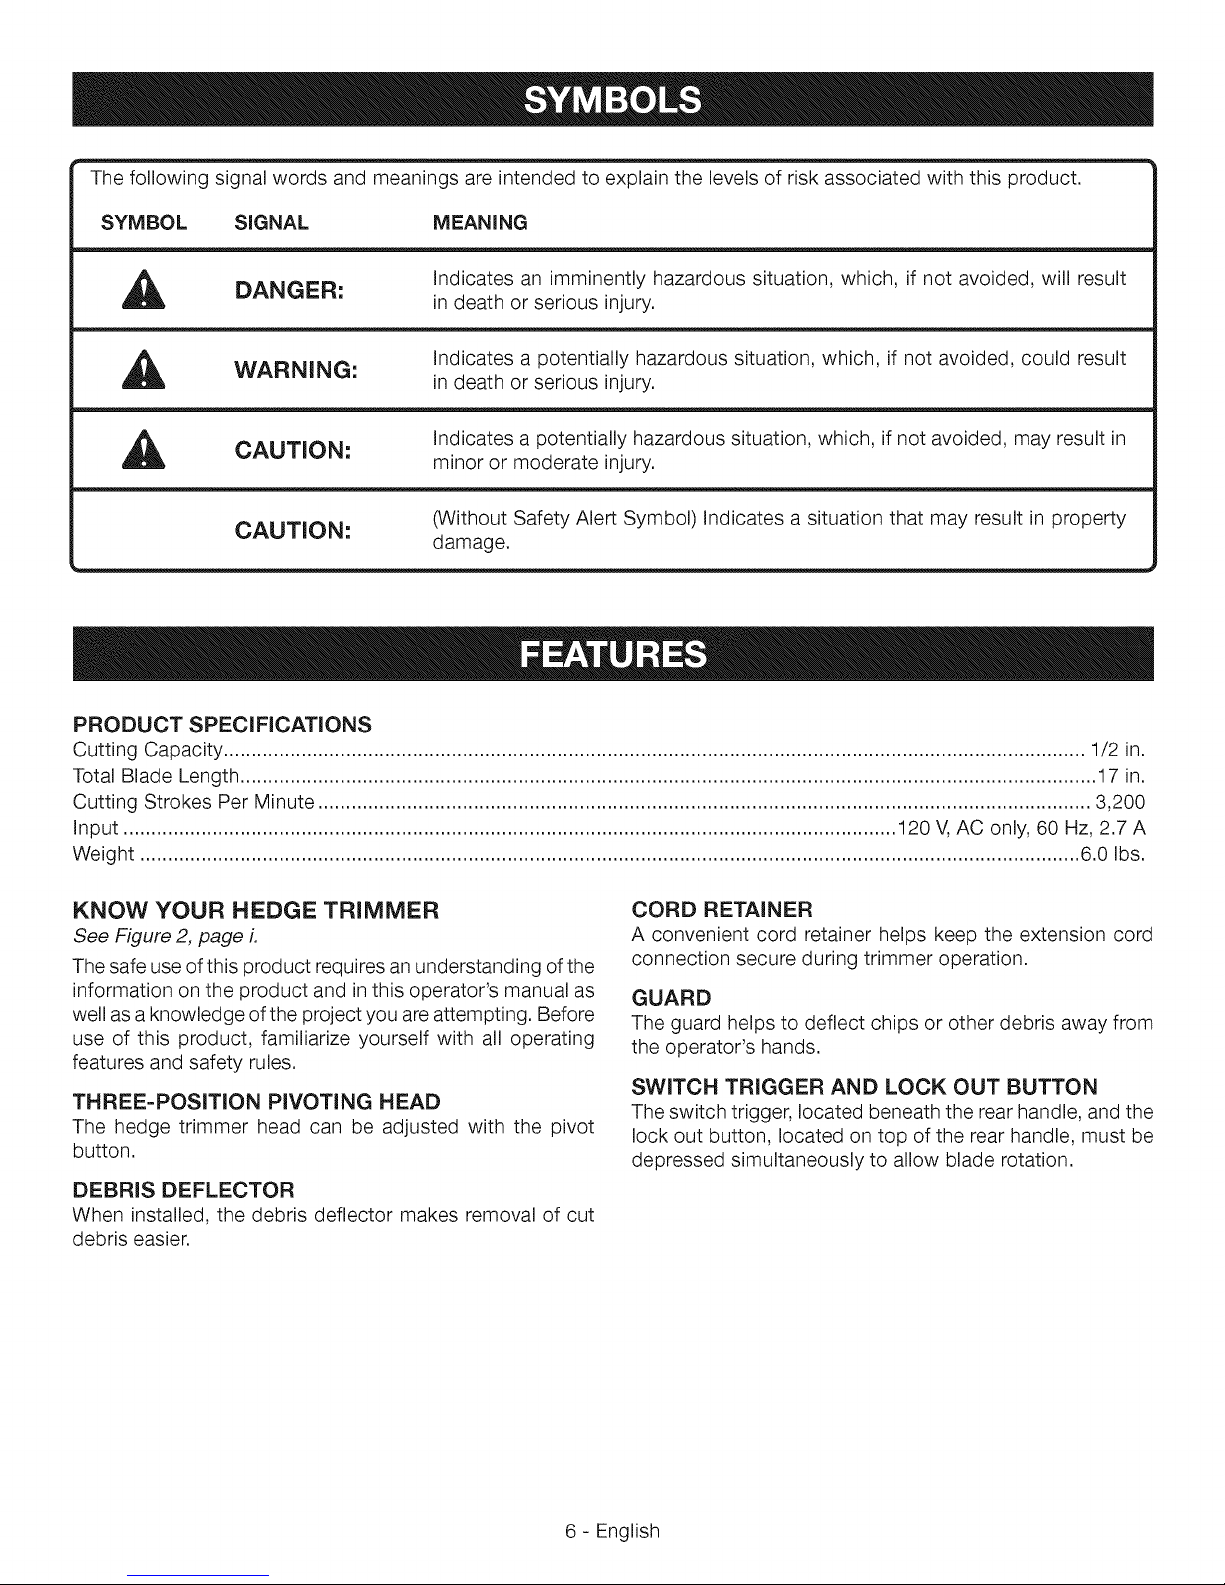
Thefollowingsignalwordsandmeaningsareintendedtoexplainthelevelsofriskassociatedwiththisproduct.
SYMBOL SIGNAL MEANING
DANGER:
WARNING:
CAUTION:
CAUTION: (Without Safety Alert Symbol) Indicates a situation that may result in property
PRODUCT SPECiFiCATiONS
Cutting Capacity ........................................................................................................................................................... 1/2 in.
Total Blade Length .......................................................................................................................................................... 17 in.
Cutting Strokes Per Minute ........................................................................................................................................... 3,200
Input ........................................................................................................................................... 120 V,AC only, 60 Hz, 2.7 A
Weight ......................................................................................................................................................................... 6.0 Ibs.
Indicates an imminently hazardous situation, which, if not avoided, will result
in death or serious injury.
Indicates a potentially hazardous situation, which, if not avoided, could result
in death or serious injury.
Indicates a potentially hazardous situation, which, if not avoided, may result in
minor or moderate injury.
damage.
KNOW YOUR HEDGE TRIMMER
See Figure 2, page L
The safe use of this product requires an understanding of the
information on the product and inthis operator's manual as
well as a knowledge of the project you are attempting. Before
use of this product, familiarize yourself with all operating
features and safety rules.
THREE=POSITION PIVOTING HEAD
The hedge trimmer head can be adjusted with the pivot
button.
DEBRIS DEFLECTOR
When installed, the debris deflector makes removal of cut
debris easier.
CORD RETAINER
A convenient cord retainer helps keep the extension cord
connection secure during trimmer operation.
GUARD
The guard helps to deflect chips or other debris away from
the operator's hands.
SWITCH TRIGGER AND LOCK OUT BUTTON
The switch trigger, located beneath the rear handle, and the
lock out button, located on top of the rear handle, must be
depressed simultaneously to allow blade rotation.
6 - English
Page 7
DOUBLEINSULATION
Doubleinsulationisa conceptinsafetyin electricpower
tools,which eliminatesthe needfor the usualthree-
wiregroundedpowercord.All exposedmetalpartsare
isolatedfromthe internalmetalmotorcomponentswith
protectinginsulation.Doubleinsulatedtoolsdo notneed
tobegrounded.
_ WARNING:Thedoubleinsulatedsystemisintended
to protecttheuserfromshockresultingfromabreak
inthetool'sinternalinsulation.Observeallnormal
safetyprecautionstoavoidelectricalshock.
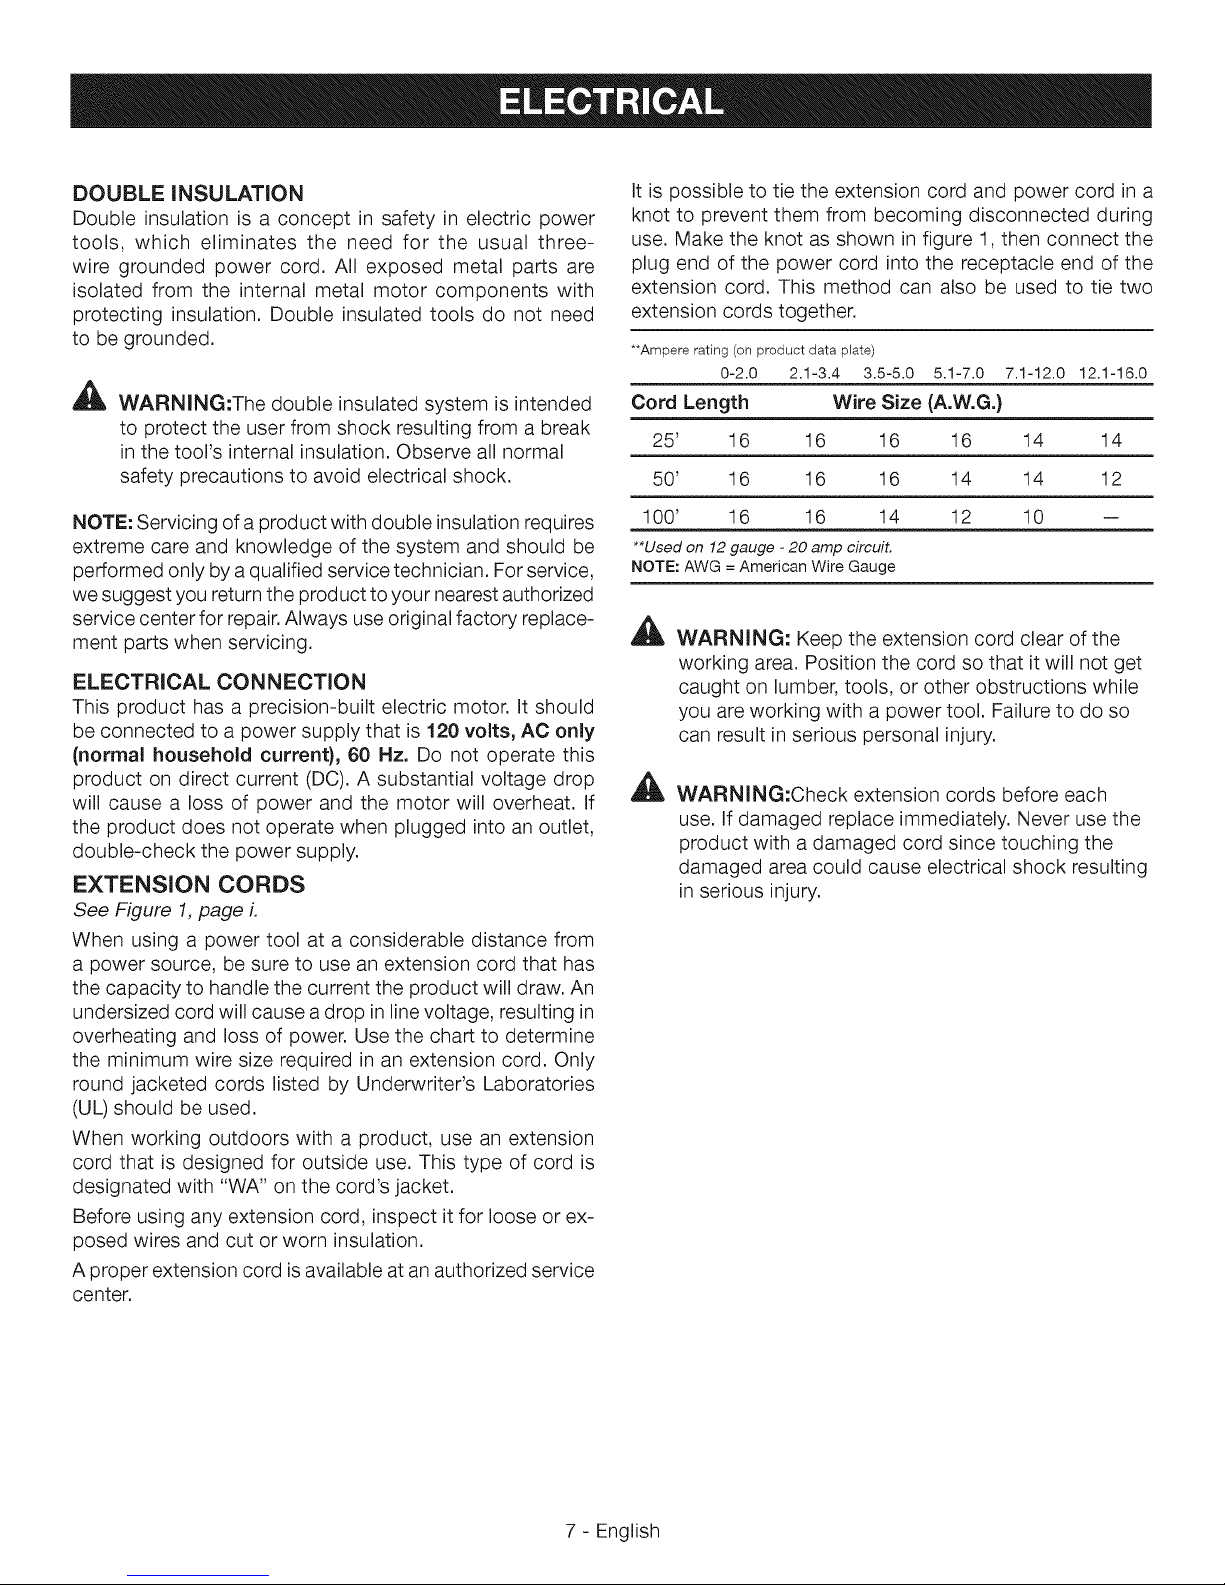
It is possible to tie the extension cord and power cord in a
knot to prevent them from becoming disconnected during
use. Make the knot as shown in figure 1, then connect the
plug end of the power cord into the receptacle end of the
extension cord. This method can also be used to tie two
extension cords together.
**Ampere rating (on product data plate)
0-2.0 2.1-3.4 3.5-5.0 5.1-7.0 7.1-12.0 12.1-16.0
Cord Length Wire Size (A.W.G.)
25' 16 16 16 16 14 14
50' 16 16 16 14 14 12
NOTE:Servicingofaproductwithdoubleinsulationrequires
extremecareandknowledgeofthesystemandshouldbe
performedonlybyaqualifiedservicetechnician.Forservice,
wesuggestyoureturntheproducttoyournearestauthorized
servicecenterforrepair.Alwaysuseoriginalfactoryreplace-
mentpartswhenservicing.
ELECTRICALCONNECTION
Thisproducthasaprecision-builtelectricmotor.Itshould
beconnectedto apowersupplythatis120volts,AC only
(normal household current}, 60 Hz. Do not operate this
product on direct current (DC). A substantial voltage drop
will cause a loss of power and the motor will overheat. If
the product does not operate when plugged into an outlet,
double-check the power supply.
EXTENSION CORDS
See Figure 1, page L
When using a power tool at a considerable distance from
a power source, be sure to use an extension cord that has
the capacity to handle the current the product will draw. An
undersized cord will cause a drop in line voltage, resulting in
overheating and loss of power. Use the chart to determine
the minimum wire size required in an extension cord. Only
round jacketed cords listed by Underwriter's Laboratories
(UL) should be used.
When working outdoors with a product, use an extension
cord that is designed for outside use. This type of cord is
designated with "WA" on the cord's jacket.
Before using any extension cord, inspect it for loose or ex-
posed wires and cut or worn insulation.
A proper extension cord is available at an authorized service
center.
100' 16 16 14 12 10 --
**Used on 12 gauge -20 amp circuit.
NOTE: AWG = American Wire Gauge
A
WARNING: Keep the extension cord clear of the
working area. Position the cord so that it will not get
caught on lumber, tools, or other obstructions while
you are working with a power tool. Failure to do so
can result in serious personal injury.
A
WARNING:Check extension cords before each
use. If damaged replace immediately. Never use the
product with a damaged cord since touching the
damaged area could cause electrical shock resulting
in serious injury.
7 - English
Page 8
UNPACKING
This product requires assembly
[] Carefully remove the product and any accessories from
the box. Make sure that all items listed in the packing list
are included.
A
WARNING: This new product has been shipped
in a partially assembled condition as described
below. Carefully check the packing list below
to ensure all items are included in the package;
the packing list describes all loose items that
are not assembled to the product as shipped.
Do not operate the product if any packing list
items are already assembled to your product
when you unpack it. Call the customer service
number below for assistance. Operation of a
product that may have been improperly preas-
sembled could result in serious personal injury.
[] Inspect the product carefully to make sure no
breakage or damage occurred during shipping.
[] Do not discard the packing material until you have care-
fully inspected and satisfactorily operated the product.
[] If any parts are damaged or missing, please call
1-800-932-3188 for assistance.
PACKING LIST
Hedge Trimmer
Debris Deflector
Deflector Retainer
Blade Sleeve Cover
Operator's Manual
_b, WARNING: Do not connect to power supply until
assembly is complete. Failure to comply could result
in accidental starting and possible serious personal
injury.
ASSEMBLING THE TOOL
See Figure 3, 4 page i and ii,
Before using the extended reach hedge trimmer, a one-time
assembly is required.
[] The rear handle and trimmer head come unassembled.
[] Remove the rubber cord protectors from the trimmer head
base and the rear handle. Position trimmer head and rear
handle as shown in figure 3.
[] Unscrew the threaded collar from trimmer head base by
rotating it counterclockwise and pull back over the cord
to the rear handle as shown.
[] Insert the rear handle into the trimmer head threaded
base until the lock holes click into place. The tubes are
egg-shaped and will only install one way. The threaded
base will spread open during assembly.
NOTE: You may need to slightly rotate tube from side to
side until it locks into place.
[] Lower the threaded collar onto the threaded base and
rotate clockwise to secure.
_t, WARNING: Failure to lock the rear handle into the
trimmer head base as directed above could result in
serious injury or death.
[] Do not operate until assembly is completed.
A
WARNING: If any parts are damaged or missing, do
not operate this product until the parts are replaced.
Failure to heed this warning could result in serious
personal injury.
A
WARNING: Do not attempt to modify this product
or create accessories not recommended for use with
this product. Any such alteration or modification is
misuse and could result in a hazardous condition
leading to possible serious personal injury.
8 - English
Page 9

_lb WARNING: Do not use any attachments or accesso-
ries not recommended by the manufacturer of this product.
The use of attachments or accessories not recommended
can result in serious personal injury.
APPLICATIONS
You may use this product for the purpose listed below:
[] Trimming and shaping hedges and shrubbery
STARTING AND STOPPING
See Figure 5, page ii.
[] Attach the outlet end of an extension cord to the plug on
the rear of the hedge trimmer. Route extension cord through
cord retainer as shown in Figure 8, page ii.
NOTE: Use only an approved outdoor extension cord as
described previously inthis manual.
[]
Grasp the front handlewith your left hand and the rear handle
with your right hand.
[]
Theswitch trigger and the lock out button must be depressed
simultaneously to begin blade rotation.
[]
Tostop blade rotation, release the switch trigger.
ADJUSTING PIVOTING HEAD
See Figure 6, page ii.
[] Release switch trigger, ensure blades have
moving, and disconnect the plug from the power
source.
[]
Place the hedge trimmer on a sturdy flat surface.
[]
Push pivot button and adjust trimmer head until it snaps
securely into place at one ofthethree positions indicated
by the notches.
A
WARNING: Do not place hand between pivoting
head and threaded base. Placement of your hand
or fingers inthis area could result in a pinch point
injury.
stopped
INSTALLING DEBRIS DEFLECTOR
See Figure 7, page ii.
NOTE: Always wear non-slip, heavy-duty gloves when installing
or removing the debris deflector.
[] Release switch trigger, ensure blades have stopped moving,
and disconnect the plug from the power source.
[] Place the hedge trimmer on a sturdy flat surface.
[] Alignthe angled edge of the debris deflector with the grooves
on the guide bar.
[] Slide the deflector completely onto the guide bar so the
angled edge of the deflector rests beneath the guard.
[] Insert the retainer in the end of guide bar.
A
WARNING: Never use the debris deflector as a han-
dle or attempt to hold or guide the hedge trimmer by
gripping the debris deflector. Always keep both hands
on the hedge trimmer handles. Handling the debris
deflector in this manner could result in serious injury.
CONNECTING TO POWER SUPPLY
See Figure 8, page ft.
This product is designed with a cord retainer that prevents the
extension cord from being pulled loose while using.
[] Form a loop with the end of the extension cord.
[] Insert loop portion of extension cord through opening in
the bottom of the rear handle and place over cord retain-
er.
[] Slowly pull loop against cord retainer until the slack is
removed.
[] Plug product into extension cord.
NOTE: Failure to remove all excess cord slack from extension
cord retainer could result in plug loosening from receptacle.
CUTTING TIPS
See Figures 9 - 10;page ii,
A
WARNING: Always keep both hands on the hedge
trimmer handles. Never hold shrubs with one hand
and operate hedge trimmer with the other. One
handed or improper handling of hedge trimmer can
result in serious injury.
,&
WARNING: Clear the area to be cut before each
use. Remove all objects such as cords, lights, wire,
or loose string which can become entangled in the
cutting blade and create a risk of serious personal
injury
[] When operating the hedge trimmer, keep the extension
cord behind the trimmer. Never drape it over the hedge
being trimmed.
[] Do not force the hedge trimmer through heavy shrubbery.
This can cause the blades to bind and slow down. If the
blades slow down, reduce the pace.
[] Do not attempt to cut stems or twigs that are larger than
1/2 in. thick or those obviously too large to feed into the
cutting blade. Use a non-powered hand saw or pruning
saw to trim large stems.
[] If blades do become jammed, stop the motor by releasing
the switch trigger, allow the blades to stop, and disconnect
the plug from the power source before attempting to
remove the obstruction.
[] If desired, you can use a string to help cut your hedge
level. Decide how high you want the hedge. Stretch a
piece of string along the hedge at the desired height.
Trim the hedge just above the guide line of string. Trim
the side of a hedge so that it will be slightly narrower at
the top. More of the hedge will be exposed when shaped
this way, and it will be more uniform.
[] Wear gloves when trimming thorny or prickly growth.
When trimming new growth, use a wide sweeping action,
so that the stems are fed directly into the cutting blade.
Older growth will have thicker stems and will be trimmed
easiest by using a sawing movement.
9 - English
Page 10

OPERATING THE HEDGE TRIMMER
_ WARNING: Read the safety information for safe
operation using the blade. Extreme care must be
taken when using blades to ensure safe operation.
Refer to Important Safety Instructions and Specific
Safety Rules.
[]
Always hold hedge trimmer with both hands when
operating. Use a firm grip on the handles. The unit is used
for cutting in either direction in a slow, sweeping action
from side to side.
[] Stand so that you are stable and balanced on both feet.
Do not overreach.
[] Inspect and clear the area of any hidden objects.
[] To protect yourself from electrocution, do not operate
within 50 feet of overhead electrical lines.
[] Never use the hedge trimmer near power lines, fencing,
posts, buildings, or other immovable objects.
[] Never cut near the extension cord or other electric power
cords.
[] Never use a blade after hitting a hard object without first
inspecting it for damage. Do not use if any damage is
detected.
A
WARNING: When servicing, use only identical re-
placement parts. Use of any other parts may create
a hazard or cause product damage.
A
WARNING: Always wear safety goggles or safety
glasses with side shields during product operation. If
operation is dusty, also wear a dust mask.
A
WARNING: Before inspecting, cleaning, or servic-
ing the machine, disconnect the plug from power
source and wait for all moving parts to stop. Failure
to follow these instructions can result in serious per-
sonal injury or property damage.
GENERAL MAINTENANCE
Avoid using solvents when cleaning plastic parts. Most
plastics are susceptible to damage from various types of
commercial solvents and may be damaged by their use. Use
clean cloths to remove dirt, dust, oil, grease, etc.
_ WARNING: Do not at any time let brake fluids,
gasoline, petroleum-based products, penetrating
oils, etc., come in contact with plastic parts. Chemi-
cals can damage, weaken, or destroy plastic which
may result in serious personal injury.
Only the parts shown on the parts list are intended to be
repaired or replaced by the customer. All other parts should
be replaced at an Authorized Service Center.
_ WARNING: Blades are sharp. When handling the
blade assembly, wear non-slip, heavy-duty protec-
tive gloves. Do not place your hand or fingers be-
tween blades or in any position where they could get
pinched or cut. NEVER touch blades or service unit
with the power supply connected.
LUBRICATING THE BLADE
See Figure 11, page ii,
For easier operation and longer blade life, lubricate the hedge
trimmer blade before and after each use.
[] Stop the motor and disconnect from power supply.
[] Lay the hedge trimmer on aflat surface. Apply light weight
machine oil along the edge of the top blade.
If you will be using the hedge trimmer for an extended period,
it is advisable to oil the blade during use.
NOTE: Do not oil while the hedge trimmer is running.
[] Stop the motor and disconnect from power supply.
[] Lubricate the hedge trimmer as described above.
[] Reconnect to the power source and resume use.
CLEANING THE HEDGE TRIMMER
[] Stop the motor and disconnect from power supply.
[] Clean dirt and debris from the body of the hedge trimmer,
using a damp cloth with a mild detergent.
NOTE: Do not use any strong detergents on the plastic
housing or the handle. They can be damaged by certain
aromatic oils such as pine and lemon, and by solvents
such as kerosene.
STORING THE TRIMMER
[] Clean all foreign material from the product.
[] Store it in a well-ventilated place that is inaccessible to
children.
[] Keep away from corrosive agents such as garden
chemicals and de-icing salts.
10 - English
Page 11

NOTES / NOTAS
Page 12

CRAFTSMAN EXTENDED REACH HEDGE TRIMMER = MODEL NUMBER 315=795490 -,
number in all correspondence regarding your HEDGE TRIMMER or when ordering repair parts,
I The model number will be found on a plate attached to the motor housing, Always mention the model 1
SEE BACK PAGE FOR PARTS ORDERING INSTRUCTIONS
1
J
Key PaN
No. Number
1 32201162G
2 3290675G
3 3290186G
4 31307171G
5 31103171G
6 34201162G
1 987000603
SEENOTEA
PARTS LiST
Description Qty.
SCREW (M4 x 23) ....................................................................................... 2
LOCK WASHER .......................................................................................... 2
WASHER ..................................................................................................... 2
FRONT HANDLE ........................................................................................... 1
DEBRIS DEFLECTOR ................................................................................... 1
DEFLECTOR RETAINER ............................................................................. 1
OPERATOR'S MANUAL ............................................................................. 1
11 - English
Page 13

Fia_l
B A
A - Cord
B- Extension cord
A- Rearhandle
B- Lock out button
C- SwitchTrigger
D- FrontHandle
E-Three-position pivoting head
F- Guard
G- blades
H- Cord Retainer
I - Debris Deflector
J - Deflector Retainer
K- Cord
F
A- Three position pivoting head
B- Front handle
C- Threaded base
D- Cord
E- Egg-shapedtube
F - Threaded collar (pulled back)
G- Rear handle
H- Threaded collar
I - Rubber cord protectors
Page 14

Fi_Lg.6
A
C
E
A
/
o
\
A
A-Threadedcollar
A-Debrisdeflector
B-Deflectorretainer
A- Rear handle
B- Cordretainer
C- Lock Out button
D- Switchtrigger
E- Front handle
A- Cord retainer
B- Extensioncord
45"
A- Pivot button
B- Notches
B
z
J
Fi_L_.lO
Q Q Q
Page 15

_, ADVERTENClA: Lea y comprenda todas las instruc-
ciones. Elincumptimiento de las instrucciones seSatadas abajo puede
causar descargas etectricas, incendios y lesiones corporales serias.
LEA TODAS LAS INSTRUCClONES
[] Para la operaci6n segura, lea y entienda todas las
instrucciones antes de usar este producto. Familiaricese
con todos los controtes y la forma correcta de utilizar la
mb.quina. Siga todas las instrucciones de seguridad. La
inobservancia de todas las instrucciones de seguridad
seSatadas abajo puede causar lesiones corporales graves.
[] No permita que utilicen esta unidad ni_os ni personas carentes
de la debida instrucci6n para su manejo.
[] Inspeccione a fondo el Area donde piense utilizar el equipo y
elimine todos los objetos extra5os.
[] At utilizar esta unidad use gafas o anteojos de seguridad con
la marca de cumptimiento de las normas ANSI Z87.1, asi como
protecci6n para la cabeza.
[] V[stase adecuadamente -- P6ngase pantatones largos de tela
gruesa, botas y g uantes. No se ponga ropa holgada o pantatones
cortos, ni ande descatzo. No se ponga joyas de ninguna clase.
[] Rec6jase el cabelto largo arriba del nivet de los hombros para
evitar que se enrede en las piezas moviles.
[] Mantenga atejados a los nifios -- Mantenga atejados a todos
los circunstantes, nifios y animales a una distancia minima de
15 m (50 pies).
[] Permanezca aterta -- Preste atenci6n a Io que este haciendo
y aptique el sentido comBn. No use esta unidad cuando se
encuentre fatigado, enfermo o bajo los efectos del alcohol,
drogas o medicamentos.
[] No utilice la unidad en condiciones deficientes de iluminaci6n.
[] No estire el cuerpo para atcanzar mayor distancia. -- Mantenga
una postura firme y buen equitibrio. No trate de atcanzar ob-
jetos fuera de su atcance. AI tratar de hacerlo puede perder el
equilibrio o exponerse at contacto con superficies catientes.
[] Mantenga todas las partes del cuerpo alejadas de toda pieza
en movimiento.
[] Inspeccione cada vez la unidad antes de usarla para ver si
tiene tornitlos flojos, etc. Reemptace toda pieza da_ada antes
de utilizar la unidad.
[] Guarde en el interior la recortadora de setos que no este
usando-- Cuando no estb.en uso, la podadora debe guardarse
en el interior, en un lugar seco y cerrado con llave, lejos del
alcance de los ni_os.
[] $61o utilice piezas de repuesto del fabricante original. De Io
contrario puede originarse un mat desempe_o de la herramienta
y lesiones corporates, ademas de anutarse la garant[a.
[] En ninguna circunstancia, use aditamento o accesorio atguno
en este producto, que no se haya suministrado con et producto
mismo, o que no este identificado como apropiado para el uso
con este producto en el manual del operador.
[] Evite los entornos peligrosos de trabajo--No use el accesorio
en lugares hOmedos o mojados. No Io use en la Iluvia.
[] Utilice el aparato adecuado para la tarea -- No utitice la
podadora de setos para ninguna funci6n diferente de las
especificadas.
[] No utilice la unidad at estar en las escateras, una andamios o en
un soporte inestabte. Una postura estabte sobre una superficie
solida permite un mejor control de la herramienta en situaciones
inesperadas.
3 - Espa5ol
[] No fuerce la prod ucto. Esmas eficaz y presenta menos riesgo de
lesiones a la velocidad de trabajo para la que fue dise_ada.
_lk ADVERTENClA: Mantenga las manos atejadas del
Area de corte. Mantenga ambas manos en los mangos al utilizar
la unidad.
[] Riesgo de corte. Mantenga las manos atejadas de la hoja de
corte. No meta las manos pot abajo de la pieza de trabajo ni
alrededor o pot encima de la hoja de corte mientras esta esta
girando. No intente retirar ningOn material cortado mientras la
hoja de corte este girando. AI retirar material atorado en las
hojas, asegOrese de que la podadora este en la posici6n de
apagado. AI recoger osostener la podadora de setos no sujete
las hojas de corte expuestas ni los fitos de corte.
_, ADVERTENClA: La hoja de corte continOa girando
pot inercia despues de apagar la unidad. Mantenga todas las
partes del cuerpo atejadas de las hojas para evitar lesiones graves.
[] Para reducir el riesgo de una descarga electrica, este
producto dispone de una clavija polarizada (una patitla es
mb.sancha que la otra) y requiere un cordon de extensi6n
polarizado. La ctavija entra s61o de una forma en el enchufe
de un cord6n de extensi6n polarizado. Si la clavija no entra
comptetamente en el enchufe del cord6n de extensi6n,
invierta la posici6n de la misma. Si aOn asi no entra la clavija,
obtenga un cord6n de extensi6n polarizado correcto. Un
cordon de extensi6n polarizado requiere el uso de una
toma de pared polarizada. Esta clavija entra s61o de una
forma en la toma de pared polarizada. Si la clavija no entra
comptetamente en ta toma de pared, invierta la posici6n de la
ctavija. Si aOn as[ no entra la ctavija, contrate a un electricista
catificado para encargarte la instataci6n de una toma de
pared adecuada. No cambie de ninguna manera la clavija del
equipo, ni el receptacuto o la clavija del cordon de extensi6n.
[] No mattrate el cordon -- Nunca utilice el cord6n para trasladar
ni para sacar la clavija de una toma. Mantenga el cord6n
atejado del cator, del aceite de bordes afilados y de piezas
m6viles. Cambie de inmediato todo cord6n daSado. Los
cordones da_ados aumentan el riesgo de descargas electricas.
[] Cordon de extensi6n -- AsegBrese de que este en buen
estado el cord6n de extensi6n. AI utilizar un cordon de
extensi6n, utilice uno del suficiente calibre para soportar la
corriente que consume el producto. Se recomienda que los
conductores sean de calibre 16 (A.W.G.) pot Io menos, para
un cordon de extensi6n de 15,2 m (50 pies) de largo o me-
nos. Si tiene dudas, utilice un cord6n det calibre mas grueso
siguiente. Cuanto menor es el nBmero de calibre, mayor es
el grueso del cord6n. Un cordon de un calibre insuficiente
causa una caida en el voltaje de Ifnea, y produce recalentam-
lento y perdida de potencia.
A
_, ADVERTENCIA:Use cordones de extensi6n para ex-
teriores que Ileven las marcas SW-A, SOW-A, STW-A, STOW-A,
SJW-A, SJTW-A o SJTOW-A. Estos cordones estan aprobados para
el uso en el exterior y reducen el riesgo de descargas electricas.
[] Los circuitos o las tomas donde se conecta esta podadora de
setos deben estar protegidos con un interruptor de circuito
accionado pot fatta de conexi6n atierra (GFCI). Hay receptacutos
con la protecci6n de un GFCI integrado, y pueden utilizarse
para contar con esta caracteristica de seguridad.
[] Inspeccione peri6dicamente los cordones de extensi6n y
reemplb.celos si estb.n daSados. Mantenga los mangos secos,
limpios y sin aceite ni grasa.
Page 16

[]
Para utilizar la podadora de setos e instalar o desmontar
las hojas p6ngase guantes gruesos de seguridad anti-
deslizante.
[] Apague el motor, desconecte la clavija de la fuente de
corriente y espere hasta que la cuchilla se detenga por
completoantes cuando no est_ en uso, de intentar retirar
cualquier obstrucci6n atrapada o atorada en la hoja, y
antes de desmontar o instalar _sta.
[] Reemplace toda hoja da_ada. Siempre aseg0rese que la
hoja est_ instalada correctamente y acoplada firmemente
antes de cada uso. La inobservancia de esta advertencia
puede causar lesiones corporales serias.
[] Mantenga los mangos secos, limpios y sin aceite ni
grasa.
[] Para protegerse de una posible electrocuci6n, no tra-
baje a menos de 15 metros (50 pies) de cables el_ctri-
cos a_reos.
[] Nunca corte ning0n material de di_metro superior a
12.7mm (1/2 pulg.).
[] Sujete firmemente la p_rtiga telesc6pico y el mango
trasero al cortar con la podadora de setos. Mantenga la
hoja lejos del cuerpo.
[] Aprenda la forma de apagar la unidad con rapidez en
caso de emergencia.
[] Para evitar un arranque accidental, nunca traslade la
podadora de setos con el dedo en el interruptor mientras
est_ conectada. Aseg0rese de que el interruptor est_ en
la posici6n de apagado antes de conectar la clavija.
[] D_ mantenimiento con cuidado a la podadora de setos.
Mantenga afilado el filo de corte y I[mpielo para Iograr un
desempe_o 6ptimo de la unidad y para reducir el riesgo
de lesiones. Siga las instrucciones correspondientes al
cambio y lubricaci6n de accesorios. Inspeccione peri6-
dicamente el cord6n de la podadora de setos, y si est_
da_ado, permita que Io reparen en un establecimiento
de servicio autorizado. Inspeccione peri6dicamente los
cordones de extensi6n y reempl_celos si est_n da_a-
dos. Mantenga los mangos secos, limpios y sin aceite
ni grasa.
[] Revise para ver si hay piezas da_adas. Antes de seguir
utilizando la podadora de setos, es necesario inspeccionar
cuidadosamente toda protecci6n o pieza da_ada para
determinar si funcionar_ correctamente y desempe_ar_
la funci6n a la que est_ destinada. Verifique la alineaci6n
de las partes m6viles, que no haya atoramiento de partes
m6viles, que no haya piezas rotas, el montaje de las
piezas y cualquier otra condici6n que pudiera afectar su
funcionamiento. Cualquier protecci6n o pieza que est_
da_ada debe ser reparada apropiadamente o reemplazada
en un centro de servicio autorizado, a menos que se
indique otra cosa en este manual.
[] Desconecte la recortadora de setos. -- Desconecte
la clavija de la fuente de corriente antes de efectuar
ajustes, cambiar accesorios o guardar la podadora de
setos. Con tales medidas preventivas de seguridad se
reduce el riesgo de poner en marcha accidentalmente
el producto.
[] S61o personal de reparaci6n calificado debe dar
servicio al producto.Todo servicio o mantenimiento
efectuado por personal no calificado puede significar
un riesgo de lesiones al usuario, y de da_os fisicos al
producto.
[] Si est_ da_ado el cord6n de corriente, debe ser
reemplazado 0nicamente por el fabricante o en un
centro de servicio autorizado para evitar riesgos.
[] Cuando le proporcione servicio, use solamente piezas
de repuesto id_nticas.
[] Guarde estas instrucciones. Cons01telas con frecuencia
y empl_elas para instruir a otras personas que puedan
utilizar esta herramienta. Si presta a alguien esta her-
ramienta, facil[tele tambi_n las instrucciones.
4- Espa_ol
Page 17

Esposiblequeseempleenenestaproductoalgunosdelossiguientess[mbolos.Lesuplicamosestudiarlosyaprendersu
significadoparamayorseguridadalmanejaresteproducto.
SiMBOLO
A
V
A
Hz
W
hrs
[]
@
0
NOMBRE EXPUCACION
S[mbolo de alerta de seguridad
Volts
Amperes
Hertz
Watts
Horas
Fabricaci6n Clase II
Alerta de condiciones h0medas
Lea el manual del operador
Protecci6n para los ojos y la
cabeza
Indica un peligro posible de lesiones personales.
Voltaje
Corriente
Frecuencia (ciclos por segundo)
Potencia
Tiempo
Fabricaci6n con doble aislamiento
No exponga la unidad a la Iluvia ni la use en lugares
h0medos.
Para reducir el riesgo de lesiones, el usuario debe leer y
comprender el manual del operador antes de usar este
producto.
P6ngase protecci6n para los ojos y la cabeza al utilizar este
equipo. P6ngase protecci6n para la cabeza al utilizar este
equipo sobre el nivel de los hombros.
@
@
&
®
@
Z
%
Guantes
Calzado de seguridad
Mantenga alejadas alas personas
presentes
Superficie caliente
Use las dos manos
Hoja afilada
Riesgo de electrocuci6n.
Descarga el_ctrica
Cuando maneje la sierra y la hoja de corte, p6ngase guantes
protectores no deslizantes para uso pesado.
Cuando utilice este equipo p6ngase calzado de seguridad
antideslizante.
Mantenga a los circunstantes a una distancia mfnima de
15 m (50 pies).
Para reducir el riesgo de lesiones corporales o dafios mate-
dales evite tocar toda superficie caliente.
Sujete y opere la podadora de setos con ambas manos.
Hojas de corte afiladas. Para evitar lesiones serias, no toque
las hojas de corte.
iPELIGRO! iRiesgo de electrocuci6n!
Si no se usa la unidad en condiciones secas y no se obser_/an
pr_cticas seguras de trabajo, puede producirse una descarga
el_ctrica.
5- Espafiol
Page 18

Lassiguientespalabrasdese_aNzaci6nysussignificadostienenelobjetodeexpNcarlosnivelesderiesgorelacionados
conesteproducto.
SIMBOLO SENAL SIGNIFICADO
,_ PELIGRO"
ADVERTENCIA"
PRECAUCION:
PRECAUCION:
Indica una situaci6n peNgrosainminente, lacual, si nose evita, causar_ la muerte
o lesiones serias.
Indica una situaci6n peNgrosa posible, la cual, si no se evita, podrfa causar la
muerte o lesiones serias.
Indica una situaci6n potencialmente peNgrosa la cual, si no se evita, puede
causar lesiones leves o moderadas.
(Sinel sfmbolo de alerta de seguridad)Indica una situaci6n que puede producir
da_os materiales.
ESPECIFICACIONES DEL PRODUCTO
Capacidad de corte .................................................................................................................................. 12,7 mm (0,5 pulg)
Longitud total de la hoja ............................................................................................................................ 43,8 mm (17 pulg)
Carreras por minuto ...................................................................................................................................................... 3 200
Corriente de entrada .................................................................................................................. 120 V,AC only, 60 Hz, 2,7 A
Peso ............................................................................................................................................................... 2,7 kg (6,0 Ibs.)
FAMILIARiCESE CON SU PODADORA DE
SETOS DE PERTIGA
Vea la figura 2, p_gina i,
Para usar este producto con la debida seguridad se debe
comprender la informaci6n indicada en la producto misma
yen este manual, y se debe comprender tambi_n el trabajo
que intenta reaNzar. Antes de usar este producto, famil-
iarfcese con todas las caracterfsticas de funcionamiento y
normas de seguridad del mismo.
CABEZA PIVOTANTE DE TRES POSICIONES
La cabeza de la podadora de setos puede ajustarse con el
bot6n del pivote.
DEFLECTOR DE DESECHOS
Una vez instalado, el deflector de desechos faciNta la remo-
ci6n de los residuos del corte.
RETI-N PARA EL CORDON
Un Otil ret_n para el cord6n ayuda a mantener el cord6n
de extensi6n seguro durante el funcionamiento de la her-
ramienta.
PROTECCION
La protecci6n ayuda a desviar virutas u otros desechos de
la direcci6n donde est_n las manos del operador.
GATILLOS DEL INTERRUPTOR / BOTON DEL
SEGURO DE APAGADO
El gatiNo del interruptor delantero, situado abajo del mango
trasero, y el bot6n del seguro de apagado, situado detr_s
del mango delantero, deben oprimirse simult_neamente para
iniciar el giro de la hoja.
6 - Espa_ol
Page 19

DOBLE AISLAMiENTO
El doble aislamiento es una caracterfstica de seguridad de
las herramientas el_ctricas, la cual eNmina la necesidad de
usar el tfpico cordon el_ctrico de tres conductores con con-
exiOn a tierra. Todas las partes met_licas expuestas est_n
aisladas de los componentes met_licos internos del motor
por medio de aislamiento de protecciOn. No es necesario
conectar a tierra las herramientas con doble aislamiento. **Ampere rating (on product data plate)
Se puede hacer un nudo para atar el cordon de extension
y el cordon el_ctrico para impedir que se desconecten du-
rante el uso. Ate el nudo como se muestra en la figura 1,
luego conecte el extremo de la clavija del cordon el_ctrico
en el extremo del recept_culo del cordon de extension. Este
m_todo tambi_n se puede usar para atar dos cordones de
extension.
ADVERTENCIA: El sistema de doble aislamiento
est_ destinado a proteger al usuario contra las
descargas el_ctricas resultantes de la ruptura del 25' 16 16 16 16 14 14
aislamiento interno de la herramienta. Observe todas
las precauciones de seguridad para evitar descargas 50' 16 16 16 14 14 12
elect ricas. 100' 16 16 14 12 10 --
NOTA: El mantenimiento de una herramienta con doble
aislamiento requiere sumo cuidado y conocimiento del
sistema, y Onicamente deben realizarlo t_cnicos de servicio
caNficados. Para dar ser_/icio a la herramienta, le sugerimos
Nevada al Centro de Servicio Autorizado de su preferencia
para que la reparen. Siempre utiNce piezas de repuesto de
la f_brica original al dar servicio a la unidad.
CONEXI6N ELECTRICA
Este producto dispone de un motor el_ctrico fabricado con
precision. Debe conectarse 0nicamente a un suministro
de corriente de 120 V, solo corr. alt. (corriente normal
para uso dom_stico), 60 Hz. No utiNce este producto con
corriente continua (corr. cont.). Una cafda considerable de
voltaje causa una p_rdida de potencia y el recalentamiento
del motor. Si el producto no funciona al conectarlo en una
toma, vuelva a verificar el suministro de corriente.
CORDONES DE EXTENSION
Vea la figura 1,p_gina i.
AI utiNzar una herramienta el_ctrica auna distancia consider-
able de lafuente de corriente, asegOrese de utilizar un cordon
de extension con la suficiente capacidad para soportar la
corriente de consumo del producto.Un cordon de un calibre
insuficiente causa una cafda en el voltaje de Nnea, la cual
a su vez produce recalentamiento y p_rdida de potencia.
B_sese en la tabla suministrada para determinar el grueso
mfnimo requerido del cordon de extension. Solamente de-
ben utiNzarse cordones con forro redondo registrados en
Underwriter's Laboratories (UL).
AItrabajar a la intemperie con un producto, utiNce un cordon
de extension fabricado para uso en el exterior. Este tipo de
cordon Nevalas letras "WA" en el forro.
Antes de utiNzarun cordon de extension, inspecciOnelo para
ver si tiene conductores fiojos o expuestos y aislamiento
cortado o gastado.
Hay un cordon de extension adecuado disponible en un
centro de servicio autorizado.
Cord Length Wire Size (A.W.G.}
**Used on 12 gauge -20 amp circuit.
NOTE: AWG = American Wire Gauge
A
A
A
0-2.0 2.1-3.4 3.5-5.0 5.1-7.0 7.1-12.0 12.1-16.0
ADVERTENClA: Mantenga el cordon de extension
fuera del area de trabajo. AI trabajar con una her-
ramienta el_ctrica, coloque el cordon de tal manera
que no pueda enredarse en la madera, herramientas
o ninguna obstrucciOn. La inobservancia de esta
advertencia puede causar lesiones corporales serias.
ADVERTENCIA: Inspeccione los cordones de ex-
tension antes de cada uso. Si est_n daSados reem-
plAcelos de inmediato. Nunca utilice el producto con
un cordon daSado, ya que si toca la parte daSada
puede producirse una descarga el_ctrica, y las con-
secuentes lesiones serias.
ADVERTENCIA:EI sistema de doble aislamiento
est_ destinado a proteger al usuario contra las
descargas el_ctricas resultantes de la ruptura del
aislamiento interno de la herramienta. Observe todas
las precauciones de seguridad para evitar descargas
el_ctricas.
7- EspaSol
Page 20

DESEMPAQUETADO
Embarcamos este producto completamente armado.
[] Extraiga cuidadosamente de la caja el producto y los
accesorios. AsegOrese de que esten presentes todos los
artfcutos enumerados en la lista de empaquetado.
_, ADVERTENCIA: Este nuevo producto se ha enviado con
un ensambtado parcial como se describe a continuaci6n.
Verifique cuidadosamente talista de empaque a continuaci6n
para asegurarse de que todos tas piezas vengan incluidas
en el paquete; la lista de empaque describe todas las piezas
sueltas que no estan ensambtadas at producto cuando se
envia. No use el producto si alguna pieza de la lista de em-
paque ya esta ensambtada a su producto cuando Io desem-
paca. Llame at nOmero del servicio de atenci6n al cliente que
aparece a continuaci6n para obtener ayuda. El uso de un
producto que haya sido ensamblado previamente de forma
inadecuada podria causar lesiones personales graves..
[] Inspeccione cuidadosamente el producto para asegurarse
de que no haya sufrido ninguna rotura o da_o durante el
transporte.
[] No deseche el material de empaquetado hasta que haya
inspeccionado cuidadosamente el producto y la haya utilizado
satisfactoriamente.
Si hay piezas da_adas o fattantes, le suplicamos Itamar al
1-800-932-3188, donde le brindaremos asistencia.
LISTA DE EMPAQLIETADO
Podadora de setos
Deflector de desechos
Ret_n del deflector
Funda del casquillo de la hojar
Manual del operador
,_ ADVERTENCIA: si fatta o esta da_ada atguna pieza,
no utilice esta producto sin haber reemplazado la pieza. La
inobservancia de esta advertencia puede causar lesiones
graves.
A
ADVERTENCIA: No intente modificar este producto
ni hacer accesorios no recomendados para la misma.
Cualquier alteraci6n o modificaci6n constituye maltrato el
cual puede causar una condici6n peligrosa, y como con-
secuencia posibtes lesiones corporales serias.
ADVERTENCIA: No conecte la unidad al suministro de
corriente sin haber terminado de armarta. De to contrario la
unidad puede ponerse en marcha accidentalmente, con el
consiguiente riesgo de lesiones serias.
ARMADO DE LA HERRAMIENTA
Vea la figura 3 - 4, p_gina i and ii.
Antes de usar ta recortadora de setos de alcance extendido, se
necesita un montaje en un solo paso.
[] El mango trasero y el cabezat de la recortadora no vienen
ensambtados.
[] Quite los protectores de cord6n de goma de la base del cabezat
de la recortadora y del mango trasero. Coloque el cabezat de
la recortadora y el mango trasero en la posici6n que se indica
en la figura 3.
[] Desenrosque el casquillo roscado de la base del cabezat de la
recortadora y tire de 61hacia atrb.s por sobre el cord6n hacia
mango trasero como se muestra.
[] Introduzca mango trasero en la base roscada del cabezat de la
recortadora hasta que los orificios de traba hagan un chasquido
at entrar en su lugar. Los tubos tienen forma ovoide y s61o se
podran instatar de una manera. La base roscada se abrira
durante el armado.
NOTA: Es posibte que deba girar levemente la pertiga de un
lado a otro hasta que se trabe en su lugar.
[] Baje el casquilto roscado hasta la base roscada y girelo hacia
la derecha para asegurarlo.
,_ ADVERTENCIA: Si no asegura mango trasero como
se indica arriba puede causarse lesiones serias e incluso
la muerte.
[] No la use hasta que se complete el montaje.
8 - Espa_ol
Page 21

_ ADVERTENCIA: No utilice ningOn aditamento o acce-
sorio no recomendado pot el fabricante de este producto.
El empteo de aditamentos o accesorios no recomendan-
dos podria causar lesiones serias.
APLICACIONES
Este producto puede emplearse para los fines enumerado
abajo:
[] Recortar y dar forma a setos y arbustos
ARRANQUE Y APAGADO
Vea la figura 5, pbgina ii.
[] Conecte el extremo de la toma de un cord6n de extensi6n a la
clavija en la parte posterior de la podadora. Pase et cord6n de
extensi6n a traves del reten para el cord6n como se muestra.
NOTA: Utitice 0nicamente un cordon de extensi6n para
intemperie aprobado como se exptic6 anteriormente en este
manual.
[] Sujete el mango telescopico con la mano izquierda y el mango
trasero con la mano derecha.
[] Para que comience a girar ta hoja, se deben oprimir simultanea-
mente el gatitlo del interruptor y el interruptor con seguro de
apagado.
[] Para detener el giro de la hoja, suelte los gatillos del interrup-
tot.
AJUSTE DE LA CABEZA PIVOTANTE
Vea la figura 6, p#gina ii.
[] Afioje el gatitlo del interruptor, asegBrese de que las hojas se
detengan y desconecte la clavija del suministro de corriente.
[] Coloque la podadora de setos sobre una superficie plana y
resistente.
[] Empuje el bot6n pivotante y ajuste elcabezat de la recortadora
hasta que quede fijo en su lugar con un chasquido, en una de
las cuatro posiciones indicadas pot las muescas.
A
ADVERTENCIA: No utilice ningOn aditamento o acce-
sorio no recomendado pot el fabricante de este producto.
El empteo de aditamentos o accesorios no recomendan-
dos podria causar lesiones serias.
INSTALACION DEL DEFLECTOR DE
DESECHOS
Vea la figura 7, p#gina ii.
NOTA: Siempre use guantes antidestizantes para servicio pesado
cuando instale o desmonte el deflector de desechos.
[] Afioje el gatitlo del interruptor, asegBrese de que las hojas se
detengan y desconecte la clavija del suministro de corriente..
[] Coloque la podadora de setos sobre una superficie plana y
resistente.
[] Atinee el borde angular del deflector de desechos con las
ranuras de la barra guia.
[] Destice completamente el deflector sobre la barra guia, de
manera que el borde angular del deflector descanse pot debajo
de la protecci6n.
[] Introduzca el reten en el extremo de la barra de la gufa.
9 - Espafiol
ADVERTENClA: Nunca use el deflector de desechos
como mango ni intente sostener o guiar la podadora de
setos sujetandola pot el deflector de desechos. Siempre
mantenga ambas manos en los mangos de la podadora de
setos. La inobservancia de esta advertencia podria causar
lesiones serias.
CONEXION AL SUMINISTRO DE CORRIENTE
Vea la figura & p#gina ii.
Esta motosierra dispone de un gancho para el cord6n de extensi6n,
el cuat evita que se afloje el cord6n en el enchfe de la unidad si
aquel experimenta un tir6n.
[] Forme una tazada con el extremo del cord6n de extensi6n.
[] Introduzca la lazada del cordon de extensi6n pot la abertura
situada en et fondo del mango trasero y col6quela en el gan-
cho para el cord6n.
[] Lentamente tire de la lazada contra el gancho hasta eliminar
toda holgura.
[] Conecte la producto con la cord6n de extensi6n.
NOTA: Si no elimina la hotgura del cord6n de extensi6n alrededor
del gancho podria aftojarse la clavija en el receptacuto.
MANEJO DE LA PODADORA DE SETOS
Vea la figura 9 - 10, p&gina iL
A
ADVERTENClA: Siempre mantenga ambas manos
en los mangos de la podadora de setos. Nunca sujete los
arbustos con una mano mientras maneja la podadora de
setos con la otra. La inobservancia de esta advertencia
podrfa causar lesiones serias.
A
ADVERTENCIA: Siempre despeje el a.rea de trabajo
antes de porter a funcionar la herramienta. Retire todos
los objetos como cordones, luces, alambre, o cordones
aflojadas, los cuates pueden enredarse en la hoja de corte
y presentar un riesgo de lesiones graves.
[] Cuando use la podadora de setos, mantenga el cord6n de
extensi6n detra.s de la podadora. Nunca Io cuelgue del seto
que esta siendo podado.
[] No fuerce la podadora de setos at estar recortando arbustos
espesos. Tal acci6n podria causar un atascamiento y una
disminuci6n en la velocidad de las hojas. Si se disminuye la
velocidad de las hojas, aminore el paso.
[] No intente cortar taltos ni ramas mas gruesos que
12,7 mm (1/2 putg.) para el modelo UT44120, ni aqueltos que
pudieran resuttar demasiado gruesos para la hoja de corte.
Para podar tatlos gruesos utitice una sierra de podar manual
o de motor..
[] Si se atascan las hojas, apague et motor, permita que se deten-
gan tas hojas, y desconecte la clavija de la fuente de corriente
antes retirar la obstrucci6n.
[] Si Io desea, puede utilizar un cordon para ayudarse a cortar el
seto a nivel. Decida que tan alto desea et seto. Estire el cord6n
a Io largo del seto, a la attura deseada. Pode el seto justo ar-
riba de la linea de guia del cord6n. Pode el costado del seto de
manera que quede levemente ma.sangosto en ta parte superior.
Cuando se le da forma de esta manera at seto, mas Area del
mismo queda expuesta, y quedara mas uniforme.
Page 22

[]
P6ngase guantes cuando corte ramas espinosas. AI podar el
renuevo de los setos, aptique un movimiento de barrido, de
manera que las hojas de corte lleguen directamente a los tat-
los. El renuevo viejo tiene tattos mas gruesos y se poda mejor
aplicando un movimiento de aserrado.
UTILIZACION DE LA PODADORA DE SETOS
_ ADVERTENCIA: Lea la informaci6n de seguridad para
manejar la hoja de forma segura. Debe tenerse un cuidado
extremo para asegurarse de manejar la unidad de forma
segura at utilizar hojas de corte. Consutte las Instrucciones
de seguridad importantes y Reglas de seguridad especfficas.
[] At utilizar la podadora de setos siempre sujetela con ambas
manos. Sujete firmemente ambos mangos. La unidad se utiliza
para cortar en cualquier direcci6n con un movimiento lento de
barrido de lado a lado.
[] Parese de manera que este estable y equilibrado en ambos
pies. No trate de atcanzar objetos fuera de su atcance.
[] Inspeccione y despeje del Area todo objeto ocutto.
[] Inspeccione y despeje del Area todo objeto ocutto.
[] Para protegerse de una posibte electrocuci6n, no trabaje a
menos de 15 metros (50 pies) de cables electricos aereos.
[] Nunca utitice la podadora de setos cerca de lineas de alto voltaje,
cercas, postes, edificaciones, ni de ningOn objeto inamovibte.
[] Nunca corte cerca del cord6n de extensi6n u otros cordones
electricos.
[] Nunca utitice ninguna hoja de corte despues de habertocado con
ella un objeto duro sin inspeccionarta despues para ver si sufri6
da_os. No utilice la unidad si detecta cualquier tipo de da_o.
A
ADVERTENCIA: At dar servicio a la unidad, s61o
utilice piezas de repuesto identicas. Elempteo de piezas
diferentes puede causar un peligro o da_ar el producto.
A
ADVERTENCIA: Siempre use gafas de seguridad o
anteojos protectores con protecci6n lateral at usar este
producto. Si la operaci6n genera mucho polvo, tambien
p6ngase una mascarilta contra el polvo.
A
ADVERTENCJA: Antes de inspeccionar, limpiar o dar
mantenimiento a la maquina, apague el motor, espere
hasta que se detengan todas las piezas en movimiento,
desconecte ta clavija de la fuente de corriente. Et incum-
ptimiento de estas instrucciones puede provocar lesiones
personales graves o da_os materiales.
MANTENIMIENTO GENERAL
Evite el empleo de sotventes at limpiar piezas de ptastico. La
mayorfa de los ptasticos son susceptibles a diferentes tipos de
sotventes comerciales y pueden resultar da_ados. Utilice pa_os lim-
pios para eliminar la suciedad, el polvo, el aceite, la grasa, etc.
_ ADVERTENCIA: No permita en ningOn momento que
fluidos para frenos, gasolina, productos a base de petr6-
leo, aceites penetrantes, etc., Ileguen a tocar tas piezas de
ptastico. Los productos quimicos pueden da_ar, debilitar o
destruir el ptastico, Io cuat puede causar lesiones serias.
Solamente las piezas mostradas en la lista de piezas pueden ser
reparadas o cambiadas por el consumidor. Todas piezas restantes
deben ser reemptazadas en un centro de servicio autorizado.
_bL ADVERTENCIA: Las hojas estan afiladas. AI manejar
las hojas p6ngase guantes protectores antidestizantes
para trabajo pesado. No coloque ta mano ni los dedos
entre las hojas ni en ninguna otra posici6n donde puedan
pellizcarse o cortarse. NUNCA toque las hojas ni pre-
ste servicio a la con la clavija de la fuente de corriente
conectado.
10-Espa_ol
LUBRICACION DE LA NOJA DE CORTE
Vea la figura 11, p#gina ii.
Para facilitar el manejo de la unidad y prolongar la vida de servicio
de la hoja, siempre lubrique esta antes y despues de utilizar la
podadora de setos.
[]
Apague el motor y desconecte la clavija de la fuente de cor-
riente.
[]
Deposite la podadora de setos en una superficie horizontal.
Aptique aceite de baja viscosidad para maquina a 1olargo del
filo de la hoja superior.
Si no va a estar utilizando la podadora de setos durante un perfodo
de tiempo prolongado, se recomienda aceitar la hoja durante el
uso de la herramienta.
NOTA: No aceite la podadora de setos mientras la tenga funcio-
nando.
[] Apague el motor y desconecte la clavija de la fuente de cor-
riente.
[] Lubrique la podadora de setos como se exptica arriba.
[] Vuelva a conectar a la fuente de energia y reanude eltrabajo.
LIMPIEZA DE LA PODADORA DE SETOS
[] Apague el motor y desconecte la clavija de la fuente de cor-
riente.
[]
Limpie toda ta tierra y la basura del cuerpo de la podadora de
setos con un paso humedecido con un detergente suave.
NOTA: No aptique ningBn detergente fuerte at atojamiento de
ptastico niat mango. Pueden resuttar da_ados por ciertos aceites
aromaticos como los de pino y lim6n, asi como por sotventes
como el queroseno.
FORMA
DE GUARDAR LA PODADORA DE
SETOS
[]
Limpie todo material extra_o de la producto.
[]
Atmacene la unidad en un espacio bien ventilado inaccesibte
a los ni_os.
[]
Evite que la unidad entre en contacto con agentes corrosivos
como las sustancias qufmicas para el jardfn y las sales para
derretir el hielo.
Page 23

NOTES / NOTAS
Page 24

Your Home
For expert troubleshooting and home solutions advice:
anage
www.managemyhome.com
For repair - in your home - of all major brand appliances,
lawn and garden equipment, or heating and cooling systems,
no matter who made it, no matter who sold it!
For the replacement parts, accessories and
owner's manuals that you need to do-it-yourself.
For Sears professional installation of home appliances
and items like garage door openers and water heaters.
1-800-4-MY-HOME ® (1-800-469-4663)
Call anytime, day or night (U.S.A. and Canada)
www.sears.com www.sears.ca
Our Home
For repair of carry-in items like vacuums, lawn equipment,
and electronics, call anytime for the location of your nearest
Sears Parts & Repair Service Center
1-800-488-1222 (U.S.A.) 1-800-469-4663 (Canada)
www.sears.com www.sears.ca
To purchase a protection agreement on a product serviced by Sears:
1-800-827-6655 (u.S.A.) 1-800-361-6665 (Canada)
Para pedir servicio de reparaci6n
a domicilio, y para ordenar piezas:
1-888-SU-HOGAR ®
(1-888-784-6427)
Au Canada pour service en fran_sais:
1-800-LE-FOYER M°
(1-800-533-6937)
www.sears.ca
® Registered Trademark / TM Trademark / SMService Mark of Sears Brands, LLC
® Marca Registrada / TM Marca de F&brica / SM Marca de Servicio de Sears Brands, LLC
MCMarque de commerce / MDMarque d6posee de Sears Brands, LLC @Sears Brands, LLC
 Loading...