

Page 1
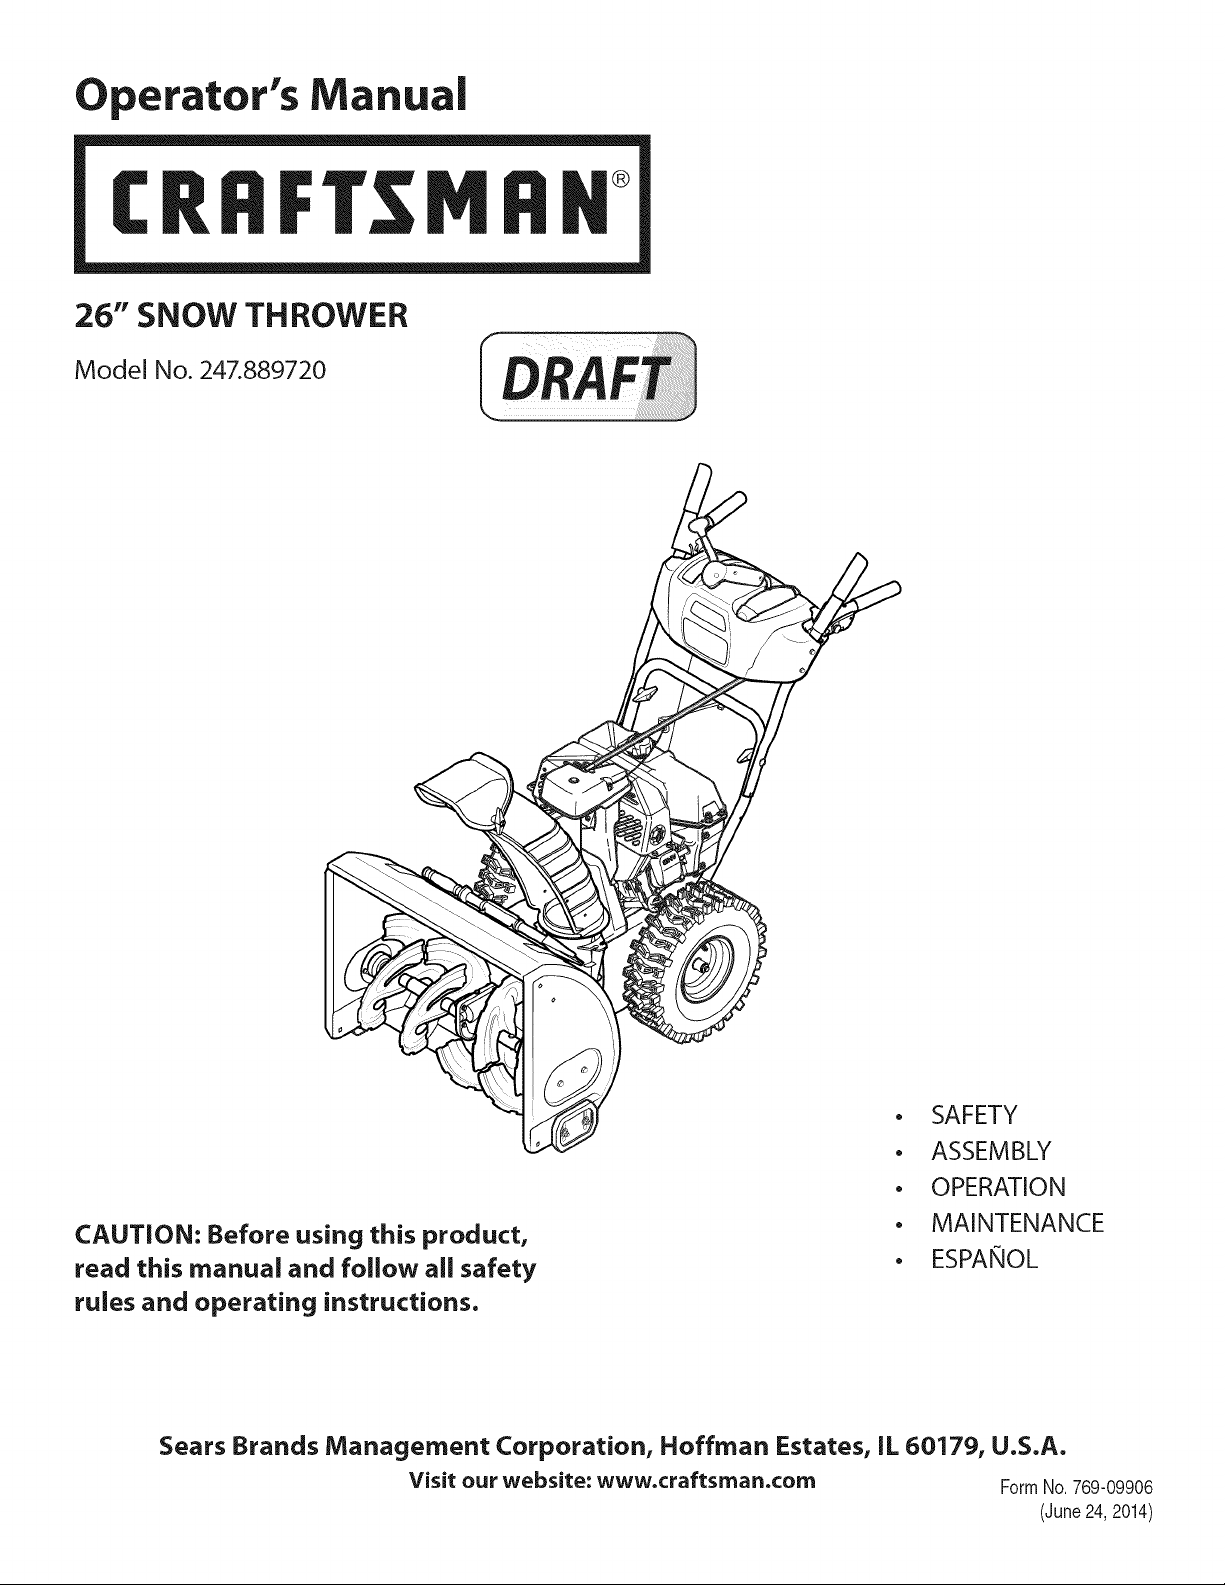
Operator's Manual
CRRFTSMFIN
26" SNOW THROWER
Model No. 247.889720
CAUTION: Before using this product,
read this manual and follow all safety
rules and operating instructions.
Sears Brands Management Corporation, Hoffman Estates, IL 60179, U.S.A.
Visit our website: www.craftsman.com FormNo.769-09906
• SAFETY
• ASSEMBLY
• OPERATION
• MAINTENANCE
• ESPANOL
(,June24,2014)
Page 2
Warranty Statement .............................. Page 2
Safe Operation Practices ...................... Pages 3-6
Assembly .................................... Pages 8-13
Operation .................................. Pages 14-17
Off-Season Storage ............................. Page 25
Troubleshooting ............................... Page 26
Repair Protection Agreement ................... Page 30
Espa_ol ......................................... Page 31
Service & Maintenance ...................... Pages 18-24
CRAFTSMANLIMITEDWARRANTY
FORTWOYEARSfromthedateofpurchase,thisproductiswarrantedagainstanydefectsinmaterialorworkmanship.
WITHPROOFOFSALE,adefectiveproductwill receivefreerepairorreplacementatoptionofseller.
ADDITIONALLIFETIMELIMITEDWARRANTYonUPPERand LOWERCHUTE
FORASLONGASITISUSEDbytheoriginalownerafterthe secondyearfromthedateofpurchase,theupperandlowerchuteofthissnowthrowerare
warrantedagainstanydefectsinmaterialorworkmanshipasverifiedbyaSearsauthorizedserviceprovider.Withproofofpurchase,youwill receiveanew
chutefreeofcharge.Youareresponsiblefor thelaborcostofinstallationandanycostincurredtoverifythedefect.
Forwarrantycoveragedetailstoobtainfreerepairorreplacement,visitthewebpage:www.craftsman.com/warranty
ThiswarrantycoversONLYdefectsinmaterialandworkmanship.WarrantycoveragedoesNOTinclude:
• Expendableitemsthatcanwearoutfromnormalusewithinthewarrantyperiod,includingbutnotlimitedtoaugers,augerpaddles,driftcutters,skid
shoes,shaveplate,shearpins,sparkplug,aircleaner,belts,andoilfilter.
• Standardmaintenanceservicing,oilchanges,ortune-ups.
• Tirereplacementorrepaircausedbypuncturesfromoutsideobjects,suchasnails,thorns,stumps,orglass.
• Tireorwheelreplacementorrepairresultingfromnormalwear,accident,orimproperoperationormaintenance.
• Repairsnecessarybecauseofoperatorabuse,includingbutnot limitedtodamagecausedbyover-speedingtheengine,orfromimpactingobjectsthat
bendtheframe,augershaft,etc.
• Repairsnecessarybecauseofoperatornegligence,includingbutnotlimitedto,electricalandmechanicaldamagecausedbyimproperstorage,failureto
usethepropergradeandamountofengineoil,orfailuretomaintaintheequipmentaccordingtotheinstructionscontainedintheoperator'smanual.
• Engine(fuelsystem)cleaningorrepairscausedbyfueldeterminedtobecontaminatedoroxidized(stale).Ingeneral,fuelshouldbeusedwithin30days
ofitspurchasedate.
• Normaldeteriorationandwearoftheexteriorfinishes,orproductlabelreplacement.
Thiswarrantyisvoidifthisproductiseverusedwhileprovidingcommercialservicesorif rentedtoanotherperson.
Thiswarrantygivesyouspecificlegalrights,andyoumayalsohaveotherrightswhichvaryfromstateto state.
SearsBrandsManagementCorporation,HoffmanEstates,IL60179
Engine Oil: 5W-30
Fuel: Unleaded Gasoline
Engine: Craftsman
Model Number
Serial Number
Date of Purchase
Record the model number, serial number,
and date of purchase above.
© Sears Brands, LLC 2
Page 3
Thissymbolpointsout importantsafetyinstructionswhich,ifnot
followed,couldendangerthe personalsafetyand/or propertyof
yourselfandothers.Readandfollow all instructions inthismanual
beforeattempting to operatethis machine.Failureto complywith these
instructionsmayresultinpersonalinjury.Whenyou seethis symbol,HEED
ITSWARNING!
Thismachinewasbuilt tobeoperatedaccordingtothesafeoperation
practicesinthis manual.Aswith anytype of powerequipment,
carelessnessorerroronthe part oftheoperatorcanresultinseriousinjury.
Thismachineiscapableof amputatingfingers, hands,toesand feetand
throwingdebris.Failuretoobservethefollowing safety instructionscould
resultinseriousinjuryor death.
CALIFORNIA PROPOSITION 65
EngineExhaust,someofitsconstituents,andcertainvehiclecomponents
containor emit chemicalsknowntoStateof Californiatocausecancerand
birth defectsorother reproductiveharm.
TRAINING
Read,understand,andfollowall instructionsonthemachineandinthe
manual(s)beforeattemptingtoassembleandoperate.Failuretodosocan
resultinseriousinjurytotheoperatorand/orbystanders.Keepthis manual
inasafeplaceforfutureandregularreferenceandfororderingreplacement
parts.
Befamiliarwith allcontrolsandtheirproperoperation.Knowhowtostop
themachineanddisengagethemquickly.
Neverallowchildrenunder14yearsofagetooperatethismachine.Children
14andovershouldreadandunderstandtheinstructionsandsafeoperation
practicesinthis manualandonthemachineandbetrainedandsupervised
byanadult.
Neverallowadultstooperatethismachinewithout properinstruction.
Thrownobjectscancauseseriouspersonalinjury.Planyoursnow-throwing
patterntoavoiddischargeofmaterialtowardroads,bystandersandthelike.
Keepbystanders,petsandchildrenatleast75feetfromthemachinewhileit
isin operation.Stopmachineif anyoneentersthearea.
Exercisecautionto avoidslippingorfalling,especiallywhenoperatingin
reverse.
PREPARATION
Thoroughlyinspecttheareawheretheequipmentistobeused.Removeall
doormats,newspapers,sleds,boards,wiresandotherforeignobjects,which
couldbetrippedoverorthrownbytheauger/impeller.
Alwayswearsafetyglassesoreyeshieldsduringoperationandwhile
performinganadjustmentor repairtoprotectyoureyes.Thrownobjects
whichricochetcancauseseriousinjurytotheeyes.
Donotoperatewithout wearingadequatewinteroutergarments.Donot
wearjewelry,longscarvesorotherlooseclothing,whichcouldbecome
entangledinmovingparts.Wearfootwearwhichwill improvefootingon
slipperysurfaces.
Usea groundedthree-wireextensioncordandreceptacleforall machines
with electricstartengines.
Your Responsibility--Restrict theuseof this power machineto
personswhoread,understandandfollow thewarningsand instructionsin
thismanualandonthe machine.
SAVETHESEINSTRUCTIONS!
Disengageallcontrolleversbeforestartingtheengine.
Adjustcollectorhousingheighttocleargravelorcrushedrocksurfaces.
Neverattemptto makeanyadjustmentswhileengineisrunning,except
wherespecificallyrecommendedin theoperator'smanual.
Letengineandmachineadjusttooutdoortemperaturebeforestartingto
clearsnow.
Safe Handling of Gasoline:
Toavoidpersonalinjuryor propertydamageuseextremecareinhandling
gasoline.Gasolineisextremelyflammableandthe vaporsareexplosive.
Seriouspersonalinjurycan occurwhengasolineisspilledonyourselforyour
clotheswhich canignite. Washyourskinandchangeclothesimmediately.
Useonlyanapprovedgasolinecontainer.
Neverfill containersinsideavehicleorona truckortrailerbedwithaplastic
liner.Alwaysplacecontainersonthegroundawayfromyourvehiclebefore
filling.
Whenpractical,removegas-poweredequipmentfromthetruckor
trailerandrefuelitontheground.Ifthisis notpossible,thenrefuelsuch
equipmentonatrailerwithaportablecontainer,ratherthanfromagasoline
dispensernozzle.
Keepthenozzleincontactwith therimofthefueltankorcontaineropening
atalltimesuntilfuelingiscomplete.Donotuseanozzlelock-opendevice.
Extinguishallcigarettes,cigars,pipesandothersourcesofignition.
Neverfuelmachineindoors.
Neverremovegascaporaddfuelwhiletheengineishotorrunning.Allow
engineto coolatleasttwominutesbeforerefueling.
Neveroverfill fueltank.Filltankto nomorethan1/2inchbelowbottomof
fillernecktoallowspaceforfuelexpansion.
Replacegasolinecapandtightensecurely.
Ifgasolineisspilled,wipeit offtheengineandequipment.Moveunitto
anotherarea.Wait5minutesbeforestartingtheengine.
Page 4
Toreducefirehazards,keepmachinefreeofgrass,leaves,orotherdebris
build-up.Cleanupoilorfuelspillageandremoveanyfuelsoakeddebris.
Neverstorethemachineorfuelcontainerinsidewherethereisanopen
flame,sparkorpilotlightasonawaterheater,spaceheater,furnace,clothes
dryerorothergasappliances.
OPERATION
Donotputhandsorfeetnearrotatingparts,intheauger/impellerhousing
orchuteassembly.Contactwith therotatingpartscanamputatehandsand
feet.
Theauger/impellercontrolleverisasafetydevice.Neverbypassits
operation.Doingsomakesthemachineunsafeandmaycausepersonal
injury.
Thecontrolleversmustoperateeasilyin bothdirectionsandautomatically
returntothedisengagedpositionwhenreleased.
Neveroperatewith amissingordamagedchuteassembly.Keepallsafety
devicesinplaceandworking.
Neverrunanengineindoorsor inapoorlyventilatedarea.Engineexhaust
containscarbonmonoxide,anodorlessanddeadlygas.
Donotoperatemachinewhileundertheinfluenceofalcoholordrugs.
Mufflerandenginebecomehotandcancauseaburn.Donottouch.Keep
childrenaway.
Exerciseextremecautionwhenoperatingonorcrossinggravelsurfaces.Stay
alertforhiddenhazardsortraffic.
Exercisecautionwhenchangingdirectionandwhileoperatingonslopes.Do
notoperateonsteepslopes.
Planyoursnow-throwingpatterntoavoiddischargetowardswindows,
walls,carsetc.Thus,avoidingpossiblepropertydamageorpersonalinjury
causedbyaricochet.
Neverdirectdischargeat children,bystandersandpetsorallowanyonein
frontofthemachine.
Donotoverloadmachinecapacitybyattemptingtoclearsnowattoofastof
arate.
Neveroperatethismachinewithoutgoodvisibilityorlight.Alwaysbesureof
yourfootingandkeepafirmholdonthehandles.Walk,neverrun.
Disengagepowertotheauger/impellerwhentransportingornotin use.
Neveroperatemachineathightransportspeedsonslipperysurfaces.Look
downandbehindandusecarewhenbackingup.
Ifthemachineshouldstarttovibrateabnormally,stoptheengine,
disconnectthesparkplugwireandgrounditagainsttheengine.Inspect
thoroughlyfordamage.Repairanydamagebeforestartingandoperating.
Disengageallcontrolleversandstopenginebeforeyouleavetheoperating
position(behindthehandles).Waituntiltheauger/impellercomesto
acompletestopbeforeuncloggingthechuteassembly,makingany
adjustments,orinspections.
Neverputyourhandin thedischargeorcollectoropenings.Donotunclog
chuteassemblywhileengineis running.Shutoff engineandremainbehind
handlesuntil allmovingpartshavestoppedbeforeunclogging.
Useonlyattachmentsandaccessoriesapprovedbythemanufacturer(e.g.
wheelweights,tirechains,cabsetc.).
Whenstartingengine,pullcordslowlyuntilresistanceisfelt,thenpull
rapidly.Rapidretractionofstartercord(kickback)will pullhandandarm
towardenginefasterthanyoucanletgo.Brokenbones,fractures,bruisesor
sprainscouldresult.
Ifsituationsoccurwhicharenotcoveredinthismanual,usecareandgood
judgment.
CLEARING A CLOGGED DISCHARGE CHUTE
Handcontactwiththerotatingimpellerinsidethedischargechuteisthemost
commoncauseofinjuryassociatedwith snowthrowers.Neveruseyourhandto
cleanoutthedischargechute.
Toclearthechute:
a. SHUTTHEENGINEOFF!
b. Wait10secondsto besuretheimpellerbladeshavestopped
rotating.
c. Alwaysuseaclean-outtool,notyourhands.
MAINTENANCE & STORAGE
Nevertamperwith safetydevices.Checktheir properoperationregularly.
Refertothemaintenanceandadjustmentsectionsofthismanual.
Beforecleaning,repairing,orinspectingmachinedisengageallcontrol
leversandstoptheengine.Waituntiltheauger/impellercometo acomplete
stop.Disconnectthesparkplugwire andgroundagainsttheengineto
preventunintendedstarting.
Checkboltsandscrewsforpropertightnessatfrequentintervalsto keepthe
machineinsafeworkingcondition.Also,visuallyinspectmachineforany
damage.
Donotchangetheenginegovernorsettingorover-speedtheengine.The
governorcontrolsthemaximumsafeoperatingspeedoftheengine.
Snowthrowershaveplatesandskidshoesaresubjectto wearanddamage.
Foryoursafetyprotection,frequentlycheckallcomponentsandreplace
with originalequipmentmanufacturer's(OEM)partsonlyaslistedinthe
Partspagesofthisoperator'smanual.Useof partswhichdonotmeetthe
originalequipmentspecificationsmayleadtoimproperperformanceand
compromisesafety!
Checkcontrolleversperiodicallyto verifytheyengageanddisengage
properlyandadjust,ifnecessary.Refertotheadjustmentsectioninthis
operator'smanualfor instructions.
Maintainorreplacesafetyandinstructionlabels,asnecessary.
Observeproperdisposallawsandregulationsforgas,oil,etc.toprotectthe
environment.
Priortostoring,runmachineafewminutestoclearsnowfrommachineand
preventfreezeupof auger/impeller.
Neverstorethemachineorfuelcontainerinsidewherethereisanopen
flame,sparkorpilotlight suchasawaterheater,furnace,clothesdryeretc.
Alwaysrefertotheoperator'smanualforproperinstructionsonoff-season
storage.
4
Page 5
Checkfuelline,tank,cap,andfittingsfrequentlyfor cracksor leaks.Replace
if necessary.
Donotcrankenginewith sparkplugremoved.
AccordingtotheConsumerProductsSafetyCommission(CPSC)andthe
U.S.EnvironmentalProtectionAgency(EPA),thisproducthasanAverage
Useful Lifeof seven(7)years,or60hoursofoperation.Attheendof
theAverage Useful Lifehavethemachineinspectedannuallybyan
authorizedservicedealertoensurethat allmechanicalandsafetysystems
areworkingproperlyandnotwornexcessively.Failureto dosocanresultin
accidents,injuriesordeath.
DO NOT MODIFY ENGINE
Toavoidseriousinjuryordeath,donot modifyengineinanyway.Tampering
with thegovernorsetting canleadto arunawayengineandcauseitto
operateat unsafespeeds.Nevertamperwith factorysetting ofengine
governor.
NOTICE REGARDING EMiSSiONS
Engineswhich arecertifiedto complywith Californiaandfederal EPA
emissionregulationsfor SORE(Sinai[OffRoadEquipment)arecertified
tooperateonregularunleadedgasoline,and mayincludethe following
emissioncontrolsystems:EngineModification (EM),OxidizingCatalyst(0C),
SecondaryAirinjection(SAI)andThreeWayCatalyst(TWC)ifsoequipped.
SPARK ARRESTOR
®
Thismachineisequippedwith aninternalcombustionengineandshould
not beusedonornearanyunimprovedforest-covered,brusbcoveredor
grass-covered[andunlessthe engine'sexhaustsystemisequippedwith a
sparkarrestormeetingapplicablelocalorstatelaws(if any).
Ifa sparkarrestorisused,it shouldbemaintainedineffectiveworking order
bythe operator,in the Stateof Californiathe aboveisrequiredbylaw (Section
4442ofthe CaliforniaPublicResourcesCode).Otherstates mayhavesimilar
laws.Federallawsapplyonfederal lands.
Asparkarrestorfor the muffler isavailablethrough yournearestSearsParts
andRepairServiceCenter.
Page 6
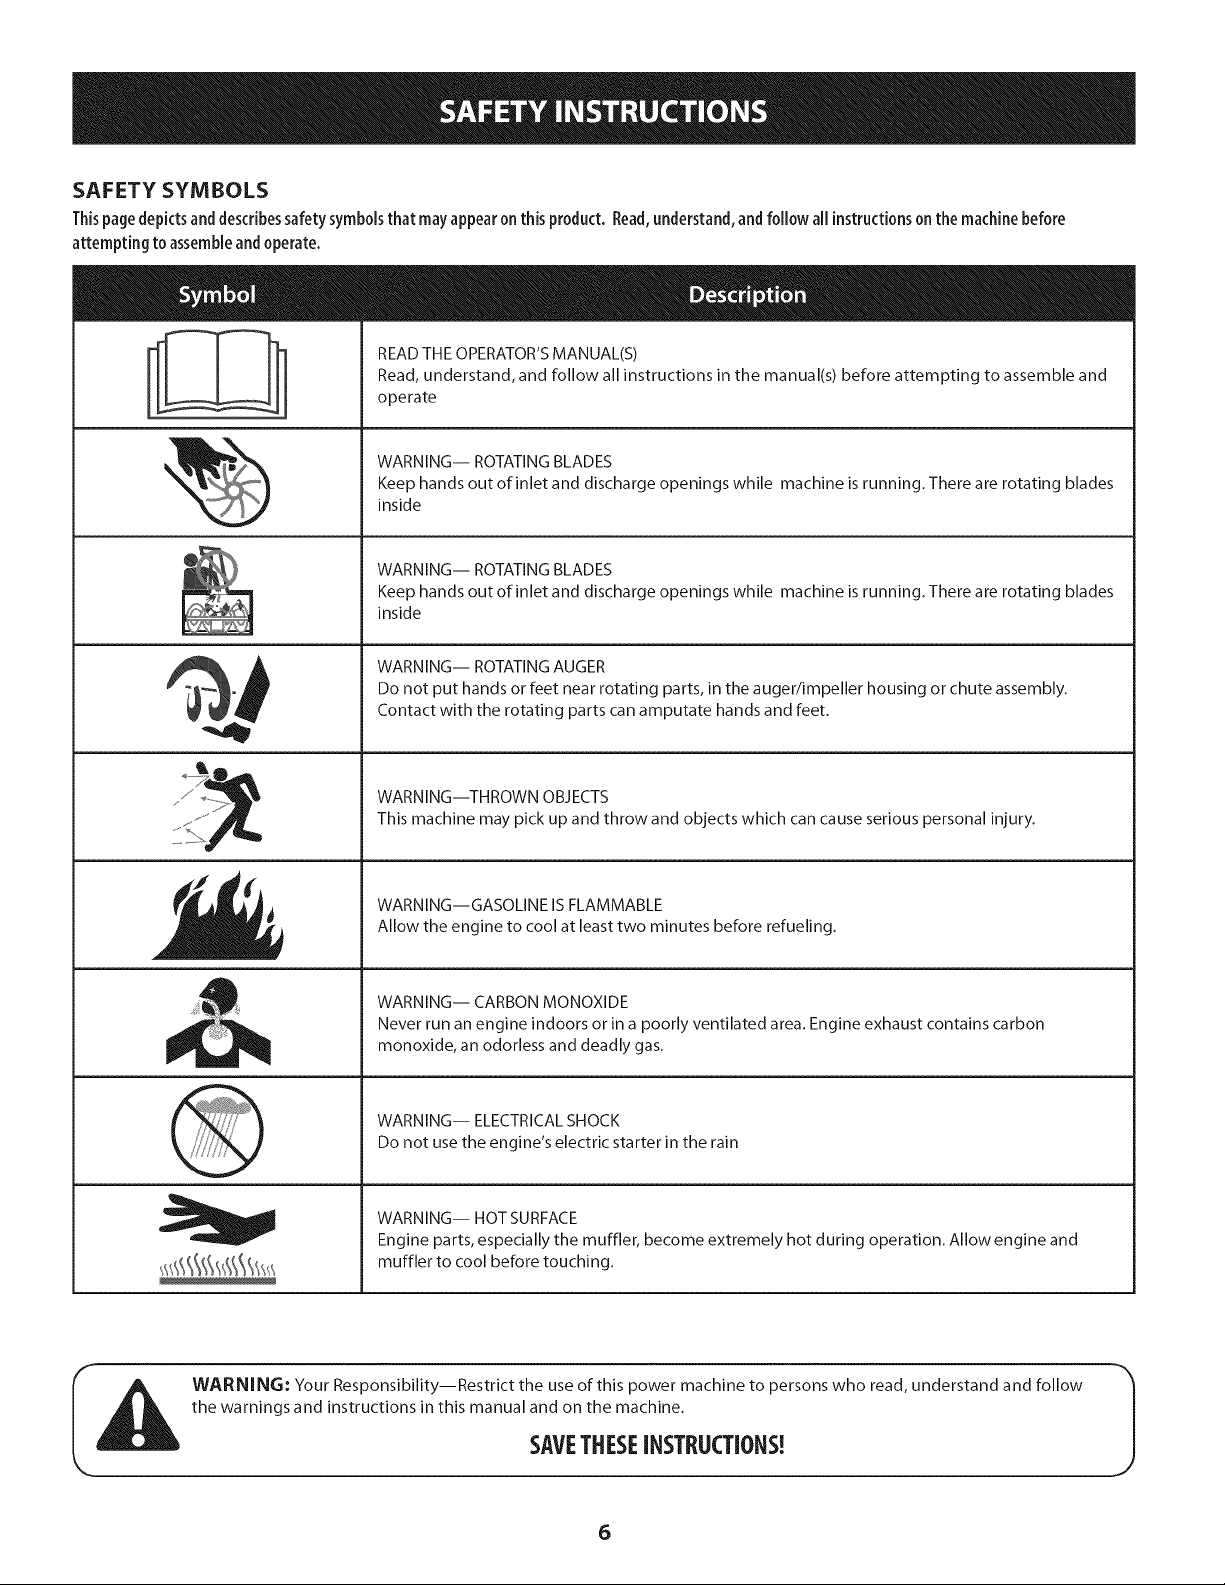
SAFETY SYMBOLS
Thispage depicts and describes safety symbols that may appear on this product. Read,understand, and follow all instructionson the machine before
attempting to assemble and operate.
READ THE OPERATOR'S MANUAL(S)
Read, understand, and follow all instructions in the manual(s) before attempting to assemble and
operate
WARNING-- ROTATING BLADES
Keep hands out of inlet and discharge openings while machine is running. There are rotating blades
inside
WARNING-- ROTATING BLADES
Keep hands out of inlet and discharge openings while machine is running. There are rotating blades
inside
WARNING-- ROTATING AUGER
Do not put hands or feet near rotating parts, in the auger/impeller housing or chute assembly.
Contact with the rotating parts can amputate hands and feet.
WARNING--THROWN OBJECTS
This machine may pick up and throw and objects which cancause serious personal injury.
WARNING--GASOLINE IS FLAMMABLE
Allow the engine to cool at least two minutes before refueling.
WARNING-- CARBON MONOXIDE
Never run an engine indoors or in a poorly ventilated area. Engine exhaust contains carbon
monoxide, an odorless and deadly gas.
WARNING-- ELECTRICAL SHOCK
Do not use the engine's electric starter in the rain
WARNING-- HOT SURFACE
Engine parts, especially the muffler, become extremely hot during operation. Allow engine and
muffler to cool before touching.
WARNING: Your Responsibility--Restrict the use of this power machine to persons who read, understand and follow
the warnings and instructions in this manual and on the machine.
SAVETHESEiNSTRUCTIONS!
6
Page 7

This pageleft intentionallyblank.
7
Page 8
flOTE:Referencestorightorleft sideofthesnowthroweraredeterminedfrom
behindtheunitin theoperatingposition(standingdirectlybehindthesnow
thrower,facingthehandlepanel).
Removing FromCarton
1. Cutthecornersofthecartonandlaythesidesflat ontheground.Remove
anddiscardallpackinginserts.
2. Movethesnowthroweroutofthecarton.
3. Makecertainthecartonhasbeencompletelyemptiedbeforediscardingit.
Assembly
Observethelowerrearareaofthesnowthrowertobesurebothcablesare
alignedwith rollerguidesbeforepivotingthehandleupward.
a. Placetheshift[everintheF6position.SeeFigure1inset.
b. Puffupandbackonupperhandleasshownin Figure1.Asyouare
raisingthehandleupward,makesurethat bothendsof thecenter
cablearepositionedproperlyinthebrackets.Alignupperhandle
withthelowerhandle.
c. Tightenhandknobssecuringupperhandletolowerhandle.Remove
anddiscardanyrubberbands,if present.Theyareforpackaging
purposesonly.
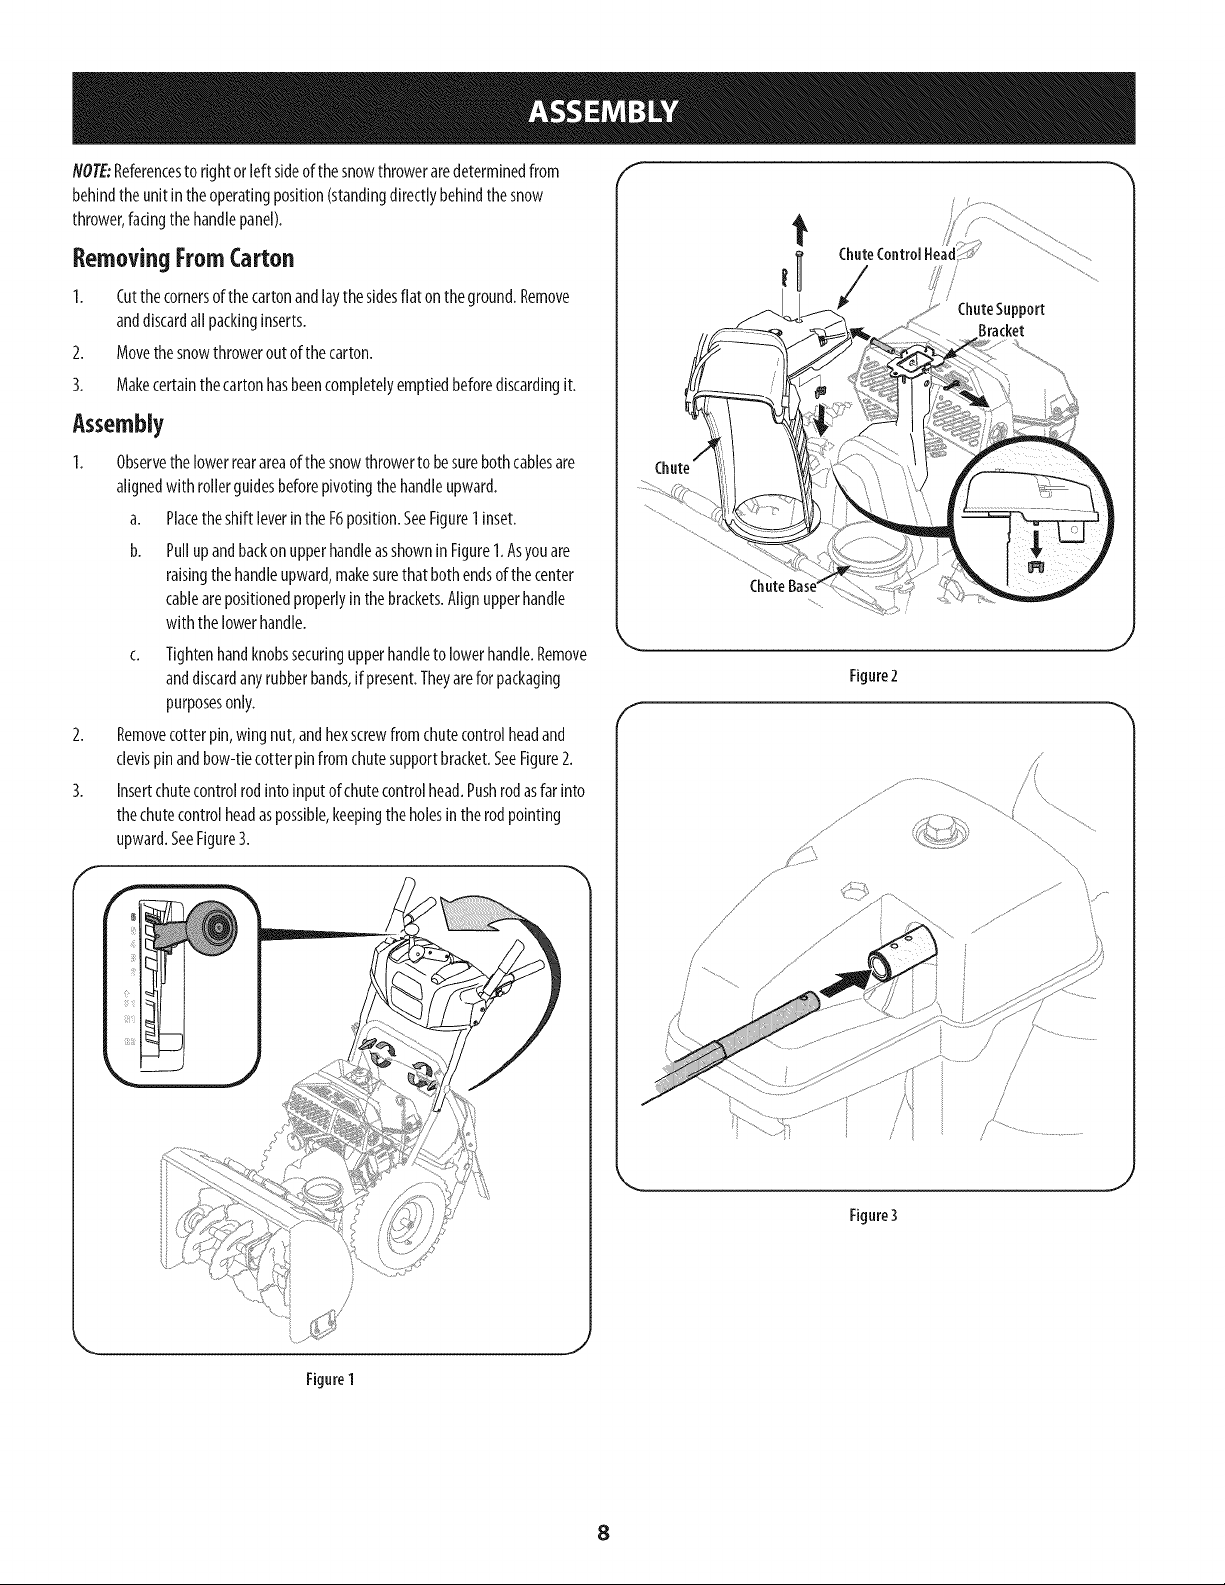
Removecotterpin,wingnut,andhexscrewfromchutecontrolheadand
clevispinandbow-tiecotterpinfromchutesupportbracket.SeeFigure2.
Insertchutecontrolrodintoinputofchutecontrolhead.Pushrodasfarinto
thechutecontrolheadaspossible,keepingtheholesin therodpointing
upward.SeeFigure3.
/ /
ChuteSupport
Bracket
.J
Figure2
f
/ .....
f
j
Rgure3
J
Figure1
8
Page 9
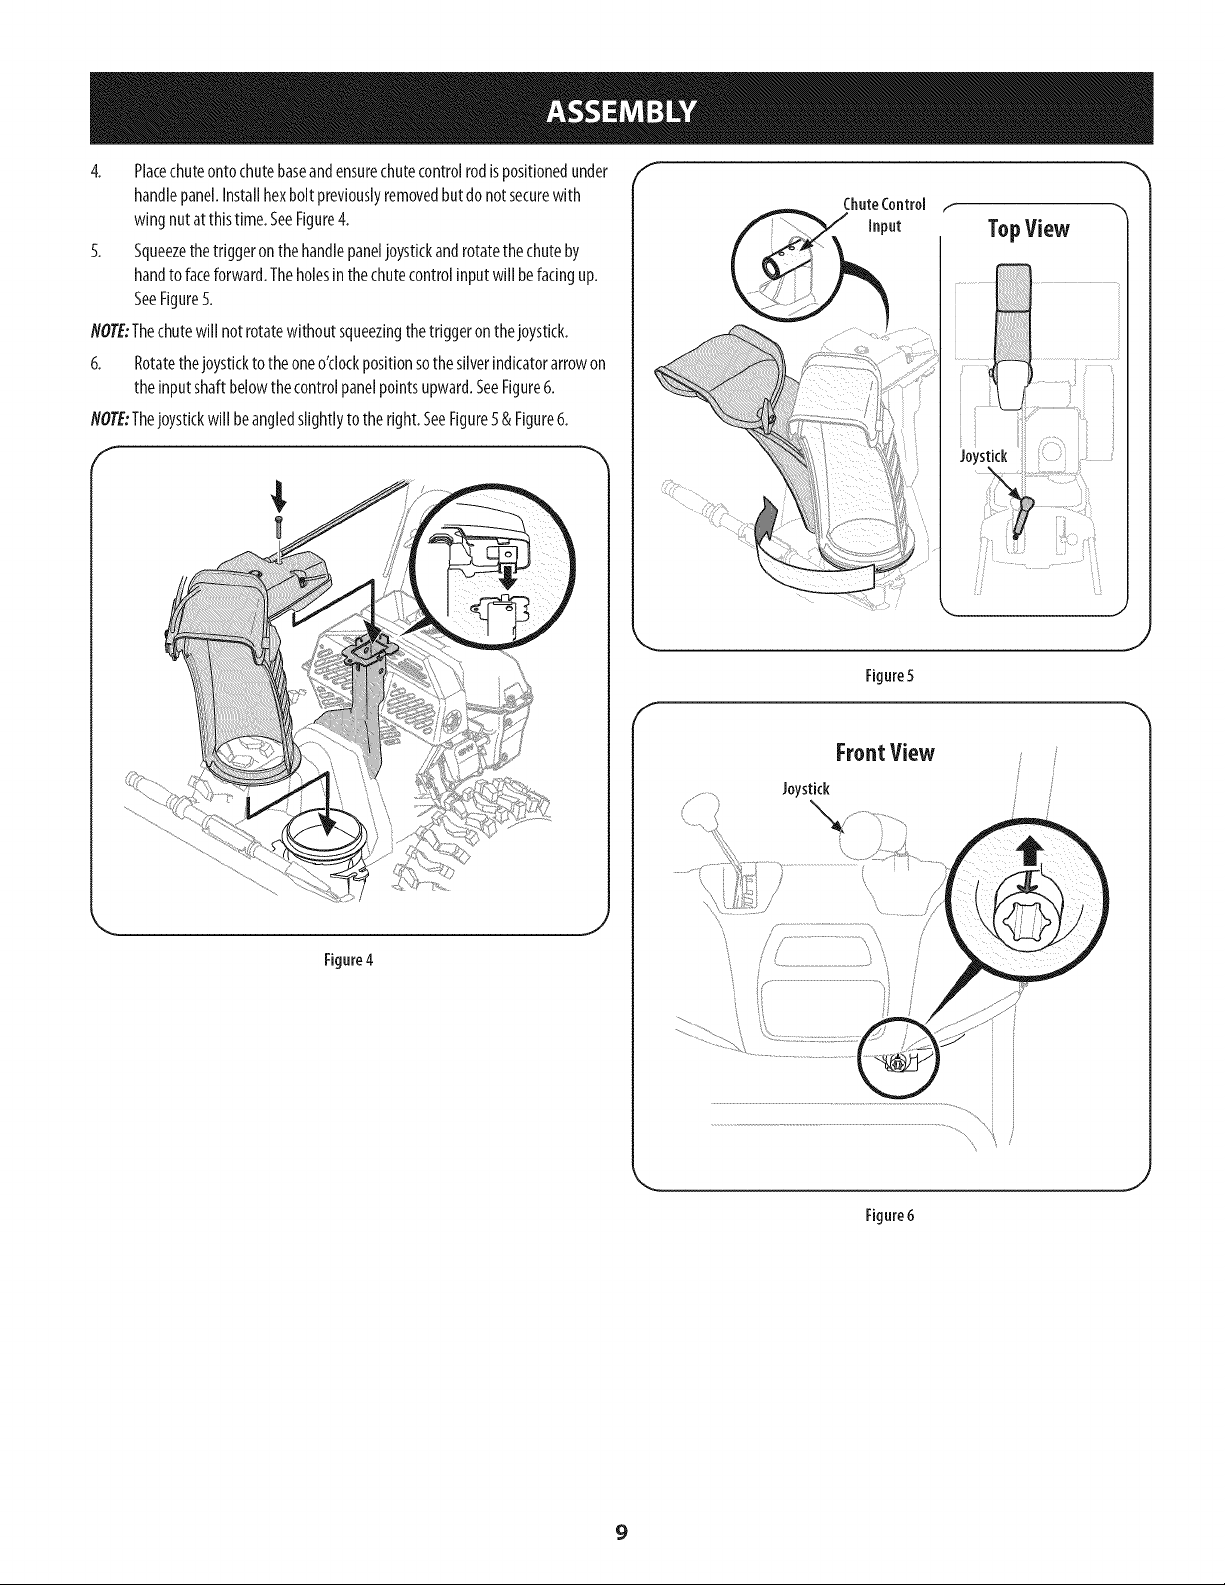
4. Placechuteontochutebaseandensurechutecontrolrodispositionedunder
handlepanel.Installhexbolt previouslyremovedbutdonotsecurewith
wingnutat thistime.SeeFigure4.
5. Squeezethetriggeronthehandlepaneljoystickandrotatethechuteby
handtofaceforward.Theholesinthechutecontrolinputwill befacingup.
SeeFigure5.
NOTE:Thechutewill notrotatewithoutsqueezingthetriggeronthejoystick.
6. Rotatethejoysticktotheoneo'clockpositionsothesliverindicatorarrowon
theinputshaftbelowthecontrolpanelpointsupward.SeeFigure6.
NOTE:Thejoystickwill beangledslightlytotheright.SeeFigure5&Figure6.
f
TopView
Figure5
FrontView
Figure4
//f "_
Joystick
\
Figure6
9
Page 10
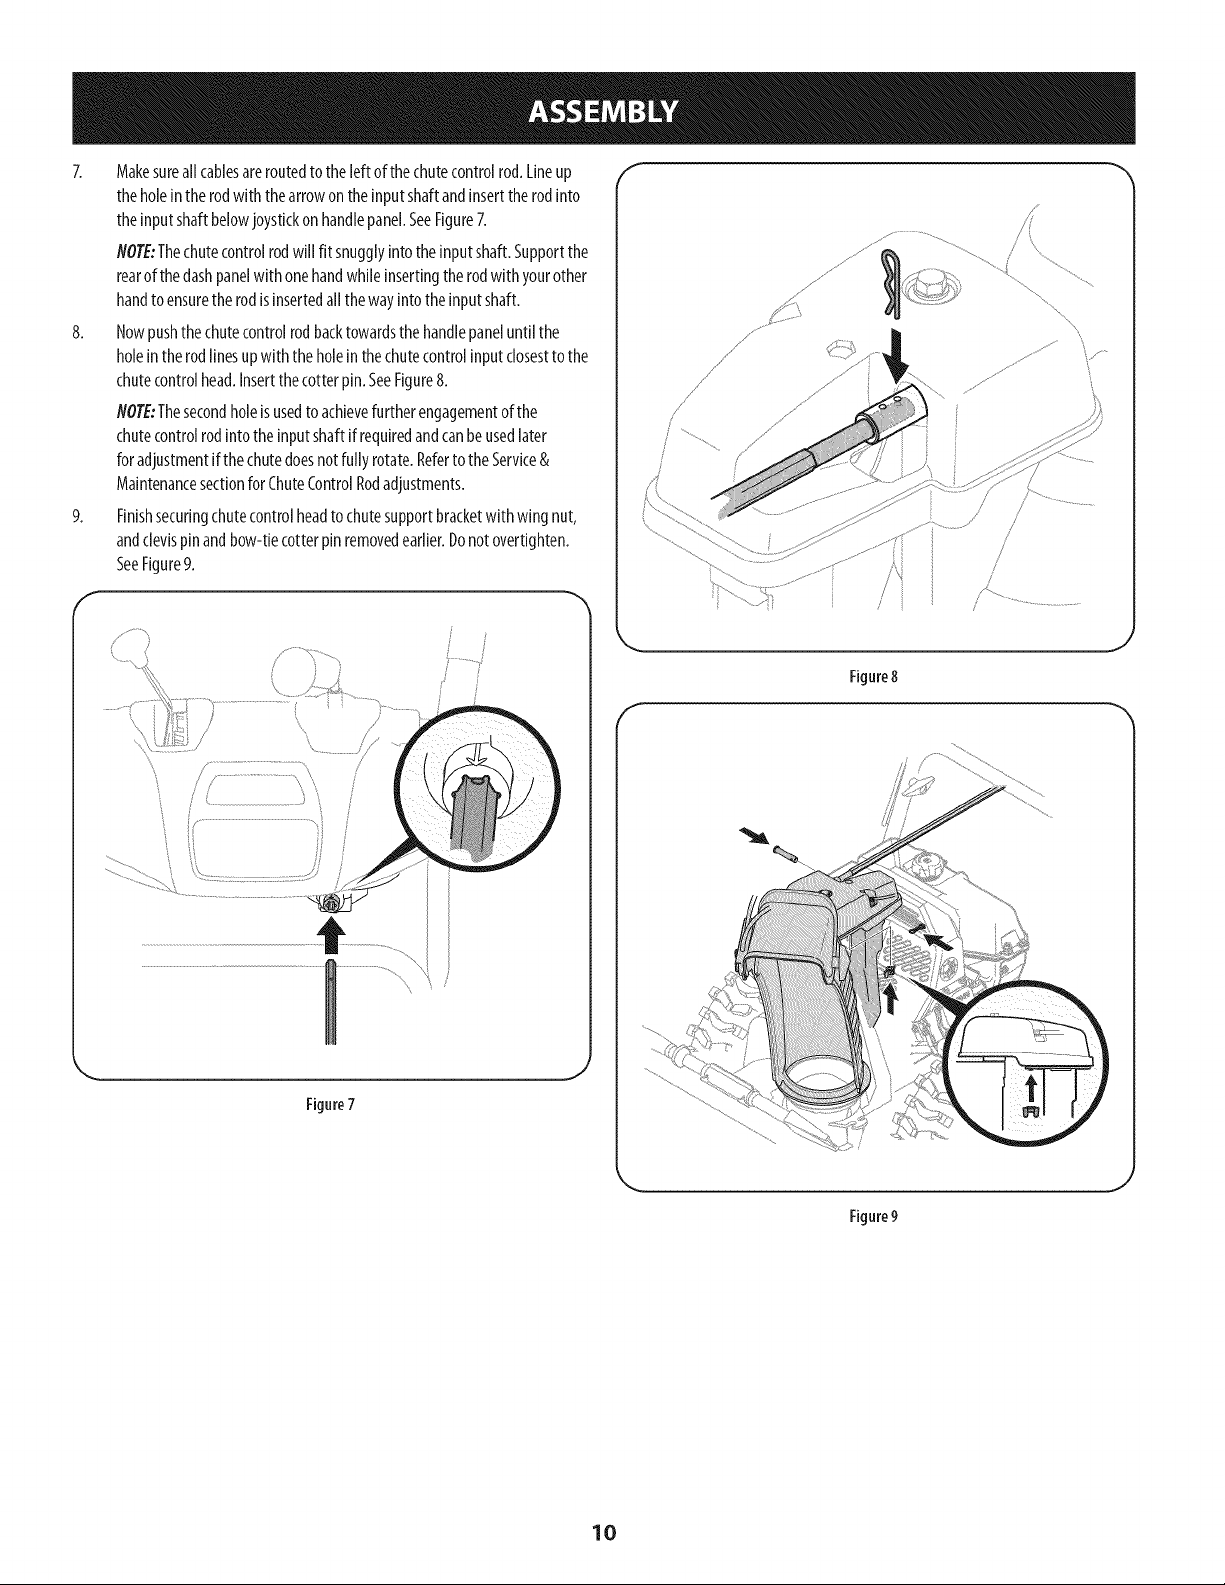
7. Makesureallcablesareroutedtotheleftofthechutecontrolrod.Lineup
theholeintherodwiththearrowontheinputshaftandinserttherodinto
theinputshaftbelowjoystickonhandlepanel.SeeFigure7.
NOTE:Thechutecontrolrodwill fit snugglyintotheinputshaft.Supportthe
rearofthedashpanelwith onehandwhileinsertingtherodwith yourother
handtoensurethe rodisinsertedallthewayintotheinputshaft.
8. Nowpushthechutecontrolrodbacktowardsthehandlepaneluntilthe
holeintherodlinesupwith theholeinthechutecontrolinputclosestto the
chutecontrolhead.Insertthecotterpin.SeeFigure8.
NOTE:Thesecondholeisusedtoachievefurtherengagementof the
chutecontrolrodintotheinputshaftifrequiredandcanbeusedlater
foradjustmentifthechutedoesnotfully rotate.RefertotheService&
MaintenancesectionforChuteControlRodadjustments.
9. Finishsecuringchutecontrolheadto chutesupportbracketwithwing nut,
andclevispinandbow-tiecotterpinremovedearlier.Donotovertighten.
SeeFigure9.
f
f
/ /
Figure8
f
Figure7
\
Figure9
10
Page 11

Checkthatallcablesareproperlyroutedthroughthecableguideonthe
engine.SeeFigure10.
NOTE:Ifthechutecontrolisnotassembledcorrectlyitwill notmovefreely
norwill it movefully totherightandleft.
Set-Up
ShearPins
Holesarelocatedintheplasticdashpanelfor convenientshearpinstorage.See
Figure11.RefertotheOperationsectionfor moreinformationregardingshearpin
replacement.
J
Figure10
f
11
J
Figure11
Page 12

ChuteClean-OutTool /"
Achuteclean-outtoolisfastenedtothetopoftheaugerhousingwith amounting
clip.SeeFigure12.Thetoolisdesignedto clearachuteassemblyoficeand
snow.Thisitemisfastenedwith acabletie atthefactory.Cutthecabletiebefore
operatingthesnowthrower.
Neveruseyour handstoclearacloggedchuteassembly.Shutoff engine
andremainbehindhandlesuntil all movingparts havestoppedbefore
usingthe clean-outtool to clearthe chuteassembly.
TirePressure
Underanycircumstancedo notexceedmanufacturer'srecommendedpsi.
Equaltire pressureshouldbemaintainedat alltimes. Excessivepressure
when seatingbeadsmaycausetirelfim assemblyto burst with force
sufficient to causeseriousinjury. Refertosidewalloftirefor recommended
pressure.
Thetiresareover-inflatedforshippingpurposes.Checkthetire pressurebefore
operatingthesnowthrower.Refertothetiresidewallfor tiremanufacturer's
recommendedpsianddeflate(orinflate)thetiresasnecessary.
NO?E:Equaltire pressureisto bemaintainedatalltimesforperformancepurposes.
Adjustments
SkidShoes
Thesnowthrowerskidshoesareadjustedupwardatthefactoryforshipping
purposes.Adjustthemdownward,ifdesired,priortooperatingthesnowthrower.
ChuteClean-outTool
.J
Figure12
f
Itis notrecommendedthat youoperatethis snowthrower on gravelas
it caneasilypickupandthrow loosegravel,causingpersonalinjury or
damageto thesnowthrower andsurroundingproperty.
Forclosesnowremovalonasmoothsurface,raiseskidshoeshigheronthe
augerhousing.Referto Figure13.
Useamiddleorlowerpositionwhentheareatobeclearedisuneven,suchas
agraveldriveway.
NOTE:Ifyouchooseto operatethesnowthroweronagravelsurface,keep
theskidshoesinpositionformaximumclearancebetweenthegroundand
theshaveplate.
Toadjusttheskidshoes:
1. Loosenthefourhexnuts(twooneachside)andcarriagebolts.Moveskid
shoestodesiredposition.SeeFigure13.
2. Makecertaintheentirebottomsurfaceofskidshoeisagainstthegroundto
avoidunevenwearontheskidshoes.
3. Retlghtennutsandboltssecurely.
UnevenSurface
\
Figure13
12
Page 13

Thedistancesnowisthrowncanbeadjustedbychangingtheangleoftheupper
chute.Todoso:
Stoptheenginebyremovingtheignitionkeyandloosenthe plasticwing
knobfoundontheleft sideofthechuteassembly.
2.
Pivotthechuteupwardordownwardbeforeretighteningthewingknob.
SeeFigure14.
AugerControl
Priorto operatingyoursnowthrower,carefullyreadandfollow all
instructionsbelow.Performall adjustmentsto verifyyoursnowthrower is
operatingsafelyandproperly.
Checktheadjustmentoftheaugercontrolasfollows:
1. Theaugercontrolislocatedonthelefthandle.SeeFigure15inset.When
theaugercontrolisreleasedandinthedisengaged"up"position,thecable
shouldhaveverylittle slack.ItshouldNOTbetight.
2. Inawell-ventilatedarea,startthesnowthrowerengine.Referto Starting
theEngineintheOperationsection.
3. Whilestandingintheoperator'sposition(behindthesnowthrower),engage
theauger.
4. Allowtheaugerto remainengagedfor approximatelyten(10)seconds
beforereleasingtheaugercontrol.Repeatthisseveraltimes.
5. Withtheaugercontrolin thedisengaged"up" position,walkto thefrontof
themachine.
6.
Toreadjustthecontrolcable,loosenthe upperhexboltontheaugercable
bracket.SeeFigure15.
Positionthebracketupwardtoprovidemoreslack(ordownwardto increase
cabletension).
8. Retightentheupperhexbolt.
9. Repeatsteps2-6aboveto verifyproperadjustmenthasbeenachieved.
10. Confirmthat theaugerhascompletelystoppedrotatingandshowsNOsigns
ofmotion.IftheaugershowsANYsignsofrotating,immediatelyreturnto
theoperator'spositionandshutoff theengine.WaitforALLmovingpartsto
stopbeforeadjustingtheaugercontrol.
.J
Figure14
f
I \, \\
1!5
J
Figure15
Page 14

Chute Assembly
Drive Control
Shift Lever
J
J
Two=WayChute Control (Joystick)
_.. Auger Control
CI
Auger Housing
Augers
Nowthatyouhavesetupyoursnowthrower,it'simportantto becomeacquainted
with itscontrolsandfeatures.Referto Figure16.
__Oil _ilid Shoe
Figure16
Shift [ever
Theshift leverislocatedontherightsideofthehandlepanel.Placetheshift
leverintoanyofeightpositionstocontrolthedirectionoftravelandground
speed.Forward
Yoursnowthrowerhassixforward(F)speeds.Positionone(1)istheslowest
andpositionsix(6)isthefastest.
Reverse
Yoursnowthrowerhastworeverse(R)speeds.One(1)istheslowerandtwo(2)R1
isthefaster. [I 2
t 2 ChokeControl
Gas
Recoil Starter
Handle
:lectric Start
Button
Oil Drain
\
Electric Starter Outlet
,ey6 Thekeyisasafetydevice.It mustbefullyinsertedin Ii
5 orderfortheenginetostart.Removethekeywhenthe
4 NOTE:Donotturntheignitionkeyinanattempttostart
snowthrowerisnotinuse. (_ O
3 theengine.Doingsomaycauseittobreak.
activated byturning the rotarychoke knob to the CHOKE
position.Activatingthechokecontrolclosesthechoke
plateon the carburetorandaids instarting the engine.
RecoUStarter Handle
Thishandleisusedtomanuallystarttheengine.
MeetsANSiSafetyStandards
CraftsmanSnowThrowersconformto thesafetystandardoftheAmericanNationalStandardsInstitute(ANSI).
14
Page 15

Throttlecontrol
Thethrottlecontrolislocatedontherearoftheengine.It regulatesthespeedofthe
engineandwill shutoffthe enginewhenmovedintotheSTOPposition.
Primer
Depressingtheprimerforcesfueldirectlyintothe
engine'scarburetortoaidincold-weatherstarting.
ElectricStarter Button
DriveControl/Auger ControlLock
f DRIVE
CONTROL
Pressingtheelectricstarterbuttonengagestheengine'selectricstarterwhen
pluggedintoa 120Vpowersource.
ElectricStarter Outlet
Requirestheuseofathree-prongoutdoorextensioncordanda120Vpowersource/
walloutlet.
OilFill
Engineoil levelcanbecheckedandoiladdedthroughtheoil fill.
GasCap
Unthreadthegascaptoaddgasolinetothefueltank.
Auger
Whenengaged,theaugerbladesrotateanddrawsnowintotheaugerhousing.
ChuteAssembly
Snowdrawnintotheaugerhousingisdischargedoutthechuteassembly.
SkidShoes
Positiontheskidshoesbasedonsurfaceconditions.Adjustupwardforhard-packed
snow.Adjustdownwardwhenoperatingongravelorcrushedrocksurfaces.
AugerControl
f
Thedrivecontrolislocatedontherighthandle.Squeezethecontrolgripagainstthe
handleto engagethewheeldrive.Releasetostop.
Thedrivecontrolalsolockstheaugercontrolsoyoucanoperatethechute
directionalcontrolwithoutinterruptingthesnowthrowingprocess.Iftheauger
controlisengagedsimultaneouslywiththedrivecontrol,theoperatorcanrelease
theaugercontrol(onthelefthandle)andtheaugerswill remainengaged.Release
bothcontrolstostoptheaugersandwheeldrive.
NOTE:Alwaysreleasethedrivecontrolbeforechangingspeeds.Failuretodosowill
resultinincreasedwearonyourmachine'sdrivesystem.
Two-WayChuteControl
Thetwo-waychutecontrol(Joystick)islocatedontheleftsideofthehandlepanel.
CHUTE DIRECTIONAL CONTROL
CHUTEROTATE CHUTEROTATE
LEFT RIGHT
J
Theaugercontrolislocatedonthelefthandle.Squeezethecontrolgripagainstthe
handleto engagetheaugerandstartsnowthrowingaction.Releaseto stop.
Tochangethedirectioninwhichsnowisthrown,squeezethebuttononthe
chutecontrolleverandpivotthechutecontrollevertotherightorto the
left.
15
Page 16

Clean-OutTool
Neveruseyour handstodear acloggedchuteassembly.Shutoffengine
andremainbehindhandlesuntil all movingparts havestoppedbefore
usingthe clean-outtool to clearthe chuteassembly.
Thechuteclean-outtoolisconvenientlyfastenedto therearoftheaugerhousing
with amountingclip.Shouldsnowandicebecomelodgedinthechuteassembly
duringoperation,proceedasfollowstosafelycleanthechuteassemblyandchute
opening:
1. ReleaseboththeAugerControlandtheDriveControl.
2. Stoptheenginebyremovingthe ignitionkey.
3. Removetheclean-outtoolfromtheclipwhichsecuresittotherearofthe
augerhousing.
4. Usetheshovel-shapedendoftheclean-outtooltodislodgeandscoopany
snowandicewhichhasformedinandnearthechuteassembly.
5. Refastentheclean-outtooltothemountingclipontherearoftheauger
housing,reinserttheignitionkeyandstartthesnowthrower'sengine.
6. Whilestandingintheoperator'sposition(behindthesnowthrower),engage
theaugercontrolforafewsecondstoclearanyremainingsnowandicefrom
thechuteassembly.
BeforeStarting Engine
Read,understand,andfollow all instructionsandwarningson the
machineandin this manualbeforeoperating.
Oil
Theunitwasshippedwith oilintheengine.Checkoillevelbeforeeachoperationto
ensureadequateoilin theengine.
NOTE:Besuretochecktheengineonalevelsurfacewiththeenginestopped.
1. Removetheoilfillercap/dipstickandwipethedipstickclean.
2. Insertthecap/dipstickintotheoilfillerneck,butdoNOTscrewit in.
3. Removetheoilfillercap/dipstick.Ifthelevelislow,slowlyaddoil(5W-30,
with aminimumclassificationofSF/SG)untiloillevelregistersbetweenhigh
(N)andlow(L).
NOTE:Donotoverfill.Overfillingwith oil mayresultinenginesmoking,hard
startingorsparkplugfouling.
4.
Replaceandtightencap/dipstickfirmlybeforestartingengine.
Gasoline
Useautomotivegasoline(unleadedorlowleadedtominimizecombustionchamber
deposits)with aminimumof87octane.Gasolinewith upto10%ethanolor15%
MTBE(MethylTertiaryButylEther)canbeused.Neveruseanoil/gasolinemixture
ordirtygasoline.Avoidgettingdirt,dust,orwaterinthefueltank.DONOTuseE85
gasoline.
Refuelin awell-ventilatedareawiththeenginestopped.Donotsmokeor
allowflamesorsparksin theareawheretheengineisrefueledorwhere
gasolineisstored.
Donotoverfillthefueltank.Afterrefueling,makesurethetankcapisclosed
properlyandsecurely.
Becarefulnottospillfuelwhenrefueling.Spilledfuelorfuelvapormay
ignite.Ifanyfuelisspilled,makesuretheareaisdrybeforestartingthe
engine.
Avoidrepeatedorprolongedcontactwithskinorbreathingofvapor.
Useextremecarewhenhandlinggasoline.Gasolineisextremely
flammableandthevaporsare explosive.Neverfuel the machineindoorsor
while the engineishotorrunning.Extinguishcigarettes,cigars,pipesand
othersourcesofignition.
I.
Cleanaroundfuelfill beforeremovingcaptofuel.
2.
Afuel levelindicatoris locatedinthefueltank.SeeFigure16inset.Be
carefulnottooverfill.Filltankuntil fuelreachesthefuellevelindicatorto
allowspaceforfuelexpansion.
Starting The Engine
Alwayskeephandsandfeet clearof movingparts.Donot useapressurized
starting fluid. Vaporsareflammable.
flOrE:Allowtheenginetowarmupfor afewminutesafterstarting.Theenginewill
notdevelopfull poweruntilit reachesoperatingtemperatures.
1. Makecertainboththeaugercontrolanddrivecontrolareinthedisengaged
(released)position.
2. Insertkeyintoslot.Makesureit snapsintoplace.Donotattemptto turnthe
key.
NOTE:Theenginecannotstartwithoutthekeyfully insertedintothe
ignitionswitch.
ElectricStarter
Theelectric starterisdesignedto operateon 120volt AChousehold
current. Itmust beusedwith aproperlygroundedextensioncordand
three-prongreceptacleat alltimes to avoidthe possibilityof electrk
shock.Followall instructionscarefullypriorto operatingthe electric
starter.DONOTuseelectricstarter inthe rain.
Determinethatyourhome'swiringisathree-wiregroundedsystem.Askalicensed
electricianif youarenotcertain.
Ifyouhavea groundedthree-prongreceptacle,proceedasfollows.Ifyoudonot
havetheproperhousewiring,DONOTusetheelectricstarterunderanyconditions.
1. Pluganextensioncordintotheoutletlocatedontheengine'ssurface.Plug
theotherendofextensioncordintoathree-prong120-volt,grounded,AC
outletinawell-ventilatedarea.
Theextensioncordcanbeanylength, but must beratedfor 15ampsat 125
volts,groundedandratedfor outdooruse.
16
Page 17

2. Movethrottlecontrolto FAST(rabbit)_l[r position.
3 MovechoketotheCHOKEI-"Ipos t on(co,deng nestart),lengthens
warm,placechokein RUNposition.
4. Pushprimerthree(3)times,makingsuretocoverventholeinprimerbulb
whenpushing.Ifengineiswarm,pushprimeronlyonce.AIwayscovervent
holewhenpushing.Coolweathermayrequireprimingto berepeated.
5. Pushstarterbuttontostartengine.Oncetheenginestarts,immediately
releasestarterbutton.Electricstarterisequippedwith thermaloverload
protection;systemwill temporarilyshut-downtoallowstarterto coolif
electricstarterbecomesoverloaded.
6.
Astheenginewarms,slowlyrotatethechokecontroltoRUNposition.Ifthe
enginefalters,restartengineandrunwith chokeat half-chokepositionfor a
shortperiodof time,andthenslowlyrotatethechokeinto RUNposition.
Afterengineisrunning,disconnectpowercordfromelectricstarter.When
disconnecting,alwaysunplugtheendatthewalloutletbeforeunplugging
theoppositeendfromtheengine.
RecoilStarter
ToEngageDrive
1. Withthethrottlecontrolinthe Fast(rabbit)_ 1t position,moveshift lever
intooneofthesixforward(F)positionsortworeverse(R)positions.Selecta
speedappropriateforthesnowconditionsandapaceyou'recomfortable
with.
NOTE:WhenselectingaDriveSpeed,usetheslowerspeedsuntilyouare
comfortableandfamiliarwiththeoperationof thesnowthrower.
2. Squeezethedrivecontrolagainstthehandleandthesnowthrowerwill
move.Releaseit anddrivemotionwillstop.
NOTE:NEVERrepositiontheshift lever(changespeedsordirectionoftravel)
withoutfirst releasingthedrivecontrolandbringingthesnowthrowerto a
completestop.Doingsowill resultinprematureweartothesnowthrower'sdrive
system.
ToEngageAuger
Toengagetheaugerandstartthrowingsnow,squeezetheaugercontrol
againstthelefthandle.Releasetostoptheauger.
ReplacingShearPins
Eachaugerbladeissecuredto thespiralshaftwith ashearpinandbow-tieclip.If
Donotpull the starter handlewhile the enginerunning.
1. Movethrottlecontrolto FAST(rabbit)_J_11position.
2. MovechoketotheCHOKEI,,'1position(coldenginestart).If engineis
warm,placechokein RUNposition.
3. Pushprimerthree(3)times,makingsuretocoverventholewhenpushing.
Ifengineiswarm,pushprimeronlyonce.Alwayscoverventholewhen
pushing.Coolweathermayrequireprimingtoberepeated.
4. Pullgentlyonthestarterhandleuntilit beginsto resist,thenpullquickly
andforcefullytoovercomethecompression.Donotreleasethehandleand
allowit tosnapback.ReturnropeSLOWLYtooriginalposition.Ifrequired,
repeatthisstep.
5. Astheenginewarms,slowlyrotatethechokecontroltoRUNposition.Ifthe
enginefalters,restartengineandrunwith chokeat half-chokepositionfor a
shortperiodof time,andthenslowlyrotatethechokeinto RUNposition.
anaugerbladestrikesa foreignobjectoricejam,thepinwill shearoff toprevent
damageto theblade.Ifanaugerbladedoesnotturn,checktoseeif itspinhas
shearedoff. SeeFigure17.
NEVERreplacethe augershearpinswith anythingother than SearsSKU#
8838910EMPartNo.738-04124Areplacementshearpins.Anydamageto
the augergearboxorother componentsasa resultoffailing to dosowill
NOTbe coveredby yoursnowthrower'swarranty.
Alwaysturn off the snowthrower'sengineand removethe keypriorto
replacingshearpins.
E
Toavoidunsupervisedengineoperation,neverleavethe machine
unattendedwith theenginerunning. Turntheengineoff after useand
removekey.
Stopping TheEngine
Afteryouhavefinishedsnow-throwing,runenginefor afewminutesbefore
stoppingtohelpdryoffany moistureon theengine.
1. Movethrottlecontrolto OFFposition.
2. Removethekey.Removingthe keywillreducethepossibilityof
unauthorizedstartingoftheenginewhileequipmentisnotinuse.Keepthe
keyina safeplace.Theenginecannotstartwithoutthekey.
3. Wipeanymoistureawayfromthecontrolsontheengine.
17
J
Figure17
Page 18

MAINTENANCESCHEDULE
Beforeperforminganytype ofmaintenance/service,disengageallcontrols
andstopthe engine.Wait until all movingpartshavecometoa complete
stop.Disconnectsparkplugwireand grounditagainstthe engineto
preventunintendedstarting.
Followthemaintenanceschedulegivenbelow.Thischartdescribesservice
guidelinesonly.UsetheServiceLogcolumntokeeptrackofcompleted
maintenancetasks.TolocatethenearestSearsServiceCenterortoscheduleservice,
callthefollowingtollfreenumber:l-888-331-4569.
EachUseandevery5hours
Ist5hours
Annuallyor25hours
Annuallyor50hours
Annuallyor100hours
BeforeStorage
1. Engineoil level
2. Looseormissinghardware
3. Unitandengine.
1. Engineoil
1. Sparkplug
2. Controllinkagesandpivots
3. Wheels
4. GearshaftandAugershaft
1. Engineoil
1. Sparkplug
1. Fuelsystem
GENERALEECOMMENDATIONS
CheckingEngineOil
Beforelubricating, repairing,or inspecting,disengageall controlsandstop
engine.Waituntil all movingparts havecometo acompletestop.
NOTE:Checktheoillevelbeforeeachusetobesurecorrectoillevelismaintained.
Whenaddingoilto theengine,refertoviscositychartbelow.Engineoilcapacity
is600ml(approx.20oz.).Donotover-fill.Usea4-stroke,oranequivalenthigh
detergent,premiumqualitymotoroilcertifiedtomeetorexceedU.S.automobile
manufacturer'srequirementsforserviceclassificationSG,SEMotoroilsclassified
SG,SFwill showthisdesignationonthecontainer.
1. Removetheoilfillercap/dipstickandwipethedipstickclean.
2. Insertthecap/dipstickintotheoilfillerneck,butdoNOTscrewitin.
3. Removetheoilfillercap/dipstick.Iflevelislow,slowlyaddoiluntiloillevel
registersbetweenhigh(H)andlow(L).SeeFigure18.
4. Replaceandtightencap/dipstickfirmlybeforestartingengine.
ChangingEngineOil
NOTE:Changetheengineoilafterthefirst5 hoursof operationandonceaseason
orevery50hoursthereafter.
1. Drainfuelfromtankbyrunningengineuntilthefueltankisempty.Besure
fuelfill capissecure.
2. Placesuitableoilcollectioncontainerunderoil drainplug.
3. Removeoildrainplugandwasher.SeeFigure19onnextpage.
4. Tipunittodrainoil intothecontainer.Usedoilmustbedisposedofata
propercollectioncenter.
1. Check
2. Tightenorreplace
3. Clean
1. Change
1. Check
2. Lubewith lightoil
3. Lubewith multipurposeautogrease
4. Lubewith lightoil
1. Change
1. Change
1. Runengineuntilitstopsfromlackoffuel
J
Figure18
Usedoil isa hazardouswasteproduct.Disposeof usedoil properly.Donot
discardwith householdwaste.Checkwithyour localauthorities orSears
ServiceCenterforsafedisposal/recyclingfacilities.
Reinstallthedrainplugandwasherandtightenit securely.
18
Page 19

Refillwith therecommendedoilandchecktheoil level.SeeRecommended
OilUsagechart.Theengine'soilcapacityis20ounces.
(oF)-40o-20 o 0o 20o 40o
(oc) -30° -20° -10° 0°
DONOTusenondetergentoil or 2-strokeengineoil. it couldshortenthe
engine'sservicelife.
7. Reinstalltheoilfiller cap/dipsticksecurely.
Thoroughlywashyour handswith soapandwaterassoonaspossibleafter
handlingusedoil.
CheckingSparkPlug
OilDrain
Washer
PLug
Figure19
SparkPlugBoot
DONOTcheckfor sparkwith sparkplugremoved.DONOTcrankenginewith
sparkplug removed.
Ifthe enginehasbeenrunning,the muffler will beveryhot. Becarefulnot
to touchthe muffler.
NOTE:Checkthe sparkplugonceaseasonorevery25 hoursofoperation.Change
thesparkplugonceaseasonorevery100hours.Toensureproperengineoperation,
thesparkplugmustbeproperlygappedandfreeofdeposits.
1. Removethesparkplugbootandusea sparkplugwrenchtoremovethe
plug.SeeFigure20.
2. Visuallyinspectthesparkplug.Discardthesparkplugifthereisapparent
wear,orif theinsulatoriscrackedorchipped.Cleanthesparkplugwitha
wirebrushifit isto bereused.
3.
Measurethepluggapwithafeelergauge.Correctasnecessarybybending
sideelectrode.SeeFigure21.Thegapshouldbesetto.02-.03inches(0.60-
0.80mm).
4. Checkthatthesparkplugwasherisin goodconditionandthreadthespark
pluginbyhandtopreventcross-threading.
5. Afterthesparkplugisseated,tightenwith asparkplugwrenchto compress
thewasher.
NOTE:Wheninstallinganewsparkplug,tighten1/2-turnafterthesparkplug
seatsto compressthewasher.Whenreinstallinga usedsparkplug,tighten1/8-to
1/4-turnafterthesparkplugseatsto compressthewasher.
Figure20
Electrode
Thesparkplug mustbetightened securely.Aloosesparkplugcanbecome
very hotandcandamagetheengine.
Figure21
19
Page 20

Lubrication "I
GearShaft
Thegear(hex)shaftshouldbelubricatedat leastonceaseasonorafterevery25
hoursof operation.
I. Topreventspillage,removeallfuelfromtankbyrunningengineuntilit
stops.
2. Carefullypivotthesnowthrowerupandforwardsothatit restsontheauger
housing.
3. Removethelowerframecoverfromtheundersideofthesnowthrowerby
removingtheself-tappingscrewswhichsecureit.
4. Applya lightcoatingofanti-seizetothehexshaft.SeeFigure22.
NOTE:Whenlubricatingthehexshaft,becarefulnottogetanyanti-seizeon
thealuminumdriveplateorrubberfrictionwheel.Doingsowill hinderthesnow
thrower'sdrivesystem.Wipeoffanyexcessorspilledanti-seize.
Wheels
Atleastonceaseason,removebothwheels.Cleanandcoattheaxleswitha
multipurposeautomotivegreasebeforereinstallingwheels.
AugerShaft
Atleastonceaseason,removetheshearpinsonaugershaft.Spraylubricantinside
shaft,andaroundthespacersandflangebearingsfoundateitherendoftheshaft.
SeeFigure23.
ShavePlateand SkidShoes
Theshaveplateandskidshoesonthebottomofthesnowthroweraresubjectto
wear.Theyshouldbecheckedperiodkallyandreplacedwhennecessary.
NOTE:Theskidshoesonthismachinehavetwowearedges.Whenonesidewears
out,theycanberotated180°tousetheotheredge.
Toremoveskidshoes:
Removethetwo carriagebolts,washers,andhexflangenutsthatsecure
eachskidshoetothesnowthrower.
2. Reassemblenewskidshoeswith thefourcarriagebolts(twooneachside),
washers,andhexflangenuts.Referto Figure24.
Toremoveshaveplate:
1. Removethecarriageboltsandhexnutswhichattachitto thesnowthrower
housing.
2. Reassemblenewshaveplate,makingsureheadsof carriageboltsaretothe
insideof housing.Tightensecurely.SeeFigure24.
F
J
Figure22
f
f_S /
Figure23
2O
NOTE:Angers not shown lor clarity.
Figure24
Page 21

Adjustments
Shift Cable
Ifthefull rangeof speeds(forwardandreverse)cannotbeachieved,refertothe
figuretothefight andadjusttheshiftcableasfollows:
I. Placetheshiftleverinthefastestforwardspeedposition(F6).
2. Loosenthehex nutontheshiftcableindexbracket.SeeFigure25.
3. Pivotthebracketdownwardtotakeupslackinthecable.
4. Retightenthehexnut.
DriveControl
Whenthedrivecontrolisreleasedandinthedisengaged"up"position,thecable
shouldhaveverylittle slack.ItshouldNOTbetight. Also,ifthereisexcessiveslack
inthedrivecableor iftheunitexperiencesintermittentdrivewhileusing,thecable
mayneedtobeadjusted.Checktheadjustmentof thedrivecontrolasfollows:
I. Withthedrivecontrolreleased,pushthesnowthrowergentlyforward.The
unitshouldrollfreely.
2. Engagethedrivecontrolandgentlyattemptto pushthesnowthrower
forward.Thewheelsshouldnotturn.Theunitshouldnotrollfreely.
3. Withthedrivecontrolreleased,movetheshiftleverbackandforthbetween
theR2positionandthe F6positionseveraltimes.Thereshouldbeno
resistanceintheshiftlever.
f
Figure25
4. Ifanyoftheabovetestsfailed,thedrivecableisinneedofadjustment.
Proceedasfollows:
a. Shutoff theengineasinstructedintheOperationsection.
b. Loosenthelowerhexbolt onthedrivecablebracket.SeeFigure26.
c. Positionthebracketupwardtoprovidemoreslack(ordownwardto
increasecabletension).
d. Retightenthelowerhexbolt.
ChuteControlRod
Toachievemorechutecontrolrodengagementintheinputshaftunderthe handle
panel,thechutecontrolrodwill haveto beadjusted.RefertoFigure27.
Toadjustthisrod,proceedasfollows:
I. Removethecotterpinfromtheholeclosesttothechutecontrolheadonthe
chutecontrolinput.
2. Pulloutthechutecontrolroduntilthe holeinit linesupwith theotherhole
inthechutecontrolinput.
3. Reinsertthecotterpinthroughthisholeandthechutecontrolrod.
Figure26
21
Figure27
Page 22

AugerControl
RefertotheAssemblysectionforinstructionsonadjustingtheaugercontrolcable.
SkidShoes
RefertotheAssemblysectionforinstructionsonadjustingtheskidshoes.
Belt Replacement
Auger Belt
Toremoveandreplaceyoursnowthrower'saugerbelt,proceedasfollows:
I. Topreventspillage,removeallfuelfromtankbyrunningengineuntilit
stops.
2. Removetheplasticbeltcoveronthefrontoftheenginebyremovingthetwo
self-tappingscrews.SeeFigure28.
3. Loosenandremovethetwo boltsandflat washerssecuringthebeltguide.
SeeFigure29. Removebeltguide.
4. Rolltheaugerbeltoffthe enginepulley.SeeFigure30.
5. Carefullypivotthesnowthrowerupandforwardsothatit restsontheauger
housing.
6. Removetheframecoverfromtheundersideofthesnowthrowerby
removingfourself-tappingscrewswhichsecureit. SeeFigure31.
22
f
......
J
Figure30
Page 23

Loosenandremovetheshoulderscrewwhichactsasabeltkeeper.Referto
Figure32.
8.
Removethebelt fromaroundtheaugerpulley,andslipthebeltbetweenthe
supportbracketandtheaugerpulley.SeeFigure33.
NOTE:Engagingtheaugercontrolwill easeremovalandreinstallationofthe
belt.
Reassembleaugerbeltbyfollowinginstructionsinreverseorder.
NOTE:DoNOTforgettoreinstalltheshoulderscrewandreconnectthespring
totheframeafterinstallingareplacementaugerbelt.
10.
PerformtheAugerControltestoutlinedintheAssemblysectionofthis
manual.
Drive Belt
flOTE:Severalcomponentsmustberemovedandspecialtoolsarerequiredin order
toreplacethesnowthrower'sdrivebelt.ContactthenearestSearsParts& Repair
Centerto havethedrivebeltreplaced.
f
FrictionWheelRemoval
Ifthesnowthrowerfailstodrivewiththedrivecontrolengaged,andperforming
thedrivecontrolcablead ustmentfailstocorrecttheproblem,thefrictionwheel
mayneedtobereplaced.Followtheinstructionsbelow.Examinethefrictionwheel
rubberfor signsofwearorcrackingandreplacewheelif necessary.
1. Topreventspillage,removeailfuelfromtankbyrunningengineuntil it
stops.
2. Placetheshiftleverinfirst Forward(F1)position.
3. Carefullypivotthesnowthrowerupandforwardsothatit restsontheauger
housing.
4. Removetheframecoverfromtheundersideofthesnowthrowerby
removingtheself-tappingscrewswhichsecureit.
5. Removetheright-handwheelbyremovingthescrewandbellwasherwhich
secureitto theaxle.SeeFigure34.
Figure32
Figure33
0
/
//
Figure34
J
23
Page 24

6. Carefullyremovethehexnutandwasherwhichsecuresthehexshaftto
thesnowthrowerframeandNghtlytaptheshaft'sendto dislodgetheban
bearingfromthe rightsideoftheframe.SeeFigure35.
NOTE:Becarefulnottodamagethethreadsontheshaft.
7. Carefullypositionthehexshaftdownwardandtothe[eft beforecarefuNy
slidingthefrictionwheelassemblyofftheshaft.SeeFigure36.
NOTE:Ifyou'rerep[adngthefrictionwheelassemblyasawhole,discardthe
wornpartandslidethenewpartontothehexshaft.
8. FoNowthestepsaboveinreverseordertoreassemblecomponents.
9. PerformthetestpreviouslydescribedintheDriveControlsection.
Ifyou'redisassemblingthefrictionwheelandreplacingonlytherubberring,
proceedasfoNows:
NOTE:Notallfrictionwheelsareserviceable.Ifthisisthecase,simplyreplacethe
frictionwheelassembly.
1. Removethefourscrewswhichsecurethefrictionwheel'ssideplates
together.SeeFigure37.
2. Removetherubberringfrombetweentheplates.
3. Reassemblethesideplateswith anewrubberring.
NOTE:Whenreassemblingthefrictionwheelassembly,makesurethat the
rubberringiscenteredandseatedproperlybetweenthesideplates.Tighten
eachscrewonlyonerotationbeforeturningthewheelclockwiseand
proceedingwith thenextscrew.Repeatthisprocessseveraltimestoensure
theplatesaresecuredwith equalforce(between6ft-[bsand9ft-[bs).
4. SlidethefrictionwheelassemblybackontothehexshaftandfoNowthe
stepsabovein reverseordertoreassemblecomponents.
5. PerformthetestpreviouslydescribedintheDriveControlsection.
f
J
Figure35
f
Figure37
J
Figure76
,J
24
Page 25

Ifthesnowthrowerwill notbeusedfor 30daysorlonger,orifit istheendofthesnowseasonwhenthelastpossibilityofsnowisgone,theequipmentneedstobestored
properly.Followstorageinstructionsbelowtoensuretopperformancefromthesnowthrowerformanymoreyears.
PreparingEngine
Enginesstoredover30daysneedtobedrainedoffuelto preventdeteriorationand
gumfromforminginfuelsystemoronessentialcarburetorparts.Ifthegasolinein
yourenginedeterioratesduringstorage,youmayneedto havethecarburetor,and
otherfuelsystemcomponents,servicedorreplaced.
1. Removeallfuelfromtankbyrunningengineuntilit stops.Donotattemptto
pourfuelfromtheengine.
2. Changetheengineoil.
3. Removesparkplugandpourapproximately1oz.(30ml)ofcleanengineoil
intothecylinder.Pulltherecoilstarterseveraltimestodistributetheoil,and
reinstallthesparkplug.
4. Cleandebrisfromaroundengine,andunder,around,andbehindmuffler.
Applya lightfilm ofoilonanyareasthat aresusceptibletorust.
Storeinaclean,dryandwellventilatedareaawayfromanyappliancethat
operateswith aflameorpilotlight,suchasafurnace,waterheater,or
clothesdryer.Avoidanyareawithasparkproducingelectricmotor,orwhere
powertoolsareoperated.
Neverstoresnowthrowerwith fuel intank indoorsor inpoorlyventilated
areas,wherefuelfumesmayreachanopenflame,sparkor pilotlight ason
afurnace,water heater,clothesdryeror gasappliance.
PreparingSnowThrower
Whenstoringthe snowthrowerin anunventilatedormetalstorageshed,
careshouldbetakentorustprooftheequipment.Usinga lightoil orsilicone,
coattheequipment,especiallyanychains,springs,bearingsandcables.
Removealldirtfromexteriorofengineandequipment.
Followlubricationrecommendations.
Storeequipmentinaclean,dryarea.
InflatethetirestothemaximumPSI.Refertotire sidewall.
Ifpossible,avoidstorageareaswithhighhumidity.
Keeptheenginelevelinstorage.Tiltingcancausefueloroil leakage.
25
Page 26

Disconnectthesparkplugwireandgrounditagainsttheengineto prevent
unintendedstarting.Beforeperforminganytypeofmaintenance/service,
disengageallcontrolsandstoptheengine.Waituntilallmovingparts
havecometoacompletestop.Alwayswearsafetyglassesduringoperation
orwhileperforminganyadjustmentsorrepairs.
Thissectionaddressesminorserviceissues.TolocatethenearestSearsServiceCenterortoscheduleservice,callthefollowingtollfreenumber:1-888-
331-4%9.
Enginefailstostart
Enginerunningerratically/
inconsistentRPM(huntingor
surging)
Excessivevibration
Lossofpower
1. ChokecontrolnotinCHOKEposition.
2. Sparkplugwiredisconnected.
3. Faultysparkplug.
4. Fueltankemptyorstalefuel.
5. Enginenotprimed.
6. Keynotinserted.
7. Extensioncordnotconnected(whenusingelectricstart
button,onmodelssoequipped).
1. EnginerunningonCHOKE.
2. Stalefuel.
3. Waterordirtinfuelsystem.
4. Carburetoroutofadjustment.
S. Over-governedengine.
1. Loosepartsordamagedauger.
1. Sparkplugwireloose.
2. Gascapventholeplugged.
1. Movechokecontrolto CHOKEposition.
2. Connectwiretosparkplug.
3. Clean,adjustgap,orreplace.
4. Filltankwithclean,freshgasoline.
S. PrimeengineasinstructedintheOperationSection.
6. Insertkeyfullyintotheswitch.
7. Connectoneendoftheextensioncordtotheelectricstarter
outletandtheotherendtoathree-prong120-volt,grounded,
ACoutlet.
1. Movechokecontrolto RUNposition.
2. Filltankwithclean,freshgasoline.
3. Drainfueltankbyrunningengineuntilitstops.Refillwithfresh
fuel.
4. ContactyourSearsParts&RepairCenter.
5. ContactyourSearsParts&RepairCenter.
1. Stopengineimmediatelyanddisconnectsparkplugwire.
Tightenallboltsandnuts.Ifvibrationcontinues,haveunit
servicedbyaSearsParts& RepairCenter.
1.
Connectandtightensparkplugwire.
2.
Removeiceandsnowfromgascap.Becertainventholeisclear.
Unitfailstopropelitself
1. Drivecableinneedofadjustment.
2. Drivebeltlooseordamaged.
3. Wornfrictionwheel.
Find this and at[ your other product manuats online.
Get answers from our team of home experts.
Get a personatized maintenance plan for your home.
Find information and tools to hetp with home projects.
26
1.
Adjustdrivecontrolcable.RefertoServiceandMaintenance
section.
2.
Havedrivebeltreplaced.ContactyourSearsParts&Repair
Center.
3.
HavefrictionwheelreplacedataSearsParts&RepairCenter.
Page 27

Unitfailstodischargesnow
1. Chuteassemblyclogged.
2. Foreignobjectlodgedinauger.
3. Augercableinneedofadjustment.
4. Augerbeltlooseordamaged.
5. Shearpin(s)sheared.
1. Stopengineimmediatelyanddisconnectsparkplugwire.Clean
chuteassemblyandinsideofaugerhousingwithdean-outtool
orastick.
2. Stopengineimmediatelyanddisconnectsparkplugwire.
Removeobjectfromaugerwithclean-outtoolorastick.
3. Adjustaugercontrolcable.RefertoAssemblysection.
4. Replaceaugerbelt.Referto ServiceandMaintenancesection.
5. Replacewithnewshearpin(s).
Chutefailstoeasilyrotate180
degrees
1. Chuteassembledincorrectly.
1. Disassemblechutecontrolandreassembleasdirectedinthe
Assemblysection.
NEED MORE HELP?
o Firid this arid air your other product manuals online,
Get answers from our team of home experts,
o Get a personalized maintenance plan for your horae_
Find information and tools to help with home projects.
27
Page 28

FEDERALand/or CALiFORNiAEMiSSiONCONTROLWARRANTYSTATEMENT
YOURWARRANTYRIGHTSANDOBLiGATiONS
MTD Consumer Group Inc, the United States Environmental Protection Agency (EPA), and for those products certified for sale in the state
of California, the California Air Resources Board (CARB) are pleased to explain the emission control system (ECS) warranty on your 2013-
2014 small off-road spark-ignited engine and equipment (outdoor equipment). In California, new outdoor equipment must be designed,
built and equipped to meet the State's stringent anti-smog standards (in other states, outdoor equipment must be designed, built, and
equipped to meet the U.S. EPA small off-road spark ignition engine regulations). MTD Consumer Group Inc must warrant the ECSon your
outdoor equipment for the period of time listed below, provided there has been no abuse, neglect, or improper maintenance of the outdoor
equipment.
Your ECS may include parts such as the carburetor, fuel-injection system, ignition system, catalytic converter, fuel tanks, fuel lines, fuel caps,
valves, canisters, filters, vapor hoses, clamps, connectors, and other associated emission-related components.
Where a warrantable condition exists, MTD Consumer Group Inc will repair your outdoor equipment at no cost to you including diagnosis,
parts, and labor.
MANUFACTURER'SWARRANTYCOVERAGE:
This emission control system is warranted for two years. If any emission-related part on your outdoor equipment is defective, the part will be
repaired or replaced by MTD Consumer Group Inc.
OWNER'SWARRANTYRESPONSiBiLiTiES:
As the outdoor equipment owner, you are responsible for performance of the required maintenance listed in your owner's manual. MTD
Consumer Group Inc recommends that you retain all receipts covering maintenance on your outdoor equipment, but MTD Consumer Group Inc
cannot deny warranty solely for the lack of receipts.
As the outdoor equipment owner, you should however be aware that MTD Consumer Group Inc may deny you warranty coverage if your
outdoor equipment or a part has failed due to abuse, neglect, improper maintenance, or unapproved modifications.
You are responsible for presenting your outdoor equipment to MTD Consumer Group Inc's distribution center or service center assoon as
the problem exists. The warranty repairs should be completed in a reasonable amount of time, not to exceed 30 days. If you have a question
regarding your warranty coverage, you should contact the MTD Consumer Group Inc Service Department at 1-800-800-7310 or at
http://su pport.mtd prod ucts.com.
GENERALEMiSSiONSWARRANTYCOVERAGE:
MTD Consumer Group Inc warrants to the ultimate purchaser and each subsequent purchaser that the outdoor equipment is: (1) designed,
built, and equipped so asto conform with all applicable regulations; and (2) free from defects in materials and workmanship that cause the
failure of a warranted part for a period of two years.
The warranty period begins on the date the outdoor equipment is delivered to an ultimate purchaser or first placed into service.
Subject to certain conditions and exclusions as stated below, the warranty on emission-related parts is as follows:
1. Any warranted part that is not scheduled for replacement as required maintenance in the written instructions supplied is warranted for
the warranty period stated above. If the part fails during the period of warranty coverage, the part will be repaired or replaced by MTD
Consumer Group Inc according to subsection (4) below. Any such part repaired or replaced under warranty will be warranted for the
remainder of the period.
2. Any warranted part that is scheduled only for regular inspection in the written instructions supplied is warranted for the warranty period
stated above. Any such part repaired or replaced under warranty will be warranted for the remaining warranty period.
3. Any warranted part that is scheduled for replacement as required maintenance in the written instructions supplied is warranted for the
period of time before the first scheduled replacement date for that part. If the part fails before the first scheduled replacement, the part
will be repaired or replaced by MTD Consumer Group Inc according to subsection (4) below. Any such part repaired or replaced under
warranty will be warranted for the remainder of the period prior to the first scheduled replacement point for the part.
4.
Repair or replacement of any warranted part under the warranty provisions herein must be performed at a warranty station at no charge
to the owner.
5. Notwithstanding the provisions herein, warranty services or repairs will be provided at all of our distribution centers that are franchised to
service the subject engines or equipment.
6. The outdoor equipment owner will not be charged for diagnostic labor that is directly associated with diagnosis of a defective, emission-
related warranted part, provided that such diagnostic work is performed at a warranty station.
7. MTD Consumer Group Inc is liable for damages to other engine or equipment components proximately caused by a failure under
warranty of any warranted part.
8. Throughout the off-road engine and equipment warranty period stated above, MTD Consumer Group Inc will maintain a supply of
warranted parts sufficient to meet the expected demand for such parts.
9. Any replacement part may be used in the performance of any warranty maintenance or repairs and must be provided without charge to
the owner. Such use will not reduce the warranty obligations of MTD Consumer Group Inc.
Page 29

10. Add-onormodifiedpartsthatarenotexemptedbytheAirResourcesBoardmaynotbeused.Theuseofanynon-exemptedadd-onor
modifiedpartsbytheultimatepurchaserwillbegroundsfordisallowingawarrantyclaim.MTDConsumerGroupIncwillnotbeliableto
warrantfailuresofwarrantedpartscausedbytheuseofanon-exemptedadd-onormodifiedpart.
WARRANTEDPARTS:
The repair or replacement of any warranted part otherwise eligible for warranty coverage may be excluded from such warranty coverage if MTD
Consumer Group Inc demonstrates that the outdoor equipment has been abused, neglected, or improperly maintained, and that such abuse,
neglect, or improper maintenance was the direct cause of the need for repair or replacement of the part. That notwithstanding, any adjustment
of a component that has a factory installed, and properly operating, adjustment limiting device is still eligible for warranty coverage. Further,
the coverage under this warranty extends only to parts that were present on the off-road equipment purchased.
The following emission warranty parts are covered (if applicable):
1. Fuel Metering System
Cold start enrichment system (soft choke)
Carburetor and internal parts (or fuel injection system)
Fuel pump
Fuel tank
2. Air Induction System
Air cleaner
Intake manifold
3. Ignition System
Spark plug(s)
Magneto ignition system
4. Exhaust System
Catalytic converter
SAI (Reed valve)
5. Miscellaneous Items Used in Above System
Vacuum, temperature, position, time sensitive valves and switches
Connectors and assemblies
6. Evaporative Control
Fuel hose
Fuel hose clamps
Tethered fuel cap
Carbon canister
Vapor lines
050790Rev.B
Page 30

Congratulationsonmakingasmartpurchase.YournewCraftsman®productisdesignedandmanufacturedforyearsof
dependableoperation.Butlikeall products,it mayrequirerepairfromtimetotime.That'swhenhavingaRepairProtection
Agreementcansaveyoumoneyandaggravation.
Here'swhat the RepairProtectionAgreement*includes:
[] Expertservicebyour10,000professionalrepairspecialists
[] Unlimited serviceand nocharge forpartsandlaboronallcoveredrepairs
[] Productreplacementupto $1500ifyourcoveredproductcan'tbefixed
[] Discountof 25%fromregularpriceofserviceandrelatedinstalledpartsnotcoveredbytheagreement;also,25%off
regularpriceofpreventivemaintenancecheck
[] Fasthelpby phone - wecallitRapidResolution- phonesupportfromaSearsrepresentative.Thinkofusasa"talking
owner'smanual."
OnceyoupurchasetheRepairProtectionAgreement,asimplephonecallisallthatit takesforyoutoscheduleservice.You
cancallanytimedayornight,orscheduleaserviceappointmentonline.
TheRepairProtectionAgreementisa risk-freepurchase.Ifyoucancelforanyreasonduringtheproductwarrantyperiod,
wewill provideafull refund.Or,a proratedrefundanytimeaftertheproductwarrantyperiodexpires.PurchaseyourRepair
ProtectionAgreementtoday!
Somelimitations and exclusionsapply. Forpricesand additional informationinthe U.S.A.call 1-800-827-6655.
*Coveragein Canadavariesonsomeitems.Forfull detailscall SearsCanadaat 1-800-361-6665.
SearsInstallationService
ForSearsprofessionalinstallationofhomeappliances,garagedooropeners,waterheaters,andothermajorhomeitems,in
theU.S.A.orCanadacall1-800-4-MY-HOME®.
3O
Page 31

il/!it:_l ________;_W__;_j__________
I RFIFT$1qFIN°I
1-888 31 569
Customer Care Hot Line i_l
ustom Hot
Get answers to questions, troubleshoot problems,
order parts, or schedule repair service.
Para respu estas a preguntas o problemas, y ordenar
piezas o pedir servicio para la reparaci6n de su equipo.
To help us help you, register your product at www.craftsman.com/registration
Para poderte ayudar mejor, registra tu producto en www.craftsman.com/registration
Join the Craftsman Club today!
@
www.craftsman.com/signup
Receive exclusive member benefits including special pricing and offers,
project sharing, expert advice, and SHOP YOUR WAY REWARDS!
Como miembro exclusivo, recibe diversos beneficios como ofertas, precios especiales, proyectos
nuevos, consejos de expertos y nuestro programa de puntos SHOP YOUR WAY REWARDS!
® Registered Trademark / TMTrademark of KCD IP, LLC in the United States, or Sears Brands, LLC in other countries
® Marca Registrada / TMMarca de Fabrica de KCD IP, LLC en Estados Unidos, o Sears Brands, LLC in otros paises
 Loading...