

Craftsman 247887821 Owner’s Manual

Operator's Manual
I:RRFrSMRN°
21" SNOW THROWER
Model No. 247.887821
• SAFETY
• ASSEMBLY
• OPERATION
• MAINTENANCE
CAUTION: Before using this product,
read this manual and follow all safety
rules and operating instructions.
Sears Brands Management Corporation, Hoffman Estates, IL 60179, U.S.A.
Visit our website: www.craftsman.com
• PARTS LIST
• ESPANOL
FormNo.769-07096C
(JuLy9,2013)
Warranty Statement ................................... 2
Safety Instructions .................................... 3
Assembly ............................................. 7
Operation ........................................... 11
Service and Maintenance ............................ 14
Off-Season Storage ................................... 19
Parts List............................................. 24
Engine Parts List ..................................... 28
Labels ............................................... 36
Repair Protection Agreement ......................... 37
Espa_ol .............................................. 40
Service Numbers ............................ Back Cover
Troubleshooting ..................................... 20
CRAFTSMANTWOYEARFULLWARRANTY
FORTWOYEARSfromthedateofpurchase,thisproductiswarrantedagainstanydefectsinmaterialorworkmanship.Adefectiveproductwillreceivefree
repairorreplacementif repairisunavailable.
Forwarrantycoveragedetailsto obtainfreerepairorreplacement,visitthewebsite:www.craftsman.com
ThiswarrantycoversONLYdefectsinmaterialandworkmanship.WarrantycoveragedoesNOTinclude:
• Expendableitemsthatcanwearoutfromnormalusewithinthewarrantyperiod,includingbutnotlimitedtoaugers,augerpaddles,drift cutters,skid
shoes,shaveplate,shearpins,sparkplug,aircleaner,belts,andoilfilter.
• Standardmaintenanceservicing,oilchanges,ortune-ups.
• Tirereplacementorrepaircausedbypuncturesfromoutsideobjects,suchasnails,thorns,stumps,orglass.
• Tireorwheelreplacementorrepairresultingfromnormalwear,accident,orimproperoperationormaintenance.
• Repairsnecessarybecauseofoperatorabuse,includingbutnot limitedtodamagecausedbyover-speedingtheengine,orfromimpactingobjectsthat
bendtheframe,augershaft,etc.
• Repairsnecessarybecauseofoperatornegligence,includingbutnotlimitedto,electricalandmechanicaldamagecausedbyimproperstorage,failureto
usethepropergradeandamountofengineoil,orfailuretomaintaintheequipmentaccordingtotheinstructionscontainedintheoperator'smanual.
• Engine(fuelsystem)cleaningorrepairscausedbyfueldeterminedtobecontaminatedoroxidized(stale).ingeneral,fuelshouldbeusedwithin30days
ofitspurchasedate.
• Normaldeteriorationandwearoftheexteriorfinishes,orproductlabelreplacement.
Thiswarrantyisvoidifthisproductiseverusedwhileprovidingcommercialservicesorif rentedtoanotherperson.
Thiswarrantygivesyouspecificlegalrights,andyoumayalsohaveotherrightswhichvaryfromstateto state.
SearsBrandsManagementCorporation,NoffmanEstates,IL60179
Engine Oil: SAE 5W-30
Engine Oil Capacity: 20 ounces
Fuel: Unleaded Gasoline
Fuel Capacity: 2 quarts
Spark Plug: F6RTC
Model Number
Serial Number
Date of Purchase
Record the model number, serial number,
and date of purchase above.
Spark Plug Gap: .020-.030"
© Sears Brands, LLC
2
Thissymbolpointsout importantsafetyinstructionswhich,if not
followed,couldendangerthe personalsafetyand/orproperty of
yourselfand others.Readandfollow all instructions inthismanual
beforeattempting to operatethis machine.Failureto complywith these
instructionsmayresultinpersonalinjury.Whenyou seethis symbol, HEED
ITSWARNING!
Thismachinewasbuilt to beoperatedaccordingtothesafeoperation
practicesinthis manual.Aswith anytype of powerequipment,
carelessnessorerroronthe part of the operatorcanresultinseriousinjury.
Thismachineiscapableof amputatingfingers, hands,toesandfeet and
throwingdebris.Failuretoobservethefollowing safetyinstructionscould
resultinseriousinjuryor death.
CALIFORNIA PROPOSITION 65
EngineExhaust,someof its constituents,andcertainvehiclecomponents
containor emit chemicalsknowntoStateof Californiatocausecancerand
birth defectsorother reproductiveharm.
TRAINING
Read,understand,andfollowallinstructionsonthemachineandinthe
manual(s)beforeattemptingtoassembleandoperate.Failuretodosocan
resultinseriousinjurytotheoperatorand/orbystanders.Keepthismanualina
safeplaceforfutureandregularreferenceandfororderingreplacementparts.
Befamiliarwith allcontrolsandtheirproperoperation.Knowhowtostop
themachineanddisengagethemquickly.
Neverallowchildrenunder14yearsofagetooperatethismachine.Children
14andovershouldreadandunderstandtheinstructionsandsafeoperation
practicesinthismanualandonthemachineandbetrainedandsupervised
byanadult.
Neverallowadultsto operatethismachinewithoutproperinstruction.
Thrownobjectscancauseseriouspersonalinjury.Planyoursnow-throwing
patterntoavoiddischargeofmaterialtowardroads,bystandersandthelike.
Keepbystanders,petsandchildrenat least75feetfromthemachinewhileit
isin operation.Stopmachineif anyoneentersthearea.
Exercisecautiontoavoidslippingorfalling,especiallywhenoperatinginreverse.
PREPARATION
Thoroughlyinspecttheareawheretheequipmentistobeused.Removeall
doormats,newspapers,sleds,boards,wiresandotherforeignobjects,which
couldbetrippedoverorthrownbytheauger/impeller.
Alwayswearsafetyglassesoreyeshieldsduringoperationandwhile
performinganadjustmentorrepairtoprotectyoureyes.Thrownobjects
whichricochetcancauseseriousinjuryto theeyes.
Donotoperatewithoutwearingadequatewinteroutergarments.Donotwear
jewelry,longscarvesorotherlooseclothing,whichcouldbecomeentangledin
movingparts.Wearfootwearwhichwill improvefootingonslipperysurfaces.
Useagroundedthree-wkeextensioncordandreceptacleforallmachines
with electricstartengines.
Disengageallcontrolleversbeforestartingtheengine.
Neverattempttomakeanyadjustmentswhileengineisrunning,except
wherespecificallyrecommendedintheoperator'smanual.
Letengineandmachineadjusttooutdoortemperaturebeforestartingto
clearsnow.
Your Responsibility--Restrict theuseof this powermachineto
personswhoread,understandandfollow thewarningsand instructionsin
thismanualandonthe machine.
SAVETHESEINSTRUCTIONS!
Safe Handling of Gasoline:
Toavoidpersonalinjuryorproperty damageuseextremecareinhandling
gasoline.Gasolineisextremelyflammable andthe vaporsareexplosive.
Seriouspersonalinjurycanoccurwhen gasolineis spilledon yourselforyour
clotheswhich canignite.Washyourskinandchangeclothesimmediately.
Useonlyanapprovedgasolinecontainer.
Extinguishallcigarettes,cigars,pipesandothersourcesofignition.
Neverfuel machineindoors.
Neverremovegascaporaddfuelwhiletheengineishotorrunning.
Allowenginetocoolatleasttwominutesbeforerefueling.
Neveroverfillfueltank.Filltankto nomorethan1/2inchbelowbottomof
fillernecktoprovidespaceforfuelexpansion.
Replacegasolinecapandtightensecurely.
Ifgasolineisspilled,wipeit offtheengineandequipment.Movemachineto
anotherarea.Wait5 minutesbeforestartingtheengine.
Neverstorethemachineorfuelcontainerinsidewherethereisanopen
flame,sparkorpilotlight (e.g.furnace,waterheater,spaceheater,clothes
dryeretc.).
Allowmachinetocoolatleast5minutesbeforestoring.
Neverfill containersinsideavehicleoronatruckortrailerbedwitha plastic
liner.Alwaysplacecontainersonthegroundawayfromyourvehiclebefore
filling.
Ifpossible,removegas-poweredequipmentfromthetruckortrailerand
refuelit ontheground.Ifthis isnotpossible,then refuelsuchequipment
onatrailerwith a portablecontainer,ratherthanfromagasolinedispenser
nozzle.
Keepthenozzleincontactwiththerimofthefueltankorcontaineropening
atalltimesuntilfuelingiscomplete.Donotuseanozzlelock-opendevice.
OPERATION
Donotputhandsorfeetnearrotatingparts,intheauger/impellerhousing
orchuteassembly.Contactwiththerotatingpartscanamputatehandsand
feet.
Theauger/impellercontrolleverisasafetydevice.Neverbypassitsoperation.
Doingsomakesthemachineunsafeandmaycausepersonalinjury.
Thecontrolleversmustoperateeasilyin bothdirectionsandautomatically
returntothedisengagedpositionwhenreleased.
Neveroperatewithamissingordamagedchuteassembly.Keepallsafety
devicesinplaceandworking.
Neverrunanengineindoorsor inapoorlyventilatedarea.Engineexhaust
containscarbonmonoxide,anodorlessanddeadlygas.
Donotoperatemachinewhileundertheinfluenceof alcoholordrugs.
Mufflerandenginebecomehotandcancauseaburn.Donottouch.Keep
childrenaway.
Exerciseextremecautionwhenoperatingonorcrossinggravelsurfaces.Stay
alertforhiddenhazardsortraffic.
Exercisecautionwhenchangingdirectionandwhileoperatingonslopes.
Planyoursnow-throwingpatterntoavoiddischargetowardswindows,
walls,carsetc.Thus,avoidingpossiblepropertydamageorpersonalinjury
causedbyaricochet.
Preventpossiblepropertydamageorpersonalinjuryfromobjectricochetby
planningyoursnowthrowingpatternto avoiddischargetowardswindows,
walls,cars,etc.
Donotoverloadmachinecapacitybyattemptingtoclearsnowattoofastof
arate.
Neveroperatethismachinewithoutgoodvisibilityorlight.Alwaysbesureof
yourfootingandkeepafirm holdonthehandles.Walk,neverrun.
Disengagepowertotheauger/impellerwhentransportingornotinuse.
Neveroperatemachineathightransportspeedsonslipperysurfaces.Look
downandbehindandusecarewhenbackingup.
Ifthemachineshouldstarttovibrateabnormally,stoptheengine,
disconnectthesparkplugwireandgrounditagainsttheengine.Inspect
thoroughlyfordamage.Repairanydamagebeforestartingandoperating.
Disengageallcontrolleversandstopenginebeforeyouleavetheoperating
position(behindthehandles).Waituntiltheauger/impellercomesto
acompletestopbeforeuncloggingthechuteassembly,makingany
adjustments,orinspections.
Neverputyourhandinthedischargeorcollectoropenings.Donotunclog
chuteassemblywhileengineisrunning.Shutoff engineandremainbehind
handlesuntilallmovingpartshavestoppedbeforeunclogging.
Useonlyattachmentsandaccessoriesapprovedbythemanufacturer(e.g.
wheelweights,tirechains,cabsetc.).
Whenstartingengine,pullcordslowlyuntilresistanceisfelt,thenpull
rapidly.Rapidretractionofstartercord(kickback)will pullhandandarm
towardenginefasterthanyoucanletgo.Brokenbones,fractures,bruisesor
sprainscouldresult.
CLEARING A CLOGGED DISCHARGE CHUTE
Handcontactwith therotatingimpellerinsidethedischargechuteisthemost
commoncauseofinjuryassociatedwith snowthrowers.Neveruseyourhandto
cleanoutthedischargechute.
Toclearthechute:
a. SHUTTHEENGINEOFF!
b. Wait10secondsto besuretheimpellerbladeshavestopped
rotating.
c. Alwaysuseaclean-outtool,notyourhands.
MAINTENANCE & STORAGE
Nevertamperwithsafetydevices.Checktheirproperoperationregularly.
Referto themaintenanceandadjustmentsectionsofthismanual.
Beforecleaning,repairing,orinspectingmachinedisengageallcontrol
leversandstoptheengine.Waituntiltheauger/impellercometoacomplete
stop.Disconnectthesparkplugwireandgroundagainsttheengineto
preventunintendedstarting.
Checkboltsandscrewsforpropertightnessatfrequentintervalstokeepthe
machineinsafeworkingcondition.Also,visuallyinspectmachineforanydamage.
Donotchangetheenginegovernorsettingorover-speedtheengine.The
governorcontrolsthemaximumsafeoperatingspeedof theengine.
Snowthrowershaveplatesandskidshoesaresubjecttowearanddamage.
Foryoursafetyprotection,frequentlycheckallcomponentsandreplace
with originalequipmentmanufacturer's(OEM)partsonlyaslistedinthe
PartspagesofthisOperator'sManual.Useof partswhichdonotmeetthe
originalequipmentspecificationsmayleadto improperperformanceand
compromisesafety!
Checkcontrolleversperiodicallytoverifytheyengageanddisengage
properlyandadjust,ifnecessary.Refertotheadjustmentsectioninthis
operator'smanualfor instructions.
Maintainorreplacesafetyandinstructionlabels,asnecessary.
Observeproperdisposallawsandregulationsforgas,oil,etc.toprotectthe
environment.
Priortostoring,runmachineafewminutestoclearsnowfrommachineand
preventfreezeupofauger/impeller.
Neverstorethemachineorfuelcontainerinsidewherethereisanopen
flame,sparkorpilotlight suchasawaterheater,furnace,clothesdryeretc.
Alwaysrefertotheoperator'smanualforproperinstructionsonoff-season
storage.
Checkfuelline,tank,cap,andfittingsfrequentlyforcracksorleaks.Replace
ifnecessary.
Donotcrankenginewithsparkplugremoved.
AccordingtotheConsumerProductsSafetyCommission(CPSC)andtheU.S.
EnvironmentalProtectionAgency(EPA),thisproducthasanAverageUsefulLife
ofseven(7)years,or60hoursofoperation.AttheendoftheAverageUseful
Lifehavethemachineinspectedannuallybyanauthorizedservicedealerto
ensurethatallmechanicalandsafetysystemsareworkingproperlyandnot
wornexcessively.Failureto dosocanresultinaccidents,injuriesordeath.
4
DO NOT MODIFY ENGINE
Toavoidseriousinjuryordeath,donot modify engineinanyway.Tampering
with thegovernorsettingcanleadto arunawayengineandcauseitto operate
atunsafespeeds.Nevertamperwith factorysettingofenginegovernor.
NOTICE REGARDING EMiSSiONS
Engineswhicharecertifiedto complywith CaliforniaandfederalEPA
emissionregulationsfor SORE(SmallOffRoadEquipment)arecertified
tooperateonregularunleadedgasoline,and mayincludethefollowing
emissioncontrolsystems:EngineModification (EM),OxidizingCatalyst(0C),
SecondaryAirinjection(SAI)andThreeWayCatalyst(TWC)if soequipped.
SPARK ARRESTOR
Thismachineisequippedwith aninternalcombustionengineandshould
not beusedon ornearanyunimprovedforest-covered,brushcoveredor
grass-coveredland unlesstheengine'sexhaustsystemisequippedwith a
sparkarrestormeetingapplicablelocalorstate laws(ifany).
Ira sparkarrestorisused,it shouldbemaintainedineffective working order
bytheoperator,intheState ofCaliforniathe aboveisrequiredbylaw (Section
4442oftheCaliforniaPublicResourcesCode).Otherstatesmayhavesimilar
laws.Federallawsapplyonfederallands.
Asparkarrestorfor the muffler isavailablethroughyour nearestSearsParts
andRepairServiceCenter.
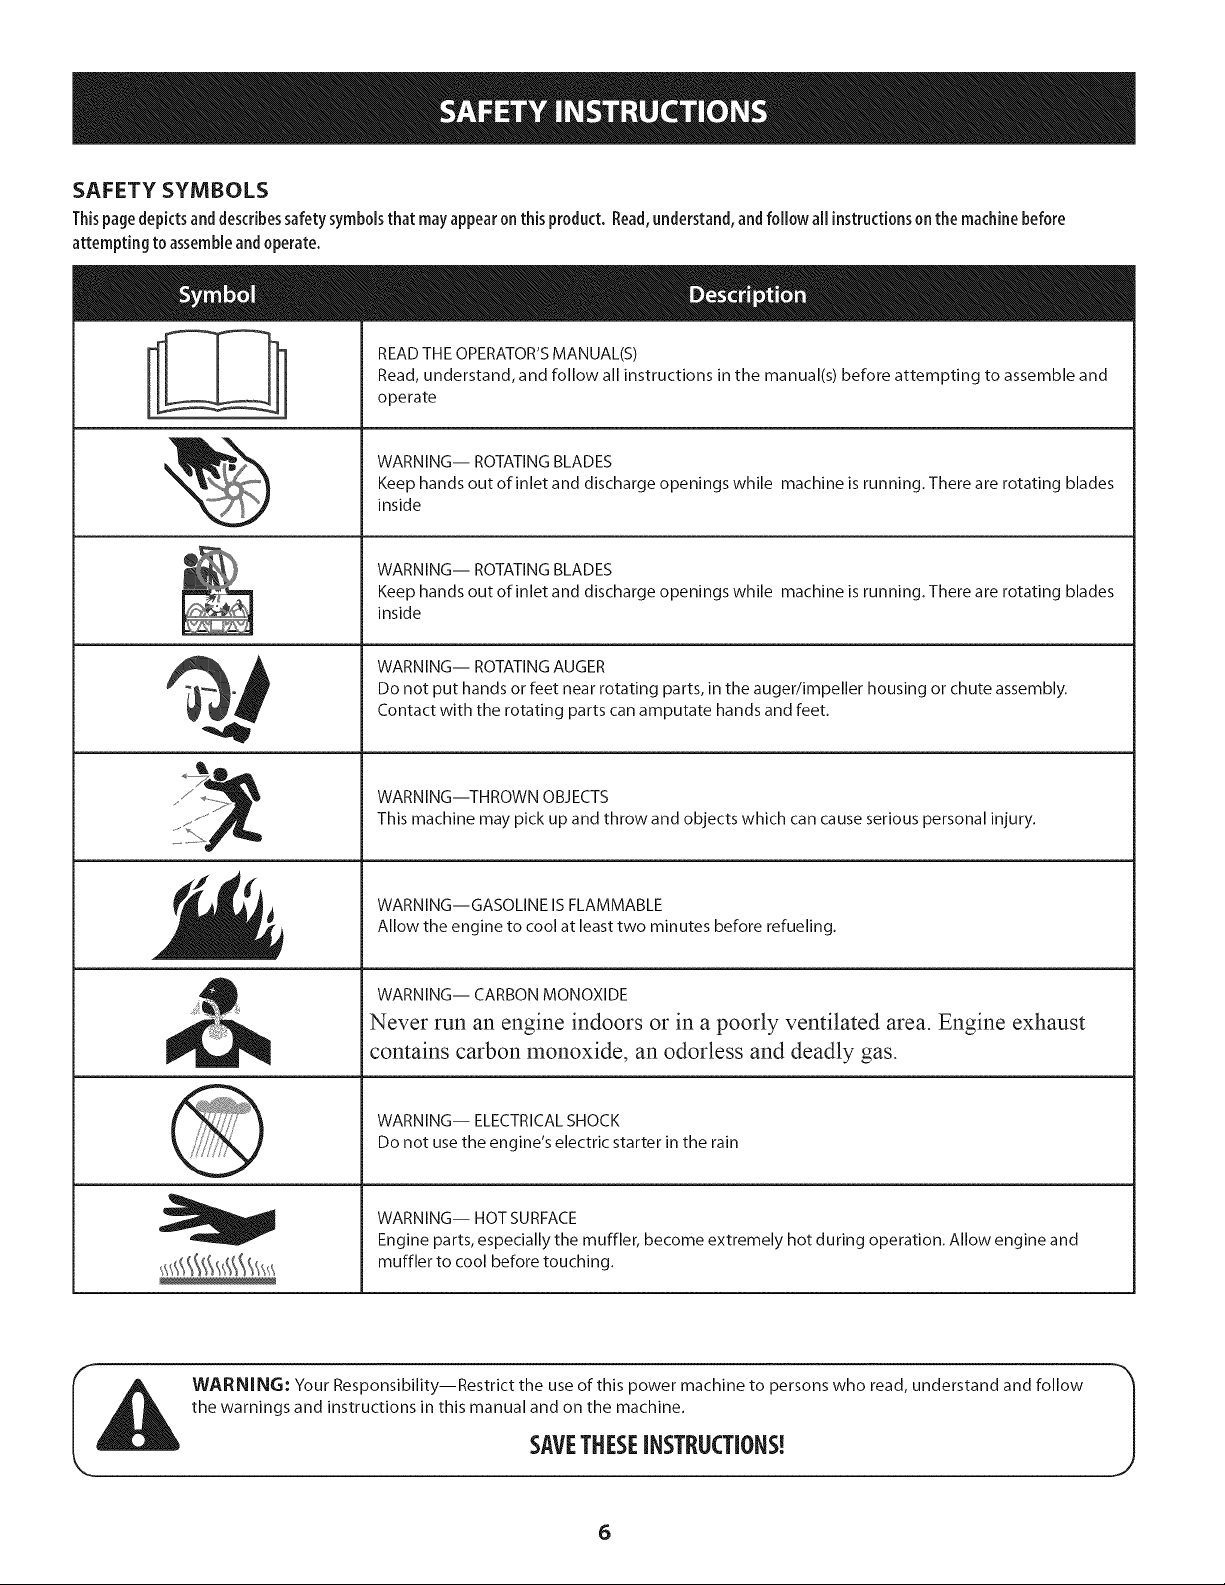
SAFETY SYMBOLS
Thispage depicts and describes safety symbols that may appear on this product. Read,understand, and follow all instructions on the machine before
attempting to assemble and operate.
READ THE OPERATOR'S MANUAL(S)
Read, understand, and follow all instructions in the manual(s) before attempting to assemble and
operate
WARNING-- ROTATING BLADES
Keep hands out of inlet and discharge openings while machine is running. There are rotating blades
inside
WARNING-- ROTATING BLADES
Keep hands out of inlet and discharge openings while machine is running. There are rotating blades
inside
WARNING-- ROTATING AUGER
Do not put hands or feet near rotating parts, in the auger/impeller housing or chute assembly.
Contact with the rotating parts can amputate hands and feet.
WARNING--THROWN OBJECTS
This machine may pick up and throw and objects which can causeserious personal injury.
WARNING--GASOLINE IS FLAMMABLE
Allow the engine to cool at least two minutes before refueling.
WARNING-- CARBON MONOXIDE
Never run an engine indoors or in a poorly ventilated area. Engine exhaust
contains carbon monoxide, an odorless and deadly gas.
WARNING-- ELECTRICAL SHOCK
Do not use the engine's electric starter in the rain
WARNING-- HOT SURFACE
Engine parts, especially the muffler, become extremely hot during operation. Allow engine and
muffler to cool before touching.
WARNING: Your Responsibility--Restrict the use of this power machine to persons who read, understand and follow
the warnings and instructions in this manual and on the machine.
SAVETHESEiNSTRUCTIONS!
6
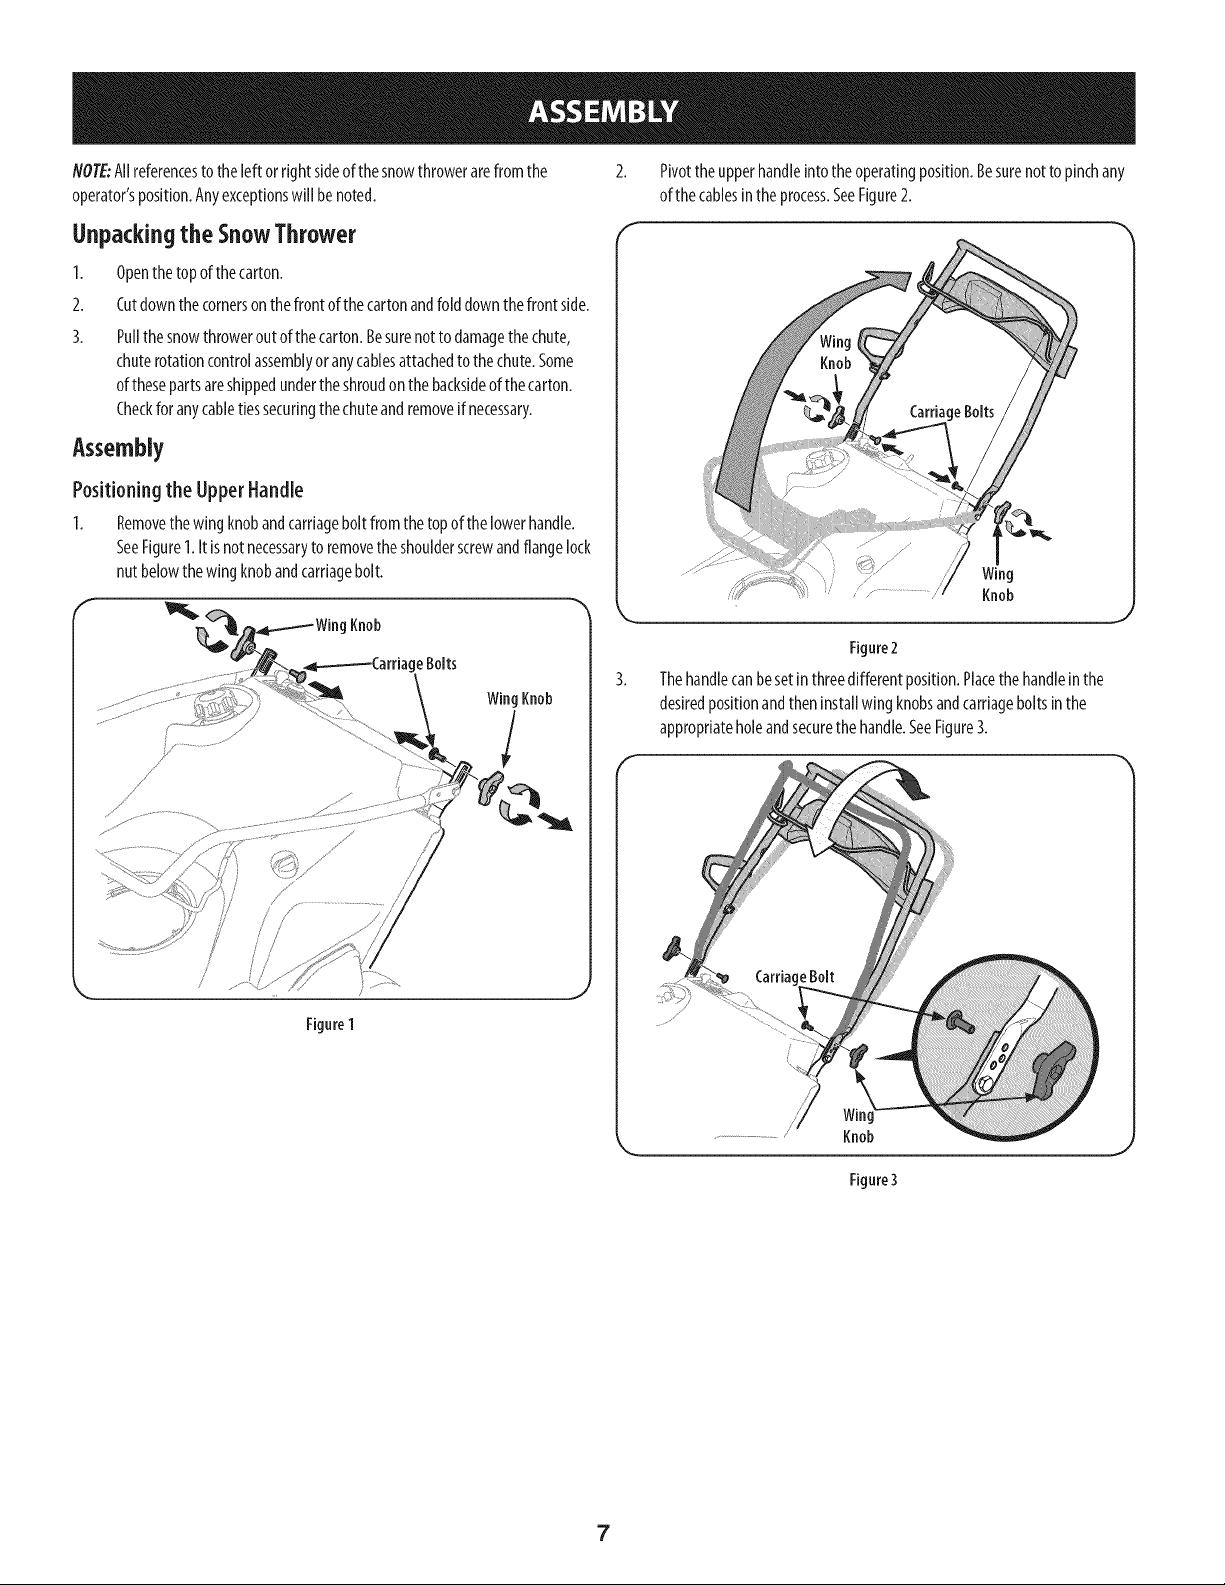
NOTE"Allreferencestothe[eftorrightsideofthesnowthrowerarefromthe
operator'sposition.Anyexceptionswi[[benoted.
Unpackingthe SnowThrower
1.
Openthetopofthecarton.
2.
Cutdownthecornerson thefrontof thecartonandfolddownthefrontside.
3.
Pullthesnowthroweroutofthecarton.Besurenotto damagethechute,
chuterotationcontrolassemblyoranycablesattachedto thechute.Some
ofthesepartsareshippedundertheshroudonthebacksideofthecarton.
Checkfor anycabletiessecuringthechuteandremoveifnecessary.
Assembly
Positioningthe UpperHandle
I. Removethewing knobandcarriageboltfromthetopof thelowerhandle.
SeeFigureI. It isnotnecessarytoremovetheshoulderscrewandflangelock
nutbelowthewing knobandcarriagebolt.
Knob
geBolts
Pivottheupperhandleintotheoperatingposition.Besurenottopinchany
ofthecablesinthe process.SeeFigure2.
Wing
" ................. Knob
J
Figure2
Thehandlecanbesetinthreedifferentposition.Placethe handleinthe
desiredpositionandtheninstallwing knobsandcarriageboltsinthe
appropriateholeandsecurethehandle.SeeFigure3.
/
Figure1
Knob
Figure3
7
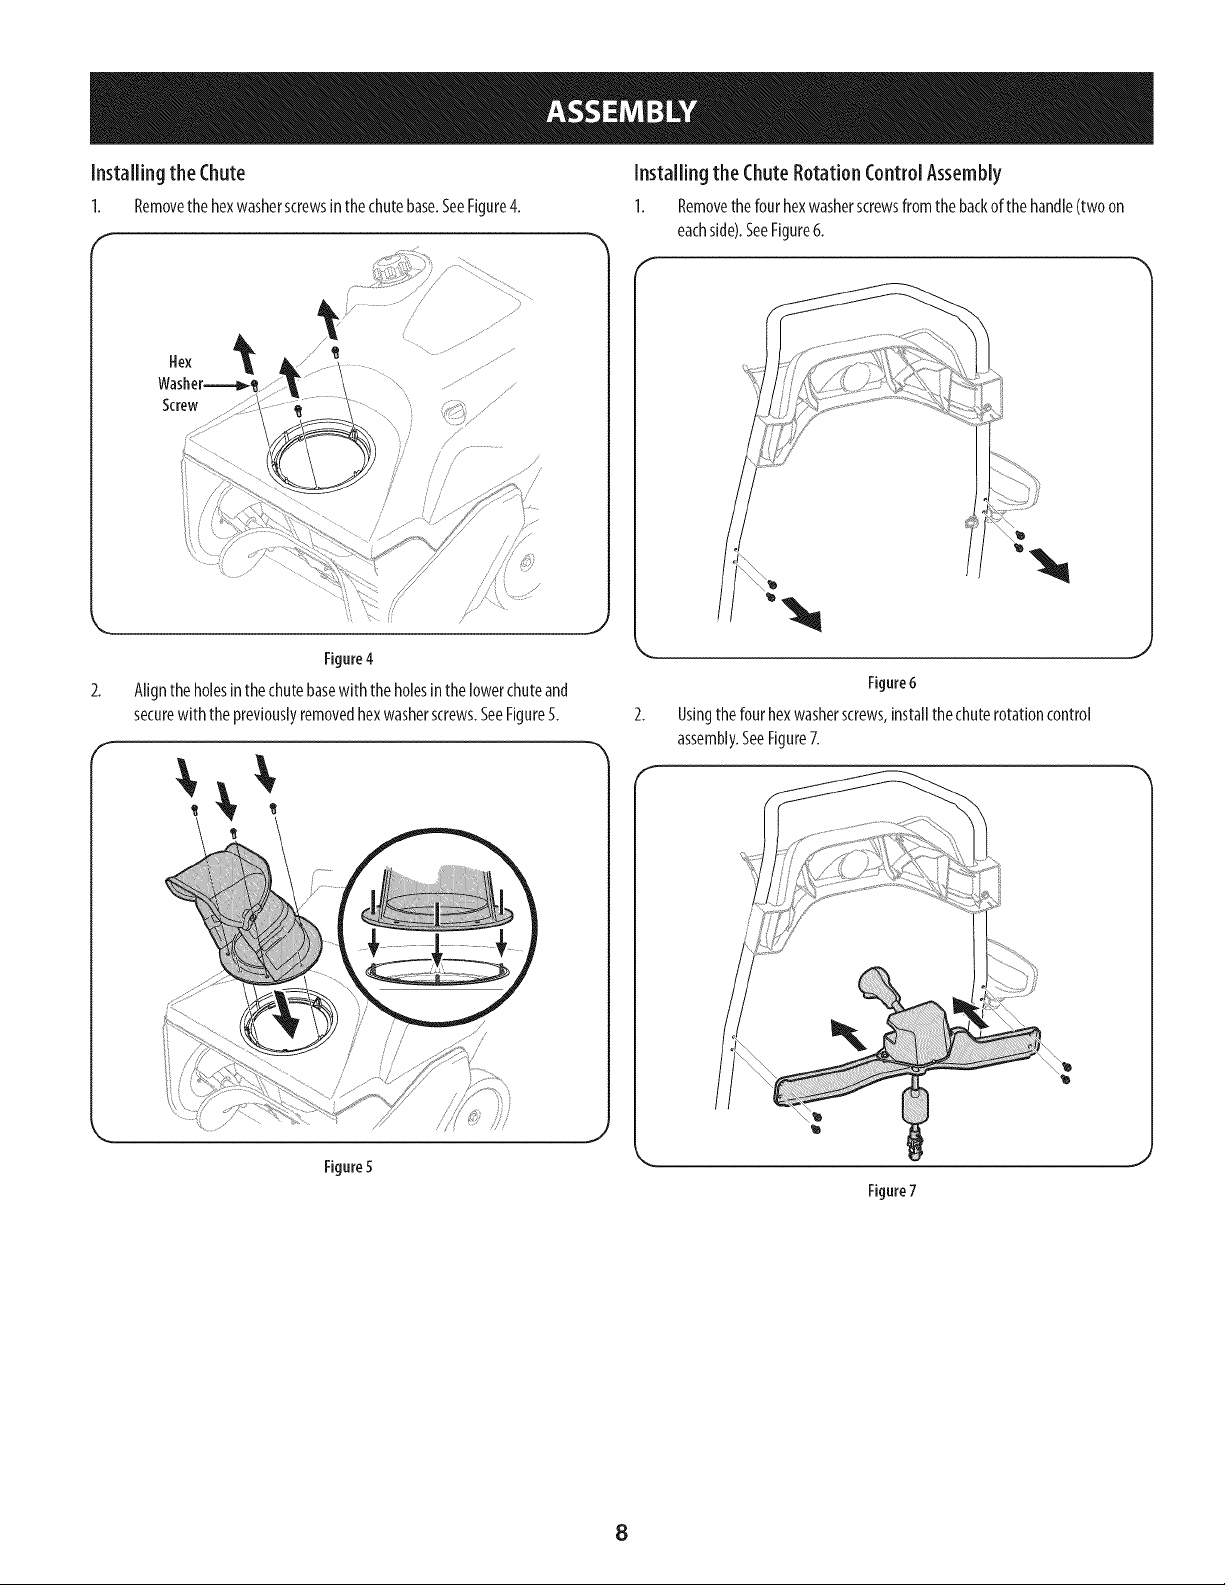
Installing the Chute
1. Removethehexwasherscrewsinthechutebase.SeeFigure4.
f
Hex
Screw
/ /
Figure4
2.
Alignthe holesinthechutebasewith theholesinthelowerchuteand
securewith thepreviouslyremovedhexwasherscrews.SeeFigure5.
f
Installing the ChuteRotation ControlAssembly
1. Removethefourhexwasherscrewsfromthebackofthehandle(twoon
eachside).SeeFigure6.
Figure6
Usingthefourhexwasherscrews,installthechuterotationcontrol
assembly.SeeFigure7.
Figure5
Figure7
8
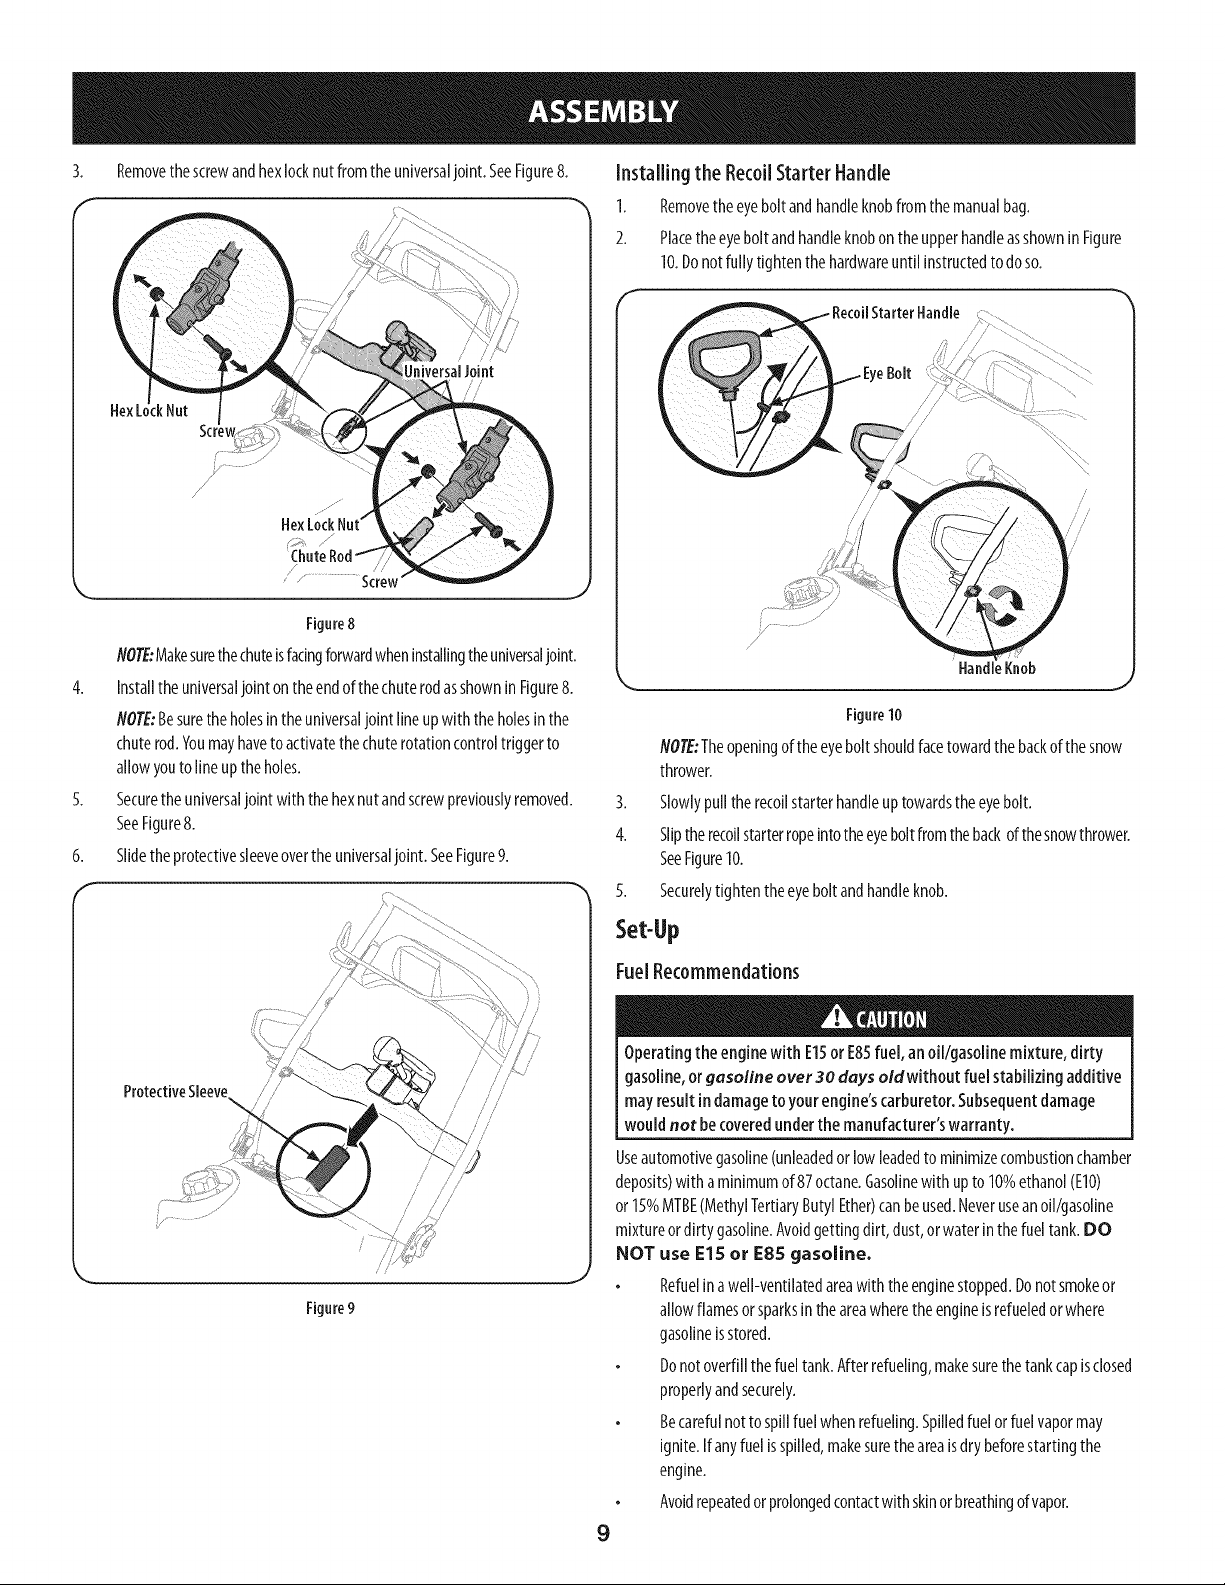
3. Removethescrewandhexlocknutfromtheuniversaljoint.SeeFigure8.
OniversaIJoini
/
/
...................Screw
Installing the RecoilStarter Handle
I. Removetheeyeboltandhandleknobfromthemanualbag.
2. Placetheeyeboltandhandleknobontheupperhandleasshownin Figure
10.Donotfully tightenthehardwareuntilinstructedtodoso.
f
RecoilStarter Handle, i
EyeBolt
/
Figure8
NOTE:Makesurethechuteisfacingforwardwheninstallingtheuniversaljoint.
4. Installthe universaljointontheendofthechuterodasshownin Figure8.
NOTE:Besuretheholesintheuniversaljoint lineupwith theholesinthe
chuterod.Youmayhavetoactivatethechuterotationcontroltriggerto
allowyoutolineuptheholes.
5. Securetheuniversaljoint with thehexnutandscrewpreviouslyremoved.
SeeFigure8.
6. Slidetheprotectivesleeveovertheuniversaljoint. SeeFigure9.
ProtectiveSleeve
Figure9
/ .........
//J
HandleKnob
Figure10
NOTE:Theopeningof theeyeboltshouldfacetowardthe backof thesnow
thrower.
3. Slowlypulltherecoilstarterhandleuptowardstheeyebolt.
4. Sliptherecoilstarterropeintotheeyeboltfromthebackofthesnowthrower.
SeeFigure10.
5. Securelytightentheeyeboltandhandleknob.
Set-Up
FuelRecommendations
Operatingthe enginewith E15or E85fuel,anoil/gasolinemixture,dirty
gasoline,orgasoline over30 days oldwithout fuel stabilizing additive
mayresultindamagetoyourengine'scarburetor.Subsequentdamage
wouldnot becoveredunderthe manufacturer'swarranty.
Useautomotivegasoline(unleadedorlowleadedtominimizecombustionchamber
deposits)with aminimumof87octane.Gasolinewith upto 10%ethanol(EIO)
or 15%MTBE(MethylTertiaryButylEther)canbeused.Neveruseanoil/gasoline
mixtureordirty gasoline.Avoidgettingdirt, dust,orwaterinthefueltank.DO
NOT use E15 or E85 gasoline.
Refuelinawell-ventilatedareawiththeenginestopped.Donotsmokeor
allowflamesorsparksintheareawheretheengineisrefueledorwhere
gasolineisstored.
Donotoverfillthefueltank.Afterrefueling,makesurethetankcapisclosed
properlyandsecurely.
Becarefulnottospillfuelwhenrefueling.Spilledfuelorfuelvapormay
ignite.Ifanyfuelisspilled,makesuretheareaisdry beforestartingthe
engine.
Avoidrepeatedorprolongedcontactwith skinorbreathingofvapor.
9
Adding Fuel
Useextremecarewhen handlinggasoline.Gasolineisextremelyflammable
andthevaporsareexplosive.Neverfuelthe machineindoorsorwhile the
engineishotor running.Extinguishcigarettes,cigars,pipesandother
sourcesofignition.
Alwayskeephandsandfeet dear ofequipmentmovingparts.Donot usea
pressurizedstarting fluid. Vaporsareflammable.
Removethegascap,checkthefuel levelandaddfuelifnecessary.Fillthe
tankuntilthefuel reaches1/2"belowthebottomofthefillernecktoallow
forfuel expansion.Becarefulnottooverfill.
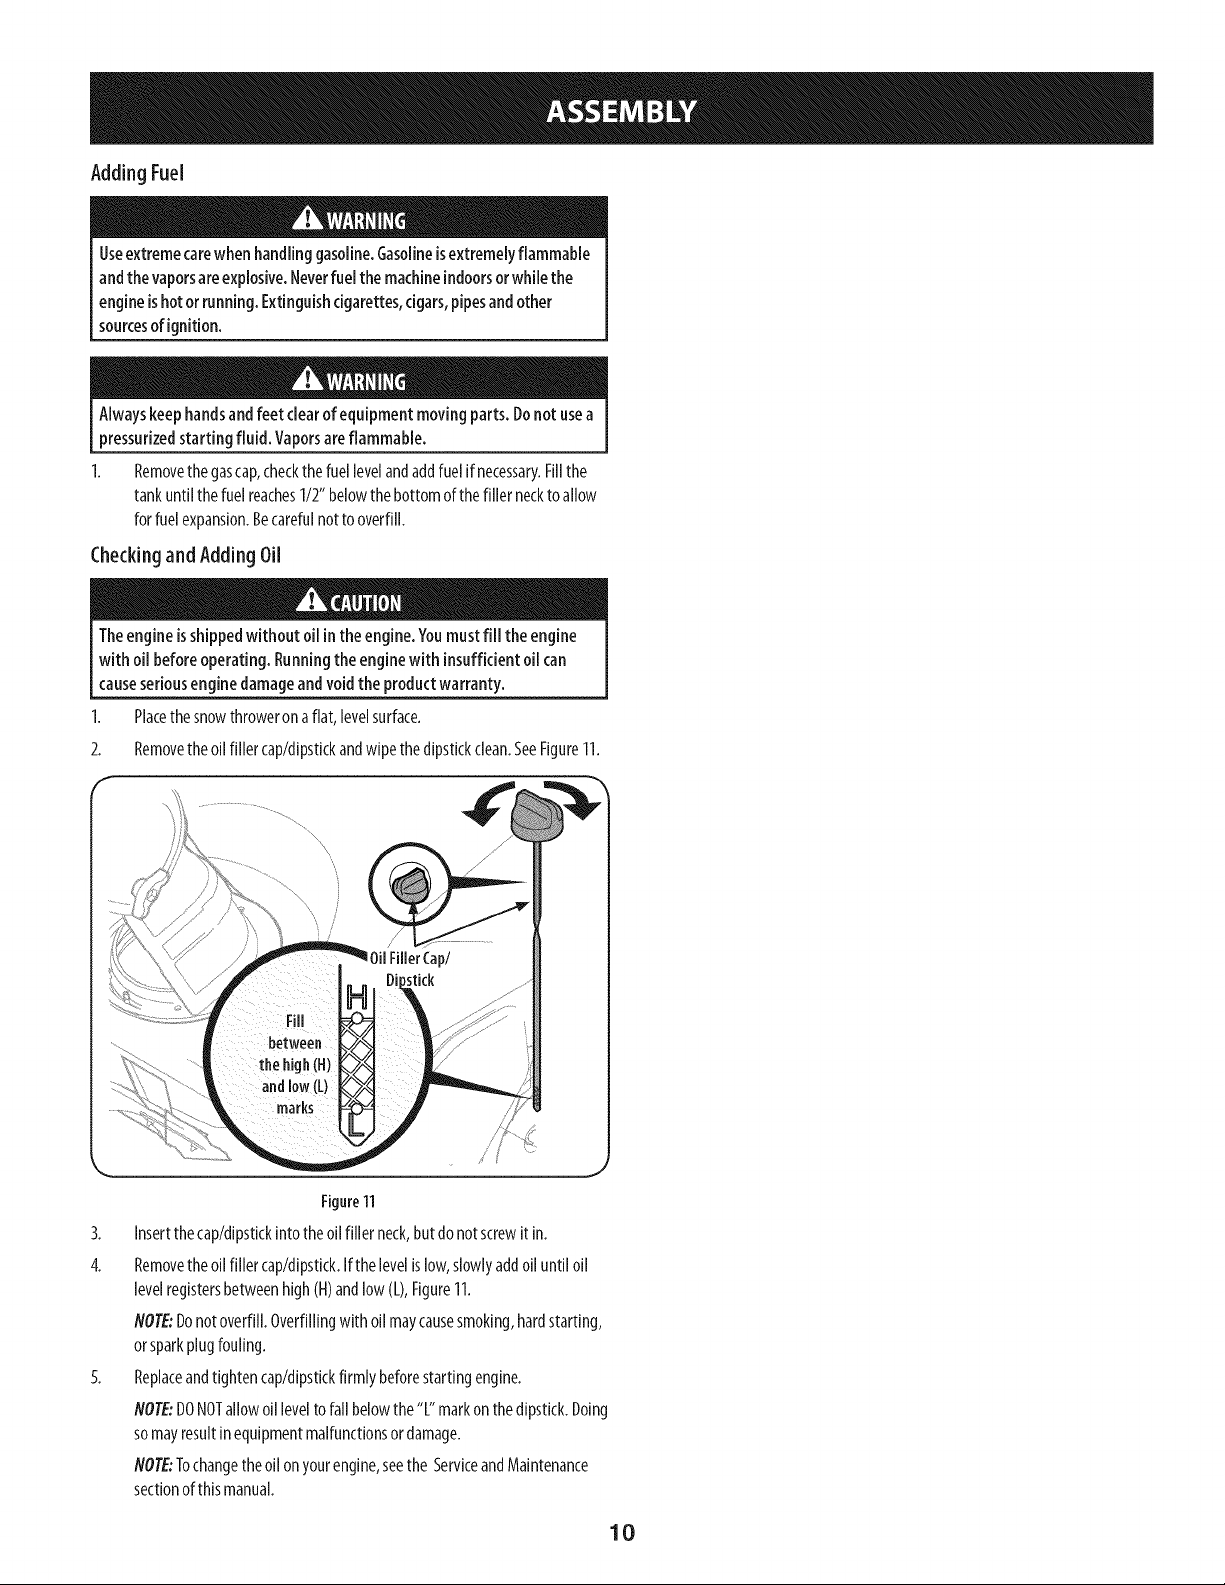
CheckingandAdding Oil
Theengineisshippedwithout oil inthe engine.Youmustfill the engine
with oil beforeoperating. Runningtheenginewith insufficientoil can
causeseriousenginedamageandvoidthe productwarranty.
1. Placethesnowthroweronaflat,levelsurface.
2. Removetheoilfiller cap/dipstickandwipethedipstickclean.SeeFigure11.
f
)il FillerCap/
bstick
Figure11
3. Insertthecap/dipstickintotheoilfillerneck,butdonotscrewitin.
4. Removetheoilfiller cap/dipstick.Ifthelevelislow,slowlyaddoiluntil oil
levelregistersbetweenhigh(H)andlow(L),Figure11.
NOTE:Donotoverfill.Overfillingwith oilmaycausesmoking,hardstarting,
orsparkplugfouling.
5. Replaceandtightencap/dipstickfirmlybeforestartingengine.
NOTE:DONOTallowoilleveltofall belowthe"L"markonthedipstick.Doing
somayresultinequipmentmalfunctionsordamage.
NOTE:Tochangetheoilonyourengine,seethe ServiceandMaintenance
sectionofthis manual.
J
10
f
Primer,
GasCa
ShavePlate'
OilDrain
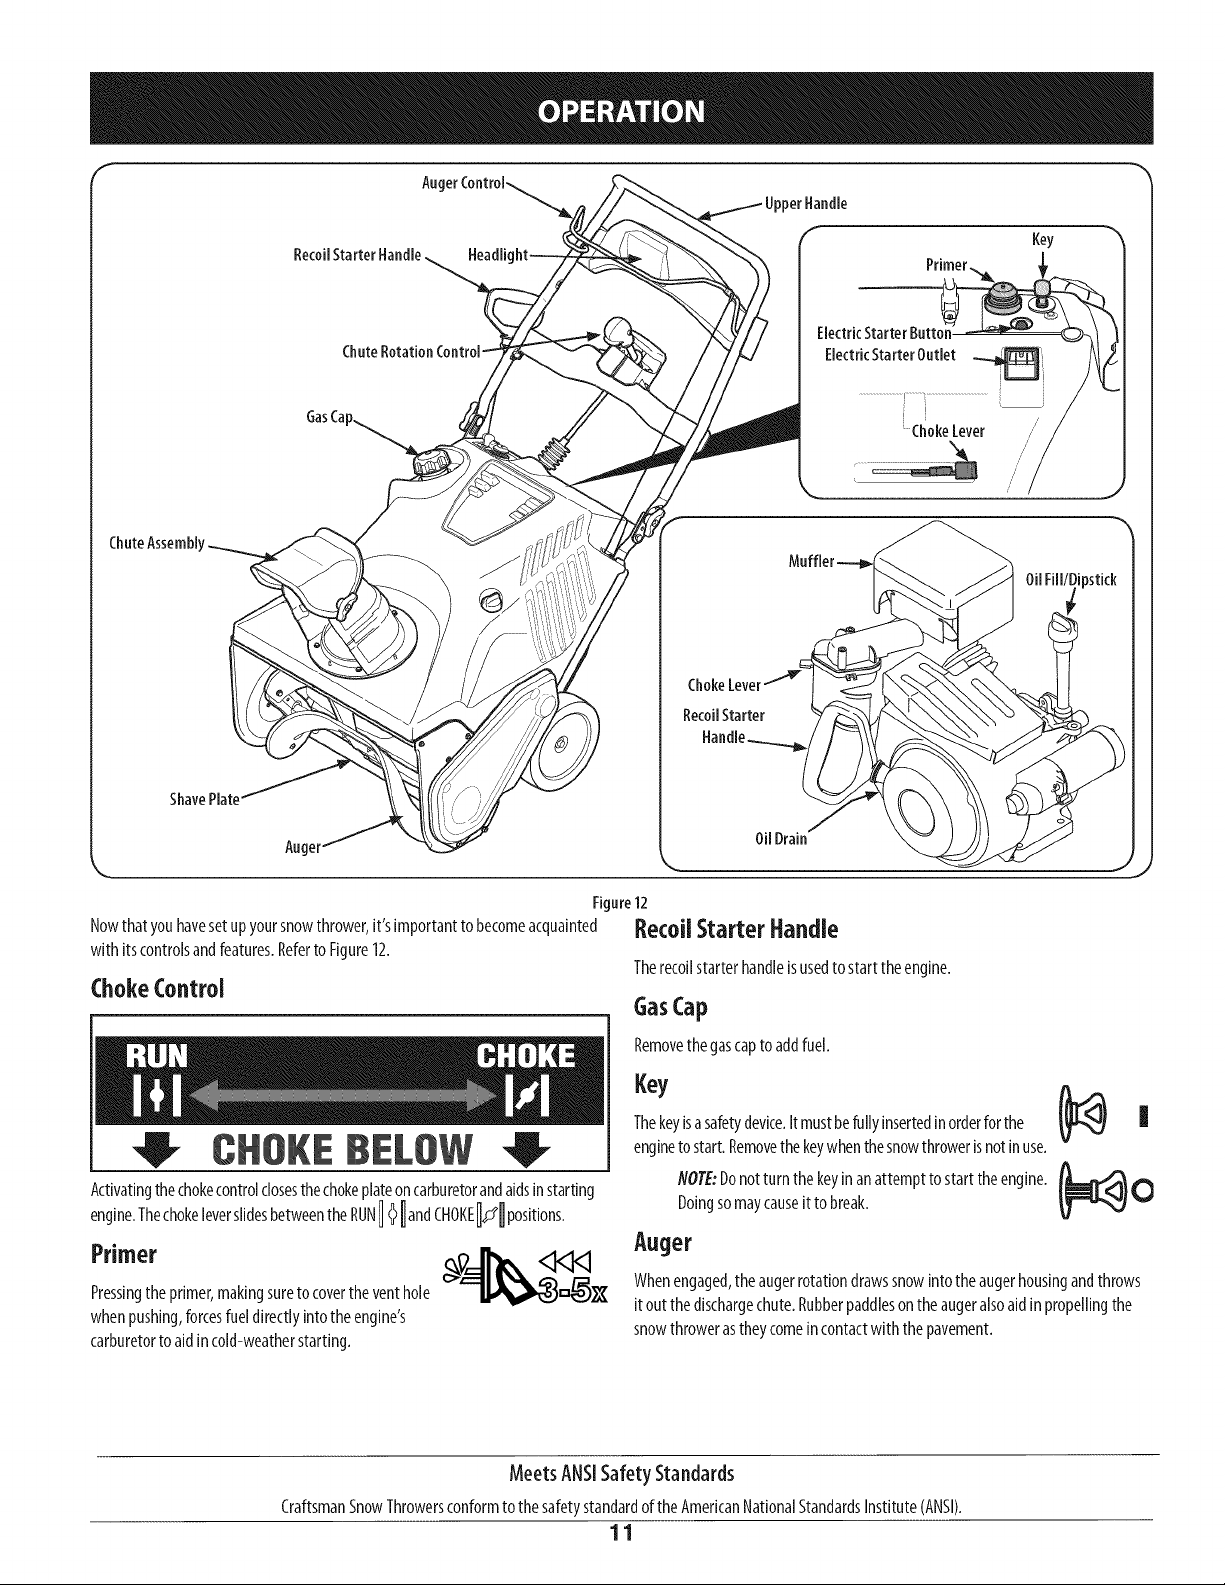
Figure12
Nowthatyouhavesetupyoursnowthrower,it's importanttobecomeacquainted Re€OnStarter Handle
with itscontrolsandfeatures.Referto Figure12.
Therecoilstarterhandleisusedto starttheengine.
Choke Control GasCap
Removethegascaptoaddfuel.
"°YThekeyisasafetydevice.Itmustbefullyinsertedinorderforthe II
CHOKEBELOW
ActivatingthechokecontroJdosesthechokepJateoncarburetorandaidsJnstarting
engine.Thechokeleverslidesbetweenthe"UNI_andC,OKEMpositions.
Primer
Pressingtheprimer,makingsuretocovertheventhole
whenpushing,forcesfueldirectlyintotheengine's
carburetorto aidincold-weatherstarting.
enginetostart.Removethekeywhenthesnowthrowerisnotinuse.
NOTE:Donotturnthekeyinanattemptto starttheengine.
Doingsomaycauseittobreak. _!_ 0
Auger
Whenengaged,theaugerrotationdrawssnowintotheaugerhousingandthrows
itoutthedischargechute.Rubberpaddlesontheaugeralsoaidin propellingthe
snowthrowerastheycomeincontactwiththe pavement.
MeetsANSISafetyStandards
CraftsmanSnowThrowersconformtothesafetystandardoftheAmericanNationalStandardsInstitute(ANSI).
11
AugerControl
Locatedontheupperhandle,theaugercontrolhandleisusedtoengageanddisengage
drivetotheauger.Squeezethecontrolhandleagainsttheupperhandletoengagethe
auger;releaseittodisengage.
Muffler
Engineexhaustexitstheengineviathemuffler.
ChuteRotation Control
Thechuterotatecontrolislocatedinthecenterofthecontrolpanelandcontrolsthe
directionsnowisthrown.Depressthebuttonandrotatethechuterotationcontroltothe
righttoturnthechutetotherightandrotatetothelefttoturnthechutetotheleft.
ChuteAssembly
Thepitchofthedischargechutecontrolstheangleatwhichthesnowisthrown.Loosen
thewingknobonthesideofthedischargechutebeforepivotingthedischargechute
upwardordownward.Retightentheknoboncethedesiredpositionhasbeenachieved.
ShavePlate
Theshaveplatemaintainscontactwith thepavementasthesnowthroweris
propelled,allowingsnowcloseto the pavement'ssurfacetobedischarged.
Oil Fill/Dipstick
Engineoillevelcanbecheckedandoiladdedthroughtheoilfill.
Oil Drain
Engineoilcanbedrainedthroughtheoildrain.
ffeadlight
Theheadlightislocatedontheuppercenterofthecontrolpanelandisonwhenthe
snowthrowerisrunning.
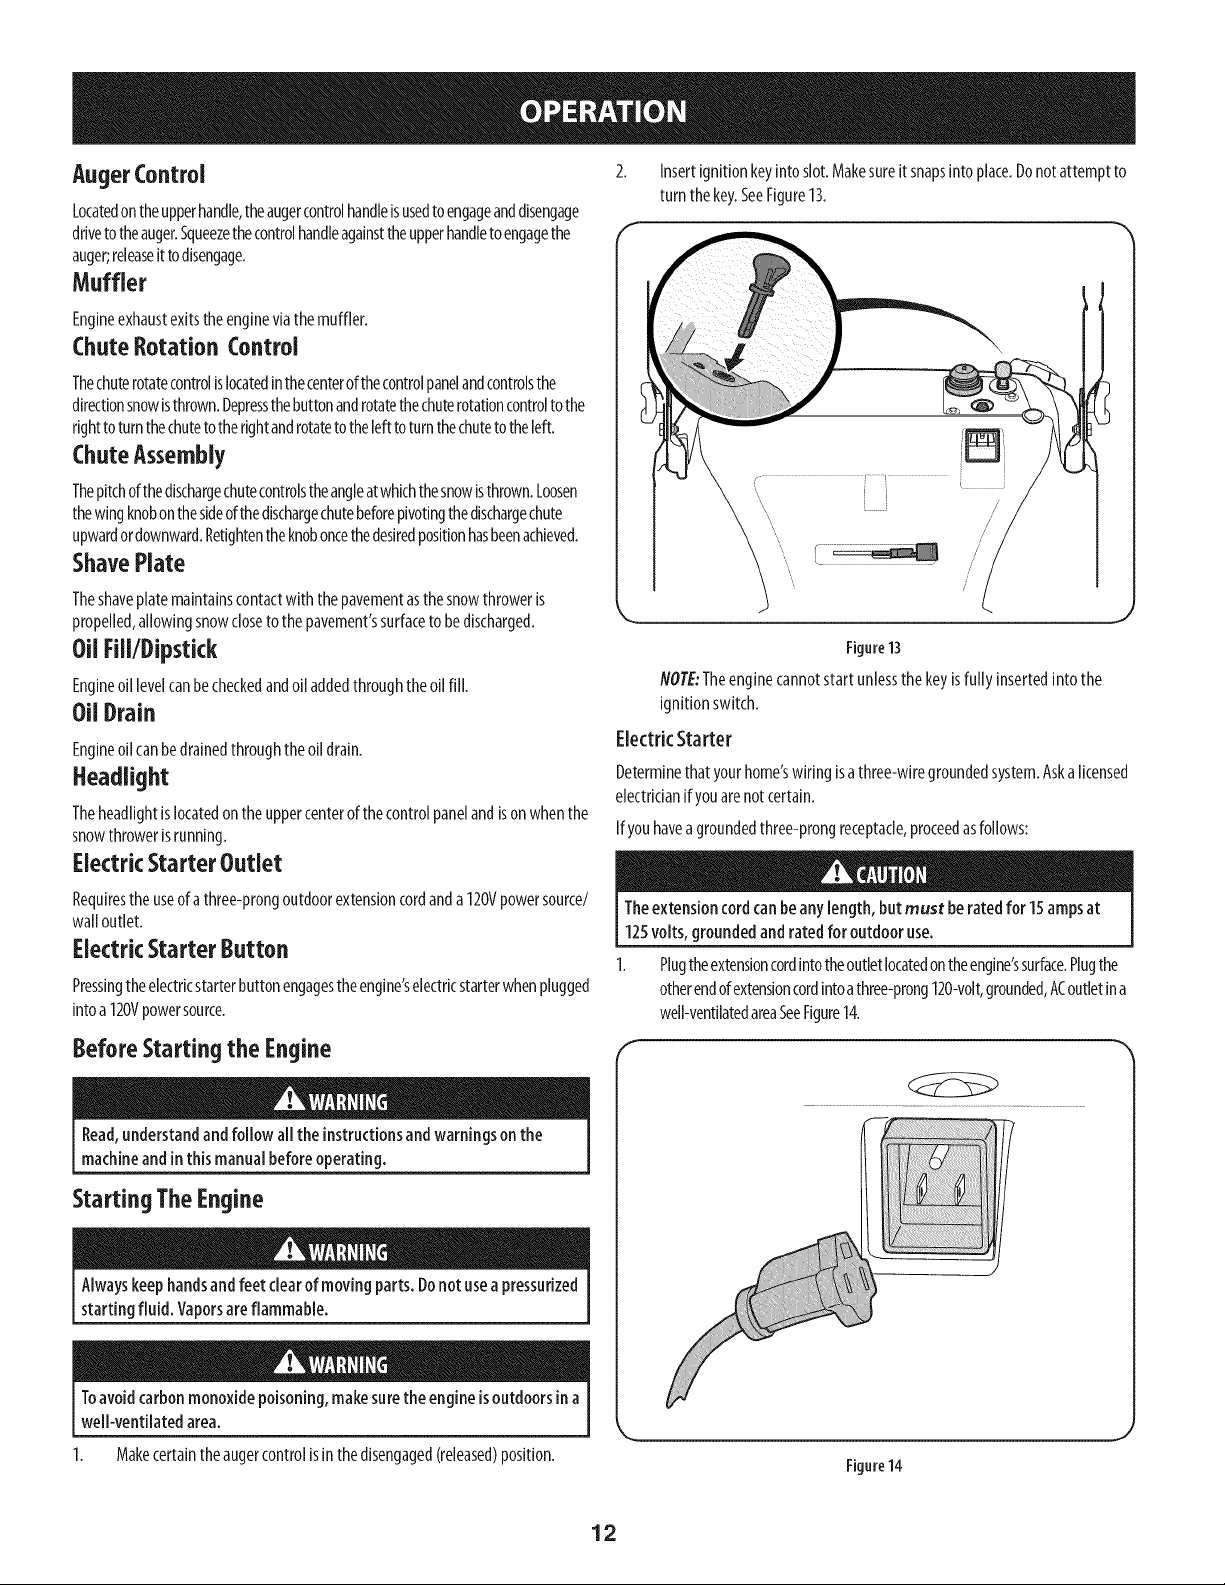
ElectricStarter Outlet
Insertignitionkeyintoslot.Makesureit snapsintoplace.Donotattemptto
turnthekey.SeeFigure13.
Figure13
NOTE:Theenginecannotstart unlessthekeyisfully insertedinto the
ignitionswitch.
ElectricStarter
Determinethatyourhome'swiringisathree-wiregroundedsystem.Askalicensed
electricianif youarenotcertain.
Ifyouhavea groundedthree-prongreceptacle,proceedasfollows:
Requirestheuseofathree-prongoutdoorextensioncordanda120Vpowersource/
walloutlet.
ElectricStarter Button
Pressingtheelectricstarterbuttonengagestheengine'selectricstarterwhenplugged
intoa120Vpowersource.
BeforeStarting the Engine
Read,understandandfollow all the instructionsandwarningsonthe
machineandin thismanualbeforeoperating.
Starting TheEngine
Alwayskeephandsandfeet clearof movingparts. Donot useapressurized
starting fluid. Vaporsareflammable.
Toavoidcarbonmonoxidepoisoning,makesurethe engineisoutdoorsin a
well-ventilated area.
1. Makecertaintheaugercontrolisinthedisengaged(released)position.
Theextensioncordcanbeanylength, but must beratedfor 15ampsat
125volts,groundedand ratedfor outdoor use.
Plugtheextensioncordintotheoutletlocatedontheengine'ssurface.Plugthe
otherendofextensioncordintoathree-prong120-volt,grounded,ACoutletina
well-ventilatedareaSeeFigure14.
Figure14
12
2. PushthechokelevertotheCHOKE_ position.
3. Iftheengineiswarm,placethechokeinthe RUN1_ I positioninsteadof
CHOKE_J0
4. Pushtheprimerthree(3)times,makingsuretocovertheventholewhenpushing.
S. Iftheengineiswarm,pushtheprimerbuttononlyonce.
6. Pushstarterbuttontostartengine.
7. Oncetheenginestarts,releasestarterbutton.
8. Allowtheengineto warmupseveralminutes,adjustingchoketowardRUN
1_ _position.Waituntilenginerunssmoothlybeforeeachchokeadjustment.
9. Whendisconnectingtheextensioncord,alwaysunplugtheend
atthethree-prongwalloutletbeforeunpluggingtheoppositeend
fromthesnowthrower.
RecoilStarter
1. PushthechokelevertotheCHOKE_J_ position.
2. Iftheengineiswarm,placethechokeinthe RUN1_ I positioninsteadof
CHOKE_B
3. Pushtheprimerthree(3)times,makingsuretocovertheventholewhenpushing.
4. Iftheengineiswarm,pushtheprimerbuttononlyonce.
S. Grasptherecoilstarterhandleandslowlypulltheropeout.Atthepointwhere
it becomesslightlyharderto pulltherope,slowlyallowtheropetorecoil.
6. Pullthestarterhandlewith afirm,rapidstroke.Donotreleasethehandle
andallowit tosnapback.Keepa firm holdonthestarterhandleandallowit
toslowlyrecoil.
7. Allowtheengineto warmupseveralminutes,adjustingchoketowardRUN1_ _
position.Waituntilenginerunssmoothlybeforeeachchokeadjustment.
Stoppingthe Engine
1. Runtheengineforafewminuteswithoutloadbeforestoppingtohelpdry
offanymoistureontheengine.
2. Tostoptheengineremovethekeyandstoreit in asafeplace.
3. Wipeallthesnowandmoistureawayfromtheenginecontrolsarea.
Muffler,engineand surroundingareasbecomehotandcancauseaburn.
Becarefulanddonottouchwhen theyarehot.
Engagingthe Auger
Engagetheaugerbysqueezingtheaugercontrolagainsttheupperhandle.Release
thecontroltostoptheauger.
Engagingthe Drive
Liftupslightlyontheupperhandleto allowtherubberpaddlesontheaugerto
contactthepavementandpropelthesnowthrowerforward.Pushingdownwardon
thehandlewill raisetheaugeroffthe groundandstoptheforwardmotion.
NOTE:Excessiveupwardpressureonthehandlewill resultinpremature
weartotherubberaugerpaddles,whichwill notbecoveredbythewarranty.
ClearingaCloggedDischargeChute
Handcontactwiththerotatingimpellerinsidethedischargechuteisthemostcommon
causeofinjuryassociatedwithsnowthrowers.Neveruseyourhandtocleanoutthe
dischargechute.
Toclearthechute:
1. SHUTTHEENGINEOFF!
2. Wait10secondstobesuretheimpellerbladeshavestoppedrotating.
3. Alwaysuseaclean-outtoolorstkk, notyourhands.
13

MAINTENANCESCHEDULE
Followthemaintenanceschedulegivenbelow.Thischartdescribesserviceguidelines
only.UsetheServiceLogcolumntokeeptrackofcompletedmaintenancetasks.To
Beforeperforminganytype of maintenance/service,disengageall controls scheduleservicefrom SearsParts& Repair,call 1-800-659-5917.
andstop theengine.Wait untilall movingpartshavecometo acomplete
stop.Disconnectspark plugwire and grounditagainsttheengineto
preventunintendedstarting. Alwayswearsafety glassesduring operation
orwhile performing anyadjustmentsor repairs.
Eachuse
1st5hours
Every5hours
25hours
Everyseason/50hours
Everyseason/lO0hours
Everyseason/Beforestorage
1. Engineoil level.
2. Snowthrowerandexhaustarea.
1. Engineoil.
1. Engineoil.
2. Exhaustarea.
1. Sparkplug.
1. Engineoil
1. Sparkplug
1. Pivotpoints
2. Controlhandle
3. Extensionspring
EngineMaintenance
Thoroughlywashyour handswith soapandwater assoonaspossibleafter
handlingusedoil.
Oil Recommendations
Whenaddingoiltotheengine,refertotheviscositychartbelow(Figure15).
o
_c:
m mlb
iv
1. Check
2. Clean
1. Change.
1. Check.
2. Clean.
1. Check.
1. Change
1. Clean,replace,re-gap
1. Lubricate
2. Lubricate
3. Lubricate
Engineoilcapacityis600ml(approx.20oz.).Donotover-fill.Usea4-stroke,oran
equivalenthighdetergent,premiumqualitymotoroilcertifiedtomeetorexceed
U.S.automobilemanufacturer'srequirementsforserviceclassificationSG,SEMotor
oilsclassifiedSG,SFwill showthisdesignationonthecontainer.
NOTE:Pleasedisposeof usedmotoroilinamannerthat isfriendlytothe
environment.Takeittoarecyclingcenterorothercollectioncenter.
DONOTusenon-detergentoil or2-strokeengineoil. It couldshorten the
engine'sservicelife.
ChangingEngineOil
L/3
OJ (u
V"
mm_mll
m ==lib
F-
(°C) -30° -20° -I0 ° 0° 100 20o 300 400
(°F)-20o 0o 150 300 500 700 850 105o j
Figure15
Shutoffthe engineandremovethe ignitionkeybeforeperformingany
maintenance.Topreventaccidentalstart-up,disconnectthe sparkplugboot.
Periodicinspectionandadjustmentof theengineisessentialifhighlevelperformance
istobemaintained.Regularmaintenancewill alsoensurealongservicelife.The
requiredserviceintervalsandthetypeofmaintenanceto beperformedaredescribed
inthetableabove.Followthehourlyorcalendarintervals,whicheveroccurfirst.More
frequentserviceisrequiredwhenoperatinginadverseconditions.
Checkoillevelbeforeeachuseandevery5 operatinghourswhentheengineis
warm.RefertoCheckingandAddingOilintheAssemblySection.
Changetheoilafterthefirst5operatinghoursandevery50operatinghours
thereafter.EngineshouldstillbewarmbutNOThotfromrecentuse.
14
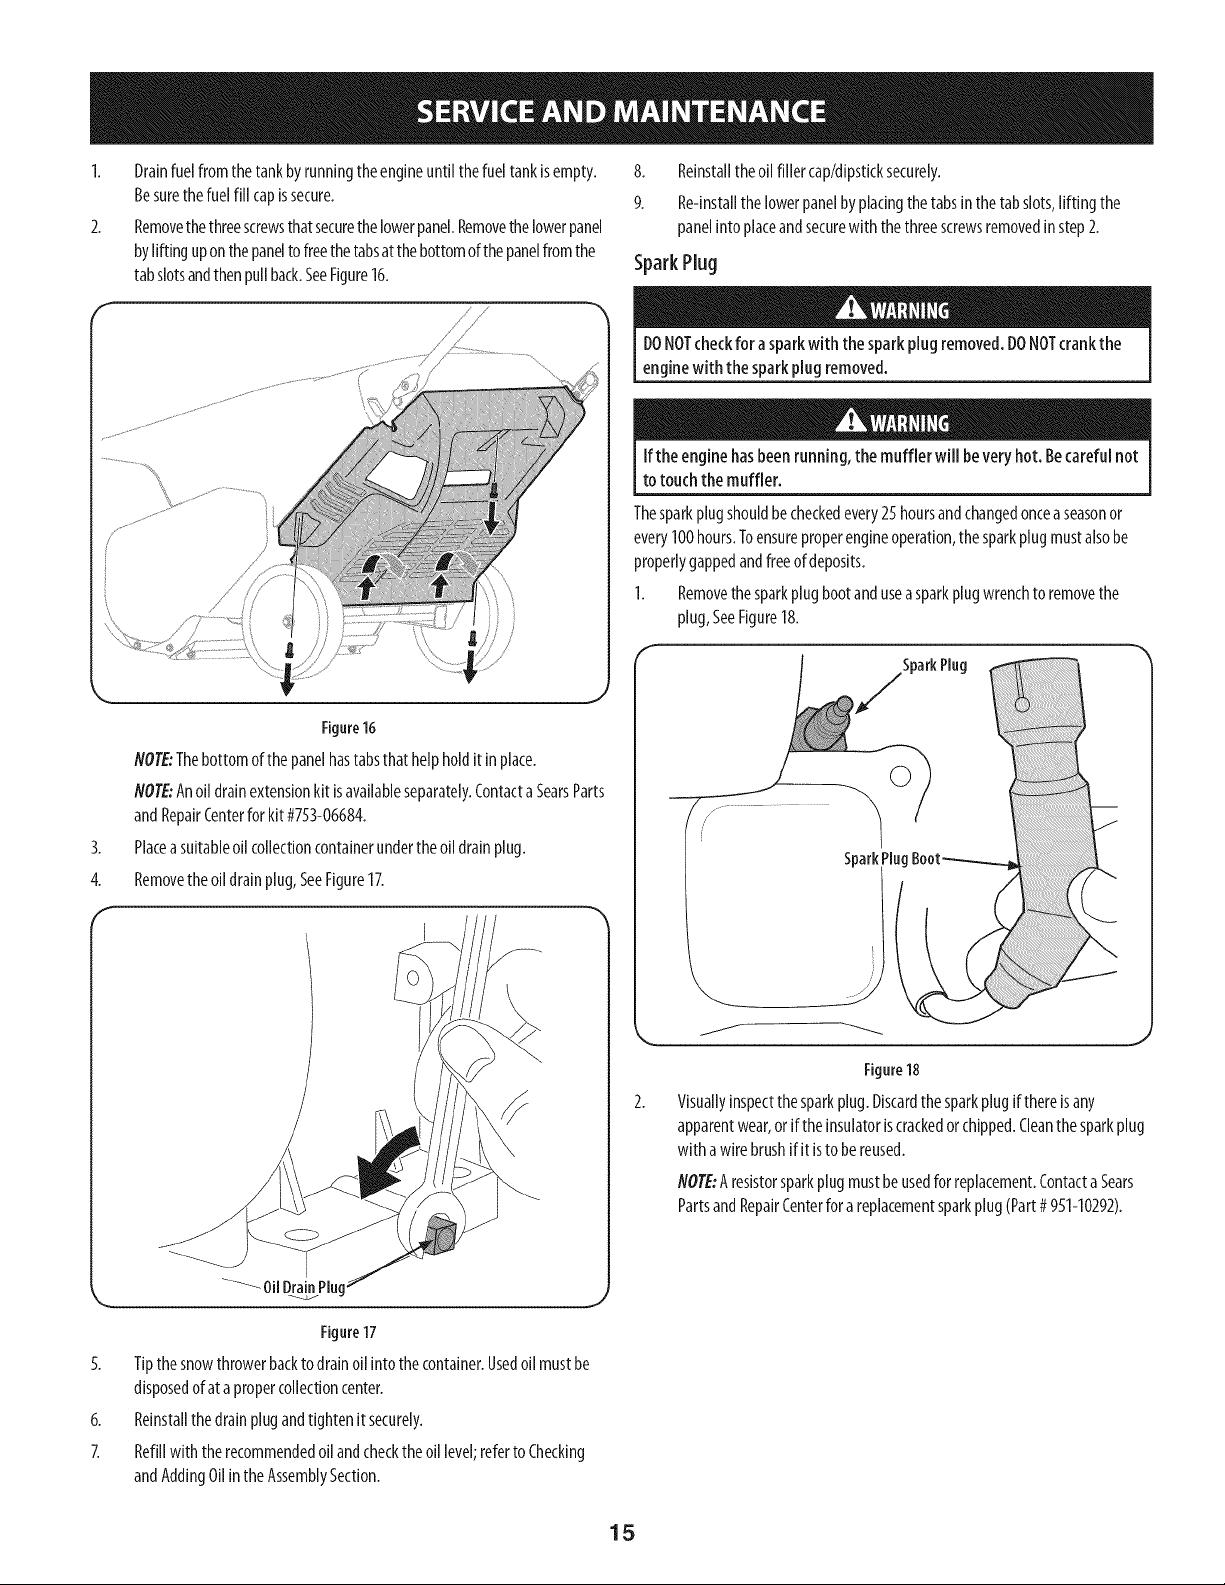
Drainfuelfromthetankbyrunningtheengineuntilthefueltankisempty.
Besurethefuelfill capissecure.
2.
Removethethreescrewsthatsecurethelowerpanel.Removethelowerpanel
bylifting uponthepaneltofreethetabsatthebottomofthepanelfromthe
tabslotsandthenpullback.SeeFigure16.
/,
/!/
Figure16
NOTE:Thebottomofthepanelhastabsthathelpholditinplace.
NOTE:Anoil drainextensionkit isavailableseparately.ContactaSearsParts
andRepairCenterfor kit#753-06684.
3.
Placeasuitableoilcollectioncontainerundertheoildrainplug.
4.
Removetheoildrainplug,SeeFigure17.
8. Reinstalltheoil filler cap/dipsticksecurely.
9. Re-installthelowerpanelbyplacingthetabsinthetabslots,liftingthe
panelintoplaceandsecurewith thethreescrewsremovedinstep2.
SparkPlug
DONOTcheckfor a sparkwith the sparkplug removed.DONOTcrankthe
enginewith the sparkplug removed.
Ifthe enginehasbeenrunning, the muffler willbeveryhot.Becarefulnot
totouch the muffler.
Thesparkplugshouldbecheckedevery25hoursandchangedonceaseasonor
every100hours.Toensureproperengineoperation,thesparkplugmustalsobe
properlygappedandfreeofdeposits.
I. Removethesparkplugbootanduseasparkplugwrenchtoremovethe
plug,SeeFigure18.
SparkPlug
©
SparkPlug
OilDrainnPlug
Figure17
5. Tipthesnowthrowerbacktodrainoilintothecontainer.Usedoilmustbe
disposedofatapropercollectioncenter.
6. Reinstallthedrainplugandtightenit securely.
7. Refillwith therecommendedoilandchecktheoil level;refertoChecking
andAddingOilintheAssemblySecUon.
Figure18
Visuallyinspectthesparkplug.Discardthesparkplugifthereisany
apparentwear,oriftheinsulatoriscrackedorchipped.Cleanthesparkplug
with awirebrushif it istobereused.
NOTE:Aresistorsparkplugmustbeusedforreplacement.Contacta Sears
PartsandRepairCenterfora replacementsparkplug(Part#951-10292).
J
15
Measurethepluggapwithafeelergauge.Correctasnecessarybybending
thesideelectrode,seeFigure19.Thegapshouldbesetto .02-.03inches
(0.60-0.80mm).
Electrode
Removingdebriswillinsureadequatecooling,correctenginespeedandreducethe
riskoffire.
Donotspraytheenginewith water to cleanit becausethe watercould
contaminatethe fuel.Usingagardenhoseor pressurewashingequipment
canalsoforcewater into the muffler opening.Waterthat passesthrough
the muffler canenter theenginecylinderandcausedamage.
Accumulationofdebris aroundthe muffler couldcauseafire. Inspectand
cleanbeforeeveryuse.
Lubrication
.02-.03in.
(0.60-0.80ram)
Figure19
4. Checkthatthesparkplugwasherisin goodconditionandthreadthespark
pluginbyhandtopreventcross-threading.
5. Afterthesparkplugisseated,tightenwithasparkplugwrenchtocompress
thewasher.
NOTE:Wheninstallinganewsparkplug,tighten1/2-turnafterthespark
plugseatsto compressthewasher.Whenreinstallingausedsparkplug,
tighten1/8-to 1/4-turnafterthesparkplugseatstocompressthewasher.
Thesparkplug mustbetightened securely.Aloosesparkplugcanbecome
veryhot and candamagetheengine.
Cleaningthe Engine
Iftheenginehasbeenrunning,allowittocoolforatleasthalfanhourbeforecleaning.
Periodicallyremovedirtbuild-upfromengine.Beforeservicingtheengine,removethe
carburetorcoverand/orblowerhousing.Cleandirtanddebrisfromthefollowingareas:
Lubricatethepivotpointsonthecontrolhandleandtheextensionspringattheend
ofthecontrolcablewithalightoilonceeveryseasonandbeforethesnowthrower
isputinto storageattheendoftheseason.
Adjustments
ShavePlate
Tochecktheadjustmentof theshaveplate,placethemachineonalevelsurface.
Thewheels,shaveplateandaugerpaddlesshouldallcontactthelevelsurface.
Notethatif theshaveplateisadjustedtoohigh,snowmayblowundertheauger
housing.Iftheshaveplatewearsoutexcessively,orthesnowthrowerdoesnot
self-propel,theshaveplatemaybetoolowthegroundandneedsto beadjusted.
NOTE:Onnewsnowthrowersormachineswithanewshaveplateinstalled,
theaugerpaddlesmaybeslightlyofftheground.
Toadjusttheshaveplateproceedasfollows:
1. Runthesnowthroweruntilthefueltankisempty.
2. Pullthestartercorduntilresistanceisfelt.Thentipthesnowthrowerbackuntilit
restsonthehandles.Toensurethatthesnowthrowerdoesnottipforward,it may
benecessarytosecurethehandletothegroundwithablockorotherobject.
3. Loosenthefourflangelocknutsandcarriagescrewswhichsecuretheshaveplate
tothehousing.SeeFigure20.Movetheshaveplatetotheappropriatepositionand
retightenthenutsandscrewssecurely.
Donotspraythe enginewith waterto cleanit becausethewater could
contaminatethe fuel.Usingagardenhoseorpressurewashingequipment
canalsoforcewaterintothe muffler opening.Waterthat passesthrough
the muffler canenterthe cylinder andcausedamage.
CoolingFins
AirIntakeScreenor RecoilStarter/FlywheelGuardAreas
SparkPlugConnection
Levers
LinkageArea
Guards
Carburetor
EngineHead
16
ReversibleShavePlate
Figure20
......./ /
/
4. Tipthesnowthrowerbacktotheoperatingpositionandpullthestarter
handleafewtimestoseeif itisdifficulttopull.
5. Ifthestarterisdifficultto pull,removethesparkplugandpullthehandle
severaltimestoensurethat anyoil trappedintheengineheadisremoved.
Oilmaycomeout of the sparkplug holewhen it isremovedand the starter
handleispulled.
6. Inspectthesparkplug.If it iswet,cleanoffanyo11beforere-installing.
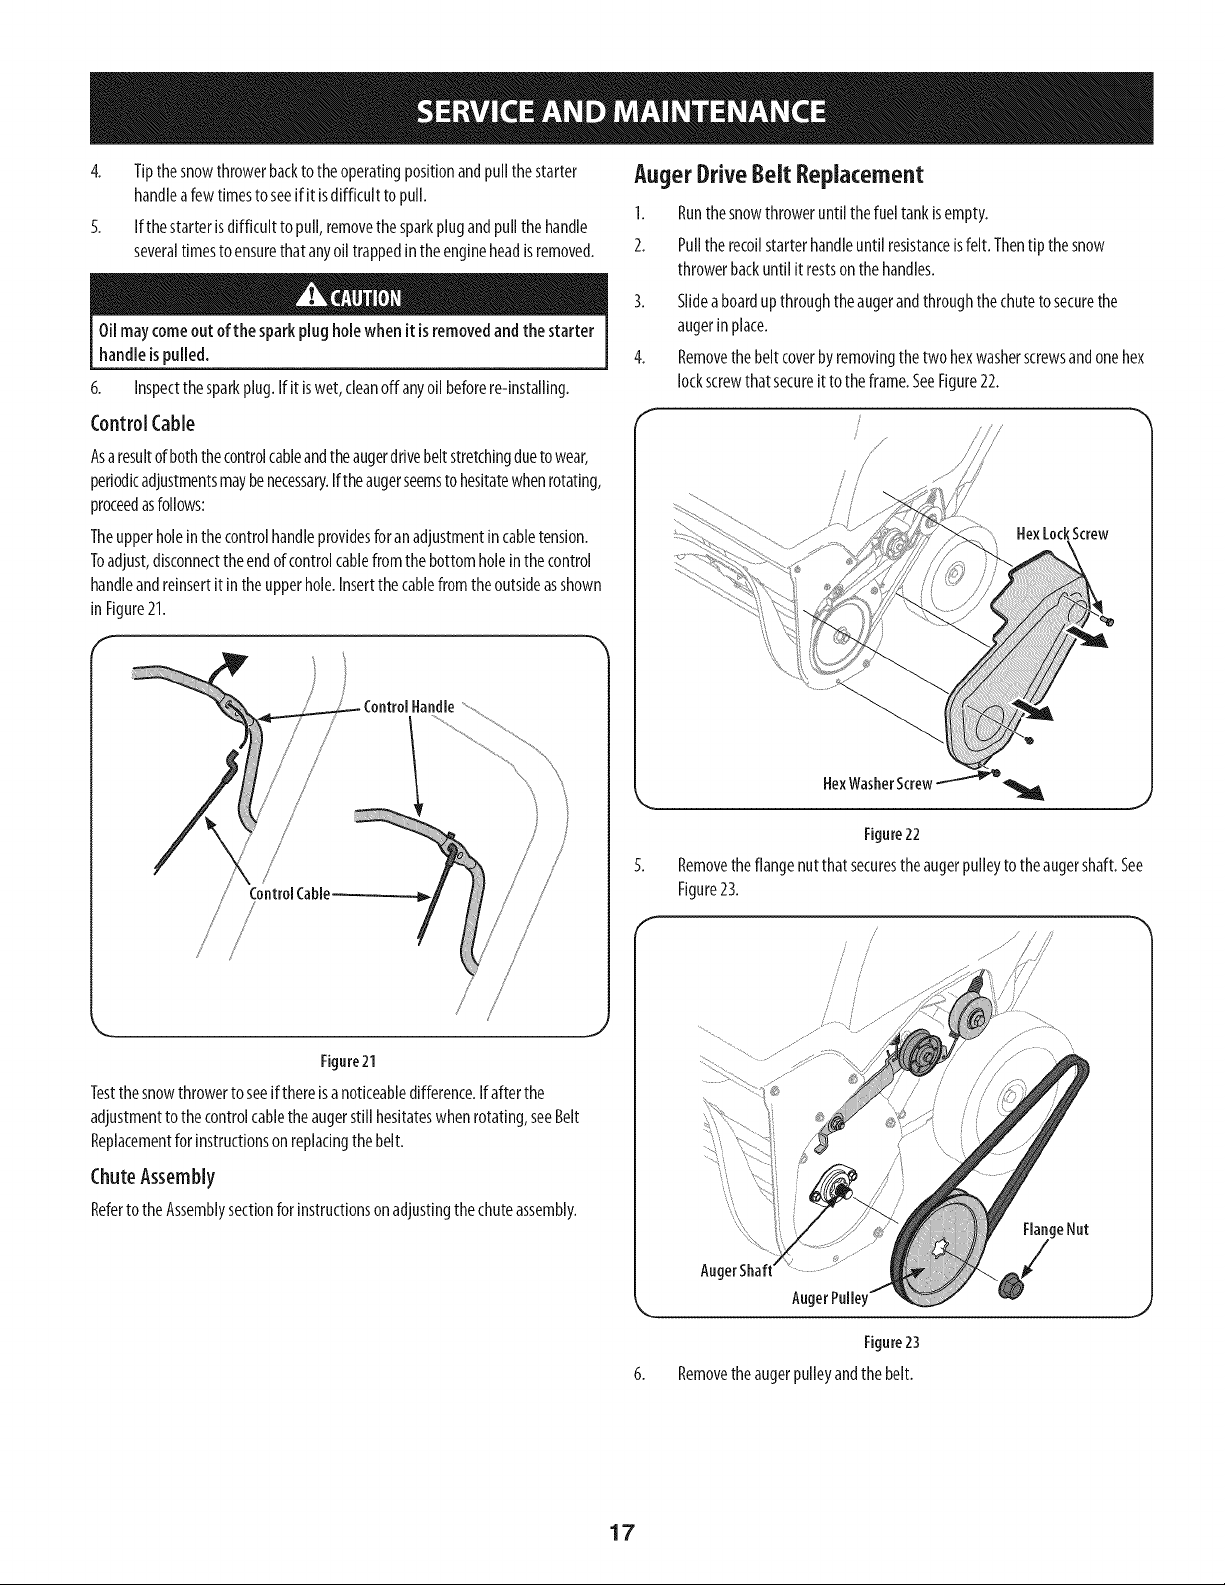
ControlCable
Asaresultofboththecontrolcableandtheaugerdrivebeltstretchingduetowear,
periodicadjustmentsmaybenecessary.Iftheaugerseemstohesitatewhenrotating,
proceedasfollows:
Theupperholeinthecontrolhandleprovidesforan adjustmentin cabletension.
Toadjust,disconnecttheendofcontrolcablefromthebottomholeinthecontrol
handleandreinsertit intheupperhole.Insertthecablefromtheoutsideasshown
in Figure21.
F
AugerDriveBelt Replacement
1. Runthesnowthroweruntilthefueltankisempty.
2. Pulltherecoilstarterhandleuntil resistanceisfelt.Thentip thesnow
throwerbackuntilit restsonthehandles.
3. Slideaboardupthroughtheaugerandthroughthechutetosecurethe
augerinplace.
4. Removethebeltcoverbyremovingthetwohexwasherscrewsandonehex
lockscrewthatsecureit totheframe.SeeFigure22.
HexLockScrew
/
/
ControlCable
Figure21
Testthesnowthrowertoseeif thereisanoticeabledifference.Ifafterthe
adjustmenttothecontrolcabletheaugerstillhesitateswhenrotating,seeBelt
Replacementforinstructionsonreplacingthebelt.
ChuteAssembly
Referto theAssemblysectionforinstructionsonadjustingthechuteassembly.
HexWasherScre_
Figure22
Removetheflangenutthat securestheaugerpulleyto theaugershaft.See
Figure23.
/
\\
FlangeNut
Ang_
An
J
Figure23
6. Removetheaugerpulleyandthebelt.
17
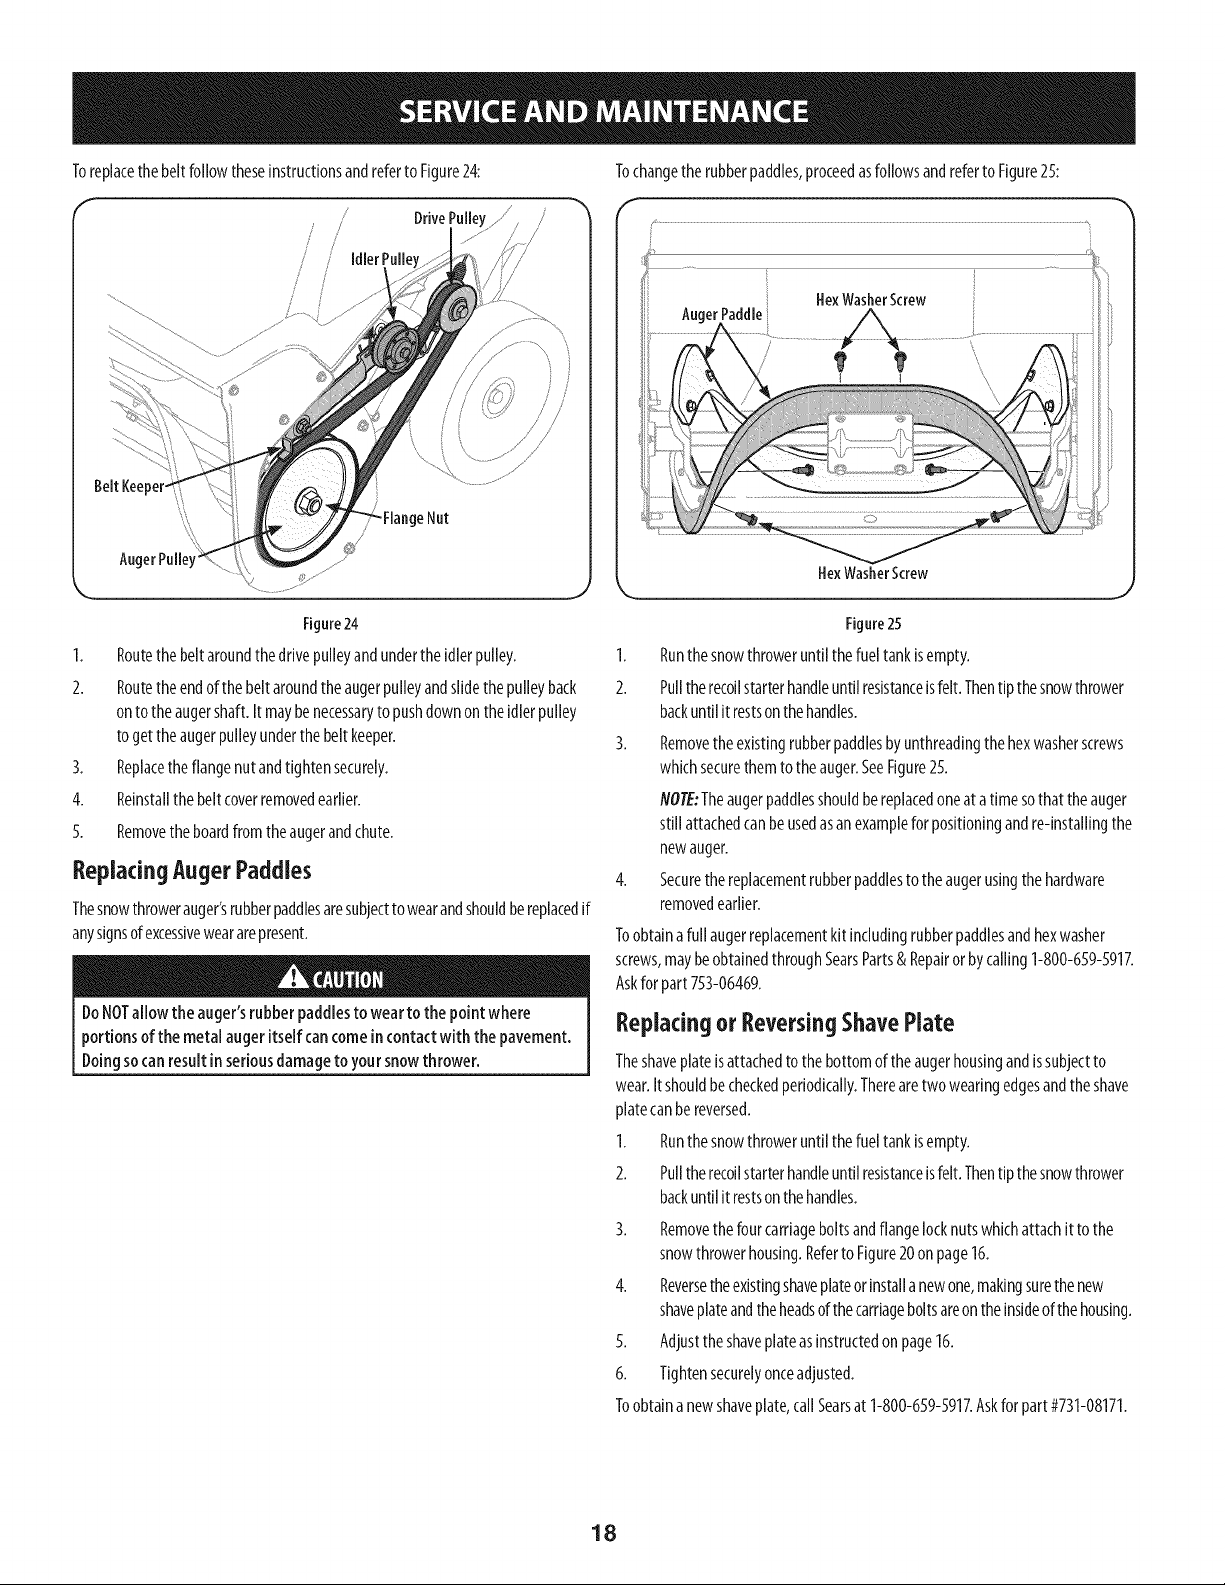
ToreplacethebeltfollowtheseinstructionsandrefertoFigure24:
/
s /
/ i/
/ IdlerPulle
Tochangetherubberpaddles,proceedasfollowsandreferto Figure25:
/
/
erPaddle
HexWasherScrew
HexWasherScrew
Figure24
1. Routethebeltaroundthedrivepulleyandundertheidlerpulley.
2. Routetheendofthe beltaroundtheaugerpulleyandslidethepulleyback
ontotheaugershaft.Itmaybenecessaryto pushdownontheidlerpulley
togettheaugerpulleyunderthe beltkeeper.
3. Replacetheflangenutandtightensecurely.
4. Reinstallthebeltcoverremovedearlier.
5. Removetheboardfromtheaugerandchute.
ReplacingAugerPaddies
Thesnowthrowerauger'srubberpaddlesaresubjectto wearandshouldbereplacedif
anysignsofexcessiveweararepresent.
DoNOTallowthe auger'srubber paddlesto weartothe pointwhere
portionsof the metal augeritselfcancomeincontactwith the pavement.
Doingsocanresultinseriousdamagetoyoursnowthrower.
Figure25
1. Runthesnowthroweruntilthefueltankisempty.
2. Pulltherecoilstarterhandleuntilresistanceisfelt.Thentipthesnowthrower
backuntilitrestsonthehandles.
3. Removetheexistingrubberpaddlesbyunthreadingthehexwasherscrews
whichsecurethemtotheauger.SeeFigure25.
NOTE:Theaugerpaddlesshouldbereplacedoneatatimesothattheauger
stillattachedcanbeusedasanexampleforpositioningandre-installingthe
newauger.
4. Securethereplacementrubberpaddlesto theaugerusingthehardware
removedearlier.
Toobtainafullaugerreplacementkitincludingrubberpaddlesandhexwasher
screws,maybeobtainedthroughSearsParts& Repairor bycalling1-800-659-5917.
Askfor part753-06469.
Replacing or ReversingShavePlate
Theshaveplateisattachedtothebottomoftheaugerhousingandissubjectto
wear.Itshouldbecheckedperiodically.Therearetwowearingedgesandtheshave
platecanbereversed.
1. Runthesnowthroweruntilthefueltankisempty.
2. Pulltherecoilstarterhandleuntilresistanceisfelt.Thentipthesnowthrower
backuntilitrestsonthehandles.
3. Removethefourcarriageboltsandflangelocknutswhichattachittothe
snowthrowerhousing.RefertoFigure20onpage16.
4. Reversetheexistingshaveplateorinstallanewone,makingsurethenew
shaveplateandtheheadsofthecarriageboltsareontheinsideof thehousing.
5. Adjusttheshaveplateasinstructedon page16.
6. Tightensecurelyonceadjusted.
Toobtainanewshaveplate,callSearsat 1-800-659-5917.Askforpart#731-08171.
18
Ifthesnowthrowerwill notbeusedfor30daysorlonger,orifit istheendofthesnowseasonwhenthelastpossibilityof snowisgone,theequipmentneedstobestored
properly.Followstorageinstructionsbelowtoensuretopperformancefromthesnowthrowerformanymoreyears.
Preparingthe engine
Enginesstoredover30daysneedtobedrainedoffueltopreventdeteriorationand
gumfromforminginthefuelsystemoron essentialcarburetorparts.Ifthegasoline
inyourenginedeterioratesduringstorage,youmayneedto havethecarburetor,
andotherfuelsystemcomponents,servicedorreplaced.
1. Removeallfuelfromthetankbyrunningtheengineuntilit stops.
2. Changetheengineoil.
3. Removethesparkplugandpourapproximately1oz.(30ml)ofdeanengine
oilintothecylinder.Pulltherecoilstarterseveraltimestodistributetheoil,
andreinstallthesparkplug.
4. Cleantheexterioroftheenginebydiscardingdirt anddebrisfromthe
followingareas:
Donotspraytheenginewith water to cleanit becausethewater could
contaminatethe fuel.Usingagardenhoseorpressurewashingequipment
canalsoforcewaterintothe muffler opening.Waterthat passesthrough
the muffler canenterthe cylinder andcausedamage.
CoolingFins
AirIntakeScreenor RecoilStarter/FlywheelGuardAreas
SparkPlugConnection
Levers
LinkageArea
Guards
Carburetor
EngineHead
5. Storeinaclean,dryandwellventilatedareaawayfromanyappliance
thatoperateswith aflameorpilotlight,suchasafurnace,waterheateror
clothesdryer.Avoidanyareawitha sparkproducingelectricmotor,orwhere
powertoolsareoperated.
Preparingsnow thrower
Ifthesnowthrowerwill notbeusedfor30daysorlonger,followtheinstructions
below.
1. Storetheequipmentinaclean,dryarea.
2. Wipedownthesnowthrowerwith a ragandremoveanydirt ordebris.
3. Ifstoringthesnowthrowerinanunventilatedarea,rustproofthemetal
partsofthemachinewith alightoilorsiliconecoating.
Neverstore snowthrowerwith fuel in tank indoorsor inpoorlyventilated
areas,wherefuelfumes mayreachanopenflame,sparkor pilotlight ason
afurnace,waterheater,clothesdryeror gasappliance.
6. Ifpossible,avoidstorageareaswith highhumidity.
7. Keeptheenginelevelinstorage.Tiltingtheenginecancausefueloroil
leakage.
19
Disconnectthesparkplugwireandgrounditagainsttheengineto prevent
unintendedstarting.Beforeperforminganytypeofmaintenance/service,
disengageallcontrolsandstoptheengine.Waituntilall movingparts
havecometoacompletestop.Alwayswearsafetyglassesduringoperation
orwhileperforminganyadjustmentsorrepairs.
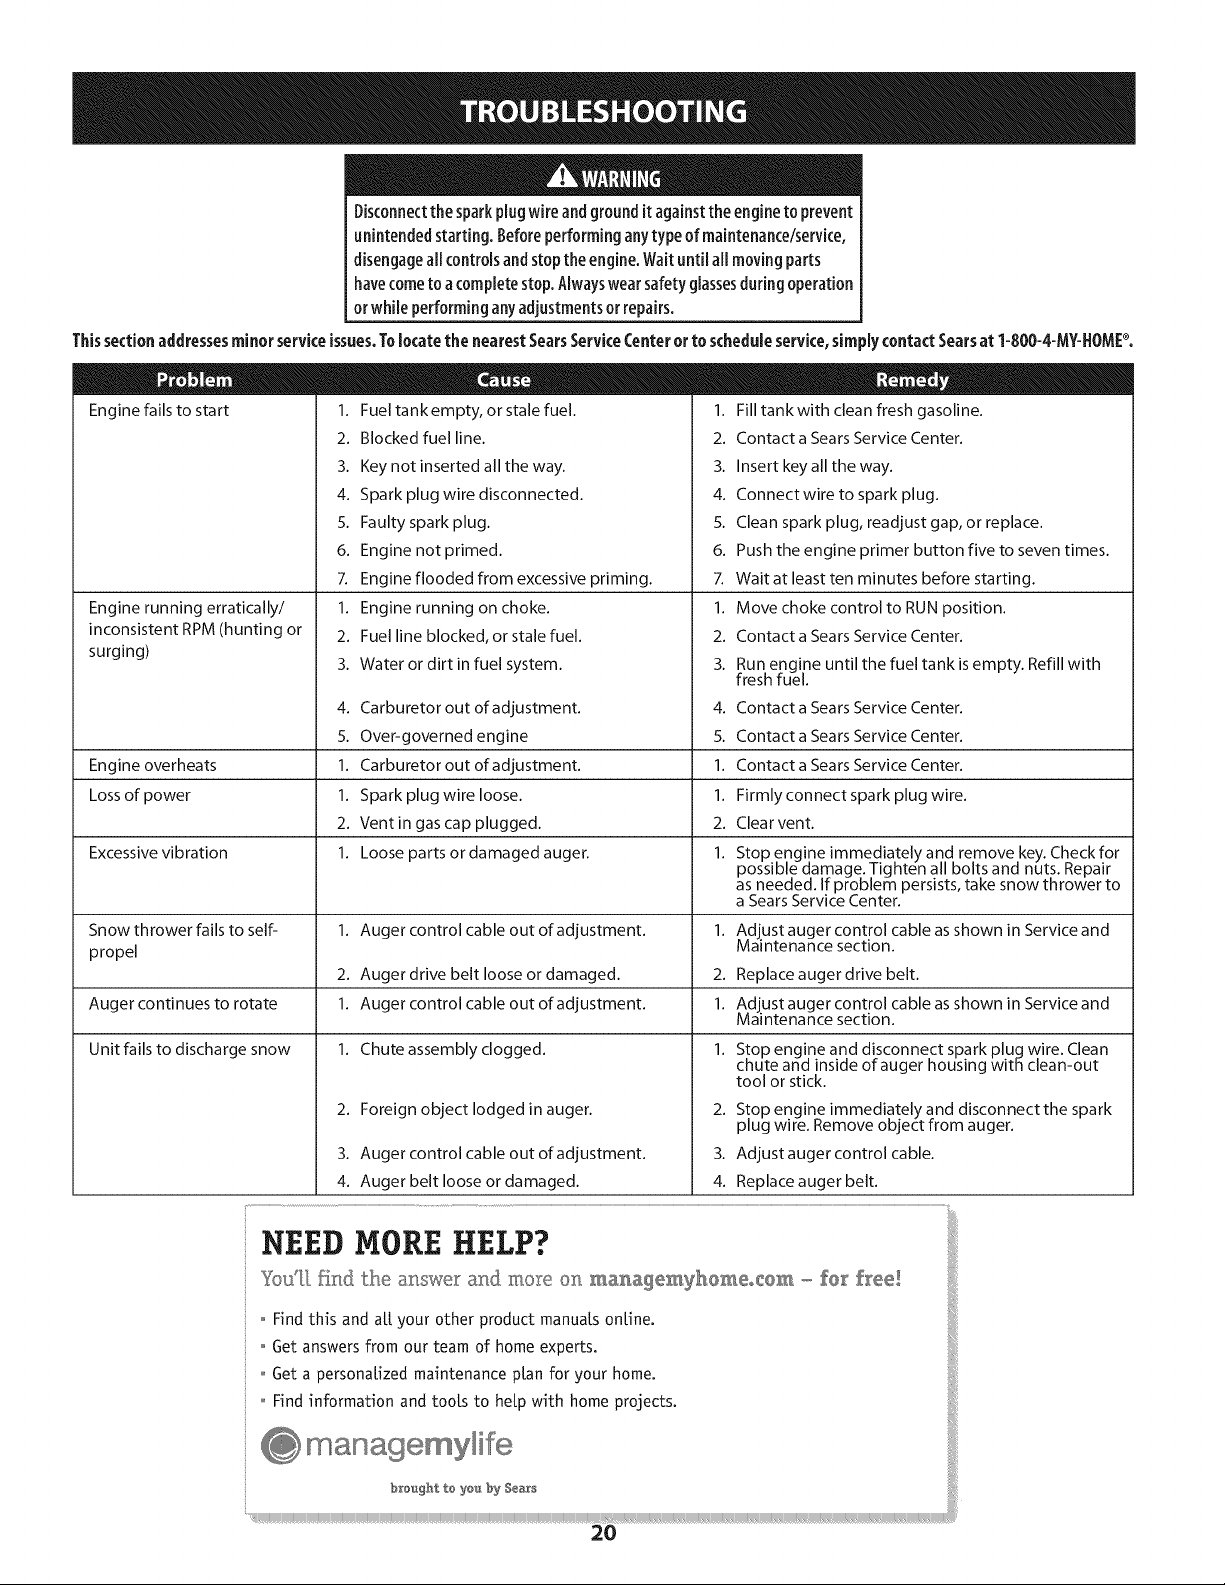
Thissectionaddressesminorserviceissues.Tolocatethe nearestSearsServiceCenterortoscheduleservice,simplycontactSearsat1-800-4-MY-HOM[_.
Engine fails to start 1. Fuel tank empty, or stale fuel 1. Fill tank with dean fresh gasoline.
2. Blocked fuel line.
3. Keynot inserted all the way.
4. Spark plug wire disconnected.
5. Faulty spark plug.
6. Engine not primed. 6.
7. Engine flooded from excessive priming. 7.
Engine running erratically/
inconsistent RPM (hunting or
surging)
Engine overheats 1. Carburetor out of adjustment. 1.
Loss of power 1. Spark plug wire loose. 1.
Excessive vibration 1. Loose parts or damaged auger. 1.
Snow thrower fails to self- 1. Auger control cable out of adjustment. 1.
propel
Auger continues to rotate 1. Auger control cable out of adjustment. 1.
Unit fails to discharge snow 1. Chute assembly clogged. 1.
1. Engine running on choke. 1.
2. Fuel line blocked, or stale fuel. 2.
3. Water or dirt in fuel system. 3.
4. Carburetor out of adjustment. 4.
5. Over-governed engine 5.
2. Ventin gas cap plugged. 2.
2. Auger drive belt loose or damaged. 2.
2. Foreign object lodged in auger. 2. Stop engine immediately and disconnect the spark
3. Auger control cable out of adjustment. 3. Adjust auger control cable.
4. Auger belt loose or damaged. 4. Replace auger belt.
2. Contact a Sears Service Center.
3. Insert key all the way.
4. Connectwire to spark plug.
5. Clean spark plug, readjust gap, or replace.
Push the engine primer button five to seven times.
Wait at least ten minutes before starting.
Move choke control to RUN position.
Contact a Sears Service Center.
Run engine until the fuel tank is empty. Refill with
fresh fuel.
Contact a Sears Service Center.
Contact a Sears Service Center.
Contact a Sears Service Center.
Firmly connect spark plug wire.
Clear vent.
Stop engine immediately and remove key. Check for
possible damage. Tighten all bolts and nuts. Repair
as needed. If problem persists, take snow thrower to
a Sears Service Center.
Adjust auger control cable asshown in Service and
Maintenance section.
Replace auger drive belt.
Adjust auger control cable asshown in Service and
Maintenance section.
Stop engine and disconnect spark plug wire. Clean
chute and inside of auger housing with clean-out
tool or stick.
plug wire. Remove object from auger.
NEED MORE HELP? !
You'll. f:ind the a_swe:_" ar_d_more on mas_agemy_OmeoCem - £er £ree!
o Find this and a[[ your other product manuals online.
: ° Get answers from our team of home
i
experts.
202122
 Loading...