

Craftsman 247887820 Owner’s Manual
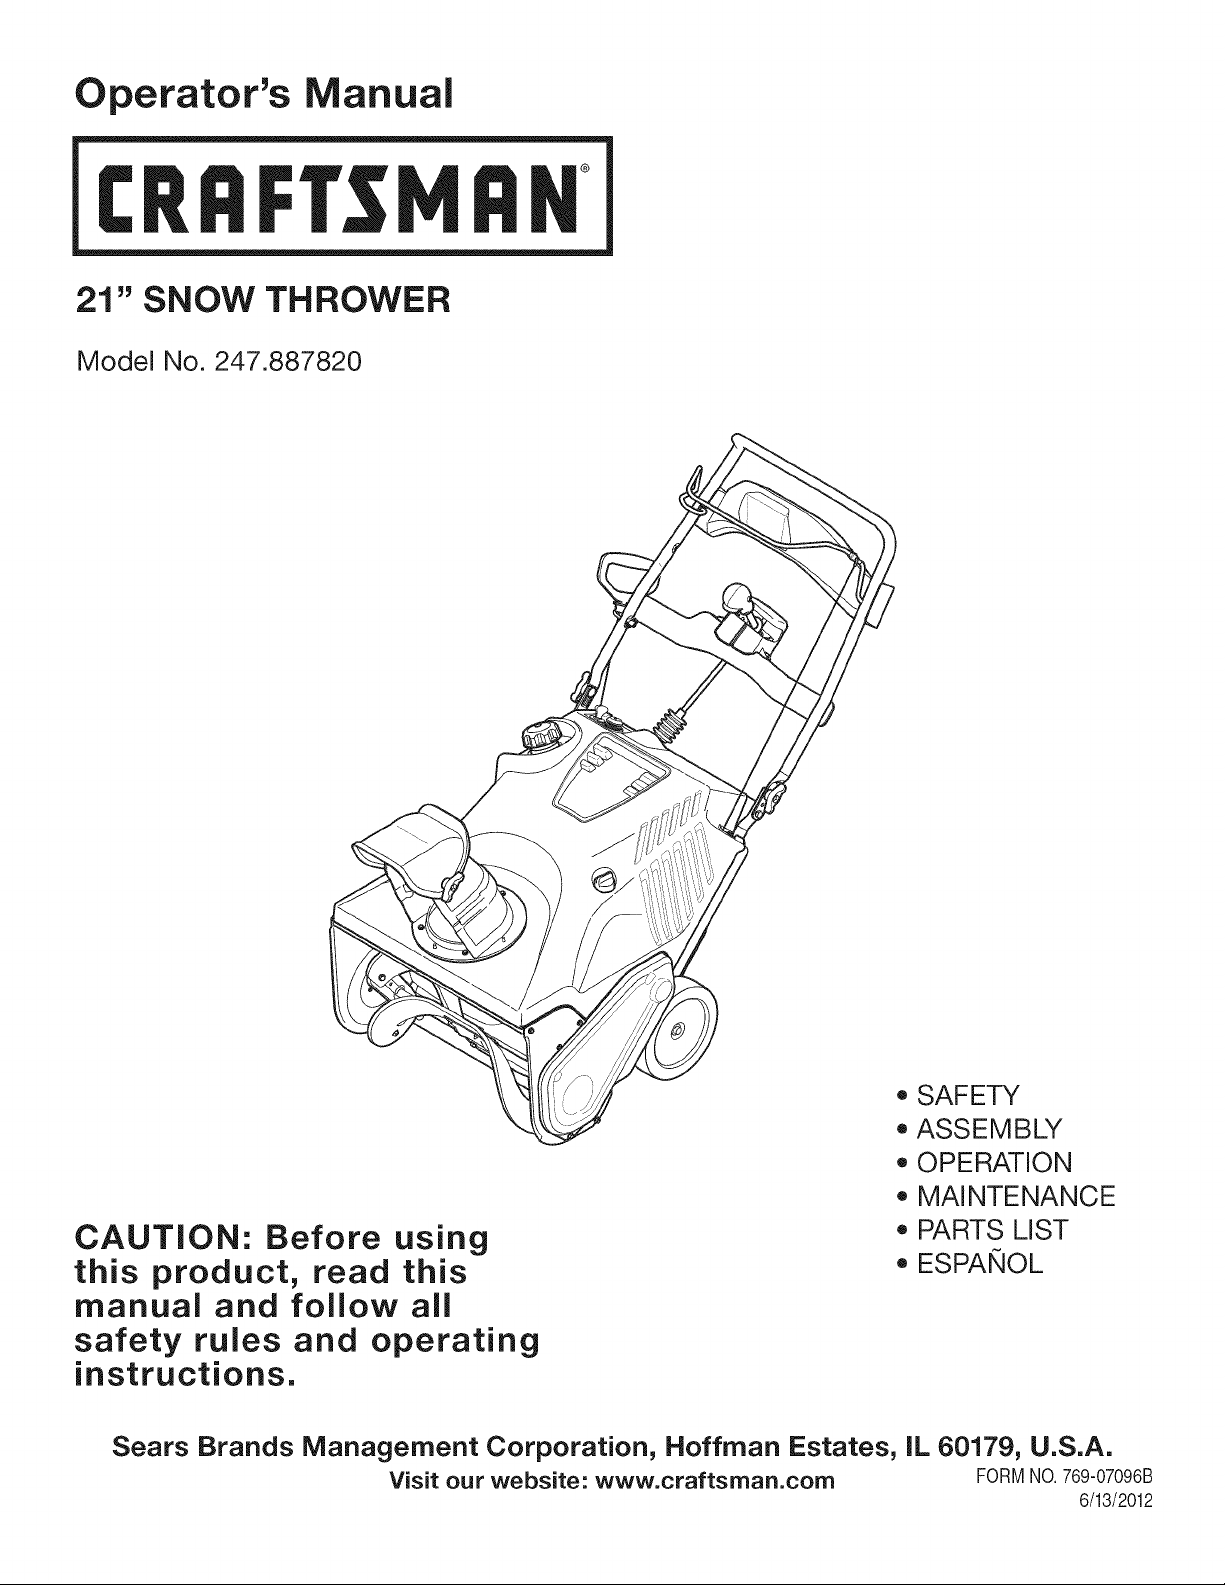
Operator's Manual
CRRFr MRN
21" SNOW THROWER
Model No. 247.887820
o SAFETY
ASSEMBLY
OPERATION
MAINTENANCE
CAUTION: Before using
this product, read this
PARTS LIST
o ESPANOL
manual and follow all
safety rules and operating
instructions.
Sears Brands Management Corporation, Hoffman Estates, IL 60179, U.S.A.
Visit our website: www.craftsman.com FORM1/O.769-07096B
6/13/2012
Warranty Statement .................................. Page 2
Safe Operation Practices .......................... Pages 3-6
Assembly .................................................. Pages 7-10
Operation .................................................. Pages 11-13
Service and Maintenance ......................... Pages 14-18
Off-Season Storage .................................. Page 19
CRAFTSMAN TWO YEAR FULL WARRANTY
FORTWOYEARSfromthe dateof purchase,this productiswarrantedagainstanydefectsin materialor workmanship.Defectiveproductwill
receivefreerepairorfree replacementifrepairis unavailable,
Thiswarrantyisvoidif thisproductiseverusedwhile providingcommercialservicesor if rentedtoanotherperson,
Forwarrantycoverage details to obtain repairor replacement,visit the website: www.craftsman.com
This warranty covers ONLYdefects in material andworkmanship. Warrantycoverage does NOTinclude:
• Expendableitemsthatcan wearoutfromnormalusewithinthewarrantyperiod,includingbutnot limitedtoaugers,augerpaddles,drift
cutters,skidshoes,shaveplate,shearpins,sparkplug,aircleaner,belts,andoilfilter.
• Standardmaintenanceservicing,oilchanges,ortune-ups.
• Tire replacementor repaircausedbypuncturesfromoutsideobjects,suchasnails,thorns,stumps,orglass.
• Tireor wheelreplacementor repairresultingfromnormalwear,accident,orimproperoperationor maintenance.
• Repairsnecessarybecauseof operatorabuse,includingbutnotlimitedtodamagecausedbyover-speedingtheengine,orfromimpacting
objectsthatbendthe frame,augershaft,etc.
• Repairsnecessarybecauseof operatornegligence,includingbutnotlimitedto,electricalandmechanicaldamagecausedbyimproper
storage,failureto usethepropergradeandamountofengineoil,or failureto maintaintheequipmentaccordingtothe instructionscontained
intheoperator'smanual.
• Engine(fuelsystem)cleaningor repairscausedbyfueldeterminedto becontaminatedoroxidized(stale).Ingeneral,fuelshouldbeused
within30 daysof itspurchasedate.
• Normaldeteriorationandwearof theexteriorfinishes,orproductlabelreplacement.
Troubleshooting ........................................ Page 20
Parts List ..................................................... Pages 22-33
Labels ....................................................... Page 34
Repair Protection Agreement ................... Page 39
Espa_ol ..................................................... Page 40
Service Numbers ...................................... Back Cover
Thiswarrantygivesyouspecificlegalrights,andyou mayalsohaveotherrightswhichvaryfromstatetostate.
Sears Brands Management Corporation, Hoffman Estates, IL 60179
EngineOilType: SAE5W-30
EngineOilCapacity: 20ounces
FuelCapacity: 2 Quarts
SparkPlug: F6RTC
SparkPlugGap: .020"-.030"
©SearsBrands,LLC
ModelNumber.................................................................
Serial Number .................................................................
Dateof Purchase.............................................................
Recordthe modelnumber,serialnumber
anddateof purchaseabove
2

Thissymbolpointsout importantsafetyinstructionswhich,if not
followed,couldendangerthepersonalsafetyand/orpropertyof
yourselfandothers. Readandfollowall instructionsin thismanual
beforeattemptingtooperatethismachine.Failureto complywith
theseinstructionsmayresultin personalinjury.Whenyouseethis
symbol,HEEDITSWARNING!
Thismachinewasbuiltto beoperatedaccordingtothesafeopera-
tionpracticesinthis manual.Aswithanytypeof powerequipment,
carelessnessorerroron thepartofthe operatorcanresultin serious
injury.Thismachineiscapableofamputatingfingers,hands,toes
andfeetandthrowingdebris.Failuretoobservethefollowingsafety
instructionscouldresultin seriousinjuryor death.
CALIFORNIA PROPOSITION 65
EngineExhaust,someof itsconstituents,andcertainvehicle
componentscontainoremitchemicalsknownto StateofCalifornia
tocausecancerandbirthdefectsorotherreproductiveharm,
TRAiNiNG
• Read,understand,andfollowall instructionson themachineand
in themanual(s)beforeattemptingto assembleandoperate.
Failuretodo socan resultinseriousinjurytotheoperatorand/
orbystanders.Keepthismanualin a safeplaceforfutureand
regularreferenceandfor orderingreplacementparts.Toorder
replacementpartscall,1-800-4MY-HOME.
• Befamiliarwithall controlsandtheirproperoperation.Knowhow
tostopthe machineanddisengagethemquickly.
• Neverallowchildrenunder14yearsofagetooperatethis
machine.Children14andover shouldreadandunderstandthe
instructionsandsafeoperationpracticesin thismanualandon
themachineandbe trainedandsupervisedbyanadult.
Neverallowadultsto operatethismachinewithoutproper
instruction.
• Thrownobjectscancauseseriouspersonalinjury.Planyour
snow-throwingpatterntoavoiddischargeof materialtoward
roads,bystandersandthe like.
Keepbystanders,petsandchildrenat least75feetfromthe
machinewhile itis in operation.Stopmachineifanyoneenters
thearea.
• Exercisecautiontoavoidslippingorfalling,especiallywhen
operatinginreverse.
Your Responsibility--Restrict theuseofthispowermachineto
personswhoread,understandandfollowthewarningsand instruc-
tionsin thismanualandon the machine,
SAVE THESE INSTRUCTIONS!
PREPARATION
Thoroughlyinspecttheareawherethe equipmentistobeused.
Removeall doormats,newspapers,sleds,boards,wiresandother
foreignobjects,whichcouldbe trippedoverorthrownbythe auger/
impeller.
• Alwayswearsafetyglassesoreyeshieldsduringoperationand
whileperformingan adjustmentor repairto protectyoureyes.
Thrownobjectswhichricochetcancauseseriousinjurytothe
eyes.
Donot operatewithoutwearingadequatewinteroutergarments.
Donot wearjewelry,longscarvesorotherlooseclothing,which
couldbecomeentangledin movingparts.Wearfootwearwhich
willimprovefootingonslipperysurfaces.
Usea groundedthree-wireextensioncordand receptacleforall
machineswithelectricstartengines.
Disengageall controlleversbeforestartingtheengine.
• Neverattempttomakeanyadjustmentswhileengineis running,
exceptwherespecificallyrecommendedintheoperator'smanual.
Letengineandmachineadjustto outdoortemperaturebefore
startingtoclearsnow.
3

SafeHandling of Gasoline
Toavoidpersonalinjuryor propertydamageuseextremecarein
handlinggasoline.Gasolineisextremelyflammableandthe vaporsare
explosive.Seriouspersonalinjurycanoccurwhengasolineis spilled
onyourselforyourclotheswhichcan ignite. Washyourskinand
changeclothesimmediately.
• Useonlyan approvedgasolinecontainer.
• Extinguishallcigarettes,cigars,pipesandothersourcesof
ignition.
• Neverfuel machineindoors.
• Neverremovegascapor addfuelwhilethe engineishotor
running.
• Allowenginetocoolat leasttwo minutesbeforerefueling.
• Neveroverfillfuel tank.Filltankto nomorethan1/2inchbelow
bottomoffillerneckto providespaceforfuelexpansion.
• Replacegasolinecapandtightensecurely.
• Ifgasolineisspilled,wipeitoff theengineandequipment.Move
machineto anotherarea.Wait5 minutesbeforestartingthe
engine.
• Neverstorethe machineorfuelcontainerinsidewherethereisan
openflame,sparkor pilotlight(e.g.furnace,waterheater,space
heater,clothesdryeretc.).
• Allowmachineto coolat least5 minutesbeforestoring.
• Neverfill containersinsidea vehicleor ona truckor trailerbed
witha plasticliner.Alwaysplacecontainersonthe groundaway
fromyourvehiclebeforefilling.
• If possible,removegas-poweredequipmentfromthe truckor
trailerandrefuelitonthe ground.Ifthis is notpossible,then refuel
suchequipmenton a trailerwitha portablecontainer,ratherthan
froma gasolinedispensernozzle.
• Keepthe nozzlein contactwiththerimofthefueltankor
containeropeningat alltimesuntilfuelingis complete.Do notuse
a nozzlelock-opendevice.
OPERATION
• Do notputhandsorfeetnear rotatingparts,intheauger/impeller
housingorchuteassembly.Contactwiththe rotatingpartscan
amputatehandsandfeet.
• Theauger/impellercontrolleverisa safetydevice.Neverbypass
itsoperation.Doingsomakesthe machineunsafeandmaycause
personalinjury.
• Thecontrolleversmustoperateeasilyinbothdirectionsand
automaticallyreturntothedisengagedpositionwhenreleased.
• Neveroperatewithamissingordamagedchuteassembly.Keep
all safetydevicesinplaceandworking.
• Neverrunanengineindoorsorina poorlyventilatedarea.Engine
exhaustcontainscarbonmonoxide,anodorlessanddeadlygas.
• Do notoperatemachinewhileundertheinfluenceofalcoholor
drugs.
• Mufflerandenginebecomehotandcancauseaburn.Donot
touch.Keepchildrenaway.
• Exerciseextremecautionwhenoperatingonorcrossinggravel
surfaces.Stayalertforhiddenhazardsortraffic.
Exercisecautionwhenchangingdirectionandwhileoperatingon
slopes.
Planyoursnow-throwingpatternto avoiddischargetowards
windows,walls,carsetc.Thus,avoidingpossibleproperty
damageorpersonalinjurycausedby a ricochet.
Preventpossiblepropertydamageorpersonalinjuryfrom
objectricochetbyplanningyoursnowthrowingpatterntoavoid
dischargetowardswindows,walls,cars,etc.
• Donotoverloadmachinecapacitybyattemptingtoclearsnowat
toofastof a rate.
• Neveroperatethismachinewithoutgoodvisibilityorlight.Always
be sureof yourfootingand keepa firmholdon thehandles.Walk,
neverrun.
• Disengagepowertotheauger/impellerwhentransportingor not
in use.
• Neveroperatemachineathightransportspeedsonslippery
surfaces.Lookdownand behindandusecarewhenbackingup.
• Ifthemachineshouldstarttovibrateabnormally,stoptheengine,
disconnectthe sparkplugwireandgroundit againsttheengine.
Inspectthoroughlyfordamage.Repairanydamagebefore
startingandoperating.
• Disengageallcontrolleversandstopenginebeforeyouleave
theoperatingposition(behindthehandles).Waituntiltheauger/
impellercomestoa completestopbeforeuncloggingthechute
assembly,makinganyadjustments,or inspections.
• Neverputyourhandinthedischargeorcollectoropenings.Do
notunclogchuteassemblywhileengineis running.Shutoff
engineand remainbehindhandlesuntilall movingpartshave
stoppedbeforeunclogging.
• Useonlyattachmentsandaccessoriesapprovedbythemanufac-
turer(e.g.wheelweights,tire chains,cabsetc.).
• Whenstartingengine,pullcordslowlyuntilresistanceisfelt,then
pull rapidly.Rapidretractionof startercord(kickback)willpull
handandarmtowardenginefasterthanyoucanletgo.Broken
bones,fractures,bruisesorsprainscouldresult.
• Call 1-800-4MY-HOMEforthe locationofthe nearestSearsParts
& RepairServiceCenter.
CLEARING A CLOGGED DISCHARGE CHUTE
Handcontactwiththe rotatingimpellerinsidethedischargechute
is the mostcommoncauseofinjuryassociatedwithsnowthrowers.
Neveruse yourhandto cleanout thedischargechute.
Toclear thechute:
1. SHUTTHEENGINEOFF!
2. Wait 10secondstobe surethe impellerbladeshavestopped
rotating.
3. Alwaysusea clean-outtool,notyourhands.
4
MAINTENANCE & STORAGE
• Nevertamperwithsafetydevices.Checktheirproperoperation
regularly.Referto themaintenanceandadjustmentsectionsof
thismanual.
• Beforecleaning,repairing,or inspectingmachinedisengageall
controlleversandstoptheengine.Waituntiltheauger/impeller
cometoa completestop.Disconnectthe sparkplugwireand
groundagainsttheengineto preventunintendedstarting.
Checkboltsand screwsforpropertightnessatfrequentintervals
tokeepthemachineinsafeworkingcondition.Also,visually
inspectmachineforanydamage.
Donotchangetheenginegovernorsettingor over-speedthe
engine.Thegovernorcontrolsthe maximumsafeoperatingspeed
ofthe engine.
Snowthrowershaveplatesandskidshoesaresubjecttowear
anddamage.Foryoursafetyprotection,frequentlycheckall
componentsand replacewithoriginalequipmentmanufacturer's
(OEM)partsonlyaslistedinthe Partspagesof thisOperator's
Manual.Useofpartswhichdonot meettheoriginalequipment
specificationsmayleadto improperperformanceandcompro-
misesafety!
Checkcontrolleversperiodicallytoverifytheyengageanddisen-
gageproperlyandadjust,ifnecessary.Referto theadjustment
sectioninthisoperator'smanualforinstructions.
Maintainor replacesafetyandinstructionlabels,as necessary.
Observeproperdisposallawsand regulationsfor gas,oil,etc. to
protecttheenvironment.
Priorto storing,runmachinea few minutestoclear snowfrom
machineand preventfreezeupof auger/impeller.
Neverstorethemachineorfuel containerinsidewherethereisan
openflame,sparkorpilot lightsuchas a waterheater,furnace,
clothesdryeretc.
Alwaysrefertothe operator'smanualforproperinstructionson
off-seasonstorage.
Checkfuelline,tank, cap,andfittingsfrequentlyforcracksor
leaks.Replaceif necessary.
Donotcrankenginewithsparkplugremoved.
Accordingto theConsumerProductsSafetyCommission(CPSC)
andtheU.S.EnvironmentalProtectionAgency(EPA),thisproduct
hasan AverageUsefulLifeof seven(7)years,or 60 hoursof
operation.At theendof theAverageUsefulLifehavethe machine
inspectedannuallybyan authorizedservicedealertoensurethat
allmechanicalandsafetysystemsareworkingproperlyand not
wornexcessively.Failureto do socan resultinaccidents,injuries
ordeath.
DO NOT MODIFY ENGINE
Toavoidseriousinjuryor death,do not modifyengineinany way.
Tamperingwiththe governorsettingcanleadto a runawayengineand
causeitto operateat unsafespeeds.Nevertamperwithfactorysetting
ofenginegovernor.
NOTICE REGARDING EMiSSiONS
EngineswhicharecertifiedtocomplywithCaliforniaandfederal
EPAemissionregulationsfor SORE(SmallOff RoadEquipment)are
certifiedto operateonregularunleadedgasoline,and mayinclude
thefollowingemissioncontrolsystems:EngineModification(EM),
OxidizingCatalyst(OC),SecondaryAirInjection(SAI)and ThreeWay
Catalyst(TWO)if so equipped.
SPARK ARRESTOR
Thismachineisequippedwithaninternalcombustionengineand
shouldnotbe usedonor nearany unimprovedforest-covered,
brush-coveredorgrass-coveredlandunlessthe engine'sexhaust
systemisequippedwitha sparkarrestormeetingapplicablelocalor
statelaws(if any)
Ifa sparkarrestorisused,it shouldbe maintainedin effectiveworking
orderbytheoperator.Inthe StateofCaliforniatheaboveisrequired
bylaw (Section4442ofthe CaliforniaPublicResourcesCode).Other
statesmayhavesimilarlaws. Federallawsapplyonfederallands.
A sparkarrestorfor themufflerisavailablethroughyournearestSears
PartsandRepairServiceCenter.
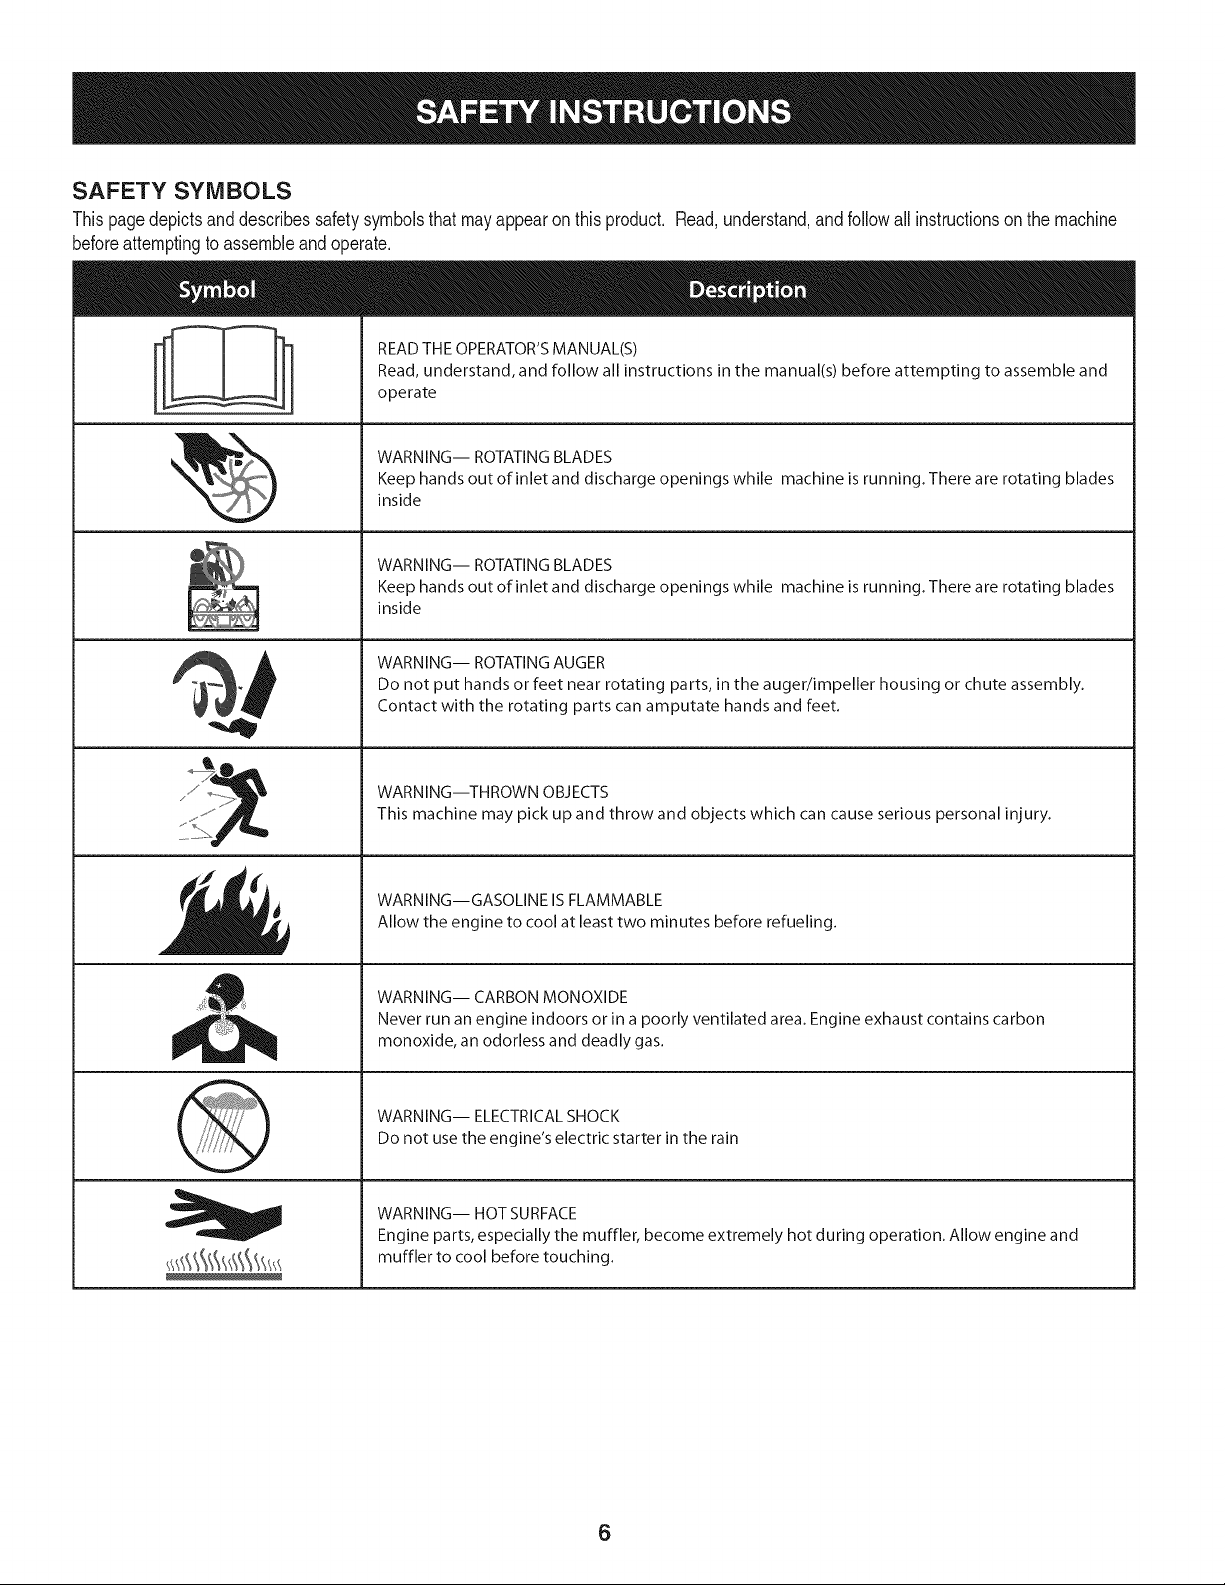
SAFETY SYMBOLS
Thispagedepictsanddescribessafetysymbolsthatmayappearonthisproduct. Read,understand,andfollowall instructionson themachine
beforeattemptingtoassembleandoperate.
READ THE OPERATOR'S MANUAL(S)
i
. +
i
Read, understand, and follow all instructions in the manual(s) before attempting to assemble and
operate
WARNING-- ROTATING BLADES
Keep hands out of inlet and discharge openings while machine is running. There are rotating blades
inside
WARNING-- ROTATING BLADES
Keep hands out of inlet and discharge openings while machine is running. There are rotating blades
inside
WARNING-- ROTATING AUGER
Do not put hands or feet near rotating parts, in the auger/impeller housing or chute assembly.
Contact with the rotating parts can amputate hands and feet.
"JIp
WARNING--THROWN OBJECTS
This machine may pick up and throw and objects which can cause serious personal injury.
WARNING--GASOLINE ISFLAMMABLE
Allow the engine to cool at least two minutes before refueling.
WARNING-- CARBON MONOXIDE
Never run an engine indoors or in a poorly ventilated area. Engine exhaust contains carbon
monoxide, an odorless and deadly gas+
WARNING-- ELECTRICAL SHOCK
Do not use the engine's electric starter in the rain
WARNING-- HOT SURFACE
Engine parts, especially the muffler, become extremely hot during operation. Allow engine and
muffler to cool before touching.
6
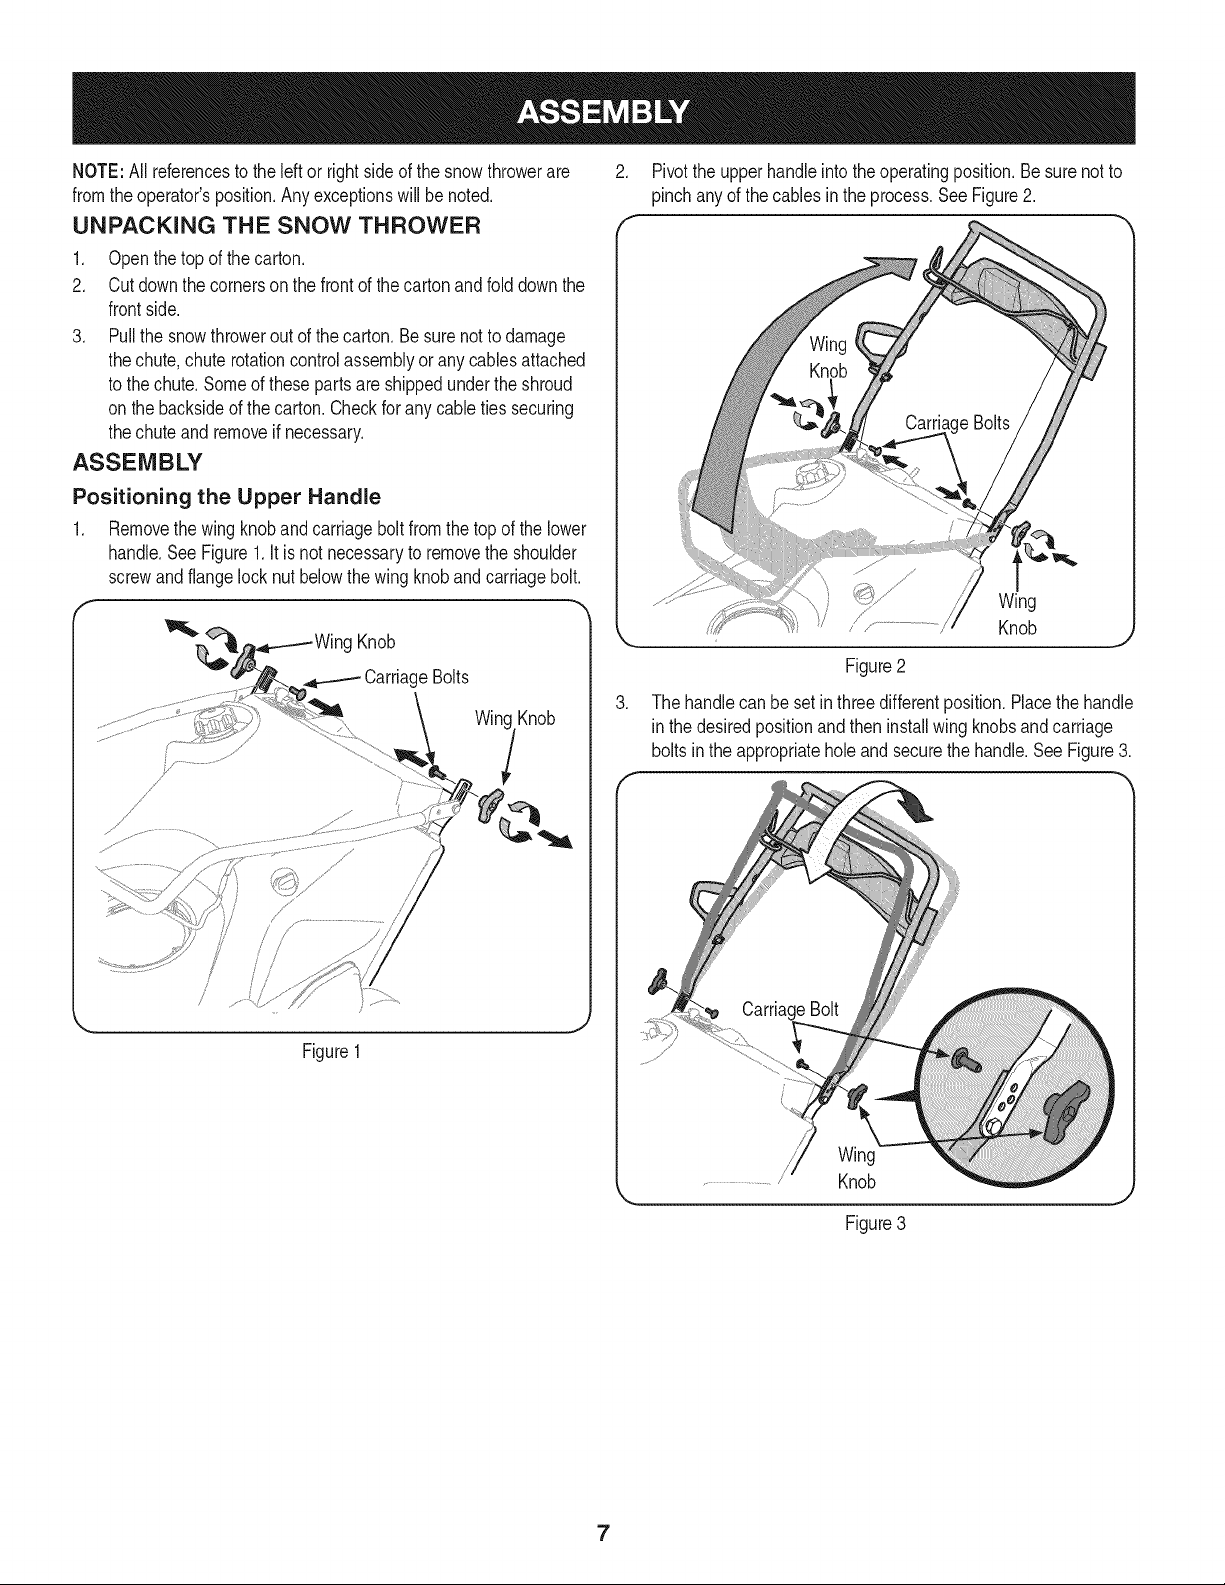
NOTE:All referencesto theleftor rightsideof thesnowthrowerare
fromtheoperator'sposition.Anyexceptionswillbe noted.
UNPACKING THE SNOW THROWER
1. Openthetop ofthe carton.
2. Cutdownthe cornersonthefrontofthecartonandfolddownthe
frontside.
3. Pullthesnowthroweroutofthe carton.Besure notto damage
thechute,chuterotationcontrolassemblyorany cablesattached
tothe chute.Someofthesepartsareshippedundertheshroud
onthebacksideofthe carton.Checkforany cabletiessecuring
thechuteand removeifnecessary.
ASSEMBLY
Positioning the Upper Handle
1. Removethewingknobandcarriageboltfromthe topof thelower
handle.SeeFigure1.Itis notnecessarytoremovetheshoulder
screwandflangelocknutbelowthewingknobandcarriagebolt.
g Knob
CarriageBolts
Win(
2. Pivottheupperhandleintotheoperatingposition.Besurenotto
pinchanyofthe cablesin theprocess.SeeFigure2.
Wing
/ J'................... Knob
Figure2
.
Thehandlecan besetin threedifferentposition.Placethehandle
in thedesiredpositionandtheninstallwing knobsandcarriage
boltsin theappropriateholeandsecurethe handle.SeeFigure3.
Figure1
.J
ing
Knob
Figure3
7
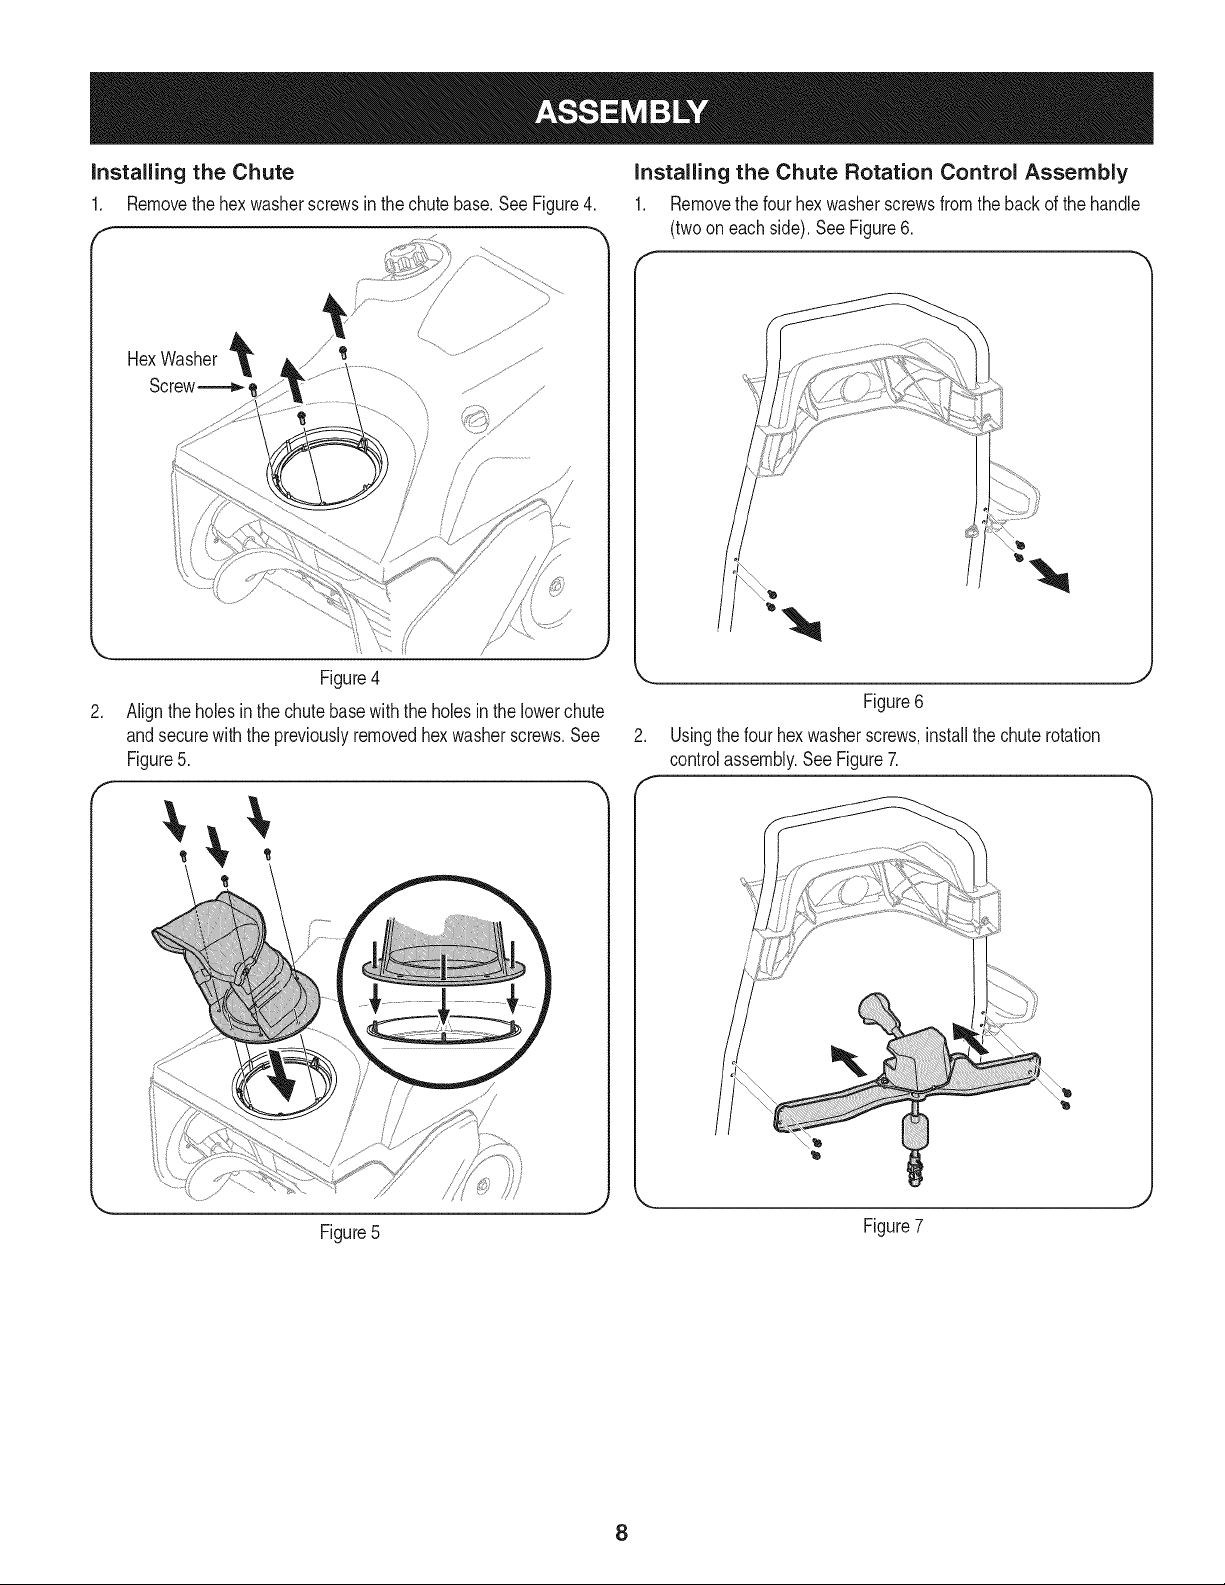
installing the Chute
1. Removethehexwasherscrewsinthechutebase.SeeFigure4.
HexWasher
Screw_,
/
/
Figure4
.
Aligntheholes inthechutebasewiththe holesinthelowerchute
andsecurewiththepreviouslyremovedhexwasherscrews.See
Figure5.
Installing the Chute Rotation Control Assembly
1. Removethefourhexwasherscrewsfromthebackofthehandle
(twoon eachside).SeeFigure6.
Figure6
Usingthefour hexwasherscrews,installthechuterotation
controlassembly.SeeFigure7.
Figure5
Figure7
8
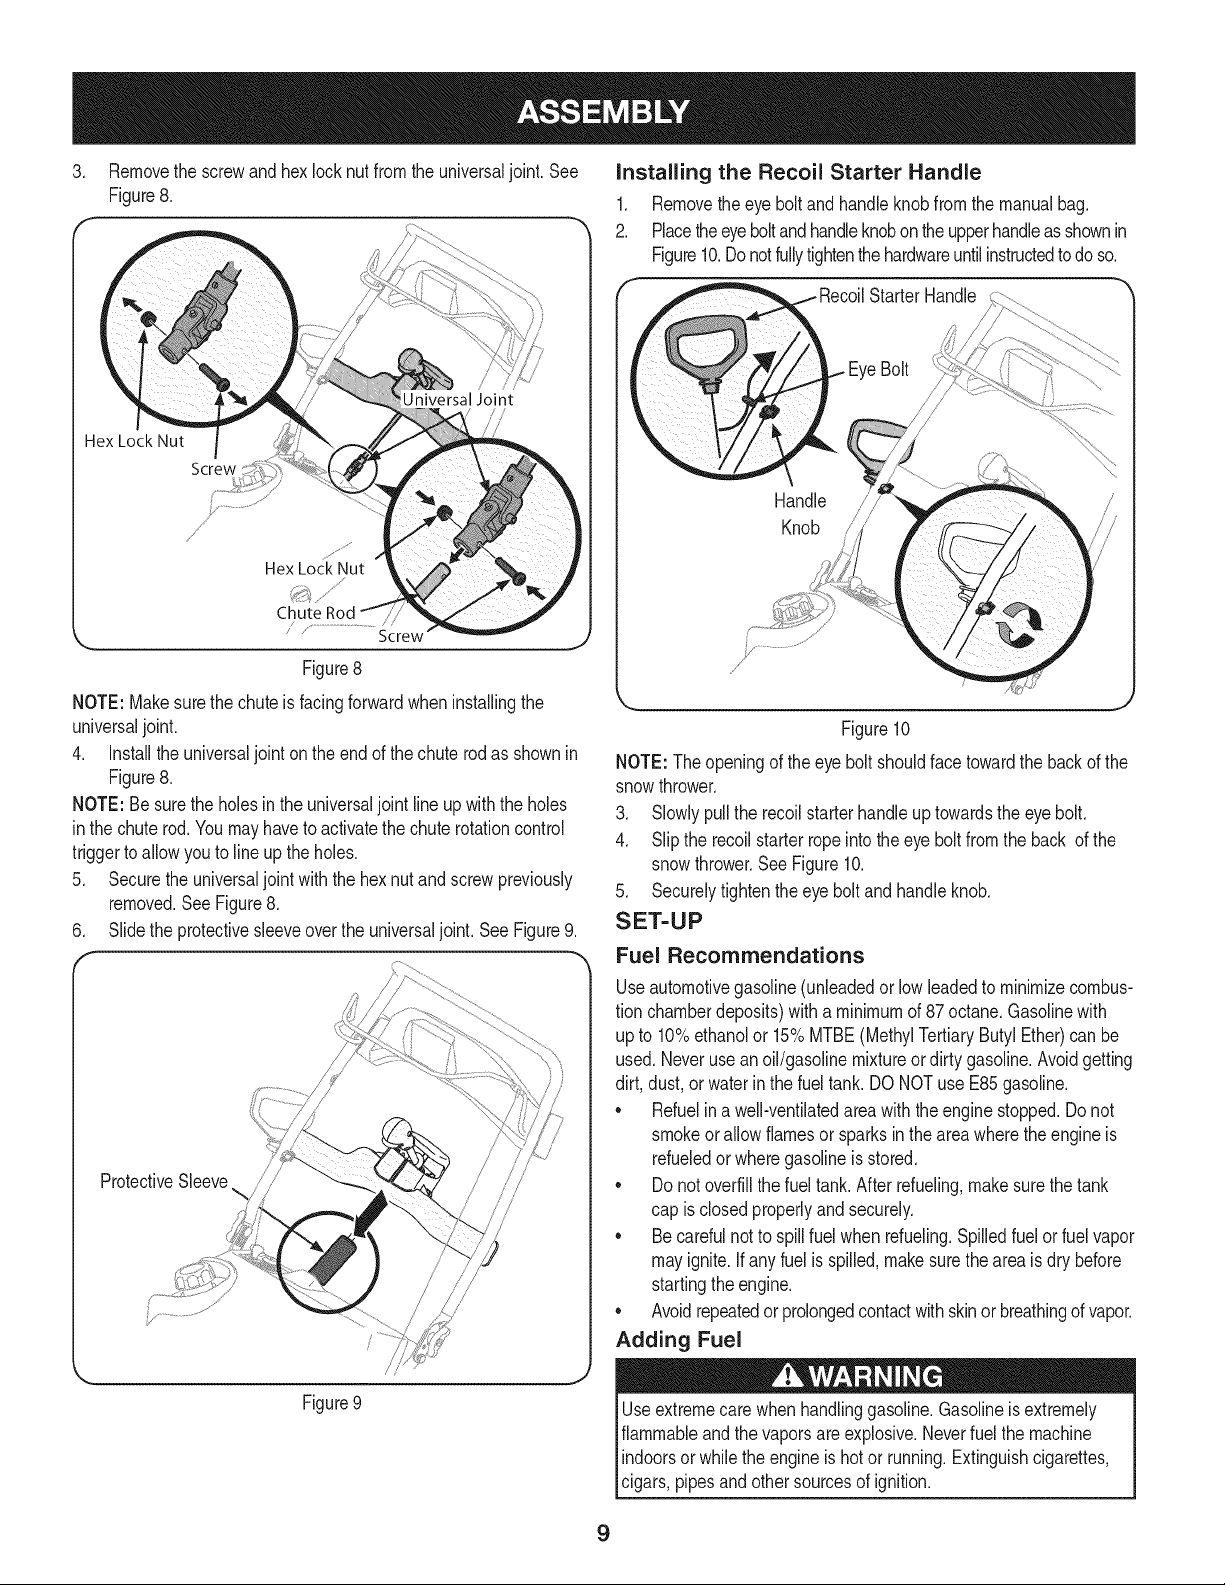
3. Removethe screwandhex locknutfromthe universaljoint.See
Figure8.
Universal Join{
Hex Lock Nut
Screw
f
/
//
Hex Lock Nut
Chute
/ "..............................................Screw
Figure8
NOTE:Makesurethechuteis facingforwardwheninstallingthe
universaljoint.
4. Installthe universaljointon theendof thechuterodas shownin
Figure8.
NOTE:Besuretheholesintheuniversaljointlineupwiththe holes
inthechuterod.Youmayhaveto activatethechuterotationcontrol
triggerto allowyoutoline upthe holes.
5. Securetheuniversaljoint withthehexnutandscrewpreviously
removed.See Figure8.
6. Slidethe protectivesleeveovertheuniversaljoint.See Figure9.
/
ProtectiveSleeve%/ ,
/
Installing the Recoil Starter Handle
1. Removetheeyeboltandhandleknobfromthemanualbag.
2. Placetheeyeboltandhandleknobontheupperhandleas shownin
Figure10.Donotfullytightenthehardwareuntilinstructedtodoso.
Handle /
Knob
J
j
Figure10
NOTE:Theopeningofthe eyebolt shouldfacetowardthe backofthe
snowthrower.
3. Slowlypullthe recoilstarterhandleuptowardstheeyebolt.
4. Slipthe recoilstarterropeintotheeyeboltfromtheback ofthe
snowthrower.See Figure10.
5. Securelytightentheeyeboltandhandleknob.
SET-UP
Fuel Recommendations
Useautomotivegasoline(unleadedor lowleadedtominimizecombus-
tionchamberdeposits)witha minimumof87 octane.Gasolinewith
up to 10%ethanolor 15%MTBE(MethylTertiaryButylEther)canbe
used.Neverusean oil/gasolinemixtureordirty gasoline.Avoidgetting
dirt, dust,or waterinthe fueltank.DONOTuse E85gasoline.
• Refuelina well-ventilatedareawiththeenginestopped.Donot
smokeorallowflamesor sparksin theareawheretheengineis
refueledor wheregasolineisstored.
• Donotoverfillthefueltank.After refueling,makesurethetank
capis closedproperlyandsecurely.
• Becarefulnotto spillfuelwhenrefueling.Spilledfuel orfuelvapor
mayignite.Ifanyfuelis spilled,makesuretheareais drybefore
startingthe engine.
• Avoidrepeatedor prolongedcontactwithskinorbreathingofvapor.
Adding Fuel
Figure9
Useextremecarewhenhandlinggasoline.Gasolineisextremely
flammableandthevaporsareexplosive.Neverfuelthemachine
indoorsorwhiletheengineis hotor running.Extinguishcigarettes,
cigars,pipesandothersourcesof ignition.
9
Alwayskeephandsandfeetclearofequipmentmovingparts.Donot
usea pressurizedstartingfluid.Vaporsareflammable.
1. Removethegascap,checkthefuellevelandaddfuelifnecessary.
Fillthetankuntilthefuelreaches1/2"belowthebottomofthefiller
necktoallowforfuelexpansion.Becarefulnottooverfill.
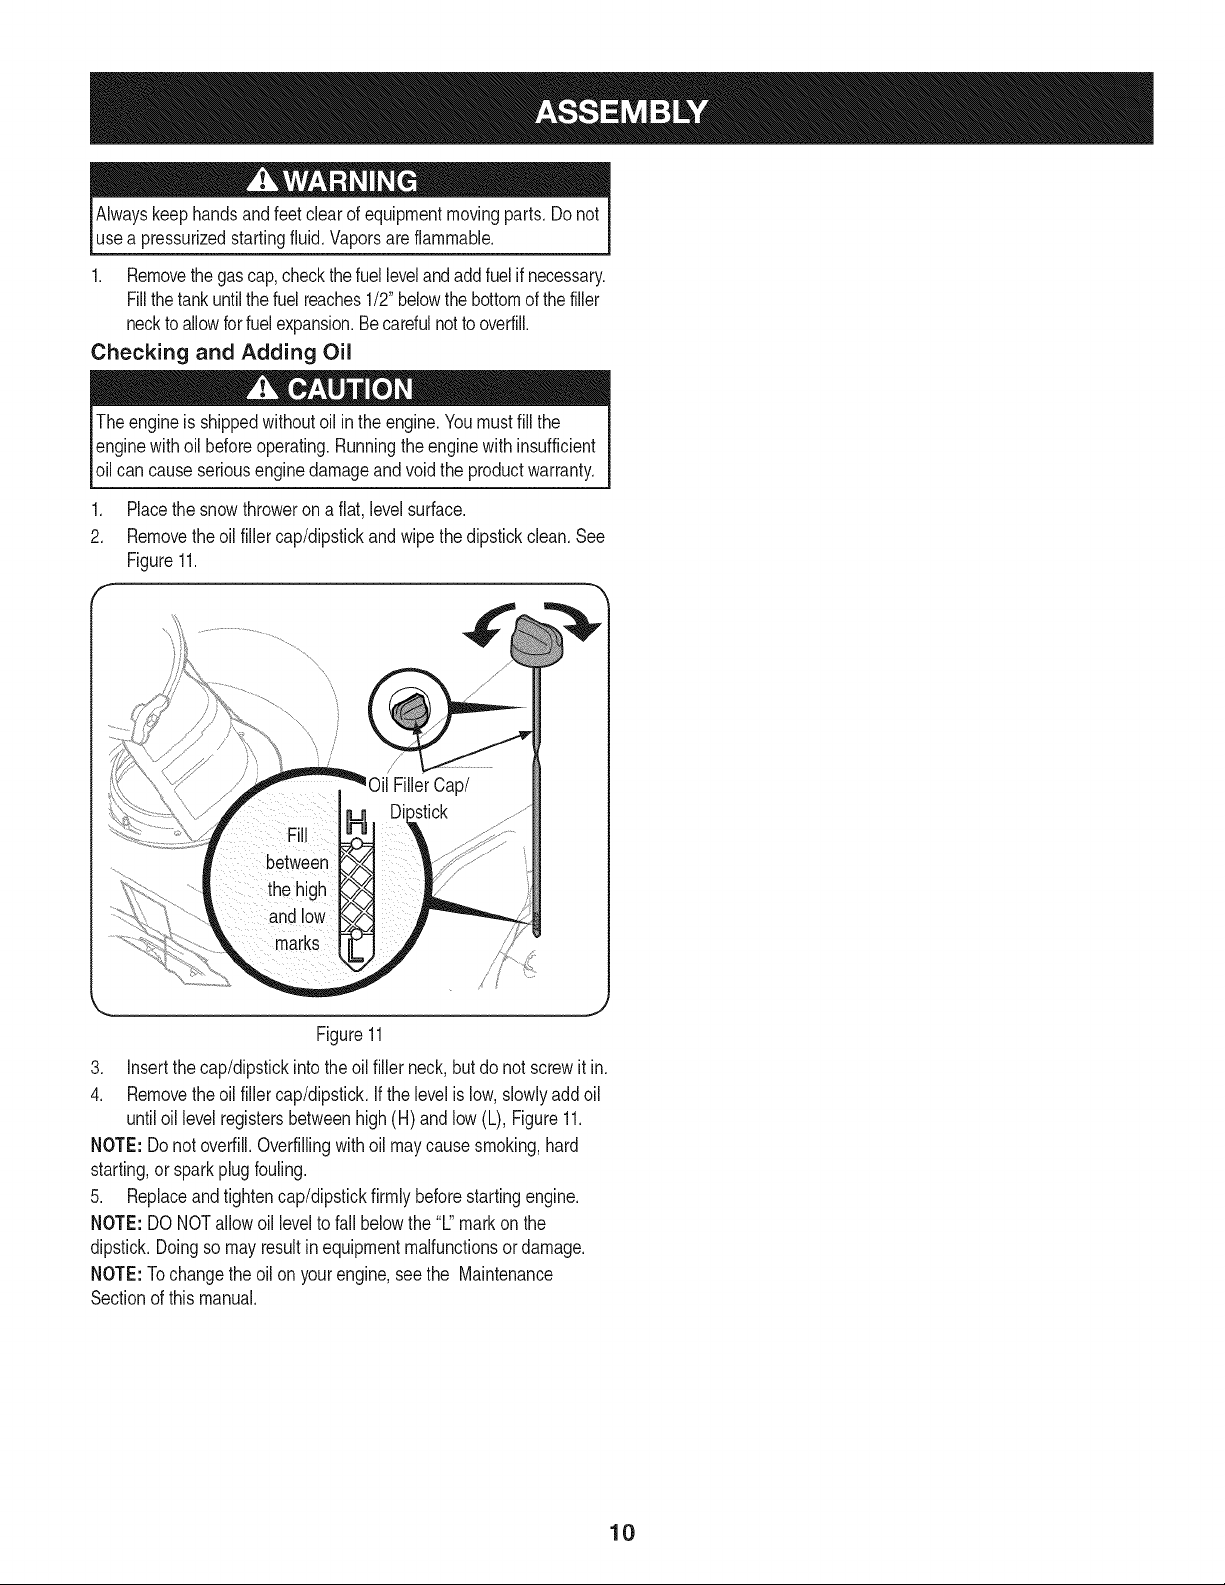
Checking and Adding Oil
Theengineis shippedwithoutoil in theengine.Youmustfill the
enginewithoilbeforeoperating.Runningthe enginewithinsufficient
oilcancauseseriousenginedamageandvoidtheproductwarranty.
Placethe snowthroweron a flat, levelsurface.
2. Removetheoil fillercap/dipstickandwipethedipstickclean.See
Figure11.
\
Figure11
.
Insertthe cap/dipstickinto theoil filler neck,butdo notscrewit in.
4.
Removetheoil fillercap/dipstick.Ifthelevelislow,slowlyaddoil
untiloil levelregistersbetweenhigh(H) andlow(L), Figure11.
NOTE:Donotoverfill.Overfillingwithoil maycausesmoking,hard
starting,or sparkplugfouling.
5. Replaceandtightencap/dipstickfirmlybeforestartingengine.
NOTE:DONOTallowoil leveltofall belowthe"L"markonthe
dipstick.Doingsomayresultin equipmentmalfunctionsordamage.
NOTE:Tochangethe oilon yourengine,seethe Maintenance
Sectionofthismanual.
10
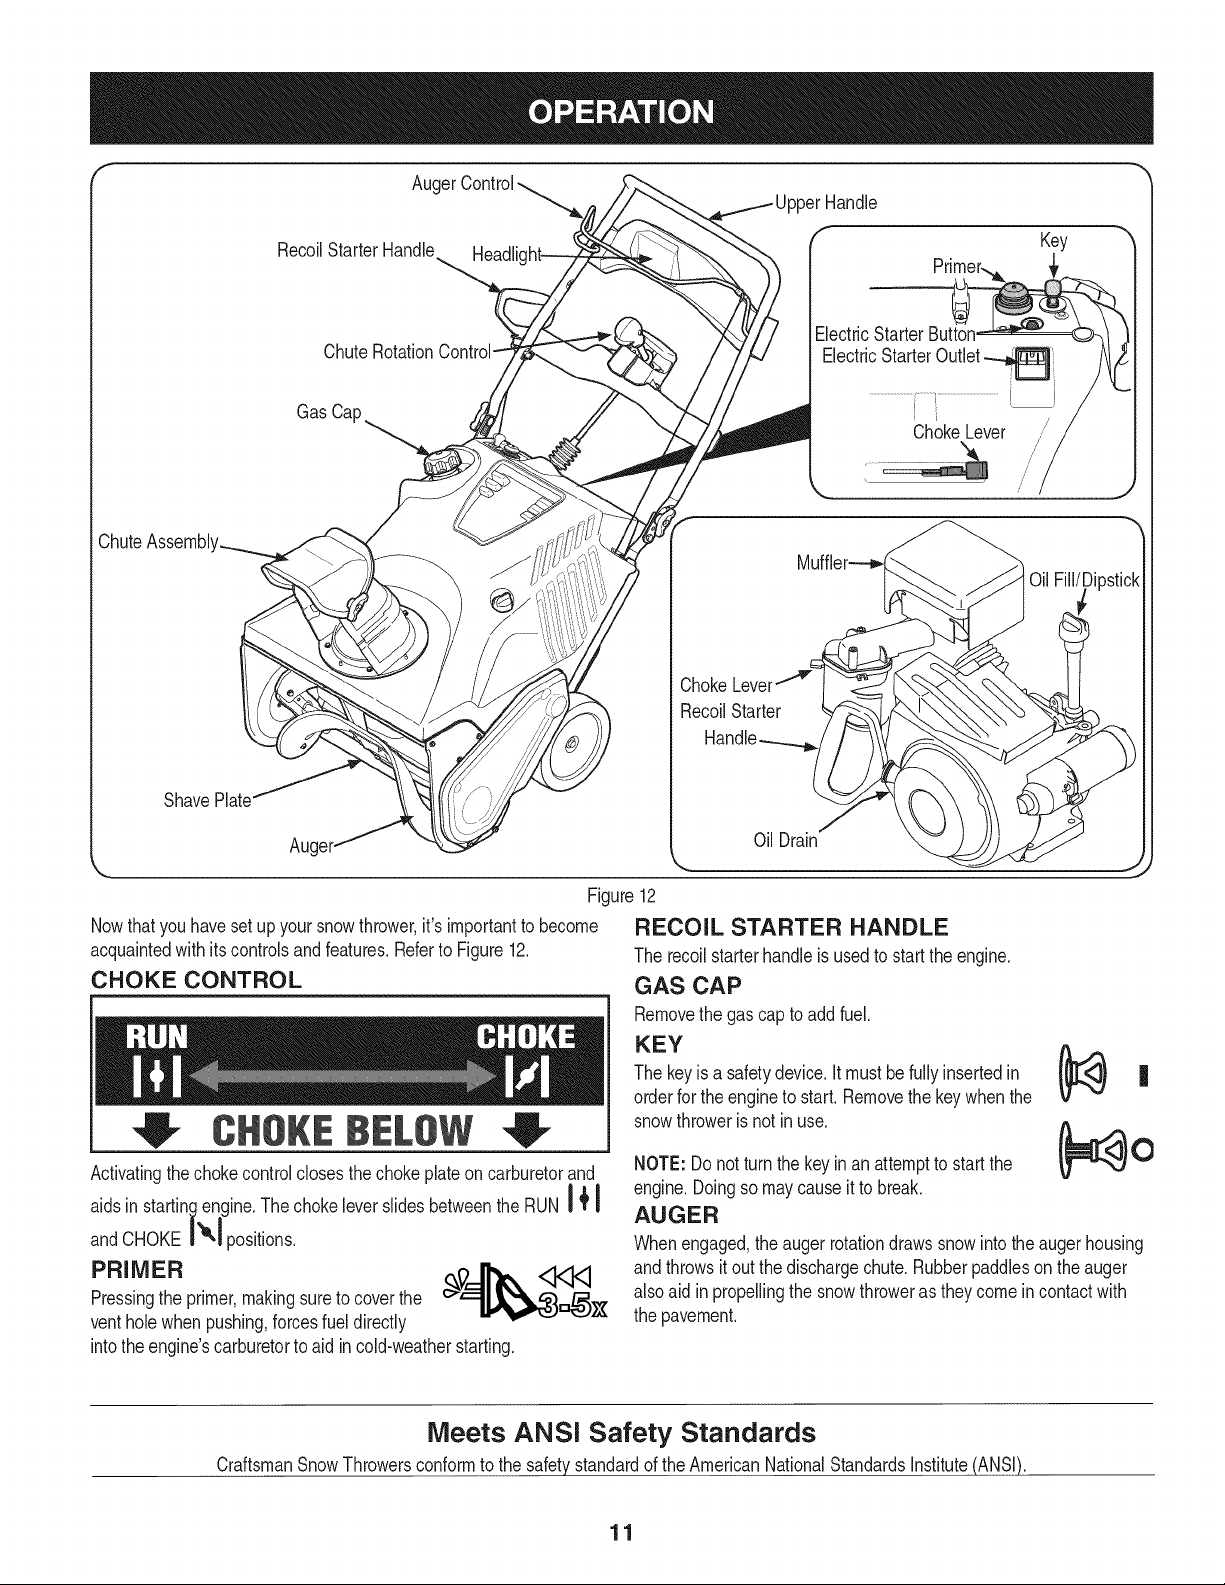
f Auger
ChuteAssembl'
Shave
RecoilStarterHandle
ChuteRotation
GasCap
Key
ElectricStarterButton
ElectricStarterOutlet
Aug
Nowthatyouhavesetupyoursnowthrower,it'simportanttobecome
acquaintedwith itscontrolsandfeatures.RefertoFigure12.
CHOKE CONTROL
CHO BELOW
Activatingthechokecontrolclosesthechokeplateoncarburetorand
aidsin startin_,,.lengine.ThechokeleverslidesbetweentheRUN I + !
andCHOKEi",1 positions.
Pressingthe primer,makingsureto coverthe
PRIMER __%_
ventholewhenpushing,forcesfueldirectly
intothe engine'scarburetorto aidin cold-weatherstarting.
Oil Drain
12
Figure
RECOIL STARTER HANDLE
Therecoilstarterhandleis usedto starttheengine.
GAS CAP
Removethegascapto addfuel.
KEY
Thekeyis a safetydevice.Itmust befullyinsertedin
orderfortheengineto start.Removethe keywhenthe
snowthrowerisnot inuse.
NOTE:Do notturn thekeyinan attemptto startthe
engine.Doingsomaycauseit tobreak.
AUGER
Whenengaged,theaugerrotationdrawssnowintotheaugerhousing
andthrowsit outthe dischargechute.Rubberpaddleson theauger
alsoaidin propellingthesnowthrowerastheycomein contactwith
thepavement.
Meets ANSI Safety Standards
CraftsmanSnowThrowersconformtothesafetystandardoftheAmericanNationalStandardsInstitute(ANSI).
11

AUGER CONTROL
Locatedon the upperhandle,theaugercontrolhandleisusedto
engageanddisengagedriveto theauger.Squeezethecontrolhandle
againsttheupperhandleto engagetheauger;releaseittodisengage.
MUFFLER
Engineexhaustexitstheenginevia themuffler.
CHUTE ROTATION CONTROL
Thechuterotatecontrolis locatedin thecenterof thecontrolpanel
andcontrolsthedirectionsnowisthrown.Depressthe buttonand
rotatethechuterotationcontroltotherightto turnthechutetothe right
androtatetothe lefttoturn thechuteto theleft.
CHUTE ASSEMBLY
Thepitchof thedischargechutecontrolstheangleat whichthesnow
isthrown.Loosenthewing knobonthe sideof thedischargechute
beforepivotingthedischargechuteupwardordownward.Retighten
theknoboncethe desiredpositionhasbeenachieved.
SHAVE PLATE
Theshaveplatemaintainscontactwiththe pavementasthe snow
throwerispropelled,allowingsnowcloseto thepavement'ssurfaceto
bedischarged.
OIL FILL/DIPSTICK
Engineoillevelcan becheckedandoil addedthroughtheoil fill.
OIL DRAIN
Engineoilcanbedrainedthroughtheoil drain.
HEADLIGHT
Theheadlightis locatedon theuppercenterof thecontrolpanelandis
onwhenthe snowthroweris running.
ELECTRIC STARTER OUTLET
Requiresthe useof a three-prongoutdoorextensioncordanda 120V
powersource/walloutlet.
ELECTRIC STARTER BUTTON
Pressingthe electricstarterbuttonengagestheengine'selectric
starterwhenpluggedintoa 120Vpowersource.
BEFORE STARTING THE ENGINE
2. Insertignitionkeyintoslot.Makesureit snapsintoplace.Do not
attempttoturn thekey.See Figure13.
Figure13
NOTE:Theenginecannotstartunlessthe keyisfullyinsertedintothe
ignitionswitch.
Electric Starter
Determinethatyourhome'swiringisathree-wiregroundedsystem.
Aska licensedelectricianifyouarenotcertain.
Ifyouhavea groundedthree-prongreceptacle,proceedasfollows:
1. Plugtheextensioncordintotheoutletlocatedontheengine's
surface.Plugtheotherendofextensioncordintoa three-prong
120-volt,grounded,ACoutletinawell-ventilatedareaSeeFigure14.
f
machineand inthismanualbefore
STARTING THE ENGINE
3ressurizedstartinc areflammable.
Toavoidcarbonmonoxidepoisoning,makesuretheengineis
outdoorsin awell-ventilatedarea.
1. Makecertaintheaugercontrolis in thedisengaged(released)
position.
Figure14
12
2. Pushthechokeleverto theCHOKEI'e,I position.
a
3. If theengineis warm,placethechokeintheRUNi ! position
insteadof CHOKEI_1.
4. Pushthe primerthree(3) times,makingsureto coverthevent
holewhenpushing.
5. If theengineis warm,pushthe primerbuttononlyonce.
6. Pushstarterbuttontostart engine.
7. Oncethe enginestarts,releasestarterbutton.
8. Allowtheenginetowarmup severalminutes,adjustingchoke
| |
towardRUN| _position.Waituntilenginerunssmoothlybefore
eachchokeadjustment.
9. Whendisconnectingtheextensioncord,alwaysunplugtheend
atthe three-prongwalloutletbeforeunpluggingthe oppositeend
fromthesnowthrower.
Recoil Starter
1. PushthechokelevertotheCHOKEI_1 position.
2. If theengineis warm,placethechokeintheRUNI_1 position
insteadof CHOKEI"_1.
3. Pushthe primerthree(3) times,makingsureto coverthevent
holewhenpushing.
4. If theengineis warm,pushthe primerbuttononlyonce.
5. Graspthe recoilstarterhandleand slowlypullthe ropeout.At
thepointwhereit becomesslightlyhardertopullthe rope,slowly
allowthe ropeto recoil.
6. Pullthestarterhandlewitha firm, rapidstroke.Donot release
thehandleandallowitto snapback.Keepafirmholdonthe
starterhandleandallowitto slowlyrecoil.
7. Allowtheenginetowarmup severalminutes,adjustingchoke
| |
towardRUN| _position.Waituntilenginerunssmoothlybefore
eachchokeadjustment.
STOPPING THE ENGINE
1. Runthe enginefora fewminuteswithoutloadbeforestoppingto
helpdryoff anymoistureontheengine.
2. Tostopthe engineremovethe keyand storeitin a safeplace.
3. Wipeallthe snowandmoistureawayfromthe enginecontrols
area.
Muffler,engineandsurroundingareasbecomehotandcan causea
burn.Becarefulanddonot touchwhentheyare hot.
ENGAGING THE AUGER
Engagethe augerbysqueezingtheaugercontrolagainsttheupper
handle.Releasethecontrolto stoptheauger.
ENGAGING THE DRIVE
Liftup slightlyonthe upperhandletoallowtherubberpaddlesonthe
augertocontactthe pavementandpropelthesnowthrowerforward.
Pushingdownwardonthe handlewill raisetheaugeroff the ground
and stoptheforwardmotion.
NOTE:Excessiveupwardpressureonthe handlewillresultin
prematureweartothe rubberaugerpaddles,whichwill notbecovered
bythe warranty.
CLEARING A CLOGGED DISCHARGE CHUTE
Handcontactwiththe rotatingimpellerinsidethedischargechute
isthe mostcommoncauseofinjuryassociatedwithsnowthrowers.
Neveruseyourhandtocleanoutthe dischargechute.
Toclear thechute:
1. SHUTTHEENGINEOFF!
2. Wait 10secondstobe surethe impellerbladeshavestopped
rotating.
3. Alwaysusea clean-outtoolor stick,notyourhands.
13
MAINTENANCE SCHEDULE
Beforeperforminganytypeof maintenance/service,disengageall
controlsandstopthe engine.Waituntilall movingpartshavecome
toa completestop.Disconnectsparkplugwireandgroundit against
theengineto preventunintendedstarting.Alwayswearsafetyglasses
duringoperationorwhileperforminganyadjustmentsor repairs.
Eachuse .
Engineoillevel.
2.
Snowthrowerandexhaust
1. Check
2. Clean
Followthemaintenanceschedulegivenbelow.Thischartdescribes
serviceguidelinesonly.Usethe ServiceLogcolumntokeeptrackof
completedmaintenancetasks.Tolocate the nearest SearsService
Centeror to scheduleservice,simplycontactSearsat
1-800-4-MY-HOME®.
= =
area.
1st5 hours 1. 1. Change.
Every5hours 1. 1. Check.
25 hours 1. 2. Check.
Everyseason/50hours 1. 1. Change
Everyseason/100hours 1. 1. Clean,replace,re-gap
Everyseason/Before 1. 1. Lubricate
storage 2. 2. Lubricate
ENGINE MAINTENANCE
Engineoil.
Engineoil.
Exhaustarea.
2. 2. Clean.
Sparkplug.
Engineoil
Sparkplug
Pivotpoints
Controlhandle
3. 3. Lubricate
Extensionspring
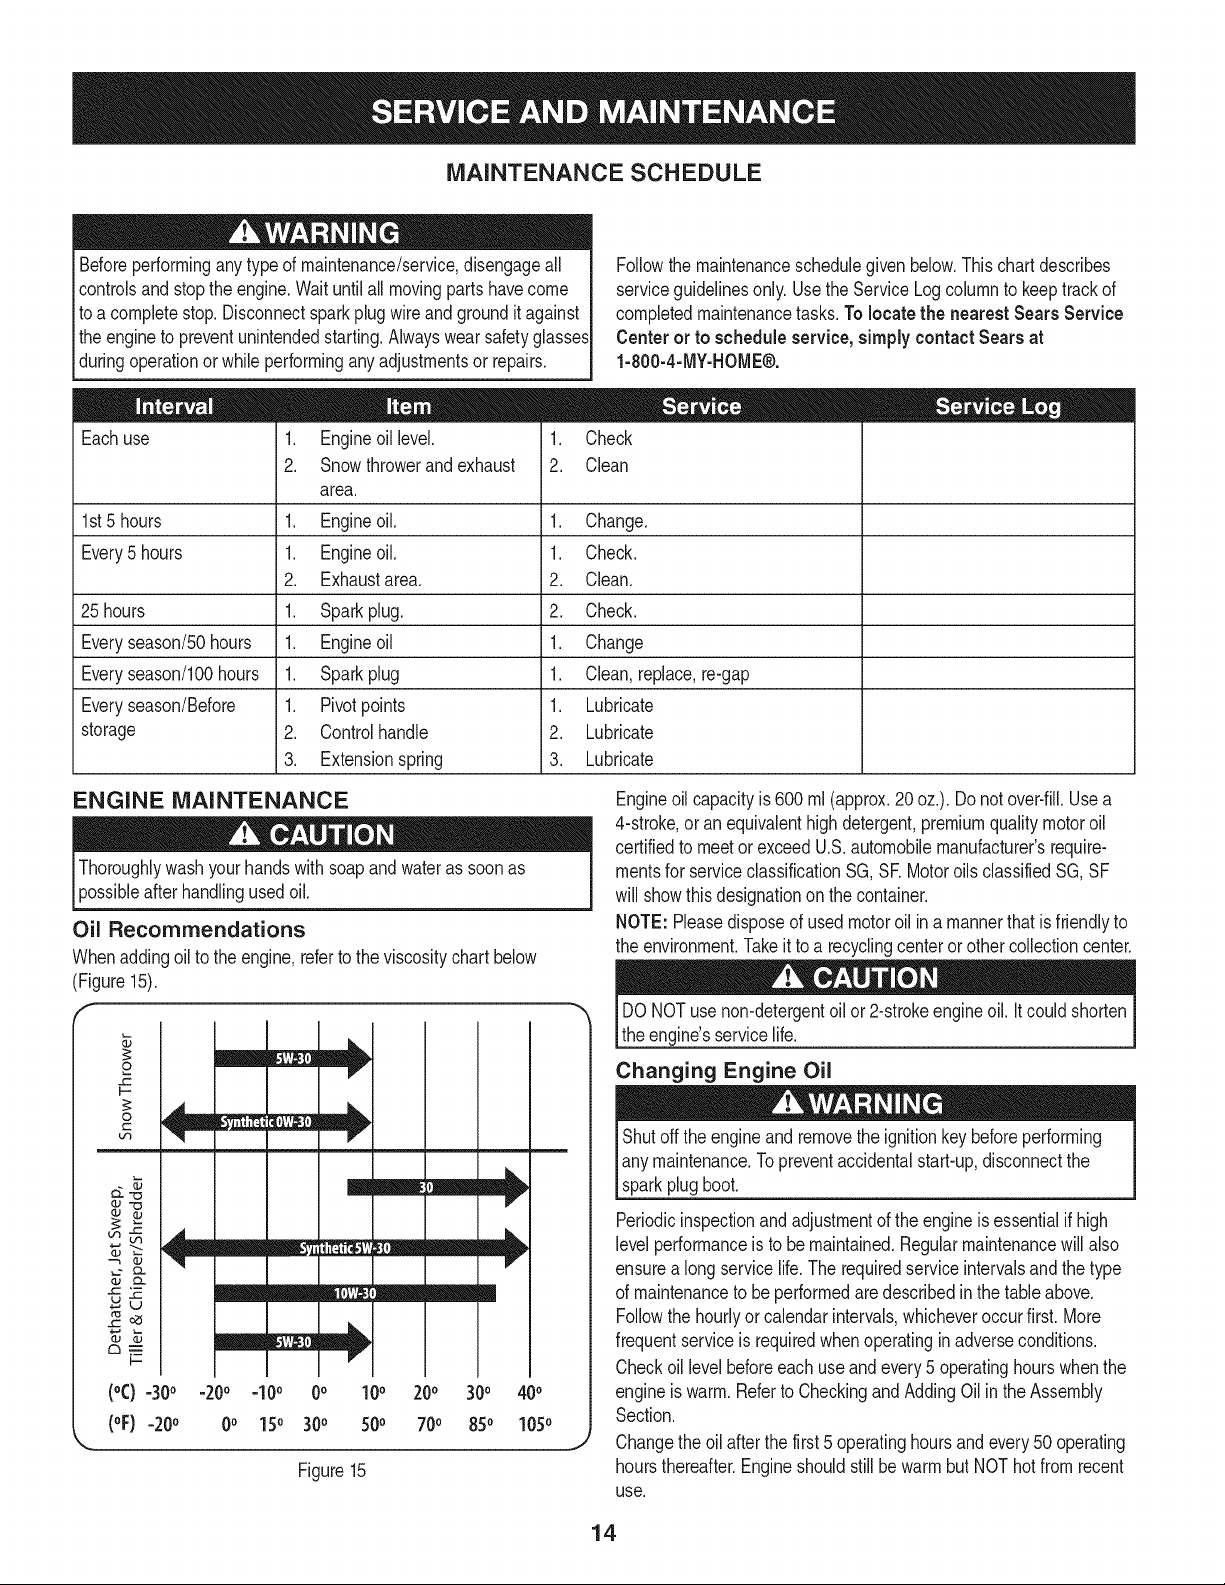
Engineoil capacityis 600ml(approx.20oz.). Donotover-fill.Usea
4-stroke,oran equivalenthighdetergent,premiumqualitymotoroil
certifiedto meetor exceedU.S.automobilemanufacturer'srequire-
mentsfor serviceclassificationSG,SE Motoroils classifiedSG, SF
usedoil.
Oil Recommendations
Whenaddingoilto theengine,referto theviscositychartbelow
willshowthis designationon thecontainer.
NOTE:Pleasedisposeofused motoroilin a mannerthatisfriendlyto
theenvironment.Takeitto a recyclingcenteror othercollectioncenter.
(Figure15).
DONOTusenon-detergentoil or2-strokeengineoil.It couldshorten
I
£
F-
O
Lf_
- r I ] [
theengine'sservicelife.
Changing Engine Oil
Shutoffthe engineand removethe ignitionkeybeforeperforming
anymaintenance.Topreventaccidentalstart-up,disconnectthe
mW/==b,
Iv
sparkplugboot.
Periodicinspectionandadjustmentoftheengineisessentialifhigh
levelperformanceis tobemaintained.Regularmaintenancewillalso
oJ t'_
CL
mm /m!
V
ensurea longservicelife.Therequiredserviceintervalsandthe type
of maintenanceto be performedaredescribedinthe tableabove.
Followthe hourlyorcalendarintervals,whicheveroccurfirst.More
mm mlb,
I-=
(°C) =30° -20o =10o 0o 100 200 300 400
(oF)-20 o 0o 150 300 500 700 850 1050
frequentserviceis requiredwhenoperatinginadverseconditions.
Checkoil levelbeforeeachuseandevery5 operatinghourswhenthe
engineiswarm.RefertoCheckingandAddingOilintheAssembly
Section.
Changetheoil afterthefirst5 operatinghoursandevery50 operating
Figure15
hoursthereafter.EngineshouldstillbewarmbutNOThotfromrecent
use.
14
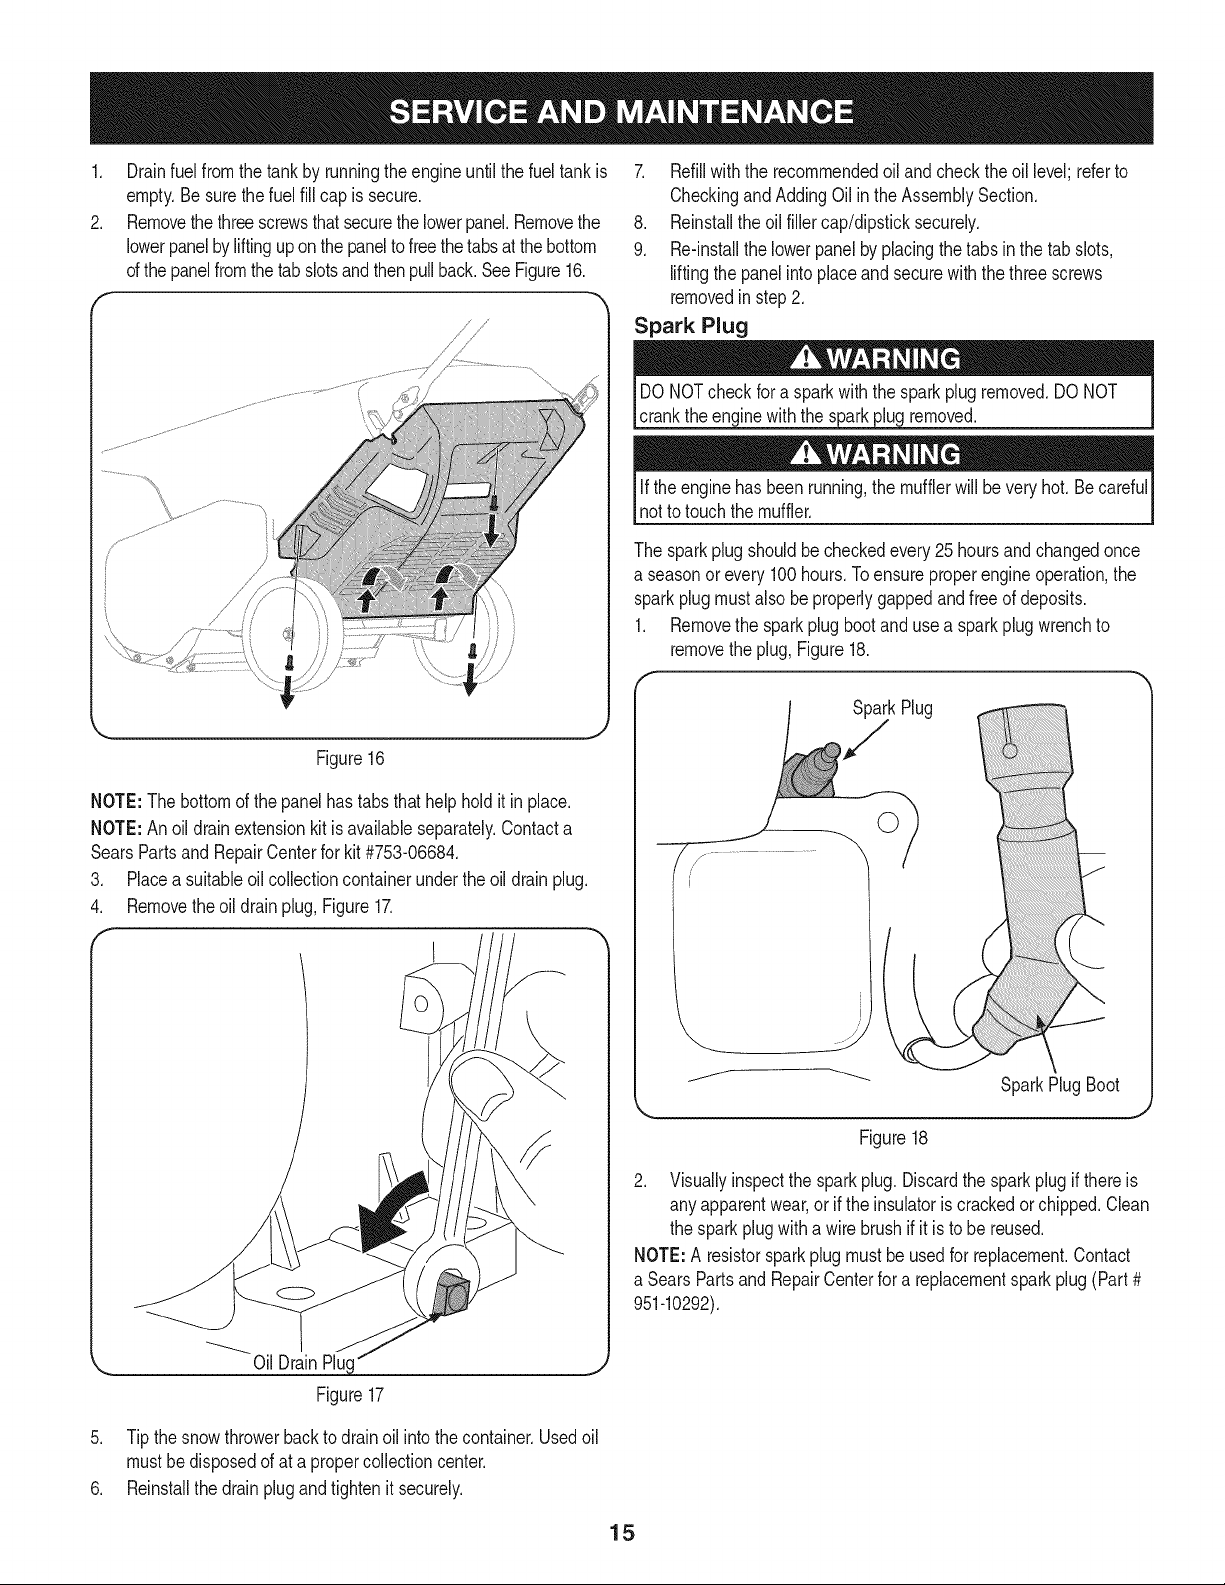
.
Drainfuelfromthetankby runningtheengineuntilthefueltankis
empty.Besurethe fuelfill capis secure.
2.
Removethethreescrewsthatsecurethelowerpanel.Removethe
lowerpanelbyliftinguponthepaneltofreethetabsatthebottom
d thepanelfromthetab slotsandthenpullback.SeeFigure16.
f
7. Refillwiththerecommendedoiland checktheoil level;referto
CheckingandAddingOil intheAssemblySection.
8. Reinstalltheoilfillercap/dipsticksecurely.
9. Re-installthelowerpanelbyplacingthetabsinthetabslots,
liftingthepanelintoplaceandsecurewiththethreescrews
removedinstep2.
Spark Plug
DONOTcheck fora sparkwiththe sparkplugremoved.DONOT
cranktheenginewiththe sparkplugremoved.
Iftheenginehas beenrunning,the mufflerwillbeveryhot. Becareful
notto touchthemuffler.
/
k. j
Figure16
NOTE:The bottomofthepanelhastabsthathelpholdit in place.
NOTE:An oildrainextensionkitisavailableseparately.Contacta
SearsPartsand RepairCenterforkit#753-06684.
3. Placea suitableoil collectioncontainerundertheoildrainplug.
4. Removetheoil drainplug,Figure17.
F 1
Thesparkplugshouldbecheckedevery25hoursandchangedonce
a seasonor every100hours.Toensureproperengineoperation,the
sparkplugmustalso beproperlygappedandfreeof deposits.
1. Removethesparkplugbootand usea sparkplugwrenchto
removethe plug,Figure18.
SparkPlugBoot
k_ Oil DrainPlug
Figure17
5. Tipthesnowthrowerbacktodrainoil intothecontainer.Usedoil
mustbedisposedof ata propercollectioncenter.
6. Reinstallthedrainplugandtightenit securely.
Figure18
2. Visuallyinspectthe sparkplug.Discardthe sparkplugif thereis
anyapparentwear,or if theinsulatoris crackedorchipped.Clean
thesparkplugwitha wire brushif it is tobe reused.
NOTE:A resistorsparkplugmustbeusedforreplacement.Contact
a SearsPartsandRepairCenterfora replacementsparkplug(Part#
951-10292).
15
.
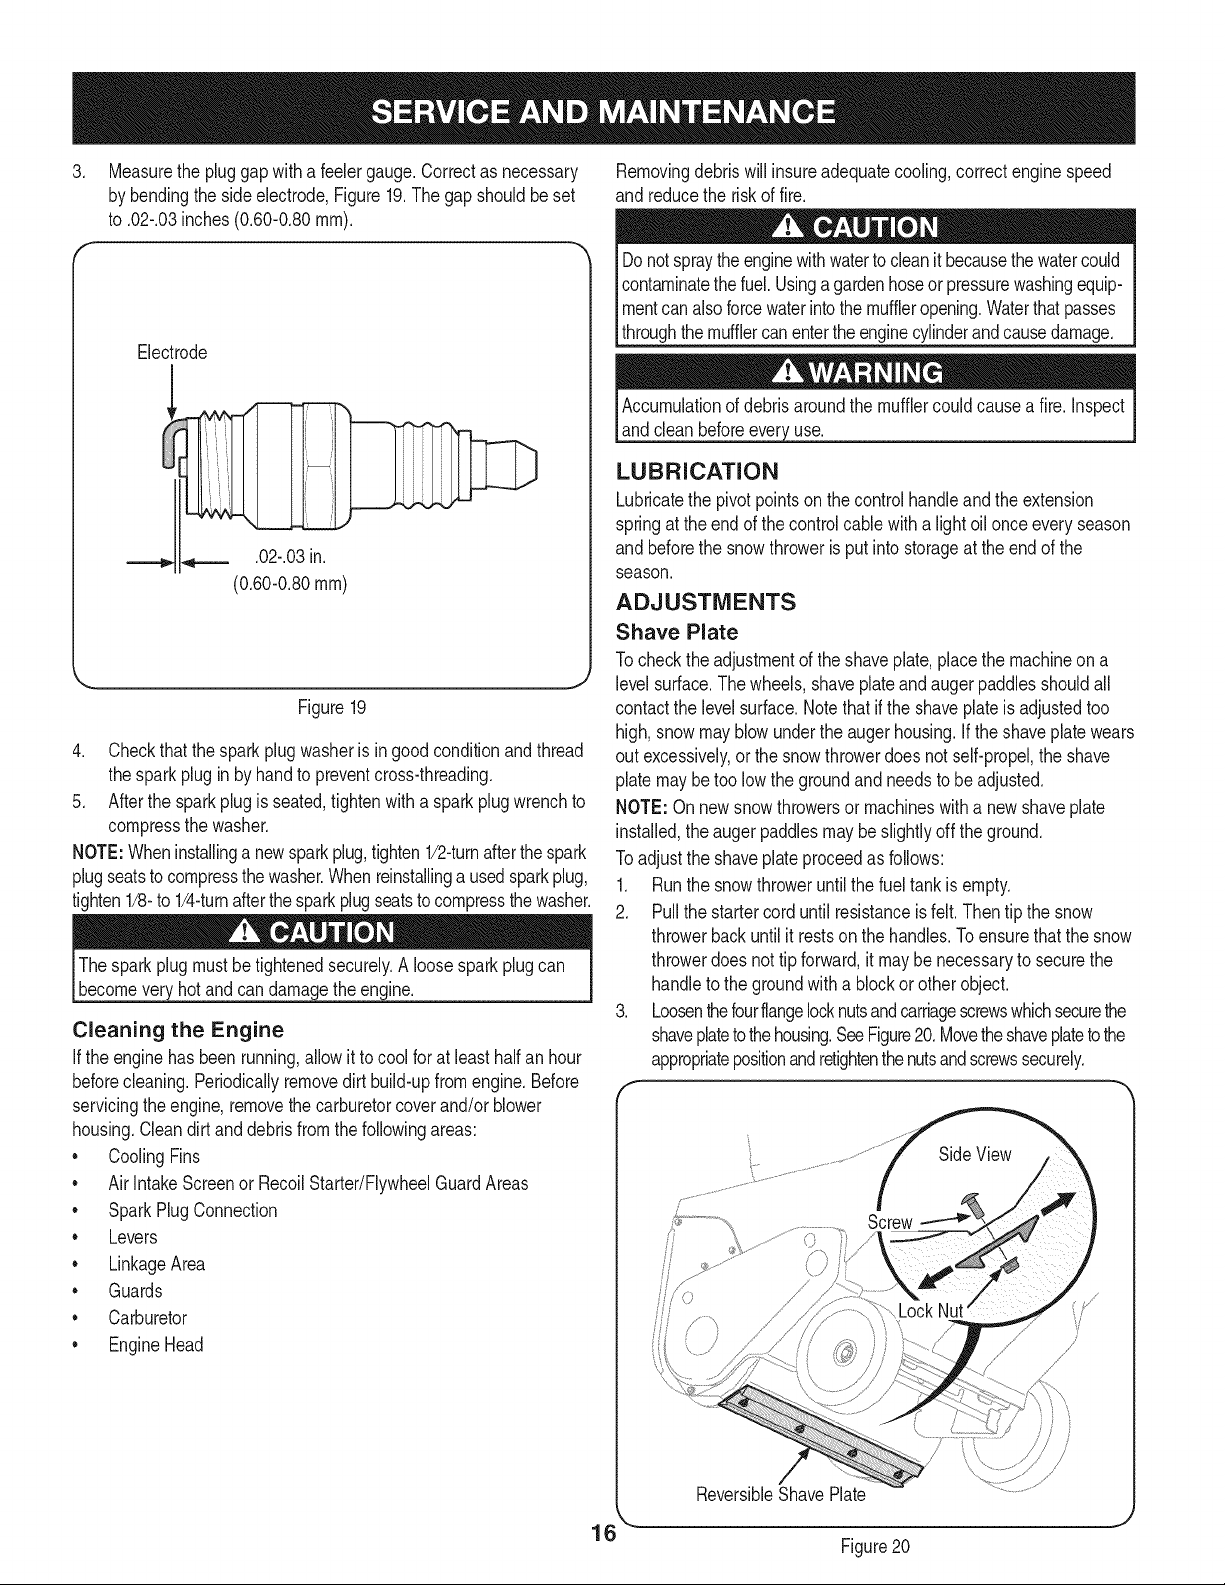
Measurethe pluggapwitha feelergauge.Correctas necessary
bybendingthesideelectrode,Figure19.Thegapshouldbeset
to.02-.03inches(0.60-0.80ram).
Electrode
.02-.03in.
(0.60-0.80ram)
Figure19
4. Checkthatthesparkplugwasherisingoodconditionandthread
thesparkplugin by handtopreventcross-threading.
5. Afterthe sparkplugisseated,tightenwitha sparkplugwrenchto
compressthe washer.
NOTE:Wheninstallinga newsparkplug,tighten1/2-turnafterthespark
plugseatstocompressthe washer.Whenreinstallingausedsparkplug,
tighten1/8-to1/4-turnafterthe sparkplugseatstocompressthe washer.
Thesparkplugmustbetightenedsecurely.A loosesparkplugcan
becomeveryhotandcan damagetheengine.
Cleaning the Engine
Iftheenginehasbeenrunning,allowittocoolforatleasthalfanhour
beforecleaning.Periodicallyremovedirt build-upfromengine.Before
servicingtheengine,removethecarburetorcoverand/orblower
housing.Cleandirtanddebrisfromthefollowingareas:
• CoolingFins
• AirIntakeScreenorRecoilStarter/FlywheelGuardAreas
• SparkPlugConnection
• Levers
• LinkageArea
• Guards
• Carburetor
• EngineHead
Removingdebriswillinsureadequatecooling,correctenginespeed
and reducetheriskoffire.
Donotspraytheenginewithwatertocleanit becausethewatercould
contaminatethe fuel.Usingagardenhoseorpressurewashingequip-
mentcan alsoforcewaterintothemuffleropening.Waterthatpasses
throughthemufflercanentertheenginecylinderandcausedamage.
Accumulationof debrisaroundthe mufflercouldcausea fire.Inspect
andcleanbeforeevery_use.
LUBRICATION
Lubricatethe pivotpointson thecontrolhandleandtheextension
springat theendof thecontrolcablewitha lightoilonceeveryseason
and beforethesnowthrowerisput intostorageat theendof the
season.
ADJUSTMENTS
Shave Plate
Tochecktheadjustmentoftheshaveplate,placethemachineona
levelsurface.Thewheels,shaveplateandaugerpaddlesshouldall
contactthelevelsurface.Notethat ifthe shaveplateis adjustedtoo
high,snowmayblowundertheaugerhousing.Iftheshaveplatewears
outexcessively,or the snowthrowerdoesnot self-propel,theshave
platemaybetoo lowthe groundand needstobeadjusted.
NOTE:Onnewsnowthrowersormachineswitha newshaveplate
installed,theaugerpaddlesmaybeslightlyoff theground.
Toadjustthe shaveplateproceedasfollows:
1. Runthe snowthroweruntilthe fueltankis empty.
2. Pullthestartercorduntilresistanceisfelt.Thentip thesnow
throwerbackuntilit restsonthehandles.Toensurethatthesnow
throwerdoesnot tipforward,it maybe necessarytosecurethe
handletothe groundwitha blockorotherobject.
3. Loosenthefourflangelocknutsandcarriagescrewswhichsecurethe
shaveplatetothehousing.SeeFigure20.Movetheshaveplatetothe
appropriatepositionandretightenthenutsandscrewssecurely.
16 ``.¸
ReversibleShavePlate
J
Figure20
4. Tipthesnowthrowerbacktotheoperatingpositionandpullthe
starterhandleafewtimestoseeifitisdifficulttopull.
5. Ifthestarterisdifficulttopull,removethesparkplugandpullthe
handleseveraltimestoensurethatanyoiltrappedintheengine
headisremoved.
Oilmaycomeoutofthesparkplugholewhenitisremovedandthe
starterhandleispulled.
6. Inspectthesparkplug.Ifitiswet,cleanoffanyoilbefore
re-installing.
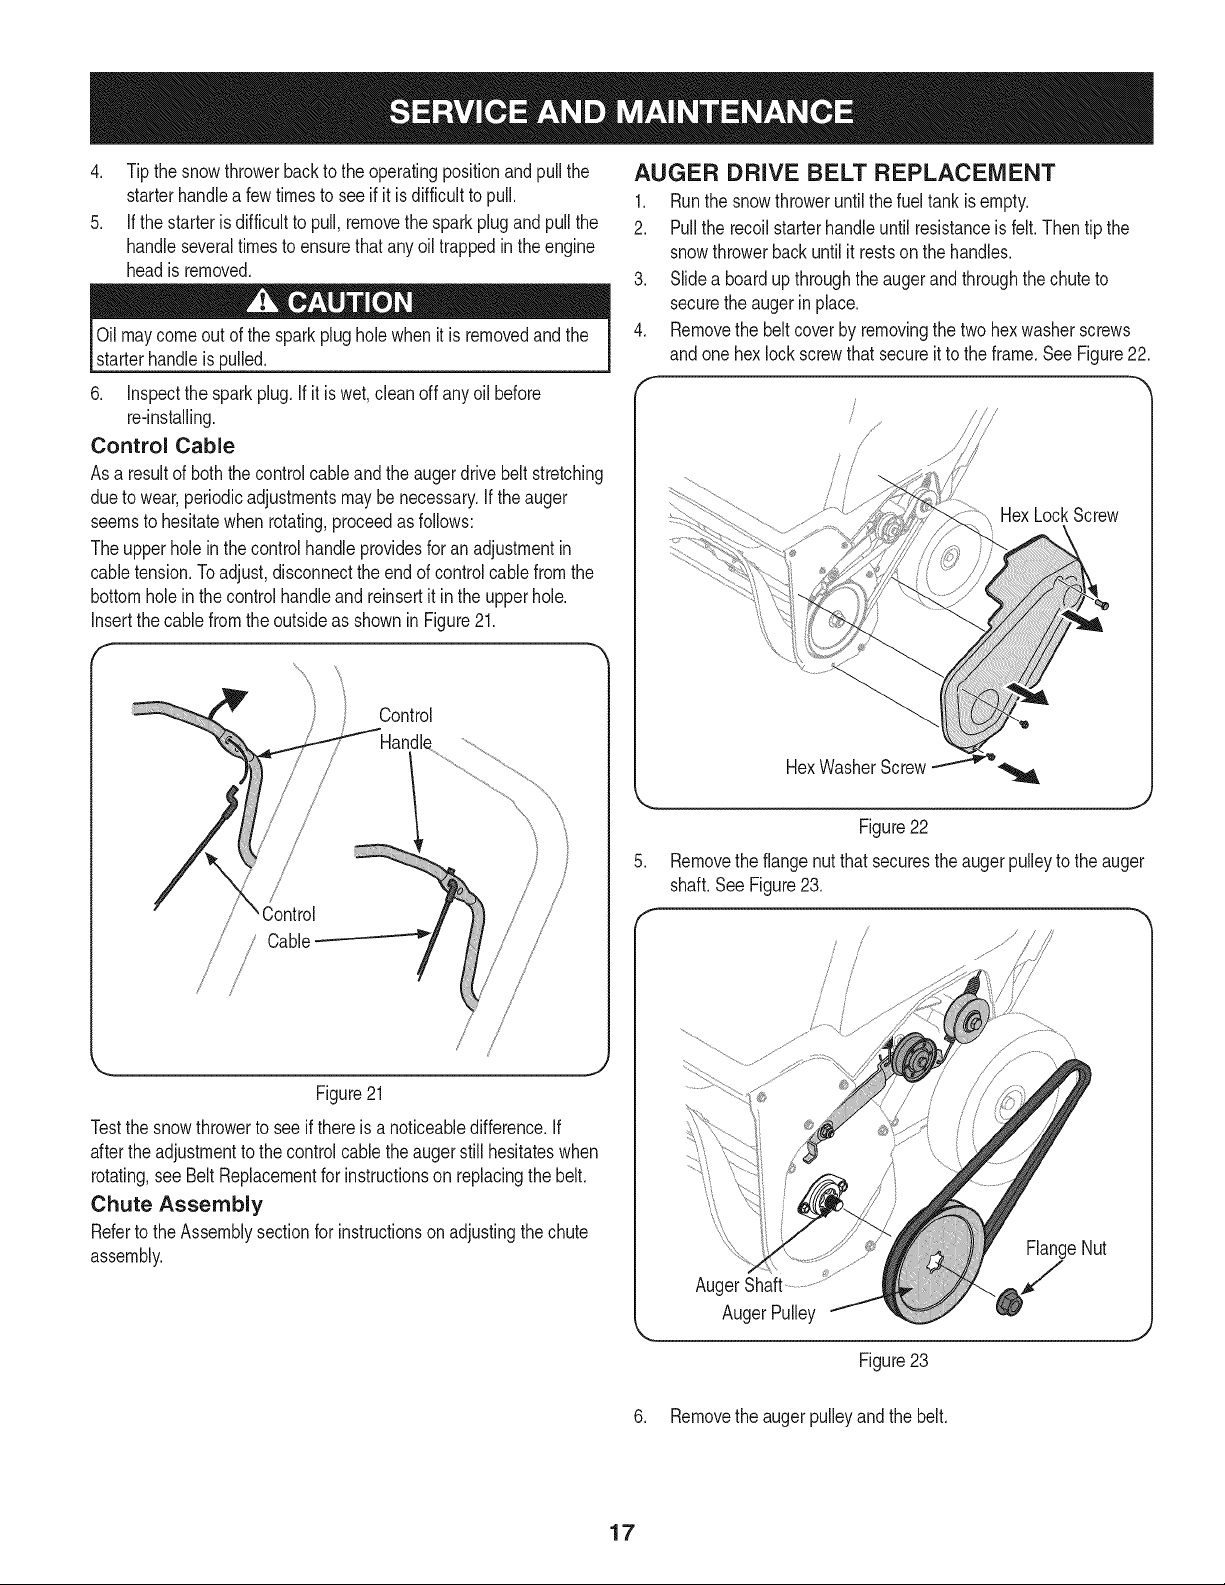
Control Cable
Asaresultofboththecontrolcableandtheaugerdrivebeltstretching
duetowear,periodicadjustmentsmaybenecessary.Iftheauger
seemstohesitatewhenrotating,proceedasfollows:
Theupperholeinthecontrolhandleprovidesforanadjustmentin
cabletension.Toadjust,disconnecttheendofcontrolcablefromthe
bottomholeinthecontrolhandleandreinsertitintheupperhole.
InsertthecablefromtheoutsideasshowninFigure21.
f
Control
AUGER DRIVE BELT REPLACEMENT
1. Runthe snowthroweruntilthe fueltankis empty.
2. Pullthe recoilstarterhandleuntilresistanceisfelt.Thentipthe
snowthrowerbackuntilit restson thehandles.
3. Slidea boardup throughtheaugerandthroughthechuteto
securethe augerinplace.
4. Removethebeltcoverbyremovingthetwohexwasherscrews
andone hexlockscrewthatsecureitto theframe.SeeFigure22.
HexLockScrew
/
Cable
Figure21
Testthesnowthrowerto seeifthereisa noticeabledifference.If
aftertheadjustmenttothecontrolcabletheaugerstill hesitateswhen
rotating,seeBeltReplacementforinstructionson replacingthebelt.
Chute Assembly
Refertothe Assemblysectionforinstructionsonadjustingthechute
assembly.
j
/
/
/
Figure22
.
Removetheflangenutthat securestheaugerpulleytothe auger
shaft.SeeFigure23.
/
FlangeNut
AugerShaft
AugerPulley
Figure23
J
J
6. Removetheaugerpulleyandthebelt.
17
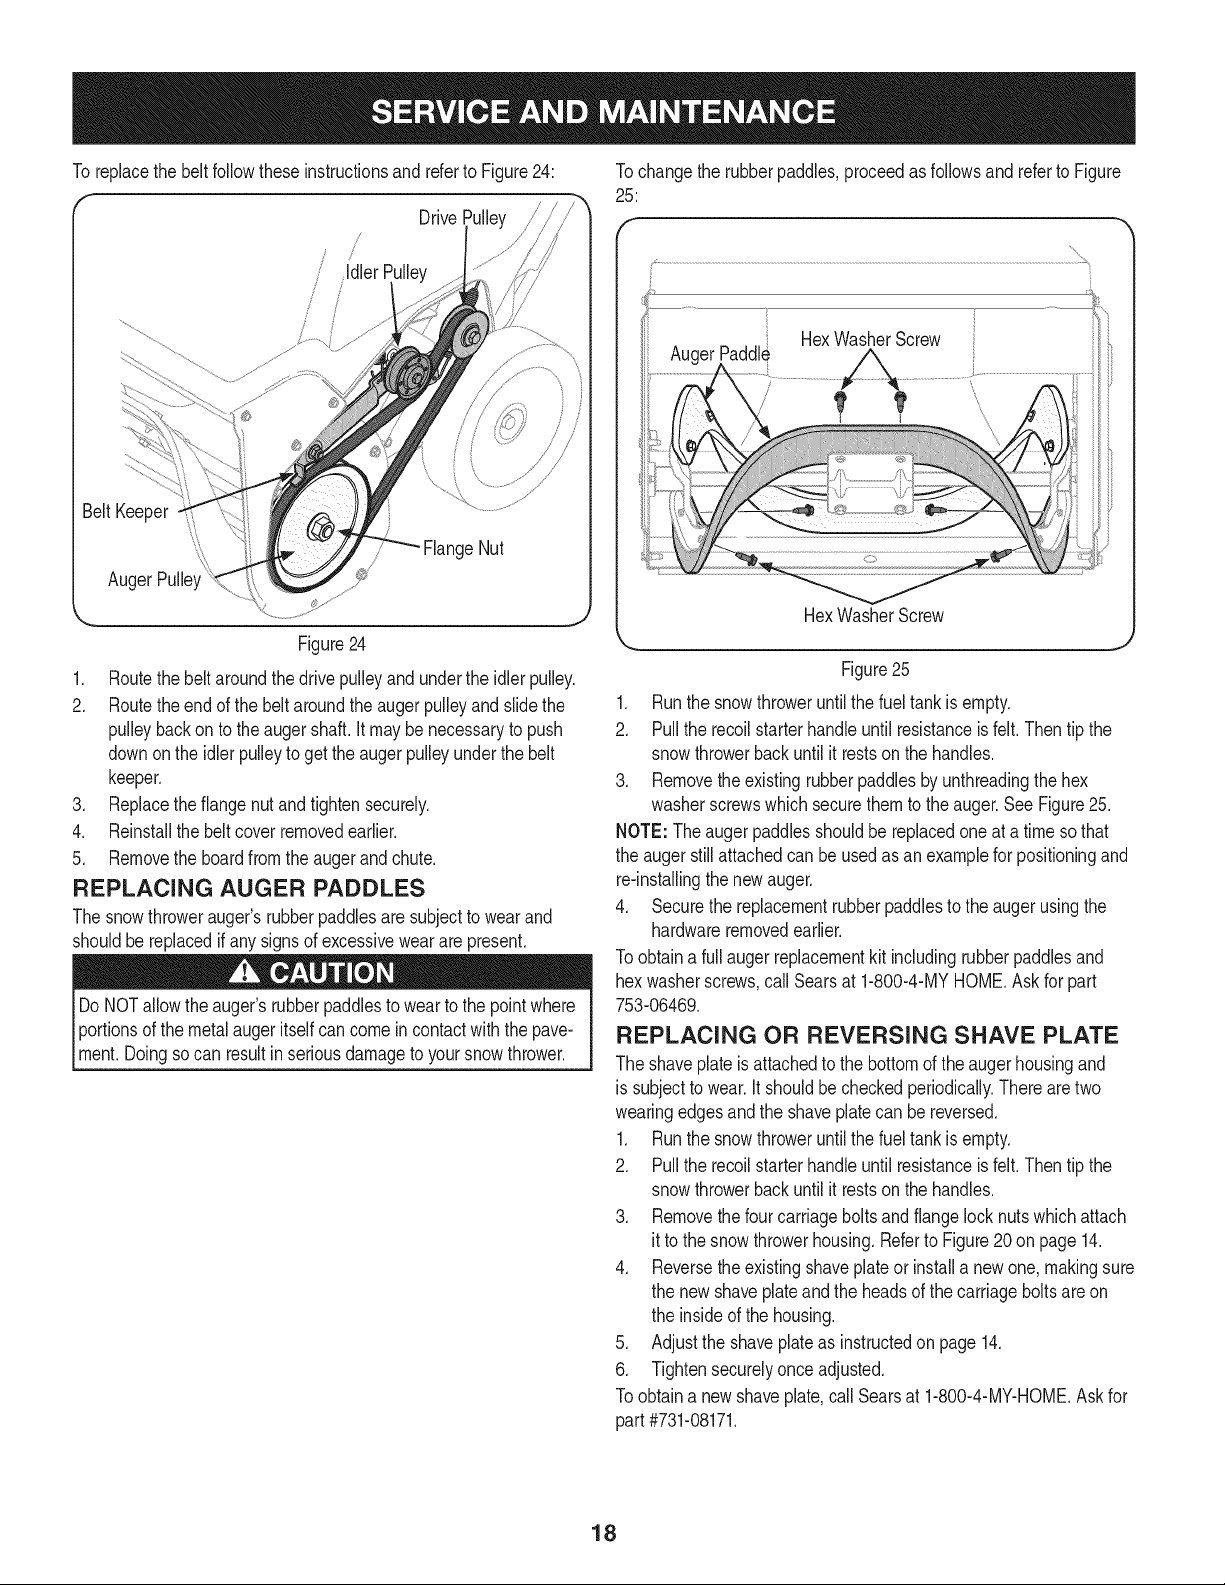
Toreplacethe beltfollowtheseinstructionsandrefertoFigure24:
Drive
js
Figure24
1. Routethebeltaroundthedrivepulleyandunderthe idlerpulley.
2. Routetheendof thebeltaroundtheaugerpulleyand slidethe
pulleybackon to theaugershaft.It maybe necessarytopush
downonthe idlerpulleyto gettheaugerpulleyunderthe belt
keeper.
3. Replacetheflangenutandtightensecurely.
4. Reinstallthebeltcoverremovedearlier.
5. Removethe boardfromtheaugerandchute.
REPLACING AUGER PADDLES
Thesnowthrowerauger'srubberpaddlesaresubjecttowearand
shouldbereplacedifany signsof excessiveweararepresent.
DoNOTallowtheauger'srubberpaddlesto wearto thepointwhere
Iportionsof themetalaugeritselfcancomein contactwiththe pave-
_ment.Doingsocan resultin seriousdamageto yoursnowthrower.
Tochangetherubberpaddles,proceedasfollowsandrefertoFigure
25:
HexWasherScrew
HexWasherScrew
Figure25
1. Runthe snowthroweruntilthe fueltankis empty.
2. Pulltherecoilstarterhandleuntilresistanceisfelt.Thentip the
snowthrowerbackuntilit restson the handles.
3. Removetheexistingrubberpaddlesby unthreadingthehex
washerscrewswhichsecurethemto theauger.See Figure25.
NOTE:Theaugerpaddlesshouldbereplacedoneatatimesothat
theaugerstillattachedcanbeusedasanexampleforpositioningand
re-installingthe newauger.
4. Securethe replacementrubberpaddlestotheaugerusingthe
hardwareremovedearlier.
Toobtaina fullaugerreplacementkit includingrubberpaddlesand
hexwasherscrews,callSearsat 1-800-4-MYHOME.Askforpart
753-06469.
REPLACING OR REVERSING SHAVE PLATE
Theshaveplateisattachedtothe bottomof theaugerhousingand
is subjecttowear.Itshouldbecheckedperiodically.Therearetwo
wearingedgesandtheshaveplatecanbe reversed.
1. Runthe snowthroweruntilthe fueltankis empty.
2. Pulltherecoilstarterhandleuntilresistanceisfelt.Thentip the
snowthrowerbackuntilit restson the handles.
3. Removethefourcarriageboltsandflangelocknutswhichattach
it to thesnowthrowerhousing.Referto Figure20on page14.
4. Reversetheexistingshaveplateor installa newone,makingsure
thenew shaveplateandthe headsofthecarriageboltsareon
theinsideofthe housing.
5. Adjustthe shaveplateas instructedon page14.
6. Tightensecurelyonceadjusted.
Toobtaina newshaveplate,call Searsat 1-800-4-MY-HOME.Askfor
part#731-08171.
18

Ifthe snowthrowerwillnotbe usedfor30 daysor longer,or ifit istheendofthesnowseasonwhenthelastpossibilityof snowis gone,the
equipmentneedstobestoredproperly.Followstorageinstructionsbelowtoensuretopperformancefromthesnowthrowerformanymoreyears.
PREPARING THE ENGINE
Enginesstoredover30daysneedtobedrainedoffueltoprevent
deteriorationandgumfromforminginthefuel systemoronessential
carburetorparts.If thegasolineinyourenginedeterioratesduring
storage,youmayneedto havethecarburetor,andotherfuelsystem
components,servicedorreplaced.
1. Removeall fuelfromthetankbyrunningtheengineuntilit stops.
2. Changetheengineoil.
3. Removethe sparkplugandpourapproximately1oz.(30 ml)of
cleanengineoil intothecylinder.Pullthe recoilstarterseveral
timesto distributetheoil,and reinstallthesparkplug.
4. Cleantheexteriorofthe enginebywipingdirtanddebrisfromthe
followingareas:
• CoolingFins
• AirIntakeScreenorRecoilStarter/FlywheelGuardAreas
• SparkPlugConnection
• Levers
LinkageArea
Guards
Carburetor
EngineHead
!
PREPARING SNOW THROWER
Ifthesnowthrowerwill notbeusedfor30daysor longer,followthe
instructionsbelow.
1. Storetheequipmentinaclean,dryarea.
2. Wipedownthesnowthrowerwitha ragand removeanydirtor
debris.
3. Ifstoringthesnowthrowerinanunventilatedarea,rustproofthe
metalpartsofthe machinewitha lightoil or siliconecoating.
Donotspraythe enginewithwatertocleanit becausethe watercould
contaminatethefuel.Usinga gardenhoseorpressurewashingequip-
Imentcanalsoforcewaterintothemuffleropening.Waterthatpasses
[throughthe mufflercanentertheenginecylinderandcausedamage.
5. Storeina clean,dry andwellventilatedareaawayfromany
appliancethatoperateswitha flameor pilot light,suchasa
furnace,waterheateror clothesdryer.Avoidanyareawitha spark
producingelectricmotor,or wherepowertoolsareoperated.
Neverstoresnowthrowerwithfuel intank indoorsorinpoorlyventi-
latedareas,wherefuelfumesmayreachanopenflame,sparkorpilol
lightas ona furnace,waterheater,clothesdryer orgasappliance.
6. If possible,avoidstorageareaswithhighhumidity.
7. Keeptheenginelevelin storage.Tiltingtheengine cancause
fuelor oil leakage.
19
Beforeperforminganytypeofmaintenance/service,disengageallcontrolsandstoptheengine.Waituntilall
movingpartshavecometo acompletestop.Disconnectsparkplugwireandgrounditagainstthe engineto
Ipreventunintendedstarting.Alwayswearsafetyglassesduringoperationorwhileperforminganyadjustmentsor
[repairs.
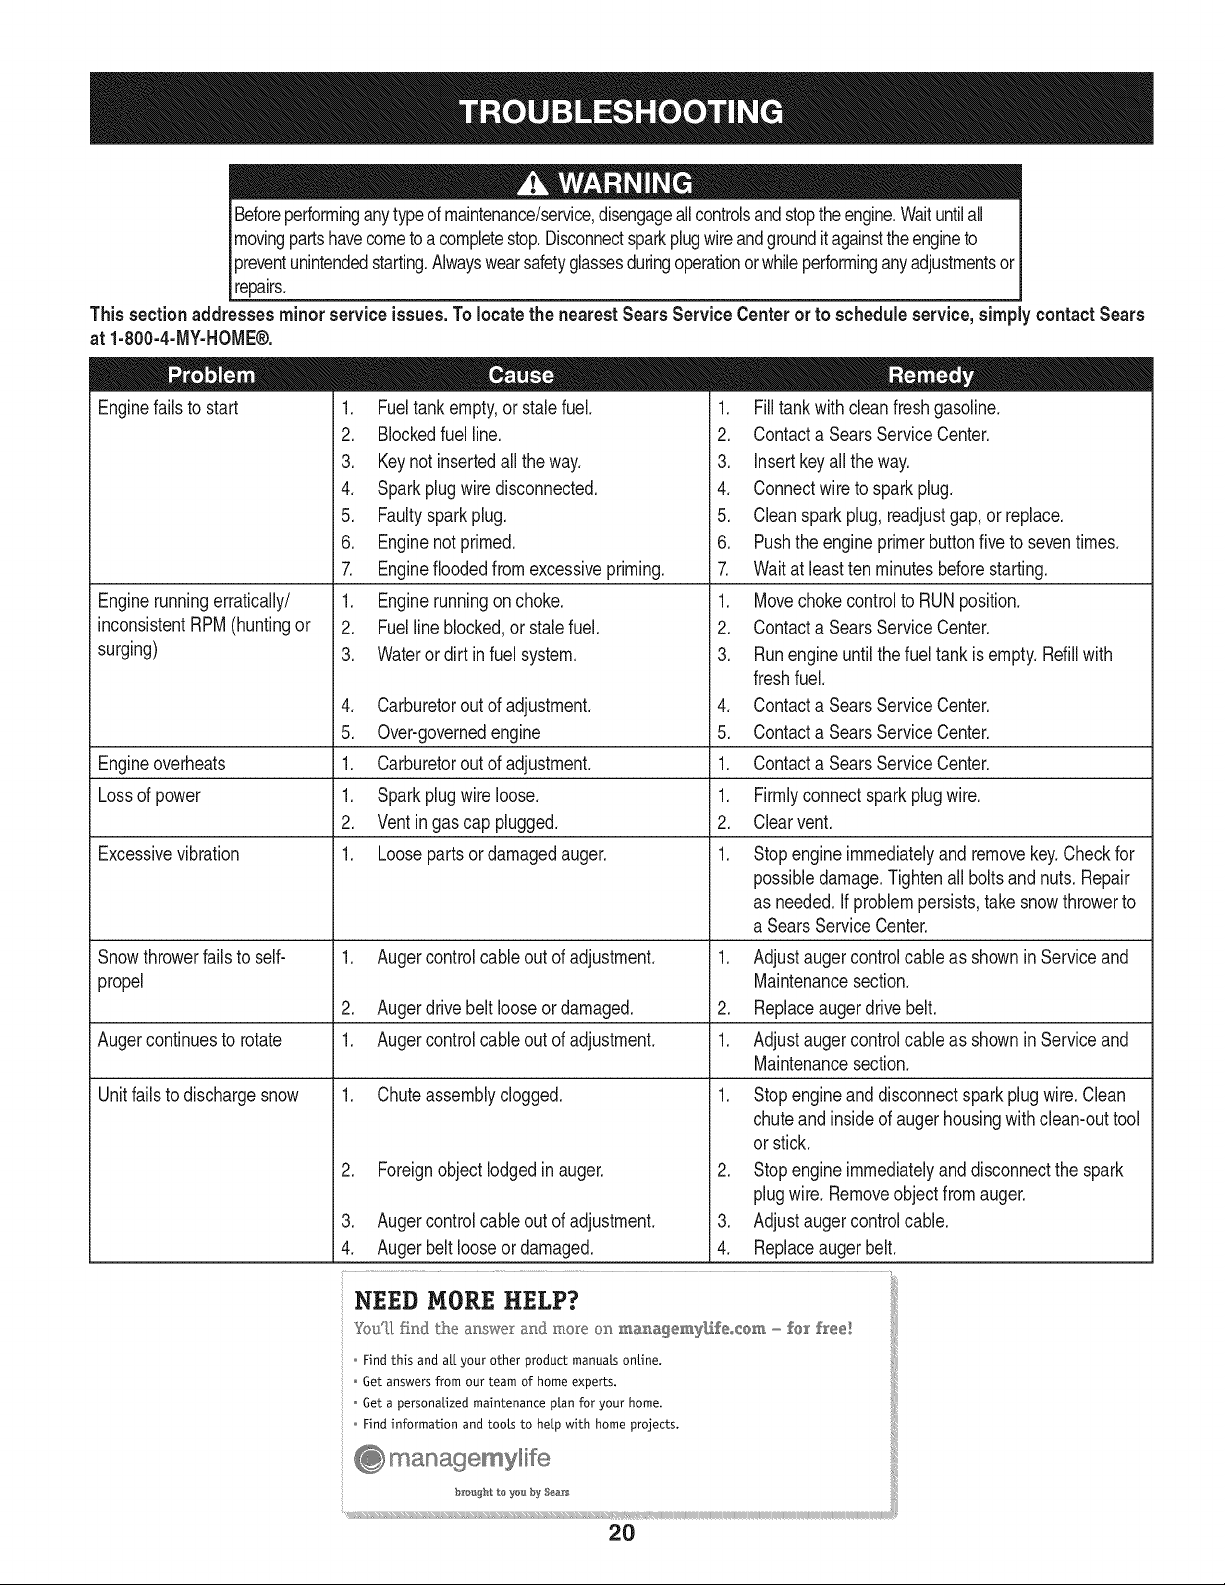
This section addresses minor service issues.Tolocate the nearest SearsService Centeror to schedule service, simply contact Sears
at 1-800-4-MY-HOME®.
Enginefailsto start 1. Fueltankempty,or stalefuel.
2. Blockedfuelline.
3. Keynotinsertedalltheway.
4. Sparkplugwiredisconnected.
5. Faultysparkplug.
6. Enginenotprimed.
7. Enginefloodedfromexcessivepriming.
Enginerunningerratically/
inconsistentRPM(huntingor
surging)
1. Enginerunningonchoke.
2. Fuellineblocked,orstalefuel.
3. Wateror dirtinfuelsystem.
1. Filltankwithcleanfreshgasoline.
2. Contacta SearsServiceCenter.
3. Insertkeyalltheway.
4. Connectwireto sparkplug.
5. Cleansparkplug,readjustgap,or replace.
6. Pushtheengineprimerbuttonfivetoseventimes.
7. Waitatleastten minutesbeforestarting.
1. MovechokecontroltoRUNposition.
2. Contacta SearsServiceCenter.
3. Runengineuntilthefueltank isempty.Rdillwith
freshfuel.
4. Carburetoroutofadjustment.
5. Over-governedengine
Engineoverheats Contacta SearsServiceCenter.
Lossof power Firmlyconnectsparkplugwire.
1. Carburetoroutofadjustment.
1. Sparkplugwireloose.
2. Ventin gascap plugged.
Excessivevibration Stopengineimmediatelyandremovekey.Checkfor
1. Loosepartsordamagedauger.
4. Contacta SearsServiceCenter.
5. Contacta SearsServiceCenter.
1.
1.
2.
Clearvent.
1.
possibledamage.Tightenall boltsand nuts.Repair
asneeded.Ifproblempersists,takesnowthrowerto
a SearsServiceCenter.
Snowthrowerfailsto self- 1. Augercontrolcableoutofadjustment. 1. Adjustaugercontrolcableasshownin Serviceand
propel Maintenancesection.
2. Augerdrivebeltlooseor damaged. 2. Replaceaugerdrivebelt.
Augercontinuesto rotate 1. Augercontrolcableoutof adjustment. 1. Adjustaugercontrolcableasshownin Serviceand
Maintenancesection.
Unitfailstodischargesnow 1. Chuteassemblyclogged. 1.
Stopengineanddisconnectsparkplugwire.Clean
chuteand insideof augerhousingwithclean-outtool
or stick.
2. Foreignobjectlodgedin auger.
2. Stopengineimmediatelyanddisconnectthe spark
plugwire.Removeobjectfromauger.
3. Augercontrolcableoutofadjustment.
4. Augerbeltlooseor damaged.
3. Adjustaugercontrolcable.
4. Replaceaugerbelt.
lqg_/1 find the a_swez a[_d z[_or{÷on maztagemy[£e,,,_om - [0[ [ree!
Find this and all your other product manual.sonl.ine.
Get answers from our team of home experts.
Get a personaLized maintenance pl.an for your home.
Find information and tools to hel.pwith home projects.
_ managemylife
b_g_t t_ ye_ By S_a_'s
2O
 Loading...