

Page 1
Operator's Manuam
CRAFTSMAN°
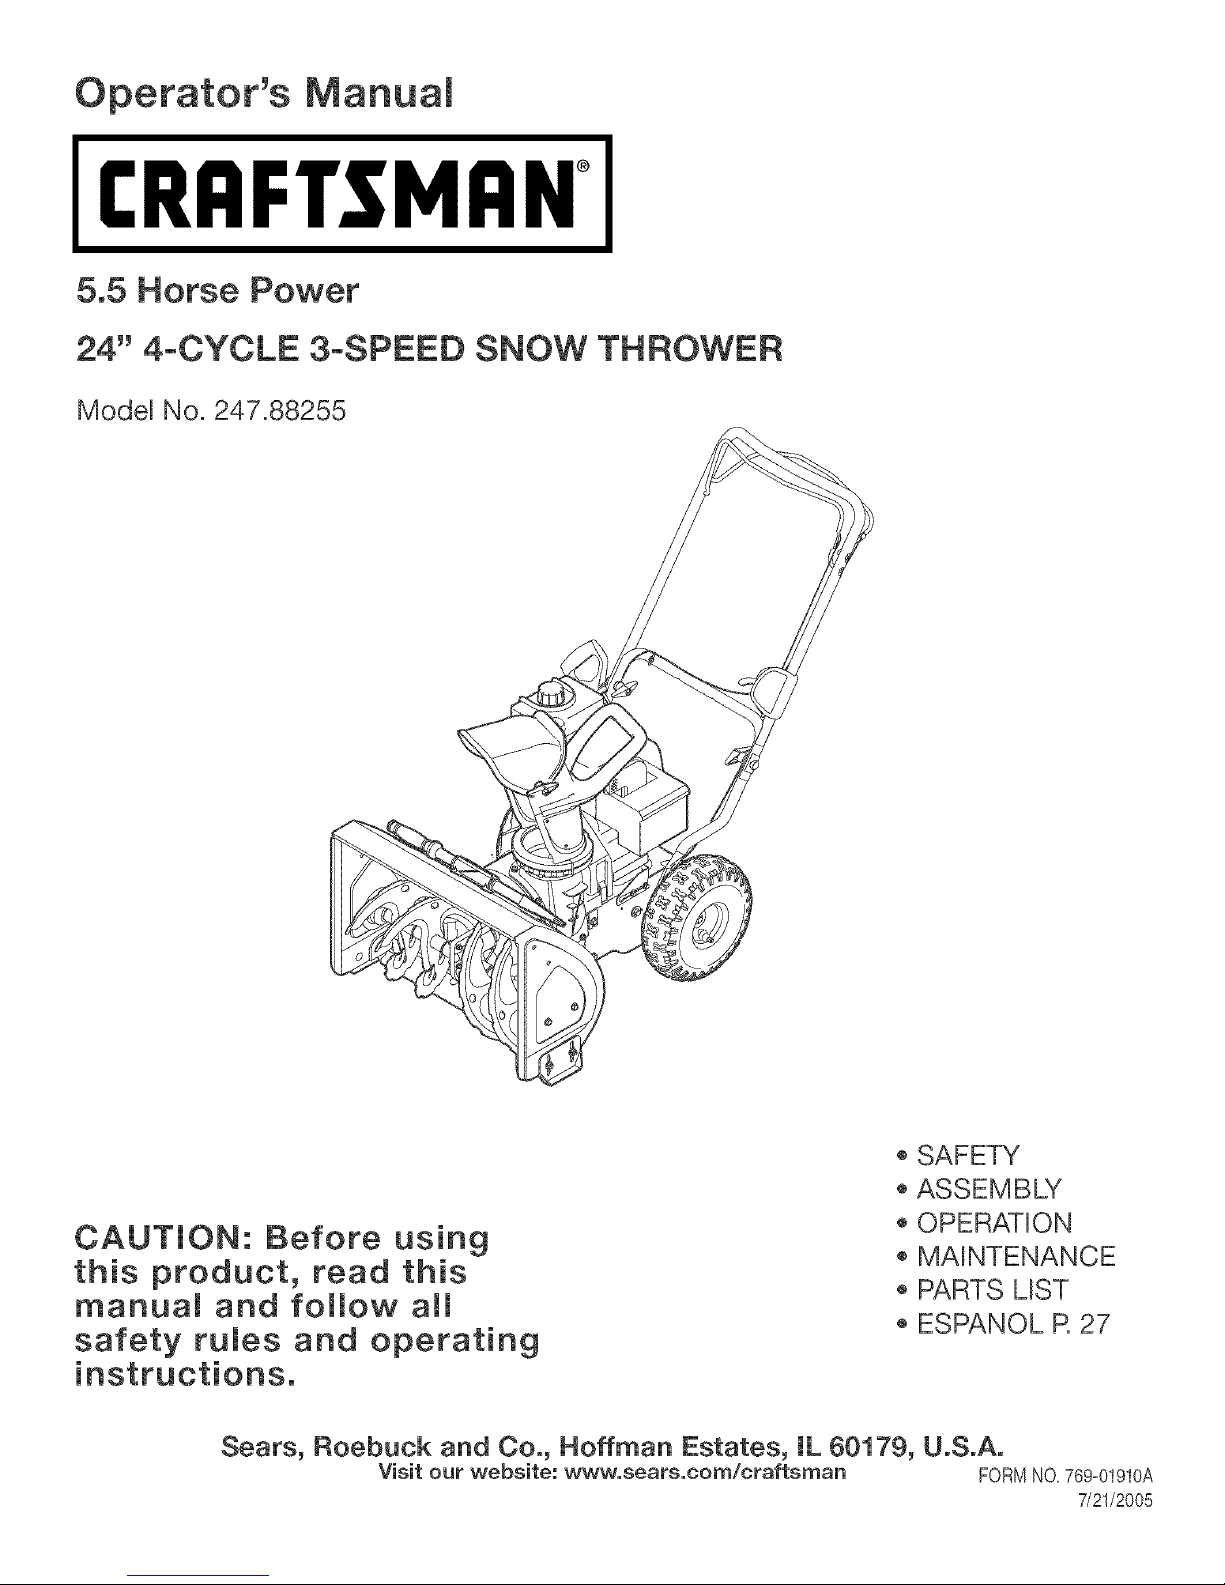
5.5 Horse Power
24" 4-CYCLE 3-SPEED SNOW THROWER
Model No. 247.88255
CAUTION: Before using
this product, read this
manual and follow aim
safety fumes and operating
Sears, Roebuck and Co., Hoffman Estates, IL 60179, U.S.A.
Visit our website: www, sears,com/craftsman FORMNO,769=01910A
o SAFETY
ASSEMBLY
OPERATION
MAINTENANCE
PARTS LIST
ESPANOL R 27
7/21/2005
Page 2

Two-YearWarrantyonCraftsmanSnowThrower
Fortwoyearsfromthedateofpurchase,whenthisCraftsmanSnowThrowerismaintained,lubricatedandtunedupaccordingtotheinstructions
intheowner'smanual,Searswillrepair,freeofcharge,anydefectinmaterialandworkmanship,IfthisCraftsmansnowthrowerisusedfor
commercialorrentalpurposes,thiswarrantyapplbsforonly30daysfromthedateofpurchase,
Thiswarrantydoesnotcover:
, Expendabbitemswhichbecomewornduringnormaluse,suchasskidshoes,shaveplateandsparkplugs,
• Repairsnecessarybecauseofoperatorabuseornegligence,includingbentcrankshaftsandthefailuretomaintaintheequipmentaccording
totheinstructionscontainedintheowner'smanual
WARRANTYSERVICEISAVAILABLEBYRETURNINGTHECRAFTSMANSNOWTHROWERTOTHENEAREST
SEARSPARTS&REPAIRCENTERINTHEUNITEDSTATES,
ThiswarrantyapplbsonlywhilethisproductisinuseintheUnitedStates,
TOLOCATETHENEARESTSEARSPARTS&REPAIRCENTERORTOSCHEDULESERVICE,
SIMPLY"CONTACTSEARSAT1-800-4-MY-HOME®,
Thiswarrantygivesyouspecificlegalrightsandyoumayalsohaveotherrightswhichmayvaryfromstatetostate,
SEARS,ROEBUCKANDCO.,D/817WA,HOFFMANESTATES,IL60179
Repair Protection Agreements
Congratulationson makinga smart purchase,YournewCraftsman®
productisdesignedand manufacturedforyearsof dependabbopera-
tion,Butlikeallproducts,it mayrequirerepairfromtimetotime,That's
whenhavinga RepairProtectionAgreementcansaveyoumoneyand
aggravation,
Here'swhat'sincludedintheAgreement:
, Expertserviceby our 12,000professionalrepairspecialists
, Unlimitedserviceand nochargefor partsand laboronall covered
repairs
, Productreplacementif yourcoveredproductcan'tbefixed
, Discountof 10%fromregularpriceofserviceandservice-related
partsnotcoveredby theagreement;also,10%off regularpriceof
preventivemaintenancecheck
• Fasthelpby phone- phonesupportfromaSearstechnicianon
productsrequiringin-homerepair,plusconvenientrepair
scheduling
PurchaseaRepairProtectionAgreementnowandprotectyourself
fromunexpectedhassleandexpense,
OnceyoupurchasetheAgreement,a simplephonecall isall thatit
takesfor youto scheduleservice,Youcancallanytimedayornight,or
schedub a serviceappointmentonline,
Searshasover12,000professionalrepairspecialists,whohave
accessto over4,5millionqualitypartsandaccessories,That'sthe
kindd
professionalismyou cancountonto helpprolongthe lifeof yournew
purchaseforyearstocome,PurchaseyourRepairProtectionAgree-
menttoday!
Somelimitations and exclusions apply. For prices and additional
information call 1-800o827o6655.
Sears Installation Service
ForSearsprofessionalinstallationofhomeappliances,garagedoor
openers,waterheaters,andother majorhomeitems,in theU,S,A,call
1-800-4-MY-HOME®
Horse Power: 5.5
Engine Oil: SAE 5W_30
Fuel: Unleaded Gasoline
Spark Plug:
Engine: Tecumaeh LH195SP
Model Number .............................................................
Serial Number ..............................................................
Date of Purchase ..........................................................
Record the model number, serial number
and date of purchase above
Page 3
1.KEEPAWAYFROMROTATINGIMPELLER
ANDAUGER.CONTACTWITHIMPELLEROR
AUGERCANAMPUTATEHANDSANDFEET,
2. USECLEAN-OUTTOOLTOUNCLOG
DISCHARGECHUTE.
3. DISENGAGECLUTCHLEVERS,STOPENGINE,
ANDREMAINBEHINDHANDLESUNTILALL
MOVINGPARTSHAVESTOPPEDBEFORE
UNCLOGGINGORSERVICINGMACHINE,
4. TOAVOIDTHROWNOBJECTSINJURIES,
NEVERDIRECTDISCHARGEATBYSTANDERS.
USEEXTRACAUTIONWHENOPERATINGON
GRAVELSURFACES.
5. READOPERATOR'SMANUAL.
Thissymbolpointsout
importantsafetyinstructions
which,if notfollowed,could
endangerthepersonalsafety
and/or propertyofyourself
and others.Readand follow
all instructionsinthis manual
beforeattemptingtooperate
this machine.Failuretocom-
plywith theseinstructions
mayresultinpersonalinjury.
Whenyouseethis symbol.
HEED ITS WARNING!
Your Responsibility
Restrictthe use of this
powermachineto persons
who read,understandand
follow the warningsand
instructionsin this manual
and on the machine.
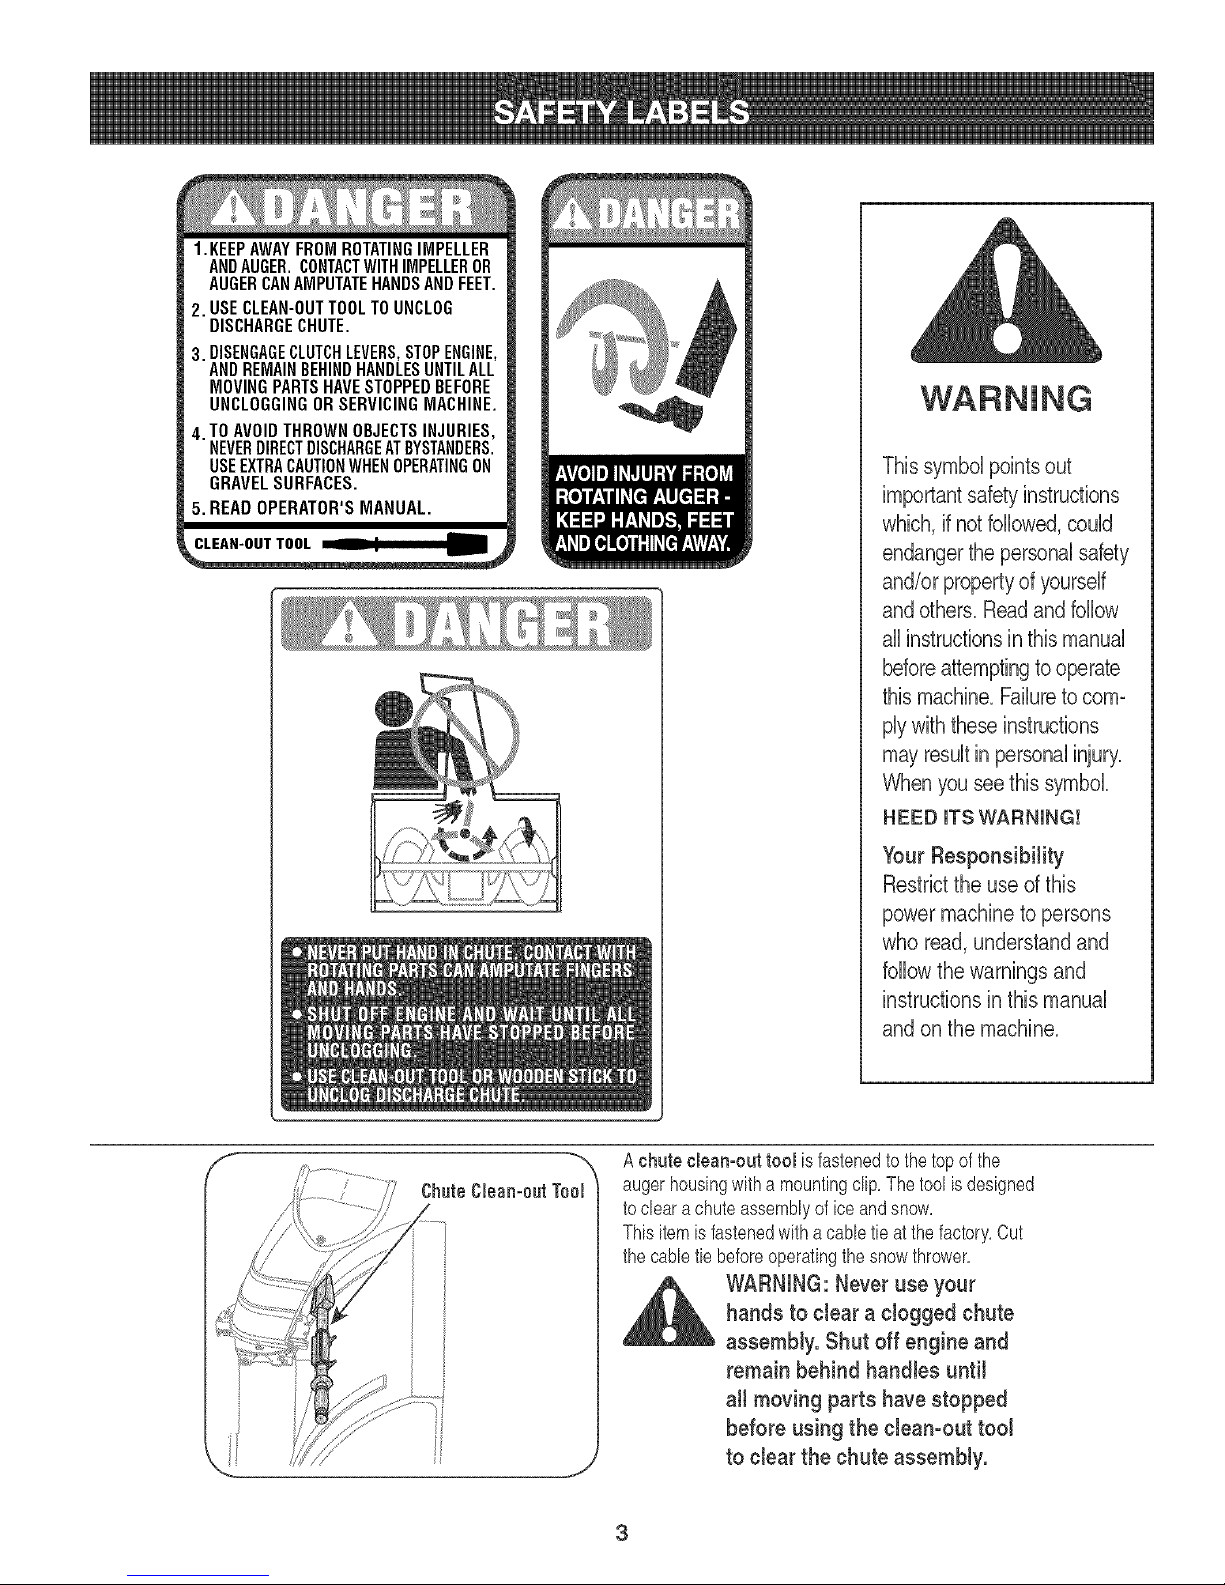
A chute cleamout tool isfastenedto thetopofthe
augerhousingwitha mountingclip,The toolis designed
tocleara chuteassemblyof iceandsnow,
Thisitemisfastenedwithacabletie atthefactory,Cut
thecabletiebeforeoperatingthesnowthrower,
,_ WARNING:Never use your
hands to clear a clogged chute
assembly. Shut off engine and
remain behind handles until
all moving parts have stopped
before using the clean-out tool
to clear the chute assembly.
3
Page 4

WARNING:EngineExhaust,someofitsconstituents,andcertainvehiclecomponentscontainoremit
chemicalsknowntoStateofCaliforniatocausecancerandbirthdefectsorotherreproductiveharm.
DANGER:ThismachinewasbuilttobeoperatedaccordingtotherulesforsafeoperationinthismanualAswithanytype
ofpowerequipment,carelessnessorerroronthepartoftheoperatorcanresultinseriousinjury.Thismachineiscapable
ofamputatinghandsandfeetandthrowingobjects.Failuretoobservethefollowingsafetyinstructionscouldresultin
seriousinjuryordeath.
WARNING:Thissymbolpointsoutimportantsafetyinstructionswhich,ifnotfollowed,couldendangerthe
personalsafetyand/orpropertyofyourselfandothers.Readandfollowallinstructionsinthismanualbefore
attemptingtooperatethismachine.Failuretocomplywiththeseinstructionsmayresultinpersonalinjury.
WhenyouseethissymbolHEEDITSWARNING!
YourResponsibility:Restricttheuseofthispowermachinetopersonswhoread,understandandfollowthewarnings
andinstructionsinthismanualandonthemachine.
Training
1 Read,understand,andfollowallinstructionsonthe machineand inthe
manual(s)beforeattemptingto assembleandoperate.Keepthismanualin
asafeplaceforfutureandregularreferenceandfor orderingreplacement
parts.
2. Befamiliarwithallcontrolsandtheir properoperation.Knowhowtostop
themachineanddisengagethemquickly.
3. Neverallowchildrenunder14yearsoldto operatethis machine.Ohildren
14yearsold andovershouldreadandunderstandthe operationinstruc-
tionsand safetyrulesinthismanualandshouldbetrainedandsupervised
bya parent.
4. Neverallowadultsto operatethismachinewithoutproperinstruction.
5. Thrownobjectscancauseseriouspersonalinjury'.Planyoursnow-throwing
patterntoavoiddischargeofmaterialtowardroads,bystandersandthelike.
6. Keepbystanders,helpers,petsandchildrenatleast75feetfromthe
machinewhileit is in operation.Stopmachineifanyoneentersthe area.
7. Exercisecautionto avoidslippingor falling,especiallywhenoperatingin
reverse.
Preparation
1. Thoroughlyinspectthe areawherethe equipmentisto beused.Remove
all doormats,newspapers,sleds,boards,wiresand otherforeignobjects,
whichcould betrippedoveror thrownbythe auger/impeller.
2. Alwayswearsafetyglassesor eyeshieldsduringoperationandwhile
performingan adjustmentor repairto protectyoureyes.Thrownobjects
whichricochetcancauseseriousinjuryto the eyes.
3. Donotoperatewithoutwearingadequatewinteroutergarments.Donot
wearjewelry,longscarvesor otherlooseclothing,whichcouldbecome
entangledinmovingparts.Wearfootwearwhichwillimprovefootingon
slipperysurfaces.
4. Useagroundedthree-wireextensioncordand receptaclefor all unitswith
electricstart engines.
5. Adjustcollectorhousingheightto cleargravelor crushedrocksurfaces.
6. Disengageall controlleversbeforestartingthe engine.
7. Neverattempttomake anyadjustmentswhileengineis running,except
wherespecificallyrecommendedinthe operator'smanual.
8. Letengineandmachineadjusttooutdoortemperaturebefore startingto
clearsnow.
9. To avoidpersonalinjuryor propertydamageuseextremecarein handling
gasoline.Gasolineisextremelyflammableandthe vaporsareexplosive.
Seriouspersonalinjurycanoccurwhengasolineisspilledonyourself
or yourclothes,whichcanignite.Washyourskin andchangeclothes
immediately.
a. Useonlyan approvedgasolinecontainer.
b. Extinguishall cigarettes,cigars,pipesandothersourcesof ignition.
c. Neverfuelmachineindoors.
d. Neverremovegascapor addfuelwhilethe engineishot or running.
e. Allowenginetocoolat leasttwo minutesbeforerefueling.
f. Neveroverfill fuel tank.Filltankto nomorethan_J2inchbelowbottom
offiller neckto providespacefor fuelexpansion.
g. Replacegasolinecapandtightensecurely.
h. Ifgasolineisspilled,wipeit offthe engineandequipment.Move
machinetoanotherarea. Wait5 minutesbeforestartingthe engine.
Neverstorethemachineorfuelcontainer insidewherethere isan open
flame,sparkorpilot light(e.g.furnace,water heater,space heater,
clothesdryeretc.).
Allowmachineto coolat least5minutesbeforestoring.
4
Page 5
Operation
1. Do notputhandsorfeet nearrotatingparts,inthe auger/impellerhousing
orchuteassembly.Contactwiththerotating partscan amputatehands
andfeet.
2. Theauger/impellercontrolleveris asafetydevice.Neverbypassits
operation.Doingso makesthemachineunsafeand maycausepersonal
injury.
3. Thecontrolleversmust operateeasilyin both directionsandautomatically
returntothe disengagedpositionwhenreleased.
4. Neveroperatewitha missingor damagedchuteassembly.Keepall safety
devicesin placeandworking.
5. Neverrunan engineindoorsorin a poorlyventilatedarea.Engineexhaust
containscarbonmonoxide,anodorlessanddeadlygas.
6. Do notoperatemachinewhileunderthe influenceofalcoholordrugs.
7. Mufflerandenginebecomehotand cancausea burn. Donottouch.
8. Exerciseextremecautionwhenoperatingonorcrossinggravelsurfaces.
Stayalertforhiddenhazardsortraffic,
9. Exercisecautionwhenchangingdirectionandwhileoperatingon slopes.
10.Planyoursnow-throwingpatterntoavoiddischargetowardswindows,
walls,carsetc.Thus, avoidingpossiblepropertydamageorpersonal
injurycausedbya ricochet.
11.Neverdirectdischargeatchildren,bystandersandpetsor allowanyonein
frontofthe machine.
12.Donotoverloadmachinecapacityby attemptingto clearsnowat toofast
ofa rate.
13.Neveroperatethis machinewithoutgood visibilityor light.Alwaysbesure
ofyourfootingandkeepa firmholdonthe handles.Walk,neverrun.
14.Disengagepowertothe auger/impellerwhentransportingor notin use.
15.Neveroperatemachineat hightransport speedson slipperysurfaces.
Lookdownand behindand usecarewhenbackingup.
16.Ifthe machineshouldstart tovibrateabnormally,stopthe engine,
disconnectthespark plugwireandgroundit againsttheengine.Inspect
thoroughlyfordamage.Repairany damagebeforestartingand operating.
17.Disengageallcontrolleversandstop enginebeforeyouleavethe operat-
ingposition(behindthe handles).Waituntiltheauger/impellercomes
toa completestopbeforeuncloggingthechuteassembly,makingany
adjustments,or inspections.
18.Neverputyour handinthe dischargeor collectoropenings.Alwaysuse
theclean-outtool providedto unclogthedischargeopening.Do notunclog
chuteassemblywhileengineis running.Shutoff engineandremain
behindhandlesuntilallmovingpartshavestoppedbeforeunclogging.
19.Useonlyattachmentsandaccessoriesapprovedbythe manufacturer(e.g.
wheelweights,tirechains,cabsetc.).
20.Ifsituationsoccurwhich arenotcoveredinthis manual,usecareand
goodjudgment.ContactyourSearsServiceCenterfor assistance.
Maintenance & Storage
1. Nevertamperwith safetydevices.Checktheir properoperationregularly.
Referto the maintenanceandadjustmentsectionsofthis manual.
2. Beforecleaning,repairing,or inspectingmachinedisengageallcontrol
leversand stoptheengine.Waituntiltheauger/impellercometo a
completestop.Disconnectthespark plugwireand groundagainstthe
enginetopreventunintendedstarting.
3. Checkboltsandscrewsfor propertightnessatfrequentintervalsto keep
the machineinsafeworkingcondition.Also,visuallyinspectmachinefor
anydamage.
4. Donotchangetheenginegovernorsettingor over-speedtheengine.The
governorcontrolsthe maximumsafeoperatingspeedof the engine.
5. Snowthrowershaveplatesandskidshoesaresubjecttowearand
damage.Foryoursafetyprotection,frequentlycheckallcomponentsand
replacewithoriginal equipmentmanufacturer's(OEM)parts only."Useof
partswhich donotmeetthe originalequipmentspecificationsmayleadto
improperperformanceandcompromisesafety!"
6. Checkcontrolsperiodicallytoverifythey engageanddisengageproperly
andadjust,if necessary.Refertothe adjustmentsectioninthisoperator's
manualforinstructions.
7. Maintainorreplacesafetyand instructionlabels,as necessary.
8. Observeproperdisposallawsandregulationsfor gas, oil,etc.to protect
the environment.
9. Priortostoring,run machineafewminutestoclear snowfrommachine
andpreventfreezeup of auger/impeller.
10.Neverstorethemachineorfuelcontainerinside wherethere isanopen
flame,sparkorpilot lightsuchas awaterheater,furnace,clothes dryer
etc.
11.Alwaysrefertothe operator'smanualfor properinstructionsonoff-season
storage.
Do not modify engine
Toavoidseriousinjury'or death,do notmodifyengineinanyway.Tampering
withthegovernorsettingcanleadto a runaway'engineandcauseitto operate
at unsafespeeds.Nevertamperwithfactorysettingofenginegovernor.
Notice regarding Emissions
Engineswhicharecertifiedto complywithCaliforniaandfederalEPAemission
regulationsforSORE(SmallOffRoadEquipment)arecertifiedtooperateon
regularunleadedgasoline,andmay'includethefollowingemissioncontrolsys-
tems:EngineModification(EM)andThreeWayCatalyst(TWC)if soequipped.
Engine identification Decal
Thisdecalindicatestheengine'smodelnumber,specificationandthe dateof
manufacture.Pleaselookatthe decalontheengineofyourequipmentand
recordtheseinformationforfuturereference.
Theengineidentificationdecalalsoincludesenginelifespecificationsforthe
emissions-relatedusefullifeperiodof the engine.This periodrelatestothe
emissioncompliancelifeascertifiedbyEPAand/orCARB.Tofindthe lifeperiod
specificationoftheengine,pleasereadthe enginedecalandlocatethe letter
(enclosedbyquotationmarks)betweenthewordsModerateandLifePeriod.
Matchone ofthefollowingletterswiththeletterprintedonyourdecal.For
example,HMSK80modelsaredesignatedas:
"C"-- 250hours
"B"-- 500 hours
"A"-- 1000hours
Page 6
IMPORTANT:This unitisshippedwiththeenginefull ofoil After
assembly,see page10forfuel andoildetails,
Removing From Carton
1, Cutthecornersofthecartonandlaythesidesflaton theground,
Removeall packinginserts,
2, Theupperhandleispackagedunattachedtothe snowthrower,
thoughconnectedbycanes, Movethe snowthrowerandupper
handleoutof thecarton,
3, Makecertainthecartonhasbeencompletelyemptiedbefore
discardingit,
Before Assembly
\
\
_lb ARNING:Disconnect the spark plug wireand Ground
NOTE:Referencetoright,left,frontor rearof the unitis fromthe
operatingpositionunlessotherwisestated,
itagainstthe engineto prevent unintendedstarting.
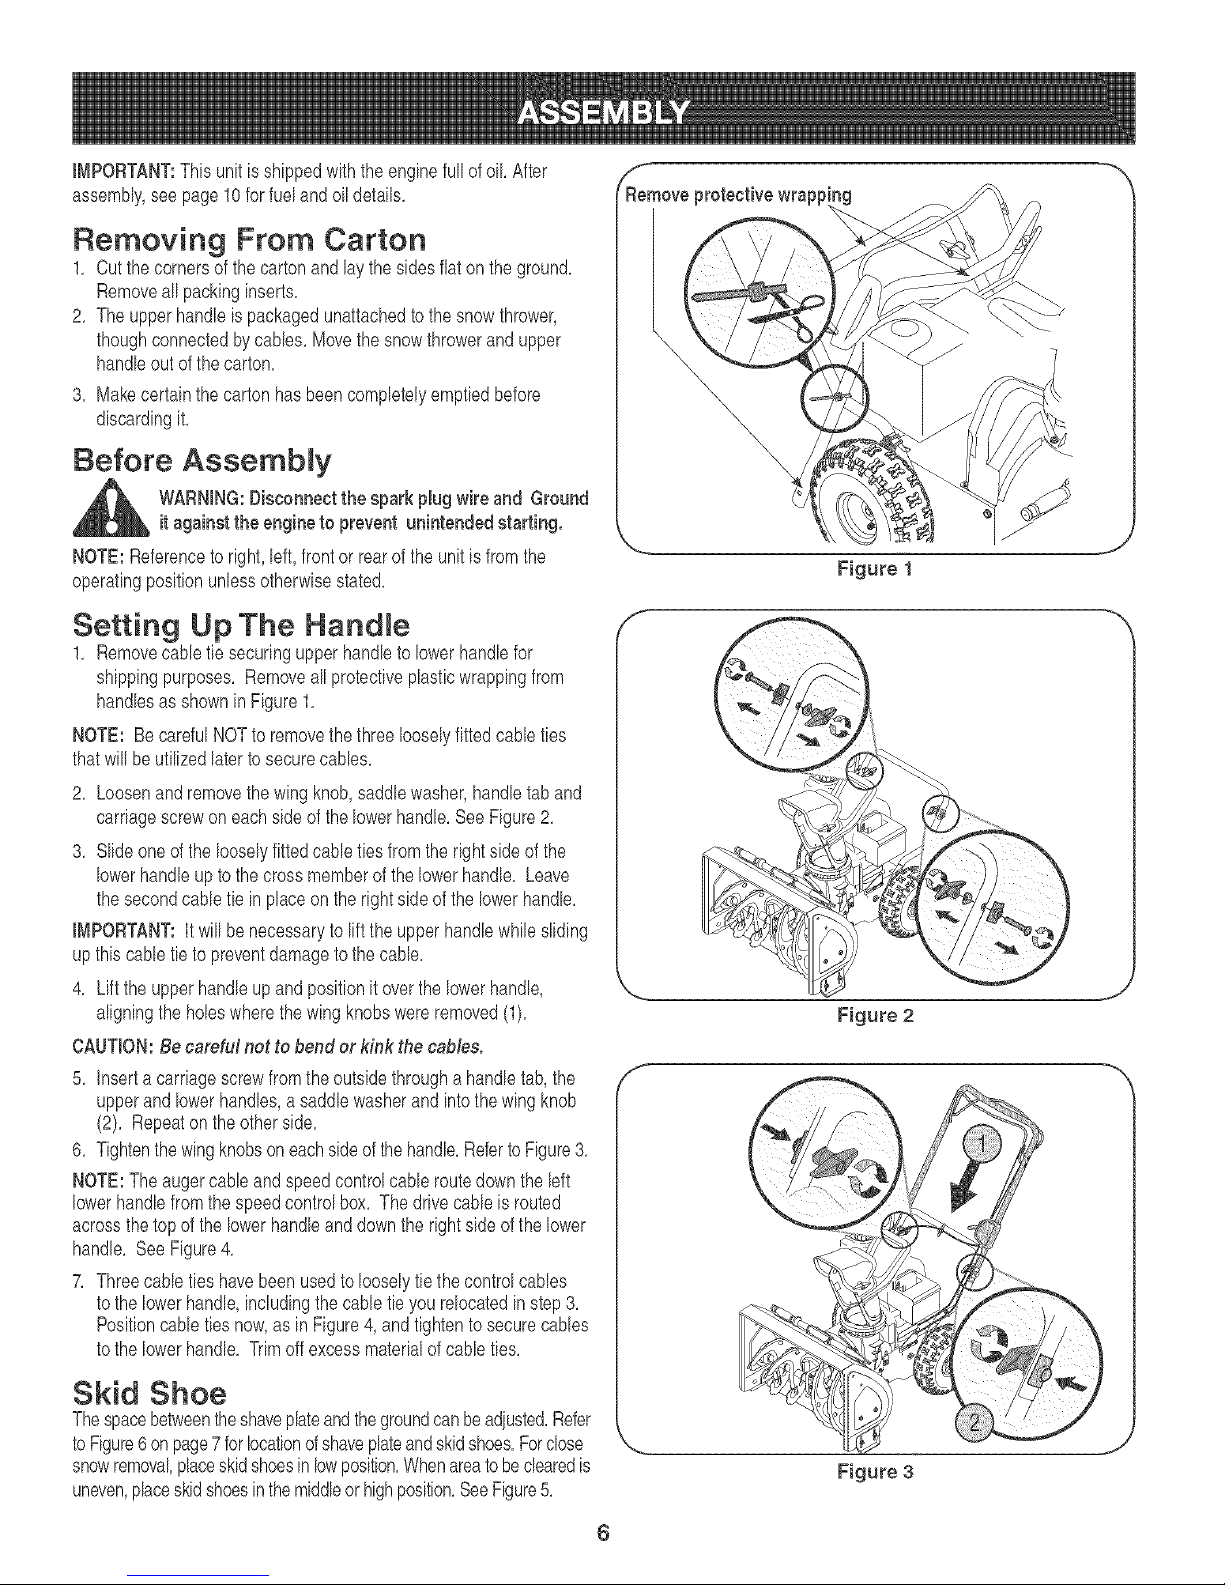
Setting Up The HandJe
1, Removecane tiesecuringupperhandletolowerhandlefor
shippingpurposes,Removeallprotectiveplasticwrappingfrom
handlesasshownin Figure1,
NOTE: BecarefulNOTto removethe threelooselyfittedcane ties
thatwillbeutilizedlatertosecurecanes,
2, Loosenandremovethe wingknob,saddlewasher,handletaband
carriagescrewoneachside ofthe lowerhandle,SeeFigure2,
3, Slideoneofthelooselyfittedcane tiesfromthe rightside ofthe
lowerhandleupto thecross memberof thelowerhandle,Leave
thesecondcane tiein placeonthe rightside ofthelowerhandle,
iMPORTANT:It willbenecessaryto lifttheupperhandlewhilesliding
upthis cane tie topreventdamagetothecane,
4, Liftthe upperhandleupand positionit overthelowerhandle,
aligningtheholeswherethe wingknobswereremoved(1),
CAUTION:Be careful net to bend er kink thecame&
5, inserta carriagescrewfromtheoutsidethrougha handletab,the
upperand lowerhandles,asaddlewasherand intothewingknob
(2), Repeaton the otherside,
6, Tightenthewingknobsoneachsideof thehandle,Referto Figure3,
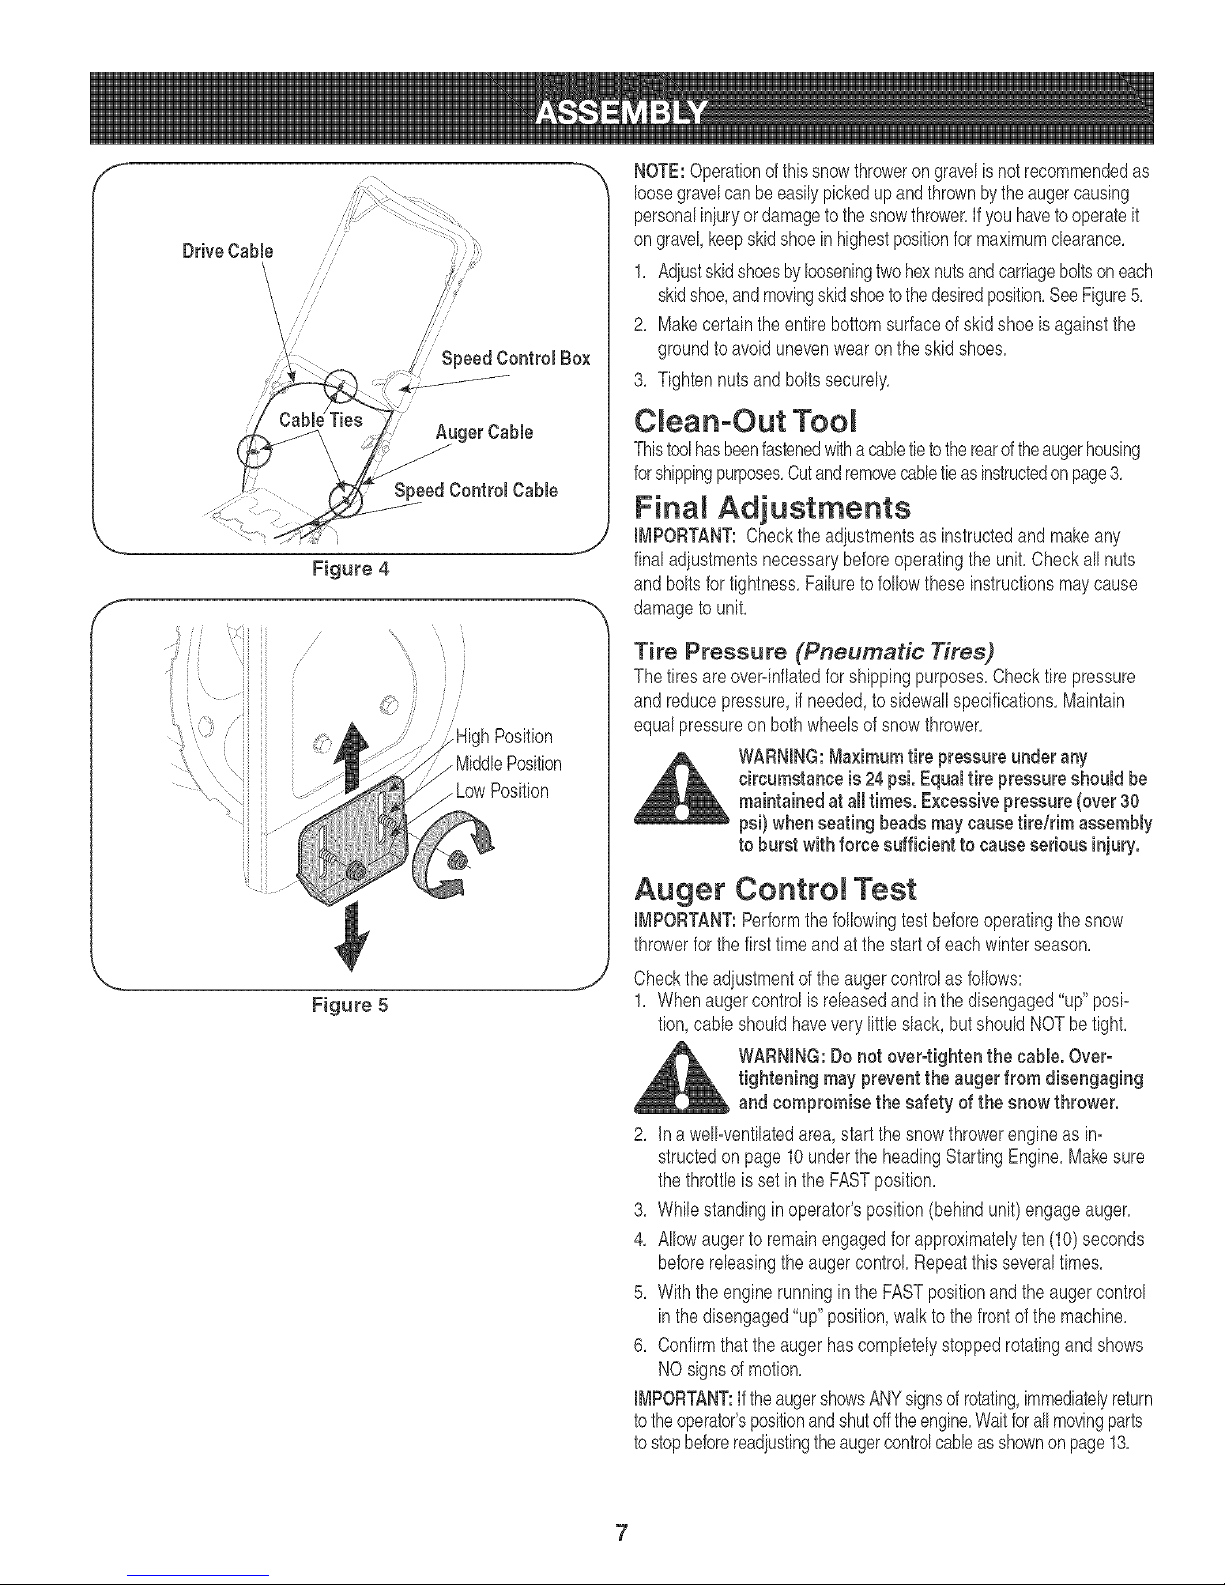
NOTE:The augercane andspeedcontrolcane routedowntheleft
lowerhandlefromthe speedcontrolbox, Thedrivecane is routed
acrossthetopof thelowerhandleanddownthe rightsideofthelower
handle, SeeFigure4,
7, Threecane tieshavebeenusedto looselytiethecontrolcanes
tothe lowerhandle,includingthecane tie yourelocatedinstep3,
Positioncane tiesnow,as in Figure4,and tightentosecurecanes
tothe lowerhandle, Trimoff excessmaterialof cane ties,
Figure 2
f
Skid Shoe
Thespacebetweentheshaveplateandthegroundcanbeadiusted,Refer
toFigure6onpage7forlocationofshaveplateandskidshoes,Fordose
snowremoval,placeskidshoesin lowposition,Whenareatobeclearedis
uneven,placeskidshoesinthemiddleor highposition,SeeFigure5,
Figure 3
6
Page 7
f -m
Drive Cable
Speed Control Box
Figure 4
f
Position
. MiddlePosition
. LowPosition
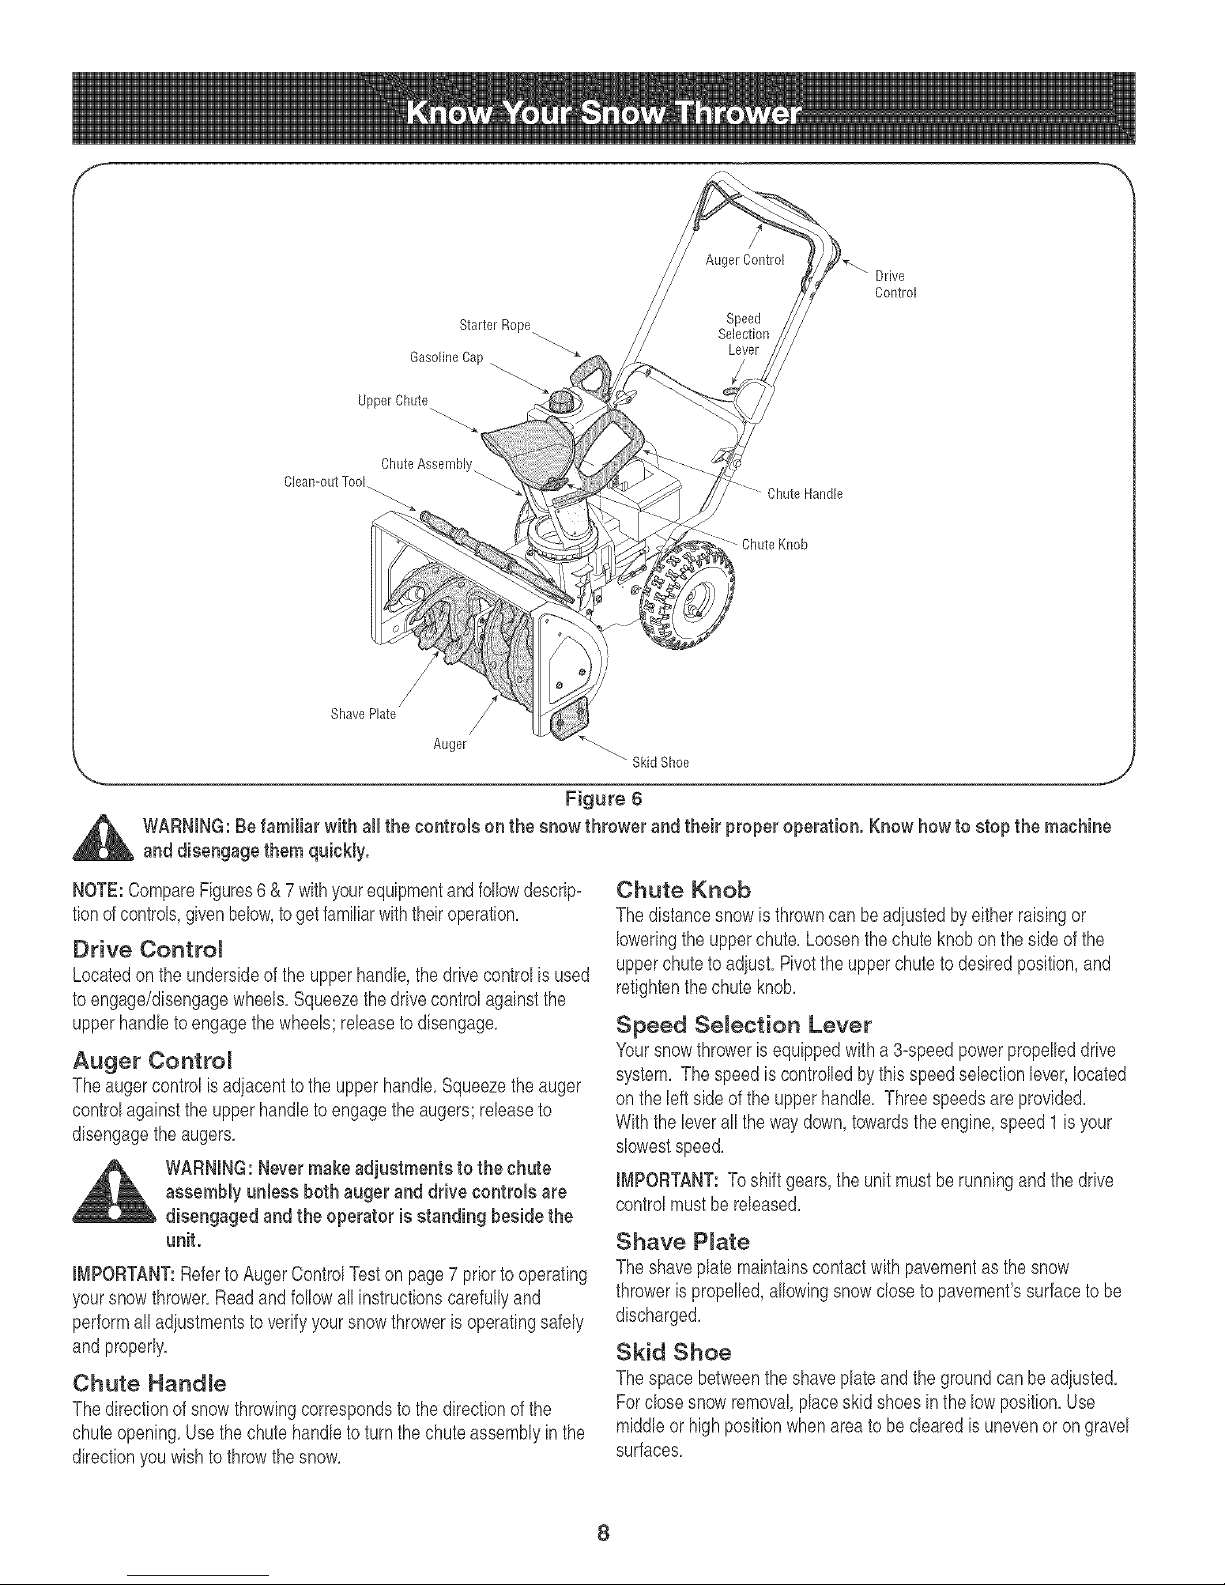
NOTE:Operationofthissnowthrowerongravelisnot recommendedas
loosegravelcanbeeasilypickedupandthrownbytheaugercausing
personaliniuryordamagetothesnowthrower.Ifyouhavetooperateit
on gravel,keepskidshoeinhighestpositionfor maximumclearance.
1. Adiustskidshoesbylooseningtwohexnutsandcarriageboltsoneach
skidshoe,andmovingskidshoetothedesiredposition.SeeFigure5.
2. Makecertainthe entirebottomsurfaceof skidshoeis againstthe
groundtoavoidunevenwearon theskid shoes.
3. Tightennutsandboltssecurely.
C ean-Out TooR
Thistoolhasbeenfastenedwithacabletietotherearoftheaugerhousing
forshippingpurposes.Cutandremovecabletieasinstructedonpage3.
FinaH Adjustments
IMPORTANT:Checktheadiustmentsasinstructedand makeany
finaladjustmentsnecessarybeforeoperatingtheunit.CheckaIInuts
and boltsfortightness.Failuretofollowtheseinstructionsmaycause
damageto unit.
Tire Pressure (Pneumatic Tires)
Thetiresareover=inflatedfor shippingpurposes.Checktirepressure
and reducepressure,ifneeded,tosidewallspecifications.Maintain
equalpressureon bothwheelsofsnowthrower.
WARNING:Ma×imumtire pressure underany
circumstanceis24psi. Equaltire pressureshould be
maintainedatall times. Excessivepressure(over 30
psi)when seating beadsmaycausetire/rim assembly
to burst with force sufficient to causeserious injury.
,... j
Figure 5
Auger Contro Test
IMPORTANT:Performthe followingtestbeforeoperatingthesnow
throwerforthe firsttimeandat thestartofeachwinterseason.
Checkthe adiustmentoftheaugercontrolas follows:
1. Whenaugercontrolis releasedandinthedisengaged"up"posi=
tion,cableshouldhaveverylittleslack,butshouldNOTbetight.
WARNING:Donot over-tighten the cable. Over-
tightening may preventthe auger from disengaging
and compromise the safety of the snow thrower.
2. ina well=ventilatedarea,startthesnowthrowerengineas in=
structedon page10undertheheadingStartingEngine.Makesure
thethrottleisset intheFASTposition.
3. Whilestandinginoperator'sposition(behindunit)engageauger.
4. Allowaugertoremainengagedforapproximatelyten(10)seconds
beforereleasingtheaugercontrol Repeatthisseveraltimes.
5. WiththeenginerunningintheFASTpositionandtheaugercontrol
inthedisengaged"up"position,walkto thefrontof themachine.
6. Confirmthattheaugerhascompletelystoppedrotatingandshows
NOsignsof motion.
IMPORTANT:IftheaugershowsANYsignsofrotating,immediatelyreturn
totheoperator'spositionandshutofftheengine.Waitforallmovingparts
tostopbeforereadjustingtheaugercontrolcableasshownonpage13.
7
Page 8
Gasoline Cap -.
Upper Chute
Drive
Control
Starter Rope
Shave Plate
Chute Assembly_
Chute Handle
Chute Knob
,/
Auger "_ SkidShoe
Clean-out Tool
Figure 6
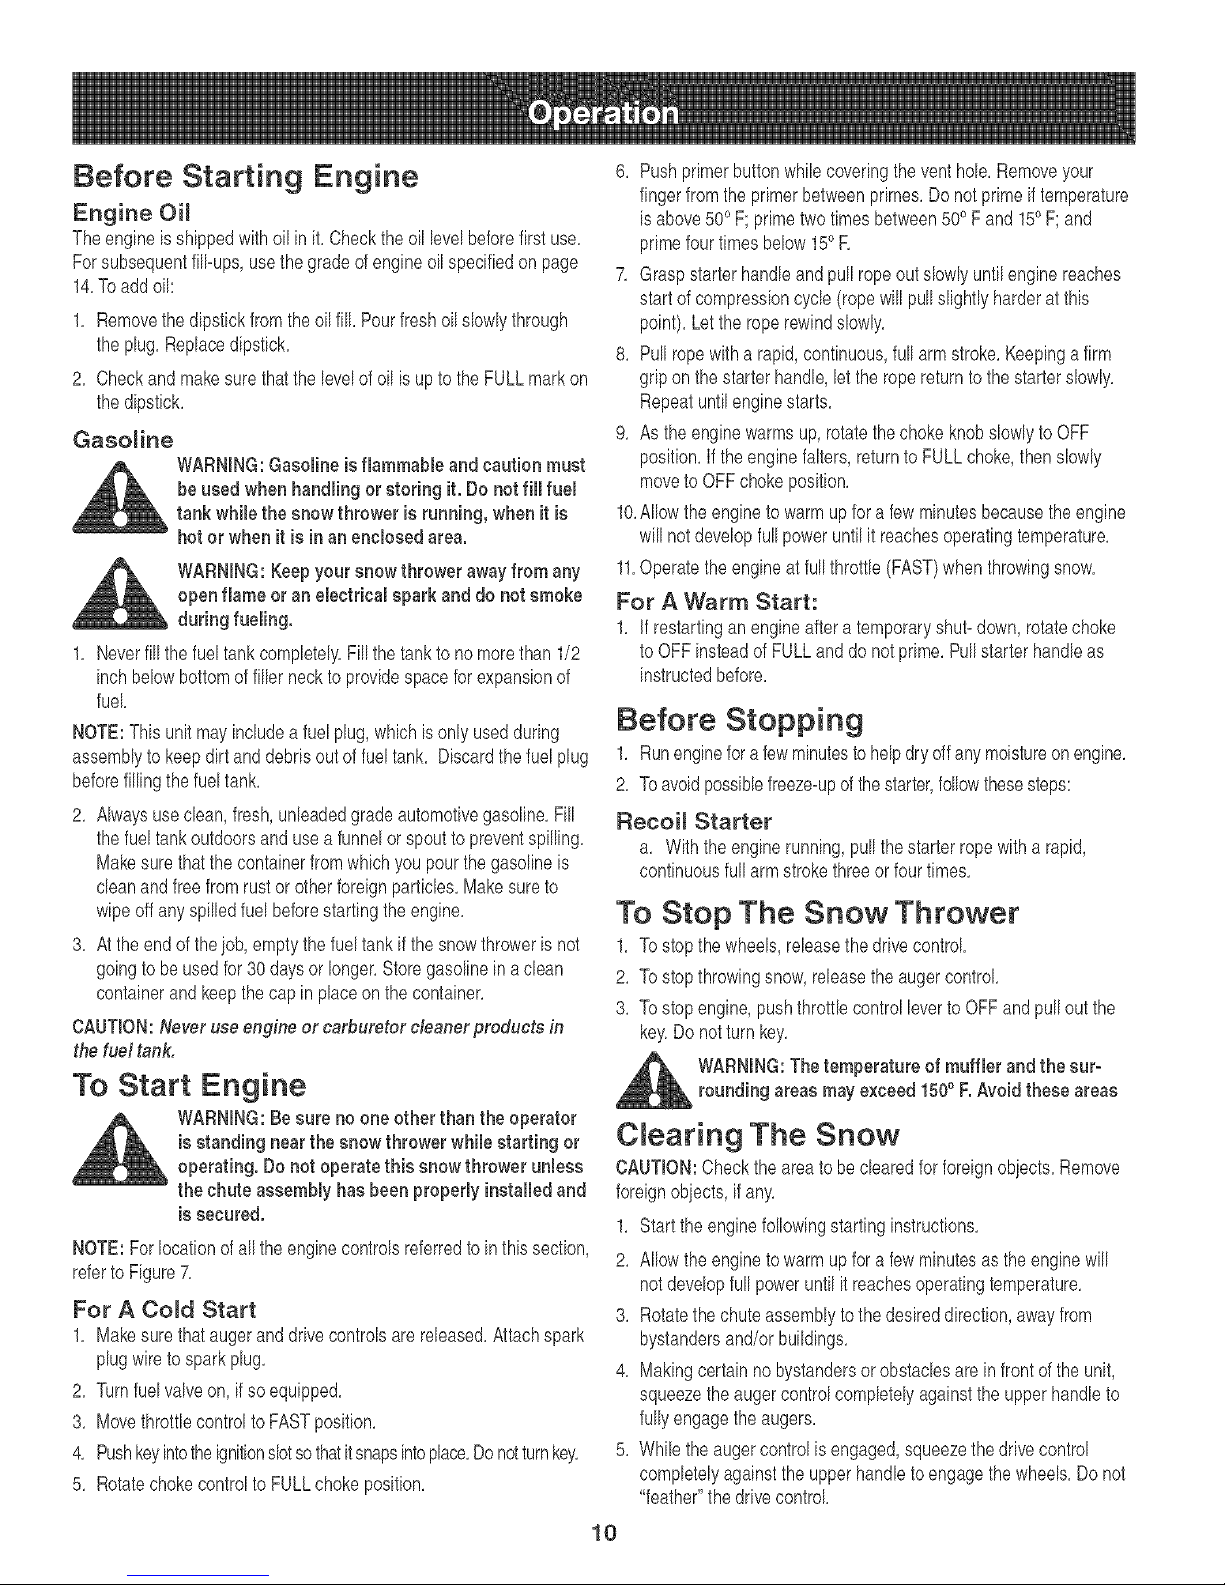
_ ARNING:Be familiar with all the controls onthe snow thrower and their proper operation. Know bowto stop the machine
NOTE:CompareFigures6&7 withyourequipmentandfollowdescrip:
tionof controls,givenbelow,togetfamiliarwiththeiroperation.
Drive Controm
Locatedon theundersideof theupperhandle,thedrivecontrolis used
toengage/disengagewheels.Squeezethe drivecontrolagainstthe
upperhandletoengagethe wheels;releasetodisengage.
Auger Contro_
Theaugercontrolis adiacenttothe upperhandle.Squeezethe auger
controlagainsttheupperhandleto engagetheaugers;releaseto
disengagethe augers.
IMPORTANT:Referto AugerControlTeston page7 priorto operating
yoursnowthrower.Readandfollowallinstructionscarefullyand
performalladiustmentsto verifyyoursnowthrowerisoperatingsafely
andproperly.
Chute HandJe
Thedirectionof snowthrowingcorrespondstothedirectionofthe
chuteopening.Usethe chutehandletoturnthechuteassemblyinthe
directionyouwishtothrowthe snow.
and disengagethem quickly.
WARNING:Nevermakeadjustments to the chute
assembly unless bothaugerand drive controls are
disengaged and the operatorisstanding besidethe
unit.
Chute Knob
Thedistancesnowisthrowncan beadiustedbyeitherraisingor
loweringthe upperchute.Loosenthechuteknobontheside ofthe
upperchutetoadiust.Pivottheupperchuteto desiredposition,and
retightenthechuteknob.
Speed Selection Lever
Yoursnowthrowerisequippedwitha 3-speedpowerpropelleddrive
system. Thespeediscontrolledbythisspeedselectionlever,located
on theleftside oftheupperhandle.Threespeedsare provided.
Withtheleverallthewaydown,towardstheengine,speed1isyour
slowestspeed.
iMPORTANT:Toshift gears,theunit mustbe runningand thedrive
controlmustbereleased.
Shave P_ate
Theshaveplatemaintainscontactwithpavementasthesnow
throwerispropelled,allowingsnowcloseto pavement'ssurfacetobe
discharged.
Skid Shoe
Thespacebetweentheshaveplateandthe groundcan be adiusted.
Forclosesnowremoval,placeskidshoesin the lowposition.Use
middleorhighpositionwhenareato beclearedisunevenor on gravel
surfaces.
8
Page 9

r_luffler
Carburetor
Cow
Ignition
Key
Choke
Control
Throttb /
Spark (ye//owcap GasolineCap
OilFill
Rug onengineblock)
\
Primer Starter
OilDrain
Figure7
,\
Recoil
Starter
Handle
C_ean Out Too_
Thecban outtoolis providedtounclogthedischargeopening,Donot
unclogdischargechutewhileengineisrunning,
WARNING:Before unclogging, shut off engine and
remainbehind handles until all moving partshave
stopped eompbtely. Neverputyour hand in the
discharge or collector openings. Always use the
chart-out tool provided.
Choke Contro_
Activatingchokecontrolclosesthechokeplateoncarburetorandaids
instartingengine,Forinformationonchokeusage,seepage10ofthis
manual
Recoi_ Starter & Starter Handme
Thismotorisfittedwitha recoilactionpullstartanda mittengrip
handleforeasyaccesswhilewearingglovesormittens,
mgnition Key
Theignitionkeyis necessaryfortheengineto start,Insertkeyand
snapinplace;do notturnittostart/stoptheunit, Removekeywhen
theunit isnot in use,
J
Primer
Depressingprimerforcesfuel directlyintoengine's
carburetortoaidincold=weatherstarting,Refertothe
startinginstructionsintheOperationsectionofthis
manualforproperprimerusage,
Oi_ Fill
Removeoil captoaddoil, Refertopage14forcheckingandadding
oil instructions,
Gasoline Cap
Removegas capto add fuel,Unitrunsonregulargas,
NOTE:Thisunit mayincludeafuel plug,whichisonlyusedduring
assemblyto keepdirtanddebrisoutof fueltank, Discardthefuel plug
beforefillingthefueltank,
Throttle Control
Thethrottb controlislocatedontheengine,It regulatesthe
speedof theengineandabe stopstheengine,Theimageto
theright representsthe speedsofthethrottbcontrol,
©
@
9
Page 10
Before Starting Engine
Engine OH
Theengineis shippedwithoil in it.Checkthe oil levelbeforefirstuse.
Forsubsequentfill-ups,usethegradeofengineoil specifiedon page
14.Toaddoil:
1. Removethedipstickfromthe oilfill. Pourfreshoilslowlythrough
theplug.Replacedipstick.
2. Checkandmakesurethatthelevelofoilisupto theFULLmarkon
thedipstick.
Gasoline
WARNING:Gasoline is flammable and caution must
be used when handling or storing it. Donot fill fuel
tank while the snow thrower is running,when it is
hot or whenit is in an enclosed area.
WARNING:Keepyour snow thrower awayfrom any
open flame or an electrical sparkanddo notsmoke
during fueling.
1. Neverfillthefueltankcompletely.Fillthetankto nomorethan 1/2
inchbelowbottomof fillerneckto providespaceforexpansionof
fuel
NOTE:Thisunit mayincludeafuel plug,whichisonlyusedduring
assemblytokeepdirtanddebrisout offuel tank. Discardthefuelplug
beforefillingthefuel tank.
2. Alwaysuseclean,fresh,unleadedgradeautomotivegasoline.Fill
thefueltankoutdoorsandusea funnelor spoutto preventspilling.
Makesurethatthe containerfromwhichyou pourthegasolineis
cleanandfreefromrustor otherforeignparticles.Makesureto
wipeoff anyspilledfuel beforestartingtheengine.
3. Attheendoftheiob,emptythefueltank if thesnowthroweris not
goingto beusedfor30 daysor longer.Storegasolineinaclean
containerand keepthecapin placeonthe container.
CAUTION:Never useengine or carburetor cleanerproducts in
the fuel tank.
6. Pushprimerbuttonwhilecoveringtheventhole.Removeyour
fingerfromthe primerbetweenprimes.Donot primeif temperature
is above500F;primetwo timesbetween500F and 150F;and
primefour timesbelow150R
7. Graspstarterhandleandpull ropeoutslowlyuntilenginereaches
startof compressioncycle(ropewill pullslightlyharderatthis
point).Letthe roperewindslowly.
8. Pull ropewitha rapid,continuous,fullarmstroke.Keepinga firm
gripon thestarterhandle,lettheropereturnto thestarterslowly.
Repeatuntilenginestarts.
9. Astheenginewarmsup,rotatethechokeknobslowlyto OFF
position.If theenginefalters,returnto FULLchoke,thenslowly
moveto OFFchokeposition.
lO.Allowtheengineto warmupfora fewminutesbecausethe engine
willnot developfullpoweruntilit reachesoperatingtemperature.
11.Operatetheengineat fullthrottle(FAST)whenthrowingsnow.
For A Warm Start:
1. if restartinganengineafteratemporaryshut-down,rotatechoke
toOFFinsteadof FULLanddo notprime.Pullstarterhandleas
instructedbefore.
Before Stopping
1. Runenginefora fewminutestohelpdryoffanymoistureonengine.
2. Toavoidpossiblefreeze-upofthestarter,followthesesteps:
Reeoi_ Starter
a. Withthe enginerunning,pullthestarterropewitha rapid,
continuousfullarmstrokethreeorfour times.
To Stop The Snow Thrower
1. Tostopthewheels,releasethe drivecontrol
2. Tostopthrowingsnow,releasetheaugercontrol
3. Tostopengine,pushthrottlecontrollevertoOFFandpulloutthe
key'.Donotturnkey.
To Start Engine
WARNING:Besure no oneother than the operator
is standing nearthe snow thrower while starting or
operating. Do not operatethis snow thrower unless
the chute assembly hasbeenproperly installed and
is secured.
NOTE:Forlocationofallthe enginecontrolsreferredtointhissection,
referto Figure7.
For A Co_d Start
1. Makesurethataugeranddrivecontrolsarereleased.Attachspark
plugwireto sparkplug.
2. Turnfuelvalveon,ifsoequipped.
3. Movethrottlecontrolto FASTposition.
4. Pushkeyintotheignitionslotsothatitsnapsintoplace.Donotturnkey'.
5. Rotatechokecontrolto FULLchokeposition.
C earing The Snow
CAUTION:Checkthe areatobeclearedforforeignobiects.Remove
foreignobiects,if any.
1. Starttheenginefollowingstartinginstructions.
2. Allowtheenginetowarmupfora fewminutesasthe enginewill
notdevelopfullpoweruntilit reachesoperatingtemperature.
3. Rotatethe chuteassemblyto thedesireddirection,awayfrom
bystandersand/orbuildings.
4. Makingcertainnobystandersorobstaclesareinfrontof the unit,
squeezetheaugercontrolcompletelyagainsttheupperhandleto
fullyengagetheaugers.
5. Whiletheaugercontrolisengaged,squeezethedrivecontrol
completelyagainsttheupperhandletoengagethewheels.Do not
"feather"thedrh,'econtrol
10
Page 11
6. Asthesnowthrowerstartsto move,maintaina firm holdon the
handle,andguidethe snowthroweralongthepathto becleared.
7. Releasethe augeranddrivecontrolstostopthe snowthrowing
actionandforwardmotion.
NOTE:Yourunitisequippedwithaclutch inthetransmission.Ifthe
wheelsstopturningwhiletryingtodischargelargevolumesofsnow,
immediatelydisengagethedrivecontrolandallowtherotatingaugers
todischargesnowfromthe housing.Reducetheclearingwidthand
continueoperation.
8. Oneachsucceedingpass,readiustthechuteassemblytothe
desiredpositionandslightlyoverlapthepreviouslyclearedpath.
Speed Selector Lever
Yourunitis equippedwitha 3-speedpowerpropelleddrive system.
Speedposition1,whentheleverisdepressedall the waydowntoward
themotor,isSlow. Speedposition2 isalittlefasterand3 is the
fastest. SeeFigure8.
f
Speed
Selector
Lever _
\.,
NOTE:It is notrecommendedthatyouoperatethissnowthroweron
gravelas loosegravelcanbeeasilypickedup andthrownbythe auger
causingpersonaliniuryand/ordamagetothe snowthrower.
4. if forsomereason,youhaveto operatethesnowthrowerongravel,
keeptheskidshoeinthe highestpositionformaximumclearance
betweenthegroundandtheshaveplate.
5. Cleanthe snowthrowerthoroughlyaftereachuse.
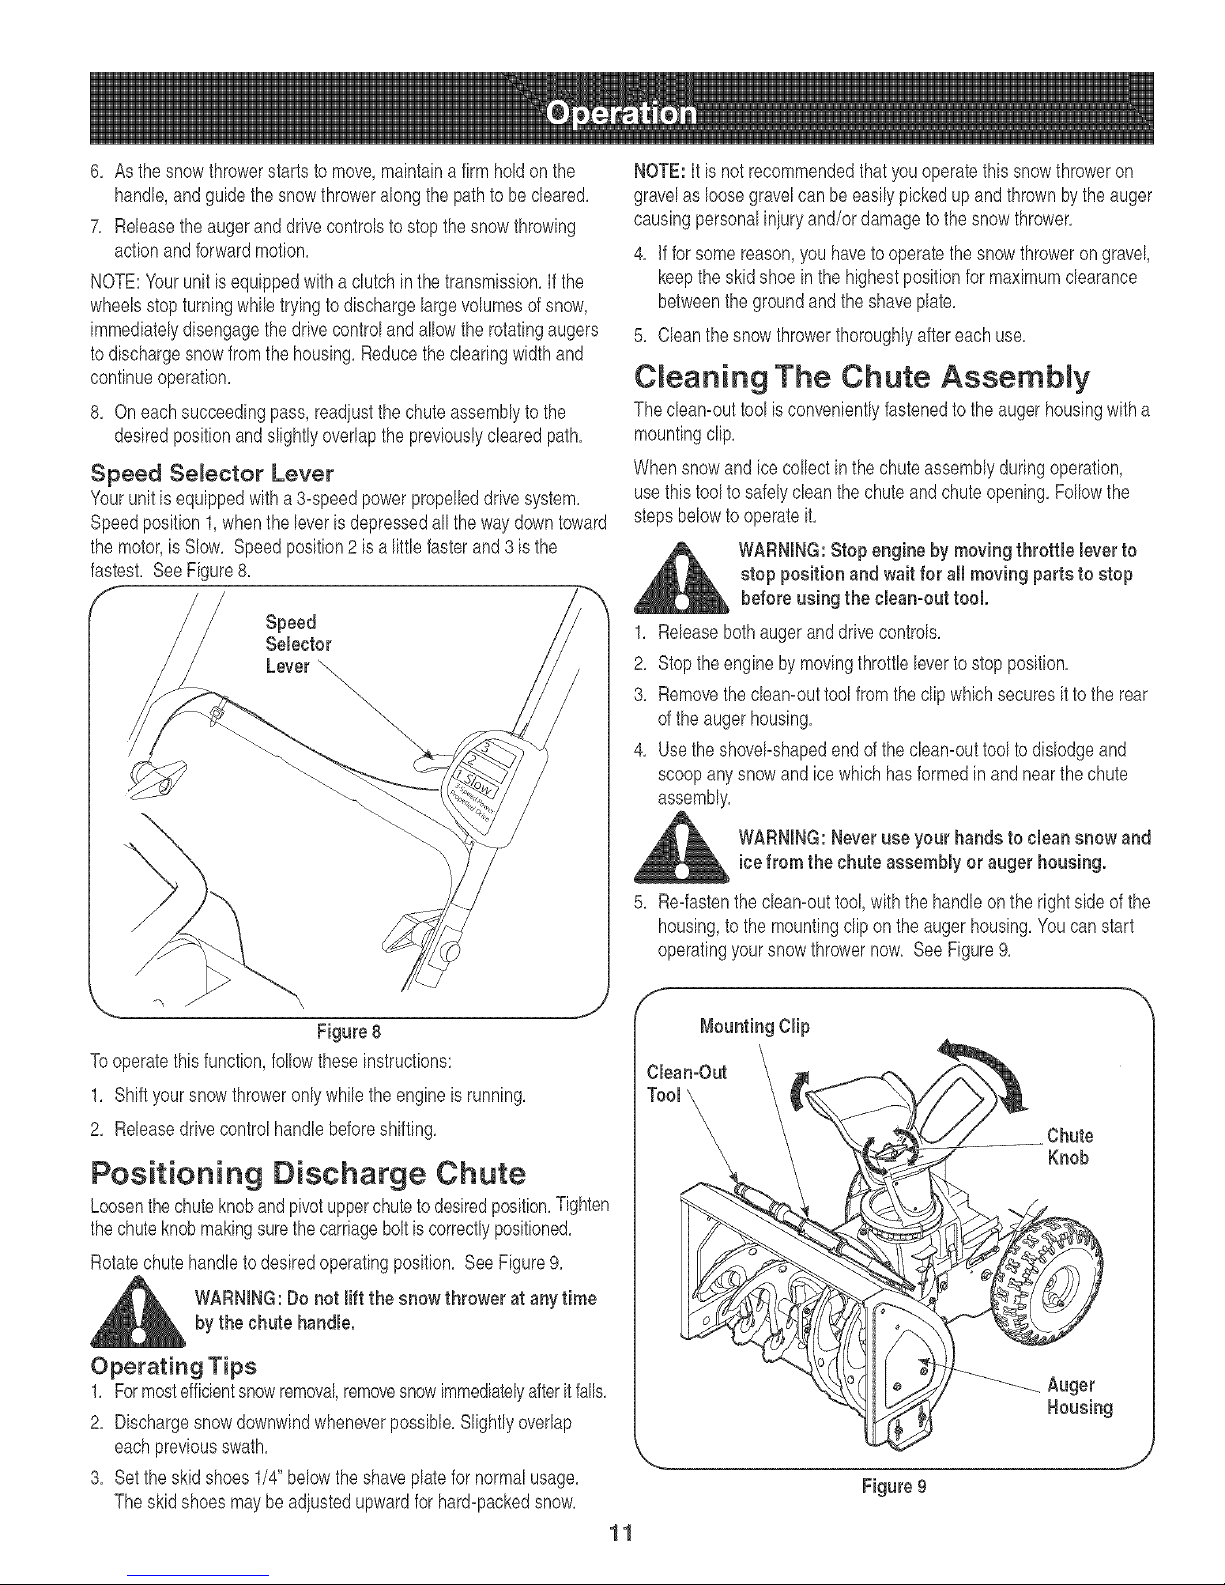
C eaning The Chute Assembly
Thecleamouttoolis convenientlyfastenedtotheaugerhousingwitha
mountingclip.
Whensnowandice collectinthe chuteassemblyduringoperation,
usethistool tosafelycleanthechuteandchuteopening.Followthe
stepsbelowtooperateit.
_L ARNING:Stop engine by moving throttle leverto
1. Releasebothaugeranddrh,'econtrols.
2. Stoptheengineby movingthrottleleverto stopposition.
3. Removethecleamouttoolfromtheclipwhichsecuresitto the rear
ofthe augerhousing.
4. Usethe shovel_shapedendofthecleamouttooltodislodgeand
scoopanysnowandice whichhasformedin andnearthechute
assembly.
stop position and wait for all moving parts to stop
before using the clean-out tool.
Figure 8
Tooperatethisfunction,followtheseinstructions:
1. Shiftyoursnowthroweronlywhiletheengineis running.
2. Releasedrive controlhandlebeforeshifting.
Positioning Discharge Chute
Loosenthechuteknobandpk_otupperchutetodesiredposition.Tighten
thechuteknobmakingsurethecarriageboltiscorrectlypositioned.
Rotatechutehandleto desiredoperatingposition. SeeFigure9.
_ll ARNING:Do not lift the snow thrower atanytime
Operating Tips
1. Formostefficientsnowremoval,removesnowimmediatelyafteritfalls.
2. Dischargesnowdownwindwheneverpossible.Slightlyoverlap
eachpreviousswath.
3. Settheskidshoes1/4"belowtheshaveplatefornormalusage.
Theskidshoesmaybeadjustedupwardforhard-packedsnow.
by the chute handle.
WARNING:Neveruseyour handsto clean snow and
icefrom the chute assembly or auger housing.
5. Re-fastenthe eleamouttool,withthehandleonthe rightsideofthe
housing,tothemountingclipontheaugerhousing.Youcanstart
operatingyoursnowthrowernow. SeeFigure9.
f
Mounting Clip
Chute
Knob
Auger
Housing
Figure9
11
Page 12
GeneraR Recommendations
1, Alwaysobservesafetyruleswhenperformingany maintenance,
2, Thewarrantyon thissnowthrowerdoesnotcoveritemsthathave
beensubiectedtooperatorabuseor negligence,Toreceivefull
valuefromthe warranty,operatormustmaintainthesnowthrower
asinstructedinthismanual,
3, Periodicallycheckall fastenersand hardwaretomakesurethese
aretight,
WARNING: Beforeservicing, repairing,lubricatingor
inspecting, disengage all controls and stop engine.
Wait until all moving parts havecometo a complete
stop.Disconnectsparkplug wireandgrounditagainst
the engineto preventunintendedstarting.Alwayswear
safety glasses during operation or while performing
anyadjustmentsor repairs.
Replacing the Shave P ate
and Skid Shoes
Theshaveplateandskidshoesonthe bottomofthe snowthrowerare
subiectto wear,Theseshouldbecheckedperiodicallyandreplaced
whennecessary
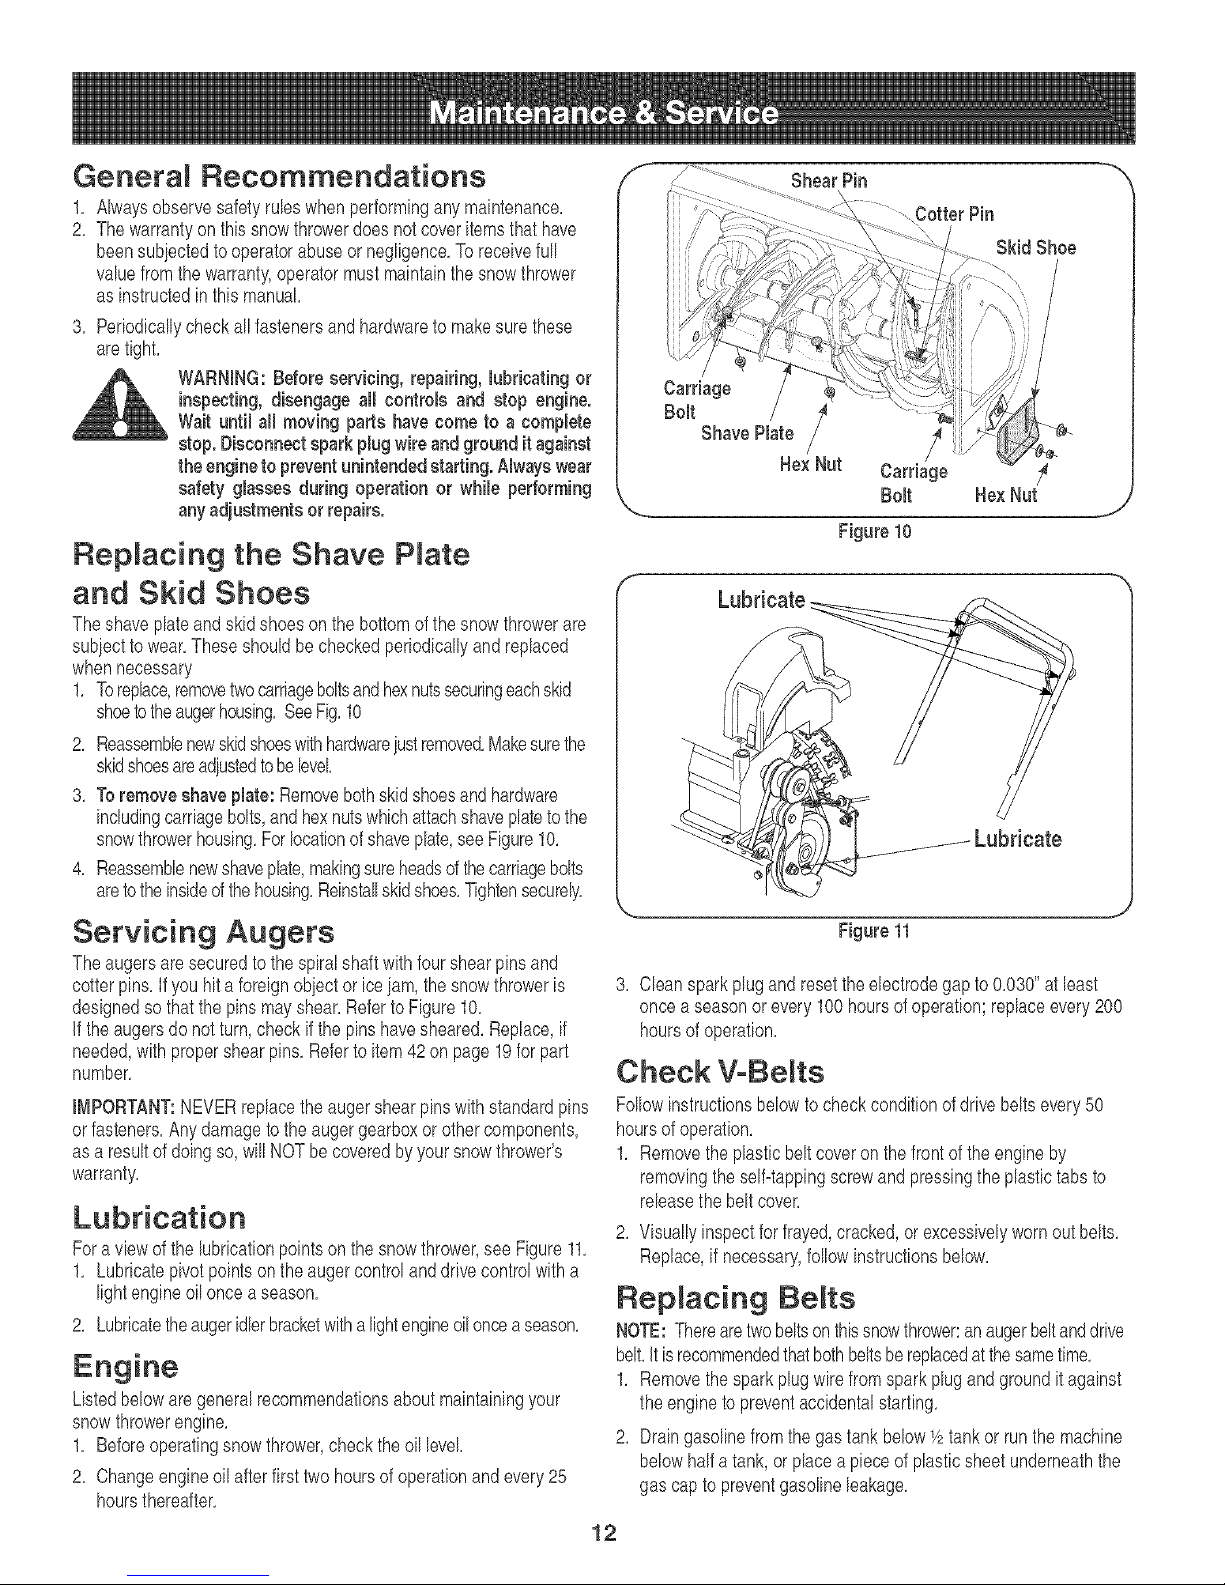
1, Toreplace,removetwocarriageboltsandhexnutssecuringeachskid
shoetotheaugerhousing,SeeFig,10
2, Reassemblenewskidshoeswithhardwareiustremoved,Makesurethe
skidshoesareadiustedtobelevel
3, Toremoveshaveplate:Removebothskidshoesandhardware
includingcarriagebolts,andhexnutswhichattachshaveplateto the
snowthrowerhousing,Forlocationofshaveplate,seeFigure10,
4, Reassemblenewshaveplate,makingsureheadsof thecarriagebolts
aretothe insideof thehousing,Reinstallskidshoes,Tightensecurely,
f
Carriage
ShavePlate _
Bolt / /
,.... j
Shear Pin
Cotter Pin
Skid Shoe
Hex Nut Carriage
Bolt HexNut
Figure10
Lubricate
Servicing Augers
Theaugersaresecuredtothe spiralshaftwithfourshearpinsand
cotterpins,Ifyou hita foreignobjector iceiam,thesnowthroweris
designedsothatthepinsmayshear,RefertoFigure10,
if the augersdonotturn,checkifthe pinshavesheared,Replace,if
needed,withpropershearpins,Referto item42on page19forpart
number,
IMPORTANT:NEVERreplacetheaugershearpinswithstandardpins
orfasteners,Anydamagetotheaugergearboxorothercomponents,
asa resultof doingso,willNOTbecoveredbyyoursnowthrower's
warranty,
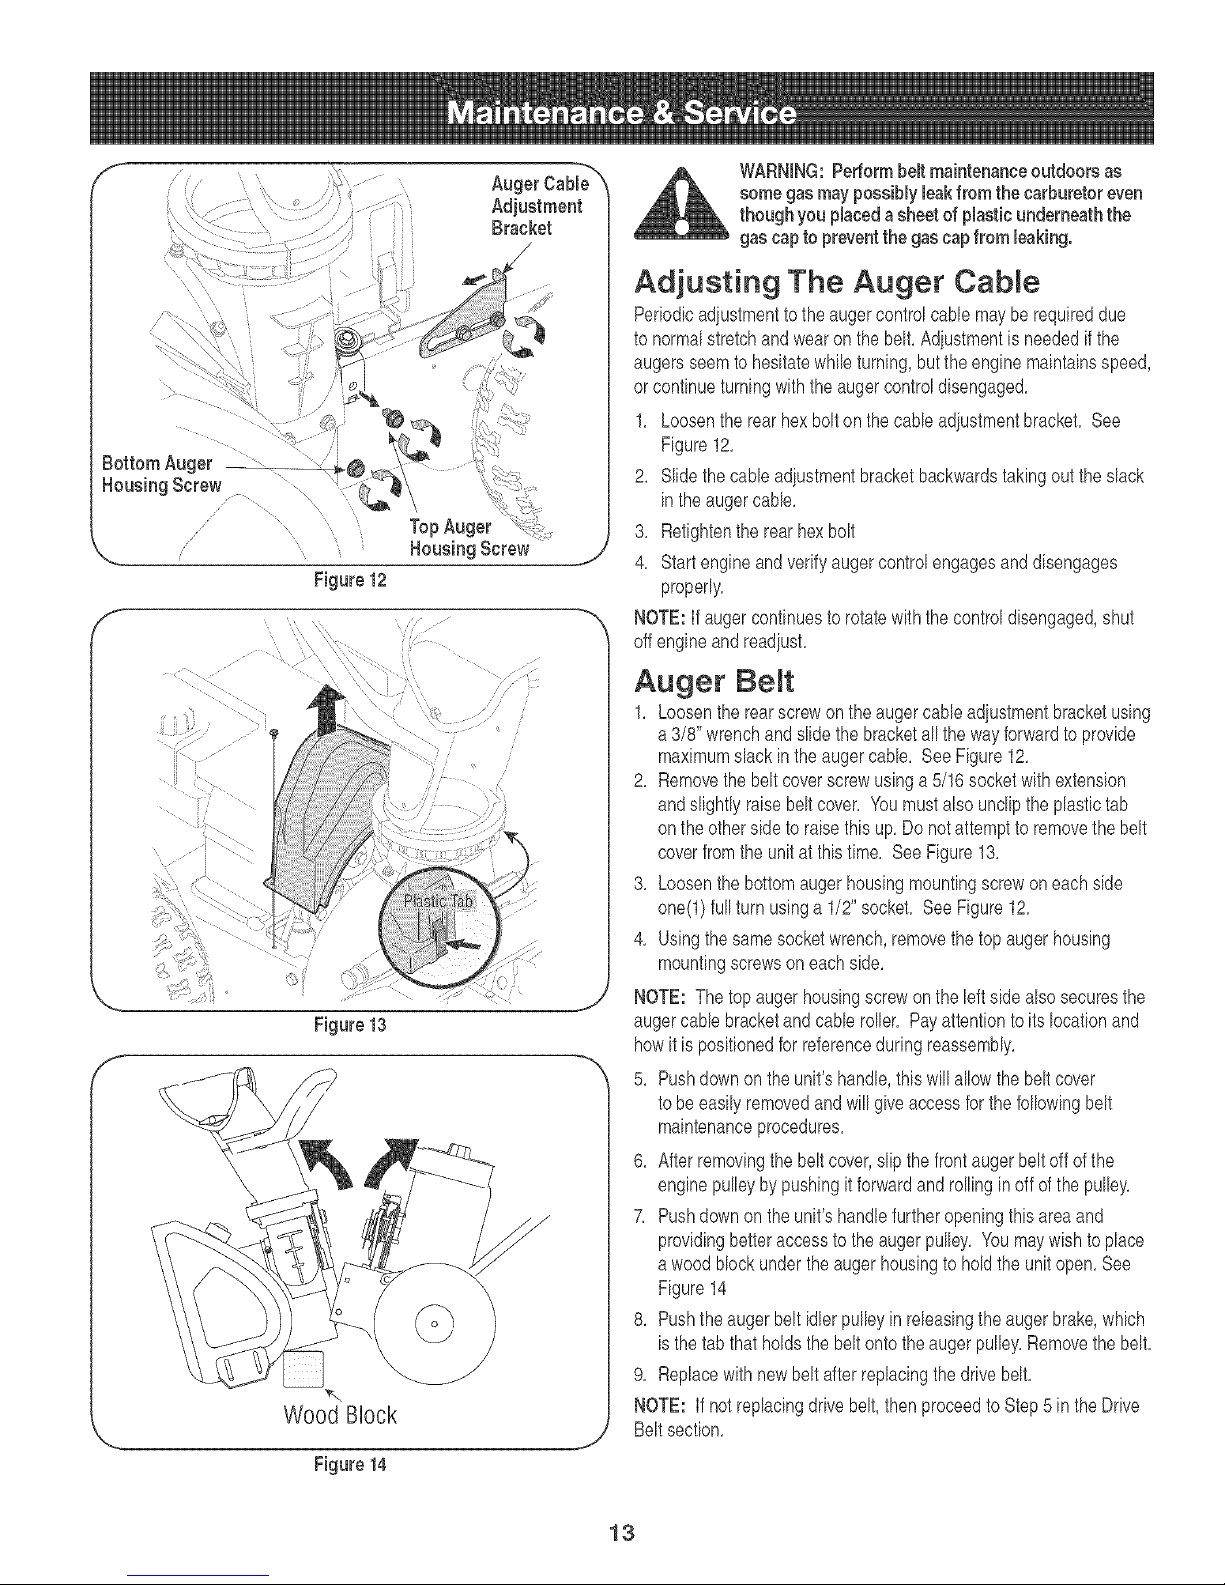
Lubrication
Fora viewof thelubricationpointson thesnowthrower,see Figure11,
1, Lubricatepivotpointsonthe augercontrolanddrivecontrolwitha
lightengineoiloncea season,
2, Lubricatetheaugeridlerbracketwithalightengineoiloncea season,
Listedbelowaregeneralrecommendationsaboutmaintainingyour
snowthrowerengine,
1, Beforeoperatingsnowthrower,checktheoil level
2, Changeengineoilafterfirst two hoursof operationandevery25
hoursthereafter,
Figure11
3, Cleansparkplugandresettheelectrodegap to0,030"atleast
oncea seasonorevery100hoursofoperation;replaceevery200
hoursof operation,
Check V-BeRts
Followinstructionsbelowtocheckconditionofdrivebeltsevery50
hoursofoperation,
1, Removetheplasticbeltcoveron thefrontoftheengineby
removingtheself=tappingscrewandpressingtheplastictabs to
releasethe beltcover,
2, Visuallyinspectfor frayed,cracked,or excessivelywornout belts,
Replace,if necessary,followinstructionsbelow,
Replacing BeRts
NOTE:Therearetwobeltsonthissnowthrower:anaugerbeltanddrive
belt,It isrecommendedthatbothbeltsbereplacedatthesametime,
1, Removethesparkplugwirefromsparkplugandgrounditagainst
theengineto preventaccidentalstarting,
2, Draingasolinefromthe gastankbelow1/2tankor runthemachine
belowhalf atank,or placeapieceof plasticsheetunderneaththe
gascap topreventgasolineleakage,
12
Page 13
f
WARNING:Performbeltmaintenanceoutdoorsas
somegasmaypossibly leakfrom thecarburetoreven
thoughyou placedasheetofplasticunderneaththe
gascap topreventthe gascap from leaking.
Adjusting The Auger Cable
Periodicadiustmentto theaugercontrolcablemayberequireddue
to normalstretchandwearonthe belt,Adiustmentis neededifthe
augersseemto hesitatewhib turning,buttheenginemaintainsspeed,
or continueturningwiththe augercontroldisengaged,
1, Loosentherearhex boltonthe cabb adiustmentbracket, See
Figure12,
2, Slidethecabb adiustmentbracketbackwardstakingouttheslack
intheaugercabb,
TopAuger
/ i
.... ..... H?us!ngS e ,_j
Figure12
f
3, Retightentherearhexbolt
4, Startengineandverifyaugercontrolengagesanddisengages
properly,
NOTE:If augercontinuestorotatewiththe controldisengaged,shut
off engineandreadiust,
Auger Beret
1, Loosentherearscrewontheaugercableadjustmentbracketusing
a 3/8" wrenchandslidethebracketall thewayforwardto provide
maximumslackinthe augercable, SeeFigure12,
2, Removethebeltcoverscrewusinga5/16 socketwithextension
andslightlyraisebeltcover, Youmustabe uncliptheplastictab
on theothersideto raisethis up,Donotattemptto removethe belt
coverfromtheunit atthistime, SeeFigure13,
3, Loosenthebottomaugerhousingmountingscrewoneachside
one(l) fullturnusinga 1/2"socket, SeeFigure12,
4, Usingthe samesocketwrench,removethetopaugerhousing
mountingscrewson eachside,
NOTE: The topaugerhousingscrewonthe leftsideabesecuresthe
Figure13
f
\
Wood Block
Figure14
augercabb bracketandcabb roller, Payattentionto itslocationand
howit is positionedforreferenceduringreassembly,
5, Pushdownon the unit'shandle,thiswillallowthe beltcover
tobe easilyremovedandwillgiveaccessfor thefollowingbelt
maintenanceprocedures,
6, Afterremovingthe beltcover,slipthefrontaugerbeltoffofthe
enginepulleybypushingit forwardandrollingin offofthe pulley,
7, Pushdownon the unit'shandlefurtheropeningthisareaand
providingbetteraccessto theaugerpulley, Youmaywishtoplace
a woodblockunderthe augerhousingtoholdtheunitopen,See
Figure14
8, Pushtheaugerbeltidlerpulleyin releasingthe augerbrake,which
isthe tabthat holdsthebeltontotheaugerpulley,Removethebelt,
9, Replacewithnewbeltafterreplacingthedrivebelt,
NOTE: If not replacingdrivebelt,thenproceedto Step5 intheDrive
Beltsection,
J
13
Page 14
Drive Be t
NOTE:To replacetheDriveBelt,youmustfirstfollowAugerBelt
instructions,Replacethe drivebeltbeforereassemblingthenewauger
belt,
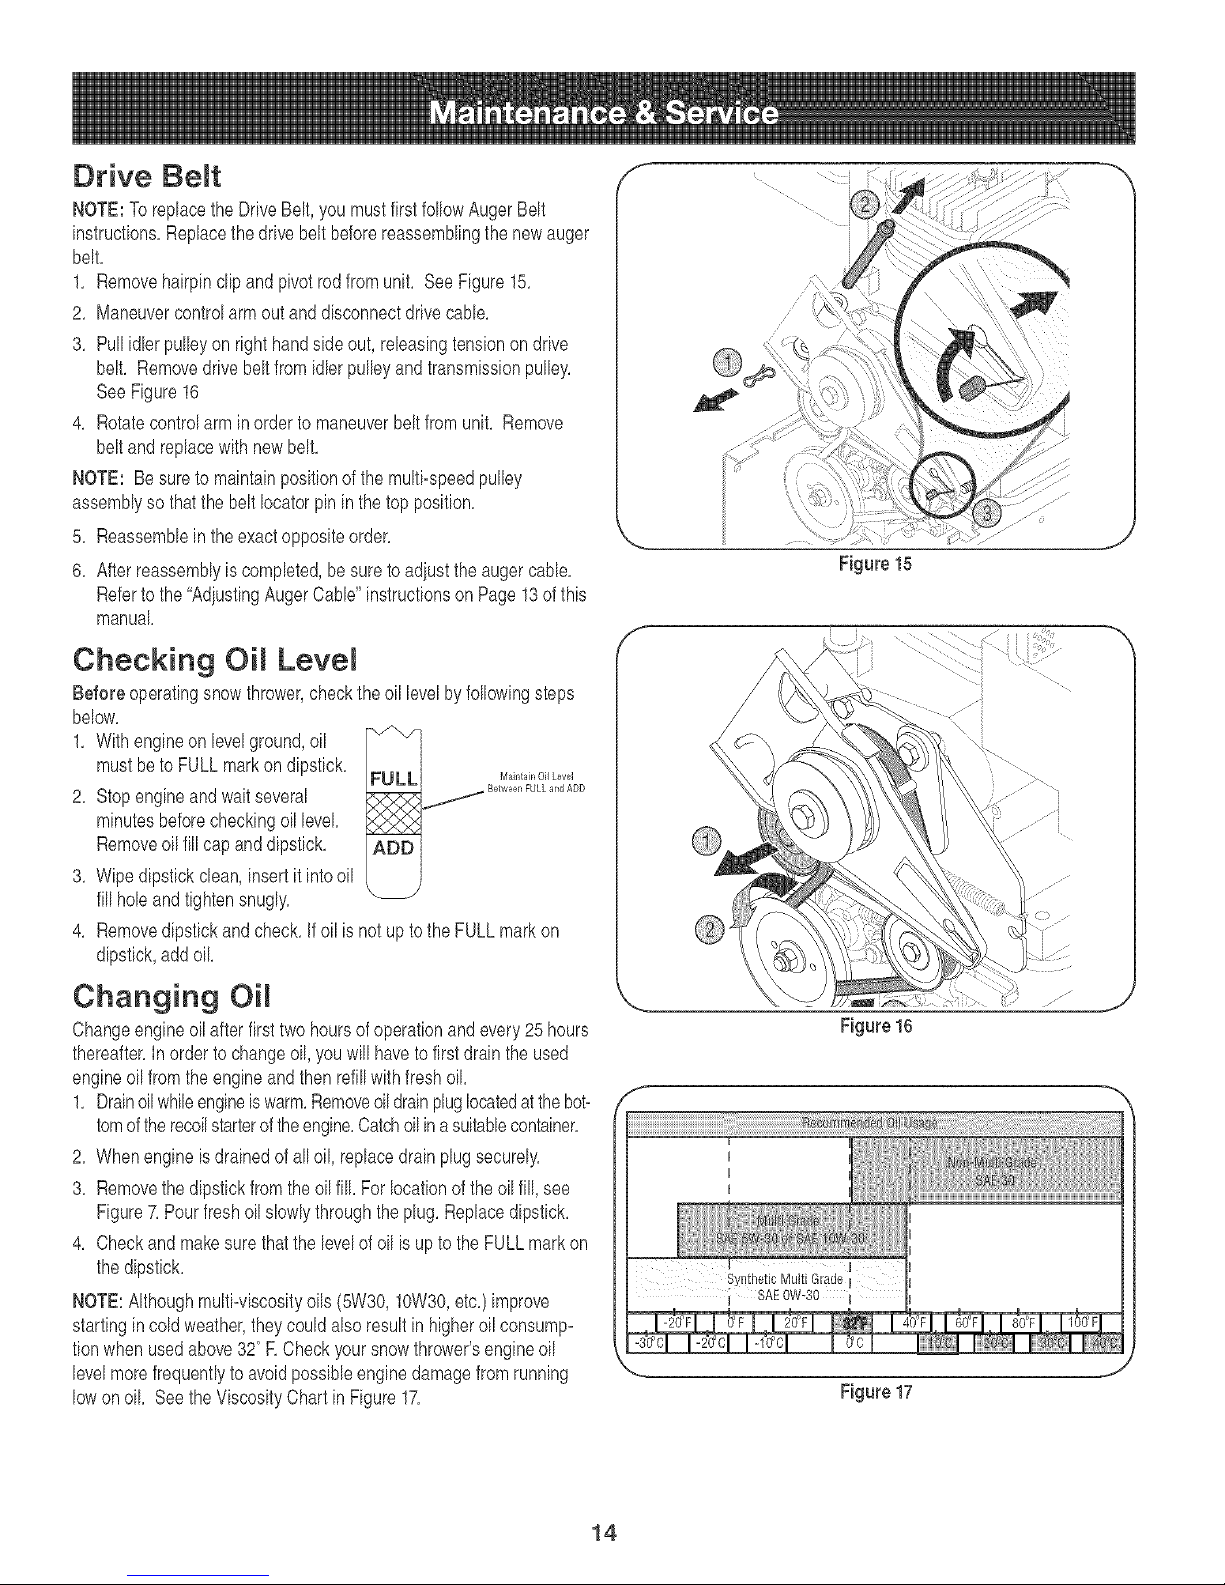
1, Removehairpinclipand pivotrodfromunit, SeeFigure15,
2, Maneuvercontrolarmoutanddisconnectdrivecable,
3, Pullidlerpulleyonrighthandsideout,releasingtensionon drive
belt, Removedrivebeltfromidlerpulleyandtransmissionpulley,
SeeFigure16
4, Rotatecontrolarmin orderto maneuverbeltfromunit, Remove
beltand replacewithnewbelt,
NOTE: Besureto maintainpositionof themulti-speedpulley
assemblysothatthebelt Iocatorpinin thetop position,
5, Reassemblein theexactoppositeorder,
6, Afterreassemblyiscompleted,be suretoadiusttheaugercable,
Refertothe "AdiustingAugerCable"instructionson Page13of this
manual
Checking Lever
Beforeoperatingsnowthrower,checktheoil levelbyfollowingsteps
below,
1, Withengineonlevelground,oil '_/"'/
mustbeto FULLmarkon dipstick, FULL Maintair,OilLevel
2, Stopengineandwaitseveral
minutesbeforecheckingoillevel......
Removeoil fill capanddipstick, ADD
3, Wipedipstickclean,insertit intooil
fillholeandtightensnugly, '_
4, Removedipstickandcheck,If oil isnotuptotheFULLmarkon
dipstick,addoil
X P<'X _
f
/
//
Figure 15
f
Changing OiR
Changeengineoilafterfirsttwo hoursofoperationandevery25hours
thereafter,Inordertochangeoil,youwillhavetofirstdraintheused
engineoil fromtheengineandthen refillwithfreshoil,
1, Drainoilwhileengineiswarm,Removeoildrainpluglocatedatthe bot-
tomoftherecoilstarteroftheengine,Catchoilina suitablecontainer,
2, Whenengineis drainedofalloil, replacedrainplugsecurely,
3, Removethedipstickfromthe oilfill, Forlocationof theoil fill,see
Figure7,Pourfreshoilslowlythroughtheplug, Replacedipstick,
4, Checkandmakesurethatthelevelofoilisupto theFULLmarkon
thedipstick,
NOTE:Althoughmulti-viscosityoils(5W30,10W30,etc,)improve
startingincold weather,theycouldalsoresultin higheroilconsump-
tionwhen usedabove320RCheckyoursnowthrower'sengineoil
levelmorefrequentlyto avoidpossibleenginedamagefromrunning
lowon oil SeetheViscosityChartin Figure17,
Figure17
14
Page 15

2 3
1, .030(.76ram)Gap
2. Electrodes
Check Spark PRug
Cleansparkplugandresetthe electrodegap to 0.030"atleastonce
a seasonor every100hoursof operation;replaceevery200hoursof
operation.
1. Cleanareaaroundthesparkplugbase.
2. Removeandinspectthesparkplug. Checkgap,makesureit is set
at .030. SeeFigure18.
3. Replacethesparkplugif electrodesare pitted,burned,orthe
porcelainis cracked.
NOTE:Donotsandblastsparkplug.Sparkplugshouldbecleanedby
scrapingor wirebrushingandwashingwitha commercialsolvent.
L Porcelain
Figure 18
/
Followthe maintenance schedulegiven below, Someadjustmentswill haveto be made periodicallyto maintainyour unit
properly, Periodicallycheck all fasteners and make sure these aretight, Keeptrack of your scheduledservice by filling in
theService Dates field below,
WARNING:Beforeservicing, repairing,lubricating or inspecting,disengageall controls andstop engine.Waituntilall moving
partshavecometo acompletestop. Disconnectsparkplugwireandgroundit againsttheengineto preventunintendedstarting.
Alwayswearsafetyglassesduringoperation orwhile performinganyadjustmentsor repairs.
Maintenance Schedule
TASKS SERVICEDATES
15
Page 16

if the snowthrowerwill notbeusedfor 30daysor longer,or if it isthe
endofthe snowseasonwhenthe lastpossibilityofsnowis gone,the
equipmentneedsto bestoredproperly,Followstorageinstructions
belowto ensuretopperformancefromthesnowthrowerformany
moreyears,
Preparing Engine
NOTE:Referto theenginemanualformoredetailedinformationon
preparingthesnowthrowerengineforstorage,
WARNING:Neverstore snow thrower with fuel in
tank indoors or in poorly ventilated areas,where
fuel fumes mayreachan openflame, spark or pilot
light asonafurnace, water heater,clothes dryer or
gasappliance.
NOTE:It is importantto preventgumdepositsfromformingin
essentialfuelsystempartsof theenginesuchasthe carburetor,fuel
filter,fuel hoseortankduringstorage,
CAUTION:Alcohol blended fuels (called gasohd or using ethanol
or methanol) can attract moisture which leads to separation and
formation of acids during storage, Acidic gas can damagethe
fuel system of an engine while in storage,
Toavoidengineproblems,thefuelsystemshouldbeemptiedbefore
storagefor 80daysor longer,Followtheseinstructionstoprepareyour
snowthrowerforstorage:
WARNING:Drainfuel into an approvedcontainer
outdoors, awayfrom any open flame.Becertain
engine is cool. Donot smoke. Fuel left in engine
during warm weatherdeteriorates and will cause
serious starting problems.
1, Removeall gasolinefromthe carburetorandthefueltankto
preventgumdepositsfromformingonthesepartsand harmingthe
engine,
2, Runthe engineuntilthefueltankisemptyanditstops duetolack
offuel
8, Draincarburetorbypressingupwardon bowldrain,locatedbelow
thecarburetorcover, SeeFigure19,
_L ARNING:Donotdraincarburetorif usingfuel stabi-
NOTE:Fuelstabilizer(suchas STA=BIL)is anacceptabbalternative
inminimizingthe formationoffuelgum depositsduringstorage,Add
stabilizertogasolineinfuel tankorstoragecontainer,Alwaysfollow
mixratiofoundonstabilizercontainer,Runengineat bast 10minutes
afteraddingstabilizertoallowit toreachthecarburetor,Donotdrain
carburetorif usingfuelstabilizer,
4, Removethesparkplugand pourone(1)ounceofengineoil
throughthe sparkplughob intothecylinder,Coversparkplughob
witha ragandcranktheengineseveraltimesto distributetheoil,
Replacesparkplug,
NOTE:Referto theenginemanualfor moreinformationon preparing
thesnowthrowerengineforstorage,
lizer.Neveruseengineor carburetorcleaningproducts
inthefuel tank or permanentdamagemayoccur.
Preparing Snow Thrower
1, Whenstoringthe snowthrowerin anunventilatedor metalstorage
shed,careshouldbetakentorustprooftheequipment,Usinga
lightoilor silicone,coattheequipment,especiallyanychains,
springs,bearingsandcanes,
2, Removealldirtfromexteriorofengineandequipment,
3, Followlubrbationrecommendationsonpage12,
4, Storeequipmentinaclean,dryarea,
S Carburetor -_
Figure 19
16
Page 17

iiiiiiiill i i _ _ _i i i _ i ii_iii{ _ ii_i_ _ _i_ _i _ i_i xi_i i _x_ _i_ii_ii_ _ _iii_i i_iii _ i_iilrill i ii_ii ii _
EnginefaibtOStart i: Fueltar]kemptY:or StaEefuel i. FiEItankWith#ieanflesh gaSQ!!r]el
2. Blockedfuelline 2. Cleanfuel Line
3. Key net fullypBggedintounit 3, Make SurekeyisfuElyinsertedintounit
priming
Enginerunserratic 1. Unitrunningonchoke
2. Fuellineblocked,orstab fuel
3. Wateror dirtinfuelsystem
4. Carburetorout ofadiustment
1. MovechokelevertoOFFposition.
2. Cleanfuel lineandfilltankwith
fresh,cban gasoline.
3. Refertoenginemanualforremedy.
4. Refertoenginemanualforremedy.
Lossof power 1. Spark plug wire loose 1. Firmly connect spark plug wire.
2. Vent in gas cap plugged 2. Char vent.
boltsand nuts,Repairasneeded.If
theproblempersists,takeunittoan
authorizedservbe dealer.
Unitfails to self-propel
1. Drivebeltlooseor damaged 1. Replacedrivebelt.
Unit fails to discharge snow 1. Chuteassemblyclogged.
2. Shearpinsheared.
3. Foreignobiectlodgedin auger.
4. Augercontrolcabb outof
5. Augerbeltlooseor damaged.
1. Stopengineanddisconnectspark
plugwire.Cleanchuteandinside
ofaugerhousingwithcbamout
toolor stick.
2. Replaceshearpin.
3. Stopengineimmediatelyand
disconnectthesparkplugwire.
Removeobjectfromauger.
4. Adjustaugercontrolcable.
adiustment.
5. Replaceaugerbelt.
17
Page 18

18
Page 19

1
2
3
4
5
8
7
8
9
lO
11
12
13
14
15
18
17
18
19
2o
21
22
23
24
884-04037
71o-o4o71
71o-o451
712-3o88
720-0284
731-04388A
731-04428A
738-0159
731-04127
731-04353
731-2836A
732-04111
712-04084
731-2843
731-2835
725-0157
710-0134
710-0520
710-0604A
712-04063
712-04065
712-0268
715-04020
728-04012
ChuteAssembly
CarriageBolt5/16-18x 1.0"
CarriageBolt5/16-18
FlangeLockNut,5/16-18
NutKnob5/16-18
ChuteHandle
UpperChute
FlatWasher.349x .879x .083
LowerChute
ChuteRing
ChuteAdapter5" Dia.
ChuteAdjustmentSpring
FlangeLockNut1/4-20
Clean-outTool
Clean-outTool Mount
CableTie
CarriageScrew1/4-20x 0.62"
HexBolt3/8-16x 1.50"
ABScrew5/18-18x .825
FlangeLockNut,5/16-18
FlangeLockNut,3/8-16
HexLockNut3/8-16
SpiralPin
PushOnNut
1 25 731-04218B
1 28 732-0811
11 27 738-0174
1 28 738-0281
1 29 741-0245
1 30 741-0309
1 31 750-04191
2 32 758-04035
1 33 784-0434
1 34 790-00075
1 35 618-04293
1 38 884-04113
5 37 884-04114
1 38 684-04165
1 39 714-04040
1 40 731-04870
5 41 736-0351
1 42 738-04124A
4 43 741-0493A
10 44 790-00087A
1 45 790-00120
1 48 784-5580
2 47 746-04248
2 48 736-0258
Impeller
ExtensionSpring
WaveWasher
ShoulderScrew3/8-16
HexFlangeBearing
BallBearing
Spacer
FlatIdler
AugerIdlerBracket
BearingHousing
AugerGearboxAssembly
AugerAssembly- LH
AugerAssembly- RH
AugerHousing,24"
BowTie CotterPin 72
Spacer,1.25x.75x 1.00
FlatWasher
ShearPin,.25x 1.50
FlangeBushing
HexBearingHousing
ShavePlate2.25x 23.86LG
SkidShoe
AugerCable
FlatWasher
1
1
1
1
2
1
1
1
1
1
1
2
2
1
4
4
2
4
8
2
1
2
1
1
19
Page 20

@
[]
20
Page 21

iiiii:ii @i !i!ii!i!i,i
iiiiiii@ !i!'ii'ii'ii'iiiiii:i i
1
71o-o449 CarriageScrew5/16-18x 2.25" 2
2
710-0106 HexScrew1/4-20x 1.25" 2
3
710-1260A Screw,5/16-18x .75" 4
4
712-04064 FlangeLockNut 1/4-20 2
5
720-0284 LockNutKnob 5/16-18 2
6
725-0157 CableTie 3
7
746-04256 DriveCable 1
8
746-04246 AugerCable 1
9
711-04478 PivotRod 1
lO
747-04405 DriveControl 1
11
749-04147 LowerHandle 1
12
749-04236 UpperHandle 1
13
790-00053 HandleTab 2
14
618-04296 TransmissionAssembly 1
15
710-0604A ABScrew5/16-18x .625 4
16
710-0809 Screw,1/4-20x 1.25" 2
17
711-1364 ClevisPin 1
18
714-0115 CotterPin, 1/8x 1.0 2
19
714-04040 BowTieCotterPin 72 2
2o
715-0249 RollPin 1
21
717-04066 Pinion14T 1
22
717-04073A Gear70T 1
23
732-0409 ExtensionSpring 1
24
736-0192 FlatWasher 2
25
738-04184 ShoulderScrew1/4-20 1
26
738-0924 CarriageScrew1/4-28 1
27
741-0245 HexFlangeBearing 2
28
741-04108 HexFlangeBearing 2
29
756-0625 CableRoller 1
3o
784-0419B DriveHousingFrame 1
31
790-00223 AugerCableBracket 1
32
790-00224 AugerCableAdj.Bracket 1
33
634-0232A WheelAssemblySnowHog Gray 2
34
710-0627 LockBolt5/16-24x 0.75" 5
35
736-0242 BellWasher 2
36
738-1231 Axle 1
37
710-0224 HexScrew,#10-16x.500 1
38
39
4O
41
42
43
44
45
46
47
48
49
5O
51
52
53
54
55
56
57
58
59
6O
61
62
63
64
65
66
67
68
69
70
71
72
73
74
710-0654A
710-0696
710-1245B
731-05364
736-0247
736-0505
748-04067
748-0234
750-04568
754-04102
754-04014
756-04024
756-0569
710-0456
790-00064
710-1667A
731-05358
731-05359
731-05360
732-0627
746-04244
710-04329
736-3092
782-7596A
790-00234
790-00235
656-0613
682-7527
741-0545
756-0613
756-0612A
684-04168
747-04394
736-0451
736-0232
750-04571
710-1652
TT SeresScrew3/8-16x 1.0" 4
HexBolt3/8-24x 0.875" 1
LockBolt5/16-24x 0.875" 1
BeltCover 1
FlatWasher,.4061Dx 1.25OD 1
FlatWasher,34JDx 1.50OD 1
Pulley:Adapter,75Dia. 1
ShoulderSpacer 1
ShoulderSpacer 1
V-Belt,3L x25.00 LG 1
V-Belt,3/8 x 26.680Lg. 1
AugerPulley 1
PulleyHalf 2
Screw,#10-16x.500 1
HeatShield 1
Screw#10-16 3
SpeedSelectorHousing- Lwr 1
SpeedSelectorHousing- Upr 1
SpeedSelectorHousing_Lever 1
6SpeedShiftLeverSpring 1
SpeedControlCable 1
Screw.159x .610 2
FlatWasher.265x 1.0x .030 2
6-SpeedControlArm 1
ActuatorMountingBracket 1
DriveWheelIdlerBracket 1
Multi-SpeedPulleyAssembly 1
6SpeedAssemblyCup 1
BallBearing 1
PulleyHalf 1
DrivePulleyHalf 1
IdlerPulleyAssembly 2
AugerControlBail 1
SaddleWasher 2
WaveWasher.531x .781x.013 1
ShoulderSpacer.60x .790x .538 2
Screw,1/4-20x 1.25" 1
21
Page 22

Tecumseh 5.5 H.R Engine LH195SPo67517D
400
310A
;;--,e
254 //
253 #
600
i
I
_._"292
_>290
_" 292
22
Page 23

Tecumseh 5.5 H.P.Engine LH195SP- 67517D
iiiiiily!ii!i!!i ill
1 36469A Cylinder(Incl.2,20,72& 125) 1
2 26727 DowelPin 2
5 30969 ExtensionCap(1/4-18NPT) 1
14 28277 Washer 1
15 31334 GovernorRod 1
16 37729 GovernorLever 1
17 31335 GovernorLeverClamp 1
18 651018 Screw,T-15,8-32x 19/64" 1
19 31426 ThrottleSpring 1
20 32600 Oil Seal 1
25 36552 BlowerHousingBaffle(Incl. 2) 1
25A 35883 BaffleExtension 1
26 650802 Screw,1/4-20x 5/8" 2
26A 650926 Screw,8-32x 21/64" 1
30 37842 Crankshaft 1
40 36073 Piston,Pin&RingSet (Std.) 1
40 36074 Piston,Pin&RingSet (.010") 1
40 36075 Piston,Pin&RingSet (.020") 1
41 36070 Piston& PinAss'y.(Std.)(In) 1
41 36071 Piston& PinAss'y.(.010"OS)Incl.43 1
41 36072 Piston& PinAss'y.(.020"OS)Incl.43 1
42 36076 RingSet(Std.) 1
42 36077 RingSet(.010"OS) 1
42 36078 RingSet(.020"OS) 1
43 20381 PistonPinRetainingRing 2
45 32875A ConnectingRodAss'y.(1rick4) 1
46 32610A ConnectingRod Bolt 2
48 37670 ValveLifter 2
49 32654 Oil Dipper 1
50 37671 Camshaft(MCR) 1
60 29745 BlowerHousingExtension 1
64 30063 Screw,T-30, 1/4-20x 1/2" 1
64A 8345 Washer 1
65 650128 Screw,10-24x 1/2"(1/4-18NPTx 4-3/4) 1
69 27677A * CylinderCoverGasket 1
70 34674C CylinderCover(Incl.75thru 2
72 27642 Oil Plug 2
75 27897 Oil Seal 1
80 30574A GovernorShaft 1
81 30590A Washer 1
82 30591 GovernorGearAssembly(Incl. 1
83 30588A GovernorSpool 1
86
89
9O
92
93
100
101
102
103
110
110A
119
120
125
125
126
127
130
130A
130B
135
150
151
169
170
171
172
173
174
178
181
182
183
184
185
186
2OO
203
2O4
206
215
219
650488
610961
611195
650815
650816
34443C
610118
651024
651007
35182
36874
36443
37675
36471
36472
32644A
650691
6021A
650694A
650818
35395
31672
31673
27234A
27666
31410
34146
35350
650783
29752
650870
6201
34583A
26756
33691
32698
36677
31342
651029
610973
35440
34582
Screw,1/4-20x 1-1/4"
FlywheelKey
Flywheel
BellevilleWasher
FlywheelNut
SolidStateIgnition
SparkPlugCover
SolidStateMountingStud
Screw,T-15,10-24x15/16"
GroundWire
GroundWire
* CylinderHeadGasket
CylinderHead(Incl.131)
ExhaustValve(Std.)(Incl. 15)
ExhaustValve(1/32"OS) (Incl.)
IntakeValve(Std.)(Incl.151)
Washer
Screw,5/16-18x1-1/2"
Screw,5/16-18x2"
Screw,5/16-18x1-1/2"
ResistorSparkPlug(RJ19LM)
ValveSpring
ValveSpringCap
*ValveCoverGasket121
BreatherBody
BreatherElement
ValveCover
BreatherTube
Screw,10-24x 3/4"
Nut& LockWasher,1/4-28"
Screw,1/4-28x 1-11/16"
Screw,1/4-28x 7/8"
Chokebracket
* CarburetorTo IntakePipeGa
IntakePipe
GovernorLink
ControlBracket(Incl.203thr
CompressionSpring
Screw,T-1O,5-40 x 7/16"
Terminal
ControlKnob
ChokeRod
7
1
1
1
1
1
1
2
2
1
1
1
1
1
1
1
1
2
5
1
1
2
2
2
1
1
1
1
2
2
1
1
1
1
1
1
1
1
1
1
1
1
23
Page 24

Tecumseh 5.5 H.R iine LH195SP- 67517D (Continuedfrompreviouspage)
220 35438 ChokeKnob 1 329A 651060 Screw,8-32x 23/84" 1
222 28820 Screw,10-32x 1/2" 2 335 35072 CarburetorCover 1
223 650684 Screw,1/4-20x1-19/32" 2 338 650257 Screw,8-32x 5/18" 2
224 33873A *IntakePipeGasket 1 340 36247 FuelTankBracket 1
253 36701 CompressionReleaseWeight 1 342 30063 Screw,T-30,1/4-20x 1/2" 1
254 36702 CompressionReleaseSpring 1 342A 650675 Washer 2
260 35858A BlowerHousing 1 345 33344 HeatBaffle 1
282 650737 Screw,1/4-20x 1/2" 2 350 570882A PrimerAssembly 1
287 34212 HoldDownBracket 1 351 32180C PrimerLine 1
268 30200 Screw,10-24x 9/16" 1 355 590574 StarterHandle(MittenGrip) 1
274 33870A *ExhaustGasket 1 384 33333 CarburetorCoverBracket 1
275 35771A Muffler(Incl.274) 1 364A 37673 LockingPlate 1
277 792005 Screw,1/4-20x 2-1/2" 2 385 650735 Screw,10-24x 3/8" 1
285 36467A StarterCup 1 370A 36261 InstructionDecal 1
287 650926 Screw,8-32x 21/64" 2 370B 35282 SpeedControlDecal 1
290 30705 FuelLine 1 370C 36501 PrimerDecal 1
292 26460 FuelLineClamp 2 370D 36534 CautionDecal 1
298 650665 Screw,1/4-15x3/4" 2 370! 37119 WarningDecal 1
300 35584 FuelTank(Incl.292& 301) 1 370K 36695 StarterDecal 1
301 37845 FuelCap 1 380 640084B Carburetor(Incl.184) 1
310 35558 Dipstick 1 390 590742 RewindStartert 1
311 37248 Oil FillPlug 1 398 33290E ElectricStarterMotor110Volt 0
312 27825 Oil FillPlugGasket 1 398 730266 ElectricStarterKit (Optional)11 0
313 34080 Spacer 1 400 36444 * GasketSet 1
328 35062 IgnitionKey 2 800 651013 Washer 1
329 610973 Terminal 1 900 754336 ReplacementShortBlock,order71-999 1
t This enginemayhavebeenbuiltwiththe590707starter.
ff (12ov)StarterKit,18-wattflywheelw/ringgear,18-wattalternator,
* IncludedinthisGasketSet.
andmountinghardware.
0 590742 RewindStarter 1
3 590740 Retainer 1
8 590618 StarterDog 2
7 590617 DogSpring 2
8 590645A Pulley& RewindSpringAss'y 1
11 590647A StarterHousingAss'y 1
12 590535 StarterRope(Length98"x 9/64" dia.) 1
13 590574 MittenGripHandle(Not includedw/starter) 1
14 590780 SpringClip 1
13
..... 8
24
Page 25

Tecumseh 5.5 H.R Engine LH195SP- 67517D
o
640084B Carburetor(Incl. 184of EngineParts List)
1
631615 ThrottleShaft&LeverAssembly
2
631767 Throttle ReturnSpring
6
640070 ThrottleShutter
7
650506 ShutterScrewt
lO
632108 ChokeShaft& LeverAssembly
14
631890 ChokeShutter
15
630735 ChokePositioningSpring
16
631807 FuelFitting
17
651025 ThrottleCrackScrew/IdleSpeedScrew
18
630766 TensionSpring
2o
640027 IdleRestrictorScrew
20A
640053 IdleRestrictorScrewCap
25
631951 FloatBowl Assembly(Incl. 32& 33)
27
631024 FloatShaftt
28
632802 Float(Plastic)
29
631028 FloatBowl O-Ring1
3O
631021A InletNeedle,Seat& Clip(Incl. 31)1
31
631022 SpringClip
32
27136A BowlDrainAssembly
33
27554 DrainPlungerGasket1
36
632745 MainNozzleTube
37
632547 O-Ring,MainNozzleTube1
40
640131 HighSpeedBowlNut
44
27110A BowlNutWasher1
47
630748 Welch Plug,IdleMixtureWellt
48
631027 Welch Plug,AtmosphericVentt
6O
632760B Repairkit(Incl.Items Marked1 inNotes)
1
1
1
1
2
1
1
1
1
1
1
1
1
1
1
1
1
1
1
1
1
1
2
1
1
1
1
1
o
590707 RecoilStarter
1
590599A SpringPin (Incl.4)
2
590600 Washer
3
590696 Retainer
4
590601 Washer
5
590697 BrakeSpring
6
590698 StarterDog
7
590699 DogSpring
8
590709 Pulley& RewindSpringAss'y.
11
590708 StarterHousingAss'y.
12
590535 StarterRope(98" X 9/64"dia.)
13
590574 MittenGripHandle(Notincludedwithstarter}
0
1
1
1
1
1
2
2
1
1
1
1
13 @--8
6
25
Page 26

26
Page 27

Manuam demoperador
CRAFTSMAN°
5.5 caballos de fuerza
M_,QUINA QUmTANIEVE DE 24", 4 CICLOS Y 3
NOmero de modelo 247.88255
PRECAUCI(DN: antes de
uti_izar este producto, mea
este manual y siga todas
masregmas de seguridad
y masinstrucciones de
funcionamiento,
Sears, Roebuck and Co., Hoffman Estates, IL 60179, EE.UU.
Visite nuestro sitio web: www.sears.corn/craftsman NOde FORNULARIO769_01910A
o SEGURRDAD
MONTAJE
OPERACION
MANTENIMENTO
MSTADO DE PEZAS
ESPANOL
07/21/2005
Page 28

Deciaraci6ndegarantia...........................PSgina2
Etiquetasdeseguridad............................PSgina3
Regiasdeoperaci6nsegura...................PSginas4-5
Configuraci6nyajuste.............................PSginas6-7
ConozcasumSquinaquitanieve.............PSgina8-9
Operaci6n.................................................PSgina10-11
Mantenimientoyservicio......................Pagina12-15
AImacenamientofueradetemporadaysoluci6nde
problemas................................................PSgina16-17
Nqmerodeservicio...........................Cubiertaposterior
Garantiadedosariesparalam_quinaquitanbveCraftsman
Durantedosahosapartirdelafechadecompra,siemprequeaestam&quinaquitanieveselerealiceelserviciodemantenimiento,lubrbacbn
ypuestaapuntodeacuerdoalasinstruccionesdelmanualdelpropietario,SearsrepararAsincargocualqubrdefectodemateriabsomanode
obra.SiestamAquinaquitanieveCraftsmanseutilizaparaprop6sitoscomerciabsodealquiler,estagaranfiaseaplicas61odurante30diasa
partirdelafechadecompra.Estagarantianocubre:
• Ebmentosdesechabbsquesedesgastanperelusonormal,incluyendoentreotros,zapatasantideslizantes,placade raspadoy buifas.
Reparacionesnecesariasdebidoa abusoonegligenciadeloperador,incluyendoabolladuradelcigOehalyfalla pornorealizarmantenimiento
delequipode acuerdoconlasinstruccionescontenidasenel manualdel propbtario.
EL SERVlCIODEGARANT[AESTADISPONiBLEPARALOSUSUARIOSQUELLEVENLAMAQUINAQUITANiEVECRAFTSMANAL
CENTRODEPARTESy REPARAClONSEARSMASCERCANODENTRODELOSESTADOSUNIDOS.
EstagarantiaesvalidaOnicamentembntraselpro@do seutilicedentrode losEstadosUnidos.
PARAUBICARELCENTRODEPARTESY REPARACiONSEARSM/_,SCERCANO0 PARAPROGRAMAREL SERVlCIOTECNICO,SIMPLE-
MENTECOMUNiQUESECONSEARSALTELEFONO1-800-4-MY-HOME@.
Estagaranfialeotorgaderechoslegabsespecfficos;ustedtambienpuedetenerotrosderechos,los cuabs variandeunestadoaotro.
SEARS,ROEBUCKANDCO., D/817WA,HOFFMANESTATES,IL 60179
Acuerdos de protecci6n sobre reparaciones
Felicitacionespor haberrealizadounaadquisici6n[nteligente,El
productoCraftsman@queha adquiridoestadisehadoyfabricadopara
brindarmuchosahosde funcionambntoconfiabb,
Perocomotodoslosproductosa vecespuederequerirderepara-
clones,Esen esemomentocuandoeldisponerde unacuerdode
protecci6nparareparacioneslepuedeahorrardineroy probbmas,
A continuaci6nsedetallanlos puntos[ncluidosen elacuerdo:
, Servb[oexpertoprestadopernuestros12,000especialistasen
reparacionesprofesionabs
, Servbio[limitadosincargo paralaspbzas y la manede obraen
todaslasreparacionescubbrtas
, Reemplazodelproductos[noesposibbrepararelproductocubbrto
• Descuentode 10%delprec[onormaldelservb[oy de laspbzas
relacionadasconel mismoquenoestencubbrtas perel acuerdo;
ademb,s, 10%de descuentodel prec[onormaldelaverificaci6nde
mantenimientopreventive
, Ayudar@idaporteldono- asistenciatebf6nicaacargode un
t6cnicodeSearsparalosproductosquerequbrenreparaci6na
domicil[o,adem_,sde unaprogramaci6nconvenbnteparalarepara-
Cabaiios de fuerza :
Aceite del motor:
Combustible:
Bujias:
Moto:
5.5
SAE 5W=30
Gasolina sin plomo
Champion@ RJ19LIVI
Tecumseh LH195SP
c[6n,Adqubraahoraunacuerdodeprotecci6nparareparacionesy
prot6iasede probbmasy gastos[nesperados
Unavezadquiridoelacuerdo,puedeprogramarelservb[ocon
tans61orealizarunaIlamadatelef6niea,PuedeIlamarencualquier
momentodeld[a o dela noche,o programarun servicioenlinea.
Searsdisponedem_sde 12,000espeeialistasenreparaeiones
profesionabsquetienenaceesoa m_sde4,5 millonesdepiezas
y aceesoriosdegranealidad,Esteesel fipo de profesiona%moen
el quepuedeeonfiarparaquele ayudeaprolongarlavida0tildel
productorecientementeadquiridoenlosahosporvenir,iAdquierahoy
suaeuerdodeprotecei6nparareparaciones!
Se aplican determinadas limitaciones y exelusiones. Paraobtener
precios e informaci6nadicional llameal 1-800-827o6655.
Servicio de instalaei6n de Sears
Sideseasolicitarla instalaci6nprofesionalde Searsde @arabs
dom6sticos,dispositivosparaabrirportones,calentadoresde aguay
otrosar%ulosdomesticosimportantes,en losEstadosUnidosIlame
al 1-800-4-MY-HOME@
NOmero de modeio ......................................................
NOmero de serie ...........................................................
Fecha de compra .........................................................
Registre arriba el nQmero del modelo, el nw3mero
de serie y la fecha de compra
Page 29

1.KEEPAWAYFROMROTATINGIMPELLER
ANDAUGER.CONTACTWITHIMPELLEROR
AUGERCANAMPUTATEHANDSANDFEET,
2. USECLEAN-OUTTOOLTOUNCLOG
DISCHARGECHUTE.
3. DISENGAGECLUTCHLEVERS,STOPENGINE,
ANDREMAINBEHINDHANDLESUNTILALL
MOVINGPARTSHAVESTOPPEDBEFORE
UNCLOGGINGORSERVICINGMACHINE,
4. TOAVOIDTHROWNOBJECTSINJURIES,
NEVERDIRECTDISCHARGEATBYSTANDERS.
USEEXTRACAUTIONWHENOPERATINGON
GRAVELSURFACES.
5. READOPERATOR'SMANUAL.
Estesimboloindica
instrucdonesde seguridad
importantesquedeno
seguirse,sepodria poneren
peligrola seguridadpersonal
y/o b propiedadsuyayde
terceros.Leay sigatodasbs
instrucdonesen este manual
antesde iniciarb operacbn
de esta m_quina.Encasode
noseguirestasinstrucdones
podrb provocarbsiones
personales.Cuandovea este
simbolo.SIGA LA ADVER-
TENCIA.
Su responsabitidad
Estamaquinael_ctricas61o
puedenusarb bs personas
que lean,comprendany
respetenbs advertencias
e instruccionesque@are°
cen en este manualy en la
maquina.
f
Hayunaherrarnientade lirnpiezadel canalaiustadaa lapartesuperior
%
delacajadelabarrenacon unpasadordeensamblado,Laherramienta
estadisehadaparalimpiarelhieloy b nievedelmontaiedeuncanal,
Esteproductosesuietamedianteunaunbn de cane en lafabric&
Cortela uni6ndecane antesdeoperarlamAquinaquitanieve,
_lb DVERTENCIA: nunca use sus manos
para liberar un montaje de canal tapado.
Apague el motor y permanezca detr_s de
las manijas hasta que todas tas partes
m6viles se hayan detenido antes de utilizar
la herramienta de limpieza para limpiar el
J
montaje del canal.
3
Page 30

DVERTENCIA:elescapedelmotordeesteproducto,algunosdesuscomponentesyalgunoscompo-
nentesdelvehiculocontienenoemitenproductosquimicosqueelestadodeCaliforniaconsideraque
puedenproducirc£ncer,defectosdenacimientouotrosproblemasreproductivos.
PELIGRO::estamaquinaestadiseiadaparaserutilizadarespetandolasreglasdeseguridadcontenidaseneste
manual.AIigualqueconcualquiertipodeequipoel_ctrico,undescuidooerrorperpartedeloperadorpuedeproducir
lesionesgraves.Estamaquinaescapazdeamputarmanosy piesy dearrojarobjetoscongranfuerza.Denorespetarlas
instruccionesdeseguridadsiguientessepuedenproducirlesionesgraveso lamuerte.
ADVERTENCIA:estesimboloindicainstruccionesdeseguridadimportantesquedenoseguirse,se
podriaponerenpeligrolaseguridadpersonaly/olapropiedadsuyaydeterceros.Leaysigatodaslas
instruccionesenestemanualantesdeiniciarlaoperaci6ndeestamaquina.Encasodenoseguirestas
instruccionespodriaprovocarlesionespersonales.CuandoyeaestesimboloSIGALAADVERTENOIA.
Suresponsablidad:estam£quinael6ctricas61opuedenusarlalaspersonasquelean,comprendanyrespetenlasad-
vertenciase instruccionesqueaparecenenestemanualyenlamaquina.
Capacitaci6n
1. Lea,entienday cumplatodaslas instruccionesincluidasenla maquinay
enlos manualesantes demontarlay utilizarla.Guardeestemanualen un
lugarseguroparaconsultasfuturasyregulares,as[comeparasolicitar
repuestos.
2.Familiaricesecontodosloscontrolesy su funcionamientoapropiado.Sepa
comodetenerla m£quinaycomodesengranarloscontrolesrapidamente.
3.Nopermitanuncaquelos niF_osmenoresde 14 afrosutilicenestam£quina.
LosnJ_osde14a_osy masmayoresdebenleery comprenderlas
instruccionesdefuncionamientoy las reglasdeseguridadcontenidasen
estemanual,ytambiendebensercapacitadosy estarsupervisadospor
unode lospadres.
4.Nuncapermitaquelos adultosutilicenestam£quinasinrecibirantesla
instrucci6napropiada.
5.Losobjetosarrojadosporlam;Jquinapuedenproducirlesionesgraves.
Planifiqueel patronenel quevaa ir arrojandonieveparaevitarquela
descargade materialse realicehacialos caminos,los observadores,etc.
6.Mantengaa losobservadores,ayudantes,mascotasy ni_osporIomenosa
75piesdela maquinamientrasla mismaestAenfuncionamiento.Detenga
la maquinasi alguienentraenla zona.
7.Seaprecavidoparaevitarpatinarseocaerseespecialmentecuandooperala
maquinaen reversa.
Preparativos
1. Inspeccioneminuciosamenteel £readondeutilizar£elequipo.Saquetodos
losfelpudos,peri6dicos,trineos,tablas,cablesy otrosobjetosextraF_oscon
los quepodr[atropezaroque podrianserarrojadosporla barrena/ motor.
2. Paraprotegerselosojosutilicesiempreanteojosoantiparrasde
seguridadmientrasopera la maquinaomientrasla ajustaorepara.Los
objetosarrojadosquerebotanpuedenlesionargravementelavista.
3. Nooperela m£quinasinla vestimentaadecuadaparaestaral aire libreen
invierno.[to utilicealhajas,bufandaslargasu otrasprendassueltasque
podrianenredarseenlas partesmoviles.Utiliceuncalzadoespecialpara
superficiesresbaladizas.
4. Useunprolongadory untomacorrientedetrescablesconconexiona
tierra paratodaslas unidadescon motoresde encendidoelectrico.
5. Ajuste laalturadela cajadeltomacorrienteparalimpiarlagravao las
superficiescon piedrastrituradas.
6. Desengranetodas laspalancasdecontrolantesdearrancarelmotor.
7. Nuncaintenterealizarajustesmientrasel motorest£enmarchaexcepto
en loscasosespeclicamenterecomendadosenelmanualdel operador.
8. Dejequeel motory la maquinaseadaptena latemperaturaexteriorantes
de comenzarasacarla nieve.
9. ParaevitarlesionespersonalesodaF_osmaterialesseasumamente
cuidadosoal manipularlagasolina.Lagasolinaes altamenteinflamabley
susvaporespuedencausarexplosiones.Sepuedelesionargravemente
si derramagasolinasobreustedo sobrelaropayaquesepuedeprender
fuego.Lavesela piely cambiesederopade inmediato.
a. Utilices61orecipientesparagasolinaautorizados.
b.Apaguetodosloscigarrillos,cigarros,pipasyotrasfuentesdecombusti6n.
c. Nuncacarguecombustibleen la maquinaen unespaciocerrado.
d. Nuncasaquelatapa delgas niagreguecombustiblemientraselmotor
est£ calienteo enmarcha.
e. Dejequeelmotorseenfr[eperIomenosdosminutesantesdevolvera
cargarcombustible.
f. Nuncarecargueel tanquedecombustible.Lleneel tanquenom;Jsde
1/2pulgadapor debajode la basedel cuellodelfiltro paradejar espacio
parala dilataci6ndelcombustible.
g. Vuelvaacolocar latapa de lagasolinay aj£stelabien.
h. Limpielagasolinaderramadasobreel motory elequipo.Trasladela
m£quinaa otrazona.Espere5 minutosantesdeencenderel motor.
i. Nuncaalmacenelam£quinaoel recipientedecombustibleen un
espaciocerradodondehayafuego,chispaso luzpiloto(por ejemplo,
hornos,calentadoresdeagua,calefactores,secadoresde ropa,etc.).
j. Dejequela m£quinaseenfr[eperIomenos5minutosantesdeguardarla
4
Page 31

Operaci6n
1 No pongalasmanosolos piescerca delas piezasrotatorias,enla caja
dela barrena/ motoroen el montajedelcanalde descarga.Elcontacto
conlas piezasrotatoriaspuedeproducirla amputaci6ndemanosy pies.
2. Lapalancadecontrolde labarrena/ motoresundispositivodeseguri-
dad.Nuncapase poralto sufuncionamiento.Dehacerlolaoperaci6nde
la maquinaes riesgosay puedeocasionarlesiones.
3. Laspalancasdecontroldebenfuncionarbienenambasdireccionesy
regresarautomaticamentea laposicionde desengranecuandose lassuelta.
4. Nuncaoperelamaquinasi faltaun montajedelcanalo si el mismoesta
dafiado.Mantengatodoslosdispositivosde seguridadensulugar y en
funcionamiento.
5. Nuncaenciendaunmotorenespacioscerradosoen unazonaconpoca
ventilaci6n.Elescapedel motorcontienemon6xidodecarbono,ungas
inodoroy letal.
6. No utilicelamaquinabajolainfluenciadel alcoholo lasdrogas.
7. Elsilenciadory el motorse calientany puedenproducirquemaduras.No
lostoque.
8. Seasumamenteprecavidocuandooperela maquinasobreuna superficie
congravao cuandolacruce.Mantengasealertapot si sepresentan
peligrosocultoso transito.
9. Tengacuidadocuandocambiede direcci6nocuandooperelamaquina
enpendientes.
10.Planifiqueelpatr6nenel queva air arrojandonieveparaevitarque
la descargadematerialse produzcahacialasventanas,las paredes,
los autom6viles,etc.y evitar as[posiblesdaflosmaterialesolesiones
producidasporlos rebotes.
11.Nuncadirijala descargahacialosniflos, losobservadoresy lasmascotas
ni dejequenadieseparedelantede la maquina.
12.Nosobrecarguela capacidaddelamaquinatratandode sacarlanieve
muyrapidamente.
13.Nuncaopereestamaquinasin buenavisibilidado iluminaci6n.Siempre
debeestarsegurode queestabienafirmadoy sostengabienlas manijas.
Camine,nuncacorra.
14.Cortelacorrientea la barrena/ motorcuandotransportelamaquinao
cuandolamismanoestaen uso.
15.Nuncaoperela maquinaa altavelocidaddedesplazamientosobre
superficiesresbaladizas.Mirehaciaabajoy haciaatrasytengacuidado
cuandovayamarchaatras.
16.Si lamaquinacomenzaraavibrarde maneraanormal,detengael motor,
desconecteel cablede la bujiay p6ngalade maneraque hagamasa
contraelmotor.Inspeccionela maquinaminuciosamenteparaversi esta
daflada.Reparetodos losdafiosantes deencenderyoperarla maquina.
17.Desengranetodas laspalancasdecontroly detengael motorantesde
dejarla posici6nde operaci6n(detrasde las manijas).Esperea quela
barrena/ motorsedetengapor completoantesdedestaparel montajedel
canalorealizarajustese inspecciones.
18.Nuncapongalasmanesen lasaberturasdedescargao derecolecci6n.
Utilicesiemprela herramientade limpiezaqueseadjuntaparadestaparla
aberturadedescarga.Nodestapeel montajedelcanalmientrasel motor
estaenfuncionamiento.Antesdedestaparlo,apagueelmotory permanezca
detr4sdelasmanijashastaquetodaslaspartesm6vilesse hayandetenido.
19.Uses61ounionesy accesoriosaprobadosper elfabricante(perejemplo,
pesasparalasruedas,cadenasparalos neumaticos,cabinas,etc.).
20.Si sepresentansituacionesquenoestanprevistasen estemanual,sea
cuidadosoyuseelsentidocomOn.Contacteconsu centrode servicio
Searsparaobtenerayuda.
Mantenimiento y aimacenamiento
1. Nuncamanipulelosdispositivosde seguridaddemaneraimprudente.
Controleperi6dicamenteque funcionende formaadecuada.Rem[tasea
las seccionesdemantenimientoy ajustedeestemanual.
2. Antesde realizarlalimpieza,repararo revisarla maquina,desengrane
todaslas palancasdecontroly detengael motor.Espereaque la barrena
/ motorse detengapercompleto.Desconecteelcabledelabuj[ay
p6ngalode maneraquehagamasacontra el motorparaevitar quese
enciendade maneraaccidental.
3. Controlefrecuentementequetodoslospernosy tornillosesten bien
ajustadosparacomprobarquela maquinaseencuentraencondiciones
segurasdefuncionamiento.Asimismo,realiceunainspeccionvisualdela
maquinaparacontrolarsi la mismaestadaflada.
4. Nocambielaconfiguraci6ndelreguladordelmotorniaceleredemasiadoel
mismo.Elreguladorcontrolalavelocidadmaximaseguradeoperaci6ndelmotor.
5. Lasplacasde raspadoy laszapatasantideslizantesque seusancon la
maquinaquitanievesedesgastany se daflan.Paraprotegersu seguridad,
verifiquefrecuentementetodos loscomponentesy reemplaceloss61ocon
partesde losfabricantesde equiposoriginales(OEM).'La utilizaci6nde
piezasqueno cumplanconlasespecificacionesdeequiposoriginales
podr[atenetcomo resultadoun rendimientoincorrecto,y ademasla
seguridadpodriaestarcomprometida"
6. Reviseloscontrolesperi6dicamenteparaverificarque engraneny desen-
granenadecuadamentey ajOstelossi esnecesario.Consultela secci6n
de ajustesen estemanualdeloperadorparaobtenerinstrucciones.
7. Mantengaoreemplacelasetiquetasdeseguridadeinstruccionesseg0n
sea necesario.
8. Respetelas normasreferentesaladisposici6ncorrectay lasreglamenta-
cionessobregas,combustible,etc.paraprotegerel medioambiente.
9. Antesdealmacenarlam4quinaenciendalaunosminutosparasacarlanieveque
hayaquedadoenlamismayparaevitaras[quesecongelelabarrena/ motor.
10.Nuncaalmacenela maquinao el recipientedecombustibleenun espacio
cerradodondehayafuego,chispaso luzpilotocomo potejemplo,
calentadoresdeagua,hornos,secadoresde ropa,etc.
11.Consultesiempreel manualdefuncionamientoparaconocerlasinstruc-
clonesadecuadasparaelalmacenamientofueradetemporada.
No modifique e! motor
Paraevitarlesionesgraveso la muerte,no modifiqueelmotorbajoninguna
circunstancia.Si cambialaconfiguraci6ndel reguladorel motorpuededescon-
trolarsey operara velocidadesinseguras.Nuncacambielaconfiguraci6nde
fabricadel reguladordel motor.
Aviso referido a emisiones
Losmotoresqueestancertificadosy cumplenconlasregulacionesdeemisio-
nesfederalesEPAy de CaliforniaparaSORE(EquiposSmallOff RoadEquip-
ment)estancertificadosparaoperarcongasolinacom0nsinplomoy pueden
incluirlossiguientessistemasdecontroldeemisiones:Modificaci6nde motor
(EM)ycatalizadordetresv[as(TWO)si estaequipadodeesamanera.
CaJcoman_a de identificaci6n de! motor
EstacalcomaniaindicaelnOmerodel modelodelmotor,lasespecificacionesy
lafechadefabricaci6n.Porfavor,mirelacalcomaniaenel motordesuequipo
y registreesainformaci6nparareferenciafutura.
Lacalcomaniade identificaci6ndel motortambi6nincluyeespecificaciones
sobreel periododevidaOtildelmotorrelacionadoconlas emisiones.Este
periodoestarelacionadoconlavidaOtilenconformidadcon lasemisiones
segOnIocertificadopotEPAy/o CARB.Parahallarla especificaci6ndel
periododevida 0tildelmotor,potfavorlealacalcomaniadelmotory ub.ique
laletra(entrecomillas)entrelaspalabrasModeradoy PeriododeVidaUtil.
Conecteunade lassiguientesletrascon laletra impresaen su calcomania.
Porejemplo,a los modelosHMSK80selosdesignacomo:
"C"-- 250horas
"B"-- 500 horas
"A"-- 1000horas
Page 32

IMPORTANTE:estaunidadse env[aconel motorIlenode aceite,
Despu6sdelmontaje,consultelapAg[na10paralosdetallesdel
combustibley elace[te,
Extracci6n de la unidad de la cain
1, Cortelasesqu[nasde lacaiade cart6ny ext[6ndalaenel p[so
Quitetodoslos[nsertosdeempaque,
2, La manijasuperiorestaempacadasinensamNarenlam_quina
qu[tan[eve,aunqueconectadamed[antecanes, Saquela mAqu[na
quitanieveylamaniiasuperiorde la cain,
3, AsegOresedevac[arcompletamentela ca]aantesde t[rarla,
Antes monta]e
ADVERTENClA:desconecteel cablede la buj[ay
p6ngalode maneraque hagamasacontra el motor para
evitar quese eneiendade maneraaccidental.
NOTA:Lasreferenciasquecont[eneestemanualsobreloslados
derechoo[zquierdodelamb,quinaquitanievesehacenobservando
la mismadesdela posici6nde operaci6na menosquese[ndiqueIo
contrario,
Configuraci6n de mamanija
1,Quitarel F_zode cane queaseguraelmangosuperiorparabajar
el mangoparaembarcarobjetivos,Quitetodoel plAst[coprotector
queseabr[gade mangoscomoen laFigura1,
NOTE:Procurenoqu[tarlostres lazosde cane sueltamenteenca]a-
dosqueserAnut[l[zadosmAstarde paraasegurarcanes,
Qf_uitela envoltura protectora
\
\
\,
\
2,Soltaryqu[tarlaperillade ala,laarandeladesilla,la et[quetade
mangoy eltornillode carrosobrecadaladedelmangoinferior,Verla
Figura2,
3,Deslizarunode loslazosdecane sueltamenteempotradosde la
derechadelmangoinferiorhastael miembroenfadadodelmango
inferior,Abandoneel segundolazode cane enel lugar,
IMPORTANTE:ser_ necesario levantarel mangosuperior
deslizando este lazode cableparaprevenir el daSoal cable.
4,Levantarelmangosuperiory colocarlosobreel mangoinferior,
al[neandolos agujerosdondelasper[llasdealafueronqu[tadas,
PRECAUCION:Procure no doblarse o vuelta los cables.
5,Insertaruntorn[llodecarrodel exteriorporunaetiquetade mango,
losmangossuperiorese [nferiores,unaarandeladesilla yen la perilla
deala,Repet[c[6ndel otrolado,
6,Apretarlasperillasdealasobrecada ladedelmango,Refi6rasea
la Figura3,
NOTE:elcamedetaladroy laruta decane decontrolde velocidad
abajoel [zquierdomAsabajosemanejandelacaja decontrolde
veloddad,Elcane depaseoesderrotadoa trav6sdelacumbredel
mangoinferioryfinalmenteabajoel mangoderechoinferior,Verla
Figura4,
7,Treslazosdecane hans[dousadossueltamenteparaatarlos
canes de controlal mangoinferior,[ndusoelcane leatantrasladado
enel paso3, Loslazosde cane depos[c[6nahora,comoenla F[gura
4,y seapr[etanparaasegurarcanes al mangoinferior,Netode
materialde excesodelazesde cane,
Zapato de Patinazo
Elespac[oentreel platodeafe[tadoy lat[errapuedeserajustado,
Refi6rasea la Figura6para laposici6ndelplatodeafeitadoy paine
Fig_Jra 3
6
Page 33

f
Aiustes finales
ORTANTE:controlelosajustesdeacuerdoconlas instrucdones
y realicelosaiustesfinalesnecesariosantesdeoperarlaunidad.
Controleel aiustedetodaslastuercasy lospernos.Sinosigueestas
instrucciones,la unidadpodriadaharse.
Presi6n de Neum tico
Losneum&ticosson enormesparaembarcarobjetivos.Compruebe
neum&ticopresionany reducenlapresbn,desernecesario,a espe-
cificacionesdefiance.Mantengalapresi6nigualsobreambasruedas
del lanzadordenieve.
Cablede la barrena
_uuede ue se revienteconla
erzasufcenteparacausarlaheridaseria.
ADVERTENCIA:lapresi6ndeneum_ticom_ximaen
cualquiercircunstanciaes24psi.Lapresi6ndeneum_tico
igualdeberiasermantenidaencualquiermemento.La
'm_sde30 asentandocuentas
Figura 4
f
J
iJ
,i f
ii i_ /
alta
, PosiciSnmedia
/ Posici6nbaia
Figura 5
zapatos.Parael retiredenievecercano,coloquezapatosde patinazoen
laposiciOnbaia.Cuandoel _reaparaserlimpiadaesdesigual,zapatos
depatinazode lugarenlaposici6nmediaoalta.Verla Figura5.
NOTE:norecomiendana la operaci6nde estelanzadorde nieve
sobrelagravacuandolagravasueltapuedeserfb,cilmenterecogiday
lanzadaperel taladroquecausaa heridapersonalodahoal lanzador
de nieve.Si ustedtiene quehacerlofuncionarsobre lagrava,guarde
elzapatode patinazoen la posici6nm_salta paraeldespachode
aduanam_ximo.
1.AiustarzapatosdepatinazosoltandodosIocodemaleficioy
cerrojosde carrosobrecadazapatode patinazo,y moviendoelzapato
de patinazoa laposici6ndeseada.Verla Figura5.
2.Hacersegurolasuperficiedefondoenteradelzapatodepatinazo
estb,contrala fierraparaevitarla ropadesigualsobreloszapatosde
patinazo.
3.ApretarIocoycerrojosbien.
Instrumento Limpio hacia fuera
Esteinstrumentohasidesuietadoconun lazodecane al reversedel
alojamientode taladroparaembarcarobjetivos.Elcortey quitael lazo
decane comeinstruidoenla p_gina3.
C6mo dirigir el cable de transmisi6n
1. Elcane detransmisi6ny elcane de la barrenasedirigena traves
de la cajadecontroldevelocidaden el ladeizquierdode la maniia.
Elcane de labarrenayel cabledecontroldevelocidadse dirigen
des_,u6shaciala manilainferiorizquierda.Elcabledetransmisl6n
sedirigea travesde lapartesuperiorde lamanijasuperiory,per
01time,haciaabaioala maniiainferiorderecha.Veala figura5.
2. Sehartutilizadotres unionesdecane paraajustarsin tensi6nlos
doscanes de controla la maniiainferior.Dosdeestasuniones
de cane est_nencadabraze,y laterceraen labarratransversal
superiordela mania inferior.Austeestasunionesdecane para
suletar oscabes a a man a nferor.Vea a fgura5.
Prueba de control de la barrena
IMPORTANTE:realicela pruebasiguienteantesde operarla m_quina
quitanieveperprimeravezalprincipiodecadainvierno.
Compruebeel ajustedelcontrolde labarrenade lasiguienteforma:
1. Cuandosesueltael controldela barrenayest_enposici6n
desengranadaarriba,el cane debetenermuypocoiuego,peroNO
debeestaraiustada.
ADVERTENCIA:rio ajuste demasiado el cable.
Ajustar ene×ceso puedeevitar que la barrenase
desengraney porter en peligro la seguridad de la
m_quinaquitanieve.
2. Enunb,reabienventilada,arranqueel motordelam&quina
quitanieveseg0nseindicaanteriormenteen estamismasecci6n
en el encabezado"Encendidodel motor. Aseg0resede queel
estranguhdorest_ajustadoenposici6nFAST(rb,pida).
3. Paradeenlaposici6ndeloperador(detr_sde launidad),engrane
labarrena.
4. Dee labarrenaengranadaduranteaproximadamentediez (10)
seguncIosantesdesotar e centre de a m sma.Reptaesta
operaclonvarlasveces.
5. Conelmotorfuncionandoenposicbnr_pidayel controlde la
barrenaen posici6ndesengranadaarriba,camineal frentede la
maquma.
6. Confirmequelabarrenahadejadodegirarpercompletey no
muestraNINGUNsignode movimiento.
IMPORTANTE:sila barrenamuestraCUALQUIERsignoderetaci6n,
vuelvaa laposicbndeloperadory apagueelmotorinmediatamente.
Esperea quetodaslaspartesm6vilessedetenganantesdevolvera
aiustarelcanedecontroldelabarren&taly comesemuestraenla
p_gina13.
7
Page 34

Canal superior..
Herramienta de.
limpiezal
Control de la transmisi6ne
Tapade la gasolina
Montaje del canal
de la
barrena
....... Manija del canal
Perilla del canal
Placa de raspado
,/
Barrena _.
_ DVERTENCIA:familiariceee con el ueo de todoe los controlee de la m_quinaquitanbve y con eu correeto funcionamiento.
Sepac6mo detener[a m_quinay c6mo deeengranarlos contro[ee r_pidamente.
NOTA:comparelasfiguras6y7consuequipoysigaladescripcbndebs
controbs,queseofrecena continuad6n,parafamiliarizarseconsuoperad6n,
Control de la transmisi6n
Ubbadosobrelapartede abajode la maniiasuperior,el controlde la
transmbi6nse utilizaparaengranar/desengranarlasruedas.Aprbte
elcontroldela transmisi6ncontrala maniiasuperiorparaengranarlas
ruedas,ysu61teloparadesengranarlas.
Control de la barrena
Elcontrolde la barrenaestb,al ladede lamaniiasuperior.Aprbte
elcontroldela regi6ncontrala maniiasuperiorparaengranarlas
barrenas,ysu61teloparadesengranarlas.
ADVERTENCIA:nunca tea[iceajuetee al montaje de[
canal a menoe que los controlee de la barrenay la
transmiei6n eetendeeengranadosy e[ operadoreet_
paradojunto a la unidad.
IMPORTANTE:consultelapruebade controlde la
barrenaenlapagina7antesdeoperarsum_quinaquitanbve. Leay
cumplatodaslasinstruccionesconcuidado,y realicetodoslos ajustes
paraverificarquesu m_quinaquitanbveoperade formaseguray
adecuada.
Manija del canal
Ladirecci6nenquesearrojala nbvecorrespondealadirecci6nde
aperturadelcanal.Usela maniiadelcanalparagirarel montaiedel
canalenla direcci6nenla que@seequitarla neve.
" Zapata antideslizante
Figura 6
Perilla del canal
Esposibleajustarladistaneiaa lacualse arroiala nbveelevandoo
bajandoel canalsuperior.Afloielaperilladelcanaldel ladedelcanal
superiorparaajustarlo.Gireel canalsuperiora laposici6ndeseaday
vuelvaa aiustarlaperilladel canal
Pa[anea de se[ecci6n de velocidad
Sum_quinaquitanbveest_equipadaconun sistemadetransmisi6n
conpropulsi6nde3 velocidades.La velocidadest_controladaporla
palancadesebcci6n de velocidad,ubbada delladeizquierdodela
manijainferior.Cuentacon treevelocidades.Con lapalancacomple-
tamentebaiadahaciael motor,lavelocidad1es lam_sbaia.
[MPORTANTE:paracambiarlasvelocidades,la unidaddebeestaren
funcionamientoy el controlde latransmisi6ndebeestardesengranado,
Plata de raspado
Laplacade raspadohacecontactoconel pavimentoa medidaquese
impulsala mSquinaquitanieve,permitbndoquesedescarguela nbve
queest5cercade lasuperficiedelpavimento,
Zapata antideslizante
Sepuedeaiustarel espacioqueexisteentrelaplacade raspadoy
el suelo.Si deseaquitarnbveal rasdelsuelo,coloquelaszapatas
antideslizantesen laposici6nbaia. Uselasposbionesmediaoalta
cuandolasuperficieque @sealimpiarseadespareiao ensuperficies
congrava,
8
Page 35

rSi_HenciadorBuj[ade Lbnadode aceiteTapadelagasolina
\ encendido X
Cubbrta del _,,
carburador
Llave
Maniiadelar-
Obturador
Controldel \ Arrancadorde
estrangulador \,
/ Cebador retroceso
Drenadodeaceite
Figura7
rancador
Herramienta de mimp
Laherrambntadelimpbzaseadjuntaparadestaparlaaberturadedescarga,
NodestapeeIcanaldedescargambntraselmotorestaenmarch&
ADVERTENCIA:antes de destaparlo, apagueel motor
y permanezcadetr_s de las marqas hastaquetodas
las partes m6viles se hayan detenidoeompbtamente.
Nuneaponga las manosen las aberturas de descarga
o de reeobeci6n, Utilieesiempre la herramientade
limpieza que seadjunta.
Contro_ de obturaci6n
AIactivarelcontrolde obturaci6nse cbrra la placadeobturaci6ndel
carburadoryseayudaa encenderel motor,Parainformacbnsobreel
usode laobturaci6n,consultelapAgina10de estemanual
Arrancador de retroceso y manija del arrancador
Estemotorcuentaconarranqueporestirambntocon acci6nde
retroeesoy maniiade laempuhadurade mit6nparaunf_cilaeeeso
usandoguanteso mitones,
Llave de encendido
LaIlavedeencendidoesnecesariaparaarrancarelmotor,Inserte
laIlaveyaiOstelaen su lugar;nolagireparaarrancar/ detenerla
unidad,RetirelaIlaveeuandonousela unidad,
J
Cebador
AIpresionarelcebadorseenviacombustibbdirectamenteal
carburadordelmotorparaayudaral encendidocuando
el climaesfrio, Consultelasinstruccionesde encendido
en lasecci6nde operaci6nde estemanualparausar
correctamenteelcebador,
Llenado de aceite
Saqueeltap6nde aceiteparaagregaraceite,Consultelap_gina14
paraobtenerinstruccionessobrecontroly Ilenadode aceite,
Tapa de _agasomina
Saqueeltap6nde Ilenadodecombustibleparaagregarcombustible,
Launidadoperaconcombustibbnormal,
NOTA:esta unidadpuedeincluiruntap6nde combustible,que
Onbamenteseufilizaduranteel montaieparamantenereltanquede
combustibblibredesucbdad yresiduos,Descarteeltap6n _.f._
de combusfibbantesdeIlenarel tanquedecombustible,
Contro_ de_ estrangu_ador
ElcontroldelestranguladorestAubbadoenel motor,Regula
lavelocidaddel motory tambi6nIodetbne, Laimagen
de laderecharepresentalasvelocidadesdelcontroldel
estrangulador,
m
q;z:>
PARADA 0
9
Page 36

Antes de encender motor
Aceite del motor
Elmotorseenviaconaceiteenelmotor,Compruebeel niveldeaceite
antesdelprimeruse,ParalosIlenadossubs[gu[entes,useel gradede
aceiteparamotorespecificadoenlap_gina14,Paraagregaraceitel:
1, Saquela var[lladel n[veldeaceitedelorificiodeIlenadodeaceite,
V[ertaace[tonuevolentamentea trav6sdel tap6n,Reemplacela
varilladelnivelde aceite,
2,Controley compruebequeel n[veldeaceiteest6hastaarribaen la
marcaFULLde la varilladelniveldelaceite,
Gasolina
ADVERTENClA:la gasolina es inflamable;tonga
precauci6n cuando la manipuleo la almacene.No
Ilene eltanque de combustible mientras la m_quina
quitanieve est_ en marcha,cuando est_ caliente o
cuando est_ en un _rea terraria.
ADVERTENCIA:evite que su m_quinaquitanieve
entre encontaeto con llamasabiertaeo chiegas
el_ctricaey no fume mientras eeagrega combustible.
1, NuncaIleneel tanquedecombustiblecompletamente,Lleneel
tanquenom&sde 1/2 pulgadaperdebajode la basedelcuellodel
Ilenadorparadeiarespac[oparaladilataci6ndelcombustible,
NOTA:estaun[dadpuede[nclu[runtap6ndecombustible,que
_nicamentese ufil[zaduranteelmontajeparamantenereltanque
decombustiblelibredesuc[edadyresidues,Descarteeltap6nde
combustibleantesde Ilenareltanquede combustible,
2, Siempreusegasol[naparaautomotoressin plomo,I[mp[ay nueva,
Lleneel tanquedecombustiblealaire librey use unembudoopico
paraev[tarderrames,Aseg0resede queel recip[entedesdeelcual
viertelagasolinaestelimpioy noesteoxidadon[ contaminadocon
otrasparticulasextrahas,Aseg0resedeI[mp[arelcombustibleque
sehayaderramadoantesde arrancarel motor,
3, AIfinal[zarel traba]o,vacieeltanquedecombustibles[la m&qu[na
quitanievenoser_utilizadadurantelossiguientes30 diasore&s,
AImacenelagasolinaenun recipientelimpioymantengalatapa
bienubicadaenel recipiente,
PRECAUCION:nunca usepreductos de Iimpiezaparaelmeter e
el carburador en el tanque decombustible.
Para encender el motor
ADVERTENCIA:aseg_resede que ninguna persona
6, Pros[oneel bot6ndelcebadormientrascubreel aguierode
vent[lac[6n,Quitesu dedodelcebadorentreuncebadoy otro,No
cebes[latemperaturasuperalos50°F;cebedosvecesentre50°F
y 15°F;ycebe cuatrovecesperdebaiode 15°R
7, Tomela man[jadel arrancadory saquecuerdalentamentehasta
queel motoralcanceel comienzodel ciclode compresi6n(la
cuerdat[rar_un pocomb,s fuerteen estepunto),Dejequela
cuerdase enrosquelentamente,
8, Tiredelacuerdademanerar&p[daycontinua.Mantengafirmela
manijadelarrancador,deiequelacuerdaregreselentamenteal
arrancador,Rep[tahastaqueelmotorseenc[enda,
9, M[entrasse cal[entaelmotor,rotelentamentelaper[lladel
obturadoraposici6nOFF(apagado),S[el motorfalla,gire hacia
posici6nFULL,luegomuevalentamentehaciaposici6nOFR
10,De]equeel motorseenfrieperalgunosminutesyaqueel motorno
alcanzar_lapotenciatotalhastaIograrlatemperaturaoperat[va,
11,Opereelmotorcon elestranguladoral m_x[mo(R,_RDO)cuando
estearroiandonieve,
Encendido en caHente:
1, s[ vuelvea arrancarun motordespuesde unaparadatemporal,
roteel obturadora posici6nOFFen lugarde FULLy no Iocebe,
Tiredela maniiadelarrancadorcomeseexplic6anteriormente,
Antes de detener la m quina
1, Dejeencendidoelmotordurantealgunosminutesparapermitirque
sesequela humedaden elmismo,
2,Paraevitarunposiblecongelamiento,sigaestospasos:
Arrancador de retroceso
a, Con el motorenfuncionamiento,tireconfuerzade la sogadel
arrancadortreso cuatrovecesdemaneracontinuayseguida,
Procedimiento para detener
m quina quitanieve
1, Paradetenerlasruedas,suelteel controlde latransm[si6n,
2, Parade]ardequ[tarlan[eve,suelteelcontrolde labarrena.
3, Paradetenerel motorpros[onelapalancadecontroldelestrangulador
hastah posici6nOFF(apagado)ysaquelaIhve,NogirelaIlave,
,_ADVERTENCIA: la temperaturadel silenciador y de lae
_reasque Io rodean puedeeuperar los 1500F.Evite
dichae_reas.
_ dem_s del operador eet_ paradacerca de la m_qui-
NOTA:paraub[cartodoslos controlesdelmotorquese menc[onanen
estasecci6n,consultelafigura7,
na quitanieve mientrae arrancauopera. Noopere
eeta m&quinaquitanieve a menos que el montaje
del canal hayaside correctamente instalado y eet_
asegurado.
Encendido en fri'o
1, Aseg0resedequelos controlesdela barrenayla transmisi6n
est_ndesengranados,Conecteelcablede labuiiaa la misma,
2, Enciendalav_lvula,s[espartedelequipo,
3, Muevaelcontroldel estranguladora laposici6nFAST(rb,pido),
4, Presionelateclaenlaranuradeencendidohastaqueencajea
presi6nensu lugar,Nogirela Ilave,
5, Roteel controlde obturaci6na posici6nFULLdelobturador,
Procedimiento para quitar la nieve
9RECAUClON:reviselazonaquedesealimpiarparadetectarla
presenciade obietosextrahos,Refireloss[ los hay,
1, Enciendaelmotorsiguiendolas [nstrucc[onesdeencendido,
2, De]equeelmotorsecalienteunosminutesyaqueelmismonodesarrolla
lapotenciam_ximahastaquealcanzalatemperaturadefuncionamiento,
3, Gireel montajedelcanalhaciala direcci6ndeseada,leiosde
transe0nteso edificios,
4, Aseg0resedeque nohayaning0ntranse0nten[n[ng0nobieto
enfrentede launidad,presioneel controlde labarrenacompleta-
montehastaengranartotalmentelas barrenas,
5, Mientrasengranaelcontroldelabarrena,pros[oneelcontrol
de latransmisi6ncompletamentecontralamanijasuperiorpara
engranarlasruedas,No"expanda"el controldetransmisi6n,
10
Page 37

6. A medidaquelamb,quinaquitanievecomienzaa moverse,
sostengafirmementela maniiay guiela m_quinaaIolargodel
caminoquedesealimpiar.
7. Suelteloscontrolesdelabarrenay latransm[s[6nparaquela
m_quinadejedequitar nieveyde desplazarsehaciadelante.
NOTA:suunidadestaequipadaconunembragueenlatransmisi6n.S[
lasruedassedetienenmientrastratadedescargargrandesvolOmenes
denieve,[nmediatamentedesengraneelcontroldelatransm[sbny
dejequehs barrenasqueestAng[randodescarguenn[evedelaca]a.
Reduzcalaanchuradeseparaci6ny cont[nOelaoperad6n.
8. Conlaspasadassucesivasreaiusteelmontaiedelcanalenh posicbn
deseaday traslapelevementelapasadaquelimpi6previamente.
Palanca de selecci6n de velocidad
Suun[dadest_equ[padaconun s[stemade transm[s[6ncon
propulsi6nde 3 velocidades.La posici6nde velocidad1,cuandola
palancaest_pres[onadacompletamentehaciael motor,es lalenta.
Laposici6nde velocidad2 es unpocomb,s r_pida,y la3 esla m_s
r_pida.Veala figura8.
selecci6n de
velocidad_
\x
\
\
\
4. S[poralgOnmot[vofienequeusarla m&quinaquitanievesobre
grava,mantengalazapataantideslizanteen laposici6nm4s
elevadaparaIograrunaseparaci6nm_ximaentreelsueloy la
placaderaspado.
5. Limpiecuidadosamenteh m4quinaquitanievedespu6sdecadauso.
Limpieza deJ monta]e del canal
Laherramientade limpiezaest&aiustadaconvenientementea la caja
de labarrenaconunahorquillademonta]e.
Cuandoseacumulennievey hieloen el montajedel canaldurante
laoperaci6n,useestaherramientaparalimpiardemanerasegura
el canaly laaberturadel canal Sigalospasosqueaparecendebajo
paraoperarla.
ADVERTENClA:detengael motor moviendo la
palancadelestrangulador a la posici6nde parada,y
esperea que todas las partes m6vilesse detengan
antes de utilizar la herramienta de limpieza.
1. Suelteloscontrolesdelabarrenaylatransm[si6n.
2. Detengaelmotormoviendolapalancadelestranguladora la
posici6nde parada.
3. Saquela herram[entadeI[mp[ezadelpasadorquela a]ustaala
parteposteriordelacaia de labarren&
4. Useel extremoconformadepala dela herram[entade I[mp[eza
paradesplazary recogerlanieveyelhieloqueseformaroncerca
del conjuntodel canal.
ADVERTENClA:nunca usesue manos para limpiar
la nievey el hielo del montajedel canalo la cajade
la barrena.
Figura 8
Paraufilizarestafunci6n,sigaestas[nstrucciones:
1. Cambielavelocidadde su m_quinaquitanieveOnicamenteconel
motoren march&
2.Sueltelamaniadecontroldelatransmisi6nantesdecambiardeveloddad.
Conse]os de operaci6n
1. Paraqueel quitadodelanieveseam_seficientedebehacerlo
[nmed[atamentedespu6sdela caidade lam[sma.
2. EnIoposible,descarguelanieveen direcci6nalviento.Traslape
levementelas pasadasanter[ores.
3. Configurelas zapatasantideslizantes1/4"pordebajode laplaca
de raspadoparaunuso normalLas zapatasantidesl[zantesse
puedenajustarhaciaarribacuandola nieveest6muycompactada.
NOTA:nose recomiendaqueopereestam_quinaquitanievesobre
grava,yaqueespos[blequelam_qu[naqu[tan[evetomelagravasuelta
ylabarrenalaexpulse,Iocualpodrfacausarlesionespersonaleso
daharlam_quinaquitanieve.
5. Vuelvaaajustarlaherramientadelimpiezaalahorquillade
montaieubicadaenlacajade labarrena.Ahorayapuedeempezar
a operarsumaquinaquitanieve.Vealafigura9.
Figura9
11
Page 38

Recomendaciones generales
1, Respetesbmprelasreglasdeseguridadcuandorealicetareasde
mantenimiento,
2, Lagarantiadeestamaquinaquitanbvenocubreebmentosque
hanestadosuietosalrealusoonegligeneiadeloperador,Pararecibir
elreembolsototaldelagarantfa,eloperadordeber_darmanten=
imbntoa lam_quinaquitanievecomoseindieaenestemanuak
3,Reviseperi6dieamentetodoslossuietadoresylosebmentosde
ferreter[ay compruebequeestenbienaiustados,
ADVERTENCIA:antes de realizartareasde servbio,
reparaci6n, lubrbaci6n o inspecci6n, desengrane
todos los eontrobs y detengael motor.Espere a que
sedetengan todas las piezasm@ibs. Desconecte la
bqia y p6ngalade maneraque haga masaeontra el
motor.Utilice siempre anteojos de seguridaddurante
la operacien o mientrasajusta o repara esteequipo.
Pernodel
Placade raspado _-
earro / S
Tuercahexagonal Pernodel
carro Tuercahexagonal
Cambio de p aca de raspado y
las zapatas antideslizantes
Laplacade raspadoy laszapatasantideslizantesubicadasen labase
dela mAquinaquitanieveestAnsu etasa desgaste,Debecontrolarlas
peri6dicamentey reemplazarlascuandoseanecesario,
1, Paraeambiarlas,quitelosjoernosdecarroy lastuereashexagonabsque
asegurancadazapataantldeslizantealacaiadelam_quinaquitanieve,
Vealafigura10,
2, Vuelvaaensamblarnuevaszapatasantideslizantesconlosmateriabs
queacabaderetirar,Compruebequelaszapatasantideslizantesest_n
aiustadasparaquequedenpareias,
3, Pararetirarlaplacaderaspado:retireambaszapatasantideslizantesy
loselementosdeferreteria,incluyendolospernosdelcarroylastuercas
hexagonabsqueunenlaphcaderaspadoalacaadelam_quina
quitanbve,Perlaubicaci6ndelaplacaderaspado,consultelafigura10,
4, Vuelvaaensamblarlaplacaderaspadonueva,asegur_.ndosedeque
lastapasdelospernosdecarroseencuentrendelladeinteriordela
caja,Vuelvaainstalarlaszapatasantideslizantes,Ajustebien,
Servicio de barrenas
LasbarrenasestAnaiustadasaleieespiralconcuatropasadoresde
cuchillaypasadoresdechaveta,Sig@ea unobietoextrahoo una
barrade hielo,la m_quinaquitanieveestb,disehadademaneraque los
pasadoressecortan,Consultelafigura10,
Silasbarrenasnogiran,verifiquesi lospasadoresse cortaron,Sies
necesario,reemplaceconlospasadoresdeeuchillaadecuados,Consulte
elebmento42enlap_gina19paraconocerel nOmerodeparte,
I[_IPORTANTE:noreemplaeeNUNCAlospasadoresdecuehillapor
pasadoresest_ndarosuietadores,Cualquierdahoquesufrael engranaie
delabarrenaoeualqubrotroeomponenteporelusodepasadores
est_ndarNOestar_eubiertoporlagarantiadesum_quinaquitanieve,
Lubricaci6n
Paraubicarlospuntosde lubricaci6nde lamAquinaquitanieve,
consultelafigura11,
1, Unavezpertemporada,lubriquelospuntosdegirodelcontroldela
barrenayelcontrolde latransmisi6nconunaceitelivianoparamotor,
2, Unavezportemporada,lubriqueelsoporteintermediodela
barrenacon unaceiteliviano,
Motor
A confinuaci6nseenumeranrecomendacionesgeneralessobreel
mantenimientodel motorde sum_quinaquitanieve,
Figura10
Lubrique
;_ue
Figura11
1, Antesdeoperarlam_quinaquitanbve,controb el niveldeaceite,
2, Cambb el aceitedel motordespuesdelasdosprimerashorasde
operaci6nya partirdeah[ cada25horasde operaci6n,
3, Limpb la buiay a usteel espaciodeelectrodesa 0,030"al
menosunavezperestaci6nocada 100horasdefuncionambnto;
reempl9celacada200horasde operaci6n,
Compruebe correas en
Sigalasinstruccionesa continuaci6nparaverificarelestadodelas
correasde transmbi6ncada50horasdefuncionambnto,
1, Saquelacubbrta plAstbade lacorreaubbadaenelfrentedel
motor,Paraellosaquelosdostornillosautorroscantesy presione
lasabtas deplAstboparasoltarlacubbrta delacorrea,
2, Compruebevisualmentelaexistenciadecorreasraidas,agrbtadas
o excesivamentegastadas,Encasede sernecesario,reemplace
segOnlas instruccionesqueaparecenacontinuaci6n,
V
Reemp azo de correas
NOTA:estam_quinaquitanbvevieneequipadacondoscorreas:una
correadelabarrenay correadetransmisi6n,Sereeomiendaqueambas
correasseanreemplazadasal mismotiempo,
1, Retirede la buliaelcabb dela misma,y p6ngalode maneraque
hagamasacontrael motorparaevitarqueseenciendade manera
accidental
12
Page 39

f
n
Mensulade "_
ajuste del cable
de la bacteria
/
2. Drenela gasolinadeltanquedecombustiblepordebajode 1/2
tanqueohaga funcionarla m&quinaconmenosde mediotanque,
o coloqueuntrozode pl_sficodebaiodel tap6ndeIlenadodel
combustibleparaevitarunap6rdidade gasolina.
ADVERTENCIA:cealiceelmantenimientodelacoccea
al aicelibre,yaque eeposibleque hayap_rdidae
de combustibledel carburadorinclueocuandose
ubicaun trozode pl_eticobajolatapadeIlenadode
combustible paraevitacque_eteedra p_rdidae.
Aiuste del cable de Ja barrena
Esposiblequeserequieranaustesperi6dicosdelcablede controlde
labarrenadebidoal estiramientoya/desgastenormalde lacorrea.
Senecesitarb,n a ustessi lasbarrenasparecentemblarmientrasgiran,
peroe motormantenesu veocdad,os sguegirandocon elcontrol
de labarrenadesengranado.
1. Afioe la tuercahexagonalposteriorenel soportedeaiustedel
cabe. Vea a fgura12.
Figuca12
f
2. Desliceel soportede austedelcablehaciaatr_,sreduciendoel
iuegodel cablede labarrena.
3. Vuelvaa aiustarla tuercahexagonalposterior.
4. Enciendael motoryverifiquequeelcontrolde labarrenase
engranay desengranaadecuadamente.
NOTA:sila barrenacontinOagirandoconelcontroldesengranado,
apagueel motoryreaiuste.
Correa de Rabarrena
1. Afloe el tornilloposteriorenla mensuladea ustedel cablede la
barrenautilizandounaIlavede 3/8' y desliceel soportecompleta-
mentehaciadelanteparaIograrelm_ximoiuegoenel cablede la
barrena.Veala figura12.
2. Retireeltornillode lacubiertade lacorreaufilizandounaIlave
de 5/16con extensi6ny elevelamismaligeramente.Asimismo,
tambi6ndebesoltarlaaletade pl_sficoen el otroladeparaelevar.
Nointenteretirarlacubiertadeh correade la unidadeneste
memento.Vealafigura13.
3. Aflojeeltornillodemontaiedelacaiadelabarrena,!nferiordecada
ladeun(1)girocompletoutilizandounaIlavede 1/2. Vealafigura12.
4. Utilicela mlsmaIlavepararetirarlostornillosde montaiede lacaia
J
Figuca13
f
\
Wood BHock
J
Figura14
de la barrenasuperioren cadalade.
NOTA:el tornillode lacajadelabarrenasuperioren el ladeizquierdo
tambi6naseguraelsoportedelcable dela barrenayelrodillodel
cable.Presteatenci6na suubicaci6ny a c6moest_situadocome
referenciaparacuandovuelvaaarmar.
5. Empuiehaciaabajola manijade la unidad,Ioquepermitequela
cubiertade la correaseretiref4cilmenteytambi6nbrindaacceso
pararealizarlosprocedimientosdemantenimientode la correaque
aparecenaconfinuaci6n.
6. Pararetirarlacubiertade la correa,deslicelacorreadelabarrena
frontalfuerade la poleadel motorempui_ndolahaciadelantey
haci6ndolarodarfuerade la polea.
7. Empue la maniadelaunidadabriendoaOnmb,s esta_reay
permitiendoun meieraccesoa la poleade labarrena.Talvez
deseecolocaruntrozode maderabaiolacaiade labarrenapara
mantenerlaunidadabierta.Veala figura14.
8. EmpuielapoleaIocade lacorreade labarrenasoltandoelfreno
de h barrena,que eslaaletaquesu etala correasobrela poleade
labarrena.Retirelacorrea.
9. ReemplAcelaperla nuevacorreadespu6sdereemplazarla correa
de la transmisi6n.
13
Page 40

NOTA:sino reemplazalacorreadela transmisi6n,procedaal paso5
en lasecci6n"Correadelatransmisi6n".
Correa de la transmisi6n
NOTA:parareemplazarla correadela transmisi6n,primerodeben
seguirselasinstruccionesde lacorreade labarren&Reemplacela
correadela transmisi6nantesdevolvera ensamblarla nuevacorrea
de labarrena.
1. Retireel brochedehorquillay girelavarillaaleiAndolade la
unidad.Vealafigura 15.
2. Saqueel brazodecontrolhaciafueray desconecteelcane de la
transmisi6n.
3. EsfirehaciafueralapoleaIocadel ladoderecho,redudendo
la tensi6nde lacorreade la transmisi6n.Retirelacorreade la
transmisi6ndela poleaIocay la poleade la transmisbn.Veala
figura16.
4. Gireel brazodecontrolparamaniobrarla correade la unidad.
Retirela correay reemphceconunanuevacorrea.
NOTA:asegOresede mantenerla posici6ndelmontae dela poleade
velocidadvariabledemaneraqueel pasadorde posicionamientodela
correaquedeen laposici6nsuperior.
5. Vuelvaaarmaren ordenexactamenteinverso.
6. Trasvolvera armar,asegOresede a ustarel cablede lab,arrena.
Consultelasinstrucciones"Aiustedelcane de la barrena en la
p_gina13deeste manual
f
Figura 15
f
Verificaci6n del nivel de aceite
Antes de operarla mbquinaquitanieve,controleel niveldeaceite
mediantelossiguientespasos
1. Conel motorubicadoensuelo
pareio,elaceitedebeestarenla
marcaFULL(lleno)de lavarilla
delnivelde aceite. FULLi Mantengaelnivel
2.Detengaelmotory esperevarios _f Full(lleno)yADD(agregue)
minutesantesdeverificarel nivel
deaceite.Saqueeltap6n de ADD
cargadeaceitey la varilladel
niveldeaceite.
3.Limpielavarilladel nivelde
aceite,ins6rtelaenel orificiode cargade aceiteyaiOstelabien.
4.Saquela varilladel nivelde aceiteycontr61ela.Siel aceiteno
IlegahastalamarcaFULL(lleno)de lavarilh del niveldeaceite,
agregueaceite.
RF:2qR_ deaceiteentre
Cambio de aceite
Changeengineoilafterfirsttwo hoursofoperationandevery25
Cambieelaceitedel motordespuesde lasdos primerashorasde
operaci6ny a partirdeah[cada25 horasdeoperaci6n.Pararealizar
elcambio deaceiteprimerodebevaciarel motordelaceiteusadoy
luegovolvera Ilenarloconaceitenuevo.
1. Dreneelaceitemientraselmotorest_caliente.Saquelatapade
drenadodelaceiteubicadaenlabasedelarrancadorderetrocesodel
motor.Junteelaceiteenunrecipienteadecuado.
2.Cuandosehayavaciadotodoelmotordeaceite,vuelvaacolocarel
tap6ndedrenadobienaiustado.
3.SaquelavarilladelniveldeaceitedelorificiodeIlenadodeaoeite.Para
conocerlaubicaci6ndelIlenadodeaceite,consultelafigura7.Vierta
aceitenuevolentamenteatrav6sdeltap6n.Reemplacelavarilladel
niveldeaceite.
4. Controleycompruebequeelnivelde aceiteest6hastaarribaen la
marcaFULLde la varilladelniveldelaceite.
Figura17
14
Page 41

f
2
NOTA:aunquelosaceitesdeviscosidadmOltiple(5W30,10W30etc.)me=
oranelencendidocuandoel climaesfrfo,losmismostambienaumentan
e consumodeacetecuandoseusanam&sde32°RCompruebee nve
deaceitedelam&quinaquitanieveconmayorfrecuenciaparaevitarque
el motorresultedahadoporoperarconunniveldeaceitebaio.Consultela
tabladeviscosidadqueapareceenlafigura17.
Contro e bujia
Limpielabui[ayajusteel espaciodeelectrodosa 0,030"al menos
unavezpor estac_6no cada100horasdefuncionamientcreemp=
I_celacada200horasdeoperaci6n.
1. Limpieel_reaalrededordelabasede labuiia.
2. Saquee inspeccionelabujia. Compruebelaseparaciony
1, Espaciode0,030pulg(0,76ram)
2. Electrodo
L Porcelana
"Y NOTA:nolie labu ia.Sedebenlimpiarlasbuias medianteraspadoo
Figura 18 talladocon cep o deaambrey avadocon unsoventecomerc_a.
Sigael cronogramade mantenimientoque se presentaa continuaci6n,AIgunosajustesdeben ser realizadosperi6di=
camenteparael mantenimientoadecuadode la unidad, Reviseperi6dicamentetodoslos sujetadoresycompruebeque
est6n bienajustados, Controle sucalendariode mantenimientocompletandoel campo "Fechas de los servicios"que
aparecea continuaci6n,
ADVERTENCIA:antes de realizar tareas de servicio, reparaci6n, lubricaci6n o inepecci6n, deeengranetodoe los controlee
y detenga el motor.Eepereaqueeedetengantodae las piezasm6viles.Deeconectelabujiay p6ngalade maneraque haga
maeacontrael motor. Utilicesiempreanteojosdeseguridaddurantela operaci6no mientraeajustao reparaesteequipo.
asegOresede queest_aiustadaa 0,03.Veala figura18.
3. Cambielabuiiasi loselectrodosest_npicados,quemadosola
porcelanaest_rota.
Camendario de mantenimiento
1
1
1 1 1
1
Fa
FECHASDELOS
SERVICIOS
Fa
Fa
15
Page 42

Si noseva a utilizael equipodurante30diaso mb_s,o sies el final
de latemporadade nieveyya noexisteposibilidadde quenieve,
esnecesarioalmacenarel equipodemaneraadecuada.Sigalas
instruccionesdealmacenamientoquese indicana confinuaci6npara
garanfizarel rendimientom_ximodela m_,quinaquitanievedurante
muchosahosmAs.
Preparaci6n de! motor
NQTA:consulteel manualdelmotorparaobtenerinformaci6nmb,s
detalladasobrec6moprepararel motordela mAquinaquitanievepara
almacenamiento.
ADVERTENCIA:nunca almacenela m_quina quita-
_lj ievecon combustible en el tanque en un espacio
NOTA:esimportanteevitarqueduranteel almacenamientose
formendep6sitosde gomaen laspiezasesencialesdelsistemade
combustibledel motorcome,pereiemplo,enelcarburador,elfiltrode
combustible,la mangueradecombustibleoel dep6sito.
PRECAUCION:: loscombustiblescon mezda dea/cehd (que se
Hamangasehd, e que utilizanetanefe metand) puedenatraer/a
humedad,/equeconducea/a separaeidny fermaddn debrides
duranteel afmaeenamiente.EIgas addiee puededafiarelsistema
de/combustible deun meter duranted almacenamientedd misme,
Paraevitarproblemasconelmotor,elsistemadelcombustibledebeser
vaciadoantesdealmacenarlamb,quinadurante30d[asomb,s.Sigaestas
instruccionesparaprepararsum_quinaquitanieveparaalmacenarla:
1. Saquetodalagasolinadel carburadory del dep6sitode combus=
fibleparaevitarlaformaci6ndedep6sitosdegomadentrodelos
mismosque puedendaF_arel motor.
2.Pongael motoren marchahastavaciarel dep6sitode combustible
y hastaqueel motorse detengadebidoalafaltadecombustible.
3.Droneelcarburadorpresionandohaciaarribael drenajedela taza,
ubicadodebaiodela cubiertadelcarburador.Vealafigura 19.
cerrado o en _reascon pocaventilaciSn, deride los
gases del combustible puedan alcanzar el fuego,
chispas o una luz piloto comelaque tienen algunos
homes, calentadores de agua, secadores de ropa o
alg_n otto dispositivo a gas.
ADVERTENCIA:drone el combustible dentro de
un recipiente aprobado en un lugar exterior, lejos
de todo tipo defuego. Compruebeque el motor
est_frio. Nofume.Elcombustible que se deje en
el motor se deteriora cuando el clima es c_lido y
causagraves problemasde encendido.
ADVERTENCIA:nodroneelcarburadorsi est_utilio
zandounestabilizadordecombustible.Enel dep6sito
decombustibleno usenuncaproductosdelimpieza
paramotoreso carburadoreso podriaproducir daSos
permanentes.
NOTA:el usede estabilizadoresde combustible(comeSTA-BIL)es
unaalternativaaceptableparaminimizarlaformaci6ndedep6sitosde
gomade combustibleduranteelalmacenamiento.Agregueel estabili=
zadora la gasolinaqueseencuentraen eldep6sitodecombustibleo
en el recipientedealmacenamiento.Respetesiemprelaproporci6nde
mezcladoquefiguraenel recipientedelestabilizador.Pongael motor
en marchaperIomenos10minutesdespuesde agregare_estabiliza-
dor parapermitirleIlegaralcarburador.Nodreneel carburadorsi est_
ufilizandounestabilizadordecombustible.
4. Retirelabu iay vierta(1)onza deaceiteparamotora travesdel
orf c o de a buiay hacae nteror de c lindro.Cubrae orf code
la bujiaconuntrapoy pongael motoren marchavariasveces para
distribuirel aceite.Reemplacelabujia.
NOTA:consulteel manualdelmotorparaobtenerm&sinformaci6n
sobrec6moprepararelmotorde la m_quinaquitanieveparaalmace=
namiento.
Preparaci6n de la m quina quitanieve
1. Cuandoalmacenelamb,quinaquitanieveenungalp6nde dep6sito
moth,lice oconpocaventilaci6n,tongaespecialcuidadode
realizarleuntratamientoanti-oxidanteal equipo.Useaceiteligero
o silic6npararecubrirelequipo,especialmentelascadenas,los
resortes,loscoiinetesylos cables.
2. Eliminetodoel polvodelexteriordel motorydelequipo.
3. Sigalas recomendacionesde lubricaci6nenla pb,gina12.
4.Almaceneelequipoen unb,readespejaday seca.
_" Carburador '_
Drenaje de [a taza
Figura 19
16
Page 43

7. ElmotorestSahogadoyaqueha 7: Aguardealmenosdiezminutosantes
sidocebadoen exceso de encenderelmotor.
Elmotorfunciona de
P6rdidade potencia 2. Laventilaci6nde latapa de
1. Launidadestb,funcionandoen la
posici6nobturaci6n
2. Lalineadelcombustibleest_
tapadao el mismoesvie]o
3. Aguao suciedadenel sistemadel
combustible
4. Esnecesarioa[ustarelcarburador
1. Elcabledelabui[aestb,floio 1. Conectefirmementeel cabledelabuiia.
gasolinaest5obstruida 2. Destapelaventilaci6n
1. Cambielapalancadeobturacbnahposici6nOFF(apagado).
2. Limpiela lineadelcombustibley Ileneeltanquecon
gasolinalimpiay fresca.
3. Remitasealmanualdelmotorparasolucionarel
problema.
4. Rem[taseal manualdelmotorparasolucionarel
problema
Demasiadavibraci6n i, Haypiezasqueestanfiojase la !. Detengael motorde inmediatoy desconecteelCable
barrenaest_da_ada de [a bujia.Controlesi larnaquinaestaddiada.
Ajustetodos lospemosy las tuercas.Realicelas
reparacionesnecesarias.Si el problemaContin8a,
Ilevelaunidada un distribuidorautorizado.
Launidadnoseautopropulsa
1. La correadetransmisi6nest_floia
o daF_ada
1. Reemplacelacorreade latransmisi6n.
Launidadno descarga la
1. El montaiedel canalestb.tapado.
nieve
2.El pasadordecuchillasecort6.
3. Hayun obietoextrahoen la
4.El cabledelcontrolde la barrena
5.La correade la barrenaest_floia
barrena.
necesitaunaiuste.
o dahada.
1. Detengael motory desconecte
el cablede la buiia.Limpieel
canaly el interiorde lacaiade
labarrenaconlaherramientade
limpiezao unavarilla.
2. Reemplaceelpasadordecuchilla.
3. Detengaelmotorde inmediatoy
desconecteel cabledelabujfa.
Retireel obietode labarrena.
4.Aiusteelcable delcontrolde la
barrena.
5. Reemplacelacorreade la
barrena.
17
Page 44

iiiiiiiiiiiiiiiiiiiiiiiiii?ii_....
iiiiiiiiiiiiii_,_,'
iiiiiiiiiiiiii
iiiiiiiiiiiiii
iiiiiiiiiiiiii
iiiiiiiiiiiiii
iiiiiiiiiiiiii
iiiiiiiiiiiiii
iiiiiiiiiiiiii
iiiiiiiiiiiiii
iiiiiiiiiiiiii
iiiiiiiiiiiiii
iiiiiiiiiiiiii
iiiiiiiiiiiiii
iiiiiiiiiiiiii
iiiiiiiiiiiiii
iiiiiiiiiiiiii
iiiiiiiiiiiiii
iiiiiiiiiiiiii
iiiiiiiiiiiiii
iiiiiiiiiiiiii
iiiiiiiiiiiiii
iiiiiiiiiiiiii
iiiiiiiiiiiiii
iiiiiiiiiiiiii
iiiiiiiiiiiiii
iiiiiiiiiiiiii
iiiiiiiiiiiiii
iiiiiiiiiiiiii
iiiiiiiiiiiiii
!_i_!jjjjjjjjjjjjjji_i_i
Your Home
For repair-in your home-of all major brand appliances,
lawn and garden equipment, or heating and cooling systems,
nomatterwhomade..nomatterwho o,dit,
iiiiiiiiiiiiiiiiii
For the replacement parts, accessories and
owner's manuals that you need to do-it-yourself.
iiiiiiiiiiiiiHHi
For Sears professional installation of home appliances
and items like garage door openers and water heaters.
1-800-4-MY-HOME ® (1-800-469-4663)
Call anytime, day or night (U.S.A. and Canada)
www.sears.cor,www.sear .ca
OurHome
For repair of carry-in items like vacuums, lawn equipment,
and electronics, call or go on-line for the location of your nearest
Sears Parts & Repair Center.
1-800-488-1222
Call anytime, day or night (U.S.A. only)
www.sears.corn
To purchase a protection agreement (U.S.A.)
or maintenance agreement (Canada)on i product serviced by Sears:
1 800 827 6655 (U.S.A.) 1 800 361 6665 (Canada)
Pare pedir servicio de reparaciOn Au Canada pour service en frangais:
a domicilio, y para ordenar piezas: 1.800.LE.FOYERMC
1-888-SU-HOGAR SM 1 800 533 6937
(1-888-784-6427) www.sears.ca
(- - _ )
SeO/rS
_) Registered Trademark / Trademark / Service Mark of Sears, Roebuck and Co,
_3 Marca Registrada / Marca de Fabrica / Marca de Servicio de Sears, Roebuck and Co.
MC MD
Marque de commerce / Marque deposee de Sears, Roebuck and Co. (cbSears, Roebuck and Co.
TM SM
TM SM
 Loading...