

Page 1
Operator's Manua[
[RAFTSMAN°
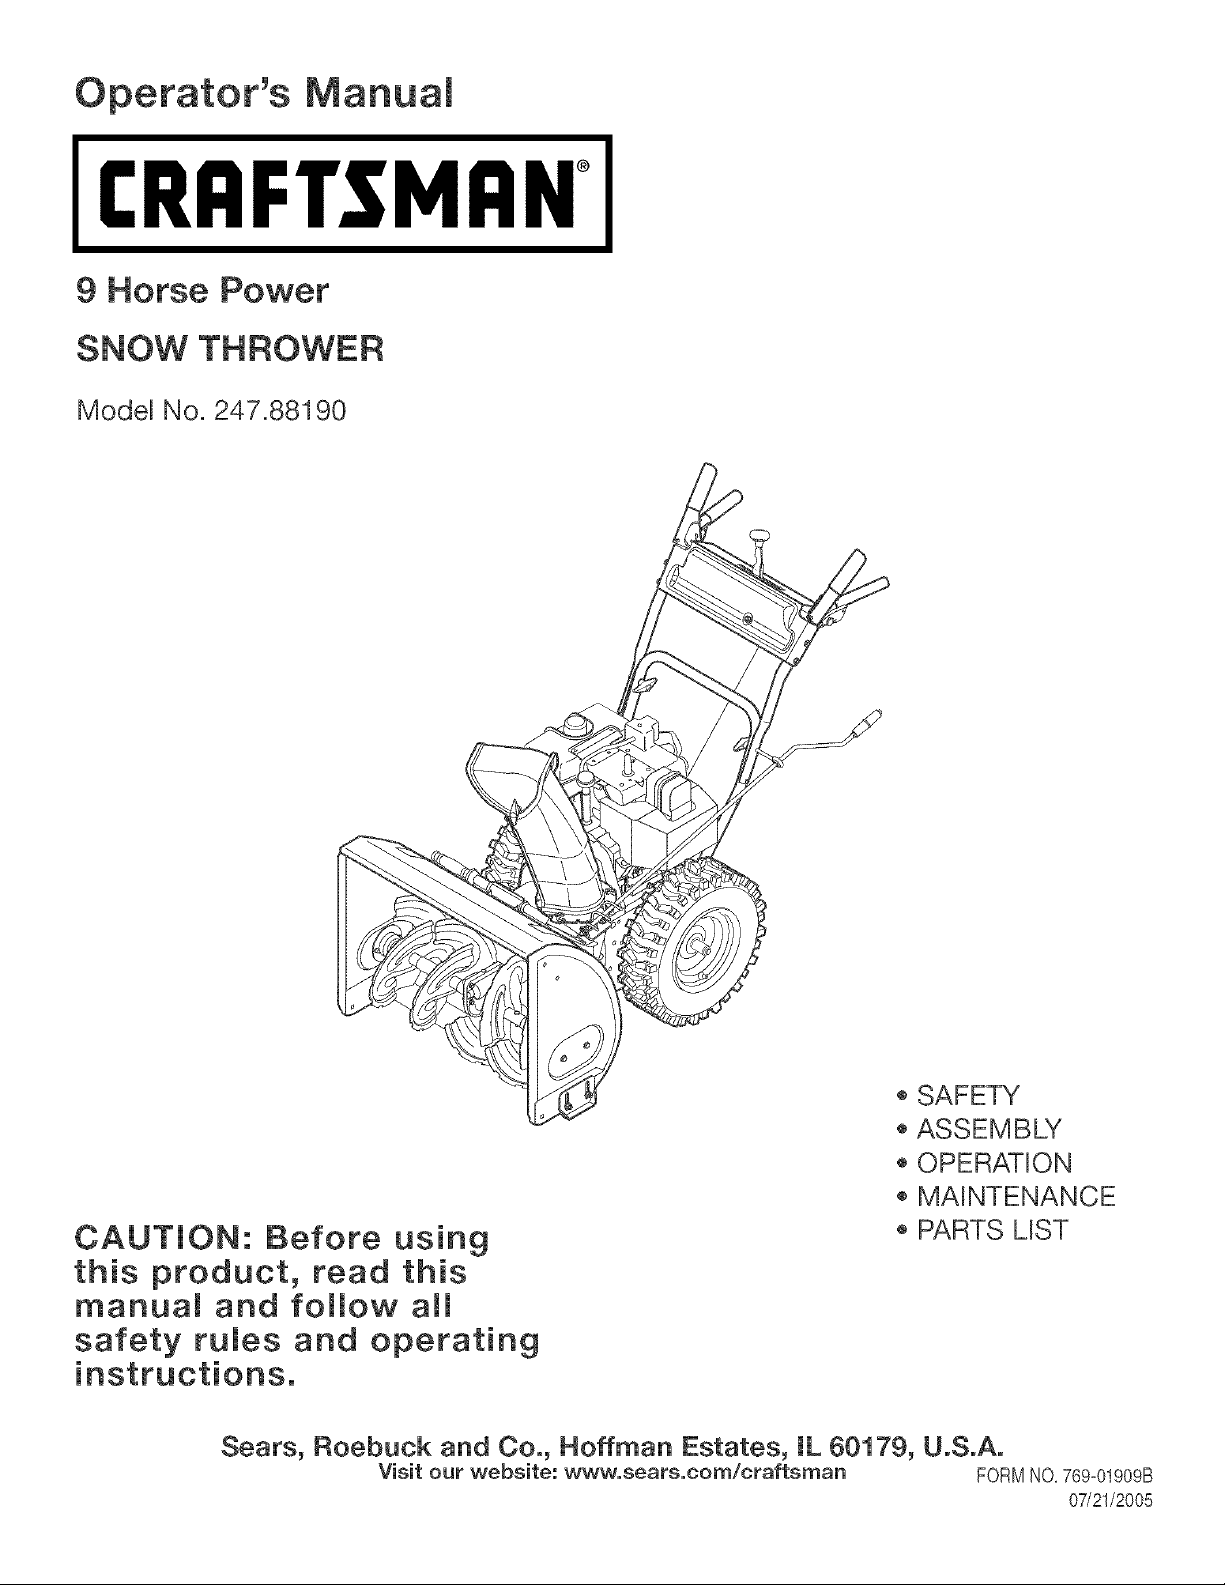
9 Horse Power
SNOW THROWER
Model No. 247.88190
CAUTmON: Before using
this product, read this
manual and follow a[[
safety rules and operating
Sears, Roebuck and Co., Hoffman Estates, [L 60179, U.S.A.
Visit our website: www, sears,com/craftsman FORMNO,769-01909B
_,SAFEW
_,ASSEMBLY
o OPERATION
o MAINTENANCE
o PARTS MST
07/21/2005
Page 2
WarrantyStatement..................................Page2
RepairProtectionAgreement....................Page2
SafeOperationPractices..........................Pages3-5
Assembly...................................................Pages6-7
Starting/Stoppinginstructions..................Pages10-11
Operation...................................................Pages8-12
Two-YearWarrantyonCraftsmanSnowThrower
Fortwoyearsfromthedateofpurchase,whenthisCraftsmanSnowThrowerismaintained,lubricatedandtunedupaccordingtotheinstructions
intheowner'smanual,Searswillrepair,freeofcharge,anydefectinmaterialandworkmanship,IfthisCraftsmansnowthrowerisusedfor
commercialorrentalpurposes,thiswarrantyapplbsforonly30daysfromthedateofpurchase,
Thiswarrantydoesnotcover:
Expendabbitemswhichbecomewornduringnormaluse,suchasskidshoes,shaveplateandsparkplugs,
Repairsnecessarybecauseofoperatorabuseornegligence,includingbentcrankshaftsandthefailuretomaintaintheequipmentaccording
totheinstructionscontainedintheowner'smanual
WARRANTYSERVICEiSAVAILABLEBYRETURNINGTHECRAFTSMANSNOWTHROWERTOTHENEAREST
SEARSPARTS&REPAIRCENTERINTHEUNITEDSTATES,
ThiswarrantyapplbsonlywhilethisproductisinuseintheUnitedStates,
TOLOCATETHENEARESTSEARSPARTS&REPAIRCENTERORTOSCHEDULESERVICE,
SIMPLYCONTACTSEARSAT1-800-4-MY-HOME@,
Thiswarrantygivesyouspecificlegalrightsandyoumayabehaveotherrightswhichmayvaryfromstatetostate,
SEARS,ROEBUCKANDCO.,D/817WA,HOFFMANESTATES,IL60179
Repair Protection Agreements
Congratula%nsonmakingasmartpurchase,YournewCraftsman@
productisdesignedand manufacturedfor yearsofdependabbopera=
tion,Butlikeallproducts,it mayrequirerepairfromtimetotime,That's
whenhavinga RepairProtectionAgreementcansaveyoumoneyand
aggravation,
Here'swhat'sincludedintheAgreement:
Expertserviceby our 12,000professionalrepairspecialists
Unlimitedserviceand nochargeforpartsand laboronall covered
repairs
Productreplacementifyourcoveredproductcan'tbe fixed
Discountof 10%fromregularpriceofserviceandservice-related
partsnotcoveredby theagreement;also,10%off regularpriceof
preventivemaintenancecheck
Fasthelpby phone- phonesupportfroma Searstechnicianon
productsrequiringin-homerepair,plusconvenientrepair
scheduling
Horse Power: 9
Engine Oil: SAE 5W=30
Fuel: Unleaded Gasoline
Spark Hug:
Engine: Tecumseh LH318SP
PurchaseaRepairProtectionAgreementnowandprotectyourself
fromunexpectedhassleandexpense,
OnceyoupurchasetheAgreement,asimplephonecallis all thatit
takesfor youto scheduleservice,Youcancallanytimedayornight,or
seheduba serviceappointmentonline,
Searshasover12,000professionalrepairspecialists,whohave
accessto over4,5millionqualitypartsandaccessories,That'sthe
kindof
professionalismyoucancountonto helpprolongthelifeofyournew
purchaseforyearsto come,PurchaseyourRepairProtectionAgree-
menttoday!
Somelimitations and exclusions apply. For prices and additional
informationcall 1-800-827-6655.
Sears Installation Service
ForSearsprofessionalinstallationof homeappliances,garagedoor
openers,waterheaters,andother majorhomeitems,in the U.S.A.call
1=800=4=MY=HOME@
Model Number .............................................................
Serial Number ..............................................................
Date of Purchase ..........................................................
Record the model number, serial number
and date of purchase above
Page 3
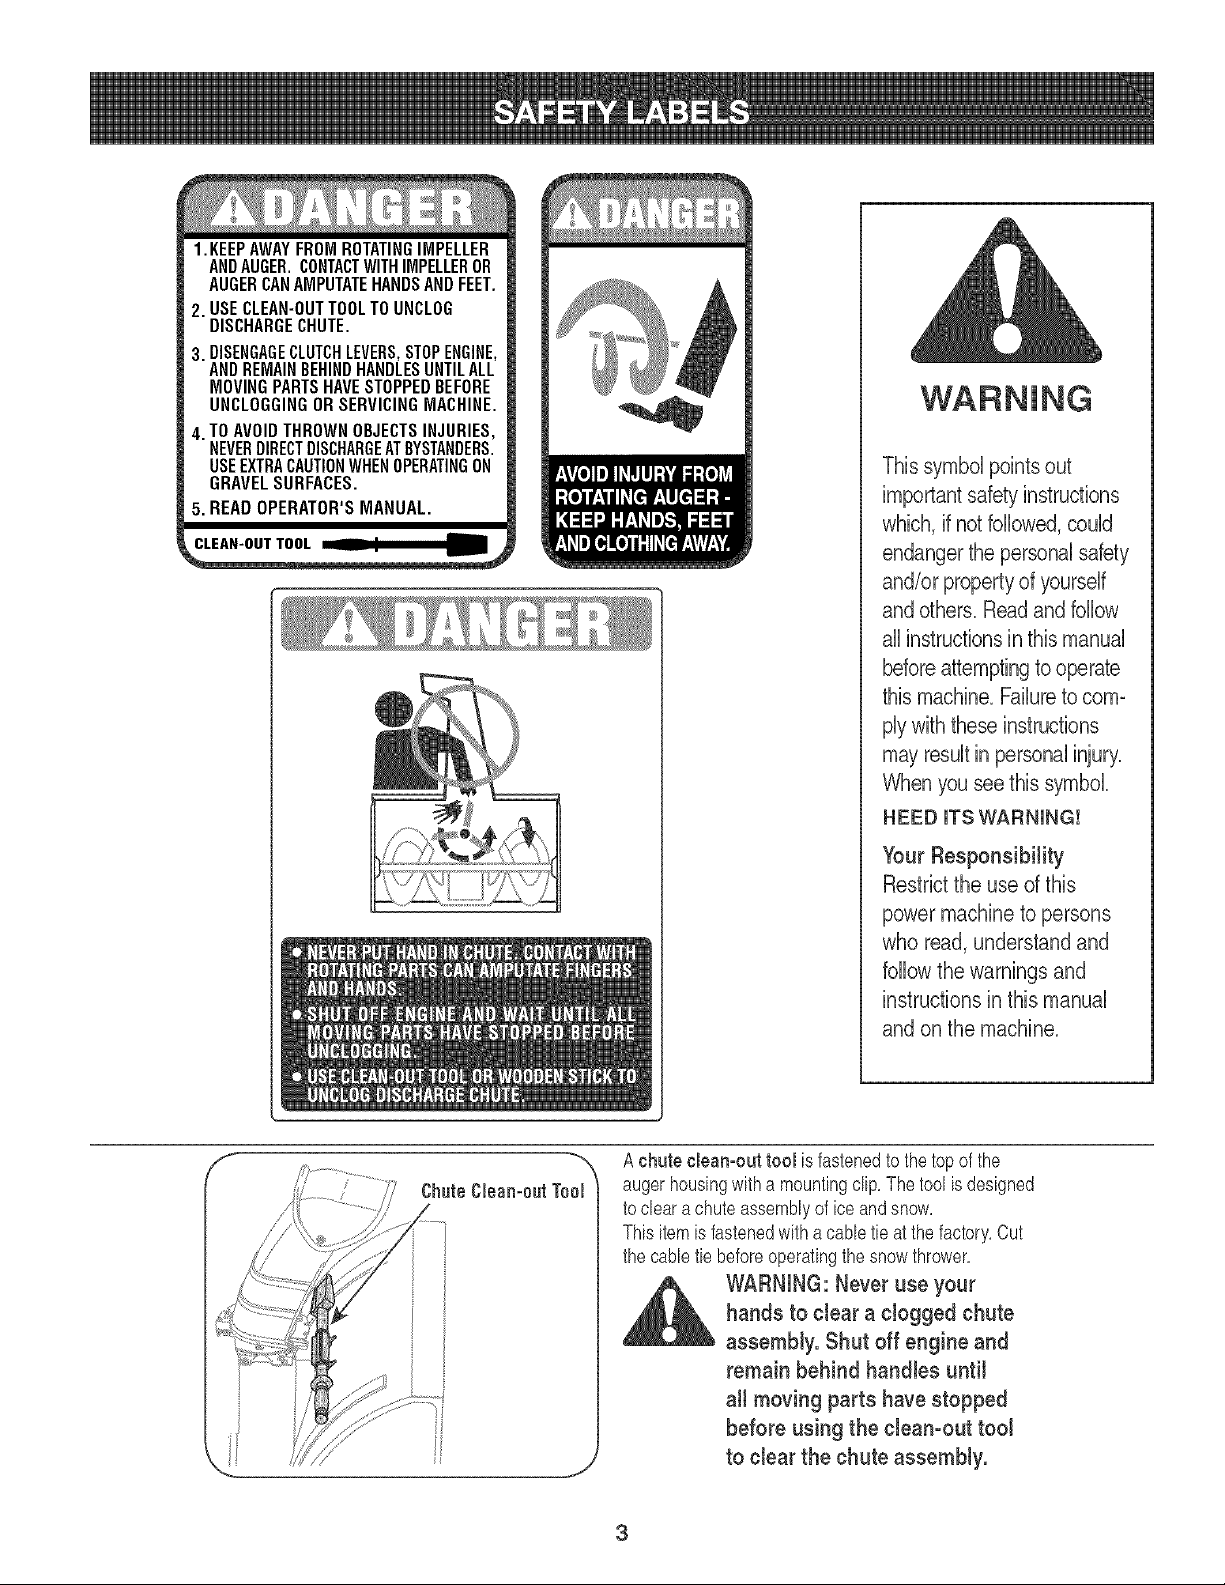
1.KEEPAWAYFROMROTATINGIMPELLER
ANDAUGER.CONTACTWITHIMPELLEROR
AUGERCANAMPUTATEHANDSANDFEET,
2. USECLEAN-OUTTOOLTOUNCLOG
DISCHARGECHUTE.
3. DISENGAGECLUTCHLEVERS,STOPENGINE,
ANDREMAINBEHINDHANDLESUNTILALL
MOVINGPARTSHAVESTOPPEDBEFORE
UNCLOGGINGORSERVICINGMACHINE,
4. TOAVOIDTHROWNOBJECTSINJURIES,
NEVERDIRECTDISCHARGEATBYSTANDERS.
USEEXTRACAUTIONWHENOPERATINGON
GRAVELSURFACES.
5. READOPERATOR'SMANUAL.
_LEAN-OUT TOOL __
Thissymbolpointsout
importantsafetyinstructions
which,if notfollowed,could
endangerthepersonalsafety
and/or propertyofyourself
and others.Readand follow
all instructionsin this manual
beforeattemptingtooperate
this machine.Failuretocom-
plywith theseinstructions
mayresultin personalinjury.
Whenyou see this symbol.
HEED ITS WARNING!
Your ResponsibUity
Restrictthe useof this
powermachineto persons
who read,understandand
follow the warnings and
instructionsin this manual
and on the machine.
A chute c(ean=outtoo( is fastenedtothe top ofthe
augerhousingwitha mountingclip,Thetoo)is designed
tocleara chuteassemblyoficeandsnow,
Thisitemisfastenedwithacabletie at thefactory,Cut
thecabletiebeforeoperatingthesnowthrower,
_ ARNING:Never use your
hands to c(ear a c)ogged chute
assemMy. Shut off engine and
remain behind bandies untiJ
all moving parts have stopped
before using the clean-out tool
to clear the chute assembly.
3
Page 4
WARNING:EngineExhaust,someofitsconstituents,andcertainvehiclecomponentscontainoremit
chemicalsknowntoStateofCaliforniatocausecancerandbirthdefectsorotherreproductiveharm.
DANGER:ThismachinewasbuilttobeoperatedaccordingtotherulesforsafeoperationinthismanualAswithanytype
ofpowerequipment,carelessnessorerroronthepartoftheoperatorcanresultinseriousinjury.Thismachineiscapable
ofamputatinghandsandfeetandthrowingobjects.Failuretoobservethefollowingsafetyinstructionscouldresultin
seriousinjuryordeath.
WARNING:Thissymbolpointsoutimportantsafetyinstructionswhich,ifnotfollowed,couldendangerthe
personalsafetyand/orpropertyofyourselfandothers.Readandfollowallinstructionsinthismanualbefore
attemptingtooperatethismachine.Failuretocomplywiththeseinstructionsmayresultinpersonalinjury.
WhenyouseethissymbolHEEDITSWARNING!
YourResponsibility:Restricttheuseofthispowermachinetopersonswhoread,understandandfollowthewarnings
andinstructionsinthismanualandonthemachine.
Training
1 Read,understand,andfollowallinstructionsonthe machineand inthe
manual(s)beforeattemptingto assembleandoperate.Keepthis manualin
asafeplaceforfuture andregularreferenceandfor orderingreplacement
parts.
2. Befamiliarwith allcontrolsandtheir properoperation.Knowhowtostop
themachineanddisengagethemquickly.
3. Neverallowchildrenunder14yearsoldto operatethis machine.Ohildren
14yearsoldandovershouldreadandunderstandthe operationinstruc-
tionsand safetyrulesinthis manualandshouldbetrainedandsupervised
bya parent.
4. Neverallowadultsto operatethis machinewithoutproperinstruction.
5. Thrownobjectscancauseseriouspersonalinjury'.Planyoursnow-throwing
patterntoavoiddischargeofmaterialtowardroads,bystandersandthelike.
6. Keepbystanders,helpers,petsandchildrenat least75feetfromthe
machinewhileit isin operation.Stopmachineif anyoneentersthearea.
7. Exercisecautionto avoidslippingor falling,especiallywhenoperatingin
reverse.
Preparation
1. Thoroughlyinspectthe areawherethe equipmentisto be used.Remove
all doormats,newspapers,sleds,boards,wiresand otherforeignobjects,
whichcould betrippedoveror thrownbythe auger/impeller.
2. Alwayswearsafetyglassesor eyeshieldsduringoperationandwhile
performingan adjustmentor repairto protectyoureyes.Thrownobjects
whichricochetcancauseseriousinjuryto the eyes.
3. Donotoperatewithoutwearingadequatewinteroutergarments.Donot
wearjewelry,longscarvesor otherlooseclothing,whichcouldbecome
entangledinmovingparts.Wearfootwearwhichwill improvefootingon
slipperysurfaces.
4. Useagroundedthree-wireextensioncordandreceptacleforall unitswith
electricstart engines.
5. Adjustcollectorhousingheighttoclear gravelor crushedrocksurfaces.
6. Disengageall controlleversbeforestartingthe engine.
7. Neverattempttomake anyadjustmentswhileengineis running,except
wherespecificallyrecommendedinthe operator'smanual.
8. Letengineandmachineadjustto outdoortemperaturebeforestartingto
clearsnow.
9. To avoidpersonalinjuryor propertydamageuseextremecare in handling
gasoline.Gasolineis extremelyflammableandthe vaporsareexplosive.
Seriouspersonalinjurycanoccurwhen gasolineisspilledonyourself
or yourclothes,which canignite.Washyourskin andchangeclothes
immediately.
a. Useonlyan approvedgasolinecontainer.
b. Extinguishall cigarettes,cigars,pipesand othersourcesofignition.
c. Neverfuelmachineindoors.
d. Neverremovegascapor addfuelwhilethe engineis hot or running.
e. Allowenginetocoolat leasttwo minutesbeforerefueling.
f. Neveroverfill fuel tank. Filltankto no morethan_J2inchbelowbottom
offiller neckto providespacefor fuelexpansion.
g. Replacegasolinecapandtightensecurely.
h. Ifgasolineisspilled,wipeit offthe engineandequipment.Move
machinetoanotherarea. Wait5 minutesbeforestartingthe engine.
Neverstorethemachineorfuelcontainerinsidewherethere isan open
flame,sparkor pilotlight(e.g.furnace,water heater,spaceheater,
clothesdryeretc.).
Allowmachineto cool atleast5 minutesbeforestoring.
4
Page 5
Operation
1. Do notputhands orfeet nearrotatingparts,inthe auger/impellerhousing
orchuteassembly.Contactwith therotatingpartscan amputatehands
andfeet.
2. Theauger/impellercontrolleverisa safetydevice.Neverbypassits
operation.Doingso makesthemachineunsafeandmaycausepersonal
injury.
3. Thecontrolleversmustoperateeasilyin both directionsandautomatically
returntothe disengagedpositionwhenreleased.
4. Neveroperatewitha missingor damagedchuteassembly.Keepall safety
devicesin placeand working.
5. Neverrunan engineindoorsor in a poorlyventilatedarea.Engineexhaust
containscarbonmonoxide,anodorlessanddeadlygas.
6. Do notoperatemachinewhile underthe influenceofalcoholordrugs.
7. Mufflerand enginebecomehotand cancauseaburn. Donottouch.
8. Exerciseextremecautionwhenoperatingon orcrossinggravel surfaces.
Stayalertforhiddenhazardsortraffic,
9. Exercisecautionwhenchangingdirectionandwhile operatingon slopes.
10.Planyoursnow-throwingpatterntoavoiddischargetowardswindows,
walls,carsetc.Thus, avoidingpossiblepropertydamageor personal
injurycausedby a ricochet.
11.Neverdirectdischargeat children,bystandersand petsor allowanyonein
frontofthe machine.
12.Do notoverloadmachinecapacityby attemptingto clearsnowattoofast
ofa rate.
13.Neveroperatethismachinewithoutgoodvisibilityor light.Alwaysbesure
ofyourfootingand keepafirmholdonthe handles.Walk,neverrun.
14.Disengagepowertothe auger/impellerwhentransportingor notin use.
15.Neveroperatemachineat hightransportspeedson slipperysurfaces.
Lookdownandbehindandusecarewhenbackingup.
16.Ifthe machineshouldstart tovibrateabnormally,stopthe engine,
disconnectthespark plugwire andgroundit againsttheengine.Inspect
thoroughlyfordamage.Repairanydamagebeforestartingand operating.
17.Disengageallcontrolleversandstop enginebeforeyouleavethe operat-
ingposition(behindthe handles).Waituntiltheauger/impellercomes
toa completestopbeforeuncloggingthechuteassembly,makingany
adjustments,orinspections.
18.Neverputyourhand inthe dischargeorcollectoropenings.Alwaysuse
theclean-outtool providedto unclogthedischargeopening.Do notunclog
chuteassemblywhileengineis running.Shutoff engineand remain
behindhandlesuntilallmovingpartshavestoppedbeforeunclogging.
19.Useonlyattachmentsandaccessoriesapprovedbythe manufacturer(e.g.
wheelweights,tirechains,cabs etc.).
20.Ifsituationsoccurwhich are notcoveredin thismanual,usecareand
goodjudgment.ContactyourSearsServiceCenterfor assistance.
Maintenance & Storage
1. Nevertamperwith safetydevices.Checktheirproperoperationregularly.
Referto the maintenanceandadjustmentsectionsofthis manual.
2. Beforecleaning,repairing,or inspectingmachinedisengageallcontrol
leversand stoptheengine.Waituntiltheauger/impellercometo a
completestop.Disconnectthesparkplugwire and groundagainstthe
enginetopreventunintendedstarting.
3. Checkboltsandscrewsfor propertightnessatfrequentintervalstokeep
the machinein safeworkingcondition.Also,visuallyinspectmachinefor
anydamage.
4. Donotchangetheenginegovernorsettingor over-speedtheengine.The
governorcontrolsthe maximumsafeoperatingspeedofthe engine.
5. Snowthrowershaveplatesandskid shoesaresubjectto wear and
damage.Foryoursafetyprotection,frequentlycheckallcomponentsand
replacewithoriginal equipmentmanufacturer's(OEM)parts only."Useof
partswhich donotmeet the originalequipmentspecificationsmayleadto
improperperformanceandcompromisesafety!"
6. Checkcontrolsperiodicallytoverifythey engageanddisengageproperly
andadjust,if necessary.Refertothe adjustmentsectionin this operator's
manualforinstructions.
7. Maintainorreplacesafetyand instructionlabels,asnecessary.
8. Observeproperdisposallawsand regulationsfor gas, oil,etc.to protect
the environment.
9. Priortostoring,run machineafewminutestoclear snowfrommachine
andpreventfreezeup of auger/impeller.
10.Neverstorethe machineorfuelcontainerinsidewherethere isanopen
flame,sparkor pilotlightsuchas a water heater,furnace,clothes dryer
etc.
11.Alwaysrefertothe operator'smanualfor properinstructionsonoff-season
storage.
Do not modify engine
Toavoidseriousinjury'or death,do notmodifyenginein anyway.Tampering
withthe governorsettingcanleadto a runaway'engineandcauseitto operate
at unsafespeeds.Nevertamperwithfactorysettingofenginegovernor.
Notice regarding Emissions
Engineswhichare certifiedto complywithCaliforniaandfederalEPAemission
regulationsfor SORE(SmallOffRoadEquipment)arecertifiedtooperateon
regularunleadedgasoline,and may'includethefollowingemissioncontrolsys-
tems:EngineModification(EM)andThreeWayCatalyst(TWC)if so equipped.
Engine identification Decal
Thisdecalindicatestheengine'smodelnumber,specificationandthe dateof
manufacture.Pleaselookatthe decalontheengineofyourequipmentand
recordthese informationforfuturereference.
Theengineidentificationdecalalsoincludesenginelifespecificationsfor the
emissions-relatedusefullifeperiodofthe engine.This periodrelatestothe
emissioncompliancelifeascertifiedby EPAand/orCARB.Tofindthe lifeperiod
specificationofthe engine,pleasereadthe enginedecaland locatethe letter
(enclosedbyquotationmarks)betweenthewordsModerateandLifePeriod.
Matchone ofthefollowingletterswiththeletterprintedonyourdecal.For
example,HMSK80modelsaredesignatedas:
"C"-- 250hours
"B"-- 500 hours
"A"-- 1000hours
Page 6
//
//
/
ii!ii!i
_i, !_:i!!i!!__'__
.._. j
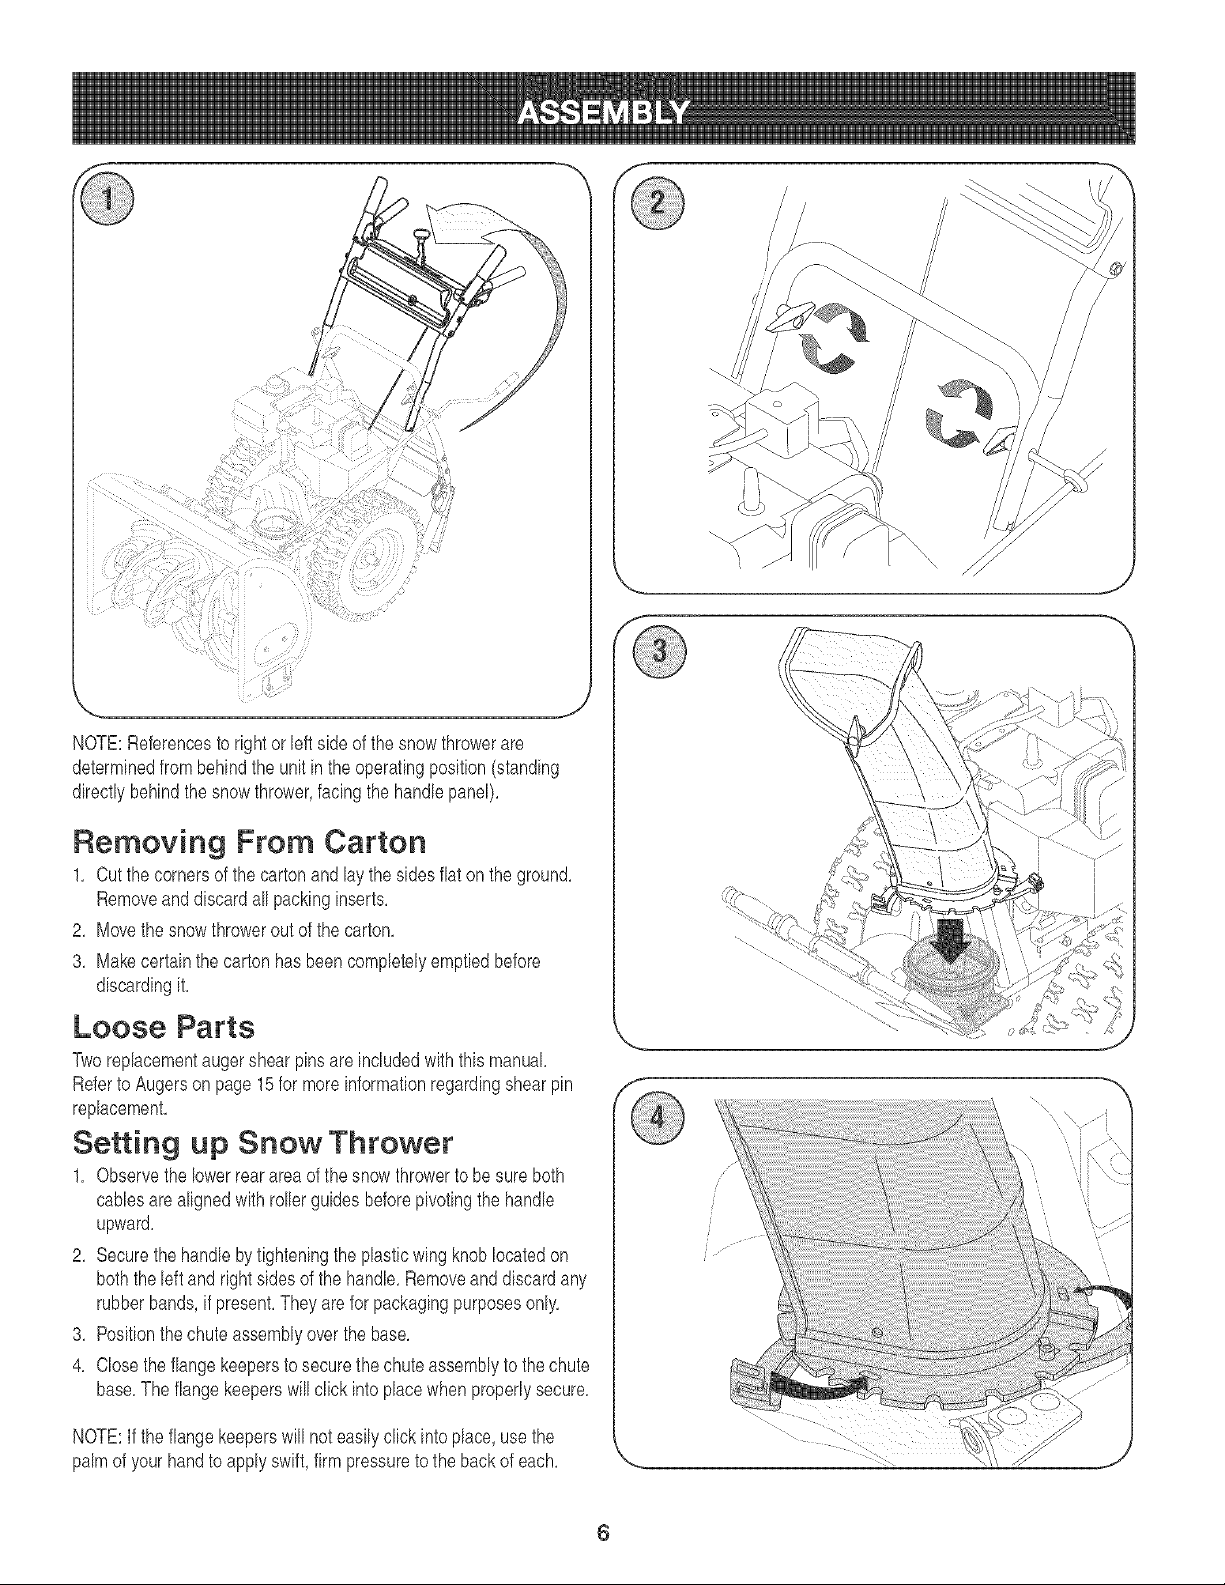
NOTE:Referencestorightor bft sideof the snowthrowerare
determinedfrombehindthe unitintheoperatingposition(standing
directlybehindthesnowthrower,facingthehandlepanel),
Removing From Carton
1, Cutthecornersofthecartonandlaythesidesfiaton theground,
RemoveanddiscardaIIpackinginserts,
2, Movethesnowthroweroutof the carton,
3, Makecertainthecartonhasbeencompletelyemptiedbefore
discardingit,
\
///,'
/
Loose Parts
Tworeplacementaugershearpinsare includedwiththismanual,
RefertoAugersonpage15formoreinformationregardingshearpin
replacement,
Setting up Snow Thrower
1, Observethelowerrearareaofthesnowthrowertobesureboth
cablesarealignedwith rollerguidesbeforepivotingthehandle
upward,
2, Securethehandlebytighteningtheplasticwing knoblocatedon
boththe leftand rightsidesofthe handb, Removeanddiscardany
rubberbands,if present,Theyareforpackagingpurposesonly,
8, Positionthechuteassemblyoverthe base,
4, Closetheflangekeeperstosecurethechuteassernblytothechute
base,TheflangekeeperswiIIclickintoplacewhenproperlysecure,
NOTE:Ifthe flangekeeperswillnoteasilyclickinto place,usethe
palmof yourhandtoapplyswift,firm pressuretothebackof each,
\
6
Page 7
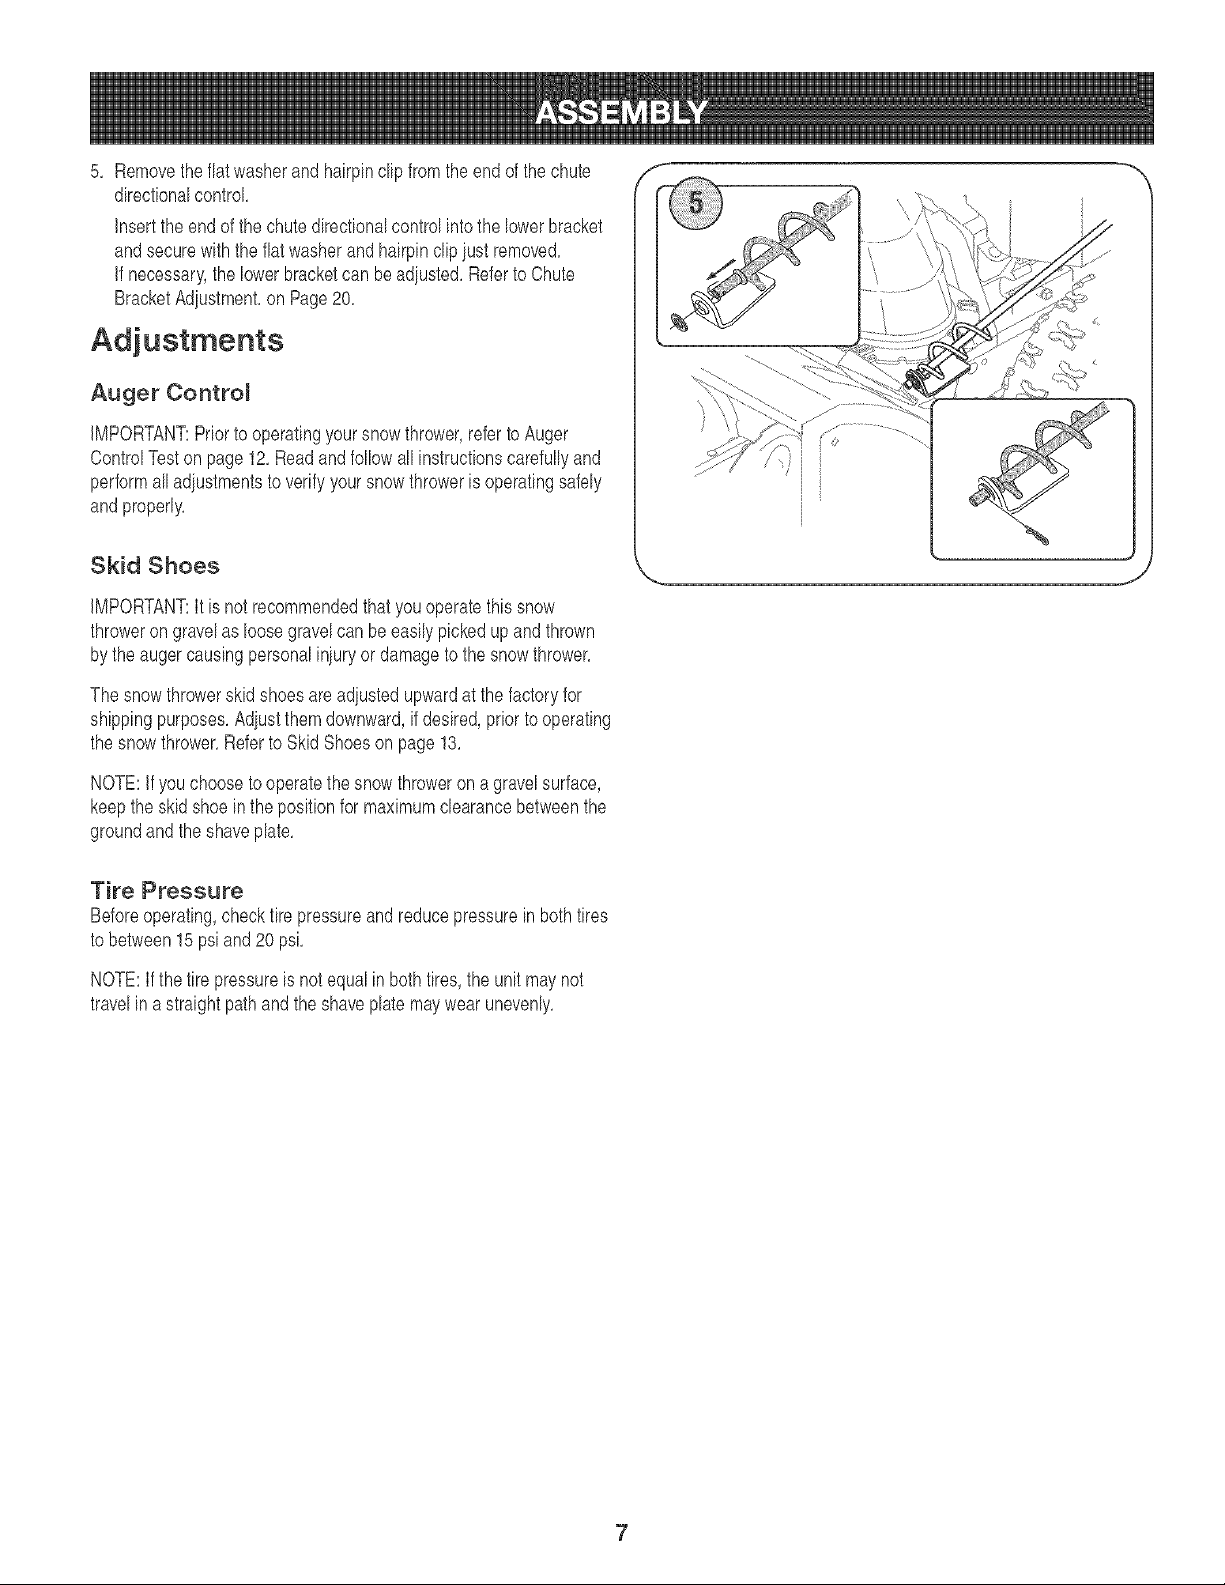
5, Removetheflatwasherand hairpinclipfromthe endof thechute
directionalcontrol
inserttheendofthechutedirectionalcontrolintothe lowerbracket
andsecurewiththeflatwasherandhairpinclipiust removed,
if necessary',thelowerbracketcanbeadiusted,RefertoChute
BracketAdiustment,on Page20,
Adjustments
Auger Contro_
iMPORTANT:Priorto operatingyoursnowthrower,refertoAuger
ControlTestonpage12,Readandfollowall instructionscarefullyand
performalladiustmentstoverifyyoursnowthrowerisoperatingsafely
andproperly,
Skid Shoes
iMPORTANT:It isnotrecommendedthatyouoperatethissnow
throweron gravelas loosegravelcanbeeasilypickedupandthrown
bytheaugercausingpersonaliniuryor damagetothesnowthrower,
Thesnowthrowerskidshoesareadiustedupwardat thefactoryfor
shippingpurposes,Adiustthemdownward,ifdesired,priorto operating
thesnowthrower,RefertoSkidShoeson page13,
NOTE:if youchoosetooperatethesnowthrowerona gravelsurface,
keepthe skidshoeinthepositionfor maximumclearancebetweenthe
groundandtheshaveplate,
Tire Pressure
Beforeoperating,checktirepressureandreducepressureinbothtires
tobetween15psiand20 psi,
NOTE:Ifthe tire pressureisnotequalinbothtires,the unitmaynot
travelin astraightpathandtheshaveplatemaywearunevenly,
7
Page 8
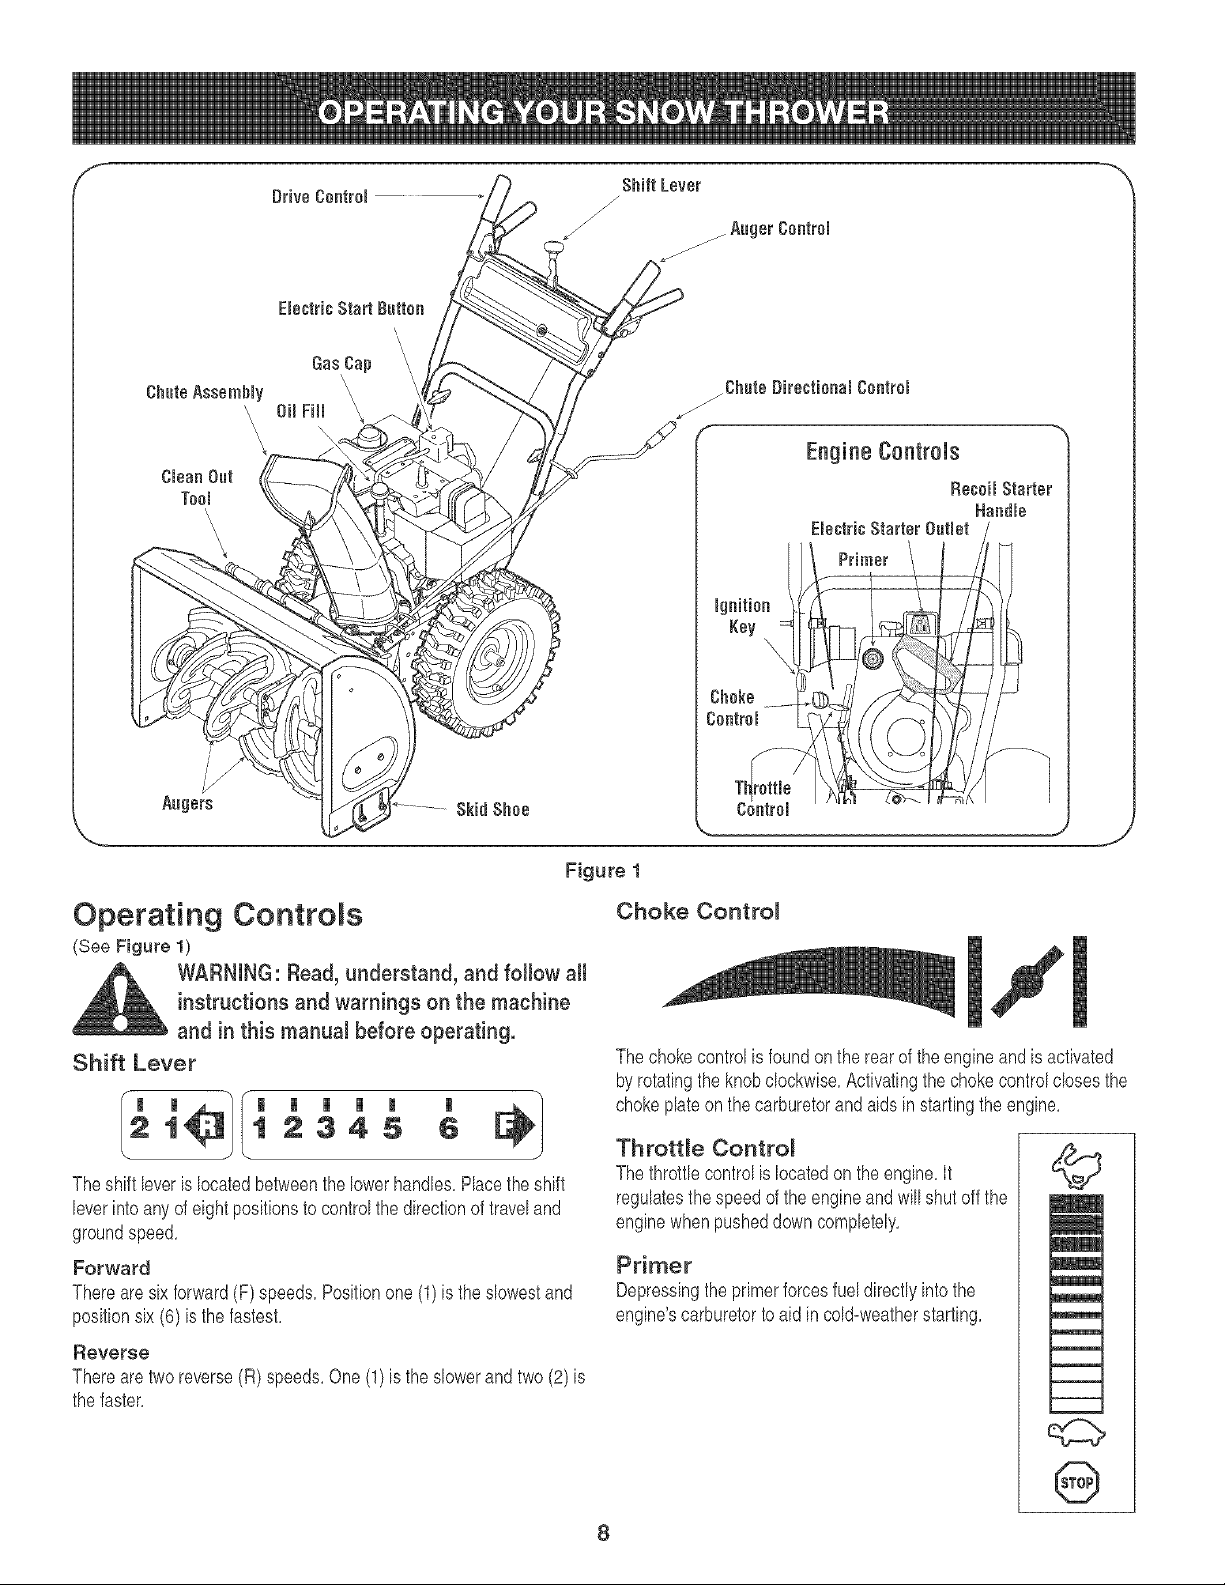
Shift Lever
Aoger (;antral
(;huteAssemNy
Aagers ......... SkidShoe
\
\
\
\
Figure 1
Operating Controls
(See Figure 1)
WARNING: Read, understand, and follow all
instructions and warnings on the machine
and in this manual before operating.
Shift Lever
12345 5
llllR l
Theshift leverislocatedbetweenthelowerhandles,Placetheshift
leverintoanyofeightpositionstocontrolthe directionoftraveland
groundspeed,
Forward
Therearesixforward(F)speeds,Positionone(1)is theslowestand
positionsix (6) isthe fastest,
Reverse
Therearetworeverse(R)speeds,One(1)is the dowerandtwo (2)is
thefaster,
j(;hute DirectiooaJ(;ontrol
F_
Engine Controls
Choke Contro_
Thechokecontrolis foundon the rearof theengineandis activated
byrotatingthe knobclockwise,Activatingthechokecontrolclosesthe
chokeplateonthecarburetorandaids instartingtheengine,
Throttle Control
Thethrottlecontrolislocatedontheengine,It
regulatesthespeedof the engineandwill shutoffthe
enginewhenpusheddowncompletely,
Primer
Depressingthe primerforcesfueldirectlyintothe
engine'scarburetortoaidin cold=weatherstarting,
©
m
l
m
q;z>
8
Page 9
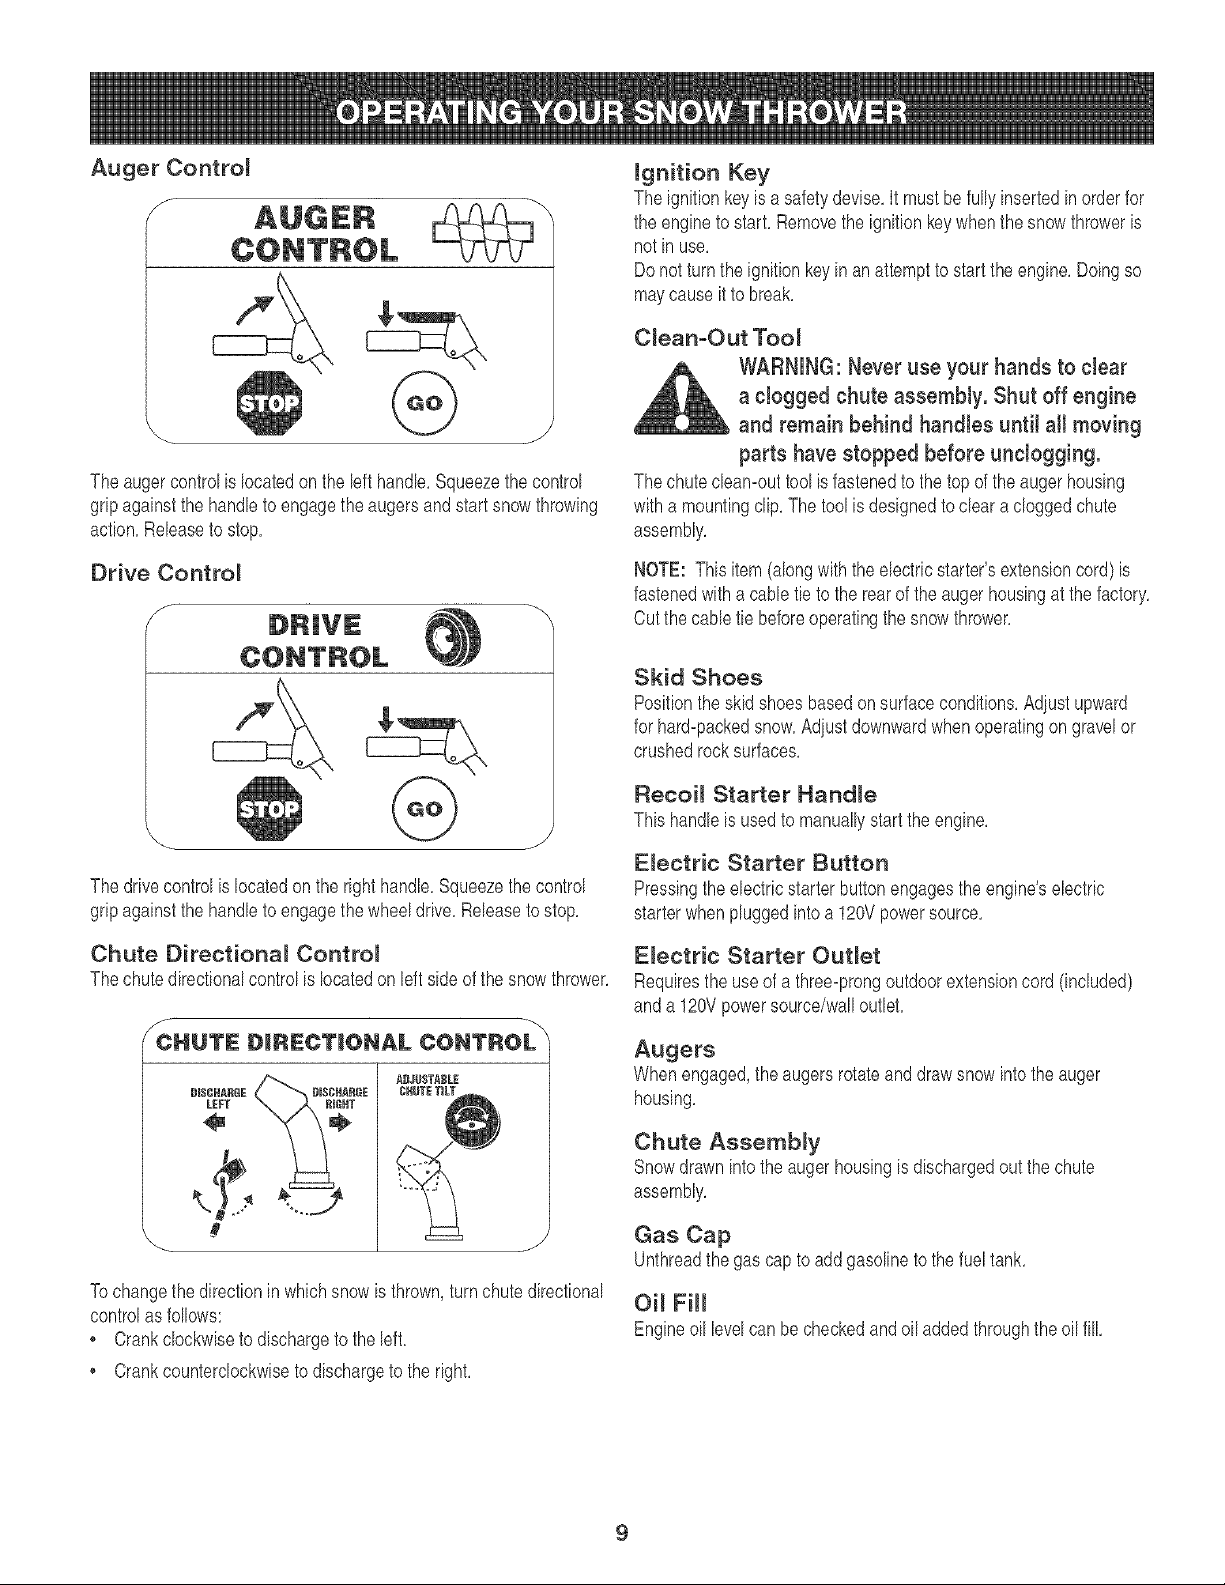
Theaugercontrolislocatedonthe lefthandle,Squeezethecontrol
gripagainstthehandletoengagethe augersandstartsnowthrowing
action,Releasetostop,
ignition Key
Theignitionkeyis asafetydevise,Itmustbefully insertedinorderfor
theengineto start, Removetheignitionkeywhenthe snowthroweris
notin use,
Donot turntheignitionkeyinanattempttostartthe engine,Doingso
maycauseittobreak,
C_ean-Out Tool
WARNING: Never use your hands to cJear
a clogged chute assembly. Shut off engine
and remain behind handles untit aHmoving
parts have stopped before unclogging.
Thechutecleamouttoolisfastenedtothetopoftheaugerhousing
witha mountingclip,The toolisdesignedtoclearacloggedchute
assembly,
Drive Control
f
Thedrivecontrolis locatedonthe righthandle,Squeezethecontrol
gripagainstthehandletoengagethe wheeldrive,Releasetostop,
Chute Directiona_ ControJ
Thechutedirectionalcontrolis locatedon leftside of thesnowthrower,
--x
CHUTe: D_R_:CT|ONAL CONTROL
BI$CHARGE
LEFT
NOTE: Thisitem(alongwiththe electricstarter'sextensioncord)is
fastenedwitha cabletie to the rearof theaugerhousingatthe factory,
Cutthecabletie beforeoperatingthesnowthrower,
Skid Shoes
Positiontheskidshoesbasedonsurfaceconditions,Adiustupward
forhard-packedsnow,Adiustdownwardwhenoperatingongravelor
crushedrocksurfaces,
Recoil Starter HandJe
Thishandleisusedtomanuallystarttheengine,
EJectric Starter Button
Pressingtheelectricstarterbuttonengagestheengine'selectric
starterwhenpluggedintoa 120Vpowersource,
E_ectric Starter Out_et
Requiresthe useofa three-prongoutdoorextensioncord(included)
anda 120Vpowersource/walloutlet,
Augers
Whenengaged,theaugersrotateanddrawsnowintotheauger
housing,
Chute Assembly
Snowdrawnintothe augerhousingisdischargedoutthechute
assembly,
\
Tochangethedirectionin whichsnowis thrown,turnchutedirectional
controlasfollows:
• Crankclockwisetodischargetothe left,
, Crankcounterclockwisetodischargetotheright,
S
Gas Cap
Unthreadthegascaptoaddgasolinetothefueltank,
Oi_ FiH
Engineoil levelcanbecheckedandoil addedthroughtheoil fill
9
Page 10
Before Starting Engine
WARNING:Read,understand, and follow all
instructionsandwarnings on the machineand in
this manual beforeoperating.
Oil
Theenginewasshippedwithoil intheengine,Checkoil levelbefore
eachoperationtoensureadequateoilintheengine,Forfurther
instructions,referto thestepson page17,
1, Removethedipstickfromthe oilfill,
2 Checkandmakesurethatthelevelofoil isupto theFULLmarkon
thedipstick,
3, If theoil levelis notupto FULL,pourfreshmotoroil (5%30, with
a minimumclassificationof%/%) slowlythroughtheopening,
Replaceoil filldipstickandcheckoil levelagain,
Gasoline
WARNING:Use extremecars when handling
gasoline. Gasoline is extremely flammable and
the vapors are explosive. Neverfusl the machine
indoorsor while the engine ishotor running.
Extinguish cigarettes, cigars, pipes and other
sources of ignition.
• Storegasolineinaclean,approvedcontainerandkeepthe capin
placeonthe container,
, Makesurethatthecontainerfromwhichyou pourthegasolineis
cleanandfreefromrustor otherforeignparticles,
NOTE:Aplasticdustcap maybe foundinsidethefuel fill opening,
Removeanddiscard,if present,
Alwaysfillthefueltankoutdoorsandusea funnelor spoutto
preventspilling,
• Fillfueltankwithclean,fresh, unleadedgasoline,
• Neverfillthe fueltankcompletely,Fillthetanktowithin1/2"from
thetopto providespaceforexpansionoffuel
• Makesuretowipeoff anyspilledfuel beforestartingtheengine,
Starting "['he Engine
1, Attachsparkplugwireto sparkplug, Makecertainthe metal
loopontheendofthesparkplug wire(insidethe rubberboot)is
fastenedsecurelyoverthe metaltipon thesparkplug,
2, Makecertainboththeaugercontrolanddrivecontrolare inthe
disengaged(released)position,
3, Movethrottlecontrolup toFASTposition,Insertignitionkeyinto
slot,Makesureitsnapsintoplace,Donotattemptto turnthe key,
NOTE:The enginecannotstartwithoutthekeyis fullyinsertedintothe
ignitionswitch,
Electric Starter
1, Determinethatyourhome'swiringisa three-wiregroundedsystem,
Aska licensedelectricianifyouarenotcertain,
WARNING: The optional electric starter is
equipped with agrounded three-wire power
cord and plug, and isdesigned to operate
on 120volt AC household current. It must
be used with a properly grounded three-
prong receptacle at all times to avoid the
possibility of electric shock.
If your home's wiring system is not a three-
wire grounded system, do not use this
electric starter under any conditions.
If your home electrical system is grounded,
but a three-hole receptacle isnot available,
do not use your snow thrower's electric
starter.
Follow all instructions carefully prior to
operating the electric starter.
ifyouhavea groundedthree-prongreceptacle,proceedasfollows:
1, Plugtheextensioncordintotheoutletlocatedontheengine's
surface,Plugtheother endof extensioncordintoa three-prong
120-volt,grounded,ACoutletina well-ventilatedarea,
2, Rotatechokecontrolto FULLchokeposition(for a coldengine
start),
NOTE:If theengineisalreadywarm,placechokecontrolin the OFF
positioninsteadofFULL,
3, Pushthe primertwoorthree timesforcold enginestart,making
sureto coverventholeinthecenteroftheprimerwhenpushing,
NOTE:DO NOTuseprimerto restarta warmengineaftera short
shutdown,
4, Pushstarterbuttonto startengine,
5, Oncethe enginestarts,releasestarterbutton,
6, Astheenginewarms,slowlyrotatethechokecontroltotheOFF
position,If theenginefalters,quicklyrotatethechokecontrolback
to FULLandthenslowlyintotheOFFpositionagain,
7, Whendisconnectingtheextensioncord,alwaysunplugtheendat
thethree-prongwalloutletbeforeunpluggingtheoppositeendfrom
thesnowthrower,
Recoil Starter
1, Rotatechokecontrolto FULLchokeposition(coldenginestart),
NOTE:If theengineisalreadywarm,placechokecontrolin the OFF
positioninsteadofFULL,
10
Page 11
2, Pushthe primertwo orthreetimesforcold enginestart,making
sureto coverventholein thecenteroftheprimerwhenpushing,
NOTE:DONOTuseprimerto restartawarmengineaftera short
shutdown,
NOTE:Additionalprimingmaybe necessaryifthetemperatureis
below15°Fahrenheit,
3, Graspthe recoilstarterhandleandslowlypullthe ropeout,Atthe
pointwhereitbecomesslightlyhardertopulltherope,slowlyallow
theropeto recoil
4, Pullthestarterhandlewitha firm,rapidstroke,Donotreleasethe
handleandallowit to snapback,Keepa firm holdon thestarter
handleandallowit to slowlyrecoil
5, Astheenginewarms,slowlyrotatethechokecontrolto theOFF
position,Ifthe enginefalters,quicklyrotatethechokecontrolback
tothe FULLpositionandthenslowlyintothe OFFpositionagain,
NOTE:Allowtheenginetowarmupforafew minutesafterstarting,
Theenginewill notdevelopfullpoweruntilit reachesoperating
temperatures,
Stopping The Engine
Runenginefor a fewminutesbeforestoppingto helpdryoff any
moistureonthe engine,
. Tohelppreventpossiblestarterfreeze-up,proceedasfollows:
E_ectric Starter
1, Connectextensioncordto the electricstarteroutleton theengine,
thento 120voltACoutlet,
2, Withtheenginerunning,pushthestarterbuttonandallowthe
starterfor spinforseveralseconds,Thenoisemadebythestarter
isnormal Theengine'sstarterisnot beingharmed,
3, Whendisconnectingtheextensioncord,alwaysunplugtheendat
thethree-prongwalloutletbeforeunpluggingtheoppositeendfrom
thesnowthrower,
4, Movethrottlecontrolto STOPposition,
5, Removetheignitionkeyandstoreina safeplace,
6, Wipeallsnowandmoisturefromtheareaaroundthe engineas
wellas theareainandaroundthedrivecontroland augercontrol
Also,engageand releasebothcontrolsseveraltimes,
Chute C ean-Out TooR
Thechutecleamouttoolisconvenientlyfastenedtothe rearof the
augerhousingwitha mountingclip,Shouldsnowand icebecome
lodgedinthechuteassemblyduringoperation,proceedasfollowsto
safelycleanthechuteassemblyandchuteopening:
1, Releaseboththe AugerControlandthe DriveControl
2, Stoptheenginebyremovingtheignitionkey,
3, Removethecleamouttoolfromtheclipwhichsecuresitto therear
ofthe augerhousing,
WARNING: The muffler, engine and sur-
rounding areas become hot and can cause
a burn. Do not touch.
4, Usethe shovel-shapedendofthecleamouttooltodislodgeand
scoopanysnowandicewhichhasformedinandnearthechute
assembly,
5, Refastenthecleamouttoolto themountingclipon therearofthe
augerhousing,reinserttheignitionkeyand startthe snowthrower's
engine,
6, Whilestandingintheoperator'sposition(behindthesnowthrower),
engagetheaugercontrolfora fewsecondstoclear anyremaining
snowandicefromthechuteassembly,
To Engage Drive
1, WiththethrottlecontrolintheFast(rabbit)position,moveshift
leverintooneofthesixforward(F)positionsortworeverse(R)
positions,Selecta speedappropriateforthesnowconditionsanda
paceyou'recomfortablewith,
NOTE:WhenselectingaDriveSpeed,usetheslowerspeedsuntil
youarecomfortableandfamiliarwiththeoperationofthesnow
thrower,
2, Squeezetheaugercontrolagainstthe handleandthe augerswill
turn,Releaseitandtheaugerswillstop,
3, Squeezethedrivecontrolagainstthehandlethesnowthrowerwill
move,Releaseit anddrivemotionwillstop,
IMPORTANT:NEVERrepositiontheshiftlever(changespeedsor
directionoftravel)withoutfirstreleasingthedrivecontroland bringing
thesnowthrowerto a completestop,Doingso will resultinpremature
wearto thesnowthrower'sdrivesystem,
Recoil Starter
1, Withenginerunning,pullstarterropewitha rapid,continuousfull
armstrokethreeor fourtimes,Pullingthestarterropewill produce
a loudclatteringsound,whichisnotharmfulto engine,
2, Movethrottlecontrolto STOPposition,
3, Removetheignitionkeyandstoreina safeplace,
4, Wipeallsnowandmoisturefromtheareaaroundthe engineas
wellas theareainandaroundthedrivecontroland augercontrol
Also,engageand releasebothcontrolsseveraltimes,
11
Page 12
To Engage Augers
1, Toengagethe augersandstartthrowingsnow,squeezetheauger
controlagainstthelefthandle,Rebaseto stopthe augers,
Auger ControJ Test
Performthefollowingtestbeforeoperatingyoursnowthrowerforthe
firsttimeandat thestart of eachwinter,
Checktheadiustmentoftheaugercontrolasfollows:
1, Whentheaugercontrolis rebasedandin thedisengaged"up"
position,theeabb shouldhaveverylittleslack,JtshouldNOTbe
tight,
2, JnaweBventilatedarea,startthesnowthrowerengineas
instructedearlbr inthissection,Makesurethethrottb issetin the
FASTposition,
3, Whilestandingintheoperator'sposition(behindthesnowthrower),
engagetheauger,
4, Allowthe augerto remainengagedforapproximatelyten(10)
secondsbeforereleasingtheaugercontrokRepeatthisseveral
times,
5, Withthethrottb controlinthe FAST(rabbit)positionandtheauger
controlin thedisengaged"up"position,walkto the frontofthe
machine,
6, Confirmthatthe augerhascompletelystoppedrotatingandshows
NOsignsofmotion,IftheaugershowsANYsignsof rotating,im-
mediatelyreturntothe operator'spositionandshutofftheengine,
WaitforALLmovingpartstostopbeforere-adiustingtheauger
control
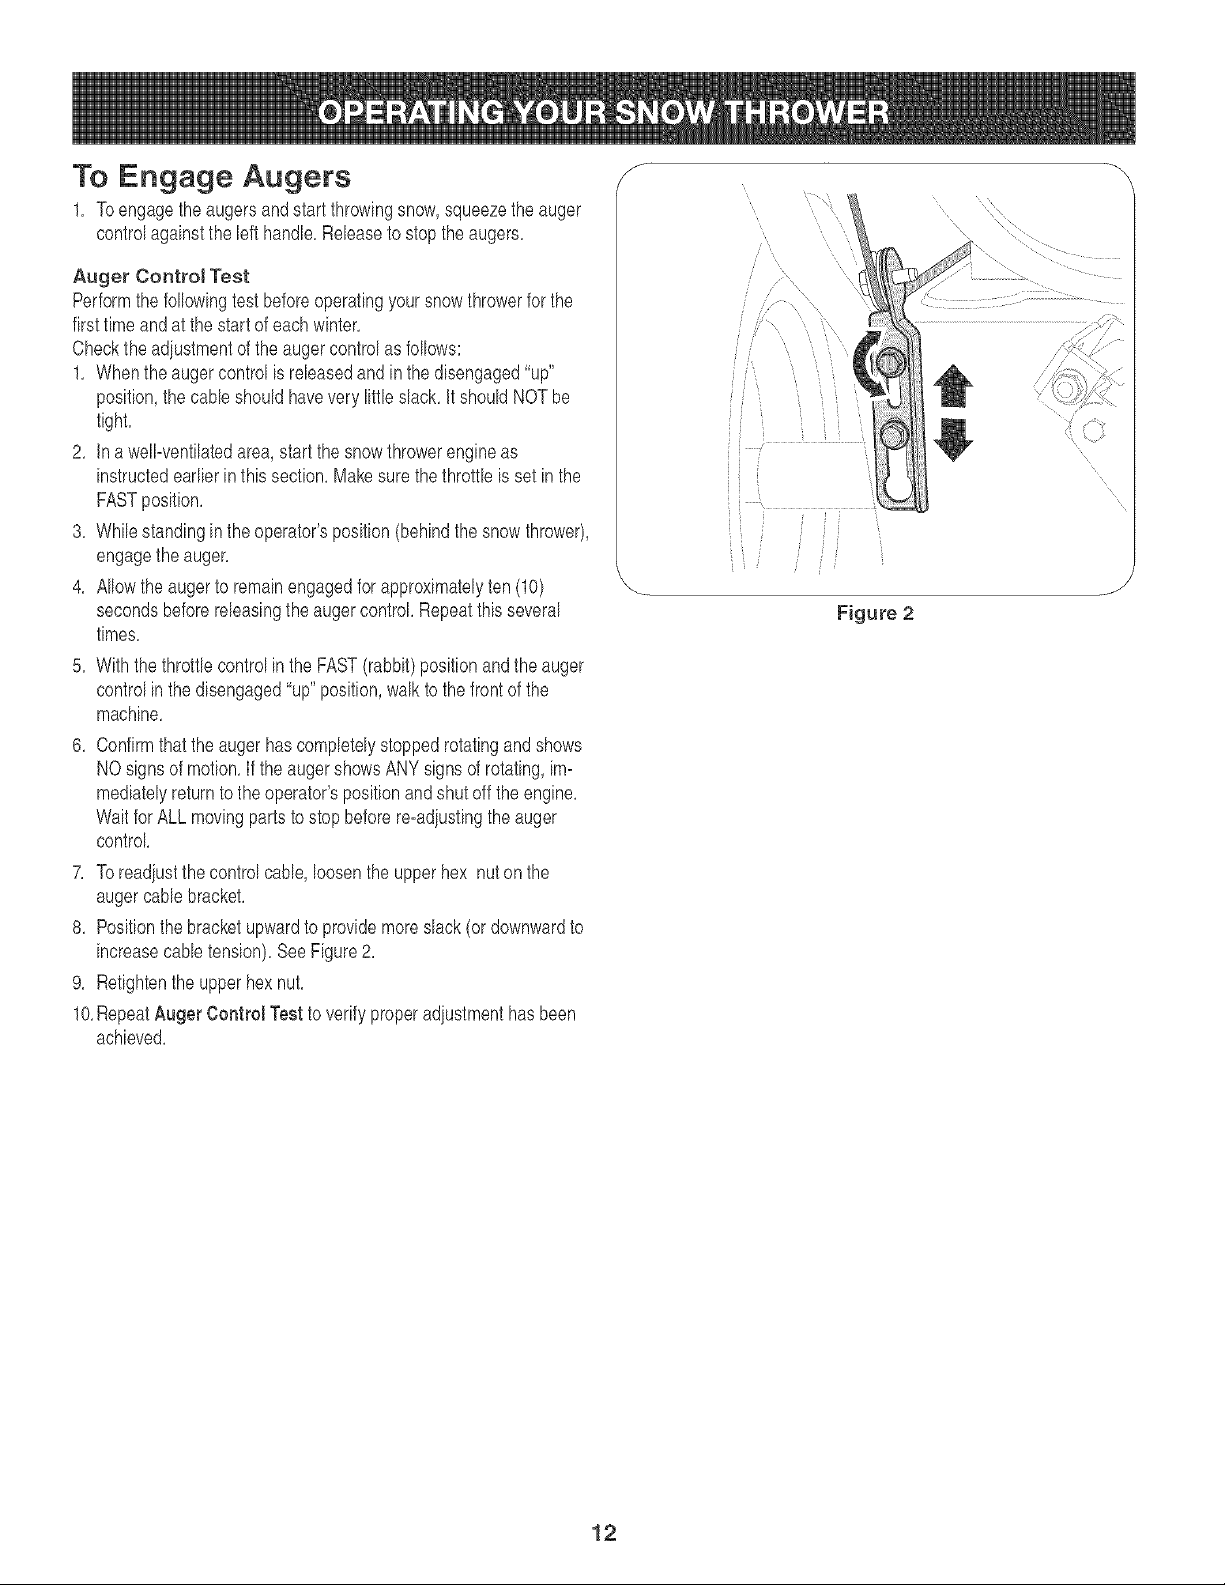
7, Toreadiustthecontrolcable,loosentheupperhex nuton the
augercabb bracket,
8, Positionthebracketupwardtoprovidemoreslack(or downwardto
increasecabb tension),SeeFigure2,
9, Retightentheupperhexnut,
10,RepeatAugerControl Testto verifyproperadiustmenthasbeen
achieved,
S
Figure 2
12
Page 13
Lubrication
WARNING: Before Jubricating, repairing,
or inspecting, disengage aHcontrols and
stop engine. Wait until aHmoving parts have
come to a complete stop.
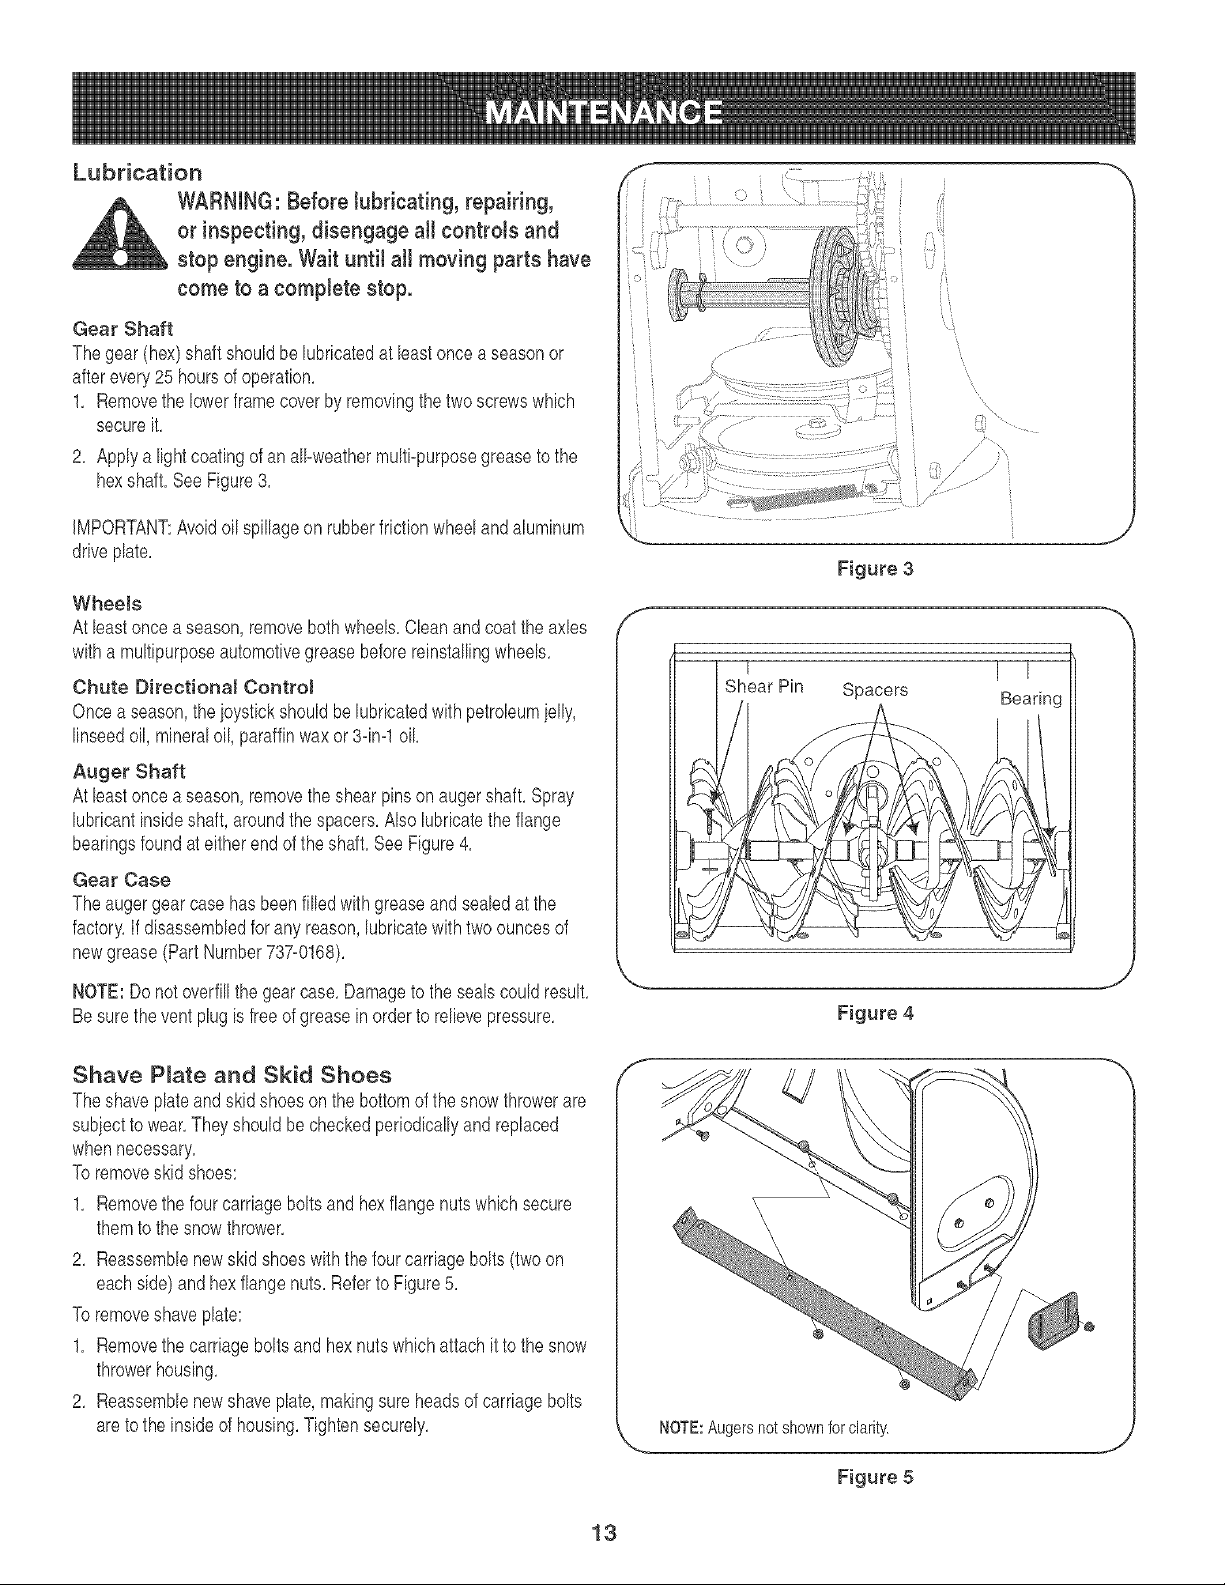
Gear Shaft
Thegear(hex)shaftshouldbelubricatedat leastoncea seasonor
afterevery25 hoursofoperation,
1, Removethe lowerframecoverbyremovingthetwo screwswhich
secureit,
2, Applya lightcoatingofan all-weathermulti-purposegreaseto the
hexshaft,SeeFigure3,
iMPORTANT:Avoidoilspillageonrubberfrictionwheelandaluminum
driveplate,
Wheels
Atleastonce a season,removebothwheels,Cleanandcoattheaxles
witha multipurposeautomotivegreasebeforereinstallingwheels,
Chute Directional Contro!
Oncea season,theioysfickshouldbelubricatedwithpetroleumielly,
linseedoil, mineraloil, paraffinwaxor 3-ira1oil
Si 'i
'i
\
\
7
Figure 3
,f
t ]
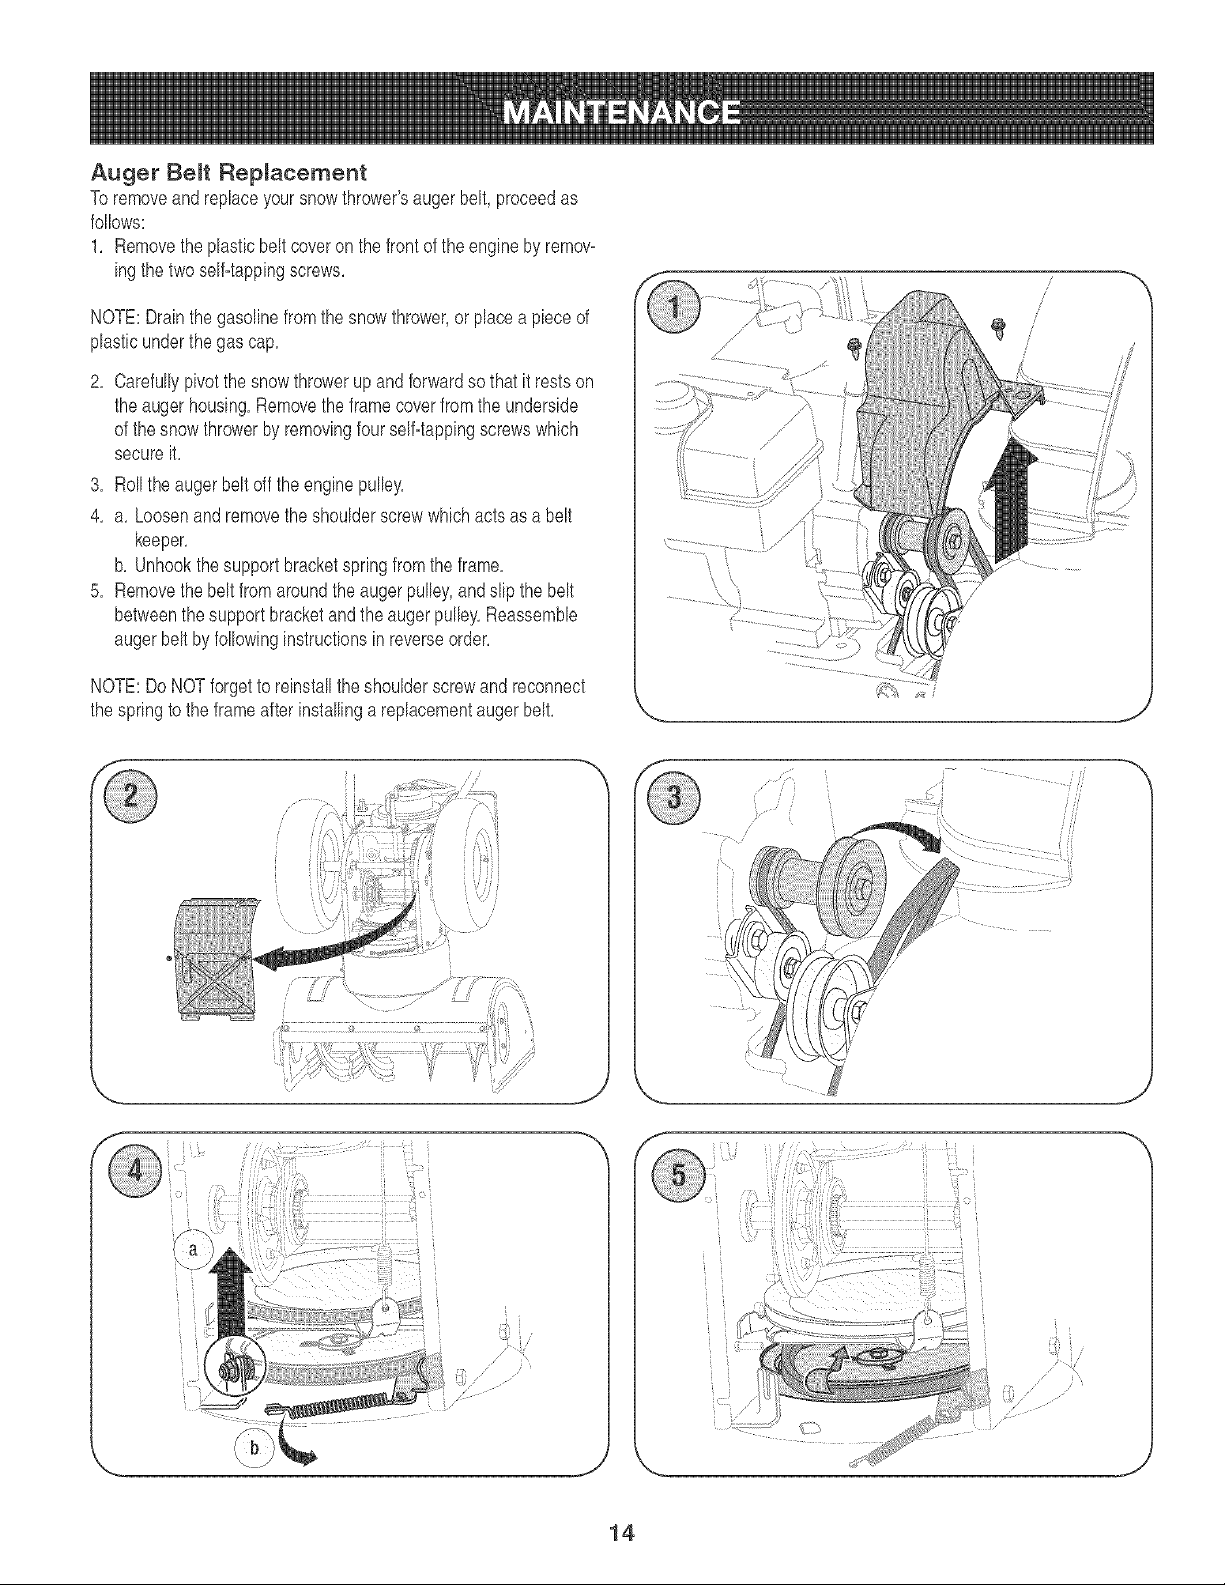
Bearing
Auger Shaft
Atleastonce a season,removetheshearpinson augershaft,Spray
lubricantinsideshaft,aroundthe spacers,Alsolubricatetheflange
bearingsfoundateitherendof theshaft,SeeFigure4,
Gear Case
Theaugergearcasehasbeenfilled withgreaseandsealedatthe
factory,Ifdisassembledforanyreason,lubricatewithtwo ouncesof
newgrease(PartNumber737-0168),
NOTE:Donotoverfillthegearcase,Damagetothe sealscouldresult,
Besurethe ventplugisfreeof greaseinorderto relievepressure,
Shave P_ate and Skid Shoes
Theshaveplateandskidshoesonthe bottomofthesnowthrowerare
subiectto wear,Theyshouldbecheckedperiodicallyandreplaced
whennecessary,
Toremoveskidshoes:
1, Removethefourcarriageboltsandhexflange nutswhichsecure
themto thesnowthrower,
2, Reassemblenewskid shoeswiththefourcarriagebolts(twoon
eachside)and hexflangenuts,RefertoFigure5,
Toremoveshaveplate:
1, Removethecarriageboltsand hexnutswhichattachitto the snow
throwerhousing,
2, Reassemblenewshaveplate,makingsureheadsof carriagebolts
aretotheinsideofhousing,Tightensecurely,
Figure 4
S
NOTE:Augersnotshownfor clarity.
13
Figure 5
Page 14
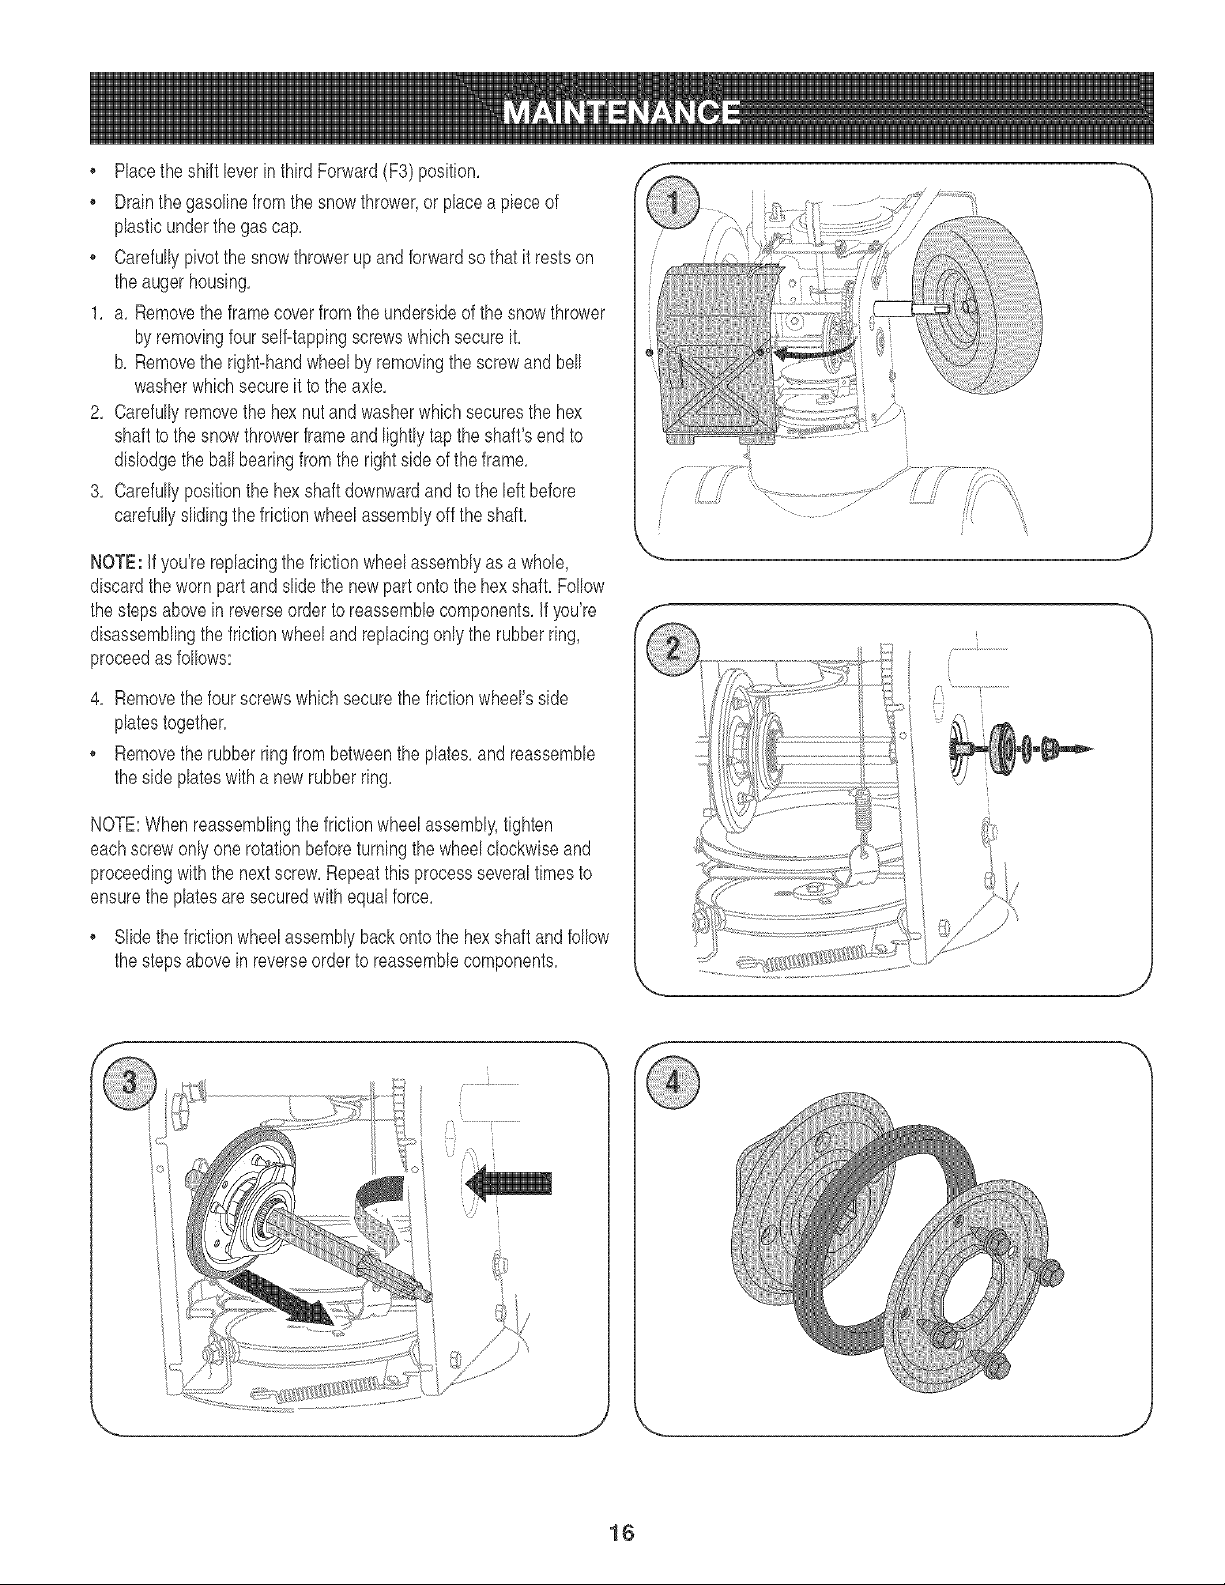
Auger Belt Replacement
Toremoveandreplaceyoursnowthrower'saugerbelt,proceedas
follows:
1, Removetheplasticbelt coveron thefrontofthe engineby remov-
ingthetwoselfqappingscrews,
NOTE:Drainthegasolinefromthesnowthrower,orplaceapieceof
plasticunderthe gascap,
2, Carefullypivotthesnowthrowerup andforwardsothatitrestson
theaugerhousing,Removetheframecoverfromtheunderside
ofthe snowthrowerby removingfourself-tappingscrewswhich
secureit,
3, Rolltheaugerbeltoff the enginepulley,
4, a, Loosenandremovetheshoulderscrewwhichactsasa belt
keeper,
b, Unhookthesupportbracketspringfromtheframe,
5, Removethebeltfromaroundtheaugerpulley,andslipthebelt
betweenthesupportbracketandtheaugerpulley,Reassemble
augerbeltby followinginstructionsinreverseorder,
NOTE:DoNOTforgettoreinstalltheshoulderscrewand reconnect
thespringtotheframeafterinstallinga replacementaugerbelt,
/
!
/
i
/
/
J
it
J \
14
J
Page 15

Augers
Theaugersaresecuredtothespiralshaftwithtwo shearpinsand
cotterpins.if theaugershouldstrikeaforeignobjectoriceiam,
thesnowthrowerisdesignedsothatthe pinsmayshear.Referto
Figure4.
iftheaugerswill notturn,checkto seeifthepinshavesheared.
Onesetof replacementshearpinshas beenprovidedwiththe
snowthrower.Whenreplacingpins,sprayan oillubricantintoshaft
beforeinsertingnewpins.
Drive Belt Replacement
Toremoveandreplaceyoursnowthrower'saugerbelt,proceedas
follows:
1. Removethe _lasticbeltcoveron thefrontofthe engineby remov-
ing thetwo self-tappingscrews.
Drainthe gasolinefromthesnowthrower,or placeapieceof
plasticunderthe gascap.
/
/
/
o Carefullypivotthesnowthrowerupandforwardso thatit restson
theaugerhousing.
2. Removetheframecoverfromthe undersideofthe snowthrowerby
removingfourself-tappingscrewswhichsecureit.
3. a. Grasptheidlerpulleyandpivotittowardthe right.
b. Rolltheaugerbelt offthe enginepulley.
c. Liftthe drivebeltoffenginepulley.
4. Slipthedrivebeltoff thepulleyandbetweenfrictionwheeland
frictionwheeldisc.
* Removeandreplacebeltin thereverseorder.
Friction Whee_ Remova_
Ifthesnowthrowerfailstodrivewiththedrivecontrolengaged,and
performingthedrivecontrolcableadiustmentonpage19failsto
correctthe problem,thefrictionwheelmayneedtobe replaced.Follow
theinstructionsbelow.Examinethefrictionwheelforsignsofwearor
crackingandreplaceif necessary
f
...._-.i_I'
J
15
Page 16
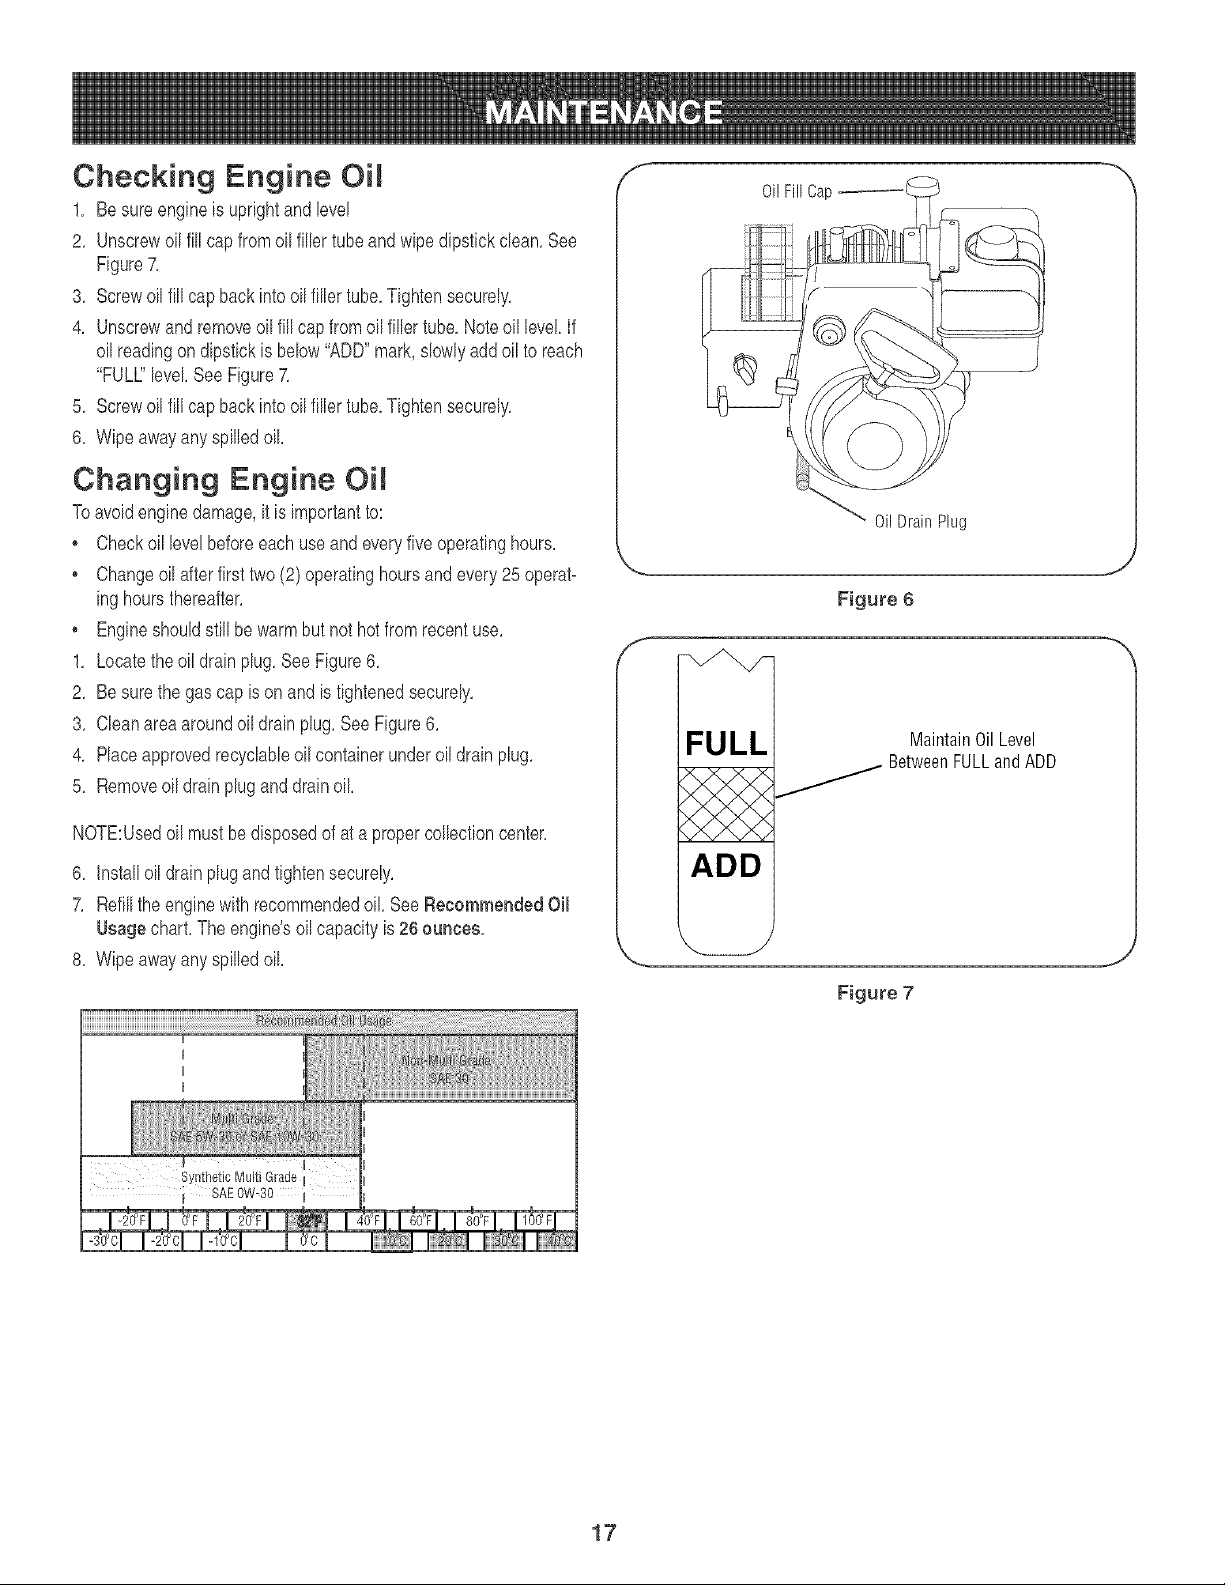
Placetheshift leverinthirdForward(F3) position,
Drainthe gasolinefromthesnowthrower,or placea pieceof
plasticunderthe gascap,
Carefullypivotthesnowthrowerup andforwardsothat it restson
theaugerhousing,
1, a, Removetheframecoverfromtheundersideofthesnowthrower
byremovingfourself-tappingscrewswhichsecureit,
b, Removethe right-handwheelby removingthescrewandbell
washerwhichsecureit totheaxle,
2, Carefullyremovethehexnutandwasherwhichsecuresthe hex
shaftto thesnowthrowerframeandlightlytap theshaft'sendto
dislodgetheballbearingfromthe rightsideoftheframe,
3, Carefullypositionthe hexshaftdownwardandto the leftbefore
carefullyslidingthefrictionwheelassemblyofftheshaft,
NOTE:if you'rereplacingthefrictionwheelassemblyasa whole, '_
discardthewornpartand slidethenewpartontothe hexshaft,Follow
thestepsaboveinreverseordertoreassemblecomponents,if you're f
disassemblingthefrictionwheeland replacingonlytherubberring,
proceedasfollows:
4, Removethefourscrewswhichsecurethefrictionwheel'sside
platestogether,
, Removetherubberringfrombetweentheplates,andreassemble
thesideplateswitha newrubberring,
NOTE:Whenreassemblingthefrictionwheelassembly,tighten
eachscrewonlyonerotationbeforeturningthewheelclockwiseand
proceedingwiththe nextscrew,Repeatthisprocessseveraltimesto
ensuretheplatesaresecuredwithequalforce,
Slidethefrictionwheelassemblybackontothe hexshaftandfollow
thestepsaboveinreverseordertoreassemblecomponents,
J
J \
16
J
Page 17
Checking Engine Oil
1. Besureengineisuprightandlevel
2. Unscrewoil fill capfromoil fillertubeandwipedipstickclean.See
Figure7.
3. Screwoil fill capbackintooilfillertube.Tightensecurely.
4. Unscrewand removeoilfill capfromoilfiller tube.Noteoil level If
oil readingondipstickis below"ADD"mark,slowlyaddoil to reach
"FULl"level SeeFigure7.
5. Screwoil fill capbackintooilfillertube.Tightensecurely.
6. Wipeawayanyspilledoil
Changing Engine Oil
Toavoidenginedamage,itisimportantto:
• Checkoillevelbeforeeachuseandeveryfiveoperatinghours.
• Changeoilafterfirst two(2) operatinghoursandevery25 operat-
inghoursthereafter.
• Engineshouldstillbewarmbutnothotfromrecentuse.
1. Locatetheoil drainplug.SeeFigure6.
2. Besurethegas cap isonand istightenedsecurely.
3. Cleanareaaroundoil drainplug.SeeFigure6.
4. Placeapprovedrecyclableoilcontainerunderoil drainplug.
5. Removeoildrainpluganddrainoil
FULL
OilFillCap_I
OilDrainPlug
J
Figure 6
MaintainOilLevel
_ BetweenFULLandADD
NOTE:Usedoilmustbedisposedof ata propercollectioncenter.
6. Installoildrainplugandtightensecurely.
7. Refilltheenginewith recommendedoil SeeRecommendedOil
Usagechart.The engine'soilcapacityis 26 ounces.
8. Wipeawayanyspilledoil
iiiiiiiiiiiiiiiiiiiiiiiiiiiiiiiiiiiiiiiiiiiiiiiiiiiiiiiiiiiilllllllllllllllllllllllllllllllllllllli!!ii_i_i_i_i_i_i_iii_i!ii_iiiiii__i_ iiiiliiiiiiilliiiiiillilliiiii¸iiiiilliiiiiiiii!ii_iiiiiiiiii!iiiilliiii!i:iiiiilliiiiiliii!iiiiiiiiii!
I I
ADD
Figure 7
17
Page 18
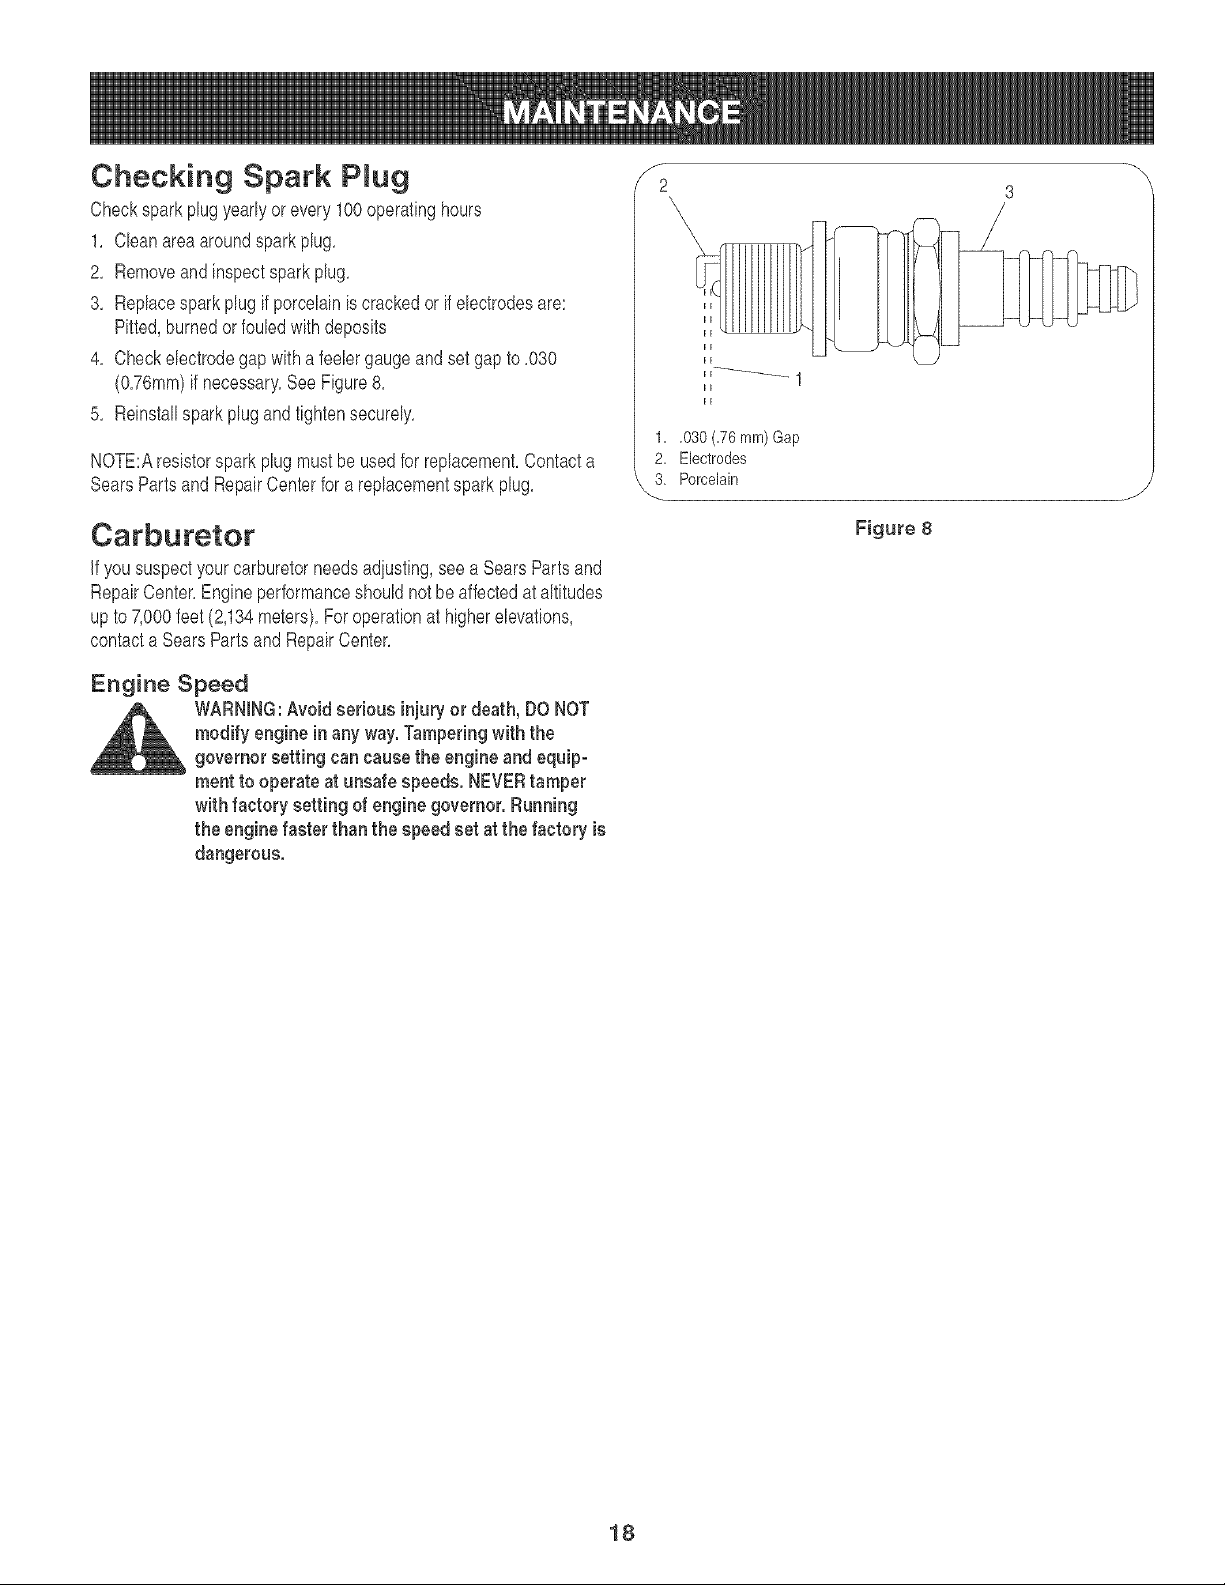
Checking Spark PRug
Checksparkplugyearlyor every100operatinghours
1. Cleanareaaroundsparkplug.
2. Removeandinspectsparkplug.
3. Replacesparkplugif porcelainiscrackedor if electrodesare:
Pitted,burnedorfouledwithdeposits
4. Checkelectrodegapwitha feelergaugeandset gapto.030
(O.76mm)if necessary.SeeFigure8.
5. Reinstallsparkplugandtightensecurely.
NOTE:Aresistorsparkplugmustbe usedforreplacement.Contacta
SearsPartsand RepairCenterfora replacementsparkplug.
f
2
1..030 (.76 ram) Gap
2. Electrodes
3. Porcelain
Carburetor
if yoususpectyourcarburetorneedsadjusting,seeaSearsPartsand
RepairCenter.Engineperformanceshouldnotbeaffectedataltitudes
upto7,000feet(2,134meters).Foroperationathigherelevations,
contacta SearsPartsand RepairCenter.
Engine Speed
WARNING:Avoid serious injury or death, DONOT
modify engine in any way.Tamperingwith the
governor setting cancause the engine and equip-
ment to operate at unsafe speeds. NEVERtamper
with factory setting of engine governor. Running
the engine faster than the speed set atthe factory is
dangerous.
Figure 8
18
Page 19

Auger Control Adjustment
RefertoAugerControlTeston Page12toadiustthe augercontrol
Drive Control Adjustment
WARNING: Never attempt to make any
adjustments while the engine is running,
except where specified in this operator's
manual
Whenthedrivecontrolisreleasedandin thedisengaged"up"position,
the cabb shouldhaveverylittb slack,It shouldNOTbe tight,
Checktheadiustmentofthedrivecontrolasfo[bws:
1, Withthedrivecontrolreleased,pushthesnowthrowergently
forward,Theunitshouldrollfreely,
2, Engagethedrivecontroland gentlyattempttopushthe snow
throwerforward,Thewheelsshouldnotturn,The unitshouldnot
roltfreely,
8, Withthedrivecontrolreleased,movetheshiftleverbackandforth
betweentheR2 positionandthe F6 positionseveraltimes,There
shouldbeno resistanceinthe shiftlever,
4, If anyoftheabovetestsfailed,thedrivecabteisin needofadiust-
ment,ProceedasfoIIows:
5, Loosenthelowerhexnut on thedrivecablebracket,SeeFigure9,
6, Positionthebracketupwardtoprovidemoreslack (ordownwardto
increasecabletension),
7, Retightentheupperhexnut,
/
/
/
/
//
ii
/
V
Figure 9
f
Chute Assembly Adjustment
Thedistancesnowisthrowncanbead}ustedbychangingtheangleof
thechuteassembly,Todo so:
1, Stopthe engineby removingtheignitionkeyand loosentheplastic
wingknobfoundon the[eftsideofthe chuteassembly,
2, Pivotthe chuteupwardordownwardbeforeretighteningthewing
knob,SeeFigure10,
Figure 10
19
Page 20

Skid Shoe Adjustment
Thespacebetweentheskidshoesand thegroundcan beadiusted,
, Forclosesnowremovalona smoothsurface,raiseskidshoeson
theaugerhousing,
, Forsnowremovalona roughsurfacesuchas a graveldriveway,
lowertheskid shoesontheaugerhousing.
Toadiustthe skidshoes:
1. Race a blockofwood(2x 4) beneaththeshaveplateto
temporarilyraisethesnowthrower'saugerhousingofftheground.
2. Loosenthefourhexnuts(twooneachside)andcarriagebolts.
Moveskidshoestodesiredposition.SeeFigure11.
3. Retightennutsandboltssecurely.
4. CarefullyremovethewoodNeck.Makecertaintheentirebottom
surfaceofskidshoeisagainstthegroundtoavoidunevenwearon
theskidshoes.Readiustif necessary.
Chute Bracket Adjustment
if thespiralat thebottomofthechutedirectionalcontrolisnotfully
engagingwiththechuteassembly,thechutebracketcanbeadiusted.
Todo so:
1. loosenthetwo nutswhichsecurethechutebracketandreposition
itslightly.SeeFigure12.
2. Retighteningthenuts.
Figure 11
f -',,
Shift Cable
If thefullrangeofspeeds(forwardandreverse)cannotbeachieved,
referto thefigurestotherightandadiusttheshiftcane asfollows:
1. Race theshiftleverin thefastest forwardspeedposition.
2. Loosenthehex nuton the shiftcane indexbracket.SeeFigure13.
3. Pivotthebracketdownwardtotakeupslack inthe cane.
4. Retightenthehexnut.
Tire Pressure
Beforeoperating,checktirepressureandreducepressureto between
15psiand20psi.
if thetirepressureis notequalin bothtires,theunit maypullto one
sideor theother.
Figure 12
/?
2O
Figure 13
Page 21

f
Carburetor
--.,,
Toavoidengineproblems,thefuel systemshouldbeemptiedbefore
storagefor30daysor longer,Followtheseinstructionstoprepareyour
snowthrowerforstorage:
Bowl
J
if thesnowthrowerwill notbe usedfor30daysor longer,or if it isthe
endofthesnowseasonwhenthelastpossibilityofsnowis gone,the
equipmentneedsto bestoredproperly,Followstorageinstructions
belowto ensuretopperformancefromthesnowthrowerformany
moreyears,
Preparing Engine
WARNING: Never store snow thrower with
fuel in tank indoors or in pooHy ventiJated
areas, where fuel fumes may reach an open
flame, spark or pilot Jightas on a furnace,
water heater, clothes dryer or gas appli-
ance.
NOTE:It isimportanttopreventgumdepositsfromformingin
essentialfuelsystempartsof theenginesuchasthecarburetor,fuel
filter,fuel hoseortankduringstorage,
CAUTION:Alcoholblendedfuels(calledgasoholor usingethanolor
methanol)canattractmoisturewhichleadstoseparationandforma-
tionof acidsduringstorage,Acidicgascandamagethefuelsystemof
anenginewhileinstorage,
,_ WARNING: Drain fuel intoan approved
container outdoors, away from any open
flame. Be certain engine is cool. Do not
smoke. Fuel left in engine during warm
weather deteriorates and will cause serious
starting problems.
1, Removeallgasolinefromthecarburetorandthefueltankto
preventgumdepositsfromformingonthesepartsandharmingthe
engine,
2, Runtheengineuntilthefueltankisemptyanditstopsdueto lack
offuel,
3, Draincarburetorbypressingupwardonbowldrain,locatedbelow
thecarburetorcover,Seefigureatleft,
WARNING: Do not drain carburetor ifusing
fuel stabilizer. Never use engine or carbure-
tor cleaning products inthe fuel tank or
permanent damage may occur.
NOTE:Fuelstabilizer(suchas STA-BIL)isanacceptablealternative
inminimizingtheformationoffuelgumdepositsduringstorage,Add
stabilizertogasolineinfueltankorstoragecontainer,Alwaysfollow
mixratiofoundonstabilizercontainer,Runengineatleast10minutes
afteraddingstabilizertoallowittoreachthecarburetor,Donotdrain
carburetorif usingfuelstabilizer,
4, Removethesparkplugand pourone(1)ounceofengineoil
throughthe sparkplugholeintothecylinder,Coversparkplughole
witha ragandcranktheengineseveraltimestodistributetheoil,
Replacesparkplug,
Preparing Snow Thrower
1, Whenstoringthe snowthrowerinanunventilatedormetalstorage
shed,careshouldbetakento rustprooftheequipment,Usinga
lightoilor silicone,coattheequipment,especiallyanychains,
springs,bearingsandcables,
2, Removealldirtfromexteriorofengineand equipment,
3, FollowlubricationrecommendationsintheMaintenancesectionof
this manual
4, Storeequipmentina clean,dryarea,
21
Page 22

Problem
Cause
Remedy
Enginerunserratic
1, UnitrunningonCHOKE,
2, Blockedfuellineorstab fuel
3, Wateror dirt infuel system,
4, Carburetoroutofadiustment,
1, Movechokebver toOFFposition,
2, Cban fuelline;filltankwithclean,
freshgasoline,
3, Drainfueltank,Refillwith
freshfuel
4, ContactSearsParts& RepairCenter,
EngineOverheats adjustedpioperiyI !i c0ntact%ars parts& ServiceCenter_
Excessive
Vibration
Unit fails
to propel itself
1, Loosepartsordamagedauger,
3. ExhaustportpBgged.
1, Drivecontrolcablein needofadiust=
ment,
2, Drivebelt looseordamaged,
1, Stopengineimmediatelyanddiscon=
nectsparkplugwire,Tightenall bolts
and nuts,If vibrationcontinues,have
unitservicedbya SearsParts& Repair
Center,
1, Adiustdrivecontrolcable,Referto
Adiustments,
2, Replacedrivebelt,
NOTE:This section addressesminor service issues.For further details,contact Sears service information line by calling
1=800=4=MY=HOME
22
Page 23

23
Page 24

%
24
9
Page 25

Craftsman 9 HP Snow Thrower Model 247.88190
1, 731-2635 SnowRemovalToolMount
2, 684-04057 ImpellerAssembly,12"Dia,
3, 710-0347 HexScrew,3/8-16,1,75,Gr5
4, 710-0451 Bolt,Carriage,5/16-18,,750Grl
5, 710-0604A Screw,5/16-18,0,625
6, 710-0703 Screw,Carriage,1/4-20,,750,Gr5
7, 712-04063 Nut,FlangeLock,5/16-18,Nylon
8, 712-04064 Nut,FlangeLock,1/4-20,Nylon
9, 712-04065 Nut,FlangeLock,3/8-16,Nylon
10, 714-04040 CotterPin,Bowqie
11, 725-0157 CaNe,Tie,3/16x ,05x7,4
12, 726-04012 Nut,Push-on,,25Dia
13, 731-04705 Chute,AdapterS"Dia
14, 732-0611 Spring,Extension,,38ODx3,6
15, 736-0174 Washer,Wave,,625x ,885x ,015
16, 736-0159 Washer,,349x ,879x ,063
17, 736-0463 Washer,Flat,,25x ,630x ,0515
18, 731-2643 SnowRemovaITool
19, 738-0143 Screw,Shoulder,,498x ,340,3/8-16
20, 738-0281 Screw,Shoulder,,625x ,17,3/8-16
21, 738-04124A ShearPin, ,25x 1,50
22, 741-0245 Bearing,HexRangex ,75ID
23, 741-0309 Bearing,Ball,,75IDx 1,85OD
24, 756-0981a FlatPulley,Idler, 2,75OD
25, 790-00075 Housing,Bearing,1,85ID
26, 790-00080 Bracket,AugerIdlerw/Brake
27, 618-04173 GearboxAssembly,Auger,28"
28, 684-04073 HousingAssembly,Auger28"
29, 684-04107 SpiralAssembly,LH
30, 684-04108 SpiralAssembly,RH
31, 731-04870 Spacer,1,25ODx ,75 IDx 1,00
32, 736-0188 Washer,Flat,,76x1,49x,06
33, 741-0493a Bushing,Range,,800 IDx ,910OD
34, 790-00087A Housing,1"HexBearing
35, 790-00118 ShavePlate,2,25x 27,66
36, 784-5580 SlideShoe
37, 719-0319 Housing,Auger,RHReduced
38, 719-0320 Housing,Auger,LHReduced
39, 721-0179 Seal,Oil, ,7501D
40, 741-0662 Bearing,Range,,75IDx 1,00ODx ,59
41, 710-0642 Screw,Self4apping,1/4-20,0,750
42, 711-04283 Axle,Auger,28"
43, 714-0161 Key,Hi-pro3/16x5/8
44, 715-04021 Pin,Dowel,,25ODx 1,2
45, 717-04126 Shaft,Worm,75OD
46, 717-0528A Gear,Worm20T
47, 718-04071 Collar,Thrust
48, 721-0325 Plug,1/4x,437
49, 721-0327 Seal,Oil, ,75x 1x,131
50, 736-0351 Washer,Flat,,760IDx 1,50D
51, 736-3084 Washer,Flat,,51x1,12
52, 741-0663 Bearing,Range,,75IDx 1,00ODx ,925
53, 741-0661A Bearing,Range,,75IDx 1,00ODx ,975
54, 746-04230 ClutchCaNe,Auger,47,23"
55, 629-0071 ExtentionCord,110V
25
Page 26

26
Page 27

Craftsman 9 HP Snow Thrower Model 247.88190
1, 631-04133 HandleAssembly,ClutchLock,LH
2, 631-04134A HandleAssembly,ClutchLock,RH
3, 684-04105A HandleAssembly,EngagementLH
4, 684-04106A HandleAssembly,EngagementRH
5, 710-0224 Screw,#10-16,0,500
6, 710-04326 Screw,#8-16x ,50
7, 710-04354 Screw,1/4-20,,375
8, 710-0608 HexScrew,1/4-20,1,50,Gr5
9, 790-00219 HandlePanel(E-Style)
10, 710-1233 Screw,Machine,#10-24,1,375
11, 711-04287 PivotRod
12, 712-04063 Nut,FlangeLock,5/16-18,GrF,Nylon
13, 712-04084 Nut,FlangeLock,1/4-20,GrF,Nylon
14, 712-04081A Nut,Hex,1/4-20,Shoulder
15, 720-0274 Grip,1,0IDx 5,0
16, 720-04039 Knob,Shift
17, 731-04894A LockPlate
18, 731-04896A Cam,ClutchLock
19, 732-0193 Spring,Compression,,39x,60x ,88
20, 732-04219 Spring,ClutchLock
21, 732-04238 Spring,Torsion,0,8156IDx ,3038
22, 736-0451 Washer,Saddle,320x ,93x,060
23, 735-0199A Bumper,Rubber,,62ODx ,22
24, 736-0262 Washer,Flat,,385x ,870x ,092
25, 738-04118 Bolt,Shoulder,5/16-18x 0,905,Special
26, 738-04122 Screw,Shoulder,,437x 1,345,1/4-20
27, 731-04869 Chute,FlangeKeeper
28, 746-04228 CaNe,SpeedSelector
29, 746-0605 Houlder,CaNeBarrel,LH
30, 747-04263 EyeBolt,ChuteCrank
31, 790-00202 ShiftLever
32, 731-04912A Chute,Lower,5,0Diameter
33, 710-0276 Bolt,Carriage,5/16-18,1,0
34, 710-04071 Bolt,Carriage,5/16-18,1,0,Custom
35, 710-0451 Bolt,Carriage,5/16-18,,750
36, 731-04428A Chute,Upper,w/Label
37, 736-0159 Washer,349IDx ,879ODx,063
38, 741-0475 Bushing,Plastic,,380
39, 784-5647 Bracket,ChuteCrank
40, 684-04104 CrankAssembly,Chute
41, 710-0449 Screw,Carriage,5/16-18,2,25,Gr5
42, 710q260A Screw,5/16-18,0,75,Gr5
43, 714-0104 Pin,Cotter,,072x 1,13
44, 720-0201A CrankKnob,1,0Diameterx3,2,Black
45, 720-0284 KnobAssembly,WingNut,5/16-18
46, 726-0100 Cap,Push,3/8 Rod
47, 735-0234 Grommet,,44IDx,94OD x ,50
48, 736-0185 Washer,Flat,,375x ,738x ,063
49, 749-04141 Handle,Upper,RH
50, 749-04142 Handle,Upper,LH
51, 749-04138 Handle,Lower
27
Page 28

@
28
Page 29

Craftsman 9 HP Snow Thrower Model 247.88190
1, 756-04177 Disc,FrictionWheel
2, 684-04153 FrictionWheelAssembly,5,50D
3, 684-04154 SupportBracketAss'y,FrictionWheel
4, 684-04156 ShiftAssembly,Rod
5, 710-0627 HexScrew,5/16-24,,750,Gr5,Lock
6, 710-0788 Screw,1/4-20,1,000
7, 710-0896 Screw,1/4-14x,625
8, 712-04065 Nut,FlangeLock,3/8-16,GrF,Nylon
9, 712-0413 Nut,JamLock,5/8-18,Gr5,Nylon
10, 714-0126 Key,HiPro,3/16x3/4 Dia,
11, 716-0104 E-ring,,500Dia,
12, 716-0136 E-ring,Retaining,,875Dia,
13, 716-0231 E-ring,,750Dia,
14, 717-04209 HexShaft,,8125,7-Tooth
15, 717-04230 Gear,80-Tooth
16, 726-0221 SpeedNut,,500
17, 732-0264 ExtensionSpring
18, 736-0242 Washer,Bell,,340x ,872x ,060
19, 736-0287 Washer,Flat,,793x 1,24x,060
20, 736-04161 Washer,Flat,,75x 1,00x ,060
21, 738-04164 Pin,FrictionDisc
22, 741-04098 BallBearing,30x 55x 13
23, 738-04184 Screw,Shoulder,,373x ,105,1/4-20
24, 738-0924 Screw,1/4-28,,375
25, 741-0245 Bearing,RexRangex ,75ID
26, 741-0563 Bearing,Ball,17x40 x 12
27, 746-04229 ClutchCaNe,Wheel,44,95"
28, 746-04230 ClutchCaNe,Auger,47,23"
29, 748-0190 Spacer,,508IDx ,75ODx ,68
30, 756-0625 Roller,CaNe
31, 790-00096 FrontGuideBracket,AugerCaNe
32, 790-00180 Frame
33, 790-00206 GuideBracket,AugerCaNe
34, 790-00207 GuideBracket,DriveCaNe
35, 790-00226 Cover,Frame
36, 634-04147A LHWheelAssembly,15x5 x 6 (X4rac)
634-04148A RHWheelAssembly,15x5 x 6 (X4rac)
37, 731-04873 Spacer,1,25x ,75x 3,0
38, 738-04168 Axle,,75x 22"
39, 741-0919 BallBearing
40, 710-0106 HexScrew,1/4-20,1,25,Gr5
41, 710-0191 RexScrew,3/8-24,1,25,Gr8
42, 710-04520 RexScrew,5/16-24,1,25,Gr5,Lock
43, 710-0654A Screw,Seres,3/8-16,1,00
44, 7104245B RexScrew,5/16-24,,875,Gr8,Lock
45, 712-04064 Nut,FlangeLock,1/4-20,GrF,Nylon
46, 726-04012 Nut,Push-on,,25Dia,
47, 731-04792A Cover,Belt
48, 732-04308 Spring,Torsion,,850IDx,354
49, 736-0247 Washer,Flat,,406x 1,25x ,157
50, 736-0362 Washer,Flat,,330x 1,25x ,06
51, 736-0505 Washer,Flat,,34x 1,50x ,150
52, 748-04053 Pulley,Adap,,75DiaW/dd
53, 748-04097 Spacer,Shoulder
54, 750-04303 Spacer,,875ID x 1,185OD
55, 750-04477 Spacer,,340x,750x ,360
56, 754-04050 Belt,AugerDrive
57, 754-04088 Belt,WheelDrive
58, 756-04109 Pulley,AugerDrive,8,1x ,5
59, 756-04113 Pulley,Half,V x2,600OD
60, 756-04179 Pulley,Half,1/4-Vx 1,50D
61, 790-00208 IdlerBracket,WheelDrive
62, 790-00230 Sleeve,Bearingldler
63, 750-04571 Spacer,Shoulder,,260x,790x ,538
64, 735-04054 Rubber,FrictionWheel,5,50D
65, 710-0751 HexScrew,1/4-20,,620,Gr5
66, 732-04311 Spring,Torsion,,750IDx ,968
67, 738-04184 Screw,Shoulder,,373x ,105,1/4-20
68, 790-00156 Bracket,ShiftSpacer
69, 790-00217 PivotBracket,SpeedSelector
70, 790-00218 ShiftBracket,SpeedSelector
71, 712-04063 Nut,RangeLock,5/16-18,Nylon
29
Page 30

Tecumseh 9 H.P. Engine LH318SA-156554
Craftsman Snow Thrower Model 247.88190
87
70
83
/'1
1C
t
E
I
301
>300
t
0_',-292
0>291
25
282
20
26
/
315
370K
S90 / _/
287
30
Page 31

Tecumseh 9 H.P. Engine LH318SA-156554
Craftsman Snow Thrower Model 247.88190
Ref.No.
1,
2,
3,
5,
14,
15,
15B,
16,
17,
18,
19,
20,
25,
26,
28,
30,
35,
36,
37,
38,
40,
40,
41,
41,
42,
42,
43,
45,
47,
48,
49,
50,
60,
65,
69,
70,
71,
72,
75,
76,
80,
Part No.
35385
27652
650820
30969
28277
30699C
650494
33454A
29916
651028
34663
35319
37853
650561
30322
35980A
29826
29918
29216
29642
40011
40012
40009
40010
40013
40014
27888
36897
651033
34034
36896
36655
33273A
650128
37342
35445B
35377
27642
35319
28926
37587
Description
Cylinder
DowelPin
Screw,1/4-20x 0,5"
ExtensionCap
Washer
GovernorRod
Screw,6-40x 5/16"
GovernorLever
GovernorLeverClamp
Screw,%15,8-32x 7/16"
SpeedControlSpring
Oil Seal
BlowerHousingBaffle
Screw,1/4-20x 19/32"
LockNut,8-32
Crankshaft
Screw,10-32x3/4"
LockWasher
Lock Nut, 10-32
RetainingRing
Piston,Pin& RingSet (Std,)
Piston,Pin& RingSet (,010"OS)
Piston,Pin& RingSet (Std,incL43)
Piston,Pin& RingSet (,010"OSincL43)
RingSet(Std,)
RingSet(,010"OS)
PistonPinRetainingRing
ConnectingRodAssembly(incL47&49)
ConnectingRodBolt
ValveLifter
Oil Dipper
Camshaft(MCR)
BlowerHousingExtension
Screw, 10-24x 1/2"
CylinderCoverGasket
CylinderCover(Incl,71,75,76,80-84)
CrankshaftBushing
Oil DrainPlug
Oil Seal
CamshaftSeal
GovernorShaft
Ref.No.
81,
82,
83,
84,
86,
87,
89,
90,
92,
93,
100,
101,
102,
103,
110,
110A,
119,
120,
125,
125,
126,
127,
130,
130A,
130B,
135,
139,
140,
149,
149A,
150,
151,
169,
170,
171,
172,
173,
174,
178,
182,
183,
PartNo.
651080
37588
30588A
29193
650833
650832
32589
611093
650880
650881
35135A
610118
651024
651007
35187
37047
36448
36449
27878A
27880A
34035
650691
6021A
650727
651055
35395
33369
650836
27882
35862
27881
32581
27896A
28423
28424
28425
35350
650128
29752
30088A
34587A
Description
Washer
GovernorGearAss'y,(Incl,81)
GovernorSpool
RetainingRing
Screw,1/4-20x 1-3/16"
Screw,1/4-20x lql/16"
FlywheelKey
Flywheel(W/RingGear)
LockWasher
FlywheelNut
SolidStateIgnition(Incl,101)
SparkPlugCover
SolidStateMountingStud
Screw,%15,10-24x 15/16"
GroundWire
GroundWire
CylinderHeadGasket
CylinderHead
ExhaustValve(Std,incl,151)
ExhaustValve(1/32"OSincL151)
IntakeValve(Std,)(Incl, 151)
Washer
Screw,5/16-18x lq/2"
Screw,5/16-18x 1-25/32"
Screw,5/16-18x 39/64"
ResistorSparkPlug(RJ19LM)
GovernorGearBracket
Screw,10-24x 1/2"
ValveSpringCap
Vak,'eSpringCap
Vak_eSpring
ValveSpringKeeper
ValveCoverGasket
BreatherBody
BreatherElement
ValveCover
BreatherTube
Screw,10-24x 1/2"
Nut& LockWasher,1/4-28
Screw,1/4-28x 1"
ChokeBracket
31
Page 32

Tecumseh 9 H.P. Engine LH318SA-156554
Craftsman Snow Thrower Model 247.88190
Ref.No. Part No. Description
184, 33263 CarburetorTointakePipeGasket
185, 33877 intakePipe
186, 34667 GovernorLink
186B, 36652 ChokeSpring
200, 34677 ControlBracket(IncL19,203,204 &206)
203, 31342 CompressionSpring
204, 651029 Screw,%10,5-40 x7/16"
206, 610973 Terminal
207, 33878 ThrottleLink
209, 650821 Screw,10-32x 1/2"
215, 35440 ControlKnob
219, 34586 ChokeRod
220, 35438 ChokeKnob
222, 28820 Screw,10-32x 1/2"
223, 650378 Screw,%30,5/16-18x 1-3/32"
224, 27915A intakePipeGasket
260, 35447A BlowerHousing
261, 650788 Screw,5/16-18x3/4"
262, 651084 Screw,5/16-18x9/16"
264A, 650802 Screw,1/4-20x5/8"
265, 33272D CylinderHeadCover(Black)
275, 35056 Muffler
276, 31588 LockingPlate
277, 651002 Screw,5/16q8x4-3/16"
281, 33013 StarterBubbleCover
282, 650760 Screw,8-32x 3/8"
285, 35985B StarterCup
287, 29752 Nut& LockWasher,1/4-28
291, 30962 FuelLine
292, 26460 FuelLineClamp
298, 650665 Screw,1/4q5 x7/8"
300, 34186A FuelTank(Incl,292& 301)
Ref.No. PartNo. Description
301, 35355 FuelCap
311, 35942 Oil FillPlug
314, 650873 Screw,1/4-20x3/4"
315, 611111 AlternatorCoil(18Watt)(tncl,322&323)
322, 611117 ConnectorBody
323, 611118 Terminal
325, 29443 WireClip
328, 35062 ignitionKeys
329, 610973 Terminal
335, 36547 CarburetorCover
336, 650765 Screw,10-32x1/2"
338, 28942 Screw,10-32x 3/8"
340, 34154 FuelTankBracket
341, 34155 FuelTankBracket
342, 650561 Screw,1/4-20x 19/32"
343, 35079A KeySwitchBracket(Incl,343A)
343A, 651060 Screw,10-32x23/64"
350, 570682A PrimerAss'y,
351, 32180C PrimerLine
355, 590574 StarterHandle
364, 37659 CarburetorCoverBracket
365, 650767 Screw,8-32x 27/64"
370C, 36501 PrimerDecal
370H, 35077 ChokeDecal
370I, 37119 WarningDecal
370K, 36695 StarterDecal
380, 640052 Carburetor(Incl,184)
390, 590749 RewindStarter
396, 33329E ElectricStarterMotor(Optional)
400, 36450C GasketSet
420, 730226A SAE5W30,4-CycleEngineOil (Quart)
32
Page 33

Tecumseh 9 H.P. Engine LH318SA-156554
Craftsman Snow Thrower Model 247.88190
25
Ref.No. Part No. Description
0 640052 Carburetor
1 631776A ThrottleShaft& LeverAssembly
2 631970 ThrottleReturnSpring
6 631778 ThrottleShutter
7 650506 ShutterScrew
10 632112 ChokeShaft& LeverAssembly
14 632174 ChokeShutter
15 630735 ChokePositioningSpring
16 632184 FuelFitting
17 650417 ThrottleCrackScrew/idleSpeedScrew
18 630766 TensionSpring
20 640016 IdleRestrictorScrew
20A 640053 IdleRestrictorScrewCap
25 631951 FloatBowlAss'y(lncL32& 33)
27 631024 FloatShaft
28 632765 Float
29 631028 FloatBowl"0" Ring
30 631021 InletNeedle,Seat &Clip (IncL31)
31 631022 SpringClip
32 27136A BowlDrainAssembly
33 27554 DrainPlungerGasket
38 640005 MainNozzleTube
37 632547 "0" Ring,MainNozzleTube
40 640055 HighSpeedBowlNut
44 27110 BowlNutWasher
47 630748 WelchPlug,IdleMixtureWell
48 631027 WelchPlug,AtmosphericVent
60 632760 RepairKit
6O
40
33
Page 34

Tecumseh 9 H.P. Engine LH318SA-156554
Craftsman Snow Thrower Model 247.88190
11
1
Ref.No. PartNo. Description
0 590749 RewindStarter
1 590599A SpringPin(IncL4)
2 590600 Washer
3 590679 Retainer
4 590601 Washer
5 590678 BrakeSpring
6 590680 StarterDog
7 590412 DogSpring
8 590682 Pulby &RewindSpringAssembly
11 590750A StarterHousingAssembly
12 590535 StarterRope(Length98"x 9/64"dia.)
13 590574 MittenGripHandb (optional)
1
13
__ 8
7
4_3
1
Ref.No. PartNo. Description
0 590733 RewindStarter
1 590599A SpringPin(IncL4)
2 590600 Washer
3 590696 Retainer
4 590601 Washer
5 590697 BrakeSpring
6 590698 StarterDog
7 590699 DogSpring
8 590709 PuIby &RewindSpringAssembly
11 590734A StarterHousingAssembly
12 590535 StarterRope(Length98"x 9/64"dia.)
13 590574 MittenGripHandb (optional)
34
Page 35

Tecumseh 9 H.P. Engine LH318SA-156554
Craftsman Snow Thrower Model 247.88190
29
16
5A
Ref.No. Part No. Description
0 33329E ElectricStarter110Volt(optional)
1 33451 DustCover
2 33842 RetainerRing
3 33430 SpringRetainer
4 33431 Anti-DriftSpring
5A 37050 Gear&Nut (IncL2)
6 35449 DriveEndCapAssembly
7 35450 "0" Ring
8 35915 Armature
9 35451B HousingAssembly
10 35452A BrushCardAssembly
11 35911 ThrustWasher
13 590500 ThrustWasher
14 33441 GroundScrew
15 35453 CommutatorEndCapAssembly
16 35454 SwitchBoxAss'y,
22 35455 CaseBolt
23 35456 GroundScrew
26 650819 Screw,6-32X 2-1/2"
26 651032 Screw,12-16x5/8'
29 32450B ExtensionCord(10'6")
30 30063 Screw,Torx%30,1/4-20X 1/2"
31 650820 Screw,1/4-20X 1/2"
22
35
Page 36

Manuam demoperador
[RAFTSMAN°
5,5 caballos de fuerza
MAQUINA QUITANIEVE
NOmero de modelo 247.88190
PRECAUCION: antes de utimizar
este producto, meaeste manual
y siga todas masregmas de
seguridad y _as instrucciones de
funcionamiento,
Sears, Roebuck and Co., Hoffman Estates, IL 60179, U.S.A.
Visite nuestro sitio web: www.sears.corn/craftsman NOde FORMULARIO769-01909
o SEGURIDAD
MONTAJE
FUNCIONAMIENTO
MANTENIMIENTO
MSTADO DE PIEZAS
06/08/2005
Page 37

Dedaraci6n de garantia ............................ Pagina 2
Acuerdo de protecci6n para reparaciones ... P_gina 2
Practbas operaci6n seguras ..................... Paginas 3-5
Montaje ...................................................... Paginas 6-7
Instrucciones de arranque/detenci6n ............ Paginas 10-11
Operaci6n .................................................. Pb,ginas 8-12
Garantiade dos mios para la m_quinaquitanbve Craftsman
Durantedosahosa partirde la fechade compra,siemprequeaestam&quinaquitanievesele realbeel servbio de mantenimbnto,lubricaci6n
ypuestaapuntodeacuerdoa lasinstruccionesdel manualdelpropietario,SearsrepararAsin cargocualqubrdefectode materiabso manode
obra.Siesta mAquinaquitanbveCraftsmanseutilizaparaprop6sitoscomerciabso dealquiler,estagaranfiase aplicas61odurante30 diasa
partirde lafechadecompra. Estagarantianocubre:
Ebmentosdesechabbsquesedesgastanporel usonormal,incluyendoentreotros,zapatasantideslizantes,placade raspadoy buiias.
• Reparacionesnecesariasdebidoaabusoonegligeneiadeloperador,incluyendoabolladuradeleigOehalyfallapor norealizarmantenimiento
delequipode acuerdoconlas instruccioneseontenidasenel manualdelpropietario.
EL SERVlCIODEGARANT[AEST#DtSPONIBLEPARALOSUSUARiOSQUELLEVENLAM/_QUINAQUITANiEVECRAFTSMANAL
CENTRODEPARTESy REPARACIONSEARSM,4SCERCANODENTRODELOSESTADOSUNIDOS.
EstagaranfiaesvalidaOnbamentembntraselproductoseutilbe dentrodelosEstadosUnidos.
PARAUBICARELCENTRODEPARTESY REPARAClONSEARSM#SCERCANO0 PARAPROGRAMAREL SERVlCIOTBCNICO,SIMPLE-
MENTECOMUNiQUESECONSEARSALTELEFONO1-800-4-MY-HOME@.
Estagaranfialeotorgaderechosbgabs espedficos;ustedtambienpuedetenetotrosderechos,loscuabs variande unestadoa otro.
SEARS,ROEBUCKANDCO., D/817WA,HOFFMANESTATES,IL 60179
Mantenimiento ........................................... Paginas 13-18
Servicio y ajustes ...................................... P_ginas 19-20
AImacenamiento fuera de temporada ....... Pagina 21
Soluci6n de problemas ............................. Pb_gina22
N0mero de servicio ................................... Cubierta ..
................................................................... posterior
Acuerdos de protecci6n sobre reparaciones
Felicitacionespor haberrealizadounaadquisici6ninteligente.El
productoCraftsman@queha adquiridoestb,disehadoyfabrbado
parabrindarmuchosahosde funcionambntoconfiable.Perocomo
todoslosproductosavecespuederequerirde reparaciones.Es en
esemomentocuandoeldisponerdeunacuerdodeprotecci6npara
reparacionesle puedeahorrardineroyprobbmas.
A continuaci6nsedetallanlospuntosincluidosenelacuerdo:
. Servbio expertoprestadopornuestros12.000especialistasen
reparacionesprofesionabs
. Servbio ilimitadosincargoparalaspbzas y la manodeobraen
todaslasreparacionescubbrtas
. Reemplazodelproductosinoesposibbrepararelproductocubbrto
• Descuentode10%delprecionormaldelservbioyde laspbzas
relacionadasconel mismoquenoestencubbrtas porel acuerdo;
ademb,s, 10%de descuentodel precionormaldelaverificaci6nde
mantenimbntopreventivo
. Ayudar@idaporteldono- asistenciatebf6nbaa cargodeunt@nbo
deSearsparalosproductosquerequbrenreparaci6nadomicilio,
adem_sdeuna ramaciOnconveniente
Cabaiios de fuerza :
Aceite del motor:
Combustible:
Bujias:
Motor:
9,0
SAE 5W=30
Gasolina sin plomoe
Champion@ RJ19LM
Tecumseh LH318SH
Adqubra ahoraunacuerdodeprotecci6nparareparacionesy
proteiasede probbmasygastosinesperados,
Unavezadquiridoelaeuerdo,puedeprogramarelservieiocon
tans61orealizarunaIlamadatelef6niea,PuedeIlamarencualquier
momentodeldia o dela noehe,oprogramarunservicioenlinea,
Searsdisponedem_sde 12,000espeeialistasenreparaeiones
profesionabsquetienenaccesoam_sde4,5millonesde piezas
y accesoriosdegrancalidad,Esteesel tipo de profesionalismoen
el quepuedeeonfiarparaquele ayudeaprolongarlavida0til del
productorecientementeadquiridoenlosahosporvenir,iAdquierahoy
suacuerdodeproteeci6nparareparaciones!
Seaplieandeterminadaslimitacionesy exclusiones,Paraobtener
informaci6nadieionaly preciosIlameal 1-800-827-6655,
Serviciode instalaci6ndeSears
Sideseasolieitarlainstalaei6nprofesionalde Searsdeaparatos
domestieos,dispositivosparaabrirportones,ealentadoresde aguay
otrosar%ulosdomestieosimportantes,enlosEstadosUnidosIlame
al 1-800-4-MY-HOME@
N0mero de modeio ......................................................
NOmero de serie ...........................................................
Fecha de compra .........................................................
Registre encima el m3mero del modelo, el m3mero
de eerie y la fecha de compra
Page 38

1.KEEPAWAYFROMROTATINGIMPELLER
ANDAUGER.CONTACTWITHIMPELLEROR
AUGERCANAMPUTATEHANDSANDFEET,
2. USECLEAN-OUTTOOLTOUNCLOG
DISCHARGECHUTE.
3. DISENGAGECLUTCHLEVERS,STOPENGINE,
ANDREMAINBEHINDHANDLESUNTILALL
MOVINGPARTSHAVESTOPPEDBEFORE
UNCLOGGINGORSERVICINGMACHINE,
4. TOAVOIDTHROWNOBJECTSINJURIES,
NEVERDIRECTDISCHARGEATBYSTANDERS.
USEEXTRACAUTIONWHENOPERATINGON
GRAVELSURFACES.
5. READOPERATOR'SMANUAL.
LEAN-OUT TOOL I1__
Thissymbolpointsout
importantsafetyinstructions
which,if notfollowed,could
endangerthepersonalsafety
and/or propertyofyourself
and others.Readand follow
all instructionsin this manual
beforeattemptingtooperate
this machine.Failuretocom-
plywith theseinstructions
mayresultin personalinjury.
Whenyou see this symbol.
HEED ITS WARNING!
Your ResponsibUity
Restrictthe useof this
powermachineto persons
who read,understandand
follow the warnings and
instructionsin this manual
and on the machine.
f
Hayunaherramientade Umpiezade)canal a)ustadaa)aparte
superiordelacaiade)abarrenaconun pasadordeensamblado,
La herramientaest_disehadapara)impiare)hie)oy )anievedel
montaiedeuncanal,Esteproductose suietamedianteunauni6n
decableen)afb,brica,Corte)auni6ndecableantesdeoperar)a
m_quinaquitanieve,
_ DVERTENCIA: Never use your hands
to e(ear a nunea use sus manes para
liberar un montaje de canal tapado.
Apague el motor y permanezea detr_s de
las manijas hasta que todas las partes
mSviles se hayan detenido antes de
utilizar ta herramienta de limpieza para
J
limpiar el montaje del eana.
3
Page 39

ADVERTENCIA:elescapedelmotordeesteproducto,algunosdesuscomponentesyalgunoscom-
ponentesdelvehiculocontienenoemitenproductosquimicosqueelestadodeCaliforniaconsideraque
puedenproducircancer,defectosdenacimientouotrosproblemasreproductivos.
PELIGRO:EstamaquinaestadiseSadaparaserutilizadarespetandolasreglasdeseguridadcontenidasenestemanual
AIigualqueconcualquierripedeequipoel6ctrico,undescuidooerrordepartedeloperadorpuedeproducirlesiones
graves.Estam_.quinaescapazdeamputarmanesypiesydearrojarobjetoscongranfuerza.Denorespetarlasinstruco
clonesdeseguridadsiguientessepuedenproducirlesionesgravesolamuerte.
ADVERTENCIA:estesimboloindicainstruccionesdeseguridadimportantesquedenoseguirse,se
podriaponerenpeligrolaseguridadpersonaly/olapropiedadsuyaydeterceros.Leaysigatodaslas
instruccionesenestemanualantesdeiniciarlaoperaci6ndeestamaquina.Encasodenoseguirestas
instruccionespodriaprovocarlesionespersonales.CuandoyeaestesimboloSlGALAADVERTENOIA
Suresponsabilidad:estamaquinael6ctricas61opuedenusarlalaspersonasquelean,comprendanyrespetenlasad-
vertenciase instruccionesqueaparecenenestemanualy enlamaquina.
Capacitaci6n
1. Lea,entienday cumplatodaslas instruccionesincluidasenla maquinay
enlos manualesantesdemontarlay utilizarla.Guardeestemanualen un
lugarseguroparaconsultasfuturasyregulares,as[comoparasolicitar
repuestos.
2. Familiaricesecontodosloscontrolesy sufuncionamientoapropiado.Sepa
c6modetenerla maquinay c6modesengranarloscontrolesrapidamente.
3. Nopermitanuncaquelosniflosmenoresde14aflosutilicenestamaquina.
Losnifiosde14afiosy masmayoresdebenleery comprenderlasinstruc-
cionesdefuncionamientoy las reglasdeseguridadcontenidaseneste
manual,ytambi6ndebensercapacitadosyestarsupervisadosporunode
lospadres.
4. Nuncapermitaquelosadultosutilicenestamaquinasin recibirantesla
instrucci6napropiada.
5. Losobjetosarrojadosperla maquinapuedenproducirlesionesgraves.
Planifiqueelpatr6nenel quevaa ir arrojandonieveparaevitarque la
descargade materialserealicehacialos caminos,losobservadores,etc.
6. Mantengaalosobservadores,ayudantes,mascotasyniflos perIomenosa
75piesdela m;Jquinamientraslamismaestaenfuncionamiento.Detenga
la maquinasialguienentraenla zona.
7. Seaprecavidoparaevitarpatinarseo caerseespecialmentecuandoopera
la maquinaenreversa.
Preparativos
1. Inspeccioneminuciosamenteel areadondeutilizaraelequipo.Saquetodos
losfelpudos,peri6dicos,trineos,tablas,cablesy otrosobjetosextrafloscon
los quepodr[atropezaroquepodrianserarrojadosporla barrena/ motor.
2. Paraprotegerselosojosutilice siempreanteojosoantiparrasde
seguridadmientrasoperalamb,quinaomientrasla ajustao repara.Los
objetosarrojadosquerebotanpuedenlesionargravementelavista.
3. Nooperela maquinasinla vestimentaadecuadaparaestaral aire libreen
invierno.No utilicealhajas,bufandaslargasu otrasprendassueltasque
podr[anenredarseenlas partesmoviles.Utiliceuncalzadoespecialpara
superficiesresbaladizas.
4. Useunprolongadoryuntomacorrientedetres cablescon conexiona
tierra paratodaslas unidadescon motoresde encendidoelectrico.
5. Ajuste laalturadela cajadeltomacorrienteparalimpiarla gravao las
superficiescon piedrastrituradas.
6. Desengranetodaslaspalancasdecontrolantes dearrancarelmotor.
7. Nuncaintenterealizarajustesmientrasel motorestaenmarchaexcepto
en loscasosespecfficamenterecomendadosenel manualdel operador.
8. Dejequeel motory la maquinaseadaptena latemperaturaexteriorantes
de cornenzarasacarla nieve.
9. Paraevitarlesionespersonalesodaflosmaterialesseasumamentecuidadosoal
manipularlagasolina.Lagasolinaesaltamenteidlamableysusvaporespuedencausar
expiosiones.Sepuedelesionargravementesiderramagasolinasobt9ustedosobrela
ropayaquesepuedept_nderfuego.Laveselapic4ycambiesederopadeinmediato.
a. Utilices61orecipientesparagasolinaautorizados.
b.Apaguetodosloscigarrillos,cigarros,pipasyotrasfuentesdecombusti6n.
c. Nuncacarguecombustibleen la m;Jquinaen unespaciocerrado.
d. Nuncasaquelatapadelgas niagreguecombustiblemientrasel motor
estacalienteo enmarcha.
e. Dejeque el motorseenfr[eporIo menosdosminutosantesdevolvera
cargarcombustible.
f. Nuncarecargueeltanque decombustible.Lleneeltanque nom;Js
de 1/2 pulgadapordebajodela basedel cuellodel filtro paradejar
espacioparala dilataci6ndelcombustible.
g. Vuelvaa colocarlatapade lagasolinay ajL_stelabien.
h. Limpiela gasolinaderramadasobreel motory el equipo.Trasladela
m;Jquinaa otra zona.Espere5 minutesantesdeencenderel motor.
Nuncaalmacenela m;Jquinao el recipientedecombustibleenun
espaciocerradodondehayafuego,chispasoluz piloto(perejemplo,
hornos,calentadoresdeagua,calefactores,secadoresde ropa,etc.).
Dejequela maquinaseenfrieperIomenos5 minutesantes de
guardarla.
4
Page 40

Operaci6n
1. No pongalasmaneso los piescercadelas piezasrotatorias,enla caja
dela barrena/ motoroen el montajedelcanalde descarga.Elcontacto
conlas piezasrotatoriaspuedeproducirla amputaci6ndemanosy pies.
2. Lapalancadecontroldela barrena/ motores undispositivodeseguri-
dad.Nuncapase poralto sufuncionamiento.Dehacerlola operaci6nde
la maquinaes riesgosay puedeocasionarlesiones.
3. Laspalancasdecontroldebenfuncionarbienenambasdireccionesy
regresarautomaticamenteaIsposici6ndedesengranecuandose lassuelta.
4. Nuncaoperelamaquinasifaltaunmontajedelcanalosielmismoest;Jdafiado.
Mantengatodoslosdispositivosdeseguridadensulugaryenfuncionamiento.
5. Nuncaenciendaunmotorenespacioscerradosoen unazonaconpoca
ventilaci6n.Elescapedel motorcontienemon6xidodecarbono,ungas
inodoroy letak
6. No utilicela m;Jquinabajola influenciadel alcoholo lasdrogas.
7. Elsilenciadory el motorse calientany puedenproducirquemaduras.No
lostoque.
8. Seasumamenteprecavidocuandooperela m_.quinasobreunasuperficie
congravao cuandola cruce.Mantengasealertapot sise presentan
peligrosocultoso transito.
9. Tengacuidadocuandocambiededirecci6no cuandooperela m;Jquina
enpendientes.
10.Planifiqueelpatr6nenel que vaair arrojandonieveparaevitarque
la descargadematerialse produzcahacialasventanas,las pare@s,
los autom6viles,etc.y evitaras[ posiblesdaflosmaterialesolesiones
producidasperlos rebotes.
11.Nuncadirijala descargahacialos niflos, losobservadoresy lasmascotas
ni dejeque nadiese paredelantede la m;Jquina.
12.No sobrecarguelacapacidaddelamaquinatratandode sacarla nieve
muyrapidamente.
13.Nuncaopereestam;Jquinasinbuenavisibilidado iluminaci6n.Siempre
debeestarsegurode queestabien afirmadoy sostengabienlas manijas.
Carnine,nuncacorra.
14.Cortelacorrientea la barrena/ motorcuandotransportelam;Jquinao
cuandola mismanoestaen uso.
15.Nuncaoperela maquinaaalta velocidaddedesplazamientosobre
superficiesresbaladizas.Mirehaciaabajoy haciaatr;Jsytengacuidado
cuandovayamarchaatras.
16.Si la m;Jquinacomenzaraavibrarde maneraanormal,detengael motor,
desconecteel cablede la bujiay p6ngalade maneraquehagsmass
contrael motor.Inspeccionelamaquinaminuciosamenteparaversiesta
daflada.Reparetodos los dafiosantesdeencendery operarla maquina.
17.Desengranetodas laspalancasdecontroly detengael motorantesde
dejarla posici6nde operaci6n(detr;_sdelasmanijas).Esperea que la
barrens/ motorsedetengaporcompletoantesdedestaparel montajedel
canalorealizarajustese inspecciones.
18.Nuncapongalas manesenlas aberturasdedescargao de recolecci6n.
Utilicesiemprela herramientadelimpiezaquese adjuntaparadestapar
la aberturadedescarga.Nodestapeel montajedelcanal mientrasel
motorest4en funcionamiento.Antesdedestaparlo,apagueel motory
permanezcadetrasdelas manijashastaquetodaslas partesm6vilesse
hayandetenido.
19.Uses61ounionesyaccesoriosaprobadosperelfabricante(perejemplo,
pesaspars las rue@s, cadenasparalos neum;Jticos,cabinas,etc.).
20.Si se presentansituacionesquenoestanprevistasen estemanual,sea
cuidadosoyuseel senti@comOn.Contacteconsu centrodeservicio
Searsparaobtenerayuda.
Mantenimiento y alrnacenamiento
1. Nuncamanipulelosdispositivosdeseguridaddemaneraimprudente.
Controleperiodicamenteque funcionende formsadecuada.RemRasea
las seccionesdemantenimientoyajustede estemanual.
2. Antesde realizarlalimpieza,repararo revisarla m_.quina,desengrane
todaslas palancasdecontroly detengael motor.Espereaque la barrena
/ motorse detengapercompleto.Desconecteelcable dela buj[ay
p6ngalode maneraque hagamasacontra el motorparsevitar quese
enciendade maneraaccidental.
3. Controlefrecuentementequetodos los pernosy tornillosesten bien
ajustadosparscomprobarquela m;Jquinaseencuentraencondiciones
segurasdefuncionamiento.Asimismo,realiceuna inspeccionvisualdela
m;_quinapars controlarsi la mismaestadafiada.
4. Nocambiela configuraci6ndelreguladordel motorniaceleredemasiado
el mismo.Elreguladorcontrolalavelocidadm;_ximaseguradeoperaci6n
delmotor.
5. Lasplacasderaspadoylaszapatasantideslizantesqueseusanconlamaquina
quitanievesedesgastany sedaflan.Parsprotegersuseguridad,verifique
fl_cuentementetodosloscomponentesy t_empl;_celoss61oconpartesdelos
fabricantesdeequiposoriginales(OEM)."Lautilizaci6ndepiezasquenocumplan
conlasespecificacionesdeequiposoriginalespodriatenercomoresuttadoun
rendimientoincorrecto,yadema.slaseguridadpodrfaestarcomprometida"
6. Reviseloscontrolesperi6dicamenteparsverificarque engranenydesen-
granenadecuadamentey ajL_stelossi esnecesario.Consultela secci6n
de ajustesen estemanualdel operadorparaobtenerinstrucciones.
7. Mantengaoreemplacelasetiquetasdeseguridade instruccionessegOn
sea necesario.
8. Respetelas normasreferentesaladisposici6ncorrectsy las reglamenta-
clonessobregas,combustible,etc.paraprotegerel medioambiente.
9. Antesde almacenarla m;Jquinaenci6ndalaunos minutosparasacarla
nieveque hayaquedadoenla mismay paraevitaras[que secongelela
barrena/ motor.
10.Nuncaalmacenela maquinaoel recipientedecombustibleenun espacio
cerradodondehayafuego,chispaso luzpilotocomo porejemplo,
calentadoresdeagua,hornos,secadoresde ropa,etc.
11.Consultesiempreel manualdefuncionamientoparaconocerlasinstruc-
clonesadecuadasparael almacenamientofueradetemporada.
No modifique el motor
Parsevitarlesionesgravesola muerte,no modifiqueelmotorbajoninguna
circunstancia.Si cambialaconfiguraci6ndelreguladorel motorpuededescon-
trolarsey operaravelocidadesinseguras.Nuncacambielaconfiguraci6nde
fabricsdel reguladordel motor.
Aviso referido a emisiones
Losmotoresqueestancertificadosy cumplenconlas regulacionesdeemisio-
nesfederalesEPAy deCaliforniaparaSORE(EquiposSmallOffRoadEquip-
ment)estancertificadosparaoperarcongasolinacomOnsinplomoy pueden
incluirlossiguientessistemasdecontroldeemisiones:Modificaci6ndemotor
(EM)ycatalizadordetresvias (TWC)siesta equipadode esamanera.
CaJcoman_a de identificaci6n de! motor
EstacalcomaniaindicaelnOmerodelmodelodelmotor,lasespecificacionesy
lafechadefabricaci6n.Porfavor,mirelacalcomaniaenelmotordesuequipo
y registreesainformaci6nparareferenciafutura.
Lacalcomaniade identificaci6ndel motortambi6nincluyeespecificaciones
sobreel periodode vida0tildel motorrelacionadoconlasemisiones.Este
periodoest;_relacionadoconlavida0tilen conformidadcon lasemisiones
seg0nIocertificadoporEPAy/o CARB.Parahallarla especificaci6ndel
periododevida Qtildelmotor,porfavorlealacalcomaniadelmotory ub.ique
laletra(entrecomillas)entrelaspalabrasModeradoy PeriododeVidaUtil.
Conecteunade lassiguientesletrasconla letra impressen su calcomania.
Porejemplo,a los modelosHMSK80se losdesignacomo:
"C"-- 250horas
"B"-- 500 horas
"A"-- 1000horas
Page 41

,._, J
NOTA:lasreferenciasalladoderechooy ciertosdelamb,quina
quitanievesedeterminandesdela parteposteriorde la unidaden
posici6ndeoperaci6n(permaneciendodirectamentedetrAsdela
m_quinaquitanieve,mirandohaciael panelde la maniia),
J' /
/
/
/
/
/
Extracci6n de la unidad de la caja
1, Cortelasesquinasde lacaiade cart6ny exti6ndaIaenel piso
Quitey descartetodoslosinsertosde empaque,
2, Saquela m_quinaquitanievede la caia,
3, AsegOresedevaciarcompIetamentela cajaantesde tirarIa
Partes sueltas
ConestemanualseincIuyendospasadoresdecuchilladebarrenade
repuesto,ConsuItelasecci6n"Barrenas"enlapb,gina20paraobtenerm_s
informacbnsobreelreempIazodelospasadoresdecuchiIIadebarrena,
Configuracidn de la m quina qu n ve
1, ObserveelAreainferiortraseradelamb,quinaquitanievepara
asegurarsede queamboscablesestenalineadoscon lasguhs
rotatoriasantesdegirar[amaniiahaciaarriba,
2,Asegure[amanijaajustando[aperi[[aa mariposadep[_stico
situadaenlos[adosizquierdoyderechodedichaman!ja.Retirey
descartetodoslas bandasdepIAstico,si lashubiera,Unicamente
seutiIizanparael empaque,
3,SitOeel montaiede[canalsobre[abase,
4,Cierrelosfiiadoresde [abridaparaasegurarelmontajedelcanal
a [abasede[canal.Losfiiadoresde [a bridaemitenunchasquido
cuandoestb,n bienasegurados,
NOTA:silosfiiadoresde [abridano se aiustanensu [ugarf_cilmente,
utilicelapalmadesu manoparaapIicarunapresi6nr_piday firme
enla parteposteriordecadauno,
\
6
Page 42

5. Quitela arandelaplanay el brochede horquilladelextremodel
controldireccionaldelcanal
Inserteelextremodelcontroldireccionaldelcanalenelsoporteinferior
yasegOrelomediantelaarandelaplanayelbrochedehorquillaque
acabaderetirar.Siesnecesario,puedeaiustarseelsoporteinferior.
Consulte"Aiustedelsoportedelcanal"enlap_,gina20.
Ajustes
Contro_ de _a barrena
IMPORTANTE:antesde operarsu mAquinaquitanieve,consultela
pruebadecontroldela barrenaen lap_.gina12.Leaycumplatodas
lasinstruccionescon cuidado,yrealicetodoslosaiustesparaverificar
quesum_,quinaquitanieveoperadeformaseguray adecuada.
Zapatas antideslizantes
IMPORTANTE:nose recomiendaqueopereestam_quinaquitanieve
sobregrava,yaque es posiblequela m_quinaquitanievetomela
gravasueltay labarrenalaexpulse,Iocualpodr[acausarlesiones
personaleso daharla m_,quinaquitanieve.
Laszapatasantideslizantesdela mAquinaquitanieveseaiustanen
f_bricaparaoperaci6nnormal Sitienequeusar lam_quinaquitanieve
sobregrava,mantengalazapataantideslizanteenla posici6nm_s
elevadaparaIograrunaseparaci6nm_ximaentreel pisoy la placade
raspado.Consulte"Zapatasantideslizantes"en lap_gina13.
Presi6n de _os neum_ticos
Antesde cualquieroperaci6n,compruebelapresi6ndeambos
neum_ticosy reduzcalamismaaentre 15psiy 20psi.
NOTA:silapresi6nde losneum&ticosno es igualen ambosneumAti-
cos,es posiblequela unidadnosigaunatrayectoriarectay quela
placade raspadosedesgastedeformadespareia.
7
Page 43

Figura 1
Contro es de operaci n
(Vea la Figura 1)
ADVERTENCIA:lea,comprenda y sigatodas
lasinstmceionesy advertenciasque apareeen
enta m_quinay en este manualantesde
operarla.
Pa_anca de cambios
B ! l l | l
12345 5
Lapalancadecambiosestb_ubicadaentrelasmaniiasinferiores,SitOe
lapalancadecambiosencualquieradelasochoposicionespara
controlarladirecci6ndel desplazamientoy lavelocidaddepiso,
Avarice
Hayeincoposicionesdeavarice(F), Laposiei6nuno(1)es lam_s
lenta,y la posici6nsix(6) eslamAsrapid&
Retroceso
Haydosvelocidadesde retroceso(R), Launo(1)eslamAs lenta,y la
dos(2)es lamAsrapid&
Contro_ de obturaci6n
Elcontroldeobturaci6nseencuentraen la parteposteriordelmotor,
y seactivahaciendogirarlaperillaen sentidode lasaguiasdel reloi,
AIactivarel controlde obturacbnsecierralaplacadeobturaci6ndel
carburadoryseayudaaencenderel motor,
Contro_ del estrangu_ador
ElcontroldelestranguladorestAubicadoen el motor,
Regulalavelocidaddelmotor,y Ioapagacuandose
presionahaciaabaiocompletamente,
Cebador
AIpresionarelcebadorseenviacombustble
directamenteal carburadordelmotorparaayudaral
encendidocuandoel climaes fifo,
©
m
l
m
8
Page 44

Contro_ de la barrena
Elcontroldela barrenaestAubicadoenla maniiaizquierda,Aprietela
empuhadurade controlcontrala maniiaparaengranarlasbarrenasy
empiecea quitarnieve,Suelteparaquesedetenga,
Contro_ de la transmisi6n
f CONTROL DE LA
S
Elcontroldetransmisi6nestb,ubicadoenlamaniiaderecha,Presione
laempuhaduradecontrolcontralamanijaparaengranarlaruedade
transmisi6n,Suelteparaquesedetenga,
Contro_ direccional del canal
DESCARGA
]ZQUIEfiDA
LJave de encendido
LaIlavedeencendidoesundispositivodeseguridad,Debeestar
completamenteinsertadaparaqueel motorarranque,RetirelaIlave
de encendidocuandono usela m_quinaquitanieve,
Nogirela Ilavedeencendidoparaintentararrancarelmotor,AI
hacerlopodrh romperla,
Herramienta de Hmpieza
ADVERTENCIA: nunca use sus manos para
Jiberar un montaje de canal tapado. Antes
de destaparlo, apague el motor y permane°
zca detr_s de Jas manijas hasta que todas
Jas partes m6viles se hayan detenido
Laherramientade limpiezadel canalestAaiustadaa la partesuperior
de lacaia de labarrenaconunpasadordeensamblado,La herra-
mientaestAdisehadaparaliberarunmontaiede canaltapado,
NOTA: esteproductoseaiustaenfb,brica medianteunauni6nde
cablea laparteposteriordela cajade labarrena,Cortelauni6nde
cableantesdeoperarla mAquinaquitanieve,
Zapatas antidesHzantes
Ubiquelaszapatasantideslizantesenfunci6ndelas condicionesde
lasuperficie,Ajustehaciaarribasila nieveestAmuycompactada,
AiOstelashaciaabaiosiusalam_quinaengravaso superficiescon
piedrastrituradas,
Manija del arrancador de retroceso
Estamaniiase utilizaparaarrancarel motormanualmente,
Bot6n del arrancador e_ctrico
sioprimeelbot6ndelarrancadorel6ctricoseengranaelarrancador
el6ctricodelmotorcuandoseIoenchufaaunafuentedeenergiade120V,
Salida de[ arrancador ei_ctrico
Esnecesariousaruncord6nprolongadorparaexterioresdetres
espigasy unafuentedeenerg[a/ tomacorrientede paredde 120V,
_arret_as
Cuandoest_nengranadas,las barrerasgirany retiranlanieveal
interiordela caiade la barrena,
\
Paracambiarla direcci6nhacialacualsearroialanieve,gireel
controldireccionaldelcanaldela siguientemanera:
• Gireensentidode lasaguiasdel reloiparadescargarlanieve
haciala izquierda,
• Gireendirecci6ncontrariadelas aguiasdel reloiparadescargarla
haciala derecha,
Montaje deJ canal
Lanieveretiradaal interiorde lacaia dela barrenasedescargaenel
montajedelcanal
Tap6n de combustible
Desenrosqueeltap6n decombustibleparaagregargasolinaal tanque
de combustible,
L{enado de aceite
Esposiblecontrolarel nivelde aceitedel motor,as[comotambi6n
agregaraceite,atrav6sdel Ilenadode aceite,
9
Page 45

Antes de encender el motor
ADVERTENCIA:lea,comprenda y siga todas las
instrucciones y advertencias que aparecenen la
m_quinayen este manual antes de operarla.
Aceite
El motorseenv[6conaceiteen el motor,Controleelnivelde aceite
antesde cadaoperaci6nparaasegurarsedequehayaaceite
suficienteenel motor,Paraobtenerm_s[nstrucciones,remitasea los
pasosqueaparecenenlapb,g[na 15,
1, Saquela varilladel niveldeaceitedelorific[ode Ilenadodeaceite,
2, Controley compruebeque elnivelde aceiteest6hastaarr[baenla
marcaFULLde la varilladelniveldelaceite,
3, S[el n[velde aceiteno IlegahastaFULL,v[ertaaceitedemotor
nuevo(5W-30,conunaclasificaci6nminimade%/%) lentamente
a travesdelaabertura,Vuelvaacolocarlavarilladel nivelace[te
enel Ilenadodeace[tey controlenuevamenteel n[velde ace[te,
Gasolina
ADVERTENClA:tenga extremocuidado cuando manipule
gasolina. La gasolinaes altamenteinflamable y
suevapores pueden cauear e×plosionee.Nunca
agregue combustible a la m_quinaen interioreso
mientras el motorest_ caliente o en funcionamiento.
Apague los cigarrillos, cigarros, pipasy otras
fuentes de combusti6n.
, AImacenelagasolinaenun recipienteaprobadolimp[oycoloquela
tapaen el recipiente,
• Aseg0resedequeelrecipientedesdeelcualviertelagasolinaest6
limp[oy noest6oxidadon[contaminadoconotrasparticulasextrahas,
NOTA:dentrodelaaperturaparaIlenadodecombustblepuedeencontrarse
unatapaguardapolvosdeplb,stico,Retirey descarte,s[lahubiera,
Llenesiempreel tanquedecombustibleal aire librey useun
embudoopico paraevitarderramamientos,
• Lleneeltanquedecombustiblecongasolinasinplomo,limpiayfresca,
• NuncaIlenecompletamenteeltanque,Lleneeltanquehasta1/2pulgpor
debaiodeltope,deiandoas[espacioparaladilatacbndelcombustible,
, Aseg0resedelimpiarelcombustiblequese hayaderramadoantes
dearrancarelmotor,
Arrancador e!_ctrico
1, Determines[elcableadodesuhogaresunsistemadetrescab#sconectadoa
t_e_a,Consulteconunelectidstamatriculadosinoestb,seguro,
ADVERTENCIA:el arrancador el_ctrico
opcional est_ equipado con un cable de
alimentaci6n y un enchufe de tres terminales
conectados a tierra y est_ diseSado para opo
erar con corriente dom_stica de 120vottios,
Debeset utilizado con un recept_culo de tres
terminales correctamente conectado a tierra
en todo momento para evitar la posibitidad
de descargas el_ctricas,
Si su sistema de cableado dom_stico no es
un sistema de tres terminales con cone×i6n
a tierra, no utitice este motor el_ctrico bajo
ningSn tipo de condiciones.
Si su sistema de cableado dom_stico es
un sistema con cone×i6n a tierra, pero no
cuenta con un recept_culo de tres terminao
les, no utilice et arrancador el_ctrico de su
m_quina quitanieve,
Siga todas tas instrucciones cuidadosao
mente para operar el arrancador el_ctrico,
s[ cuentaconunrecept_culodetresterm[hales,sigaloss[gu[entes
pasos:
1, Conecteel prolongadora lasalidasituadaen lasuperficiedel
motor,Conecteelotroextremodelprolongadorenun receptb,culo
de CAconconexi6natierradetresterminalesde 120voltios,en
un _reabienventilada,
2,G[reel controlde obturacbnapos[ci6nde obturac[6nFULL(para
encendidoconel motorenfr[o),
NOTA:s[el motoryaestb,caliente,ubiqueelcontroldelobturadoren
posici6nOFFenlugarde FULL,
3, Presioneelcebadordoso tres vecesparaarrancarel motoren
fr[o,asegurb,ndosedecubrirel orific[odeventilaci6nsituadoenel
centrodelcebadorcuandoest6pres[onando,
NOTA:NO UTILICEelcebadorparareiniciarunmotorcalientetras
unadetenci6nbreve,
Encendido de[ motor
1, Conecteelcablede labuifaa la misma,Compruebequeel lazo
de metaldelextremode la bujiaeste bienajustado(dentrodela
mangadegoma)sobrelapuntamet_licadela buiia,
2, Aseg0resedequeel controlde labarrenay el controlde la
transmisi6nestenen posici6ndesengranada(sinpresionar),
3, Muevaelcontroldel estranguladora laposici6nFAST(rb,pido),
InsertelaIlavede encend[doen la ranura,Aseg0resedequeentre
a presi6nensu lugar,No[ntenteg[rarlaIlave,
NOTA:el motornopuedearrancars[la Ilavenoest_completamente
[nsertadaenel [nterruptorde encendido,
4, Pres[oneel bot6ndelarrancadorparaarrancarel motor,
5, Unavezencendidoelmotor,suelteel bot6ndelarrancador,
6, Mientrassecalientael motor,girelentamenteel controldelobtu-
radora posici6nOFF(apagado),S[el motorfalla,vuelvaa girar
r&p[damenteelobturadora pos[ci6nFULLyluego,lentamente,a
posici6nOFFde nuevo,
7, Cuandodesconecteel prolongador,desenchufesiempreelextremo
delreceptb,culodetresterminalesenel tomacorrientede paredantes
dedesenchufarelextremoopuestodela m_qu[naqu[tan[eve,
10
Page 46

Arrancador de retroceso
1, Gireelcontrolde obturaei6naposici6ndeobturaci6nFULL
(encendidoconel motorenif[o),
NOTA:Is[ el motoryaestAcaliente,ubiqueelcontroldel obturadoren
posici6nOFFen lugardeFULL,
2, Presioneelcebadordoso tresvecesparaarrancarel motoren
if[o,asegur_ndosedeeubrirel orifie[ode ventilaei6nsituadoenel
centrodelcebadorcuandoest6presionando,
NOTA:NO UTILICEelcebadorparareiniciarunmotorcalbnte tras
unadetenci6nbreve,
NOTA:tal vezsea necesar[ouncebadoadicionals[la temperaturaes
inferiora 15°Fahrenheit,
3, Tomelamaniiadelarrancadorderetrocesoytirede lacuerda
baciaafuerabntamente,Enel momentoen elquese baga
bvementem_sdificiltirarde la euerda,permitaque la misma
retrocedalentamente,
4, Tiredela maniiadelarrancadorconunmovimientofirmey r@ido,
Nosueltela maniian[permitaquese desenganche,Mantengala
maniiadelarraneadorfirmementesuietaypermitaque lacuerda
retroeedalentamente,
5, Mientrassecalientael motor,girebntamenteelcontroldelobtu-
radora posici6nOFF(apagado),Siel motorfalla,vuelvaagirar
r@idamenteelobturadoraposici6nFULLy luego,bntamente,a
posiei6nOFFdenuevo,
NOTA:permitaqueel motorsecalbnte duranteunosminutostrasel
arranque,Elmotorno desarrollar_todasupotenciabastaquealeance
temperaturasoperativas,
Detenci6n motor
Deieencendidoel motordurantealgunosminutosantesdedetenerlo
parapermitirque sesequela humedadenel mismo,
Paraayudaraprevenirunposibleeongelamientodelarraneador,
procedadelasiguientemanera:
Arrancador el_ctrico
1, Conecteelprolongadora la salidadelarrancadorel@tricoenel
motory luegoal tomaeorrientedeCAde 120voltios,
2, Conel motorfuncionando,presioneel bot6ndelarraneadorydeie
girarelarrancadordurantevariossegundos,Elruidorealizadopor
elarraneadoresnormal Elarraneadordelmotornoestb,dahado,
3, Cuandodeseoneeteelprolongador,desenehufesiempreel extremo
delrecept_eulodetresterminabseneltomaeorrientedeparedantes
dedesencbufarelextremoopuestodelam_quinaquitanieve,
4, Muevaelcontroldelestranguladoralaposiei6nSTOP(parada),
5, Retirela Ilavedeencendidoygu_rdelaenun lugarseguro,
6, Limpiela nievey la humedaddel_reaalrededordelmotor,as[
comotambi6nenel _rea(yalrededordeesta)del interiorde los
controbsde latransmisi6ny dela barrena,Asimismo,engancbey
suelteamboscontrolesvariasveces,
Arrancador de retroceso
1, Conel motorenfuncionamiento,tireconfuerzadela sogadelar-
rancadortreso cuatrovecesde maneracontinuay seguida,AItirar
de la sogadelarrancadorseoir_ unfuertesonidodetraqueteo,el
cualnodahaal motor,
2, Muevaelcontroldelestranguladora la posici6nSTOP(parada),
3, Retirela Ilavede encendidoy gu_rdelaen unlugarseguro,
4, Limpb la nbvey lahumedaddel£reaalrededordelmotor,ad
comotambi6nenel _rea(yalrededordeesta)del interiorde los
controbsde latransmisi6ny dela barrena,Asimismo,enganchey
suelteamboscontrolesvariasveces,
Herramienta de impieza del canal
Laherrambntade limpbzadel canalest_ajustadaconvenbntemente
a laparteposteriordela cajade labarrenacon unpasadorde ensam-
blado,S[seacumulannbvey hieloenel canaldedescargadurante
laoperaci6n,procedacomose indba a continuaci6nparalimpiarde
manerasegurael montajedelcanaly laaberturadel canal:
1, Suelteelcontrolde labarrenay el controlde latransmisi6n,
2, Paradetenerel motorsaquela Ilavedeencendido,
3, Saquela herrambntadelimpiezadelpasadorquela a]ustaala
parteposteriordelacaiade labarrena,
ADVERTENCIA: el sitenciador, el motor y
las zonas que toe rodean pueden cabntarse
y eausar quemaduras. No tos toque.
4, Useel extremoconformade paladela herrambntade limpbza
paradesplazary recogerlanbve yel hMoqueseformaroncerca
del conjuntodelcanal,
5, Vuelvaaajustarlaberrambntade limpiezaalpasadordeensam-
bladoubbadoen laparte posteriordelacajadelabarrena,[nserte
de nuevolaIlavede encendidoy encbndaelmotorde la m_quina
quitanbve,
6, Paradoen laposbi6ndeloperador(detr_sdelam_quinaquitanbve),
engraneelcontroldelabarrenaduranteunossegundosparaeliminar
lanbveo elhieloquehayanquedadoenelconiuntodelcanal,
Procedimiento para engranar
transmisi6n
1, Conelcontroldelestranguladorenposici6nr@ida (dibujode
unconejo),muevalapalancadecambiosa unade las cinco
poslcionesdeavarice(F) o de lasdosposlclonesdereversa
(R),Sebccionela velocidadadecuadaparaelestadode la nbve
existenteyunavelocidadconlaquesesbnta c6modo,
11
Page 47

NOTA:alseleccionarunavelocidadde latransmisi6n,uselasveloci-
dadesm_slentashastaquesesientac6modoyse hayafamiliarizado
conel funcionamientode la m_quinaquitanieve.
2. Aprieteelcontrolde la barrenacontrala maniiaylasbarrenas
rotarAn.Su61telaylasbarrenassedetendrAn.
3. Aprieteelcontrolde latransmisi6ncontralamaniiaderecha,yla
mAquinaquitanievesemoverA.Su61teloy se detendrAel mov-
imientodela transmisi6n.
IMPORTANTE:NUNCAcambie la posici6n de la palaneade
eambios (eambiode velocidades ode direeci6n de desplaza-
miento) sin soltar primero el control de transmisi6n y detener
pot cornpleto larn_quinaquitanieve. Esto producir_ un desgaste
prematuro del sisterna detransrnisi6n de la rn_quinaquitanieve.
Procedimiento para engranar
barrenas
1. Paraengranarlasbarrenasy comenzaraquitarlanieve,apriete
el controldela barrenacontrala maniiaizquierda.Sueltepara
detenerlasbarrenas.
Prueba de controJ de ta barrena
Realicelapruebasiguienteantesde operarsu m_quinaquitanievepor
primeravezal principiodecadainvierno.
Compruebeel ajustedel controlde labarrenade lasiguienteforma:
1. Cuandosesueltael controlde la barrenayestb,enposici6n
desengranadaarriba,elcabledebetenermuypocoiuego.NO
debeestartense.
2. Enun Areabienvenfilada,arranqueelmotorde la mAquina
quitanievesegOnse indicaanteriormenteenestamismasecci6n.
AsegOresedequedelestranguladorestAaiustadoenposici6n
FAST(r_pida).
3. Paradeen la posici6ndel operador(detr_sdela m_quinaquita-
nieve),engranelabarrena.
4. Deiela barrenaengranadaduranteaproximadamentediez(10)
segundosantesde soltarel controlde la barrena.Repitaesta
operaci6nvariasveces.
5. Conel controldelestranguladorenposici6nrApida(dibuiodeun
coneio),yla barrenaenposici6ndesengranadaarriba,camineal
frentede lamAquina.
6. Confirmequelabarrenahadeiadode girarpercompletey no
muestraNINGONsignode movimiento.Si labarrenamuestra
CUALQUIERsignoderotaci6n,vuelvaala posici6ndeloperadory
apagueelmotorinmediatamente.Esperea queTODASlaspartes
m6vilessedetenganantesdevolveraaiustarelcontroldela
barrena.
7. Paravolvera aiustarel cablede control,afioiela tuercahexagonal
superiorenlam6nsuladelcablede labarrena.
8. Ubiquela mensulahaciaarribaparabrindarmAsiuego(o hacia
abaioparaaumentarlatensi6ndelcable).Vealafigura2.
9. Vuelvaaapretarlatuercahexagonalsuperior.
10.Repitala prueba de controJ de ta barrena paraverificar
quese haIogradoelajusteadecuado.
S
Figura 2
12
Page 48

Lubricaci6n
ADVI RTENCiA: antes de reatizar tareas de Jubricaci6n,
reparaci6n o inspecci6n, desengrane tedes
los controles y detenga et motor. Espere a
que se detengan tedas las piezas rnSviles.
Eje de engranaje
Eleie deengranaie(hexagonal)sedebelubricaral menosunavezpor
temporadaotras cada25 horasde operaci6n.
1. Retirela cubiertadel marcoinferiorquitandolosdostornillosque la
aseguran.
2.Apliqueal eiehexagonalunacapaligerade unagrasamultiusos
aptaparacondicionesclim_ticasmOltiples.Vealafigura3.
IMPORTANTE:Evitelosderramesde aceitesobrela ruedade fricci6n
decauchoy sobrelaplacade transmisi6nde aluminio.
Ruedas
Retireambasruedasal menosunavezcadatemporada.Limpiey
recubraloseiesconunagrasaparaautomotoresmultiusosantesde
voKfera instalarlasruedas.
Control direccional del canal
Unavezportemporadaesnecesariolubricarlapalancadecontrolcon
vaselina,aceitedelinaza,aceitemineral,grasadeparafinaoaceite3-en-1.
Si 'i
'i
\
\
7
Fig_Jra 3
Eje de la barrena
AImenosunavezpor temporada,quitelospasadoresdecuchilladel
eiede labarrena.Rodelubricanteal interiordeleie,alrededorde
losseparadores.Asimismo,lubriqueloscoiinetesbridadosquese
encuentranenambosextremosdel eie.Vealafigura4.
Caja de engranajes
Laca}adeengranaiesdela barrenase haIlenadacongrasay seha
selladoenf_brica.Si se desmontaporalgOnmofivo,lubrfquelacon
dosonzasdegrasanueva(nOmerode pieza737-0168).
NOTA:no sobrecarguedegrasala caiade engranaies.Sepodrfan
daharlossellos.Compruebequenohayagrasaenel tap6ndecierre
de latuberfadeventilaci6nafinde liberarpresi6n.
Plata de raspado y zapatas antides_izantes
Laplacaderaspadoy laszapatasantideslizantesubicadasenlabase
dela m_quinaquitanieveestb,nsuietasa desgaste.Peri6dicamente
deberhcontrolarlospernosyreemplazarloscuandoseanecesario.
Pararetirarlaszapatasantideslizantes:
1. Quitelos cuatropernosdel carroy lastuercasdebridahexago-
halesquelos asegurana lam&quinaquitanieve.
2.Montelas nuevaszapatasantideslizantesconcuatrospernos
decarro(dosencadalado)ylas tuercasde bridahexagonales.
Consultelafigura5.
Pararetirarlaplacade raspado:
1. Quitelos pernosde carroy lastuercashexagonalesquelasuietan
a lacaia de lam_quinaquitanieve.
2. Montela placade raspadonueva,asegurb,ndosede quelas
cabezasdelospernosdecarrose encuentrendelladointeriorde
la caja.Ajustebien
Figura 4
S
k,,,_ NOTA:lasbarrenasnose muestranparamayorclaridad.
Figura 5
.Y
13
Page 49

Reemplazo de la correa de la barrena
Pararetirary reemplazarlacorreadela barrenadesum_quina
quitanieve,procedacomose indicaa continuaci6n:
1, Saquela cubiertapl_sticade lacorrea ubicadaenel frentedel
motor,Paraellosaquelosdostornillosautorroscantes,
NOTA:drenelagasolinade lamb,quinaquitanieveocoloqueun trozo
de plAsticodebaiodeltap6nde Ilenadodelcombustible,
2, Gireconcuidadolamb,quinaquitanievehaciaarribay hacia
delantedemaneraquequedeapoyadasobrela cajade labarrena,
Saquela cubiertadelmarcodesdedebaiode la mAquinaquita-
nieveretirandoloscuatrotornillosautorroscantesque laaseguran,
3, Saquela correade labarrenade la )oleadelmotor,
4, a,Afloiey retireel tornilloconrebordequeactOacomoguardade
la correa,
b,Desengancheel resortede la m6nsuladesoportedel marco,
5,Retirela correadealrededorde la poleade labarrenay deslice
la mismaentrelamensuladesoportey lapoleadela barrena,
Pararealizarelreensambladode lacorreade labarrenasigalas
instruccionesenordeninverso,
NOTA:NOolvidevolverainstalarel tornilloconrebordey volvera
conectarelresorteal marcotrasinstalarunacorreadela barrena
de repuesto,
/
/
/
/
i
J
J \
J
14
Page 50

_arrenas
Lasbarrenasest_naiustadasal eieespiralcondospasadoresde
cuchillaypasadoresde chaveta.Si labarrenagolpeaunobieto
extrahoo unabarradehielo,la ma'quinaquitanieveestb,disehadade
maneraquelospasadoressepuedencortar.Consultelafigura4.
Silasbarrenasnogiran,verifiquesi lospasadoressecortaron.
Juntoconlam_quinaquitanieveseincluyeuniuegodepasadores
de cuchillade repuesto.Cuandoreemplacelospasadores,rode
unlubricantedeaceitedentrodel ejeantesde colocarlosnuevos
pasadores.
Reempmazo de la correa de _a transmisi6n
Pararetirary reemplazarlacorreade la barrenadesu mAquina
quitanieve,procedacomoseindicaa continuaci6n:
1. SaquelacubiertaplSsticade lacorreaubicadaenelfrentedel
J
motor.Paraellosaquelosdostornillosautorroscantes.
. Drenela gasolinade lamb,quinaquitanieveocoloqueuntrozode
plSsticodebaiodeltap6nde Ilenadodelcombustible.
• Gireconcuidadolam_quinaquitanievehaciaarribay hacia
delantedemaneraquequedeapoyadasobrelacaiade labarren&
2. Saquelacubiertadel marcodesdedebaiode lamSquinaquita-
nieveretirandoloscuatrotornillosautorroscantesquela aseguran.
3. a.Tomela poleaIocay girelahaciala derecha.
b. Saquelacorreade labarrenadela poleadel motor.
c. Levantelacorreadela barrenaparasacarladelapoleadel motor.
4. Deslicelacorreadelatransmisi6nfuerade lapoleay de entrela
ruedadefricci6nyel discodela ruedade fricci6n.
• Retirey reemplacela correaenelordeninverso.
..... 17
Extracci6n de _a rueda de fricci6n
si la m_quinaquitanievenoseaccionacuandoelcontrolde latrans-
misi6nestb,engranado,y sial realizarelaiustedelcane de controlde
latransmisi6nqueapareceenlapSgina19el problemanose corrige,
talvezsedebareemplazarla ruedadefriccbn. Sigalasinstrucciones
queaparecenacontinuaci6n.Examinelaruedadefricci6nen busca
de signosde desgasteogrietasy reemplacesies necesario
f
...._'.i_i_
J
15
Page 51

Coloquelapalancadecambiosenlaterceraposici6ndeavance(F3),
, Drenelagasolinadela mb,quinaquitanieveo coloqueuntrozode
pl£sticodebaiodeltap6nde Ilenadodel combustible,
• Gireconcuidadola m_quinaquitanievehaciaarribay hacia
delantedemaneraquequedeapoyadasobrela cajade labarrena,
1, a, Saquelacubiertadelmarcodesdedebaiodelam£quinaquitanieve
retirandoloscuatrotornillosautorroscantesquelaaseguran,
b,Retirela ruedaderechaquitandoeltornilloy laarandelade
campanaque laaseguranaleie,
2,Retirecon cuidadola tuercahexagonaly laarandelaquesujetan
el eiehexagonalal marcode la m_quinaquitanieve,ygolpee
suavementeelextremodel ejeparadesplazarelcoiinetede
bolasdel ladoderechodelmarco,
3,Con cuidado,ubiqueeleiehexagonalhaciaabaioyhaciala
izquierdaantesdedeslizarcon precauci6nel montaiede la
ruedade fricci6nfueradeleie,
NOTA:cuandosedeseareemplazarel coniuntode la ruedadefricci6n
completo,descartelapiezadesgastadaydeslicela nuevapiezaen
eleie hexagonal,Parareensamblarlos componentessigalospasos
anterioresenordeninverso,Siest£desmontandolaruedadefricci6n
parareemplazarOnicamenteel anillodegoma,procedacomose
indicaa continuaci6n:
4, Saqueloscuatrotornillosde mantienenunidaslasplacaslaterales
de laruedadefricci6n,
Retireel anillode gomadeentre las placasyreensamblelas
placaslateralescon unnuevoanillodegoma,
.j
f
NOTA:alreensambhrelconiuntodelaruedadefricci6n,aprietecadatornillo
Onicamenteungiroantesdegirarlaruedaenelsentidodehsaguiasdelreloi
yprocederconelsiguientetornillo,Repitaesteprocesovariasvecespara
asegurarsedequelasplacasseaprietanconlamismafuerza,
Vuelvaadeslizarelconjuntodela ruedade fricci6nsobreeleie
hexagonalysigalospasosanterioresenordeninversopara
reensamblarloscomponentes,
J
J \
16
J
Page 52

Contro_ de_ aceite tier motor
1, AsegOresedequeel motorest_verticalynivelado
2, Desenrosqueel tap6nde Ilenadodeaceitedel tubode Ilenadode
aeeitey limpielavarilladeniveldeaeeite,Veala figura7,
3, Vuelvaaenroscarel tap6nde Ilenadodeaceiteen eltubode
Ilenadodeaeeite,Aiustebien,
4, Desenrosquey retireeltap6nde Ilenadodeaceitedeltubode
Ilenadodeaceite,Fiieseen el niveldeaceite,Sila lecturaen
la varilladelniveldeaceiteestb,pordeba}odelamarca"ADD"
(agregue),agregueaceitelentamentehastaalcanzarel nivel
"FULl"(lleno),Yealafigura7,
5, Vuelvaaenroscarel tap6nde Ilenadodeaceiteen eltubode
Ilenadodeaceite,Aiustebien,
6, Limpietodoel aceitequesehayaderramado,
Cambio de aceite de_ motor
TParaevitarqueel motorresultedahado,esimportanteque:
• Controleelniveldeaceiteantesde cadausoycadacincohorasde
operaci6n,
, Cambieelaceitedespu6sde lasdos (2)primerashorasde
operaci6ny despuesdecada25 horasde operaci6n,
, El motordebeestartibio perono calienteporsuusoreciente,
1, Localiceeltap6nde drenaiedelaceite,Veala figura6,
2, AsegOresedequelatapadelagasolinaestapuestay bienajustada,
3, Limpieel_reaalrededordeltap6ndedrenaiedelaceite,Vealafigura6,
4,Coloqueun recipientedeaceitereciclableaprobadobaioel tap6n
deldrenaiedelaceite,
5, Saqueel tap6ndedrenaiedelaceitey dreneel aceite,
NOTA:elaceiteusadodebedesecharseenuncentroderecogidaadecuado,
6,Instaleeltap6nde drenaiedelaceitey ajustebien,
7, VuelvaaIlenarelmotorconelaceiterecomendado,Consulteel
grb,fico Uso de aceite recomendado, Lacapacidadde
aceitedel motoresde26 onzas,
8,Limpietodoel aceitequese hayaderramado,
f
Tap6ndeIlenadodeaceite
_ Tap6nparadrenadodeaceite
Figura 6
f
FULL
Mantengael nivel
---'''"_Full ( de aceiteentre
Ileno) y ADD (agregue)
ADD
I
I
Synthetic M[_ltiGrade l
i SAEOW-30 I
17
Page 53

ControR de bujia
Controlelabuiiaanualmenteo cadatO0horasdeoperaci6n,
1, Limpieel_reaalrededorde labuiia,
2, Saquee inspeccionela buiia,
3, Cambiela buiiasi laporeelanaest_rotao si loselectrodosest&n:
picados,quemadosoatoradoscondep6sitos
4, Controleel espaciodelelectrodoconuncalibradordeseparacio-
nesy aiustedichoespaeioa0,030pulg(0,76ram)si esnecesario,
Vealafigura8,
5, Vuelvaainstalarla buiiay aiustebien,
NOTA:paraelreemplazosedebeufilizarunabuiiade resistor,
Contacteconuncentrodepartesy reparaci6nSearsparaunabuiia
de repuesto,
Carburador
Si creequesucarburadornecesitaunaiuste,consulteconuncentro
de partesyreparaci6nSears,EldesempeRodelmotorno debeverse
afectadoaaltitudesde hasta7,000pies(2,134m),Paraoperacionesa
mayoraltitud,contacteconuncentrode partesy reparaci6nSears,
Ve_ocidad de_ motor
ADVERTENCIA:paraevitarlesionesgraveso lamuerte,
NOmodifiqueelmotorbaioningunacircunstancia,Si
cambialaconfiguraci6ndel regulador,el motoryel
equipopuedenoperara velocidadesinseguras,NUNCA
cambielaconfiguraci6nde fb,bricadel reguladordelmo-
tor,Hacerfuncionarel motora unavelocidadsuperiora
la establecidaenf_bricaespeligroso,
f
2
1. Espacio de 0,030 pulg (0,76 ram)
2. Electrodo
3. Porcelana
Figura 8
18
Page 54

Ajuste de[ control de [a barrena
Consultelapruebade controlde labarrenaen [ap_gina12para
ajustardichocontrol,
Ajuste de control de [a transmis[Sn
ADVERTENC[A: NUNCA intente reaJizar
f
_IL ning_n tipo de ajuste mientras e[ motor est_
Cuandosesueltae[controlde latransmisi6nyest_ enposici6n
desenganchadaardba,el cabledebetener muypocojuego,NOdebe
estartenso,
Compruebeel ajustedelcontroldelatransmisi6nde[asiguienteforma:
1, Cuandosuelteelcontrolde latransmisi6n,empujesuavemente
la maquinaquitanievehaciadelante,La unidaddeberiaavanzar
[ibremente,
2, Engancheelcontrolde [atransmisi6ne [ntenteempujarsuave-
mentela maquinaquitanievehaciade[ante,Lasruedasnodeben
girar,Launidadno debeavanzarlibremente,
3, Conel controlde latransmisi6nsuetto,muevala palancadecam-
bioshaciaatrAsy haciadelanteentrelapos[ci6nR2y [aposici6n
F6variasveces,No deberiahaberresistenciaenlapalancade
cambios,
4, S[falla cualqu[eradelaspruebasanteriores,esnecesadoajustar
elcabledela transm[si6n,Procedade lasiguientemanera:
5, Afloje[atuercahexagonalinferiordelsoportede[cabledela
transmisi6n,Vealafigura9,
6, Ubiquelam6nsulahaciaarribaparabrindarm_sjuego (ohacia
abajoparaaumentar[atensi6ndelcable),
7, Vue[vaa apretar[atuercahexagonalsuperior,
encendido, excepto si se especifica asi en
este manual de[ operador.
Figura 9
Ajuste de[ rnontaje del canal
Esposibleajustarladistanciaa la cualse arrojalanievecambiandoe[
angulodel montajedelcanal Parahaeerlo:
1, Detengael motorquitandolaI[avedeencendidoy aflojelaperil[a
a mariposadeplasticoqueseencuentraen ellado izquierdodel
montajede[canal
2,Gireelcanalhaciaarribao haciaabajoantesdeapretarla peritlaa
mariposa,Vea[a figura10,
J
J
Figura 10
19
Page 55

Ajuste de la zapata antidestizante
Sepuedeaiustarelespacioqueexisteentrelazapataantideslizantey
elsuelo,Yealafigura 11,
Sideseaquitarnieveal rasdelsuelo,elevem_slaszapatas
antideslizantesenla caiade la barrena,
Uselasposicionesmediao baiacuandolasuperficiequedesee
limpiarseadespareia,comouncaminodegrava,
Paraaiustarlaszapatasantideslizantes:
1, Afloielas cuatrostuercashexagonales(dosencadalado)y los
pernosdelcarro,Muevalas zapatasantideslizantesa la posici6n
deseada,
2, Compruebeque todala superficieinferiorde laszapatasantidesli=
zantesest6contraelsueloparaevitarundesgastedesparejode
losmismos,
3, Vuelvaaaiustarbienlastuercasy lospernos,
Ajuste del soporte del canal
Si laespiralsituadaen laparteinferiordelcontroldireccionaldel canal
noseenganchacompletamenteconel montaiedelcanal,es posible
aiustarel soportedelcanal,Parahacerlo:
1, Afloielas dostuercasquesuietanelsoportedel canalycambiesu
posici6nligeramente,Veala figura12,
2, Vuelvaaaiustarlastuercas,
Figuta 11
f -',,
Presi6n de los neum_ticos
Antesde cualquieroperaci6n,controlelapresi6ndelos neum&ticosy
reduzcalapresi6naentre15psi y 20psi,
Si lapresi6ndelosneum_ticosnoesigualenambosneum_ticos,es
posiblequelaunidadse inclinehaciaun ladeuotro,
Figuta 12
2O
Page 56

f ---,,
Carburador
Sinosevaa utilizaelequipodurante30diasomb_s,o si eselfinaldela
temporadadenieveyyanoexisteposibilidaddequenieve,es necesario
almacenarelequipodemaneraadecuada,Sigalasinstrucciones
dealmacenamientoqueseindicana continuaci6nparagarantizarel
rendimientom_ximodelam_,quinaquitanievedurantemuchosahos,
Preparaci6n motor
ADVERTENCIA: nunca aJmacenela m_qui-
na quitanieve con combustiMe en el tanque
en un espaeio eerrado o en _reas con poea
ventiJaei6n, donde los gases deJ eombus°
tible puedan aleanzar eJfuego, chispas o
una luz piloto como Jaque tienen algunos
homos, catentadores de agua, seeadores
de ropa o aJgSnotto dispositivo a gas.
NOTA:es importanteevitarqueduranteelalmacenamientose
formendep6sitosdegomaen laspiezasesencialesdelsistemade
combustibledel motorcomo,poreiemplo,enelcarburador,elfiltrode
combustible,lamangueradecombustibleo el dep6sito,
Paraevitarproblemasconel motor,elsistemadel combustibledebe
servaciadoantesdealmacenarlamb,quinadurante30dhs om_s,
Sigaestasinstruccionesparaprepararsu m_,quinaquitanievepara
almacenarla:
ADVERTENCIA: drene et combustible
dentro de un reeipiente aprobado en un
lugar exterior, lejos de todo tipo de fuego.
Compruebe que el motor est_ fdo. No fume.
El combustible que se deje en el motor se
deteriora cuando el elima es e_lido y eausa
graves problemas de eneendido.
1, Saquetodalagasolinadelcarburadory deldep6sitodecombus=
fibleparaevitarla formaci6ndedep6sitosdegomadentrode los
mismosquepuedendaharel motor,
2, Pongael motoren marchahastavaciarel dep6sitodecombustible
y hastaqueel motorse detengadebidoa lafaltade combustible,
3, Dreneel carburadorpresionandohaciaarribaeldrenajede lataza,
ubicadodebajode lacubiertadelcarburador,Vealafigurade la
izquierda,
ADVERTENCIA: no drene el carburador si
_i st_ utitizando un estabilizador de combus-tible. En e! dep6sito de combustible no use
nunea productos de timpieza para motores
o earburadores o podda produeir daSos
permanentes.
NOTA:Elusode estabilizadoresdecombustible(comoSTA=BtL)es
unaalternativaaceptableparaminimizarlaformaci6ndedep6sitosde
gomade combustibleduranteelalmacenamiento,Agregueel estabili-
zadora la gasolinaqueseencuentraen eldep6sitodecombustibleo
en el recipientedealmacenamiento,Respetesiemprela proporci6nde
mezcladoquefiguraenel recipientedelestabilizador,Pongael motor
en marchaporIo menos10minutosdespu6sde agregarelestabiliza-
dor parapermitirleIlegaralcarburador,Nodreneelcarburadorsiest_
ufilizandounestabilizadordecombustible,
4, Retirelabuiiay vierta(1)onzadeaceiteparamotora trav6sdel
orificiodela buifay haciael interiordelcilindro,Cubraelorificiode
la bujiacon untrapoy pongael motoren marchavariasvecespara
distribuirel aceite,Reemplacelabuiia,
PRECAUCION:AIoscombustiblesconmezclade alcohol(quese
Ilamangasohol,o queufilizanetanolo metanol)puedenatraerla
humedad,Ioqueconducea la separaci6nyformaci6ndeAcidos
duranteelalmacenamiento,Elgasac[dicopuededaharel sistemadel
combustiblede un motorduranteelalmacenamientodel mismo,
Preparacidn de la m quina quitanieve
1, Cuandoalmacenelam_quinaquitanieveenungalp6nde dep6sito
met_licoocon pocaventilaci6n,tengaespecialcuidadode
realizarleuntratamientoanti-oxidanteal equipo,Useaceiteligero
o silic6npararecubrirelequipo,especialmentelascadenas,los
resortes,loscoiinetesyloscables,
2, Eliminetodoel polvodelexteriordel motorydelequipo,
3, Sigalasrecomendacionesde lubricaci6nenlasecci6nde
mantenimientodeestemanual,
4, Almaceneel equipoen un_readespeiaday seca,
21
Page 57

Probiema Causa Remedio
m __ __
E motor no arranoa 1. Lapalancadeobturaci6nnoest6.enla I, Pongalapalancadeobturaci6nenla
Elmotorfunciona de
maneraerratica
posicbnON(encendjdo). posicJ6nON(encendido),
2,SehadesconectadoelCabledeh bujfal 2. ConecteelCablealabujial
3,E!tanquedeCombustibleest_vacio0el 3. UeneeltanqueCongasolJnalimpiayfresca,
c°mbust_b!eesvae/O' 4. cebee!motorta!y ComeseindJcaen
4.ElmotornoestA¢ebado. _'Operaci6ndesumAquinaquitanieve:
5,LabuifanofuncionaCorrectamente, 5. Lirnpie,aiusteladisianciadisruptivao
6,LaJheade!Cembust!b!eestAbloqueadal carrlbie_
7,LaIlavedeSeguridadnoSeencuentraen 6, Lirnpie[alineade! combust!b!el
encendidedetmotor 7,InsertelaIlavetetalmentedentrodel
interrupto[
1, LaunidadestAfuncionandoen la
posici6nCHOKE(obturaci6n),
2, LalineadelcombustibleestAtapadao
el combustibleesvieio,
3,Aguao suciedadenelsistemadel
combustible,
4,Es necesarioajustarelcarburador,
1, Cambielapalancade obturacidna la
posici6nOFF(apagado),
2,Limpielalineadelcombustible;Ileneel
tanquecon gasolinalimpiayfresca,
3,Vade eltanquedelcombustible,Vuelva
a Ilenarloconcombustiblelimpio,
4,Contacteconuncentrede partesy
reparaci6nSears,
Demasiadavibraci6n
3, Eto_ificiodeescapeestaobstruido, 3, Contacteconuncentrede partesy
1, Haypiezasqueestb_nfloiaso la
barrenaestb.dahada,
1, Detengael motorde inmediatoy
desconecteel camede la buiia,Aiuste
todos lospernosy lastuercas,Si/a
vibraci6ncontinOa,Ilevelaunidad
a repararaun centrede partesy
reparaci6nSears,
_araei6n Sears,
Launidad no se 1, Elcane delcontrolde transmisidn 1, Aiusteelcane delcontroldetransmis-
autopropulsa necesitaunaiuste, i6n,Consultela secci6ndeaiustes,
2, Lacorreadetransmisidnestaflojaodahada, 2,Reemplacelacorreadelatransmisbn,
cortados, de cuchilla
NOTA: en esta secci6n se analizan problemas menores de servicio. Si desea mas detalles comuniquese con la linea de
informaci6n de servicio de Sears al 1-8004-MY-HOME.
222324
Page 58

Page 59

Page 60

iiiiiiiiiiiiiiiiiiiiiiiiii?ii_....
iiiiiiiiiiiiii_,_,'
iiiiiiiiiiiiii
iiiiiiiiiiiiii
iiiiiiiiiiiiii
iiiiiiiiiiiiii
iiiiiiiiiiiiii
iiiiiiiiiiiiii
iiiiiiiiiiiiii
iiiiiiiiiiiiii
iiiiiiiiiiiiii
iiiiiiiiiiiiii
iiiiiiiiiiiiii
iiiiiiiiiiiiii
iiiiiiiiiiiiii
iiiiiiiiiiiiii
iiiiiiiiiiiiii
iiiiiiiiiiiiii
iiiiiiiiiiiiii
iiiiiiiiiiiiii
iiiiiiiiiiiiii
iiiiiiiiiiiiii
iiiiiiiiiiiiii
iiiiiiiiiiiiii
iiiiiiiiiiiiii
iiiiiiiiiiiiii
iiiiiiiiiiiiii
iiiiiiiiiiiiii
iiiiiiiiiiiiii
iiiiiiiiiiiiii
!_i_!jjjjjjjjjjjjjji_i_i
Your Home
For repair-in your home-of all major brand appliances,
lawn and garden equipment, or heating and cooling systems,
nomatterwhomade.,nomatterwho
iiiiiiiiiiiiiiiiii
For the replacement parts, accessories and
owner's manuals that you need to do-it-yourself.
iiiiiiiiiiiiiHHi
For Sears professional installation of home appliances
and items like garage door openers and water heaters.
1-800-4-MY-HOME ® (1-800-469-4663)
Call anytime, day or night (U.S.A. and Canada)
www.sears.cor,www.sear .ca
OurHome
For repair of carry-in items like vacuums, lawn equipment,
and electronics, call or go on-line for the location of your nearest
Sears Parts & Repair Center.
1-800-488-1222
Call anytime, day or night (U.S.A. only)
www.sears.corn
To purchase a protection agreement (U.S.A.)
or maintenance agreement (Canada)on i product serviced by Sears:
1 800 827 6655 (U.S.A.) 1 800 361 6665 (Canada)
Pare pedir servicio de reparaciOn Au Canada pour service en frangais:
a domicilio, y para ordenar piezas: 1.800.LE.FOYERMC
1-888-SU-HOGAR SM 1 800 533 6937
(1-888-784-6427) www.sears.ca
(- - _ )
S'eOi
_) Registered Trademark / Trademark / Service Mark of Sears, Roebuck and Co,
_3 Marca Registrada / Marca de Fabrica / Marca de Servicio de Sears, Roebuck and Co.
MC MD
Marque de commerce / Marque deposee de Sears, Roebuck and Co. (cbSears, Roebuck and Co.
TM SM
TM SM
 Loading...