

Page 1

perator's nual
CRRFrsM N"
Edger/Trencher
Model No. 247.796510
For answers to your questions about this product,
call 1-800-4MY-HOME.
CAUTION: Before using this
product, read this manual and
follow all safety rules and operating
instructions.
Sears, Roebuck and Co., Hoffman Estates, IL 60179, U.S.A.
Visit our website: www.sears.com/craftsman
,, SAFETY
,, ASSEMBLY
,, OPERATION
,, MAINTENANCE
,, PARTS LIST
o ESPANOL R 32
FormNo.769-05829
(February9,2010)
Page 2

Warranty Statement .......................................................... 2
Safety Instructions ............................................................ 3
Assembly ........................................................................... 8
Operation ........................................................................ 11
Service and Maintenance .............................................. 14
Off-Season Storage ........................................................ 18
Troubleshooting .............................................................. 19
Parts List ......................................................................... 20
Espa_ol ............................................................................ 32
Service Numbers ............................................. Back Cover
CRAFTSMAN FULL WARRANTY
IfthisCraftsmanproductfailsduetoadefectin materialor workmanshipwithintwo yearsfromthedateof purchase,returnittoanySearsstore,
Parts&RepairServiceCenter,orotherCraftsmanoutletintheUnitedStatesforfreerepair(orreplacementif repairprovesimpossible).
Thiswarrantyappliesforonly90daysifthis productis everusedforcommercialor rentalpurposes.
ThiswarrantycoversONLYdefectsin materialandworkmanship.SearswillNOTpayfor:
• Expendableitemsthatcanwearoutfromnormalusewithinthewarrantyperiod,suchasbelts,filters,sparkplugsoredgingblades.
• Repairsnecessarybecauseof accident,suchas a bentcrankshaft,orfailuretooperateor maintaintheproductaccordingtoallsupplied
instructions.
• Preventivemaintenance,or repairsnecessaryduetoimproperfuelmixture,contaminatedor stalefuel.
Thiswarrantygivesyouspecificlegalrights,andyoumayalsohaveotherrightswhichvaryfromstatetostate.
Sears, Roebuck and Co.,Hoffman Estates, IL 60179
Fuel:
SparkPlug:
Engine:
UnleadedGasoline
ChampionRJ19LM
BriggsandStratton10T802-0711-B1
Model Number
Serial Number
Dateof Purchase
Recordthemodelnumber,serialnumber,
anddateof purchaseabove.
© SearsBrands,LLC 2
Page 3
Thissymbolpointsoutimportantsafetyinstructionswhich,if not
followed,couldendangerthepersonalsafetyand/orpropertyof
yourselfandothers. Readandfollowall instructionsin thismanual
beforeattemptingtooperatethismachine.Failuretocomplywith
theseinstructionsmayresultin personalinjury.Whenyou seethis
symbol,HEEDITSWARNING!
Thismachinewasbuilt to beoperatedaccordingto the safeopera-
tionpracticesin thismanual.Aswithanytypeof powerequipment,
carelessnessorerroronthe part of the operatorcan resultin
seriousinjury.Thismachineiscapableofamputatingfingers,hands,
toesandfeetandthrowingdebris.Failureto observethefollowing
safetyinstructionscouldresultin seriousinjuryordeath.
CALIFORNIA PROPOSITION 65
EngineExhaust,someof itsconstituents,andcertainvehicle
componentscontainoremitchemicalsknownto Stateof California
tocausecancerandbirthdefectsorotherreproductiveharm.
TRAINING
• Readthisoperator'smanualcarefullyin itsentiretybefore
attemptingtoassemblethis machine.Read,understand,and
followall instructionsonthemachineandinthemanual(s) before
operation.Keepthismanualina safeplacefor futureand regular
referenceandfororderingreplacementparts.
• Becompletelyfamiliarwiththecontrolsandtheproperuseof this
machinebeforeoperatingit.
• Thismachineisa precisionpieceofpowerequipment,nota
plaything.Therefore,exerciseextremecautionat alltimes.Your
machinehasbeendesignedto performonejob: to edgelawn.Do
notuseit for any otherpurpose.
• Neverallowchildrenunder14yearsofageto operatethis
machine.Children14andovershouldreadandunderstandthe
instructionsandsafeoperationpracticesinthismanualandon
themachineandbe trainedandsupervisedbyanadult.
• Only responsibleindividualswhoarefamiliarwiththeserulesof
safeoperationshouldbe allowedtousethis machine.
• Tohelpavoidbladecontactor athrownobjectinjury,stayin
operatorzonebehindhandlesandkeepchildren,bystanders,
helpersandpetsatleast75feetfromlawnedgerwhileitis in
operation.Stopmachineif anyoneentersarea.
Your Responsibility--Restrict theuseofthis powermachineto
personswhoread,understandandfollowthewarningsand instruc-
tionsin thismanualandon themachine.
SAVETHESEINSTRUCTIONS!
PREPARATION
• Thoroughlyinspecttheareawherethe equipmentistobeused.
Removeall stones,sticks,wire,bones,toysandotherforeign
objectswhichcould betrippedoveror pickedupandthrownby
theblade.Thrownobjectscancauseseriouspersonalinjury.
• Alwayswearsafetyglassesorsafetygogglesduringoperation
andwhileperformingan adjustmentorrepairto protectyoureyes.
Thrownobjectswhichricochetcancauseseriousinjurytothe
eyes.
• Wearsturdy,rough-soledworkshoesandclose-fittingslacks
and shirts.Shirtsand pantsthatcoverthearmsandlegsand
steel-toedshoesare recommended.Neveroperatethismachine
inbarefeet,sandals,slipperyorlightweight(e.g.canvas)shoes.
• Neverattempttomakeanyadjustmentswhiletheengineis
running,exceptwherespecificallyrecommendedintheoperator's
manual.
SAFE HANDLING OF GASOLINE:
Toavoidpersonalinjuryorpropertydamageuseextremecarein
handlinggasoline.Gasolineisextremelyflammableandthevaporsare
explosive.Seriouspersonalinjurycanoccurwhengasolineis spilled
on yourselforyourclotheswhichcanignite. Washyourskinand
changeclothesimmediately.
• Useonly anapprovedgasolinecontainer.
• Neverfillcontainersinsidea vehicleoron a truckortrailerbed
witha plasticliner.Alwaysplacecontainerson thegroundaway
fromyourvehiclebeforefilling.
• Removegas-poweredequipmentfromthetruckortrailerand
refuelit ontheground.Ifthisis notpossible,thenrefuelsuch
equipmenton atrailerwitha portablecontainer,ratherthanfrom
a gasolinedispensernozzle.
• Keepthe nozzleincontactwiththerimofthefueltankor
containeropeningatall timesuntilfuelingis complete.Donotuse
a nozzlelock-opendevice.
3
Page 4
• Extinguishallcigarettes,cigars,pipesandothersourcesof
ignition.
• Neverfuel machineindoorsbecauseflammablevaporswill
accumulatein the area.
• Neverremovegascapor addfuelwhileengineis hotor running.
Allowengineto coolat leasttwo minutesbeforerefueling.
• Neveroverfillfueltank.Filltankto nomorethan1/2inchbelow
bottomoffillerneckto provideforfuelexpansion.
• Replacegasolinecapandtightensecurely.
• Ifgasolineis spilled,wipe it off theengineandequipment.Move
machinetoanotherarea.Wait5 minutesbeforestarting engine.
• Neverstorethe machineorfuelcontainernearanopenflame,
sparkor pilotlightasona waterheater,spaceheater,furnace,
clothesdryeror othergasappliances.
• To reducefirehazard,keeplawnedgerfreeofgrass,leaves,or
otherdebrisbuild-up.Cleanupoil orfuelspillageandremoveany
fuelsoakeddebris.
• Allowa lawnedgertocoolatleastfive (5)minutesbeforestoring
OPERATION
• Do not puthandsorfeetnear rotatingparts.Contactwiththe
rotatingbladecanamputatehandsandfeet.
Thebladecontrolhandleisa safetydevice.Neverbypassits
operation.Doingso,makesthemachineunsafeand maycause
personalinjury.
Neveroperatewithoutbladeguard,debrisshieldandblade
controlhandlein placeandworking.
Neveroperatewithdamagedsafetydevices.Failuretodo so,can
resultinpersonalinjury.
Neverrunanengineindoorsorina poorlyventilatedarea. Engine
exhaustcontainscarbonmonoxide,anodorlessanddeadlygas.
Donotoperatemachinewhileundertheinfluenceofalcoholor
drugs.
Mufflerandenginebecomehotandcancausea burn.Donot
touch.
Neveroperatethismachinewithoutgoodvisibilityor light.Always
be sureofyourfootingandkeepa firmholdonthe handles.Walk,
neverrun.
Donotoperatethis machineif it has beendroppedor damaged.
Returnmachinetoyournearestauthorizedservicingdealerfor
examinationand repair.
Donotoperatethis machinewitha damagedorexcessivelyworn
cuttingblade.
Neverattempttoclearmaterialfromthe bladeguardwhilethe
engineis running.Shut theengineoff,disconnectthespark
plugwireandgroundagainsttheenginetopreventunintended
starting.
Donotoverloadmachinecapacitybyattemptingtoedgeat too
fastof a rate.
Stayalertforunevensidewalks,terrainetc.Alwayspushslowly
overroughsurfaces.Donotusethis machineon gravelsurfaces.
Donotoperatemachinein rainorwetsoil conditions.
• Alwaysoperatemachinefrombehindthe handlesandposition
yourselfwherethedirectlineof sightto cuttingbladeisblocked
byguards.
• Alwaysstopenginewhenedgingortrimmingisdelayedorwhen
transportingmachinefromonelocationtoanother.
• Neverleavea runningmachineunattended.Stoptheengine,
disconnectsparkplugwireandgroundagainsttheengineto
preventunintendedstarting.
• Only usepartsandaccessoriesmadeforthismachinebythe
manufacturer.Failuretodo so,canresultin personalinjury.
• Ifsituationsoccurwhichare notcoveredinthis manual,usecare
andgoodjudgment.ContactCustomerSupportforassistanceor
thenameof your nearestservicedealer.
CHILDREN
Tragicaccidentscanoccuriftheoperatorisnot alerttothepresence
ofchildren.Childrenareoftenattractedto powerequipmentsuchas
lawnedgers.Theydo notunderstandthedangers.Neverassumethat
childrenwill remainwhereyoulastsawthem.
Keepchildrenoutoftheedgingareaandunderwatchfulcareofa
responsibleadultotherthantheoperator.
Bealertandturnlawnedgeroff if achildentersthearea.
• Beforeandwhilemovingbackwards,look behindanddown for
smallchildren.
Useextremecarewhenapproachingblindcorners,doorways,
shrubs,trees,orotherobjectsthatmayobscureyourvisionof a
childwhomayrunintothelawnedger.
Keepchildrenawayfromhot or runningengines.Theycansuffer
burnsfroma hot muffler.
Neverallowchildrenunder14yearsof agetooperatethis
machine.Children14andovershouldreadand understandthe
instructionsandsafeoperationpracticesinthis manualandon
themachineand betrainedandsupervisedby an adult.
MAINTENANCE & STORAGE
• Neverrunanengineindoorsorin apoorlyventilatedarea.Engine
exhaustcontainscarbonmonoxide,an odorlessanddeadlygas.
Beforecleaning,repairing,or inspecting,makecertainthe
bladeandall movingpartshavestopped.Disconnectthespark
plugwireand groundagainsttheengineto preventunintended
starting.
Checkthe bladeandenginemountingboltsat frequentintervals
forpropertightness.Also,visuallyinspectbladefor damage(e.g.,
bent,cracked,worn)Replacebladewiththe originalequipment
rnanufacture's(O.E.M.)bladeonly,listedinthis manual."Useof
partswhichdonotmeettheoriginalequipmentspecificationsmay
leadtoimproperperformanceandcompromisesafety!"
Lawnedgerbladesare sharpandcancut.Wrapthebladeor
weargloves,and useextracautionwhenservicingthem.
Keepallnuts,bolts,andscrewstightto besurethe equipmentis
in safeworkingcondition.
Nevertamperwith safetydevices.Checktheirproperoperation
regularly.
4
Page 5
• Afterstrikingaforeignobject,stoptheengine,disconnectthe
sparkplugwireand groundagainsttheengine.Thoroughly
inspectthelawnedgerforanydamage.Repairthedamage
beforestartingandoperatingthelawnedger.
Neverattempttomakea wheeladjustmentwhiletheengineis
running.
Manycomponentson yournewedgercanwearwithcontinued
use. Forsafetyprotection,frequentlycheckall edgercomponents
andreplaceimmediatelywithoriginalequipmentmanufacturer's
(O.E.M.)partsonly,listedin thismanual."Useofpartswhich
donotmeettheoriginalequipmentspecificationsmayleadto
improperperformanceandcompromisesafety!"
Donotchangetheenginegovernorsettingor overspeedthe
engine.Thegovernorcontrolsthe maximumsafeoperatingspeed
oftheengine.
Maintainor replacesafetyandinstructionlabels,asnecessary.
Observeproperdisposallawsand regulationsfor usedgas,
oil,etc..Improperdisposaloffluidsandmaterialscanharmthe
environment.
AccordingtotheConsumerProductsSafetyCommission(CPSC)
andtheU.S.EnvironmentalProtectionAgency(EPA),thisproduct
hasan Average UsefulLifeof seven(7)years,or 70hoursof
operation.AttheendoftheAverage UsefulLifehavethe machine
inspectedannuallybyan authorizedservicedealerto ensurethat
allmechanicalandsafetysystemsareworkingproperlyandnot
wornexcessively.Failureto do socanresultinaccidents,injuries
ordeath.
DO NOT MODIFY ENGINE
Toavoidseriousinjuryordeath,donotmodifyenginein anyway.
Tamperingwiththegovernorsettingcanleadto a runawayengineand
causeittooperateat unsafespeeds.Nevertamperwithfactorysetting
ofenginegovernor.
NOTICE REGARDING EMISSIONS
EngineswhicharecertifiedtocomplywithCaliforniaandfederal
EPAemissionregulationsfor SORE(SmallOffRoadEquipment)are
certifiedto operateon regularunleadedgasoline,and mayinclude
thefollowingemissioncontrolsystems:EngineModification(EM),
OxidizingCatalyst(OC),SecondaryAirInjection(SAI)and ThreeWay
Catalyst(TWO)if so equipped.
SPARK ARRESTOR
Thismachineis equippedwithan internalcombustionengineand
shouldnotbe usedonor nearanyunimprovedforest-covered,
brushcoveredor grass-coveredlandunlesstheengine'sexhaust
systemisequippedwitha sparkarrestermeetingapplicablelocalor
statelaws(ifany)
Ifa sparkarresterisused,itshouldbemaintainedin effectiveworking
orderbytheoperator.Inthe StateofCaliforniatheaboveis required
bylaw (Section4442oftheCaliforniaPublicResourcesCode).Other
statesmayhavesimilarlaws. Federallawsapplyonfederallands.
A sparkarresterforthemuffleris availablethroughyournearestSears
PartsandRepairServiceCenter.
Page 6
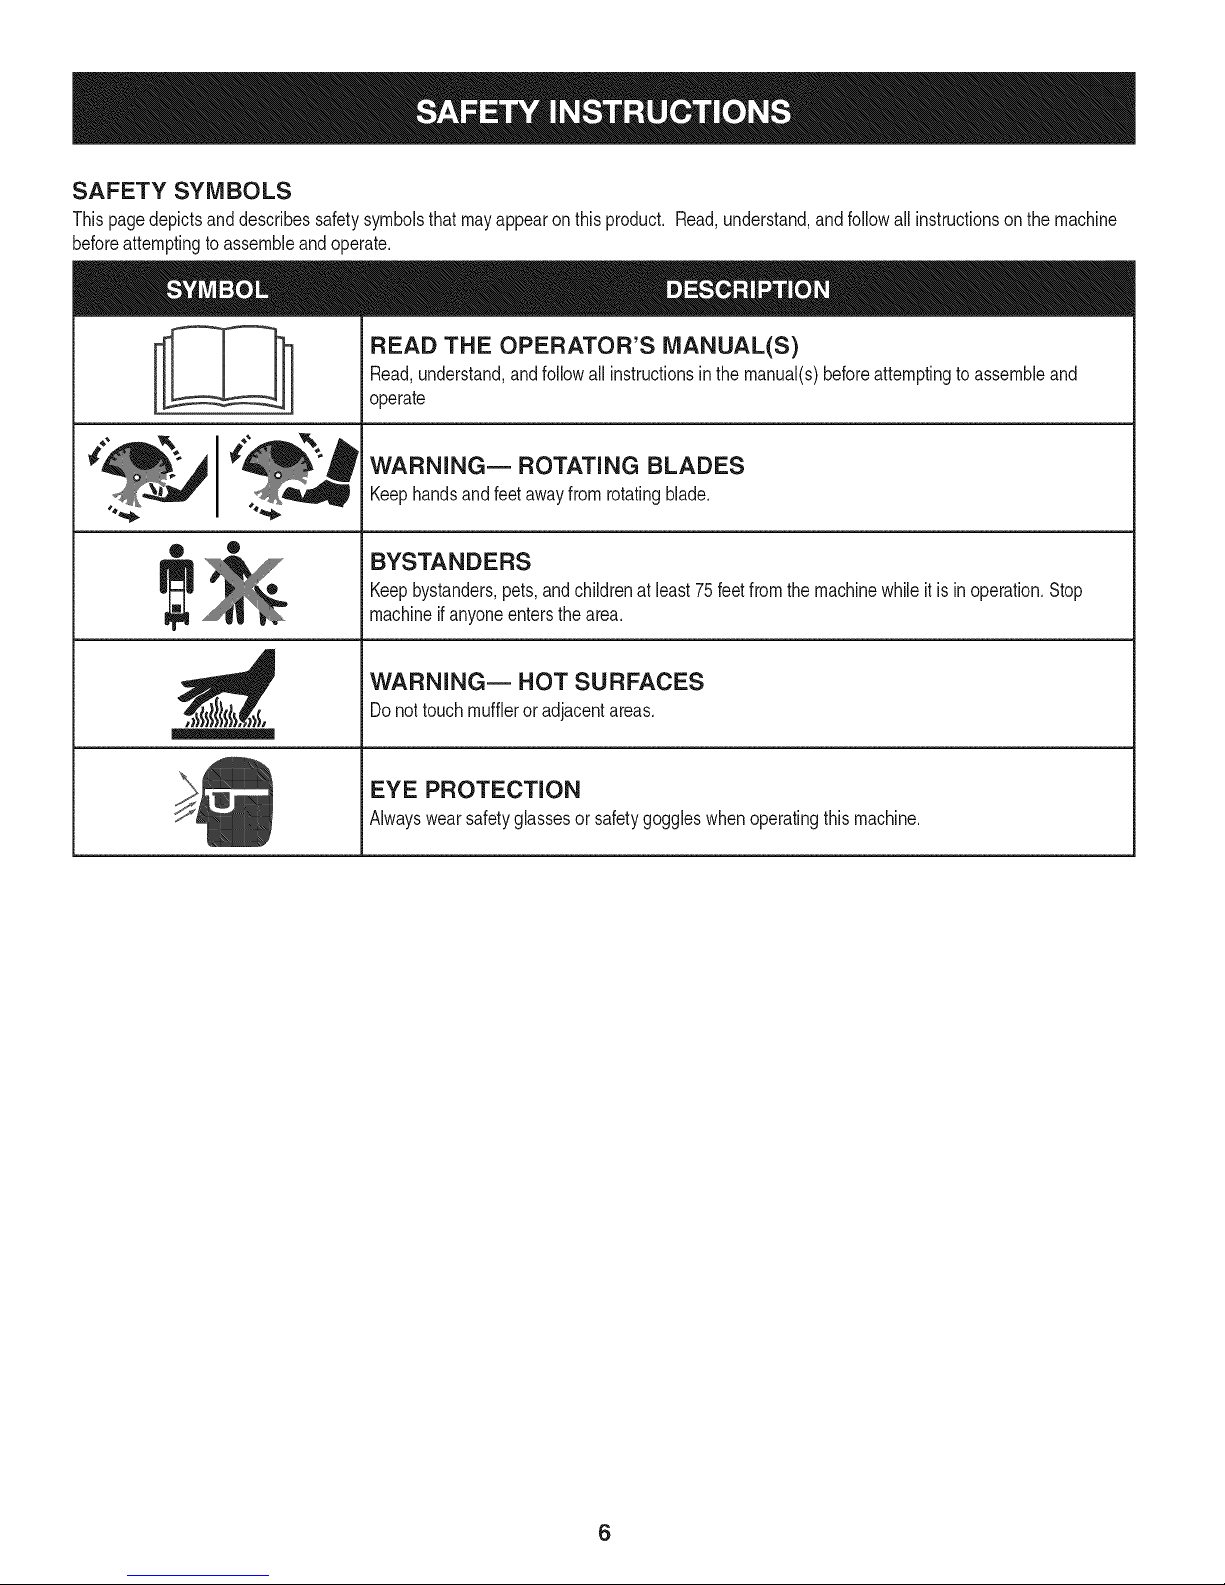
SAFETY SYMBOLS
Thispagedepictsanddescribessafetysymbolsthatmayappearonthisproduct. Read,understand,andfollowall instructionson the machine
before attempting to assemble and operate.
READ THE OPERATOR'S MANUAL(S)
Read,understand,andfollowall instructionsinthe manual(s)beforeattemptingtoassembleand
1
operate
WARNING m ROTATING BLADES
Keephandsandfeetawayfrom rotatingblade.
• ®
BYSTANDERS
Keepbystanders,pets,andchildrenatleast75feetfromthemachinewhileitisin operation.Stop
machineifanyoneentersthearea.
WARNINGm HOT SURFACES
Donot touchmuffleroradjacentareas.
EYE PROTECTION
Alwayswearsafetyglassesorsafetygoggleswhenoperatingthismachine.
6
Page 7

Thispageleftintentionallyblank.
7
Page 8
NOTE:Thismachineis shippedWITHOUTGASOLINEor OIL.After
settinguptheedger,servicetheenginewithgasolineandoilas
instructed.
NOTE:Referenceto rightor lefthandsideoftheedgeris observed
fromtheoperatingposition.
ASSEMBLY
Handle
Removeanddiscardanypackagingcardboardthatmaybe present
betweentheupperhandleandthe lowerhandle.
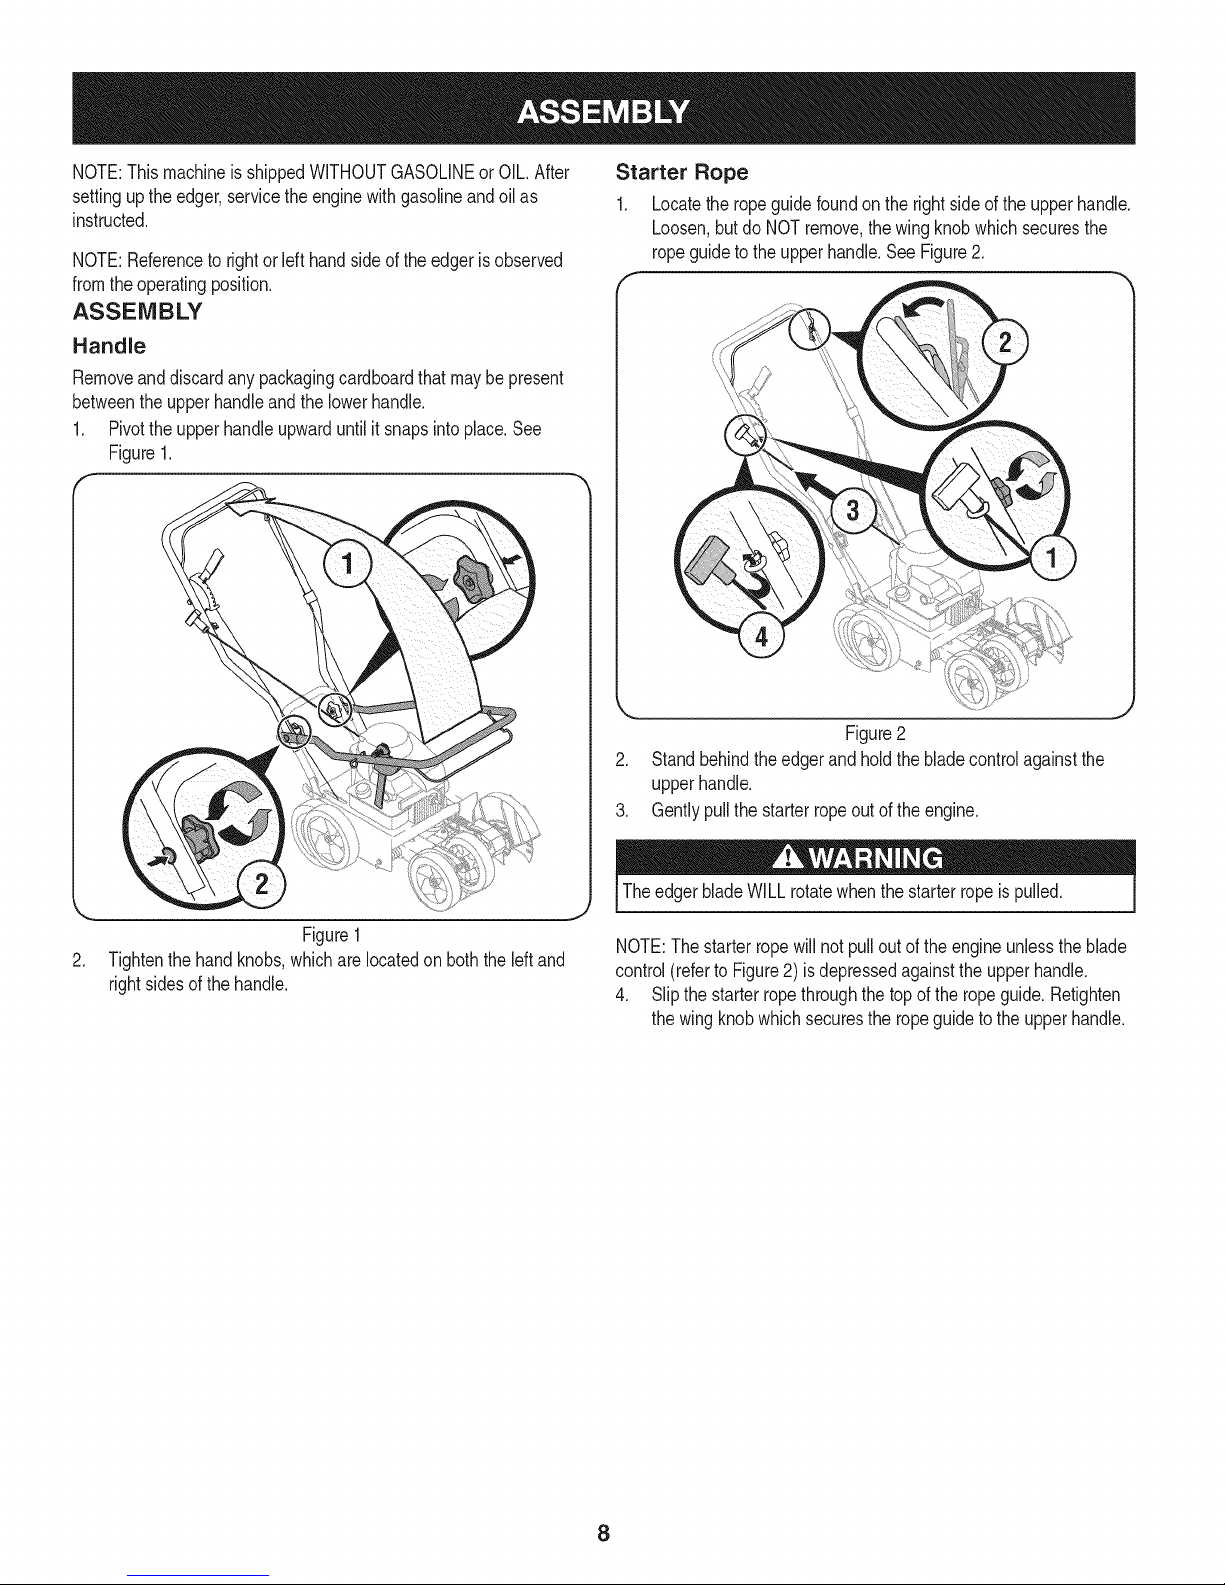
1. Pivottheupperhandleupwarduntilit snapsinto place.See
Figure1.
Starter Rope
1. Locatetheropeguidefoundontherightsideoftheupperhandle.
Loosen,butdo NOTremove,thewingknobwhichsecuresthe
ropeguidetotheupperhandle.SeeFigure2.
J
Figure2
2. Standbehindthe edgerandholdthebladecontrolagainstthe
upperhandle.
3. Gentlypullthe starterropeoutoftheengine.
Figure1
2. Tightenthehandknobs,whichare locatedon boththeleftand
rightsidesofthehandle.
TheedgerbladeWILLrotatewhenthestarterropeis pulled.
NOTE:Thestarterropewillnotpulloutoftheengineunlesstheblade
control(referto Figure2) isdepressedagainsttheupperhandle.
4. Slipthe starterropethroughthetopoftheropeguide.Retighten
thewingknobwhichsecuresthe ropeguidetotheupperhandle.
8
Page 9
ADJUSTMENTS
SET-UP
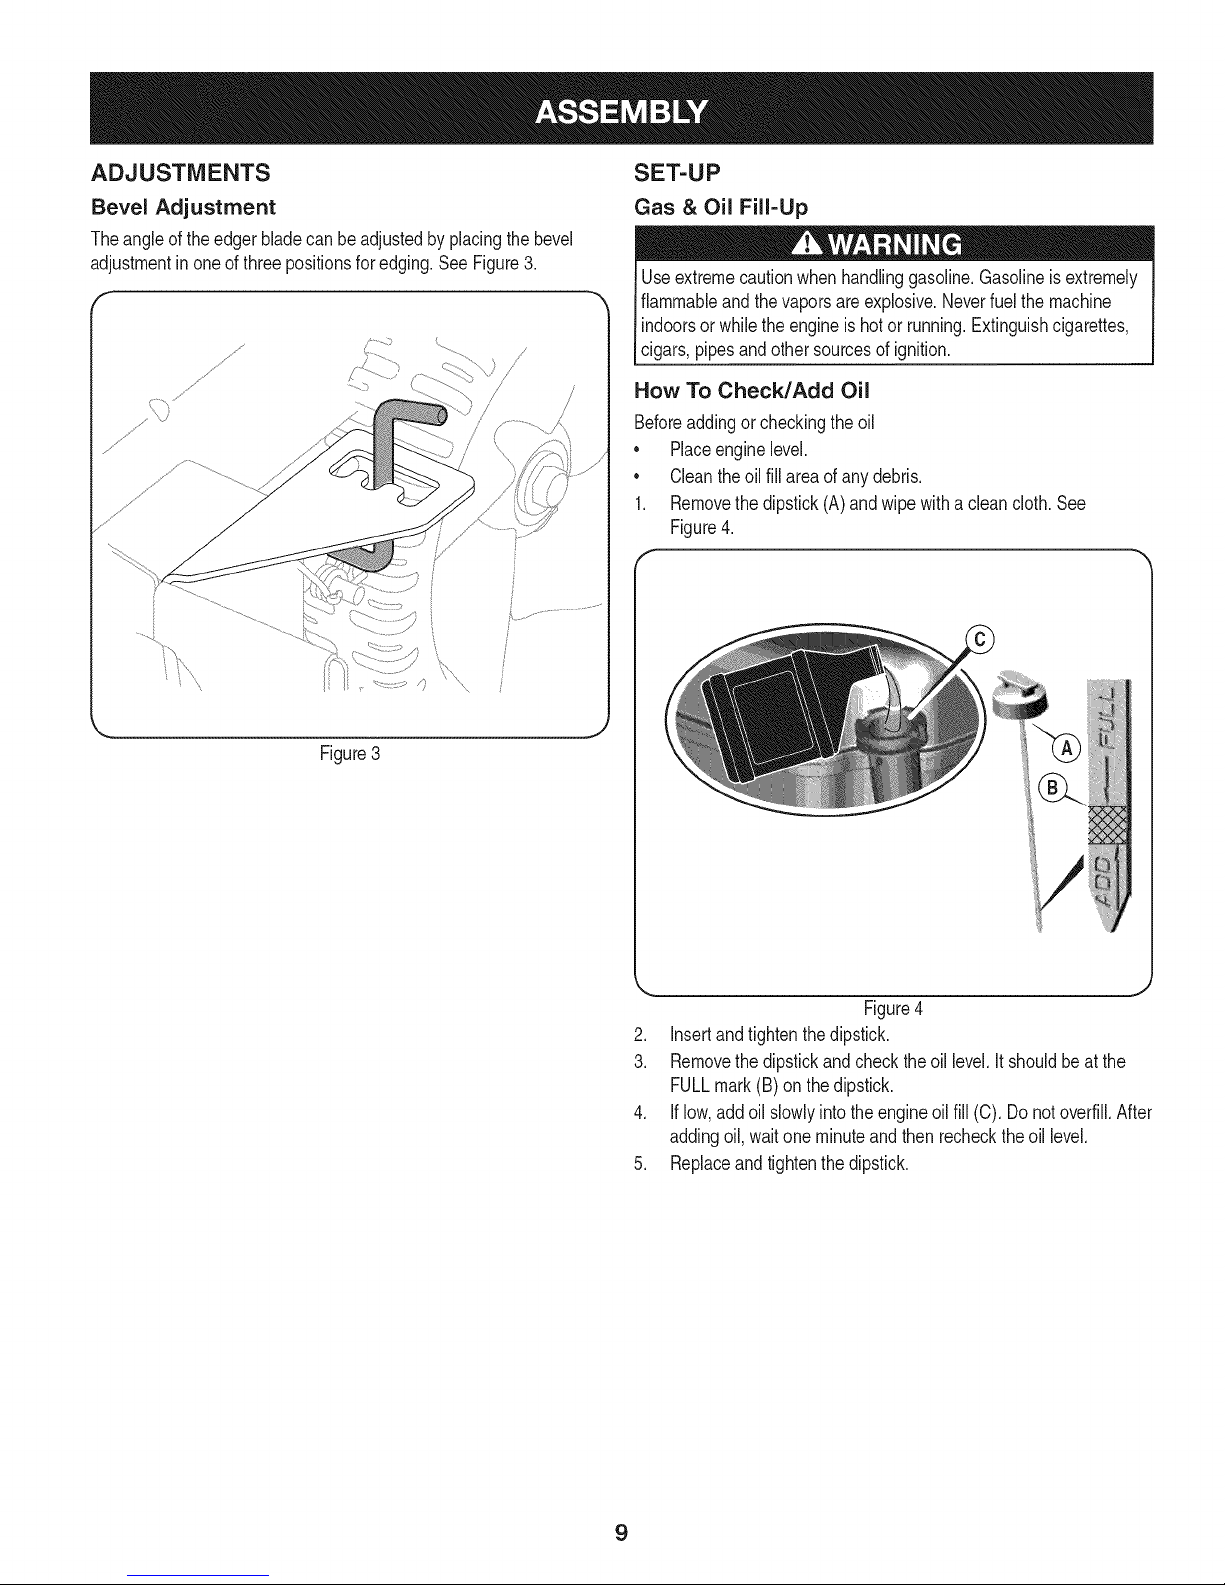
Bevel Adjustment
Theangleoftheedgerbladecanbe adjustedbyplacingthebevel
adjustmentinoneof three positionsforedging.SeeFigure3.
f
j, ','.
' ,\\
,. J
Figure3
Gas & Oil Fill=Up
Useextremecautionwhenhandlinggasoline.Gasolineisextremely
flammableand thevaporsare explosive.Neverfuelthemachine
indoorsorwhilethe engineis hotor running.Extinguishcigarettes,
cigars,pipesandothersourcesof ignition.
How To Check/Add Oil
Beforeaddingorcheckingtheoil
• Placeenginelevel.
• Cleantheoilfillareaof any debris.
1. Removethedipstick(A)andwipewitha cleancloth.See
Figure4.
Figure4
.
Insertandtightenthedipstick.
3.
Removethe dipstickandcheckthe oillevel.It shouldbeat the
FULLmark(B)onthedipstick.
4.
Iflow,addoilslowlyintotheengineoil fill(C). Do notoverfill.After
addingoil,waitoneminuteandthenrechecktheoillevel.
5.
Replaceandtightenthedipstick.
9
Page 10
FUEL RECOMMENDATIONS
Fuelmustmeettheserequirements:
• Clean,fresh,unleadedgasoline.
• A minimumof 87 octane/87AKI(91RON). Highaltitudeuse,see
below.
• Gasolinewithupto 10%ethanol(gasohol)orupto 15%MTBE
(methyltertiarybutylether)isacceptable.
use
unapprovedgasolines,
gasolineormodifytheengineto runon alternatefuels.Thiswill
l Do not such E85.Do not mixoil in
damagetheenginecomponentsandvoidtheenginewarranty.
Toprotectthefuelsystemfromgumformation,mixa fuelstabilizer
intothe fuel.SeeStorage.Allfuel is notthesame.If startingor
performanceproblemsoccur,changefuel providersorchangebrands.
Thisengineiscertifiedtooperateongasoline.Theemissionscontrol
systemforthisengineis EM(EngineModifications).
High Altitude
Ataltitudesover5,000feet(1524meters),a minimum85octane/85
AKI(89RON)gasolineisacceptable.Toremainemissionscompliant,
highaltitudeadjustmentisrequired.Operationwithoutthisadjustment
willcausedecreasedperformance,increasedfuelconsumption,and
increasedemissions.Seea Briggs&StrattonAuthorizedDealerfor
highaltitudeadjustmentinformation.
Operationof theengineataltitudesbelow2,500feet(762meters)with
thehighaltitudekitis not recommended.
as
HOW TO ADD FUEL
Gasolineanditsvaporsareextremelyflammableandexplosive.
Fireorexplosioncancausesevereburnsordeath.
When Adding Fuel
• Turnengineoff andletenginecoolat least2 minutesbefore
removingthefuelcap.
• Fillfueltankoutdoorsorinwell-ventilatedarea.
• Donotoverfillfueltank.Filltankto approximately1.5inches(38
ram)belowtopofneckto allowforfuelexpansion.
• Keepgasolineawayfromsparks,openflames,pilotlights,heat,
andotherignitionsources.
• Checkfuellines,tank,cap,andfittingsfrequentlyfor cracksor
leaks.Replaceif necessary.
• Iffuelspills,waituntilit evaporatesbeforestartingengine.
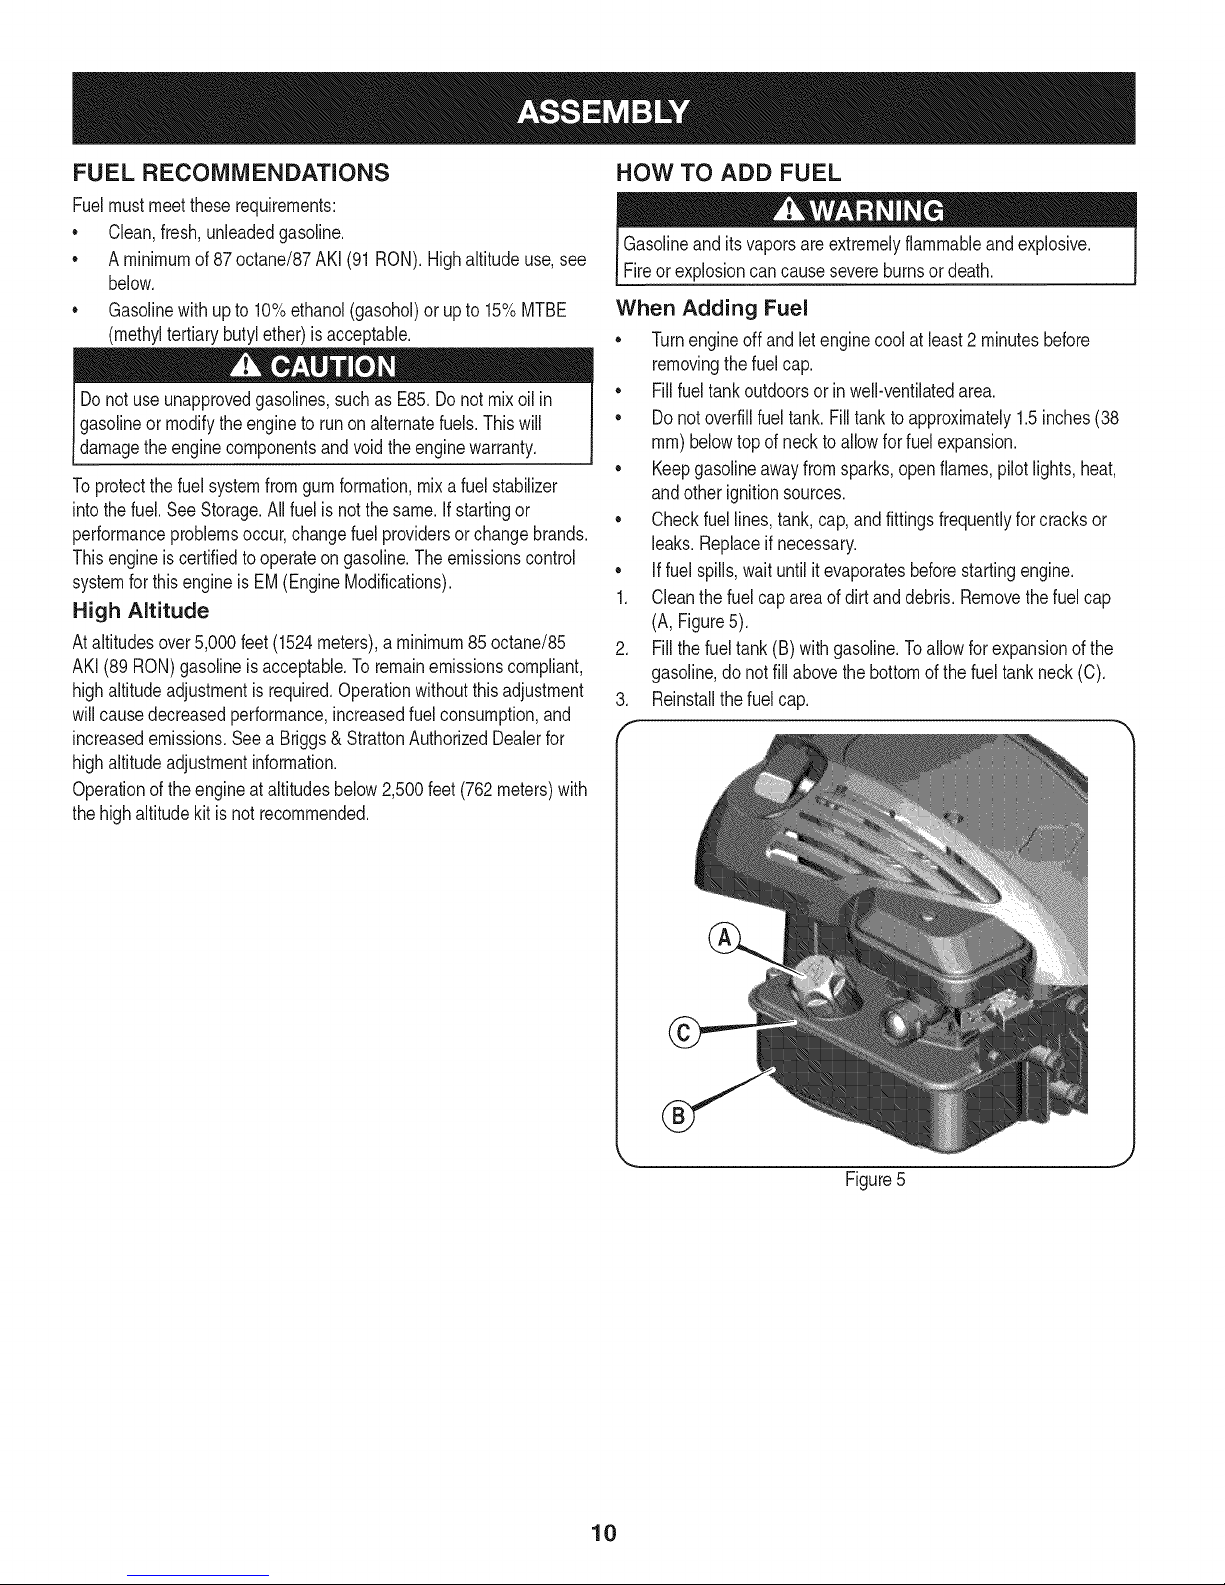
1. Cleanthe fuelcap areaofdirtanddebris.Removethefuelcap
(A, Figure5).
2. Fillthefueltank (B)withgasoline.Toallowforexpansionofthe
gasoline,do not fill abovethebottomof the fueltankneck(C).
3. Reinstallthefuel cap.
f
J
Figure5
10
Page 11
f
BladeControl
Bail
BladeDepthControlLever
RecoilStarter
BevelAdjl
Lever
CurbHeight
AdjustmentLever
\
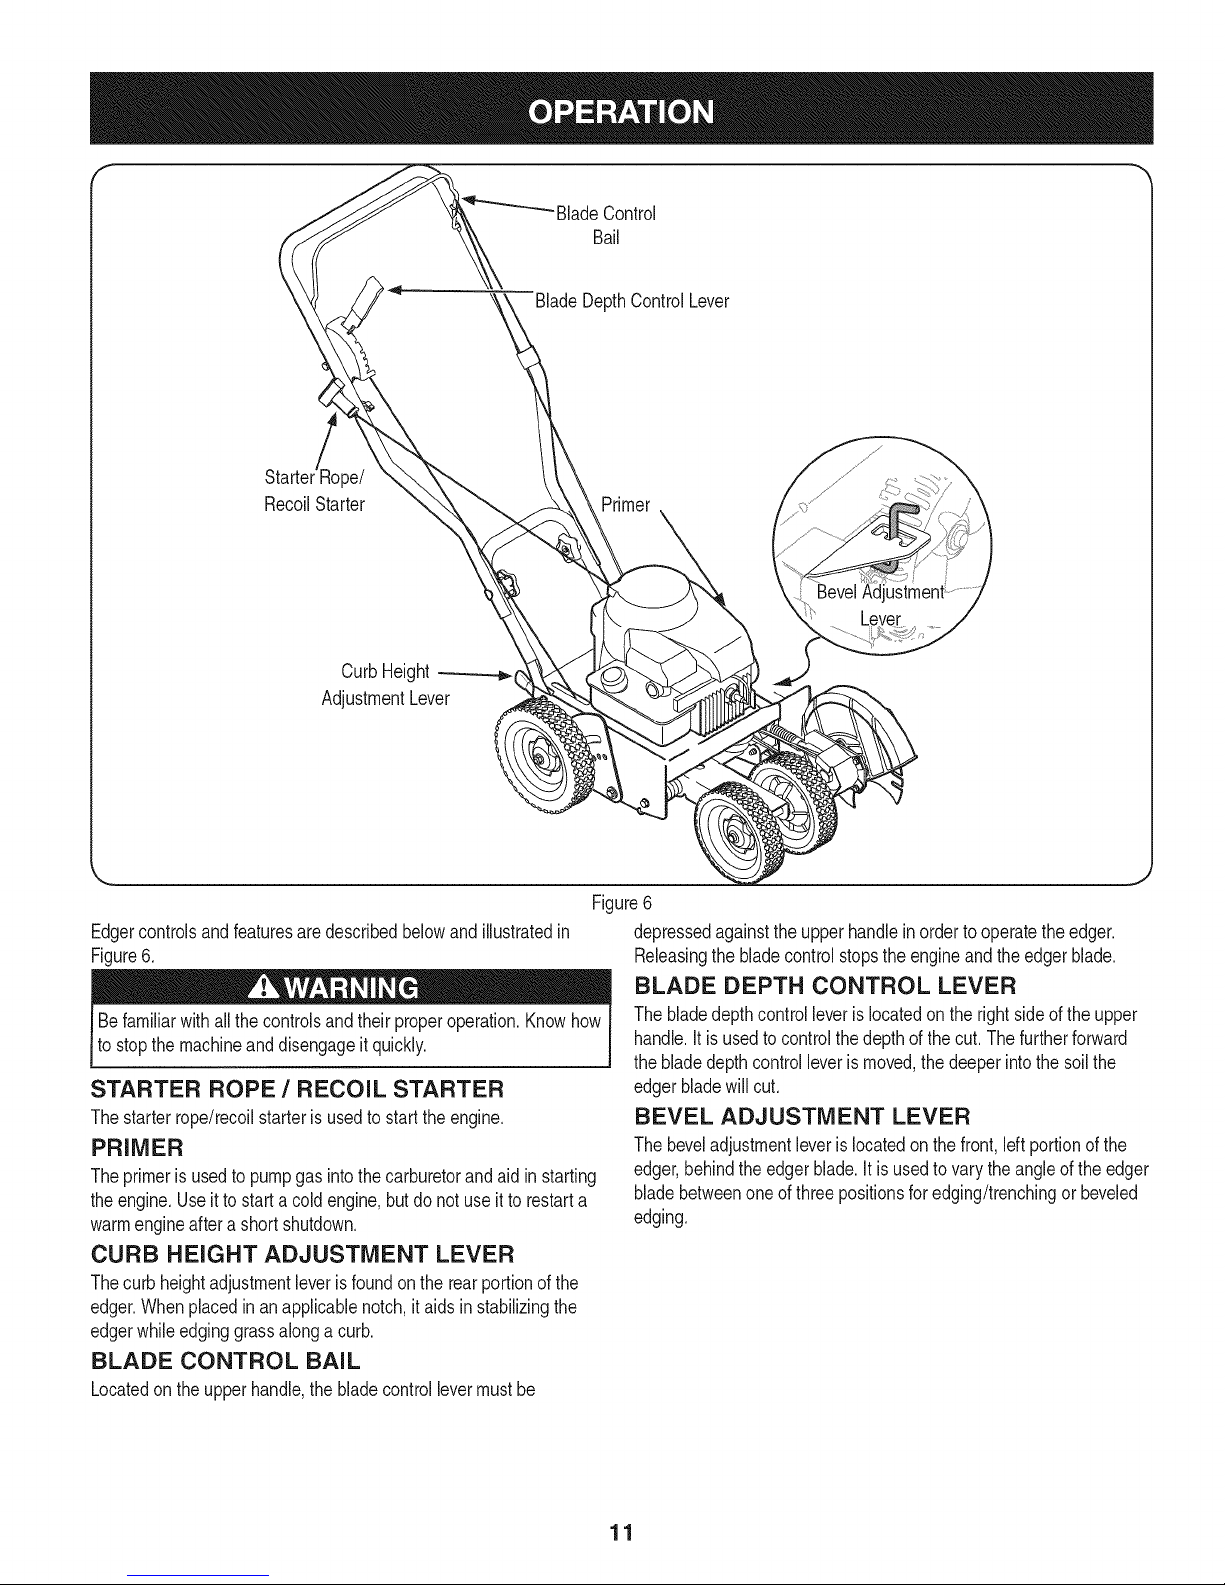
Edgercontrolsandfeaturesaredescribedbelowandillustratedin
Figure6.
Befamiliarwithallthecontrolsandtheir properoperation.Knowhow
to stopthe machineanddisengageitquickly.
STARTER ROPE / RECOIL STARTER
Thestarter rope/recoilstarterisusedto start the engine.
PRIMER
Theprimeris usedto pumpgasintothecarburetorandaid instarting
theengine.Useit to start a coldengine,butdo not useitto restarta
warmengineaftera shortshutdown.
CURB HEIGHT ADJUSTMENT LEVER
Thecurb heightadjustmentleveris foundon therearportionofthe
edger.Whenplacedinan applicablenotch,it aidsin stabilizingthe
edgerwhileedginggrassalongacurb.
BLADE CONTROL BAIL
Locatedon the upperhandle,thebladecontrollevermustbe
Figure6
depressedagainsttheupperhandleinordertooperatetheedger.
Releasingthebladecontrolstopstheengineandtheedgerblade.
BLADE DEPTH CONTROL LEVER
Thebladedepthcontrolleveris locatedontherightside of the upper
handle.Itisusedto controlthe depthofthecut.Thefurtherforward
thebladedepthcontrolleveris moved,thedeeperintothe soil the
edgerbladewillcut.
BEVEL ADJUSTMENT LEVER
Thebeveladjustmentleveris locatedon thefront,leftportionofthe
edger,behindthe edgerblade.It isusedtovarythe angleof the edger
bladebetweenoneofthreepositionsforedging/trenchingorbeveled
edging.
11
Page 12
STARTING THE ENGINE
Tostart theedger'sengine,proceedasfollows:
1. Attachthe sparkplugwireto the sparkplug.Makecertainthe
metalcapontheendof the sparkplugwireisfastenedsecurely
overthe metaltip on thesparkplug.
2. Movethebladedepthcontrolleverbackto the STARTpositionin
theadjacent(top) notch.
3. Depresstheprimerbulbthreetimes,pausingtwotothree
secondsbetweeneach push.Incold weather(below50°F/19°0),
itmaybe necessarytodepressthe primerbulbfouror fivetimes.
NOTE:Usingthe primerto restartawarmengineaftera short
shutdownis usuallynot necessary.Doingso mayresultina flooded
engine.
4. Standingbehindtheedger,depressthebladecontrolbailand
holditagainsttheupperhandlewithyour Idt hand.
_eration.
5. Withyourrighthand,grasptherecoilstarterhandleandslowly
pulltheropeoutwarduntilenginereachesthestartofits com-
pressioncycle(theropewillpullslightlyharderatthispoint).
6. Afterslowlyallowingtheropeto recoil,pullthe ropewitha rapid,
continuous,fullarmstroke.Keepa firmgripon starterhandle
throughouttheentirestroke.
7. Allowthestarterhandleto slowlyreturntothe eyebolt.
EDGING
Rotatingcuttingblademaythrowobjectscausingpersonalinjury.
Keepareaclearof bystandersanddo notoperatewithoutguardsin
)lace.
Donot lowerbladeif bladeisoverconcrete,asphalt,rocksorthe like.
Bade canstrke supportng surface,resut ng npersona njuryor |
propertydamage.
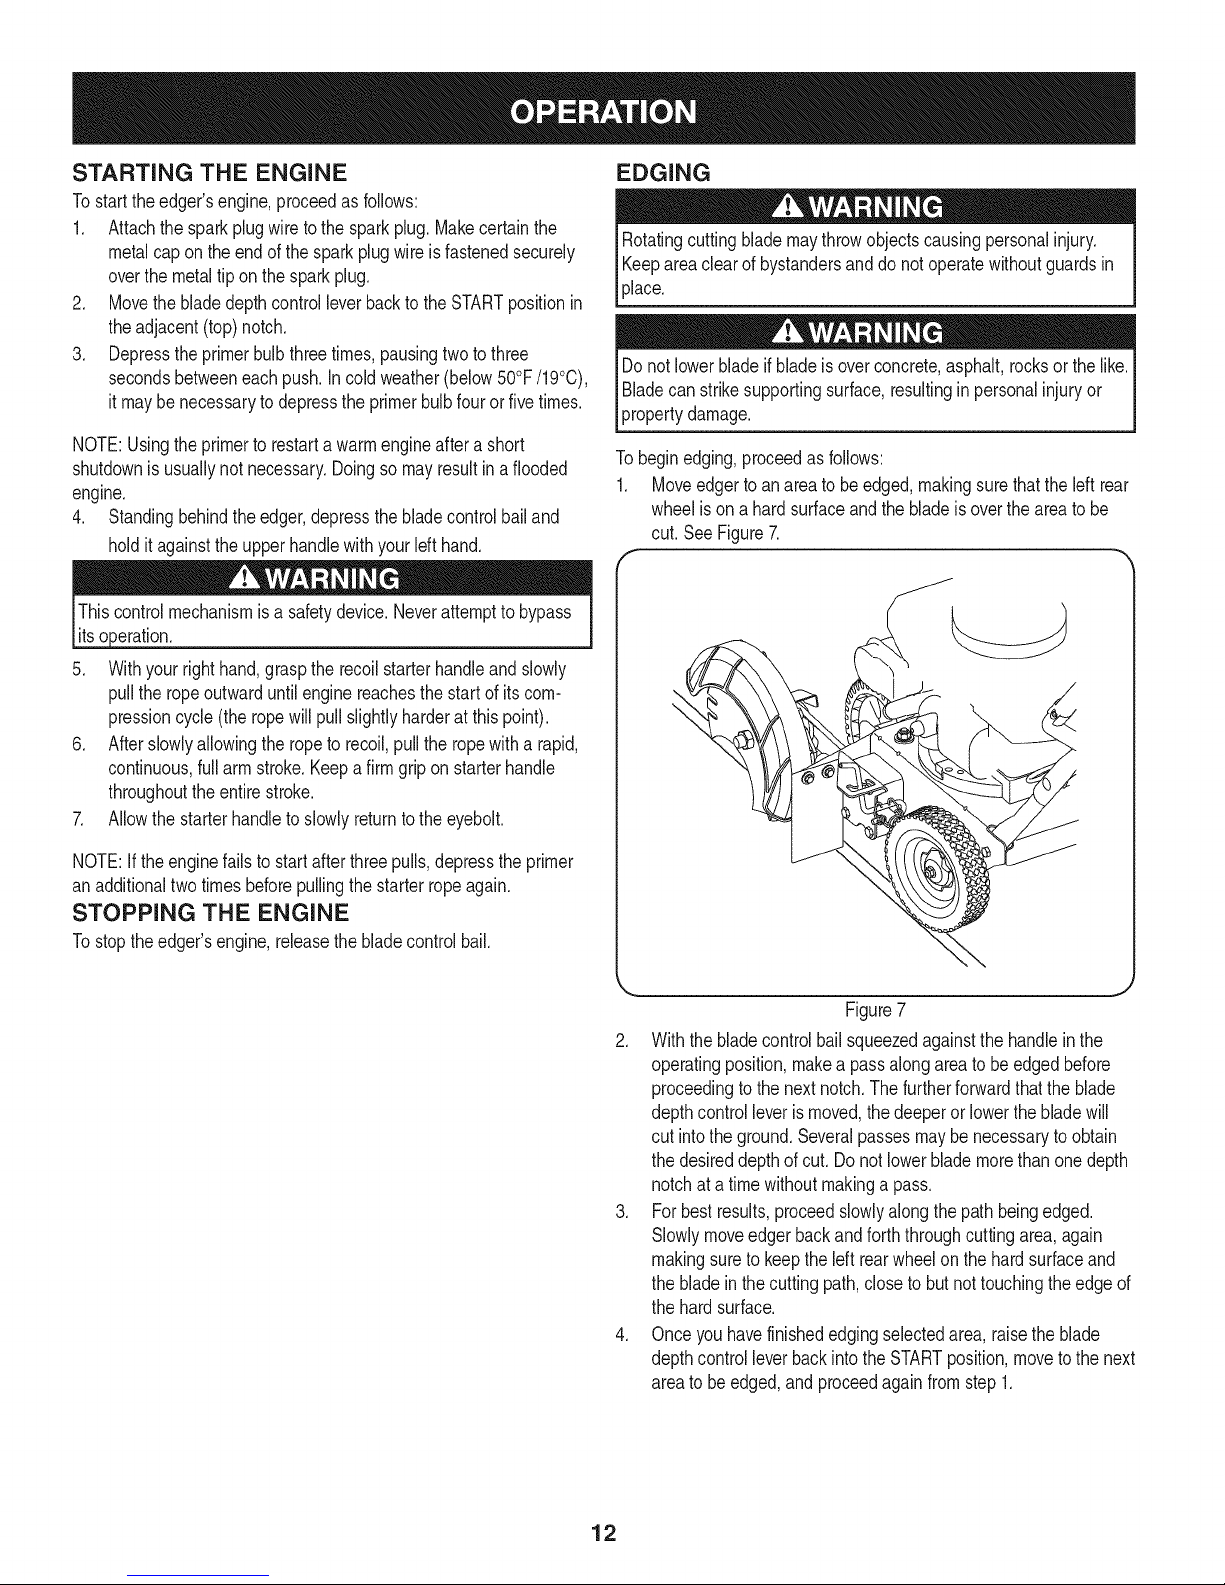
Tobeginedging,proceedasfollows:
1. Moveedgertoanareato beedged,makingsurethattheleftrear
wheelis on a hardsurfaceandthe bladeisovertheareato be
cut.SeeFigure7.
J
NOTE:Iftheenginefailstostartafterthreepulls,depresstheprimer
anadditionaltwotimesbeforepullingthestarterropeagain.
STOPPING THE ENGINE
Tostoptheedger'sengine,releasethebladecontrolbail.
Figure7
2. Withthe bladecontrolbailsqueezedagainstthe handleinthe
operatingposition,makea passalongareato beedgedbefore
proceedingtothenextnotch.Thefurtherforwardthattheblade
depthcontrolleveris moved,thedeeperor lowerthe bladewill
cut intotheground.Severalpassesmaybe necessarytoobtain
thedesireddepthof cut.Donot lowerblademorethanonedepth
notchata timewithoutmakingapass.
3. Forbestresults,proceedslowlyalongthepathbeingedged.
Slowlymoveedgerbackandforththroughcuttingarea,again
makingsureto keeptheleftrearwheelonthehardsurfaceand
thebladeinthe cuttingpath,closeto but not touchingtheedgeof
thehardsurface.
4. Onceyouhavefinishededgingselectedarea,raisetheblade
depthcontrolleverbackinto theSTARTposition,movetothenext
areatobe edged,andproceedagainfromstep1.
12
Page 13
Edging Along A Curb
Theright,rearwheeloftheedgercanbe loweredintooneoffive
positionstoeasethetaskof edgingalonga curb.Toadjusttheheight
ofcurbwheel,proceedasfollows:
1. Lowerthe right,rearwheelby movingthecurb heightadjustment
leverslightlytotheleft.SeeFigure8.
"" CurbHeight
Adjustment
Lever
Trenching
Youcanutilizetheedger'soptionaltrenchingfeaturein ordertocreate
a widercuttingpathfor suchthingsaslayingwireforlandscape
lighting.
thefollowinc _s.
Usetwowrenches(onewrenchtopreventhexbolt headfrom
spinningand theotherto unthreadtheflangenut)to remove
flangenut thatsecuresedgerblade,leavingtheedgerbladein
place.SeeFigure10.
(
Figure8
2. Pivottheright,rearwheelintoanapplicablepositionin relationto
theheightofthecurbtobeedgedalong.SeeFigure6.
3. Releasethecurbheightadjustmentlevertolockthewheelin
position.SeeFigure6.
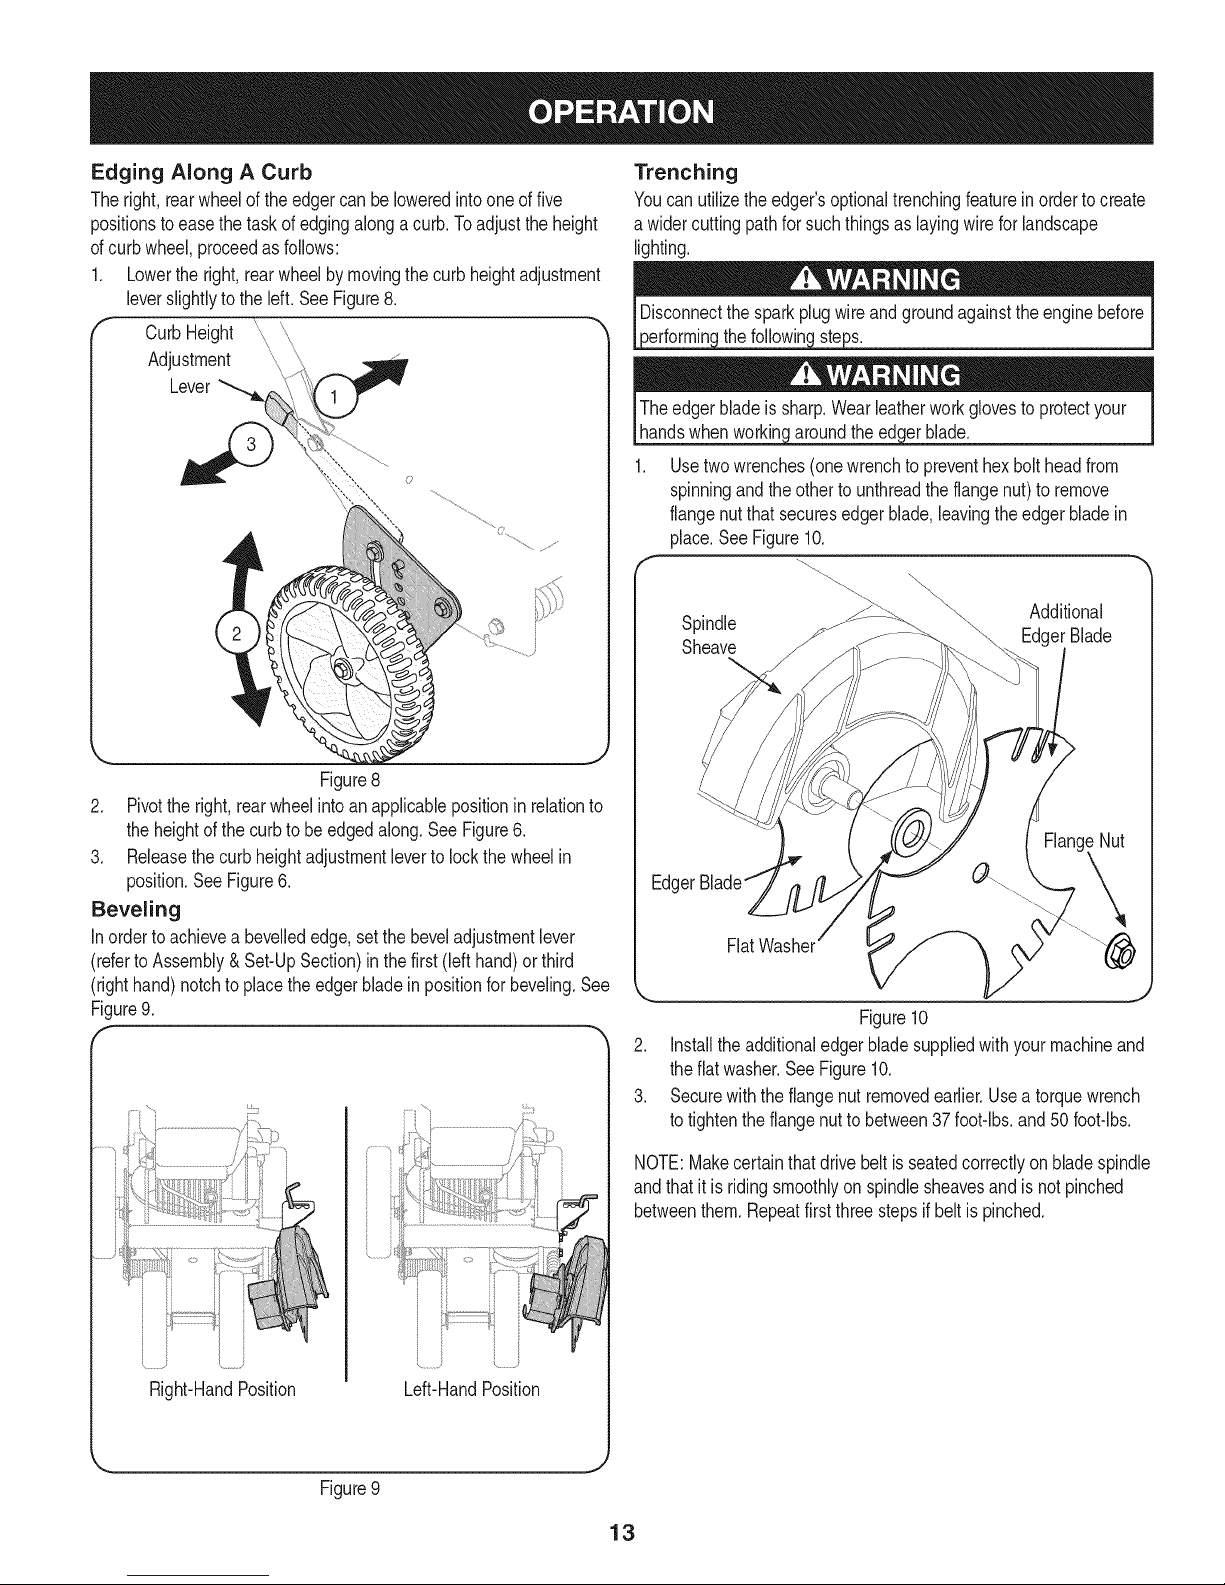
Beveling
Inordertoachievea bevellededge,setthebeveladjustmentlever
(referto Assembly&Set-UpSection)inthefirst(lefthand)orthird
(righthand)notchtoplacethe edgerbladein positionfor beveling.See
Figure9.
Spindle Additional
Sheave EdgerBlade
Edger
J
Figure10
.
Installtheadditionaledgerbladesuppliedwithyourmachineand
theflatwasher.SeeFigure10.
3.
Securewiththe flangenutremovedearlier.Usea torquewrench
totightentheflangenut to between37foot-lbs,and50 foot-lbs.
NOTE:Makecertainthatdrive beltisseatedcorrectlyon bladespindle
andthatit isridingsmoothlyonspindlesheavesandisnotpinched
betweenthem.Repeatfirstthreestepsifbeltispinched.
Figure9
13
Page 14
BELT REPLACEMENT
Drive Belt
NOTE:Toaid in reassembly,notetheorientationofthedrivebelton
thetwo idlerpulleysandtheengineflywheelpulleypriorto performing
thefollowingsteps.Referto Figure9.
Theedgerdrivebelt is subjecttowearand shouldbereplacedifany
signsofcracking,shreddingorrottingarepresent.Toreplacethebelt,
proceedasfollows:
1. Workinginfrontoftheedger,loosentheflangelock nuton topof
frame,allowingtheidlerpulleyassemblytopivotslightlyoutfrom
theframe.SeeFigure11.
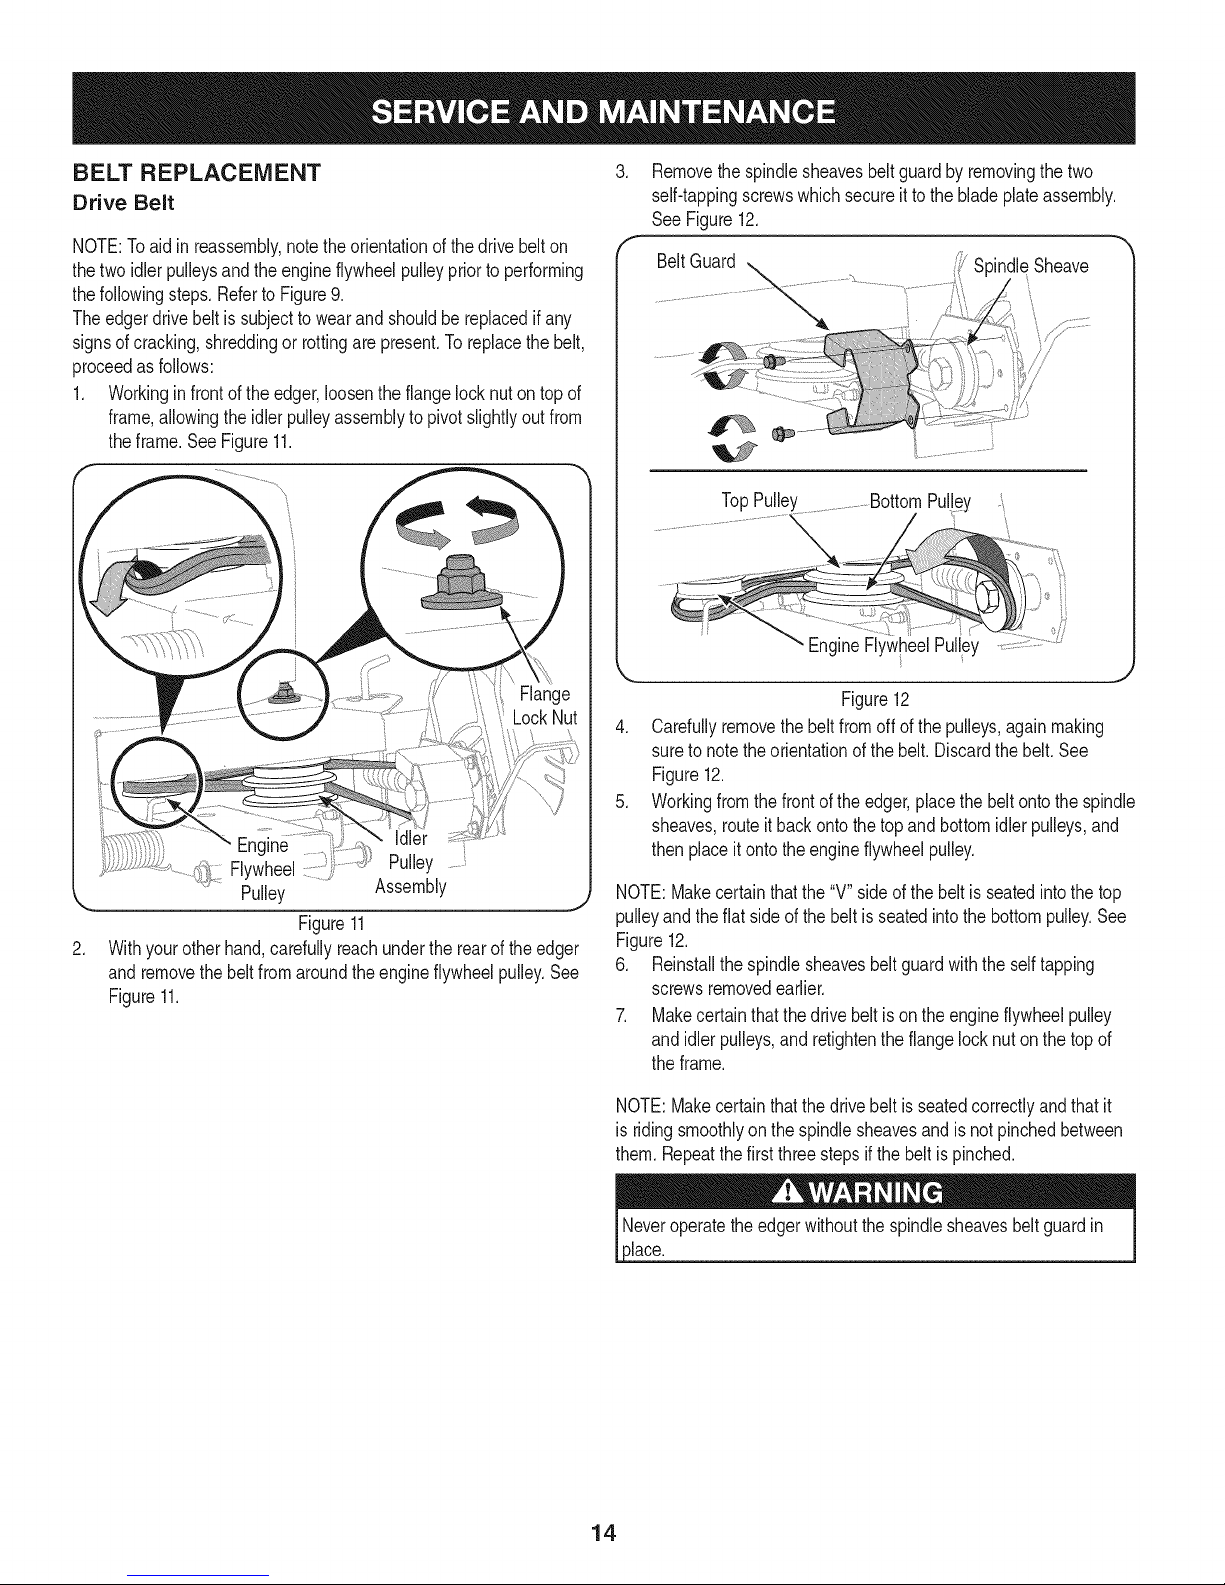
.
Removethe spindlesheavesbeltguardby removingthe two
self-tappingscrewswhichsecureitto the bladeplateassembly.
See Figure12.
BeltGuard ._ _indleSheave
--,..
TopPulley ............BottomPul!ey
EngineFlywheelPulley
Figure12
4. Carefullyremovethebeltfromoffofthepulleys,againmaking
sureto notetheorientationofthebelt.Discardthebelt.See
Figure12.
5. Workingfromthefrontof the edger,placethebeltontothespindle
sheaves,routeit backontothetopandbottomidlerpulleys,and
thenplaceit ontotheengineflywheelpulley.
Assembly
Figure11
.
Withyourotherhand,carefullyreachundertherearof the edger
andremovethebeltfromaroundtheengineflywheelpulley.See
Figure11.
NOTE:Makecertainthatthe "V" sideof thebeltisseatedintothetop
pulleyandtheflatsideofthebeltisseatedintothe bottompulley.See
Figure12.
6. Reinstallthespindlesheavesbeltguardwiththe selftapping
screwsremovedearlier.
7. Makecertainthatthe drivebeltisonthe engineflywheelpulley
and idlerpulleys,and retightentheflangelocknuton thetopof
theframe.
NOTE:Makecertainthatthe drivebeltisseatedcorrectlyandthatit
isridingsmoothlyon the spindlesheavesandisnotpinchedbetween
them.Repeatthefirstthree stepsifthebeltispinched.
14
Page 15
MAINTENANCE
ustment,re
Edger Blade
Theedgerbladeis sharp.Wearleatherworkglovesto protectyour
handswhenworkingaroundtheedgerblade.
Usetwowrenches(onewrenchto preventthehexbolt headfrom
spinningandthe othertoremovetheflangenut)to removethe
edgerblade.Referto Figure13.
LUBRICATION
Wheels
Lubricatethewheelsand bearingsat leastoncea seasonwitha light
oil.Alsoifthewheelsareremovedforanyreason,lubricatethesurface
oftheaxleboltand theinnersurfaceof thewheelwithlightoil.
Pivot Points
Lubricatethepivotpointson the bladecontrolbail,bladedepthcontrol
lever,andifapplicable,thebladeadjustmentlever,andcurbheight
adjustmentleverwithlightoil atleastoncea season.
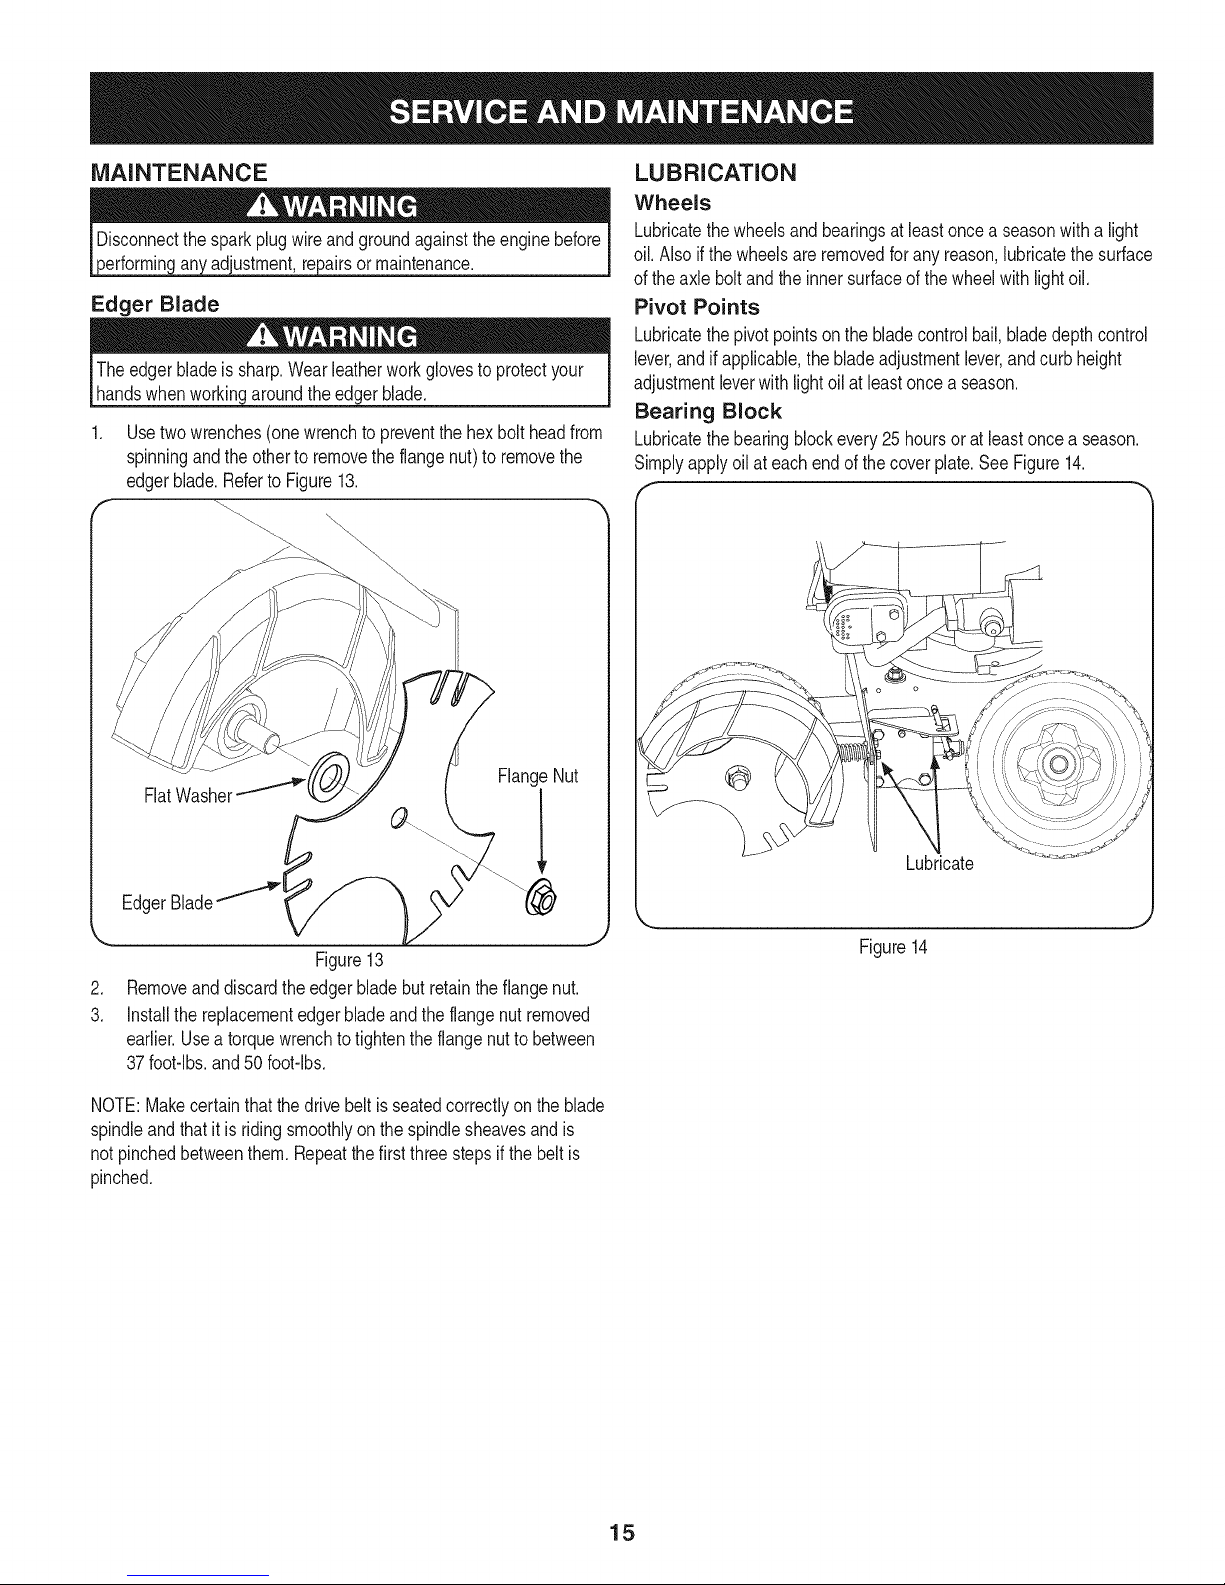
Bearing Block
Lubricatethebearingblockevery25 hoursorat leastoncea season.
Simplyapplyoilateachendof thecoverplate.SeeFigure14.
f
FlangeNut
!
Figure13
.
Removeanddiscardtheedgerbladebutretaintheflangenut.
3.
Installthe replacementedgerbladeandthe flangenutremoved
earlier.Usea torquewrenchtotightentheflangenuttobetween
37foot-lbs,and50foot-lbs.
NOTE:Makecertainthatthedrivebelt is seatedcorrectlyontheblade
spindleandthatitisridingsmoothlyonthespindlesheavesandis
notpinchedbetweenthem. Repeatthefirstthreestepsif the belt is
pinched.
Figure14
15
Page 16
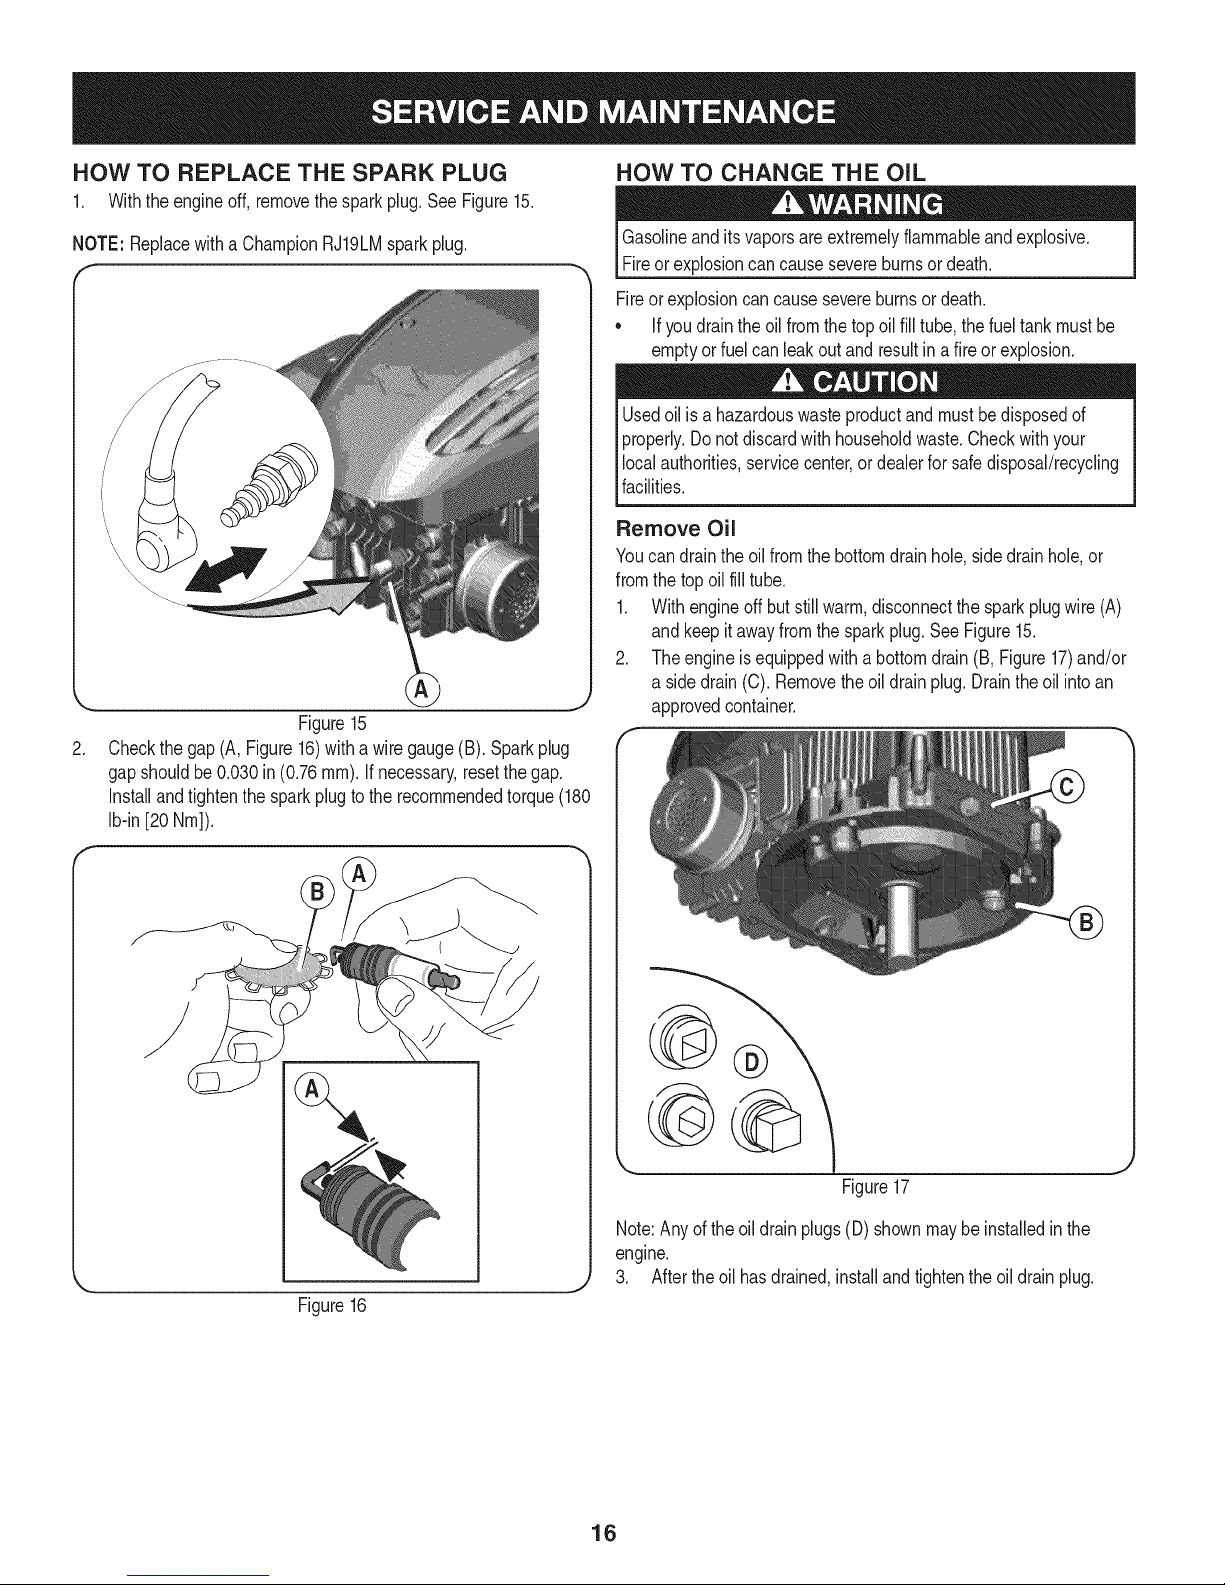
1. Withtheengineoff, removethesparkplug.See Figure15.
HOW TO CHANGE THE OILHOW TO REPLACE THE SPARK PLUG
NOTE:Replacewitha ChampionRJ19LMsparkplug.
Figure15
.
Checkthegap (A,Figure16)witha wiregauge(B).Sparkplug
gapshouldbe0.030in(0.76ram).If necessary,resetthegap.
Installandtightenthesparkplugtotherecommendedtorque(180
Ib-in[20 Nm]).
Gasolineandits vaporsareextremelyflammableandexplosive.
Fireorexplosioncancausesevereburnsor death.
Fireorexplosioncancausesevereburnsor death.
• Ifyoudraintheoil fromthe top oilfilltube,thefueltank mustbe
emptyor fuelcan leakoutand resultina fire orexplosion.
Usedoilis a hazardouswasteproductandmust bedisposedof
properly.Donot discardwithhouseholdwaste.Checkwithyour
localauthorities,servicecenter,ordealerforsafedisposal/recycling
facilities.
Remove Oil
Youcandraintheoilfromthebottomdrainhole,sidedrainhole,or
fromthetopoilfill tube.
1. Withengineoff butstillwarm,disconnectthesparkplugwire(A)
and keepitawayfromthe sparkplug.SeeFigure15.
2. Theengineisequippedwitha bottomdrain(B, Figure17)and/or
a side drain(C).Removetheoil drainplug.Draintheoilinto an
approvedcontainer.
f
Figure16
©
J
Figure17
Note:Anyoftheoildrainplugs(D) shownmaybe installedinthe
engine.
3. Afterthe oil hasdrained,installandtightenthe oildrainplug.
16
Page 17

.
If youdrainthe oilfromthetopoil fill tube (E), keepthespark
plugendof the engine(F) up. SeeFigure18.Draintheoil intoan
approvedcontainer.
f
Figure18
2. Pourtheoil slowlyintothe engineoil fill(H). Do notoverfill.After
addingoil,waitoneminuteandthenchecktheoil level.
3. Installandtightenthe dipstick.
4. Removethedipstickandcheckthe oillevel.It shouldbeat the
FULLmark(J)on the dipstick.
5. Installandtightenthe dipstick.
HOW TO SERVICE THE AIR FILTER
Gasolineanditsvaporsareextremelyflammableandexplosive.
Fireorexplosioncancausesevereburnsor death.
• Neverstartor runtheenginewiththeair cleanerassemblyor the
air filterremoved.
Donot use pressurizedair orsolventstocleanthefilter.Pressurized
air candamagethefilterandsolventswilldissolvethefilter.
1. Removethescrew(A)fromthetop of the airfilterassembly(B).
SeeFigure20.
Ifyoudraintheoil fromthetopoil filltube,thefueltankmustbe
emptyorfuelcanleakout andresultin a fireor explosion.To empty
thefuel tank, runtheengineuntilit stopsfromlackof fuel.
Add Oil
• Placeenginelevel.
• Cleantheoil fill areaofanydebris.
• SeetheSpecificationssectionforoil capacity.
1. Removethedipstick(G)andwipewitha cleancloth.See
Figure19.
f
Figure20
2. Topreventdebrisfromfallingintothe carburetor,carefullyremove
theair filterassembly.
3. Removethefoamelement(C) fromtheairfilterbase.
4. Washthefoamelementinliquiddetergentandwater.Squeeze
drythefoamelementin acleancloth.
5. Saturatethefoamelementwithcleanengineoil.Toremovethe
excessengineoil,squeezethefoamelementina cleancloth.
6. Installthefoamelementinto theair filterbase.
7. Installtheairfilterassemblyontothecarburetorand securewith
screw.
_k
Figure19
J
17
Page 18

Iftheedgerwill not beusedfor 30daysor longer,theequipmentneedstobe storedproperly.Followstorageinstructionsbelowto ensuretop
performancefromthe edgerformanymoreyears.
PREPARING THE ENGINE
Enginesstoredover30daysneedtobedrainedoffueltoprevent
deteriorationandgumfromforminginthe fuel systemor onessential
carburetorparts.If thegasolineinyourenginedeterioratesduring
storage,youmayneedto havethecarburetor,andotherfuelsystem
components,servicedor replaced.
1. Removeallfuelfromthetankby runningtheengineuntilit stops.
2. Changetheengineoil.
3. Removethe sparkplugandpourapproximately1oz.(30ml)of
cleanengineoil intothe cylinder.Pullthe recoilstarterseveral
timesto distributetheoil,and reinstallthesparkplug.
4. Cleandebrisfromaroundthe engine,andunder,around,and
behindthemuffler.Applya lightfilmofoilon anyareasthatare
susceptibletorust.
5. Storeina clean,dry andwellventilatedareaawayfromany
appliancethatoperateswitha flameor pilot light,suchasa
furnace,waterheateror clothesdryer.Avoidanyareawitha spark
producingelectricmotor,orwherepowertoolsareoperated.
6. if possible,avoidstorageareaswithhighhumidity.
7. Keeptheenginelevelin storage.Tiltingtheengine cancause
fuelor oil leakage.
PREPARING EDGER
iftheedgerwillnotbeusedfor30 daysor longer,followtheinstruc-
tionsbelow.
1. Storethe edgerina dry,cleanarea.Do not storenexttoany
corrosivematerials,suchaslawnfertilizer.
2. Coatthe edgerbladewithchassisgreasetopreventrustingand
corrosion.
3. Coatthe edger,especiallyanyspringsandbearingswitha light
oil or siliconespray.
4. Cleanthe exteriorof the engineandtheedger.
NOTE:Whenstoringanytypeofpowerequipmentinan poorly
ventilatedormetalstorageshed,careshouldbetakentorustproofthe
equipment.
18
Page 19

Beforeperforminganytypeofmaintenance/service,disengageallcontrolsandstoptheengine.Waituntilall
movingpartshavecometo acompletestop.Disconnectsparkplugwireandgrounditagainsttheengineto
Ipreventunintendedstarting.Alwayswearsafetyglassesduringoperationorwhileperforminganyadjustmentsor
[repairs.
Thissectionaddressesminorserviceissues.Tolocate the nearestSearsService Centeror to scheduleservice,simplycontactSears
at 1-800-4-MY-HOME®.
Enginefailsto start
Enginerunserratically
Engineoverheats
Excessivevibration
Drive-beltSlips
1. Dirtyaircleaner
2. Engineneedsto be primed
3. Fueltankempty
4. Stalefuel in gasolinetank
5. Sparkplugwiredisconnected.
6. Sparkplugfouled
1. Sparkplugwireloose
2. Stalefuel in gasolinetank
3. Ventin gascapplugged
4. Wateror dirtinfuelsystem
5. Dirtyaircleaner
6. Carburetoroutof adjustment
1. Engineoil levellow
2. Airflow restricted
3. Dirtyairfilter
4. Carburetoroutof adjustment
1. Edgerbladebentor damaged
2. Bladespindlebentor damaged
1. Beltwornor stretched
1. RefertotheServiceAnd MaintenanceSection.
2. Pushprimerbulbthreetimes.
3. Filltankwithclean,freshgasoline.
4. Draingasolineand refilltankwithclean,fresh
gasoline.
5. Connectthesparkplugwiretothesparkplug.
6. Clean,adjustgap or replacesparkplug.
1. Connectandtightensparkplugwire.
2. Draingasolineand refilltankwithclean,fresh
gasoline.
3. Clearventofanydebris.
4. Drainfueltank.Refillwithfreshfuel.
5. RefertotheServiceAnd MaintenanceSection.
6. Contacta Searsorotherqualifieddealer.
1. Fillcrankcasewithproperoil.
2. Cleanthe areaaroundthe engine'scoolingfins.
3. Replacetheengine'sair filter.
4. Contacta Searsorotherqualifieddealer.
1. Replaceedgerblade.
2. Contacta Searsorotherauthorizedservicedealer.
1. Replacedrivebelt.
NEED MORE HELP?
You'H f_nd the answer 4_nd mov'e or_ managemyBome corn - Io_ Iree
Find this and all your other product manuals online.
Get answers from our team of home experts.
Get a personalized maintenance plan for your home.
Find information and tools to help with home projects.
b_ou@/d: t:o ye_ by gears
19
Page 20

EdgedTrencher B Model No. 247.772460
14,
13
38
5
19
62
26"
2O
Page 21

Edger/Trencher -- Model No. 247.772460
I
Ref,
I Part No,
1 687-02022
2 687-02125A
3 687-02126
4 710-0191
5 710-0411
6 710-04389
7 710-0599
8 710-0654A
9 710-0726
10 710-0870
II 710-1143A
12 710-1174
13 710-1205
14 710-3180
15 711-04361
16 711-04440
17 712-04063
18 712-04065
19 712-0417A
20 714-3010
21 718-04012
22 720-0142
23 720-0279
24 720-04072A
25 726-0299
26 931-04207
27 731-05063
28 731-05064
29 732-0188A
30 932-0369
31 732-04045
32 932-04169
33 734-1264
Description
Curb Height Adjustment Lever
Curb Height Adjuster Plate
Blade Plate Assembly
Screw 3/8-24
Screw 3/8-16
Hex Screw, %o-18
Self-tapping Screw, I/4-20
Screw, 3/8-16
Hex Screw, %o-12
Hex Screw %o-18
Hex Screw, %-18
Carriage Bolt, %0-18
Rope Guide (Eye Bolt)
Hex Screw, %o-18
Axle Shaft .50x6.65
Frame Spacer .50x9.25
Lock Flange Nut, %0-I 8
Flange Nut %-16
Flange Nut,%-18
Clevis Pin 3/32x .625
Bearing Cup
Grip
Wing Nut
Star Knob
Push Cap 1/2"rod
Bearing Block
Debris Guard
Blade Guard
Double Torsion Spring
Compression Spring
Torsion Spring
Compression Spring
Wheel 7 x 1.75 T-Tread
|
Ref,
I Part No,
34 734-1268
35 936-0179
36 936-0232
37 736-0234
38 736-0258
39 936-04088
40 936-0452
41 738-04149
42 738-0706C
43 738-0929
44 941-0524
45 746-04035
46 946-04036
47 747-04110
48 747-0976A-0637
49 749-04183-0637
50 749-04234-0637
51 950-04105
52 750-04129
53 950-04142
54 750-0547
55 954-04032B
56 756-04148
57 956-0449
58 756-1150A
59 781-0427-0637
60 781-0741A
61 781-0742-0637
62 781-0748-0637
63 787-01081A-0721
64 787-01239-0721
65 787-01304-0721
Description
Wheel 8 x 1.75 T-Tread
Flat Washer 1/2x 1.25 x .10
Wave Washer .531 x .781 x .013
Flat Washer, .385 x 1.5 x .075
Flat Washer .385 x 1.0 x .135 ±
Flat Washer .635xl.24x.181
Bell Washer,.396 x 1.140
Shoulder Screw, 3/8-16
Shoulder Screw
Shoulder Screw, 3/8-16
Bearing, .625 ID x 1.57 OD
Control Cable (Briggs & Stratton)
Wheel Adjustment Cable
Blade Adjustment Rod
Bail Handle
Upper Handle
Lower Handle
Spacer, .63 x 1.12 x 1.06
Spacer
Pulley Mount Spacer
Spacer, .64 x.88 x .50
Belt
Flat Idler Pulley, 2.50D
Sheave
Combination Flywheel Pulley
Belt Guard
Depth Index Bracket
Depth Index Lever
Tri-Star Blade
Bracket Plate
Dual Wheel Bracket
Frame
21
Page 22

Briggs and Stratton lOL802=O713-F1
11
523
287
842 ,_ ,_
525
11
_z
89
524 <}_?
/
_ol
.........718
51
18'70II869II-b_
635
616
22
Page 23

Briggs and Stratton lOL802-O713-F1
358 ENGINE GASKET SET
51
20 163 _ =_z_'
524 *_)
4o_,
4o_;_
27
45_,X
z /5)
35
868
1095 VALVE GASKET SET
7 9
842 _ ,_
868 _
868 -_'_
24_
46
74
41
43
12
22
15_
23
Page 24

Briggs and Stratton lOL802=O713-F1
J
13941 _:_ . __.
,- __%::-....
393
163
612
390
97
633 _ _
724
0_
529
L3
222
300
729
635
745
745A _
334 @'
0
356 .... :__.
s_,__. ....._
_ 621
<',J ?,_ )
L( _229 _
534
535
163
24
Page 25

Briggs and Stratton lOL802=O713=F1
921
969
37A
[ 1036 EMISSIONS LABEL ]
3O4
55
1211
1210
/--- ....... -
459 L._ _
dr ..=
689 '_' _?)
456
78
37
455
332
597 _,#
73
23 r__ _ _i_{ 'Y'_":_
25
Page 26

Briggs and Stratton lOL802=O713=F1
m = 0 O
699650 CylinderAssembly
2 399269 Kit-Bushing/Seal(MagnetoSide)
3 299819s Seal-Oil(MagnetoSide)•
4 798264 Sump-Engine
5 790169 Head-Cylinder
7 698747 Gasket-CylinderHead,+
8 791781 BreatherAssembly
9 695890 Gasket-Breather
10 691666 Screw(BreatherAssembly
11 691245 Tube-Breather
12 692218 Gasket-Crankcase•
13 691640 Screw(CylinderHead)
15 691680 Plug-OilDrain
16 796217 Crankshaft
20 391483s Seal-Oil(PTOSide)
22 692551 Screw(CrankcaseCover/Sump)
23 795549 Flywheel
24 222698s Key-Flywheel
25 795691 PistonAssembly(Standard)
795689 PistonAssembly(.020"Oversize)
26 795690 RingSet(Standard)
795688 RingSet(.020"Oversize)
27 691588 Lock-PistonPin
28 699659 Pin-Piston
29 699654 Rod-Connecting
32 1691664 Screw(ConnectingRod)
33 296676 Valve-Exhaust
34 1296677 Valve-Intake
35 690520 Spring-Valve(Intake)
36 690520 Spring-Valve(Exhaust)
37 793478 Guard-Flywheel(MufflerSide)
37A 697403 Guard-Flywheel(CarburetorSide)
[40 _692194 Retainer-Valve
i43 697799 Slinger-Governor/Oil
i45 690762 Tappet-Valve
i46 691998 Camshaft
i48 793347 ShortBlock
i50 792388 Manifold-Intake
i 51 792389 Gasket-intake_+
54 691111 Screw(IntakeManifold)
692144 Housing-RewindStarter
58 697316 Rope-Starter
60 691915 Grip-StarterRope
65 690837 Screw(RewindStarter)
73 699850 Screen-Rotating
78 692198 Screw(FlywheelGuard)
89 692348 Plug(Cylinder)
90 795476 Carburetor
97 697414 Shaft-Throttle
106 690901 Seat-Inlet
130 794060 Valve-Throttle
163 271139s Gasket-AirCleaner
180 795473 Tank-Fuel
188 692198 Screw(ControlBracket)
190 691640 Screw(FuelTank)(13A"Long)
190A 691108 Screw(FuelTank)(9/16"Long)
202 698835 Link-MechanicalGovernor
209 698719 Spring-Governor(Light Blue)
222 698725 Bracket-Control
227 697402 Lever-GovernorControl
287 691002 Screw(DipstickTube)
300 394569s Muffler
304 697411 Housing-Blower
305 692198 Screw(BlowerHousing)
332 690662 Nut(Flywheel)
333 793281 Armature-Magneto
334 691061 Screw(MagnetoArmature)
337 802592s Plug-Spark
356 692390 Wire-Stop
358 794209 GasketSet-Engine
365 790029 Screw(Carburetor)
390 691839 Spring-ChokeDiaphragm
393 691837 Screen-Carburetor
394 795478 Diaphragm-Carburetor
404 690272 Washer(GovernorCrank)
455 691236 Cup-Flywheel
456 692299 Plate-PawlFriction
459 281505s PawI-Ratchet
505 691251 Nut(GovernorControlLever)
523 692040 Dipstick
26
Page 27

Briggs and Stratton lOL802=O713-F1
691876 Seal-DipstickTube
525 691320 Tube-Dipstick
529 692189 Grommet
534 691417 Screw(AirCleaner)
535 698369 Filter-AirCleanerFoam
536 698472 Cleaner-Air
562 691119 Bolt(GovernorControlLever)
592 690800 Nut(RewindStarter)
597 691696 Screw(PawlFrictionPlate)
608 499706 Starter-Rewind
612 .496046s JTube-P!ckUp
615 690340 Retainer-GovernorShaft
616 697405 Crank-Governor
617 270344s Seal-ORing(IntakeManifold)
621 692310 Switch-Stop(Brake)
633 691321 SeaI-Choke/ThrtleShft (ThrtleShft)
635 66538s Boot-SparkPlug
670 691633 Spacer-FuelTank
689 691855 Spring-Friction
718 690959 Pin-Locating
724 697478 Retainer-Seal
729 690586 Clip-Wire
741 796210 Gear-Timing
745 691146 Screw(Brake)(7/8"Long)
745A 690859 Screw(Brake)(1/2" Long)
842 691870 Seal-ORing(DipstickTube)
847 691440 Dipstick/TubeAssembly
851 493880s Terminal-SparkPlug
868 697338 Seal-Valveo+
869 699641 Seat-Valve(Intake)
870 699642 Seat-Valve(Exhaust)
871 699643 Bushing-ValveGuide(ExhaustValve)
63709 Bushing-ValveGuide(IntakeValve)
913 494409 Seat-CheckValve
1058 277038
1095 498526
1210 499901
1211 499901
1218 695866
1329 10L802-OO15-F1
1330 270962
o
+
Includedin EngineGasketSet,Key.No.358
Includedin ValveGasketSet,Key.No.1095
D= I O O
EmissionsLabel
Operator'sManual
GasketSet-Valve
Pulley/SpringAssembly(Pulley)
Pulley/SpringAssembly(Spring)
Seal-ORing(Carburetor)
ReplacementEngine
RepairManual
921 L795397 LCover-B!owerHous!ng
922 692135 Spring-Brake
923 691487 Brake
957 795472 Cap-Fuel
969 694046 Screw(BlowerHousingCover)
976 694394 Primer-Carburetor
27
Page 28

Congratulationson makingasmartpurchase.YournewCraftsman@
productisdesignedandmanufacturedfor yearsof dependableopera-
tion.Butlikeall products,itmayrequirerepairfromtimetotime.That's
whenhavinga RepairProtectionAgreementcansaveyoumoneyand
aggravation.
Here'swhatthe RepairProtectionAgreement*includes:
* Expert service byour 10,000professionalrepairspecialists
o Unlimitedserviceand no chargefor partsand laboron all
coveredrepairs
o Product replacementupto$1500if yourcoveredproductcan'tbe
fixed
• Discountof 10%from regularpriceofserviceandrelatedinstalled
partsnotcoveredbytheagreement;also,10%off regularpriceof
preventivemaintenancecheck
• Fasthelp byphone- wecallitRapidResolution- phonesupport
froma Searsrepresentative.Thinkof usasa "talkingowner's
manual."
OnceyoupurchasetheAgreement,asimplephonecallisall thatit
takesfor youto scheduleservice.Youcancallanytimedayor night,or
schedulea serviceappointmentonline.
TheRepairProtectionAgreementisa risk-freepurchase.Ifyoucancel
foranyreasonduringtheproductwarrantyperiod,wewillprovideafull
refund.Or,a proratedrefundanytimeafterthe productwarrantyperiod
expires.Purchaseyour RepairProtectionAgreementtoday!
Somelimitationsandexclusionsapply. Forpricesand additional
informationin the U.S.A.call 1-800-827-6655.
*CoverageinCanadavaries on someitems.Forfull details call
SearsCanadaat 1-800-361-6665.
SearsInstallation Service
ForSearsprofessionalinstallationofhomeappliances,garagedoor
openers,waterheaters,andothermajorhomeitems,in theU.S.A.or
Canadacall1-800-4-MY-HOME®.
28
Page 29

29
Page 30

30
Page 31

31
Page 32

Declaracion de garantia .................................................. 32
Medidas importantes de seguridad ................................ 33
Montaje ........................................................................... 38
Funcionamiento ............................................................... 41
Servicio y Mantenimiento ................................................ 44
Almacenamiento fuera de temporada ............................ 48
Solucion de problemas ................................................... 49
NL_merode servicio ............................................... Cubierta
posterior
GARANTiA LLENA CRAFTSMAN
SiesteCraftsmanproductofalladebidoa undefectoenmaterialo habilidaddentrodedosaSosdelafechaocompra,vu_lvaloa cualquier
Sears,iasPartes& Centrode reparacionesde Reparaci6n,uotrasalidade Craftsmanen EstadosUnidoshacerlosarregiosparareparaci6n
libre(oel reemplazosi reparaci6ndemuestraimposible).
Estagaranfias61otendr_,validezdurante90diassiesteproductoseutilizaen cualquiermomentoparafinescomercialeso dealquiler.
Esta garantia cubreSOLOdefectos enmaterialyhabilidad.Searsno pagar_para:
• Losarficuiosprescindiblesquesehaceniievadospuestosduranteeiusonormal,inciuso,perono iimitadosparabujia,fiitros,cinturones,y
filtro.
• Reparacionesnecesariasdebidoanegligenciadeloperador,incluyendoentreotros,da_osmecanicoyeBctricoocasionadoporunalmace-
namientonoapropiadoo pornodarmantenimientoal equipodeacuerdoconlas instruccionescontenidasenel manualdeloperador.
• Mantenimientopreventivo,iimpiezao reparacionesai motor(sistemadecombustible)provocadaspor uncombustiblecontaminadou
oxidado.
Estagaranfialeotorgaderechoslegalesespecificos,peroustedpodriagozarde otrosderechosen raz6nde su lugarde residencia.
Sears, Roebuck and Co.,Hoffman Estates, IL 60179
N_mero de modelo.........................................................
Combustible GasolinasinPlomo
Bujiadeencendido TorchF6RTC
Motor BriggsandStratton10T802-0711-B1
N_rnero de serie ............................................................
Fecha de cornpra.........................................................................
RegistreelnQmerodemodelo,nQmerode serie
y fechade compram_sarriba
©SearsBrands,LLC 32
Page 33

Lapresenciade estesirnboloindicaquesetratade instrucciones
irnportantesde seguridadque sedebenrespetarparaevitar
ponerenpeligrosu seguridadpersonaly/omaterialy la deotras
personas.Leay sigatodaslas instruccionesde estemanualantes
de poneren funcionarnientoestarn_.quina.Sino respetaestas
instruccionespodriaprovocarlesionespersonales.Cuandoveaeste
sirnbolo,ipresteatenci6na laadvertencia!
Estarn_.quinarueconstruidaparaseroperadadeacuerdocon
lasreglasdeseguridadcontenidasenestemanual.AI igualque
concualquiertipode equipornotorizado,undescuidoo errorpor
partedeloperadorpuedeproducirlesionesgraves.Estarn_.quina
escapazde arnputarrnanosy piesy dearrojarobjetoscon gran
fuerza.De norespetarlasinstruccionesde seguridadsiguientesse
puedenproducirlesionesgravesolarnuerte.
PROPOSICION 65 DE CALIFORNIA
Elescapedel motordeesteproducto,algunosde suscornponentes
y algunoscornponentesdelvehiculocontieneno liberansustancias
quirnicasqueelestadodeCaliforniaconsideraque puedenproducir
cancer,defectosdenacirnientouotrosproblernasreproductivos.
CAPACITACION
• Leaconatenci6ntodaslas instruccionescontenidasen esteman-
ualantesde intentarensarnblaresta rn_.quina.Lea,cornprenday
respetetodaslasinstruccionesquefiguranenla rn_.quinayen el
o los rnanualesantesde hacerlafuncionar.Guardeestemanual
enun lugarseguroparaconsultasfuturasy peri6dicas,asi corno
parasolicitarrepuestos.
• Antesdeoperaresteequipo,farniliaricesetotalrnenteconlos
controlesyel usocorrectodelrnisrno.
• Estarn_.quinaes unaunidaddeequipornotorizadode precisi6n,
nounjuguete.PotIo tanto,tengarnuchocuidadoentodo
rnornento.Estarn_.quinaruedise_adapararealizarunatarea:
bordearelc_sped.NolautiliceparaningOnotrofin.
• No perrnitanuncaquelosni_osrnenoresde 14a_osutilicen
estarn_.quina.Losni_osde 14a_osen adelantedebenleery
entenderlasinstruccionesde operaci6ny norrnasdeseguridad
contenidaseneste manual,yen larn_.quinay debenser
entrenadosy supervisadospor unadulto.
• S61ose debeperrnitirusarestarn_.quinaa individuosrespons-
ablesy farniliarizadosconsusreglasdeseguridad.
• Paraayudaraevitarel contactoconlacuchillao unalesi6npor
unobjetoarrojado,rnant_ngaseen lazonadeloperadordetr_.s
delasrnanijasy rnantengaa losni_os,observadores,ayudantes
yrnascotasapartadosal rnenos25 metrosde labordeadora
decespedrnientrasest,.en operaci6n.Detengala rn_.quinasi
alguienentraen lazona.
Su responsabilidad--Restrinja el usode estarn_.quina
rnotorizadaalas personasquelean,cornprendany respetenlas
advertenciase instruccionesque aparecenen estemanualyen la
rn_.quina.
iGUARDEESTASINSTRUCCIONES!
PR E PARATIVO S
• Inspeccionerninuciosarnenteel_.readondeutilizar_,el equipo.
Retiretodaslaspiedras,palos,Ilantas,huesos,juguetesy
otrosobjetosextraSosquepodrianhacertropezary caero ser
recogidosyarrojadosporla acci6nde lascuchillas.Losobjetos
arrojadosporla rn_.quinapuedenproducirlesionesgraves.
• Paraprotegerselosojosutilicesiernpreanteojosoantiparras
de seguridadrnientrasoperala rn_.quinao rnientrasla ajusta
o repara.Losobjetosarrojadosquerebotanpuedenproducir
lesionesocularesgraves.
• Utilicezapatosdetrabajoresistentes,desuelafuerte,asicorno
pantalonesycarnisasajustados.Se recorniendavestircarnisay
pantal6nparacubrirbrazosy piernasy usarzapatosconpuntera
de acero.Nuncaopereesta rn_.quinadescalzo,consandalias,
zapatosresbalososo livianos(porej.deIona).
• Nuncaintenterealizarajustesrnientrasel motorest,.enrnarcha
exceptoenloscasosespecificarnenterecornendadosen el
manualdeloperador.
Manejoseguro de lagasolina
ParaevitarlesionespersonalesodaSosrnaterialesseasurnarnente
cuidadosoal rnanipularlagasolina.Lagasolinaes surnarnente
inflarnabley susvaporespuedencausarexplosiones.Sisederrarna
gasolinaencirnao sobrela ropasepuedelesionargravernenteya que
sepuedeincendiar.L_.veselapiely c_.rnbiesede ropade inrnediato.
• Utilices61orecipientesparagasolinaautorizados.
• NuncaIlenelos recipientesen el interiorde unvehiculoo carni6n
o caja de rernolqueconrecubrirnientopl_.stico.Coloquesiernpre
losrecipientesenel pisoy lejosdelvehiculoantesde realizarla
carga.
• Retireelequipoa gasolinadel carni6no rernolquey II_neloen
el piso.Siestono esposible,Ileneelequipoenun rernolque
conuncontenedorport_.til,envezde hacerloconunaboquilla
dispensadorade gasolina.
33
Page 34

• Mantengalaboquillade Ilenadoencontactoconelhordedel
dep6sitode combustibleo conla aberturadel recipienteentodo
rnornento,hastaterrninarlacarga.Noutiliceundispositivode
boquilladeapertura/cierre.
• Apaguetodoslos cigarrillos,cigarros,pipasyotrasfuentesde
cornbusti6n.
• Nuncacarguecombustibleen larn_.quinaen interioresporquelos
vaporesinfiarnablespodrianacurnularseenel _.rea.
• Nuncasaquela tapade lagasolinaniagreguecombustible
rnientrasel motorest,.calienteo en rnarcha. Dejequeel motor
seenfrieporIornenosdosrninutosantesdevolvera cargar
combustible.
• NuncaIleneenexcesoel dep6sitodecombustible.Lleneel
tanqueano rn_.sde1/2pulgadapot debajode la basedelcuello
deltap6nde carga,paraperrnitirlaexpansi6ndelcombustible.
• Vuelvaa colocarlatapadelagasolinayajQstelabien.
• Lirnpieelcombustiblequesehayaderrarnadosobreel motoryel
equip&Trasladela rn_.quinaa otra zona.Espere5rninutosantes
deencenderelmotor.
• Nuncaalrnacenela rn_.quinao el recipientedecombustible
cercade llamaexpuesta,chispasoaparatosconpilotocornopor
ejernplo,calentadoresdeagua,calefactores,hornos,secadores
de ropau otrosaparatosa gas.
• Parareducirelriesgodeincendiornantengala bordeadorade
cespedlirnpiade pasto,hojasy de laacurnulaci6nde otros
desechos.Lirnpielosderrarnesdeaceiteo combustibleysaque
todoslosresiduosernbebidosdecombustible.
• Dejequela bordeadorade c_spedse enfriecinco(5) rninutospor
Iornenosantesdealrnacenarla.
FUNCIONAIVIIENTO
• Nocoloquelasrnanosnilospiescercade laspiezasgiratorias.
Elcontactoconlacuchillagiratoriapuedeproducirlaarnputaci6n
de rnanosy pies.
• El mecanisrnodecontrolde la cuchillaesundispositivode
seguridad.Nuncaevitesufuncionarniento.Si Io hace,la rn_.quina
setornapeligrosaypuedecausarlesionespersonales.
• Nuncahagafuncionarla bordeadorasinusarelprotectordela
cuchilla,elescudocontraescornbrosy larnanijadecontrolde la
cuchillaenel lugarcorrespondienteyen funcionarniento.
• Nuncaoperelabordeadorasilosdispositivosdeseguridadest_.n
daSados.Si noIohace,puedenproducirselesionespersonales.
• Nuncaenciendael motorenespacioscerradosoenunazona
conpocaventilaci6n.Elescapedel motorcontienernon6xidode
carbono,un gasinodoroy letal.
• No utilicela rn_.quinabajola influenciadelalcoholo lasdrogas.
• El silenciadory elmotorse calientany puedencausarquernadu-
ras.Nolostoque.
• Nuncaopereestarn_.quinasinbuenavisibilidado ilurninaci6n.
Siernpredebeestarsegurodequeest,.bienafirrnadoy su-
jetandofirrnernentelas rnanijas.Carnine,nuncacorra.
• Noopereestarn_.quinasi se ha caidoo est,.daSada.Regrese
la rn_.quinaal serviciot_cnicodesudistfibuidorautorizadorn_.s
cercanoparaquela examiney larepare.
• No hagafuncionarlarn_.quinasi lacuchillade corteest,.daSada
oexcesivarnentedesgastada.
• Nuncaintentesacarmaterialdelprotectorde la cuchillasi el
motorest,.en funcionarniento.Apagueel motor,desconecteel
cabledela bujiayp6ngalode rnaneraquehagarnasacontrael
motorparaevitarqueseenciendaaccidentalrnente.
• Nosobrecarguelacapacidaddela rn_.quinatratandode bordear
a unavelocidaddernasiador_.pida.
• Mant_ngasealertaparaadvertirla existenciade aceraso terreno
desparejos,etc. Siernpreernpujelentarnentesobrelassuperficies
_.speras.Noutiliceestarn_.quinasobrepedregullo.
• Nooperelarn_.quinabajola Iluviao encondicionesdesuelo
hQrnedo.
• Siernprehagafuncionarlarn_.quinadesdedetr_.sdelasrnanijas
y col6quesede rnodoquelalineadevistadirectahaciala
cuchillade cortequedebloqueadaporlosprotectores.
• Siernpredetengael motorcuandoel bordeadoorecortesevean
dernoradoso cuandoest_trasladandolarn_.quinade unlugara
otto.
• Nuncadejelarn_.quinaenfuncionarnientosinvigilancia.Detenga
el motor,desconecteel cabledela bujiayp6ngalode rnanera
que hagarnasacontrael motorparaevitarqueseencienda
accidentalrnente.
• Utilicesolarnentepiezasyaccesoriosrnanufacturadosparaesta
rn_.quinaporel fabricante.Si noIohace,puedenproducirse
lesionespersonales.
• Si sepresentansituacionesquenoest_.nprevistaseneste
manual,seacuidadosoy useel sentidocornQn.P6ngaseen
contactoconAsistenciaal Clienteparasolicitarayudao el
nornbredel distribuidordeserviciorn_.scercanoa sudornicilio.
NINOS
Puedenocurriraccidentestr_.gicossi el operadornoest,.atentoa
la presenciadeni_os.PorIogeneral,losni_ossesientenatraidos
por equiposrnotofizadostalescornolasbordeadorasde c_sped.No
entiendenlosriesgosni lospeligros.Nuncaasurnaquelosni_os
perrnanecer_.nenel rnisrnolugardondelosvio porQltirnavez.
• Mantengaa losni_osfueradel_.reade bordeadoy bajoestricta
vigilanciadeun adultoresponsableadern_.sdeloperador.
• Est_alertayapaguelabordeadoradecespedsi unni_oingresa
al _.rea.
• Antesde rnoversehaciaatr_.sy rnientrasIoest_haciendo,mire
haciaatr_.sycuideque nohayani_os.
• Tengaextrernaprecauci6ncuandose aproxirnea esquinas
ciegas,entradasdepuertas,arbustos,_.rbolesu otrosobjetos
que puedanobstaculizaflela vistade unni_oquepudiese
toparseconla bordeadorade c_sped.
• Mantengaa losni_osalejadosde los rnotoresen rnarchao
calientes.Puedensufrirquernadurasconunsilenciadorcaliente.
• Noperrnitanuncaquelos ni_osrnenoresde14a_osutilicen
estarn_.quina.Losni_osde 14a_osenadelantedebenleery
entenderlasinstruccionesdeoperaci6nynorrnasdeseguridad
contenidasenestemanualyen larn_.quinay debenserentrena-
dosy supervisadosporunadulto.
34
Page 35

MANTENIMIENTO Y ALMACENAMIENTO
• Nuncaenciendael motorenespacioscerradosoen unazona
conpocaventilacidn.Elescapedelmotorcontienernondxidode
carbono,un gas inodoroy letal.
• Antesde lirnpiar,repararo inspeccionarla rn_.quina,cornpruebe
quela cuchillaytodaslaspartesrn6vilessehayandetenido.
Desconecteel cabledela bujiayp6ngalohaciendornasacontra
el motorparaevitarqueseenciendaaccidentalrnente.
Reviselospernosdernontajedelacuchillay del motora
intervalosfrecuentesparaverificarqueest_nbienapretados.
Inspeccioneadern_.svisualrnentelacuchillaen buscadeda_os
(abolladuras,desgaste,roturas,etc).Reernplacela cuchilla
Onicarnenteconequipooriginaldelfabricante(OEM)listadoen
estemanual."El usode piezasquenocurnplenconlasespe-
cificacionesdelequipooriginalpodriatenercornoresultadoun
rendirnientoincorrectoyadern_.sponeren riesgola seguridad".
Lascuchillasdelas bordeadorasdec_spedsonrnuyafiladasy
puedenproducircortaduras.Envuelvalacuchillao utiliceguantes
yextremelasprecaucionescuandoefectOernantenirniento.
Mantengatodoslospernos,tuercasy tornillosbienajustados
paraasegurarsede quela rn_.quinaseencuentraencondiciones
segurasde operaci6n.
Nuncaalterelos dispositivosde seguridad.Controleperiddica-
rnentequefuncionencorrectarnente.
Despu_sdegolpearcon algQnobjetoextra_o,detengael motor,
desconecteelcablede la bujfay conecteel motora rnasa.
Inspeccionerninuciosarnentela bordeadoradecespedparaver
siest,.da_ada.Repareel da_oantesde arrancaryoperarla
bordeadora.
Nuncaintenteajustarunaruedarnientrasel motorest,.en
rnarcha.
Muchoscornponentesde la nuevabordeadorasedesgastanen
raz6ndelusocontinuo.Paraprotegersuseguridad,verifique
frecuenternentetodosloscornponentesdela bordeadoray
reernpl_.celosinrnediatarnentes61oconpiezasde los fabricantes
deequiposoriginales(O.E.M.)listadasen estemanual."Eluso
depiezasque nocurnplenconlasespecificacionesdel equipo
originalpodriatenetcornoresultadounrendirnientoincorrectoy
adern_.sponeren riesgola seguridad".
Nocarnbielaconfiguracidndel reguladordelmotorni acelere
dernasiadoelrnisrno.Elreguladordelmotorcontrolala velocidad
rn_.xirnaseguradefuncionarnientodelmotor.
Mantengao reernplacelasetiquetasde seguridade instrucciones
segQnseanecesario.
Respetelasleyesy regulacionesdeelirninaci6ncorrespondientes
paradesecharlagasolina,el aceite,etc.,usados.La elirninaci6n
inapropiadade liquidoso rnaterialespuededa_arelmedic
arnbiente.
NO MODIFIQUE EL MOTOR
Paraevitarlesionesgraveso larnuerte,nornodifiqueelmotorbajo
ningunacircunstancia.Si carnbiala configuraci6ndel reguladorel
motorpuededescontrolarsey operara velocidadesinseguras.Nunca
carnbielaconfiguracidndef_.bricadel reguladordel motor.
AVISO REFERIDO A EMISIONES
Losrnotoresqueest&ncertificadosycurnplenconlasregulaciones
de ernisionesfederalesEPAy de CaliforniaparaSORE(Equipos
peque_ostodoterreno)est_.ncertificadosparaoperarcongasolina
cornQnsinplornoy puedenincluirlossiguientessisternasde control
de ernisiones:Modificaci6ndemotor(EM)ycatalizadordetresvias
(TWO)si est_.nequipadosde esa rnanera.
AMORTIGUADOR DE CHISPAS
Estarn&quinaest&equipadaconunmotorde cornbusti6ninternay
nodebeser utilizadaeno cercade unterrenoagrestecubiertopor
bosque,rnalezaso hierbaexceptosiel sisternade escapedelmotor
est,.equipadoconunarnortiguadordechispasquecurnplaconlas
leyeslocaleso estatalescorrespondientes,encasode haberlas.
Siseutilizaun arnortiguadordechispasel operadorIodebernantener
en condicionesde usoadecuadas.Enel Estadode Californialas
rnedidasanteriorrnenternencionadassonexigidasporley (Arficulo
4442del C6digode RecursosPOblicosdeCalifornia).Esposible
queexistanleyessirnilaresenotrosestados.Lasleyesfederalesse
aplicanenterritoriosfedexrales.
Puedeconseguirelarnortiguadordechispasparael silenciadora
travesde sudistribuidorautorizadode rnotoreso poni_ndoseen
contactoconeldepartarnentodeservicios.
35
Page 36

SilVIBOLOS DE SEGURIDAD
Estap_ginarepresentay describelaseguridadlossimbolosquepuedenpareceren esteproducto.Lea,comprenda,y sigatodasinstrucciones
en iamfiquina antes procurar para reunir y operar.
LEA EL MANUAL(S) DEL OPERADOR
Lea, comprenda, y siga todas instrucciones en el manual (manuales) antes procurar para
1
reunir y operar
ADVERTENCIA-- CUCHILLAS ROTATIVAS
Mantegna manos y pies lejos de girar hoja.
• ®
ESPECTADORES
Mantenga a espectadores, los animales favoritos, y los ni_os por Io menos 75 pies de la
m_iquina mientras est,1 en la operaci6n. Pare m_iquina si cualquiera entra el _irea.
ADVERTENCIA-- SUPERFICIESCALIENTES
No toque el silenciador o zonas adyacentes.
PROTECCION DE OJO
Siempre Ileve gafas de seguridad o gafas de seguridad al operar esta m_iquina.
36
Page 37

Estapgtginasemarch6intencionadamenteenblanco.
37
Page 38

NOTA:Estaunidadse entregaSIN GASOLINAniACEITE.Despuesdearmar
la unidad,realicelacargade gasolinadelmotorsegQnlasinstrucciones.
NOTA:Lasreferenciasal ladoderechooizquierdodelabordeadorase
observandesdelaposici6ndeloperador.
MONTAJE
Barra
Retireydesechecualquiercart6ndeempaquequepudierehaber
entrela barrasuperiory la barrainferior.
1. Pivotela barrasuperiorhaciearribahastaquecalceensu lugar.
V6aselaFigura1.
Cuerda de Arranque
1. Ubiquelaguia dela cuerdadelladoderechodelabarrasuperior.
Afioje,peroNOretire,la perilladealetasqueaseguralaguiade
la cuerdaa labarrasuperior.V6aselaFigura2.
Figura1
.
Aprietelasperillasdemano,ubicadasa derechae izquierdade
la barra.
Figura2
2. P_.resedetr_.sdela unidady sostengael controlde lacuchilla
contrala barrasuperior.
3. Jalesuavementedela cuerdadearranquefueradel motor.
!ue.
NOTA:Lacuerdadearranquenoseseparadelmotoramenosqueelcontrol
delacuchilla(consultelaFigura2)estepresionadocontralabarrasuperior.
4. Deslicelacuerdadearranquea travesdela partesuperiorde
la guiade lacuerda.Vuelvaaajustarla perillade aletasque
aseguralaguiaa labarrasuperior.
38
Page 39

AJUSTE
CONFIGURACI6N
Ajuste Bisel
El_.ngulodela cuchilladela bordeadorasepuedeajustarcolocando
el ajustedelbiseladoenunadetresposicionesderecorte.Veala
Figura3.
f --.,
...... ;.................., /
......... 7<
/7
J
Figura3
Gasolina y Aceite llene
Nuncacargueeltanquedecombustibleenespacioscerradosconel [
motorenrnarchaohastaquehayadejadoqueel rnisrnoseenfrfepor[
[ o rnenosdosrnnutosdespu_sdehaberestadoen rnarcha. 1
C6mo verificar/Afiadir aceite
Antesdeaprovisionarcon aceiteo decornprobarelnivelde aceite
• Coloqueel motora nivel.
• Lirnpieel_.reade Ilenadodeaceitedetododesecho.
1. RernuevalavariNaindicadoradenivelde aceite(A)y Ifrnpielacon
untrapolirnpio(Figura4).
39
Figura4
,
InserteyaprietelavariNaindicadoradenivelde aceite.
3.
Rernuevalavarillaindicadoradenivelde aceiteycornpruebeel
niveldeaceite.ElaceitedebealcanzarlarnarcaFULL(B)en la
varillaindicadoradenivelde aceite.
Siel niveldeaceiteesbajo,aSadaaceitelentarnentepordentro
del tubode Nenadodeaceite(C). NoNeneexcesivarnente.
Despu_sde aprovisionarconaceite,espereunrninutoydespu_s
vuelvaa cornprobarel niveldeaceite.
Coloquey aprietelavarillaindicadoradeniveldeaceite.
Page 40

RECOMENDACIONESPARA EL COMBUSTIBLE C6MO AGREGAR COMBUSTIBLE
Elcombustibledebecurnplirconestos requerirnientos:
• Gasolinalirnpia,frescaylibrede plorno.
• Un rnfnirnode87 octanos/87AKI(91RON).Parausoa alta
altitudveaacontinuaci6n.
• El usodegasolinahastacon el 10%deethanol(gasohol)ohasta
el 15%de MTBE(methyltertiarybutylether),esaceptable.
NousegasolinaquenohayasidoaprobadatalcornoE85.No
rnezcleel aceitecon la gasolina,nirnodifiqueelmotorparaoperarlo I
concombustiblesalternos.Estoda_ar_,los cornponentesdelmotoreI
[nva dar_.a garanfiade motor. 1
Paraprotegerelsisternadecombustibledelaforrnaci6ndedep6sitos
degorna,rn_zcleleunestabiNzadordecombustiblecuandole a_ada
combustible.Consulteelaparte:Bodegaje.Todosloscombustibles
no sonlosrnisrnos.Sisepresentanproblernasdearranqueo de
rendirnientocarnbiede proveedorde combustibleo de rnarca.Este
motorest,.certificadoparaoperarcongasolina.Elsisternadecontrol
deernisionesparaestemotoresEM(ModificacionesdelMotor).
Alta Altitud
Paraaltitudessuperioresa 5.000pies(1.524metros),esaceptable
el usode gasoNnaconun rnfnirnode85 octanos/85AKI(89RON).
Paracurnplirconlasernisiones,serequierehacerun ajustepara
altaaltitud.Si laoperaci6nse realizarsinhaberhecho_steajustese
causar_,unadisrninuci6nenel rendirniento,unaurnentodelconsurno
decombustibley unaurnentoen lasernisiones.Consulteconun
distribuidorautorizadode Briggs& Strattonparaobtenerinforrnaci6n
relacionadaconel ajusteparaaltaaltitud.No se recorniendaoperar
el motora altitudesinferioresa 2.500pies (762metros)conel kit para
altaaltitud.
Lagasolinay susvaporessonextrernadarnenteinfiarnablesy
explosivos.
Unincendioounaexplosi6npuedencausargravesquernaduraso la
rnuerte.
Cuando Aprovisione con Combustible
• Apagueel motorydejequeel motorseenfrfeporIornenos2
rninutosantesde removerlatapadecombustible.
• Lleneeltanquede combustibleen exterioreso en un_.reabien
ventilada.
• NoIlenedernasiadoeltanquedecombustible.Lleneeltanque
hastaaproximadarnente1,5pulgadas(38rnrn)pordebajode la
partesuperiordelcueNoparaperrnitirlaexpansi6ndelcombus-
tible.
• MantengalagasoNnay susvaporesa distanciade chispas,
Narnasabiertas,testigospiloto,calor,o decualquierotrafuente
de encendido.
• Cornpruebeconfrecuenciasiexistengrietaso fugasen las
rnanguerasdecombustible,el tanque,latapayen losacceso-
rios.C_.rnbielossi es necesario.
• Si sederrarn6combustible,esperehastaquese hayaevaporado
antesdedarlearranqueal motor.
1. Lirnpieel _.reade la tapadecombustiblede polvoydesechos.
Retirelatapadecombustible(A).(Figura5).
Figura5
2. Lleneeltanquede combustible(B)congasolina.A finde perrnitir
la expansi6ndelagasolina,noNeneporencirnadelrondodel
cuellodel tanquedecombustible(C).
3. Relinstalelatapa de combustible.
4O
Page 41

Cuerdade
arranque/
Arrancadorde
retroceso
Palancade controlde
lascuchillas
Palancade controldela
cuchilla
Cebador
Palancadeajuste
de alturadelbordillo
Figura4
Edgercontrolaylascaracteristicassondescritasabajoe ilustradosen
Figura4.
Familiaricesecontodosloscontrolesyconel usoadecuadodelos
mismos.Sepac6modetenerla m_.quinay desactivarloscontroles
r_.pidamente.
CUERDA DE ARRANQUE/ARRANCADOR DE
RETROCESO
Lacuerdadearranque/arrancadorde retrocesoseusaparaarrancar
el motor.
CEBADOR
Eicebadordeusa,parabombeargasoiinaalcarburadory ayudara
arrancarelmotor.Useloparaarrancarunmotorfrio,peronoIo use
paravolveraarrancarunmotorcalienteluegodeapagarseporcorto
tiempo.
PALANCA DE AJUSTE DE ALTURA DEL
BORDILLO
La palancadeajustede alturadelbordillose encuentraenlaparte
posteriorde la bordeadora.Cuandoselacolocaenla muesca
indicada,ayudaa estabilizarlabordeadoramientrasrecortapastoa Io
largodeun bordillo.
PALANCA DE CONTROL DE LAS CUCHILLAS
Elcontrolde lacuchilla,ubicadoen labarradecontrolsuperior,se
debepresionarcontralabarrasuperiorparapoderoperarla unidad
AIsoltarel controlde lacuchillasedetieneel motory la cuchillade la
bordeadora.
PALANCA DE CONTROL DE LA CUCHILLA
Lapalancadecontroldeprofundidadde lacuchillaseencuentradel
ladoderechodela barrasuperior.Seusaparacontrolarlaprofundidad
del corte.Cuantom_.shaciaadelantesemuevala palancadecontrol
de profundidaddela cuchilla,m_.sprofundoser_.el cortede lacuchilla
de la bordeadora.
PALANCA DE AJUSTE DEL BISELADO
Lapalancadeajustedelbiseladoseencuentraen elfrenteizquierdo
de la bordeadora,detr_.sdela cuchilladelabordeadora.Se usapara
variarel _.ngulode lacuchillade labordeadoraentretresposiciones
pararecorte/zanjadoo recortebiselado.
41
Page 42

ENCENDIDO DEL MOTOR
NOTA:Consulteel manualdelmotorentregadoconsubordeadora
paraobtenerunadescripci6ndetalladadetodoslos controlesy
cornponentesrelacionadoscon el motor.Paraencenderel motorde la
bordeadora,procedade lasiguienteforrna:
1. Conecteelcablede labujfaa larnisrna.AsegQresede queel
capuch6nrnet_.licosobreel extrernodelcable dela bujiade
encendidoest,. biensujetosobrelapuntarnet_.licade la bujia.
2. Muevala palancadecontrolde profundidaddela cuchillapara
atr_.sa la posici6nINICIOde larnuescaadyacente(superior).
3. Presionelabornbilladelcebadortresveces,haciendounapausa
dedosa tressegundosentrecadapresi6n.Cuandohacefrio
(debajode50°F/19°C),puedesernecesariopresionarel bulbodel
cebadorcuatroocincoveces.
NOTA:Generalrnentenohacefaltausarel cebadorparavolvera
arrancarunmotorcaliente.Hacerlopuedeprovocarqueel motorse
ahogue.
4. Paradodetr_.sdelaunidad,presionelapalancadecontrolde
lacuchillay sost_ngalocontralabarrasuperiorconlarnano
izquierda.
Esternecanisrnode controlesundispositivode seguridad.Nunca
intenteevitarsufuncionarniento.
BORDEADO
Lacuchilladecortegiratoriapuedelanzarobjetosycausarlesiones
personales.Mantengael _.realibredeobservadoresynooperesin
tenettodoslos protectores.
Nobajelacuchillasi lacuchillaseencuentrasobreconcreto,asfalto,
rocaso similar.Lacuchillapuedegolpearcontralasuperficiede
apoyoy provocarlesionespersonaleso perjuiciosrnateriales.
Paracornenzara bordear,procedadelasiguienteforrna:
1. Mueva[aunidada[_.reaquevaa recortar,asegur_.ndosedeque
[a ruedaposteriorizquierdaest_sobreuna superficieduray que
la cuchillaest,.sobreel _.reaa cortar.Veala Figura5.
5. Conlarnanoderecha,tomela rnanijadel arrancadorde retroceso
ylentarnentetirede lacuerdahaciaafuerahastaqueel motor
Ileguealprincipiodesuciclodecornpresi6n(la cuerdaestar_,un
pocorn_.stensaen estepunto).
6. Despu_sdeperrnitirquela cuerdavuelvalentarnente,tirede la
cuerdaconun rnovirnientodebrazor_.pidoy continuo.Durante
todoel rnovirnientornantengafirrnernentesujetala rnanijadel
arrancador.
7. Perrnitaquelarnanijadelarrancadorvuelvalentarnentealperno
deanilla.
NOTA:Si el motornoIograarrancarluegode tresintentos,preslone
elcebadordosvecesrn_.santesdejalar nuevarnentede lacuerdade
arranque.
DETENCION DEL MOTOR
Paradetenerelmotorde la bordeadora,sueltela palancadecontrol
de lacuchilla.
Figura5
2. Conla palancadecontrolde la cuchillaenla posici6nde
funcionarniento,hagaunapasadaporel _.reaa recortarantesde
procedera[asiguienternuesca.Cuantorn_.sadelantesernueva
la palancade controlde profundidadde la cuchilla,rn_.sprofundo
o rn_.sabajoser_.elcortede lacuchillaen elsuelo.Puedehacer
faitahacervariaspasadasparaobtenerlaprofundidaddecorte
deseada.Nobajelacuchillarn_.sde unarnuescadeprofundidad
porvezsin hacerunapasada.
3. Pararnejoresresuitados,procedalentarnenteporel sendero
queest,. recortando,rnoviendo[abordeadoraparaatr_.sy
paraadelanteporel _.readecorte,siernpreasegur_.ndosede
rnantener[a ruedaposteriorizquierdasobre[a superficieduray [a
cuchillaen el senderodecorte,cercaperosintocarel hordede
la superficiedura.
4. Unavezquehaterrninadode recortarel_.reaseleccionada,
vuelvaa co[ocarlapalancade controlde lacuchillaen laposici6n
INICIO,rnu_vasea [a siguiente_.reaa recortar,y proceda
nuevarnentedesdeel paso1.
42
Page 43

RECORTEA LO LARGO DE UN BORDILLO
La ruedaposteriorderechade la bordeadorasepuedebajara una
decincoposicionesparafacilitarlatareade recorteaIolargodeun
bordillo.
Paraajustarla alturade laruedadelbordillo,hagaIosiguiente:
1. Bajela ruedaposteriorderecharnoviendola palancadeajustede
la alturadel bordilloligerarnentea la izquierda.Veala Figura6.
f Palancade \.
ajustede ....
altura
del bordillo
ZANJADO (Sl EST.&. EQUIPADO)
Sepuedeutilizarla caracteristicadezanjadoopcionalde labordea-
dora,paracrearunsenderodecortern_.sanchoparacosastales
cornotendidode cablesparala ilurninaci6npaisajista
Desconecteel cablede labujiade encendidoy hagarnasacontrael
motorantesde realizarlossi_asos.
Elbordede labordeadoraesfiloso.P6ngaseguantesdetrabajode
cueroparaprotegerselasrnanoscuandotrabajacercade lacuchilla
de la bordeadora..
UsedosIlaves(unaparairnpedirquela cabezadelperno
hexagonalgire Iocay laotraparadesenroscarlatuercade brida)
paraextraerla tuercade bridaqueaseguralacuchillade la
bordeadora,dejandola cuchilladela bordeadoraensulugar.Vea
laFigura8.
Husilloroldana "" .....
LAminade la
Figura6
2.
Girela ruedaposteriorderechaauna posici6naplicableen
relaci6nala curbadela alturadelbordilloa recortar.Veala
Figura6.
3. Sueltelapalancadeajustede laalturadel bordilloparatrabarla
ruedaen esa posici6n.Veala Figura6.
BISELADO
ParaIograrunhordebiselado,pongala palancade ajustedelbiselado
(consultelaMontajey Configuraci6n)en laprirnerarnuesca(rnano
izquierda)o tercerarnuesca(rnanoderecha)paracolocarla bordea-
doraenposici6nparabiselar.Vealafigura 7.
LAminadel
Edger
Arandelaplana
Figura8
2. [nstale[acuchiliaadicionaldela bordeadorasurninistradacon[a
unidady la arandelaplana.Veala Figura8.
3. Sujetecon[atuercade bridaextraidaanteriorrnente.Useuna
[lavede torsi6nparaajustar[atuercaconrebordeentre37
pies-librasy 50pies-libras.
NOTA:AsegQresedeque lacorreadetransrnisi6nest,.correctarnente
asentadasobreelhusillode lacuchillay queseencuentrac6rnoda-
rnenteubicadasobrelos hordesdel husilloy nopellizcadaentreellos.
Repitalostres prirnerospasossi la correaest,.pellizcada.
Figura7
43
Page 44

REEIVIPLAZODE CORREA
Correadetransmisi6n
NOTA:Paraayudaraarrnarnuevarnente,observela orientaci6nde la
correadetransrnisi6nsobrelasdospoleasIocasy la poleavolantedel
motorantesde realizarlossiguientespasos.Veala Fig.7-1.
Lacorreadetransrnisi6nde[abordeadoraestasujetaa desgastey
sedeberiacarnbiarsisepresentansignosdeagrietarniento,desin-
tegraci6no descornposici6n.Paracarnbiarlacorreaprocedadela
siguienternanera:
1. Trabajandodelantede la bordeadora,afiojelatuercadesegu-
ridadconbridaqueest,.sobreel bastidor,perrnitiendoqueel
conjuntode la poleaIocagirelevernentefueradelbastidor.Vea
la Figura9.
Tuercade seguridad
de la brida
Polea de polea
_._ volante de holgaz_.n
delmotor
Figura9
2.
Conlaotrarnano,alcancecuidadosarnentedebajodela parle
posteriorde la unidadyextraigalacorreade alrededordela
poleavolantedel motor.Veala Figura9
J
.
Retirelaguardade lacorreade laspoleasdelhusil[osacandolos
dostornillosautoroscantesquela sujetanalrnontajedela placa
de lacuchilla.VealaFigura10.
Defensade lacorrea
Husilloroldana
P°!easuperi°r............................Poieainferior.................._
Poleavolantedel motor
Figura10
4. Cuidadosarnenteretire[a correade las poleas,verificandouna
vezrn_.sla orientaci6ndela correa.Descartelacorrea.Veala
Figura10.
5. Trabajandodelantede la bordeadora,coloquelacorreaen las
poleasdel husillo,ori_ntelanuevarnentehacialasdospoleas
Iocasy luegocol6quelaen lapoleadel volantedelmotor.
NOTA:AsegOresede queel lado"V" de lacorreaest,.asentadosobre
la poleasuperioryqueel ladopianode lacorreaest,.asentadosobre
la poleainferior.Veala Figura10.
6. Vuelvaa instalarel protectordelos bordesdelhusilloconlos
tornillosautorroscadosextraidosanteriorrnente.
7. Aseg[3resedeque [acorreadetransrnisi6nest,.sobrela polea
volantedel motory las poleasIocas,yvuelvaa ajustarlatuerca
de seguridadconbridaquese encuentraenlapartesuperiordel
bastidor.
NOTA:AsegOresede quela correade transrnisi6nest,.correctarnente
asentaday queseencuentrac6rnodarnenteubicadasobrelosbordes
del husilloy nopellizcadaentreellos.Repitalostresprirnerospasossi
la correaest,.pellizcada.
Nuncaoperela bordeadorasinel protectordela correadelos
hordesdelhusilloensulunar.
44
Page 45

iVlANTENIIVllENTO
Desconecteelcablede[abujiadeencendidoy hagarnasacontrael
motorantesde realizarcualquierajuste,reparaci6no rnantenirniento.
El Borde de la Bordeadora
El hordedela bordeadoraesfiloso.P6ngaseguantesdetrabajode
cueroparaprotegerselasrnanoscuandotrabajacercadela cuchilla
de labordeadora.
1. Usedos Ilaves(unaparairnpedirquelacabezadel perno
hexagonalgireIocayla otraparadesenroscarlatuercadebrida)
paraextraerlacuchillade la bordeadora.ConsultelaFigura11.
F
Pedestal
Lubriqueel pedestalcada25 horaso porIornenosunavezpor
ternporada.Sirnplernenteapliqueaceiteen arnbosextrernosde la
placadecubierta.Veala Figura12.
F
Lubricar
Figura12
Tuercadel
L_.rninade[
Edger
J
Figura11
2. Retireydesechela cuchilladela bordeadoraperoconservela
tuercaconreborde.
3. Instalelacuchillade reernplazode la bordeadoray latuercacon
reborderetiradaantes.Useuna[lavedetorsi6nparaajustar[a
tuercaconrebordeentre37pies-librasy 50pies-libras.
NOTA:AsegQresedeque lacorreadetransrnisi6nest,.correctarnente
asentadasobreel husillodela cuchillay queseencuentrac6rnoda-
rnenteubicadasobrelosbordesdelhusilloyno pellizcadaentreellos.
Repitalostresprirnerospasossi[acorreaest,.peiiizcada.
LUBRICACI(SN
Ruedas
Lubriquelas ruedasycojinetesporIornenosunavezporternporada
conunaceiteliviano.Adern_.s,sise quitanlasruedaspotcualquier
rnotivo,lubriquela superficiede[pernode[ejey la superficieinterna
de[a ruedaconaceiteliviano.
Puntos de giro
Lubriquelospuntosde girodelganchopalancadecontrolde la
cuchilla,lapalancadecontrolde profundidadde la cuchilla,ysi
corresponde,lapalancadeajuste,y la palancadeajustede alturade[
bordilloconaceitelivianoporIornenosunavezporternporada.
45
Page 46

1. Conel motorapagadoperoa_ncaliente,desconectelabujfa.Yea
Figura15.
NOTA:Reemplazarcon unaChampionRJ19LMbujfa.
Figura15
.
Compruebeel entrehierro(A,Figura16)conuncalibradordealam-
bre(B).Sies necesario,reajusteel entrehierro.Instaleyaprietela
bujfaalpardeaprieterecomendado.Paraelajustedelentrehierro
oel pardeapriete,consultelasecci6ndeEspecificaciones.
C61VlOCAIVIBIAREL ACEITEC6NIO REEMPLAZAR LA BUJiA- FIGURA
Lagasolinay susvaporessonextremadamenteinfiamablesy
explosivos.
Unincendioounaexplosi6npuedencausargravesquemadurasola
muerte.
• Si drenael aceitedesdeel tubosuperiorde Ilenadodeaceite,el
tanquedecombustibledebeestarvacfoo de Iocontrariopodrfa
presentarseunafugadecombustiblequepodrfaocasionarun
incendioo unaexplosi6n.
Elaceiteusadoesun productodedesechopeligrosoy sedebe
disponerde_steadecuadamente.NoIodescarteen la basurera
dela casa.Verifiqueconsusautoridadeslocales,conelcentrode
servicio,o con su distribuidorparaobtenerinformaci6nacercade las
facilidadessegurasparasudestrucci6n/reciclaje.
Remoci6n del Aceite
Se puededrenarel aceitedesdeel orificiodedrenajeinferior,el
orificiodedrenajelateralodesdeel tubosuperiordeIlenadodeaceite.
1. Conel motorapagadoperoaQncaliente,desconecteelcablede
la bujfa(A)y mant_ngaloa distanciadelabujfa(Figura15)
2. Elmotorest,.equipadoconundrenajeinferior(B,Figura17)
and/oundrenajelateral(C). Remuevael tap6ndedrenajede
aceite.Dreneelaceitea unrecipienteaprobado.
Figura16
©
Figura17
NOTA:Cualquierade lostaponesdeaceite(D)mostradospuede
estarinstaladoen elmotor.
3. Despu_sde haberdrenadoelaceitedelmotor,instaley aprieteel
tap6nde drenajedeaceite.
46
Page 47

.
SidrenaelaceitedesdeeltubosuperiordeNenadodeaceite(E),
rnantengaelextrernodela bujfadelmotor(F) haciaarriba(Figura
18).Dreneel aceitea un recipienteaprobado.
Figura18
2. ViertaelaceitelentarnentepordentrodeltubodeIlenadodeaceite
delmotor(H).NoIoIleneexcesivarnente.Despu_sdea_adiraceite,
espereunrninutoydespu_svuelvaa cornprobarelniveldeaceite.
3. Coloquey ajustelavarillaindicadora.
4. Rernuevalavarillaycornpruebeelniveldeaceiteenla varilla.El
aceitedebealcanzarla rnarcaFULL(J)en lavarillaindicadorade
niveldeaceite.
5. Coloquey ajustelavarillaindicadora.
C61VIO MANTENER EL FILTRO DE AIRE
Lagasolinay susvaporessonextrernadarnenteinflarnablesy
explosivos.
IUnincendioounaexplosi6npuedencausargravesquernadurasola
lrnuerte.
• Nuncaarranque_opereel motorsi rernovi6el conjuntodelfiltro
de aireo elfiltrode aire.
Nouseairea presi6nni solventesparalirnpiarelfiltro.Elaire a
presi6npuededaBarelfiltroy lossolventespuedendisolverlo.
1. Rernuevaeltornillo(A)de la partesuperiordelconjuntodelfiltro
de aire(B).VeaFigura20.
Si drenael aceitedesdeel tubosuperiorde Nenadodeaceite,el
tanquedecombustibledebeestarvacfoo de Iocontrariopodrfa
presentarseunafugade combustibleque podrfaocasionarun
incendioounaexplosi6n.Paradesocupareltanquedecombustible,
opereelmotorhastaquesedetengapotla faltadecombustible.
Aprovisionamiento de Aceite
• Coloqueel motora nivel.
• Lirnpieel_.reade Ilenadode aceitedetododesecho.
• Consultelasecci6ndeEspecificacionesparalacapacidaddeaceite.
1. Rernuevala variNaindicadorade niveldeaceite(G)y Ifrnpiela
conuntrapolirnpio(Figura19).
F
J
Figura19
47
Figura20
.
Paraprevenirque caigandesechosdentrodelcarburador,
rernuevacuidadosarnenteel conjuntodelfiltrodeaire.
3.
Rernuevaelelernentodeespurna(C)de labasedel filtrode aire.
4.
Laveelelernentode espurnaen detergenteIfquidoyagua.
Escurrahastasecarel elernentodeespurnaen untrapoNrnpio.
5.
SatureelelernentodeespurnaconaceiteNrnpioparamotor.Para
removerel excesode aceite,escurrael elernentode espurnaen
untrapolirnpio.
.
Instaleelelernentodeespurnaenlabasedel filtrodeaire.
7.
Instaleelconjuntodelfiltrode airesobreelcarburadory
asegckelocon untornillo.
Page 48

Sinosevaautilizarelequipodurante30dfasorn_.sesnecesarioalrnacenarelequipodernaneraadecuada.Sigalasinstruccionesde
alrnacenarnientoqueseindicanacontinuaci6nparagarantizarelrendirnientorn_.xirnodelabordeadoraduranternuchosa_osrn_.s.
PREPARACI6N DEL MOTOR
Losrnotoresalrnacenadosrn_.sde30 dfasnecesitanserdrenados
decombustibleparaevitarquesedeterioreny se forrnegornaenel
sisternacombustibleoen laspiezasprincipalesdel carburador.Si la
gasolinaensumotorsedeterioraduranteelalrnacenarniento,debe
repararo reernplazarel carburadory otroscornponentesdel sisterna
combustible.
1. Elirninetodoel combustibledeldep6sitohaciendofuncionarel
motorhastaquesedetenga.
2. Carnbieelaceitedelmotor.
3. Extraigala bujfade encendidoyviertaenelcilindro
aproxirnadarnente1onza(30 rnl)de aceiteparamotorlirnpio.Tire
variasvecesdelarrancadorde retrocesoparadistribuirelaceitey
reinstalelabujfa.
4. Lirnpielosresiduosacurnuladosalrededordel motor,y debajo,
alrededor,y detr_.sdelsilenciador.Apliqueunacapadelgadade
aceiteen todaslas _.reasquepuedenNegara oxidarse.
5. Alrnaceneel motorenun sectorlirnpio,secoy bienventilado,
lejosdecualquierartefactoquefuncionecon unallamao luz
pilotocornohornos,calentadoresdeaguao secadoresde ropa.
Evitecualquiersectorconunmotorel_ctricoqueproduzca
chispasodondeseutilicenherrarnientasel_ctricas.
6. Sies posible,evitesectoresdealrnacenarnientoconrnucha
hurnedad.
7. Mantengael motorniveladocuandoIoalrnacene.Lainclinaci6n
delmotorpuederesultarenfugasdecombustibleoaceite.
PREPARACION DE LA BORDEADORA
Si no seva a usarlabordeadoradurante30dfaso rn_.s,sigalas
siguientesinstruccionesincluidasa continuaci6n.
1. Alrnaceneel equipoen un_.readespejaday seca.No la
alrnacenecontiguaa ningOnmaterialcorrosivo,cornoes el
fertiNzanteparacesped.
2. Escudode la hojabordeadorachasiscongrasaparaevitarla
oxidaci6ny la corrosi6n.
3. Escudode la bordeadora,y especialrnentelosrnanantialesy los
rodarnientosconunaceiteligeroo sprayde silicona.
4. Lirnpieel exteriordelmotoryde la bordeadora.
NOTA:Siva a alrnacenarcualquiertipo de equipornotorizadoen
un lugarrnalventiladoo ungalp6nrnet_.lico,debetenetcuidadode
ponerleantioxidanteal equipo.
48
Page 49

Antesderealizarcualquiertipodernantenirnientoo servicio,desenganchetodosloscontrolesydetengael
motor.Esperea quesedetengancornpbtarnentetodaslaspiezasrn6viles.Desconecteelcabledelabujfay
p6ngalohaciendornasacontrael motorparaevitarqueseenciendaaccidentalrnente.Utilicesiernpreanteojos
[desegurdaddurantee funconarnentoo rnentrasajustao reparaesteequpc.
Esta secci6nanaliza problemasmenores de servicio.Paraubicar elCentrodeServicio Searsm_scercanoo paraprogramarun
servicio,sirnplementecomuniqueseconSearsal tel_fono 1-800-4-MY-HOME®.
Elmotornoarranca
1. Elfiltrodeaireest,.sucio
1. Consulteel Servicioy MantenirnientoSecci6n.
2. Ernpujeel bulbodelcebadortresveces.
2. Elmotordebesercebado
3. Eltanquede cornbustibbest,.vacio
4. Combustibleviejoenel tanquedegasolina
3. Lleneel tanquecongasolinalirnpiayfresca.
4. Drenelagasolinay vuelvaa Ilenareltanquecon
gasolinalirnpiay nueva.
5. Conecteelcablede la bujiaa labujia.
5. Sehadesconectadoel cablede labujia.
6. Lirnpie.ajustelaseparaci6n,o carnbiela bujia.
6. Bujfadefectuosa
El motorfuncionade manera
err_tica
1. Elcablede labujiaest,.fiojo
2. Combustibleviejoenel tanquedegasolina
1. Conecteyajusteel cablede la bujfa.
2. Drenelagasolinay vuelvaa Ilenareltanquecon
gasolinalirnpiay nueva.
3. Laventilaci6nen latapadelcombustibleest,.
3. Despejela ventilaci6nretirandolos residuos.
obstruida
4. Aguao suciedaden elsisternadecornbustibb
4. Vadeel dep6sitodecornbustibb.Carguecombus-
tiblenuevoenel dep6sito.
5. Elfiltrodeaireest,.sucio
6. Esnecesarioajustarelcarburador
5. ConsulteelServicioy MantenirnientoSecci6n.
6. P6ngaseen contactoconundistribuidordeservicio
Searsautorizado.
El motorrecalienta
1. Elniveldeaceitedelmotorest,.bajo
2. Flujodeaire restringido
1. Lleneel c_.rterconaceiteadecuado.
2. Lirnpieel _.reaalrededorde lasabtas de refriger-
aci6n.
3. Filtrodeaire sucio
4. Esnecesarioajustarelcarburador
3. Reernplaceelfiltrode airedelmotor.
4. P6ngaseen contactoconundistribuidordeservicio
Searsautorizado.
Demasiadavibraci6n 1. Lacuchiiiadelabordeadoraest_.dobladaodaffada 1. Reernplacelacuchiliade la bordeadora.
2. Elhusillode la bordeadoraest,.dobladoo 2. P6ngaseen contactoconundistribuidorde servicio
daffado Searsautorizado.
Lacorreadetransmisi6n 1. Lacorreaest,.gastadao estirada 1. Reernpiace[acorreade transrnisi6n.
se resbala
...... ; ........ ....
sNECESITAMASAYUDA?
Encon_rar& la respues_a y m_is en managemyhome corn _isin ca_3o
• En Ifnea podrb, encontrar este manual y los manuales de todos sus otros
productos.
• Sus preguntas ser_.n respondidas pot nuestro equipo de especialistas
• Obtenga un plan de mantenimiento personalizado para su hogar.
• Encuentre informaci6n y herramientas que Io ayudaran con los proyectos
domesticos
49
Page 50

Felicitacionespor haberrealizadounaadquisici6ninteligente.El
productoCraftsman@queha adquiridoest_dise_adoyfabricado
parabrindarrnuchosa_osde funcionarnientoconfiable.Perocorno
todoslosproductosavecespuederequerirdereparaciones.Esen
esernornentocuandoeldisponerdeunAcuerdodeprotecci6npara
reparacionesle puedeahorrardineroy problernas.
A continuaci6nsedetallanlospuntosincluidosenel Acuerdo:
• Servicio experto prestadopornuestros10,000especialistasen
reparacionesprofesionales
• Servicio ilirnitadosincargoparalaspiezasylarnanodeobraen
todaslas reparacionescubiertas
• Reernplazodel productohasta1500d61aressino esposible
repararel productocubierto
• Descuentode 10%del precionormaldelservicioy delaspiezas
relacionadasconel rnisrnoqueno est_ncubiertasporel acuerdo;
adern&s,10%del precionormaldelaverificaci6ndernantenirniento
preventivo
• Ayudar_pidapottel_fono- IoIlarnarnosResoluci6nR_pida- el
apoyotelef6nicode unCharnuscaal representante.Pienseen
nosotroscornoel manual"deundue_ohablador."
Unavezadquiridoel Acuerdo,puedeprograrnarel serviciocon
tans61orealizarunaIlarnadatelef6nica.PuedeIlarnarencualquier
mornentodeldia odela nocheo prograrnarun servicioen linea.
ElAcuerdodeProtecci6ndeReparaci6nesunacornprasinriesgo.
Siustedanulaporalgunaraz6nduranteel periododegarantiade
producto,proporcionarernosun reernbolsoIleno.O,un reernbolso
prorrateadoencualquiermornentodespu_sdelperiodode garantia
de productoexpira,iAdquieraboysuacuerdodeprotecci6npara
reparaciones!
Seaplican deterrninadaslirnitaciones y exclusiones.Paraobtener
inforrnaci6nadicional y preciosen los Estados UnidosIlarneal
1-800-827-6655.
El*CoverageenCanad_variaenalgunosarticulos. Paradetalles
IlenoslaIlarnadaCharnuscaCanad_en 1-800-361-6665.
Servicio de instalaci6ndeSears
Sideseasolicitarlainstalaci6nprofesionalde Searsdeaparatos
dorn_sticos,dispositivosparaabrirportones,calentadoresde agua
y otrosarficulosdorn_sticosirnportantes,en losEstadosUnidoso
Canad_Ilarneal 1-800-4-MY-HOME®.
5O
Page 51

51
Page 52

Your Home
For troubleshooting, product manuals and home solutions advice:
÷anag÷
www.managemyhome.com
For repair - in your home - of all major brand appliances,
lawn and garden equipment, or heating and cooling systems,
no matter who made it, no matter who sold it!
For the replacement parts, accessories and
owner's manuals that you need to do-it-yourself.
For Sears professional installation of home appliances
and items like garage door openers and water heaters.
1-800-4-MY-HOME ® (1-800-469-4663)
Call anytime, day or night (U.S.A. and Canada)
www.sears.com www.sears.ca
Our Home
For repair of carry-in items like vacuums, lawn equipment,
and electronics, call anytime for the location of your nearest
Sears Parts & Repair Service Center
1-800-488-1222 (U.S.A.) 1-800-469-4663 (Canada)
www.sears.com www.sears.ca
To purchase a protection agreement on a product serviced by Sears:
1-800-827-6655 (U.S.A.) 1-800-361-6665 (Canada)
Para pedir servicio de reparaci6n Au Canada pour service en fran£ais:
a domicilio, y para ordenar piezas: 1-800-LE-FOYER Mc
1-888-SU-HOGAR ® (1-800-533-6937)
(1-888-784-6427) www.sears.ca
® Registered Trademark / TMTrademark of KCD IP, LLC in the United States, or Sears Brands, LLC in other countries
® Marca Registrada / TMMarca de Fabrica de KCD IP, LLC en Estados Unidos, o Sears Brands, LLC in otros paises
MCMarque de commerce / MDMarque deposee de Sears Brands, LLC
;ii
 Loading...