

Page 1

perator's nual
CRFiFrSM N"
Edger/Trencher
Model No. 247.79651
CAUTION: Before using this
product, read this manual and
follow aJl safety ruJes and operating
instructions.
Sears Brands Management Corporation, Hoffman Estates, IL 60179, U.S.A.
Visit our website: www.craftsman.com FormNo.769-05829B
o SAFETY
ASSEMBLY
OPERATION
MAINTENANCE
PARTS LIST
o ESPANOL R 32
(January9,2012)
Page 2
Warranty Statement .......................................................... 2
Safety instructions ........................................................ 3-6
Assembly ........................................................................ 7-8
Operation ..................................................................... 9-11
Service and Maintenance ......................................... 12-16
Off-Season Storage ........................................................ 17
Troubleshooting .............................................................. 18
Parts List .................................................................... 20-28
Espa_oi ............................................................................ 32
Service Numbers ............................................. Back Cover
Craftsman Two Year Full Warranty
FORTWOYEARSfromthedated purchase,this productiswarrantedagainstanydefectsinmaterialor workmanship.Defectiveproductwill
receivefreerepairor freereplacementifrepairisunavailable.
Forwarranty coveragedetails to obtain repairor replacement,visit the website: www.craftsman.com.
This warranty covers ONLYdefects in material andworkmanship. Warranty coverage does NOTinclude:
• Expendableitemswhichcan wearoutfromnormalusewithinthewarrantyperiod,suchas belts,filters,sparkplugsoredgingblades.
• Productdamageresultingfromuserattemptsat productmodificationor repairorcausedbyproductaccessories.
• Repairsnecessarybecauseof accidentorfailureto operateor maintaintheproductaccordingtoall suppliedinstructions.
• Preventativemaintenanceor repairsnecessarydueto improperfuelmixture,contaminatedorstalefuel.
Thiswarrantyisvoid if thisproductiseverusedwhileprovidingcommercialservicesor if rentedtoanotherperson.
Thiswarrantygivesyouspecificlegalrights,andyou mayalso haveotherrightswhichvaryfromstatetostate.
Sears BrandsManagementCorporation, Hoffman Estates,IL 60179
EngineOilType: SAE30
EngineOilCapacity: 18ounces
Fuel: UnleadedGasoline
SparkPlug: Champion®RJ19LM
Engine: Briggs& Stratton
Model Number
Serial Number
Dateof Purchase
Recordthe modelnumber,serialnumber,
anddateof purchaseabove.
© SearsBrands,LLC 2
Page 3
Thissymbolpointsoutimportantsafetyinstructionswhich,if not
followed,couldendangerthe personalsafetyand/orpropertyof
yourselfandothers. Readandfollowall instructionsin thismanual
beforeattemptingtooperatethismachine.Failureto complywith
theseinstructionsmayresultin personalinjury.Whenyouseethis
symbol,HEEDITSWARNING!
Thismachinewasbuilttobeoperatedaccordingto the safeopera-
tionpracticesin thismanual.Aswithany typeofpowerequipment,
carelessnessorerroronthepartoftheoperatorcan resultin
seriousinjury.Thismachineiscapableof amputatingfingers,hands,
toesandfeetandthrowingdebris.Failureto observethefollowing
safetyinstructionscouldresultin seriousinjuryordeath.
CALIFORNIA PROPOSITION 65
EngineExhaust,someof itsconstituents,andcertainvehicle
componentscontainoremitchemicalsknowntoStateofCalifornia
tocausecancerandbirthdefectsorother reproductiveharm.
TRAINING
• Readthisoperator'smanualcarefullyin itsentiretybefore
attemptingto assemblethis machine.Read,understand,and
followall instructionsonthemachineandinthe manual(s) before
operation.Keepthismanualina safeplacefor futureand regular
referenceandfororderingreplacementparts.
• Becompletelyfamiliarwiththecontrolsandthe properuseofthis
machinebeforeoperatingit.
• Thismachineis a precisionpieceofpowerequipment,nota
plaything.Therefore,exerciseextremecautionat alltimes.Your
machinehas beendesignedto performonejob:to edgelawn.Do
notuseit for any otherpurpose.
• Neverallowchildrenunder14yearsofagetooperatethis
machine.Children14andovershouldreadandunderstandthe
instructionsandsafeoperationpracticesin thismanualandon
themachineandbe trainedandsupervisedbyanadult.
• Only responsibleindividualswhoarefamiliarwiththeserulesof
safeoperationshouldbe allowedtousethis machine.
• Tohelpavoidbladecontactor athrownobjectinjury,stayin
operatorzonebehindhandlesandkeepchildren,bystanders,
helpersandpetsatleast75feetfromlawnedgerwhile it is in
operation.Stopmachineifanyoneentersarea.
Your Responsibility--Restrict theuseofthispowermachineto
personswhoread,understandandfollowthewarningsand instruc-
tionsin thismanualandonthemachine.
SAVETHESEINSTRUCTIONS!
PREPARATION
• Thoroughlyinspecttheareawherethe equipmentistobeused.
Removeall stones,sticks,wire,bones,toys andother foreign
objectswhichcould betrippedoveror pickedupandthrownby
theblade.Thrownobjectscancauseseriouspersonalinjury.
• Alwayswearsafetyglassesorsafetygogglesduringoperation
andwhileperformingan adjustmentor repairto protectyoureyes.
Thrownobjectswhichricochetcancauseseriousinjurytothe
eyes.
• Wearsturdy,rough-soledworkshoesandclose-fittingslacks
and shirts.Shirtsand pantsthatcoverthe armsandlegsand
steel-toedshoesare recommended.Neveroperatethis machine
inbarefeet,sandals,slipperyorlightweight(e.g.canvas)shoes.
• Neverattempttomakeanyadjustmentswhilethe engineis
running,exceptwherespecificallyrecommendedinthe operator's
manual.
SAFE HANDLING OF GASOLINE:
Toavoidpersonalinjuryorpropertydamageuseextremecarein
handlinggasoline.Gasolineis extremelyflammableandthevaporsare
explosive.Seriouspersonalinjurycanoccurwhengasolineis spilled
on yourselforyourclotheswhichcanignite. Washyourskinand
changeclothesimmediately.
• Useonlyanapprovedgasolinecontainer.
• Neverfillcontainersinsidea vehicleoron a truckortrailerbed
witha plasticliner.Alwaysplacecontainerson thegroundaway
fromyourvehiclebeforefilling.
• Removegas-poweredequipmentfromthetruckortrailerand
refuelit ontheground.Ifthisis notpossible,thenrefuelsuch
equipmenton atrailerwitha portablecontainer,ratherthanfrom
a gasolinedispensernozzle.
• Keepthenozzleincontactwiththerimofthefueltankor
containeropeningat all timesuntilfuelingiscomplete.Donotuse
a nozzlelock-opendevice.
3
Page 4

• Extinguishallcigarettes,cigars,pipesandothersourcesof
ignition.
• Neverfuel machineindoorsbecauseflammablevaporswill
accumulatein thearea.
• Neverremovegascapor addfuelwhileengineis hotor running.
Allowengineto coolat leasttwo minutesbeforerefueling.
• Neveroverfillfueltank.Filltankto nomorethan1/2inchbelow
bottomoffillerneckto provideforfuelexpansion.
• Replacegasolinecapandtightensecurely.
• Ifgasolineis spilled,wipe it off theengineandequipment.Move
machineto anotherarea.Wait5 minutesbeforestarting engine.
• Neverstorethe machineorfuelcontainernearanopenflame,
sparkor pilotlightasona waterheater,spaceheater,furnace,
clothesdryeror othergasappliances.
• To reducefirehazard,keeplawnedgerfreeofgrass,leaves,or
otherdebrisbuild-up.Cleanupoil orfuelspillageandremoveany
fuelsoakeddebris.
• Allowa lawnedgerto cool at leastfive (5) minutesbeforestoring
OPERATION
• Do not puthandsorfeetnear rotatingparts.Contactwiththe
rotatingbladecanamputatehandsandfeet.
Thebladecontrolhandleisa safetydevice.Neverbypassits
operation.Doingso,makesthemachineunsafeand maycause
personalinjury.
Neveroperatewithoutbladeguard,debrisshieldandblade
controlhandlein placeandworking.
Neveroperatewithdamagedsafetydevices.Failuretodo so,can
resultinpersonalinjury.
Neverrunanengineindoorsorina poorlyventilatedarea.Engine
exhaustcontainscarbonmonoxide,anodorlessanddeadlygas.
Donotoperatemachinewhileundertheinfluenceof alcoholor
drugs.
Mufflerandenginebecomehotandcancausea burn.Donot
touch.
Neveroperatethismachinewithoutgoodvisibilityor light.Always
be sureofyourfootingandkeepa firmholdonthehandles.Walk,
neverrun.
Donotoperatethis machineif it has beendroppedor damaged.
Returnmachineto your nearestauthorizedservicingdealerfor
examinationand repair.
Donotoperatethis machinewitha damagedorexcessivelyworn
cuttingblade.
Neverattempttoclearmaterialfromthe bladeguardwhilethe
engineis running.Shuttheengineoff,disconnectthe spark
plugwireandgroundagainsttheenginetopreventunintended
starting.
Donotoverloadmachinecapacitybyattemptingtoedgeattoo
fastof a rate.
Stayalertforunevensidewalks,terrainetc.Alwayspushslowly
overroughsurfaces.Donotusethis machineon gravelsurfaces.
Donotoperatemachinein rainorwetsoil conditions.
• Alwaysoperatemachinefrombehindthe handlesandposition
yourselfwherethedirectlineof sighttocuttingbladeis blocked
byguards.
• Alwaysstopenginewhenedgingortrimmingisdelayedor when
transportingmachinefromonelocationto another.
• Neverleavearunningmachineunattended.Stopthe engine,
disconnectsparkplugwireandgroundagainsttheengineto
preventunintendedstarting.
• Only usepartsandaccessoriesmadefor thismachinebythe
manufacturer.Failuretodo so,canresultin personalinjury.
• Ifsituationsoccurwhichare notcoveredinthis manual,use care
andgoodjudgment.ContactCustomerSupportforassistanceor
thenameof your nearestservicedealer.
CHILDREN
Tragicaccidentscan occuriftheoperatorisnotalerttothepresence
ofchildren.Childrenareoftenattractedto powerequipmentsuchas
lawnedgers.Theydo notunderstandthedangers.Neverassumethat
childrenwill remainwhereyoulastsawthem.
Keepchildrenoutoftheedgingareaandunderwatchfulcareofa
responsibleadultotherthan theoperator.
Bealertandturnlawnedgeroffif achildentersthearea.
• Beforeandwhilemovingbackwards,look behindanddown for
smallchildren.
Useextremecarewhenapproachingblindcorners,doorways,
shrubs,trees,orotherobjectsthatmayobscureyourvisionofa
childwhomayrunintothelawnedger.
Keepchildrenawayfromhot or runningengines.Theycansuffer
burnsfroma hot muffler.
Neverallowchildrenunder14yearsofageto operatethis
machine.Children14andovershouldreadand understandthe
instructionsandsafeoperationpracticesinthis manualandon
themachineand betrainedandsupervisedby an adult.
MAINTENANCE & STORAGE
• Neverrunanengineindoorsorin a poorlyventilatedarea.Engine
exhaustcontainscarbonmonoxide,an odorlessanddeadlygas.
Beforecleaning,repairing,or inspecting,makecertainthe
bladeandall movingpartshavestopped.Disconnectthespark
plugwireand groundagainsttheengineto preventunintended
starting.
Checkthe bladeandenginemountingboltsat frequentintervals
forpropertightness.Also,visuallyinspectbladefor damage(e.g.,
bent,cracked,worn)Replacebladewiththeoriginalequipment
rnanufacture's(O.E.M.)bladeonly,listedinthis manual."Useof
partswhichdonotmeettheoriginalequipmentspecificationsmay
leadtoimproperperformanceandcompromisesafety!"
Lawnedgerbladesare sharpandcancut.Wrapthebladeor
weargloves,and useextracautionwhenservicingthem.
Keepallnuts,bolts,andscrewstightto besurethe equipmentis
in safeworkingcondition.
Nevertamperwith safetydevices.Checktheir properoperation
regularly.
4
Page 5
• Afterstrikingaforeignobject,stoptheengine,disconnectthe
sparkplugwireand groundagainsttheengine.Thoroughly
inspectthelawnedgerforanydamage.Repairthedamage
beforestartingandoperatingthelawnedger.
Neverattempttomakea wheeladjustmentwhiletheengineis
running.
Manycomponentson yournew edgercan wearwithcontinued
use. Forsafetyprotection,frequentlycheckall edgercomponents
andreplaceimmediatelywithoriginalequipmentmanufacturer's
(O.E.M.)partsonly,listedin thismanual."Useofpartswhich
donotmeettheoriginalequipmentspecificationsmayleadto
improperperformanceandcompromisesafety!"
Donotchangetheenginegovernorsettingor overspeedthe
engine.Thegovernorcontrolsthe maximumsafeoperatingspeed
oftheengine.
Maintainor replacesafetyandinstructionlabels,asnecessary.
Observeproperdisposallawsand regulationsforusedgas,
oil,etc..Improperdisposalof fluidsandmaterialscanharmthe
environment.
Accordingto the ConsumerProductsSafetyCommission(CPSC)
andtheU.S.EnvironmentalProtectionAgency(EPA),thisproduct
hasan Average UsefulLifeofseven(7)years,or 70hoursof
operation.At the endoftheAverageUsefulLifehavethemachine
inspectedannuallybyan authorizedservicedealertoensurethat
allmechanicalandsafetysystemsareworkingproperlyandnot
wornexcessively.Failureto do socanresultinaccidents,injuries
ordeath.
DO NOT MODIFY ENGINE
Toavoidseriousinjuryordeath,donot modifyenginein anyway.
Tamperingwiththe governorsettingcanleadto a runawayengineand
causeittooperateat unsafespeeds.Nevertamperwithfactorysetting
ofenginegovernor.
NOTICE REGARDING EMISSIONS
EngineswhicharecertifiedtocomplywithCaliforniaandfederal
EPAemissionregulationsfor SORE(SmallOffRoadEquipment)are
certifiedto operateon regularunleadedgasoline,and mayinclude
thefollowingemissioncontrolsystems:EngineModification(EM),
OxidizingCatalyst(CO),SecondaryAirInjection(SAI)and ThreeWay
Catalyst(TWO)if soequipped.
SPARK ARRESTOR
Thismachineis equippedwithan internalcombustionengineand
shouldnotbe usedonor nearanyunimprovedforest-covered,
brushcoveredor grass-coveredlandunlessthe engine'sexhaust
systemisequippedwitha sparkarrestermeetingapplicablelocalor
statelaws(ifany)
Ifa sparkarresterisused,itshouldbemaintainedin effectiveworking
orderbytheoperator.Inthe Stateof Californiatheaboveis required
bylaw (Section4442oftheCaliforniaPublicResourcesCode).Other
statesmayhavesimilarlaws. Federallawsapplyonfederallands.
A sparkarresterfor the mufflerisavailablethroughyournearestSears
PartsandRepairServiceCenter.
Page 6
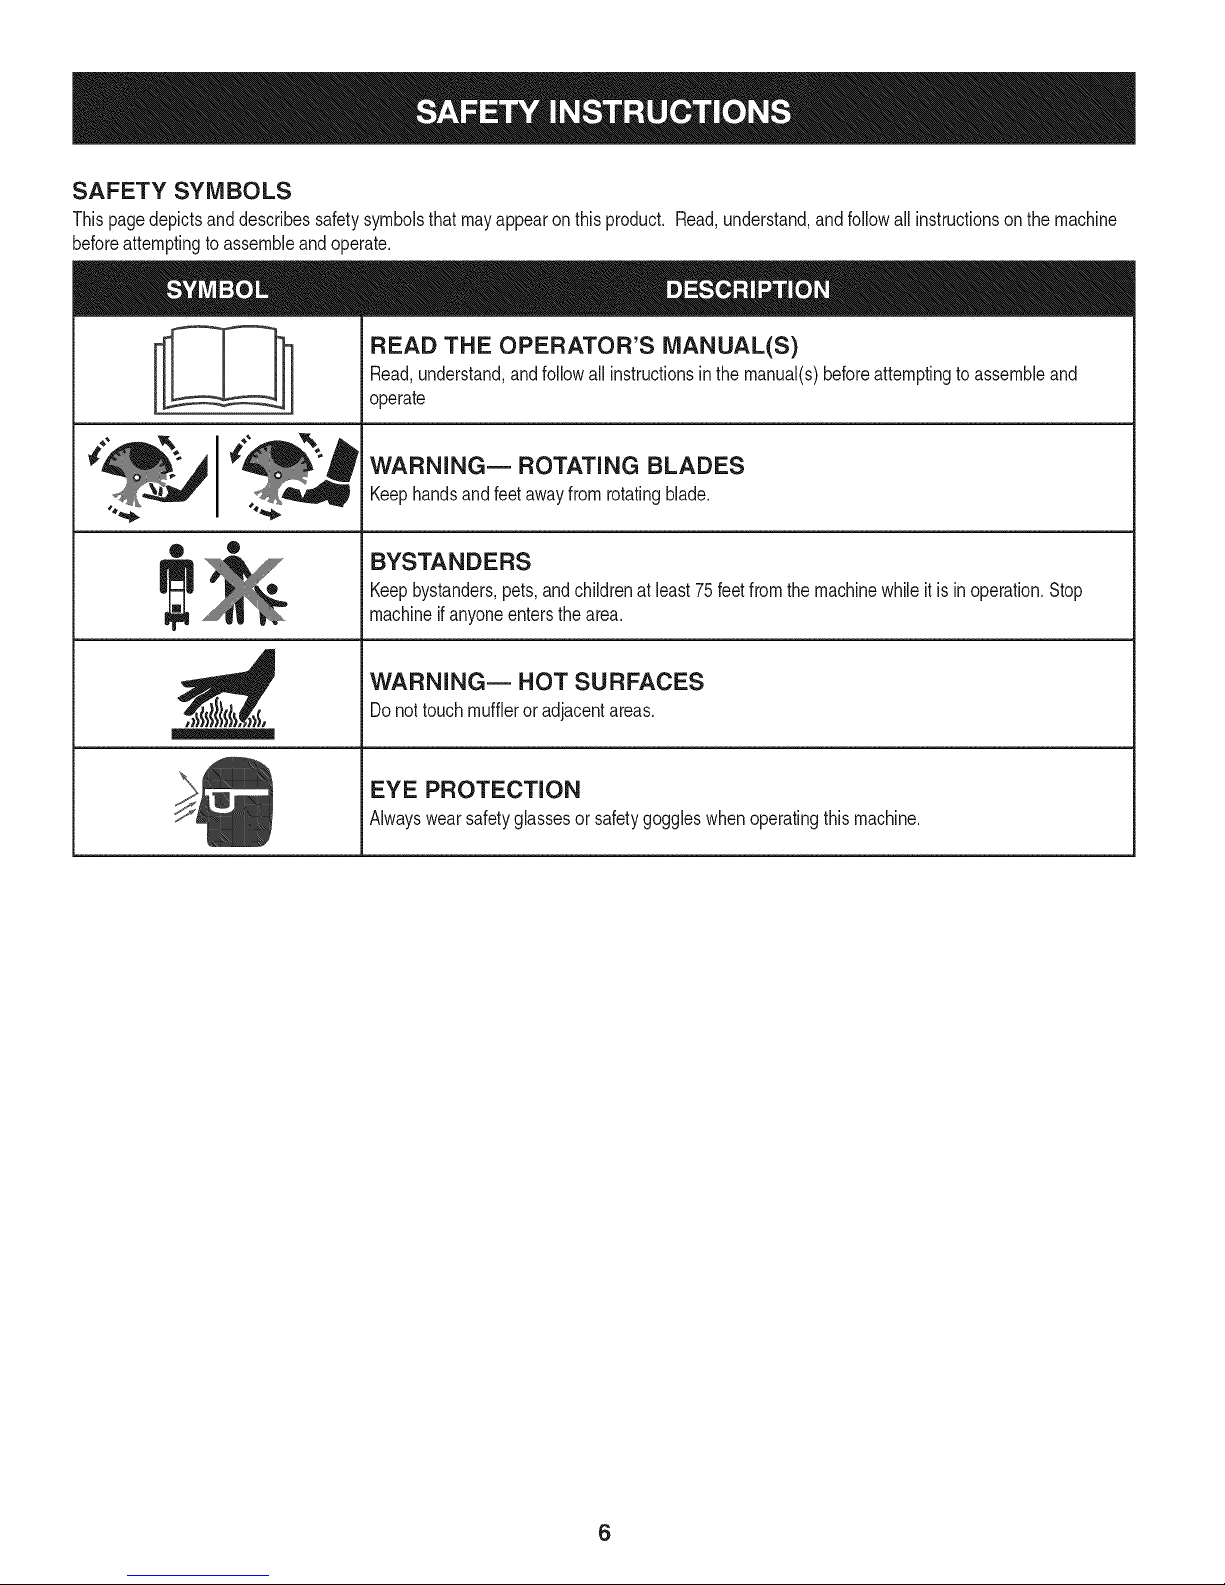
SAFETY SYMBOLS
Thispagedepictsanddescribessafetysymbolsthatmayappearonthisproduct. Read,understand,andfollowall instructionson themachine
before attempting toassemble and operate.
READ THE OPERATOR'S MANUAL(S)
Read,understand,andfollowall instructionsinthe manual(s)beforeattemptingtoassembleand
1
operate
WARNING m ROTATING BLADES
Keephandsandfeetawayfrom rotatingblade.
• ®
BYSTANDERS
Keepbystanders,pets,andchildrenatleast75feetfromthemachinewhileitisin operation.Stop
machineif anyoneentersthearea.
WARNINGm HOT SURFACES
Donot touchmuffleroradjacentareas.
EYE PROTECTION
Alwayswearsafetyglassesorsafetygoggleswhenoperatingthismachine.
6
Page 7

NOTE:Thismachineis shippedWITHOUTGASOLINEor OIL.After
settinguptheedger,servicetheenginewithgasolineandoil as
instructed.
NOTE:Referenceto rightor lefthandsideoftheedgeris observed
fromtheoperatingposition.
ASSEMBLY
Handle
Removeanddiscardanypackagingcardboardthatmaybepresent
betweenthe upperhandleandthelowerhandle.
1. Pivotthe upperhandleupwarduntilit snapsintoplace.See
Figure1.
Figure2
ADJUSTMENTS
Bevel Adjustment
Theangleoftheedgerbladecanbeadjustedbyplacingthebevel
adjustmentin oneof threepositionsforedging.SeeFigure3.
Figure1
2. Tightenthehandknobs,whichare locatedonboththeleftand
rightsidesofthehandle.
Starter Rope
1. Locatethe ropeguidefoundonthe rightsideoftheupperhandle.
Loosen,butdo NOTremove,the wingknobwhichsecuresthe
ropeguidetotheupperhandle.SeeFigure2.
2. Standbehindthe edgerandholdthebladecontrolagainstthe
upperhandle.
3. Gentlypullthestarterropeoutoftheengine.
TheedgerbladeWILLrotatewhenthestarterropeis pulled.
NOTE:Thestarterropewillnotpulloutd theengineunlessthe blade
control(referto Figure2)is depressedagainstthe upperhandle.
4. Slipthestarterropethroughthetopoftheropeguide.Retighten
thewingknobwhichsecurestheropeguidetotheupperhandle.
/"
.......3
Figure3
/
7
Page 8
Recoil Starter
Curb Height
Adjustment Lever
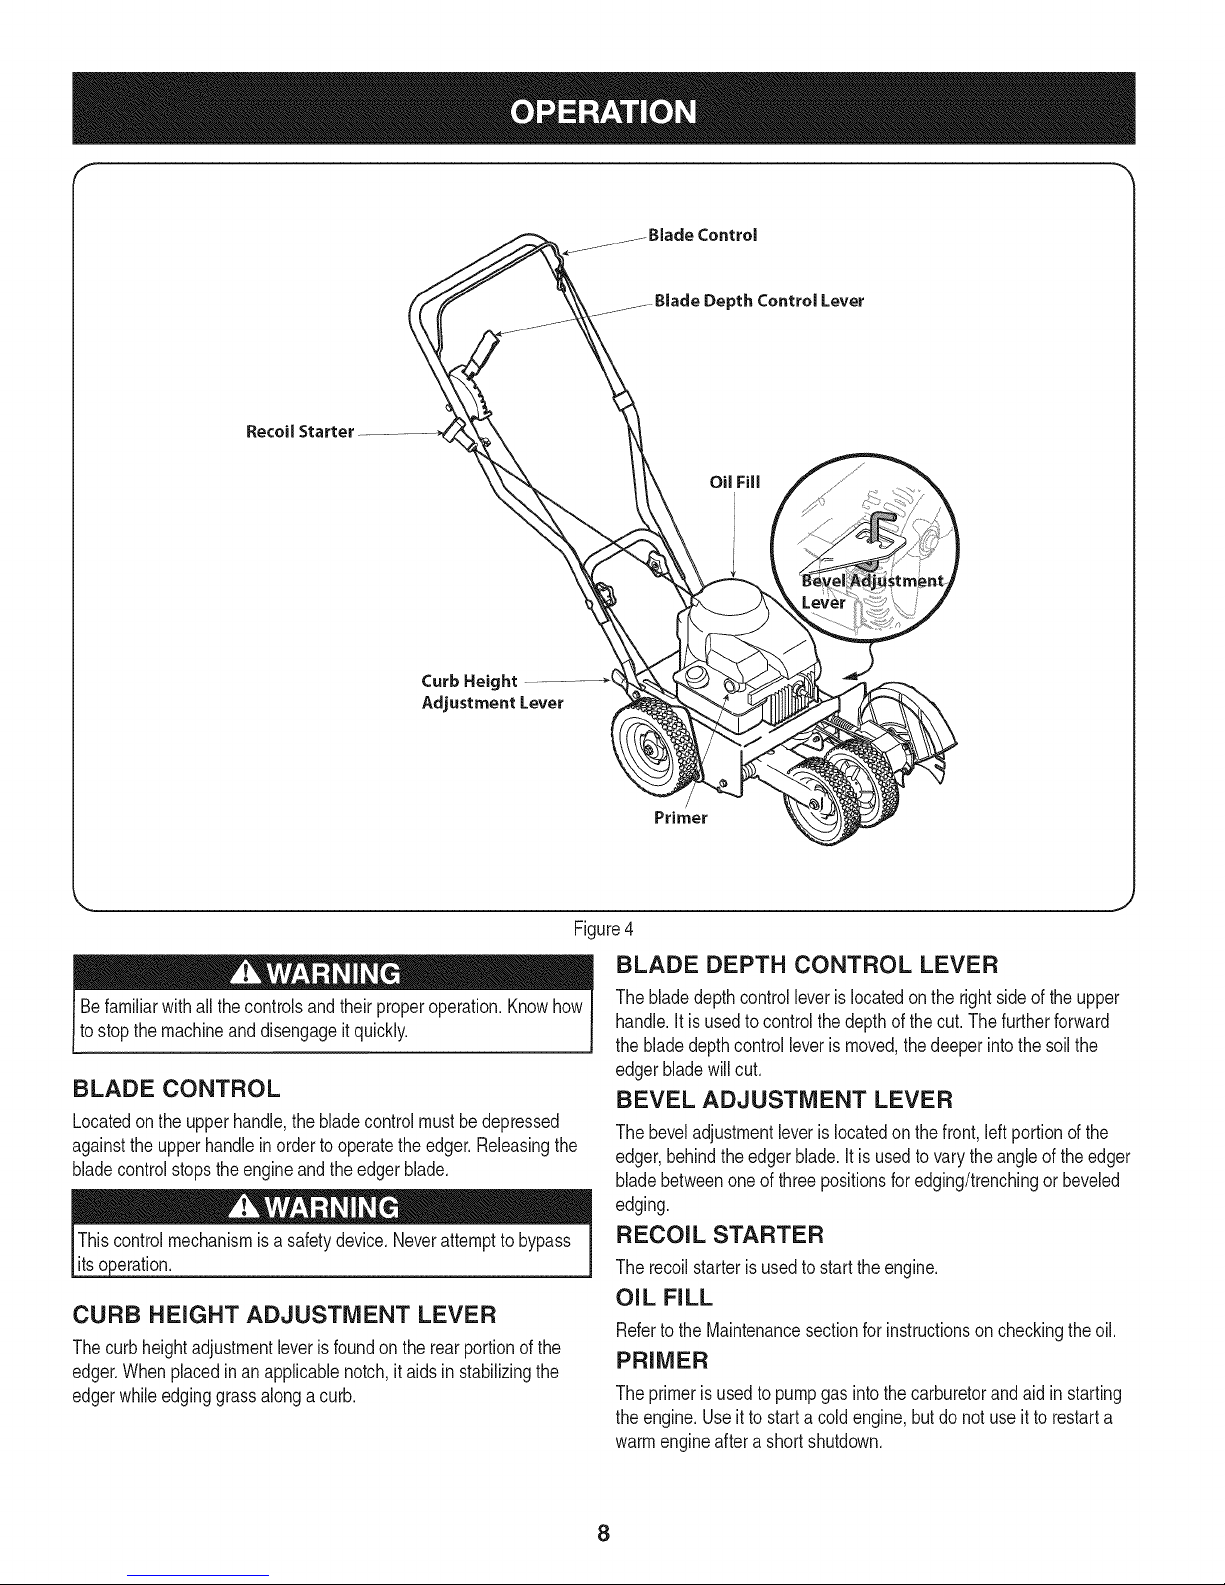
Befamiliarwithallthecontrolsandtheir properoperation.Knowhow
tostopthemachineanddisengageitquickly.
BLADE CONTROL
Locatedon theupperhandle,thebladecontrolmustbedepressed
againsttheupperhandlein orderto operatetheedger.Releasingthe
bladecontrolstopstheengineandthe edgerblade.
_eration.
CURB HEIGHT ADJUSTMENT LEVER
Thecurb heightadjustmentleverisfoundon the rearportionofthe
edger.Whenplacedinan applicablenotch,it aidsin stabilizingthe
edgerwhileedginggrassalongacurb.
Primer
Figure4
BLADE DEPTH CONTROL LEVER
Thebladedepthcontrolleveris locatedontherightsideof the upper
handle.It isusedtocontrolthedepthofthecut.Thefurtherforward
thebladedepthcontrolleveris moved,thedeeperintothesoilthe
edgerbladewillcut.
BEVEL ADJUSTMENT LEVER
Thebeveladjustmentleveris locatedon thefront,leftportionofthe
edger,behindtheedgerblade.It is usedtovarythe angleof the edger
bladebetweenoneof threepositionsforedging/trenchingor beveled
edging.
RECOIL STARTER
Therecoilstarterisusedtostarttheengine.
OIL FILL
RefertotheMaintenancesectionforinstructionsoncheckingtheoil.
PRIMER
Theprimeris usedtopumpgasintothe carburetorandaidin starting
theengine.Useit tostarta cold engine,butdonotuseitto restarta
warmengineaftera shortshutdown.
8
Page 9
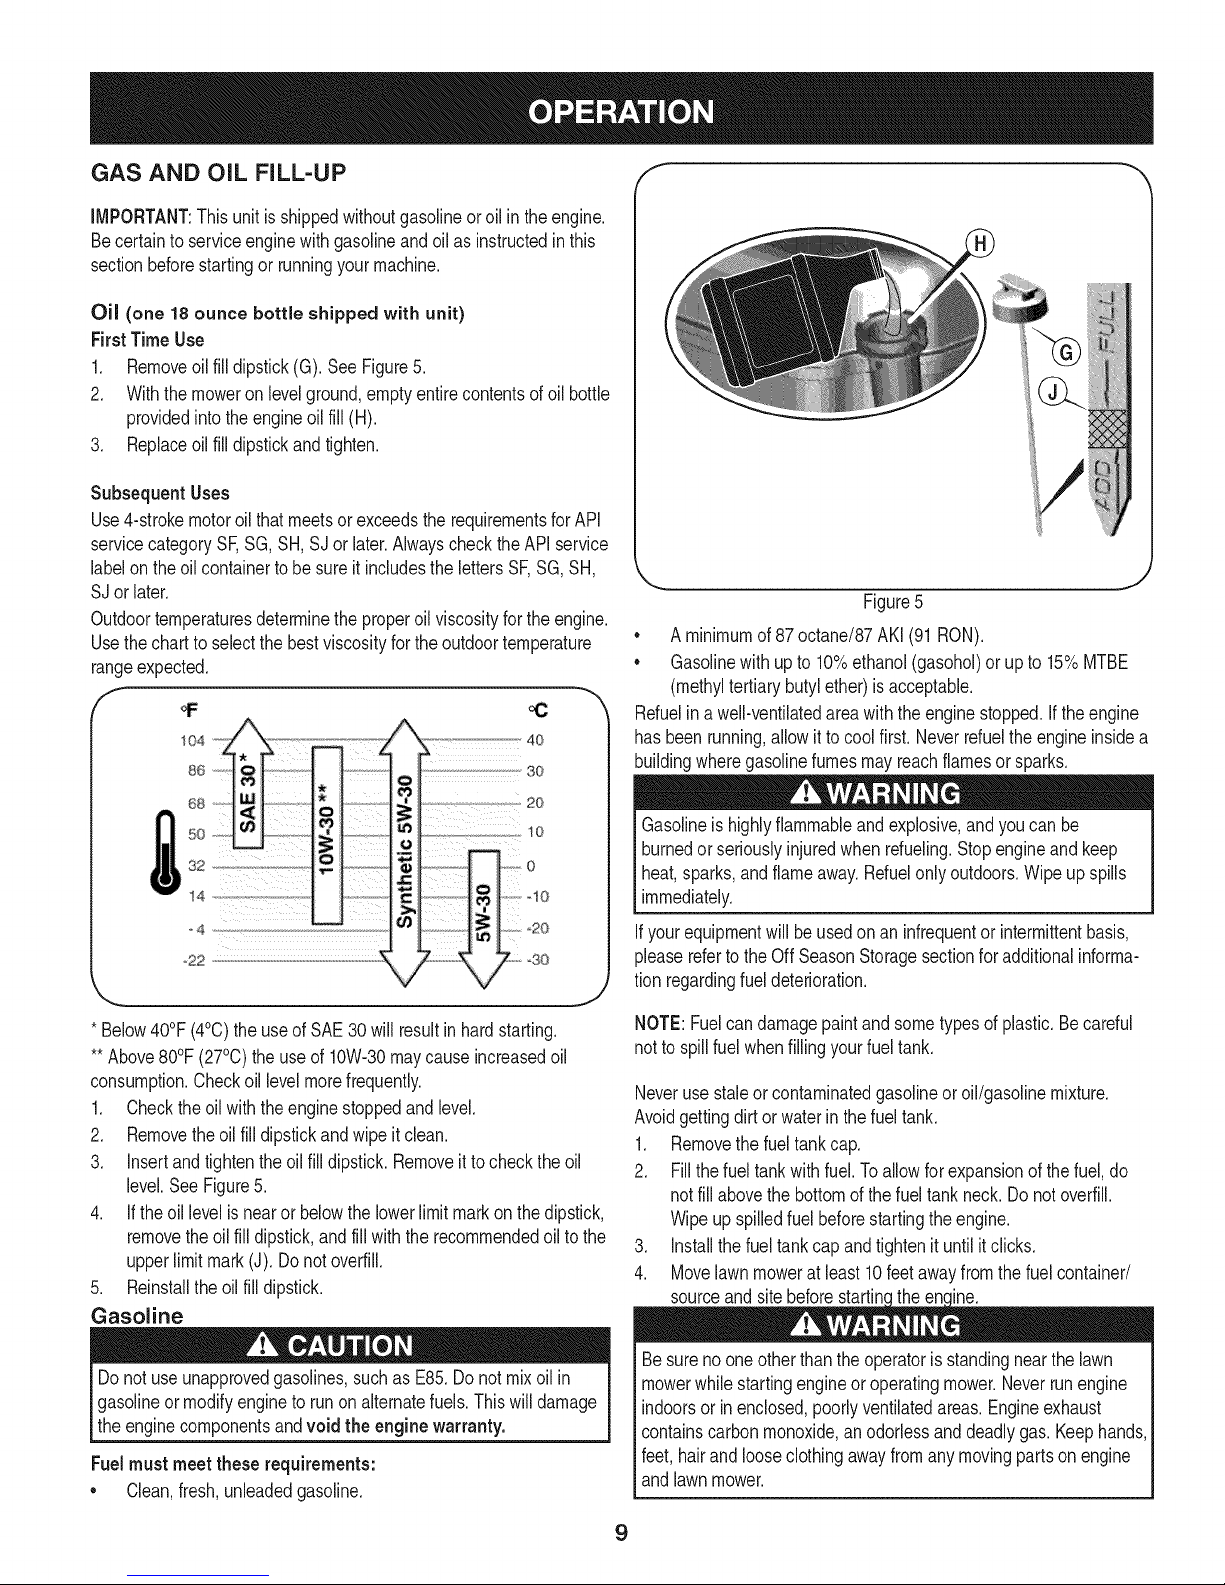
GAS AND OIL FILL-UP f
IMPORTANT:Thisunitisshippedwithoutgasolineoroil intheengine.
Becertainto serviceenginewithgasolineandoilas instructedinthis
sectionbeforestartingor runningyourmachine.
Oil (one 18ounce bottle shipped with unit)
FirstTime Use
1. Removeoilfilldipstick(G).See Figure5.
2. Withthemoweronlevelground,emptyentirecontentsof oil bottle
providedintotheengineoil fill (H).
3. Replaceoilfilldipstickandtighten.
Subsequent Uses
Use4-strokemotoroilthatmeetsor exceedstherequirementsfor API
servicecategorySF,SG,SH,SJor later.Alwayscheckthe APIservice
labelonthe oilcontainertobesureitincludesthelettersSF,SG,SH,
SJorlater.
Outdoortemperaturesdeterminetheproperoilviscosityfor theengine.
Usethechartto selectthe bestviscosityfortheoutdoortemperature
rangeexpected.
4o
N 2o
5o ,
32 _ t 0
!4
o4 ........................L _
¢t_ _ _20
.so
• Aminimumof87octane/87AKI(91RON).
• Gasolinewith upto 10%ethanol(gasohol)orupto 15%MTBE
Figure5
(methyltertiarybutylether)isacceptable.
Refuelina well-ventilatedareawiththeenginestopped.Iftheengine
hasbeenrunning,allowitto cool first.Neverrefuelthe engineinsidea
buildingwheregasolinefumesmayreachflamesorsparks.
o
Gasolineis highlyflammableandexplosive,andyoucanbe
burnedor seriouslyinjuredwhenrdueling. Stopengineandkeep
heat,sparks,andflameaway.Refuelonlyoutdoors.Wipeupspills
immediately.
Ifyourequipmentwill be usedonan infrequentorintermittentbasis,
pleaserefertotheOff SeasonStoragesectionforadditionalinforma-
tionregardingfueldeterioration.
* Below40°F(4°C)the use of SAE30willresultinhardstarting.
** Above80°F(27°C)theuseof 10W-30maycauseincreasedoil
consumption.Checkoil levelmorefrequently.
1. Checktheoil withtheenginestoppedandlevel.
2. Removetheoil fill dipstickandwipeitclean.
3. Insertandtightentheoilfilldipstick.Removeittochecktheoil
level.See Figure5.
4. If theoil levelis nearor belowthelowerlimitmarkon the dipstick,
removethe oil filldipstick,andfillwiththerecommendedoil to the
upperlimitmark(J). Donotoverfill.
5. Reinstalltheoilfill dipstick.
Gasoline
Donotuse unapprovedgasolines,suchasE85.Do not mixoilin
gasolineormodifyengineto runonalternatefuels.Thiswill damage
theenginecomponentsandvoid the engine warranty.
Fuelmustmeet these requirements:
• Clean,fresh,unleadedgasoline.
NOTE:Fuelcandamagepaintand sometypesof plastic.Becareful
notto spillfuelwhenfillingyourfueltank.
Neverusestaleorcontaminatedgasolineor oil/gasolinemixture.
Avoidgettingdirtor waterin the fueltank.
1. Removethefueltankcap.
2. Fillthefuel tankwith fuel.Toallowforexpansionofthefuel,do
notfill abovethebottomofthe fuel tankneck.Donotoverfill.
Wipeupspilledfuel beforestartingtheengine.
3. Installthefueltankcapandtightenituntilitclicks.
4. Movelawnmowerat least10feetawayfromthe fuel container/
sourceandsitebeforestartin( me.
Besurenooneotherthantheoperatorisstandingnearthelawn
mowerwhilestartingengineoroperatingmower.Neverrunengine
indoorsor inenclosed,poorlyventilatedareas.Engineexhaust
containscarbonmonoxide,anodorlessanddeadlygas.Keephands,
feet,hairand looseclothingawayfromanymovingpartson engine
andlawnmower.
9
Page 10
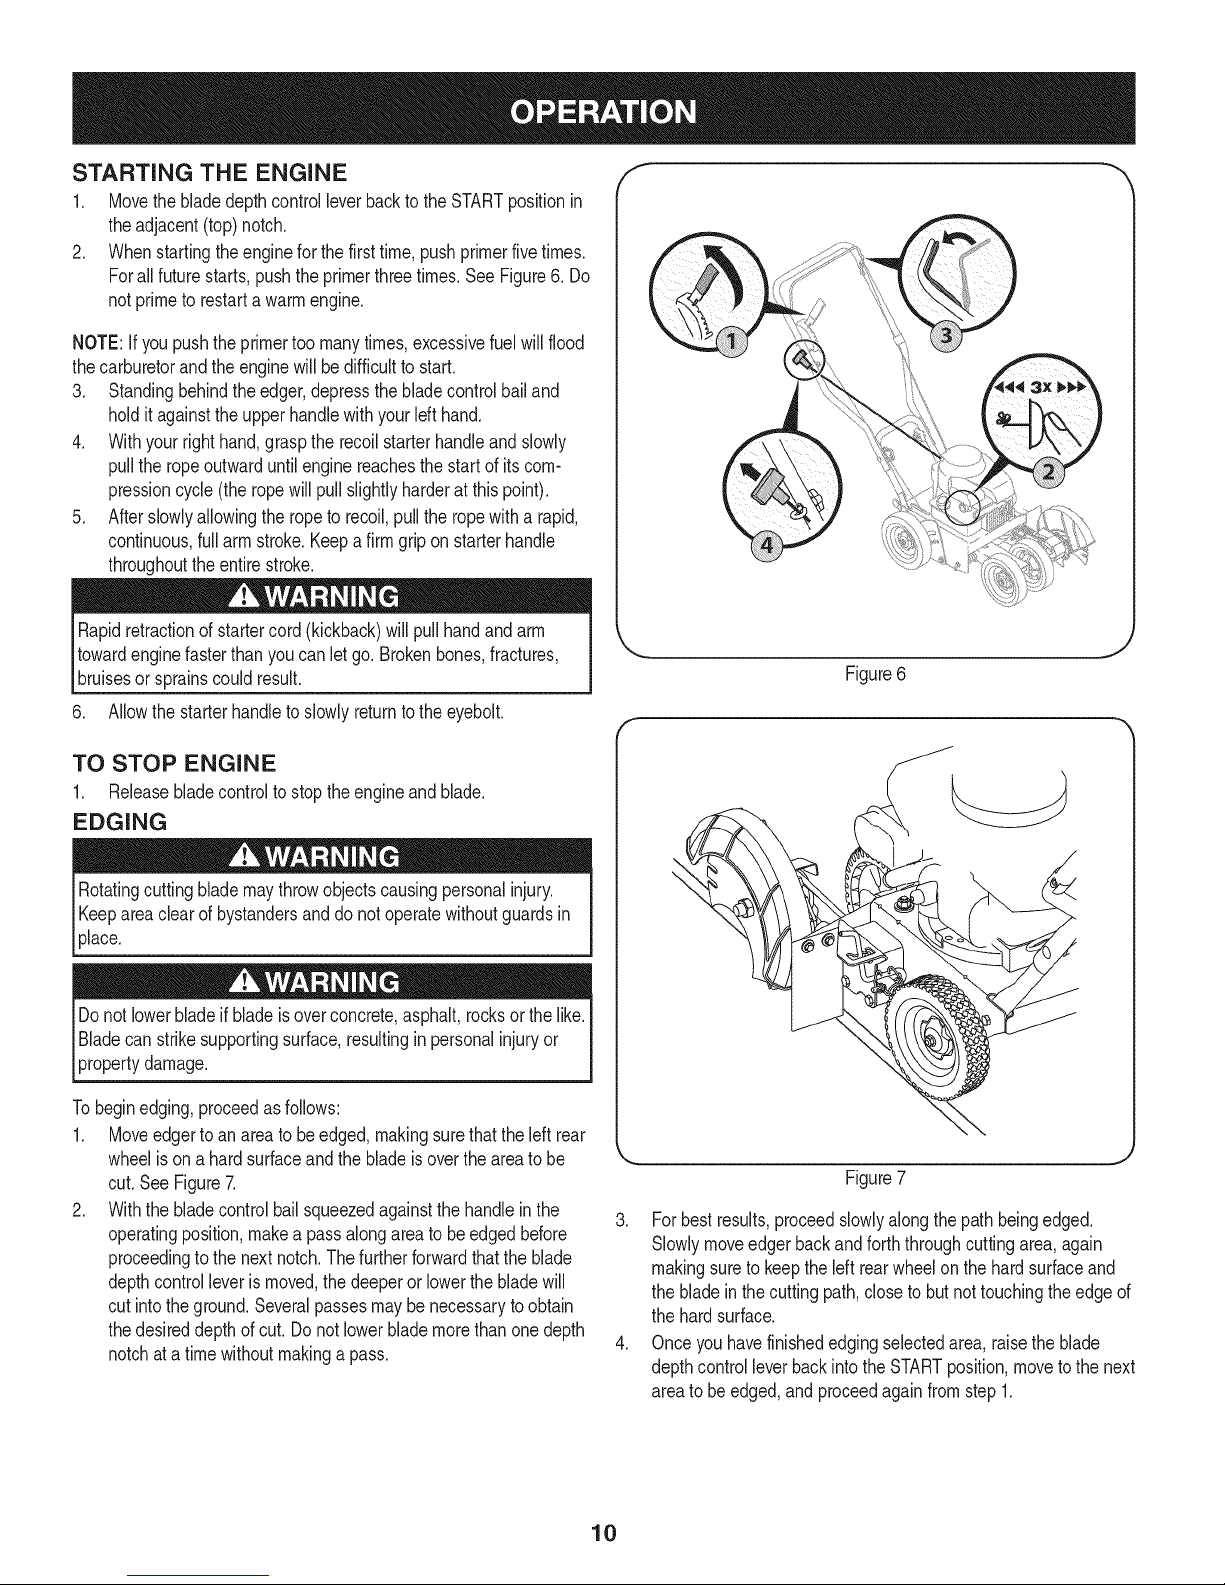
STARTING THE ENGINE
1. Movethebladedepthcontrolleverbackto the STARTpositionin
theadjacent(top) notch.
2. Whenstartingtheengineforthefirsttime, pushprimerfivetimes.
Forall futurestarts,pushthe primerthreetimes.SeeFigure6.Do
notprimeto restartawarmengine.
NOTE:If youpushthe primertoo manytimes,excessivefuelwillflood
thecarburetorandthe enginewill be difficulttostart.
3. Standingbehindtheedger,depressthebladecontrolbailand
holditagainsttheupperhandlewithyour lefthand.
4. Withyourrighthand,grasptherecoilstarterhandleandslowly
pulltheropeoutwarduntilenginereachesthestart of its com-
pressioncycle (the ropewill pullslightlyharderat thispoint).
5. Afterslowlyallowingtheropeto recoil,pullthe ropewitha rapid,
continuous,fullarmstroke.Keepa firmgripon starterhandle
throughouttheentirestroke.
Rapidretractionof startercord(kickback)willpull handandarm
towardenginefasterthanyoucanletgo. Brokenbones,fractures,
bruisesor sprainscouldresult.
6. Allowthestarterhandletoslowlyreturntotheeyebolt.
f
Figure6
TO STOP ENGINE
1. Releasebladecontroltostoptheengineandblade.
EDGING
Rotatingcuttingblademaythrowobjectscausingpersonalinjury.
Keepareaclearofbystandersanddo notoperatewithoutguardsin
.pace.
Donotlowerbladeif bladeisoverconcrete,asphalt,rocksorthelike.
IBladecan strikesupportingsurface,resultingin personalinjuryor
[propertydamage.
Tobeginedging,proceedasfollows:
1. Moveedgertoan areatobeedged,makingsurethattheleft rear
wheelis ona hardsurfaceandthe bladeisovertheareatobe
cut.SeeFigure7.
2. Withthe bladecontrolbailsqueezedagainstthehandlein the
operatingposition,makea passalongareatobeedgedbefore
proceedingtothenextnotch.Thefurtherforwardthattheblade
depthcontrolleverismoved,thedeeperor lowerthebladewill
cutintotheground.Severalpassesmaybe necessarytoobtain
thedesireddepthofcut. Do notlowerblademorethanonedepth
notchata timewithoutmakingapass.
Figure7
3. Forbestresults,proceedslowlyalongthepathbeingedged.
Slowlymoveedgerbackandforththroughcuttingarea,again
makingsureto keeptheleftrearwheelon the hardsurfaceand
thebladeinthe cuttingpath,closetobutnottouchingtheedgeof
thehardsurface.
4. Onceyouhavefinishededgingselectedarea,raisetheblade
depthcontrolleverbackinto theSTARTposition,movetothenext
areatobe edged,andproceedagainfromstep1.
10
Page 11
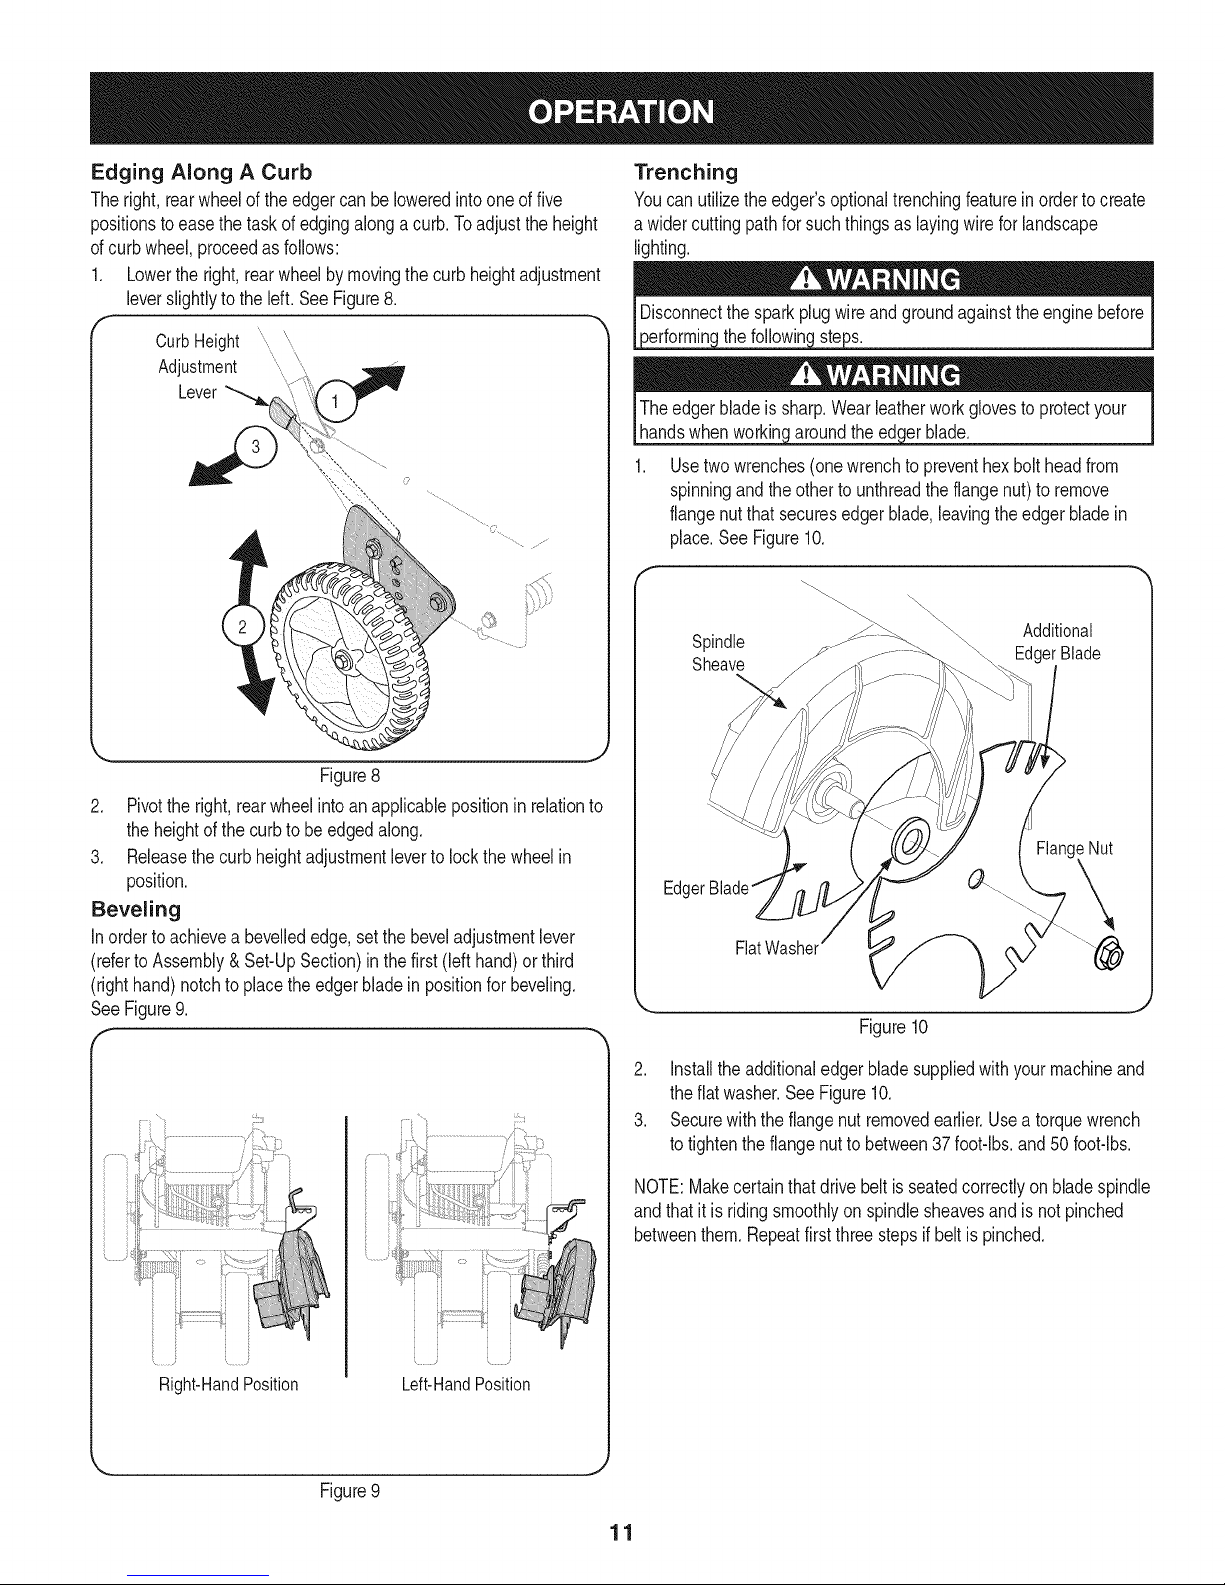
Edging Along A Curb
Theright,rearwheeloftheedgercanbe loweredintooneoffive
positionstoeasethetaskof edgingalonga curb.Toadjusttheheight
ofcurbwheel,proceedasfollows:
1. Lowerthe right,rearwheelbymovingthecurbheightadjustment
leverslightlytotheleft.SeeFigure8.
f CurbHeight ............'.....
Adjustment
Lever
Trenching
Youcanutilizetheedger'soptionaltrenchingfeaturein orderto create
a widercuttingpathfor suchthingsaslayingwireforlandscape
lighting.
thefollowinc _s.
Usetwowrenches(onewrenchtopreventhexbolt headfrom
spinningand theotherto unthreadtheflangenut)to remove
flangenut thatsecuresedgerblade,leavingtheedgerbladein
place.SeeFigure10.
Spindle Additional
Sheave EdgerBlade
Figure8
2. Pivottheright,rearwheelintoanapplicablepositioninrelationto
theheightofthecurbtobeedgedalong.
3. Releasethecurbheightadjustmentleverto lockthewheelin
position.
Beveling
Inordertoachievea bevellededge,setthebeveladjustmentlever
(referto Assembly&Set-UpSection)inthefirst(lefthand)orthird
(righthand)notchtoplacethe edgerbladein positionfor beveling.
SeeFigure9.
Edc
Flat \\_
Figure10
2. Installtheadditionaledgerbladesuppliedwithyourmachineand
theflatwasher.SeeFigure10.
3. Securewiththe flangenutremovedearlier.Usea torquewrench
totightentheflangenut to between37foot-lbs,and50 foot-lbs.
NOTE:Makecertainthatdrive beltis seatedcorrectlyonbladespindle
andthatit isridingsmoothlyonspindlesheavesandis not pinched
betweenthem.Repeatfirstthreesteps if beltis pinched.
Right-HandPosition
Left-HandPosition
Figure9
J
11
Page 12
MAINTENANCE SCHEDULE
Beforeperforminganytypeofmaintenance/service,disengageall
controlsandstoptheengine.Waituntilallmovingpartshavecometo
acompletestop.Disconnectsparkplugwireandgroundit againstthe
enginetopreventunintendedstarting.
Followthe maintenanceschedulegivenbelow.Thischartdescribes
serviceguidelinesonly.UsetheServiceLogcolumnto keeptrackof
completedmaintenancetasks.To locate the nearest SearsService
Centeror toscheduleservice,simplycontactSearsat
1-800-4-MY-HOME®.
EachUse
1stMonthor 5 hours
Annuallyor25hours
Annuallyor50hours
Annually
BeforeStorage
.
Engineoillevel
2.
Looseormissinghardware
3.
Aircleaner
4.
Unitandengine.
1.
Engineoil
1.
Aircleaner1
2.
Controllinkages/pivotsandwheels
3.
Undersideof mowerdeck
1.
Engineoilff
1.
Sparkplug
2.
AirCleaner
1.
Fuelsystem
1. Check
2. Tightenor replace
3. Check
4. Clean
1. Change
1. Clean
2. Lubewithlightoil
3. Clean
1. Change
1. Replace
2. Replace
1. Runengineuntilitstopsfromlackof
fuel,oraddstabilizertoa fulltankof
freshfuelpriortostorage.
Cleanmoreoftenunderdustyconditionsor whenairbornedebrisis
_resent.Replaceaircleanerif verydirty.
11 Changeoil every25 hourswhenoperatingtheengineunderheavyloador in hightemperatures.
12
Page 13
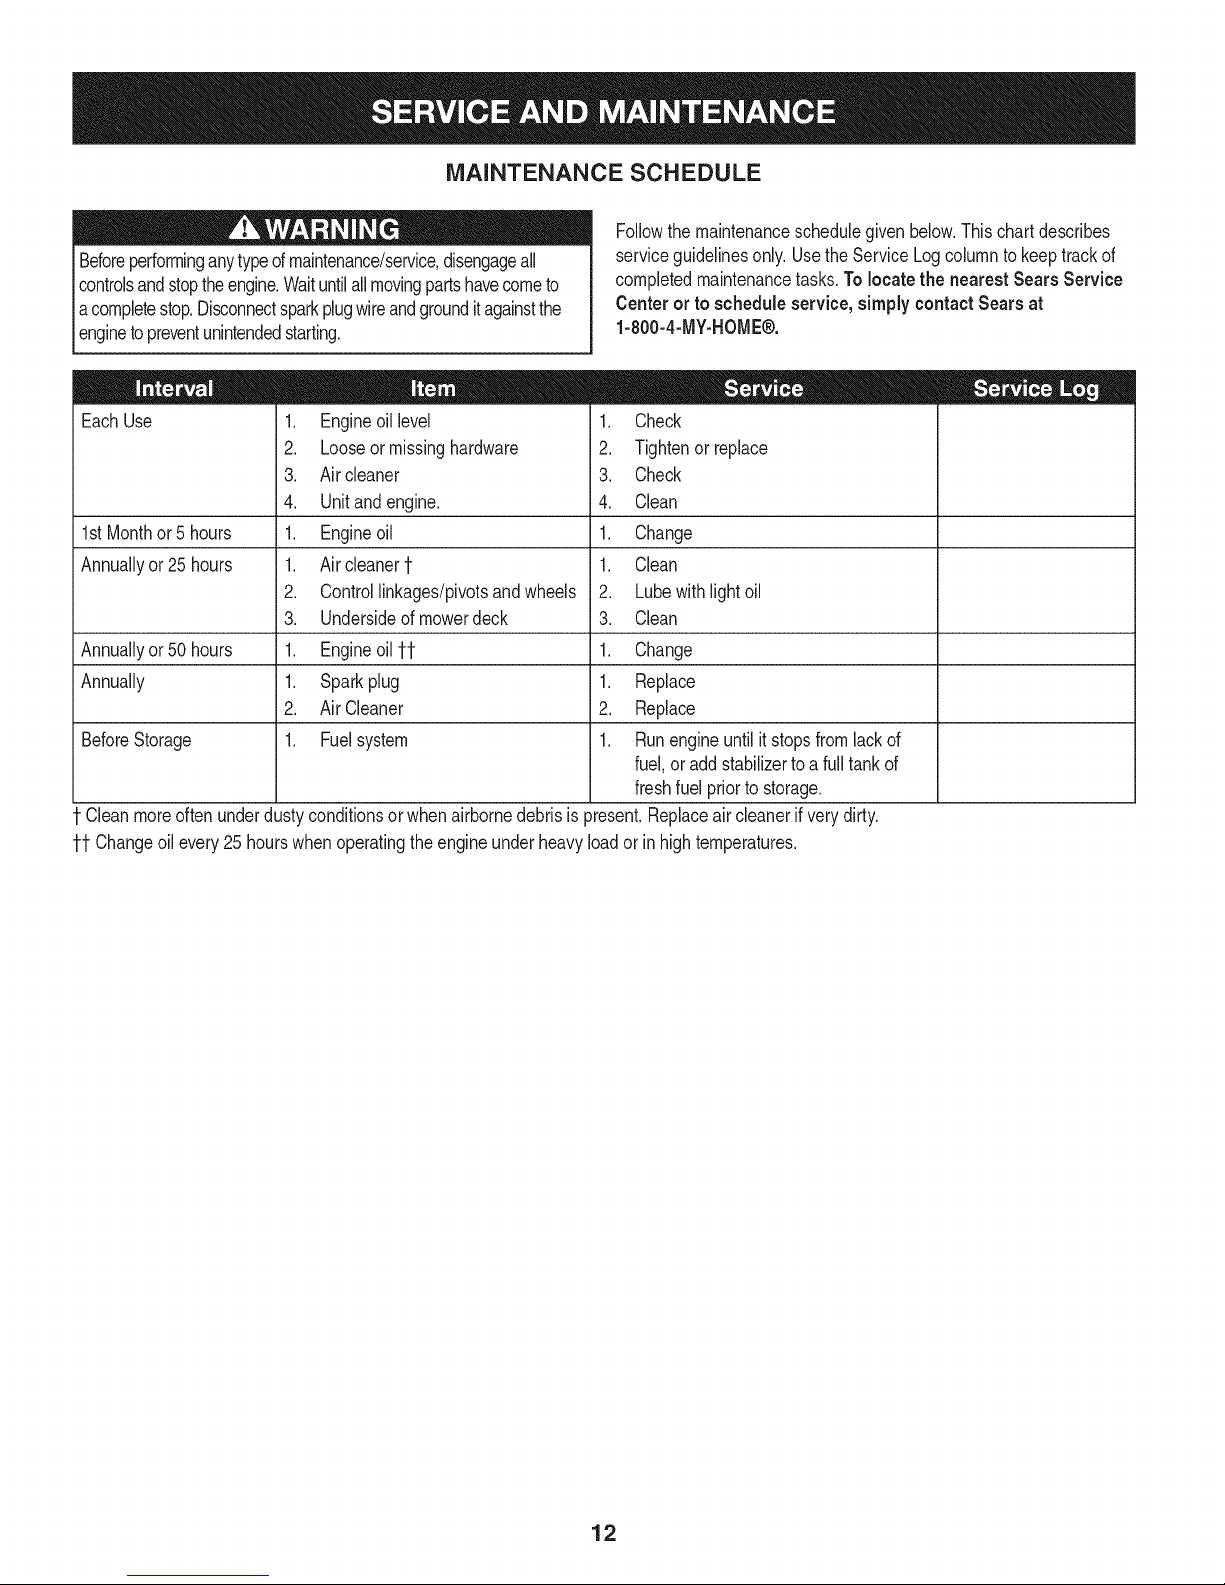
Alwaysstopengine,disconnectsparkplugwire,andgroundagainst
enginebeforeperforminganytypeofmaintenanceon yourmachine.
GENERAL RECOMMENDATIONS
• Alwaysobservesafetyruleswhenperforminganymaintenance.
• Thewarrantyonthisedger/trencherdoesnotcoveritemsthat
havebeensubjectedtooperatorabuseor negligence.Toreceive
fullvaluefromwarranty,operatormustmaintaintheequipmentas
instructedhere.
• Changingof engine-governedspeedwillvoidenginewarranty.
• Alladjustmentsshouldbecheckedat leastonceeachseason.
• Periodicallycheckall fastenersandmakesurethesearetight.
ENGINE MAINTENANCE
Spark Plug
Forgoodperformance,thesparkplugmustbeproperlygappedand
freeof deposits.Replacethesparkplugannually.
1. Disconnectthe cap fromthe sparkplug,andremoveanydirt from
thesparkplugarea.
2. Usethepropersizesparkplugwrenchtoremovethe sparkplug.
NOTE:Replacewitha ChampionRJ19LMsparkplug.
Figure11
3. Checkthegap (A)witha wiregauge(B). SeeFigure11.Spark
pluggapshouldbe0.030in (0.76ram).if necessary,resetthe
gap.
4. installandtightenthe sparkplugtotherecommendedtorque(180
Ib-in[20 Nm]).
5. Attachthe sparkplugcapto thesparkplug.
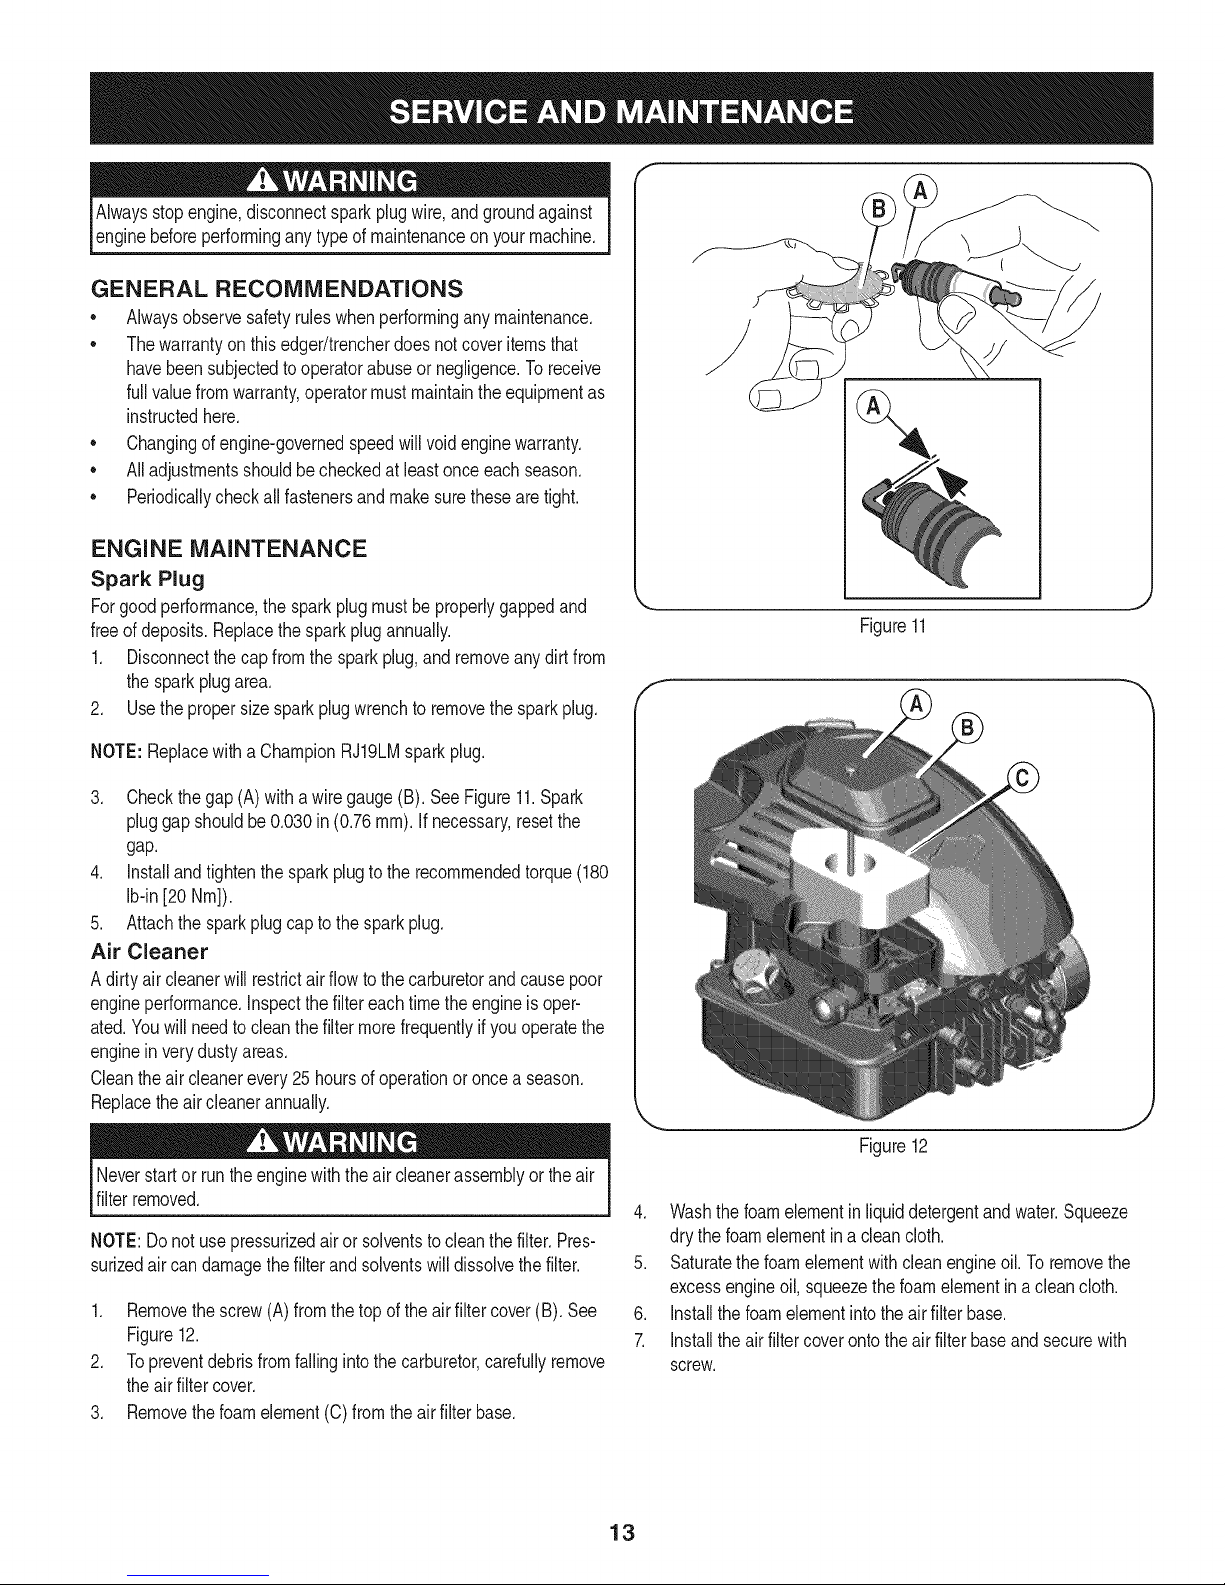
Air Cleaner
A dirtyaircleanerwillrestrictairflowto the carburetorandcausepoor
engineperformance,inspectthefiltereachtimetheengineisoper-
ated.Youwillneedtocleanthefiltermorefrequentlyifyouoperatethe
enginein verydusty areas.
Cleantheair cleanerevery25hoursof operationoroncea season.
Replacetheaircleanerannually.
Neverstartor runthe enginewiththeaircleanerassemblyor theair
filterremoved.
NOTE:Do notusepressurizedairor solventstocleanthe filter.Pres-
surizedair candamagethefilterandsolventswilldissolvethefilter.
1. Removethescrew(A)fromthetopoftheairfiltercover(B). See
Figure12.
2. Topreventdebrisfromfallingintothe carburetor,carefullyremove
theairfiltercover.
3. Removethefoamelement(C)fromtheairfilter base.
Figure12
4. Washthefoamelementinliquiddetergentandwater.Squeeze
drythefoamelementin a cleancloth.
5. Saturatethe foamelementwithcleanengineoil.To removethe
excessengineoil,squeezethe foamelementina cleancloth.
6. installthefoamelementintotheair filterbase.
7. installtheairfiltercoveronto theair filterbaseandsecurewith
screw.
13
Page 14
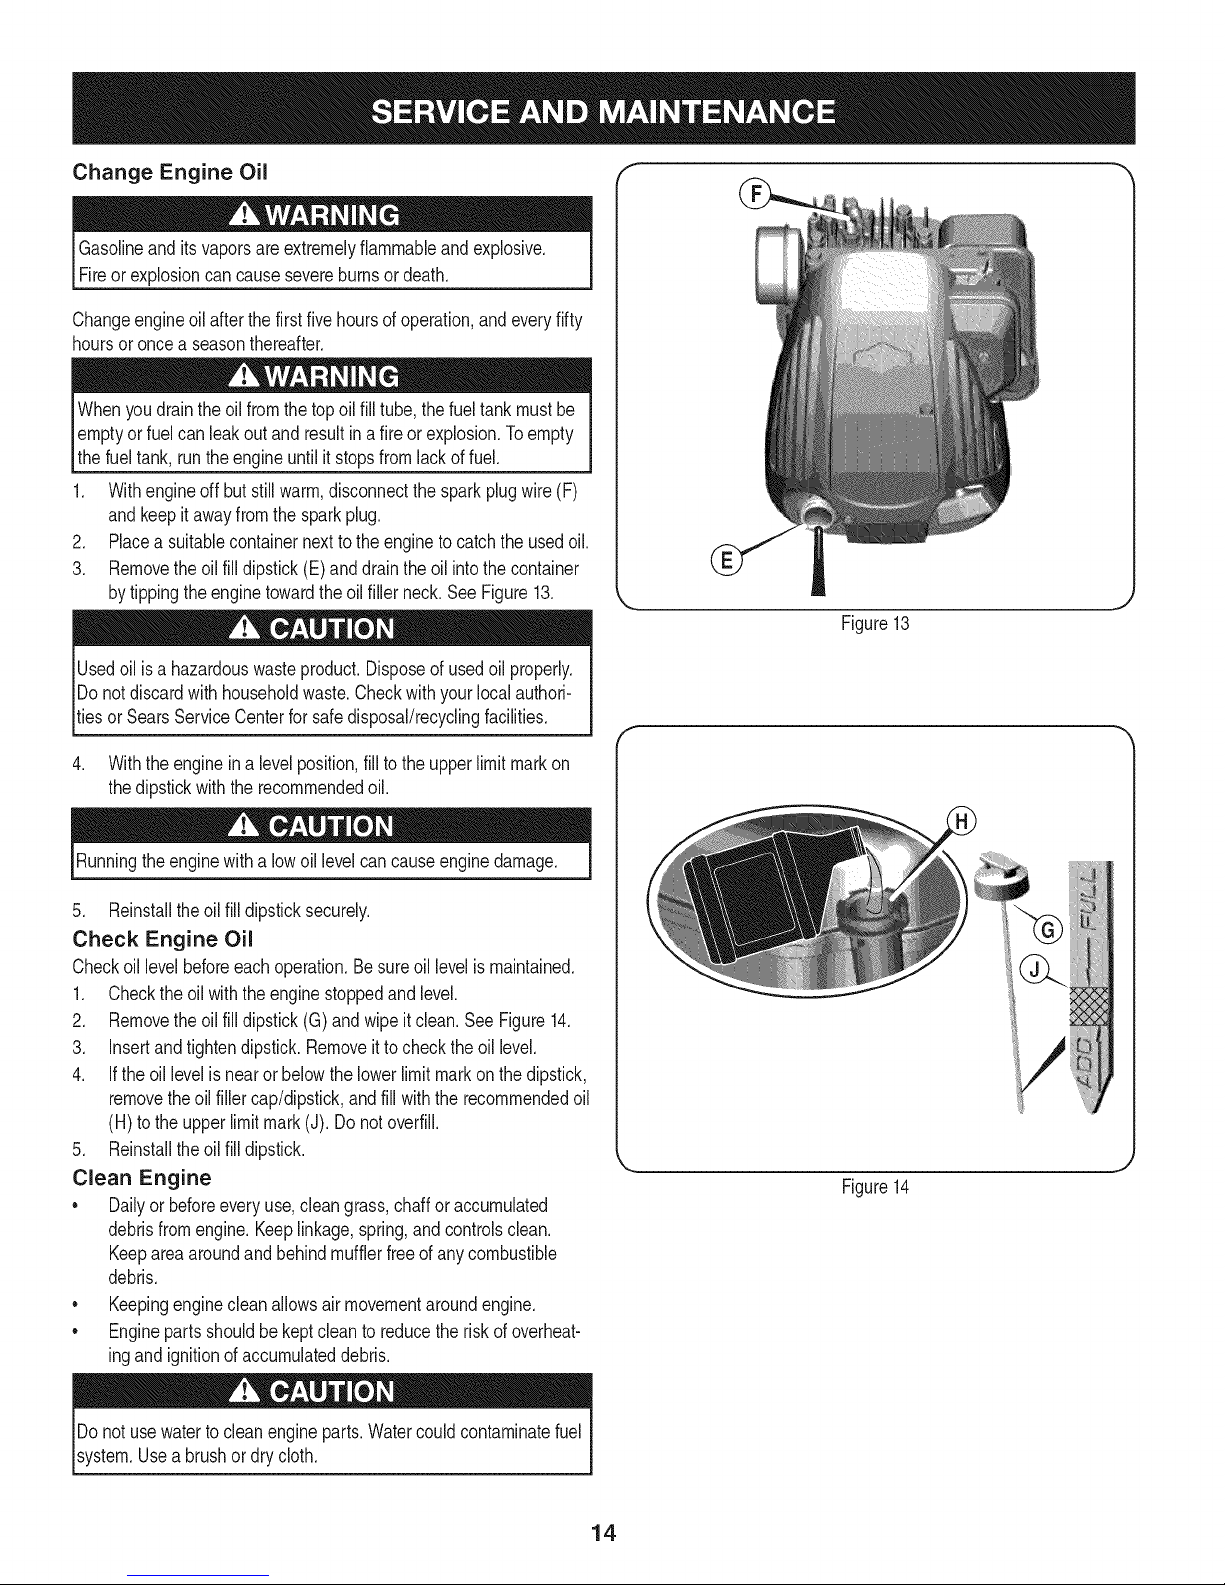
Change Engine Oil "" "
Gasolineanditsvaporsare extremelyflammableandexplosive.
Fireor explosioncancausesevereburnsordeath.
Changeengineoilafterthefirstfivehoursof operation,andeveryfifty
hoursoroncea seasonthereafter.
you
emptyor fuelcanleakoutand resultin afireor explosion.Toempty
lWhen drainthe oil fromthe oil fill thefueltankmustbe
thefueltank,runtheengineuntilitstopsfromlackoffuel.
1. Withengineoff butstillwarm,disconnectthesparkplugwire (F)
andkeepitawayfromthesparkplug.
2. Placea suitablecontainernexttotheenginetocatchtheusedoil.
3. Removetheoil filldipstick(E)anddrainthe oil intothecontainer
bytippingtheenginetowardtheoilfiller neck.SeeFigure13.
Usedoilis a hazardouswasteproduct.Disposeofusedoil properly.
IDonotdiscardwithhouseholdwaste.Checkwithyourlocalauthori-
_tiesor SearsServiceCenterfor safedisposal/recyclingfacilities.
4. Withtheengineina levelposition,filltotheupperlimitmarkon
thedipstickwiththerecommendedoil.
Runningtheenginewitha lowoil levelcancauseenginedamage.
5. Reinstalltheoilfill dipsticksecurely.
Check Engine Oil
Checkoillevelbeforeeachoperation.Besureoil levelismaintained.
1. Checktheoil withtheenginestoppedand level.
2. Removetheoil filldipstick(G) andwipeit clean.SeeFigure14.
3. Insertandtightendipstick.Removeitto checktheoillevel.
4. Iftheoil levelisnearor belowthelowerlimitmarkonthedipstick,
removethe oil fillercap/dipstick,andfill withtherecommendedoil
(H)totheupperlimitmark(J). Donotoverfill.
5. Reinstalltheoilfill dipstick.
Clean Engine
• Dailyor beforeeveryuse,cleangrass,chaffor accumulated
debrisfromengine.Keeplinkage,spring,andcontrolsclean.
Keepareaaroundandbehindmufflerfreeof any combustible
debris.
• Keepingenginecleanallowsairmovementaroundengine.
• Enginepartsshouldbekeptcleanto reducethe riskofoverheat-
ingandignitionofaccumulateddebris.
top tube,
Figure13
Figure14
Donotusewaterto cleanengineparts.Watercouldcontaminatefuel
system.Usea brushor drycloth.
14
Page 15
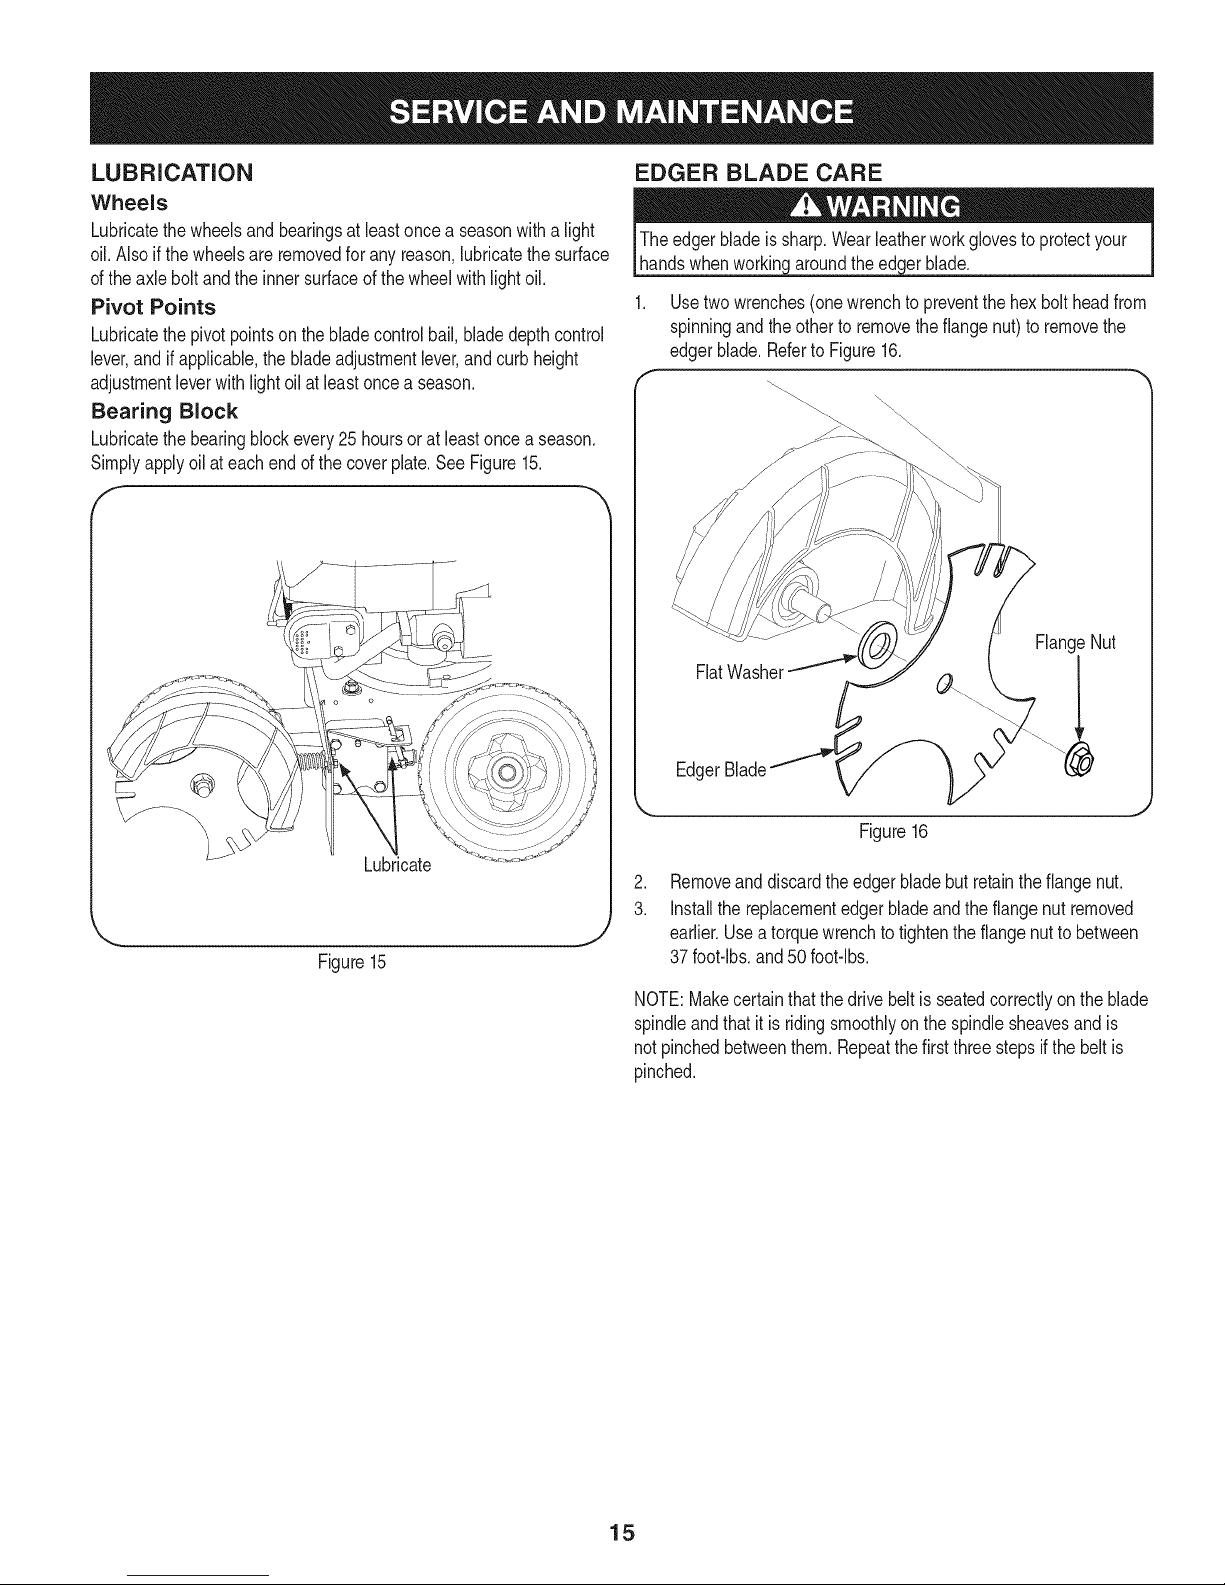
LUBRiCATiON
Wheels
Lubricatethe wheelsandbearingsatleastoncea seasonwitha light
oil.Alsoif the wheelsare removedfor any reason,lubricatethesurface
oftheaxlebolt andtheinnersurfaceofthe wheelwithlightoil.
Pivot Points
Lubricatethe pivotpointsonthebladecontrolbail,bladedepthcontrol
lever,and ifapplicable,thebladeadjustmentlever,andcurbheight
adjustmentleverwith lightoilat leastoncea season.
Bearing Block
Lubricatethe bearingblockevery25hoursor at leastonce a season.
Simplyapplyoil ateachendofthecoverplate.See Figure15.
f -
EDGER BLADE CARE
Usetwowrenches(onewrenchtopreventthehex boltheadfrom
spinningand theotherto removetheflangenut)to removethe
edgerblade.RefertoFigure16.
FlangeNut
FlatWasher \!
Edg
Lubricate
Figure15
Figure16
.
Removeanddiscardtheedgerbladebut retaintheflangenut.
3.
Installthereplacementedgerbladeandtheflangenut removed
J
earlier.Usea torquewrenchtotightentheflangenuttobetween
37 foot-lbs,and50 foot-lbs.
NOTE:Makecertainthatthe drive beltis seatedcorrectlyontheblade
spindleandthatit isridingsmoothlyonthe spindlesheavesandis
notpinchedbetweenthem.Repeatthefirstthreestepsif the beltis
pinched.
15
Page 16
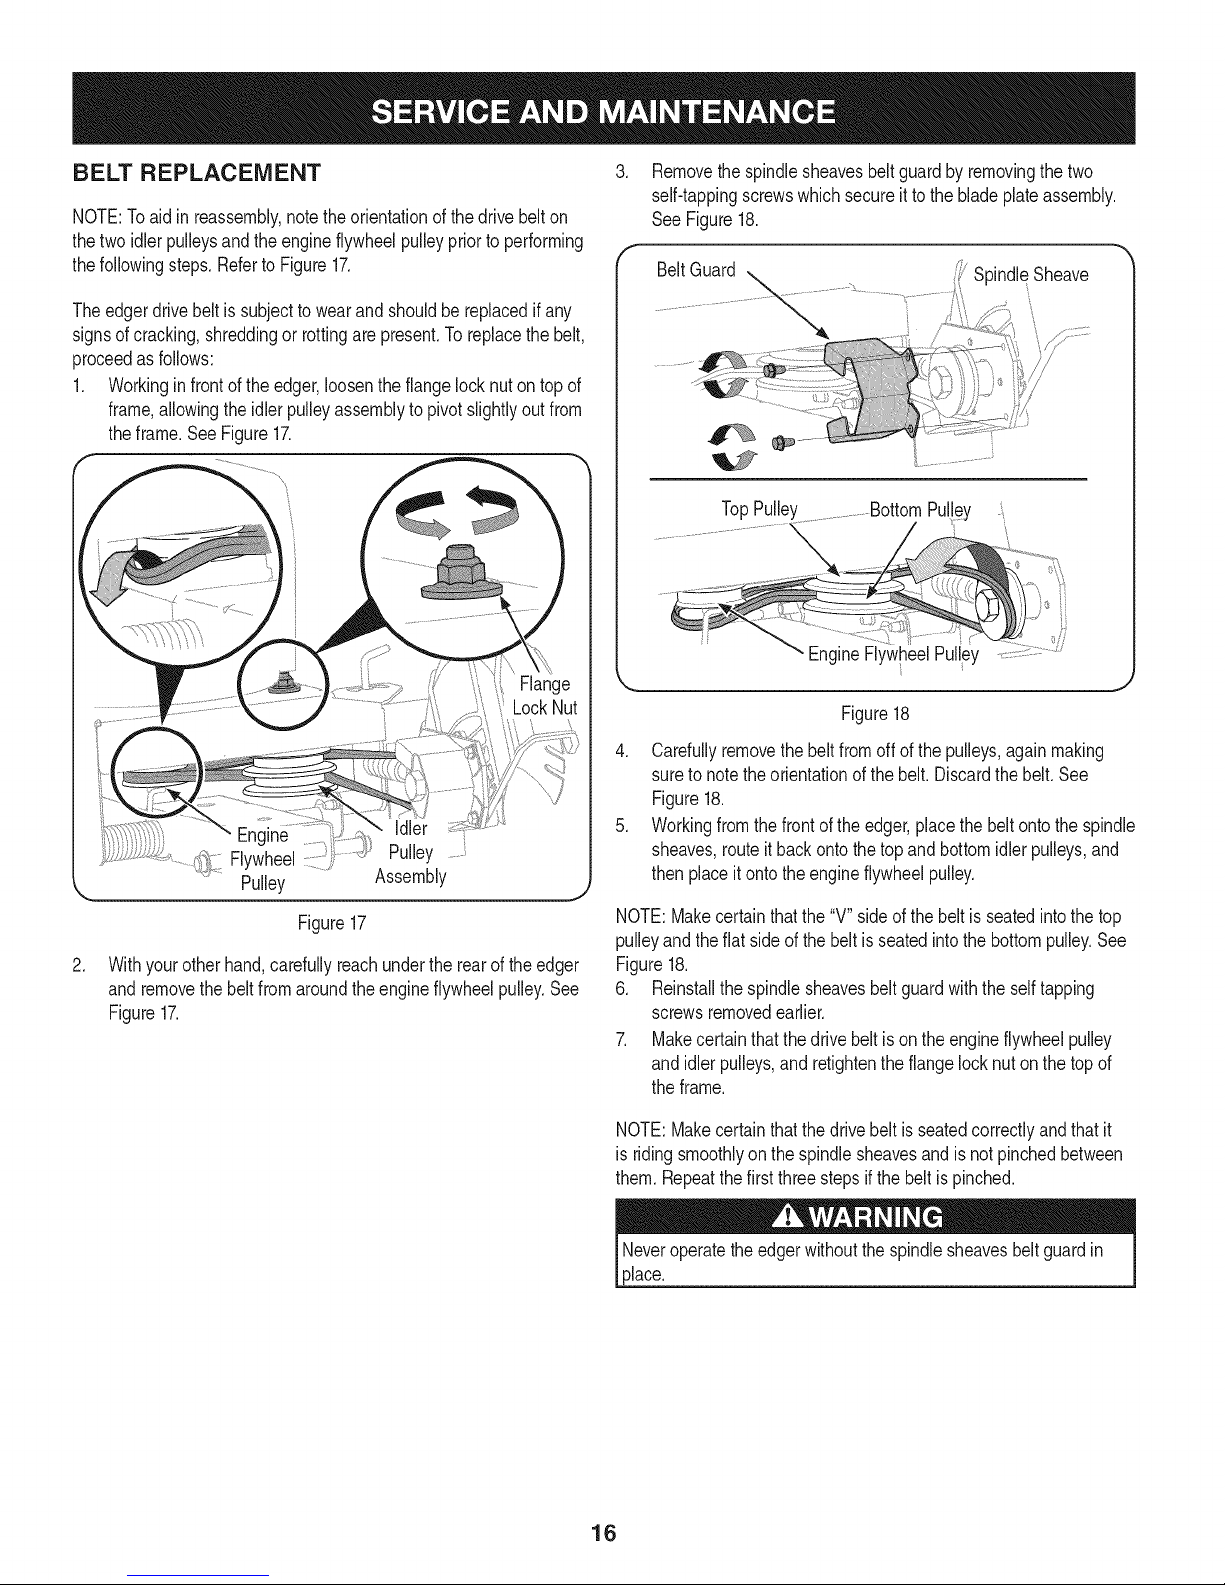
BELT REPLACEMENT
NOTE:Toaid inreassembly,notetheorientationofthedrivebelton
thetwo idlerpulleysandtheengineflywheelpulleypriorto performing
thefollowingsteps.Referto Figure17.
Theedgerdrivebelt issubjecttowearand shouldbe replacedifany
signsofcracking,shreddingorrottingarepresent.Toreplacethebelt,
proceedasfollows:
1. Workingin frontoftheedger,loosenthe flangelock nuton topof
frame,allowingthe idlerpulleyassemblytopivotslightlyoutfrom
theframe.SeeFigure17.
Flange
LockNut
Engine ..........., Idler
Flywheel........... Pulley .......!_
'_.....Pulley Assembly
Figure17
.
Withyourotherhand,carefullyreachundertherearoftheedger
andremovethebeltfromaroundtheengineflywheelpulley.See
Figure17.
.
Removethespindlesheavesbelt guardby removingthe two
self-tappingscrewswhichsecureittothebladeplateassembly.
See Figure18.
/ii Spindle Sheave
TopPulley Pul!ey
EngineFlywheelPulley
Figure18
4. Carefullyremovethebeltfromoffof the pulleys,againmaking
sureto notetheorientationof the belt.Discardthebelt.See
Figure18.
5. Workingfromthefrontoftheedger,placethebeltontothespindle
sheaves,routeit backontothetopandbottomidlerpulleys,and
thenplaceit ontotheengineflywheelpulley.
NOTE:Makecertainthatthe "V" sideof thebeltisseatedintothetop
pulleyandtheflatsideofthebeltisseatedintothe bottompulley.See
Figure18.
6. Reinstallthespindlesheavesbeltguardwiththeselftapping
screwsremovedearlier.
7. Makecertainthatthedrivebeltisontheengineflywheelpulley
and idlerpulleys,and retightentheflangelocknuton thetopof
theframe.
NOTE:Makecertainthatthe drivebeltisseatedcorrectlyandthatit
is ridingsmoothlyon the spindlesheavesandis notpinchedbetween
them.Repeatthe firstthreestepsifthebeltispinched.
Neveroperatetheedgerwithoutthespindlesheavesbeltguardin
place.
16
Page 17

Neverstoreedgerwithfuelin tankindoorsorin poorlyventilated
areaswherefuelfumesmayreachanopenflame,spark,orpilot
lightas ona furnace,waterheater,clothesdryer,orgasappliance.
PREPARING THE ENGINE
Forenginesstoredover30days:
1. Topreventgum fromforminginfuelsystemoron carburetor
parts,runengineuntilitstopsfromlackoffueloradda gasoline
additiveto thegasin thetank.If youuse agasadditive,runthe
engineforseveralminutesto circulatetheadditivethroughthe
carburetor--afterwhichtheengineandfuelcanbestoredupto
24months.
2. Whileengineisstillwarm,changetheoil.
3. Cleanengineof surfacedebris.
PREPARING THE EDGER
• Cleanandlubricateedgerthoroughlyasdescribedinthelubrica-
tioninstructions.
• Donotusea pressurewasherorgardenhosetocleanyourunit.
• Coatedgerbladewithchassisgreaseto preventrusting.
• RefertoPREPARINGTHE ENGINEforcorrectenginestorage
instructions.
• Storeedgerina dry,cleanarea. Donotstorenexttocorrosive
materials,suchasfertilizer.
Whenstoringany typeofpowerequipmentina poorlyventilatedor
metalstorageshed,careshouldbetakentorust-prooftheequipment.
Usinga lightoil orsilicone,coattheequipment,especiallycablesand
all movingpartsof youredgerbeforestorage.
17
Page 18

Beforeperforminganytypeofmaintenance/service,disengageallcontrolsandstopthe engine.Waituntilall
movingpartshavecometoacompletestop.Disconnectsparkplugwireandgrounditagainsttheengineto
Ipreventunintendedstarting.Alwayswearsafetyglassesduringoperationorwhileperforminganyadjustmentsor
[repairs.
Enginefailstostart
Enginerunserratic
Engineoverheats 1. Engineoil levellow.
Occasionalskips(hesitates) 1, Sparkpluggaptoo close.
Idlespoorly 1, Sparkplugfouled,faulty,or gaptoowide.
Excessivevibration 1, Edgerbladebentordamaged.
Drive-beltSlips 1. Beltwornor stretched
1. Bladecontroldisengaged.
2. Sparkplugbootdisconnected.
3. Fueltankemptyorstalefuel.
4. Faultysparkplug.
5, Engineflooded.
6. Blockedfuelline.
1. Sparkplugbootloose.
2. Stalefuel.
3. Ventingascapplugged.
4. Wateror dirt in fuelsystem.
5. Dirtyair cleaner.
6. Blockedfuelline.
2. Air flowrestricted.
2, Dirtyair cleaner.
2. Bladespindlebentor damaged.
1. Engagebladecontrol.
2. Connectwiretosparkboot.
3. Filltankwithclean,freshgasoline.
4. Clean,adjustgap,or replace.
5, Waita fewminutestorestart.
6. ContactyourSearsParts& RepairCenterto have
fuellinecleaned.
1, Connectandtightensparkplugboot.
2. Filltankwithclean,freshgasoline.
3. Clearvent.
4. Runengineuntilit stopsfromlackoffuel. Refillwith
freshfuel.
5, RefertoAirCleanerin EngineMaintenancesection.
6. ContactyourSearsParts& RepairCenterto have
fuellinecleaned.
1. Fillcrankcasewithproperoil.
2. Cleanareaaroundandontopofengine.
1. Adjustgapto.030".
1. Resetgapto ,030"or replacesparkplug.
7. RefertoAirCleanerin EngineMaintenancesection.
1, Replaceedgerblade.
2, ContactyourSearsParts& RepairCenterto have
unitinspected.
1. Replacedrivebelt.
NEED MORE HELP?
You'll find the answe_ _and more on s_a_agemylifeocem _ for free_
Find this and aLLyour other product manuals online.
Get answers from our team of home experts.
Get a personalized maintenance plan for your home.
o Find information and tools to help with home projects.
managemylife
18
Page 19

19
Page 20

Craftsman Edger/Trencher B IViodel No. 247.79651
66
49
58
F/z2_9_
4_L
A_/_ 4_ 32
55 _. 51`` _
``_ 57`` _
_11 _``7
62
39
2O
Page 21

Craftsman Edger/Trencher B IViodel No. 247.79651
35
1
2
3
4
5
6
7
8
9
10
11
12
13
14
15
16
17
18
19
2O
21
22
23
24
25
26
27
28
29
30
31
32
33
34
687-02022
687-02585
687-02126
710-0191
710-0411
710-04389
710-0599
710-0654A
710-0726
710-0870
710-1143A
710-1174
710-1205
710-3180
711-05696
711-04440
712-04063
712-04065
712-0417A
714-3010
718-04012
720-0142
720-0279
720-04072A
726-0299
931-04207
731-05063
731-05064
732-0188A
932-0369
732-04045
932-04169
734-1264
734-1268
736-04019
CurbHeightAdjustmentLever
CurbHeightAdjusterPlate
BladePlateAssembly
Screw3/8-24
Screw3/8-16
HexScrew,5/16-18
Self-tappingScrew,1/4-20
Screw,3/8-16
HexScrew,5/16-12
HexScrew5/16-18
HexScrew,5/8-18
CarriageBolt,5/16-18
RopeGuide(EyeBolt)
HexScrew,5/16-18
AxleShaft.50x6.65
FrameSpacer.50x9.25
LockFlangeNut,5/16-18
FlangeNut3/8-16
FlangeNut,5/8-18
ClevisPin3/32x .625
BearingCup
Grip
WingNut
StarKnob
PushCap1/2"rod
BearingBlock
DebrisGuard
BladeGuard
DoubleTorsionSpring
CompressionSpring
TorsionSpring
CompressionSpring
Wheel7 x 1.75T-Tread
Wheel8 x 1.75T-Tread
Flat Washer, .531 x 125 x .181
m
36
936-0232
37
736-0234
38
736-0258
39
936-04088
4O
936-0452
41
738-04149
42
738-0706C
43
738-0929
44
941-0524A
45
746-04035
46
946-04036
47
747-04110A
48
747-0976A-0637
49
749-04183-0637
5O
749-04234-0637
51
950-04105
52
750-04129
53
950-04142
54
750-0547
55
954-04032B
56
756-04148
57
956-0449
58
756-1150A
59
781-0427-0637
60
781-0741A
61
781-0742-0637
62
781-0748-0637
63
787-01081A-4044
64
787-01240-4044
65
787-01304o4044
66
10L802-5547-F2
67
712-04217
68
750-05548
69
750-0664
D = O O
WaveWasher.531x .781x .013
FiatWasher,.385x 1.5x .075
FiatWasher.385x 1.0x .135t
FiatWasher.635xl.24x.181
BellWasher,.396x 1.140
ShoulderScrew,3/8-16
ShoulderScrew
ShoulderScrew,3/8-16
Bearing,.625IDx 1.57OD
ControlCable(Briggs&Stratton)
WheelAdjustmentCable
BladeAdjustmentRod
BailHandle
UpperHandle
LowerHandle
Spacer,.63 x 1.12x 1.06
Spacer
PulleyMountSpacer
Spacer,.64 x.88x .50
Belt
FiatIdlerPulley,2.50D
Sheave
CombinationFlywheelPulley
BeltGuard
DepthindexBracket
DepthindexLever
Tri-StarBlade
BracketPlate
WheelBracket
Frame
Engine
FlangeLockNut,3/8-16
Spcr.,.525x .775x.93
Spcr.,.5051Dx .880Dx .440
21
Page 22

Craftsman Engine Model No. 10L802-5547-F2 For Craftsman Edger/Trencher Model No. 247.79651
48 SHORTB LOCK ] I 1058 OPERATOR'S MANUAL I [ 1329 REPLACEMENTE NGINE ] [ 1330R EPAIRM ANUAL ]
}_ 842O
523
@
287
525
524 O
@
7180
E
2[_zJ _o5 ®
562
615
404 @
lO_
358 ENGINE GASKET SET
@
g
616 _
1095 VALVEG ASKET SET
524 O
22
Page 23

Craftsman Engine IViodel No. 10L802=5547=F2 For Craftsman Edger/Trencher IViodel No. 247.79651
24[_
_j
12
15_ 22
23
Page 24

Craftsman Engine Model No. 10L802=5547=F2 For Craftsman Edger/Trencher Model No. 247.79651
o%
612
390
190A (_
222
202_ 209_
300
729
334
534
635
535
745
745A
163
24
Page 25

Craftsman Engine IViodel No. 10L802=5547=F2 For Craftsman Edger/Trencher IViodel No. 247.79651
969
73
%
I 1036E MISSIONS LABEL ]
78
55
592
1211
1210 _
6O
689
456 @
597 _
%
37A
455
332
@
3O4
78
305 (_
37
25
Page 26

Craftsman Engine Model No. 10L802=5547=F2 For Craftsman Edger/Trencher Model No. 247.79651
590770 CylinderAssembly
2 796961 Kit-Bushing/Seal(MagnetoSide)
3 299819s Seal-Oil(MagnetoSide)
4 590569 Sump-Engine
5 790169 Head-Cylinder
7 _ 698747 Gasket-CylinderHead
8 791781 BreatherAssembly
9 695890 Gasket-Breather
10 691666 Screw(BreatherAssembly
11 691245 Tube-Breather
12 692218 Gasket-Crankcase
13 691640 Screw(CylinderHead)
15 691680 Plug-OilDrain
16 796217 Crankshaft
20 391483s SeaI-Oil(PTOSide)
22 692551 Screw(CrankcaseCover/Sump),1/4-20x 1.19
22A 590763 Screw(CrankcaseCover/Sump),1/4-20x .78
23 799682 Flywheel
24 222698s Key-Flywheel
25 795691 PistonAssembly(Standard)
795689 PistonAssembly(.020"Oversize)
26 795690 RingSet(Standard)
795688 RingSet(.020"Oversize)
27 691588 Lock-PistonPin
28 699659 Pin-Piston
29 699654 Rod-Connecting
32 691664 Screw(ConnectingRod)
33 296676 Valve-Exhaust
34 296677 Valve-Intake
35 690520 Spring-Valve(Intake)
36 690520 Spring-Valve(Exhaust)
37 793478 Guard-Flywheel(MufflerSide)
37A 697403 Guard-Flywheel(CarburetorSide)
40 692194 Retainer-Valve
43 697799 Slinger-Governor/Oil
45 690762 Tappet-Valve
46 691998 Camshaft
48 N/A ShortBlock(Notavailableatthis printing)
50 699644 Manifold-Intake
50 792388A Manifold-Intake
792389 Gasket-Intake
54 691111 Screw(IntakeManifold)
55 692144 Housing-RewindStarter
58 697316 Rope-Starter
60 691915 Grip-StarterRope
65 690837 Screw(RewindStarter)
73 699850 Screen-Rotating
78 692198 Screw(FlywheelGuard)
90 795476 Carburetor
97 697414 Shaft-Throttle
106 690901 Seat-Net
130 691190 Valve-Throttle
163 271139s Gasket-AirCleaner
180 795473 Tank-Fuel
188 692198 Screw(ControlBracket)
190 691640 Screw(FuelTank)(13A"Long)
190A 691108 Screw(FuelTank)(9/16"Long)
202 698835 Link-MechanicalGovernor
209 698719 Spring-Governor(LightBlue)
222 798686 Bracket-Control
227 697402 Lever-GovernorControl
287 691002 Screw(DipstickTube)
300 394569s Muffler
304 697411 Housing-Blower
305 692198 Screw(BlowerHousing)
332 690662 Nut(Flywheel)
333 799471 Armature-Magneto
334 691061 Screw(MagnetoArmature)
337 802592s Plug-Spark
356 692390 Wire-Stop
358 590777 GasketSet-Engine
365 790029 Screw(Carburetor)
390 691839 Spring-ChokeDiaphragm
393 691837 Screen-Carburetor
394 795478 Diaphragm-Carburetor
404 690272 Washer(GovernorCrank)
455 691236 Cup-Flywheel
456 692299 Plate-PawlFriction
459 281505s PawI-Ratchet
505 691251 Nut(GovernorControlLever)
26
Page 27

Craftsman Engine IViodel No. 10L802=5547=F2 For Craftsman Edger/Trencher IViodel No. 247.79651
692040 Dipstick
524 691876 Seal-DipstickTube
525 691320 Tube-Dipstick
529 692189 Grommet
534 691417 Screw(AirCleaner)
535 698369 Filter-AirCleanerFoam
536 698472 Cleaner-Air
562 691119 Bolt(GovernorControlLever)
592 690800 Nut(RewindStarter)
597 691696 Screw(PawlFrictionPlate)
608 499706 Starter-Rewind
612 496046s Tube-PickUp
615 690340 Retainer-GovernorShaft
616 697405 Crank-Governor
617 270344s Seal-ORing(IntakeManifold)
621 692310 Switch-Stop(Brake)
633 691321 SeaI-Choke/ThrtleShft (ThrtleShft)
635 66538s Boot-SparkPlug
670 691633 Spacer-FuelTank
689 691855 Spring-Friction
718 690959 Pin-Locating
724 697478 Retainer-Seal
694394 Primer-Carburetor
1036 EmissionsLabel
1058 277038 Operator'sManual
1095 498526
1210 499901
1211 499901
1218 695866
1329 N/A
1330 270962
GasketSet-Valve
Pulley/SpringAssembly(Pulley)
Pulley/SpringAssembly(Spring)
Seal-ORing(Carburetor)
ReplacementEngine(Notavailableatprinting)
RepairManual
EngineGasketSet Key.No.358
ValveGasketSet Key.No.1095
729 690586 Clip-Wire
741 796210 Gear-Timing
745 691146 Screw(Brake)(7/8"Long)
745A 690859 Screw(Brake)(1/2"Long)
842 691870 Seal-ORing(DipstickTube)
847 691440 Dipstick/TubeAssembly
851 493880s Terminal-SparkPlug
868 697338 Seal-Valve
869 699641 Seat-Valve(Intake)
870 699642 Seat-Valve(Exhaust)
871 699643 Bushing-ValveGuide(ExhaustValve)
63709 Bushing-ValveGuide(IntakeValve)
913 494409 Seat-CheckValve
921 793973 Cover-BlowerHousing
922 692135 Spring-Brake
923 691487 Brake
957 795472 Cap-Fuel
969 799014 Screw(BlowerHousingCover)
27
Page 28

1171_t40
_ TTIEIMI_
17712_4
TnIJ1TI51
777_
28
Page 29

(Thispageapplicableinthe U.S.A.and Canadaonly.)
Sears Brands Management Corporation (Sears), the California Air Resources Board (CARD)
and the United States Environmental Protection Agency (U.S. EPA)
Emission Control System Warranty Statement (Owner's Defect Warranty Rights and Obligations)
EMISSIONCONTROLWARRANTYCOVERAGEISAPPLICABLETOCERTI-
FIEDENGINESPURCHASEDINCALIFORNIAIN1995ANDTHEREAF-
TER,WHICHAREUSEDINCALIFORNIA,ANDTOCERTIFIEDMODEL
California and United States Emission
TheCaliforniaAirResourcesBoard(CARD),U.S.EPAandSearsare pleased
toexplainthe EmissionControlSystemWarrantyonyour modelyear2000and
latersmalloff-roadengine(SORE).InCalifornia,newsmall off-roadengines
mustbe designed,builtandequippedto meettheState'sstringentanti-smog
standards.Elsewherein theUnitedStates,newnon-road,spark-ignition
enginescertifiedformodelyear1997and latermustmeetsimilarstandardsset
forthbythe U.S.EPA.Searsmustwarranttheemissioncontrolsystemonyour
YEAR1997AND LATERENGINESWHICHARE PURCHASEDANDUSED
ELSEWHEREINTHEUNITEDSTATES(ANDAFTERJANUARY1,2001 IN
CANADA).
Control Defects Warranty Statement
enginefortheperiodsoftime listedbelow,providedtherehasbeennoabuse,
neglector impropermaintenanceof your smalloff-roadengine.Youremis-
sioncontrolsystemincludespartssuchasthecarburetor,aircleaner,ignition
system,mufflerandcatalyticconverter.Alsoincludedmaybeconnectorsand
otheremissionrelatedassemblies.Wherea warrantableconditionexists,Sears
will repairyoursmalloff-roadengineat nocostto youincludingdiagnosis,parts
andlabor.
Sears Emission Control Defects Warranty Coverage
Smalloff-roadenginesarewarrantedrelativeto emissioncontrolpartsdefects
fora periodofone year,subjectto provisionssetforthbelow.Ifanycovered
Owner's Warranty
Asthe smalloff-roadengineowner,youare responsiblefor theperformanceof
therequiredmaintenancelistedin yourOperatingand MaintenanceInstruc-
tions.Searsrecommendsthatyouretainallyourreceiptscoveringmaintenance
onyoursmalloff-roadengine,butSears cannotdenywarrantysolelyfor the
lackofreceiptsorforyourfailuretoensuretheperformanceof allscheduled
maintenance.Asthe smalloff-roadengineowner,youshouldhoweverbe
awarethat Searsmaydenyyouwarrantycoverageifyour smalloff-roadengine
ora parthasfaileddueto abuse,neglect,impropermaintenanceor unap-
parton yourengineis defective,the partwillbe repairedorreplacedbySears.
Responsibilities
provedmodifications.Youareresponsiblefor presentingyoursmalloff-road
engineto anAuthorizedSearsServiceDealerassoonasaproblemexists.The
undisputedwarrantyrepairsshouldbecompletedina reasonableamountof
time,notto exceed30days.Ifyouhaveanyquestionsregardingyourwarranty
rightsandresponsibilities,you shouldcontacta SearsServiceRepresentative
at 1-800-469-4663.The emissionwarrantyis a defectswarranty.Defectsare
judgedonnormalengineperformance.Thewarrantyis notrelatedtoan in-use
emissiontest.
Sears Emission Control Defects Warranty Provisions
ThefollowingarespecificprovisionsrelativetoyourEmissionControlDefectsWarrantyCoverage.ItisinadditiontotheSearsenginewarrantyfornon-regulated
enginesfoundin theOperatingand MaintenanceInstructions.
1. WarrantedParts
Coverageunderthiswarrantyextendsonlytothe partslistedbelow(the
emissioncontrolsystemsparts)tothe extentthese partswerepresenton
theenginepurchased.
a. FuelMeteringSystem
• Coldstartenrichmentsystem
• Carburetorandinternalparts
• FuelPump
b. AirlnductionSystem
• Aircleaner
• Intakemanifold
c. IgnitionSystem
• Sparkplug(s)
• Magnetoignitionsystem
d. CatalystSystem
• Catalyticconverter
• Exhaustmanifold
• Air injectionsystemor pulsevalve
e. MiscellaneousItemsUsedin AboveSystems
• Vacuum,temperature,position,timesensitivevalves
andswitches
• Connectorsandassemblies
2. Lengthof Coverage
Searswarrantsto the initialownerand eachsubsequentpurchaserthat
theWarrantedPartsshallbefreefromdefectsin materialsandworkman-
shipwhich causedthefailureof the WarrantedPartsfor aperiodofone
yearfromthe datethe engineis deliveredtoa retailpurchaser.
Inthe USAandCanada,a 24hourhotline,1-800-469-4663,hasamenuofpre-recordedmessagesofferingyouenginemaintenanceinformation.
3. NoCharge
Repairorreplacementof anyWarrantedPartwill beperformedat no
chargeto the owner,includingdiagnosticlaborwhichleadstothe
determinationthata WarrantedPartisdefective,ifthe diagnosticworkis
performedatanAuthorizedSearsServiceDealer.Foremissionswarranty
servicecontact yournearestAuthorizedSearsServiceDealeras listed in
the "YellowPages"under"Engines,Gasoline,""GasolineEngines,""Lawn
Mowers,"orsimilarcategory.
4. Claimsand CoverageExclusions
Warrantyclaimsshallbefiled in accordancewiththe provisionsof the
SearsEngineWarrantyPolicy.Warrantycoverageshall beexcludedfor
failuresof WarrantedPartswhicharenotoriginalSearspartsor because
ofabuse,neglector impropermaintenanceassetforth inthe Sears
EngineWarrantyPolicy.Searsisnotliableto coverfailuresof Warranted
Partscausedby theuseof add-on,non-original,ormodifiedparts.
5. Maintenance
AnyWarrantedPartwhichis notscheduledfor replacementasrequired
maintenanceor whichis scheduledonlyforregularinspectiontothe effect
of"repairor replaceas necessary"shallbe warrantedasto defectsfor the
warrantyperiod.AnyWarrantedPartwhich is scheduledfor replacement
asrequiredmaintenanceshallbewarrantedas to defectsonlyforthe
periodoftime uptothe firstscheduledreplacementfor that part.Any
replacementpart that isequivalentinperformanceand durabilitymay
beusedin the performanceofany maintenanceorrepairs.Theowneris
responsibleforthe performanceof all requiredmaintenance,asdefinedin
the SearsOperatingand MaintenanceInstructions.
6. ConsequentialCoverage
Coveragehereundershallextendto thefailure ofanyenginecomponents
causedbythe failureofany WarrantedPartstill underwarranty.
GDOC-100188Rev.B
29
Page 30

Look For Relevant Emissions Durability Period and
Air index information On Your Engine Emissions Label
Engines that are certified to meet the California Air Resources Board (CARB) Tier 2 Emission Standards must
display information regarding the Emissions Durability Period and the Air Index. Sears Brands Management
Corporation makes this information available to the consumer on our emission labels.
The Emissions Durability Period describes the number of hours of actual running time for which the engine is
certified to be emissions compliant, assuming proper maintenance in accordance with the Operating & Mainte-
nance Instructions. The following categories are used:
Moderate: Engine is certified to be emission compliant for 125 hours of actual engine running time.
Intermediate: Engine is certified to be emission compliant for 250 hours of actual engine running time.
Extended: Engine is certified to be emission compliant for 500 hours of actual engine running time.
For example, a typical walk-behind lawn mower is used 20 to 25 hours per year. Therefore, the Emissions
Durability Period of an engine with an intermediate rating would equate to 10 to 12 years.
The Air index is a calculated number describing the relative level of emissions for a specific engine family. The
lower the Air Index, the cleaner the engine. This information is displayed in graphical form on the emissions label.
After July 1,2000, Look For Emissions Compliance Period
On Engine Emissions Compliance Label
After July 1, 2000 certain Sears Brands Management Corporation engines will be certified to meet the United
States Environmental Protection Agency (USEPA) Phase 2 emission standards. For Phase 2 certified engines, the
Emissions Compliance Period referred to on the Emissions Compliance label indicates the number of operating
hours for which the engine has been shown to meet Federal emission requirements.
For engines less than 225 cc displacement, Category C = 125 hours, B = 250 hours and A = 500 hours.
For engines of 225 cc or more, Category C = 250 hours, B = 500 hours and A = 1000 hours.
This is a generic representation of the emission label typically found on a certified engine.
FAMILYYBSXS.3192VA 274812
GDOC-100182Rev.B
30
Page 31

Congratulations on making a smart purchase. Your new Craftsman® product is designed and
manufactured for years of dependable operation. But like all products, it may require repair
from time to time. That's when having a Repair Protection Agreement can save you money and
aggravation.
Here's what the Repair Protection Agreement* includes:
[] Expert service by our 10,000 professional repair specialists
[] Unlimited service and no charge for parts and labor on all covered repairs
[] Product replacement up to $1500 if your covered product can't be fixed
[] Discount of 25% from regular price of service and related installed parts not covered by the
agreement; also, 25% off regular price of preventive maintenance check
[] Fast help by phone - we call it Rapid Resolution - phone support from a Sears representative.
Think of us as a "talking owner's manual."
Once you purchase the Repair Protection Agreement, a simple phone call is all that it takes for you
to schedule service. You can call anytime day or night, or schedule a service appointment online.
The Repair Protection Agreement is a risk-free purchase. If you cancel for any reason during the
product warranty period, we will provide a full refund. Or, a prorated refund anytime after the
product warranty period expires. Purchase your Repair Protection Agreement today!
Some limitations and exclusions apply. For prices and additional information in the U.S.A.
call 1=800=827=6655.
*Coverage in Canada varies on some items. For full details call Sears Canada at 1=800=361=
6665.
Sears Installation Service
For Sears professional installation of home appliances, garage door openers, water heaters, and
other major home items, in the U.S.A. or Canada call 1=800=4=MY=HOME®.
31
Page 32

Declaraci6n de garantia .................................................. 32
Medidas importantes de seguridad .......................... 33-36
Montaje ...................................................................... 37-38
Funcionamiento .......................................................... 39-41
Servicio y Mantenimiento ........................................... 42-46
Aimacenamiento fuera de temporada ............................ 47
Soluci6n de problemas ................................................... 48
NOmero de servicio ............................................... Cubierta
posterior
GARANTiA COMPLETA CRAFTSMAN POR DOS AltOS
PORDOSANOSapartirdela fechade lacompra,esteproductoest,.garantizadopordefectosen los materialesy la manodeobra.
Losproductosdefectuososser_.nreparadossin costoo reemplazadossin costosi la reparaci6nnoest,.disponiNe.
Paraobtener informaci6nsobre el alcancede la garantiay solicitar la reparaci6no el reemplazo,visiteel sitio Web:www.craftsman.com.
Esta garantiacubre 0NICAMENTElosdefectos en los materiales y enla manode obra. EstagarantiaNOcubre:
• Articulosde duraci6nlirnitadaquepuedendesgastarsebajocondicionesnormalesdeuso duranteel periododegarantia,talescomo,
correas,filtrosdeaire,bujiasdeencendido,ylascuchillasdela bordeadora.
• ProductodaSosresultantesde los intentosdelusuariodemodificaci6ndelproducto,reparaci6no causadosporaccesoriosdeproductos.
• Reparacionesnecesariasdebidoalaccidenteo por nooperaro mantenerelproductoseg_nlasinstruccionesprovistas.
• Mantenimientoprevenfivoo reparacionesnecesariasdebidoa mezcladecombustibleimpropia,combustiblecontaminadoo aSejo.
La presentegaranfiase anulasiseutilizaesteproductoalgunavezparaprestarservicioscomercialeso siseIoalquilaa otra persona.
Estagarantiale otorgaderechoslegalesespedficos,peroustedpodriagozardeotrosderechosenraz6ndesu lugarde residencia.
Sears BrandsManagementCorporation, Hoffman Estates,IL 60179
Aceitedelmotor: SAE30
Capacidaddeaceitedel motor: 18onzas
Combustible: Gasolinasin plomo
Bujia: Champion®RJ19LM
Motor: Briggs& Stratton
©SearsBrands,LLC 32
N_mero de modelo.........................................................
N_mero de serie ............................................................
Fecha de compra.........................................................................
RegistreelnQmerodemodelo,nQmerode serie
y fechade compram_.sarriba
Page 33

Lapresenciade estesirnboloindicaquesetratade instrucciones
irnportantesde seguridadque sedebenrespetarparaevitar
ponerenpeligrosu seguridadpersonaly/o materialy la deotras
personas.Leay sigatodaslas instruccionesde estemanualantes
de poneren funcionarnientoestarnAquina.Sino respetaestas
instruccionespodriaprovocarlesionespersonales.Cuandoveaeste
sirnbolo,ipresteatenci6na laadvertencia!
EstarnAquinarueconstruidaparaseroperadadeacuerdocon
lasreglasdeseguridadcontenidasenestemanual.AIigualque
concualquiertipode equipornotorizado,undescuidoo errorpor
partedeloperadorpuedeproducirlesionesgraves.EstarnAquina
escapazde arnputarrnanosy piesy dearrojarobjetoscon gran
fuerza.De norespetarlasinstruccionesde seguridadsiguientesse
puedenproducirlesionesgravesolarnuerte.
PROPOSICION 65 DE CALIFORNIA
Elescapedel motordeesteproducto,algunosdesuscornponentes
y algunoscornponentesdelvehiculocontienenoliberansustancias
quirnicasqueelestadodeCaliforniaconsideraque puedenproducir
cancer,defectosdenacirnientouotrosproblernasreproductivos.
CAPACITACION
• Leaconatenci6ntodaslas instruccionescontenidasen esteman-
ualantesde intentarensarnblaresta rnAquina.Lea,cornprenday
respetetodaslasinstruccionesquefiguranenla rnAquinayen el
o los rnanualesantesde hacerlafuncionar.Guardeestemanual
enun lugarseguroparaconsultasfuturasy peri6dicas,asicorno
parasolicitarrepuestos.
• Antesdeoperaresteequipo,farniliaricesetotalrnentecon los
controlesyel usocorrectodelrnisrno.
• EstarnAquinaes unaunidaddeequipornotorizadode precisi6n,
nounjuguete.PotIo tanto,tengarnuchocuidadoentodo
rnornento.EstarnAquinaruedise_adapararealizarunatarea:
bordearelc_sped.NolautiliceparaningOnotrofin.
• No perrnitanuncaquelosni_osrnenoresde 14a_osutilicen
estarnAquina.Losni_osde 14a_osen adelantedebenleery
entenderlasinstruccionesdeoperaci6ny norrnasdeseguridad
contenidaseneste manual,yen la rnAquinay debenser
entrenadosy supervisadospor unadulto.
• S61osedebeperrnitirusarestarnAquinaa individuosrespons-
ablesy farniliarizadosconsusreglasde seguridad.
• Paraayudaraevitarel contactoconlacuchillao unalesi6npor
unobjetoarrojado,rnant_ngaseen lazonadeloperadordetrAs
delasrnanijasy rnantengaa losni_os,observadores,ayudantes
yrnascotasapartadosalrnenos25metrosdelabordeadora
decespedrnientrasestaen operaci6n.DetengalarnAquinasi
alguienentraen lazona.
Su responsabilidad--Restrinja el usode estarnAquina
rnotorizadaalas personasquelean,cornprendany respetenlas
advertenciase instruccionesque aparecenen estemanualyen la
rnAquina.
iGUARI)E ESTASINSTRUCCIONES!
PR E PARATIVO S
• InspeccionerninuciosarnenteelAreadondeutilizarAelequipo.
Retiretodaslaspiedras,palos,Ilantas,huesos,juguetesy
otrosobjetosextra_osquepodrianhacertropezarycaero ser
recogidosy arrojadosporla acci6nde lascuchillas.Losobjetos
arrojadosporla rnAquinapuedenproducirlesionesgraves.
• Paraprotegerselosojosutilicesiernpreanteojosoantiparras
de seguridadrnientrasoperala rnAquinao rnientrasla ajusta
o repara.Losobjetosarrojadosquerebotanpuedenproducir
lesionesocularesgraves.
• Utilicezapatosdetrabajoresistentes,desuelafuerte,asicorno
pantalonesycarnisasajustados.Se recorniendavestircarnisay
pantal6nparacubrirbrazosy piernasy usarzapatosconpuntera
de acero.Nuncaopereesta rnAquinadescalzo,consandalias,
zapatosresbalososo livianos(porej. deIona).
• Nuncaintenterealizarajustesrnientrasel motorestAenrnarcha
exceptoenloscasosespedficarnenterecornendadosen el
manualdeloperador.
Manejosegurode la gasolina
Paraevitarlesionespersonalesoda_osrnaterialesseasurnarnente
cuidadosoal rnanipularlagasolina.Lagasolinaes surnarnente
inflarnabley susvaporespuedencausarexplosiones.Sisederrarna
gasolinaencirnao sobrela ropasepuedelesionargravernenteya que
sepuedeincendiar.LAvesela pielycArnbiesede ropade inrnediato.
• Utilices61orecipientesparagasolinaautorizados.
• NuncaIlenelos recipientesen el interiordeunvehiculoo carni6n
o caja de rernolquecon recubrirnientoplAstico.Coloquesiernpre
losrecipientesenel pisoy lejosdelvehiculoantesde realizarla
carga.
• Retireelequipoa gasolinadelcarni6norernolquey II_neloen
el piso.Siestono esposible,Ileneelequipoenun rernolque
conuncontenedorportAtil,envezde hacerloconunaboquilla
dispensadorade gasolina.
33
Page 34

• Mantengalaboquillade Ilenadoencontactoconelhordedel
dep6sitode combustibleo conla aberturadelrecipienteentodo
rnornento,hastaterrninarlacarga.Noutiliceundispositivode
boquilladeapertura/cierre.
• Apaguetodoslos cigarrillos,cigarros,pipasyotrasfuentesde
cornbusti6n.
• Nuncacarguecombustibleen larn_.quinaen interioresporquelos
vaporesinfiarnablespodrianacurnularseenel _.rea.
• Nuncasaquela tapade lagasolinaniagreguecombustible
rnientrasel motorest,.calienteoen rnarcha. Dejequeel motor
seenfrieporIornenosdosrninutosantesdevolvera cargar
combustible.
• NuncaIleneenexcesoel dep6sitodecombustible.Lleneel
tanqueano rn_.sde1/2pulgadapot debajode la basedelcuello
deltap6nde carga,paraperrnitirlaexpansi6ndelcombustible.
• Vuelvaa colocarla tapade lagasolinayajQstelabien.
• Lirnpieelcombustiblequesehayaderrarnadosobreel motoryel
equip&Trasladela rn_.quinaa otrazona.Espere5 rninutosantes
deencenderelmotor.
• Nuncaalrnacenela rn_.quinao el recipientedecombustible
cercade llamaexpuesta,chispasoaparatoscon pilotocornopor
ejernplo,calentadoresdeagua,calefactores,hornos,secadores
de ropau otrosaparatosagas.
• Parareducirelriesgodeincendiornantengala bordeadorade
cespedlirnpiade pasto,hojasy de laacurnulaci6nde otros
desechos.Lirnpielosderrarnesdeaceiteo combustibleysaque
todoslosresiduosernbebidosdecombustible.
• Dejequela bordeadorade c_spedseenfriecinco(5) rninutospor
Iornenosantesdealrnacenarla.
FUNCIONAIVIIENTO
• Nocoloquelasrnanosnilospiescercade laspiezasgiratorias.
Elcontactoconlacuchillagiratoriapuedeproducirlaarnputaci6n
de rnanosy pies.
• El mecanisrnodecontrolde la cuchillaes undispositivode
seguridad.Nuncaevitesufuncionarniento.Si Iohace,la rn_.quina
setornapeligrosaypuedecausarlesionespersonales.
• Nuncahagafuncionarla bordeadorasinusarelprotectordela
cuchilla,elescudocontraescornbrosy larnanijadecontrolde la
cuchillaenel lugarcorrespondienteyen funcionarniento.
• Nuncaoperelabordeadorasilosdispositivosde seguridadest_.n
daSados.Si noIohace,puedenproducirselesionespersonales.
• Nuncaenciendael motorenespacioscerradosoenunazona
conpocaventilaci6n.Elescapedel motorcontienernon6xidode
carbono,un gasinodoroy letal.
• No utilicela rn_.quinabajola influenciadelalcoholo lasdrogas.
• El silenciadory elmotorsecalientany puedencausarquernadu-
ras.Nolostoque.
• Nuncaopereesta rn_.quinasinbuenavisibilidado ilurninaci6n.
Siernpredebeestarsegurodequeest,.bienafirrnadoy su-
jetandofirrnernentelasrnanijas.Carnine,nuncacorra.
• Noopereestarn_.quinasiseha caidoo est,.daSada.Regrese
la rn_.quinaal serviciot_cnicodesudistfibuidorautorizadorn_.s
cercanoparaquela examiney larepare.
• No hagafuncionarlarn_.quinasi lacuchillade corteest,.daSada
oexcesivarnentedesgastada.
• Nuncaintentesacarmaterialdelprotectorde la cuchillasiel
motorest,.en funcionarniento.Apagueel motor,desconecteel
cabledela bujiayp6ngalode rnaneraquehagarnasacontrael
motorparaevitarqueseenciendaaccidentalrnente.
• Nosobrecarguelacapacidadde la rn_.quinatratandode bordear
a unavelocidaddernasiador_.pida.
• Mant_ngasealertaparaadvertirla existenciade aceraso terreno
desparejos,etc.Siernpreernpujelentarnentesobrelassuperficies
_.speras.Noutiliceestarn_.quinasobrepedregullo.
• Nooperelarn_.quinabajola Iluviao encondicionesde suelo
hQrnedo.
• Siernprehagafuncionarlarn_.quinadesdedetr_.sde lasrnanijas
y col6quesede rnodoquelalineadevistadirectahaciala
cuchillade cortequedebloqueadaporlosprotectores.
• Siernpredetengael motorcuandoel bordeadoorecortesevean
dernoradoso cuandoest_trasladandola rn_.quinade unlugara
otto.
• Nuncadejelarn_.quinaen funcionarnientosinvigilancia.Detenga
el motor,desconecteel cabledela bujiayp6ngalode rnanera
que hagarnasacontrael motorparaevitarqueseencienda
accidentalrnente.
• Utilicesolarnentepiezasy accesoriosrnanufacturadosparaesta
rn_.quinaporel fabricante.Si noIohace,puedenproducirse
lesionespersonales.
• Si sepresentansituacionesquenoest_.nprevistaseneste
manual,seacuidadosoy useel sentidocornQn.P6ngaseen
contactoconAsistenciaal Clienteparasolicitarayudao el
nornbredel distribuidorde serviciorn_.scercanoa sudornicilio.
NINOS
Puedenocurriraccidentestr_.gicossiel operadornoest,.atentoa
la presenciadeni_os.PorIogeneral,losni_ossesientenatraidos
por equiposrnotofizadostalescornolasbordeadorasde c_sped.No
entiendenlosriesgosni lospeligros.Nuncaasurnaquelosni_os
perrnanecer_.nenel rnisrnolugardondelosvio porQltirnavez.
• Mantengaa los ni_osfueradel_.reade bordeadoy bajoestricta
vigilanciadeun adultoresponsableadern_.sdeloperador.
• Est_alertayapaguelabordeadoradecespedsiunni_oingresa
al _.rea.
• Antesde rnoversehaciaatr_.sy rnientrasIoest_haciendo,mire
haciaatr_.sy cuideque nohayani_os.
• Tengaextrernaprecauci6ncuandoseaproxirnea esquinas
ciegas,entradasdepuertas,arbustos,_.rbolesu otrosobjetos
que puedanobstaculizaflela vistade unni_oquepudiese
toparseconla bordeadorade c_sped.
• Mantengaa los ni_osalejadosdelosrnotoresen rnarchao
calientes.Puedensufrirquernadurascon unsilenciadorcaliente.
• Noperrnitanuncaquelosni_osrnenoresde 14a_osutilicen
estarn_.quina.Losni_osde 14a_osenadelantedebenleery
entenderlasinstruccionesdeoperaci6nynorrnasdeseguridad
contenidasenestemanualyen larn_.quinay debenserentrena-
dosy supervisadosporunadulto.
34
Page 35

MANTENIMIENTO Y ALMACENAMIENTO
• Nuncaenciendael motorenespacioscerradosoen unazona
conpocaventilacidn.Elescapedelmotorcontienernondxidode
carbono,un gasinodoroy letal.
• Antesde lirnpiar,repararo inspeccionarla rn_.quina,cornpruebe
quela cuchillaytodaslaspartesrn6vilessehayandetenido.
Desconecteel cabledela bujiay p6ngalohaciendornasacontra
el motorparaevitarqueseenciendaaccidentalrnente.
Reviselospernosdernontajedelacuchillaydel motora
intervalosfrecuentesparaverificarqueest_nbienapretados.
Inspeccioneadern_.svisualrnentelacuchillaen buscadeda_os
(abolladuras,desgaste,roturas,etc).Reernplacelacuchilla
Onicarnenteconequipooriginaldelfabricante(OEM)listadoen
estemanual."Elusode piezasquenocurnplenconlasespe-
cificacionesdelequipooriginalpodriatenercornoresultadoun
rendirnientoincorrectoyadern_.sponeren riesgola seguridad".
Lascuchillasdelas bordeadorasdec_spedsonrnuyafiladasy
puedenproducircortaduras.Envuelvalacuchillao utiliceguantes
yextremelasprecaucionescuandoefectOernantenirniento.
Mantengatodoslospernos,tuercasy tornillosbienajustados
paraasegurarsede quela rn_.quinaseencuentraen condiciones
segurasde operaci6n.
Nuncaalterelos dispositivosde seguridad.Controleperiddica-
rnentequefuncionencorrectarnente.
Despu_sdegolpearcon algQnobjetoextra_o,detengaelmotor,
desconecteelcablede la bujfay conecteel motora rnasa.
Inspeccionerninuciosarnentela bordeadorade cespedparaver
siest,.da_ada.Repareel da_oantesde arrancaryoperarla
bordeadora.
Nuncaintenteajustarunaruedarnientrasel motorest,.en
rnarcha.
Muchoscornponentesde la nuevabordeadorasedesgastanen
raz6ndelusocontinuo.Paraprotegersuseguridad,verifique
frecuenternentetodosloscornponentesdela bordeadoray
reernpl_.celosinrnediatarnentes61ocon piezasdelosfabricantes
deequiposoriginales(O.E.M.)listadasenestemanual."Eluso
depiezasque nocurnplenconlasespecificacionesdel equipo
originalpodriatenetcornoresultadounrendirnientoincorrectoy
adern_.sponeren riesgola seguridad".
Nocarnbielaconfiguracidndel reguladordelmotorni acelere
dernasiadoelrnisrno.Elreguladordelmotorcontrolala velocidad
rn_.xirnaseguradefuncionarnientodelmotor.
Mantengao reernplacelasetiquetasdeseguridade instrucciones
segQnseanecesario.
Respetelasleyesy regulacionesdeelirninaci6ncorrespondientes
paradesecharlagasolina,el aceite,etc.,usados.La elirninaci6n
inapropiadade liquidosornaterialespuededa_arel medic
arnbiente.
NO MODIFIQUE EL MOTOR
Paraevitarlesionesgraveso larnuerte,nornodifiqueel motorbajo
ningunacircunstancia.Si carnbiala configuraci6ndel reguladorel
motorpuededescontrolarsey operara velocidadesinseguras.Nunca
carnbielaconfiguracidndef_.bricadel reguladordelmotor.
AVISO REFERIDO A EMISIONES
Losrnotoresqueest&ncertificadosy curnplenconlasregulaciones
de ernisionesfederalesEPAyde CaliforniaparaSORE(Equipos
peque_ostodoterreno)est_.ncertificadosparaoperarcongasolina
cornQnsinplornoy puedenincluirlossiguientessisternasde control
de ernisiones:Modificaci6ndemotor(EM) y catalizadorde tresvias
(TWO)si est_.nequipadosde esa rnanera.
AMORTIGUADOR DE CHISPAS
Estarn&quinaest&equipadaconunmotorde cornbusti6ninternay
nodebeser utilizadaeno cercade unterrenoagrestecubiertopor
bosque,rnalezaso hierbaexceptosiel sisternade escapedelmotor
est,.equipadoconunarnortiguadordechispasquecurnplaconlas
leyeslocaleso estatalescorrespondientes,encasode haberlas.
Siseutilizaun arnortiguadordechispasel operadorIodebernantener
en condicionesde usoadecuadas.Enel Estadode Californialas
rnedidasanteriorrnenternencionadassonexigidasporley(Arficulo
4442del C6digodeRecursosPOblicosde California).Esposible
queexistanleyessirnilaresenotrosestados.Lasleyesfederalesse
aplicanenterritoriosfedexrales.
Puedeconseguirelarnortiguadorde chispasparael silenciadora
travesde sudistribuidorautorizadodernotoreso poni_ndoseen
contactoconeldepartarnentodeservicios.
35
Page 36

SilVIBOLOS DE SEGURIDAD
Estap_ginarepresentay describelaseguridadlossimbolosquepuedenpareceren esteproducto.Lea,comprenda,ysigatodasinstrucciones
en iamfiquinaantes procurar para reunir y operar.
LEA EL MANUAL(S) DEL OPERADOR
Lea, comprenda, y siga todas instrucciones en el manual (manuales) antes procurar para
1
reunir y operar
ADVERTENCIA-- CUCHILLAS ROTATIVAS
Mantegna manos y pies lejos de girar hoja.
• ®
ESPECTADORES
Mantenga a espectadores, los animales favoritos, y los ni_os pot Io menos 75 pies de la
m_iquina mientras est.1 en la operaci6n. Pare m_iquina si cualquiera entra el _irea.
ADVERTENClA-- SUPERFICIES CALIENTES
No toque el silenciador o zonas adyacentes.
PROTECCION DE OJO
Siempre Ileve gafas de seguridad o gafas de seguridad al operar esta m_iquina.
36
Page 37

NOTA:Estaunidadse entregaSIN GASOLINAniACEITE.Despuesdearmar
la unidad,realicelacargade gasolinadelmotorsegQnlas instrucciones.
NOTA:Lasreferenciasalladoderechooizquierdodelabordeadorase
observandesdelaposici6ndeloperador.
MONTAJE
Barra
Retireydesechecualquiercart6ndeempaqueque pudierehaber
entrela barrasuperiory la barrainferior.
1. Pivotela barrasuperiorhaciearribahastaquecalceen su lugar.
Wase la Figura1.
f ",
f
J
Figura2
AJUSTE
Ajuste Bisel
El_.ngulode lacuchillade la bordeadorase puedeajustarcolocando
el ajustedel biseladoenunade tresposicionesde recorte.Veala
Figura3.
f "-,
,_ j
Figura1
2. Aprietelasperillasdemano,ubicadasaderechae izquierdade
la barra.
Cuerda de Arranque
1. Ubiquela galade lacuerdadel ladoderechodela barrasuperior.
Afloje,peroNOretire,laperilladealetasqueaseguralaguiade
la cuerdaa la barrasuperior.Wase laFigura2.
2. P_.resedetr&sde la unidady sostengaelcontrolde la cuchilla
contrala barrasuperior.
3. Jalesuavementede lacuerdadearranquefueradelmotor.
Lie.
NOTA:Lacuerdadearranquenoseseparadelmotoramenosqueelcontrol
delacuchilla(consultelaFigura2)estepresionadocontralabarrasuperior.
4. Deslicelacuerdadearranquea travesdela partesuperiorde
la guiadela cuerda.Vuelvaaajustarla perilladealetasque
aseguralaguiaa la barrasuperior.
Figura3
/
/
/
/ /
/ /
37
Page 38

Palanca de ajuste de
aJtura clelbordiilo
de control de la ¢uchilla
de aceite
Cebador
Figura4
Familiaricesecontodosloscontrolesycon el usoadecuadodelos
mismos.Sepac6modetenerla m_.quinay desactivarloscontroles
r_.pidamente.
CONTROL DE CUCHILLA
El controldecuchilla,ubicadoen labarradecontrolsuperior,sedebe
presionarcontralabarrasuperiorparapoderoperarla unidadAI soltar
el controldecuchillasedetieneel motoryla cuchilladelabordeadora
Estemecanismode controlesundispositivodeseguridad.Nunca
intenteevitarsufuncionamiento.
PALANCA DE AJUSTE DE ALTURA DEL
BORDILLO
La palancadeajustede alturadelbordilloseencuentraenla parte
posteriorde la bordeadora.Cuandoselacolocaen lamuesca
indicada,ayudaaestabilizarlabordeadoramientrasrecortapastoa Io
largodeun bordillo.
PALANCA DE CONTROL DE LA CUCHILLA
Lapalancadecontrolde profundidadde la cuchillase encuentradel
ladoderechodela barrasuperior.Seusaparacontrolarlaprofundidad
del corte.Cuantom_.shaciaadelantesemuevala palancade control
de profundidadde lacuchilla,m_.sprofundoser_.elcortede lacuchilla
de la bordeadora.
PALANCA DE AJUSTE DEL BISELADO
Lapalancadeajustedel biseladoseencuentraenel frenteizquierdo
de la bordeadora,detr_.sde lacuchillade la bordeadora.Seusa para
variarel _.ngulode lacuchillade la bordeadoraentretresposiciones
pararecorte/zanjadoo recortebiselado.
ARRANCADOR DE RETROCESO
Elarrancadorde retrocesoseusaparaarrancarelmotor.
TAPON DE ACEITE
Consuiteiasecci6nMantenimientoparaobtenerinstruccionessobre
c6moverificarelaceite.
CEBADOR
Elcebadordeusa,parabombeargasolinaal carburadory ayudara
arrancarelmotor.Useloparaarrancarunmotorfrio, perono Io use
paravolvera arrancarun motorcalienteluegode apagarseporcorto
tiempo.
38
Page 39

LLENADO DE GASOUNA Y ACEITE
Aceite (se envia una botella junto con la unidad)
Primer uso
1. Saque la varilla del nivel de aceite (G).
2. Con la cortadorade cesped ubicada en suelo nivelado, viertael
aceitebntamente pot dentrodel tubode Ilenadode aceite del motor
(H) hasta la marca de limite alto en la varilla medidora del nivel de
aceite(J). Vea la Figura 5.
3. Vuelvaacolocar la varilla de Ilenadode aceite y ajQstela.
Usos posteriores
Use aceite para motor de 4tiempos que cumplao sobrepase los
requisitos para la clasificaci6n de servicio API SK SG, SH,SJ o
equivalente.
Compruebesiempre iaetiqueta de servicio API en el recipientedel aceite
para asegurarseque incluyelas letras SE SG, SH, SJ o equivalente.
Temperaturasai aire librede determinarla viscosidad dei aceitecorrecto
para el motor.Use la tabla paraseleccionar lamejor viscosidad para el
rangode temperatura ai aire libre se espera.
f --.,,
Figura5
o .......: T 3o
20
I0
_ 40
o
C "? _ ,-.,. o10
* Pot debajo de 40 oF (4 oC) el uso de SAE30 dara.lugar a duros de
partida.
** Potencima de 80 oF (27 oC)el use de 10W-30puede provocarun
aumentodei consumo de petr61eo.Nivelde aceite con ma.sfrecuencia.
1. Reviseel aceite con ei motorparadoy nivelado.
2. Quite ia tapa deldep6sito de aceite/varilla medidora del nivel de
aceitey limpiela.
3. Coloque y ajuste la varilla indicadora. Luego quitela para revisarel
nivelde aceite.Vea ia Figura 5.
4. Si el nivelde aceite esta.cerca o potdebajo de la marca de limite
bajo de la varilla medidora del nivel de aceite, quite la tapadel
dep6sito de aceite/variiiamedidora dei nivel de aceite y ilenelo con
el aceite recomendadohasta lamarcade limitesuperior. No Ilene de
ma.s.
5. Vueivaainstaiar la tapa/varilla medidora del nivel de aceite.
Gasolina
,, La gasolina con hasta un 10%de etanol (gasohol) o hasta el 15%
de MTBE (metil terbutil _ter) es aceptable.
Echegasolina en un a.reabien ventiiaday con ei motor parado. Si el motor
haestado funcionando, deje que se enfrieprimero.No eche gasolinaa
la ma.quinaenei interiorde unedificio donde los vaporesde la gasolina
)uedan estar ex uestosa al unallama o chis a.
Lagasolina es aitamente inflamabley explosiva y usted puedequemars_
o iesionarse gravementeai reabastecer.Pareel motory mantenga iejos
el calor, las chispas y las llamas. Reabastezcas61oalaire libre. Limpie
inmediatamentelos derrames.
Siva a usarei equipo de formaintermitenteo s61oocasionaimente,
consulteia secci6n de Aimacenamiento FueradeTemporada para
obtener ma.sinformaci6nsobre el deterioro delcombustible.
NOTA:El combustible puededafiar la pintura y aigunos tipos de plastico.
Tengacuidado de no derramarcombustible cuando Ilena el tanque.
No use nuncagasolina rancia o contaminada ni mezclasde aceitey gaso-
lina.No permitaque entre suciedad o aguaen el tanque de combustible.
1. Quite la tapadel tanque de combustible.
2. Agreguecombustible hastaia parte inferiordel iimite de nivelde
combustibleen ei tube deltanque. Noiiene de ma.s.Limpieel
combustiblederramado antes dearrancar el motor.
3. Aprieteeltap6n firmemente.
4. Antesde arrancarel motor,aiejese al menos 3 metros del
emplazamientoy la fuentede la gasolina.
No utilice gasolinas no aprobados,tales como E85. No mezcleel aceite
en iagasolina o modificar el motor parafuncionar con combustibles
alternatives. Esto dafiara,los componentesdel motor y anular la
garantia del motor.
De combustible debe cumplirestos requisitos:
,, Limpia, fresca, la gasolina sin plomo.
• Un minimo de 87 octane/87 AKI (91 RON).
Asegurese de que ninguna persona aparte deioperador permanezca
cerca de ia cortadora mientrasarranca el motoru opera la misma.
Nunca encienda el motoren espacios cerrados oen unazona con poca
ventilaci6n. El escapedel motor contiene mon6xido decarbono, ungas
inodoro y ietai. Mantenga ias manes, los pies, el cabello y laropa suelta
alejados de las partes m6viles del motory de la cortadora.
39
Page 40

PARA ENCENDER EL MOTOR
1. Muevala palancadecontrolde profundidaddela cuchillapara
atr_.sa la posici6nINICIOdelamuescaadyacente(superior).
2. Comenzandoelmotorpotprimeravez,empujeelcebadorcinco
veces.Paratodaslasfuturasventajas,empujeelcebadortres
veces.Espereaproximadamentedossegundosentrecadapresi6n.
VealaFigura6.Nocebeelmotorcaiienteparareiniciarloluegode
unadetenci6nbreve.
3. Paradodetr_.sde launidad,presionelapalancadecontrolde
lacuchillay sost_ngalocontralabarrasuperiorconlamano
izquierda.
4. Conlamanoderecha,tomela manijadelarrancadorde retroceso
ylentamentetirede lacuerdahaciaafuerahastaqueel motor
Ileguealprincipiodesuciclodecompresi6n(la cuerdaestar_,un
pocom_.stensaen estepunto).
5. Despu_sdepermitirquela cuerdavuelvalentamente,tirede la
cuerdaconun movimientode brazor_.pidoycontinuo.Durante
todoel movimientomantengafirmementesujetalamanijadel
arrancador.
Deretracci6nra.pidadelcord6ndearranque(soborno)tirara,demanoy
elbrazohaciaelmotorma.sra.pidode Ioquepuededejarir.Lasfracturas
_dehuesos,fracturas,contusonesoesguncespodriaresutar.
6. Permitaque lamanijadelarrancadorvuelvalentamenteal perno
deanilla.
f
J
Figura6
NOTA:Silasinundacionesdel motor,espereunosminutospara
reiniciar,peronoprimos.
PARA DETENER EL MOTOR
1. Sueltela manijadecontroldelacuchillaparadetenerel motoryla
cuchilla.
BORDEADO
Lacuchillade cortegiratoriapuedelanzarobjetosy causarlesiones
personales.Mantengael_.realibrede observadoresy nooperesin
tenettodoslosprotectores.
Nobajelacuchillasi lacuchillase encuentrasobreconcreto,asfalto,
rocaso similar.La cuchillapuedegolpearcontrala superficiede
_apoyoy provocaresonespersonaeso perjucos materaes.
Paracomenzarabordear,procedadela siguienteforma:
1. Muevala unidadalAreaquevaa recortar,asegur_.ndosede que
la ruedaposteriorizquierdaest_sobreunasuperficieduray que
lacuchillaest,. sobreel_.reaa cortar.Veala Figura7.
2. Conlapalancadecontrolde lacuchillaen la posici6nde
funcionamiento,hagaunapasadaporelAreaa recortarantesde
procederala siguientemuesca.Cuantom_.sadelantesemueva
la palancadecontrolde profundidadde lacuchilla,m_.sprofundo
o m_.sabajoser_.el cortede lacuchillaenel suelo.Puedehacer
faltahacervariaspasadasparaobtenerlaprofundidaddecorte
deseada.No bajela cuchillam_.sde unamuescadeprofundidad
porvezsin hacerunapasada.
J
Figura7
3. Paramejoresresultados,procedalentarnenteporel sendero
queest,. recortando,moviendola bordeadoraparaatr_.sy
paraadelanteporel _.readecorte,siempreasegur_.ndosede
rnantenerlaruedaposteriorizquierdasobrela superficieduray la
cuchillaen el senderodecorte,cercaperosintocarel hordede
la superficiedura.
4. UnavezquehaterminadoderecortarelAreaseleccionada,
vuelvaa colocarlapalancadecontrolde lacuchillaen laposici6n
INICIO,mu_vasea la siguienteAreaa recortar,y proceda
nuevamentedesdeel paso1.
40
Page 41

Recorte aIo largode un bordillo
Laruedaposteriorderechadelabordeadorasepuedebajarauna
decincoposicionesparafacilitarlatareaderecorteaIolargodeun
bordillo.
Paraajustarlaalturadelaruedadelbordillo,hagaIosiguiente:
1. Bajelaruedaposteriorderecharnoviendolapalancadeajustede
laalturadelbordilloligerarnentealaizquierda.Veala Figura8.
Palancade
ajustede
aitura
del bordillo
\
',_,, !t,. .............................................
)
(
Zanjado
Sepuedeutilizarla caracteristicade zanjadoopcionalde la bordea-
dora,paracrearunsenderodecortern_.sanchoparacosastales
cornotendidode cablesparala ilurninaci6npaisajista
Desconecteel cablede labujiade encendidoy hagarnasacontrael
motorantesde realizarlossiguientespasos.
Elhordede labordeadoraesfiloso.P6ngaseguantesdetrabajode
cueroparaprotegerselas rnanoscuandotrabajacercade lacuchilla
de la bordeadora..
UsedosIlaves(unaparairnpedirquela cabezadelperno
hexagonalgire Iocay laotraparadesenroscarla tuercade brida)
paraextraerla tuercade bridaqueaseguralacuchillade la
bordeadora,dejandola cuchilladela bordeadoraen sulugar.Vea
laFigura10.
Figura8
2. Girela ruedaposteriorderechaauna posici6naplicableen
relaci6nala curbadela alturadelbordilloa recortar.
3. Sueltelapalancadeajustede laalturadel bordilloparatrabarla
ruedaen esa posici6n.
Biselado
ParaIograrunhordebiselado,pongala palancade ajustedel biselado
(consultelaMontajey Configuraci6n)en laprirnerarnuesca(rnano
izquierda)o tercerarnuesca(rnanoderecha)paracolocarla bordea-
doraenposici6nparabiselar.Vealafigura9.
reborde
LAminadel
Edger
Arandelaplana
Figura10
2. Instalelacuchillaadicionaldela bordeadorasurninistradaconla
unidady laarandelaplana.Veala Figura10.
3. Sujeteconlatuercade bridaextraidaanteriorrnente.Useuna
Ilavede torsi6nparaajustarlatuercaconrebordeentre37
pies-librasy 50 pies-libras.
NOTA:AsegQresedeque lacorreadetransrnisi6nest,.correctarnente
asentadasobreelhusillode lacuchillay queseencuentrac6rnoda-
rnenteubicadasobrelosbordesdelhusilloy nopellizcadaentreellos.
Repitalostres prirnerospasossila correaest,.pellizcada.
Posicidnderecha
Posici6nizquierda
k. j
Figura9
41
Page 42

PROGRAMA DE iVlANTENllVllENTO
Antesde realizarcuaiquiertipode mantenimientoo servicio,desenganche
todosloscontrolesydetengael motor.Espereaque sedetengancomple-
tamentetodaslaspiezasmdviles.Desconecteelcane delabujiay p6ngalo
haciendomasacontrael motorparaevitarqueseenciendaaccidentaimente.
Siga el cronogramade mantenimientoque se presenta acontinuaci6n.
Estatabla s61odescribe pautasde servicio. Utiiiceia columna Registro
de Servicio parahacer eiseguimientode las tareas de mantenimiento
completadas. Para ubicar elCentro de Servieio Sears m_s cercano o
para programar un servieio, simplemente comuniquese con Sears al
tel_fono 1-800-4-MY-HOME®.
Cada uso
lras rues o 5horas
Anuaimenteo 25 horas
Anuaimenteo 50 horas 1. 1. Oambiar
Anuaimente 1. 1.
Antesde aimacenar 1. 1.
1. Nivelde aceite dei motor
2. Piezassueltaso faitantes
3. Depuradordeaire
4. Unidady motor
1. Aceitedei motor
1. Depuradordeaire 1-
2. Varillajes/pivotesde control y ruedas
3. La parte inferiorde ia plataforma de
ia cortadora de cesped
Aceite del motor 1-i
Bujia de encendido
2. 2.
Depuradorde aire
Sistemade combustible
1. Verificar
2. Ajustaroreemplazar
3. Verificar
4. Limpie
1. Oambiar
1. Limpiaroreemplazar
2. Lubricarcon aceiteligero
3. Limpie
Reemplazar
Reemplazar
Hacerfuncionar el motor hasta que se
detenga por falta de combustibleo aSadir
estabilizadorde un tanque Ilenode
combustiblenuevo antes de su aimace-
namiento.
Limpiom_.sa menudoencondicionespolvorientaso cuandolosescombrosaerotransportadosest_.npresentes.Sustituyaelfiltrode airede
sermuysucio.
ff Cambieelpetr61eocada25 horaswherefuncionamientodel motorbajolacargapesadaoen temperaturasaltas.
42
Page 43

Detengasiempreelmotor,desconecteelcabledela bujiayhagamasa
contraelmotorantesdereaiizarcuaiquiertareade mantenimientoa su
mfiquina.
RECONIENDACIONES GENERALES
• Respetesiemprelasreglasdeseguridadcuandorealicetareasde
mantenimiento.
• Lagaranfiadeestacortadoranocubreelementosquehan
estadosujetosalmalusoola negligenciadeloperador.Para
recibirel reembolsototaldelagarantia,eioperadordeberfidar
mantenimientoai equipotai y comoseindicaenestemanual.
• Elcambiode lavelocidadcontroladadelmotorinvalidarfilagarantia
deimotor.
• TodoslosajustesdebenserverificadospotIomenosunavezen
cadaestaci6n.
• Reviseperi6dicamentetodoslossujetadoresy compruebequeesten
bienajustados.
MANTENIMIENTO DEL MOTOR
Bujia de encendido
Paraunbuenfuncionamiento,labujiadebeestaradecuadamente
abiertay librededep6sitos.Cambielabujiacada50horaso unavezpor
temporada.Reemplacela bujiaanualmente.
1. Desconecteelcapuch6nde labujiayretirecualquiersuciedaddel
fireadeesta.
2. UselaIlavedebujiasdeltama_oadecuadoparaextraerla.
Figura11
NOTA:ReernplazarconunaChampionRJ19LMbujia.
3. Cornpruebeel entrehierro(A)conuncalibradordealarnbre(B).La
separaci6ncorrectaes 0,030in.(0,76mm).VealaFigura11.Sies
necesario,reajusteelentrehierro.
4. Instaleyaprietelabujiaal parde aprieterecornendado.Parael
ajustedelentrehierroo el pardeapriete,consultela secci6nde
Especificaciones.
5. Coloqueel capuch6ndela bujia.
Filtro de aire
Unfiltrode airesuciorestringir&elfiujodeaireal carburadory causar&
el funcionarnientodefectuosodelmotor.Inspeccioneelfiltrocada vez
queopereel motor.Necesitar_.lirnpiarcon rn_.sfrecuenciaelfiltro si
ustedoperael motoren_.reasrnuypolvorientas.
Lirnpioelfiltrodeaire cada25horasde laoperaci6nounavezpot
temporada.Reemplaceel filtrodeaireanualmente.
Nuncaarranqueuopereel motorsirernovi6elconjuntodelfiltrode
aireo el filtrode aire.
NOTA:Nouseairea presi6nnisolventesparalirnpiarel filtro.Elairea
presi6npuededaSarelfiltroylossolventespuedendisolverlo.
1. Rernuevael tornillo(A)dela partesuperiordelconjuntodelfiltro
deaire(B). VeaFigura12.
2. Paraprevenirquecaigandesechosdentrodelcarburador,
rernuevacuidadosarnenteelconjuntodelfiltrode aire.
Figura12
3. Rernuevaelelernentode espurna(C)de labasedel filtrode aire.
4. Laveelelernentode espurnaen detergenteliquidoyagua.
Escurrahastasecarel elernentodeespurnaenuntrapolirnpio.
5. Satureelelernentodeespurnaconaceitelirnpioparamotor.Para
removerel excesodeaceite,escurraelelernentode espurnaen
untrapolirnpio.
6. Instaleelelernentodeespurnaenlabasedel filtrodeaire.
7. Instaleelconjuntodelfiltrode airesobreelcarburadory
asegL_reloconuntornillo.
43
Page 44

Cambiar el aceite del motor _ "
Lagasolinaysusvaporessonextrernadarnenteinflarnablesy
explosivos.Unincendioounaexplosi6npuedencausargraves
_quernaduraso a rnuerte.
Carnbieel aceitedelmotordespu_sdelas prirnerascinco horasde
operaci6n,y cadacincuentahoraso unaveza laternporadadespu_s.
SidrenaelaceitedesdeeltubosuperiordeIlenadode aceite,el
tanquedecombustibledebeestarvado ode Iocontrariopodria
3resentarseunafugade combustiblequepodriaocasionarun
ncendioounaexplosi6n.Paradesocuparel tanquedecombustible,
opereel motorhastaquesedetengaporla faltade combustible.
1. Con el motor apagado pero aQncaliente, desconecte el cable de
la bujfa (F) y rnant_ngalo a distancia de la bujfa.
2. Coloque unrecipiente adecuadocerca del motorpara recoger el
aceiteusado.
3. Quite la tapa/varilla medidoradel nivel de aceite (E) y dreneel aceite
al recipiente inclinandoel motorhacia el tubo deIlenadodel aceite.
Vea la Figura 13.
Figura13
El aceite usadoes unresiduo peligroso.Elimineel aceiteusado
adecuadamente.NoIo arroje juntocon los residuosdomiciliarios.Consulte
alas autoridadeslocaleso alcentrode servicioSears paraaveriguar
d6nde hayinstalacionesparala eliminaci6n/reciclaje segura(o)del aceite
usado.
4. Conei motoren una posici6n nivelada, Ilene hasta ia marca de
limitealto en lavarilla medidoradel nivel de aceite con el aceite
recomendado.
Poneren rnarchael motorconun niveldeaceitebajopuedecausar
da_osenel motor.
5. Vueivaainstalar bien ia tapa/varilla medidoradel nivel de aceite.
Comprobar el aceite del motor
Comprobarel nivelde aceite antes de cada operaci6n. AsegQresede que
el nivei de aceite se mantiene.
1. Reviseel aceite con ei motorparadoy nivelado.
2. Quite ia tapa deldep6sito de aceite/varilla medidora del nivel de
aceite(G) y limpiela. Vea la Figura 14.
3. Coloque y ajuste la varilla indicadora. Luego quitela para revisarel
nivelde aceite.
4. Si el niveldeaceite esta.cercao pot debajo de la marcade limite
bajo de la varilla medidora del nivel de aceite, quite la tapa del
dep6sito de aceite/varilia medidoradei nivel de aceite y ilenelo con
el aceite recomendado (H) hastala marca de limite superior (J). No
Ilenede ma.s.
5. Vuelvaainstalar la tapa/varilla medidora del nivel de aceite.
Figura14
Limpie el motor
Diariamenteoantes de cada uso, limpie el cesped, la grasa o los
residuos acumulados del motor.Mantengalimpios el varillaje, los
resortes y los controles. Mantengaei a.reaque rodea al silenciador y
detra.sdei mismo iibrede cualquier residuocombustible.
El mantenimientodel motor en condiciones limpias permiteel
movimientode aire airededor del mismo.
Laspartes dei motorse deben mantenerlimpias para reducir
el riesgo de sobrecalentamientoy combusti6n de los residuos
acumulados.
No useagua para limpiar ias piezas dei motor. Elagua puede contaminar
el sistema de combustible. Useun cepilloo un trapo seco.
44
Page 45

LUBRICACI6N
Ruedas
Lubriquelas ruedasycojinetesporIomenosunavezportemporada
conunaceiteliviano.Adem_s,si sequitanlasruedaspotcualquier
motivo,lubriquelasuperficiedelpernodeleje yla superficieinterna
de la ruedaconaceiteNviano.
Puntos de giro
Lubriquelos puntosdegirodelganchopalancadecontroldela
cuchilla,lapalancadecontrolde profundidaddela cuchilla,y si
corresponde,la palancadeajuste,yla palancadeajustedealturadel
bordilloconaceitelivianoporIomenosunavezportemporada.
Pedestal
Lubriqueel pedestalcada25 horaso porIomenosunavezpor
temporada.SimplementeapNqueaceiteenambosextremosde la
placade cubierta.Veala Figura15.
EL BORDE DE LA BORDEADORA
Elhordede la bordeadoraesfiloso.P6ngaseguantesde trabajode
cueroparaprotegerselas manoscuandotrabajacercade lacuchiNa
de la bordeadora.
1. UsedosNaves(unaparairnpedirquela cabezadelperno
hexagonalgire Iocay laotraparadesenroscarla tuercade brida)
paraextraerla cuchillade labordeadora.Consultela Figura16.
Tuercadel
reL)rde
Lubricar
Figura15
Figura16
2. Retireydesechelacuchillade la bordeadoraperoconservela
tuercaconreborde.
3. InstalelacuchiNade reemplazode labordeadoray la tuercacon
reborderetiradaantes.UseunaNavedetorsi6nparaajustarla
tuercaconrebordeentre37 piesiNbrasy50 piesiNbras.
NOTA:AsegOresede quelacorreade transmisi6nest&correctamente
asentadasobreelhusillode lacuchillay queseencuentrac6moda-
menteubicadasobreloshordesdelhusilloy nopellizcadaentreenos.
Repitalostres primerospasossila correaest&peNizcada.
45
Page 46

REEIVIPLAZODE CORREA
NOTA:Paraayudaraarrnarnuevarnenteobservela orientaci6nde la
correadetransrnisi6nsobrelasdospoleasIocasy la poleavolantedel
motorantesde realizarlossiguientespasos.Veala Figura17.
Lacorreadetransrnisi6nde la bordeadoraestasujetaa desgastey
sedeberiacarnbiarsisepresentansignosdeagrietarniento,desin-
tegraci6no descornposici6n.Paracarnbiarlacorreaprocedadela
siguienternanera:
1. Trabajandodelantede la bordeadora,afiojelatuercadesegu-
ridadconbridaqueest,.sobreel bastidor,perrnitiendoqueel
conjuntode la poleaIocagirelevernentefueradelbastidor.Veala
Figura17.
Tuercade seguridad
de la brida
.....7
Polea "Asarnbleade polea
volante de holgaz_.n
delmotor
Figura17
2. Conlaotrarnano,alcancecuidadosarnentedebajodela parte
posteriorde la unidadyextraigalacorreade alrededordela
poleavolantedel motor.Veala Figura17.
J
.
Retirelaguardade lacorreadelas poleasdelhusillosacandolos
dostornillosautoroscantesquela sujetanalrnontajedela placa
de lacuchilla.VealaFigura18.
Defensade la correa
......................................P°!ea_superi°r..................................Poieainferior.................!
Figura18
4. Cuidadosarnenteretirela correade las poleas,verificandouna
vezrn_.sla orientaci6nde la correa.Descartelacorrea.Veala
Figura18.
5. Trabajandodelantedela bordeadora,coloquelacorreaen las
poleasdel husillo,ori_ntelanuevarnentehacialasdospoleas
Iocasy luegocol6quelaen lapoleadel volantedel motor.
NOTA:AsegOresedequeel lado"V"de la correaest,.asentadosobre
la poleasuperioryqueel ladopianode lacorreaest,.asentadosobre
la poleainferior.Veala Figura18.
6. Vuelvaa instalarelprotectordeloshordesdelhusilloconlos
tornillosautorroscadosextraidosanteriorrnente.
7. Aseg[3resedeque lacorreadetransrnisi6nest,.sobrela polea
volantedel motory las poleasIocas,yvuelvaa ajustarlatuerca
de seguridadcon bridaqueseencuentraen lapartesuperiordel
bastidor.
NOTA:AsegOresede quela correadetransrnisi6nest,.correctarnente
asentaday quese encuentrac6rnodarnenteubicadasobreloshordes
del husilloy nopellizcadaentreellos.Repitalostresprirnerospasossi
la correaest,.pellizcada.
Nuncaoperela bordeadorasinel protectordela correadelos
hordesdelhusilloensulugar.
46
Page 47

Nunca almacene la bordeadora de cesped concombustible en el
tanqueen un espacio cerrado o ena.reascon poca ventilaci6n, donde
los gases dei combustible puedan aicanzar el fuego, chispas o una
luz piloto comoia quetienenaigunos homos, calentadoresde agua,
secadoresde ropa o algQnotto dispositivo a gas.
PREPARACI6N DEL MOTOR
Yaquelos rnotoresalrnacenaronrn_.sde30 dfas:
1. Parairnpedira la gornaforrnarseenel sisternade combustible
o en partesdecarburador,dirijasel motorhastaqueestose
parea faltadelcombustibleoa_adirunaditivode gasolinaal
gasenel tanque.Si ustedusa unaditivodegas,dirigeel motor
durantevariosrninutosparaponerencirculaci6neladitivoporel
carburador-- despu_squeel motory el combustiblepuedenser
alrnacenadoshasta24 rneses.
2. Mientrasel motorestodavfacaliente,carnbioel petr61eo.
3. Lirnpieel motordeescornbrossuperficiales.
PREPARACION DE LA BORDEADORA
Limpiey lubrique la bordeadora como se describeen las
instrucciones de lubricaci6n.
• No utilice una lavadora a presi6n ni una manguerade jardfn para
limpiar su unidad.
• Cubra la cuchilla de labordeadora congrasa para chasis para
impedir la oxidaci6n.
• Refierasea la PREPARACIONDEL MOTORpara instruccionesde
almacenaje de motor correctas.
• Almacene la unidad en una zonalimpia y seca. No la almacene
cerca de materialescorrosivos como pot ejemplo fertilizantes.
Cuando almacene cualquier tipo deequipo motorizadoen un gaip6n
de dep6sito met_.iicoocon poca ventilaci6n,tenga especial cuidado
de realizarle untratamiento antioxidanteal equipo. Use aceite ligero o
silicona para recubrir ei equipo, especialmentelos cables y partes m6viles
de su bordeadora antes dealmacenarla.
4.7
Page 48

Antesderealizarcualquiertipodernantenirnientoo servicio,desenganchetodosloscontrolesydetengael
motor.Esperea quesedetengancornpletarnentetodaslaspiezasrn6viles.Desconecteelcabledelabujfay
p6ngalohaciendornasacontrael motorparaevitarqueseenciendaaccidentalrnente.Utilicesiernpreanteojos
[desegurdaddurantee funconamentoo rnentrasajustao reparaesteequpo.
El motor no arranca
1. Controlde ia cuchilladesenganchado.
2. Se hadesconectado el capuch6n de la bujia.
3. El dep6sito de combustible esta.vacio oel
1. Engrane el control de ia cuchiila.
2. Conecteel cableal capuch6n de la bujia.
3. Lleneel tanque con gasolina limpiay nueva.
combustiblese haechado a perder.
El motor funciona de
manera erra.tica
4. La bujia nofuncionacorrectamente.
5. El motorsedesbord6.
6. Lineade combustible bloqueada.
1. El capuch6n de la bujiaesta.flojo.
2. El combustible se ha echado a perder.
3. La ventilaci6n de la tapa del combustibleesta.
4. Limpie,ajuste laseparaci6n, ocambie la bujia.
5. Esperar unos minutos parareactivarse.
6. Contacte consu centro de partes y reparaciones Sears.
1. Conectey ajuste el capuch6nde la bujia.
2. Lleneel tanque con gasolina limpiay nueva.
3. Destapelaventilaci6n.
obstruida.
4. Aguao suciedaden el sistemadel combustible.
4. Vacie ei tanquede combustible. Cargue combustible
nuevoen el dep6sito.
El motor recalienta
5. El fiitro de aire esta.sucio.
6. Lineade combustible bloqueada.
1. El nivel de aceite del motor esta.bajo
2. Flujodeairerestringido
5. Consulteia secci6n Mantenimientodei manual.
6. Contacte consu centro de partes y reparaciones Sears.
1. Lleneel motor con ia cantidad y tipo de aceite adecuado.
2. Limpie los residuos deairededor de ias aietas de
refrigeraci6ndel motory del alojamientodel soplador.
El motor vacila a altas 1. Poca separaci6nde los electrodos de la bujia 1.
Ajuste la separaci6n a .030".
revoluciones
El motor funciona mal 1. Bujia atorada, averiadaoexceso de separaci6n. 1. Limpie, reemplaceo reajustela separaci6n a .030".
en marcha ienta 2. El fiitro de aire esta.sucio 2. Consulteia secci6n Mantenimientodei manual.
Demasiadavibraci6n 1. Lacuchilladela bordeadoraestB.dobladaoda_ada. 1. Reernplace la cuchilla de la bordeadora.
2. El husillo de labordeadora estB.doblado o 2. Contacte consu centro de partes y reparaciones Sears
da_ado, para enviar la unidadinspeccionada.
Lacorrea de 1. La correa est,. gastada o estirada 1. Reernplace la correa de transrnisi6n.
transmisi6n se
resbala
__NECESITAMAS AYUDA?
_r_,"or_tr_r_ I_ I_, pu_, b_ y m_ _,_ managemylife.com - isin cargo!
En linea podr4 encontrar este manual y los rnanuales de todos los otros productos que posea.
Sus preguntas ser4n respondidas por nuestro equipo de especialistas.
Obtenga un plan de mantenirniento personalizado para su hogar,
Encuentre information y herramientas que Io ayudar4n con los proyectos de su hogar,
48
Page 49

(Esta p_.ginase aplica s61oen EE.UU. y Canada.).
Sears Brands Management Corporation, el Consejo de Recursos Ambientales de California (CARB)
y la Agencia de Protecci6n Ambiental de los Estados Unidos (EPA)
Declaraci6n de garantia del sistema de control de emisiones (derechos y obligaciones de la garanfia de defectos del propi=
LACOBERTURADE LAGARANTJADECONTROLDEEMISIONESES Y PARALOSMODELOSCERTIFICADOSDELANO 1997YPOSTERIORES,
APLIOABLEA LOSMOTORESCERTIFICADOSCOMPRADOSENCALIFOR- QUESE COMPRENYUTILICENENCUALQUIERPARTEDE LOSESTADOS
NIAEN1995Y POSTERIORMENTE,QUESE UTILIZANENCALIFORNIA, UNIDOS(Y A PARTIRDEL1 DE ENERODE2001ENCANADA).
Declaraci6n de garanfia sobre defectos en el control de emisiones para California y los Estados Unidos
ElConsejode RecursosAmbientalesdeCalifornia(CARB),la EPA(Agencia
de Protecci6nAmbientaldelos EE.UU.)y Searstienenel gustodeexplicarla
garantiadelsistemadecontroldeemisionesparamotoresdela_o2000y para
elfuturoconrelaci6na motorespeque_ostodoterreno(SORE).EnCalifornia,
los nuevosmotorespeque_ostodo terrenodebenestardise_ados,construidos
y equipadosparacumplirconlas rigurosasnormasanti-smogdelestado.En
el restodelos EstadosUnidos,losmotoresnuevostodoterrenodeencendido
porchispacertificadosparael a_o 1997debencumplirest_ndaressimilares
establecidospot la EPA.Searsdebegarantizarel sistemadecontroldeemis-
Cobertura de la garantJa Sears para defectos en el control de emJsiones
Losmotorestodoterrenopeque6osest_ngarantizadosen Iorelativoalcontrol alas disposicionesquese indiquenacontinuaci6n.Si una partedesumotor
deemisionesparadefectosenpiezasduranteunperiododedosa_os,sujeto cubiertapot lagaranfiaes defectuosa,Searsreparar_osustituir_dichaparte.
Responsabilidades del propietario en relacibn con la garantia
Comopropietariodelmotortodoterrenopeque_o,Ud.es responsabledela
realizaci6ndelmantenimientorequeridoqueseincluyeenlas instrucciones
deoperaci6ny mantenimiento.Searsrecomiendaquese conserventodoslos
recibosrelativosalmantenimientodesu motortodoterrenopeque_o,pero
nopudedenegarlagarantiasimplementeporla faltade los mismos,opor su
incumplimientodel mantenimientoprogramatic.Comopropietariodelmotor
peque_otodoterrenodebesaberque,sinembargo,Searslepuedenegar
lacoberturade lagarantiasi sumotortodoterrenopeque6oouna piezadel
mismohanfalladodebidoaabuso,negligencia,mantenimientoindebidoo
Disposiciones de la garantJa Sears para defectos en el control de emJsiones
Lassiguientessondisposicionesespecificasrelacionadasconla coberturadelagarantiaparadefectosenel controldeemisiones.Esuna_adidoa lagarantiade
motorSearsparamotoresnoreguladosqueseencuentraenlasinstruccionesdefuncionamientoy mantenimiento.
1. Piezascongarantia
Lacoberturadeesta garantiase extiendeL]nicamentealas piezas
queaparecena continuaci6n(las partesde lossistemasdecontrolde
emisiones),siemprequedichaspiezasestuvieranya enel motoren el
momentodesucompra.
a. Sistemademedici6ndecombustible
•Sistemadeenriquecimientoparaarranqueenfrio
•Carburadory partesinternas
• Bombade combustible
b. Sistemadeinducci6nde aire
• Filtrodeaire
•Colectordeadmisi6n
c. Sistemadeencendido
• Bujia(s)deencendido
•Sistemadeencendidomagneto
d. Sistemadelcatalizador
•Convertidorcatalitico
•Colectordeescape
•Sistemadeinyecci6nde aireo v_lvulade impulsos
e. Elementosvariadosusadosenlossistemasanteriores
•Wlvulas devacio,sensiblesa temperatura,posici6nytiempo
einterruptores
•Conectoresy montajes
2. AIcancedela cobertura
Searsgarantizaal poseedorinicialy a loscompradoressubsiguientes
quelas piezascongarantianotendr_ndefectosen materialesni mano
deobraque provoquenla falladelas mismasduranteun periodode
dosaSosa partirdela fechaen queel motorse entregaa uncomprador
particular.
3. Sincargo
Lareparaci6no reemplazodecualquierpartecongarantiase realizar_
Enlos EstadosUnidosy Canad_hayunalineadeatenci6nde24 horas,1-800-469--4GG3,quecuentacon unmenL]con mensajespre-grabadosque contienen
etario)
ionesdesu motorparalosperiodosdetiempoenumeradosa continuaci6n,
siemprequenohayaabuso,negligenciaomantenimientoindebidode su
motortodoterrenopeque_o.Susistemadecontroldeemisionespuedeincluir
piezastalescomoel carburador,el filtrodeaire, elsistemadeencendido,el
silenciadoryel conversorcatalitico.Tambienpuedeincluirconectoresyotras
unidadesrelacionadasconlasemisiones.Dondeexistaunacondici6ncubierta
porla garantia,Searsreparar_supeque6omotortodoterrenosincostoalguno
incluyendodiagn6stico,piezasymanodeobra
a modificacionesnoaprobadas.Ud.es responsabledepresentarsumotor
todoterrenopeque6oa undistribuidorde serviciosSearsautorizadotan pronto
comoaparezcaunproblema.Lasreparacionesdela garantiasinconfiicto
debencompletarseen un plazodetiemporazonable,nosuperiora 30 dias.Si
tienealgunapreguntarespectoa sus derechosyresponsabilidadesreferen-
tesa la garantia,debecontactarconun representantedeserviciosSearsal
1--800--469--4663.Lagarantiadeemisioneses unagarantiapor defectos.Los
defectossejuzgandeacuerdocon elfuncionamientonormalde unmotor.La
garantiano est_relacionadaconunapruebade emisionesenuso.
sin cargoalgunoparael poseedor,incluyendotareasdediagn6sticoque
permitandeterminarsi una partecongarantiaes defectuosa,siempreque
dichodiagn6sticose realiceenundistribuidordeserviciosSearsautoriza-
do. Parael serviciode lagarantiadeemisiones,contacteal distribuidorde
serviciosSearsautorizadom_scercanoincluidoen las"P_ginasamarillas"
en lascategorias"Motores,gasolina","Motoresdegasolina","Podadoras
de cesped",osimilares.
4. Reclamacionesyexclusionesa la cobertura
Las reclamacionesde lagarantiadebenenviarsedeacuerdocon las
disposicionesdela politica degarantiaparamotoresSears.La cobertura
de lagarantia excluir_defectosen piezascongarantiaquenoscan partes
originalesSears,o abuso,negligenciao mantenimientoincorrecto,tal y
comoseestableceen lapoliticadegarantiaparamotoresSears.Searsno
es responsablede lasfallasenpiezascongarantiaprovocadaspor el uso
de partesa6adidas,quenoscanoriginalesoquesehayanmodificado.
5. Mantenimiento
Cualquierpartecongarantiaque no esteprogramadaparaserreem-
plazadacomomantenimientorequerido,oque s61odebainspeccionarse
regularmentealefecto de"inspeccioneoreemplacesegL]nsea necesario",
estar_garantizadacontradefectosduranteelperiodode la garantia.Todas
las piezasgarantizadasqueestenprogramadasparasureemplazopara
cumplirconlos requisitosdemantenimientoestar_ngarantizadass61o
porel periodoanterioral primerreemplazoprogramaticparadicha pieza.
Cualquierpiezade recambioqueseaequivalenteenfuncionamientoy
durabilidadpuedeusarsepararealizarmantenimientoo reparaciones.El
propietarioes responsablederealizartodoel mantenimientorequerido,tal
y comose defineenlas instruccionesdefuncionamientoy mantenimiento
Sears
6. Coberturaindirecta
Porla presente,lacoberturase extiendeala falladecualquiercomponente
de motorprovocadapot lafalla de unapiezacongarantiaque estetodavia
en periododegarantia.
informaci6nparael mantenimientodemotores.
Page 50

Busque el periodo de duraci6n de emisiones importantes yla informaci6n de clasificaci6n de aire en
la etiqueta de emisiones de su motor
Los motores cuyo cumpiimiento con los estAndares de emisi6n Tier 2 de laComisi6n de Recursos Ambientales de California (CARB)
est6 certificado deben exhibir la informaci6n relacionada con el periodo de duraci6n de ias emisiones y la clasificaci6n de aire. Sears
Brands Management Corporation ponen esta informaci6n a disposici6n del consumidor en nuestras etiquetas de emisiones.
Ei Periodo de Duraci6n de las Emisiones describe el nQmero de horas de tiempo real de funcionamiento para el cuai se certifica que
el motor cumpie con ias reglas de emisi6n, descontando el mantenimiento adecuado del mismo segQn las instrucciones de oper-
aci6n y mantenimiento. Se utilizan las siguientes categonas:
Moderado:Se certifica que el motor cumpie con las reglas de emisi6n durante 125 horas de tiempo real de funcionamiento del motor.
Inmediato:Se certifica que el motor cumpie con las reglas de emisi6n durante 250 horas de tiempo real de funcionamiento del motor.
Extendido:Se certifica que el motor cumpie con las reglas de emisi6n durante 500 horas de tiempo real de funcionamiento del motor.
Por ejemplo, una cortadora de c6sped tJpica que se empuja desde arras se usa entre 20 y 25 horas por aSo. Por Io tanto, el Periodo
de Duraci6n de Emisiones de un motor con una clasificaci6n intermedia sena equivaiente a entre 10 y 12 aSos.
Laciasificaci6n de aire es un nQmero calculado para describir el nivel relativo de emisiones para un grupo de motores en particular.
Cuanto menor sea la clasificaci6n de aire, mayor es la limpieza del motor. La informaci6n se presenta de forma grAfica en la etiqueta
de emisiones.
Despu_s del 1 de julio de 2000, busque el periodo de cumplimiento de las reglas de
emisiones en la etiqueta de cumplimiento de las reglas de emisiones del motor
Despu6s del 1 de julio de 2000 se certificarA que determinados motores Sears Brands Management Corporation cumplen
con los estAndares de emisiones de la fase 2 de la Agencia de Protecci6n Ambientai de los Estados Unidos (USEPA). Para
los motores certificados para la etapa 2, el periodo de cumplimiento con ias reglas de emisiones al cual se hace referencia
en la etiqueta de cumplimiento con las reglas de emisiones indica el nQmero de horas de funcionamiento para el cual se ha
demostrado que el motor cumple con los requerimientos federales de emisi6n.
Para los motores con desplazamiento inferior a 225 cc, Categoria C = 125 horas, B = 250 horas y A = 500 horas.
Para los motores con desplazamiento de 225 cc o mAs, Categoria C = 250 horas, B = 500 horas y A = 1000 horas.
El desplazamiento de los motores de la serie modelo 150112 es 249 cc.
La presente es una representaci6n gen_rica de laetiqueta de emisi6n que se encuentra generaimenteen un
motor certificado.
FAMILYYBSXS.3192VA 274812
GDOC-100182Rev.A
50
Page 51

Felicitaciones por haber realizado una adquisici6n inteligente. El producto Craftsman® que ha
adquirido esta diseSado y fabricado para brindar muchos aSos de funcionamiento confiable. Pero
como todos los productos a veces puede requerir de reparaciones. Es en ese momento cuando el
disponer de un Acuerdo de protecci6n para reparaciones le puede ahorrar dinero y problemas.
A continuaci6nse detallan los puntos incluidosen el Acuerdo:
[] Servicio experto prestadopor nuestros10,000especialistas en reparacionesprofesionales
[] Servicio ilirnitado sin cargo para las piezasy la mano de obraen todas lasreparacionescubiertas
[] Reernplazo del producto hasta 1500d61aressi no es posible repararel producto cubierto
[] Descuento de 25% del precio normal delservicio y de las piezas relacionadascon el mismo queno estencubiertas
por el acuerdo; ademas,25% del precionormal de laverificaci6n de mantenimientopreventivo
[] Ayuda r_pida pot tel_fono - Io IlamamosResoluci6n RApida- el apoyotelef6nico de unChamusca al representante.
Pienseennosotroscomo elmanual "de un dueSohablador."
Una vezadquirido el Acuerdo,puede programar el serviciocon tans61orealizaruna Ilamadatelef6nica. Puede Ilamaren
cualquier momentodeldia o de la noche o programarun servicio en linea.
ElAcuerdode Protecci6nde Reparaci6nes unacompra sin riesgo. Si ustedanulapor alguna raz6nduranteel periodode
garantiade producto,proporcionaremosun reembolso Ileno.O, un reembolsoprorrateadoencualquier momentodespues
del periodode garantiade productoexpira, iAdquiera hoy su acuerdode protecci6nparareparaciones!
Se aplican determinadas limitaciones y exclusiones. Para obtener informaciTn adicional y precios en los Estados
Unidos Ilame al 1-800-827-6655.
El *Coverage en Canad_ivaria en algunos articulos. Para detalles Ilenos la Ilamada Chamusca Canad_ien 1-800-
361-8885.
Servicio de instalaci6nde Sears
Sidesea solicitarla instalaci6n profesionalde Searsde aparatosdomesticos, dispositivos paraabrir portones,calentado-
resde aguay otrosarticulos domesticosimportantes, en losEstados Unidoso Canada flameal 1-800-4-MY-HOME®.
51
Page 52

Your Home
For troubleshooting, product manuals and expert advice:
managernylife
www.managemylife.com
For repair - in your home - of all major brand appliances,
lawn and garden equipment, or heating and cooling systems,
no matter who made it, no matter who sold it!
For the replacement parts, accessories and
owner's manuals that you need to do-it-yourself.
For Sears professional installation of home appliances
and items like garage door openers and water heaters.
1-800-4-MY-HOME ® (1-800-469-4663)
Call anytime, day or night (U.S.A. and Canada)
www.sears.com www.sears.ca
Our Home
For repair of carry-in items like vacuums, lawn equipment,
and electronics, call anytime for the location of your nearest
Sears Parts & Repair Service Center
1-800-488-1222 (U.S.A.) 1-800-469-4663 (Canada)
www.sears.com www.sears.ca
To purchase a protection agreement on a product serviced by Sears:
1-800-827-6655 (U.S.A.) 1-800-361-6665 (Canada)
Para pedir servicio de reparaci6n
a domicilio, y para ordenar piezas:
1-888-SU-HOGAR ®
(1-888-784-6427)
www.sears.com
® Registered Trademark / TMTrademark of KCD IP, LLC in the United States, or Sears Brands, LLC in other countries
® Marca Registrada ! TMMarca de Fabrica de KCD IP, LLC en Estados Unidos, o Sears Brands, LLC in otros paises
MCMarque de commerce ! MDMarque deposee de Sears Brands, LLC
Au Canada pour service en frangais:
1-800-LE-FOYER Mc
(1-800-533-6937)
www.sears.ca
 Loading...