

Page 1
Operator's Manual
33" LAWN MOWER
Model No. 247.374880
CX
S
o SAFETY
ASSEMBLY
OPERATION
MAINTENANCE
CAUTION" Before using this
product, read this manual and
follow all safety rules and operating
instructions.
Sears Brands Management Corporation, Hoffman Estates, IL 60179, U.S.A.
Visit our website: www.craftsman.com FormNo. 769-08683
PARTS LIST
o ESPANOL
(December10,2012)
Page 2
WarrantyStatement.............................. Page2
SafetyInstructions............................ Pages3-6
SlopeGuide..................................... Page7
Assembly.................................... Pages8-12
Operation.................................. Pages13-15
Off-SeasonStorage............................. Page26
Troubleshooting............................... Page27
PartsList.................................... Page28-47
Espa_ol......................................... Page51
ServiceNumbers............................ BackCover
ServiceandMaintenance................... Pages16-25
CRAFTSMANCXTWOYEARFULLWARRANTY
Fortwoyearsfromthedateofpurchase,thisproductiswarrantedagainstanydefectsinmaterialorworkmanship.Adefectiveproductwillreceivefree
repairorfreereplacementifrepairisunavailable.
Thiswarrantyappliesforonlyoneyearfromthedateofpurchaseifthisridingequipmentiseverusedwhileprovidingcommercialservicesorifrentedto
anotherperson.
Forwarrantycoveragedetailstoobtainrepairorreplacement,visitthewebsite:www.craftsman.com.
ThiswarrantycoversONLYdefectsinmaterialandworkmanship.WarrantycoveragedoesNOTinclude:
, Expendableitemsthatcanwearoutfromnormalusewithinthewarrantyperiod,includingbutnotlimitedtoblades,sparkplugs,aircleaners,belts,
andoilfilters.
, Standardmaintenanceservicing,oilchanges,ortune-ups.
, Tirereplacementorrepaircausedbypuncturesfromoutsideobjects,suchasnails,thorns,stumps,orglass.
, Tireorwheelreplacementorrepairresultingfromnormalwear,accident,orimproperoperationormaintenance.
, Repairsnecessarybecauseofoperatorabuse,includingbutnotlimitedtodamagecausedbyimpactingobjectsthatbendtheframeorcrankshaft,or
over-speedingtheengine,etc.
• Repairsnecessarybecauseofoperatornegligence,includingbutnotlimitedto,electricalandmechanicaldamagecausedbyimproperstorage,failureto
usethepropergradeandamountofengineoil,failuretokeepthedeckclearofflammabledebris,orfailuretomaintaintheequipmentaccordingtothe
instructionscontainedintheoperator'smanual.
• Engine(fuelsystem)cleaningorrepairscausedbyfueldeterminedtobecontaminatedoroxidized(stale).Ingeneral,fuelshouldbeusedwithin30days
ofitspurchasedate.
• Normaldeteriorationandwearoftheexteriorfinishes,orproductlabelreplacement.
Thiswarrantygivesyouspecificlegalrights,andyoumayalsohaveotherrightswhichvaryfromstatetostate.
SearsBrandsManagementCorporation,NoffmanEstates,IL60179
Engine Oil: SAE 30
Fuel: Unleaded Gasoline
Engine: MTD
Model Number
Serial Number
Date of Purchase
Record the model number, serial number,
and date of purchase above.
© Sears Brands, LLC 2
Page 3
Thissymbolpointsout importantsafety instructionswhich,ifnot
followed,couldendangerthepersonalsafetyand/orproperty of
yourselfandothers.Readandfollow all instructions inthismanual
beforeattempting to operatethis machine.Failureto complywith these
instructionsmayresultinpersonalinjury.Whenyouseethis symbol,HEED
ITSWARNING!
Thismachinewasbuilt to beoperatedaccordingtothesafeoperation
practicesinthismanual.Aswith anytype of powerequipment,
carelessnessorerroronthepart ofthe operatorcanresultinseriousinjury.
Thismachineiscapableof amputating fingers, hands,toesandfeet and
throwingdebris.Failureto observethefollowing safety instructionscould
resultinseriousinjury or death.
CALIFORNIA PROPOSITION 65
EngineExhaust,someofits constituents,and certainvehiclecomponents
containor emit chemicalsknowntoStateof Californiato causecancerand
birth defectsorother reproductiveharm.
GENERAL OPERATION
Readthisoperator'smanualcarefullyinitsentiretybeforeattemptingto
assemblethis machine.Read,understand,andfollowallinstructionsonthe
machineandinthemanualsbeforeoperation.Keepthismanualina safe
placeforfutureandregularreferenceandfororderingreplacementparts
Becompletelyfamiliarwiththecontrolsandtheproperuseofthismachine
beforeoperatingit.
Thismachineisaprecisionpieceofpowerequipment,nota plaything.
Therefore,exerciseextremecautionatalltimes.Thismachinehasbeen
designedto performonejob:tomowgrass.Donotuseitforanyother
purpose.
Neverallowchildrenunder14yearsof agetooperatethismachine.Children
14andovershouldreadandunderstandtheinstructionsandsafeoperation
practicesinthismanualandonthemachineandshouldbetrainedand
supervisedbyanadult.
Onlyresponsibleindividualswhoarefamiliarwith theserulesofsafe
operationshouldbeallowedtousethis machine.
Thoroughlyinspecttheareawheretheequipmentistobeused.Removeall
stones,sticks,wire,bones,toysandotherforeignobjects,whichcouldbe
trippedoverorpickedupandthrownbytheblade.Thrownobjectscancause
seriouspersonalinjury.
Planyourmowingpatterntoavoiddischargeofmaterialtowardroads,
sidewalks,bystandersandthelike.Also,avoiddischargingmaterialagainst
awall orobstruction,whichmaycausedischargedmaterialtoricochetback
towardtheoperator.
Tohelpavoidbladecontactora thrownobjectinjury,stayinoperatorzone
behindhandlesandkeepchildren,bystanders,helpersandpetsatleast75
feetfrommowerwhileitisinoperation.Stopmachineifanyoneentersarea.
Alwayswearsafetyglassesorsafetygogglesduringoperationandwhile
performinganadjustmentor repairto protectyoureyes.Thrownobjects
whichricochetcancauseseriousinjurytotheeyes.
Your Responsibility--Restrict theuseofthis powermachineto
personswhoread,understandandfollow thewarningsandinstructionsin
thismanualandon the machine.
SAVETHESEINSTRUCTIONS!
Wearsturdy,rough-soledworkshoesandclose-fittingslacksandshirts.
Shirtsandpantsthatcoverthearmsandlegsandsteel-toedshoesare
recommended.Neveroperatethismachineinbarefeet,sandals,slipperyor
light-weight(e.g.canvas)shoes.
Donotputhandsorfeetnearrotatingpartsorunderthecuttingdeck.
Contactwith bladecanamputatefingers,hands,toesandfeet.
Amissingordamageddischargecovercancausebladecontactorthrown
objectinjuries.
Manyinjuriesoccurasaresultofthemowerbeingpulledoverthefoot
duringafall causedbyslippingortripping.Donotholdontothemowerif
youarefalling:releasethehandleimmediately.
Neverpullthemowerbacktowardyouwhileyouarewalking.Ifyoumust
backthemowerawayfromawallorobstructionfirstlookdownandbehind
toavoidtrippingandthenfollowthesesteps:
a. Stepbackfrom mowertofullyextendyourarmsforward.
b. Besureyouarewellbalancedwith surefooting.
c. Pullthemowerbackslowly,nomorethanhalfwaytowardyou.
d. Repeatthesestepsasneeded.
Donotoperatethemowerwhileundertheinfluenceofalcoholordrugs.
Donotengagetheself-propelledmechanismonmachinessoequipped
whilestartingengine.
Thebladecontrolhandleisasafetydevice.Neverattemptto bypassits
operation.Doingsomakesthesafetydeviceinoperativeandmayresultin
personalinjurythroughcontactwith therotatingblade.Thebladecontrol
handlemustoperateeasilyinbothdirectionsandautomaticallyreturntothe
disengagedpositionwhenreleased.
Neveroperatethemowerinwetgrass.Alwaysbesureofyourfooting. A
slipandfallcancauseseriouspersonalinjury.Ifyoufeelyouarelosingyour
footing,releasethebladecontrolhandleimmediatelyandthebladewill
stoprotatingwithin threeseconds.
Mowonlyindaylightorgoodartificiallight.Walk,neverrun.
Stopthebladewhencrossinggraveldrives,walksorroads.
Page 4
Iftheequipmentshouldstarttovibrateabnormally,stoptheengineand
checkimmediatelyforthecause.Vibrationisgenerallyawarningoftrouble.
Shuttheengineoffandwaituntilthebladecomestoacompletestopbefore
removingthegrasscatcheroruncloggingthechute.Thecuttingblade
continuestorotateforafewsecondsafterthebladecontrolisreleased.
Neverplaceanypartofthebodyinthebladeareauntilyouaresurethe
bladehasstoppedrotating.
Neveroperatemowerwithoutpropertrailshield,dischargecover,grass
catcher,bladecontrolhandleorothersafetyprotectivedevicesinplaceand
working.Neveroperatemowerwithdamagedsafetydevices.Failuretodo
socanresultinpersonalinjury.
Mufflerandenginebecomehotandcancauseaburn.Donottouch.
Neverattempttomakeawheelorcuttingheightadjustmentwhilethe
engineisrunning.
Onlyusepartsandaccessoriesmadeforthismachinebythemanufactureras
listedinthePartspagesofthisOperator'sManual.Failuretodosocanresult
inpersonalinjury.
Whenstartingengine,pullcordslowlyuntilresistanceisfelt,thenpull
rapidly.Rapidretractionofstartercord(kickback)willpullhandandarm
towardenginefasterthanyoucanletgo.Brokenbones,fractures,bruisesor
sprainscouldresult.
Ifsituationsoccurwhicharenotcoveredinthismanual,usecareandgood
judgement.
SLOPE OPERATION
Slopesareamajorfactorrelatedto slipandfall accidents,whichcanresultinsevere
injury.Operationonslopesrequiresextracaution.Ifyoufeeluneasyonaslope,do
notmowit.Foryoursafety,usetheSlopeGuideincludedaspartofthismanualto
measureslopesbeforeoperatingthismachineonaslopedor hillyarea.Iftheslope
isgreaterthan 15degrees,donotmowit.
Do:
Mowacrossthefaceofslopes;neverupanddown.Exerciseextremecaution
whenchangingdirectiononslopes.
Watchforholes,ruts,rocks,hiddenobjects,orbumpswhichcancauseyou
tosliportrip.Tallgrasscanhideobstacles.
Alwaysbesureof yourfooting.Aslipandfallcancauseseriouspersonal
injury.Ifyoufeelyouarelosingyourbalance,releasethebladecontrol
handleimmediatelyandthebladewillstoprotatingwithinthree(3)
seconds.
Do Not:
Donotmowneardrop-offs,ditchesorembankments,becauseyoucould
loseyourfootingorbalance.
Donotmowslopesgreaterthan15degreesasshownontheslopeguide.
Donotmowonwetgrass.Unstablefootingcouldcauseslipping.
CHILDREN
Tragicaccidentscanoccuriftheoperatorisnotalerttothepresenceof children.
Childrenareoftenattractedtothemowerandthemowingactivity.Theydonot
understandthedangers.Neverassumethatchildrenwillremainwhereyoulastsaw
them.
Keepchildrenoutofthemowingareaandunderwatchfulcareofa
responsibleadultotherthantheoperator.
Bealertandturnmoweroff ifa childentersthearea.
Beforeandwhilemovingbackwards,lookbehindanddownforsmall
children.
Useextremecarewhenapproachingblindcorners,doorways,shrubs,trees,
orotherobjectsthatmayobscureyourvisionofachildwhomayrunintothe
mower.
Keepchildrenawayfromhotorrunningengines.Theycansufferburnsfrom
ahotmuffler.
Neverallowchildrenunder14yearsofagetooperatethismachine.Children
14andovershouldreadandunderstandtheinstructionsandsafeoperation
practicesinthismanualandonthemachineandbetrainedandsupervised
byanadult.
SERVICE
Safe Handling of Gasoline:
Toavoidpersonalinjuryorpropertydamageuseextremecareinhandling
gasoline.Gasolineisextremely flammableandthe vaporsare explosive.
Seriouspersonalinjury canoccurwhengasolineisspilledonyourselforyour
clotheswhichcanignite.Washyourskinandchangeclothesimmediately.
Useonlyanapprovedgasolinecontainer.
Neverfill containersinsideavehicleoronatruckortrailerbedwith a plastic
liner.Alwaysplacecontainersonthegroundawayfromyourvehiclebefore
filling.
Removegas-poweredequipmentfromthetruckortrailerandrefuelit on
theground.Ifthisisnotpossible,thenrefuelsuchequipmenton atrailer
with a portablecontainer,ratherthanfromagasolinedispensernozzle.
Keepthenozzleincontactwiththe rimofthefueltankorcontaineropening
atalltimesuntilfuelingiscomplete.Donotuseanozzlelock-opendevice.
Extinguishallcigarettes,cigars,pipesandothersources
ofignition.
Neverfuelmachineindoorsbecauseflammablevaporswillaccumulatein
thearea.
Neverremovegascaporaddfuelwhileengineishotorrunning.Allow
enginetocoolatleasttwominutesbeforerefueling.
Neverover-fillfueltank.Toallowforexpansionof thefuel,donotfill above
thebottomofthefueltankneck.
Replacegasolinecapandtightensecurely.
Ifgasolineisspilled,wipeitofftheengineandequipment.Movemachineto
anotherarea.Wait5 minutesbeforestartingengine.
Neverstorethemachineorfuelcontainernearanopenflame,sparkorpilot
lightasonawaterheater,spaceheater,furnace,clothesdryerorothergas
appliances.
Toreducefire hazard,keepmachinefreeofgrass,leaves,orotherdebris
build-up.Cleanupoilorfuelspillageandremoveanyfuel-soakeddebris.
Allowmachinetocoolatleast5 minutesbeforestoring.
4
Page 5
General Service:
Neverrunanengineindoorsorinapoorlyventilatedarea.Engineexhaust
containscarbonmonoxide,anodorlessanddeadlygas.
Beforecleaning,repairing,orinspecting,makecertainthebladeandall
movingpartshavestopped.Disconnectthesparkplugwireandground
againsttheenginetopreventunintendedstarting.
Checkthebladeandenginemountingboltsatfrequentintervalsforproper
tightness.Also,visuallyinspectbladefordamage(e.g.,bent,cracked,worn).
Replacebladewith theoriginalequipmentmanufacture's(O.EM.)blade
only,listedinthe Partspagesofthismanual.Useofpartswhichdonotmeet
theoriginalequipmentspecificationsmayleadto improperperformance
andcompromisesafety!
Mowerbladesaresharpandcancut.Wrapthebladeorweargloves,anduse
extracautionwhenservicingthem.
Keepallnuts,bolts,andscrewstightto besuretheequipmentisin safe
workingcondition.
Nevertamperwith safetydevices.Checktheir properoperationregularly.
Afterstrikingaforeignobject,stoptheengine,disconnectthesparkplug
wireandgroundagainsttheengine.Thoroughlyinspectthemowerforany
damage.Repairthedamagebeforestartingandoperatingthe mower.
Neverattempttomakeawheelorcuttingheightadjustmentwhilethe
engineisrunning.
Grasscatchercomponents,dischargecover,andtrailshieldaresubjectto
wearanddamagewhichcouldexposemovingpartsorallowobjectsto be
thrown.Forsafetyprotection,frequentlycheckcomponentsandreplace
immediatelywithoriginalequipmentmanufacturer's(O.EM.)partsonly,
listedinthePartspagesof thismanual.Useofpartswhichdonotmeetthe
originalequipmentspecificationsmayleadto improperperformanceand
compromisesafety!
Donotchangetheengine'sgovernorsettingorover-speedtheengine.The
governorcontrolsthemaximumsafeoperatingspeedof theengine.
Checkfuelline,tank,cap,andfittingsfrequentlyfor cracksor leaks.Replace
if necessary.
Donotcrankenginewith sparkplugremoved.
Maintainorreplacesafetyandinstructionlabels,asnecessary.
Observeproperdisposallawsandregulations.Improperdisposalof fluids
andmaterialscanharmtheenvironment.
AccordingtotheConsumerProductsSafetyCommission(CPSC)andtheU.S.
EnvironmentalProtectionAgency(EPA),thisproducthasanAverageUseful
Lifeofseven(7)years,or140hoursofoperation.AttheendoftheAverage
UsefulLifehavethemachineinspectedannuallybyaSearsorotherqualified
servicedealertoensurethat allmechanicalandsafetysystemsareworking
properlyandnotwornexcessively.Failureto dosocanresultinaccidents,
injuriesordeath.
DO NOT MODIFY ENGINE
Toavoidseriousinjuryordeath,do notmodifyengineinanyway.Tampering
with thegovernorsetting canleadto a runawayengineandcauseitto
operateat unsafespeeds.Nevertamperwith factory settingof engine
governor.
NOTICE REGARDING EMISSIONS
Engineswhkh arecertified to complywith CaliforniaandfederalEPA
emissionregulationsfor SORE(SmallOff RoadEquipment)arecertified
to operateonregularunleadedgasoline,and mayincludethefollowing
emissioncontrolsystems:EngineModification (EM),OxidizingCatalyst(OC),
SecondaryAirInjection (SAI)andThreeWayCatalyst(TWC)if soequipped.
SPARK ARRESTOR
Thismachineisequippedwith an internalcombustionengineandshould
not beusedonornearanyunimprovedforest-covered,brusbcoveredor
grass-coveredlandunlesstheengine'sexhaustsystemisequippedwith a
sparkarrestormeetingapplicablelocalor state laws(if any).
Ifasparkarrestorisused,itshouldbemaintained ineffectiveworkingorder
bythe operator.IntheStateof Californiathe aboveisrequiredby law(Section
4442ofthe CaliforniaPublicResourcesCode).Otherstatesmayhavesimilar
laws.Federallawsapply onfederallands.
Asparkarrestorfor the muffler isavailablethrough yournearestSearsParts
andRepairServiceCenter.
Page 6
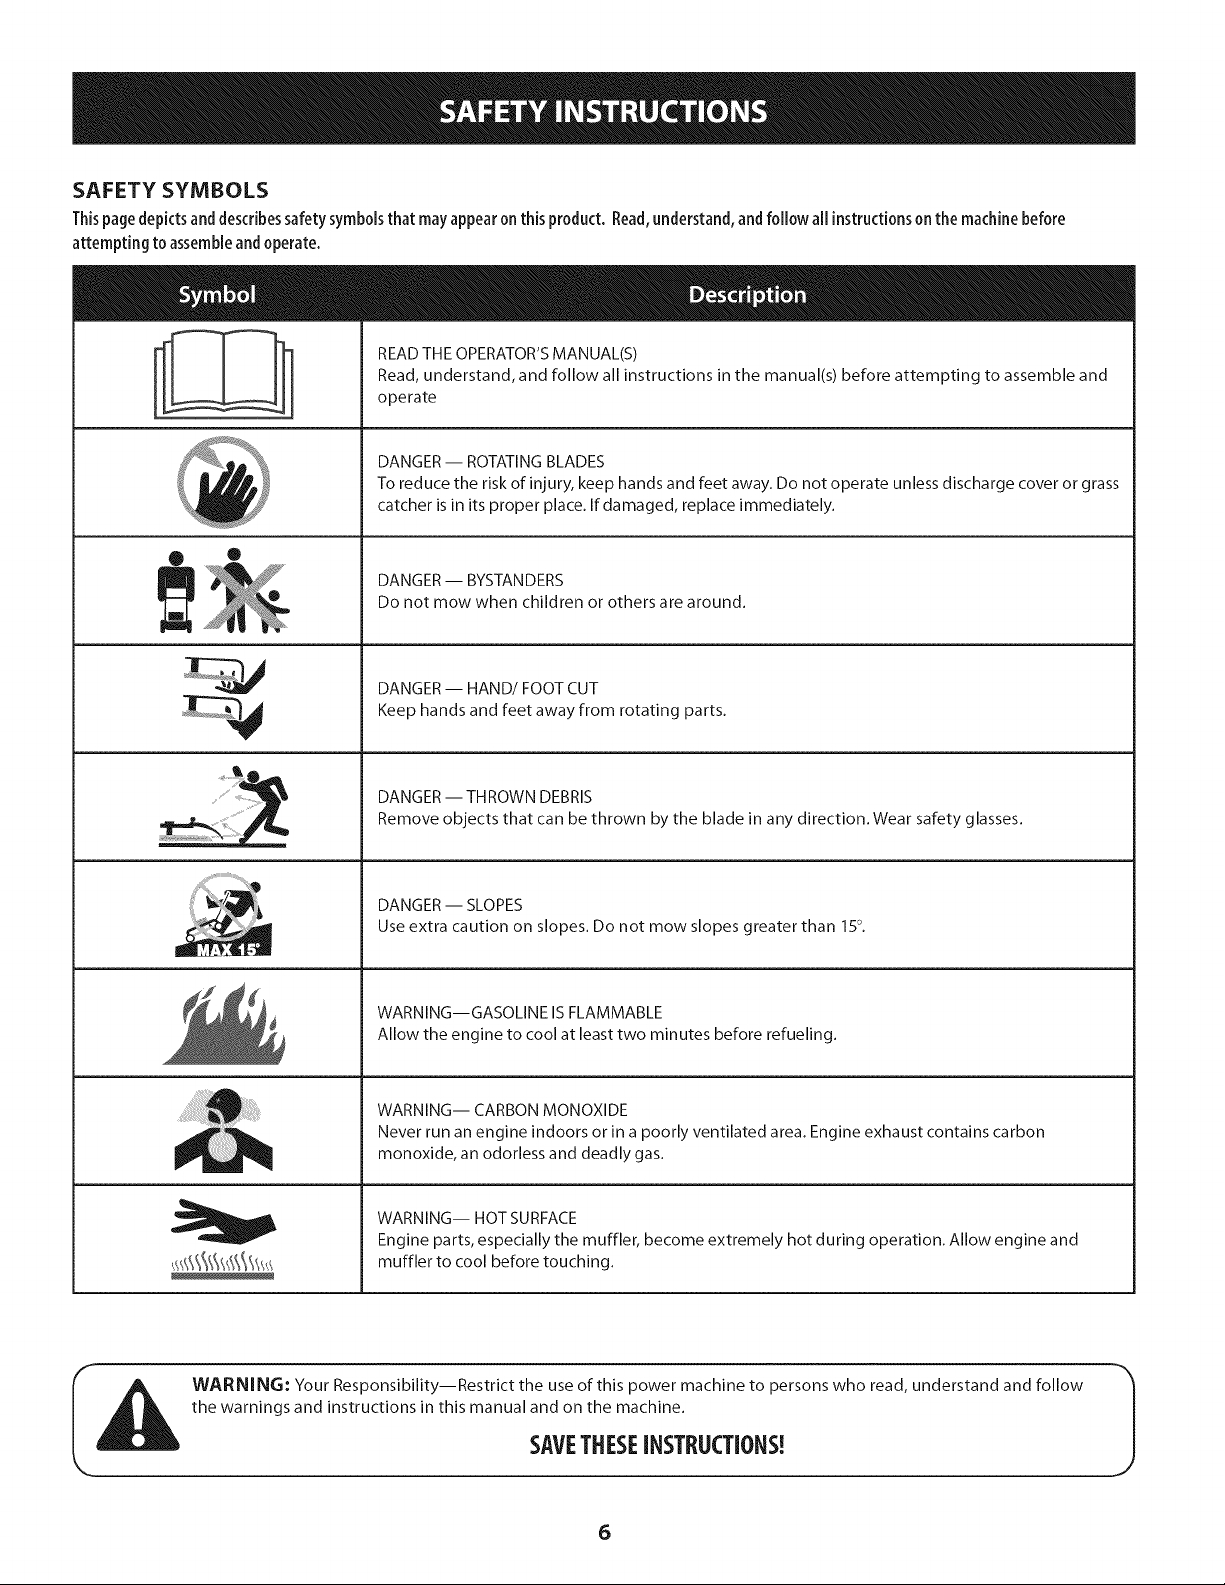
SAFETY SYMBOLS
Thispage depicts and describes safety symbols that may appear on this product. Read, understand, and follow all instructions on the machine before
attempting toassembleandoperate.
READ THE OPERATOR'S MANUAL(S)
Read, understand, and follow all instructions in the manual(s) before attempting to assemble and
operate
DANGER -- ROTATING BLADES
To reduce the risk of injury, keep hands and feet away. Do not operate unless discharge cover or grass
catcher is in its proper place. If damaged, replace immediately.
• ®
imI
DANGER -- BYSTANDERS
Do not mow when children or others are around.
DANGER -- HAND/FOOT CUT
Keep hands and feet away from rotating parts.
DANGER-- THROWNDEBRIS
Remove objects that can be thrown by the blade in any direction. Wear safety glasses.
DANGER -- SLOPES
Use extra caution on slopes. Do not mow slopes greater than 15°.
WARNING--GASOLINE ISFLAMMABLE
Allow the engine to cool at least two minutes before refueling.
WARNING-- CARBON MONOXIDE
Never run an engine indoors or in a poorly ventilated area. Engine exhaust contains carbon
monoxide, an odorless and deadly gas.
WARNING-- HOT SURFACE
Engine parts, especially the muffler, become extremely hot during operation. Allow engine and
muffler to cool before touching.
WARNING: Your Responsibility--Restrict the use of this power machine to persons who read, understand and follow
the warnings and instructions in this manual and on the machine.
SAVETHESEINSTRUCTIONS!
6
Page 7
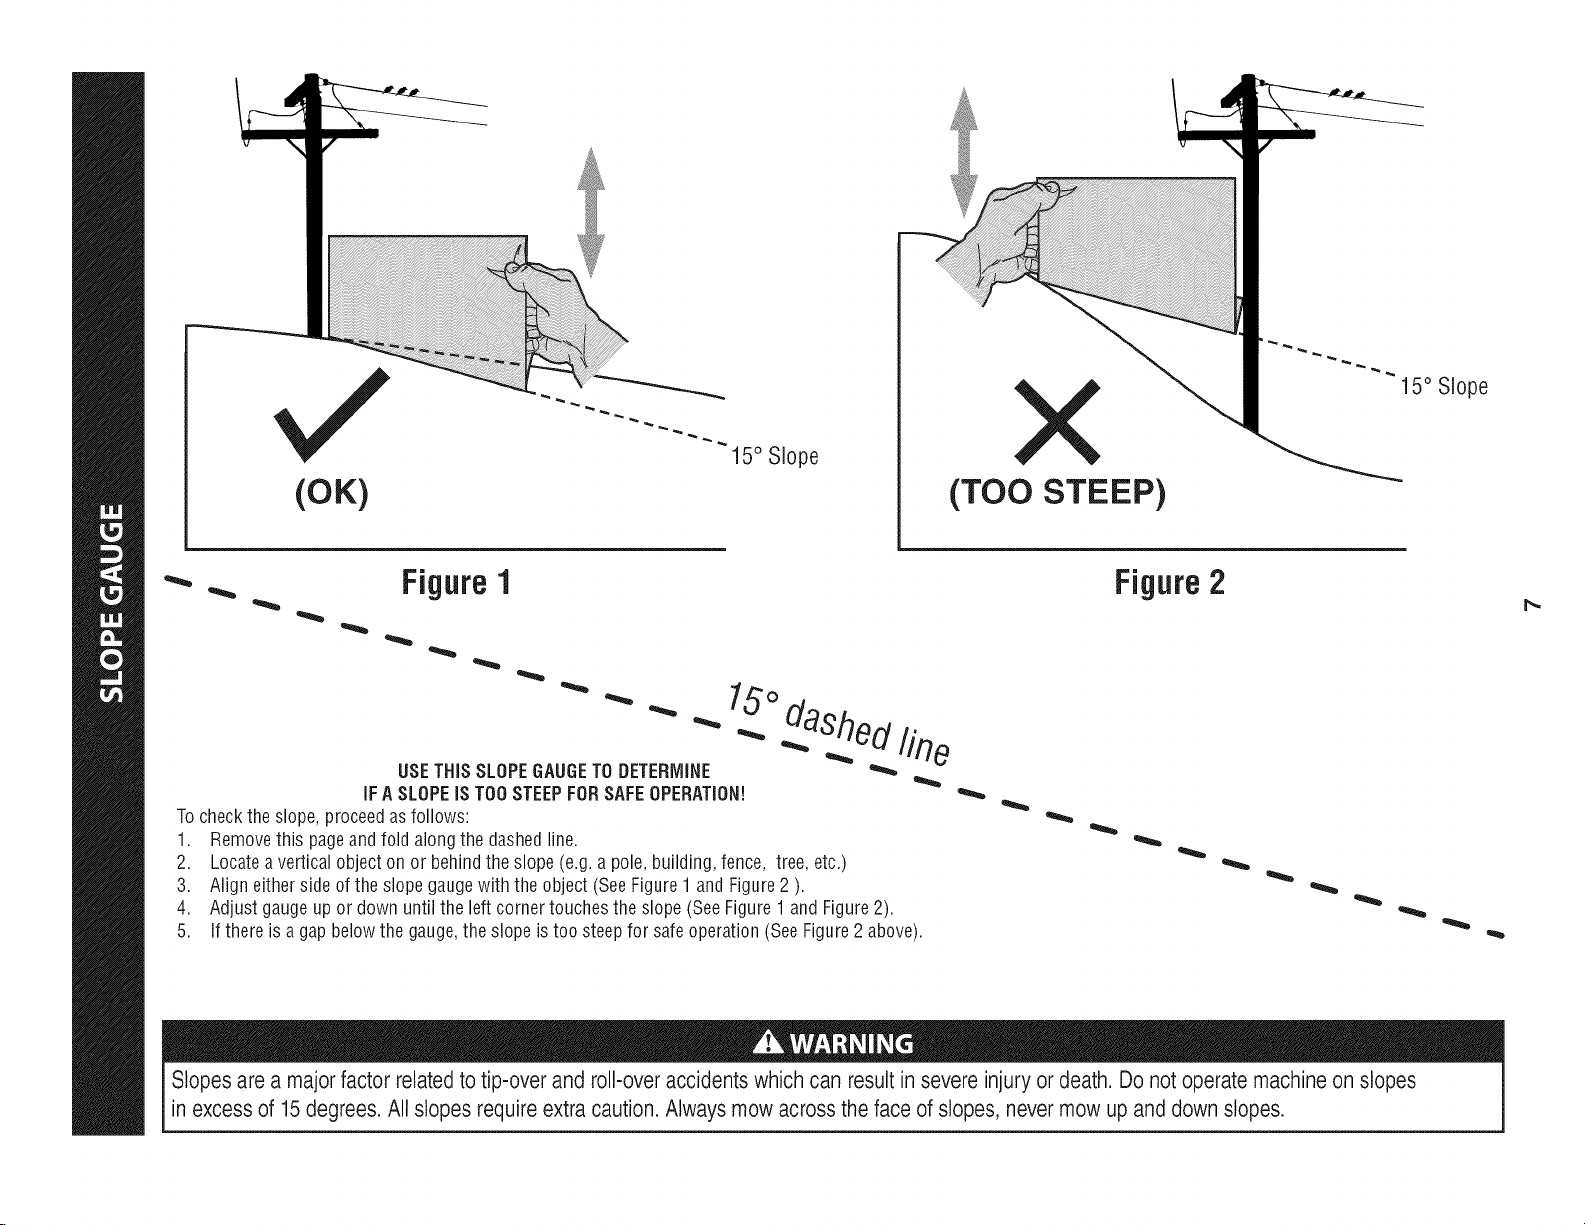
15° Slope
15° Slope
X
(OK)
_- _. Figure1
_O._daShed._fine
USETHiSSLOPEGAUGETO DETERMINE
iFASLOPEiSTOOSTEEPFORSAFEOPERATION!
Tochecktheslope,proceedasfollows:
1. Removethispageandfold alongthe dashedline.
2. Locateaverticalobjectonor behindthe slope(e.g.apole, building,fence, tree, etc.)
3. Aligneithersideofthe slopegaugewith the object(SeeFigure1 andFigure2).
4. Adjust gaugeup or downuntil the left cornertouchestheslope (SeeFigure1 andFigure2).
5.
If thereis agap belowthe gauge,theslopeis too steepfor safeoperation(SeeFigure2above).
(TOO STEEP)
Figure2
Slopesare a major factor relatedto tip-over and roll-overaccidentswhich can resultin severe injury or death. Do not operate machine onslopes
in excess of 15 degrees.All slopesrequire extracaution. Always mowacrossthe face of slopes, nevermow up and down slopes.
Page 8
iMPORTANT:Thisunitisshippedwith oil intheengine.Afterassembly,seepage13
forfuel andoildetails.
NOTE:ReferencetorightandlefthandsideoftheLawnMowerisobservedfromthe
operatingposition.
Disconnectthe sparkplugwire andgrounditagainstthe engineto prevent
unintendedstarting.
LoosePartsIn Carton
Oildrainhose
Waterhosecoupler
Operator'sManual
EngineManual
ToolsNeededfor Assembly
Asetofadjustablewrenchesandtiregauge
Assembly
ShippingBraceRemoval
Themowingdeck iscapableofthrowing objects.Failureto operatethe
mowerwithout the dischargecoverin the properoperatingpositioncould
resultinseriouspersonalinjury and/or propertydamage.
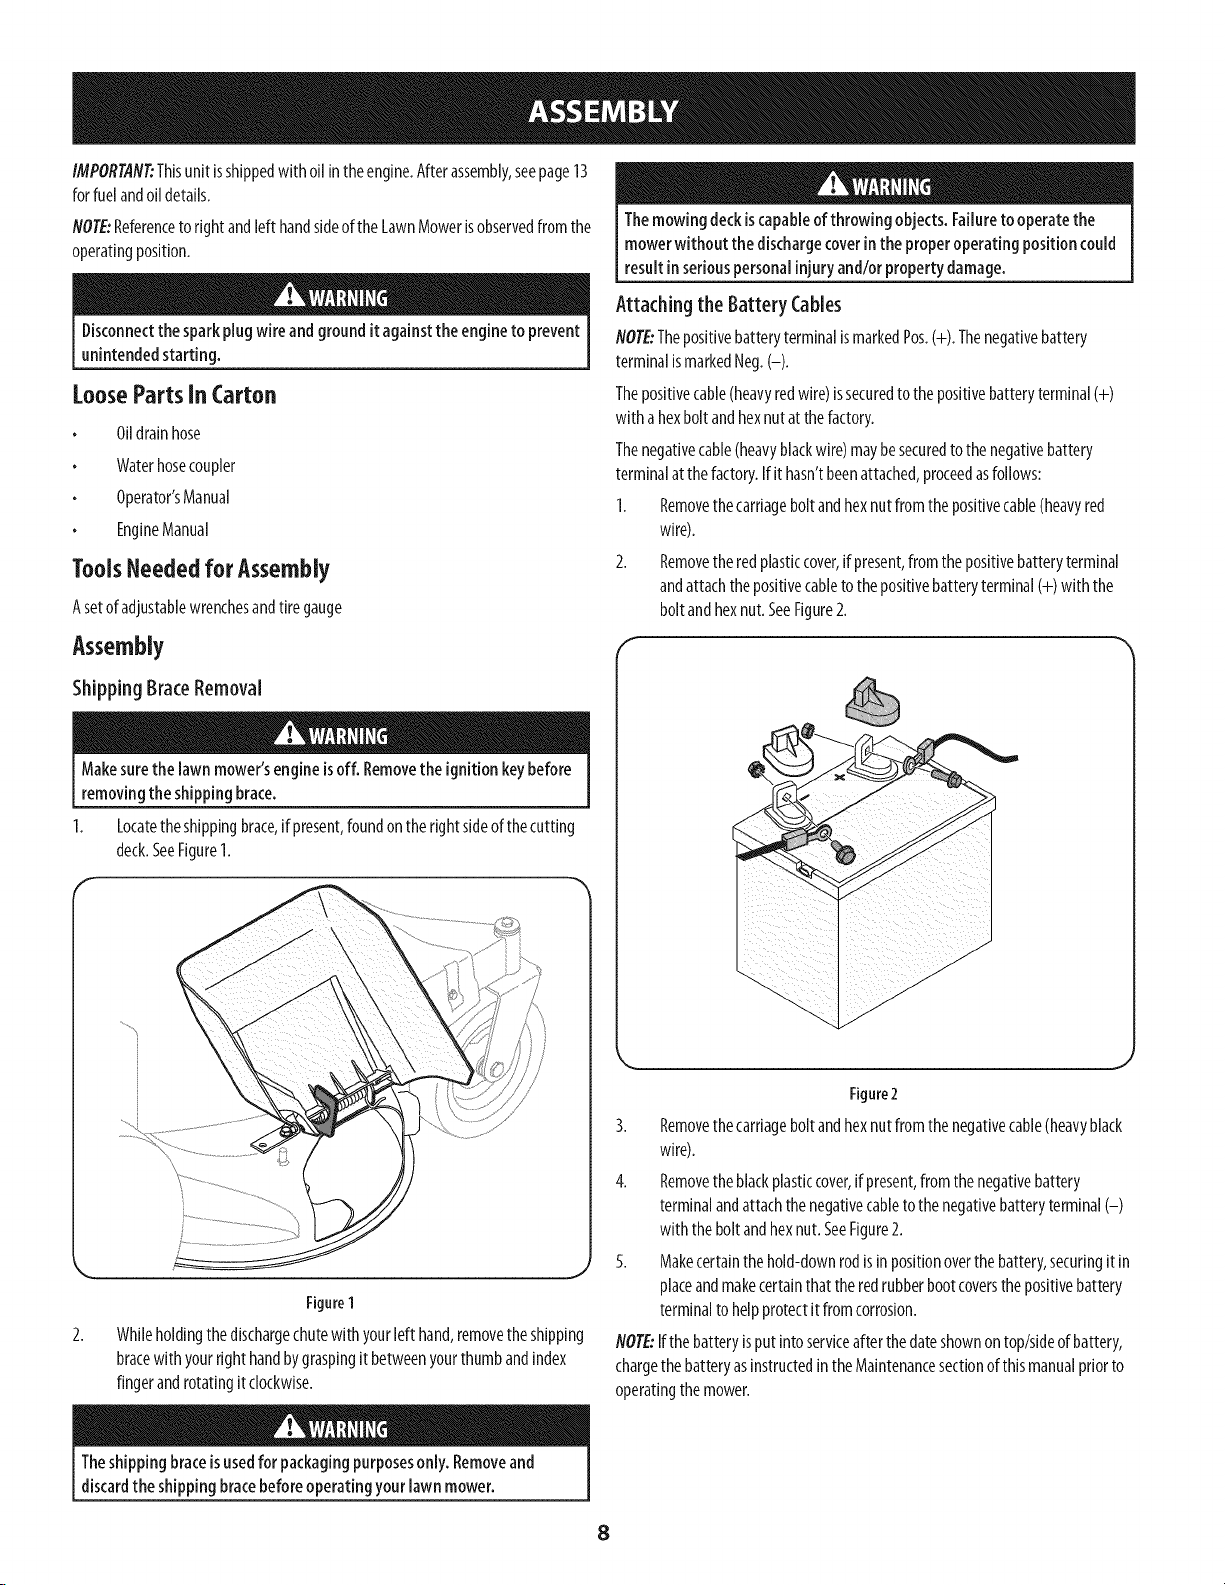
Attaching the Battery Cables
NOTE:ThepositivebatteryterminalismarkedPos.(+). Thenegativebattery
terminalismarkedaeg.(-).
Thepositivecable(heavyredwire)issecuredtothepositivebatteryterminal(+)
with a hexboltandhexnutatthefactory.
Thenegativecable(heavyblackwire)maybesecuredto thenegativebattery
terminalatthefactory.Ifit hasn'tbeenattached,proceedasfollows:
1. Removethecarriageboltandhexnutfromthepositivecable(heavyred
wire).
Removetheredplasticcover,ifpresent,fromthepositivebatteryterminal
andattachthepositivecabletothepositivebatteryterminal(+)with the
boltandhexnut.SeeFigure2.
Makesurethe lawn mower'sengineisoff.Removethe ignition keybefore
removingthe shippingbrace.
Locatetheshippingbrace,if present,foundonthe rightsideofthecutting
deck.SeeFigure1.
Figure1
Whileholdingthe dischargechutewithyourleft hand,removetheshipping
bracewithyourrighthandbygraspingit betweenyourthumbandindex
fingerandrotatingit clockwise.
Figure2
Removethecarriageboltandhexnutfromthenegativecable(heavyblack
wire).
4. Removetheblackplasticcover,ifpresent,fromthenegativebattery
terminalandattachthenegativecabletothe negativebatteryterminal(-)
with theboltandhexnut.SeeFigure2.
5. Makecertainthehold-downrodis inpositionoverthebattery,securingitin
placeandmakecertainthat theredrubberbootcoversthepositivebattery
terminalto helpprotectitfromcorrosion.
NOTE:Ifthebatteryisputintoserviceafterthedateshownontop/sideofbattery,
chargethebatteryasinstructedintheMaintenancesectionofthis manualpriorto
operatingthemower.
Theshippingbraceisusedfor packagingpurposesonly.Removeand
discardthe shippingbracebeforeoperatingyourlawnmower.
8
Page 9
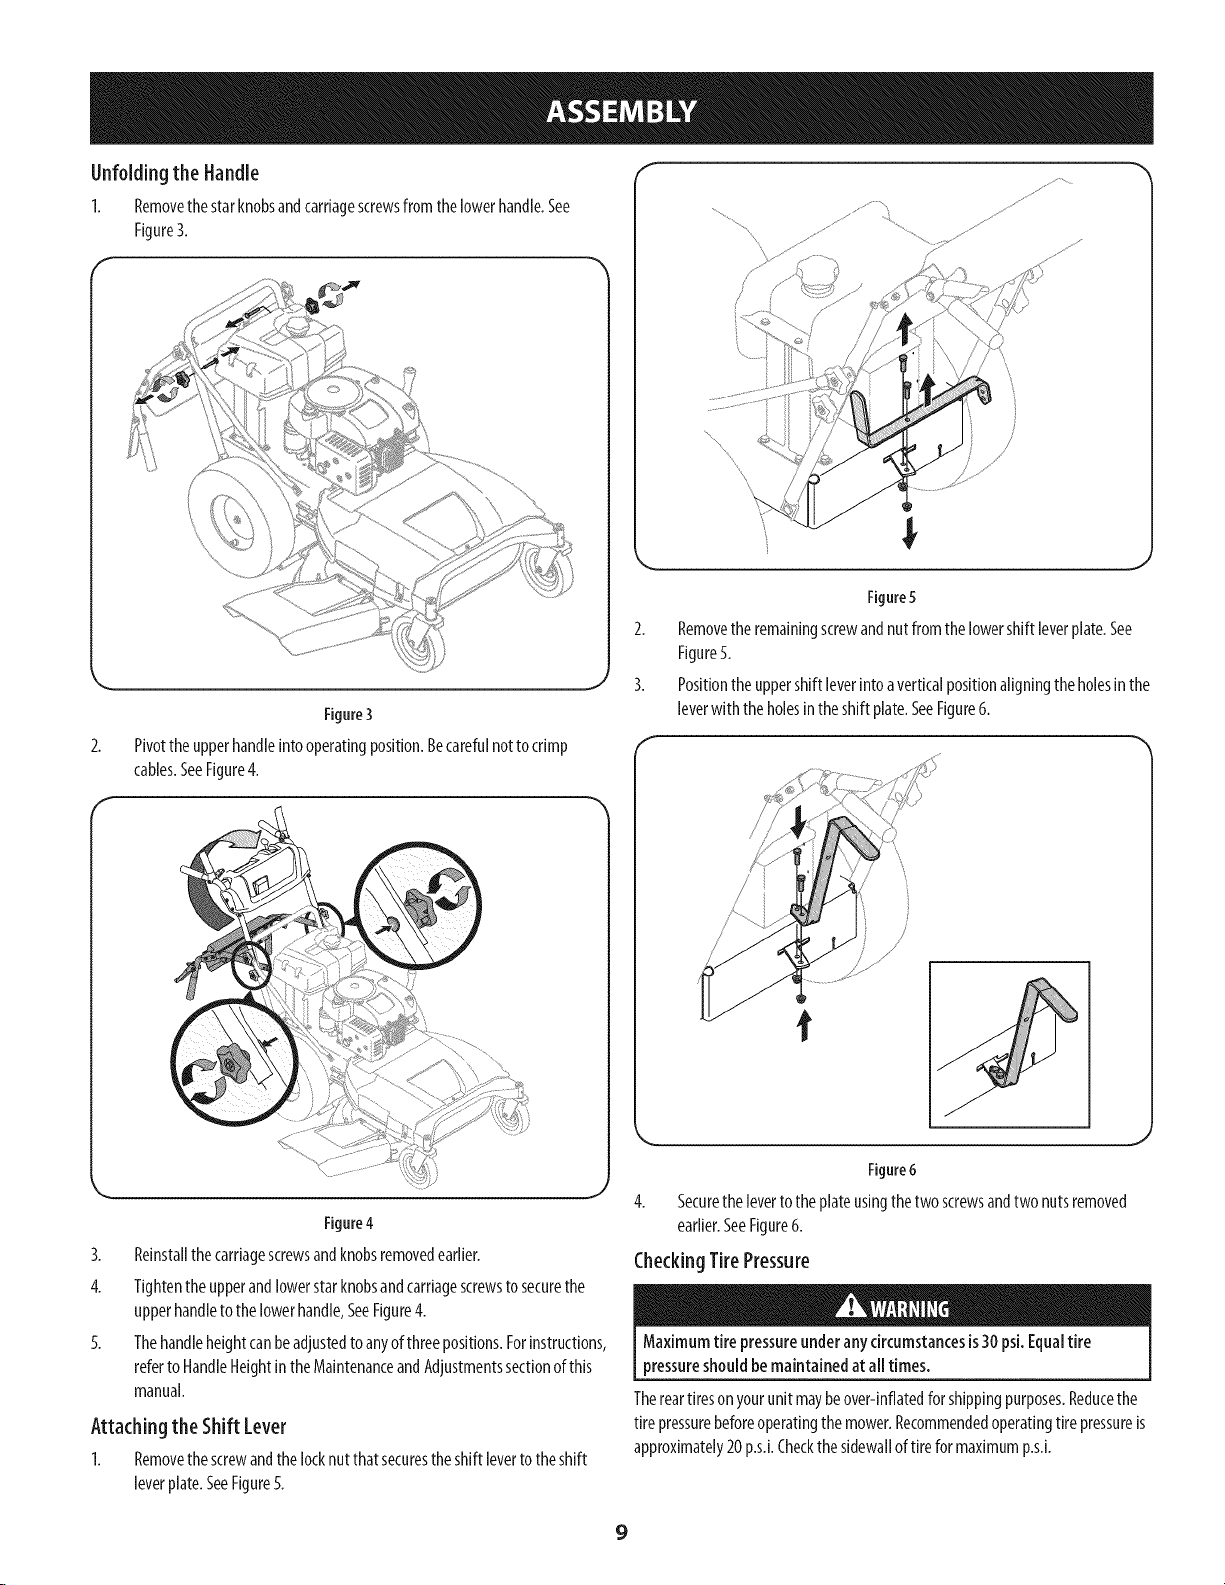
Unfoldingthe Handle
1. Removethestarknobsandcarriagescrewsfromthelowerhandle.See
Figure3.
Figure3
2. Pivottheupperhandleintooperatingposition.Becarefulnottocrimp
cables.SeeFigure4.
Figure5
2. Removetheremainingscrewandnutfromthelowershiftleverplate.See
Figure5.
3. Positiontheuppershift leverintoaverticalpositionaligningtheholesin the
leverwiththeholesintheshiftplate.SeeFigure6.
Figure4
3. Reinstallthecarriagescrewsandknobsremovedearlier.
4. Tightentheupperandlowerstarknobsandcarriagescrewstosecurethe
upperhandletothelowerhandle,SeeFigure4.
5. Thehandleheightcanbeadjustedtoanyofthreepositions.Forinstructions,
refertoHandleHeightintheMaintenanceandAdjustmentssectionofthis
manual.
Attaching the Shift Lever
I. Removethescrewandthelocknutthatsecurestheshiftlevertotheshift
leverplate.SeeFigure5.
Figure6
4. Securethe levertotheplateusingthetwoscrewsandtwo nutsremoved
earlier.SeeFigure6.
CheckingTirePressure
Maximumtire pressureunderanycircumstancesis30psi.Equaltire
pressureshouldbemaintainedat alltimes.
Thereartiresonyourunitmaybeover-inflatedforshippingpurposes.Reducethe
tire pressurebeforeoperatingthemower.Recommendedoperatingtire pressureis
approximately20p.s.i.Checkthesidewallof tireformaximump.s.i.
9
Page 10
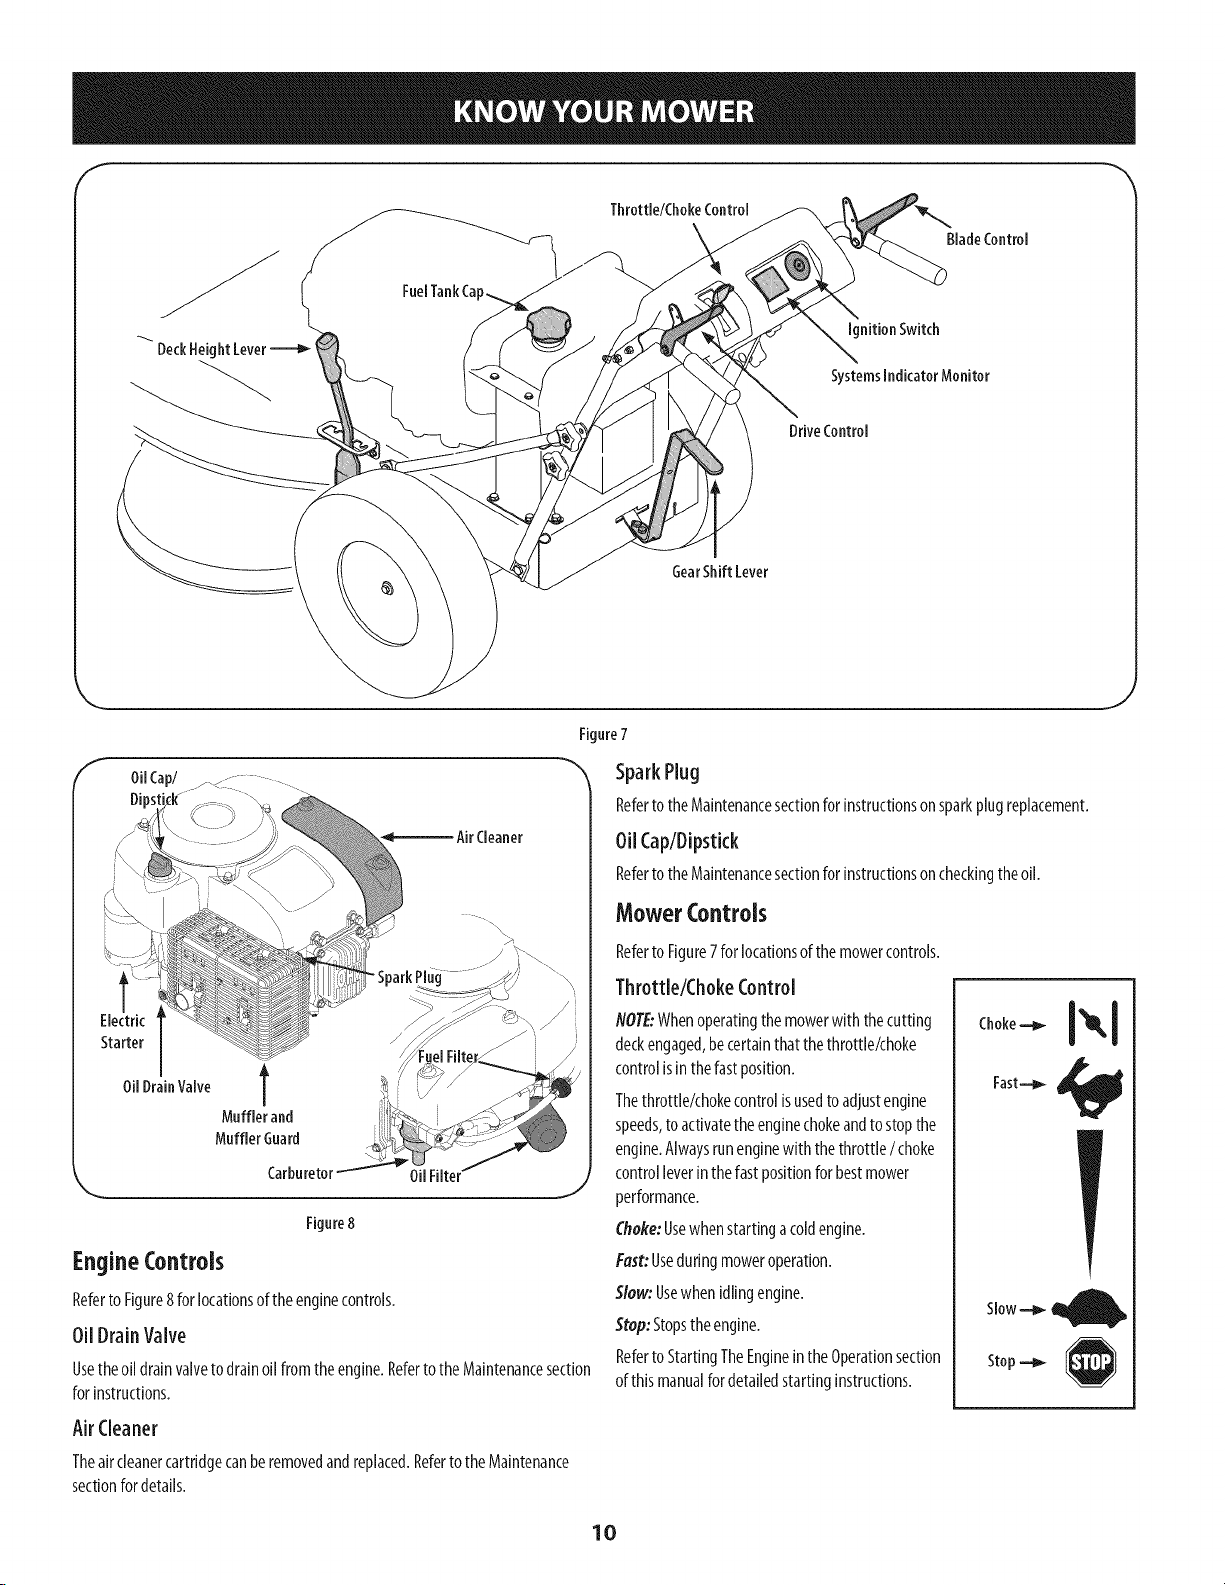
FuelTankCa
Throttle/ChokeControl
BladeControl
_ DeckHeightLever
OilCap/
Ignition Switch
SystemsIndicator Monitor
DriveControl
GearShiftLever
J
Figure7
SparkPlug
Referto theMaintenancesectionforinstructionsonsparkplugreplacement.
Oil Cap/Dipstick
Referto theMaintenancesectionforinstructionsoncheckingtheoil.
Figure8
EngineControLs
RefertoFigure8forlocationsoftheenginecontrols.
Oil DrainValve
Usetheoil drainvalvetodrainoilfromtheengine.RefertotheMaintenancesection
forinstructions.
Air Cleaner
Theaircleanercartridgecanberemovedandreplaced.RefertotheMaintenance
sectionfordetails.
Mower Controls
Referto Figure7 forlocationsofthemowercontrols.
Throttle/Choke Control
NOTE:Whenoperatingthemowerwith thecutting
deckengaged,becertainthat thethrottle/choke
controlisin thefastposition.
Thethrottle/chokecontrolisusedtoadjustengine
speeds,toactivatetheenginechokeandtostopthe
engine.Alwaysrunenginewiththethrottle/ choke
controlleverinthefastpositionforbestmower
performance.
Choke:Usewhenstartingacoldengine.
Fast:Useduringmoweroperation.
5low: Usewhenidlingengine.
5top:Stopstheengine.
Referto StartingTheEngineintheOperationsection
ofthismanualfordetailedstartinginstructions.
Slow--_ d
Stop
10
Page 11
DeckHeightLever
DriveControl
Usethislevertoadjustthemowingdeck'scuttingheight.Touse,movetheleverto
theleft,thenplacetheleverinthenotchbestsuitedfor yourapplication.
/ -
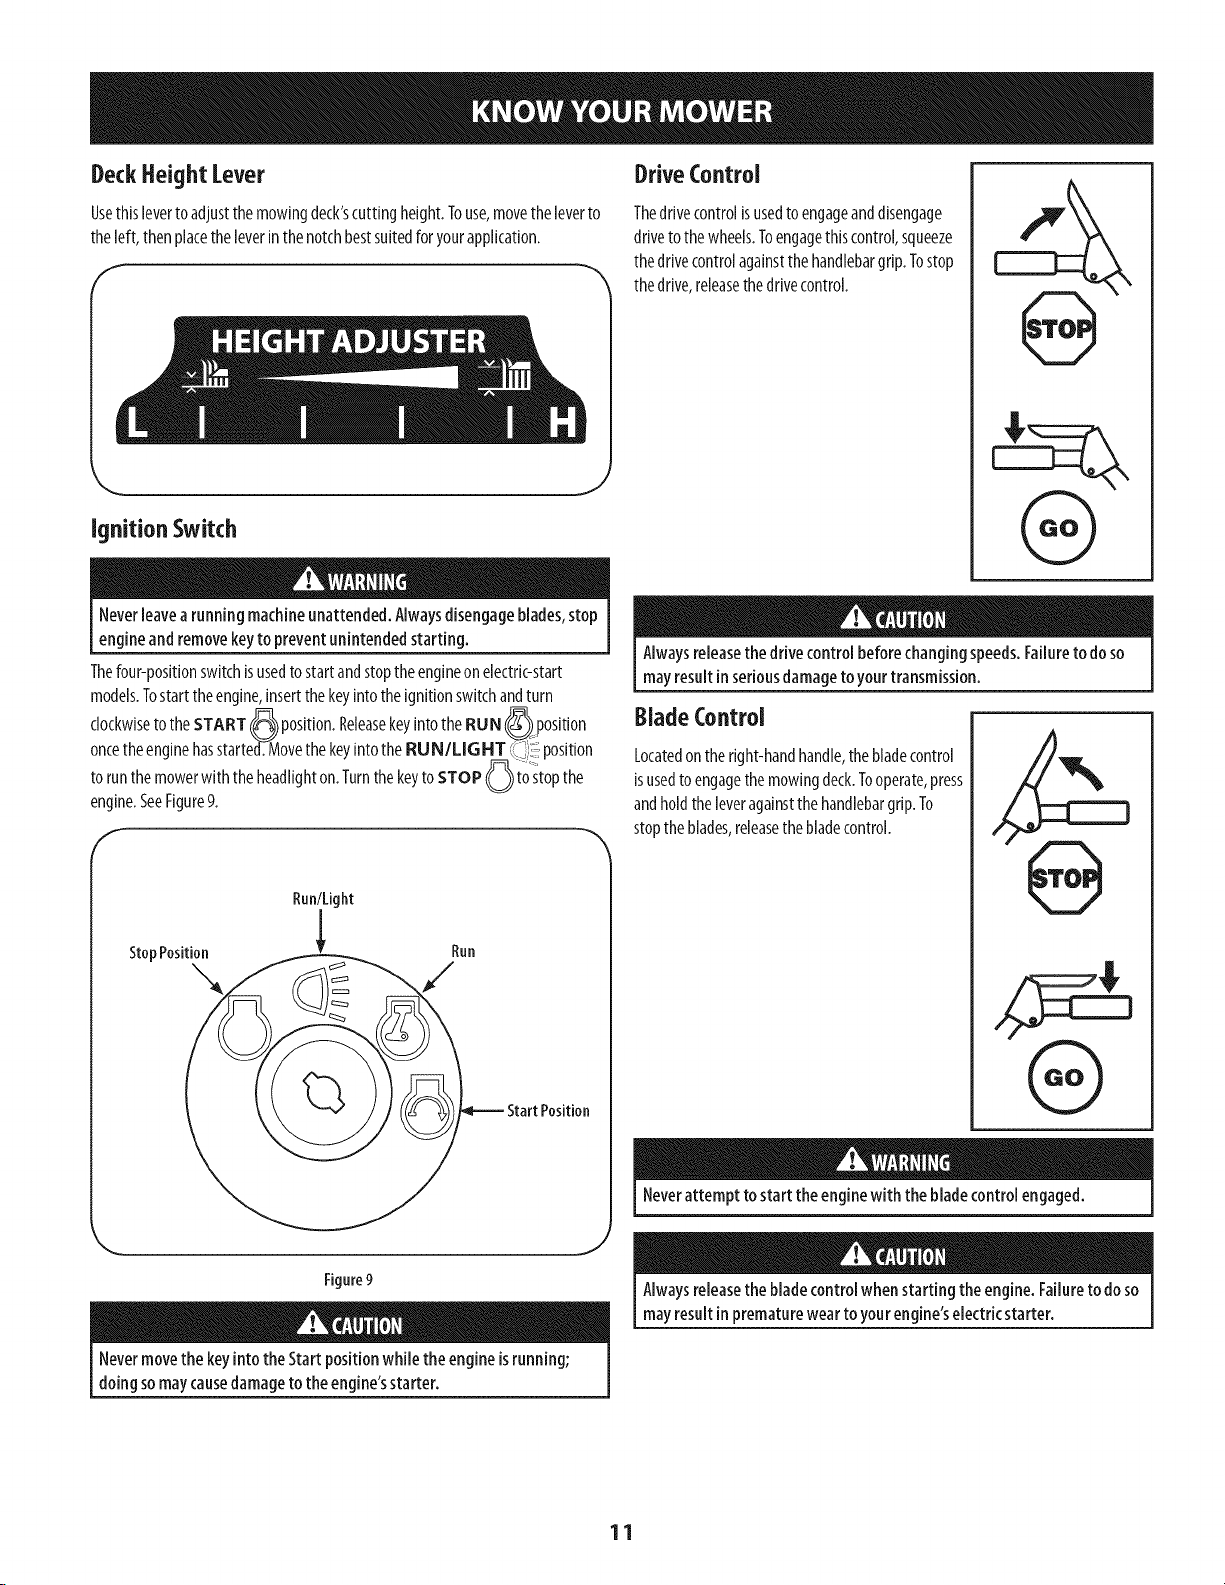
Ignition Switch
Neverleavearunning machineunattended.Alwaysdisengageblades,stop
engineandremovekeyto preventunintendedstarting.
Thefour-positionswitchisusedto startandstoptheengineonelectric-start
models.Tostarttheengine,insertthekeyintotheignitionswitchandturn
clockwiseto theSTART(J_)_position.ReleasekeyintotheRUN (_)=position
oncetheenginehasstarted.MovethekeyintotheRUN/UGHT i_C_)'L!position
torunthemowerwith theheadlighton.TurnthekeytoSTOP __ tostopthe
engine.SeeFigure9.
Thedrivecontrolisusedto engageanddisengage
drivetothewheels.Toengagethiscontrol,squeeze
thedrivecontrolagainstthehandlebargrip.Tostop
thedrive,releasethedrivecontrol.
Alwaysreleasethedrive controlbeforechangingspeeds.Failuretodoso
mayresultinseriousdamagetoyourtransmission.
f
BladeControl
Locatedontheright-handhandle,thebladecontrol
isusedtoengagethemowingdeck.Tooperate,press
andholdtheleveragainstthehandlebargrip.To
stoptheblades,releasethebladecontrol.
Run/Light
|
StopPosition _ Run
StartPosition
Figure9
Nevermovethe keyintotheStartposition while the engineisrunning;
doingsomaycausedamagetothe engine'sstarter.
Neverattempt tostart the enginewith the bladecontrolengaged,
,J
Alwaysreleasetheblade controlwhenstarting the engine.Failuretodoso
mayresultinprematurewear toyourengine'selectricstarter.
11
Page 12
GearShiftLever
r
Usethislevertoselectanyoffourforwardgroundspeeds,neutral,orreverse.
Forward
Fourforwardspeedsareavailable.Positionone(1)istheslowestandpositionfour
(4)isthefastest.
Reverse
Toselectreverse,puttheleverinthe Reverse(R)position.
Lookbehindthe mowerbeforeandduring reverseoperation.Stopthe
mowerbladesbeforeoperating inreverse.
Neutral
Placetheleverinneutral(N)beforestartingthemowerandwhenthemoweris
notinuse.Inaddition,themowercanbemanuallypushedorpulledbyplacingthe
gearshiftleverintoN(neutral)positionandpressingthedrivecontrolagainstthe
handlebargrip.
Alwaysreleasethedrivecontrol beforechangingspeeds.Failureto doso
mayresultin seriousdamagetoyour transmission.
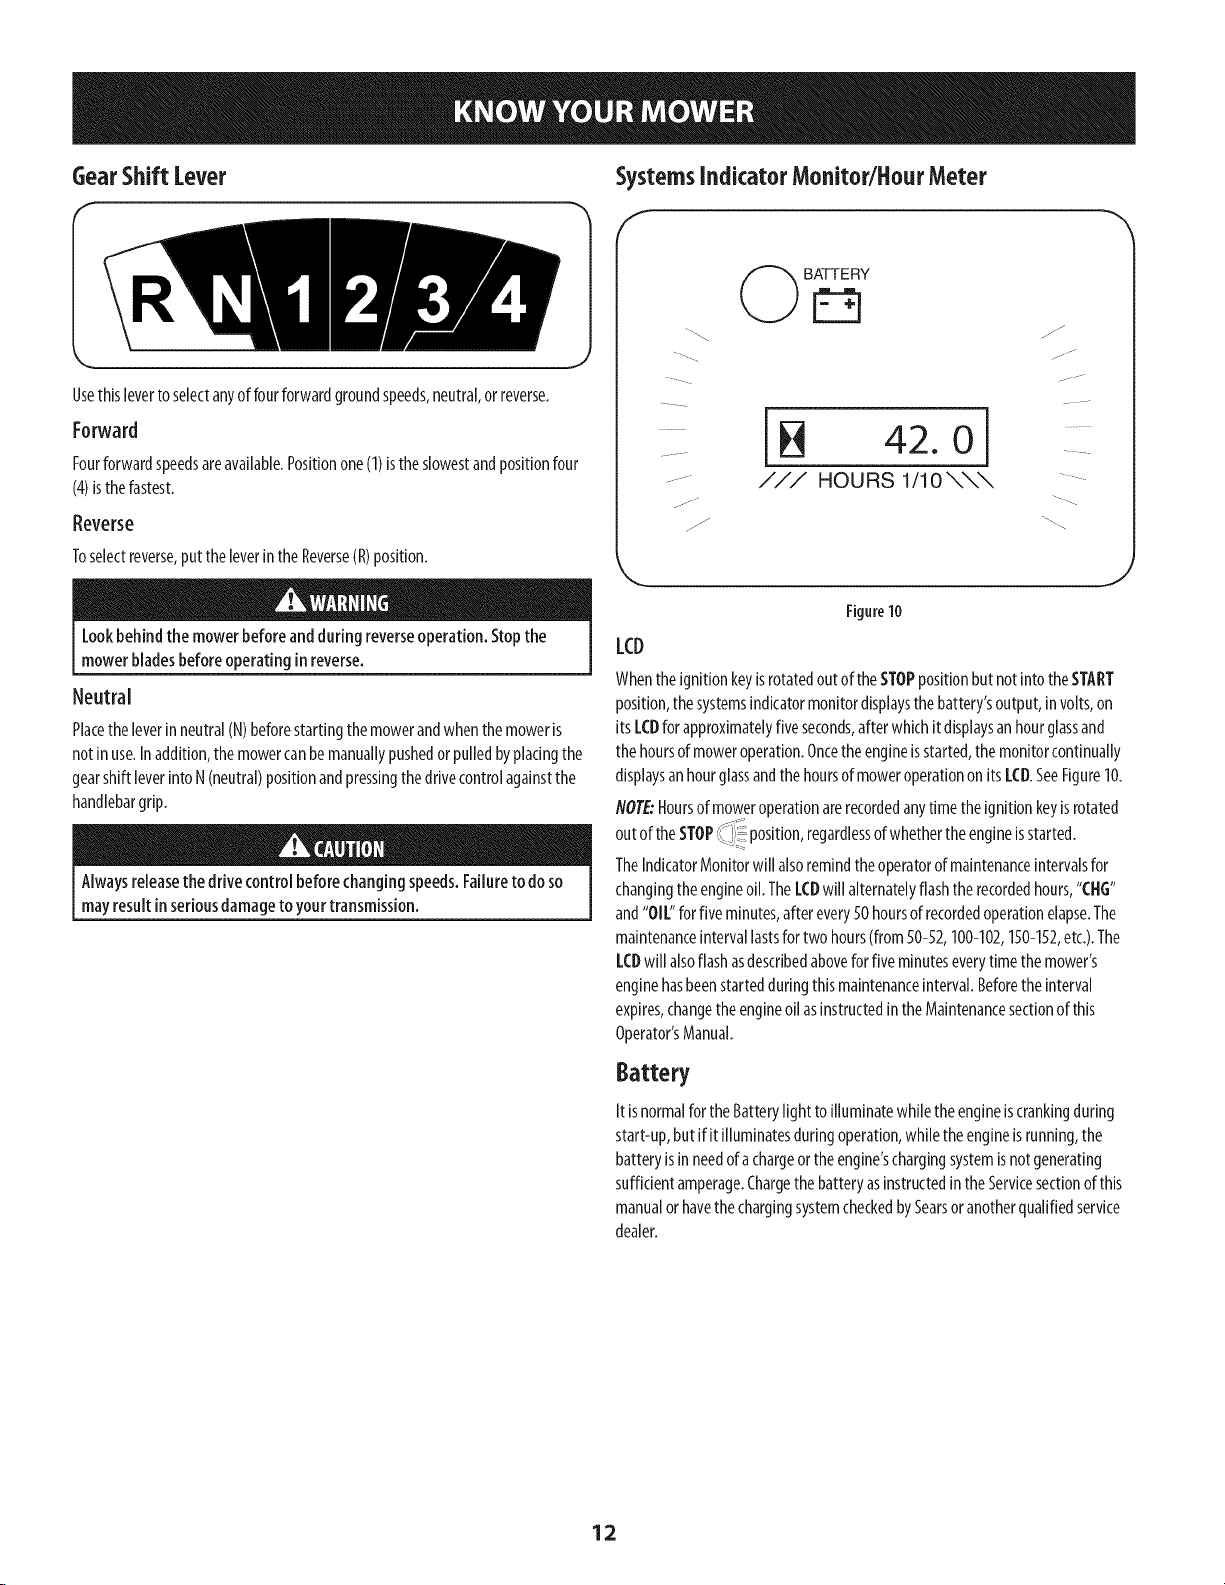
SystemsindicatorMonitor/Bout Meter
f
BATTERY
©©
j Jr
.o.
42.0]
HOURS 1/10 \\\
J
Figure10
LCD
WhentheignitionkeyisrotatedoutoftheSTOPpositionbut notintotheSTART
position,thesystemsindicatormonitordisplaysthebattery'soutput,involts,on
itsLCDfor approximatelyfiveseconds,afterwhichitdisplaysanhourglassand
thehoursof moweroperation.Oncetheengineisstarted,themonitorcontinually
displaysanhourglassandthehoursofmoweroperationon itsLCD.SeeFigure10.
NOTE:Hoursofmoweroperationarerecordedanytimetheignitionkeyisrotated
out
oftheSTOP,_:,:_ ofwhetherthe isstarted.
TheIndicatorMonitorwillalsoremindtheoperatorofmaintenanceintervalsfor
changingtheengineoil.TheLCDwill alternatelyflashthe recordedhours,"CBG"
and"OIL"forfiveminutes,afterevery50hoursofrecordedoperationelapse.The
maintenanceintervallastsfor two hours(from50-52,100-102,150-152,etc.).The
LCDwill alsoflashasdescribedaboveforfiveminuteseverytimethemower's
enginehasbeenstartedduringthis maintenanceinterval.Beforetheinterval
expires,changetheengineoilasinstructedintheMaintenancesectionofthis
Operator'sManual.
position,regardless engine
Battery
ItisnormalfortheBatterylighttoilluminatewhiletheengineiscrankingduring
start-up,butif itilluminatesduringoperation,whiletheengineisrunning,the
batteryisinneedofachargeortheengine'schargingsystemisnotgenerating
sufficientamperage.Chargethebatteryasinstructedinthe Servicesectionof this
manualor havethechargingsystemcheckedbySearsoranotherqualifiedservice
dealer.
12
Page 13
GASANDOILFILL-UP
IMPORTANT:Theengineisshippedwithout gasolineandwith motoroilinthe
engine.However,youMUSTchecktheoil levelbeforeoperating.Becarefulnotto
overfill.Runningtheenginewithinsufficientoil cancauseseriousenginedamage
andvoidtheenginewarranty.
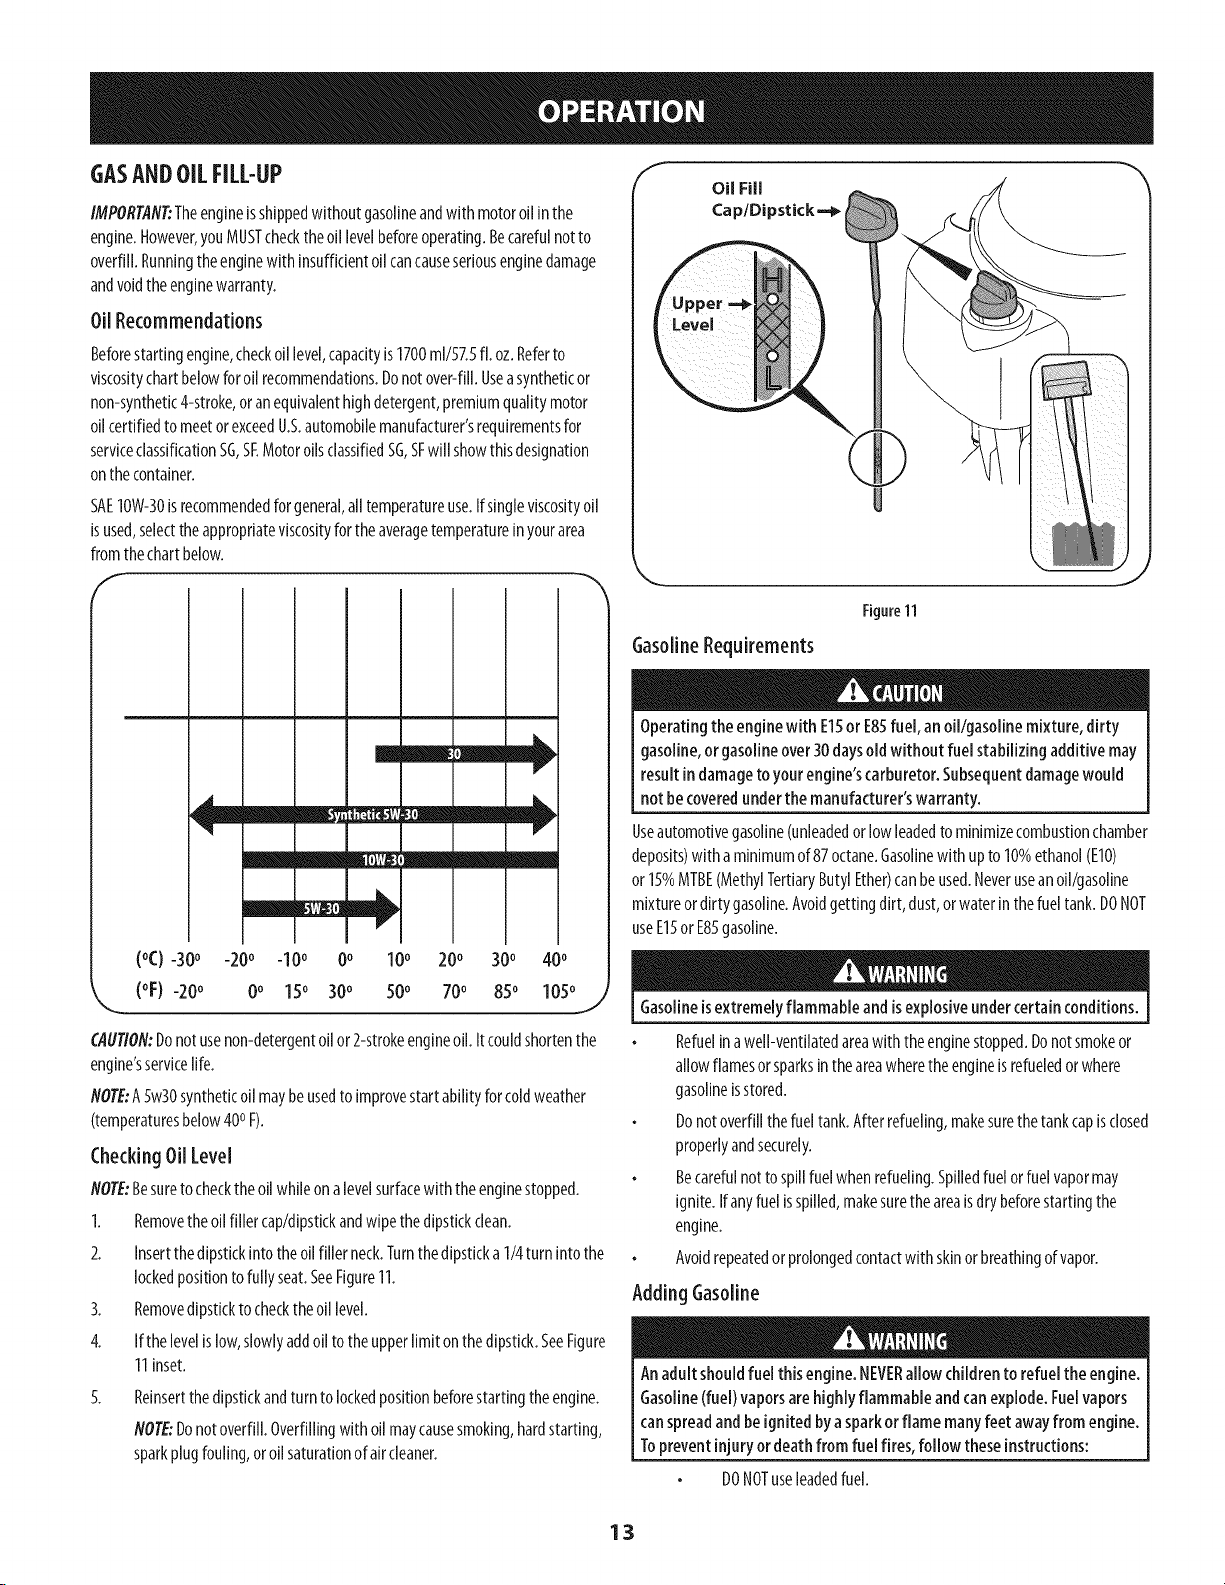
Oil Recommendations
Beforestartingengine,checkoillevel,capacityis1700ml/57.5fl. oz.Referto
viscositychartbelowforoil recommendations.Donotover-fill.Useasyntheticor
non-synthetic4-stroke,oranequivalenthighdetergent,premiumqualitymotor
oilcertifiedtomeetorexceedU.S.automobilemanufacturer'srequirementsfor
serviceclassificationSG,SEMotoroilsclassifiedSG,SFwill showthisdesignation
onthecontainer.
SAElOW-30isrecommendedforgeneral,alltemperatureuse.Ifsingleviscosityoil
isused,selecttheappropriateviscosityfortheaveragetemperatureinyourarea
fromthechartbelow.
f
f
Oil Fill
Cap/Dipstick=_
Figure11
GasolineRequirements
mm --
II
mi
/m
91
/m
(oC)-300 200 300 400
(oF)-200 700 850 1050
CAUTION:Donotusenon-detergentoilor2-strokeengineoil. Itcouldshortenthe
engine'sservicelife.
NOTE:ASw30syntheticoilmaybeusedto improvestart abilityforcoldweather
(temperaturesbelow400F).
CheckingOilLevel
NOTE:Besuretocheckthe oilwhileonalevelsurfacewith theenginestopped.
I. Removetheoilfillercap/dipstickandwipethedipstickclean.
2. Insertthedipstickintotheoilfiller neck.Turnthedipsticka I/4 turn into the
lockedpositiontofullyseat.SeeFigure11.
3. Removedipsticktochecktheoillevel.
4. Ifthelevelislow,slowlyaddoiltotheupperlimitonthedipstick.SeeFigure
11inset.
5. Reinsertthedipstickandturntolockedpositionbeforestartingtheengine.
flOTE:Donotoverfill.Overfillingwith oilmaycausesmoking,hardstarting,
sparkplugfouling,oroilsaturationofaircleaner.
-200 -100 0o 100
0o 15o 300 500
J
Operatingthe enginewith EISor E85fuel, an oil/gasolinemixture, dirty
gasoline,orgasolineover30daysoldwithout fuel stabilizingadditive may
resultin damagetoyourengine'scarburetor.Subsequentdamagewould
not becoveredunderthemanufacturer'swarranty.
Useautomotivegasoline(unleadedorlowleadedtominimizecombustionchamber
deposits)with aminimumof87octane.Gasolinewith upto 10%ethanol(EIO)
or 15%MTBE(MethylTertiaryButylEther)canbeused.Neveruseanoil/gasoline
mixtureordirtygasoline.Avoidgettingdirt, dust,orwaterin thefueltank.DONOT
useE15orE85gasoline.
Gasolineisextremelyflammable andisexplosiveundercertainconditions.
Refuelinawell-ventilatedareawith theenginestopped.Donotsmokeor
allowflamesorsparksintheareawheretheengineisrefueledorwhere
gasolineisstored.
Donotoverfillthefueltank.Afterrefueling,makesurethetankcapisclosed
properlyandsecurely.
Becarefulnottospillfuelwhenrefueling.Spilledfuelorfuelvapormay
ignite.If anyfuelisspilled,makesuretheareaisdrybeforestartingthe
engine.
Avoidrepeatedor prolongedcontactwith skinorbreathingofvapor.
Adding Gasoline
Anadult shouldfuel this engine.NEVERallow childrento refuelthe engine.
Gasoline(fuel)vaporsarehighly flammableandcanexplode.Fuelvapors
canspreadandbeignited bya sparkorflame manyfeetawayfrom engine.
Topreventinjuryordeathfrom fuel fires, follow these instructions:
DONOTuseleadedfuel.
13
Page 14
Fuelmustbefreshandclean.NEVERusefuelleftoverfromlast
seasonorstoredforlongperiods.
NEVERmixoilwithfuel.
DONOTusefuelcontainingMethanol(WoodAlcohol)
NOTE:Beforerefueling,allowengineto cooltwo minutes.
I. Cleanaroundfuelfill beforeremovingcapto fuel.
2. FilltankuntilfuelreachesI/2inchbelowthebottomofthefiller neckto
allowspaceforfuelexpansion.Becarefulnottooverfill.
3. Replacethegasolinecapandtightensecurely.Wipeupspilledfuelbefore
startingengine.If fuelisspilledDONOTstartengine.Movemachineaway
fromareaofspillage.Avoidcreatinganysourceofignitionuntilfuelvapors
aregone.
Besurenooneotherthantheoperatorisstandingnearthe lawn mower
while starting engineoroperatingmower.Neverrunengineindoorsor
inenclosed,poorlyventilatedareas.Engineexhaustcontainscarbon
monoxide,anodorlessanddeadlygas.Keephands,feet, hair andloose
clothing awayfrom anymoving parts onengineandlawn mower.
Starting the Engine
4. Removethekeyfromtheignitionswitchtopreventunintendedstarting.
Engagingthe Drive
Avoidsuddenstarts,excessivespeedandsuddenstops.
Starttheengineasinstructedearlierinthissectionandmovethethrottle/choke
controlintotheFAST_ position.
TotravelFORWARD:
1. Placethegearshift leverinanyofthefourforwardgroundspeeds.Selecta
speedappropriatefortheconditionsanda paceyou'recomfortablewith.
2. SlowlysqueezetheDriveControlagainsttheleft handlegripandthemower
will move.Releaseit anddrivemotionwillstop.
Totravelin REVERSE:
1. Checkthattheareabehindisclear.
2. Placethegearshift leverinReverse(R).
3. SlowlysqueezetheDriveControlagainsttheleft handlegripandthemower
will move.Releaseit anddrivemotionwillstop.
1. Disengageallcontrolsonthemower.
2. Movethegearshift leverintotheneutral(N)position.
3. Insertthekeyintotheignitionswitch.
4. Ifstartingacoldengine,placethethrottle/chokecontrolalltheway
forward,intotheCHOKE|_1 position.Ifrestartingawarmengine,placethe
throtNe/chokecontrolintotheFast_ position.
5. Turntheignitionkeyclockwisetothe START___osition. Aftertheengine
starts,releasethekey.Itwill returntothe RUN0 position.
DoNOTholdthe keyinthe STARTpositionfor longerthanfive secondsata
time. Doingsomaycausedamageto yourengine'selectricstarter.
6. MovethekeytotheRUN/LIGI-IT_-iii_positiontooperatethemowerusing
theheadlight.
7. Movethethrottle/chokecontrolintotheFAST_11 position.
NOTE:Neverleavethethrottle/chokecontrolintheCHOKE_.l positionwhile
operatingthemower.Doingsowill resultina"rich"fuelmixtureandcausethe
enginetorunpoorly.
Stopping the Engine
Ifyoustrike aforeign object,stopthe engineandremovethe ignition
key.Thoroughlyinspectthe machinefor anydamage.Repairthe damage
beforerestartingandoperating.
1. Ifthebladesareengaged,releasetheBladeControl.
2. Movethethrottle/chokecontrolintotheSTOP[_ position.
3. TurntheignitionkeycounterclockwisetotheSTOP/O position.
DoNOTattempt to changethedirectionof travelwhenthe moweris
inmotion.Alwaysreleasethedrivecontrolandbring the mowertoa
completestopbeforerepositioning the gearshift leverfromaforward
gearinto Reverse.Failuretodosomayresult in seriousdamageto your
transmission.
Donotleavethe operator'spositionwithout first releasingthe Blade
Control.If leavingthe mowerunattended,alsoturn the engineoff and
removethe ignition key.
Engagingthe Blades
Tohelpavoidbladecontactorathrown objectinjury,keepbystanders,
helpers,childrenand petsatleast75feet from the machinewhile it isin
operation.Stopmachineif anyoneentersthearea.
1. Movethethrottle/chokecontroltothe FAST_t position.
2. SlowlysqueezetheBladeControlagainstthe righthandlegripandthe
bladeswill engage.Releaseit andthebladeswill stop.
Operating OnSlopes
Referto theSLOPEGUIDEonpage7to helpdetermineslopeswhereyoumay
operatethemowersafely.
Donotmowon inclineswith aslopeinexcessof 15degrees(ariseof
approximately2-I12feet every10feet).Themowercouldoverturnand
causeseriousinjury.
Mowacrossthefaceofslopes;neverupanddown.
14
Page 15
Exerciseextremecautionwhenchangingdirectiononslopes.
Watchforholes,ruts,rocks,Nddenobjects,orbumpswhichcancauseyou
tosliportrip.Tallgrasscanhideobstacles.
Alwaysbesureof yourfooting.Aslipandfallcancauseseriouspersonal
injury.Ifyoufeelyouarelosingyourbalance,releasethebladecontrol
handleimmediatelyandthebladewillstoprotatingwithinthree(3)
seconds.
Donotmowneardrop-offs,ditchesorembankments,youcouldloseyour
footingorbalance.
Donotmowslopesgreaterthan15degreesasshownontheslopegauge.
Donotmowonwetgrass.Unstablefootingcouldcauseslipping.
Usingthe DeckHeightLever
Toraiseorlowerthecuttingdeck,movethedeckheightleverto theleft,thenplace
it inthenotchbestsuitedforyourapplication.
Mowing
Thefollowinginformationwill behelpfulwhenoperatingyourmower.
Planyourmowing patternto avoiddischargeofmaterialstoward roads,
sidewalks,bystanders.Also,avoiddischargingmaterial againstawall or
obstructionwhichmaycausedischargedmaterial toricochetbacktoward
the operator.
Donotmowatfastgroundspeeds,especiallyifa mulchkitorgrasscollector
isinstalled.
Neverattempttomulchifthe lawnisdamp.Wetgrasstendstosticktothe
undersideofthecuttingdeckpreventingpropermulchingoftheclippings.
DoNOTattempttomulchmorethan1/3thetotalheightofthegrass.Doing
sowill causetheclippingsto clumpupbeneaththedeckandnotbemulched
effectively.
Maintainaslowgroundspeedto allowthegrassclippingsmoretimeto
effectivelybemulched.
Alwayskeepthethrottlecontrolleverinthe FAST_ positionwhile
mowing.Failingtokeeptheengineatfullthrottle placesstrainonthe
mower'sengineanddoesnotallowthebladestoproperlymulchthegrass
clippings.
Installing/Removing MulchBaffle
Beforeinstallingorremovingthe mulch baffle,disengageblades,stopthe
engineandremovekeytopreventunintendedstarting.
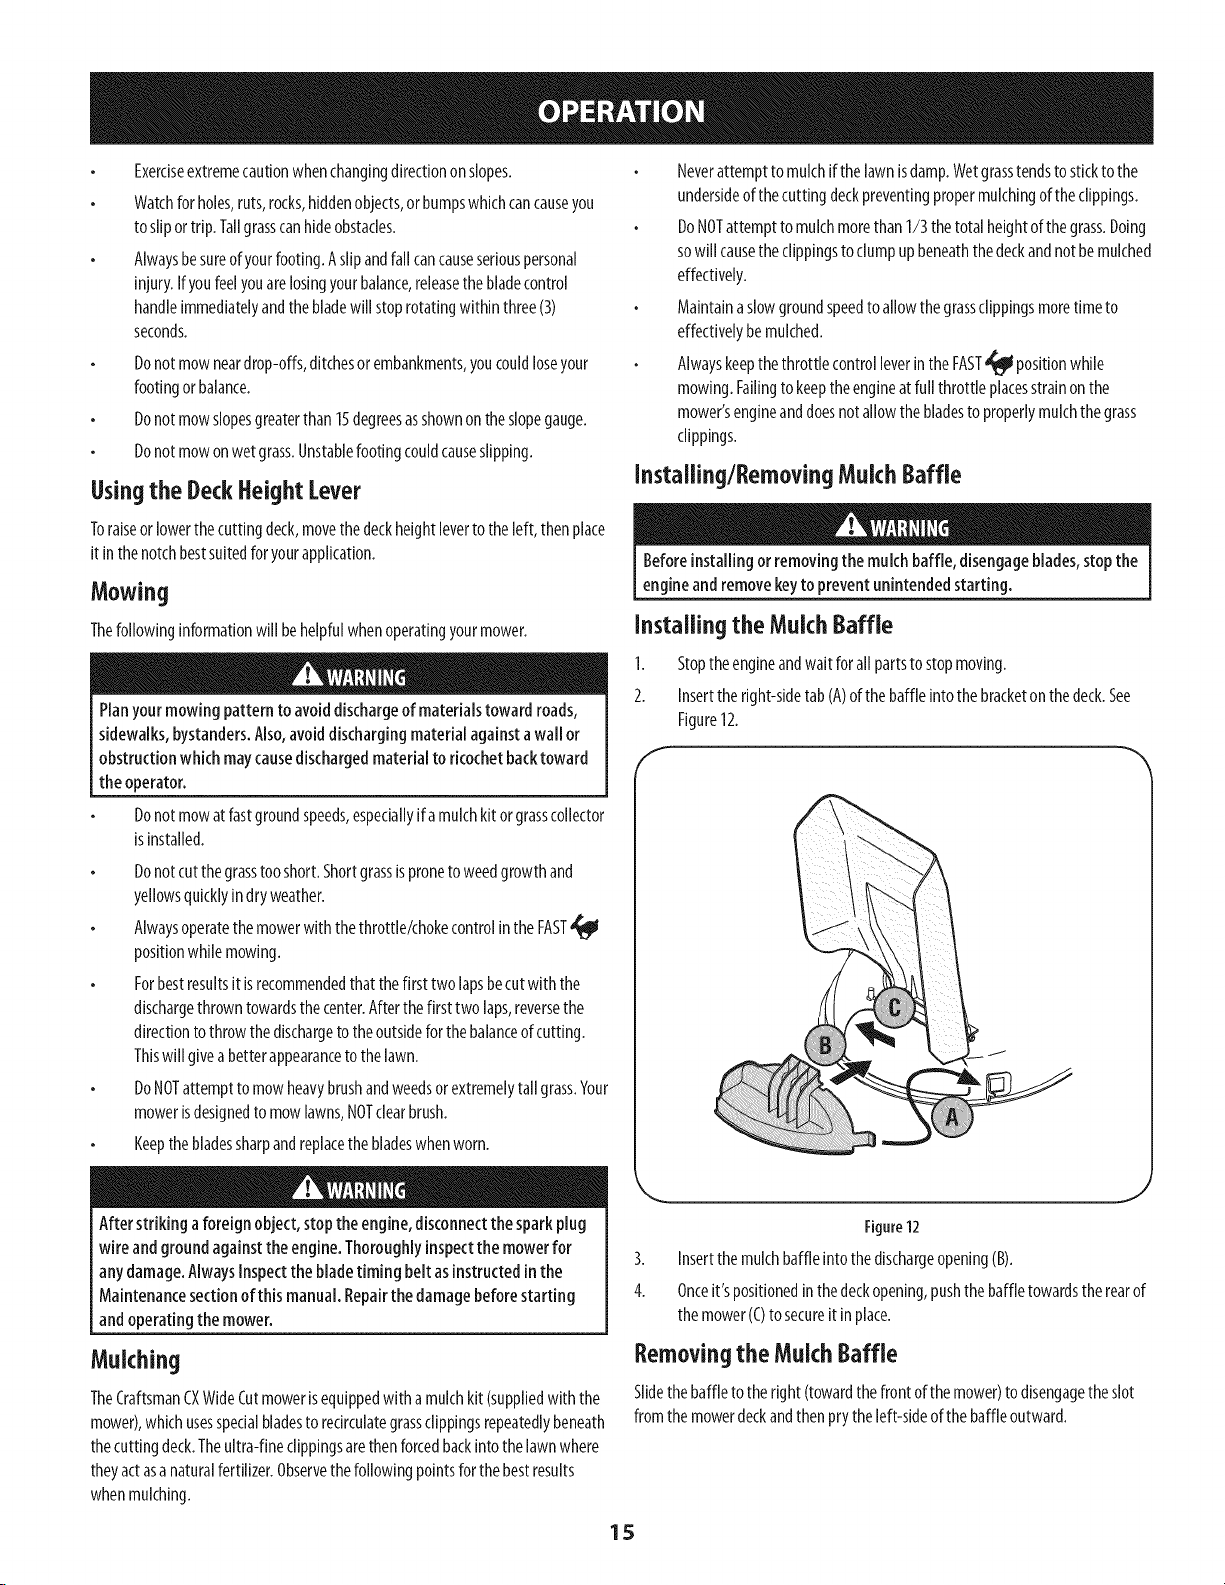
Installing the MulchBaffle
1. Stoptheengineandwaitforall partstostopmoving.
2. Inserttheright-sidetabCA)ofthebaffleintothebracketonthedeck.See
Figure12.
Donotcutthegrasstooshort.Shortgrassispronetoweedgrowthand
yellowsquicklyin dryweather.
Alwaysoperatethemowerwith thethrottle/chokecontrolinthe FAST
positionwhile mowing.
Forbestresultsitisrecommendedthatthefirsttwolapsbecutwith the
dischargethrowntowardsthecenter.Afterthefirsttwolaps,reversethe
directionto throwthedischargetotheoutsideforthebalanceofcutting.
Thiswill giveabetterappearancetothelawn.
DoNOTattempttomowheavybrushandweedsorextremelytall grass.Your
mowerisdesignedto mowlawns,NOTclearbrush.
Keepthebladessharpandreplacethe bladeswhenworn.
After striking aforeign object,stop theengine,disconnectthesparkplug
wireandgroundagainstthe engine.Thoroughlyinspectthe mowerfor
anydamage.AlwaysInspectthebladetiming belt asinstructedinthe
Maintenancesectionofthis manual.Repairthe damagebeforestarting
andoperatingthe mower.
Mulching
TheCraftsmanCXWideCutmowerisequippedwith amulchkit (suppliedwiththe
mower),whichusesspecialbladesto redrculategrassclippingsrepeatedlybeneath
thecuttingdeck.Theultra-fineclippingsarethenforcedbackintothelawnwhere
theyactasanaturalfertilizer.Observethefollowingpointsforthebestresults
whenmulching.
Figure12
3. Insertthemulchbaffleintothedischargeopening(B).
4. Onceit'spositionedinthedeckopening,pushthebaffletowardstherearof
themower(C)tosecureit inplace.
Removingthe MulchBaffle
Slidethebaffletotheright(towardthefrontofthemower)todisengagetheslot
fromthemowerdeckandthenprytheleft-sideofthe baffleoutward.
15
Page 16
MAINTENANCESCHEDULE
Beforeperforminganytypeof maintenance/service,disengageallcontrols
andstopthe engine.Wait until allmovingpartshavecometo a complete
stop.Disconnectsparkplugwireand grounditagainstthe engineto
preventunintendedstarting.
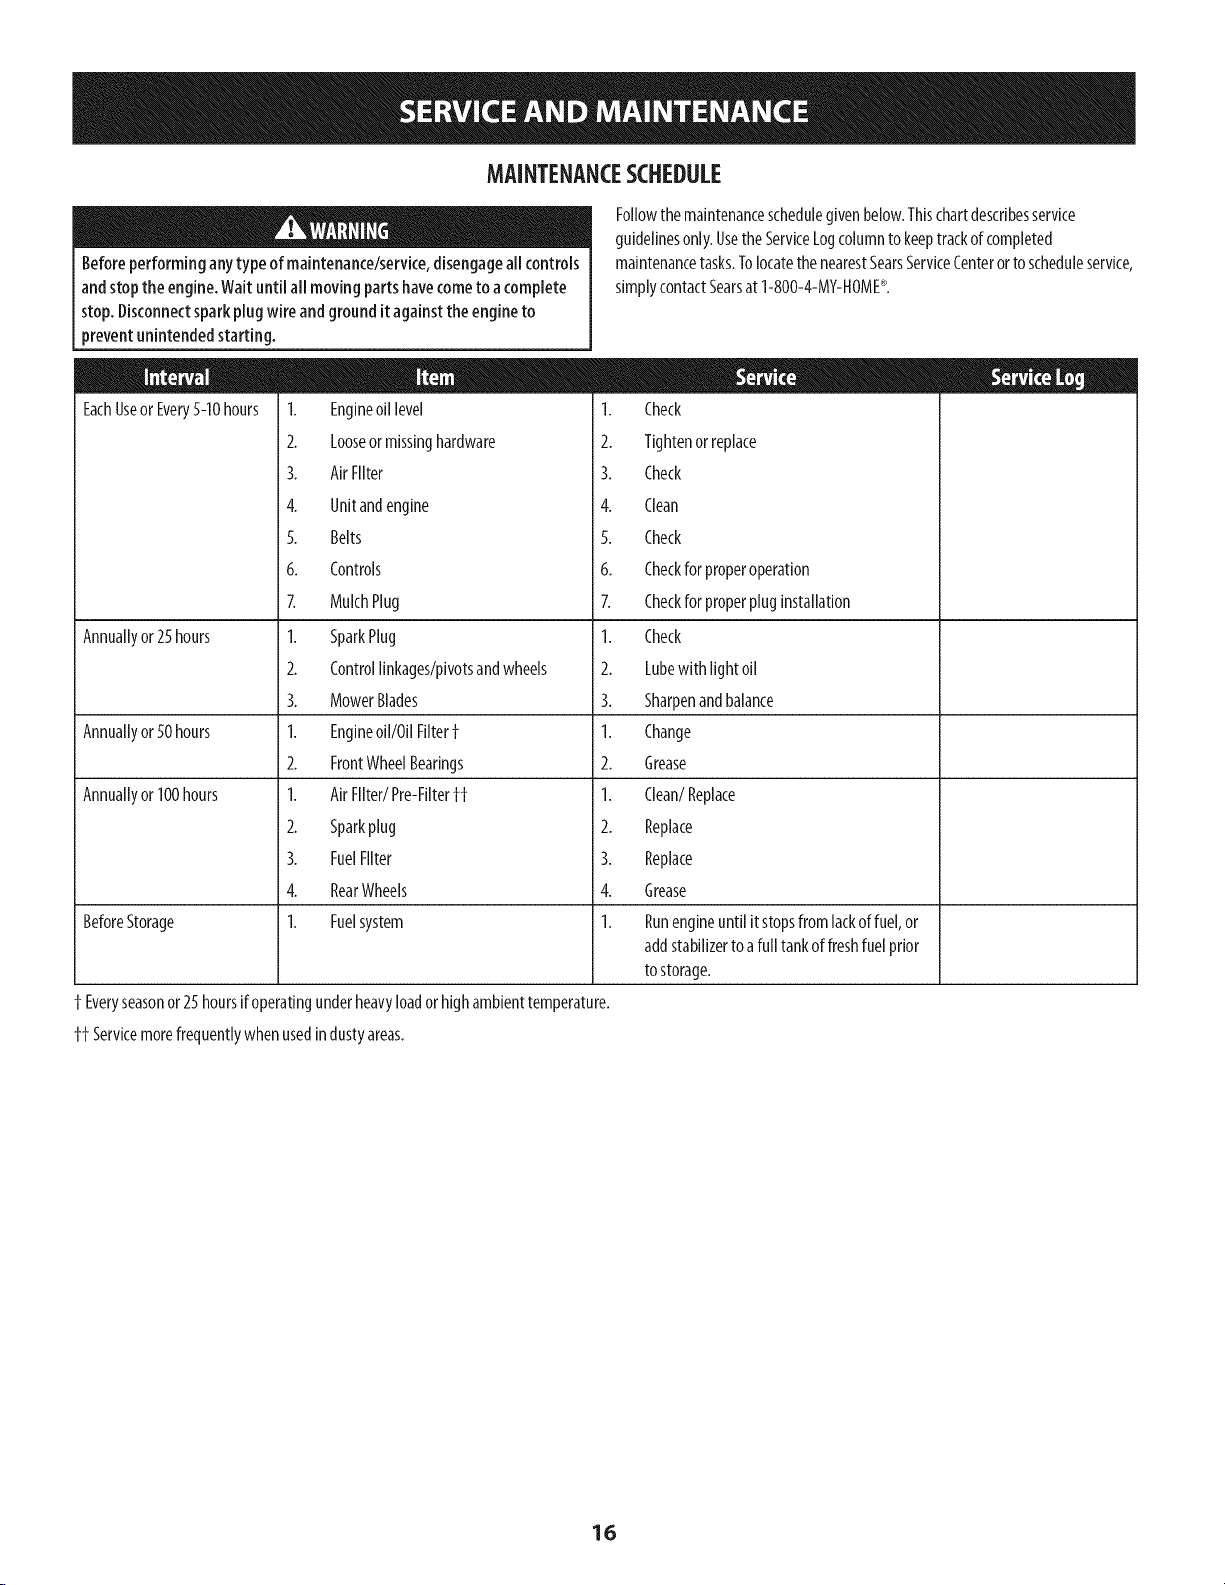
Followthemaintenanceschedulegivenbelow.Thischartdescribesservice
guidelinesonly.UsetheServiceLogcolumntokeeptrackofcompleted
maintenancetasks.TolocatethenearestSearsServiceCenterortoscheduleservice,
simplycontactSearsat1-800-4-MY-HOME®.
EachUseorEvery5-10 hours
1. Engineoillevel
2. Looseormissinghardware
3. AirFilter
4. Unitandengine
5. Belts
6. Controls
Z MulchPlug
Annuallyor25hours
1. SparkPlug
2. Controllinkages/pivotsandwheels
3. MowerBlades
Annuallyor50hours
1. Engineoil/OilFilterf
2. FrontWheelBearings
Annuallyor100hours
1. AirFilter/Pre-Filterff
2. Sparkplug
3. FuelFilter
4. RearWheels
BeforeStorage
1. Fuelsystem
Everyseasonor25hoursifoperatingunderheavyloadorhighambienttemperature.
ff Servicemorefrequentlywhenusedindustyareas.
1. Check
2. Tightenorreplace
3. Check
4. Clean
5. Check
6. Checkfor properoperation
7. Checkfor properpluginstallation
I. Check
2. Lubewithlight oil
3. Sharpenandbalance
I. Change
2. Grease
I. Clean/Replace
2. Replace
3. Replace
4. Grease
1. Runengineuntilitstopsfromlackoffuel,or
addstabilizertoafull tankoffreshfuelprior
tostorage.
16
Page 17
Beforeperforminganymaintenanceorrepairs,disengageblades,stop
engineandremovekeyto preventunintendedstarting.
GeneralRecommendations
Alwaysobservesafetyruleswhenperforminganymaintenance.
Thewarrantyonthislawnmowerdoesnotcoveritemsthat havebeen
subjectedto operatorabuseornegligence.Toreceivefull valuefrom
warranty,operatormustmaintaintheequipmentas
instructedhere.
Changingof engine-governedspeedwillvoidenginewarranty.
AlladjustmentsshouNbecheckedat leastonceeachseason.
Periodkallycheckallfastenersandmakesurethesearetight.
EngineMaintenance
Checkingthe EngineOil
Checkoillevelregularly.
Besurecorrectoillevelismaintained.Checkeveryfivetotenhoursbefore
startingengine.
NOTE:Besuretochecktheoilwhileonalevelsurfacewiththeenginestopped.
I. Removetheoilfillercap/dipstkkandwipethedipstickclean.
2. Insertthedipstickintotheoilfiller neck.Turnthedipsticka I/4 turn into the
lockedpositiontofullyseat.
3. Removedipsticktochecktheoillevel.
4. Ifthelevelislow,slowlyaddoilto theupperlimitonthedipstick.
5. Reinsertthedipstickandturntolockedpositionbeforestartingtheengine.
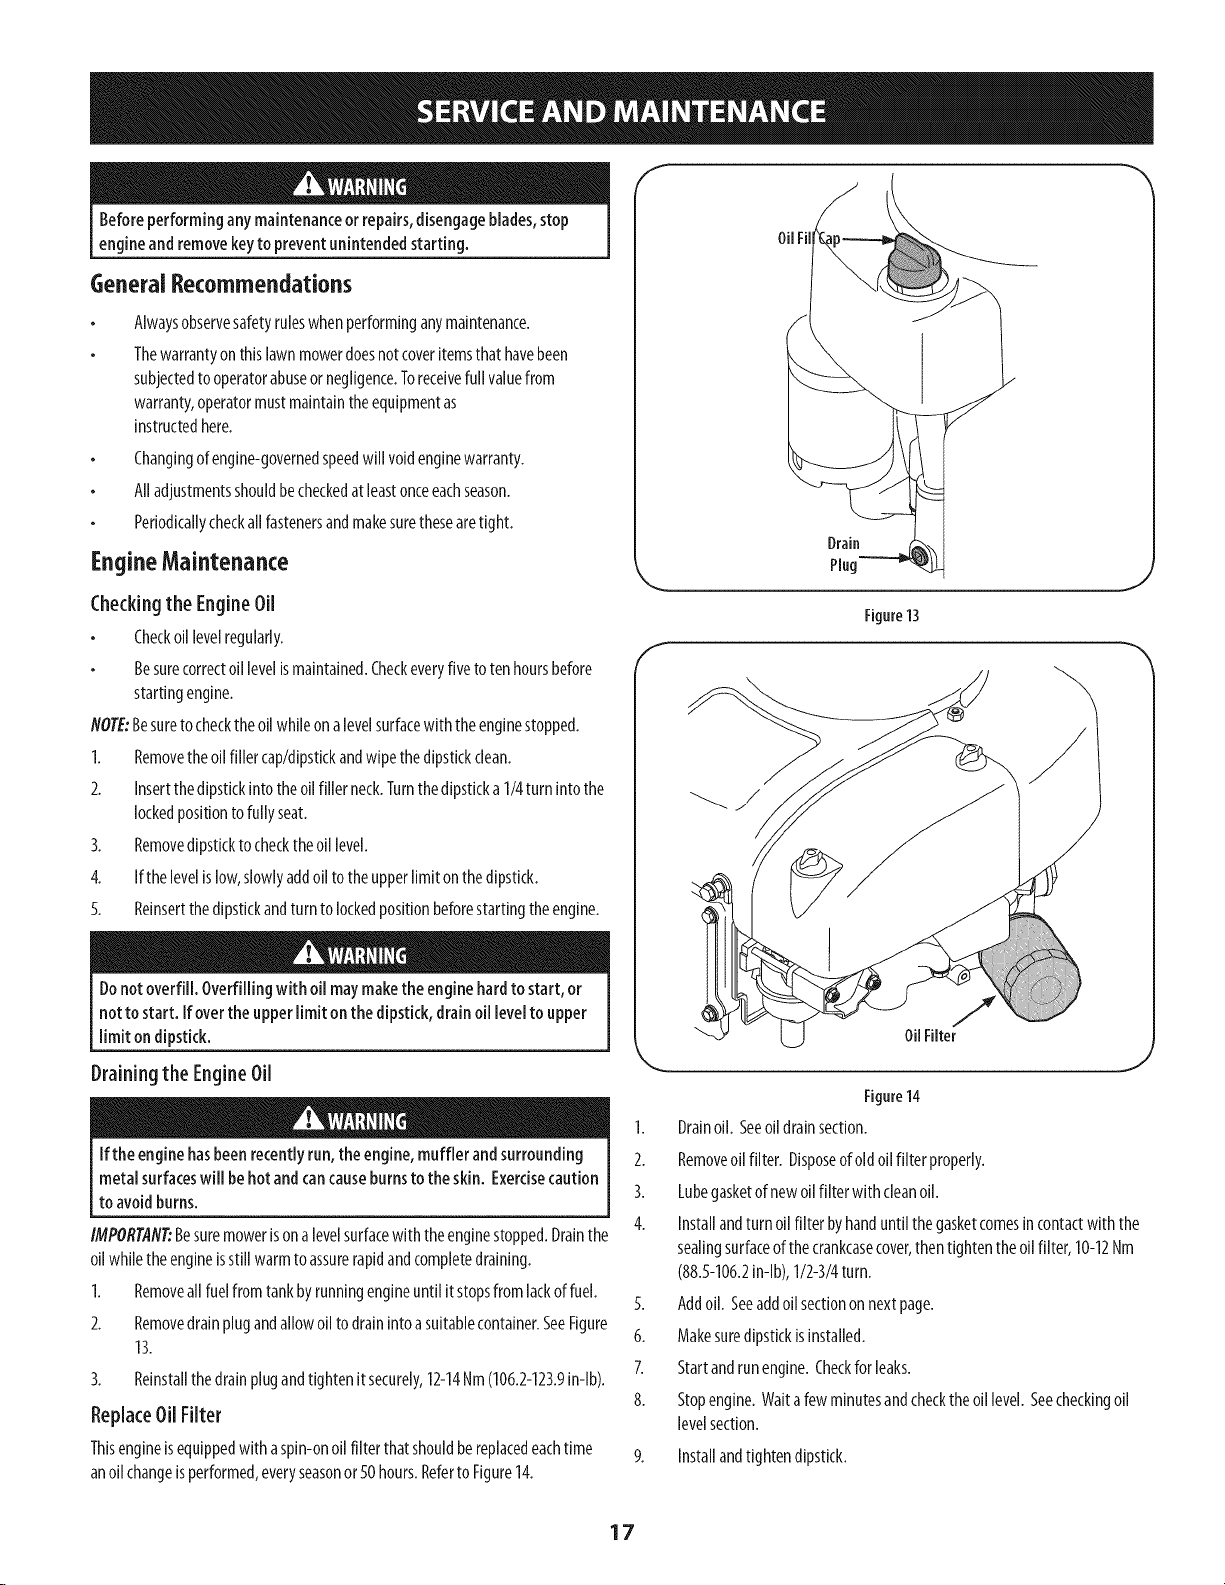
OilFil
Drain
Plug
J
Figure13
Donotoverfill. Overfillingwith oii maymaketheenginehardto start,or
not to start. Ifovertheupper limit onthe dipstick,drainoil levelto upper
limit ondipstick.
Draining the EngineOil
Ifthe enginehasbeenrecentlyrun,theengine,muffler andsurrounding
metal surfaceswill behotand cancauseburnstothe skin. Exercisecaution
to avoidburns.
IMPORTAN#Besuremowerisonalevelsurfacewiththeenginestopped.Drainthe
oilwhiletheengineisstill warmtoassurerapidandcompletedraining.
1. Removeallfuelfromtankbyrunningengineuntilit stopsfromlackoffuel.
2. Removedrainplugandallowoiltodrainintoasuitablecontainer.SeeFigure
13.
3. Reinstallthedrainplugandtightenitsecurely,12-14Nm(106.2-123.9in-lb).
ReplaceOilFilter
Thisengineisequippedwithaspin-onoil filterthatshouldbereplacedeachtime
anoilchangeisperformed,everyseasonor50hours.RefertoFigure14.
OilFilter
J
Figure14
1. Drainoil. Seeoildrainsection.
2. Removeoilfilter. Disposeof oldoilfilter properly.
3. Lubegasketofnewoilfilterwith cleanoil.
4. Installandturnoilfilterbyhanduntilthegasketcomesincontactwiththe
sealingsurfaceofthecrankcasecover,thentightentheoilfilter,10-12Nm
(88.5-106.2in-lb),1/2-3/4turn.
5. Addoil. Seeaddoilsectiononnextpage.
6. Makesuredipstickisinstalled.
7. Startandrunengine.Checkfor leaks.
8. Stopengine.Waitafewminutesandchecktheoillevel.Seecheckingoil
levelsection.
9. Installandtightendipstick.
17
Page 18

AddOil
IMPORTANT:Besureunitisona{eve{surfacewith theenginestopped.
1. Wipearounddipstickcapandtubewithadeanclothto removeanydebris.
RefertoFigure13onpreviouspage.
2. Removedipstkkandwipedeanwith acloth.
3. Pouro1[intothedJpstkktube. Donotoverfill Withan o1[filter changethe
highlevelamountofoi[ for thisengineis1700ml(5Z48N-oz.).
4. Instal[dipstickandturnto [goRedpositionbeforestartingengine.
5. Startengine.Allowtorunforafewsecondsandthenshutdowntheengine.
6. Checkthe o11level.SeeChecking01{Levelsection.
Checkingthe SparkPlug
DONOTcheckfor sparkwith sparkplugremoved.DONOTcrankenginewith
sparkplug removed.
Toensureproperengineoperation,thesparkplugmustbeproperlygappedand
freeofdeposits.
1. Removethesparkplugbootanduseasparkplugwrenchtoremovethe
plug.
f
Electrode
--_ _ 0.024-0.031in.
Figure15
ThumbSere
Ifthe enginehasbeenrunning,themuffler willbeveryhot.Becarefulnot
to touchthemuffler.
Visuallyinspectthesparkplug.Discardthesparkplugif thereisapparent
wear,orif theinsulatoriscrackedorchipped.Cleanthesparkplugwith a
wirebrushif it isto bereused.
3. Measurethepluggapwith afeelergauge.Correctasnecessarybybending
sideelectrode.SeeFigure15.Thegapshouldbesetto0.024-0.031in.
4. Checkthatthesparkplugwasherisingoodcondit{onandthreadthespark
pluginbyhandtopreventcross-threading.
5. Afterthesparkplugisseated,tightenwith asparkplugwrenchtocompress
thewasher.
NOTE:Wheninstallinganewsparkplug,tighten1/2turnafterthespark
plugseatsto compressthewasher.Whenreinstallingausedsparkplug,
tighten1/8-1/4turnafterthesparkplugseatsto compressthewasher.
IMPORTANT:Thesparkplugmustbesecurelytightened.Animproperly
tightenedsparkplugcanbecomeveryhotandmaydamagetheengine.
AirFilter Cover
Figure16
Servicing the Air F}Iter
Iffilters, orcoversarenot installedcorrectlyseriousinjuryordeath
couldresultfrom backfire.Donot attempt to start the enginewith them
removed.
Donotusepressurizedair orsolventsto cleanthe airfilter cartridge.
Paperfilterscannotbecleanedandshouldbereplacedevery100operatinghours;
moreoftenifusedinextremelydustyconditions.
I. Unscrewthethumbscrewsandremovetheairfiltercover.SeeFigure16.
18
Page 19
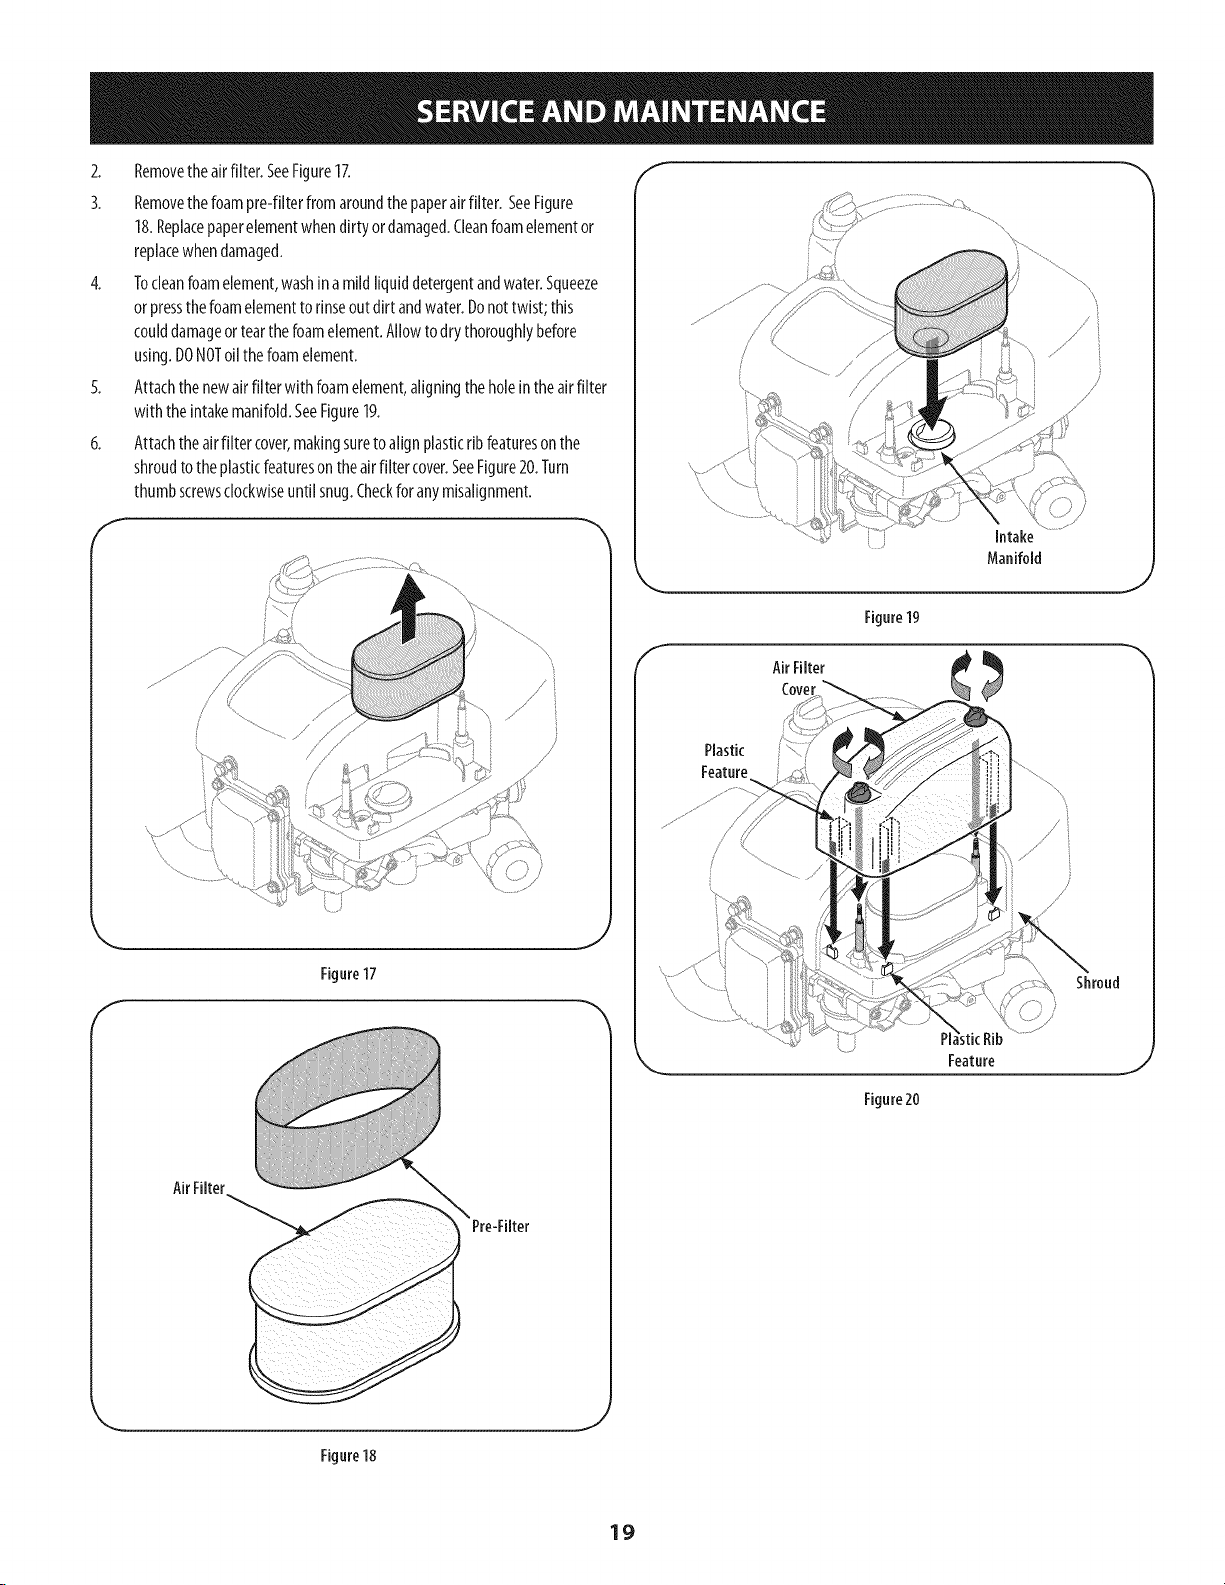
2. Removetheairfilter.SeeFigure17.
3. Removethefoampre-filterfromaroundthepaperairfilter. SeeFigure
18.Replacepaperelementwhendirty ordamaged.Cleanfoamelementor
replacewhendamaged.
4. Tocleanfoamelement,washinamildliquiddetergentandwater.Squeeze
orpressthefoamelementtorinseoutdirtandwater.Donottwist;this
coulddamageortearthefoamelement.Allowtodrythoroughlybefore
using.DONOToilthefoamelement.
5. Attachthenewairfilter with foamelement,aligningtheholeintheairfilter
with theintakemanifold.SeeFigure19.
6. Attachtheairfilter cover,makingsuretoalignplasticribfeaturesonthe
shroudtotheplasticfeaturesontheairfiltercover.SeeFigure20.Turn
thumbscrewsclockwiseuntilsnug.Checkforanymisalignment.
............/'_ !i
/
f ",,
/
/
Figure17
f
/'/ i
/
/
/
J
...... Intake
Manifold
Figure19
AirFilter
Cover
Plastic
Feature
Shroud
Figure20
AirFilter
J
Figure18
19
Page 20
[:uel [:liter
f
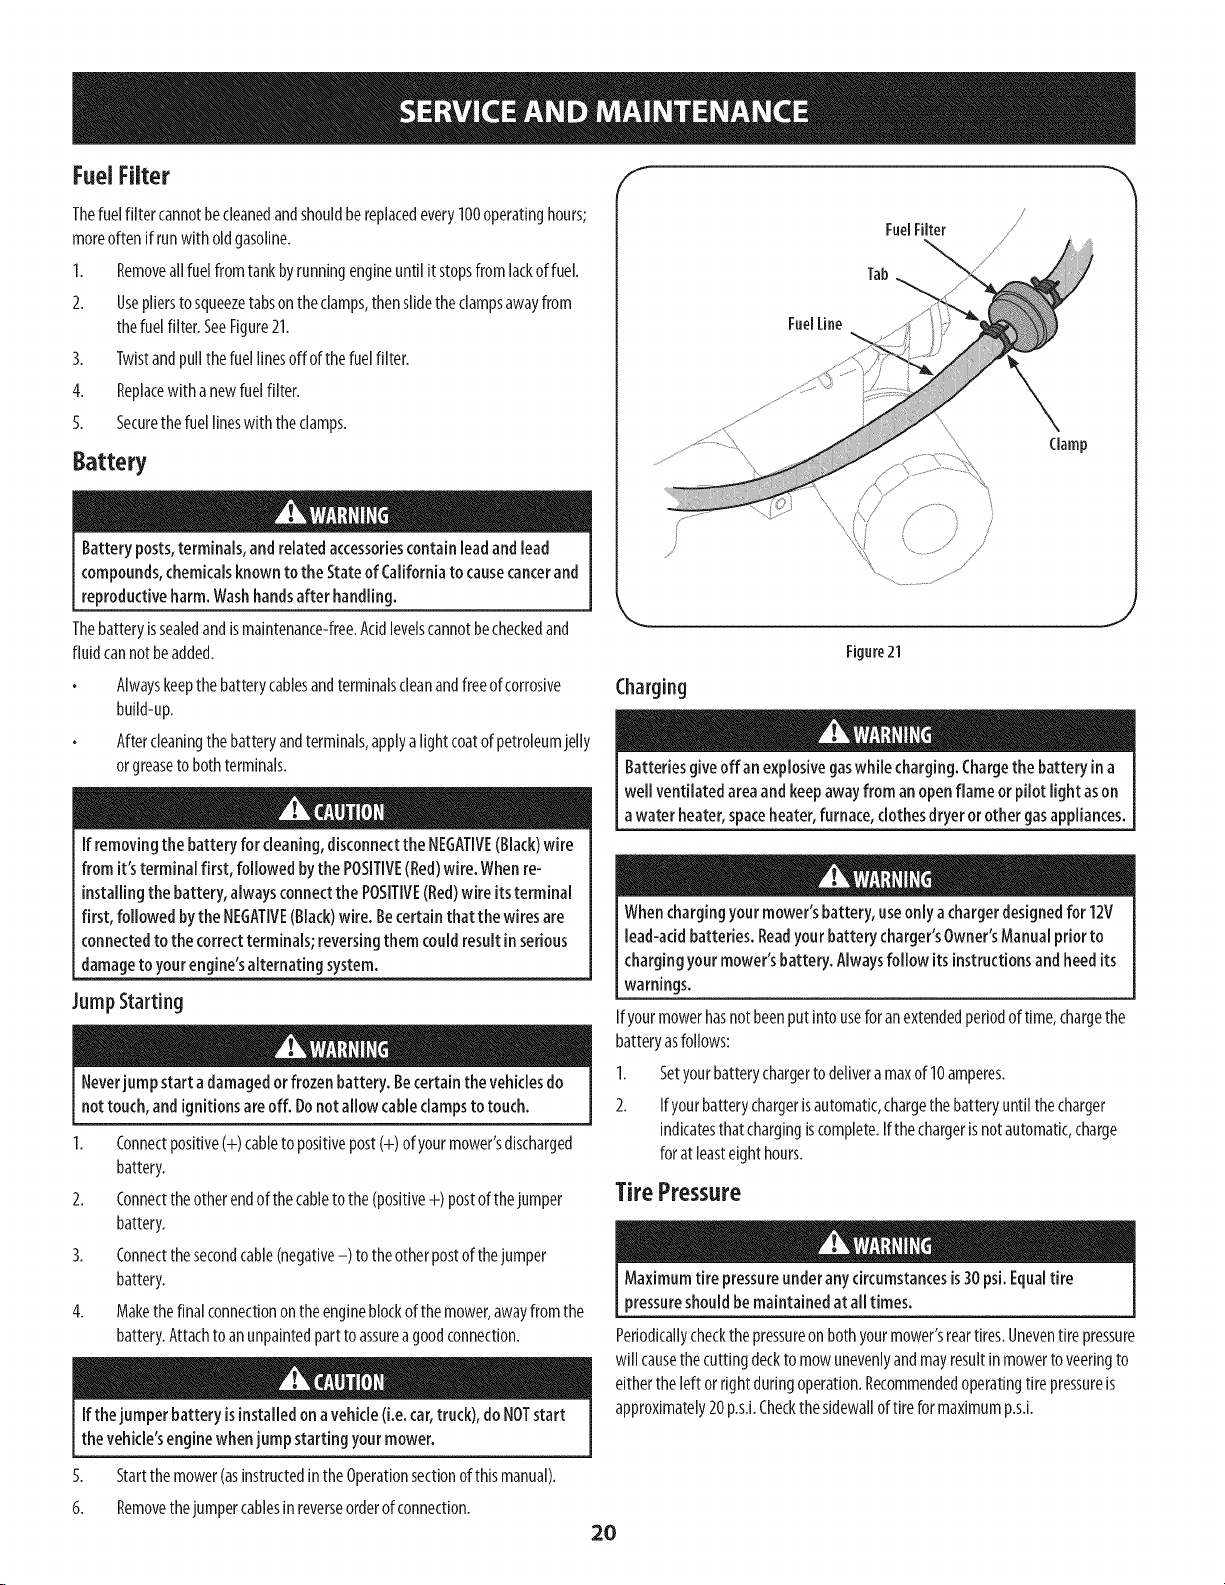
Thefuelfilter cannotbecleanedandshouldbereplacedevery100operatinghours;
moreoftenif runwith oldgasoline.
1. Removeallfuelfromtankbyrunningengineuntilit stopsfromlackoffuel.
2. Useplierstosqueezetabson theclamps,thenslidetheclampsawayfrom
thefuelfilter.SeeFigure21.
3. Twistandpullthefuellinesoffof thefuelfilter.
4. Replacewith a newfuelfilter.
5. Securethefuellineswith theclamps.
Battery
Batteryposts,terminals,and relatedaccessoriescontain leadandlead
compounds,chemicalsknowntothe StateofCaliforniato causecancerand
reproductiveharm.Washhandsafter handling.
Thebatteryissealedandismaintenance-free.Acidlevelscannotbecheckedand
fluidcannotbeadded.
Alwayskeepthebatterycablesandterminalscleanandfreeofcorrosive
build-up.
Aftercleaningthe batteryandterminals,applyalightcoatofpetroleumjelly
orgreasetobothterminals.
Ifremovingthe batteryfor cleaning,disconnectthe NEGATIVE(Black)wire
from it's terminalfirst, followed bythe POSITIVE(Bed)wire. Whenre-
installingthebattery,alwaysconnectthe POSITIVE(Bed)wire its terminal
first, followed bythe NEGATIVE(Black)wire. Becertainthat the wires are
connectedto the correctterminals;reversingthem couldresultinserious
damagetoyourengine'salternating system.
JumpStarting
Neverjumpstart adamagedor frozenbattery. Becertainthevehiclesdo
nottouch,andignitions areoff. Donotallowcableclampstotouch.
1. Connectpositive(+)cableto positivepost(+)ofyourmower'sdischarged
battery.
2. Connecttheotherendofthecabletothe(positive+) postofthejumper
battery.
3. Connectthesecondcable(negative-) to theotherpostof thejumper
battery.
4. Makethefinalconnectionontheengineblockofthemower,awayfromthe
battery.Attachtoanunpaintedparttoassurea goodconnection.
Ifthejumperbattery isinstalledonavehicle(i.e.car,truck),do NOTstart
the vehicle'senginewhenjump starting yourmower.
FuelFilter /
Tab
FuelLine
........................................ Clamp
/
/
/
f
Figure21
Charging
Batteriesgive off anexplosivegaswhile charging.Chargethe battery in a
wellventilated areaandkeepawayfromanopenflame or pilot light ason
awater heater,spaceheater,furnace,clothesdryeror othergasappliances.
Whenchargingyourmower'sbattery, useonlyachargerdesignedfor 12V
lead-acidbatteries.Beadyourbattery charger'sOwner'sManualpriorto
chargingyourmower'sbattery. Alwaysfollow itsinstructionsandheedits
warnings.
Ifyourmowerhasnotbeenputintouseforanextendedperiodoftime,chargethe
batteryasfollows:
1. Setyourbatterychargertodeliveramaxof 10amperes.
2. Ifyourbatterychargerisautomatic,chargethebatteryuntilthecharger
indicatesthatchargingiscomplete.Ifthechargerisnotautomatic,charge
forat leasteighthours.
TirePressure
Maximumtire pressureunderanycircumstancesis]0 psi.Equaltire
pressureshouldbemaintainedat alltimes.
Periodicallycheckthepressureonbothyourmower'sreartires.Uneventire pressure
will causethecuttingdecktomowunevenlyandmayresultinmowertoveeringto
eithertheleft orrightduringoperation.Recommendedoperatingtirepressureis
approximately20p.sJ.Checkthesidewallof tireformaximump.sJ.
5. Startthe mower(asinstructedintheOperationsectionofthismanual).
6. Removethejumpercablesinreverseorderofconnection.
20
Page 21
Cleaningthe Mower
Anyfueloroilspilledonthemachineshouldbewipedoffpromptly.DoNOTallow
debristoaccumulatearoundthecoolingfinsof theengine,thetransmission's
coolingfanoronanyotherpartofthemachine,especiallythebeltsandpulleys.
SmartJet
Yourmower'sdeckisequippedwithawaterportonitssurfaceaspartofitsdeck
washsystem.
UsetheSmartJettorinsegrassclippingsfromthedeck'sundersideandpreventthe
buildupofcorrosivechemicals.CompletethefollowingstepsAFTEREACHMOWING:
Beforeusingthe deckwashsystem,alwaysdisengagetheBladeControl,
stopengineandremovekeyto preventunintended starting,
1. Positionthemowerona level,clearspotonyourlawn,nearenoughforyour
gardenhosetoreach.
2. Threadthehosecoupler(packagedwithyourmower'sOperator'sManual)
ontotheendofyourgardenhose.
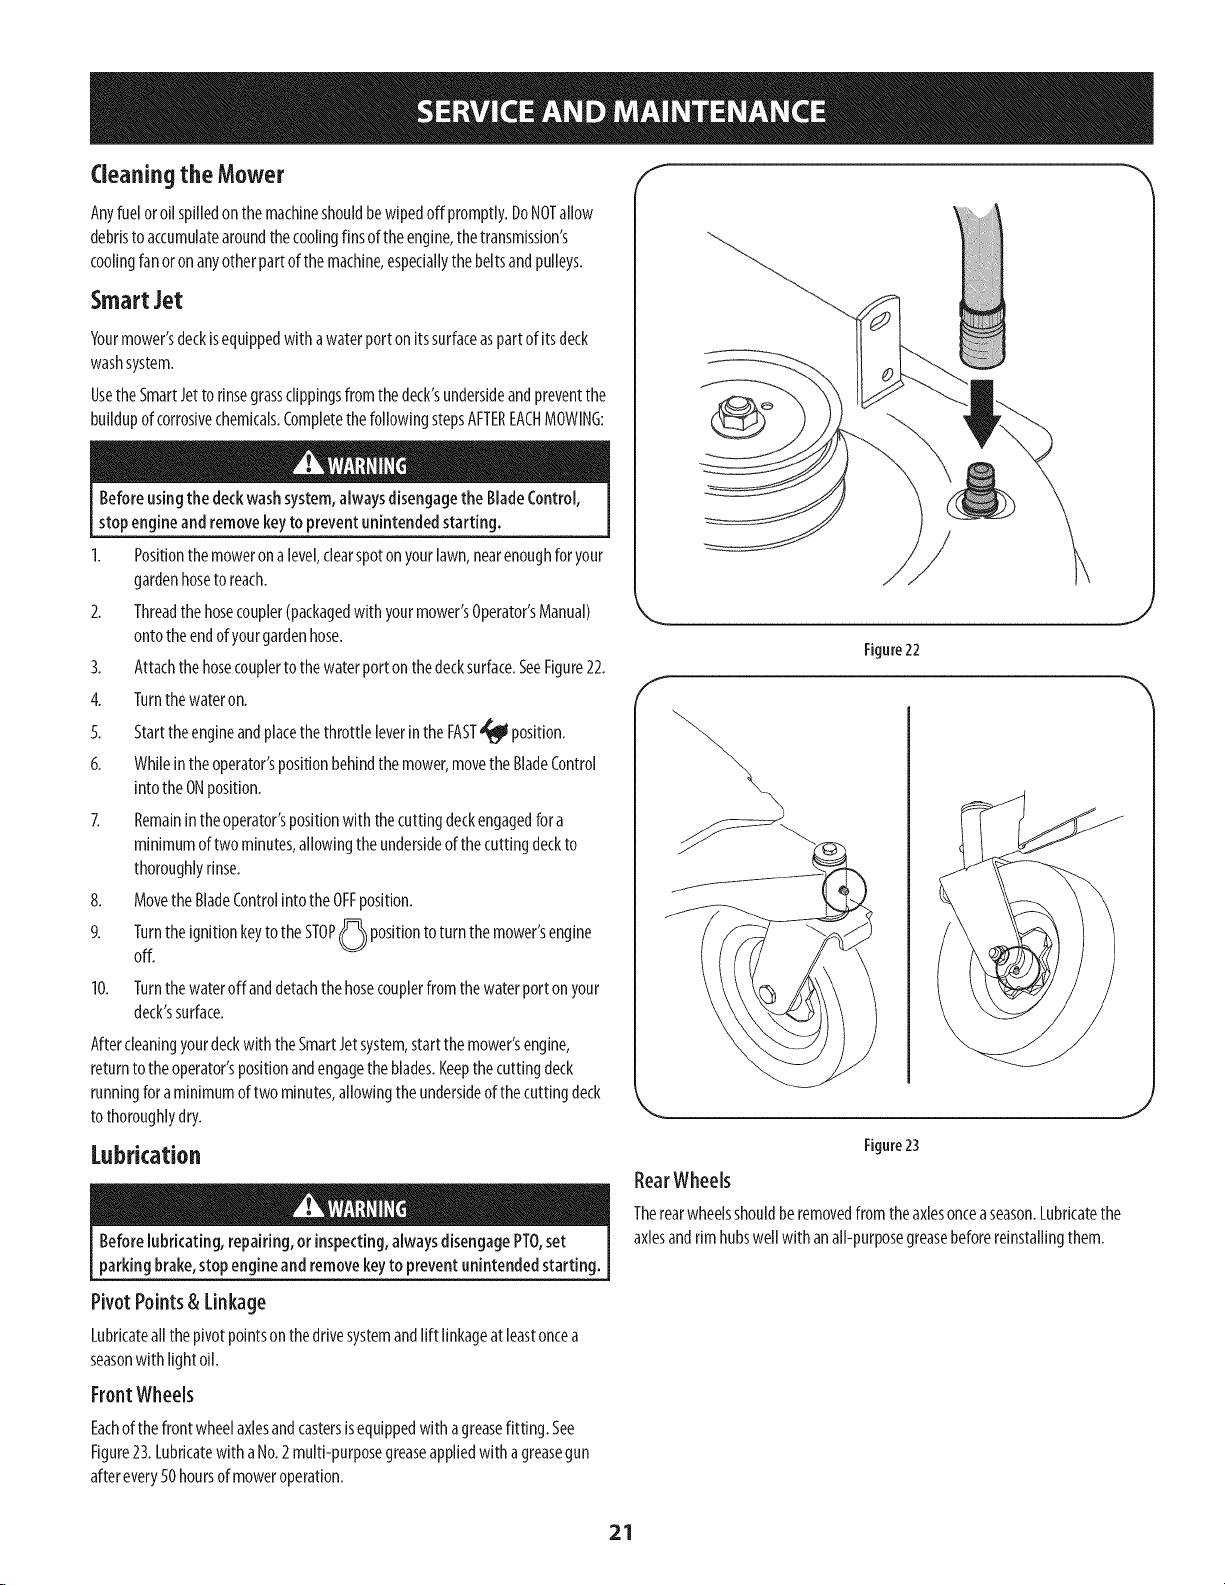
3. Attachthehosecouplertothewaterportonthedecksurface.SeeFigure22.
4. Turnthewateron.
5. StarttheengineandplacethethrottleleverintheFAST'_ position.
6. Whileintheoperator'spositionbehindthemower,movethe BladeControl
intotheONposition.
7. Remainintheoperator'spositionwiththecuttingdeckengagedfora
minimumoftwominutes,allowingtheundersideof thecuttingdeckto
thoroughlyrinse.
8. Movethe BladeControlinto theOFFposition.
9. TurntheignitionkeytotheSTOP(_ positionto turn themower'sengine
off.
10. Turnthewateroffanddetachthehosecouplerfromthewaterportonyour
deck'ssurface.
Aftercleaningyourdeckwith theSmartJetsystem,startthe mower'sengine,
returntotheoperator'spositionandengagetheblades.Keepthecuttingdeck
runningforaminimumoftwominutes,allowingthe undersideofthecuttingdeck
tothoroughlydry.
Lubrication
Beforelubricating, repairing,or inspecting,alwaysdisengagePTO,set
parking brake,stopengineandremovekeyto preventunintendedstarting,
Figure22
f
-,. J
Figure23
RearWheels
Therearwheelsshouldberemovedfromtheaxlesonceaseason.Lubricatethe
axlesandrimhubswellwithanall-purposegreasebeforereinstallingthem.
Pivot Points& Linkage
Lubricateallthepivotpointsonthedrivesystemandlift linkageatleastoncea
seasonwith lightoil.
Front Wheels
Eachofthefrontwheelaxlesandcastersisequippedwith agreasefitting. See
Figure23.Lubricatewitha No.2multi-purposegreaseappliedwithagreasegun
afterevery50hoursofmoweroperation.
21
Page 22
Adjustments
Shutthe engineoff and removetheignitionkeybeforemaking
adjustments.
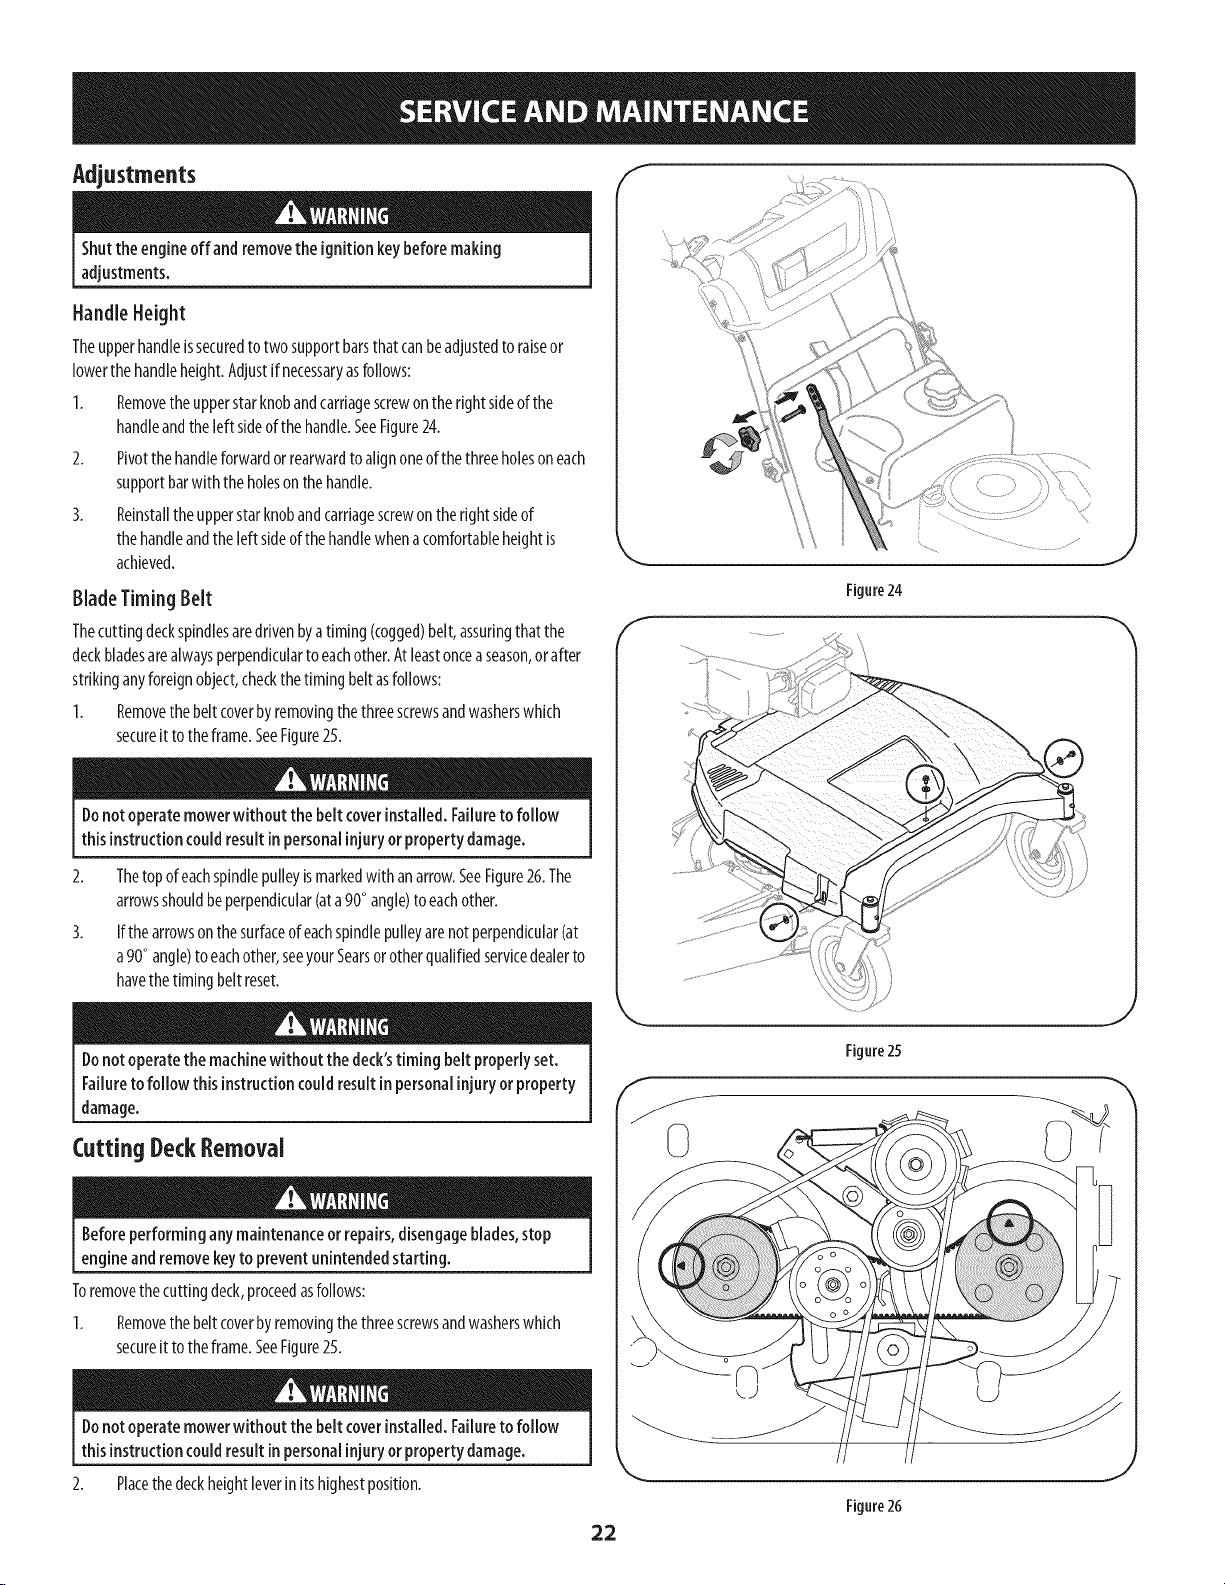
Handle Height
Theupperhandleissecuredtotwosupportbarsthatcanbeadjustedto raiseor
lowerthehandleheight.Adjustif necessaryasfollows:
1. Removetheupperstarknobandcarriagescrewontherightsideofthe
handleandtheleft sideofthehandle.SeeFigure24.
2. Pivotthehandleforwardorrearwardtoalignoneofthethreeholesoneach
supportbarwiththeholeson thehandle.
3. Reinstalltheupperstarknobandcarriagescrewontherightsideof
thehandleandthe[eftsideofthehandlewhenacomfortableheightis
achieved.
BladeTimingBelt
Thecuttingdeckspindlesaredrivenbyatiming (cogged)belt,assuringthatthe
deckbladesarealwaysperpendiculartoeachother.Atleastonceaseason,orafter
strikinganyforeignobject,checkthetimingbeltasfollows:
I. Removethebeltcoverbyremovingthethreescrewsandwasherswhich
secureit totheframe.SeeFigure25.
J
Figure24
f
Donotoperatemowerwithout the belt coverinstalled.Failureto follow
thisinstructioncouldresultinpersonalinjuryorproperty damage.
2. Thetopofeachspindlepulleyismarkedwithanarrow.SeeFigure26.The
arrowsshouldbeperpendicular(ata90°angle)toeachother.
3. Ifthearrowsonthesurfaceofeachspindlepulleyarenotperpendicular(at
a90°angle)toeachother,seeyourSearsorotherqualifiedservicedealerto
havethetimingbeltreset.
Donotoperatethemachinewithout the deck'stimingbelt properlyset.
Failuretofollow thisinstructioncouldresultinpersonalinjuryor property
damage.
Cutting DeckRemoval
Beforeperforminganymaintenanceor repairs,disengageblades,stop
engineandremovekeyto prevent unintendedstarting.
Toremovethecuttingdeck,proceedasfollows:
I. Removethebeltcoverbyremovingthethreescrewsandwasherswhich
secureit totheframe.SeeFigure25.
J
Figure25
Donotoperatemowerwithout the belt coverinstalled.Failuretofollow
thisinstructioncouldresultinpersonalinjuryor property damage.
2. Placethedeckheightleverin itshighestposition.
Figure26
22
Page 23
3. Positionwoodblocksat variousplacesunderthedeck'sedge.Thesewill
temporarilysupportthedeckintheprocessof removingit.
4. Usethedeckheightlevertolowerthedeck,sothatit restson thewood
blocks.
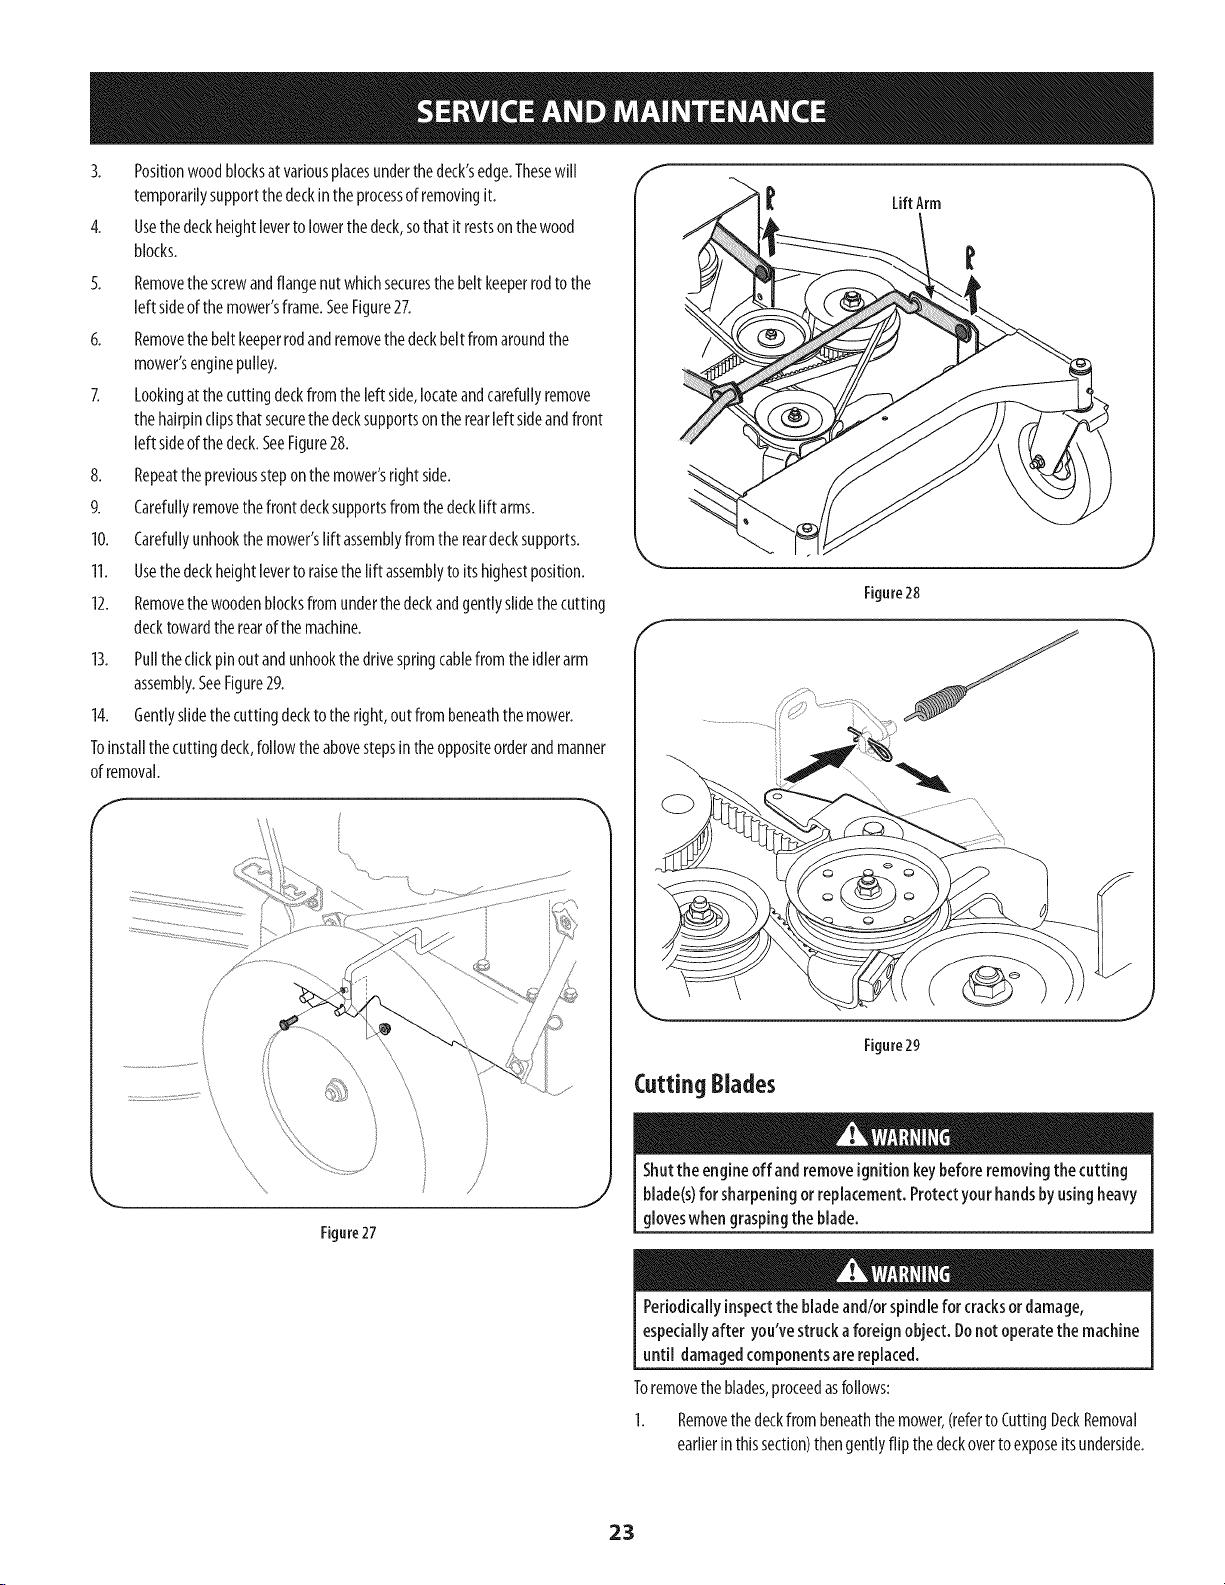
5. Removethescrewandflangenutwhichsecuresthebeltkeeperrodto the
leftsideofthemower'sframe.SeeFigure27.
6. Removethebeltkeeperrodandremovethedeckbeltfromaroundthe
mower'senginepulley.
7. Lookingatthecuttingdeckfromthe leftside,locateandcarefullyremove
thehairpinclipsthatsecurethedecksupportsontherearleftsideandfront
leftsideofthedeck.SeeFigure28.
8. Repeattheprevioussteponthemower'srightside.
9. Carefullyremovethefront decksupportsfromthedecklift arms.
10. Carefullyunhookthemower'slift assemblyfromthe reardecksupports.
11. Usethedeckheightlevertoraisethelift assemblytoitshighestposition.
12. Removethewoodenblocksfromunderthedeckandgentlyslidethecutting
decktowardtherearofthemachine.
13. Pulltheclickpinoutandunhookthedrivespringcablefromtheidlerarm
assembly.SeeFigure29.
14. Gentlyslidethecuttingdeckto theright,outfrombeneaththemower.
Toinstallthecuttingdeck,followtheabovestepsintheoppositeorderandmanner
ofremoval.
LiftArm
Figure28
Figure29
Cutting Blades
\
\
\
/
J
Figure27
Shutthe engineoff andremoveignitionkeybeforeremovingthecutting
blade(s)for sharpeningorreplacement.Protectyourhandsbyusingheavy
gloveswhen graspingtheblade.
Periodicallyinspectthe bladeand/or spindlefor cracksordamage,
especiallyafter you'vestruckaforeign object. Donot operatethemachine
until damagedcomponentsarereplaced.
Toremovetheblades,proceedasfollows:
1. Removethedeckfrombeneaththemower,(refertoCuttingDeckRemoval
earlierinthissection)thengentlyflipthedeckovertoexposeitsunderside.
23
Page 24
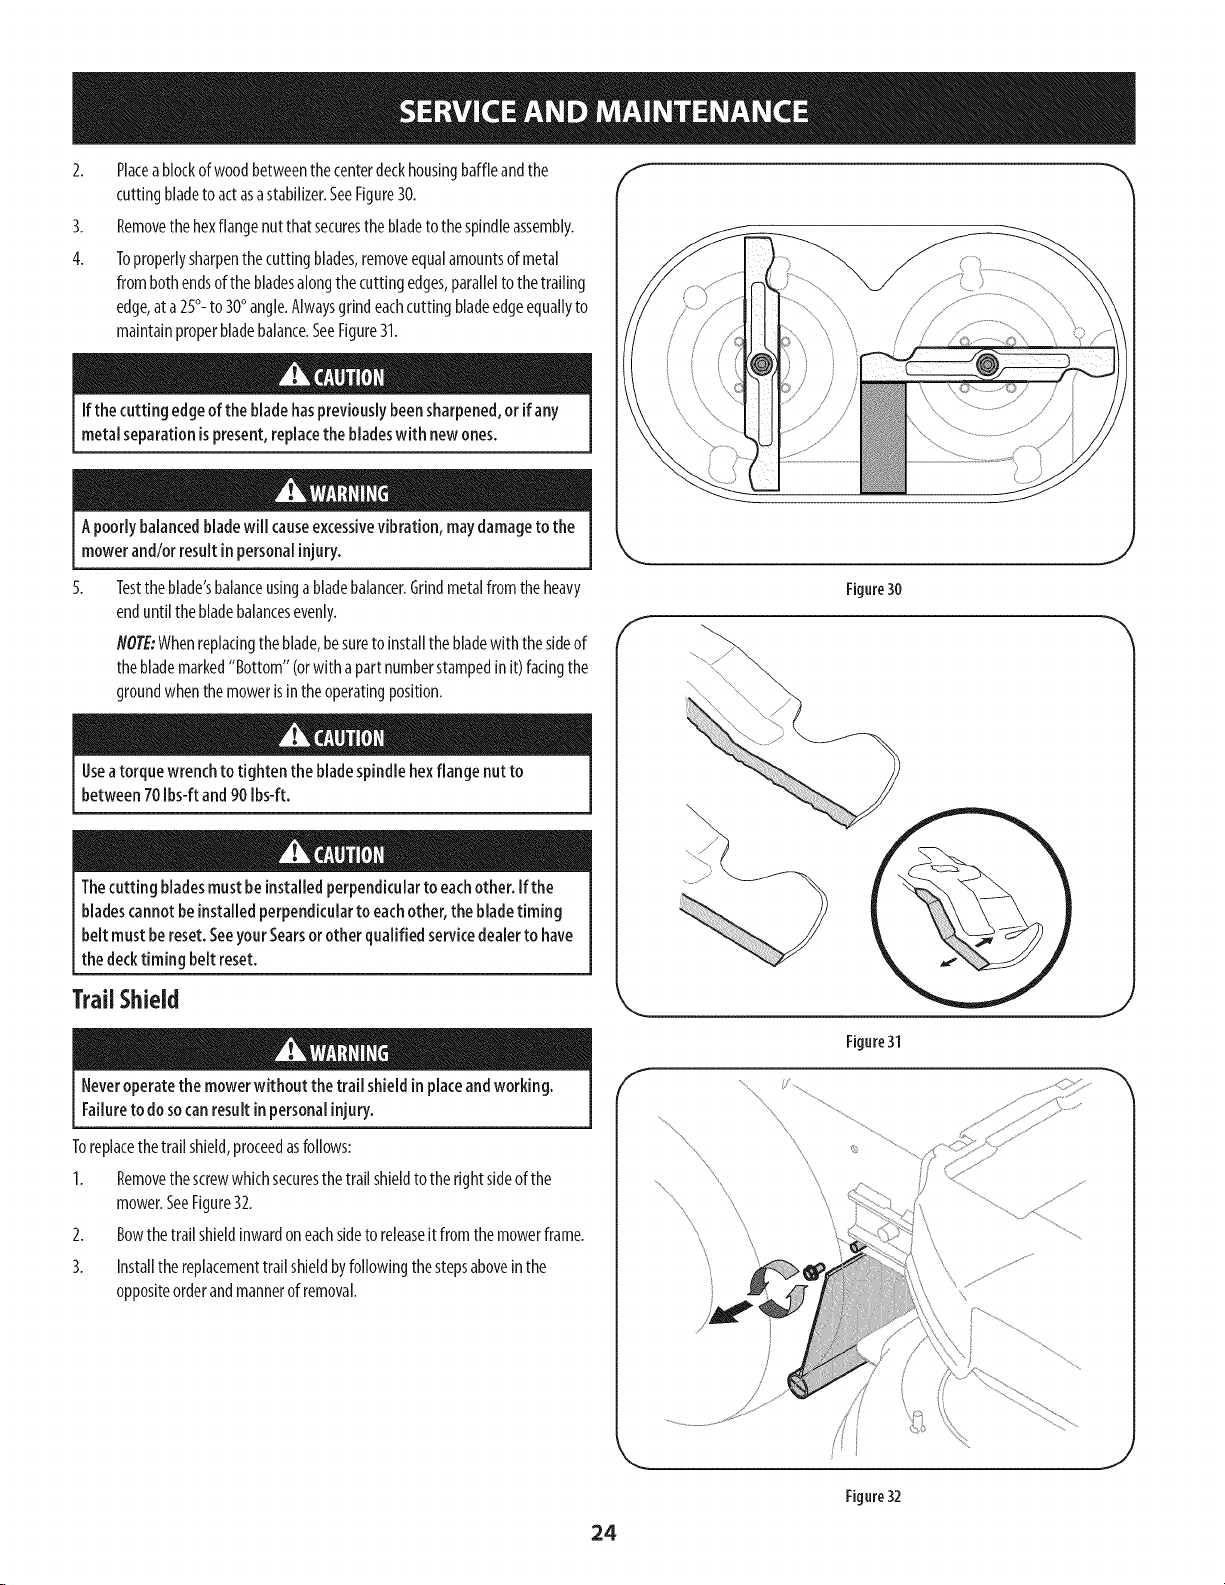
2. Placeablockofwoodbetweenthecenterdeckhousingbaffleandthe
cuttingbladetoactasastabilizer.SeeFigure30.
3. Removethehexflangenutthatsecuresthe bladetothespindleassembly.
4. Toproperlysharpenthecuttingblades,removeequalamountsofmetal
frombothendsofthe bladesalongthecuttingedges,paralleltothetrailing
edge,ata 25°-to 30° angle.Alwaysgrindeachcuttingbladeedgeequallyto
maintainproperbladebalance.SeeFigure31.
Ifthe cutting edge of the bladehaspreviouslybeensharpened,orifany
metalseparationispresent,replacethe bladeswith newones.
Apoorlybalancedbladewillcauseexcessivevibration,maydamageto the
mowerand/orresultin personalinjury.
5.
Testtheblade'sbalanceusingabladebalancer.Grindmetalfromtheheavy
enduntilthebladebalancesevenly.
flOTE:Whenreplacingtheblade,besuretoinstallthebladewiththesideof
theblademarked"Bottom"(orwith apart numberstampedinit) facingthe
groundwhenthemowerisintheoperatingposition.
Figure30
f
\
Useatorquewrenchtotighten the bladespindlehexflangenut to
between70Ibs-ft and90Ibs-ft.
Thecutting bladesmustbeinstalledperpendicularto eachother.If the
bladescannotbeinstalledperpendiculartoeachother,the bladetiming
beltmustbereset.SeeyourSearsorother qualified servicedealerto have
the decktiming belt reset.
TrailShield
Neveroperatethe mowerwithout the trail shieldinplaceandworking.
Failuretodosocanresultinpersonalinjury.
Toreplacethetrailshield,proceedasfollows:
1. Removethescrewwhichsecuresthetrailshieldtothe rightsideofthe
mower.SeeFigure32.
2. Bowthetrailshieldinwardoneachsidetoreleaseitfromthemowerframe.
3. Installthe replacementtrailshieldbyfollowingthestepsaboveinthe
oppositeorderandmannerofremoval.
Figure31
f
\
\
\
\
\
\
24
Figure32
Page 25
ChangingTheDeckEngagementBelt f
Shutthe engineoffand removeignitionkey beforeremovingthe cutting
blade(s)for sharpeningorreplacement.Protectyourhandsby usingheavy
gloveswhengraspingbladesandpulleys.
TheV-beltsfoundonyourmowerarespeciallydesignedto engageand
disengagesafely.Asubstitute(non-OEM)V-beltcanbedangerousbynot
disengagingcompletely.Fora properworking machine,useidentical
replacementbeltsaslistedin parts list of this operator'smanual.
Allbeltsonyourmoweraresubjecttowearandshouldbereplacedifanysignsof
weararepresent.Tochangeor replacethedeckengagementbelt onyourmower,
proceedasfollows:
I. Removethecuttingdeckfromthemowerasinstructedearlierinthis
section.
Avoidpinchinginjuries.Neverplaceyourfingersontheidler springor
between the beltand apulleywhile removingthe belt.
2. Removethebeltcoverasinstructedearlierinthissection.Referto Figure25
onpage22.
3. Removethebeltkeeperasinstructedearlierin thissection.RefertoFigure
27onpage23.
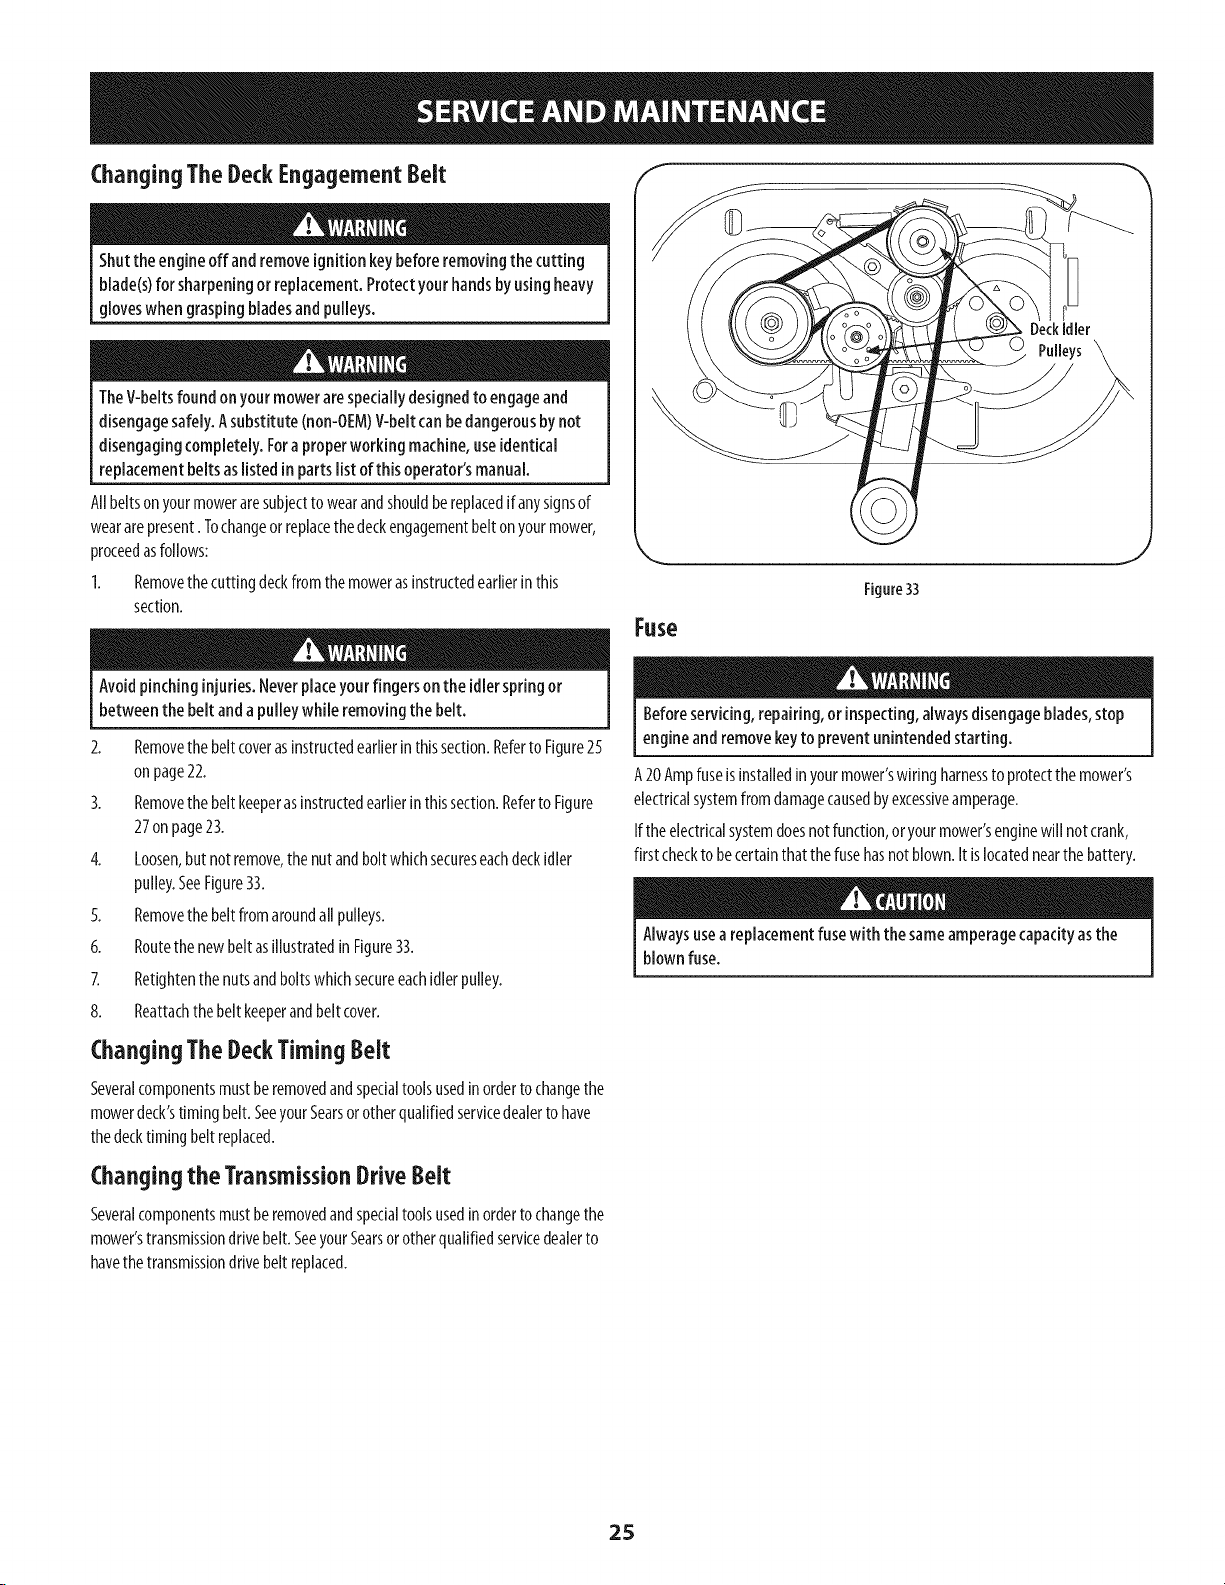
4. Loosen,but notremove,thenutandboltwhichsecureseachdeckidler
pulley.SeeFigure33.
5. Removethebeltfromaroundallpulleys.
6. Routethenewbeltasillustratedin Figure33.
7. Retightenthenutsandboltswhichsecureeachidlerpulley.
8. Reattachthebeltkeeperandbeltcover.
DeckIdler
J
Figure33
Fuse
Beforeservicing,repairing,or inspecting,alwaysdisengageblades,stop
engineandremovekeyto preventunintendedstarting.
A20Ampfuseisinstalledinyourmower'swiring harnesstoprotectthemower's
electricalsystemfromdamagecausedbyexcessiveamperage.
Iftheelectricalsystemdoesnotfunction,oryourmower'senginewill notcrank,
firstcheckto becertainthatthefusehasnotblown.It islocatednearthebattery.
Alwaysuseareplacementfusewith the sameamperagecapacityasthe
blownfuse.
ChangingTheDeckTiming Belt
Severalcomponentsmustberemovedandspecialtoolsusedinordertochangethe
mowerdeck'stimingbelt.SeeyourSearsorotherqualifiedservicedealerto have
thedecktimingbeltreplaced.
Changingthe TransmissionDriveBelt
Severalcomponentsmustberemovedandspecialtoolsusedinordertochangethe
mower'stransmissiondrivebelt.SeeyourSearsorotherqualifiedservicedealerto
havethetransmissiondrivebeltreplaced.
25
Page 26

Neverstorelawnmowerwith fuelin tank indoorsorin poorlyventilated
areaswherefuel fumesmayreachanopenflame, spark,orpilot light ason
afurnace,water heater,clothesdryer, orgasappliance.
PreparingTheEngine
Forenginesstoredover30days:
Topreventgumfromforminginfuelsystemoroncarburetorparts,run
engineuntilit stopsfromlackof fueloraddagasolineadditivetothegas
inthetank.Ifyouuseagasadditive,runtheenginefor severalminutesto
circulatetheadditivethroughthecarburetor--afterwhichtheengineand
fuelcanbestoredupto24months.
Whileengineisstillwarm,changetheoil.
Removesparkplugandpourabout1/2anounceofengineoilintocylinder.
Replacesparkplugandcrankslowlytodistributeoil.
Cleanengineofsurfacedebris.
Thefollowingattachmentsandaccessoriesareavailableforthelawnmower.ContactaSearsServiceCenter1-800-4-MY-HOME®for moreinformation.
PreparingThelawn mower
Cleanandlubricatemowerthoroughlyasdescribedinthelubrication
instructions.
Donotusea pressurewasherorgardenhoseto cleanyourunit.
Coatmower'scutting bladewith chassisgreaseto preventrusting.
Referto PreparingtheEngineforcorrectenginestorageinstructions.
Storemowerinadry,deanarea.Donotstorenexttocorrosivematerials,
suchasfertilizer.
Whenstoringanytypeofpowerequipmentinapoorlyventilatedormetalstorage
shed,careshouldbetakento rust-prooftheequipment.Usingalightoil orsilicone,
coattheequipment,especiallycablesandallmovingpartsof yourlawnmower
beforestorage.
PARTNO. DESCRIPTION
33731 BaggerGrassCollector
26
Page 27
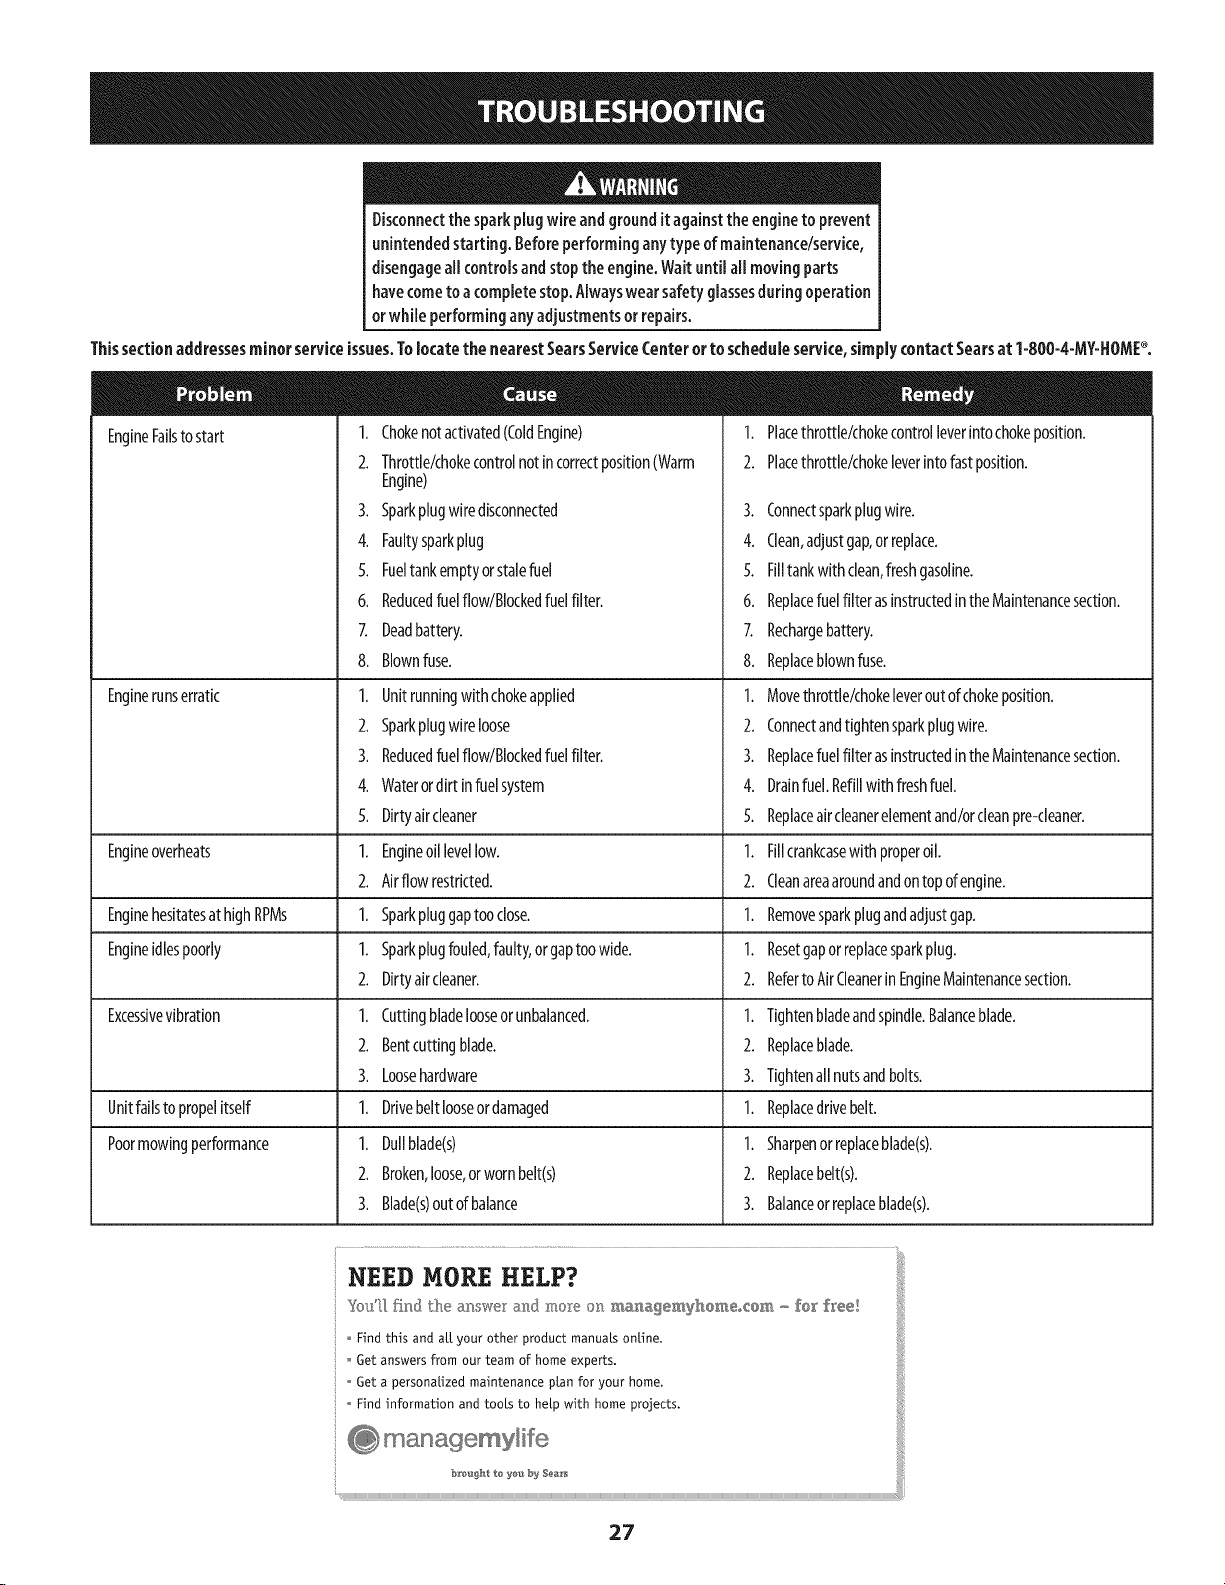
Disconnectthe sparkplugwireand grounditagainstthe engineto prevent
unintendedstarting. Beforeperforminganytypeof maintenance/service,
disengageall controlsandstopthe engine.Waituntil aHmovingparts
havecometo acompletestop.Alwayswearsafetyglassesduringoperation
orwhile performinganyadjustmentsorrepairs.
Thissectionaddressesminorserviceissues.Tolocatethe nearestSearsServiceCenterortoscheduleservice,simplycontactSearsat1-800-4-MY-HOME_.
EngineFailstostart
Enginerunserratic
Engineoverheats
EnginehesitatesathighRPMs
Engineidlespoorly
Excessivevibration
Unitfailstopropelitself
Poormowingperformance
1. Chokenotactivated(ColdEngine)
2. Throttle/chokecontrolnotincorrectposition(Warm
Engine)
3. Sparkplugwiredisconnected
4. Faultysparkplug
5. Fueltankemptyorstalefuel
6. Reducedfuelflow/Blockedfuelfilter.
7. Deadbattery.
8. Blownfuse.
1. Unitrunningwithchokeapplied
2. Sparkplugwireloose
3. Reducedfuelflow/Blockedfuelfilter.
4. Waterordirt infuelsystem
5. Dirtyaircleaner
1. Engineoil levellow.
2. Airflow restricted.
1. Sparkpluggaptooclose.
1. Sparkplugfouled,faulty,orgaptoowide.
2. Dirtyaircleaner.
1. Cuttingbladelooseorunbalanced.
2. Bentcuttingblade.
3. Loosehardware
1. Drivebeltlooseordamaged
1. Dullblade(s)
2. Broken,loose,orwornbelt(s)
3. Blade(s)outofbalance
1. Placethrottle/chokecontrolleverintochokeposition.
2. Placethrottle/chokeleverintofastposition.
3. Connectsparkplugwire.
4. Clean,adjustgap,orreplace.
5. Filltankwithclean,freshgasoline.
6. ReplacefuelfilterasinstructedintheMaintenancesection.
7. Rechargebattery.
8. Replaceblownfuse.
1. Movethrottle/chokeleveroutofchokeposition.
2. Connectandtightensparkplugwire.
3. ReplacefuelfilterasinstructedintheMaintenancesection.
4. Drainfuel.Refillwithfreshfuel.
5. Replaceaircleanerelementand/orcleanpre-cleaner.
1. Fillcrankcasewithproperoil.
2. Cleanareaaroundandontopofengine.
1. Removesparkplugandadjustgap.
1. Resetgaporreplacesparkplug.
2. RefertoAirCleanerinEngineMaintenancesection.
1. Tightenbladeandspindle.Balanceblade.
2. Replaceblade.
3. Tightenallnutsandbolts.
1. Replacedrivebelt.
1. Sharpenorreplaceblade(s).
2. Replacebelt(s).
3. Balanceorreplaceblade(s).
NEED MORE HELP?
t_c_lf_O,find the an_;we_and _o_e on _a_age_'_yho_e,,com_ _r f_ee!
Find this and aLtyour other product manuaLs online,
Get answers from our team of home experts.
Get a personaEzed maintenance pl.anfor your home.
Find information and tools to hel_pwith home projects.
rnanagemylifre
27
Page 28

Craftsman33-inchWide CutMower -- ModelNo.247.374880
_. 50 33
13_
7
5O
34
28
38i
76
28
Page 29

Craftsman33-in(h Wide CutMower -- Model No.247.374880
m
1
2
3
4
5
6
7
8
9
10
II
12
13
14
15
16
17
18
19
2O
21
22
23
24
25
26
27
28
29
3O
31
32
33
34
35
36
37
38
39
4O
41
687-02427
687-02426
710-0572
710-0599
710-0606
712-04063
912-0442
720-0274
720-04072A
736-0270
938-0140
938-1226
946-04609
946-04606
946-04610
946-04604
946-04608
749-04330-0637
749-04331-0637
749-04332-0637
749-04333-0637
787-01548-0691
787-01490A-0637
787-01491A-0637
687-02591-0691
687-02263-0691
687-02419-0637
687-02265-0637
710-0627
925-1649
710-04312
712-04065
914-0145
720-0311
931-05684
731-05791
732-04418A
736-0242
736-0343
936-0351
937-3000
738-04216A
Lever Assembly - LH
Lever Assembly - RH
Screw, Carriage, 5/16-18 x 2.25
Screw, 1/4-20 x 0.500
Screw, Cap, 1/4-20 x 1.50
Nut, Flange Lock, 5/16-18
Nut, Lock Cap, 1/4-20
Grip, 1.0 ID x 5.0 Lg
Star Knob, 5/16-18
Washer, Bell, .265 x .75 x .062
Screw, Shoulder, .435 x .178-5/16
Screw, Shoulder, .375 x 1.355, 1/4-20
Cable, Clutch Wheel
Cable, Brake, Transmission - RH
Cable, Clutch Deck
Cable, Throttle/Choke, 38 x 1.1
Cable, Brake, Transmission - LH
Lower Handle
Upper Handle - LH
Upper Handle - RH
Brace Tube
Handle Panel
Cable Mount Bracket- RH
Cable Mount Bracket- LH
Frame Assembly
Caster Wheel Bracket Assembly
Deck Lift Assembly, RR
Deck Lift Assembly, Front
Screw, HH Cap, 5/16-24 x .750
Lamp Socket
Screw, HH Cap, 5/16-18 x .50
Nut, Flange Lock, 3/8-16
Click Pin, .092 x 1.64
Handle Grip
Belt Cover
Snap Spacer, .63 ID x .75 LG
Deck Height Lever
Washer, Bell, .340 x .872 x .060
Washer, Flat, .330 x 1.25 x .120
Washer, Flat, .760 ID x 1.50 OD
Lube Fitting, 3/16
Bolt, Shoulder, .625 x 2.515 x 3/8-16
42
43
44
45
46
47
48
49
5O
51
52
53
54
55
56
57
58
59
6O
61
62
63
64
65
66
67
68
69
7O
71
72
73
74
75
76
77
78
79
8O
741-0660A
787-01496-0691
787-01510-0637
787-01521-0637
710-0604A
738-04282
951-04322
951-12182
787-01507-0691
734-04243
710-05283
710-0136
712-3006
931-04339A
931-06935A
725-0157
710-0642
710-1007
787-01932-0691
712-04064
936-0463
925-04022B
925-1741
725-04439
751-3013
731-05319
787-02009
941-0706
751-10349
726-0205
951-10517A
751-3141-14
735-04081
925-1745A
710-0896
925-1629
777X41805
751-12118
751-12089
725-04478t
925-05237t
712-0266At
Flange Bearing, .760 x .941 x 1.0
Height Adjustment Bracket
Link Pivot Bracket
Lever Pivot Bracket
Screw, TT, 5/16-18 x .625
Screw, Shoulder, .32 x 1.8 x 1/4-20
Fuel Tank, 2 Gal.
Fuel Cap
Fuel Tank Mounting Bracket
Wheel, 8 x 1.75
Screw, TT, 3/8-16 x 2.25
Screw, HH Cap, 1/4-20 x 1.75
Nut, Hex, 1/4-20
Handle Panel
Tank Cover
Cable Tie
Screw, TT, 1/4-20 x .75
Screw, TT, 3/8-16 x 1.5
Engine Mounting Plate
Nut, Flange Lock, 1/4-20
Washer, Flat, .25 x .63 x .0515
Hour Indicator Meter
Key Switch
Solenoid, 12V
Fuel Filter
Lens
Shift Adjust Plate
Flange Bearing w/Fitting
Fuel Hose
Hose Clamp
Oil Drain
Oil Drain Hose
Rubber Gromet
Key, Ignition, Black
Screw, 1/4-20 x 1.75
Lamp
Label Reflector
Rollover Valve
Vent Hose
Starter Wire
Wiring Harness
Nut, Jam Lock (Ground Wire)
± Not pictured
29
Page 30

Craftsman33-inchWide CutMower -- Model No.247.374880
73
1
74
............ 13__
76
13
12
10
26
4
34
14
60
69
21
28
72
55
51
42 54
47
3O
Page 31
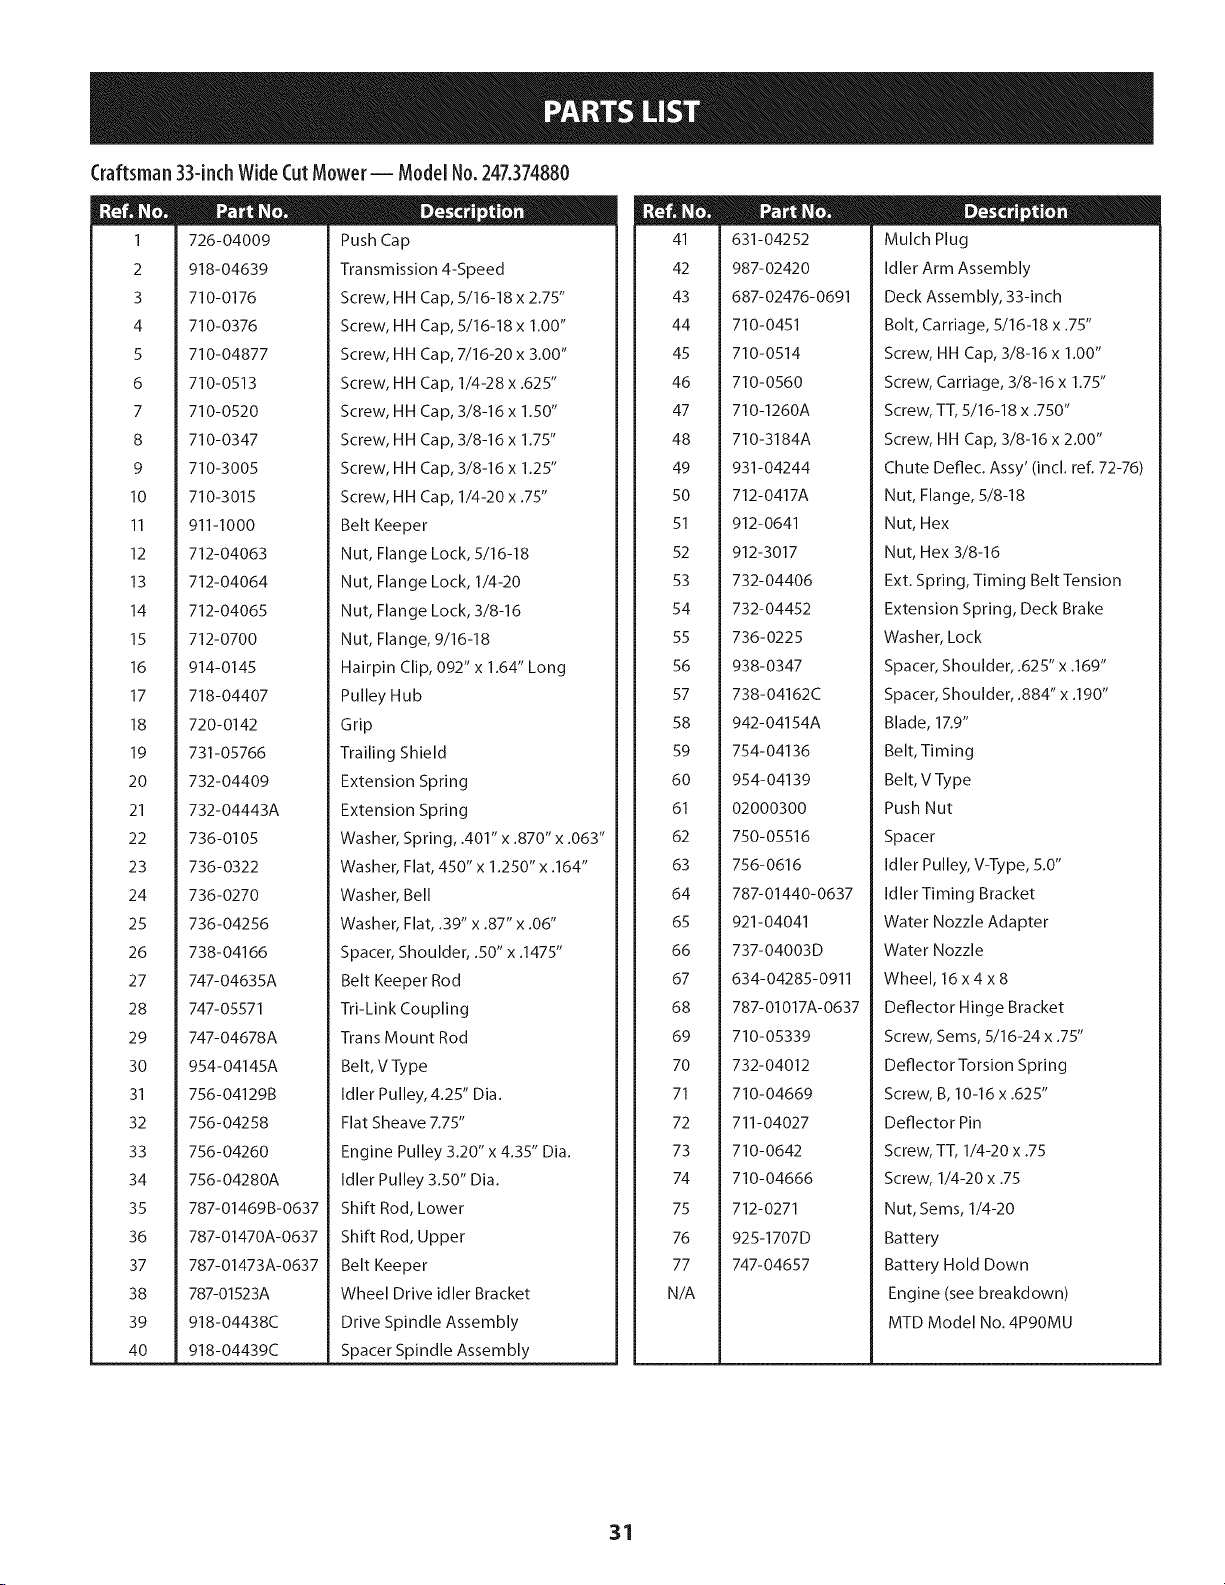
Craftsman
33-inchWideCutMower-- ModelNo.247.374880
38
39
4O
26
27
28
29
3O
31
32
33
34
35
36
37
1
2
3
4
5
6
7
8
9
10
11
12
13
14
15
16
17
18
19
20
21
22
23
24
25
726-04009
918-04639
710-0176
710-0376
710-04877
710-0513
710-0520
710-0347
710-3005
710-3015
911-1000
712-04063
712-04064
712-04065
712-0700
914-0145
718-04407
720-0142
731-05766
732-04409
732-04443A
736-0105
736-0322
736-0270
736-04256
738-04166
747-04635A
747-05571
747-04678A
954-04145A
756-04129B
756-04258
756-04260
756-04280A
787-014698-0637
787-01470A-0637
787-01473A-0637
787-01523A
918-04438C
918-04439C
D- o o
Push Cap
Transmission 4-Speed
Screw, HH Cap, 5/16-18 x 2.75"
Screw, HH Cap, 5/16-18 x 1.00"
Screw, HH Cap, 7/16-20 x 3.00"
Screw, HH Cap, 1/4-28 x .625"
Screw, HH Cap, 3/8-16 x 1.50"
Screw, HH Cap, 3/8-16 x 1.75"
Screw, HH Cap, 3/8-16 x 1.25"
Screw, HH Cap, 1/4-20 x .75"
Belt Keeper
Nut, Flange Lock, 5/16-18
Nut, Flange Lock, 1/4-20
Nut, Flange Lock, 3/8-16
Nut, Flange, 9/16-18
Hairpin Clip, 092" x 1.64" Long
Pulley Hub
Grip
Trailing Shield
Extension Spring
Extension Spring
Washer, Spring, .401" x .870" x .063"
Washer, Flat, 450" x 1.250" x .164"
Washer, Bell
Washer, Flat, .39" x .87" x .06"
Spacer, Shoulder, .50" x .1475"
Belt Keeper Rod
Tri-Link Coupling
Trans Mount Rod
Belt, V Type
Idler Pulley, 4.25" Dia.
Flat Sheave 7.75"
Engine Pulley 3.20" x 4.35" Dia.
Idler Pulley 3.50" Dia.
Shift Rod, Lower
Shift Rod, Upper
Belt Keeper
Wheel Drive idler Bracket
Drive Spindle Assembly
Spacer Spindle Assembly
72
73
74
75
76
77
N/A
64
65
66
67
68
69
70
71
41
42
43
44
45
46
47
48
49
50
51
52
53
54
55
56
57
58
59
6O
61
62
63
631-04252
987-02420
687-02476-0691
710-0451
710-0514
710-0560
710-1260A
710-3184A
931-04244
712-0417A
912-0641
912-3017
732-04406
732-04452
736-0225
938-0347
738-04162C
942-04154A
754-04136
954-04139
02000300
750-05516
756-0616
787-01440-0637
921-04041
737-04003D
634-04285-0911
787-01017A-0637
710-05339
732-04012
710-04669
711-04027
710-0642
710-04666
712-0271
925-1707D
747-04657
D- _ o I
Mulch Plug
Idler Arm Assembly
Deck Assembly, 33-inch
Bolt, Carriage, 5/16-18 x .75"
Screw, HH Cap, 3/8-16 x 1.00"
Screw, Carriage, 3/8-16 x 1.75"
Screw,TT,5/16-18 x .750"
Screw, HH Cap, 3/8-16 x 2.00"
Chute Deflec. Assy' (incl. ref. 72-76)
Nut, Flange, 5/8-18
Nut, Hex
Nut, Hex 3/8-16
Ext. Spring, Timing Belt Tension
Extension Spring, Deck Brake
Washer, Lock
Spacer, Shoulder, .625" x .169"
Spacer, Shoulder, .884" x .190"
Blade, 17.9"
Belt, Timing
Belt, V Type
Push Nut
Spacer
Idler Pulley, V-Type, 5.0"
Idler Timing Bracket
Water Nozzle Adapter
Water Nozzle
Wheel, 16 x 4 x 8
Deflector Hinge Bracket
Screw, Seres, 5/16-24 x .75"
Deflector Torsion Spring
Screw,B,10-16 x .625"
Deflector Pin
Screw, TT, 1/4-20 x .75
Screw, 1/4-20 x .75
Nut, Seres, 1/4-20
Battery
Battery Hold Down
Engine (see breakdown)
MTD Model No. 4P9OMU
31
Page 32
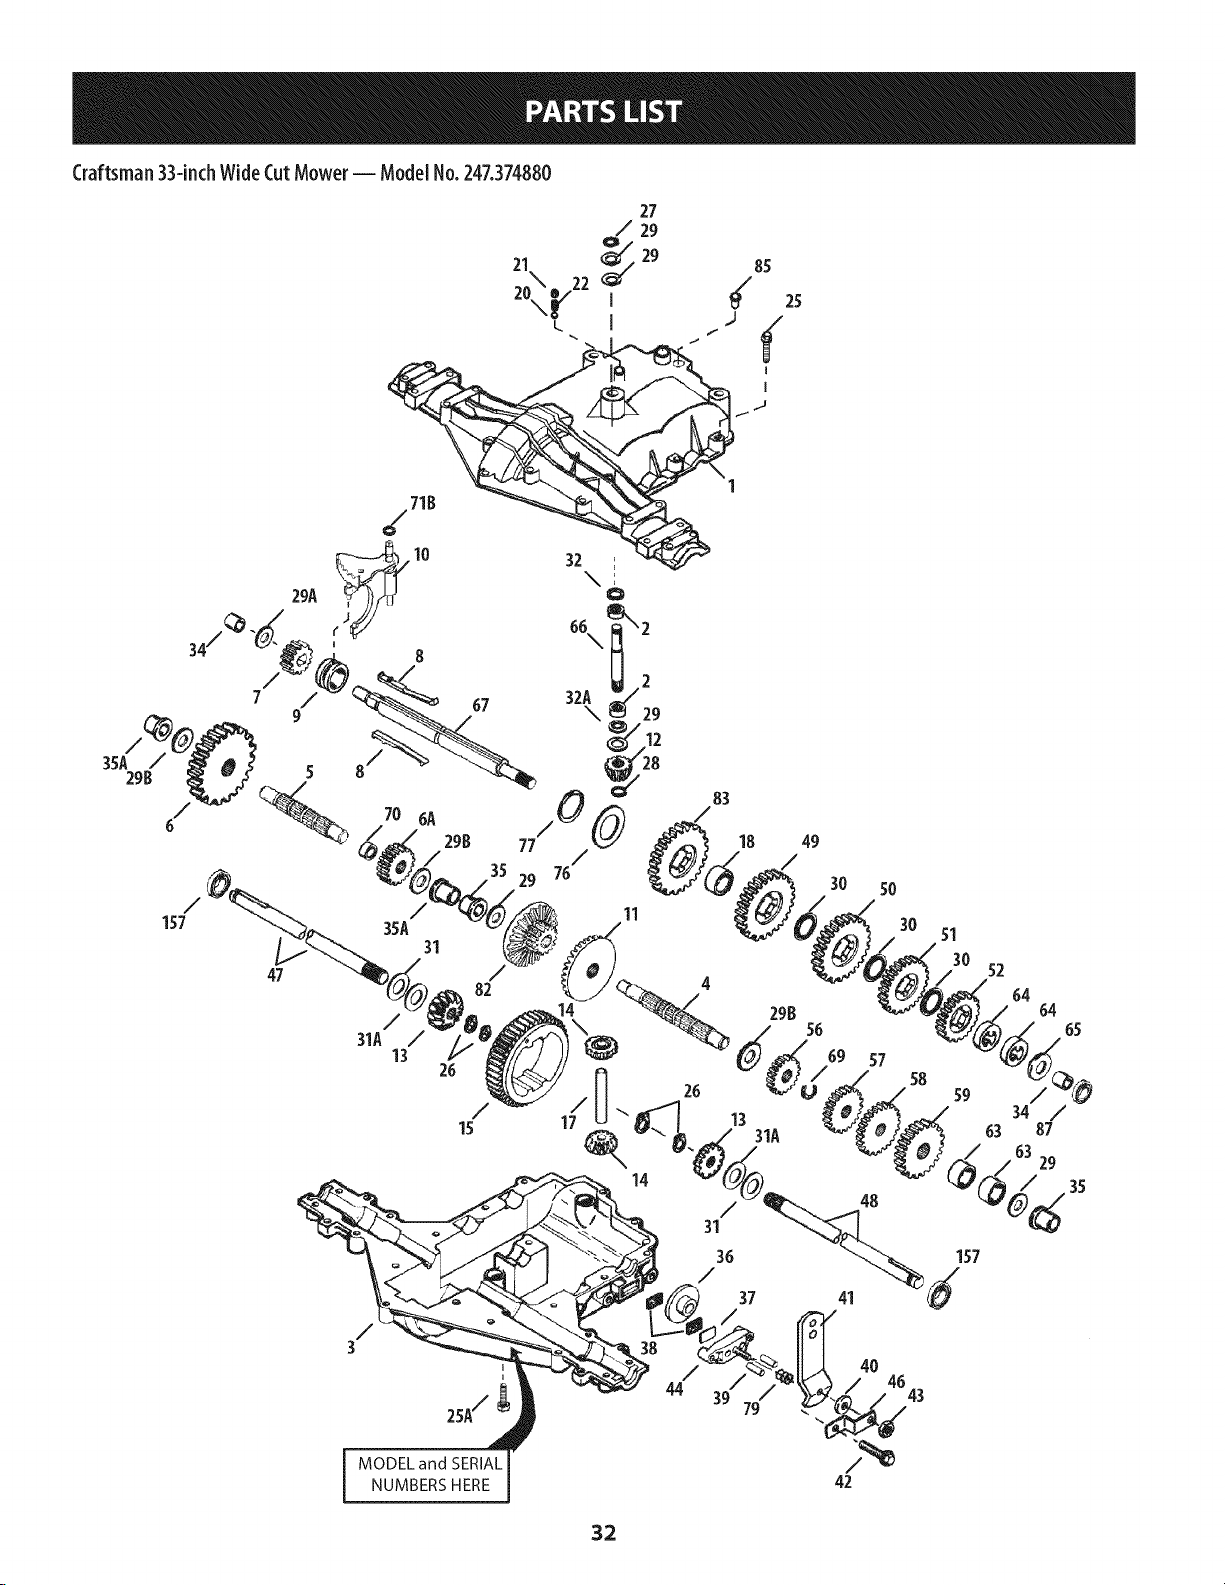
Craftsman33-inchWideCutMower-- ModelNo.247.374880
157
/
35A
31
47 /
/
31A /
13
/
3
82
26
14
83
26
/
44 39
18
37
29B
49
56
41
48
4O
57
5O
46
30
58
43
51
52
64
64
65
s9 /
34 /
63 87
/ 632_
157
MODEL and SERIAL
NUMBERS HERE
42
32
Page 33

Craftsman33-in(h Wide CutMower -- Model No.247.374880
TC-772147 Transaxle Cover
2 TC-780086A Needle Bearing
3 TC-770128A Transaxle Case
4 TC-776395 Countershaft
5 TC-776409 Output Shaft
6 TC-778364 Spur Gear (38T-PM/SER)
6A TC-778369 Spur Gear (15T-PM/SER)
7 TC-778330 Spur Gear (11T-PM/SER)
8 TC-792180A Shift Key Set (Qty. 2)
9 TC-784352 Shift Collar
10 TC-784378 Shift Rod & Fork Assembly
11 TC-778334 Bevel Gear (30T-PM)
12 TC-778309 Input Bevel Pinion (13T-PM)
13 TC-778368 Bevel Gear 13T (Incl. ref. 13 & 14)
14 TC-778368 Bevel Gear 13T (Incl. ref. 13 & 14)
15 TC-778370 Ring Gear (43T)
17 TC-786188 Drive Pin
18 TC-786102 Spacer (1.130" x .695")
20 TC-792077A Ball (Stainless Steel 5/16" dia.)
21 TC-792211 Screw, 3/8-16 x 3/8"
22 TC-792079 Spring
25 TC-792073A Screw, 1/4-20 x 1-1/4"
25A TC-792177 Screw, 1/4-20 x 1-3/8"
26 TC-792125 Retaining Ring-package of 2
27 TC-792035 Retaining Ring
28 TC-788040 Retaining Ring
29 TC-780072 Washer .627" ID .031"
29A TC-780160 Thrust Washer (.563" ID x .031")
29B TC-780051 Thrust Washer (.762" ID X .031")
30 TC-780108 Shift Washer (Cupped)
31 TC-780001 Washer .750" ID .56"
31A TC-780195 Washer .750" ID .062
32 TC-788083 Oil Seal 5/8"
32A TC-792001 O Ring (.823" OD)
34 TC-780194 Bushing (.563")
35 TC-780193 Flanged Bushing (.625" ID)
35A TC-780197 Flanged Bushing (.751" ID)
TC-790075 Brake Disk
37 TC-790007 Brake Pad Plate
38 TC-799021A Brake Pad (pkg. of 2)
39 TC-786026 Dowel Pin .3125" x .750"
40 736-3078 Washer .312" ID .059"
41 TC-790104 Brake Lever
42 TC-792177 Screw 1/4-20 x 1-3/8"
43 912-0237 Lock Nut 5/16-24
44 TC-790025 Brake Pad Holder
46 TC-786086 Bracket
47 TC-775146 Axle (10.719" long) (Incl. 26)
48 TC-775147 Axle (15.312" long) (Incl. 26)
49 TC-778338 Spur Gear (27T-PM/IC)
50 TC-778342 Spur Gear (22T-PM/IC)
51 TC-778313 Spur Gear (19T-PM/IC)
52 TC-778350 Spur Gear (16T-PM/IC)
56 TC-778337 Spur Gear (13T-PM/SER)
57 TC-778341 Spur Gear (18T-PM/SER)
58 TC-778351 Spur Gear (21T-PM/SER)
59 TC-778349 Spur Gear (24T-PM/SER)
63 TC-786071 Countershaft Spacer 1-1/8" x 3/8"
64 TC-786072 Brake Shaft Spacer 1-3/8" x 3/8"
65 TC-780189 Washer .563" ID .062
66 TC-776472 Input Shaft
67 TC-776396 Brake Shaft
69 TC-792170 Retaining Ring (.75" x .042")
70 TC-786187 Spacer (.890")
71B TC-788092 O-Ring
76 TC-780090 Flat Washer (1.128" ID x .058")
77 TC-788078A Retaining Ring (1.125" x .050")
79 TC-792144 Spring
82 TC-778333 Bevel (30T) & Spur Gear
83 TC-778338 Spur Gear (27T-PM/IC)
85 TC-792154 Oil Fill Plug
87 TC-788089A Oil Seal 9/16" ID
157 TC-788088A Oil Seal 3/4" ID
33
Page 34
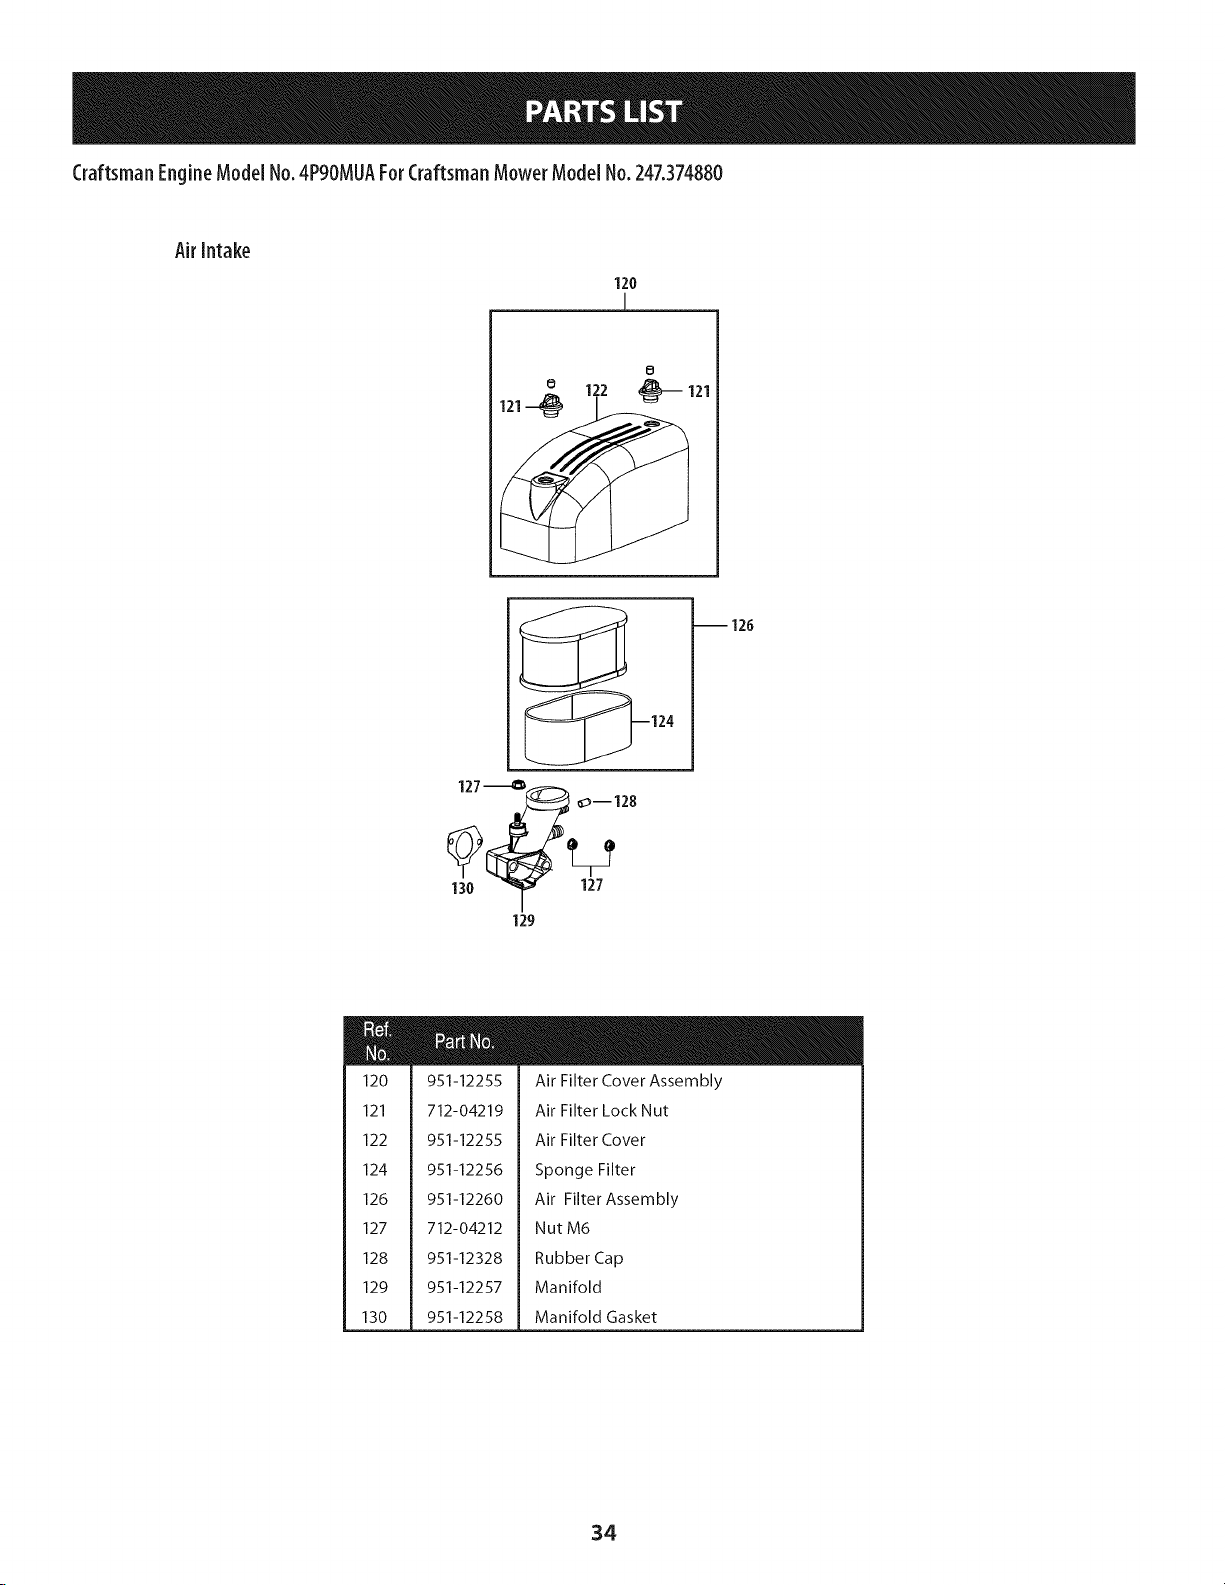
CraftsmanEngineModelNo.4PgOMUA ForCraftsmanMower ModelNo.247.374880
Air intake
120
]
0
_124
127_.L_ o--128
130 __ 127
129
0
-- 126
m
m
120
121
122
124
126
127
128
129
130
951-12255
712-04219
951-12255
951-12256
951-12260
712-04212
951-12328
951-12257
951-12258
Air Filter Cover Assembly
Air Filter Lock Nut
Air Filter Cover
Sponge Filter
Air Filter Assembly
Nut M6
Rubber Cap
Manifold
Manifold Gasket
34
Page 35
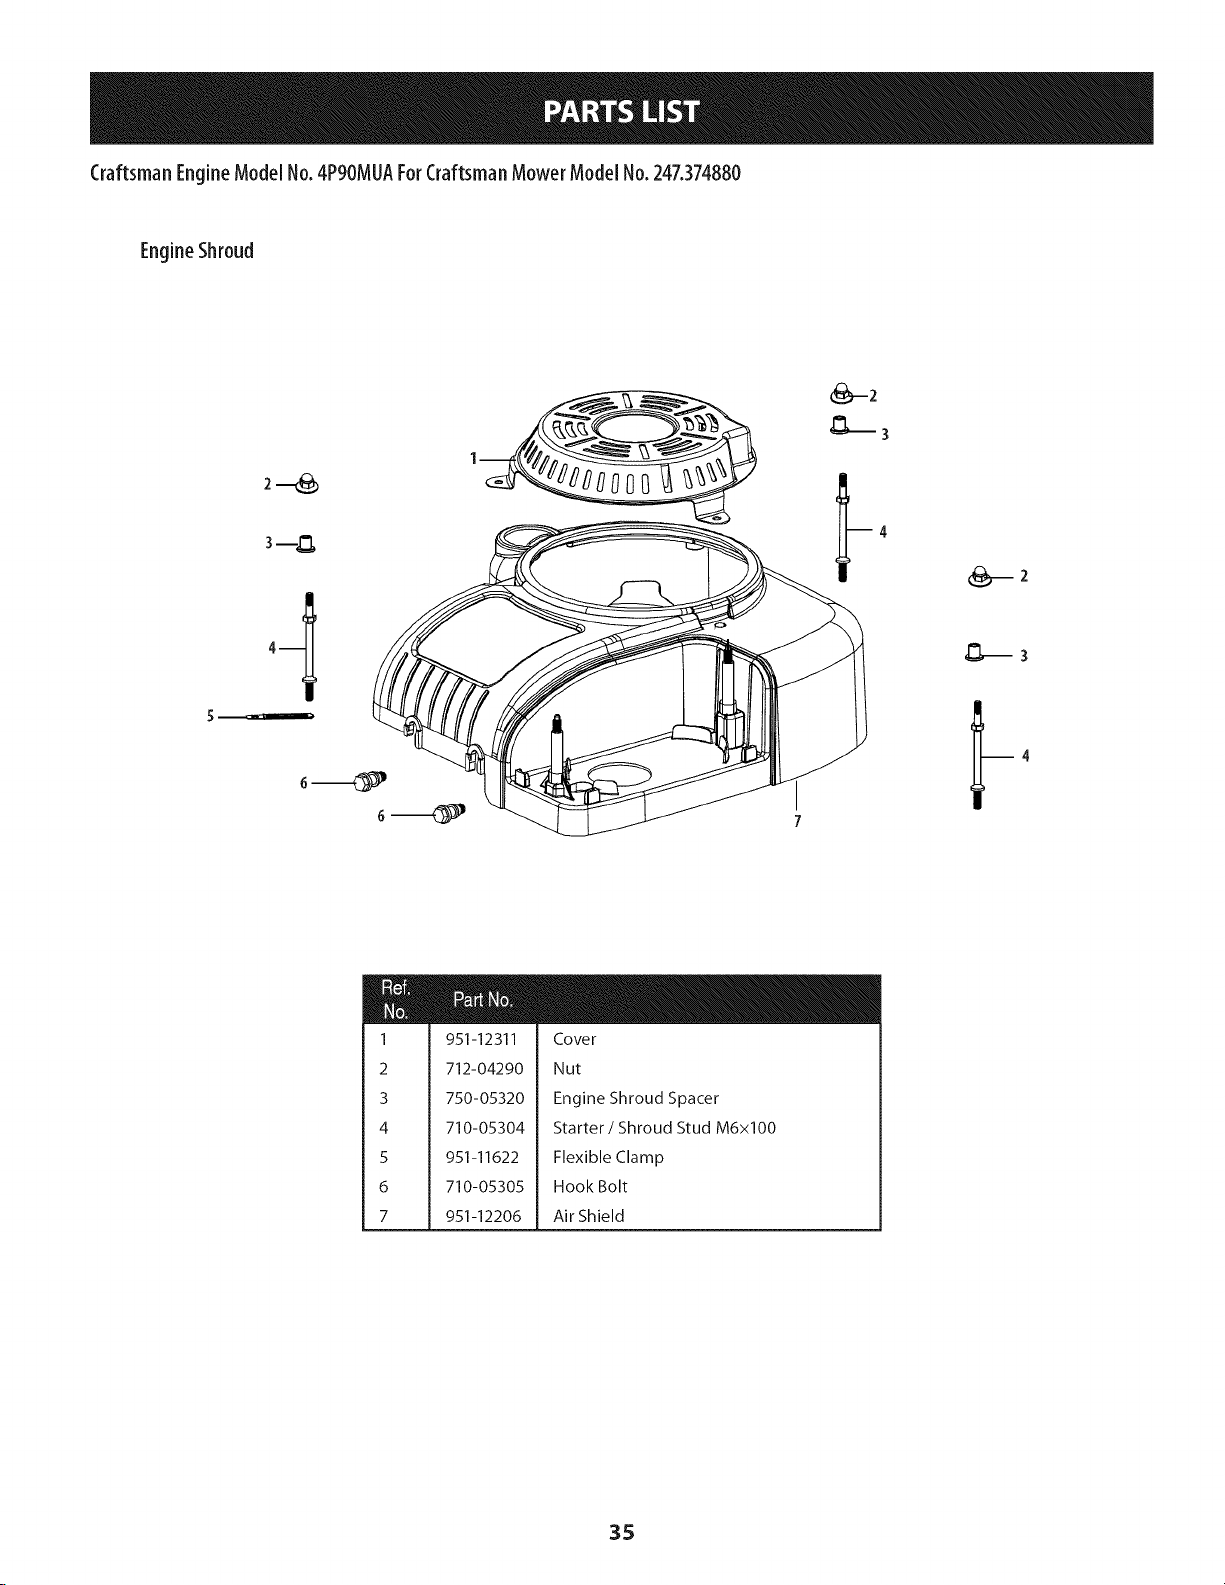
CraftsmanEngineModelNo.4PgOMUA ForCraftsmanMower ModelNo.247.374880
EngineShroud
(_-_ 2
m
m
7
m
I
2
3
4
5
6
7
951-12311
712-04290
750-05320
710-05304
951-11622
710-05305
951-12206
Cover
Nut
Engine Shroud Spacer
Starter/Shroud Stud M6xlO0
Flexible Clamp
Hook Bolt
Air Shield
35
Page 36

CraftsmanEngineModelNo.4PgOMUAForCraftsmanMowerModelNo.247.374880
Crankcase
196-GasketKit-Complete
197-GasketKit-External
198-CornpJeteEngine
189
_Z_I-49
_-so
s1_
_--s3
_47
18S_ _ 74
67
7O
36
Page 37

CraftsmanEngineModelNo.4P9OMUA ForCraftsmanMower ModelNo.247.374880
m
M
47
48
49
60
62
63
64
65
66
67
68
50
51
52
53
54
55
56
57
58
59
951-11499
710-04916
751-12770
951-12226
951-12685
951-12227
951-12686
951-12228
951-12229
736-04558
714-04074
951-11574
951-12230
951-12231
951-12232
710-04908
712-04212
951-12233
710-04979
710-05310
951-12234
Upper Crankshaft Seal
Bolt M6x14
Breather Cover Plate
Breather Gasket
Umbrella Valve
Mesh Screen
Umbrella Valve Seat
Choke Linkage
Governor Arm Shaft
Governor Washer
Governor Cotter Pin
Governor Seal
Throttle Linkage
Throttle Linkage Spring
Governor Arm
Governor Arm Bolt
Governor Arm Nut M6
Governor Spring
Bolt M6x18
Bolt M6x38
Throttle Control Bracket
m
M
69
70
72
73
74
178
183
184
185
186
189
196
197
198
750-05530 Component Bracket Spacer
951-12235 Breather Hose Assembly
951-12236 Breather Hose Clamp
751-12200A Short Block Assembly
951-12237 Crankcase Cover Gasket
951-12275 Piston Ring Set
951-11953 Piston Pin Snap Ring
951-12276 Piston
951-11954 Piston Pin
951-12277 Connecting Rod Assembly
710-05319 Connecting Rod Bolt
951-12204 Gasket Kit - Complete
951-12201 Gasket Kit- External
952z4Pg0MU Complete Engine
(Incl.37,47-53,55-58,73-77,84,86-89,
91-93,98-104,112,113,115-119,137,138,
144,160,172,176,175-178,183-186)
(Incl.47,50,58,74,113,118,130,
136-138,144,160,166)
(Inc1.113,130,136-138,144,160)
37
Page 38

CraftsmanEngineModelNo.4P9OMUA ForCraftsmanMower ModelNo.247.374880
StarterAssembly
9
8
I
11--_ II _--11
12--_.._ =-12
36 34
35
2S@ I
25---o
24--! \_
24
25
J=
10
11 ,=--12
37
A
_--_=
m
M
8
9
I0
II
12
13
14
15
16
17
18
19
21
710-05306
951-12207
710-05307
736-04554
736-04556
951-12208
951-12211
951-12210
951-12312
951-12209
951-12212
951-12214
951-12216
Bolt M8x40
Sta rter Assembly
Screw MSx25
Lock Washer
Plain Washer
Electrical Starter Front Cover
Bearing
Pinion/Clutch Assembly
Gear
Bearing
Pinion Cover
Bearing 6001Zz
Bearing
38
m
m
23
24
25
28
29
30
31
33
34
35
36
37
m
951-12528
951-12217
736-04554
951-12529
951-12219
710-05308
951-12324
736-04555
736-04556
736-04477
712-04212
715-04120
Starter Housing Assembly
Screw
Lock Washer
Brush Assembly
Electrical Starter Back Cover
Bolt M6xl00
Bolt M6x30 Assembly
Insulation Washer
Plain Washer
Lock Washer
NutM6
Dowel Pin 10x14
Page 39
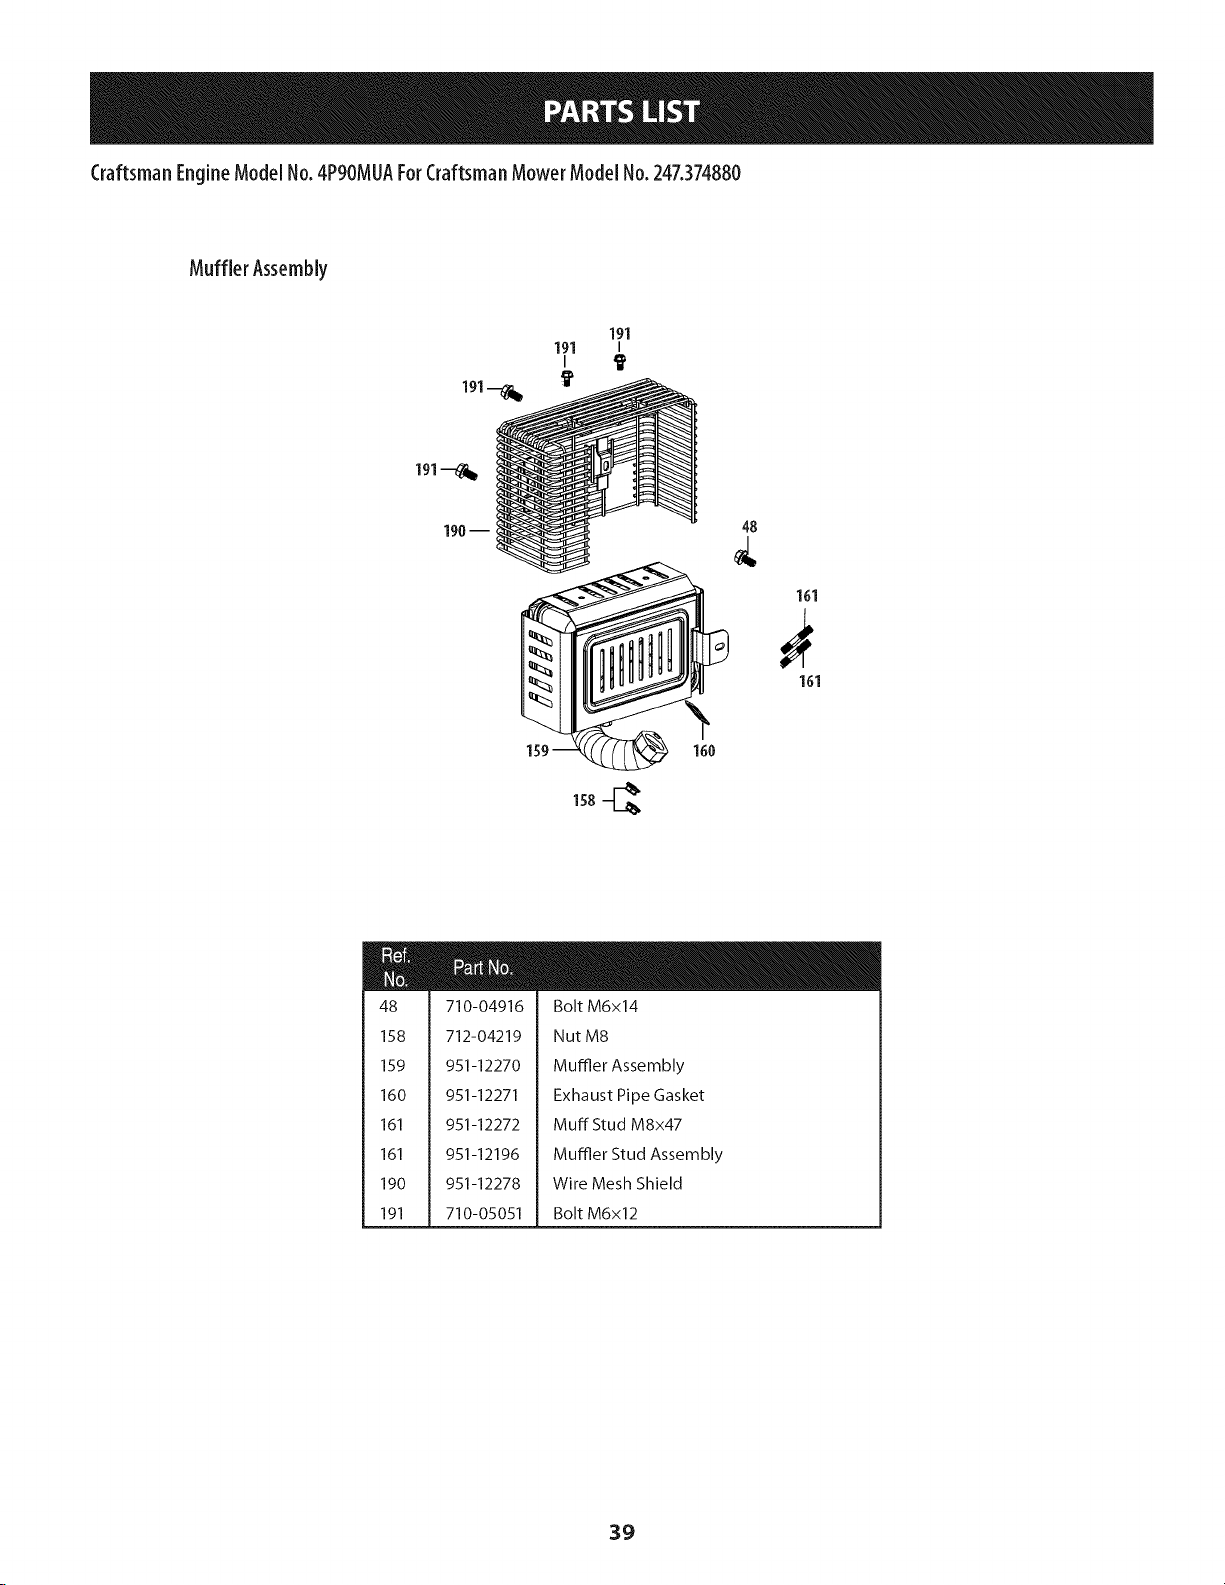
CraftsmanEngineModelNo.4PgOMUA ForCraftsmanMower ModelNo.247.374880
MufflerAssembly
190--
m
48
161
161
m
48
158
159
160
161
161
190
191
710-04916
712-04219
951-12270
951-12271
951-12272
951-12196
951-12278
710-05051
Bolt M6x14
NutM8
MuFfler Assembly
Exhaust Pipe Gasket
Muff Stud M8x47
Muffler Stud Assembly
Wire Mesh Shield
Bolt M6x12
39
Page 40
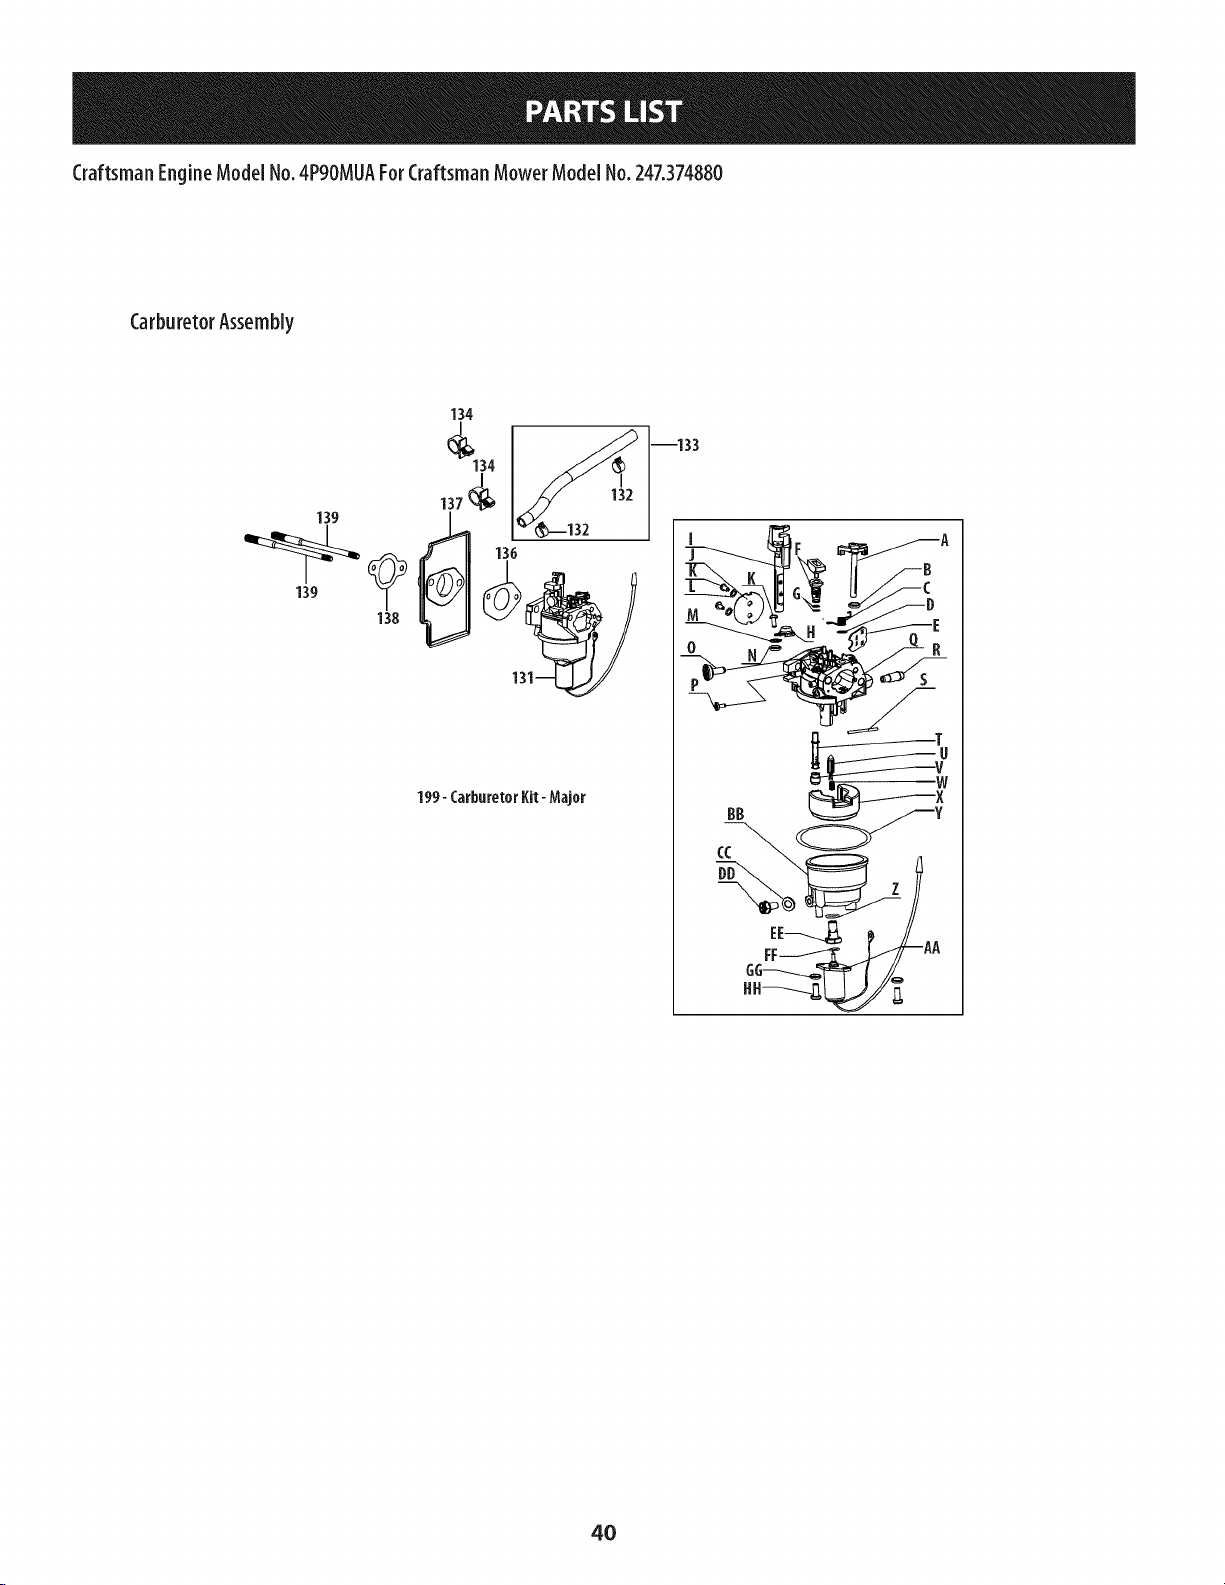
CraftsmanEngineModelNo.4PgOMUA ForCraftsmanMower ModelNo.247.374880
CarburetorAssembly
--133
o _ __
F A
199-CarburetorKit- Major
4O
Page 41
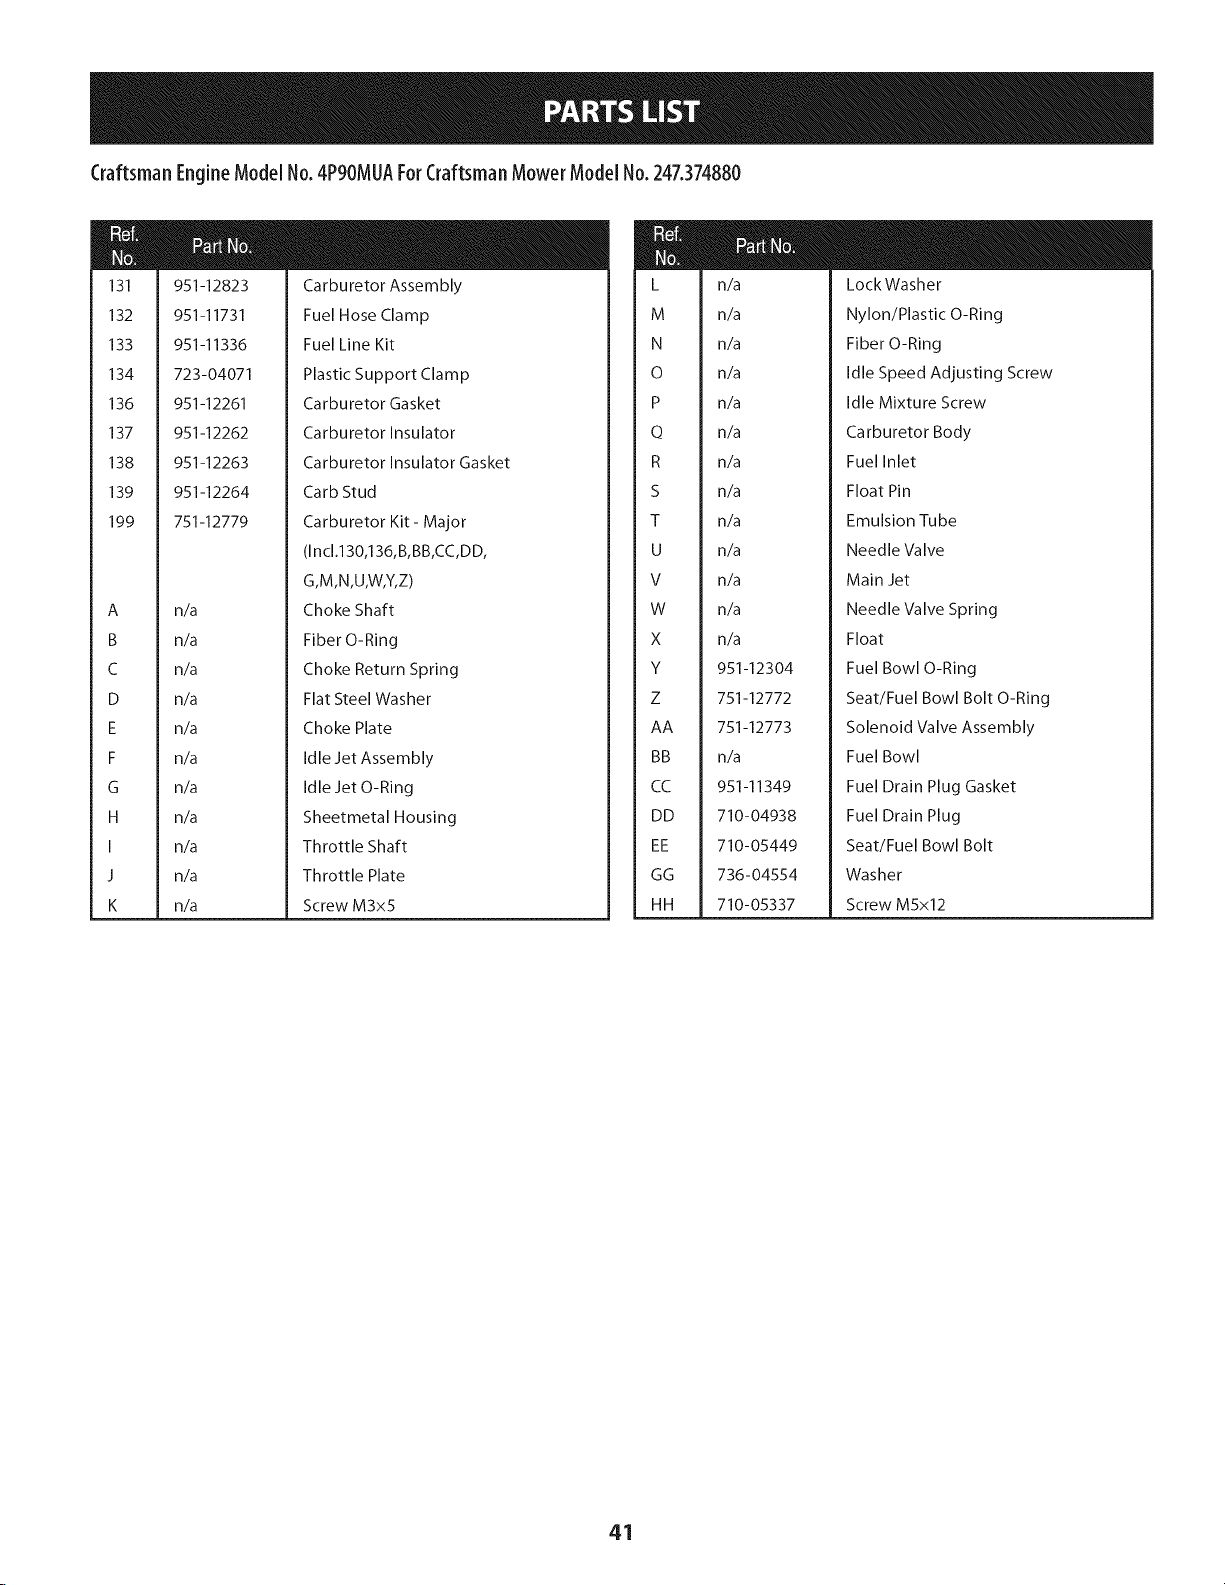
CraftsmanEngineModelNo.4P9OMUA ForCraftsmanMower ModelNo.247.374880
m
M
131
132
133
134
136
137
138
139
199
A
B
C
D
E
F
G
H
I
J
K
m
951-12823
951-11731
951-11336
723-04071
951-12261
951-12262
951-12263
951-12264
751-12779
n/a
n/a
n/a
n/a
n/a
n/a
n/a
n/a
n/a
n/a
n/a
Carburetor Assembly
Fuel Hose Clamp
Fuel Line Kit
Plastic Support Clamp
Carburetor Gasket
Carburetor Insulator
Carburetor Insulator Gasket
Carb Stud
Carburetor Kit - Major
(IncI.130,136,B, BB,CC,DD,
G,M,N,U,W,Y,Z)
Choke Shaft
Fiber O-Ring
Choke Return Spring
Flat Steel Washer
Choke Plate
Idle Jet Assembly
Idle Jet O-Ring
Sheetmetal Housing
Throttle Shaft
Throttle Plate
Screw M3x5
m
M
L
M
N
0
P
Q
R
S
T
U
V
W
X
Y
Z
AA
BB
CC
DD
EE
GG
HH
n_
n_
n_
n_
n_
n_
n_
n_
n_
n_
n_
n_
n_
951-12304
751-12772
751-12773
n_
951-11349
710-04938
710-05449
736-04554
710-05337
LockWasher
Nylon/Plastic O-Ring
Fiber O-Ring
Idle Speed Adjusting Screw
Idle Mixture Screw
Carburetor Body
Fuel Inlet
Float Pin
Emulsion Tube
Needle Valve
Main Jet
Needle Valve Spring
Float
Fuel Bowl O-Ring
Seat/Fuel Bowl Bolt O-Ring
Solenoid Valve Assembly
Fuel Bowl
Fuel Drain Plug Gasket
Fuel Drain Plug
Seat/Fuel Bowl Bolt
Washer
Screw M5x12
41
Page 42

CraftsmanEngineModelNo.4PgOMUA ForCraftsmanMower ModelNo.247.374880
Crankshaft& CrankcaseCover
76--_
--7S
79_ -8,
84--6
117_i
116
F
117
104
0--86
102 103
114
I
117
42
Page 43
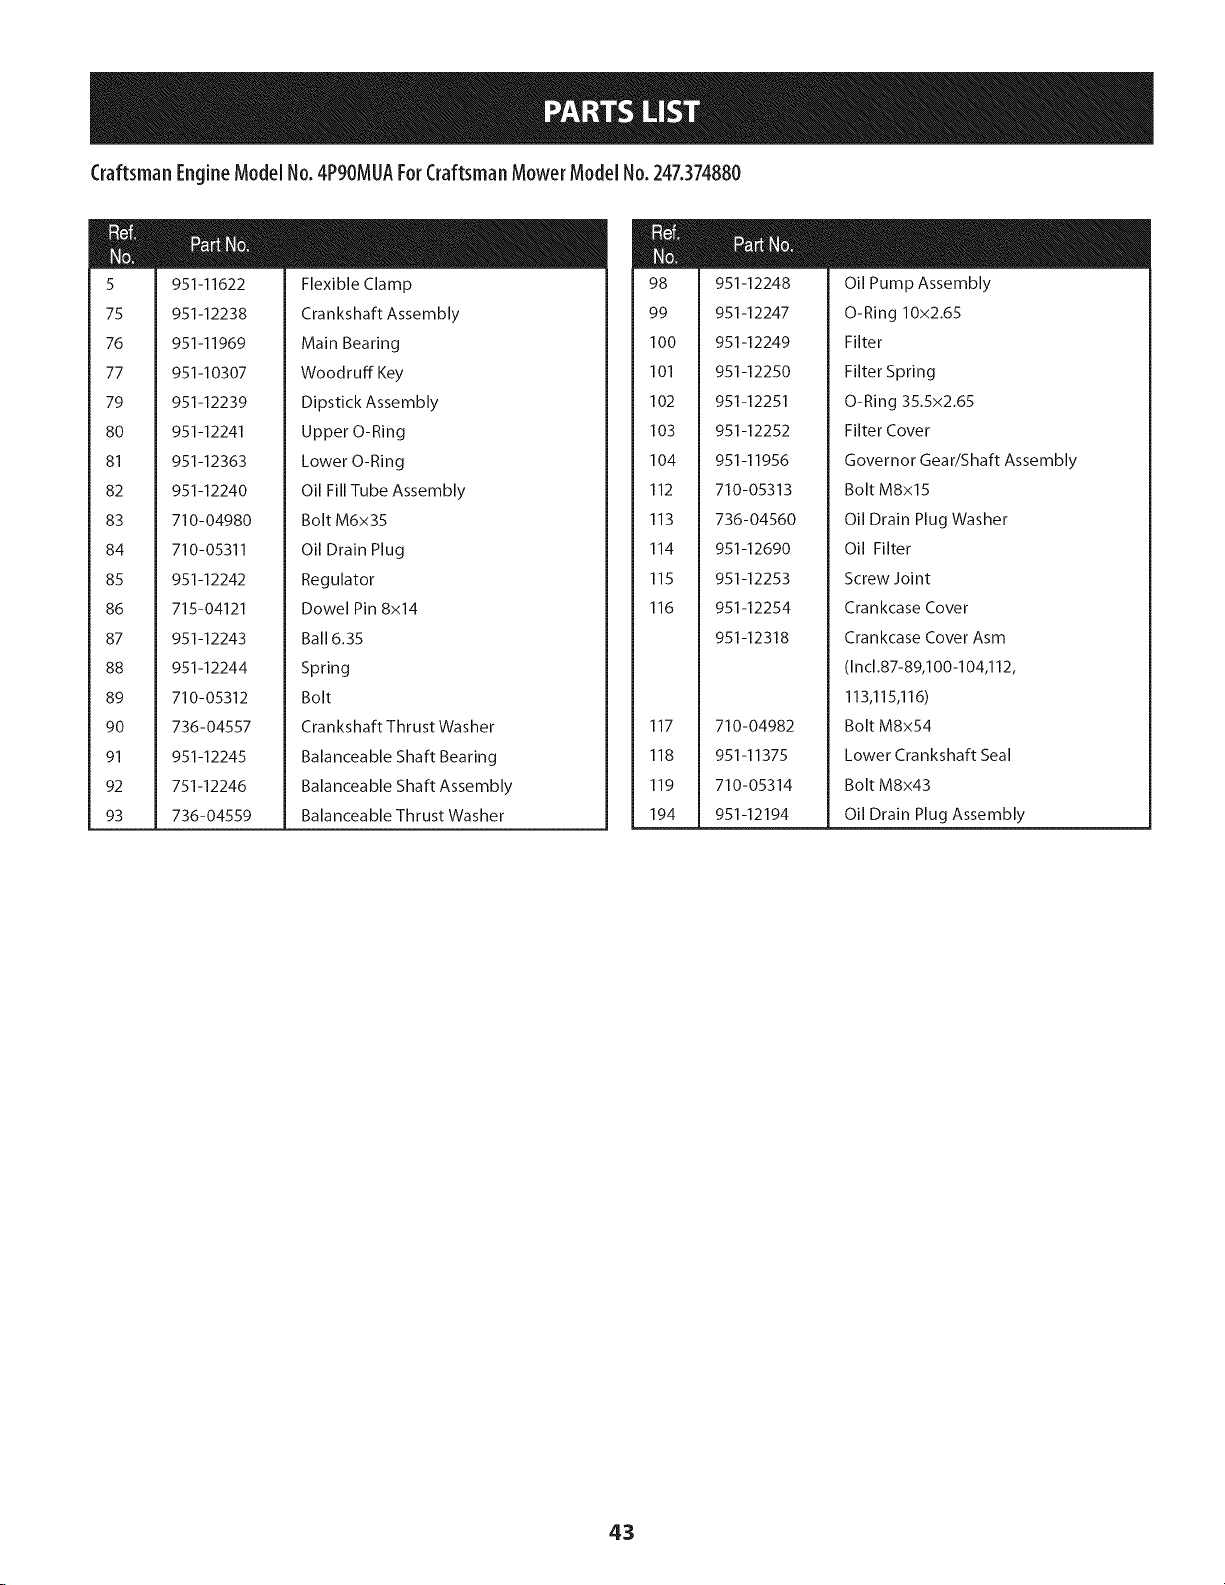
CraftsmanEngineModelNo.4PgOMUA ForCraftsmanMower ModelNo.247.374880
m
m
5
75
76
77
79
8O
81
82
83
84
85
86
87
88
89
9O
91
92
93
951-11622
951-12238
951-11969
951-10307
951-12239
951-12241
951-12363
951-12240
710-04980
710-05311
951-12242
715-04121
951-12243
951-12244
710-05312
736-04557
951-12245
751-12246
736-04559
Flexible Clamp
Crankshaft Assembly
Main Bearing
Woodruff Key
Dipstick Assembly
Upper O-Ring
Lower O-Ring
Oil Fill Tube Assembly
Bolt M6x35
Oil Drain Plug
Regulator
Dowel Pin 8x14
Ball 6.35
Spring
Bolt
Crankshaft Thrust Washer
Balanceable Shaft Bearing
Balanceable Shaft Assembly
Balanceable Thrust Washer
m
m
98
99
100
101
102
103
104
112
113
114
115
116
117
118
119
194
m
951-12248
951-12247
951-12249
951-12250
951-12251
951-12252
951-11956
710-05313
736-04560
951-12690
951-12253
951-12254
951-12318
710-04982
951-11375
710-05314
951-12194
Oil Pump Assembly
O-Ring 10x2.65
Filter
Filter Spring
O-Ring 35.5x2.65
Filter Cover
Governor Gear/Shaft Assembly
Bolt M8xl 5
Oil Drain Plug Washer
Oil Filter
Screw Joint
Crankcase Cover
Crankcase Cover Asm
(Incl.87-89,100-104,112,
113,115,116)
Bolt M8x54
Lower Crankshaft Seal
Bolt M8x43
Oil Drain Plug Assembly
43
Page 44

CraftsmanEngineModelNo.4PgOMUA ForCraftsmanMower ModelNo.247.374880
CylinderHead
173
(_ 175
174 _)
154 157
152_ _153 _ _--'_'_(_)
I 157 164
153 155
1_ 147 148 149
147 148 149
I
145
195
142
143 [_
174
175
162
=_ 173
163
150
192--_)
I
193
I
OPTIONAL
169
142
t
142
142
14o
141
_--14o
44
Page 45

CraftsmanEngineModelNo.4PgOMUA ForCraftsmanMower ModelNo.247.374880
m
M
140
141
142
143
144
145
146
147
148
149
150
151
152
153
154
155
157
162
163
164
m
710-05315
951-12265
710-05316
951-12266
951-12267
951-11981
751-11124
751-11123
951-11966
710-04962
951-12268
951-12081
951-12080
951-12078
951-11964
951-12077
951-11337
951-10292
710-05317
710-05318
Bolt M5xlO
Cowl
Valve Cover Bolt
Valve Cover
Valve Cover Ring
Rocker Arm Assembly
Jam Nut
Fulcrum Nut
Rocker Arm
Rocker Arm Stud
Push Rod Guide
Exhaust Valve Adjuster
Exhaust Valve Spring Retainer
Valve Spring
Intake Valve Seal
Valve Spring Retainer
Valve Kit
Spark Plug/F6Rtc
Bolt M10x1.25x85
Bolt/MlOx1.25x65
m
M
165
166
167
168
169
170
171
172
173
174
175
176
177
192
193
195
751-12778 Cylinder Head Asm
(Incl.137-139,144,146-157,
160,161,163-172)
951-12202
Cylinder Head Kit
(Inc1.144,154,163,164,166)
751-12774
751-12775
751-12776
751-12777
736-04629
710-05450
951-12273
715-04122
951-11335
951-11962
736-04561
951-12274
951-12329
710-05344
951-12197
Air Valve Core
Strainer Clip
Strainer
The Air Valve Bonnet
Washer
Screw M5x12
Cylinder Head Gasket
Cylinder Head Dowel 12x16
Push Rod Kit
Tappet
Camshaft Thrust Washer
Camshaft Assembly
Spark Arrestor
Spark Arrestor Screw
Valve Cover Kit
45
Page 46

CraftsmanEngineModelNo.4P9OMUA ForCraftsmanMower ModelNo.247.374880
ignition& Electrical
38
m
m
38
39
4O
41
42
43
44
45
46
m
710-04920
951-12220
712-04220
951-12221
751-12222A
951-12223
951-12224
710-04940
951-12279
45
Bolt M6x28
Ignition Coil Assembly
Flywheel Nut M16x1.5
Plate
Cooling Fan
Flywheel
Coil Assy.Charge
Bolt M6xl0
Cowl
46
Page 47

CraftsmanMower Labek -- Model No.247.374880
777S30145 777D15546 777122793
777S30117
777D18493
777122808
777D16808
777122815
777122759 777D18515
777122760
777122814
777X43688
777122809
47
Page 48
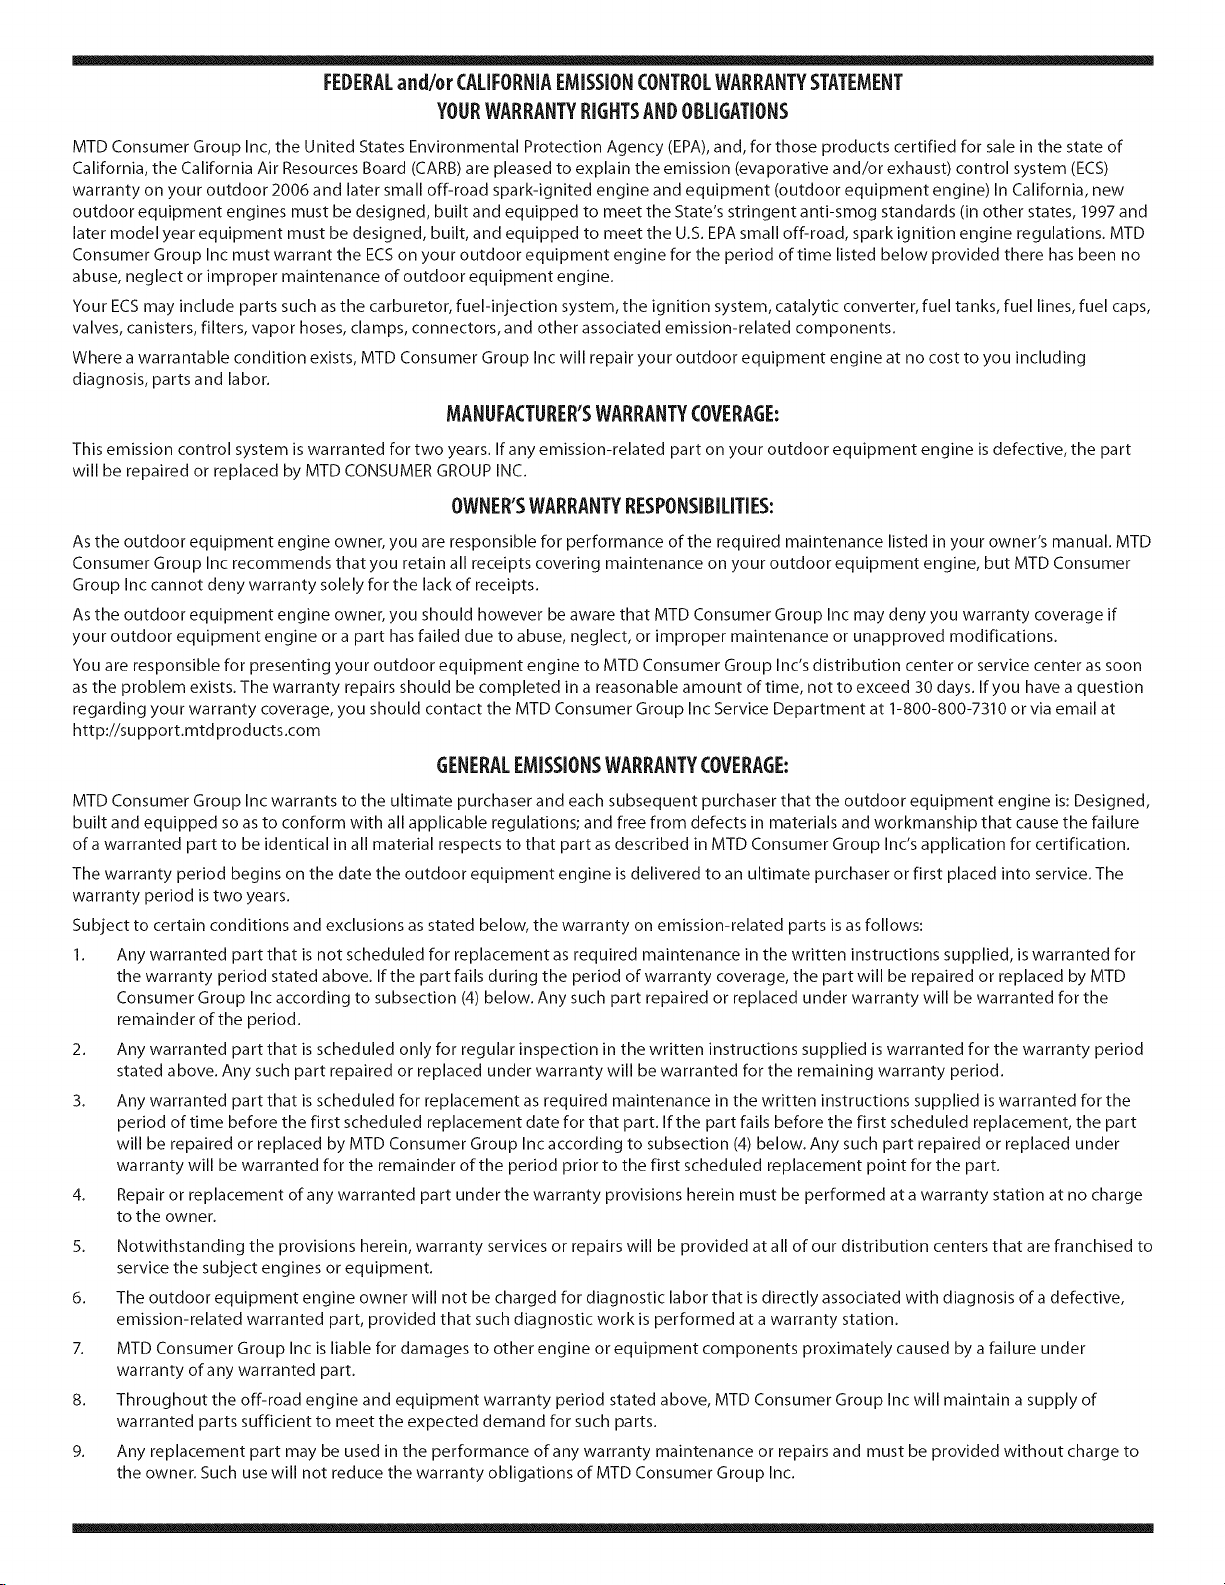
FEDERALand/or CALIFORNIAEMISSIONCONTROLWARRANTYSTATEMENT
YOURWARRANTYRIGHTSANDOBLIGATIONS
MTD Consumer Group Inc, the United States Environmental Protection Agency (EPA), and, for those products certified for sale in the state of
California, the California Air Resources Board (CARB) are pleased to explain the emission (evaporative and/or exhaust) control system (ECS)
warranty on your outdoor 2006 and later small off-road spark-ignited engine and equipment (outdoor equipment engine) In California, new
outdoor equipment engines must be designed, built and equipped to meet the State's stringent anti-smog standards (in other states, 1997 and
later model year equipment must be designed, built, and equipped to meet the U.S. EPAsmall off-road, spark ignition engine regulations. MTD
Consumer Group Inc must warrant the ECSon your outdoor equipment engine for the period of time listed below provided there has been no
abuse, neglect or improper maintenance of outdoor equipment engine.
Your ECS may include parts such as the carburetor, fuel-injection system, the ignition system, catalytic converter, fuel tanks, fuel lines, fuel caps,
valves, canisters, filters, vapor hoses, clamps, connectors, and other associated emission-related components.
Where a warrantable condition exists, MTD Consumer Group Inc will repair your outdoor equipment engine at no cost to you including
diagnosis, parts and labor.
MANUFACTURER'SWARRANTYCOVERAGE:
This emission control system is wa rranted for two years. If any emission-related part on your outdoor equipment engine is defective, the part
will be repaired or replaced by MTD CONSUMER GROUP INC.
OWNER'SWARRANTYRESPONSIBILITIES:
As the outdoor equipment engine owner, you are responsible for performance of the required maintenance listed in your owner's manual. MTD
Consumer Group Inc recommends that you retain all receipts covering maintenance on your outdoor equipment engine, but MTD Consumer
Group Inc cannot deny warranty solely for the lack of receipts.
As the outdoor equipment engine owner, you should however be aware that MTD Consumer Group Inc may deny you warranty coverage if
your outdoor equipment engine or a part has failed due to abuse, neglect, or improper maintenance or unapproved modifications.
You are responsible for presenting your outdoor equipment engine to MTD Consumer Group Inc's distribution center or service center as soon
as the problem exists. The warranty repairs should be completed in a reasonable amount of time, not to exceed 30 days. If you have a question
regarding your warranty coverage, you should contact the MTD Consumer Group Inc Service Department at 1-800-800-7310 or via email at
http://su pport.mtd prod ucts.com
GENERALEMISSIONSWARRANTYCOVERAGE:
MTD Consumer Group Inc warrants to the ultimate purchaser and each subsequent purchaser that the outdoor equipment engine is: Designed,
built and equipped so as to conform with all applicable regulations; and free from defects in materials and workmanship that cause the failure
of a warranted part to be identical in all material respects to that part as described in MTD Consumer Group Inc's application for certification.
The warranty period begins on the date the outdoor equipment engine is delivered to an ultimate purchaser or first placed into service. The
warranty period is two years.
Subject to certain conditions and exclusions as stated below, the warranty on emission-related parts is as follows:
1. Any warranted part that is not scheduled for replacement as required maintenance in the written instructions supplied, is warranted for
the warranty period stated above. If the part fails during the period of warranty coverage, the part will be repaired or replaced by MTD
Consumer Group Inc according to subsection (4) below. Any such part repaired or replaced under warranty will be warranted for the
remainder of the period.
2. Any warranted part that is scheduled only for regular inspection in the written instructions supplied is warranted for the warranty period
stated above. Any such part repaired or replaced under warranty will be warranted for the remaining warranty period.
3. Any warranted part that is scheduled for replacement as required maintenance in the written instructions supplied is warranted for the
period of time before the first scheduled replacement date for that part. If the part fails before the first scheduled replacement, the part
will be repaired or replaced by MTD Consumer Group Inc according to subsection (4) below. Any such part repaired or replaced under
warranty will be warranted for the remainder of the period prior to the first scheduled replacement point for the part.
4.
Repair or replacement of any warranted part under the warranty provisions herein must be performed at a warranty station at no charge
to the owner.
5. Notwithstanding the provisions herein, warranty services or repairs will be provided at all of our distribution centers that are franchised to
service the subject engines or equipment.
6. The outdoor equipment engine owner will not be charged for diagnostic labor that is directly associated with diagnosis of a defective,
emission-related warranted part, provided that such diagnostic work is performed at a warranty station.
7. MTD Consumer Group Inc is liable for damages to other engine or equipment components proximately caused by a failure under
warranty of any warranted part.
8. Throughout the off-road engine and equipment warranty period stated above, MTD Consumer Group Inc will maintain a supply of
warranted parts sufficient to meet the expected demand for such parts.
9. Any replacement part may be used in the performance of any warranty maintenance or repairs and must be provided without charge to
the owner. Such use will not reduce the warranty obligations of MTD Consumer Group Inc.
Page 49

10. Add-onormodifiedpartsthatarenotexemptedbytheAirResourcesBoardmaynotbeused.Theuseofanynon-exemptedadd-onor
modifiedpartsbytheultimatepurchaserwillbegroundsfordisallowingawarrantyclaims.MTDConsumerGroupIncwillnotbeliableto
warrantfailuresofwarrantedpartscausedbytheuseofanon-exemptedadd-onormodifiedpart.
WARRANTEDPARTS:
The repair or replacement of any warranted part otherwise eligible for warranty coverage may be excluded from such warranty coverage if
MTD Consumer Group Inc demonstrates that the outdoor equipment engine has been abused, neglected, or improperly maintained, and that
such abuse, neglect, or improper maintenance was the direct cause of the need for repair or replacement of the part. That notwithstanding,
any adjustment of a component that has a factory installed, and properly operating, adjustment limiting device is still eligible for warranty
coverage. Further, the coverage under this warranty extends only to parts that were present on the off-road engine and equipment purchased.
The following emission warranty parts are covered (if applicable):
1. Fuel Metering System
Cold start enrichment system (soft choke)
Carburetor and internal parts (or fuel injection system)
Fuel pump
Fuel tank
2. Air Induction System
Air cleaner
Intake manifold
3. Ignition System
Spark plug(s)
Magneto ignition system
4. Exhaust System
Catalytic converter
SAI (Reed valve)
5. Miscellaneous Items Used in Above System
Vacuum, temperature, position, time sensitive valves and switches
Connectors and assemblies
6. Evaporative Control
Fuel hose
Fuel hose clamps
Tethered fuel cap
Carbon canister
* Vapor lines
GDOC-100223Rev.A
Page 50
Congratulationsonmakingasmartpurchase.YournewCraftsman®productisdesignedandmanufacturedforyearsof
dependableoperation.Butlikeallproducts,it mayrequirerepairfromtimetotime.That'swhenhavinga RepairProtection
Agreementcansaveyoumoneyandaggravation.
Here'swhat the RepairProtectionAgreement_includes:
[] Expertservice byour10,000professionalrepairspecialists
[] Unlimitedserviceand nochargeforpartsandlaboronallcoveredrepairs
[] Productreplacementupto $1500ifyourcoveredproductcan'tbefixed
[] Discountof 25%from regularpriceofserviceandrelatedinstalledpartsnotcoveredbytheagreement;also,25%off
regularpriceofpreventivemaintenancecheck
[] Fasthelpby phone- wecallitRapidResolution- phonesupportfromaSearsrepresentative.Thinkof usasa"talking
owner'smanual."
OnceyoupurchasetheRepairProtectionAgreement,a simplephonecallisallthatit takesforyouto scheduleservice.You
cancallanytimedayornight,orscheduleaserviceappointmentonline.
TheRepairProtectionAgreementisa risk-freepurchase.Ifyoucancelfor anyreasonduringtheproductwarrantyperiod,
wewill provideafull refund.Or,a proratedrefundanytimeaftertheproductwarrantyperiodexpires.PurchaseyourRepair
ProtectionAgreementtoday!
Somelimitations and exclusionsapply. Forpricesand additional informationinthe U.S.A.call 1-800-827-6655.
_CoverageinCanadavariesonsomeitems.Forfull detailscall SearsCanadaat 1-800-361-6665.
SearsInstallationService
ForSearsprofessionalinstallationof homeappliances,garagedooropeners,waterheaters,andothermajorhomeitems,in
theU.S.A.orCanadacall1-800-4-MY-HOME®.
5O
Page 51

Declaraci6n de garantia .............................. 51
Instrucciones de seguridad ........................ 52-55
Pendiente de Calibre ................................. 56
Montaje .......................................... 57-61
Servicio y Mantenimiento ......................... 66-75
Almacenamiento fuera de temporada ................ 76
Soluci6n de problemas ............................... 78
Numero de servicio .................. Cubierta posterior
Operaci6n ........................................ 62-65
GARANTIACOMPLETAYCXDECRAFTSMANPORDOSANOS
PORDOSANOSapartirdelafechadelacompra,esteproductoest_garantizadopotdefectosenlosmaterialesylamanodeobra.Losproductosdefectuosos
ser_nreparadossincostooreemplazadossincostosilareparaci6nnoest_disponible.
Estagarantiaesv_lidas61oporunaEoapartirdelafechadecomprasiesteequipoecuestresehautilizadoalgunavez,mientrasquelaprestaci6nde
servicioscomercialesosisealquilaaotrapersona.
Paraobtenerinformaci6nsobreelalcancedelagarantiay solicitarlareparaci6noelreemplazo,visiteelsitioWeb:www.craftsman.com.
EstagarantiacubreONICAMENTElosdefectosenlosmaterialesyen lamanodeobra.EstagarantiaNOcubre:
• Elementosquesedesgastanporel usonormal,incluyendoentreotrosperonolimitadoalascuchillas,bujias,filtros deaire,correas,yfiltrosdeaceite.
• Serviciosdemantenimientoest_ndar,cambiodeaceiteoreajustes.
• CambiodeIlantasoreparacionesocasionadosporpinchadurasconobjetosdelexteriorcomoclavos,espinas,toconesovidrios,etc.
• Reemplazooreparaci6ndeneum_ticosoruedascomoresultadodeldesgastenormal,unaccidente,ofuncionamientoomantenimientoincorrectos.
• Reparacionesrequeridascomoresultadodelabusodeloperador,incluyendoperonolimitadoadaEoocasionadopotobjetosqueimpactanlam_quinay
quetuercenelbastidorocigiJeEal,odebidoaqueelmotorrueaceleradoenexceso.
• Reparacionesnecesariasdebidoanegligenciadeloperador,incluyendoentreotros,daEosmec_nicoyel_ctricoocasionadopotunalmacenamientono
apropiado,noutilizarelaceitedegradoy/ocantidadnoapropiada,nomantenerlacubiertalimpiaderesiduosinflamables,opornodarmantenimiento
alequipodeacuerdoconlasinstruccionescontenidasenelmanualdelpropietario.
• Limpiezaoreparacionesalmotor(sistemadecombustible)provocadaspotuncombustiblecontaminadouoxidado(viejo).Engeneral,elcombustible
debeutilizarseenunperiodonomayorde30diasapartirdesuadquisici6n.
• Eldeterioroydesgastenormaldelosacabadosexteriores,oreemplazodelaetiquetadelproducto.
Estagarantialeotorgaderechoslegalesespecificos,peroustedpodriagozardeotrosderechosenraz6ndesulugarderesidencia.
SearsBrandsManagementCorporation,HoffmanEstates,IL60179
Aceite del motor: SAE30
Combustible: Gasolina sin plomo
Motor: MTD
Numero de modelo
Numero de serie
Fecha de compra
Registre el numero de modelo, numero de serie y fecha
de compra m_s arriba.
© Sears Brands, LLC 51
Page 52
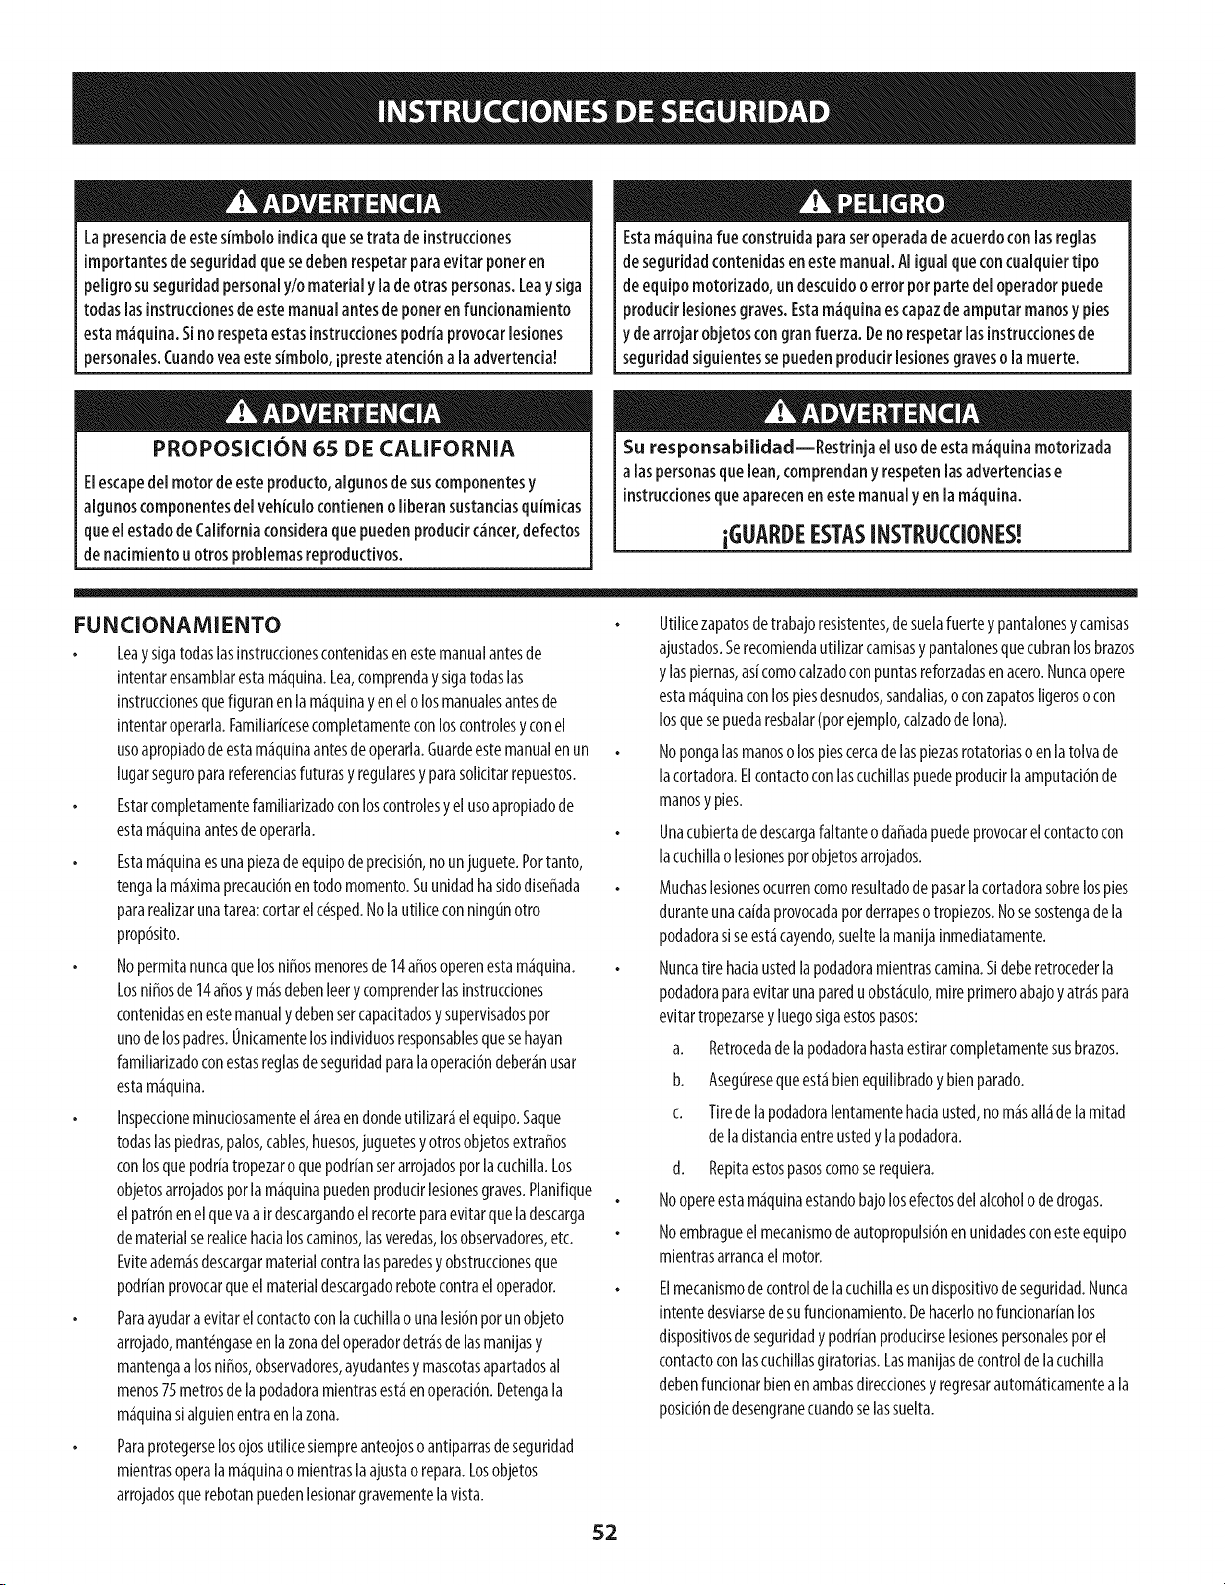
Lapresendadeestesimboloindicaquesetrata deinstrucdones
importantesdeseguridadquesedebenrespetarparaevitar poneren
peligrosuseguddadpersonaly/o materialy ladeotraspersonas.Leaysiga
todaslasinstruccionesdeestemanualantesdeponerenfundonamiento
estam_quina.Sinorespetaestasinstrucdonespodriaprovocarlesiones
personales.Cuandoyeaestesimbolo,ipresteatend6n a laadvertenda!
Estam_quinafue construidaparasetoperadadeacuerdoconlasreglas
deseguddadcontenidasenestemanual.AIigualqueconcualquiertipo
deequipomotodzado,undescuidoo errorpot parte deloperadorpuede
produdr lesionesgraves.Estam_quinaescapazdeamputar manosypies
ydearrojarobjetoscongranfuerza.Denorespetarlasinstrucdonesde
seguddadsiguientessepuedenprodudr lesionesgraveso la muerte.
PROPOSICION 65 DE CALiFORNiA
Elescapedel motor deesteproducto,algunosdesuscomponentesy
algunoscomponentesdelvehkulo contieneno liberansustanciasCluimkas
clueelestadodeCaliforniaconsideracluepuedenprodudr c_ncer,defectos
denadmientou otrosproblemasreproductivos.
FUNCIONAMIENTO
Leaysigatodaslasinstruccionescontenidasenestemanualantesde
intentarensamblarestam_quina.Lea,comprendaysigatodaslas
instruccionesquefiguranenla m_quinayen elolosmanualesantesde
intentaroperarla.Familiarkesecompletamenteconloscontrolesyconel
usoapropiadodeestam_quinaantesdeoperarla.Guardeestemanualenun
lugarseguroparareferenciasfuturasy regularesyparasolicitarrepuestos.
Estarcompletamentefamiliarizadoconloscontrolesyel usoapropiadode
estam_quinaantesdeoperarla.
Estam_quinaesunapiezadeequipodeprecisi6n,nounjuguete.Pottanto,
tengalam_ximaprecauci6nentodomomento.Suunidadhasidodisefiada
pararealizarunatarea:cortarelc_sped.Nolautiliceconningtinotro
prop6sito.
Nopermitanuncaquelosnifiosmenoresde14afiosoperenestam_quina.
Losnifiosde14afiosy m_sdebenleerycomprenderlasinstrucciones
contenidasenestemanualydebensercapacitadosysupervisadospot
unodelospadres.0nicamentelosindividuosresponsablesquesehayan
familiarizadoconestasreglasdeseguridadparalaoperaci6ndeber_nusar
estam_quina.
Inspecdoneminudosamenteel_reaendondeutilizar_elequipo.Saque
todaslaspiedras,palos,cables,huesos,juguetesyotrosobjetosextrafios
conlosquepodriatropezaroquepodrianserarrojadosporlacuchilla.Los
objetosarrojadosporlam_quinapuedenprodudrlesionesgraves.Planifique
elpatr6nenelquevaair descargandoel recorteparaevitarqueladescarga
dematerialserealicehadaloscaminos,lasveredas,losobservadores,etc.
Eviteadem_sdescargarmaterialcontralasparedesyobstrucdonesque
podrianprovocarqueelmaterialdescargadorebotecontrael operador.
Paraayudara evitarelcontactoconlacuchillao unalesi6nporunobjeto
arrojado,mant_ngaseenlazonadeloperadordetr_sde lasmanijasy
mantengaa losnifios,observadores,ayudantesymascotasapartadosal
menos75metrosdelapodadoramientrasest_enoperad6n.Detengala
m_quinasialguienentraenlazona.
Paraprotegerselosojosutilicesiempreanteojosoantiparrasdeseguddad
mientrasoperalam_quinaomientraslaajustaorepara.Losobjetos
arrojadosquerebotanpuedenlesionargravementelavista.
Su responsabilidad--Restdnja el usodeestam_quinamotodzada
alaspersonascluelean,comprendanyrespetenlasadvertendase
instrucdonesqueaparecenenestemanualyen la m_quina.
iGUARDEESTASINSTRUCCIONES!
Utillcezapatosdetrabajoreslstentes,desuelafuerteypantalonesycamlsas
ajustados.Serecomiendautillzarcamlsasypantalonesquecubranlosbrazos
ylaspiernas,as[comocalzadoconpuntasreforzadasenacero.Nuncaopere
estam_quinaconlospiesdesnudos,sandalias,oconzapatosIlgerosocon
losquesepuedaresbalar(pot ejemplo,calzadodeIona).
Nopongalasmanosolospiescercadelasplezasrotatodasoen latolvade
lacortadora.Elcontactoconlascuchlllaspuedeprodudrlaamputad6nde
manosypies.
Unacublertadedescargafaltanteodafiadapuedeprovocarelcontactocon
lacuchillaolesionespotobjetosarrojados.
Muchasleslonesocurrencomoresultadodepasarlacortadorasobrelospies
duranteunacaJdaprovocadapotderrapesotroplezos.Nosesostengadela
podadorasiseest_cayendo,sueltelamanljalnmediatamente.
Nuncatirehaciaustedlapodadoramlentrascamlna.Sideberetrocederla
podadoraparaevitarunapareduobst_culo,mirepdmeroabajoyarraspara
evltartropezarseyluegoslgaestospasos:
a. Retrocedadelapodadorahastaestirarcompletamentesusbrazos.
b. Aseguresequeest_blenequillbradoyblenparado.
c. Tiredelapodadoralentamentehadausted,nom_sall_delamltad
deladlstanciaentreustedylapodadora.
d. Repitaestospasoscomoserequiera.
Noopereestam_quinaestandobajolosefectosdelalcoholodedrogas.
Noembragueel mecanlsmodeautopropulsi6nenunldadesconesteequipo
mlentrasarrancaelmotor.
Elmecanlsmodecontroldelacuchillaesundispositivodeseguridad.Nunca
lntentedesviarsedesufundonamlento.Dehacerlonofundonar[anlos
dlsposltlvosdeseguddady podrianprodudrseleslonespersonalesporel
contactoconlascuchlllasglratodas.Lasmanljasdecontrolde lacuchllla
debenfundonarblenenambasdlrecdonesyregresarautom_ticamenteala
posid6ndedesengranecuandoselassuelta.
52
Page 53

Nuncaoperelapodadoraenc_spedhumedo.Siempreest_segurodesu
equilibdo.Sitropiezaycaepuedelesionarsegravemente.Sisienteque
pierdeelequilibrio,suelteinmediatamentelamanijadecontroldela
cuchillaylacuchilladejar_degirarentressegundos.
Corteelc_spedsolamenteconluzded[aoconunabuenaluzartificial.
Camine,nuncacorra.
Detengalacuchillacuandocrucecaminosdegravilla,pasosoandadores.
Silam_quinacomenzaraavibrardemaneraanormal,detengaelmotor,
ybusqueinmediatamentelacausa.Lavibrad6nporIogeneralesuna
advertendadealgunproblema.
Apagueelmotoryesperehastaquelacuchillasedetengacompletamente
antesderetirarlaguardaparael recortedec_spedodesatorarlatolva.La
cuchillacontinuagirandoporunoscuantossegundosdespu_squeel motor
sehaapagado.Nuncacoloqueningunapartedelcuerpoenel _readela
cuchillahastaqueest_seguroquelacuchillahadetenidosumovimiento
rotatorio.
Nuncaoperelacortadorasinlasguardasapropiadas,cubiertadedescarga,
guardapararecorte,manijadecontroldelacuchillayotrosdispositivosde
seguddadyprotecd6nensulugaryfundonando.Nuncaoperelacortadora
silosdispositivosdeseguddadest_ndaffados.SinoIohace,estopuede
tenetcomoresultadolesiones.
Elsilenciadoryelmotorsecalientanypuedenprodudrquemaduras.Nolos
toque.
Utilicesolamentepartesyaccesonosfabricadosespedalmenteparaesta
m_quina,onginalesdelfabncante(OEM).S[noIohace,estopuedetener
comoresultadolesionespersonales.
Paraencenderel motor,jaledelacuerdalentamentehastaquesienta
resistencia,luegojaler_pidamente.Elreplieguer_pidodelacuerdade
arranque(tensi6nderetroceso)lejalar_lamanoyelbrazohadael motor
m_sr_pidodeIoqueustedpuedesoltar.Elresultadopuedenserhuesos
rotos,fracturas,hematomasoesguinces.
Sisepresentansituacionesquenoest_nprevistasenestemanualsea
cuidadosoyuseelsentidocomtin.
DIENTES
Laspendientessonunfactor[mportantequeserelacionaconlosaccidentes
produddospotderrapesyca[dasyquepuedenproducirlesionesgraves.La
operad6nenpendientesrequieremayorprecaud6n.Sinosesienteseguroenuna
pendiente,no lapode.Parasegundad,useelmedidordependientesqueseincluye
comopartedeestemanualparamedirlapendienteantesde operarlaunidaden
unazona[nclinada.S[lapendientesuperalos15grados,nolapode.
Haga Io siguiente:
Muevalapodadoraatrav_sdelascarasdelapendiente,nuncahaciaardbay
abajo.Tengacuidadocuandocambiededirecd6ncuandooperelam_quinaen
pendientes.
Est_atentoalosagujeros,rakes,rocas,objetosocultosoabultamientosque
puedanprovocarquesederrapeo setropiece.Elc_spedaltopuedeocultar
obst_culos.
Siempreest_segurodesuequilibdo.Sitropiezaycaepuedelesionarse
gravemente.Sisientequepierdeelequilibno,suelte[nmediatamentelamanija
decontroldelacuchillaylacucMladejar_degirarentres(3)segundos.
No haga Io siguiente:
Nocorteelc_spedcercadepozos,hundimientos,bancos,podr[aperderel
equlllbrlo.
Nopodependientesmayoresde15gradoscomoIoindicaelmedidorde
pendientes.
Nopodeelc_spedht_medo.SInoest_firmementeparado,puederesbalarse.
NINOS
Puedenocurnracddentestr_gicoss[eloperadornoest_atentoalapresendade
nifos.PotIogeneralalosnifos lesatraenlaspodadorasylaactividaddepodarel
c_sped.Noentiendenlosdesgosnllospeligros.Nuncad_porsentadoquelosnifos
permanecer_nenelmismolugardondelosviopott_ltimavez.
Mantengaalosnifosfueradel_readetrabajoy bajoestdctavigilandadeun
adultoresponsableadem_sdeloperador.
Est_alertay apaguelapodadorasiunnifo ingresaal_rea.
Antesy mientasseest_moviendohadaarras,mirehadaarrasycuideque
nohayanlffos.
Tengaextremaprecaud6ncuandoseaproximeaesquinasdegas,entradas
depuertas,_rbolesuotrosobjetosquepuedanobstaculizarlelavistadeun
nifo quepudiesecorrerhadalapodadora.
Mantengaalejadosalosnifosdelosmotoresenmarchaocalientes.Pueden
sufrlrquemadurasconunsllendadorcallente.
Nuncapermitaquenifosmenoresde14afrosoperenestam_quina.Los
nifos mayoresde14afrosdebenleeryentenderlasinstrucdonesde
operad6nyreglasdeseguddadcontenidasenestemanualydebenset
entrenadosysupervlsadosporsuspadres.
SERVIClO
Manejo seguro de la gasolina:
Paraevitarlesionespersonalesodafos materialesseasumamentecuidadoso
al manipularla gasolina.Lagasolinaesaltamente inflamableylosvapores
sonexplosivos.Sepuedelesionargravementesiderramagasolinasobreusted
osobrela ropaya quesepuedeencender.
Utilices61orecipientesparagasolinaautorizados.
NuncaIleneloscontenedoresenel interiordeunvehkuloocami6nocajade
camionetaconrecubrimientospl_sticos.Coloquesiemprelosrecipientesen
el pisoylejosdelvehkuloantesdeIlenarlos.
Retireelequlpoagasollnadelcaml6noremolqueyII_neloenel plso.Slesto
noesposible,entoncesIlenedichoequipoenunremolqueconunredpiente
port_til,envezdedesdeundispensadordegasolina.
MantengalaboquilladeIlenadoencontactoconel bordedelaentradadel
tanquedegasolinaocontenedorentodomomentohastaqueest_Ileno.No
utillceundlsposltlvoparaabrlr/cerrarlaboqullla.
Apaguetodoslosdgardllos,dgarros,pipasyotrasfuentesdecombusti6n.
Nuncacarguecombustibleenlam_quinaenintedoresporqueLosvapores
inflamablespodr[anacumularseenel_rea.
Nuncasaquelatapadelgasniagreguecombustiblemientraselmotorest_
calienteoenmarcha.Dejequeel motorseenfr[eporIomenosdosminutos
antesdevolveracargarcombustible.
53
Page 54

Nuncarecargueeltanquedecombustible.Lleneeltanquenom_sdeI
pulgadapordebajodelabasedel cuellodellenadoparadejarespadoparala
expansi6ndelcombustible.
Vuelvaacolocarlatapadelagasollnayajfistelablen.
Limplelagasollnaderramadasobreel motoryelequipo.Trasladela
m_quinaaotrazona.Espere5 mlnutosantesdeencenderelmotor.
Nuncaalmacenela m_quinaoelredpientedecombustibleenunespado
cerradodondehayafuego,chlspasoaparatosconpilotocomoporejemplo,
calentadoresdeagua,calentadores,hornos,secadoresderopauotros
aparatosagas.
Pararedudrelrlesgodeincendlomantengalam_qulnalimpiadepasto,
hojasydeacumulaci6ndeotrosescombros.Limpielosderramesdeacelteo
combustibleysaquetodoslosdesechosembebldosconcombustible.
Dejequelam_quinaseenfrie5minutosporIomenosantesdealmacenarla.
Funcionamiento general:
Nuncaenciendaunmotorenespacioscerradosoenunazonaconpoca
ventilad6n.Elescapedel motorcontienemon6xidodecarbono,ungas
inodoroyletal.
AntesdeIlmpiar,repararo lnspecdonarlam_quina,compruebequela
cuchHlaytodaslaspartesquesemuevensehandetenldo.Desconecteel
cabledelabujiayp6ngalodemaneraquehagamasacontrael motorpara
evitarqueseendendademaneraaccidental.
Reviselospernosdemontajedelacuchlllaydelmotoralntervalos
frecuentesparaverlficarqueest_nbienapretados.Inspecdoneadem_s
vlsualmentelacuchHlaenbuscadeda_os(abolladuras,desgaste,roturas,
etc.).Reemplacelacuchillaconequipooriginaldelfabrkante(OEM)
Ilstadoenestemanual.Lautilizaci6ndepartesquenocumplanconlas
espedficacionesdeequlposoriginalespodriatenercomoresultadoun
rendimlentolncorrectoyadem_slasegurldadpodriaestarcomprometida.
LascuchHlasdelaspodadorassonmuyafiladasypodriancortarlo.Envuelva
lacuchillaoutiliceguantesyextremeprecaudonescuandoledeservkio.
Mantengatodoslospernos,tuercasytornillosbienajustadospara
asegurarsequelam_qulnaseencuentraencondlclonessegurasde
operad6n.
Nuncamanipulelosdispositivosdesegurldaddemaneralmprudente.
Controleperi6dicamentequefundonendeformaadecuada.
Despu_sdegolpearconalgtinobjetoextra,o,detengaelmotor,desconecte
elcabledelabujiayconecteelmotoramasa.Inspecdoneminudosamente
lam_quinaparadetermlnarsiest_da_ada.Repareelda_oantesde
encenderlayoperarla.
Nuncatratedeajustarunaruedaolaalturadecortemientraselmotorest_
enmarcha.
Loscomponentesdelatolvapararecorte,cublertadedescargayescudode
riel,est_nsujetosadesgasteydaffosquepodriadejarexpuestaspartesque
semuevenopermltirquesearrojenobjetos.Paraprotegersusegurldad,
verlfiquefrecuentementetodosloscomponentesyreempl_celoss61ocon
partesdelosfabrkantesdeequlposoriginales(O.E.M.)listadaseneste
manual.Lautilizad6ndepartesquenocumplanconlasespeciflcadonesde
equiposoriginalespodriatenercomoresultadounrendimlento[ncorrectoy
adem_slasegurldadpodriaestarcomprometida.
Nocambielaconflgurad6ndelreguladordelmotorniaceleredemadadoel
mismo.Elreguladorcontrolalaveloddadm_ximaseguradeoperad6ndel
motor.
Verifiquefrecuentementelalineadecombustible,eltanque,eltapbn,ylos
accesoriosbuscandorajaduraso pdrdidas.Reemplacedesernecesario.
Noddarranqueal motorsinoest_labujiadeencendido.
Mantengao reemplacelasetiquetasdeseguridad,segtinseanecesario.
Observelasleyesynormasaplicablesparadisponeradecuadamentedelos
desechos.Ladescargainapropiadadeliquidosomaterialespuededa_arel
medioambiente.
SegtinlaComisibndeSeguridaddeProductosparaelConsumidordelos
EstadosUnidos(CPSC)ylaAgenciadeProtecci6nAmbientaldelosEstados
Unidos(EPA),esteproductotieneunavidatitil mediadesiete(7)a_os,
6140horasdefundonamiento.AI finalizarlavidatitil media,adquiera
unam_quinanuevaohagainspeccionaranualmente_staSearsporuno
uotrodistribuidordeserviciosparacerciorarsedequetodoslossistemas
mec_nicosydeseguridadfundonancorrectamenteynotienenexcesivo
desgaste.SinoIohace,puedenprodudrseacddentes,lesionesomuerte.
NO MODIFIQUE EL MOTOR
Paraevitarlesionesgravesola muerte,nomodifique elmotor bajoninguna
circunstancia.Sicambialaconfiguraci6ndelreguladordel motorel motor
puededescontrolarsey operaravelocidadesinseguras.Nuncacambiela
configuraci6ndef_bricadelreguladordel motor.
AVISO REFERIDO A EMISIONES
Losmotoresqueest_ncertificadosycumplenconlasregulacionesde
emisionesfederalesEPAydeCaliforniaparaSORE(Equipospequeffostodo
terreno)est_ncertificadosparaoperarcongasolina(omfin sinplomoy
puedenincluirlossiguientessistemasdecontroldeemisiones:Modifkaci6n
demotor(EM)y catalizadordeires vias(TWC)siest_nequipadosdeesa
manera.
GUARDACHISPAS
Estam_quinaest_equipadaconunmotor de combusti6ninternayno
debeserutilizadaeno cercadeunterreno agrestecubiertopot bosque,
malezaso hierbaexceptosiel sistemadeescapedel motorest_equipado
conunamortiguador dechispasquecumplaconlasleyeslocaleso
estatalescorrespondientes,encasodehaberlas.
Siseutiliza un amortiguador dechispaseloperadorIodebemantener
encondicionesdeusoadecuadas.Enel EstadodeCalifornia lasmedidas
anteriormentemencionadassonexigidaspotley(Artkulo 4442del C6digo
de RecursosPfiblicosdeCalifornia).Esposiblequeexistanleyessimilaresen
otrosestados,l.asleyesfederalesseaplkan enterritorios federales.
Puedeconseguirel amortiguadordecbispasparael silenciadoratray, sdesu
distribuidor autorizadode motoresoponi_ndoseencontactoconel centrode
servicioSears.
54
Page 55
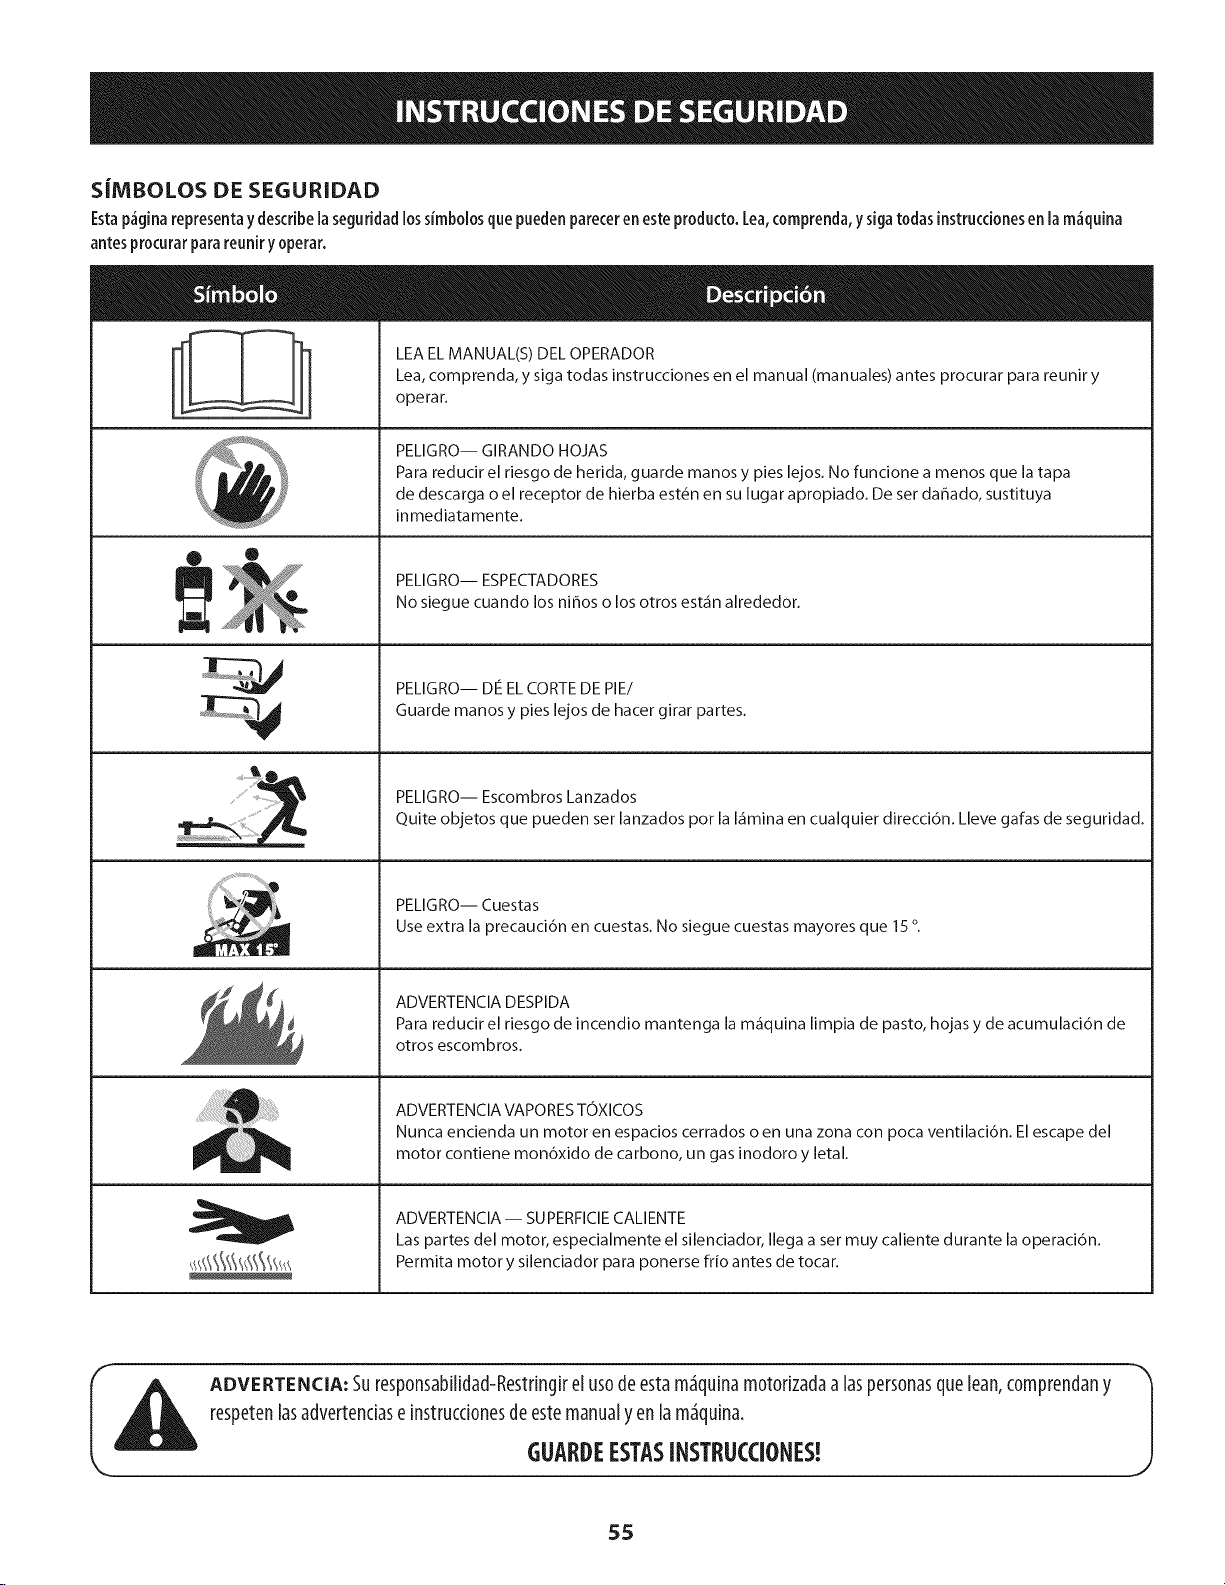
S|MBOLOSDESEGURIDAD
Estap_gina representa y describe la seguridad lossimbolosque pueden parecer en este producto. Lea,comprenda, ysigatodas instruccionesen la m_quina
antes procurar para reunir y operar.
LEA EL MANUAL(S) DEL OPERADOR
Lea, comprenda, y siga todas instrucciones en el manual (manuales) antes procurar para reuniry
operar.
PELIGRO-- GIRANDO HOJAS
Para reducir el riesgo de herida, guarde manos y pies lejos. No funcione a menos que la tapa
de descarga o el receptor de hierba est6n en su lugar apropiado. De ser daflado, sustituya
inmediatamente.
• ®
PELIGRO-- ESPECTADORES
No siegue cuando los niflos o los otros est_n alrededor.
1At
PELIGRO-- Die EL CORTE DE PIE/
Guarde manos y pies lejos de hacer girar partes.
PELIGRO-- Escombros Lanzados
Quite objetos que pueden ser lanzados pot la I_mina en cualquier direcci6n. Lleve galas de seguridad.
PELIGRO-- Cuestas
Use extra la precauci6n en cuestas. No siegue cuestas mayores que 15 °.
ADVERTENClA DESPIDA
Para reducir el riesgo de incendio mantenga la m_quina limpia de pasto, hojas y de acumulaci6n de
otros escombros.
ADVERTENCIA VAPORES TOXICOS
Nunca encienda un motor en espacios cerrados o en una zona con poca ventilaci6n. El escape del
motor contiene mon6xido de carbono, un gas inodoro y letal.
ADVERTENClA-- SUPERFIClE CALIENTE
Las partes del motor, especialmente el silenciador, Ilega a set muy caliente durante la operaci6n.
Permita motor y silenciador para ponerse fifo antes de tocar.
ADVERTENCIA: Suresp0nsabilidad-Restringirel us0deestam_quinam0t0rizadaa laspersonasqueLean,c0mprendany
respetenlasadvertenciase instrucci0nesdeestemanualyenlam_quina.
GUARDEESTASINSTRUCCIONES!
55
J
Page 56
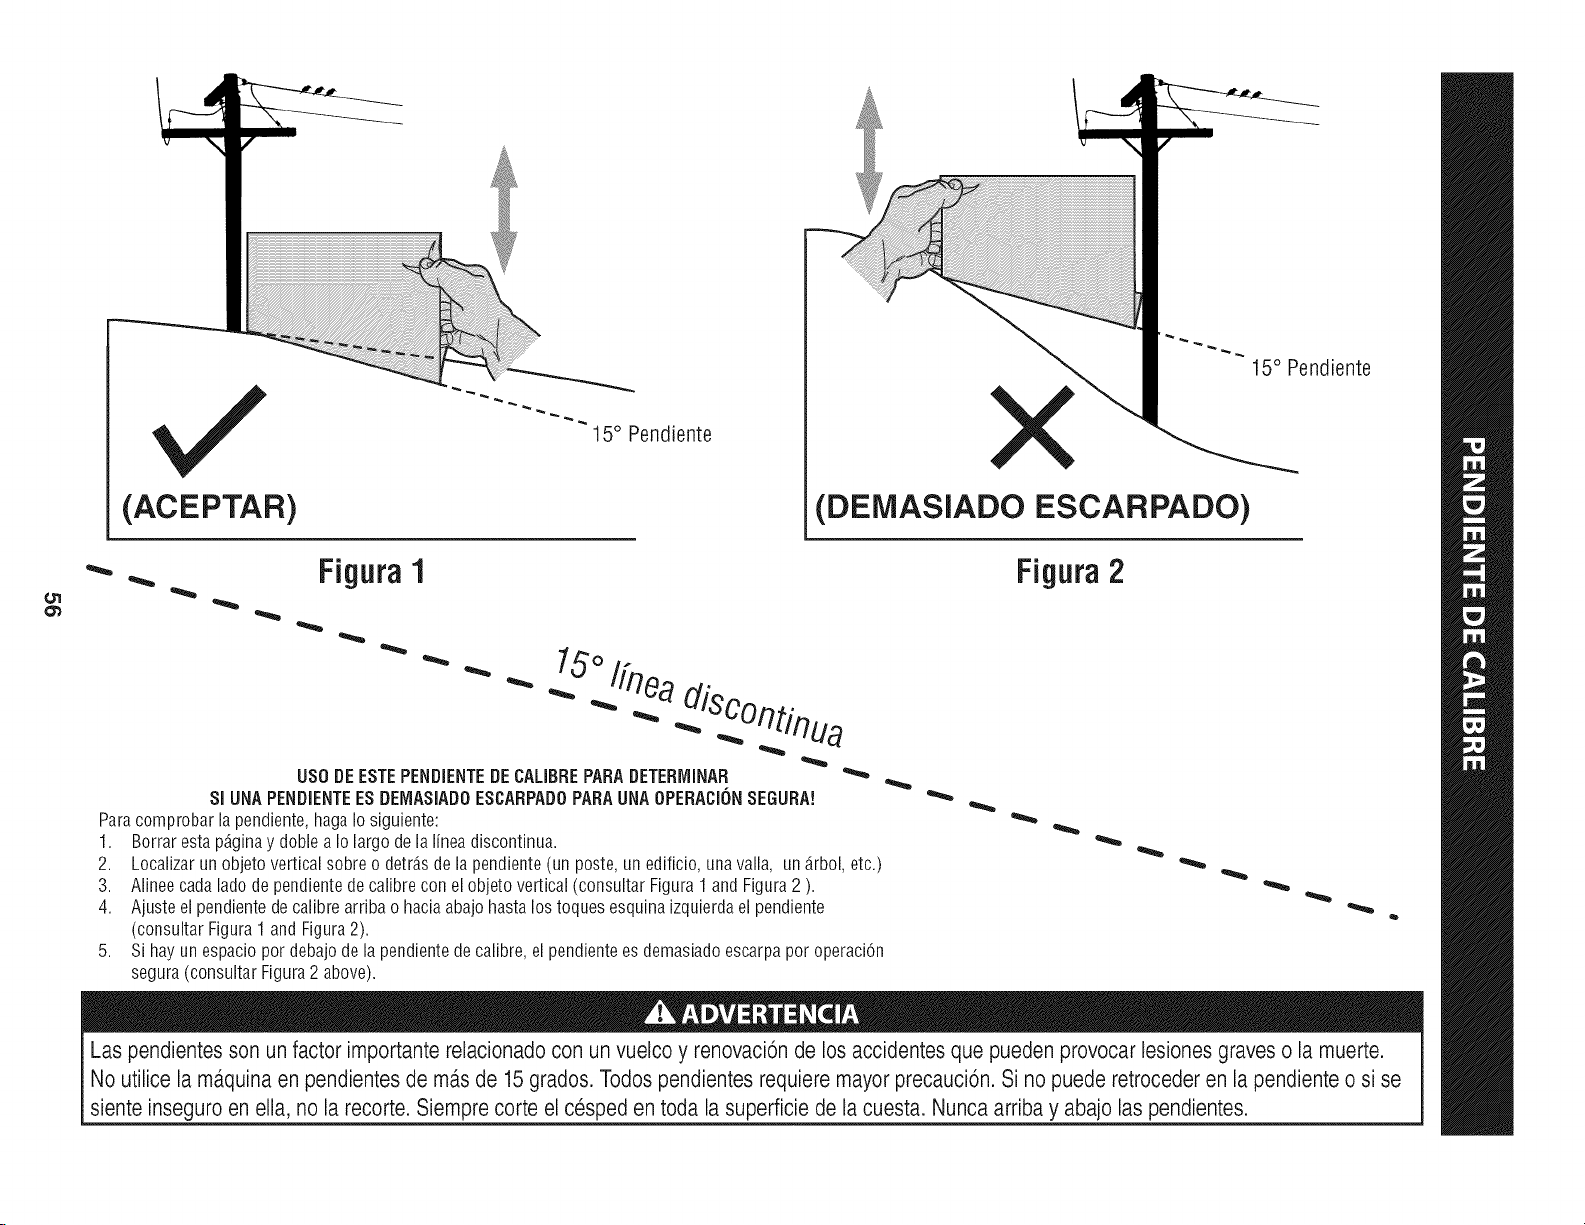
15° Pendiente
,/
(ACEPTAR)
_- _. Figura1
O'1
O'}
" " "- 15°/fneadisco t.
USO BE ESTE PENBiENTE BE CALIBREPARA BETERrvIINAR
SiUNA PENDIENTE ES DEMASIADO ESCARPADO PARA UNA OPERACION SEGURA!
Paracomprobar la pendiente, hagaIo siguiente:
1. Borrar esta p_gina y doble a Iolargo de la linea discontinua.
2.
Localizar un objeto vertical sobre o detr_.sde la pendiente (un poste, un edificio, una valla, un _.rbol,etc.)
3.
Alinee cada lado de pendientede calibre con el objeto vertical (consultar Figura1and Figura 2 ).
4.
Ajuste el pendiente de calibre arriba o haciaabajo hasta los toques esquina izquierdael pendiente
(consultar Figura1 and Figura 2).
5,
Si hay un espacio pordebajo de la pendiente decalibre, el pendiente es demasiado escarpa por operaci6n
segura (consultar Figura 2 above).
15° Pendiente
(DEMASIADO ESCARPADO)
Figura 2
Las pendientesson un factor importanterelacionadocon un vuelco y renovaci6nde los accidentesque pueden provocar lesionesgraveso la muerte.
No utilice la ma.quinaen pendientes de ma.sde 15grados.Todos pendientesrequiere mayorprecauci6n.Si no puede retrocederen la pendiente o si se
siente inseguroenella, no la recorte. Siempre corte el cespeden toda la superficie de la cuesta. Nuncaarriba y abajolas pendientes.
Page 57

IMPORTANTE:Estaunidadseenviasinaceiteenelmotor.Despu_sdelmontaje,
consultela p_gina61paralosdetallesdelcombustibleyelaceite.
/MPORTANTE:Lasreferendasa losladosderechoo izquierdodelacortadorade
c_spedsehacenobservandolam&quinadesdelaposid6ndeoperad6n.
Desconecteelcabledelabujiay p6ngalohaciendomasacontrael motor
paraevitarqueseenciendaacddentalmente.
Piezassueltasdentrode iacaja
Mangueradedrenajedeaceite
AcopladordeMangueradeAgua
ManualdelOperador
ManualdelMotor
Herramientas necesarias para el montaje
UnjuegodeIlavesajustaHesyun man6metroparaneum_tkos
Montaje
Extracd6n de laTrabadeSeguddadOtilizadaenel Envio
Laplataformadela cortadoradec_spedpuedearrojarobjetos.Encaso
deoperarlacortadoradec_spedsin colocarlacubiertadedescargaenla
posici6ndefuncionamientoadecuada,podrian produdrsegraveslesiones
personalesy/odaffosmateriales.
Instalad6n de losCablesdela Bateda
NOTA:Elbornepositivodelabater[aest_marcadocomoPos(+).Elbornenegativo
delabater[aest_marcadocomoNeg(-).
Elcablepositivo(grueso,decolorrojo)vienedef_bdcasujetoalbornepositivodela
bater[a(+) potmediodeunpernohexagonaly unatuercahexagonal.
Elcablenegativo(grueso,decolornegro)puedevenirdef_bricasujetoal borne
negativodelabater[a.Sinoseentregaunido,procedadelsiguientemodo:
1. Retireelpernodelcarroylatuercahexagonaldelcablepositivo(cablerojo
grueso).
2. Retirelacubiertapl_sticaroja,siesqueest_presente,del bornepositivode
la bateriayunaelcablepositivoalbornepositivodelabateria(+) utilizando
el pernoylatuercahexagonal.Veala Figura2.
Aseguresedequeel motor delacortadoradec_spedest_apagado.Quite
la llavedeencendidoantesderetirar latraba deseguridadutilizadaenel
envio.
Localkelatrabadeseguddadque,silahay,seencuentraenlapartederecha
delaplataformadecorte.YealaFigura1.
Figura1
2. Mientrassostieneelcanaldedescargaconsumanoizquierda,extraigacon
lamanoderechalatrabadeseguddad,sujet_ndolaentrelosdedospulgare
inditeyrot_ndolaenelsentidodelasagujasdelreloj.
Figura2
3. Retireelpernodelcarroylatuercahexagonaldelcablenegativo(cable
negrogrueso).
4. Retirelacubiertapl_sticanegra,siesqueest_presente,delbornenegativo
delabateriayunaelcablenegativoal bornenegativodelabater[a(-)
utilizandoelpernoylatuercahexagonal.YealaFigura2.
5. Aseguresedequelavadlladesujed6nest_colocadasobrelabateria,
manteni_ndolaensulugaryaseguresedequeelbornepositivodelabateria
est_cubiertoconelcapuch6ndegomarojoparaprotegerlodelacorrosi6n.
NOTA:Silabateriaseponeenfundonamientodespu_sdelafechaindkadaenla
partesuperioroalcostadodelamisma,c_rguelasiguiendolasinstrucdonesdela
secd6nMantenimientodeestemanualantesdehacerfundonarlacortadora.
Latraba deseguddadseusaunkamenteparaelembalaje.Retirey
desecbelatraba antesdeoperarlacortadoradec_sped.
Page 58
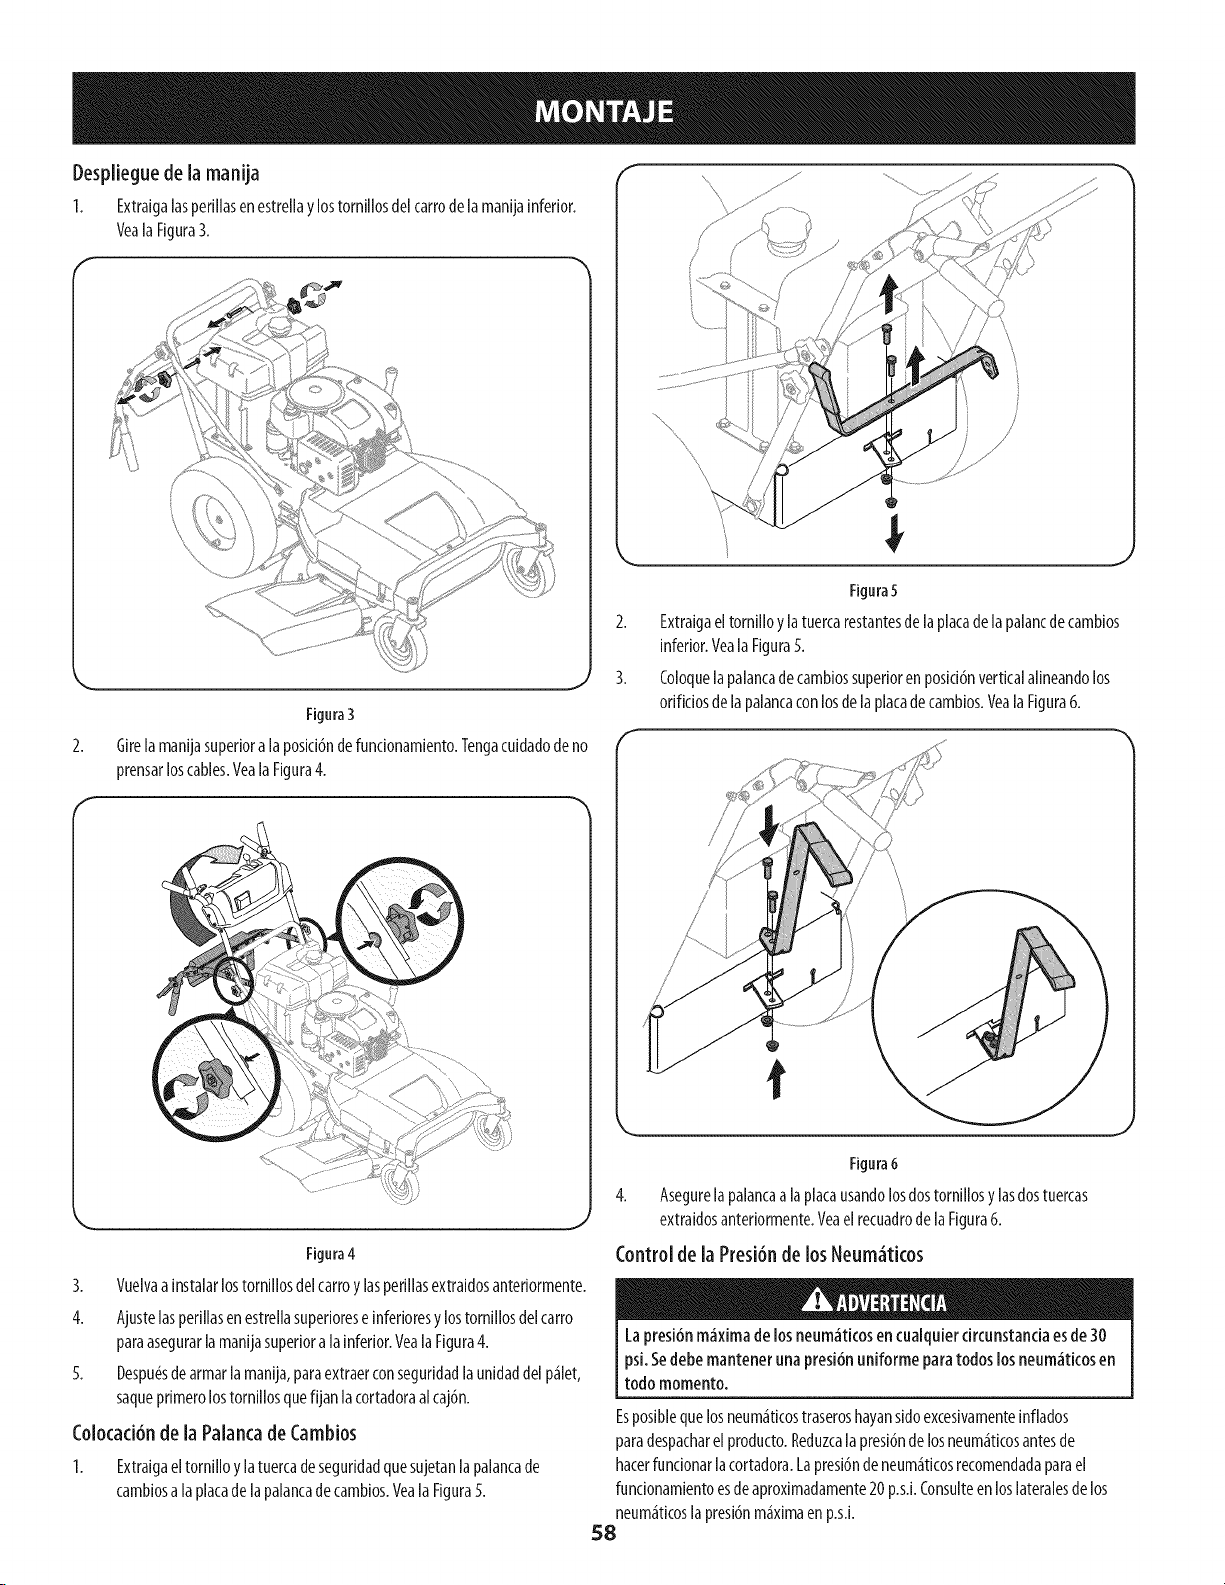
Desplieguedela manija
1. Extraigalasperillasenestrellaylostornillosdelcarrodelamanijainferior.
VealaFigura3.
Figura3
Girelamanijasuperioralaposici6ndefuncionamiento.Tencjacuidadodeno
prensarloscables.VealaFigura4.
Figura5
2. Extraigaeltorni[[oy[atuercarestantesde[aplatade[apa[ancdecambios
inferior.Vea[a Figura5.
3. Coloque[apa[ancadecambiossuperiorenposid6nverticala[ineandolos
J
orificiosdelapalancaconlosdelaplatadecambios.VealaFigura6.
J
Figura4
3. Vuelvaainstalarlostornillosdelcarroylasperillasextraidosanteriormente.
4. Ajustelasperillasenestrellasuperioreseinferioresy lostornillosdelcarro
paraasegurarlamanijasuperioralainferior.VealaFigura4.
5. Despu_sdearmarlamanija,paraextraerconseguridadlaunidaddelp_let,
saqueprimerolostornillosquefijanlacortadoraalcaj6n.
Colocad6ndela Palancade Cambios
1. Extraigaeltornilloy [atuercadeseguridadquesujetan[apalancade
cambiosalaplatadelapalancadecambios.VealaFigura5.
58
/
4. Asegure[apalancaalaplatausandolosdostorniiiosylasdostuercas
extraidosanteriormente.VeaelrecuadrodelaFigura6.
!
Figura6
Control de la Presi6ndelos Neum_ticos
Lapresi6nm_ximadelosneum_ticosencualcluiercircunstanciaesde30
psi.Sedebemantenerunapresi6nuniforme paratodoslosneum_ticosen
todomomento.
Esposiblequelosneum_ticostraseroshayansidoexcesivamenteinflados
paradespacharelproducto.Reduzcalapresi6ndelosneum_ticosantesde
hacerfuncionarlacortadora.Lapresi6ndeneum_ticosrecomendadaparael
funcionamientoesdeaproximadamente20p.s.i.Consulteenloslateralesdelos
neum_ticoslapresi6nm_ximaenp.s.i.
Page 59
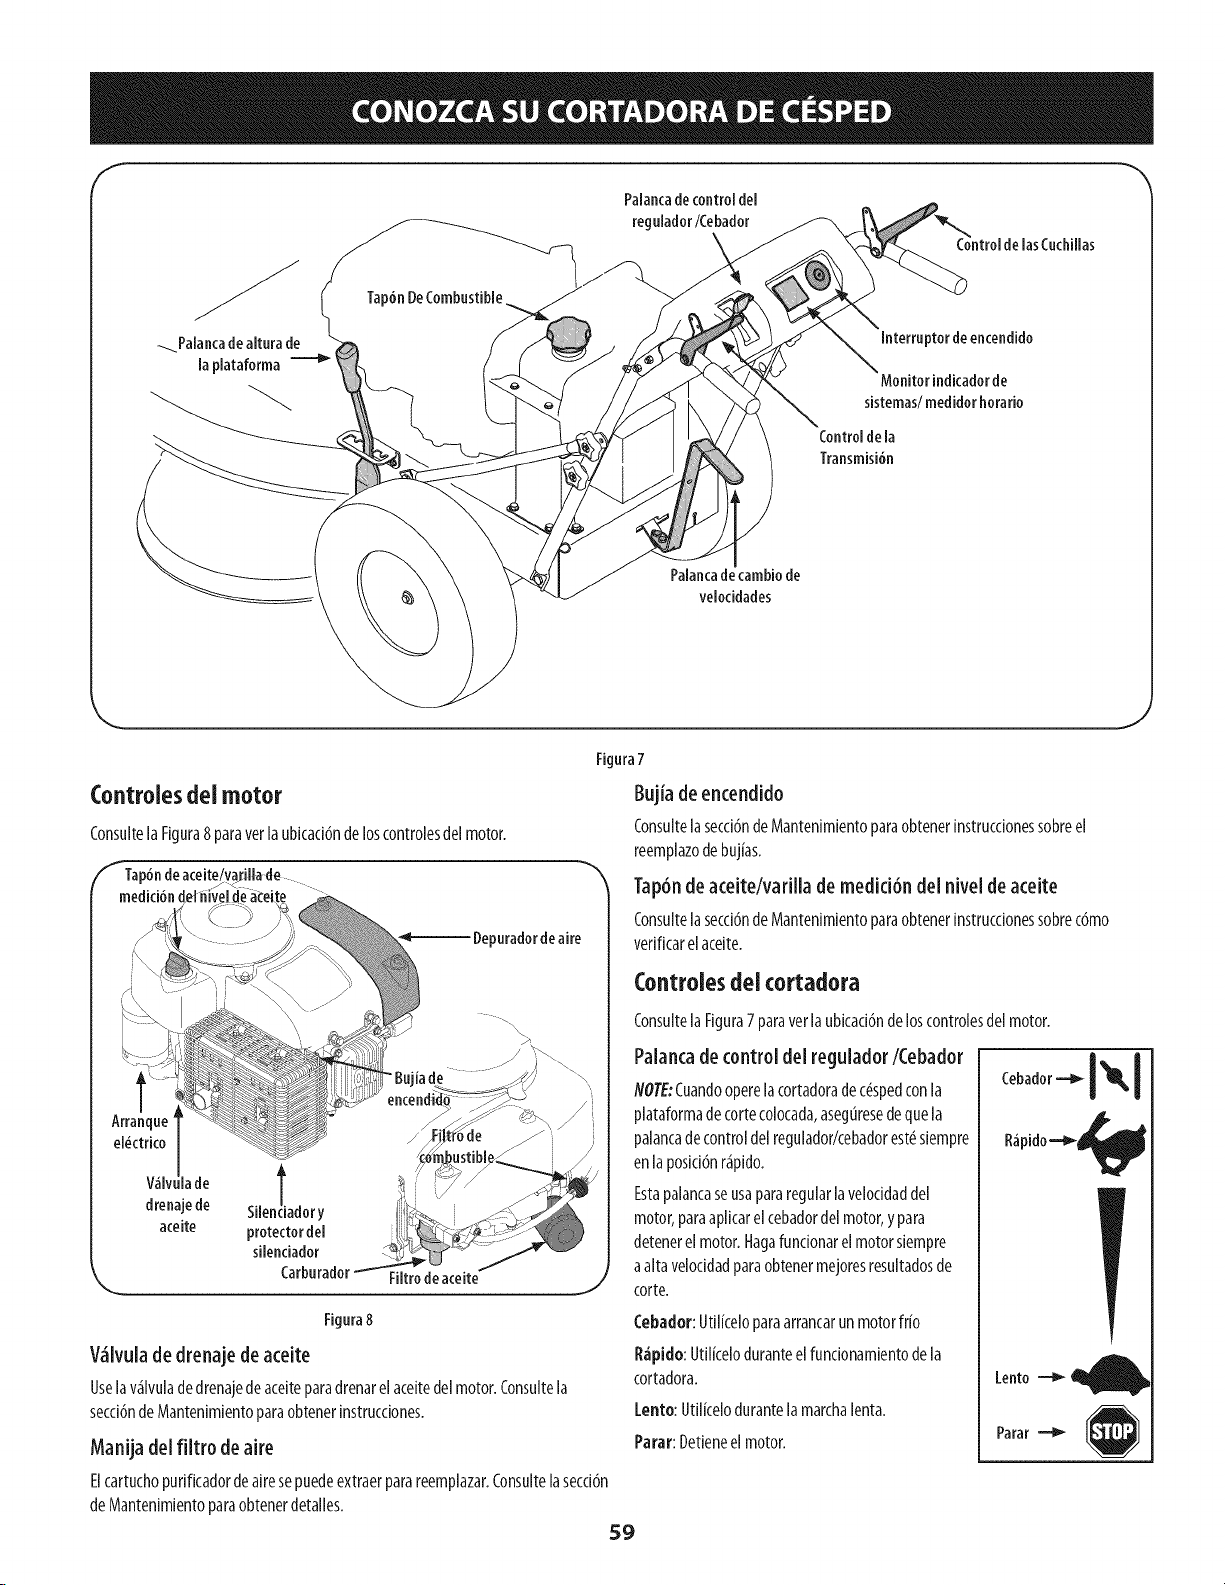
F
Palancadecontrol del
regnlador/Cebador
lasCnchillas
Tap6nDeCombustible
_Palanca dealturade
laplataforma
Controlesdelmotor
Consultela Figura8 paraverla ubicaci6ndeloscontrolesdelmotor.
f Tap6ndeaceite/w
pnradordeaire
Interrnptordeencendido
Monitor indicadorde
sistemas/medidor horario
Controldela
Transmisi6n
Palancadecambio de
velocidades
Fignra
Bujia deencendido
Consultelasecci6ndeMantenimientoparaobtenerinstruccionessobreel
reemplazodebujias.
Tap6nde aceite/varilla de medici6n del nivel deaceite
Consultelasecci6ndeMantenimientoparaobtenerinstruccionessobrec6mo
verificarelaceite.
Arranque
el_ctrico
V_lv lade |
drenajede Silen_iadory
aceite protectordel
A
silenciador
Carburador
Fignra8
Filtrodeaceite
J
V,_lvuladedrenaje deaceite
Uselav_lvuladedrenajedeaceiteparadrenarelaceitedelmotor.Consultela
secci6ndeMantenimientoparaobtenerinstrucciones.
Manila del filtro deaire
Elcartuchopurificadordeairesepuedeextraerparareemplazar.Consultelasecci6n
deMantenimientoparaobtenerdetalles.
Controlesdelcortadora
ConsultelaFigura7paraverlaubicaci6ndeloscontrolesdel motor.
Palanca de control del regulador/Cebador
NOTE:Cuandooperelacortadoradec_spedconla
plataformadecortecolocada,aseguresedequela
palancadecontroldelregulador/cebadorest_siempre
enlaposici6nr_pido.
Estapalancaseusapararegularlavelocidaddel
motor,paraaplicarelcebadordelmotor,ypara
detenerelmotor.Hagafuncionarelmotorsiempre
aaltavelocidadparaobtenermejoresresultadosde
corte.
Cebader:Utilkeloparaarrancarunmotorffio
R_pido:Utilkeloduranteelfuncionamientodela
cortadora.
Lento:Utilkelodurantelamarchalenta.
Parar:Detieneelmotor.
59
Lento
Page 60

Palancadealtura de la plataforma
Useestapalancaparaajustarlaalturadecorte.Parautilizarla,muevalapalanca
hadalaizquierda,luegocol6quelaenlamuescaquemejorseadaptealaaplicaci6n
deseada.
Tap6nDeCombustible
Retireeltap6ndecombustibleparaagregarcombustiblealtanquedecombustible.
Controlde lascuchillas
Seusaelcontroldelascuchillasparaengancharla
plataformadelacortadora.Paraenganchareste
control,predoney retengalapalancacontrala
empufiaduradelabarradecontrol.Paradetener
lascuchillas,suelteelcontroldelascuchillas.
Desenganchesiempreelcontroldelascuchillas
antesdearrancarelmotor.Asiseaseguradequelas
cuchillasnocomenzar&nagirarcuandoarrancael
motor.
Control de la transmisi6n
Elcontroldelatransmisi6nseusaparaengranar
ydesengranarlatransmisi6ndelasruedas.Para
engancharestecontrol,aprieteelcontroldela
transmisi6ncontralaempufiaduradelabarrade
control.Paradetenerlatransmisi6n,suelteelcontrol
delatransmisi6n.
I/t/IPORTANTE:Sueltesiempreelcontroldela
transmisi6nantesdecambiarlasvelocidades.
Sueltesiempreelcontroldelatransmisi6nantesdecambiardeveloddad.
DeIocontrariopuedeocasionargravesdaffosalatransmisi6n.
f
PalancadeCambiodeVeloddades
Sueltesiempreelcontrol delascuchillasantesdearrancarel motor.DeIo
contrariopuedeocasionardesgasteprematuroal arranqueel_ctrko del
motor.
Nuncaintente detenerelmotorconelcontroldelascuchillasenganchado.
Useestapalancaparaseleccionarunadecuatrovelocidadesdemarchadirecta,
neutralomarchaatr&
Marcha Directa
Haycuatroveloddadesdemarchadirecta.Laposici6nuno(1)eslam_slenta,yla
posici6ncuatro(4)eslam_sr_pida.
MarchaAtr_s
Paraseleccionarmarchaatr& pongalapalancaenlaposici6ndereversa(R).
Miredetr_sdela cortadoraantesyduranteelfuncionamientomarcha
atr& Detengalascuchillasdelacortadoraantesdeoperarmarchaatr&
Neutral
Coloquelapalancaenneutro(N)antesdecomenzarelcortac_sped,ycuandoel
cortac_spednoest_eneluso.Adem_s,elcortacdspedpuedeseramanoempujado
otiradocolocandolapalancadepalancade cambiosenelNposici6n(neutra)y
presionandoelcontroldepaseocontrael apret6ndemanillar.
Sueltesiempreelcontroldelatransmisi6nantesdecambiardeveloddad.
DeIocontrariopuedeocasionargravesdaffosalatransmisi6n.
6O
Page 61

InterruptordeEncendiclo MonitorIndicadordeSistemas/MedidorFlorario
Nuncadejelam_quinaenfuncionamientosinvigilancia.Siempre
desenganchelascuchillas,apagueelmotoryretirelaIlave,paraevitarel
encendidoaccidentaldelmotor.
Elinterruptordecautroposicionesseusaparaencenderyapagarelmotorde
losmodelosconarranqueeldctrico.Paraencenderelmotor,insertela Ilaveen
elinterruptordeencendidoygirelaenelsentidodelasagujasdelrelojhadala
posid6nENCENDIDO.SueltelaIlaveenlaposid6nFUFICIONAMIENTOunavezque
hayaarrancadoelmotor.MuevalaIlaveenlaposici6nCORRE/LIGEROacorrerel
cortac_spedesconelfaro.Paradetenerelmotor,girelaIlaveaPARAR.VealaFigura
9.
F
Corre/Ligero
,1
Encencliclo
k_ j
Figura9
NuncamuevalaIlavealaposici6nStart(encendido)mientrasel motor
est_funcionando;siIohace,puedeocasionardaffosalarrancadordel
motor.
BATTERY
42. O
/// HOURS 1/10 \\\
Figura10
LCD(Pantallade CristalLiquiclo)
CuandolaIlavedeencendidoserotafueradelaposici6nSTOP(parar)peronose
colocaenlaposici6nSTART(encendido),elmonitorindkadordesistemasmuestra
lasalidadelabateria,envoltios,ensupantallaLCDduranteaproximadamente
cincosegundos,ydespu_smuestraunrelojdearenaylashorasdefuncionamiento
delacortadora.Unavezqueelmotorhaarrancado,elmonitormuestra
continuamenteunrelojdearenay lashorasdefuncionamientodelacortadoraenla
pantalla.YealaFigura10.
NOTA:Lashorasdefuncionamientodelacortadoraseregistrancadavezquela
Ilavedeencendidoserotafueradelaposici6nSTOP(detener),independientemente
dequesehayaarrancadoelmotor.
Elmonitorindicadortambi_nlerecuerdaaloperadorlosintervalosde
mantenimientoparacambiarelaceitedelmotor.Lapantallade cristalliquido
parpadeaalternativamentelashorasregistradas,"CtIG"(cambiar)y"OIL"(aceite)
durantedncominutos,despu_sdecada50horasdeoperaci6nregistrada.El
intervalodemantenimientoduradoshoras(entre50-52,100-102,150-152,etc.)
LapantallaLCDtambi_nparpadeasegtinsedescribem_sarriba,durantecinco
minutos,cadavezqueel motordelacortadoraseenciendeduranteelintervalo
demantenimiento.Antesdequefinaliceelintervalo,cambieel niveldeaceitedel
motorsegtinseindicaenlasecci6nMantenimientodeesteManualdel0perador.
Bateria
Esnormalquelaluzdelabateriaseiluminecuandoelmotorest_girando
duranteelarranque,perosiseiluminadurantelaoperaci6n,cuandoelmotorest_
funcionando,labaterianecesitacargaoelsistemadecargadelmotornoest_
generandoamperajesuficiente.Controlelabateriacomoseindicaenlasecd6n
Serviciodeestemanualohagaqueel sistemadecargaseaverificadoporsu
distribuidorSearsuotrodistribuidor.
61
Page 62
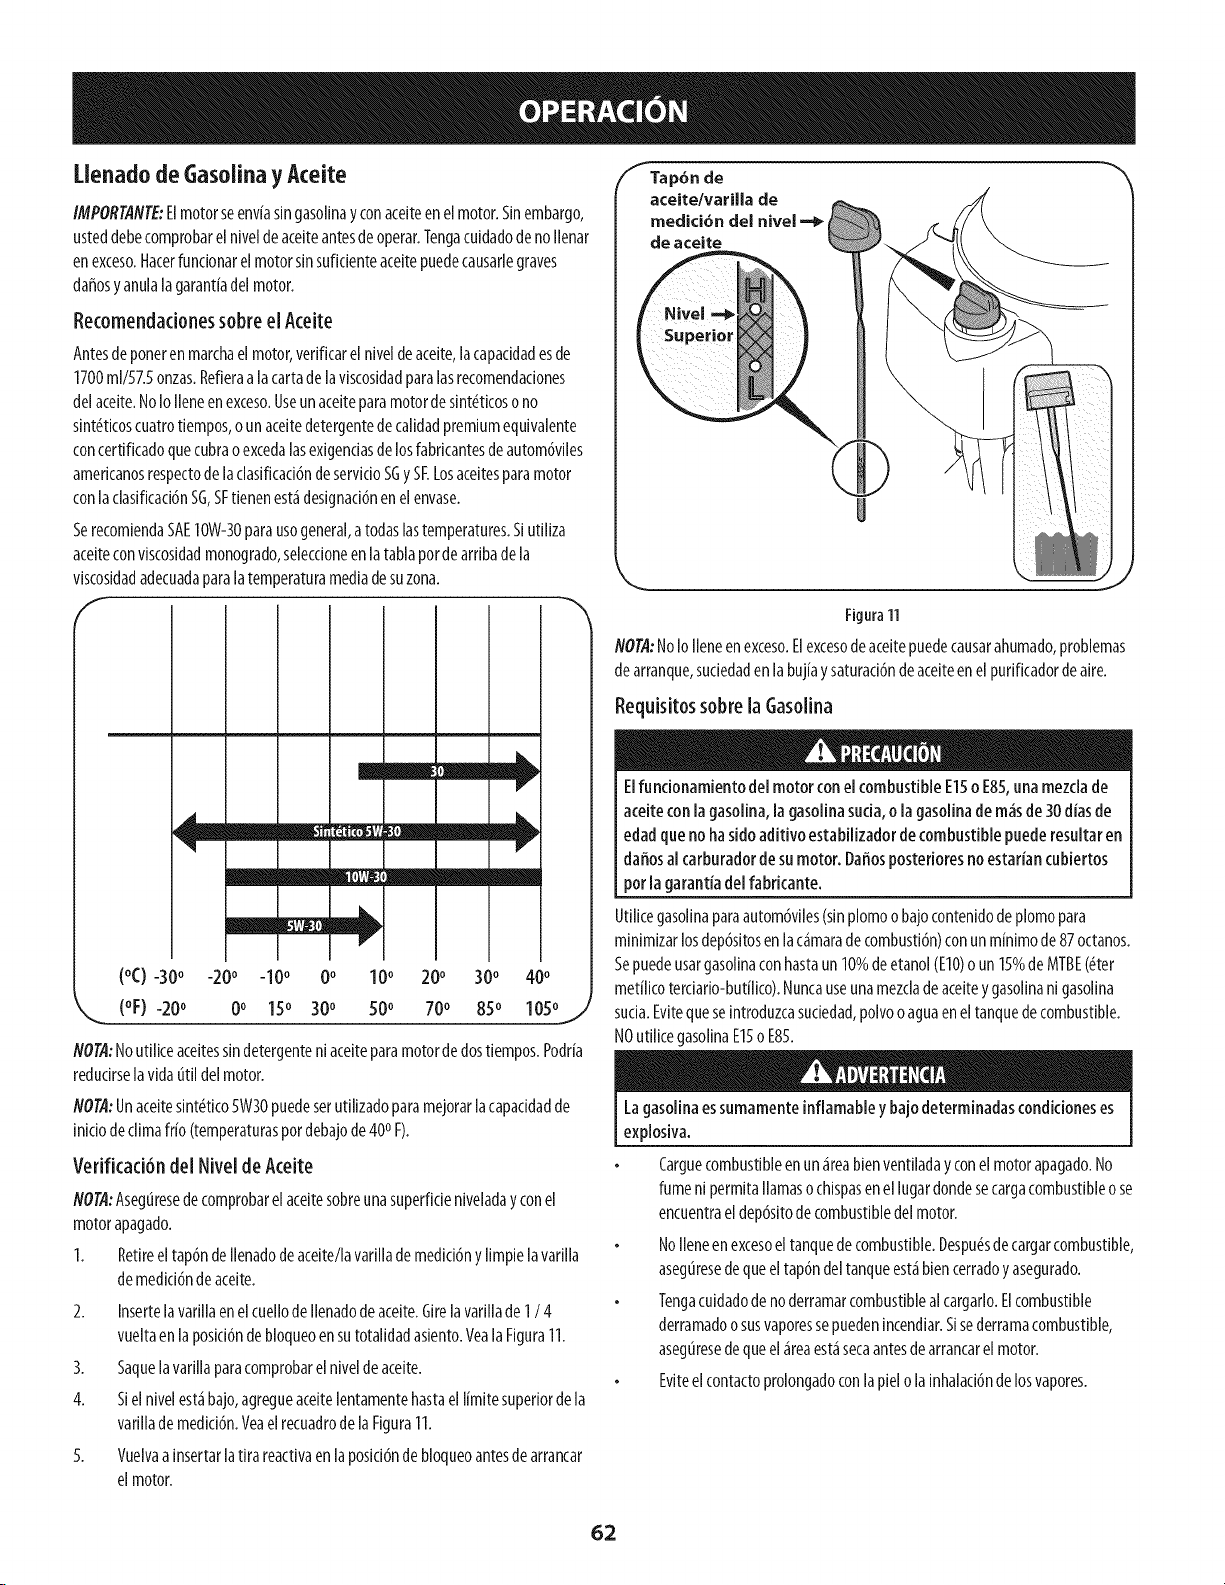
LlenadodeGasolinay Aceite
IMPORTANTE:Elmotorseenviasingasolinay conaceiteenelmotor.Sinembargo,
usteddebecomprobarelniveldeaceiteantesdeoperar.Tengacuidadodenollenar
enexceso.Hacerfuncionarelmotorsinsuficienteaceitepuedecausarlegraves
daffosyanulalagarantiadelmotor.
Recomendadonessobre el Aceite
Antesdeponerenmarchael motor,vefificarel niveldeaceite,lacapaddadesde
1700ml/57.5onzas.Refleraalacartadelaviscosidadparalasrecomendadones
delaceite.NoIo Ileneenexceso.Useunaceiteparamotordesint_ticosono
sint_ticoscuatrotiempos,o unaceitedetergentedecalidadpremiumequivalente
concertificadoquecubraoexcedalasexigendasdelosfabficantesdeautom6viles
ameficanosrespectodeladasifkad6ndeservkioSGySELosaceitesparamotor
conlaclasificad6nSG,SFtienenest5designad6nenelenvase.
SerecomiendaSAE10W-30parausogeneral,atodaslastemperatures.Siutiliza
aceiteconviscosidadmonogrado,selecdoneenlatablapordearfibadela
viscosidadadecuadaparalatemperaturamediadesuzona.
f Tap6n de
aceite/varUla de
medici6n deJ nivel -=_
de aceite
Superior
Figura11
NOTA:NoIoIleneenexceso.Elexcesodeaceitepuedecausarahumado,problemas
dearranque,suciedadenlabujiaysaturaci6ndeaceiteenel purificadordeaire.
Requisitossobrela Gasolina
(°C) -300 -200 -100 0o 100 200 300 400
,. (°F)-200 0o 150 300 50o 700 850 I05°j
NOTA:Noutiliceaceitessindetergenteniaceiteparamotordedostiempos.Podfia
redudrselavidat_tildelmotor.
NOTA:Unaceitesint_tico5W30puedeserutilizadoparamejorarlacapaddadde
inkiodeclimaffio (temperaturaspordebajode40oF).
Verifkad6n del Nivelde Aceite
NOTA:Asegtiresedecomprobarelaceitesobreunasuperficieniveladayconel
motorapagado.
1. Retireeltap6nde[[enadodeacelte/lavafillademedki6nylimpielavafilla
demedid6ndeacelte.
2. InsertelavafillaenelcuellodeIlenadodeaceite.Girelavafillade1/4
vueltaenlaposki6ndebloqueoensutotalidadasiento.YealaFigura11.
3. Saquelavafillaparacomprobarel niveldeaceite.
4. Siel nivelest_bajo,agregueaceitelentamentehastaellimitesuperiordela
vafillademedki6n.YeaelrecuadrodelaFigura11.
5. Vuelvaainsertarlatirareactivaenlaposid6ndebloqueoantesdearrancar
el motor.
Elfundonamiento del motor conel combustibleE15o E85,unamezdade
aceiteconlagasolina,la gasolinasuda, o lagasolinadem_sde30diasde
edadquenoha sidoaditivoestabilizadordecombustiblepuederesultaren
daffosal carburadordesumotor.Daffosposterioresnoestafiancubiertos
potlagarant{adel fabrkante.
Utilicegasolinaparaautom6viles(sinplomoobajocontenidodeplomopara
minimizarlosdep6sitosenlac_maradecombusti6n)conunminimode87octanos.
Sepuedeusargasolinaconhastaun10%deetanol(EIO)oun15%deMTBE(_ter
metilicoterciario-butflico).Nuncauseunamezcladeaceiteygasolinanigasolina
sucia.Evitequeseintroduzcasuciedad,polvooaguaeneltanquedecombustible.
NOutllicegasolinaE15o E85.
Lagasolinaessumamenteinflamabley bajodeterminadascondidoneses
explosiva.
Carguecombustibleenun_reabienventiladayconelmotorapagado.No
fumenipermitallamasochispasenellugardondesecargacombustibleose
encuentraeldep6sitodecombustibledelmotor.
NoIleneenexcesoeltanquedecombustible.Despu_sdecargarcombustible,
aseguresedequeeltap6ndeltanqueest_biencerradoyasegurado.
Tengacuidadodenoderramarcombustiblealcargarlo.Elcombustible
derramadoosusvaporessepuedenincendiar.Sisederramacombustible,
aseguresedequeel_reaest_secaantesdearrancarelmotor.
Eviteelcontactoprolongadoconlapielo lainhalad6ndelosvapores.
62
Page 63

CargadeGasolina
Onadultodebedecombustibledeestemotor. NONCApermita que
losniffosparaabastecersedecombustibledelmotortis. Lagasolina
(combustible)vaporessonaltamenteinflamablesypuedene×plotar.Los
vaporesdelcombustiblepuedee×tendersey setencendidapotunachispa
ollama muchosmetrosdedistanciadelmotor. Paraevitar lesioneso la
muerte porelincend[odelcombustible,sigaestasinstrucciones:
NOusegasolinaconplomo.
Elcombustibledebeserfrescoy limpio.NUNCAuseel combustiblesobrante
delatemporadapasadaoalmacenadosdurantelargospeffodos.
NUNCAmezcleelaceiteconel combustible.
NOutilicecombustiblequecontengametanol(alcoholdemadera)
NOTA:Antesdecargar,dejequeelmotorseenfffedosminutos.
1. Antesdesacarlatapaparacargarcombustible,limpiealrededor.
2. Cargueeldep6sitohastaqueelcombustibleIleguea1/2pulgadapordebajo
delabasedelcuellodeIlenadoparadejarespadoparalaexpansi6ndel
combustible.TengacuidadodenoIlenaren exceso.
3. Vuelvaacolocarlatapadelagasolinayajustelabien.Limpieelcombustible
derramadoantesdearrancarelmotor.SisederramacombustibleNO
arranqueel motor.Muevalam_quinalejosdel_readederrame.Evitarla
cread6ndecualquierfuentedeignici6nhastaquelosvaporessehayanido.
Aseguresedequeninguna personaapartedeloperadorpermanezca
cercadela cortadoramientrasarrancaelmotor u operalamisma.Nunca
enciendaelmotorenespacioscerradosoen unazonaconpocaventilaci6n.
Elescapedelmotorcontienemon6xidodecarbono,ungasinodoroy fetal.
Mantengalasmanos,lospies,el cabelloy la ropasueltaalejadosdelas
partesm6vilesdel motory delacortadora.
Encendidodei Motor
1.
Sueltetodosloscontrolesdelacortadora.
2.
Muevalapalancadecambiosa laposici6nneutral(N).
3.
InsertelaIlaveenelinterruptordeencendido.
4.
Sielmotorest_frio,muevaelcontroldelregulador/cebadorcompletamente
hadadelante,alaposid6nCHOKE(cebador).Siest_volviendoaarrancarun
motorcaliente,muevaelcontroldel regulador/cebadora laposici6nFAST
(veloddadr_pida,representadaporunaliebre).
5.
GirelaIlavedeencendidoenelsentidodelasagujasdelrelojhastala
posid6nSTART(encendido).Unavezquearranqueelmotor,sueltelaIlave.
Volver_alaposicl6nRUN(fundonamlento).
Muevaelcontroldelregulador/cebadoralaposid6nFast(veloddadr_pida,
representadaporunaliebre).
NO@:Nuncadejeelcontroldelregulador/cebadorenlaposid6nCHOKE
(cebador)mientrasoperalacortadora.SiIohace,segenerar_unamezcla
"rica"decombustibles,Iocualhar_queelmotorpierdapotenda.
Detend6ndei Motor
Sigolpeaunobjetoextraffo,detengael motor ysaquela flare de
encendido.Inspeccioneminuciosamentela m_quinaparavetsiest_
daffada.Repareeldaffoantesdevolvera arrancarelmotoryoperarla
m_guina.
I. SIlascuchillasest_nenganchadas,suelteelcontroldelascuchillas.
2. Muevaelcontroldelregulador/cebadora laposici6nSTOP(parar)
3. Girelallavedeencendidoen sentidocontrar[oalasagujasdelrelojala
posid6nSTOP(parar).
4. RetirelaIlavedelinterruptordeencendidoparaevitarqueelmotorse
endendaacddentalmente.
Enganchedela Transmisi6n
Evitearrancarsubitamente,desarrollarexcesivaveloddadydetenersede
repente.
Endendaelmotorsegunlasinstrucdonesanterioresymuevaelcontroldel
regulador/cebadorala posid6nFAST(veloddadr_pida,representadaporuna
liebre).
ParacondudrhadaADELANTE:
Coloquelapalancadecambiosen cualquieradelascuatroveloddadesde
avance.Selecdoneunaveloddadadecuadaalascondidonesyconlacualse
sientac6modo.
2.
Oprimaelcontroldelatransmisi6n.
3.
Oprimalentamenteelcontroldelatransmisi6ncontralamanUadela
empuffaduraylacortadorasemover_.Su_lteloysedetendr_el movimiento
delatransmisi6n.
ParacondudrhadaATRAS:
1. Verifiquequeel_readetr_ssuyoest_despejada.
2. Coloquelapalancadecambiosenmarchaarras(R).
3. Oprimalentamenteelcontroldelatransmisi6ncontralamanUadela
empuffaduraylacortadorasemover_.Su_lteloysedetendr_el movimiento
delatransmisi6n.
Nomantengala flare enla posici6nSTART(encendido)durantem_sde
cincosegundosporvez.SiIohace,puedeocasionardaffosalarrancador
el#ctricodelmotor.
6.
MuevalaIlavea laposid6nCORRE/LIGEROaoperarelcortac6spedesque
utillzaelfaro.
Nointentecambiarla direcd6n de desplazamientomientraslacortadora
est_en movimiento.Siempredebesoltarel controldelatransmisi6ny
detenerlacortadoratotalmente antesdemoverlapalancadecambiosde
unaposici6ndeavanceaMarchaatr_s.DeIocontrario puedeocasionar
gravesdaffosa latransmisi6n.
63
Page 64
Usode la Palanca de Altura de la Plataforma
Nodejela posici6ndeloperadorsinantessoltarelcontrol delascuchillas.
Sidejalacortadorasinvigilancia, debeapagarelmotory retirarla llavede
encendido.
Enganchede iasCuchUlas
Paratratar deevitar el contactoconlascucbillaso unalesi6nporalgun
objeto queseaarrojado,mantengaalosobservadores,a losayudantes,
niffosy mascotasalejadosal menos25metrosdela m_quinamientrasest_
enfuncionamiento.Detengala m_quinasialguienseacerca.
I. Muevaelcontroldelregulador/cebadoralaposici6nFAST(veloddadr_pida,
representadaporunaliebre).
2. Oprimalentamenteelcontroldelascuchillascontralaempuffadurade
lamanijaderechaylacortadorasemover_.Su_Itelay lascuchillasse
detendr_n.
Fundonamientoen Pendiente
Consultelasecd6nINDICADORDEPENDIENTEdelap_gina57paradetermlnaren
qu6pendJentespuedeoperarlacortadoraconsegurJdad.
Nocorteenpendientesconunainclinad6n dem_sde15grados(elevad6n
apro×imadade2112piesporcada10pies).Lacortadorapodriavoltearsey
causarlesionesgraves.
Muevalapodadoraatrav_sdelascarasdela pendiente,nuncahadaarribay
abajo.Tengacuidadocuandocambiededirecd6ncuandooperela m_quina
enpendientes.
Est_atentoalosagujeros,raices,rocas,objetosocultosoabultamientosque
puedanprovocarquesederrapeo setropiece.Elc_spedaltopuedeocultar
obst_culos.
Siempreest_segurodesuequilibr[o.S[tropiezaycaepuedelesionarse
gravemente.Sisientequepierdeel equilibrio,suelte[nmediatamente
lamanijadecontroldelacucHIlaylacucMladejaki degirarentres(3)
segundos.
Nocorteelc_spedcercadepozos,hundimientos,bancos,podr[aperderel
equilibrio.
Nopodependientesmayoresde15gradoscomoIo[ndkaelmedidorde
pendientes.
Nopodeelc#spedhumedo.Sinoest_ifirmementeparado,puederesbalarse.
Parasubirobajarla plataformadecorte,muevalapalancadealturadela
plataformahadalaizquierdaycol6quelaenlamuescaquemejorseadapteala
aplicaci6ndeseada.
CortedeC sped
Laslgulentelnformad6nle resultar_it_tilparaoperarlacortadora.
Planifiqueelpatr6ndetorte, paraevitar queladescargadematerialesse
realke hadaloscaminos,lasveredas,losobservadores,etc. Eviteadem_s
descargarmaterialcontrauna pareduobstrucd6n quepodriahater queel
materialdescargadorebotecontrael operador.
Nocorteaaltaveloddad,espedalmentesisehalnstaladoun kitparaabono
ouncolectordec6sped.
Nocorteelc6speddemasladocorto.Elc_spedcortoallentaelcredmlentode
malezasyseponeamarillor_pldamentecuandoescasealaIluvla.
Slemprehagafundonarlacortadoraconelcontroldelregulador/cebador
enlaposicl6nFAST(r_pida,representadapotunaIlebre)mlentrascortael
c6sped.
Paraobtenerlosmejoresresultados,serecomlendarealizarlosdosprlmeros
cortesdec6spedarrojandoladescargahadaelcentro.Despu6sdelasdos
prJmerasvueltas,cambleladlrecd6nparaarrojarladescargahadaafuera,
paraequilibrarelcorte.Estootorgar_unmejoraspectoalc_sped.
NOJntentecortarmalezasfrondosasoc_spedextremadamentealto.La
cortadoraruedJseffadaparacortarelc6sped,NOparapodarmalezas.
Mantengalascuchlllasafiladasyreempl_celascuandosedesgasten.
Despu_sdegolpearalgun objetoextraffo,detengael motor,desconecte
elcabledela bujiay con_cteloatierra conel motor. Inspecdone
minuciosamente[am_quinaparadeterminarsiest_daffada.Controle
siemprelacorreadesincronizaci6ndelacucbillacomoseindkaen
lasecci6nMantenimientodeestemanual.Repareeldaffoantesde
encenderlay hacerfuncionar[acortadora.
64
Page 65

Abono
Lascortadorasdec#spedanchasSearsvJenenequJpadasconunkitparaabonoque
incorporacucM[asespeda[es,quevienendeserieensucortadora,pararedrcular
losrecortesdec#spedrepetidasvecespordebajode[aplataformadetorte. Los
recortesmuyfinos[uegosondespedidoshadaatr_sparaquesedepositenen
elc#spedyactuencomofertJlJzantenatural.Observelossiguientespuntospara
obtenerlosme[oresresultadosalrealizarelabono.
Nunca[ntenterealizarelabonos[elc#spedest_humedo.Elc#spedhumedo
tiendeaadherirseal ladoinferiordelaplataformadetorte e[mpideel
procesoadecuadodelosrecortesdec#spedcomoabono.
NO[ntenterealizarelabonoa m_sde1/3delaalturatotaldelc#sped.DeIo
contrar[olosrecortesdec#spedseamontonar_nformandoterronesdebajo
delaplataformaynoseprocesar_neficazmentecomoabono.
Mantengaunaveloddadabsolutalentaparapermitirquelosrecortesde
c#spedseproceseneficazmentecomoabono.
SiempremantengalapalancadecontroldelreguladorenlaposkidnFAST
(veloddadr_pida,representadaporunaIiebre)mientrasmientrascorta
elc#sped.S[elmotornosemantieneconelreguladoraplenosesomete
almotordelacortadoraaunesfuerzoquenoperm[tequelascuchillas
procesenadecuadamentelosrecortesdec#spedqueseusar_ndeabono.
Instaiaci6n/ Extracci6ndeiaToivade Abono
Antesdeinstalaro extraerla ciavijadeabono,desenganchelascuchillas,
apagueel motor y retirela[lave,paraevitar quealguienendenda
acddentalmenteel motor.
[nstalad6n de [aTolvadeAbono
1. Detengaelmotoryesperaquetodaslaspiezasdejendemoverse.
2. InsertelalengiJetaderecha(A)delaclavljaenelsoportedelaplataforma.
Yeala Figura12.
f
Figura12
3. Insertelaclavijadeabonoenlaaberturadedescarga(B).
4. Unavezcolocadaenlaaberturadelaplataforma,empujeladavijahadala
parteposteriordelacortadora(C)parafijarlaensulugar.
Extracd6nde la Tolvade Abono
Desllcelaclavljahadaladerecha(hadalapartedelanteradelacortadora)para
desengancharla ranuradelaplataformadelacortadorayluegofuerceellado
izquierdodelaclavijahadafuera.
J
65
Page 66
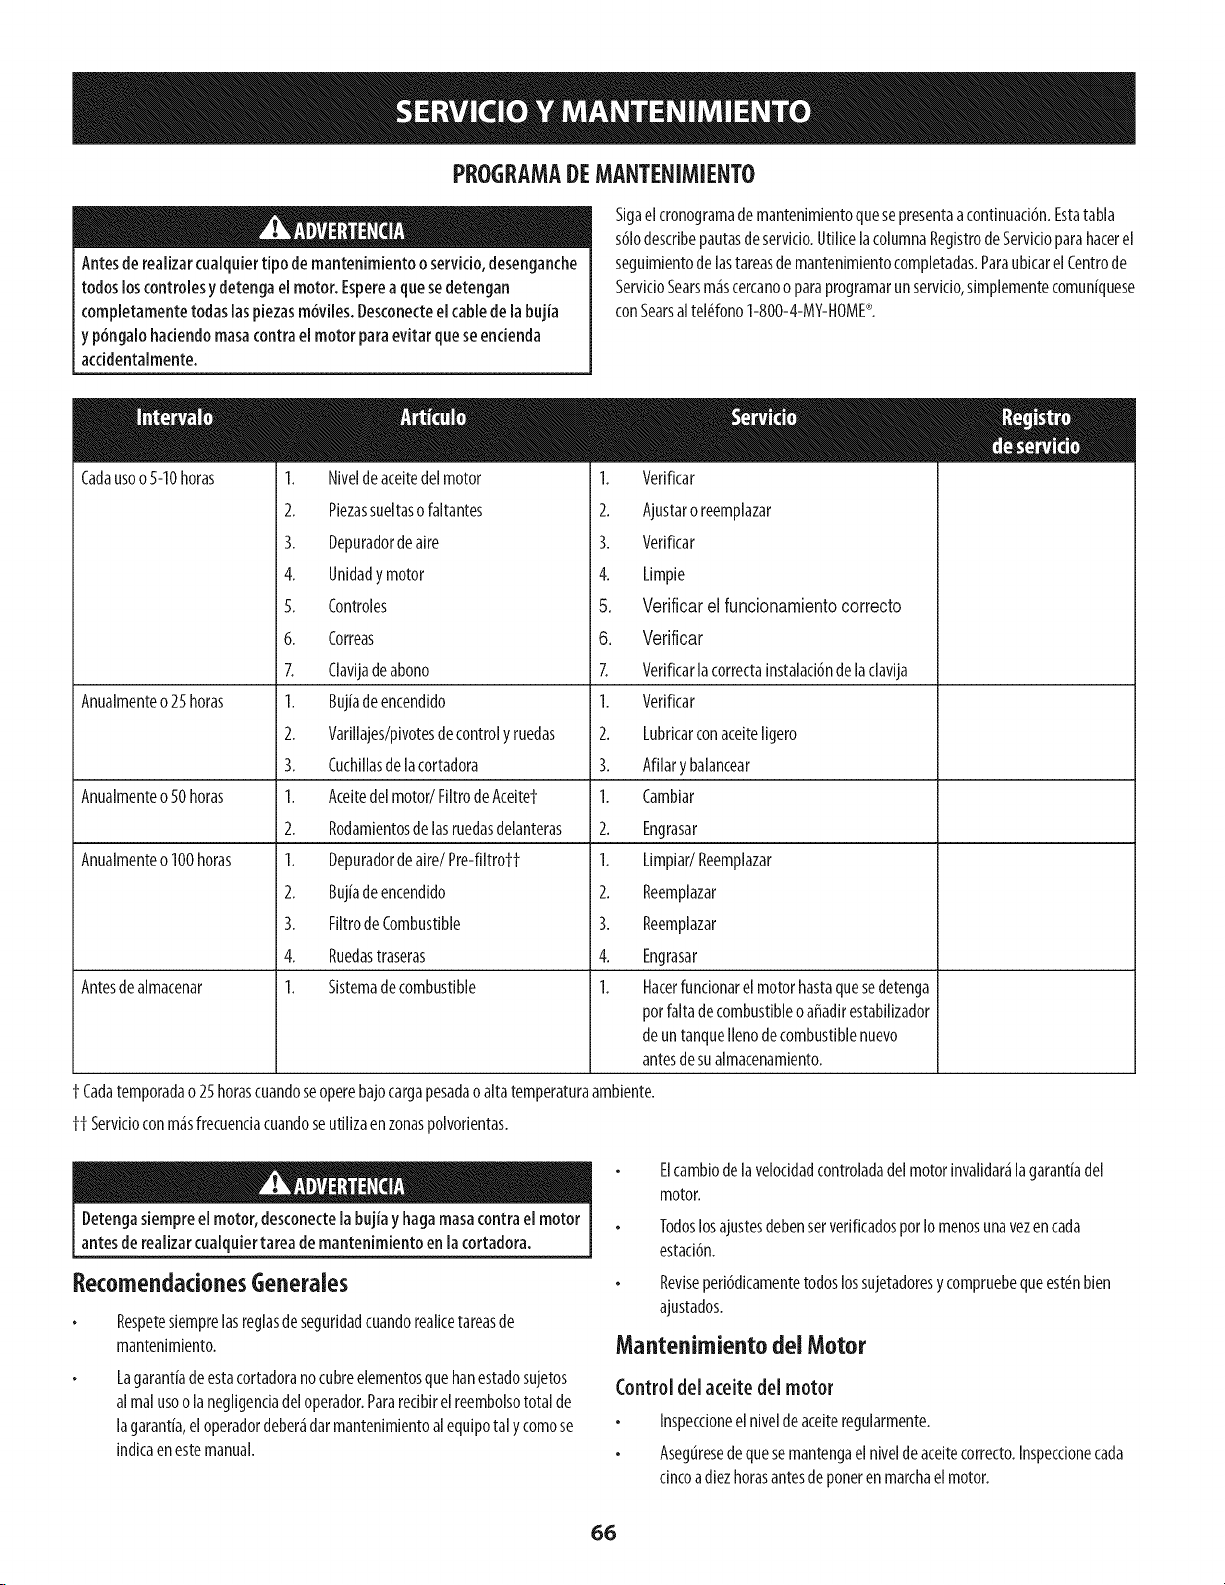
PROGRAMADEMANTENIMIENTO
Antesderealizarcualquiertipodemantenimientoo servicio,desenganche
todosloscontrolesydetengaelmotor.Espereaquesedetengan
completamentetodaslaspiezasm6viles.Desconecteelcabledelabujia
y p6ngalobaciendomasacontraelmotor paraevitar queseencienda
acddentalmente.
Sigaelcronogramademantenimientoquesepresentaacontinuaci6n.Estatabla
s61odescribepautasdeservicio.UtilicelacolumnaRegistrodeServicioparahacerel
seguimientodelastareasdemantenimientocompletadas.ParaubicarelCentrode
ServicioSearsm_scercanoo paraprogramarunservicio,simplementecomuniquese
conSearsalteBfono1-800-4-MY-HOME®.
Cadausoo5-10horas
Anualmenteo25horas
Anualmenteo.50horas
Anualmenteo100horas
Antesdealmacenar
1. Niveldeaceitedelmotor
2. Piezassueltasofaltantes
3. Depuradordeaire
4. Unidadymotor
5. Controles
6. Correas
7. Clavijadeabono
1. Bujiadeencendido
2. Varillajes/pivotesdecontrolyruedas
3. Cuchillasdelacortadora
1. Aceitedelmotor/FiltrodeAceitef
2. Rodamientosdelasruedasdelanteras
1. Depuradordeaire/Pre-filtroff
2. Bujiadeencendido
3. FiltrodeCombustible
4. Ruedastraseras
1. Sistemadecombustible
1. Verificar
2. Ajustaroreemplazar
3. Verificar
4. Limpie
5. Verificar el funcionamiento correcto
6. Verificar
7. Verificarlacorrectainstalad6ndelaclavija
1. Verificar
2. Lubricarconaceiteligero
3. Afilarybalancear
1. Cambiar
2. Engrasar
1. LimpiadReemplazar
2. Reemplazar
3. Reemplazar
4. Engrasar
1. Hacerfuncionarelmotorhastaquesedetenga
potfaltadecombustibleo afiadirestabilizador
deuntanqueIlenodecombustiblenuevo
antesdesualmacenamiento.
$Cadatemporadao25horascuandoseoperebajocargapesadaoaltatemperaturaambiente.
ff Servicioconm_sfrecuenciacuandoseutilizaenzonaspolvorientas.
Detengasiempreelmotor,desconectela bujiay hagamasacontrael motor
antesderealizarcualquiertareademantenimientoenlacortadora.
EecomendacionesGenerales
Respetesiemprelasreglasdeseguridadcuandorealicetareasde
mantenimiento.
Lagarantiadeestacortadoranocubreelementosquehanestadosujetos
almalusoolanegligenciadeloperador.Pararedbirelreembolsototalde
lagarantia,el operadordeber_darmantenimientoalequipotalycomose
indlcaenestemanual.
Mantenimientodei Motor
Control del aceite del motor
66
Elcambiodelavelocidadcontroladadelmotorinvalidar_lagarantiadel
motor.
TodoslosajustesdebenserverificadosporIomenosunavezencada
estaci6n.
Reviseperi6dicamentetodoslossujetadoresycompruebequeest_nbien
ajustados.
Inspeccioneelniveldeaceiteregularmente.
Asegtkesedequesemantengaelniveldeaceitecorrecto.Inspeccionecada
cincoadiezhorasantesdeponerenmarchael motor.
Page 67
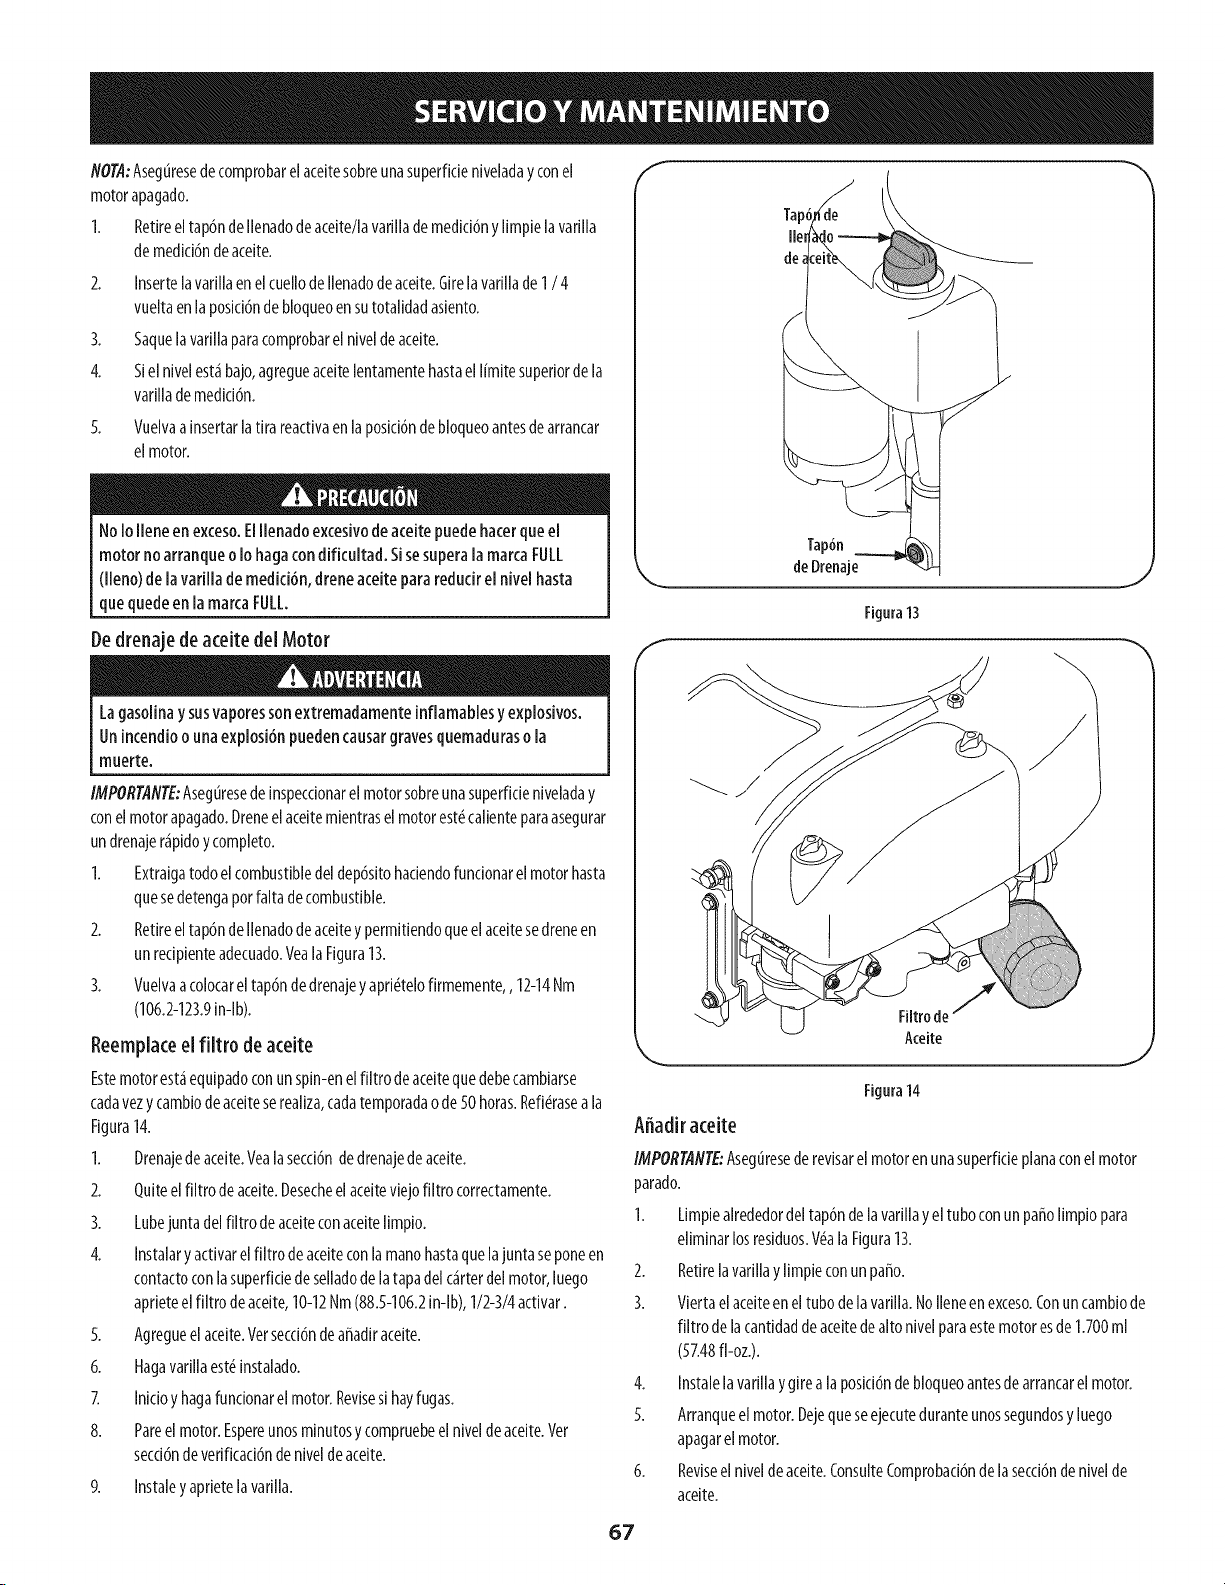
NOTA:Asegtiresedecomprobarelaceitesobreunasuperfideniveladayconel
motorapagado.
1. Retireeltap6ndellenadodeaceite/lavarillademedkidny limpielavarilla
demedki6ndeaceite.
2. InsertelavarillaenelcuellodeIlenadodeaceite.Girelavarillade1/4
vueltaenlaposici6ndebloqueoensutotalidadasiento.
3. Saquelavarillaparacomprobarelniveldeaceite.
4. Sielnivelest_bajo,agregueaceitelentamentehastael I[mitesuperiordela
varfllademedid6n.
5.
Vuelvaainsertarlatirareactivaenlaposici6ndebloqueoantesdearrancar
elmotor.
f
Tapd
Ile_
dea
NoIoIleneenexceso.ElIlenadoe×cesivodeaceitepuedehaterqueel
motor noarranqueoIohagacondificultad. SisesuperalamarcaFULL
([leno)de lavariflademedici6n,dreneaceiteparareducire[nive[hasta
quequedeen[amarcaFULL.
Dedrenaje de aceitedel Motor
Lagasoiinay susvaporessonextremadamenteinflamabiesyexpiosivos.
Unincendioounaexpiosi6npuedencausargravesquemaduraso[a
muerte.
IMPORTANTE:Asegtiresedeinspeccionarelmotorsobreunasuperfideniveladay
conel motorapagado.Dreneelaceitemientraselmotorest_calienteparaasegurar
undrenajer&pidoycompleto.
1. Extraigatodoelcombustibledeldep6sitohaciendofuncionarelmotorhasta
quesedetengaporfaltadecombustible.
2. Retireeltap6ndeIlenadodeaceiteypermitiendoqueelaceitesedreneen
unrecipienteadecuado.YealaFigura13.
3. Vuelvaacolocareltap6ndedrenajeyapri_telofirmemente,,12-14Nm
(106.2-123.9in-lb).
Reemplaceelfiltro de aceite
Estemotorest_equipadoconunspin-enelfiltro deaceitequedebecambiarse
cadavezycambiodeaceiteserealiza,cadatemporadaode50horas.Refi_raseala
Figura14.
1. Drenajedeaceite.Vealasecci6ndedrenajedeaceite.
2. Quiteelfiltro deaceite.Desecheelaceiteviejofiltro correctamente.
3. Lubejuntadel filtrodeaceiteconaceitelimpio.
4. Instalaryactivarelfiltro deaceiteconlamanohastaquelajuntaseponeen
contactoconlasuperfidedeselladodelatapadelc&rterdelmotor,luego
aprieteelfiltro deaceite,10-12Nm(88.5-106.2in-lb),1/2-3/4activar.
5. Agregueelaceite.Vetsecd6ndeaffadiraceite.
6. Hagavarillaest_instalado.
7. Inicioyhagafuncionarelmotor.Revisesihayfugas.
8. Pareelmotor.Espereunosminutosycompruebeelniveldeaceite.Vet
secd6ndeverificaci6ndeniveldeaceite.
9. Instaleyaprietelavarilla.
Tap6n
deDrenaje , ._
Figura13
f
Filtrode
Aceite
J
Figura14
Affadir aceite
IMPORTANTE:Asegtiresederevisarelmotorenunasuperficieplanaconel motor
parado.
I. Limpiealrededordeltap6ndelavarillayel tuboconun paffolimpiopara
eliminarlosresiduos.V_ala Figura13.
2. Retirelavarillaylimpieconunpaffo.
3. Viertaelaceiteeneltubodelavarilla.Nolleneenexceso.Conuncambiode
filtro delacantidaddeaceitedealtonivelparaestemotoresde1.700ml
(57.48fl-oz.).
4. Instalelavarillaygirea laposici6ndebloqueoantesdearrancarelmotor.
5. Arranqueelmotor.Dejequeseejecuteduranteunossegundosyluego
apagarelmotor.
6. Reviseelniveldeaceite.ConsulteComprobaci6ndelasecci6ndenivelde
aceite.
67
Page 68
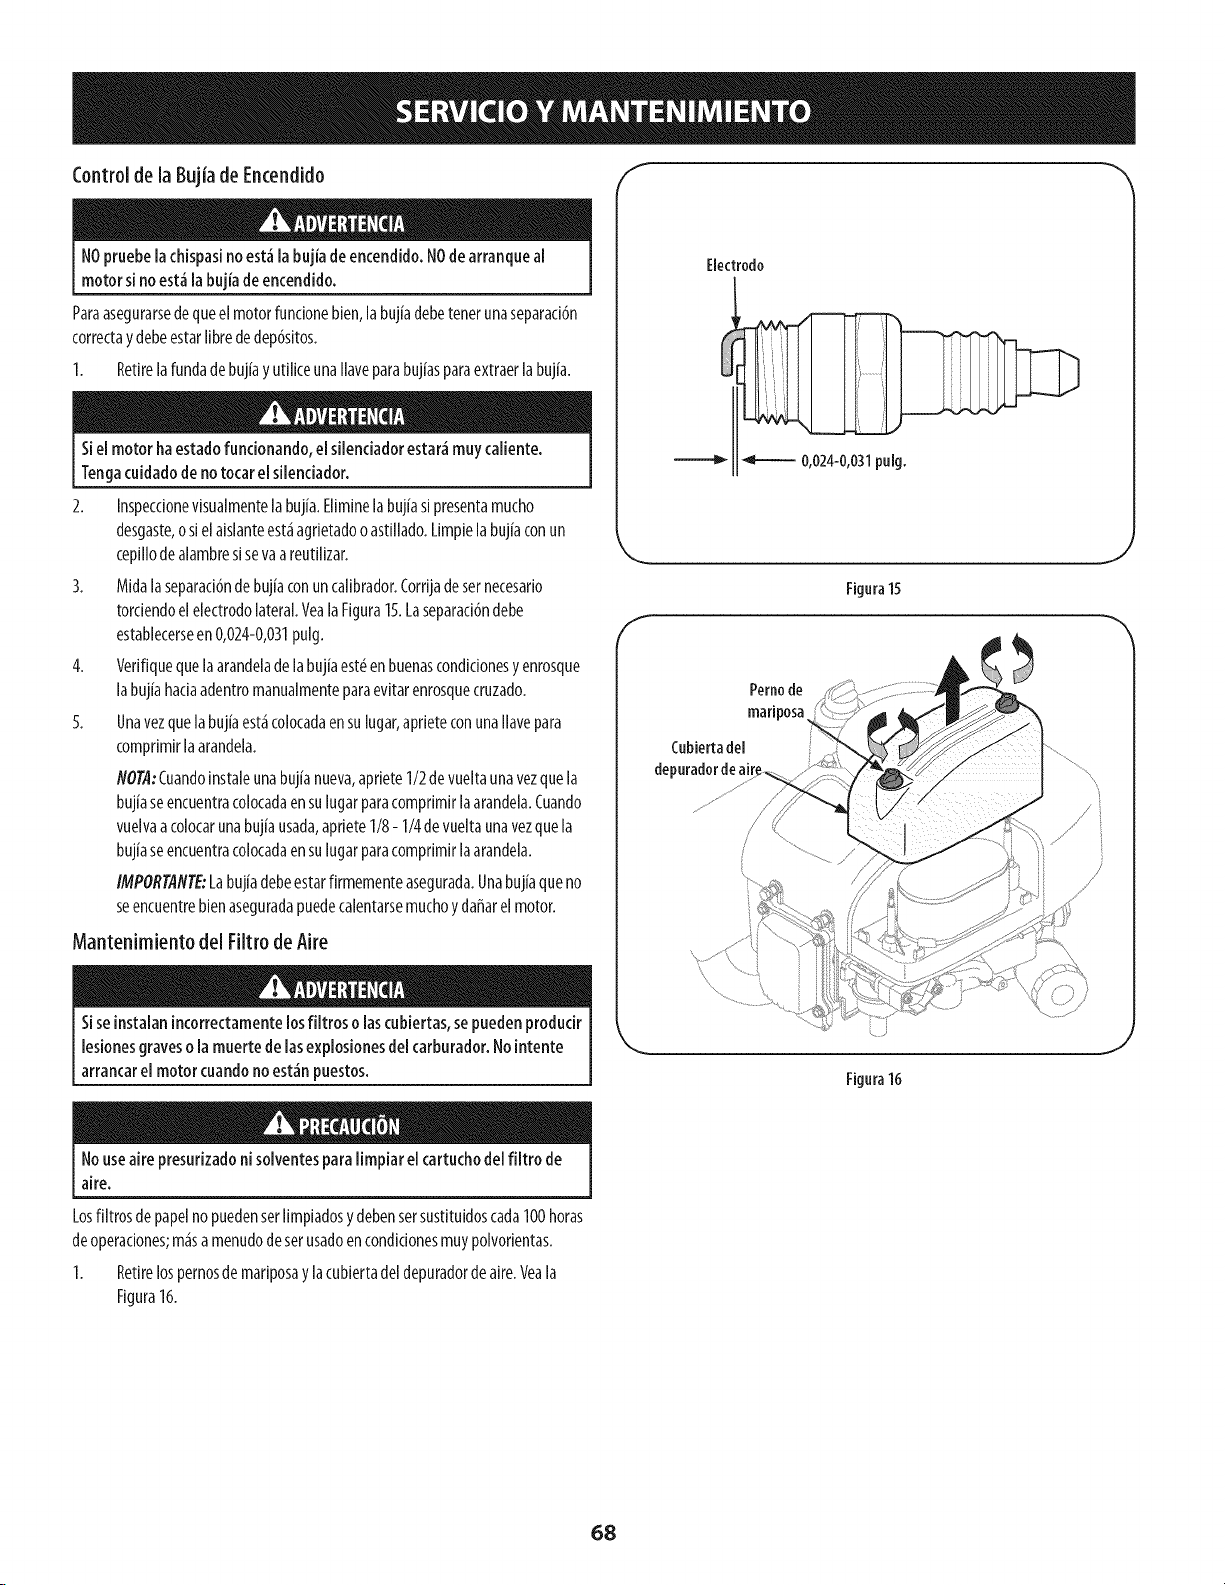
Controlde la Bujiade Encendido f "
NOpruebelachispasinoest_labujiadeencendido.NOdearranqueal
motorsi noest_la bujiadeencendido.
Paraasegurarsedequeelmotorfuncionebien,labujiadebetenerunaseparaci6n
correctaydebeestarlibrededep6sitos.
1. RetirelafundadebujiayutiliceunaIlaveparabujiasparaextraerlabujia.
Sielmotor haestadofuncionando,elsilenciadorestar_muycaliente.
Tengacuidadodenotocarel silenciador.
Inspecdonevisualmentela bujia.Eliminelabujias[presentamucho
desgaste,osielaislanteest_agdetadooastillado.Limpielabuj[aconun
cepillodealambresisevaareutilizar.
Midalaseparaci6ndebujiaconuncalibrador.Corrijadesetnecesario
tordendoelelectrodolateral.Yeala Figura15.Laseparad6ndebe
establecerseen0,024-0,031pulg.
4.
Verifiquequelaarandeladelabujiaest_enbuenascondidonesyenrosque
labujiahaciaadentromanualmenteparaevitarenrosquecruzado.
5.
Unavezquelabujiaest_colocadaensulugar,aprieteconunaIlavepara
comprimirlaarandela.
NOTA:Cuandoinstaleunabuj[anueva,apriete1/2devueltaunavezquela
bujiaseencuentracolocadaensulugarparacomprimirlaarandela.Cuando
vuelvaacolocarunabujiausada,apdete1/8- 1/4devueltaunavezquela
buj[aseencuentracolocadaensulugarparacomprimirlaarandela.
IMPORTANTE:Labujiadebeestarfirmementeasegurada.Unabujiaqueno
seencuentrebienaseguradapuedecalentarsemuchoydaffarelmotor.
Mantenimiento del Filtro de Aire
Electrodo
0,024-0,031pulg.
Figura15
f
Pemode
mariposa
Cubiertadel
depuradordeair_
\
Siseinstalanincorrectamentelosfiltros o lascubiertas,sepuedenprodudr
lesionesgravesolamuertedelasexplosionesdelcarburador.Nointente
arrancarel motorcuandonoest_npuestos.
Nouseairepresudzadonisolventesparalimpiar el cartuchodel filtro de
aire.
Losfiltrosdepapelnopuedenserlimpiadosydebensersustituidoscada100horas
deoperaciones;m_sa menudodeserusadoencondidonesmuypolvorientas.
1. Retirelospernosdemariposay lacubiertadeldepuradordeaire.Veala
Figura16.
68
Page 69
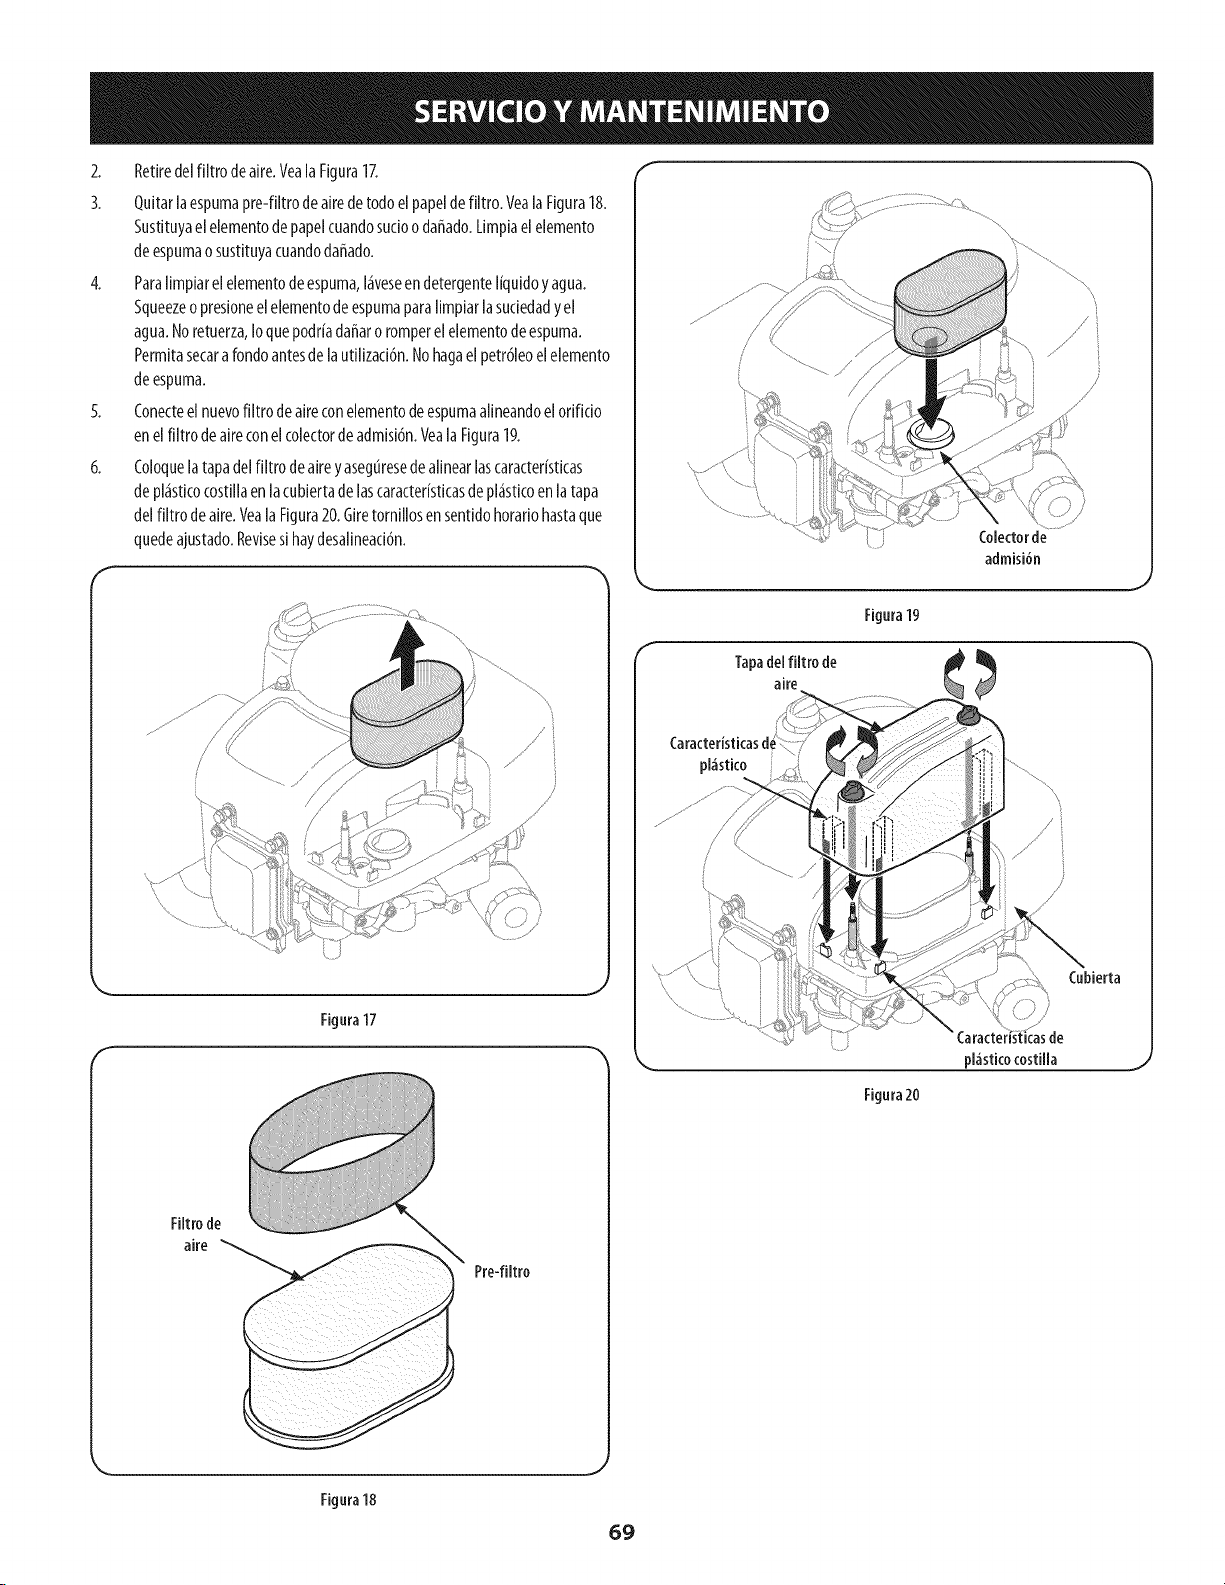
2. Retiredelfiltrodeaire.Veala Figura17.
3. Ouitarlaespumapre-filtrodealredetodoel papeldefiltro.VealaFlgura18.
Sustituyaelelementodepapelcuandosucioodafiado.Limpiaelelemento
deespumaosustituyacuandodafiado.
4. Paralimpiarelelementodeespuma,I_veseendetergenteliquidoyagua.
Squeezeopresioneelelementodeespumaparalimpiarlasuciedadyel
agua.Noretuerza,Ioquepodriadafiaroromperelelementodeespuma.
Permitasecara rondoantesdelautilizaci6n.Nohagaelpetr61eoelelemento
deespuma.
5. Conecteel nuevofiltro deaireconelementodeespumaalineandoel orificio
enelfiltrodeaireconelcolectordeadmisibn.VealaFigura19.
6. Coloquelatapadelfiltro deaireyaseguresedealinearlascaracteristicas
depl_sticocostillaenlacubiertadelascaracteristicasdepl_sticoenlatapa
delfiltro deaire.Veala Figura20.Giretornillosensentidohorariohastaque
quedeajustado.Revisesihaydesalineaci6n.
f
Colectorde
admisi6n
Figura19
Tapadelfiltrode
aire
Filtro de
aire
Figura17
Pre-filtro
pl_stico
,j
pl;_sticocostilla
Figura20
Cubierta
asde
Figura18
69
Page 70

ServidoconFiltrodeCombustible
Elfiltro decombustibleno puedeserIlmpiadoydebesersustituidocada100horas
deoperaciones;m_samenudodesetdirigidoconviejagasolina.
1. Quitetodoelcombustibledeltanquedlrlgiendoelmotorhastaqueestose
pareafaltadelcombustible.
2. Usepinzasparaagarrarlaspestaffasdelasabrazaderas,acontinuacl6n,aleje
lasabrazaderasdelfiltro decombustible.VerlaFlgura21.
3. Glreytiredelaslineasdecombustiblefueradelfiltro decombustible.
4. Reemplaceconunnuevofiltro decombustible.
5. Asegurelaslineasdecombustibleconlasabrazaderas.
Bateria
Losbornesde[abateriaylosaccesoriosafinescontienenpiomoy
compuestosdepiomo,sustanciasqu[micasquesegun1oestabieddopor
el EstadodeCaliforniacausanc_ncerydaffosenelsistemareproductivo.
L_veselasmanosdespu_sdeestarencontactoconestoscomponentes.
Labater[aest_selladaynonecesitamantenimiento.Losnivelesde_cidonose
puedencontrolarynosepuedeagregarI[quido.
Siempremantengalimpiosylibresdeacumulad6ndeelementoscorrosivos
loscablesylosbornesdelabater[a.
Despu_sdelimplarlabater[aylosbornes,apliqueunacapadelgadade
vaselinaograsaaambosbornes.
f
Filtrode /
Combustible ,,,
Pesta_a
lineade
combustible
Figura21
Arranquelacortadora(segunlasinstruccionesdelasecci6nFuncionamiento
deestemanual).
6. Retireloscablesdearranqueenordeninversoa laconexi6n.
/
/
Abrazadera
Cargade la Bateda
Siextraelabateriaparalimpiarla,desconecteprimeroel cableNEGATIVO
(negro)desuborney acontinuad6nelcablePOSITIVO(rojo).Cuandovuelva
ainstaiarla bateria,conectesiempreprimeroelcablePOSITIVO(rojo)asu
borne,y acontinuaci6nelcableNEGATIVO(negro).AsegLiresedequelos
cablesest_nconectadosalosterminaiescorrectos,yaquesilosinvierte
puedecausardaffosgravesalsistemaaiternadordel motor.
Arranque conPinzaspara Bateda
Nuncaarranqueconpinzasunabateriadaffadaocongelada.Aseguresede
cluelosvehkulos nosetoqueny losmotoresest_napagados.Nopermita
cluelaspinzasdeloscablessetoquen.
Conecteelcablepositivo(+)albornepositivo(+) delabater[adescargada
desucortadora.
2. Conecteelotroextremodelcablealbornepositivo(+) delabateriacargada.
3. Conecteelsegundocablenegativo(-)alotrobornedelabateriacargada.
4. Hagalaconexi6nfinalsobreelbloquedelmotordelacortadora,lejosde
labateria.Acopleaunapartesinpinturaparaasegurarsedequehayauna
buenaconexi6n.
Si[abateriacargadaest_instaladaenunvehkulo (esdealt,autom6vil,
cami6n)NOpongaen marcbaelmotor delvehkulocuandoarranquela
cortadoraconlaspinzas.
AIcargarse,lasbateriasemitenun gasquepuedecausarexplosiones.
Carguela bateriaenun_reabienventiladay mant_ngalaalejadadeuna
llamaexpuestaopiloto,comolosdeloscalentadoresdeagua,calefactores
deambiente,hornos,secadoresderopay otrosaparatosa gas.
Cuandocarguela bateriadela cortadora,utilice unicamenteuncargador
diseffadoparabateriasdeplomo-_cidode12V.Leael ManualdelOperador
delcargadordelabateriaantesdecargarla bateriadelacortadora.
Siempresigalasinstrucdonesy tengaencuentalasadvertendas.
Sisucortadoranosehausadoduranteunper[ododetiempoprolongado,carguela
bater[adelasiguientemanera:
1. Ajusteelcargadorde bater[aparaqueproduzcaunm_ximode10amperios.
2. S[sucargadordebateriaesautom_tico,carguelabateriahastaqueel
cargador[ndiquequesehacompletadolacarga.Sielcargadornoes
autom_tico,cargueporochohorascomom[nimo.
Presi6ndelosNeum ticos
Lapresi6nm_×imadelosneum_ticosencualquierdrcunstanciaesde30
psi.Sedebemantenerunapresi6nuniforme paratodoslosneum_tkosen
todomomento.
7O
Page 71
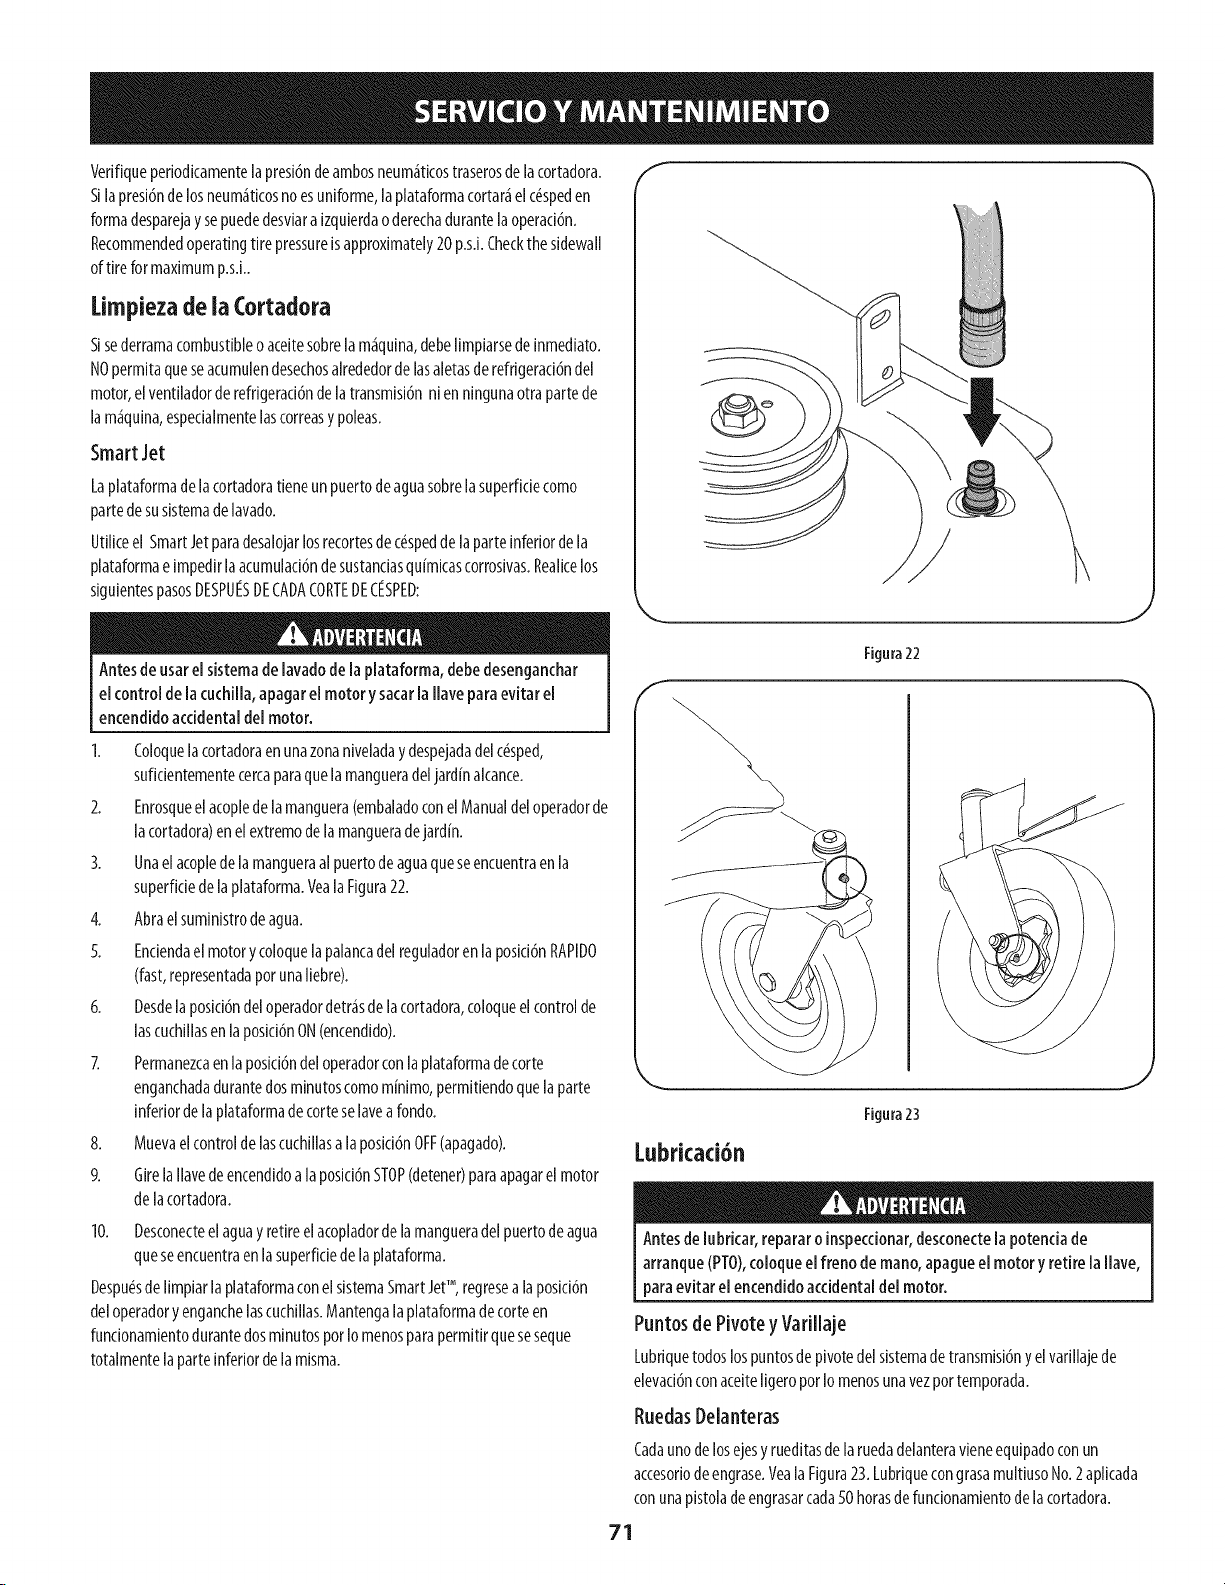
Verifiqueperiodicamentelapresi6ndeambosneum_ticostraserosdelacortadora.
Silapresi6ndelosneum_tkosnoesuniforme,laplataformacortar_elc_speden
formadesparejaysepuededesviara[zquierdao derechadurantelaoperad6n.
Recommendedoperatingtirepressureisapproximately20p.sJ.Checkthesidewall
oftireformaximump.sJ..
Limpieza de ia Cortadora
Sisederramacombustibleoaceitesobrelam_quina,debelimpiarsedeinmediato.
NOpermltaqueseacumulendesechosairededordelasaietasderefrigerad6ndel
motor,elventiladorderefrlgerad6ndelatransmlsi6nn[ennlngunaotrapartede
lam_quina,espedalmentelascorreasypoleas.
SmartJet
Laplataformadelacortadoratieneunpuertodeaguasobrelasuperfidecomo
partedesuslstemadelavado.
Utiliceel SmartJetparadesalojarlosrecortesdec_speddelaparteinferiordela
plataformae[mpedlrlaacumulad6ndesustandasqu[mlcascorrosivas.Reallcelos
siguientespasosDESPUESDECADACORTEDEClaSPED:
Antesdeusarelsistemadelavadodela plataforma,debedesenganchar
el controldela cuchilla,apagarel motor ysacarla llaveparaevitar el
encendidoacddentaldelmotor.
I. Coloquelacortadoraenunazonaniveladaydespejadadelc_sped,
sufidentementecercaparaquelamangueradeljardinalcance.
2. Enrosqueelacopledelamanguera(embaladoconelManualdeloperadorde
lacortadora)enelextremode lamangueradejardin.
3. Unaelacopledelamangueraal puertodeaguaqueseencuentraenla
superfidedelaplataforma.Veala Figura22.
4. Abraelsumlnlstrodeagua.
5. Endendael motorycoloquelapalancadelreguladorenlaposid6nRAPIDO
(fast,representadaporunaliebre).
6. Desdelaposld6ndeloperadordetr_sde lacortadora,coloqueelcontrolde
lascuchlllasenlaposld6nON(encendldo).
7. Permanezcaenla posid6ndeloperadorconlaplataformadecorte
enganchadadurantedosminutoscomominimo,permitiendoquelaparte
inferiordelaplataformadecorteselavearondo.
8. Muevaelcontroldelascuchlllasalaposid6nOFF(apagado).
9. Girelallavedeencendidoalaposid6nSTOP(detener)paraapagarelmotor
delacortadora.
10. Desconecteelaguayretireelacopladordelamangueradelpuertodeagua
queseencuentraenlasuperfidedelaplataforma.
Despu_sdeIJmpiarlapiataformaconelsistemaSmartJetTM, regresealaposJd6n
deloperadoryenganchelascucHIlas.Mantengalapiataformadecorteen
fundonamientodurantedosminutosporIomenosparapermitirqueseseque
totalmentelaparteinferiordelamisma.
Figura22
,,_ j
Figura23
Lubricad6n
Antesdelubrkar, repararoinspecdonar,desconectelapotenda de
arranque(PTO),coloqueelfrenodemano,apagueel motor y retire la llave,
paraevitar elencendidoaccidentaldelmotor.
PuntosdePivoteyVarillaje
Lubrlquetodoslospuntosdeplvotedelsistemadetransmisi6nyelvarlllajede
elevad6nconaceltellgeroporIomenosunavezportemporada.
RuedasDelanteras
Cadaunodelosejesyrueditasdelaruedadelanteravieneequipadoconun
accesoriodeengrase.VealaFigura23.LubriquecongrasamultlusoNo.2aplicada
conunapistoladeengrasarcada50horasdefundonamlentodelacortadora.
71
Page 72
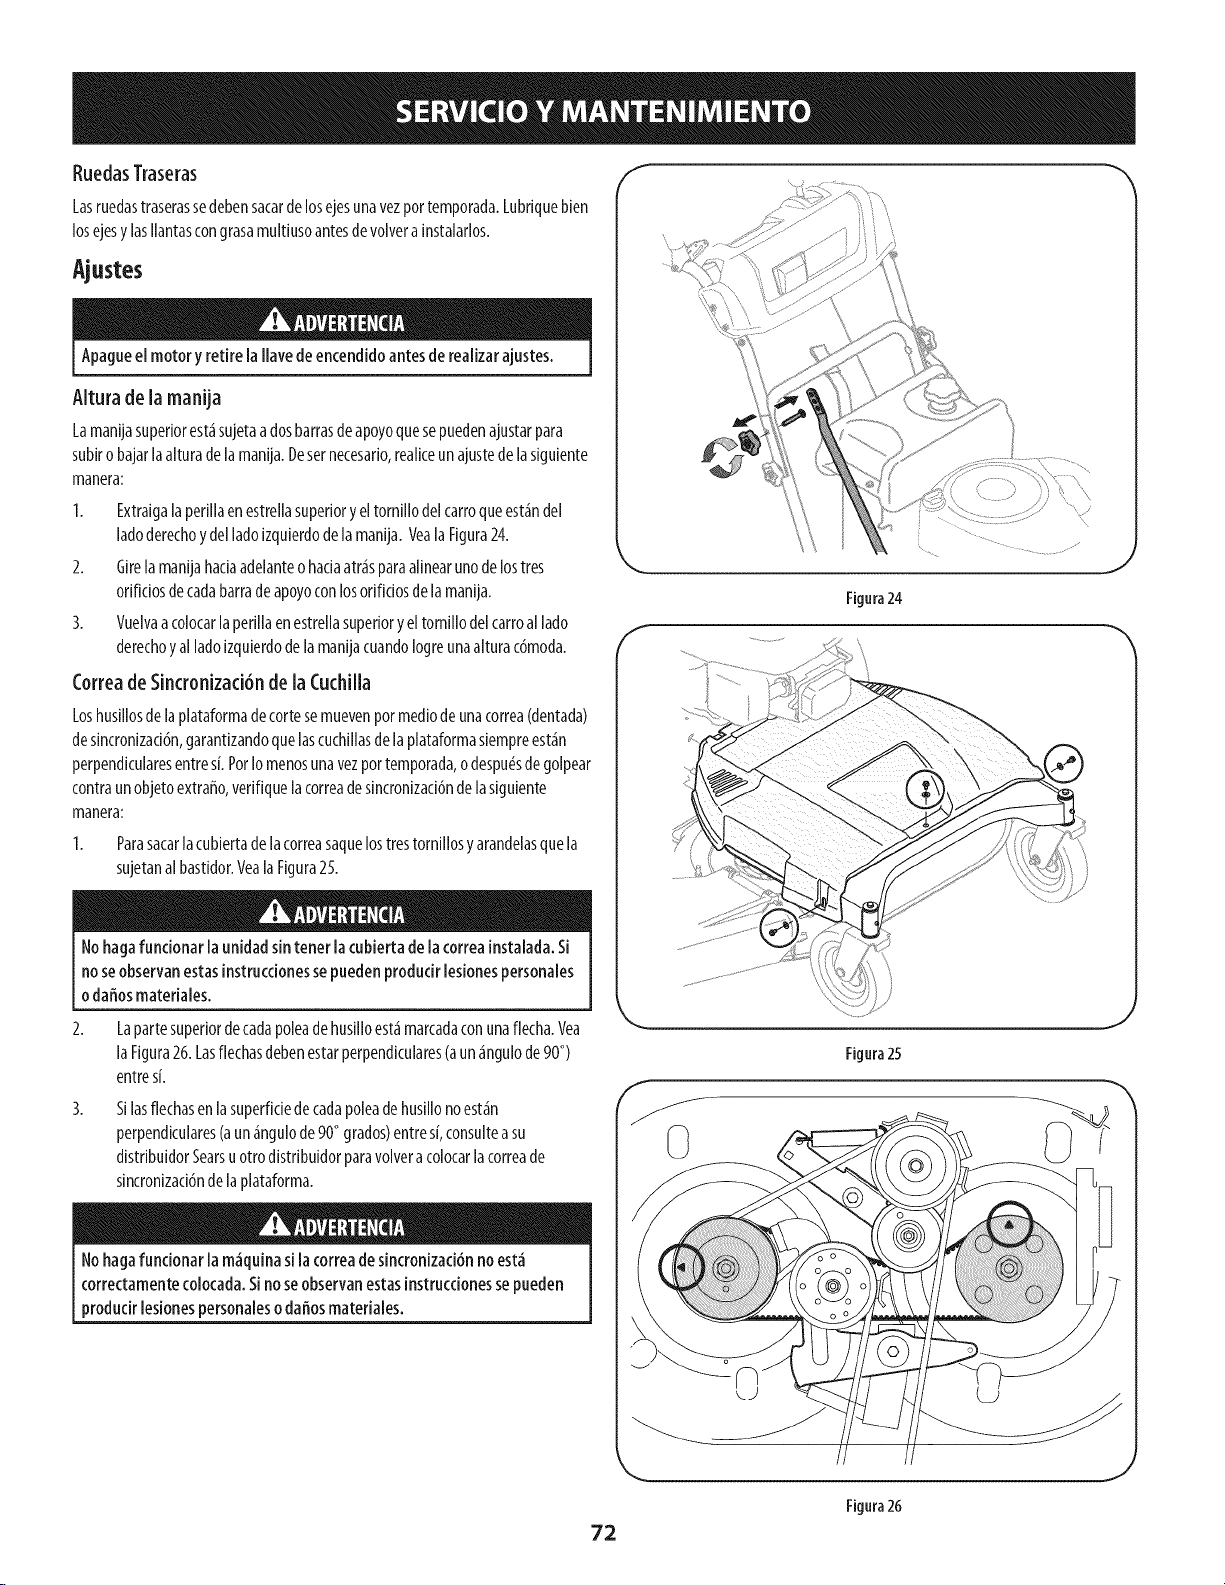
RuedasTraseras
Lasruedastraserassedebensacardelosejesunavezportemporada.Lubfiquebien
losejesylasIlantascongrasamultiusoantesde volverainstalarlos.
Ajustes
Apaguee[motoryretire[a Havedeencendidoantesdereaiizarajustes.
Altura de [amanija
Lamanijasuperiorest_sujetaa dosbarrasdeapoyoquesepuedenajustarpara
subirobajar[aaiturade[amanija.Desernecesafio,reake unajustede[asiguiente
manera:
1. Extraigalaperillaenestrellasuperioryeltornillodel carroqueest_ndel
ladoderechoydelladoizquierdodela manija.VealaFigura24.
2. Girelamanijahaciaadelanteo haciaatr_sparaalinearunodelostres
orificiosdecadabarradeapoyoconlosorificiosdelamanija.
3. Vuelvaacolocarlaperillaenestrellasuperioryeltornillodel carroallado
derechoyal ladoizquierdodelamanijacuandoIogreunaalturac6moda.
CorreadeSincronizad6n de la Cuchilla
Loshusillosdelaplataformadecortesemuevenpormediodeunacorrea(dentada)
desincronizaci6n,garantizandoquelascucHllasdelaplataformasiempreest_n
perpendicularesentres[.PorIomenosunavezportemporada,odespu_sdegolpear
contraunobjetoextraffo,vefifiquelacorreadesincronizaddndelasiguiente
manera:
Parasacarlacubiertadelacorreasaquelostrestornillosyarandelasquela
sujetanalbastidor.VealaFlgura25.
f
J
Figura24
f
!
Nohagafuncionar[aunidadsintener [acubiertade[acorreainstaiada.Si
noseobservanestasinstruccionessepuedenproducir[esionespersonaies
odaffosmateriaies.
Lapartesuperiordecadapoleadehusilloest_marcadaconunaflecha.Vea
laFlgura26.Lasflechasdebenestarperpendlculares(aun_ngulode90°)
entres[.
SIlasflechasenlasuperficiedecadapoleadehusillonoest_n
perpendiculares(aun_ngulode90°grados)entres[,consulteasu
distfibuidorSearsuotrodistfibuidorparavolvera colocarlacorreade
sincronizad6ndelaplataforma.
Nohagafuncionar[am_quinasi[acorreadesincronizaci6nnoest_
correctamenteco[ocada.Sinoseobservanestasinstruccionessepueden
producir[esionespersonaiesodaffosmateriaies.
J
Figura25
J
Figura26
72
Page 73

Extracci6nde ia Plataforma deCorte
Antesderealizarcualquiermantenimiento o reparaci6n,desconecte
lascuchillas,apagueelmotor yretirela llaveparaevitare[encendido
accidentaldelmotor.
Paraextraerlaplataformadecorte,procedadelasiguientemanera:
1. Parasacarlacubiertadelacorreasaquelostrestornillosyarandelasquela
sujetanalbastidor.Yeala Figura25.
Nohagafuncionar [aunidadsin tenerlacubiertadelacorreainstalada.Si
noseobservanestasinstruccionessepuedenproducirlesionespersonales
odaffosmateriales.
2.
Coloquelapalancadealturadelaplataformaenlaposici6ndetortem_s
alia.
3. Coloquetacosdemaderaenvarioslugaresdebajodelbordedela
plataforma.Soportar_ntemporalmentelaplataformamientrasladesmonta.
4. Uselapalancadealturadelaplataformaparabajarlaplataformayhacerla
descansarsobrelostacosdemadera.
5. Extraigaeltornilloy latuercadebridaquesujetalavarilladelguardacorrea
alladoizquierdodelbastidordelacortadora.YeaFigura27.
6. Extraigalavarilladelguardacorreayextraigalacorreade laplataformaque
est_alrededordelapolleadelmotordelacortadora.
7. Mirelaplataformadecortedesdeel ladoizquierdoysaqueconcuidadolos
pasadoreshorquillaquesujetanlossoportesdelaplataformaaloslaterales
posterioryanteriorizquierdosdelaplataforma.Veala Figura28.
8. Repitalospasosanterioresdelladoderechodelacortadora.
9. Retireconcuidadolossoportesdelanterosdelaplataformadelosbrazosde
elevaci6ndelaplataforma.
10. Concuidadodesengancheelmontajedeelevaci6ndelacortadoradelos
soportesposterioresdelaplataforma.
11. Uselapalancadealturadelaplataformaparalevantarelmontajeasu
posici6nm_salta.
12. Retirelostacosdemaderadedebajodelaplataformaydeslicesuavemente
laplataformadecortehaciaelrondodelam_quina.
13. Desengancheelcableresortedelatransmisi6ndelmontajedelbrazo
secundariolibre.YealaFigura29.
14. Deslicelentamentelaplataformahacialaderecha,sac_ndoladedebajode
lacortadora.
E
Figura27
Brazode
1_ elevaci6n
J
Figura28
Parainstalarlaplataformadecorte,sigalospasosanterioresenordeninversopara
volveraacoplarlaplataformaylacubiertadelacorrea.
J
Figura29
73
Page 74
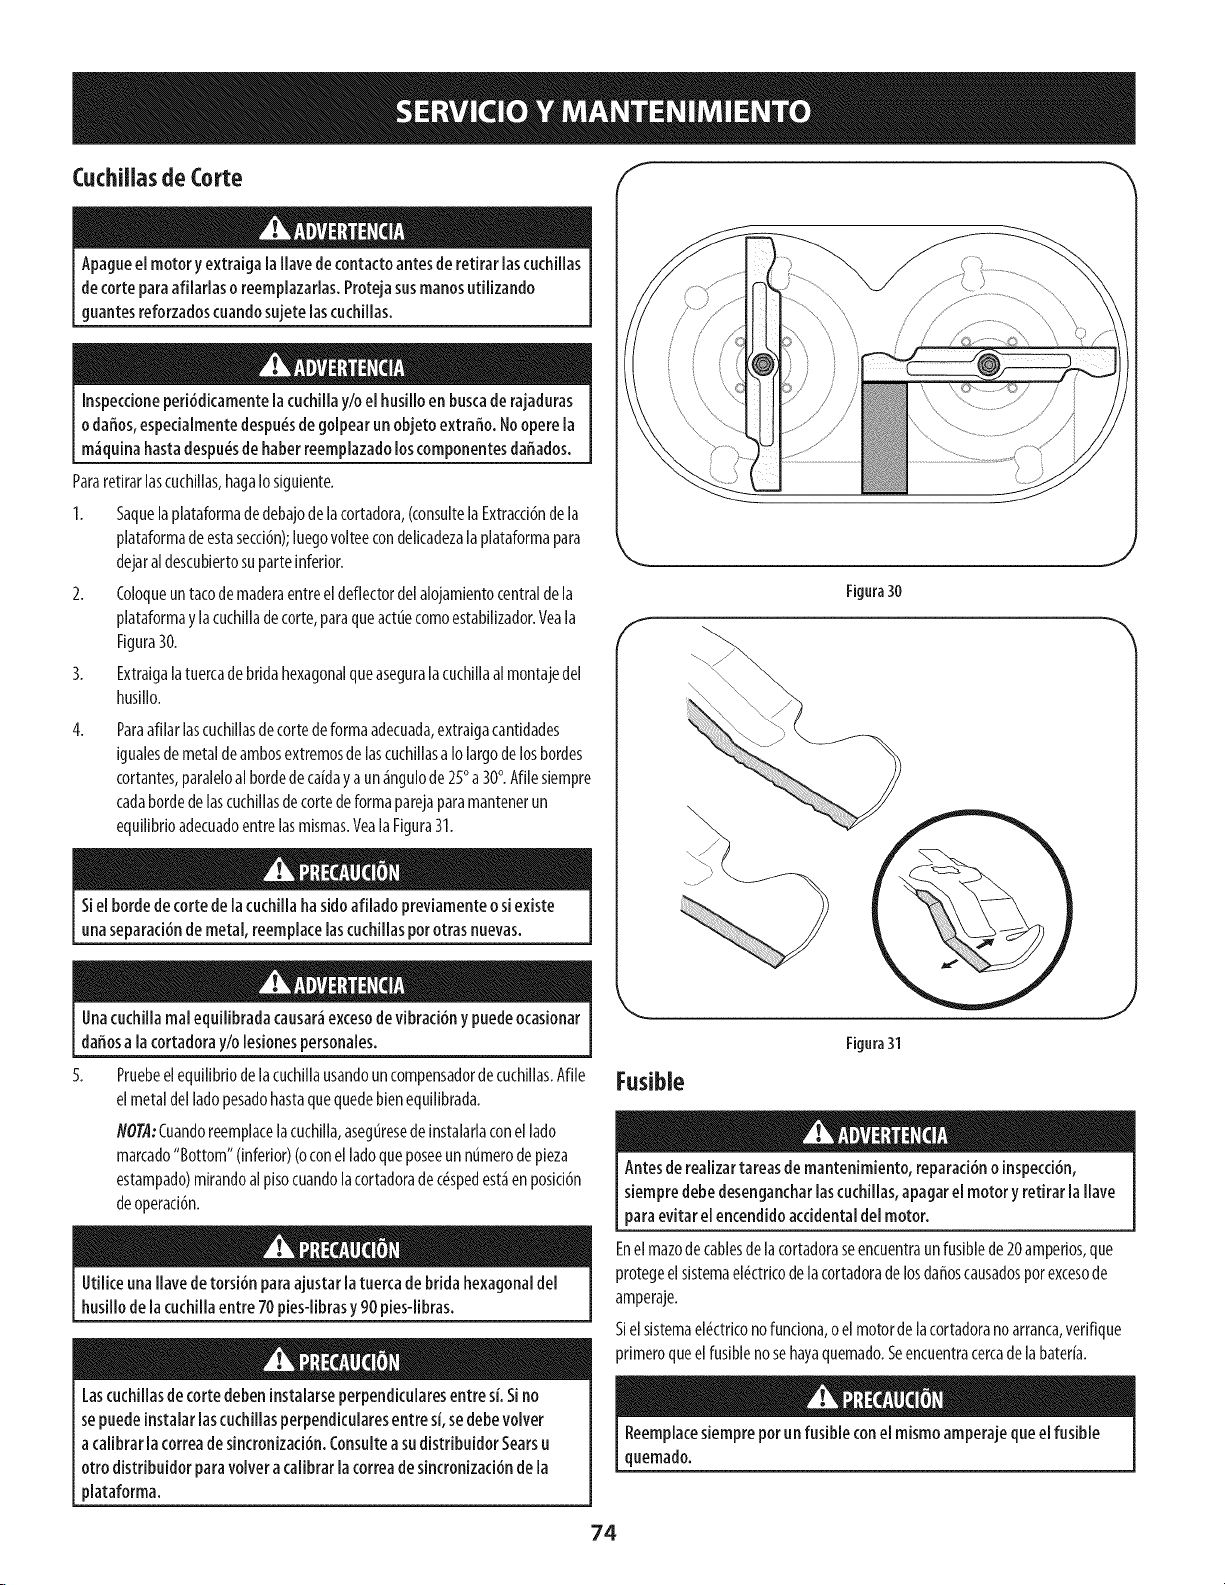
CuchUlasde Corte f
Apagueelmotoryextraiga la Ilavedecontactoantesde retirar[ascuchillas
decorteparaafilarlasoreemplazarlas.Prote]asusmanosutilizando
guantesreforzadoscuandosujete[ascuchillas.
Inspeccioneperi6dicamentelacuchillay/oelhusilloenbuscaderajaduras
odafios,especialmentedespu_sdegoipearunobjetoextraffo. Noopere[a
m_quinahastadespu_sde haberreemplazadoloscomponentesdaffados.
Pararetirarlascuchillas,hagaIosiguiente.
1. Saquelaplataformadedebajodelacortadora,(consultelaExtracci6ndela
plataformadeestasecci6n);luegovolteecondekadezalaplataformapara
dejaraldescubiertosuparteinferior.
2. Coloqueuntacodemaderaentreeldeflectordelalojamientocentraldela
plataformaylacucHIladetorte, paraqueacttiecomoestabilizador.Veala
Figura30.
3. Extraigalatuercade bridahexagonalqueaseguralacuchillaalmontajedel
husillo.
4.
Paraafilarlascuchillasdecortedeformaadecuada,extraigacantidades
[gualesdemetaldeambosextremosdelascucHIlasaIolargodelosbordes
cortantes,paraleloal bordedeca[daya un_ngulode25°a 30°.Afilesiempre
cadabordedelascucHIlasdecortedeformaparejaparamantenerun
equilibdoadecuadoentrelasmismas.VealaFigura31.
_, ,J
Figura30
Sie[bordedecorte de[a cuchiiiahasidoafiiadopreviamenteosi existe
unaseparaci6ndemetal reempiace[ascuchiiiasporotrasnuevas.
Unacuchiiiarealequilibrada causar_excesodevibraci6nypuedeocasionar
daffosa [acortadoray/o [esionespersonaies.
5.
Pruebeelequillbdodelacuchillausandouncompensadordecuchillas.Afile
elmetaldelladopesadohastaquequedebienequilibrada.
NO@:Cuandoreemplacelacuchilla,aseguresede[nstalarlaconellado
marcado"Bottom"(inferior)(oconelladoqueposeeunnumerodepieza
estampado)mirandoal pisocuandolacortadoradec_spedest_enposici6n
deoperaci6n.
UtiiiceunaHavedetorsi6nparaajustar[atuercadebridahexagonalde[
husii[ode[acuchiiiaentre70pies-iibrasy 90pies-iibras.
Lascuchi[iasdecortedebeninstaiarseperpendku[aresentresi.Sino
sepuedeinstaiar[ascuchHlasperpendkularesentre si,sedebevoiver
acalibrar[acorreade sincronizad6n.Consulteasudistdbuidor Searsu
otro distdbuidor paravoiveracaiibrar[acorreadesincronizad6nde[a
piataforma.
Fusible
Antesderealizartareasdemantenimiento,reparad6noinspecd6n,
siempredebedesenganchar[ascuchillas,apagarel motor yretirar[a[lave
paraevitarelencendidoaccidentalde[motor.
Enelmazodecablesdelacortadoraseencuentraunfusiblede20amperios,que
protegeelslstemael_ctrlcodelacortadoradelosdaffoscausadosporexcesode
amperaje.
Sielsistemael_ctriconofundona,oel motordelacortadoranoarranca,verifique
primeroqueelfusiblenosehayaquemado.Seencuentracercadelabateria.
Reemplacesiempreporun fusiblecone[ mismoamperajequee[fusible
quemado.
74
Page 75
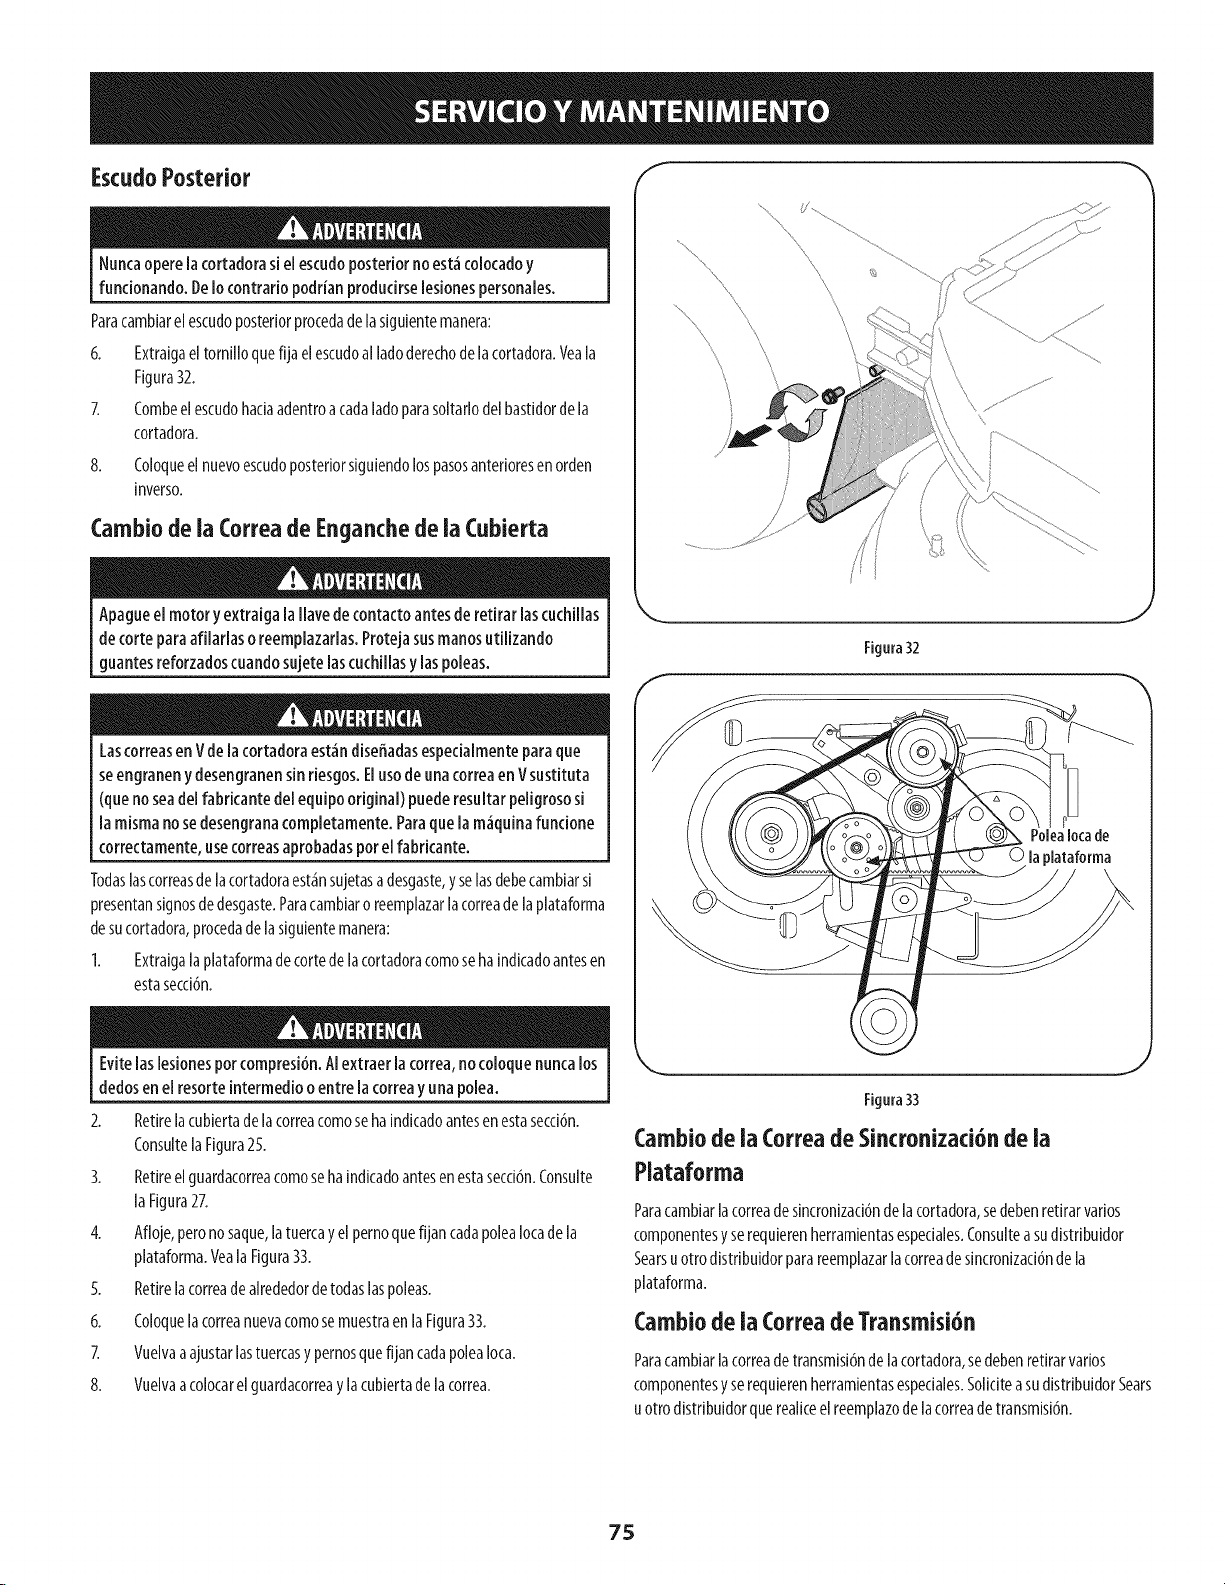
EscudoPosterior
Nuncaopere[acortadorasi el escudoposteriornoest_colocadoy
funcionando.De[ocontrario podrianproducirse[esionespersonales.
Paracambiarelescudoposteriorprocedadelasiguientemanera:
6. Extraigaeltornilloquefijaelescudoal ladoderechodelacortadora.Veala
Figura32.
Z Combeelescudohadaadentroacadaladoparasoltarlodelbastidordela
cortadora.
8.
Coloqueelnuevoescudoposteriorsiguiendolospasosanterioresenorden
inverso.
Cambio de ia Correa de Enganchede ia Cubierta
Apaguee[motoryextraigala[lavedecontactoantesderetirar [ascuchillas
decorteparaaft[ariaso reemp[azar[as.Protejasusmanosuti[izando
guantesreforzadoscuandosujete[ascuchi[[asy [aspo[eas.
LascorreasenVdela cortadoraest_ndiseffadasespecialmenteparaque
seengranenydesengranensinriesgos.Elusodeunacorreaen Vsustituta
(quenoseade[fabricantede[equipooriginal) puederesultarpeiigrososi
[amismanosedesengranacompietamente.Paraque[am_quinafuncione
correctamente,usecorreasaprobadasporelfabricante.
Todaslascorreasdelacortadoraest_nsujetasadesgaste,yselasdebecambiarsi
presentansignosdedesgaste.Paracambiaro reemplazarlacorreadelaplataforma
desucortadora,procedadelasiguientemanera:
1. Extraigalaplataformadecortedelacortadoracomosehaindicadoantesen
estasecd6n.
\
\
/
/
Figura32
Evitelaslesionespot compresi6n.A[extraer[acorrea,nocoloquenuncalos
dedosenel resorteintermediooentre[acorreayunapoiea.
2. Retirelacubiertadelacorreacomosehaindicadoantesenestasecd6n.
Consuite[aFigura25.
3. Retireelguardacorreacomosehaindicadoantesenestasecd6n.Consulte
laFigura27.
4. Afloje,peronosaque,[atuercayelpemoquefijancadapoleaIocadela
plataforma.VealaFigura33.
5. Retirelacorreadealrededordetodaslaspoieas.
6. Coloquelacorreanuevacomosemuestraenla Figura33.
7. Vueivaaajustarlastuercasy pemosquefijancadapoleaIoca.
8. Vuelvaacolocarelguardacorreaylacubiertadelacorrea.
Figura33
Cambio de ia Correa de Sincronizad6n de ia
Piataforma
Paracambiar[acorreadesincronizad6nde[acortadora,sedebenretirarvarios
componentesyserequierenherramientasespedales.Consuiteasudistribuidor
Searsuotrodistribuidorparareempiazar[acorreadesincronizad6nde[a
piataforma.
Cambio de ia Correa de Transmisi6n
Paracambiarlacorreadetransmisi6ndelacortadora,sedebenretirarvarios
componentesyserequierenherramientasespeciaies.SoiiciteasudistribuidorSears
uotrodistribuidorquereaiiceelreempiazodelacorreadetransmisi6n.
75
Page 76

Nuncaalmacene[acortadoradec_spedconcombustibleeneltanque en
unespaciocerradooen_reasconpocaventilaci6n,dondelosgasesdel
combustiblepuedanalcanzarelfuego,chispasounaluzpilotocomolaque
tienenalgunoshomos,calentadoresdeagua,secadoresderopaoalgun
otro dispositivoagas.
Preparaci6ndeiMotor
Yaquelosmotoresalmacenaronm_isde30dias:
Paraimpediralagomaformarseenel sistemadecombustibleoen partes
decarburador,dirijaselmotorhastaqueestoseparea faltadelcombustible
oaffadirunaditivodegasolinaalgaseneltanque.Siustedusaunaditivo
degas,dirigeelmotordurantevariosminutosparaponerendrculaci6nel
aditivoporelcarburador-- despu#squeelmotoryelcombustiblepueden
seralmacenadoshasta24meses.
Preparaci6n de ia Cortadora de C_sped
Limpieylubriquelacortadoracomosedescribeenlasinstruccionesde
lubricad6n.
Noutiliceunalavadoraa presibnniunamangueradejard[nparalimpiarsu
unidad.
Cubralacuchilladelacortadoracongrasaparachasisparaimpedirla
oxidaci6n.
Refi_rasealaPreparaci6ndelMotorparainstruccionesdealmacenajede
Mientraselmotorestodaviacaliente,cambioel petr61eo.
Extriagalabujiayviertealrededorde1/2onzadeaceitedemotordentro
delcilindro.Vuelvaacolocarlabujiayarranquelentamenteel motorpara
distribuirelaceite.
Limpieel motordeescombrossuperficiales.
motorcorrectas.
Almacenelaunidadenunazonalimpiayseca.Nolaalmacenecercade
materialescorrosivoscomoporejemplofertilizantes.
Cuandoalmacenecualquiertipodeequipomotorizadoen ungalp6ndedepdsito
met_ilicooconpocaventilaci6n,tengaespecialcuidadodereaiizarleuntratamiento
antioxidantealequipo.Useaceiteligeroosiiiconapararecubdrelequipo,
especialmenteloscablesypartesmdvilesdesucortadoraantesdealmacenarla.
Puedeobtenerlossiguientesaditamentosyaccesoriosparasucortadoradec#sped.P6ngaseencontactoconuCentrodeservidoSearseneltel#fono1-800-4-MY-HOME®
param_isinformaci6n.
No.de Pieza Descripci6n
33731 Colectordec_spedcon
sistemadeembolsado
76
Page 77

77
Page 78

Antesderealizarcualquiertipo del mantenimiento/servicio,suelte
todoslosmandosypareel motor.Esperehastaquetodaslaspartesde
movimientohayanvenidoaunaparadacompleta.Desconecteel alambre
debujiay b_selocontraelmotor paraprevenirelcomienzoinvoluntario.
Siemprellevepuestoscfistalesinastillablesdurante laoperad6no
realizandocualquierajusteo reparadones.
Estasecd6nseocupadecuestionesdemenor importanda del servkio.Paralocalizarel m_scercanoCentrode Servkio Sears,opara programar un
servido,simplemente p6ngaseencontactoconSearsal 1-800-4-MY-HOMEo
Elmotornoarranca
Nosehaactivadoelcebador(Motorffio).
I. Coloquelapalancadecontroldelregulador/cebadorenla
1.
posici6ncebador.
2.
Elcontroldelregulador/cebadornoest_enlaposici6n
correcta(Motorcaliente).
3.
Sehadesconectadoelcabledelabujia.
4.
Labujianofuncionacorrectamente.
5.
Eltanquedecombustibleest_vadoo elcombustible
2. Coloquelapalancadecontroldelregulador/cebadorenla
posid6nr_pido.
3. Conecteloscablesalabujia.
4. Limpie,ajuste[aseparad6n,ocambielabujia.
5. Lleneeltanquecongasolinalimpiayfresca.
esviejo.
6.
Elmotorfuncionademanera
err_tica
Elmotorrecalienta
Reducci6ndelflujodecombustibleyfiltrode
combustiblebloqueados.
Z Sinbatefia.
8. Fusiblequemado.
1. Launidadest_funcionandoconelcebadoractivado.
2.
Elcabledelabujiaest_flojo.
3.
Reducd6ndelflujodecombustibleyfiltrode
combustiblebloqueados.
4.
Aguaosudedadenelsistemadecombustible.
5.
Elfiltrodeaireest_sucio.
1.
Elniveldeaceitedelmotorest_bajo
2.
Flujodeakerestfingido
6. Reemplaceelfiltro decombustiblecomoseindicaenlasecd6n
demantenimiento.
Z Recarguelabatefia.
8. Cambieelfusiblequemado.
1. Muevalapalancadelregulador/cebadorparasacarlodela
posici6ncebador.
2. Conecteyajusteelcabledelabujia.
3. Reemplaceelfiltro decombustiblecomoseindicaenlasecd6n
demantenimiento.
4. DreneelcombustibleCarguecombustiblenuevoeneldep6sito.
5. Reemplaceelelementodelfiltrodealrey/oIlmpleeldepurador.
1. Lleneel motorconlacantidadytipodeaceiteadecuado.
2. Limpielosrecortesdepastoysudedadacumuladosalrededor
delasaletasdereffigerad6ndelmotorydelalojamientodel
soplador.
LNECESITAMAS AYUDA?
Encont_a_ k_re_ ue_ta _ managemylife.com isin cargo!
En I[nea podr_ encontrar este manual y los manuales de todos los otros productos que posea.
Sus preguntas ser_n respondidas pot nuestro equipo de especialistas.
Obtenga un plan de mantenimiento personalizado para su hogar.
Encuentre informaci6n y herramientas que Io ayudari_n con los proyectos de su hogar.
........p ..........y ma en --
managemylife
78
Page 79

Elmotorvacilaaaltasrevoluciones 1. Laseparaci6ndeloselectrodosdelabujfaesmuypoca. 1. Retirelabujfayreajustelaseparaci6n.
Elmotorfuncionamalenmarcha 1. Labujiadeencendidoest_sucia 1. Reajustelaseparaci6noreemplacelabujfa.
lenta 2. Elfiltrodeaireest_sudo 2. Consultelasecci6nMantenimientodelmanual.
Demasiadavibrad6n I. Lascuchillasdecorteest_nflojasodesbalanceadas I. Aprietelacuchillayelhusillo.Balanceelacuchilla.
2. Lacuchilladecorteest_daffada,desafiladaodoblada. 2. Reemplacelacuchilla.
3. Herrajesflojos 3. Ajustetodoslospernosylastuercas.
Launidadnoseautoimpulsa I. Lacorreadetransmisi6nest_flojaodaffada I. Reemplacelacorreadetransmisi6n.
Bajorendimientodecorte I. @chiNasdesafiladas I. Afileocambielascuchillas.
2. Correasrotas,flojasogastadas 2. Cambielascorreas.
3. @chiNasdesbalanceadas 3. Afileocambielascuchillas.
LNECESITAMAS AYUDA?
EncontraK_ la respuesta.........y m_s en rY_anagerY_ylife.com--isin cargo!
En Ifnea podr4 encontrar este manual y los manuales de todos los otros productos que posea.
Sus preguntas ser4n respondidas pot nuestro equipo de especialistas.
Obtenga un plan de mantenimiento personalizado para su hogar.
Encuentre informaci6n y herramientas que Io ayudar_'_n con los proyectos de su hogar.
imanagemylife
79
Page 80

DECLARACION FEDERAL y/o DE CALIFORNIA SOBRE GARANTJAS EN EL CONTROL DE EIVIISIONES
SUS DERECHOS Y OBLIGACIONES EN CUANTO A LA GARANTJA
MTDConsumerGroupInc,laAgenciadeProtecci6nMedioambientaldelos EstadosUnidos(EPA),y paraaquellosproductoscertificadosparasu ventaenel es-
tadode California,el Departamentode los RecursosdelAire deCalifornia(CARB)secomplacenenexplicarlagaranfiaque cubreal sistemade control(ECS)de
emisiones(evaporativasy/ode escape)de suequipoy motor(motordeequiposdeexteriores)deencendidopotchispaparatodoterreno,peque_o,deexteriores
dela_o2006ya_osposterioresEnCalifornia,losnuevosmotoresdeequiposdeexterioresdebenestar dise_ados,construidosyequipadosparacumplircon las
estrictasnormasantipoluci6ndel Estado(en otrosestados,losequiposdela_o1997y modelosposterioresdebenserestardise_ados,construidosyequipados
paracumplirconlas regulacionesdemotoresdeencendidoporchispaparatodoterrenopeque_osde laAgenciade Protecci6nMedioambientaldelosEstados
Unidos,(EPA).MTDConsumerGroupInc.debegarantizarelsistemadecontrolde emisiones(ECS) desu motordeequiposdeexteriorespot el periodode
tiempoindicadom_sabajo,siempreycuando noexistausoincorrecto,negligenciaomantenimientoinadecuadodedichomotor.
SuECSpuedeincluirpiezastalescomoel carburador,el sistemadeinyecci6ndecombustible,el sistemadeencendido,elconvertidorcatalitico,losdep6sitos
decombustible,laslineasdecombustible,lostaponesdecombustible,lasv_lvulas,contenedores,filtros, manguerasdevapor,abrazaderas,conectoresyotros
componentesafinesrelacionadosconlasemisiones.
Dondeexistaunacondici6ncubiertapor la garantia,MTDConsumerGroupInc.reparar_su motorde equiposde exterioressincostoalgunoincluyendoel
diagn6stico,las piezasy la manodeobra.
COBERTURA DE LA GARANTJA DEL FABRICANTE:
Estesistemadecontroldeemisionessegarantizaporelt@minodedosaSos.Si algunapiezarelacionadacon lasemisionesdesu motorde equiposde
exterioresesdefectuosa,MTDCONSUMERGROUPINC.reparar_o sustituir_dichapieza.
RESPONSABILIDADES DEL PROPIETARIO SEGUN LA GARANTJA:
Ensucar_cterdepropietariodel motorde equiposdeexteriores,ustedes responsabledel mantenimientorequeridoquese especificaenel manualdel propieta-
rio.MTDConsumerGroupIncle recomiendaque conservetodoslosrecibosquecubrenelmantenimientode su motor,noobstanteIocualMTDConsumerGroup
Incnopodr_denegarel cumplimientodelagarantiaQnicamenteporlafaltade los recibos.
Comopropietariodel motordeequiposde exteriores,usteddebe saberqueMTDConsumerGroupInc.puededenegarlacoberturade lagarantiasisumotoro
unapiezadel mismofallandebidoa uso incorrecto,negligencia,mantenimientoindebidooa modificacionesnoaprobadas.
Ustedesresponsablede presentarsu motoral centrodedistribuci6no serviciotecnico deMTDConsumerGroupInc.tanprontocomoaparezcael problema.Las
reparacionescubiertasporla garantiasedebenIlevaracaboen unlapsorazonablequenoexcedade30 dias.Sitienealgunapreguntarespectode lacobertura
delagarantia,p6ngaseencontactoconel DepartamentodelServicioT@nicode MTDConsumerGroupInc.al telefono1-800-800-7310o pot correoelectr6nico
enhttp://support.mtdproducts.com
COBERTURA DE LA GARANTJA DE EMISIONES GENERALES:
MTDConsumerGroupIncgarantizaalcompradorfinaly a cadacompradorsubsiguienteque el motordeequiposdeexteriores:est_ dise_ado,construidoy
equipadodemododecumplircontodaslas regulacionesaplicablesy queseencuentralibrededefectosdematerialesydefabricaci6nquepudierencausarla
falladeuna piezagarantizadaidentica,entodoslosaspectosmaterialesalapiezadescriptaen la solicitudde certificaci6ndeMTDConsumerGroupInc.
El periododegarantiacomienzaenlafechade entregadel motoral compradorfinalo en lafechaenque la m_quinaseponeenfuncionamientopot primeravez.
El periododegarantiaes de dosaSos.
Sujetoa ciertascondicionesyexclusionesqueseindicana continuaci6n,lagarantiadelas piezasrelacionadascon lasemisionesesla siguiente:
1. Cualquierpiezagarantizadaquenoesteprogramadaparaserreemplazadacomo partedel mantenimientorequeridoen lasinstruccionesescritassuminis-
tradassegarantizaporel periodo degarantiaarriba mencionado.Sila piezafalladuranteelperiodo de coberturadelagarantia,lamismaser_reparada
oreemplazadaporMTDConsumerGroupInc.deacuerdoconelparrafo(4)acontinuaci6n.Cualquierpiezareparadao reemplazadasegQnlagaranfiase
garantizar_potelrestodelperiododegarantia.
2. Cualquierpiezagarantizadaqueeste programadasolamenteparainspecci6nregularenlasinstruccionesescritassuministradassegarantizapotelperiodo
degarantiaarribamencionado.Cualquierpiezareparadao reemplazadasegQnla garantiase garantizar_pot el restodelperiodo.
3. Cualquierpiezagarantizadaqueeste programadaparareemplazosegL]nelmantenimientorequeridodeconformidadconlasinstruccionesescritassuminis-
tradas,se garantizaporel periododetiempoanteriora laprimerafechade reemplazoprogramadaparaesapieza.Sila piezafallaantes del primerreemplazo
programatic,lamismaser&reparadaoreemplazadapot MTDConsumerGroupInc.deacuerdoconelparrafo(4)acontinuaci6n.Cualquierpiezareparadao
reemplazadabajogarantiasegarantizar_potelrestodelperiodoanterioral primerreemplazoprogramaticpuntualparaesapieza.
4. Lareparaci6noel reemplazodecualquierpiezagarantizadadeconformidadconlasdisposicionesde lagarantiaqueaquiseestipulasedeben realizarenun
centrodegarantiasincostoalgunoparael propietario.
5. Noobstantelasdisposicionesqueaquiseestipulan,losserviciosoreparacionesbajo garantiase suministrar_nentodosnuestroscentrosdedistribuci6nbajo
franquiciademantenimientoparalos motoreso equiposen cuesti6n.
6. El propietariodelmotorde equiposde exterioresno deber_pagarel trabajodediagn6sticodirectamenteasociadocon unapiezagarantizadadefectuosaen
relaci6nconlasemisiones,siempreycuandodichotrabajode diagn6sticoserealiceen uncentrocubiertopot lagarantia.
7. MTDConsumerGroupInces responsablepotdaSoscausadosaotroscomponentesdemotoreso equiposderivadosde lafallabajo garantiadecualquier
piezagarantizada.
Page 81
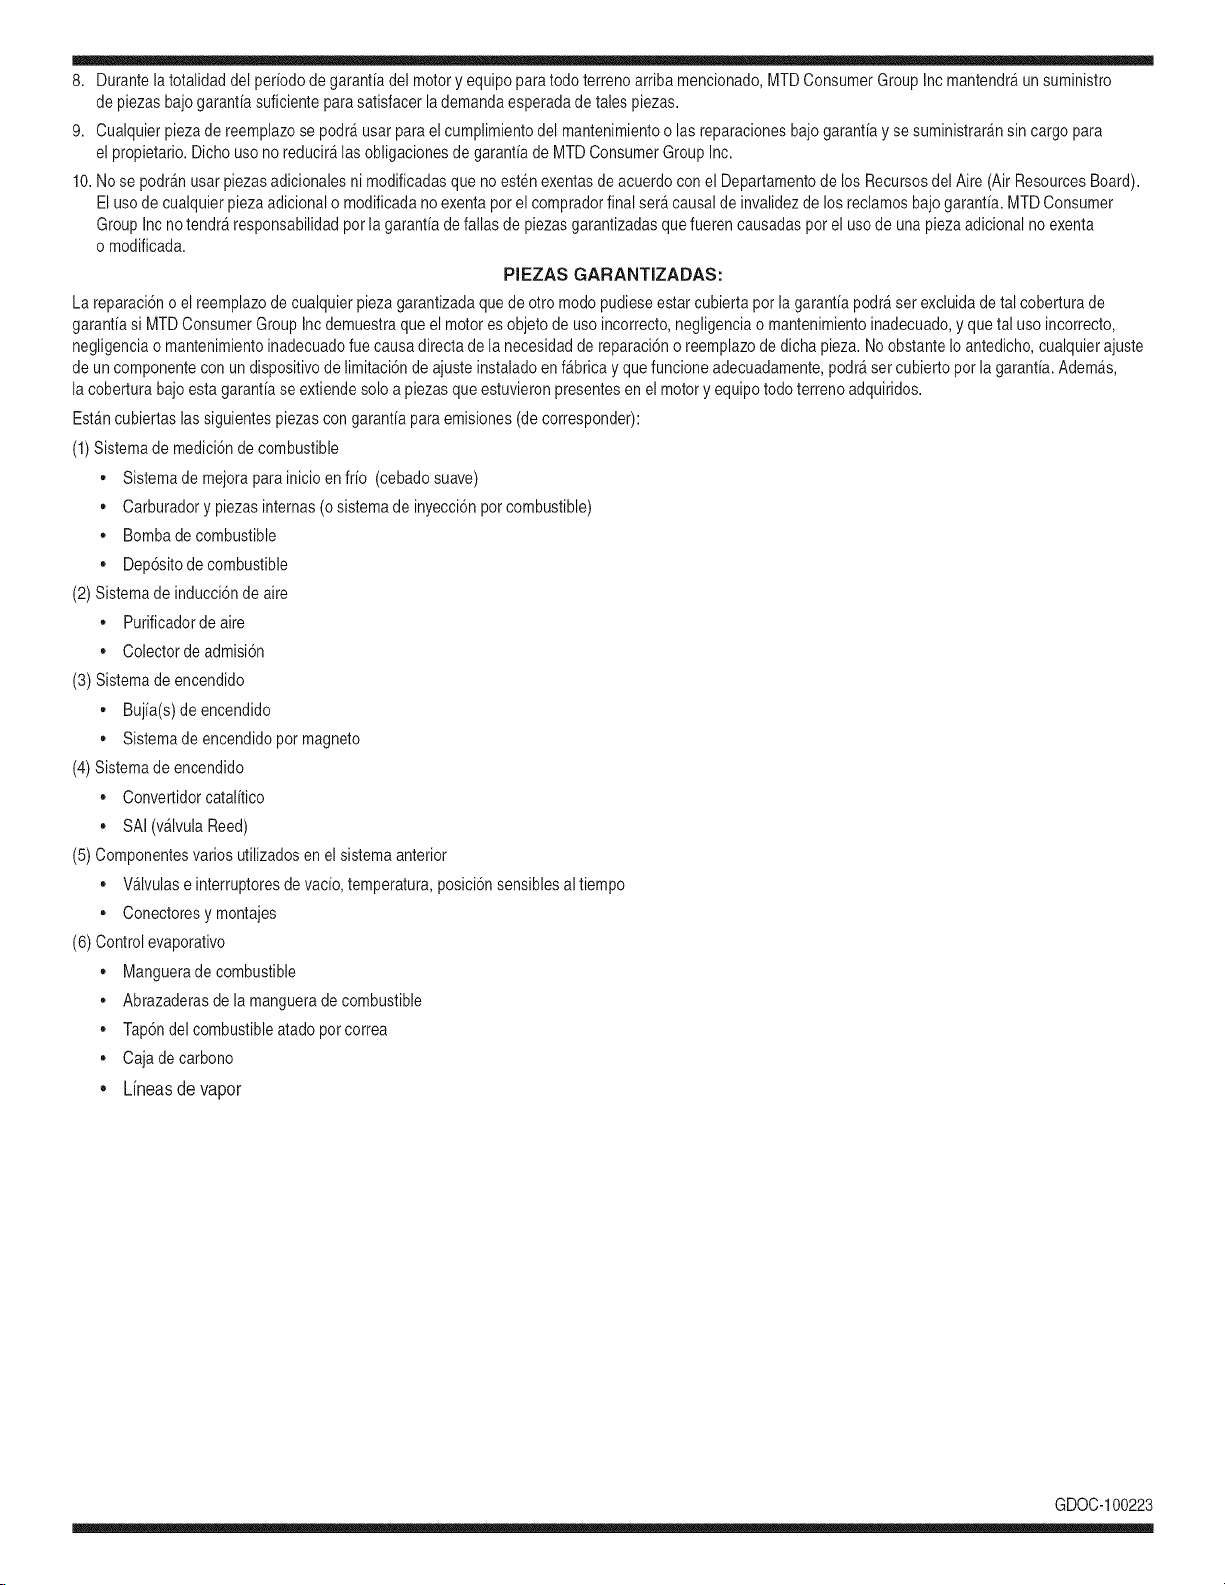
8.Durantelatotalidaddelperiododegarantiadelmotoryequipoparatodoterrenoarribamencionado,MTDConsumerGroupIncmantendr_unsuministro
depiezasbajogarantiasuficienteparasatisfacerlademandaesperadadetalespiezas.
9.Cualquierpiezadereemplazosepodr_usarparaelcumplimientodelmantenimientoolasreparacionesbajogarantiaysesuministrar_nsincargopara
elpropietario.Dichousonoreducir_lasobligacionesdegarantiadeMTDConsumerGroupInc.
10.Nosepodr_nusarpiezasadicionalesnimodificadasquenoestenexentasdeacuerdoconelDepartamentodelosRecursosdelAire(AirResourcesBoard).
Elusodecualquierpiezaadicionalomodificadanoexentaporelcompradorfinalser_causaldeinvalidezdelosreclamosbajogaranfia.MTDConsumer
GroupIncnotendr_responsabilidadpotlagarantiadefallasdepiezasgarantizadasquefuerencausadaspotelusodeunapiezaadicionalnoexenta
omodificada.
PIEZAS GARANTIZADAS:
Lareparaci6noel reemplazodecualquierpiezagarantizadaquede otto modopudieseestarcubiertapor lagarantiapodr_set excluidadetalcoberturade
garantiasi MTDConsumerGroupIncdemuestraqueelmotoresobjetodeusoincorrecto,negligenciao mantenimientoinadecuado,y que tal uso incorrecto,
negligenciaomantenimientoinadecuadofuecausa directade la necesidadde reparaci6noreemplazodedichapieza.NoobstanteIoantedicho,cualquierajuste
deuncomponenteconundispositivodelimitaci6nde ajusteinstaladoenf_bricay quefuncioneadecuadamente,podr_setcubiertopotla garantia.Adem_s,
la coberturabajoestagarantiase extiendesoloa piezasqueestuvieronpresentesenel motoryequipotodo terrenoadquiridos.
Est_ncubiertaslassiguientespiezascongaranfiaparaemisiones(decorresponder):
(1)Sistemademedici6nde combustible
• Sistemade mejoraparainicioenfrio (cebadosuave)
• Carburadory piezasinternas(osistemade inyecci6npotcombustible)
• Bombadecombustible
• Dep6sitodecombustible
(2)Sistemade inducci6ndeaire
• Purificadordeaire
• Colectordeadmisi6n
(3) Sistemadeencendido
• Bujia(s) deencendido
• Sistemade encendidopot magneto
(4)Sistemade encendido
• Convertidorcatalitico
,, SAI(v_lvula Reed)
(5)Componentesvariosutilizadosenel sistemaanterior
• Wlvulas e interruptoresdevacio,temperatura,posici6nsensiblesaltiempo
• Conectoresy montajes
(6) Controlevaporativo
• Manguerade combustible
• Abrazaderasde la mangueradecombustible
• Tap6ndelcombustibleatadopot correa
• Cajadecarbono
• Lineas de vapor
GDOC-100223
Page 82

Felicitacionespor haberrealizadounaadquisicidninteligente.EIproductoCraftsman®quehaadquiridoestddise#adoy fabricado
parabrindarmuchosa#osde funcionamientoconfiable.Perocomotodoslosproductosa vecespuederequerirdereparaciones.Es
enesemomentocuandoeldisponerdeun Acuerdodeproteccidnparareparacioneslepuedeahorrardineroy problemas.
Acontinuad6nsedetailanlospuntosinduidosenelAcuerdo:
[] Servido expertoprestadopornuestros10,000espedalistasenreparadonesprofesionales
[] Servido Uimitado sincargo paralaspiezasy lamanodeobraentodaslasreparadonescubiertas
[] Reemplazodel producto hasta1500d6laressinoesposiblerepararelproductocubierto
[] Descuentode25%delpredonormaldelservkioy delaspiezasreladonadasconelmismoquenoest_ncubiertaspor
elacuerdo;adem_s,25%delpredonormaldelavefificaci6ndemantenimientopreventivo
[] Ayudar_pidapot tei_fono- IoIlamamosResolud6nR_pida- elapoyotelef6nicodeunChamuscaalrepresentante.
Pienseennosotroscomoelmanual"deundueffohablador."
UnavezadquiridoelAcuerdo,puedeprogramarelservidocontans61orealizarunaIlamadatelef6nica.PuedeIlamaren
cualquiermomentodeldfaodelanocheoprogramarunservk[oenIfnea.
ElAcuerdodeProtecd6ndeReparad6nesunacomprasinfiesgo.Siustedanulaporalgunaraz6nduranteelpeffodode
garantfadeproducto,propordonaremosunreembolsoIleno.O,unreembolsoprorrateadoencualquiermomentodespu_s
delpeffododegarantfadeproductoexpira,iAdquierahoysuacuerdodeprotecd6nparareparadones[
Seaplican determinadas iimitacionesy exclusiones.Paraobtenerinformaci6nadicionai y preciosen los
EstadosUnidosiiameai 1-800-827-6655.
El*Coverageen Canad_variaen algunosartkulos. Paradetalles llenos la llamada ChamuscaCanad_en 1-800-
361-6665.
Servidodeinstalad6ndeSears
Sideseasolidtarlainstalad6nprofesionaldeSearsdeaparatosdom_sticos,dispositivosparaabfirportones,calentadoresde
aguayotrosartkulosdom_sticosimportantes,enlosEstadosUnidoso Canad_Ilameal1-800-4-MY-HOME®.
82
Page 83

Estapgtginase march6 intencionadamenteen blanco.
83
Page 84

Your Home
For troubleshooting, product manuals and expert advice:
managernylife
www.managemylife.com
For repair - in your home - of all major brand appliances,
lawn and garden equipment, or heating and cooling systems,
no matter who made it, no matter who sold it!
For the replacement parts, accessories and
owner's manuals that you need to do-it-yourself.
For Sears professional installation of home appliances
and items like garage door openers and water heaters.
1-800-4-MY-HOME ® (1-800-469-4663)
Call anytime, day or night (U.S.A. and Canada)
www.sears.com www.sears.ca
Our Home
For repair of carry-in items like vacuums, lawn equipment,
and electronics, call anytime for the location of your nearest
Sears Parts & Repair Service Center
1-800-488-1222 (U.S.A.) 1-800-469-4663 (Canada)
www.sears.com www.sears.ca
To purchase a protection agreement on a product serviced by Sears:
1-800-827-6655 (U.S.A.) 1-800-361-6665 (Canada)
Para pedir servicio de reparaci6n
a domicilio, y para ordenar piezas:
1-888-SU-HOGAR ®
(1-888-784-6427)
www.sears.com
® Registered Trademark / TMTrademark of KCD IP, LLC in the United States, or Sears Brands, LLC in other countries
® Marca Registrada ! TMMarca de Fabrica de KCD IP, LLC en Estados Unidos, o Sears Brands, LLC in otros paises
MCMarque de commerce ! MDMarque deposee de Sears Brands, LLC
Au Canada pour service en frangais:
1-800-LE-FOYER Mc
(1-800-533-6937)
www.sears.ca
 Loading...