

Craftsman 143995007 Owner’s Manual
operator's
manual
MODEL NO. 143.995007
SOLID STATE IGNITION_
ENGIN
CAUTION:!
Read RULES for
Safe OPERATION
and INSTRUCTIONS
Carefully
_ CaliforniaProposition65WARNING: The engine exhaust from this product contains chemicals [
Printed in U.S.A. 2-1-99 181-1175-11
known to the State of California to cause cancer, birth defects or other reproductive harm.
Sold by SEARS, ROEBUCK AND CO., CHICAGO, IL 60684 U.S.A.
and SEARS CANADA, INC., TORONTO, ONTARIO, CANADA
• Operating
• Maintenance
• Repair Parts

I OIL FILL AND DIPSTICK
FUEL TANK
SPARK PLUG
IIIIIllllll IIllllllllll
\
MODELAND
D.O.M. DECAL
MUFFLER
\
PRIMER--'
CARBURETOR SPEED CONTROL
AIR CLEANER
THIS SYMBOL POINTS OUT IMPORTANT SAFETY INSTRUCTIONS WHICH IF NOT FOLLOWED COULD
ENDANGER THE PERSONAL SAFETY AND/OR PROPERTY OF YOURSELF AND OTHERS, READ AND
FOLLOW ALL INSTRUCTIONS IN THIS MANUAL AND ANY PROVIDED WITH THE EQUIPMENT ON WHICH
THIS ENGINE IS USED BEFORE A'rrEMPTING TO OPERATING.
THESE SYMBOLS MAY APPEAR ON THE ENGINE:
_FUEL CAP
RECOIL STARTER
--AIRINTAKE
STARTER HANDLE
OIL DRAIN PLUG
Figure 1
FAST SLOW STOP P,HOKE
ENGINES WHICH ARE CERTIFIED TO COMPLY WITH CALIFORNIA AND
US EPA EMISSION REGULATIONS FOR ULGE ENGINES: Are certified to
operate on regular unleaded gasoline. Include the following emission control
system(s): EM, TWC (if so equipped); Do not include any user adjustable
features - therefore no other adjustments are needed.
OIL & FUEL RECOMMENDATIONS
TO OPERATE ENGINE, YOU WILL NEED THE FOLLOWING:
(_ A CLEAN, HIGH QUALITY, DETERGENT OIL.
Be sure original container is marked:
A.P.I. service "SF"-"SJ"
FOR SUMMER (ABOVE 32°F;0°C) USE SAE 30 OIL.
Tecumseh speciallyformutated oil isavaitable atany Authorized Tecumseh
Service Outlet. Order as part number 730225.
Using muitigrade oil will increase oil consumption.
FOR WINTER (BELOW 32°F;0°C) USE SAE 5W30 OIL.
Tecumseh specially formulated oiiis available at any Authorized Tecumsen
Service Outlet Order as pa_t number 730226
!SAE 10W is an acceptable substitute.)
(BELOW O_F;-18aC ONLY): SAE 0W30 OIL is an acceptab!e substitute
DO NOT USE SAE 10W40 OIL.
OIL SUMP CAPACITY: 2! ounces (1 1/4 US pints)
62 liter
(2) A FRESH, CLEAN, UNLEADED REGULAR,
UNLEADED PREMIUM, OR REFORMULATED
AUTOMOTIVE GASOLINE ONLY. DO NOT USE
LEADED GASOLINE.
NOTE: DO NOT USE GASOLINE CONTAINING METHANOL (WOOD
ALCOHOL). Gasoline containing up to 10% ethanol or grain alcohol
("Gasohor') may be used but requires special care when engine is unused
for extended periods. See "STORAGE" instructions on Page 5
OFF FULL
NOTE: Use clean oil and fuel and store in approved, clean coverer
containers. Use clean fill funnels
Never use "stale" gasoline left over from last season or stored for long
pedods.
IMPORTANT
KEEP THIS MANUAL HANDY AT ALL TIMES FOR FUTURE REFERENCE.
READ IT CAREFULLY AND FAMILIARIZE YOURSELF WITH THE OPERAT-
ING, MAINTENANCE AND SAFETYINSTRUCTIONS. THIS MANUAL ALSO
CONTAINS A COMPLETE PARTS LISTING.
BEFORE STARTING
(_) READ ALL INSTRUCTIONS PROVIDED WITH THE EQUiP-
MENT ON WHICH THIS ENGINE IS USED.
CHECK OIL LEVEL:
Page 1
CAUTION: NEVER RUN ENGINE UNLESS OIL LEVELIS BETWEEN
CHECK OIL LEVEL OFTEN DURING ENGINE BREAK-IN.
NEVER RUN ENL_iNE UNLESS OIL _lt_t. =-,LUG _STIGHi'ENED S_.-
CURELY INTO OIL FILL HOLE,
A. POSITION EQU!PMENT SO ENGI'S_ !S ! _\'EL
B Clean area around oil fill plug (see eeure 1 )
C. Remove oil fill plug and dipstick.
D Wipe dipstick ele_n, insert it into oil fill ho!e and t_gh!en securely, remove
dips{Jck. Ifoil is not up to IIFULL" mark un dipstick, add rec.omme=ided
oit. POUR SLOWLY Wipe dipstick clean eacl_ time oil ieve! is
checked
IMPORTANT: DO NOT FILL ABOVE FtJL{." MAR;< ON D!PSI !CK
E. Insta!l oil fill plug arid dipstick, tighter, sec_lrely
See "MAINTENANCE" _ection for any ';Jtb_c .] ,evG: ar,_ oil Ch,_¢_
instructions (see P;,g, 3) ! 81 - ! 175 _i
"FULL" AND "ADD" MARKS ON DIPSTICK.
(_) FILL FUEL TANK
with gasoline as specified in the preceding "OIL & FUEL
RECOMMENDATIONS" item 2.
NEVER MIX OIL WITH GASOLINE
Never use "stale" gasoline left over from last season or stored for long
periods.
,_ NEVER FILL FUEL TANK INDOORS, NEVER FILL FUEL TANK WHEN
ENGINE IS RUNNING OR HOT, DO NOTSMOKE WHEN FILLING FUEL
TANK.
_ NEVER FILL FUEL TANK COMPLETELY. FILL TANK TO 1/2" BELOW
BOTrOM OF F LLER NECK TO PROV DE SPACE FOR FUEL EXPAN-
I SION. WIPE ANY FUEL SPILLAGE FROM ENGINE AND EQUIPMENT
l BEFORE STARTING ENGINE.
_ANY LIQUEFIED pETROLEUM (LPG) OR NATURAL GAS FUEL SYS-
TEM MUST BE LEAKPROOF AND MEET ALL APPLICABLE CODES
L AND REGULATIONS.
(_ CHECK THE FOLLOWING:
STOPPING
(_ Moveequipmentcontroloranyignitionstopswitehonengineto
STOP or OFF (see equipment manufacturer's instructions).
_) AFTER ENGINE IS STOPPED:
DISCONNECT SPARK PLUG WIRE FROM SPARK PLUG AND
KEEP IT AWAY FROM SPARK PLUG.
TURN IGNITION SWITCH KEY (IF SO EQUIPPED) TO "OFF" POSI-
TION AND REMOVE KEY FROM SWITCH. THIS WILL REDUCE THE
POSSIBILITY OF UNAUTHORIZED STARTING OF ENGINE WHILE
EQUIPMENT IS NOT IN USE.
NEVER STORE ENGINE WITH FUEL IN TANK INDOORS OR IN
ENCLOSED, POORLY VENTILATED AREAS, WHERE FUEL FUMES
MAY R EACH AN OPEN FLAME, SPA RKOR PILOT LIGHT AS ON A
FURNACE, WATER HEATER, CLOTHES DRYER OR OTHER GAS
APPLIANCE
,_A. BE SURE EQUIPMENT IS IN NEUTRAL GEAR WITH CLUTCHES,
BELTS, CHAINS AND SAFETY SWITCHES DISENGAGED. (FUL-
SHOULD PLACE ANY SAFETY SWITCHES IN SAFE STARTING
l LOW EQUIPMENT MANUFACTURER'S INSTRUCTIONS.) THIS
POSITION.
S. Be sure spark plug wire isattached to spark plug (see Figure 1).
C. SesureanyignitionswitchonengineorequipmentisinON, RUNor-
START position.
STARTING
,_ NEVER RUN ENGINE INDOORS OR IN ENCLOSED, POORLY VENTI-
LATED AREAS ENG NE EXHAUST CONTA NS CARBON MONOX-
IDE, AN ODORLESS AND DEADLY GAS (CARBON MONOXIDE IS
ALSO PRESENT IN ENGINE EXHAUST FROM LIQUID PETROLEUM
(LPG'JAND NATURAL GAS FUEL SYSTEMS).
_k KEEP HANDS, FEET, HAIR AND LOOSE CLOTHING AWAY FROM
ANY MOVING PARTS ON ENGINE AND EQUIPMENT.
,_WARNING: TEMPERATURE OF MUFFLER AND NEARBY AREAS
MAY EXCEED 150°F (65aC). AVOID THESE AREAS.
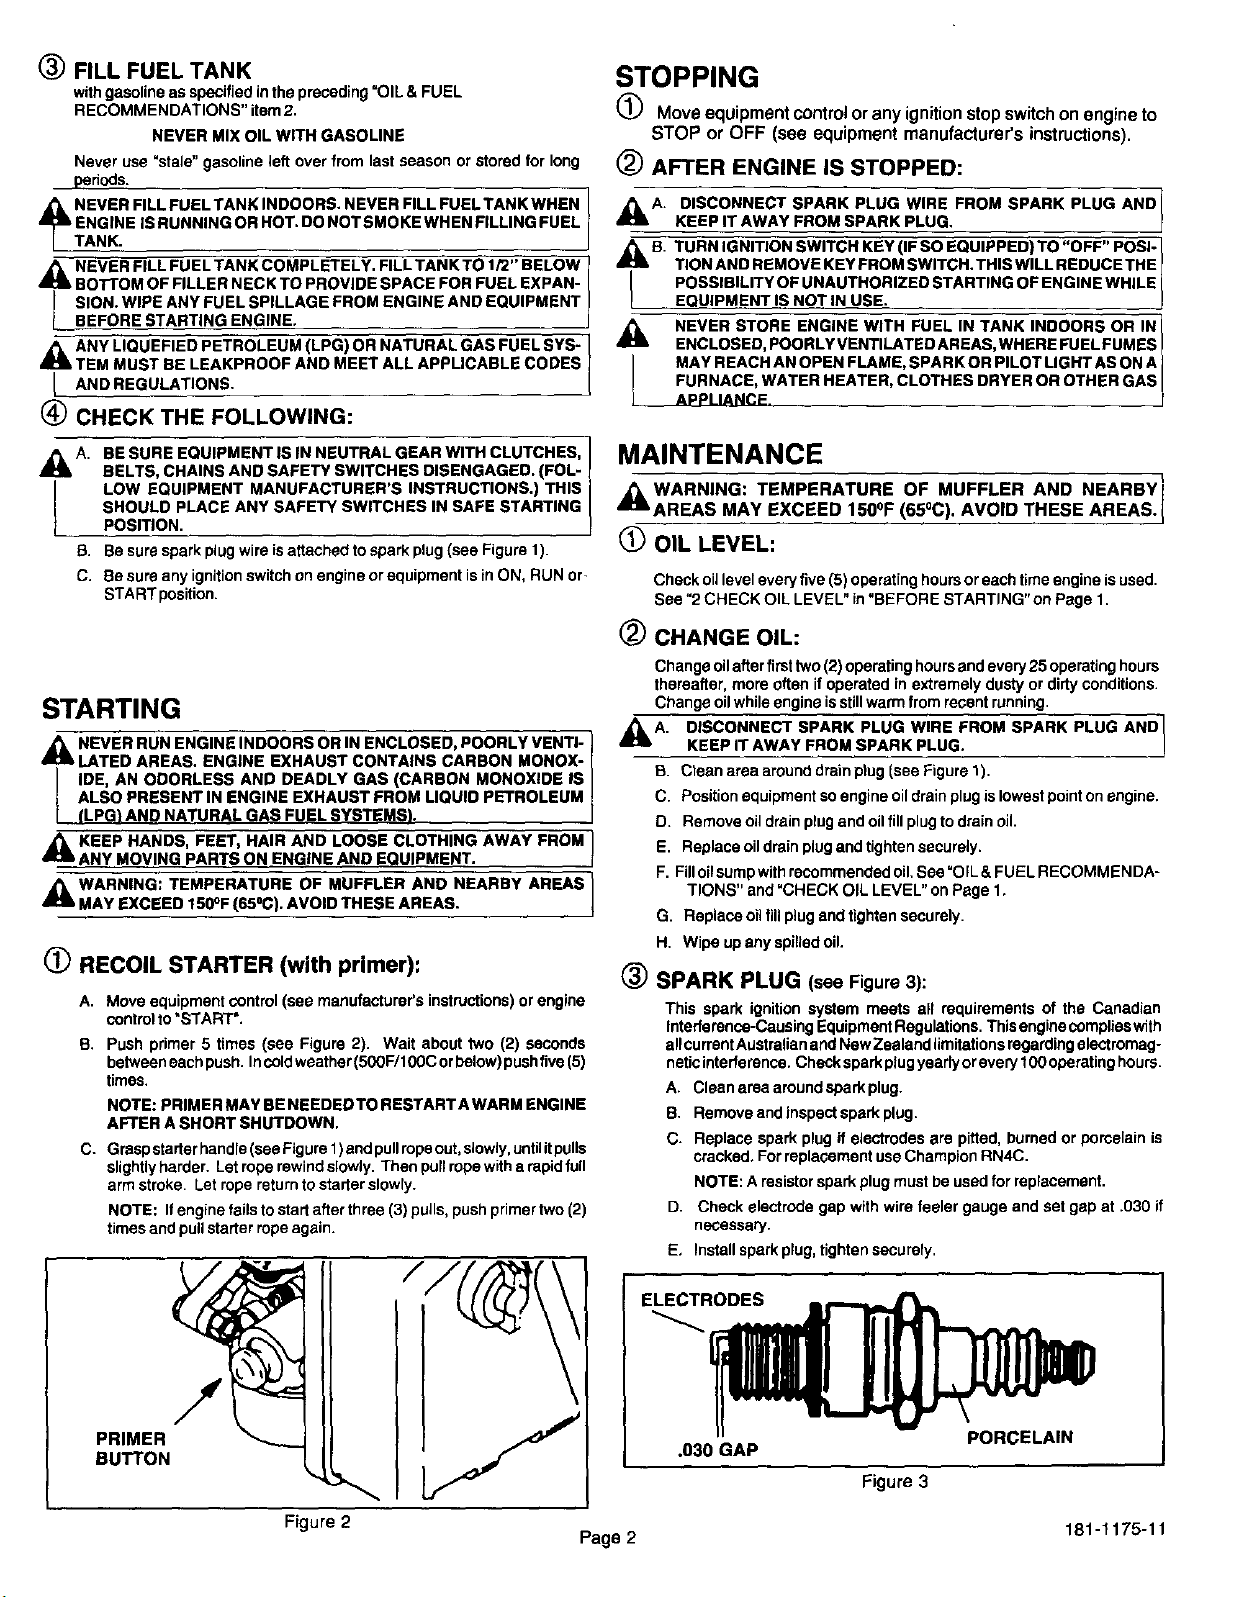
(_ RECOIL STARTER (with primer):
A.
Move equipment control (see manufacturer's instructions) or engine
controlto "START'.
B.
Push primer 5 times (see Figure 2). Wait about two (2) seconds
between each push. Incold weather (500F/100C or below) push five (5)
times.
NOTE: PRIMER MAY BE NEEDEDTO RESTARTA WARM ENGINE
AFTER A SHORT SHUTDOWN.
C.
Grasp starter handre(see Figure 1)and pullrope out,slowly, untilitpulls
slightly harder. Let rope rewind slowly. Then pull rope with a rapid full
arm stroke. Let rope return to starter slowry.
NOTE: If engine fails to start after three (3) pulis, push primer two (2)
times and pull starter rope again.
MAINTENANCE
,_WARNING: TEMPERATURE OF MUFFLER AND NEARBY_
AREAS MAY EXCEED 150°F (65°C). AVOID THESE AREAS._
OIL LEVEL:
Check oiJlevel every five (5) operating hours or each time engine is used.
See "2 CHECK OIL LEVEL" in "BEFORE STARTING" on Page 1.
_) CHANGE OIL:
Change oil after firsttwo (2) operating hours and every 25 operating hours
thereafter, more often if operated in extremely dusty or dirty conditions.
Change oilwhile engine isstill warm from recent running,
,_A. DISCONNECT SPARK PLUG WIRE FROM SPARK PLUG AND[
KEEP iT AWAY FROM SPARK PLUG.
B. Ctean area around drain ptug (see Figure 1).
C. Position equipment so engine oildrain plug is lowest point on engine.
D. Remove oil drain plug and oilfill plug to drain oil.
E. Replace oil drain plug and tighten securely.
F. Filloilsump with recommended oil. See "OIL & FUEL RECOMMENDA-
TIONS" and "CHECK OIL LEVEL" on Page 1.
G. Replace oil fill plug and tighten securely.
H. Wipe up any spilled oil.
(_) SPARK PLUG (see Figure 3):
This spark ignition system meets all requirements of the Canadian
Interference-Causing Equipment Regulations. Thisengine complies with
allcurrantAustralian andNew Zealand limitations regarding electromag-
netic interference. Check spark plugyearly or every 100 operating hours.
A. Clean area around spark plug.
B. Remove and inspect spark plug.
C. Replace spark plug if electrodes are pitted, burned or pomelain is
cracked. For replacement use Champion RN4C.
NOTE: A resistor spark plug must be used for replacement.
D. Check electrode gap with wire feeler gauge and set gap at .030 if
necessary.
E, Install spark plug, tighten securely,
_J
PRIMER
BUTTON
Figure 3
Figure 2 181-1175-11
Page 2

MAINTENANCE (Continued)
@ AIR CLEANER:
IMPORTANT: NEVER RUN ENGINE WITHOUT COMPLETE AIR
A. TO REMOVE AND INSTALL FILTER(S) (see Figure 6):
1. Remove wing nut and cover. Remove paper element.
2. Remove and inspect foam filter(if so equipped) for discolorationor
dirt accumulation. If either is present, service per following "TO
SERVICE FILTER(S)" instructions.
3. Clean inside of base and cover thoroughly.
4. Replacefoamfilter(ifsoequipped),makingsurethescreenside
istowards the paper element. Then tighten wing nut securely,
B.
TO SERVICE FILTER(S) (see Figure 6):
1. FOAM FILTER:
2, PAPER FILTER:
C.
ANTHCING RAFFLE
Some engines may be equipped with an anti-icing air cleaner feature
to enable the engine to runat temperatures below 32OF(0°C), without
ice forming in the carburetor.
Ifso equipped, the air cleaner base will have an opening which draws
warm air from the muffler into the air cleaner housing. To work
effectively, it is necessary to block cold air from entering the air
cleaner.
IN TEMPERATURES 32°F (0°C) AND BELOW: (See figure 6)
1. Remove wing nut from air cleaner cover.
2. Remove aircleaner cover from base.
3. Remove red baffle from inside of air cleaner cover,
4. insert red baffle in "winter" position shown.
5. Reinstall air cleaner cover onto base.
6 Reinstall wing nut;tighten securely.
IN TEMPERATURES ABOVE 32OF(0oC):
Fellow above directions, removing baffle from "winter" position and
reinstalling in "summer" position.
CLEANER INSTALLED ON ENGINE.
Clean and re-oil every three (3) months or every 25 operating
hours. Clean and re-oildaily ifused inextremelydustyconditions.
a. Wash in water and detergent solution and squeeze (don't
twist) untilalldirt is removed.
b. Rinse thoroughly in clear water.
c. Wrap ina cleanclothand squeeze (don'ttwist)untilccmpletely
dry.
d. Saturatewithengineoilandsqueeze(don'ttwist)todistribute
oil and remove excess oil
Replace once a year or every 1O0ope rating hours, more offen if
used in extremely dusty conditions.
Replacement filters are available at any Authorized Tecumseh
Service Outlet.
MAINTENANCE (Continued)
BASE
PAPER ELEMENT
/ FOAM FILTER (IF SO EQUIPPED)
•_'<'i>\ W,NGNUT
I
RED BAFFLE SHOWN IN
"WINTER" POSITION
COVER
-- RED BAFFLE "SUMMER" POSITION
" " 0 I
ANTI-ICING FEATURE
Figure 4
(_ COOLING SYSTEM: (see Figure 1and 5):
IMPORTANT: Frequently remove grass clippings, dirt and debris from
coolingfins, air intake screen and levers and linkage. This willhelp ensure
adequate cooling andcorrect engine speed.
COOLING FINS
LEVERS AND
RECOIL
LINKAGE COVER
NOTE: RECOIL COVER CUTAWAY TO SHOWCOOLING FINS
Figure 5
OLd) CHECK ENGINE AND EQUIPMENT OFTEN FOR LOOSE
_IL NUTS, BOLTS AND ATTACHMENTS, AND KEEP THESE
ITEMS TIGHTENED.
L
Page 3 181-1175-11
 Loading...