

Page 1
1-888-266-7096
1-888-266-7096
www.craftsman.com
www.craftsman.com
Model No.
138.37670
Número de modelo
138.37670
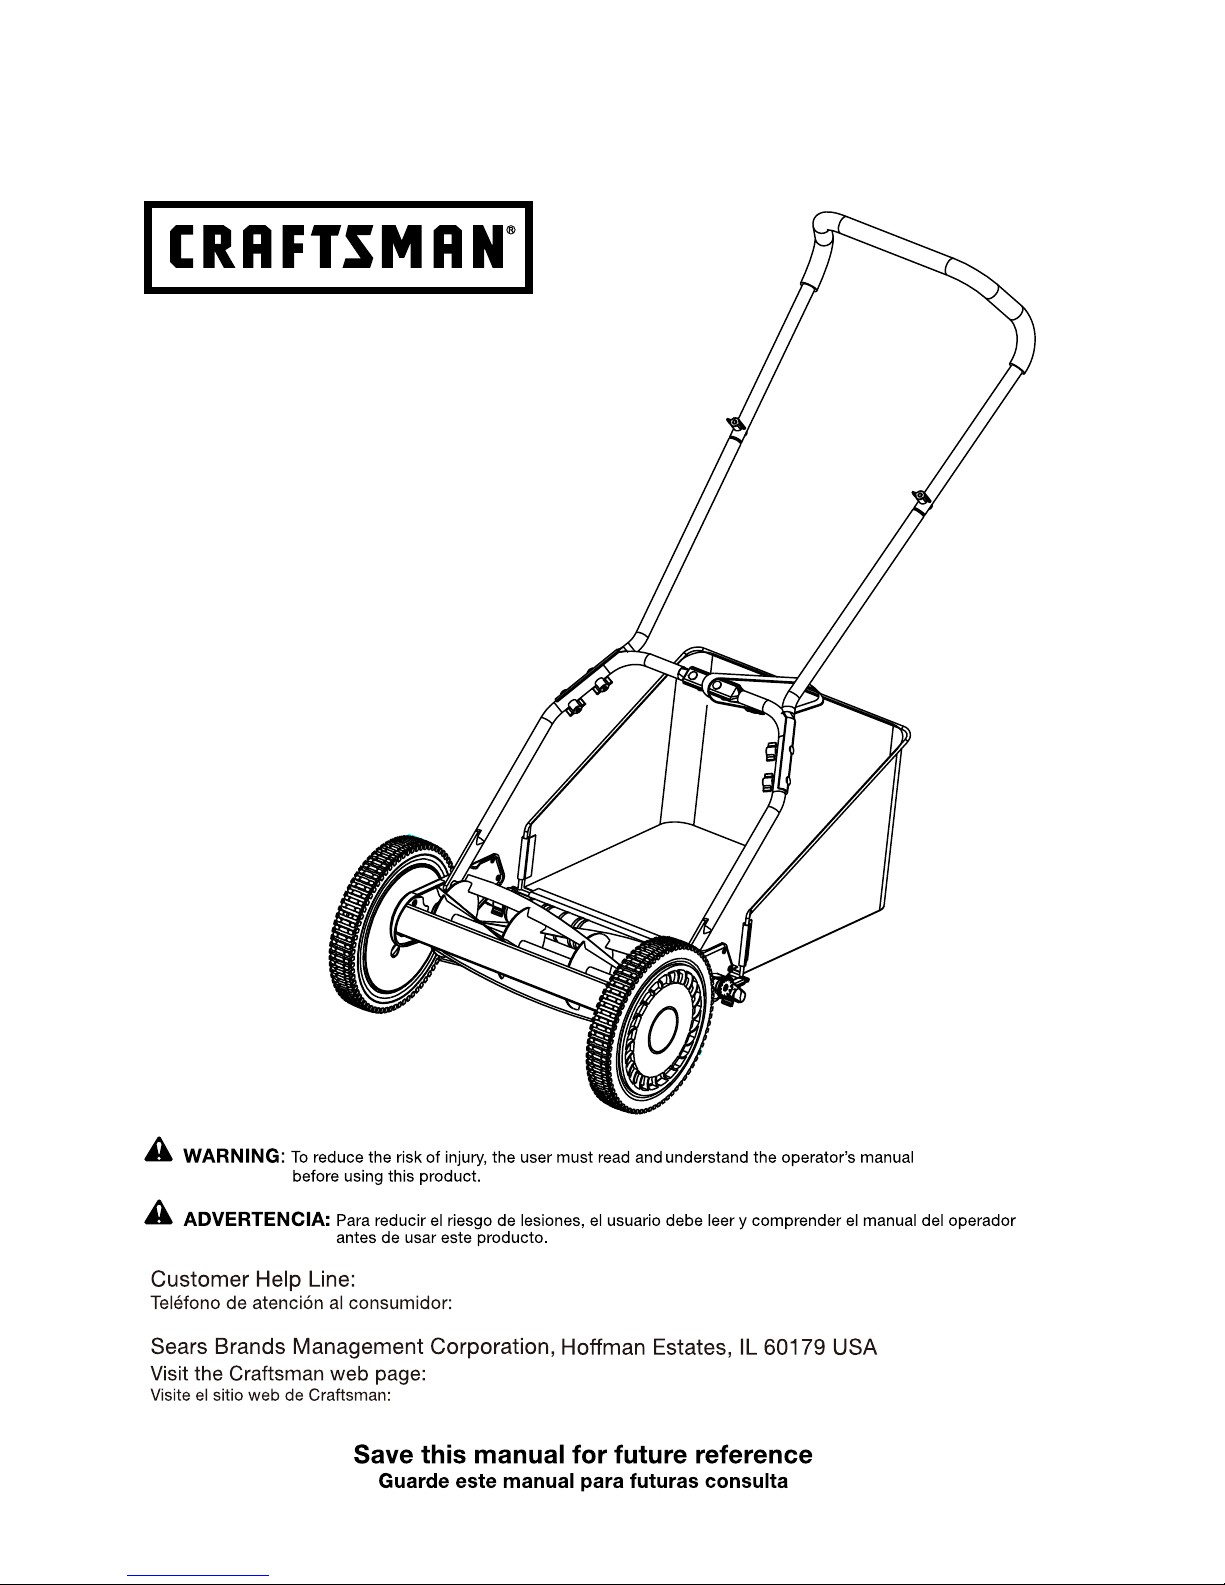
OPERATOR'S MANUAL
MANUEL DEL OPERADOR
16 in. QUIET REEL MOWER
400 mm (16 pulg.) PODADORA DE CARRETE
SILENCIOSO DE 16 PULG.
Page 2

TABLE OF CONTENTS / ÍNDICE DE CONTENIDO
INTRODUCTION / INTRODUCCIÓN
ENGLISH ESPAÑOL
■ Warranty.................................................................. 2
■ Introduction..............................................................2
■ Safety Information................................................3-4
■ Symbols...............................................................5-6
■ Features...................................................................6
■ Assembly..................................................................7
■ Operation.................................................................8
■ Care and maintenance.............................................9
■ Illustrated parts list...........................................10-12
■ Garantía............................Sección de Inglés pág. 2
■ Introducción.......................Sección de Inglés pág. 2
■ Información sobre seguridad................................3-4
■ Símbolos.............................................................5-6
■ Características........................................................6
■ Armado....................................................................7
■ Funcionamiento......................................................8
■ Cuidado y mantenimiento.......................................9
■ Figura numeras (ilustraciones)..............................i-v
CRAFTSMAN
®
TW0 YEAR LIMITED WARRANTY
FOR TWO YEARS from the date of purchase this power tool is warranted against any defects in material or
workmanship. With proof of purchase, a defective product will be replaced free of charge.
For warranty coverage details to obtain free replacement, visit the web page: www.craftsman.com/warranty
This warranty does not cover the blades or rear bag, which are expendable parts that can wear out from normal use
within the warranty period.
This warranty is void if this product is ever used while providing commercial services or if rented to another person.
This warranty gives you specic legal rights, and you may also have other rights which vary from state to state.
Sears Brands Management Corporation, Hoffman Estates, IL 60179
GARANTÍA DE CUATRO AÑOS CRAFTSMAN
®
DURANTE CUATRO AÑOS a partir de la fecha de adquisición, esta herramienta eléctrica cuenta con garantía frente
a defectos de material o mano de obra. Adjuntando la prueba de compra, se reemplazará gratuitamente el producto
defectuoso.
Para detalles sobre la cobertura de la garantía para el reemplazo gratuito, visite la página web: www.craftsman.com/
warranty
Esta garantía no cubre las hojas o bolsa trasera, que son piezas consumibles que pueden desgastarse con el uso
normal durante el período de garantía.
Esta garantía se anula si se utiliza este producto durante la prestación de servicios comerciales o si se alquila a otra
persona.
Esta garantía le otorga derechos legales especícos y también puede tener otros derechos que varían de estado a
estado.
Sears Brands Management Corporation, Hoffman Estates, IL 60179
This tool has many features for making its use more pleasant and enjoyable. Safety, performance, and
dependability have been given top priority in the design of this product making it easy to maintain and operate.
Esta herramienta ofrece numerosas características para hacer más agradable y placentero su uso. En el
diseño de este producto se ha conferido prioridad a la seguridad, el desempeño y la abilidad, por lo cual se
facilita su manejo y mantenimiento.
2 — English
* * *
* * *
Page 3
SAFETY INFORMATION
READ AND UNDERSTAND
ALL INSTRUCTIONS. Failure to follow all instructions
listed below may result in electric shock, fire, and/or
serious personal injury.
This symbol points out important
safety instructions, which if not followed, could
endanger the personal safety and/or property of
yourself and others. Read and follow all instructions in
this manual before attempting to operate this machine.
Failure to comply with these instructions may result in
personal injury.
When using reel mowers, basic
safety precautions should always be followed to
reduce the risk of fire, electric shock, and personal
injury.
This machine was built to be
operated according to the rules for safe operation in
this manual. As with any type of power equipment,
carelessness or error on the part of the operator can
result in serious injury. This machine is capable of
amputating hands and feet and throwing objects.
Failure to observe the following safety instructions
could result in serious injury or death.
IMPORTANT!
WARNING!
WARNING!
DANGER!
IMPORTANT SAFETY INSTRUCTIONS
■ Do not operate power tools in explosive atmospheres,
such as in the presence of ammable liquids, gases, or
dust. Power tools create sparks which may ignite the
dust or fumes.
■ Avoid body contact with grounded surfaces such as
pipes, radiators, ranges, and refrigerators. There is an
increased risk of electric shock if your body is grounded.
■ Never allow children to operate the equipment. This is
not a toy. Never allow adults to operate the equipment
without proper instruction.
■ Keep all bystanders, children, and pets at least 50 ft.
away.
■ Always wear safety glasses with side shields.
Everyday glasses have only impact resistant lenses.
They are NOT safety glasses. Following this rule will
reduce the risk of eye injury. Use face mask if operation
is dusty.
■ Wear eye protection with side shields which are
marked to comply with ANSI Z87.1 when operating this
product.
■ Do not expose to rain; store indoors.
■ Use only as described in this manual. Use only
identical manufacturer’s replacement parts and
accessories. Use of any other parts may create a hazard
or cause product damage.
■ Secure long hair so it is above shoulder level to
prevent entanglement in any moving parts.
■ Wear heavy long pants, boots, and gloves. Avoid loose
garments or jewelry that could get caught in moving
parts of the machine.
■ Keep firm footing and balance. Do not overreach.
Overreaching can result in loss of balance.
■ Do not operate the equipment while barefoot or
when wearing sandals or similar lightweight footwear.
Wear protective footwear that will protect your feet and
improve your footing on slippery surfaces.
■ Never place hands, fingers or feet inside the reel.
Although a motor does not power this mower, when the
wheels turn the reel spins and can cut.
■ Never mow when grass is wet as it can be slippery.
■ Do not use the reel mower while barefoot or while
wearing sandals.
■ Walk behind, never run, while using reel mower.
■ Always make sure of your footing when using this reel
mower.
■ Never intentionally strike or hit trees, fences, etc. This
can cause injuries or severely damage the reel mower
mechanisms.
■ Make sure your reel mower is in a safe operating
condition. Do not attempt to operate this reel mower if
damaged. Contact customer service or have the reel
mower repaired by a qualified repair service provider
before using.
■ Do not force tool. Use the correct tool for your
application. The correct tool will do the job better and
safer at the rate for which it is designed.
SPECIFIC SAFETY RULES FOR REEL MOWER
GENERAL OPERATION
Use of this reel mower should be restricted to individuals
who have read, understood and will follow the warnings
and instructions that are printed in this manual and on
the reel mower.
■ Carefully read all instructions on the reel mower and in
the manual before attempting to assemble and operate
the reel mower. Keep this manual in a safe place for
future reference, and consult it regularly.
■ In order to avoid contact with the blade or injury
caused by a thrown object, stay in the operating zone
behind the handles, and keep children and bystanders
at least 50 ft.(15 m) away from the mower while it is
in operation. Stop the motor immediately if someone
enters the mowing area.
3 — English
Page 4

4 — English
SAFETY INFORMATION
SAVE THESE INSTRUCTIONS
■ Thoroughly inspect the area where the reel mower is
to be used. Remove all stones, sticks, wire, toys, and
other objects that could be tripped over or thrown by the
blade. Thrown objects can cause serious personal injury.
■ Plan your mowing pattern in such a way as to
avoid discharging material toward roads, sidewalks,
bystanders, etc.
■ Always wear a face mask or a dust mask when
operating the mower in a dusty environment.
■ Dress properly. Do not wear loose clothing or jewelry
that can get caught in moving parts. The wearing of
protective gloves and safety footwear is recommended.
■ Do not use the reel mower for any job except that for
which it is intended. Do not force the reel mower.
■ Avoid dangerous environments. Do not operate the
mower in the rain or in wet or damp grass.
■ Mow only in daylight or in good articial light. Do not
rush a mowing job.
■ Stop machine if anyone enters the area.
■ Do not pull machine backward unless absolutely
necessary. Always look down and behind before and
while moving backward.
■ Never leave a running machine unattended.
■ Operate machine only in daylight or good articial light.
CHILD SAFETY
Tragic accidents can occur if the operator is not aware
of the presence of children.
■ Keep children out of the mowing area and under the
watchful care of a responsible adult.
■ Do not allow children under the age of 14 to operate
this reel mower. Children who are 14 years of age
and older must read and understand the operating
instructions and safety rules in this manual and must
be trained and supervised by a parent.
■ Stay alert, and stop the reel mower if a child or any
other person enters the mowing area.
■ Look behind and down for small children before and
while moving backwards.
■ Use extreme care when approaching blind corners,
doorways, shrubs, trees, or other objects that may
obscure your view of a child who may run into the path
of the reel mower.
Some dust created by power sanding, sawing,
grinding, drilling and other construction activities
contains chemicals known to the state of California to
cause cancer, birth defects or other reproductive harm.
Some examples of these chemicals are:
• Lead from lead-based paints,
• Crystalline silica from bricks and cement and other
masonry products, and
• Arsenic and chromium from chemically-treated
lumber.
Your risk from these exposures varies, depending on
how often you do this type of work. To reduce your
exposure to these chemical: work in a well ventilated
area, and work with approved safety equipment, such
as those dust masks that are specially designed to
lter out microscopic particles.
WARNING! (PROPOSITION65)
Page 5
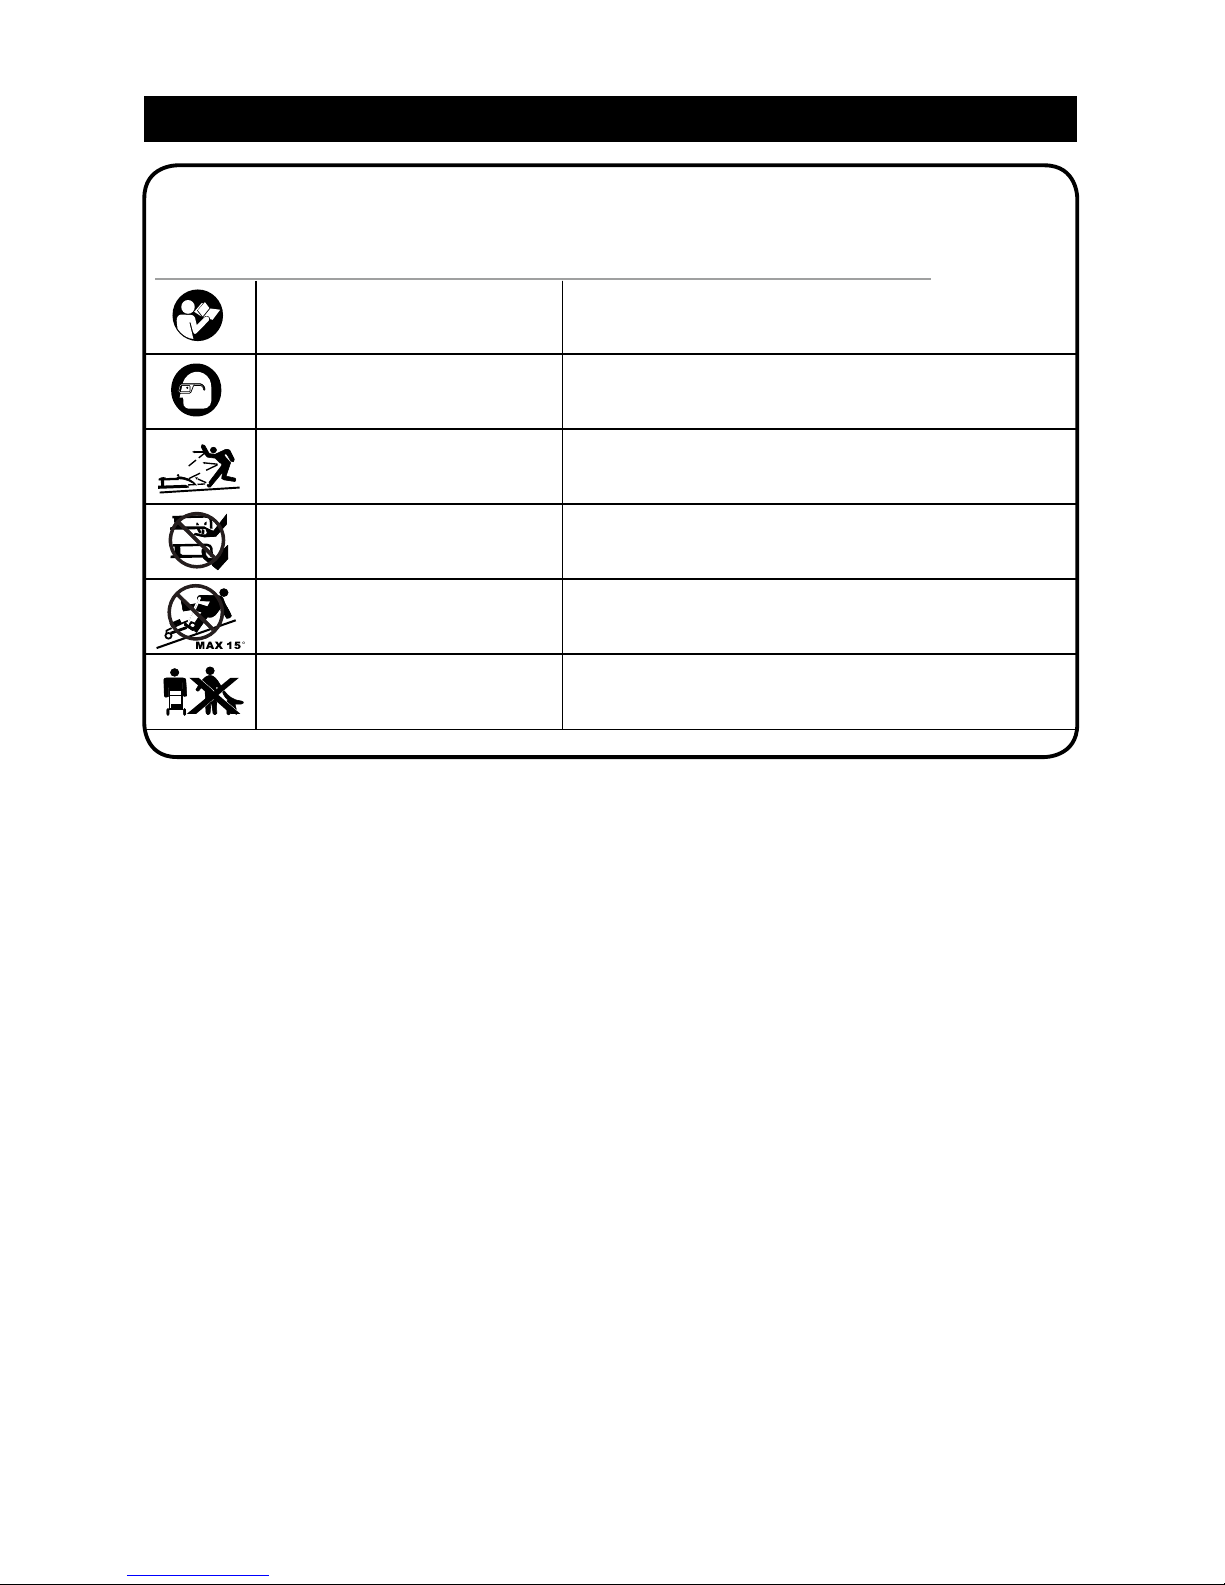
SYMBOLS
5 — English
Some of the following symbols may be used on this product. Please study them and learn their meaning.
Proper interpretation of these symbols will allow you to operate the product better and safer.
SYMBOL NAME DESIGNATION/EXPLANATION
Read The Operator’s Manual To reduce the risk of injury user must read and
understand operator’s manual before using this product.
Eye and Head Protection Always wear eye protection with side shields that are
marked to comply with ANSI Z87.1.
Ricochet Thrown objects can ricochet and result in personal
injury or property damage.
Sharp Blade Danger – Keep hands and feet away from blade.
Operating on a slope Do not mow a slope that has an angle of greater than 15°.
Keep Bystanders Away Keep all bystanders at least 50 ft. away.
Page 6
SYMBOLS
FEATURES
6 — English
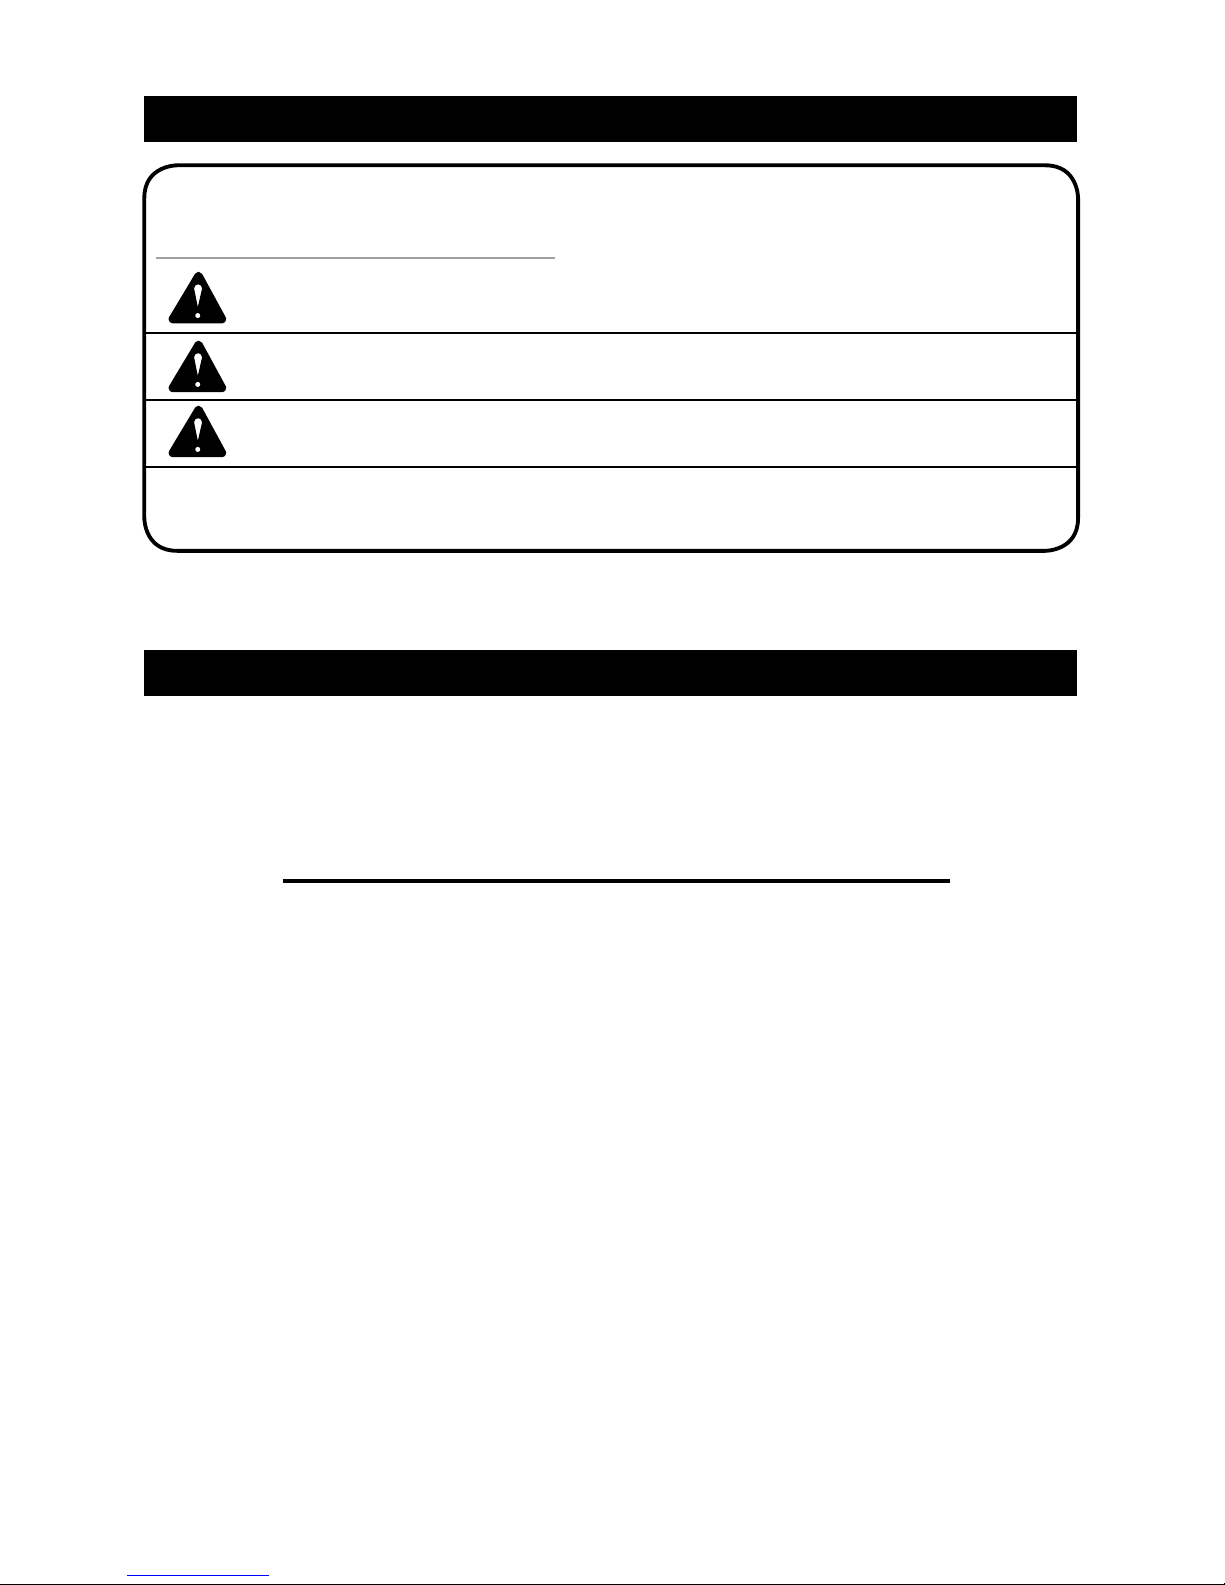
The following signal words and meanings are intended to explain the levels of risk associated with this
product.
SYMBOL SIGNAL MEANING
DANGER
Indicates an imminently hazardous situation, which, if not
avoided, will result in death or serious injury.
WARNING Indicates a potentially hazardous situation, which, if not avoided,
could result in death or serious injury.
CAUTION Indicates a potentially hazardous situation, which, if not avoided,
may result in minor or moderate injury.
CAUTION (Without Safety Alert Symbol) Indicates a situation that may
result in property damage.
PRODUCT SPECIFICATIONS
Cutting path .........................................................................................................................................16" (40 cm)
Height adjustments .................................................................................................................1 - 2” (2.6 - 5.1 cm)
Number of blades .........................................................................................................................5 Helical blades
Weight ........................................................................................................................................24.7 lbs (11.2 kg)
KNOW YOUR LAWN MOWER
See Figure 1.
The safe use of this product requires an understanding
of the information on the product and in this operator’s
manual as well as a knowledge of the project you
are attempting. Before use of this product, familiarize
yourself with all operating features and safety rules.
REAR BAG
The rear bag prevents grass clippings from being
scattered across your lawn as you mow.
HEIGHT ADJUSTMENT KNOB
The height adjustment knob provides cutting height
adjustments.
Page 7

ASSEMBLY
7 — English
UNPACKING
Before attempting to assemble, empty carton and
compare parts with parts list below.
■ Carefully remove the product and any accessories
from the box.
■ Inspect the parts to make sure no breakage or
damage occurred during shipping.
■ Do not discard the packing material until all parts
are examined.
■ If any parts are damaged or missing, please call
1-888-266-7096 for assistance.
■ Be sure to tighten the lock nuts when assembled to
prevent the handle from rocking.
PACKING LIST
See Figure 2.
■ 1-Top handle
■ 2-Center handle pieces
■ 2-Lower handle pieces
■ 8-Knobs
■ 8-Carriage bolts
■ 1-Reel mower body
■ 1-Bar frame
■ 1-Rear bag
ASSEMBLING THE HANDLE
See Figure 3-5.
NOTE: Do not completely tighten bolts until assembly
is complete.
■ Insert the two center handle pieces (4) into the left
and right side of the top handle (2) and secure with
two carriage bolts (3) and knobs (5) provided. (Fig. 3)
■ Connect the right lower handle (6) with the left
lower handle (7) and secure with two carriage bolts (3)
and knobs (5) provided. (Fig. 4)
■ Attach the top handle subassembly previously
assembled, to the lower handle subassembly using
four carriage bolts (3) and knobs (5) provided. (Fig. 5)
■ Tighten all the knobs on the joints of the handle
assembly.
ATTACHING THE HANDLE TO THE MOWER BASE
See Figure 6.
■ Align holes (1) at the lower end of each handle arm
with posts (2) extending from the mower base side
plates.
■ Slide lower ends of handle arms onto posts.
ATTACH THE REAR BAG
See Figure 7-10.
■ Take out all components in the packing.
■ Push the bar frame into the grass box tube, snap
the side fastening lugs on the grass box over the
bar frame, and snap the bottom fastening lug on the
grass box over the bar frame. (Fig. 7-8).
■ Place the hooks on the rear bag onto the roller
shaft. Secure the bag to the lower handle using the
belt supplied . (Fig. 9).
■ Adjust strap for proper height so the bag does not
rub the ground while mowing or transporting. (Fig.10).
Do not allow familiarity with this
product to make you careless. Remember that a
careless fraction of a second is sufficient to inflict
serious injury.
Do not use any attachments or
accessories not recommended by the manufacturer of
this product. The use of attachments or accessories
not recommended can result in serious personal
injury.
WARNING!
WARNING!
Page 8

OPERATION
8 — English
CUTTING HEIGHT ADJUSTMENT
See Figure 11.
■ Use the roller assembly to adjust the cutting height
of the mower to four positions, from 1- 2 inches (2.6 -
5.1 cm).
■ For the highest cutting level, move the adjustment
knobs to position A as shown in Fig. 11.
■ For the lowest cutting level, move the adjustment
knobs to position B as shown in Fig. 11.
■ Set intermediate cutting heights by moving the
adjustment knobs to one of the two stops between
highest and lowest positions.
For best performance, align the edge of the cutting
blades to overlap the previously cut path. This will
ensure no grass is missed during the process.
NOTE: Do not use wheels as a reference point for
grass cut line.
MOWER BLADE ADJUSTMENTS
See Figure 12.
NOTE: Blades are factory adjusted.
■ Misalignment can occur, often caused by blades
being too loose or too tight. This can cause an
uneven cut or difculty pushing the mower.
■ Each end of the cutting bar is adjusted separately.
■ To move the cutting bar closer to the blades turn
the adjustment screw clockwise. To move the cutting
bar away from the blades turn the adjustment screw
counterclockwise.
■ When the space equals the thickness of paper (0.12
mm), insert a piece of paper between the blades and
the cutting bar, and slowly turn the wheel by hand.
■ The reel should cut the paper evenly at every point.
If not, it is necessary to readjust the cutting action.
CHECKING THE ADJUSTMENT
See Figure 13.
■ Turn mower upside down.
■ Insert a piece of paper between cutting bar and reel
blades, and slowly turn wheel by hand.
■ Each blade should cut across the paper in a
continuous line. If there are missed spots in the cut, it
is necessary to make further adjustments. See Mower
Blade Adjustments.
Blades are extremely sharp.
To avoid injury, do not touch blades when making
adjustments.
Do not overtighten adjustment
screws, as this could damage cutting bar. Both
screws must be tight on nal adjustment.
Αdjusting the screws for blade
adjustments is a very sensitive procedure. A sixteenth
of a turn is considered a major adjustment. Βefore
tightening one adjustment screw, make sure to loosen
the opposite screw an equal amount.
WARNING!
CAUTION!
CAUTION!
Page 9

CARE AND MAINTENANCE
9 — English
■ Minimum care is required to ensure smooth
operation of your mower.
■ To avoid damage to mower or cutting blades, keep
area to be mowed free from debris.
■ For best results, regularly apply lubricant to
mower’s cutting surfaces, cutting reel axle shaft and
wheels.
SHARPENING THE CUTTING BLADES
■ Spread a thin layer of lapping compound, available
at most hardware stores, onto the front edge of the
reel blades.
■ Adjust the cutting bar so that the blade has light but
rm contact across the full width of the cutting bar.
■ Turn the reel blades until the front edge of the
cutting bar blade is polished.
NOTE: Clean any grinding compound or debris from
the cutting bar blade, reel blade, pinions, and pawls.
NOTE: Use industrial or valve lapping compound
between 100 and 240 grit. Lubricate the axle and
pinion with a light lm of wheel bearing grease.
CLEANING AND STORAGE
■ Clean the exterior of the machine thoroughly using
a soft brush and cloth before storing. Do not use
water, solvents or polishes.
■ Turn the mower on its side to clean the blade area.
■ Store the mower in a dry place. Do not place other
objects on top of the mower during storage.
Do not place hands in the
mower near blades. If grass cuttings are compacted
in the blade area, remove using a wood or plastic
cleaning tool appropriate for the cleaning of the
blades.
Do not overtighten the adjusting
screws, as this could damage the cutting bar. Tighten
both screws during nal adjustment.
WARNING!
CAUTION!
Page 10

CRAFTSMAN 16in. REEL MOWER – MODEL NUMBER 138.37670
The model number will be found on a label attached to the motor housing.
TO PURCHASE REPLACEMENT PARTS, CALL 1-800-469-4663
10 — English
2935 3132333436 30
37
40
39
38
41
42
46
45
44
43
13
28
26
27
25
24
23
21
19
20
22
16
14
15
17
18
12
8
9
6
11
10
7
2
5
4
3
1
Page 11

11 — English
TO PURCHASE REPLACEMENT PARTS, CALL 1-800-469-4663
ITEM NO. PART NO. DESCRIPTION QTY
1 N-1 Soft grip 1
2 N-2 Top handle 1
3 N-3 Carriage Bolt 8
4 N-4 Middle handle 2
5 N-5 Knob 8
6 N-6 Left lower handle 1
7 N-7 Roller shaft 1
8 N-8 Roller 1
9 N-9 Roller shaft sleeve 2
10 N-10 Height adjustment pin 2
11 N-11 Spring 2
12 N-12 Height adjustment bracket (L) 1
13 N-13 Height adjustment knob 2
14 N-14 C-clip 2
15 N-15 Bolt 2
16 N-16 Cutting bar pivot rod 1
17 N-17 Cutting bar assy. 1
18 N-18 Blade adjustment nut 2
19 N-19 Blade adjustment spring 2
20 N-20 Blade adjustment bolt 2
21 N-21 Supporting plate (L) 1
22 N-22 Wheel assy. 2
23 N-23 Wheel cover 2
24 N-24 C-clip 2
25 N-25 Washer 2
26 N-26 Nut M8 2
27 N-27 Spring washer 2
28 N-28 Supporting assy.(L) 1
29 N-29 Washer 2
30 N-30 Lock nut M10 2
31 N-31 Gear (L) 1
32 N-32 Pin 2
33 N-33 Washer 2
34 N-34 Ball bearing 2
35 N-35 C-clip 2
36 N-36 Cylinder-blade assy. 1
37 N-37 Gear (R) 1
38 N-38 Cover assy. 1
CRAFTSMAN 16in. REEL MOWER – MODEL NUMBER 138.37670
The model number will be found on a label attached to the motor housing.
Page 12

12 — English
TO PURCHASE REPLACEMENT PARTS, CALL 1-800-469-4663
ITEM NO. PART NO. DESCRIPTION QTY
39 N-39 Supporting assy. (R) 1
40 N-40 Wheel shaft 2
41 N-41 Supporting plate (R) 1
42 N-42 Washer 2
43 N-43 Height adjustment bracket (R) 1
44 N-44 Right lower handle 1
45 N-45 Bar frame 1
46 N-46 Grass bag 1
CRAFTSMAN 16in. REEL MOWER – MODEL NUMBER 138.37670
The model number will be found on a label attached to the motor housing.
Page 13

i
See this section for all of the gures referenced in the
operator’s manual.
Consulte esta sección para ver todas las guras a las que se hace
referencia en el manual del operador.
Fig. 1
A - Upper handle (Agarradera superior)
B - Middle handle (Agarradera central)
C - Lower handle (Agarradera inferior)
D - Rear bag (Bolsa trasera)
E - Height adjustment knob (Perilla para ajuste de
altura)
F - Wheel (Rueda)
G - Housing (Carcasa)
H - Bag support belt (Bolsa con cinta de sujeción)
A
B
H
D
E
F
C
G
Page 14

Fig. 2
Fig. 3 Fig. 4
ii
A - Foam grip (Asidero de espuma)
B - Top handle (Agarradera superior)
C - Carriage bolts (Pernos de soporte)
D - Center handle pieces (Piezas centrales de la agarradera)
E - Knobs (Perillas)
F - Right lower handle (Agarradera inferior derecha)
G - Left lower handle (Agarradera inferior izquierda)
H - Reel mower body (Cuerpo de la podadora de carrete)
I - Bar frame (Barra del marco)
J - Rear bag (Bolsa)
A
D
D
B
C
C
C
E
E
E
E
F
G
H
J
I
C
C
Page 15

Fig. 5
Fig. 7
Fig. 8
Fig. 6
Fig. 9
Fig. 10
iii
1 2
Page 16

Fig. 11
iv
Position B
Position A
A
B
C
A - The Highest cutting position (Posición de corte más alta)
B - The Lowest cutting position (Posición de corte más baja)
C - The Height adjustment knob (Perilla para ajuste de altura)
Page 17

Fig. 12
Fig. 14
v
A
B
C
A
B
A - Adjustment screw (Tornillo de ajuste)
B - Cutting bar (Barra de corte)
C - Rear roller (Rodillo trasero)
A - Paper (Papel)
B - Cutting bar (Barra de corte)
Page 18

INFORMACIÓN DE SEGURIDAD
3 — Español
LEA Y COMPRENDA
TODAS LAS INSTRUCCIONES. No seguir las
instrucciones que se enumeran a continuación puede
resultar en descarga eléctrica, incendio y/o lesiones
personales graves.
estos símbolos indican
importantes instrucciones de seguridad que, si no las
sigue, podría poner en peligro su propia seguridad
y propiedad y la de otros. Lea y siga todas las
instrucciones en este manual antes de intentar usar
esta máquina. El no cumplir con estas instrucciones
podría ocasionar lesiones personales.
cuando utilice podadoras
eléctricas, tome siempre precauciones de seguridad
básicas para reducir el riesgo de incendios, descargas
eléctricas y lesiones personales.
esta maquina se diseñó para
funcionar de acuerdo con las normas de uso seguro
que contiene este manual. Como sucede con
cualquier tipo de equipo electromecánico, un descuido
o error del operador pueden ocasionar lesiones
graves. Esta máquina puede amputar extremidades
y arrojar objetos. El incumplimiento de las siguientes
instrucciones de seguridad podría provocar lesiones
graves o la muerte.
IMPORTANTE!
ADVERTENCIA!
ADVERTENCIA!
PELIGRO!
INSTRUCCIONES IMPORTANTES DE SEGURIDAD
■ No utilice herramientas eléctricas en atmósferas en
las que exista riesgo de explosión, como por ejemplo en
presencia de líquidos inflamables, gases o polvo. Las
herramientas eléctricas producen chispas que podrían
encender el polvo o humo.
■ Evite el contacto del cuerpo con superficies
conectadas a tierra como tubos, radiadores, extractores
o refrigeradores. Existe un gran riesgo de descarga
eléctrica si su cuerpo tiene contacto a tierra.
■ Nunca permita que los niños utilicen el equipamiento.
Nunca permita que adultos utilicen el equipamiento sin
la instrucción adecuada.
■ Mantenga a los transeúntes, niños y mascotas al
menos a 15 m de distancia.
■ Utilice siempre gafas de seguridad con protecciones
laterales. Las gafas comunes sólo poseen lentes
con resistencia al impacto. Éstas NO son gafas de
seguridad. Seguir esta norma puede reducir el riesgo de
lesiones oculares. Utilice una máscara si va a utilizar en
condiciones de polvo.
■ Siempre use protección ocular con protección lateral
con la marca de cumplimiento de la norma ANSI Z87.1
■ No lo exponga a la lluvia, almacene bajo techo.
■ Utilícelo sólo como se describe en este manual. Use
sólo partes y accesorios de repuesto idénticos a los del
fabricante. El uso de cualquier otra parte podría causar
peligro o daños al producto.
■ Mantenga el cabello, las ropas holgadas, los dedos
y todas las partes del cuerpo lejos de las aberturas y
partes en movimiento.
■ Utilice pantalones largos y pesados, botas y guantes.
Evite usar ropa holgada o joyas ya que éstas podrían
atraparse en las partes en movimiento de la máquina.
■ Mantenga un apoyo de pies y un equilibrio adecuados.
No se extienda demasiado. Hacerlo puede causar
pérdida de equilibrio.
■ No utilice el equipamiento a pies descalzos o si lleva
sandalias u otro tipo de zapato liviano similar. Use
calzado de seguridad que proteja sus pies y mejore su
equilibrio en supercies resbaladizas.
■ Nunca coloque las manos, los dedos o los pies dentro
del cilindro. Aún cuando esta podadora no tiene un
motor que la accione, cuando las ruedas dan vueltas el
cilindro gira y puede cortar.
■ Nunca siegue cuando el césped este mojado, ya que
puede estar resbaloso.
■ No use la podadora de cilindro mientras usted tenga
los pies descalzos o cuando este usando sandalias.
■ Mientras éste usando la podadora de cilindro camine
detrás de ella, nunca corra. Siempre arme su pisada
cuando este usando esta podadora de cilindro.
■ Nunca golpee o choque intencionalmente con
árboles, cercas, etc. Esto puede causar lesiones o
dañar severamente a la podadora de cilindro.
■ Compruebe que su podadora de cilindro este en
condiciones seguras de funcionamiento. No intente
poneren funcionamiento esta podadora de cilindro si
esta dañada. Póngase en contacto con el servicio al
cliente o, antes de usarla, haga que se la repare un
técnico calicado en servicios de reparación.
■ No fuerce las herramientas. Utilice la herramienta
adecuada para su aplicación. La herramienta apropiada
realizará un trabajo mejor y más seguro al ritmo para la
que fue diseñada.
NORMAS ESPECÍFICAS DE SEGURIDAD PARA
LA PODADORA
FUNCIONAMIENTO GENERAL
Solo aquellas personas que leyeron, comprendieron y
que seguirán las advertencias e instrucciones impresas
en este manual y sobre la podadora deben utilizarla.
Page 19

INFORMACIÓN DE SEGURIDAD
4 — Español
GUARDAR ESTAS INSTRUCCIONES
■ Lea atentamente todas las instrucciones en la
podadora y este manual antes de intentar ensamblar y
usar la podadora. Guarde el manual en un lugar seguro
y consúltelo regularmente en el futuro.
■ Para evitar el contacto con la cuchilla o lesiones
ocasionadas por un objeto lanzado, permanezca en la
zona de operación detrás de la podadora y mantenga
tanto a niños como transeúntes a al menos 15 m (50
pies) de distancia si está funcionando. Detenga el motor
de inmediato si alguien entra en el área de poda.
■ Inspeccione minuciosamente el área donde se utilizará
la podadora. Elimine piedras, palos, cables, juguetes y
otros objetos con los que alguien se pueda tropezar o
que la cuchilla pueda lanzar. Los objetos que lance la
podadora pueden ocasionar lesiones personales graves.
■ Establezca su patrón de poda de tal manera que
evite descargar material del lado de calles, aceras,
transeúntes, etc.
■ Siempre utilice un máscara si usa la podadora en
condiciones de polvo.
■ Use ropa adecuada. No use ropa holgada o joyas
que pueden atraparse en las partes en movimiento Se
recomienda el uso de guantes de protección y calzado
de seguridad.
■ No use la podadora en tareas diferentes para la que
fue diseñada. No fuerce la podadora.
■ No ponga las manos ni los pies cerca de piezas
rotatorias o debajo de la plataforma de corte. El contacto
con las cuchillas puede producir la amputación de
manos y pies.
■ Corte el césped sólamente con luz de día o una buena
luz articial. No apresure el trabajo de poda.
■ Detenga la máquina si alguien entra en el área.
■ No tire la podadora hacia atrás a menos que sea
absolutamente necesario. Siempre mire hacia abajo y
hacia atrás antes de moverla hacia atrás.
■ Nunca deje de supervisar una máquina en
funcionamiento.
■ Use la máquina sólamente con luz de día o una buena
luz articial.
SEGURIDAD DE LOS NIÑOS
Pueden ocurrir accidentes trágicos si el operador no
está atento a la presencia de niños.
■ Mantenga a los niños fuera del área de trabajo y
bajo estricta vigilancia de un adulto responsable.
■ No permita que niños menores de 14 años usen esta
podadora. Los niños de 14 años o más deben leer y
com prender las instrucciones de funcionamiento y las
normas de seguridad en este manual, además de ser
entrenados y supervisados por sus padres.
■ Esté alerta y detenga el cortacésped helicoidal si
un niño o cualquier otra persona ingresan al área de
trabajo.
■ Antes y mientras se está moviendo hacia atrás, mire
hacia abajo y atrás y verique que no haya niños.
■ Tenga extremo cuidado cuando se acerque a
esquinas ciegas, entradas de puertas, arbustos,
árboles u otros objetos que puedan bloquearle la vista
de un niño que pudiera correr hacia la podadora.
Algo del polvo provocado por las lijas, sierras,
trituradoras y taladros eléctricos, y otras actividades
de construcción Contiene químicos reconocidos como
causantes de cáncer y defectos congénitos u otros
daños en el aparato reproductivo. Algunos ejemplos de
estos químicos son:
• plomo de pinturas con base de plomo
• sílice cristalina de ladrillos, cemento y otros productos
de mampostería
• arsénico y cromo de madera tratada con químicos
El riesgo que corre a la exposición de estos químicos
varía dependiendo de la frecuencia con que realiza
estos tipos de trabajos. Para reducir la exposición a
estos químicos: trabaje en un área bien ventilada y
con el equipamiento de seguridad aprobado, como por
ejemplo máscaras especialmente diseñadas para ltrar
laspartículas microscópicas.
ADVERTENCIA (PROPUESTA 65)
Page 20

SÍMBOLOS
5 — Español
Es posible que se empleen en este producto algunos de los siguientes símbolos. Le suplicamos estudiarlos
y aprender su significado. Una correcta interpretación de estos símbolos le permitirá utilizar mejor y de
manera más segura el producto.
SÍMBOLO NOMBRE DENOMINACIÓN/EXPLICACIÓN
Lea el manual del operador Para reducir el riesgo de lesiones, el usuario debe leer y
comprender el manual del operador antes de usar este
producto.
Protección ocular Siempre use protección ocular con protección lateral con
la marca de cumplimiento de la norma ANSI Z87.1
Rebote Cualquier objeto lanzado puede rebotar y producir lesiones
personales o daños físicos.
Hoja Alada Peligro – Para evitar una lesíon grave, no toque la hoja
que corta la cuerda.
Funcionamiento en terrenos No corte la grama en terrenos inclinados mayores de 15°.
inclinados.
Mantenga alejadas a las Mantenga a los circunstantes a una distancia mínima de
personas presentes 15 m (50 pies).
Page 21

SÍMBOLOS
CARACTERÍSTICAS
Las siguientes palabras de señalización y sus signicados tienen el objeto de explicar los niveles de riesgo
relacionados con este producto.
SÍMBOLO SEÑAL SIGNIFICADO
PELIGRO
Indica una situación peligrosa inminente, la cual, si no se evita, causará
la muerte o lesiones serias.
ADVERTENCIA Indica una situación peligrosa posible, la cual, si no se evita, podría
causar la muerte o lesiones serias.
PRECAUCIÓN Indica una situación potencialmente peligrosa la cual, si no se evita, puede
causar lesiones leves o moderadas.
PRECAUCIÓN (Sin el símbolo de alerta de seguridad) Indica una situación que puede
producir daños materiales.
6 — Español
ESPECIFICACIONES DEL PRODUCTO
Senda de corte .............................................................................................................................16 pulg. (40 cm)
Ajustadores de altura. .....................................................................................................1 y 2 pulg. (2,6 y 5,1 cm)
Número de cuchillas .........................................................................................................................5 helicoidales
Peso ............................................................................................................................................24,7 lb. (11,2 kg)
FAMILIARÍCESE CON SU PODADORA DE PASTO
Vea la gura 1.
Para usar este producto con la debida seguridad se
debe comprender la información indicada en el producto
mismo y en este manual, y se debe comprender
también el trabajo que intenta realizar. Antes de usar
este producto, familiarícese con todas las características
de funcionamiento y normas de seguridad del mismo.
BOLSA TRASERA
La bolsa trasera impide que los recortes de césped se
dispersen por el pasto mientras lo poda.
PERILLA DE AJUSTE DE ALTURA
La perilla de ajuste de altura brinda ajustes de la
altura de corte.
Page 22

ARMADO
7 — Español
DESEMPAQUETADO
Antes de intentar el ensamblaje, vacíe la caja de
cartón y compruebe que tiene todas las piezas que
aparecen en la siguiente lista.
■ Saque cuidadosamente las piezas de la caja.
■ Revise las piezas cuidadosamente para asegurarse
de que no han sucedido quebraduras o daños
durante el envió.
■ No deseche el material de embalaje hasta haber
examinado todas las piezas.
■ Si hay alguna pieza dañada o perdida, sírvase
llamar al 1-888-266-7096 para recibir ayuda.
■ Para evitar que la manija oscile, asegúrese de
apretar la tuerca de inmovilización al ensamblar la
manija.
LISTA DE EMPAQUETADO
Consulte la gura 2.
■ 1-Agarradera superior
■ 2-Piezas centrales de la agarradera
■ 2-Agarradera inferior
■ 8-Perillas
■ 8-Pernos de soporte
■ 1-Cuerpo de la podadora de carrete
■ 1-Barra del marco
■ 1-Bolsa
ENSAMBLE DE LA MANIJA
Consulte las guras 3-5.
NOTA: No apriete completamente los pernos hasta
terminar de ensamblar.
■ Introduzca las dos piezas centrales (4) de la manija
en los lados derecho e izquierdo de la parte superior
de la manija (2) y asegúrelas con los dos pernos de
soporte (3) y las perillas (5) que se suministran. (Fig.
3)
■ Conecte la pieza inferior derecha (6) de la manija
a la pieza inferior izquierda (7) y asegúrela con los
dos pernos de soporte (3) y las perillas (5) que se
suministran. (Fig. 4)
■ Una el conjunto superior de la manija previamente
ensamblado, al conjunto inferior de la manija
utilizando los cuatro pernos de soporte (3) y las
perillas (5) que se suministran. (Fig. 5)
■ Apriete todas las contratuercas en las junturas del
conjunto de la manija.
CÓMO UNIR LA AGARRADERA A LA BASE DE LA
PODADORA
Consulte la gura 6.
■ Alinee los agujeros (1) en la parte inferior de cada
brazo de agarradera con los postes cortos (2) que se
extienden desde las placas laterales de la base de la
podadora.
■ Inserte la parte inferior de los brazos de las
agarraderas en los postes.
COLOQUE LA BOLSA TRASERA
Consulte las guras 7-10.
■ Saque todos los componentes en el embalaje (Fig.
7).
■ Empuje la barra del marco dentro del tubo de la
caja de recogida de hierba. Coloque, hasta que haga
clic, las orejas de fijación laterales en la caja de
recogida de hierba por encima de la barra del marco.
Coloque, hasta que haga clic y las orejas de jación
del fondo en la caja de recogida de hierba por encima
de la barra del marco (Fig. 7-8).
■ Coloque los enganches en la bolsa trasera del
eje del rodillo. Asegure la bolsa al mango inferior
utilizando la correa suministrada (Fig. 9).
■ Ajuste el tirante al peso correcto de forma que la
bolsa no roce el suelo mientras se realiza el corte o el
transporte (Fig.10).
No permita que su
familarización con este producto le vuelva
descuidado. Tenga presente que un descuido de un
instante es suciente para inigir una lesión grave.
No utilice ningún
aditamento o accesorio no recomendado por
el fabricante de este producto. El empleo de
aditamentos o accesorios no recomendandos podría
causar lesiones serias.
ADVERTENCIA!
ADVERTENCIA!
Page 23

FUNCIONAMIENTO
8 — Español
CÓMO AJUSTAR LA ALTURA DE CORTE
Consulte la gura 11.
■ Utilice el conjunto de rodillos para ajustar la
altura de corte de la cortadora de césped a cuatro
posiciones, 1 a 2 pulgadas (2.6 a 5.1 cm).
■ Para obtener el corte más alto, coloque las perillas
de ajuste en el agujero superior que está en el marco
lateral. (posición A)
■ Para obtener el corte más bajo, coloque las perillas
de ajuste en el agujero inferior que está en el marco
lateral. (Posición B)
■ Conjunto alturas de corte intermedios moviendo
las perillas de ajuste a una de las dos paradas entre
posiciones más alta y más baja.
Para un mejor desempeño, alinee el borde de las
hojas de corte para solapar la ruta previamente
cortado. Esto asegurará sin hierba se pierde durante
el proceso.
NOTA: No usar ruedas como punto de referencia
para la línea de corte de césped.
CÓMO AJUSTAR LA CUCHILLA DE LA
PODADORA
Consulte la gura 12.
NOTA: Las cuchillas están ajustadas de fábrica.
■ Sepue de producir una desalineación, que a
menudo es causada porque las cuchillas están
demasiado ojas o demasiado apretadas. Esto puede
originar un corte disparejo o que la podadora sea
difícil de empujar.
■ Cada terminal de la barra de corte se puede ajustar
por separado.
■ Para moverse las cuchillas más cercano a la
barra del corte dan vuelta a las tuercas del ajuste a
la derecha. Para mover las cuchillas lejos desde la
vuelta de la barra del corte, dan vuelta a las tuercas
del ajuste a la izquierda.
■ Cuando el espacio es igual al espesor de papel
(0,12 mm), insertar una hoja de papel entre las
cuchillas y la barra de corte, y despacio gire la rueda
a mano.
■ El carrete debe cortar el papel de manera uniforme
en todos los puntos. Si no, es necesario volver a
ajustar la acción de corte.
COMO VERIFICAR LOS AJUSTES
Consulte la gura 13.
■ Coloque la podadora boca arriba.
■ Coloque una hoja de papel entre la barra para corte
y las hojas del carrete y gire la rueda cuidadosamente
con la mano para hacer girar el carrete.
■ Cada hoja debe cortar el papel en una línea
continua. Si no se pierden puntos en el corte, es
necesario realizar más ajustes. Ver Cómo Ajustar la
Cuchilla de la Podadora.
Las cuchillas son
extremadamente losas.Para evitar lesiones, no toque
las cuchillas al hacer el ajuste.
No apriete demasiado los
tornillos de ajuste, ya que eso pudiera dañar la barra
cortadora. Ambos tornillos deben apretarse en el
ajuste nal.
El ajuste de los tornillos
para los ajustes de la cuchilla es un procedimiento
muy sensible. Una vuelta de 1,6 mm se considera un
ajuste mayor. Antes de apretar un tornillo de ajuste,
asegúrese de aflojar el tornillo opuesto en la misma
medida.
ADVERTENCIA!
PRECAUCIÓN!
PRECAUCIÓN!
Page 24

9 — Español
CUIDADO Y MANTENIMIENTO
■ Se requiere de un cuidado mínimo para asegurar
un funcionamiento sin dicultades de su podadora.
■ Para evitar daños a la podadora o a las cuchillas
cortadoras, mantenga el área que se va a podar libre
de desechos.
■ Para mejores resultados aplique, con regularidad,
aceite o lubricante a las supercies cortadoras de la
podadora, al árbol del eje del cilindro cortador y a las
ruedas.
AFINAMIENTO DE LAS CUCHILLAS DE CORTAR
■ Aplique una capa delgada de compuesto, disponible
en la mayoría de las ferreterías, para pulir en el eje
delantero de las cuchillas del cilindro.
■ Ajuste la barra de cortar de forma tal que la cuchilla
haga un contacto leve pero rme a todo lo ancho de
la barra de corte.
■ Dé vueltas hacia atrás a las cuchillas del cilindro
hasta que el eje delantero de la cuchilla de la barra
cortadora esté pulido.
NOTA: Limpie cualquier partícula del compuesto o
restos de la cuchilla de la barra cortadora, cuchilla del
cilindro, piñones y trinquetes.
NOTA: Use un compuesto industrial para pulir o para
válvulas, entre 100 y 240 de granalla. Lubrique el
eje y el piñón con una película ligera de grasa para
cojinetes de ruedas.
ALMACENAMIENTO
■ Limpie muy bien la parte externa de la máquina con
una brocha suave y con tela, antes de guardarla. No
use agua, disolventes o pulimentos.
■ Coloque la podadora de lado, para limpiar el área
de la cuchilla.
■ Guarde la podadora en un lugar seco. No coloque
encima de la podadora otros objetos cuando la tenga
almacenada.
No ponga las manos en
la podadora, cerca de las cuchillas. Si hay césped
cortado y compactado en el área de la cuchilla,
quítelo con una herramienta de limpieza de madera o
plástica que sea la adecuada para la limpieza de las
cuchillas.
No apriete demasiado los
tornillos de ajuste, ya que eso podría dañar la barra
cortadora. Apriete rmemente ambos tornillos durante
el ajuste nal.
ADVERTENCIA!
PRECAUCIÓN!
Page 25

 Loading...