

Craftsman 137212060 Owner’s Manual

Operator's Manual
15Amp 3 HP (Max. Developed)
12" Blade
4200 R.P.M.
SLIDING COMPOUND
MITER SAW
With Laser
Model 137.212060
CAUTION:
Before using this Sliding Miter Saw,
read this manual and follow
all its Safety Rules and
Operating Instructions
e
e
e
e
e
Customer Help Line
1-800-843-1682
Sears, Roebuck and Co., Hoffman Estates, IL 60179 U.S.A.
Visit our Craftsman website: www.sears.com/craltsman
Pan No.:137212060001
Safety Instructions
Installation
Operation
Maintenance
Parts List

SECTION PAGE
Warranty ........................................ 2
Product Specifications ....................... 2
Power Tool Safety ............................ 3
Compound Miter Saw Safety ............... 4
Electrical Requirements and Safety ...... 4-5
Accessories and Attachments .............. 6
Tools Needed For Assembly ................ 6
Carton Contents .............................. 7
SECTION PAGE
Know Your Sliding Miter Saw .............. 8
Glossary of Terms ............................ 9
Assembly ...................................... 10
Adjustments .................................... 11
Operation ....................................... 17
Maintenance ...................................26
TroubleshooIJngGuide.......................27
Parts List ......................................... 28
FULL ON E YEAR WARRANTY
Ifthis tool fails due to a defect in material or workmanship within one year of date of purchase, Sears will
at its option repair or replace it free of charge.
Return this tool to a Sears Service Center for repair, or to place of purchase for replacement.
This warranty gives you specific legal rights, and you may also have other rights which may ,vary from
state to state.
Sears, Roebuck and Co., Dept. 817 WA, Hoffman Estates, IL 60179
Some dust created I_y power sanding, sawing, grinding, drilling and other construction activities contains chemicals known
(to the State of California) to cause cancer, birl_ defects or other reproductive harm. Some examples of these chemicals
are:
Lead from lead-based paints
• Crystalline silica from bricks, cement and other masonry products
• Arsenic and chromium from chemically treated lumber
Your risk from these exposures varies, depending on how often you do this type of work. To reduce your e:_posure to
these chemicals, work in a well ventilated area and work with approved safety equipment such as dust masks that are
specially designed to filter out microscopic particles.
MOTOR
Power Source.....................
Horsepower........................
Speed.................................
Brake.................................
D_bte Insulated....................
lvlotorArbor Shaft Size .........
MITER SAW
Cutting Capacity:
Crosscut..............................
Mter45°R,&L ;.60°F_..........
Bevel45°R & L ......................
45°tvlterand45°BeveiR&L ...
60°Mterand45°BeveiR ........
120VAC, 60HZ, 15Amp
3PP (Max. Developed)
4200 I_M ('Noload)
Electric
Yes
5_"
4" x 12-1/#'
4"× 6-1/4"R&L;4" × 8-3/4"R
2-1/2"×12-1/4"LI 1-3/4"x12-I/4" R
2-1/2" × 8-3/4"
3/4" x 6.-1/4"
BLADE SIZE
Diameter..............................
Arbor size ............................
Rotating Table:
Diameter..............................
Mter DetentStops..................
BevelPositiv_ Stops...............
Base Dimensions...................
ExtensionTak)le....................
NetWeight ...........................
12"
1" v/ a 5/8" reducer
13-W16"
0, 15, 22.5, 31.6, 45 °
RL&L. 60°R
0, 33.9, 45° R& L
23"x 16-3/4"
Yes
66Lbs
To avoid electrical hazards, fire hazards or damage to the tool, use proper circuit protection.
This tool is wired at the factory for 110-120 Volt operation. It must be connected to a 110-120 Volt / 15 Ampere time delay
fuse or circuit breaker. To avoid shock or fire, replace power cord immediately if it is worn, cut or damaged in any way.
Before using your tool, it is criticai that you read and understand these safety rules. Failure to follow these rules could
result in serious injury to you or damage to the tool.
GENERAL SAFETY INSTRUCTIONS
BEFORE USING THE SLIDING MITER SAW
Safety is a combination of commonsense, staying alert
and knowing howto use your sliding miter saw.
To avoid mistakes that could cause serious injury,do not
plug the tool inuntilyou have read and understood the
following.
1. READ and become farniliarwith the entire Operators
Manual. LEARN the tool's application, limitations and
possible hazards.
2.
KEEP GUARDS IN PLACE and in working order.
3.
REMOVE ADJUSTING KEYS ANDWRENCHES.
Form the habit of checking to see that keys and
adjustingwrenchesareremovedfrom thetoolbefore
turning ON.
4.
KEEP WORK AREA CLEAN. Cluttered areas and
benches invite accidents.
5.
DON'T USE IN DANGEROUS ENVIRONMENTS,
Don't use power tools indamp locations, or expose
them to rain or snow. Keep work area well lighted.
6. KEEP CHILDREN AWAY. All visitors and bystanders
should be kept a safe distance from work area.
7. MAKE WORKSHOP CHILD PROOF with padlocks,
master switches, or by removing starter keys.
8. DON'T FORCE THE TOOL. Itwill do the job better
and safer at the rate for which itwas designed.
9. USE THE RIGHT TOOL. Do not force the tool or an
attachment to do ajob for which it was not designed.
10. USE PROPER EXTENSION CORDS. Make sure
your extension cord is in good condition. When using
an extension cord, be sure to use one heavy enough
to carry the current your product will draw. An
undersized cord will result in a drop in line voltage
and inloss of power which will cause the tool to
overheat. The table on page 5 shows the correct size
to use depending on cord length and nameplate
ampere rating. If in doubt, use the next heavier gauge.
The smaller the gauge number, the heavier the cord.
11.WEAR PROPER APPAREL. Do not wear loose
clothing, gloves, neckties, rings, bracelets, or other
jewelry which may get caught in moving parts.
Nonslip footwear is recommended. Wear protective
hair covering to contain long hair,
12.ALWAYS WEAR EYE PROTECTION. Any power tool
can throw foreign objects into the eyes and could
cause permanent eye damage.ALWAYS wear Safety
Goggles (not glasses) that comply with ANSI Safety
standard Z87.1 Everyday eyeglasses have only
impact-resistance lenses.
TheyARE NOT safety glasses, Safety
Goggles are available at Sears.
NOTE: Glasses or goggles not in
compliance with,Z_lSI Z87.1 could
seriously injure you when they break.
13.WEAR AFACE MASK OR DUST MASK. Sawing
operation produces dust.
14.SECURE WORK. Use clamps or avise to hold work
when practical. It's safer t_an using your hand and it
frees both hands to operate tool.
15.DISCONNECT TOOLS before the servicing, and
when changing accessories such as blades, bits and
cutters.
16.REDUCE THE RISK OF UNINTENTIONAL
STARTING. Make sure switch is in the OFF position
before plugging the tool in.
17.USE RECOMMENDED ACCESSORIES. Consult this
Operators Manualfor recommended accessories.
The use of improperaccessories may cause riskof
injuryto yourself or others.
18.NEVER STAND ON THE TOOL. Serious injury could
occur ifthe tool is tipped or if the cutting tool is
unintentionally contacted.
19.CHECK FOR DAMAGED PARTS. Before further use
of the tool, a guard or otherpartthat is damaged
should be carefullycheckedto determinethat itwill
operateproperlyandperformits intendedfunction -
checkfor alignmentofmoving parts,bindingof
moving parts,breakageof parts,mounting, and any
otherconditionsthatmayaffectitsoperation.Aguard
or other partthat is damaged shouldbe properly
repairedorreplaced.
20.NEVER LEAVE THE TOOL RUNNING UNATTENED.
TURN THE POWER "OFF". Don't walk away from a
running tool untilthe blade comes to a complete stop
& unplug the unit.
21 .DON'T OVERREACH. Keep proper footing and
balance at all times.
22.MAINTAIN TOOLS WITH CARE. Keep tools sharp
and clean for best and safest performance. Follow
instructions for lubricating and changing accessories.
23.WARNING: Dust generated from certain materials
can be hazardous to your health. Always operate s_rw
in well-ventilated area and provide for proper dust
removal.
24.1MPORTAN'F: After completing a cut, release the
power switch and wait for the blade to stop before
returning the saw to the raised position.
Laser is acSvated when blade is rotating. Do not stare
into beam or view directly with optical instruments. Do
not remove the warning label affixed to the blade
guard. Avoid direct eye contact with light source.
i!!_i!!_i!!_i!!_i!!_i!!_i!!_i!!_i!!_i!!_i!!_i!!_i!!_i!!_i!!_i!!_i!!_i!!_i!!_i!!_i!!_i!!_i!!_i!!_i!!_i!!_i!!_i!!_i!!_i!!_i!!_i!!_i!!_

SPECIFICSAFETY INSTRUCTIONS FOR 18. NEVER reach around the saw blade.
THIS SLIDING MITER SAW
The right side sliding fence must be removed when
making any right bevel angle cuts greater than 35° in
combination with any right hand miter angle.
This fence must also be removed whenever a 45 _'bevel
angle is desired with a miter angle greater than 22.5 °.
1. USE ONLY CROSS-CUTTING SAW BLADES. When
using carbide tipped blades, make sure they have a
nega_ve hook angle. IMPORTANT: DO NOT USE
THIN KERF BLADES- they can deflect and contact
guard and can cause possible injuryto the operator.
2. DO NOT operate the miter saw until it is completely
assembled and installed according to these
instructions.
3. IF YOU ARE NOT thoroughly familiar with the
operation of miter saws, seek guidance from your
supervisor, instructor, or other qualified person.
19.MAKE SURE the blade is not contacting the
workpiece before the switch is turned ON.
20.IMPORTANT: After completing the cut, release the
power switch and wait for the blade to stop before
returning the saw to the raised position.
21.MAKE SURE the blade has come to a complete stop
before removing or securing the workpiece, changing
the workpiece angle, or changing the angle of the
blade.
22.NEVER cut metals or masonry products with this tool.
This miter saw is designed for use on wood and
wood-like products.
23.NEVER cut small pieces. If the workpiece being cut
would cause your hand or fingers to be within 8-3/4"
inches of the saw blade the workpiece is too small.
24.PROVIDE adequate support to the sides of the saw
table for long work pieces.
4. ALWAYS hold the work firmly against the fence and
table. DO NOT perform any operation free hand (use
clamp wherever possible).
5. KEEP HANDS out of the path of the saw blade. If the
workpiece you are cut_ng would cause your hands to
be within 8-3/4" inches of the saw blade, the
workpiece should be clamped in place before making
the cut.
6. BE SURE the blade is sharp, runs freely, and is free
of vibration.
7. ALLOW the motor to come up to full speed before
starting a cut.
8. KEEP THE MOTORAIR SLOTS CLEAN and free of
chips or dust.
9. ALWAYS MAKE SURE all handles are tight and
locked in position before cutting. Lock the quick
cam miter lock for every cut even if the table is
positioned in one of the positive stops.
10.BE SURE both the blade and the collars are clean
and the arbor bolt is securely tightened.
11. USE only blade collars specified for your saw.
12. NEVER use blades larger or smaller in diameter
than 12-inches.
13. NEVER apply lubricants to the blade when it is
running.
t4. ALIi_AYS check the blade for cracks or damage
before operation. Replace a cracked or damaged
blade immediately.
t5. NEVER use blades recommended for operation at
less than 4200 RPM
16. USE the blade guards at all times.
17. ALWAYS keep the blade guards in place.
25.NEVER use the miter saw inan areawith flammable
liquids or gases,
26.NEVER use solvents to clean plastic parts. Solvents
could possibly dissolve or otherwise damage the
material.
27.SHUT OFF the power before servicing or adjusting
the tool.
28.DISCONNECT the saw from the power source and
clean the machine when finished using.
29.MAKE SURE the work area is clean before leaving
the machine.
30.SHOULD any part of your miter saw be missing,
damaged, or fail in any way, or any electrical
component fail to perform properly, shut off the switch
and remove the plug from the power supply outlet.
Replace missing, damaged, or failed parts before
resuming operation.
ELECTRICAL REQUIREMENTS
POWER SUPPLYAND MOTOR
SPECIFICATIONS
The AC motor used in this saw is a universal,
nonreversible type. See "MOTOR" in the "PRODUCT
SPECIFICATIONS" section on page 2.
To avoid electrical hazards, fire hazards, or damage to
the tool, use proper circuit protection. Your saw is wired
at the factory for 120V operation. Connect to a 120V, 15
Amp circuit and use a 15 amp. time delay fuse or circuit
breaker. To avoid shock or fire, if power cord is worn or
cut, or damaged in any way, have it replaced
immediately.
4
DOUBLE INSULATED
The power tool is double insulated to provide a double
thickness of insulation between you and tool's electrical
system. All exposed metal parts are isolated from the
internal metal motor components with protecting insulation.
Replacement parts - When servicing use only identical
replacement parts.
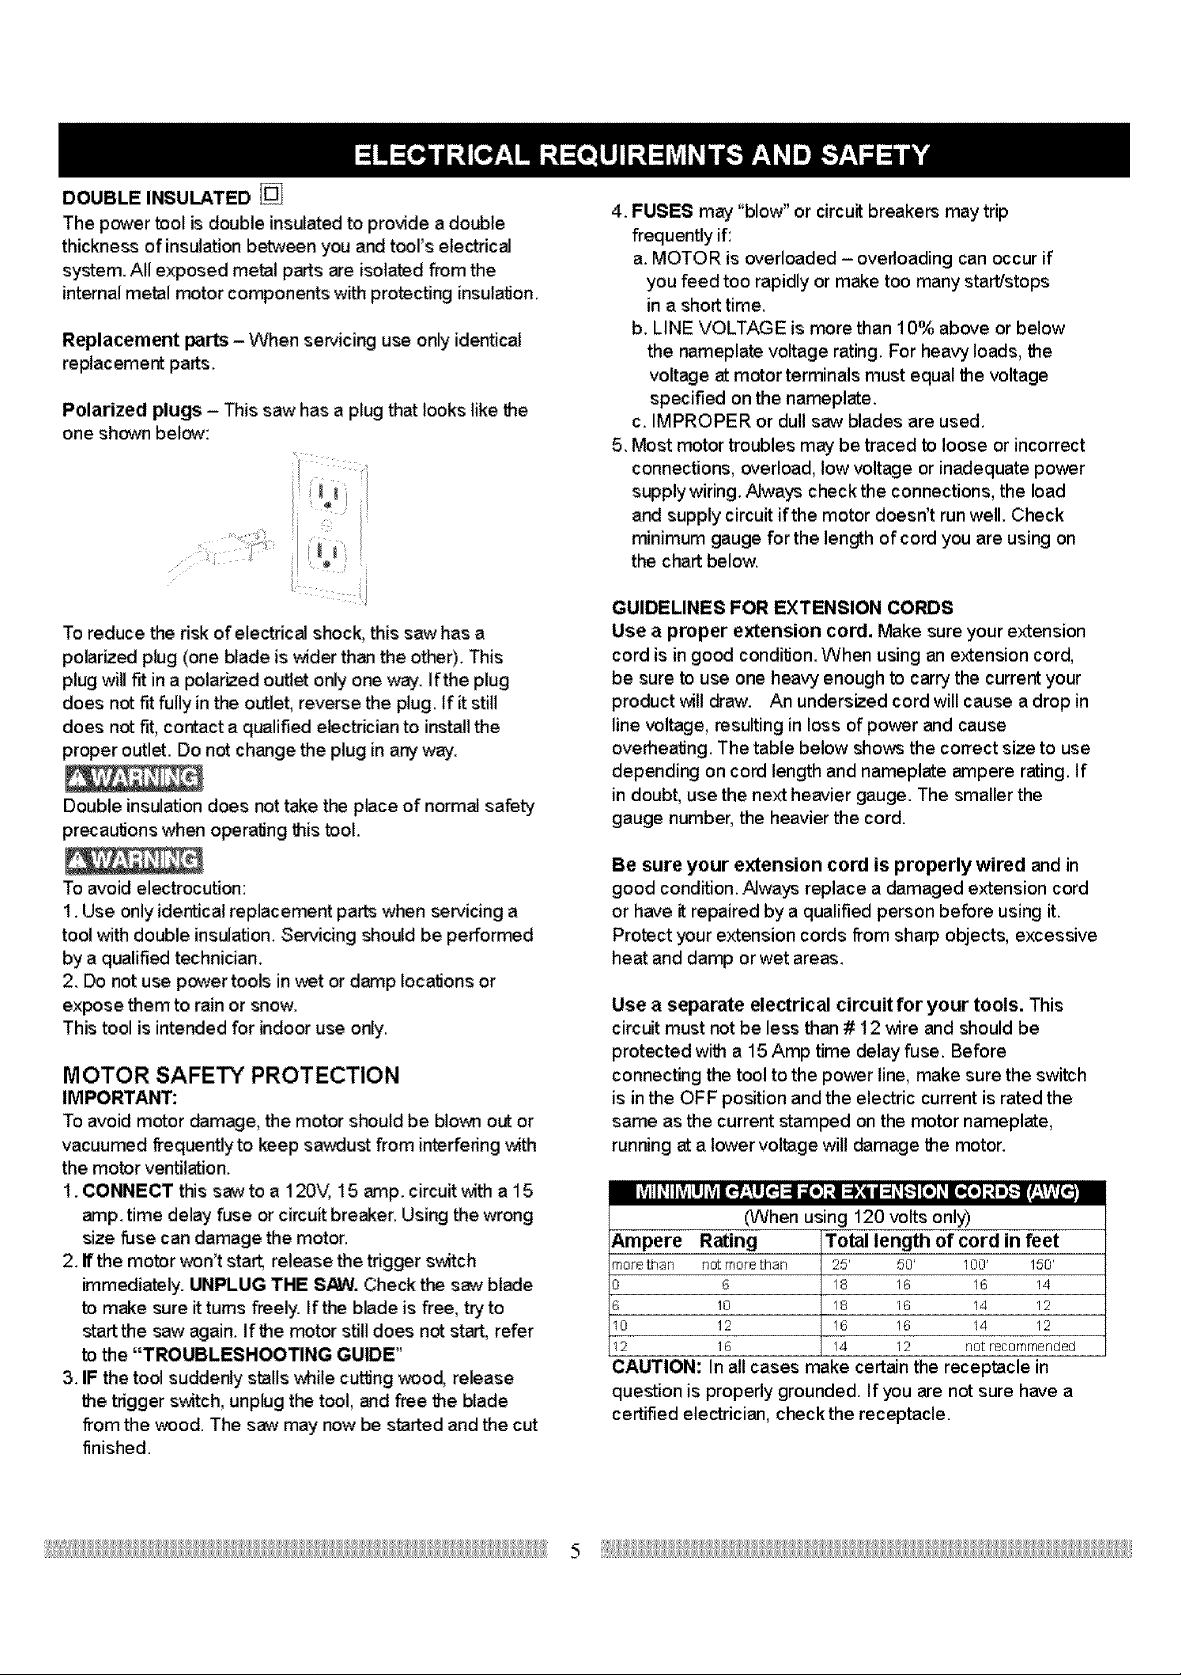
Polarized plugs - This saw has a plug that looks like bhe
one shown below:
To reduce the risk of electrical shock, this saw has a
polarized plug (one blade is wider than the other). This
plug will fit in a polarized outlet only one way. If the plug
does not fit fully in the outlet, reverse the plug. If it still
does not fit, contact a qualified electrician to install the
proper outlet. Do not change the plug in any way.
Double insulation does not take the place of normal safety
precautions when operating this tool.
To avoid electrocution:
1. Use only identical replacement parts when servicing a
tool with double insulation. Servicing should be performed
by a qualified technician.
2. Do not use power tools in wet or damp locations or
expose them to rain or snow.
This tool is intended for indoor use only.
MOTOR SAFETY PROTECTION
IMPORTANT:
To avoid motor damage, the motor should be blown out or
vacuumed frequently to keep sawdust from interfering with
the motor ventilation.
1. CONNECT this saw to a 120V, 15 amp. circuit with a 15
amp. time delay fuse or circuit breaker. Using the wrong
size fuse can damage the motor.
2. If the motor won't start, release the trigger switch
immediately. UNPLUG THE S/_v_. Check the saw blade
to make sure it turns freely. If the blade is free, tryto
start the saw again. If the motor still does not start, refer
to the "TROUBLESHOOTING GUIDE"
3. IF the tool suddenly stalls while cutting wood, release
the trigger switch, unplug the tool, and free the blade
from the wood. The saw may now be started and the cut
finished.
4. FUSES may "blow" or circuit breakers may trip
frequently if:
a. MOTOR is overloaded - overloading can occur if
you feed too rapidly or make too many start/stops
in a short time.
b. LINE VOLTAGE is more than 10% above or below
the nameplate voltage rating. For heawt loads, the
voltage at motor terminals must equal the voltage
specified on the nameplate.
c. IMPROPER or dull saw blades are used.
5. Most motor troubles may be traced to loose or incorrect
connections, overload, low voltage or inadequate power
supply wiring. Always check the connections, the load
and supply circuit if the motor doesn't run well. Check
minimum gauge for the length of cord you are using on
the chart below.
GUIDELINES FOR EXTENSION CORDS
Use a proper extension cord. Make sure your extension
cord is in good condition. When using an extension cord,
be sure to use one heavy enough to carry the current your
product will draw. An undersized cord will cause a drop in
line voltage, resulting in loss of power and cause
overheating. The table below shows the correct size to use
depending on cord length and nameplate ampere rating. If
in doubt, use the next heavier gauge. The smaller the
gauge number, the heavier the cord.
Be sure your extension cord is properly wired and in
good condition. Always replace a damaged extension cord
or have it repaired by a qualified person before using it.
Protect your extension cords from sharp objects, excessive
heat and damp or wet areas.
Use a separate electrical circuit for your tools. This
circuit must not be less than # 12 wire and should be
protected with a 15 Amp time delay fuse. Before
connecting the tool to the power line, make sure the switch
is in the OFF position and the electric current israted the
same as the current stamped on the motor nameplate,
running at a lower voltage will damage the motor.
(When using 120 volts only)
Ampere Rating
if]ore th_n not mofe thZ_R
3 6
10
10 12
12 16
CAUTION: In allcases make certain the receptacle in
question is properly grounded. If you are not sure have a
certified electrician, check the receptacle.
Total length of cord in feet
25' 50' 100' 150'
18 16 16 14
18 16 14 12
16 16 14 12
14 12 notrecommended
RECOM MENDED ACCESSORIES
• Use only accessories recommended for this miter saw.
Follow instructions that accompany accessories. Use
of improper accessories may cause hazards.
• The use of any cutting tool except 12 inch saw blades
that meet the requirements under recommended
accessories is prohibited. Do not use accessories such
as shaper cutters or dado sets. Ferrous metal cutting,
the use of abrasive wheels and the cutting of masonry
products are prohibited.
• Do not attempt to modify this tool or create
accessories not recommended for use with this tool.
Any such alteration or modification is misuse and could
result ina hazardous condition leading to possible
serious injury.
ACCESSORIES
Visit your Sears Hardware Depar_nent or see the Sears
Power and Hand Tool Catalog to purchase recommended
accessories for this power tool.
To avoid the risk of personal injury, do not modify this
power tool or use accessories not recommended by Sears.
Read warnings and conditions on your carbide tipped saw
blade. Do not operate the saw without the proper saw
blade guard in place. Carbide is avery hard but brittle
material. Care should be taken while mounting, using, and
storing carbide tipped blades to prevent accidental
damage. Slight shocks, such as striking the tip while
handling, can seriously damage the blade. Foreign objects
in the workpiece, such as wire or nails, can also cause tips
to crack or break off. Before using, always visually
examine the blade and tips for bent teeth, cracks,
breakage, missing or loose tips, or other damage. Do not
use if damage is suspected. Failure to heed to these safety
instructions and warnings can result in serious bodily
injury.
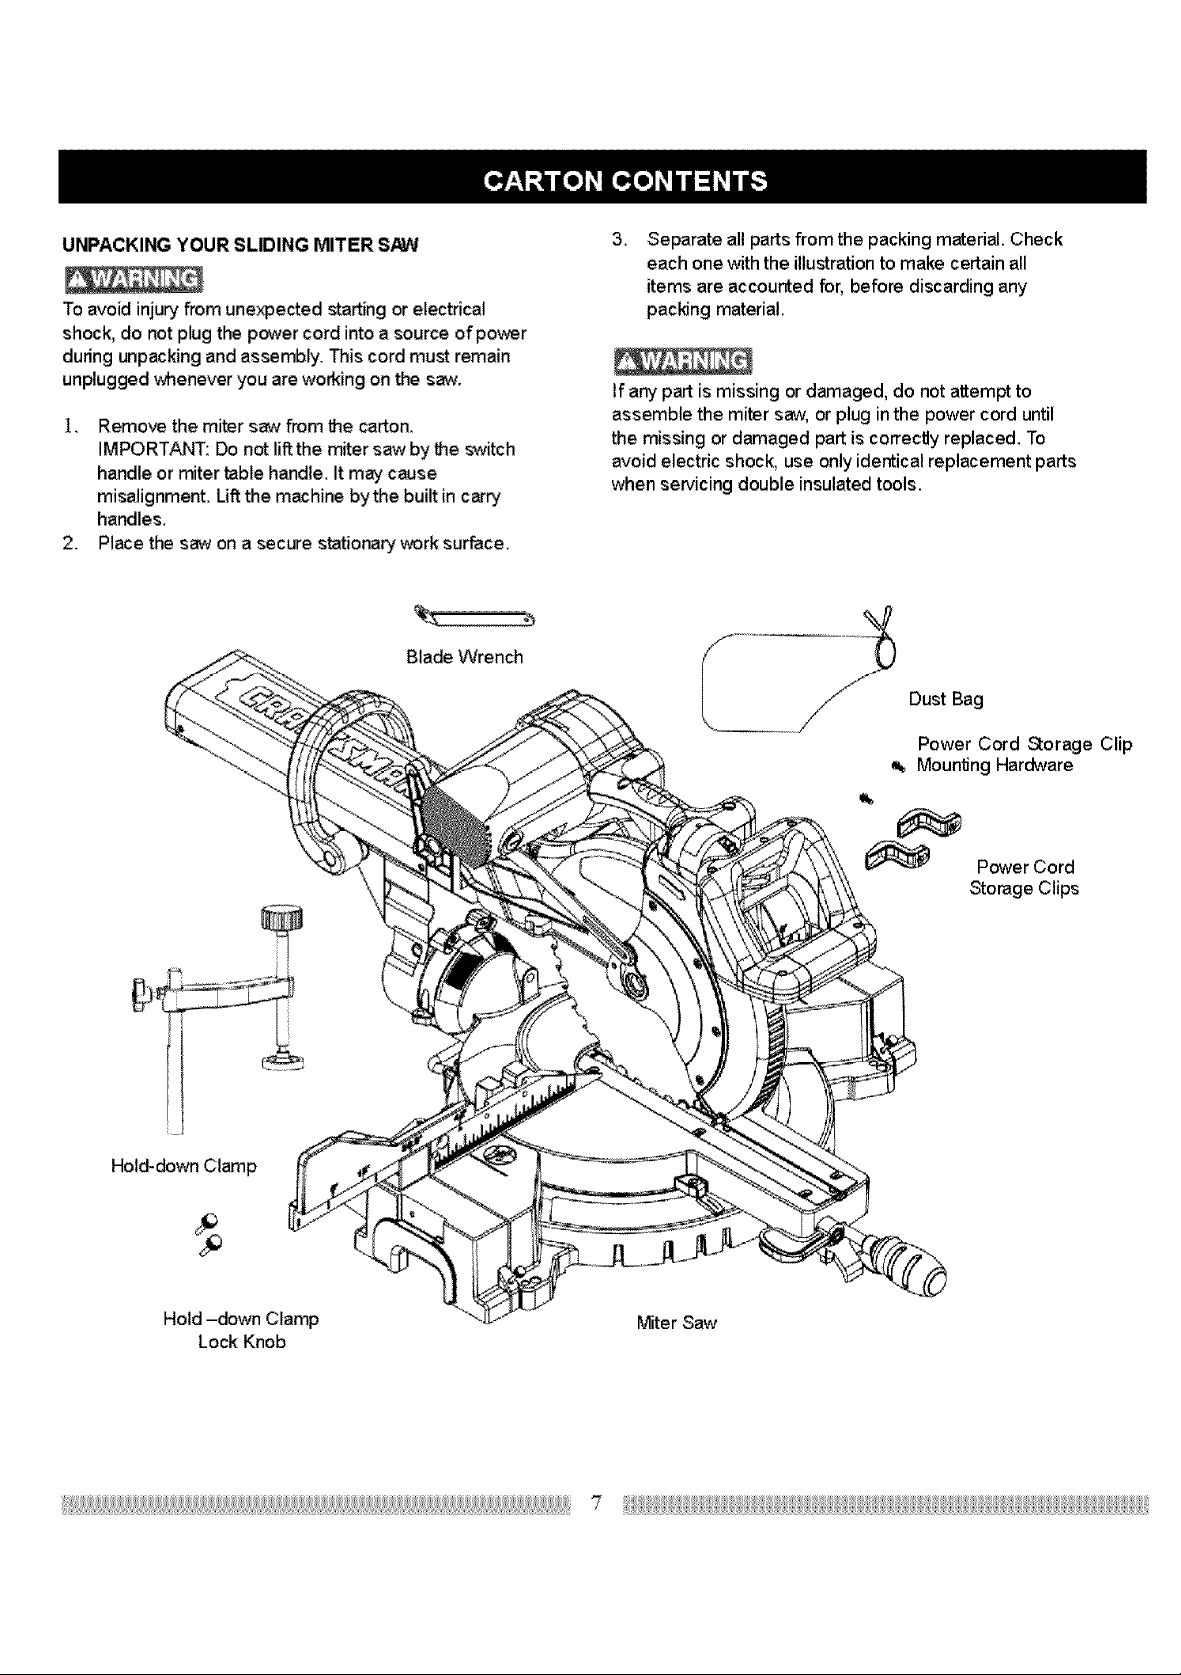
UNPACKING YOUR SLIDING MITER SAW
To avoid injury from unexpected starting or electrical
shock, do not plug the power cord into a source of power
during unpacking and assembly. This cord must remain
unplugged whenever you are working on the saw.
]. Remove the miter saw from the carton.
IMPORTANT: Do not lift the miter saw by the switch
handle or miter table handle. It may cause
misalignment. Lift the machine by the built in carry
handles.
2. Place the saw on a secure stationary work surface.
Blade Wrench
3,
Separate all parts from the packing material. Check
each one with the illustration to make certain all
items are accounted for, before discarding any
packing material.
If any part is missing or damaged, do not attempt to
assemble the miter saw, or plug in the power cord until
the missing or damaged part is correctly replaced. To
avoid electric shock, use only identical replacement parts
when servicing double insulated tools.
Dust Bag
Power Cord _orage Clip
Mounting Hardware
Hold-down Clamp
Hold -down Clamp Miter Saw
Lock Knob
Power Cord
Storage Clips
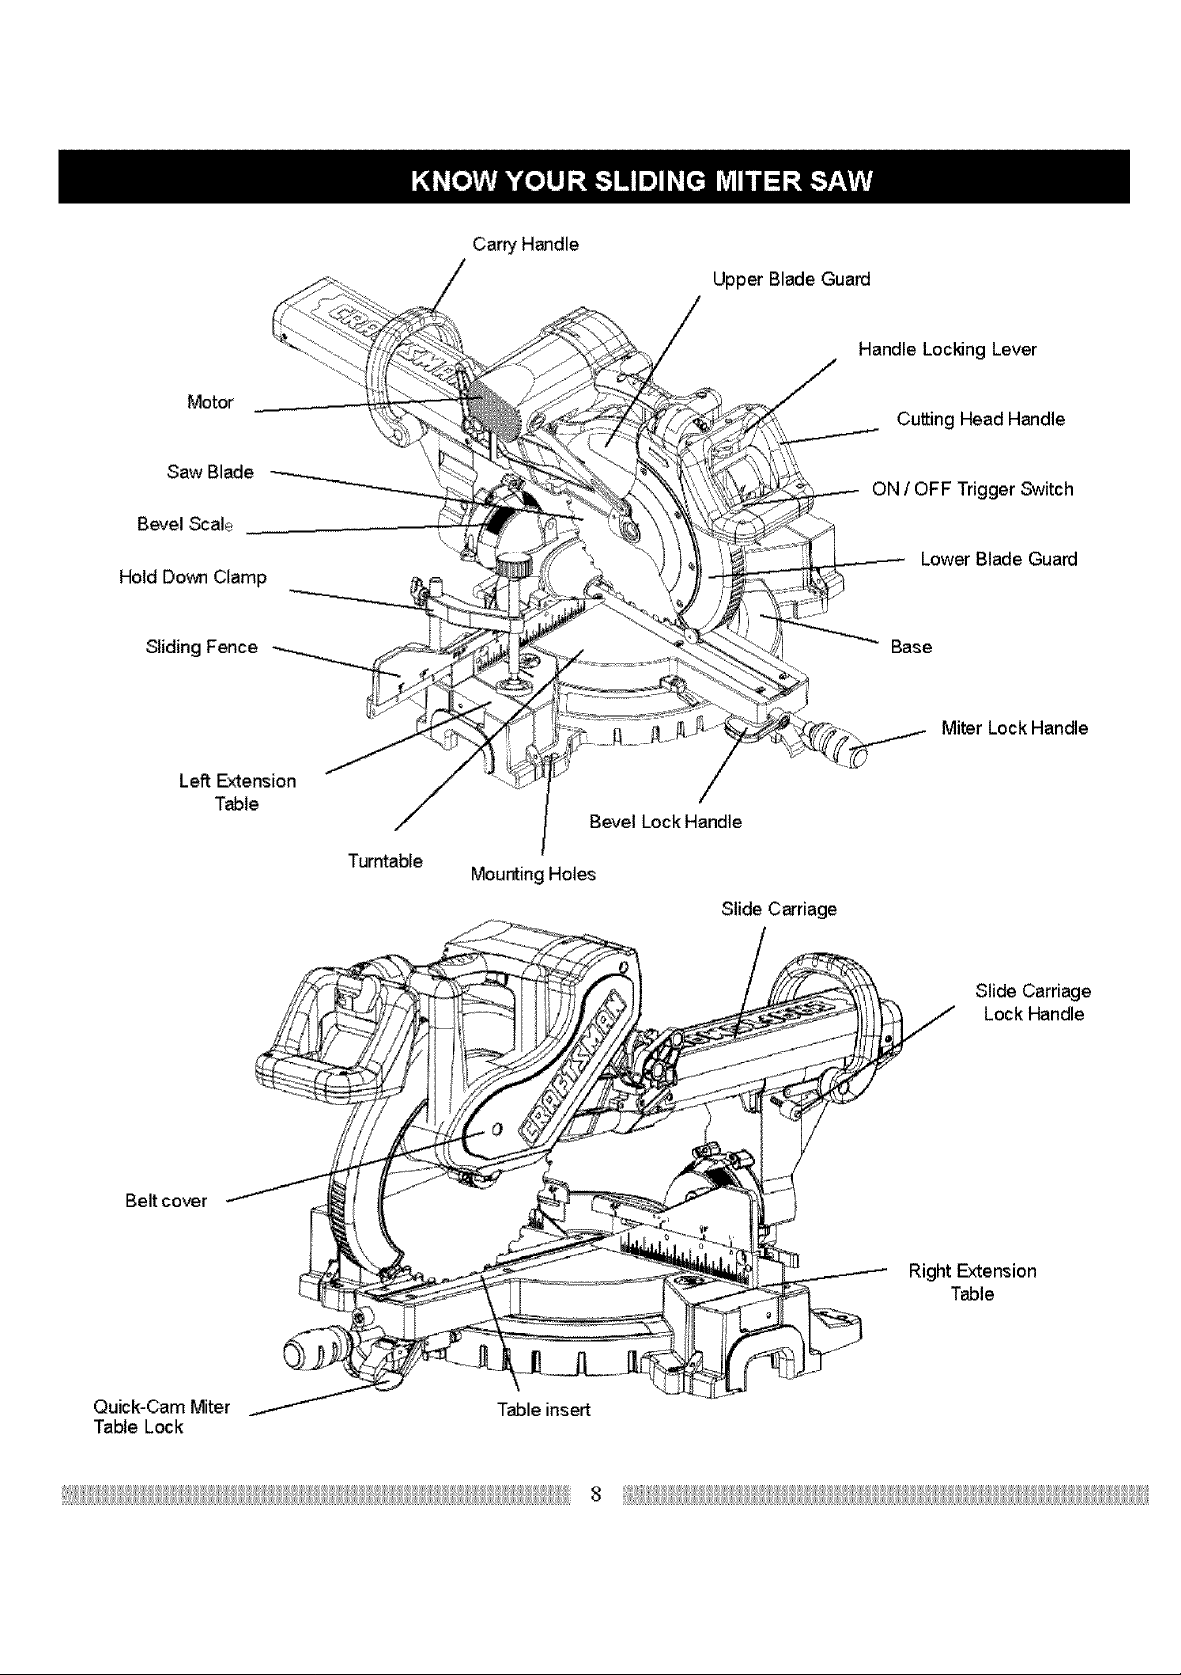
Carry Handle
Upper Blade Guard
Handle Locking Lever
Motor
Saw Blade
Bevel Scale
Hold Down Clamp
Sliding Fence Base
Left Extension
Table
Bevel Lock Handle
f
Turntable
Mounting Holes
Slide Carriage
Cutting Head Handle
ON / OFF Trigger Switch
Lower Blade Guard
Miter Lock Handle
Belt cover
Quick-Cam Miter
Table Lock
Slide Carriage
Lock Handle
Right Extension
Table
Table insert
CRAFTSMAN SLIDING COMPOUND MITER
SAW TERMS
ARBOR LOCK - Allows the user to keep the blade from
rotating while tightening or loosening the arbor Ioct_ng bolt
during blade replacement or removal.
BASE - Supports the table, holds accessories and allows
for workbench or leg set mounting.
BEVEL LOCKING HANDLE - Locks the miter saw at a
desired bevel angle.
BEVEL SCALE - To measure the bevel angle of the saw
blade 0° to 45 ° left and right.
COVER PLATE SCREW - Loosen this screw and rotate
the plate for access to the blade arbor Iocl_ng bolt.
DUST CHUTE - Exhausts debris away from the user.
EXTENSION TABLE - Extends the width of the work table
for support while cutting long work pieces. Each extension
table incorporates a stop lever for repetitive cuts.
FENCE - Helps to keep the workpiece from moving when
sawing. Scaled toassistwithaccuratecuing.
RETRACTABLE LOWER BLADE GUARD - Helps protect
your hands from the blade in the raised position, it retracts
as the blade is lowered.
SWITCH HANDLE - The cutting head handle contains the
1rigger switch and a safety lock-off slide switch. The blade
is lowered into the workpiece by pushing down on the
handle. The saw will return to its upright position when the
handle is released.
WARNING LABELS - Read and understand for your own
safety. Always make certain these are in place & legible.
WRENCH STORAGE - Convenient storage to prevent
misplacing the blade wrench.
WOODWORKING TERMS
ARBOR- The shaft on which a blade is mounted.
BEVEL CUT - An angle cut made through the face of the
workpiece.
COMPOUND CUT -A simultaneous bevel and miter cut.
CROSS CUT- A cut made across the width or grain of the
workpiece.
FREEHAND - Performing a cut without using a fence
(guide), hold down or other proper device to prevent the
w_rkpiece from twisting during the cutting operation.
MITER HANDLE - Used to rotate the saw to the right or
leftcuttingposition.
MITER SCALE - Measures the miter angle of the saw
blade. Positive stop index points have been provided at 0's,
15 °, 22.5 °, 31.6 _'and 45 ° right and left, and 60 ° right.
MITER SPRING LOCK - Used in combination with the
miter handle, it locks the miter saw at a preset positive stop
for the desired miter angle.
MOUNTING HOLES - To mount the miter saw to a stable
surface.
ON/OFF TRIGGER SWITCH - To prevent the trigger from
being accidentally engaged, a lock-off slide switch is
provided. To start the tool, push the lock-off slide switch
forward and squeeze the trigger. Release the trigger to
stop the miter saw.
STOP LATCH - Locks the miter saw in the lowered
position for compactstorage andtransportation.
GUM-A sticky sap from wood products.
HEEL - Misalignment of the blade.
KERF - The amount of material removed by blade cut.
MITER CUT- An angle cut made across the width or grain
of the workpiece.
RESIN -A sticky sap that has hardened.
REVOLUTIONS PER MINUTE (RPM) - The number of
turns completed by a spinningobjectinone minute.
SAW BLADE PATH - The area of the workpiece or table
top directly in line with the travel of the blade or the part of
the workpiece which will be cut.
SET - The distance between two saw blade tips, bent
outward in opposite directions to each other. The further
apart the tips are, the greater the set.
WORKPIECE - The item being cut. The surfaces of a
workpiece are commonly referred to as faces, ends, and
edges.
ASSEM BLY INSTRUCTIONS
To avoid injury, do not connect this miter saw to the
power source until it is completely assembled and
adjusted, and you have read and understood this
Operators Manual.
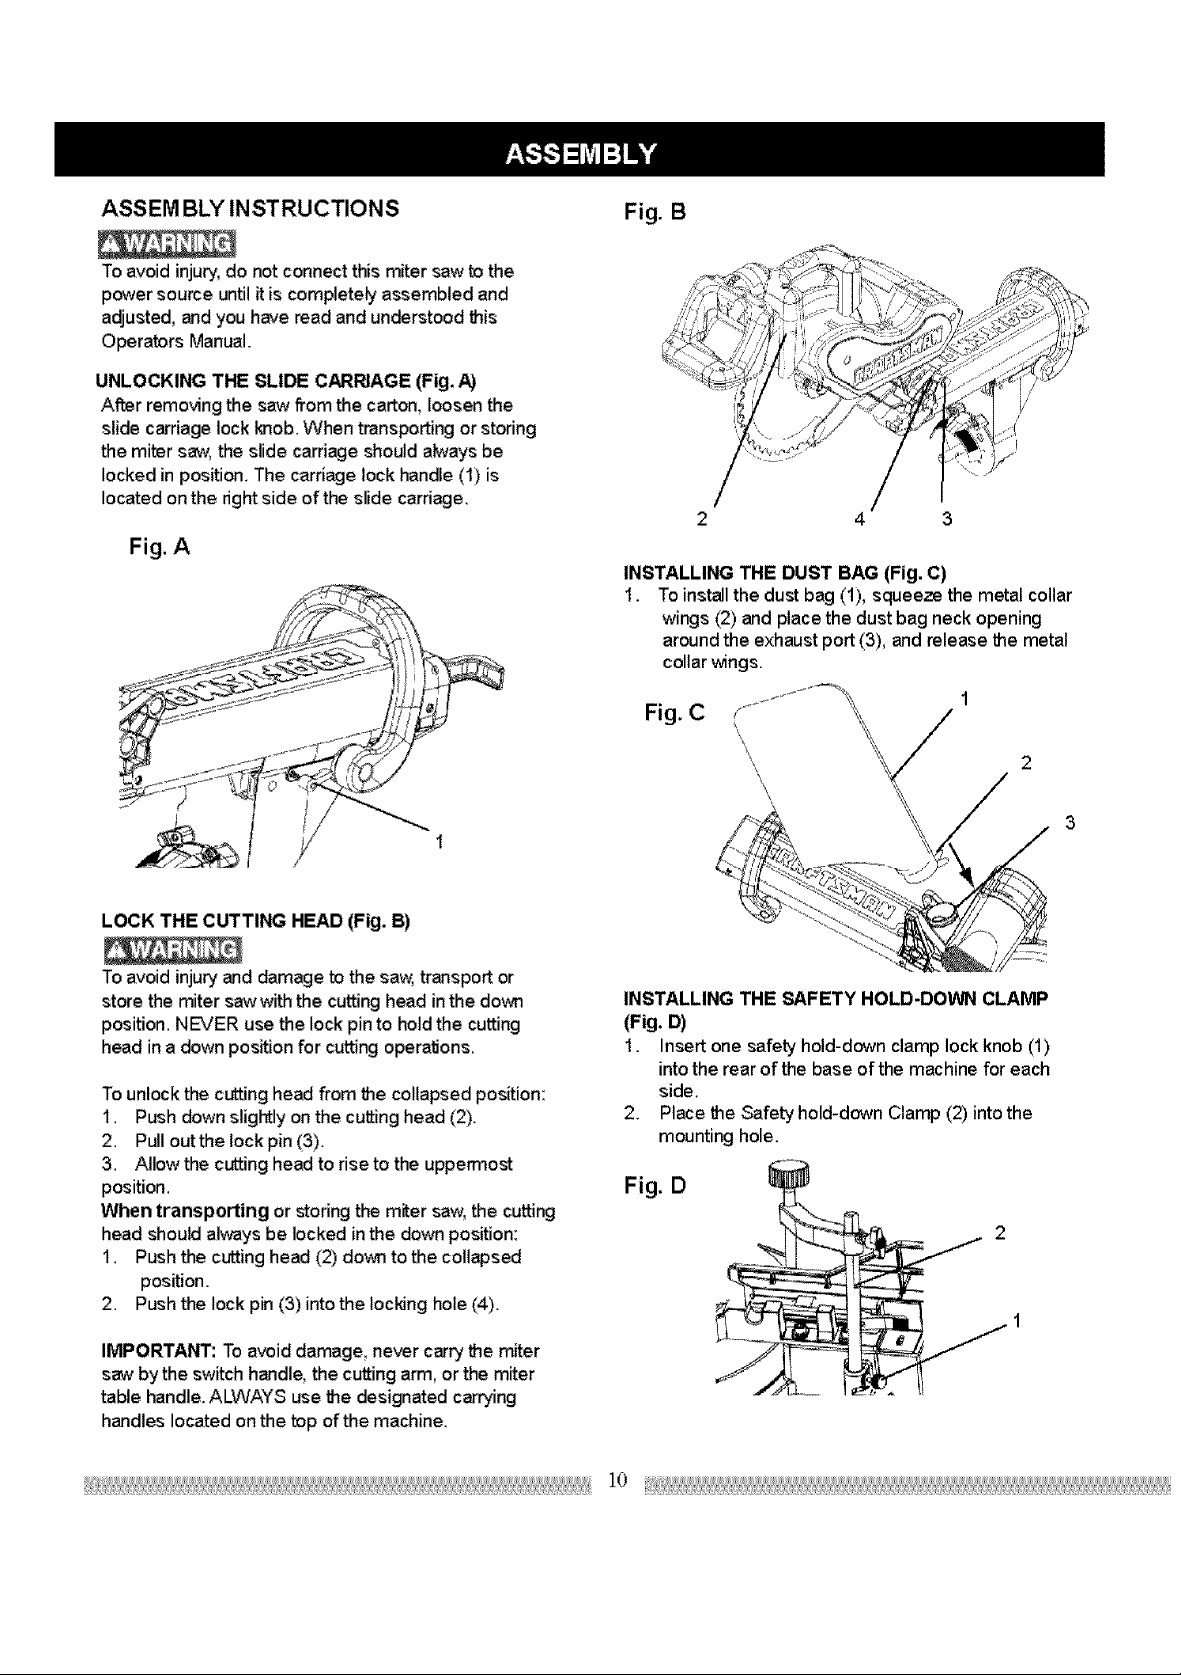
UNLOCKING THE SLIDE CARRIAGE (Fig, A)
Afl_r removing the saw from the carton, loosen the
slide carriage lock knob. When transporting or storing
the miter saw, the slide carriage should always be
locked in position. The carriage lock handle (1) is
located on the right side of the slide carriage.
Fig. A
Fig. B
/
4
INSTALLING THE DUST BAG (Fig. C)
1. To install the dust bag (1), squeeze the metal collar
wings (2) and place the dust bag neck opening
around the exhaust port (3), and release the metal
collar wings.
Fig. C
\
\
LOCK THE CUTTING HEAD (Fig. B)
To avoid injury and damage to the saw, transport or
store the miter saw with the cutting head in the down
position. NEVER use the lock pin to hold the cutting
head in a down position for cutting operations.
To unlock the cutting head from the collapsed position:
1. Push down slightly on the cutting head (2).
2. Pull outthelockpin (3).
3. Allow the cutting head to rise to the uppermost
position.
When transporting or storing the miter saw, the cutting
head should always be locked in the down position:
1. Push the cutting head (2) down to the collapsed
position.
2. Push the lock pin (3) into the locking hole (4).
IMPORTANT: To avoid damage, never carry the miter
saw by the switch handle, the cutting arm, or the miter
table handle. ALWAYS use the designated carrying
handles located on the top of the machine.
INSTALLING THE SAFETY HOLD-DOWN CLAMP
(Fig. D)
1. Insert one safety hold-down clamp lock knob (1)
intothe rear of the base of the machine for each
side.
2. Place the Safety hold-down Clamp (2) intothe
mounting hole.
Fig. D
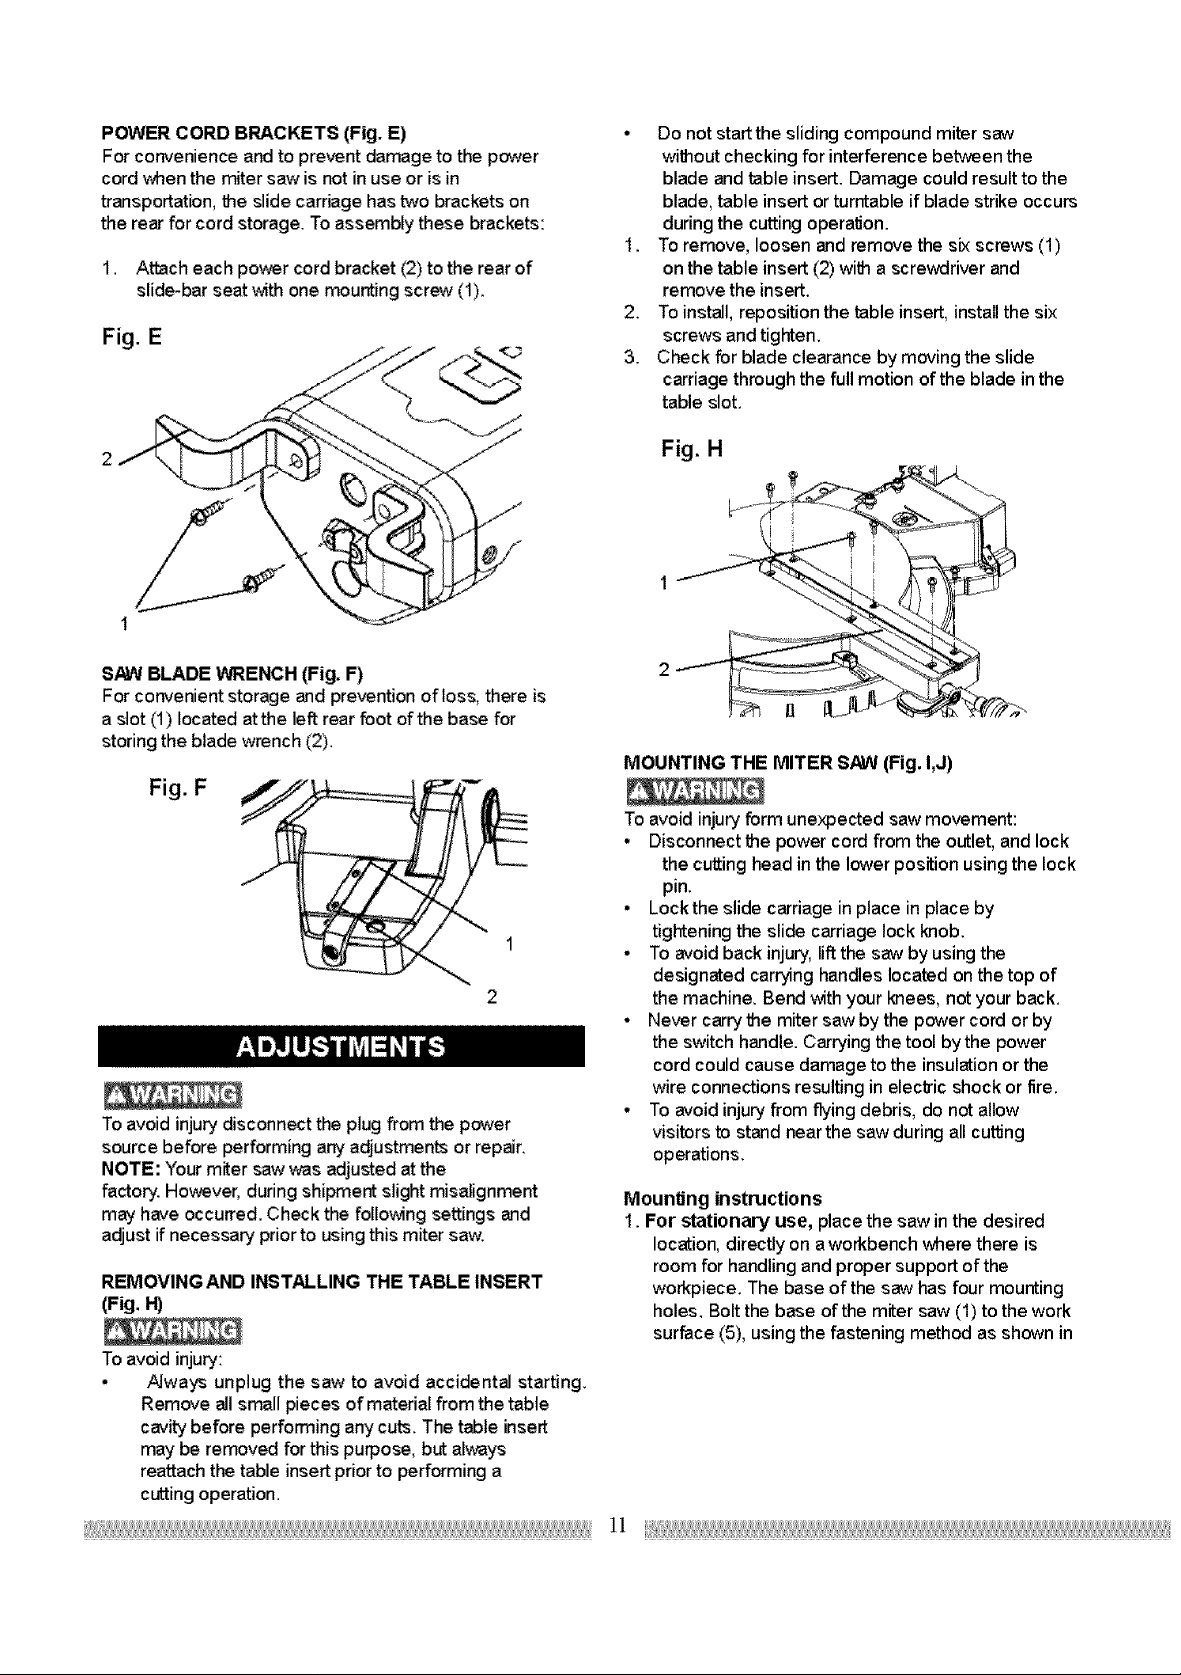
POWER CORD BRACKETS (Fig. E)
For convenience and to prevent damage to the power
cord when the miter saw is not in use or is in
transportation, the slide carriage has two brackets on
the rear for cord storage. To assembly these brackets:
1. Attach each power cord bracket (2) to the rear of
slide-bar seat with one mounting screw (1),
Fig. E
• Do not start the sliding compound miter saw
without checking for interference between the
blade and table insert. Damage could result to the
blade, table insert or turntable if blade strike occurs
during the cutting operation.
1. To remove, loosen and remove the six screws (1)
on the table insert (2) with a screwdriver and
remove the insert.
2. To install, reposition the table insert, install the six
screws and tighten.
3. Check for blade clearance by moving the slide
carriage through the full motion of the blade inthe
table slot.
Fig. H
mi
S,_IN BLADE WRENCH (Fig. F)
For convenient storage and prevention of loss, there is
a slot (1) located atthe left rear foot of the base for
storing the blade wrench (2).
Fig. F
To avoid injury disconnect the plug from the power
source before performing any adjustments or repair.
NOTE: Your miter saw was adjusted at the
factory. However, during shipment slight misalignment
may have occurred. Check the following settings and
adjust if necessary prior to using this miter saw.
REMOVINGAND INSTALLING THE TABLE INSERT
(Fig. H)
To avoid injury:
• Always unplug the saw to avoid accidental starting.
Remove all small pieces of material from the table
cavity before performing any cuts. The table insert
may be removed for this purpose, but always
reattach the table insert prior to performing a
cutting operation.
2
MOUNTING THE MITER S/_f (Fig. I,J)
To avoid injury form unexpected saw movement:
• Disconnect the power cord from the outlet, and lock
the cutting head in the lower position using the lock
pin.
° Lockthe slide carriage in place in place by
tightening the slide carriage lock knob.
° To avoid back injury, lift the saw by using the
designated carrying handles located on the top of
the machine. Bend with your knees, not your back.
• Never carry the miter saw by the power cord or by
the switch handle. Carrying the tool by the power
cord could cause damage to the insulation or the
wire connections resulting in elecb'ic shock or fire.
• To avoid injury from flying debris, do not allow
visitors to stand near the saw during all cuing
operations.
Mounting instructions
1. For stationary use, place the saw in the desired
location, directly on aworkbench where there is
room for handling and proper support of the
workpiece. The base of the saw has four mounting
holes. Bolt the base of the miter saw (1) to the work
surface (5), using the fastening method as shctwn in
]:t
 Loading...