

Page 1
CAUTION: Before using this
product, read this manual and
follow all its Safety Rules and
Operating Instructions.
5 Gallon Wet/Dry Vacuum
• Safety
• Assembly
• Operation
• Maintenance
• Parts
• Español - página 16
Operator’s Manual
Model No. 125.16821
Sears Brands Management Corporation, Homan Estates, IL 60179 U.S.A
www.craftsman.com
Page 2

2
Warranty
CRAFTSMAN LIMITED WARRANTY
FOR ONE YEAR from the date of purchase, this product is warranted against
defects in material or workmanship.
WITH PROOF OF SALE, a defective product will be replaced free of charge.
For warranty coverage details to obtain free replacement, visit the web page:
www. craftsman.com/warranty
This warranty does not cover bags, lters, hose or attachments, which are
expendable parts that can wear out from normal use within the warranty period.
This ONE YEAR warranty is void if this product is ever used while providing
commercial services or if rented to another person. For 90 DAY commercial and
rental use terms, see the Craftsman warranty web page.
This warranty gives you specic legal rights, and you may also have other rights
which vary from state to state.
Sears Brands Management Corporation, Homan Estates, IL 60179
IMPORTANT SAFETY INSTRUCTIONS
READ AND UNDERSTAND ALL
INSTRUCTIONS BEFORE USING
THIS VACUUM.
Read and understand this operator's
manual and all labels on the Wet/Dry
Vacuum cleaner before operating. Safety
is a combination of common sense,
staying alert and knowing how your
vacuum works. Use this Wet/Dry Vac only
as described in this manual. To reduce
the risk of personal injury or damage to
your Wet/Dry Vac, use only Craftsman
recommended accessories.
Household Type
SAVE THIS MANUAL
FOR FUTURE REFERENCE.
When using an electrical appliance,
basic precautions should always be
followed including the following:
WARNING:
TO REDUCE
THE RISK OF FIRE, ELECTRIC
SHOCK OR INJURY:
• Do not run vac unattended.
• Do not vacuum, or use this Wet/Dry
Vac near flammable liquids, gases,
or explosive vapors like gasoline or
other fuels, lighter fluids, cleaners, oilbased paints, natural gas, hydrogen,
or explosive dusts like coal dust,
magnesium dust, grain dust, or gun
power. Sparks inside the motor can
ignite flammable vapors or dust.
• Do not vacuum anything that is burning
or smoking, such as cigarettes,
matches, or hot ashes.
• Keep cord away from heated surfaces.
• Do not expose to rain. Store indoors.
• Do not unplug by pulling on cord. To
unplug, grasp the plug, not the cord.
• Do not use with damaged cord, plug or
other parts.
• If vac is not working as it should, has
been dropped, damaged, left outdoors,
or dropped into water, take it to a
service dealer for inspection and repair
before using it again.
• Do not pull or carry by cord, use cord
as handle, close a door on cord, or pull
cord around sharp edges or corners.
• Do not run Wet/Dry Vac over cord.
• Do not handle plug or the Wet/Dry Vac
with wet hands.
• To reduce the risk of health hazards
from vapors or dusts, do not vacuum
toxic materials.
• Do not store near hazardous materials.
• Do not use this Wet/Dry Vac with a
torn filter or without the filter installed
except when vacuuming liquids as
described in the operation section of
this manual.
• Do not allow to be used as a toy. Close
attention is necessary when used by or
near children.
• To reduce the risk of injury from
Page 3
3
accidental starting, unplug power cord
before changing or cleaning filter.
• Do not leave Wet/Dry Vac unattended
when plugged in. Unplug from outlet
when not in use and before servicing.
• Turn off Wet/Dry Vac before unplugging.
• Do not put any object into ventilation
openings. Do not vacuum with any
ventilation openings blocked; keep free
of dust, lint, hair or anything that may
reduce air flow.
• Keep hair, loose clothing, fingers, and
all parts of body away from openings
and moving parts.
• To reduce the risk of falls, use extra
care when cleaning on stairs.
When using as blower:
• Direct air discharge only at work area.
• Do not use Wet/Dry Vac as a sprayer it is not intended to dispense chemicals
such as fertilizer or pesticide.
• Do not direct air at bystanders.
• Keep children away when blowing.
• Wear safety goggles.
Polarized Plug
To reduce the risk of electrical shock, this
appliance has a polarized plug (with one
blade wider than the other). This plug will
fit in a polarized outlet only one way. If the
plug does not fit fully in the outlet, reverse
the plug. If it still does not fit, contact a
qualified electrician to install the proper
outlet. Do not change the plug in any
way. Double insulation eliminates the
need for the three wire grounded power
cord and grounded power supply system.
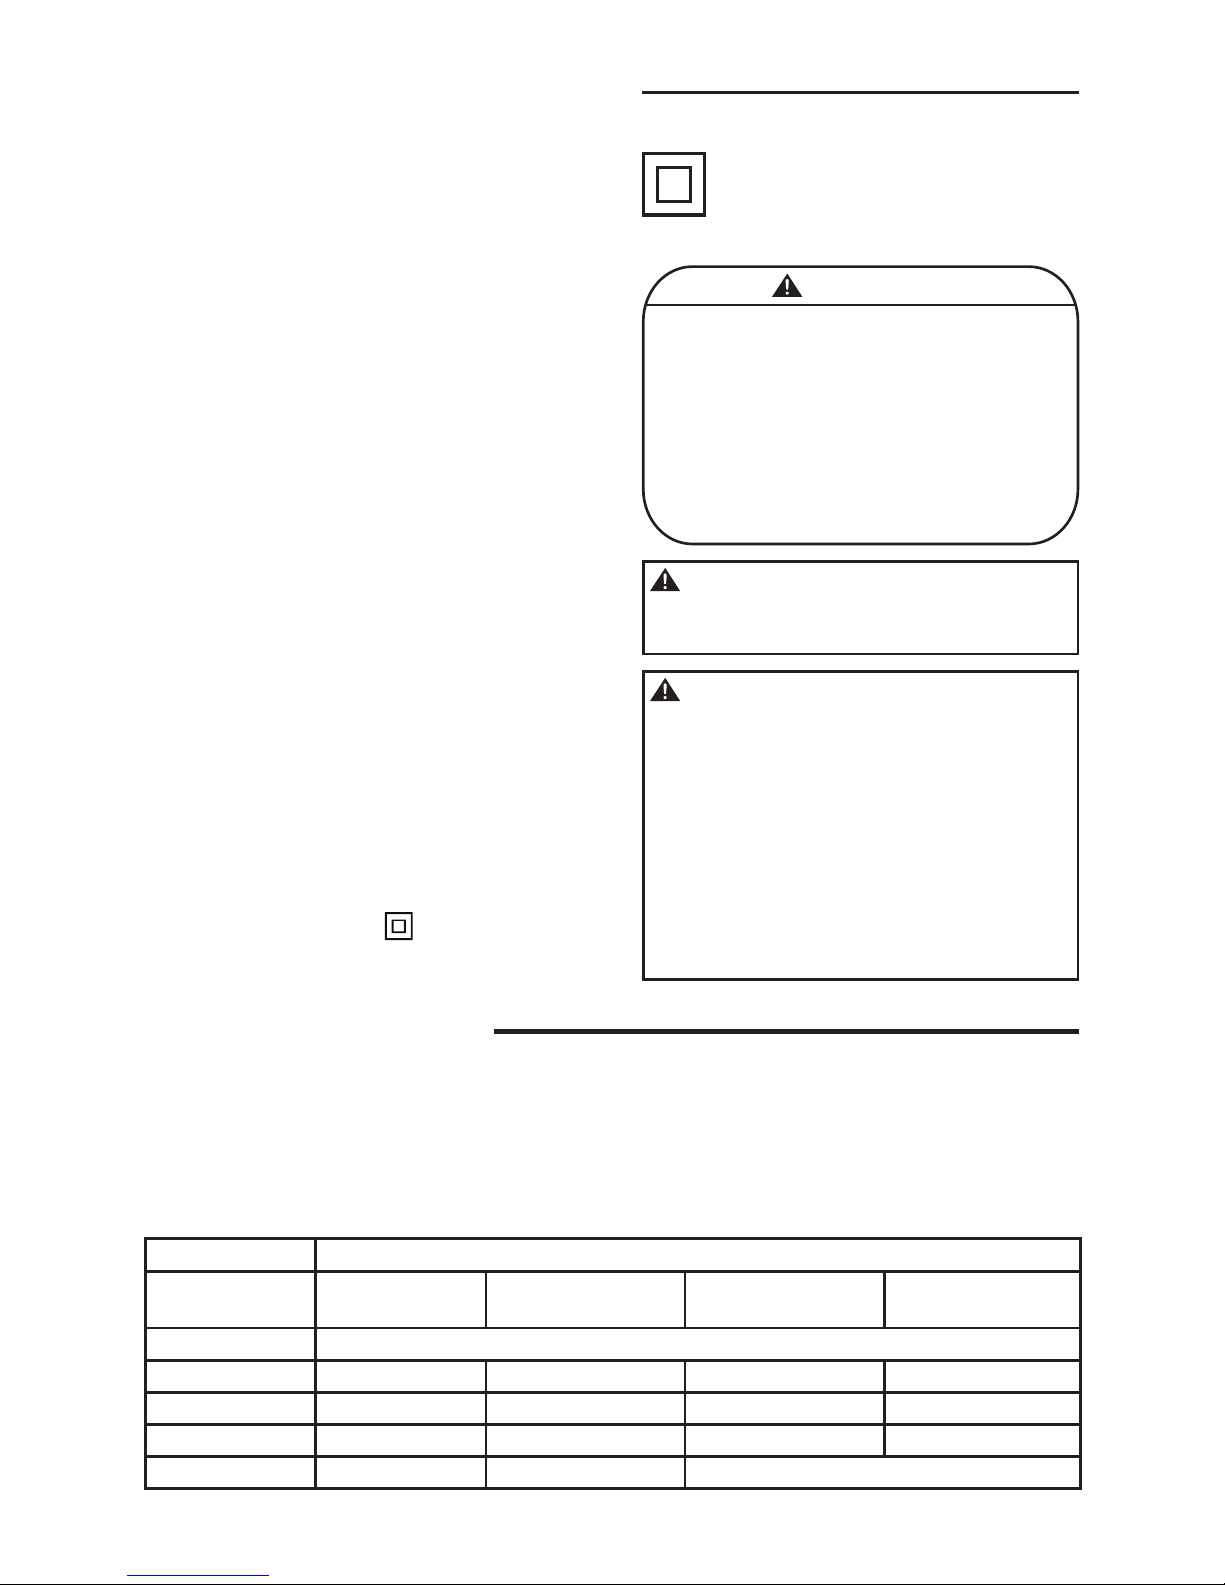
Extension Cords
When using an extension cord with your Wet/Dry Vac refer to the following table
to determine the required A.W.G. (American Wire Gauge) wire size. Before using
Wet/Dry Vac, make sure it is in good working condition, including power cord.
Also, make sure extension cord is in good working condition prior to use. Make
repairs or replacements before using the vacuum cleaner. Only use extension cords
that are rated for outdoor use.
Length of Extension Cord
110V-120V
25 Feet
7.5 Meters
50 Feet
15.25 Meters
100 Feet
30.5 Meters
150 Feet
45.7 Meters
Amps A.W.G. Wire Size
0-6 18 16 16
14
7-10 18 16 14
12
11-12 16 16 14
12
13-16 14 12 Not recommended
Observe the following warnings that
appear on the motor housing of your Vac:
DOUBLE INSULATED
GROUNDING NOT REQUIRED.
WHEN SERVICING USE ONLY
IDENTICAL REPLACEMENT PARTS.
• For your own safety, read and
understand owner's manual.
• Do not allow unit to be in
operation if unattended.
• Do not pick up hot ashes,
coals, toxic, ammable, or other
hazardous materials.
• Do not use around explosive
liquids or vapors.
WARNING
WARNING: To reduce the risk of
electric shock - do not expose to rain
- store indoors.
WARNING: When using as a
blower:
Wear safety goggles labeled "ANSI
Z87.1" (Canada CSA Z94.3) on the
package. Turn unit o before setting
on ground or releasing grasp of
handle. Electric shock could occur
if used on wet surfaces. Direct tool
discharge only at work area. Do not
direct discharge at bystanders. Keep
children away.
Page 4

4
Introduction
Table of Contents
This Wet/Dry Vac is intended for
vacuuming wet and dry materials and
may be used as a blower.
Read this operator's manual to
familiarize yourself with the product
features and to understand the specic
usage of your new Wet/Dry Vac.
Section Page
Warranty ...............................................2
Important Safety Instructions ..............2
Polarized Plug ...................................3
Extension Cords ...................................3
Introduction ..........................................4
Table of Contents .................................4
Assembly ..............................................5
Carton Contents List ........................5
General Assembly Instructions ........6
Operation ..............................................7
Vacuuming Dry Materials .................7
Vacuuming Liquids ...........................8
Blower Operation..............................9
Section Page
Maintenance .......................................10
Emptying the Collection Tank ........10
Installing & Cleaning
Reusable Cloth Filter ......................10
Installing A Replacement
Cartridge Filter ................................11
Installing & Cleaning
Foam Sleeve Filter ..........................12
Cleaning & Disinfecting
the Wet/Dry Vac..............................12
Storage............................................12
Troubleshooting .................................13
Repair Parts ........................................14
Page 5
5
Assembly
Remove entire contents of carton and
check for parts inside the collection
tank. Check each item against the
Carton Contents List. If any parts are
missing or damaged please call
1-888-331-4569 for replacement.
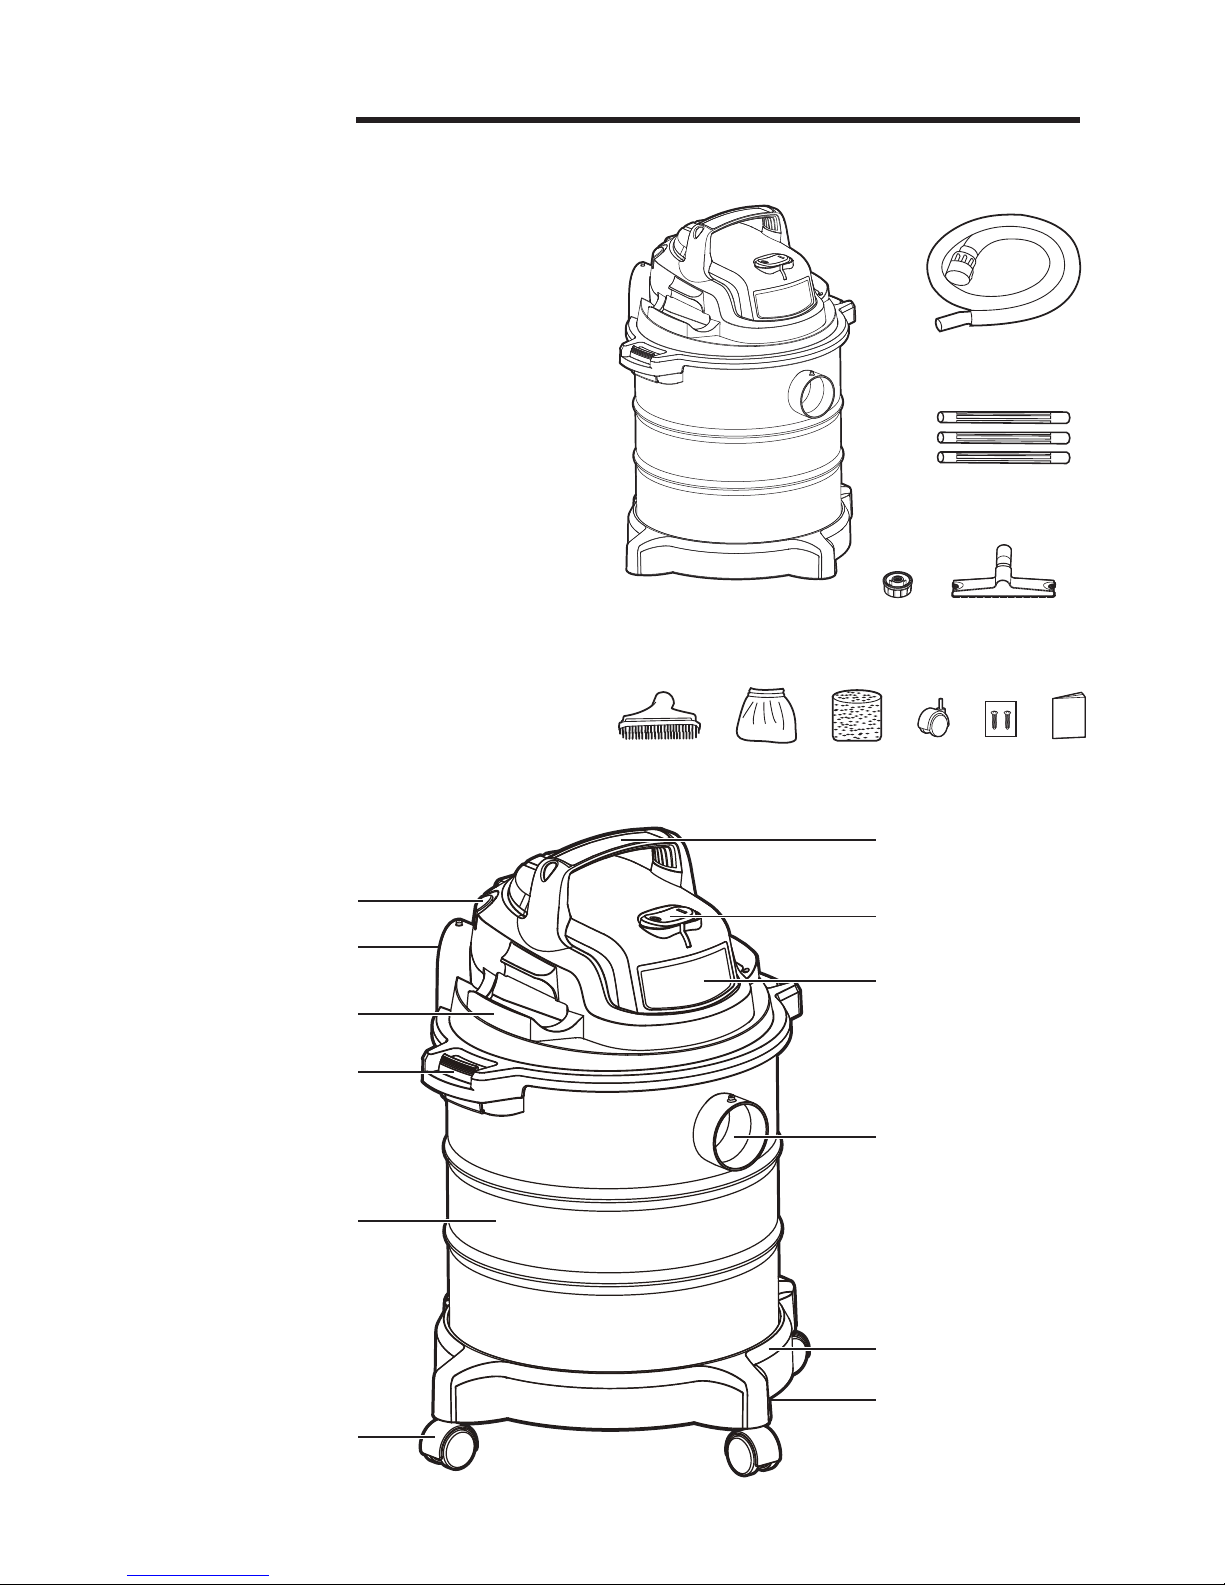
Carton Contents List
Key Description .........................Qty.
A Vac Assembly ......................... 1
B Hose ....................................... 1
C Extension Wand ..................... 3
D Floor Brush/Squeegee .......... 1
E Utility Nozzle .......................... 1
F Reusable Cloth Filter ............. 1
G Foam Sleeve Filter ................. 1
H Caster ..................................... 4
I Screw ..................................... 2
J Nut .......................................... 1
K Operator’s Manual ................. 1
Handle
On/O Switch
Power Head
Vacuum Port
Base
Blower Port
Latch
Hose Storage
Accessory Storage
Caster
Collection Tank
Static Discharge
Chain (Under Tank,
Not Shown)
A
B
C
D
E F G H I K
J
Page 6
6
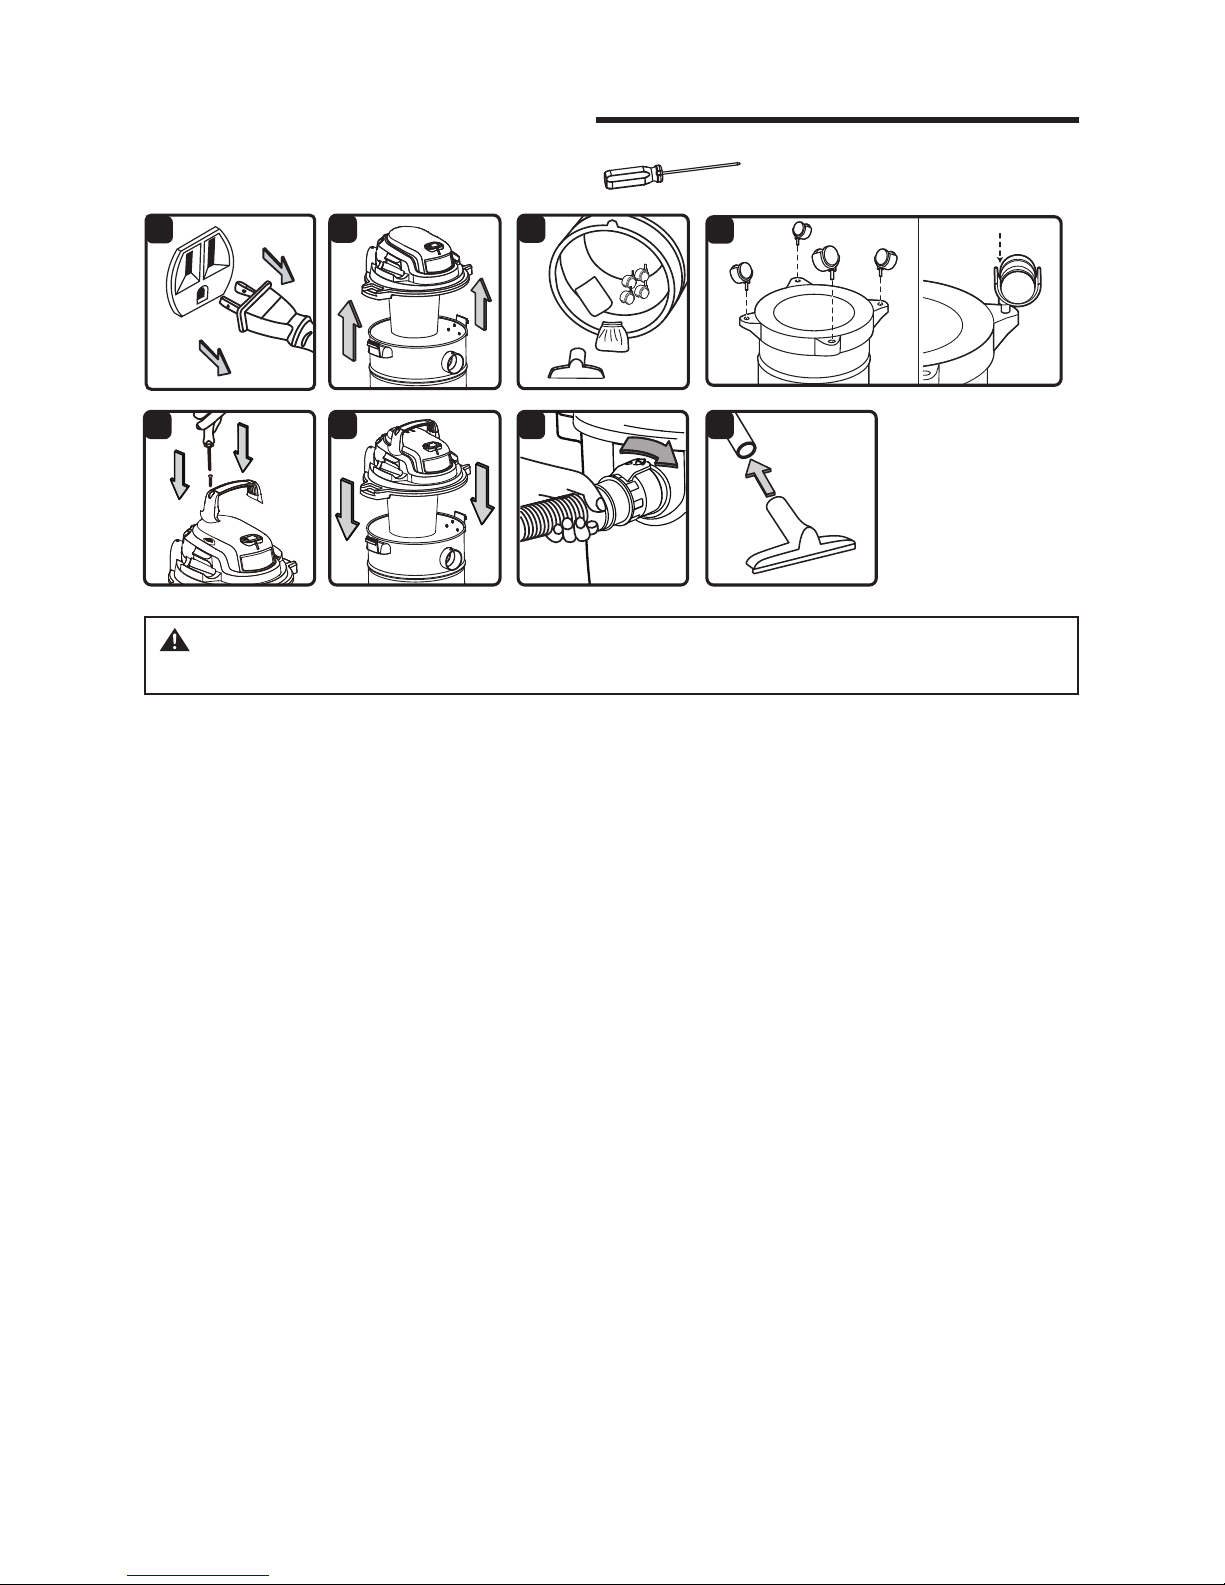
Assembly (continued)
GENERAL ASSEMBLY INSTRUCTIONS
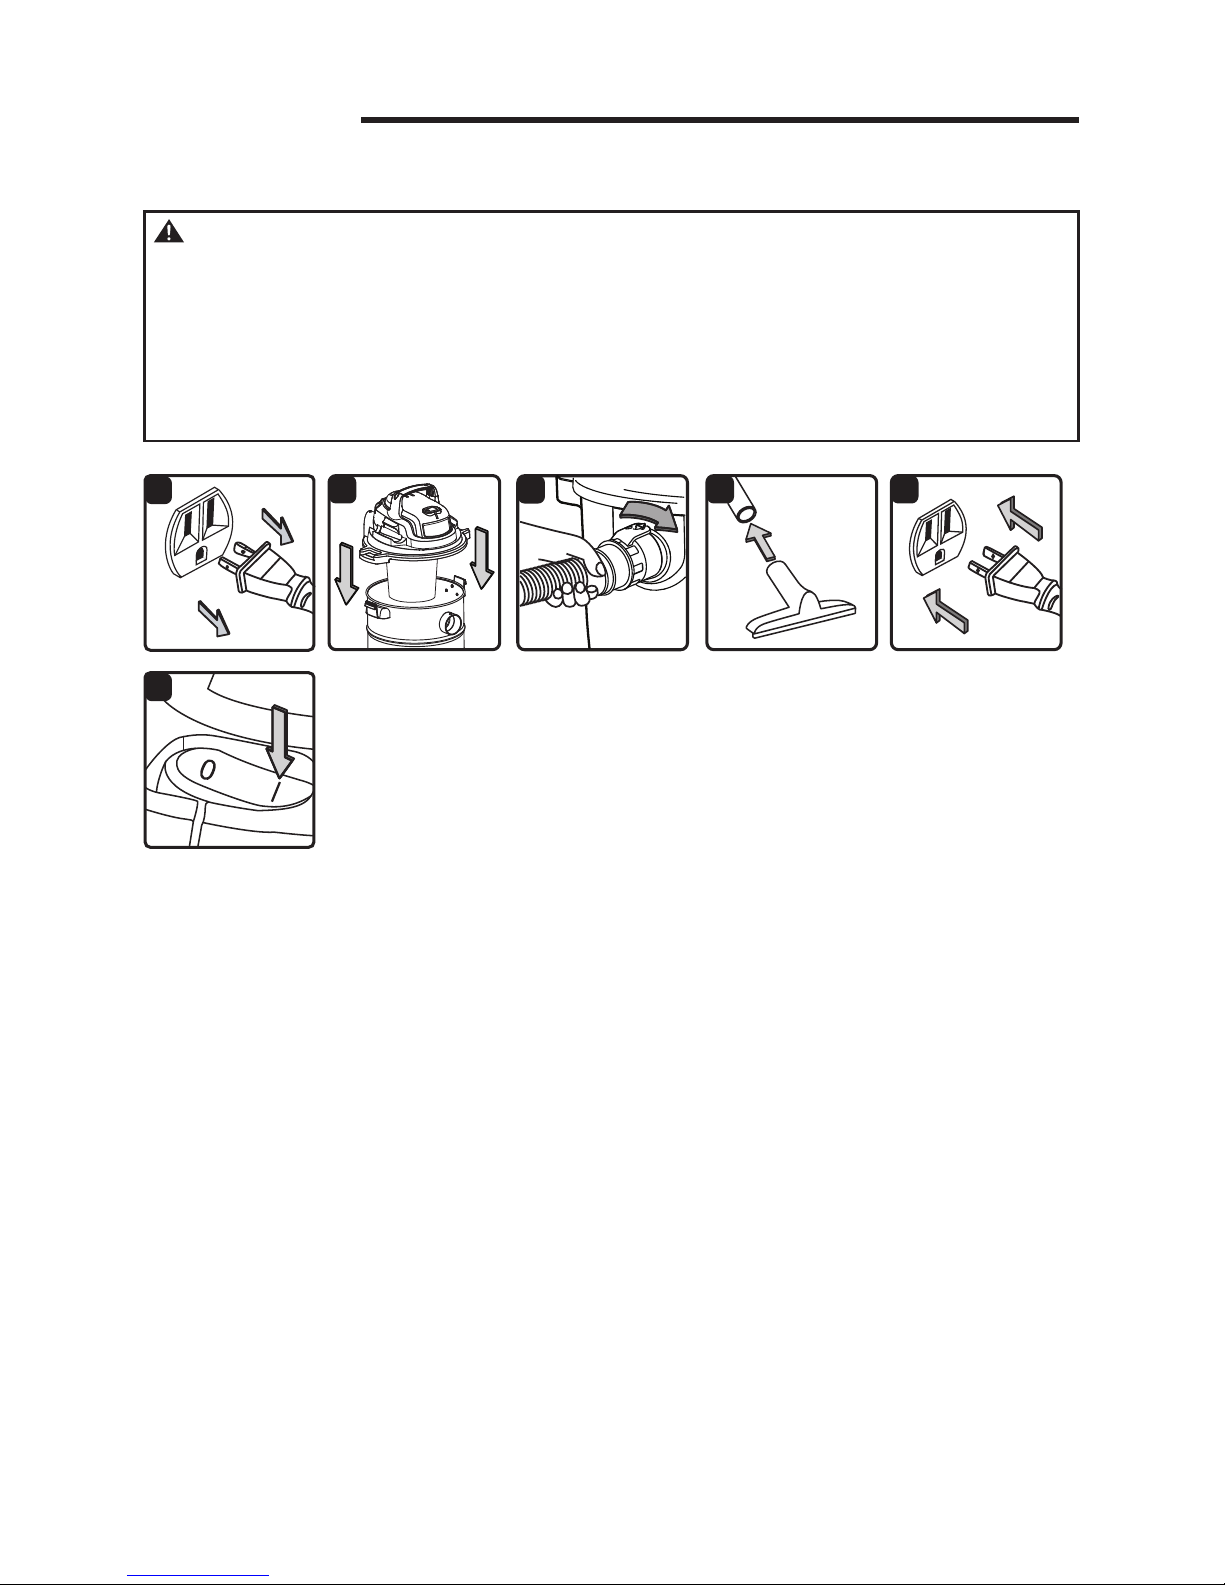
1. Verify that the power cord is
disconnected from the outlet. (Fig. 1)
2. Undo the latches and lift the power
head o of the collection tank.
(Fig. 2)
3. Remove the hardware package from
inside the collection tank. (Fig. 3)
4. Place the collection tank upside
down and insert the casters into
the sockets on the bottom of the
collection tank. Ensure each caster
is aligned straight into the collection
tank and apply pressure until the
casters snap into place. Use a hand
to support the base of the collection
tank when pressing in the casters.
(Fig. 4)
5. Insert the handle into the slots
located on the top of the power
head and secure it with the screws
provided. Do not overtighten the
screws. (Fig. 5)
6. Place the power head back on the
collection tank, and secure into
place using the 2 side latches.
(Fig. 6)
7. Insert the locking end of the hose
into the port on the collection tank
and turn clockwise to lock in to
place. (Fig. 7)
8. Choose the desired accessory and
insert onto the end of the hose.
(Fig. 8)
9. After vac use, store hose,
accessories and cord as illustrated
on page 12.
Note that a static discharge chain is
attached to the bottom of the tank. It
is normal for this chain to drag on the
ground. Operating the vacuum in dry
conditions can build up static, and the
chain helps dissipate any build-up by
allowing it a path of least resistance to
the ground.
A Phillps head screw driver is required.
87
5
4
3
1
6
2
WARNING: Do not plug in power cord to power outlet, make sure plug is
disconnected before assembling the wet/dry vac.
Page 7
7
Operation
Vacuuming Dry Materials
1. Verify that the power cord is
disconnected from the outlet. (Fig. 1)
2. For dry vacuuming, the cloth lter
must be installed correctly. To verify,
please refer to Installing Reusable
Cloth Filter on page 10.
3. Place the power head back on the
collection tank, and secure it in
place using the latches. (Fig. 2)
4. Insert the locking end of the hose
into the vacuum port and lock in
place. (Fig. 3)
5. Choose the desired accessory and
insert onto the end of the hose.
(Fig. 4)
6. Plug the power cord into the outlet.
(Fig. 5)
7. Turn the motor on by pressing the
power switch to the ‘I’ (ON) position
and begin vacuuming. (Fig. 6)
4
3
1
6
5
2
8. Once you have completed
vacuuming, press the power switch
to the ‘O’ (OFF) position and unplug
the power cord from the outlet.
O = OFF I = ON
DO NOT USE THE REUSABLE CLOTH
FILTER FOR LIQUID VACUUMING.
CAUTION: Do not vacuum drywall dust,
replace soot or ash with standard
Wet/Dry lter. This is very ne dust
which will not be captured by the lter
and may cause damage to motor. To
purchase the ne dust lter, call
1-888-331-4569 or visit a Sears store.
WARNING: Be sure to read, understand and apply all the information in the
Important Safety Instructions section at the beginning of this operator's manual.
Do not vacuum in areas with ammable gases, vapors, or explosive dusts in the
air. Flammable gases or vapors include but are not limited to: lighter uid,
solvent type cleaners, oil-base paints, gasoline, alcohol, or aerosol sprays.
Explosive dusts include but are not limited to: coal, magnesium, grain, or gun
powder. To reduce the risk of health hazards from vapors or dust, do not
vacuum toxic materials.
Page 8
8
Operation (continued)
Vacuuming Liquids
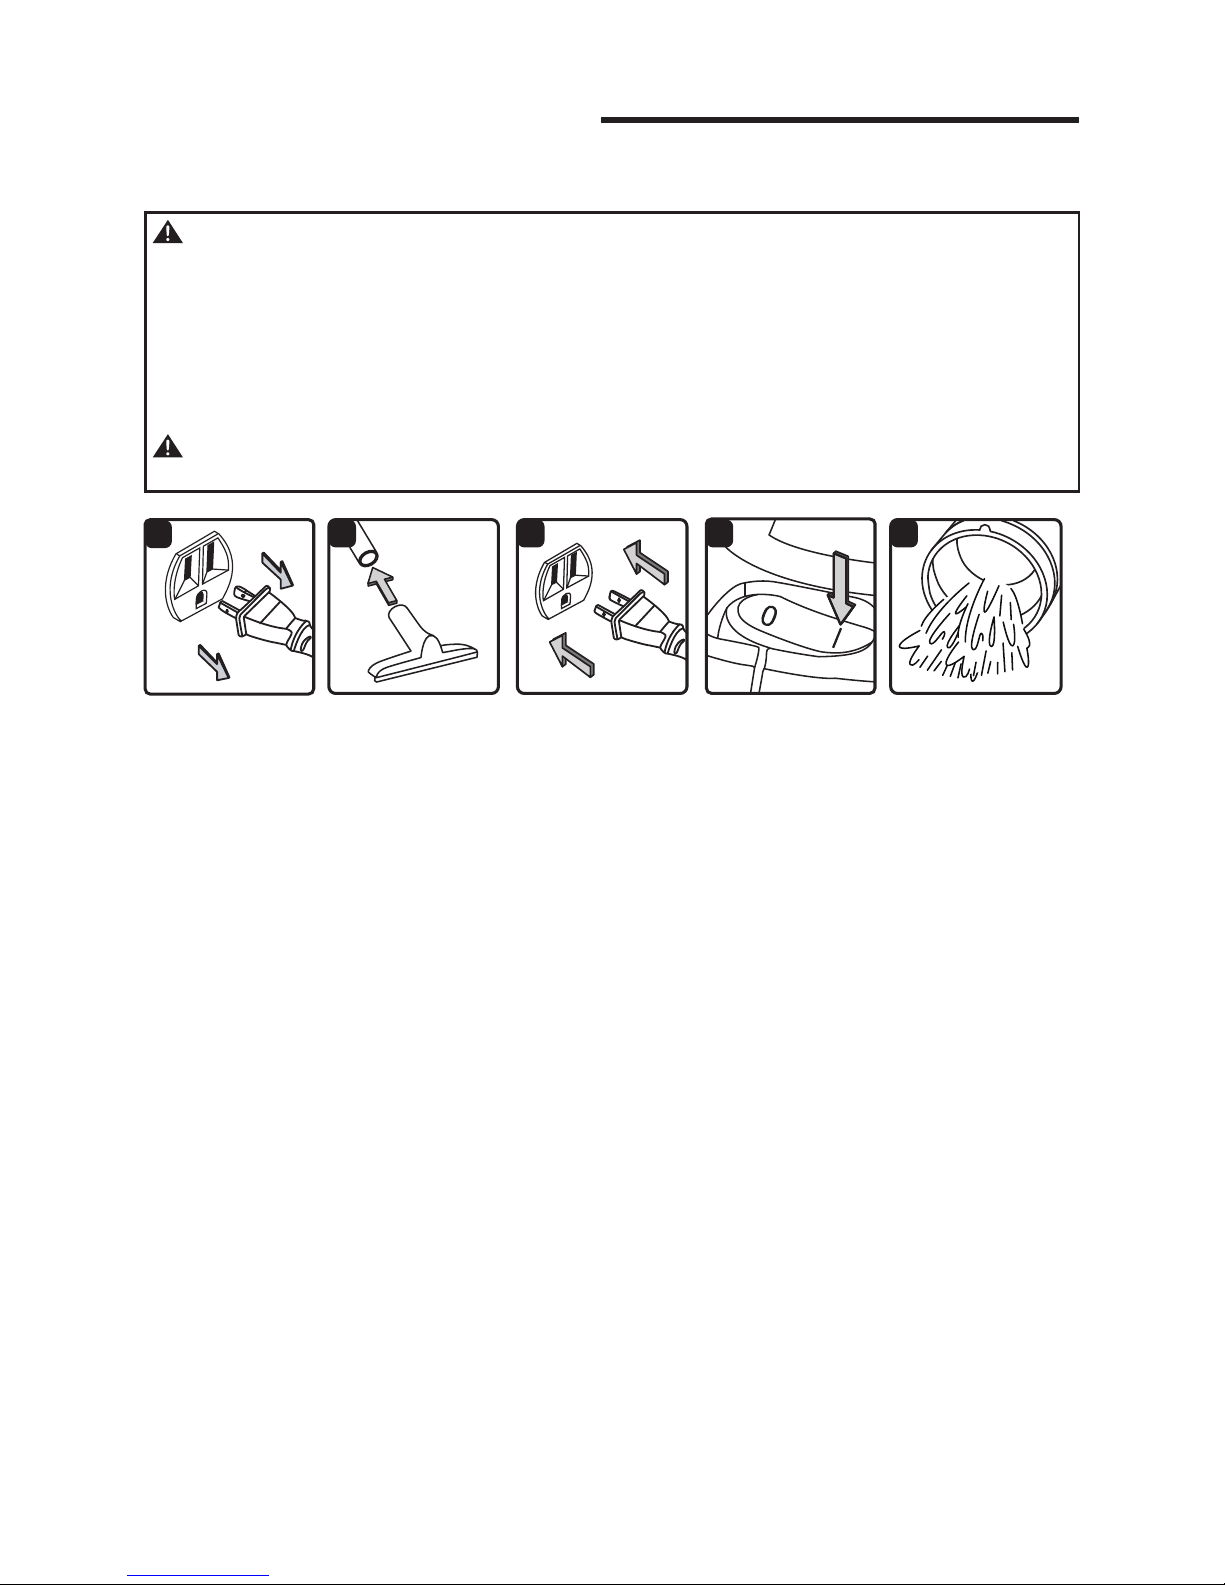
1. Verify that the power cord is
disconnected from the outlet. (Fig. 1)
2. Remove cloth lter as shown in
Removing and Cleaning Reusable
Cloth Filter on page 10. Then install
the foam sleeve lter as shown in
Installing Foam Sleeve Filter on
page 12 and secure power head
back on the collection tank.
DO NOT USE THE CLOTH FILTER FOR
LIQUID VACUUMING.
3. Fit the desired nozzle to the vacuum
hose. (Fig. 2)
4. Verify that the power switch is in the
‘O’ (OFF) position before plugging
the power cord into the outlet.
(Fig. 3)
O = OFF I = ON
5. Turn the motor on by pressing the
switch to the ‘I’ (ON) position. (Fig. 4)
6. Once you have completed
vacuuming, press the power switch
to the 'O' (OFF) position and unplug
the power cord from the outlet.
7. After use, empty the collection tank,
clean and dry the inside and outside
before storage. (Fig. 5)
IMPORTANT! When vacuuming large
quantities of liquids, do not immerse
the nozzle completely in the liquid;
leave a gap at the tip of the nozzle
opening to allow air inow.
The machine is tted with a oat valve
that stops the suction action when the
collection tank reaches its maximum
capacity. You will notice an increase
in motor speed. When this happens,
turn o the machine, disconnect from
power supply, and drain the liquid
into a suitable receptacle or drain. To
continue vacuuming, ret the collection
tank with the drain cap.
After wet vacuuming, turn the machine
o and remove plug from power supply.
Empty the collection tank, clean and
dry the inside and outside before
storage.
REMEMBER! The foam lter must be
removed after wet vacuuming and a
reusable cloth lter must be installed
before dry vacuuming again.
1
4
5
2 3
WARNING: Be sure to read, understand and apply all the information in the
Important Safety Instructions section at the beginning of this operator's manual.
Do not vacuum in areas with ammable gases, vapors, or explosive dusts in the
air. Flammable gases or vapors include but are not limited to: lighter uid,
solvent type cleaners, oil-base paints, gasoline, alcohol, or aerosol sprays.
Explosive dusts include but are not limited to: coal, magnesium, grain, or gun
powder. To reduce the risk of health hazards from vapors or dust, do not
vacuum toxic materials.
WARNING: Do not plug in power cord to power outlet, make sure plug is
disconnected before assembling the Wet/Dry Vac.
Page 9
9
Operation (continued)
Blower Operation
This Wet/Dry Vac has blowing
capabilities. To use the blower feature
follow the instructions listed below:
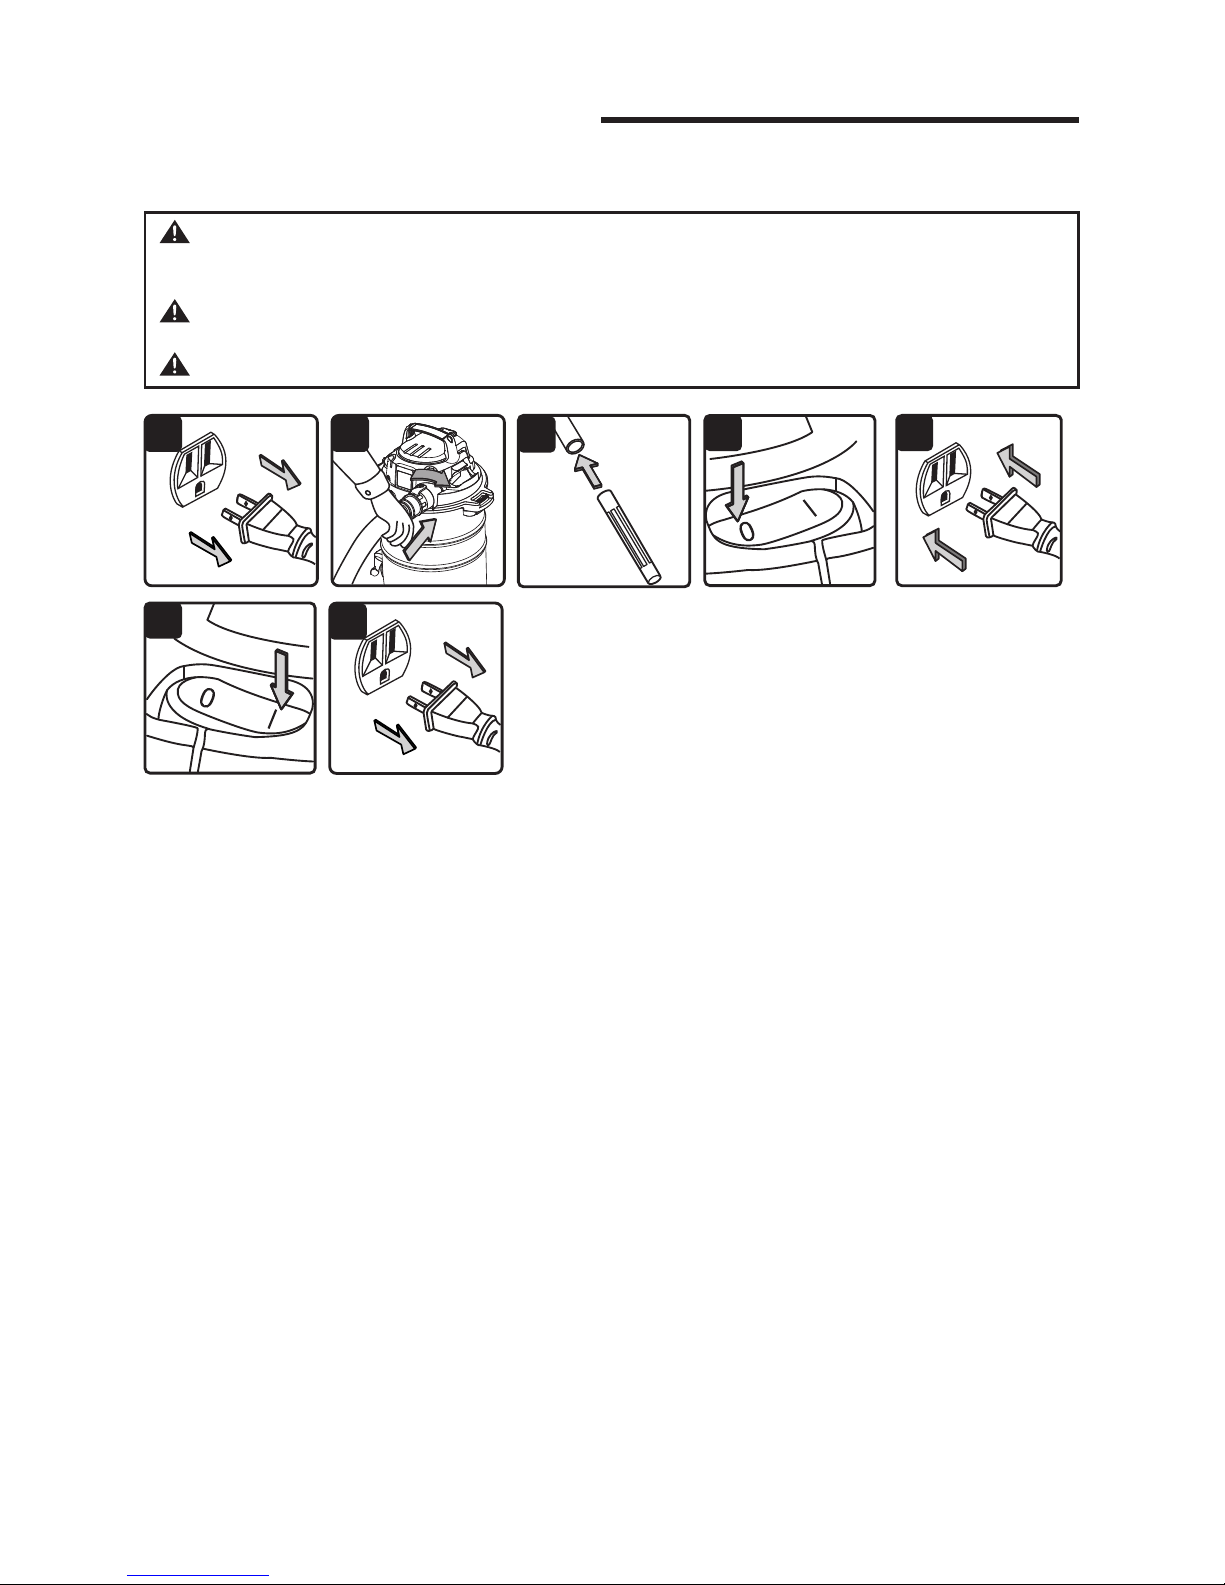
1. Verify that the power cord is
disconnected from the outlet. (Fig.1)
2. Make sure the collection tank is
empty before using as a blower.
3. Remove hose from the vacuum port.
4. Insert the larger end of the hose into
the blowing port on the back side of
the power head. (Fig. 2)
5. Fit the desired attachment to the
hose. (Fig. 3)
4
3
1
5
6
7
2
6. Verify that the power switch is in the
‘O’ (OFF) position before plugging
the power cord into the outlet.
(Fig. 4, Fig. 5)
7. Before turning ON the vac, rmly
hold the loose end of the hose. Turn
the motor on by pressing the switch
to the ‘I’ (ON) position. (Fig. 6)
8. Once you have completed
vacuuming, press the power switch
to the 'O' (OFF) position and unplug
the power cord from the outlet.
(Fig. 7)
WARNING: Always wear safety goggles complying with ANSI Z87.1 (or in
Canada, CSA Z94.3) before using blower.
WARNING: Keep bystanders clear from blowing debris.
WARNING: Wear a dust mask if blowing creates dust that might be inhaled.
Page 10
10
1
5
4
2 3
Emptying the Collection Tank
Installing & Cleaning Reusable Cloth Filter
Maintenance
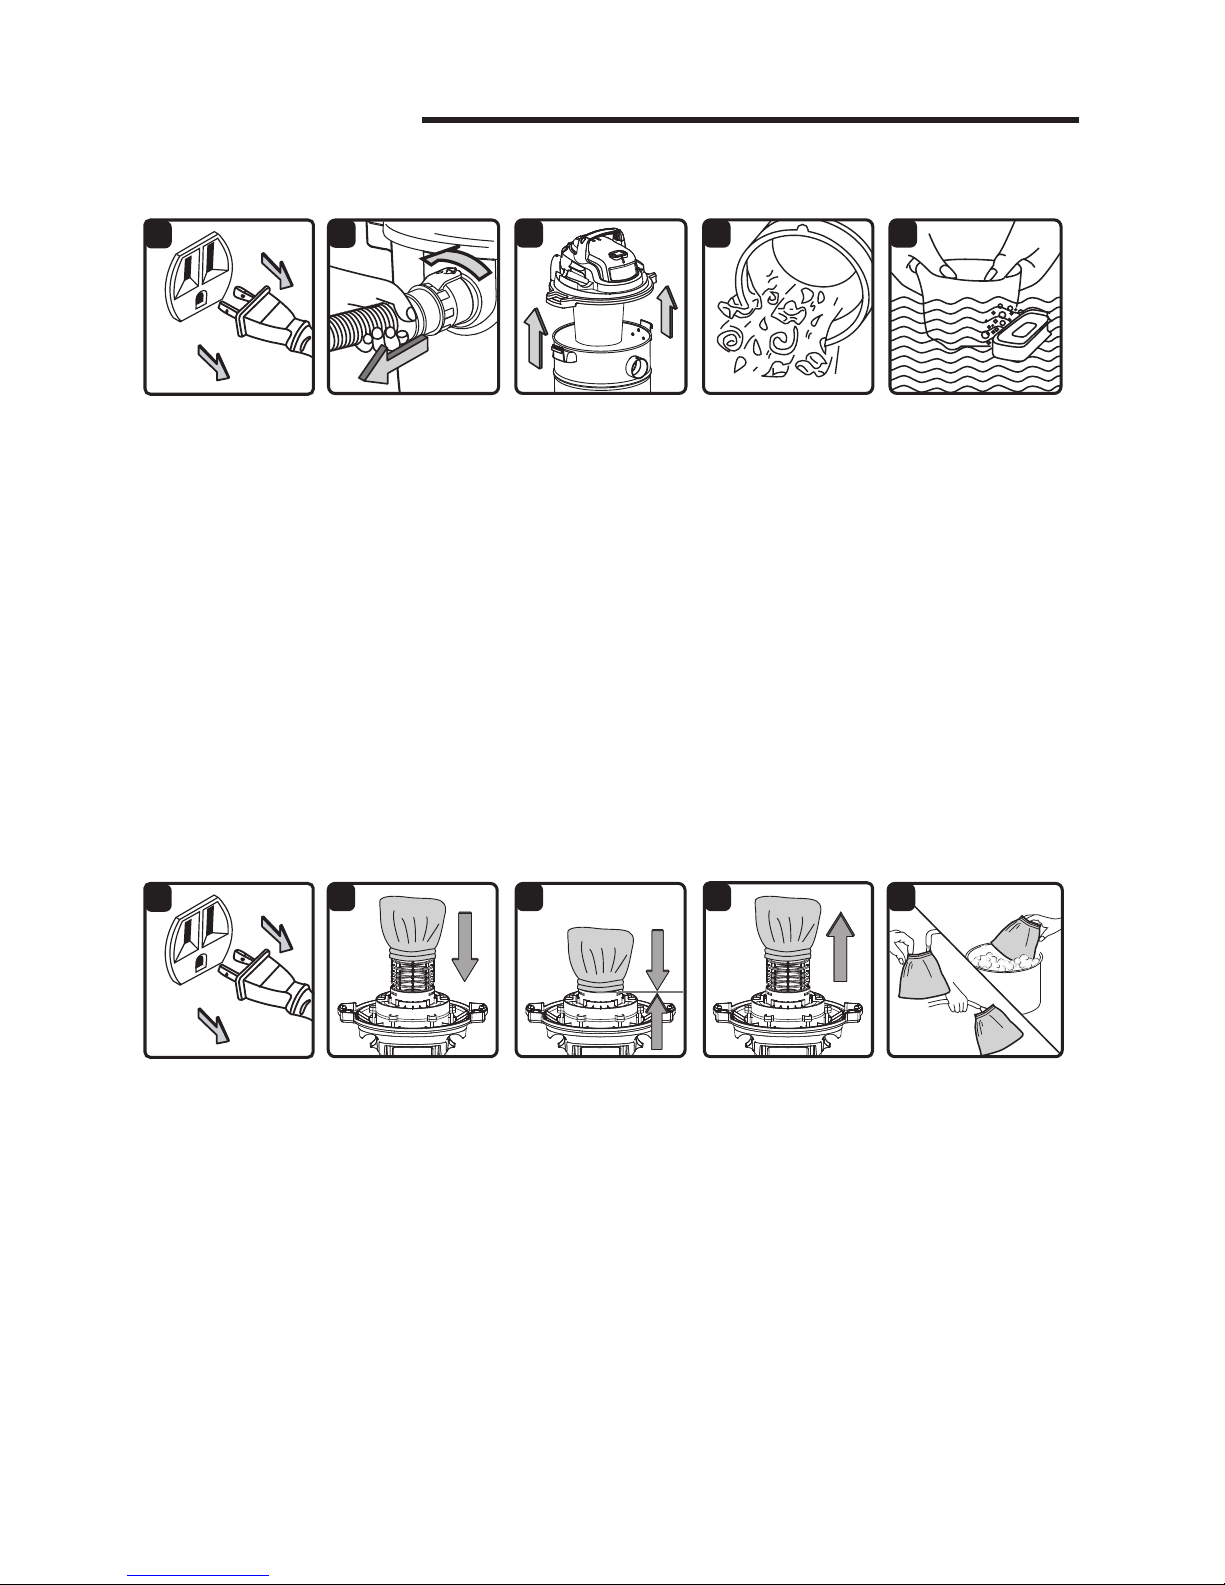
1. Verify that the power cord is
disconnected from the outlet. (Fig. 1)
2. Disconnect the hose from the
vacuum. (Fig. 2)
3. Undo the latches and remove the
power head from the collection tank.
(Fig. 3)
4. Clear all dirt or debris from the
collection tank and hose. (Fig. 4)
5. Clean or replace the lters. (Fig. 5)
6. Check the hose, attachments, and
power cord to verify that they have
not been damaged.
Installing Reusable Cloth Filter
1. Verify that the power cord is
disconnected from the outlet. (Fig. 1)
2. Remove power head and place in
the upside down position.
3. Slide reusable cloth lter down
over the lter cage making sure the
whole cage is covered. (Fig. 2 & 3)
4. Replace and lock the power head
onto the collection tank.
Removing and Cleaning Cloth Filter
1. Remove power head and place in
the upside down position.
2. Carefully remove the reusable cloth
lter from the lter cage. (Fig. 4)
Clean the lter by gently tapping or
brushing dirt o. Cleaning should
not be done indoors in living areas.
3. Use a mild soap and water solution
to wash reusable cloth lter and
rinse with clean water. (Fig. 5)
4. Allow the wet lter to air dry for 24
hours before installing onto the lter
cage.
NOTICE! The lter included is made of
high quality material designed to stop
small dust particles. The lter should
be used for dry pick-up only. A dry lter
is necessary to pick up dust. If the dust
lter is wet, it will clog quickly and be
very dicult to clean. Handle the lter
carefully when removing it for cleaning
and replacing it. Check the lters for
tears or small holes; a small hole can
let dust pass through and out of the
cleaner. Do not use a lter with holes or
tears; replace it immediately.
4 5
1
2
3
Page 11

11
Maintenance (continued)
Installing A Replacement Cartridge Filter (Sold Separately)
IMPORTANT! Clean or change the dust
lter regularly for best performance.
ALWAYS USE DUST FILTER FOR DRY
VACUUMING. If the machine is used
without the dust lter, the motor will
burn out and the warranty will be
voided. Always keep spare lters on-
hand.
This vacuum cleaner is designed to be able to use a Craftsman cartridge lter.
1. Carefully slide the Craftsman
cartridge lter over the lter cage
with the at end of the lter towards
the power head. (Fig. 1a)
2. Carefully push lter down until it
is fully seated on the power head.
(Fig. 2a)
3. To secure lter; put on retainer nut
and turn clockwise to tighten until
snug. Do not overtighten. (Fig. 3a)
3a1a 2a
NOTE: Always retain the original
retainer nut. Do not misplace it while
removing or replacing the cartridge
lter.
Craftsman cartridge lters can be found
at Sears, Kmart or other Craftsman
outlets. They may also be purchased
online at sears.com.
Part Number Description
17892 High Eciency Filter Bag 5-8 Gallons
17816 Cartridge Filter
17907 Fine Dust Cartridge Filter
17912 HEPA Material Cartridge Filter
17292 Wet Pickup Cartridge Filter
17888 Wet Pickup Foam Sleeve
16949 Reusable Cloth Filter
Replacement Filters and Bags (Sold Separately)
WARNING: Always disconnect
the plug from the power outlet
before removing the power head
from the collection tank.
Page 12

12
Maintenance (continued)
Installing & Cleaning Foam Sleeve Filter
Cleaning Foam Sleeve Filter
1. With the removed power head in
the upside down position, carefully
remove foam sleeve lter. (Fig. 4)
2. Use a mild soap and water solution
to wash foam sleeve lter and rinse
with clean water. (Fig. 5)
3. Allow lter to air dry before installing
and using again.
Installing Foam Sleeve Filter
1. Verify that the power cord is
disconnected from the outlet. (Fig. 1)
2. Remove power head and place
in upside down position. Follow
instructions to remove cloth lter.
3. Carefully slide foam sleeve lter
down over the lter cage making
sure the whole cage is covered.
(Fig. 2 & 3)
4. Replace the power head onto the
collection tank.
To keep your Wet/Dry Vac looking
its best, clean the outside with a
dampened cloth, then dry with a clean
towel.
To clean the inside of the collection
tank:
1. Empty debris out.
2. Wash collection tank thoroughly with
warm water and mild soap.
3. Wipe out with dry cloth.
Before prolonged storage or as needed
(i.e. after waste water pick up)
the collection tank should be
disinfected.
To disinfect the collection tank:
1. Pour 1 gallon of water and 1
teaspoon chlorine bleach into the
collection tank.
2. Let solution stand for 20 minutes,
carefully swishing every few minutes,
making sure to wet all inside surfaces of
the collection tank.
Storage
Before storing your vac, the collection
tank should be emptied and cleaned.
The cord and the accessories can be
stored as illustrated above (Fig. 1-2)
so they can be readily available when
needed. Store vac indoors.
Cleaning and Disinfecting the
Wet/Dry Vac
3
1
4
5
2
3. Empty collection tank after 20
minutes. Rinse with water until bleach
smell is gone. Allow collection tank
to dry completely before sealing the
motor on the collection tank.
I
I
I
I
I
I
I
I
I
I
I
I
I
I
I
I
I
I
I
I
I
I
I
I
I
I
I
I
I
I
I
I
I
I
I
I
I
I
I
I
I
I
I
I
I
I
I
I
I
I
I
I
I
I
I
I
I
I
I
I
I
I
I
I
I
I
I
I
I
I
I
I
I
I
I
I
I
I
I
I
I
I
I
I
I
1 2
Page 13

13
Troubleshooting
Problem Possible Causes Corrective Action
Vacuum will not operate.
1) No power supply.
1) Check power supply cord, breakers, and fuses.
2) Faulty power cord.
2) Unplug and check the
power cord. If damaged,
have it repaired by a
professional.
3) Collection tank is full. 3) Empty collection tank.
4) Switch in the wrong
position.
4) Press the ON ‘I’ button
on the power head.
Dust comes out from
motor cover.
1) The cartridge lter
missing or damaged.
1) Attach or replace the
catridge lter.
2) Vacuum has been used
to collect ne dust, such
as drywall dust, replace
soot, or ash, without a ne
dust lter equipped.
2) Remove the standard
cloth or cartridge lter and
install the appropriate ne
dust cartridge lter.
Reduced eciency and
motor/speed vibration.
1) There is a blockage in
the inlet. The dust lter is
clogged by ne dust.
1) Check nozzle, hose, and
tank inlets for blockage.
Take o the lter and clean
it, or install new lter.
WARNING: TO REDUCE THE RISK OF ELECTRIC SHOCK
UNPLUG BEFORE TROUBLESHOOTING.
Page 14

14
Repair Parts
125.16821 5 Gallon Wet/Dry Vac
Always order by part number, not by key number. Always mention the model
number when ordering parts. The model number is found on the serial plate
located on the vacuum. To order parts, call 1-888-331-4569.
WARNING: Servicing of double-insulated wet/dry vacuum.
With double-insulated wet/dry vacuum, two systems of insulation are
provided instead of grounding. No grounding means is provided on a doubleinsulated appliance, nor should a means for grounding be added. Servicing a
double insulated wet/dry vacuum requires extreme care and knowledge of the
system, and should be done only by qualied service personnel. Replacement
parts for a double-insulated wet/dry vacuum must be identical to the parts
they replace. Your double-insulated wet/dry vacuum is marked with the words
‘double insulated’ and the symbol (square within a square) may also be
marked on the appliance.
Key No. Part Number Description Quantity
1 VOD1PF.10.01.X1 Handle 1
2 VOC2S0.10.00 Power Head Assembly 1
3 TVQTZS.06.YZ.W2.00 Float 1
4 VJ51PF.10.04.W2.00 Filter Cage 1
5 TVQTXK.06.01.X2.01 Vacuum Port Assembly 1
6 VJA2S0.20.00.Y1 Collection Tank 1
7 VL01S0.20.02.X1.02 Latch assembly 2
8 VO40S0.20.02 Base 1
9 VO40S0.21.00 Grounding Chain 1
10 TVQTJL.01.00 Caster 4
11 17849 Extension Wand 3
12 FV7701.01.00.01 Floor Brush/Squeegee 1
13 FV7774.01.00 Utility Nozzle 1
14 17866 Hose 1
15 17888 Foam Sleeve Filter 1
16 16949 Reusable Cloth Filter 1
17 17816 General Dust Cartridge Filter Sold Separately
18 16938 Filter Retainer 1
19 Manual 1
Page 15

15
125.16821 5 Gallon Wet/Dry Vac
Repair Parts (continued)
Page 16

16
PRECAUCIÓN: Antes de usar este
producto, lea este manual y siga
todas las reglas de seguridad e
instrucciones de operación.
Aspiradora de Materiales
Húmedos/Secos de 5 Galones
• Seguridad
• Ensamble
• Operación
• Mantenimiento
• Piezas
• English - Page 1
Manual Del Usuario
Núm. de modelo 125.16821
Sears Brands Management Corporation, Homan Estates, IL 60179 U.S.A
www.craftsman.com
Page 17

17
Garantía
GARANTÍA LIMITADA CRAFTSMAN
DURANTE UN AÑO a partir de la fecha de compra, este producto está
garantizado contra defectos de material o mano de obra.
Un producto defectuoso puede reemplazarse por uno nuevo, de manera
gratuita, considerando que se presente una PRUEBA DE VENTA.
Para detalles sobre la cobertura de la garantía para obtener un reemplazo
gratuito, visite la página web: www.craftsman.com/warranty
Esta garantía no cubre bolsas de cubierta, ltros, mangueras o accesorios, que
son partes consumibles que pueden desgastarse por el uso normal dentro del
periodo de la garantía.
Esta garantía de UN AÑO es inválida si este producto alguna vez se usa para
servicios comerciales o si se renta a otra persona. Para obtener los términos de
uso comercial y de renta por 90 DÍAS, consulte la página web de la garantía de
Craftsman.
Esta garantía le ofrece derechos legales especícos y también puede tener
otros derechos que varían de estado a estado.
Sears Brands Management Corporation, Homan Estates, IL 60179
LEA Y COMPRENDA TODAS LAS
INSTRUCCIONES ANTES DE USAR
ESTA ASPIRADORA.
Lea y entienda este manual del operador
y todas las etiquetas de la aspiradora de
material húmedo/seco antes de operarla.
La seguridad es una combinación de
sentido común, mantenerse alerta y
saber cómo funciona su aspiradora. Use
esta aspiradora de material húmedo/seco
únicamente como se describe en este
manual. Para reducir el riesgo de lesiones
personales o daños a la aspiradora de
material húmedo/seco, use únicamente
los accesorios recomendados de
Craftsman.
Tipo doméstico
GUARDE ESTE MANUAL
PARA CONSULTA FUTURA.
Al utilizar un electrodoméstico, siempre
se deben seguir las precauciones
básicas, incluyendo las siguientes:
ADVERTENCIA:
PARA REDUCIR EL RIESGO
DE INCENDIOS, DESCARGA
ELÉCTRICA O LESIONES:
• No deje la aspiradora desatendida.
• No aspire ni use esta aspiradora
de material húmedo/seco cerca de
líquidos inflamables, gases o vapores
explosivos como gasolina u otros
combustibles, líquidos encendedores,
limpiadores, pinturas con base de
aceite, gas natural, hidrógeno o polvos
explosivos como polvo de carbón,
polvo de magnesio, polvo de granos o
pólvora. Las chispas dentro del motor
pueden encender vapores o polvos
inflamables.
• No aspire nada que se esté quemando
o emitiendo humo, como cigarrillos,
cerillos o cenizas calientes.
• Mantenga el cable alejado de
superficies calientes.
• No la exponga a la lluvia. Almacénela
en interiores.
INSTRUCCIONES DE SEGURIDAD IMPORTANTES
Page 18

18
ninguna de las aberturas de ventilación
bloqueadas; manténgala libre de polvo,
pelusa, cabello o cualquier objeto que
pudiera reducir el flujo de aire.
• Mantenga el cabello, ropa holgada,
dedos y todas las partes del cuerpo
lejos de las aberturas y partes móviles.
• Para reducir el riesgo de caídas, tenga
mucho cuidado al limpiar escaleras.
Cuando se use como soplador:
• Dirija la descarga de aire únicamente
hacia el área de trabajo.
• No use la aspiradora de material
húmedo/seco como un atomizador No apto para desechar químicos tales
como fertilizantes o pesticidas.
• No dirija el aire hacia los transeúntes.
• Mantenga a los niños alejados del
soplador.
• Use lentes de seguridad.
Enchufe polarizado
Para reducir el riesgo de una descarga
eléctrica, este electrodoméstico tiene un
enchufe polarizado (con un conector más
ancho que el otro). Este enchufe entrará
en un tomacorriente polarizado solo de
una manera. Si el enchufe no entra por
completo en el tomacorriente, invierta el
enchufe. Si aún no entra, comuníquese
con un electricista calificado para instalar
el tomacorriente adecuado. No modifique
el enchufe de ninguna manera. El doble
aislamiento elimina la necesidad
de una extensión de tres contactos
con conexión a tierra y un sistema de
suministro de energía con conexión a
tierra.
• No desconecte jalando el cable de
corriente. Para desconectar, sujete el
enchufe y no el cable.
• No la use con el cable, enchufe u otras
partes dañadas.
• Si la aspiradora no está funcionando
como debería, se ha dejado caer, está
dañada, se dejó a la intemperie o cayó
en agua, llévela a un distribuidor de
servicio para que la inspeccione y
repare antes de usarla de nuevo.
• No la jale ni cargue por el cable, ni use
el cable como agarradera, no cierre una
puerta sobre el cable ni jale el cable por
bordes filosos ni esquinas.
• No pase la aspiradora de material
húmedo/seco por encima del cable.
• No maneje el enchufe ni la aspiradora
de material húmedo/seco con manos
húmedas.
• Para reducir el riesgo de peligros a la
salud debido a vapores o polvos, no
aspire materiales tóxicos.
• No almacene la aspiradora cerca de
materiales peligrosos.
• No use esta aspiradora de material
húmedo/seco con un filtro rasgado o
sin el filtro instalado, excepto cuando
se aspiren los líquidos que se describen
en la sección de operación de este
manual.
• No permita que se use como un
juguete. Se necesita poner mucha
atención cuando se usa cerca de niños.
• Para reducir el riesgo de una lesión por
un encendido accidental, desconecte el
cable de corriente antes de cambiar o
limpiar el filtro.
• No deje la aspiradora de material
húmedo/seco desatendida cuando
la conecte. Desconéctela del
tomacorriente cuando no está en uso y
antes de realizar el servicio.
• Apague la aspiradora de material
húmedo/seco antes de desconectarla.
• No coloque ningún objeto en las
aberturas de ventilación. No aspire con
Page 19

19
Extensiones
Al usar una extensión con la aspiradora de material húmedo/seco, consulte la
siguiente tabla para determinar el tamaño de cable A.W.G. (calibre americano de
cables) requerido. Antes de usar la aspiradora de material húmedo/seco, asegúrese
de que esté en buenas condiciones, incluyendo el cable de corriente.
Además, asegúrese de que la extensión esté en buenas condiciones antes de usarla.
Realice las reparaciones o reemplazos necesarios antes de usar la aspiradora. Solo
use extensiones que están clasicadas para uso en exteriores.
Longitud de las extensiones
110V-120V
25 pies
7,5 metros
50 pies
15,25 metros
100 pies
30,5 metros
150 pies
45,7 metros
Amperes Tamaño de cable de A.W.G
0-6 18 16 16
14
7-10 18 16 14
12
11-12 16 16 14
12
13-16 14 12 No se recomienda
Obedezca las siguientes advertencias
queaparecen en la caja del motor de su
aspiradora:
NO REQUIERE DE CONEXIÓN A
TIERRA CON DOBLE AISLAMIENTO.
AL REALIZAR EL SERVICIO,
USE ÚNICAMENTE PARTES DE
REPUESTO IDÉNTICAS.
• Por su propia seguridad, lea y
entienda el manual del propietario.
• No permita que la unidad funcione
si está desatendida.
• No levante cenizas calientes,
carbón, materiales tóxicos,
inamables u otros materiales
peligrosos.
• No la use alrededor de líquidos
explosivos o vapores.
ADVERTENCIA:
ADVERTENCIA: Para reducir el
riesgo de una descarga eléctrica, no
la exponga a la lluvia y almacénela en
interiores.
ADVERTENCIA: Al usar como
soplador:
Use lentes de seguridad con la
etiqueta "ANSIZ87.1" (Canadá CSA
Z94.3) en el paquete. Apague la
unidad antes de colocarla sobre el
suelo o soltar la agarradera. Podría
ocurrir una descarga eléctrica si se
usa en supercies húmedas. Dirija
la descarga de aire únicamente al
área de trabajo. No dirija la descarga
hacia los transeúntes. Mantenga la
máquina lejos de los niños.
Page 20

20
Esta aspiradora de material húmedo/
seco está diseñada para aspirar
materiales húmedos y secos, además
puede usarse como un soplador.
Lea este manual del operador para
familiarizarse con las características
del producto y para entender el uso
especíco de su nueva aspiradora de
material húmedo/seco.
Introducción
Índice
Sección Página
Garantía ..............................................17
Instrucciones de seguridad
importantes .........................................17
Enchufe polarizado.........................19
Extensiones ........................................19
Introducción ........................................20
Índice ..................................................20
Ensamble ............................................21
Lista del contenido de la caja ........21
Instrucciones de armado general ..22
Operación ...........................................23
Aspiración de materiales secos .....23
Aspiración de líquidos ....................24
Uso del soplador ............................25
Sección Página
Mantenimiento ....................................26
Cómo vaciar el tanque
de recolección ................................26
Instalación y limpieza del filtro
de tela reutilizable ..........................26
Instalación de un filtro
de cartucho de reemplazo .............27
Instalación y limpieza filtro
de manga de espuma ....................28
Limpieza y desinfección de la
aspiradora de material
húmedo/seco .................................28
Almacenamiento ............................29
Resolución de problemas ..................29
Partes de repuesto .............................30
Page 21

21
Ensamble
Retire todo el contenido de la caja
y verique si hay partes dentro del
tanque de recolección. Verique cada
parte contra la lista de contenido de
la caja. Si hay alguna parte faltante o
dañada, llame al 1-888-331-4569 para
recibir un reemplazo.
Lista de contenidos de la caja
Clave Descripción ......................Cant.
A Ensamble de la aspiradora ... 1
B Manguera ............................... 1
C Tubos extensores .................. 3
D Boquilla para Piso
y Escurridor ............................ 1
E Boquilla de uso general ......... 1
F Filtro de tela ........................... 1
G Filtro de manga de espuma ... 1
H Rueda ..................................... 4
I Tornillo .................................... 2
J Tuerca ..................................... 1
K Manual del usuario ................ 1
A
B
C
D
E F G H I K
J
Manual del usuario
Interruptor de
encendido/apagado
Cabeza motriz
Puerto de la aspiradora
Base
Portal del soplador
Asas
Almacenamiento
de accesorios
Almacenamiento
de manguera
Rueda
Tanque de
recolección
Cadena de descarga
estática (bajo el
tanque, no ilustrado)
Page 22

22
Ensamble (continuación)
INSTRUCCIONES DE ARMADO
GENERAL
1. Verique que el cable de
corriente esté desconectado del
tomacorriente. (Fig. 1)
2. Suelte las asas y levante la tapa que
esta sobre el envase. (Fig. 2)
3. Saque el paquete de herramientas
desde el tanque colector. (Fig. 3)
4. Coloque el tanque colector boca
abajo e inserte las ruedas en los
oricios del fondo del tanque.
Asegúrese de que cada rueda esté
alineada con el tanque colector y
aplique presión hasta que la rueda
calce en su lugar. Utilice una mano
para apoyar la base del tanque
colector mientras presiona las
ruedas. (Fig. 4)
5. Inserte el extremo de jación de la
manguera en el puerto situado en el
tanque de recolección y gírelo para
inmovilizarlo. (Fig. 5)
6. Coloque de nuevo la sección de la
cabeza motriz sobre el tanque de
recolección e inmovilícela usando
los 2 pasadores laterales. (Fig. 6)
7. Inserte el extremo de jación de la
manguera en el puerto situado en el
tanque de recolección y gírelo para
inmovilizarlo. (Fig. 7)
8. Seleccione el accesorio deseado
e insértelo en el extremo de la
manguera. (Fig. 8)
9. Después de usar la aspiradora,
guarde la manguera, los accesorios
y el cable según la ilustración de la
página 29.
Tenga en cuenta que la cadena de
descarga estática está unida al fondo
del tanque. Es normal que esta cadena
se arrastre hasta el suelo. Utilizar la
aspiradora en condiciones secas puede
generar estática; en tal caso, la cadena
ayuda a disipar toda acumulación
para así ofrecer una ruta de menor
resistencia hacia el suelo.
Se requiere de un destornillador de cabeza Phillips.
87
5
4
3
1
6
2
ADVERTENCIA: No enchufe el cable de corriente al tomacorriente; asegúrese
de que el enchufe esté desconectado antes de ensamblar la aspiradora de
material húmedo/seco.
Page 23

23
Operación
Aspiración de Materiales Secos
1. Verique que el cable de
corriente esté desconectado del
tomacorriente. (Fig. 1)
2. Para aspirar material seco,
debe instalar el ltro de tela
correctamente. Para vericar,
consulte la sección Instalación del
ltro de tela en la página 26.
3. Coloque la cabeza motriz de nuevo
sobre el tanque de recolección e
inmovilícela usando los pasadores.
(Fig. 2)
4. Inserte el extremo de jación de
la manguera en el puerto de la
aspiradora y asegúrelo en su lugar.
(Fig. 3)
5. Seleccione el accesorio deseado
e insértelo en el extremo de la
manguera. (Fig. 4)
6. Conecte el cable de corriente en el
tomacorriente. (Fig. 5)
4
3
1
6
5
2
7. Encienda el motor poniendo
el interruptor en la posición 'I'
(Encendido) y empiece a aspirar.
(Fig. 6)
8. Una vez que haya terminado
de aspirar, ponga el interruptor
en la posición 'O' (Apagado) y
desconecte el cable de corriente del
tomacorriente.
O = Apagado I = Encendido
NO UTILICE EL FILTRO DE TELA
PARA ASPIRAR LÍQUIDOS CON LA
ASPIRADORA.
PRECAUCIÓN: No aspire polvo
de tablarroca, hollín o cenizas de
chimenea con un ltro estándar para
material húmedo/seco. Este es un
polvo muy no que no será capturado
por el ltro y puede causar daños al
motor. Para comprar el ltro de polvo
no, llame al 1-888-331-4569 o visite
una tienda Sears.
ADVERTENCIA: Asegúrese de leer, entender y aplicar toda la información de
la sección de instrucciones de seguridad importantes que está al inicio de este
manual de operaciones. No aspire en áreas con gases inamables, vapores o
polvos explosivos en el aire. Los gases o vapores inamables incluyen, entre
otros: líquidos encendedores, limpiadores de tipo solvente, pinturas con base
de aceite, gasolina, alcohol o aerosoles. Los polvos explosivos incluyen, entre
otros: carbón, magnesio, granos o pólvora. Para reducir el riesgo de peligros a
la salud debido a vapores o polvos, no aspire materiales tóxicos.
Page 24

24
Operación (continuación)
Aspiración de Líquidos
1. Verique que el cable de
corriente esté desconectado del
tomacorriente. (Fig. 1)
2. Saque el ltro de tela tal como se
indica en Extracción y limpieza del
ltro de tela reutilizable, en la página
26. Luego, instale el ltro con manga
de espuma, tal como se indica en
Cómo instalar el ltro con manga de
espuma, en la página 28, y asegure
el cabezal de potencia al tanque
colector.
NO UTILICE EL FILTRO DE POLVO
PARA ASPIRAR LÍQUIDOS CON LA
ASPIRADORA.
3. Instale la boquilla deseada en la
manguera de la aspiradora. (Fig. 2)
4. Verique que el interruptor esté en
la posición 'O' (Apagado) antes de
enchufar el cable de corriente en el
tomacorriente. (Fig. 3)
O = Apagado I = Encendido
5. Encienda el motor poniendo
el interruptor en la posición 'I'
(Encendido). (Fig. 4)
6. Una vez que haya terminado
de aspirar, ponga el interruptor
en la posición 'O' (Apagado) y
desconecte el cable de corriente del
tomacorriente.
7. Después de cada uso, vacié el
envase en un receptáculo apropiado
o un desaguadero. (Fig. 5)
¡IMPORTANTE!
Al aspirar grandes
cantidades de líquido, no sumerja la
boquilla por completo en el líquido;
deje un espacio en la punta de la
abertura de la boquilla para permitir la
entrada de aire.
La máquina está equipada con una
válvula de otación que detiene la
acción de succión cuando el tanque
de recolección alcanza su máxima
capacidad. Notará un aumento en
la velocidad del motor. Cuando
esto ocurra, apague la máquina,
desconéctela del suministro de energía
y drene el líquido en un receptáculo
adecuado o resumidero. Para continuar
aspirando, vuelva a colocar la tapa del
drenaje en el tanque de recolección.
Después de aspirar material húmedo,
apague la máquina y desconecte el
enchufe del suministro de energía.
Vacíe el tanque de recolección, limpie
y seque el interior y exterior antes de
almacenar.
¡RECUERDE! El ltro de espuma debe
retirarse después de aspirar material
húmedo y debe instalarse un ltro de
cartucho antes de aspirar material
seco de nuevo.
1
4
5
2 3
ADVERTENCIA: Asegúrese de leer, entender y aplicar toda la información de
la sección de instrucciones de seguridad importantes que está al inicio de este
manual de operaciones. No aspire en áreas con gases inamables, vapores o
polvos explosivos en el aire. Los gases o vapores inamables incluyen, entre
otros: líquidos encendedores, limpiadores de tipo solvente, pinturas con base
de aceite, gasolina, alcohol o aerosoles. Los polvos explosivos incluyen, entre
otros: carbón, magnesio, granos o pólvora. Para reducir el riesgo de peligros a
la salud debido a vapores o polvos, no aspire materiales tóxicos.
ADVERTENCIA: No enchufe el cable de corriente al tomacorriente; asegúrese
de que el enchufe esté desconectado antes de ensamblar la aspiradora de
material húmedo/seco.
Page 25

25
Operación (continuación)
Uso del soplador
Esta aspiradora de material húmedo/
seco tiene capacidades de soplado.
Para utilizar la función sopladora, siga
estas instrucciones:
1. Verique que el cable de
corriente esté desconectado del
tomacorriente. (Fig. 1)
2. Asegúrese de que el tanque de
recolección esté vacío antes de usar
la aspiradora como soplador.
3. Retire la manguera del puerto de la
aspiradora.
4. Inserte el extremo más largo de la
manguera en el puerto del soplador
situado en la parte trasera de la
cabeza motriz. (Fig. 2)
5. Instale el accesorio deseado en la
manguera. (Fig. 3)
4
3
1
5
6
7
2
6. Verique que el interruptor esté en
la posición 'O' (Apagado) antes de
enchufar el cable de corriente en el
tomacorriente. (Fig. 4, Fig. 5)
7. Antes de encender la aspiradora,
sostenga rmemente el extremo
holgado de la manguera. Encienda
el motor poniendo el interruptor en
la posición 'I' (Encendido). (Fig. 6)
8. Una vez que haya terminado de
soplar, ponga el interruptor en
la posición 'O' OFF (Apagado) y
desconecte el cable de corriente del
tomacorriente. (Fig. 7)
ADVERTENCIA: Siempre use lentes de seguridad que cumplan con la norma
ANSI Z87.1 (o en Canadá, CSA Z94.3) antes de usar el soplador.
ADVERTENCIA: Mantenga a los transeúntes lejos de los desechos voladores.
ADVERTENCIA: Use una mascarilla anti polvo si el soplado crea polvo que
pudiera inhalarse.
Page 26

26
1
5
4
2 3
Cómo Vaciar el Tanque de Recolección
Instalación y Limpieza del Filtro de Tela Reutilizable
Mantenimiento
1. Verique que el cable de
corriente esté desconectado del
tomacorriente. (Fig. 1)
2. Desconecte la manguera de la
aspiradora. (Fig. 2)
3. Abra los pasadores y retire la cabeza
motriz del tanque de recolección.
(Fig.3)
4. Limpie todo el sucio o partículas del
envase y manguera. (Fig.4)
5. Limpie o reemplace los ltros. (Fig.5)
6. Revise la manguera, accesorios y
cable de corriente para vericar que
no se hayan dañado.
Instalación del ltro de tela reutilizable
1. Verique que el cable de
corriente esté desconectado del
tomacorriente. (Fig. 1)
2. Retire la cabeza motriz y colóquela
en posición invertida.
3. Deslice el ltro de tela reutilizable
hacia abajo por la caja del ltro
asegurándose de que cubra toda la
caja.(Fig. 2 y 3)
4. Vuelva a colocar y asegure la cabeza
motriz al tanque de recolección.
Retirar y limpiar el ltro de tela de limpieza
1. Retire la cabeza motriz y colóquela
en posición invertida.
2. Retire con cuidado el ltro de tela
reutilizable de la caja del ltro. (Fig. 4)
Limpie el ltro golpeando suavemente
o cepillándolo para quitar la suciedad.
La limpieza no debe hacerse en el
interior de áreas habitables.
3. Use una solución de jabón suave
y agua para lavar el ltro de tela
reutilizable y enjuague con agua
limpia. (Fig. 5)
4. Deje secar el ltro húmedo al aire libre
durante 24 horas antes de instalarlo
en la caja del ltro.
¡AVISO! El ltro incluido está hecho de
un material de alta calidad diseñado
para detener las partículas de polvo
pequeñas. El ltro debe usarse
únicamente para levantar material seco.
Es necesario tener un ltro de material
seco para levantar el polvo. Si el ltro
de polvo está húmedo, se obstruirá
rápidamente y será muy difícil de
limpiar. Maneje el ltro con cuidado al
quitarlo para limpiarlo o reemplazarlo.
Verique que los ltros no estén
rasgados ni tengan oricios pequeños,
un oricio pequeño puede dejar pasar
y salir el polvo de la aspiradora. No
use un ltro con oricios o desgarres;
reemplácelo inmediatamente.
4 5
1
2
3
Page 27

27
Mantenimiento (continuación)
Instalación de un Filtro de Cartucho de Reemplazo (Vendido por Aparte)
¡IMPORTANTE! Limpie o cambie
el ltro regularmente para mejor
funcionamiento. SIEMPRE UTILICE
EL FILTRO DE POLVO PARA LIMPIAR
CON LA ASPIRADORA EN SECO. Si la
máquina se utiliza sin el ltro de polvo,
el motor se quemará y la garantía
será anulada. Siempre tenga a mano
repuestos de los ltros.
Esta aspiradora está diseñada para poder utilizar un ltro de cartucho Craftsman.
1. Con cuidado deslice el ltro de
cartucho Craftsman sobre la caja
del ltro con el extremo plano del
ltro hacia la cabeza motriz. (Fig. 1a)
2. Con cuidado empuje el ltro hacia
abajo hasta que se asiente por
completo sobre la cabeza motriz.
(Fig. 2a)
3. Para asegurar el ltro, coloque la
tuerca de retención y gírela hacia
la derecha para apretarla hasta
que quede apretada. No la apriete
demasiado. (Fig. 3a)
3a1a 2a
NOTA: Siempre conserve la tuerca
de retención original. No la extravíe
cuando retire o reemplace el ltro de
cartucho.
Los ltros de cartucho Craftsman
pueden adquirirse en Sears, Kmart u
otras tiendas que distribuyan productos
Craftsman. También pueden adquirirse
en línea en sears.com.
Número de parte Descripción
17892 Bolsa de ltro de alta eciencia, con 19-30 litros de capacidad
17816 Filtro de cartucho
17907 Filtro de cartucho para polvo no
17912 Filtro de cartucho de material HEPA
17292 Filtro de cartucho de recolección húmeda
17888 Manga de espuma de recolección húmeda
16949 Filtro de tela reutilizable
Filtros y bolsas de repuesto (Vendido por Aparte)
ADVERTENCIA: Siempre
desconecte el enchufe del
tomacorriente antes de quitar
la cabeza motriz del tanque de
recolección.
Page 28

28
Mantenimiento (continuación)
Instalación y Limpieza del Filtro de Manga de Espuma
Limpieza del ltro de manga de espuma
1. Después de retirar la cabeza
motriz en posición invertida, retire
con cuidado el ltro de manga de
espuma. (Fig. 4)
2. Use una solución de jabón suave y
agua para lavar el ltro de manga de
espuma y enjuague con agua limpia.
(Fig. 5)
3. Deje secar el ltro al aire libre antes
de instalarlo y usarlo de nuevo.
Instalación del ltro de esponja
1. Verique que el cable de
corriente esté desconectado del
tomacorriente. (Fig. 1)
2. Quite la tapa del envase y colóquela
en posición invertida con la jaula
hacia arriba. Siga las instrucciones
para quitar el ltro de polvo.
3. Cuidadosamente resbale el ltro de
esponja hacia abajo, sobre la jaula
del ltro y empuje el ltro hacia
adentro hasta que cubra la jaula
completamente. (Fig. 2 y 3)
4. Ponga la tapa de vuelta a su lugar
en el envase y asegúrela con las
asas.
Para mantener su aspiradora de
material húmedo/seco en las mejores
condiciones, limpie el exterior con un
paño húmedo, luego seque con una
toalla limpia.
Para limpiar la parte interior del tanque
de recolección:
1. Tire los desechos.
2. Lave el tanque de recolección a
fondo con agua tibia y un jabón
suave.
3. Limpie con un paño seco.
El tanque de recolección debe
desinfectarse antes de un
almacenamiento prolongado o según
sea necesario (es decir, después de
levantar agua de desecho).
Limpieza y desinfección de
la aspiradora de material
húmedo/seco
3
1
4
5
2
Para desinfectar el tanque de
recolección:
1. Vierta 1 galón de agua y 1
cucharadita de blanqueador en el
tanque de recolección.
2. Deje remojando en la solución
durante 20 minutos, agitando
suavemente después de unos minutos,
asegurándose de humedecer todas
las supercies interiores del tanque de
recolección.
3. Vacíe el tanque de recolección
después de 20 minutos. Enjuague con
agua hasta que desaparezca el olor
a blanqueador. Deje que el tanque de
recolección se seque por completo
antes de colocar el motor en el tanque
de recolección.
Page 29

29
Mantenimiento (continuación)
Almacenamiento
Antes de almacenar la aspiradora,
debe vaciar y limpiar el tanque de
recolección. El cable y los accesorios
deben almacenarse como se muestra
en la ilustración anterior (Fig. 1-2) a
n de que puedan estar fácilmente
disponibles cuando se necesiten.
Almacene la aspiradora en interiores.
Resolución de Problemas
Problema Causas posibles Acción correctiva
La aspiradora no
funciona.
1) No hay suministro de
energía.
1) Revise el suministro de
energía - cable, disyuntores,
fusibles.
2) Cable de corriente
defectuoso.
2) Desconecte y revise el
cable de corriente. Si está
dañado, envíelo a reparar
con un profesional.
3) El tanque de
recolección está lleno.
3) Vacíe el tanque de
recolección.
4) El interruptor no está en
la posición correcta.
4) Presione el botón ON "|"
(Encendido) en la cabeza
motriz.
Sale polvo de la cubierta
del motor.
1) El ltro del cartucho
falta o está dañado.
1) Instale o reemplace el
ltro de cartucho.
2) La aspiradora se ha
utilizado para recolectar
polvo no, como aquel de
paneles de yeso, hollín de
chimeneas o cenizas, sin
tener equipado un ltro de
polvo no.
2) Saque el ltro de
cartucho o de tela estándar
e instale un ltro de
cartucho para polvo no.
Menor eciencia y
vibración del motor/
velocidad.
1) Hay una obstrucción
en la boquilla, manguera
o la entrada del tanque.
El ltro de polvo está
obstruido con polvo no.
1) Revise las entradas de la
boquilla, manguera y tanque
para buscar obstrucciones.
Quite el ltro y límpielo. O
bien instale un ltro nuevo.
ADVERTENCIA: PARA REDUCIR EL RIESGO DE DESCARGAS ELÉCTRICAS,
DESCONECTE LA ASPIRADORA ANTES DE RESOLVER UN PROBLEMA.
I
I
I
I
I
I
I
I
I
I
I
I
I
I
I
I
I
I
I
I
I
I
I
I
I
I
I
I
I
I
I
I
I
I
I
I
I
I
I
I
I
I
I
I
I
I
I
I
I
I
I
I
I
I
I
I
I
I
I
I
I
I
I
I
I
I
I
I
I
I
I
I
I
I
I
I
I
I
I
I
I
I
I
I
I
1 2
Page 30

30
Partes de Repuesto
125.16821 Aspiradora de Materiales Húmedos/Secos de 5 Galones
Siempre ordene por número de parte y no por número de clave. Siempre mencione el
número del modelo cuando ordene partes. El número de modelo se encuentra en la
placa de serie que se encuentra en la aspiradora. Para ordenar partes, llame al
1-888-331-4569.
Núm. de
clave
Número de parte Descripción Cantidad
1 VOD1PF.10.01.X1 Manija 1
2 VOC2S0.10.00 Ensamblaje de motor 1
3 TVQTZS.06.YZ.W2.00 Flota 1
4 VJ51PF.10.04.W2.00 Jaula 1
5 TVQTXK.06.01.X2.01 Asamblea portal de aspirar 1
6 VJA2S0.20.00.Y1 Envase 1
7 VL01S0.20.02.X1.02 Asas 2
8 VO40S0.20.02 Base 1
9 VO40S0.21.00 Cadena a tierra 1
10 TVQTJL.01.00 Rueda 4
11 17849 Tubos extensores 3
12 FV7701.01.00.01 Boquilla para piso y escurridor 1
13 FV7774.01.00 Boquilla de uso general 1
14 17866 Manguera 1
15 17888 Filtro de manga de espuma 1
16 16949 Filtro de tela 1
17 17816 Filtro de cartucho para polvo en general
Vendido por aparte
18 16938 Tuerca
1
19 Manual del usuario 1
ADVERTENCIA: Cómo dar servicio a una aspiradora de material húmedo/seco de
doble aislamiento.
Con la aspiradora de material húmedo/seco de doble aislamiento, se proporcionan
dos sistemas de aislamiento en vez de una conexión a tierra. En un aparato con
doble aislamiento no se provee un medio de conexión a tierra, ni se debe añadir
un medio de conexión a tierra. El servicio a una aspiradora de material húmedo/
seco con doble aislamiento requiere de mucha atención y conocimiento del
sistema y debe ser realizado únicamente por personal calicado para el servicio.
Las partes de reemplazo para una aspiradora de material húmedo/seco de doble
aislamiento deben ser idénticas a las partes que reemplazan. Su aspiradora de
material húmedo/seco con doble aislamiento está marcada con las palabras
"double insulated" (doble aislamiento" y el símbolo (cuadrado dentro de un
cuadrado) también puede estar marcado en el aparato.
Page 31

31
125.16821 Aspiradora de Materiales Húmedos/Secos de 5 Galones
Partes de Repuesto (continuación)
Page 32

32
® Registered Trademark / TM Trademark of KCD IP, LLC in the United States, or Sears Brands, LLC in other countries
® Marca Registrada /
TM
Marca de Fábrica de KCD IP, LLC en Estados Unidos, o Sears Brands, LLC in otros países
Product questions or problems?
1-888-331-4569
Customer Care Hot Line
Get answers to questions, troubleshoot problems,
order parts, or schedule repair service.
Para respuestas a preguntas o problemas, y ordenar
piezas o pedir servicio para la reparación de su equipo.
To help us help you, register your product at www.craftsman.com/registration
Para poderte ayudar mejor, registra tu producto en www.craftsman.com/registration
Join the Craftsman Club today!
Receive exclusive member benefits including special pricing and offers,
project sharing, expert advice, and SHOP YOUR WAY REWARDS!
Como miembro exclusivo, recibe diversos beneficios como ofertas, precios especiales, proyectos
nuevos, consejos de expertos y nuestro programa de puntos SHOP YOUR WAY REWARDS!
 Loading...