

Craftsman 12512005, VJF910PF Owner’s Manual
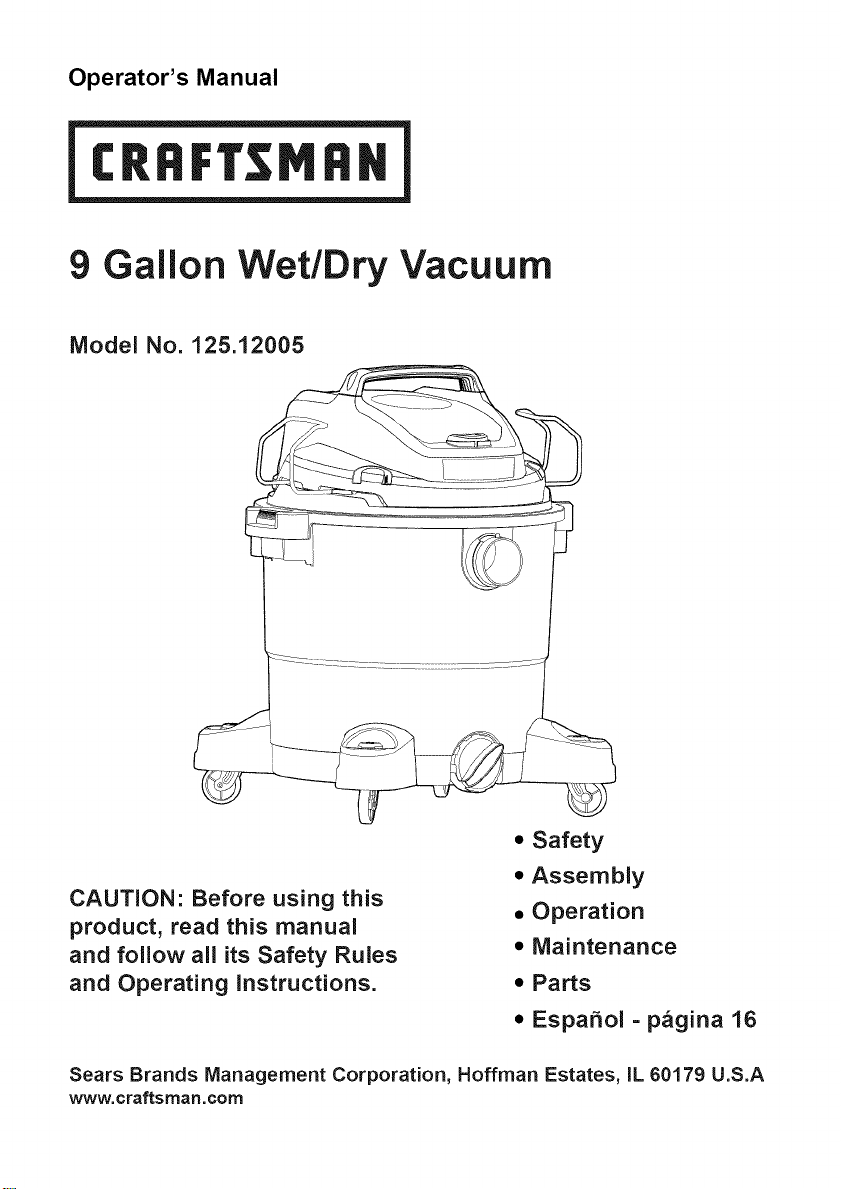
Operator's Manual
9 Gallon Wet/Dry Vacuum
Model No. 125.12005
• Safety
• Assembly
CAUTION: Before using this
product, read this manual
and follow all its Safety Rules
and Operating instructions.
Sears Brands Management Corporation, Hoffman Estates, IL 60179 U.S.A
WWW. crafts man. COrn
• Operation
• Maintenance
• Parts
• Espa_ol =p_gina 16
Warranty
CRAFTSMAN ONE YEAR FULL WARRANTY
FOR ONE YEAR from the date of purchase, this product is warranted against
defects in material or workmanship. A defective product will be replaced free of
charge.
For warranty coverage details to obtain free replacement, visitthe web page:
www. craftsman.com/warranty
This warranty does not cover bags, filters, hose or attachments, which are
expendable partsthat can wear out from normal use within the warranty period.
This ONE YEAR warranty is void if this product is ever used while providing
commercial servicesor if rented to another person. For 90 DAY commercial and
rental use terms, see the Craftsman warranty web page.
Thiswarranty gives you specific legal rights, and you may also have other rights
which vary from state to state.
Sears Brands Management Corporation, Hoffman Estates, JL60179
iMPORTANTSAFETY
READ AND UNDERSTANDALL
iNSTRUCTiONS BEFORE USING THiS
VACUUM
Read and understand this operator's
manual and all labels on the Wet/Dry
Vacuum cleaner before operating. Safety is
a combination of common sense, staying
alert and knowing how your vacuum works.
Use this Wet/Dry Vac only as described in
this manual. To reduce the risk of personal
injury or damage to your Wet/Dry Vac, use
only Craftsman recommended accessories.
Household Type
SAVETHiSMANUAL
FOR FUTURE REFERENCE.
When using an electrical appliance,
basic precautions should always be
followed including the following:
WARNING: o
THE RISK OF FIRE, ELECTRIC
SHOCK OR iNJURY:
, Do not run vac unattended.
•Do not vacuum, or use this Wet/Dry Vac
near flammable liquids, gases, or explosive
vapors like gasoline or other fuels,
lighter fluids, cleaners, oil-based paints,
natural gas, hydrogen, or explosive dusts
like coal dust, magnesium dust, grain
dust, or gun power. Sparks inside the
iNSTRUCTiONS
motor can ignite flammable vapors or
dust.
* Do not vacuum anything that is burning
or smoking, such as cigarettes, matches,
or hot ashes.
* Keep cord away from heated surfaces.
* Do not expose to rain. Store indoors.
, Do not unplug by pulling on cord. To
unplug, grasp the plug, not the cord.
* Do not use with damaged cord, plug or
other parts.
* If vac is not working as it should, has
been dropped, damaged, left outdoors,
or dropped into water, take it to a service
dealer for inspection and repair before
using it again.
, Do not pull or carry by cord, use cord as
handle, close a door on cord, or pull
cord around sharp edges or corners.
, Do not run Wet/Dry Vac over cord.
* Do not handle plug or the Wet/Dry Vac
with wet hands.
* To reduce the risk of health hazards
from vapors or dusts, do not vacuum
toxic materials.
* Do not store near hazardous materials.
* Do not use this Wet/Dry Vac with a torn
filter or without the filter installed except
when vacuuming liquids as described in
the operation section of this manual.
* Do not allow to be used as a toy. Close
attention is necessary when used by or
near children.
*To reduce the risk of injury from accidental
starting,unplugpowercordbefore
changingorcleaningfilter.
•DonotleaveWet/DryVacunattended
whenpluggedin.Unplugfromoutlet
whennotinuseandbeforeservicing.
•TurnoffWet/DryVacbeforeunplugging.
•Donotputanyobjectintoventilation
openings.Donotvacuumwithany
ventilationopeningsblocked;keepfree
ofdust,lint,hairoranythingthatmay
reduceairflow.
•Keephair,looseclothing,fingers,and
allpartsofbodyawayfromopenings
andmovingparts.
•Toreducetheriskoffalls,useextra
carewhencleaningonstairs.
When using as blower:
• Direct air discharge only at work area.
• Do not use Wet/Dry Vac as a sprayer.
• Do not direct air at bystanders.
• Keep children away when blowing.
• Wear safety goggles.
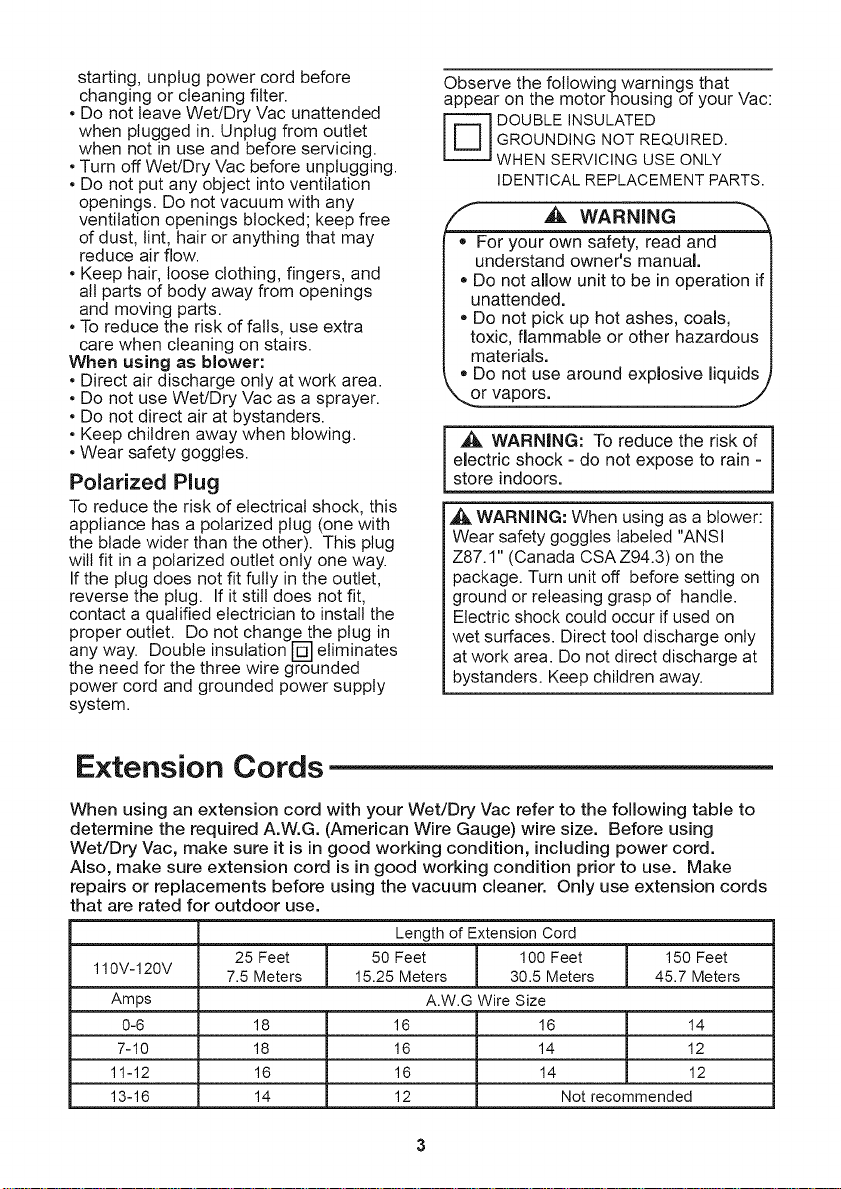
Polarized Plug
To reduce the risk of electrical shock, this
appliance has a polarized plug (one with
the blade wider than the other). This plug
will fit in a polarized outlet only one way.
If the plug does not fit fully in the outlet,
reverse the plug. If it still does not fit,
contact a qualified electrician to install the
proper outlet. Do not change the plug in
any way. Double insulation [] eliminates
the need for the three wire gro_unded
power cord and grounded power supply
system.
Observe the followingwarnings that
appear on the motorhousing of your Vac:
GROUNDING NOT REQUIRED.
'_ OUBLE INSULATED
WHEN SERVICING USE ONLY
IDENTICAL REPLACEMENT PARTS.
A WARNING
= For your own safety, read and
understand owner's manual.
oDo not allow unit to be in operation if
unattended.
Do not pick up hot ashes, coals,
toxic, flammable or other hazardous
materials.
, Do not use around explosive liquids
_or vapors, j
WARNING: To reduce the risk of
electric shock =do not expose to rain =
store indoors.
,_, WARNING: When using as a blower:
Wear safety goggles labeled "ANSI
Z87.1" (Canada CSA Z94.3) on the
package. Turn unit off before setting on
ground or releasing grasp of handle.
Electric shock could occur if used on
wet surfaces. Direct tool discharge only
at work area. Do not direct discharge at
bystanders. Keep children away.
Extension Cords
When using an extension cord with your VVet/Dry Vac refer to the following table to
determine the required A.W.G. (American Wire Gauge) wire size. Before using
Wet/Dry Vac, make sure it is in good working condition, including power cord.
Also, make sure extension cord is in good working condition prior to use. Make
repairs or replacements before using the vacuum cleaner. Only use extension cords
that are rated for outdoor use.
Length of Extension Cord
110V-120V
Amps A.W.G Wire Size
0-6 18 16 16 14
7-10 18 16 14 12
11-12 16 16 14 12
13-16 14 12 Not recommended
25 Feet 50 Feet 100 Feet 150 Feet
7.5 Meters 15.25 Meters 30.5 Meters 45.7 Meters

Introduction
This Wet/Dry Vac is intended for
vacuuming wet and dry materials and
may be used as a blower.
Read this operator's manual to
familiarize yourself with the product
features and to understand the specific
usage of your new Wet/Dry Vac.
Table of Contents
Section Page Section Page
Warranty ................................................. 2 Maintenance ......................................... 10
important Safety instructions ........... 2 Emptying the Collection Tank ........ 10
Polarized Plug .................................... 3
Extension Cords ..................................... 3
introduction ............................................ 4
Table of Contents ................................... 4
Assembly ................................................ 5
Carton Contents List ......................... 5
Unpacking Your Wet/Dry Vacuum
& General Assembly .......................... 6
Operation ................................................ 7
Vacuuming Dry Materials .................. 7
installing & Cleaning
the Supplied Cartridge Filter .......... 10
Installing A Replacement
Cartridge Filter ................................ 11
Installing & Cleaning
Foam Sleeve Filter .......................... 12
Cleaning & Disinfecting
the Wet/Dry Vac .............................. 12
Storage ............................................. 12
Troubleshooting .................................... 13
Repair Parts ........................................... 14
Vacuuming Liquids ............................ 8
Blowing Feature ................................. 9
Assembly
Remove entire contents of carton and
check for parts inside the collection
tank. Check each item against the
Carton Contents List. If any parts are
missing or damaged please call
1-800-469-4663 for replacement.
Carton Content List
Key
A
B
C
D
E
F
G
H
I
J
K
Description ........................ Qty.
Vac Assembly. ........................ 1
Hose ....................................... 1
Extension Wands .................. 2
Utility Nozzle ......................... 1
Hose Storage Rack ............... 2
Floor Squeegee Nozzle ......... 1
Foam Sleeve Filter ............... 1
Cartridge Filter. ...................... 1
Caster Assembly Screws...4
Caster Feet Assemblies ........4
Operator's Manual ................ 1
Handle
)
On/Off Switch --
Power Head
Vacuum Port --
Collection Tank
Caster
Drain
-- Hose Storage Rack
-- Blower Port
-- Latch
Caster Assemblies
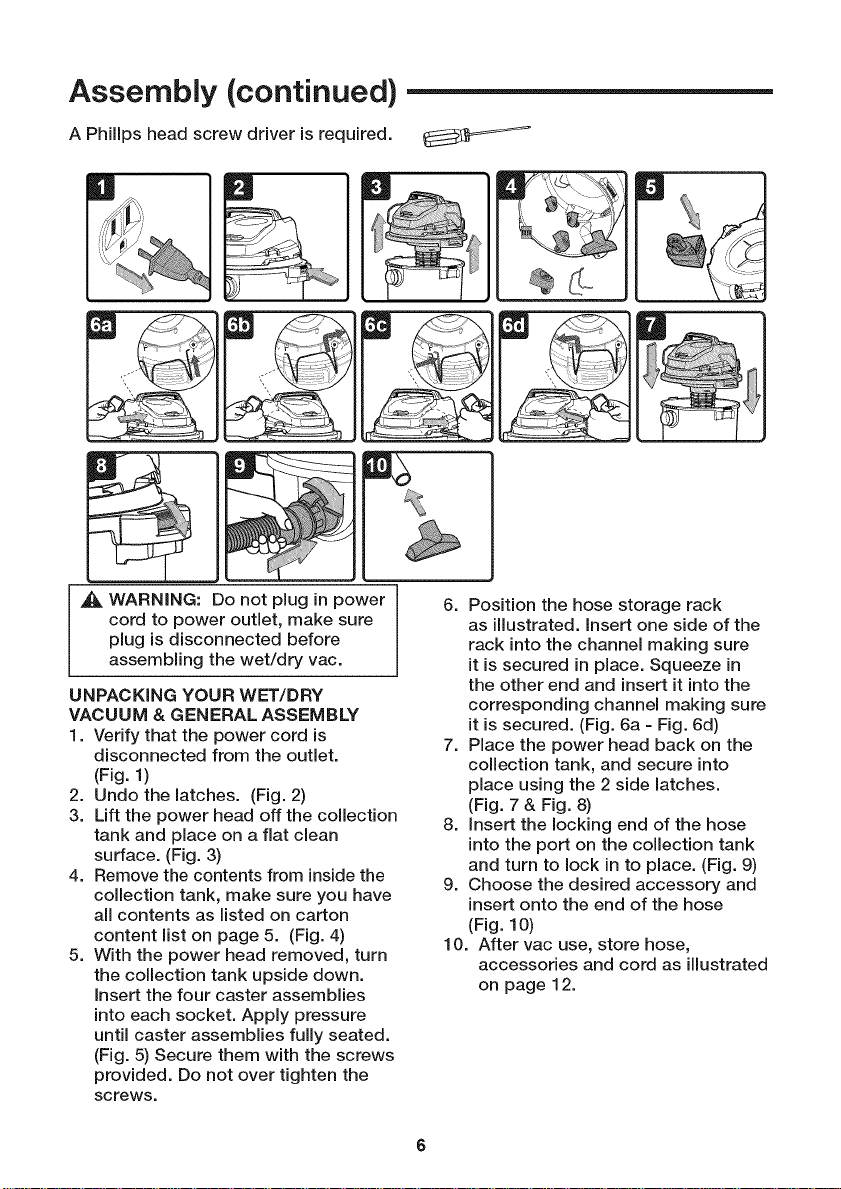
Assembly (continued)
A Phillps head screw driver is required.
,_, WARNING: Do not plug in power
cord to power outlet, make sure
plug is disconnected before
assembling the wet/dry vac.
UNPACKING YOUR WET/DRY
VACUUM & GENERAL ASSEMBLY
1. Verify that the power cord is
disconnected from the outlet.
(Fig. 1)
2. Undo the latches. (Fig. 2)
3. Lift the power head off the collection
tank and place on a flat clean
surface. (Fig. 3)
4. Remove the contents from inside the
collection tank, make sure you have
all contents as listed on carton
content list on page 5. (Fig. 4)
5. With the power head removed, turn
the collection tank upside down.
insert the four caster assemblies
into each socket. Apply pressure
until caster assemblies fully seated.
(Fig. 5) Secure them with the screws
provided. Do not over tighten the
screws.
6. Position the hose storage rack
as illustrated, insert one side of the
rack into the channel making sure
it is secured in place. Squeeze in
the other end and insert it into the
corresponding channel making sure
it is secured. (Fig. 6a =Fig. 6d)
7. Place the power head back on the
collection tank, and secure into
place using the 2 side latches.
(Fig. 7 & Fig. 8)
8. insert the locking end of the hose
into the port on the collection tank
and turn to lock in to place. (Fig. 9)
9. Choose the desired accessory and
insert onto the end of the hose
(Fig. 10)
10. After vac use, store hose,
accessories and cord as illustrated
on page 12.
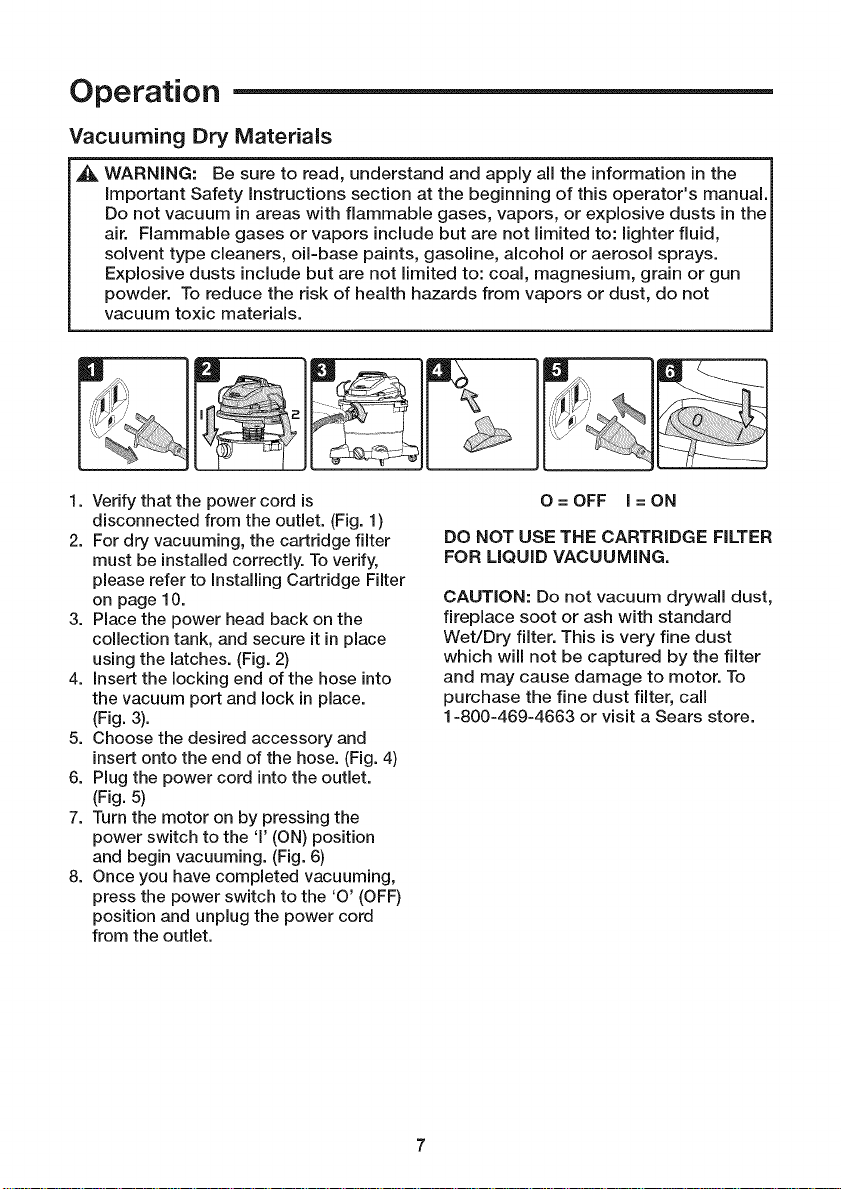
Operation
Vacuuming Dry Materials
,_ WARNING: Be sure to read, understand and apply all the information in the
important Safety instructions section at the beginning of this operator's manual.
Do not vacuum in areas with flammable gases, vapors, or explosive dusts in the
air. Flammable gases or vapors include but are not limited to: lighter fluid,
solvent type cleaners, oil-base paints, gasoline, alcohol or aerosol sprays.
Explosive dusts include but are not limited to: coal, magnesium, grain or gun
powder. To reduce the risk of health hazards from vapors or dust, do not
vacuum toxic materials.
1. Verify that the power cord is
disconnected from the outlet. (Fig. 1)
2. For dry vacuuming, the cartridge filter
must be installed correctly. To verify,
please refer to installing Cartridge Filter
on page 10.
3. Place the power head back on the
collection tank, and secure it in place
using the latches. (Fig. 2)
4. insert the locking end of the hose into
the vacuum port and lock in place.
(Fig. 3).
5. Choose the desired accessory and
insert onto the end of the hose. (Fig. 4)
6. Plug the power cord into the outlet.
(Fig. 5)
7. Turn the motor on by pressing the
power switch to the '1'(ON) position
and begin vacuuming. (Fig. 6)
8. Once you have completed vacuuming,
press the power switch to the '0' (OFF)
position and unplug the power cord
from the outlet.
O = OFF I = ON
DO NOT USE THE CARTRIDGE FILTER
FOR LiQUiD VACUUMING.
CAUTION: Do not vacuum drywall dust,
fireplace soot or ash with standard
Wet/Dry filter. This is very fine dust
which will not be captured by the filter
and may cause damage to motor. To
purchase the fine dust filter, call
1-800-469-4663 or visit a Sears store.

Operation (continued)
Vacuuming Liquids
,_ WARNING: Be sure to read, understand and apply all the information in the
important Safety instructions section at the beginning of this operator's manual.
Do not vacuum in areas with flammable gases, vapors, or explosive dusts in the
air. Flammable gases or vapors include but are not limited to: lighter fluid,
solvent type cleaners, oil=base paints, gasoline, alcohol or aerosol sprays.
Explosive dusts include but are not limited to: coal, magnesium, grain or gun
powder. To reduce the risk of health hazards from vapors or dust, do not
vacuum toxic materials.
WARNING: Do not plug in power cord to power outlet, make sure plug is
disconnected before assembling the Wet/Dry Vac.
@
1. Verify that the power cord is
disconnected from the outlet. (Fig. 1)
2. Remove cartridge filter as shown in
Removing and Cleaning Cartridge
Filter on page 10. Then install the
foam sleeve filter as shown in
Installing Foam Sleeve Filter on page
12 and secure power head back on
the collection tank.
DO NOT USE THE CARTRIDGE FILTER
FOR LIQUID VACUUMING.
3. Fit the desired nozzle to the vacuum
hose. (Fig. 2)
4. Verify that the power switch is in the 'O'
OFF position before plugging the
power cord into the outlet. (Fig. 3)
5. Turn the motor on by pressing the
switch to the '1'ON position. (Fig. 4)
6. Once you have completed vacuuming,
press the power switch to the 'O' (OFF)
position and unplug the power cord
from the outlet.
7. After use, empty the collection tank by
unscrewing the drain cap and drain
liquids into suitable receptacle or
drain. (Fig. 5) Remember to refit the
drain cap to the tank after draining.
iMPORTANT! When vacuuming large
quantities of liquids, do not immerse the
nozzle completely in the liquid; leave a
gap at the tip of the nozzle opening to
allow air inflow. The machine is fitted with
afloat valve that stops the suction action
when the collection tank reaches its
maximum capacity. You will notice an
increase in motor speed. When this
happens, turn off the machine,
disconnect from power supply, and drain
the liquid into a suitable receptacle or
drain. To continue vacuuming, refit the
collection tank with the drain cap. After
wet vacuuming, turn the machine off and
remove plug from power supply. Empty
the collection tank, clean and dry the
inside and outside before storage.
REMEMBER! The foam filter must be
removed after wet vacuuming and a
cartridge filter must be installed before
dry vacuuming again.
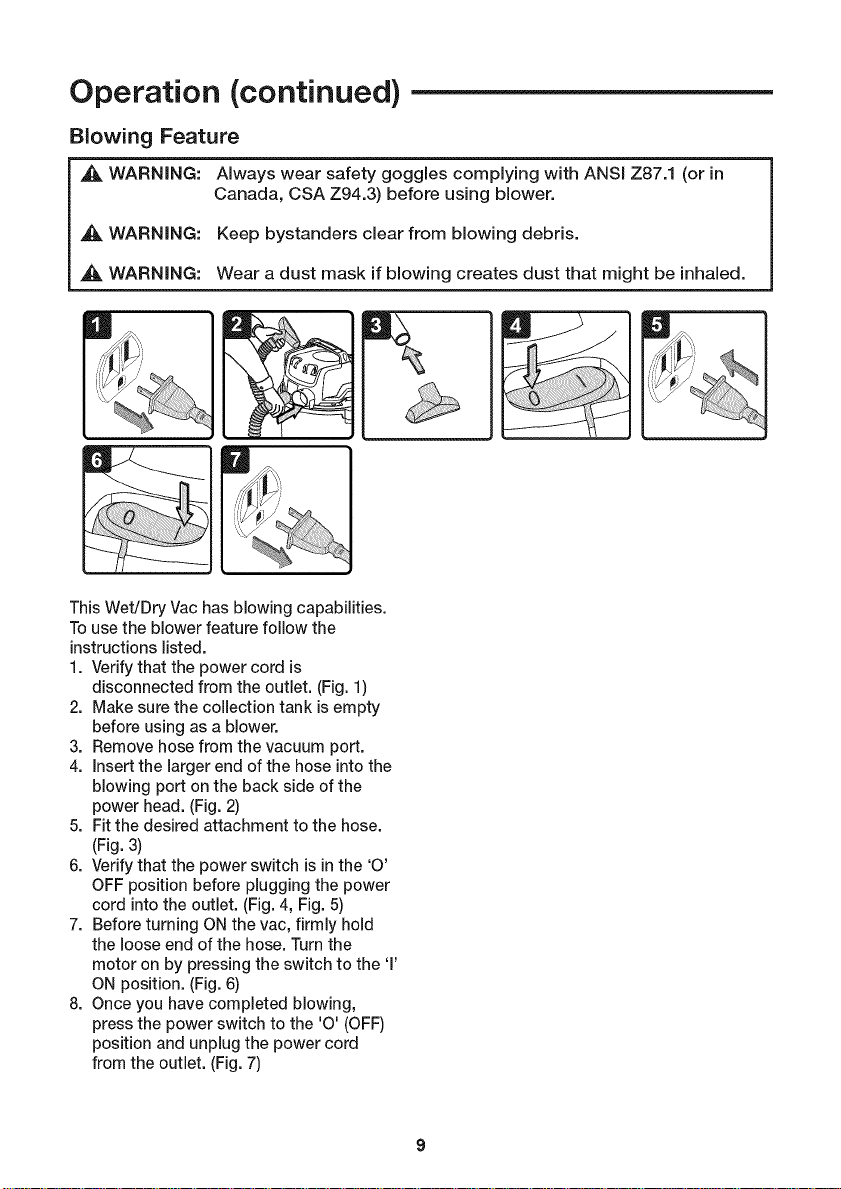
Operation (continued)
Blowing Feature
WARNING:
Always wear safety goggles complying with ANSi Z87.1 (or in
Canada, CSA Z94.3) before using blower.
WARNING:
WARNING:
This Wet/Dry Vac has blowing capabilities.
Touse the blower feature follow the
instructionslisted.
1. Verify that the power cord is
disconnected from the outlet. (Fig. 1)
2. Make sure the collection tank isempty
before using as a blower.
3. Remove hose from the vacuum port.
4. Insertthe larger end of the hose intothe
blowing port on the back side of the
power head. (Fig. 2)
5. Fit the desired attachment to the hose.
(Fig. 3)
6. Verify that the power switch isinthe 'O'
OFF position before plugging the power
cord into the outlet. (Fig. 4, Fig. 5)
7. Before turning ON the vac, firmly hold
the loose end of the hose. Turn the
motor on by pressing the switch to the 1'
ON position. (Fig. 6)
8. Once you have completed blowing,
press the power switch to the 'O' (OFF)
position and unplug the power cord
from the outlet. (Fig. 7)
Keep bystanders clear from blowing debris.
Wear a dust mask if blowing creates dust that might be inhaled.
 Loading...