

Craftsman 113.177745 Owner's Manual
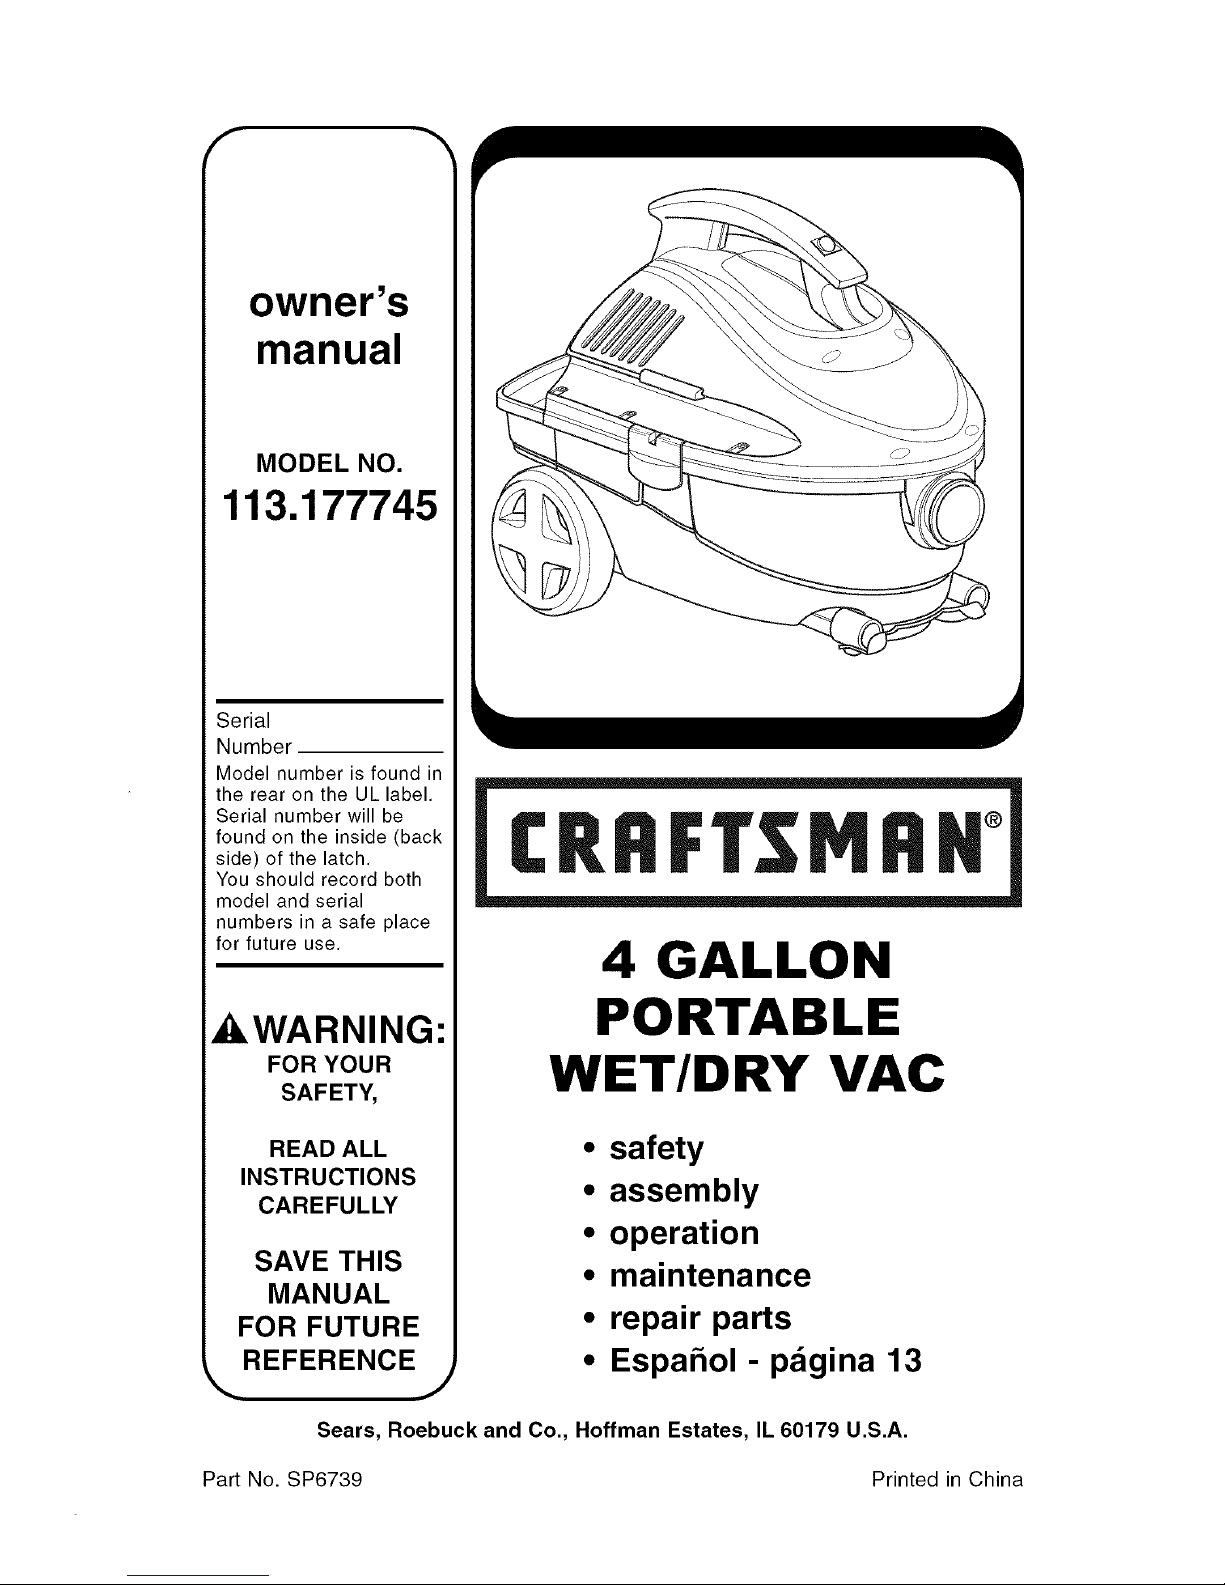
owner's
manual
MODEL NO.
113.177745
Serial
Number
Model number is found in
the rear on the UL label,
Serial number will be
found on the inside (back
side) of the latch,
You should record both
model and serial
numbers in a safe place
for future use,
AWARNING:
FOR YOUR
SAFETY,
READ ALL
INSTRUCTIONS
CAREFULLY
SAVE THIS
MANUAL
FOR FUTURE
REFERENCE
J
CRRFT MRII °
4 GALLON
PORTABLE
WET/DRY VAC
• safety
• assembly
• operation
• maintenance
• repair parts
• Espahol- pagina 13
Sears, Roebuck and Co., Hoffman Estates, IL 60179 U.S.A.
Part No. SP6739 Printed in China
Warranty
r
Craftsman One Year Full Warranty
If this Craftsman product fails due to a defect in material or workmanship
within one year from the date of purchase, return it to any Sears store,
Sears Service Center, or other Craftsman outlet in the United States for
free repair (or replacement if repair proves impossible).
This warranty applies for only 90 days from the date of purchase if this
product is ever used for commercial or rental purposes.
This warranty does not include bags or filters, which are expendable
parts that can wear out from normal use within the warranty period.
This warranty gives you specific legal rights, and you may also have
other rights, which vary, from state to state.
Sears, Roebuck and Co., Hoffman Estates, IL 60179
IMPORTANT SAFETY INSTRUCTIONS
Safety is a combination of using common
sense, staying alert, and knowing how your
Wet/Dry Vacuum cleaner ('_/ac") works.
Safety Signal Words
,_ DANGER: Indicates a hazardous
situation which, if not avoided, will result
in death or serious injury.
,_. WARNING: Indicates a hazardous
situation which, if not avoided, could
result in death or serious injury.
CAUTION: Indicates a hazardous
situation which, if not avoided, could
result in minor or moderate injury.
When using your Vac, always follow basic
safety precautions including the following:
WARNING-To reduce
the risk of fire, electric shock, or
injury:
• Read and understand this manual and
all labels on the Vac before operating. •
• Use only as described in this manual.
• Do not leave Vac running while
unattended - you may fail to notice •
important signs indicating abnormal
operation such as loss of suction,
debris/liquid exiting exhaust, or
abnormal motor noises. Immediately •
stop using Vac if you notice these
signs.
• Do not leave Vac when plugged in.
Unplug from outlet when not in use and
before servicing.
• Sparks inside the motor can ignite
flammable vapors or dust. To reduce
the risk of fire or explosion, do not use
near combustible liquids, gases, or
dusts, such as gasoline or other fuels,
lighter fluid, cleaners, oil-based paints,
natural gas, coal dust, magnesium
dust, grain dust, aluminum dust, or gun
powder.
• Do not vacuum anything that is burning
or smoking, such as cigarettes,
matches, or hot ashes.
• Do not vacuum drywall dust, cold
fireplace ash, or other fine dusts with
standard filter. These may pass
through the filter and be exhausted
back into the air. Use a fine dust filter
instead.
To reduce the risk of inhaling toxic
vapors, do not vacuum or use near
toxic or hazardous materials.
To reduce the risk of electric shock,
do not expose to rain or allow liquid to
enter motor compartment. Store
indoors.
Do not allow to be used as a toy. Close
attention is necessary when used by or
near children.
Donotusewithatornfilterorwithout
thefilterinstalledexceptwhen
vacuumingliquidsasdescribedinthis
manual.Drydebrisingestedbythe
impellermaydamagethemotororbe
exhaustedintotheair.
• TurnoffVacbeforeunplugging.
• Toreducetheriskofinjuryfrom
accidentalstarting,unplugpowercord
beforechangingorcleaningfilter.
• Donotunplugbypullingoncord.To
unplug,grasptheplug,notthecord.
• Donotusewithdamagedcord,plugor
otherparts.IfyourVacisnotworking
asitshould,hasmissingparts,has
beendropped,damaged,leftoutdoors,
ordroppedintowater,callcustomer
service.
Donotpullorcarrybycord,usecord
ashandle,closeadooroncord,orpull
cordaroundsharpedgesorcorners.
DonotrunVacovercord.Keepcord
awayfromheatedsurfaces.
Donothandleplug,switch,ortheVac
withwethands.
Useonlyextensioncordsthatarerated
foroutdooruse.Extensioncordsin
poorconditionortoosmallinwiresize
canposefireandshockhazards.
Toreducetheriskofthesehazards,
besurethecordisingoodcondition
andthatliquiddoesnotcontactthe
connection.Donotuseanextension
cordwithconductorssmallerthan
16gauge(AWG)insize.Toreduce
powerloss,usea14gaugeextension
cordif25to50ftlongand12gauge
for50ftorlonger.
ThisVacisdouble-insulated,
eliminatingtheneedforaseparate
groundingsystem.Useonlyidentical
replacementparts.Readthe
instructionsforServicingDouble-
InsulatedWet/DryVacs
Donotputanyobjectintoventilation
openings.Donotvacuumwithany
ventilationopeningsblocked;keepfree
ofdust,lint,hairoranythingthatmay
reduceairflow.
• Keephair,looseclothing,fingers,and
allpartsofbodyawayfromopenings
andmovingparts.
• Toreducetheriskoffalls,useextra
carewhencleaningonstairs.
• Toreducetheriskofpersonalinjuryor
damagetoVac,useonlyCraftsman
recommendedaccessories.
Toreducetheriskofeyeinjury,wear
safetyeyewear.Theoperationofany
utilityVacorblowercanresultin
foreignobjectsbeingblownintothe
eyes,whichcanresultinsevereeye
damage.
_, CAUTION:
• Toreducetheriskofhearingdamage,
wearearprotectorswhenusingfor
extendedtimeorinanoisyarea.
• Fordustyoperations,weardustmask.
• Staticshocksarecommonwhenthe
relativehumidityoftheairislow.
VacuumingfinedebriswithyourVac
candepositstaticchargeonthehose
orVac.Toreducethefrequencyof
staticshocksinyourhomeorwhen
usingthisVac,addmoisturetotheair
withahumidifier.
Observethefollowingwarningsthat
appearonthemotorhousingofyourVac:
._ DOUBLE INSULATED
GROUNDING NOT REQUIRED.
WHEN SERVICING USE ONLY
IDENTICAL REPLACEMENT PARTS.
,_, WARNING: For your own safety,
read and understand owner's
manual. Do not run unattended.
Do not pick up hot ashes, coals,
toxic, flammable or other hazardous
materials. Do not use around explosive
liquids or vapors.
_, WARNING: To reduce the risk of
electric shock - do not expose to rain -
store indoors.
SAVE THIS MANUAL
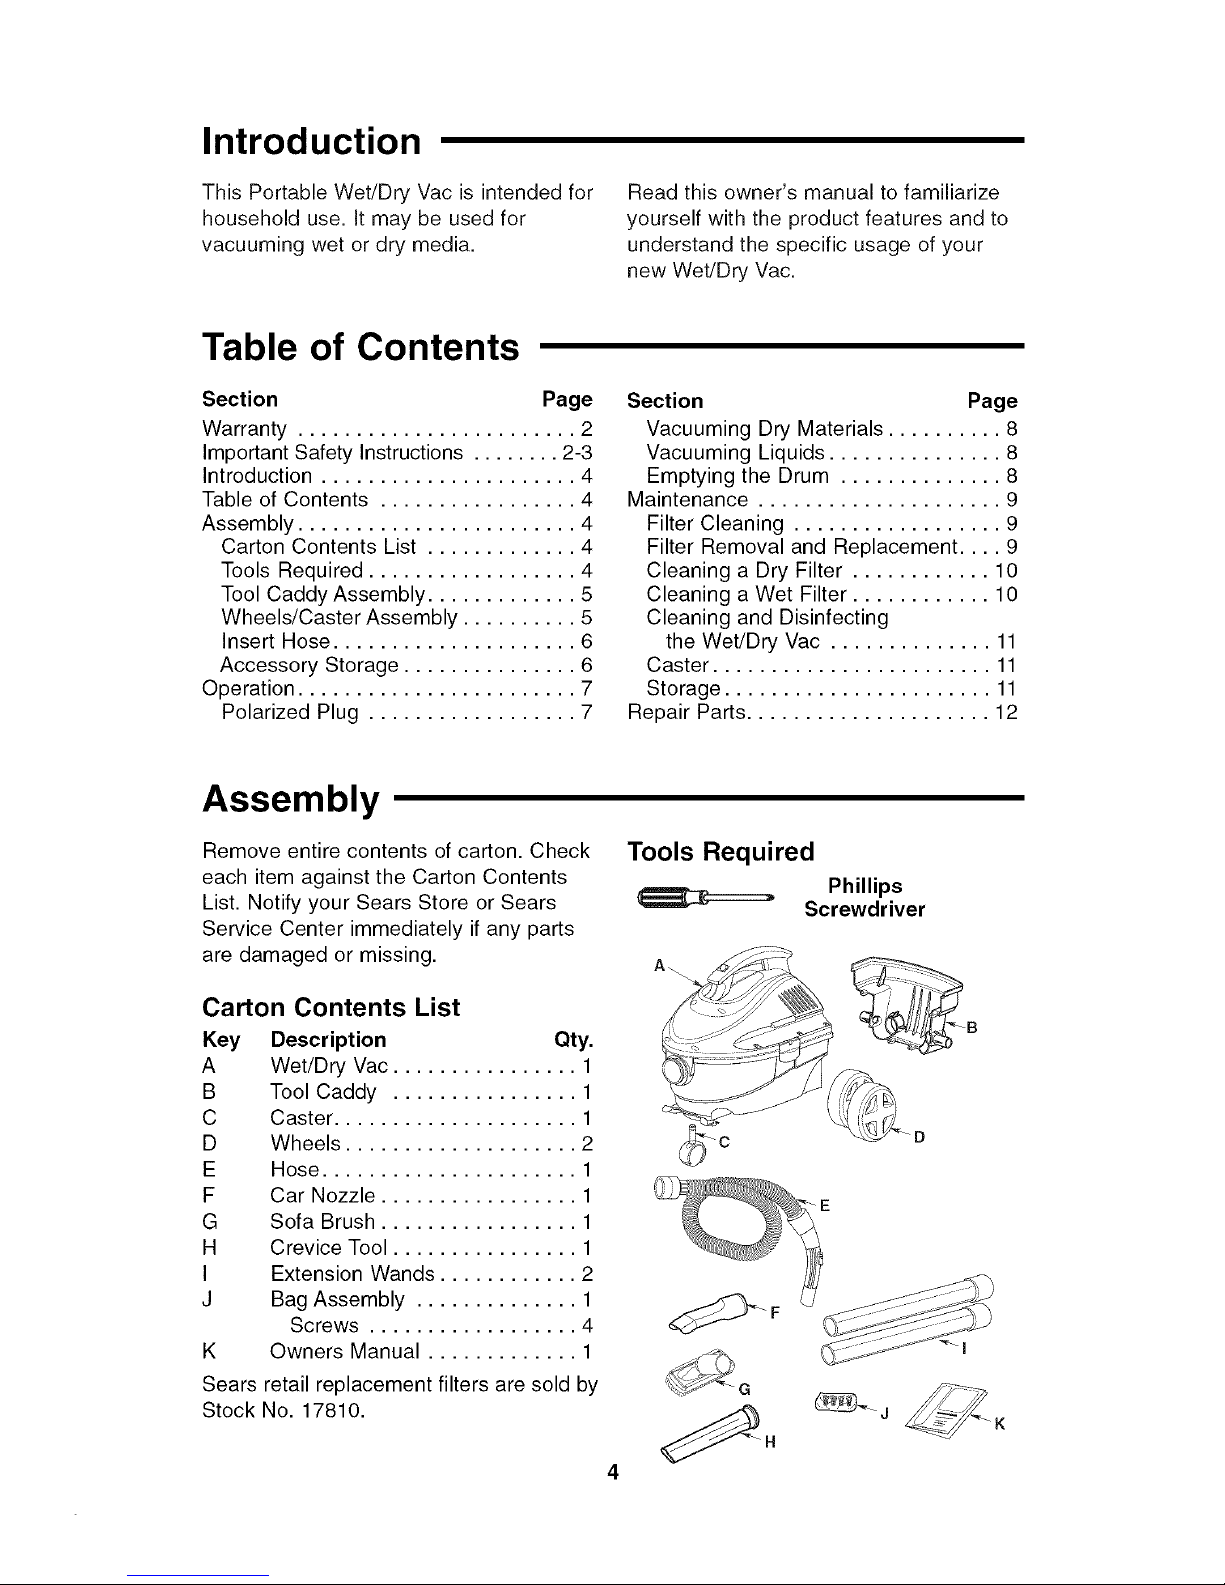
Introduction
This Portable Wet/Dry Vac is intended for
household use. It may be used for
vacuuming wet or dry media.
Read this owner's manual to familiarize
yourself with the product features and to
understand the specific usage of your
new Wet/Dry Vac.
Table of Contents
Section Page
Warranty ........................ 2
Important Safety Instructions ........ 2-3
Introduction ...................... 4
Table of Contents ................. 4
Assembly ........................ 4
Carton Contents List ............. 4
Tools Required .................. 4
Tool Caddy Assembly ............. 5
Wheels/Caster Assembly .......... 5
Insert Hose ..................... 6
Accessory Storage ............... 6
Operation ........................ 7
Polarized Plug .................. 7
Section Page
Vacuuming Dry Materials .......... 8
Vacuuming Liquids ............... 8
Emptying the Drum .............. 8
Maintenance ..................... 9
Filter Cleaning .................. 9
Filter Removal and Replacement .... 9
Cleaning a Dry Filter ............ 10
Cleaning a Wet Filter ............ 10
Cleaning and Disinfecting
the Wet/Dry Vac .............. 11
Caster ........................ 11
Storage ....................... 11
Repair Parts ..................... 12
Assembly
Remove entire contents of carton. Check
each item against the Carton Contents
List. Notify your Sears Store or Sears
Service Center immediately if any parts
are damaged or missing.
Carton Contents List
K
Sears retail replacement filters are sold
Stock No. 17810.
Key Description Qty.
A Wet/Dry Vac ................ 1
B Tool Caddy ................ 1
C Caster ..................... 1
D Wheels .................... 2
E Hose ...................... 1
F Car Nozzle ................. 1
G Sofa Brush ................. 1
H Crevice Tool ................ 1
I Extension Wands ............ 2
J Bag Assembly .............. 1
Screws .................. 4
Owners Manual ............. 1
by
Tools Required
Phillips
Screwdriver
_'_- j
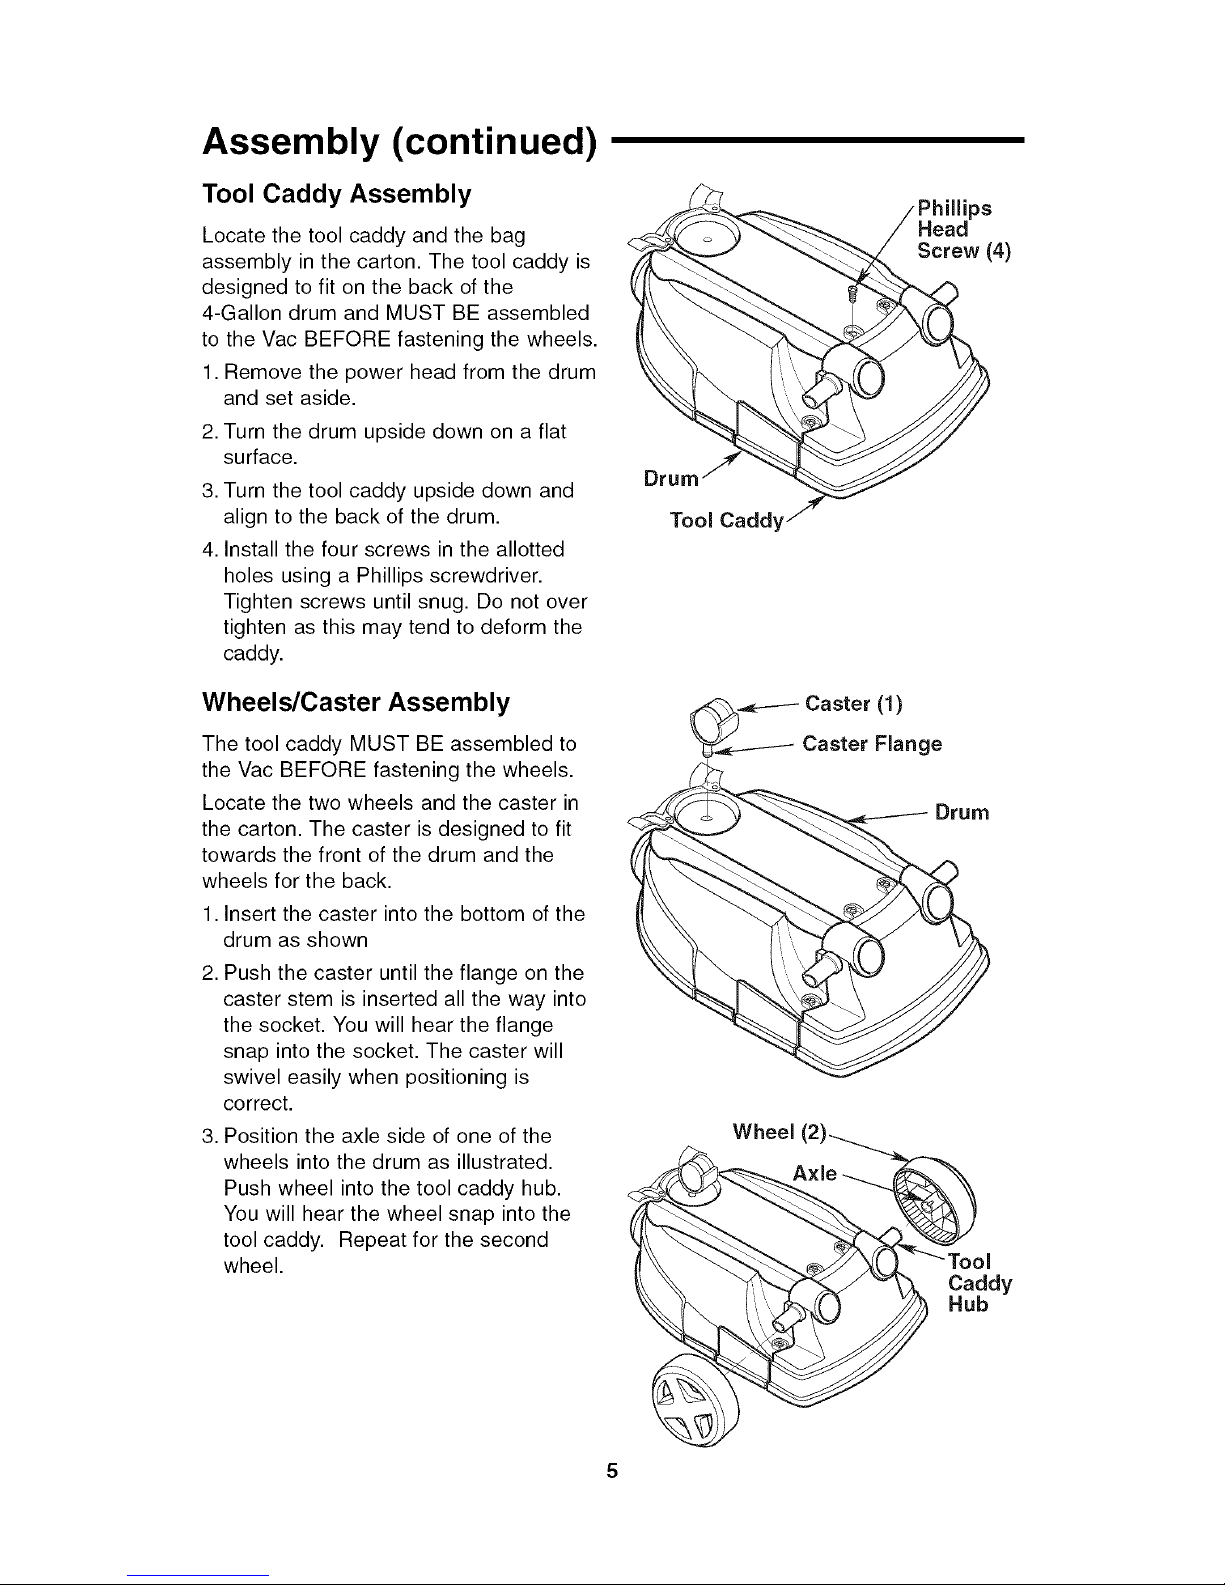
Assembly (continued)
Tool Caddy Assembly
Locate the tool caddy and the bag
assembly in the carton. The tool caddy is
designed to fit on the back of the
4-Gallon drum and MUST BE assembled
to the Vac BEFORE fastening the wheels.
1. Remove the power head from the drum
and set aside.
2. Turn the drum upside down on a flat
surface.
3. Turn the tool caddy upside down and
align to the back of the drum.
4. Install the four screws in the allotted
holes using a Phillips screwdriver.
Tighten screws until snug. Do not over
tighten as this may tend to deform the
caddy.
Wheels/Caster Assembly
The tool caddy MUST BE assembled to
the Vac BEFORE fastening the wheels.
Locate the two wheels and the caster in
the carton. The caster is designed to fit
towards the front of the drum and the
wheels for the back.
1. Insert the caster into the bottom of the
drum as shown
2. Push the caster until the flange on the
caster stem is inserted all the way into
the socket. You will hear the flange
snap into the socket. The caster will
swivel easily when positioning is
correct.
3. Position the axle side of one of the
wheels into the drum as illustrated.
Push wheel into the tool caddy hub.
You will hear the wheel snap into the
tool caddy. Repeat for the second
wheel.
_s
Head
Screw (4)
Drum J
Tool Caddy
_ Caster (1)
Caster Flange
Drum
Wheel
Caddy
Hub
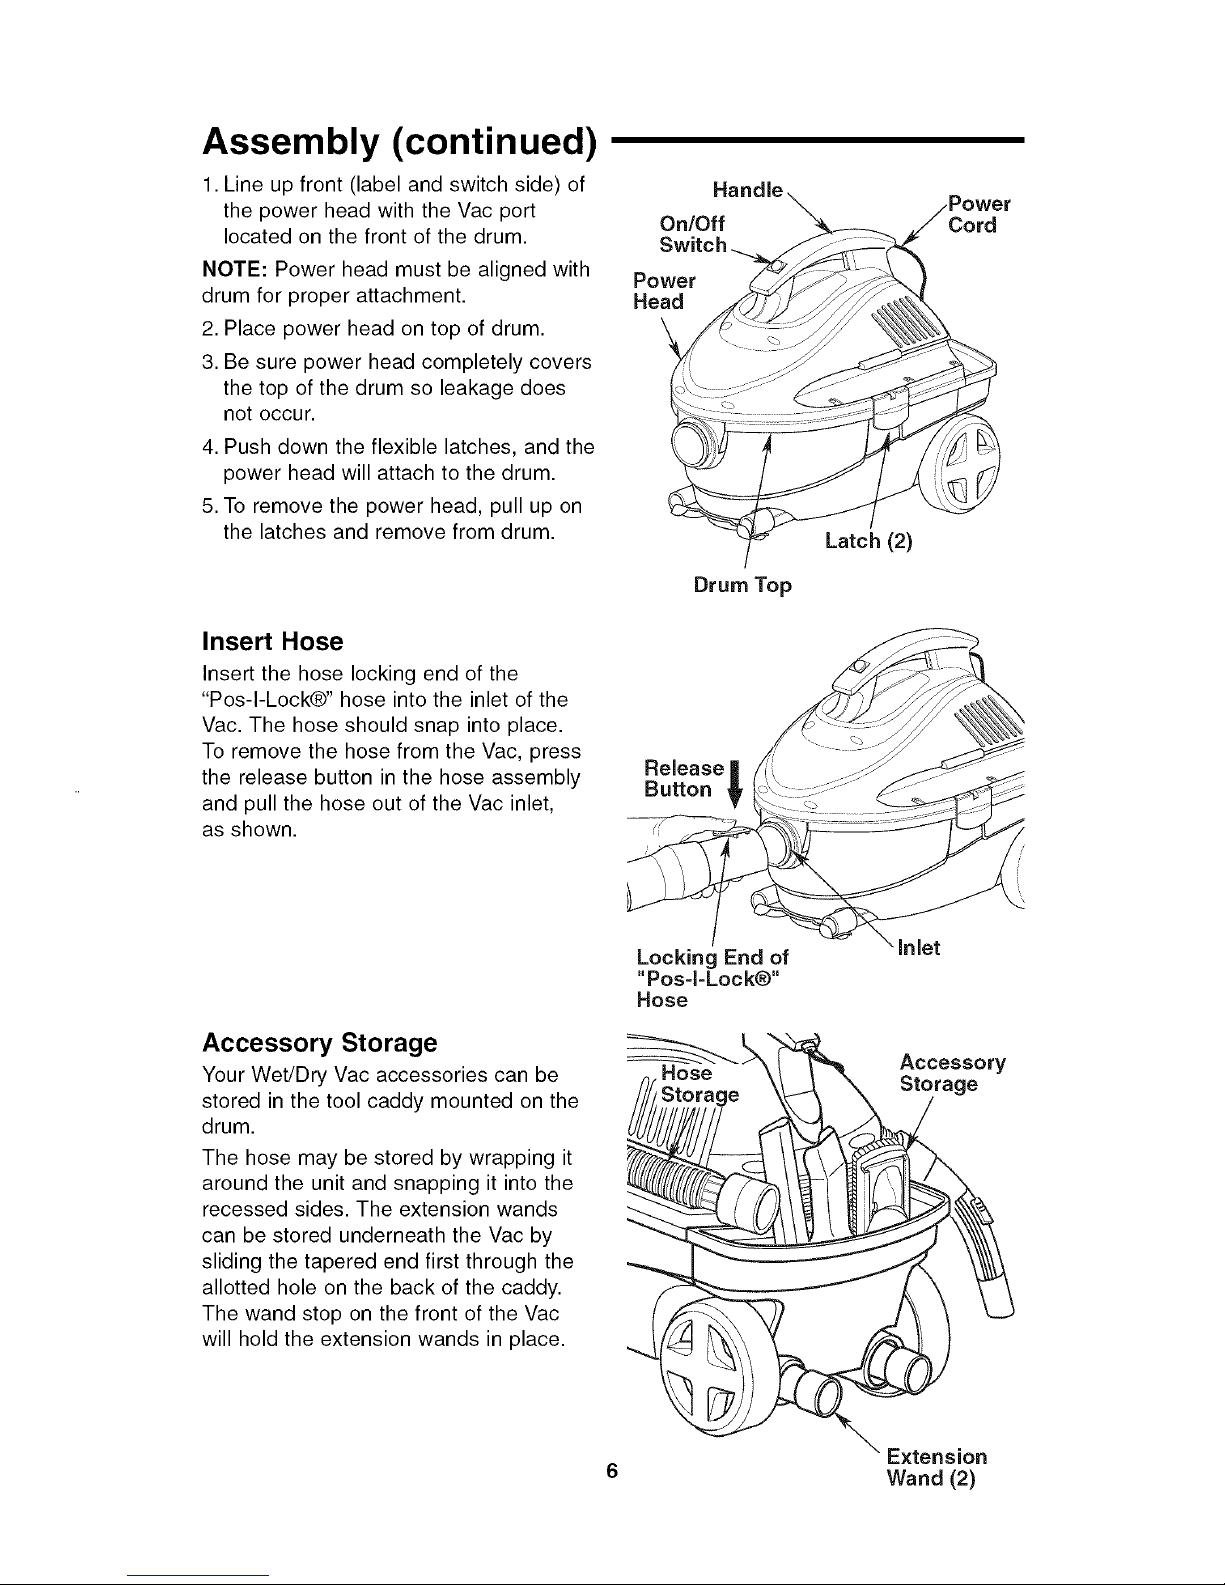
Assembly (continued)
1. Line up front (label and switch side) of
the power head with the Vac port
located on the front of the drum.
NOTE: Power head must be aligned with
drum for proper attachment.
2. Place power head on top of drum.
3. Be sure power head completely covers
the top of the drum so leakage does
not occur.
4. Push down the flexible latches, and the
power head will attach to the drum.
5. To remove the power head, pull up on
the latches and remove from drum.
Insert Hose
Insert the hose locking end of the
"Pos-I-Lock®" hose into the inlet of the
Vac. The hose should snap into place.
To remove the hose from the Vac, press
the release button in the hose assembly
and pull the hose out of the Vac inlet,
as shown.
On/Off
Power
Head
Drum Top
Release|
Button _,
Latch (2)
Accessory Storage
Your Wet/Dry Vac accessories can be
stored in the tool caddy mounted on the
drum.
The hose may be stored by wrapping it
around the unit and snapping it into the
recessed sides. The extension wands
can be stored underneath the Vac by
sliding the tapered end first through the
allotted hole on the back of the caddy.
The wand stop on the front of the Vac
will hold the extension wands in place.
Locking End of
"Pos=l=Lock®"
Hose
Hose
Accessory
Storage
Extension
6 Wand (2)
Operation
,_ WARNING: To reduce the risk of fire, explosion, or damage to Vac:
• Do not leave Vac running while unattended - you may fail to notice important signs indicating
abnormal operation such as loss of suction, debris/liquid exiting exhaust, or abnormal motor
noises. Immediately stop using Vac if you notice these signs.
• Do not leave Vac plugged-in when not in use.
• Do not continue running when float has cut off suction.
• Do not operate Vac in areas with flammable gases, vapors or explosive dust in the air.
Sparks inside the motor can ignite airborne flammables. Flammable gases and vapors
include: lighter fluid, solvent-type cleaners, oil-based paints, gasoline,
alcohol, or aerosol sprays. Flammable dusts include: coal, magnesium, aluminum, grain, or
gun powder.
• Do not vacuum up explosive dusts, flammable liquids, or hot ashes.
• Do not use Vac as a sprayer.
_. WARNING: To reduce the risk of electric shock or injury:
• Do not expose to rain or allow liquid to enter motor compartment. Store indoors.
• Do not handle plug, switch, or Vac with wet hands.
• Do not service Vac while it is plugged-in. If your Vac is not working as it should, has missing
parts, has been dropped, damaged, left outdoors, or dropped into water, return it to a Sears
service center or call customer service.
• When using an extension cord, use only outdoor-rated cords that are in good condition.
Do not allow the connection to come into contact with liquid.
• Do not vacuum toxic materials to reduce the risk of inhaling the vapors or dust.
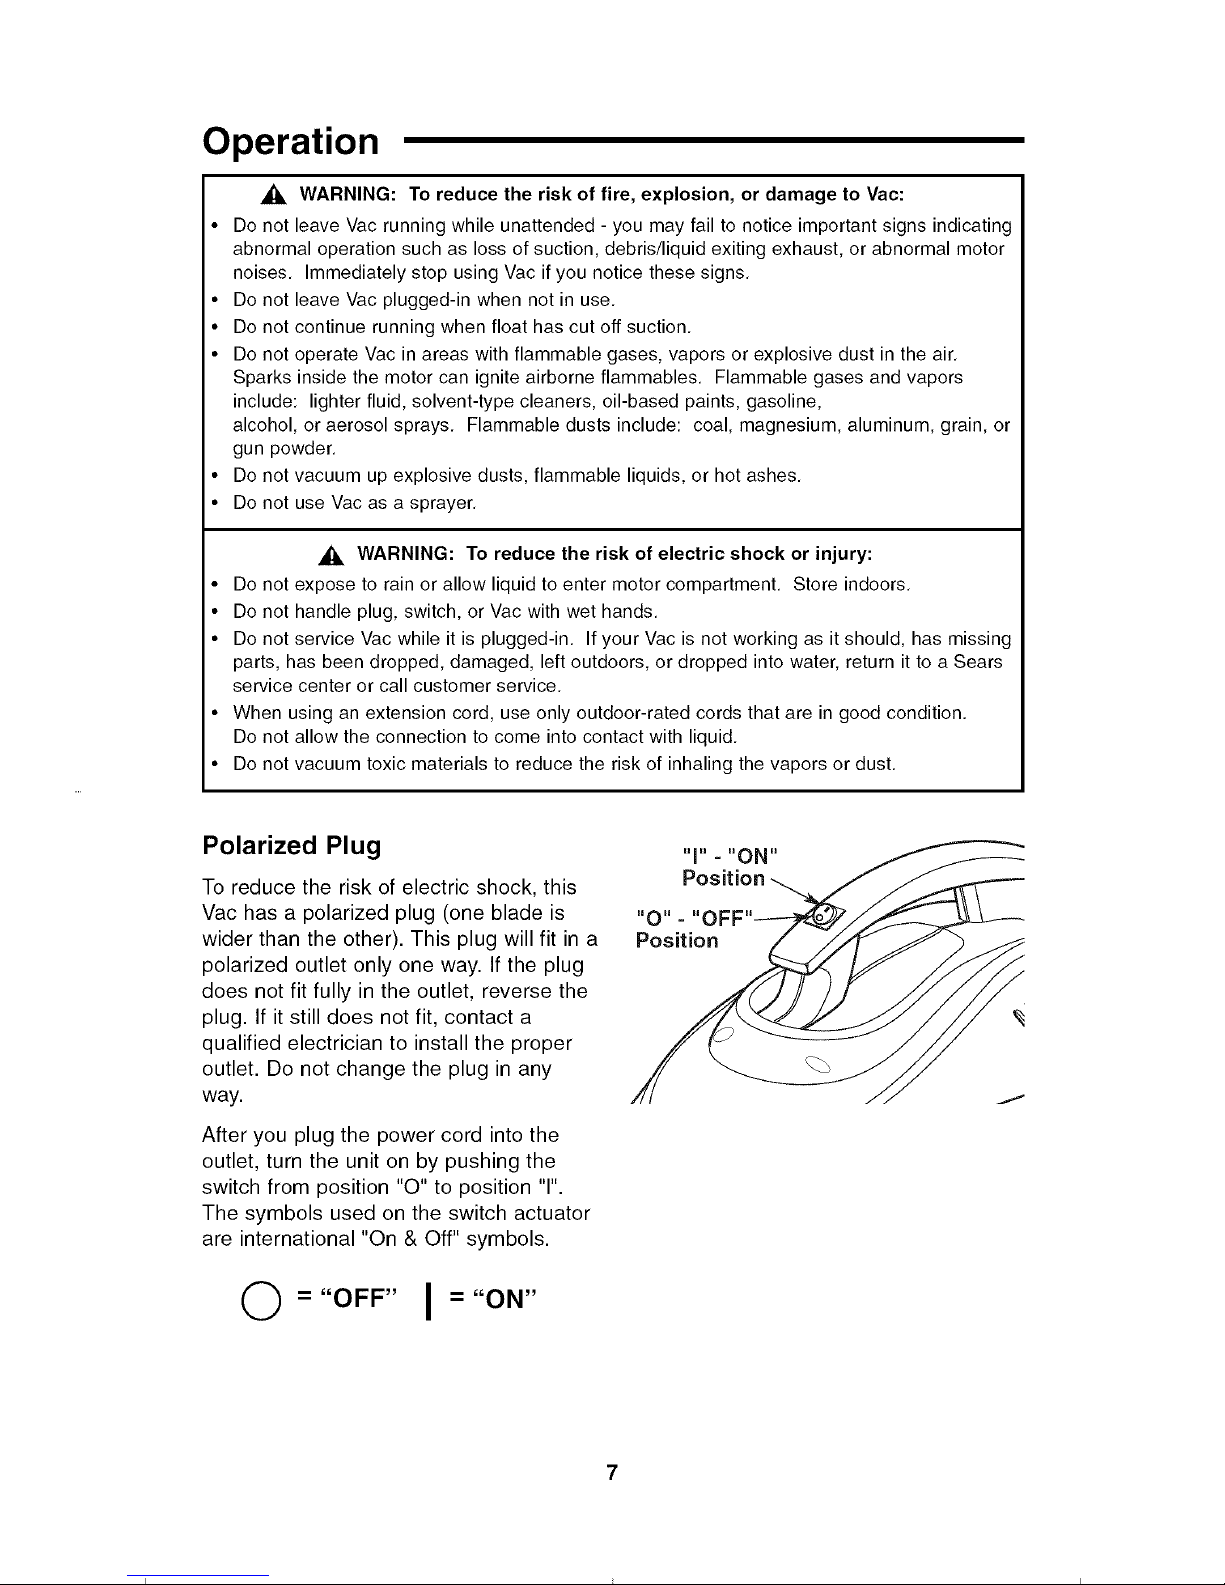
Polarized Plug
To reduce the risk of electric shock, this
Vac has a polarized plug (one blade is
wider than the other). This plug will fit in a
polarized outlet only one way. If the plug
does not fit fully in the outlet, reverse the
plug. If it still does not fit, contact a
qualified electrician to install the proper
outlet. Do not change the plug in any
way.
After you plug the power cord into the
outlet, turn the unit on by pushing the
switch from position "0" to position "1".
The symbols used on the switch actuator
are international "On & Off" symbols.
="OFF" I =''ON''
Operation (continued)
Vacuuming Dry Materials
1. The filter must always be in correct
position to reduce the risk of leaks and
possible damage to Vac.
2. When using your Vac to pick up very
fine dust, it will be necessary for you to
empty the drum and clean the filter at
more frequent intervals to maintain
peak Vac performance.
NOTE: A dry filter is necessary to pick up
dry material. If you use your Vac to pick
up dust when the filter is wet, the filter will
clog quickly and be very difficult to clean.
Dry the filter before storing.
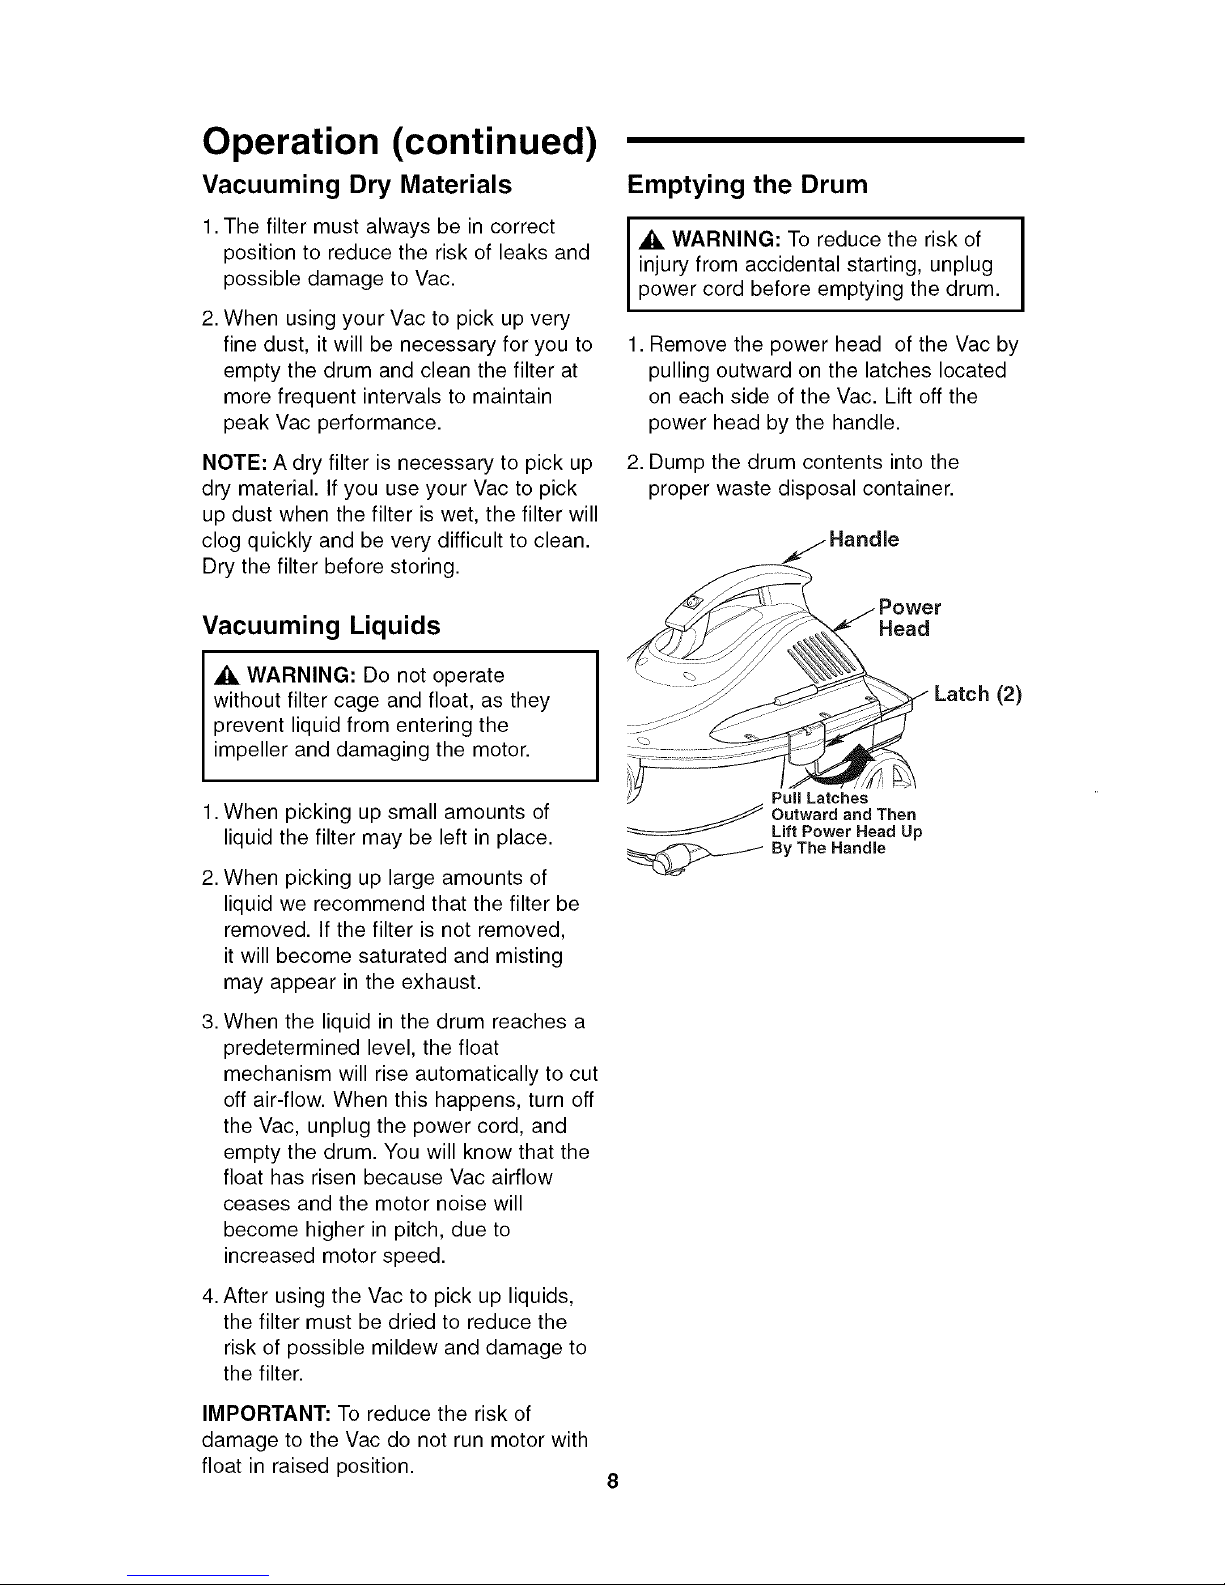
Emptying the Drum
_ WARNING: To reduce the risk of
injury from accidental starting, unplug
power cord before emptying the drum.
1. Remove the power head of the Vac by
pulling outward on the latches located
on each side of the Vac. Lift off the
power head by the handle.
2. Dump the drum contents into the
proper waste disposal container.
j_./- Handle
Vacuuming Liquids
_, WARNING: Do not operate
without filter cage and float, as they
prevent liquid from entering the
impeller and damaging the motor.
1. When picking up small amounts of
liquid the filter may be left in place.
2. When picking up large amounts of
liquid we recommend that the filter be
removed. If the filter is not removed,
it will become saturated and misting
may appear in the exhaust.
3. When the liquid in the drum reaches a
predetermined level, the float
mechanism will rise automatically to cut
off air-flow. When this happens, turn off
the Vac, unplug the power cord, and
empty the drum. You will know that the
float has risen because Vac airflow
ceases and the motor noise will
become higher in pitch, due to
increased motor speed.
4. After using the Vac to pick up liquids,
the filter must be dried to reduce the
risk of possible mildew and damage to
the filter.
IMPORTANT: To reduce the risk of
damage to the Vac do not run motor with
float in raised position.
Head
Pull Latches
____ Outward and Then
Lift Power Head Up
_ By The Handle
(2)

........\ii]7.......
Maintenance
Filter
,_, WARNING: To reduce the risk of
injury from accidental starting, unplug
power cord before changing or
cleaning filter.
NOTE: This filter is made of high quality
paper designed to stop very small
particles of dust. The filter can be used
for wet or dry pick up. Handle the filter
carefully when removing to clean or
installing it. Creases in the filter pleats
may occur from installation but creases
will not affect the performance of the
filter.
Filter Cleaning
Your filter should be cleaned often to
maintain peak Vac performance.
Be sure to dry the filter before storing or
picking up dry debris.
IMPORTANT: After cleaning, check the
filter for tears or small holes. Do not use
a filter with holes or tears in it. Even a
small hole can cause a lot of dust to
come out of your Vac. Replace it
immediately.
Filter Removal and Replacement
IMPORTANT: To reduce the risk of
damage to the blower wheel and motor,
always reinstall the filter before using the
Vac for dry material pickup.
Filter Removal:
1. To remove the filter for cleaning or
replacement, unscrew the filter nut
from the filter cage, remove filter plate
and lift off filter.
2. To replace the filter, carefully slide the
filter over the filter cage, sliding it over
the center ring covering the three slots
until the filter stops against the power
head.
3. Place the hole in the filter plate over
the threaded screw of the filter cage.
4. Gently push on the filter plate to seat
the rubber ring of the filter inside the
circular channel of the filter plate.
5. Place the filter nut onto the threaded
screws and tighten it down. Finger
tighten only.
NOTE: Lever of filter nut should be away
from plate as shown.
IMPORTANT: Do not over tighten as this
may deform or crack the filter cage or
filter plate.
NOTE: Your filter has a purple stripe that
matches an in-store displayer. When you
visit your local Sears store, just
remember the color of your stripe for the
correct size filter.
_ Filter Nut
_ Filter Plate
_ Filter
Latch (2) _llJ [JY
\ F,te,Cage
 Loading...