

Page 1
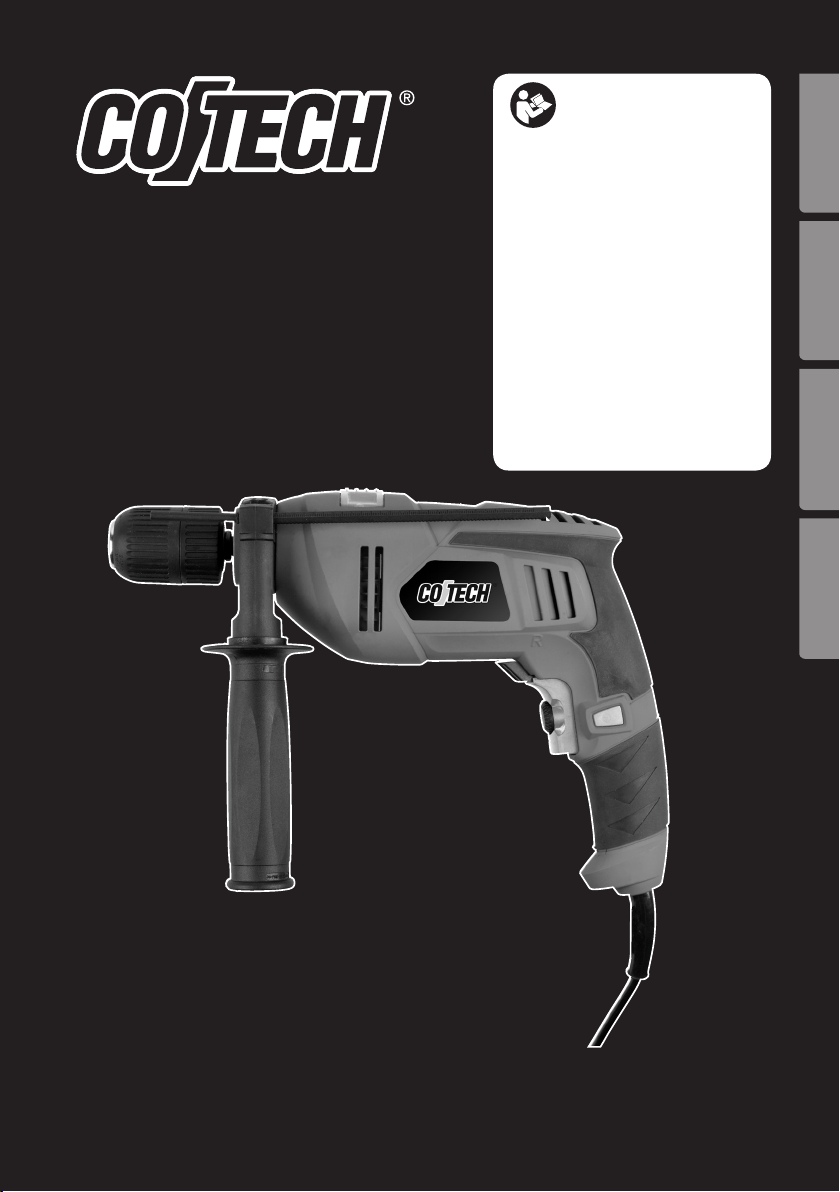
Impact Drill
Slagborrmaskin
Slagbormaskin
Iskuporakone
Important!
Read the entire instruction manual carefully
and make sure that you fully understand
it before you use the equipment. Keep the
manual for future reference.
Viktig information:
Läs hela bruksanvisningen noggrant och
försäkra dig om att du har förstått den innan
du använder utrustningen och spara den för
framtida bruk.
Viktig informasjon:
Les disse anvisningene nøye og forsikre deg
om at du forstår dem før du bruker enheten
og oppbevar dem for senere bruk.
Tärkeätä tietoa:
Lue nämä ohjeet huolellisesti ja varmista
että olet ymmärtänyt ne, ennen kuin alat
käyttää laitetta. Säilytä ohjeet myöhempää
tarvetta varten.
ENGLISHSVENSK ANOR SKSUOMI
Art.no Model
18-3175 Z1J-TD12-13E2-UK
40-7964 Z1J-TD12-13E2
Ver. 201212
Original instructions
Bruksanvisning i original
Original bruksanvisning
Alkuperäinen käyttöohje
Page 2

Page 3

Impact Drill
Art.no 18-3175 Model Z1J-TD12-13E2-UK
40-7964 Z1J-TD12-13E2
Please read the entire instruction manual before using and save for future use.
We apologise for any text or photo errors and any changes of technical data.
If you have any questions concerning technical problems please contact our
Customer Service Department (see address on reverse.)
Table of Contents
General Safety Requirements 4
Product Description 7
Use 8
Tips for use 10
Care and Maintenance 11
Disposal 11
Specifications 11
ENGLISH
3
3
Page 4

General Safety Requirements
ENGLISH
Warning! Read all the instructions. Failure to adhere to the following instructions
may lead to electric shocks, fires and/or serious injury. The term “power tools” in the
warning text below refers to your handheld mains operated or battery operated tool.
SAVE THESE INSTRUCTIONS.
1) The work space
a. Keep the work space clean and well illuminated. Cluttered and areas invite
accidents.
b. Do not use electrical hand tools in explosive environments, i.e. nearby flammable
liquids, gas or dust. Electrical hand tools generate sparks that
could easily ignite dust or fumes.
c. Keep away from children and other spectators while using the electrical hand
tool. Interference can make you loose your concentration and control.
2) Electrical safety
a. The electrical hand tools plug must fit correctly in the wall socket. Never modify
the plug in any way. Never use an adaptor together with earthed electrical hand
tools. Unmodified plugs and suitable wall sockets decreases the risk of electric
shock.
b. Avoid body contact with earthed objects, such as pipes, radiators, ovens
or refridgerators. There is an increased risk of electrical shock if your body
is earthed.
c. Do not expose the electrical hand tool to rain or other wet conditions. If water
gets inside an electrical hand tool it increases the risk of electrical shock.
d. Do not misuse the lead. Never use the lead to carry, drag or pull the plug out of
the wall socket. Keep the lead away from heat, oil, sharp edges and movable
parts. Damaged or tangled leads increases the risk of electrical shock.
e. When you use an electrical hand tool outdoors; use an extension cord suitable
for this purpose. Use of an extension cord for outdoor use decreases the risk of
electrical shock.
f) If for some reason you must use a power tool in a wet environment, always
connect it to the mains via an earth-fault circuit breaker such as an RCD (residual
current device). Using an RCD significantly reduces the chances
of you receiving an electric shock.
4
Page 5

3) Personal safety
a. Pay attention to what you do and use common sense when using electrical hand
tools. Never use an electrical hand tool if you are tired or under the influence of
drugs, alcohol or medication. One moment of not paying attention while using an
electrical hand tool may result in serious injury.
b. Use protective equipment. Always use safety glasses. Using protective
equipment such as a face mask, slip resistant protection shoes, a helmet and ear
defenders when needed decreases the risk of injury.
c. Avoid accidental starting. Make sure that the switch is set to OFF before you
connect the device to the wall socket. Never carry an electrical hand tool with
one finger on the trigger or never connect the hand tool to a wall socket when
the switch is set to ON, since it may result in injury.
d. Remove all service tools/keys before switching on the hand tool. A service tool
forgotten on a rotating part of the electrical hand tool may result in injury.
e. Do not overreach. Make sure you stand steady and well balanced
at all times. This gives better control in unexpected situations.
f. Wear suitable clothing. Do not wear loose fitting clothes or jewellery.
Keep hair, clothes and gloves away from movable parts. Loose fitting clothes,
jewellery or long hair could get caught in movable parts.
g. If the equipment for suctioning or collecting dust is available make sure
it is connected and used properly. Using technical aid may decrease dust related
hazards.
4) Use and maintenance of the electrical hand tools.
a. Do not overdrive the hand tool. Use a hand tool suitable for the work you are to
perform. The correct electrical hand tool will perform the task better and safer if
used at the correct feed rate.
b. Never use the electrical hand tool if the switch does not work properly to turn
on and shut off the tool. All electrical hand tools that can not be operated by the
switch are dangerous and must be repaired.
c. Unplug the lead from the wall socket before making any adjustments, changes of
accessories or storing the electrical hand tool away. These precautions reduces
the risk of unexpected start of the electrical hand tool.
ENGLISH
5
Page 6

d. Store electrical hand tools that are not being used out of reach from children.
Electrical hand tools can be dangerous if they get in the hands
of inexperienced users.
ENGLISH
e. Maintenance of electrical hand tools. Check if something is incorrectly set, if
movable parts are getting jammed, or parts are broken or something else that
might cause dysfunction to the electrical hand tool. If something is damaged it
must be repaired before use. Many accidents are caused by poorly maintained
electrical hand tools.
f. Keep the tools sharp and clean. Properly maintained cutting tools with sharp
blades are less disposed to getting jammed and easier to control.
g. Use the electrical hand tool, accessories and such according to the instructions
and in a way suitable for the type of electrical hand tool used. Using the electrical
hand tool for work other then suitable work could result
in a dangerous situation.
5) Service
a. Repairs and service should only be performed by qualified persons, and only with
original spare parts. This guarantees the safety on the electrical hand tool.
Specific Safety Regulations for Impact Drills
1. Ear protectors should be worn when using the impact drill.
Exposure to high levels of noise can cause hearing impairment.
2. Use the supplied side handle when using the impact drill.
Losing control of the drill could result in personal injury.
Safety symbols
Read the entire instruction!
Always use protective glasses or a visor.
Always use ear protection.
6
Page 7
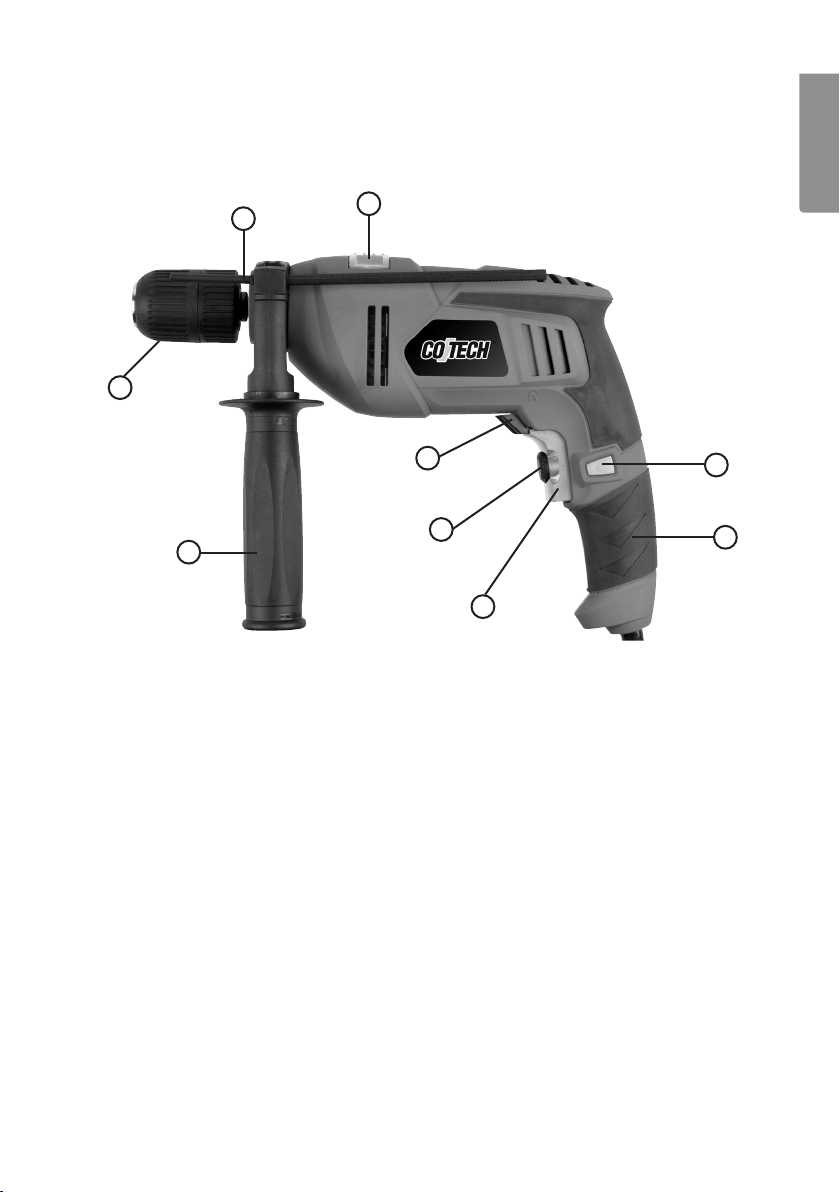
Product Description
ENGLISH
9
5
8
1. Power Switch
2. Lock on button for power switch
3. Handle
4. Forward/Reverse Selector
5. Keyless Chuck
6. Impact/Normal Action Selector
7. Stepless Variable Speed Control
8. Side handle
9. Depth Stop
6
4
7
1
2
3
7
Page 8
Use
ENGLISH
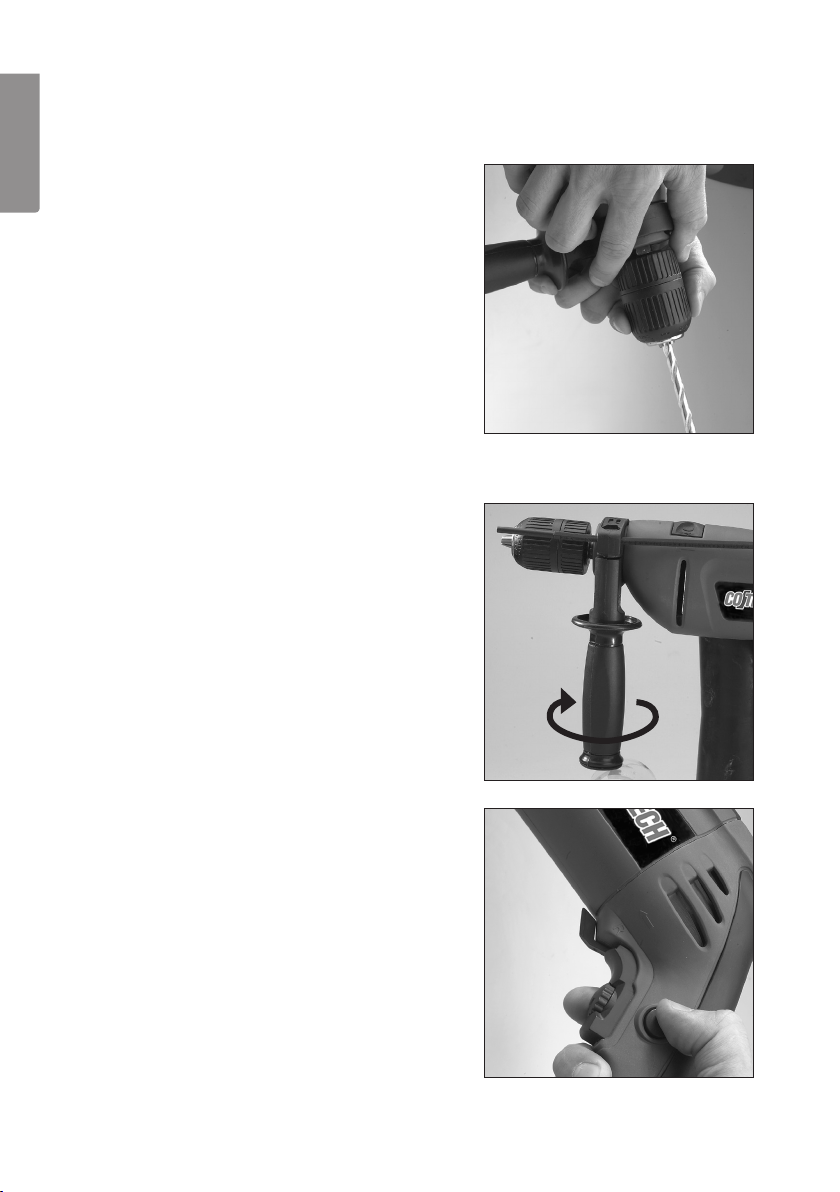
Chuck
1. The impact drill has a keyless quick
chuck (1.5-13 mm).
2. Hold the rear collar of the chuck and twist
the front collar anticlockwise until the
jaws are wide enough apart to allow the
drill bit to enter.
3. Insert a drill bit or other tool.
4. Hold the rear collar of the chuck and twist
the front collar until the jaws lock onto the
tool or bit.
Warning: Do not try to tighten the chuck by
holding the rear collar whilst starting the drill,
this could result in personal injury. Moreover,
the chuck tightens better if the two collars
are gripped and tightened by hand.
Side handle
1. Screw the side handle anticlockwise to
undo it.
2. Set the side handle in the desired
position, set the depth stop if necessary.
3. Screw the side handle clockwise to lock
both the handle and depth stop.
Power Switch
1. Plug the lead into a wall socket after
inserting a tool into the chuck and
tightening it.
2. Start the impact drill by gently pulling
the power switch (1), check that the tool
rotates in the correct direction. Release
the power switch to stop the drill.
3. When the chuck is rotating, the power
switch can be locked by pressing the
lock button (2) and releasing the power
switch. To stop the drill, pull the power
switch and then release it.
8
Page 9
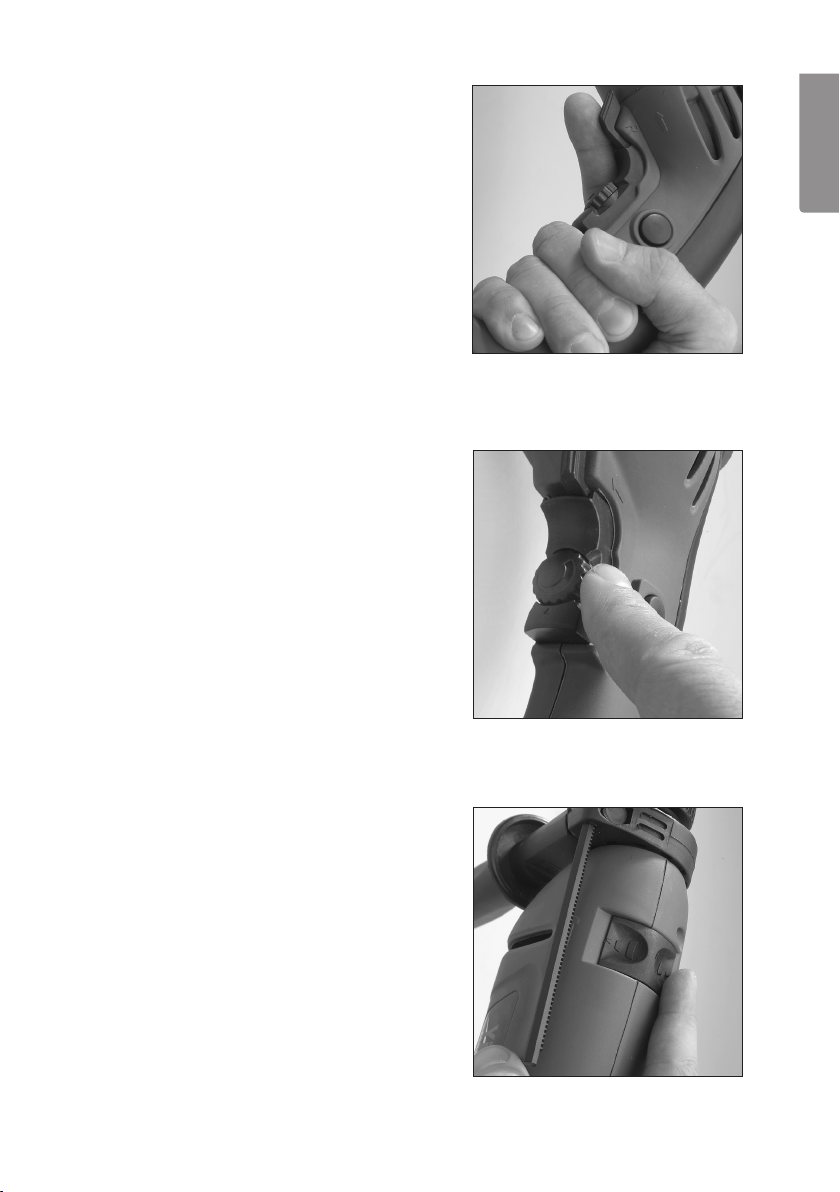
Changing Direction of Rotation
1. Stop the drill.
2. Turn the selector (4) to the right or
left to select the direction of rotation.
Note: The drill will not work if the selector is
between settings. The selector switch must
be fully turned in the desired direction.
Stepless Variable Speed Control
1. Start the drill by pulling the power
switch (1).
2. Turn the speed selector (7) anticlockwise
to reduce speed or clockwise to increase
speed.
3. The speed selector limits how far the power
switch can be pulled in.
Note: Always start drilling at a low speed if drilling without a pilot hole or centre-punch mark.
As a rule, use higher speeds with thin drill bits
and lower speeds with thicker bits. Cleaning
and polishing usually require a high speed.
Impact Drilling or Normal Drilling
1. Stop the drill completely.
2. Set the selector switch (6) to the desired
drill action. Select impact drilling for hard
materials (concrete, stone, etc) and normal
drilling for steel, aluminium and wood, etc.
• When the hammer symbol can be seen, the
drill is set on impact drill mode.
• When the drill bit symbol can be seen, the
drill is set on normal drill mode.
ENGLISH
Warning: Do not move the selector unless the
chuck is completely stationary. Make sure that
the selector is set correctly, a “click ” can be
heard when it locks into place.
9
Page 10

Useful Tips
• After having worked the drill hard for a while let the motor run for a few minutes
ENGLISH
(until the air leaving the ventilation slits is at room temperature) without any load,
to cool it down.
• Use the side handle to help maintain full control when drilling.
• Only use sharp tools.
• Use Titanium coated drill bits for hard metals and Tungsten Carbide tipped drill
bits for concrete/tiles. If in doubt read the packet.
• Fasten the workpiece down securely. Use clamps or vices when you can, this will
leave you with both hands free to manoeuvre the machine with, which increases
precision.
• If you are drilling into thin materials it is important that you place a small piece of waste
material behind the hole to be drilled, otherwise there is a risk of burring on the back.
• Hold the drill perpendicular to the workpiece before you start drilling (look from
several directions) make sure that you do not tilt the drill when drilling.
• Do not press too hard (so that the machine loses speed) let the tool do the job!
Reduce pressure before the drill breaks through the material.
• Let the drill bit spin and lift it up after drilling through, it allows the machine to cool
down and the drill bit is freed of dust and wood chips.
Things to consider when drilling into wood and plastic
• For wood and other soft materials there are several types of tools, chose the tool
most suitable for the work to be done. Test drill on a piece of waste first.
• The tool can overheat if you don’t pull it up often to free it of sawdust.
• Place a small piece of waste material behind the hole to be drilled before starting to
drill otherwise there is a risk of burring around the edges of the hole on the back.
Things to consider when drilling into metal
• Mark the hole using a centre punch.
• The tool can overheat if you use the wrong speed. Use cooling liquid suitable for your
material e.g. methylated spirit for aluminium (cast iron and brass are cut dry).
• Use a low gear and low speed for big holes.
• Be extra careful with the clamping of thin or sharp metal objects so that they
do not come loose and cause damage or injury, use a vice if possible.
Things to consider when drilling into concrete, tile or brick
• Use Tungsten carbide tipped drill bits.
• Use a drill with hammer/impact action and work carefully, applying
constant pressure.
• The material residue comes out of the drilled hole as powder or dust, wear
a dust mask.
10
Page 11

Care and Maintenance
• Before using the drill, make sure that all the screws are tightened.
When impact drilling the machine will vibrate a great deal.
• Make sure the cool air vents on the machine are free and open.
• Clean with a damp cloth when needed using only mild detergent.
Never use solvents or strong detergents.
• Store the instruction manual together with the drill.
Disposal
Follow local ordinances when disposing of this product. If you are
unsure about how to dispose of this product contact your municipality.
Specifications
Mains Supply 230 V AC, 50 Hz
Power 850 W
No-Load Speed 0–2800 rpm
Chuck Capacity 1.5–13 mm
Drilling Capacity Steel: 13 mm
Concrete: 13 mm
Wood: 25 mm
Weight 2.35 kg
Decibel level LwA: 97 dB (A) K: 3 dB
LpA: 86 dB (A) K: 3 dB
Vibration Drilling in concrete: ah.ID: 7.19 m/s², K: 1.5 m/s²
Drilling in metal: ah.ID: 2.62 m/s², K: 1.5 m/s²
ENGLISH
11
Page 12

Slagborrmaskin
Art.nr 18-3175 Modell Z1J-TD12-13E2-UK
40-7964 Z1J-TD12-13E2
Läs igenom hela bruksanvisningen före användning och spara den sedan för
framtida bruk. Vi reserverar oss för ev. text- och bildfel samt ändringar av tekniska data. Vid tekniska problem eller andra frågor, kontakta vår kundtjänst
(se adressuppgifter på baksidan).
SVENSK A
Innehåll
Generella säkerhetsföreskrifter 13
Produktbeskrivning 16
Användning 17
Användningstips 19
Skötsel och underhåll 20
Avfallshantering 20
Specifikationer 20
12
Page 13

Generella säkerhetsföreskrifter
Varning! Läs alla instruktioner. Om nedanstående instruktioner inte följs kan detta
leda till elektrisk stöt, brand och/eller allvarlig skada. Termen ”elektriskt handverktyg” i
varningstexten nedan refererar till ditt nätanslutna eller batteridrivna handverktyg.
1) Arbetsutrymmet
a) Håll arbetsutrymmet rent och väl upplyst. Belamrade och mörka utrymmen
inbjuder till olyckor.
b) Använd inte elektriska handverktyg i explosiva miljöer, som i närheten av
lättantändliga vätskor, gaser eller damm. Elektriska handverktyg genererar gnistor
som kan antända damm eller ångor.
c) Håll undan barn och åskådare medan du använder det elektriska handverktyget.
Störningsmoment kan göra att du tappar kontrollen.
2) Elektrisk säkerhet
a) Det elektriska handverktygets stickpropp måste passa i vägguttaget. Modifiera
aldrig stickproppen på något vis. Använd aldrig adapter tillsammans med jordade
elektriska handverktyg. Omodifierade stickproppar och passande vägguttag
minskar risken för elektrisk stöt.
b) Undvik kroppskontakt med jordade föremål, som rör, element, köksspis eller
kylskåp. Det finns ökad risk för elektrisk stöt om din kropp är jordad.
c) Utsätt inte det elektriska handverktyget för regn eller våta förhållanden. Om vatten
tränger in i ett elektriskt handverktyg ökar det risken för elektrisk stöt.
d) Misshandla inte nätsladden. Använd aldrig nätsladden för att bära, dra eller rycka
stickproppen ur vägguttaget. Håll nätsladden undan från värme, olja, vassa kanter
och rörliga delar. Skadade eller trassliga nätsladdar ökar risken för elektrisk stöt.
e) När du använder ett elektriskt handverktyg utomhus, använd en skarvsladd
anpassad för detta ändamål. Användning av en skarvsladd för utomhusbruk
minskar risken för elektrisk stöt.
f) Om du måste använda ett elektriskt handverktyg på en fuktig plats, anslut
verktyget till elnätet via en jordfelsbrytare. Användning av jordfelsbrytare minskar
risken för elektrisk stöt.
SVENSK A
13
Page 14

3) Personlig säkerhet
a) Var uppmärksam på vad du gör och använd sunt förnuft när du använder ett
elektriskt handverktyg. Använd inte ett elektriskt handverktyg om du är trött eller
påverkad av droger, alkohol eller medicinering. Ett ögonblicks ouppmärksamhet
när du använder ett elektriskt handverktyg kan resultera
i allvarlig personskada.
b) Använd skyddsutrustning. Bär alltid skyddsglasögon. Användning av
skyddsutrustning som andningsskydd, halksäkra skyddsskor, hjälm och
hörselskydd vid behov minskar risken för personskada.
SVENSK A
c) Undvik oavsiktlig start. Se till att strömbrytaren är i läge ”OFF” innan du ansluter
stickproppen till vägguttaget. Att bära ett elektriskt handverktyg med ett finger på
strömbrytaren/avtryckaren eller att ansluta ett elektriskt handverktyg till elnätet när
strömbrytaren är i läge ”ON” inbjuder till olyckor.
d) Tag bort alla serviceverktyg/nycklar innan du slår på det elektriska handverktyget.
Ett kvarglömt serviceverktyg på en roterande del av det elektriska handverktyget
kan reslutera i personskada.
e) Sträck dig inte för långt. Se till att du står stadigt med god balans hela tiden.
Detta möjliggör bättre kontroll i oväntade situationer.
f) Bär lämplig klädsel. Bär inte löst sittande kläder eller smycken. Håll hår, kläder
och handskar undan från rörliga delar. Lösa kläder, smycken eller
långt hår kan fastna i rörliga delar.
g) Om utrustning för utsugning och uppsamling av damm finns tillgängligt, se till att
denna är ansluten och används ordentligt. Användning av dessa hjälpmedel kan
minska dammrelaterade faror.
4) Användning och underhåll av det elektriska handverktyget
a) Pressa inte det elektriska handverktyget. Använd ett elektriskt handverktyg som
är avsett för det arbetsmoment du utför. Korrekt elektriskt handverktyg gör jobbet
bättre och säkrare med avsedd matningshastighet.
b) Använd inte det elektriska handverktyget om strömbrytaren inte slår på och
stänger av verktyget. Alla elektriska handverktyg som inte kan kontrolleras med
strömbrytaren är farliga och måste repareras.
c) Tag stickproppen ur vägguttaget innan du utför några justeringar, byter tillbehör
eller lägger undan det elektriska handverktyget för förvaring. Dessa åtgärder i
förebyggande syfte minskar risken för att starta det elektriska handverktyget
oavsiktligt.
14
Page 15

d) Förvara elektriska handverktyg som inte används utom räckhåll för barn och låt
inte personer som inte är förtrogna med det elektriska handverktyget eller dessa
instruktioner använda det. Elektriska handverktyg är farliga om de kommer i
händerna på ovana användare.
e) Underhåll elektriska handverktyg. Kontrollera om något är felinställt, om rörliga
delar kärvar, om delar har gått sönder eller något annat som kan påverka
funktionen av det elektriska handverktyget. Om något är skadat
måste det repareras före användning. Många olyckor beror på dåligt underhållna
elektriska handverktyg.
f) Håll verktygen vassa och rena. Ordentligt underhållna skärverktyg med vassa
eggar är mindre benägna att kärva och lättare att kontrollera.
g) Använd det elektriska handverktyget, tillbehör och liknande enligt instruktionerna
och på det sätt som är ämnat för just den typen av elektriskt handverktyg, och
ta även hänsyn till arbetsförhållandena och den typ av arbete som ska utföras.
Användning av det elektriska handverktyget för arbeten andra än vad det är
ämnat för kan resultera i en farlig situation.
5) Service
a) Låt behörig personal utföra service och reparationer, endast med
originalreservdelar. Detta garanterar att säkerheten på det elektriska
handverktyget behålls.
Särskilda säkerhetsregler för slagborrmaskin
1. Bär öronskydd vid arbete med en slagborrmaskin.
Bullerexponering kan orsaka hörselskador.
2. Använd medföljande handtag vid arbete med slagborrmaskinen.
Tappad kontroll av slagborrmaskinen kan orsaka personskador.
SVENSK A
Produktmärkning med säkerhetssymboler
Läs hela bruksanvisningen!
Använd alltid skyddsglasögon/visir och hörselskydd.
15
Page 16

Produktbeskrivning
9
SVENSK A
5
8
1. Strömbrytare
2. Låsknapp för strömbrytare
3. Handtag
4. Omställning för höger- eller vänstergång
5. Snabbchuck
6. Omställning för slagborrning eller normal borrning
7. Steglös varvtalsreglering
8. Sidohandtag
9. Djupanslag
6
4
7
1
2
3
16
Page 17

Användning
Chuck
1. Slagborrmaskinen är försedd med en
nyckellös snabbchuck (1.5 – 13 mm).
2. Håll i den bakre delen av chucken och
vrid den främre motsols tills öppningen är
så stor att borren går i.
3. Sätt i en borr eller annat verktyg.
4. Håll i den bakre delen av chucken och
vrid den främre medsols så att den låser
fast borren.
Varning: Försök inte dra åt chucken genom
att hålla i chuckens ytterdel och samtidigt
starta borrmaskinen, det kan resultera i
olycksfall. Dessutom låser chucken bättre om
man håller i både fram- och bakdel och drar
åt med handkraft.
Sidohandtag
1. Skruva sidohandtaget motsols
för att lossa det.
2. Ställ in sidohandtaget i önskad position,
ställ in djupanslaget vid behov.
3. Skruva sidohandtaget medsols för att
låsa både handtag och djupanslag.
SVENSK A
Strömbrytare
1. Anslut stickproppen till ett eluttag efter att
du har satt i ett verktyg i chucken
och dragit åt.
2. Starta slagborrmaskinen genom att
trycka in strömbrytaren (1) sakta,
kontrollera att verktyget roterar åt
rätt håll. Släpp strömbrytaren för att
stoppa maskinen.
3. När chucken roterar kan du låsa
strömbrytaren genom att trycka in
låsknappen (2) och släppa strömbrytaren.
Tryck in strömbrytaren och släpp den när
du vill stoppa borrmaskinen.
17
Page 18

Växla rotationsriktning
1. Stoppa borrmaskinen.
2. Vik omställningsvredet (4) till vänster
eller höger för önskad rotationsriktning.
Obs! Borrmaskinen fungerar inte om omställningsvredet är i ett mellanläge. Vredet måste
vridas till fullo till önskad rotationsriktning.
SVENSK A
Steglös varvtalsreglering
1. Starta slagborrmaskinen genom
att trycka in strömbrytaren (1).
2. Vrid på inställningsratten (7) motsols
för att minska varvtalet, och medsols
för att öka varvtalet.
3. Inställningsratten reglerar hur långt
strömbrytaren kan tryckas in.
Obs! Starta alltid på låg hastighet vid
borrning utan förborrat hål eller körnslag. Använd som regel högre hastighet med tunna
borrar och lägre hastighet med grova borrar.
Putsning och polering kräver som regel hög
hastighet.
Slagborrning eller
normal borrning
1. Stoppa borrmaskinen helt.
2. Tryck omställningsreglaget (6) till önskad
borrningsmetod. Välj slag borrning för hårda
material (betong,
sten etc.) och välj normalborrning för
stål, aluminium och trä etc.
• När symbolen för en hammare visas
vid reglaget används maskinen som
en slagborrmaskin.
• När symbolen för en borr visas vid reglaget
används maskinen som en
vanlig borrmaskin.
Varning! Rör inte omställningsreglaget om inte
chucken står helt stilla. Se till att reglaget är i
rätt läge, ett ”klick” hörs när det är rätt inställt.
18
Page 19

Användningstips
• Låt motorn gå obelastad i några minuter (tills kylluften har rumstemperatur)
för att kylas efter att du har belastat slagborrmaskinen hårt.
• Använd sidohandtaget, det ger extra kontroll på borrningen.
• Använd endast verktyg med god skärpa.
• Till hårda metaller används Titanbelagda borrar och betong/kakel används borrar
med hårdmetallskär, läs på förpackningen!
• Sätt fast ämnet som ska bearbetas ordentligt. Använd tvingar eller skruvstäd där
det går, då kan du använda båda händerna till att styra borrmaskinen vilket ger
större precision.
• Om du borrar i tunna material är det viktigt att du placerar en spillbit bakom det
tänkta borrhålet innan du börjar borra, annars är det stor risk att hålet får fula
kanter på baksidan.
• Rikta in borrmaskinen vinkelrät mot arbetsstycket innan du börjar borra (titta från
flera vinklar), se till att du inte trycker borrmaskinen snett när du borrar.
• Tryck inte för hårt (så att maskinen tappar fart), låt verktyget göra jobbet! Minska
trycket innan borren går igenom.
• Låt borren snurra när du har borrat igenom och lyfter upp maskinen, då kyls
borrmaskinen ner och borren rensas från spånor.
Tänk på detta när du borrar i trä och plast
• För trä och andra mjukare material finns flera olika typer av verktyg t.ex., Hålsåg,
flat träborr etc, välj det som passar bäst! Provborra en spillbit först.
• Verktyget kan överhettas om du inte drar upp det ofta för att rensa bort spånor.
• Placera en spillbit bakom det tänkta borrhålet innan du börjar borra, annars är det
stor risk att hålkanten flisas på baksidan.
SVENSK A
Tänk på detta när du borrar i metall
• Märk ut borrhålet och gör ett märke med en körnare.
• Verktyget kan överhettas om du använder fel hastighet. Använd gärna kylvätska
som är avsett för ditt material t.ex., T-röd till aluminium (gjutjärn och mässing
bearbetas torrt).
• Använd lägsta växeln och lågt varvtal till stora hål.
• Var särskilt noga med fastspänningen för tunna eller vassa metallföremål så att de
inte lossnar och ger skärskador vid borrningen, använd gärna ett skruvstycke.
19
Page 20

Tänk på detta när du borrar i betong, kakel eller tegel
• Använd borrar med hårdmetallskär!
• Använd slagborrning och tryck försiktigt med samma matning hela tiden.
• Materialet som borras bort kommer ut ur borrhålet som pulver eller damm,
använd andningsskydd.
• Använd slagborrning till betong och tegel, och tryck försiktigt med samma
matning hela tiden. Använd INTE slagborrning till kakel.
SVENSK A
Skötsel och underhåll
• Kontrollera innan användning att alla skruvar sitter fast på slagborrmaskinen. Vid
slagborrning vibrerar maskinen mycket.
• Se till att maskinens kylluftsöppningar alltid är fria och öppna.
• Rengör vid behov, med en tvättduk fuktad med svagt diskmedel.
Använd aldrig lösningsmedel eller starka rengöringsmedel.
• Förvara bruksanvisningen tillsammans med slagborrmaskinen.
Avfallshantering
När du ska göra dig av med produkten ska detta ske enligt
lokala föreskrifter. Är du osäker på hur du ska gå tillväga,
kontakta din kommun.
Specifikationer
Nätspänning 230 V AC, 50 Hz
Effekt 850 W
Varvtal, obelastad 0–2800 v/min
Chuckkapacitet 1,5–13 mm
Borrkapacitet Stål: 13 mm
Betong: 13 mm
Trä: 25 mm
Vikt 2,35 kg
Ljudnivåer LwA: 97 dB (A) K: 3 dB
LpA: 86 dB (A) K: 3 dB
Vibration Borrning i betong: ah.ID: 7,19 m/s², K: 1,5 m/s²
Borrning i metall: ah.ID: 2,62 m/s², K: 1,5 m/s²
20
Page 21

Slagbormaskin
Art.nr. 18-3175 Modell Z1J-TD12-13E2-UK
40-7964 Z1J-TD12-13E2
Les hele bruksanvisningen grundig og ta vare på den til senere bruk. Vi reserverer
oss for ev. tekst og bildefeil, samt forandringer av tekniske data. Ved tekniske problemer eller andre spørsmål, ta kontakt med vår kundetjeneste (se adresseopplysninger
på baksiden).
Innholdsfortegnelse
Generelle sikkerhetsinstrukser 22
Produktbeskrivelse 25
Bruk 26
Brukertips 28
Vedlikehold 29
Avfallshåndtering 29
Spesifikasjoner 29
NOR SK
21
Page 22

Generelle sikkerhetsinstrukser
Advarsel! Les gjennom hele instruksjonen. Hvis ikke instruksjonen følges, kan dette
føre til elektrisk støt, brann og/eller alvorlige skader. Med ”elektrisk håndverktøy”
i teksten nedenfor, menes verktøy koblet til strømnettet eller batteridrevne håndverktøy. Ta vare på denne instruksjonen.
1) Arbeidsplassen
a) Hold arbeidsplassen ren, ryddig og godt opplyst. Rotete arbeidsplass eller
dårlig opplyste områder kan føre til ulykker.
b) Bruk ikke elektriske håndverktøy i omgivelser med eksplosjonsfare,
som for eksempel i nærheten av lettantennelige væsker, gasser eller støv.
Elektrisk håndverktøy kan danne gnister som igjen kan antenne støv eller trespon.
c) Hold barn og andre tilskuere unna mens du bruker elektriske håndverktøy. Du
NOR SK
kan lett miste kontrollen dersom du blir forstyrret mens du arbeider.
2) Sikkerhet ved bruk av elektrisk strøm
a) Strømkabelens støpsel, til det elektriske verktøyet, må passe i vegg uttaket.
Støpselet må ikke forandres på. Bruk aldri adapter sammen med elektrisk
håndverktøy som krever jording. Ved bruk av originale kontakter
og støpsler minskes faren for elektrisk støt.
b) Unngå kroppskontakt med jordede gjenstander som rør, ovner, komfyrer og
kjøleskap. Kroppskontakt med disse øker faren for elektrisk støt.
c) Elektrisk håndverktøy bør ikke utsettes for regn eller fuktighet. Hvis det
kommer vann inn i et elektrisk håndverktøy, øker faren for elektrisk støt.
d) Håndter strømkabelen med forsiktighet. Den må ikke bli brukt til å bære
verktøyet med. Dra ikke i kabelen når du skal ha stikket ut av kontakten.
Hold kabelen unna varme, olje, skarpe kanter og bevegelige deler.
Skadde eller deformerte støpsler kan øke faren for elektrisk støt.
e) Ved bruk av elektrisk håndverktøy utendørs, skal det benyttes skjøtekabel
som er beregnet til dette formålet. Når skjøtekabel som er beregnet for
utendørs bruk benyttes, minsker faren for elektrisk støt.
f) Dersom det elektriske håndverktøyet må benyttes i fuktige omgivelser, skal
verktøyet kobles til et strømnett via en jordfeilbryter. Bruk av jordfeilbryter
reduserer faren for elektrisk støt.
22
Page 23

3) Personlig sikkerhet
a) Vær våken og bruk sunn fornuft når du bruker et elektrisk verktøy. Ikke bruk
elektriske håndverktøy når du er trett eller påvirket av rusmidler, alkohol
eller sterke medisiner. Når du bruker elektrisk håndverktøy, kan et lite øyeblikk
med uoppmerksomhet resultere i store personskader.
b) Bruk verneutstyr. Benytt alltid vernebriller. Bruk av verneutstyr som
støvmaske, sklisikre såler på skoene, hjelm og hørselsvern, ved behov, minsker
faren for personskade.
c) Unngå uønsket oppstart. Påse at strømbryteren står i posisjon ”OFF” før du
kobler til strømmen. Det å bære et elektrisk håndverktøy med en finger
på avtrekkeren/strømbryteren, eller å koble til strømmen når strømbryteren står i
posisjon ”ON”, kan forårsake ulykker.
d) Fjern alle nøkler/serviceverktøy før du starter det elektriske håndverktøyet.
Et gjenglemt serviceverktøy på en roterende del, kan forårsake personskader.
e) Strekk deg ikke for langt. Påse at du står støtt og har god balanse hele
tiden. Da er du bedre forberedt når uventede situasjoner oppstår.
f) Benytt fornuftige arbeidsklær. Ikke bruk løstsittende klær og smykker. Hold
klær, hansker og smykker unna bevegelige deler. Løstsittende klær, smykker
eller langt hår, kan sette seg fast i bevegelige deler.
g) Hvis det er mulig å koble til en støvsamler/støvsuger, bør dette gjøres. Ved
bruk av sådanne hjelpemidler, kan en minske faren for støvrelaterte skader og
ulykker.
4) Bruk og vedlikehold av elektrisk håndverktøy
a) Ikke press et elektrisk håndverktøy. Bruk elektriske håndverktøy som
er beregnet til den arbeidsoperasjonen du skal utføre. Riktig innmatings-
hastighet er viktig for å utføre bedre og sikrere arbeide.
b) Ikke bruk det elektriske håndverktøyet dersom ikke strømbryteren virker og
verktøyet kan skrues av. Alle elektriske håndverktøy, som ikke kan kontrolleres
med en strømbryter, er farlige og må repareres.
c) Dra ut støpselet før du utfører justeringer, bytter tilbehør eller legger det
elektriske håndverktøyet fra deg. Dette for å unngå at elektrisk håndverktøy får
en ukontrollert start.
NOR SK
23
Page 24

d) Oppbevar elektrisk håndverktøy utilgjengelig for barn. Påse også at
elektrisk håndverktøy er utilgjengelig for personer som ikke har fått
tilstrekkelig opplæring på eller er fortrolig med verktøyet. Elektrisk
håndverktøy kan være farlige dersom de kommer i hendene på ukyndige.
e) Vedlikehold av elektrisk håndverktøy. Påse at verktøyet ikke er feilinnstilt, at
bevegelige deler ikke beveger seg usymmetrisk, at ingen deler er skadet eller at
det elektriske håndverktøyet har andre feil, som kan påvirke verktøyets funksjon.
Dersom noe er skadet må dette repareres før verktøyet tas i bruk. Mange ulykker
skyldes dårlig eller manglende vedlikehold.
f) Hold verktøyet rent. Påse også at det elektriske verktøyet holdes skarpt.
Godt vedlikeholdt skjæreverktøy, med skarpe egger, er lettere å kontrollere.
g) Følg instruksjonen, ta hensyn til arbeidsforholdene og den type arbeide
som skal utføres. Bruk av elektrisk håndverktøy til andre arbeidsoperasjoner enn
det det er beregnet til, kan skape farlige situasjoner.
NOR SK
5) Service
a) La profesjonelle fagfolk utføre service og reparasjoner. Benytt kun originale
reservedeler. Dette for å opprettholde sikkerheten ved bruk av det elektriske
håndverktøyet.
Spesielle sikkerhetsregler for slagbormaskin
1. Bruk hørselsvern ved arbeide med slagbormaskin. Eksponering av høy lyd over
tid kan medføre hørselsskader.
2. Bruk det medfølgende håndtaket ved arbeide med slagbormaskin. Dersom man
mister kontrollen på maskinen kan dette medføre personskader.
Produktmerking med sikkerhetssymboler
Les bruksanvisningen.
Bruk vernebriller/visir og hørselsvern.
24
Page 25

Produktbeskrivelse
9
5
8
1. Strømbryter
2. Lås for strømbryter
3. Håndtak
4. Innstilling for høyre-/venstregang
5. Hurtigchuck
6. Innstilling for slagboring eller normalboring
7. Justeringsratt for trinnløst turtall
8. Støttehåndtak
9. Dybdeanslag
6
4
2
7
1
3
NOR SK
25
Page 26

Bruk
Chuck
1. Slagbormaskinen er utstyrt med en
nøkkelløs hurtigchuck (1,5 – 13 mm).
2. Hold i den bakre delen av chucken og
vri den forreste delen motsol, til åpningen
er så stor at du får plassert boret.
3. Plasser bor eller et annet verktøy
i chucken.
4. Hold den bakre delen av chucken og
vri den forreste delen medsols til boret
låses fast.
Advarsel! Ikke dra til chucken ved å holde
NOR SK
i den forreste delen og starte bormaskinen.
Det kan forårsake ulykke. Dessuten låser
chucken bedre hvis man holder i både forreste
og bakerste del og drar til med håndkraft.
Sidehåndtak
1. Skru sidehåndtaket motsols for å
løsne det.
2. Still håndtaket i ønsket posisjon og
still inn dybdeanslaget etter behov.
3. Skru sidehåndtaket medsols for å
låse både håndtak og dybdeanslag.
Strømbryter
1. Plasser stikket i kontakten først etter
at du har satt et verktøy i chucken og
dratt til.
2. Start slagbormaskinen ved å trykke
strømbryteren (1) sakte inn. Kontroller
at du har riktig rotasjonsretning. Slipp
strømbryteren for å stoppe maskinen.
3. Når chucken roterer kan du låse
strømbryteren ved å trykke inn
låseknappen (2) og slippe strømbryteren.
Trykk strømbryteren inn og slipp den for
å stanse maskinen.
26
Page 27

Skifte av rotasjonsretning
1. Stopp bormaskinen.
2. Skyv innstillingsknappen (4) til høyre
eller venstre for ønsket rotasjonsretning.
OBS! Bormaskinen fungerer ikke hvis innstillingsknappen står i midtposisjon. Bryteren må
skyves helt ut i en av posisjonene, avhengig
av ønsket rotasjonsretning.
Trinnløs turtallsregulering
1. Start slagbormaskinen ved å trykke
inn strømbryteren (1).
2. Vri innstillingsrattet (7) motsols for
å minske turtallet, og medsols for
å øke det.
3. Innstillingsrattet regulerer hvor langt inn
strømbryteren kan trykkes.
OBS! Start alltid på lav hastighet ved boring
uten forboring eller merking med kjørner. Ved
boring med tynne bor kan hastigheten være
høyere enn når grovere bor brukes. Pussing
og polering krever som regel høy hastighet.
NOR SK
Slagboring eller normalboring?
1. Stopp bormaskinen helt.
2. Trykk på innstilleren (6) til ønsket
boremetode. Velg slagboring for harde
materialer (betong, stein etc.) og
normalboring for stål, aluminium, tre etc.
• Når symbolet med hammer vises, er
maskinen stilt inn som slagbormaskin.
• Når symbolet for et bor vises, er
maskinen stilt inn som vanlig bormaskin.
Advarsel! Ikke still om maskinen hvis ikke
chucken står helt stille. Påse at du har stilt
maskinen helt i riktig posisjon, et ”klikk” skal
høres, når du treffer innstillingsleiet.
27
Page 28

Brukertips
• La maskinen gå i noen minutter (til kjøleluften har romtemperatur),
for å kjøle den ned etter at du har belastet den hardt.
• Bruk sidehåndtaket, det gir ekstra kontroll på boringen.
• Bruk kun skarpe verktøy.
• Til harde metaller brukes Titanbelagte bor. Til betong og keramikkfliser
brukes bor med hardmetallskjær. Les på forpakningen!
• Fest emnet som skal bearbeides ordentlig. Fest det med tvinger, skrustikke eller
lignende. Da har du begge hendene frie til å jobbe med. Dette gir større sikkerhet
og presisjon.
• Dersom du borer i tynne materialer/emner, er det viktig at du plasserer en spillbit
i bakkant av det tenkte borehulles før boring. Dette forhindrer stygge kanter på
baksiden av borehullet.
• Bor vinkelrett i emnet (sjekk fra flere vinkler), og se til at du trykker bormaskinen
NOR SK
rett når du borer.
• Ikke trykk for hardt på maskinen når du borer, slik at maskinens hastighet
minsker. La verktøyet gjøre jobben i sitt eget tempo! Minsk trykket før boret
går helt gjennom.
• La boret fortsatt gå rundt mens du trekker maskinen ut av borehullet.
Da avkjøles maskinen og boret renses for spon.
Tenk på dette når du borer i tre og plast
• For tre og andre myke materialer finnes det flere typer verktøy, for eksempel
hullsag, flatt trebor etc. Velg det som passer best! Prøvebor på en testbit først.
• Verktøyet kan overopphetes dersom du ikke dra det opp ofte og renser det
for spon.
• Plasser en spillbit bak det tenkte borehullet før du starter boringen. Dette hindrer
hullet i å få stygge kanter på baksiden.
Tenk på dette når du borer i metall
• Merk borehullet med en kjørner.
• Verktøyet kan overopphetes dersom du kjører på feil hastighet. Bruk en
kjøleveske som er beregnet på materialet du jobber med, for eksempel rødsprit
til aluminium (Støpejern og messing skal bearbeides tørt).
• Bruk laveste gir og lavt turtall til store hull.
• Vær nøye med å feste arbeidsemnene, især hvis de er tynne eller skarpe. De kan
forårsake store skader dersom de løsner. Bruk skrustikke eller liknende.
28
Page 29

Tenk på dette når du borer i betong, keramikkfliser eller tegl
• Bruk bor med hardmetallskjær!
• Bruk slagbor og trykk forsiktig med samme innmating hele tiden.
• Materialet som bores bort kommer ut gjennom borehullet som pulver eller støv.
Bruk åndedrettsvern (maske).
• Bruk slagboring til betong og tegl, og trykk forsiktig med samme mating hele
tiden. Bruk IKKE slagboring til keramikkfliser.
Vedlikehold og reparasjon
• Kontroller at alle skruer sitter fast på slagbormaskinen. Ved slagboring
vibrerer maskinen.
• Hold alltid ventilasjonsåpningene frie for spon og støv.
• Rengjør maskinen regelmessig med en lett fuktet klut. Unngå sterke
rengjøringsmidler og løsemidler.
• Oppbevar bruksanvisningen sammen med slagbormaskinen.
Avfallshåndtering
Når du skal kaste dette produktet, skal det skje i henhold til gjeldende
forskrifter. Dersom du er usikker på reglene, ta kontakt med lokale
myndigheter for mer informasjon.
Spesifikasjoner
Spenning 230 V AC, 50 Hz
Effekt 850 W
Turtall (ubelastet) 0–2800 o/min
Chuck-kapasitet 1,5–13 mm
Borekapasitet Stål: 13 mm
Betong: 13 mm
Tre: 25 mm
Vekt 2,35 kg
Lydnivåer LwA: 97 dB (A) K: 3 dB
LpA: 86 dB (A) K: 3 dB
Vibrasjon Boring i betong: ah.ID: 7,19 m/s², K: 1,5 m/s²
Boring i metall: ah.ID: 2,62 m/s², K: 1,5 m/s²
NOR SK
29
Page 30

Iskuporakone
Tuotenro 18-3175 Malli Z1J-TD12-13E2-UK
40-7964 Z1J-TD12-13E2
Lue käyttöohjeet ennen tuotteen käyttöönottoa. Säilytä käyttöohjeet tulevaa
tarvetta varten. Pidätämme oikeudet teknisten tietojen muutoksiin. Emme vastaa
mahdollisista teksti- tai kuvavirheistä. Jos laitteeseen tulee teknisiä ongelmia, ota
yhteys myymälään tai asiakaspalveluun (yhteystiedot käyttöohjeen lopussa).
Sisällysluettelo
Yleisiä turvallisuusohjeita 31
Tuotekuvaus 34
Käyttö 35
Vinkkejä 37
Huolto ja ylläpito 38
Kierrätys 38
Tekniset tiedot 38
SUOMI
30
Page 31

Yleisiä turvallisuusohjeita
Varoitus! Lue kaikki ohjeet. Seuraavien ohjeiden noudattamatta jättäminen saattaa
johtaa sähköiskuun, tulipaloon ja/tai vakavaan onnettomuuteen. Alla olevan tekstin
termi ”sähkökäyttöinen käsityökalu” viittaa verkko- tai akkukäyttöiseen käsityökaluun.
SÄÄSTÄ NÄMÄ OHJEET.
1) Työtila
a) Pidä työtilat puhtaina ja hyvin valaistuina. Täynnä tavaraa olevat ja pimeät tilat
ovat avoin kutsu onnettomuudelle.
b) Älä käytä sähkökäyttöisiä käsityökaluja räjähdysherkässä ympäristössä,
kuten helposti syttyvien nesteiden, kaasujen tai pölyn lähellä. Sähkö-
käyttöiset käsityökalut muodostavat kipinöitä, jotka saattavat sytyttää pölyn
tai höyryt.
c) Pidä lapset ja vierailijat loitolla, kun käytät sähkökäyttöisiä käsityökaluja.
Häiriötekijät saattavat johtaa laitteen hallinnan menettämiseen.
2) Sähköturvallisuus!
a) Sähkökäyttöisen käsityökalun pistokkeen tulee sopia pistorasiaan.
Älä muuta tuotetta millään tavalla. Älä käytä adapteria maadoitettujen
sähkökäyttöisten sähkötyökalujen kanssa. Pistokkeet, joita ei ole muutettu sekä
sopivat pistorasiat pienentävät sähköiskun vaaraa.
b) Vältä koskettamasta maadoitettuja esineitä, kuten putkia, lämpöpattereita,
hellaa tai jääkaappia. Sähköiskun riski kasvaa, mikäli kehosi on maadoitettu.
c) Älä altista sähkökäyttöistä käsityökalua sateelle, äläkä käytä sitä kosteissa
olosuhteissa. Veden joutuminen sähkökäyttöiseen käsityökaluun lisää
sähköiskun vaaraa.
d) Käsittele sähköjohtoa varoen. Älä käytä sähköjohtoa laitteen kantamiseen,
äläkä irrota pistoketta pistorasiasta johdosta vetämällä. Älä altista virtajohtoa
kuumuudelle, öljyille, teräville reunoille tai liikkuville osille. Vioittuneet tai
sotkeutuneet virtajohdot lisäävät sähköiskun vaaraa.
e) Kun käytät sähkökäyttöistä käsityökalua ulkona, käytä ainoastaan ulko-
käyttöön sopivia jatkojohtoja. Ulkokäyttöön sopivan jatkojohdon käyttäminen
pienentää sähköiskun vaaraa.
f) Jos käytät sähkökäyttöistä käsityökalua kosteassa paikassa, liitä työkalu
sähköverkkoon vikavirtasuojakytkimen kautta. Vikavirtasuojakytkimen käyttö
pienentää sähköiskun vaaraa.
SUOMI
31
Page 32

3) Oma turvallisuutesi
a) Ole huolellinen ja käytä tervettä järkeä kun työskentelet sähkökäyttöisellä
käsityökalulla. Älä käytä sähkökäyttöistä käsityökalua, mikäli olet väsynyt
tai huumeiden, lääkkeiden tai alkoholin vaikutuksen alaisena. Lyhyenkin
hetken kestävä tarkkaavaisuuden herpaantuminen saattaa johtaa vakavaan
loukkaantumiseen.
b) Käytä suojavarusteita. Käytä aina suojalaseja. Suojavarusteiden, kuten
hengityssuojaimen, liukuestekenkien, kypärän ja kuulosuojaimien käyttäminen
vähentää loukkaantumisvaaraa.
c) Vältä tahatonta käynnistystä. Varmista, että virtakytkin on asennossa ”OFF”
ennen kuin liität pistokkeen seinäpistorasiaan. On äärimmäisen vaarallista
kantaa sähkökäyttöistä käsityökalua sormi liipaisimella tai liittää sähkökäyttöinen
käsityökalu pistorasiaan virtakytkimen ollessa ”ON”-asennossa.
d) Poista kaikki huoltotyökalut/avaimet ennen kuin käynnistät sähkökäyttöisen
käsityökalun. Sähkökäyttöisen käsityökalun liikkuvan osan päälle unohdettu
työkalu saattaa johtaa onnettomuuteen.
e) Älä kurota liian kauas. Varmista, että työasentosi on tasapainoinen
työn jokaisessa vaiheessa. Näin olet paremmin varustautunut mahdollisen
onnettomuuden sattuessa.
f) Käytä sopivia vaatteita. Älä käytä löysiä vaatteita tai koruja. Pidä hiukset,
vaatteet ja käsineet loitolla liikkuvista osista. Löysät vaatteet, korut tai pitkät
hiukset saattavat juuttua liikkuviin osiin.
SUOMI
g) Jos käytössäsi on pölynpoistojärjestelmä, käytä sitä. Näiden apuvälineiden
käyttö saattaa vähentää pölyyn liittyviä vaaroja.
4) Sähkökäyttöisten käsityökalujen käyttäminen
ja huoltaminen.
a) Älä pakota sähkökäyttöistä käsityökalua. Käytä sähkökäyttöistä käsityökalua,
joka soveltuu suunnittelemaasi työtehtävään. Sopiva sähkökäyttöinen käsityökalu
tekee työn paremmin ja turvallisemmin oikealla nopeudella.
b) Älä käytä sähkökäyttöistä käsityökalua, mikäli virtakytkin ei käynnistä
ja sammuta laitetta. Kaikki sähkökäyttöiset käsityökalut, joita ei voida hallita
virtakytkimellä, ovat vaarallisia ja ne tulee korjata.
c) Irrota pistoke pistorasiasta ennen kuin teet sähkökäyttöiseen käsityökaluun
säätöjä tai ennen kuin vaihdat sen varusteita tai ennen kuin asetat sen
säilytykseen. Nämä ennaltaehkäisevät toimenpiteet vähentävät sähkökäyttöisen
käsityökalun tahatonta käynnistymistä.
32
Page 33

d) Säilytä sähkökäyttöisiä käsityökaluja lasten ulottumattomissa. Älä
luovuta sähkökäyttöistä käsityökalua henkilöille, jotka eivät tunne sitä tai sen
käyttöohjetta. Sähkökäyttöiset käsityökalut ovat vaarallisia tottumattomien
käyttäjien käsissä.
e) Huolla sähkökäyttöisiä käsityökaluja. Tarkasta, että säädöt ovat kunnossa,
että liikkuvat osat liikkuvat esteettä, että osat ovat ehjiä, ja että sähkökäyttöisessä
käsityökalussa ei ole muita seikkoja, jotka vaikuttavat laitteen toimintaan. Jos jokin
osa on vioittunut, se tulee korjata ennen käyttöä. Monet onnettomuudet johtuvat
väärin hoidetuista sähkökäyttöisistä käsityökaluista.
f) Pidä työkalut puhtaina ja terävinä. Terätyökalun hallinta on helpompaa,
kun se on oikein hoidettu ja sen terät ovat teräviä.
g) Käytä sähkökäyttöistä käsityökalua, sen varusteita tms. ohjeiden
mukaisesti ja sellaisella tavalla, joka sopii kyseiselle sähkökäyttöiselle
käsityökalulle ja ota myös huomioon työskentelyolosuhteet ja suoritettava
työ. Sähkökäyttöisen käsityökalun käyttäminen muihin kuin sille tarkoitettuihin
työtehtäviin saattaa johtaa vaaratilanteeseen.
5) Huolto
a) Laitteen saa huoltaa ja korjata ainoastaan ammattihenkilö ja huollossa tulee
käyttää ainoastaan alkuperäisosia. Näin taataan sähkökäyttöisen käsityökalun
turvallisuus.
SUOMI
Iskuporakoneen turvallisuusohjeita
1. Käytä kuulosuojaimia työskennellessäsi iskuporakoneella.
Melulle altistuminen saattaa aiheuttaa kuulovaurioita.
2. Käytä mukana tullutta kahvaa työskennellessäsi iskuporakoneella.
Iskuporakoneen hallinnan menettäminen saattaa johtaa loukkaantumiseen.
Tuotteen merkinnät ja turvallisuussymbolit
Lue koko käyttöohje!
Käytä aina visiiriä/suojalaseja ja kuulosuojaimia.
33
Page 34

Tuotekuvaus
9
5
8
SUOMI
1. Virtakytkin
2. Virtakytkimen lukituspainike.
3. Kahva
4. Suunnanvaihto
5. Pikaistukka
6. Iskuporauksen/tavallisen porauksen valitsin
7. Portaaton kierrosluvun säätö
8. Sivukahva
9. Syvyydenrajoitin
6
4
7
1
2
3
34
Page 35

Käyttö
Istukka
1. Iskuporakoneessa on avaimeton
pikaistukka (1,5 – 13 mm).
2. Pidä kiinni istukan taaemmasta osasta ja
väännä etummaista osaa vastapäivään
kunnes avautuma on tarpeeksi iso
poranterälle.
3. Aseta poranterä tai muu työkalu.
4. Pidä kiinni istukan taaemmasta osasta ja
väännä etummaista osaa myötäpäivään
kunnes poranterä lukittuu.
Varoitus! Älä yritä kiristää terää pitämällä kiinni
istukan etummaisesta osasta ja käynnistämällä porakonetta, yritys voi johtaa onnettomuuteen. Istukka lukittuu myöskin paremmin kun
sekä etummaisesta että taaemmasta osasta
pidetään kiinni ja kiristetään käsin.
Sivukahva
1. Irrota sivukahva vääntämällä sitä
vastapäivään.
2. Säädä sivukahva haluttuun asentoon,
säädä tarvittaessa myös syvyydenrajoitin.
3. Lukitse sivukahva ja syvyydenrajoitin
kiertämällä sivukahvaa myötäpäivään.
SUOMI
Virtakytkin
1. Liitä pistoke pistorasiaan vasta kun olet
kiinnittänyt terän istukkaan ja kiristänyt
kunnolla.
2. Käynnistä iskuporakone painamalla
varovasti virtakytkintä (1), varmista, että
terä pyörii oikeaan suuntaan. Pysäytä
moottori päästämällä virtakytkin.
3. Virtakytkimen voi lukita istukan pyöriessä:
paina lukituspainiketta (2) ja päästä
virtakytkin. Sammuta porakone painamalla
ja päästämällä virtakytkin.
35
Page 36

Pyörimissuunnan vaihto
1. Sammuta porakone.
2. Käännä suunnanvalitsinta (4) vasemmalle
tai oikealle ja valitse pyörimissuunta.
Huom! Porakone ei toimi, mikäli suunnanvalitsin on keskiasennossa. Käännä valitsin ääriasentoon, kun valitset pyörimissuuntaa.
Portaaton kierrosluvun säätö
1. Käynnistä porakone painamalla virtakytkintä
(1).
2. Pienennä kierroslukua kääntämällä
säätönuppia (7) vastapäivään, suurenna
kierroslukua kääntämällä säätönuppia
myötäpäivään.
3. Säätönuppi säätää kuinka syvälle
virtakytkintä voi painaa.
Huom! Poratessa ilman esiporattua tai –painettua reikää, tulee aloittaa alhaisella nopeu-
SUOMI
della.. Käytä ohuita poranteriä suurilla nopeuksilla ja paksuja poranteriä alhaisilla nopeuksilla.
Puhdistus ja kiillotus vaativat yleensä suuren
kierrosluvun.
Iskuporaus ja normaali poraus
1. Sammuta porakone kokonaan.
2. Valitse haluttu poraustila valitsimella (6).
Valitse iskuporaus koville materiaaleille
(betoni, kivi ym.) ja normaali poraus
teräkselle, alumiinille, puulle ym.
• Vasara-symboli tarkoittaa iskuporausta.
• Pora-symboli tarkoittaa tavallista porausta.
Varoitus! Älä koske valitsimeen, jos istukka on
liikkeessä. Varmista, että valitsin on oikeassa
asennossa, laitteesta kuuluu naksahdus, kun
valitsin on säädetty oikein.
36
Page 37

Vinkkejä
• Anna moottorin käydä muutaman minuutin ajan ilman kuormitusta (kunnes
jäähdytysilma on huoneenlämpöistä) kovan kuormituksen jälkeen.
• Käytä sivukahvaa, sen avulla saat hyvän tuntuman poraukseen.
• Käytä ainoastaan teräviä työkaluja.
• Kovat metallit vaativat titaanipäällystetyt terät, betonia ja kaakelia kannattaa
porata kovametalliterillä. Lue pakkauksesta!
• Kiinnitä työstettävä materiaali kunnolla. Käytä puristimia tai ruuvipenkkiä jos
mahdollista; tällöin molemmat kätesi ovat vapaina poran käsittelyyn, mikä tekee
työskentelystä tarkempaa.
• Ohutta materiaalia poratessa kannattaa porattavan materiaalin taakse laittaa
taustakappale, näin estetään rumien jälkien syntyminen porausreiän taustaan.
• Suuntaa porakone suorassa kulmassa kohti porattavaa materiaalia ennen
porauksen aloittamista (katso useista kulmista), varmista ettet paina porakonetta
vinoon poratessa.
• Älä paina liian kovaa (vauhti hidastuu), anna koneen tehdä työ puolestasi! Paina
vähemmän juuri ennen kuin terä menee materiaalin läpi.
• Anna terän pyöriä kun se on porautunut läpi ja kun vedät terän porausreiästä,
näin porakone jäähtyy ja puhdistuu purusta.
Ota huomioon puuta ja muovia poratessa!
• Puun ja muiden pehmeiden materiaalien työstämiseen on olemassa monia
erilaisia työkaluja, esim. reikäsaha, puukeskiöpora ym. Valitse parhaiten soveltuva
työkalu! Koeporaa ensin koepalaa!
• Terä saattaa ylikuumentua, mikäli et nosta sitä ylös tarpeeksi usein puhdistaaksesi
sitä puruista.
• Laita taustakappale porattavan materiaalin taakse porausreiän kohdalle, muuten
porausreikä tausta saattaa rispaantua.
Ota huomioon metallia poratessa!
• Merkitse porausreikä pistepuikolla.
• Terä saattaa ylikuumentua jos poraat väärällä nopeudella. Voit käyttää
porattavaan materiaaliin soveltuvaa jäähdytysainetta esim. alumiinia punaisella
etanolilla (valurauta ja messinki tulee työstää kuivina).
• Käytä suuriin reikiin alinta vaihdetta ja pientä kierroslukua.
• Kiinnitä ohuet ja terävät esineet erittäin huolellisesti, etteivät ne irtoa ja aiheita
haavoja. Kiinnitä vaikka puristimilla.
37
SUOMI
Page 38

Ota huomioon betonia, kaakelia ja tiiltä poratessa!
• Käytä kovametalliteriä!
• Käytä iskuporausta ja paina varoen samalla voimakkuudella koko ajan.
• Porattava materiaali tulee porausreiästä pölynä, käytä hengityssuojainta.
• Käytä iskuporausta betoniin ja tiileen. Paina varovasti samalla tasaisesti syöttäen.
ÄLÄ käytä iskuporausta kaakeliin.
Huolto ja ylläpito
• Tarkista ennen käyttöä, että kaikki ruuvit ovat kunnolla kiinni porakoneessa. Laite
tärisee voimakkaasti iskuporauksen aikana.
• Varmista, että laitteen jäähdytysaukot ovat avoinna.
• Puhdista tarvittaessa liinalla ja miedolla tiskiaineliuoksella.
Älä käytä voimakkaita puhdistusaineita tai liuottimia!
• Säilytä käyttöohje porakoneen yhteydessä.
Kierrätys
Kierrätä tuote asianmukaisesti, kun poistat sen käytöstä.
Ota yhteys kuntasi jäteneuvontaan, mikäli olet epävarma.
SUOMI
Tekniset tiedot
Verkkojännite 230 V AC, 50 Hz
Teho 850 W
Kuormittamaton kierrosluku 0–2800 kierr./min
Istukka 1,5–13 mm
Porausteho Teräs: 13 mm
Betoni: 13 mm
Puu: 25 mm
Paino 2,35 kg
Äänenvoimakkuuden tasot LwA: 97 dB (A) K: 3 dB
LpA: 86 dB (A) K: 3 dB
Tärinä Betonin poraaminen: ah.ID: 7,19 m/s², K: 1,5 m/s²
Metallin poraaminen: ah.ID: 2,62 m/s², K: 1,5 m/s²
38
Page 39

Declaration of Conformity
Försäkran om överrenstämmelse
Samsvarerklæring
Vakuutus yhdenmukaisuudesta
CLAS OHLSON AB
SE-793 85 INSJÖN, SWEDEN
Declares that this product complies with the requirements of the following directives and standards
Intygar att denna produkt överensstämmer med kraven i följande direktiv och standarder
Bekrefter at dette produktet er i samsvar med følgende direktiver og standarder
Vakuuttaa, että tämä tuote täyttää seuraavien direktiivien ja standardien vaatimukset
IMPACT DRILL
COTECH 40-7964 / 18-3175
Z1J-TD12-13E2 / Z1J-TD12-13E2-UK
Machinery directive
2006/42/EC
EN 607451:2009+A11:2010
EN 60745-2-1:2010
EMC directive
2004/108/EC
EN 55014-1:2006
EN 55014-2:1997
+A1:2001+A2:2008
EN 61000-3-2:2006
EN 61000-3-3:2008
Klas Balkow
President
Insjön, Sweden, 2012-12-07
Page 40

SVERIGE
KUNDTJÄNST Tel: 0247/445 00
Fax: 0247/445 09
E-post: kundservice@clasohlson.se
INTERNET www.clasohlson.se
BREV Clas Ohlson AB, 793 85 INSJÖN
NORGE
KUNDESENTER Tlf.: 23 21 40 00
Faks: 23 21 40 80
E-post: kundesenter@clasohlson.no
INTERNETT www.clasohlson.no
POST Clas Ohlson AS, Postboks 485 Sentrum, 0105 OSLO
SUOMI
ASIAKASPALVELU Puh.: 020 111 2222
Sähköposti: asiakaspalvelu@clasohlson.fi
INTERNET www.clasohlson.fi
OSOITE Clas Ohlson Oy, Annankatu 34–36 A, 00100 HELSINKI
UNITED KINGDOM
Customer Service Contact number: 08545 300 9799
E-mail: customerservice@clasohlson.co.uk
Internet www.clasohlson.com/uk
Postal 10 – 13 Market Place
Kingston Upon Thames
Surrey
KT1 1JZ
 Loading...