

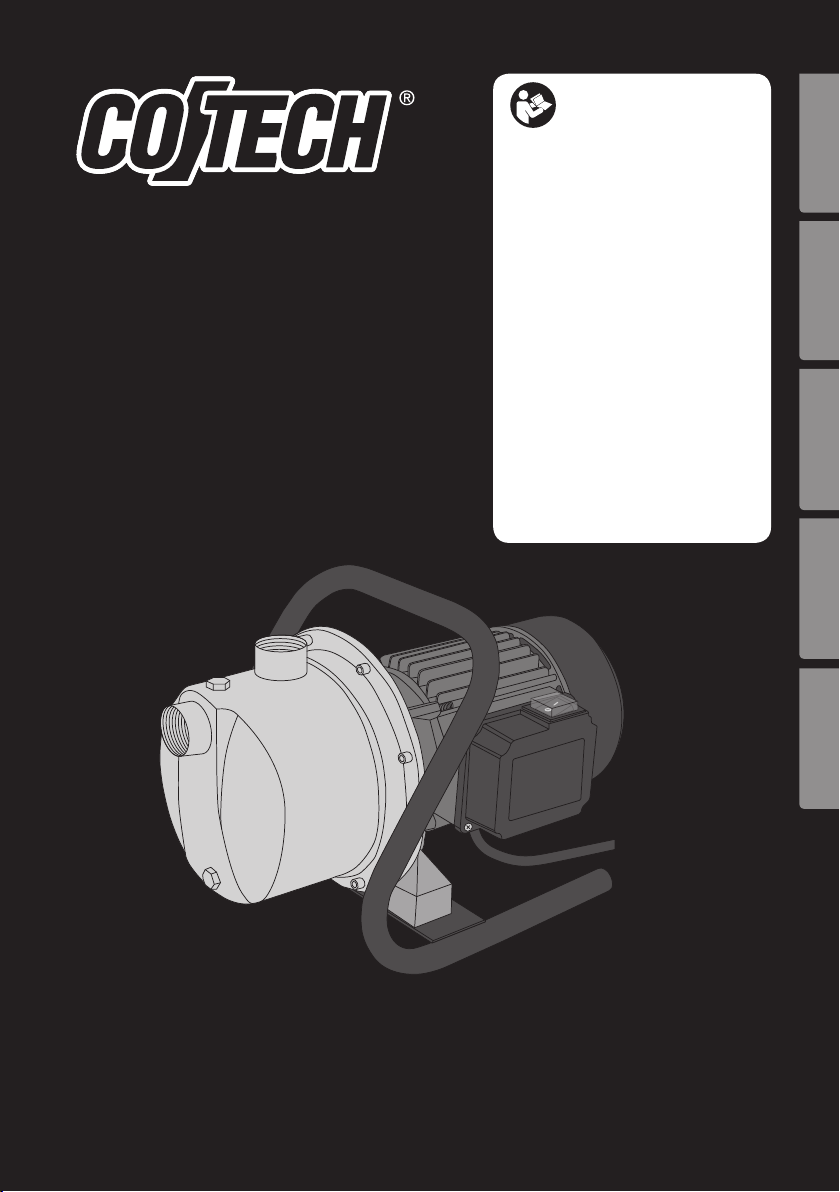
Page 1
Garden Pump
Trädgårdspump
Hagepumpe
Puutarhapumppu
Gartenpumpe
Important!
Read the entire instruction manual carefully
and make sure that you fully understand
it before you use the equipment. Keep the
manual for future reference.
Viktig information:
Läs hela bruksanvisningen noggrant och
försäkra dig om att du har förstått den
innan du använder utrustningen. Spara
bruksanvisningen för framtida bruk.
Viktig informasjon:
Les disse anvisningene nøye og forsikre deg om
at du forstår dem, før du tar produktet i bruk.
Ta vare på anvisningene for seinere bruk.
Tärkeää tietoa:
Lue nämä ohjeet huolellisesti ja varmista
että olet ymmärtänyt ne, ennen kuin alat
käyttää laitetta. Säilytä ohjeet myöhempää
tarvetta varten.
Wichtiger Hinweis:
Vor Inbetriebnahme die komplette
Bedienungsanleitung durchlesen und
aufbewahren.
ENGLISHSVENSK ANORSKSUOMIDEUTSCH
Art.no Model
18-3114 XKJ-1305S-UK
30-1004 XKJ-1305S
Ver. 20150126
Original instructions
Bruksanvisning i original
Original bruksanvisning
Alkuperäinen käyttöohje
Original Bedienungsanleitung
Page 2

2
Page 3

Garden Pump 1300 W
Art.no 18-3114 Model XKJ-1305S-UK
30-1004 XKJ-1305S
Please read theentire instruction manual before using theproduct and save it
for future reference. We reserve theright for any errors in text or images and any
necessary changes made to technical data. If you have any questions regarding
technical problems please contact our Customer Services (see address on reverse).
Safety
• This appliance can be used by children aged from 8 years
and above and persons with reduced physical, sensory or
mental capabilities or lack of experience and knowledge if
they have been given supervision or instruction concerning
use of theappliance in asafe way and understand
thehazards involved.
• Children shall not play with theappliance.
• Cleaning and user maintenance shall not be made by children
without supervision.
• Themains lead should be checked regularly. Never use
theproduct if themains lead or plug is damaged.
ENGLISH
• If thesupply cord is damaged, it must be replaced by
themanufacturer, its service agent or similarly qualified
persons in order to avoid ahazard.
• Use thepump only as described in this instruction manual.
• Always use aresidual current device (RCD or RCCB) which
trips at < 30 mA between thepump and thepower supply.
• Always inspect thepump before using it, especially thepower
lead and plug. Never use thepump if any of theparts is
damaged.
3
Page 4

• Make sure that thepump and all electrical connections
(extension lead, RCD, etc) are placed in adry place
ENGLISH
and protected from rain, moisture and high water level.
Thetemperature should not exceed 35 °C.
• Do not expose themains lead to extreme heat, oil or sharp
edges.
• Keep children and animals away from thepump when it is
running.
• Thepump must not be used for corrosive, flammable or
explosive liquids such as petrol, kerosene or thinners.
• Thepump should also not be used for grease, oil, saltwater,
brackish water, urine or toilet sewage water.
• Thepumped liquid’s temperature must not exceed 35 °C.
• Keep everyone out of theliquid (pool, etc.) being pumped.
• Theoperator of thepump is responsible for thesafety of
thepump and all its applications.
• Always unplug thepump before adjusting, repairing, etc.
• Do not expose thepump directly to jets of water.
• Thepump should only be repaired by aqualified electrician
using original parts.
• Thepump must not be run dry since this will wear out
thepump. Turn off thepump as soon as water has stopped
coming out of thehose. Theguarantee will be void if
thepump is damaged due to dry running.
• Thepump must only be used by those who have read
theinstruction manual. Keep children and animals away from
thepump, especially if it is under pressure.
4
Page 5
Product Description
Operating Range
Thepump is intended for domestic use; in thehome and garden.
Suitable uses:
• Watering gardens, vegetable gardens, lawns, etc.
• Pumping water from springs, wells, water containers, etc.
Note: Thepump is only designed for pumping clean water except drinking water.
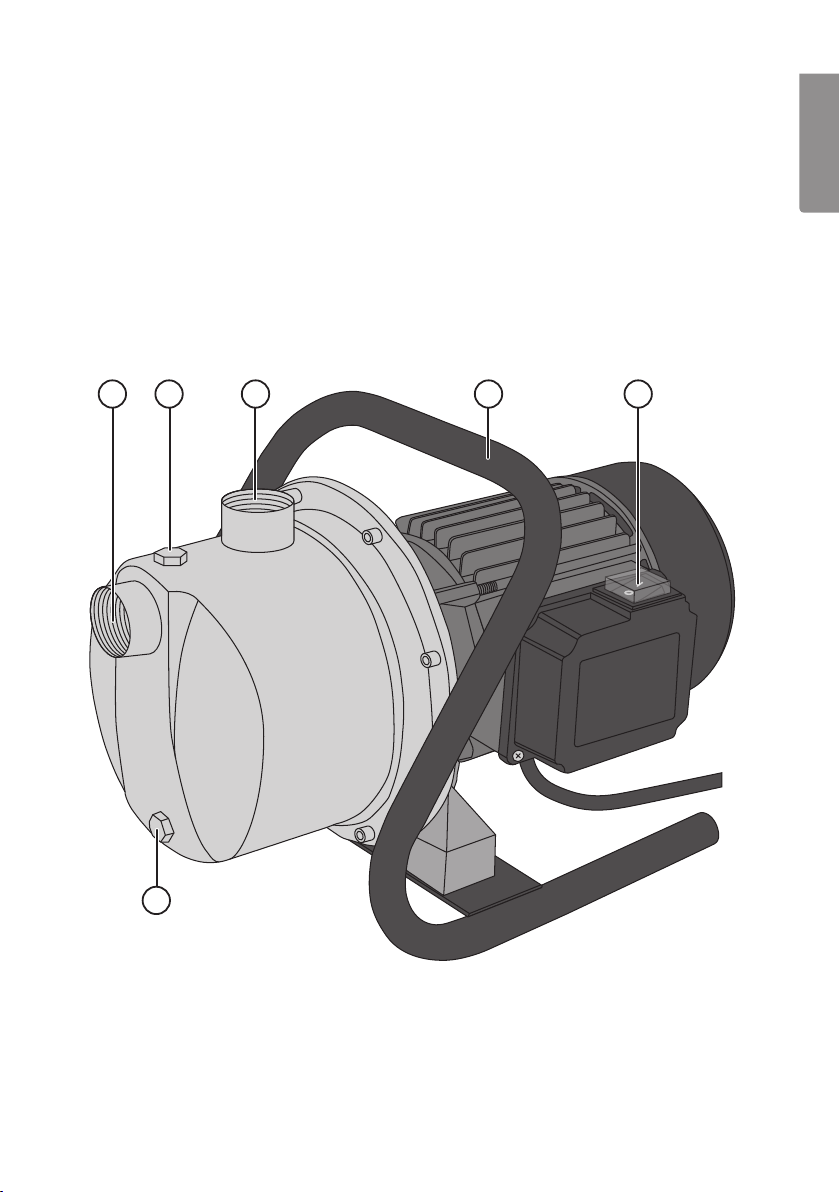
Parts
6543 2
ENGLISH
1
1. Drain plug
2. Pressure hose connection (Female R25,1″)
3. Suction hose connection (Female R25)
5
4. Filler plug
5. Handle
6. Power switch
Page 6

Before using
Placement
ENGLISH
Prevent water damage. Pre-planning prevents accidents!
Leakage in thepump and hoses may occur through freezing, incorrect installation,
pressure surges, etc. Thepump should therefore be placed in awaterproof
environment approved by your insurance company and your insurance policy.
Contact your insurance company if you are unsure.
Place thepump on afirm, hard surface, well protected from water spray.
Suction hose connection
• Connect a25 mm (1″) diameter hose to thesuction hose connection (R25) on
thepump.
• Thesuction hose should be equipped with afoot valve with anon-return valve
that is placed at theend of thesuction hose (pipe).
• Place thesuction hose so that it slopes upwards from thewater to thepump inlet
connection.
• Thesuction hose must always be on alower level than theinlet to thepump.
Air-pockets in thehose could disrupt thepump’s operation.
• Hoses or pipes must not be connected in such away as to exert any pulling
strain or tensile stress on thepump unit.
• Thefoot valve should be anchored to thebottom so that thepump does not run
dry if thewater level drops.
• Thesuction hose assembly must be air-tight to prevent air from being sucked
into thepump.
• Afilter should be fitted to thesuction side to prevent sand, mud, etc from being
sucked into thepump.
Pressure hose connection (outlet)
Connect ahose with amin.12.5 mm (1/2″) diameter to theoutlet connection (R25).
Mains connection
• Connect themains lead to anRCD protected earthed socket for personal safety.
• Thepump has abuilt-in thermal motor protection and automatically shuts off
when overheating (and re-starts automatically when cooled).
6
Page 7

Starting the pump
1. Place thepump on afirm, hard surface, well protected from water spray.
2. Connect thesuction hose to thesuction inlet (3).
3. Connect themains lead to anRCD protected earthed socket for personal safety.
4. Fill thepump housing with water via thefiller hole (4).
5. Connect thepressure hose to theoutlet connection (2).
6. Turn thepump on using thepower switch (6). It can take from four to six minutes
for thepump to reach maximum effectiveness, depending on thepressure head,
and amount of air on thesuction side. Fill thepump with water via thefiller hole (4)
once more if thepump does not work satisfactorily after six minutes.
7. If thepump is detached and reattached thepump unit should be filled with water
via thefiller hole (4).
Maintenance
• Always unplug thepump before carrying out any kind of maintenance.
• Use asoft lightly moistened cloth to clean theplastic pump parts. Never clean
theproduct using strong detergents or solvents.
• If there is arisk of frost or if thepump is not being used during winter it should be
emptied of water. Store thepump in adry place.
• If thepump has not been run for awhile it is agood idea to check that therotor
moves freely by quickly turning thepump on and off.
• Thepump should be checked regularly. Check theoperation and inspect for
any damage.
ENGLISH
General guidelines
• Dry running of thepump should be avoided because it increases wear.
• Pull theplug not thelead when unplugging thepump from themains.
• Never lift or carry thepump by its power lead.
• Sand and other abrasive substances in theliquid that is pumped will increase wear
and tear and reduce thecapacity of thepump.
• Make sure that therecommended suction head (8 m) is not exceeded.
• Protect thepump from frost.
• Thepump is designed for intermittent use, not continual operation such
as for afountain.
7
Page 8
Troubleshooting
Problem Possible Cause Remedy
ENGLISH
Thepump
does not
start.
Thepump
is running
but does
not pump.
Thepump
has
diminished
capacity
or low
pressure.
Thepump
stops
suddenly.
No power supply. Check fuses and RCD,etc.
Dirt lodged in thepump. Remove any dirt or deposits.
Thethermal protection
device has triggered.
There is air in thepump. Open all nozzles and valves etc.
Thesuction hose is above
thewater’s surface.
Suction hose leaking. Tighten, or seal theleak.
Max. suction head exceeded. Check suction head (max. 8 m).
Max. pressure head exceeded. Check pressure head (max. 46 m).
Max. suction head exceeded. Check suction head (max. 8 m).
Max. pressure head exceeded. Check pressure head (max. 46 m).
Thesuction hose is above
thewater level.
Dirt lodged in thepump. Remove any dirt or deposits.
Thethermal protection
device has triggered.
Unplug and clean thepump
Remember that themax. liquid
temperature cannot exceed 35 °C.
so theair can pass through.
Place it below thewater surface.
Place it below thewater surface.
Unplug and clean thepump.
Remember that themax. liquid
temperature cannot exceed 35 °C.
Disposal
Follow local ordinances when disposing of this product. If you are unsure
of how to dispose of this product, please contact your municipality.
Specifications
Rated power 1300 W
Rated voltage 230 V AC, 50 Hz
Max. pump capacity 65 l/min
Max. pressure 4.6 bar
Max. water temperature 35 °C
Max. pressure head 46 metres
Max. suction head 8 metres
Hose connections R25 female thread
Size 38×25 cm
Weight 9.8 kg
8
Page 9

Trädgårdspump 1300 W
Art.nr 18-3114 Modell XKJ-1305S-UK
30-1004 XKJ-1305S
Läs igenom hela bruksanvisningen före användning och spara den sedan för framtida bruk.
Vi reserverar oss för ev. text- och bildfel samt ändringar av tekniska data. Vid tekniska
problem eller andra frågor, kontakta vår kundtjänst (se adressuppgifter på baksidan).
Säkerhet
• Apparaten får användas av barn från 8 år och av personer
med någon form av funktionsnedsättning, brist på erfarenhet
eller kunskap som skulle kunna äventyra säkerheten, om de
har fått instruktioner om hur produkten på ett säkert sätt ska
användas och förstår faror och risker som kan uppkomma.
• Låt aldrig barn leka med produkten.
• Rengöring och skötsel får inte utföras av barn utan vuxens närvaro.
• Nätsladden bör regelbundet kontrolleras. Använd aldrig
produkten om nätsladden eller stickproppen är skadade.
• Om nätsladden skadats får den, för att risk för elektrisk stöt
eller brand ska undvikas, endast bytas av tillverkaren, dess
serviceställe eller av en kvalificerad yrkesman.
• Använd pumpen endast enligt beskrivningen i denna
bruksanvisning.
• Anslut alltid pumpen via en jordfelsbrytare som löser ut vid
< 30 mA felström.
• Kontrollera alltid pumpen innan användning, särskilt anslutningskabeln och stickproppen. Använd aldrig pumpen om någon
komponent är skadad.
SVENSK A
• Se till att pumpen och elanslutningar (skarvuttag, jordfelsbrytare
etc.) är placerade på en torr plats, skyddade mot regn, fukt
och ev. översvämning. Temperaturen får inte överstiga 35 °C.
9
Page 10

• Utsätt inte anslutningskabeln för värme, olja eller vassa kanter.
• Håll barn och husdjur borta från trädgårdspumpen när den är
i drift.
• Pumpen får inte användas till frätande, brännbara eller
explosiva vätskor som t.ex. bensin, fotogen eller förtunning.
Pumpen får inte heller användas till fetter, oljor, saltvatten,
bräckt vatten, urin eller avloppsvatten från toalett.
• Temperaturen på vätskan som pumpas får inte överstiga 35 °C.
SVENSK A
• Ingen får uppehålla sig i vätskan (swimmingpool, fontän etc.)
som pumpas.
• Du som användare är ansvarig för säkerheten vid pumpen och
dess applikationer.
• Ta alltid ur stickproppen innan justering, reparation etc. av pumpen.
• Utsätt aldrig pumpen för direkt vattenstråle.
• Pumpen får endast repareras med originaldelar, av behörig
elektriker.
• Pumpen får inte köras torr eftersom torrkörning leder till
snabb förslitning. Stäng omedelbart av pumpen när vattnet
slutar rinna ur slangen. Inga garantier gäller om pumpen har
gått sönder p.g.a. torrkörning.
• Pumpen får endast användas av person som har läst
bruksanvisningen. Håll undan barn och obehöriga från
pumpen, särskilt från en pump som är trycksatt.
10
Page 11
Produktbeskrivning
Användningsområde
Pumpen är avsedd att användas för privat bruk i hem och trädgård.
Lämpliga användningsområden är:
• Bevattning av odlingar, trädgårdar, gräsmattor etc.
• Pumpning av vatten från källor, brunnar, regnvattenbehållare etc.
Obs! Pumpen är endast avsedd för att pumpa rent sötvatten, dock inte dricksvatten.
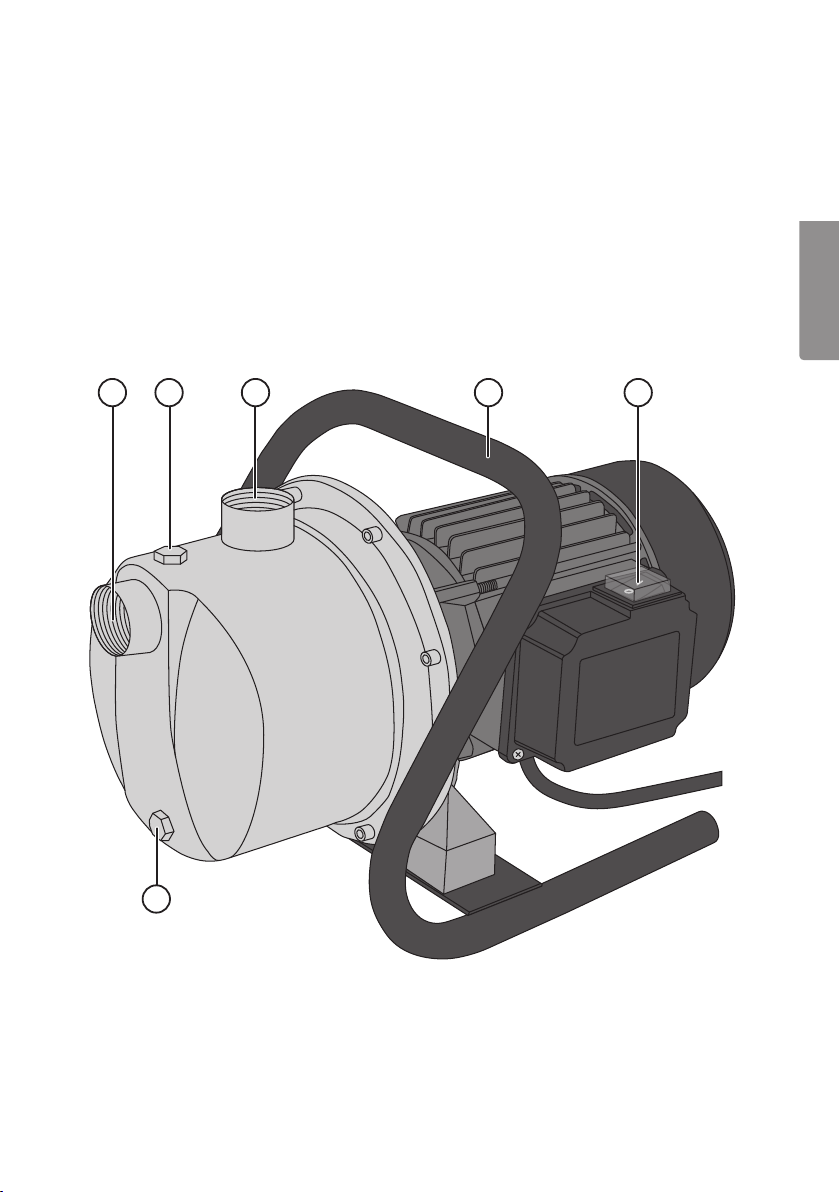
Delar och benämningar
SVENSK A
6543 2
1
1. Plugg för avtappning
2. Anslutning för tryckslang (Inv. R25)
3. Anslutning för sugslang (Inv. R25)
4. Plugg för påfyllning
5. Handtag
6. Strömbrytare
11
Page 12

Före användning
Placering
Förebygg vattenskada, tänk efter innan det händer!
Läckor i pump och ledningar kan uppstå genom sönderfrysning, felaktig installation,
tryckstötar etc. Pumpen skall därför placeras i en våtrumsmiljö som ditt försäkringsbolag godkänner i försäkringsvillkoren. Kontakta ditt försäkringsbolag om du är osäker.
Ställ pumpen på ett fast och hårt underlag väl skyddad från vattensprut.
SVENSK A
Anslutning av sugslang
• Anslut en slang med diameter 25 mm (1″) till suganslutningen (R25) på pumpen.
• Sugslangen ska vara försedd med en bottenventil med backventil som placeras
i slutet på sugledningen (slang/rör).
• Lägg sugslangen stigande uppåt från vattnet till ingången på pumpen.
• Sugslangen ska alltid vara på en lägre nivå än ingången på pumpen.
Luftblåsor i slangen kan annars störa funktionen.
• Slang eller rör får inte anslutas så att pumphuset belastas med tryck
eller dragpåkänningar.
• Bottenventilen ska vara förankrad i botten så att pumpen inte går torr om
vattennivån sjunker.
• Sugledningen måste sluta helt tätt så att inte pumpen kan suga in luft.
• Använd ett filter på sugsidan så att inte sand, lera etc. sugs in i pumpen.
Anslutning av tryckslang (utlopp)
Skruva fast en slang med min. diameter 12,5 mm (1/2″) i utloppet (R25).
Elanslutning
• Anslut anslutningskabelns stickpropp till ett jordat vägguttag som är skyddat via en
jordfelsbrytare avsedd för personskydd.
• Pumpen har ett inbyggt termiskt motorskydd och stängs automatiskt av när den
blir överhettad (motorn startar automatiskt när den kallnar).
12
Page 13

Starta pumpen
1. Ställ pumpen på ett fast och hårt underlag väl skyddad från vattensprut.
2. Anslut sugslang till suganslutningen (3).
3. Anslut nätkabeln till ett jordat vägguttag som är skyddat med en jordfelsbrytare
avsedd för personskydd.
4. Fyll pumphuset med vatten genom påfyllningshålet (4).
5. Anslut tryckslangen till anslutningen (2).
6. Starta pumpen med strömbrytaren (6). Det kan ta upp till 5 minuter innan den
pumpar bra, beroende på tryckhöjd och luftmängd på sugsidan. Fyll pumpen
med vatten genom hålet (4) en gång till om inte pumpen fungerar tillfredställande
efter ca 5 minuter.
7. Om pumpen tas bort och sätts tillbaka ska pumphuset fyllas med vatten genom
påfyllningshålet (4).
Underhåll
• Drag alltid ur stickproppen innan du gör någon typ av underhåll på pumpen.
• Använd en mjuk lätt fuktad trasa för att rengöra pumpens delar i plast.
Använd inte lösningsmedel eller starka rengöringsmedel.
• Om det är risk för frost eller om pumpen inte ska användas vintertid ska pumpen
tömmas på vatten. Förvara pumpen på en torr plats.
• Om pumpen har stått stilla en längre period bör du kontrollera att rotorn rör sig lätt
genom att snabbt slå på och av pumpen en gång.
• Pumpen bör kontrolleras regelbundet. Kontrollera funktionen samt titta efter
eventuella skador.
SVENSK A
Användarråd
• Torrkörning av pumpen ska absolut undvikas då det leder till snabb förslitning.
• Drag i stickproppen och inte i kabeln när anslutningskabeln ska tas ur vägguttaget.
• Lyft eller bär aldrig pumpen i dess anslutningskabel.
• Sand eller annat slipande material i vätskan som pumpas ger ökat slitage och
reducerad kapacitet.
• Kontrollera att sughöjden inte överskrider den maximala (8 m).
• Skydda pumpen mot frost.
• Pumpen är konstruerad för intermittent användning, inte för kontinuerlig drift,
som t.ex. fontäner.
13
Page 14

Felsökning
Problem Tänkbara fel Åtgärd
Pumpen
startar inte.
SVENSK A
Pumpen
går men
pumpar inte.
Pumpen har
dålig kapacitet eller lågt
tryck.
Pumpen
stannar
plötsligt.
Strömlöst. Kontrollera säkringar och
jordfelsbrytare etc.
Smuts har fastnat
i pumpen.
Det termiska motorskyddet
har löst ut.
Luft i pumpen. Öppna alla munstycken och ventiler etc.
Sugslangen ligger
över vattenytan.
Luftläcka i sugslangen. Dra åt, täta.
Max. sughöjd överskriden. Kontrollera sughöjden (max 8 m).
Max. tryckhöjd överskriden. Kontrollera tryckhöjd (max 46 m).
Max. sughöjd överskriden. Kontrollera sughöjden (max 8 m).
Max. tryckhöjd överskriden. Kontrollera tryckhöjd (max 46 m).
Sugslangen ligger
över vattenytan.
Smuts har fastnat
i pumpdelen.
Det termiska
motorskyddet har löst ut.
Ta bort ev. föroreningar
eller beläggningar.
Dra ur stickproppen och gör rent
i pumpen. Tänk på att vätskans
temperatur inte får överstiga 35 °C.
så att luften kan passera.
Ändra placeringen så att den
kommer under ytan.
Ändra placeringen så att den
kommer under ytan.
Ta bort ev. föroreningar
eller beläggningar.
Dra ur stickproppen och gör rent
i pumpen. Tänk på att vätskans
temperatur inte får överstiga 35 °C.
Avfallshantering
När du ska göra dig av med produkten ska detta ske enligt lokala föreskrifter.
Är du osäker på hur du ska gå tillväga, kontakta din kommun.
Specifikationer
Märkeffekt 1300 W
Märkspänning 230 V AC, 50 Hz
Max pumpkapacitet 65 l/min
Max tryck 4,6 bar
Max vattentemperatur 35 °C
Max tryckhöjd 46 meter
Max sughöjd 8 meter
Slanganslutningar R25 invändig gänga
Storlek 38×25 cm
Vikt 9,8 kg
14
Page 15

Hagepumpe 1300 W
Art.nr. 18-3114 Modell XKJ-1305S-UK
30-1004 XKJ-1305S
Les igjennom bruksanvisningen grundig før bruk av produktet, og ta vare på den for ev.
framtidig bruk. Vi reserverer oss mot ev. tekst- og bildefeil, samt forandringer av tekniske
data. Ved tekniske problemer eller andre spørsmål, ta kontakt med vårt kundesenter.
(Se opplysninger om kundesenteret her i denne bruksanvisningen).
Sikkerhet
• Produktet kan benyttes av barn fra 8 års alderen og av
personer med funksjonshemming og manglende erfaring og
kunnskap om produktet, dersom de har fått opplæring om
sikker bruk av det. Det er dog viktig at de forstår faren ved
bruk av det.
• La aldri barn leke med produktet.
• Rengjøring og vedlikehold kan utføres av barn under tilsyn
av voksne.
• Strømledningen bør kontrolleres regelmessig. Bruk ikke
produktet dersom strømledningen eller støpselet er skadet.
• Dersom strømledningen er skadet skal den, for å unngå
elektrisk støt eller brann, skiftes av produsenten, på et
serviceverksted eller av annen fagperson.
NORSK
• Bruk kun pumpen i henhold til beskrivelsen i denne
bruksanvisningen.
• Pumpen skal kobles til strøm via en jordfeilbryter som løses ut
ved < 30 mA feil.
• Kontroller alltid pumpen før bruk, spesielt tilslutningskabelen
og støpslet. Bruk aldri pumpen dersom noen komponenter
er skadet.
15
Page 16

• Påse at pumpen og el-tilkoblinger (skjøter, jordfeilbrytere etc.)
er plassert på et tørt sted og at den er beskyttet mot regn,
fuktighet og eventuell oversvømmelse. Temperaturen må ikke
overstige 35 °C.
• Utsett ikke tilslutningskabelen for varme, olje eller skarpe kanter.
• Hold barn og husdyr vekk fra pumpen mens den er i drift.
• Pumpen må ikke brukes til brennbare eller eksplosive væsker
som f.eks. bensin, parafin eller fortynning. Pumpen må
heller ikke brukes til fett, olje, saltvann, brakkvann, urin eller
avløpsvann fra toalett.
• Temperaturen på væsken som pumpes må ikke overstige 35 °C.
• Ingen må oppholde seg i væsken (svømmebassenget,
NORSK
fontenen etc.) mens væsken pumpes.
• Du, som bruker, er ansvarlig for sikkerheten ved pumpe med
applikasjoner.
• Ta alltid ut støpslet før justering, reparasjon etc.
• Utsett ikke pumpen for direkte vannstråle.
• Pumpen skal kun repareres med originaldeler, og av autorisert
elektriker.
• Pumpen må ikke tørrkjøres. Det vil redusere levetiden
betraktelig. Steng pumpen umiddelbart når vannet slutter å
renne ut av slangen. Dersom pumpen går i stykker på grunn
av tørrkjøring, gjelder ikke garantien.
• Pumpen må kun brukes av voksne personer som har lest
bruksanvisningen. Hold barn og andre uvedkommende vekk
fra pumpen, særlig fra en pumpe som er trykksatt.
16
Page 17

Produktbeskrivelse
Bruksområde
Pumpen er beregnet på privat bruk i hjem og hage.
Passende bruksområder er:
• Vanning av avlinger, hageplanter, gressmatter etc.
• Pumpe vann fra kilder, brønner, regnvannbeholdere etc.
Obs! Pumpen er kun beregnet for pumping av rent ferskvann, dog ikke drikkevann.
Deler og benevninger
6543 2
NORSK
1
1. Tappeplugg
2. Tilkobling for trykkslange (Innv. R25)
3. Tilkobling for sugeslange (Innv. R25)
4. Påfyllingsplugg
5. Håndtak
6. Strømbryter
17
Page 18

Før bruk
Plassering
Forebygg vannskade, tenk deg om før det skjer.
Lekkasjer i pumpe og ledninger kan oppstå ved frost, feil installasjon, trykkskader etc.
Pumpen skal derfor plasseres i et våtromsmiljø som forsikringsselskapet godkjenner i
forsikringsvilkårene. Kontakt forsikringsselskapet hvis du er i tvil.
Still pumpen på et stabilt og hardt underlag, godt beskyttet mot vannsprut.
Tilkobling av sugeslange
• Koble en slange med diameter 25 mm (1″) til sugetilkoblingspunktet (R25)
på pumpen.
• Sugeslangen skal være utstyrt med en bunnventil med tilbakeslagsventil som
plasseres i enden på denne slangen.
• Legg sugeslangen slik at den stiger fra vannet og til inngangen på pumpen.
NORSK
• Innløpet på sugeslangen skal alltid være på et lavere nivå enn inngangen på
pumpen. Hvis ikke kan luftbobler i slangen forstyrre funksjonen.
• Slange eller rør må ikke kobles til slik at pumpehuset belastes med
trykk/strekkbelastninger.
• Bunnventilen skal være forankret i bunnen så ikke automatpumpen går tørr hvis
vannivået synker.
• Sugeslangen må være helt tett i koblingen så pumpen ikke suger inn luft.
• Bruk filter på sugesiden så ikke sand, leire etc. suges inn i automatpumpen.
Tilkobling av trykkslange (utløp)
Skru fast en slange med min. diameter 12,5 mm (1/2″) i utløpet (R25).
Strømtilkobling
• Strømkabelen kobles til et jordet vegguttak som er beskyttet med en jordfeilsbryter.
• Pumpen har innebygd termisk motorbeskyttelse, og den skrus automatisk av når den
blir overopphetet (motoren starter automatisk igjen når motoren er tilstrekkelig kald).
18
Page 19

Starte pumpen
1. Plasser pumpen på et fast og hardt underlag, godt beskyttet mot vannsprut.
2. Koble sugeslangen til sugetilkoblingen (3).
3. Strømkabelen kobles til et jordet vegguttak som er beskyttet med en jordfeilsbryter.
4. Fyll pumpen med vann gjennom påfyllingshullet (4).
5. Koble trykkslangen til inntaket (2).
6. Start pumpen med strømbryteren (6). Det kan ta inntil 5 minutter før den pumper
optimalt, avhengig av trykkhøyde og luftmengde på sugesiden. Fyll pumpen
med vann gjennom hullet (4) en gang til hvis ikke automatpumpen fungerer
tilfredsstillende etter ca. 5 minutter.
7. Dersom pumpen tas bort og settes tilbake, skal pumpehuset fylles med vann
gjennom påfyllingshullet (4).
Vedlikehold
• Trekk alltid ut stikkontakten før vedlikehold på pumpen.
• Bruk en myk lett fuktet klut til å rengjøre automatpumpens plastdeler. Bruk aldri
rengjøringsmiddel eller sterke løsemidler.
• Ved fare for frost eller hvis pumpen ikke skal brukes om vinteren, skal den tømmes
for vann. Oppbevar pumpen på et tørt sted.
• Hvis pumpen har stått stille i lengre tid bør du kontrollere at rotoren beveger seg
lett ved å slå på og av pumpen raskt.
• Pumpen bør kontrolleres regelmessig. Kontroller funksjonen og se etter
eventuelle skader.
Gode råd
• Tørrkjøring må ikke forekomme, da dette fører til store slitasjer.
• Dra i støpslet og ikke i kabelen når tilslutningskabelen skal tas ut fra strømuttaket.
• Ikke løft eller bær pumpen i strømkabelen.
• Sand eller annet slipende materiale i væsken som pumpes gir økt slitasje
og redusert kapasitet.
• Kontroller at sugehøyden ikke overskrider det anbefalte (8 m).
• Beskytt pumpen mot frost.
• Pumpen er konstruert for å brukes i perioder, ikke for kontinuerlig drift,
som f. eks til fontener.
NORSK
19
Page 20

Feilsøking
Problem Tenkbare feil Tiltak
Pumpen
starter ikke.
Pumpen går
men pumper
ikke.
NORSK
Automatpumpen har
dårlig kapasitet eller lavt
trykk.
Pumpen
stopper
plutselig.
Strømløs. Kontroller sikringer og
jordfeilbrytere etc.
Smuss har festet seg
i pumpen.
Den termiske motorbeskyttelsen er utløst.
Luft i pumpen. Åpne opp alle munnstykker og ventiler
Sugeslangen ligger over
vannoverflaten.
Luftlekkasje i sugeslangen. Trekk til/tett.
Maks. sugehøyde overskredet. Kontroller sugehøyden (maks. 8 m).
Maks. trykkhøyde overskredet. Kontroller trykkhøyden (maks. 46 m).
Maks. sugehøyde overskredet. Kontroller sugehøyden (maks. 8 m).
Maks. trykkhøyde overskredet. Kontroller trykkhøyden (maks. 46 m).
Sugeslangen ligger
over vannoverflaten.
Smuss har festet seg
i pumpedelen.
Den termiske
motorbeskyttelsen er utløst.
Fjern forurensning og belegg.
Trekk ut støpselet og rengjør pumpen.
Husk at væskens temperatur ikke må
overstige 35 °C.
etc. slik at den tømmes for luft.
Flytt pumpen slik at den
kommer lavere.
Flytt pumpen slik at den
kommer lavere.
Fjern forurensning og belegg.
Trekk ut støpselet og rengjør pumpen.
Husk at væskens temperatur ikke må
overstige 35 °C.
Avfallshåndtering
Når du skal kvitte deg med produktet, skal dette skje i henhold
til lokale forskrifter. Er du usikker på hvordan du går fram, ta kontakt
med lokale myndigheter.
Spesifikasjoner
Effekt 1300 W
Spenning 230 V AC, 50 Hz
Maks. pumpekapasitet 65 l/min
Maks. tillatt trykk 4,6 bar
Maks. vanntemperatur 35 °C
Maks. trykkhøyde 46 meter
Maks. sugehøyde 8 meter
Slangetilkoblinger R25 innvendig gjenger
Størrelse 38×25 cm
Vekt 9,8 kg
20
Page 21

Puutarhapumppu 1300 W
Tuotenro 18-3114 Malli XKJ-1305S-UK
30-1004 XKJ-1305S
Lue käyttöohjeet ennen tuotteen käyttöönottoa. Säilytä käyttöohjeet tulevaa tarvetta
varten. Pidätämme oikeuden teknisten tietojen muutoksiin. Emme vastaa mahdollisista
teksti- tai kuvavirheistä. Jos laitteeseen tulee teknisiä ongelmia, ota yhteys myymälään
tai asiakaspalveluun (yhteystiedot käyttöohjeen lopussa).
Turvallisuus
• Laitetta saavat käyttää vain yli 8-vuotiaat. Henkilöt, joilla
on fyysisiä tai psyykkisiä rajoitteita tai henkilöt, joilla ei ole
riittävästi laitteen käytön turvallisuuteen vaikuttavia taitoja tai
kokemusta, saavat käyttää laitetta, jos heitä on ohjeistettu sen
turvallisesta käytöstä ja käytön mahdollisista vaaroista.
• Älä anna lasten leikkiä laitteella.
• Yli 8-vuotiaat lapset saavat puhdistaa laitteen aikuisen
valvonnassa.
• Tarkista virtajohdon kunto säännöllisesti. Älä käytä laitetta, jos
sen virtajohto tai pistoke on vioittunut.
• Vioittuneen virtajohdon saa vaihtaa ainoastaan valmistaja,
sen määräämä huoltopiste tai valtuutettu ammattilainen.
Näin vähennetään sähköiskujen ja tulipalojen mahdollisuutta.
SUOMI
• Käytä pumppua ainoastaan käyttöohjeen ohjeiden mukaisesti.
• Kytke pumppu vikavirtasuojakytkimeen, joka laukeaa
vikavirran ollessa < 30 mA.
• Tarkista pumpun kunto aina ennen käyttöönottoa, varsinkin
liitäntäkaapelin ja pistotulpan kohdalta. Älä käytä pumppua,
jos jokin sen osista on vahingoittunut.
• Varmista, että laite ja sähköliitännät (jatkojohdot,
vikavirtasuojakytkin) on sijoitettu kuivalle paikalle ja suojaan
esim. sateelta ja tulvalta. Lämpötila ei saa ylittää 35 °C.
21
Page 22

• Suojaa liitäntäkaapeli kuumuudelta, öljyltä ja teräviltä kulmilta.
• Älä päästä lapsia tai kotieläimiä pumpun läheisyyteen käytön
aikana.
• Pumpulla ei saa pumpata syövyttäviä, helposti syttyviä tai
räjähtäviä nesteitä, kuten bensiiniä, fotogeeniä tai ohenteita.
Pumpulla ei saa myöskään pumpata rasvoja, öljyjä,
suolavettä, murtovettä, virtsaa tai wc:n viemärivettä.
• Pumpattavan nesteen lämpötila ei saa olla yli 35 °C.
• Pumpattavassa vedessä (altaassa, suihkulähteessä) ei saa
olla ihmisiä.
• Pumppulaitteiston turvallisuus on käyttäjän vastuulla.
• Poista aina pistoke verkkovirrasta ennen pumpun säätöä,
korjausta tms.
• Älä kohdista vesisuihkua suoraan pumppuun.
• Pumpun osat saa korvata vain alkuperäisosilla. Vaihdon saa
tehdä ainoastaan valtuutettu sähköasentaja.
• Älä käytä pumppua kuivana, sillä se johtaa pumpun
SUOMI
nopeaan kulumiseen. Sammuta pumppu välittömästi, kun
poistoletkusta ei enää tule vettä. Takuu ei ole voimassa, jos
pumppua on käytetty kuivana.
• Laitetta saa käyttää vain käyttöohjeisiin perehtynyt henkilö.
Pidä lapset ja muut asiaankuulumattomat henkilöt pois
vesiautomaatin ulottuvilta, etenkin jos laite on paineenalainen.
22
Page 23

Tuotekuvaus
Käyttöalueet
Pumppu on tarkoitettu yksityiskäyttöön kodissa ja puutarhassa.
Pumpulle sopivia käyttötarkoituksia:
• Viljelysten, puutarhojen ja nurmikoiden kastelu.
• Veden pumppaus lähteestä, kaivosta, sadevesitynnyristä tms.
Huom.! Pumppu soveltuu ainoastaan puhtaan makean veden (ei juomaveden)
pumppaamiseen.
Osat ja niiden nimitykset
6543 2
SUOMI
1
1. Tyhjennystulppa
2. Paineletkun liitin ( sisäkierre R25)
3. Imuletkun liitin ( sisäkierre R25)
4. Täyttötulppa
5. Kahva
6. Virtakytkin
23
Page 24

Ennen käyttöä
Sijoitus
Estä vesivahingot ja suunnittele asiat huolellisesti etukäteen!
Jäätyminen, vääränlainen asennus, paineenvaihtelut saattavat aiheuttaa vuotoja pumpussa
tai letkuissa/putkissa. Pumppu tulee tämän vuoksi sijoittaa vakuutusyhtiön hyväksymiin
märkätiloihin. Kysy neuvoa vakuutusyhtiöltäsi, jos olet epävarma.
Aseta pumppu kiinteälle alustalle sellaiseen paikkaan, jossa se on suojattu vesisuihkeilta.
Imuletkun liittäminen
• Liitä pumpun imuliitäntään (R25) letku, jonka halkaisija on 25 mm (1″).
• Imuletkun päässä tulee olla takaiskuventtiili.
• Aseta imuletku nousemaan vedestä pumpun imuaukkoon.
• Imuletku on sijoitettava pumpun imuaukkoa alemmaksi. Ilmakuplat letkussa
saattavat muutoin häiritä toimintaa.
• Letku tai putki on asennettava niin, että pumppu ei kuormitu paineesta tai vedosta.
• Pohjaventtiilin on oltava kiinnitetty pohjaan niin, että pumppu ei käy tyhjänä
vedenpinnan laskettua.
• Imuliitännän on oltava täysin tiivis, jotta pumppu ei pumppaisi ilmaa.
• Käytä imuletkun päässä suodatinta, jotta järjestelmään ei pääse hiekkaa, savea tms.
SUOMI
Paineletkun liittäminen (poistoaukko)
Kiinnitä poistoaukkoon (R25) letku, jonka halkaisija on vähintään 12,5 mm (1/2″).
Sähköliitäntä
• Liitä liitäntäkaapelin pistoke maadoitettuun seinäpistorasiaan
vikavirtasuojakytkimen kautta.
• Pumpussa on sisäänrakennettu ylikuumenemissuoja, ja se sammuu itsestään
ylikuumentuessaan (moottori käynnistyy automaattisesti jäähdyttyään).
24
Page 25

Pumpun käynnistäminen
1. Aseta pumppu kiinteälle alustalle sellaiseen paikkaan, jossa se on
suojattu vesisuihkeilta.
2. Liitä imuletku imuliitäntään (3).
3. Liitä virtajohto maadoitettuun seinäpistorasiaan vikavirtasuojakytkimen kautta.
4. Täytä pumppu vedellä täyttöreiän (4) kautta.
5. Liitä paineletku liitäntään (2).
6. Käynnistä pumppu virtakytkimestä (6). Pumppu tarvitsee noin 5 minuuttia
pumpatakseen kunnolla riippuen painekorkeudesta ja imupuolen ilmamäärästä.
Täytä pumppu vedellä reiän (4) kautta toistamiseen, mikäli pumppu ei toimi
kunnolla 5 minuutin kuluttua.
7. Pumppu on täytettävä vedellä täyttöreiän (4) kautta aina kun se on nostettu pois
ja asetettu uudestaan paikoilleen.
Huolto
• Irrota aina pistoke pistorasiasta ennen pumpun huoltoa.
• Puhdista pumpun muoviosat kevyesti kostutetulla liinalla. Älä käytä voimakkaita
puhdistusaineita tai liuottimia.
• Jos on mahdollista, että pumppu pääsee jäätymään, tai jos sitä ei käytetä talvella,
tyhjennä se vedestä.
• Säilytä pumppua kuivassa paikassa.
• Mikäli pumppu on ollut käyttämättömänä pitkään, testaa roottorin jouheva toiminta
kytkemällä pumppu nopeasti päälle ja pois.
• Tarkasta pumpun kunto säännöllisesti. Tarkasta laitteen toiminta ja kunto.
SUOMI
Ohjeita
• Pumpun käyttö kuivana on ehdottomasti kielletty. Kuivakäyttö kuluttaa
laitetta nopeasti.
• Irrota johto pistorasiasta pistokkeesta vetämällä.
• Älä nosta tai kanna laitetta sen virtajohdosta.
• Hiekka ja muut hiovat hiukkaset kuluttavat pumppua ja vähentävät sen suorituskykyä.
• Varmista, että imukorkeus ei ole suositeltua suurempi (8 m).
• Suojaa pumppu pakkaselta.
• Pumppu on suunniteltu ajoittaiseen käyttöön, ei jatkuvaan pumppaamiseen
esim. suihkulähteissä.
25
Page 26

Vianetsintä
Ongelma Mahdolliset syyt Toimenpiteet
Pumppu ei
käynnisty.
Pumppu
käy mutta ei
pumppaa.
Pumpussa
on heikko
suorituskyky
tai alhainen
paine.
Pumppu
SUOMI
pysähtyy
äkillisesti.
Ei virtaa. Tarkista sulakkeet,
Pumppuosassa on likaa. Poista mahdolliset kertymät.
Moottorin ylikuumenemis-
suoja on lauennut.
Pumpussa on ilmaa. Avaa kaikki suuttimet ja venttiilit
Imuletku on
vedenpinnan yläpuolella.
Imuletkussa on ilmavuoto. Kiristä, tiivistä.
Suurin imukorkeus ylitetty. Tarkista imukorkeus (maks. 8 m).
Suurin painekorkeus ylitetty. Tarkista painekorkeus (maks. 46 m).
Suurin imukorkeus ylitetty. Tarkista imukorkeus (maks. 8 m).
Suurin painekorkeus ylitetty. Tarkista painekorkeus (maks. 46 m).
Imuletku on
vedenpinnan yläpuolella.
Pumppuosassa on likaa. Poista mahdolliset kertymät.
Moottorin ylikuumenemis-
suoja on lauennut.
Kierrätys
Kierrätä tuote asianmukaisesti, kun poistat sen käytöstä.
Ota yhteys kuntasi jäteneuvontaan, mikäli olet epävarma.
vikavirtasuojakytkin ym.
Irrota pistoke ja puhdista pumppuosa.
Muista että nesteen lämpötila ei saa
olla yli 35 °C.
ym. jotta ilma pääsee kiertämään.
Laita letku vedenpinnan alapuolelle.
Laita letku vedenpinnan alapuolelle.
Irrota pistoke ja puhdista pumppuosa.
Muista että nesteen lämpötila ei saa
olla yli 35 °C.
Tekniset tiedot
Teho 1300 W
Nimellisjännite 230 V AC, 50 Hz
Suurin virtaus 65 l minuutissa
Suurin paine 4,6 baaria
Suurin veden lämpötila 35 °C
Suurin painekorkeus 46 metriä
Suurin imukorkeus 8 metriä
Letkuliitännät R25 sisäkierre
Mitat 38×25 cm
Paino 9,8 kg
26
Page 27

Gartenpumpe 1300 W
Art.Nr. 18-3114 Modell XKJ-1305S-UK
30-1004 XKJ-1305S
Vor Inbetriebnahme diekomplette Bedienungsanleitung durchlesen und aufbewahren.
Irrtümer, Abweichungen und Änderungen behalten wir uns vor. Bei technischen Problemen
oder anderen Fragen freut sich unser Kundenservice über eine Kontaktaufnahme
(Kontakt siehe Rückseite).
Sicherheitshinweise
• DasGerät ist nur dann für Kinder ab 8 Jahren oder Personen
mit eingeschränkten physischen, sensorischen oder geistigen
Fähigkeiten, bzw. mangelnder Erfahrung/Wissen geeignet,
wenn diese in diesichere Handhabung eingeführt worden
sind und Risiken und Gefahren der Benutzung verstehen.
• Kein Kinderspielzeug.
• Reinigung und Wartung darf von Kindern nur unter Aufsicht
eines Erwachsenen durchgeführt werden.
• DasNetzkabel regelmäßig überprüfen. DasGerät niemals benutzen,
wenn dasNetzkabel oder der Netzstecker beschädigt ist.
• Um Stromschläge oder Feuer zu vermeiden, das Netzkabel
bei Beschädigung nur vom Hersteller, seinem Kundendienst
oder qualifiziertem Fachpersonal austauschen lassen.
• DiePumpe nur wie in dieser Bedienungsanleitung
beschrieben verwenden.
• DiePumpe über einen Fehlerstromschutzschalter anschließen,
derbei einem Fehlerstrom von < 30 mA auslöst.
• Vor derInbetriebnahme diePumpe (insbesondere Anschlusskabel und Stecker) überprüfen. DiePumpe keinesfalls in Betrieb
nehmen, wenn Teile beschädigt sind.
• Sicherstellen, dass Pumpe und Stromanschluss (Stecker kupplung,
Fehlerstrom-schutzschalter usw.) aneinem trockenen Ort
vor Regen, Feuchtigkeit und Überschwemmung geschützt
platziert sind. DieTemperatur darf 35 °C nicht übersteigen.
DEUTSCH
27
Page 28

• Hitze sowie Kontakt mit Öl oder scharfen Kanten schaden
dem Kabel.
• Kinder und Haustiere von derGartenpumpe fernhalten, wenn
sie in Betrieb ist.
• DiePumpe darf nicht für ätzende, entzündliche oder explosive
Flüssigkeiten wie z. B. Benzin, Petroleum oder Verdünner
verwendet werden. Auch darf diePumpe nicht für Fette,
Öle, Salzwasser, Brackwasser, Urin oder Toilettenabwasser
verwendet werden.
• DieTemperatur dergepumpten Flüssigkeit darf 35 °C nicht
übersteigen.
• Es darf sich niemand in derherauszupumpenden Flüssigkeit
(z. B. Wasser aus dem Swimmingpool, Springbrunnen etc.)
aufhalten.
• Der Benutzer ist für den sicheren Betrieb und Einsatz
derPumpe verantwortlich.
• Vor Einstell-, Reparaturarbeiten usw. ander Pumpe stets den
Stecker ziehen.
• DiePumpe niemals direktem Wasserstrahl aussetzen.
• Reparaturen dürfen nur von einem befugten Elektriker mit
Originalersatzteilen ausgeführt werden.
• DiePumpe nicht trocken laufen lassen, da dies zu einem
DEUTSCH
schnellen Verschleiß derPumpe führt. DiePumpe sofort
ausschalten, wenn kein Wasser mehr aus dem Schlauch läuft.
Der Garantieanspruch erlischt, wenn diePumpe aufgrund von
Trockenlaufen beschädigt wird.
• DiePumpe darf nur von Personen benutzt werden,
diedieBedienungsanleitung gelesen haben. Kinder und
Unbefugte von derPumpe fernhalten, insbesondere, wenn
diePumpe unter Druck steht.
28
Page 29

Produktbeschreibung
Einsatzbereich
DiePumpe ist nur für den Privatgebrauch in Haus und Garten bestimmt.
Geeignete Anwendungsbereiche sind:
• Bewässerung von Anbauflächen, Gärten, Rasenflächen etc.
• Abpumpen von Wasser aus Kellern, Bodeneinläufen, Regenwasserbehältern usw.
Hinweis: DiePumpe ist nur zum Pumpen von sauberem Süßwasser vorgesehen,
jedoch nicht für Trinkwasser.
Teile und Bezeichnungen
6543 2
1
1. Stutzen zum Entleeren
2. Anschluss für Druckschlauch (Inw. R25)
3. Anschluss für Saugschlauch (Inw. R25)
DEUTSCH
4. Stutzen zum Auffüllen
5. Tragegriff
6. Ein-/Ausschalter
29
Page 30

Vor der Inbetriebnahme
Aufstellen
Durch Aufmerksamkeit Wasserschäden vorbeugen.
Lecks in Pumpe und Leitungen können durch Frost, fehlerhafte Installation,
Druckstoß usw. auftreten. DiePumpe muss daher in einem Feuchtraum installiert
werden, derden Anforderungen derVersicherung entspricht. Ggf. Versicherung
zuvor befragen.
DiePumpe vor Spritzwasser geschützt auf einer harten, ebenen Unterlage platzieren.
Anschluss des Saugschlauchs
• Einen Schlauch mit einem Durchmesser von 25 mm (1″) am Saugstutzen (R25)
der Pumpe befestigen.
• Der Saugschlauch muss mit einem Bodenventil mit Rückflusssperre ausgestattet
sein, dasam Ende derSaugleitung (Schlauch/Rohr) platziert wird.
• Den Saugschlauch so verlegen, dass er vom Wasser zum Einsaugstutzen
derPumpe ansteigt.
• Der Saugschlauch muss stets niedriger liegen als derEinsaugstutzen. Ansonsten
kann derBetrieb durch eventuelle Luftblasen gestört werden.
• Angeschlossene Schläuche oder Rohre dürfen dasPumpengehäuse nicht durch
Druck oder Zug belasten.
• DasBodenventil muss am Boden verankert werden, damit diePumpe bei
sinkendem Wasserstand nicht trocken läuft.
• DieSaugleitung muss dicht um dasVentil schließen, damit keine Luft angesaugt
werden kann.
• Auf derSaugseite einen Filter vorsehen, damit kein Sand, Lehm usw. in diePumpe
eingesaugt werden kann.
DEUTSCH
Anschluss des Druckschlauchs (Auslass)
Einen Schlauch mit einem Durchmesser von min. 12,5 mm (1/2″) auf den Auslassstutzen
(R25) schrauben.
Stromanschluss
• Den Stecker des Anschlusskabels in eine geerdete Steckdose stecken, diezum
Schutz vor Personenschäden über einen Fehlerstromschutzschalter abgesichert ist.
• DiePumpe hat einen eingebauten thermischen Motorschutzschalter und schaltet
sich bei Überhitzung automatisch aus (der Motor startet automatisch, sobald er
abgekühlt ist).
30
Page 31

Starten der Pumpe
1. DiePumpe vor Spritzwasser geschützt auf einer harten, ebenen Unterlage
platzieren.
2. Den Saugschlauch am Saugstutzen (3) anschließen.
3. DasAnschlusskabel aneine geerdete Steckdose anschließen, diezum Schutz
vor Personenschäden über einen Fehlerstromschutzschalter abgesichert ist.
4. Pumpengehäuse durch dieEinfüllöffnung (4) mit Wasser füllen.
5. Den Druckschlauch am Saugstutzen (2) anschließen.
6. DieMaschine mit dem Ein-/Ausschalter (6) starten. Je nach Förderhöhe und
Luftmenge auf derSaugseite kann es bis zu 5 Minuten dauern, bis diePumpe
einwandfrei funktioniert. DiePumpe durch dieEinfüllöffnung (4) erneut mit Wasser
füllen, wenn diePumpe nach ca. 5 Minuten nicht zufriedenstellend funktioniert.
7. Wenn diePumpe entfernt und zurückgesetzt wird, muss dasPumpengehäuse
durch dieEinfüllöffnung (4) mit Wasser gefüllt werden.
Wartung
• Vor Wartungsarbeiten ander Pumpe den Stecker ziehen.
• Kunststoffteile derPumpe mit einem weichen, feuchten Tuch reinigen.
Keine Lösungsmittel oder starke Reinigungsmittel benutzen.
• Bei Frostgefahr oder wenn diePumpe im Winter nicht verwendet werden soll,
muss dasim Inneren derPumpe vorhandene Wasser entleert werden.
DiePumpe aneinem trockenen Ort aufbewahren.
• Hat diePumpe längere Zeit stillgestanden, den Rotor auf Leichtgängigkeit prüfen.
Dazu diePumpe schnell ein- und ausschalten.
• DiePumpe sollte regelmäßig kontrolliert werden. DieFunkion kontrollieren und
diePumpe auf eventuelle Beschädigungen überprüfen.
DEUTSCH
Ratschläge für den Benutzer
• DiePumpe möglichst nicht trocken laufen lassen, da dies Verschleiß fördert.
• Beim Ziehen des Steckers aus derSteckdose am Stecker und nicht am Kabel ziehen.
• DiePumpe nicht am Anschlusskabel anheben oder tragen.
• Abrasives Material (Sand usw.) im zu pumpenden Wasser erhöht den Verschleiß
und senkt dieLeistungsfähigkeit.
• Sicherstellen, dass dieempfohlene maximale Saughöhe (8 m) nicht überschritten wird.
• DiePumpe vor Frost schützen.
• DiePumpe ist nicht für Dauerbetrieb (z. B. für Springbrunnen) ausgelegt.
31
Page 32

Fehlersuche
Problem Mögliche Ursache Maßnahme
DiePumpe
startet nicht.
Pumpe läuft
aber fördert
nicht.
DieFördermenge
derPumpe
ist gering
oder
derDruck ist
niedrig.
Stromlos. Sicherungen und Fehlerstrom-
Schutzeinrichtung usw. überprüfen.
Es hat sich Schmutz im Inneren
derPumpe festgesetzt.
Der thermische Motorschutzschalter hat ausgelöst.
Luft in derPumpe. Mundstücke, Ventile usw. öffnen,
Der Saugschlauch liegt oberhalb
derWasseroberfläche.
Luftleck im Saugschlauch. Verbindung festziehen bzw.
Max. Saughöhe überschritten. Saughöhe überprüfen (max. 8 m).
Max. Förderhöhe überschritten. Förderhöhe überprüfen (max. 46 m).
Max. Saughöhe überschritten. Saughöhe überprüfen (max. 8 m).
Max. Förderhöhe überschritten. Förderhöhe überprüfen (max. 46 m).
Der Saugschlauch liegt oberhalb
derWasseroberfläche.
Es hat sich Schmutz im Inneren
derPumpe festgesetzt.
Ggf. Verschmutzungen oder
Ablage rungen entfernen.
Netzstecker ziehen und Pumpe
reinigen. Darauf achten, dass
dieTemperatur derFörderflüssigkeit
nicht mehr als 35 °C beträgt.
damit dieLuft entweichen kann.
Lage so ändern, dass er unter
Wasser liegt.
Schlauch abdichten.
Lage so ändern, dass er unter
Wasser liegt.
Ggf. Verschmutzungen oder
Ablagerungen entfernen.
DiePumpe
bleibt plötz-
DEUTSCH
lich stehen.
Der thermische Motorschutzschalter ist aktiviert worden.
32
Netzstecker ziehen und Pumpe
reinigen. Beachten, dass
dieTemperatur derFörderflüssigkeit
nicht mehr als 35 °C beträgt.
Page 33

Hinweise zur Entsorgung
Bitte dasProdukt entsprechend den vor Ort geltenden Bestimmungen
entsorgen. Weitere Informationen sind von derGemeinde oder den
kommunalen Entsorgungsbetrieben erhältlich.
Technische Daten
Nennleistung 1300 W
Nennspannung 230 V AC, 50 Hz
Max. Förderleistung 65 l/min
Max. Druck 4,6 bar
Max. Wassertemperatur 35 °C
Max. Förderhöhe 46 Meter
Max. Saughöhe 8 Meter
Schlauchanschlüsse R25 Innengewinde
Größe 38×25 cm
Gewicht 9,8 kg
33
DEUTSCH
Page 34

Declaration of Conformity
Försäkran om överenstämmelse
Samsvarerklæring
Vakuutus yhdenmukaisuudesta
Konformitätserklärung
CLAS OHLSON AB
SE-793 85 INSJÖN, SWEDEN
Declares that this product complies with the requirements of the following directives and standards
Intygar att denna produkt överensstämmer med kraven i följande direktiv och standarder
Bekrefter at dette produktet er i samsvar med følgende direktiver og standarder
Vakuuttaa, että tämä tuote täyttää seuraavien direktiivien ja standardien vaatimukset
Erklärt hiermit, dass dieses Produkt die Anforderungen und Bestimmungen folgender Richtlinien erfüllt
GARDEN JET PUMP
Cotech 30-1004 / 18-3114
XKJ-1305S / XKJ-1305S-UK
Machinery directive
2006/42/EC
EMC directive
2004/108/EC
EN 55014-1:2006+A1+A2
EN 55014-2:1997+A1+A2
EN 61000-3-2:2006+A1+A2
EN 61000-3-3:2008
Klas Balkow
President
Insjön, Sweden, 2013-10-31
34
Low voltage directive
2006/95/EC
EN 60335-1:2012
EN 60335-2-41:2003
+A1+A2
EN 62233:2008
Page 35

35
Page 36

SVERIGE
KUNDTJÄNST Tel: 0247/445 00
Fax: 02 47/4 45 09
E-post: kundservice@clasohlson.se
INTERNET www.clasohlson.se
BREV Clas Ohlson AB, 793 85 INSJÖN
NORGE
KUNDESENTER Tlf.: 23 21 40 00
Faks: 23 21 40 80
E-post: kundesenter@clasohlson.no
INTERNETT www.clasohlson.no
POST Clas Ohlson AS, Postboks 485 Sentrum, 0105 OSLO
SUOMI
ASIAKASPALVELU Puh.: 020 111 2222
Sähköposti: asiakaspalvelu@clasohlson.fi
INTERNET www.clasohlson.fi
OSOITE Clas Ohlson Oy, Maistraatinportti 4 A, 00240 Helsinki
UNITED KINGDOM
CUSTOMER SERVICE Contact number: 020 8247 9300
E-mail: customerservice@clasohlson.co.uk
INTERNET www.clasohlson.co.uk
POSTAL 10 – 13 Market Place
Kingston Upon Thames
Surrey
KT1 1JZ
DEUTSCHLAND
KUNDENSERVICE Unsere Homepage www.clasohlson.de besuchen
und auf Kundenservice klicken.
 Loading...