

CO/Tech X03D White UK, X03D Black UK, X03D White, X03D Black, X03D Original Instructions Manual
Page 1
Tower Fan
Pelarfläkt
Tårnvifte
Pylvästuuletin
Turmventilator
Important!
Read the entire instruction manual carefully
and make sure that you fully understand
it before you use the equipment. Keep the
manual for future reference.
Viktig information:
Läs hela bruksanvisningen noggrant och
försäkra dig om att du har förstått den
innan du använder utrustningen. Spara
bruksanvisningen för framtida bruk.
Viktig informasjon:
Les disse anvisningene nøye og forsikre deg om
at du forstår dem, før du tar produktet i bruk.
Ta vare på anvisningene for seinere bruk.
Tärkeää tietoa:
Lue nämä ohjeet huolellisesti ja varmista
että olet ymmärtänyt ne, ennen kuin alat
käyttää laitetta. Säilytä ohjeet myöhempää
tarvetta varten.
Wichtiger Hinweis:
Vor Inbetriebnahme die komplette
Bedienungsanleitung durchlesen und
aufbewahren.
ENGLISHSVENSK ANORSKSUOMIDEUTSCH
Art.no Model
18-2861 X03D White UK
18-2862 X03D Black UK
36-5527 X03D White
36-5528 X03D Black
Ver. 20150610
Original instructions
Bruksanvisning i original
Original bruksanvisning
Alkuperäinen käyttöohje
Original Bedienungsanleitung
Page 2

2
Page 3

Tower Fan, 100 cm
Art.no 18-2861, 18-2862 Model X03D White UK, X03D Black UK
36-5527, 36-5528 X03D White, X03D Black
Please read theentire instruction manual before using theproduct and then save
it for future reference. We reserve theright for any errors in text or images and any
necessary changes made to technical data. If you have any questions regarding
technical problems please contact our Customer Services (see address details on
theback).
Safety
• Never use thetower fan if themains lead, plug or any other part is damaged or
does not work properly.
• Never attempt to repair or modify theproduct in any way.
• The tower fan is designed exclusively for domestic use.
• The tower fan is only to be used indoors and in adry and clean environment. Do not
place thetower fan in such away as to risk it falling into water or other types of liquid.
• Always unplug thetower fan from thepower point when it is not in use.
• Never leave children unsupervised in thevicinity of thetower fan when it is in operation.
• Never expose thetower fan to water or other liquids.
• Do not turn on thepower before thetower fan is completely assembled. The fan
must be vertically upright or in one of its set tilt settings during use and must never
be used in aflat, horizontal position.
• Make sure that no foreign objects get inside thetower fan.
• Never turn thetower fan off by pulling theplug out of thewall socket. First turn it
off using thepower button on thecontrol panel and then unplug it.
• Make sure that thetower fan is completely assembled before using it for thefirst time.
• Never use thetower fan in places where explosive gases or substances are stored.
• The product may be used by children aged 8 or over provided they have been
instructed in its safe use and can understand and cope with any hazards or risks
involved with theproduct’s use. Cleaning and maintenance may be carried out by
children aged 8 or over, but only under adult supervision. Keep theproduct and its
mains lead out of reach of children under theage of 8.
• The product may be used by persons with reduced physical, sensory or mental
capabilities or persons with alack of experience or knowledge which could
jeopardize their safety, provided they have been instructed in thesafe operation
of theproduct and understand thehazards involved. Never let children play with
theproduct.
ENGLISH
3
Page 4
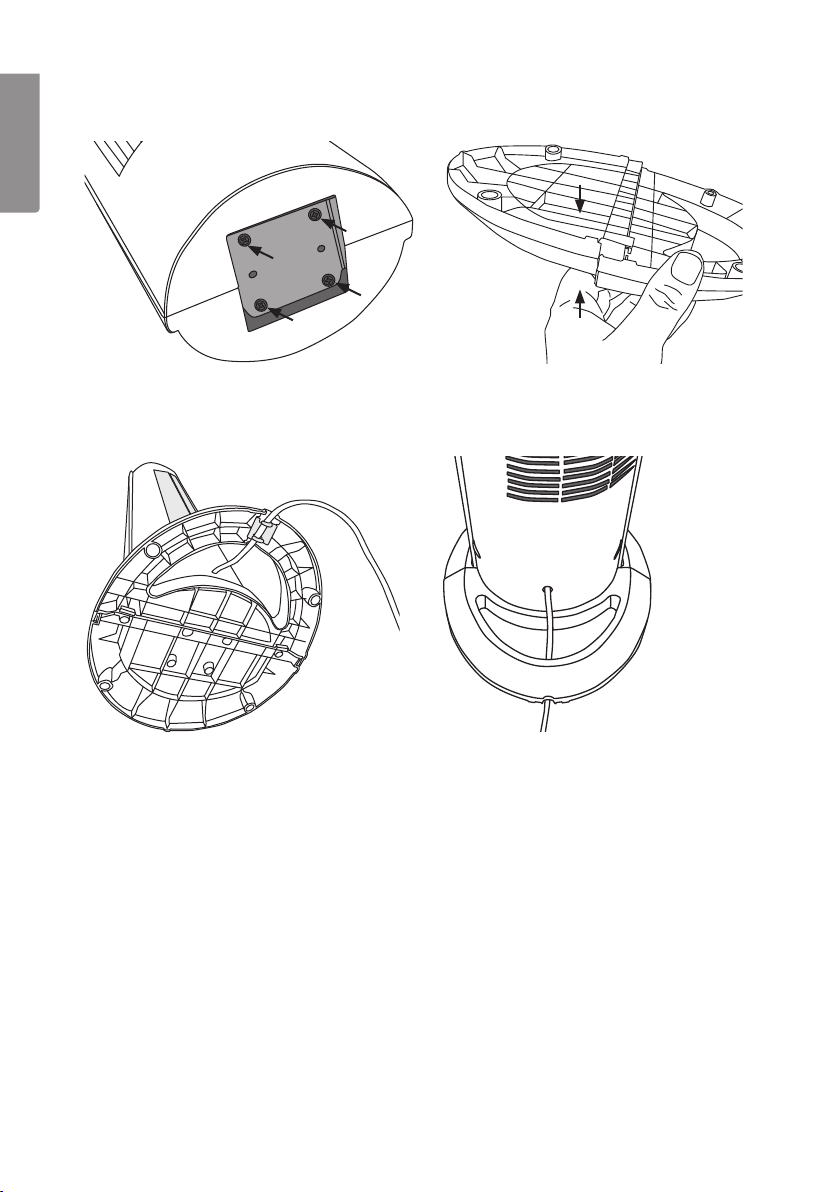
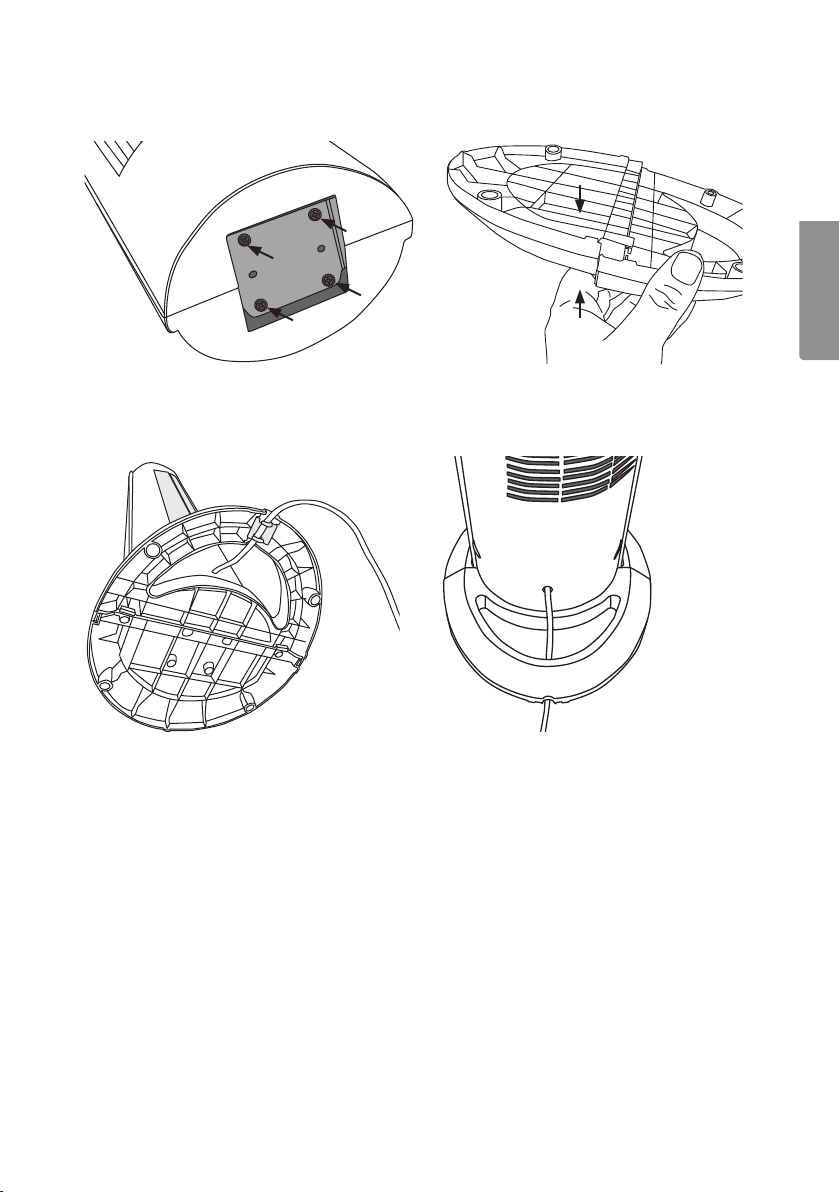
Assembly
ENGLISH
Remove the4 screws from thebase of
thetower fan.
Thread themains lead through thehole
in thebase and fasten thelead into its
retainer.
Slide thetwo pieces of thebase together.
Fasten thebase onto thetower fan
using the4 screws removed previously.
The base only fits on in one way, with
thehole lined up with themains lead at
theback of thefan.
4
Page 5
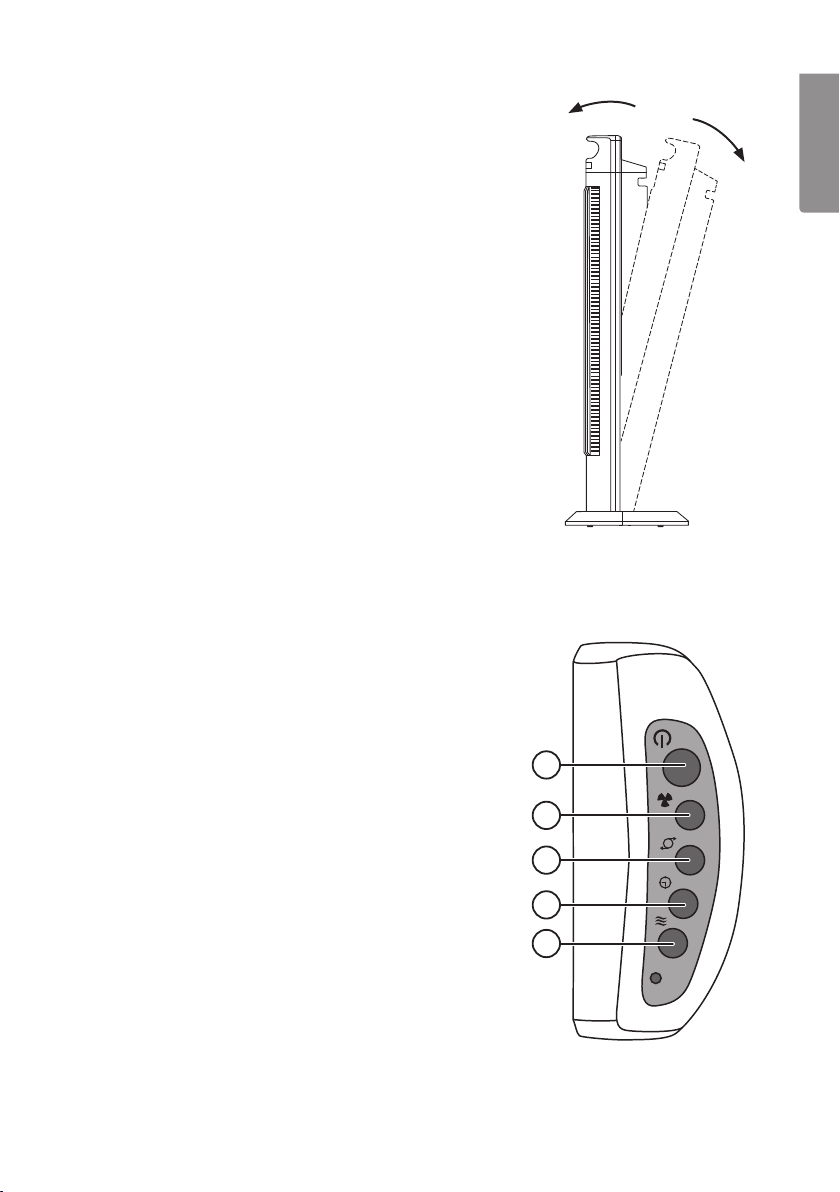
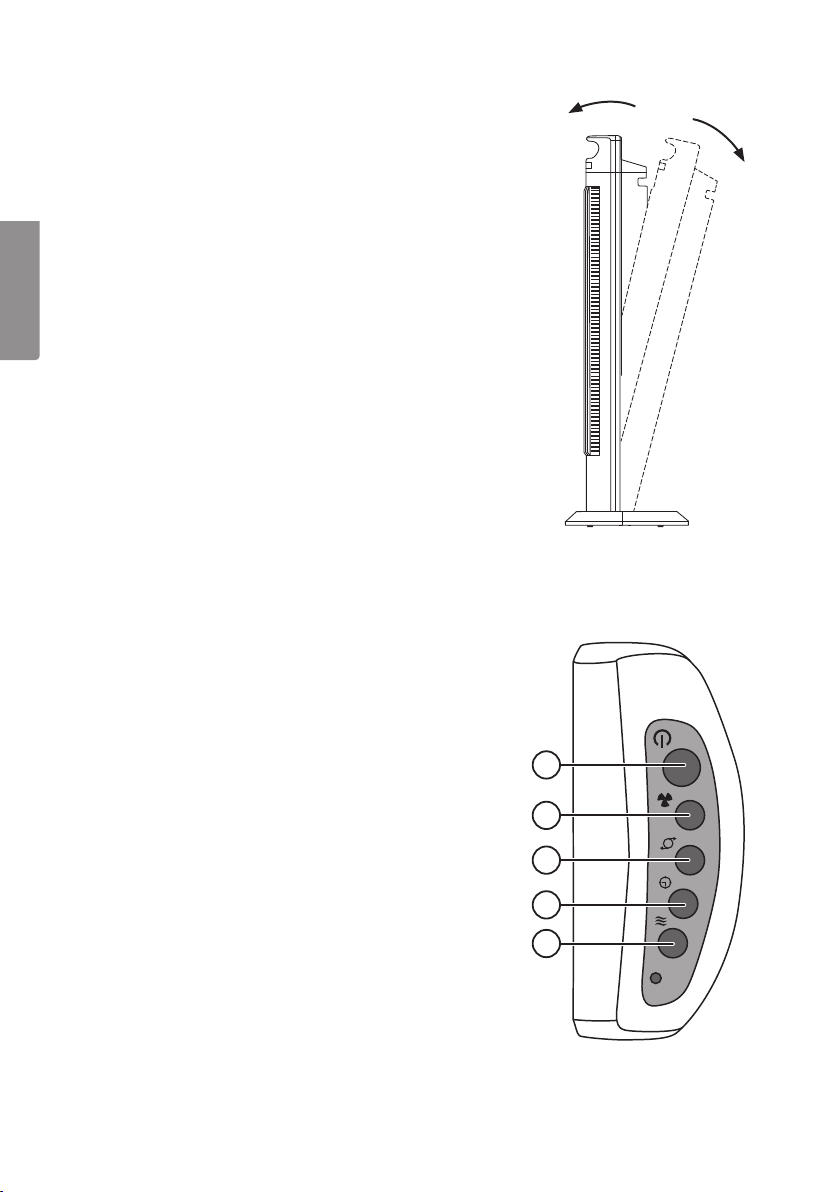
Tilt function
The fan has two tilt settings: 6 or 12degrees.
Lean thefan back carefully to select atilt setting.
Carefully pull thefan back forwards to return it
to its original upright position.
Buttons and functions
Remote control
Open thebattery compartment on theback of
theremote control by sliding thecover in thedirection
of thearrow and insert thebatteries (2 x AAA/LR03).
Note thepolarity markings in thebattery compartment
to ensure correct battery insertion.
1. On/off.
2. Fan speed settings: AUTO - L (low), M (medium),
H (high).
3. Oscillation, on/off.
4. Countdown timer settings: Sets thefan’s runtime.
Press therequired number of times for programming
thedesired timer setting (from 30 min to 7 h and
30 min) in 30 min increments.
5. Fan modes: normal, nature or sleep.
Note: The remote control does not have atemperature
control button, which is only found on thefan’s
control panel.
0/6/12°
ENGLISH
1
2
3
4
5
5
Page 6
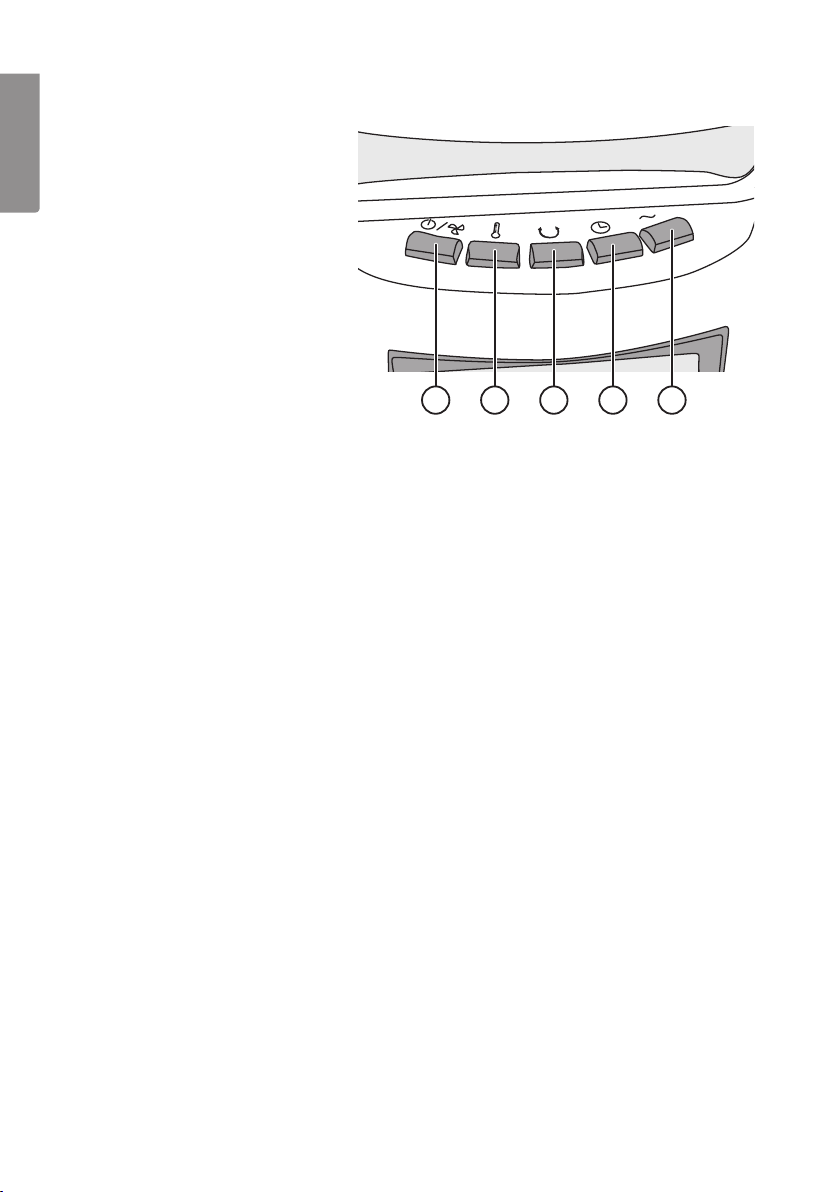
Control panel
6. On/off, fan speed settings:
ENGLISH
AUTO - L (low), M (medium),
H (high).
7. Temperature setting: Press
therequired number of
times to set thedesired
temperature.
Note: The fan itself has no
heating or cooling function.
This setting only influences
thefan speed and is only
operative in AUTO mode.
If thedesired temperature is
set below theambient room
temperature, thefan speed
will increase, etc.
8. Oscillation, on/off.
9. Countdown timer settings: Sets thefan’s runtime. Press therequired number of
times for programming thedesired timer setting (from 30 min to 7 h 30 min)
in 30 min increments.
10. Fan modes: normal, nature or sleep.
6 7 8 9 10
Display backlight
When thefan is switched on thedisplay comes on automatically and stays on.
If you wish to switch thedisplay off, do so in thefollowing way:
1. Hold in thefunction selector button (10) on thefan (or theremote control) for
3 seconds until thedisplay switches off.
2. Pressing any button on either thefan or theremote control will then switch
thedisplay back on for alimited period of approximately 3 minutes.
3. If you wish to switch thedisplay back on so that it stays on all thetime, hold in
thefunction selector button (10) for 3 seconds.
4. Unplugging thefan from thewall socket, thus cutting its power supply will reset
thefan to its default factory settings so that thedisplay stays on when thefan is
switched on.
6
Page 7
Mode description
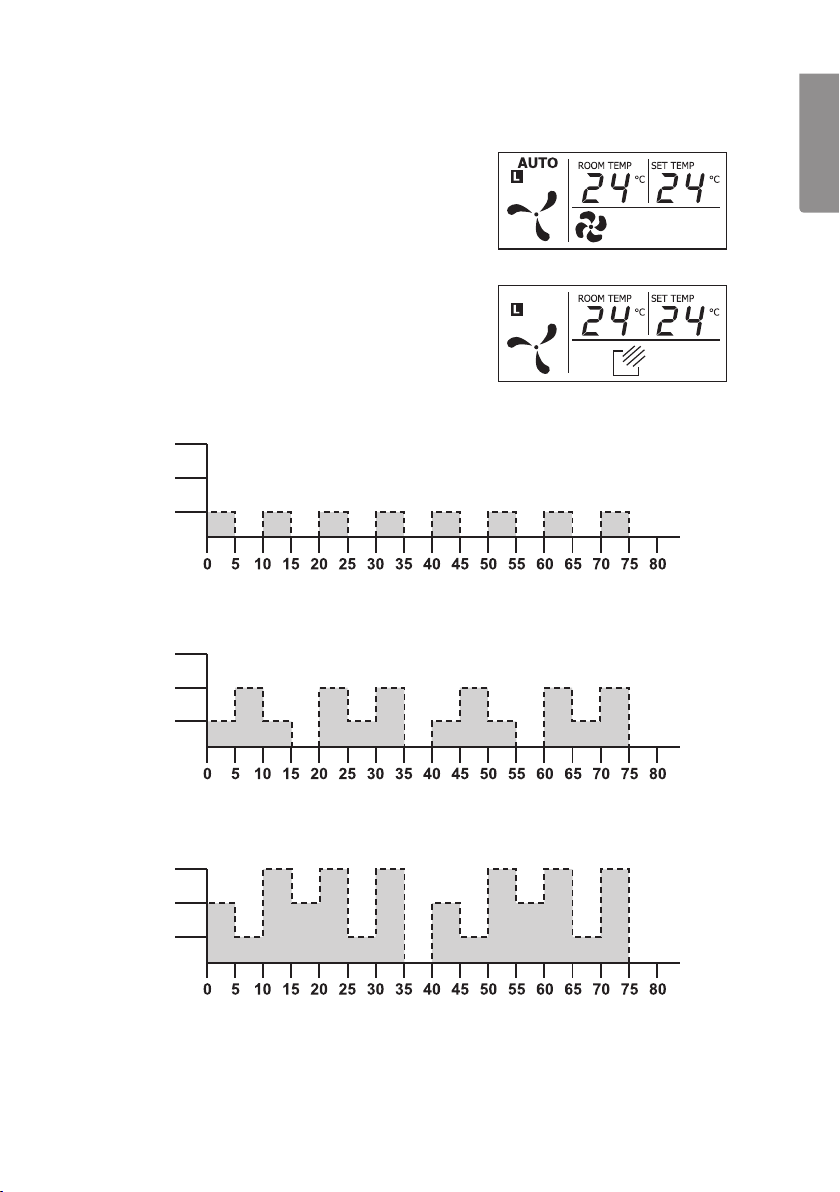
Normal mode
Display example:
Nature mode
Display example:
In nature mode thefan will run in 5 second intervals
with varying fan speed according to afixed pattern
and depending on thefan speed selected. The fan
will alternate between off, low, medium and high.
If L (low) has been selected, thefan will follow thepattern shown in thediagram below.
High
Medium
Low
Time (seconds)
If M (medium) has been selected, thefan will follow thepattern shown in thediagram below.
High
Medium
Low
ENGLISH
Time (seconds)
If H (high) has been selected, thefan will follow thepattern shown in thediagram below.
High
Medium
Low
Time (seconds)
7
Page 8
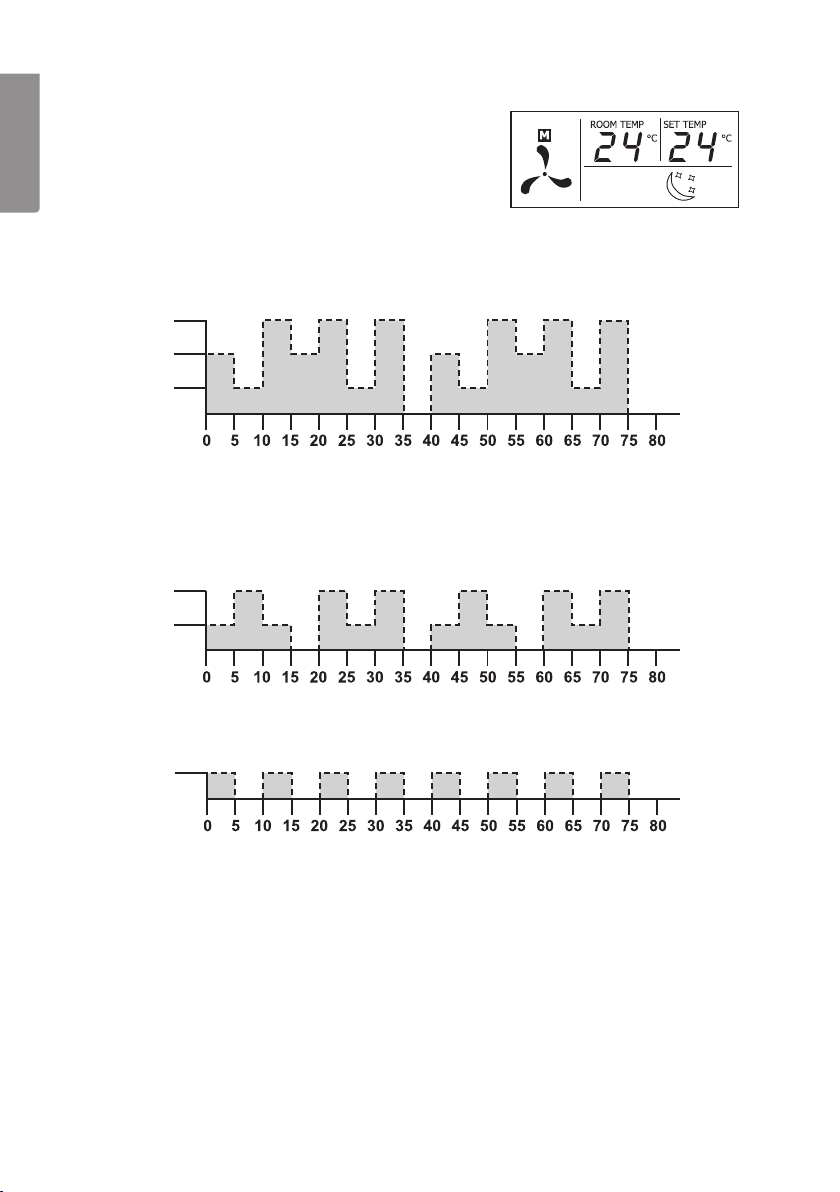
Night mode
Display example:
When night mode is chosen, the fan will operate
ENGLISH
in the same pattern as in the Nature mode, but
with one difference – it will reduce the fan speed
successively at 1-hour intervals.
Example:
High fan speed
High
Medium
Low
Time (seconds)
1. If Night mode and high speed are selected, the timer must also be set to control
the length of time the fan runs before it switches off. Let us say that the fan is to
run for 4 hours, it starts off running as per the Nature mode diagram for high fan
speed for 1 hour.
Medium
Low
1 h fan speed H (high)
1 h fan speed M (medium)
Time (seconds)
2. The fan then runs as per the diagram for medium fan speed for 1 hour.
2 h fan speed L (low)
Low
Time (seconds)
3. For the last 2 hours, the fan then runs as per the diagram for low fan speed. The
fan automatically switches off after 4 hours. The fan can be switched off manually
before it switches off automatically.
Medium-high fan speed
If you choose to run the fan in Night mode on medium-high fan speed, it will run as
per the medium-high fan speed diagram for 1 hour and then as per the low fan speed
diagram for 3 hours before switching off after 4 hours. The fan can be switched off
manually before it switches off automatically.
8
Page 9

Low fan speed
If you choose to begin running the fan in Night mode on low fan speed, it will run as
per the low fan speed diagram for 4 hours before switching off after 4 hours. The fan
can be switched off manually before it switches off automatically.
Bear in mind that the timer must be set to control how long the fan runs for.
Care and maintenance
• Always unplug themains lead from theelectrical socket before cleaning.
• Clean theexterior of thetower fan using alightly moistened cloth. Use only mild
cleaning agents, never solvents or corrosive chemicals.
• Turn off thefan, unplug it from thewall socket and vacuum theintake grille on
theback of thefan regularly.
• If thefan is not to be used for anextended period, unplug it from thewall socket
and store thefan in adry and dust-free location.
Disposal
This product should be disposed of in accordance with local regulations.
If you are unsure how to proceed, contact your local council.
Specifications
Power supply 230 V AC, 50 Hz
Power output 40 W
Height 100 cm
Weight 4.5 kg
Remote control batteries 2×AAA/LR03
ENGLISH
Description Symbol Value Unit
Maximum fan flow rate F 28.03 m³/min
Fan power input P 34.9 W
Service value SV 0.803 (m³/min)/W
Standby power consumption P
Fan sound power level LwA 61.0 dB(A)
Maximum air velocity c 2.705 metres/sec
Measurement standard for
service value
SB
IEC 60879:1986 (corr.1992)
9
0.368 W
Page 10

Pelarfläkt 100 cm
Art.nr 18-2861, 18-2862 Modell X03D White UK, X03D Black UK
36-5527, 36-5528 X03D White, X03D Black
Läs igenom hela bruksanvisningen före användning och spara den sedan för framtida bruk.
Vi reserverar oss för ev. text- och bildfel samt ändringar av tekniska data. Vid tekniska
problem eller andra frågor, kontakta vår kundtjänst (se adressuppgifter på baksidan).
Säkerhet
SVENSK A
• Använd aldrig pelarfläkten om sladden, stickproppen eller någon annan del är
skadad eller inte fungerar normalt.
• Försök aldrig reparera eller modifiera pelarfläkten på något sätt.
• Pelarfläkten är endast avsedd för normalt bruk i hemmet.
• Pelarfläkten får endast användas inomhus i torra och rena miljöer. Placera aldrig
pelarfläkten på sådant sätt att den kan falla ned i vatten eller andra vätskor.
• Dra alltid ut stickproppen ur vägguttaget när pelarfläkten inte används.
• Lämna aldrig barn utan tillsyn när de vistas i pelarfläktens närhet.
• Utsätt aldrig pelarfläkten för vatten eller andra vätskor.
• Anslut inte pelarfläkten till elnätet innan den är helt monterad och klar.
Pelarfläkten måste stå i upprätt eller tiltat läge, den får inte användas liggande.
• Se till att främmande föremål inte kommer in i pelarfläkten.
• Stäng aldrig av pelarfläkten genom att dra ut stickproppen ur vägguttaget.
Stäng av med strömbrytaren och dra därefter ut stickproppen ur vägguttaget.
• Försäkra dig om att pelarfläkten är helt färdigmonterad innan den används
första gången.
• Använd aldrig pelarfläkten i miljöer där explosiva gaser eller ämnen förvaras.
• Pelarfläkten får användas av barn från 8 år om de har fått instruktioner om hur den
på ett säkert sätt ska användas och förstår faror och risker som kan uppkomma.
Rengöring och skötsel får utföras av barn från 8 år i vuxens närvaro. Håll pelarfläkten
och dess nätkabel utom räckhåll för barn under 8 år.
• Pelarfläkten får användas av personer med någon form av funktionsnedsättning,
brist på erfarenhet eller kunskap som skulle kunna äventyra säkerheten, om de har
fått instruktioner om hur pelarfläkten på ett säkert sätt ska användas och förstår
faror och risker som kan uppkomma. Låt aldrig barn leka med pelarfläkten.
10
Page 11
Montering
SVENSK A
Skruva ur de 4 skruvarna ur fotens fäste
i botten på pelarfläkten.
Dra nätkabeln genom hålet i foten och
fäst kabeln i kabelhållaren.
Skjut ihop fotens 2 delar.
Fäst foten på pelarfläkten med de
4 skruvarna. Den passar bara på ett
sätt, med hålet i linje med nätkabeln
på fläktens baksida.
11
Page 12
Tiltfunktion
Du kan luta pelarfläkten bakåt för att vid behov
styra luftströmmen. Välj mellan 2 lägen: 6 eller
12 graders lutning.
Tryck försiktigt fläkten bakåt för att välja läge.
Dra försiktigt tillbaka fläkten för att få den att
återgå till upprätt läge.
SVENSK A
Knappar och funktioner
Fjärrkontroll
Öppna batteriluckan på fjärrkontrollens baksida
genom att skjuta den i pilens riktning och sätt i
batterier (2 x AAA/LR03). Se märkningen i botten
på batterihållaren så att polariteten blir rätt.
1. På/av.
2. Val av fläkthastighet: AUTO – L (låg), M (medel),
H (hög).
3. Svepande rörelse på/av.
4. Inställning av timer. Bestäm hur länge fläkten ska
vara påslagen för att sedan automatiskt stängas
av. Tryck upprepade gånger för att välja gångtid
(från 30 min till 7 tim och 30 min) i steg om 30 min.
5. Val av funktion: normal, natur eller natt.
Obs! Fjärrkontrollen saknar manöverpanelens knapp
för temperaturinställning.
0/6/12°
1
2
3
4
5
12
Page 13

Manöverpanel
6. På/av, val av fläkthastighet:
AUTO – L (låg), M (medel),
H (hög).
7. Temperaturinställning.
Tryck upprepade gånger
för att ställa in önskad
temperatur. Obs! Fläkten
har ingen kylnings- eller
uppvärmningsfunktion.
Inställning av temperatur
påverkar enbart fläkthastigheten. Gäller endast
AUTO-läge. Om den
önskade temperaturen ställs
lägre än rumstemperaturen
ökar fläkthastigheten etc.
8. Svepande rörelse på/av.
9. Inställning av timer. Bestäm hur länge fläkten ska vara påslagen för att sedan automatiskt
stängas av. Tryck upprepade gånger för att välja gångtid (från 30 min till 7 tim och
30 min) i steg om 30 min.
10. Val av funktion: normal, natur eller natt.
6 7 8 9 10
Displaybelysning
När fläkten slås på tänds displaybelysningen automatiskt och förblir tänd.
Om du vill släcka den, gör så här:
1. Håll in knappen för val av funktion (10) på fläkten (eller på fjärrkontrollen) i 3 sek tills
displayen släcks.
2. Om du sedan trycker in någon knapp (på fläkten eller på fjärrkontrollen) tänds
belysningen igen och lyser i ca 3 min för att sedan släckas.
3. Om du åter vill slå på belysningen så att den är tänd hela tiden, håll in knappen för
val av funktion (10) i 3 sek.
4. Om du drar ut nätkabeln ur vägguttaget så att fläkten blir strömlös återgår den till
fabriksinställningen så att belysningen alltid är på när fläkten slås på.
SVENSK A
13
Page 14

Förklaring av fläktens olika funktionslägen
Normalläge
Displayen visar t.ex.:
Naturläge
Displayen visar t.ex.:
I naturläge varieras fläkthastigheten med 5 sek-intervall
utifrån ett fast mönster, beroende på vilken
SVENSK A
fläkthastighet som valts. Fläkten växlar mellan:
avstängd, låg, medium och hög.
Om fläkthastighet L (låg) valts varieras fläkthastigheten enligt diagrammet nedan.
Hög
Medium
Låg
Tid (sekunder)
Om fläkthastighet M (medel) valts varieras fläkthastigheten enligt diagrammet nedan.
Hög
Medium
Låg
Tid (sekunder)
Om fläkthastighet H (hög) valts varieras fläkthastigheten enligt diagrammet nedan.
Hög
Medium
Låg
Tid (sekunder)
14
Page 15

Nattläge
Displayen visar t.ex.:
När man väljer nattläget kommer fläkten att gå efter
samma mönster som i naturläget men med den
skillnaden att den kommer att sänka fläkthastigheten
successivt med 1 tim mellanrum.
Exempel:
Hög fläkthastighet
Hög
Medium
Låg
Tid (sekunder)
1. Om man väljer nattläge och fläkthastighet hög, måste man även ställa in timern på
hur länge man vill att den ska gå innan fläkten stänger av sig. Låt säga att fläkten
ska gå i 4 tim, då startar fläkten i naturlägesdiagrammet för hög fläkthastighet i 1 tim.
1 tim fläkthastighet H (hög)
SVENSK A
Medium
1 tim fläkthastighet M (medel)
Låg
Tid (sekunder)
2. Sedan går fläkten efter diagrammet för medelhög fläkthastighet i 1 tim.
2 tim fläkthastighet L (låg)
Låg
Tid (sekunder)
3. De sista 2 tim går fläkten efter diagrammet för låg fläkthastighet. Fläkten stänger
av sig efter de 4 tim marna. Fläkten kan stängas av manuellt innan den stänger av
sig automatiskt.
Medelhög fläkthastighet
Väljer man istället att börja nattläget på medelhög fläkthastighet så går den efter
diagrammet för medelhög fläkthastighet i 1 tim och sedan efter diagrammet för låg
fläkthastighet i 3 tim innan den stänger av sig efter 4 tim. Fläkten kan stängas av
manuellt innan den stänger av sig automatiskt.
15
Page 16

Låg fläkthastighet
Väljer man istället att börja nattläget på låg fläkthastighet går den efter diagrammet för
låg fläkthastighet i 4 tim innan den stänger av sig efter 4 tim. Fläkten kan stängas av
manuellt innan den stänger av sig automatiskt.
Observera att man måste ställa in timern på hur länge man vill att den ska gå.
Skötsel och underhåll
• Dra ut stickproppen ur vägguttaget innan rengöring påbörjas.
• Rengör fläkten utvändigt med en lätt fuktad trasa. Använd ett milt
SVENSK A
rengöringsmedel, aldrig lösningsmedel eller frätande kemikalier.
• Stäng av fläkten, dra ut stickproppen ur vägguttaget och dammsug gallret på
fläktens baksida (luftintag) med jämna mellanrum.
• Om fläkten inte ska användas under en längre period, dra ut stickproppen ur
vägguttaget och förvara fläkten på en torr och dammfri plats.
Avfallshantering
När du ska göra dig av med pelarfläkten ska detta ske enligt lokala föreskrifter.
Är du osäker på hur du ska gå tillväga, kontakta din kommun.
Specifikationer
Nätanslutning 230 V AC, 50 Hz
Effekt 40 W
Höjd 100 cm
Vikt 4,5 kg
Batterier fjärrkontroll 2×AAA/LR03
Beskrivning Symbol Värde Enhet
Fläktens högsta flödeshastighet F 28,03 m³/min
Fläktens ineffekt P 34,9 W
Driftsvärde SV 0,803 (m³/min)/W
Effektförbrukning i standbyläge P
Fläktens ljudeffektnivå LwA 61,0 dB(A)
Maximal lufthastighet c 2,705 meter/sek
Standard som använts för
mätning av driftsvärde
SB
IEC 60879:1986 (corr.1992)
16
0,368 W
Page 17

Tårnvifte 100 cm
Art.nr. 18-2861, 18-2862 Model X03D White UK, X03D Black UK
36-5527, 36-5528 X03D White, X03D Black
Les brukerveiledningen grundig før produktet tas i bruk og ta vare på den for framtidig
bruk. Vi reserverer oss mot ev. feil i tekst og bilde, samt forandringer av tekniske data.
Ved tekniske problemer eller spørsmål, ta kontakt med vårt kundesenter.
(Se opplysninger om kundesenteret i denne bruksanvisningen).
Sikkerhet
• Bruk ikke viften dersom støpselet, strømledningen eller andre deler er skadet.
• Produktet må ikke modifiseres eller endres på.
• Produktet er kun beregnet for vanlig bruk i hjemmet.
• Produktet må kun brukes innendørs i tørre, rene omgivelser. Plasser ikke produktet
slik at det kan falle ned i vann eller annen væske.
• Trekk alltid støpselet ut av strømuttaket når viften ikke er i bruk.
• La aldri barn oppholde seg i nærheten av tårnviften uten tilsyn.
• Ikke utsett viften for vann eller annen væske.
• Viften må ikke kobles til strømnettet før den er ferdig montert og klar til bruk.
Tårnviften må stå oppreist eller i den vinkelen som er oppgitt her. Den må ikke
brukes liggende.
• Påse at det ikke kommer uønskede gjenstander inn i viften.
• Viften må ikke skrus av ved kun å trekke ut støpselet fra strømuttaket. Steng viften
med strømbryteren og trekk deretter støpselet ut av strømuttaket.
• Forviss deg om at tårnviften er ferdig montert før den tas i bruk første gang.
• Bruk ikke produktet i miljøer hvor eksplosive gasser etc. oppbevares.
• Produktet kan brukes av personer over 8 år dersom de har fått instruksjon i hvordan
den fungerer og hvilke farer som er forbundet med dette. Rengjøring og stell
kan utføres av barn fra 8 års alderen under tilsyn av voksne. Hold produktet og
strømledning utenfor barns rekkevidde (gjelder barn under 8 år).
• Produktet kan benyttes av personer med funksjonshemming og manglende
erfaring og kunnskap om produktet, dersom noen har lært dem opp i bruken av
det og forståelse for alle eventuelle farer. La aldri barn leke med produktet.
NORSK
17
Page 18

Montering
Skru ut de 4 skruene under viften. Skyv de to delene til foten sammen.
NORSK
Trekk strømkabelen gjennom hullet i foten
og fest kabelen til kabelholderen.
Fest foten til tårnviften med de fire
skruene Den kan kun monteres på én
måte, med hullet på linje med strømkabelen på viftens bakside.
18
Page 19

Tiltfunksjon
Tårnviften kan vinkles bakover for å styre luftstrømmen i en litt annen retning. Velg mellom 2
posisjoner: 6 eller 12 graders helling.
Trykk viften forsiktig bakover for å stille den inn
i en av posisjonene. Trekk den forsiktig tilbake
for å gå tilbake til oppreist stilling.
Knapper og funksjoner
Fjernkontroll
Batterilokket, som sitter på hovedenhetens bakside,
åpnes ved å skyve lokket i pilens retning. Sett inn
batteriene (2 x AAA/LR03). Følg merkingen for polaritet
i bunnen av batteriholderen.
1. På/av.
2. Valg av hastighet på viften: AUTO - L (lav),
M (middels), H (høy).
3. Pendlende bevegelser på/av.
4. Innstilling av timer. Bestem hvor lenge viften skal
være påslått, og når du ønsker at den skal stenges,
automatisk. Trykk gjentatte ganger for å velge
aktiv brukstid (fra 30 min til 7 timer og 30 min)
i trinn på 30 min av gangen.
5. Valg av funksjon: normal, natur eller natt.
Obs! Fjernkontrollen har ingen temperaturinnstillingsknapp.
0/6/12°
NORSK
1
2
3
4
5
19
Page 20

Manøvreringspanel
6. På/av, valg av viftehastighet:
AUTO - L (lav), M (middels),
H (høy).
7. Temperaturinnstilling. Trykk
gjentatte ganger for å stille
inn ønsket temperatur.
Obs! Viften har ingen kjøleeller oppvarmingsfunksjon.
Innstilling av temperatur
påvirker kun viftehastigheten.
Gjelder kun AUTOinnstillingen. Hvis den
ønskede temperaturen stilles
lavere enn romtemperaturen
NORSK
vil viftehastigheten øke etc.
8. Pendlende bevegelser på/av.
9. Innstilling av timer. Bestem hvor lenge viften skal være påslått, og når du ønsker at
den skal stenges automatisk. Trykk gjentatte ganger for å velge aktiv brukstid
(fra 30 min til 7 timer og 30 min) i trinn på 30 min av gangen.
10. Valg av funksjon: normal, natur eller natt.
6 7 8 9 10
Displaybelysning
Når viften skrus på vil displaybelysningen også tennes. Hvis den ikke deaktiveres vil
den forblir tent så lenge viften er på.
Belysningen kan skrues av slik:
1. Hold knappen (10) på viften (eller på fjernkontrollen) inne i 3 sekunder til
displayet slukkes.
2. Når du seinere trykker inn en knapp, enten på viften eller på fjernkontrollen,
vil belysningen tennes igjen og lyse i ca. 3 minutter, for så å slukke igjen.
3. Hvis du ønsker kontinuerlig lys på displayet igjen holdes knappen for valg av
funksjon (10) inne i ca. 3 sekunder.
4. Når støpselet trekkes ut av strømuttaket vil viften stilles tilbake til fabrikkinnstillingene igjen slik at lyset alltid skinner når viften er slått på.
20
Page 21

Forklaring av forskjellige funksjonsinnstillinger
Normalinnstilling
Displayet viser f.eks.:
Naturlig innstilling
Displayet viser f.eks.:
I den naturlige innstillingen varieres viftehastigheten
med 5 sekunders intervaller (se skjema nedenfor) ut
fra et fast mønster, avhengig av hvilken hastighet som
er valgt. Viften skifter mellom: Stengt, lav, middels og
høy.
Hvis viftehastigheten L (lav) er valgt, varieres viftehastigheten som vist i diagrammet nedenfor.
Høy
Medium
Lav
Tid (sekunder)
Hvis viftehastigheten M (middels) er valgt, varieres viftehastigheten som vist
i diagrammet nedenfor.
Høy
Medium
Lav
Tid (sekunder)
Hvis viftehastigheten H (høy) er valgt, varieres viftehastigheten som vist i diagrammet
nedenfor.
Høy
Medium
Lav
NORSK
Tid (sekunder)
21
Page 22

Nattinnstilling
Displayet viser f.eks.:
Når man velger nattinnstillingen vil viften gå i det
samme mønsteret som ved normalinnstilling, men
med den forskjellen at den vil senke viftehastigheten
suksessivt med én times mellomrom.
Eksempel:
Høy viftehastighet
Høy
Medium
Lav
1 tim viftehastighet H (høy)
NORSK
Tid (sekunder)
1. Hvis man velger nattinnstillingen og viftehastigheten er høy, må man også stille
inn timeren på hvor lenge man vil at den skal gå før den skrus av. Hvis f.eks. viften
skal gå i 4 timer, så starter den i normalinnstillingen for høy hastighet og går slik i én time.
Medium
1 tim viftehastighet M (middels)
Lav
Tid (sekunder)
2. Deretter går viften ned på middelshøy viftehastighet og går slik i én time.
2 tim viftehastighet L (lav)
Lav
Tid (sekunder)
3. De siste 2 timene vil den gå på lav viftehastighet. Viften skrus av etter 4 timer.
Viften kan stenges manuelt før disse 4 timene har gått.
Middelshøy viftehastighet
Hvis man i stedet velger å starte nattinnstillingen på middelshøy viftehastighet, så går
den slik i én time før den senker hastigheten til lav og går på lav intensitet i de 3 siste
timene. Etter 4 timer skrus den av. Viften kan stenges manuelt før disse 4 timene har gått.
22
Page 23

Lav viftehastighet
Hvis man i stedet velger å starte nattinnstillingen på lav viftehastighet, så går den på
lav intensitet i 4 timer for så å skrus av. Viften kan stenges manuelt før disse 4 timene
har gått.
Vær oppmerksom på at man selv må stille inn hvor mange timer den skal gå.
Stell og vedlikehold
• Trekk støpselet ut fra strømuttaket før rengjøring.
• Rengjør produktet med en lett fuktet klut. Bruk et mildt rengjøringsmiddel,
aldri løsningsmidler eller etsende kjemikalier.
• Steng viften, trekk ut støpselet fra strømuttaket og støvsug gitteret på viftens
bakside (luftinntaket) med jevne mellomrom.
• Hvis viften ikke skal brukes på en stund må strømkabelen trekkes ut. Viften må
oppbevares på en tørr og støvfri plass.
Avfallshåndtering
Når produktet skal kasseres, må dette skje i henhold til lokale forskrifter.
Ved usikkerhet, ta kontakt med lokale myndigheter.
Spesifikasjoner
Nettspenning 230 V AC, 50 Hz
Effekt 40 W
Høyde 100 cm
Vekt 4,5 kg
Batterier fjernkontroll 2×AAA/LR03
NORSK
Beskrivelse Symbol Verdi Enhet
Viftens største luftstrømhastighet F 28,03 m³/min
Viftens effekt inn P 34,9 W
Driftsverdi SV 0,803 (m³/min)/W
Effektforbruk (i standby-modus) P
Viftens lydeffektnivå LwA 61,0 dB(A)
Maks lufthastighet c 2,705 m/s
Standard som er benyttet for
måling av driftsverdi
SB
IEC 60879:1986 (corr.1992)
23
0,368 W
Page 24

Pylvästuuletin 100 cm
Tuotenro 18-2861, 18-2862 Malli X03D White UK, X03D Black UK
36-5527, 36-5528 X03D White, X03D Black
Lue käyttöohje ennen tuotteen käyttöönottoa ja säilytä se tulevaa tarvetta varten.
Pidätämme oikeuden teknisten tietojen muutoksiin. Emme vastaa mahdollisista tekstitai kuvavirheistä. Jos tuotteeseen tulee teknisiä ongelmia, ota yhteys myymälään tai
asiakaspalveluun (yhteystiedot käyttöohjeen lopussa).
Turvallisuus
• Älä käytä pylvästuuletinta, jos sen virtajohto, pistoke tai jokin muu osa on
vaurioitunut tai ei toimi normaalisti.
• Älä yritä itse korjata laitetta tai muokata sitä millään tavalla.
• Pylvästuuletin on tarkoitettu ainoastaan normaaliin yksityiskäyttöön kotona.
• Käytä tuuletinta ainoastaan sisätiloissa kuivassa ja puhtaassa ympäristössä.
Älä sijoita pylvästuuletinta siten, että se voi pudota veteen tai muuhun nesteeseen.
• Irrota pistoke pistorasiasta, kun et käytä tuuletinta.
• Älä jätä lapsia ilman valvontaa pylvästuulettimen läheisyyteen.
• Älä altista pylvästuuletinta vedelle tai muille nesteille.
• Älä liitä virtaa laitteeseen ennen kuin olet asentanut sen käyttövalmiiksi.
SUOMI
Pylvästuulettimen tulee olla pystyasennossa tai kallistettuna. Tuuletinta ei saa
käyttää vaakatasossa.
• Varmista, että pylvästuulettimeen ei joudu vieraita esineitä.
• Älä sammuta pylvästuuletinta irrottamalla pistoketta pistorasiasta. Sammuta
pylvästuuletin virtakytkimellä ja irrota sen jälkeen pistoke pistorasiasta.
• Varmista ennen ensimmäistä käyttökertaa, että pylvästuuletin on täysin koottu.
• Älä käytä pylvästuuletinta ympäristössä, jossa säilytetään räjähtäviä kaasuja tai aineita.
• Yli 8-vuotiaat lapset saavat käyttää laitetta, jos heitä on ohjeistettu sen turvallisesta
käytöstä ja käytön mahdollisista vaaroista. Vain yli 8-vuotiaat lapset saavat puhdistaa
laitteen aikuisen valvonnassa. Pidä laite ja sen virtajohto alle 8-vuotiaiden lasten
ulottumattomissa.
• Henkilöt, joilla on fyysisiä tai psyykkisiä rajoitteita, tai henkilöt, joilla ei ole riittävästi
turvallisuuteen vaikuttavia taitoja tai kokemusta, saavat käyttää laitetta, jos heitä
on ohjeistettu sen turvallisesta käytöstä ja käytön mahdollisista vaaroista. Älä anna
lasten leikkiä tuulettimella.
24
Page 25

Asennus
Irrota pylvästuulettimen pohjassa olevat
neljä ruuvia jalan kiinnikkeestä.
Pujota virtajohto jalan reiän läpi ja kiinnitä
johto kaapelipidikkeeseen.
Työnnä jalan kaksi osaa yhteen.
SUOMI
Kiinnitä jalka pylvästuulettimen neljällä
ruuvilla. Jalka voidaan kiinnittää vain
yhdellä tavalla siten, että reikä on
linjassa virtajohdo kanssa tuulettimen
takapuolella.
25
Page 26

Pylvästuulettimen kallistaminen
Pylvästuuletinta voi kallistaa taaksepäin, jos
ilmavirtaa halutaan suunnata eri paikkaan.
Kallistuksessa on kaksi tasoa: 6 ja 12 astetta.
Valitse kallistus kääntämällä tuuletinta varovasti
taaksepäin. Palauta tuuletin alkuperäiseen
asentoon kääntämällä sitä varovasti eteenpäin.
Painikkeet ja toiminnot
SUOMI
Kaukosäädin
Avaa kaukosäätimen takapuolella olevan paristolokeron kansi työntämällä sitä nuolen suuntaan, ja aseta
lokeroon paristot (2 kpl AAA/LR03). Varmista paristolokeron pohjassa olevista merkinnöistä, että paristot
tulevat oikein päin.
1. Päällä/pois päältä
2. Puhallusnopeuden valinta: AUTO - L (matala),
M (keskitaso), H (korkea).
3. Pyörivän liikkeen käynnistys/sammutus.
4. Ajastimen asetus. Valitse päälläoloaika (30 minuuttia –
7,5 tuntia) 30 minuutin jaksoissa painamalla
painiketta useita kertoja.
5. Toiminnonvalinta: Tasainen, luonnollinen ja yö.
Huom.! Kaukosäätimessä ei ole lämpötilanvalintapainiketta.
0/6/12°
1
2
3
4
5
26
Page 27

Ohjauspaneeli
6. Päälle/pois päältä,
puhallusnopeuden valinta:
AUTO - L (matala),
M (keskitaso), H (korkea).
7. Lämpötilansäätö. Valitse
sopiva lämpötila painamalla
painiketta useita kertoja.
Huom.! Pylvästuulettimessa
ei ole jäähdytys- ja
lämmitystoimintoa.
Lämpötilansäätö
vaikuttaa ainoastaan
puhallusnopeuteen. Tämä
koskee ainoastaan AUTOtilaa. Jos haluttu lämpötila esimerkiksi asetetaan alhaisemmaksi kuin huoneen
lämpötila, puhaltimen nopeus kasvaa.
8. Pyörivän liikkeen käynnistys/sammutus.
9. Ajastimen asetus. Valitse päälläoloaika (30 minuuttia – 7,5 tuntia) 30 minuutin
jaksoissa painamalla painiketta useita kertoja.
10. Toiminnonvalinta: Tasainen, luonnollinen ja yö.
6 7 8 9 10
Näytön valo
Näytön valo syttyy automaattisesti, kun tuuletin käynnistetään.
Sammuta näytön valo seuraavalla tavalla:
1. Paina tuulettimen (tai kaukosäätimen) toimintopainiketta (10) kolmen sekunnin
ajan, kunnes näytön valo sammuu.
2. Voit sytyttää näytön valon kolmen minuutin ajaksi painamalla jotain tuulettimen tai
kaukosäätimen painiketta.
3. Jos haluat, että näytön valo palaa jatkuvasti, paina toimintopainiketta (10) kolmen
sekunnin ajan.
4. Jos irrotat muuntajan pistorasiasta, tuulettimen tehdasasetukset palautuvat,
ja näytön valo palaa aina, kun tuuletin käynnistetään.
27
SUOMI
Page 28

Tuulettimen toimintojen selitykset
Normaalitila
Näytöllä lukee esim.:
Luonnollinen tila
Näytöllä lukee esim.:
Luonnollisessa tilassa tuulettimen nopeus vaihtelee
viiden sekunnin välein kiinteän ohjelman mukaan
riippuen puhallusnopeudesta. Puhaltimessa on
seuraavat tehot: Sammutettu, matala, keskitaso
ja korkea.
Jos valitset matalan (L) tehon, puhaltimen nopeus vaihtelee alla olevan diagrammin mukaan.
Korkea
Keskitaso
Matala
SUOMI
Jos valitset keskitehon (M), puhaltimen nopeus vaihtelee alla olevan diagrammin mukaan.
Korkea
Keskitaso
Matala
Jos valitset korkean (H) tehon, puhaltimen nopeus vaihtelee alla olevan diagrammin mukaan.
Korkea
Keskitaso
Matala
Aika (sekuntia)
Aika (sekuntia)
Aika (sekuntia)
28
Page 29

Yötila
Näytöllä lukee esim.:
Yötilassa tuuletin käy muuten kuten luonnontilassa,
mutta se alentaa puhallusnopeutta asteittain yhden
tunnin välein.
Esimerkki:
Suuri puhallusnopeus
Korkea
Keskitaso
Matala
Aika (sekuntia)
1. Jos valitset yötilan ja puhallusnopeudeksi suuren, ajastimella tulee valita, kuinka
pitkään tuuletin on käynnissä, ennen kuin se sammuu. Jos tuuletin on päällä neljä
tuntia, puhallin käynnistyy luonnontilassa, ja se käy suurella nopeudella yhden tunnin.
1 h puhallusnopeus H (korkea)
Keskitaso
1 h puhallusnopeus M (keskitaso)
Matala
Aika (sekuntia)
2. Sen jälkeen tuuletin käy keskiteholla yhden tunnin.
2 h puhallusnopeus L (matala)
Matala
Aika (sekuntia)
3. Tämän jälkeen tuuletin käy alhaisella nopeudella kaksi tuntia. Tämän jälkeen tuuletin
sammuu. Tuulettimen voi myös sammuttaa manuaalisesti ennen kuin se sammuu
automaattisesti.
Keskiteho
Jos valitset yötilan ja puhallusnopeudeksi keskitehon, tuuletin käy keskiteholla yhden
tunnin, minkä jälkeen se käy alhaisella nopeudella kolme tuntia, minkä jälkeen tuuletin
sammuu. Tuulettimen voi myös sammuttaa manuaalisesti ennen kuin se sammuu
automaattisesti.
29
SUOMI
Page 30

Alhainen puhallusnopeus
Jos valitset yötilan ja puhallusnopeudeksi alhaisen tehon, tuuletin käy alhaisella teholla
neljä tuntia, minkä jälkeen se sammuu. Tuulettimen voi myös sammuttaa manuaalisesti
ennen kuin se sammuu automaattisesti.
Ota huomioon, että käyntiaika tulee asettaa ajastimella.
Puhdistaminen ja huolto
• Irrota pistoke pistorasiasta ennen pylvästuulettimen puhdistamista.
• Puhdista pylvästuuletin ulkopuolelta kevyesti kostutetulla liinalla. Käytä mietoa
puhdistusainetta. Älä käytä liuotusaineita tai syövyttäviä kemikaaleja.
• Sammuta pylvästuuletin, irrota pistoke pistorasiasta ja imuroi tuulettimen takana
oleva ritilä (ilman sisääntulo) tasaisin väliajoin.
• Jos pylvästuuletinta ei käytetä pitkään aikaan, irrota pistoke pistorasiasta ja säilytä
pylvästuuletinta kuivassa ja pölyttömässä paikassa.
Kierrättäminen
Kierrätä pylvästuuletin asianmukaisesti, kun poistat sen käytöstä.
Tarkempia kierrätysohjeita saat kuntasi jäteneuvonnasta.
Tekniset tiedot
SUOMI
Sähköverkkoliitäntä 230 V AC, 50 Hz
Teho 40 W
Korkeus 100 cm
Paino 4,5 kg
Kaukosäätimen paristot 2 kpl AAA/LR03
Kuvaus Symboli Arvo Yksikkö
Tuulettimen enimmäisilmavirta F 28,03 m³/min
Tuulettimen ottoteho P 34,9 W
Käyttöarvo SV 0,803 (m³/min)/W
Tehonkulutus valmiustilassa P
Tuulettimen äänitehotaso LwA 61,0 dB(A)
Suurin ilman nopeus c 2,705 m/s
Käyttöarvon mittausstandardi IEC 60879:1986 (corr.1992)
SB
30
0,368 W
Page 31

Turmventilator 100 cm
Art.nr. 18-2861, 18-2862 Modell X03D White UK, X03D Black UK
36-5527, 36-5528 X03D White, X03D Black
Vor Inbetriebnahme diekomplette Bedienungsanleitung durchlesen und aufbewahren.
Irrtümer, Abweichungen und Änderungen behalten wir uns vor. Bei technischen Problemen
oder anderen Fragen freut sich unser Kundenservice über eine Kontaktaufnahme
(Kontakt siehe Rückseite).
Sicherheit
• Das Gerät nicht betreiben, wenn es bzw. Netzkabel/Netzstecker auf irgendeine
Weise beschädigt ist oder nicht fehlerfrei funktioniert.
• Niemals versuchen, dasGerät zu reparieren oder anderweitig Änderungen
daran vorzunehmen.
• Das Gerät ist nur für den Hausgebrauch bestimmt.
• Das Gerät nur im Innenbereich in trockener, sauberer Umgebung verwenden.
Das Gerät immer so aufstellen, dass es nicht in Wasser oder andere Flüssigkeiten
fallen kann.
• Bei Nichtbenutzung stets den Netzstecker ziehen.
• Kinder, diesich in derNähe des Gerätes befinden, niemals unbeaufsichtigt lassen.
• Das Gerät niemals Wasser oder anderen Flüssigkeiten aussetzen.
• Das Gerät erst dann andas Stromnetz anschließen, wenn es vollständig montiert
und betriebsbereit ist. Das Gerät immer aufrecht aufstellen und nicht in liegender
Position benutzen.
• Sicherstellen, dass keine Fremdkörper in dasGerät gelangen.
• Das Gerät niemals durch Herausziehen des Netzsteckers ausschalten. Das Gerät mit
dem Ein-/Ausschalter ausschalten und dann den Netzstecker aus derSteckdose ziehen.
• Sicherstellen, dass dasGerät komplett fertig montiert ist, bevor es in Betrieb
genommen wird.
• Das Gerät niemals in Bereichen einsetzen, in denen explosive Gase oder Stoffe
gelagert werden.
• Das Gerät ist nur dann für Kinder ab 8 Jahren geeignet, wenn diese in diesichere
Handhabung eingeführt worden sind und Risiken und Gefahren derBenutzung
verstehen. Reinigung und Wartung darf von Kindern ab 8 Jahren unter Aufsicht
eines Erwachsenen durchgeführt werden. Das Gerät inklusive Netzkabel außer
Reichweite von Kindern unter 8 Jahren halten.
• Das Gerät ist für Personen mit eingeschränkten physischen, sensorischen oder
geistigen Fähigkeiten bzw. mangelnder Erfahrung/mangelndem Wissen nur dann
geeignet, wenn diese in diesichere Handhabung eingeführt worden sind und
dieRisiken und Gefahren derBenutzung verstehen. Kein Kinderspielzeug.
DEUTSCH
31
Page 32

Montage
Die 4 Schrauben ander Halterung
des Ständers unten am Turmventilator
abschrauben.
Das Netzkabel durch dasLoch
DEUTSCH
im Sockel ziehen und in
derKabelhalterung befestigen.
Die zwei Teile des Sockels zusammenschieben.
Den Sockel mithilfe der4 Schrauben am
Gerät festschrauben. Er passt nur auf
eine Weise, mit dem Loch in einer Linie
mit dem Netzkabel auf derRückseite
des Gerätes.
32
Page 33

Kippfunktion
Das Gerät kann bei Bedarf nach hinten gekippt
werden um den Luftstrom zu steuern. Auswahl
zwischen 2 Stufen, Neigung mit 6 oder 12 Grad.
Das Gerät vorsichtig nach hinten drücken um
diegewünschte Stellung auszuwählen. Das Gerät
vorsichtig nach vorne ziehen um dienormale
Stellung wieder einzunehmen.
Tasten und Funktionen
Fernbedienung
Die Batterieabdeckung ander Rückseite derFernbedienung durch Schieben in Pfeilrichtung öffnen und
die Batterien einsetzen (2 x AAA/LR03). Die Abbildung
unten im Batteriefach zeigt diekorrekte Ausrichtung
derBatterien an.
1. Ein/Aus.
2. Einstellung derLüftungsgeschwindigkeit: AUTO L (low=niedrig), M (medium=mittel), H (high=hoch).
3. Oszillation ein/aus.
4. Einstellung des Timers. Die Betriebsdauer
des Gerätes kann festgelegt werden, so
dass dieses nach dereingestellten Zeit
automatisch ausschaltet. Wiederholt drücken
um dieBetriebszeit in Schritten von 30 min
einzustellen (von 30 min bis 7 h und 30 min).
5. Auswahl derFunktion: Normal, Natur oder Nacht.
Achtung: Die Fernbedienung hat keine Taste zur
Temperatureinstellung, im Gegensatz zum Bedienfeld
am Gerät.
0/6/12°
1
2
3
4
5
DEUTSCH
33
Page 34

Bedienfeld
6. Ein/aus, Einstellung
derLüftungsgeschwindigkeit:
AUTO - L (low=niedrig),
M (medium=mittel),
H (high=hoch).
7. Temperatureinstellung.
Wiederholt drücken um
diegewünschte Temperatur
einzustellen.
Achtung: Der Ventilator
hat keine Kühl- oder
Aufwärmfunktion. Die
Temperatureinstellung hat
lediglich Auswirkung auf
dieGeschwindigkeit. Gilt nur für den Automodus. Liegt dieeingestellte Temperatur
unter derZimmertemperatur, erhöht sich dieGeschwindigkeit etc.
8. Oszillation ein/aus.
9. Einstellung des Timers. Die Betriebsdauer des Gerätes kann festgelegt werden, so dass
dieses nach dereingestellten Zeit automatisch ausschaltet. Wiederholt drücken um
dieBetriebszeit in Schritten von 30 min einzustellen (von 30 min bis 7 h und 30 min).
10. Auswahl dergewünschten Funktion: Normal, Natur oder Nacht.
6 7 8 9 10
Hintergrundbeleuchtung
Wird der Ventilator eingeschaltet, leuchtet die Displaybeleuchtung auf und bleibt
eingeschaltet.
Um diese zu auszuschalten, folgenderweise vorgehen:
1. Den Funktionswahlschalter (10) 3 Sekunden lang am Ventilator gedrückt halten
DEUTSCH
(oder auf der Fernbedienung), bis das Display erlischt.
2. Wenn dann irgendeine Taste gedrückt wird (am Ventilator oder auf der
Fernbedienung), schaltet die Displaybeleuchtung wieder ein und leuchtet
ca. 3 min um dann zu erlöschen.
3. Um die Beleuchtung wieder im Dauerbetrieb einzuschalten, den Funktionswahlschalter (10) ca. 3 Sekunden lang gedrückt halten.
4. Wird das Netzkabel aus der Steckdose gezogen und die Stromversorgung
des Ventilators getrennt, geht er auf die Werkseinstellung zurück, sodass die
Beleuchtung im Betrieb konstant leuchtet.
34
Page 35

Erklärung zu den versch. Funktionsstufen des Ventilators
Normalmodus
Auf dem Display erscheint z. B.:
Naturmodus
Auf dem Display erscheint z. B.:
Im Naturmodus variiert dieVentilatorgeschwindigkeit
mit 5-Sekunden-Intervall in einem bestimmten Muster,
je nach eingestellter Geschwindigkeit. Der Ventilator
wechselt zwischen: ausgeschaltet, niedrig, mittel
und hoch.
Bei Geschwindigkeitseinstellung L (niedrig) variiert dieGeschwindigkeit gemäß dem
folgenden Diagramm.
Hoch
Mittel
Niedrig
Zeit (Sekunden)
Bei Geschwindigkeitseinstellung M (mittel) variiert dieGeschwindigkeit gemäß dem
folgenden Diagramm.
Hoch
Mittel
Niedrig
Zeit (Sekunden)
Bei Geschwindigkeitseinstellung H (hoch) variiert dieGeschwindigkeit gemäß dem
folgenden Diagramm.
Hoch
Mittel
Niedrig
Zeit (Sekunden)
35
DEUTSCH
Page 36

Nachtmodus
Auf dem Display erscheint z. B.:
Wird der Nachtmodus ausgewählt, folgt der Ventilator
demselben Muster wie im Naturmodus, mit dem
Unterschied, dass die Gebläsegeschwindigkeit im
Stundentakt schrittweise gesenkt wird.
Beispiel:
Hohe Gebläsegeschwindigkeit
Hoch
Mittel
Niedrig
Zeit (Sekunden)
1. Wird der Nachtmodus gewählt und die Gebläsegeschwindigkeit hoch, muss
am Timer eingestellt werden, wie lange es dauern soll bis der Ventilator ganz
ausschaltet. Wenn der Ventilator 4 Std. lang laufen soll, startet er 1 Stunde lang
im Naturbetriebdiagramm für hohe Gebläsegeschwindigkeit.
Mittel
Niedrig
1 Std. Gebläsegeschwindigkeit H (hoch)
1 Std. Gebläsegeschwindigkeit M (mittel)
Zeit (Sekunden)
2. Danach läuft der Ventilator 1 Stunde lang nach dem Diagramm für mittlere
DEUTSCH
Gebläsegeschwindigkeit.
2 Std. Gebläsegeschwindigkeit L (niedrig)
Niedrig
Zeit (Sekunden)
3. Die letzten 2 Stunden läuft der Ventilator nach dem Diagramm für niedrige Gebläsegeschwindigkeit. Nach den 4 Std. schaltet der Ventilator aus. Der Ventilator kann
bereits vor der automatischen Abschaltung manuell ausgeschaltet werden.
Mittlere Gebläsegeschwindigkeit
Wird der Nachtmodus in mittlerer Gebläsegeschwindigkeit gewählt, läuft der Ventilator
1 Stunde lang nach dem Diagramm für mittlere Geschwindigkeit und dann 3 Std. nach
dem Diagramm für niedrige Geschwindigkeit und schaltet dann nach 4 Std. ab. Der Ventilator
kann bereits vor der automatischen Abschaltung manuell ausgeschaltet werden.
36
Page 37

Niedrige Gebläsegeschwindigkeit
Wird der Nachtmodus in niedriger Gebläsegeschwindigkeit gewählt, läuft der Ventilator
4 Std. lang nach dem Diagramm für niedrige Geschwindigkeit und schaltet dann nach
4 Std. ab. Der Ventilator kann bereits vor der automatischen Abschaltung manuell
ausgeschaltet werden.
Bitte beachten, dass der Timer auf die gesamte Betriebsdauer eingestellt werden muss.
Pflege und Wartung
• Vor Pflege und Wartung stets den Netzstecker aus derSteckdose ziehen.
• Das Produkt außen mit einem leicht befeuchteten Tuch reinigen. Ein sanftes
Reinigungsmittel verwenden, keine scharfen Chemikalien oder Reinigungslösungen.
• Das Gerät ausschalten, den Netzstecker aus derSteckdose ziehen und dasGitter
ander Rückseite des Gerätes (Lufteinlass) regelmäßig mit dem Staubsauger reinigen.
• Bei längerer Nichtbenutzung stets den Netzstecker ziehen und dasGerät aneinem
trockenen und staubfreien Ort aufbewahren.
Hinweise zur Entsorgung
Bitte dasProdukt entsprechend den lokalen Bestimmungen entsorgen.
Weitere Informationen sind von derGemeinde oder den kommunalen
Entsorgungsbetrieben erhältlich.
Technische Daten
Betriebsspannung 230 V AC, 50 Hz
Leistung 40 W
Höhe 100 cm
Gewicht 4,5 kg
Batterien Fernbedienung 2×AAA/LR03
DEUTSCH
Beschreibung Symbol Wert Einheit
Max. Volumenstrom des Ventilators F 28,03 m³/min
Leistungsaufnahme des Ventilators P 34,9 W
Serviceverhältnis SV 0,803 (m³/min)/W
Leistungsaufnahme im Bereitschaftszustand P SB 0,368 W
Schallleistungspegel des Ventilators LwA 61,0 dB(A)
Max. Luftgeschwindigkeit c 2,705 m/s
Messnorm für die Entwicklung
des Serviceverhältnisses
IEC 60879:1986 (corr.1992)
37
Page 38

38
Page 39

39
Page 40

SVERIGE
KUNDTJÄNST Tel: 0247/445 00
Fax: 0247/445 09
E-post: kundservice@clasohlson.se
INTERNET www.clasohlson.se
BREV Clas Ohlson AB, 793 85 INSJÖN
NORGE
KUNDESENTER Tlf.: 23 21 40 00
Faks: 23 21 40 80
E-post: kundesenter@clasohlson.no
INTERNETT www.clasohlson.no
POST Clas Ohlson AS, Postboks 485 Sentrum, 0105 OSLO
SUOMI
ASIAKASPALVELU Puh.: 020 111 2222
Sähköposti: asiakaspalvelu@clasohlson.fi
INTERNET www.clasohlson.fi
OSOITE Clas Ohlson Oy, Maistraatinportti 4 A, 00240 Helsinki
UNITED KINGDOM
CUSTOMER SERVICE Contact number: 020 8247 9300
E-mail: customerservice@clasohlson.co.uk
INTERNET www.clasohlson.co.uk
POSTAL 10 – 13 Market Place
Kingston Upon Thames
Surrey
KT1 1JZ
DEUTSCHLAND
KUNDENSERVICE Unsere Homepage www.clasohlson.de besuchen
und auf Kundenservice klicken.
 Loading...