

Page 1

Snow Blower
Snöslunga
Snøfreser
Lumilinko
Important!
Read the entire instruction manual carefully
and make sure that you fully understand
it before you use the equipment. Keep the
manual for future reference.
Viktig information:
Läs hela bruksanvisningen noggrant och
försäkra dig om att du har förstått den innan
du använder utrustningen. Spara manualen
för framtida bruk.
Viktig informasjon:
Les disse anvisningene nøye og forsikre deg
om at du forstår dem før du tar produktet i bruk.
Ta vare på anvisningene for seinere bruk.
Tärkeää tietoa:
Lue nämä ohjeet huolellisesti ja varmista
että olet ymmärtänyt ne, ennen kuin alat
käyttää laitetta. Säilytä ohjeet myöhempää
tarvetta varten.
ENGLISH
SVENSK A
NORSKSUOMI
Art.no Model
31-5052 DB75524FM
Ver. 20140428
Original instructions
Bruksanvisning i original
Original bruksanvisning
Alkuperäinen käyttöohje
Page 2

2
Page 3

3.5 kW Two-Stage Snow Blower
Art.no 31-5052 Model DB75524FM
Please read the entire instruction manual before using the product and save it for future reference.
We reserve the right for any errors in text or images and any necessary changes made to technical data.
If you have any questions regarding technical problems please contact our Customer Services.
Safety
Read the entire instruction manual before use.
Use hearing protection.
Wear eye protection.
Danger – rotating auger.
Danger – rotating fan blades.
Beware of flying objects. Make sure onlookers are kept at a safe distance.
ENGLISH
Never touch any of the machine’s moving parts until they have stopped completely,
the machine has been turned off and the ignition key has been removed.
Never insert your hands into the discharge chute.
Keep unauthorised persons a safe distance away from the machine.
Danger - Petrol is highly flammable. Let the machine cool for at least 2 minutes before refuelling.
Never start the machine indoors or in a poorly ventilated area. The engine’s exhaust
contains deadly carbon monoxide.
Danger – risk of electric shock (machines with electric start). Never start the machine
from the mains (230V) under rainy conditions.
3
Page 4

General safety precautions
• Read carefully through the instructions and inform yourself about all the controls and functions and how to
correctly use the snow blower.
ENGLISH
• Never let children or people who do not have adequate knowledge of these instructions use the snow blower.
Local authorities might have restrictions regarding the age of the user.
• Never use the machine in the vicinity of others, especially children or animals.
• Remember that the user/driver is always ultimately responsible for accidents caused by use of the product.
• Be careful of falling or slipping, especially while the snow blower is in reverse.
• Never use the snow blower when you are tired or sick or whilst under the influence of drugs, alcohol or medicine.
• This product may only be repaired by qualified staff and only using original parts.
• Never use accessories not approved for use by the manufacturer or the retailer where the product
was purchased.
Safety precautions during use
• Make sure to keep hands and feet away from rotating parts. Never stand in front of the discharge chute.
• Certain engine parts will become very hot during use and could cause burn injuries.
• The snow blower must not be used for any other purpose than for removing snow.
• Be careful when using the snow blower on gravel paths, pavement and roads. Watch out for traffic and
possible hazards. Avoid steep inclines.
• Never point the discharge chute towards public roads or traffic.
• Stop the engine immediately if you have struck a foreign object. Inspect the machine carefully after such an
incident. Do not reuse the snow blower until any possible damage has been repaired.
• If the snow blower begins to vibrate abnormally, turn off the engine immediately and find the cause.
Vibrations are normally a sign of problems.
• Existing safety features must not be disconnected or made inoperative.
• Never use the snow blower in the vicinity of fences, cars, windows, inclines, etc. without properly adjusting
the discharge chute.
• Always keep children out of the area to be cleared of snow.
• Never overload the blower by driving it too fast.
• Be very careful when reversing. Always look behind you for possible obstacles.
• Never point the chute towards onlookers. Never let anyone stand in front of the snow blower.
• Never use the snow blower in conditions of inadequate visibility or lighting.
• Make sure you are steadily balanced and have a firm grip on the handles while using the snow blower.
• Use only the included cleaning tool to clean out the chute and impeller housing. Never use your hands.
• Never use the snow blower on the roof.
Contents
• Snow blower
• Chute
• Spark plug spanner
• 2 ignition/safety keys
• 4 shear pins with locking nuts
• Instruction manual
• Funnel
• Engine oil
4
Page 5
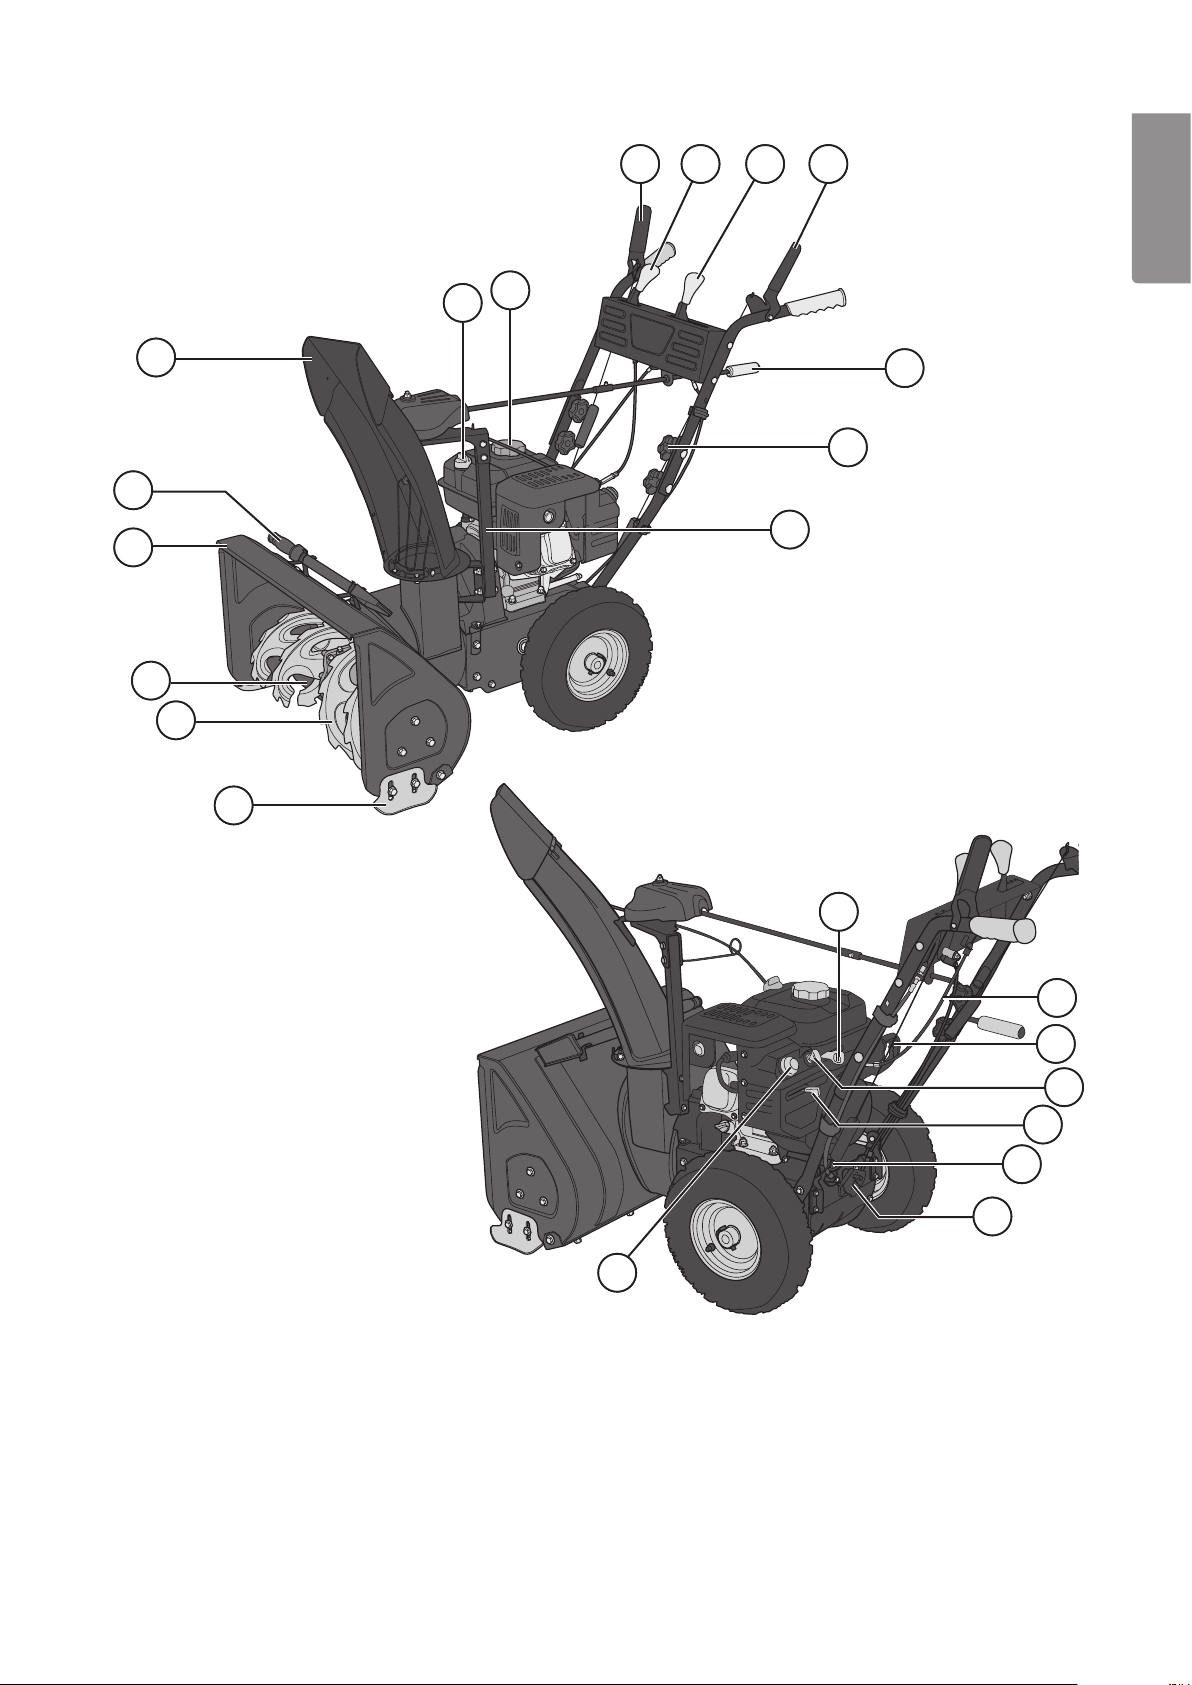
Controls and functions
106
101 102 103 104
ENGLISH
107
1011
1012
105
1013
108
109
1010
1014
1015
1016
1. Drive clutch lever
2. Chute deflector angle control
3. Gear lever (4 forward gears
and 2 reverse gears)
4. Auger clutch lever
5. Discharge chute with deflector
6. Oil filler cap/dipstick
7. Fuel cap
8. Chute rotation crank
9. Star knob
10. Chute support column
11. Cleaning tool
12. Auger housing
13. Scraper blade
14. Auger
15. Skid shoes (one on each side)
16. Throttle
17. Chute deflector control wire
18. Starter handle
1017
1018
1019
1020
1021
1022
1023
19. Ignition key
20. Choke
21. Oil drain screw
22. Chute rotation control linkage
23. Primer
5
Page 6
Assembly
Upper and lower handle assemblies
ENGLISH
1. Unscrew the 4 large plastic star knobs, washers and bolts from
the lower handle.
2. Raise the upper handle assembly and align it with the lower
handle assembly.
3. Join the two handle assemblies together using the bolts,
washers and star knobs.
4. Make sure that all the control wires are free and accessible.
A) Upper handle
B) Bolt
C) Star knob
D) Lower handle
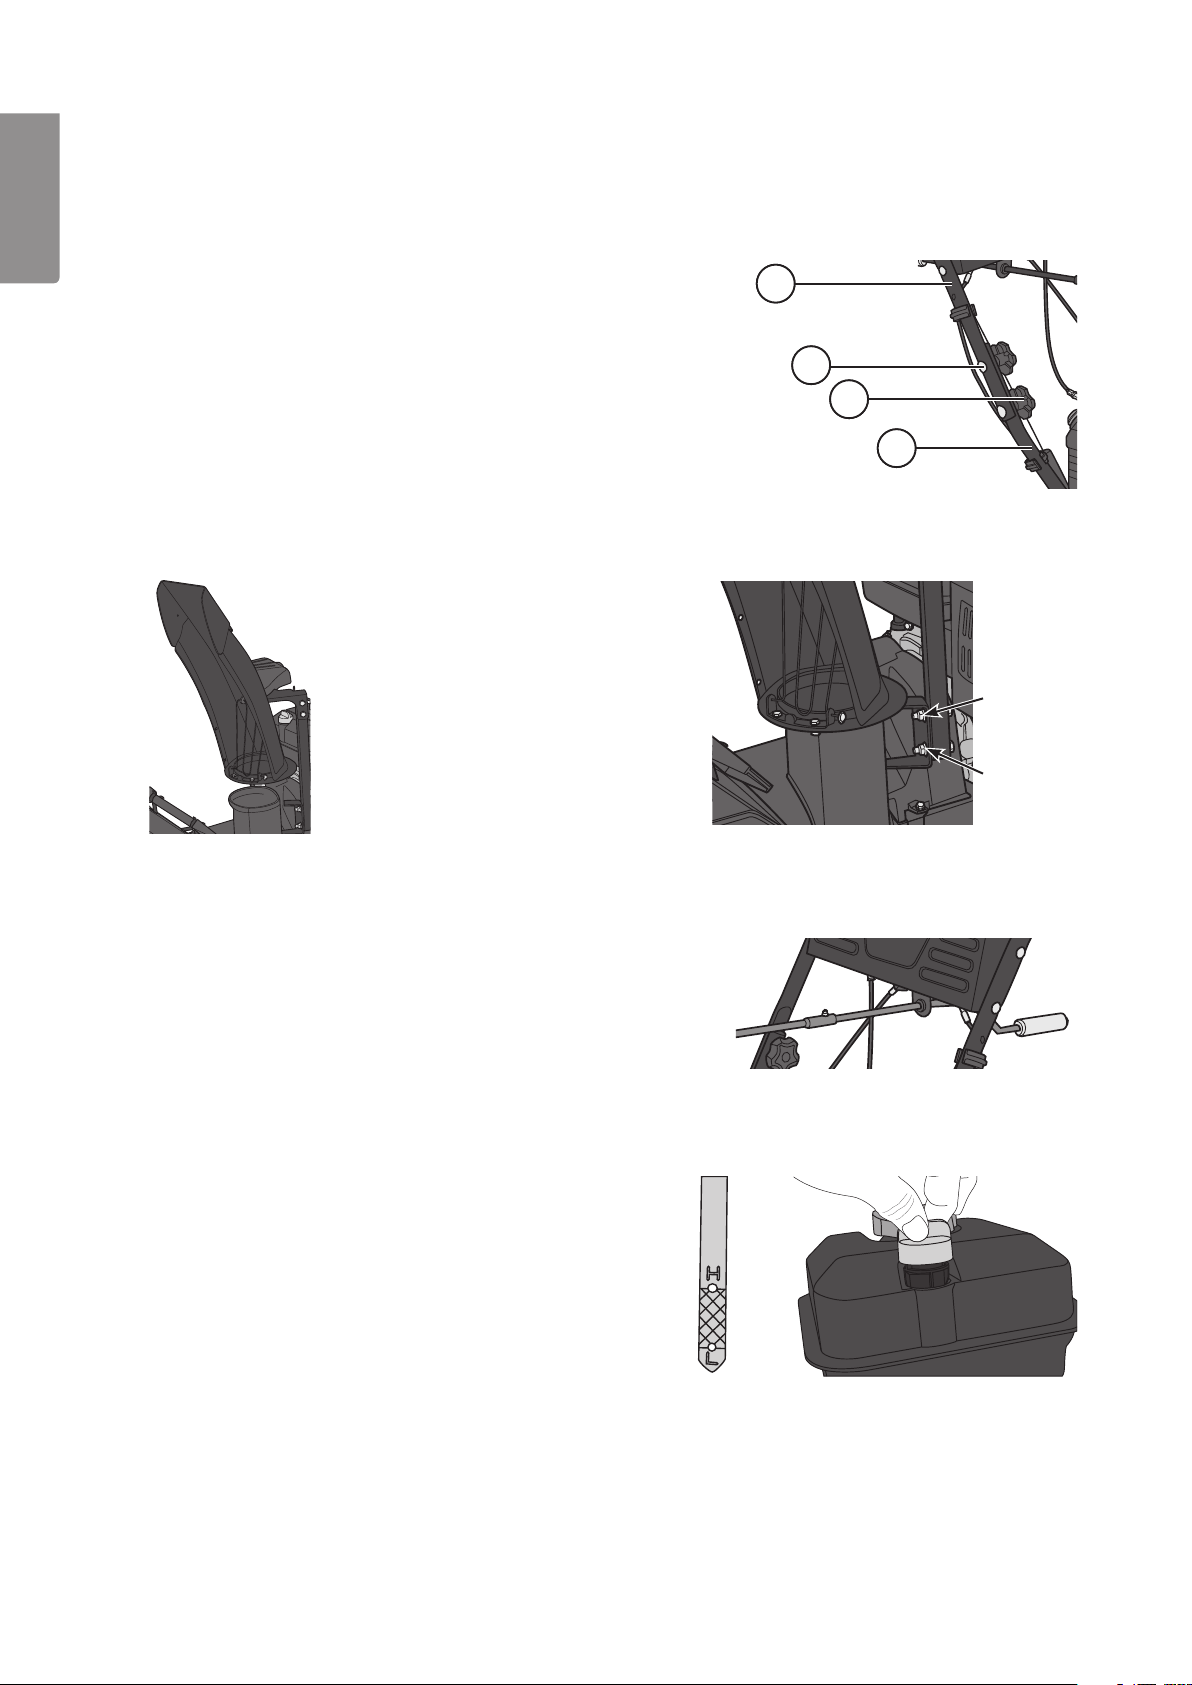
Mounting the discharge chute
10a
10b
10c
10d
1. Place the discharge chute over the outlet
from the auger housing.
2. Fasten the discharge chute support
column in place using two bolts at
the bottom of the column.
Discharge chute crank linkage
The crank comes in two parts and is bolted together in the middle.
1. Slide the crank handle into the sleeve on the end of the link rod.
2. Pass a bolt through the hole in both the sleeve and the crank
handle and join them with a dome nut.
Operation
Oil level checks and refills
Note: The snow blower comes without oil in the engine.
The engine oil must be filled before the snow blower
is started. Engine oil capacity is 0.6 l.
Note: The engine has a combined dipstick/oil filler cap.
• Use SAE 5W-30 grade 4-stroke petrol engine oil, service
classification SG, SF.
• Remove the oil filler cap and pour in the recommended
amount of oil. Check the oil level using the dipstick – it
should be between the marks on the dipstick. Do not overfill!
Note: When checking the oil level, do not screw the cap on; just dip the stick until the cap is flush against
the opening for measuring the correct level.
Note: This engine is used for a variety of machines and has an additional filler plug which should NEVER be
used for this machine. Only use the filler cap that is on top.
IMPORTANT: The oil should be changed after the first 5 hours of use.
6
Page 7
Preparations
• Make sure that the area being cleared is free from loose stones and foreign objects.
• Make sure that the controls are easily manoeuvrable and that they return to their original position when released.
• Disengage all controls before starting the engine.
• Plan ahead and think about where the cleared snow will be ejected in order to avoid personal injury or
property damage caused by flying objects.
• Never use the snow blower without wearing suitable clothing. Use appropriate footwear with solid traction,
especially in slippery conditions.
• Under no circumstances may maintenance and service be performed when the engine is on (unless
otherwise directed in the instruction manual).
• Always use safety glasses or a visor when operating or carrying out maintenance on the snow blower.
• Adjust the height of the auger housing so that there is enough free clearance when driving over gravel or similar.
• Let the snow blower adjust to outdoor temperatures before use.
Before use
Before switching the snow blower on, always make sure that the inner impeller can move freely and is not
jammed by any obstruction. Small stones can accumulate between the inner impeller (the impeller behind
theauger) and the drum and prevent the impeller from rotating; the impeller might also have frozen to the drum.
Ifthe inner impeller cannot rotate, the drive belt will soon wear out.
After use
Store the the snow blower tilted forwards a little so that snow and water run out and don’t collect inside
thehousing causing the impeller to freeze solid.
ENGLISH
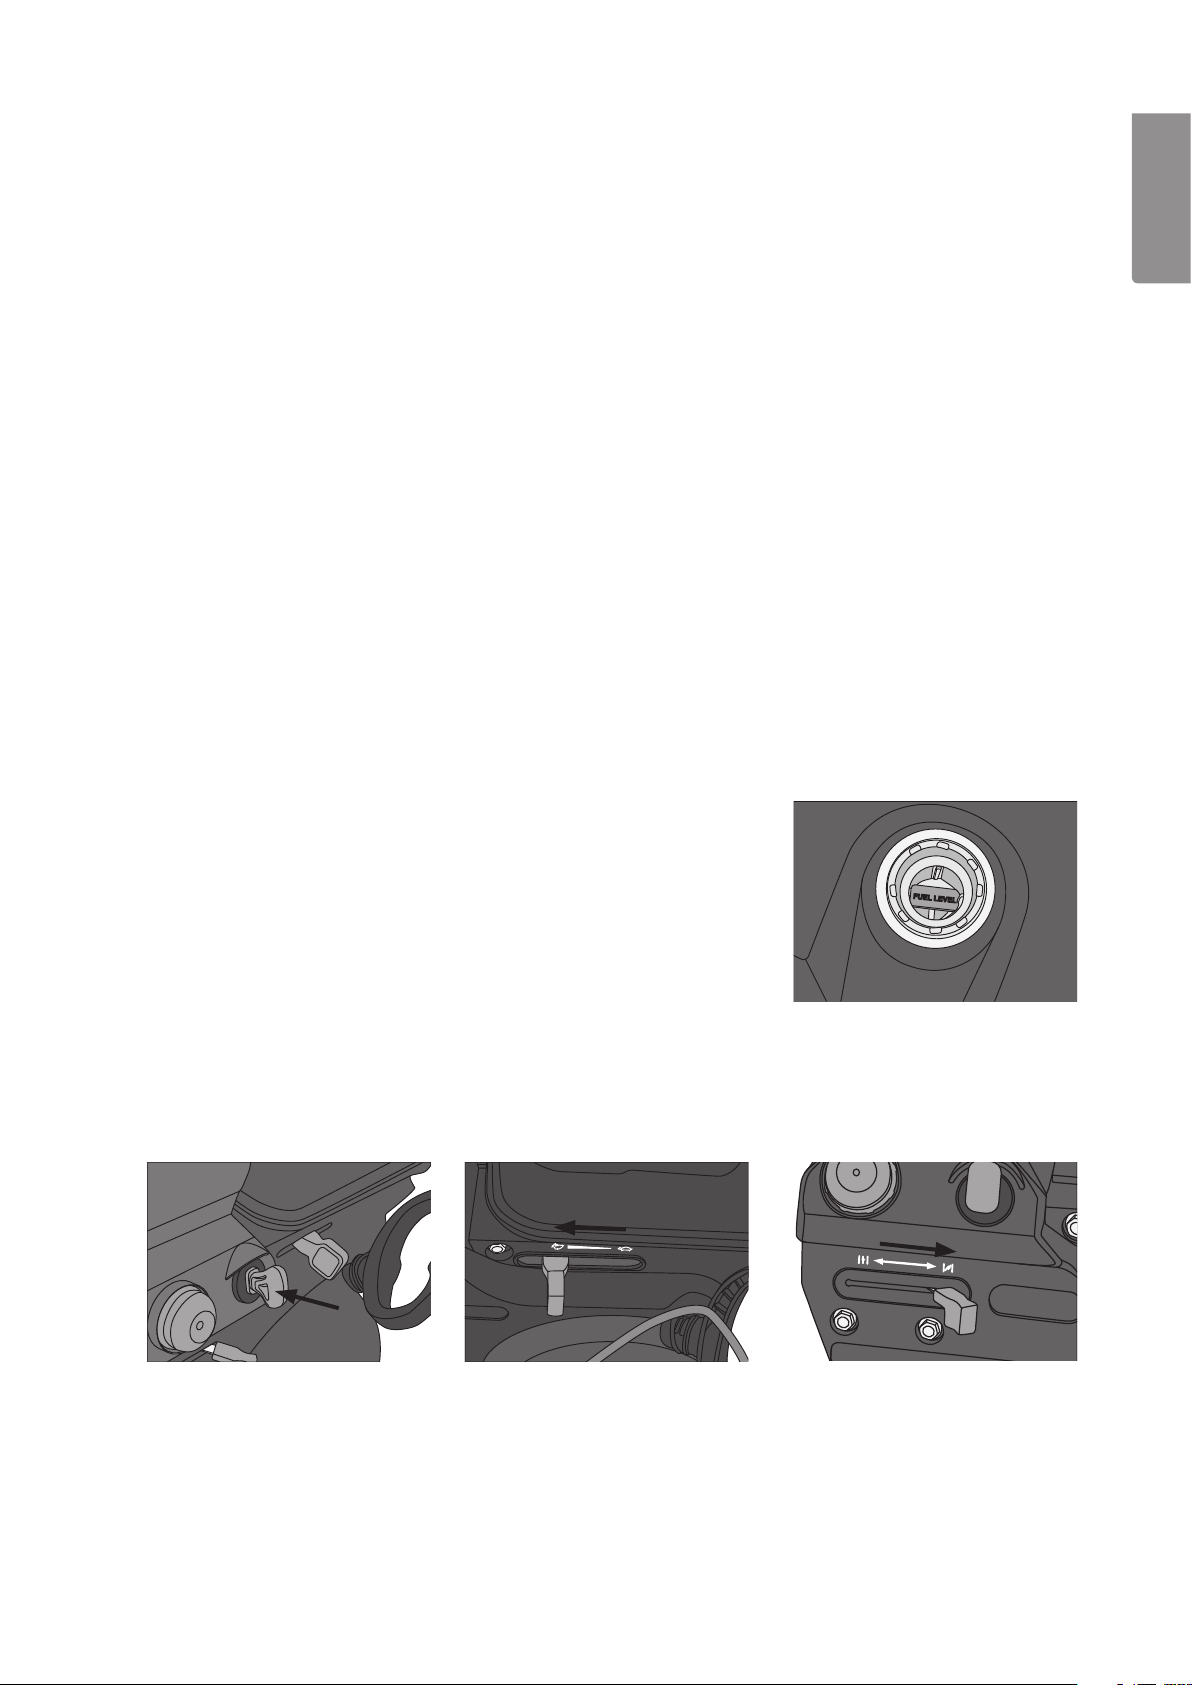
Refuelling precautions
Note: Petrol is highly flammable.
• Use only 95 or 98 octane unleaded petrol.
• Never mix in more than 10% ethanol in the fuel.
• Store the fuel in a container that is suitable for petrol.
• Always refuel outdoors and never smoke whilst refuelling.
• Do not overfill! The fuel should come up to the fuel level mark
under the cap (see fig.).
• Fill with fuel before starting the engine. Never open the fuel cap
for filling when the engine is running or when warm.
• Replace the fuel cap securely and wipe off any spilt fuel.
Starting
Note: Check the oil and fuel levels before starting. Make sure that both the drive and auger clutch levers are released.
1. Insert the ignition key completely into the ignition. Do not turn the key, but make sure it is fully inserted.
2. Set the throttle to maximum (all the way toward the picture of the hare on the left).
3. Set the choke to the cold start position (to the right). If the engine is warm, set the choke to
the opposite position.
4. Press the primer 3–5 times. Cover the vent hole in the centre of the primer bladder when pressing it in.
In cold weather conditions the engine may need to be primed again. If the engine is warm, press
the primer once only.
7
Page 8
5. Pull the starter handle slowly at first until you feel some resistance, and then give it a sharp tug to start
the engine. Do not release the handle but keep it in position and then slowly return it to its original position.
6. Once the engine has been started and is warm, slowly move the choke to its starting position (to the left).
7. If the engine should stall, restart it with the choke set in the middle position for a short time. Once the engine
ENGLISH
is running smoothly, slowly return the choke to its original position.
Safety checks
Note: Check that the auger is working properly the first time you use the snow blower and also before every
new season. Always allow for some amount of free play in the wire controlling the auger clutch.
1. Start the snow blower and depress the clutch lever. Let the auger run for about 10 seconds. Repeat this
procedure several times.
2. Release the clutch lever and inspect the auger from the front. Make sure that the auger is completely
motionless and shows no tendency of rotating.
3. If the auger is rotating or showing a tendency to rotate once the clutch lever is released, turn off the engine
and adjust the clutch control wire.
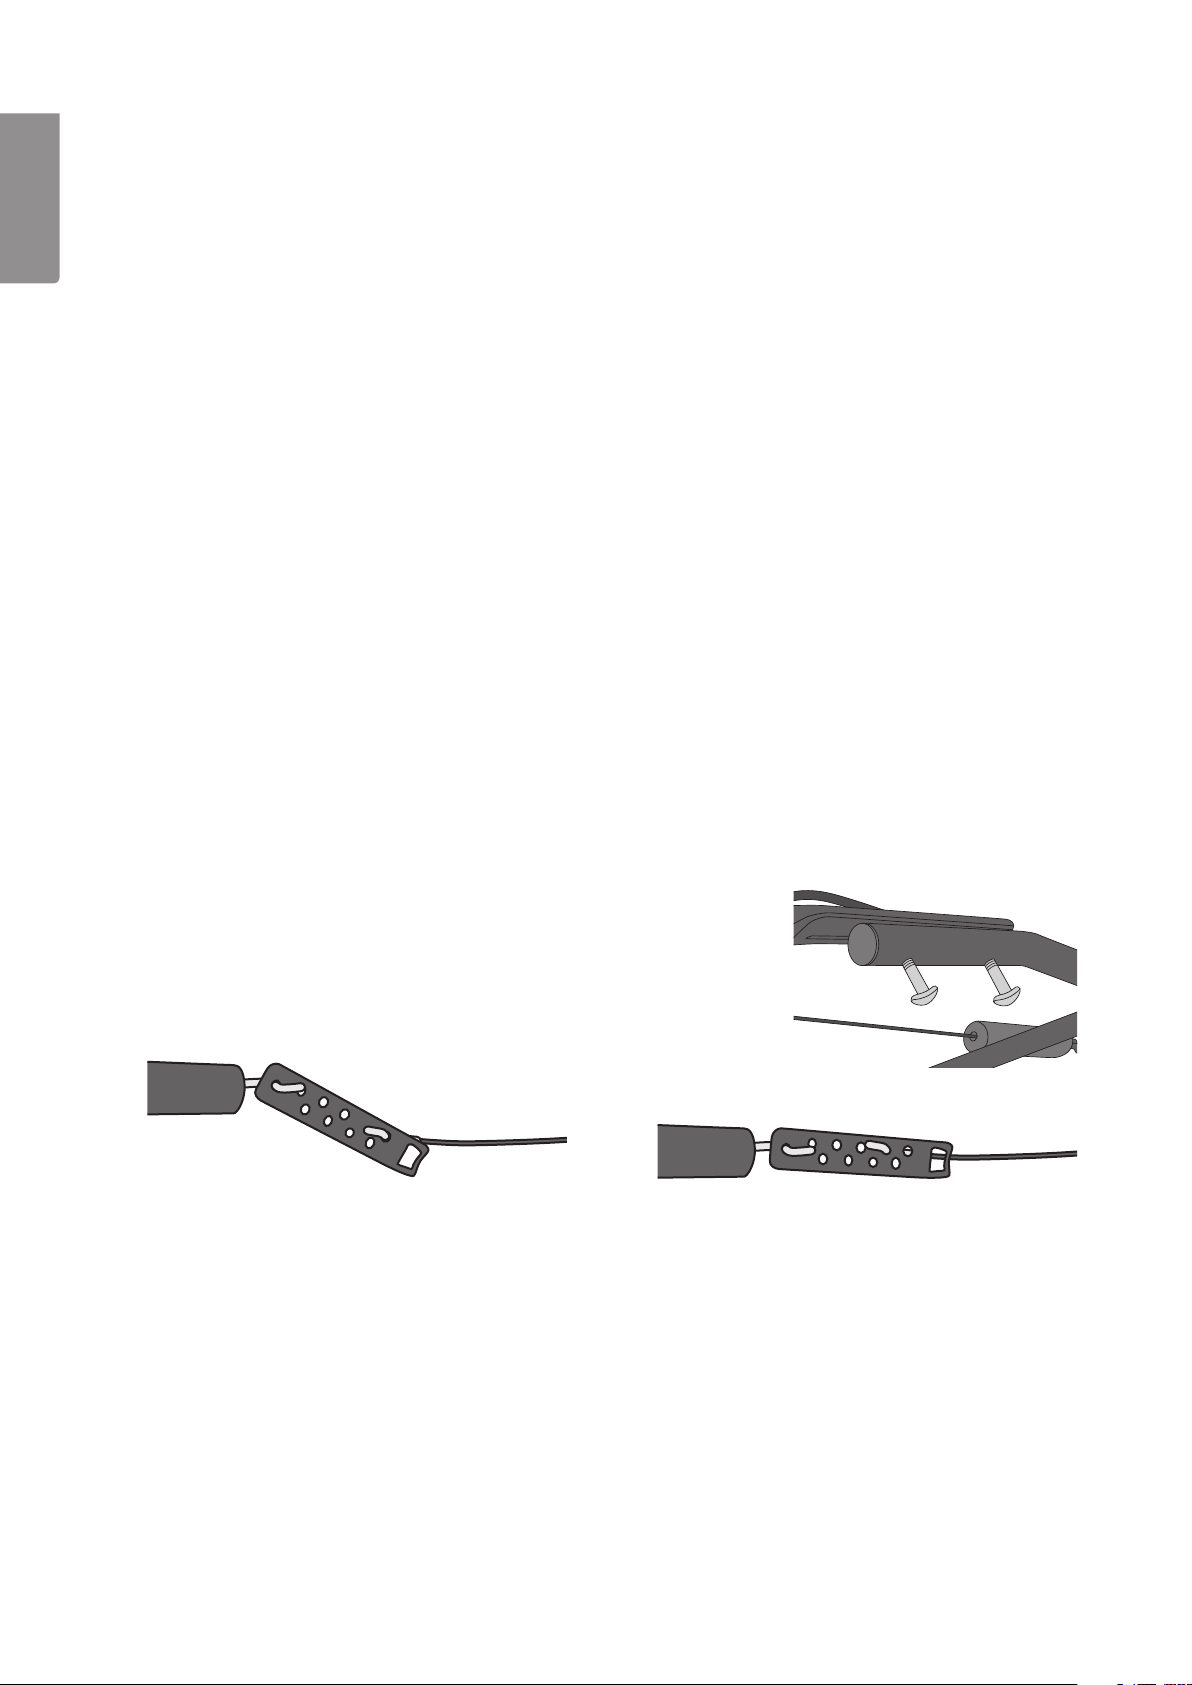
Adjust the auger drive control wire before using the snow blower for the first time
Checking and adjusting the auger drive clutch wire
The auger clutch wire is set at the factory, but it might need checking/adjusting once the handle assemblies
have been fitted to the snow blower.
Checking the operation of the clutch:
1. Start the engine. Note: The snow blower comes without oil in the engine; the oil is supplied in a separate bottle.
2. Depress the clutch lever, the auger should rotate. Switch the engine off.
3. If the auger did not rotate when the engine was on, the clutch wire needs adjusting. An incorrectly set clutch
wire will cause the drive belt to wear out quickly.
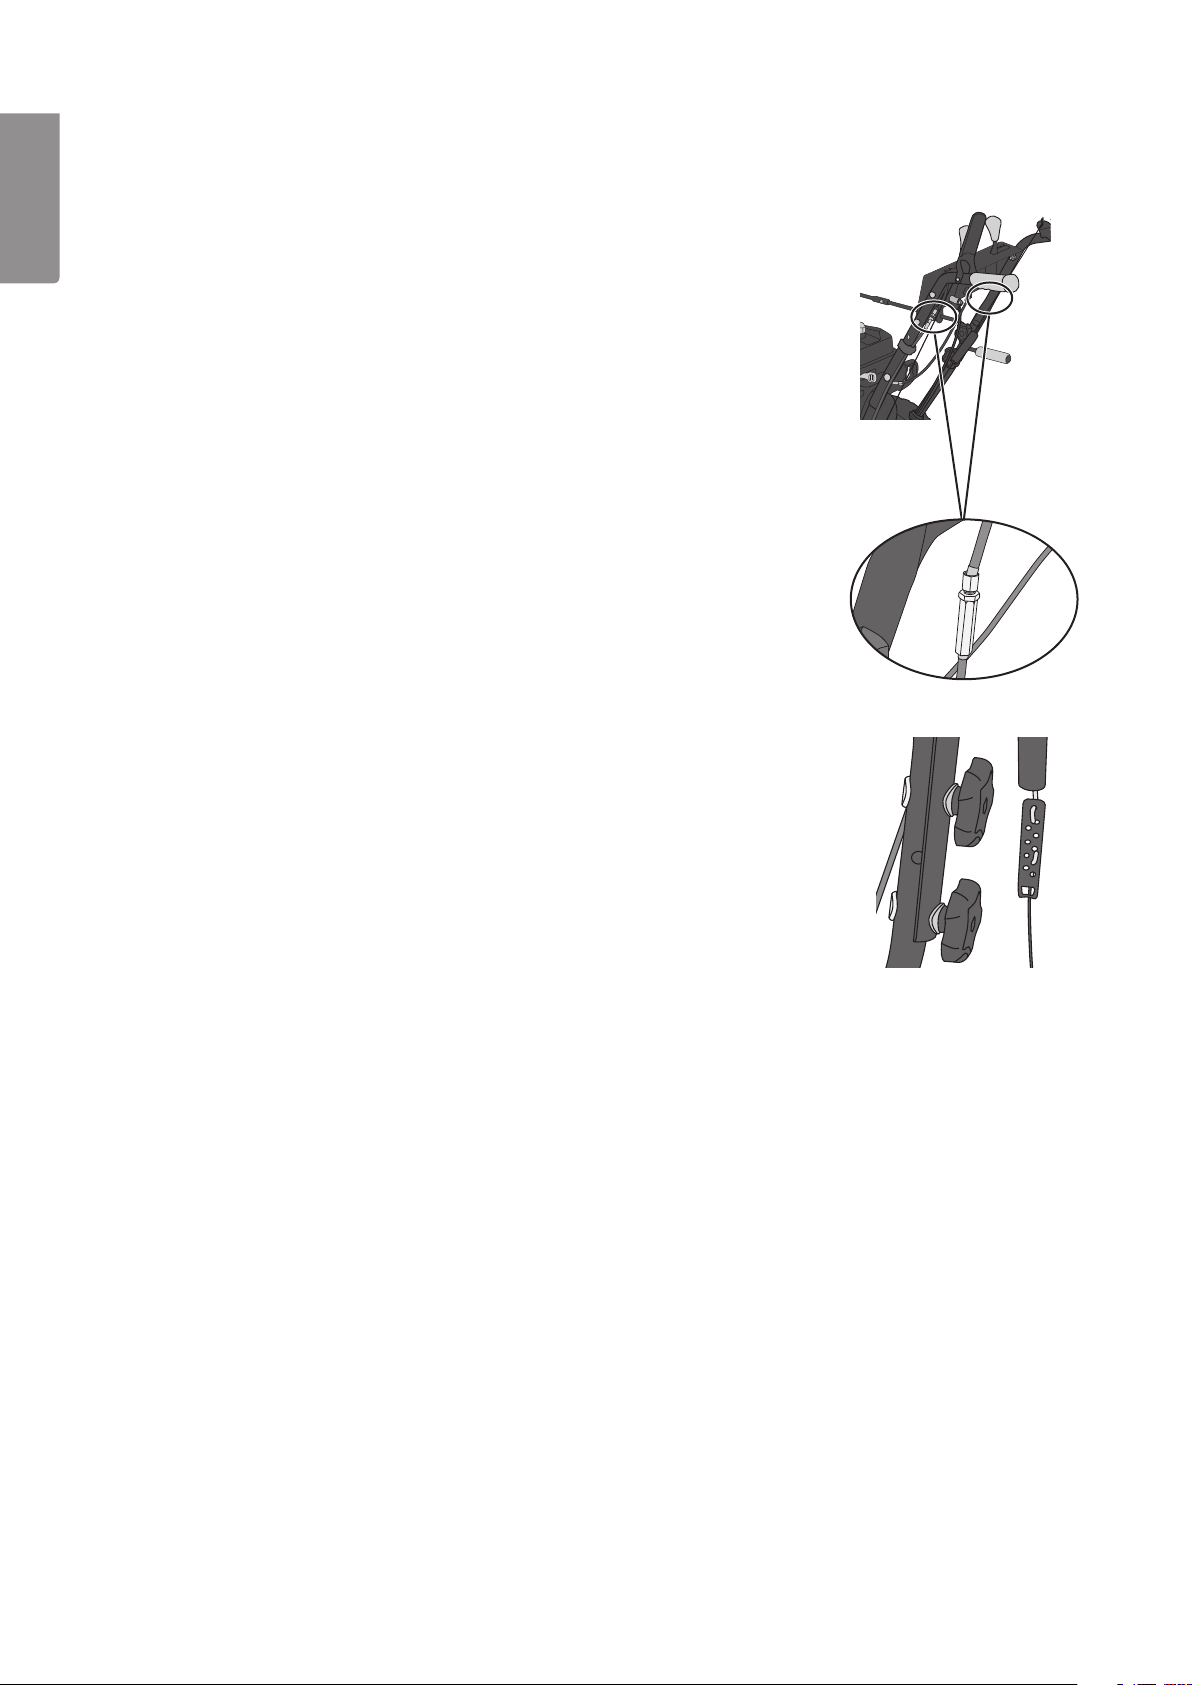
Adjust the clutch wire as follows:
1. Remove the bolts on the left hand side which hold the upper and lower
handle assemblies together, so that the clutch wire is less taut.
2. Pull up the dust boot over the wire connector plate.
3. Pull up on the bottom wire to increase wire slack in the upper wire
enabling you to remove the hook.
4. Turn the plate over and begin working the lower
s-hook loose from the plate.
5. Pull the wire taut and insert the hook down
anotch on the plate.
6. Bolt the handle assemblies together again so that the clutch wire is taut.
8
Page 9

Skid shoe adjustment
• Normal use: Set the skid shoes to about ½ to 1 cm below the scraper blade.
• Hard packed snow: Set the skid shoes slightly higher (in order to lower
the scraper blade).
• Gravel or uneven surfaces: Set the skid shoes somewhat lower (in order to raise
the scraper blade).
Operation
1. Plan the area of operation and where the snow is to be removed before starting.
2. Start the engine and set the throttle to full.
3. Let the engine warm up for a few minutes to reach full power before beginning snow removal.
4. Set the gear lever to a suitable gear setting. The second forward drive gear is appropriate for most snow
removal situations.
5. Depress the auger clutch lever to begin snow removal.
6. Depress the drive clutch to engage the drive wheels and propel the snow blower forwards.
Note: Never move the gear lever while the snow blower is in motion and always release the drive clutch
before changing gears.
7. After work has been completed: Let the engine idle a few minutes before stopping it. Let the snow blower
and auger stand still in order to let most of the moisture and snow dry off.
ENGLISH
Shutting off the engine
1. Pull the throttle back completely.
2. Remove the ignition key.
3. Carefully clean the entire snow blower and move the controls back and forth to prevent them freezing
into position.
Care and maintenance
Note: Turn off the engine, remove the ignition key and remove the spark plug cable from the spark plug
before servicing, cleaning or maintenance.
Lubrication
• Regularly lubricate the gear lever and other moving parts with a few drops of motor oil and/or spray
(e.g. 5–56, WD-40). Do not over-lubricate!
• Use a type of universal grease suitable for cars and machinery on the screw end of the chute
directional crank. Do not over-lubricate!
Servicing and lubricating the auger
• The auger is equipped with shear pins that are meant to shear if the auger strikes hard compacted ice or
other foreign objects. The snow blower is supplied with extra shear pins so that they can be replaced
when needed. Note: Never substitute the shear pins with ordinary bolts. This can seriously damage
the snow blower gears if the auger jams on an obstruction.
• Unscrew the shear pins once per season and spray inside the shaft with lubricant. Also lubricate the plastic
bearings on the auger drive shaft.
9
Page 10
Transmission, auger and clutch control adjustments
Checking the gear controls
Follow these procedures:
ENGLISH
1. With the engine off, move the gear lever to the highest gear (4th).
Release the drive clutch lever. The blower should now be in neutral
and free to move in both directions.
2. Depress the drive clutch lever. The blower should now be unable to
be moved forwards or backwards.
3. Release the drive clutch – you should now be able to move
the blower back and forwards freely again.
4. Move the gear lever to one end (reverse 2nd gear) and then to
the other (4th gear). You should feel no resistance in the lever and
the blower should be freely movable regardless of which gear it is in.
Adjusting the gear lever wire
The gear lever has two wires, one for each direction. Make sure that
all the gears work and that the gear lever can be easily moved to its end
points (4th forward gear and 2nd reverse gear). If adjustment is necessary,
undo the lock nut and turn the adjusting screw on one of the wires.
When one wire is lengthened the other one should be shortened by
the same amount to compensate.
Auger drive control
Adjusting the auger drive clutch wire:
1. Pull up the dust boot over the wire connector plate.
2. Pull up on the bottom wire to increase wire slack in the upper wire
enabling you to remove the hook.
3. Turn the plate over and begin working the s-hook loose from the plate.
4. Pull the wire taut and insert the hook down a notch on the plate.
5. Start the engine, check performance and adjust if necessary.
Note: If the auger does not turn when engaged then the amount of
free play in the wire is too great. Move the s-hook to a hole further down
the plate if needed.
Drive wheel clutch
Adjusting the drive wheel clutch wire:
1. If the blower has a tendency to move forward even though the clutch lever is not depressed, then the wire is
too taut. Adjust the wire so that there is some free play in it using the same procedure used for adjusting the
auger control wire described above.
2. If the blower does not move forward when the clutch lever is depressed, then the wire is too loose.
Tighten the wire by moving the s-hook down a notch on the plate as described above.
3. Test the clutch and adjust accordingly.
Cleaning and inspection
• Use the cleaning tool to remove any snow or ice clogged in the chute or around the auger.
Never use your hands!
• Inspect regularly to make sure that all bolts, nuts and screws are tight and that there is no visible damage.
• The scraper blade and skid shoes will become worn with time and will need to be replaced.
Use only original parts or parts approved by the retailer.
• Regularly check the fuel system for any visible signs of leakage at the tank, fuel cap or fuel lines.
• Never attempt to tamper with or modify the product in any way.
10
Page 11
Engine service intervals
After thefirst
5 hours.
Check theoil level. •
Change oil. • •
Check spark plug. •
Clear area
aroundmuffler.
At every use or after
every 5 hours.
•
At every season or
after every 25 hours.
At every season or
after every 50 hours.
Changing oil
Note: Check the oil level every time the snow blower is used.
Note: The blower needs to be tilted backwards to drain out all the oil. If the tank is completely full
the fuel can run out at the fuel cap.*
1. Start the engine and run it for a few minutes to warm the oil so that it runs out easier.
2. Place an appropriate container under the drain hole to collect the oil when the drain plug (20) is removed.
3. Unscrew the plug, tip the blower backwards and empty of all oil. Bear in mind that the oil might be hot.
4. Refit the drain plug and fill with new oil. Refer to the earlier section Oil level checks and refills.
*Empty the fuel tank if it is full. The engine should be cold when the fuel tank is emptied. Do the work outside
and collect the fuel in an appropriate container. If the fuel is not to be reused, deposit it at the most appropriate
recycling centre.
Spark plug
ENGLISH
Note: Let the engine cool before unscrewing and removing the spark plug. Both the spark plug and muffler
become very hot after use. Check the spark plug before every season and replace it if necessary.
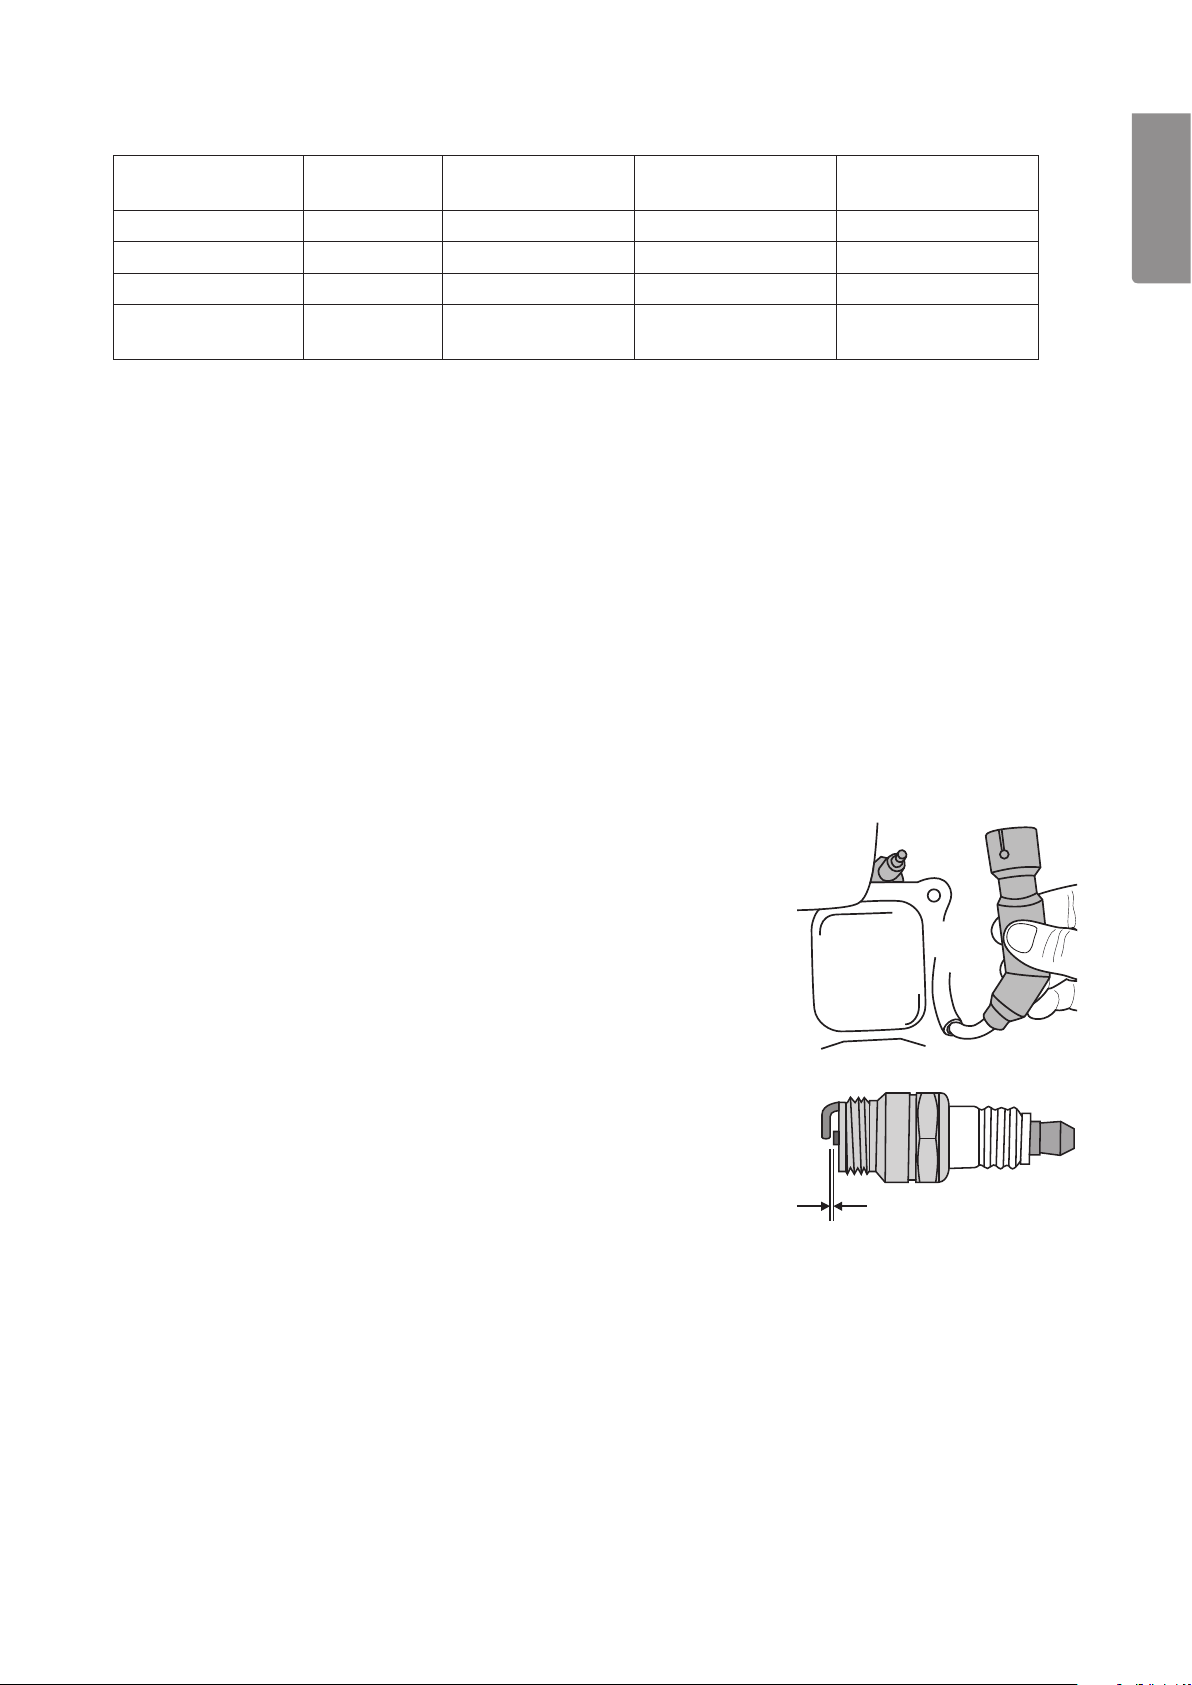
1. Remove the spark plug cable from the spark plug. Do not pull
the cable but rather grip the spark plug cap and wiggle it back and
forth to loosen it.
2. Use a spark plug spanner to remove it from its socket.
3. Check the electrodes for any visible damage and clean with a steel
brush when necessary.
4. Make sure that the electrode gap is 0.6–0.8 mm. Special tools for
gapping (feeler gauges) are available for purchase separately.
5. Try to screw the spark plug partway in by hand to make sure the
threads catch correctly. Tighten using a spark plug spanner.
6. Washers on the new spark plug must be compressed during
installation. Tighten a ½ turn extra after the spark plug is securely in
place to compress the washer and create a proper seal.
7. Turn a ¼ turn extra if you are using the existing spark plug.
Handy hint: Thread a small piece of PVC hose to the spark plug wire
end to make it easier to access when it is time to manually thread it in
the socket.
0.6–0.8 mm
11
Page 12
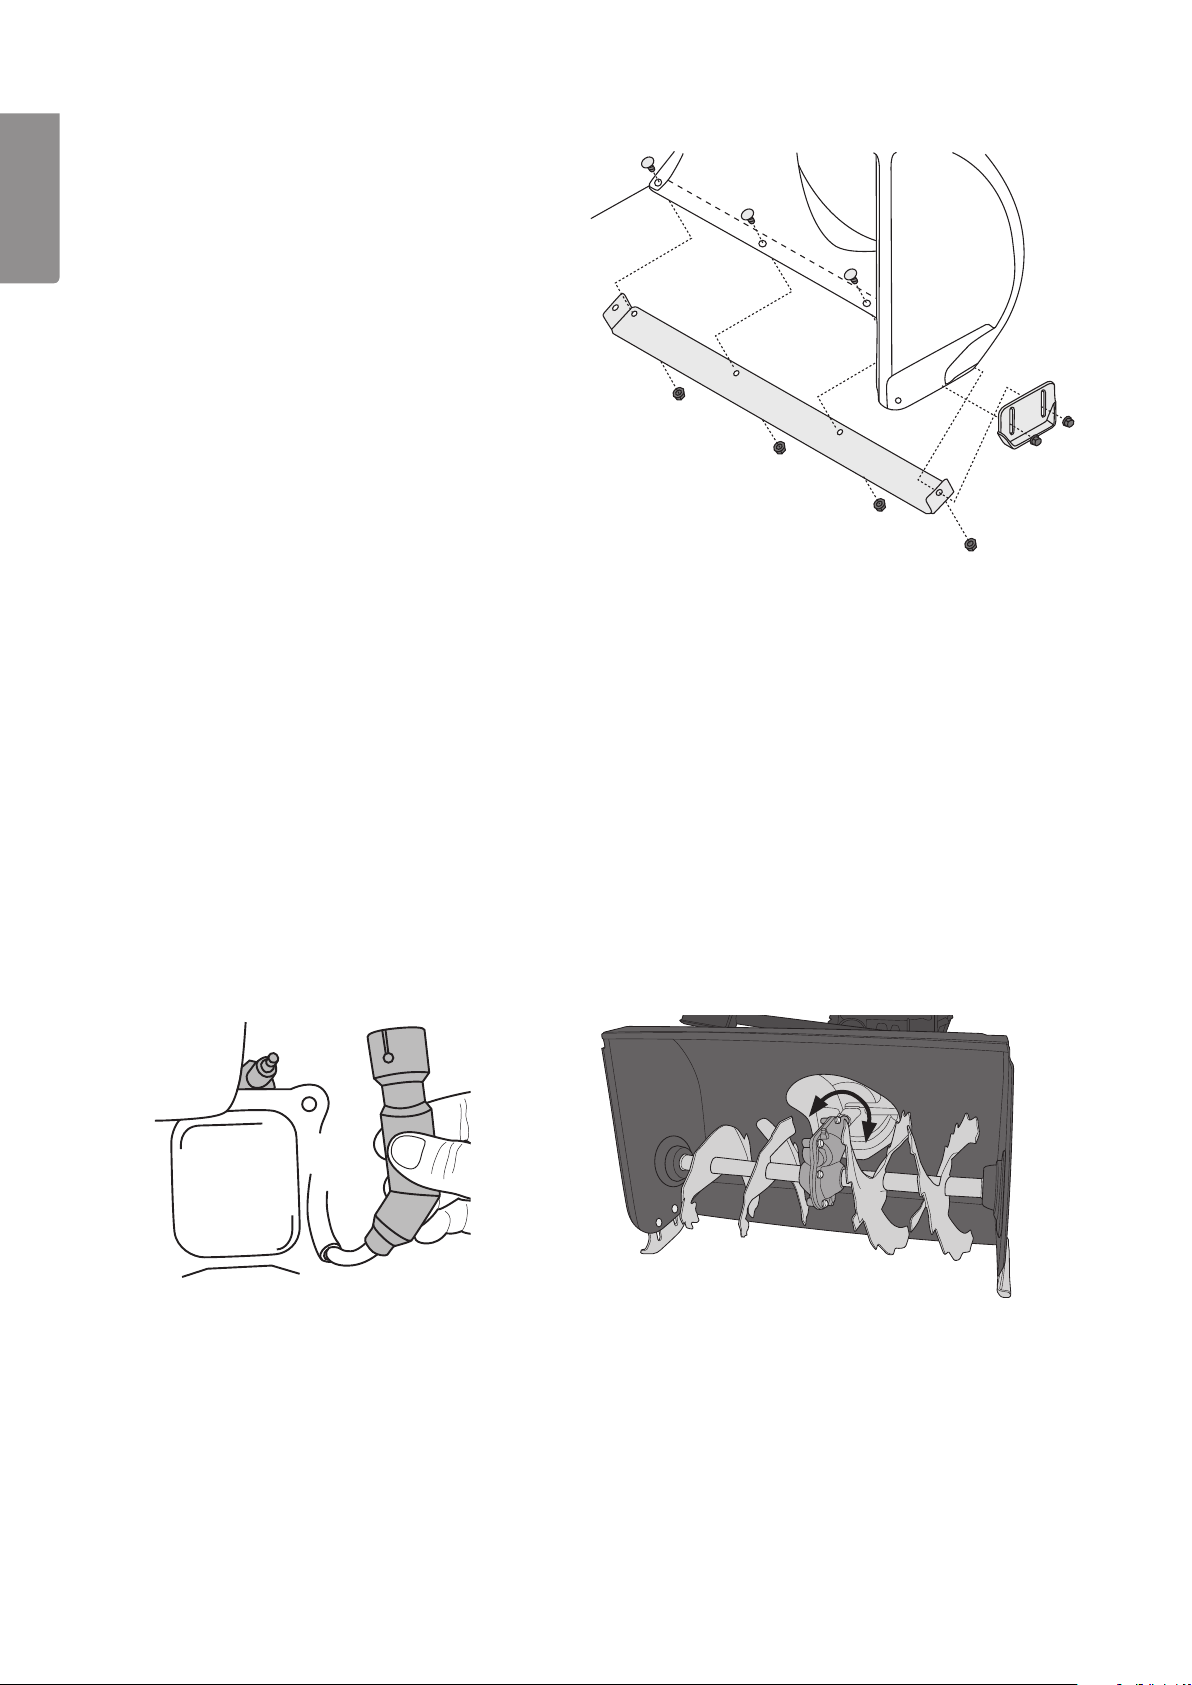
Replacing the scraper blade
• Undo the 3 bolts holding the scraper blade
and remove the blade.
ENGLISH
• Attach the new blade. Make sure that all
the bolt heads are on top, inside
the auger housing.
• Use only original parts or parts approved by
the retailer.
Changing the skid shoes
• Remove the skid shoes by undoing the 2 bolts in each.
• Mount the new shoes. Make sure that all the bolt heads are on the inside of the auger housing.
• Use only original parts or parts approved by the retailer.
Long-term storage procedures (over a month)
• Empty the fuel tank when the engine is cold. Do the work outside and collect the fuel in an appropriate
container. If the fuel is not to be reused, deposit it at the most appropriate recycling centre.
• Start the engine and let it run until it is out of fuel.
• Store the snow blower in a well-ventilated area, never in an enclosed storage facility subject to
naked flames or sparks.
Changing the drive belt
Note: Before changing the drive belt, make sure that the 2nd stage of the snow feed (the impeller behind
theauger) moves freely and has not jammed.
1. Note: Remove the spark plug cap from
thespark plug and remove the ignition key.
2. Then make sure that the inner impeller (theimpeller
behind the auger) can move freely and is not jammed
by any obstruction. Small stones can accumulate
between the inner impeller and the drum and prevent
the impeller from rotating, the impeller might also have
frozen to the drum.
3. Make sure that the inner impeller is free to move before
starting the engine again, otherwise the new drive belt
will soon wear out.
12
Page 13
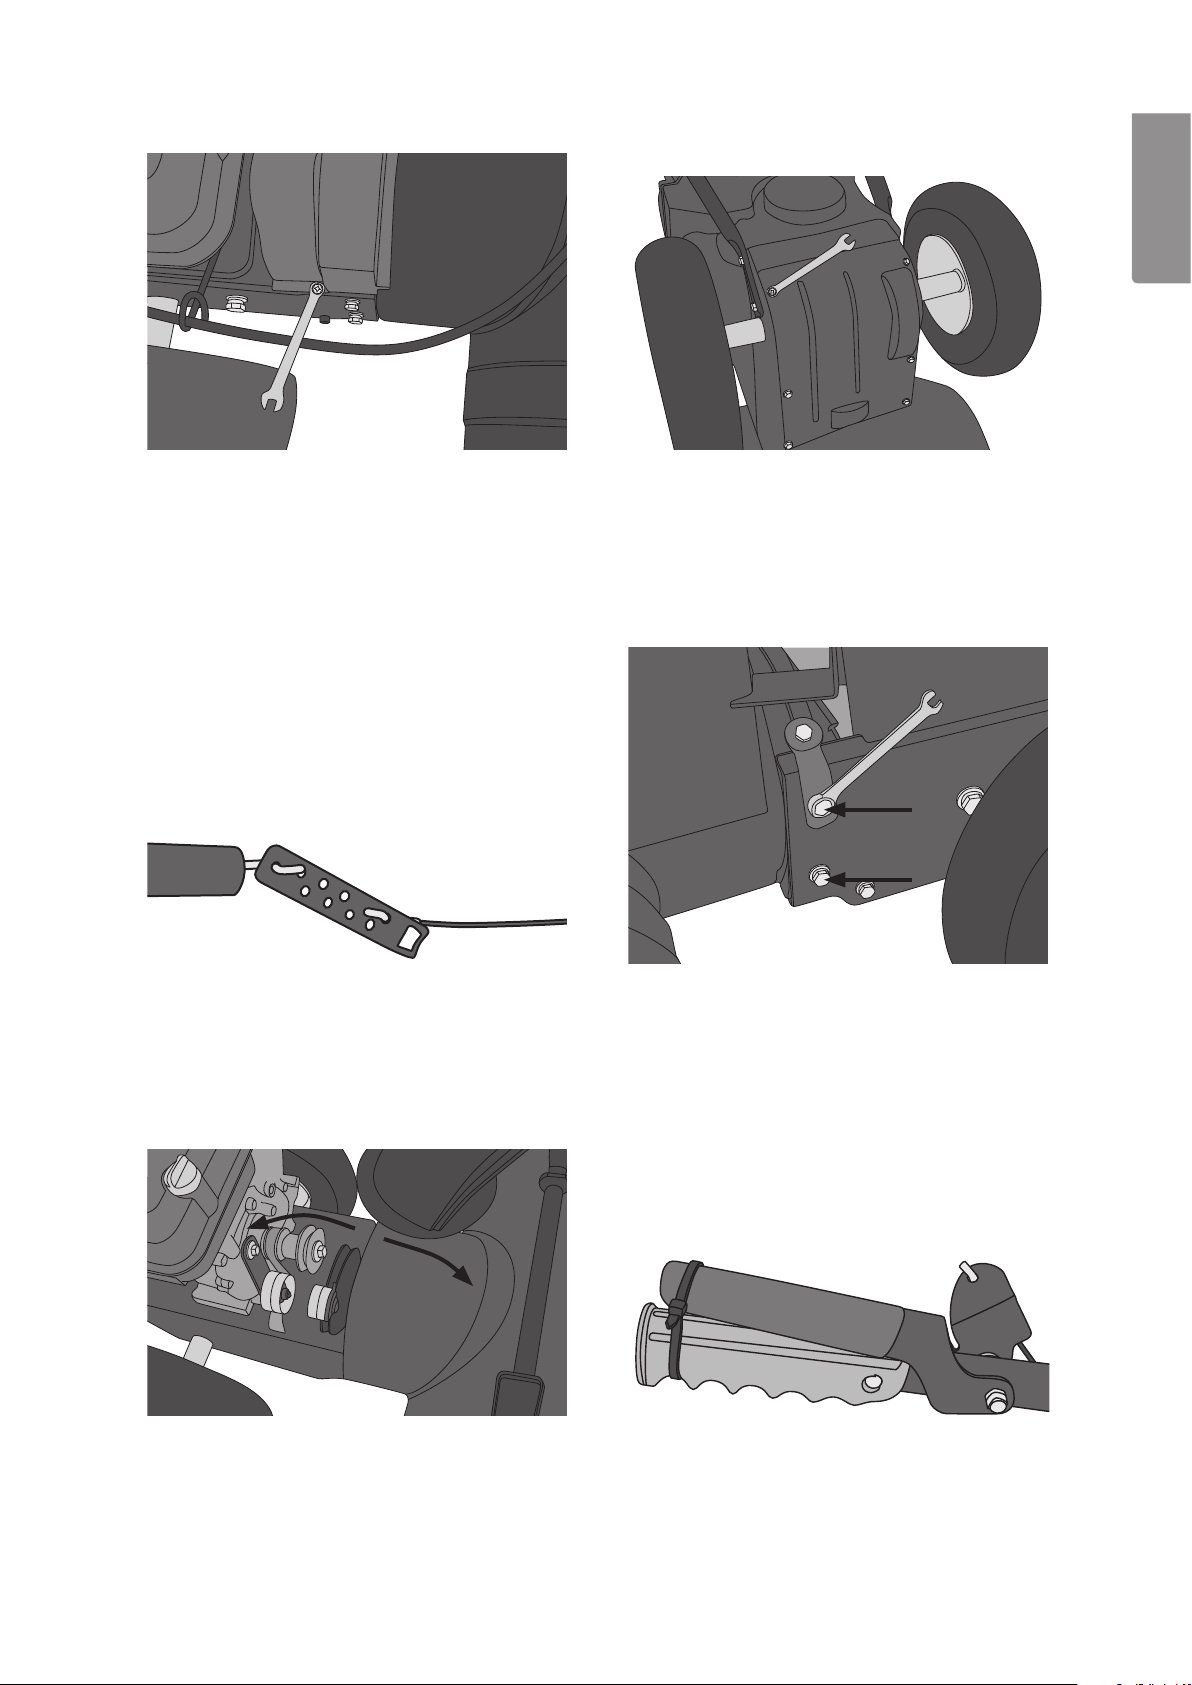
Changing the drive belt
ENGLISH
1. Remove the two bolts holding the plastic cover
(10 mm spanner).
4. Slacken the auger drive clutch wire connected
to the left handle. Remove the s-hook from
theconnector plate.
2. Tilt the snow blower so that it stands on theauger
housing. Note: Make sure that no petrol runs out of
the petrol tank when you stand thesnow blower on
its end. Make sure that thetank is only half-full.
3. Remove the six bolts holding the protective plate
(10 mm spanner).
5. To access the drive belt the snow blower needs
to be opened up in the middle. Return the snow
blower to its normal upright position and remove the
uppermost of the two bolts just behind the impeller
housing on both sides. The two lower bolts do not
need to be removed, just loosened (13 mm spanner).
6. Tilt down the front and rear parts of the snow
blower, pivoting on the two loosened bolts
to create room for you to work on the now
exposed drive belt pulleys.
7. Squeeze the clutch lever on the right handle and
tie it down with a cable tie or similar. This moves
the drive wheel away from the belt pulley giving
you more room to work.
13
Page 14

ENGLISH
8. Remove the damaged drive belt and insert a
new belt from above. Press in the belt tensioner
to allow room for the drive belt to pass over
theguide wheel/brake assembly.
10. Pass thereafter the drive belt over the upper
pulley (see fig).
11. Untie the clutch lever on the right handle and
refit the wire connected to the left handle.
12. Refit all the disassembled parts in reverse order.
13. Check the operation of the drive belt
(Transmission, auger and clutch control
adjustments in the instruction manual).
9. Pass the drive belt over the lower pulley once
the guide wheel/brake has been moved.
Note:This view is from below the snow blower.
Lubrication of the auger and replacement of the shear pins
The auger is equipped with shear pins (24) that are
meant to shear if the auger strikes hard compacted
ice or other foreign objects. The snow blower is
supplied with extra shear pins so that they can be
replaced when needed.
Note: Never substitute the shear pins with ordinary
bolts. This can seriously damage the snow blower
gears if the auger jams on an obstruction.
Unscrew the shear pins once per year and spray
theauger drive shaft and hole with oil. Also lubricate
the auger drive shaft’s plastic bearings (25).
10251024
14
Page 15

Troubleshooting guide
Problem Possible cause Solution
The engine
does not start.
The engine
runs irregularly.
The engine is
underpowered.
The engine is
overheated.
Abnormal
vibrations
occur.
The blower’s
transmission
doesn’t work.
The auger
continues
to rotate
despite being
disengaged.
No snow exits
thechute.
1. No fuel or thefuel is too old.
2. Clogged fuel lines.
3. Ignition key not fully inserted.
4. Spark plug cable not
properlyconnected.
5. Defective spark plug.
6. Engine not adequately primed.
7. Engine is flooded (over-priming).
8. Throttle set to idle.
1. The engine runs on choke even
when warm.
2. Blocked fuel lines or old petrol.
3. Sediment and/or water in
thefuelsystem.
4. The carburettor is maladjusted.
1. Spark plug cable loose.
2. Fuel cap’s vents blocked.
The carburettor is maladjusted. Contact an authorised service centre.
Loose parts or damaged auger. Turn off theengine and disconnect thespark plug
1. The wire is maladjusted.
2. The drive belt is loose or
damaged.
The wire is maladjusted. Adjust thewire according to theinstructions listed
1. The chute is clogged and/
or there is aforeign object
obstructing theauger’s rotation.
2. The shear pins have sheared off.
3. The auger control wire is
maladjusted or thedrive belt
needs changing.
1. Empty thetank and refill with new fuel.
2. Clean or replace thefuel lines.
3. Insert thekey completely.
4. Securely attach thespark plug wire.
5. Clean theplug and check theelectrode gap or
change plugs.
6. Press theprimer about 3–5 times.
7. Wait at least 10 min. before arestart attempt.
8. Set thethrottle control to full throttle.
1. Reset thechoke back into place.
2. Clean or replace thefuel lines. Emptythetank
and refill with new fuel.
3. Empty thetank and carburettor and refill with
newfuel.
4. Contact an authorised service centre.
1. Fasten thespark plug cable securely to theplug.
2. Clean thefuel cap and make sure ventilation
openings are free.
wire. Tightenall bolts. Checktheauger and replace
any damaged parts. Iftheproblem persists, contact
your authorised service centre.
1. Adjust thewire according to theinstructions listed
under thesection Adjusting thedrive control wire
and shift lever described above.
2. Contact your authorised service centre to have
thedrive belt checked.
under thesection Adjusting theauger control wire
described above.
1. Turn off theengine and disconnect thespark
plug wire. Cleanthechute and thearea around
theauger.
2. Replace theshear bolts with new ones.
3. Adjust thewire according to theinstructions listed
under theAdjusting theauger control wire section
above. Contact your authorised service centre to
have thedrive belt checked.
ENGLISH
15
Page 16

Disposal
This product should be disposed of in accordance with local regulations.
If you are unsure how to proceed, contact your local authority.
ENGLISH
Specifications
Type Two-stage snow blower
Working width 600 mm
Max snow depth 400 mm
Discharge range Up to 8 m
Engine single-cylinder, 4-stroke petrol engine 3.5 kW
Fuel tank capacity 2 litres
Oil tank capacity 0.6 litres
Gears 4 forward, 2 reverse
Discharge chute Rotatable 180 degrees
Chute deflector Tiltable 25 degrees
Drive Self-propelled
Wheels Pneumatic rubber tyres, diam: 330 mm (13″)
Weight 68.5 kg
LpA 86 dB(A), K= 3.0 dB(A)
LwA 101 dB(A), K= 3.0 dB(A)
Vibration 7.95 m/s², K=1.5 m/s²
16
Page 17

Tvåstegs snöslunga 3,5 kW
Art.nr 31-5052 Modell DB75524FM
Läs igenom hela bruksanvisningen före användning och spara den sedan för framtida bruk.
Vi reserverar oss för ev. text- och bildfel samt ändringar av tekniska data.
Vid tekniska problem eller andra frågor, kontakta vår kundtjänst (se adressuppgifter på baksidan).
Säkerhet
Läs igenom hela bruksanvisningen före användning.
Använd hörselskydd.
Använd skyddsglasögon.
Fara – roterande snöskruv.
Fara – roterande fläkt.
Se upp för utflygande föremål. Se till att åskådare befinner sig på behörigt avstånd.
Rör aldrig maskinens roterande delar förrän de har stannat helt,
maskinen har slagits av och tändningsnyckeln har tagits ur.
Stoppa inte ner händerna i utkastet.
SVENSK A
Håll obehöriga på säkert avstånd från maskinen.
Fara – bensin är mycket brandfarligt. Låt maskinen svalna minst 2 minuter innan bränsle fylls på.
Starta aldrig maskinen inomhus eller i dåligt ventilerade utrymmen. Motorns avgaser
innehåller livsfarlig kolmonoxid.
Fara – risk för elektrisk stöt (för maskin med elstart). Vid regn, starta inte maskinen
med hjälp av230 V.
17
Page 18

Allmänna säkerhetsföreskrifter
• Läs noga igenom instruktionerna och lär dig alla reglage samt korrekt användning av snöslungan.
• Låt aldrig barn eller personer som inte har tillräcklig kännedom om dessa instruktioner använda snöslungan.
Lokala föreskrifter kan ha restriktioner gällande användarens ålder.
• Använd aldrig maskinen i närheten av andra, särskilt barn eller djur.
• Kom ihåg att användaren/föraren alltid är ansvarig för olyckor som orsakats av produkten.
• Var försiktig så att du inte faller eller halkar, speciellt när snöslungan backas.
• Använd aldrig snöslungan om du är påverkad av alkohol eller mediciner. Använd den inte heller om du är
trött eller sjuk.
• Produkten får bara repareras av kvalificerad servicepersonal och endast med originalreservdelar.
SVENSK A
• Använd endast tillbehör som är godkända av tillverkaren eller av den återförsäljare där produkten inköptes.
Säkerhetsföreskrifter under användning
• Håll händer och fötter borta från roterande delar. Undvik alltid utkastets öppning.
• Vissa motordelar blir mycket varma vid användning. Risk för brännskador.
• Snöslungan får inte användas till att slunga någonting annat än snö.
• Var försiktig vid användning på grusgångar, trottoarer och vägar. Var uppmärksam på eventuella faror
ochtrafik. Undvik branta sluttningar.
• Rikta aldrig utkastet mot allmän väg eller trafik.
• Slå av motorn omedelbart om snöslungan träffar ett främmande föremål. Inspektera därefter snöslungan
noggrant. Använd inte snöslungan förrän eventuella skador reparerats.
• Om snöslungan börjar vibrera onormalt, slå genast av motorn och kontrollera orsaken. Vibrationer är normalt
ett tecken på problem.
• Befintliga säkerhetsanordningar får inte kopplas bort eller sättas ur funktion.
• Använd aldrig snöslungan i närheten av inhägnader, bilar, fönsterrutor, sluttningar etc. utan korrekt inställt utkast.
• Håll alltid barn borta från det område som ska snöröjas.
• Överbelasta inte snöslungan genom att köra den för fort.
• Var försiktig vid backning. Titta bakåt efter eventuella hinder.
• Rikta aldrig utkastet mot åskådare. Låt aldrig någon stå framför snöslungan.
• Använd aldrig snöslungan utan god sikt eller utan tillfredsställande belysning.
• Se till att ha god balans och håll stadigt i handtagen när du använder snöslungan.
• Använd endast det medföljande redskapet för att rengöra utkast och skovelhus. Använd aldrig händerna.
• Använd aldrig snöslungan på tak.
Förpackningen innehåller
• Snöslunga
• Utkast
• Tändstiftsnyckel
• 2 tänd-/säkerhetsnycklar
• 4 brytpinnar med låsmuttrar
• Bruksanvisning
• Tratt
• Oljeflaska
18
Page 19

Reglage och funktioner
106
101 102 103 104
107
1011
1012
105
1013
108
SVENSK A
109
1010
1014
1015
1016
1. Kopplingshandtag till drivning
2. Reglage för riktskärm
3. Växelreglage (4 växlar framåt
och 2 bakåt)
4. Kopplingshandtag till
inmatningsskruv
5. Utkast med riktskärm
6. Oljepåfyllning/oljesticka
7. Tanklock
8. Vev för sidojustering av utkast
9. Plastmutter
10. Fäste till utkast
11. Rengöringsverktyg
12. Skovelhus
13. Skrapskär
14. Inmatningsskruv
15. Släpsko (en på vardera sidan)
16. Gasreglage
17. Vajer till riktskärm
1017
1018
1019
1020
1021
1022
1023
18. Starthandtag
19. Tändningsnyckel
20. Chokereglage
21. Skruv för oljeavtappning
22. Länkage till riktskärm
23. Primer
19
Page 20

Montering
Övre och nedre handtag
1. Skruva bort de 4 stora plastvreden, brickorna och bultarna från
det nedre handtaget.
2. Lyft upp det övre handtaget och placera det utanpå
den nedre delen.
3. Skruva ihop övre och nedre handtag med bultar, brickor och
plastvred.
4. Kontrollera att alla vajrar ligger bra och är lättrörliga.
A) Övre handtag
SVENSK A
B) Bult
C) Plastvred
D) Nedre handtag
Montera utkastet
10a
10b
10c
10d
1. Ställ utkastet på utloppet från skovelhuset. 2. Skruva fast utkastets fäste med 2 bultar
längst ned.
Montera vev till utkast
Veven levereras delad och ska skruvas ihop med en skruv.
1. Skjut in vevens ytterdel genom hålet och in i hylsan.
2. Tryck in en skruv genom hålet i hylsan och veven och
skruva på muttern.
Användning
Oljepåfyllning och nivåkontroll
Obs! Snöslungan levereras utan olja. Olja måste fyllas på
innan slungan används. Motorn rymmer ca 0,6 l.
Obs! Motorn har kombinerad oljesticka/oljepåfyllningslock.
• Använd SAE 5W-30 för 4-takts bensinmotorer,
kvalitetsklass SG, SF.
• Skruva ur oljepåfyllningslocket och fyll på
rekommenderad mängd. Kontrollera sedan oljenivån
med oljestickan så att oljenivån ligger inom det
markerade området på oljestickan. Överfyll inte!
Obs! Skruva inte ner oljestickan vid nivåkontroll, håll endast ner den mot påfyllningshålet för att få rätt oljenivå.
Obs! På motorns nedre vänstra sida finns en plugg som används till påfyllning när motorn är monterad
i annan produkt. På denna modell används INTE den pluggen. Det är endast oljepåfyllningslocket på
ovansidan som används.
VIKTIGT! Byt olja första gången när motorn har gått 5 timmar.
20
Page 21

Förberedelser
• Kontrollera att det område som ska snöröjas är fritt från främmande föremål.
• Kontrollera att alla reglage går lätt och att de återgår till ursprungsläget när de släpps.
• Frikoppla alla reglage innan motorn startas.
• Planera i förväg var snön ska kastas för att undvika att personer eller egendom skadas av främmande föremål.
• Använd aldrig snöslungan utan att vara rätt klädd. Använd lämpliga skor med bra fäste vid halt underlag.
• Under inga omständigheter får underhåll, justeringar och service göras när motorn är igång (om inte
bruksanvisningen anger annat).
• Bär alltid skyddsglasögon eller visir vid användning, underhåll och service av snöslungan.
• Justera höjden på inmatningshuset så att det går fritt vid grusgångar o.d.
• Låt snöslungan anpassa sig till utomhustemperaturen innan snöröjningen påbörjas.
Innan användning
Kontrollera alltid innan start att det inre fläkthjulet är rörligt och inte är blockerat av något. Det kan ha fastnat
småstenar mellan det inre fläkthjulet (innanför inmatningsskruven) och trumman som gör att fläkthjulet inte kan
rotera. Fläkthjulet kan också vara fastfruset. Om inte det inre fläkthjulet kan rotera kommer drivremmen att slitas
ner snabbt.
Efter användning
Ställ snöslungan så att den lutar framåt så att snö och vatten rinner ur och inte blir kvar i snöslungan och gör att
fläkthjulet fryser fast.
SVENSK A
Påfyllning av bränsle
Obs! Bensin är mycket brandfarligt!
• Använd 95 eller 98 oktan blyfri bensin.
• Max 10 % etanolinblandning i bränslet.
• Förvara bränslet i en behållare som är avsedd för bensin.
• Fyll endast på bensin utomhus och rök inte under påfyllningen.
• Överfyll inte. Bränslenivån bör ligga i nivå med nivåmätaren (se bild).
• Fyll på bränsle innan motorn startas. Öppna aldrig tanklocket för att fylla
på bränsle när motorn är igång eller fortfarande är varm.
• Stäng tanklocket ordentligt och torka upp eventuellt utspilld bensin.
Start
Obs! Kontrollera olje- och bränslenivåerna innan snöslungan startas. Kontrollera att kopplingshandtagen för
drivning och inmatningsskruv är uppsläppta.
1. Tryck in tändningsnyckeln helt i tändlåset. Vrid inte nyckeln, den ska bara tryckas in.
2. Ställ gasreglaget på full gas (åt vänster mot symbolen med haren).
3. Ställ chokereglaget i kallstartsläge (åt höger). Om motorn är varm, ställ choken helt åt motsatt håll.
4. Tryck in primerblåsan 3–5 gånger. Håll för lufthålet uppe på blåsan när du trycker. Vid kall väderlek kan
motorn behöva primas en gång till. Om motorn är varm, tryck in blåsan en gång.
21
Page 22

5. Dra sakta i starthandtaget tills du känner motstånd. Dra sedan snabbt och kraftfullt i handtaget för att starta.
Släpp inte handtaget utan håll kvar och för sakta tillbaka handtaget till utgångsläget.
6. När motorn startat och efterhand värms upp, för sakta tillbaka chokereglaget till utgångsläget (åt vänster).
7. Om motorn stannar, starta om och låt den gå med chokereglaget i mittenläge en kort stund. För sedan
sakta tillbaka chokereglaget till utgångsläget.
Säkerhetskontroll
Obs! Kontrollera inmatningsskruvens funktion första gången snöslungan startas och inför varje ny säsong.
Det måste finnas ett litet spel i vajern som går från kopplingshandtaget.
1. Starta slungan och tryck ner kopplingshandtaget. Låt inmatningsskruven arbeta i ca 10 sekunder.
Upprepa detta några gånger.
SVENSK A
2. Släpp upp kopplingshandtaget och ställ dig framför slungan. Kontrollera att inmatningsskruven står helt stilla
och inte visar några tendenser till att rotera.
3. Om inmatningsskruven roterar eller visar tendenser till att rotera trots att kopplingshandtaget inte trycks ner,
slå av motorn och justera vajern.
Justera vajern till inmatningsskruvens drivning innan första användning
Kontroll och justering av inmatningsskruvens kopplingsvajer
Inmatningsskruvens kopplingsvajer är inställd på fabriken, men kan ändå behöva kontrolleras/justeras när
handtaget har blivit monterat.
Kontrollera funktionen så här:
1. Starta motorn. Obs! Motorn levereras utan påfylld olja, oljan levereras i en separat flaska.
2. Tryck ner kopplingshandtaget, inmatningsskruven ska rotera. Stäng sedan av motorn.
3. Om inte inmatningsskruven roterar måste kopplingsvajern justeras. Feljusterad kopplingsvajer gör att
drivremmen slits snabbt.
Justera kopplingsvajern så här:
1. Lossa skruvarna på den vänstra sidan som håller ihop det övre och
nedre handtaget så att kopplingsvajern blir mindre spänd.
2. Lyft upp gummihylsan över hålplåten.
3. Dra i den nedre vajern för att skapa ett större spel så att det blir möjligt
att ta ur kroken.
4. Vik hålplåten åt sidan och ta ur den nedre
vajerns krok ur hålplåten.
5. Sträck vajern, vik hålplåten åt sidan och sätt i
vajerns krok i ett hål längre in på hålplåten.
6. Skruva fast skruvarna som håller ihop handtaget igen, så att kopplingsvajern blir spänd.
22
Page 23

Justering av släpskor
• Normal användning: Justera släpskorna 0,5–1 cm lägre än skrapskäret.
• Hårt packad snö: Justera släpskorna något högre (för att sänka skrapskäret).
• Grus eller ojämnt underlag: Justera släpskorna något lägre (för att höja skrapskäret).
Körning
1. Planera körningen och var snön ska kastas innan du börjar.
2. Starta motorn och ställ gasreglaget nära full gas.
3. Låt motorn värmas upp någon minut för att uppnå full effekt innan snöröjningen påbörjas.
4. Ställ växelreglaget i en lämplig växel. 2:ans växel framåt är vid normala förhållanden mest lämplig vid snöröjning.
5. Tryck ner kopplingshandtaget för inmatningsskruven för att påbörja snöröjningen.
6. Tryck ner kopplingshandtaget för drivningen, snöslungan rör sig framåt. Obs! Rör aldrig växelreglaget när
slungan är i rörelse, släpp upp kopplingshandtaget för drivningen innan växling.
7. När arbetet är avslutat: Låt motorn gå några minuter på tomgång efter användning. Låt slungan och
inmatningsskruven stå stilla under tiden för att fukt och snö på motorn ska torka upp.
Stäng av motorn
SVENSK A
1. Skjut tillbaka gasreglaget helt.
2. Dra ut tändningsnyckeln.
3. Rengör noggrant hela slungan och rör alla reglage fram och tillbaka några gånger för att undvika fastfrysning.
Skötsel och underhåll
Obs! Stäng av motorn, ta ur tändningsnyckeln och ta bort tändkabeln från tändstiftet innan någon service,
rengöring eller underhåll utförs på maskinen.
Smörjning
• Smörj regelbundet växelreglaget och övriga rörliga delar med några droppar motorolja och/eller spray
(typ 5–56, WD 40). Använd inte för mycket!
• Använd ett universalfett lämpat för bilar och maskiner till snäckdrevet längst ner på veven som kontrollerar
utkastet. Använd inte för mycket!
Service och smörjning av inmatningsskruven
• Inmatningsskruven är försedd med brytpinnar som är konstruerade så att de bryts om skruven, när den
roterar, träffar hård kompakt is eller annat främmande föremål. Snöslungan levereras med extra brytpinnar så
att de vid behov kan bytas ut. Obs! Ersätt aldrig brytpinnarna med vanliga bultar, detta kan allvarligt skada
slungan om inmatningsskruven fastnar på något främmande föremål.
• Skruva ur brytpinnarna en gång per säsong och spraya olja in i skruvhålet/skruvaxeln. Smörj också
skruvaxelns plastlagringar.
23
Page 24

Justering av vajrar för växelreglage, inmatningsskruvens drivning och
hjulens drivning
Kontroll av växelreglage
Testa justeringen för växelreglaget så här:
1. Med motorn avstängd, skjut växelreglaget till den högsta växeln
(4:an). Släpp upp kopplingshandtaget för drivningen, slungan ska nu
gå att skjuta framåt och bakåt.
2. Tryck ner kopplingshandtaget för drivningen, slungan ska nu inte gå
att skjuta framåt eller bakåt.
3. Släpp upp kopplingshandtaget, slungan ska gå att skjuta framåt
SVENSK A
och bakåt igen.
4. Flytta växelreglaget till backväxel 2 och sedan tillbaka till 4:an igen.
Det ska inte kännas något motstånd i reglaget och slungan ska gå
att skjuta oavsett var växelreglaget står.
Justering av växelreglagets vajrar
Växelreglaget har två vajrar, vilka drar växelföraren åt varsitt håll.
Kontrollera att alla växlar fungerar och att växelreglaget lätt når ut i sina
ändlägen (4:an framåt och 2:an bakåt). Justera vid behov genom att
lossa låsmuttern och vrida justerskruven på den ena vajern. Släpper
man på den ena sidans kopplingsvajer ska den andra spännas.
Inmatningsskruvens drivning
Justering av inmatningsskruvens kopplingsvajer:
1. Lyft upp gummihylsan över hålplåten.
2. Dra i den nedre vajern för att skapa ett större spel så att det blir
möjligt att ta ur kroken.
3. Vik hålplåten åt sidan och ta ur den ena vajerns krok ur hålplåten.
4. Sträck vajern, vik hålplåten åt sidan och sätt i vajerns krok i ett hål
längre in på hålplåten.
5. Starta motorn, kontrollera funktionen.
Obs! Om inmatningsskruven inte roterar ordentligt trots att motorn går
och kopplingshandtaget är nertryckt är spelet i vajern för stort.
Flytta kroken till ett hål längre in på hålplåten vid behov.
Hjulens drivning
Justering av vajer för hjulens drivning:
1. Om slungan visar tendenser till att drivas framåt utan att kopplingshandtaget för drivningen är nedtryckt
är vajern för spänd. Justera så att ett litet spel skapas på samma sätt som vid justering av vajern för
inmatningsskruven som beskrivits ovan.
2. Om slungan inte drivs framåt trots att kopplingshandtaget trycks ner är vajern för slak. Spänn vajern genom
att flytta en krok i hålplåten på samma sätt som beskrivits ovan.
3. Testa drivningen och efterjustera vid behov.
Rengöring och övrig översyn
• Använd rengöringsverktyget för att vid behov ta bort snö och is som fastnat i utkastet eller kring
inmatningsskruven. Använd aldrig händerna!
• Kontrollera regelbundet att alla skruvar och muttrar är åtdragna och att det inte finns några synliga skador.
• Skrapskär och släpskor blir med tiden slitna och behöver bytas ut. Använd endast originaldelar eller delar
godkända av återförsäljaren.
• Kontrollera regelbundet bränslesystemet så att inget läckage eller skador uppkommit på tank, tanklock eller
bränsleledning.
• Försök inte modifiera eller ändra produkten på något sätt.
24
Page 25

Motorns serviceintervall
Efter de första
5 timmarna.
Kontrollera oljenivån. •
Byt olja. • •
Kontrollera tändstiftet. •
Rengör området kring
ljuddämparen.
Vid varje användning
eller var 5:e timme.
•
Vid varje ny säsong
eller var 25:e timme.
Vid varje ny säsong
eller var 50:e timme.
Oljebyte
Obs! Kontrollera oljenivån varje gång snöslungan ska användas.
Obs! Slungan måste lutas bakåt för att få ur all olja. Om tanken är helt fylld kan bränsle rinna ur vid tanklocket.*
1. Starta motorn och varmkör ett par minuter, så blir oljan lättare att tömma ur.
2. Placera ett lämpligt uppsamlingskärl under oljeavtappningspluggen.
3. Skruva ur skruven, luta slungan bakåt och töm ur oljan. Tänk på att oljan kan vara varm vid avtappning.
4. Skruva tillbaka skruven och fyll på ny olja. Se tidigare avsnitt Oljepåfyllning och nivåkontroll.
*Töm i så fall ur bränsletanken innan du tömmer ur oljan. Motorn ska vara kall när du tömmer ur bränslet.
Utför arbetet utomhus och samla upp bränslet i lämpligt kärl. Om bränslet inte ska återanvändas lämna det
till återvinningscentral.
Tändstift
Obs! Låt motorn svalna innan tändstiftet skruvas ur. Tändstift och ljuddämpare är mycket heta efter användning.
Kontrollera tändstiftet före varje säsong, byt vid behov.
1. Ta bort tändkabeln från tändstiftet. Dra inte i kabeln utan ta tag
i tändhatten av metall och vicka fram och tillbaka samtidigt som
du drar.
2. Använd en tändstiftsnyckel och skruva ur stiftet.
3. Kontrollera stiftet så att det inte har några synliga skador, rengör
med en stålborste vid behov.
4. Kontrollera elektrodavståndet, det ska vara 0,6–0,8 mm.
Specialverktyg för detta finns att köpa separat.
5. Skruva om möjligt tillbaka tändstiftet för hand så du känner att det
tar gäng ordentligt. Dra sedan åt med tändstiftsnyckeln.
6. På ett nytt tändstift måste stiftets bricka komprimeras vid montering.
Dra åt ½ varv efter att det nya stiftet har gängats i botten.
7. När ett använt stift monteras, dra åt ¼ varv efter att stiftet gängats
i botten.
Tips! Trä på en bit PVC-slang på tändstiftets anslutning för tändkabeln
så går det lättare att komma åt att skruva i det för hand.
0,6–0,8 mm
SVENSK A
25
Page 26

Byte av skrapskär
• Skruva loss skrapskärets 3 fästbultar och
demontera skäret.
• Montera det nya skäret. Se till att alla
bultskallar hamnar på ovansidan, inne i
skovelhuset.
• Använd endast originaldelar eller delar
godkända av leverantören.
SVENSK A
Byte av släpskor
• Skruva loss släpskornas 2 fästbultar och demontera skorna.
• Montera de nya skorna. Se till att alla bultskallar hamnar på insidan, inne i skovelhuset.
• Använd endast originaldelar eller delar godkända av leverantören.
Om inte snöslungan ska användas under en längre period (längre än en månad)
• Töm bränsletanken när motorn är kall. Utför arbetet utomhus och samla upp bränslet i lämpligt kärl.
Om bränslet inte ska användas, lämna det till återvinningscentral.
• Starta motorn och låt den gå tills den stannar på grund av bränslebrist.
• Förvara snöslungan och bränslebehållaren i ett väl ventilerat utrymme, aldrig inomhus i lokaler där öppna
lågor eller gnistor förekommer.
Byte av drivrem
Obs! Kontrollera innan du byter drivrem, att inmatningens 2:a steg (inre fläkthjulet) är rörligt och inte sitter fast.
1. Obs! Ta bort tändstiftshylsan från tändstiftet och
ta ur tändningsnyckeln.
2. Kontrollera sedan att det inre fläkthjulet är rörligt
och inte är blockerat av något. Det kan ha
fastnat småstenar mellan det inre fläkthjulet och
trumman som gör att fläkthjulet inte kan rotera,
fläkthjulet kan också vara fastfruset.
3. Se till att det inre fläkthjulet är rörligt innan du
startar motorn igen, annars kommer den nya
drivremmen att slitas ner snabbt.
26
Page 27

Byte av drivrem
SVENSK A
1. Skruva bort de två skruvarna som håller fast
plastkåpan (10 mm nyckel).
4. Släpp på vajern till inmatningen vid det vänstra
handtaget. Dra ihop vajern och ta ur S-kroken
urhålplåten.
2. Vik upp slungan så att den vilar på inmatningsöppningen. Obs! Se till att inte bensin rinner
ur bensintanken när du viker upp snöslungan.
Setill att ha mindre än halva tanken fylld.
3. Skruva bort de 6 skruvarna som håller fast
underplåten (10 mm nyckel).
5. För att komma åt drivremmen måste snöslungan
delas/öppnas. Skruva ur de övre skruvarna på
båda sidorna och lossa de undre skruvarna
något (13 mm nyckel).
6. Tryck ner den främre och bakre delen av
snöslungan så att det blir mera plats till att
montera den nya drivremmen.
7. Håll in höger handtag, lås fast det med ett
buntband eller liknande. Drivhjulet flyttas då från
remskivan och det blir mera plats.
27
Page 28

SVENSK A
8. Ta bort den trasiga drivremmen och tryck
ner den nya drivremmen uppifrån. Tryck in
spännrullen för att ge plats för drivremmen
innanför remstyrningen/bromsplåten.
10. Lägg sedan på drivremmen på den övre
remskivan (se bild).
11. Lossa höger handtag och återmontera vajern på
vänster handtag respektive hålplåt.
12. Montera tillbaka allt i omvänd ordning.
13. Kontrollera drivremmens funktion (Justering
av vajrar för växelreglage, inmatningsskruvens
drivning och hjulens drivning i bruksanvisningen).
9. Lägg på drivremmen på den nedre remskivan
när remstyrningen/bromsplåten är frilagd från
remskivan. Obs! Bilden visar snöslungans
undersida.
Service och smörjning av inmatningsskruven, byte av brytpinnar
Inmatningsskruven är försedd med brytpinnar (24)
som är konstruerade så att de bryts om skruven
träffar hård kompakt is eller annat främmande
föremål. Snöslungan levereras med extra brytpinnar
så att de vid behov kan bytas ut.
Obs! Ersätt aldrig brytpinnarna med vanliga bultar,
detta kan allvarligt skada slungan om inmatningsskruven fastnar på något främmande föremål.
Skruva ur brytpinnarna en gång per år och spraya
in olja in i skruvhålet/skruvaxeln. Smörjockså
skruvaxelns plastlagringar (25).
10251024
28
Page 29

Felsökningsschema
Problem Orsak Åtgärd
Motorn
startar inte.
Motorn går
ojämnt.
Motorn är svag. 1. Tändkabeln är lös.
Motorn
överhettas.
Onormala vibrationer uppstår.
Snöslungan drivs
inte framåt.
Inmatningsskruven fortsätter
att rotera trots att
kopplingshandtaget släpps upp.
Ingen snö
slungas ut.
1. Inget bränsle itanken eller bränslet är
för gammalt.
2. Igensatt bränsleledning.
3. Tändningsnyckeln är inte helt inskjuten.
4. Tändkabeln har inte kontakt
medtändstiftet.
5. Defekt tändstift.
6. Motorn är inte primad tillräckligt.
7. Motorn har fått för mycket bränsle
(primats för mycket).
8. Gasreglaget står på tomgång.
1. Motorn går på choke fast den är varm.
2. Blockerad bränsleledning eller
gammalbensin.
3. Smuts och/eller vatten
ibränslesystemet.
4. Förgasaren är feljusterad.
2. Tanklockets ventilationshål är igensatt.
Förgasaren är feljusterad. Kontakta auktoriserad verkstad.
Lösa delar eller skadad inmatningsskruv. Slå av motorn och ta bort tändkabeln
1. Vajern är feljusterad.
2. Drivremmen är lös eller skadad.
Vajern är feljusterad. Justera vajern på det sätt som beskrivs under
1. Utkastet är igensatt och/eller
främmande föremål hindrar skruven
från att rotera.
2. Brytpinnarna har gått av.
3. Inmatningsskruvens vajer är feljusterad
eller drivremmen behöverbytas.
1. Töm tanken och fyll på nytt bränsle.
2. Rengör eller byt bränsleledning.
3. Skjut in nyckeln helt.
4. Tryck fast tändkabeln ordentligt.
5. Rengör stiftet och kontrollera
6. Tryck in primerblåsan 3–5 gånger.
7. Vänta minst 10 minuter innan nya
8. Ställ upp gasreglaget på fullgas.
1. Skjut tillbaka choken.
2. Rengör eller byt bränsleledning.
3. Töm tanken och förgasaren och fyll på
4. Kontakta auktoriserad verkstad.
1. Fäst tändkabeln ordentligt på tändstiftet.
2. Rengör tanklocket och se till att
från tändstiftet. Draåt alla lösa bultar.
Kontrollerainmatningsskruven och byt ut
ev. skadade delar. Omproblemen kvarstår
kontaktaauktoriseradverkstad.
1. Justera vajern på det sätt som beskrivs
2. Kontakta auktoriserad verkstad för att få
avsnitt Justering av inmatningsskruvens
kopplingsvajer.
1. Slå av motorn och ta bort tändkabeln från
2. Ersätt brytpinnarna med nya.
3. Justera vajern enligt avsnitt Justering av
Kontakta auktoriserad verkstad för att få
driv remmen kontrollerad.
elektrodavståndet eller byt tändstift.
startförsökgörs.
Tömtanken och fyll på nytt bränsle.
nyttbränsle.
ventilationshålet är öppet.
under avsnitt Justering av vajrar för
drivning och växelreglage.
drivremmen kontrollerad.
tändstiftet. Rengörutkastet och området
kring inmatningsskruven.
inmatningsskruvens kopplingsvajer.
SVENSK A
29
Page 30

Avfallshantering
När du ska göra dig av med produkten ska detta ske enligt lokala föreskrifter.
Är du osäker på hur du ska gå tillväga, kontakta din kommun.
Specifikationer
Typ Tvåstegs snöslunga
Arbetsbredd 600 mm
Max snödjup ca 400 mm
Kastlängd Upp till 8 m
SVENSK A
Motor 1-cylindrig 4-takts bensinmotor, 3,5 kW
Tankvolym ca 2 liter
Oljevolym 0,6 liter
Växlar 4 framåt, 2 bakåt
Utkast Vridbart 180º
Riktskärm Vinklingsbar ca 25º
Drivning Självgående
Luftfyllda gummihjul Ø 330 mm
Vikt 68,5 kg
LpA 86 dB(A), K= 3,0 dB(A)
LwA 101 dB(A), K= 3,0 dB(A)
Vibration 7,95 m/s², K=1,5 m/s²
30
Page 31

Snøfreser 3,5 kW, Totrinns
Art. nr. 31-5052 Modell DB75524FM
Les brukerveiledningen nøye før produktet tas i bruk, og ta vare på den for framtidig bruk. Vi reserverer oss mot
ev. feil i tekst og bilde, samt forandringer av tekniske data. Ved tekniske problemer eller spørsmål, ta kontakt
med vårt kundesenter. (Se opplysninger om kundesenteret i denne bruksanvisningen).
Sikkerhet
Les hele bruksanvisningen før bruk.
Bruk hørselsvern.
Bruk vernebriller.
Fare – roterende snøskrue.
Fare – roterende vifte.
NORSK
Se opp for gjenstander som kan slynges ut. Påse at tilskuere oppholder seg på god avstand.
Berør aldri maskinens roterende deler før de har stoppet helt opp,
maskinen er slått helt av og tenningsnøkkelen er fjernet.
Hold hender unna utkastet.
Hold uvedkommende på sikker avstand fra maskinen.
Fare - bensin er svært brannfarlig. La maskinen avkjøles i minst 2 minutter før
påfylling av nytt drivstoff.
Maskinen må ikke startes innendørs eller i dårlig ventilerte omgivelser.
Motorens avgasser inneholder livsfarlig kullmonoksid.
Fare for elektrisk støt (gjelder maskiner med elstart). Start ikke maskinen med hjelp
av 230 V ved regn.
31
Page 32

NORSK
Generelle sikkerhetsanbefalinger
• Les nøye gjennom brukerveiledningen, og sørg for at du kan alle innstillinger og riktig bruk av snøfreseren.
• La aldri barn eller personer, som ikke har nok kunnskap om produktet, bruke det. Det kan være lokale
forskrifter vedr. aldersgrense for bruk av produktet, som skal følges.
• Bruk aldri maskinen nær andre individer, særlig ikke barn eller dyr.
• Husk at det er alltid brukeren/føreren som er ansvarlig for ulykker som er forårsaket av produktet.
• Vær forsiktig så du ikke sklir eller faller, særlig når snøfreseren bakker.
• Bruk aldri snøfresen hvis du er påvirket av alkohol eller medisiner. Bruk den heller ikke dersom du er trett
eller syk.
• Produktet skal kun repareres av kompetente fagpersoner og kun med originale reservedeler.
• Bruk kun tilbehør som er godkjent av produsent eller forhandler.
Sikkerhetsanbefalinger ved bruk
• Hold hender og føtter unna roterende deler. Pass opp for utkastet.
• Enkelte motordeler blir svært varme ved bruk. Fare for brannskader.
• Snøfreseren må ikke brukes til annet enn snørydding.
• Vær forsiktig ved bruk i grusganger, og på stier og veier. Vær oppmerksom på eventuelle farer og trafikk.
• Unngå bratte skråninger.
• Vend aldri utkaster mot offentlig vei eller trafikk.
• Stopp motoren umiddelbart hvis snøfreseren treffer en gjenstand. Inspiser deretter freseren grundig.
Bruk ikke snøfreseren før ev. skader er retter opp.
• Hvis snøfreseren begynner å vibrere unormalt må den stoppes umiddelbart og årsaken må sjekkes.
Vibrasjoner er normalt et tegn på problemer.
• Sikkerhetsanordningene på snøfreseren må ikke fjernes eller settes ut av funksjon.
• Bruk aldri snøfreseren i nærheten av innheininger, biler, vinduer, skråninger etc. uten riktig innstilling på utkastet.
• Hold alltid barn unna området som skal ryddes for snø.
• Overbelast ikke snøfreseren ved å kjøre den for fort.
• Vær påpasselig ved bakking. Se da bakover etter ev. hinder.
• Vend aldri utkaster mot tilskuere. La aldri noen stå foran snøfreseren.
• Sørg for god sikt og tilfredsstillende belysning.
• Påse at du har god balanse i kroppen og godt grep i styret når du bruker snøfreseren.
• Bruk kun det medfølgende redskapet for rengjøring av utkast og skovelhus. Bruk aldri fingrene.
• Bruk aldri snøfreseren på tak.
Forpakningen inneholder
• Snøfreser
• Utkaster
• Tennpluggnøkkel
• 2 stk. tennings-/sikkerhetsnøkler
• 4 brytepinner med låsemutre
• Brukerveiledning
• Trakt
• Oljeflaske
32
Page 33

Brytere og funksjoner
106
101 102 103 104
107
1011
1012
105
1013
108
109
1010
NORSK
1014
1015
1016
1. Koblingshåndtak til driving
2. Bryter for justering
av retningsskjerm
3. Gir (4 framover og 2 bakover)
4. Koblingshåndtak til
innmatingsskruen
5. Utkast med skjerm for å styre utkast
6. Åpning for påfylling av olje, oljepeiler
7. Tanklokk
8. Sveiv for sidejustering av utkast
9. Plastmutter
10. Feste til utkast
11. Rengjøringsverktøy
12. Skovelhus
13. Skjær
14. Innmatingsskrue
15. Meier (en på hver side)
16. Gassregulering
17. Vaier til skjerm for styring av utkast
1017
1018
1019
1020
1021
1022
1023
18. Starthåndtak
19. Tennpluggnøkkel
20. Sjåk
21. Skrue for oljetapping
22. Til retningsskjerm
23. Primer
33
Page 34

NORSK
Montering
Øvre og nedre håndtak
1. Skru av de 4 store plastmutrene, skivene og boltene som sitter
på det nedre håndtaket.
2. Løft opp det øvre håndtaket og plasser det utenpå den
nedre delen på håndtaket.
3. Skru sammen øvre og nedre håndtak med bolter, skiver
og plasthjul.
4. Kontroller at alle vaiere har god frigange.
A) Øvre håndtak
B) Bolt
C) Plasthjul
D) Nedre håndtak
Montere utkastet
10a
10b
10c
10d
1. Fest utkastet på utløpet av skovelhuset. 2. Utkastet festes med 2 bolter nederst.
Monter sveiven til utkastet
Sveiven leveres delt og skal skrus sammen med den
medfølgende skruen.
1. Sveivens ytre del skyves gjennom hullet og inn i hylsen.
2. Trykk en skrue inn gjennom hullet i hylsen og sveiven, og
skru på mutteren.
Bruk
Oljepåfylling og nivåkontroll
Obs! Snøfreseren leveres uten olje. Det må fylles på olje før
freseren tas i bruk. Motoren rommer ca. 0,6 l.
Obs! Motoren har kombinert oljepeiler og lokk til oljetanken.
• Bruk SAE 5W-30 for 4-takts bensinmotorer,
kvalitetsklasse SG, SF.
• Skru av lokket til oljetanken og fyll på anbefalt mengde
olje. Oljemengden må kontrolleres regelmessig.
Nivået skal ligge innenfor det markerte området på
oljepeileren. Ikke fyll på for mye!
Obs! Oljepeileren skal ikke skrus ned ved nivåkontroll. Hold den kun ned mot påfyllingshullet for å få riktig nivå.
Obs! På den venstre siden av motoren er det en plugg som benyttes til påfylling når motoren er montert til et annet
produkt. På denne modellen skal IKKE pluggen brukes. Man skal kun fylle olje ved inntaket under oljelokket.
VIKTIG! Første oljeskift skal skje etter at motoren har gått i 5 timer.
34
Page 35

Forberedelser
• Kontroller at det området som skal ryddes for snø er fritt for fremmede gjenstander.
• Kontroller at alle brytere og knapper går lett og at de går tilbake til utgangsposisjonen når de slippes opp.
• Alle innstillinger må frikobles (stilles i «fri») før motoren startes.
• Planlegg på forhånd hvor snøen skal kastes. Dette for å unngå at personer eller ting skades av
uønskede gjenstander.
• Bruk ikke snøfreseren uten å være riktig kledd. Bruk passende skotøy med gode såler, ved glatt føre.
• Service, justeringer og vedlikehold må kun skje med motoren skrudd av (dersom ikke bruksanvisningen
sier noe annet).
• Bruk alltid vernebriller eller visir når snøfresingen pågår og ved vedlikehold og service av maskinen.
• Juster høyden på innmatingshuset slik at den går fritt ved grusganger etc.
• La snøfreseren tilpasses utendørstemperaturen før bruk.
Før bruk
Sjekk deretter at det indre viftehjulet er bevegelig og ikke blokkert. Småstein kan ha festet seg mellom det indre
viftehjulet og trommelen, og dette kan igjen føre til at viftehjulet ikke roterer. En annen mulighet kan være at det
har frosset fast. Hvis ikke det indre viftehjulet kan rotere fritt, vil drivreimen slites raskt.
Etter bruk
Plasser snøfreseren slik at den heller framover og at snø og vann renner ut. Dette hindrer at viftehjulet fryser fast.
Påfylling av drivstoff
Obs! Bensin er svært brannfarlig!
• Bruk 95 eller 98 oktan blyfri bensin.
• Maks 10 % etanolinnhold i drivstoffet.
• Drivstoffet må kun oppbevares i kanner som er godkjent til
dette formålet.
• Bensintanken må fylles utendørs. Ikke røyk under påfyllingen.
• Ikke fyll på for mye. Drivstoffmengden bør ligge innenfor nivået
på nivåmåleren (se fig.).
• Fyll opp bensintanken før motoren startes. Tanklokket må ikke åpnes
mens motoren er i gang eller mens den fremdeles er varm.
• Steng tanklokket godt og tørk opp eventuelt spill av bensin før motoren startes igjen.
Start
Obs! Kontroller olje- og drivstoffnivåene før snøfreseren startes. Kontroller at koblingshåndtaket for driving og
innmatningsskruen ikke er trykket inn.
NORSK
1. Trykk tenningsnøkkelen helt inn i tenningslåsen. Nøkkelen skal ikke dreies på, kun trykkes inn.
2. Still inn gassen på fult (mot venstre).
3. Still inn sjåken på innstilling for kaldstart (mot høyre). Hvis motoren er varm må sjåken stilles til motsatt side.
4. Trykk 3–5 ganger på bensinpumpen. Dekk til lufthullet som sitter oppå pumpen mens du pumper.
Ved kjørlige temperaturer kan motoren trenge å bli primet en gang til. Hvis motoren er varm trykkes primeren
inn én gang til.
35
Page 36

5. Trekk sakte i starthåndtaket til du kjenner motstand. Trekk deretter raskt og kraftig i håndtaket for å starte.
Ikke slipp håndtaket, men hold igjen for å føre det sakte tilbake til utgangsposisjonen.
6. Når motoren har startet og blitt varm føres sjåken sakte tilbake til utgangsposisjonen (mot venstre).
7. Hvis motoren stopper og må startes igjen, skal den gå med sjåken i midtstilling en kort stund.
Før den deretter sakte tilbake til utgangsposisjonen.
Sikkerhetskontroll
Obs! Kontroller innmatningsskruen posisjon før første gangs bruk og før hver sesong. Det skal være en liten
slakk i vaieren som går fra koblingshåndtaket.
1. Start freseren og trykk koblingshåndtaket ned. La innmatningsskruen jobbe i ca. 10 sekunder.
Gjenta dette noen ganger.
2. Slipp opp koblingshåndtaket og plasser deg foran freseren. Kontroller at innmatningsskruen står helt stille og
ikke viser noen tendens til å ville rotere.
3. Hvis den roterer eller viser tendens til å ville rotere, tross at koblingshåndtaket ikke er trykket ned,
må motoren skrus av og vaieren justeres.
Før første gangs bruk må vaieren til innmatingsskruen justeres
NORSK
Kontroll og justering av innmatningsskruens koblingsvaier
Innmatingsskruens koblingsvaier er innstilt fra fabrikken, men det kan hende den må etterjusteres etter at håndtaket er montert.
Kjedesmøringen kontrolleres på følgende måte:
1. Start motoren. Obs! Motoren leveres uten olje. Oljen leveres i separat flaske.
2. Trykk koblingshåndtaket ned. Innmatningsskruen skal rotere. Skru deretter av motoren.
3. Hvis innmatningsskruen ikke roterer må koblingsvaieren justeres. Ved feiljustert koblingsvaier vil drivreimen
slites raskt.
Juster koblingsvaieren slik:
1. Løsne på skruene på den venstre siden. Det er disse skruene som
holder det øvre og nedre håndtaket sammen slik at koblingsvaieren blir
mindre spendt.
2. Løft gummihylsen opp over hullplaten.
3. Trekk i den nederste vaieren for å lage større åpning, slik at det blir
mulig å ta kroken ut.
4. Bend hullplaten til side og ta ut den nedre
kroken til vaieren fra hullplaten.
6. Fest skruene som holder sammen håndtaket igjen slik at koblingsvaieren blir spendt.
5. Strekk vaieren og brett hullplaten til side. Plasser
vaierens krok i et hull lengre inne på hullplaten.
36
Page 37

Justering av meier
• Normal bruk: Juster meiene sånn at de er 0,5–1 cm lavere enn skrapeskjæret.
• Hardt pakket snø: Juster meiene noe høyre (for å senke skrapeskjæret).
• Grus eller ujevnt underlag: Juster meiene noe lavere (for å kunne
heve skrapeskjæret).
Kjøring
1. Planlegg kjøringen og hvor snøen skal kastes før du starter.
2. Start motoren og juster gassen nær full gass.
3. La motoren varmes opp i noen minutter før snøryddingen begynner, for å oppnå full effekt.
4. Still inn giret i passende innstilling. 2. giret framover er vanligvis det beste til snørydding ved normale forhold.
5. Trykk koblingshåndtaket for innmatningsskruen ned for å starte snøryddingen.
6. Trykk ned koblingshåndtaket for å starte kjøringen, og snøfreseren beveger seg framover. Obs! Man må ikke
skifte gir mens freseren er i bevegelse. Slipp koblingshåndtaket for kjøring før skifte av gir.
7. Når jobben er utført: La motoren gå på tomgang i noen minutter etter bruk. La freseren og
innmatningsskruen stå stille slik at snø og fuktighet tørker opp.
Stopp motoren
NORSK
1. Skyv gasspaken helt tilbake.
2. Trekk ut tenningsnøkkelen.
3. Rengjør freseren grundig og beveg alle spaker fram og tilbake noen ganger, for å unngå fastfrysing.
Stell og vedlikehold
Obs! Skru av motoren, ta ut tenningsnøkkelen og fjern tenningskabelen fra tennpluggen før service, rengjøring
eller vedlikehold på maskinen.
Smøring
• Smør girspaken og øvrige bevegelige deler regelmessig med noen dråper motorolje og/eller spray
(type 5–56, WD 40). Bruk ikke for mye smøring!
• Bruk universalfett som er beregnet for biler og maskiner til drevet lengst nede på sveiven som
kontrollerer utkastet. Bruk ikke for mye smøring!
Service og smøring av innmatningsskruen
• Innmatningsskruen er utstyrt med «brytebolter» som er konstruert slik at de brytes hvis skruen roterer når
den treffer hard, kompakt is eller andre gjenstander. Snøfreseren leveres med ekstra brytebolter slik at de
kan skiftes ved behov. Obs! Bryteboltene må aldri erstattes med vanlige bolter. Det kan føre til store skader
på freseren dersom gjenstander kommer inn i innmatningsskruen.
• Bryteboltene skal skrus ut en gang per sesong for at skruehullet skal kunne smøres med olje.
Smør også skrueakselens plastlagringer.
37
Page 38

NORSK
Justering av vaiere for gir, og drift av innmatingsskrue og hjul
Kontroll av gir
Giret testes slik:
1. Skyv girspaken framover til det høyeste giret (4.) mens motoren er
slått av. Slipp opp koblingshåndtaket for kjøring, og snøfreseren skal
nå kunne skyves både fram- og bakover.
2. Trykk koblingshåndtaket for kjøring ned og det skal nå ikke gå an
å skyve freseren fram- eller bakover.
3. Slipp koblingshåndtaket opp og nå skal freseren kunne skyver
fram- og bakover igjen.
4. Flytt girspaken til 2 revers og deretter tilbake til 4. igjen. Man skal
ikke kjenne noen motstand i spaken og freseren skal kunne skyves
uansett hvilket gir den står i.
Justering av vaier til girspak
Girspaken har to vaire, noe som trekker giret til hver side. Kontroller at
alle gir fungerer og at girspaken går enkelt ut til sine ytre stillinger (4. gir
framover og 2. bakover). Juster ved behov ved å løsne låsemutteren og
dreie på justerskruen til den ene vaieren. Hvis man slipper opp på den
ene siden på koblingsvaieren, skal den andre siden spennes.
Driving av innmatingsskruen
Justering av innmatningsskruens koblingsvaier:
1. Løft gummihylsen opp over hullplaten.
2. Trekk i den nederste vaieren for å lage større åpning, slik at det blir
mulig å ta kroken ut.
3. Brenn hullplaten til side og ta ut den ene kroken fra hullplaten.
4. Strekk vaieren og brett hullplaten til side. Plasser vaierens krok i et
hull lengre inne på hullplaten.
5. Start motoren og sjekk funksjonen.
Obs! Hvis innmatningsskruen ikke roterer skikkelig, tross at motoren går
og koblingshåndtaket er trykket ned, er slakken i vaieren. Flytt kroken til
et hull lengre inne på hullplaten ved behov.
Driving av hjulene
Justering av vaier for driving/kjøring:
1. Hvis freseren har tendens til å trekkes framover uten at koblingshåndtaket for kjøring er tykket inn er
vaieren for stram. Juster den slik at det blir en liten slakk på samme måte som ved justering av vaieren for
innmatningsskruen, som beskrevet ovenfor.
2. Hvis freseren ikke drives framover tross at koblingshåndtaket blir trykket inn er vaieren for slakk.
Spenn vaieren ved å flytte på en krok i hullplaten, på samme måte som beskrivelsen ovenfor.
3. Test hvordan freseren drives framover og etterjuster ved behov.
Rengjøring og øvrig vedlikehold
• Bruk rengjøringsverktøyet for, ved behov, å fjerne snø og is som har festet seg i utkastet eller
rundt innmatningsskruen. Bruk aldri fingrene!
• Kontroller regelmessig at alle skruer og mutre er trukket til og at freseren ikke har synlige skader.
• Skrapeskjær og meier blir med tiden slitt og må skiftes ut. Bruk kun originaldeler og deler som er
godkjent av forhandler.
• Drivstoffsystemet må kontrolleres regelmessig. Sjekk at det ikke er lekkasjer eller skader på tank,
lokk eller bensinslange.
• Produktets må ikke modifiseres eller endres på.
38
Page 39

Motorens serviceintervaller
Etter de 5
første timene.
Sjekk oljenivået. •
Skift olje. • •
Kontrollere tennplugg. •
Rengjør området rundt
lyddemperen.
Ved hver gangs bruk
eller hver 5. time.
•
Ved hver sesongstart
eller hver 25. time.
Ved hver sesongstart
eller hver 50. time.
Oljeskift
Obs! Kontroller oljenivået hver gang snøfreseren skal brukes.
Obs! Ved tømming av olje fra oljetanken må freseren helles bakover. Hvis tanken er fylt hel opp kan drivstoffet
renne ut ved tanklokket.*
1. Start motoren og varmkjør den ett par minutter. Da blir det enklere å tømme ut oljen.
2. Sett et passende oppsamlingskar under oljeavtappingspluggen.
3. Skru ut pluggen, hell freseren bakover og tøm ut oljen. Husk at oljen kan være svært varm.
4. Sett skruen på plass igjen og fyll på med ny olje. Se avsnittet Påfylling av olje og nivåkontroll ovenfor.
* Tøm i så fall ut bensinen før oljen tømmes ut. Motoren må være kald når bensinen tømmes ut. Utfør jobben
utendørs og samle opp drivstoffet i godkjent beholder. Hvis drivstoffet ikke skal brukes igjen skal det leveres til
en gjenvinningsstasjon.
Tennplugg
NORSK
Obs! La motoren bli kald før tennpluggen skrues ut. Tennpluggen og lyddemperen er svært varme etter bruk.
Tennpluggen skal kontrolleres før hver sesong og skiftes ved behov.
1. Ta bort kabelen fra tennpluggen. Ikke trekk i kabelen, men ta tak
i tennhetten av metall og press den lett fram og tilbake samtidig som
du trekker i den.
2. Bruk tennpluggnøkkelen og skru ut pluggen.
3. Kontroller at pluggen ikke har synlige skader og rengjør den med en
stålbørste ved behov.
4. Kontroller elektrodeavstanden. Den skal være 0,6–0,8 mm.
Spesialverktøy til dette formålet fås kjøpt separat.
5. Skru tennpluggen tilbake for hånd til du kjenner at den entrer
skikkelig. Trekk deretter til med pluggnøkkelen.
6. På ny plugg må pluggens skive komprimeres ved montering.
Trekk til ½ omdreining etter at den nye pluggen er skrudd til bunnen.
7. Når en brukt plugg monteres, trekkes den 1/4 omdreining til etter at
den er skrudd til bunns.
Tips! Tre en bit PVC-slange på tennpluggens tilkoblingspunkt for kabelen.
Da er det enklere å komme til å få skrudd for hånd.
0,6–0,8 mm
39
Page 40

Skifte av skrapeskjær
• Skru ut skrapeskjærets 3 festebolter og
demonter skjæret.
• Monter det nye skjæret. Påse at alle
boltehodene kommer på oversiden,
inne i skovlehuset.
• Bruk kun originaldeler eller deler som er
godkjent av forhandler.
NORSK
Skifte av meier
• Skru ut de to festeboltene til meiene og demonter meiene.
• Monter de nye meiene. Påse at alle boltehodene kommer på innsiden, inn i skovlehuset.
• Bruk kun originaldeler eller deler som er godkjent av forhandler.
Hvis snøfreseren ikke skal brukes på en stund (dvs. lagres i over en måned)
• Tøm drivstofftanken. Dette må gjøres mens motoren er kald. Utfør jobben utendørs og samle opp drivstoffet
i godkjent beholder. Hvis drivstoffet ikke skal brukes igjen skal det leveres til en gjenvinningsstasjon.
• Start motoren og la den gå til den stopper på grunn av mangel på drivstoff.
• Snøfreseren og bensinkannen skal oppbevares i et godt ventilert rom og aldri innendørs i lokaler med
åpenflamme eller gnister.
Skifte av drivreim
Obs! Før skifte av drivreim må man kontrollere at det 2. trinn på innmatingen (det indre viftehjulet) kan beveges.
1. Obs! Fjern hylsen fra tennpluggen og ta
ut tenningsnøkkelen.
2. Sjekk deretter at det indre viftehjulet er bevegelig og ikke
blokkert. Småstein kan ha festet seg mellom det indre
viftehjulet og trommelen, og dette kan igjen føre til at
viftehjulet ikke kan rotere. En annen mulighet til at det
ikke er bevegelig er at det har frosset fast.
3. Pass også på at det indre viftehjulet er bevegelig før
du starter motoren igjen. Hvis det ikke er bevegelig vil
drivreimen bli fort slitt.
40
Page 41

Skifte av drivreim
1. Skru ut de to skruene som holder plastdekselet
på plass. Bruk en 10 mm nøkkel.
4. Løsne på vaieren til innmatingen ved det venstre
håndtaket. Trekk ut vaieren og fjern S-kroken fra
hullplaten.
2. Legg freseren over på siden slik at den hviler på
innmatingsåpningen. Obs! Pass på at det ikke
renner bensin ut av tanken når snøfreseren ligger på
siden. Bensintanken bør ha mindre enn halvfull tank.
3. Skru ut de 6 skruene som holder plastdekselet på
undersiden av slyngen på plass. Bruk en 10 mm
nøkkel.
5. For å få tilgang til drivreimen må snøfreseren åpnes.
Skru ut de øvre skruene på begge sider og løsne litt
på de underste skruene. Bruk en 13 mm nøkkel.
NORSK
6. Trykk ned den fremre og bakre delen på
snøfreseren slik at det blir mer plass til montering
av den nye drivreimen.
7. Trykk inn det høyre håndtaket, og lås det i denne
posisjonen med et bånd o.l. Drivhjulet flyttes da fra
reimskiven og det blir mer plass.
41
Page 42

NORSK
8. Fjern den gamle drivreimen og sett på plass den
nye. Den settes i ovenfra. Trykk inn spennrullen
for å gi plass til drivreimen, bak reimstyringen/
bremsen.
10. Legg deretter drivreimen over den øvre
reimskiven (se bilde).
11. Løsne på det høyre håndtaket og monter vaieren
(og hullplaten) igjen på det venstre håndtaket.
12. Monter alle delene i omvendt rekkefølge.
13. Kontroller hvordan drivreimen fungerer (Justering
av vaier for gir, innmatingsskruens drift og
hjulenes drift i bruksanvisningene).
9. Legg drivreimen på den nedre reimskiven når
reimstyringen/bremsen er fristilt fra reimskiven.
Obs! Bildet viser snøfreserens underside.
Service og smøring av innmatningsskruen, skifte av brytepinner
Innmatningsskruen er utstyrt med «brytebolter» som
er konstruert slik at de brytes hvis skruen roterer når
den treffer hard, kompakt is eller andre gjenstander.
Snøfreseren leveres med ekstra brytebolter slik at de
kan skiftes ved behov.
Obs! Bryteboltene må ikke erstattes med vanlige
bolter. Det vil skade freseren hvis innmatningsskuren
fester seg på boltene eller annet.
Bryteboltene skal skrus ut en gang per sesong
og skruehullene smøres med olje. Smør også
skrueakselens plastlagringer (25).
10251024
42
Page 43

Feilsøking
Problem Mulig årsak Tiltak
Motoren
starterikke.
Motoren
gårujevnt.
Motoren
ersvak.
Motoren
overopphetes.
Vibrasjoner
imaskinen.
Snøfreseren
drar ikke
framover.
Innmatningsskruen fortsetter årotere
tross at koblingshåndtaket
slippes opp.
Snøen slynges
ikke ut.
1. Tom for drivstoff eller drivstoffet er
forgammelt.
2. Tett bensinslange.
3. Tenningsnøkkelen er ikke skjøvet
heltinn.
4. Tennpluggkabel og tennplugg har ikke
kontakt med hverandre.
5. Defekt tennplugg.
6. Motoren er ikke smurt godt.
7. Motoren har fått for mye drivstoff.
8. Gassen er innstilt på tomgang.
1. Motoren går med choken ute selv om
den er varm.
2. Blokkert bensinslange eller gammel
bensin.
3. Rusk og/eller kondens (vann)
idrivstoffsystemet.
4. Forgasseren er feiljustert.
1. Løs tennpluggkabel.
2. Motorens ventilasjonshull er tette.
Forgasseren er feiljustert. Kontakt etautorisert serviceverksted.
Løse deler eller skadet innmatningsskrue. Skru av motoren og koble tennpluggkabelen
1. Vaieren er feiljustert.
2. Drivreimen er slakk eller skadet.
Vaieren er feiljustert. Juster vaieren som beskrevet ovenfor.
1. Utkastet er tett og/eller det kan være
noe annet som hindrer skruen fra
årotere.
2. Brytepinnene har fallt av.
3. Innmatningsskruens vaier er feiljustert
eller drivreimen må skiftes ut.
1. Tøm tanken og fyll på nytt drivstoff.
2. Rengjør eller skift bensinslange.
3. Skyv nøkkelen helt inn.
4. Trykk tennpluggkabelen ordentlig på plass.
5. Rengjør pluggen og kontroller
6. Trykk 3–5 ganger på bensinpumpen.
7. Vent iminst 10 minutter før neste
8. Still gassen på «Full gass».
1. Still choken iriktig posisjon.
2. Rengjør eller skift bensinslange.
3. Tøm tanken og fyll på nytt drivstoff.
4. Kontakt etautorisert serviceverksted.
1. Fest tennpluggkabelen godt på pluggen.
2. Rengjør tanklokket og påse at
fra pluggen. Trekk til alle løse bolter.
Kontrollerinnmatningsskruen og skift ut
de skadede delelne. Hvisdette ikke løser
problemet, så ta kontakt med autorisert service.
1. Juster vaieren som beskrevet under
2. Kontakt autorisert service for åfå drivreima
1. Skru av motoren og koble
2. Sett på plass nye brytepinner.
3. Juster vaieren. Seavsnittet Justering
elektrodeavstanden eller skift plugg.
startforsøk.
Tømtanken og fyll på nytt drivstoff.
NORSK
ventilasjonshuller er åpent.
avsnittet Justering av vaier for driving/
kjøring og gir ovenfor.
kontrollert.
tennpluggkabelen fra pluggen.
Rens utkastet og området rundt
innmatningsskruen.
av innmatningsskruens koblingsvaier
ovenfor. Kontakt autorisert service for åfå
drivreimakontrollert.
43
Page 44

NORSK
Avfallshåndtering
Når produktet skal kasseres, må det skje i henhold til lokale forskrifter.
Ved usikkerhet, ta kontakt med lokale myndigheter.
Spesifikasjoner
Type Totrinns snøfreser
Arbeidsbredde 600 mm
Maks snødybde Ca. 400 mm
Kastelengde Inntil ca. 8 m
Motor 1-sylindret 4-takts bensinmotor; 3,5 kW
Tankvolum Ca. 2 liter
Volum oljetank 0,6 liter
Gir 4 framover, 2 bakover
Utkast Dreibart 180º
Retningsdeksel Dreibar ca. 25º
Driving Selvgående
Luftfylte gummihjul Ø 330 mm
Vekt 68,5 kg
LpA 86 dB(A), K= 3,0 dB(A)
LwA 101 dB(A), K= 3,0 dB(A)
Vibration 7,95 m/s², K=1,5 m/s²
44
Page 45

Lumilinko, 3,5 kW
Tuotenro 31-5052 Malli DB75524FM
Lue käyttöohjeet ennen tuotteen käyttöönottoa ja säilytä ne tulevaa tarvetta varten. Pidätämme oikeuden teknisten tietojen muutoksiin. Emme vastaa mahdollisista teksti- tai kuvavirheistä. Jos laitteeseen tulee teknisiä ongelmia, ota yhteys myymälään tai asiakaspalveluun (yhteystiedot käyttöohjeen lopussa).
Turvallisuus
Lue koko käyttöohje huolellisesti ennen laitteen ensimmäistä käyttökertaa.
Käytä kuulosuojaimia.
Käytä suojalaseja.
Vaara – liikkuva lumiruuvi.
Vaara – pyörivät lavat.
Varo lentäviä esineitä. Varmista, että sivulliset ovat riittävän kaukana.
Älä koske koneen liikkuviin osiin niiden liikkuessa. Sammuta ensin kone,
odota että liikkuvat osat eivät liiku ja poista sytytysavain.
Älä laita käsiä ulostuloaukkoon.
Pidä ulkopuoliset loitolla koneesta.
Vaara – bensiini on erittäin helposti syttyvää. Anna koneen jäähtyä vähintään
kahden minuutin ajan ennen bensiinin lisäämistä.
Älä käynnistä konetta sisällä tai huonosti tuuletetuissa tiloissa. Moottorin pakokaasut
sisältävät hengenvaarallista häkää.
Vaara - sähköiskuvaara (koneille, joissa on sähkökäynnistys). Jos sataa, älä käynnistä
konetta 230 V:n sähkövirralla.
SUOMI
45
Page 46

Yleisiä turvallisuusohjeita
• Lue käyttöohjeet huolellisesti läpi. Opettele kaikkien säädinten toiminta ja lumilingon oikeaoppinen käyttö.
• Älä koskaan anna lasten tai sellaisten aikuisten, jotka eivät ole perehtyneet tarpeeksi näihin käyttöohjeisiin,
käyttää lumilinkoa. Paikalliset määräykset saattavat sisältää käyttäjän ikää koskevia rajoituksia.
• Älä koskaan käytä konetta muiden, etenkään lasten tai eläinten, lähettyvillä.
• Muista, että laitteen käyttäjä on aina vastuussa lumilingon aiheuttamista onnettomuuksista.
• Varo ettet liukastu tai kaadu, varsinkaan lumilingon peruuttaessa.
• Älä koskaan käytä lumilinkoa alkoholin tai lääkkeiden vaikutuksen alaisena. Älä myöskään käytä laitetta, jos
olet väsynyt tai sairas.
• Lumilingon saa korjata ainoastaan valtuutetussa huoltoliikkeessä, ja korjaamisessa tulee käyttää ainoastaan
alkuperäisiä varaosia.
• Käytä ainoastaan valmistajan tai jälleenmyyjän hyväksymiä tarvikkeita.
Käyttöä koskevia turvallisuusohjeita
• Älä laita käsiä ja jalkoja liikkuvien osien lähelle. Varo aina poistoaukkoa.
• Tietyt moottorin osat saattavat kuumentua erittäin paljon käytön aikana. Palovammavaara.
• Lumilingolla saa lingota vain lunta.
• Ole varovainen kun raivaat lunta sorakäytäviltä, jalkakäytäviltä ja teiltä. Ole tarkkana mahdollisten vaarojen ja
liikenteen varalta. Vältä jyrkkiä rinteitä.
• Älä koskaan säädä linkoussuuntaa tielle tai liikenteeseen.
• Pysäytä moottori välittömästi jos lumilinko osuu vieraaseen esineeseen. Tutki lumilinko tämän jälkeen tarkasti
mahdollisten vaurioiden varalta. Älä käytä lumilinkoa ennen kuin mahdolliset vauriot on korjattu.
• Jos lumilinko alkaa täristä oudosti, pysäytä moottori välittömästi ja selvitä tärinän syy. Tärinä on tavallisesti
merkki siitä, että jotain on vialla.
SUOMI
• Älä kytke laitteen turvalaitteita irti tai pois toiminnasta.
• Älä koskaan käytä lumilinkoa aitauksien, autojen, ikkunaruutujen, rinteiden jne. läheisyydessä ilman oikein
säädettyä linkoussuuntaa.
• Pidä lapset poissa lumesta raivattavalta alueelta.
• Älä ylikuormita lumilinkoa ajamalla sitä liian kovaa.
• Ole varovainen peruuttaessasi lumilinkoa. Katso taaksepäin ja huomioi mahdolliset esteet.
• Älä koskaan suuntaa linkousta lähistöllä olevia ihmisiä päin. Älä anna kenenkään seisoa lumilingon edessä.
• Älä koskaan käytä lumilinkoa, jos näkyvyys tai valaistus on huono.
• Muista pitää hyvä tasapaino ja pidä kunnolla kiinni ohjaustangosta lumilinkoa käyttäessäsi.
• Käytä ulosheittosaukon ja siipipyörän rungon puhdistamiseen ainoastaan mukana tulevaa työkalua.
Älä puhdista kyseisiä osia käsin.
• Älä koskaan käytä lumilinkoa katolla.
Pakkauksen sisältö
• Lumilinko
• Ulosheitto
• Sytytystulpan avain
• 2 sytytys-/turva-avainta
• 4 murtopulttia ja lukkomutteria
• Käyttöohje
• Suppilo
• Öljypullo
46
Page 47

Ohjaimet ja toiminnot
106
101 102 103 104
107
1011
1012
105
1013
108
109
1010
1014
SUOMI
1015
1016
1. Vedon kytkinkahva
2. Lumen heittosuunnan säädin
3. Vaihteenvaihtaja
(4 eteen ja 2 taakse)
4. Syöttöruuvin kytkinkahva
5. Ulosheitto ja suuntain
6. Öljyntäyttö/öljytikku
7. Säiliön kansi
8. Ulosheiton sivusäädön kampi
9. Muovimutteri
10. Ulosheiton kiinnike
11. Puhdistustyökalu
12. Siipipyörän runko
13. Kaavinterä
14. Syöttöruuvi
15. Vaste (yksi kummallakin puolella)
16. Kaasunsäädin
17. Suuntaimen vaijeri
18. Käynnistyskahva
1017
1018
1019
1020
1021
1022
1023
19. Sytytysavain
20. Rikastin
21. Öljyntyhjennysruuvi
22. Suuntainvaijereiden väliosa
23. Primer
47
Page 48

Asennus
Ylempi ja alempi kahva
1. Ruuvaa irti neljä isoa muoviväännintä, aluslaatat ja pultit
alemmasta kahvasta.
2. Nosta ylempi kahva ja sijoita se kahvan alaosan päälle.
3. Ruuvaa ylempi ja alempi kahva yhteen pulttien, aluslaattojen ja
muoviväänninten avulla.
4. Varmista, että kaikki vaijerit liikkuvat hyvin.
A) Ylempi kahva
B) Pultti
C) Muoviväännin
D) Alempi kahva
Ulosheiton asentaminen
10a
10b
10c
10d
SUOMI
1. Aseta ulosheitto-osa siipipyörän rungon
ulostuloaukkoon.
2. Ruuvaa ulosheiton kiinnike kiinni alaosasta
kahdella pultilla.
Kammen asentaminen ulosheittoaukkoon
Kampi toimitetaan osissa ja se tulee kasata yhdellä ruuvilla.
1. Työnnä kammen ulko-osa reiän läpi hylsyyn.
2. Paina ruuvi hylsyn ja kammen reiän läpi ja ruuvaa mutteri kiinni.
Käyttö
Öljyntäyttö ja öljymäärän tarkistaminen
Huom! Lumilingossa ei ole toimitusvaiheessa öljyä.
Lisää lumilinkoon öljyä ennen lumilingon käyttöönottoa.
Moottoriin mahtuu noin 0,6 l öljyä.
Huom! Moottorissa on yhdistetty öljytikku/öljyntäyttökansi.
• Käytä 4-tahtimoottoreille tarkoitettua SAE 5W-30 -öljyä,
jonka laatuluokka on SG, SF.
• Avaa öljyntäyttökansi ja lisää suositeltu määrä öljyä.
Tarkasta tämän jälkeen öljytaso öljytikulla. Öljyn tulee
olla mittatikun merkityllä alueella. Älä täytä liikaa öljyä.
HUOM.! Älä kierrä öljytikkua pohjaan asti mitatessasi öljymäärää. Riittää, että painat tikun kiinni täyttöaukkoon
nähdäksesi oikean öljytason.
Huom! Moottorin vasemmalla alapuolella on tulppa, jota käytetään, jos moottori on asennettu toiseen tuotteeseen.
Tulppaa EI käytetä tässä mallissa. Tässä mallissa käytetään ainoastaan yläpuolella olevaa täyttöaukkoa.
Tärkeää! Vaihda öljyt ensimmäisten viiden käyttötunnin jälkeen.
48
Page 49

Esivalmistelut
• Varmista, että lumesta raivattavalla alueella ei ole irtonaisia ja vieraita esineitä.
• Varmista, että kaikki säätimet liikkuvat kevyesti ja että ne palaavat alkuperäisasentoon, kun ne päästetään.
• Kytke kaikki säätimet vapaalle ennen moottorin käynnistämistä.
• Suunnittele ennen työn aloittamista, mihin lumi lingotaan. Näin vähennetään henkilö- ja
omaisuusvahinkojen mahdollisuutta.
• Älä koskaan käytä lumilinkoa ilman asianmukaista vaatetusta. Käytä liukkaalle alustalle sopivia jalkineita.
• Älä koskaan huolla tai hoida laitetta moottorin ollessa päällä (ellei käyttöohje näin nimenomaisesti neuvo).
• Käytä aina suojalaseja tai visiiriä lumilinkoa käyttäessäsi, huoltaessasi ja hoitaessasi.
• Säädä syöttökammion korkeus siten, että se ei koske maahan, esim. kun lumen alla on soratie.
• Anna lumilingon sopeutua ulkolämpötilaan ennen käyttöä.
Ennen käyttöä
Varmista aina ennen käyttöä, että puhaltimen pyörä pääsee liikkumaan, ja että mikän ei estä sen liikkumista.
Sisemmän puhaltimen pyörän (syöttöruuvin etupuolella) ja rummun väliin saattaa joutua pieniä kiviä, jotka estävät
puhaltimen pyörän liikkumisen. Puhaltimen pyörä saattaa myös jäätyä kiinni. Jos sisempi puhaltimen pyörä ei
pääse pyörimään, vetohihna kuluu nopeasti.
Käytön jälkeen
Aseta lumilinko nojaamaan eteenpäin, jotta lumi ja vesi valuu ulos, eikä aiheuta puhaltimen pyörän jäätymistä.
Polttoaineen täyttö
Huom! Bensiini on erittäin helposti syttyvää!
• Käytä 95- tai 98-oktaanista lyijytöntä bensiiniä.
• Polttoaineseoksen etanolipitoisuus saa olla korkeintaan 10 %.
• Säilytä polttoainetta bensiinille tarkoitetussa säiliössä.
• Lisää bensiiniä ainoastaan ulkona, äläkä tupakoi täyttämisen aikana.
• Älä täytä liikaa. Polttoaineen tason tulee olla tasomittarin
kohdalla (katso kuva).
• Lisää bensiiniä ennen moottorin käynnistämistä. Älä koskaan
avaa säiliön korkkia polttoaineen täyttämiseksi moottorin ollessa
käynnissä tai lämmin.
• Sulje säiliön kansi kunnolla ja pyyhi pois mahdollinen ylivuotanut bensiini.
Käynnistys
Huom! Tarkasta öljy- ja polttoainetasot ennen lumilingon käynnistämistä. Varmista, että vedon kytkinkahva ja
syöttöruuvi ovat vapaalla.
SUOMI
1. Paina sytytysavain kokonaan sytytyslukkoon. Älä käännä avainta, avain painetaan sisään.
2. Säädä kaasunsäädin täydelle kaasulle (vasemmalle kohti jänissymbolia).
3. Aseta rikastin kylmäkäynnistystilaan (oikealle). Jos moottori on lämmin, aseta rikastin vastakkaiselle puolelle.
4. Paina primer-pumppua 3–5 kertaa. Paina primerin päällä olevaa ilmareikää, kun painat primeria. Kylmällä
säällä moottori saattaa vaatia uuden primerointikerran. Jos moottori on lämmin, paina uudelleen.
49
Page 50

5. Vedä hitaasti käynnistyskahvasta, kunnes tunnet vastuksen. Vedä sen jälkeen nopeasti ja voimakkaasti
käynnistääksesi lumilingon. Älä päästä irti kahvasta, vaan vie se varoen takaisin lähtöasentoon.
6. Kun moottori on käynnistynyt ja jonkin ajan kuluttua lämmennyt, aseta rikastin takaisin lähtöasentoon (vasemmalle).
7. Jos moottori sammuu, käynnistä se uudelleen ja anna sen käydä hetki rikastimen ollessa keskiasennossa.
Laita sen jälkeen rikastin alkuasentoon.
Turvallisuustoimenpiteet
Huom! Tarkasta syöttöruuvin toiminto lumilingon ensimmäisellä käyttökerralla ja aina joka talven alussa.
Kytkinkahvasta lähtevässä vaijerissa tulee olla hieman välystä.
1. Käynnistä lumilinko ja paina kytkinkahva alas. Anna syöttöruuvin pyöriä noin 10 sekunnin ajan.
Toista tämä muutaman kerran.
2. Päästä kytkinkahva ja asetu lumilingon eteen. Varmista, että syöttöruuvi on täysin pysähtynyt,
eikä lähde liikkumaan.
3. Jos syöttöruuvi pyörii tai vaikuttaa siltä, että se saattaa ruveta pyörimään, vaikka kytkinkahvaa ei paineta
alas, sammuta moottori ja säädä vaijeria.
Säädä syöttöruuvin vedon vaijeri ennen ensimmäistä käyttökertaa
Syöttöruuvin kytkinvaijerin tarkistaminen ja säätäminen
Syöttöruuvin kytkinvaijeri on säädetty tehtaalla, mutta se saattaa tarvita tarkistamista/säätöä kahvan
asentamisen jälkeen.
Kytkinvaijerin tarkistaminen:
1. Käynnistä moottori. Huom! Moottorissa ei ole toimitusvaiheessa öljyä. Öljy on erillisessä pullossa.
SUOMI
2. Paina kytkinkahva alas, syöttöruuvin pitäisi pyöriä. Sammuta tämän jälkeen moottori.
3. Jos syöttöruuvi ei pyöri, kytkinvaijeri pitää säätää. Väärin säädettty kytkinvaijeri aiheuttaa vetohihnan
nopeankulumisen.
Kytkinvaijerin säätäminen:
1. Avaa vasemmalla puolella olevat ylempää ja alempaa kahvaa paikoillaan
pitävät ruuvit, jotta kytkinvaijeri löystyy.
2. Nosta kumihylsy reikälevyn päälle.
3. Vedä alemmasta vaijerista saadaksesi enemmän liikkumavaraa, jolloin
voit irrottaa koukun.
4. Taita reikälevy sivulle ja irrota alemman vaijerin
koukku reikälevystä.
5. Suorista vaijeri, taita reikälevy sivuun ja
aseta vaijerin koukku pidemmällä olevaan
reikälevynreikään.
6. Ruuvaa kahvaa yhdessä pitävät ruuvit kiinni, jotta kytkinvaijeri kiristyy.
50
Page 51

Vasteiden säätäminen
• Tavallinen käyttö: Säädä vasteita 0,5–1 cm kaavinterää alemmaksi.
• Kovaksi pakkautunut lumi: Säädä vasteita hieman korkeammalle
(alentaaksesi kaavinterää).
• Sora tai epätasainen alusta: Säädä vasteita hieman alemmaksi
(korottaaksesi kaavinterää).
Ajaminen
1. Suunnittele ennen työn aloittamista, missä työskentelet ja mihin lumilinko linkoaa lumen.
2. Käynnistä moottori ja säädä kaasunsäädin melkein täysille.
3. Anna moottorin lämmetä muutaman minuutin ajan ennen työskentelyn aloittamista.
4. Valitse sopiva vaihde vaihteistolla. Vaihde 2 on paras normaaleissa olosuhteissa.
5. Aloita lumen linkoaminen painamalla syöttöruuvin kytkinkahva alas.
6. Paina vedon kytkinkahva alas, lumilinko liikkuu eteenpäin. Huom! Älä koske vaihteistoon lumilingon ollessa
liikkeessä, päästä vedon kytkinkahva ennen vaihtamista.
7. Kun lopetat työt: Anna moottorin käydä tyhjäkäynnillä muutaman minuutin ajan. Pidä lumilinko ja syöttöruuvi
paikoillaan tänä aikana, jotta kosteus ja lumi kuivuvat pois moottorista.
Moottorin sammuttaminen
1. Työnnä kaasusäädin täysin taakse.
2. Irrota sytytysavain.
3. Puhdista koko lumilinko huolellisesti ja liikuta kaikkia säätimiä muutamia kertoja edestakaisin
kiinnijäätymisen estämiseksi.
Huolto ja ylläpito
Huom! Sammuta moottori, irrota sytytysavain ja poista sytytyskaapeli sytytystulpasta ennen laitteen huoltoa
japuhdistusta.
Voitelu
• Voitele vaihteisto ja muut liikkuvat osat säännöllisesti pienellä määrällä moottoriöljyä ja/tai spraylla
(esim. 5–56, WD 40). Älä käytä liikaa öljyä!
• Käytä ulosheittoaukkoa säätävän kammen alaosan kierukan voiteluun autoihin ja koneisiin sopivaa
yleisrasvaa. Älä käytä liikaa!
Syöttöruuvin huolto ja voitelu
• Syöttöruuvissa on murtosokat, jotka on suunniteltu katkeamaan, jos ruuvi pyöriessään osuu kovaan jäähän
tai muuhun vieraaseen esineeseen. Lumilingon mukana tulee ylimääräiset murtosokat.
Huom! Älä korvaa murtosokkia tavallisilla pulteilla. Tavalliset pultit saattavat vahingoittaa lumilinkoa vakavasti,
jos sillä ajetaan vieraaseen esineeseen.
• Irrota murtosokat kerran talvessa ja suihkuta ruuvinreikään/-akseliin öljyä. Voitele myös ruuviakselin
muoviosat.
SUOMI
51
Page 52

Vaihteiston säätimen, syöttöruuvin vedon ja pyörien vedon säätäminen
Vaihteiston tarkastaminen
Testaa vaihteisto seuraavalla tavalla:
1. Sammuta moottori, aseta vaihteisto suurimmalle vaihteelle.
Päästä vedon kytkinkahva. Lumilinkoa pitäisi nyt pystyä työntämään
eteen- ja taaksepäin.
2. Paina vedon kytkinkahva alas. Lumilinkoa ei pitäisi nyt pystyä
työntämään eteen- tai taaksepäin.
3. Päästä kytkinkahva. Lumilinkoa pitäisi nyt pystyä työntämään
eteen- ja taaksepäin.
4. Vaihda vaihteistosta peruutusvaihde 2 ja sen jälkeen taas vaihde 4.
Säätimessä ei pitäisi tuntua vastusta, ja lumilinkoa pitäisi pystyä
työntämään riippumatta siitä, missä asennossa vaihteisto on.
Vaihteiston vaijereiden säätäminen
Vaihteistossa on kaksi vaijeria, jotka vetävät vaihteenviejää eri suuntiin.
Varmista, että kaikki vaihteet toimivat ja että vaihteisto liikkuu helposti
kaikkiin asentoihin (4 edessä ja 2 takana). Säädä tarvittaessa avaamalla
lukkomutteria ja kiertämällä toisen vaijerin säätöruuvia. Kun toisen
puolen kytkinvaijeri päästetään, toisen pitäisi kiristyä.
Syöttöruuvin veto
Syöttöruuvin kytkinvaijerin säätäminen:
1. Nosta kumihylsy reikälevyn päälle.
SUOMI
2. Vedä alemmasta vaijerista saadaksesi enemmän liikkumavaraa,
jolloin voit irrottaa koukun.
3. Taita reikälevy sivulle ja irrota toisen vaijerin koukku reikälevystä.
4. Suorista vaijeri, taita reikälevy sivuun ja aseta vaijerin koukku
pidemmällä olevaan reikälevyn reikään.
5. Käynnistä moottori, tarkasta toiminnot.
Huom! Jos syöttöruuvi ei pyöri kunnolla, vaikka moottori käy ja kytkinkahva on painettuna, vaijerissa on liikaa välystä. Siirrä koukkua tarvittaessa kauempana olevaan reikään reikälevyssä.
Pyörien veto
Pyörien vedon säätäminen:
1. Jos lumilinko vaikuttaa liikkuvan eteenpäin, vaikka vedon kytkinkahvaa ei paineta, vaijeri on liian kireällä.
Säädä niin, että vaijeriin tulee pieni välys. Katso ohjeet yltä kohdasta, jossa on ohjeet syöttöruuvin
vaijerin säätöön.
2. Jos lumilinko ei liiku eteenpäin kytkinkahvaa painettaessa, vaijeri on liian löysällä. Kiristä vaijeria siirtämällä
koukkua reikälevyssä yllä kuvatulla tavalla.
3. Testaa veto ja säädä tarvittaessa.
Puhdistaminen ja muut huoltotoimenpiteet
• Puhdista ulosheittoaukkoon ja syöttöruuviin juuttunut jää ja lumi tarvittaessa puhdistustyökalulla.
Älä puhdista kyseisiä osia käsin!
• Tarkasta säännöllisesti, että kaikki ruuvit ja mutterit on kiristetty ja että lumilingossa ei ole näkyviä vahinkoja.
• Kaavinterät ja vasteet kuluvat ja ne tulee vaihtaa tarvittaessa. Käytä ainoastaan alkuperäisosia tai
jälleenmyyjän hyväksymiä osia.
• Tarkasta polttoainejärjestelmä säännöllisesti. Tarkasta, että polttoainesäiliössä, sen korkissa tai
polttoaineletkuissa ei ole vuotokohtia tai vaurioita.
• Älä muuta laitetta millään tavalla.
52
Page 53

Moottorin huoltoväli
Viiden ensimmäisen tunnin
jälkeen.
Tarkista öljytilanne. •
Vaihda öljy. • •
Tarkista sytytystulppa. •
Puhdista äänenvaimen-
ninta ympäröivä alue.
Jokaisen käytön
yhteydessä tai
joka viides tunti.
•
Jokaisen käyttökauden yhteydessä
tai joka 25. tunti.
Jokaisen käyttökauden yhteydessä tai
joka 50. tunti.
Öljynvaihto
Huom! Tarkasta öljytaso ennen jokaista käyttökertaa.
Huom! Lumilinkoa tulee kallistaa taaksepäin, jotta kaikki öljy saadaan ulos. Jos säiliö on aivan täysi, säiliön korkin
kohdalta saattaa valua polttoainetta.*
1. Käynnistä moottori ja anna sen käydä muutaman minuutin ajan, jonka jälkeen öljyn tyhjentäminen
on helpompaa.
2. Sijoita sopiva keräysastia öljyntyhjennystulpan alle.
3. Avaa ruuvi, kallista lumilinkoa taaksepäin ja tyhjennä öljy. Ota huomioon, että öljy saattaa olla kuumaa.
4. Laita ruuvi takaisin paikoilleen ja lisää uudet öljyt. Katso kappale Öljyntäyttö ja öljytason säätö.
*Tyhjennä polttoainesäiliötä, jos se on aivan täynnä. Jos poistat polttoainetta, moottorin tulee olla kylmä.
Tyhjennä säiliö ulkona ja kerää polttoaine sopivaan astiaan. Jos polttoainetta ei käytetä uudelleen,
vie polttoaine jäteasemalle.
Sytytystulppa
Huom! Anna moottorin jäähtyä kokonaan ennen sytytystulpan irrottamista. Sytytystulppa ja äänenvaimennin
kuumenevat erittäin paljon käytön aikana. Tarkasta sytytystulppa aina ennen talvea ja vaihda se tarvittaessa.
1. Irrota tulpanjohto sytytystulpasta. Älä vedä kaapelista, vaan ota kiinni
metallisesta tulpanhatusta, liikuta sitä edestakaisin ja vedä samalla.
2. Käytä sytytystulppa-avainta ja irrota sytytystulppa.
3. Tarkasta, että sytytystulpassa ei ole näkyviä vaurioita ja puhdista se
tarvittaessa teräsharjalla.
4. Tarkasta sytytystulpan kärkiväli, sen tulee olla 0,6–0,8 mm. Tähän on
olemassa erityistyökaluja.
5. Jos mahdollista, ruuvaa sytytystulppaa takaisin käsin, kunnes tunnet,
että se menee kunnolla kierteille. Kiristä lopuksi sytytystulppaavaimella.
6. Uuden sytytystulpan kärjen aluslaatta saattaa vaatia muokkaamista
ennen asentamista. Kiristä puoli kierrosta sen jälkeen, kun uusi
tulppa on mennyt kierteille.
7. Kun asennat käytetyn sytytystulpan, kiristä sitä neljäsosakierros sen
jälkeen, kun se on mennyt kierteille.
Vinkki! Pujota pala PVC-letkua sytytystulpan sytytyskaapeliliitäntään, niin
tulpan kiertäminen käsin sujuu helpommin.
0,6–0,8 mm
SUOMI
53
Page 54

Kaavinterän vaihtaminen
• Irrota kaavinterän 3 kiinnityspulttia ja irrota terä.
• Asenna uusi terä paikoilleen. Varmista, että
kaikkien pulttien kannat ovat sisäpuolella
siipipyörän sisällä.
• Käytä ainoastaan alkuperäisosia tai
jälleenmyyjän hyväksymiä osia.
Vasteiden vaihtaminen
• Avaa vasteiden kaksi kiinnityspulttia ja irrota vasteet.
• Asenna uudet vasteet paikoilleen. Varmista, että kaikkien pulttien kannat ovat sisäpuolella siipipyörän sisällä.
• Käytä ainoastaan alkuperäisosia tai jälleenmyyjän hyväksymiä osia.
Jos lumilinkoa ei käytetä yli kuukauteen
SUOMI
• Tyhjennä polttoainesäiliö, kun moottori on kylmä. Tyhjennä säiliö ulkona ja kerää polttoaine sopivaan astiaan.
Jos polttoainetta ei käytetä uudelleen, vie polttoaine jäteasemalle.
• Käynnistä moottori ja anna sen käydä, kunnes polttoaine loppuu.
• Säilytä lumilinkoa ja polttoainesäiliötä hyvin ilmastoidussa tilassa. Älä säilytä niitä tiloissa, joissa esiintyy
avotulta tai kipinöitä.
Vetohihnan vaihtaminen
Huom.! Varmista ennen vetohihnan vaihtamista, että sisäänsyötön toinen askel (sisempi puhaltimen pyörä)
liikkuu, eikä ole juuttunut kiinni.
1. Huom.! Irrota sytytystulpan
hattu sytytystulpasta ja poista
sytytysavain.
2. Varmista, että sisempi puhaltimen pyörä pääsee
liikkumaan, ja että mikän ei estä sen liikkumista.
Sisemmän puhaltimen pyörän ja rummun väliin saattaa
joutua pieniä kiviä, jotka estävät puhaltimen pyörän
liikkumisen. Puhaltimen pyörä saattaa myös jäätyä kiinni.
3. Varmista ennen mottorin käynnistämistä, että sisempi
puhaltimen pyöri liikkuu vapaasti, muuten uusi vetohihna
kuluu nopeasti.
54
Page 55

Vetohihnan vaihtaminen
1. Ruuvaa irti muovikuvun kaksi ruuvia
(10 mm:n avaimella).
4. Löysennä sisäänsyötön vaijeria vasemman
kahvan kohdalta. Irrota S-koukku reikälevystä.
2. Käännä lumilinko auki siten, että se nojaa sisäänsyöttöaukkoon. Huom.! Varmista, että polttoaine ei
valu ulos tankista, kun käännät lumilingon. Varmista,
että polttoainetta on alle puoli tankillista.
3. Ruuvaa irti alapellin kuusi ruuvia
(10 mm:n avaimella).
SUOMI
5. Lumilinko pitää avata, jotta vetohihnaan pääsee
käsiksi. Irrota molemmilla sivuilla olevat ylemmät
ruuvit ja löysennä alempia ruuveja hieman
(13 mm:n avaimella).
6. Paina lumilingon etu- ja takaosia alas, jotta saat
enemmän tilaa vetohihnan asentamiselle.
7. Paina vasen kahva pohjaan ja lukitse se
nippusiteellä tai vastaavalla. Vetopyörä liikkuu
tällöinhihnapyörästä, jolloin vetohihnan
vaihtaminenhelpottuu.
55
Page 56

8. Poista vanha vetohihna ja paina uusi vetohihna
alas yläpuolelta. Paina kiristysrulla sisään,
jolloin vetohihnalle vapautuu enemmän tilaa
hihnanohjaimen/jarrulevyn kohdalta.
10. Laita tämän jälkeen vetohihna ylemmän
hihnapyörän päälle (katso kuvaa).
11. Löysennä vasenta kahvaa ja asenna vaijeri
vasempaan kahvaan ja siihen kuuluvaan
reikäpeltiin.
12. Asenna kaikki osat takaisin käänteisessä
järjestyksessä.
13. Tarkista vetohihnan toiminta käyttöohjeen
kohdasta Vaihteiston vaijereiden, syöttöruuvin
SUOMI
vedon ja pyörien vedon säätäminen.
9. Laita vetohihna alempaan hihnapyörään,
kun hihnanohjain/jarrulevy on vapautettu
hihnapyörästä. Huom.! Kuva on lumilingon
alapuolelta.
Syöttöruuvin huolto ja voitelu, murtopulttien vaihtaminen
Syöttöruuvissa on murtopultit (24), jotka on
suunniteltu katkeamaan, jos ruuvi osuu kovaan
jäähän tai muuhun vieraaseen esineeseen
Lumilingon mukana tulee ylimääräiset murtopultit.
Huom! Älä korvaa murtopultteja tavallisilla pulteilla.
Tavalliset pultit saattavat vahingoittaa lumilinkoa
vakavasti, jos sillä ajetaan vieraaseen esineeseen.
Irrota murtopultit kerran vuodessa ja suihkuta
ruuvinreikään/-akseliin öljyä. Voitele myös
ruuviakselin muoviosat (25).
56
10251024
Page 57

Vianhaku
Ongelma Syy Toimenpide
Moottori ei
käynnisty.
Moottorin
käynti on
epätasaista.
Moottorin
käynti on
heikkoa.
Moottori
ylikuumenee.
Esiintyy
epänormaalia
tärinää.
Lumilinko
ei kulje
eteenpäin.
Syöttöruuvi
jatkaa pyörimistä, vaikka
kytkentäkahva
vapautetaan.
Lunta ei
linkoudu ulos.
1. Säiliössä ei ole polttoainetta tai
polttoaine on vanhentunutta.
2. Tukkeutunut polttoaineputki.
3. Virta-avain ei ole kunnolla virtalukossa.
4. Sytytysjohdon ja sytytystulpan välillä
on kontaktihäiriö.
5. Viallinen sytytystulppa.
6. Primer-pumppua ei ole käytetty
tarpeeksi.
7. Moottori on saanut liikaa polttoainetta
primer-pumppua käytetty liikaa.
8. Kaasusäädin on tyhjäkäynnillä.
1. Moottori käyttää rikastinta, vaikka se
on lämmin.
2. Tukkeutunut polttoaineputki tai
vanhentunut bensiini.
3. Epäpuhtauksia ja/tai vettä
polttoainejärjestelmässä.
4. Kaasutin on säädetty väärin.
1. Sytytysjohto on irti.
2. Polttoainesäiliön korkin tuuletusreikä
on tukkeutunut.
Kaasutin on säädetty väärin. Ota yhteys valtuutettuun huoltoon.
Osat ovat löystyneet tai syöttöruuvi
vaurioitunut.
1. Vaijeri on säädetty väärin.
2. Vetohihna on irti tai vaurioitunut.
Vaijeri on säädetty väärin. Säädä vaijeria edellä kohdassa Syöttöruuvin
1. Poistoputki on tukkeutunut ja/
tai vieraat esineet estävät ruuvia
pyörimästä.
2. Murtosokat ovat katkenneet.
3. Syöttöruuvin vaijeri on säädetty väärin
tai vetohihna täytyy vaihtaa.
1. Tyhjennä polttoainesäiliö ja täytä uudella
polttoaineella.
2. Puhdista tai vaihda polttoaineputki.
3. Työnnä avain kokonaan virtalukkoon.
4. Paina sytytysjohto kunnolla kiinni.
5. Puhdista sytytystulppa ja tarkista elektrodiväli
tai vaihda sytytystulppa.
6. Paina primer-painiketta 3–5 kertaa.
7. Odota vähintään kymmenen minuuttia ennen
uutta käynnistysyritystä.
8. Säädä kaasusäädin täyskaasulle.
1. Työnnä rikastinvipu takaisin.
2. Puhdista tai vaihda polttoaineputki. Tyhjennä
polttoainesäiliö ja täytä uudella polttoaineella.
3. Tyhjennä säiliö ja kaasutin, täytä uudella
polttoaineella.
4. Ota yhteys valtuutettuun huoltoon.
1. Kiinnitä sytytysjohto kunnolla
sytytystulppaan.
2. Puhdista polttoainesäiliön korkki ja varmista,
että tuuletusreikä on auki.
Sammuta moottori ja irrota sytytysjohto
sytytystulpasta. Kiristä kaikki löysät pultit.
Tarkistasyöttöruuvi ja vaihda tarvittaessa
vaurioituneet osat. Jos ongelma ei poistu, ota
yhteys valtuutettuun huoltoon.
1. Säädä vaijeria edellä kohdassa Vaihteiston
säätimen, syöttöruuvin vedon ja pyörien
vedon säätäminen kuvatulla tavalla.
2. Ota yhteys valtuutettuun huoltoon vetohihnan
tarkistamiseksi.
kytkentävaijerin säätö kuvatulla tavalla.
1. Sammuta moottori ja irrota sytytysjohto
sytytystulpasta. Puhdista poistoputki ja
syöttöruuvin ympäristö.
2. Vaihda murtosokat uusiin.
3. Säädä vaijeria kohdassa Syöttöruuvin
kytkentävaijerin säätö kuvatulla tavalla.
Ota yhteys valtuutettuun huoltoon
vetohihnantarkistamiseksi.
SUOMI
57
Page 58

Kierrättäminen
Kierrätä tuote asianmukaisesti, kun poistat sen käytöstä. Tarkempia kierrätysohjeita saat kuntasi jäteneuvonnasta.
Tekniset tiedot
Tyyppi Kaksivaihelumilinko
Työleveys 600 mm
Lumen syvyys Maks. 400 mm
Lumen heittopituus n. 8 metriä
Moottori 1-sylinterinen 4-tahtinen bensiinimoottori, 3,5 kW
Polttoainesäiliön tilavuus n. 2 litraa
Öljytilavuus 0,6 litraa
Vaihteet 4 eteen, 2 taakse
Ulosheitto Kääntyy 180º
Suuntain Taittuu n. 25º
Veto Itsestäänvetävä
Ilmatäytteiset kumipyörät Ø 330 mm
Paino 68,5 kg
LpA 86 dB(A), K= 3,0 dB(A)
LwA 101 dB(A), K= 3,0 dB(A)
Tärinäarvo 7,95 m/s², K=1,5 m/s²
SUOMI
58
Page 59

Declaration of Conformity
Försäkran om överenstämmelse
Samsvarerklæring
Vakuutus yhdenmukaisuudesta
CLAS OHLSON AB
SE-793 85 INSJÖN, SWEDEN
Declares that this product complies with the requirements of the following directives and standards
Intygar att denna produkt överensstämmer med kraven i följande direktiv och standarder
Bekrefter at dette produktet er i samsvar med følgende direktiver og standarder
Vakuuttaa, että tämä tuote täyttää seuraavien direktiivien ja standardien vaatimukset
GASOLINE POWERED SNOWTROWER
Cotech 31-5052
DB75524FM
Machinery directive
2006/42/EC
ISO/DIS 8437:2008 EN ISO 14982:2009
EC type approval no. E13*97/68SN3G1*2010/26*0338*02
Issued by the following notified body:
Utfärdats av följande anmälda organ:
Utstedt av følgende teknisk kontrollorgan:
Myöntänyt seuraava ilmoitettu laitos:
Sociéte Nationale De Certification Et D´homologation s.á.r.l
Registre de Commerce: B 27180
L-5201 Sandweiler
EMC directive
2004/108/EC
Klas Balkow
President
Insjön, Sweden, 2012–06-27
59
Page 60

SVERIGE
KUNDTJÄNST Tel: 0247/4 45 0 0
Fax: 0247/4 45 0 9
E-post: kundservice@clasohlson.se
INTERNET www.clasohlson.se
BREV Clas Ohlson AB, 793 85 INSJÖN
NORGE
KUNDESENTER Tlf.: 23 21 40 00
Faks: 23 21 40 80
E-post: kundesenter@clasohlson.no
INTERNETT www.clasohlson.no
POST Clas Ohlson AS, Postboks 485 Sentrum, 0105 OSLO
SUOMI
ASIAKASPALVELU Puh.: 020 111 2222
Sähköposti: asiakaspalvelu@clasohlson.fi
INTERNET www.clasohlson.fi
OSOITE Clas Ohlson Oy, Maistraatinportti 4 A, 00240 Helsinki
UNITED KINGDOM
CUSTOMER SERVICE Contact number: 0845 300 9799
E-mail: customerservice@clasohlson.co.uk
INTERNET www.clasohlson.com/uk
POSTAL 10 – 13 Market Place
Kingston Upon Thames
Surrey
KT1 1JZ
 Loading...