

Page 1

Angle Grinder
Vinkelslipmaskin
Vinkelslipemaskin
Kulmahiomakone
Important!
Read the entire instruction manual carefully
and make sure that you fully understand
it before you use the equipment. Keep the
manual for future reference.
Viktig information:
Läs hela bruksanvisningen noggrant och
försäkra dig om att du har förstått den innan
du använder utrustningen och spara den för
framtida bruk.
Viktig informasjon:
Les disse anvisningene nøye og forsikre deg
om at du forstår dem før du bruker enheten
og oppbevar dem for senere bruk.
Tärkeätä tietoa:
Lue nämä ohjeet huolellisesti ja varmista
että olet ymmärtänyt ne, ennen kuin alat
käyttää laitetta. Säilytä ohjeet myöhempää
tarvetta varten.
Ver. 001-200604
ENGLISHSVENSKANOR SKSUOMI
Art.no Model
30-9316 CT3234
Ver. 200802
Page 2

2
Page 3

Angle Grinder
Art. no. 30-9316, model CT3234
Please read the entire instruction manual before using the product and save it for
future reference. We apologise for any text or photographic errors and any changes
of technical data. If you have any questions concerning technical problems please
contact our Customer Service Department (see address on reverse.)
Table of Contents
Safety 4
Product Description 11
Assembly 12
Use 13
Changing of grinding wheel 14
Rotating the rear handle 14
Care and Maintenance 15
Troubleshooting Guide 15
Disposal 15
Specications 15
ENGLISH
3
Page 4

1. General safety instructions
Warning! Read all the instructions. Failure to adhere to the following instructions
may lead to electric shocks, res and/or serious injury. The term “electrical hand
ENGLISH
tools” in the warning text below is referring to your mains operated or battery
operated hand tool.
1) The work space
a) Keep the work space clean and well illuminated. Cluttered and poorly lit areas
invite accidents.
b) Do not use electrical hand tools in explosive environments, i.e. nearby
ammable liquids, gas or dust. Electrical hand tools generate sparks that could
easily ignite dust or fumes.
c) Keep away from children and other spectators while using the electrical hand
tool. Distractions can make you lose your concentration and control.
2) Electrical safety
a) The electrical hand tool’s plug must t correctly in the wall socket. Never modify
the plug in any way. Never use an adaptor together with earthed electrical hand
tools. Unmodied plugs and suitable wall sockets decrease the risk of electric
shock.
b) Avoid body contact with earthed objects, such as pipes, radiators, ovens or
refrigerators. There is an increased risk of electrical shock if your body is
earthed.
c) Do not expose the electrical hand tool to rain or other wet conditions. If water
gets inside an electrical hand tool it increases the risk of electrical shock.
d) Do not misuse the lead. Never use the lead to carry, drag or pull the plug out of
the wall socket. Keep the lead away from heat, oil, sharp edges and movable
parts. Damaged or tangled leads increase the risk of electrical shock.
e) When you use an electrical hand tool outdoors; use an extension cord suitable
for this purpose. Use of an extension cord for outdoor use decreases the risk of
electrical shock.
3) Personal safety
a) Pay attention to what you do and use common sense when using electrical hand
tools. Never use an electrical hand tool if you are tired or under the inuence
of drugs, alcohol or medication. One moment of inattention while using an
electrical hand tool may result in serious injury.
b) Use protective equipment. Always use safety glasses. Using protective
equipment such as a face mask, slip resistant protection shoes, a helmet and
ear plugs when needed decreases the risk of injury.
4
Page 5

c) Avoid unexpected starts. Make sure that the switch is set to OFF before you
connect the device to the wall socket. Never carry an electrical hand tool with
one nger on the trigger or never connect the hand tool to a wall socket when
the switch is set to ON, since it may result in injury.
d) Remove all service tools/keys before switching on the hand tool. A forgotten
service tool on a rotating part of the electrical hand tool may result in injury.
e) Do not overreach. Make sure you stand steady and well balanced at all times.
This gives better control in unexpected situations.
f) Wear suitable clothing. Do not wear loose tting clothes or jewellery. Keep hair,
clothes and gloves away from movable parts. Loose tting clothes, jewellery or
long hair could get caught in movable parts.
g) If the equipment for suctioning or dust collecting is available make sure it is
connected and used properly. Using technical aids may reduce dust related
hazards.
4) Use and maintenance of the electrical hand tools
a) Do not overdrive the hand tool. Use a hand tool suitable for the work you are to
perform. At the correct rate of feed, the correct tool will carry out the work better
and more safely.
b) Never use the electrical hand tool if the switch does not work properly to turn
on and shut off the tool. All electrical hand tools that cannot be operated by the
switch are dangerous and must be repaired.
c) Unplug the lead from the wall socket before making any adjustments, changes
of accessories or storing the electrical hand tool away. These precautions
reduce the risk of unexpected starts of the electrical hand tool.
d) Store electrical hand tools that are not being used out of reach from children.
Do not let people unfamiliar with the electrical hand tool or its instructions
use it. Electrical hand tools can be dangerous if they get into the hands of
inexperienced users.
e) Maintenance of electrical hand tools. Check if something is incorrectly set, if
movable parts are getting jammed, or parts are broken or something else that
might cause the electrical hand tool to malfunction. If something is damaged it
must be repaired before use. Many accidents are caused by poorly maintained
electrical hand tools.
f) Keep the tools sharp and clean. Properly maintained cutting tools with sharp
blades are less likely to jam and are easier to control.
g) Use the electrical hand tool, accessories and such according to the instructions
and in a way suitable for the type of electrical hand tool used. Using the
electrical hand tool for work other than that for which it is intended could result in
a dangerous situation.
ENGLISH
5
Page 6

5) Service
a) Let only qualied personel perform service and repairs using original parts.
This guarantees that the safety of the electrical hand tool is maintained.
ENGLISH
2. Safety warnings common for grinding,
sanding, wire brushing, polishing or abrasive
cutting-off operations
a) This power tool is intended to function as a grinder, sander, wire brush or cut-
off tool. Read all safety warnings, instructions, illustrations and specications
provided with this power tool. Failure to follow all instructions listed below may
result in electric shock, re and/or serious injury.
b) Operations such as polishing are not recommended to be performed with this
power tool. Operations for which the power tool was not designed may create a
hazard and cause personal injury.
c) Do not use accessories which are not specically designed and recommended
by the tool manufacturer. Just because the accessory can be attached to your
power tool, it does not assure safe operation.
d) The rated speed of the accessory must be at least equal to the maximum speed
marked on the power tool. Accessories running faster than their rated speed can
break and y apart.
e) The outside diameter and the thickness of your accessory must be within the
capacity rating of your power tool. Incorrectly sized accessories cannot be
adequately guarded or controlled.
f) The arbour size of wheels, anges, backing pads or any other accessory must
properly t the spindle of the power tool. Accessories with arbour holes that
do not match the mounting hardware of the power tool will run out of balance,
vibrate excessively and may cause loss of control.
g) Do not use a damaged accessory. Before each use inspect the accessory
such as abrasive wheels for chips and cracks, backing pad for cracks, tear or
excess wear, wire brush for loose or cracked wires. If power tool or accessory
is dropped, inspect for damage or install an undamaged accessory. After
inspecting and installing an accessory, position yourself and bystanders away
from the plane of the rotating accessory and run the power tool at maximum
no-load speed for one minute. Damaged accessories will normally break apart
during this test time.
6
Page 7

h) Wear personal protective equipment. Depending on application, use face shield,
safety goggles or safety glasses. As appropriate, wear dust mask, hearing
protectors, gloves and workshop apron capable of stopping small abrasive or
workpiece fragments. The eye protection must be capable of stopping ying
debris generated by various operations . The dust mask or respirator must be
capable of ltrating particles generated by your operation. Prolonged exposure
to high intensity noise may cause hearing loss.
i) Keep bystanders a safe distance away from work area. Anyone entering the
work area must wear personal protective equipment. Fragments of workpiece or
of a broken accessory may y away and cause injury beyond immediate area of
operation.
j) Hold power tool by insulated gripping surfaces only, when performing an
operation where the cutting accessory may contact hidden wiring or its own
cord. Cutting accessory contacting a “live” wire may make exposed metal parts
of the power tool “live” and shock the operator.
k) Position the cord clear of the spinning accessory. If you lose control, the cord
may be cut or snagged and your hand or arm may be pulled into the spinning
accessory.
l) Never lay the power tool down until the accessory has come to a complete stop.
The spinning accessory may grab the surface and pull the power tool out of your
control.
m) Do not run the power tool while carrying it at your side. Accidental contact with
the spinning accessory could snag your clothing, pulling the accessory into your
body.
n) Regularly clean the power tool’s air vents. The motor’s fan will draw the dust
inside the housing and excessive accumulation of powdered metal may cause
electrical hazards.
o) Do not operate the power tool near ammable materials. Sparks could ignite
these materials.
p) Do not use accessories that require liquid coolants. Using water or other liquid
coolants may result in electrocution or shock.
ENGLISH
7
Page 8

Kickback and Related Warnings
Kickback is a sudden reaction to a pinched or snagged rotating wheel, backing pad,
brush or any other accessory. Pinching or snagging causes rapid stalling of the
rotating accessory which in turn causes the uncontrolled power tool to be forced in
ENGLISH
the direction opposite of the accessory’s rotation at the point of the binding.
For example, if an abrasive wheel is snagged or pinched by the workpiece, the
edge of the wheel that is entering into the pinch point can dig into the surface of
the material causing the wheel to climb out or kick out. The wheel may either jump
toward or away from the operator, depending on direction of the wheel’s movement
at the point of pinching. Abrasive wheels may also break under these conditions.
Kickback is the result of power tool misuse and/or incorrect operating procedures or conditions and can be avoided by taking proper precautions as
given below.
a) Maintain a rm grip on the power tool and position your body and arm to allow
you to resist kickback forces. Always use auxiliary handle, if provided, for
maximum control over kickback or torque reaction during start-up. The operator
can control torque reactions or kickback forces, if proper precautions are taken.
b) Never place your hand near the rotating accessory. Accessory may kickback
over your hand.
c) Do not position your body in the area where power tool will move if kickback
occurs. Kickback will propel the tool in direction opposite to the wheel’s
movement at the point of snagging.
d) Use special care when working corners, sharp edges etc. Avoid bouncing and
snagging the accessory. Corners, sharp edges or bouncing have a tendency to
snag the rotating accessory and cause loss of control or kickback.
e) Do not attach a saw chain woodcarving blade or toothed saw blade. Such
blades create frequent kickback and loss of control.
Safety Warnings specific for grinding and abrasive cutting-off
operations
a) Use only wheel types that are recommended for your power tool and the specic
guard designed for the selected wheel. Wheels for which the power tool was not
designed cannot be adequately guarded and are unsafe.
b) The guard must be securely attached to the power tool and positioned for
maximum safety, so the least amount of wheel is exposed towards the operator.
The guard helps to protect operator from broken wheel fragments and accidental
contact with wheel.
8
Page 9

c) Wheels must be used only for recommended applications. For example: do
not grind with the side of cut-off wheel. Abrasive cut-off wheels are intended
for peripheral grinding, side forces applied to these wheels may cause them to
shatter.
d) Always use undamaged wheel anges that are of correct size and shape for
your selected wheel. Proper wheel anges support the wheel thus reducing the
possibility of wheel breakage. Flanges for cut-off wheels may be different from
grinding wheel anges.
e) Do not use worn down wheels from larger power tools. Wheels intended for
larger power tool are not suitable for the higher speed of a smaller tools and
may burst.
Additional Safety Warnings specific for abrasive cutting-off
operations
a) Do not “jam” the cut-off wheel or apply excessive pressure. Do not attempt to
make an excessive depth of cut. Overstressing the wheel increases the loading
and susceptibility to twisting or binding of the wheel in the cut and the possibility
of kickback or wheel breakage.
b) Do not position your body in line with and behind the rotating wheel. When the
wheel, at the point of operation, is moving away from your body, the possible
kickback may propel the spinning wheel and the power tool directly at you.
c) When wheel is binding or when interrupting a cut for any reason, switch off
the power tool and hold the power tool motionless until the wheel comes to a
complete stop. Never attempt to remove the cut-off wheel from the cut while
the wheel is in motion otherwise kickback may occur. Investigate and take
corrective action to eliminate the cause of wheel binding.
d) Do not restart the cutting operation in the workpiece. Let the wheel reach full
speed and carefully re-enter the cut. The wheel may bind, walk up or kickback if
the power tool is restarted in the workpiece.
e) Support panels or any oversized workpiece to minimize the risk of wheel
pinching and kickback. Large workpieces tend to sag under their own weight.
Supports must be placed under the workpiece near the line of cut and near the
edge of the workpiece on both sides of the wheel.
f) Use extra caution when making a “pocket cut” into existing walls or other blind
areas. The protruding wheel may cut gas or water pipes, electrical wiring or
objects that can cause kickback.
ENGLISH
9
Page 10
Safety Warnings specific for sanding operations
a) Do not use excessively oversized sanding disc paper. Follow manufacturers
recommendations, when selecting sanding paper. Larger sanding paper
ENGLISH
extending beyond the sanding pad presents a laceration hazard and may cause
snagging, tearing of the disc or kickback.
Safety Warnings specific for wire brushing operations
a) Be aware that wire bristles are thrown by the brush even during ordinary
operation. Do not overstress the wires by applying excessive load to the brush.
The wire bristles can easily penetrate light clothing and/or skin.
b) If the use of a guard is recommended for wire brushing, do not allow any
interference of the wire wheel or brush with the guard. Wire wheel or brush may
expand in diameter due to work load and centrifugal forces.
Product marking with safety symbols
Read the safety and operating instructions
Always use ear defenders. Always use safety glasses or a visor
and wear a face mask.
10
Page 11

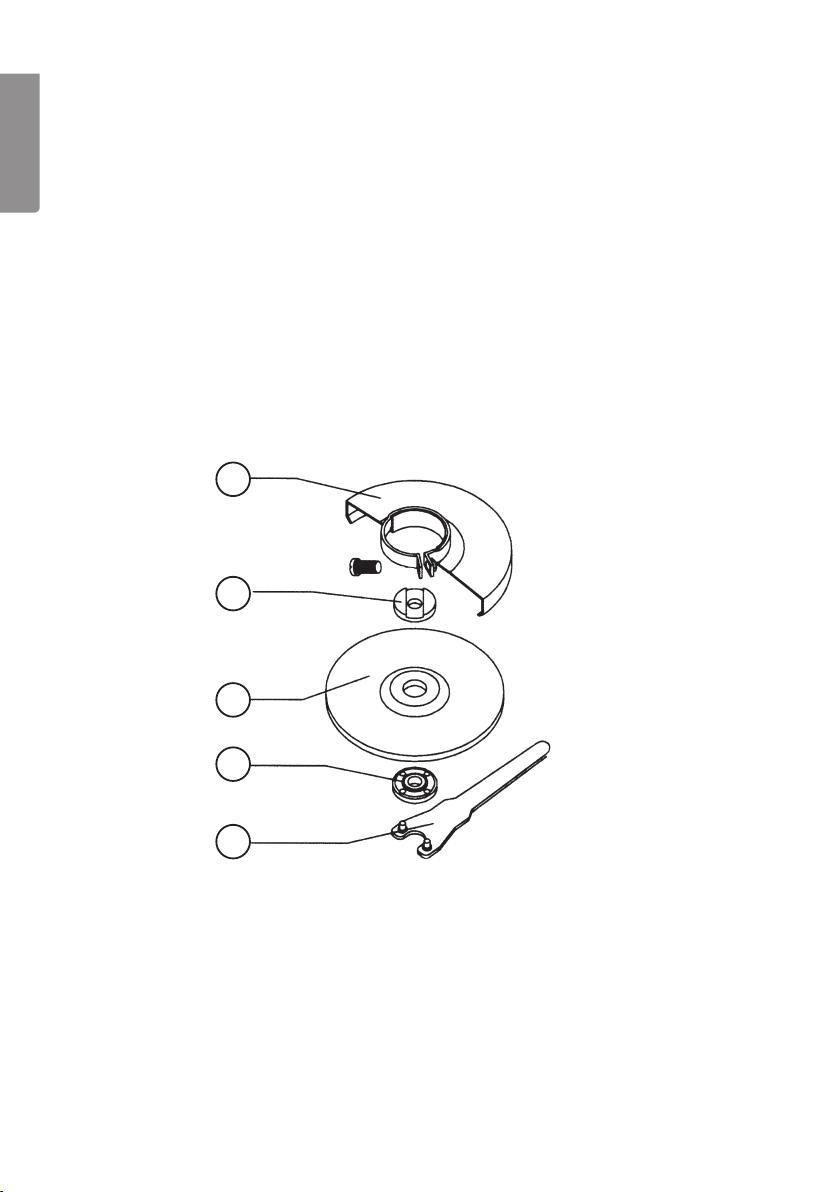
3. Product Description
A
B
C
D
E
F
ENGLISH
I
G
H
a) Handle
b) Shatter guard
c) Inner ange
d) Grinding wheel (not included)
e) Outer ange
f) Spanner
g) Power Switch
h) Machine body
i) Locking button for rotation of handle
11
Page 12
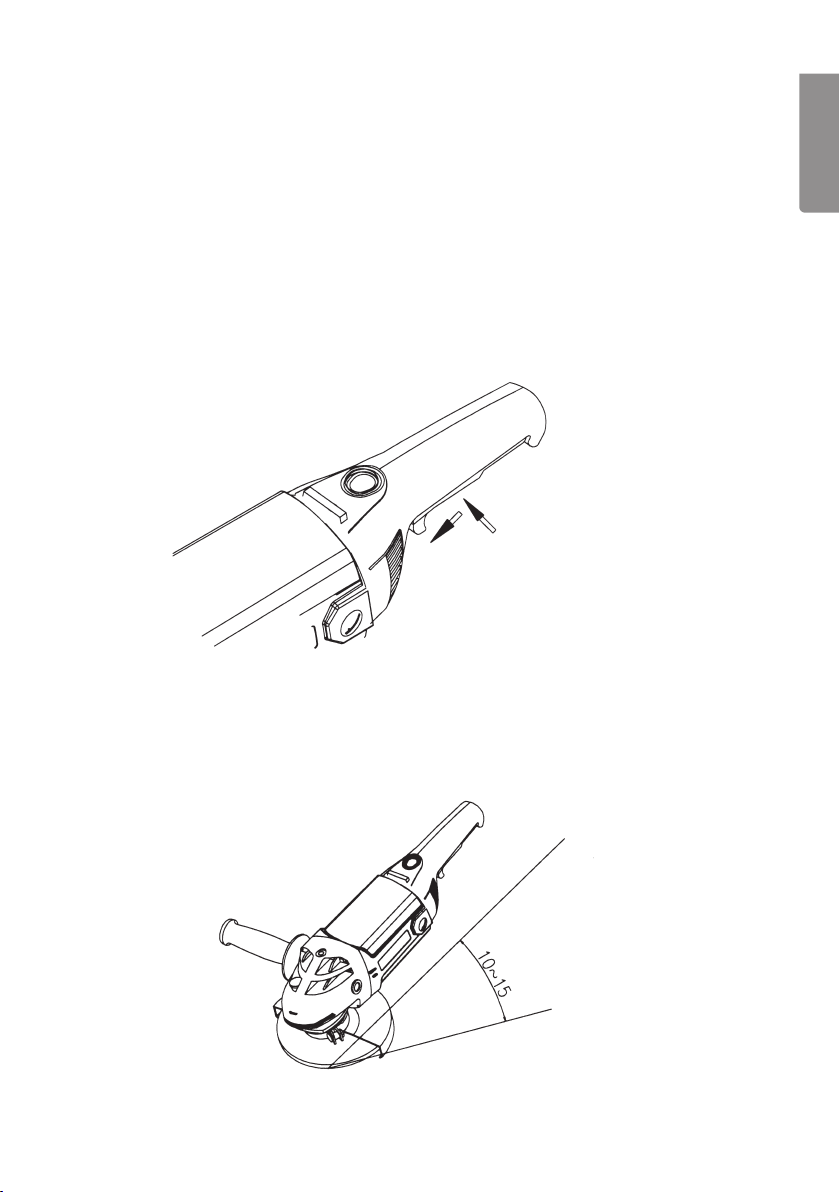
4. Assembly
1. Screw the side handle on the side of the gearbox that ts best. Insert the rubber
ENGLISH
plugs in the holes that are not used. Three different kinds of assembly are
possible.
2. Place the inner unthreaded ange (C) on the spindle and twist it until it locks on
the spindle.
3. Put on a grinding/cutting disc (D) on the spindle so it centres.
4. Put on the outer ange (E) with the concave side towards the disc.
5. Push in the spindle lock and tighten the ange clockwise with the included key.
6. Start the machine and let it run for awhile to make sure the disc is balanced
before grinding.
B
C
D
E
F
12
Page 13
5. Use
• Let the machine come up to speed before grinding.
• Make sure you have good overview when grinding.
• Do not use the side of cutting discs for grinding since they cannot handle
pressure to the face.
• Use a diamond grinding wheel when cutting stone etc.
• Do not angle the machine while cutting. Make straight cuts only with
a cutting disc.
1. Stand steady and hold the machine rmly in both hands.
2. Push the switch forward and then up.
ENGLISH
3. Turn off the machine by releasing the switch.
4. The best method for grinding is to hold the machine in at a 10-15º angle.
13
Page 14
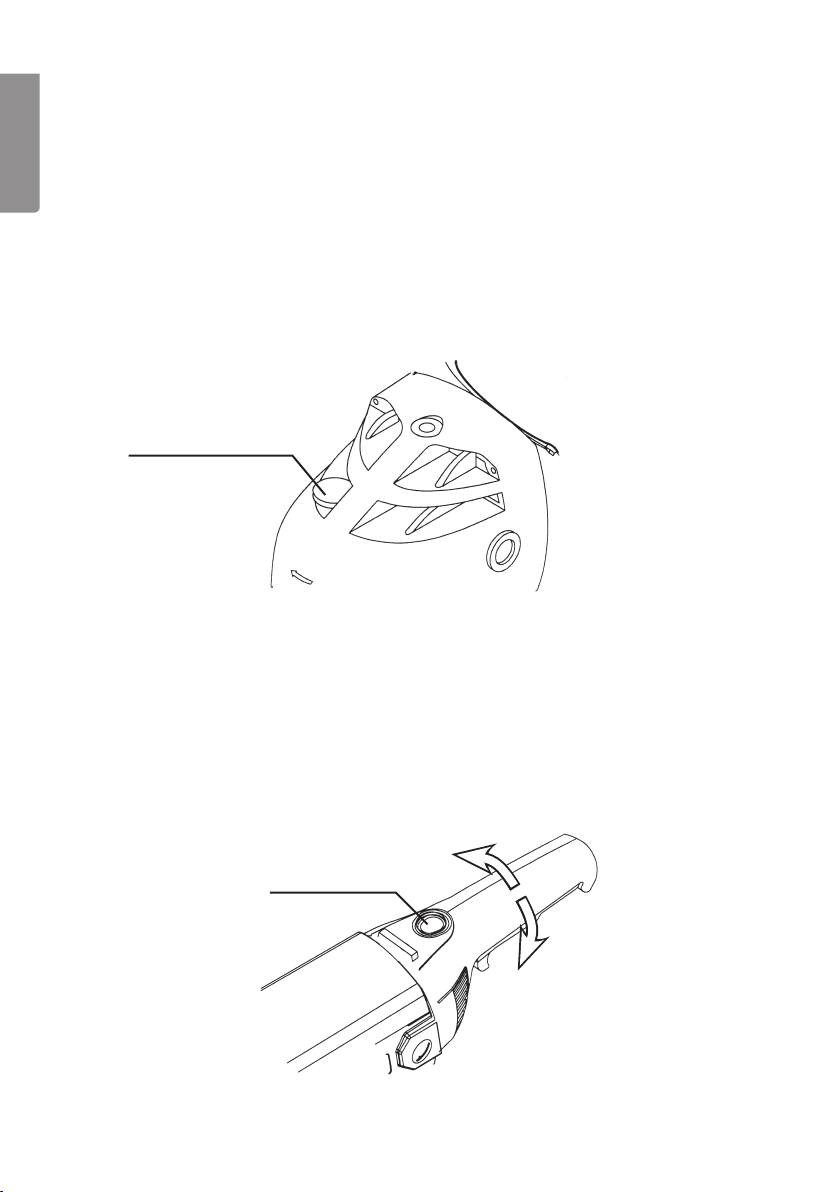
6. Changing of grinding wheel
The grinding wheel must have the correct inner diameter. Never use loose sleeves.
It should be approved for at least 8500 rpm.
ENGLISH
1. Pull out the plug from the outlet before changing the grinding disc.
2. Activate the spindle loc. Loosen the spindle bolt from the outer ange of the
spindle.
3. Remove the old grinding disc and attach a new one.
4. Assemble in reversed order.
5. Start the machine and let it run for awhile to make sure the disc is balanced
before grinding.
Spindle Lock Button
7. Rotating the rear handle
1. Unplug the mains lead before rotating the handle.
2. Push in the locking button to rotate the handle.
3. Rotate the handle to one of the three set positions.
4. Release the locking button and make sure the handle clicks in position.
Locking buttton
14
Page 15

8. Care and Maintenance
Always keep the motor’s ventilation openings free of dust and debris. If needed
dry off the angle grinder with a soft damp cloth. Avoid strong detergents or solvents.
9. Troubleshooting Guide
Problem Possible Cause Remedy
The machine does
not start.
The machine runs
slowly.
Strange noise. Mechanical fault. Contact us in case of motor or
Strong vibrations. Loose cutter/bit. Tighten the tool and make sure
Sparks in the
motor.
No power. Check the power point.
Worn brushes. Contact Customer Service in
Short circuit.
Faulty power switch.
Worn/damaged cutter/bit. Sharpen or change the cutter/bit.
Speed too low. Do not press down too hard.
The motor is overheated.
Faulty windings.
Brushes jammed. Contact Customer Service in
Winding short circuited.
Dirt on collector.
case of motor or electrical faults.
electrical faults.
it is set correctly.
case of motor or electrical faults.
ENGLISH
10. Disposal
Follow local ordinances when disposing this product. If you are unsure
about the disposal of this product contact your municipality.
11. Specifications
Power Supply 230 V ~ 50 Hz
Power 1800 W
No-Load Speed: 8500 rpm
Grinding Wheel Ø 180 mm, hole Ø 22 mm
Weight 4.7 kg (excluding grinding wheel)
Sound Pressure (LpA) 95 dB (A)
Sound Power (Lwa) 108 dB (A)
Vibration Value 4.7 m/s²
15
Page 16

Vinkelslipmaskin
art.nr 30-9316, modell CT3234
Läs igenom hela bruksanvisningen före användning och spara den sedan för
framtida bruk. Vi reserverar oss för ev. text- och bildfel samt ändringar av tekniska
data. Vid tekniska problem eller andra frågor, kontakta vår kundtjänst (se adressuppgifter på baksidan).
SVENSKA
Innehållsförteckning
Säkerhetsinstruktioner 17
Produktbeskrivning 24
Montering 25
Användning 26
Byte av slipskiva 27
Att rotera det bakre handtaget 27
Skötsel och underhåll 28
Felsökningsschema 28
Avfallshantering 28
Specifikationer 28
16
Page 17

1. Generella säkerhetsinstruktioner
Varning! Läs alla instruktioner. Om nedanstående instruktioner inte följs kan detta
leda till elektrisk stöt, brand och/eller allvarlig skada. Termen ”elektriskt handverktyg”
i varningstexten nedan refererar till ditt nätanslutna eller batteridrivna handverktyg.
1) Arbetsutrymmet
a) Håll arbetsutrymmet rent och väl upplyst. Belamrade och mörka utrymmen
inbjuder till olyckor.
b) Använd inte elektriska handverktyg i explosiva miljöer, som i närheten av
lättantändliga vätskor, gaser eller damm. Elektriska handverktyg genererar
gnistor som kan antända damm eller ångor.
c) Håll undan barn och åskådare medan du använder det elektriska
handverktyget. Störningsmoment kan göra att du tappar kontrollen.
2) Elektrisk säkerhet
a) Det elektriska handverktygets stickpropp måste passa i vägguttaget. Modiera
aldrig stickproppen på något vis. Använd aldrig adapter tillsammans med
jordade elektriska handverktyg. Omodierade stickproppar och passande
vägguttag minskar risken för elektrisk stöt.
b) Undvik kroppskontakt med jordade föremål, som rör, element, köksspis eller
kylskåp. Det innebär ökad risk för elektrisk stöt om din kropp är jordad.
c) Utsätt inte det elektriska handverktyget för regn eller våta förhållanden. Om
vatten tränger in i ett elektriskt handverktyg ökar det risken för elektrisk stöt.
d) Misshandla inte nätsladden. Använd aldrig nätsladden för att bära, dra eller
rycka stickproppen ur vägguttaget. Håll nätsladden undan från värme, olja,
vassa kanter och rörliga delar. Skadade eller trassliga nätsladdar ökar risken
för elektrisk stöt.
e) När du använder ett elektriskt handverktyg utomhus, använd en skarvsladd
anpassad för detta ändamål. Användning av en skarvsladd för utomhusbruk
minskar risken för elektrisk stöt.
SVENSKA
3) Personlig säkerhet
a) Var uppmärksam på vad du gör och använd sunt förnuft när du använder
ett elektriskt handverktyg. Använd inte ett elektriskt handverktyg om du är
trött eller påverkad av droger, alkohol eller medicinering. Ett ögonblicks
ouppmärksamhet när du använder ett elektriskt handverktyg kan resultera i
allvarlig personskada.
17
Page 18

b) Använd skyddsutrustning. Bär alltid skyddsglasögon. Användning av
skyddsutrustning som andningsskydd, halksäkra skyddsskor, hjälm och
hörselskydd vid behov minskar risken för personskada.
c) Undvik oavsiktlig start. Se till att strömbrytaren är i läge ”OFF” innan du
ansluter stickproppen till vägguttaget. Att bära ett elektriskt handverktyg
med ett nger på strömbrytaren/avtryckaren eller att ansluta ett elektriskt
handverktyg till elnätet när strömbrytaren är i läge ”ON” inbjuder till olyckor.
d) Tag bort alla serviceverktyg/nycklar innan du slår på det elektriska
handverktyget. Ett kvarglömt serviceverktyg på en roterande del av det
SVENSKA
elektriska handverktyget kan resultera i personskada.
e) Sträck dig inte för långt. Se till att du står stadigt med god balans hela tiden.
Detta möjliggör bättre kontroll i oväntade situationer.
f) Bär lämplig klädsel. Bär inte löst sittande kläder eller smycken. Håll hår, kläder
och handskar undan från rörliga delar. Lösa kläder, smycken eller långt hår
kan fastna i rörliga delar.
g) Om utrustning för utsugning och uppsamling av damm nns tillgängligt, se till
att denna är ansluten och används ordentligt. Användning av dessa hjälpmedel
kan minska dammrelaterade faror.
4) Användning och underhåll av det elektriska handverktyget
a) Pressa inte det elektriska handverktyget. Använd ett elektriskt handverktyg
som är avsett för det arbetsmoment du utför. Korrekt elektriskt handverktyg gör
jobbet bättre och säkrare med avsedd matningshastighet.
b) Använd inte det elektriska handverktyget om strömbrytaren inte slår på och
stänger av verktyget. Alla elektriska handverktyg som inte kan kontrolleras
med strömbrytaren är farliga och måste repareras.
c) Tag stickproppen ur vägguttaget innan du utför några justeringar, byter
tillbehör eller lägger undan det elektriska handverktyget för förvaring. Dessa
åtgärder i förebyggande syfte minskar risken för att starta det elektriska
handverktyget oavsiktligt.
d) Förvara elektriska handverktyg som inte används utom räckhåll för barn och
låt inte personer som inte är förtrogna med det elektriska handverktyget eller
dessa instruktioner använda det. Elektriska handverktyg är farliga om de
kommer i händerna på ovana användare.
e) Underhåll elektriska handverktyg. Kontrollera om något är felinställt, om rörliga
delar kärvar, om delar har gått sönder eller något annat som kan påverka
funktionen av det elektriska handverktyget. Om något är skadat måste
det repareras före användning. Många olyckor beror på dåligt underhållna
elektriska handverktyg.
18
Page 19

f) Håll verktygen vassa och rena. Ordentligt underhållna skärverktyg med vassa
eggar är mindre benägna att kärva och lättare att kontrollera.
g) Använd det elektriska handverktyget, tillbehör och liknande enligt
instruktionerna och på det sätt som är ämnat för just den typen av elektriskt
handverktyg, och ta även hänsyn till arbetsförhållandena och den typ av arbete
som ska utföras. Användning av det elektriska handverktyget för arbeten andra
än vad det är ämnat för kan resultera i en farlig situation.
5) Service
a) Låt behörig personal utföra service och reparationer, och endast med
originalreservdelar. Detta garanterar att säkerheten på det elektriska
handverktyget behålls.
2.
Särskilda säkerhetsvarningar gällande slipning,
putsning, borstning eller kapning
a) Detta elektriska handverktyg är avsett för slipning, putsning, borstning
och kapning. Läs alla säkerhetsvarningar, instruktioner, illustrationer och
specikationer som medföljer detta verktyg. Underlåtelse att följa alla
instruktioner nedan kan resultera i elektrisk chock, brand och/eller allvarlig
skada.
b) Polering rekommenderas ej att utföras med detta elektriska handverktyg.
Utförande av arbeten som detta verktyg inte är avsett för kan orsaka fara och
leda till personlig skada.
c) Använd inte tillbehör som inte är speciellt avsedda och rekommenderade
av verktygstillverkaren. Även om tillbehöret kan monteras på ditt elektriska
handverktyg är det ingen försäkran om säker användning.
d) Märkhastigheten på tillbehöret måste minst motsvara den maximala
hastigheten märkt på det elektriska handverktyget. Tillbehör som roterar
snabbare än märkhastigheten kan gå sönder och falla isär.
e) Ytterdiametern och tjockleken på tillbehöret måste vara inom märkkapaciteten
på ditt elektriska handverktyg. Fel storlek på tillbehören kan inte skyddas eller
kontrolleras ordentligt.
f) Axelstorleken på skivor, änsar och stödrondeller eller något annat tillbehör
måste passa spindeln på ditt elektriska handverktyg ordentligt. Tillbehör vars
fästhål inte passar ihop med det monterade tillbehöret hamnar i obalans,
vibrerar häftigt och kan orsaka att du tappar kontrollen.
SVENSKA
19
Page 20

g) Använd inte ett skadat tillbehör. Inspektera tillbehören och se om det nns
isor eller sprickor på slipskivorna; sprickor, nötningar eller slitage på
stödrondellen, eller lösa eller trasiga borst på stålborstrondellerna. Om du
tappar ditt elektriska handverktyg eller ett tillbehör, kontrollera om det nns
skador eller montera ett oskadat tillbehör. Efter inspektion och montering av ett
tillbehör, placera dig själv och åskådare utanför maskinens riskområde och kör
det elektriska handverktyget på fullt varvtal i en minut. Skadade tillbehör går
normalt sönder under testperioden.
h) Bär personlig skyddsutrustning. Beroende på hur du använder maskinen,
använd ansiktsskydd eller skyddsglasögon. Vid behov, använd ansiktsmask,
SVENSKA
hörselskydd, handskar och arbetsförkläde som skyddar mot små slippartiklar
eller isor från arbetsstycket. Ögonskyddet ska kunna skydda mot
kringygande skräp som bildas vid olika arbetsmoment. Andningsskyddet ska
kunna ltrera partiklar som bildas vid arbetet. Långvarig vistelse i buller kan
orsaka hörselskador.
i) Håll åskådare på behörigt avstånd från arbetsplatsen. Alla som besöker
arbetsplatsen måste bära personlig skyddsutrustning. Flisor från arbetsstycket
eller från ett trasigt tillbehör kan yga iväg och orsaka skada utanför arbetets
omedelbara närområde.
j) Håll det elektriska handverktyget endast i isolerade gripytor när du utför
arbetsmoment där kapskivan kan komma i kontakt med gömda kablar eller den
egna sladden. Kapskivor som kommer i kontakt med en strömförande kabel
kan göra utsatta metalldelar av verktyget strömförande och utsätta användaren
för elektriska stötar.
k) Placera sladden på avstånd från det roterande tillbehöret. Om du förlorar
kontrollen kan sladden kapas eller fastna och din hand eller arm kan dras in i
det roterande tillbehöret.
l) Lägg aldrig ifrån dig det elektriska handverktyget innan tillbehöret har stannat
helt. Det roterande tillbehöret kan fastna i underlaget och dra iväg verktyget
utanför din kontroll.
m) Kör inte det elektriska handverktyget när du bär det med dig. Oavsiktlig kontakt
med det roterande tillbehöret kan göra att det fastnar i dina kläder och dra
verktyget mot kroppen.
n) Rengör regelbundet motorns ventilationsöppningar. Motorns äkt drar åt sig
damm som kommer in under höljet, och överödigt metallspån som ansamlats
kan orsaka elektriska faror.
o) Använd inte det elektriska handverktyget i närheten av lättantändliga material.
Gnistor kan antända dessa material.
p) Använd inte tillbehör som kräver kylvätskor. Användning av vatten eller andra
kylvätskor kan resultera i elektrisk chock eller dödande elektrisk stöt.
20
Page 21

Kast och tillhörande varningar
Kast är en plötslig reaktion på en klämd eller fastkörd rondell, stödrondell, borste
eller någon annat tillbehör. Klämning eller fastkörning orsakar ett snabbt stopp av
det roterande tillbehöret som i sin tur gör att det elektriska handverktyget tvingas i
motsatt riktning mot tillbehörets rotation vid fastkörningspunkten.
Till exempel, om en slipskiva fastnar eller kläms fast i arbetsstycket kan kanten
av slipskivan få grepp i arbetsstycket och orsaka att slipskivan gräver sig ner eller
kastas upp. Slipskivan kastas antingen mot eller bort från användaren, beroende
på rotationsriktningen på slipskivan när den fastnar. Slipskivor kan också gå sönder under dessa omständigheter.
Kast är resultatet av att det elektriska handverktyget används på fel sätt, för fel saker eller under felaktiga förhållanden och kan undvikas genom att nedanstående
försiktighetsåtgärder vidtas.
a) Håll stadigt i det elektriska handverktyget och håll armarna och kroppen så att
du kan parera kast. Använd alltid hjälphandtaget om det nns ett sådant för
maximal kontroll över kast eller reaktioner på vridmomentet vid start. Kast eller
reaktioner på vridmomentet kan kontrolleras av användaren om nödvändiga
försiktighetsåtgärder vidtas.
b) Placera aldrig din hand nära det roterande tillbehöret. Tillbehöret kan få ett
kast över din hand.
c) Ställ dig inte det område dit det elektriska handverktyget kan tänkas hamna
om det inträffar ett kast. Kast driver verktyget i motsatt riktning mot slipskivans
rotation vid fastkörningspunkten.
d) Var extra försiktig när du bearbetar hörn, vassa kanter etc. Undvik att studsa
med och sätta fast tillbehöret. Hörn, vassa kanter och studsning har en
tendens att sätta fast det roterande tillbehöret och orsaka kast eller att du
tappar kontrollen över verktyget.
e) Montera aldrig fast ett sågblad med sågkedja för träbearbetning eller ett tandat
sågblad. Sådana blad orsakar frekventa kast och gör att du tappar kontrollen.
SVENSKA
21
Page 22

Säkerhetsvarningar speciellt för slipning och kapning med kapskiva
a) Använd endast skivtyper som är rekommenderade för det elektriska
handverktyget och ett speciellt sprängskydd avsett för den valda kapskivan.
Skivor som inte är avsedda för det elektriska handverktyget kan inte skyddas
ordentligt och kan vara farliga.
b) Sprängskyddet ska monteras på det elektriska handverktyget på ett säkert sätt
och inställt för maximal säkerhet, så att användaren utsätts för så liten del som
möjligt av skivan. Sprängskyddet hjälper till att skydda användaren från trasiga
skivdelar och oavsiktlig kontakt med skivan.
SVENSKA
c) Skivorna får endast användas för rekommenderade arbetsmoment. Till
exempel: Slipa inte med sidan av en kapskiva. Kapskivor är avsedda för
slipning med kanten, utsätts de för krafter från sidan kan de splittras.
d) Använd alltid oskadade skivänsar av rätt storlek och form för den skiva du
har valt. Passande skivänsar stöder skivan och minskar risken för att den
ska gå sönder. Flänsar för kapskivor kan vara olika mot dem som används för
slipskivor.
e) Använd aldrig nedslitna skivor från ett större elektrisk handverktyg. Skivor
avsedda för större elektriska handverktyg passar inte för det varvtal som
mindre verktyg har och kan spricka.
Ytterligare säkerhetsvarningar speciellt för kapning med kapskiva
a) Pressa inte kapskivan eller lägg på för mycket tryck. Försök inte att kapa för
djupt. Överbelastning av skivan ökar trycket och mottagligheten för att skivan
ska vridas eller fastna i snittet och risken för kast eller att skivan går sönder.
b) Ställ dig aldrig i linje med eller bakom den roterande skivan. När skivan under
användning rör sig bort från dig kan ett kast driva den roterande skivan och det
elektriska handverktyget direkt mot dig.
c) När skivan fastnar eller om du av någon anledning vill avbryta en kapning,
stäng av det elektriska handverktyget och håll still det tills skivan har stannat
helt. Försök aldrig att ta bort kapskivan från kapspåret medan skivan är i
rörelse eftersom det då kan inträffa kast. Undersök och vidta nödvändiga
åtgärder för att minimera riskerna för att kapskivan ska fastna.
d) Efter stopp, återstarta inte kapningen med skivan i arbetsstycket. Låt skivan
nå fullt varvtal först och fortsätt sedan försiktigt i kapspåret. Skivan kan
fastna, vandra upp ur kapspåret eller orsaka kast om kapningen återstartas i
arbetsstycket.
e) Stöd stora skivor eller andra stora arbetsstycken för att minimera risken för
fastkörning eller kast. Stora skivor tenderar att bågna av sin egen vikt. Stöd
måste placeras under skivan nära kapspåret och nära kanten på arbetsstycket
på båda sidor om kapskivan.
22
Page 23

f) Var extra försiktig vid instickskapning i väggar eller andra föremål där du
inte ser var du sågar. Den utskjutande sågklingan kan såga i gas- eller
vattenledningar, elkablar eller andra föremål som kan orsaka kast.
Säkerhetsvarningar speciellt för putsning
a) Använd inte för stora sliprondeller. Följ tillverkarens rekommendationer när du
väljer sliprondeller. Större sliprondeller som sticker ut utanför stödrondellen
innebär risk för sönderslitning och kan orsaka att rondellen fastnar eller går
sönder eller att det inträffar kast.
Säkerhetsvarningar speciellt för stålborstning
a) Tänk på att borst lossnar från stålborstrondellen även vid normal användning.
Pressa inte borstrondellen genom lägga på för mycket tryck. Lösa borst kan
enkelt gå igenom tunna kläder eller huden.
b) Om sprängskydd rekommenderas vid stålborstning, se till att borstrondellen
inte rör vid sprängskyddet. Stålborstrondellen kan expandera av
arbetsbelastningen eller centrifugalkraften.
Produktmärkning med säkerhetssymboler
SVENSKA
Läs igenom hela bruksanvisningen före användning och spar den sedan som referensmaterial.
Använd hörselskydd och andningsskydd.
Använd skyddsglasögon eller visir.
23
Page 24

3. Produktbeskrivning
I
A
SVENSKA
G
B
H
C
D
E
F
A. Handtag
B. Sprängskydd
C. Inre äns
D. Slipskiva (medföljer ej)
E. Yttre äns
F. Nyckel
G. Strömbrytare
H. Maskinkropp
I. Spärrknapp för rotation av handtag
24
Page 25

4. Montering
1. Skruva i sidohandtaget på den sida av växelhuset som känns bäst, sätt i
gummipluggen i dom hålen som inte används. Tre olika monteringar är möjligt.
2. Placera den inre ogängade änsen (C) på spindeln, vrid den så att den låser
på spindeln.
3. Lägg på en slip/kapskiva (D) på spindeln så att den centrerar,
4. Gänga på den yttre änsen (E) så att den konkava sidan är mot skivan.
5. Tryck in spindellåset och dra åt änsen medurs med den bifogade nyckeln.
6. Starta vinkelslipmaskinen och låt den gå i en stund för att kontrollera att
slipskivan är balanserad innan du börjar slipa.
B
C
D
SVENSKA
E
F
25
Page 26

5. Användning
• Låt slipmaskinen gå upp i varv innan slipningen påbörjas.
• Stå så att du har god överblick av slipningen.
• Använd inte sidan på kapskivor till slipning, de tål inte tryck från sidan.
• Använd diamantskiva vid kapning av sten och liknande.
• Vinkla inte vinkelslipen under kapning, gör raka snitt med kapskiva.
• Håll ventilationsöppningarna fria så att inte motorn blir för varm.
SVENSKA
1. Stå stadigt och håll i vinkelslipen med båda händerna.
2. Tryck strömbrytaren framåt och sedan uppåt.
3. Stäng av maskinen genom att släppa strömbrytaren.
4. Bästa metoden för slipning är att hålla vinkelslipen i en vinkel av ca 10 till 15º.
26
Page 27

6. Byte av slipskiva
Slipskivan ska ha rätt innerdiameter, använd aldrig lösa bussningar. Den ska vara
godkänd minst för ett varvtal på 8500 RPM.
1. Dra ut nätsladdens stickpropp ur uttaget innan slipskivebyte.
2. Aktivera spindellåset, lossa yttre änsen från spindeln.
3. Ta bort den gamla slipskivan och sätt dit den nya.
4. Montera i omvänd ordning.
5. Stå bredvid vinkelslipmaskinen och starta den och låt den gå i en stund för att
kontrollera att slipskivan är balanserad innan du börjar slipa.
Spindellås
7. Att rotera det bakre handtaget
1. Dra ut nätsladden innan handtaget roteras.
2. Tryck in spärrknappen för rotering av handtag.
3. Rotera handtaget till ett av dom 3 fasta lägena.
4. Släpp spärrknappen och se till att handtaget klickar fast i läge.
SVENSKA
Spärrknapp
27
Page 28

8. Skötsel och underhåll
Håll motorns ventilationsöppningar fria från spån och skräp. Torka vid behov av
maskinen med en lätt fuktad trasa. Undvik starka eller slipande rengöringsmedel
eller lösningsmedel.
9. Felsökningsschema
Problem Möjlig orsak Åtgärd
SVENSKA
Maskinen går inte. Ingen ström. Kontrollera att uttaget är
strömförande.
Slitna kolborstar. Kontakta oss vid motor- och
Kortslutning.
Fel på strömbrytaren.
Maskinen går sakta. Slött eller skadat verktyg. Slipa om eller byt ut verktyget.
För lågt varvtal. Mata inte så hårt.
Motorn är överhettad.
Ovanliga ljud hörs. Mekaniskt hinder. Kontakta oss vid motor- och
Lindning delvis korsluten.
Starka vibrationer. Verktyget sitter löst. Dra åt verktyget och se till att
Gnistbildning i
motorn.
Kolborstarna sitter fast. Kontakta oss vid motor-
Lindningen kortsluten.
Kollektorn är smutsig.
elfel.
elfel.
det är rätt installerat.
eller elfel.
10. Avfallshantering
När du ska göra dig av med produkten ska detta ske enligt lokala föreskrifter. Är du osäker på hur du ska gå tillväga, kontakta din kommun.
11. Specifikationer
Märkspänning: 230 VAC, 50 Hz
Märkeffekt: 1800 W
Varvtal, obelastad: 8500 v/min
Slipskiva: Ø 180 mm, hål Ø 22mm
Ljud: LPA 95 dB(A)
LWA 108 dB(A)
Vibration: 4,7 m/s
Vikt: 4,7 kg (utan slipskiva)
2
28
Page 29

Vinkelslipemaskin
Art.nr 30-9316, modell CT3234
Les nøye igjennom hele bruksanvisningen og ta vare på den til senere bruk.
Vi reserverer oss mot ev. tekst- og bildefeil, samt forandringer av tekniske data.
Ved tekniske problemer eller andre spørsmål, ta kontakt med vårt kundesenter
(se opplysninger på baksiden).
Innholdsfortegnelse
Sikkerhetsinstruksjoner 30
Produktbeskrivelse 36
Montering 37
Bruk 38
Bytte av slipeskive 39
Hvordan rotere det bakerste håndtaket 39
Vedlikehold og reparasjon 40
Feilsøkningsskjema 40
Avfallshåndtering 40
Spesifikasjoner 40
NOR SK
29
Page 30

1. Generelle sikkerhetsinstruksjoner
Advarsel! Les gjennom hele instruksjonen. Hvis ikke instruksjonen følges, kan
dette føre til elektrisk støt, brann og/eller alvorlige skader. Med ”elektrisk håndverktøy” i teksten nedenfor, menes strømtilkoblet eller batteridrevne håndverktøy.
1) Arbeidsplassen
a) Hold arbeidsplassen ren, ryddig og godt opplyst. Rotete arbeidsplass eller
dårlig opplyste områder kan føre til ulykker.
b) Ikke bruk elektriske håndverktøy i omgivelser med eksplosjonsfare, som for
eksempel i nærheten av lettantennelige væsker, gasser eller støv. Elektrisk
håndverktøy kan danne gnister som kan antenne støv eller trespon.
c) Hold barn og andre tilskuere unna mens du bruker elektriske håndverktøy. Du
kan lett miste kontrollen dersom du blir forstyrret mens du arbeider.
NOR SK
2) Sikkerhet ved bruk av elektrisk strøm
a) Kontakten til det elektriske verktøyet må passe i veggstøpselet. Kontakten må
ikke forandres på. Bruk aldri adapter sammen med elektrisk håndverktøy som
krever jording. Ved bruk av originale kontakter og støpsler minskes faren for
elektrisk støt.
b) Unngå kroppskontakt med jordede gjenstander som rør, ovner, komfyrer og
kjøleskap. Kroppskontakt med disse øker faren for elektrisk støt.
c) Elektrisk håndverktøy bør ikke utsettes for regn eller fuktighet. Hvis det
kommer vann inn i et elektrisk håndverktøy, øker faren for elektrisk støt.
d) Håndter ledningen forsiktig. Den må ikke bli brukt til å bære verktøyet med.
Dra heller ikke i ledningen når du skal ha den ut av stikkontakten. Hold
ledningen unna varme, olje, skarpe kanter og bevegelige deler. Skadede eller
deformerte kontakter kan øke faren for elektrisk støt.
e) Ved bruk av elektrisk håndverktøy utendørs, skal en benytte en skjøteledning
som er beregnet til dette formålet. Når skjøteledning som er beregnet for
utendørs bruk benyttes, minsker faren for elektrisk støt.
3) Personlig sikkerhet
a) Vær våken og bruk sunn fornuft når du bruker et elektrisk verktøy. Ikke bruk
elektriske håndverktøy når du er trøtt eller påvirket av dop, alkohol eller
sterke medisiner. Når du bruker elektrisk håndverktøy kan et lite øyeblikks
uoppmerksomhet resultere i store personskader.
b) Bruk verneutstyr. Benytt alltid vernebriller. Bruk av verneutstyr som støvmaske,
sklisikre såler på skoene, hjelm og hørselvern, ved behov, minsker faren for
personskade.
30
Page 31

c) Unngå uønsket oppstart. Påse at strømbryteren står i posisjon ”OFF” før du
kobler til strømmen. Det å bære et elektrisk håndverktøy med en nger på
avtrekkeren/strømbryteren, eller å koble til strømmen når strømbryteren står i
posisjon ”ON”, kan forårsake ulykker.
d) Fjern alle nøkler/serviceverktøy før du starter det elektriske håndverktøyet. Et
gjenglemt serviceverktøy på en roterende del, kan forårsake personskader.
e) Strekk deg ikke for langt. Påse at du står støtt og har god balanse hele tiden.
Da er du bedre forberedt når uventede situasjoner oppstår.
f) Benytt fornuftige arbeidsklær. Ikke bruk løstsittende klær og smykker. Hold
klær, hansker og smykker unna bevegelige deler. Løse klær, smykker eller
langt hår, kan sette seg fast i bevegelige deler.
g) Hvis det er mulig å koble til en støvsamler/støvsuger, bør dette gjøres. Ved
bruk av sådanne hjelpemidler, kan en minske faren for støvrelaterte skader og
ulykker.
4) Bruk og vedlikehold av elektrisk håndverktøy
a) Ikke press et elektrisk håndverktøy. Bruk elektriske håndverktøy som er
beregnet til den arbeidsoperasjonen du skal utføre. Riktig innmatings-hastighet
er viktig for å utføre bedre og sikrere arbeide.
b) Ikke bruk det elektriske håndverktøyet dersom ikke strømbryteren virker og
verktøyet kan skrues av. Alle elektriske håndverktøy, som ikke kan kontrolleres
med en strømbryter, er farlige og må repareres.
c) Dra ut støpselet før du utfører justeringer, bytter tilbehør eller legger det
elektriske håndverktøyet fra deg. Dette for å unngå at elektrisk håndverktøy får
en ukontrollert start.
e) Vedlikehold av elektrisk håndverktøy. Se til at verktøyet ikke er feilinnstilt, at
bevegelige deler ikke beveger seg usymmetrisk, at ingen deler er skadet eller
at det elektriske håndverktøyet har andre feil, som kan påvirke dets funksjon.
Dersom noe er skadet må dette repareres før verktøyet tas i bruk. Mange
ulykker skyldes dårlig eller manglende vedlikehold.f) Hold verktøyet
rent. Påse også at det elektriske verktøyet holdes skarpt. Godt vedlikeholdt
skjæreverktøy, med skarpe egger, er lettere å kontrollere.
g) Følg instruksjonen, ta hensyn til arbeidsforholdene og den type arbeide som
skal utføres. Bruk av elektrisk håndverktøy til andre arbeidsoperasjoner enn
det det er beregnet til, kan skape farlige situasjoner.
5) Service
a) La profesjonelle fagfolk utføre service og reparasjoner. Benytt kun originale
reservedeler. Dette for å opprettholde sikkerheten ved bruk av det elektriske
håndverktøyet.
NOR SK
31
Page 32

2. Sikkerhetsadvarsler for sliping, pussing, børsting, polering eller
kapping
a) Dette elektriske håndverktøyet er beregnet for sliping, pussing, børsting,
polering og kapping. Les alle sikkerhetsadvarsler, instruksjoner og
spesikasjoner som følger med dette verktøyet. Hvis du unngår å følge alle
instruksjonene nedenfor kan det resultere i elektrisk støt, brann og/eller alvorlig
skade.
b) Polering anbefales ikke med dette elektriske håndverktøy. Hvis maskinen blir
brukt til arbeid den ikke er konstruert for, kan dette forårsake fare og føre til
personlig skade.
c) Bruk ikke tilbehør som ikke er spesielt beregnet for verktøyet og anbefalt
av verktøyprodusenten. Selv om tilbehøret kan monteres på ditt elektriske
håndverktøy er det ingen forsikring om sikker bruk.
d) Merkehastigheten på tilbehøret må minst tilsvare den maksimale hastigheten
det elektriske håndverktøyet er merket med. Tilbehør som roterer raskere enn
NOR SK
merkehastigheten kan gå i stykker.
e) Den utvendige diameteren og tykkelsen på tilbehøret må være innenfor
merkekapasiteten på det elektriske håndverktøyet. Feil størrelse på tilbehøret
kan ikke beskyttes eller kontrolleres ordentlig.
f) Akselstørrelsen på skiver, enser og støtterondeller eller noe annet tilbehør
må passe spindelen på ditt elektriske håndverktøy ordentlig. Tilbehør med
festehull som ikke passer sammen med det monterte tilbehøret havner i
ubalanse, vibrerer kraftig og kan føre til at du mister kontrollen.
g) Bruk ikke tilbehør som er skadet. Kontroller tilbehøret og se om det nnes
iser eller sprekker på slipeskivene; Som sprekker, ujevnheter, slitasje på
støtterondellen, eller løse eller ødelagte bust på stålbørsterondellene. Hvis
du mister ditt elektriske håndverktøy eller et tilbehør, kontroller om det er blitt
skadet. Dersom det er skadet så monter et uskadet tilbehør. Etter inspeksjon
og montering av et tilbehør, plasser deg selv og tilskuere utenfor maskinens
risikoområde, og kjør det elektriske håndverktøyet på fullt turtall i et minutt.
Skadet tilbehør går normalt i stykker under testperioden.
h) Bruk personlig verneutstyr, avhengig av hvordan du bruker maskinen. Bruk
støvmaske og vernebriller. Ved behov, bruk ansiktsmaske, hørselsvern,
hansker og arbeidsforkle, som beskytter mot små slipepartikler eller iser
fra arbeidsstykket. Vernebrillene skal kunne beskytte mot ygende skrap,
som dannes ved forskjellige arbeidsmoment. Støvmasken skal kunne ltrere
partikler, som dannes ved arbeidet. Langvarig opphold i støy kan forårsake
hørselskader.
i) Hold tilskuere på behørig avstand fra arbeidsplassen. Alle som besøker
arbeidsplassen må ha på seg personlig sikkerhetsutstyr. Fliser fra
arbeidsstykket eller fra ødelagte tilbehør, kan bli slynget bort og forårsake
skade utenfor arbeidets umiddelbare nærområde.
32
Page 33

j) Hold det elektriske håndverktøyet kun på isolerte steder når du utfører en
arbeidsoperasjon der kappeskiven kan komme i kontakt med skjulte kabler
eller sin egen ledning.
k) Plasser ledningen på avstand fra det roterende tilbehøret. Hvis du mister
kontrollen kan ledningen kappes eller sette seg fast, og din hånd eller arm kan
dras inn i det roterende tilbehøret.
l) Legg aldri ifra deg det elektriske håndverktøyet før tilbehøret har stoppet helt.
Det roterende tilbehøret kan feste seg i underlaget og kastes bort utenfor din
kontroll.
m) Kjør ikke det elektriske håndverktøyet når du bærer det med deg. Det
roterende verktøyet kan feste seg i klærne og dras mot kroppen.
n) Rengjør regelmessig motorens ventilasjonsåpninger. Motorens vifte trekker til
seg støv, som kommer inn under dekselet. Overødige metallspon samles opp
og kan forårsake elektriske farer.
o) Bruk ikke det elektriske håndverktøyet i nærheten av lettantennelige
materialer. Gnister kan antenne disse materialene.
p) Bruk ikke tilbehør som krever kjølevæsker. Bruken av vann eller andre
kjølevæsker kan resultere i elektrisk sjokk eller dødelig elektrisk støt.
Kast med tilhørende advarsler
Kast er en plutselig reaksjon på en klemt eller fastkjørt rondell, støtterondell, børste eller andre tilbehør. Klemming eller fastkjøring forårsaker en bråstopp av det
roterende tilbehøret som i sin tur tvinger det elektriske håndverktøyet i motsatt
retning av tilbehørets rotasjon ved fastkjøringspunktet.
NOR SK
For eksempel: Hvis en slipeskive setter seg fast i arbeidsstykket, kan kanten av
slipeskiven få tak i arbeidsstykket og forårsake at slipeskiven graver seg ned og
kastes opp. Slipeskiven kastes sannsynligvis mot eller bort fra brukeren, avhengig
av rotasjonsretningen på slipeskiven når det setter seg fast. Slipeskiver kan også
gå i stykker under disse omstendigheter.
Kast er resultatet av at det elektriske håndverktøyet brukes feil, til feil formål eller
under feil forhold. Dette kan unngås ved å ta visse forhåndsregler: Se nedenfor!
a) Hold godt fast i det elektriske håndverktøyet, og hold armene og kroppen slik
at du kan parere kast. Bruk alltid hjelpehåndtaket hvis det nnes, for maksimal
kontroll over kast eller reaksjonene på vrimomentet under oppstart. Kast eller
reaksjoner på vridmomentet kan kontrolleres av brukeren hvis nødvendige
forhåndsregler følges.
b) Plasser aldri hånden nær det roterende tilbehøret. Tilbehøret kan få et kast
over hånden.
33
Page 34

c) Still deg ikke i det området der det elektriske håndverktøyet kan tenkes å
havne hvis det inntreffer et kast. Kast driver verktøyet i motsatt retning av
tilbehørets rotasjon ved fastkjøringspunktet.
d) Vær ekstra forsiktig når du bearbeider hjørner, skarpe kanter etc. Unngå å
stusse med og sette fast tilbehøret. Hjørner, skarpe kanter og stussing har en
tendens til å sette fast det roterende tilbehøret, og å forårsake kast eller at du
mister kontrollen over verktøyet.
e) Monter aldri fast et sagblad med sagkjede for trebearbeiding eller et tannet
sagblad. Slike blad forårsaker frekvente kast, og gjør at du mister kontrollen.
Sikkerhetsadvarsler spesielt for sliping og kapping med kappeskive
a) Bruk kun skivetyper som er anbefalt for det elektriske håndverktøyet, og en
spesiell beskyttelseshette beregnet for den valgte kappeskiven. Skiver, som
ikke er beregnet for det elektriske håndverktøyet kan ikke beskyttes skikkelig,
og det kan være farlig.
NOR SK
b) Beskyttelseshetten skal monteres på det elektriske håndverktøyet på en sikker
måte og innstilt for maksimal sikkerhet, slik at brukeren blir utsatt for så liten
del av skiven som mulig.
c) Skivene må kun brukes til de anbefalte arbeidsmomentene. For eksempel: Slip
ikke med siden av en kappeskive. Kappeskiver er beregnet for sliping med
kanten. Utsettes de for krefter fra siden, kan de splittes.
d) Bruk alltid uskadde skiveenser i riktig størrelse og form, for den skiven du har
valgt. Riktige skiveenser støtter skiven og minsker risikoen for at den skal gå
i stykker. Flenser for kappeskiver, kan være forskjellige fra de som brukes for
slipeskiver.
e) Bruk aldri nedslitte skiver fra et større elektrisk håndverktøy. Skiver beregnet
for større elektriske håndverktøy, passer ikke for det turtall som mindre verktøy
har og det kan sprekke.
Ytterligere sikkerhetsadvarsler spesielt for kapping med kappeskive
a) Press ikke kappeskiven eller legg for mye trykk på den. Prøv ikke å kappe for
dypt. Overbelastning av skiven, øker trykket og sjansene for at skiven kan vris
eller sette seg fast i snittet, og risikoen for kast eller at skiven går i stykker.
b) Still deg aldri i linje med eller bak den roterende skiven. Når skiven ved bruk
beveger seg bort fra deg, kan et kast drive den roterende skiven og det
elektriske håndverktøyet direkte mot deg.
c) Når skiven setter seg fast eller hvis du av en eller annen grunn vil avbryte en
kapping, så skru av det elektriske håndverktøyet, og hold det stille, til skiven
har stoppet helt. Prøv aldri å fjerne kappeskiven fra sporet mens den er i
bevegelse fordi kast da kan inntreffe. Undersøk og gjennomfør nødvendige
tiltak for å minimere risikoen for at kappeskiven kan sette seg fast.
34
Page 35

d) Start ikke kappingen igjen med skiven i arbeidsstykket etter et stopp. La skiven
nå fullt turtall først og før den deretter forsiktig i kappesporet. Skiven kan sette
seg fast, vandre opp fra kappesporet eller forårsake kast hvis kappingen
startes opp igjen i arbeidsstykket.
e) Støtt store skiver eller andre store arbeidsstykker for å minimere risikoen for
fastkjøring eller kast. Store skiver har en tendens til å bue seg av sin egen
vekt. Støtte må plasseres under skiven av kappesporet og nær kanten på
arbeidsstykket på begge sider av kappeskiven.
f) Vær ekstra forsiktig ved innstikkskapping i vegger eller andre gjenstander, der
du ikke ser hvor du sager. Den utstikkende sageklingen kan sage i gass- eller
vannledninger, strømkabler eller andre gjenstander som kan forårsake kast.
Sikkerhetsadvarsler spesielt for pussing
a) Bruk ikke for store sliperondeller. Følg produsentens anbefalinger når
du velger sliperondeller. Større sliperondeller, som stikker ut utenfor
støtterondellen, innebærer risiko for at rondellen slites i stykker, og at det kan
inntreffe kast.
Sikkerhetsadvarsler spesielt for stålbørsting
a) Tenk på at bust løsner fra stålbørsterondellen selv ved normal bruk. Press ikke
børsterondellen ved å legge for mye trykk på. Løs bust kan enkelt gå igjennom
tynne klær eller hud.
b) Om beskyttelseshetten er anbefalt ved stålbørsting, påse at
børsterondellen ikke kommer bort i beskyttelseshetten. Vær oppmerksom
på at stålbørsterondellen kan ekspandere av arbeidsbelastningen eller
sentrifugalkraften.
NOR SK
Produktmerking med sikkerhetssymboler
Les hele bruksanvisningen før du bruker
produktet og spar den for framtidig bruk.
Bruk alltid hørselvern.
Bruk alltid vernebrille og støv-/vernemaske.
35
Page 36

3. Beskrivelse
A
I
G
B
H
NOR SK
C
D
E
F
A. Håndtak
B. Beskyttelsesdeksel
C. Indre ens
D. Slipeskive (følger ikke med)
E. Ytre ens
F. Nøkkel
G. Strømbryter
H. Maskinkropp
I. Sperreknapp for rotasjon av håndtak
36
Page 37

4. Montering
1. Monter håndtaket på den siden av maskinkroppen som er riktig for deg.
Plasser gummipluggen i det hullet som ikke brukes. Det er tre mulige
festepunkter for håndtaket.
2. Plasser den indre ensen (C) på spindelen og vri den slik at den sitter fast på
spindelen.
3. Plasser en slipe-/kappskive (D) på spindelen. Påse at den er sentrert.
4. Skru på den ytre ensen (E) slik at den konkave siden kommer mot skiven.
5. Trykk spindellåsen inn og dra til ensen medurs med nøkkelen (F).
6. Start vinkelslipemaskinen og la den gå en stund, så du får kontrollert at skiven
er balansert, før du begynner å slipe.
B
C
NOR SK
D
E
F
37
Page 38

5. Bruk
• La slipemaskinen komme opp i riktig turtall før du starter slipingen.
• Stå plassert slik at du har god oversikt over slipingen.
• Kappskivens sider tåler ikke trykk fra siden. Du må derfor ikke slipe med
skivens sider.
• Ved kapping av stein og lignende må det benyttes diamantskive.
• Kappskiven er kun beregnet for rette snitt.
• Hold ventilasjonsåpningene rene og åpne slik at motoren får kjøling. Hvis ikke
kan den bli overopphetet og motoren gå i stykker.
1. Hold kroppen i god balanse og hold maskinen med begge hendene, mens du
jobber med den.
2. Trykk først strømbryteren framover, deretter oppover.
NOR SK
3. Maskinen skrus av ved å slippe opp strømbryteren.
4. Best jobber vinkelsliperen når den holdes i en vinkel på ca 10 º til 15º.
38
Page 39

6. Bytte av slipeskive
Slipeskiven skal ha riktig indre diameter. Bruk aldri løse bussinger.
De må være godkjente for et omdreiningstall på 8500 omdreininger/minutt.
1. Dra ut strømledningens støpsel fra uttaket før bytte av slipeskive.
2. Aktiver spindellåsen og skru løs den ytre ensen fra spindelen.
3. Fjern den gamle slipeskiven og sett den nye på plass.
4. Monter i omvendt rekkefølge.
5. Start vinkelslipemaskinen og la den gå en stund for å kontrollere at slipeskiven
er balansert, før du begynner å slipe.
Spindellås
7. Dreie det bakerste håndtaket
1. Dra ut stikket før du dreier håndtaket.
2. Trykk i
3. Drei håndtaket til en av de 3 faste stillingene.
4. Slipp sperreknappen og påse at håndtaket fester seg i den ønskede stillingen.
nn sperreknappen før dreiing av håndtaket.
Du skal da høre et ”klikk”.
Sperreknapp
NOR SK
39
Page 40

8. Vedlikehold og reparasjon
- Hold alltid ventilasjonsåpningene frie for spon og støv.
- Rengjør maskinen regelmessig med en lett fuktet klut. Unngå sterke
rengjøringsmidler og løsemidler.
9. Feilsøkingsskjema
Problem Mulig årsak Tiltak
Maskinen går
ikke.
NOR SK
Maskinen går
sakte.
Maskinen har
ulyd.
Sterke
vibrasjoner.
Gnistdannelse
i motoren.
Ingen strøm. Kontroller at uttaket er strømfø-
rende.
Slitte kullbørster. Kontakt forhandler ved feil på
Kortslutning.
Feil på strømbryteren.
Sløvt eller skadet verktøy. Slip eller skift ut verktøy.
For lavt turtall. Ikke mat så hardt.
Motoren er overopphetet.
Mekanisk hindring. Kontakt forhandler ved feil på
Kabel er delvis kortsluttet.
Verktøyet er ikke skikkelig
festet.
Kullbørstene sitter fast. Kontakt forhandler ved feil på
Kabelen er kortsluttet.
Kollektoren er full av støv.
motor eller det elektriske.
motor eller det elektriske.
Dra til festemutter for verktøy og
påse at verktøy er riktig montert.
motor eller det elektriske.
10. Avfallshåndtering
Når du skal kaste dette produktet, skal det skje i henhold til gjeldende lokale
forskrifter. Dersom du er usikker på reglene, kontakt de lokale myndigheter for
mer informasjon.
11. Spesifikasjoner
Spenning: 230 V AC, 50 Hz
Effekt: 1800 W
Turtall (ubelastet): 8500 o/min
Slipeskive: Ø 180 mm, hull Ø 22 mm
Lyd: LPA 95 dB(A)
LWA 108 dB(A)
Vibrasjon: 4,7 m/s²
Vekt: 4,7 kg (uten slipeskive)
40
Page 41

Kulmahiomakone
tuotenumero 30-9316, malli CT3234
Lue käyttöohjeet ennen tuotteen käyttöönottoa. Säilytä käyttöohjeet tulevaa tarvetta varten. Pidätämme oikeuden teknisten tietojen muutoksiin. Emme vastaa
mahdollisista teksti- tai kuvavirheistä. Jos laitteeseen tulee teknisiä ongelmia, ota
yhteys myymälään tai asiakaspalveluun (yhteystiedot käyttöohjeen lopussa).
Sisällysluettelo
Turvallisuusohjeita 32
Tuotekuvaus 49
Asennus 50
Käyttö 51
Hiomalaikan vaihto 52
Taaemman kädensijan kääntö 52
Huolto ja ylläpito 53
Vianhakutaulukko 53
Kierrätys 53
Tekniset tiedot 53
41
SUOMI
Page 42

1. Yleisiä turvallisuusohjeita
Varoitus! Lue kaikki ohjeet. Seuraavien ohjeiden noudattamatta jättäminen
saattaa johtaa sähköiskuun, tulipaloon ja/tai vakavaan onnettomuuteen. Varoitustekstien termi ”sähkökäyttöinen käsityökalu” tarkoittaa sinun verkkovirralla tai
paristoilla/akulla toimivaa käsityökaluasi.
1) Työtila
a) Pidä työtilat puhtaina ja hyvin valaistuina. Täynnä tavaraa olevat ja pimeät tilat
ovat avoin kutsu onnettomuudelle.
b) Älä käytä sähkökäyttöisiä käsityökaluja räjähdysherkässä ympäristössä,
kuten helposti syttyvien nesteiden, kaasujen tai pölyn lähellä. Sähkökäyttöiset
käsityökalut muodostavat kipinöitä, jotka saattavat sytyttää pölyn tai höyryt.
c) Pidä lapset ja vierailijat loitolla, kun käytät sähkökäyttöisiä käsityökaluja.
Häiriötekijät saattavat johtaa laitteen hallinnan menettämiseen.
2) Sähköturvallisuus
a) Sähkökäyttöisen käsityökalun pistokkeen tulee sopia pistorasiaan. Älä muuta
pistoketta millään tavalla. Älä käytä adapteria maadoitettujen sähkökäyttöisten
sähkötyökalujen kanssa. Pistokkeet, joita ei ole muutettu sekä sopivat
pistorasiat pienentävät sähköiskun vaaraa.
SUOMI
b) Vältä koskettamasta maadoitettuja esineitä, kuten putkia, lämpöpattereita,
hellaa tai jääkaappia. Sähköiskun riski kasvaa, mikäli kehosi on maadoitettu.
c) Älä altista sähkökäyttöistä käsityökalua sateelle, äläkä käytä sitä kosteissa
olosuhteissa. Veden joutuminen sähkökäyttöiseen käsityökaluun lisää
sähköiskun vaaraa.
d) Käsittele sähköjohtoa varoen. Älä käytä sähköjohtoa laitteen kantamiseen,
äläkä irrota pistoketta pistorasiasta johdosta vetämällä. Älä altista virtajohtoa
kuumuudelle, öljyille, teräville reunoille tai liikkuville osille. Vioittuneet tai
sotkeutuneet virtajohdot lisäävät sähköiskun vaaraa.
e) Kun käytät sähkökäyttöistä käsityökalua ulkona, käytä ainoastaan ulkokäyttöön
sopivia jatkojohtoja. Ulkokäyttöön sopivan jatkojohdon käyttäminen pienentää
sähköiskun vaaraa.
3) Oma turvallisuutesi
a) Ole huolellinen ja käytä tervettä järkeä kun työskentelet sähkökäyttöisellä
käsityökalulla. Älä käytä sähkökäyttöistä käsityökalua, mikäli olet väsynyt
tai huumeiden, lääkkeiden tai alkoholin vaikutuksen alaisena. Lyhyenkin
hetken kestävä tarkkaavaisuuden herpaantuminen saattaa johtaa vakavaan
loukkaantumiseen.
42
Page 43

b) Käytä suojavarusteita. Käytä aina suojalaseja. Suojavarusteiden, kuten
hengityssuojaimen, liukuestekenkien, kypärän ja kuulosuojaimien käyttäminen
vähentää loukkaantumisvaaraa.
c) Vältä tahatonta käynnistystä. Varmista, että virtakytkin on asennossa
”OFF” ennen kuin liität pistokkeen seinäpistorasiaan. On äärimmäisen
vaarallista kantaa sähkökäyttöistä käsityökalua sormi liipaisimella tai liittää
sähkökäyttöinen käsityökalu pistorasiaan virtakytkimen ollessa ”ON”asennossa.
d) Poista kaikki huoltotyökalut/avaimet ennen kuin käynnistät sähkökäyttöisen
käsityökalun. Sähkökäyttöisen käsityökalun liikkuvan osan päälle unohdettu
työkalu saattaa johtaa onnettomuuteen.
e) Älä kurota liian kauas. Varmista, että työasentosi on tasapainoinen työn
jokaisessa vaiheessa. Näin olet paremmin varustautunut mahdollisen
onnettomuuden sattuessa.
f) Käytä sopivia vaatteita. Älä käytä löysiä vaatteita tai koruja. Pidä hiukset,
vaatteet ja käsineet loitolla liikkuvista osista. Löysät vaatteet, korut tai pitkät
hiukset saattavat juuttua liikkuviin osiin.
g) Jos käytössäsi on pölynpoistojärjestelmä, käytä sitä. Näiden apuvälineiden
käyttö saattaa vähentää pölyyn liittyviä vaaroja.
4) Sähkökäyttöisten käsityökalujen käyttäminen ja huoltaminen
a) Älä pakota sähkökäyttöistä käsityökalua. Käytä sähkökäyttöistä käsityökalua,
joka soveltuu suunnittelemaasi työtehtävään. Sopiva sähkökäyttöinen
käsityökalu tekee työn paremmin ja turvallisemmin oikealla syöttönopeudella.
b) Älä käytä sähkökäyttöistä käsityökalua, mikäli virtakytkin ei käynnistä ja
sammuta laitetta. Kaikki sähkökäyttöiset käsityökalut, joita ei voida hallita
virtakytkimellä, ovat vaarallisia ja ne tulee korjata.
c) Irrota pistoke pistorasiasta ennen kuin teet sähkökäyttöiseen käsityökaluun
säätöjä tai ennen kuin vaihdat sen varusteita tai ennen kuin asetat
sen säilytykseen. Nämä ennaltaehkäisevät toimenpiteet vähentävät
sähkökäyttöisen käsityökalun tahatonta käynnistymistä.
d) Säilytä sähkökäyttöisiä käsityökaluja lasten ulottumattomissa. Älä luovuta
sähkökäyttöistä käsityökalua henkilöille, jotka eivät tunne sitä tai sen
käyttöohjetta. Sähkökäyttöiset käsityökalut ovat vaarallisia tottumattomien
käyttäjien käsissä.
e) Huolla sähkökäyttöisiä käsityökaluja. Tarkasta, että säädöt ovat kunnossa, että
liikkuvat osat liikkuvat esteettä, että osat ovat ehjiä, ja että sähkökäyttöisessä
käsityökalussa ei ole muita seikkoja, jotka vaikuttavat laitteen toimintaan. Jos
jokin osa on vioittunut, se tulee korjata ennen käyttöä. Monet onnettomuudet
johtuvat väärin hoidetuista sähkökäyttöisistä käsityökaluista.
f) Pidä työkalut puhtaina ja terävinä. Terätyökalun hallinta on helpompaa, kun se
on oikein hoidettu ja sen terät ovat teräviä.
SUOMI
43
Page 44

g) Käytä sähkökäyttöistä käsityökalua, sen varusteita tms. ohjeiden mukaisesti
ja sellaisella tavalla, joka sopii kyseiselle sähkökäyttöiselle käsityökalulle ja
ota myös huomioon työskentelyolosuhteet ja suoritettava työ. Sähkökäyttöisen
käsityökalun käyttäminen muihin kuin sille tarkoitettuihin työtehtäviin saattaa
johtaa vaaratilanteeseen.
5) Huolto
a) Laitteen saa huoltaa ja korjata ainoastaan ammattihenkilö ja huollossa tulee
käyttää ainoastaan alkuperäisosia. Näin taataan sähkökäyttöisen käsityökalun
turvallisuus.
2. Hiontaa, puhdistusta, harjausta ja katkaisua
koskevia turvallisuusohjeita
a) Tämä sähkökäyttöinen käsityökalu on tarkoitettu hiontaan, puhdistukseen,
harjaukseen ja katkaisuun. Lue kaikki laitteen mukana tulevat varoitukset,
ohjeet, kuvitukset ja tekniset tiedot. Ohjeiden noudattamatta jättäminen saattaa
johtaa sähköiskuun, tulipaloon tai vakavaan loukkaantumiseen.
b) Kiillotusta ei suositella tehtäväksi tällä koneella. Työt, joita ei ole tarkoitettu
suoritettavaksi tällä laitteella, saattavat aiheuttaa vaaratilanteen tai käyttäjän
loukkaantumisen.
SUOMI
c) Käytä ainoastaan valmistajan hyväksymiä ja suosittelemia tarvikkeita.
Vaikka varuste voidaan asentaa laitteeseen, sen käyttö ei silti välttämättä ole
turvallista.
d) Varusteen ilmoitetun kierrosnopeuden tulee vastata vähintään sähkökäyttöisen
käsityökalun suurinta kierrosnopeutta. Varusteet, jotka pyörivät niiden suurinta
sallittua kierrosnopeutta nopeammin, saattavat vahingoittua ja hajota pieniin
osiin.
e) Varusteen ulkohalkaisija ja paksuus ei saa ylittää sähkökäyttöisen käsityökalun
ilmoitettu kapasiteettia. Liian ison varusteen käyttäminen tekee laitteen
käsittelystä vaikeaa ja heikentää turvallisuutta.
f) Laikkojen, laippojen, tukilaikkojen tms. akselin tulee sopia laitteen karaan,
jotta laitteen käsittely on turvallista. Varusteet, joiden kiinnitysreiät eivät sovi
asennettuun varusteeseen tärisevät voimakkaasti, käyvät epätasaisesti ja
saattavat johtaa laitteen hallinnan menettämiseen.
g) Älä käytä viallisia varusteita. Tarkasta varusteet: Hiomalaikoissa ei saa olla
irrallisia osasia tai halkeamia, tukilaikoissa ei saa olla halkeamia, koloja tai
kulumaa, teräslankaharjoissa ei saa olla irrallisia tai vioittuneita harjaksia.
Mikäli sähkökäyttöinen laite tai jokin varuste putoaa, varmista etteivät ne
ole vioittuneet. Tarkasta ja asenna varuste, sijoitu koneen vaara-alueen
ulkopuolelle (koskee myös sivullisia) ja käytä laitetta täysillä kierroksilla yhden
minuutin ajan. Vioittunut varuste hajoaa yleensä testin aikana.
44
Page 45

h) Käytä henkilökohtaisia suojavarusteita. Käytä kasvosuojusta tai suojalaseja
koneen käyttötavasta riippuen. Käytä tarvittaessa sellaisia suojavarusteita
(kasvo- ja kuulosuojain, käsineet ja työesiliina), jotka suojaavat työkappaleesta
irtoavilta pieniltä hiontakappaleilta ja paloilta. Silmäsuojuksen tulee suojata
lentäviltä osilta, joita syntyy eri työvaiheissa. Hengityssuojaimen tulee suodattaa työssä syntyvät hiukkaset. Pitkäaikainen oleilu meluisassa ympäristössä
saattaa aiheuttaa kuulovaurioita.
i) Pidä vierailijat riittävän kaukana työpisteestä. Kaikkien työpisteessä oleskele
vien tulee käyttää henkilökohtaisia suojavarusteita. Työkappaleesta tai viallisesta varusteesta lentävät lastut saattavat aiheuttaa vahinkoa myös työpisteen
ulkopuolella.
j) Pidä kiinni ainoastaan laitteen eristetyistä pinnoista, kun työskentelet alueilla,
jossa laikka voi joutua kosketuksiin piilossa olevien kaapeleiden tai laitteen
virtajohdon kanssa. Jos laikka joutuu kosketuksiin virtaa johtavan kaapelin
kanssa, laitteen metalliosat saattavat tulla jännitteisiksi, mikä aiheuttaa käyttäjälle sähköiskun vaaran.
k) Sijoita virtajohto siten, että se ei joudu pyörivän varusteen läheisyyteen. Mikäli
menetät laitteen hallinnan, johto saattaa katketa tai jumittua ja kätesi saattaa
joutua pyörivään varusteeseen.
l) Älä laske sähkökäyttöistä käsityökalua käsistäsi ennen kuin se on lakannut
kokonaan pyörimästä. Pyörivä varuste saattaa tarttua alustaan ja aiheuttaa
laitteen hallitsemattoman liikkumisen.
m) Älä käytä sähkökäyttöistä käsityökalua samanaikaisesti kun kannat sitä. Ta
haton kosketus pyörivään varusteeseen saattaa aiheuttaa laitteen juuttumisen
vaatteisiin ja käyttäjään.
n) Puhdista moottorin ilmastointiaukot säännöllisesti. Moottorin puhallin kerää
pölyä, joka kerääntyy kotelon alle. Laitteeseen kerääntyvä metallijäte saattaa
aiheuttaa turvallisuusriskin.
o) Älä käytä sähkökäyttöistä käsityökalua helposti syttyvien materiaalien läheisyy
dessä. Kipinöinti saattaa aiheuttaa näiden materiaalien syttymisen.
p) Älä käytä varusteita, jotka vaativat jäähdytysnesteitä. Veden tai muiden jääh
dytysnesteiden käyttö saattaa johtaa hengenvaaralliseen sähköiskuun.
-
-
-
SUOMI
-
Takapotku ja sitä koskevat varoitukset
Takapotku on äkillinen ilmiö, joka tapahtuu silloin, kun laikka, tukilaikka, harja tai
jokin muu varuste juuttuu äkillisesti. Puristuminen tai juuttuminen aiheuttaa pyörivän varusteen nopean pysähtymisen, mikä johtaa siihen, että sähkökäyttöinen käsityökalu muuttaa äkillisesti liikesuuntaa varusteen pyörimissuunnan vastaiseksi.
45
Page 46

Esimerkki: hiomalaikka jumittuu tai puristuu työkappaleeseen, mikä saattaa aiheuttaa sen, että hiomalaikan reuna osuu työkappaleeseen ja aiheuttaa sen, että
hiomalaikka kaivautuu työkappaleeseen tai lennähtää ylöspäin. Hiomalaikka lennähtää joko poispäin käyttäjästä tai kohti käyttäjää riippuen hiomalaikan pyörimissuunnasta sen juuttuessa. Hiomalaikka voi myös hajota tietyissä tapauksissa.
Takapotkun riski kasvaa, jos sähkökäyttöistä käsityökalua käytetään väärällä tavalla, väärään tarkoitukseen tai väärissä olosuhteissa, mutta se voidaan välttää
noudattamalla alla olevia turvallisuusohjeita.
a) Pidä tukevasti kiinni sähkökäyttöisestä käsityökalusta ja pidä käsiä ja vartaloa
siten, että pystyt reagoimaan mahdolliseen takapotkuun. Käytä aina laitteen
mahdollista apukahvaa, sillä sen käyttäminen lisää laitteen hallittavuutta
takapotkun tai käynnistyessä tapahtuvan nykäyksen aikana. Takapotku tai
käynnistyksessä tapahtuva vääntömomentin nykäisy voidaan hallita paremmin,
jos käyttäjä noudattaa turvallisuusohjeita.
b) Älä sijoita käsiäsi koskaan pyörivän varusteen läheisyyteen. Laite saattaa
lennähtää kädestäsi.
c) Älä asetu sille paikalle, jonne sähkökäyttöinen käsityökalu todennäköisesti
lentää takapotkun sattuessa. Työkalu lentää takapotkun vaikutuksesta
varusteen pyörimissuuntaan nähden vastakkaiseen suuntaan
juuttumispisteestä.
d) Noudata erityistä varovaisuutta kun työskentelet kulmien, terävien reunojen
SUOMI
tms. kanssa. Varo varusteen kimpoamista ja juuttumista. Kulmat, terävät
reunat ja kimpoaminen saattavat aiheuttaa pyörivän varusteen juuttumisen
sekä takapotkun tai työkalun hallinnan menettämisen.
e) Älä asenna puun työstöön sahanterää, jossa on teräketju tai sahanterää, jossa
on hampaat. Tällaiset terät aiheuttavat usein takapotkun ja laitteen hallinnan
menettämisen.
Katkaisulaikalla tapahtuvaa hiontaa ja katkaisua koskevia
turvallisuusohjeita
a) Käytä ainoastaan sähkökäyttöiseen käsityökaluun sopivia laikkatyyppejä ja
käyttämääsi laikkaan sopivaa laikansuojusta. Laikkoja, joita ei ole tarkoitettu
käsikäyttöisille sähkötyökaluille, ei voida suojata kunnolla, ja niiden käyttö voi
olla vaarallista.
b) Laikan suojus tulee asentaa sähkökäyttöiseen käsityökaluun turvallisella
tavalla ja siten, että suojus antaa parhaan mahdollisen suojan siten, että
käyttäjä altistuu mahdollisimman pienelle osalle laikkaa. Laikan suojus suojaa
käyttäjää viallisilta laikoilta ja tahattomalta kontaktilta laikan kanssa.
c) Laikkoja saa käyttää ainoastaan niille tarkoitettuihin työtehtäviin. Esimerkki:
Älä hio laikan sivulla. Hio katkaisulaikan kehällä. Laikka saattaa hajota, mikäli
siihen kohdistuu painetta sivulta.
46
Page 47

d) Käytä aina ehjiä sekä valitsemaasi laikkaan sopivia oikean kokoisia
ja muotoisia levylaippoja. Sopiva laippa tukee laikkaa ja vähentää se
hajoamisriskiä. Katkaisulaikkojen laipat saattavat erota hiomalaikkojen
laipoista.
e) Älä käytä suuremmassa sähkökäyttöisessä käsityökalussa käytettyjä kuluneita
laikkoja. Suurempiin sähkökäyttöisiin käsityökaluihin tarkoitetut laikat eivät
kierrosluvun takia sovellu pienempiin laitteisiin, vaan ne saattavat hajota.
Erityisesti katkaisulaikkaa koskevia turvallisuusohjeita
a) Älä pakota katkaisulaikkaa, älä kohdista siihen liikaa painetta. Älä yritä leikata
liian syvälle. Laikan ylikuormitus lisää painetta. Laikalla on myös suurempi riski
taittua tai juuttua leikkauskohtaan. Myös takapotkun ja laikan hajoamisen riski
kasvaa.
b) Älä seiso linjassa pyörivän laikan kanssa. Kun laikka käytön aikana
liikkuu poispäin käyttäjästä, takapotku saattaa heittää pyörivän laikan ja
sähkökäyttöisen käsityökalun suoraan käyttäjää kohti.
c) Jos laikka juuttuu tai jos jostain syytä haluat keskeyttää katkaisun, sammuta
sähkökäyttöinen käsityökalu ja pidä siitä kiinni kunnes se on täysin pysähtynyt.
Älä yritä irrottaa katkaisulaikkaa leikkausurasta laikan pyöriessä, sillä se
saattaa aiheuttaa takapotkun. Suunnittele työ huolella ja noudata riittäviä
tuvallisuusohjeita pienentääksesi laikan jumittumisen riskiä.
d) Älä käynnistä sähkökäyttöistä käsityökalua laikan ollessa kiinni
työkappaleessa. Anna laikan kiihtyä täysille kierroksille ja aloita
leikkaaminen varovasti leikkauskohdasta. Laikka saattaa juuttua, liikkua ylös
leikkauskohdassa tai aiheuttaa takapotkun, mikäli laite käynnistetään laikan
ollessa leikkauskohdassa.
e) Tue suuria levyjä ja työkappaleita, niin laikan juuttumisen ja takapotkun riski
pienenee. Suurilla levyillä on taipumus taipua omasta painostaan. Tuen
tulee olla levyn alla leikkauskohdan alla sekä työkappaleen reunojen lähellä
leikkauskohdan kummallakin puolella.
f) Ole erityisen tarkkana, kun työstät seiniä tai muita kohteita, joita et näe.
Ulostuleva terä saattaa leikata kaasu- tai vesiputkia, sähköjohtoja tai muita
esineitä, jotka saattavat aiheuttaa takapotkun.
SUOMI
47
Page 48

Erityisesti puhdistamista koskevia turvaohjeita
a) Älä käytä liian suuria hiomalaikkoja. Noudata valmistajan suosituksia
hiomalaikkaa valitessasi. Suuret hiontalaikat, jotka pistävät ulos tukilaikasta
lisäävät rikkikulumisen vaaraa ja saattavat aiheuttaa laikan juuttumisen,
hajoamisen tai takapotkun.
Erityisesti teräsharjausta koskevia turvaohjeita
a) Ota huomioon, että teräsharjasta irtoaa harjaksia myös normaalissa käytössä.
Älä pakota harjalaikkaa kohdistamalla siihen liikaa painetta. Irralliset harjat
saattavat helposti läpäistä ohuita vaatteita tai ihon.
b) Mikäli teräsharjauksessa suositellaan laikansuojusta, varmista, että teräsharja
ei kosketa laikan suojukseen. Teräsharjalaikka saattaa laajentua kuormituksen
tai keskipakoisvoiman vaikutuksesta.
Tuotteen merkinnät ja turvallisuussymbolit
Lue käyttöohje huolellisesti ennen käyttöä ja
SUOMI
säilytä se vastaisuuden varalle.
Käytä kuulosuojaimia hengityssuojainta.
Käytä visiiriä tai suojalaseja.
48
Page 49

3. Tuotekuvaus
A
B
C
D
E
I
G
H
F
A. Kahva
B. Laikan suojus
C. Sisempi laippa
D. Hiomalevy
E. Ulompi laippa
F. Avain
G. Virtakytkin
H. Kotelo
I. Kädensijan lukitus
SUOMI
49
Page 50

4. Asennus
1. Asenna sivukahva vaihteiston sille puolelle, mikä tuntuu paremmalta. Laita
kumitulppa siihen reikään, jota ei käytetä. Kolme eri asennusmahdollisuutta.
2. Aseta sisempi kierteetön laippa (C) karaan siten että se lukittuu.
3. Aseta hioma-/katkaisulaikka (D) karaan siten, että se pyörii.
4. Kierrä ulompi laippa (E) siten, että kovera puoli on laikkaa vasten.
5. Paina karalukko ja kiristä laippaa myötäpäivään mukana tulevalla avaimella.
6. Käynnistä kulmahiomakone ja anna sen käydä hetki ennen työn aloittamista.
Näin varmistetaan, että laikka on tasapainossa.
B
C
SUOMI
D
E
F
50
Page 51

5. Käyttö
• Anna laitteen saavuttaa täydet kierrosluvut ennen hionnan aloittamista.
• Seiso niin, että pystyt seuraamaan hiontaa ilman esteitä.
• Älä käytä katkaisulaikkoja hiontaan, ne eivät kestä painetta sivulta.
• Käytä kivien ja kiviainesten työstöön timanttilaikkoja.
• Älä kallista kulmahiomakonetta leikkauksen aikana, tee katkaisulaikalla
ainoastaan suoria leikkauksia.
• Pidä ilmastointiaukot puhtaina, jotta moottori ei ylikuumene.
1. Seiso tukevasti ja pidä kiinni laitteesta molemmin käsin.
2. Paina virtakytkintä eteenpäin ja sen jälkeen hiljaa ylöspäin.
SUOMI
3. Sammuta laite päästämällä virtakytkin.
4. Paras hiontakulma on noin 10 - 15º.
51
Page 52

6. Hiomalaikan vaihto
Hiomalaikassa tulee olla oikea sisähalkaisija, älä käytä irrallisia holkkeja. Laikan
hyväksytty kierrosluku tulee olla vähintään 8500 k/min.
1. Irrota virtajohdon pistoke pistorasiasta ennen laikan vaihtoa!
2. Aktivoi karalukko, irrota karan mutteri ja ulompi laippa karasta.
3. Poista vanha hiomalaikka ja aseta uusi tilalle.
4. Kokoa käänteisessä järjestyksessä purkamiseen nähden.
5. Seiso kulmahiomakoneen vieressä kun käynnistät koneen. Anna koneen
käydä hetken ajan ennen hionnan aloittamista varmistaaksesi, että laikka on
tasapainossa.
Karan lukko
SUOMI
7. Pyöritä takakahvaa
1. Irrota virtajohto ennen kahvan pyörittämistä.
2. Paina kahvan pyörimisen lukitsinta.
3. Pyöritä kahvaa johonkin kolmesta kiinteästä tilasta.
4. Päästä lukitsinpainike ja varmista, että kahva lukittuu.
Lukituspainike
52
Page 53

8. Huolto ja ylläpito
Pidä moottorin tuuletusaukot puhtaina, poista mahdolliset purut, roskat ym. Kuivaa
ulkopuolelta kevyesti kostutetulla liinalla. Älä käytä liuotinaineita tai hankaavia
puhdistusaineita.
9. Vianhakutaulukko
Ongelma Mahdollinen syy Toimenpiteet
Laite ei käy. Ei virtaa. Varmista, että pistorasiassa on virtaa.
Kuluneet hiiliharjat. Ota yhteys myymälään, jos laitteessa
Oikosulku.
Virtakytkimessä vikaa.
Laite käy hitaasti. Tylsä/viallinen työkalu. Hio tai vaihda terä.
Liian alhainen kierrosluku. Älä syötä liian kovaa.
Moottori on ylikuumentunut.
Epätavallisia
ääniä.
Laite tärisee
voimakkaasti.
Moottori kipinöi. Hiiliharjat juuttuneet. Ota yhteys myymälään, jos laitteessa
Mekaaninen este. Ota yhteys myymälään, jos laitteessa
Käämi osittain oikosulussa.
Työkalu on löysästi kiinni. Kiristä työkalu ja varmista, että se on
Käämi oikosulussa.
Kollektori on likainen.
on moottori- tai sähkövika.
on moottori- tai sähkövika.
asennettu oikein.
on moottori- tai sähkövika.
SUOMI
10. Kierrätys
Kierrätä tuote asianmukaisesti, kun poistat sen käytöstä. Ota yhteys kuntasi
jäteneuvontaan, mikäli olet epävarma.
11. Tekniset tiedot
Nimellisjännite: 230 VAC, 50 Hz
Teho: 1800 W
Kuormittamaton kierrosluku: 8500 kierrosta minuutissa
Hiomalaikka: Ø 180 mm, reikä Ø 22 mm
Melutaso: LPA 95 dB(A)
LWA 108 dB(A)
Tärinä: 4,7 m/s
Paino: 4,7 kg (ilman laikkaa)
2
53
Page 54

Declaration of Conformity
Hereby, Clas Ohlson AB, declares that the machinery:
Angle Grinder Cotech
30-9316 / CT3234
Complies with the provisions of the following Directives:
98/37/EC Machinery
2006/95/EC LOW VOLTAGE EQUIPMENT
89/336/EEC EMC
Insjön, Sweden, February 2008
Klas Balkow
President
Clas Ohlson, 793 85 Insjön, Sweden
54
Page 55

55
Page 56

SVERIGE
KUNDTJÄNST Tel: 0247/445 00
Fax: 0247/445 09
E-post: kundtjanst@clasohlson.se
INTERNET www.clasohlson.se
BREV Clas Ohlson AB, 793 85
INSJÖN
NORGE
KUNDESENTER Tlf.: 23 21 40 00
Faks: 23 21 40 80
E-post: kundesenter@clasohlson.no
INTERNETT www.clasohlson.no
POST Clas Ohlson AS, Postboks 485 Sentrum, 0105 OSLO
SUOMI
ASIAKASPALVELU Puh: 020 111 2222
Faksi: 020 111 2221
Sähköposti: info@clasohlson.fi
INTERNET www.clasohlson.fi
OSOITE Clas Ohlson Oy, Yrjönkatu
23 A, 00100 HELSINKI
UNITED KINGDOM
For consumer contact, please visit
www.clasohlson.co.uk and click on
customer service.
INTERNET www.clasohlson.co.uk
 Loading...