

Vacuum Sealer
Model No.: CP428-VS
COSORI SUPPORT:
Mon - Fri 9:00 AM - 5:00 PM PST
(888) 402-1684 | support@cosori.com


With Heartfelt Thanks
We thank you for purchasing a new Premium Vacuum Sealer, and we’re excited to see
what you’ll cook up very soon.
We’re looking forward with you to preparing many fresh meals in your kitchen with
minimal operation or eort. And when we say “with you,” we mean it—our helpful
customer support team is available by phone at 888-402-1684 or by email at
support@cosori.com. We’re here to lend an ear to your questions and concerns (or your
joy over a successful recipe). Happy cooking!
3
Table of Contents
Keeping Things Safe
Getting to Know Your Vacuum Sealer
How Does it Work?
Tips for Vacuum Packaging
Care & Maintenance
Troubleshooting
Warranty
Customer Support
Connect with Us
Package Contents
1 x Vacuum sealer
1 x AC power cord
1 x Roll (20cm width x 500cm length)
5 x Vacuum bags
1 x Hose Attachment
1 x User manual
Specifications
5
6
8
12
12
13
14
15
16
Voltage:
Rated Power: 120W
Sealing Bar Length: ≤11.8” (30 cm)
Sealing Time: 6~10 seconds
Vacuum & Sealing Time: 10~20 seconds
Vacuum Pressure: -9.4 PSI (-65 kPa)
Sealing Type: Heating lament sealing
Size: 16” x 7.9” x 3.4” (40.8 × 20.1 × 8.7 cm)
4
100V~240V/50-60Hz

Keeping Things Safe
IMPORTANT SAFEGUARDS
Please read, understand, and
comply with all the instructions
provided in this manual before
using the device. Failure to comply
with the instructions given in this
manual and/or using the device
in ways other than the ones
mentioned in this manual may
result in serious injury and/or
damage to the product.
General Safety
• DO NOT operate this appliance
on wet surfaces or in outdoor
settings; this appliance is for
indoor use only.
• DO NOT operate this appliance
if it has a damaged power cord
or plug.
• DO NOT operate this appliance
if it malfunctions or is damaged
in anyway. Contact customer
service immediately if any part of
this appliance is damaged.
• DO NOT place this appliance
on or near a hot gas or electric
burner, heated ovens, or any
other heat sources.
• DO NOT immerse any part of
the appliance, power cord, or
plug in water or other liquids.
• DO NOT use this vacuum sealer
as a toy. Close supervision is
required when being used near
or by children.
• When not in use, do not lock the
lid. Locking the lid for extended
periods of time will deform the
foam gaskets.
Safe Use & Care
• Only use this appliance for its
intended use as described in this
manual.
• Always make sure the lid is
unlocked before plugging in and
disconnecting the appliance.
• Always unplug the vacuum
sealer when it is not in use, is
unattended, or when being
cleaned.
• For best results, use Cosori
vacuum bags, bag rolls,
containers, and accessories.
• This vacuum sealer is also
compatible with most 8” and 11”
vacuum sealer bags and vacuum
sealer bag rolls.
• When sealing multiple bags,
allow the vacuum sealer to
rest for at least 40 seconds in
between each bag to prevent
the device from overheating.
• DO NOT reuse bags after
storing raw meats, raw sh,
or greasy foods to prevent
contamination.
• DO NOT reuse bags that have
been microwaved or simmered.
Bags used for cooking should
not be used more than once to
help prevent contamination.
• DO NOT vacuum package
carbonated or sparkling
beverages as gas removal will
cause such liquids to go at.
SAVE THESE
INSTRUCTIONS
5
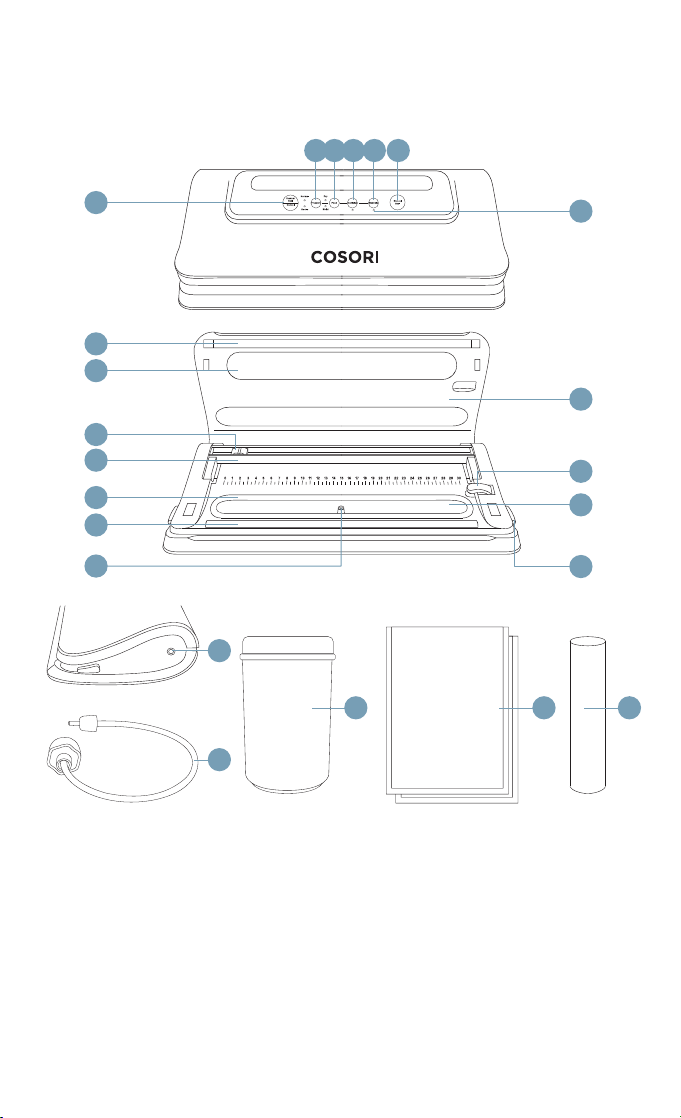
Geting to Know Your Vacuum Sealer
PRODUCT DIAGRAM
2 3 4 5 6
1
8
9
10
11
12
13
14
19
21 2322
20
7
15
16
17
18
1. Vacuum & Seal / Cancel Button
2. Pressure Button
3. Food Button
4. Canister Button
5. Marinate Button
6. Manual Seal Button
7. LED Indicators
8. Sealing Bar
9. Upper Foam Gasket
10. Bag Cutter
11. Bag Cutting Rack
12. Lower Foam Gasket
6
13. Rubber Sealing Lip
14. Air Intake
15. Lid
16. Bag Corner Cutter
17. Vacuum Chamber
18. Release Buttons
19. Exterior Hose Port
20. Hose Attachment
21. Canister
22. Vacuum Bags
23. Vacuum Roll

BUTTON CONTROLS
Button Function
• Press the ‘Vacuum & Seal / Cancel’ button while in standby mode to
automatically vacuum and seal a bag.
• To cancel any function, press ‘Vacuum & Seal / Cancel’ while the
vacuum sealer is operating.
Allows you to select a pressure level.
• Normal - for heartier foods and items that can be vacuum sealed
without any protection (i.e. rice, potatoes, frozen foods, seasonal
clothing).
• Gentle - for softer foods and items that need to be packaged with less
vacuum pressure (i.e. tomatoes, strawberries, dry pasta)
Adjusts the vacuum and sealing time for foods with dierent moisture
levels.
• Dry - for dry foods and items that have no moisture; this setting has a
shorter heat sealing time (i.e. uncooked rice & pasta, crackers, spices)
• Moist - for wet foods; this setting has a longer heat sealing time (i.e.
meats, poultry, sh, partially frozen soups & stews)
For vacuum sealing canisters, mason jar lids, wine stoppers or other
accessories.
• Make sure both ends of the hose are properly connected before
vacuum sealing.
For locking in avors when marinating various foods in the included
vacuum canister (See Marinating Foods).
• Press the ‘Manual Seal’ button to seal the end of a bag made using the
bag roll.
• After the vacuum & seal function has been completed, the ‘Manual
Seal’ button can be used to control the remaining vacuum pressure so
that delicate items are not crushed before sealing.
NOTE: The ‘Manual Seal’ button will not work for 15 seconds after sealing
has been completed. This is to prevent the sealing bar from overheating.
7

How Does it Work?
CREATING YOUR OWN
VACUUM BAGS
1. Connect the power cord to the
vacuum sealer, then connect
the plug to a powered electrical
outlet.
3. Lift up the cutter rack and pull
the end of the vacuum bag roll
through. Place the cutter rack
back over the roll.
2. Press the release buttons
on both sides of the vacuum
sealer to open the lid. Place the
vacuum bag roll toward the back
of vacuum sealer.
8
4. Pull out the desired length
of the bag roll, and use the
bag cutter to cut out the bag.
Remove the bag roll after your
bag has been cut.

5. Place an open end of your bag
onto the rubber sealing lip, then
close the lid. You will hear two
clicks, indicating that the lid has
been closed properly.
6. Press the ‘Manual Seal’ button
to seal the bag. The LED
indicator will come on while
the bag is being sealed, and will
turn o when the process is
complete.
VACUUM PACKAGING &
SEALING
1. Plug in the vacuum sealer. Open
the lid by pressing the release
buttons on both sides of the
device.
2 in.
2. Carefully place items into the
vacuum bag, ensuring there
is at least 2 inches of space
between the bag contents and
the opening.
7. Press the release buttons on both
sides of the vacuum sealer to unlock
the lid. Remove your sealed bag from
the rubber strip.
3. Insert the opening of the bag
into the vacuum chamber. Make
sure the opening is inside the
chamber or else all of the air
will not be vacuumed out of
the bag.
9

4. Close the lid; you will hear two clicks
to indicate that the lid is locked in
place.
5. Press the ‘Vacuum & Seal
/ Cancel’ button. The LED
indicator will come on while the
bag is being vacuum packaged,
and will turn o when the
vacuum process is complete.
USING THE HOSE
ATTACHMENT
1. Open the included canister
and place the desired items
inside until the canister is ¾ full.
Make sure to properly seal the
container.
NOTE:
You can customize your vacuum
settings using the ‘Pressure’ and
‘Food’ buttons.
6. Press the release buttons on
both sides of the vacuum sealer
to unlock the lid. Open the lid
and remove the sealed bag.
2. Plug the vacuum sealer into a
powered electrical outlet.
3. Connect the hose attachment
to the exterior hose port, then
connect the hose attachment
to the container.
10

4. Press the ‘Canister’ button to
start vacuuming the container.
The LED indicator will turn on
during the process and will
turn o when vacuuming is
complete.
NOTE:
• Make sure the canister is dry before
each use.
• For best results, only ll the canister
until it is ¾ full.
MARINATING FOODS
1. Place the desired food and
marinade in the canister. Make
sure to only ll the canister ¾
full.
2. Plug the vacuum sealer into a
powered electrical outlet.
3. Connect both ends of the hose
to the exterior hose port and to
the container for the marinated
food.
4. Press the ‘Marinate’ button to start
the marinating process. The vacuum
sealer will remove air for 60 seconds,
maintain negative pressure at 9.4 PSI
(65 kPa) for 40 seconds, then release
excess pressure for 20 seconds. This
process will repeat 5 times for a total
of 10 minutes.
5. The LED indicator will turn o when
the marinating process is complete.
11

Tips for Vacuum
Packaging
• DO NOT overll bags. Always ensure
there is at least 2 inches (5 cm) of
space left at the top of the bag.
• DO NOT reuse bags after storing raw
meats, raw sh, or greasy foods, doing
so may result in contamination and
could lead to possible illness.
• DO NOT reuse bags that have been
microwaved or simmered. Bags
used for cooking should not be used
more than once to help prevent
contamination.
• DO NOT vacuum package carbonated
or sparkling beverages as gas removal
will cause such liquids to go at.
• Ensure that the opening of the bag is
not wet. Wet bags may be dicult to
properly seal.
• Vacuum sealing foods can not
completely replace refrigeration or
freezing. Perishable foods need to be
refrigerated or frozen.
• Flatten the opening of the plastic bag
before sealing or vacuum packaging.
Ensure that no foreign objects or folds
are on the bag, otherwise it will cause
the bag to tear or leak during sealing.
• When vacuum sealing bulky items,
gently stretch the bag at while
inserting it into vacuum chamber and
hold the bag until the pump begins to
work.
• Pre-freeze fruits and blanch
vegetables before vacuum sealing for
best results.
• Bags used to store dried or fresh fruits,
nuts, grains, and vegetables can be
washed and reused.
• When vacuum sealing multiple bags,
allow the vacuum sealer to rest for 40
seconds between each bag.
• If you are unsure whether your bag was
sealed properly, reseal the bag about ¼
inch above the rst seal.
Care &
Maintenance
1. Unplug the vacuum sealer before
cleaning.
2. DO NOT immerse the appliance in
water or other liquids.
3. DO NOT use abrasive cleaners on
the vacuum sealer.
4. With the vacuum sealer unplugged,
wipe the outside of of the vacuum
sealer with a damp cloth; if
necessary, use a sponge with mild
soap. Dry the appliance with a clean
cloth immediately after.
5. Clean the vacuum chamber by wiping
away any food or liquid with a clean,
damp cloth.
6. Thoroughly dry all parts before using
again or storing.
12

Troubleshooting
Problem Solution
Nothing happens after
pressing the button.
The bag cannot be
inserted.
Air has re-entered the bag. Examine the seal for wrinkles. To prevent wrinkles in the
Bag melts when sealing. Sealing Strip may have overheated. Always wait at least
The appliance continues to
vacuum without sealing.
Make sure the vacuum sealer is plugged in.
Make sure wall outlet is functional.
Open the vacuum sealer and close the lid again,
making sure you hear two clicks to indicate that the lid
is properly closed.
Make sure there is enough bag material to reach the
center of the vacuum chamber. Always allow 2 inches
(50.8 mm) of extra space in the bag so that it can be
properly vacuumed.
Gently stretch the bag at while inserting. Make sure
the opening reaches the vacuum chamber.
seal, gently stretch the bag at while inserting the bag
into the vacuum chamber.
Sometimes moisture or food material (such as juices,
grease, crumbs, powders, etc.) along the seal prevents
the bag from sealing properly. Cut the bag open, wipe
the upper insides of the bag, then reseal.
Sharp food items may have punctured the bag. Use a
new bag if there is a hole. Cover sharp food items with
a soft cushioning material, such as a paper towel, and
reseal.
Food may have started to ferment and gases may have
been released inside the bag. Discard the food and bag
immediately.
15 seconds for appliance to cool down before you
vacuum package another item.
Make sure the sealing bag is not damaged.
Make sure the bag is placed correctly in the vacuum
chamber.
Remove upper and lower foam gaskets and reinstall
them.
NOTE: The vacuum chamber may leak if the foam
gaskets are damaged or deformed.
13

Warranty
Terms & Policy
Cosori warrants all products to be of the
highest quality in material, craftsmanship
and service for a minimum of 1 year,
eective from the date of purchase.
Warranty lengths may vary between
product categories. Cosori will replace
any product found to be defective due to
manufacturer aws based on eligibility;
refunds are available within the rst 30
days of purchase. This warranty extends
only to personal use and does not extend
to any product that has been used for
commercial, rental, or any other use in
which the product is not intended for.
There are no warranties other than the
warranties expressly set forth with each
product.
This warranty is non-transferrable.
Cosori is not responsible in any way for
any damages, losses or inconveniences
caused by equipment failure or by user
negligence, abuse, or use noncompliant
with the user manual or any additional
safety, use, or warnings included in the
product packaging and manual.
ALL EXPRESSED AND IMPLIED
WARRANTIES, INCLUDING THE
WARRANTY OF MERCHANTABILITY,
ARE LIMITED TO THE PERIOD OF THE
LIMITED WARRANTY.
Should your product prove defective
within the specied warranty period,
please return the defective unit in its
original packaging with (1) an original copy
of the invoice, (2) your order conrmation
number, (3) and your warranty ID number.
To nd out more about extending your
warranty, visit www.cosori.com/warranty
or contact customer support.
Date of Purchase:
____________________
Purchased From:
____________________
Order Number:
____________________
This warranty does not apply to the
following:
• Damage due to abuse, accident,
alteration, misuse, tampering or
vandalism.
• Improper or inadequate maintenance.
• Damage in return transit.
• Unsupervised use by children under 18
years of age.
Cosori and its subsidiaries assume
no liability for damage caused by the
use of the product other than for its
intended use or as instructed in the user
manual. Some states do not allow this
exclusion or limitation of incidental or
consequential losses so the foregoing
disclaimer may not apply to you. This
warranty gives you specic legal rights
and you may also have other rights which
may vary from state to state.
14

We’re One Call (or Email) Away!
Should you encounter any issues or
have any questions regarding your
new product, feel free to contact our
helpful Customer Support Team. Your
satisfaction is our goal!
CUSTOMER SUPPORT
Cosori Corporation
1202 N. Miller St. Suite A
Anaheim, CA 92806
Phone: (888) 402-1684
Email: support@cosori.com
SUPPORT HOURS
Monday - Friday: 9:00 am - 5:00 pm PST
*Please have your order conrmation
number ready before contacting
customer support.
15

Show Us What You’re Making
We hope this has been helpful to you. We can’t wait to see your beautiful results, and
we think you’ll want to share glam shots! Others already in the community await your
uploads—just pick your platform of choice below. Snap, hashtag, and tag away, Cosori
chef!
#iCookCosori
@cosoricooks
Cosori Appliances
Considering what to cook? Many recipe ideas are available, both from us and the Cosori
community.
More Cosori Products
Lastly, if you’re happy with this multi-cooker, the line doesn’t stop here. Check out www.
cosori.com for a line of all our beautiful and thoughtfully designed cookware. They might
be right at home in your kitchen, too!
16


COSORI SUPPORT:
Mon - Fri 9:00 AM - 5:00 PM PST
(888) 402-1684 | support@cosori.com
18
 Loading...