


Premium 8-Quart Pressure Cooker
Model No.: CP018-PC
Hot Pot
COSORI SUPPORT:
Mon - Fri 9:00 AM - 5:00 PM PST (888) 402-1684 | support@cosori.com

With Heartfelt Thanks
We thank you for purchasing a new Electric Pressure Cooker by Cosori, and we’re excited to see what you’ll cook up very soon.
We’re looking forward with you to preparing many fresh meals in your kitchen with minimaloperationoreffort.Andwhenwesay“withyou,”wemeanit—ourhelpful customer support team is available by phone at 888-402-1684 or by email at support@cosori.com. We’re here to lend an ear to your questions and concerns (or your joy over a successful recipe). Happy cooking!
3
Table of Contents
Keeping Things Safe |
5 |
Getting to Know Your Pressure Cooker |
8 |
Before Using Your Pressure Cooker |
13 |
How Does it Work? |
14 |
Safely Removing the Lid |
27 |
AdditionalTipsforPressureCooking |
29 |
Care & Maintenance |
30 |
Troubleshooting |
32 |
Warranty |
34 |
Customer Support |
35 |
Connect with Us |
37 |
Package Contents
1 x Electric Pressure Cooker
1 x Spoon
1 x Ladle
1 x Measuring Cup
1 x Glass Lid
1 x Sealing Ring
1 x User Manual
1 x Steamer Rack
1 x Recipe Book
Specifications
Power Supply: |
AC120V/60Hz |
|
|
Rated Power: |
1200W |
|
|
Capacity: |
8.4 Quarts (8 Liters) |
|
|
Working Pressure: |
5.8-10 PSI (40-70 kPa) |
|
|
PressurizedWorkingTemperature: |
235° - 239°F (113° - 115°C) |
|
|
4
Keeping Things Safe
IMPORTANT SAFEGUARDS
Please read, understand, and comply with all the instructions provided in this manual before using the device. Failure to comply with the instructions given in this manualand/orusingthedevice in ways other than the ones mentioned in this manual may resultinseriousinjuryand/or damage to the product.
General Safety
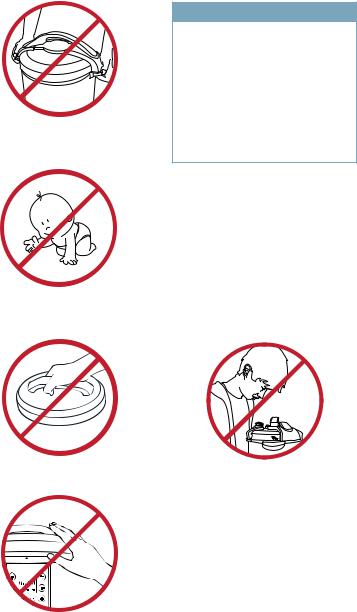
•DO NOT touch hot surfaces. Use handle and pot holders when necessary.
•Use extreme caution when moving the pressure cooker if it contains hot oil or other hot liquids.
•To protect against electrical shock, do not immerse cord, plugs, or the unit in water or other liquid.
•Close supervision is necessary when this appliance is used by or near children.
•DO NOT place on or near a hot gasorelectricburnerand/orina heated oven.
•DO NOT use the unit for anything other than its intended use.
•DO NOT alter the safety mechanisms or attempt to repair the pressure cooker as this will void the warranty. Please refer to the Care & Maintenance section on page 25 on how to properly maintain the pressure cooker.
•DO NOT place the unit close to
flammablematerials,heating units, or wet environments.
•In case of overheating, immediatelyturnoffandunplug the pressure cooker. DO NOT attempt to move the pressure cooker if it is overheating.
•DO NOT place any object above the pressure release valve while the steam is being released from the pressure cooker.
•DO NOT lean over the pressure cooker at any time while it is cooking.
•This pressure cooker should not be used for any medical purposes. It is not designed to reach the required temperature forsterilization.
Use & Care Guidlelines
•DO NOT operate the pressure cooker if the cord or plug is damaged, if the unit
malfunctions, or if the unit has been damaged in any manner. If the unit is malfunctioning, please contact customer support.
•Alwayscheckthepressure releasevalveandfloatvalvefor any clogging before use.
•Make sure all parts of the pressurereleasevalveandfloat valve are clean and properly assembled before each use.
•Using other accessories that are not compatible with the pressure cooker is not recommended.
Doing so may damage the unit or cause injury and will void your warranty.
5
•The pressure cooker is intended for indoor use only.
•To disconnect the unit from a power source, press ‘Stop/
Cancel’, then remove plug from the outlet.
•Itisextremelyimportanttofill the pressure cooker with liquid prior to operation. Never cook without liquid; doing so can cause the unit to overheat and damage the safety mechanisms.
•DO NOT placefrozenmeatsor fishintothepressurecooker; alwaysmakesuremeatandfish are thawed before cooking.
•If you cook meat with a casing, such as sausage, swelling can occur when cooked under pressure. Piercing the skin after cooking can lead to bursts of hot liquid.
•The silicone sealing ring creates a pressure seal between the lid and the pot. Keep the sealing ring completely clean and free from any cracks or deterioration.
•DO NOT break the silicone sealing ring. Do not replace it with other rubber sealing rings or use a tension belt to make the pressure cooker seal.
•Checkandwashanti-clogfilter and pressure release valve regularly to avoid any blockage.
•DO NOT attempt to open the lid whilethefloatvalveisstillup.
•DO NOT put anything on or use other objects to replace the pressure release valve.
•Never use a towel to clog the gap between the lid and edge of the housing.
•The bottom of the inner pot and heating plate should be kept
clean. Do not put the inner pot on other heat sources. Do not replace the inner pot with other containers.
•DO NOT attempt to move the pressure cooker while it is
cooking; wait until it cools down to move it. Move the unit using the built-in handle; do not try to hold the pressure cooker from the lid handles.
•DO NOT disassemble the unit on your own or use replacement partsfromdifferentbrands.
•Make sure pressure completely discharges after cooking has finishedandbeforeopeningthe lid.
•Clean and properly place the water collection cup before each use.
•You may experience some smoke coming out the unit duringthefirstfewusesdue to the initial heating of the materials; this is normal.
•Unplug from outlet when not in useandbeforecleaning.Allow it to cool before putting on or takingoffparts.
•DO NOT let power cord hang over the edges of tables or counters, or touch hot surfaces.
•Ashortpowersupplycordis provided to reduce injuries resulting from entanglement and tripping. If an extension cord is used, the electrical rating of the cord must be at least
120V/20A.Theextensioncord must be arranged so that it will not hang over the edge of a table or counter where it can be pulled or accidentally tripped over.
6
DO NOT move the pressure cooker while it is operating.
NOTE:
•This appliance has a threeprong grounding plug. To reduce the risk of electric shock,thisplugwillonlyfitone way into a grounded electrical outlet that is easily accessible. DO NOT attempt to modify the plug in anyway if it does notfitintotheoutlet.
SAVE THESE
INSTRUCTIONS
HOUSEHOLD USE ONLY
Keep out of reach of infants and young children.
DO NOT use any other lid. |
While the cooker is operating, or |
||
|
|
|
releasing pressure, DO NOT place |
|
|
|
unprotected skin over the steam |
|
|
|
release valve. |
|
|
|
|
DO NOT touch the lid or metal surface the pressure cooker is operating or immediately after it hasfinishedcooking.
7

Geting to Know Your Pressure Cooker
PRESSURE COOKER |
OUTSIDE OF LID |
2 |
4 |
1 |
|
|
5 |
3 |
|
6 |
|
15 |
INSIDE OF LID |
7
|
|
11 |
8 |
|
|
9 |
|
13 |
|
|
|
|
10 |
14 |
|
|
16 |
|
INSIDE OF COOKER |
|
|
|
17 |
18 |
19 |
|
||
|
|
1. |
Lid |
11. |
Sealing ring rack |
2. |
Lid handle |
12. |
Anti-clogfilter |
3. |
Latch |
13. |
Retainer nut |
4. |
Pressure release valve |
14. |
Float valve sealing ring |
5. |
Float valve |
15. |
Safety pin catch |
6. |
Inner pot |
16. |
Water collection cup |
7. |
Handles |
17. |
Power cord |
8. |
Housing |
18. |
Inner pot sensor |
9. |
Control panel |
19. |
Heating plate |
10. |
Sealing ring |
|
|
8
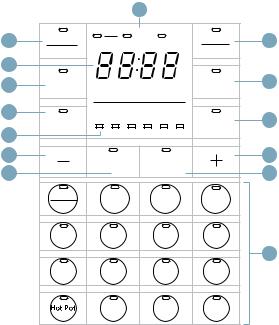
CONTROL PANEL |
|
|
|
|
|
|
|
|
|
1 |
|
|
|
2 |
Stop |
Less |
Normal |
More |
On |
7 |
Low |
Medium |
High |
||||
|
Cancel |
|
|
|
Start |
|
3 |
|
|
|
|
|
|
4 |
Delay |
|
|
|
Keep |
8 |
Start |
|
|
|
Warm |
|
|
|
|
|
|
|
||
5 |
Cook |
Pressure |
|
|
|
9 |
|
|
|
|
Manual |
||
6 |
Time |
|
|
|
|
|
|
|
|
|
|
||
|
|
|
|
|
|
|
10 |
|
Adjust |
Pressure |
|
12 |
|
|
|
|
|
|||
11 |
|
|
Temp |
|
13 |
|
|
|
|
|
|||
|
Meat |
Poultry |
|
Soup |
Beans |
|
|
Stew |
|
Chili |
|
||
|
|
|
|
|
||
|
White |
Brown |
Multigrain |
Steam |
|
|
|
Rice |
Rice |
Vegetables |
|
||
|
|
|
|
|||
|
|
|
|
|
|
14 |
|
Slow |
Yogurt |
|
Pasta |
Steam |
|
|
Cook |
|
Boil |
Potatoes |
|
|
|
|
|
|
|||
|
|
Sauté |
|
Bake |
Reheat |
|
|
|
Brown |
|
|
||
|
|
|
|
|
|
|
1. |
Adjustindicator |
8. |
Keep Warm button |
2. |
Stop/Cancelbutton |
9. |
Manual button |
3. |
Digital display |
10. |
Decrease value |
4. |
Delay Start button |
11. |
Adjustbutton |
5. |
Cook Time button |
12. |
Increase value |
6. |
Pressure indicator |
13. |
Pressure/Tempbutton |
7. |
On/Startbutton |
14. |
Cooking functions |
9
DISPLAY DESCRIPTIONS
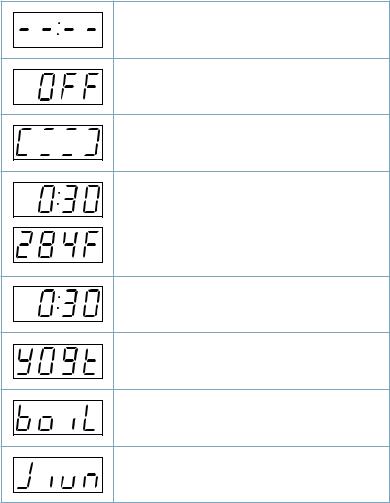
Unit is on standby
Function has been cancelled
Unitisheatingup/pressurizing
Displaytimefornon-pressurizedcookingsettings
NOTE: The display will switch between the cooking time and temperature every two seconds.
Displaytimeforpressurizedcookingsettings
Yogurt function
Pasteurizationfunction
Jiu niang function
10
CONTROLS
Button |
Function |
|||||
|
|
|
|
|
|
|
|
|
On |
|
Starts any selected cooking function. |
||
|
|
|
|
|||
|
|
Start |
|
|
||
|
|
|
|
|
|
|
|
|
Stop |
|
Cancels any cooking process; also cancels any selections that are |
||
|
|
made. |
||||
|
|
Cancel |
||||
|
|
NOTE: Thedisplaywillshow“OFF”afterpressing‘Stop/Cancel’, indicating |
||||
|
|
|
|
|
||
|
|
|
|
|
that the pressure cooker has stopped cooking. The pressure cooker will go into |
|
|
|
|
|
|
standbymode,showing“--:--”,after3minutes. |
|
|
|
|
|
|
|
|
|
|
|
|
|
Activatesthemanualpressurecookingmodeontheunit,whichallows |
|
|
|
Manual |
youtofullycustomizeyourcookingsettings.(seeManualCooking |
|||
|
|
|
|
|
Mode). |
|
|
|
|
|
|
|
|
|
|
Cook |
Press the ‘Cook Time’ button then use the ‘+’ or ‘-’ buttons to adjust |
|||
|
|
thetimeofanycookingfunction.Thedisplaywillflash5timesbefore |
||||
|
|
Time |
||||
|
|
your selected time is set. |
||||
|
|
|
|
|
||
|
|
|
|
|
|
|
|
|
Delay |
This function allows you to delay the start time of your cooking. |
|||
|
|
1. |
Select a cooking function, then press the ‘Delay Start’ button. |
|||
|
|
Start |
||||
|
|
2. |
Use the ‘+’ or ‘-’ buttons to change the delay start time; you can |
|||
|
|
|
|
|
||
|
|
|
|
|
|
delay the start time of the pressure cooker from 30 minutes to 12 |
|
|
|
|
|
|
hours. |
|
|
|
|
|
3. |
Press ‘On/Start’ when you are ready to start the delay process. |
|
|
|
|
|
4. |
The unit will beep when cooking has begun. |
|
|
|
|
|
NOTE: This delay function does not work with ‘Yogurt,’ ‘Pasta/Boil,’ ‘Hot Pot,’ |
|
|
|
|
|
|
‘Sauté/Brown,’ ‘Reheat,’ and ‘Manual’ modes. |
|
|
|
|
|
|
|
|
|
|
|
|
|
This function acts as a quickstart guide to help you better cook your |
|
|
|
Adjust |
food. The ‘Adjust’buttonservesthreedifferentpurposesonthe |
|||
|
|
|
|
|
pressure cooker: |
|
|
|
|
|
|
1. |
Changing the cooking time for all pressure cooking functions |
|
|
|
|
|
|
(except for ‘Manual’ and ‘Pasta/Boil’ mode) as well as ‘Slow |
|
|
|
|
|
|
Cook’ mode. |
|
|
|
|
|
2. |
Changing the temperature on the ‘Slow Cook,’ ‘Sauté/Brown,’ |
|
|
|
|
|
|
‘Hot Pot,’ and ‘Reheat’ functions. |
|
|
|
|
|
3. |
Selectingdifferentcookingprogramsonthe‘Yogurt’ function. |
|
|
|
|
|
NOTE: |
|
|
|
|
|
|
• Manually changing the cooking time for the pressure cooking functions will |
|
|
|
|
|
|
|
turnofftheAdjustfunction. |
|
|
|
|
|
|
|
|
Pressure |
Changing Pressure Level & Temperature |
||||
|
Use the ‘Pressure/Temp’ button to adjust the pressure or |
|||||
|
|
Temp |
temperatureofacookingfunction.Therearesixdifferentpressure |
|||
|
|
|
|
|
||
|
|
|
|
|
levels to help better cook your food. |
|
|
|
|
|
|
1. |
Select your desired cooking function. |
|
|
|
|
|
2. Press the ‘Pressure/Temp’ button, then use the ‘+’ or ‘-’ buttons |
|
|
|
|
|
|
|
to increase or decrease the temperature or pressure of the |
|
|
|
|
|
|
selectedcookingfunction.Thedisplaywillflash5timesbefore |
|
|
|
|
|
|
your selected temperature or pressure is set. |
|
|
|
|
|
NOTE: |
|
|
|
|
|
|
• The working pressure for level 1 is 5.8 PSI (40 kPa), while the pressure for level |
|
|
|
|
|
|
|
6 is 10 PSI (70 kPa). |
|
|
|
|
|
|
|
11

|
|
|
|
• |
It is recommended to cook tender foods such as vegetables on the lower |
|
|
|
|
|
pressure levels. |
|
|
|
|
• |
The actual working pressure may vary depending on the amount of food and |
|
|
|
|
|
liquid being cooked. |
|
|
|
|
|
|
Keep |
The warming function keeps food warm until you are ready to eat. |
||||
Follow the steps below to manually set up the warming function. |
|||||
Warm |
1. |
Press the ‘Keep Warm’ button. |
|||
|
|
|
|
||
|
|
|
|
2. Press ‘Pressure/Temp’ and use the ‘+’ or ‘-’ buttons to adjust the |
|
|
|
|
|
|
warming temperature from 140° to 210°F (60° to 99°C). |
|
|
|
|
3. |
Press the ‘Cook Time’ button and use the ‘+’ or ‘-’ buttons to |
|
|
|
|
|
adjust the warming time in 10 minute increments; you can adjust |
|
|
|
|
|
the time anywhere from 10 minutes to 99 hours and 30 minutes. |
|
|
|
|
4. |
Press the ‘On/Start’ button once you have set your time. |
|
|
|
|
NOTE: |
|
|
|
|
|
• |
DO NOT cook foods using the warming mode. |
|
|
|
|
• |
The pressure cooker will automatically switch to this mode when cooking has |
|
|
|
|
|
finished;thedefaulttimeis6hours. |
|
|
|
|
• |
The automatic warming function does not work with ‘Pasta/Boil,’ Yogurt,’ |
|
|
|
|
|
and ‘Hot Pot.’ |
|
|
|
|
|
|
|
|
|
|
The ‘+’ and ‘-’ buttons are used to increase or decrease the cooking |
|
|
|
|
|
||
|
|
|
|
time, pressure,andtemperatureonthedifferentcookingfunctionsof |
|
|
|
|
|
the pressure cooker. Press and hold either button to quickly adjust the |
|
|
|
|
|
||
|
|
|
|
numbers, and release when you have reached your desired number. |
|
Changing Temperature Units
The default temperature unit for the pressure cooker is in Fahrenheit
(“F”),butcanbeswitchedtoCelsius(“C”)tomeetyourpreferences.
•Press ‘+’ and ‘-’ simultaneously. The display will now show“C”toindicatethatthetemperatureunithasbeen switched to Celsius. The unit will show the previous display you were on after 3 seconds.
12
 Loading...