


User Manual
Premium 5.8-Quart Air Fryer
Model No.: CP258-AF
Questions or Concerns?
Mon–Fri, 9:00 am–5:00 pm PST/PDT
support@cosori.com | (888) 402-1684

Table of Contents
Package Contents
Specifications
Important Safeguards
Getting to Know Your Air Fryer
· Air Fryer Diagram
· Display
· Display Messages
Before First Use
· Basket Tips
Using Your Air Fryer
· Preheating
· Air Frying
· Preset Settings
· Shaking Food
· Cooking Guide
· More Functions
Care & Maintenance
Accessories
Troubleshooting
Warranty Information
Customer Support
Package Contents
2
2
4
6
6
7
7
8
8
9
9
10
11
12
13
14
15
15
16
17
18
1 x Premium 5.8-Quart Air Fryer CP258-AF
1 x Recipe Book
1 x Reference Guide
1 x User Manual
1 x Warranty Card
Specifications
Power Supply
Rated Power
Capacity
Temperature Range
Time Range
2
AC 120V, 60Hz
1700W
5.8 qt / 5.5 L
(serves 3–5 people)
170–400°F /
77–205°C
1–60 min

(We hope you love your new air fryer as much as we do.)
join
join
enjoy
enjoy
explore
explore
the Cosori Cooks Community on Facebook
facebook.com/groups/cosoricooks
weekly, featured recipes
Penny Plates | Quick Cuisines | Easy One-Pot
our recipe gallery
www.cosori.com/recipes
CONTACT OUR CHEFS
Our helpful, in-house chefs are ready to assist
you with any questions you might have!
Email: recipes@cosori.com
Toll-Free:
M-F:
(888) 402-1684
9:00 am–5:00 pm PST/PDT
On behalf of all of us at Cosori,
3
IMPORTANT SAFEGUARDS
Follow basic safety precautions when using your air fryer. Read all instructions.
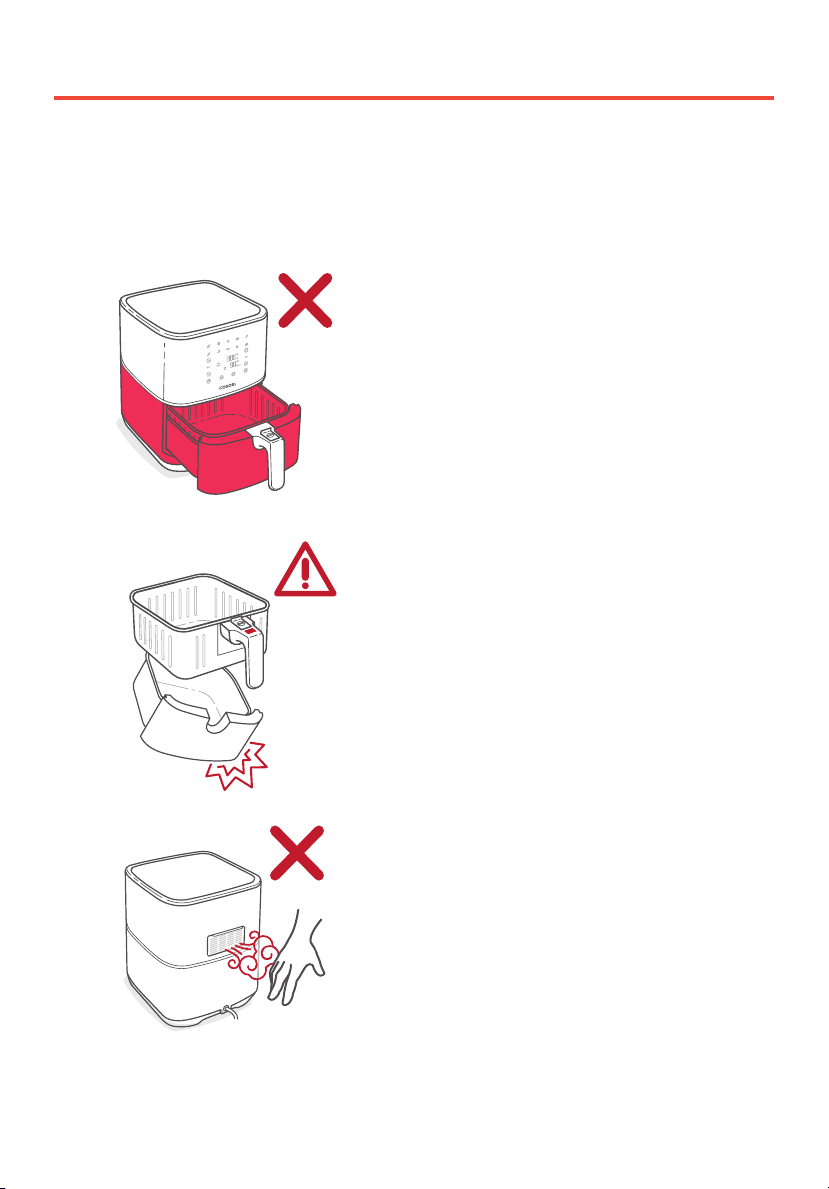
Key Safety Points
Do not touch hot surfaces. To open, use
handle and a heat-resistant glove or oven
mitt to avoid touching the front of the outer
basket. Do not use a potholder.
Only press the basket release button with
the baskets resting flat on a counter (or
any level, heat-resistant surface).
The handle is attached to the inner
basket, not the outer basket. When you
press the basket release button, the outer
basket will drop.
Do not block any ventilation openings. Hot
steam is released through air outlets. Keep
your hands and face clear of openings.
4

General Safety
• Do not immerse the air fryer housing or plug
in water or liquid.
• Closely supervise children near your air fryer.
• Unplug when not in use and before cleaning.
Allow to cool before putting on or taking o
parts.
• Do not use your air fryer if it is damaged, not
working, or if the cord or plug is damaged.
Contact Customer Support (see page 18).
• Do not use third-party replacement parts or
accessories, as this may cause injuries.
• Do not use outdoors.
• Do not place on a stove, near gas or electric
burners, or in a heated oven.
• Be extremely cautious when moving your air
fryer (or removing the baskets) if it contains
hot oil or other hot liquids.
• To disconnect the air fryer, turn o, then
remove plug from wall outlet.
• Do not clean with metal scouring pads. Metal
fragments can break o the pad and touch
electrical parts, creating a risk of electric shock.
• Do not place anything on top of your air fryer.
Do not store anything inside your air fryer.
• Only use your air fryer as directed in this
manual.
• Not for commercial use. Household use only.
• Never put baking or parchment paper into the air
fryer without food on top. Air circulation can cause
paper to lift and touch heating coils.
• Always use heat-safe containers. Be extremely
cautious if using containers that aren’t metal or
glass.
• Keep your air fryer away from flammable materials
(curtains, tablecloths, etc). Use on a flat, stable, heat-
resistant surface away from heat sources or liquids.
• Immediately turn o and unplug your air fryer if
you see dark smoke coming out. Food is burning.
Wait for smoke to clear before pulling the baskets
out.
• Do not leave your air fryer unattended while in use.
Plug and Cord
• Your fryer has a polarized plug (one prong is
wider than the other), which fits into a polarized
outlet only one way. If the plug does not fit,
reverse the plug. If it still does not fit, do not use
the plug in that outlet. Do not alter the plug in
any way.
• Do not let the power cord (or any extension cord)
hang over the edge of a table or counter, or touch
hot surfaces.
NOTE: This fryer uses a short power-supply
cord to reduce the risk of entangling or tripping.
Use extension cords with care. The marked
electrical rating of the extension cord must be as
great as the rating of the fryer (see page 2).
While Air Frying
• An air fryer works with hot air only. Never fill
the baskets with oil or fat.
• Never use your air fryer without the baskets in
place.
• Do not place oversized foods or metal utensils
into your air fryer.
• Do not place paper, cardboard, non-heat-
resistant plastic, or similar materials, into your air
fryer. You may use parchment paper or foil.
Electromagnetic Fields (EMF)
The Cosori Air Fryer complies with all standards
regarding electromagnetic fields (EMF). If handled
properly and according to the instructions in this
user manual, the appliance is safe to use based on
scientific evidence currently available.
SAVE THESE
INSTRUCTIONS
5
GETTING TO KNOW YOUR AIR FRYER
Your Cosori Air Fryer uses rapid 360° air circulation technology to cook with little to no oil, for
quick, crispy, delicious food with 75% fewer calories than deep fryers.
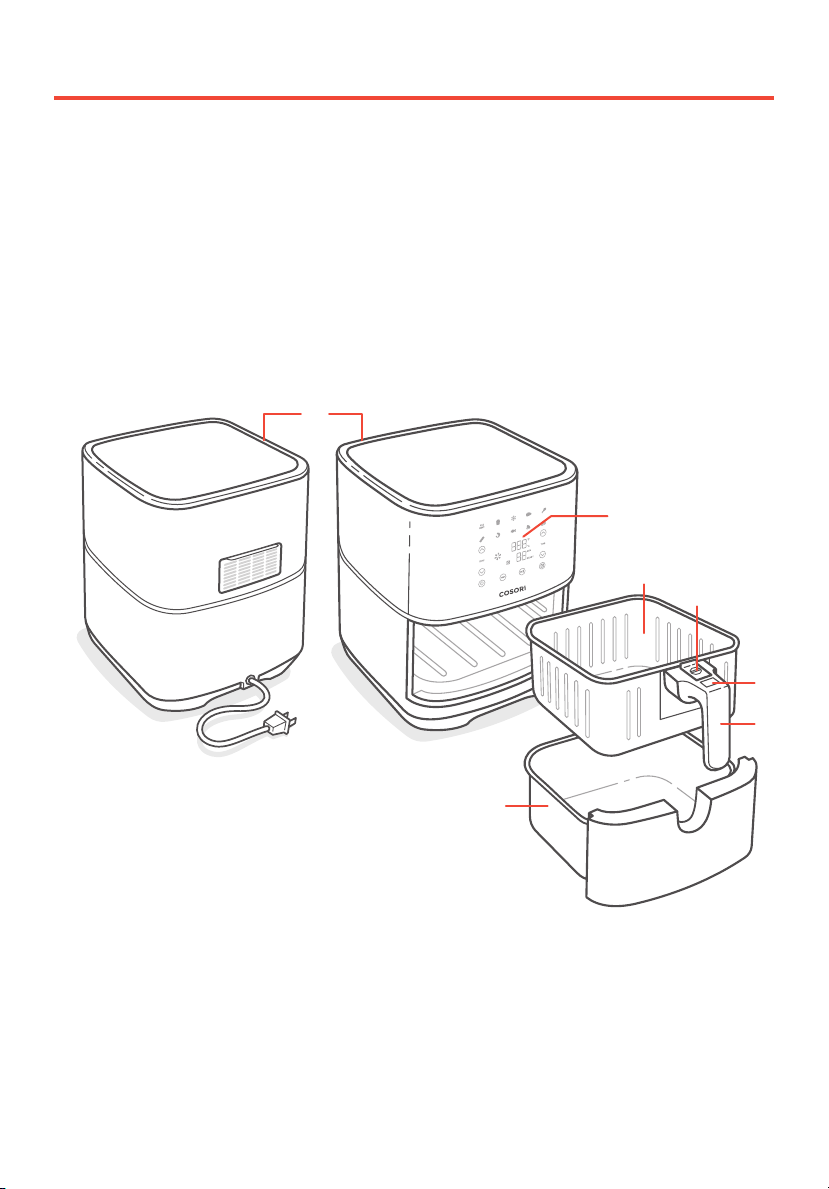
Air Fryer Diagram
FRONTBACK
A
B
I
A. Air Inlet
B. Air Outlet
C. Control Screen
D. Inner Basket
E. Sliding Button-Guard
C
D
E
F
G
H
F. Basket Release Button
G. Basket Handle
H. Outer Basket
I. Power Cord
6

Display
Frozen Foods
French Fries
Preheat
Shrimp
Bacon
Seafood
Increase or
decrease
temperature
Air frying
indicator
Cycles through
air fryer presets
indicator
Start/Pause Set alarm
Alarm
Power
NOTE: To quickly increase or decrease time or temperature, press and hold the
Steak
Chicken
Vegetables
Desserts
Temperature
display
Increase or
decrease time
Time display
reminder
or buttons.
Display Messages
Cooking program
has ended
: Alarm
Solid
has been set.
Blinking
Alarm has gone o.
:
Air fryer is
preheated and
ready to start
cooking
7

BEFORE FIRST USE
1. Remove all packaging from the air
fryer, including any temporary stickers.
2. Place the air fryer on a stable, level,
heat-resistant surface, away from areas
that can be damaged by steam (such as
walls or cupboards).
NOTE:
Leave 5 inches (13 cm) of space behind
and above the air fryer. [Figure 1.1] Leave
enough room to remove the baskets.
3. Pull the handle to remove the baskets.
Remove all plastic from baskets.
4. Press the basket release button to
separate the inner basket from the
outer basket.
5. Wash both baskets, using either a
dishwasher or a non-abrasive sponge.
6. Wipe the inside and outside of the air
fryer with a slightly moist cloth. Dry
with a towel.
7. Put the baskets back inside the air fryer.
Basket Tips
• Separate baskets only to clean or after
cooking.
• The button guard protects the basket
release button from being pressed
accidentally. Slide the button guard
forward to press the basket release
button.
• Never press the basket release button
while carrying the baskets.
• Only press the basket release button
with the baskets resting flat on a counter
(or any level, heat-resistant surface).
• The handle is attached to the inner
basket, not the outer basket. When you
press the basket release button, the outer
basket will drop.
NOTE:
To order replacement parts, please
contact Customer Support (see page 18).
5 in
(13 cm)
5 in
(13 cm)
Figure 1.1
8

USING YOUR AIR FRYER
Preheating
We recommend preheating before placing food into the air fryer, unless your air fryer is already
hot. Food will not cook thoroughly without preheating.
1. Plug in. Press to turn on the air fryer display.
2. Press Menu once to select Preheat. The display will show “400°F” and “5 MIN”.
3. Optionally, press “TEMP” or to change the temperature. The time will adjust
automatically.
Temperature Time
400F° / 205°C 5 minutes
390°F / 199°C 5 minutes
380°F / 193°C 5 minutes
370°F / 188°C 4 minutes
360°F / 182°C 4 minutes
350°F / 177°C 4 minutes
340°F / 171°C 4 minutes
330°F / 166°C
and below
3 minutes
4.
Press to begin preheating.
5. When preheating is done, the air fryer will beep 5 times. The display will show:
NOTE:
If no buttons are pressed for 3 minutes, the air fryer will clear all settings and turn o.
9

Air Frying
NOTE:
•
Do not place anything on top of your air
fryer. This disrupts airflow and causes
poor air frying results. [Figure 2.1]
•
An air fryer is not a deep fryer. Do not fill
the pan with oil, frying fat, or any liquid.
•
When taking the baskets out of the air
fryer, use a heat-resistant glove or oven
mitt to avoid touching the front of the
basket. Be careful of hot steam, and do
not press the basket release button.
1. Preheat your air fryer (see page 9).
2. When your air fryer displays “READY”,
add food to the baskets.
3. Press Menu repeatedly to select a
preset cooking program (see page 11).
The selected preset will light up blue.
NOTE:
Presets are programmed with an ideal
time and temperature for cooking certain foods.
You can also set a custom time and temperature
without choosing a preset.
4. Optionally, customize the temperature
and time. You can do this anytime
during cooking.
a. Press “TEMP” or to
change the temperature (between
170°–400°F / 77°–205°C).
b. Press “TIME” or to change
the time (between 1–60 minutes).
5. Optionally, set an alarm to go o
during cooking time.
a. Press on the control panel.
b. Press “TIME” or to change
the alarm time.
c. Press to confirm the alarm, or
wait 5 seconds without touching
the control panel. The
will appear on the display.
icon
Figure 2.1
Alarm:
•
This alarm is intended as a reminder to
shake or flip your food, or to check on
your food during cooking. See Shaking
Food (page 12).
•
While the alarm is active, you can view
it by pressing
Press
alarm.
•
To cancel an alarm, press and hold on
the control panel (not on the display) for 2
seconds. The
disappear.
•
The alarm can be set for 1–30 minutes.
•
The alarm will only count down while
cooking. Pausing the air fryer will also
pause the alarm.
•
Set the alarm for a time shorter than the
cooking time. The alarm is cleared once
air frying is finished. If an alarm is set for
longer than the cooking time, it will not
go o.
6. Press to begin. The display will
show
7. If the alarm was set, then the air fryer
while air frying.
on the control panel.
a second time to change the
icon on the display will
will beep 5 times when the alarm goes
o, and
will flash on the display.
If you set the alarm as a reminder to
shake your food, follow the instructions
in Shaking Food (see page 12).
10

Air Frying (cont.)
The air fryer will beep 5 times when
8.
finished. The display will show:
9. Remove inner basket from outer basket
to serve food. When separating baskets:
a. Make sure the baskets are resting
on a flat surface.
b. Watch for hot oil or fat collected
in the outer basket. To avoid
splashing, drain oil before
Take the baskets out of the air fryer,
using a heat-resistant glove or oven mitt
10. Allow to cool before cleaning.
replacing inner basket.
to avoid touching the front of the outer
basket. Be careful of hot steam, and do
not press the basket release button.
Preset Settings
• You can customize time (1–60 minutes) and temperature (170°–400°F / 77°–205°C), unless
noted.
• Results may vary. Check out our Reference Guide and Recipe Book for a guide to
customizing presets for perfect results.
Preset Symbol Default Temperature Default Time (Minutes)
Steak
Chicken
Seafood
Shrimp
Bacon
Frozen Foods
French Fries*
Vegetables
Desserts
Preheat
*
See Cooking Guide (page 13) for tips on air frying French fries.
PRE
HEAT
400F° / 205°C 6 minutes
380°F / 193°C 25 minutes
350°F / 177°C 8 minutes
370°F / 188°C 6 minutes
320°F / 160°C 8 minutes
350°F / 177°C 10 minutes
380°F / 193°C 25 minutes
300°F / 149°C 10 minutes
300°F / 149°C 30 minutes
400F° / 205°C 5 minutes
11

Shaking Food
How to Shake
• During cooking, take the baskets out of the
air fryer and shake, mix, or flip the food.
a. To shake food:
1. For safety purposes, hold the
baskets just above a heat-resistant
surface. Do not press the basket
release button. [
2. Shake the baskets.
b. If the baskets are too heavy to shake:
1. Place the baskets on a heat-
resistant holder or surface
2. Separate the baskets. Make sure
no liquids are dripping from the
inner basket.
3. Carefully shake the inner basket.
NOTE:
Do not use this method if there is a risk
of hot liquids splashing.
c. If the baskets are too heavy to
shake and there are hot liquids
present:
1. Place the baskets on a heat-
resistant holder or surface.
2. Use tongs to mix or flip the
food.
• When you take the baskets out, the air
fryer will pause cooking automatically.
As a safety feature, the display will turn
o until baskets are replaced.
Figure 3.1
]
What to Shake
• Small foods that are stacked will usually
need shaking, such as fries or nuggets.
• Without shaking, foods may not be
crispy or evenly cooked.
• You can flip other foods, such as steak,
to ensure even browning.
When to Shake
• Shake or flip food once halfway through
cooking, or more if desired.
• Use the alarm function to remind
yourself to shake or flip the food.
• The alarm will alert you with 5 beeps,
and will blink on the display.
• If you do not remove the baskets, the
alarm will beep again after 1 minute and
will continually blink.
• will stop blinking and go away once
you take out the baskets.
• When you replace the baskets, cooking
will automatically resume.
• Avoid shaking longer than 30 seconds,
as the air fryer may start to cool down.
12
Figure 3.1

Cooking Guide
Over-Filling
• If the basket is overfilled, food will cook
unevenly. [
• Food should not be filled over the “MAX”
line of the inner basket. [
not pack in food.
Figure 3.2
Do not overfill
Figure 3.2
]
Figure 3.3
] Do
French Fries
• Add ½ to 1 tablespoon oil for crispiness.
• When making fries from raw potatoes,
soak uncooked fries in water for 15
minutes to remove starch prior to
air frying. Pat dry with a towel before
adding oil.
• Cut uncooked fries smaller for crispier
results.
• Try cutting fries into ¼-inch by 3-inch
(0.6 cm by 7.6 cm) strips.
Food Tips
• You can air fry any frozen foods or
goods that can be baked in an oven.
• To make cakes, hand pies, or any food
with filling or batter, place food in a
heat-safe container before placing in the
baskets.
• Air frying high-fat foods will cause fat
to drip to the bottom of the baskets. To
avoid excess smoke while cooking, pour
out fat drippings after cooking.
Figure 3.3
Using Oil
• Adding a small amount of oil to your
food will make it crispier. Use no more
than 2 tablespoons of oil.
• Oil sprays are excellent for applying
small amounts of oil evenly to all food
items.
• Liquid-marinated foods create splatter
and excess smoke. Pat these foods dry
before air frying.
NOTE:
For more from the Cosori Kitchen, check
out our Recipe Book and Reference Guide.
13

More Functions
Pausing
• Press to pause cooking. The air fryer
will stop heating, will disappear from
the display, and will blink until you
press to resume cooking.
• The alarm will also pause while the
cooking program is paused.
• After 30 minutes of inactivity, the air
fryer will turn o.
• This function allows you to pause the
cooking program without taking the
baskets from the air fryer.
Switching Temperature Units
1. Press and hold “TEMP” and at
the same time for 2 seconds.
2. The air fryer will beep once, and the
temperature units will change from
Fahrenheit to Celsius.
3. Repeat to switch back to Fahrenheit.
Automatic Shutoff
• If the air fryer has no active cooking
programs, the air fryer will turn o, after
3 minutes of inactivity.
Overheat Protection
• If the air fryer overheats, it will
automatically shut down as a safety
feature.
• Allow the air fryer to cool down before
using it again.
Automatically Resume Cooking
• If you pull out the baskets, the air fryer
will pause cooking automatically. The
display will turn o temporarily as a
safety feature.
• When you return the baskets, the air
fryer will automatically resume cooking
based on your previous settings.
14

CARE & MAINTENANCE
NOTE:
Always clean the air fryer after every use.
•
•
Lining the outer basket with foil may make
cleanup easier.
1. Turn o and unplug the air fryer. Allow
it to cool completely before cleaning.
Pull out the baskets for faster cooling.
2. Wipe the outside of the air fryer with a
moist cloth.
3. The baskets are dishwasher safe.
You can also wash the baskets with
hot, soapy water and a non-abrasive
sponge. Soak if necessary.
NOTE: Baskets have a non-stick coating. Avoid
metal utensils and abrasive cleaning materials.
4. For stubborn grease:
a. In a small bowl, mix 2 tablespoons
(30 mL) of baking soda and 1
tablespoon of water (15 mL) to form
a spreadable paste.
Wash baskets with soap and water
c.
before using.
5. Clean the inside of the air fryer with a
slightly moist, non-abrasive sponge or
cloth. Do not immerse in water.
[
Figure 4.1
6. Clean the heating coil, if needed, to
remove food debris.
7. Dry before using.
NOTE: Make sure that the heating coil is dry
before turning on the air fryer.
]
b. Use a sponge to spread the paste
on the baskets and scrub. Let the
baskets sit for 15 minutes before
rinsing.
ACCESSORIES
You can purchase accessories for your air fryer from Amazon.com
by searching for “C158-6AC” or by scanning the QR code.
If you have any questions, please contact Customer Support
(see page 18).
Figure 4.1
15

TROUBLESHOOTING
Problem Possible Solution
The air fryer will not turn on.
Foods are not completely
cooked.
Foods are cooked unevenly.
Foods are not crispy after air
frying.
French fries are not fried
correctly.
Baskets will not slide into the
air fryer securely.
White smoke is coming out of
the air fryer.
Make sure the air fryer is plugged in.
Push the baskets securely into the air fryer.
Place smaller batches of ingredients into the inner
basket. If the basket is overstued, then ingredients will
be undercooked.
Increase cooking temperature or time.
Ingredients that are stacked on top of each other or close
to each other need to be shaken during cooking (see
Shaking Food, page 12).
Spraying or brushing a small amount of oil on foods can
increase crispiness (see Cooking Guide, page 13).
See French Fries, page 13.
Make sure the basket is not overfilled with food.
Make sure the inner basket is securely inside the outer
basket.
The air fryer may produce some white smoke when you
use it for the first time. This is normal.
Make sure the pan is properly cleaned and not greasy.
Cooking greasy foods will cause oil to leak into the
outer basket. This oil will produce white smoke, and the
baskets may be hotter than usual. This is normal, and
should not aect cooking. Handle baskets with care.
Dark smoke is coming out of
the air fryer.
Display shows Error Code “E1”.
Display shows Error Code “E2”.
16
Immediately unplug your air fryer. Food is burning. Wait
for smoke to clear before pulling the baskets out.
There is an open circuit in the temperature monitor.
Contact Customer Support (see page 18).
There is a short circuit in the temperature monitor.
Contact Customer Support (see page 18).

WARRANTY INFORMATION
Product Name Premium 5.8-Quart
Model Number CP258-AF
Default Warranty
Period
For your own reference, we strongly recommend
that you record your order number and date of
Date of Purchase
Order Number
TERMS & POLICY
Cosori warrants all products to be of the highest
quality in material, craftsmanship, and service,
eective from the date of purchase to the end of
the warranty period.
Cosori will replace any product found to be
defective due to manufacturer flaws based on
eligibility. Refunds are available within the first 30
days of purchase. Refunds are only available to the
original purchaser of the product. This warranty
extends only to personal use and does not extend
to any product that has been used for commercial,
rental, or any other use in which the product is
not intended for. There are no warranties other
than the warranties expressly set forth with each
product.
This warranty is non-transferrable. Cosori is not
responsible in any way for any damages, losses, or
inconveniences caused by equipment failure by
user negligence, abuse, or use noncompliant with
the user manual or any additional safety, use, or
warnings included in the product packaging and
manual.
Air Fryer
1 year
purchase.
This warranty does not apply to the following:
• Damage due to abuse, accident, alteration,
misuse, tampering, or vandalism.
• Improper or inadequate maintenance.
• Damage in return transit.
• Unsupervised use by children under 18
years of age.
Cosori and its subsidiaries assume no liability
for damage caused by the use of the product
other than for its intended use or as instructed
in the user manual. Some states do not allow
this exclusion or limitation of incidental or
consequential losses so the foregoing disclaimer
may not apply to you. This warranty gives you
specific legal rights and you may also have other
rights which may vary from state to state.
ALL EXPRESSED AND IMPLIED WARRANTIES,
INCLUDING THE WARRANTY OF MERCHANTABILITY,
ARE LIMITED TO THE PERIOD OF THE LIMITED
WARRANTY.
Additional 1-Year Warranty
You can extend your 1-year warranty by an
additional year. Log onto
www.cosori.com/warranty and enter your order
number (e.g., from Amazon or Houzz) within the
first 14 days of your purchase to register your new
product for the extended warranty.
If you are unable to provide the order number for
your product, please type a short note in the order
number field along with the date you received
your product.
17

WARRANTY INFORMATION (CONT.)
Defective Products & Returns
Should your product prove defective within
the specified warranty period, please contact
Customer Support via support@cosori.com with
your order number. DO NOT dispose of your
product before contacting us. Once our Customer
Support Team has approved your request, please
return the unit with a copy of the invoice and your
order number.
CUSTOMER SUPPORT
We’re Here to Help!
If you encounter any issues or have any questions regarding your
new product, please contact our helpful Customer Support Team.
Your satisfaction is our goal!
Customer Support
Arovast Corporation
1202 N. Miller St., Suite A
Anaheim, CA 92806
Email: support@cosori.com
Toll-Free: (888) 402-1684
* Please have your order confirmation number ready
before contacting Customer Support.
18
Support Hours
Monday–Friday
9:00 am–5:00 pm PST/PDT

SHOW US WHAT YOU’RE MAKING
We hope this manual has been helpful. We can’t wait to see your
beautiful results, and we think you’ll want to share glam shots! Our
community awaits your uploads—just pick your platform of choice
below. Snap, hashtag, and tag away, Cosori chef!
#iCookCosori
@cosoricooks
Cosori Appliances
Considering what to cook? Many recipe ideas are
available, both from us and the Cosori community.
MORE COSORI PRODUCTS
If you’re happy with this air fryer, the line doesn’t stop here. Check
out www.cosori.com for a line of all our beautiful and thoughtfully
designed cookware. They might be right at home in your kitchen, too!
19

20
Questions or Concerns?
Mon–Fri 9:00 am–5:00 pm PST/PDT
support@cosori.com | (888) 402-1684
v01.01
 Loading...