

Cosori CP016-PC Recipe Book

6-Quart Pressure Cooker CP016-PC
Recipes

Thank You
Thank you for purchasing the Premium 6Qt Electric Pressure Cooker by
Cosori. This cutting-edge culinary appliance is designed to help you prepare
delicious and nutritious meals with greater convenience, safety, and eciency
than traditional cooking methods. Now, you can cut down on meal preparation
and clean-up time while still enjoying delectable dishes in your own kitchen.
We hope you’ll enjoy preparing and sharing these meals with your friends
and family for years to come. And remember, these recipes serve as merely a
starting point to get you familiarized with pressure cooking. You’ll be inspired
to create culinary masterpieces of your own in no time!
(888) 402-1684 | support@cosori.com | www.cosori.com
Need help? Talk to us!
3

Table of Contents
Tips & Tricks
Tips & Tricks
Cheat Sheet
Meat/Stew
Beef Stew
Mongolian Beef
Baby Back Ribs
Poultry
Chicken Taco Filling
General Tso’s Chicken
Soup
Classic Chicken and Vegetable Soup
Corn & Coconut Soup
Chicken Tortilla Soup
Beans/Chili
Simple Southern Chili
Mexican Cilantro Lime Black Beans
White Rice
Mexican Rice
Cilantro Rice
Steam Vegetables
6
Artichoke Appetizer
8
Garlic Broccoli
Slow Cook
10
Pasta Fagioli
11
White Chocolate Fudge
12
Steam Potatoes
Potato Salad
14
Russet Red Mashed Potatoes
15
Hot Pot
Coq Au Vine Broth
17
Salted Caramel Dessert
18
19
Sauté/Brown
Corn Sauté
Popcorn
21
Lemon Garlic Chicken
22
Bake
Peach Cobbler
24
Pumpkin French Toast Casserole
25
33
34
36
37
39
40
42
43
45
46
47
49
50
Brown Rice
Healthy Fried Rice
Mushroom Brown Rice Pilaf
Multigrain
Coconut Scented Quinoa
Cinnamon Oats
4
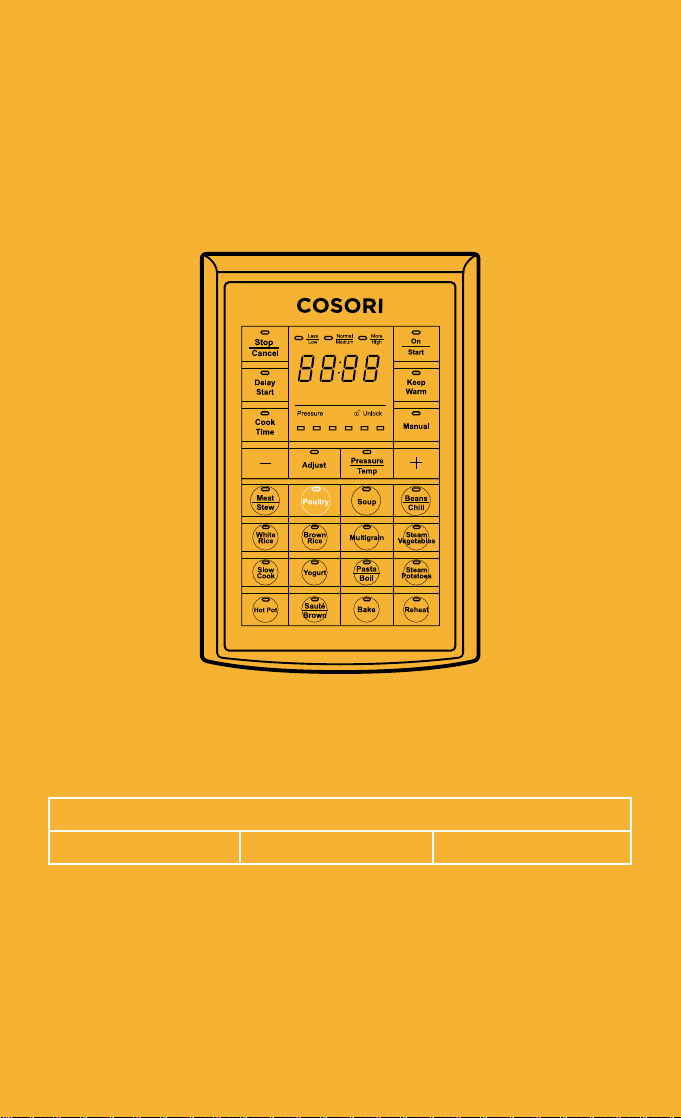
Manual Setting
Quick Deviled Eggs
27
Spring Veggie Risotto
28
Tilapia with Lemon & Cherry Tomatoes
30
31
52
53
54

Tips & Tricks
5

Tips & Tricks
This handy cookbook will illustrate how to get the most out of your Electric
Pressure Cooker. Pressure cooking has many advantages over other cooking
methods:
Quick Prep Time
Pressure cookers use pressure to
cook food at a higher temperature
than what can be achieved with
conventional stovetop boiling,
allowing food to be cooked very
quickly. In fact, pressure cooking is
about twice as fast (sometimes even
faster!) as conventional cooking.
More Nutritious Food
The problem with cooking food
using conventional methods like
frying or boiling is that vital nutrients
tend to be lost during preparation.
Pressure cooking, however, is one
of the healthiest cooking methods
because it preserves 90-95% of
vitamins contained in food, according
to a study published in the Journal of
Food Science. The increased speed
and heat produced by pressure
cooking essentially ash-cooks
vegetables, retaining more vitamins
than boiling (40-75% vitamin
retention rate) or even steaming (7590% retention rate).
Eco-friendly Efficiency
Pressure cookers require less
energy to operate during the
cooking process than other cooking
methods. Because pressure
cookers need less heat and time
than cooking methods like stovetop
boiling, you can enjoy an impressive
70% energy savings.
Effortless Cooking
Using a pressure cooker couldn’t be
easier—add your ingredients and
liquid, select a cooking program, and
release the pressure once it’s done
cooking. Best of all, you don’t have
to hover over it while your gourmet
food is being prepared, so you’ll have
more free time to relax after long,
stressful days.
Less Mess, Less Stress
Stress Sully your pristine countertops
with messy oil droplets no more—
pressure cookers contain all of the
splatters that you’d normally accrue
from conventionally boiling or frying
food. Big plus: the inner pot is quick
and easy to clean.
Safe Operation
Pressure cookers employ a
comprehensive network of safety
systems designed to prevent user
injuries or product damage. One
such safeguard that the Cosori
Electric Pressure Cooker uses is that
it shuts o if it begins to overheat
in order to protect the unit from a
circuit overload or a potential re.
6

Give it Time to Build Up
Pressure
Recipe cooking times for pressure
cookers do tend to be conveniently
short. But before you shut the lid and
immediately start counting down
the minutes that the recipe dictates,
please rst let the pressure cooker
build up the right pressure and give
out a beep (approximately 5-20
minutes). Thus, for your planning,
include enough time for not only the
prep and the cooking time listed in
the recipe, but an additional 5-20
minutes for the cooker to get its
momentum going.
7

RICE/BEANS/GRAINS
Cheat Sheet
INGREDIENT TO
WATER RATIO
Black Beans, soaked 1:3 10-12m Beans/Chili
Chickpeas, soaked 1:3 11-13m Beans/Chili
Pinto Beans, soaked 1:3 5-7m Beans/Chili
Brown Rice 1:1½ 13-15m Brown Rice
Quinoa 1:2 6m Multigrain
Steel Cut Oats* 1:4 10-15m Multigrain
Jasmine Rice 1:1 3m White Rice
White Rice 1:1½ 5-6m White Rice
*It is recommended to use a natural release of at least 10 minutes.
TIME SETTING
VEGETABLES/PRODUCE
AMOUNT OF
INGREDIENT
Potato 4-7 potatoes 2 c 25-30m Steam Potato
Artichoke 1-2 whole
artichokes
MINIMUM
AMOUNT OF
LIQUID
2 c 35-43m Steam
TIME SETTING
Vegetables
POULTRY/MEAT/FISH
AMOUNT OF
INGREDIENT
Fish, tilapia ½in
thick llet
Beef, 1-2in pieces
of stew meat
Chicken, boneless
skinless breast
Chicken, bonein thighs and
drumsticks
Whole chicken 3-5 lb 8 c 25-30m Poultry
Hard Boiled Eggs 4-8 eggs 2 c 7m Steam
1-2 llets 2 c 1-3m Bake
1-4 lb 2 c 35m Meat/Stew
1-5 lb 2 c 8-15m Poultry
1-5 lb 2 c 10-15m Poultry
MINIMUM
AMOUNT OF
LIQUID
TIME SETTING
Vegetables
8

Meat/Stew
Pressure: High
Less: 25m Normal: 30m More: 45m
9

Beef Stew
Yield: 4-6 servings
Prep Time: 10m Cook Time: 40m
INGREDIENTS DIRECTIONS
• 2 tbs oil
• 2 lb beef stew meat, 1-1½in
pieces
• 1 tbs our
• 2 tsp salt
• 1 tsp pepper
• 1 tbs tomato paste
• 2 onions, chopped
• 4 carrots, chopped
• 4 celery, chopped
• 2 cloves of garlic, nely
chopped
• 1 c red wine
• 2 bay leaves
• 4 sprigs thyme
• 2 c potato, cubed
• 2 tsp worcestershire sauce
• 4 c beef stock
10
1. Press the Sauté/Brown function, then
press Adjust to “More/High”, followed by
the Start button. Add 1 tbs of oil to pot.
2. While pot is heating up, toss beef in our,
salt, and pepper until well coated in our.
Once at temperature, add ½ of beef mixture
into pot in an even layer and brown. Let
meat develop brown crust on one side
before turning with tongs. After about 10
minutes or when all sides of the meat have
browned, take out the meat.
3. Add 1 tbs of oil to the pot and repeat the
browning process with the second half of
meat.
4. Once meat is browned, add all remaining
ingredients. Stir until combined, scraping
the bottom for any brown bits that may have
stuck to pot. Secure lid on pressure cooker,
press the Meat/Stew button followed by
Start .

Mongolian Beef
Yield: 3-4 servings
Prep Time: 8m Cook Time: 26m
INGREDIENTS DIRECTIONS
• 2 lbs top sirloin or ank steak,
quartered
• 2 tbs olive oil
• 1 tsp ginger, minced
• 2-3 cloves garlic, minced
• ½ c water
• 1 c soy sauce
• 1½ c dark brown sugar
• 2 tbs cornstarch
• 3 tbs cold water
• Green onions, chopped
1. Press the Sauté function. Place the
olive oil and meat in the pot and allow
to brown for 1 minute.
2. Add the garlic, water, soy sauce, and
ginger to the pot. Stir well.
3. Close lid, ensure the steam valve is
closed, and press Meat/Stew, then
Adjust to “Less/Low”.
4. Once nished, quick release the
pressure, and open pot carefully.
5. Place machine back on Sauté and
add cornstarch, the cold water, and
onions to the pot. Stir until the sauce
thickens, then serve.
11

Baby Back Ribs
Yield: 3-5 servings
Prep Time: 5m Cook Time: 45m
INGREDIENTS DIRECTIONS
• 1 (3-4 lb) rack baby back ribs (dry &
pre-seasoned) cut into quarters
• 1 c water
• Barbeque sauce of choice
12
1. If frozen, thaw baby back ribs.
2. Add 1 c water.
3. Cut baby back ribs into four parts
with meat scissors and evenly place
inside inner pot.
4. Secure and close the lid. Press the
Meat/Stew function, then Adjust to
“More/High”. Then press Start.
5. Top baby back ribs with barbecue
sauce. Allow to rest for 10 minutes,
then cut and serve.
Poultry
Pressure: High
Less: 8m Normal: 15m More: 25m
13

Chicken Taco Filling
Yield: 3-5 servings Prep Time: 5m Cook Time: 15m
INGREDIENTS DIRECTIONS
Chicken Taco Filling
• 14-16 oz chicken breast cutlets,
frozen
• 1 yellow onion, chopped
• 1 garlic clove, minced
• 1 tbs olive oil
• 1 can (10 oz) diced tomatoes
• 1 tbs chili powder
• 1 tsp season salt
• ½ tsp pepper
• Dash of cumin
Finished Taco
• Tortilla
• Pico de Gallo (optional)
• Guacamole (optional)
14
1. Place all ingredients in pressure
cooker and close the lid. Make sure
the release valve is fully closed.
Select the Poultry function button
followed by the Start button.
2. Once cooking is done, release the
pressure immediately and let it
fully release before opening the
container.
3. Shred chicken with a fork.
4. Prep the rest of your taco as you
would like, and enjoy.

General Tso’s Chicken
Yield: 3-4 servings
Prep Time: 5m Cook Time: 15m
INGREDIENTS DIRECTIONS
• 1 ½-2 lb chicken breast, cubed
• 6 tbs rice vinegar
• 7 tbs soy sauce
• ¼ c Hoisin sauce
• 3 tbs brown sugar
• ¼ tsp ginger
• 2 cloves garlic, minced
• 1 tsp red pepper akes
• 2 tbs cornstarch
• 1 green onion, chopped
1. Place cubed chicken, rice vinegar, 6
tbs soy sauce, hoisin sauce, brown
sugar, ginger, garlic, and red pepper in
pot, and stir well.
2. Close lid, ensure the valve is closed,
and select the the Poultry function
followed by the Start button.
3. Once machine is done, make sure to
quick release and wait for the steam
to nish releasing from the top.
4. Place your pot back on Sauté, and
whisk in cornstarch and 1 tbs of soy
sauce. Mixture will turn thick and
bubbly after about 2 minutes.
5. Serve with chopped green onion.
15

16
Soup
Pressure: Medium
Less: 15m Normal: 25m More: 35m

Classic Chicken and Vegetable Soup
Yield: 6-8 servings
Prep Time: 15m Cook Time: 25m
INGREDIENTS DIRECTIONS
• 2 c leeks
• 1 c carrot
• 1 c celery
• 1 tbs garlic
• 6 sprigs of thyme
• 1 tsp pepper
• 1 tbs salt
• 3-4 lb whole chicken
• 1 c white wine
• 8 c chicken broth or water
• 1 c zucchini
• ½ lemon, squeezed
• ½ c parsley
1. Combine leeks, carrots, celery, garlic,
thyme, salt, pepper, chicken, wine
and broth or water in the pressure
cooker.
2. Secure the lid, and press the Soup
function, then the Start button.
3. Once done, quick release the
pressure cooker.
4. Take chicken out of soup and place
on a cutting board to cool. While the
chicken is cooling, discard the sprigs
of thyme.
5. Add zucchini, lemon, and parsley to
soup.
6. Remove and discard the skin and
bones from the chicken. Cut meat
into ½ in pieces.
7. Add chicken meat back to soup.
Taste soup and adjust with salt and
pepper.
17

Corn & Coconut Soup
Yield: 4-6 servings
Prep Time: 15m Cook Time: 35m
INGREDIENTS DIRECTIONS
Corn and Coconut Soup
• 1 tbs coconut oil
• 1 sweet onion, diced
• 2 jalapeños, seeded and chopped
• 1 c cilantro stems, chopped
• 2 tsp paprika
• 2 limes, zested and juice reserved for
relish
• 6 corn, cob cut in half crosswise, kernels
cut o, reserve kernels of one corn for
relish
• 6 c chicken broth
• 2 cans coconut milk
• 2 tsp salt
• 1 tsp pepper
Corn Salsa
• 1 tbs coconut oil
• 1 sweet onion, diced
• 2 jalapeños, seeded and chopped
• 1 c chopped cilantro stems
• 2 tsp paprika
• 2 lime, zested and juice reserved for relish
• 6 corn, cob cut in half crosswise, kernels
cut o, reserve kernels of one corn for
relish
• 6 c chicken broth
• 2 cans coconut milk
• 2 tsp salt
• 1 tsp pepper
18
1. Set Sauté function to 15 minutes
and add coconut oil. Once melted,
add onions and stir to coat them
in the oil. Stir onions occasionally,
about every 3 minutes, to allow
them to caramelize.
2. In the last two minutes, add
jalapeño, cilantro, paprika, and lime
zest, stirring occasionally until the
time is done.
3. Add corn cobs, kernels from
two ears of corn, chicken broth,
coconut milk, salt and pepper; stir
until combined.
4. Select the Soup function, then
Adjust to “Less/Low” and
securely close the lid, and ensure
the pressure valve is closed.
5. While soup is cooking, combine
all salsa ingredients in a bowl. Add
salt to taste
6. Quick release the pressure when
done.
7. Throw away corn cobs and blend
soup until smooth.
8. Taste the soup and add more salt
or pepper if desired.
9. Top with corn salsa to serve.
 Loading...