


Premium 6-Quart Pressure Cooker
Model No.: CP016-PC
Hot Pot
COSORI SUPPORT:
Mon - Fri 9:00 AM - 5:00 PM PST
(888) 402-1684 | support@cosori.com
1

With Heartfelt Thanks
We thank you for purchasing a new Electric Pressure Cooker by Cosori, and we’re excited
to see what you’ll cook up very soon.
We’re looking forward with you to preparing many fresh meals in your kitchen with
minimal operation or eort. And when we say “with you,” we mean it—our helpful
customer support team is available by phone at 888-402-1684 or by email at
support@cosori.com. We’re here to lend an ear to your questions and concerns (or your
joy over a successful recipe). Happy cooking!

Table of Contents
Keeping Things Safe
Getting to Know Your Pressure Cooker
How Does it Work?
Safely Removing the Lid
Care & Maintenance
Troubleshooting
Warranty
Customer Support
Connect with Us
4
7
12
25
27
29
30
31
32
Package Contents
1 x Electric Pressure Cooker
1 x Spoon
1 x Ladle
1 x Measuring Cup
1 x Glass Lid
1 x Sealing Ring
1 x User Manual
1 x Steamer Rack
1 x Recipe Book
Specifications
Power Supply: AC 120V / 60Hz
Rated Power: 1000W
Capacity: 6.3 Quarts (6 Liters)
Working Pressure: 5.8 - 10 PSI (40 - 70 kPa)
Pressurized Working Temperature: 235° - 239°F (113° - 115°C)
3

Keeping Things Safe
IMPORTANT SAFEGUARDS
Please read, understand, and
comply with all the instructions
provided in this manual before
using the device. Failure to comply
with the instructions given in this
manual and/or using the device
in ways other than the ones
mentioned in this manual may
result in serious injury and/or
damage to the product.
General Safety
• DO NOT touch hot surfaces.
Use handle and pot holders
when necessary.
• Use extreme caution when
moving the pressure cooker if
it contains hot oil or other hot
liquids.
• To protect against electrical
shock, do not immerse cord,
plugs, or the unit in water or
other liquid.
• Close supervision is necessary
when this appliance is used by or
near children.
• DO NOT place on or near a hot
gas or electric burner and/or in a
heated oven.
• DO NOT use the unit for
anything other than its intended
use.
• DO NOT alter the safety
mechanisms or attempt to
repair the pressure cooker as
this will void the warranty. Please
refer to the Care & Maintenance
section on page 26 on how to
properly maintain the pressure
cooker.
• DO NOT place the unit close to
4
ammable materials, heating
units, or wet environments.
• In case of overheating,
immediately turn o and unplug
the pressure cooker. DO NOT
attempt to move the pressure
cooker if it is overheating.
• DO NOT place any object above
the pressure release valve while
the steam is being released from
the pressure cooker.
• DO NOT lean over the pressure
cooker at any time while it is
cooking.
• This pressure cooker should
not be used for any medical
purposes. It is not designed to
reach the required temperature
for sterilization.
Use & Care Guidlelines
• DO NOT operate the
pressure cooker if the cord
or plug is damaged, if the unit
malfunctions, or if the unit has
been damaged in any manner. If
the unit is malfunctioning, please
contact customer support.
• Always check the pressure
release valve and oat valve for
any clogging before use.
• Make sure all parts of the
pressure release valve and oat
valve are clean and properly
assembled before each use.
• Using other accessories that are
not compatible with the pressure
cooker is not recommended.
Doing so may damage the unit
or cause injury and will void your
warranty.

• The pressure cooker is intended
for indoor use only.
• To disconnect the unit from
a power source, press ‘Stop/
Cancel’, then remove plug from
the outlet.
• It is extremely important to ll
the pressure cooker with liquid
prior to operation. Never cook
without liquid; doing so can
cause the unit to overheat and
damage the safety mechanisms.
• DO NOT place frozen meats or
sh into the pressure cooker;
always make sure meat and sh
are thawed before cooking.
• If you cook meat with a casing,
such as sausage, swelling can
occur when cooked under
pressure. Piercing the skin after
cooking can lead to bursts of hot
liquid.
• The silicone sealing ring creates
a pressure seal between the lid
and the pot. Keep the sealing
ring completely clean and free
from any cracks or deterioration.
• DO NOT break the silicone
sealing ring. Do not replace it
with other rubber sealing rings
or use a tension belt to make the
pressure cooker seal.
• Check and wash anti-clog lter
and pressure release valve
regularly to avoid any blockage.
• DO NOT attempt to open the lid
while the oat valve is still up.
• DO NOT put anything on or use
other objects to replace the
pressure release valve.
• Never use a towel to clog the
gap between the lid and edge of
the housing.
• The bottom of the inner pot and
heating plate should be kept
clean. Do not put the inner pot
on other heat sources. Do not
replace the inner pot with other
containers.
• DO NOT attempt to move
the pressure cooker while it is
cooking; wait until it cools down
to move it. Move the unit using
the built-in handles; do not try to
hold the pressure cooker from
the lid handle.
• DO NOT disassemble the unit
on your own or use replacement
parts from dierent brands.
• Make sure pressure completely
discharges after cooking has
nished and before opening the
lid.
• Clean and properly place the
water collection cup before each
use.
• You may experience some
smoke coming out the unit
during the rst few uses due
to the initial heating of the
materials; this is normal.
• Unplug the unit when not in use
and before cleaning. Allow it to
cool before putting on or taking
o parts.
• DO NOT let power cord hang
over the edges of tables or
counters, or touch hot surfaces
as it may present a tripping
hazard.
• A short power supply cord is
provided to reduce injuries
resulting from entanglement
and tripping. If an extension
cord is used, the electrical rating
of the cord must be at least
120V/20A. The extension cord
must be arranged so that it will
not hang over the edge of a
table or counter where it can be
5
pulled or accidentally tripped
over.
NOTE:
• This appliance has a three-
prong grounding plug. To
reduce the risk of electric
shock, this plug will only t one
way into a grounded electrical
outlet that is easily accessible.
DO NOT attempt to modify
the plug in anyway if it does
not t into the outlet.
SAVE THESE
INSTRUCTIONS
HOUSEHOLD USE ONLY
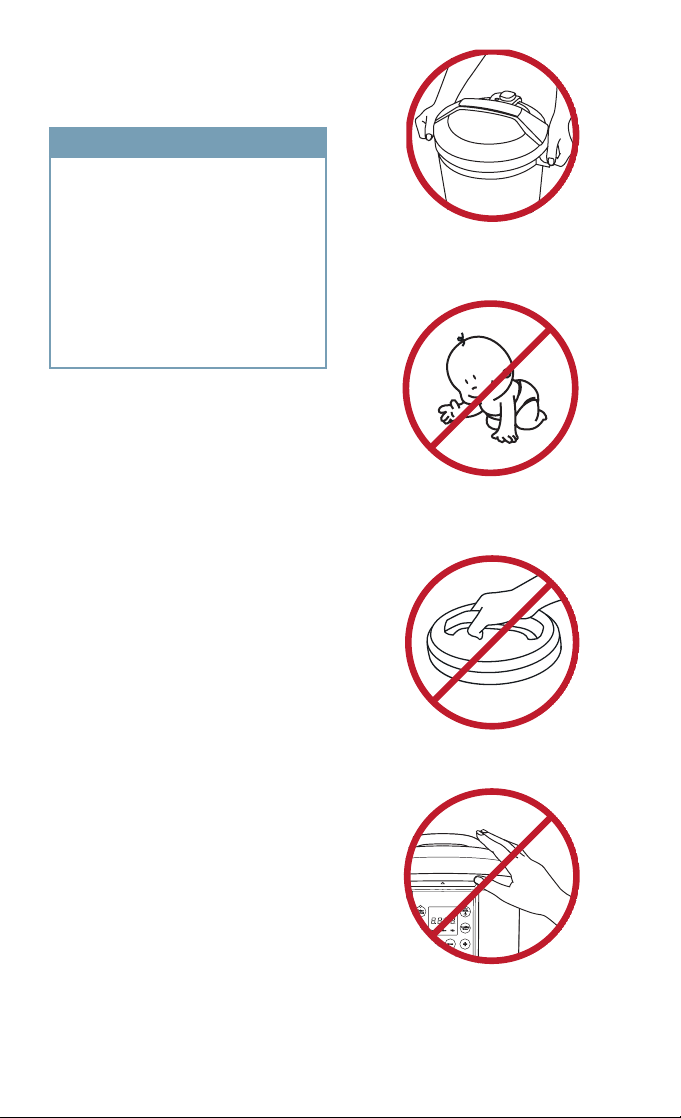
When moving the unit, hold the
pressure cooker by its handles.
Keep out of reach of infants and
young children.
DO NOT use any other lid.
DO NOT touch the lid or stainless
steel surface while heating or
cooking.
6

Geting to Know Your Pressure Cooker
10
11
PRESSURE COOKER
1
2
8
3
4
5
6
12
99
14
15
INSIDE OF LID
7
INSIDE OF COOKER
13
1. Lid
2. Lid handle
3. Float valve
4. Pressure release valve
5. Sealing ring
6. Float valve sealing ring
7. Anti-clog lter
8. Inner pot
16
9. Handles
10. Housing
11. Control panel
12. Inner pot sensor
13. Heating plate
14. Safety pin
15. Water collection cup
16. Power cord
7
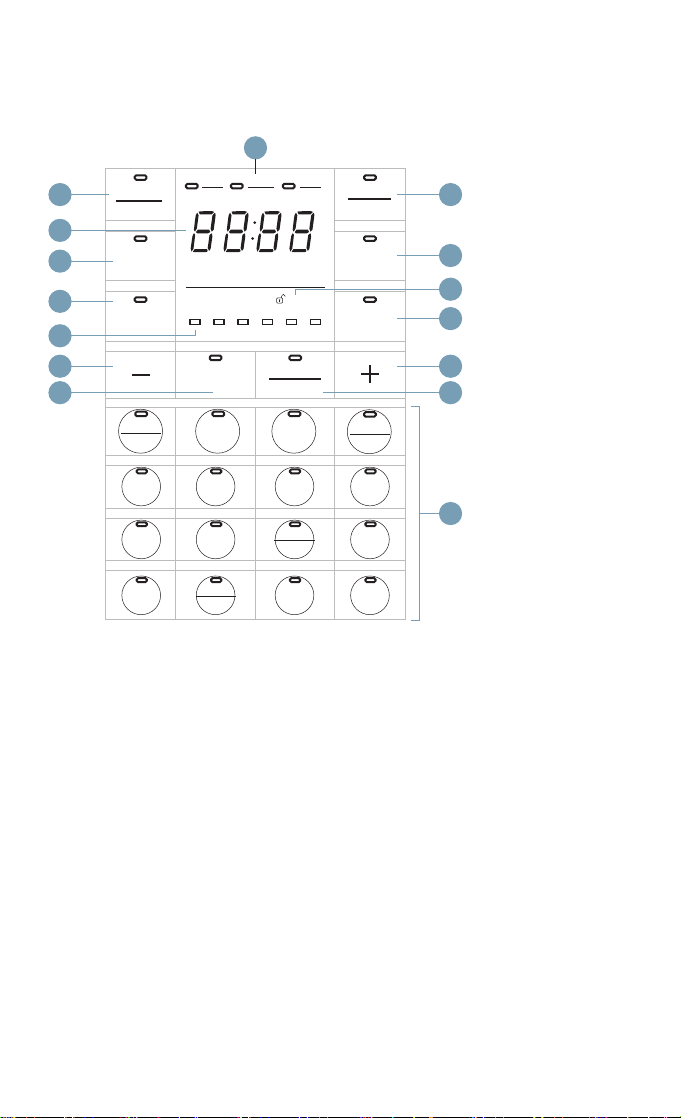
CONTROL PANEL
1
Less
2 7
Stop
Cancel
Low
Medium
High
On
Start
More
Normal
3
4
5
6
11 13
12 14
Delay
Start
Cook
Time
Pressure
Adjust
Unlock
Pressure
Temp
Keep
Warm
Manual
8
9
10
Meat
Stew
White
Rice
Slow
Cook
Hot Pot
Poultry Soup
Brown
Rice
Yogurt
Sauté
Brown
1. Adjust indicator
2. Stop/Cancel button
3. Digital display
4. Delay Start button
5. Cook Time button
6. Pressure level indicator
7. On/Start
8. Keep Warm button
Multigrain
Pasta
Boil
Bake
Beans
Chili
Steam
Vegetables
15
Steam
Potatoes
Reheat
9. Unlock indicator
10. Manual button
11. Decrease value
12. Adjust button
13. Increase value
14. Pressure/Temperature button
15. Cooking functions
8
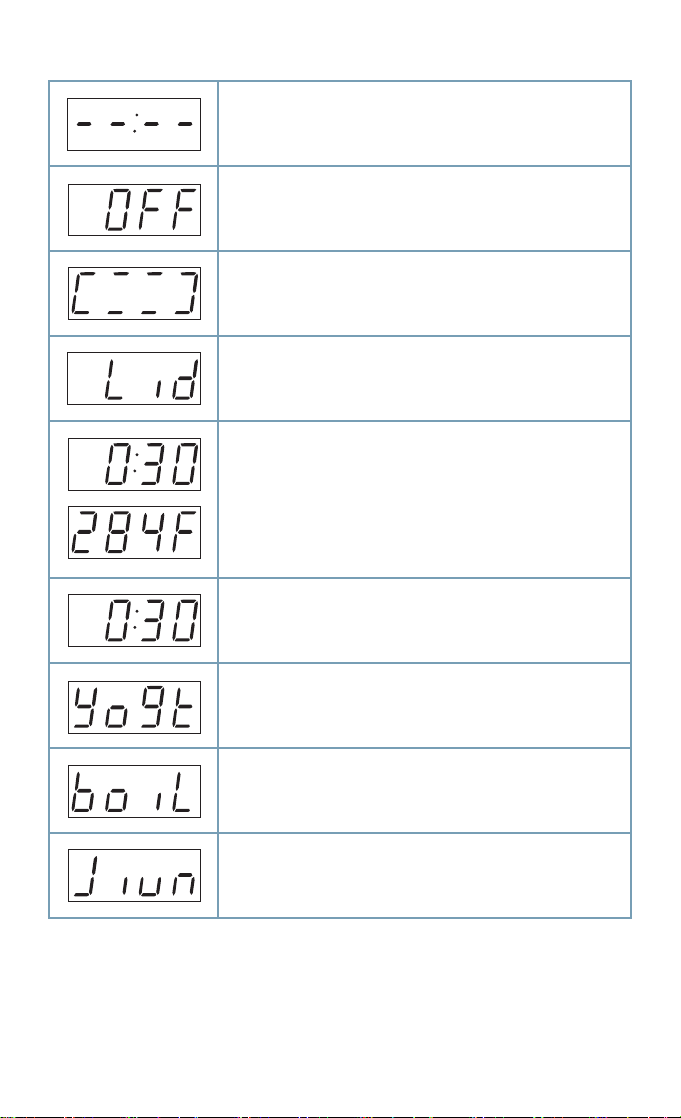
DISPLAY DESCRIPTIONS
Unit is on standby
Function has been cancelled
Unit is heating up/pressurizing
Lid is not closed properly
Display time for non-pressurized cooking settings
NOTE: The display will switch between the cooking time
and temperature every two seconds.
Display time for pressurized cooking settings
Yogurt function
Pasteurization function
Jiu niang function
9
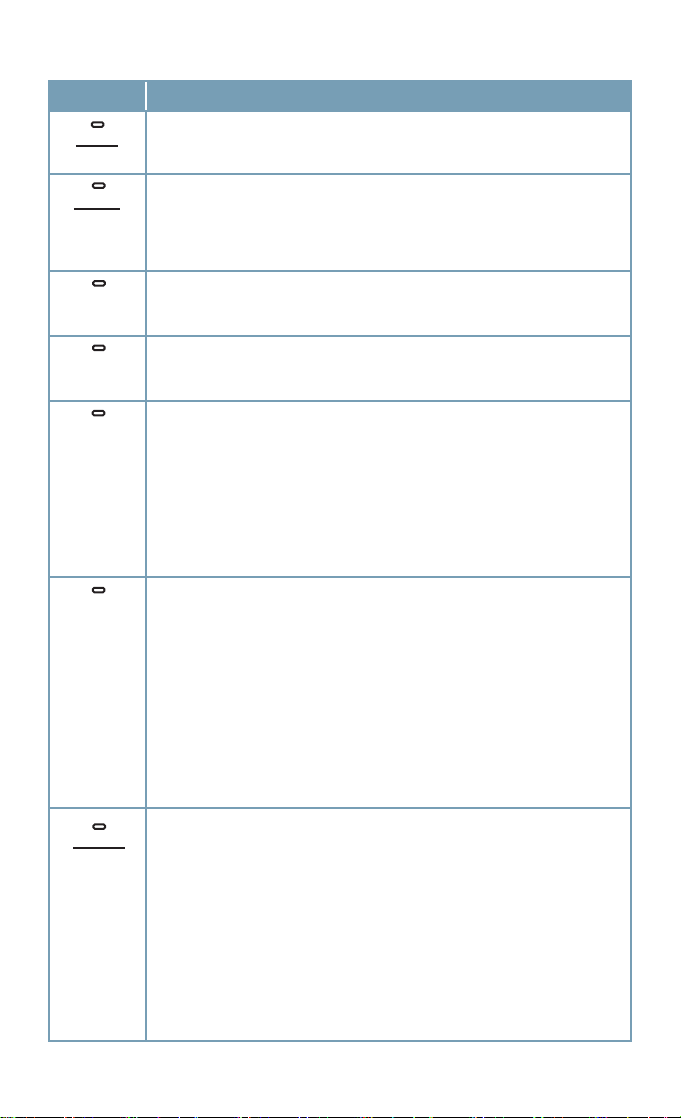
CONTROLS
Button Function
On
Start
Starts any selected cooking function.
Stop
Cancel
Manual
Cook
Time
Delay
Start
Adjust
Pressure
Temp
Cancels any cooking process; also cancels any selections that are
made.
NOTE: The display will show “OFF” after pressing ‘Stop/Cancel’, indicating
that the pressure cooker has stopped cooking. The pressure cooker will go into
standby mode, showing “--:--”, after 3 minutes.
Activates the manual pressure cooking mode on the unit, which allows
you to fully customize your cooking settings. (see Manual Cooking
Mode).
Press the ‘Cook Time’ button then use the ‘+’ or ‘-’ buttons to adjust
the time of any cooking function. The display will ash 5 times before
your selected time is set.
This function allows you to delay the start time of your cooking.
1. Select a cooking function, then press the ‘Delay Start’ button.
2. Use the ‘+’ or ‘-’ buttons to change the delay start time; you can
delay the start time of the pressure cooker from 30 minutes to 12
hours.
3. Press ‘On/Start’ when you are ready to start the delay process.
4. The unit will beep when cooking has begun.
NOTE: This delay function does not work with ‘Yogurt,’ ‘Pasta/Boil,’ ‘Hot Pot,’
‘Sauté/Brown,’ ‘Reheat,’ and ‘Manual’ modes.
This function acts as a quickstart guide to help you better cook your
food. The ‘Adjust’ button serves three dierent purposes on the
pressure cooker:
1. Changing the cooking time for all pressure cooking functions
(except for ‘Manual’ and ‘Pasta/Boil’ mode) as well as ‘Slow
Cook’ mode.
2. Changing the temperature on the ‘Slow Cook,’ ‘Sauté/Brown,’
‘Hot Pot,’ and ‘Reheat’ functions.
3. Selecting dierent cooking programs on the ‘Yogurt’ function.
NOTE:
• Manually changing the cooking time for the pressure cooking functions will
turn o the Adjust function.
Changing Pressure Level & Temperature
Use the ‘Pressure/Temp’ button to adjust the pressure or
temperature of a cooking function. There are six dierent pressure
levels to help better cook your food.
1. Select your desired cooking function.
2. Press the ‘Pressure/Temp’ button, then use the ‘+’ or ‘-’ buttons
to increase or decrease the temperature or pressure of the
selected cooking function. The display will ash 5 times before
your selected temperature or pressure is set.
NOTE:
• The working pressure for level 1 is 5.8 PSI (40 kPa), while the pressure for level
6 is 10 PSI (70 kPa).
10
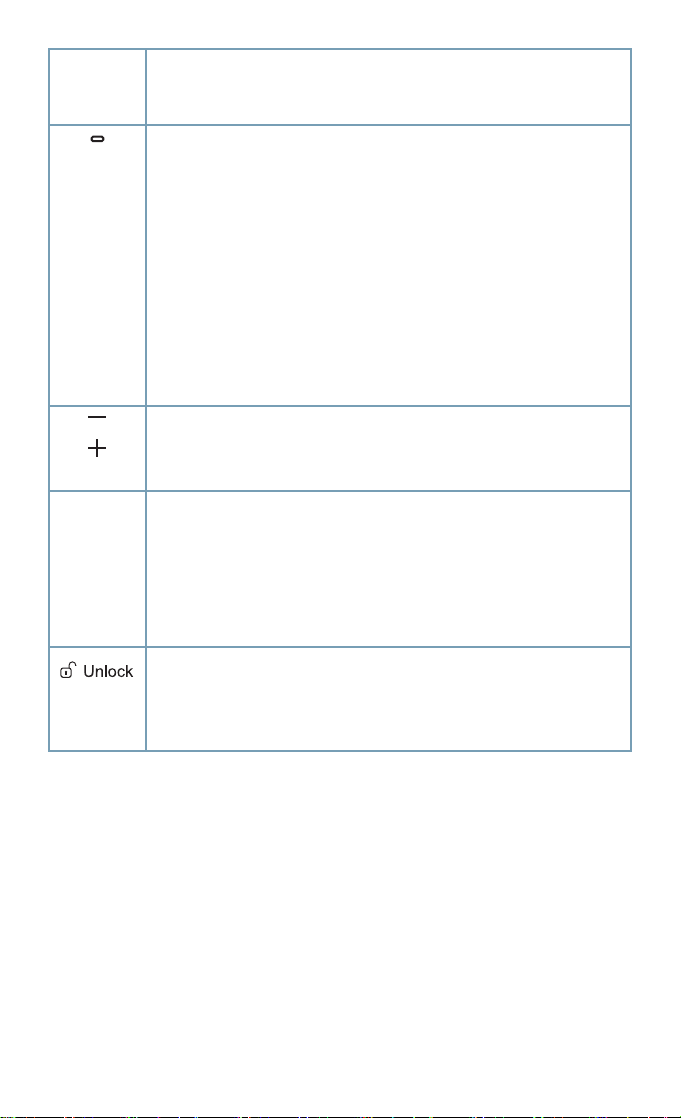
Keep
Warm
• It is recommended to cook tender foods such as vegetables on the lower
pressure levels.
• The actual working pressure may vary depending on the amount of food and
liquid being cooked.
The warming function keeps food warm until you are ready to eat.
Follow the steps below to manually set up the warming function.
1. Press the ‘Keep Warm’ button.
2. Press ‘Pressure/Temp’ and use the ‘+’ or ‘-’ buttons to adjust the
warming temperature from 140° to 210°F (60° to 99°C).
3. Press the ‘Cook Time’ button and use the ‘+’ or ‘-’ buttons to
adjust the warming time in 10 minute increments; you can adjust
the time anywhere from 10 minutes to 99 hours and 30 minutes.
4. Press the ‘On/Start’ button once you have set your time.
NOTE:
• DO NOT cook foods using the warming mode.
• The pressure cooker will automatically switch to this mode when cooking has
nished; the default time is 6 hours.
• The automatic warming function does not work with ‘Pasta/Boil,’ Yogurt,’
and ‘Hot Pot.’
The ‘+’ and ‘-’ buttons are used to increase or decrease the cooking
time, pressure, and temperature on the dierent cooking functions of
the pressure cooker. Press and hold either button to quickly adjust the
numbers, and release when you have reached your desired number.
Changing Temperature Units
The default temperature unit for the pressure cooker is in Fahrenheit
(“F”), but can be switched to Celsius (“C”) to meet your preferences.
• Press ‘+’ and ‘-’ simultaneously. The display will now
show “C” to indicate that the temperature unit has been
switched to Celsius. The unit will show the previous
display you were on after 3 seconds.
The unlock indicator illuminates when the lid is not properly secured
onto the pressure cooker. If you attempt to start a pressurized cooking
function while the lid is not properly secured, the display will show “Lid”
and the pressure cooker will not start heating up or pressurizing until
the lid is secured onto the housing.
11

How Does it Work?
PREPARING TO COOK
NOTE:
• Thoroughly wash the inner pot
before each use.
• The minimum amount of
ingredients needed to cook in the
pressure cooker is ⅕ of the capacity
of the inner pot.
• The minimum amount of liquid
needed for cooking is 2 cups/500
mL. (This may vary depending on
the recipe you are following.)
1. Open lid by turning the handle
counterclockwise so that
the symbol aligns with the
symbol, then lift the handle to
remove the lid.
3. Place the inner pot into the
housing; make sure the bottom
of the pot is dry. Check the
silicone sealing ring inside the lid
and make sure it is secure.
2. Place ingredients into the inner
pot. Ingredients and water/
liquid should not exceed ⅘
height of the inner pot. If the
ingredients expand easily in
water, then the total amount
should not exceed ⅗ height of
the inner pot.
12
4. Replace the lid onto the housing
by aligning the symbol with
the symbol. To lock the lid,
turn the lid clockwise so that
the symbol aligns with the
symbol.
5. Set the the pressure release
valve to the “Sealed” position.

6. Attach the water collection cup
onto the back of the pressure
cooker by aligning the top of
the cup with the guides on the
pressure cooker. Secure the
cup by gently pressing it in until
it snaps into place.
PRESET COOKING
FUNCTIONS FOR PRESSURE
COOKING
The pressurized preset cooking functions
include Meat/Stew, Poultry, Soup, Beans/
Chili, White Rice, Brown Rice, Multigrain,
Steam Vegetables, Steam Potatoes, and
Bake.
1. Make sure the unit is connected
to a powered electrical outlet.
2. Select a pressurized cooking
function on the control panel to
cook your food.
7. Plug the pressure cooker into a
powered electrical outlet. The unit
will beep and the display will show
“--:--”, indicating that the unit is in
standby mode.
3. (Optional): Use the ‘Cook Time’
button to change the cooking time
with the ‘+’ and ‘-’ buttons, or use
the ‘Adjust’ button to select a preprogrammed cooking time (see time
table on the next page). You can
also change the pressure using the
‘Pressure/Temp’ button and the ‘+’
and ‘-’ buttons.
13

4. Before cooking, make sure
the lid is properly secured to
the pressure cooker and the
pressure release valve is set to
the “Sealed” position.
5. Press ‘On/Start’ to begin
cooking. The display will show
the image above, indicating that
the unit is pressurizing.
6. Once the unit reaches optimal
cooking pressure, the unit will
beep once and the display will
begin to count down.
7. The pressure cooker will beep three
times to alert you when cooking has
nished, and it will automatically set
itself to the Keep Warm mode for 6
hours. (See Safely Removing the Lid.)
14

PRESSURIZED COOKING FUNCTION TIMES
NOTE: All pressurized cooking times can be adjusted from 1 minute to 4 hours.
Preset Functions Adjust Default Time Setting Default Pressure Level
Less 25 minutes
Meat/Stew
6Normal 30 minutes
More 45 minutes
Less 8 minutes
Poultry
6Normal 15 minutes
More 25 minutes
Less 15 minutes
Soup
4Normal 25 minutes
More 35 minutes
Less 5 minutes
Beans/Chili
6Normal 11 minutes
More 30 minutes
Less 3 minutes
White Rice
4Normal 6 minutes
More 8 minutes
Less 13 minutes
Brown Rice
6Normal 15 minutes
More 20 minutes
Less 6 minutes
Multigrain
6Normal 10 minutes
More 20 minutes
Less 20 minutes
Bake
Normal 25 minutes
6
More 30 minutes
Less 2 minutes
Steam
Vegetables
6Normal 7 minutes
More 12 minutes
Less 10 minutes
Steam Potatoes
6Normal 25 minutes
More 30 minutes
15

NON-PRESSURIZED COOKING
FUNCTIONS
Slow Cook
This function allows you to cook various
recipes at low temperatures ranging from
180°-211°F (82°-99°C). Only use the
glass lid for this cooking function.
4. Press the ‘Pressure/Temp’
button to change the cooking
temperature, use ‘+’ or ‘-’ to
change the temperature.
5. (Optional): Use the ‘Adjust’ button
to select a pre-programmed cooking
time and temperature (see table
below).
1. Open the pressure cooker and
place your ingredients into the
inner pot.
2. Plug in the pressure cooker and
select ‘Slow Cook.’
3. Press the ‘Cook Time’ button
and ‘+’ or ‘-’ to set a custom
cooking time anywhere from 30
minutes to 12 hours.
Cooking
time
Cooking
temp
Less/
Low
8 hours 6 hours 4 hours
193°F
(89°C)
Normal/
Medium
200°F
(93°C)
More/
High
204°F
(95°C)
6. Place the glass lid onto the
pressure cooker and press ‘On/
Start ’ to start cooking.
7. The unit will beep 3 times when
cooking has nished, and it will
automatically switch to the ‘Keep
Warm’ mode for 6 hours.
16

Pasta/Boil
This function allows you to boil water or
liquids as well as cook pasta al dente.
1. Pour the desired amount of
water or liquid into the pot.
NOTE:
The pressure cooker always heats up
liquids using high power, but maintains
the boiling temperature using the
programmed setting.
4. Press ‘On/Start’, to start
cooking. If you are boiling pasta
or other foods, add in your
food when the unit reaches the
programmed temperature.
5. The unit will beep three times when
cooking has nished. Carefully
remove the lid and take your
ingredients out of the pot.
2. Press ‘Pasta/Boil’, and set up
your cooking time using the
‘Cook Time’ and the ‘+’ or ‘-’
buttons (default cooking time is
30 minutes).
3. (Optional): You can use
the ‘Adjust’ button to
adjust the power level of
the ‘Pasta/Boil’ function
(see table below).
Power
Level
Less/
Low
Low
Power
Normal/
Medium
Normal
Power
More/
High
High
Power
17

Sauté/Brown
This function allows you to sauté, simmer,
or even pan fry foods inside the inner pot.
1. Open the pressure cooker
and pour the required amount
cooking oil into the inner pot.
4. Press the ‘Pressure/Temp’
button and use ‘+’ or ‘-’ to
change the temperature from
104° to 320°F.
5. (Optional): Use the ‘Adjust’ button
to select a pre-programmed cooking
time and temperature (see table
below for cooking times).
Cooking
temp
Less/
Low
266°F
(130°C)
Normal/
Medium
284°F
(140°C)
More/
High
302°F
(150°C)
2. Plug in the pressure cooker and
select ‘Sauté/Brown.’
3. Press the ‘Cook Time’ button
and ‘+’ or ‘-’ to set a custom
cooking time anywhere from 1
to 30 minutes (the default time
is 20 minutes).
18
6. Press the ‘On/Start’ to start
cooking. You can use the glass
lid to prevent any oil splatters.
7. The pressure cooker will beep ve
times when it has reached the
programmed temperatures. Carefully
add your food into the inner pot. The
display will begin to countdown.
8. The unit will beep three times when
cooking has nished. Carefully
remove your ingredients from the
pot or add ingredients if you are still
cooking.

Hot Pot
This function allows you to create savory
soups for a family hot pot dinner or sweet
dipping sauces for fun desserts.
1. Plug in the pressure cooker
and select ‘Hot Pot.’ The lid is
not necessary for this cooking
function.
Hot P
2. Press the ‘Adjust’ button to select
your cooking temperature (see
tables for temperature references).
You can also set a custom
temperature and cook time using the
‘Pressure/Temp’ and ‘Cook Time’
buttons.
4. The pressure cooker will beep 5
times when it has reached the
programmed temperature. Add
your ingredients to the inner pot
according to your recipe. Be sure to
constantly stir your ingredients so
that they do not stick to the bottom
of the pot.
5. The pressure cooker will beep three
times when the cooking time has
nished. Carefully transfer your liquid
to a fondue pot or a warm bowl.
NOTE:
It is recommended to melt cheese on
the “Normal/Medium” setting. Use the
“Less/Low” setting to melt chocolates.
Cooking
temp
Less/
Low
100°F
(38°C)
Normal/
Medium
130°F
(54°C)
More/
High
248°F
(120°C)
3. Press ‘On/Start’ when you are
ready to cook.
19

Reheat
This function allows you to reheat
prepared food in the pressure cooker.
Please note that raw foods should not be
cooked using this setting.
1. Open the pressure cooker and
place your food inside the pot.
2. Plug in the pressure cooker and
select ‘Reheat.’
Cooking
temp
Less/
Low
165°F
(74°C)
Normal/
Medium
212°F
(100°C)
More/
High
248°F
(120°C)
4. Replace the lid and press ‘On/
Start ’ when you are ready to
cook. The pressure cooker
will beep ve times when it
has reached the programmed
temperatures. The display will
begin to countdown. If you are
reheating liquids such as soups
or stews, be sure to constantly
stir your ingredients so that
they do not stick to the bottom
of the pot.
5. The unit will beep three times when
cooking has nished. Carefully
remove the lid and take your
reheated food out of the pot.
NOTE:
• Please note that using the ‘Reheat’
function at high temperatures
for extended periods of time may
change the texture of your food.
• The maximum temperature is
320°F/160°C and the maximum
time is 30 minutes for the ‘Reheat’
function.
3. Press the ‘Adjust’ button
to select your cooking
temperature (see table for
temperature references).
You can also set a custom
temperature and cook time
using the ‘Pressure/Temp’ and
‘Cook Time’ buttons.
20

Yogurt
Your new Cosori electric pressure cooker
can heat up milk at a safe temperature
to create fresh yogurt for you to enjoy.
Follow the steps below to make your
yogurt at home.
1. Pasteurizing the Milk
a. Pour the necessary amount of
milk according to your recipe
into the inner pot.
d. Press ‘On/Start’. The unit
will start heating up to the
pasteurization temperature
(180°F/83°C) and the display
will cycle. The display show
“00:10” when the pressure
cooker has reached the optimal
pasteurization temperature.
e. The pressure cooker will beep when
the process is complete and will go
into standby mode.
f. Once the pasteurization process
is complete, allow the milk to cool
below 115°F/46°C.
2. Yogurt Incubation
b. Select the ‘Yogurt’ function.
c. Use the ‘Adjust’ button to
select the “High” setting. The
display will show the word “boil”,
indicating that the cooker is
pasteurizing the milk.
a. Add in yogurt starter or fresh
yogurt.
21

b. Press the ‘Yogurt’ button.
The display will show “Yogt” to
indicate that yogurt setting has
been selected. You can use the
‘Cook Time’ button to select a
cooking time using ‘+’ and ‘-’.
c. Press ‘On/Start’ when you are
ready. The display will show the
cooking time, indicating that
the yogurt function has started.
d. When the Yogurt program is
complete, the pressure cooker will
beep three times and go into standby
mode.
3. Serve your yogurt right out of the
pressure cooker with savory dishes
like lamb or curry. You can also place
the yogurt into smaller containers
along with honey, fruit, and jam for a
sweet and healthy snack.
NOTE:
If your yogurt is too thin, run it through
a strainer before serving.
Jiu Niang
Jiu Niang, also known as fermented
glutinous rice, is a sweet and mildly
alcoholic delicacy of Asia. Glutinous
rice, more commonly known as sticky
rice, is used in making Jiu Niang and
contains a high concentration of starch
that is converted to sugar during the
fermentation process.
NOTE:
Make sure that all tools and utensils are
clean and free from bacteria, oil and
salt before you start cooking.
1. Soak two cups of glutinous rice in
cold water for at least 5 hours until
the rice grains become easily broken
with ngers. Meanwhile, prepare 1
cup of boiling water and set aside so
that it completely cools down.
2. Drain the water and wrap the soaked
rice with cheesecloth. Place it into
a steaming basket, and place the
cheesecloth on steamer rack and
add 2 cups of water into the inner
pot. Cook the rice using the ‘Steam
Vegetable’ function for 30 minutes.
Allow the the pressure to naturally
release before opening the lid (See
Safely Removing the Lid).
3. Place starter yeast powder in a glass
or ceramic container, and set the
container to the side.
4. Allow the steamed rice to cool down
below 95°F/35°C. Mix the cold boiled
water and yeast powder with the rice
thoroughly in the container. Make
sure that each rice grain is separated,
rather than stuck together. Gently
press the rice mixture together and
leave a hole in the middle of the
mixture.
5. Add water to the 3 cup mark in the
inner pot. Place the container into
the inner pot with the steamer
rack. Water should submerge to
22

about 0.5in/1cm of the bottom
of the containers for even heat
conduction. Make sure to close the
lid of the containers to avoid excess
evaporation from the rice.
1. Make sure the unit is connected to a
powered electrical outlet.
6. Press the ‘Yogurt’ button and then
press the ‘Adjust’ button twice
for “Less” to access the Jiu Niang
function (the display will read “JIUN”).
The default fermentation time is
24 hours. You may need to change
the time based on the type of yeast
used; use the ‘Cook Time’ button
and the ‘+’ and ‘-’ buttons to change
the cooking time.
7. Jiu Niang will be ready when the
program nishes. A well-made
fermented glutinous rice has
transparent liquid and some small
gas bubbles with an aroma of
liquor and is very sweet. If there are
some white fungi on the surface,
this is normal. If it has black fungi,
the rice was contaminated during
the process and it should not be
consumed. Avoid running the
fermentation for too long, which
causes the rice to turn sour.
8. When the program is nished, the
pressure cooker will beep three times
and go into standby mode.
Manual Pressure Cooking Mode
Your new Cosori Electric Pressure Cooker
also gives you the option to manually
set up the pressure cooker for complete
control over your cooking settings. There
are two methods for setting up the
manual pressure cooking mode. Please
note that the ‘Adjust’ function will not
work with this setting.
Method 1: Pressure Level
NOTE:
The default setting for the manual
pressure level mode is 30 minutes at
pressure level 4.
2. Press the ‘Manual’ button once
to select the manual pressure
level cooking function. The
pressure level indicator will
be illuminated, indicating that
the pressure cooker is set to
manual pressure level mode.
3. Press ‘Pressure/Temp’ and use
the ‘+’ or ‘-’ buttons to adjust
the pressure level.
4. Press the ‘Cook Time’ button,
then use the ‘+’ or ‘-’ buttons to
select your cooking time.
5. Press ‘On/Start’ to begin
cooking. The display will show
the image below, indicating that
the unit is pressurizing.
23

6. Once the unit reaches optimal
cooking pressure, the display
will begin to count down.
7. The pressure cooker will beep three
times when cooking has nished, and
it will automatically set itself to the
Keep Warm mode for 6 hours. (See
Safely Removing the Lid)
Method 2: Temperature
NOTE:
The default setting for manual
pressure temperature mode is 30
minutes at 212°F/100°C.
1. Make sure the unit is connected to a
powered electrical outlet.
2. Press the ‘Manual’ button
twice to set the unit to manual
pressure temperature mode.
4. Press the ‘Cook Time’ button,
then use the ‘+’ or ‘-’ buttons to
select your cooking time.
NOTE:
When the programmed temperature
exceeds 248°F/120°C, the maximum
time that can be set is 30 minutes.
5. Press ‘On/Start’ to begin
cooking. The display will show
the image above, indicating
that the unit is pressurizing or
heating.
3. Press ‘Pressure/Temp’ and use
the ‘+’ or ‘-’ buttons to adjust
the temperature.
24
6. Once the unit reaches
optimal cooking pressure or
temperature, the display will
begin to count down.
7. When cooking has nished, the
pressure cooker will beep three times
and go into standby mode. (See
Safely Removing the Lid).

Safely Removing
the Lid
For your safety, open the lid slowly.
Escaping steam is hot and may cause
burns to exposed skin. Do not open
the lid before all pressure has escaped
through the exhaust valve and the
oat valve has completely fallen back
into the lid. The handle may also be
hot when cooking has nished. The
following methods should be used
when opening the lid:
QUICK RELEASE
1. Unplug the pressure cooker to
turn it o. Use oven mitts or pot
holders to switch the pressure
release valve from “Sealed” to
“Release.”
NATURAL RELEASE
1. Once cooking is complete, turn
o the pressure cooker’s power
by unplugging the power cable.
15-20 minutes
2. Let the unit cool down on its
own for 15-20 minutes or until
the oat valve drops down
before opening the lid.
2. Wait until all pressure has
released and oat valve has
dropped down to open the lid.
3. For your safety, open the lid slowly
and away from your face. Escaping
steam will be hot.
3. Set the pressure release valve
to the “Release” position to let
out any remaining pressure in
the unit.
25

4. Wait until oat valve drops
down to open the pressure
cooker.
5. Unlock the lid by turning it
counterclockwise, then carefully
lift the lid away from your face.
The steam coming out from the
pressure cooker will be hot.
NOTE:
It is recommended to use the natural
release method when cooking liquids
such as soups or rice porridge.
Immediately releasing pressure after
cooking such foods may result in food
spraying out through the pressure
release valve.
26

Care &
Maintenance
1. Unplug the pressure cooker and
allow it to completely cool before
cleaning.
2. DO NOT immerse the
base in water or spray any
water inside the housing. If
necessary, wipe the inside
and outside of the base with a
clean, damp cloth.
b. Remove the oat valve sealing
ring to remove the oat valve
from the lid. Rinse the oat
valve with clean water and
secure it back onto the lid
using the oat valve sealing
ring.
3. Remove the water collection cup.
Rinse it out with clean water and wipe
it dry with a clean cloth. Place it back
onto the side of the pressure cooker.
4. All parts inside the lid can be
hand washed separately with
water and should always be
checked to make sure they
are not damaged or cracked.
a. Remove the anti-clog lter by
pushing it toward the metal
ring, then pulling up. Rinse
and dry the anti-clog lter and
replace it onto the lid.
5. The silicone sealing ring can be
removed from the lid. Wash the
sealing ring with liquid detergent
and warm water, and dry with a clean
cloth (see Silicone Sealing Ring
Installation).
6. Use a sponge or non-metallic soft
brush to clean the inner pot, then
wipe the surface with a clean cloth.
27

SILICONE SEALING RING
INSTALLATION
NOTE:
Make sure the silicone sealing ring is
not cracked or damaged in any way.
Removal
1. Take lid o of pressure cooker.
2. While holding the lid in place,
gently pull out the silicone
sealing ring.
Installation
1. Line up silicone sealing ring on
top of the metal ring.
2. Gently push down on silicone
sealing ring, ensuring that
the metal ring is inside the
ring’s groove as shown above.
Continue pushing the silicone
sealing ring all around until it is
secured by the metal ring.
3. Wash sealing ring with warm soapy
water, and dry with a clean cloth.
28
3. Place lid back onto pressure
cooker.

Troubleshooting
Problem Cause Solution
Diculty closing lid. Silicone sealing ring may
Diculty opening lid. Pressure release valve
Steam leaking from
cooker lid.
Steam leaking from
oat valve sealing
ring.
Float valve does not
rise up.
not be placed correctly.
Lid not properly placed
onto housing.
may not be falling down
properly.
Pot may still be under
pressure.
Some ingredients may be
stuck to silicone sealing
ring.
Silicone sealing ring may be
broken.
Some ingredients may
stick to the anti-clog lter.
Float valve sealing ring may
be broken.
There may not be enough
ingredients/water to
generate enough pressure.
Excessive steam leakage
from lid or pressure release
valve.
Correctly place the silicone
sealing ring inside the lid.
Align the unlock symbol on
the lid with the arrow above
control panel. Turn the lid
counterclockwise to close.
Set pressure release valve to
the “Release” position to let
out any remaining pressure.
Clean silicone sealing ring.
Replace silicone sealing ring.
Clean the anti-clog lter.
Replace oat valve sealing
ring.
Ingredients or water need to
be at minimum level.
Unit may be defective.
Contact customer support.
Contact Customer Support if any of these errors occur
Code E1 E2 E3 E4
Error
Broken circuit in
sensor.
Short circuit in
sensor.
Unit is
overheating.
Signal switch
broken.
29

Warranty
Terms & Policy
Cosori warrants all products to be of the
highest quality in material, craftsmanship
and service for a minimum of 1 year,
eective from the date of purchase.
Warranty lengths may vary between
product categories. Cosori will replace
any product found to be defective due to
manufacturer aws based on eligibility;
refunds are available within the rst 30
days of purchase. This warranty extends
only to personal use and does not extend
to any product that has been used for
commercial, rental, or any other use in
which the product is not intended for.
There are no warranties other than the
warranties expressly set forth with each
product.
This warranty is non-transferrable.
Cosori is not responsible in any way for
any damages, losses or inconveniences
caused by equipment failure or by user
negligence, abuse, or use noncompliant
with the user manual or any additional
safety, use, or warnings included in the
product packaging and manual.
ALL EXPRESSED AND IMPLIED
WARRANTIES, INCLUDING THE
WARRANTY OF MERCHANTABILITY,
ARE LIMITED TO THE PERIOD OF THE
LIMITED WARRANTY.
Should your product prove defective
within the specied warranty period,
please return the defective unit in its
original packaging with (1) an original copy
of the invoice, (2) your order conrmation
number, (3) and your warranty ID number.
To nd out more about extending your
warranty, visit www.cosori.com/warranty
or contact customer support.
Date of Purchase:
____________________
Purchased From:
____________________
Order Number:
____________________
This warranty does not apply to the
following:
• Damage due to abuse, accident,
alteration, misuse, tampering or
vandalism.
• Improper or inadequate maintenance.
• Damage in return transit.
• Unsupervised use by children under 18
years of age.
Cosori and its subsidiaries assume
no liability for damage caused by the
use of the product other than for its
intended use or as instructed in the user
manual. Some states do not allow this
exclusion or limitation of incidental or
consequential losses so the foregoing
disclaimer may not apply to you. This
warranty gives you specic legal rights
and you may also have other rights which
may vary from state to state.
30

We’re One Call (or Email) Away!
Should you encounter any issues or
have any questions regarding your
new product, feel free to contact our
helpful Customer Support Team. Your
satisfaction is our goal!
CUSTOMER SUPPORT
Cosori Corporation
1202 N. Miller St. Suite A
Anaheim, CA 92806
Phone: (888) 402-1684
Email: support@cosori.com
SUPPORT HOURS
Monday - Friday: 9:00 am - 5:00 pm PST
*Please have your order conrmation
number ready before contacting
customer support.
31

Show Us What You’re Making
We hope this has been helpful to you. We can’t wait to see your beautiful results, and
we think you’ll want to share glam shots! Others already in the community await your
uploads—just pick your platform of choice below. Snap, hashtag, and tag away, Cosori
chef!
#iCookCosori
@cosoricooks
Cosori Appliances
Considering what to cook? Many recipe ideas are available, both from us and the Cosori
community.
More Cosori Products
Lastly, if you’re happy with this pressure cooker, the line doesn’t stop here. Check out
www.cosori.com for a line of all our beautiful and thoughtfully designed cookware. They
might be right at home in your kitchen, too!
32

33

COSORI SUPPORT:
Mon - Fri 9:00 AM - 5:00 PM PST
(888) 402-1684 | support@cosori.com
34
 Loading...